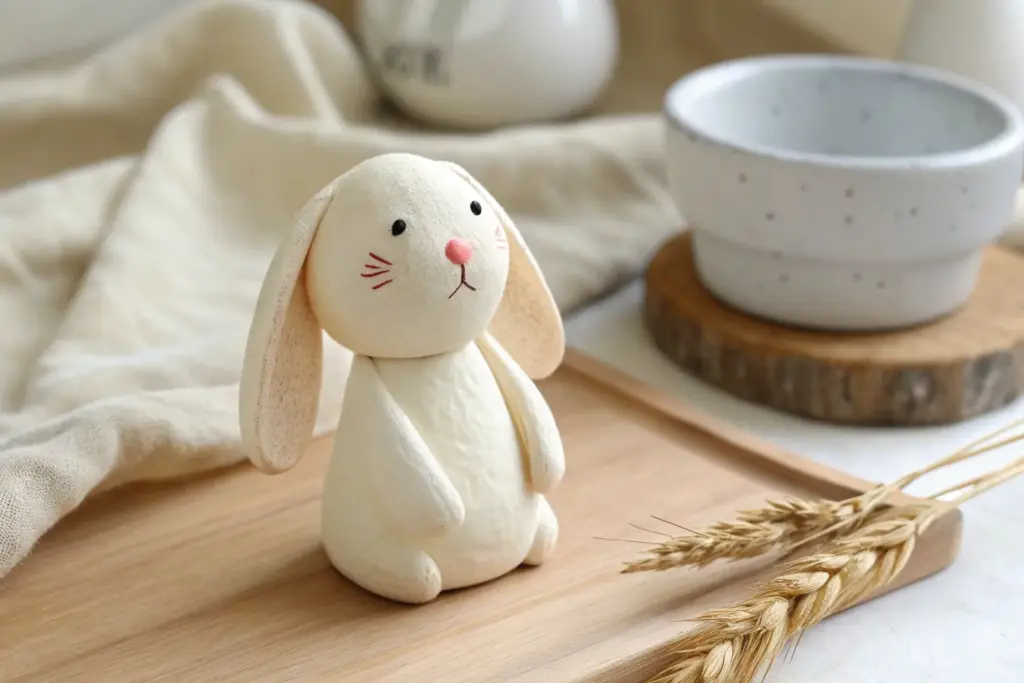
When I need a quick creative win, I grab air dry clay and make something tiny and extra cute. Think soft shapes, simple details, and those little dotted faces that somehow make everything feel friendlier.
Smiley Mushroom Buddies
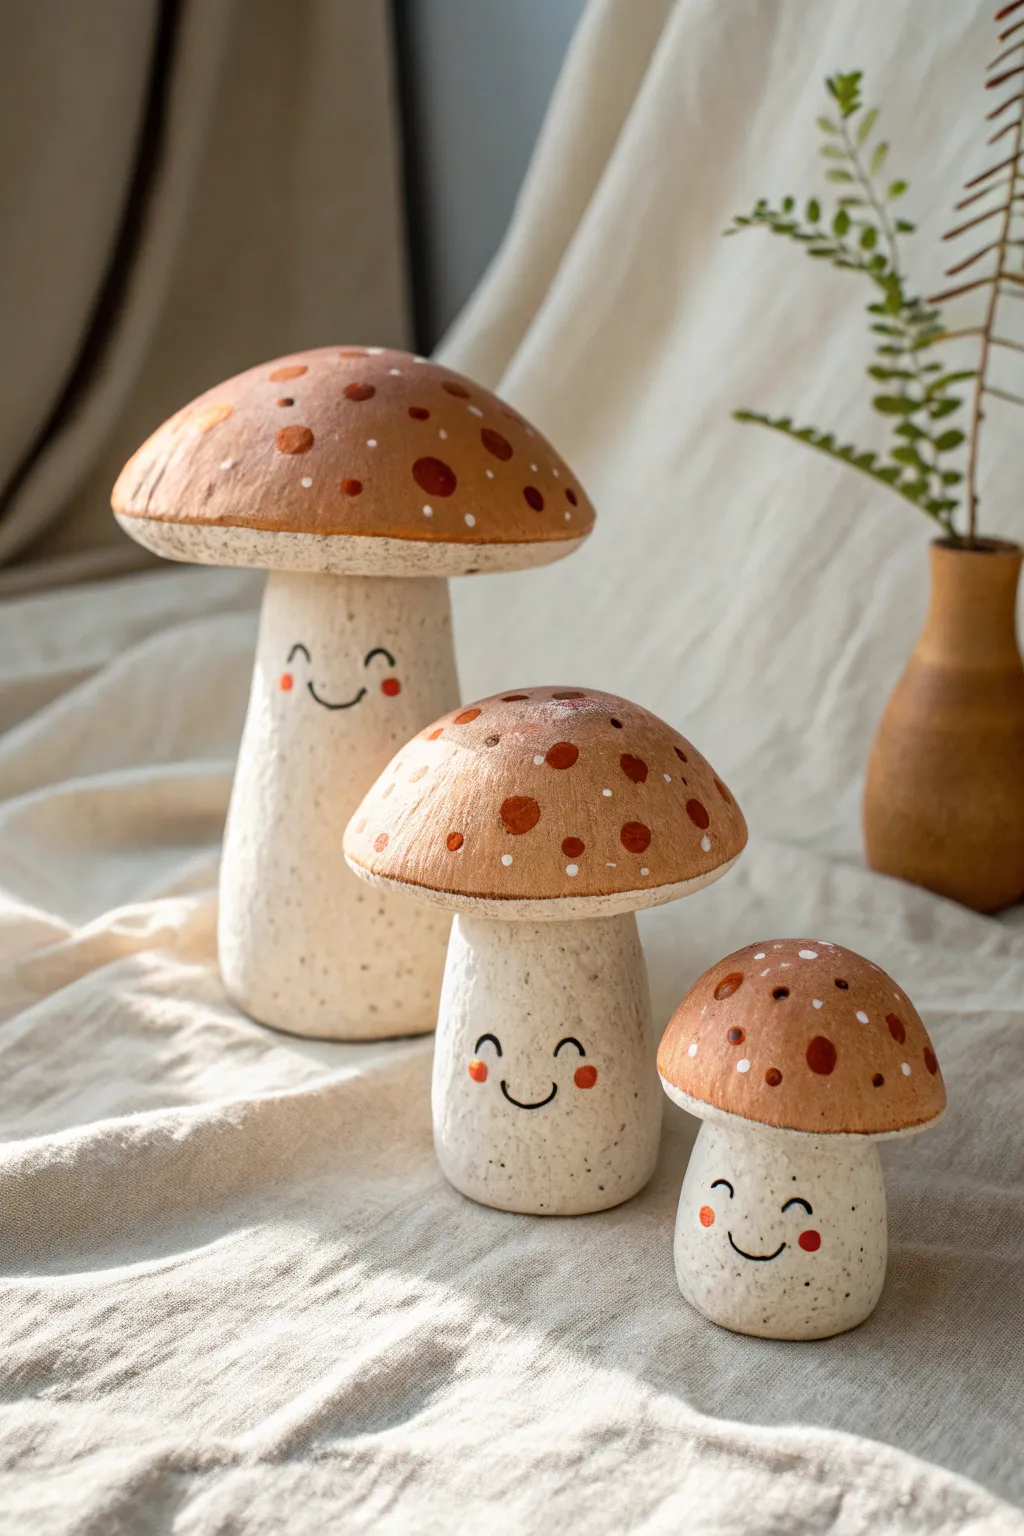
Create a whimsical family of woodland friends with this simple yet charming air-dry clay project. These mushrooms feature a speckled, stone-like texture, warm terracotta caps, and sweet painted faces that are sure to brighten any shelf.
How-To Guide
Materials
- Stone-effect air-dry clay (or speckle-mix polymer clay)
- Acrylic paints (Terracotta/Burnt Sienna, Cream/Off-white, Black, White, Orange)
- Small paintbrush (detail round)
- Medium paintbrush (flat shader)
- Aluminum foil
- Water cup
- Rolling pin
- Clay sculpting tools (specifically a smoothing tool)
- Matte varnish or sealant
Step 1: Sculpting the Shapes
-
Build the armatures:
To save clay and reduce weight, scrunch aluminum foil into tight cone shapes for the stems and flattened domes for the caps. Make three sets of graduating sizes: one tall, one medium, and one squat. -
Prepare the stems:
Roll out slabs of your speckled clay to about 1/4 inch thickness. Wrap the clay around your foil stem armatures, smoothing the seam down the back with a little water on your finger. -
Shape the bases:
Gently tap the bottom of each stem against your work surface to flatten it, ensuring the mushrooms will stand upright securely. Round off the top of the stem slightly where the cap will sit. -
Create the caps:
Roll out circular slabs for the caps. drape them over your foil domes, pressing the clay gently to conform to the shape without thinning it too much at the edges. -
Texture the underside:
Flip the caps over. If you want extra detail, use a sculpting tool or a stiff brush to gently score lines radiating from the center to the edge, mimicking gills, though a smooth finish works beautifully too. -
Attach cap to stem:
Score the top of the stem and the center underside of the cap. Apply a dab of water or liquid clay (slip) to the scored areas. I like to twist the cap slightly as I press it down to ensure a tight bond. -
Smooth the transition:
Use a modeling tool to blend the clay from the underside of the cap onto the stem so they become one solid unit. This prevents heads from popping off later. -
Final smoothing:
Dip your finger in water and run it over the entire surface of each mushroom to remove fingerprints and crate a porcelain-smooth finish. Let them dry completely, ideally for 24-48 hours.
Step 2: Painting & Details
-
Base coat the caps:
Using a flat brush, paint the top of the mushroom caps with a warm terracotta or burnt sienna acrylic paint. Bring the color just over the rim, leaving the underside and stem unpainted to show the clay’s natural speckles. -
Add cap details:
Mix a slightly darker brown and dot random spots onto the terracotta while it’s dry. Add smaller, distinct dots of cream or white scattered between the larger spots for that classic toadstool look. -
Paint the rosy cheeks:
Dilute a small amount of bright orange or pink paint. Using your pinky finger or a small round brush, dab two circle cheeks onto the stem, roughly one-third of the way down from the cap. -
Draft the faces:
If you are nervous about freehand painting, lightly sketch the eyes and mouth with a dull pencil first to get the spacing right. -
Detail the expressions:
Using your finest detail brush and black paint, create small u-shapes for the smiling eyes and a simple curved line for the mouth nestled between the cheeks. -
Seal the work:
Once the paint is fully dry, apply a coat of matte varnish. This protects the paint and keeps that lovely natural clay texture from looking too glossy or plastic.
Cracks appeared?
If small cracks appear while drying, mix a tiny bit of fresh clay with water to make a paste. Fill the crack, smooth it with a finger, and let it dry again.
Make it a planter
Before drying, hollow out the top of the largest mushroom stem instead of capping it. It makes an adorable home for a tiny air plant or succulent.
Arranging these three distinct sizes together creates a heartwarming little scene perfect for a desk or windowsill


Mini Fruit Charms With Cute Faces
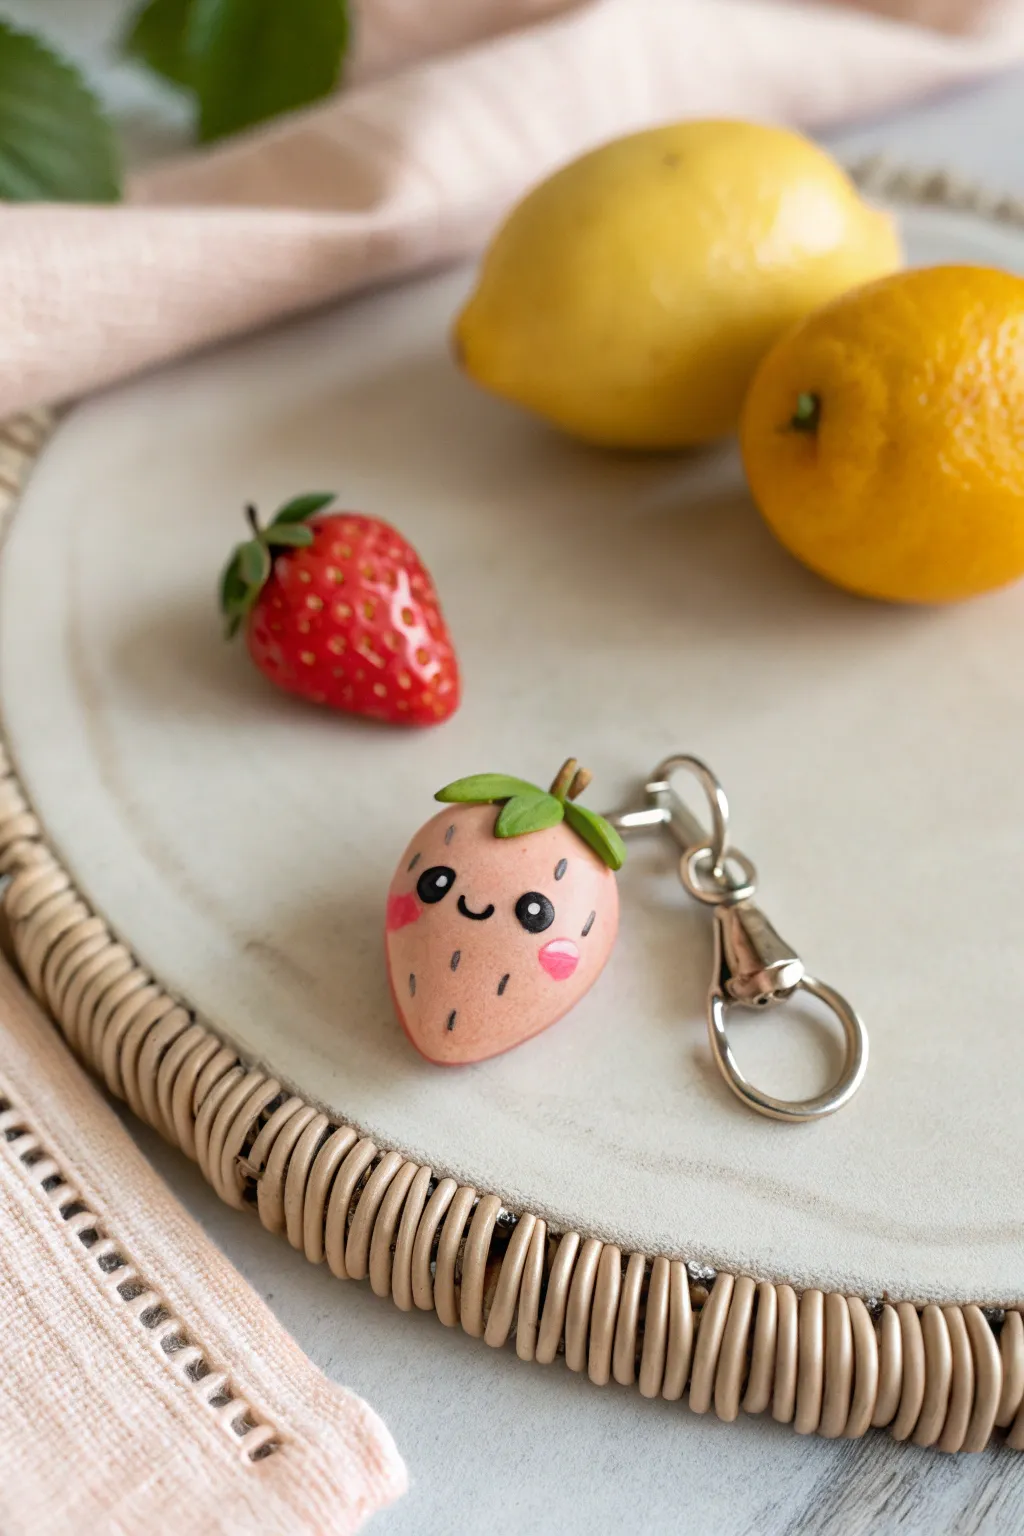
Brighten up your keyring with this adorable, blushing strawberry charm made from air-dry clay. Its soft pink hue and sweet kawaii expression make it a perfect beginner-friendly project that looks professionally finished.
Detailed Instructions
Materials
- Air-dry clay (white)
- Acrylic paints (pale pink/peach, leaf green, black, bright pink)
- Fine detail paintbrush (00 or 000 size)
- Clay sculpting tools (or a toothpick)
- Strong craft glue (like E6000)
- Metal screw eye pin
- Keychain hardware (jump ring and lobster clasp keyring)
- Glossy varnish or glaze (optional)
- Water cups for smoothing
Step 1: Sculpting the Base
-
Mix the base color:
Start by tinting a ping-pong ball sized amount of white clay with a tiny drop of pale pink acrylic paint. Knead it thoroughly until the color is uniform and streak-free; you want a soft, pastel strawberry shade. -
Form the shape:
Roll the clay into a smooth ball between your palms to remove any cracks. Gently taper one end to create a rounded cone shape, mimicking a plump strawberry. -
Flatten the top:
Lightly press the wider end on your work surface to flatten it slightly. This provides a stable area for the leaves to sit later. -
Smooth imperfections:
Dip your finger in a little water and gently run it over the clay to smooth out fingerprints or tiny fissures. -
Add the hardware:
Dip the threaded end of a screw eye pin into a dab of strong glue. Insert it straight down into the center of the strawberry’s top while the clay is still wet.
Prevent Cracking
If you see tiny cracks forming while the clay dries, smooth a tiny bit of fresh, wet clay (slurry) into the crack with your finger immediately.
Step 2: Adding the Leaves
-
Mix the leaf color:
Take a pea-sized amount of fresh white clay and tint it with green acrylic paint. Aim for a vibrant, grassy green. -
Shape the greenery:
Flatten the green clay into a small, thin disk. Use a craft knife or clay tool to cut out a star shape with four or five points. -
Attach the leaves:
Apply a tiny amount of water or slip to the bottom of the star shape. Thread the eye pin through the center of the star and press the green clay onto the top of the strawberry. -
Refine the shape:
Gently curve the points of the star downwards so they hug the top of the fruit. I like to press a tiny line down the center of each leaf for texture. -
Create the stem:
Roll a very tiny cylinder of green or brown clay. Glue it right next to the eye pin to look like the main stem cut. -
Let it dry:
Allow the sculpted piece to dry completely. Depending on your climate and clay brand, this usually takes 24 to 48 hours.
Step 3: Painting the Details
-
Check the surface:
Once fully hard, check if the paint colors faded. If the pink looks too dull, you can give the body a wash of watered-down pink acrylic paint, but the tinted clay usually looks smoothest. -
Paint the eyes:
Using your finest detail brush and black paint, create two small oval eyes about halfway down the strawberry. Space them wide apart for that cute kawaii look. -
Add the smile:
Carefully paint a small ‘u’ shape directly between the eyes to create a smiling mouth. -
Create shiny eyes:
Dip a toothpick into white paint and add a tiny dot to the upper right corner of each black eye. This ‘catchlight’ makes the charm look alive. -
Blush the cheeks:
Mix a brighter pink paint. Paint two soft ovals or circles just under the outer corners of the eyes for rosy cheeks. -
Add seeds:
Using the very tip of your brush or a thin marker, add tiny vertical dashes or dots of black or dark grey randomly around the rest of the strawberry body to represent seeds.
Glittery Twist
Mix ultra-fine iridescent glitter into your varnish before applying the final coat. It gives the strawberry a magical, sugary sparkle.
Step 4: Finishing Up
-
Seal the charm:
Once the paint is totally dry, coat the entire charm in a layer of glossy varnish or glaze. This protects the paint and gives it a polished, ceramic-like shine. -
Assemble the keychain:
Open a jump ring using two pairs of pliers (twist side-to-side, never pull apart). Loop it through the eye pin on your strawberry and the last link of your keychain hardware. -
Secure the closure:
Twist the jump ring back ensuring the ends meet perfectly flush so your charm doesn’t slip off.
Enjoy your sweet new accessory or gift it to a friend who loves fruit-themed items


Cute Animal Magnets
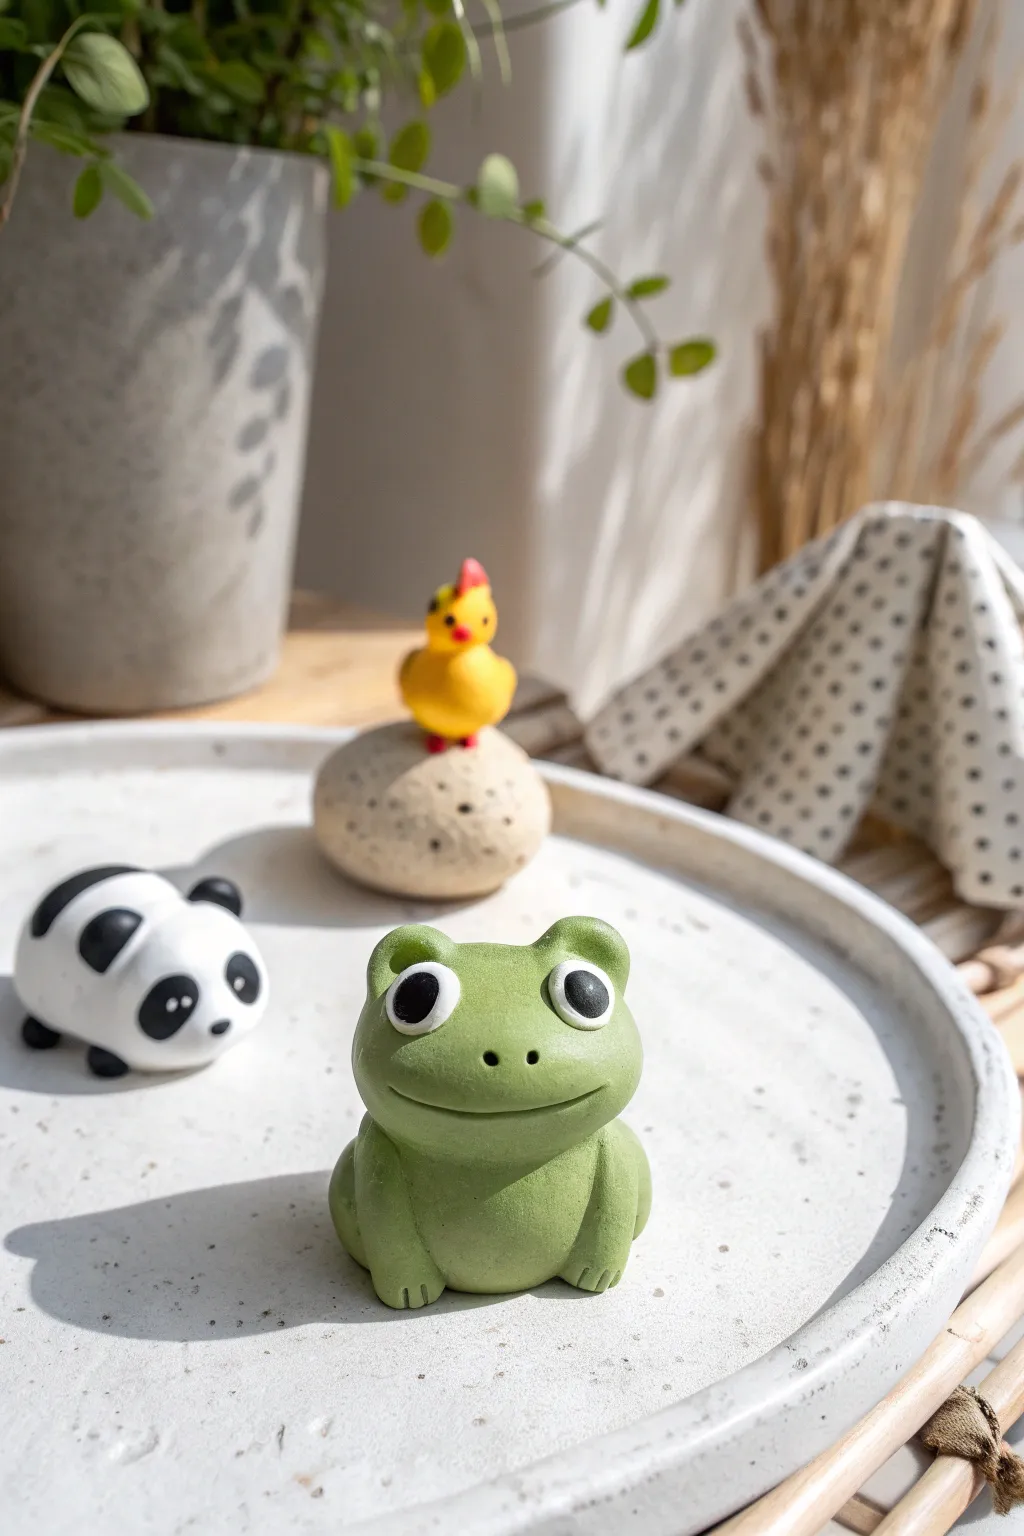
Bring a touch of whimsical charm to your desk or shelf with this trio of adorable clay animals. These smooth, matte-finished figurines—a cheerful frog, a rolling panda, and a perching chick—are simple enough for beginners but full of character.
Detailed Instructions
Materials
- Air-dry clay or polymer clay (white)
- Acrylic paints (leaf green, black, yellow, red, cream/beige)
- Fine grit sandpaper
- Small detail paintbrushes
- Dotting tool or toothpick
- Matte sealant spray or varnish
- Water and a small sponge (for smoothing)
Step 1: Sculpting the Friendly Frog
-
Form the Base:
Start with a lime-sized ball of clay. Roll it until it’s perfectly smooth, then gently flatten the bottom so it sits stable without rolling away. Use your thumb to slightly indent the top third to define the head area from the body. -
Add the Eye Mounds:
Roll two small pea-sized balls of clay. Place them on top of the head area, spacing them slightly apart. Blend the seams downward into the head using a little water or a clay tool so they look like raised bumps rather than separate pieces attached on top. -
Shape the Legs:
Create two small elongated teardrop shapes for the front legs. Press them vertically onto the front of the body. For the back legs, make larger, thicker teardrops and press them onto the sides, curving the bottom forward to suggest sitting haunches. -
Carve the Toes:
Use a clay knife or toothpick to gently press three indentations into the bottom of each leg to create little toes. Keep these subtle and rounded. -
Create the Smile:
Use a needle tool or the edge of a credit card to press a wide, gentle curve into the face for the mouth. I like to curve the ends up slightly for a happier expression.
Cracks Appearing?
If you see hairline cracks while drying, mix a tiny bit of fresh clay with water to make a paste (slip) and fill the cracks. Smooth over with a damp finger immediately.
Step 2: Crafting the Rolling Panda
-
Shape the Body:
Roll a smooth, oval-shaped piece of clay, slightly flattening the bottom. This will be the main body of your panda. -
Add Ears and Limbs:
Make tiny balls for the ears and press them onto the top of the head area, flattening them slightly. Add four small nubs for the paws near the bottom edge of the oval. -
Smooth the Surface:
Take a moment to dip your finger in water and run it over the entire panda form to remove any fingerprints and ensure a sleek finish before drying.
Step 3: Building the Chick & Rock
-
Form the Rock Base:
Create an irregular, flattened stone shape. Use a stiff brush or a crumpled ball of foil to press texture into the surface so it looks less like clay and more like stone. -
Sculpt the Chick:
Roll a small yellow ball for the body and a smaller one for the head. Stack them securely. Pinch a tiny bit of clay for the beak and add a small crest on top of the head.
Pro Tip: Weighted Base
For better stability, crush a small piece of aluminum foil into a tight ball and wrap your clay around it. This saves clay and keeps the figurine lighter but sturdy.
Step 4: Painting and Finishing
-
Drying and Sanding:
Let all pieces dry completely (24-48 hours usually). Once dry, use fine-grit sandpaper to buff away any rough spots or fingerprints, wiping away dust with a damp cloth. -
Painting the Frog:
Paint the entire frog a soft, muted leafy green. You may need two thin coats for even coverage. Once dry, use white paint for large round eyes, and add black pupils with a dotting tool. Use a fine liner brush to paint nostrils and emphasize the smile line. -
Painting the Panda:
Paint the body white. Carefully paint black oval patches for the eyes, rounded ears, and the small paws. Add two black dots inside the white eye patches for the actual eyes, and a tiny triangular nose. -
Coloring the Chick:
Paint the chick bright yellow with an orange or red beak and crest. For the rock, use a beige or light grey base coat. Once dry, splatter tiny specks of black or dark grey paint using an old toothbrush to create a granite texture. -
Sealing:
Finish everything with a matte spray sealant to protect your paint job without making the animals look plasticky or shiny.
Arranging your finished trio together creates an instant storybook scene for your desk


Rainbow Wall Charm Set
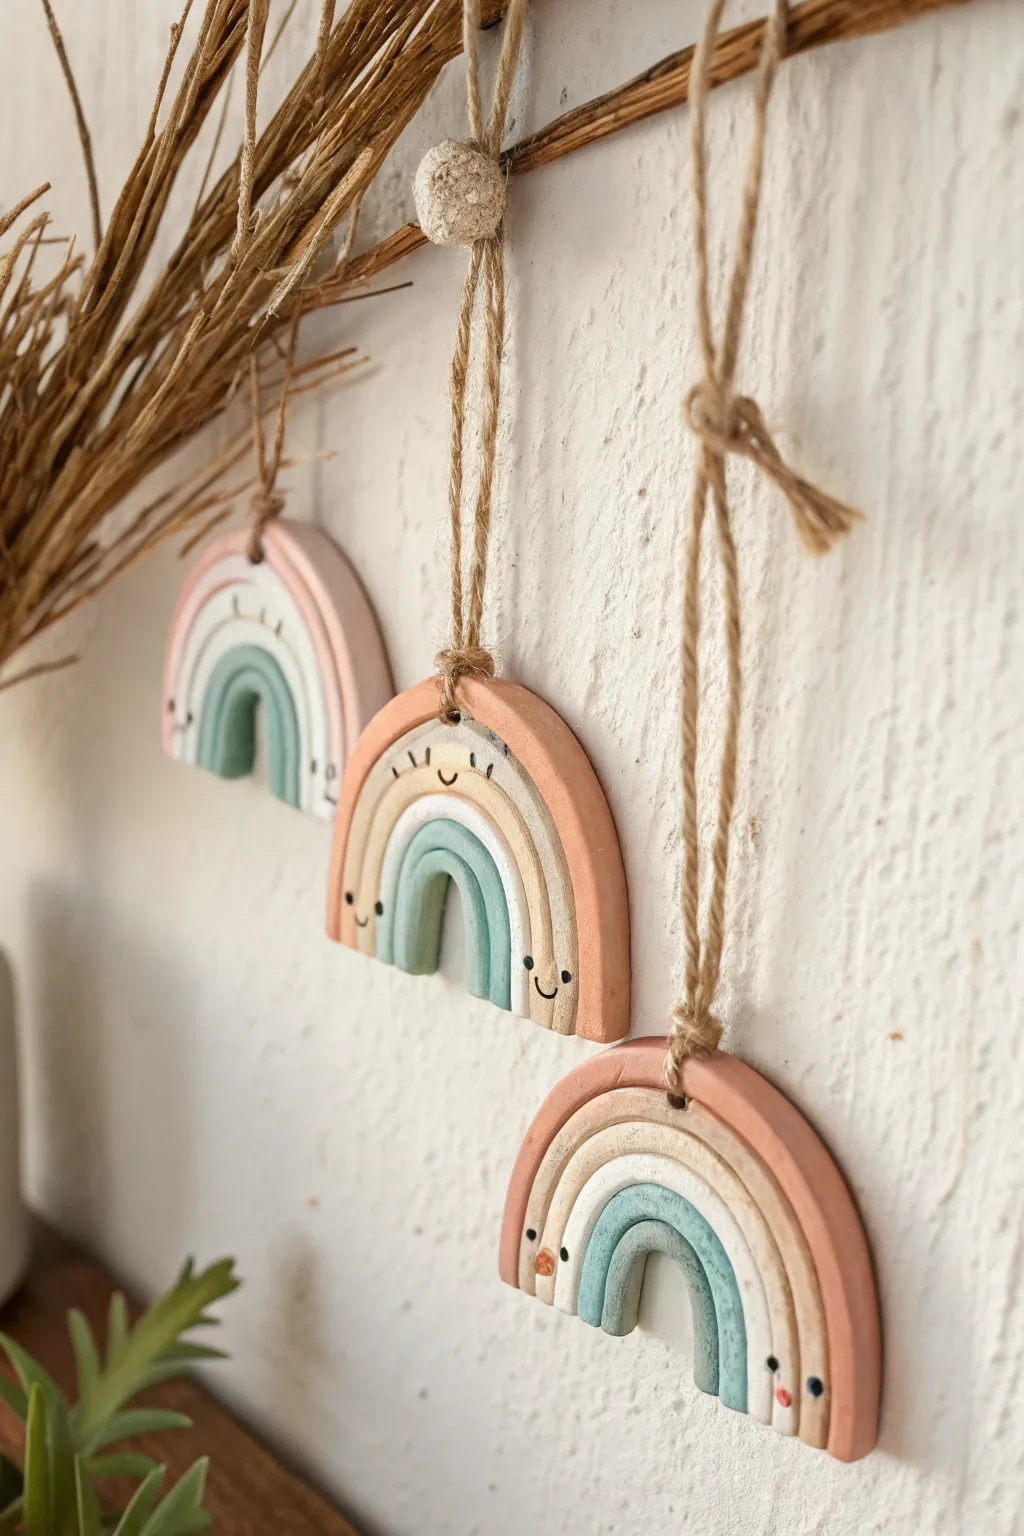
Add a touch of whimsy to your walls with these adorable hanging rainbow charms, featuring earthy pastel tones and sweet little faces. This simple air-dry clay project is perfect for using up scraps and creates a lovely, textured piece of decor.
Step-by-Step Tutorial
Materials
- Air-dry clay (white or terra cotta)
- Rolling pin
- Circle cutters (various sizes) or bowls to trace
- Craft knife or scalpel
- Acrylic paints (terracotta/rust, creamy beige, sage green)
- Fine detail paintbrush
- Black fine-liner pen or black acrylic paint
- Water cup and paper towels
- Sandpaper (fine grit)
- Jute twine
- Wooden skewer or toothpick
- Matte varnish (optional)
Step 1: Shaping the Rainbows
-
Condition the Clay:
Begin by taking a handful of air-dry clay and kneading it in your hands until it becomes soft, pliable, and free of cracks. If it feels too dry, dip your fingers in a tiny bit of water. -
Roll It Out:
Roll the clay out on a smooth surface to an even thickness of about 1/4 inch (6-7mm). I find that using guide sticks on either side helps keep the thickness uniform. -
Cut the Base Arches:
Use a large circle cutter or trace around a bowl to cut out a large circle. Then, use a slightly smaller cutter to cut a circle inside that one, and repeat until you have concentric rings. -
Create the Rainbow Shape:
Slice the concentric circle set exactly in half horizontally using your craft knife. This immediately gives you two sets of rainbow arches. -
Separate and Smooth:
Gently separate the individual arches. Dip your finger in water and smooth down the sharp edges created by the knife cutting, rounding them off slightly for a softer look. -
Reassemble the Rainbows:
Place the arches back together, leaving a deliberate, very tiny gap between each band to define the segments clearly. Use a little clay slip (clay mixed with water) between the arches to bond them together permanently if you want a solid piece, or simply press them gently against each other on the back side. -
Add Texture (Optional):
For a rustic look, you can gently lightly press a texture sponge or fabric onto the surface, though smooth looks great too. -
Create Hanging Holes:
Use a wooden skewer to poke a hole through the top center of the outermost arch. Wiggle the skewer slightly to ensure the hole is large enough for your twine. -
Dry Completely:
Let the clay dry on a flat surface for 24-48 hours. Flip them over halfway through the drying process to prevent curling.
Cracking Issues?
If you see tiny cracks whilst drying, don’t panic. Mix a small amount of fresh clay with water to make a paste and fill the cracks, then sand smooth once dry.
Step 2: Painting and Finishing
-
Sand Imperfections:
Once fully dry, use fine-grit sandpaper to gently smooth out any rough edges or uneven bumps on the surface. -
Paint the Outer Arch:
Mix a warm terracotta or rust color and paint the largest, outermost arch. Apply two thin coats for opaque coverage. -
Paint the Middle Arch:
Paint the middle arch in a creamy beige or warm off-white tone. Be careful near the edges where the colors meet. -
Paint the Inner Arch:
Finish with a muted sage green or teal for the smallest inner arch options. Let the paint dry completely between coats. -
Draw the Faces:
Using a very fine black pen or a thin brush with black paint, carefully draw small eyes and a smile. Place them low on the rainbow legs for a cute, ‘kawaii’ proportional look. -
Add Rosy Cheeks:
Dip a toothpick or the back of a brush into a tiny bit of watered-down pink or terracotta paint and dot it onto the ‘cheeks’ outside the smile. -
Seal the Charm:
Apply a coat of matte varnish to protect the paint and give the ornament a finished, professional quality. -
String the Twine:
Cut a length of jute twine about 8 inches long. Thread it through the hole at the top. -
Tie the Knot:
Bring the ends of the twine together and tie a simple overhand knot close to the clay, or higher up depending on how long you want the loop to be. -
Hang and Enjoy:
Arrange your trio of rainbows on a branch or hang them individually on the wall.
Pro Tip: Clean Lines
Use a small, flat angled brush to clean up the grooves between the arches if your paint slips. It creates a much sharper definition between colors.
Now you have a sweet set of handmade charms ready to brighten up any corner of your home

The Complete Guide to Pottery Troubleshooting
Uncover the most common ceramic mistakes—from cracking clay to failed glazes—and learn how to fix them fast.
Moon and Star Mini Garland
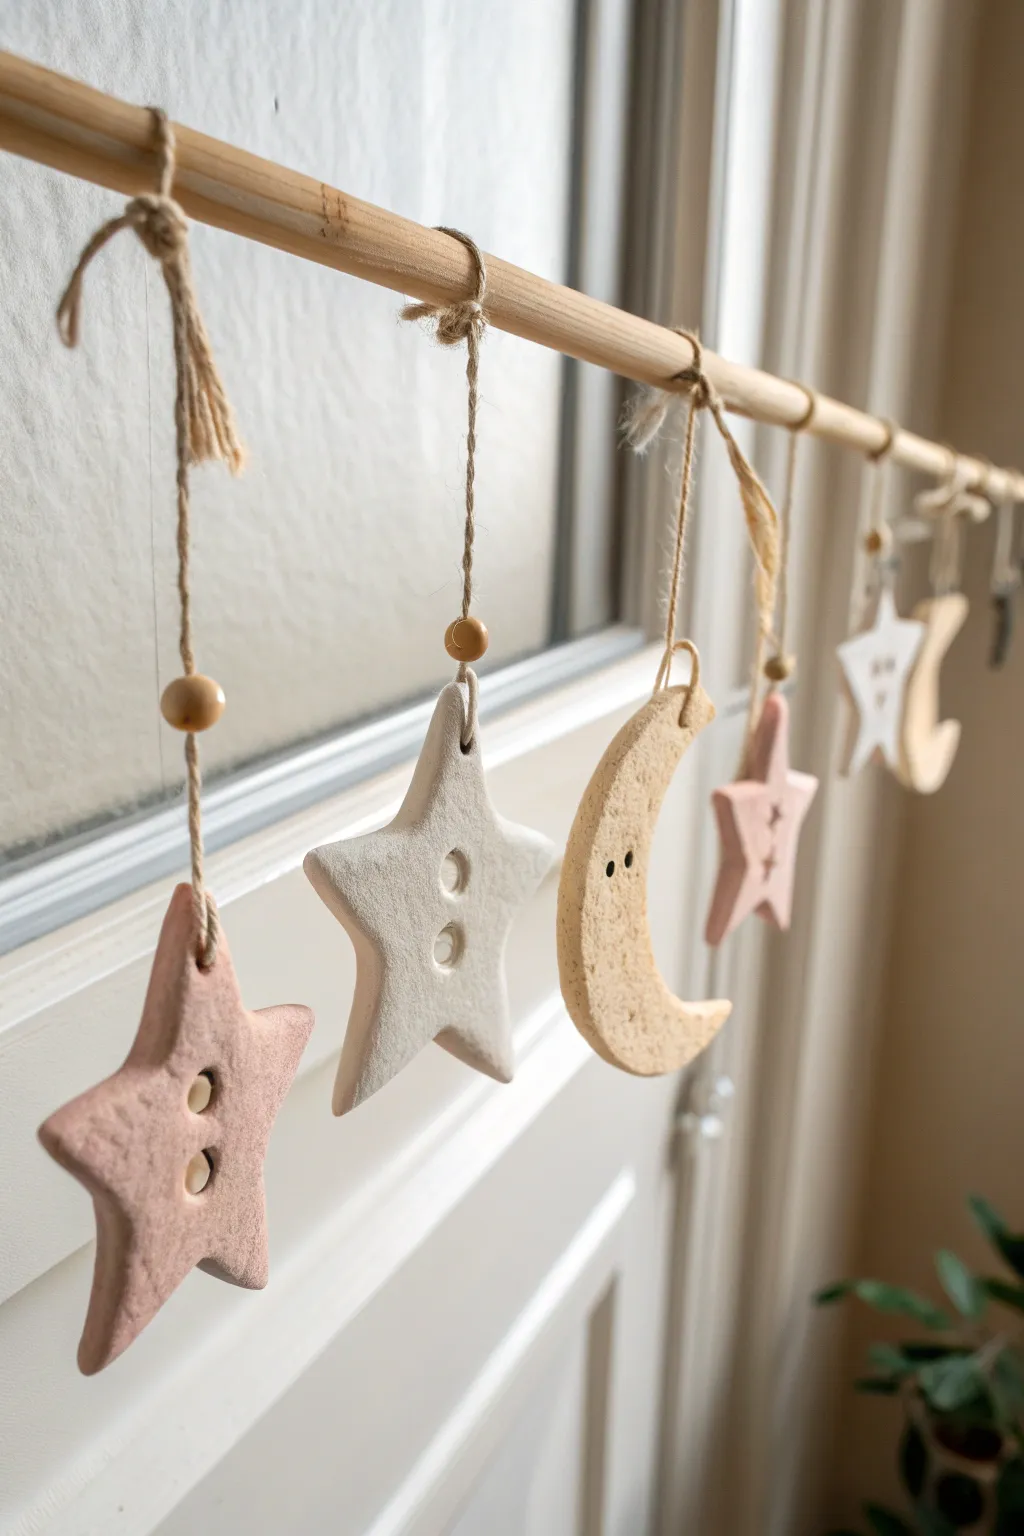
Bring the night sky indoors with this charming mobile made from simple clay shapes. Featuring soft pastel stars and a textured moon hanging from a rustic wooden dowel, this project adds a gentle, handmade touch to any nursery or cozy corner.
Step-by-Step Guide
Materials
- Air-dry clay (white or natural)
- Acrylic paints (dusty pink, warm beige/sand)
- Rolling pin
- Star and crescent moon cookie cutters
- Drinking straw or skewer (for holes)
- Fine-grit sandpaper
- Wooden dowel (approx. 12-18 inches)
- Jute twine
- Small wooden beads
- Scissors
- Matte sealant (optional)
Step 1: Shaping the Celestial Bodies
-
Prepare the Clay:
Pinch off a generous amount of air-dry clay and knead it in your hands until it becomes warm and pliable. This prevents cracking later on. -
Roll it Out:
On a clean, flat surface, roll the clay out to an even thickness of about 1/4 inch. If the clay is sticky, you can lay down a sheet of parchment paper first. -
Cut the Shapes:
Using your cookie cutters, press firmly into the clay to create several stars and at least one crescent moon. Wiggle the cutter slightly before lifting to ensure a clean edge. -
Create Hanging Holes:
While the clay is still wet, use a straw or skewer to poke a hole at the very top point of each star and the top tip of the moon. Make sure the hole is wide enough for your twine to pass through. -
Make the ‘Button’ Detail:
For the stars specifically, use a skewer or a straw to punch two holes in the center, mimicking the look of a large button. This adds that cute, stitched aesthetic seen in the photo. -
Add Moon Details:
For the moon, use the tip of a small paintbrush or skewer to create two small indentations for eyes. You can leave it simpler if you prefer a minimalist look. -
Smoothing:
Dip your finger in a tiny bit of water and gently run it along the cut edges of your shapes to smooth down any roughness or stray bits of clay. -
Dry Completely:
Place all your shapes on a flat surface to dry. Depending on humidity and thickness, this can take 24-48 hours. Flip them halfway through so the bottom dries evenly.
Cracking Clay?
If small cracks appear while drying, mix a tiny amount of fresh clay with water to make a paste (slip) and smooth it into the cracks with your finger.
Step 2: Decorating and Assembly
-
Sand for Smoothness:
Once fully cured, lightly sand the edges with fine-grit sandpaper to remove any sharp points or uneven textures. -
Paint the Stars:
Leave some stars natural white. For the others, mix a dusty pink acrylic paint. Apply a thin, even coat, ensuring you don’t clog the button holes. I like to do two thin coats rather than one thick one for a smoother finish. -
Texture the Moon:
Paint the moon a warm sandy beige. To replicate the texture in the image, you can dab the wet paint gently with a crumpled tissue or a dry sponge. -
Seal (Optional):
If you want extra durability, apply a clear matte sealant over the painted shapes once they are dry. -
Prepare the Twine:
Cut lengths of jute twine, varying them slightly (between 8 and 12 inches) so your shapes will hang at different heights. -
Thread the Beads:
Thread a wooden bead onto each piece of twine. Position it about 2 inches up from where the clay shape will hang, securing it with a simple overhand knot underneath the bead so it stays in place. -
Attach the Shapes:
Thread the end of the twine through the top hole of your clay shape. Tie secure knots. -
Tie to Dowel:
Tie the top ends of your twine strands to the wooden dowel. Space them out evenly, alternating between pink stars, white stars, and the moon. -
Secure the Knots:
For a rustic look, leave the tail ends of the knots on the dowel visible, or trim them close if you prefer a cleaner finish. A tiny dab of glue on the knot can keep it from sliding along the wood.
Add Sparkle
Mix a small amount of fine gold glitter into your beige paint before applying it to the moon for a subtle, magical shimmer.
Hang your beautiful new mobile near a window or above a crib to enjoy the gentle movement of the stars
Little Mountain Photo Holders
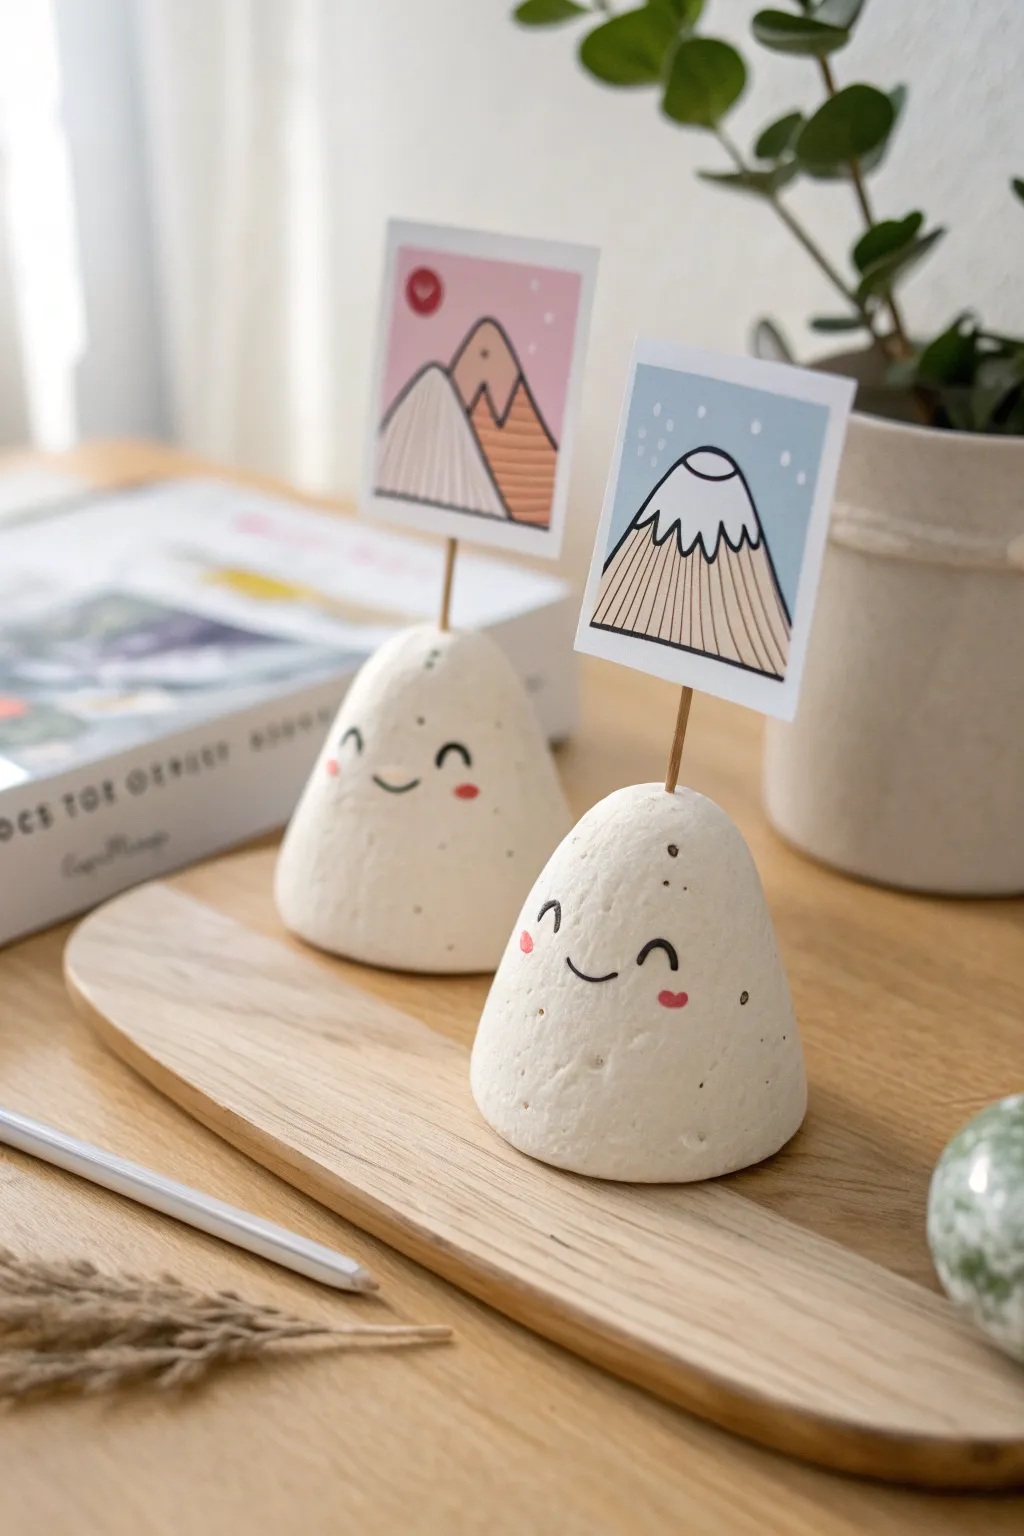
Bring the outdoors inside with these charming, smiling mountain photo holders made from air-dry clay. Their speckled stone-like texture and rosy stamped cheeks make them the sweetest way to display your favorite mini polaroids or notes.
How-To Guide
Materials
- White air-dry clay (stone effect or plain)
- Speckled clay additive (e.g., ground pepper or faux stone granules) if using plain clay
- Thin wooden dowels or toothpicks
- Wire cutters
- Fine-grit sandpaper
- Black fine-point permanent marker or acrylic paint
- Pink acrylic paint
- Small paintbrush or dotting tool
- Water in a small cup
- Cardstock or heavy paper
- Color markers or pencils (for the mountain illustrations)
- Craft glue or strong adhesive
Step 1: Shaping the Base
-
Prepare the clay:
Start with a golf-ball-sized amount of air-dry clay. If your clay isn’t already speckled, knead in a pinch of faux stone granules or even cracked black pepper to achieve that textured, rocky look. -
Form the cone:
Roll the clay into a smooth ball between your palms to remove cracks. Then, gently roll it on your work surface while applying more pressure to one side to form a cone shape. -
Soften the peak:
Tap the bottom of the cone on the table to flatten the base so it stands stable. Use your fingertips to gently round off the sharp top point; we want a friendly, soft hill rather than a sharp spike. -
Smooth the surface:
Dip your finger in a little water and run it over the clay to smooth out any fingerprints or uneven textures. The smoothness creates a perfect canvas for the face later. -
Insert the holder:
Take a wooden dowel or toothpick and insert it vertically into the very center of the mountain top. Push it down about halfway into the clay for stability, leaving enough sticking out to hold your photo. -
Remove and dry:
Gently twist and remove the stick for now, or leave it in if you prefer (though wood can swell with wet clay). Set the mountain aside to dry completely for 24-48 hours. I like to rotate them occasionally so the bottom dries evenly.
Crack Control
If tiny cracks appear as the clay dries, don’t panic. Mix a small amount of fresh clay with water to make a paste (slip) and smooth it into the cracks with your finger.
Step 2: Refining and Decorating
-
Sand for smoothness:
Once fully dry and hard, take a piece of fine-grit sandpaper and lightly buff the surface. Focus on the bottom edge to ensure it sits perfectly flat. -
Secure the stick:
Cut your dowel to the desired height using wire cutters. Add a dab of craft glue to the bottom end and re-insert it into the hole you made earlier. -
Draw the eyes:
Using a black fine-point marker or a very thin brush with black paint, draw two small, curved arches for the smiling eyes. Place them about halfway down the mountain. -
Add the smile:
Draw a small, simple ‘U’ shape right between the eyes for the mouth. Keep the lines delicate to maintain the cute aesthetic. -
Paint the cheeks:
Dip a dotting tool or the end of a paintbrush handle into pink acrylic paint. Gently stamp two rosy oval cheeks just below the eyes. -
Add speckles (optional):
If your clay wasn’t pre-speckled, you can flick a toothbrush dipped in watered-down grey paint over the surface, or manually add tiny dots with a marker for texture.
Seasonal Switch
Instead of gluing the art directly to the stick, attach a mini alligator clip or a coiled wire to the top. This lets you swap out photos or name cards whenever you like.
Step 3: Creating the Photo Topper
-
Create the mini art:
Cut small rectangles from white cardstock to mimic polaroid frames. Draw simple mountain scenes inside using markers, or print out tiny photos. -
Prepare the mount:
Cut a second small piece of cardstock to act as a backing mount. Apply a line of glue to the center of this backing piece. -
Assemble the holder:
Sandwich the top of the wooden dowel between your artwork and the backing piece. Press firmly until the glue sets, ensuring the picture sits straight.
Place these cheerful little mountains on a desk or shelf to hold your fondest memories


What Really Happens Inside the Kiln
Learn how time and temperature work together inside the kiln to transform clay into durable ceramic.
Mini Ghost Shelf Sitters
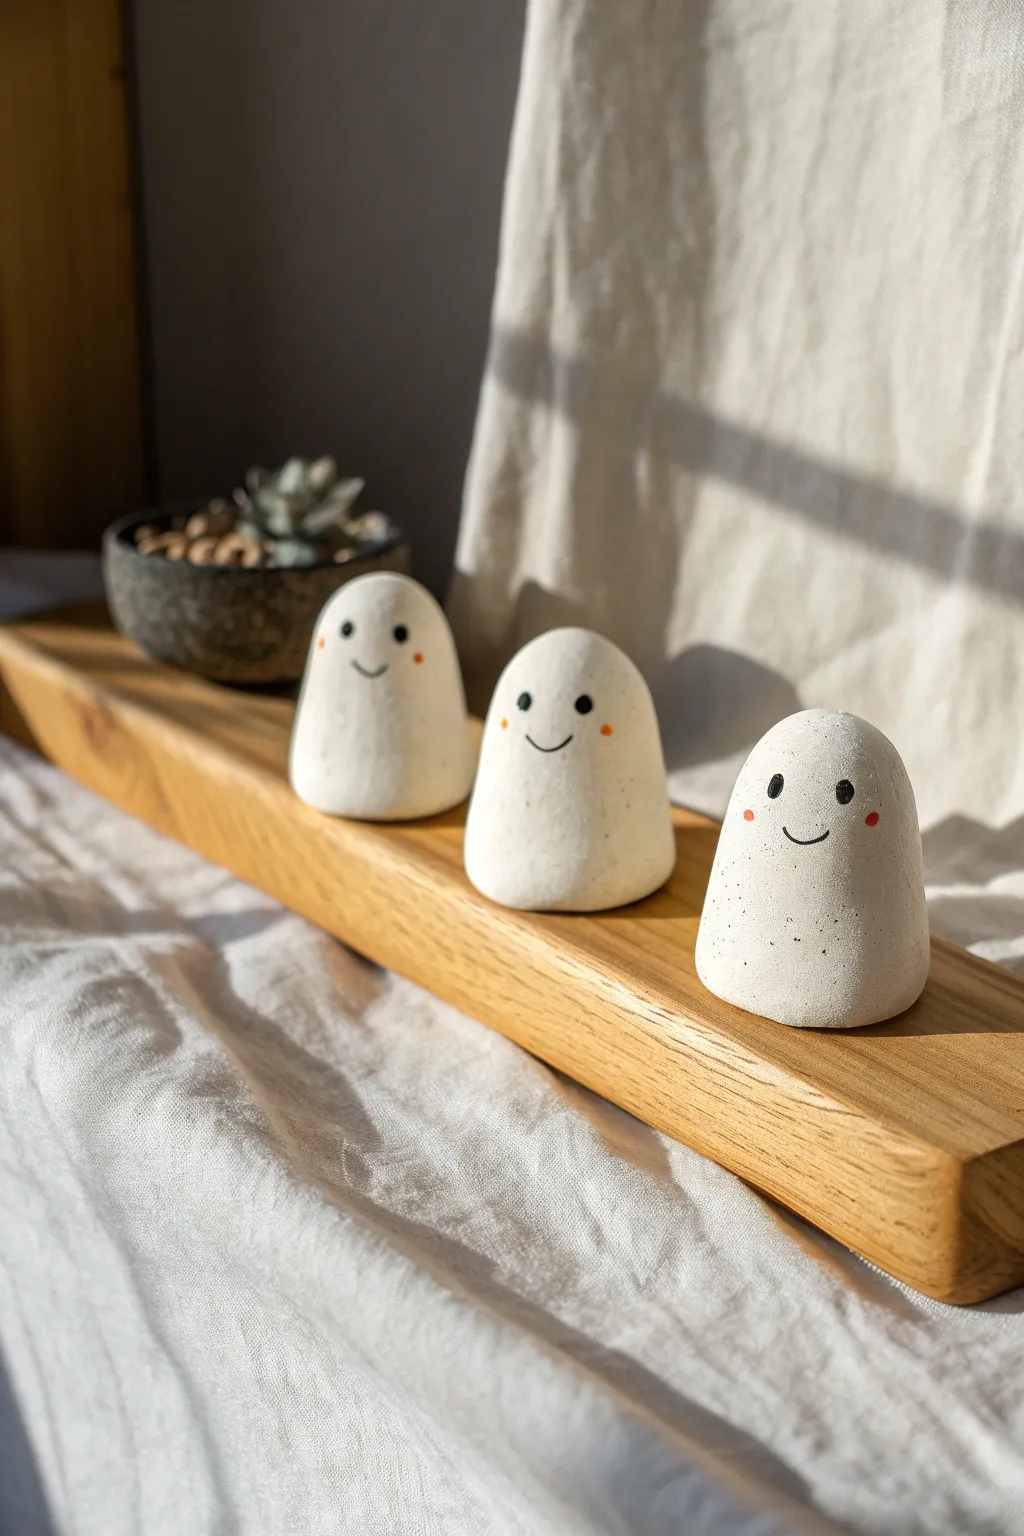
These charming little specters bring a touch of playful spookiness to any shelf without being frightening. Their smooth, rounded forms and minimalist painted faces make for a clean, modern Halloween decoration that looks great year-round.
Step-by-Step
Materials
- Air-dry clay (white)
- Small cup of water
- Rolling pin or smooth jar
- Fine-grit sandpaper
- Acrylic paint (black and muted orange/terracotta)
- Fine detail paintbrush
- Old toothbrush (for speckling)
- Grey acrylic paint (watered down) or grey watercolor
- Matte sealant or varnish
Step 1: Shaping the Forms
-
Portion the clay:
Start by cutting three equal chunks of white air-dry clay, each roughly the size of a golf ball or slightly larger depending on your desired size. -
Condition the material:
Knead each ball of clay in your hands for a minute until it feels warm, pliable, and free of any cracks. -
Create the base cylinder:
Roll one ball into a thick cylinder shape between your palms, keeping the bottom flat so it will eventually stand on its own. -
Form the dome:
Gently gently press and smooth the top of the cylinder into a rounded dome shape, tapering it slightly inward to create that classic ghost silhouette. -
Flatten the bottom:
Tap the bottom of the ghost firmly against your work surface to ensure it sits perfectly flat and stable. -
Smooth the surface:
Dip your finger in a tiny bit of water and run it over the entire surface of the clay to erase any fingerprints or small fissures. -
Repeat for the trio:
Shape the remaining two ghosts, varying the height or width slightly if you want them to look like individuals rather than identical clones. -
Let them cure:
Set the figures aside in a dry, room-temperature spot for 24-48 hours until they are completely hard and cool to the touch.
Step 2: Painting and Finishing
-
Sand imperfections:
Once fully dry, take your fine-grit sandpaper and lightly buff the surface to remove any bumps or rough spots for a buttery smooth finish. -
Create the stone effect:
Dilute a small drop of grey paint with plenty of water. Dip an old toothbrush into this mixture. -
Speckle the surface:
Run your thumb over the bristles to flick tiny droplets of grey paint onto the ghosts. I like to practice on a scrap paper first to control the spray intensity. -
Dry the texture:
Allow the speckled paint to dry completely, which should only take about 10-15 minutes. -
Draft the faces:
Lightly sketch the position of the eyes and mouth with a pencil to ensure the expressions are centered and sweet. -
Paint the eyes:
Using your finest detail brush and black acrylic paint, dab two small oval or round dots for eyes. -
Add the smile:
Carefully paint a thin, shallow ‘U’ shape between the eyes for a subtle smile. -
Rosy cheeks:
Dip the back end of your paintbrush handle into the orange or terracotta paint and dot it gently onto the cheeks, just outside the smile line. -
Seal the work:
Apply a coat of clear matte varnish over the entire figure to protect the paint and give the clay a finished, professional look.
Smooth Moves
Use a barely damp sponge during the shaping phase to constantly smooth the clay. This minimizes sanding later and keeps the shape uniform.
Spooky Accessories
For a ‘Level Up,’ sculpt tiny accessories like a pumpkin, a witch hat, or a broom to place next to your ghosts for extra festive flair.
Arranging these little friends on a wooden ledge warms up the space instantly
Cute Whale Phone Rest
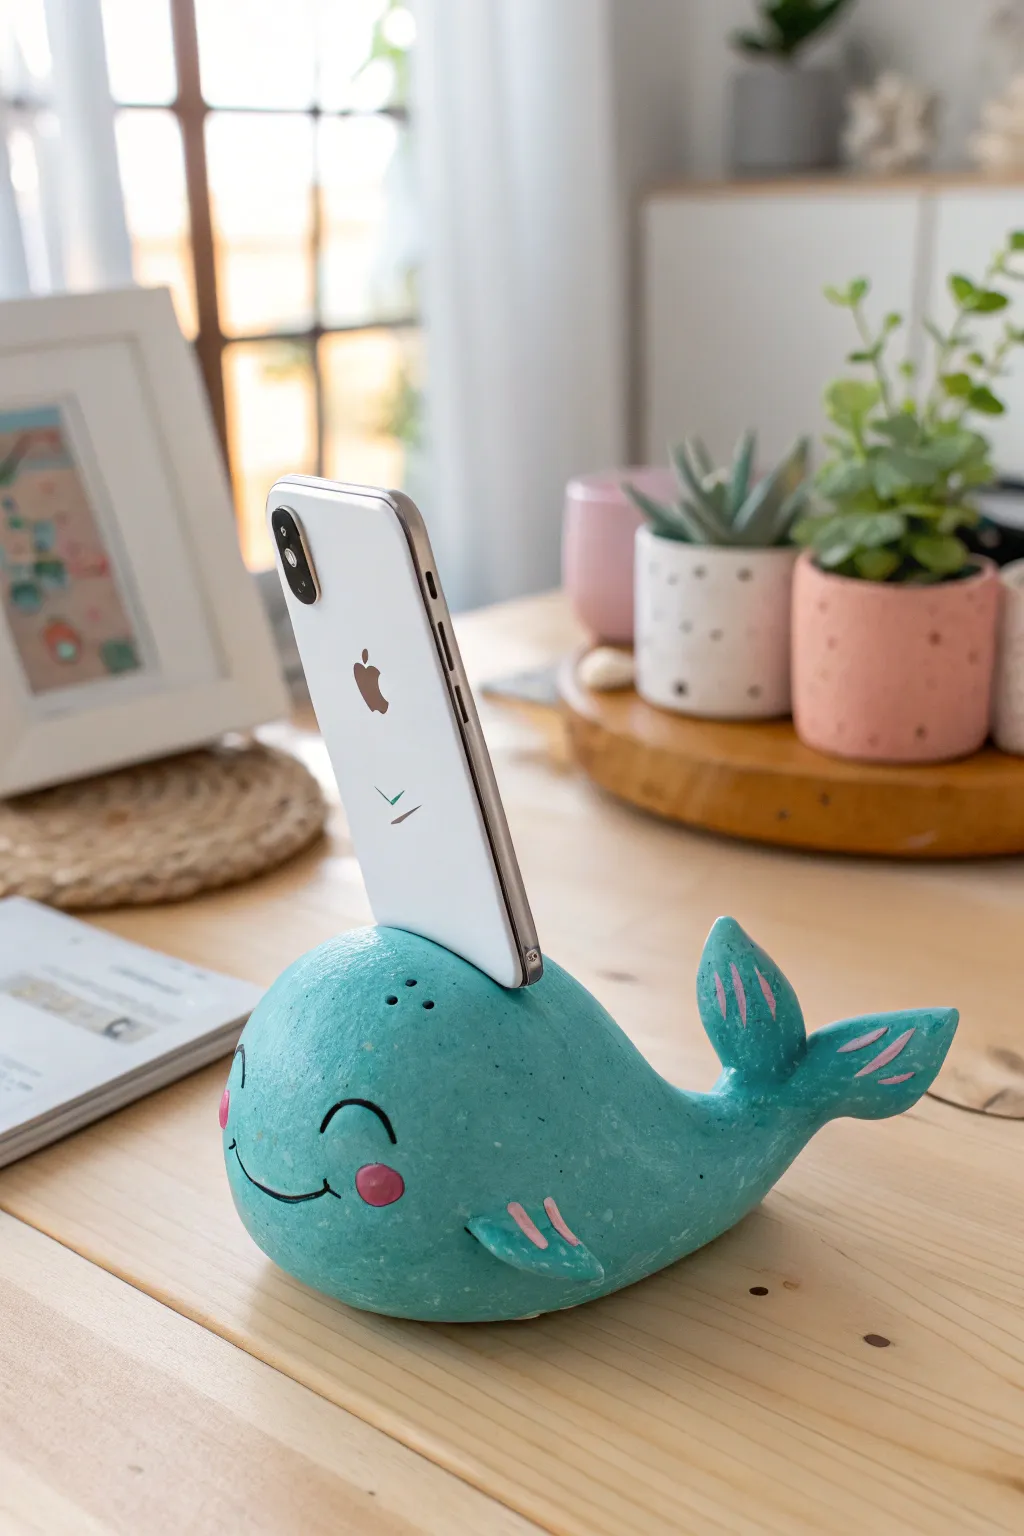
Keep your phone upright and adorable with this charming teal whale desk companion. Sculpted from air-dry clay, this functional figurine features a sweet painted smile and a perfectly sized groove to hold your device securely.
How-To Guide
Materials
- White air-dry clay (approx. 300-400g)
- Acrylic paints (teal, light pink, black, white)
- Clay sculpting tools (specifically a needle tool and smoothing tool)
- Rolling pin
- Small cup of water
- Fine grit sandpaper
- Detail paintbrushes
- Matte or glossy varnish
- Your phone (for measuring)
Step 1: Sculpting the Base Form
-
Condition the clay:
Start by kneading your air-dry clay until it is warm, soft, and pliable. This prevents cracking later on. -
Form the body:
Roll a large handful of clay into a smooth ball, then gently elongate it into a teardrop shape. This will be the main body of the whale, so ensure it is substantial enough to hold the weight of a phone. -
Flatten the bottom:
Tap the bottom of the teardrop shape against your work surface to create a flat, stable base. The whale shouldn’t wobble when you nudge it. -
Create the tail:
Pinch the tapered end of the teardrop and curve it upwards. Flatten the tip slightly and use your fingers or a knife tool to split it down the middle, fanning out two flukes to create the tail shape. -
Add the fins:
Roll two small, equal-sized pieces of clay into flattened triangles. Score the side of the whale body and the back of the fins with a needle tool, dab with a little water, and press the fins firmly onto the sides. -
Blend the seams:
Use a smoothing tool or your finger dipped in water to seamlessly blend the clay where the fins meet the body so they look like one continuous piece.
Weight Saver
If your phone is heavy, press a few small, clean stones into the bottom center of the clay while sculpting. This adds internal ballast to prevent tipping.
Step 2: Creating the Functionality
-
Measure the slot:
Determine where you want your phone to sit on the whale’s back. It should be slightly forward of the center to balance the weight. Mark this area lightly. -
Carve the groove:
Using a knife tool, carefully carve out a rectangular channel across the top of the whale. I prefer to cut slightly narrower than the phone first and widen it gradually. -
Test the fit:
Wrap your phone in plastic wrap (to protect it from moisture) and gently press it into the groove to ensure the fit is snug and the angle is correct for viewing. -
Smooth the phone slot:
Once the size is right, use a little water on your finger to smooth the inside edges of the groove so it won’t scratch your device later. -
Add the blowhole:
Use a needle tool or toothpick to poke two tiny holes near the top of the head for the blowhole detail. -
Let it dry:
Allow the sculpture to dry completely. For a piece this thick, it will likely take 48 to 72 hours. Turn it occasionally to help the bottom dry.
Creative Splash
Paint the whale a dark grey or navy blue and add tiny white speckles across the back to mimic a ‘galaxy’ pattern or underwater bubbles.
Step 3: Painting and Finishing
-
Sand the surface:
Once bone dry, specifically check the phone slot and base. Use fine-grit sandpaper to buff away any fingerprints or rough ridges. -
Apply the base coat:
Paint the entire whale with a teal acrylic paint. You may need two to three coats to get an opaque, even finish. -
Paint the facial features:
Using a fine liner brush and black paint, draw a sweeping smile low on the face and two curved arches for closed, happy eyes. -
Add pink details:
Mix a soft pink color. Paint round circles for the cheeks at the ends of the smile, and add small, decorative stripes on the fins and tail flukes. -
Seal the piece:
Protect your paint job with a coat of matte or glossy varnish. This prevents the paint from chipping when you slide your phone in and out.
Now your desk has a cheerful helper ready to display your notifications in style