When kids get their hands on pottery clay, the magic is watching simple shapes turn into tiny treasures they’re genuinely proud of. These kid-friendly clay projects are all about easy wins—cute characters, bright colors, and pieces that are fun to use long after they dry.
Pinch Pot Animal Bowls

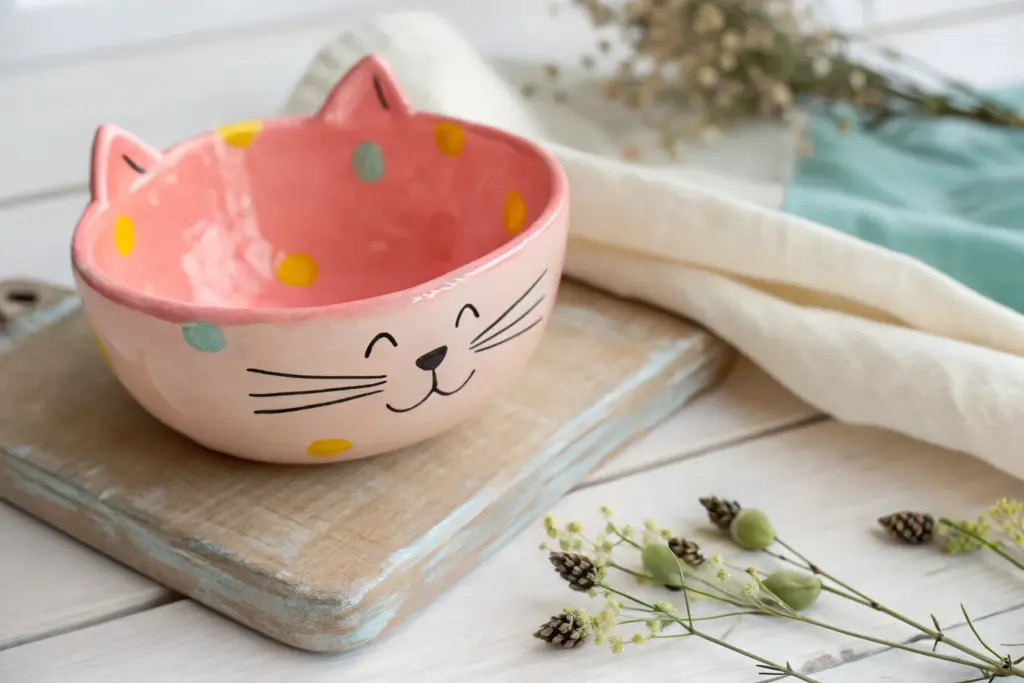
Transform a basic pinch pot into a delightful, friendly turtle character with this fun hands-on project. With its lively polka dots and sweet expression, this sturdy little bowl is perfect for holding trinkets or purely for decoration.
How-To Guide
Materials
- White or speckled stoneware clay
- Pottery sponge
- Needle tool or toothpick
- Scoring tool (or fork)
- Slip (clay mixed with water)
- Small paintbrush
- Underglazes (orange, yellow, blue, teal, black)
- Clear glaze
Step 1: Forming the Body
-
Start the pinch pot:
Begin with a ball of clay roughly the size of a tennis ball. Press your thumb into the center, leaving about a half-inch of thickness at the bottom. -
Shape the walls:
Gently pinch and turn the clay ball in your hand, working from the bottom up. Aim for a wide, shallow bowl shape rather than a tall cup. -
Smooth the rim:
As you pinch, the rim might crack slightly. Use a damp sponge to smooth over the rim, keeping it rounded and even. -
Flatten the bottom:
Tap the bowl gently on your table surface to create a slightly flat base so it doesn’t wobble while you work.
Legs falling off?
If legs detach while drying, your clay was likely too dry when joining. Wrap the turtle in plastic for a day to equalize moisture, then re-score and add more slip.
Step 2: Adding Character
-
Create the head:
Roll a smaller ball of clay, about the size of a walnut, to form the turtle’s head. Smooth it so it’s round but slightly elongated. -
Score and slip:
Scratch hatched lines (scoring) on one side of the head and on the rim of the bowl where you want to attach it. Add a dab of slip to both scratched areas. -
Attach the head:
Press the head firmly onto the rim. Use your thumb to smudge the clay from the neck onto the body to create a seamless connection that won’t fall off. -
Make the legs:
Roll four small, equal-sized nuggets of clay into short, thick cylinders for the legs. -
Attach the legs:
Flip the bowl upside down carefully. Score and slip the bottoms of the feet and the four corners of the bowl, then press them on securely. -
Add gentle toes:
Before flipping it back over, use your needle tool to press two or three tiny vertical lines into the front of each foot to suggest toes. -
Refine the shape:
Turn the turtle right-side up. If the bowl sagged a little, gently reshape it with your fingers.
Step 3: Decorating and Glazing
-
Bisque fire:
Let your turtle dry completely (bone dry) for several days, then have it bisque fired in a kiln. -
Paint the face:
Using a very fine brush and black underglaze, sketch a large, round eye on the side of the head and a simple curved smile. -
Outline the eye:
Carefully draw a circle around the black pupil to make the eye pop, giving the turtle an alert, cartoon-like expression. -
Dot the shell:
Dip a small round brush into your colored underglazes. Press dot shapes randomly all over the outside and inside of the bowl. -
Vary the colors:
I prefer to alternate between orange, teal, and yellow dots to keep the pattern playful and scattered. -
Clear glaze application:
Once the underglaze is dry, dip the entire piece into a clear dipping glaze or brush on three coats of clear brushing glaze. -
Final wipe:
Use a damp sponge to wipe any glaze off the very bottoms of the feet so they don’t stick to the kiln shelf. -
Final firing:
Fire the turtle again to the temperature required by your clay and glaze (usually Cone 5 or 6 for stoneware).
Even Polka Dots
For perfectly round dots without a brush, dip the eraser end of a standard pencil into the underglaze and stamp it onto the clay like a printing tool.
Now you have a charming little ceramic friend ready to hold your treasures or brighten up a shelf


Painted Treasure Pinch Pots
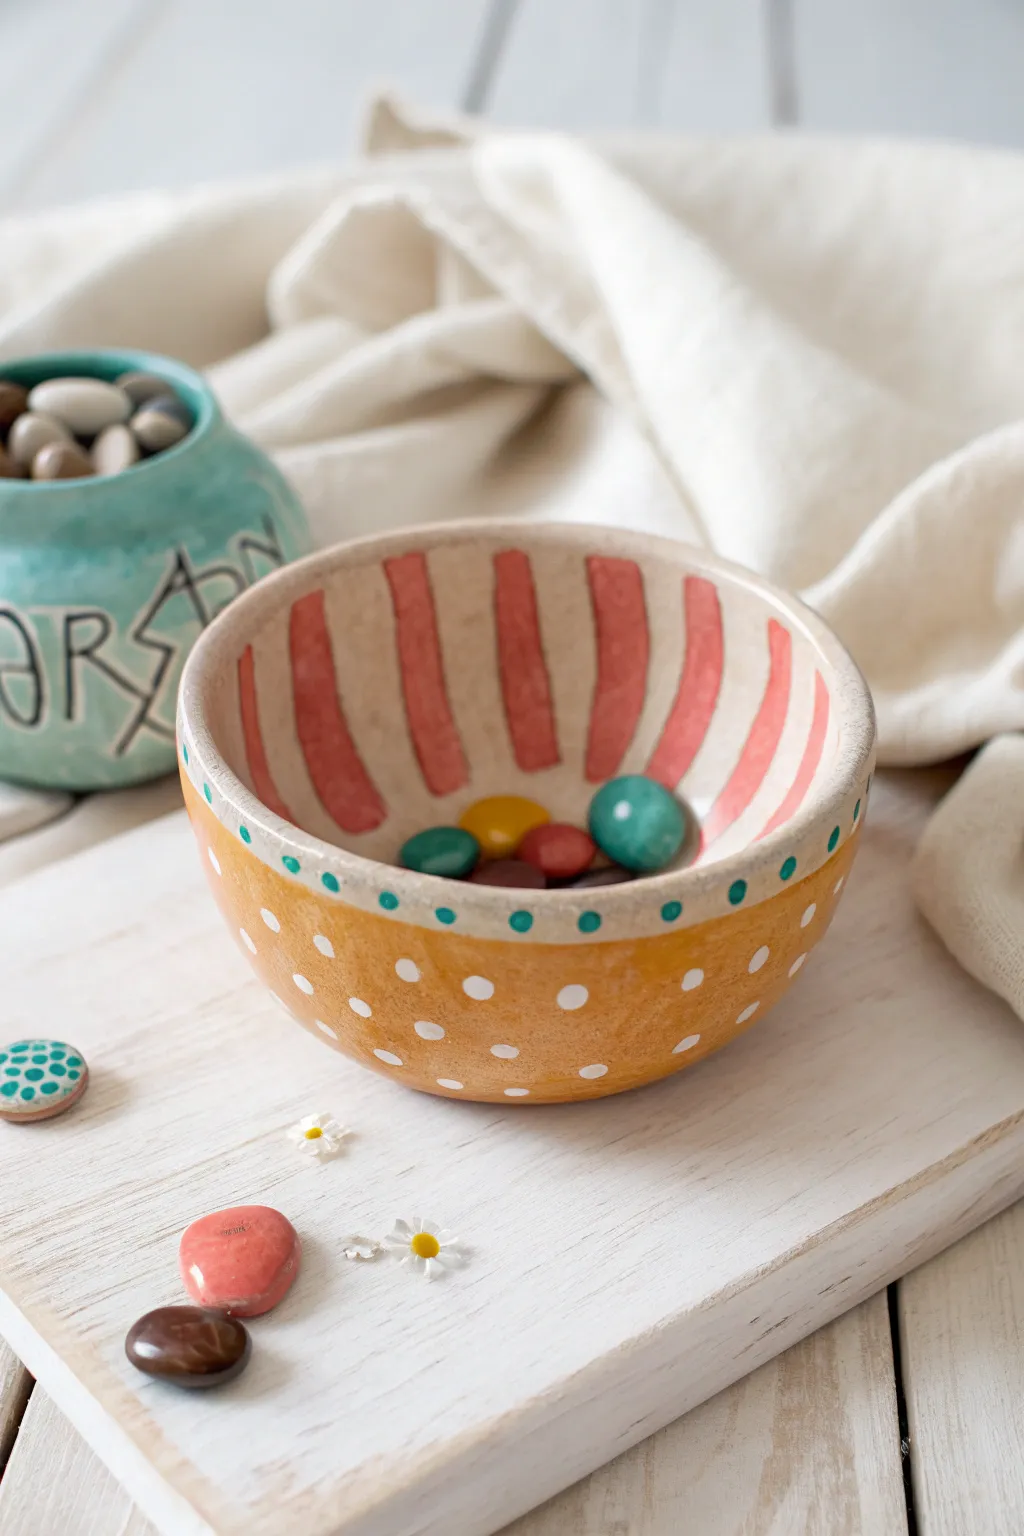
Brighten up any shelf with this cheerful pinch pot that combines bold interior stripes with a playful, spotted exterior. With its sunny yellow base and candy-colored accents, it’s the perfect size for holding tiny treasures like coins, buttons, or smooth stones.
Detailed Instructions
Materials
- Air-dry clay or low-fire earthenware clay
- Rolling pin (optional)
- Small bowl of water
- Sponge
- Pottery paints or acrylic paints (Mustard Yellow, Salmon Pink, Cream/White, Teal)
- Fine detail paintbrush
- Medium flat paintbrush
- Gloss varnish or clear sealant
Step 1: Forming the Bowl
-
Prepare the Clay Ball:
Start with a fist-sized lump of clay. Roll it firmly between your palms until you have a smooth, round sphere without deep cracks. -
Start the Pinch:
Hold the clay sphere in one hand. Press your thumb directly into the center of the ball, stopping about half an inch from the bottom. -
Shape the Walls:
Gently pinch the clay between your thumb (inside) and fingers (outside), rotating the ball as you go. Work your way from the bottom up to thin out the walls. -
Smooth the Rim:
Aim for an even thickness of about a quarter-inch. If the rim gets uneven, gently tap the pot upside down on your table to level it, then smooth the edge with a damp finger. -
Refine the Surface:
Take a slightly damp sponge and wipe the entire surface of the pot to remove fingerprints and smooth out any small cracks. Let the clay dry completely according to your package instructions.
Step 2: Painting the Base Colors
-
Prime the Surface:
If your clay is grey or dark, paint a base coat of cream or white all over the pot to make the colors pop. Let it dry. -
Paint the Interior:
Using a creamy off-white or beige paint, coat the entire inside of the bowl. Apply two coats if necessary for solid coverage. -
Paint the Exterior:
Paint the outside of the bowl with a warm mustard yellow or light orange. Be careful to create a neat line where the rim meets the inside. -
Define the Rim Band:
Leave a small band of the cream interior color visible at the very top edge, or paint a fresh cream band around the upper rim of the exterior if you painted over it.
Paint Hack
For perfectly round polka dots on the exterior, use a Q-tip or a unused pencil eraser as a stamp instead of a brush.
Step 3: Adding the Details
-
Paint Interior Stripes:
Using a flat brush and salmon pink paint, create vertical stripes on the inside of the bowl. Start from the bottom center and pull the brush up toward the rim. -
Space the Stripes:
Don’t worry about perfect spacing; a little irregularity adds handmade charm. Leave gaps of the cream background visible between each pink stroke. -
Add Exterior Polka Dots:
Dip the back end of a paintbrush handle into white paint. Dot it onto the mustard yellow exterior to create uniform polka dots. -
Create the Teal Rim:
Using a smaller tool or fine brush, add a row of small teal or turquoise dots along the cream band near the rim of the bowl. -
Finishing Touches:
Once all paint is fully dry, apply a coat of gloss varnish or clear sealant. This gives the pot a ceramic-like shine and protects your hard work.
Cracked Clay?
If small cracks appear while drying, mix a tiny bit of vinegar into a slip (watery clay paste) and fill the cracks, then smooth over.
Fill your new handmade bowl with colorful trinkets and enjoy the pop of color on your table


Handprint Keepsake Dish
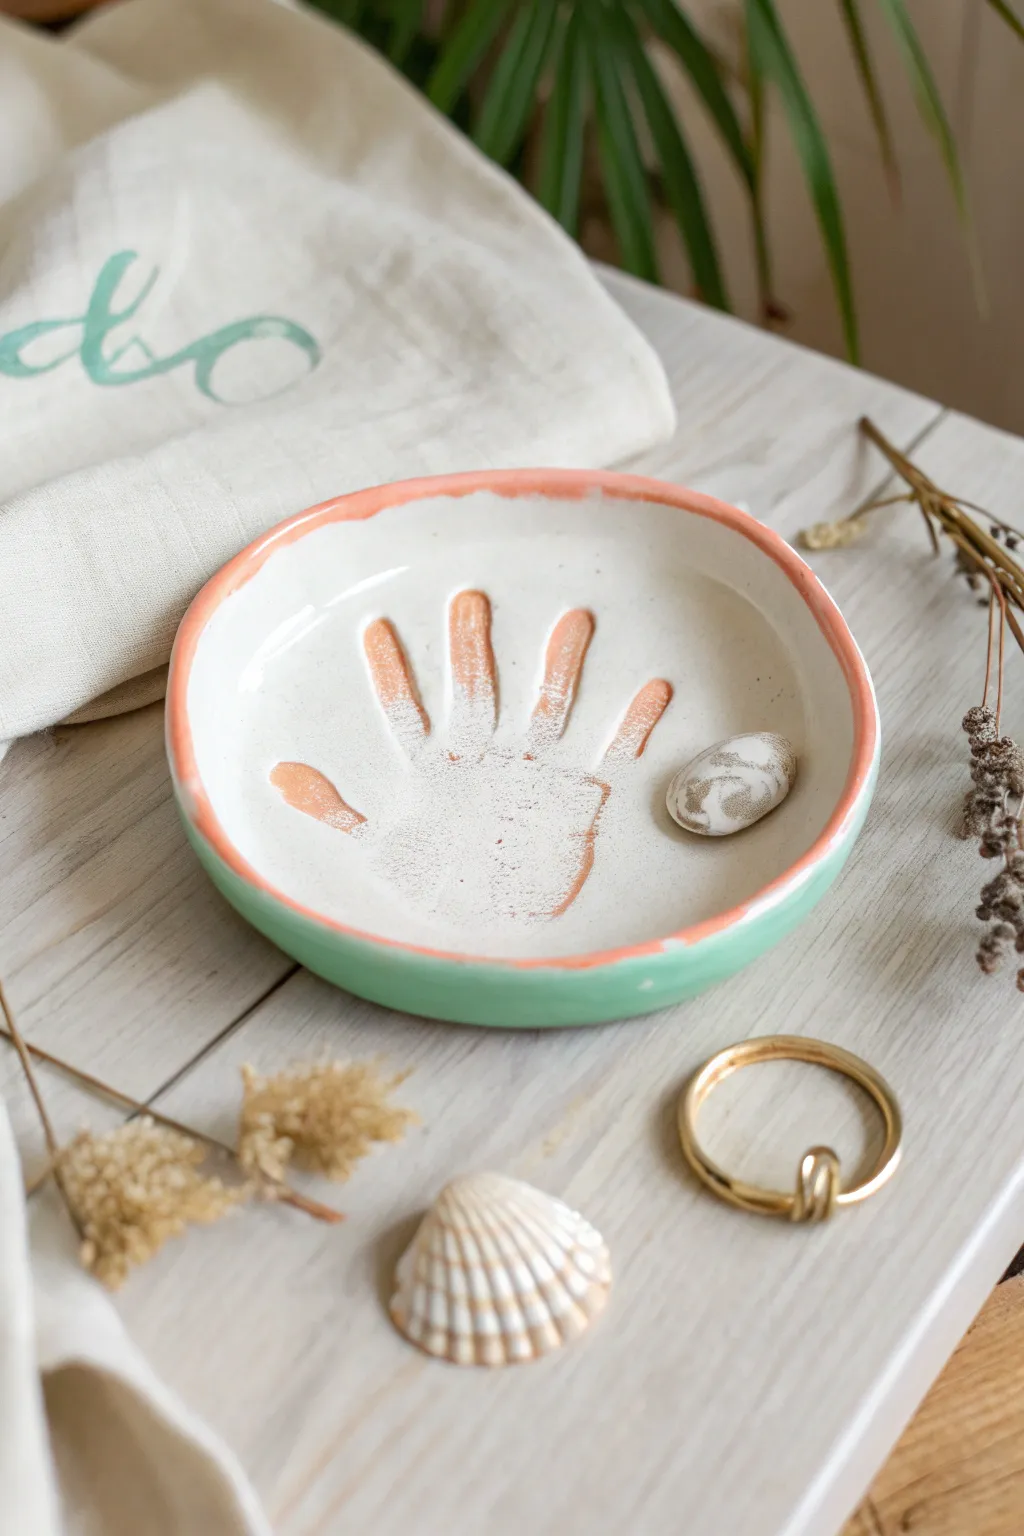
Capture a moment in time with this charming ceramic dish featuring a relief handprint impression. The soft terracotta and mint green glaze combination gives it a modern, beachy feel perfect for holding rings or small treasures.
How-To Guide
Materials
- Air-dry clay or kiln-fire clay (white)
- Rolling pin
- Canvas mat or parchment paper
- Bowl for use as a mold (approx. 6-8 inches diameter)
- Fettling knife or clay needle tool
- Sponge
- Terracotta or peach-colored acrylic paint (or underglaze)
- Mint green acrylic paint (or underglaze)
- Clear gloss sealant or glaze
- Small round paintbrush
- Flat shader paintbrush
- Baby wipes (optional)
Step 1: Shaping the Clay Base
-
Prepare your workspace:
Set up a canvas mat or parchment paper to prevent sticking. Take a large ball of white clay and begin kneading it to remove air bubbles and warm it up. -
Roll out the slab:
Using your rolling pin, roll the clay out into an even slab about 1/4 inch thick. Aim for a circle slightly larger than the hand you intend to imprint. -
Smooth the surface:
Take a slightly damp sponge and gently wipe the surface of the clay slab. This removes canvas texture marks and ensures a smooth area for the handprint. -
Make the impression:
Guide the child’s hand onto the center of the slab. Press down firmly on the palm and each individual finger to ensure a deep, clear impression. -
Lift and check:
Carefully lift the hand straight up to avoid smudging the edges. Check the impression quality; if it’s too light, you can re-roll the clay and try again. -
Cut the circle:
Place a bowl upside down over the handprint to use as a template. Use a needle tool or knife to trace around the bowl, cutting a perfect circle. -
Create the curve:
Lift your clay circle and gently place it inside a slightly larger bowl. Press it down so it takes the curved shape of the bowl, forming the dish sides. -
Refine the edges:
Use a damp sponge or your finger to smooth the cut rim of the dish, rounding off any sharp angles or rough clay crumbs.
Cracking Clay?
If using air-dry clay, cracks can happen if it dries too fast. Drape a plastic bag loosely over the bowl while drying to slow the process down.
Step 2: Drying and Decorating
-
Dry completely:
Allow the clay to dry fully inside the mold to maintain its shape. For air-dry clay, this usually takes 24-48 hours; kiln clay will need to be fired before glazing. -
Sand imperfections:
Once fully dry (and harder), use fine-grit sandpaper to gently smooth any rough spots on the rim or back of the dish. -
Paint the handprint:
Dip a small round brush into the terracotta or peach paint. Carefully paint inside the depressed areas of the handprint. -
Create the washed look:
I like to immediately wipe the painted handprint gently with a damp paper towel or baby wipe. This leaves pigment in the textures but cleans the high points, creating a rustic, weathered look. -
Paint the rim:
Using the same terracotta color, carefully paint the top edge of the rim. An uneven, slightly organic line adds to the handmade charm seen in the photo. -
Paint the exterior:
Flip the dish over or hold it carefully. Use a flat brush to apply the mint green paint to the exterior walls and the underside of the dish. -
Clean up lines:
Check where the mint green meets the terracotta rim. You can leave a tiny gap of white clay showing, or have them touch, but keep the line relatively tidy. -
Seal or glaze:
If using air-dry clay, apply two coats of clear gloss sealant to protect the finish. For ceramic clay, apply a clear transparent glaze and fire the piece one last time.
Add a Date
Before the clay dries, use a toothpick or small letter stamps to impress the child’s name and the year on the back of the dish for a true heritage piece.
Place this lovely dish on a bedside table or shelf to keep jewelry safe while preserving a precious memory


Coil Clay Snake Bowls
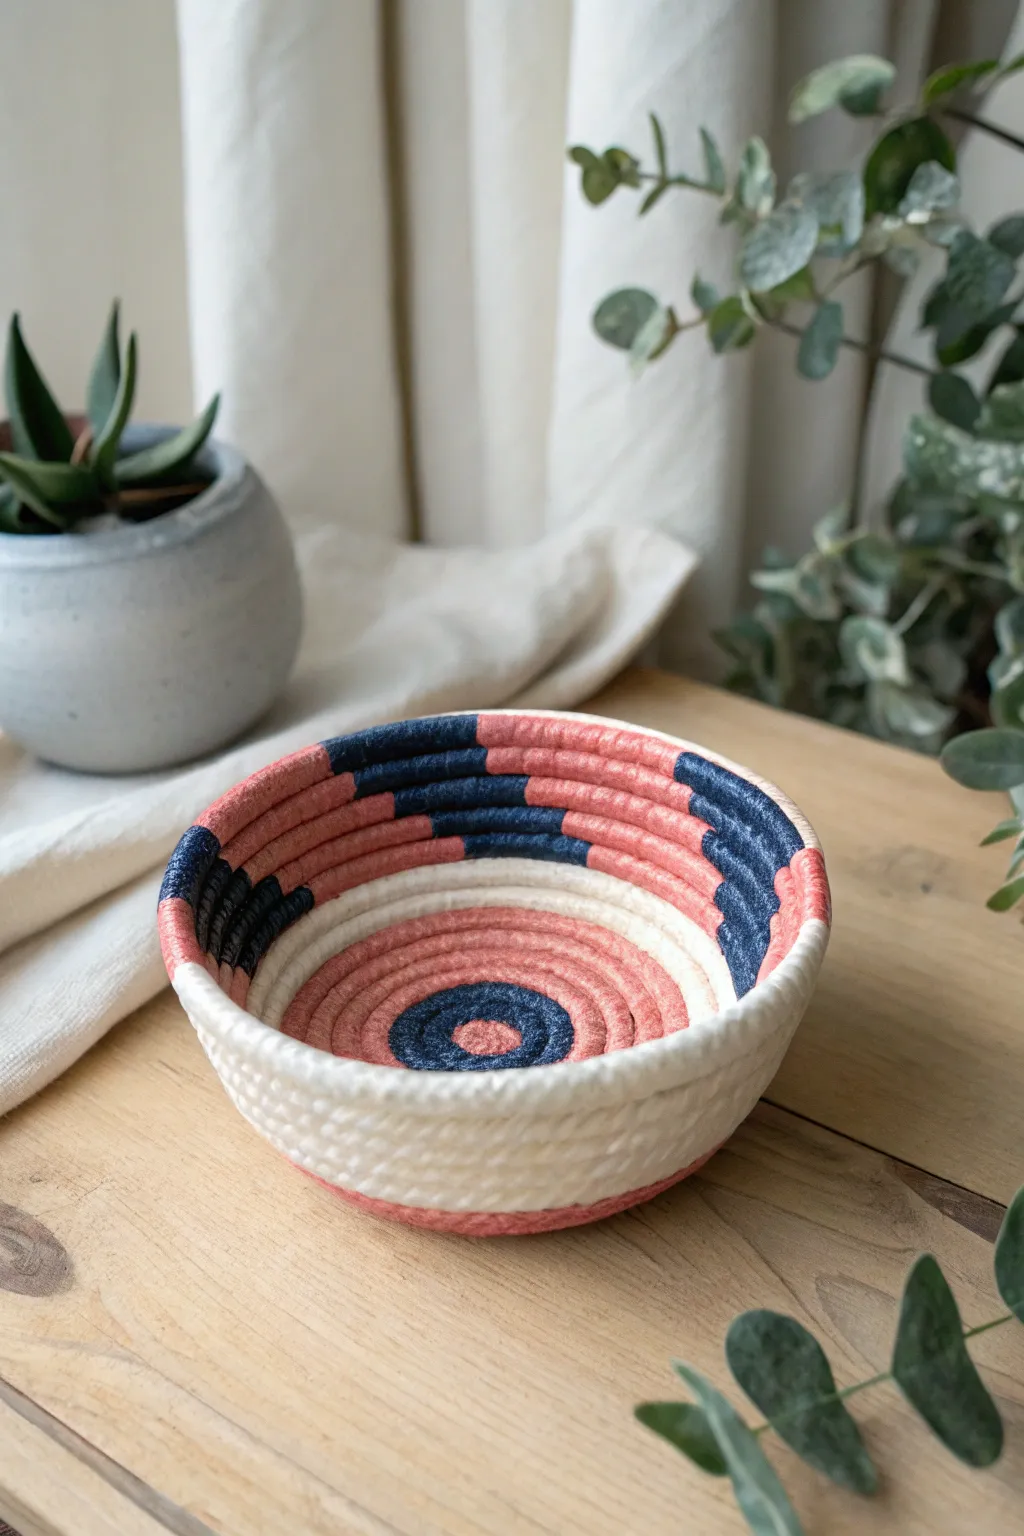
This charming little bowl uses the ancient technique of coiling to create a sturdy vessel with a modern, graphical twist. By alternating colors of rolled clay snakes, you create a striking pattern of salmon pink, deep navy, and creamy white that feels both playful and sophisticated.
Detailed Instructions
Materials
- Air-dry clay or polymer clay (White, Salmon Pink, Navy Blue)
- Clay roller or rolling pin
- Small bowl (to use as a mold/armature)
- Plastic wrap
- Smoothing tool or old toothbrush
- Small cup of water (for air-dry clay)
- Scoring tool or plastic knife
- Clear acrylic sealer or varnish (optional)
Step 1: Preparing the Coils
-
Condition the clay:
Start by warming up your clay in your hands. Knead each color separately—white, salmon pink, and navy blue—until they are soft, pliable, and free of cracks. -
Roll the snakes:
Pinch off manageable chunks of each color. Place a chunk on your work surface and use the palms of your hands to roll it back and forth. -
Achieve uniform thickness:
Aim to create long, even ropes (or ‘snakes’) that are about the thickness of a pencil or a pinky finger. -
Repeat for all colors:
Continue rolling snaked until you have a good pile of each color. You will need mostly pink and white, with slightly less blue for the accent spots.
Cracking Coils?
If your clay snakes crack while rolling, your clay is too dry. Dip your fingers in water (for air-dry) or add a drop of clay softener (for polymer) and re-knead well.
Step 2: Creating the Base
-
Start the center spiral:
Take a blue coil to begin. Tightly wind one end into a small, flat spiral to create the very center ‘button’ of the bowl base. -
Switch colors:
Cut the blue coil cleanly. Attach a pink coil by pressing the ends firmly together (score and add a dab of water if using air-dry clay) and continue winding around the blue center. -
Expand the floor:
Continue wrapping the pink coil around until you have created a flat disc about 2-3 inches wide. This forms the bottom of your bowl. -
Color change to white:
Slice off the pink coil and attach a white coil. Wind this around for several rotations to create a distinct white band separating the base from the walls.
Make it Functional
To make the bowl usable for holding small trinkets, brush a layer of watered-down white glue (Mod Podge) over the inside to seal any tiny gaps between coils.
Step 3: Building the Walls
-
Prepare the mold:
To get a perfect shape, I prefer to flip a small bowl upside down and cover it with plastic wrap. Place your flat clay disc on top of this form. -
Stacking upward:
Begin stacking coils directly on top of the previous row (rather than beside it) to build height. Start with a section of white coil. -
Creating the pattern:
To mimic the image, you need to alternate colors within a single row. Cut small segments of blue, pink, and white clay. -
Join segments carefully:
Attach a short blue segment to your white row, followed by a longer pink segment. Thoroughly blend the seams where the colors meet so the rope looks continuous. -
Stagger the colors:
On the next rotation, place your color changes slightly to the left or right of the row below. This creates that stepped, geometric look seen in the photo. -
Press and secure:
Gentle downward pressure is key. As you stack, lightly press the new coil onto the one below it to ensure they fuse. -
Finish the rim:
For the final row, use segments of pink and blue to create a decorative top edge. Smooth the very top surface gently with your finger.
Step 4: Finishing Touches
-
Blend the interior (optional):
For a smoother inside surface, you can use a modeling tool to gently smear the coils together on the interior of the bowl only, keeping the exterior coiled texture visible. -
Dry or bake:
If using air-dry clay, leave the bowl on the mold until it’s leather-hard, then remove carefully to finish drying. If using polymer, bake according to package instructions with the oven-safe bowl mold. -
Seal:
Once fully cured or dry, apply a coat of clear varnish to protect the surface and make the colors pop.
Now you have a stylish, handmade vessel ready to hold your treasures or decorate your shelf

The Complete Guide to Pottery Troubleshooting
Uncover the most common ceramic mistakes—from cracking clay to failed glazes—and learn how to fix them fast.
Slab-Built Name Plaques

This personalized name plaque combines the warmth of raw terracotta with crisp white lettering for a clean, modern look. The double-slab construction creates a wonderful framed effect, while the dot detailing adds just the right amount of texture.
Step-by-Step Guide
Materials
- Terracotta clay (or grogged red clay)
- White clay (or low-fire white slip/underglaze)
- Rolling pin
- Canvas or cloth work surface
- Clay knife or needle tool
- Ruler or straight edge
- Slip and scoring tool (fork or serrated rib)
- Small paintbrush
- Letter stamps or paper stencils (optional)
- Small round tool (like a retracted ballpoint pen or straw)
Step 1: Creating the Base Slabs
-
Roll the main slab:
Start by rolling out a piece of terracotta clay on your canvas to an even thickness of about 1/4 inch. Smooth out any canvas texture with a rib tool if desired. -
Cut the rectangles:
Using a ruler and needle tool, cut two rectangles. The first one should be your larger base (e.g., 4 x 7 inches), and the second should be slightly smaller (e.g., 5.5 x 2.5 inches) to create the inner raised section. -
Refine the edges:
Gently run your damp finger along the cut edges of both rectangles to soften any sharp burrs or clay crumbs. -
Score the surfaces:
Mark the center of the large rectangle where the smaller one will sit. Score this area thoroughly with a serrated tool. Do the same to the back of the smaller rectangle. -
Join the slabs:
Apply a liberal amount of clay slip to the scored areas. Press the smaller rectangle firmly onto the center of the larger one, ensuring no air bubbles are trapped between the layers.
Warping Woes?
If the corners start lifting while drying, flip the plaque over onto a piece of foam or drywall board and place a light weight (like a beanbag) on the center to keep it flat.
Step 2: Adding the Letters
-
Roll coils for lettering:
Roll out thin, even coils of white clay. If you are using terracotta only and plan to paint later, you can use the same red clay, but white clay coils create the look instantly. -
Form the name:
Cut and shape the coils to form the letters of the name. Lay them lightly on the center slab to check spacing and size before attaching. -
Attach the letters:
Once happy with the arrangement, lightly score the spot under each letter and apply a tiny dab of water or slip. Press the coils down gently so they stick without losing their rounded shape. -
Smooth the joins:
Use a small modeling tool to gently blend the ends of coil segments together where lines meet (like the middle of the ‘K’), keeping the forms clean.
Make it hangable
Before drying, use a straw to punch two clean holes in the top corners. After firing, thread a leather cord or rustic twine through for easy wall mounting.
Step 3: Detailing and Border
-
Create the dot border:
Roll tiny balls of clay—roughly the size of peppercorns. You will need enough to go all the way around the inner rectangle. -
Attach the dots:
Score the perimeter of the inner rectangle. Place the tiny clay balls evenly along this edge, pressing them down slightly so they adhere firmly. -
Paint the outer border:
If you used terracotta for the base, apply a layer of white underglaze or slip to the exposed outer border of the large bottom slab. Be careful not to get paint on the inner red section. -
Add texture holes:
Using a small round tool or the end of a paintbrush, press small indentations or holes into the white outer border. Space them evenly for a stitched leather effect. -
Dry slowly:
Place the finished plaque under a loose sheet of plastic. I find this helps the two slabs dry at the same rate, preventing the corners from curling up. -
Clean up:
Once leather hard, do a final check for any rough spots or crumbs of clay and gently brush them away with a soft dry brush. -
Fire:
Bisque fire the piece according to your clay’s temperature guidelines. If you used white clay for letters and slip for the border, apply a clear glaze over the whole piece and fire again for a glossy finish.
This charming custom plaque makes for a thoughtful gift or a perfect sign for a bedroom door
Clay Bead Bracelets
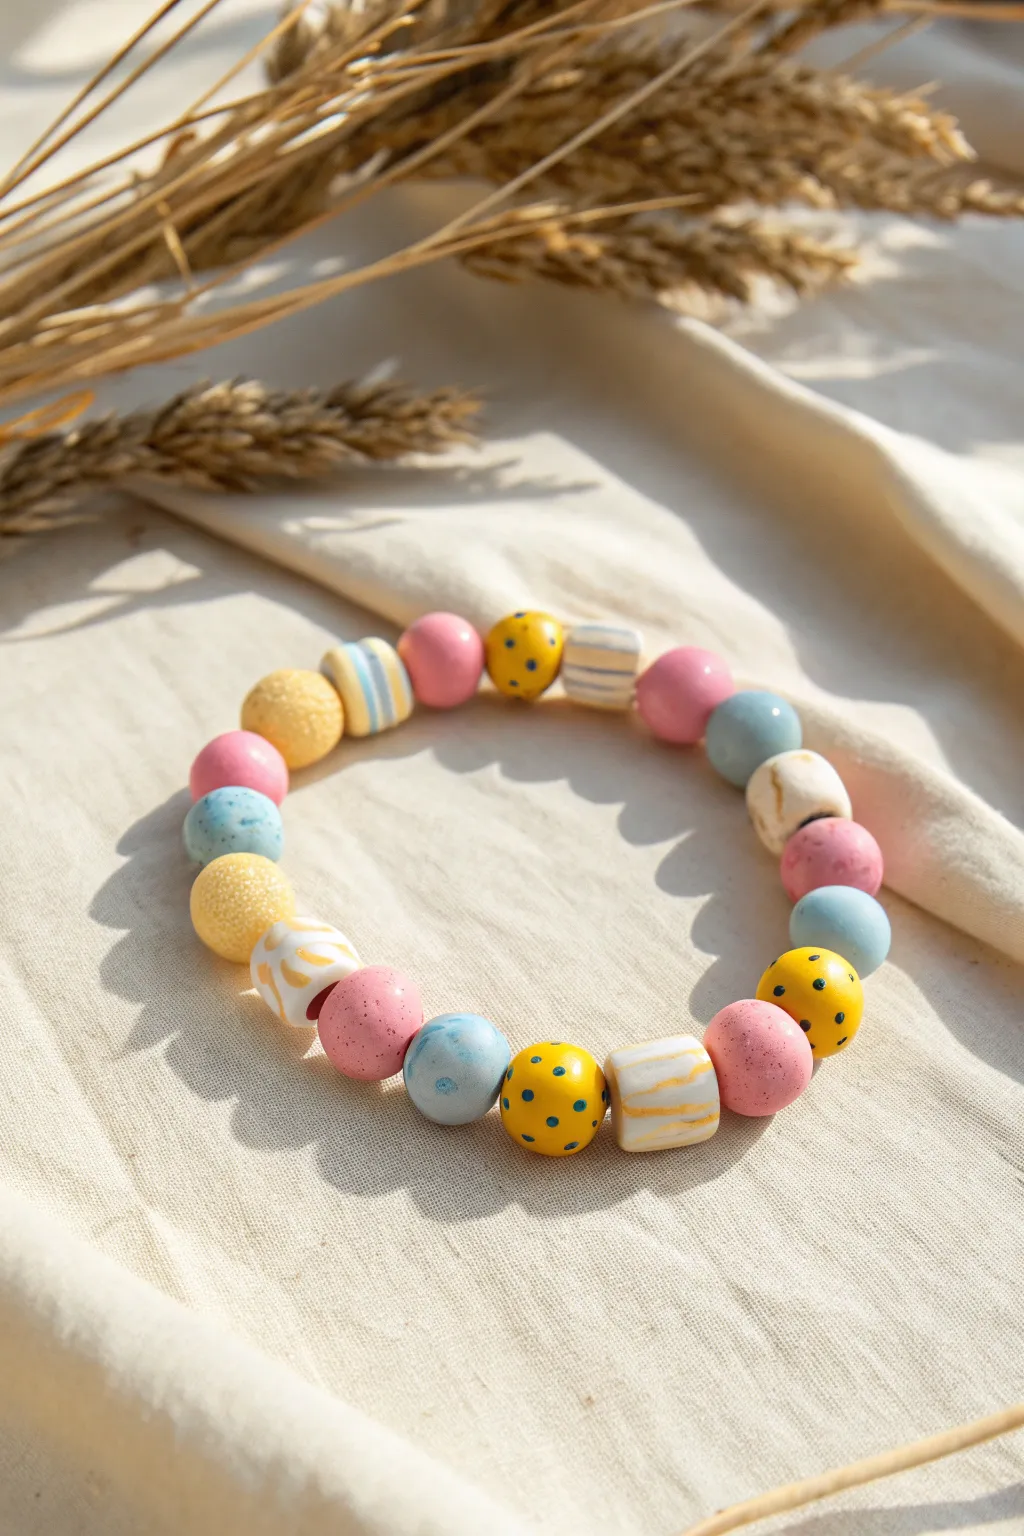
This cheerful bracelet combines soft pastels with fun patterns like polka dots and stripes, creating a wearable piece of art. The mix of spherical and cylindrical beads adds a delightful texture and rhythm to the design.
Detailed Instructions
Materials
- Polymer clay or air-dry clay (pink, light blue, yellow, white)
- Clay rolling pin or acrylic roller
- Toothpick, skewer, or bead reamer
- Acrylic paints (if using air-dry clay)
- Fine detail paintbrush
- Elastic cord (0.8mm or 1mm)
- Gloss or matte varnish (optional)
- Scissors
Step 1: Shaping the Beads
-
Prepare your clay:
Begin by conditioning your clay. Knead small amounts of pink, light blue, yellow, and white clay until they are soft and pliable. If you want a speckled look like some of the beads in the photo, you can mix a tiny pinch of black pepper or craft sand into the clay body. -
Form the spheres:
Pinch off equal-sized pieces of each color. Roll them between your palms to create smooth, uniform spheres about the size of a large pea or a small marble. Aim for a mix: approximately 5 pink, 4 blue, and 4 yellow spheres. -
Create the cylinders:
Take a portion of white or yellow clay and roll it into a short, thick log. Slice this log into small segments to create cylindrical ‘tube’ beads. You’ll need about 4 or 5 of these to break up the pattern. -
Add texture:
For the solid yellow beads, you can gently roll them over a piece of sandpaper or a textured sponge before hardening to give them a subtle, grainy surface similar to citrus skin. -
Pierce the holes:
Carefully insert a toothpick or designated bead tool through the center of each bead. Rotate the tool gently as you push through to avoid distorting the shape. I find it helpful to pierce halfway from one side, then meet the hole from the other side.
Step 2: Decorating & Baking
-
Detail the polka dots:
Using a very fine tool or the tip of a toothpick, add small dots to the yellow spheres. You can use tiny bits of blue or black clay pressed on, or paint the dots after baking. The image shows contrasting blue and black dots on yellow backgrounds. -
Create the stripes:
For the cylindrical beads, add decorations. Take extremely thin snakes of blue or yellow clay and press them around the white cylinders to create circles or stripes. Gently perform a final roll to flatten these stripes flush with the bead surface. -
Bake or dry:
If using polymer clay, arrange your beads on a baking sheet lined with parchment paper. Bake according to the manufacturer’s instructions (usually around 230°F – 275°F for 15-30 minutes). If using air-dry clay, leave them in a dry, warm spot for 24-48 hours. -
Cool down:
Let the beads cool completely before handling. Polymer clay is slightly fragile when warm, so patience here ensures perfectly round beads.
Smooth Operator
To remove fingerprints from polymer clay before baking, lightly brush the raw beads with a little baby oil or cornstarch.
Step 3: Painting & Assembly
-
Painting touches:
If you didn’t add patterns with clay, now is the time to paint. Use a fine brush to add blue polka dots to yellow beads, or delicate stripes on the cylinders. You can also spatter a little blue paint on the solid beads for a speckled egg effect. -
Seal the beads:
Apply a coat of glaze or varnish to protect the surface. A matte finish looks very natural, while a gloss finish will make the bright colors pop. -
Plan the pattern:
Lay out your beads in a circle to finalize the sequence. Try alternating shapes—place a cylinder bead between every 3 or 4 spherical beads to create visual interest. -
String the beads:
Cut a piece of elastic cord about 10 inches long. String your beads according to your layout. Check the size against your wrist as you go, adding or removing beads as needed. -
Secure the knot:
Tie a strong surgeon’s knot (right over left, left over right) to secure the bracelet. Pull the elastic tight enough so there are no gaps between beads, but not so tight that the bracelet puckers. -
Hide the knot:
Trim the excess cord and apply a tiny dab of super glue to the knot. Gently slide a bead with a slightly larger hole over the knot to hide it inside.
Marbled Magic
Twist two colors together but don’t fully mix them before rolling a bead. This creates a beautiful marble effect perfect for the ‘solid’ beads.
Enjoy wearing your handcrafted accessory and watch how the colors brighten up your outfit.


What Really Happens Inside the Kiln
Learn how time and temperature work together inside the kiln to transform clay into durable ceramic.
Heart Ornaments With Texture
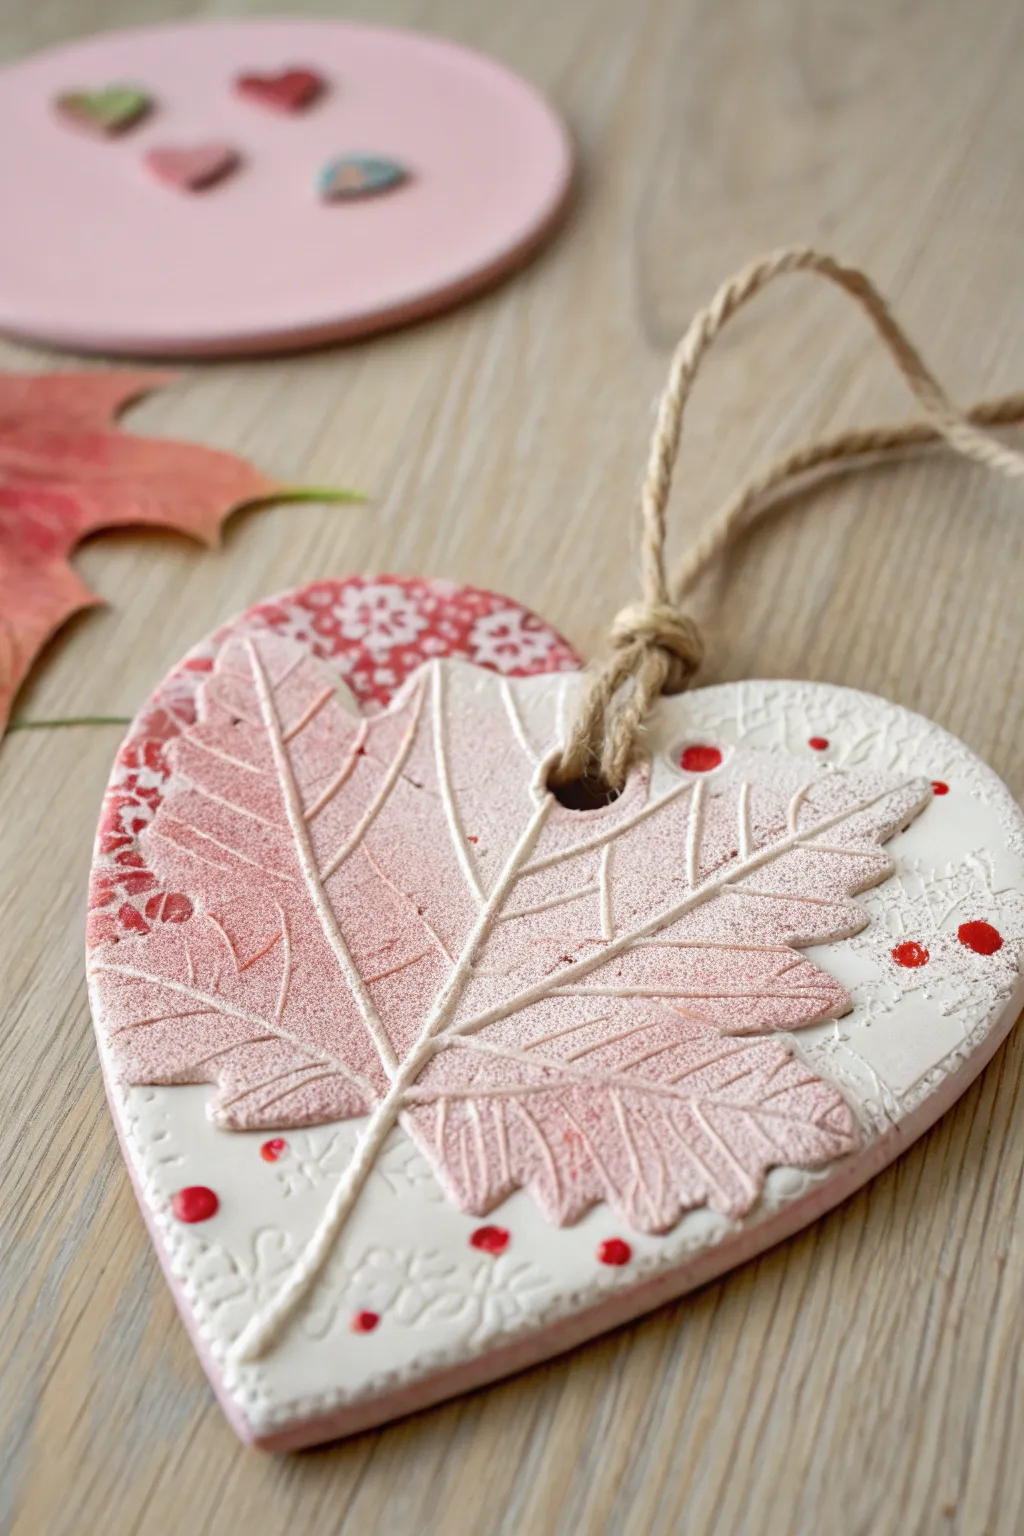
Capture the beauty of nature with this textured clay heart that features a stunning relief leaf impression. The combination of delicate lace backgrounds and a bold, painted botanical element makes this a charming rustic ornament perfect for gifting.
Step-by-Step
Materials
- Air-dry clay or polymer clay (white)
- Small rolling pin
- Heart-shaped cookie cutter (large)
- Real leaf with prominent veins (maple works well)
- Patterned lace doily or textured rubber stamp
- Acrylic paints (Red, Pink, White)
- Small sponge or foam dabber
- Small detail paintbrush
- Straw or skewer (for hole punching)
- Jute twine or ribbon
- Sandpaper (fine grit)
- Clear varnish (optional)
- Matte mod podge (optional for transfer)
Step 1: Preparing the Clay Base
-
Roll the Slab:
Begin by conditioning your clay widely until it is soft and pliable. Roll it out into a smooth slab approximately 1/4 inch thick. Aim for an even thickness so the ornament dries without warping. -
Add Background Texture:
Before cutting the shape, gently press a piece of lace or a textured stamp into the clay surface. Use the rolling pin to pass over it once lightly; this imprints a subtle, beautiful pattern that will serve as the backdrop for your leaf. -
Cut the Heart:
Position your large heart-shaped cookie cutter over the textured clay. Press down firmly to cut out your base shape, then carefully peel away the excess clay from the outside edges. -
Smooth the Edges:
Dip your finger in a tiny bit of water and run it along the cut edges of the heart to smooth out any roughness left by the cutter.
Clay sticking?
If the leaf sticks to the clay and tears when peeling, lightly dust the leaf with cornstarch or baby powder before pressing it down.
Step 2: Creating the Leaf Impression
-
Position the Leaf:
Select a leaf with strong, thick veins. Place it vein-side down onto the center of your clay heart. Ensure the stem is pointing towards where the hanging hole will be, typically the top center. -
Pressing the Leaf:
Use your rolling pin to firmly roll over the leaf. You want to press it deep enough into the clay that the veins make a clear indentation, but not so hard that you deform the heart shape. -
The Reveal:
Use a pair of tweezers or a craft knife tip to carefully lift the stem and peel the leaf off the clay. You should see a crisp, detailed negative impression of the leaf structure. -
Create Hanging Hole:
While the clay is still wet, use a plastic straw or a skewer to punch a hole near the top dip of the heart. Make sure it is wide enough for your jute twine to pass through later. -
Dry the Ornament:
Set the heart aside to dry on a flat surface. Turn it over occasionally to ensure even drying. Depending on your clay type, this may take 24-48 hours. I find placing a heavy book on it once it’s leather-hard helps keep it perfectly flat.
Step 3: Decoration and Finishing
-
Pre-Sanding:
Once fully dry, lightly sand the edges with fine-grit sandpaper to remove any sharp burrs. -
Base Color Application:
Squeeze out a small amount of reddish-pink acrylic paint. Using a sponge or foam dabber, lightly tap paint over the leaf impression area. The texture of the sponge helps simulate the mottled look of an autumn leaf. -
Highlighting Veins:
To make the veins pop like the image, use a dry-brush technique with white paint. Lightly brush over the raised parts of the leaf texture; the white will catch on the high points while the pink stays in the recesses. -
Partial Painting:
For the artistic effect shown, paint only one side of the heart’s background in a deeper red or patterned contrast if desired, or simply add red dots around the leaf for a pop of color using the back of a paintbrush. -
Adding Details:
Using a tiny detail brush, add small groupings of red dots scattered around the white negative space of the heart to balance the composition. -
Sealing:
Apply a coat of clear varnish or matte sealer to protect the paint and give the ornament a finished, professional sheen. -
Stringing:
Cut a length of jute twine or rustic string. Fold it in half to create a loop, thread the fold through the hole, and pull the loose ends through the loop to secure it with a lark’s head knot.
Glaze It Up
For a glossy ceramic look without a kiln, use ‘Triple Thick’ gloss glaze over the leaf area only. It makes the colors pop and mimics fired pottery.
Hang your beautiful nature-inspired ornament in a window or on a festive tree and enjoy your handiwork
Mini Pinch Pot Planters
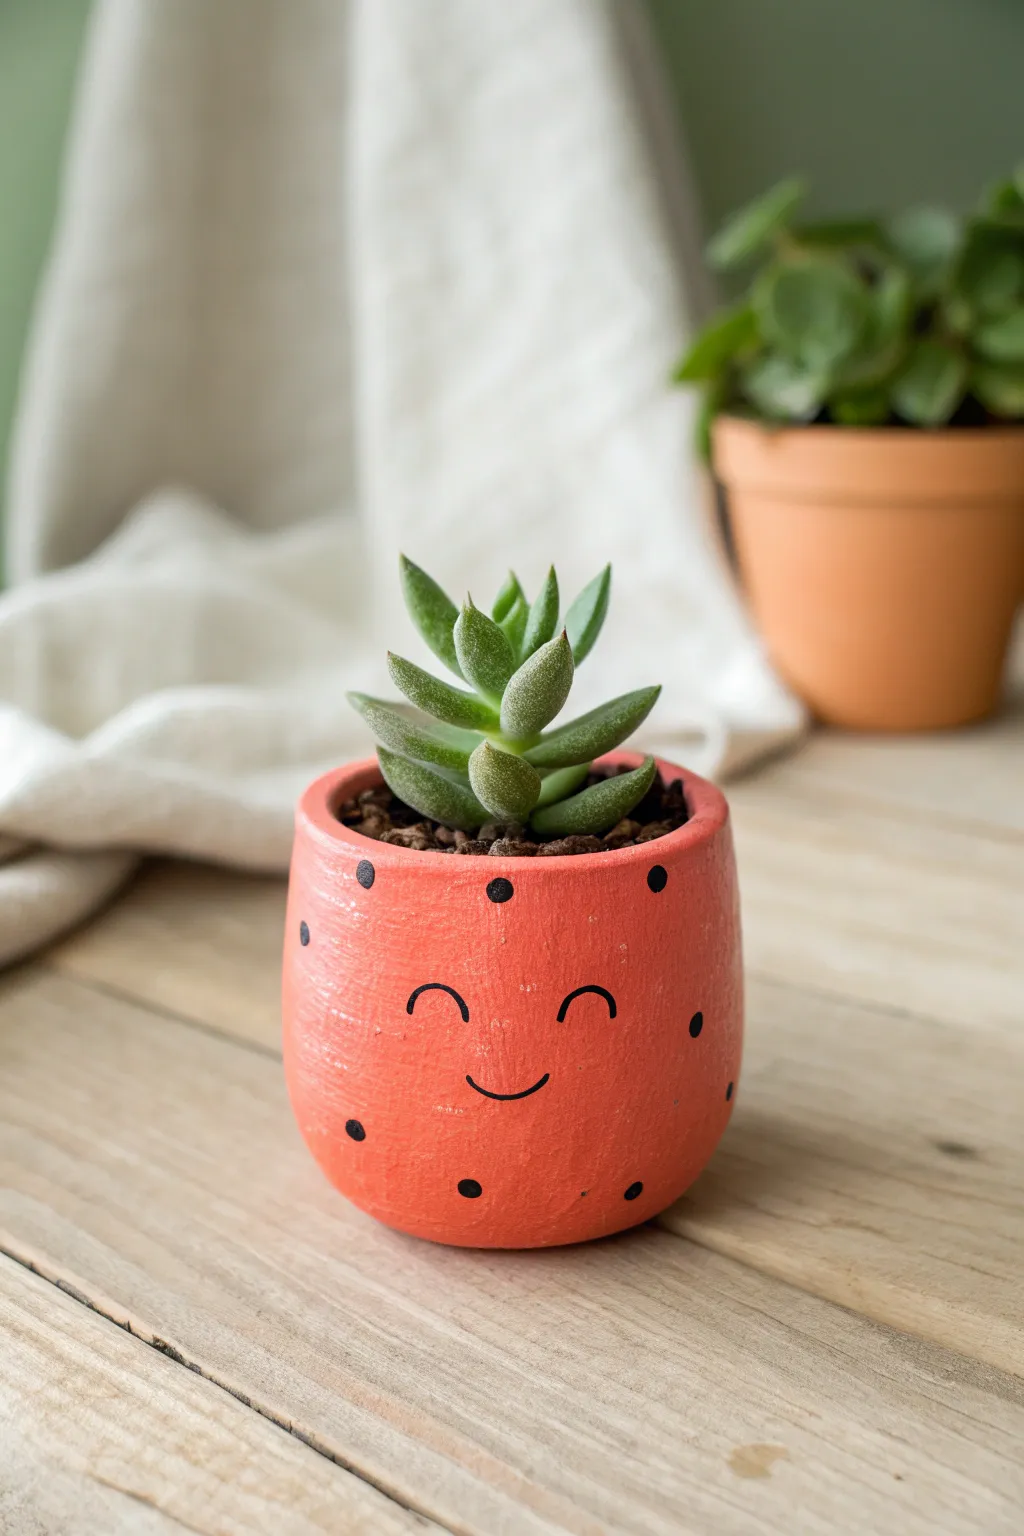
Bring little plants to life with this cheerful, coral-colored companion. This beginner-friendly pinch pot features a bright, matte finish with scattered black polka dots and a beaming, simple smile.
Step-by-Step Tutorial
Materials
- Air-dry clay (white or terracotta)
- Acrylic paint (coral pink/salmon color)
- Black acrylic paint or a black permanent paint marker
- Small paintbrush
- Clear matte sealant (spray or brush-on)
- A small bowl of water
- Toothpick or sculpting tool
- Small succulent or cactus for planting
- Potting soil
Step 1: Sculpting the Pot
-
Prepare the clay:
Start with a ball of clay roughly the size of a tangerine. Squeeze and knead it in your hands to warm it up and remove air bubbles, rolling it into a smooth sphere. -
Start the pinch:
Hold the sphere in one hand and gently press your other thumb into the center, going about three-quarters of the way down. Don’t push all the way through the bottom. -
Shape the walls:
Using your thumb on the inside and fingers on the outside, gently pinch and rotate the clay ball. Work your way from the bottom up to thin out the walls evenly. -
Check the thickness:
Aim for a wall thickness of about a quarter-inch all around. If the rim gets uneven, you can gently tap the pot upside down on the table to level it out. -
Create drainage (optional):
If you plan to plant directly inside, use a straw or tool to poke a small hole in the bottom center for water drainage. -
Smooth the surface:
Dip your finger in a tiny bit of water and rub it over the exterior of the pot to erase fingerprints and cracks. I like to spend extra time here to get a really nice canvas for the paint later. -
Dry the clay:
Set the pot aside in a dry, ventilated area. Depending on your clay type and humidity, this could take 24 to 48 hours. The clay should be hard and turn a lighter color when fully dry.
Step 2: Painting and Finishing
-
Base coat application:
Paint the entire outside and the inner rim of the pot with your coral pink acrylic paint. Use broad, smooth strokes. -
Second coat:
Let the first layer dry for about 20 minutes. Apply a second coat to ensure the color is solid and opaque, hiding any clay texture underneath. -
Draft the face:
Once the base color is bone dry, lightly sketch the location of the eyes and mouth with a pencil if you’re nervous about freehanding. Center the face so it sits just below the middle of the pot. -
Paint the smile:
Using a very fine detail brush or a black paint marker, draw two small inverted ‘U’ shapes for the scrunched-up happy eyes. -
Add the mouth:
Draw a simple ‘U’ shape between and below the eyes for the smile. Keep the lines relatively thin for a cute, delicate look. -
Add the dots:
Use the back end of a paintbrush handle dipped in black paint to stamp perfect circles. Scatter them randomly around the rest of the pot, keeping them away from the face area. -
Seal the work:
After the black paint is completely dry, apply a coat of clear matte sealant. This protects the paint from moisture when you water your plant. -
Planting time:
Fill the bottom with a little gravel or soil, gently place your succulent inside, and fill in the gaps with extra soil until secure.
Cracks while drying?
If small hairline cracks appear as the clay dries, don’t panic. Mix a tiny bit of fresh wet clay with water to make a paste and smooth it over the crack.
Give it legs
Before the clay dries, roll three tiny balls of clay and attach them to the bottom to create little tripod feet for your planter.
Now you have a smiling desk buddy ready to hold your favorite little green friend

TRACK YOUR CERAMIC JOURNEY
Capture glaze tests, firing details, and creative progress—all in one simple printable. Make your projects easier to repeat and improve.
Leaf Print Clay Tiles
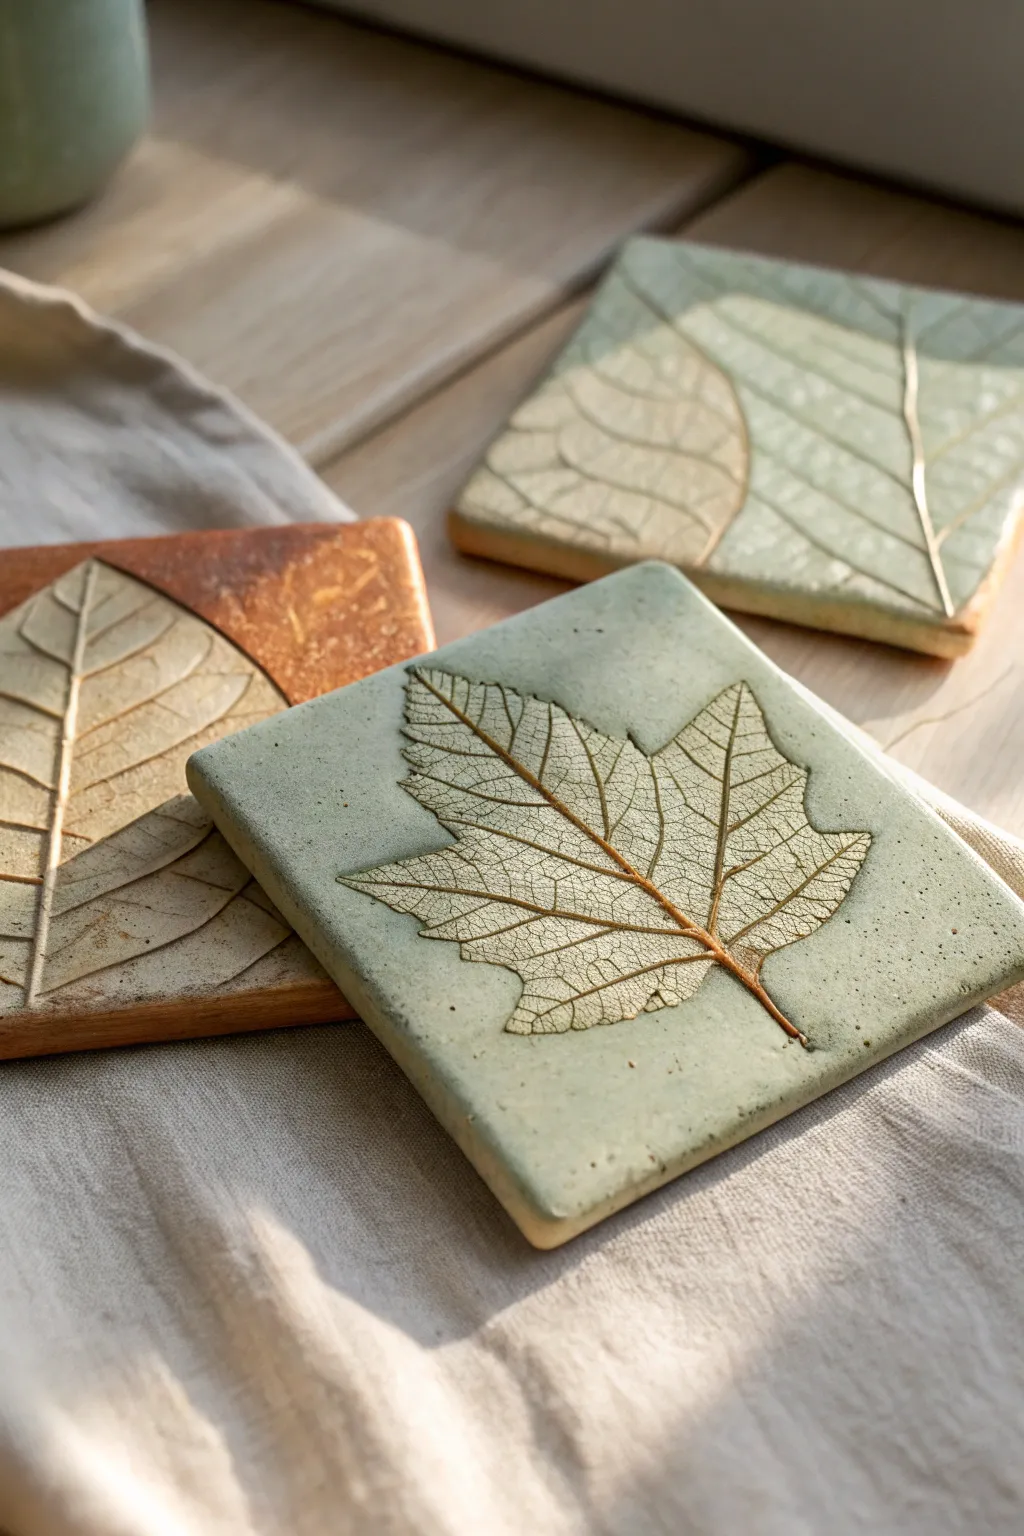
Capture the delicate veins and organic beauty of nature with these sophisticated yet simple leaf-imprinted clay tiles. The subtle washes of oxide or paint highlight the tiny details, transforming fallen leaves into permanent, fossil-like keepsakes.
Detailed Instructions
Materials
- Air-dry clay or low-fire white earthenware clay
- Rolling pin
- Wooden guide strips or two flat rulers (approx. 1/4 inch thick)
- Fresh leaves with prominent veins (maple, hydrangea, etc.)
- Fettling knife or plastic clay knife
- Square cookie cutter or a paper template
- Sponge
- Small rolling tool or brayer (optional)
- Watercolors, acrylics, or ceramic oxides (iron/copper)
- Clear matte varnish or sealant (if using air-dry clay)
- Fine grit sandpaper
Step 1: Preparing the Canvas
-
Wedge the clay:
Begin by working a fist-sized ball of clay in your hands to remove air bubbles and make it pliable. -
Set up guides:
Place your wooden guide strips or rulers on either side of your workspace. These will ensure your tile has a perfectly even thickness. -
Roll out the slab:
Place the clay ball between the guides and roll it flat with your rolling pin until the pin rides smoothly on the strips. -
Check surface:
Look for any creases or textures from the canvas. Smooth the surface gently with a slightly damp sponge or your fingertips if needed.
Vein Definition
If your leaves are too soft, press the veins gently with a modeling tool to deepen them before rolling. This exaggerates the texture for a crisper print.
Step 2: Capturing Nature
-
Select your leaf:
Choose a leaf that is fresh but sturdy. Dried leaves will crumble, so use one that is still flexible. -
Position the leaf:
Place the leaf vein-side down onto the clay slab. The underside of the leaf usually has the most prominent texture. -
Initial press:
Gently press the leaf into the clay with your fingers to tack it in place. -
Roll the impression:
Use the rolling pin or a small brayer to firmly roll over the leaf. I find that doing one confident pass is better than rolling back and forth, which might shift the leaf. -
Cut the shape:
Place your square cutter or template over the leaf area. You can center the leaf, or create an artistic crop where the leaf runs off the edge. -
Slice neatly:
Press down the cutter or trace your template with the fettling knife. Remove the excess clay from around the square. -
Reveal the print:
Carefully peel the leaf away by lifting the stem. Do this slowly to avoid tearing the delicate clay surface.
Step 3: Finishing Touches
-
Smooth the edges:
Dip your finger in a little water and run it along the cut edges of the tile to round them off and remove sharp burrs. -
Slow drying:
Place the tile on a piece of drywall or between two boards to dry. Drying it slowly helps prevent the corners from curling up. -
Light sanding:
Once bone dry (turns chalky white), use fine sandpaper to gently smooth any rough spots on the edges. -
Apply a wash:
Mix a small amount of brown or copper paint (or oxide) with plenty of water. Brush this wash over the entire textured surface. -
Wipe back:
Immediately use a slightly damp sponge to wipe the surface. The color will stay trapped in the deep veins of the leaf print while clearing from the high points. -
Seal:
After the paint is completely dry, apply a coat of matte varnish to protect the surface, especially if these will be used as coasters.
Make it a Set
Create a set of four coasters using leaves from the same tree in different sizes, or four different leaves (oak, maple, fern, birch) for a botanical collection.
Once sealed, these nature-inspired tiles make beautiful gifts or functional art for your coffee table
Silly Monster Magnets
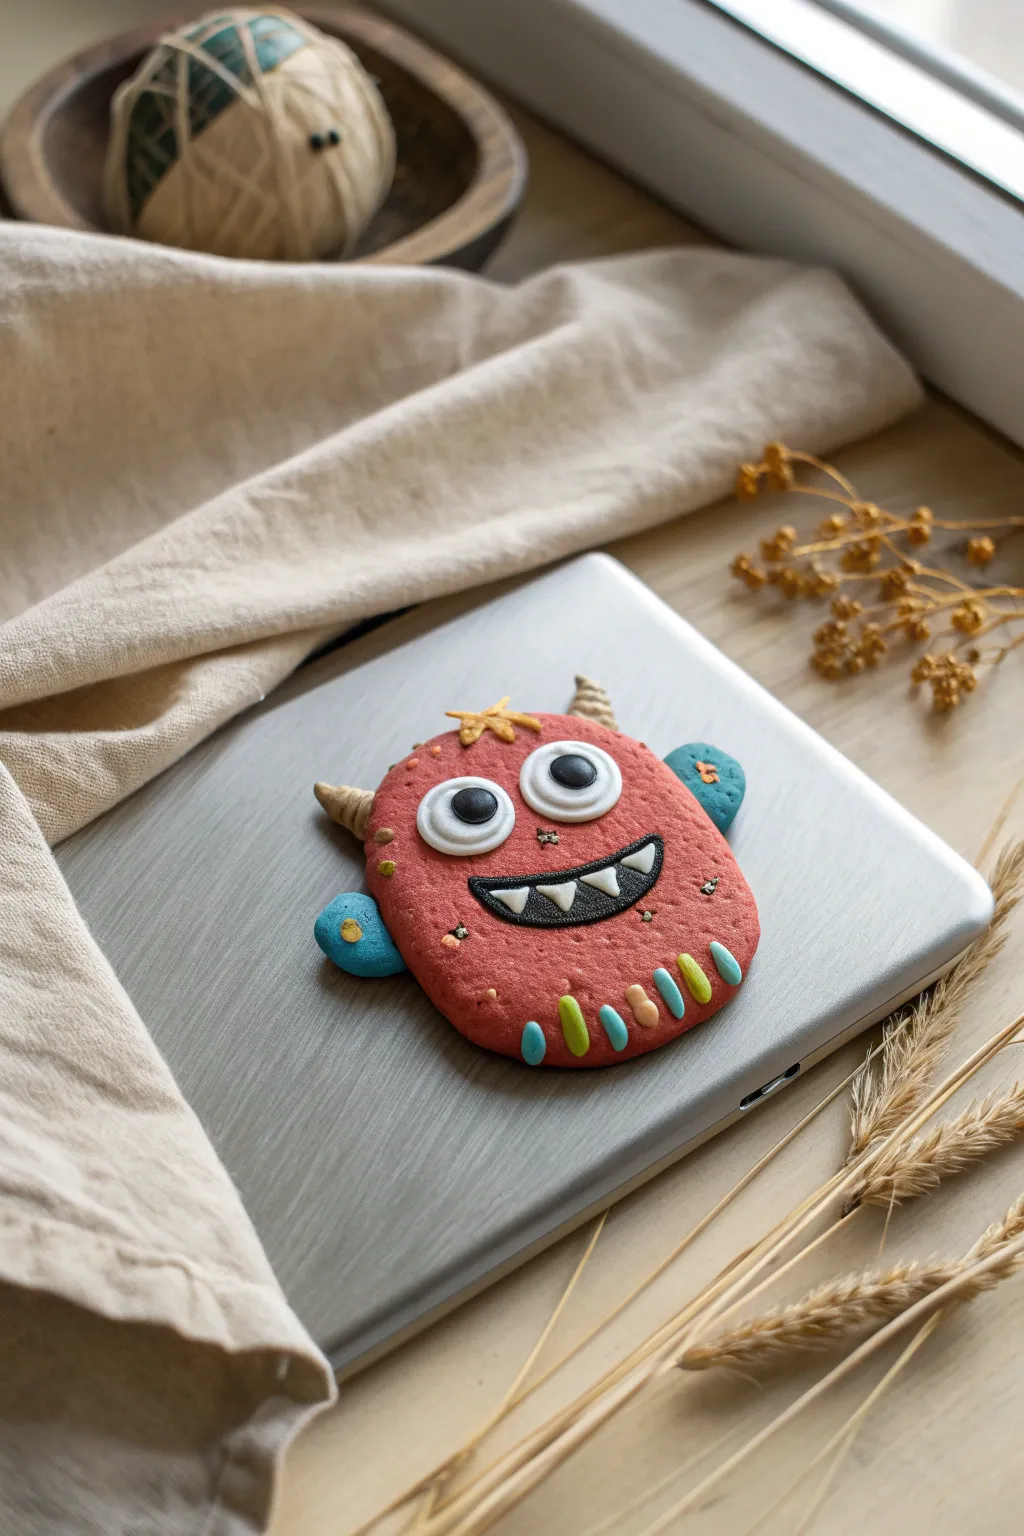
Brighten up the fridge or a school locker with this hilariously flattened, red monster magnet that features a goofy grin and stubby little blue arms. The smooth texture and cheerful stripes at the base make it a fantastic tactile project for young sculptors.
Step-by-Step Tutorial
Materials
- Red polymer clay (apx. 50g)
- Blue polymer clay (small amount)
- White polymer clay
- Black polymer clay
- Yellow/gold polymer clay
- Green polymer clay
- Orange polymer clay
- Rolling pin or acrylic roller
- Needle tool or toothpick
- Small circle cutter (optional)
- Strong craft glue (E6000 or similar)
- Round ceramic magnet
- Baking sheet and parchment paper
Step 1: Basic Body Shaping
-
Condition the main color:
Start by kneading the red clay until it is soft and pliable. Warm clay prevents cracking later on. -
Form the base:
Roll the red clay into a smooth ball, then gently flatten it into an oval shape about 1/4 inch thick. It should look like a slightly squashed egg. -
Smooth the edges:
Use your finger to gently round off the edges of the red oval so they are nice and soft, not sharp. -
Add texture:
Take a toothpick and prick very tiny, shallow holes sporadically across the red surface to give it a slightly porous, monster-skin texture.
Step 2: Face and Arms
-
Create the arm stubs:
Roll two small balls of blue clay. Flatten them slightly and attach one to the left side and one to the upper right side of the red body. -
Detail the arms:
Press a tiny pinch of gold clay onto the left blue arm for a spot of decoration. Use a needle tool to poke three tiny holes on the right arm for texture. -
Make the eyes bases:
Roll two balls of white clay—make one slightly larger than the other for a goofy look. Press them flat onto the upper half of the face. -
Add pupils:
Roll two smaller balls of black clay, flatten them, and place them in the center of the white circles. -
Form the mouth:
Roll a thin sausage of black clay and shape it into a wide ‘U’ smile. Press it onto the face below the eyes. Flatten it significantly so it becomes a black shape rather than a line. -
Add teeth:
Shape tiny triangles of white clay. Carefully press three or four of them onto the black mouth area to look like sharp but friendly teeth. -
Create the horns:
Roll two small cones of gold or beige clay. Twist them slightly to look like ribbed horns and attach them to the top of the head.
Clean Clay Tip
Use baby wipes to clean your hands when switching clay colors. Red pigment loves to stain white clay, so wipe well before making the eyes and teeth!
Step 3: Colorful Details & Finishing
-
Prepare the bottom stripes:
Roll very tiny, rice-sized logs of blue, green, orange, and yellow clay. -
Attach facial details:
Place a tiny star-shaped piece of gold clay (or just a flattened ‘X’) right between the horns on the forehead. -
Apply the bottom fringe:
Press the colorful little logs vertically along the bottom edge of the monster, alternating colors creatively. -
Final inspection:
Check that all pieces are firmly pressed together. I like to do a gentle ‘tap down’ with a flat tool to ensure good adhesion without squashing the details. -
Bake the project:
Place your monster on parchment paper on a baking sheet. Follow the temperature and time instructions on your specific package of polymer clay (usually 275°F for 15-30 minutes). -
Cool it down:
Let the clay cool completely on the baking sheet to harden fully before moving it. -
Magnetize:
Once cool, flip the monster over. Apply a dab of strong craft glue to the back and press your round magnet firmly into place. Let the glue set according to the bottle instructions.
Glow Up
Try using glow-in-the-dark polymer clay for the eyes and teeth. When the lights go out, your monster’s goofy face will still be visible on the fridge.
Now your friendly red monster is ready to guard your refrigerator artwork with a smile
Animal Figurine Play Set

Create a charming set of miniature animal figurines perfect for open-ended play or decoration. This project uses simple hand-building techniques to form a sweet blue puppy, a perky red rabbit, a friendly green dino, and a vibrant yellow fish, all with a smooth, matte finish.
Step-by-Step
Materials
- Polymer clay or air-dry modeling clay (blue, red-orange, sage green, yellow, white, black, pink)
- Clay sculpting tools (needle tool, small spatula)
- Clean work surface or silicone mat
- Rolling pin (optional)
- Small paintbrush (if using water for smoothing)
- Water (for air-dry clay) or liquid clay/bake-and-bond (for polymer)
Step 1: Shaping the Blue Puppy
-
Form the Body:
Start with a walnut-sized ball of blue clay. Roll it into a smooth pear shape, flattening the bottom slightly so it stands upright securely. This forms the combined torso and sitting legs. -
Add the Head:
Roll a slightly smaller ball for the head. Shape it into a rounded oval and press it firmly onto the top of the body pear. Blend the connection point at the neck slightly for strength. -
Attach the Snout:
Take a pea-sized piece of blue clay, flatten it into a small dome, and attach it to the front of the face to create a distinct snout. -
Ears and Arms:
Shape two flattened teardrops for ears and attach them to the sides of the head so they flop downwards. Roll two small sausages for arms and press them against the chest, blending the shoulders into the body.
Step 2: Sculpting the Red Rabbit
-
Create the Base:
Using red-orange clay, form a thick ‘U’ shape for the body, ensuring the four leg stumps are thick enough to support the weight. Tap the feet on the table to create a flat standing surface. -
Head and Neck:
Roll a round ball for the head. Attach it to the front-top of your ‘U’ shape. You might need to gently pinch the clay upwards from the body to create a subtle neck. -
The Tall Ears:
Roll two medium cylinders and flatten them slightly into long ovals. Press these firmly onto the top of the head, smoothing the seam so they stand up tall without flopping. -
Tail Detail:
Add a tiny, pointed triangle of clay to the rear for a cute little tail.
Floppy Head Fix
If heads or heavy ears keep drooping while creating, insert a small piece of toothpick or uncooked spaghetti inside the neck or ear base to act as an internal skeleton for support.
Step 3: Building the Green Dino
-
Body and Tail:
Start with a large lump of sage green clay. Roll a thick log that tapers into a long tail on one end and a blunt, rounded head on the other. Gently curve the tail upwards. -
Sturdy Legs:
Form four stout cylinder shapes for legs. Press them underneath the body, blending the clay well so the dinosaur stands solidly on all fours. -
Spiny Plates:
Switch to pink or red clay. Pinch off small pieces and shape them into triangles. Press a row of these spines down the center of the dino’s back, starting at the head and going down to the tail. -
Details:
Use a needle tool or the back of a fingernail to impress tiny paw marks onto the feet.
Texture Play
Before the clay dries, gently press a piece of rough fabric or a clean toothbrush against the animal bodies to give them a stone-like or fuzzy texture instead of a purely smooth look.
Step 4: Creating the Yellow Fish
-
Main Shape:
Roll yellow clay into a smooth oval. Pinch one end to flatten it vertically, creating the tail fin, and gently curve the tail upward for a swimming motion. -
Fins and Scales:
Attach two small triangles to the underside for pectoral fins. Use a needle tool to scratch delicate lines into the fins and poke a pattern of small dots along the fish’s back for texture. -
Mouth:
Use a clay knife to slice a simple horizontal line at the front for a smiling mouth.
Step 5: Final Touches
-
Adding Eyes:
For all animals, press tiny balls of white clay onto the faces, then add even tinier black pupils on top. I find placing the pupils slightly off-center gives them a goofy, lovable expression. -
Noses:
Add tiny black dots for noses on the dog, rabbit, and dino. -
Finish:
If using polymer clay, bake according to package instructions. If using air-dry clay, let them sit undisturbed for 24-48 hours until fully hardened.
Once dried or baked, these little critters are ready to inhabit your shelves or join in on playtime adventures
Tiny Food Charms
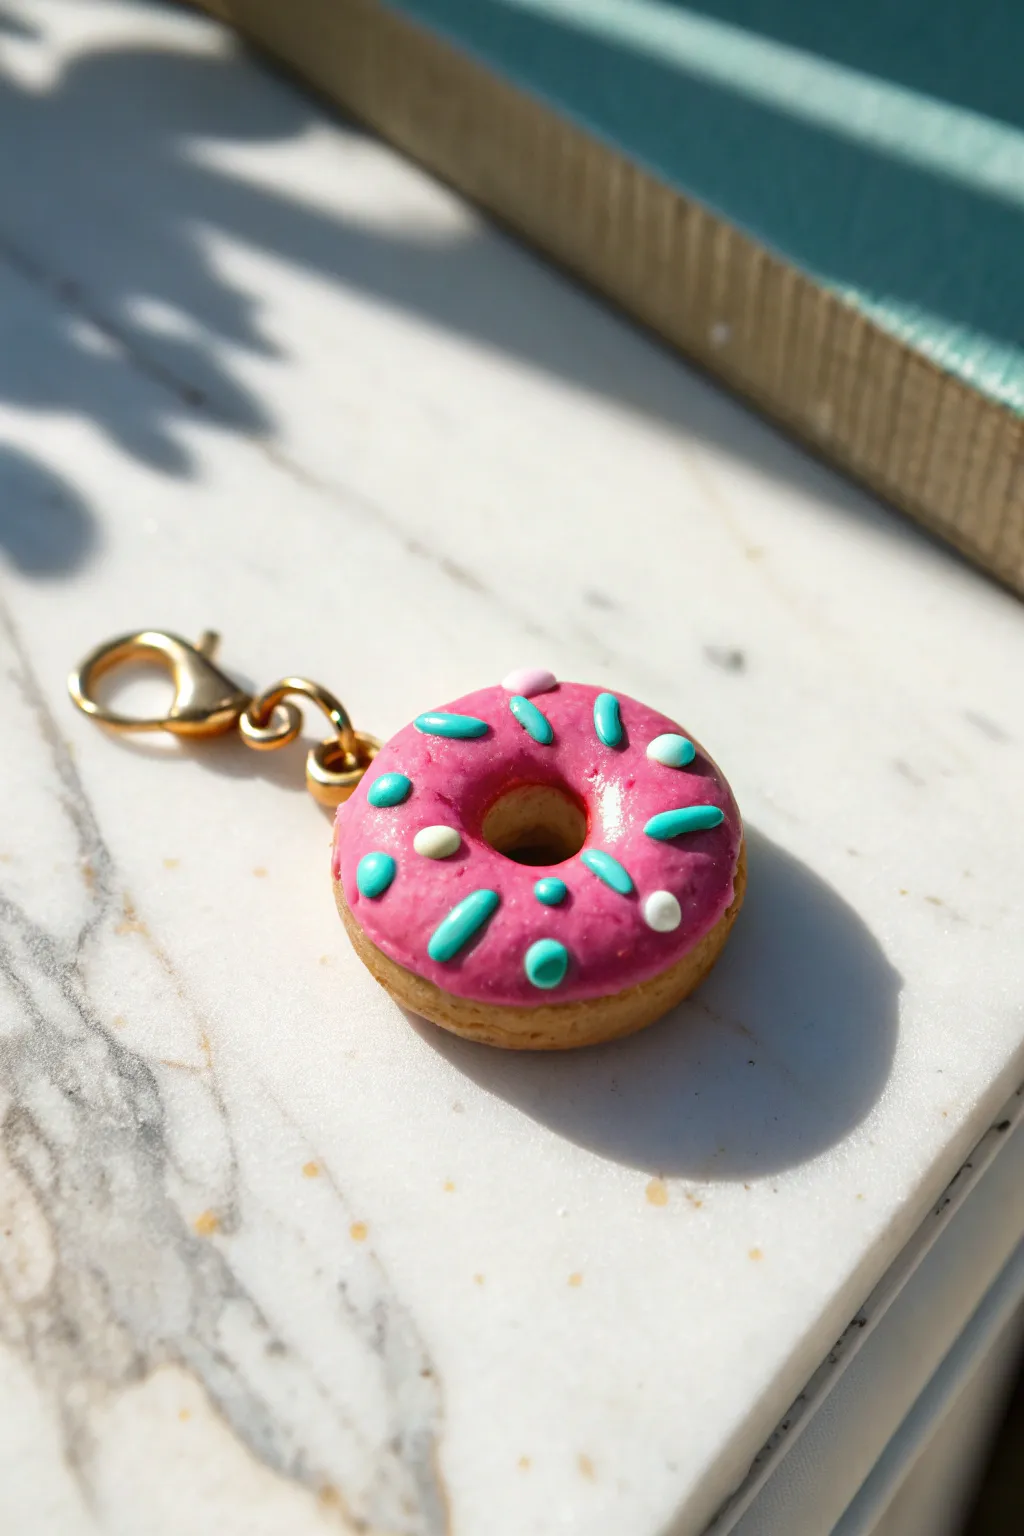
Transform a tiny ball of clay into a mouth-watering, bite-sized donut charm complete with glossy pink frosting and sprinkles. This adorable accessory captures the classic dessert look in miniature form, perfect for hanging on zippers, bags, or keychains.
How-To Guide
Materials
- Polymer clay (tan/beige for dough)
- Polymer clay (bright pink for frosting)
- Polymer clay (teal and white for sprinkles)
- Liquid polymer clay (Translucent or white)
- Gold screw eye pin
- Gold jump ring
- Gold lobster clasp
- Dotting tool or small ball stylus
- Needle tool or toothpick
- Gloss glaze or polyurethane varnish
- Small paintbrush
- Jewelry pliers
- Oven (for baking)
Step 1: Shaping the Dough Base
-
Condition the clay:
Start by warming up a small amount of tan or beige clay in your hands. Knead it thoroughly until it is soft, pliable, and free of any cracks. -
Form the initial shape:
Roll the conditioned tan clay into a smooth, perfect sphere about the size of a large marble, ensuring there are no visible seams. -
Flatten the sphere:
Gently press the sphere down onto your workspace with the palm of your hand to create a thick, rounded disc shape; mimic the puffiness of a real donut. -
Create the center hole:
Use the back end of a small paintbrush or a dedicated dotting tool to push directly through the center of the disc. Make the hole wide enough that it won’t close up during baking. -
Soften the edges:
Use your fingertip to gently smooth the edges around the center hole and the outer rim to remove any sharp tool marks and keep the dough looking soft. -
Texture the dough (Optional):
For added realism, you can lightly tap the surface of the tan clay with an old toothbrush or a crumpled ball of aluminum foil to give it a baked texture.
Sticky Situation?
If your clay is too soft and sticky, press it between sheets of plain white printer paper for an hour. This leeches out excess oil and makes it firmer to work with.
Step 2: Frosting and Sprinkles
-
Prepare the frosting:
Mix a small amount of pink clay with a drop or two of liquid polymer clay until it reaches a sticky, frosting-like consistency (similar to thick peanut butter). -
Apply the frosting layer:
Carefully spread your pink clay mixture onto the top of the donut shape using a toothpick or small tool. I like to let it naturally droop slightly down the sides to look like gravity is pulling the glaze. -
Make the sprinkles:
Roll extremely thin snakes of teal and white clay. Using a sharp blade or needle tool, slice tiny little segments off the snakes to create individual sprinkles. -
Decorate the donut:
Gently pick up the tiny sprinkles with a needle tool or damp toothpick and press them lightly into the soft pink frosting. Arrange them randomly for a natural look. -
Add a few round sprinkles:
Roll barely-there specks of white clay into tiny balls and press them onto the frosting to add shape variety alongside the rod-shaped sprinkles.
Pro Tip: Realistic Texture
Use soft pastels shaved into dust to shade the donut base before baking. A little golden-brown dust brushed on the edges makes it look perfectly oven-toasted.
Step 3: Hardware and Finishing
-
Insert the eye pin:
Take your gold screw eye pin and gently twist it into the top side of the donut. If the clay is soft, you can push it straight in; twisting helps secure it better. -
Bake the charm:
Place your creation on a baking tile or sheet of parchment paper. Bake according to your specific clay package instructions (usually around 275°F or 135°C for 15-30 minutes). -
Cool down:
Let the donut cool completely before handling it. The clay hardens fully as it returns to room temperature. -
Secure the pin:
Once cool, check if the pin is loose. If so, pull it out, add a dab of superglue, and reinsert it for a permanent hold. -
Add the shine:
Paint a thin layer of gloss glaze exclusively over the pink frosting area. This mimics the wet look of real sugar glaze and makes the colors pop. -
Attach the clasp:
Use two pairs of jewelry pliers to twist open a gold jump ring (twist sideways, never pull apart). Loop it through the eye pin and the lobster clasp, then twist it closed again.
Now you have a sweet, imperishable treat ready to accessorize your favorite gear
Fairy House Mini Homes
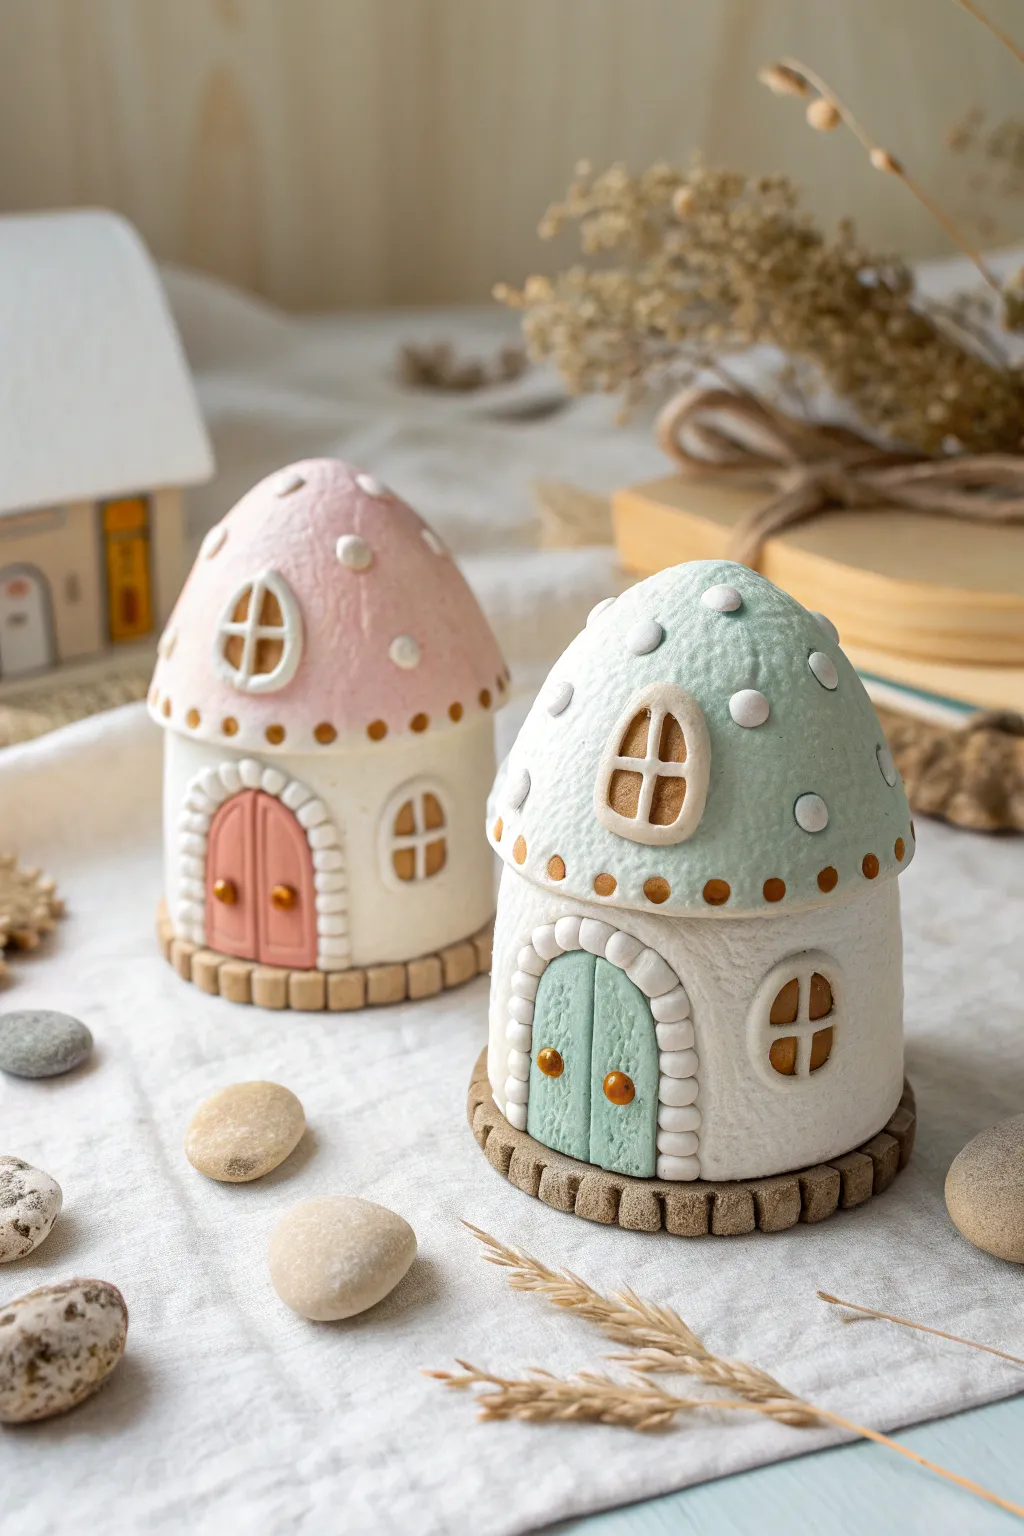
These adorable miniature dwellings look like they were plucked straight from an enchanted forest floor. With their bumpy textures, pastel roofs, and tiny arched doorways, they make the perfect magical addition to any bedroom shelf or garden nook.
Detailed Instructions
Materials
- Air-dry clay (white)
- Acrylic paints (pastel pink, teal, white, brown/gold)
- Small rolling pin
- Modeling tools (ball tool, needle tool, small knife)
- Texture sponge or rough sandpaper
- Water cup and slip (clay and water mix)
- Paintbrushes (small detail brush and flat brush)
- Cardboard or aluminum foil (for internal support)
- Clear matte varnish (optional)
Step 1: Building the Base Structure
-
Form the core:
Start by scrunching aluminum foil into a cylinder shape with a rounded top, roughly the size of a lemon. This acts as an armature to save clay and keep the house light. -
Roll the walls:
Roll out a slab of white air-dry clay to about 1/4 inch thickness. Cut a long rectangular strip that is tall enough to cover the bottom half of your foil form. -
Wrap the base:
Wrap the clay strip around the bottom of the foil form. Join the seam by scoring (scratching) both edges, adding a dab of water, and smoothing them together until the line disappears. -
Create the roof cone:
Roll out a circular piece of clay and drape it over the top of your form to create the rounded mushroom cap roof. Gently press the edges down to meet the wall section. -
Blend the sections:
Smooth the clay where the roof meets the wall. You want a seamless transition, but it’s okay if the roof overhangs slightly to look like a mushroom cap. -
Texture the surface:
Gently press a texture sponge or a piece of rough sandpaper against the wet clay walls and roof. This gives it that organic, stucco-like appearance seen in the photo.
Cracks Appearing?
If small cracks appear while drying, mix a tiny bit of fresh clay with water to make a paste (slip) and fill the cracks. Smooth over with a finger.
Step 2: Adding Architectural Details
-
Make the foundation:
Roll a thin snake of clay and slice it into small, equal chits. Flatten these slightly into rounded squares and attach them in a ring around the very bottom edge to create a stone foundation. -
Sculpt the door:
Cut a small arch shape from a rolled slab of clay. Use a needle tool to lightly carve a vertical line down the center to separate the double doors. -
Add the door frame:
Roll tiny balls of clay and press them around the arched door shape to simulate a cobblestone frame, then attach the entire door assembly to the house using a bit of water. -
Create windows:
Sculpt small oval shapes for windows. Use a knife or needle tool to impress a cross shape for the panes, then attach the window frame pieces around them just like the door. -
Add roof dots:
Roll very small balls of clay and press them gently onto the roof at random intervals. Flatten them slightly so they look like polka dots or mushroom spots. -
Detail the rim:
Using a small ball tool or the end of a paintbrush, press small indentations around the bottom rim of the roof for a decorative border.
Make It Glow
Instead of a foil core, use an empty glass jar. Leave the windows open (don’t fill with clay) so you can put an LED tea light inside for a glowing lamp!
Step 3: Painting and Finishing
-
Dry completely:
Let the sculpture dry for at least 24-48 hours. I find it’s best to rotate it occasionally so the bottom dries evenly. -
Paint the roof:
Paint the roof section in a soft pastel color, like the teal or pink shown. carefully paint around the raised white dots to keep them bright white. -
Paint the door:
Use a matching or contrasting pastel shade for the door panels. Use a tiny brush to paint the door knobs and window interiors in a warm golden-brown. -
Define the stonework:
Paint the bottom foundation stones in a soft beige or light brown. You can water down the paint slightly to let it settle into the cracks for depth. -
Highlight the dots:
Paint the spots on the roof rim using the golden-brown color to add a little warmth and contrast against the pastel roof. -
Seal the work:
Once the paint is fully dry, apply a coat of matte varnish to protect your fairy home and give it a finished, professional look.
Place your finished cottage near a plant or window to invite a little everyday magic into your home
Under-the-Sea Coral Relief
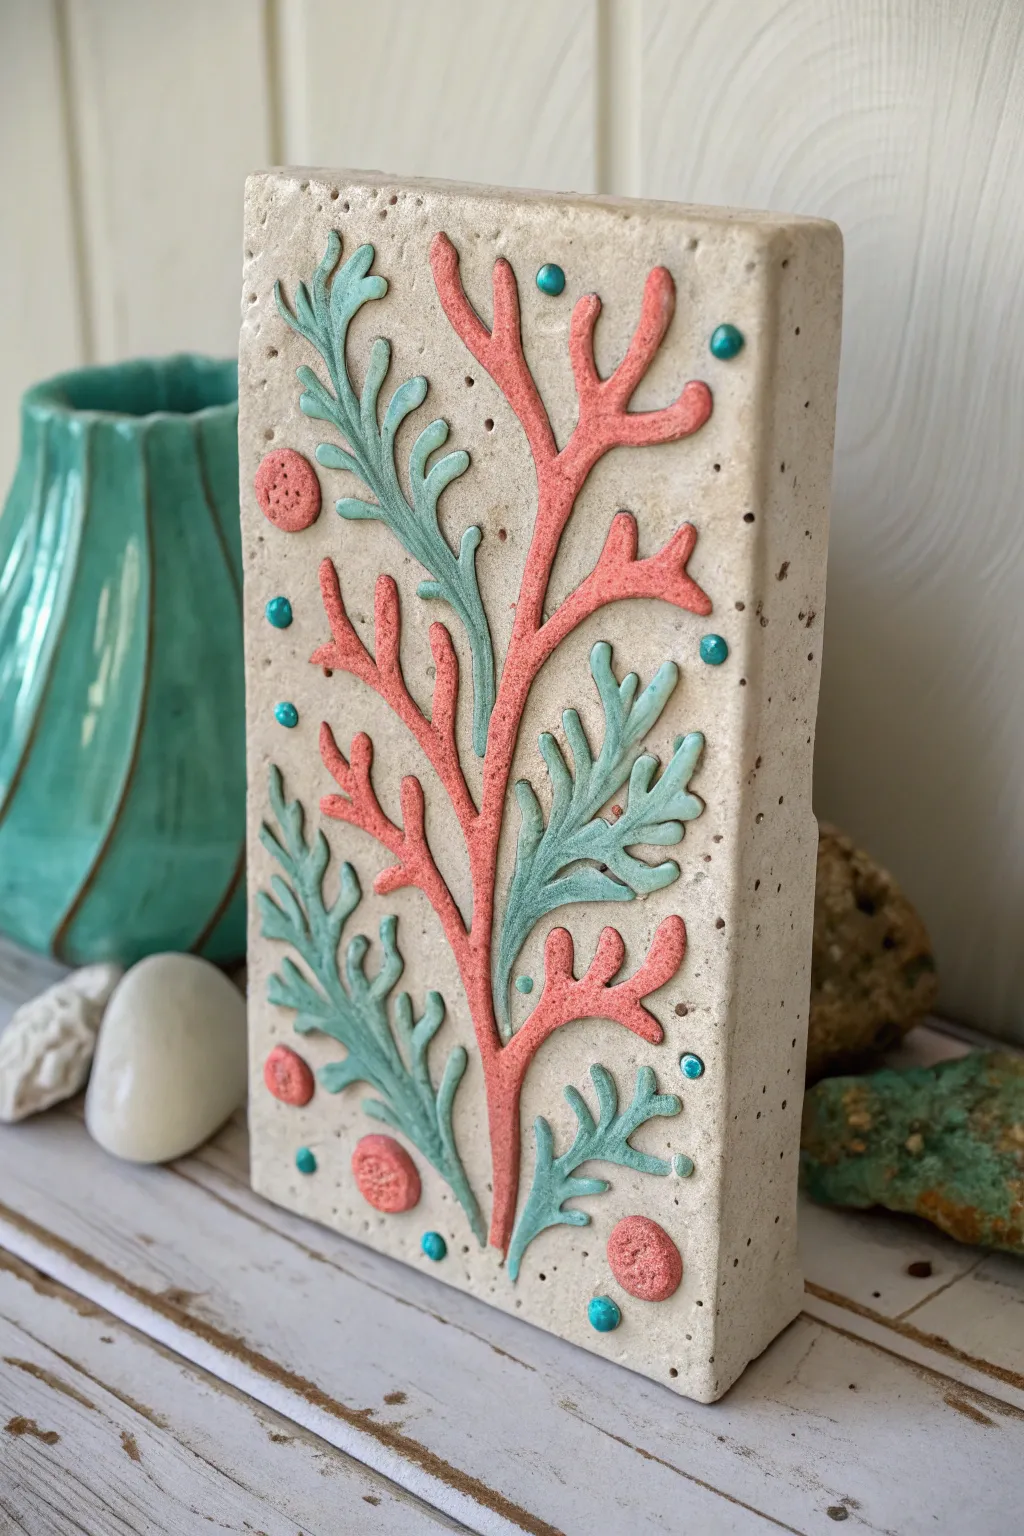
Bring the vibrant colors of the ocean into your home with this beautiful relief sculpture featuring coral branches and sea plants. This project is a fantastic way for young artists to practice coil rolling and attachment techniques while creating a dimensional, textured masterpiece.
Step-by-Step Tutorial
Materials
- Light-colored stoneware or polymer clay (beige/off-white)
- Acrylic paints (coral pink, turquoise/seafoam green)
- Small round paintbrushes
- Rolling pin
- Clay knife or fettling knife
- Slip and scoring tool (if using stoneware clay)
- Small circular cutters or a straw
- Texturing tool (sponge or old toothbrush)
- Clear matte varnish (optional)
Step 1: Preparing the Base
-
Roll the slab:
Start by rolling out a thick slab of your beige clay. Aim for a thickness of about 3/4 of an inch so it can stand upright on its own later. You want it sturdy. -
Cut the rectangle:
Using your clay knife and a ruler (if you want it precise), cut a clean rectangle. The example is tall and narrow, roughly 3 inches wide by 6 inches tall. -
Texture the surface:
Before adding any details, gently tap the surface with a coarse sponge or an old toothbrush. This gives the background a sandy, stone-like appearance rather than being perfectly smooth.
Sticky Situation
If using air-dry or kiln clay, always score (scratch) and slip (add water/mud) both surfaces before joining. This prevents pieces from popping off as they dry.
Step 2: Sculpting the Coral
-
Roll thin coils:
Roll out several thin ‘snakes’ or coils of clay. These will become the branches of your coral and seaweed. Keep them relatively thin, about the width of a shoelace. -
Create the main stem:
Place a long coil vertically up the center of your slab, slightly curving it like a natural plant. If using earth clay, don’t forget to score and slip the back so it sticks; for polymer, gentle pressure works fine. -
Add side branches:
Cut shorter pieces of your coils and attach them to the main central stem, angling them upwards. Smooth the connection points with a modeling tool or your finger so the branch looks continuous. -
Form the seaweed leaves:
For the leafy green sections, flatten small pieces of clay into teardrop shapes. Use a tool to carve tiny notches into the sides to mimic fern-like leaves. -
Attach the greenery:
Arrange these leafy shapes around the coral branches, filling in the empty spaces. Press them firmly onto the background slab. -
Add circular details:
Create small flat circles of clay for the larger ‘polyp’ textures and press them onto the background. You can texture these by poking them gently with a toothbrush. -
Create tiny bubbles:
Roll very tiny balls of clay for the smallest bubble accents and scatter them around the composition. -
Refine the edges:
Check the sides of your main rectangular block. You can gently tap the block on the table to flatten the bottom so it stands straight. -
Different drying methods:
If using stoneware, let the piece dry slowly under plastic before firing. If using polymer clay, bake according to the package instructions.
Glow Up
Mix a tiny amount of glitter into your varnish or use metallic pearl acrylics for the bubbles to give the piece a shimmering, underwater wet look.
Step 3: Painting and Finishing
-
Paint the background (Optional):
If your clay isn’t naturally beige, you can paint the whole block a sandy color first. Otherwise, leave the natural clay exposed. -
Color the central coral:
Using a coral-pink or salmon acrylic paint, carefully paint the central branch structure. I find a stiff brush helps get paint into the tiny crevices of the clay. -
Paint the greenery:
Switch to a seafoam green or turquoise color. Paint the fern-like leaves you created. A slight watering down of the paint can help it look more like a stain. -
Highlight the dots:
Paint the small ‘bubble’ dots with a bright turquoise or blue to make them pop against the sand color. -
Paint the textured circles:
Use the coral pink shade for the larger, textured circles. Dabbing the paint on rather than stroking it produces a nice finish. -
Dry brush texture:
Once the base colors are dry, you can lightly ‘dry brush’ a lighter shade over the raised areas to enhance the 3D effect. -
Seal the work:
To protect the paint and give it a finished look, apply a coat of clear matte varnish over the entire piece.
Display your new underwater sculpture on a shelf to add a splash of coastal charm to your room
Pinch Pot Animal Whistles
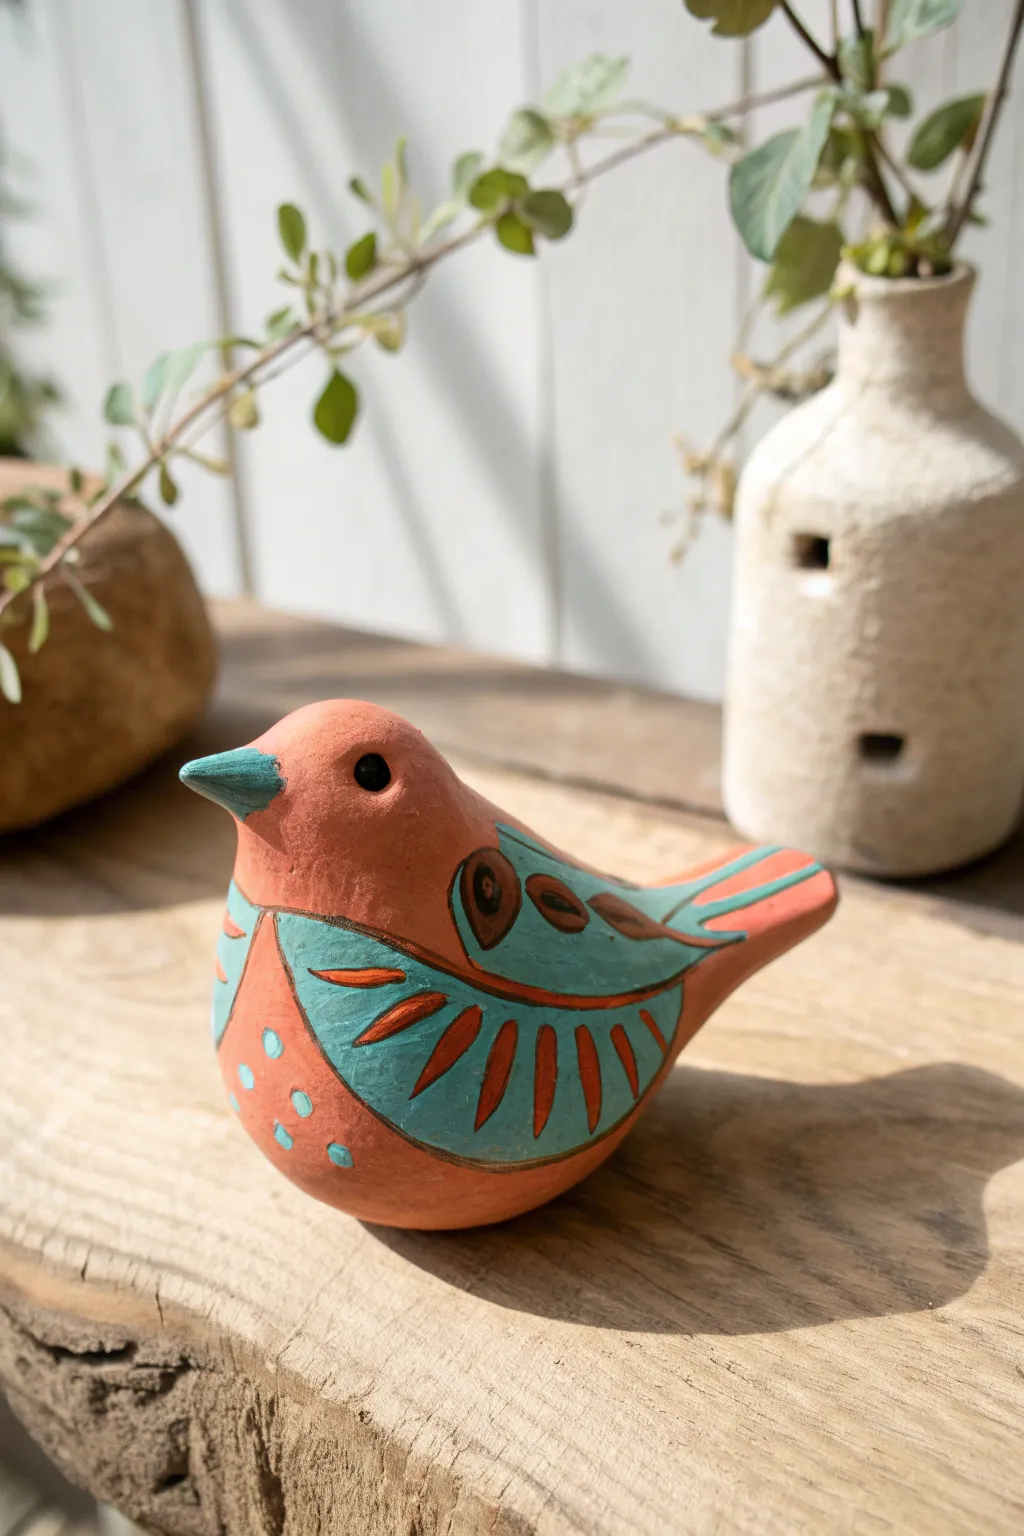
Transform a simple pinch pot into a delightful chirping companion with this charming clay bird project. The warm terracotta body contrasts beautifully with hand-painted turquoise wings, creating a rustic yet playful sculpture that actually sings.
Step-by-Step Guide
Materials
- Red earthenware or terracotta clay
- Wooden modeling tools (skewer or needle tool)
- Popsicle stick (craft stick)
- Small bowl of water
- Underglaze (Turquoise and Black) or Acrylic paints if air-drying
- Fine detail paintbrush
- Sponge
Step 1: Shaping the Bird Body
-
Form the base:
Start with a ball of clay roughly the size of a tangerine. Holding it in your palm, use your thumb to press a hole into the center, creating a basic pinch pot shape. Keep the walls about a quarter-inch thick for stability. -
Close the form:
Gently pinch the rim of your pot inward to close the hole completely. You want to trap a hollow pocket of air inside, forming a sealed egg shape. Smooth over the seam with your thumb until it disappears. -
Pinch the tail:
Choose one end of the egg to be the tail. Gently pinch and pull the clay outward to create a short, triangular tail that points slightly upward. -
Shape the head:
On the opposite end, mold the clay upwards to define a rounded head. It doesn’t need a neck; just a gentle slope distinguishing the head from the body will do. -
Add the beak:
Pinch a tiny amount of clay at the front of the head to form a small, pointed beak.
Step 2: Creating the Whistle Mechanism
-
Create the mouthpiece:
I like to flatten the end of the tail slightly before cutting. Insert a popsicle stick into the end of the tail to create the mouthpiece airway. Push it in horizontally until it reaches the main hollow cavity. -
Cut the window:
On the underside or lower back of the bird (where the tail meets the body), cut a small square hole known as the ‘fipple’ or window. Cut straight down vertically, then slice at a 45-degree angle pointing toward the tail to remove a wedge of clay. -
Align the airway:
Re-insert your popsicle stick through the tail mouthpiece. Look through the window you just cut; the stick should emerge right at the edge of the 45-degree ramp. The air needs to split against this sharp edge to create sound. -
Test the sound:
Blow gently through the tail. If it hisses instead of whistles, adjust the angle of the ramp (the sharp edge) slightly until you get a clear tone.
Silent Bird?
If the whistle won’t sound, the splitting edge is likely dull or misaligned. Re-sharpen the 45-degree ramp edge and ensure the air channel aims straight at it.
Step 3: Refining and Decorating
-
Define the wings:
Using a needle tool or skewer, lightly etch the outline of teardrop-shaped wings onto the sides of the bird’s body. These lines will guide your painting later. -
Carve wing details:
Inside your wing outlines, carve radiating lines or scallop shapes to suggest feathers. Make these grooves deep enough to be seen, but be careful not to puncture the hollow body. -
Dry the clay:
Allow your bird to dry completely. If using kiln-fire clay, fire to bisque temperature now. If using air-dry clay, wait until it is bone dry and hard (usually 24-48 hours).
Level Up
Turn this into a pendant ocarina by poking two extra holes on the sides of the body. Covering and uncovering them will change the pitch of the whistle.
Step 4: Painting the Finish
-
Paint the wings and tail:
Using a turquoise underglaze or acrylic paint, fill in the wing shapes and the top of the tail. Don’t worry if paint gets into the carved grooves for now. -
Highlight the beak:
Paint the tiny beak with the same turquoise color to tie the design together. -
Add eye details:
Dip the handle end of a paintbrush into black paint and dot two eyes on either side of the head. -
Paint decorative dots:
Using a lighter turquoise or mixing a little white into your teal paint, add small decorative dots on the red clay chest area for extra texture. -
clean up lines:
If you want the carved lines to show the red clay underneath (sgraffito style), gently wipe the painted wing areas with a slightly damp sponge before the paint fully sets, or carefully scrape dry paint out of the grooves.
Once the paint is dry, your little terracotta songbird is ready to perch on a shelf or sing a tune
Jingle Bells From Clay
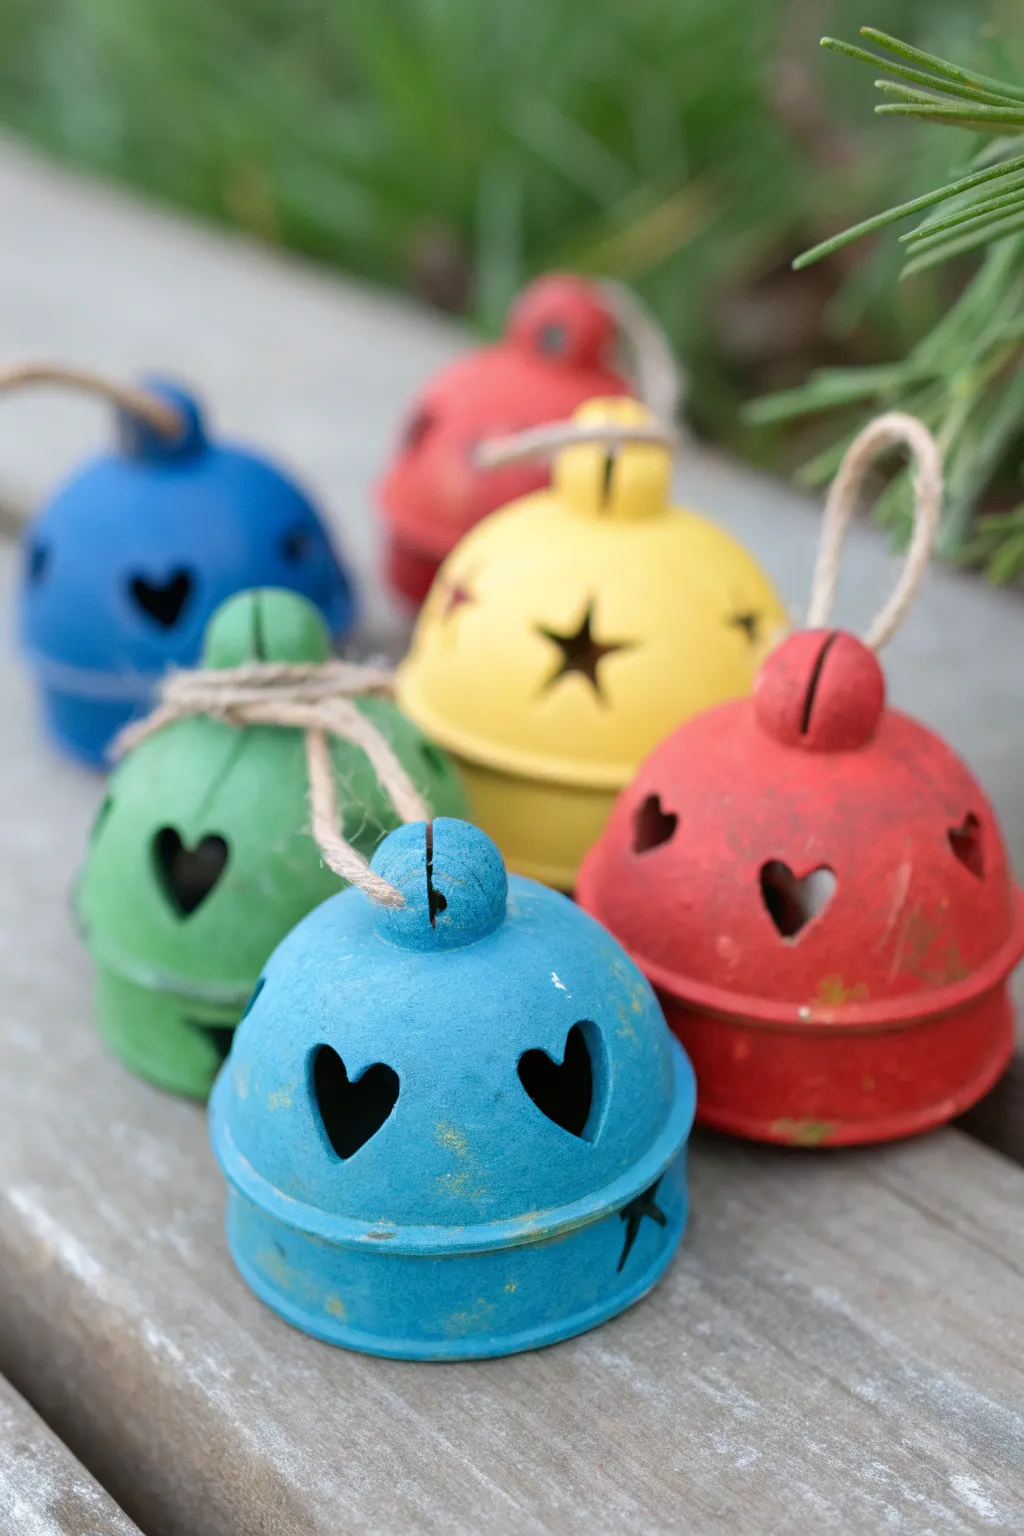
These charming, rustic bells bring a festive jingle to any season, featuring cutout shapes that let the light peek through. With their vibrant matte finish and distressed edges, they look like vintage treasures discovered in an old workshop.
How-To Guide
Materials
- Air-dry clay or kiln-fire clay (white or terracotta)
- Small rolling pin
- Circle cookie cutter (approx. 4 inches)
- Small shaped cutters (hearts, stars)
- Small wooden ball or bead (for the ringer)
- Jute twine or rustic string
- Acrylic paints (red, blue, yellow, green)
- Fine-grit sandpaper
- Paintbrushes
- Toothpick or skewer
- Small bowl or cup (to use as a mold)
Step 1: Forming the Bell Shape
-
Roll the clay:
Start by rolling out a slab of clay to an even thickness of about 1/4 inch. If you are working with sticky clay, roll it out on a piece of canvas or wax paper. -
Cut the circle:
Press a 4-inch circle cutter firmly into the slab to create your base disc. Peel away the excess clay. -
Shape the dome:
Gently drape the clay circle over the bottom of a small upturned bowl or cup. Smooth the clay down the sides to create a dome shape without pressing too hard, or it might stick. -
Add cutout details:
While the clay is still on the form, use tiny heart or star cutters to punch shapes out of the sides. Remove the clay pieces carefully with a toothpick. -
Create the rim:
Roll a very thin snake of clay and wrap it around the bottom edge of the bell. Blend the top seam of the snake into the bell body, leaving the bottom edge defined for a distinct rim.
Cracking Issues?
If cracks appear while drying the dome over the mold, drape a loose piece of plastic wrap over the clay. This slows the drying process and helps prevent tension fractures.
Step 2: Adding the Handle and Ringer
-
Form the top knob:
Roll a small ball of clay about the size of a marble. Score and slip (scratch and wet) the top center of your bell dome, then press the ball firmly onto it. -
Make the string hole:
Use a skewer or chopstick to pierce a hole horizontally through the clay knob. Make it slightly larger than your twine, as clay shrinks when drying. -
Refine the surface:
Smooth out any fingerprints with a slightly damp sponge. I find that smoothing the edges of the cutout shapes now saves a lot of sanding time later. -
Dry completely:
Carefully remove the bell from the mold and set it aside to dry. Allow full drying time according to your clay package instructions—usually 24 to 48 hours.
Step 3: Painting and Assembly
-
Sand the imperfections:
Once fully dry (and fired, if using kiln clay), use fine-grit sandpaper to gently smooth any rough edges, especially around the rim and the handle. -
Apply base color:
Paint the entire exterior with matte acrylic paint. Use bright primary colors like the blue, red, yellow, and green seen here. You may need two coats for opaque coverage. -
Distress the finish:
To get that rustic look, wait for the paint to dry completely, then lightly sand raised areas or random spots to reveal the raw clay underneath. -
Add a wash (optional):
If the colors look too new, mix a tiny drop of brown paint with water and brush it over the bell, quickly wiping it off with a paper towel to dirty it up slightly. -
Attach the ringer:
Tie a wooden bead to one end of a piece of jute twine. Thread the other end up through the inside of the bell and out through the handle hole. -
Secure the loop:
Knot the twine at the top to create a hanging loop, ensuring the bead hangs at the right level inside to clink against the clay walls.
Add Metallic Flair
Before sealing your work, dab a dry sponge into gold or copper paint and lightly tap it over the textured areas. This creates a faux-metal element that catches the light beautifully.
Hang your finished collection on a sturdy branch or hook to enjoy their cheerful colors and gentle sound.
Cutout Clay Luminary Jars
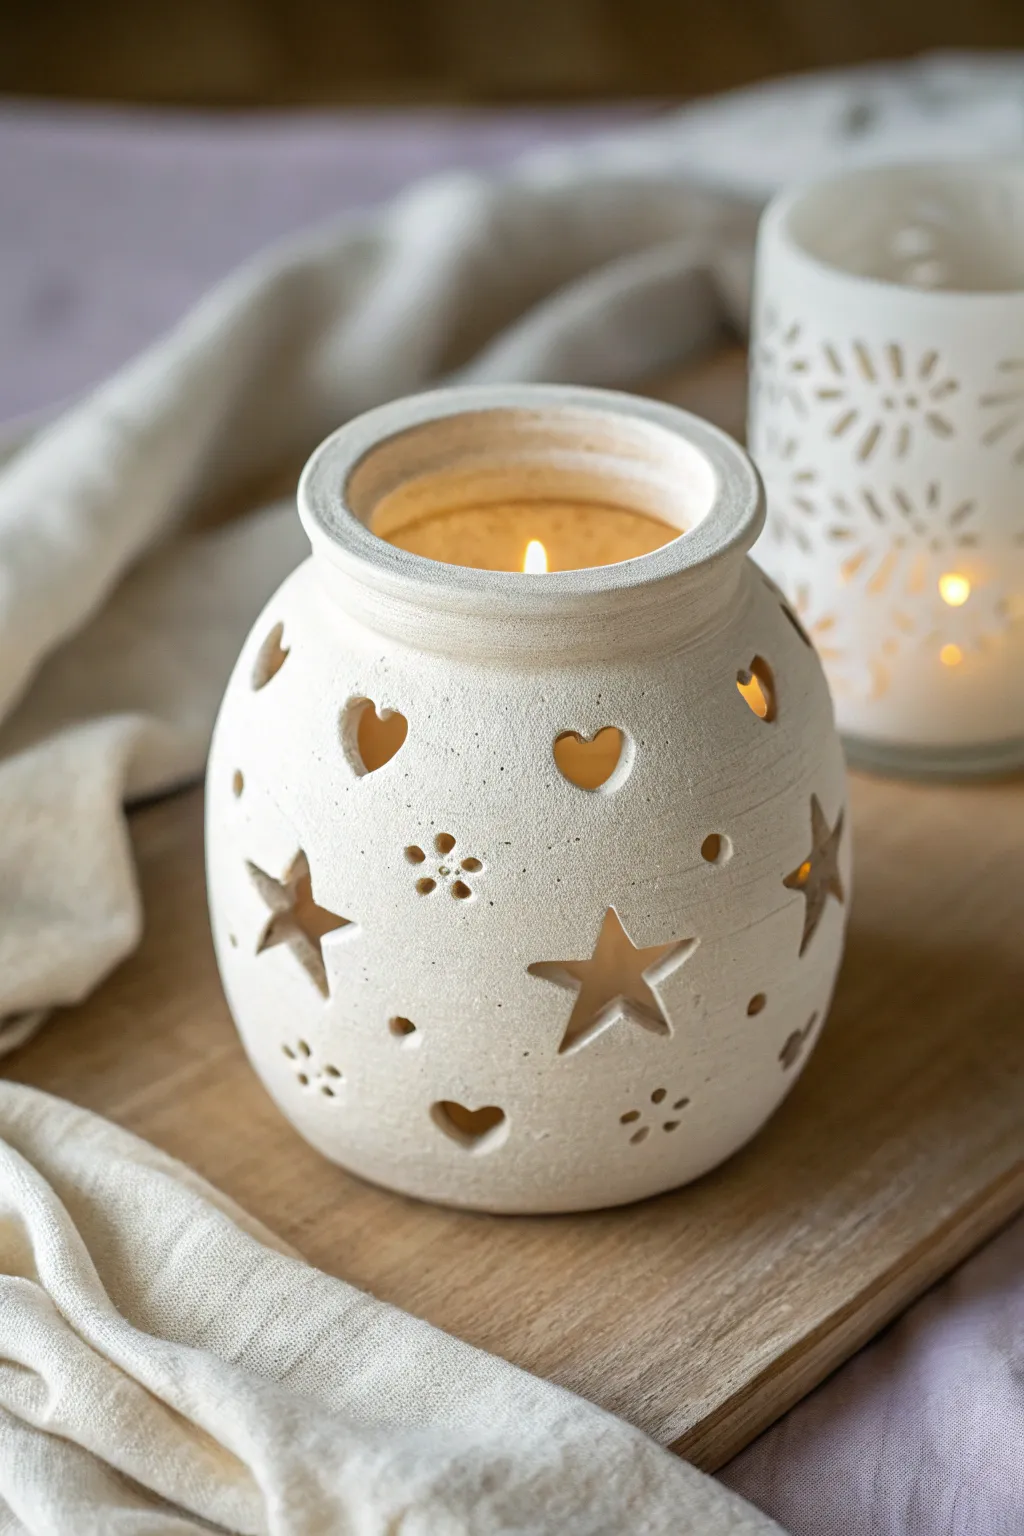
Create a warm, glowing atmosphere with this charming clay luminary that features whimsical star and heart cutouts. This project introduces kids to working with slab construction and negative space, resulting in a beautiful, functional piece of decor.
Step-by-Step Guide
Materials
- White air-dry clay or white earthenware clay
- Rolling pin
- Canvas mat or parchment paper
- Small cookie cutters (star, heart shapes)
- Straw or small circular tool
- Needle tool or wooden skewer
- Small bowl or balloon (for mold support)
- Sponge
- Water bowl
- Sandpaper (fine grit)
- Tea light candle (battery-operated recommended)
Step 1: Preparing the Clay Body
-
Wedging:
Begin by taking a generous handful of white clay. Wedge it firmly against your work surface to remove air bubbles—this is crucial to prevent cracks later. -
Rolling the slab:
Place the clay on your canvas mat or parchment paper. Use the rolling pin to flatten it into a long rectangular slab, aiming for an even thickness of about 1/4 inch. -
Checking consistency:
Run your fingers over the slab to check for uneven spots. If one side is thicker, roll over it gently until the surface is uniform. -
Trimming the shape:
Using a needle tool or knife, trim the irregular edges of your slab to create a clean, straight rectangle. The length of the rectangle will determine the circumference of your jar.
Step 2: Adding Cutout Designs
-
Planning the layout:
Before cutting, lightly press your cookie cutters into the clay just to mark where you want your shapes. Alternate between stars and hearts for a varied look. -
Cutting the shapes:
Press the cutters firmly all the way through the clay slab. Carefully lift the cutter and poke the cutout piece gently to remove it. -
Adding details:
Use a straw to punch small circular holes between the larger shapes. You can cluster five small holes together to create simple flower patterns. -
Smoothing edges:
Dip your finger in a little bit of water and gently smooth around the inside of each cutout to remove any rough clay burrs.
Clean Cuts Only
Let the clay slab stiffen for about 15-20 minutes before cutting shapes. Slightly firmer clay creates much cleaner cutouts than wet, sticky clay.
Step 3: Assembling the Jar
-
Scoring:
Take the two short ends of your clay rectangle. Use the needle tool to scratch up the surface (scoring) on the areas where the clay will overlap. -
Applying slip:
Dab a little water or liquid clay (slip) onto the scored areas to act as glue. -
Forming the cylinder:
Stand the slab up and curl it around into a cylinder shape, pressing the scored ends together firmly. I like to support the inside with one hand while smoothing the outside seam. -
Balloon shaping:
To get that rounded, bulbous shape like in the picture, gently inflate a balloon inside the cylinder just enough to push the walls outward slightly, or carefully push from the inside with a curved rib tool. -
Creating the rim:
Roll a thick coil of clay and attach it to the top opening. Smooth it down onto the main body to create a sturdy, slightly raised lip. -
Refining the form:
Use a damp sponge to wipe down the entire exterior, softening any harsh marks or fingerprints left during assembly.
Sagging Walls?
If the cylinder walls start to collapse inward, lightly stuff the inside with crumpled newspaper or paper towels to hold the shape while it firms up.
Step 4: Finishing Touches
-
Drying:
Let the luminary dry slowly away from direct sunlight. If using air-dry clay, this usually takes 24-48 hours. Turn it occasionally for even drying. -
Sanding:
Once bone dry, take fine-grit sandpaper and gently sand any rough spots, especially around the rim and the cutouts. -
Final cleaning:
Wipe away the sanding dust with a slightly damp cloth or a dry brush. -
Lighting up:
Place a battery-operated tea light inside to see your patterns come to life with a cozy glow.
Enjoy the magical patterns of light dancing on your walls with your new handmade creation