If you’ve got a lonely glass jar hanging around, you’ve already got the perfect base for a seriously cute clay project. I love using air dry clay to turn everyday jars into “wait, you made that?” storage, décor, and giftable little treasures.
Faux Pottery Wrapped Jar Vase
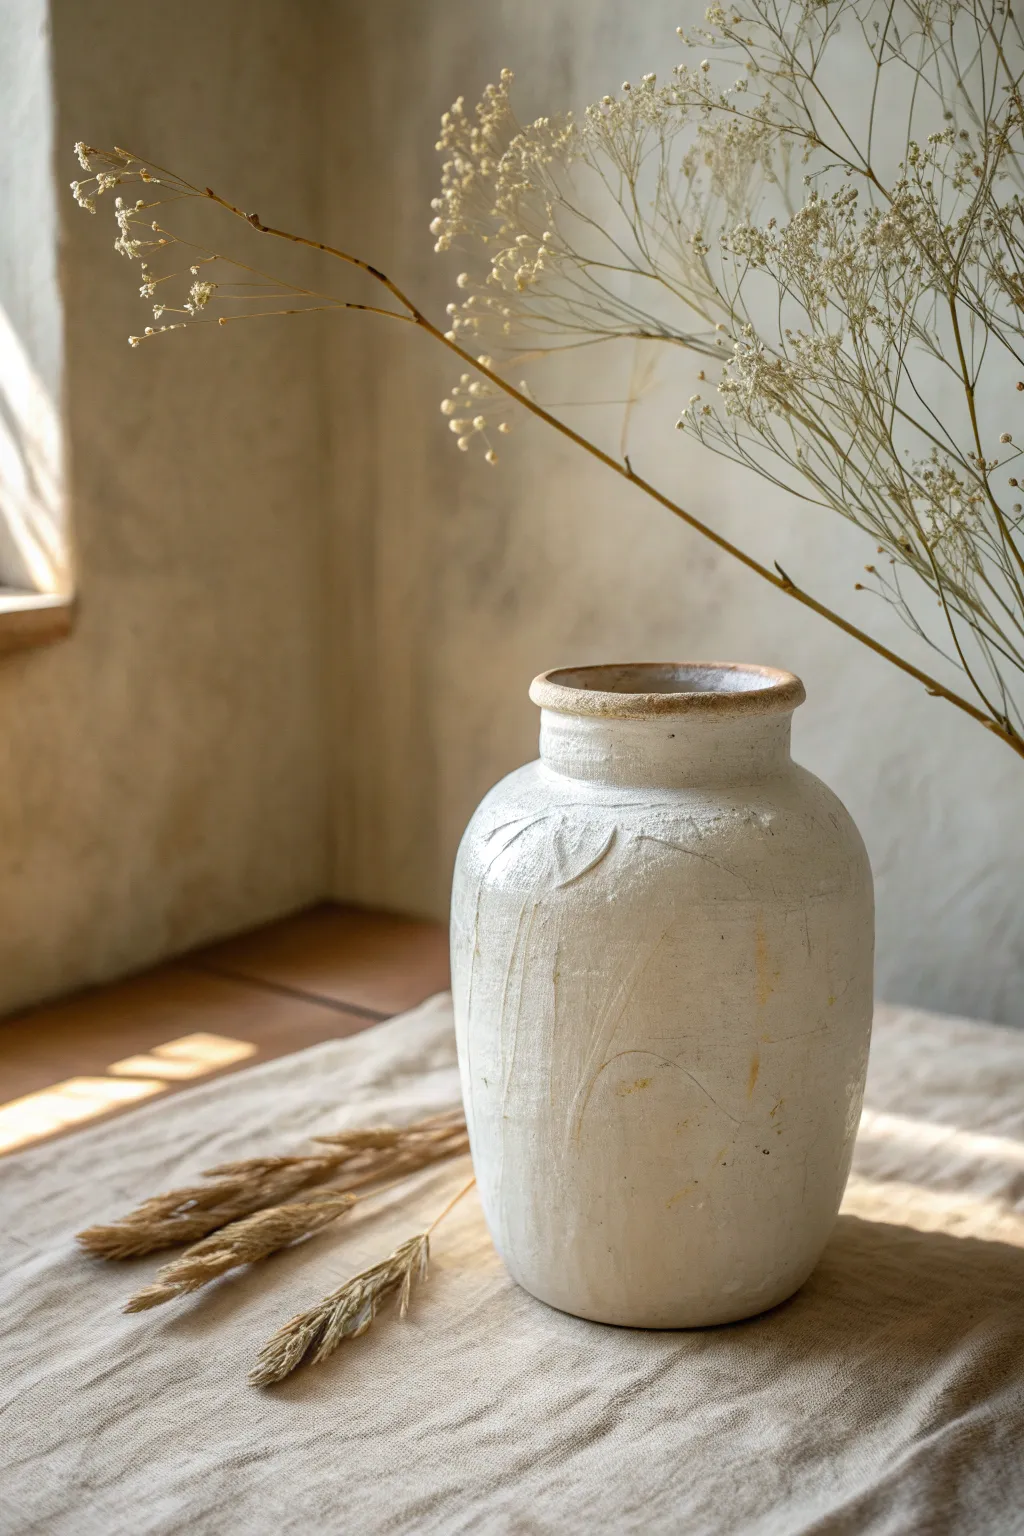
Transform a plain glass vessel into what looks like an antique, hand-thrown ceramic masterpiece using this clever wrapping technique. With its textured, creamy white finish and subtle carved details, this vase brings a rustic, organic warmth to any corner of your home.
How-To Guide
Materials
- Recycled glass jar or vase (smooth sides preferred)
- White or natural air-dry clay (approximately 500g)
- Rolling pin
- Sharp knife or clay cutting tool
- Small bowl of water
- Sponge or scourer
- Clay carving tools (or a toothpick)
- Rolling pin guides (optional, for even thickness)
- Fine-grit sandpaper
- Acrylic paint (warm white/cream)
- Matte clear sealant spray
Step 1: Preparing the Clay Wrap
-
Condition the Clay:
Start by taking a large chunk of air-dry clay and kneading it in your hands to warm it up. This conditioning process makes the clay more pliable and less prone to cracking when you wrap it around the glass. -
Roll Out a Slab:
On a clean, flat surface, roll out the clay into a large rectangular slab. Aim for a thickness of about 1/4 inch (6mm). If you want perfect uniformity, place wooden guides on either side of your roller. -
Measure the Vessel:
Place your glass jar on its side on top of the clay slab. Briefly roll the jar to ensure the clay is wide enough to cover the circumference and tall enough to cover the height plus a little extra for the rim. -
Trim to Size:
Using your sharp knife or cutting tool, trim the clay into a clean rectangle that matches the dimensions of your jar. Keep the excess clay handy for patching gaps later.
Cracks happen!
If hairline cracks appear while drying, don’t panic. Mix a tiny bit of fresh clay with water to make a paste (slip) and fill the cracks, then smooth over.
Step 2: Applying and Shaping
-
Wrap the Jar:
Carefully lift the clay slab and wrap it around the glass jar. Press it firmly against the glass to remove air pockets, ensuring the clay adheres well to the smooth surface. -
Seal the Seam:
Where the two ends of the clay meet, use your fingers to smudge the clay together until the seam disappears. Dip your finger in water to help smooth the join, creating a seamless cylinder. -
Form the Base:
Fold the excess clay at the bottom over the edge of the jar base. Smooth it down so the vase sits flat. I usually tap the jar gently on the table to flatten the bottom completely. -
Create the Rim:
At the top, fold the excess clay over the jar’s lip and into the opening. Shape this into a thick, rounded rim. Don’t worry about perfection; a slightly uneven, chunky rim adds to that hand-thrown pottery aesthetic.
Step 3: Texturing and Finishing
-
Add Rough Texture:
While the clay is arguably too neat, take a damp sponge or a slightly rough scourer and pat the surface. This creates subtle pitting and removes fingerprints, giving it an aged stone look. -
Carve Subtle Lines:
Using a carving tool or even just a toothpick, gently drag faint, curved vertical lines down the sides of the vase. These shouldn’t be deep grooves, just surface scratches to mimic turning marks or glaze imperfections. -
Strategic Imperfections:
Use the back of a spoon or your thumb to make slight indentations here and there. This makes the rigid glass form underneath look softer and more organic. -
Allow to Dry:
Let the vase dry completely in a cool, dry place. This usually takes 24-48 hours. Avoid direct sunlight or heat, as this can cause the clay to shrink too fast and crack. -
Sand for smoothness:
Once fully bone dry, use fine-grit sandpaper to knock down any overly sharp ridges or rough bits on the rim, but leave the side texture intact. -
Paint the Base Coat:
Mix a warm white or cream acrylic paint. Apply a thin, uneven wash over the vase. Let some of the raw clay color peek through in the carved lines to create depth. -
Highlight the Texture:
Using a very dry brush with a lighter white paint, lightly sweep over the raised textures. This ‘dry brushing’ technique catches the high points and emphasizes the carved details. -
Seal the Project:
Finish by spraying the entire exterior with a matte clear sealant. This protects the clay from moisture and gives the faux ceramic a durable finish.
Pro Tip: Internal Water
Since air dry clay isn’t waterproof, coating the INSIDE of the jar rim with waterproof varnish ensures you can still use water for fresh flowers safely.
Now style your new vase with dried botanicals or fresh blooms for an elegant, earthy display

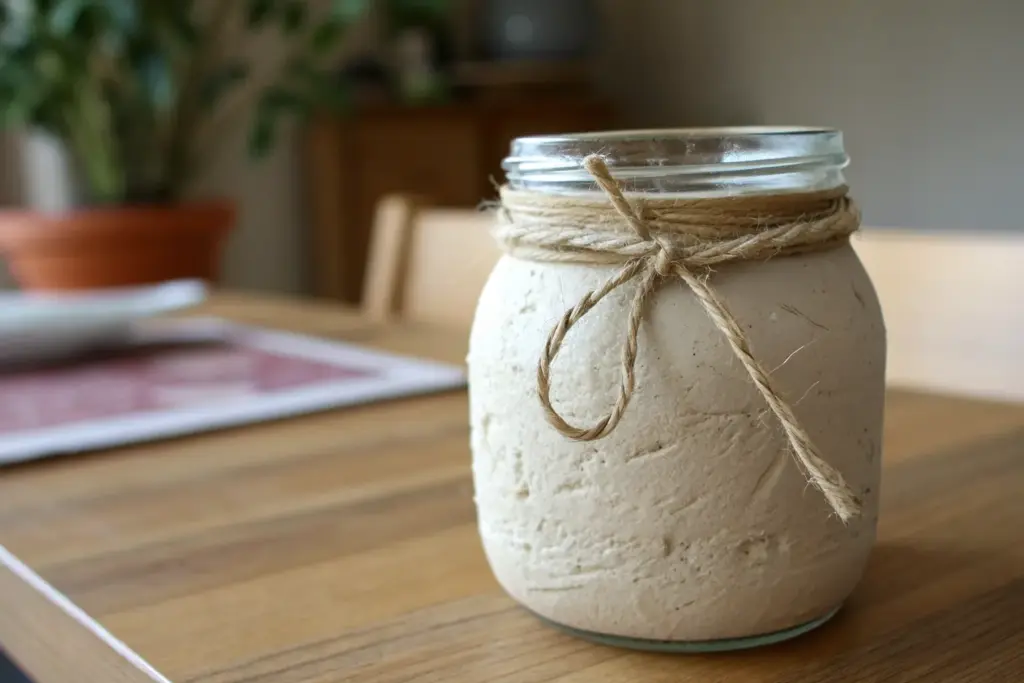
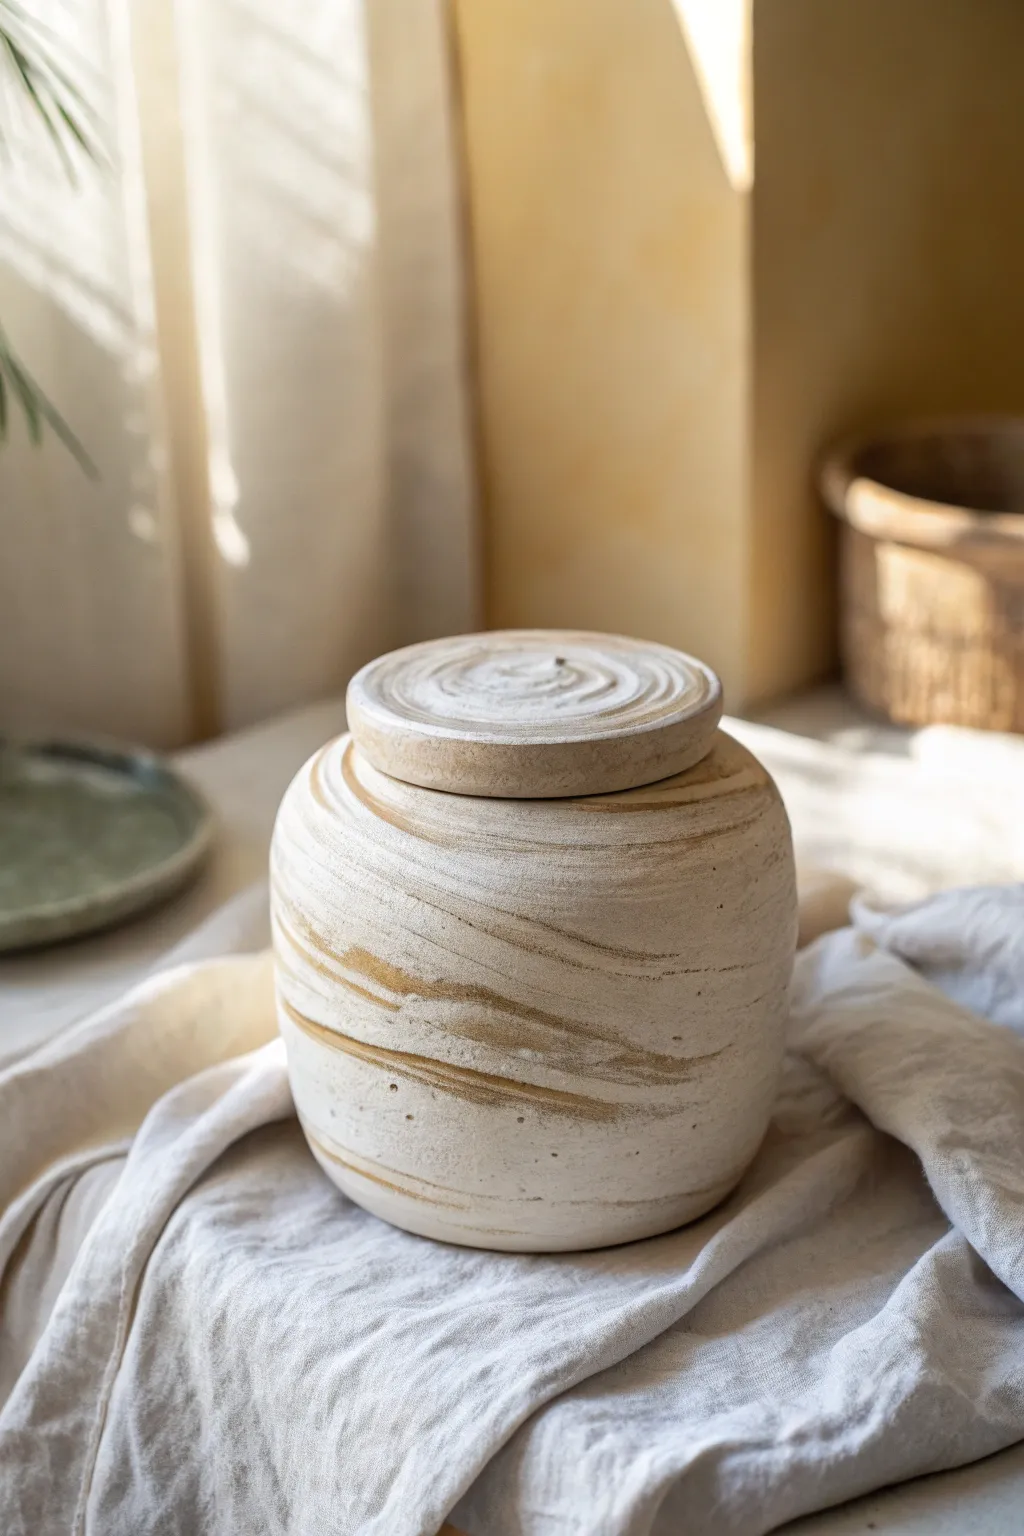
Minimal Matte Apothecary Jar
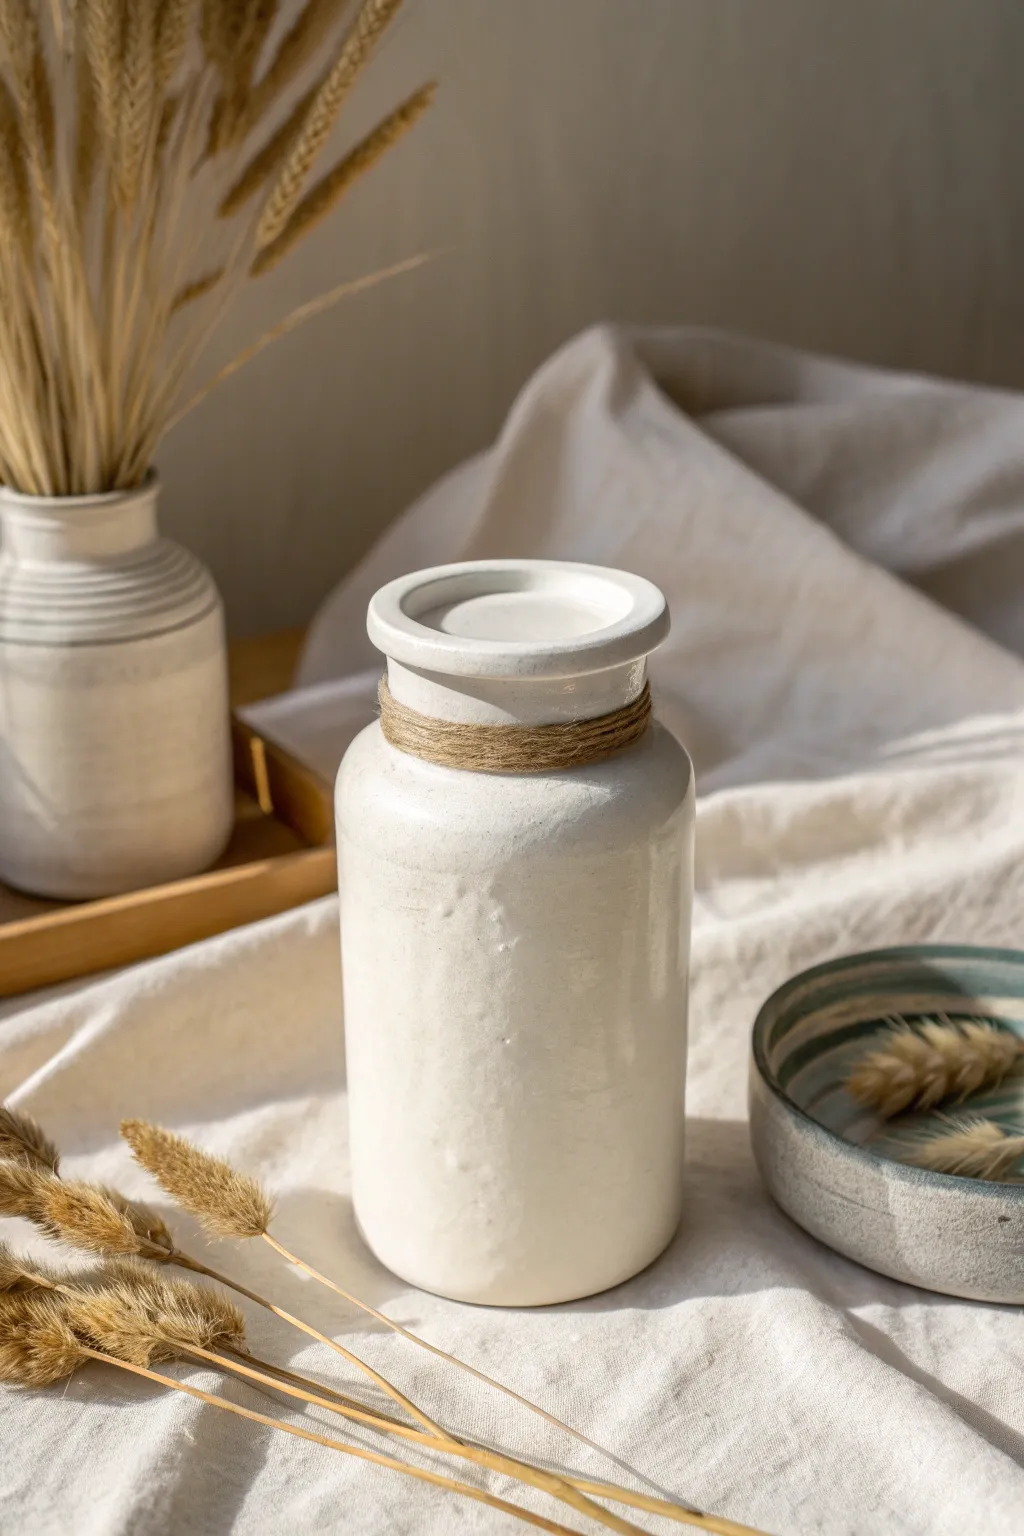
Channel the serene vibes of a minimalist studio with this hand-formed apothecary jar. Its imperfect, matte finish and simple twine accent give it an authentic, old-world charm that looks beautiful holding dried grasses or standing alone.
Step-by-Step
Materials
- White original air dry clay (approx. 500g)
- Wide glass jar or bottle (to use as an armature/mold)
- Cling film (plastic wrap)
- Rolling pin
- Clay knife or craft knife
- Small sponge
- Slip (clay mixed with water)
- Clear matte varnish or acrylic sealer
- Sandpaper (medium and fine grit)
- Jute twine
- Strong craft glue or hot glue gun
Step 1: Forming the Base Structure
-
Prepare your mold:
Select a glass jar or bottle that matches the cylindrical shape you want. Wrap the glass completely in cling film to ensure the clay won’t stick permanently to the surface. -
Roll out the slab:
Roll your air dry clay out into a large, even slab, roughly 1/4 inch thick. Aim for a rectangular shape that is tall enough to cover your jar and wide enough to wrap around it fully. -
Create the cylinder:
Lift the slab and wrap it around your cling-film-covered jar. Cut off any excess clay so the two ends meet perfectly without significant overlap. -
Seal the seam:
Score the meeting edges with your knife, apply a little slip, and press them firmly together. Use your thumb or a modeling tool to smooth the seam until it disappears completely. -
Form the base:
Place the cylinder upright on a fresh piece of rolled clay. Trace around the bottom, cut out the circle, and attach it to the bottom of your cylinder using the score-and-slip method.
Step 2: Sculpting the Neck and Rim
-
Narrow the neck:
Near the top of the jar, gently squeeze the clay inward to create a slightly tapered neck. -
Create the rim collar:
Roll a thick snake of clay. Flatten it slightly so it becomes a ribbon, then attach this around the very top edge of your jar to build up the rim. -
Shape the rim:
Use your fingers to pinch and flatten the top of this added coil, creating a wide, flat lip that overhangs slightly. It doesn’t need to be perfectly symmetrical; organic wobbles add character. -
Refine the surface:
Wet your sponge slightly and drag it over the entire surface of the jar. This will smooth out fingerprints but leave that lovely, subtle hand-built texture visible in the photo. -
Initial drying:
Let the jar sit until it is leather hard (firm to the touch but not dry). I usually carefully slide the glass jar armature out at this stage so the clay can shrink without cracking. -
Full cure:
Allow the piece to dry completely for 24-48 hours, keeping it away from direct heat sources to prevent warping.
Water Smoothing Magic
Keep a bowl of water nearby while sculpting. Regularly dipping your fingers helps smooth cracks instantly, creating that seamless ‘ceramic’ look before drying.
Step 3: Finishing and Decorating
-
Sanding:
Once bone dry, use medium grit sandpaper to level out any sharp peaks or rough seams. Follow up with fine grit for a smooth, matte stone feel. -
Cleaning:
Wipe away all sanding dust with a slightly damp cloth or a dry tack brush. -
Sealing:
Apply two coats of a clear matte varnish. This preserves the white color and protects the clay without making it look plasticky or shiny. -
Start the twine:
Dab a small dot of glue on the back of the jar’s neck. Press the end of your jute twine into the glue to anchor it. -
Wrap the neck:
Wind the twine tightly around the indented neck area multiple times. Aim for a distinct band of texture that sits just below the rim. -
Secure the end:
Cut the twine and tuck the loose end under the wrapped layers, securing it with another small dab of glue on the back side.
Cracks Appearing?
If hairline cracks appear during drying, create a patching paste by mixing dry clay dust with white glue. Fill the crack, let dry, then sand smooth.
Place your new rustic vessel on a linen cloth and fill it with dried bunny tails for an effortless decorative statement

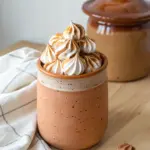
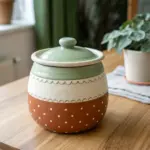
Speckled Stoneware Look Jar
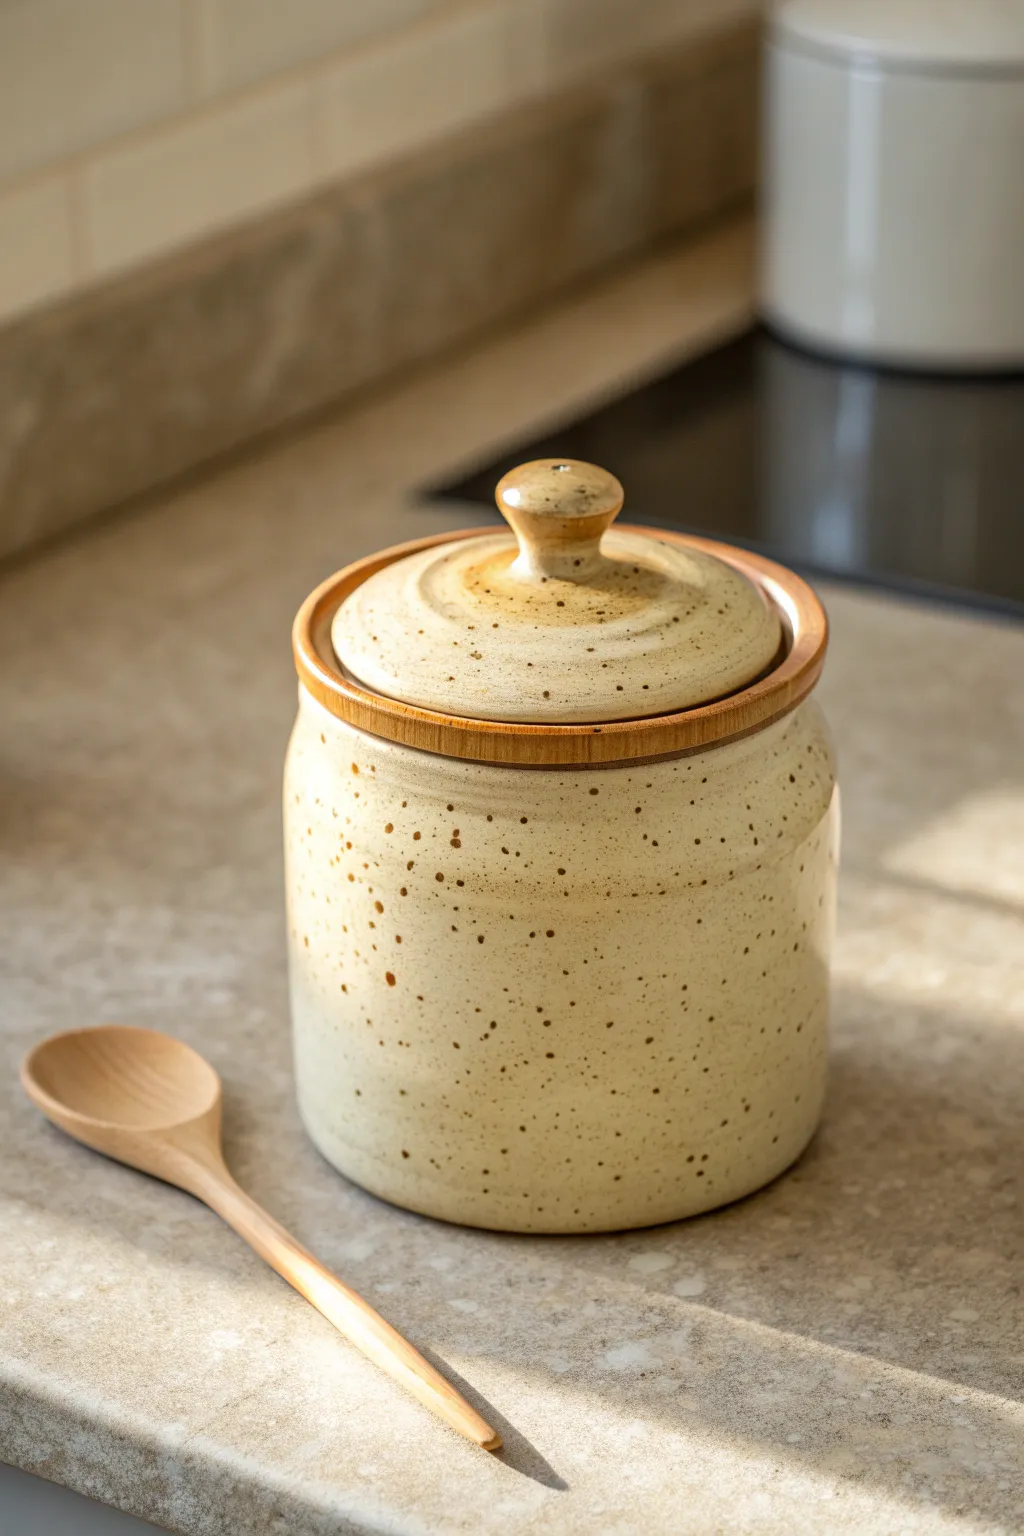
Replicate the warmth of wheel-thrown stoneware without a kiln using this satisfying air-dry clay technique. The finished piece features a creamy glaze effect with realistic coffee-colored speckles, perfect for adding rustic charm to your kitchen counter.
How-To Guide
Materials
- Air dry clay (white or cream)
- Clay roller and mat
- Circular cookie cutters or templates (two sizes)
- Small bowl or jar (for use as a mold)
- Clay knife or craft blade
- Sponge and water bowl
- Sandpaper (medium and fine grit)
- Acrylic paint (cream/off-white, caramel brown, dark espresso)
- Old toothbrush
- High-gloss varnish or polyurethane sealer
- Paintbrushes (flat shader and detail round)
Step 1: Forming the Canister Body
-
Prepare the clay:
Begin by conditioning a large ball of white air-dry clay until it is pliable and smooth. Roll it out into a long rectangular slab about 1/4 inch thick; keeping the thickness consistent is key for a professional look. -
Cut the walls:
Measure the circumference of your chosen mold (a glass jar works well). Cut a rectangle from your clay slab that matches this length plus a little extra for overlap, and stands as tall as you want your jar to be. -
Wrap and seam:
Wrap the clay rectangle around your mold (you can cover the mold in plastic wrap first for easier removal). Join the ends by scoring the edges with a tool, adding a dab of water, and pressing them together firmly. -
Smooth the exterior:
Use a damp sponge or your fingers to smooth out the vertical seam completely. You want the join to disappear so the cylinder looks like one continuous piece. -
Add the base:
Roll out a small circle of clay for the bottom. Score and slip the bottom edge of your cylinder and attach the circle. Smooth the seam upward onto the wall of the jar to secure it. -
Refine the rim:
If the top edge is uneven, trim it carefully with your knife. Dip your finger in water and run it along the rim to round it off softly, mimics the feel of thrown pottery. -
Create the inner flange:
Roll a thin snake (coil) of clay. Attach this to the *inside* rim of the jar, creating a small ledge for the lid to sit on later. Blend the bottom edge of the coil into the jar wall, but keep the top edge of the coil flat and crisp.
Step 2: Sculpting the Lid
-
Cut the lid base:
Roll a slab of clay slightly thicker than the walls. Cut a circle that is just slightly larger than the opening of your jar. -
Shape the dome:
Gently press the center of the circle to create a very subtle dome shape. You can do this by resting it on a slightly curved surface or just molding it with your thumbs. -
Form the knob:
Roll a small ball of clay and pinch it into a mushroom or knob shape. I like to make the top rounded and the stem slightly tapered. -
Attach the knob:
Score the center of the lid and the bottom of the knob. Use water or slip to attach them securely. Smooth the transition area where the knob meets the lid so it looks seamless. -
Carve details:
If you want the concentric ring look shown in the inspiration photo, place the lid on a turntable or lazy susan. Hold a modeling tool steady while slowly spinning the lid to carve shallow circular grooves. -
Initial dry:
Let both the jar and lid dry for 24-48 hours. Turn them occasionally to ensure airflow reaches all sides.
Cracking Up?
If small cracks appear during drying, don’t panic. Mix a small amount of fresh clay with water to make a paste (slip) and fill the cracks, then sand smooth once dry.
Step 3: Finishing and Painting
-
Sand for smoothness:
Once fully dry, sand the entire piece. Start with medium grit to remove bumps, then switch to fine grit for a silky ceramic finish. Wipe away all dust with a barely damp cloth. -
Base coat:
Paint the entire exterior and lid with a cream or warm off-white acrylic paint. You may need 2-3 coats for opaque coverage. -
Highlight the rim:
Identify the rim of the jar and the edge of the lid. Paint these a warm caramel or light terra cotta color to mimic exposed raw clay or a glaze break. -
Create the splatter:
Mix a dark espresso brown acrylic paint with a tiny bit of water to thin it. Dip an old toothbrush into this mixture. -
Apply the speckles:
Hold the toothbrush about 6 inches from the jar and run your thumb across the bristles to flick paint onto the surface. Aim for random distribution to achieve that natural ‘stoneware’ look. -
Seal the piece:
Once the paint is bone dry, apply two coats of high-gloss varnish. This not only protects the paint but gives it the shiny, wet look of fired ceramic glaze.
Make It Functional
Since air dry clay isn’t food safe, insert a glass jar or plastic container inside your finished clay shell if you plan to store tea, sugar, or coffee beans.
Place your beautiful faux-stoneware jar on the counter and enjoy the handcrafted elegance it brings to your space


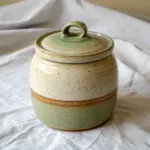
Ribbed Coil-Wrapped Canister
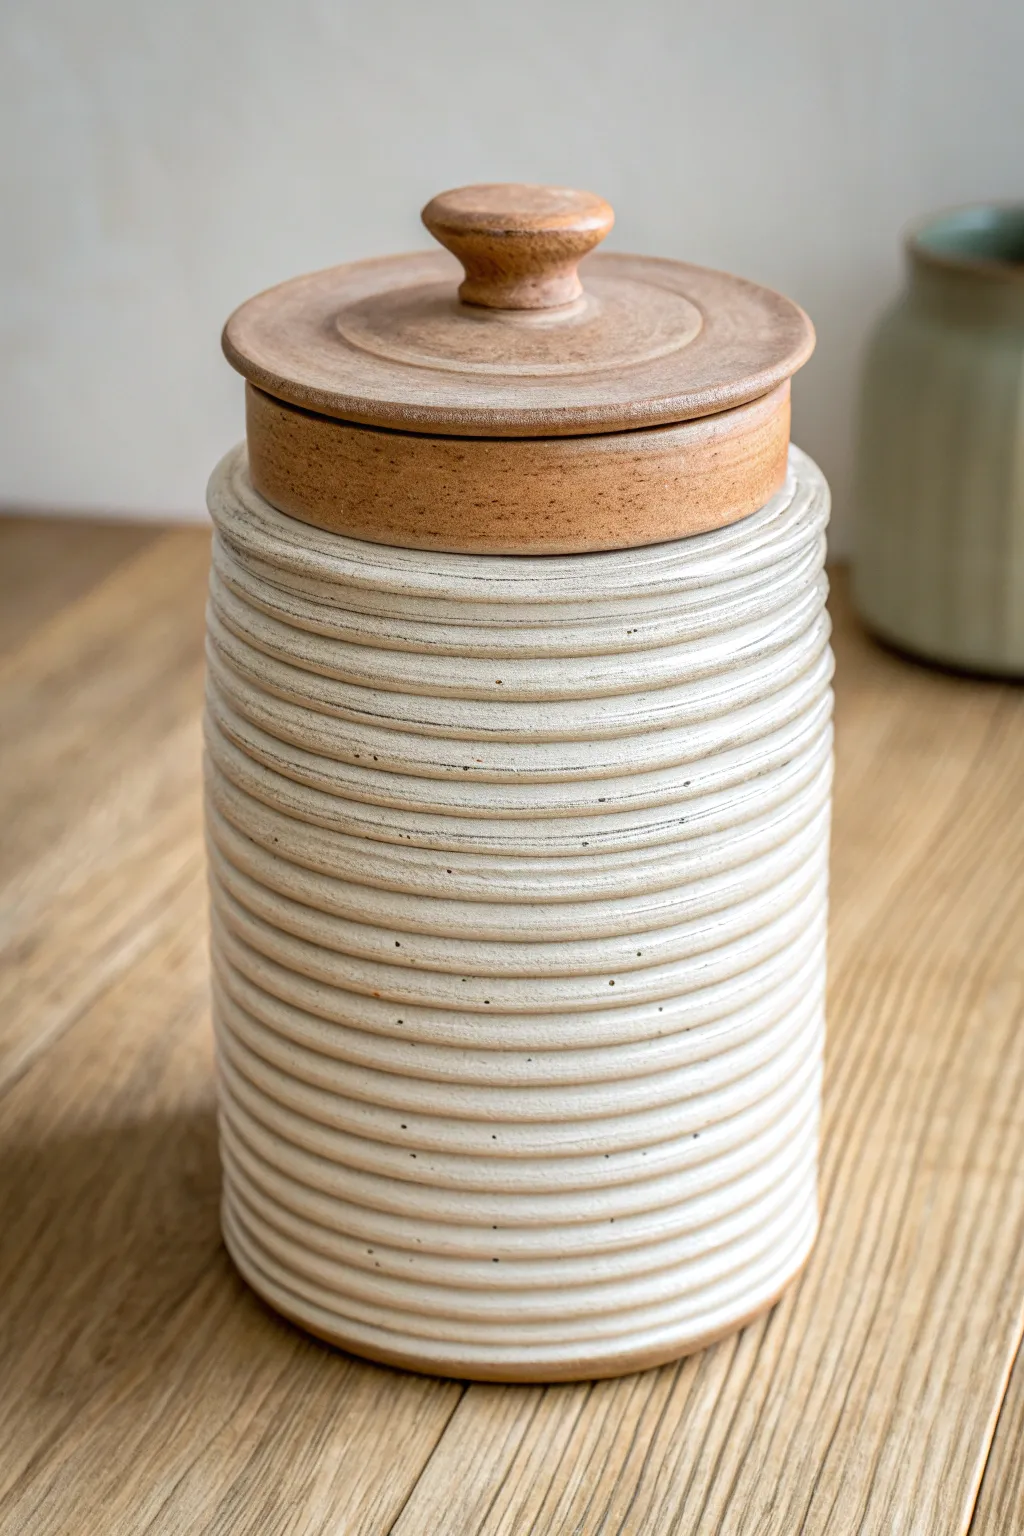
Create a stunningly textured storage jar that mimics the look of wheel-thrown pottery using humble coil techniques. This canister features tight, rhythmic ridges along the body and a smooth, unglazed-style lid for a natural, earthy finish.
Step-by-Step Guide
Materials
- White or cream air dry clay
- Terracotta colored air dry clay (or acrylic paint to tint)
- Rolling pin
- Clay knife or fettling tool
- Slip (clay mixed with water)
- Scoring tool or old fork
- Circle template or round object (approx 4-5 inches)
- Sponge
- Sandpaper (fine grit)
- Small wooden knob (optional, or make clay knob)
- Matte sealant or varnish
Step 1: Forming the Base and Walls
-
Roll the base:
Begin by rolling out a slab of white air dry clay to about a 1/4 inch thickness. Use your circle template to cut a perfect round base for your canister. -
Create consistent coils:
Roll out several long ropes of clay on your work surface. Try to keep them even, roughly the thickness of a thick pencil or a pinky finger. -
Start the stacking:
Score the outer edge of your base and apply a dab of slip. Lay your first coil around the circumference, pressing it gently onto the base. -
Build the height:
Continue stacking coils one on top of another. Unlike traditional smoothing, we want to keep the definition of each ring on the outside, so only blend the coils together on the *inside* of the jar to secure them. -
Keep it vertical:
As you build up, pause occasionally to check that your walls are rising straight up and not flaring out. I find using a ruler held vertically against the side helps keep the profile cylindrical. -
Refining the ridges:
Once you reach your desired height, take a mesmerizing moment to smooth the coils slightly with a damp finger or sponge, rounding them off so they look uniform but distinct. -
Adding texture detail:
For that extra ‘thrown’ look, you can gently run a slightly damp sponge around the exterior to soften sharp edges while maintaining the ribbed pattern.
Uneven Ridges?
If your coils look messy, use a flat paddle tool or ruler to gently tap the sides while the clay is wet. This aligns the coils vertically without destroying their rounded shape.
Step 2: Crafting the Contrast Lid
-
Prepare the terracotta clay:
Switch to your terracotta-colored clay. If you only have white clay, you can knead in burnt sienna acrylic paint until the color is uniform. -
Measure the opening:
Measure the inner and outer diameter of your jar’s opening. You want the lid to sit comfortably on top without sliding off. -
Cut the lid slab:
Roll out a slab of the terracotta clay and cut a circle that is slightly larger than the outer diameter of your jar. -
Add the inner flange:
Cut a smaller circle (or a thick ring) that fits loosely *inside* the jar opening. Score and slip this onto the underside of your main lid piece to keep it centered when closed. -
Make the gallery rim:
Roll a wide, flat strip of terracotta clay and attach it to the edge of your lid circle to create a chunky vertical rim, giving the lid visual weight. -
Sculpt the knob:
Form a small mushroom-shaped knob from the terracotta clay. Attach it securely to the center of the lid using scoring and slip. -
Refining the lid shape:
Smooth all joins on the lid with a sponge, paying attention to the rim and the connection point of the knob.
Faux Glaze Look
Mix gloss varnish with a drop of white paint and apply it only to the jar body’s interior. This creates a realistic ‘glazed’ inside contrasting with the matte exterior.
Step 3: Finishing Touches
-
Dry thoroughly:
Let both the jar and lid dry completely. This can take 24-48 hours depending on humidity. Keep the lid off the jar so air circulates. -
Sanding:
Once bone dry, lightly sand the rim of the jar and the underside of the lid to ensure they sit flush against each other. -
Enhance the white body:
If the white clay looks dull, you can dry-brush a tiny bit of cream paint over the ridges to highlight the texture. -
Seal for durability:
Apply a coat of matte varnish or sealant to both pieces. This protects the clay from moisture and gives it a finished, professional look. -
Final assembly:
Place the lid on your jar and admire your handiwork.
Enjoy using your beautifully textured canister to organize your space

What Really Happens Inside the Kiln
Learn how time and temperature work together inside the kiln to transform clay into durable ceramic.
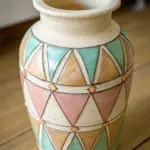
Geometric Faceted Jar Sleeve

Transform a plain glass jar into a piece of modern sculptural decor with this textured clay sleeve project. The repeating triangular facets catch the light beautifully, creating deeply satisfying shadows while offering sturdy storage for your favorite brushes or tools.
Step-by-Step
Materials
- Clean glass jar (mason jar or similar)
- White classic air dry clay
- Rolling pin
- Craft knife or scalpel
- Ruler or straight edge
- Clay carving tools (flat chisel or ribbon tool)
- Small bowl of water
- Sandpaper (fine grit)
- White acrylic paint (optional)
- Matte sealant/varnish (optional)
- Parchment paper or non-stick mat
Step 1: Preparing the Base
-
Prep the jar:
Ensure your glass jar is completely clean and dry. Remove any sticker residue with rubbing alcohol to ensure the clay adheres properly later or sits flush against the glass. -
Roll out the slab:
Take a large chunk of air dry clay and knead it briefly to wake it up. Roll it out on parchment paper into a long rectangular slab, roughly 1/4 inch thick. You want it long enough to wrap around the jar circumference and tall enough to cover the body up to the neck threads. -
Trim to size:
Measure the height of your jar’s main body. Using a ruler and craft knife, trim your clay slab into a neat rectangle that matches this height and is just slightly longer than the jar’s circumference. -
Wrap the jar:
Carefully lift the clay slab and wrap it around the glass jar. I find it helpful to stand the jar up and roll it onto the clay. -
Create the seam:
Where the ends meet, slice through both layers of overlap with your knife to create a perfect butt joint. Remove the excess scraps. -
Blend the join:
Dip your finger in a little water and smooth the seam together until it disappears completely. The clay should feel like a continuous sleeve around the glass.
Step 2: Carving the Facets
-
Mark the grid:
Lightly score a grid onto the clay surface using your ruler. You want vertical lines spaced about 1 inch apart, and horizontal lines also spaced about 1 inch apart. This doesn’t need to be deep; it’s just a guide. -
Draw diagonals:
Connect the corners of your grid squares with diagonal lines to create a network of triangles. This pattern is the blueprint for your facets. -
Carve the first angle:
Using a flat chisel tool or a sharp sculpting loop, begin carving into one of the marked triangles. Angle your tool so you are removing clay from the center of the triangle, sloping down toward the lines. You want the grid lines to remain the ‘high points’ or ridges. -
Bevel the adjacent triangle:
Move to the neighboring triangle and carve similarly, sloping inward. The goal is to create a pyramid-like depression or a raised pyramid, depending on your preference. For the look in the photo, leave the intersection points high and carve out the flat planes in between to create angular valleys. -
Repeat the pattern:
Continue this carving process around the entire jar. It creates a rhythm; try to keep your carving depth consistent so the facets look uniform. -
Refine the edges:
Once the rough carving is done, use a slightly damp finger or a soft brush to smooth out any clay burrs or crumbs, but be careful not to round over your crisp geometric edges.
Grid Guide
Make a paper template of your grid first. Wrap it around the clay and poke pinholes at the intersections to transfer the pattern perfectly.
Step 3: Finishing Touches
-
Create the lid cover (optional):
Roll out a smaller circle of clay, drape it over the jar’s lid, and trim the excess. You can carve a matching faceted pattern around the rim of the lid for a cohesive set. -
Extended drying:
Let the jar dry slowly away from direct heat or sunlight. Because the clay is wrapped around a non-porous glass core, it needs to dry from the outside in. Give it at least 24-48 hours. -
Sanding:
Once bone dry, use fine-grit sandpaper to gently polish the flat surfaces of your facets. This makes the geometry look sharper and more professional. -
Painting and sealing:
The natural white clay looks great, but for a brighter finish, apply a coat of white acrylic paint. Finish with a matte spray varnish to protect the surface from handling marks.
Marble Effect
Before rolling your slab, mix a tiny bit of grey or black clay into the white but don’t fully blend it. This creates a faux marble stone look.
Now you have a stunning, architectural vessel ready to organize your creative space
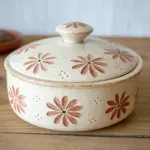
Stamped Pattern Storage Jar
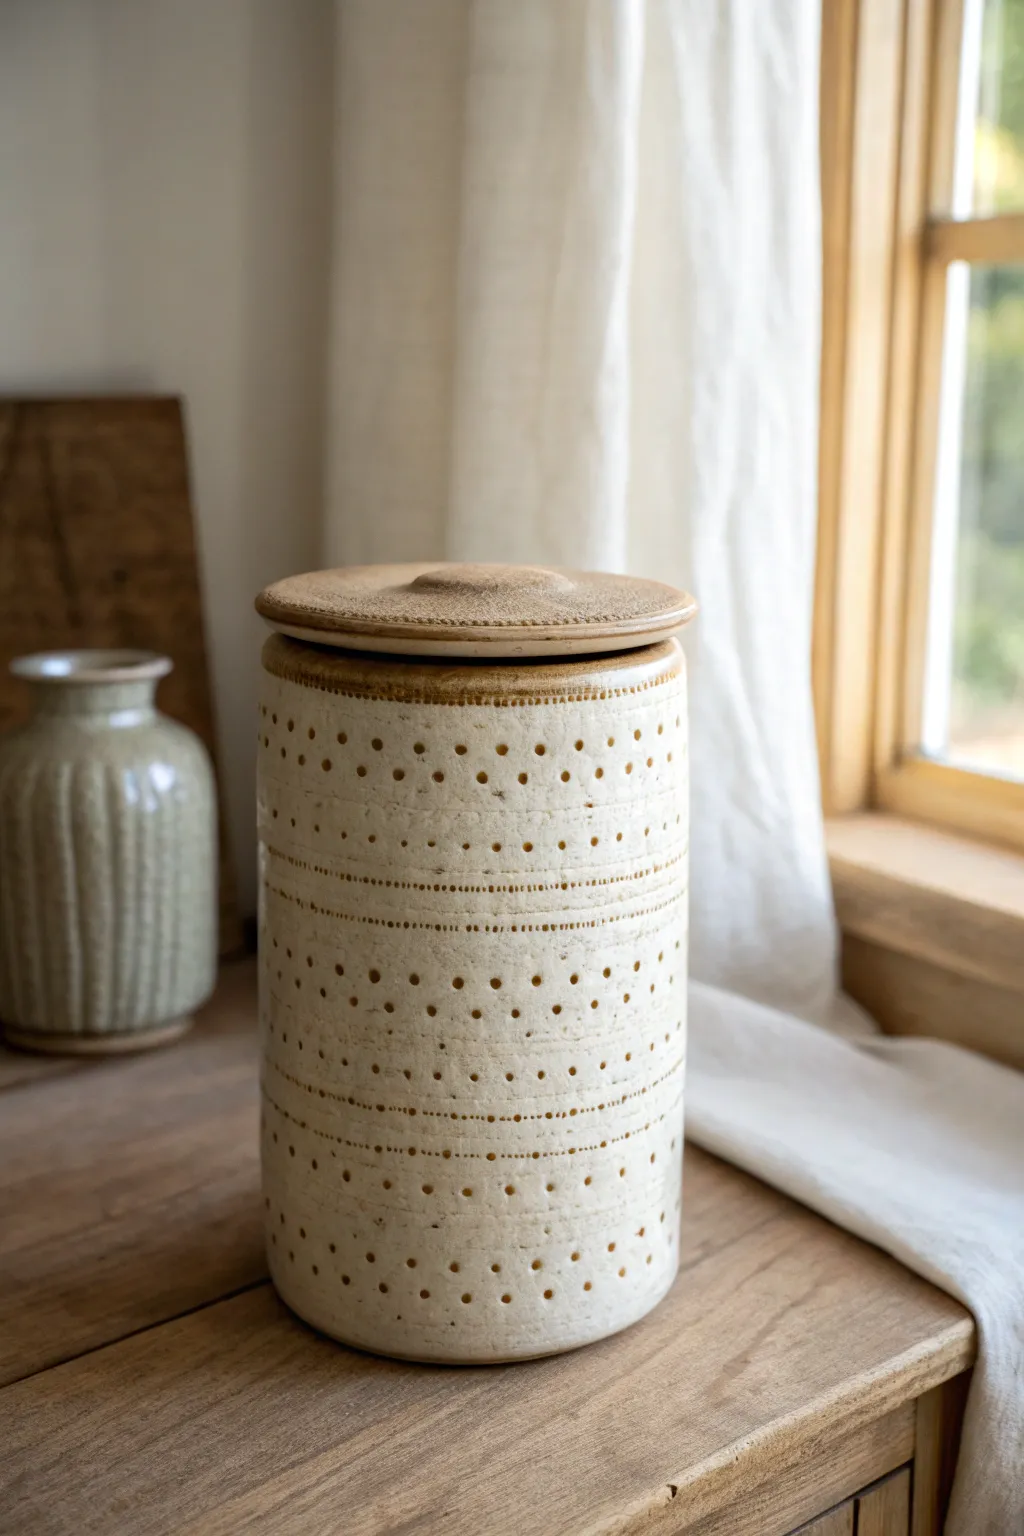
This earthy, textured storage jar combines simple slab-building techniques with rhythmic pattern work for a piece that looks remarkably like wheel-thrown speckled pottery. The repetitive dot styling creates a beautiful play of light and shadow, making it a perfect functional art piece for your kitchen or vanity.
How-To Guide
Materials
- High-quality air dry clay (white or cream)
- Rolling pin
- Canvas mat or parchment paper
- Clay knife or fettling knife
- Slip (clay mixed with water)
- Small circular object for the base form (like a sturdy cardboard tube or large can)
- Wooden skewer or knitting needle (for the dots)
- Fork or scoring tool
- Ruler
- Sandpaper (fine grit)
- Acrylic paints (creamy beige and burnt umber)
- Matte paint sealer or varnish
Step 1: Forming the Cylinder Body
-
Roll the slab:
Begin by wedging your clay briefly to remove air bubbles, then roll it out on your canvas mat to an even thickness of about 1/4 inch. Aim for a long rectangular shape. -
Cut to size:
Using your ruler and knife, cut a clean rectangle. The length should be the circumference of your chosen mold (plus a slight overlap), and the height can be adjusted to your preference. -
Create the base:
Roll a small separate piece of clay and cut out a circle that matches the diameter of your mold form. This will become the bottom of your jar. -
Wrap the form:
Wrap your rectangular slab around your mold. If you are using a rigid mold like a can, wrap it in parchment paper first so the clay slides off easily later. -
Join the seam:
Score (scratch) and add slip to both ends of the rectangle where they meet. Press them firmly together and smooth the seam with your finger or a modeling tool until it disappears. -
Attach the base:
Score and slip the bottom edge of your cylinder and the edge of your circular base. Press them together gently, smoothing the clay on the outside to create a seamless transition.
Step 2: Creating the Lid
-
Cut the lid slab:
Roll out a fresh slab of clay using the same thickness as the body. Determine the diameter needed to cover your jar—it should be slightly wider than the jar opening—and cut out a circle. -
Add a flange:
Roll a small coil (snake) of clay. Attach this coil to the underside of the lid in a circle that fits *inside* the jar’s opening. This flange keeps the lid from sliding off. -
Form the handle:
Roll a slightly flattened ball of clay to create a low-profile knob. Score and slip the center of the lid’s top surface and attach the knob, smoothing the edges down for a clean look.
Clean Impressions
Dip your skewer or tool into water or cornstarch frequently while stamping. This prevents the tool from sticking to the clay and keeps your dot edges sharp and clean.
Step 3: Texturing and Finishing
-
Mark your guidelines:
while the clay is leather-hard (firm but still cool to the touch), lightly etch horizontal lines around the jar using a ruler. These will guide your pattern rows. -
Stamp the pattern:
Using the dull end of a wooden skewer or a knitting needle, press small indents into the clay along your guide lines. Vary the spacing: create dense rows of dots for bands of texture, separated by areas of negative space. -
Detail the rim:
Add a row of very fine dots right along the upper rim of the jar and the edge of the lid for a cohesive finish. -
Dry completely:
Let the jar dry slowly away from direct heat or drafts. This usually takes 24-48 hours depending on humidity. I find covering it loosely with plastic for the first night prevents cracking. -
Sand until smooth:
Once bone dry, use fine-grit sandpaper to gently smooth the rim, the lid edges, and any rough spots on the body. Wear a dust mask for this step. -
Base coat painting:
Paint the entire jar and lid with a creamy beige acrylic paint. You may need two thin coats for opaque coverage. -
Antiquing wash:
Mix a small amount of burnt umber paint with water to create a thin wash. Brush this over the textured areas, letting it settle into the dots. -
Wipe back:
Immediately wipe the surface with a damp cloth or paper towel. This leaves the dark color inside the dots while revealing the cream color on the surface, mimicking speckled stoneware. -
Seal the piece:
Protect your work with a matte varnish or sealant to give it durability and a professional finish.
Cracked Seams?
If a crack appears at the seam while drying, mix a tiny bit of fresh clay with vinegar to make a paste (vinegar slip). Fill the crack, smooth it over, and let it dry slowly.
Now you have a stunning, faux-ceramic storage vessel ready to display on your shelf


The Complete Guide to Pottery Troubleshooting
Uncover the most common ceramic mistakes—from cracking clay to failed glazes—and learn how to fix them fast.
Scalloped Rim Jar Cover
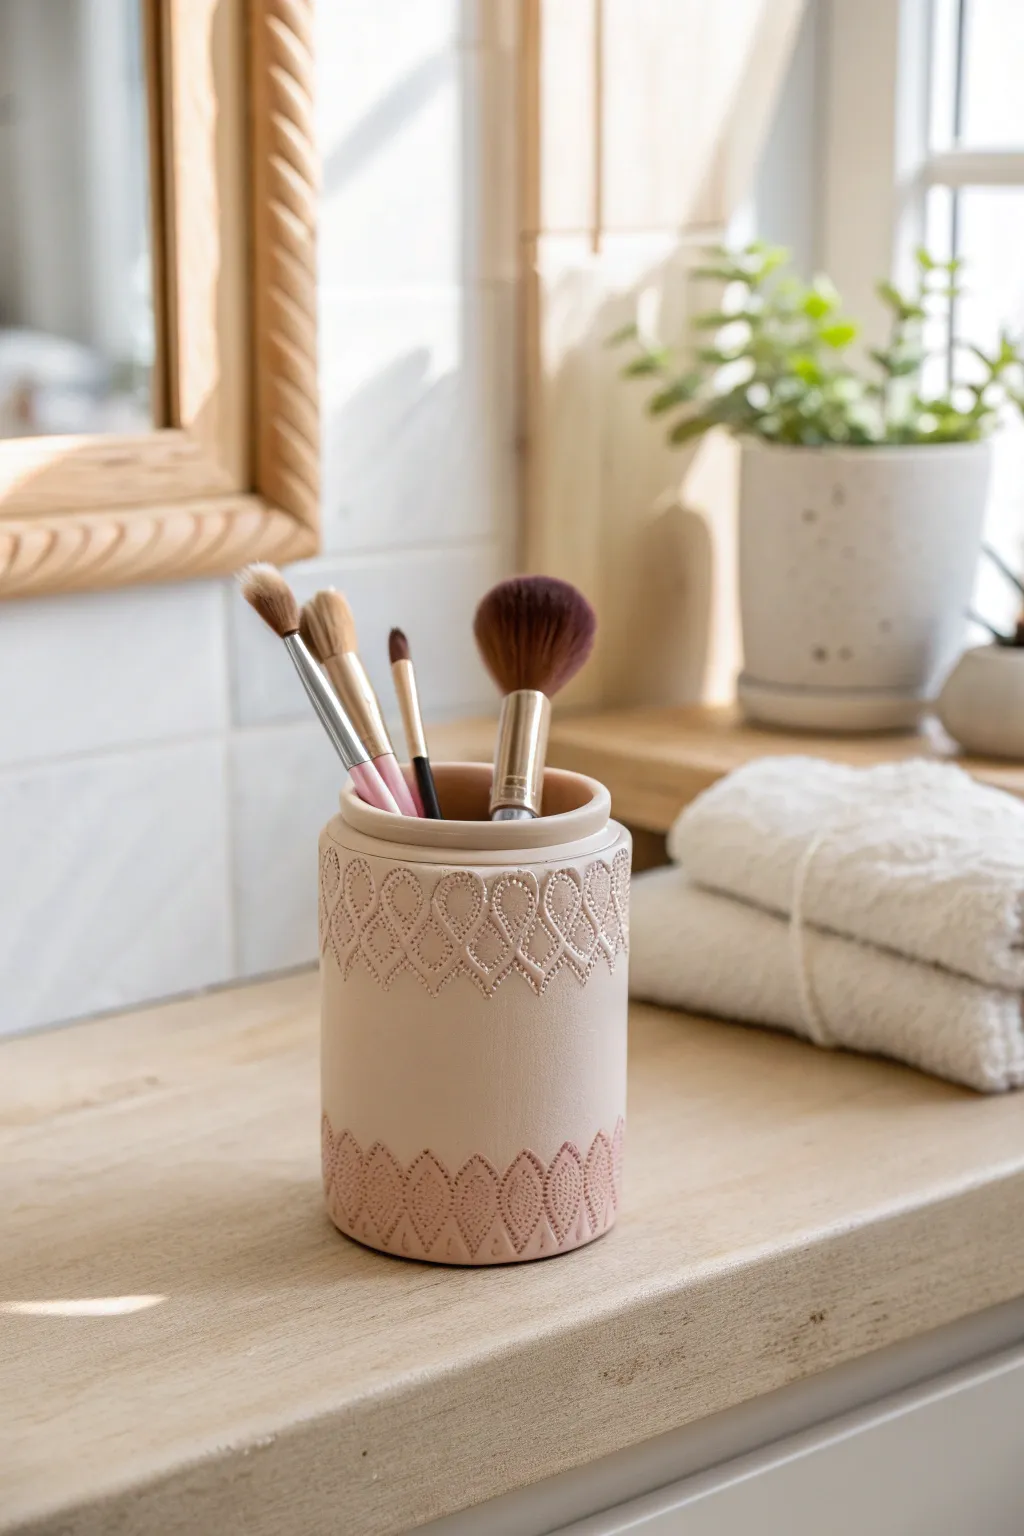
Transform a simple glass jar into a chic, bohemian makeup organizer using air dry clay and a few simple tools. The delicate, dotted scalloped patterns add an elegant, handcrafted touch that looks like high-end ceramic decor.
Step-by-Step Guide
Materials
- Clean, straight-sided glass jar or tin can
- White or terracotta air dry clay
- Rolling pin
- Craft knife
- Water and a small sponge
- Needle tool, dotting tool, or a toothpick
- Sandpaper (fine grit)
- Matte acrylic varnish or sealant
Step 1: Preparing the Base
-
Clean the surface:
Start by thoroughly washing and drying your glass jar or tin can to remove any oils or labels. This ensures the clay adheres properly to the surface. -
Condition the clay:
Take a large chunk of air dry clay and knead it in your hands until it becomes soft, pliable, and free of cracks. If it feels too dry, add a tiny drop of water. -
Roll a slab:
On a clean, flat surface, roll out the clay into a long rectangular slab. Aim for an even thickness of about 1/4 inch (approx 5-6mm). -
Measure and cut:
Measure the height and circumference of your jar. Cut the clay slab to matching dimensions, adding a tiny bit of overlap for the seam.
Step 2: Wrapping the Jar
-
Apply the clay:
Gently lift the clay slab and wrap it around the jar. Press it firmly against the glass to eliminate any trapped air bubbles. -
Seal the seam:
Where the two ends meet, use your fingers and a little water to smooth the seam together until it disappears completely. I find a wet finger works best for blending these join lines. -
Trim the edges:
Use your craft knife to trim away any excess clay at the top rim and the base. Smooth the rim with a damp sponge for a professional, rounded finish. -
Smooth the surface:
Run a damp sponge or your fingers over the entire cylinder to create a pristine, smooth canvas for your distinctive texture work.
Cracking Up?
If small cracks appear while drying, don’t panic. Mix a tiny bit of clay with water to make a paste (slip) and fill the cracks, then smooth over.
Step 3: Creating the Texture
-
Marking guidelines:
Lightly trace a horizontal guideline about an inch below the rim and another an inch above the base using a needle tool. This helps keep your pattern straight. -
Outline the scallops:
Using a needle tool, lightly sketch a repeating scalloped or looped pattern along your top guideline. Repeat this process for the bottom section. -
Dotting the pattern:
Take your dotting tool or a dull toothpick and press firmly into the clay along your sketched lines. Create a continuous chain of small, uniform divots to form the ‘beaded’ look. -
Filling the shapes:
Inside each scallop loop, add additional rows of dots or a vertical line of dots to enhance the intricate, lace-like appearance shown in the inspiration photo. -
Refine the details:
Check your pattern for any rough edges. If a dot looks messy, gently smooth it with a fingertip and repress the tool.
Make it Luxe
After the clay is dry, paint the inside of the dotted depressions with liquid gold leaf or metallic paint for a glamorous, inlaid effect.
Step 4: Finishing Touches
-
Slow drying:
Allow the jar to dry slowly away from direct sunlight or heat sources. This usually takes 24-48 hours depending on humidity. -
Sanding:
Once fully dry and hard, use fine-grit sandpaper to gently smooth out any fingerprints or rough spots on the unpatterned areas. -
Painting (Optional):
If you used white clay but want the terracotta look, mix a beige-pink acrylic paint and apply a thin wash. Wipe it back slightly to let the paint settle into the textured dots. -
Sealing:
Protect your work by applying a coat of matte varnish. This seals the clay and makes it more durable for bathroom environments.
Enjoy styling your vanity with your beautiful new handmade organizer
Terrazzo Confetti Clay Jar
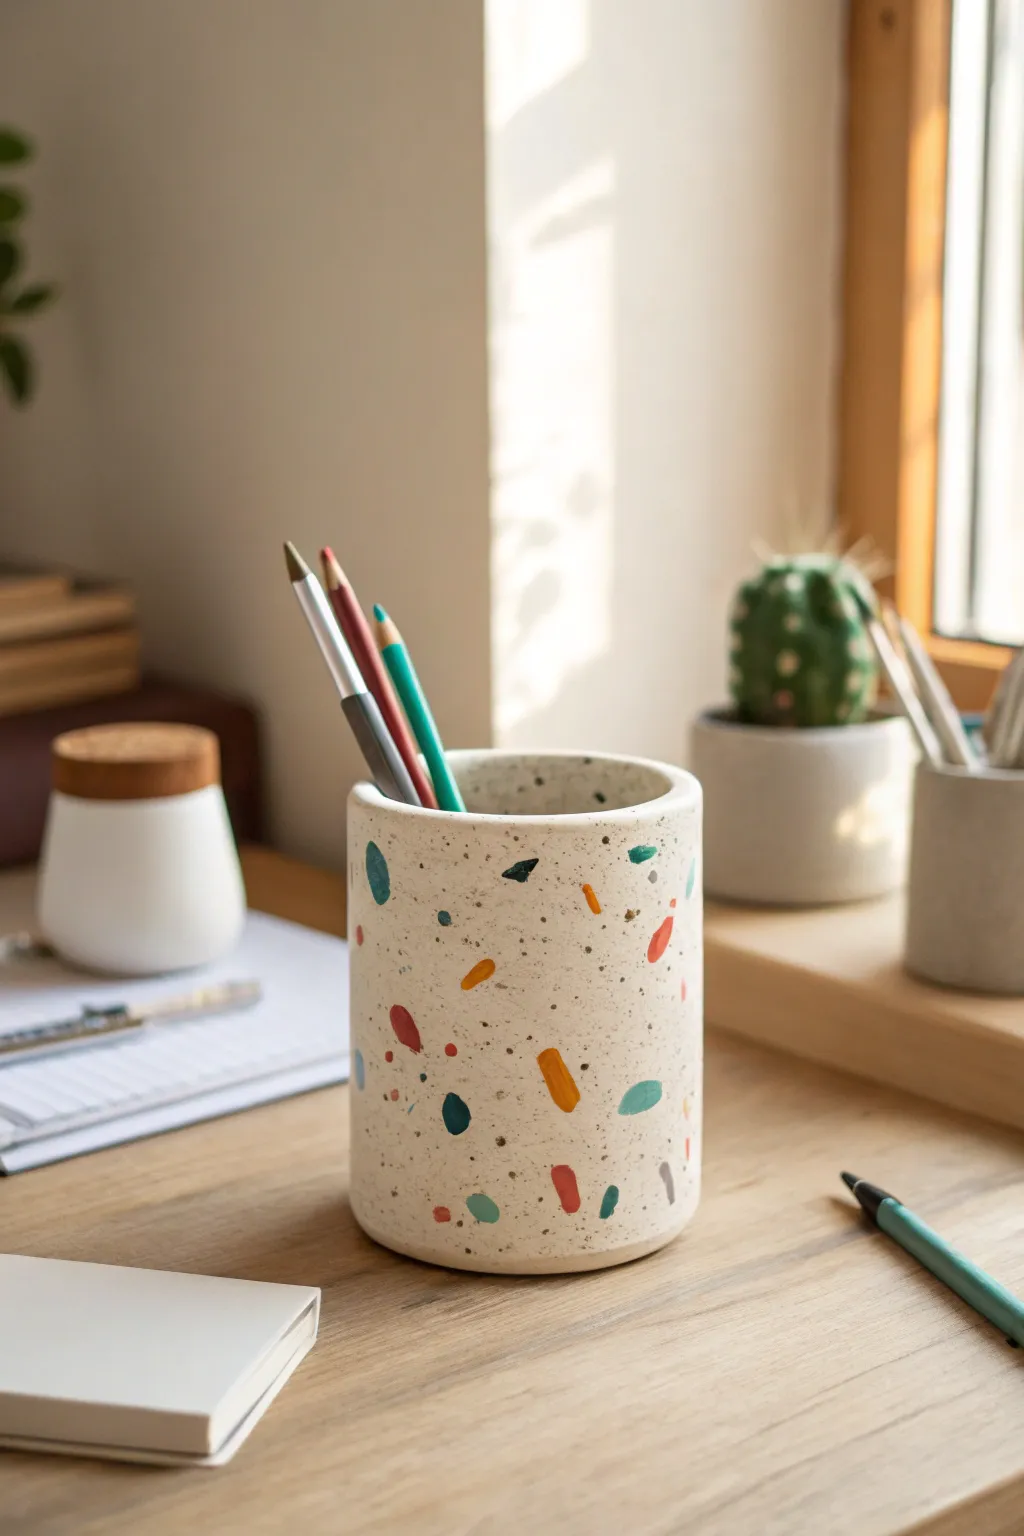
Bring the playful, speckled charm of classic Italian flooring to your desk with this faux terrazzo jar. By kneading colorful clay chips into a white base, you can achieve this sophisticated confetti look without any heavy machinery.
How-To Guide
Materials
- White air dry clay (2 lbs)
- Acrylic paints (teal, orange, mustard yellow, brick red, navy)
- Rolling pin
- Empty can or jar (to use as a mold)
- Parchment paper
- Precision craft knife
- Plastic wrap
- Sponge or fine-grit sandpaper
- Clear matte varnish or sealant
- Palette knife or old credit card
Step 1: Preparing the Confetti
-
Color the Clay:
Pinch off five small grape-sized balls of white clay. Mix a different acrylic paint color into each ball by kneading until the pigment is fully incorporated and uniform. -
Flatten the Colored Clay:
Roll out each colored ball into a very thin, organic sheet, about 1-2mm thick. These don’t need to be perfect circles; rough shapes are actually better for the final effect. -
Dry the Chips:
Let these colored sheets sit out for about an hour until they are leathery and firm, but not brittle. -
Create the Terrazzo Pieces:
Use your craft knife to chop the colored sheets into erratic, geometric fragments. Aim for a mix of tiny specks and larger, distinct triangles or quadrilaterals.
Uneven Seams?
If the seam is bumpy, use a little water on your finger to turn the clay into slip (mud) and fill the gap. Let it dry slightly, then sand it flush.
Step 2: Building the Vessel
-
Roll the Base:
Take your main block of white clay and roll it out on parchment paper into a large rectangular slab, aiming for a consistent 1/4 inch thickness. -
Embed the Confetti:
Scatter your colored clay chips randomly across the white slab. Gently press them down with your fingers so they stick initially. -
Integrate the Pattern:
Use the rolling pin to pass over the slab again firmly. This forces the colored chips flush with the white surface, embedding them completely. -
Prepare the Mold:
Wrap your empty can or glass jar in plastic wrap. I find this extra step crucial because it ensures the clay slides off easily later. -
Cut to Size:
Measure the circumference and height of your mold. Trim the clay slab into a rectangle that matches these dimensions, adding a slight overlap for the seam. -
Form the Cylinder:
Lift the clay and wrap it around the mold. Press the vertical seam together firmly and smooth it with a wet finger until the join is invisible. -
Add the Base:
Roll a separate small circle of white clay for the bottom. Place your cylinder on top of it and blend the edges of the circle up into the walls using a sculpting tool or your thumb.
Step 3: Finishing Touches
-
Initial Drying:
Let the jar dry on the mold for about 24 hours to hold its shape. -
Remove Mold:
Carefully slide the can or jar out from the center. Allow the clay to dry completely for another 24-48 hours until it turns chalky white. -
Sand for Depth:
Sand the entire exterior with fine-grit sandpaper. This is the magic step—it removes the thin film of white clay covering your colored chips, making the terrazzo pop vividly. -
Create Texture:
If you want a speckled effect like the inspiration image, flick a toothbrush loaded with diluted black or grey paint lightly over the surface. -
Seal:
Apply two coats of clear matte varnish to protect the clay from moisture and give it that finished ceramic feel.
Add Gold Flakes
For a luxe upgrade, press small pieces of gold leaf into the clay alongside the colored chips before the final roll. The metallic shine looks amazing.
Now you have a stylish and functional piece of decor that brightens up your workspace

TRACK YOUR CERAMIC JOURNEY
Capture glaze tests, firing details, and creative progress—all in one simple printable. Make your projects easier to repeat and improve.
Marbled Swirl Band Jar
Capture the organic beauty of desert canyons with this elegant storage vessel. Using a simple layering technique, you’ll create sophisticated horizontal striations that mimic natural sedimentary rock.
Detailed Instructions
Materials
- White or cream air dry clay (approx. 500g)
- Tan or ochre air dry clay (or white clay tinted with acrylic paint)
- Rolling pin
- Sharp clay knife or fettling knife
- Needle tool
- Small bowl of water
- Sponge
- Clear matte varnish or sealant
- Sandpaper (fine grit)
Step 1: Preparing the Marbled Clay
-
Condition the clay:
Start by kneading both your white and tan clays separately until they are soft, pliable, and free of any cracks. -
Create the slabs:
Flatten portions of both clay colors into rough pancakes. They don’t need to be perfect circles, just relatively flat shapes. -
Stack the layers:
Stack the flattened pieces on top of each other, alternating between thick layers of white and thinner layers of tan to mimic the reference image’s banding. -
Compress the stack:
Gently press the stack together to remove air bubbles, then twist the stack slightly—just a half turn—to encourage natural-looking waves in the bands. -
Roll out the slab:
Roll your marble stack into a long, rectangular slab about 1/4 inch thick. You should see beautiful, elongated streaks of color running horizontally.
Step 2: Building the Jar Body
-
Cut the base:
Use a round cookie cutter or trace a template to cut a circular base from a plain section of leftover white clay. -
Cut the wall:
Trim your marbled slab into a clean rectangle. The length needs to be the circumference of your base, and the height depends on how tall you want your jar. -
Form the cylinder:
Wrap the rectangular slab around the base tile. Score (scratch) and slip (wet) the edges where they meet the base and where the vertical seam connects. -
Smooth the seam:
Use your finger or a modelling tool to blend the vertical seam. I prefer to blend aggressively on the inside for strength, while being very gentle on the outside to preserve the horizontal pattern. -
Shape the belly:
With one hand inside supporting the wall, gently push the clay outward to create a rounded, bulbous shape. Narrow the opening slightly at the top rim. -
Refine the rim:
Use a damp sponge to smooth the top rim so it is flat and level, ensuring the lid will sit correctly later.
Fixing Cracks
If hairline cracks appear during drying, make a paste of clay and vinegar (called ‘slip’). Fill the cracks, smooth over, and let dry again.
Step 3: Creating the Lid
-
Measure the opening:
Measure the inner diameter of your jar’s top opening. You need a lid that sits completely on top but has a stopper underneath to keep it in place. -
Form the lid top:
Roll a ball of marbled clay and press it into a thick disc larger than the jar opening. Use your thumbs to create a subtle spiral texture on the top surface. -
Add the stopper:
Create a smaller disc of clay that fits specifically inside the jar’s neck. Score and slip to attach this to the underside of your main lid piece. -
Test the fit:
Gently place the lid on the jar to ensure it fits. If the clay is too soft, let the lid stiffen for 30 minutes before testing.
Add Weathered Texture
Before drying, gently roll a textured stone or a crumpled ball of aluminum foil over the exterior to enhance that natural, rock-like feel.
Step 4: Finishing Touches
-
Slow drying:
Loosely cover the jar with plastic wrap to let it dry slowly over 24-48 hours. This prevents the seams from cracking. -
Sanding:
Once bone dry, use fine-grit sandpaper to smooth any rough edges on the rim or base, but avoid over-sanding the textured side walls. -
Seal the piece:
Apply a coat of clear matte varnish. This brings out the contrast in the clay colors and protects the surface from dust.
Enjoy using your new handcrafted vessel to store small treasures or simply as a standalone decor piece
Pastel Jar With Metallic Rim
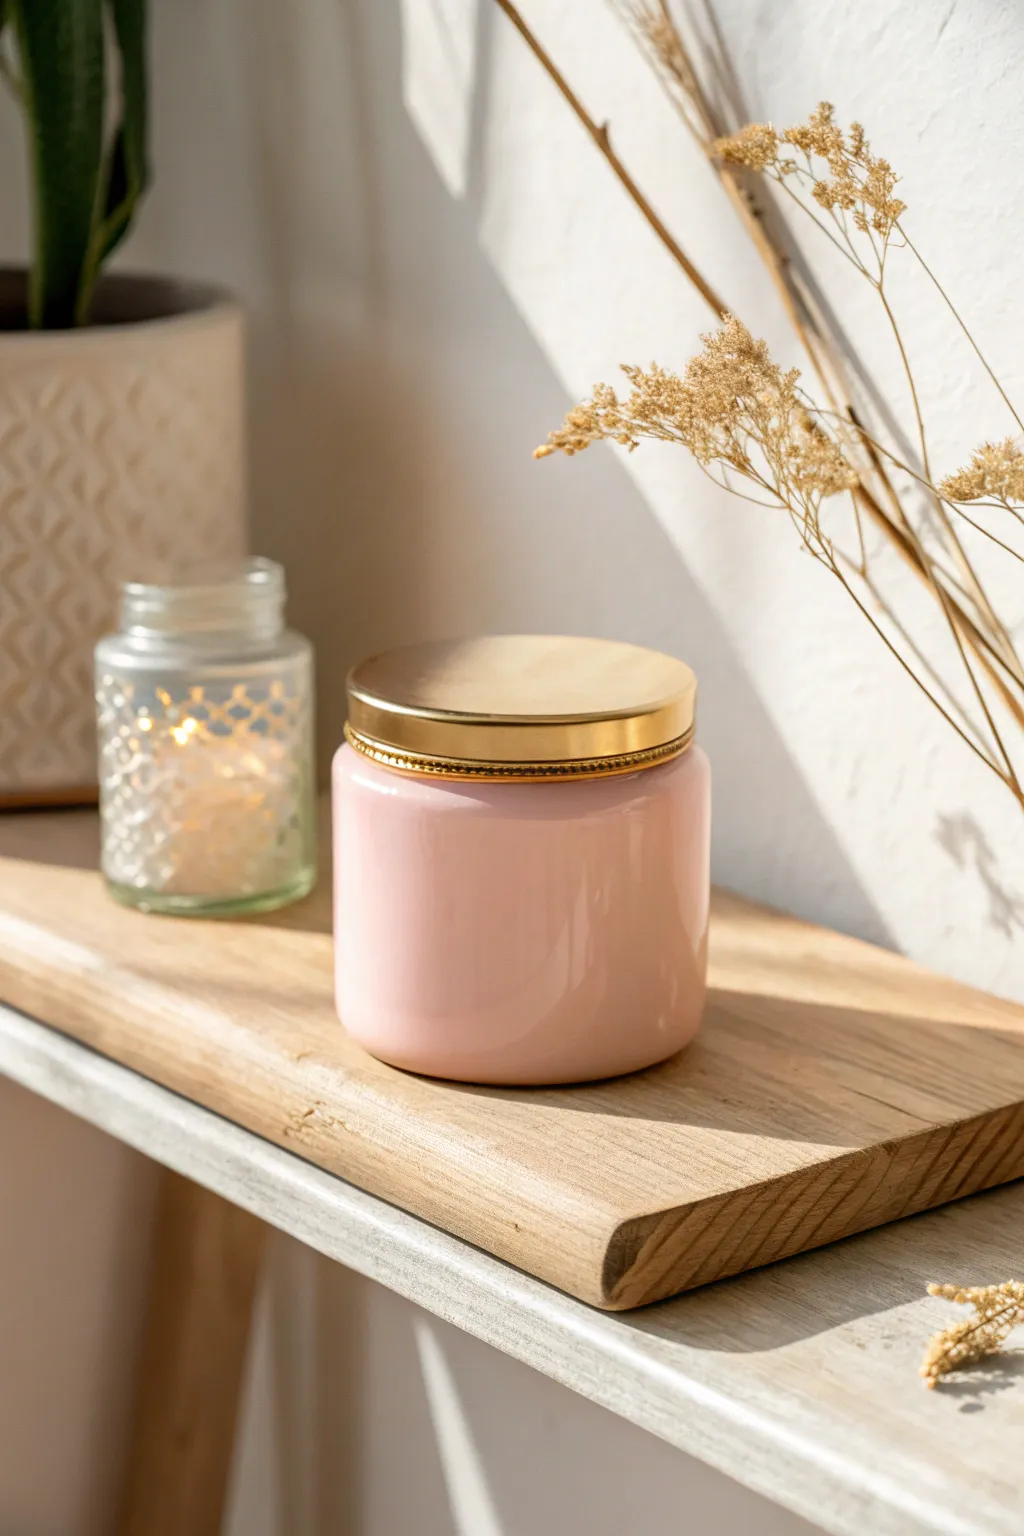
Transform a plain glass jar into a chic decor piece with a coat of smooth air-dry clay and a high-gloss finish. This project combines a soft pastel pink body with an elegant gold metallic rim for a sophisticated, modern canister look.
Step-by-Step Tutorial
Materials
- Clean glass jar with a screw-top metal lid
- White stone air-dry clay
- Rolling pin
- Craft knife
- Cup of water and sponge
- Sandpaper (fine grit)
- Pastel pink acrylic paint (gloss finish preferred)
- Gold metallic spray paint or gold leaf paint
- Gloss varnish or clear sealant
- Small paintbrush
- Masking tape or painter’s tape
Step 1: Preparing the Base
-
Prep the jar:
Begin by thoroughly cleaning and drying your glass jar and its lid to ensure no oils or residue remain. -
Roll the clay:
Take a large chunk of air-dry clay and knead it until soft. Roll it out into a long rectangle approximately 1/4 inch thick, ensuring it is long enough to wrap entirely around the jar and wide enough to cover it from the neck down. -
Wrap the jar:
Carefully lift the clay sheet and wrap it around the glass jar. Press it firmly against the glass to remove any air pockets, but be gentle to avoid leaving deep finger indentations. -
Seal the seam:
Where the two ends of the clay meet, use your fingers and a little water to blend the seam together until it becomes invisible. -
Trim edges:
Use a craft knife to trim the excess clay flush with the bottom of the jar and just below the threading at the top rim. You want the clay to stop where the lid threads begin so the jar can still close properly. -
Smooth the surface:
Dip your fingers or a slightly damp sponge into water and smooth the entire outer surface of the clay. I find circular motions work best here to erase fingerprints and create that polished ceramic look.
Step 2: Refining and Painting
-
Let it dry:
Allow the clay to dry completely. This usually takes 24 to 48 hours depending on humidity. Don’t rush this step, as trapped moisture can cause cracking later. -
Sand for perfection:
Once bone-dry, use fine-grit sandpaper to gently sand the surface. Focus on any bumps or uneven areas to create a perfectly smooth, manufactured feel. -
Wipe down:
Use a dry cloth or tack cloth to remove all sanding dust before you begin painting. -
Paint the body:
Apply a coat of pastel pink acrylic paint to the clay surface. Use a soft brush to minimize brushstrokes. -
Apply second coat:
Let the first coat dry, then add a second layer of pink paint for full, opaque coverage. If you want that super glossy look from the photo, you might even need a third thin coat.
Crack Control
If small cracks appear as the clay dries, don’t panic. Mix a small amount of fresh clay with water to make a paste (slip) and fill the cracks, then sand smooth once dry.
Step 3: The Metallic Lid Detail
-
Prep the lid:
While the jar dries, take the original metal lid and place it on a scrap piece of paper or cardboard. -
Apply gold finish:
Spray paint the lid with metallic gold paint for the smoothest finish. Alternatively, you can use liquid gilding or gold leaf paint with a brush for a richer texture. -
Check the rim:
Ensure the very edge of the lid is fully covered in gold, as this creates the metallic rim detail visible when the jar is closed. -
Varnish the jar:
Once the pink paint is fully cured, apply a high-gloss varnish over the painted clay. This gives it the ceramic shine shown in the reference image. -
Final assembly:
After all parts are completely dry and not tacky, screw the golden lid onto your new faux-ceramic jar.
Decorative Rim
Before the clay dries, press a thin gold chain or a textured cord into the clay right below the jar’s neck to create an indented detail that you can later paint gold.
Now you have a stunning, high-end looking canister perfect for storing bathroom essentials or trinkets
Pressed Botanical Impression Jar
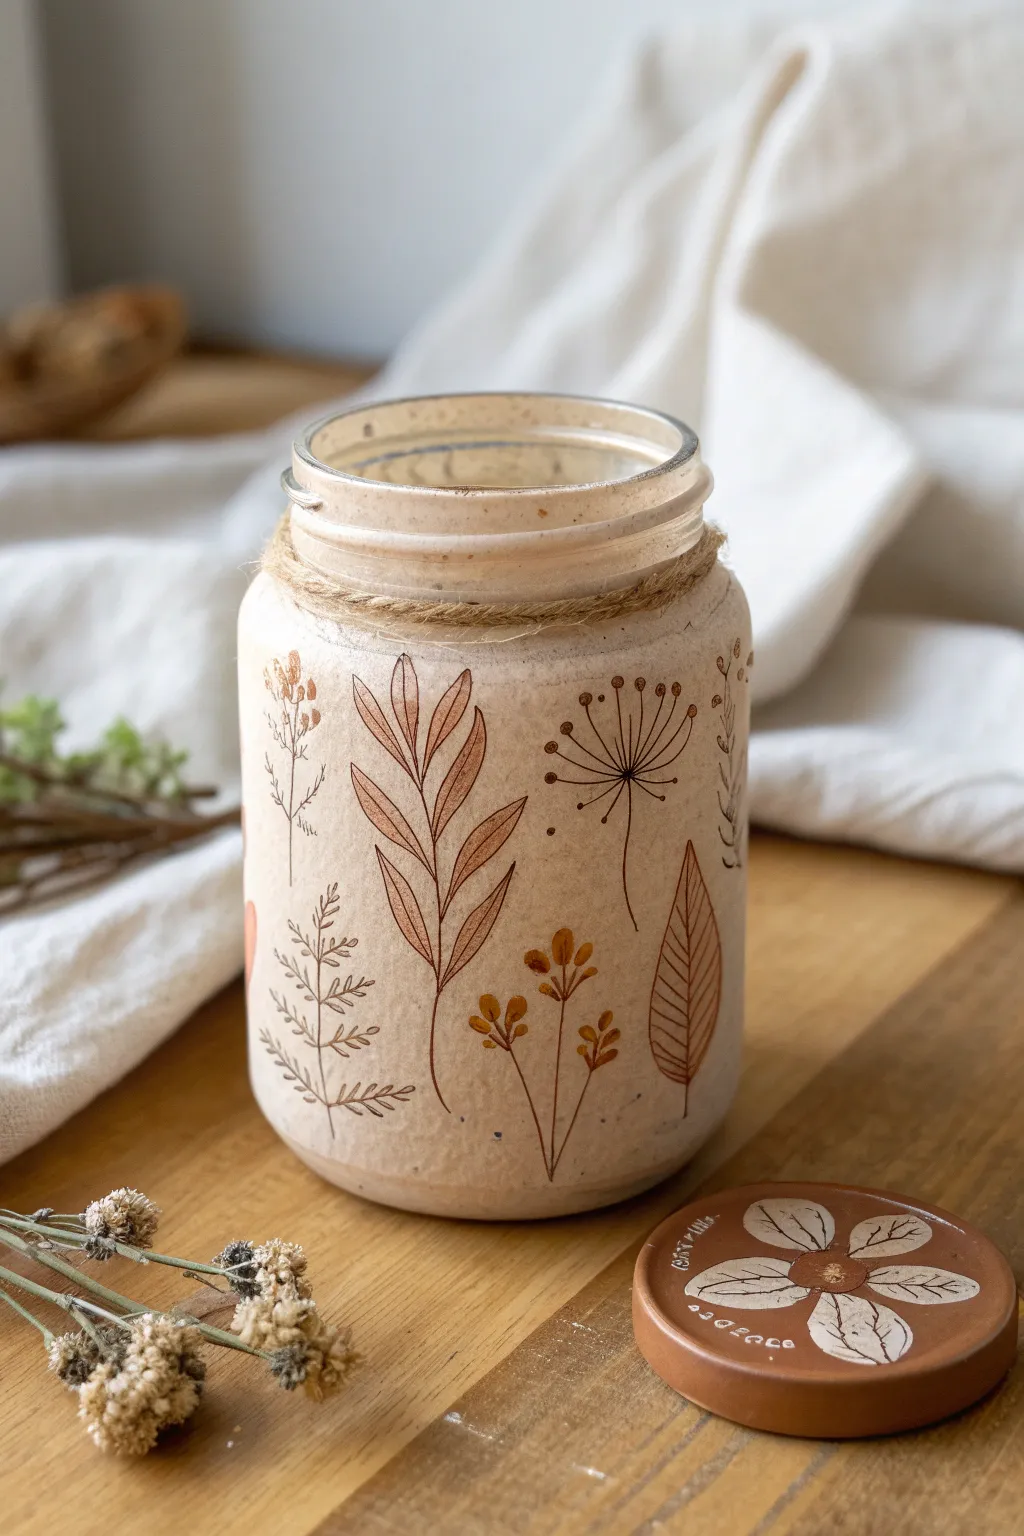
Transform a plain glass jar into a stunning piece of earthy decor using air-dry clay and delicate line art. This project mimics the look of high-end ceramic pottery with a beautiful, matte finish and intricate hand-drawn botanical details.
Step-by-Step Guide
Materials
- Clean glass jar (mason jar or similar)
- White or terracotta air-dry clay
- Rolling pin
- Craft knife
- Water and sponge
- Fine-grit sandpaper
- Fine-tip reddish-brown permanent marker or acrylic paint pen
- Acrylic paints (terracotta orange, warm ochre, creamy white)
- Small round paintbrushes
- Jute twine
- Matte spray sealant (optional)
- Hot glue gun
Step 1: Preparing the Clay Base
-
Prepare the glass:
Start by thoroughly washing and drying your glass jar to remove any oils. This ensures the clay adheres properly to the surface. -
Roll out the clay:
Take a generous chunk of air-dry clay and condition it in your hands until it’s pliable. Roll it out on a flat surface into a rectangular sheet about 1/4 inch thick. I find rolling it slightly thinner makes it easier to wrap. -
Wrap the jar:
Carefully lift the clay sheet and wrap it around the body of the glass jar. Press it firmly against the glass to remove air bubbles. -
Create the seam:
Where the two ends of the clay meet, overlap them slightly. Use a wet finger to smooth the seam until it disappears and the surface looks continuous. -
Trim the excess:
Use a craft knife to trim away any excess clay at the bottom and the top rim. You want the clay to stop just below the threading of the jar neck. -
Smooth the texture:
Dip a sponge in a little water and gently wipe the entire surface of the clay. This smooths out fingerprints and creates that nice, matte ceramic texture. -
Cover the lid:
Don’t forget the lid! Apply a thin circle of flattened clay to the top of the lid, smoothing the edges down. -
Dry completely:
Let the jar dry for 24-48 hours. It needs to be bone dry and hard to the touch before moving on.
Crack Control
Minimal shrinkage cracks are normal. If large cracks appear while drying, fill them immediately with a wet slurry of clay and water, then smooth over.
Step 2: Adding Botanical Art
-
Sand for smoothness:
Once fully dry, lightly gently sand the clay surface with fine-grit sandpaper to remove any rough bumps. -
Color wash:
Mix a tiny drop of terracotta paint with water to create a very pale, transparent wash. Brush this over the white clay to give it a warm, aged parchment look. Let it dry. -
Sketch foliage:
Using a fine-tip reddish-brown marker or paint pen, start drawing your stems. vary the height and curvature of the lines to mimic natural growth. -
Add leaf details:
Draw leaves attached to your stems. For this specific look, outline the leaves first, then draw the central vein and angled veins branching off. -
Draw floral elements:
Add variety by drawing different botanical shapes, such as dandelion tufts (radiating lines with dots on the ends) or fern fronds. -
Add color accents:
Using a very small brush and slightly watered-down ochre or rust paint, fill in select leaves or add dots of color to the flower heads for a subtle pop. -
Decorate the lid:
On the clay-covered lid, paint the background a deep terracotta color. Once dry, use white or cream paint to add a simple, five-petal flower design in the center.
Stamp Accent
Before the clay dries, gently press real dried leaves or rubber stamps into the surface to create embossed textures alongside your drawings.
Step 3: Final Touches
-
Wrap the neck:
Take your jute twine and wrap it several times around the exposed glass neck of the jar, covering the transition between the clay and the rim. -
Secure the twine:
Use a tiny dab of hot glue to secure the end of the twine so it doesn’t unravel. -
Seal the artwork:
To protect your drawing from smudging, spray the entire jar with a matte clear coat sealant in a well-ventilated area.
Place your beautiful faux-ceramic jar on a shelf to enjoy its warm, handmade charm
Rope-Trimmed Coastal Jar
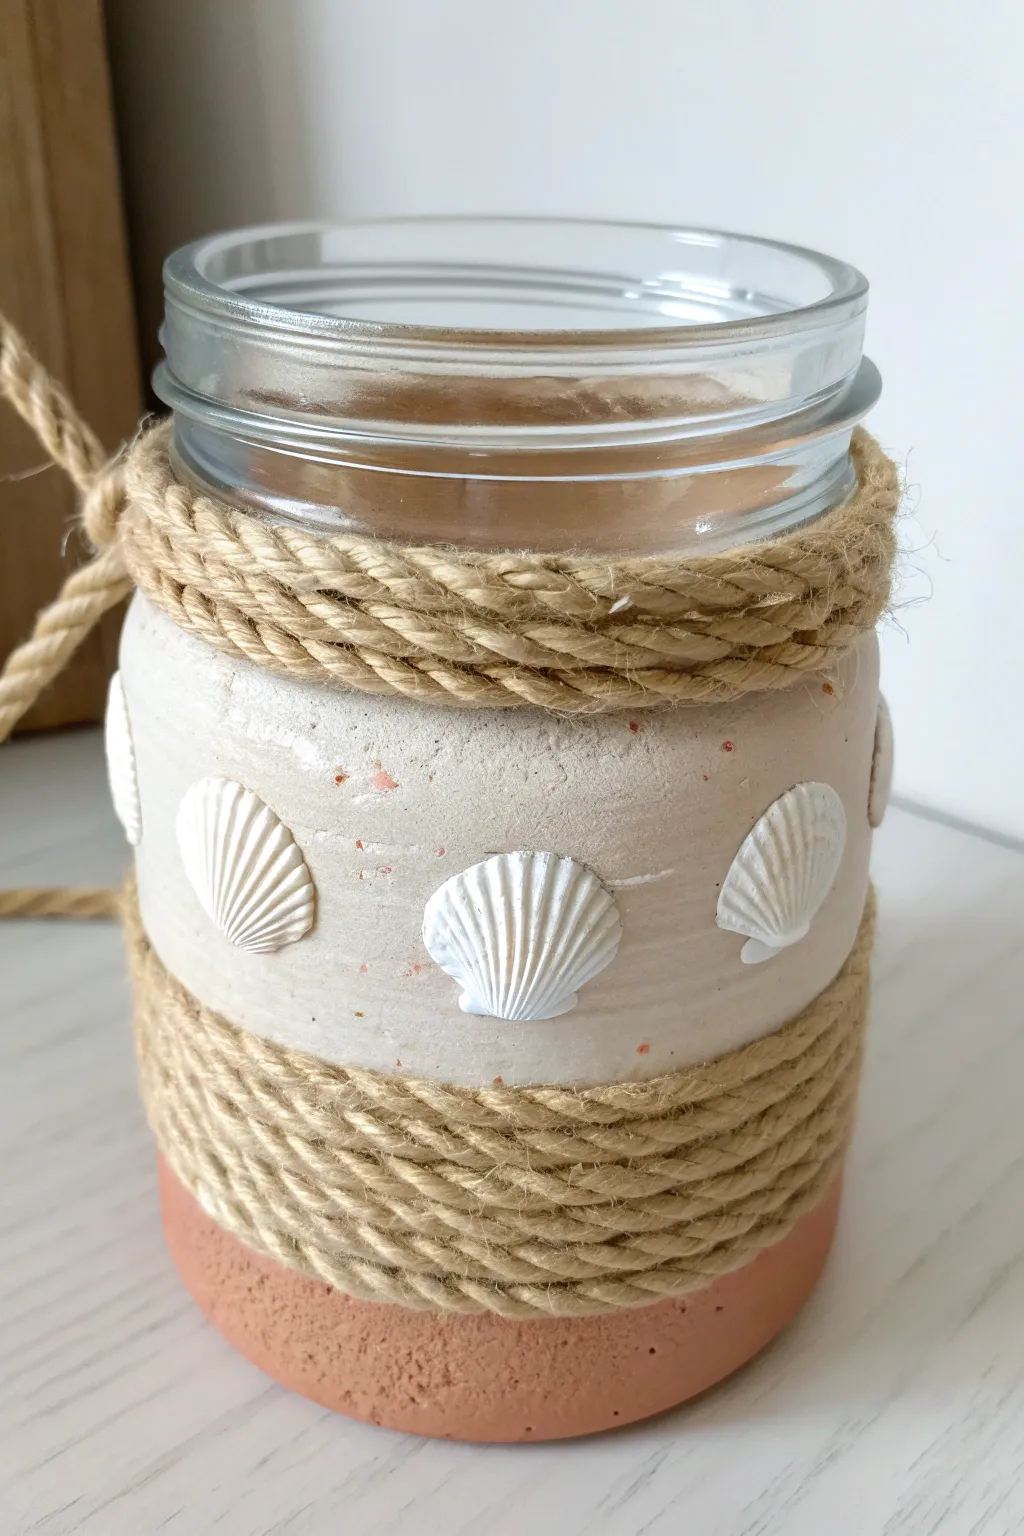
Transform a simple glass jar into a beach-inspired treasure using air dry clay and natural textures. This coastal vessel features a sandy-hued coating, delicate shell imprints, and rustic rope accents that bring a touch of the seaside to your home decor.
How-To Guide
Materials
- Clean glass jar (mason jar style)
- Air dry clay (white or light terracotta)
- Thick jute rope or hemp cord
- Real seashells (scallop shape works best)
- Acrylic paint (terracotta or reddish-brown)
- White acrylic paint
- Hot glue gun and glue sticks
- Rolling pin
- Sponge or textured cloth
- Paintbrush
- Water
Step 1: Preparation & Base Color
-
Paint the base:
Start by painting the bottom third of your clean glass jar with a terracotta or reddish-brown acrylic paint. This creates that warm, earthen footing visible at the bottom of the finished project. -
Allow to dry:
Let the paint dry completely. If the glass shows through too much, apply a second coat for better opacity.
Adhesion Trick
If the clay slides off the glass while wet, apply a thin layer of PVA glue (white school glue) to the glass surface first and let it become tacky before wrapping the clay
Step 2: Applying the Clay Texture
-
Roll out clay:
Roll out a sheet of air dry clay to about 1/4 inch thickness. You want a long strip that will wrap around the middle section of the jar. -
Add color speckles:
To mimic the speckled look in the photo, you can knead tiny bits of dried reddish clay or coarse sand into your fresh white clay before rolling, or simply splatter very tiny dots of terracotta paint onto the clay surface. -
Apply to jar:
Wrap the clay strip around the center of the jar, leaving the painted bottom exposed and space at the neck for the rope. Press it firmly against the glass to ensure it adheres. -
Smooth the seam:
Where the clay ends meet, dampen your finger with a little water and smooth the seam until it disappears into a continuous band. -
Embed the shells:
While the clay is still soft and pliable, press your scallop shells firmly into the surface. Space them evenly around the circumference. You want them embedded deep enough to hold, but not so deep they disappear. -
Create texture:
Take a damp sponge or a crumpled textured cloth and gently dab the surface of the clay around the shells. This removes fingerprints and gives the clay that weathered, sandy stone appearance. -
Dry the clay:
Allow the clay to dry fully according to the package instructions. This usually takes 24-48 hours. I like to let this dry away from direct sunlight so it doesn’t crack too quickly.
Step 3: Finishing Touches
-
Paint the shells:
Once dry, paint the embedded shell shapes with bright white acrylic paint to make them pop against the sandy clay background. -
Start the top rope:
Apply a bead of hot glue right at the top edge of your clay layer. Press the end of your thick jute rope into the glue. -
Wrap the neck:
Wind the rope upward around the jar neck, applying small dots of glue as you go to keep it secure. Create about 3-4 distinct rows until you reach the threading of the jar. -
Cut and secure:
Cut the rope at an angle and glue the end down neatly so it blends into the coil. -
Base rope preparation:
Now move to the bottom edge of the clay section. Apply glue along the clay’s lower rim. -
Wrap the base:
Start wrapping a second section of rope securely around the jar, covering the transition line between the clay and the painted bottom. -
Continue wrapping:
Continue wrapping downwards for 4-5 rows, covering a portion of the terracotta paint but leaving the very bottom visible. -
Final secure:
Glue down the final end of the rope tightly. Check for any glue strings or loose edges and clean them up.
Use Real Texture
Instead of painting the bottom, mix real sand into your bottom paint layer or press sand into wet paint for an authentic, gritty beach texture that matches the clay
Now you have a serene, beach-themed vessel perfect for holding dried flowers or soft candlelight
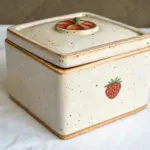
Raised Label Plaque Jar
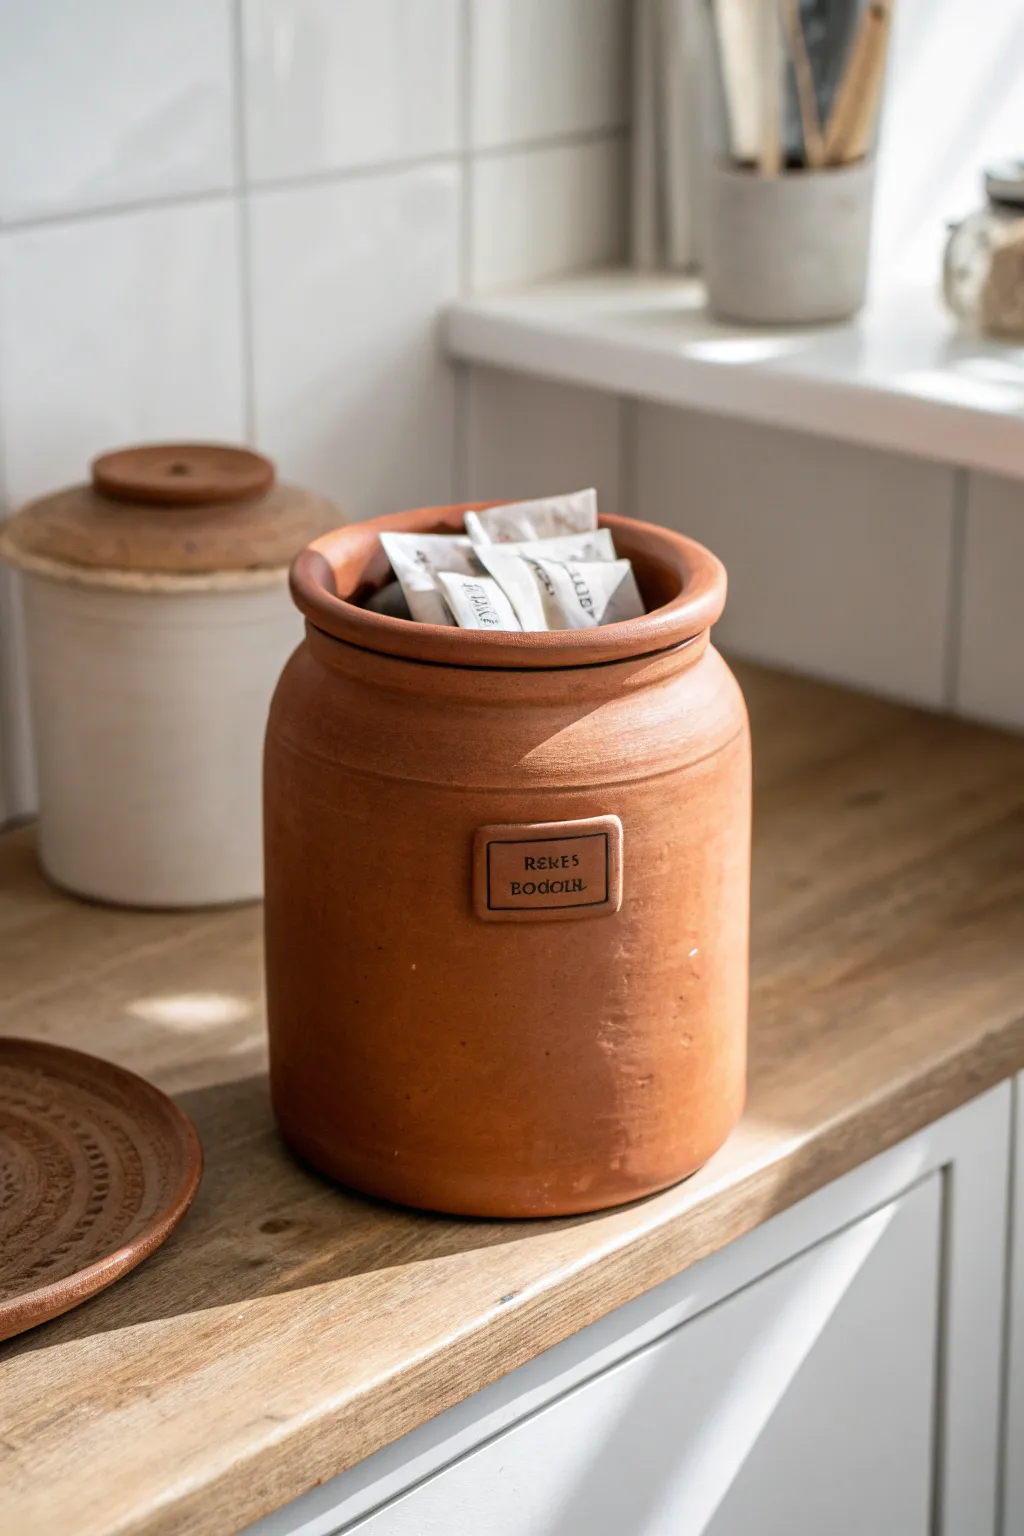
Earthy and undeniably charming, this project mimics the look of traditional fired pottery using accessible air-dry clay. The standout feature is the distinctive raised label plaque, which adds a professional, personalized finish to your kitchen storage.
Detailed Instructions
Materials
- Terracotta colored air-dry clay (or standard white clay + terracotta acrylic paint)
- Rolling pin
- Empty cylindrical container (glass jar or coffee tin) to use as a form
- Clay sculpting tools (specifically a needle tool and a flat smoothing tool)
- Small alphabet stamps
- Water in a small cup
- Sponge
- Sandpaper (medium and fine grit)
- Matte varnish or sealant
- Parchment paper
Step 1: Building the Base Structure
-
Prepare the workspace:
Lay down a sheet of parchment paper to prevent sticking. Since air-dry clay picks up texture easily, ensure your surface is clean and smooth. -
Roll out the slab:
Take a large chunk of terracotta-colored clay and knead it briefly to warm it up. Roll it out into a large, rectangular slab about 1/4 inch thick. Aim for an even thickness throughout. -
Cut to size:
Using your chosen cylindrical container as a guide, measure the height and circumference needed. Cut a rectangle of clay that is slightly taller than your container and just long enough to wrap around it with a small overlap. -
Wrap the form:
Wrap the clay sheet around your container form. If you want the clay to be removable later, wrap the container in parchment paper first. Join the seam where the clay edges meet. -
Blend the seam:
Using a modeling tool or your fingers, smooth the seam together on the outside. Adding a tiny bit of water can help create a ‘slip’ to bond the edges securely. It doesn’t need to be invisible, as the rustic look is forgiving. -
Create the base:
Roll a separate circle of clay for the bottom. Place your cylinder on top of it and cut around the edge. Score the bottom edges of the cylinder and the top of the base circle, apply a little water, and press them firmly together. -
Smooth the join:
Use a flat tool to blend the clay from the walls down onto the base so it becomes one solid piece. I find using a slightly damp sponge here helps erase fingerprints.
Stamp Clarity Tip
Dust your alphabet stamps with cornstarch before pressing them into the damp clay. This prevents the clay from sticking inside the detailed letters.
Step 2: Adding Details and the Plaque
-
Form the rim:
Roll a long snake of clay. Attach this to the top edge of your jar to create a thick, rounded rim. Blend the bottom edge of the coil into the jar wall, but leave the top rounded. -
Add the ridge detail:
Use a sculpting tool to carve a shallow horizontal groove just below the rim, separating the neck from the main body of the jar. This mimics wheel-thrown pottery. -
Create the label plaque:
Roll out a small jagged piece of clay, slightly thinner than the main body. Cut a small rectangle with rounded corners. This will be your raised label. -
Stamp the text:
While the plaque is flat on the table, use your alphabet stamps to press your desired label (like ‘HERBS’ or ‘TEA’) into the center. Press firmly but don’t cut all the way through. -
Attach the plaque:
Score the back of the plaque and the spot on the jar where it will sit. Wet both surfaces and press the plaque onto the jar. Smooth the edges down slightly to ensure a good bond. -
Create the border frame:
Roll a very thin, spaghetti-like string of clay. Carefully lay this around the inner perimeter of your rectangle plaque to create a framed border around the text.
Step 3: Finishing Touches
-
Initial texture check:
Before drying, look over the jar. If it looks too perfect, tap it lightly with a textured cloth or sponge to add that stone-like character. -
Drying process:
Let the jar dry slowly in a cool place away from direct sunlight. This can take 24–48 hours. If you used a rigid internal form, try to remove it carefully once the clay is leather-hard but not fully dry to prevent cracking. -
Sanding:
Once bone dry, use fine-grit sandpaper to smooth out any sharp ridges on the rim or the plaque specifically, but leave the main body texturized. -
Applying the wash:
If you didn’t use terracotta clay, paint the jar now with a burnt orange or terracotta acrylic. If you did use colored clay, you can dilute some dark brown paint and wash it over the stamped letters to make them pop. -
Seal:
Finish with a matte varnish. This deepens the color and protects the surface from moisture, though remember air dry clay is never 100% food safe for liquids.
Faux-Ceramic Texture
Mix baking soda into your acrylic paint for the final coat. It creates a granular, gritty texture that looks and feels exactly like unglazed terracotta pottery.
Fill your new jar with tea bags or dried goods and enjoy the warmth it brings to your countertop
Lidded Canister With Knob Top
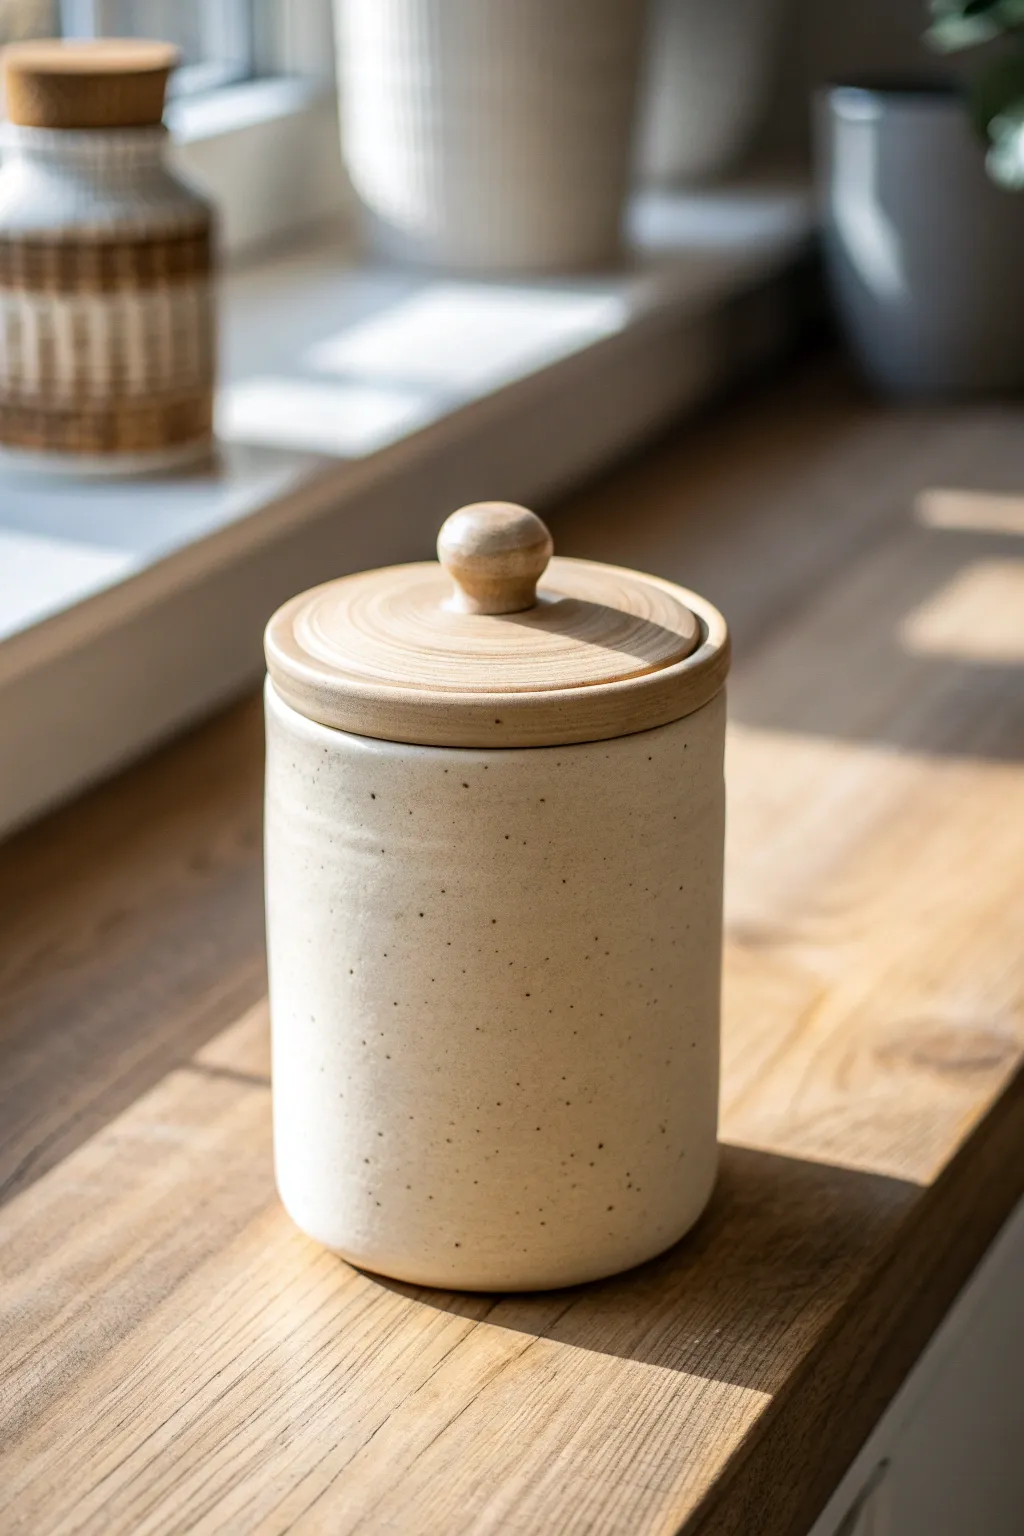
This minimalist canister combines the earthy charm of speckled pottery with the warmth of natural wood. The result is a clean, modern storage jar perfect for holding dry goods or organizing small treasures on a sunny shelf.
How-To Guide
Materials
- Air dry clay (white or cream)
- Acrylic rolling pin
- Clay knife or craft blade
- Slip (clay mixed with water)
- Canister mold (like a large glass jar or sturdy cardboard tube wrapped in parchment paper)
- Sandpaper (medium and fine grit)
- Wooden lid blank (pre-made) or thin wood round + wooden knob + wood glue
- Acrylic paint (cream/off-white)
- Acrylic paint (dark brown or black) for speckling
- Old toothbrush or stiff bristle brush
- Matte finish sealant or varnish
Step 1: Forming the Base
-
Prepare your clay:
Start by conditioning a large chunk of air dry clay in your hands until it becomes pliable and warm, removing any air bubbles. -
Roll out a slab:
Using your acrylic rolling pin, roll the clay out into a long, rectangular slab. Aim for a consistent thickness of about 1/4 inch to ensure the walls remain sturdy. -
Cut the base:
Place your chosen mold cylinder onto the clay slab and trace around the bottom to cut out a perfect circle. Set this disc aside; this will be the floor of your jar. -
Measure the walls:
Wrap a piece of string or paper around your mold to get the circumference, then use this measurement to cut a long rectangle from your clay slab. Add an extra half-inch to the length for the seam overlap. -
Construct the cylinder:
Carefully wrap the rectangular slab around your mold. Pro tip: wrap the mold in parchment paper first so the clay doesn’t stick. Score and slip the overlapping edges, pressing them firmly together to create a seam. -
Attach the bottom:
Score the bottom edge of your cylinder and the outer edge of your base disc. Apply slip to both areas. -
Seal the join:
Press the cylinder onto the base. Use a modeling tool or your finger to smooth the clay from the wall down onto the base, blending the seam until it’s invisible on the outside.
Don’t Rush the Seam
When joining the vertical seam of the cylinder, bevel the edges at 45-degree angles in opposite directions. This creates a larger surface area for the join and prevents cracking as it dries.
Step 2: Refining and Drying
-
Smooth the surface:
With the clay still on the mold (or carefully removed if it’s sturdy enough), use a slightly damp sponge to smooth out any fingerprints or texture from the rolling pin. -
Create a subtle texture:
For that handmade pottery look seen in the photo, allow slight imperfections to remain rather than making it mechanically smooth. I like to gently pat the surface with a dry sponge. -
Rim adjustment:
Check the fit of your wooden lid against the wet clay rim. If the lid has an inner lip, ensure the jar opening is wide enough to accommodate it. Gently flare or compress the rim as needed. -
Slow drying:
Let the canister dry slowly away from direct heat or sunlight. To prevent cracking, cover it loosely with plastic wrap for the first 24 hours, then uncover to finish drying. -
Sanding:
Once bone dry (usually 24-48 hours), use medium grit sandpaper to level the rim so it sits flat. Switch to fine grit sandpaper to buff the exterior walls to a soft finish.
Make it Functional
Add a thin strip of self-adhesive cork or a rubber gasket to the underside of the wooden lid. This creates an airtight seal, making your jar actually functional for storing tea or spices.
Step 3: Finishing Touches
-
Base coat painting:
Apply two coats of cream or off-white acrylic paint to the exterior and interior, allowing full drying time between layers. -
Creating the speckles:
Mix a small amount of dark brown paint with a drop of water to thin it. Dip an old toothbrush into this mixture. -
Splattering technique:
Hold the toothbrush near the jar and run your thumb across the bristles to flick tiny specks of paint onto the surface. Practice on paper first to control the density. -
Prepare the lid:
If you are assembling the lid yourself, glue the wooden knob to the center of your wood round. Sand the wood smooth if it’s rough. -
Seal the wood:
Apply a clear wood oil or light varnish to the lid to bring out the grain and match the warm tones in the photo. -
Final assembly:
Once the paint is fully dry, seal the entire clay jar with a matte varnish to protect the surface and the speckles. Place the lid on top to complete the look.
Place your finished canister on a sunny windowsill where the natural light can highlight the subtle texture and speckles
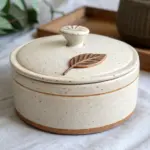
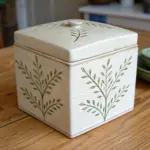
Leaf Handle Lid Jar
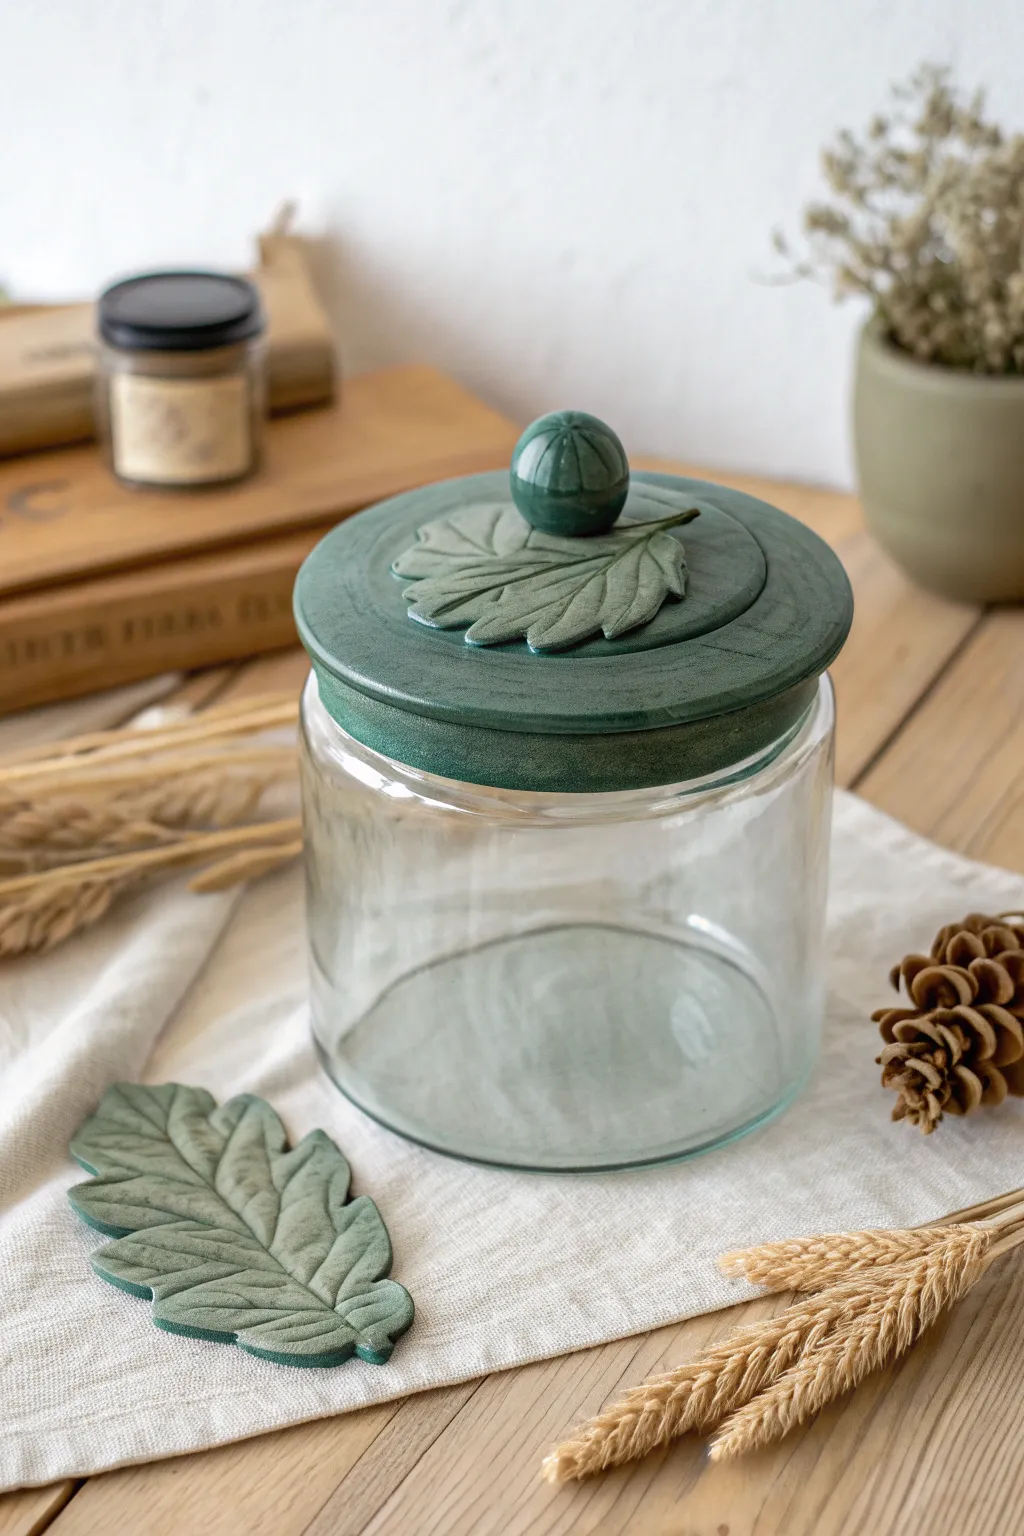
Transform a simple glass jar into a woodland treasure with this textured air dry clay topper. The deep sage green finish and realistic leaf veining give it the cozy, sophisticated look of carved wood.
Detailed Instructions
Materials
- Glass jar with a flat, screw-on metal lid
- Air dry clay (white or terracotta)
- Leaf Veiner mold or a real leaf with prominent veins
- Rolling pin
- Craft knife or scalpel
- Water and a small sponge
- Acrylic paints: Deep sage green, forest green, dark brown, black
- Paintbrushes (flat and fine detail)
- Matte varnish or sealant
- Strong craft glue (like E6000)
- Sandpaper (medium grit)
Step 1: Creating the Clay Base and Leaf
-
Prepare the lid:
Clean and dry your metal jar lid thoroughly. Lightly sand the top surface to give the clay something to grip onto, then wipe away any dust. -
Cover the lid:
Roll out a slab of air dry clay to about 1/4 inch thickness. Place your metal lid on top and cut a circle slightly larger than the lid itself so you can wrap the edges down. -
Smooth the foundation:
Press the clay firmly onto the lid, smoothing the edges down over the rim. Use a wet finger to smooth out any fingerprints or cracks. I like to create a slightly rustic, uneven texture here rather than making it perfectly smooth. -
Impress the leaf texture:
Take a fresh piece of clay and roll it out thinner than your base. Press a real leaf (vein side down) or a silicone veiner mold firmly into the clay to capture the intricate details. -
Cut the leaf shape:
Using your craft knife, carefully cut around the impressed leaf pattern. You can refine the edges with a wet fingertip to remove any sharp clay burrs. -
Attach the leaf:
Score the back of your clay leaf and the center of the clay-covered lid. Add a dab of water or slip (clay mixed with water) and press the leaf gently onto the center of the lid. -
Sculpt the knob:
Roll a small ball of clay for the handle. Use a knife to gently score vertical lines around it, mimicking the texture of a seed pod or acorn. -
Secure the handle:
Attach the ball to the center of the leaf where the stem would be, using the score-and-slip method. Press down firmly to ensure a strong bond. -
Create the coaster (optional):
If you have extra clay, repeat the leaf impression and cutting steps to make a matching standalone leaf decoration, as seen in the photo.
Natural Texture
For a wood-grain effect on the lid rim, drag a stiff-bristled brush horizontally through the wet clay before it dries.
Step 2: Painting and Finishing
-
Drying time:
Let the project dry completely. This usually takes 24-48 hours depending on humidity. Rotate it occasionally for even drying. -
Base coat:
Paint the entire clay surface with a deep sage green acrylic paint. Don’t worry about perfect coverage; a little unevenness adds character. -
Add depth:
While the green is still slightly tacky, or using a dry brush technique afterwards, gently brush a darker forest green into the deep recesses of the veins and around the base of the knob. -
Antique the edges:
Mix a tiny amount of black or dark brown paint with water to create a wash. Apply this selectively to the rim of the lid and the deepest crevices of the leaf to simulate age. -
Highlighting:
Using a very dry brush and a lighter, dusty green shade, lightly skim over the raised veins and the top of the knob to make the texture pop. -
Seal the work:
Once the paint is fully dry, apply two coats of matte varnish. This protects the clay from moisture and gives it that soft, finished look shown in the image. -
Final assembly:
If your clay shrank and loosened from the metal lid during drying, pop it off, apply strong craft glue to the metal, and press the clay cap back into place.
Gift Idea
Make a set of three jars in varying sizes but matching colors to create a stunning, cohesive kitchen canister set.
Place your new jar on a shelf or fill it with dried goods to enjoy a touch of nature indoors
Cutout Window Jar Lantern
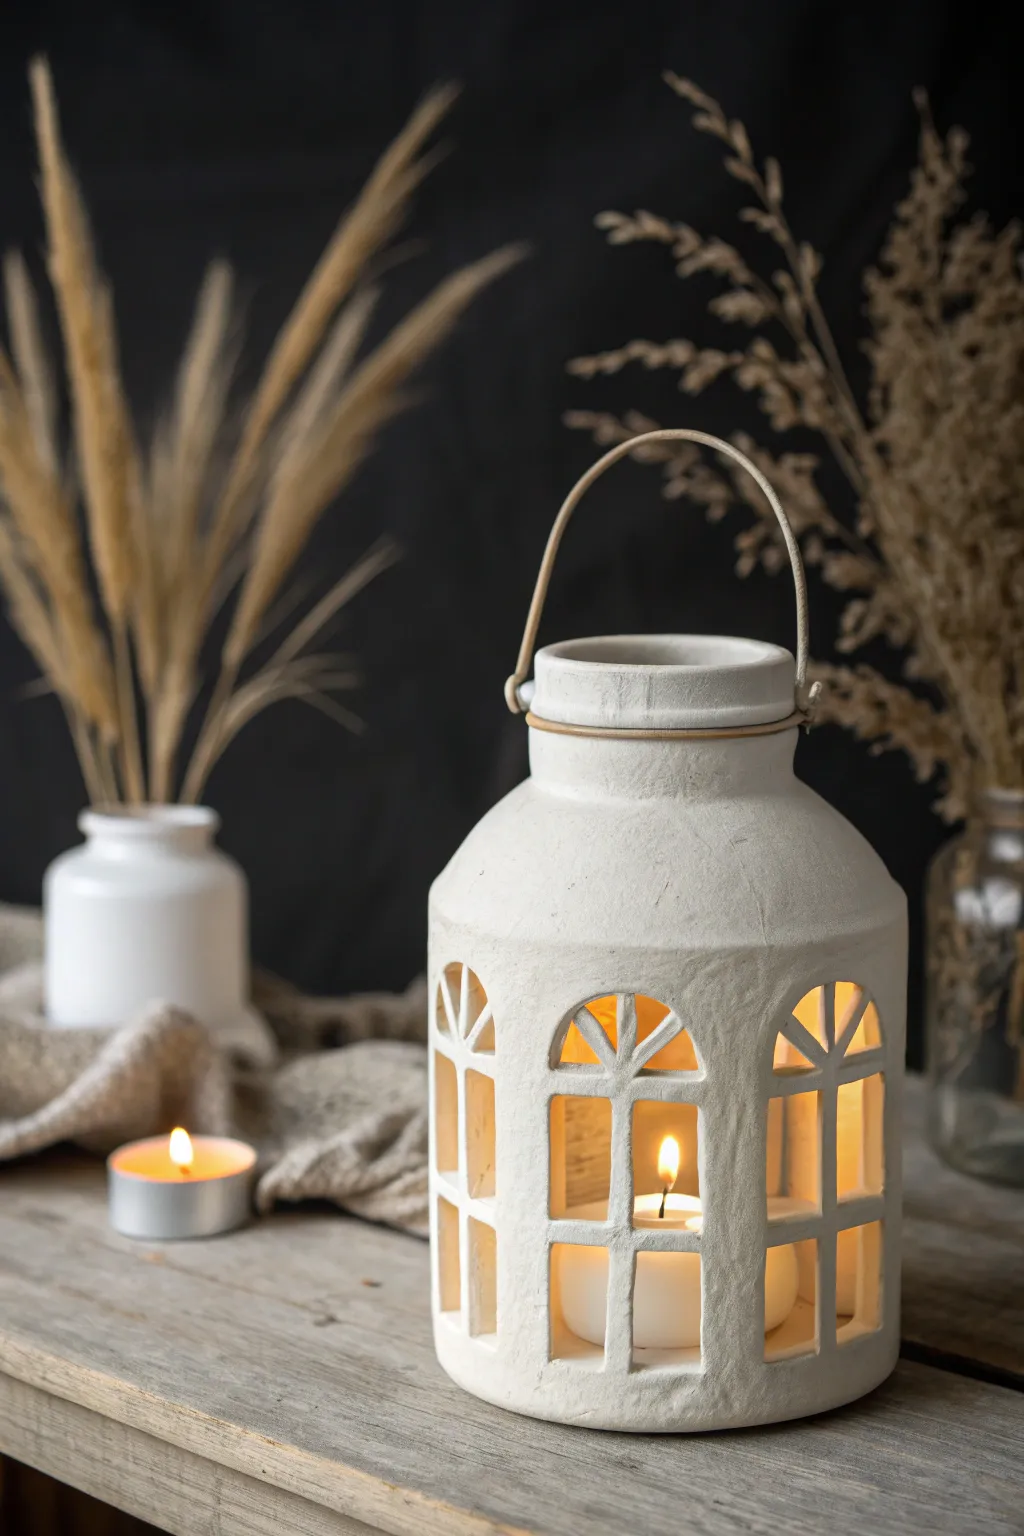
Transform a simple glass jar into a cozy, architectural light source with this air dry clay project. The finished piece features elegant arched cutouts that let candlelight flicker through, creating a warm, cottage-core ambiance.
Step-by-Step Tutorial
Materials
- Large cylindrical glass jar (upcycled pickle or mason jar)
- White air dry clay (approx. 1kg)
- Rolling pin
- Craft knife or X-Acto knife
- Ruler
- Water and sponge
- Sandpaper (fine grit)
- Flexible wire (for the handle)
- Twine or rust-colored cord (to wrap wire)
- Cardstock (for templates)
- Clay sculpting tools
Step 1: Preparing the Clay Base
-
Roll the Slab:
Begin by conditioning your clay, kneading it until it is soft and pliable. Roll it out into a large, rectangular slab about 1/4 inch thick. Ensure the slab is long enough to wrap entirely around your chosen glass jar with a little overlap. -
Measure and Cut:
Measure the height of your jar up to the neck. Use a ruler and craft knife to trim your clay slab into a clean rectangle that matches this height and the circumference of the jar. -
Wrap the Jar:
Carefully lift the clay slab and wrap it around the glass jar. Press the clay firmly against the glass to ensure adhesion, but be gentle so you don’t leave deep finger marks. Join the seam by scoring both edges, adding a bit of water, and smoothing them together until the join is invisible.
Cracked Clay?
Mix a small amount of clay with water to create a paste (slip). Fill any cracks with this paste, smooth it over with a damp finger, and let it dry again.
Step 2: Creating the Windows
-
Make a Template:
Draw an arched window shape on a piece of cardstock. The shape should have a flat bottom and a rounded top. Cut this out to use as your stencil. -
Trace the Design:
Lightly press your cardstock template onto the clay surface to mark where your windows will go. Space them evenly around the jar. I usually aim for three or four large windows depending on the jar size. -
Cut the Panes:
Using a sharp craft knife, carefully cut out the negative space inside your traced arches. Leave a vertical strip down the center and a horizontal strip across to create a four-pane window grill effect. Remove the cut clay pieces gently. -
Smooth the Edges:
Dip your finger or a small sponge in water and run it along the cut edges of the windows to smooth out any roughness or sharp corners.
Step 3: Forming the Roof and Handle
-
Shape the Shoulder:
Roll a thick snake of clay and wrap it around the top edge of the jar where it begins to taper inward. Smooth this down into the main body to create a rounded shoulder that narrows toward the jar opening. -
Create the Collar:
Add a vertical strip of clay around the very mouth of the jar to form a distinct collar or rim. Keep this relatively thick to support the handle later. -
Refine the Shape:
Use a damp sponge to smooth the transition between the main body, the shoulder, and the collar. The silhouette should look seamless and bottle-like. -
Add Handle Holes:
While the clay is still wet, use a skewer or the end of a paintbrush to poke two holes on opposite sides of the collar for the wire handle.
Faux Stone Look
Mix baking soda into white acrylic paint before applying the final coat. This creates a gritty, stone-like texture that mimics old pottery beautifully.
Step 4: Finishing Touches
-
Dry Slowly:
Let the lantern dry completely. This creates a stronger bond. Place a plastic bag loosely over it for the first 24 hours to prevent cracking, then let it air dry for another 24-48 hours until it turns chalky white. -
Sand for Texture:
Once bone dry, take fine-grit sandpaper and gently sand the surface. You aren’t trying to make it perfectly smooth; a little texture adds to the rustic, stony look. -
Prepare the Handle:
Cut a length of flexible wire. Tightly wrap it with twine or a beige cord to give it a natural, rustic appearance. -
Attach Handle:
Feed the ends of your wrapped wire through the holes in the collar. Twist the ends securely on the inside or loop them back up to secure the handle in place. -
White Wash (Optional):
If your dried clay isn’t as white as you’d like, you can give the entire piece a coat of matte white acrylic paint. Dab it on with a sponge for a textured, limestone finish.
Now create a cozy atmosphere by placing a LED tea light inside your new handcrafted lantern
Fairy Cottage Jar With Door
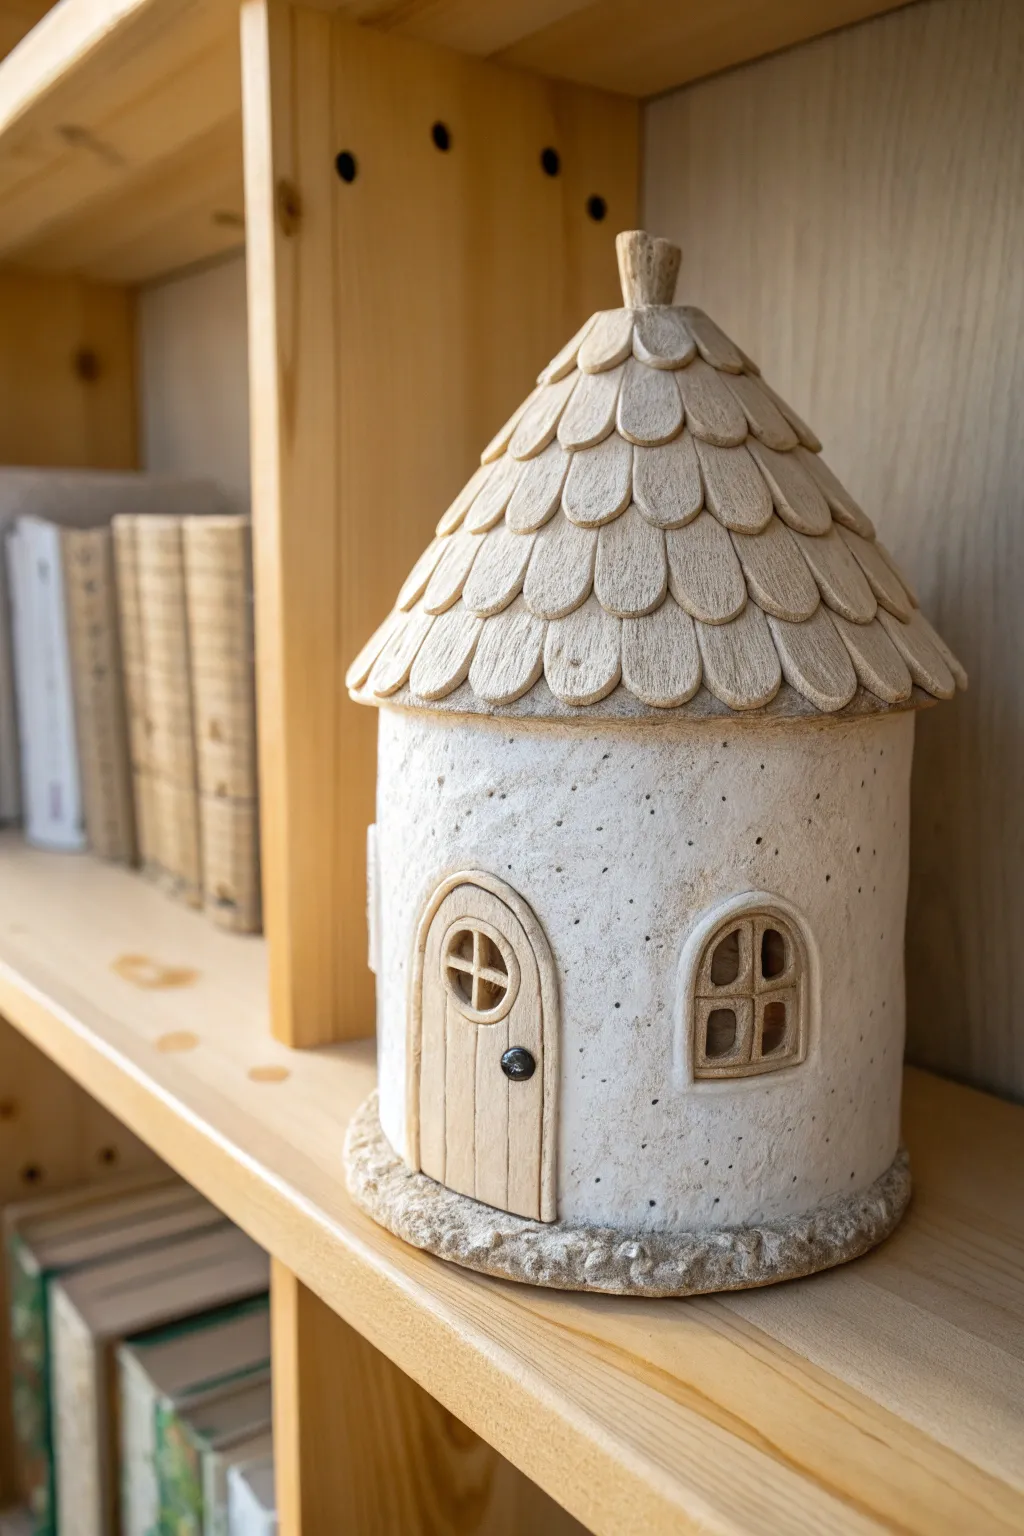
Transform a simple glass jar into an enchanting woodland abode featuring a textured, shingled roof and charming architectural details. This project uses clever texturing techniques to mimic the look of aged stone and carved wood without needing any special carving tools.
Step-by-Step Guide
Materials
- Clean glass jar with a screw-top lid
- Air dry clay (white or grey)
- Aluminum foil
- Acrylic paints (Cream, beige, timber brown, dark brown, black)
- PVA glue or tacky glue
- Rolling pin
- Texture tools (old toothbrush, toothpick, sculpting tool)
- Clear matte varnish
- Small round cutter or bottle cap (for roof tiles)
- Craft knife
Step 1: Building the Stone Walls
-
Prepare the jar:
Begin by cleaning your glass jar thoroughly with rubbing alcohol to remove oils. Apply a thin layer of PVA glue to the outside of the glass to help the clay adhere better. -
Base layer application:
Roll out a sheet of air dry clay to about 1/4 inch thickness. Wrap this around the glass jar, trimming the excess at the seam and smoothing it together with a bit of water so the join is invisible. -
Cut the openings & texture:
While the clay is soft, use a craft knife to cut out arch shapes where you want the door and window to be. Don’t remove the clay yet; just mark the boundaries firmly. -
Create the stone texture:
Take an old toothbrush or a ball of crumpled foil and press it repeatedly all over the clay surface. This stippling effect creates a realistic, porous stone or stucco appearance. -
Add detail holes:
Use a toothpick to poke random, scatter-shot holes into the wall surface. This mimics natural imperfections found in old cottage walls.
Step 2: Constructing the Roof
-
Form the armature:
Take the jar lid and build a cone shape on top of it using crumpled aluminum foil. Glue the foil down and compact it until it forms a sturdy, pointed peak. -
Cover with clay:
Roll out another sheet of clay and drape it over your foil cone. Trim the bottom edge so it overhangs the lid slightly, pressing the clay firmly against the foil shape. -
Create shingles:
Roll out a thin strip of clay. Use a small round cutter or a bottle cap to cut out many small circles. Slice the top third off each circle to create a flat edge. -
Apply the shingles:
Starting at the bottom rim of the roof, glue a row of these clay shapes side-by-side. For the next row up, overlap the tiles noticeably, staggering them so the center of the new tile sits over the seam of the two below it. -
Texture the wood:
Before the shingles dry, use a needle tool or knife to gently drag vertical lines down each tile. This simulates wood grain texture. -
Finish the peak:
Repeat the tiling process until you reach the top. Create a small, twisted stump of clay and attach it to the very point to look like a chimney or wooden finial.
Clay Cracking?
If you see cracks forming as the clay dries, smooth a small amount of fresh clay mixed with water (slip) into the cracks immediately to seal them.
Step 3: Doors, Windows & Finishing
-
sculpt the door:
Roll a small slab of clay into an arch shape that fits your door outline. Use a knife to score vertical plank lines and create a raised border around the edge for the frame. -
Add the window:
Create a thick clay frame for the window. Roll tiny snakes of clay to form a cross shape for the window panes and press them inside the frame. -
Attach features:
Score the back of your door and window pieces, add a dab of water or slip, and press them firmly onto the jar body over the areas you marked earlier. -
Create the base:
Roll a long snake of clay and wrap it around the very bottom of the jar. Press it down with a rough texture tool to create a jagged, stony foundation. -
Adding hardware:
Roll a tiny ball of clay for the doorknob and press it onto the door. I find using the head of a pin helps create a nice rivet detail in the center. -
Painting the base:
Once fully dry (24-48 hours), paint the walls a creamy white. Use a dry brush with light beige paint to highlight the stone texture. -
Painting details:
Paint the roof shingles, door, and window frames with a timber brown. Once dry, apply a dark brown or black wash (paint diluted with water) and wipe it off quickly to let the dark color settle into the grooves.
Pro Illuminator Tip
Leave the window glass unpainted behind the clay frame. Place a battery-operated tea light inside the finished jar to make the cottage glow from within.
Now you have a cozy little hiding spot for your trinkets that looks like it came straight from a storybook
Toadstool Mushroom House Jar
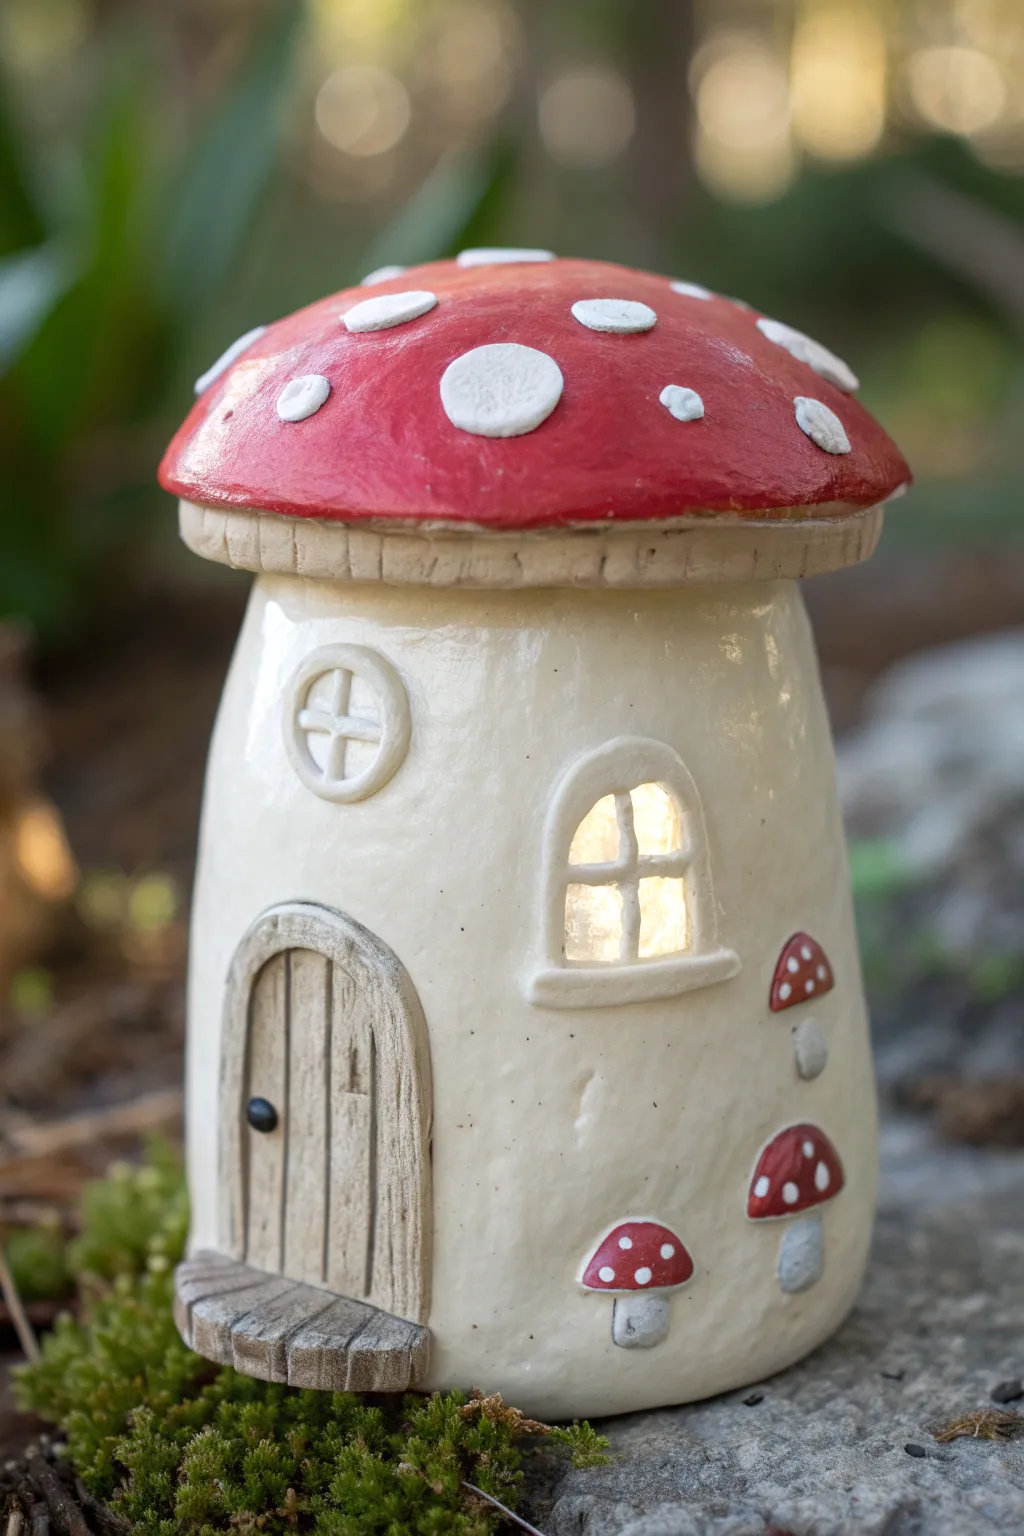
Transform an ordinary glass jar into a magical woodland abode with this charming toadstool mushroom house project. Featuring a textured ‘wooden’ door, glowing windows, and a vibrant red cap, this air-dry clay creation makes for an enchanting nightlight or garden decor.
Step-by-Step
Materials
- Clean glass jar (mason jar or similar)
- Air-dry clay (white or terracotta)
- Aluminum foil
- Rolling pin
- Sculpting tools (needle tool, ball stylus, knife)
- Acrylic paints (cream/off-white, bright red, white, brown, grey)
- Paintbrushes (flat and fine detail)
- Gloss varnish or sealer
- Water cup
Step 1: Building the Form
-
Prepare the Jar Base:
Begin with a clean, dry glass jar. To help the clay adhere better, you can lightly sand the glass surface or apply a very thin layer of PVA glue, letting it dry until tacky before adding clay. -
Wrap and Roll:
Roll out a slab of air-dry clay to about 1/4 inch thickness. Wrap this slab entirely around the vertical sides of the jar, pressing it firmly against the glass to remove air pockets. -
Seal the Seams:
Where the clay ends meet, use a bit of water on your finger to smooth and blend the seam until it is invisible. Trim any excess clay from the top threading and the bottom edge. -
Shape the Mushroom Cap:
For the lid, create a dome shape using aluminum foil to bulk it out without using too much heavy clay. Press this foil dome onto the jar’s original metal lid. -
Cover the Cap:
Roll out another slab of clay and drape it over your foil dome. Smooth the clay down the sides and tuck it under the rim of the lid, creating a slight overhang for that classic mushroom silhouette. -
Add Gills:
Flip the lid upside down. Use a needle tool or knife to score fine, radiating lines on the underside of the clay overhang to resemble mushroom gills.
Clay Cracking?
If small cracks appear as the clay dries, mix a tiny amount of fresh clay with water to make a paste (slip) and fill the cracks, then smooth over.
Step 2: Sculpting Details
-
Carve the Windows:
Decide where your windows will go. Use a craft knife to carefully cut out window shapes from the wet clay on the jar, revealing the glass underneath so light can shine through later. -
Window Frames:
Roll thin snakes of clay. pressing them around the cut-out borders to create window frames. Add inner cross-bars to create panes. -
Construct the Door:
Form a small arch shape from a fresh piece of clay and attach it near the base for the door. Use a spacing tool or knife to draw vertical wood grain lines and add a tiny ball of clay for the doorknob. -
Add the Doorstep:
Sculpt a semi-circle slab at the base of the door. Score lines across it to make it look like wooden planks or stone steps leading into the house. -
Grow Tiny Mushrooms:
Roll tiny balls and stems of clay. attach these to the side of the house in clusters. These miniature toadstools add a lovely sense of scale. -
Add Cap Texture:
Press small, flattened discs of clay unevenly onto the red mushroom cap to create the classic raised white spots. I find varying the sizes makes it look more organic.
Step 3: Painting and Finishing
-
Base Coat:
Once fully dry (24-48 hours), paint the main body of the house in a soft cream or off-white. You may need two coats for opaque coverage. -
Paint the Cap:
Paint the top mushroom cap a vibrant, deep red, carefully painting around the raised clay spots. Paint the spots pure white. -
Detail the Wood:
Paint the door and doorstep with a wash of brown paint. Wipe away excess while wet to let the paint settle into the grooves, highlighting the wood grain texture. -
Miniature Details:
Using a fine brush, paint the caps of the tiny side mushrooms red with white dots to match the roof. Paint the doorknob black or gold. -
Seal:
Finish with a coat of gloss varnish, particularly on the red cap to make it look wet and dewy. Place a battery-operated tea light inside to illuminate the windows.
Pro Tip: Glowing Windows
Before painting the body, put masking tape over the exposed glass window panes. This keeps paint off the glass for a cleaner light transparency.
Place your finished cottage on a shelf or amongst some moss for a delightful fairy garden vibe
Woodland Bark-and-Vines Jar
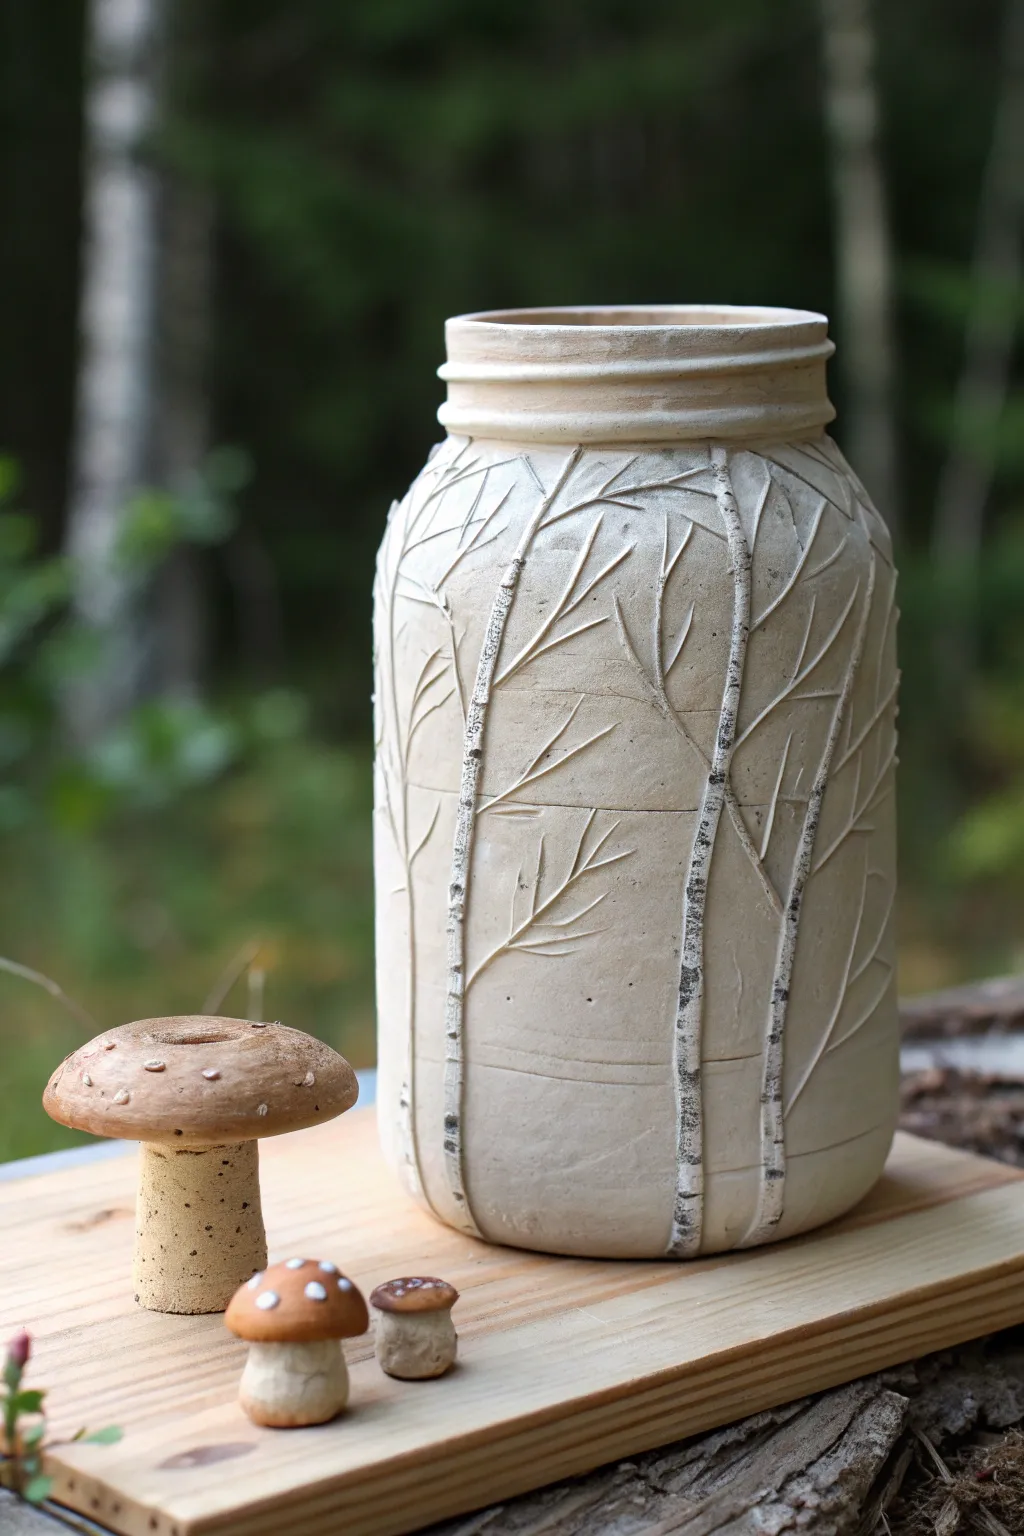
Bring the serene beauty of the forest indoors with this faux-mason jar sculpture, featuring raised birch tree reliefs and delicate branch carvings. The natural, unglazed finish highlights the subtle texture of the bark and the elegance of the organic lines.
Detailed Instructions
Materials
- Large cylindrical glass jar (as a form) or simple cardboard tube
- White or stone-colored air dry clay (2-3 lbs)
- Clay roller or rolling pin
- Clay knife or X-Acto blade
- Needle tool
- Slip (clay mixed with water)
- Black acrylic paint or black ink wash
- Fine-grit sandpaper
- Pottery sponge
- Small flat brush
Step 1: Forming the Base Vessel
-
Prepare the workspace:
Begin by covering your clear glass jar or cardboard tube with a layer of plastic wrap or parchment paper. This prevents the clay from sticking to your mold so you can remove it later if you wish to make it hollow, or simply keep the glass inside for structural support. -
Roll the slab:
Roll out a large slab of air dry clay to an even thickness of about 1/4 inch. Ensure the slab is wide enough to wrap completely around your chosen form and tall enough to cover the height. -
Wrap the form:
carefully lift the clay slab and wrap it around the jar. Where the ends meet, score deeply with your needle tool, apply a generous amount of slip, and press the edges firmly together to create a seam. -
Smooth the seam:
Use your fingers or a flat sculpting tool to smooth the vertical seam until it disappears completely. If the clay feels dry, dip your finger in a little water to help blend it. -
Create the threaded rim:
Roll two thin coils of clay. Attach them around the very top opening of the jar, stacking them slightly to mimic the screw threads of a classic mason jar. Use your thumb to flatten them slightly against the vessel wall for a realistic look. -
Let it set:
Allow the main vessel to firm up for about an hour. It needs to be ‘leather hard’—stiff enough to hold its shape but soft enough to accept attachments.
Step 2: Sculpting the Birch Trees
-
Roll tree trunks:
Roll out several thin snakes of clay for the birch trunks. These should be varied in thickness but generally quite slender, running the full vertical length of the jar. -
Attach the trunks:
Score the surface of the jar in vertical lines where you want your trees. Apply slip, then press the clay snakes onto the jar. Flatten them gently so they look like semi-raised reliefs rather than round worms sitting on top. -
Texture the bark:
Using a needle tool or the dull side of a knife, gently scrape and notch the surface of the attached trunks to create a rough, bark-like texture. I like to make these marks uneven for a more natural feel. -
Carve the branches:
Instead of adding more clay for branches, use a carving tool or a sharp needle to incise the branch lines directly into the surface of the jar wall. Draw them extending outward and upward from the trunks, branching into finer twigs. -
Deepen the lines:
Go back over your carved branch lines to deepen them slightly, brushing away any clay potential crumbs with a soft, dry brush to keep the lines crisp. -
Add horizontal markings:
Birch trees have distinctive horizontal lenticels (markings). Use your knife to make small horizontal dashes across the raised trunks you sculpted.
Pro Tip: Clean Lines
Keep a baby wipe or damp sponge cloth nearby while carving branches. Wiping the tool tip frequently prevents clumping and keeps your delicate branch incisions sharp.
Step 3: Finishing Touches
-
Initial Drying:
Let the jar dry completely. This will take 24 to 48 hours depending on humidity. Flip it occasionally if possible to ensure even airflow. -
Apply the wash:
Water down a tiny amount of black acrylic paint until it is very thin and inky. Using a fine brush, carefully paint this wash only into the horizontal dashes on the birch trunks and lightly into the carved branch lines. -
Wipe back excess:
Immediately after applying the wash, use a barely damp sponge to wipe the surface gently. This leaves the dark pigment in the recesses while cleaning the high points of the white clay. -
Sand for smoothness:
Once the paint is dry, use fine-grit sandpaper to smooth the rim and the un-textured parts of the jar, giving it a professional, stoneware-like finish. -
Seal (optional):
If you plan to use this for dried flowers, a matte varnish works well. If you want it to hold water, you will need to apply a waterproof resin sealant to the interior.
Level Up: Mushroom Accents
Create tiny, separate clay mushrooms like the ones in the photo. Sculpt a simple cap and stem, attach them with slip near the base of the ‘trees’ before drying.
Place your finished jar near a window to let natural light interact with the beautiful carved textures you created
Geode-Facet “Crystal” Jar
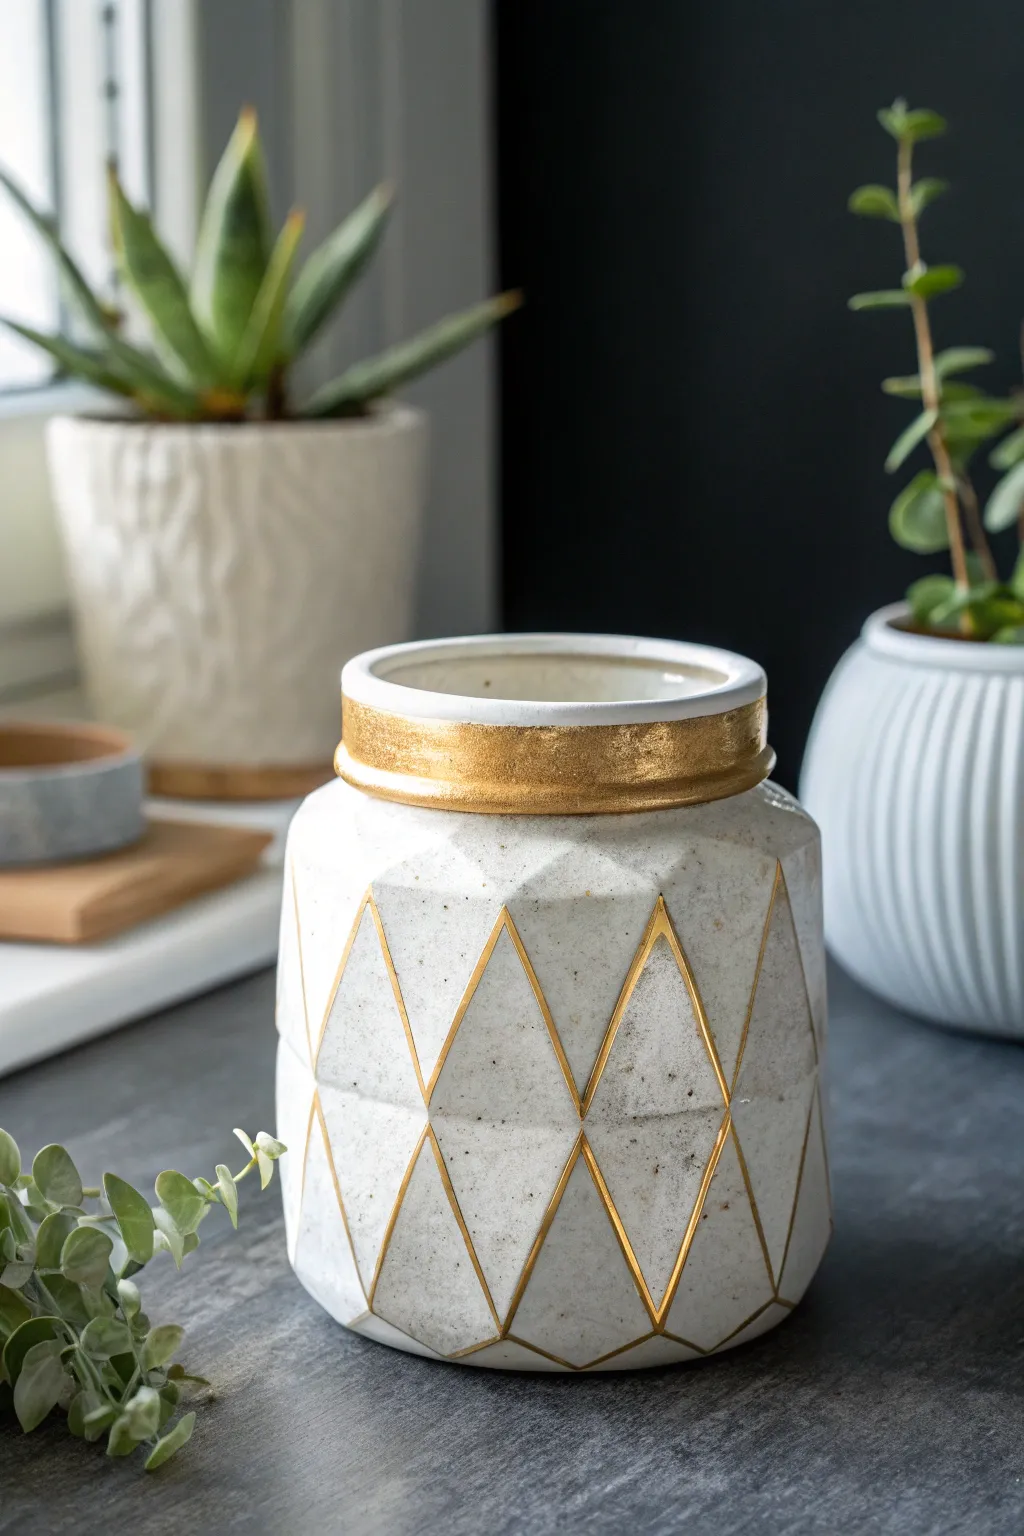
Transform a plain glass jar into a high-end decor piece with this geometric design that mimics the look of cut stone or crystal. By carving air dry clay into sharp facets and highlighting them with gold, you create a stunning vessel that looks far more expensive than its humble origins.
Step-by-Step Tutorial
Materials
- Clean glass jar (mason jar or similar)
- Air dry clay (white or stone finish)
- Rolling pin
- Sharp crafting knife or X-Acto blade
- Ruler or straight edge
- Sandpaper (fine grit)
- White or stone-speckled acrylic paint (optional)
- Gold leafing paint or liquid gilding
- Fine liner paintbrush
- Gloss varnish or sealant
- Small bowl of water
- Sponge
Step 1: Prepping and Wrapping
-
Clean surface:
Begin by thoroughly cleaning and drying your glass jar to remove any oils or residue, ensuring the clay adheres properly to the surface. -
Roll the clay:
Roll out a slab of air dry clay to a uniform thickness of about 1/4 to 1/2 inch; you want it thick enough to carve into later without hitting the glass immediately. -
Wrap the jar:
Carefully wrap the clay slob around the exterior of the jar, pressing it firmly against the glass to remove air pockets. -
Seal the seam:
Where the clay ends meet, use a little water on your finger to blend the seam together until it is completely invisible. -
Trim edges:
Slice off any excess clay from the bottom so the jar sits flat, and trim the top rim neatly just below the jar’s threading or opening. -
Create the rim:
Add a slightly thicker band or simply smooth the top edge to create a defined lip, smoothing it down with a damp sponge.
Keep Edges Sharp
When smoothing the clay with water, use a flat tool or a credit card rather than just your finger to maintain crisp, angular facet lines.
Step 2: Carving the Geode Facets
-
Mark vertical guides:
Using a ruler, lightly score vertical lines around the jar spaced evenly apart to act as structural guides for your diamond pattern. -
Define the diamonds:
Lightly sketch a connecting zigzag pattern between your vertical lines to form a grid of diamond shapes across the surface. -
First cuts:
Take your sharp craft knife and begin slicing away clay at an angle along the lines of your grid. -
Angling the facets:
The goal is to create peaks in the center of the diamonds and valleys along the lines. Slice inward from the center of a diamond toward the edges to create planar, faceted surfaces. -
Refine the shapes:
Continue carving around the jar. It doesn’t have to be mathematically perfect; slightly irregular cuts enhance the organic ‘hewn stone’ look. -
Smooth the texture:
Once carved, dip your finger in water and gently run it over the flat planes to smooth out knife drag marks while keeping the edges sharp. -
Extended dry time:
Allow the jar to dry completely. Because the clay is thick in some areas, I recommend letting it sit for at least 24-48 hours.
Marble Effect
Knead a small amount of grey or black clay into your white clay before rolling. Stop before it’s fully blended for a striking marble swirl.
Step 3: Gilding and Finishing
-
Sanding:
Once bone dry, use fine-grit sandpaper to sharpen the ridges if they softened during drying, dusting off the powder afterward. -
Base coat (optional):
If you want a speckled stone look and didn’t use effect clay, dab on a white paint mixed with tiny flecks of grey or brown. -
Paint the rim:
Apply a bold coat of gold leafing paint or liquid gilding to the top rim of the jar, creating a luxurious solid band. -
Highlight the geometry:
Using a fine liner brush and the same gold paint, carefully trace the indented lines (the valleys) between your faceted shapes. -
Define the bottom:
Paint a thin gold line along the very bottom edge where the facets meet the base to frame the design. -
Seal:
Protect your work with a coat of gloss varnish, which will also make the facets catch the light like real ceramic or stone.
Place your new geometric vessel on a desk or windowsill where the light can play off the gold accents and angular surfaces