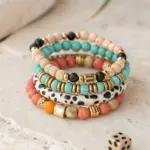
When the weather flips to sweater season, I immediately reach for autumn clay bead colors—those cozy, toasted, leafy tones that make everything feel warm. Here are my favorite fall bracelet ideas you can mix, match, and stack until it feels like your perfect little harvest vibe.
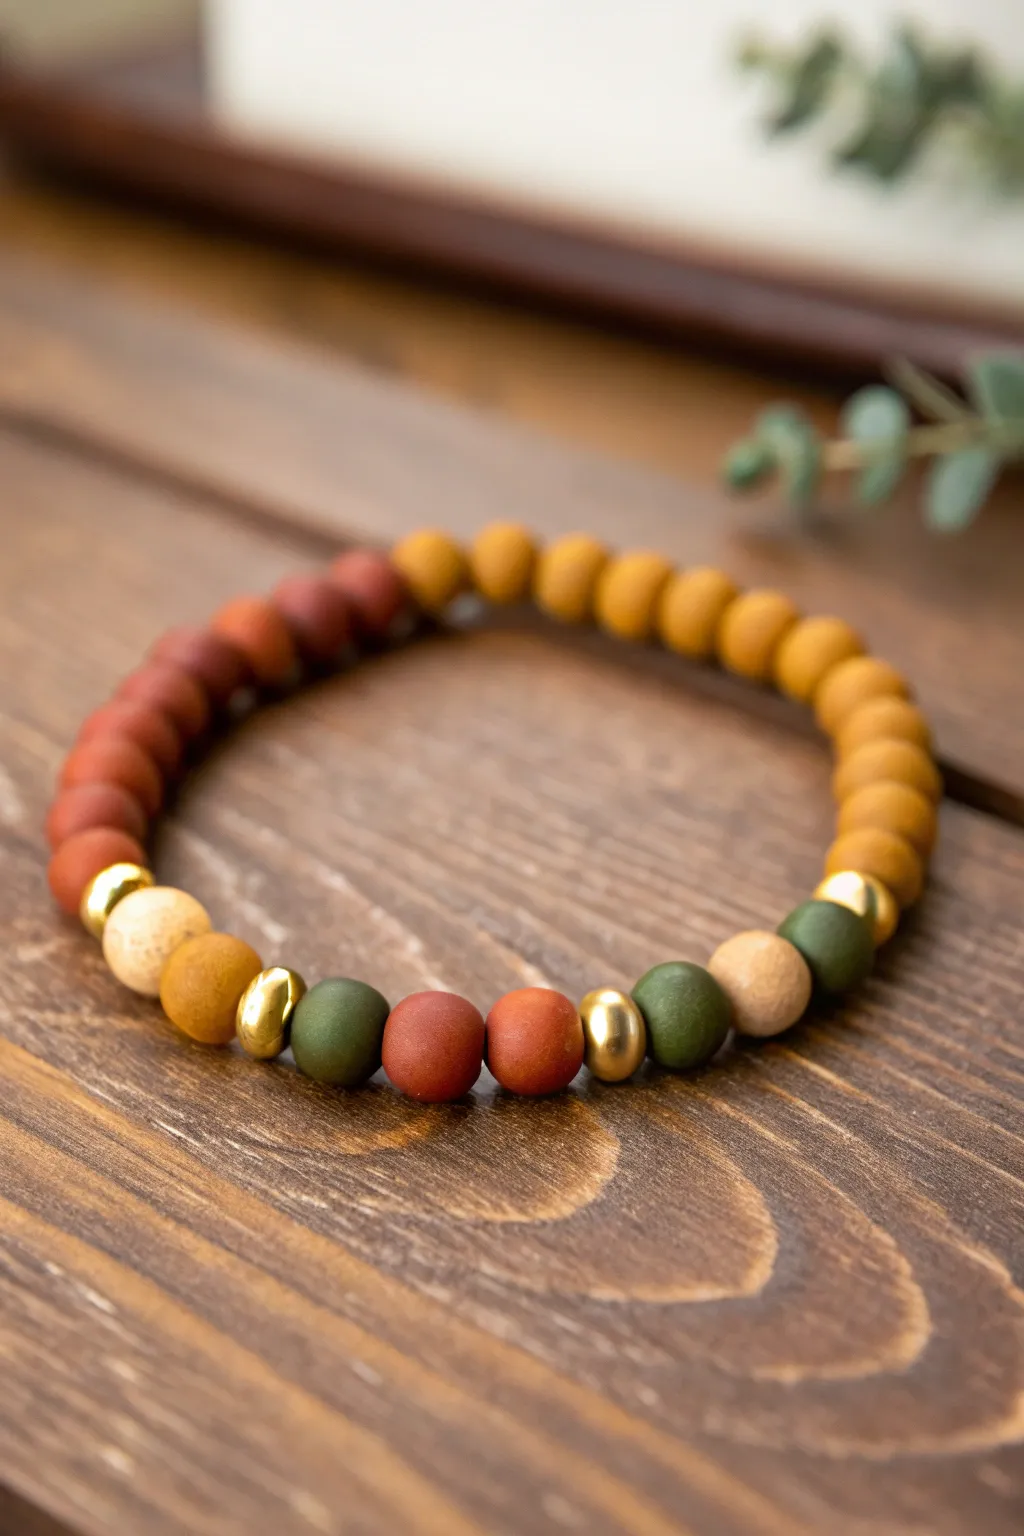
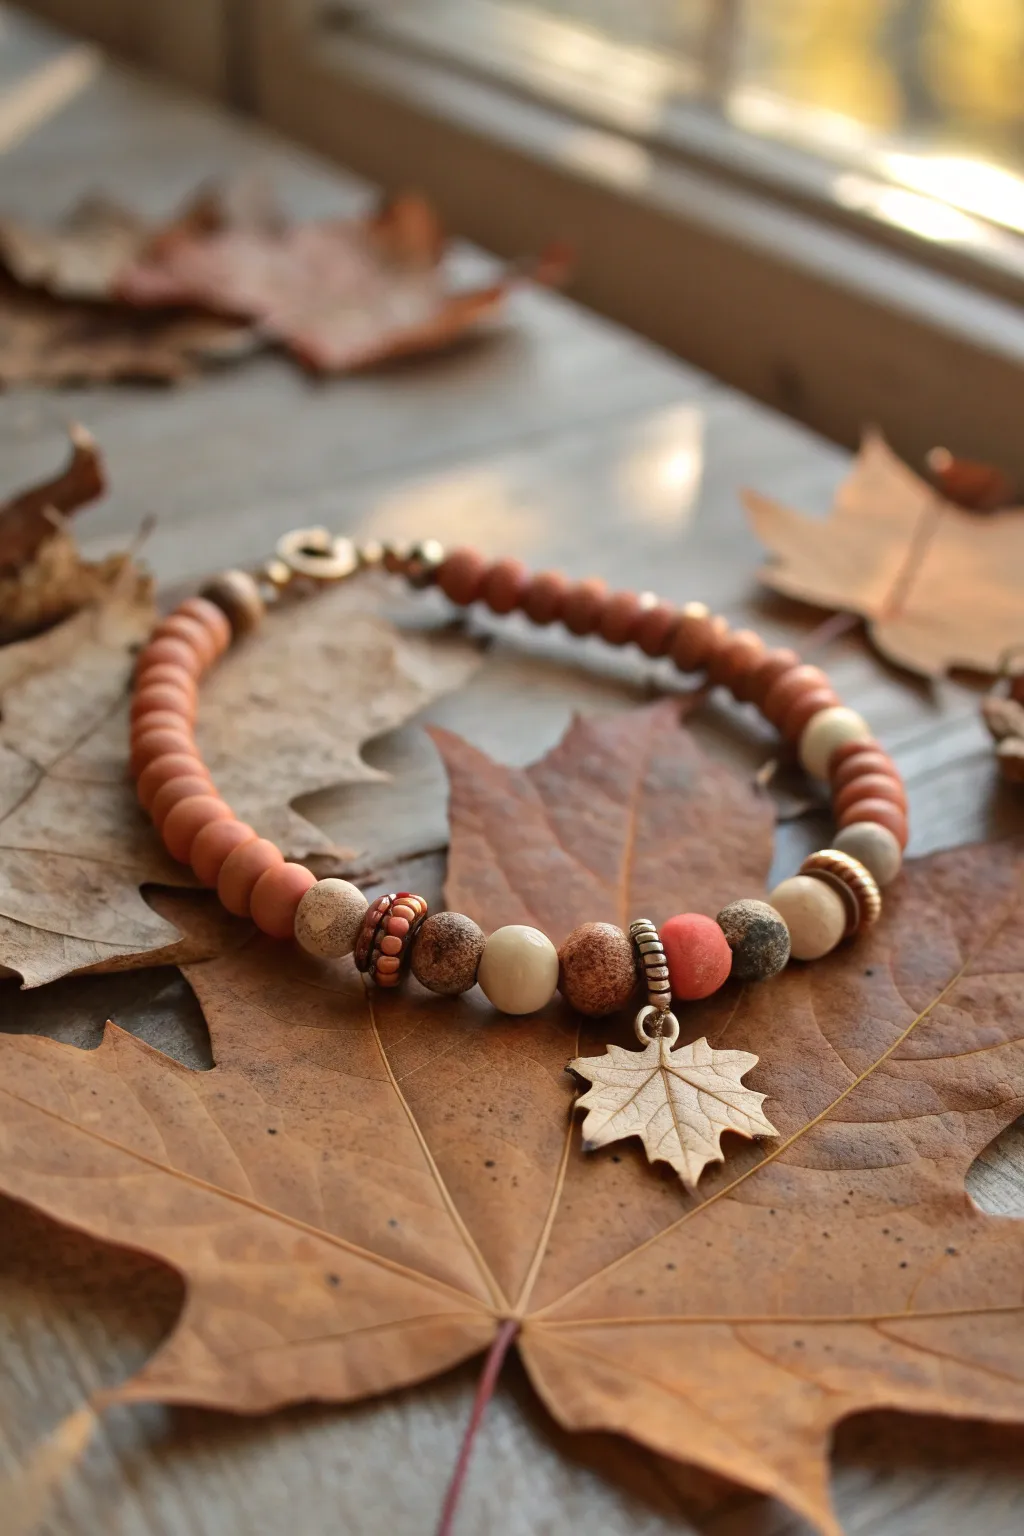
Classic Harvest Heishi Stack
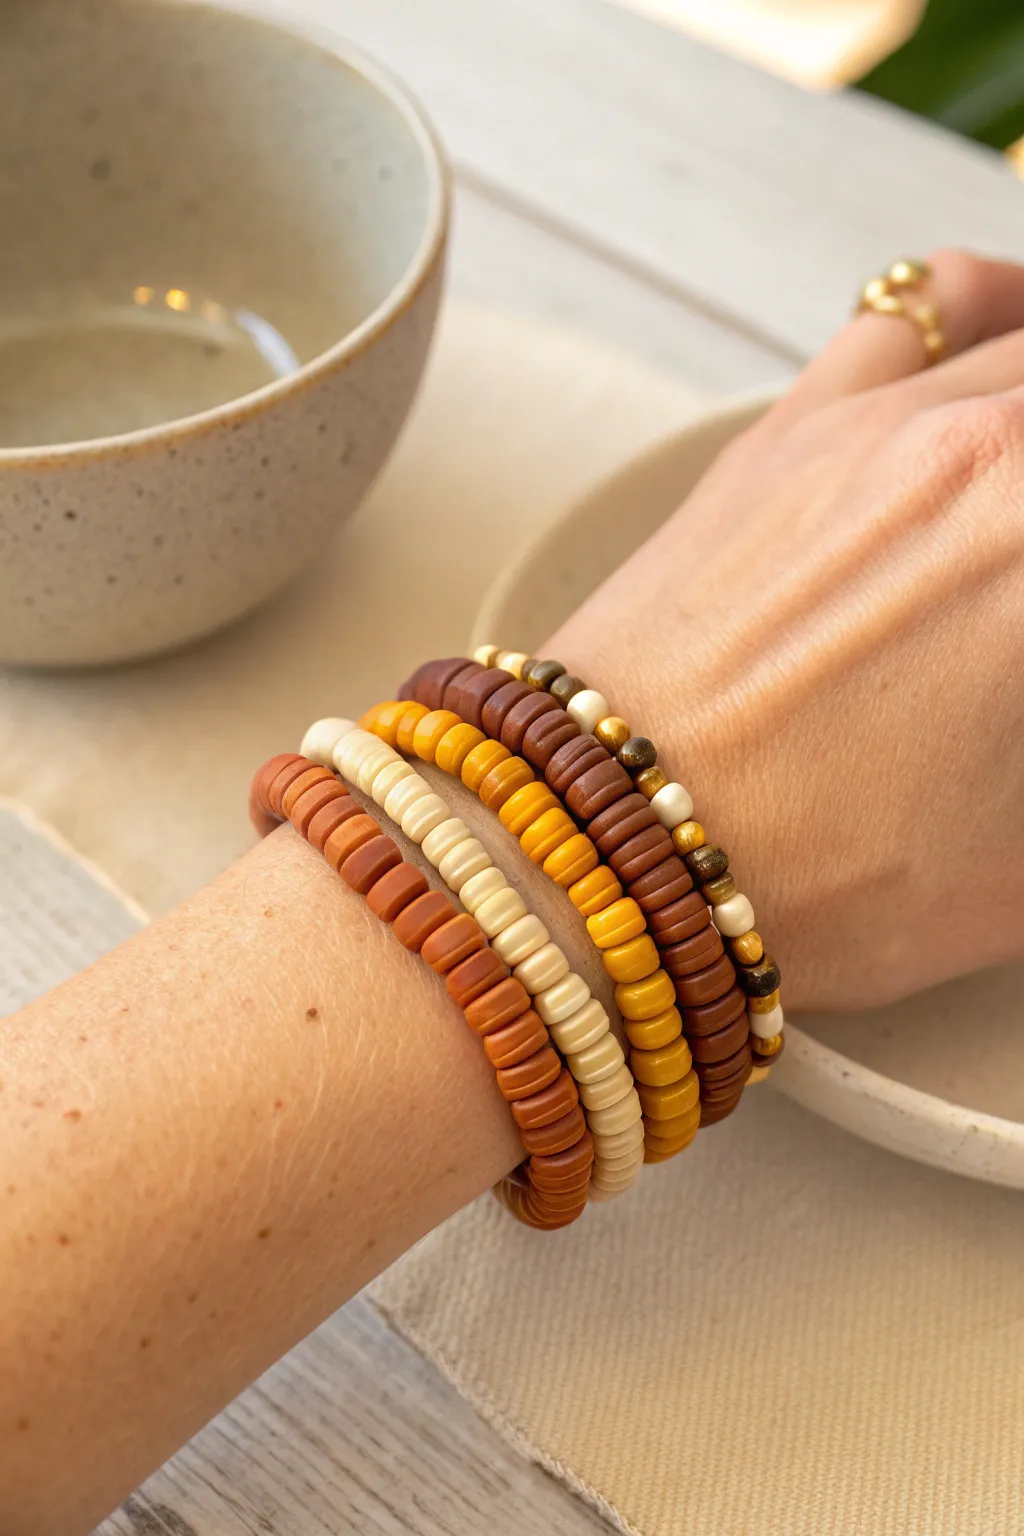
Capture the cozy essence of fall with this stack of five coordinating stretch bracelets. Using a warm palette of clay heishi beads mixed with earthy accents, this set mimics the changing leaves and pairs perfectly with chunky knits.
Step-by-Step Guide
Materials
- Polymer clay heishi disc beads (6mm) in: terracotta (rust orange), light cream/beige, mustard yellow, and dark chocolate brown
- Round accent beads (4mm-6mm): wood, gold spacer beads, and cream ceramic or glass beads
- Strong elastic cord (0.8mm or 1mm recommended)
- Super glue or jewelry adhesive
- Scissors
- Bead stopper or tape
- Ruler or measuring tape
Step 1: Preparation
-
Measure your wrist:
Before cutting any cord, measure your wrist with a flexible tape measure. Add about 0.5 to 1 inch to this measurement depending on how loose you like your bracelets to fit. -
Prepare the elastic:
Cut five strands of elastic cord, each about 4 inches longer than your final bracelet size. This extra length is crucial for tying secure knots later. -
Secure the ends:
Place a bead stopper or a piece of masking tape on one end of each elastic strand to prevent beads from sliding off while you work.
Knot Slipping?
If your elastic knots won’t stay tight, try a “surgeon’s knot.” Wrap the elastic through the loop twice instead of once before pulling tight for extra grip.
Step 2: Solid Color Strands
-
String the terracotta bracelet:
Begin your first bracelet using only the terracotta (rust orange) heishi beads. Thread them continuously until the beaded section matches your wrist measurement. -
String the cream bracelet:
Repeat the process for the second bracelet using only the light cream or beige heishi beads. I find it helpful to hold this one up against the terracotta strand to ensure they are the exact same length. -
String the mustard bracelet:
Create the third solid strand using the mustard yellow heishi beads. Visualizing the stack as you go helps keep the sizing consistent. -
String the chocolate bracelet:
For the fourth solid strand, use the dark chocolate brown heishi beads. This deep tone anchors the lighter colors in the stack.
Step 3: The Accent Strand
-
Plan the pattern:
The fifth bracelet has a varied pattern. Lay out your beads on a mat first: aim for an alternating mix of small round wooden beads, gold spacers, cream rounds, and perhaps a few leftover dark heishi beads. -
Thread the mixed strand:
String your mixed pattern onto the final piece of elastic. This bracelet adds texture and breaks up the uniformity of the flat clay discs.
Add a Charm
Personalize the stack by adding a small gold leaf charm or an initial letter bead to the mixed accent bracelet for a custom focal point.
Step 4: Finishing Up
-
Pre-stretch the elastic:
Before tying, gently pull on the ends of each bracelet to pre-stretch the cord. This prevents the bracelets from sagging or loosening after the first wear. -
Tie the knots:
Remove the bead stopper and tie a square knot (right over left, left over right) on your first bracelet. Pull it tight. -
Secure with glue:
Add a tiny drop of super glue or jewelry adhesive directly onto the knot. Let it dry for a few seconds to ensure it won’t slip. -
Hide the knot:
If the hole of an adjacent bead is large enough, gently slide the knot inside to hide it. This gives a professional, seamless finish. -
Trim the excess:
Using sharp scissors, trim the excess elastic tails close to the knot (or close to the bead hiding the knot). Be careful not to nick the main cord. -
Repeat for all strands:
Systematically finish the remaining four bracelets using the same tying, gluing, and trimming method.
Now you have a stunning set of autumn-hued accessories ready to wear or gift.


Burnt Orange and Cream Color Blocks
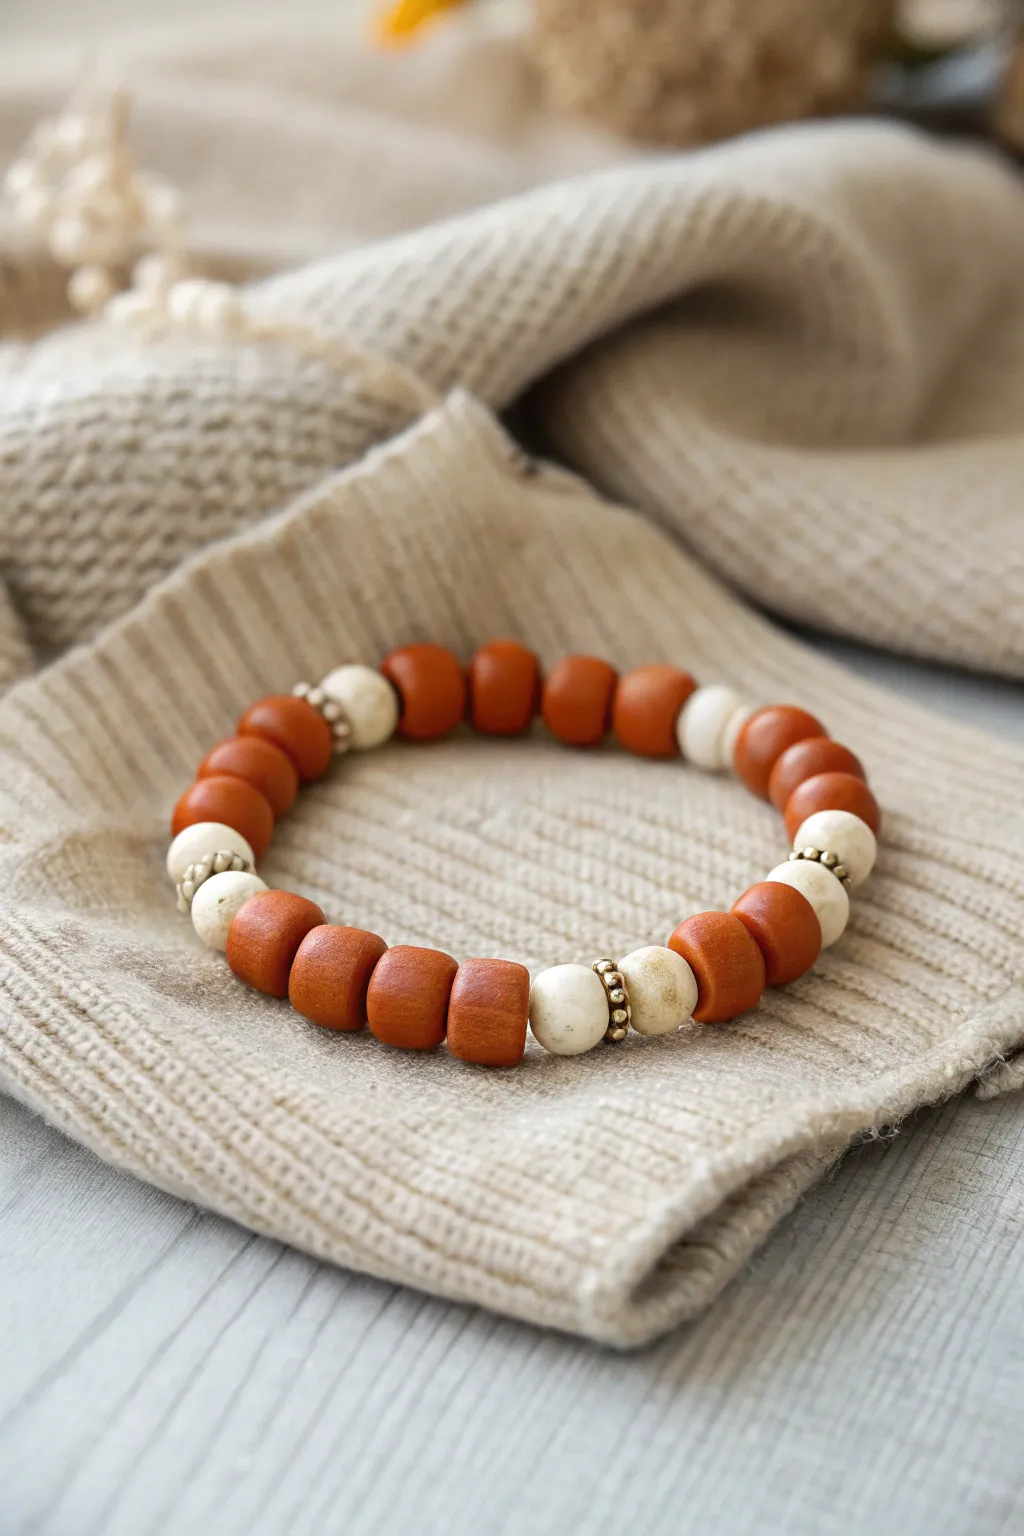
Embrace the cozy vibes of fall with this chunky clay bead bracelet featuring rich burnt orange tones paired with creamy white accents. The distinct color-blocking pattern, highlighted by subtle metallic spacers, creates a warm, textured accessory perfect for sweater weather.
How-To Guide
Materials
- Polymer clay (Burnt Orange/Terracotta color)
- Polymer clay (Cream/Off-White color)
- Elastic cord (0.8mm or 1mm thickness)
- Small gold or antique brass spacer beads (daisy or rondelle shape)
- Bead roller tool (optional, for uniform sizing)
- Needle tool or toothpick
- Super glue or jewelry adhesive
- Scissors
- Baking sheet and parchment paper
- Oven
Step 1: Prepping and Rolling Beads
-
Condition the clay:
Start by warming up your burnt orange and cream polymer clay in your hands. Knead each color separately until it is soft, pliable, and free of cracks. -
Portion the clay:
Pinch off equal-sized chunks of clay for your beads. Aim for pieces that are roughly the size of a large pea or a small marble to achieve that chunky look. -
Roll the orange beads:
Roll the orange clay chunks between your palms or use a bead roller to create smooth, round spheres. You will need about 20-24 orange beads depending on your wrist size. -
Create the cylinder shape:
Gently press the spherical beads against your work surface and roll slightly to flatten the sides, turning them into short, rounded cylinders rather than perfect balls. -
Roll the cream beads:
Repeat the rolling and shaping process with the cream clay. You will need approximately 8-10 of these beads for the accent sections. -
Pierce the holes:
Using your needle tool or a toothpick, carefully pierce a hole through the center of each bead. I find twisting the tool as you push helps prevent the bead from deforming. -
Bake the beads:
Arrange your beads on a baking sheet lined with parchment paper. Bake according to the manufacturer’s instructions on your clay package (usually around 275°F/135°C for 15-30 minutes). -
Cool down:
Let the beads cool completely before handling them. They harden fully as they return to room temperature.
Uneven Bead Holes?
If the bead holes distort while piercing, let the clay sit in the fridge for 10 minutes to firm up before drilling, or drill after baking using a small hand drill.
Step 2: Stringing and Assembly
-
Measure the elastic:
Cut a piece of elastic cord about 10-12 inches long. This gives you plenty of extra slack for tying the final knot. -
Pre-stretch the cord:
Give the elastic cord a few firm tugs. This pre-stretching step is crucial to prevent the bracelet from loosening up after you wear it a few times. -
Secure the end:
Place a piece of tape on one end of the cord or attach a binder clip to stop beads from sliding off while you work. -
Start the pattern:
Begin threading your beads. Start with a block of burnt orange beads—usually 3 or 4 in a row depending on the spacing you prefer. -
Add spacers:
Slide on a gold spacer bead, followed by a cream bead, and then another gold spacer bead. This creates a refined transition between colors. -
Continue the pattern:
Repeat the sequence: 3-4 orange beads, spacer, cream bead(s), spacer. Looking at the design, you can also do double cream beads with spacers in between them for variety. -
Check the fit:
Wrap the strung beads around your wrist to check the size. Add or remove beads to ensure a comfortable fit that isn’t too tight. -
Tie the knot:
Remove the tape/clip and tie the ends together using a surgeon’s knot (right over left, left over right, and loop through an extra time). -
Secure with glue:
Apply a tiny drop of super glue or jewelry adhesive directly onto the knot. Pull the knot tight again and let it dry for a minute. -
Hide the knot:
Trim the excess cord ends close to the knot, then gently tug the bracelet so the knot slides inside the hole of one of the larger clay beads.
Add Texture
Before baking, gently roll the unbaked clay beads over a piece of sandpaper or a textured fabric to give them a natural, stone-like matte finish.
Now you have a stunning, handmade accessory that perfectly captures the warmth of the season


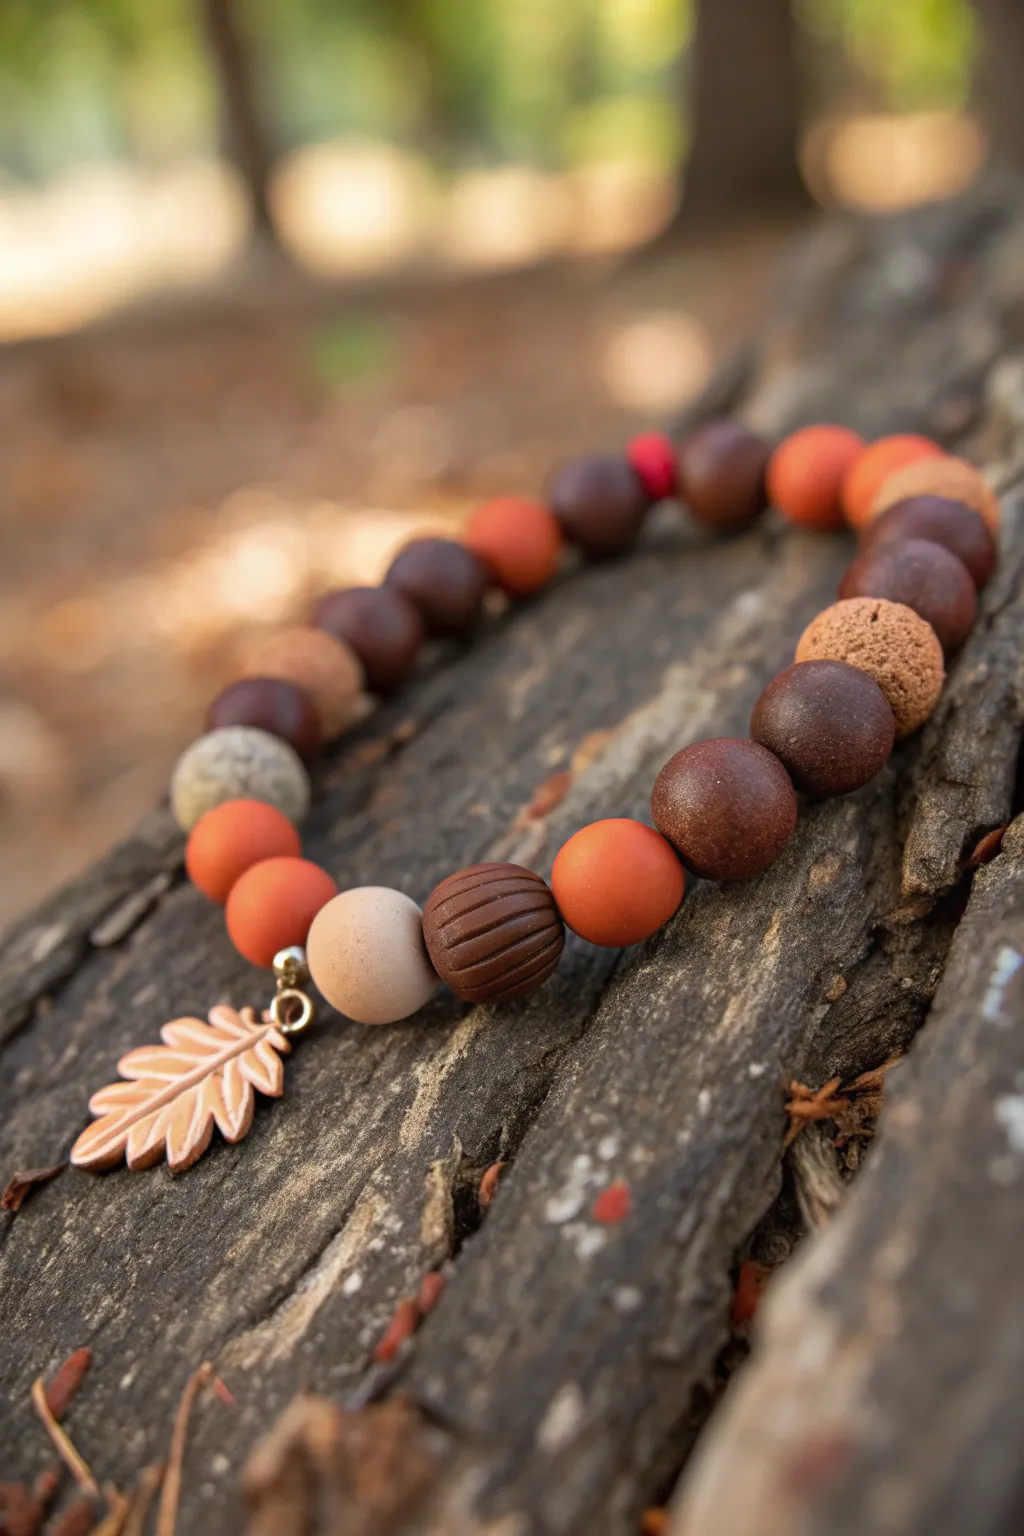
Mustard, Terracotta, and Cocoa Mix
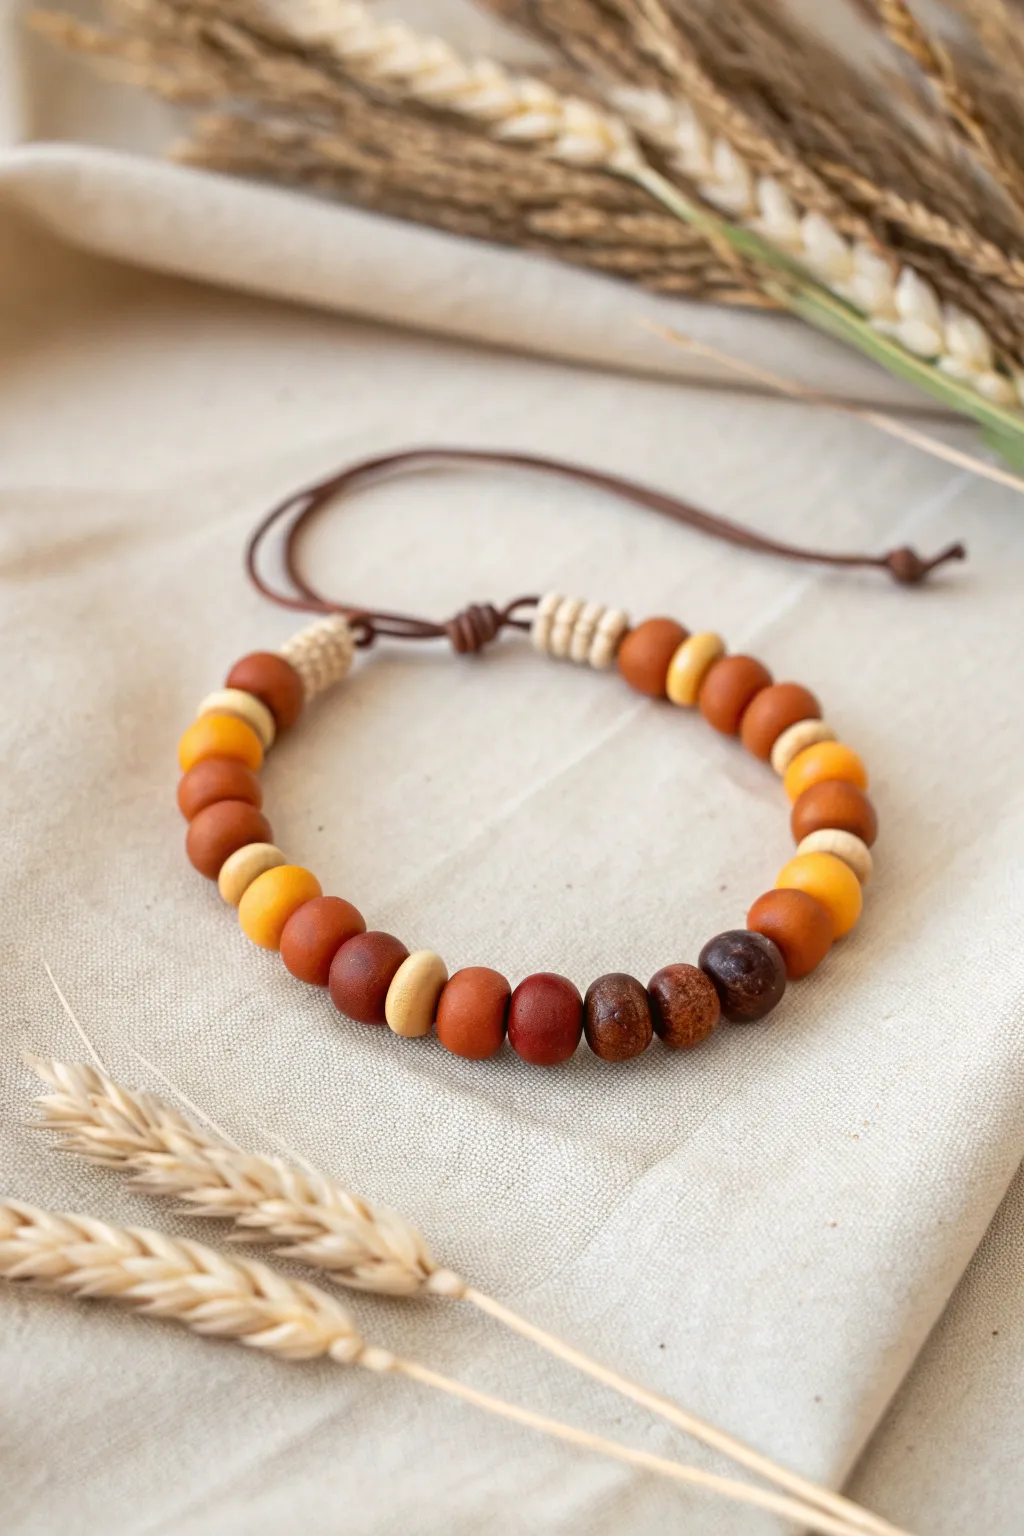
Embrace the cozy warmth of fall with this beautiful bracelet featuring a rich palette of terracotta, mustard, and deep cocoa tones. The design uses natural-looking clay or ceramic beads strung on a durable cord for a rustic yet polished accessory perfect for sweater weather.
Detailed Instructions
Materials
- Polymer clay (terracotta, mustard yellow, dark brown, and beige)
- Round bead roller tool (optional but helpful)
- Beading awl or toothpick
- Waxed cotton cord or durable beading string (brown, approximately 1mm)
- Oven for baking clay
- Baking sheet with parchment paper
- Scissors
Step 1: Crafting the Beads
-
Prepare your clay colors:
Begin by conditioning four distinct blocks of polymer clay: a deep rusty terracotta, a bright mustard yellow, a dark cocoa brown, and a creamy natural beige. Warm the clay in your hands until it is pliable and smooth. -
Form the terracotta beads:
Pinch off even amounts of the terracotta clay to roll approximately 8-10 round beads. Aim for a size around 8-10mm in diameter. -
Create the mustard and cocoa accents:
Roll about 4-6 beads using the mustard clay and 3 beads using the dark cocoa clay. Keep these roughly the same size as your terracotta base beads for consistency. -
Shape the spacer beads:
Using the beige clay, create small, flat disc-shaped spacers. You will need about 6-8 of these. Simply roll a small ball and flatten it gently between your thumb and forefinger. -
Create the textured end caps:
Roll two cylindrical beads from the beige clay, about 1cm long. While the clay is soft, use a knife edge to gently press parallel grooves around the circumference to create a ribbed texture. -
Pierce the bead holes:
Carefully use a beading awl or a toothpick to poke a hole through the center of every bead. Make sure the hole is wide enough to accommodate your cord—I usually wiggle the tool slightly to widen it just a bit. -
Bake the clay:
Arrange your beads on a baking sheet lined with parchment paper. Bake them according to the manufacturer’s instructions on your clay package (usually around 275°F/135°C for 15-30 minutes). Let them cool completely before handling.
Step 2: Stringing the Design
-
Cut the cord:
Cut a piece of brown waxed cotton cord to approximately 18 inches in length. This gives you plenty of slack for the sliding knot mechanism. -
Start the center sequence:
Begin by threading the darkest three cocoa beads onto the center of the cord. Place the very darkest focal bead in the middle, flanked by the two slightly lighter brown ones. -
Add the first transition:
On either side of the dark center trio, thread a beige disc spacer followed by a terracotta bead. -
Build the pattern outward:
Continue the pattern symmetrically on both sides. Add a mustard bead, then a terracotta bead, followed by a beige spacer. -
Complete the color run:
Finish the main bead sequence by adding the remaining terracotta beads and mustard accents, using spacers intermittently to break up the solid colors. -
Attach end caps:
Finally, thread the ribbed beige cylindrical beads onto each end of your beaded section. These act as the visual ‘bookends’ for your design. -
Secure the beads:
Tie a simple overhand knot right next to each ribbed end cap. This keeps all your beautiful beads centered and prevents them from sliding around loosely.
Pro Tip: Getting Natural Texture
Before baking, gently roll your clay beads over a piece of canvas or rough fabric. This imitates the earthy, porous look of real ceramic or wood beads.
Step 3: Finishing the Closure
-
Prepare the ends:
Bring the two loose ends of the cord together so they overlap parallel to each other. -
Tie the sliding knot:
Using a separate short piece of cord (about 5 inches), tie a square knot or a sliding macramé knot around the two parallel cords. Tighten it enough to hold but loose enough to slide. -
Trim the sliding knot:
Trim the excess tails of the separate knot piece close, and carefully use a tiny drop of glue or a lighter (if using synthetic cord) to seal the cut ends so the knot doesn’t unravel. -
Add stopper knots:
Tie a small overhand knot at the very end of each main cord tail to prevent them from pulling through the sliding mechanism tailored to your wrist size.
Level Up: Glossy Contrast
Apply a glossy glaze varnish only to the dark cocoa beads after baking. This creates a stunning texture contrast against the matte finish of the other colors.
Slip this bracelet on to add an instant touch of autumn elegance to your outfit


Gold Spacer Bead Glow-Up
Capture the essence of fall foliage with this warm, earthy bracelet design that elevates simple clay beads with elegant gold accents. The mix of matte polymer clay textures and shiny metallic spacers creates a sophisticated accessory perfect for sweater weather.
Step-by-Step Tutorial
Materials
- Polymer clay beads (6-8mm round): Mustard yellow
- Polymer clay beads (6-8mm round): Terracotta/rust red
- Polymer clay beads (6-8mm round): Olive green
- Polymer clay beads (6-8mm round): Cream/beige speckle
- Gold saucer or rondelle spacer beads (metal or plated)
- Strong elastic stretch cord (0.7mm or 0.8mm)
- Beading needle (collapsible eye recommended)
- Super glue or jewelry adhesive
- Scissors
Step 1: Planning and Prep
-
Measure your wrist:
Wrap a flexible measuring tape around your wrist to find your size. Add about 1/2 to 1 inch to this measurement depending on how loose you like your bracelets to fit. -
Cut the cord:
Cut a piece of elastic cord about 10-12 inches long. Having this extra length makes tying the finishing knot much easier than fighting with short ends. -
Pre-stretch the elastic:
Hold both ends of the cord and give it several firm tugs. This crucial step prevents the bracelet from stretching out and becoming loose after the first few times you wear it. -
Sorting your palette:
Lay out your beads on a bead board or velvet mat. Group them by color: mustard, rust, olive, and cream. Having them separated makes the patterning process smoother.
Step 2: Creating the Pattern
-
Start with the focal section:
Thread your needle onto the elastic. We will begin building the decorative front section first. Slide on one gold spacer bead. -
Add the first color accent:
Thread on a cream or beige speckled bead, followed by a mustard yellow bead. The cream bead acts as a nice neutral transition. -
Insert gold separator:
Slide on another gold spacer bead. These gold accents act as visual breaks that make the earthy colors pop. -
Build the center motif:
Add one olive green bead. Follow this immediately with one rust-colored bead, and then a second rust-colored bead. Using two of the same color creates a bold block of warmth. -
Complete the center symmetry:
Slide on a second gold spacer, then one olive green bead. -
Mirror the accent:
Add another gold spacer, followed by a cream bead. This mirrors the start of our focal section, creating a balanced look for the top of the wrist.
Knot Security
Use a flexible jewelry cement (like G-S Hypo Cement) rather than rigid super glue. It allows the knot to flex slightly with the elastic, preventing it from snapping.
Step 3: Finishing the Loop
-
Begin the color block:
Now, transition to the main band color. Thread on about 10-12 mustard yellow beads. This creates a solid block of color that wraps around the side of the wrist. -
Create the ombre fade:
After the yellow block, switch to the rust/terracotta beads. Add approximately 10-12 of these remaining beads until you reach your desired length. -
Check the fit:
I always secure the loose ends with a bead stopper or tape and wrap it around my wrist. Ensure it sits comfortably without digging in or sliding off too easily. -
Tie the surgeon’s knot:
Remove the needle. Cross the ends, loop one under twice, and pull tight. Make a standard overhand knot on top to lock it in place. -
Secure the knot:
Apply a tiny dot of jewelry adhesive or super glue directly onto the knot. Let it dry completely—don’t rush this part or the glue might cloud the beads. -
Hide and trim:
Once dry, trim the excess elastic close to the knot. If possible, gently tug the knot inside one of the larger-holed beads (like the gold spacer) to hide it from view.
Add a Charm
Before tying the final knot, execute a simple upgrade by attaching a small gold leaf charm or an acorn pendant to one of the gold spacer sections for extra fall flair.
Slip on your new bracelet and enjoy how those golden accents catch the autumn sunlight

The Complete Guide to Pottery Troubleshooting
Uncover the most common ceramic mistakes—from cracking clay to failed glazes—and learn how to fix them fast.
Ombre Fall Leaves Fade
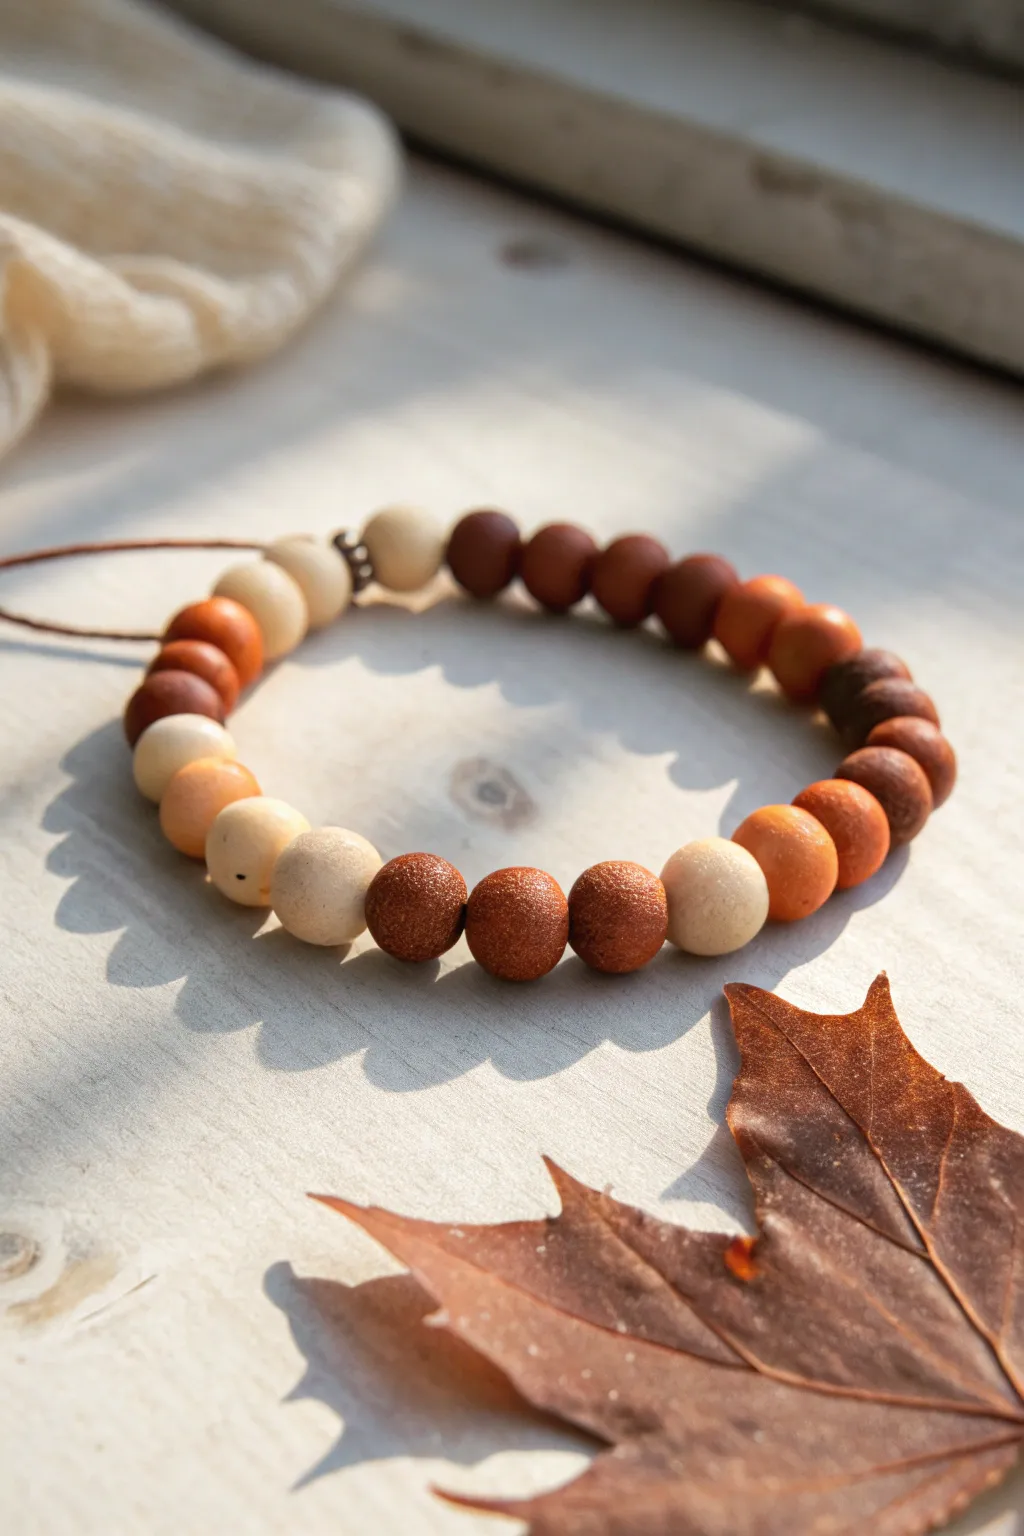
Capture the fleeting warmth of fall sunlight with this stunning ombre bead bracelet. By arranging clay and accent beads in a carefully curated gradient, you create a wearable piece that transitions seamlessly from soft cream to deep russet and glittering gold.
How-To Guide
Materials
- Polymer clay in White, Beige, Terracotta, and Dark Brown
- Goldstone round beads (8mm or 10mm)
- Elastic clear beading cord or brown waxed cotton cord
- Small brass spacer bead (optional)
- Bead reamer or toothpick
- Oven for baking clay
- Gloss varnish (optional)
Step 1: Prepping the Clay Palette
-
Condition the clay:
Start by warming up your polymer clay blocks in your hands. Knead each color—white, beige, terracotta, and dark brown—separately until they are soft and pliable. -
Mix custom shades:
To achieve a smooth ombre effect, you’ll need intermediate shades. Mix a little white into the beige to create a ‘latte’ color. Then, blend terracotta with a touch of brown for a deep rust hue. -
Portion the beads:
Roll each color into a long snake of even thickness. Slice these logs into equal segments to ensure your finished beads are roughly the same size.
Smooth Rolling Tip
To eliminate fingerprints on your clay spheres, roll the final shape while wearing latex gloves, or lightly dust your palms with cornstarch before rolling.
Step 2: Forming the Beads
-
Roll the spheres:
Take each clay segment and roll it between your palms. Use a gentle circular motion to create smooth, perfect spheres. You’ll need about 20-22 beads total, depending on wrist size. -
Pierce the holes:
Using a bead reamer or a toothpick, carefully pierce a hole through the center of each sphere. I find rotating the bead while gently pushing the tool through helps keep the shape round. -
Refine the shape:
Handling the clay can sometimes flatten the beads slightly. Give them one last gentle roll to ensure they remain spherical, being careful not to close up the holes you just made. -
Bake the beads:
Arrange your raw beads on a baking sheet or ceramic tile. Bake them according to the polymer clay package instructions (usually around 275°F/135°C for 15-30 minutes). Let them cool completely.
Scented Variation
Swap one or two of the wood-toned clay beads for actual porous lava stone or raw wooden beads. Add a drop of cinnamon or clove essential oil for a fall scent.
Step 3: Assembly & Finishing
-
Lay out the design:
Before stringing, plan your gradient on a bead board or flat surface. Start with the lightest cream beads, transitioning into beige, then the light rust, followed by the dark browns. -
Incorporate accents:
Insert the glittering goldstone beads into the sequence. These work beautifully as a focal point between the matte clay textures, adding that ‘golden hour’ sparkle. -
Begin stringing:
Cut a length of cord (about 10 inches). Tie a temporary stopper knot at one end. Begin feeding your beads onto the cord, following the gradient pattern you laid out. -
Add the spacer:
If using a small brass spacer bead, thread it on near the transition between the lightest and darkest sections to hide the knot later or simply add visual interest. -
Check fit:
Wrap the strand around your wrist to check the sizing. Determine if you need to add or remove a bead to get the perfect comfortable fit. -
Tie the knot:
Once satisfied, tie a strong surgeon’s knot (right over left, left over right) to secure the bracelet. If using elastic, pull it tight to pre-stretch it slightly before knotting. -
Secure the ends:
Apply a tiny dot of jewelry glue or clear nail polish to the knot for extra security. Let it dry for a few minutes. -
Hide the knot:
Trim the excess cord carefully. Gently tug the bracelet so the knot slips inside the hole of the nearest large bead, hiding it from view. -
Final polish:
Inspect your clay beads. If you want a shinier finish to match the goldstone, you can buff them with a soft cloth or apply a thin layer of gloss varnish.
Enjoy wearing this cozy slice of autumn on your wrist all season long
Speckled Pumpkin Bread Neutrals
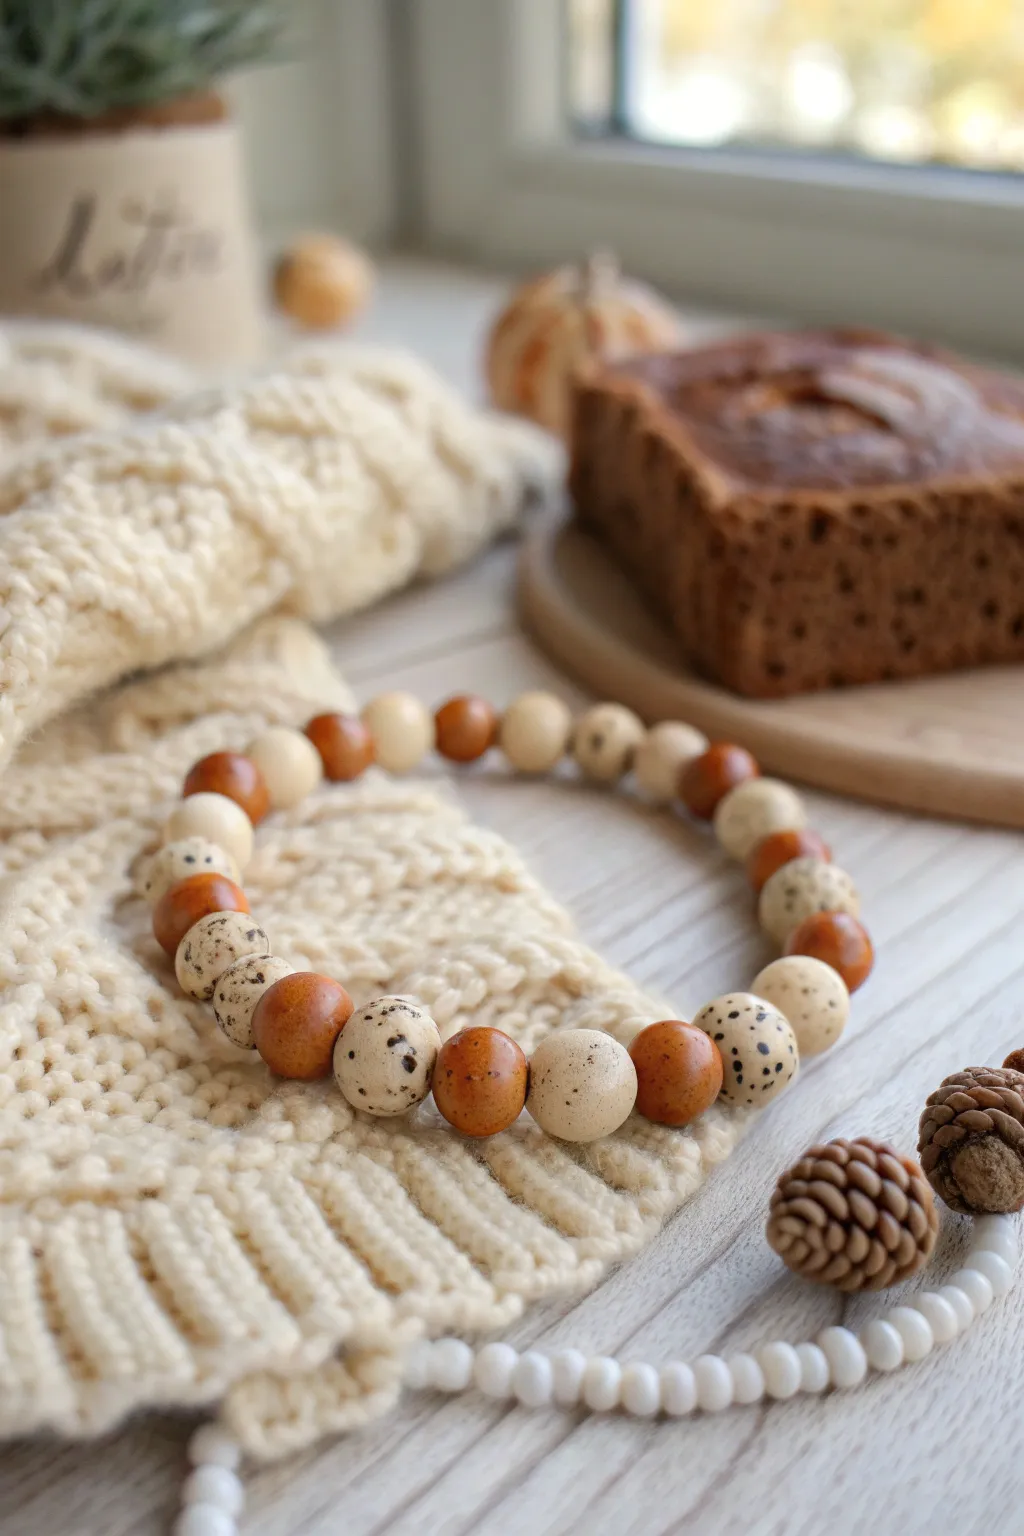
Embrace the cozy vibes of autumn with this warm and inviting clay bead bracelet. Combining rich amber tones with creamy neutrals and whimsical speckles, this accessory perfectly mimics the comforting look of fresh pumpkin bread.
Step-by-Step Tutorial
Materials
- Polymer clay (burnt orange/amber)
- Polymer clay (cream/off-white)
- Black acrylic paint or black polymer clay (very small amount)
- Bead rolling tool or acrylic block
- Toothpicks or bead piercing pins
- Baking sheet with parchment paper
- Gloss or matte varnish (optional)
- Strong elastic stretch cord (0.8mm or 1mm)
- Jewelry glue (e.g., G-S Hypo Cement)
- Scissors
Step 1: Creating the Clay Colors
-
Condition the Clay:
Start by warming up your polymer clay in your hands. Knead the amber and cream clays separately until they are soft, pliable, and free of cracks. -
Prepare the Base Colors:
If you don’t have the exact amber shade, mix a standard orange with a touch of brown and a tiny bit of translucent clay to give it depth. For the cream, plain white mixed with a speck of yellow or tan creates a warmer off-white. -
Whisking up the Speckles:
For the speckled beads, take a portion of your cream clay. There are two ways to do this: either mix in finely grated black cured clay ‘dust’ for a natural look, or knead in very tiny bits of raw black clay until they streak and speckle, stopping before it turns gray.
Clay Texture Tip
For a ‘bready’ texture, lightly roll the raw beads over coarse sandpaper or dab with a stiff brush before baking to remove the perfect smoothness.
Step 2: Forming the Beads
-
Portioning:
Roll your conditioned clay into snakes of even thickness. Cut equal-sized segments from the amber, solid cream, and speckled cream logs to ensure your beads will be uniform in size. -
Rolling Rounds:
Take each segment and roll it between your palms to form a rough ball. For a perfectly spherical shape, I like to use an acrylic block or a bead rolling tool, moving in a circular motion over the clay on your work surface. -
Piercing the Holes:
Gently hold a bead between your thumb and forefinger. Using a toothpick or piercing pin, slowly twist into the center of the bead. Stop when you are halfway through. -
Finishing the Hole:
Turn the bead over and pierce from the opposite side until the holes meet in the middle. This technique prevents the clay from bulging out or deforming on the exit side. -
Refining the Shape:
Because handling the beads can slightly flatten them, give each one a very gentle final roll between your fingers or on the table to restore their perfect roundness. -
Arranging for Baking:
Place your pierced beads onto a baking sheet lined with parchment paper. If you want to avoid flat spots entirely, you can string them on a rigid wire suspended over a foil pan.
Make it Organic
Make the beads slightly irregular sizes rather than identical spheres. This organic variation mimics natural stones and fits the rustic autumn theme perfectly.
Step 3: Baking and Finishing
-
Bake:
Bake the beads according to the manufacturer’s instructions for your specific brand of clay—usually around 275°F (130°C) for 15-30 minutes. -
Cool Down:
Let the beads cool completely on the tray. Do not attempt to handle them while hot, as polymer clay is still slightly soft until fully cooled. -
Alternative Speckle Method:
If you didn’t mix speckles into the clay earlier, now is the time to dip an old toothbrush into black acrylic paint and gently flick it over the cooled cream beads for a surface-level splatter effect. Let this dry thoroughly. -
Varnishing (Optional):
If you prefer a shinier look like polished stone, apply a thin coat of water-based gloss varnish to the beads and let them dry on a toothpick rack.
Step 4: Assembly
-
Determine Length:
Cut a piece of elastic cord about 10-12 inches long. This gives you plenty of extra room for tying knots without struggling. -
Pre-stretch the Cord:
Give the elastic cord a few firm tugs. This pre-stretching step is crucial as it prevents the bracelet from sagging or loosening up immediately after you wear it. -
Patterning:
String your beads in a random or repeating pattern. The image shows an organic mix: try groups like one amber, one speckled, one cream, then switch it up to keep it looking natural. -
Tying the Knot:
Once the beaded strand fits your wrist comfortably, tie a surgeon’s knot (right over left, left over right, looping through twice on the second pass). Pull it tight. -
Securing:
Place a tiny drop of jewelry glue on the knot. Allow it to dry for a minute, then trim the excess elastic ends close to the knot. -
Hiding the Knot:
Gently pull the elastic so the knot slides inside the hole of the nearest bead, hiding it from view for a professional finish.
Enjoy wearing your new autumn accessory that brings a touch of warmth to any outfit


What Really Happens Inside the Kiln
Learn how time and temperature work together inside the kiln to transform clay into durable ceramic.
Plaid-Inspired Autumn Stripes
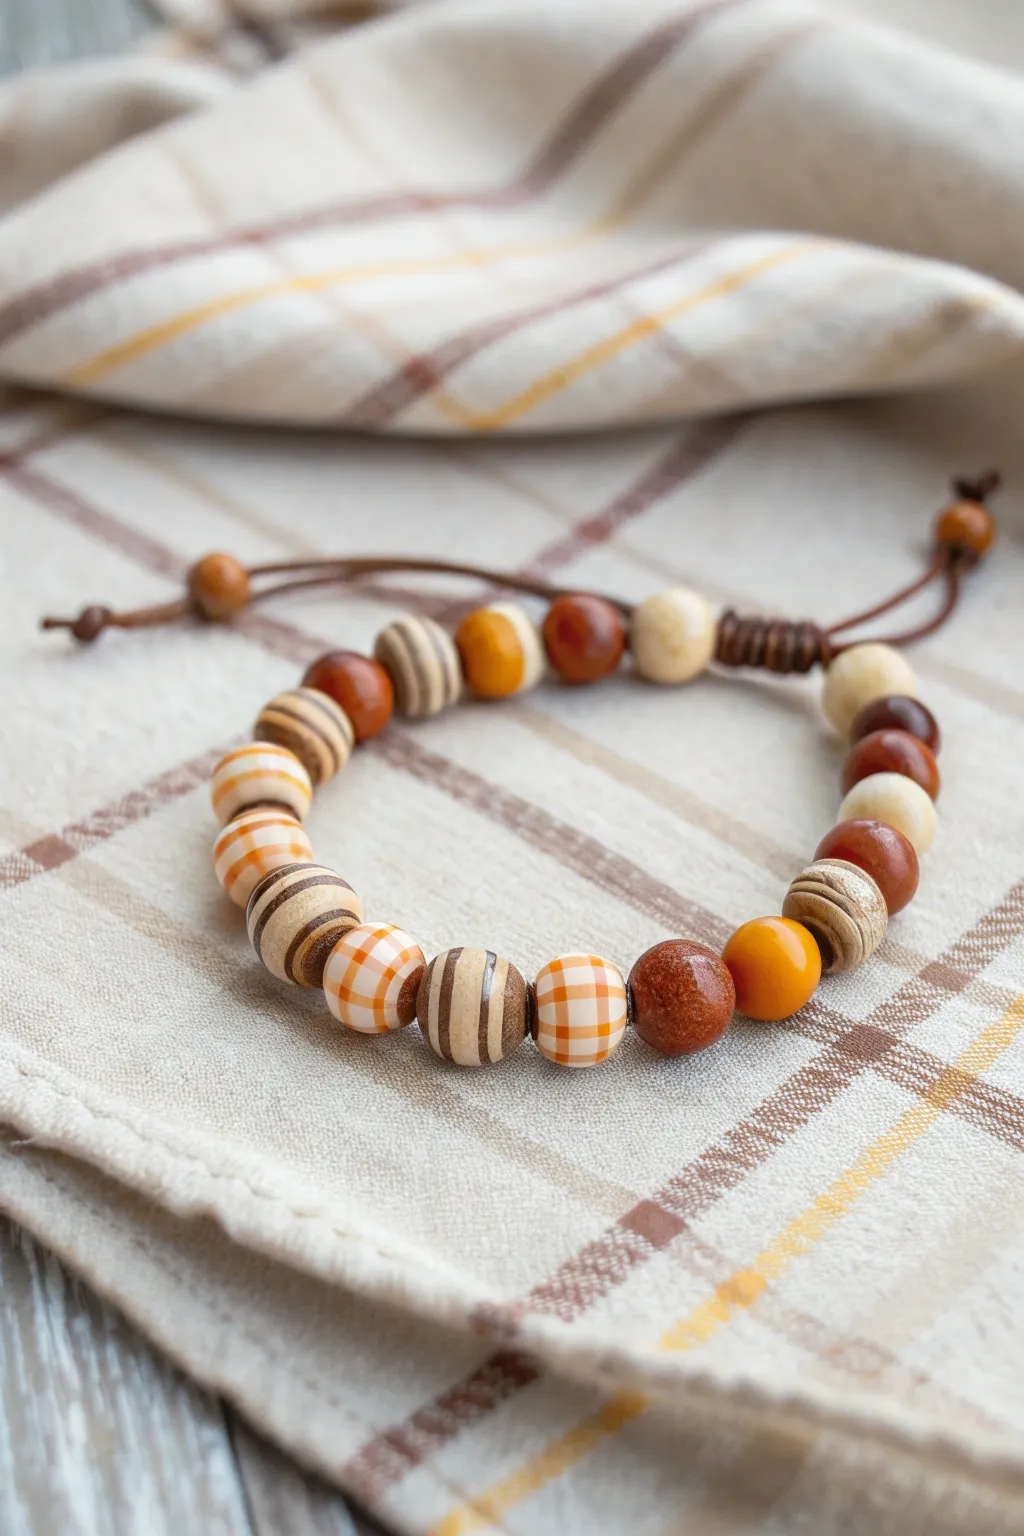
Capture the essence of a warm autumn day with this chunky beaded bracelet. Featuring hand-painted plaid and striped patterns mixed with natural wood and warm-toned clay beads, this accessory brings a rustic yet polished touch to any fall outfit.
Step-by-Step Guide
Materials
- Polymer clay in white, pumpkin orange, and deep reddish-brown
- Wooden beads (approximately 10-12mm)
- Acrylic paints (dark brown, cream, orange)
- Fine detail paintbrush (size 0 or 00)
- Gloss or matte varnish (for clay)
- 1.5mm brown leather or waxed cotton cord
- Small clay loop tool or toothpick
- Sandpaper (fine grit)
- Oven for baking clay
Step 1: Creating the Solid Clay Beads
-
Condition the Clay:
Begin by thoroughly conditioning your pumpkin orange, deep reddish-brown, and white polymer clay until it is soft and malleable. -
Form the Base Beads:
Roll balls of clay approximately 12mm in diameter. Create several solid orange, several reddish-brown, and several white beads. -
Add Texture (Optional):
For the reddish-brown ‘sparkle’ beads seen in the design, you can mix in a tiny pinch of gold glitter into the clay before rolling, or choose a pre-mixed metallic effect clay. -
Pierce the Holes:
Using a toothpick or a piercing tool, create a hole through the center of each bead. Make sure the hole is wide enough (about 2mm) to accommodate your leather cord later. -
Bake the Beads:
Bake your clay beads according to the manufacturer’s instructions. Usually, this is around 275°F (135°C) for 15-30 minutes. Let them cool completely before painting.
Steady Hands Tip
Put beads on a skewer while painting. Rest your wrists on a table to stabilize your hands for cleaner lines.
Step 2: Painting the Patterns
-
Base Coat the Wood:
Select your plain wooden beads. For the striped beads, you can leave the natural wood showing or apply a very light wash of cream paint as a base. -
Paint Vertical Stripes:
On several wooden beads, use your fine brush to paint thick vertical stripes using dark brown acrylic paint. Keep your hand steady and rotate the bead on a toothpick for stability. -
Create the Plaid Pattern:
Take your cooled white clay beads. Paint a grid of horizontal and vertical lines using orange paint to create a gingham or plaid effect. Keep the lines relatively thick. -
Add Stripe Variations:
On the remaining plain wood or cream-colored beads, paint horizontal bands. Vary the thickness—some thin, some wide—using alternating orange and brown tones to mimic a woven textile look. -
Seal the Beads:
Once the paint is fully dry, apply a coat of varnish to all painted beads (both clay and wood) to protect the design and add a subtle sheen.
Step 3: Assembly and Finishing
-
Prepare the Cord:
Cut a length of brown leather cord, approximately 12-14 inches long. Fold it in half to create a loop at one end if you prefer a loop-and-knot closure, or keep it single for an adjustable sliding knot. -
Plan the Layout:
Lay out your beads on a cloth to finalize the pattern. I like to alternate textures: place a solid glossy bead next to a matte wood pattern, then a plaid bead, ensuring no two identical beads touch. -
String the Beads:
Thread the beads onto the cord in your chosen order. If the cord end frays, wrap a tiny piece of tape around the tip to make it act like a needle. -
Create the Sliding Knot:
Once all beads are strung, bring the two ends of the cord together. Use a separate piece of cord to tie a square knot or a series of macramé knots around the main cords to create a sliding closure. -
Finish the Ends:
Tie small overhand knots at the very ends of the pull cords. For a polished look, add a small wooden bead to each end before knotting. -
Trim Excess:
Trim any excess cord close to the knots. Your rustic autumn bracelet is now ready to wear.
Uneven Paint?
If stripes look shaky, wipe them off immediately with a damp paper towel before the acrylic dries and try again.
Now you have a charming, handcrafted accessory that perfectly captures the cozy spirit of the season
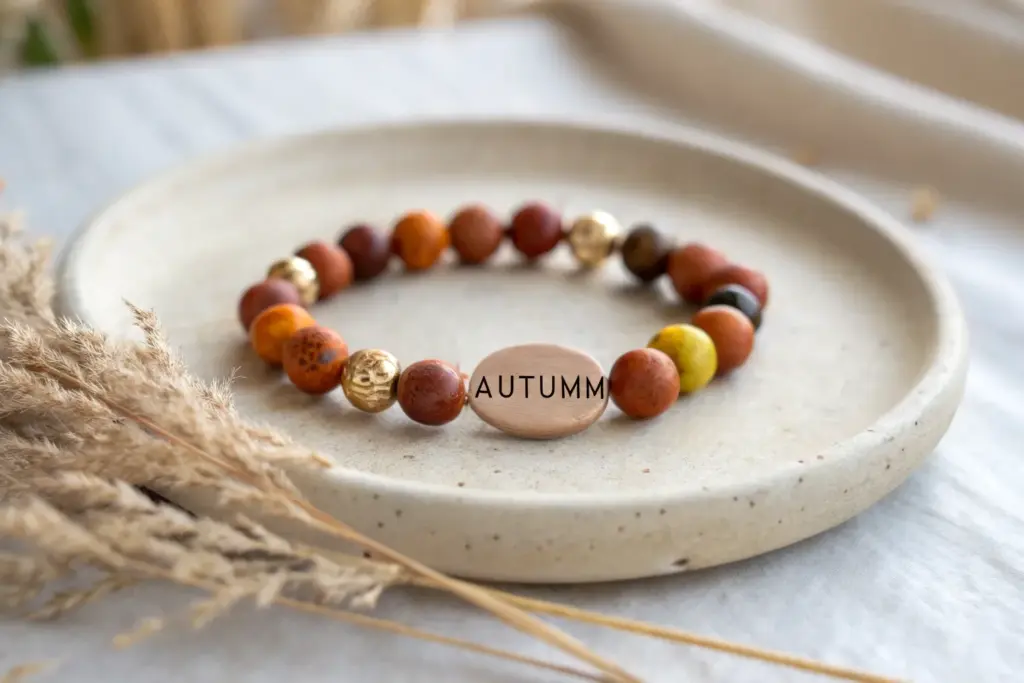
“FALL” Letter Bead Centerpiece
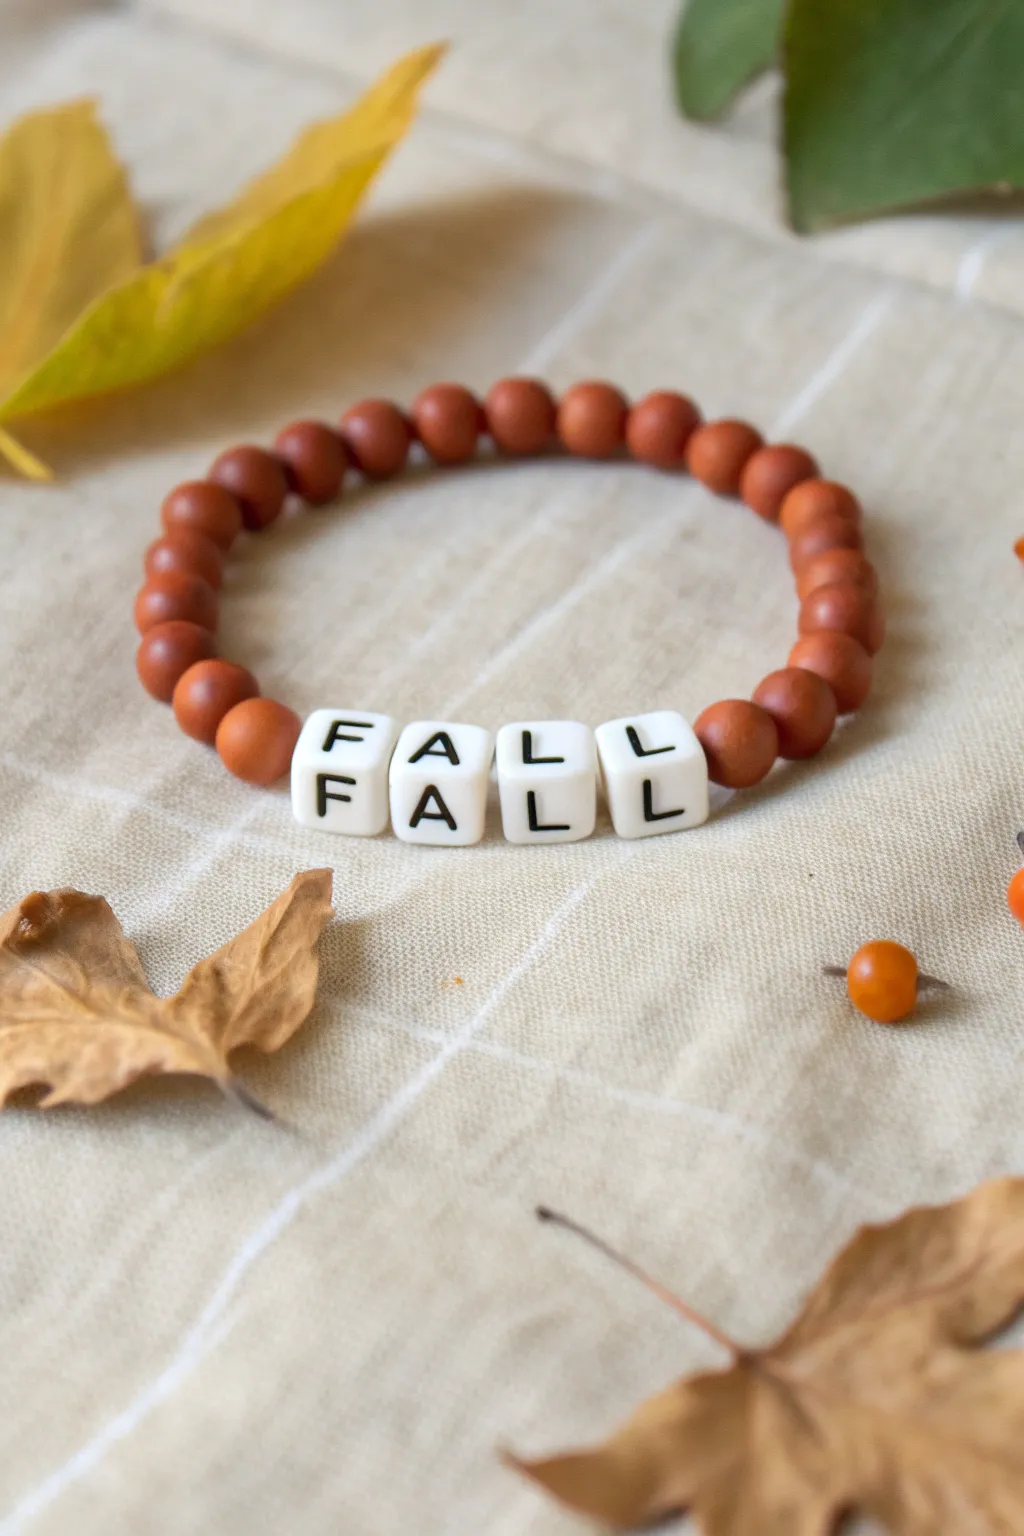
Capture the essence of the season with this simple yet striking bracelet design. Using warm terracotta-colored round beads and bold letter cubes, this accessory serves as a perfect understated nod to autumn cozy vibes.
How-To Guide
Materials
- Stretch cord (0.7mm or 0.8mm clear elastic)
- Terracotta or reddish-brown round wood or clay beads (approx. 8mm)
- White square letter beads spelling ‘F’, ‘A’, ‘L’, ‘L’
- Scissors
- Bead stopper or sturdy tape
- Jewelry glue or clear nail polish (optional)
Step 1: Preparation
-
Measure your wrist:
Wrap a piece of string or a soft measuring tape around your wrist to determine the circumference. Add about half an inch to this measurement to ensure a comfortable fit that isn’t too tight. -
Cut the cord:
Cut a length of stretch cord about 10-12 inches long. Having this extra length makes tying the final knots much easier than struggling with short ends. -
Pre-stretch the elastic:
Give your cut piece of elastic a few gentle tugs. This pre-stretching helps prevent the bracelet from loosening up immediately after you finish making it. -
Secure the end:
Place a bead stopper or a piece of masking tape on one end of the cord. This is a crucial little safety net so your beads don’t slide right off while you work.
Step 2: Beading the Design
-
Sort your letter beads:
Find your ‘F’, ‘A’, ‘L’, and ‘L’ beads. Lay them out on your workspace in the correct order to ensure you don’t accidentally spell it backwards. -
Calculate bead count:
For an average adult wrist (approx. 7 inches), you will likely need about 20-22 of the 8mm round beads total. Divide this number by two to figure out how many go on each side. -
Thread the first half:
Begin threading the terracotta round beads onto the cord. Start with roughly 10 or 11 beads, which will form the first half of the bracelet band. -
Double-check spacing:
Slide these beads down to the stopper and hold them against your wrist to see if this covers half the distance you need. -
Add the centerpiece:
Thread the letter beads in order: F, then A, then L, then L. Check the orientation so the letters are all facing the same direction and not upside down relative to each other. -
Thread the second half:
Add the remaining terracotta round beads to the other side of the letter centerpiece. Try to match the number of beads you used on the first side for symmetry. -
Check the final fit:
Wrap the unfinished strand around your wrist. The ends should meet comfortably without gaps between beads, but without stretching the cord tight.
Knot Security Tip
Don’t cut the tails flush immediately! Leave 2mm of tail when trimming. If the knot slips slightly inside the bead hole, that extra length prevents it from untying completely.
Step 3: Finishing Touches
-
Prepare to knot:
Remove the bead stopper or tape carefully, holding both ends of the elastic firmly so no beads escape. -
Tie the first knot:
Cross the right end over the left and pull tight to create a simple overhand knot. Pull the elastic strands firmly to tighten the beads together. -
Tie a surgeon’s knot:
For the second knot, loop the elastic through twice before pulling it tight. This creates a secure surgeon’s knot that is less likely to slip. -
Secure with glue:
I prefer to add a tiny drop of jewelry glue or clear nail polish directly onto the knot. Let this dry for a few minutes to ensure it won’t unravel. -
Hide the knot:
Once the glue is tacky or dry, gently tug on the bracelet to pull the knot inside one of the adjacent round beads. -
Trim the excess:
Using sharp scissors, trim the excess cord ends close to the bead hole where the knot is hidden.
Level It Up
Add two small gold spacer beads on either side of the word ‘FALL’ to frame the text and add a metallic accent that complements the warm terracotta tones.
Slip on your new bracelet and enjoy carrying a little piece of autumn with you wherever you go

TRACK YOUR CERAMIC JOURNEY
Capture glaze tests, firing details, and creative progress—all in one simple printable. Make your projects easier to repeat and improve.
Pumpkin Spice Word + Cozy Charms
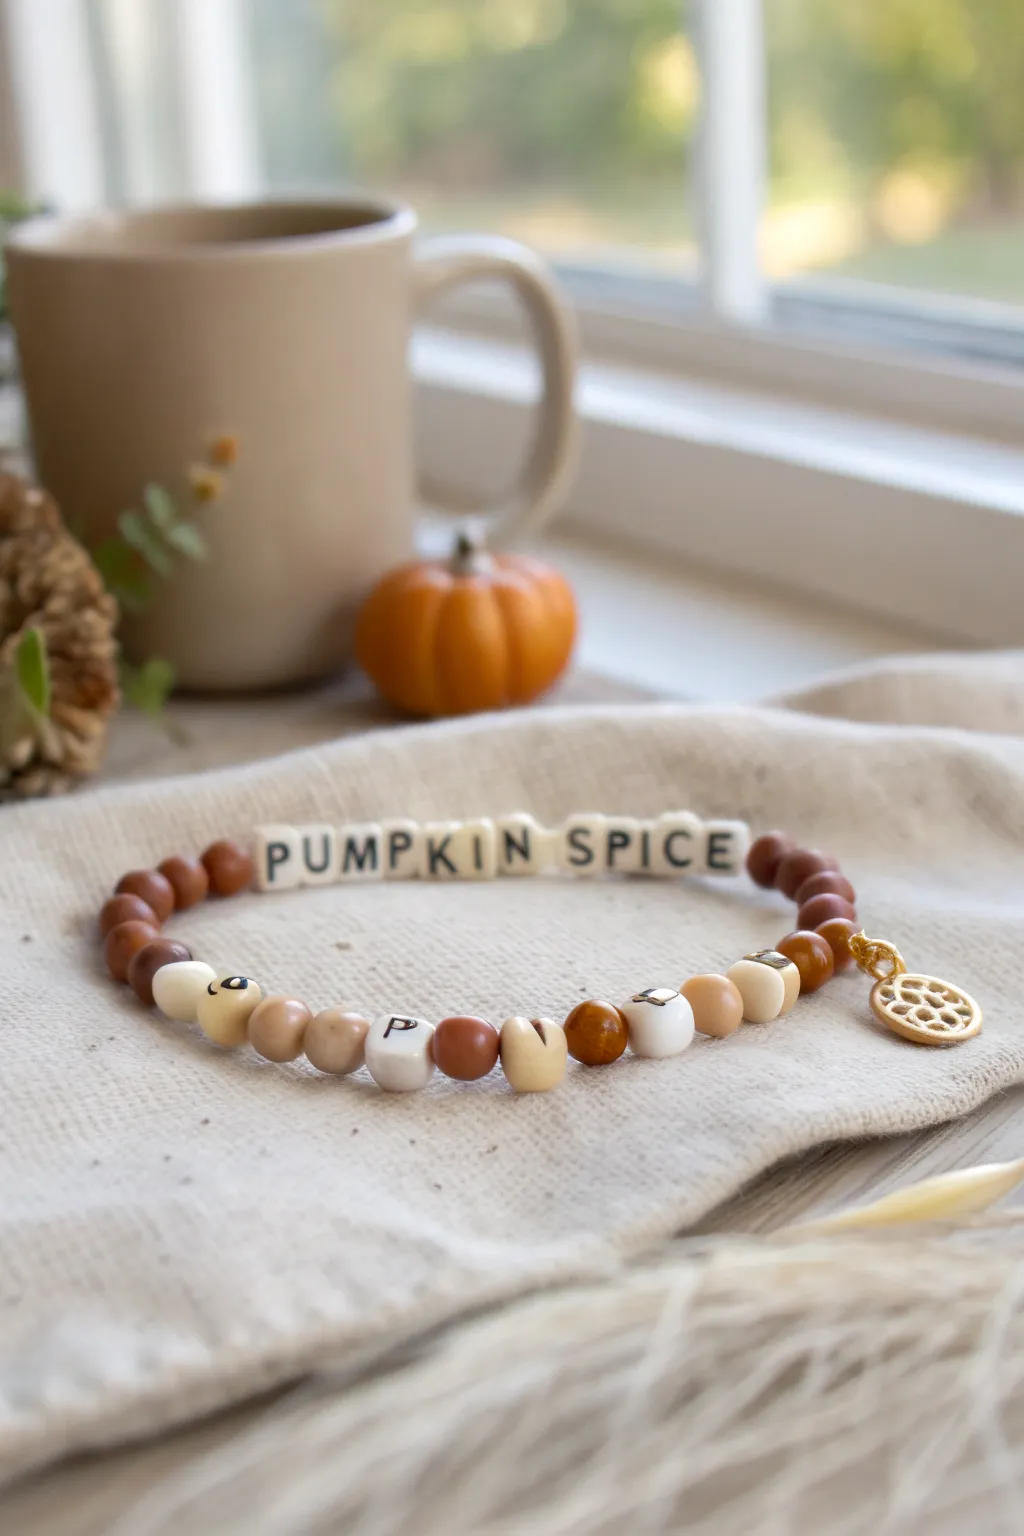
Embrace the cozy vibes of fall with this warm-toned beaded bracelet featuring playful text and charming accents. Mixing matte beads, letter cubes, and a honeycomb charm creates a piece perfect for sipping cider by the window.
Step-by-Step Tutorial
Materials
- Stretch elastic cord (0.8mm or 1mm)
- Square letter beads spelling ‘PUMPKIN SPICE’
- Wooden or matte clay beads (approx. 6mm) in burnt sienna/terracotta
- Wooden or matte clay beads (approx. 6mm) in sand/beige
- Additional random letter/symbol beads for the bottom curve (optional)
- Gold tone honeycomb charm
- Gold jump ring
- Jewelry glue or clear nail polish
- Scissors
Step 1: Planning and Sorting
-
Measure your wrist:
Wrap the elastic cord loosely around your wrist to estimate length, adding about 3-4 inches excess on each side for tying the knot later. Do not cut the cord from the spool yet if you want to avoid beads slipping off. -
Sort your letters:
Find all the required letter beads to spell ‘PUMPKIN SPICE’. Lay them out on your workspace to ensure you have the full phrase ready before stringing. -
Select accent colors:
Separate your round beads into color groups. You’ll need a mix of the darker terracotta/burnt sienna color and the lighter sand/beige color to create the alternating gathered effect seen in the bottom half.
Step 2: Stringing the Design
-
Start the sequence:
Begin by stringing 3-4 of the darker terracotta round beads onto the elastic cord. -
Add the first word:
Thread the letter beads for ‘PUMPKIN’ onto the cord. Ensure they are all facing the correct direction so the word reads clearly from left to right. -
Create the spacer:
Add a single darker round bead. This acts as a visual space between your two words. -
Add the second word:
Thread the letter beads for ‘SPICE’ onto the cord, double-checking the orientation again. -
Finish the top half:
Add 3-4 more of the darker terracotta round beads to balance the beginning of the strand. -
Attach the charm:
Use pliers to open a small gold jump ring and attach the honeycomb charm to the cord. Place this right after the last terracotta bead.
Knot Slipping?
If your elastic knot feels insecure, try a drop of Hypo Cement. It has a precision tip perfect getting right into the knot without gluing the beads together.
Step 3: Creating the Bottom Half
-
Start the alternating pattern:
For the bottom half of the bracelet, you want a more random, organic feel. Start with a mix of light beige and dark terracotta beads. -
Incorporate random accents:
I like to mix in a few random white beads or extra letter beads turned sideways (like the ‘P’ seen in the image) to break up the pattern and add visual interest. -
Check the fit:
Wrap the unfinished strand around your wrist to check the size. Add or remove round beads from this bottom section until the two ends meet comfortably without stretching the cord.
Pro Tip: Bead Texture
For that authentic finish, use wooden or matte acrylic beads instead of glossy ones. The matte texture gives the softer, cozier fall aesthetic shown here.
Step 4: Finishing Touches
-
Pre-stretch the cord:
Give the entire beaded strand a gentle tug. This pre-stretching prevents the bracelet from loosening up significantly after the first wear. -
Tie the knot:
Tie a secure surgeon’s knot (right over left, left over right) to close the loop. Pull it tight. -
Secure with glue:
Dab a tiny drop of jewelry glue or clear nail polish onto the knot to seal it. Let it dry for a few minutes. -
Hide the knot:
If possible, gently tug the knot inside the hole of one of the adjacent round beads to hide it from view. -
Trim excess cord:
Cut off the remaining tails of the elastic cord close to the bead, being careful not to clip the knot itself.
Slip on your new accessory and enjoy the perfect companion for your favorite warm beverage
Maple Leaf Accent Beads
Capture the cozy essence of fall with this earthy bracelet featuring handmade-style clay beads and a striking metal maple leaf charm. The mix of terracotta tones, speckled natural textures, and metallic accents creates a sophisticated accessory perfect for sweater weather.
How-To Guide
Materials
- Polymer clay (terracotta/rust orange, beige/cream, granite/stone effect)
- Small round bead mold (optional, for uniformity)
- Beading wire (flexible, 0.45mm)
- Metal silver-tone maple leaf charm
- Silver-tone jump ring (6mm)
- Textured copper or bronze spacer beads (barrel or disc shape)
- Silver-tone ribbed spacer beads
- Gold or brass crimp beads
- Gold or brass lobster clasp and jump ring
- Beading needle (optional)
- Needle-nose pliers
- Bead design board or ruler
- Oven for baking clay
Step 1: Crafting the Clay Beads
-
Prepare your palette:
Begin by conditioning your polymer clay blocks. You will need a significant amount of rust/terracotta orange for the main body of the bracelet, plus smaller amounts of beige and granite-effect clay for the focal section. -
Roll the main beads:
Roll approximately 30-40 small spheres from the terracotta orange clay. Aim for a consistent size of about 6mm. I find that using a small circle cutter to portion the clay helps keep them identical. -
Create the focal beads:
Create the special accent beads for the center. You need two cream/beige beads, one granite-effect bead, one rust bead (slightly larger), and two textured brown/speckled beads. These should be larger than your main beads, around 8-10mm. -
Add texture:
For the two brown speckled beads, gently roll them over a piece of coarse sandpaper or use a toothbrush to stipple the surface, giving them a natural, stone-like appearance. -
Pierce the beads:
Carefully pierce a hole through the center of every bead using a needle tool or toothpick. Ensure the holes are large enough to accommodate your beading wire comfortably. -
Bake the clay:
Arrangement your unbaked beads on a baking sheet or tile. Bake them according to the specific temperature and time instructions on your polymer clay package. Let them cool completely before handling.
Smoother Finishes
To remove fingerprints from your raw clay beads before baking, lightly brush them with a drop of baby oil or cornstarch.
Step 2: Assembly
-
Cut the wire:
Cut a length of beading wire roughly 9-10 inches long. This gives you plenty of slack to work with for finishing the ends. -
Secure the first end:
Thread a crimp bead onto one end of the wire, followed by the loop of your clasp. Thread the wire back through the crimp bead and use your pliers to flatten it securely. String a small gold bead next to hide the wire tail. -
String the first section:
Begin threading your terracotta orange beads. Continue until you have covered about one-third of your desired bracelet length. The image shows a long run of these uniform beads leading up to the center. -
Start the focal pattern:
Now, introduce your first transition. Slide on one speckled beige/stone bead, followed by a ribbed copper spacer bead. -
Add texture and contrast:
Next, add the textured brown bead, followed by a smooth cream bead. This builds the visual variety leading to the center. -
Center point assembly:
For the centerpiece, thread the textured brown bead, then a ribbed silver spacer. Before adding the next bead, we need to prep the charm. -
Attach the charm helper:
Slide the maple leaf charm onto its jump ring. Thread this jump ring onto the beading wire so it sits right next to that silver spacer. -
Complete the focal section:
Immediately follow the charm with the bright orange focal bead, a dark granite-effect bead, another smooth cream bead, and finally a ribbed copper spacer to mirror the other side. -
Finish the bead run:
Resume stringing the smaller terracotta orange beads for the remainder of the bracelet length until it fits your wrist comfortably. -
Close the bracelet:
Thread on a crimp bead and a jump ring (for the clasp to hook into). Loop the wire back through the crimp and a few adjacent beads. -
Final trim:
Pull the wire taut so there are no gaps but the bracelet isn’t stiff. Flatten the crimp bead with pliers and trim the excess wire close to the beads.
Adding Shimmer
Brush a tiny amount of gold mica powder onto the textured brown beads before baking to make the stone texture catch the light.
Now you have a charming piece of autumn jewelry ready to wear on your next walk through the falling leaves
Woodland Acorn and Pinecone Vibes
Capture the essence of a crisp forest walk with this beaded bracelet featuring a mix of earthy textures and warm autumn tones. The combination of matte, wood-grain, and ribbed beads culminates in a delicate metallic leaf charm that moves with you.
Step-by-Step Tutorial
Materials
- Polymer clay (burnt orange, terracotta, dark brown, latte/cream, speckled gray/granite)
- Textured blending sponge or lava stone stamp
- Beading elastic cord (0.8mm or 1mm)
- Small metal leaf charm (copper or rose gold tone)
- Jump ring (matching metal tone)
- Jewelry pliers
- Needle tool or toothpick
- Bead reamer tool (optional)
- Super glue or jewelry adhesive
- Acrylic roller
- Cornstarch (optional for preventing sticking)
Step 1: Crafting the Clay Beads
-
Condition the Clay:
Begin by conditioning each color of polymer clay separately until it is soft and pliable. Roll them into even snakes of roughly the same thickness to ensure consistent bead sizes later. -
Portion the Clay:
Cut the clay snakes into equal segments. For this bracelet, you’ll need approximately 15-20 segments depending on wrist size. Aim for segments that will roll into 10mm-12mm spheres. -
Roll the Spheres:
Take each segment and roll it briskly between your palms to create smooth, round spheres. Create a mix of burnt orange, dark brown, and latte-colored beads. -
Create the Speckled Stone Bead:
For the gray ‘stone’ bead, use the granite-effect clay. Roll it into a ball, then gently roll it over a piece of coarse sandpaper or texturing sponge to give it a pitted, rocky surface. -
Create the Cork Texture Bead:
Take a light brown or tan sphere. Press a piece of crumpled aluminum foil or a stiff sponge against the surface repeatedly to create a porous, cork-like texture. -
Create the Ribbed Bead:
Select a dark brown sphere. Using the side of a needle tool or a dull knife, gently press vertical indentations all around the bead to create a ribbed, pumpkin-like effect. -
Pierce the Beads:
Carefully insert a needle tool or toothpick through the center of each bead to create the stringing hole. Rotate the tool as you push through to prevent the bead from squashing. -
Bake the Clay:
Arrange your beads on a baking sheet or tile. Bake according to the manufacturer’s instructions for your specific brand of clay—usually around 275°F (135°C) for 15-30 minutes.
Fixing Wonky Holes
If you struggle to pierce beads straight, let the clay sit for 15 mins to firm up first, or pierce halfway from one side and meet in the middle.
Step 2: Assembly & Finishing
-
Cool and Ream:
Allow the beads to cool completely. If any holes shrank during baking or have rough edges, twist a bead reamer or small drill bit inside to clean them up. -
Prepare the Charm:
Using two pairs of jewelry pliers, gently twist the jump ring open laterally (never pull it apart). Slide on your metal leaf charm. -
Plan the Layout:
Lay out your beads on a bead board or towel to finalize the pattern. Alternate the solid colors with the special textured beads to create visual interest. -
String the Beads:
Cut a length of elastic cord about 10-12 inches long. Stretch it gently a few times to ‘pre-stretch’ it. Thread the beads onto the cord in your chosen order. -
Attach the Charm:
I like to place the charm between two contrasting beads, like the bright orange and the pale latte bead. Slide the jump ring onto the cord at your desired location. -
Check the Fit:
Wrap the strung beads around your wrist to check the size. Add or remove beads as necessary for a comfortable fit. -
Tie the Knot:
Tie the ends of the elastic cord together using a surgeon’s knot (looping the elastic through twice on the first pass). Pull it tight. -
Secure and Trim:
Place a tiny dot of super glue right on the knot to secure it. Let it dry for a moment, then trim the excess cord ends close to the knot. -
Hide the Knot:
Gently pull the elastic so the knot slides inside the hole of the nearest bead, hiding it from view for a professional finish.
Scent Infusion
Use unfinished wood or lava stone beads for the textured accents. Add a drop of cinnamon or cedarwood essential oil to them for a scented autumn accessory.
Wear your handmade piece on your next outdoor adventure to celebrate the season
Halloween Pop: Orange, Black, and “BOO”
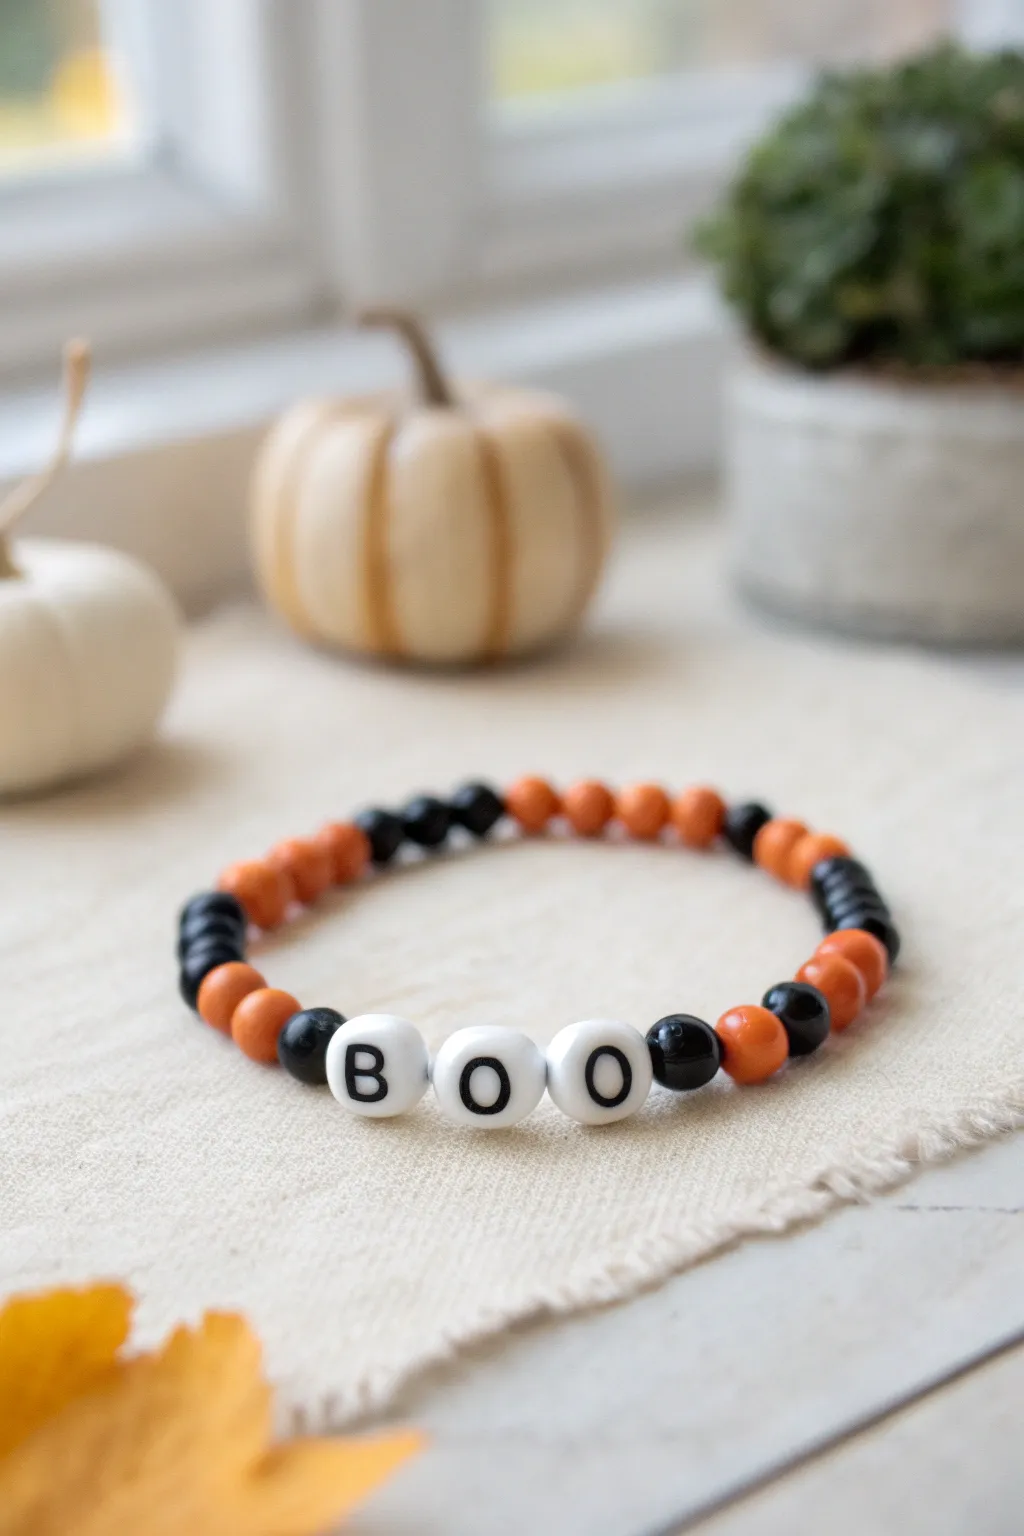
Celebrate the playful side of Halloween with this simple yet striking beaded bracelet. Featuring a classic alternating orange and black color scheme surrounding cheerful “BOO” letter beads, it’s the perfect accessory for pumpkin picking or trick-or-treating.
Step-by-Step Guide
Materials
- Orange round wooden or clay beads (approx. 6mm-8mm)
- Black round wooden or clay beads (approx. 6mm-8mm)
- White round alphabet beads (letters B, O, O)
- Elastic beading cord (clear, 0.5mm-0.8mm)
- Beading needle (optional but helpful)
- Scissors
- Super glue or jewelry cement (optional)
- Tape or a bead stopper
Step 1: Preparation
-
Measure your cord:
Cut a piece of elastic beading cord about 10-12 inches long. This extra length makes tying the final knot much easier than working with a short tail. -
Pre-stretch the elastic:
Gently pull the cord a few times to stretch it out. This prevents the bracelet from stretching out permanently after the first time you wear it. -
Secure the end:
Place a piece of tape or attach a bead stopper to one end of the cord to prevent your beads from sliding off while you work. -
Layout design:
Lay out your beads on a soft surface or bead board to visualize the pattern before threading them. -
Center the message:
Find your ‘B’, ‘O’, and ‘O’ alphabet beads. Set a black bead on either side of this word group to act as a frame.
Knot Security
When tightening your elastic knot, pull on all four strands (the two tails and the bracelet loop itself) to ensure it locks tight.
Step 2: Creating the Pattern
-
Start the sequence:
Begin threading beads onto the non-taped end of the cord. I like to start about halfway through the back section so the final knot is hidden at the back of the wrist, not near the letters. -
Thread the first orange section:
Add approximately 4-5 orange beads. The exact number will depend on your wrist size, but this creates a bold block of color. -
Add a black transition:
Thread a single black bead, followed by a single orange bead, then another single black bead. This creates a speckled transition effect. -
Create the black section:
Add a sequence of solid black beads, roughly 3-4 of them, to balance the orange block. -
Build towards the center:
Continue alternating small groups of orange and black. For the design shown, aim for a balanced look where the colors switch every few beads. -
Add the centerpiece:
Thread one black bead, followed by the letter ‘B’, then ‘O’, then the second ‘O’. -
Anchor the message:
Immediately follow the last ‘O’ with one black bead. This frames the white letters perfectly against the colored beads. -
Mirror the pattern:
Continue threading the rest of the bracelet, mirroring the pattern you established on the first side. If you did an orange block earlier, place an orange block on this side too.
Step 3: Finishing Up
-
Check the size:
Wrap the unfinished strand around your wrist to check the fit. There should be no gaps, but it shouldn’t be tight enough to pinch. -
Prepare to knot:
Remove the tape or bead stopper carefully. Bring the two ends of the cord together. -
Tie the first knot:
Tie a simple overhand knot, pulling it snug against the beads to remove any slack. -
Secure with a surgeon’s knot:
Tie a surgeon’s knot (loop the cord through twice before pulling tight) on top of the first knot for extra security. -
Hide the knot:
Trim the excess cord ends to about 1/4 inch. If the hole of a neighboring bead is large enough, gently tug the knot inside to hide it. -
Add glue (optional):
For added durability, place a tiny drop of super glue or jewelry cement on the knot before hiding it.
Glow Up
Swap the white alphabet beads for glow-in-the-dark letter beads to make your bracelet shine during trick-or-treating!
Now slip on your festive bracelet and enjoy that spooky autumn flair
Spooky Chic Purple, Orange, and Charms
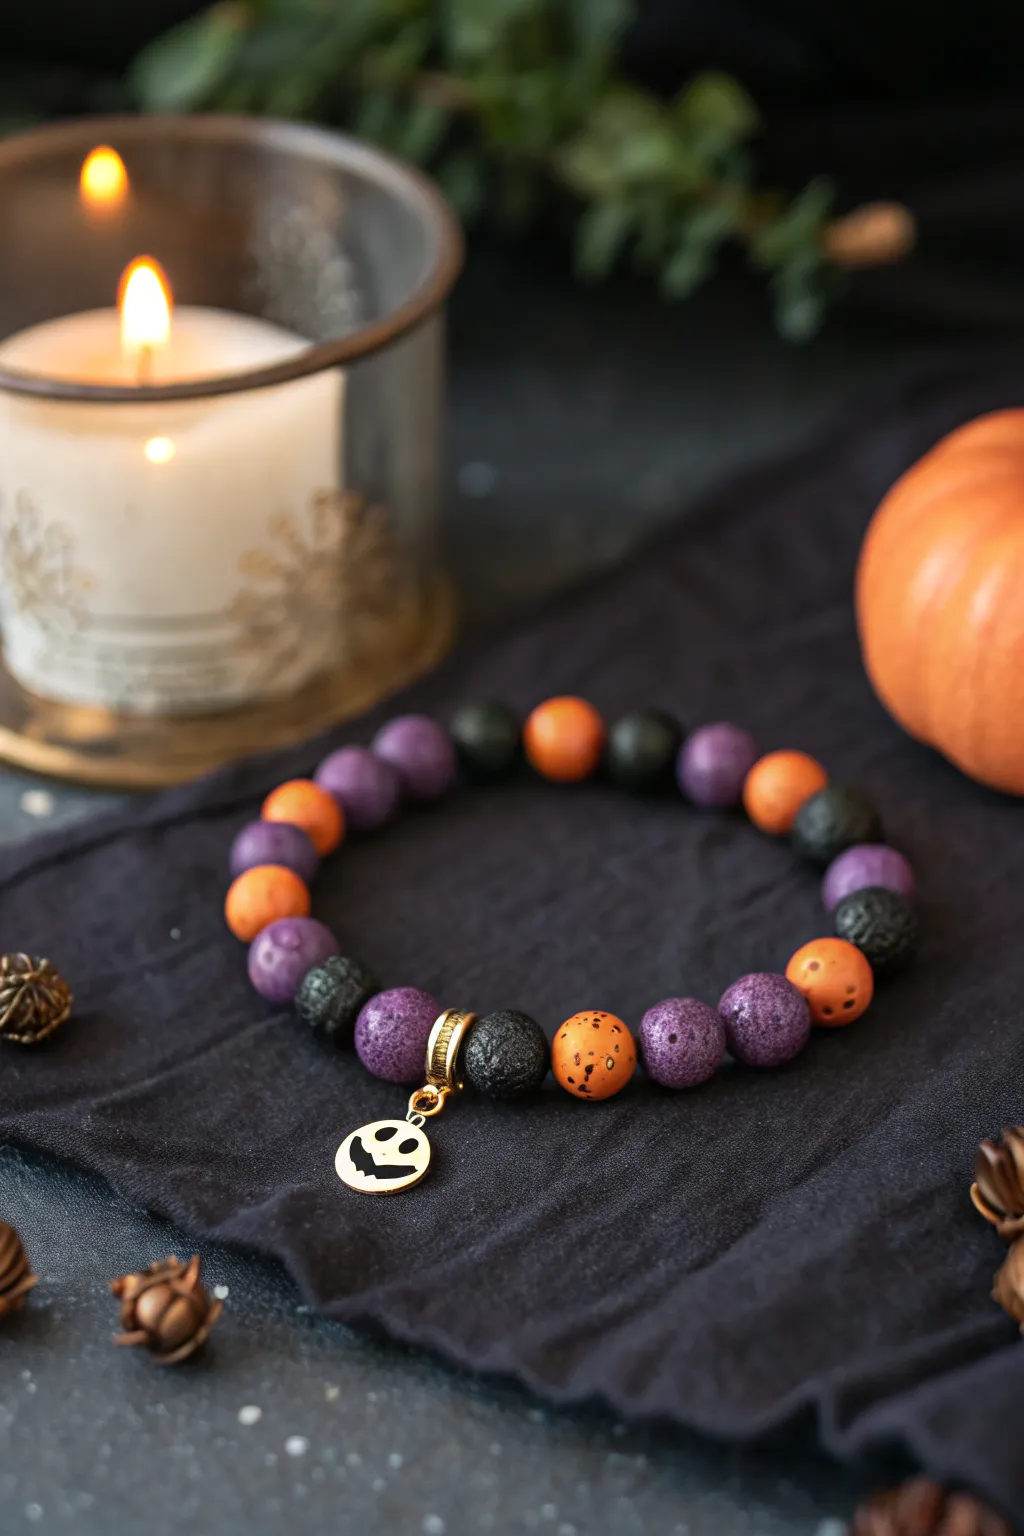
Embrace the Halloween spirit with this delightfully eerie yet elegant beaded bracelet. Featuring a classic trio of purple, orange, and black textures, this piece is finished with a playful Jack Skellington-inspired ghost charm.
Detailed Instructions
Materials
- Purple polymer clay beads (10mm, round, speckled/stone effect)
- Orange polymer clay beads (10mm, round, speckled/stone effect)
- Black lava rock beads (10mm or 8mm)
- Black round matte beads (10mm, likely polymer clay or onyx)
- Gold-tone Jack Skellington or pumpkin charm
- Gold-tone fluted ornate bail bead (large hole)
- Gold-tone jump ring (4-6mm)
- Sturdy elastic cord (0.8mm or 1mm)
- Jewelry glue (GS Hypo Cement or super glue)
- Scissors
Step 1: Planning and Prep
-
Measure the wrist:
Before you begin, wrap the elastic cord loosely around your wrist to estimate the length needed, but don’t cut it yet. Keeping the cord attached to the spool prevents beads from slipping off the other end while you work. -
Establish the pattern:
Lay out your beads on a bead board or a towel to visualize the design. The pattern shown alternates between blocks of color and textures. Notice the sequence: two purples, one black lava, one orange, two purples, one black lava, and so on, but allowed to break pattern slightly for an organic feel. -
Prepare the charm assembly:
Using pliers, open your gold jump ring by twisting the ends sideways (never pull them apart). Thread the ghost or pumpkin charm onto the ring. -
Attach the bail:
Loop the jump ring through the small loop on the gold fluted bail bead. Close the jump ring securely by twisting it back into place so the opening is flush.
Aromatic Addition
Add 1-2 drops of essential oil (like cinnamon or cedarwood) to the porous lava beads. They act as natural diffusers, making your bracelet smell like autumn.
Step 2: Stringing the Beads
-
Start the stringing:
Begin threading your beads onto the elastic cord. I like to start with a bead that has a slightly larger hole if possible, which helps hide the knot later. -
Create the first purple section:
Thread two textured purple beads followed by a black porous lava stone bead. -
Add a pop of orange:
Thread one speckled orange clay bead next. The orange acts as a bright accent against the darker tones. -
Continue the sequence:
Follow the orange bead with two more purple beads, then another black lava bead. This 2-1-1 rhythm creates a balanced look without being too rigid. -
Incorporate matte black:
Mix in a smooth matte black bead occasionally instead of the lava rock to add variation in texture. The bracelet shown uses both porous and smooth black beads. -
Place the focal point:
Once you have strung about half of your beads, execute the central focal section. Thread a purple bead, then the decorative gold bail bead (which holds your charm), and then a black lava bead. -
Finish the strand:
Continue your pattern—orange, lava, purple, purple—until the bracelet reaches your desired length. Check the fit by wrapping it around your wrist; it should sit comfortably without pinching.
Step 3: Finishing Touches
-
Pre-stretch the cord:
Gently pull on both ends of the elastic cord to ‘pre-stretch’ it. This crucial step prevents the bracelet from stretching out permanently the first time you wear it. -
Tie the knot:
Tie a surgeon’s knot (a square knot with an extra loop through) to secure the ends. Pull the knot tight, ensuring there are no gaps between the beads. -
Secure with glue:
Dab a tiny drop of jewelry glue directly onto the knot. Be careful not to get glue on the surrounding beads. -
Hide the knot:
While the glue is still slightly tacky but not wet, slide an adjacent bead over the knot to conceal it inside the hole. -
Trim excess cord:
Once the glue is fully dry, use sharp scissors to trim the excess elastic cord close to the bead hole.
Glow Up
Swap the white elements of the charm or specific beads for glow-in-the-dark polymer clay versions to make your bracelet shine during trick-or-treating.
Now you have a festive accessory ready to accompany you to any pumpkin patch or Halloween party
Thankful Tones With “GRATEFUL” Letters
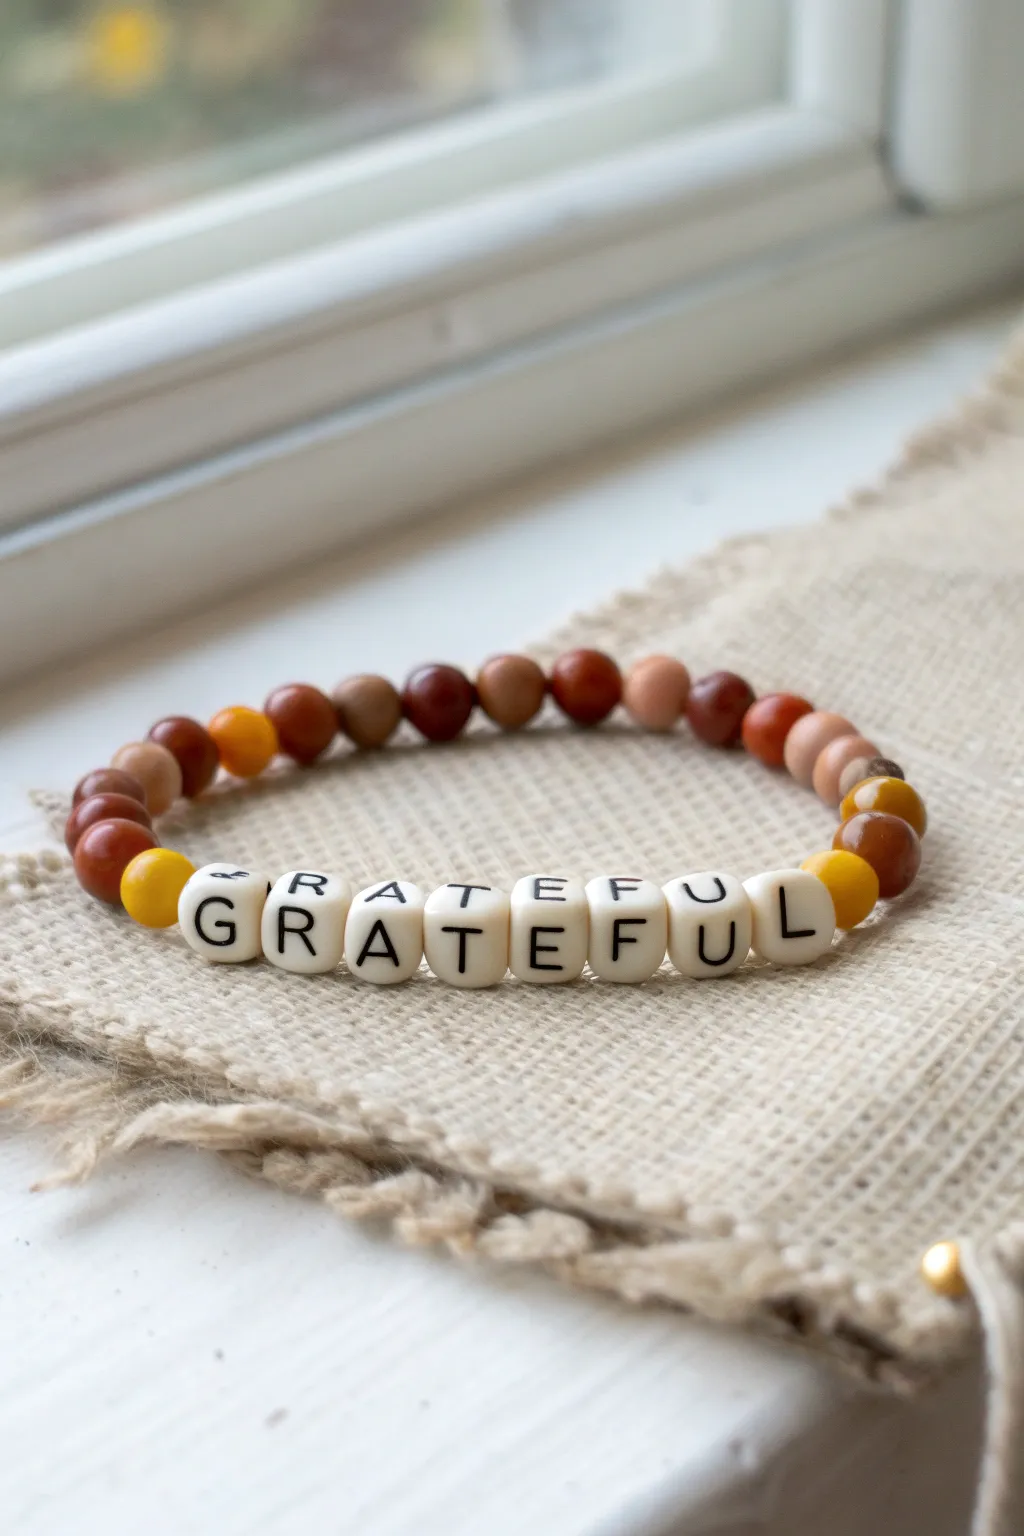
Capture the warm, comforting essence of autumn with this beaded bracelet featuring rich earth tones and a centering message. The mix of smooth wooden beads and polished gemstones creates a tactile reminder to stay thankful throughout the season.
How-To Guide
Materials
- Stretch elastic cord (0.7mm or 0.8mm)
- White square alphabet beads spelling ‘GRATEFUL’
- 6mm or 8mm wooden beads (natural light brown)
- 6mm or 8mm gemstone or glass beads (assorted autumn colors: deep red, burnt orange, mustard yellow, caramel brown)
- Jewelry glue (GS Hypo Cement) or clear nail polish
- Scissors
- Bead stopper or tape
- Beading board or ruler
Step 1: Planning and Preparation
-
Measure the wrist:
Before cutting anything, measure your wrist size using a flexible measuring tape. For a comfortable fit, add about 0.5 to 0.75 inches to that measurement. -
Cut the cord:
Cut a piece of elastic cord about 10-12 inches long. Having this extra length makes tying the finishing knots much easier and less frustrating. -
Pre-stretch the elastic:
Hold the cord ends firmly and give the elastic several gentle tugs. This pre-stretching step helps prevent the bracelet from loosening up effectively after the first few wears. -
Secure the end:
If you have a bead stopper, clip it onto one end of your cord. If not, a simple piece of tape works perfectly to stop beads from sliding off while you work.
Knot Slipping?
If the elastic feels slippery, try a surgeon’s knot. Loop the cord through twice instead of once on the first tie for extra friction.
Step 2: Designing the Pattern
-
Lay out the focus:
On your bead board or a towel, line up your ‘GRATEFUL’ letter beads in the center of your workspace to establish the focal point. -
Organize autumn tones:
Pour out your colored beads. Separate them by shade: the mustard yellows, the deep terracottas, the coffee browns, and the natural woods. -
Select flanking beads:
I like to start designing immediately next to the letters. Choose two bright mustard yellow beads to place on either side of the word ‘GRATEFUL’ to make the white letters pop. -
Create the random mix:
For the rest of the bracelet, avoid a strict repeating pattern. Instead, alternate between the wooden beads and colored stones randomly to create an organic, earthy feel. -
Check the length:
Line up your random mix beads alongside your ruler until the total length of beads (including the letters) matches your target wrist size.
Add Texture
Mix in one or two lava rock beads. Their porous surface allows you to add a drop of essential oil like cinnamon for a scented accessory.
Step 3: Stringing and Finishing
-
String the letters:
Thread the letter beads onto the cord first. Double-check that they are all facing the correct direction and spelling the word properly before moving on. -
Add first side beads:
String the beads you planned for the right side of the word, starting with that mustard yellow accent bead. -
Add second side beads:
String the remaining beads for the left side, again ensuring the yellow accent bead sits directly next to the ‘G’. -
Verify the fit:
Carefully lift the cord by both ends and wrap it around your wrist to check the size. Add or remove a bead or two if it feels too tight or too loose. -
Tie the first knot:
Remove your bead stopper or tape. Bring the two ends together and tie a simple overhand knot, pulling it snug against the beads. -
Secure with a square knot:
Follow up with a strong square knot (right over left, left over right). Pull the elastic tight; you should see the knot disappear slightly inside the hole of a neighboring bead if possible. -
Apply adhesive:
Dab a tiny drop of jewelry glue or clear nail polish onto the knot. This is crucial for longevity and keeps the knot from slipping undone. -
Final trim:
Allow the glue to dry for at least 15 minutes. Once dry, use your scissors to trim the excess cord ends close to the knot, being careful not to cut the main knot itself.
Wear your new bracelet as a daily reminder to embrace the season with a thankful heart
Cord-and-Clay Wrap Bracelet for Fall
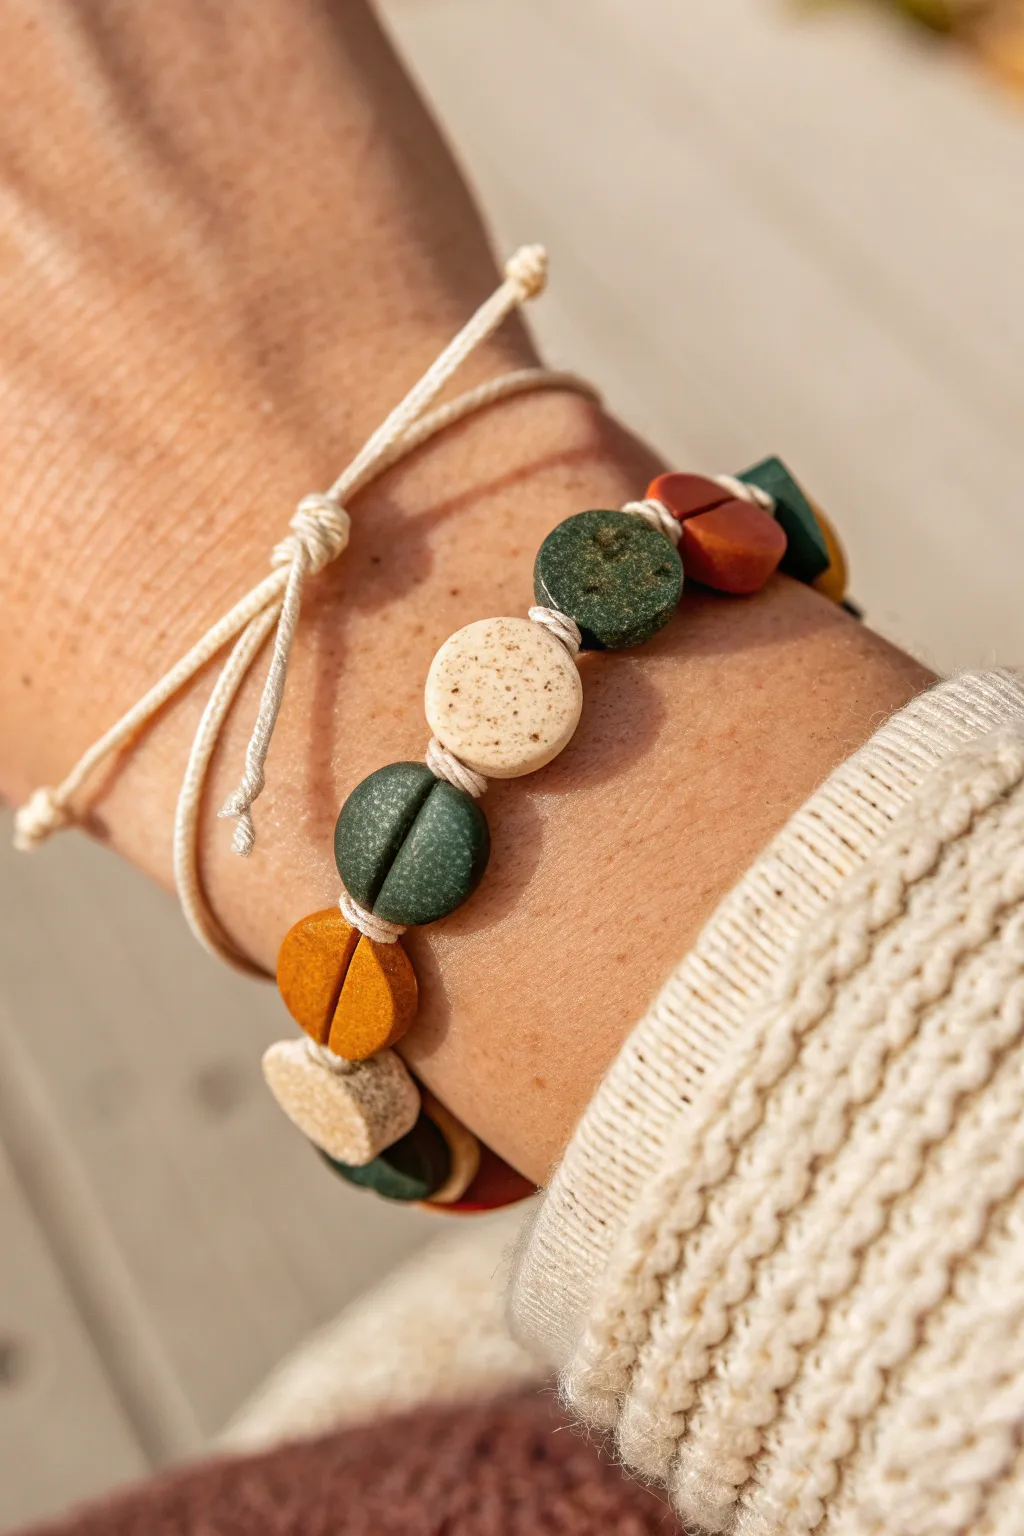
Celebrate the changing season with this rustic, nature-inspired wrap bracelet featuring handcrafted polymer clay beads. The design alternates between full textured circles and playful split ‘half-moon’ shapes in warm fall tones like mustard, moss, and terracotta.
Step-by-Step Guide
Materials
- Polymer clay (terracotta, mustard yellow, forest green, speckled beige/granite)
- Light beige waxed cotton cord or thin hemp cord (approx. 1mm)
- Acrylic rolling pin
- Small circle cutter (approx. 1cm or 0.5 inch diameter)
- Clay slicer blade or craft knife
- Toothpick or piercing tool
- Baking sheet with parchment paper
- Oven (for curing clay)
- Scissors and ruler
Step 1: Crafting the Clay Beads
-
Condition the clay:
Begin by warming up your polymer clay colors in your hands until they are soft and pliable. You will need small amounts of the terracotta, mustard, forest green, and the speckled beige. -
Roll out the slab:
Using an acrylic roller, roll each color out onto a smooth surface to a uniform thickness of about 3-4mm. You want them chunky enough to look like stone beads. -
Add texture (optional):
For a more organic look like in the photo, you can lightly press a piece of sandpaper or a toothbrush onto the surface of the green and yellow clay to give it a stone-like texture. -
Cut the circles:
Use your small circle cutter to punch out multiple discs from each color. Aim for about 12-16 circles total, depending on your wrist size. -
Create the split shapes:
Take about half of your colored circles (saving the beige ones for whole beads) and use your slicer blade to cut them perfectly in half. This creates the ‘split bead’ look. -
Pierce the holes:
For the whole circles, use a toothpick to poke a hole through the side (edge-to-edge), not the center face. Wiggle the toothpick to ensure the hole is wide enough for your cord. -
Pierce the semi-circles:
For the half-circle pieces, pierce the hole through the straight cut edge, exiting through the rounded edge. Ensure the holes will line up when two halves are placed back-to-back. -
Bake the beads:
Arrange all your pieces on a parchment-lined baking sheet and bake according to your clay manufacturer’s instructions (usually 275°F/135°C for 15-30 minutes). Let them cool completely.
Smooth Edges
Before baking, gently rub a tiny bit of cornstarch or baby oil over the clay fingerprints. It smooths out imperfections instantly.
Step 2: Assembling the Bracelet
-
Prepare the cord:
Cut a length of waxed cotton cord about 24 inches long. This generous length allows for easier knotting and an adjustable closure. -
Start the knotting sequence:
Tie a simple overhand knot about 6 inches from one end of the cord. This acts as a stopper for your first bead. -
String a whole bead:
Thread one of the whole speckled beige beads onto the cord and slide it down to the knot. -
Secure the bead:
Tie another overhand knot snugly against the other side of the bead to lock it in place. -
String a split pair:
Next, thread on two matching half-circles (like the green ones shown) so their flat sides face each other. This creates a divided circle look. -
Knot and repeat:
Tie a knot after the split pair. Continue this pattern—alternating colors and shapes (whole bead, knot, split pair, knot)—until you reach your desired length. -
Create the closure:
Once the beading is done, tie a final knot. Overlap the two remaining cord tails. -
Add a sliding knot:
Tie a sliding macramé square knot or a simple adjustable slip knot around the overlapped cords to join them. This allows you to loosen and tighten the bracelet. -
Trim the ends:
Tie tiny knots at the very tips of the cord tails to prevent fraying, then trim any excess length.
Mix It Up
Try mixing actual black pepper or dried spices into solid colored clay to create a faux-granite speckle effect like the white bead shown.
Now you have a stunning, texturally rich accessory that perfectly captures the mood of autumn
Unexpected Twist: Moody Autumn Night Palette
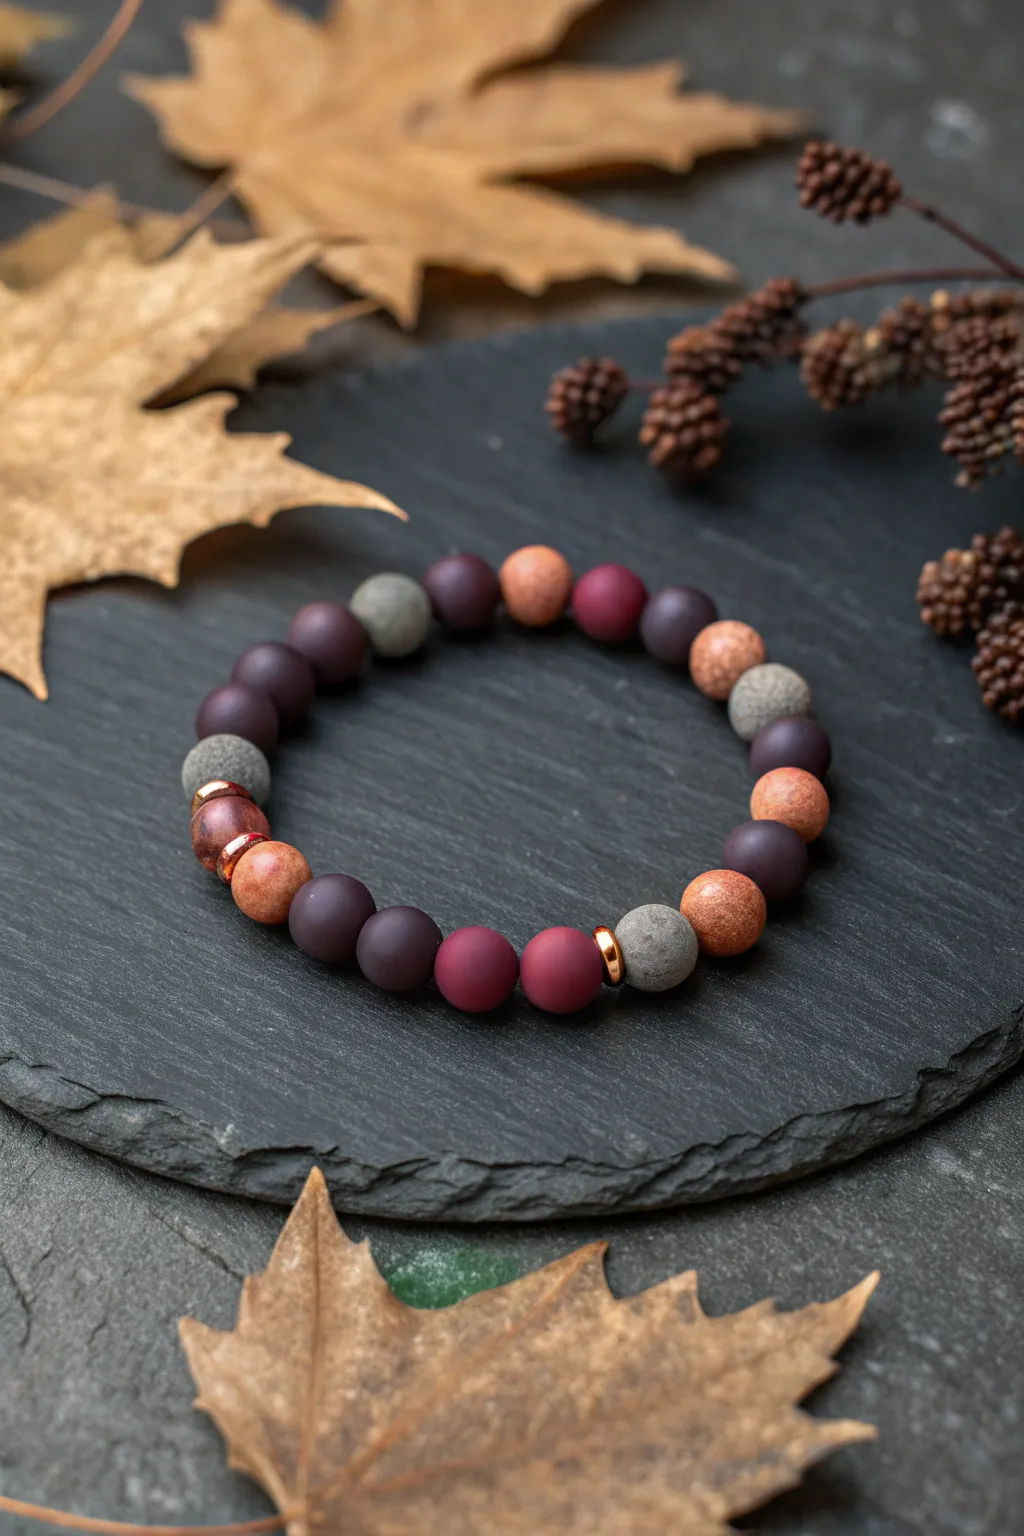
Capture the essence of a late autumn evening with this sophisticated bracelet design, blending deep berry tones with cool greys and earthy russets. The smooth, matte finish of the clay beads creates a luxurious, understated texture perfect for cooler weather.
Detailed Instructions
Materials
- Polymer clay (Deep plum/burgundy)
- Polymer clay (Light warm grey/stone)
- Polymer clay (Terra cotta/russet orange)
- Polymer clay (Medium mauve/purple)
- Small copper or rose gold spacer rings (approx. 4mm)
- Elastic beading cord (0.8mm or 1mm)
- Bead roller tool (optional but recommended)
- Needle tool or toothpick
- Medium-grit sandpaper or a stiff texture sponge
- Piece of denim fabric (for buffing)
- Jewelry glue
- Scissors
Step 1: Creating the Clay Colors
-
Mix the Deep Plum:
Start by conditioning your deep plum or burgundy clay. If the color is too bright, mix in a tiny pinch of black or dark green to desaturate it into a moodier, wine-colored hue. -
Create the Stone Grey:
For the grey beads, mix white clay with a small amount of black. To give it that ‘stone’ look seen in the photo, don’t mix it perfectly; leave microscopic swirls or add a speck of beige for warmth. -
Blend the Russet:
Mix orange clay with brown to create a warm, earthy terra cotta tone. This will serve as the bright accent against the darker beads. -
Prepare the Mauve:
Finally, ensure you have a medium mauve or muted purple shade ready to bridge the gap between the dark plum and the lighter accent beads.
Stone Texture Trick
Mix semi-dried coffee grounds or black pepper into your grey clay before rolling. This adds genuine grit and speckling for a realistic rock effect.
Step 2: Forming and Texturing
-
Portion the Clay:
Roll your clay into logs of equal thickness and slice off small, uniform segments. You want beads that will finish at about 8-10mm in diameter. -
Roll Smooth Spheres:
Roll each segment vigorously between your palms to create a perfect sphere. I like to use a clear acrylic block or a bead roller here to get them perfectly round without fingerprints. -
Texture the Grey Beads:
Take your grey spheres and gently roll them over a piece of medium-grit sandpaper or press a stiff texture sponge against the surface. This mimics the porous look of natural stone. -
Texture the Russet Beads:
Repeat the texturing process for the terra cotta beads, giving them a slightly mottled surface similar to weathered pottery. -
Keep Dark Beads Smooth:
Leave the deep plum and mauve beads distinctively smooth. This contrast between the textured ‘stone’ and smooth ‘berry’ surfaces is key to the design. -
Piercing the Holes:
Carefully pierce the center of each bead with your needle tool. Rotate the bead as you push the tool through to prevent it from flattening out. -
Baking:
Bake the beads according to the manufacturer’s instructions for your specific brand of polymer clay. Usually, this is around 275°F (135°C) for 15-30 minutes.
Scented Beads
Add a drop of essential oil (like cedarwood or cinnamon) to the textured beads after baking. The rough surface holds scent for a wearable diffuser.
Step 3: Finishing and Assembly
-
Cool and Buff:
Once baked and fully cooled, take a piece of denim fabric and vigorously rub the smooth plum and mauve beads. This burnishing creates a soft, matte sheen. -
Plan the Pattern:
Lay out your design on a bead board or towel. The pattern isn’t strictly symmetrical; try grouping two dark beads, then a grey, then a russet, interspersing them organically. -
Insert Spacers:
Place the small copper or rose gold spacer rings strategically. In the photo, they are used sparingly—often flanking a textured bead to highlight it. -
Stringing:
Cut a piece of elastic cord about 10 inches long. Pre-stretch it by pulling on it firmly a few times to prevent sagging later. -
Thread the Beads:
String your beads onto the elastic following your laid-out pattern. Check the fit around your wrist periodically to ensure you have the right circumference. -
Tying the Knot:
Tie a surgeon’s knot (loop the thread through twice before pulling tight). Pull the knot firmly tight. -
Secure and Trim:
Add a tiny drop of jewelry glue to the knot. Let it dry for a minute, then trim the excess cord ends closely. Ideally, pull the knot inside one of the bead holes to hide it.
Enjoy wearing your new accessory that perfectly balances rustic texture with elegant autumn hues