Whenever I’m craving color and a little bit of wonder, I reach for clay and go straight into space clay ideas. Here are my favorite projects—ranging from classic planets and rockets to weirder deep-space pieces—so you can build your own tiny universe.
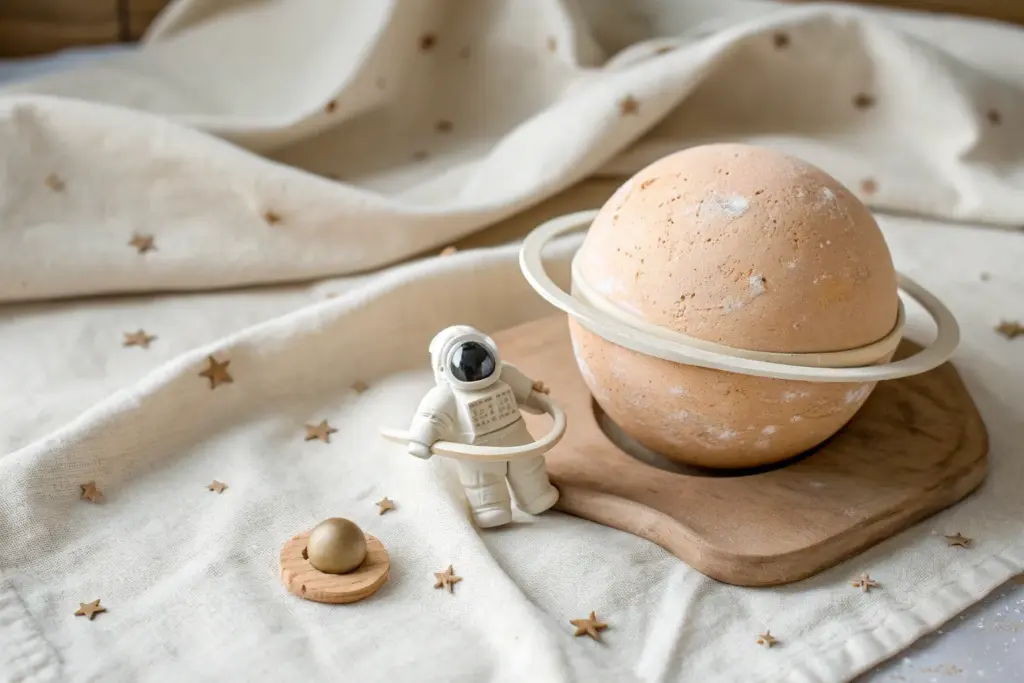
Solar System Clay Diorama
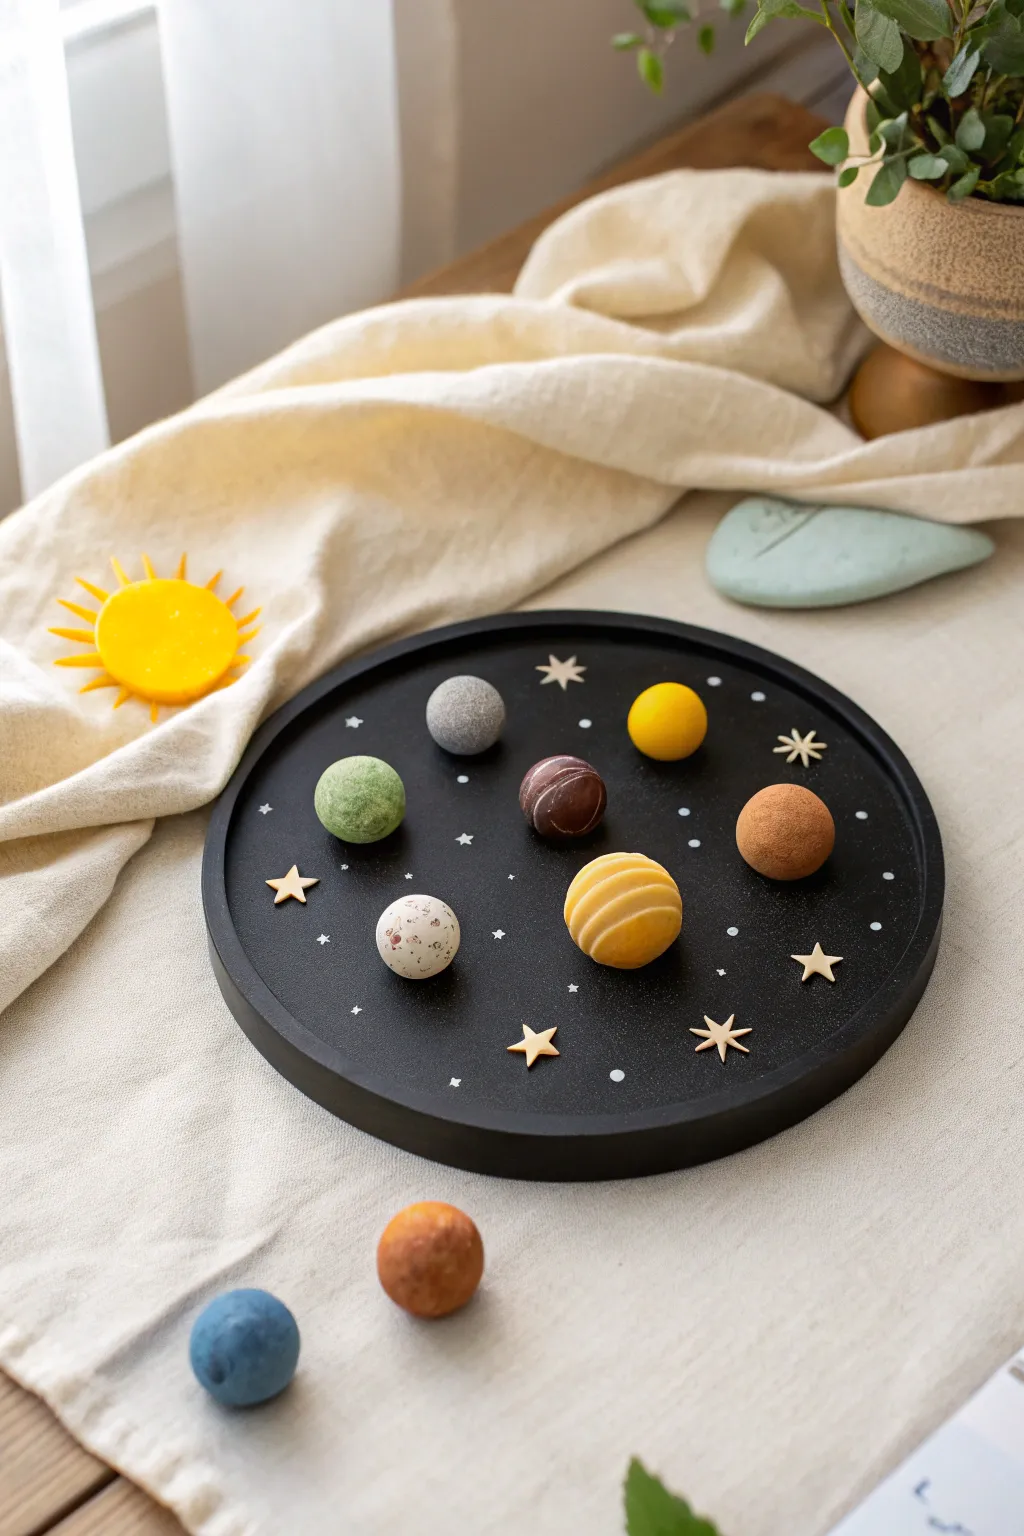
Create a stunningly simple solar system display using air-dry clay and a sleek presentation tray. This project combines minimalist design with colorful planetary details, resulting in a sophisticated diorama perfect for a desk or shelf.
How-To Guide
Materials
- Air-dry clay (white)
- Acrylic paints (yellow, orange, red, green, blue, brown, grey, white)
- Round wooden tray (approx. 10-12 inches diameter)
- Black acrylic paint (matte finish)
- White paint pen or fine brush
- Small wooden star cutouts (approx. 0.5 – 1 inch)
- Clear matte sealant spray
- Sandpaper (fine grit)
- Toothpicks or sculpting tools
- Palette for mixing colors
Step 1: Preparing the Canvas
-
Paint the base:
Start by painting your round wooden tray entirely black. Use a matte finish paint to mimic the deep void of space and prevent distracting reflections. -
Add the starfield:
Once the black base is dry, take your white paint pen or a very fine brush dipped in white paint. Gently dot the surface of the tray to create distant stars. Vary the pressure to create dots of different sizes for a realistic depth. -
Prepare the wooden stars:
Select about 5-6 small wooden star cutouts. Leave them in their natural wood tone for a Scandinavian look, or paint them a pale metallic gold if you prefer a little shimmer. -
Attach the constellations:
Arrange the wooden stars randomly on the black tray. Glue them down securely, ensuring they are spaced out enough to leave room for the planets later.
Step 2: Sculpting the Celestial Bodies
-
Size your spheres:
Divide your air-dry clay into portions. You’ll need varying sizes: a large one for Jupiter, medium sizes for planets like Earth and Saturn, and smaller ones for Mercury and Mars. Roll them between your palms until they are perfectly smooth spheres. -
Create the Sun:
For the sun (the large yellow object outside the tray), sculpt a flattened disc or semi-sphere. Attach small clay spikes around the circumference to represent solar flares. Let all your clay pieces dry completely, which usually takes 24-48 hours depending on thickness. -
Smooth the surfaces:
If your dried clay spheres have any cracks or fingerprints, gently buff them with fine-grit sandpaper until they are silky smooth. -
Paint the gas giants:
For Jupiter (the striped planet), paint a base of light brown. While it’s still slightly tacky, layer on darker brown stripes. For Saturn (the yellow striped planet), use a bright yellow base and carefully paint horizontal bands in a slightly paler cream tone to suggest rings. -
Detail the terrestrial planets:
Paint the Earth-like sphere a soft moss green. For the moon or Mercury, use a grey base and splatter it slightly with darker grey or white to create a cratered texture. I find using an old toothbrush for splattering gives the most natural rocky look. -
Texture the rocky planets:
For Mars and Venus, use terracotta and warm brown tones. You can sponge the paint on rather than brushing it to give these planets a dusty, textured appearance. -
Paint the Sun:
Paint your sun sculpture a vibrant, solid yellow. Ensure the paint gets into the crevices between the rays.
Cracked Clay?
If your clay spheres crack while drying, mix a small amount of fresh clay with water to make a paste (slip). Fill the cracks, let dry, and sand smooth.
Step 3: Assembly and Finishing
-
Seal the planets:
Once all paint is thoroughly dry, spray each planet with a clear matte sealant. This protects the clay and gives the colors a unified finish. -
Arrange the system:
Place your planets onto the black tray. You don’t need to glue them down if you want the diorama to be interactive; simply balance them in a pleasing arrangement among the wooden stars. -
Position the extras:
Place the sun and any extra planetary spheres (like the blue and brown ones shown) outside the tray to expand the scene onto the table surface.
Add Orbital Rings
Make Saturn even more impressive by cutting a ring from thin cardstock or stiff felt. Paint it to match and slide it over the sphere before gluing.
Now you have a beautiful, minimalist model of the solar system ready for display


Marbled Earth Mini Planet
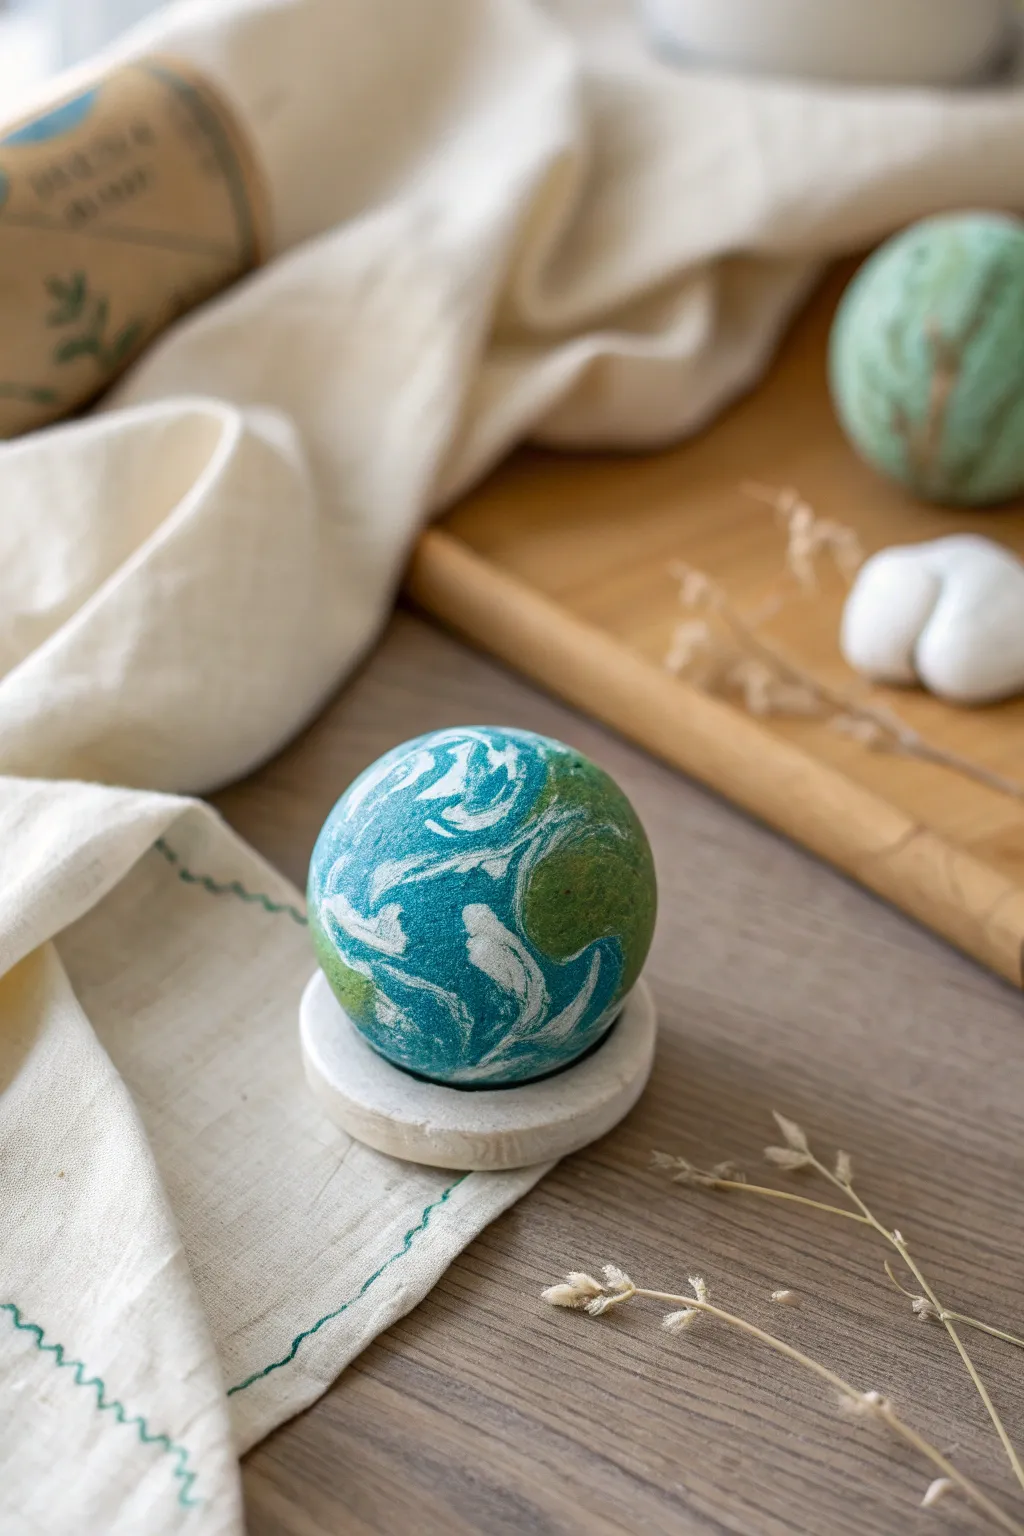
Capture the beauty of our home planet in miniature with this captivating marbled clay project. By blending blue, green, and white air-dry clay, you’ll create a swirling, realistic Earth that rests perfectly on a custom-made stand.
Detailed Instructions
Materials
- Air-dry clay (blue, green, white)
- Small cup of water
- Rolling pin (optional)
- Smooth work surface or clay mat
- Sculpting tool or toothpick
- Fine-grit sandpaper (optional)
- Clear acrylic sealant (matte or satin finish)
Step 1: Preparing the Colors
-
Condition the clay:
Begin by taking portions of blue, green, and white air-dry clay. Knead each color separately in your hands until they are soft, pliable, and free of cracks. This ensures the colors will blend smoothly later. -
Create color ropes:
Roll each color into a long, thin snake or rope shape. You’ll want about two parts blue (for the oceans), one part green (for land), and a smaller amount of white (for clouds). -
Combine the ropes:
Twist the blue and green ropes together first. Then, gently wind the thinner white rope around the twisted pair. This initial combination sets up the distribution of colors for the marbling process.
Muddy colors?
If your colors are blending into one solid shade, stop twisting sooner next time. The key is to stop mixing while the stripes are still thick and distinct.
Step 2: Marbling and Shaping the Earth
-
Fold and twist:
Fold the twisted rope in half and twist it again. Repeat this folding and twisting motion three or four times. Be careful not to over-mix, or the colors will turn into a muddy teal instead of distinct continents and oceans. -
Form a ball:
Once you like the marbled pattern, roll the clay between your palms to form a smooth sphere. Apply gentle, even pressure to avoid flattening any side. -
Refine the surface:
Inspect your sphere for any seams or deep cracks. Dip your finger in a tiny bit of water and gently smooth these areas out. I find using a circular motion with a wet fingertip helps blend the surface without smearing the pattern too much. -
Perfecting the shape:
Continue rolling the ball lightly on your work surface until it is perfectly round. This might take a few minutes of gentle coaxing.
Step 3: Creating the Base
-
Form the stand:
Take a separate piece of white clay, roughly the size of a walnut. Roll it into a ball and then gently flatten it into a thick disc shape about half an inch thick. -
Create the indentation:
While the white disc is still soft, gently press your Earth sphere into the center of it to create a concave nesting spot. Wiggle it slightly to ensure the fit is snug, then remove the sphere. -
Shape the rim:
Use your fingers to smooth the edges of the white base disc, keeping it relatively simple so it doesn’t distract from the planet.
Add an atmosphere
Before sealing, dry brush a tiny amount of white acrylic paint lightly over the blue areas to create wispy, dimensional cloud cover.
Step 4: Finishing Touches
-
Dry the pieces:
Set both the Earth sphere and the base aside to dry. Place the sphere on a soft cloth or a piece of foam to prevent flat spots from forming while it hardens. Let them dry for at least 24-48 hours. -
Rotate while drying:
Every few hours during the drying process, give the sphere a little turn. This helps air reach all sides evenly and further prevents flat spots. -
Sand for smoothness:
Once fully dry, you can lightly buff the sphere with fine-grit sandpaper if there are any fingerprints or rough patches. Wipe away the dust with a barely damp cloth. -
Seal the project:
Apply a coat of clear acrylic sealant to both pieces. A matte or satin finish works best to keep the look natural and earthy like the reference image. Allow the sealant to dry completely. -
Assembly:
Place your finished Earth sphere onto the white clay stand. Your miniature world is now ready for display.
Enjoy displaying your tiny, personal world on a desk or shelf for a touch of cosmic inspiration


Swirled Gas Giant Planets

Capture the majesty of our solar system’s gas giants with these stunning marbled clay planets. Using the natural mixing properties of polymer clay, you’ll create realistic atmospheric bands and storms that look beautiful displayed on a shelf or desk.
Step-by-Step Tutorial
Materials
- Polymer clay (Orange, Cream, Terracotta, White, and Dark Brown)
- Clay roller or pasta machine
- Tissue blade or craft knife
- Smooth work surface
- Oven and baking sheet
- Clear satin or matte varnish (optional)
- Fine grit sandpaper (400-1000 grit, optional)
Step 1: Preparing the Clay Colors
-
Condition the clay:
Start by kneading each block of clay individually until it is soft, pliable, and warm to the touch. This prevents cracking later on. -
Create base logs:
Roll each color into a thick log, roughly 1 inch in diameter and 4 inches long. You’ll need more orange and cream than the darker accent colors. -
Mix custom shades:
To add depth, I like to mix a little orange into the cream to create a soft peach tone, and some brown into the orange for a rust shade. Create logs of these new custom colors as well.
Muddy Colors?
If your twisting merges colors into a single brown blob, you over-mixed! Stop twisting sooner next time. The distinct stripes should be visible before you form the ball.
Step 2: Creating the Marbled Bands
-
Stack the logs:
Gather your various colored logs and stack them together into one large, thick cylinder. Order them randomly to create variety in your bands. -
Twist and lengthen:
Grasp the ends of your large cylinder and twist them in opposite directions while gently stretching the clay. This begins the marbling process. -
Fold and roll:
Fold the twisted log in half on itself and roll it smooth again. Repeat the twisting and stretching action. -
Check the striations:
Stop when you see distinct, thin lines of color running parallel to the length of the log. Don’t overmix, or the colors will turn muddy. -
Create specific features:
If you want a ‘Great Red Spot’ like Jupiter, set aside a small flattened ball of rust-colored clay now.
Step 3: Forming the Planets
-
Portion the clay:
Cut your long marbled log into sections based on the size of the planets you want to make. Use more material for a large Jupiter-style planet and less for smaller moons. -
Shape the core:
Take a portion of scrap clay or aluminum foil and roll it into a tight ball to act as the core. This saves good clay and reduces baking time. -
Wrap the core:
Flatten your marbled sections into thick sheets. Wrap these sheets carefully around your foil or scrap clay core, ensuring the decorative bands run horizontally around the ‘equator’. -
Smoothing the seams:
Gently rub any seams with your thumb to merge the clay. The warmth of your hand helps blend the lines without destroying the pattern. -
Roll into a sphere:
Place the rough planet between your palms and roll firmly in a circular motion. This is crucial for getting that perfect spherical shape.
Orbital Effects
Before baking, use a needle tool to drag lines perpendicular to the bands. This creates ‘atmospheric turbulence’ effects seen on real gas giants.
Step 4: Finishing Touches and Baking
-
Add surface details:
To create the swirling storms (like the eye shown in the image), press your thumb gently into a banded area to distort the lines, creating a swirl effect. -
Refine the shape:
Give the planet one final gentle roll on your work surface to ensure it is perfectly round. -
Bake the planets:
Preheat your oven according to the clay manufacturer’s instructions (usually around 275°F/135°C). Place planets on a baking sheet lined with parchment. -
Support the spheres:
To prevent flat spots, nestle the spheres into a bed of baking soda or on a folded piece of batting while they bake. -
Cool and finish:
Let them cool completely in the oven. Once cold, you can lightly sand any fingerprints away. A light coat of satin varnish will bring out the richness of the colors.
Arrange your new planetary system on a dark cloth to mimic the depth of space


Cratered Moon Texture Trick
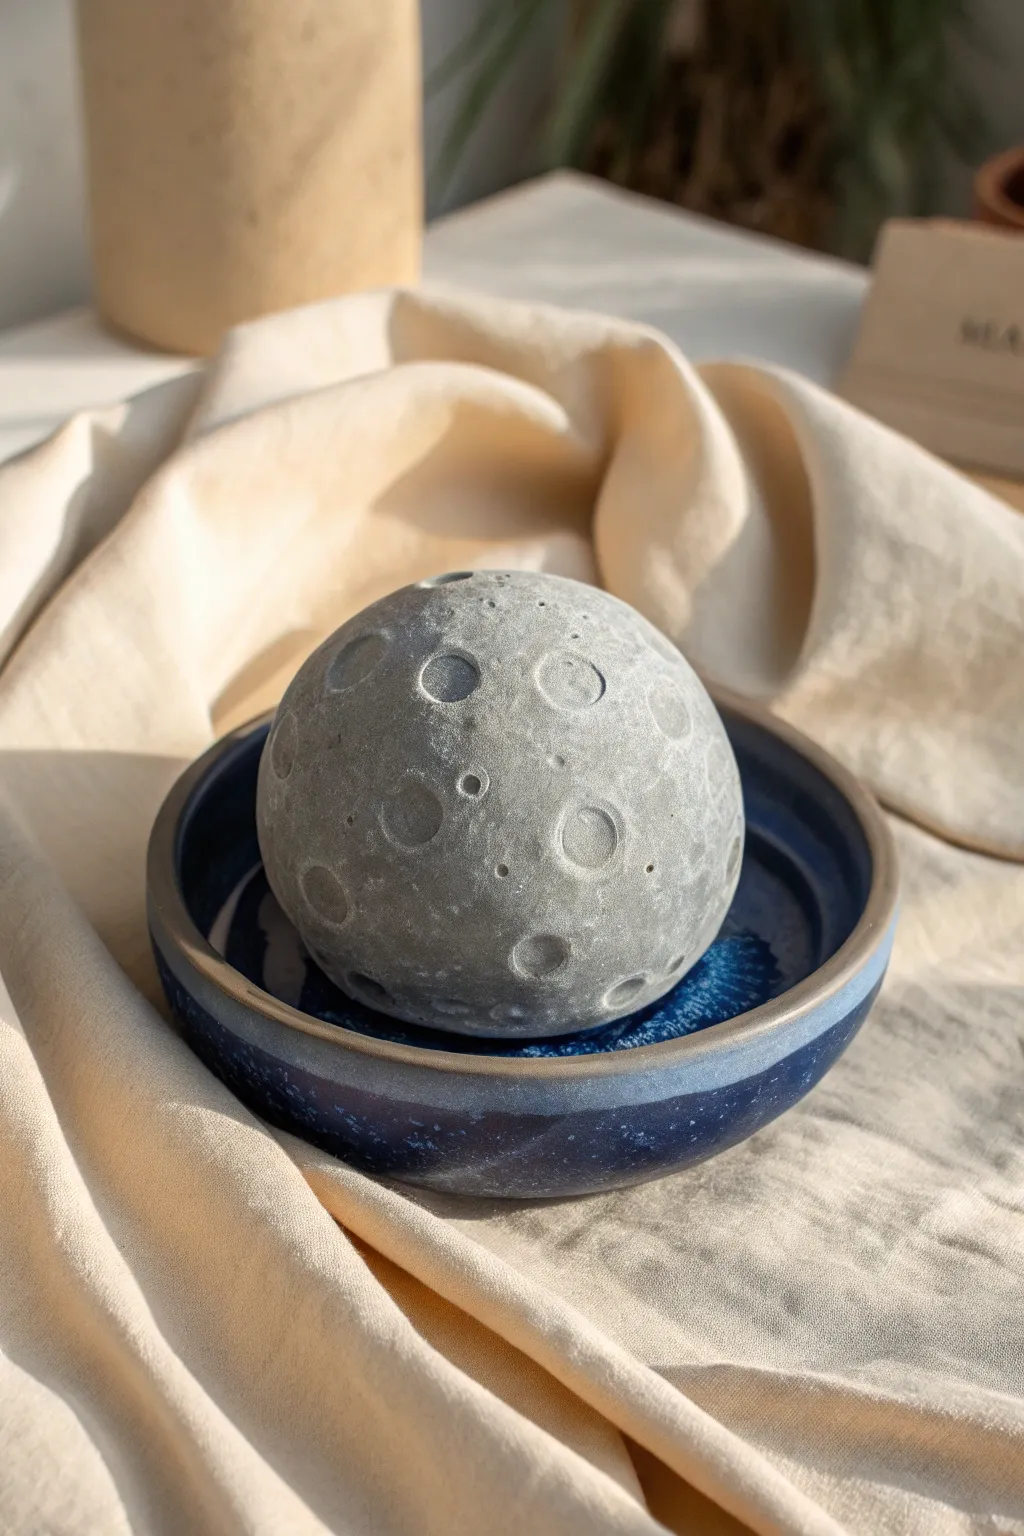
Bring a piece of the cosmos into your home with this textured clay moon that features realistic crater detailing. The soft grey finish and organic surface make perfectly imperfect accent piece that looks stunning when displayed in a contrasting bowl.
Step-by-Step
Materials
- Air-dry clay (grey or white)
- Acrylic paint (black and white if mixing grey, or pre-mixed light grey)
- Sponge or foam brush
- Assorted circular tools (pen caps, straw ends, measuring spoons)
- Fine-grit sandpaper
- Matte sealant or varnish
- Small bowl of water
- Deep blue glazed saucer for display
Step 1: Forming the Base
-
Condition the clay:
Begin by taking a large handful of air-dry clay and kneading it thoroughly until it is warm and pliable. This helps prevent cracks from forming later. -
Roll a sphere:
Roll the clay between your palms or on a smooth surface to create a tight, solid ball. Aim for a size roughly slightly smaller than a tennis ball. -
Smooth the surface:
Dip your fingers in a tiny bit of water and glide them over the sphere to smooth out any major creases or fingerprints. It doesn’t need to be perfect, as the texture will cover minor flaws.
Cracks Appearing?
Mix a small amount of clay with water to create a paste (slip). Fill any cracks that appear during drying, smooth over, and let dry again.
Step 2: Creating the Craters
-
Plan your impact sites:
Visualise where your largest craters will go. Using a rounded measuring spoon or a large marker cap, press gently into the soft clay to create the main concave impressions. -
Add medium details:
Switch to a smaller tool, like a pen cap or the back of a paintbrush. Press these randomly around the sphere, occasionally overlapping the larger craters for a realistic chaotic look. -
Refine the edges:
For some craters, wiggle the tool slightly as you pull it away to create a raised rim, mimicking the debris ring of a real impact site. -
Create micro-texture:
Take a rough stone, a crumpled ball of foil, or a stiff bristle brush and gently tap it over the smooth areas between craters. This removes the ‘manufactured’ look of smooth clay. -
Softening the look:
If any crater edges look too sharp or synthetic, lightly tap them with a fingertip to blur the harsh lines just a little.
Glow Up Idea
Use glow-in-the-dark acrylic paint for your dry brushing step. In the daylight it looks like stone, but at night it will faintly luminesce.
Step 3: Drying and Finishing
-
Initial dry time:
Place your moon on a soft cloth or foam pad to dry. Rotate it every few hours so the bottom doesn’t flatten out under its own weight. -
Let it cure:
Allow the piece to dry completely for 24 to 48 hours. The clay will turn a lighter colour and feel hard when fully cured. -
Surface prep:
Once fully dry, you can run a piece of fine-grit sandpaper very lightly over the surface to knock down any unwanted sharp peaks. -
Mixing the grey:
If you used white clay, mix a dab of black acrylic paint into a larger dollop of white to create a soft, concrete-like grey. -
Applying the base coat:
Sponge the grey paint over the entire sphere. Sponging rather than brushing helps maintain that stony, porous texture we created earlier. -
Highlighting craters:
I like to mix a slightly lighter shade of grey and dry-brush it very gently over the raised rims of the craters to make the texture pop. -
Sealing the moon:
Finish with a coat of matte varnish spray to protect the paint without adding an unrealistic glossy shine. -
Final display:
Place your finished moon into a deep blue glazed saucer to simulate it floating in a dark night sky.
Enjoy the calming presence of this little orbital sculpture on your desk or shelf

The Complete Guide to Pottery Troubleshooting
Uncover the most common ceramic mistakes—from cracking clay to failed glazes—and learn how to fix them fast.
Classic Rocket Clay Figurine
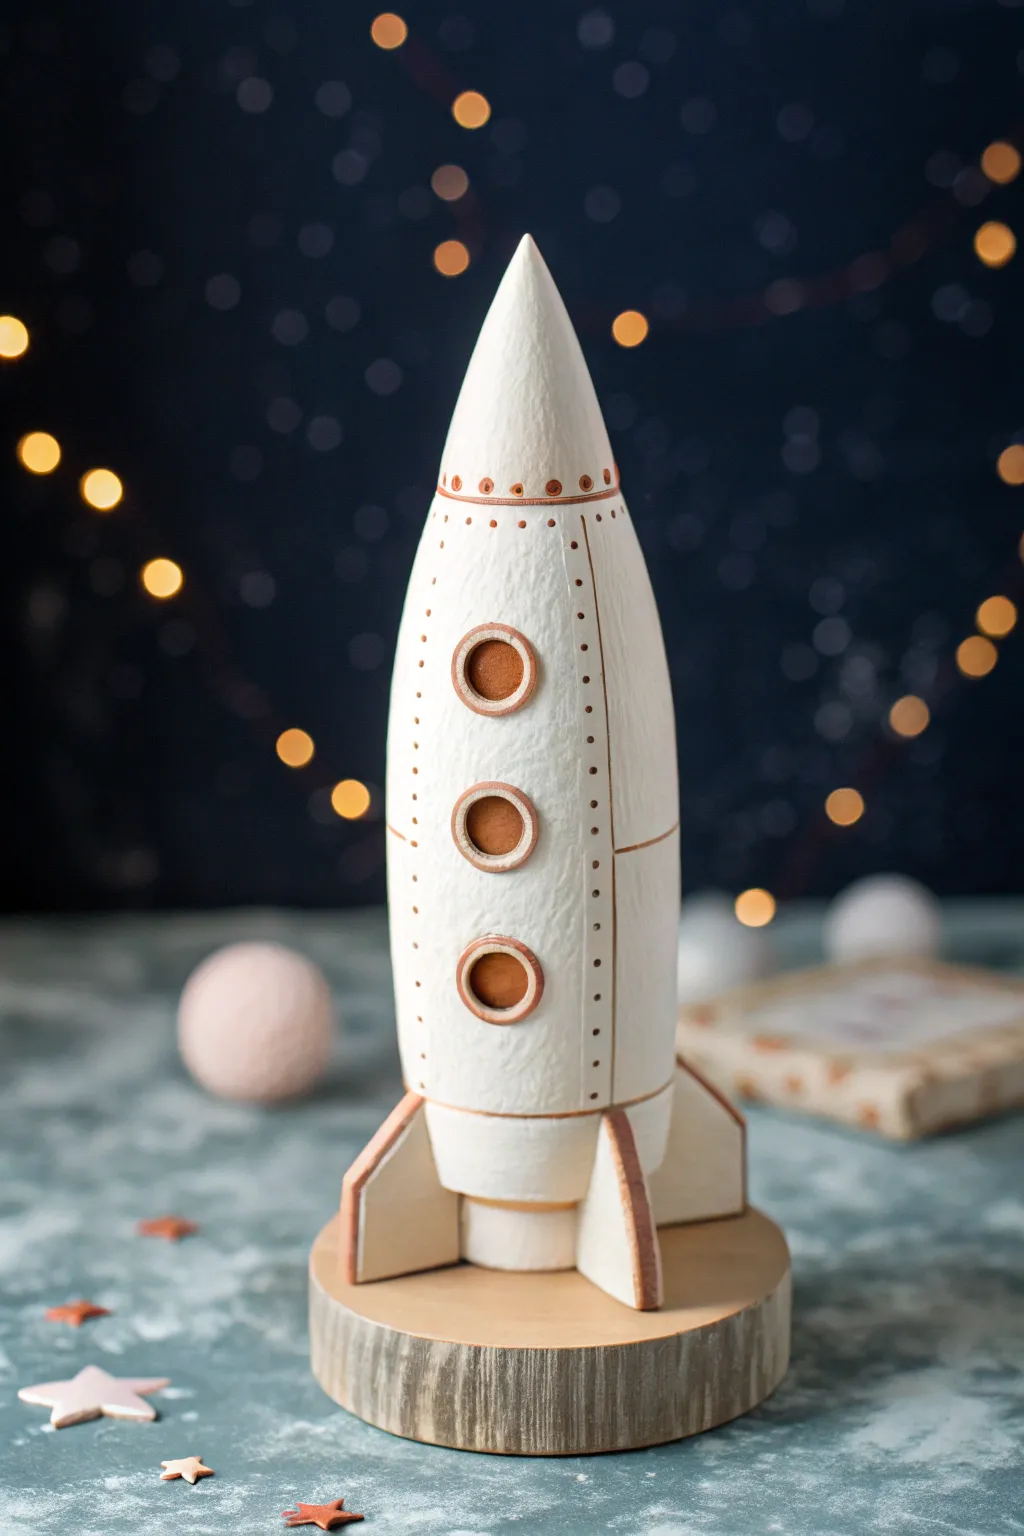
Capture the nostalgia of early space exploration with this charming, textured rocket figurine. Featuring a rustic white finish and warm copper accents, this piece stands proudly on a wooden base as a timeless decorative accent.
Step-by-Step Guide
Materials
- White or light gray air-dry clay (stone texture preferred)
- Wooden circular base (approx. 3-4 inches diameter)
- Rolling pin
- Clay sculpting tools (knife, needle tool)
- Copper or metallic bronze acrylic paint
- Fine grit sandpaper
- Strong craft glue or wood glue
- Small circular cutters (optional, for windows)
- Fine detail paintbrush
- Texture sponge or stiff bristle brush
Step 1: Sculpting the Fuselage
-
Form the core:
Start by taking a substantial chunk of white clay and rolling it into a smooth ball to remove air bubbles. Gradually elongate this into a thick cylinder shape. -
Shape the cone:
Begin gently tapering the top half of your cylinder to form a pointed nose cone. Keep the bottom flat so it can stand upright on your work surface. -
Refine the silhouette:
Standardize the shape by smoothing the sides with your fingers or a flat tool. The rocket should bulge slightly in the middle and curve elegantly up to the tip. -
Add surface texture:
To achieve that specific stony look seen in the photo, lightly dab a damp sponge or a stiff bristle brush all over the wet clay. I find this hides fingerprints and adds great character. -
Create the engine nozzle:
Roll a smaller, separate cylinder of clay for the engine exhaust. Attach this to the center of the flat bottom of your rocket body using a bit of water or slip to secure it.
Drooping Fins?
If your clay fins keep falling off while wet, support them with small cardboard wedges or toothpicks underneath until the clay stiffens enough to hold its own weight.
Step 2: Adding Details & Fins
-
Make the fins:
Roll out a slab of clay to about 1/4 inch thickness. Use a knife to cut three or four identical trapezoid shapes for the stabilizing fins. -
Attach the fins:
Score the attachment points at the base of the rocket and the edge of each fin. Use a little water to bond them securely to the lower fuselage, spacing them equally. -
Sculpt the windows:
Roll three small balls of clay and flatten them into discs. Press these firmly onto the front of the rocket in a vertical line to create the portholes. -
Detail the portholes:
Use a smaller tool or the back of a pen to press an indentation into the center of each window disc, creating a raised rim effect. -
Impress rivets:
Using a needle tool or an awl, gently press small dots in vertical lines down the sides of the rocket and around the nose cone area to simulate riveted metal panels. -
Dry partially:
Let the sculpture sit for several hours or overnight until the outside is firm but not fully cured.
Pro Tip: Hidden Strength
For a taller rocket that won’t sag, form your main clay body around a crumpled core of aluminum foil. This saves heavy clay and makes the final piece much lighter.
Step 3: Painting & Assembly
-
Paint the window interiors:
Using copper or bronze metallic paint, carefully fill in the depressed centers of your porthole windows. -
Highlight the rims:
Use a very fine brush to paint a thin ring of copper around the raised outer rim of each window. -
Accent the nose cone:
Paint a thin horizontal band where the nose cone meets the body. Add tiny dots of copper paint into the ‘rivet’ holes you poked earlier near the top. -
Define the fins:
Paint the thin outer edges of the fins copper to make the geometry pop against the white body. -
Initial assembly:
Once the clay is fully dry and the paint is set, apply strong glue to the bottom of the engine nozzle and fins. -
Mount to base:
Press the rocket firmly onto the center of your wooden circular base. Hold it in place for a minute to ensure a good bond. -
Final touches:
If desired, dry-brush a tiny amount of white paint over the copper areas to weather them slightly, giving the piece a flown-in-space durability.
Place your finished rocket on a shelf or desk to inspire your next great adventure.
Flying Saucer UFO Charm
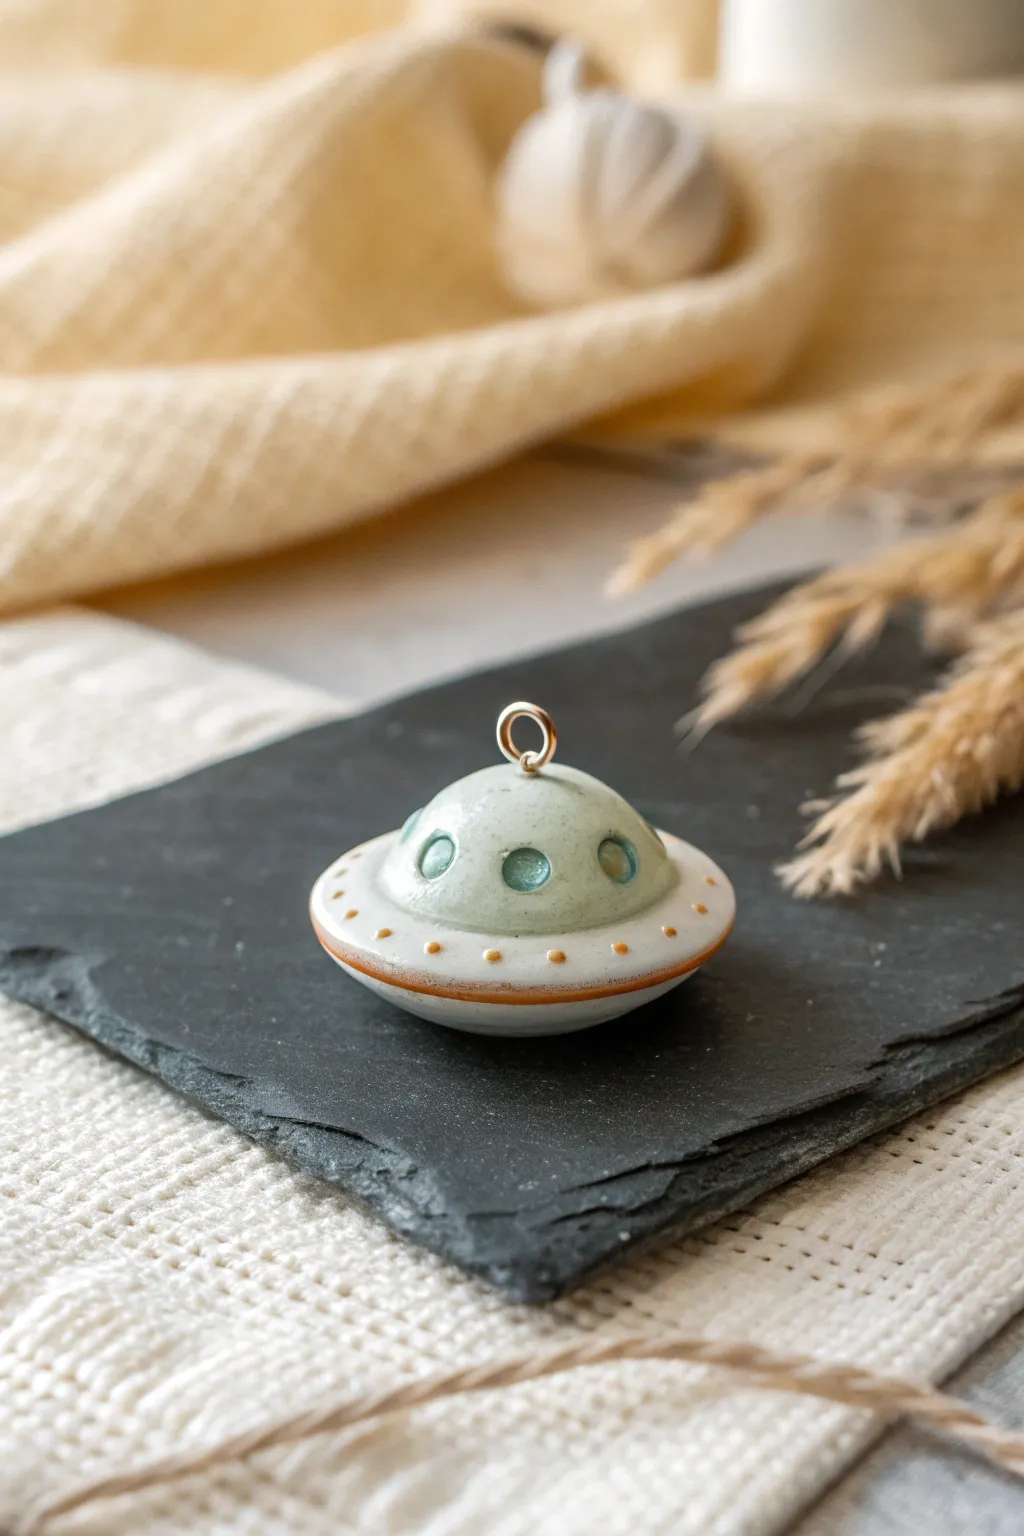
This adorable flying saucer charm combines space-age whimsy with an earthy, ceramic-style finish. Its pale sage green dome and speckled orange details give it a charming, handcrafted look perfect for a necklace or keychain.
Step-by-Step Tutorial
Materials
- White polymer clay
- Translucent liquid clay
- Acrylic paints (Sage Green, Burnt Orange, Teal/Aqua)
- Gloss glaze or UV resin
- Ball stylus tools (small and medium)
- Small jump ring
- Jewelry pliers
- Clay roller or pasta machine
- Blade or craft knife
- Small round cutter (approx. 1 inch)
- Very fine detail paintbrush
- Oven for baking clay
Step 1: Shaping the Saucer Base
-
Condition the Clay:
Begin by conditioning your white polymer clay until it is soft and pliable. Since this project mimics glazed ceramic, keeping the clay clean and free of dust is important, so wash your hands before starting. -
Form the Base Disc:
Roll a small ball of white clay, about the size of a marble, and flatten it into a thick disc. You want it to be slightly domed on the bottom rather than perfectly flat, resembling a lens shape. -
Refine the Edges:
Smooth around the circumference with your finger to ensure the edge is distinct but rounded, not sharp. This will be the main body of your spaceship. -
Create the Brim Groove:
Use a modeling tool or the side of a toothpick to gently press an indentation around the waist of the disc. This separates the top half from the bottom half and creates a guiding line for your orange trim later.
Porcelain Effect
To get that speckled ceramic look, mix a tiny pinch of black pepper or ground vanilla bean into your white clay before shaping.
Step 2: Forming the Cockpit Dome
-
Roll the Dome:
Take a smaller amount of white clay—about one-third the volume of your base—and roll it into a neat ball. Cut it in half so you have a perfect hemisphere. -
Attach the Dome:
Press this hemisphere gently onto the center of your base disc. Smooth the seam where the dome meets the base using a silicone tool or your finger to make it look like one cohesive piece. -
Add the Jump Ring Hole:
Before baking, carefully insert a small metal eye pin into the very top of the dome, or use a needle tool to pierce a hole horizontally through the top if you plan to use a jump ring directly. If using a pin, I suggest adding a dab of liquid clay to the shaft for a stronger hold. -
Create Window Indents:
Using a medium-sized ball stylus, press three to four evenly spaced circular indentations around the side of the dome. These will become the porthole windows.
Step 3: Painting and Glazing
-
Initial Bake:
Bake the clay piece according to the manufacturer’s instructions on the package. Let it cool completely before moving on to painting. -
Paint the Dome:
Mix a watery wash of sage green acrylic paint. Apply this to the dome section only, letting it pool slightly in the textures to mimic a ceramic glaze. Wipe off excess with a damp paper towel if it looks too opaque; you want a semi-translucent look. -
Fill the Windows:
Mix a small amount of teal or aqua paint with a drop of gloss glaze or liquid clay. Carefully drop this mixture into the circular indentations on the dome to create glassy-looking windows. -
Add the Orange Rim:
Using a very fine liner brush and burnt orange paint, carefully trace the groove you created around the waist of the saucer. Keep a steady hand to maintain an even line. -
Dot the Lights:
Dip the tip of a toothpick or a very small dotting tool into the burnt orange paint. Apply tiny, evenly spaced dots around the flat brim of the saucer, just below the green dome. -
Seal the Charm:
Once the paint is fully dry, coat the entire piece in a high-gloss glaze or UV resin. This is the secret step that transforms it from matte clay into something that looks like fired porcelain. -
Final Cure:
If using UV resin, cure it under a UV lamp. If using a varnish, let it air dry in a dust-free environment for several hours. -
Assembly:
Open your silver jump ring using two pairs of pliers (twist, don’t pull apart) and thread it through the loop or hole at the top of the charm. Close the ring securely.
Glow Up
Mix glow-in-the-dark powder into the teal paint for the windows. Your little alien ship will actually glow when the lights go out.
Now your intergalactic traveler is ready to be worn as a pendant or added to a charm bracelet


What Really Happens Inside the Kiln
Learn how time and temperature work together inside the kiln to transform clay into durable ceramic.
Chunky Astronaut Buddy
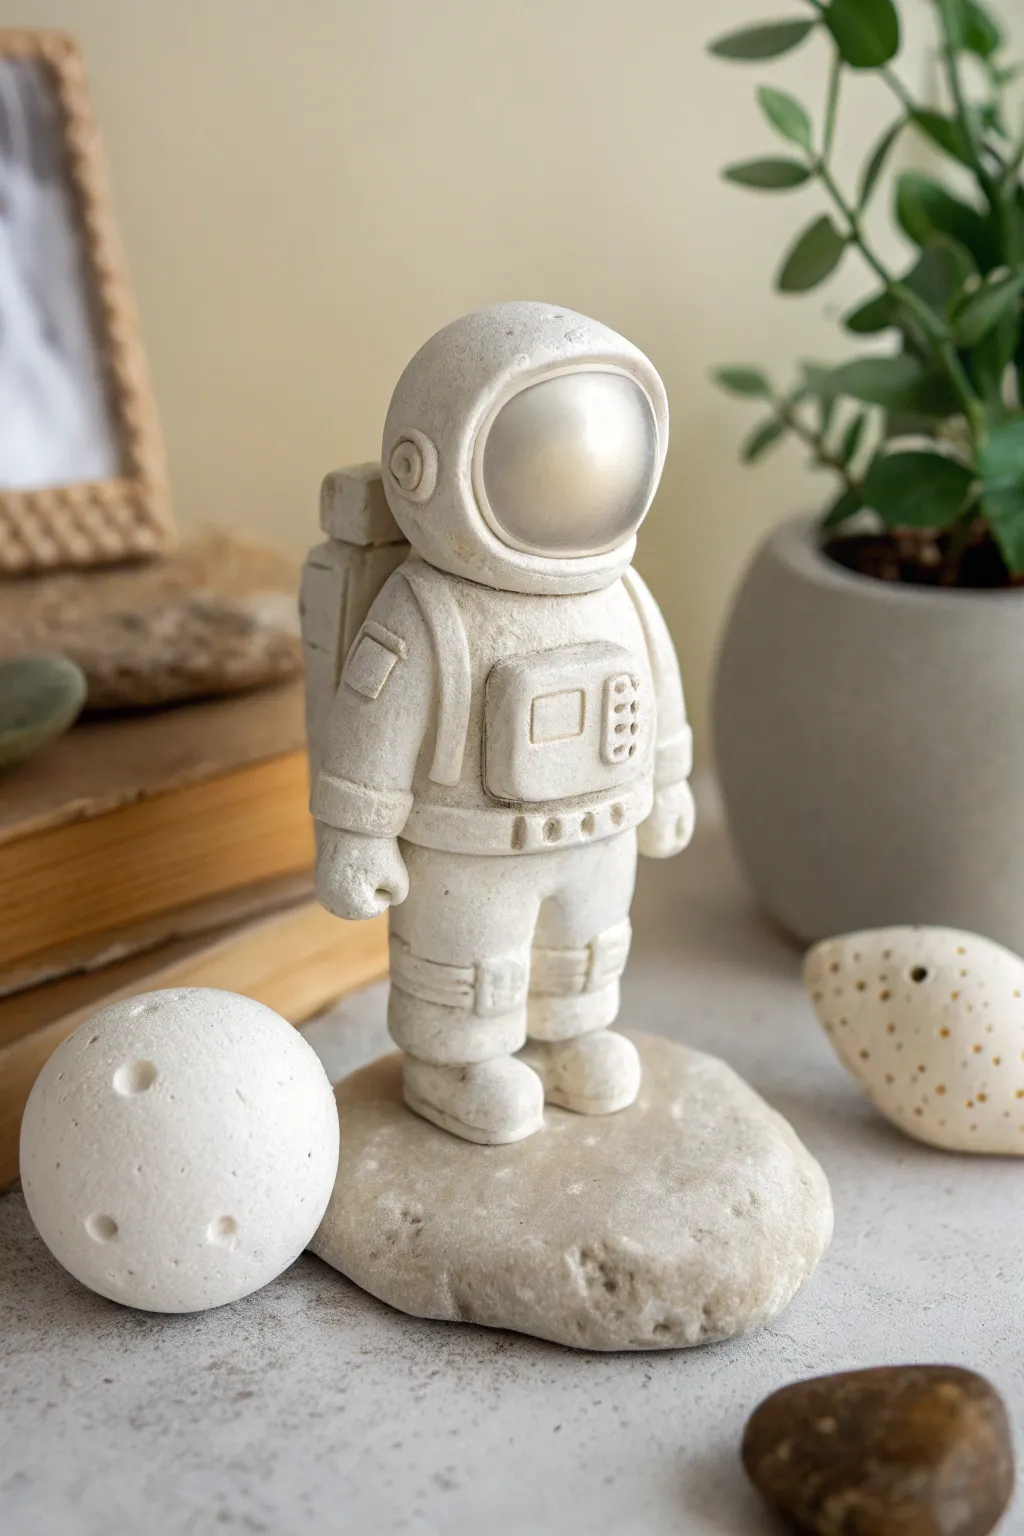
Create a charming, stylized space explorer with a unique stone-like finish that looks great on any desk or shelf. This chunky astronaut figure features a simplified design with a faux-stone texture and a matching moon companion.
Step-by-Step
Materials
- White polymer clay or air-dry stone clay
- Aluminum foil (for armature)
- Translucent liquid clay or bake and bond (if using polymer)
- Acrylic rolling pin
- Sculpting tools (needle tool, ball stylus)
- Toothbrush or stiff bristle brush (for texture)
- Smooth river stone (for the base)
- Small round cutter
- Pearl or iridescent white acrylic paint (optional)
- Sandpaper
Step 1: Forming the Body Structure
-
Create the core armature:
Begin by crumpling a small piece of aluminum foil into a stout cylinder shape for the body and a slightly larger ball for the helmet. This saves clay and keeps the figure lightweight. -
Cover the body:
Roll out a sheet of white clay just under a quarter-inch thick. Wrap it smoothly around your foil cylinder, blending the seams at the back to create the main torso. -
Shape the legs:
Roll two thick logs of clay for the legs. Attach them vertically to the bottom of the torso, blending the clay upwards so they are seamlessly connected. Keep them short and chunky for stability. -
Sculpt the boots:
Form two rounded, D-shaped blobs of clay for boots. Press the legs firmly onto these boots, ensuring the figure can stand level on a flat surface. -
Add boot details:
Wrap thin strips of clay around the ankles where the leg meets the boot. Use your needle tool to scribe vertical lines for simplified tread detailing.
Cracks Appearing?
If you see cracks while texturing air-dry clay, dip your finger in water and smooth them out immediately. For polymer clay, blend cracks with a drop of baby oil.
Step 2: Suit Details & Helmet
-
Form the helmet:
Cover your foil ball with a layer of white clay, rolling it until perfectly smooth. Flatten the bottom slightly where it will sit on the shoulders. -
Carve the visor:
Press a thumb or a large ball tool into the front of the helmet to create the visor indentation. Smooth the interior of this hollow thoroughly. -
Attach the helmet:
Insert a piece of wire or toothpick into the neck area for support, then press the helmet firmly onto the torso. I like to add a subtle roll of clay around the neck seam to simulate a seal. -
Add the backpack:
Shape a rectangle of clay for the life-support backpack. Press it onto the back of the figure. It doesn’t need high detail, just a solid blocky form. -
Sculpt the control panel:
Create a small square of clay with rounded corners. Press this onto the chest. Use a small stylus to indent tiny buttons or a screen area on the right side of the panel.
Pro Tip: Weighted Base
If your astronaut is top-heavy from the solid clay helmet, bake the feet first, then glue them to the stone base before baking the rest to ensure it stands perfectly straight.
Step 3: Texturing & Accessories
-
Add the arms:
Roll two tapered logs for arms. Attach them at the shoulders, curving them slightly downward. -
Create hands:
Shape simple mitten-like balls for hands and attach them to the ends of the arms. Keep the fingers simplified into a single heavy shape. -
Apply stone texture:
Gently tap the entire surface of the clay (except the visor area) with a toothbrush or stiff bristle brush. This stippling creates that weathered, stone-like finish visible in the photo. -
Create the ear pieces:
Make small circles of clay and press them onto the sides of the helmet. Use a small round cutter or straw to imprint a circle detail in the center of each. -
Make the moon:
Roll a separate ball of clay. Use ball tools of various sizes to press craters into the surface. Texture the surface around the craters with your brush. -
Bake or dry:
Follow the instructions for your specific clay type to bake or air-dry the figure and the moon.
Step 4: Finishing Touches
-
Sand and smooth:
Once hardened, lightly sand the visor area to make it as smooth as possible, contrasting with the textured suit. -
Paint the visor:
Dilute a pearlescent white or very light silver paint with water. Apply a sheer wash to the visor area to give it a glassy, reflective sheen. -
Dry brush:
Dip a dry brush into white or light grey acrylic paint, wipe most of it off, and lightly whisk it over the textured parts of the suit to highlight the ‘stone’ pitting. -
Assemble:
Using strong glue, mount your finished astronaut onto the smooth river stone base, positioning the clay moon nearby.
Now you have a stoic little space traveler ready to guard your bookshelf
Cute Alien Minis With Antennae

These adorable, gelatinous-looking alien minis are perfect for brightening up a desk or shelf with their cheerful expressions and soft pastel hues. Made from colored air-dry or polymer clay, their simplicity is their strength, combining smooth dome shapes with natural-looking twig antennae for a touch of organic whimsy.
Step-by-Step Tutorial
Materials
- Polymer clay or air-dry clay (teal, salmon pink, yellow, lavender, green, light yellow)
- Black acrylic paint or black clay
- Small dotting tool or toothpick
- Thin crafting wire (brown) or very thin dried flower stems
- Fine-grit sandpaper (optional)
- Matte or satin sealant spray
- Adhesive (super glue or tacky glue)
Step 1: Shaping the Bodies
-
Portion the clay:
Start by pinching off small amounts of your colored clays. You’ll need about a walnut-sized piece for each alien figure. -
Condition the clay:
Knead each color thoroughly in your hands until it becomes soft, pliable, and warm. This prevents cracking later on. -
Create a sphere:
Roll each piece of clay into a tight, smooth ball between your palms, ensuring there are no visible seams or wrinkles. -
Form the dome:
Place the sphere on a flat surface and gently press down on the top with your finger or palm. You want to flatten the bottom completely while maintaining a rounded, gumdrop-like top. -
Refine the shape:
Use your fingers to smooth out any fingerprints. The silhouette should look like a soft mound or a half-sphere that’s slightly taller than it is wide.
Use Nature
Instead of wire, use real dried stems from flowers like baby’s breath. The natural texture adds an organic contrast to the smooth clay body.
Step 2: Adding Faces
-
Mark eye positions:
Before committing to paint or clay eyes, use a needle tool to lightly mark two dots where the eyes will go. They should be set slightly wide apart for maximum cuteness. -
Create black eyes:
If using black clay, roll two tiny balls flattened into discs and press them onto the marked spots. If using paint, dip a dotting tool into black acrylic paint and dab it firmly onto the clay. -
Draw the mouth:
Using a very fine detail brush or a thin black marker (if the clay is dry/baked), draw a tiny ‘u’ shape between the eyes. Keep the line thin and delicate. -
Cure the clay:
If using polymer clay, bake the figures according to the package instructions (usually 275°F/135°C for 15-30 minutes). If using air-dry clay, let them sit undisturbed for 24-48 hours.
Step 3: Finishing Touches
-
Prepare the antennae:
Cut your brown wire or dried flower stems into very small segments, about half an inch long. You need two per alien. -
Create the tips:
If you are using plain wire, you might want to add a tiny dab of brown clay or a bead of glue to the top tip to create the little nub seen in the photo. Let these dry or bake if necessary. -
Make insertion holes:
I usually like to drill two tiny holes at the top of the head using a pin drill or a needle tool, just slightly smaller than your wire thickness. -
Attach antennae:
Dip the bottom end of each antenna into a tiny bit of strong adhesive. -
Secure the parts:
Insert the glue-dipped ends into the holes on top of the head. Position them so they angle slightly outward in a V-shape. -
Seal the surface:
Once any glue or paint is completely dry, apply a light coat of matte or satin sealant to protect the finish without making them look too glossy.
Galaxy Glitter
Mix a tiny amount of fine iridescent glitter into the clay body before shaping it to give your aliens a sparkling, cosmic effect.
Now you have a whole squad of friendly intergalactic visitors ready to explore your home

TRACK YOUR CERAMIC JOURNEY
Capture glaze tests, firing details, and creative progress—all in one simple printable. Make your projects easier to repeat and improve.
Ringed Planet Desk Decor
Create a sophisticated piece of functional desk decor with this ringed planet trinket box. The finished project features a deep matte blue finish, a sleek wooden planetary ring, and a hidden storage compartment for your smallest treasures.
Step-by-Step Guide
Materials
- Air-dry clay (preferably white or terracotta)
- Wooden craft ring (flat, 4-5 inch diameter)
- Wooden circular display base (2-3 inch diameter)
- Deep navy blue acrylic paint
- Matte finish sealant/varnish
- Pottery needle tool or toothpick
- Rolling pin
- Fine-grit sandpaper (220 and 400 grit)
- Strong craft glue (E6000 or similar)
- Old toothbrush (for spline texture)
- Small styrofoam ball (optional, for internal support structure)
Step 1: Shaping the Sphere
-
Prepare the core:
Start by rolling two equal-sized balls of clay. If you want a hollow interior for storage (like in the photo), the pinch pot method works best. Press your thumb into the center of each ball and pinch the walls until you have two hemispheres. -
Check the fit:
Before refining the shape, gently press the two open ends of your pinch pots together to ensure they meet evenly. They should form a sphere roughly 3 to 3.5 inches in diameter. -
Create the lip (optional):
If you want the top lid to sit securely without sliding, add a small coil of clay to the inner rim of the bottom hemisphere creating a slight ridge that the top lid can slot onto. Alternatively, you can just rest them flush for a decorative object. -
Refine the surface:
Smooth out any major bumps with a little water on your finger. The surface doesn’t need to be perfectly glass-smooth yet, as we will be adding texture.
Clean Separation
To prevent the lid and base sticking together while drying but keep the shape matched, place a piece of cling wrap between the two halves and let them dry while stacked.
Step 2: Texturing and Details
-
Add latitude lines:
While the clay is still leather-hard, place the sphere on a rotating surface or manually turn it. Use a needle tool to gently scribe horizontal lines around the top hemisphere. -
Create depth:
Vary the pressure of your lines. Some should be deeper grooves, while others are faint scratches. This mimics the gaseous bands of planets like Neptune or Saturn. -
Smooth the texture:
Once the lines are carved, lightly run a damp sponge over them to soften the harsh clay burrs. I prefer leaving a few imperfections here to give it that organic, hand-thrown pottery look. -
Dry completely:
Separate the two halves and let them dry fully for 24-48 hours. Turn them occasionally so the rims dry evenly and don’t warp.
Warped Rims?
If the clay dried and the lid rocks instead of sitting flat, place a sheet of sandpaper on a flat table and rub the rim of the clay bowl across it in circular motions to level it.
Step 3: Sanding and Painting
-
Initial sanding:
Once bone dry, use fine-grit sandpaper to smooth the bottom of the base hemisphere so it sits flat. Lightly sand the rim where the two halves meet. -
Base coat application:
Apply a coat of deep navy blue acrylic paint to the exterior of both halves. Use a soft flat brush to get inside the textured grooves. -
Second coat:
Apply a second coat of blue. For a more dimensional look, you can mix a tiny drop of black into the blue for the deeper grooves, and a drop of white for the upper surface. -
Speckling (optional):
Dip an old toothbrush into slightly watered-down white paint. Flick the bristles with your thumb toward the planet to create tiny white stars or dust motes on the surface. -
Seal the finish:
Apply a matte varnish to protect the paint. A matte finish is crucial here to achieve that stone-like, modern aesthetic shown in the photo.
Step 4: Assembly
-
Prepare the ring:
Take your flat wooden craft ring. Sand it lightly to ensure it looks natural. If the wood is too pale, you can stain it lightly with tea or a diluted brown wash to match the base. -
Attach the base:
Glue the bottom clay hemisphere to your wooden display base. Center it carefully and hold firmly until the glue tacks. -
Position the planetary ring:
This is the tricky part—slide the wooden ring over the bottom hemisphere. It needs to sit angled. Use a few dabs of strong craft glue (like E6000) where the ring touches the clay to secure it in that tilted ‘orbit’ position. -
Final placement:
Place the lid on top. The wooden ring should sit just below the separation line, essentially hugging the bottom bowl.
Set this on your desk to hold paperclips or jewelry and enjoy a little piece of the cosmos right at home
Shooting Star Wall Hanging
Create a cozy, puffy-looking star ornament that mimics the texture of felt using air-dry space clay. This charming wall hanging features delicate punctured details and a rustic jute accent, perfect for adding a touch of whimsy to any room.
Step-by-Step Tutorial
Materials
- White space clay (lightweight air-dry clay)
- Star-shaped cookie cutter (large) or paper template
- Rolling pin
- Parchment paper or craft mat
- Toothpick or awl
- White embroidery floss or thin cotton yarn
- Large embroidery needle
- Jute twine
- Scissors
- Clear craft glue or hot glue gun
- Polyester fiberfill or cotton balls (for stuffing)
- White twisted cord for hanging
Step 1: Shaping the Star Body
-
Condition the Clay:
Begin by taking a generous amount of white space clay and kneading it gently in your hands until it becomes pliable and smooth. -
Roll It Out:
Place the clay on a sheet of parchment paper. Use a rolling pin to flatten it into an even slab, aiming for a thickness of about 3-4mm. You want it substantial enough to hold stitches but not too bulky. -
Cut the First Star:
Press your large star cookie cutter firmly into the clay. If using a template, lay it on the clay and carefully trace around it with a craft knife. -
Cut the Second Star:
Repeat the rolling and cutting process to create an identical second star shape. These two pieces will form the front and back of your ornament. -
Create Texture:
To achieve that fuzzy, felt-like appearance seen in the photo, gently dab the surface of the clay with a stiff bristle brush or a crumpled ball of aluminum foil. Do this for both stars on the outward-facing sides.
Step 2: Adding Details
-
Punch the Design:
Take one of the stars (this will be the front) and use a toothpick or awl to poke a pattern of small holes. Start from the center and radius outward, or scatter them randomly like constellations. -
Pre-punch Stitching Holes:
This is crucial for easy assembly: Use your needle or toothpick to make evenly spaced holes around the entire perimeter of both stars, about 3mm from the edge. Try to line up the holes on the top and bottom stars. -
Let it Cure:
Set both stars aside on a flat surface to dry completely. Space clay usually takes 24-48 hours to fully cure, depending on humidity. Flip them occasionally to ensure even drying.
Texturing Trick
To get the ultra-soft visuals shown here, press a piece of coarse sandpaper or a darker towel onto the wet clay. It transfers a natural, fabric-like grain.
Step 3: Assembly and Finishing
-
Start Stitching:
Thread your needle with white floss. Place the dried stars back-to-back. Begin stitching them together using a simple running stitch or whip stitch through your pre-punched holes. -
Continue Around:
Work your way around the star points. The lightweight space clay mimics fabric beautifully here, but be gentle so you don’t crack the edges. -
Stuff the Star:
Before you close up the final side, pause stitching. Gently insert small amounts of polyester fiberfill into the star’s center to give it a 3D, puffy effect. Use a pencil to push stuffing into the tips. -
Close the Seam:
Finish stitching the remaining edge and knot the thread securely. You can hide the knot by tucking it between the two clay layers. -
Create the Hanger:
Cut a length of white twisted cord. Fold it in half to create a loop and glue the ends to the very top tip of the star. -
Wrap the Top:
Apply a dab of glue at the base of the hanging loop (the top tip of the star). Take a piece of jute twine and wrap it tightly around the connection point several times to hide the glue and add a rustic touch. -
Tie it Off:
Secure the end of the jute twine with a small knot or a final drop of glue at the back of the ornament.
Clay Shrinkage
If the stars shrink unevenly and the holes don’t align perfectly, simply use a slightly larger needle to re-pierce the path as you stitch.
Now hang your celestial creation on the wall for a soft, dreamy focal point in your home
Starry Sky Trinket Dish
Capture the magic of a clear midnight sky with this elegant, celestial-themed jewelry holder. The deep navy blue base is speckled with delicate white stars, creating a dreamy resting place for your favorite rings and charms.
How-To Guide
Materials
- Air-dry clay or polymer clay (white)
- Acrylic paint (deep navy blue, white, gold)
- Paintbrushes (medium flat brush, fine detail brush, stiff bristle brush)
- Rolling pin
- Circle cutter or a bowl (approx. 4-5 inches diameter)
- Small bowl (for shaping)
- Sandpaper (fine grit)
- Gloss or matte varnish (optional)
- Clean toothbrush (optional for splatter effect)
Step 1: Shaping the Clay
-
Condition the clay:
Begin by taking a handful of clay and kneading it in your hands until it becomes soft, pliable, and free of cracks. Warm clay is much easier to work with. -
Roll it out:
Roll the clay into a smooth slab on a clean, flat surface. Aim for a consistent thickness of about 1/4 inch (6mm) to ensure durability. -
Cut the circle:
Place your circle cutter or an overturned bowl onto the clay slab. Press down firmly to cut out a perfect circle, then peel away the excess clay from the edges. -
Smooth the edges:
Dip your finger in a little water and gently run it along the cut edge of the circle to smooth out any roughness or sharp bits. -
Form the dish shape:
Gently lift your clay circle and drape it into a slightly larger bowl to help it hold a curved shape while drying. I like to gently press the center down so it nestles perfectly. -
Refine the rim:
While it sits in the mold, use your fingers to slightly thicken or curve the rim upwards if you prefer a more defined lip for your dish. -
Let it dry:
Allow the clay to dry completely according to the package instructions. This usually takes 24-48 hours for air-dry clay. Flipping it halfway through helps the bottom dry evenly.
Step 2: Painting the Cosmos
-
Sand for smoothness:
Once fully dry, lightly sand any rough spots or uneven edges with fine-grit sandpaper until the surface feels smooth to the touch. Wipe away the dust with a damp cloth. -
Apply the base coat:
Using a flat brush, paint the entire interior and exterior of the dish with a deep navy blue acrylic paint. You may need two coats to achieve a rich, opaque color. -
Dry the base:
Let the blue paint dry completely before moving on to the stars. This prevents the white details from turning muddy. -
Create the splatter stars:
Dilute a small mount of white acrylic paint with a drop of water. Dip a stiff brush (or clean toothbrush) into the mixture and run your thumb across the bristles to flick tiny speckles onto the dish. -
Add larger stars:
Using your finest detail brush, hand-paint a few slightly larger dots or tiny four-pointed stars scattered randomly across the surface. -
Optional constellations:
If you want to get specific, use the fine brush to connect some of the dots with incredibly thin lines to form your favorite constellation. -
Paint the rim:
For a finished look, you can leave the rim blue or carefully paint the very top edge with the same navy to ensure coverage, or add a thin gold line if you want extra contrast.
Starry Splatter Tip
Test your splatter technique on a piece of scrap paper first. The distance and speed of your flick will change the size of the ‘stars’ dramatically.
Step 3: Finishing Touches
-
Add a gold accent:
To mimic the tiny star charm seen in the inspiration, create a tiny clay star, paint it gold, and glue it into the dish, or simply paint a single bright gold star on the blue background. -
Seal the piece:
Protect your paint job by applying a coat of varnish. A matte varnish keeps the velvety night sky look, while a gloss adds a ceramic-like shine. -
Final cure:
Let the varnish cure fully before placing any jewelry inside to ensure the surface isn’t tacky.
Metallic Magic
Mix a tiny amount of iridescent medium into your navy blue base paint. This adds a subtle, shimmering depth that mimics distinct galaxies.
Now you have a piece of the universe on your dresser to hold your most treasured items
Galaxy Marble Beads
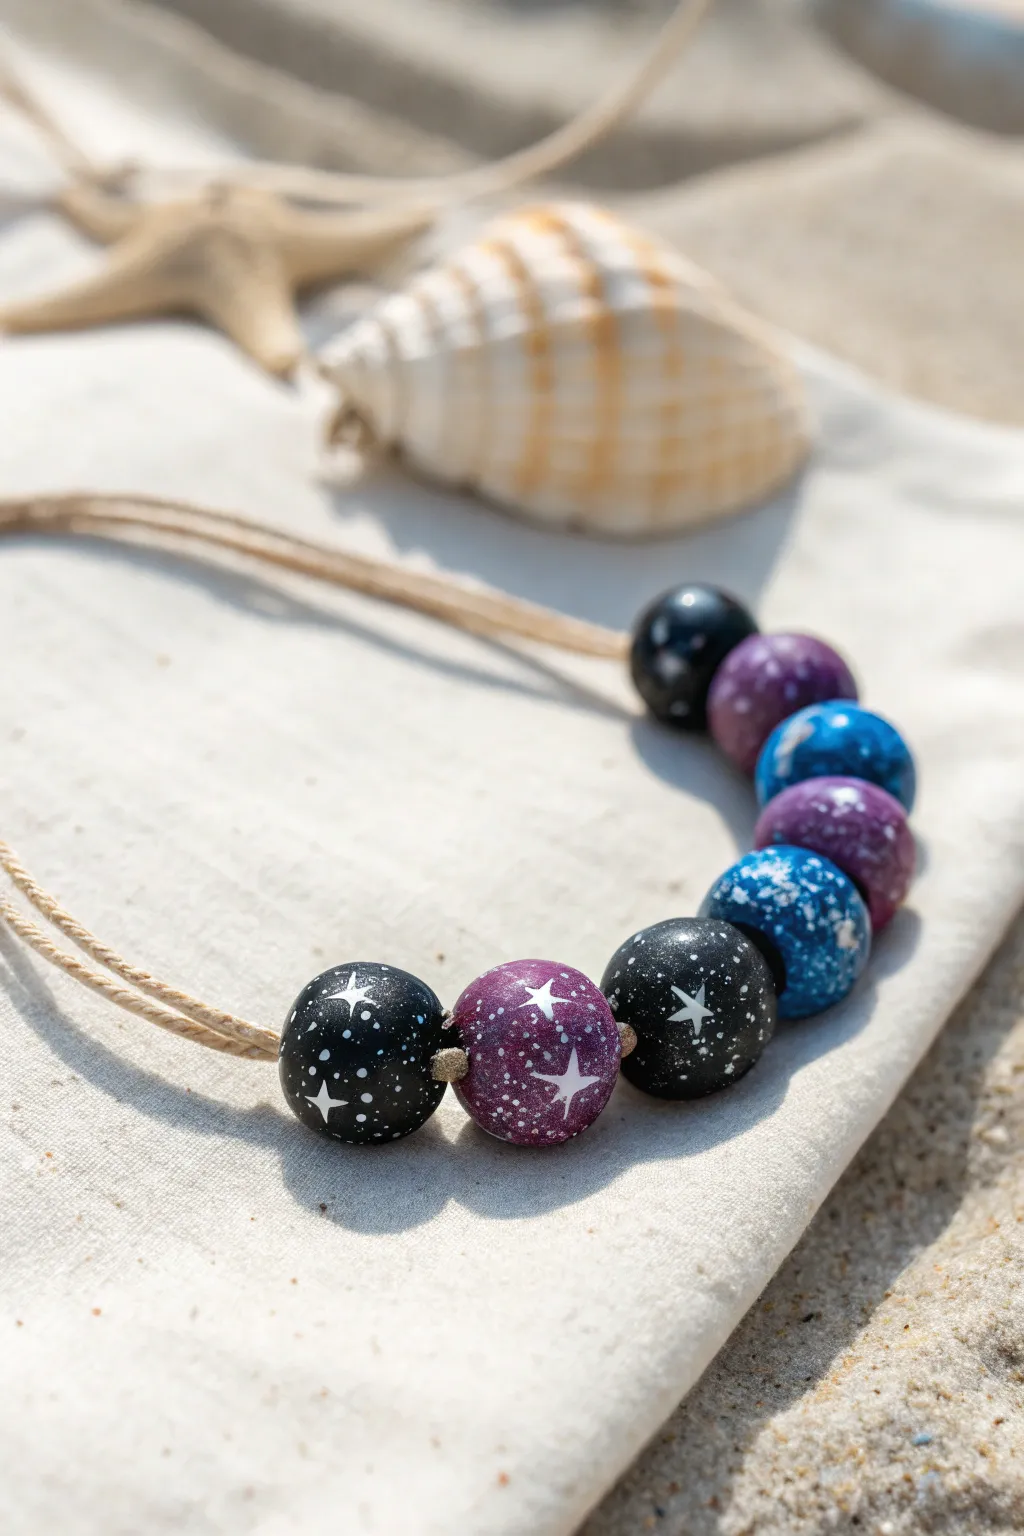
These celestial beads capture the mysteries of deep space with their swirling nebula colors and tiny, scattered star fields. Strung on simple twine, they make for a striking piece of wearable art that brings the galaxy a little closer to home.
Detailed Instructions
Materials
- Polymer clay (black, deep purple, royal blue)
- White acrylic paint
- Stiff bristle toothbrush or splatter brush
- Fine detail paintbrush (size 00 or 000)
- Bead piercing tool or large needle
- Glossy polymer clay varnish or glaze
- Hemp cord or jute twine (natural color)
- Baking sheet and parchment paper
- Oven (for curing)
- Wet sandpaper (optional, 400-800 grit)
Step 1: Shaping the Cosmos
-
Condition the clay:
Start by warming up your black, purple, and blue polymer clay in your hands until it is soft and malleable. This prevents cracking later. -
Create the base spheres:
Roll approximately 9 balls of clay, roughly 3/4-inch in diameter. Create a mix of solid colors: aim for mostly black, with a few purple and perhaps one or two blue beads. -
Marble the colors (optional):
For a more nebulous look on the colored beads, I sometimes take a small pinch of black and mix it partially into the purple or blue clay before rolling it into a ball, creating subtle swirls. -
Smooth the surface:
Roll each bead gently between your palms to remove any fingerprints or creases. The smoother the surface now, the better the final paint job will look. -
Pierce the holes:
Using your piercing tool, carefully bore a hole through the center of each bead. Rotate the bead as you push to keep the hole centered and prevent the exit side from bulging. -
Check hole size:
Ensure the hole is wide enough to accommodate your specific jute twine or hemp cord; string tends to be thicker than standard wire, so you might need to wiggle the tool slightly to widen it. -
Bake the beads:
Arrangement the beads on a parchment-lined baking sheet. Bake them according to the manufacturer’s instructions for your specific brand of clay (usually around 275°F/130°C for 15-30 minutes). -
Cool down:
Let the beads cool completely before handling them. They harden fully as they return to room temperature.
Smooth Operator
Before painting, lightly sand your baked beads under running water with 800-grit sandpaper. This removes fingerprints and gives the surface a professional, stone-like quality.
Step 2: Painting the Stars
-
Prepare the splatter paint:
Dilute a small amount of white acrylic paint with a few drops of water. You want a consistency that is thin enough to flick off a brush but opaque enough to show up against black. -
Create the star field:
Dip your toothbrush or stiff brush into the diluted paint. Run your thumb across the bristles to flick a fine mist of white specks onto the beads. Do this over a protected surface to catch the mess. -
Add varied splatter:
Rotate the beads and repeat the splatter process to ensure coverage on all sides. Vary the distance of the brush to create different sizes of ‘distant stars.’ -
Paint major stars:
Using your fine detail brush and undiluted white paint, draw larger four-pointed stars on the center beads. Start with a simple cross, then gently curve the lines inward to create points. -
Add bright accents:
Place a solid white dot in the center of your four-pointed stars to make them glow. You can also add a few larger, singular dots randomly around the beads to represent planets or brighter stars. -
Seal the galaxy:
Once the paint is thoroughly dry, apply a coat of glossy varnish. This not only protects the paint but simulates the shiny, glass-like finish seen in the original image.
Step 3: Assembly
-
Arranging the layout:
Line up your beads in your desired order. A symmetrical pattern often looks best, perhaps with purple or blue beads flanking a central black one. -
Stringing:
Thread your natural hemp or jute twine through the beads. If the twine frays, wrap a small piece of tape around the tip to make a ‘needle’. -
Knotting (optional):
For spacing, you can tie a simple overhand knot in the twine between each bead to keep them separated, or let them sit flush against each other as shown in the inspiration photo. -
Finish the necklace:
Tie off the ends of the twine at your desired length, creating a simple slip knot or attaching a clasp if you prefer.
Cosmic Depth
Before the white splatter, sponge on faint patches of metallic blue or magenta paint. This creates a nebula effect beneath the stars for added dimension.
Enjoy wearing your personal constellation and carrying a piece of the universe with you wherever you go
Constellation Tile Coasters
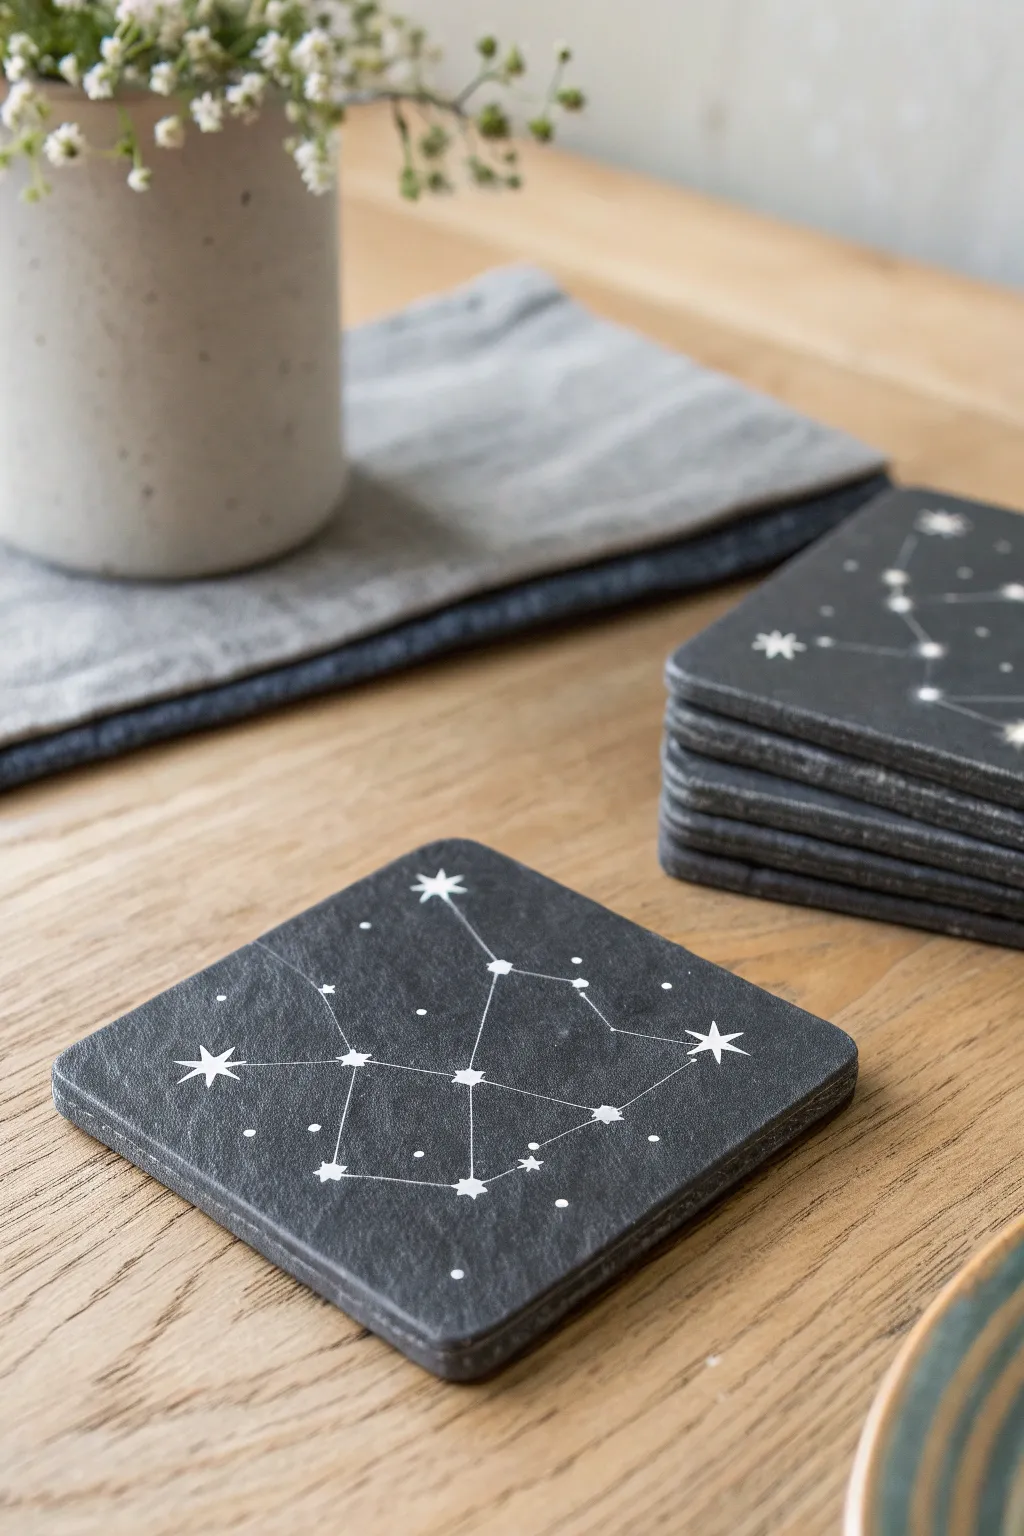
Bring the night sky to your coffee table with these elegant, minimalist constellation coasters. The dark, textured surface of slate or clay mimics the depth of space, making the crisp white star patterns pop beautifully.
Step-by-Step
Materials
- Black polymer clay or pre-cut square slate coasters
- Rolling pin (if using clay)
- Square cookie cutter or craft knife (if using clay)
- Sandpaper (fine grit)
- White acrylic paint or a white oil-based paint pen (fine tip)
- Small round paintbrush (size 0 or 00)
- Printed constellation templates or reference images
- Pencil or white transfer paper
- Ruler
- Matte spray sealant or varnish
Step 1: Preparing the Base
-
Shape the clay:
If you are starting from scratch with black polymer clay, condition the clay until it is soft and pliable. Roll it out to an even thickness of about 1/4 inch (6mm). Using a square cutter or a knife and ruler, cut out 4-inch squares. I like to gently tap the edges to soften them and mimic the look of natural slate. -
Texture the surface:
To achieve that slate-like texture seen in the photo, gently press a piece of crumpled aluminum foil or a coarse sandpaper sheet onto the clay surface before baking. This gives it a natural, stony finish rather than a perfectly smooth plastic look. -
Bake and cool:
Bake your clay squares according to the manufacturer’s instructions. Once baked, let them cool completely on a flat surface to prevent warping. If you are using pre-bought slate tiles, simply wipe them clean with a damp cloth to remove any dust.
Star Power
Use a toothpick dipped in paint for the tiniest background stars. It offers much better control than even the smallest brush.
Step 2: Mapping the Stars
-
Choose your constellations:
Select which constellations you want to feature. Simple, linear ones like Cassiopeia, Orion, or the Big Dipper work best. Print out simple line diagrams of these constellations sized to fit your coasters. -
Transfer the design:
Place your printed template over the coaster. If the paper is thin enough, you can press firmly with a pencil at the star points to leave a small indentation on the soft clay or slate surface. Alternatively, use white transfer paper under your template and trace the lines and dots. -
Mark the major stars:
Identify where the largest, brightest stars in the constellation are located. Use a pencil to lightly mark these spots so you know where to paint the larger star icons later.
Glow Up
Mix glow-in-the-dark powder into your white paint or use glow paint for the stars. The constellation will reveal itself when the lights go down.
Step 3: Painting the Galaxy
-
Connect the dots:
Using a fine-tip white paint pen or a very thin brush with white acrylic paint, draw the straight lines connecting your star points. Use a ruler if your hand isn’t steady, but a slightly organic line creates a hand-drawn charm. -
Paint the main stars:
At the major intersection points you marked earlier, carefully paint small 5-pointed stars. They don’t need to be perfect; slight variations make them look twinkling. Ensure these are solid white and opaque. -
Add minor stars:
For the smaller stars in the constellation, just add simple solid dots. Vary the size of these dots slightly to suggest different star magnitudes. -
Create background stars:
To fill the empty space and create depth, add tiny, random dots around the main constellation. Keep these very small, almost like dust specks, to represent distant stars in the background. -
Clean up edges:
If you made any mistakes or smudges, quickly wipe them away with a damp Q-tip before the paint dries. For stubborn dried mistakes on slate, you can gently scrape them off with a craft knife.
Step 4: Finishing Touches
-
Let it dry:
Allow the white paint to dry completely. This usually takes about 15-30 minutes for acrylics, but oil-based pens might need a bit longer to cure fully. -
Seal the deal:
To protect your artwork from drink condensation, spray the coasters with a matte sealant. Apply 2-3 light coats rather than one heavy one to avoid cloudiness. -
Add protective feet:
Flip the coasters over and attach small felt or rubber pads to the four corners. This protects your furniture from scratches and keeps the coaster stable.
Now you have a stunning set of custom coasters ready to star in your next gathering
Meteorite Rock Paperweights
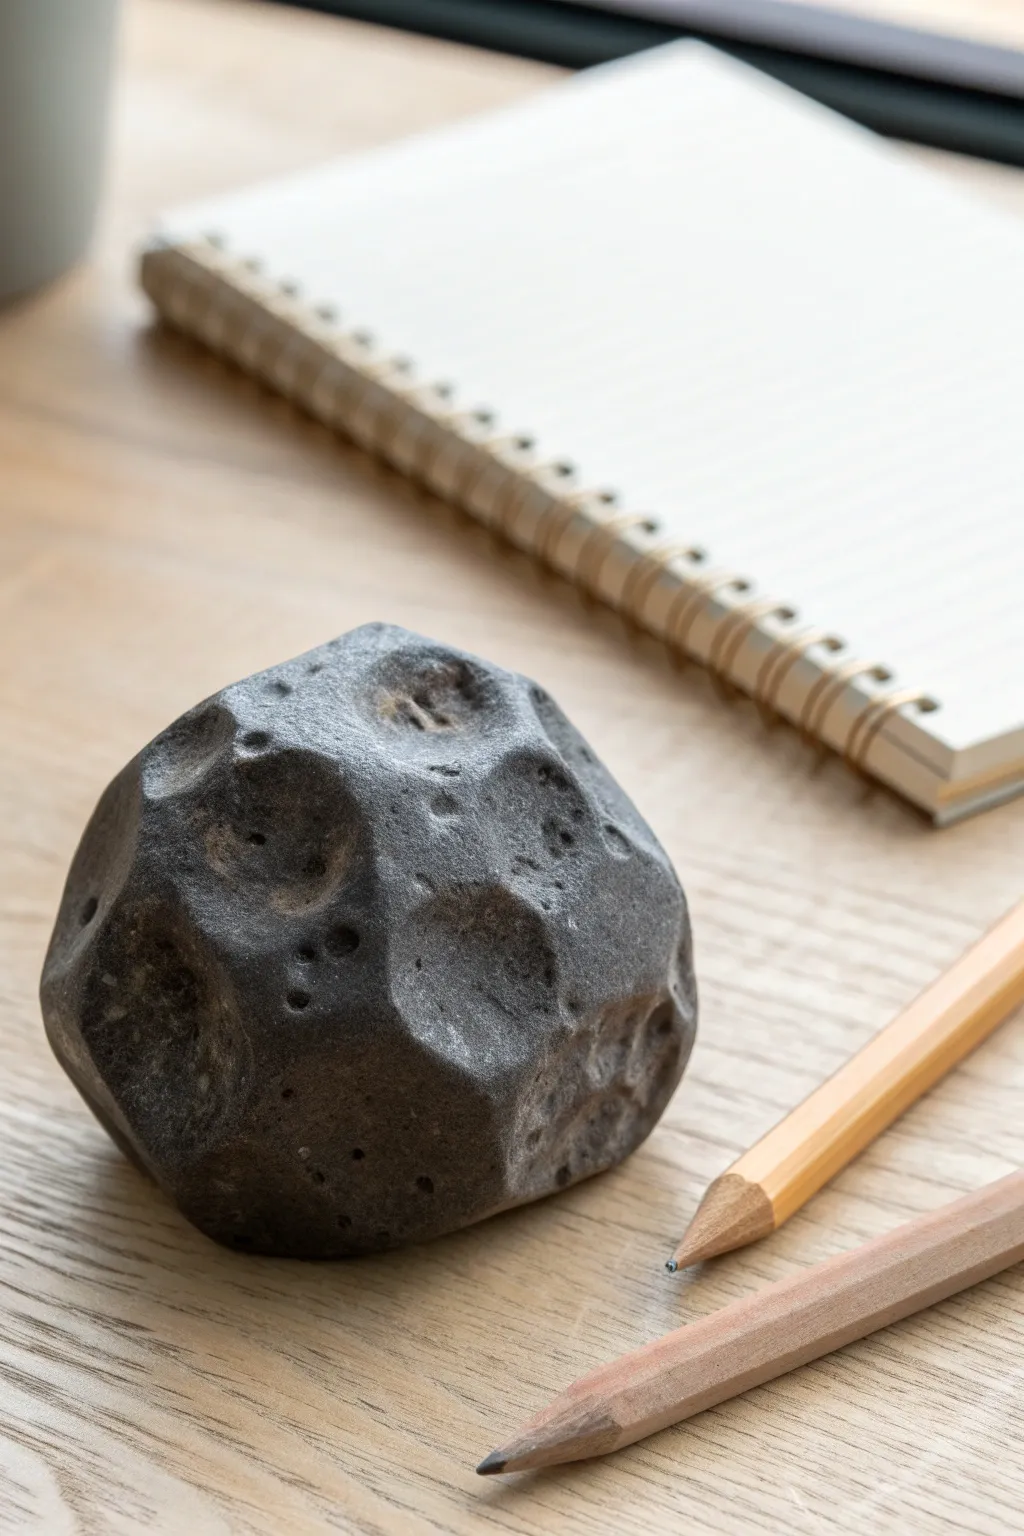
Transform a simple lump of clay into a mysterious celestial visitor with this realistic meteorite paperweight tutorial. The finished piece features deep craters, rugged texture, and that signature scorched-rock look that makes it feel like it just survived atmospheric entry.
Step-by-Step Guide
Materials
- Air-dry modeling clay (grey or stone colored)
- Acrylic paints (black, dark grey, metallic silver)
- Tools for texturing (rounded stylus, old toothbrush, crumpled foil)
- Sponge or foam brush
- Fine-grit sandpaper
- Matte or satin sealant spray
Step 1: Shaping the base form
-
Condition the clay:
Begin by kneading a fist-sized ball of air-dry clay until it’s warm and pliable, removing any air bubbles to prevent cracking later. -
Form the irregular shape:
Shape the clay into a rough, polyhedral form. Avoid perfect spheres; meteorites are often jagged or lumpy, so press the clay against your work surface to create flat facets. -
Soften the edges:
Use your thumbs to gently round over the sharpest corners created by the faceting layer, ensuring the transition between sides looks worn rather than cut. -
Add initial texture:
Take a ball of crumpled aluminum foil and press it firmly all over the surface of the clay to create a microscopic, rocky skin texture.
Step 2: Creating the craters
-
Map out impact sites:
Decide where your largest craters will go. I like to group a few together for a more natural look rather than spacing them evenly. -
Indent with tools:
Use the rounded end of a large modeling tool (or even the back of a thick marker) to press deep, circular indents into the clay. -
Detail the crater walls:
Wiggle the tool slightly as you pull it out to roughen the edges of the holes, making them look like impact zones rather than perfect drill holes. -
Add micro-craters:
Use a smaller stylus or a toothpick to prick tiny holes locally around the larger craters, mimicking secondary impacts or porous rock. -
Refine the surface:
Lightly tap a toothbrush over the crater edges to add a pitted, grainy texture that disrupts any smoothness left by the modeling tools. -
Dry partially:
Let the clay set for about 30 minutes until it stiffens slightly, then check for any fingerprints you might have accidentally left and smooth them out. -
Full cure:
Allow the clay to dry completely according to the package instructions, usually 24-48 hours depending on thickness.
Weight It Down
Add real weight to your paperweight by embedding a heavy, smooth river rock inside your clay ball during the initial shaping phase.
Step 3: Painting the scorched look
-
Apply the base coat:
Paint the entire rock with a solid coat of dark grey acrylic paint, ensuring you get the brush bristles deep into every crater and pore. -
Add the char layer:
While the grey is still tacky, stipple on patches of black paint, focusing heavily on the insides of the craters to create deep shadows. -
Dry brush technique:
Dip a dry brush into a lighter grey shade, wipe most of it off on a paper towel, and lightly flick it across the raised edges of the rock to highlight the texture. -
Metallic accents:
Mix a tiny amount of metallic silver with black paint. Lightly sponge this onto the high points to simulate iron content often found in meteorites. -
Final wash:
Create a very watery wash of black paint and flow it over the entire object. Wipe the surface quickly with a rag so the dark color stays only in the deepest pits. -
Seal the work:
Once fully dry, spray the meteorite with a matte or satin sealant to protect the paint and give it a slight, rock-like sheen.
Magnetic Magic
Embed small neodymium magnets inside the clay surface before drying. Now your meteorite can actually hold paperclips, just like real iron ore.
Set this on your desk to hold your papers down while keeping your head in the clouds
Mini Space Helmet Planter
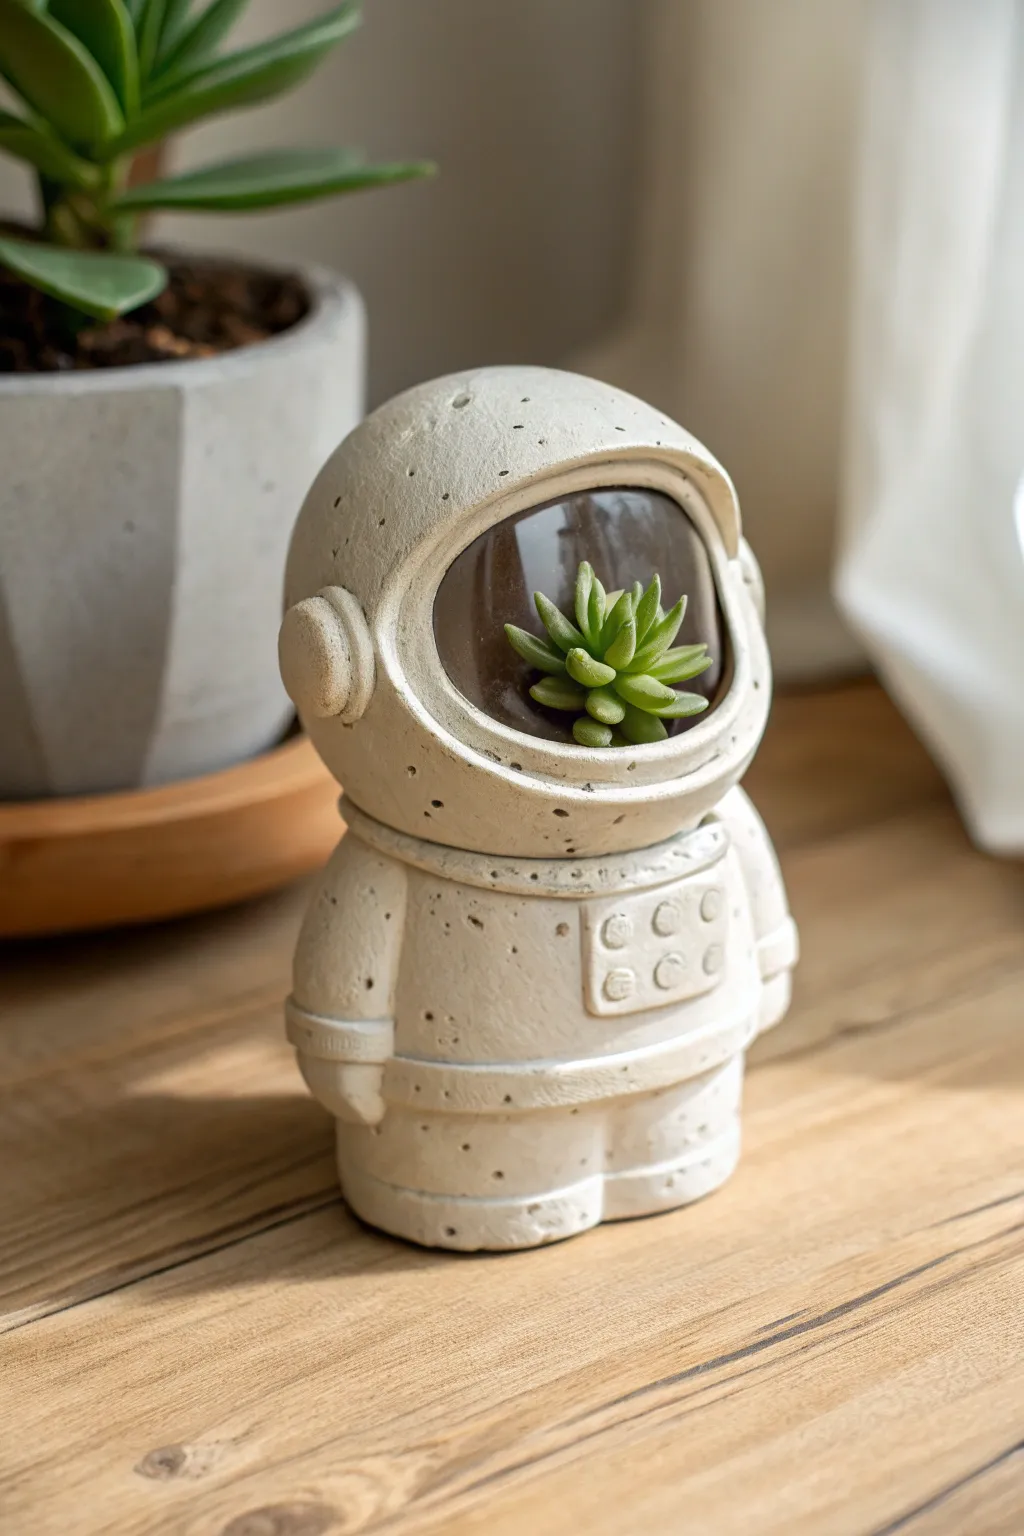
This adorable planter brings a bit of cosmic charm to your desk, featuring a chunky astronaut suit that doubles as a home for a tiny succulent. With its stone-like finish and minimalist design, it looks like a high-end ceramic piece but is entirely handmade.
Step-by-Step Tutorial
Materials
- Air-dry clay (white or light grey)
- Small plastic cup or foil ball (for armature)
- Clay sculpting tools (needle tool, smoothing tool)
- Rolling pin
- Water and sponge
- Acrylic paint (white, cream, black/grey)
- Old toothbrush
- Clear matte sealant or varnish
- Small succulent and potting soil
Step 1: Forming the Base Structure
-
Create the core armature:
Start by creating a temporary core for the head. Crumple aluminum foil into a tight ball slightly larger than a tennis ball, or use a small plastic cup if you want a perfect cylindrical opening later. This saves clay and keeps the figure lightweight. -
Shape the body block:
Roll a solid cylinder of clay for the body. It should be slightly wider than your head armature and squat—this astronaut is cute and chubby, not tall. Flatten the bottom firmly against your work surface so it stands stable. -
Add the legs:
Instead of sculpting separate legs, define them on the body block. Use a needle tool or a knife to cut a shallow vertical groove into the bottom front and back of the cylinder, suggesting two legs standing together. Smooth the edges so they look rounded. -
Prepare the head:
Roll out a slab of clay about 1/4 inch thick. Drape this over your foil ball or cup armature, smoothing it down the sides. Leave the bottom open so it can attach to the body. -
Cut the visor opening:
While the clay on the head is still soft, use a circular cutter or a knife to remove a large oval section for the face. This is where your plant will eventually live. Smooth the cut edges with a wet finger.
Core Removal Hack
If removing the foil core is difficult, just push it deeper to create space for the soil. As long as there is room for roots, the foil can stay inside permanently.
Step 2: Refining the Astronaut Details
-
Attach head to body:
Score (scratch) the top of the body and the bottom of the head. Add a little water or slip, then press them firmly together. I like to blend the clay across the seam with a modeling tool to ensure a permanent bond. -
Add the neck ring:
Roll a thin snake of clay and wrap it around the seam where the head meets the body. Flatten it slightly and smooth it to create the collar of the space suit. -
Sculpt the visor rim:
To give the helmet depth, roll another thin snake of clay. Attach this around the perimeter of the visor opening you cut earlier. Blend the outer edge into the helmet, but leave the inner edge distinct to look like a frame. -
Attach the ear pucks:
Roll two small balls of clay and flatten them into thick discs. Score and slip these onto the sides of the helmet where ears would be. These represent the communication details on the helmet. -
Create the arm details:
Roll two sausage shapes for arms. Attach them flat against the sides of the body, blending the shoulders into the main torso. Add a tiny strip of clay around the wrist area to simulate gloves. -
Add the control panel:
Cut a small rectangle from your clay slab and attach it to the chest completely flat. Inside this rectangle, press tiny balls of clay to look like buttons or dials.
Step 3: Texture and Finishing
-
Texture the surface:
To mimic the stone look in the photo, gently dab the surface with a stiff brush or a crumpled ball of foil. You want a matte, slightly pitted texture rather than perfectly smooth porcelain. -
Add craters:
Use the end of a paintbrush handle or a needle tool to poke random shallow holes and dots into the helmet and body. This enhances the weathered, moon-rock aesthetic. -
Dry properly:
If you used a foil core, careful remove it if possible (or carve it out) once the clay is leather-hard. Let the piece dry completely for 24-48 hours until it is hard and room temperature to the touch. -
Paint the base:
Paint the entire figure with an off-white or cream acrylic paint. Avoid bright titanium white; a warmer bone color looks more natural. -
Create the speckle effect:
Dilute some grey or black paint with water. Dip an old toothbrush into it and run your thumb across the bristles to flick tiny speckles over the dried planter. This is crucial for that faux-stone finish. -
Seal the piece:
Apply a coat of matte waterproof varnish, especially inside the head cavity. This protects the clay from moisture when you water your plant. -
Planting:
Add a small amount of soil into the helmet cavity and nestle your succulent inside. Use a brush to sweep any stray soil off the white rim.
Galaxy Visor
Instead of a real plant, paint the glossy black curve of a ‘glass’ visor inside the helmet, then add tiny white stars and purple nebulae for a painted reflection effect.
Place your little space traveler near a window and enjoy the greenery growing from their helmet
Planet and Star Mobile Set
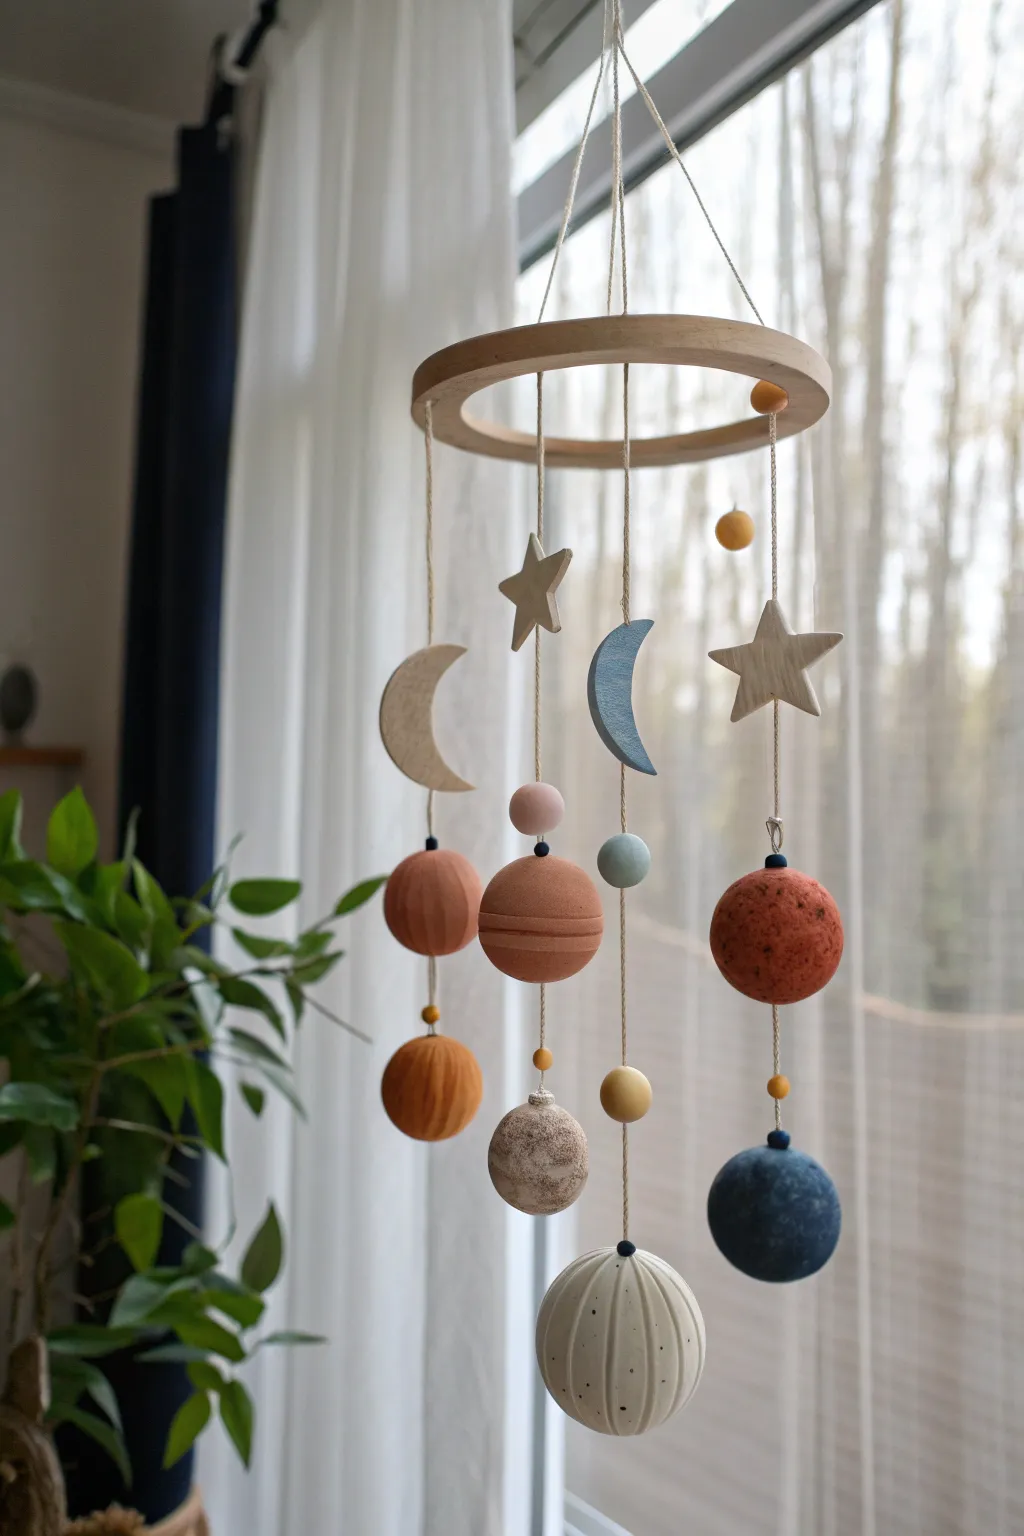
Bring the wonder of space into a nursery with this serene, earthy-toned mobile featuring handcrafted planets, stars, and celestial bodies. The textured clay and muted palette create a calming, artisanal look perfect for a modern baby room.
Step-by-Step
Materials
- Polymer clay (terracotta, beige, white, navy blue, dusty pink, sage green)
- Wooden embroidery hoop (inner ring only, approx. 8-10 inches)
- Texturing tools (old toothbrush, toothpick, sandpaper)
- Small rolling pin
- Cookie cutters (star and crescent moon shapes)
- Aluminum foil (for planet cores)
- Needle tool or thick awl
- Strong cotton twine or cream hemp cord
- Acrylic paint (optional, for adding details/speckles)
- Matte spray varnish
- Wooden beads (small, varying natural colors)
- Scissors and ruler
Step 1: Shaping the Celestial Bodies
-
Core preparation:
To keep the mobile lightweight, create small balls of aluminum foil as cores for your larger round planets. Compress them tightly so they become dense spheres ranging from 1 to 2 inches in diameter. -
Covering the planets:
Condition your polymer clay by kneading it until soft. Roll out sheets of terracotta, beige, and mixed earthy tones. Wrap these sheets around your foil cores, smoothing the seams completely until you have perfect spheres. -
Creating the textured planet:
For the beige textured planet at the bottom, gently roll the clay sphere over a piece of sandpaper or press an old toothbrush against it to create a cratered, moon-like surface. -
Ringed planet detailing:
For the central ringed planet (like Saturn), flatten a small rope of clay and wrap it around the equator of a dusty-pink/terracotta sphere. Blend the edges slightly so it adheres but remains distinct. -
Cutting flat shapes:
Roll a slab of clay to about 1/4 inch thickness. Use your cutters to punch out two large stars, a smaller star, and two crescent moons. Use different colors like light beige and slate blue for variety. -
Adding ribbed texture:
The bottom-most white planet features vertical ribs. Carefully use your needle tool or the back of a knife to press vertical identifying lines from the top pole to the bottom pole all around the sphere.
Weight Balance Tip
Weigh your completed strands before tying them to the hoop. If one strand is significantly heavier, adjust the spacing or swap a bead to prevent the mobile from tilting.
Step 2: Assembly Prep & Baking
-
Creating suspension holes:
Before baking, you must create holes for the string. Use a needle tool to pierce a hole completely through the center of the planets (top to bottom) and through the top points of your stars and moons. -
Inserting eye pins (alternative):
If piercing all the way through distorts the shape too much, insert a small metal eye pin into the top of each piece instead. I find this helps keep heavy spheres perfectly round. -
Baking the clay:
Arrange all pieces on a baking sheet lined with parchment paper. Bake according to your specific clay brand’s instructions (usually 275°F for 15-30 minutes). Let them cool completely. -
Sanding and finishing:
Once cool, lightly sand any fingerprints or rough edges. If you want a speckled effect like the blue planet, flick a toothbrush loaded with slightly watered-down white paint over the surface.
Galaxy Swirls
Twist two colors of clay together just before rolling your spheres to create a marbled ‘gas giant’ effect for some of the planets, adding depth without painting.
Step 3: Rigging the Mobile
-
Prepare the hoop:
Take the inner ring of your embroidery hoop. Cut four long lengths of cotton twine (about 3 feet each) to serve as the main hanging lines. -
Marking placement:
Mark four equidistant points on your wooden hoop. This ensures the mobile hangs level and doesn’t tilt to one side. -
Stringing the strands:
Lay out your design on a table first to check balance. Thread a piece of twine through your bottom planet, knotting it securely underneath. Then, thread on a small wooden bead above it. -
Layering the elements:
Continue up the same string, adding a second element (like a moon or another planet) higher up. Secure each item’s position by tying a knot underneath it or underneath the bead that supports it. -
Attaching to the hoop:
Once you have four distinct strands loaded with your clay shapes, tie each strand securely to the four marked points on the wooden hoop. Adjust lengths so the elements cascade at different heights. -
Balancing the top:
Bring the four loose ends of twine from the hoop upwards to a central point. Adjust the tension carefully until the hoop hangs perfectly horizontal, then knot all four strands together into a hanging loop.
Now suspend your handcrafted solar system and watch the planets slowly orbit in the gentle breeze of the room.
Personalized Space Name Plaque
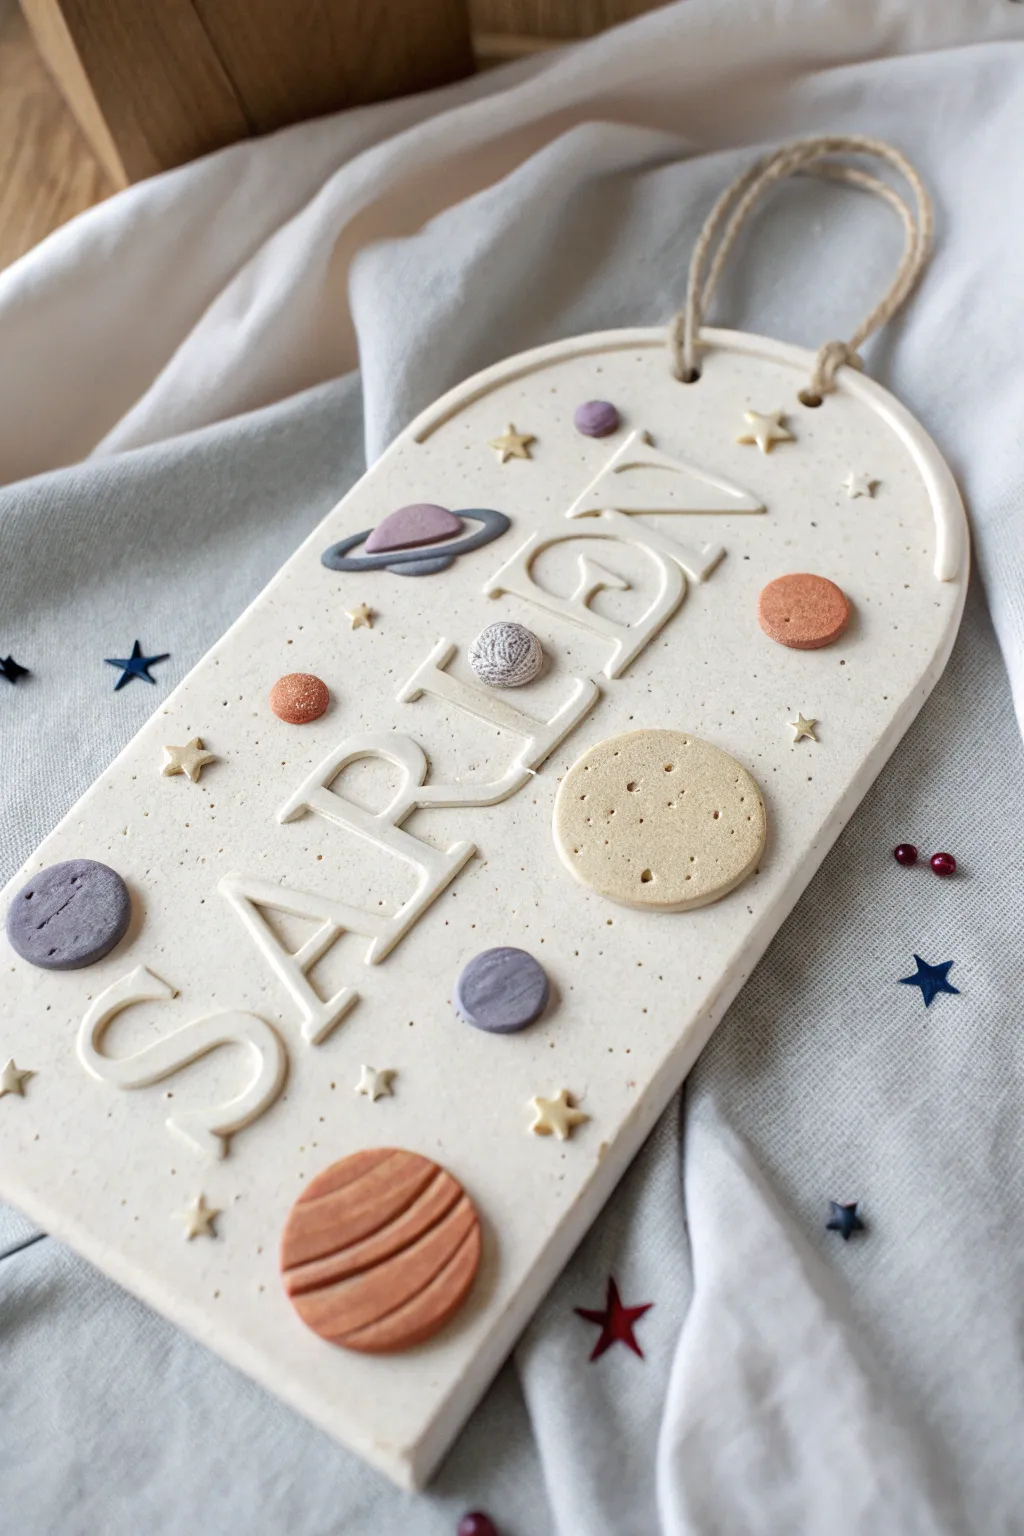
Create a dreamy, textured keepsake with this space-themed name plaque made from polymer clay. Featuring raised lettering and an assortment of planets, stars, and celestial bodies in soft, muted tones, this plaque adds a whimsical touch to any nursery or bedroom.
Step-by-Step Tutorial
Materials
- Polymer clay (White, Beige, Grey, Terracotta/Rust, Lavender)
- Small rolling pin
- Arch template or cutter (approx. 8-10 inches tall)
- Letter stamps or alphabet cutters (serif font)
- Needle tool or toothpick
- Ball tool (small and large)
- Small star cutters (various sizes)
- Twine or jute cord
- Speckled clay (optional, or mix black pepper/sand into white clay)
- Liquid polymer clay or bake-and-bond
- Sandpaper (fine grit)
- Oven and baking sheet
Step 1: Base Preparation
-
Mix the base clay:
Start by conditioning a large block of white polymer clay. To achieve the speckled stone/granite look seen in the photo, mix in a very small amount of black glitter, ground black pepper, or a small pinch of black clay until fully incorporated but still speckled. -
Roll the slab:
Roll out the conditioned clay to a uniform thickness of about 1/4 inch. Ensure the surface is smooth and free of air bubbles or lint. -
Shape the arch:
Place your arch template on the clay slab. Use a sharp craft knife to cut around the perimeter cleanly. Smooth the edges with your finger to remove any sharpness from the cut. -
Create hanging holes:
Use a straw or a large hole cutter to punch two holes at the top curve of the arch. Make sure they are evenly spaced and far enough from the edge to support the weight of the plaque.
Uneven surface?
If fingerprints are visible before baking, lightly brush the raw clay with a little cornstarch or baby oil. This smooths imperfections without ruining the crisp edges of your letters.
Step 2: Lettering
-
Cut the letters:
Roll out a thin sheet of plain white clay. Using alphabet cutters, cut out the letters for your desired name. If you don’t have cutters, you can hand-cut the letters using a printed paper template and a needle tool. -
Arrange the name:
Gently place the letters onto the center of the arch without pressing them down yet. Adjust the spacing to ensure the name is centered vertically and horizontally. -
Secure the text:
Once satisfied with the placement, lift each letter, apply a tiny dot of liquid polymer clay to the back, and press it firmly onto the base. Smooth the edges of the letters gently to bond them to the plaque.
Step 3: Celestial Details
-
Sculpt the moon:
Roll a small ball of beige clay and flatten it into a disc. Press it onto the plaque. Use a needle tool or small ball tool to create different-sized craters for a textured moon surface. -
Form the ringed planet:
Flatten a small ball of lavender clay. Roll a very thin snake of grey clay and wrap it around the center to form a ring. Press this onto the plaque, slightly overlapping or near the letters. -
Create the striped planet:
Layer thin slices of terracotta and rust-colored clay, roll them together, and cut a circle to create a striped Jupiter-like planet. Attach this to the lower section of the plaque. -
Add simple planets:
Roll small balls of grey, rust, and purple clay. Flatten them slightly and adhere them in the empty spaces around the name to balance the composition. -
Scatter the stars:
Roll out a thin sheet of pale yellow or gold clay. Use tiny star cutters to punch out several stars. I like to arrange these in clusters of varying sizes to fill the negative space comfortably. -
Texturing detail:
For added depth, use a toothbrush or a stiff brush to gently tap the surface of the base clay around the planets, enhancing the stone-like texture.
Make it sparkle
Before baking, lightly dust the planets or stars with metallic mica powder in gold or silver. This gives a subtle, magical shimmer that catches the light beautifully.
Step 4: Finishing
-
Baking:
Preheat your oven according to the clay manufacturer’s instructions (usually 230°F – 275°F). Place the plaque on a parchment-lined baking sheet and bake for 30-45 minutes depending on thickness. -
Cooling:
Let the plaque cool completely in the oven with the door strictly closed. This slow cooling process helps prevent the clay from cracking. -
Sanding edges:
Once fully cool, inspect the edges. If there are any rough spots, gently wet-sand them with fine-grit sandpaper for a professional finish. -
Sealing (Optional):
If you want a matte look, leave it as is. For protection, apply a thin layer of matte water-based varnish, avoiding the textured moon areas to keep the contrast. -
Attach the cord:
Cut a length of jute twine. Thread the ends through the holes from the front to the back and tie sturdy knots on the backside to secure the hanger.
Hang your new handcrafted plaque on the wall and enjoy the personalized touch of the cosmos in your space
Black Hole Swirl Sculpture
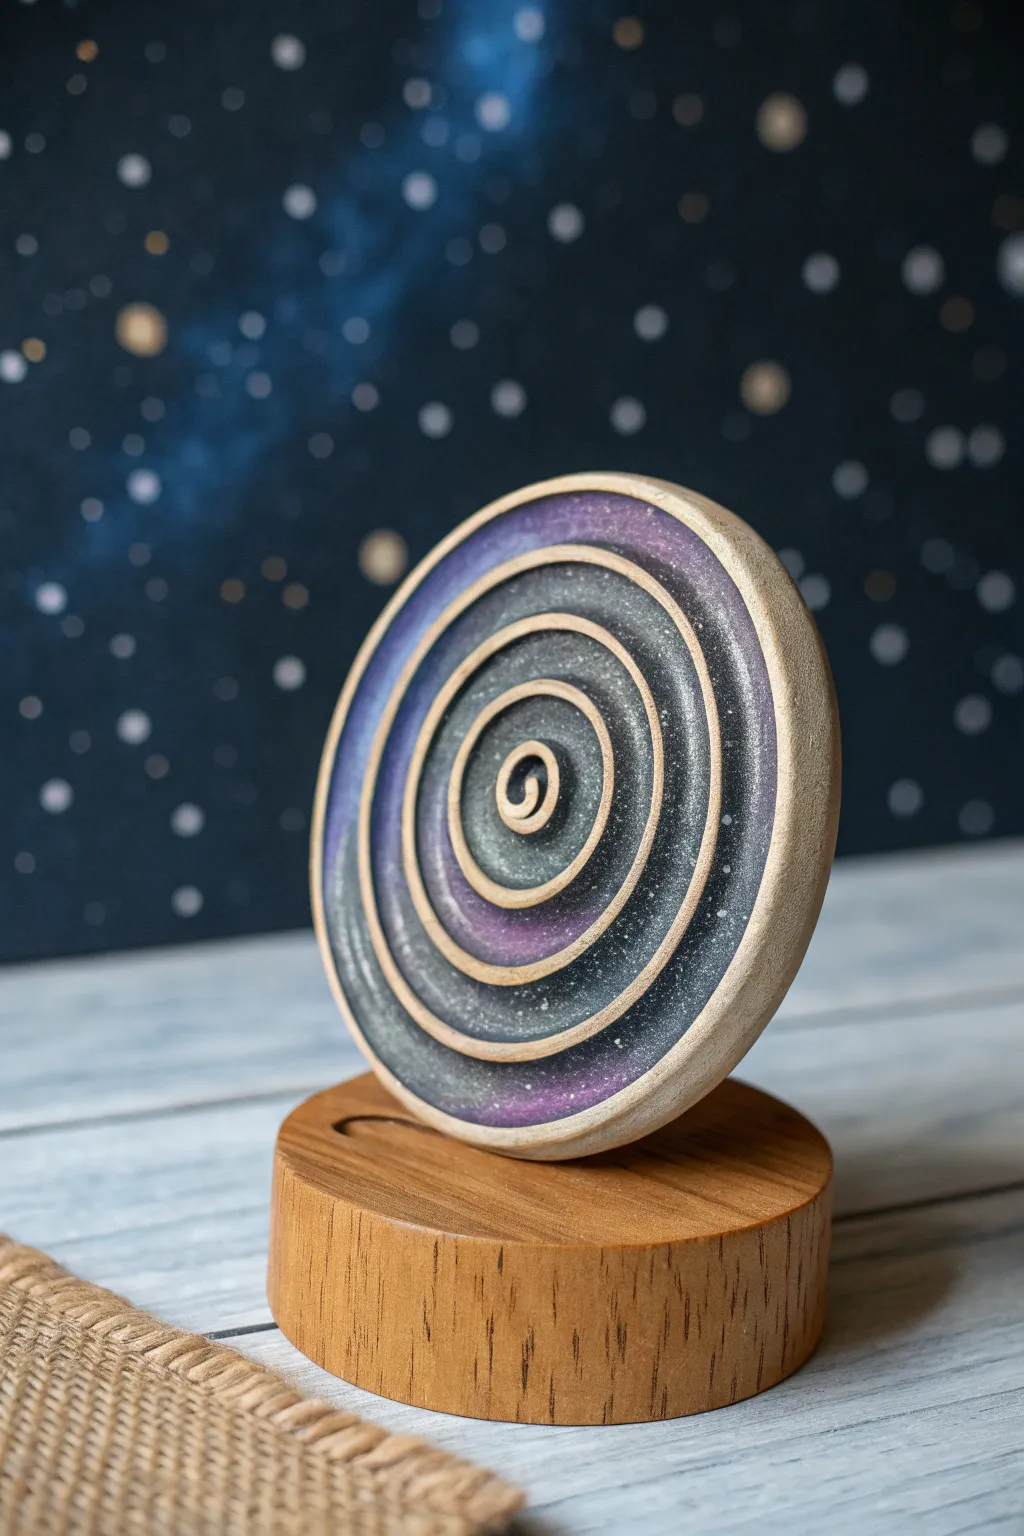
Capture the mesmerizing pull of a black hole with this decorative clay sculpture. Featuring a deep, carved spiral painted in galaxy hues of purple and black, it sits elegantly on a wooden base to bring a touch of the cosmos to your desk.
Step-by-Step Guide
Materials
- Air-dry clay or polymer clay (white or light beige)
- Round cookie cutter or jar lid (approx. 4-inch diameter)
- Small carving loop tool or ribbon tool
- Rolling pin
- Sandpaper (fine grit)
- Acrylic paints: Black, Deep Purple, Navy Blue, White
- Small flat brush and detail brush
- Stiff-bristled toothbrush (for splattering)
- Matte or satin varnish
- Round wooden base (pre-made or cut from dowel)
- Super glue or strong craft adhesive
Step 1: Shaping the Base
-
Roll the Slab:
Begin by conditioning your clay until it’s pliable. Roll it out into a smooth, even slab that is roughly 1/4 to 1/2 inch thick. You want it substantial enough to carve into without breaking through to the other side. -
Cut the Circle:
Use your round cookie cutter or a jar lid to stamp out a perfect circle from the slab. Smooth the outer edges with a little water on your finger to remove any rough texture left by the cutter. -
Mark the Spiral:
Lightly sketch a spiral path onto the surface using a needle tool or toothpick. Start from the very center and wind your way outward to the edge. Don’t dig deep yet; this is just your guide line.
Step 2: Carving the Vortex
-
Carve the Channels:
Using a small ribbon or loop tool, carefully carve out the clay *between* the lines of your spiral. The goal is to create a recessed channel, leaving a raised wall of clay that forms the spiral pattern. -
Refine the Depth:
Go back over your channels to ensure they are relatively even in depth. I find it helpful to keep the walls slightly thicker at the base for stability. -
Smooth the Channels:
Dip a small brush in water (or clay softener if using polymer) and run it through the carved channels to smooth out tool marks. Leave the top ridges sharp and flat. -
Dry or Bake:
If using air-dry clay, let the piece dry for 24-48 hours until completely hard and white. If using polymer clay, bake according to the manufacturer’s instructions.
Sticky Situation?
If acrylic paint dries too fast on the ridges before you can wipe it, just sand the top surface with 200-grit sandpaper. It cleans the edge and flattens it perfectly.
Step 3: Painting the Galaxy
-
Sand the ridges:
Once fully cured, gently sand the the very top surface of the spiral ridges. This ensures they are flat and clean, ready to contrast against the dark paint. -
Base Coat:
Mix a dark base color using black and a touch of navy blue. Paint inside the carved channels. It’s okay if you get paint on the ridges for now, but try to keep the bulk of the color deep in the grooves. -
Add Nebula Effects:
While the black is still slightly tacky or just dry, sponge or dry-brush patches of deep purple and lighter blue into the channels to create a nebula effect. -
Create Stars:
Dilute a small drop of white acrylic paint with water. Dip a stiff toothbrush into it and flick the bristles with your thumb to spray tiny white stars across the painted areas. -
Clean the Ridges:
Once the paint is dry, take a slightly damp cloth or fine sandpaper and carefully wipe or sand the top surface of the spiral ridges again. This removes stray paint and reveals the natural clay color, creating that striking definition.
Glow Up
Mix glow-in-the-dark powder into your white paint for the stars. When the lights go out, your spiral will actually look like a swirling, glowing galaxy.
Step 4: Assembly
-
Seal:
Apply a coat of matte or satin varnish over the painted areas to protect the finish and deepen the colors. -
Prepare the Base:
Take your round wooden base. If it doesn’t have a slot, you can simply glue the disk on top, but for a secure fit, use a saw or file to create a shallow groove in the wood matching the thickness of your clay disk. -
Attach:
Apply a strong adhesive or super glue into the groove (or onto the contact point) and firmly press the clay disk into place. Hold it steady for a minute until the glue sets.
Place your finished sculpture near a light source to let the cosmic details truly shine