Whenever I have a little extra clay on my table, I turn it into something cute and tiny that makes me smile every time I see it. Here are my favorite cute clay ideas—all beginner-friendly, small-scale, and perfect for building a sweet little collection.
Chibi Bunny Mini Figurines
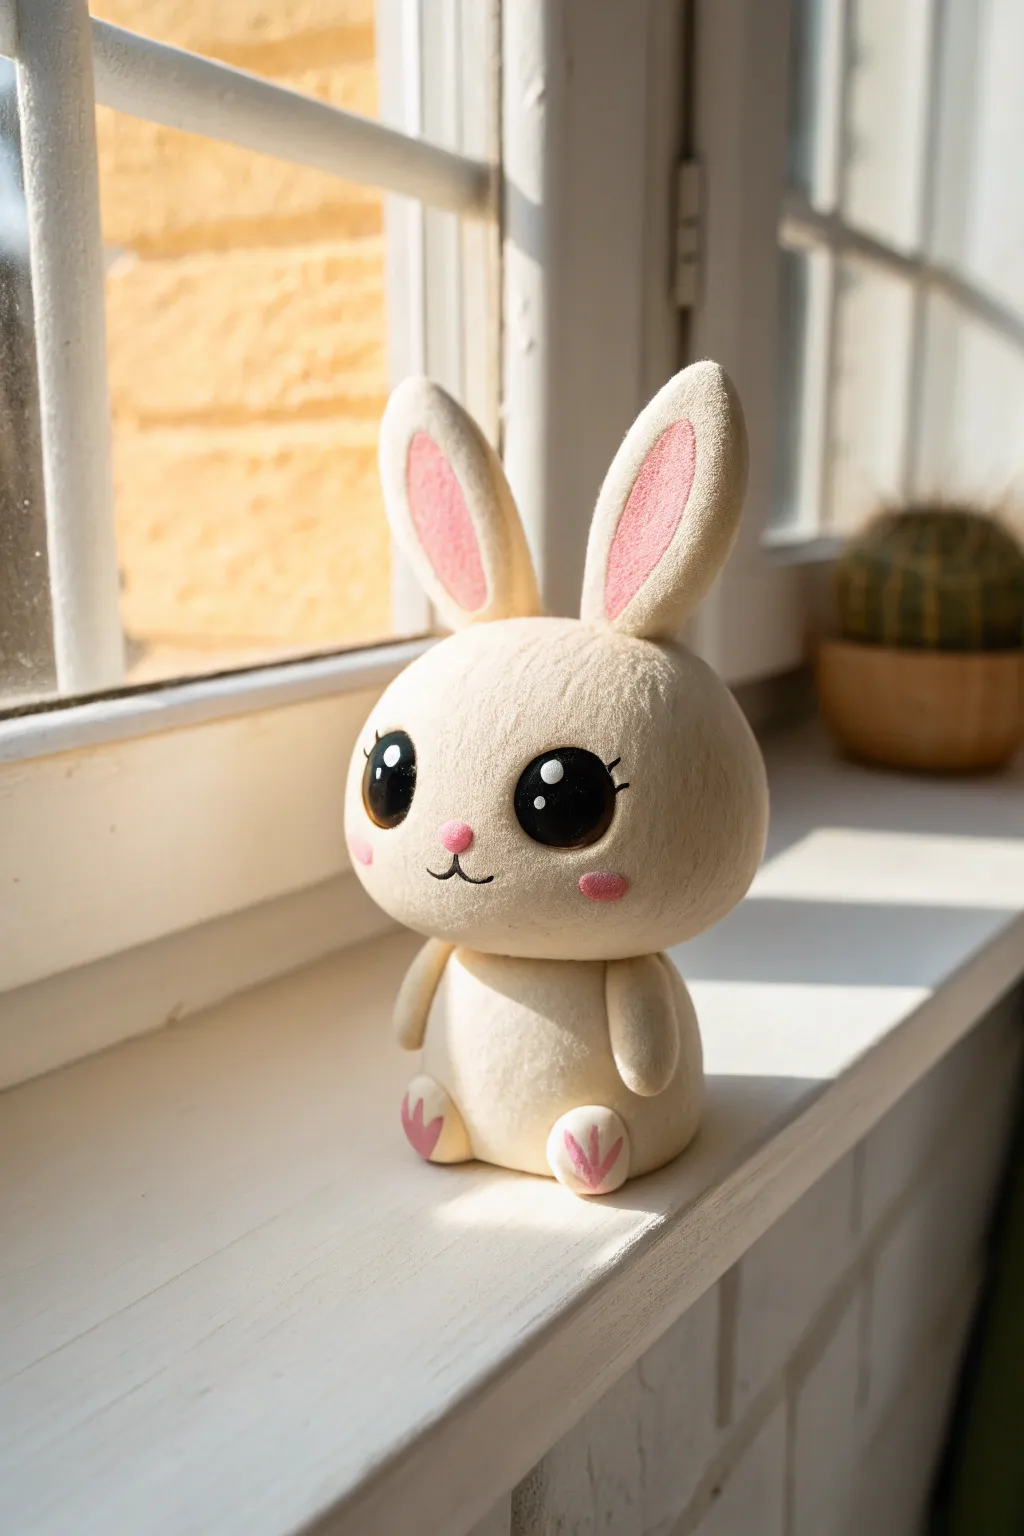
Capture the charm of a sweet, sun-soaked afternoon with this adorable chibi bunny figurine. With its oversized head, soulful eyes, and soft pink accents, this polymer clay creation makes a perfect desk companion or windowsill guardian.
Detailed Instructions
Materials
- White polymer clay (soft variety suggested)
- Soft pink polymer clay
- High-gloss black glass beads or black clay
- Gloss glaze (if using black clay for eyes)
- Needle tool or toothpick
- Ball stylus tool (medium size)
- Isopropyl alcohol and Q-tips (for smoothing)
- Oven for baking
- Soft pastel chalks in pink (optional, for shading)
Step 1: Shaping the Body
-
Condition the Clay:
Begin by thoroughly conditioning your white polymer clay until it is warm, pliable, and free of cracks. Since white clay shows dust easily, make sure your hands and work surface are impeccably clean before starting. -
Create the Base:
Roll a sphere of white clay about the size of a walnut to create the body. Gently flatten the bottom against your work surface so it sits stably without tipping over. -
Shape the Head:
Roll a second, larger sphere for the head—chibi proportions usually mean the head is bigger than the body. This one should be closer to a golf ball size. Press it gently into a slightly oval shape to give it chubby cheeks. -
Connect the Pieces:
Insert a short piece of toothpick or wire into the body sphere to act as an armature, then press the head firmly onto the body. The connection needs to be secure so the heavy head doesn’t droop during baking.
Dirty Clay Blues?
White clay picks up lint instantly. Keep baby wipes nearby to clean your hands often, or wear latex finger cots. If dust gets stuck, gently scrape it off with a craft knife before baking.
Step 2: Facial Features
-
Eye Sockets:
Using your thumbs or a large ball tool, create two shallow indentations about halfway down the face where the eyes will sit. Space them widely apart for that classic cute look. -
Insert the Eyes:
Press two large, black glass beads firmly into the sockets. If you don’t have beads, roll two balls of black clay, flatten them slightly, and press them in. I prefer using glass beads because they withstand baking heat and keep their shine. -
Add Highlights:
If using black clay, add tiny dots of white clay to the upper corners of the eyes for life-like reflections. If using glass beads, you can skip this or paint them on later. -
Nose and Mouth:
Roll a tiny speck of pink clay into a soft triangle for the nose. Below it, use a needle tool to gently scribe a ‘u’ shape for the mouth. For extra definition, you can press a thin thread of black clay into the mouth line. -
Rosy Cheeks:
Flatten two tiny circles of pink clay and press them onto the cheeks below the eyes. Alternatively, dust a little pink pastel chalk in these spots for a softer, airbrushed effect.
Make it a Texture Bunny
Before baking, gently stipple the white clay surface with an old toothbrush. This creates a fuzzy, flocked texture that makes your bunny look like a plush toy instead of smooth ceramic.
Step 3: Ears and Limbs
-
Form the Ears:
Roll two logs of white clay and taper them at one end. Flatten them slightly to create the long ear shape. -
Pink Inner Ears:
Take two smaller pieces of pink clay, mirror the shape of the white ears, and press them into the center of the white pieces. Smooth the edges so the pink lies flush with the white. -
Attach the Ears:
Press the ears firmly onto the top of the head. Use a blending tool to smooth the seam where the ear meets the skull so they look like one continuous piece. -
Make the Arms:
Roll two small sausage shapes of white clay for arms. Attach them to the sides of the body, curving them slightly forward as if the bunny is resting its hands on its belly. -
Create the Feet:
Form two oval discs of white clay for feet and attach them to the front bottom of the body. They should stick out just enough to be visible when sitting. -
Paw Details:
Add tiny teardrops of pink clay to the soles of the feet to create paw pads. Use your needle tool to create small indentations for toes if desired.
Step 4: Finishing Touches
-
Adding Eyelashes:
Roll incredibly thin threads of black clay or use a fine-tip black acrylic marker (after baking) to add three distinct eyelashes to the outer corner of each eye. -
Smoothing:
Dip a Q-tip in a little isopropyl alcohol and gently brush over the white clay to remove fingerprints and dust specks. This step is crucial for that professional, smooth finish. -
Bake:
Bake the figurine according to your clay package instructions (usually around 275°F/135°C for 15-30 minutes). Let it cool completely inside the oven to prevent cracking. -
Glaze:
If you used black clay for eyes instead of beads, paint them with a high-gloss glaze now to make them sparkle.
Now your little bunny is ready to bring a touch of sweetness to any corner of your home


Frog Pocket Buddy Charms
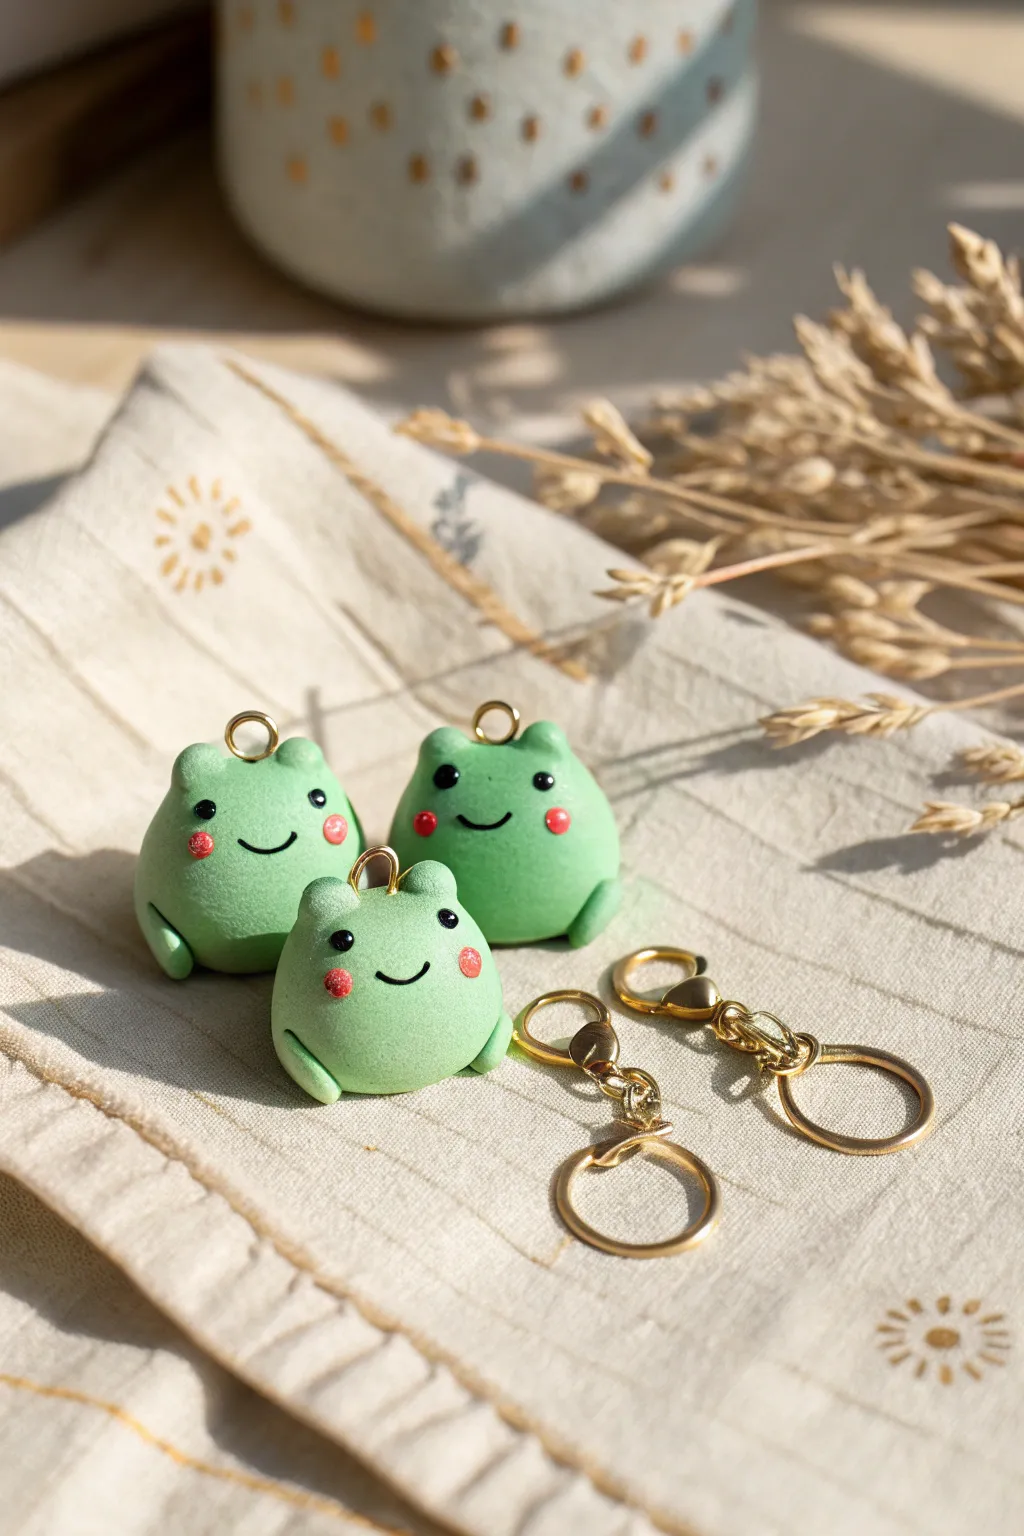
These adorable froggy charms are remarkably simple to sculpt, featuring a smooth, matte green finish and sweet little rosy cheeks. They make perfect keychains, zipper pulls, or just tiny desk companions to brighten your day.
Step-by-Step Tutorial
Materials
- Polymer clay (light sage or mint green)
- Acrylic paint (black, pink/coral)
- Small eye screws (gold or silver)
- Keychain jump rings and lobster clasps
- Dotting tool or toothpick
- Needle tool
- Fine-grit sandpaper (optional)
- Gloss glaze (optional, for eyes only)
Step 1: Sculpting the Base
-
Condition the clay:
Begin by warming up your green polymer clay in your hands. Knead and roll it until it is soft, pliable, and free of cracks. -
Form the body:
Roll a piece of clay about the size of a large grape into a smooth, seamless ball. Gently tap the bottom against your work surface to flatten it slightly so the frog sits upright without rolling away. -
Shape the head:
Using your thumb and forefinger, gently pinch the top third of the ball to slightly narrow it, creating a subtle distinction between the head area and the rounder body.
Keep it Clean
To avoid dust specks on light green clay, wipe your hands and work surface with a wet wipe before starting. You can also clean raw clay with a Q-tip dipped in rubbing alcohol.
Step 2: Adding Features
-
Create eye sockets:
At the top of the head, pinch up two small mounds of clay on the left and right sides to form the raised eye bumps. -
Refine the eyes:
Smooth these bumps with your fingertip so they merge seamlessly into the head, ensuring they look like natural extensions of the skull rather than attached balls. -
Make the legs:
Roll two very small, pea-sized balls of green clay. Roll them into slight oval shapes. -
Attach the legs:
Press these ovals onto the bottom sides of the body. Use a blending tool or your finger to smooth the seam where the leg meets the body, but leave the front curve distinct to look like folded legs. -
Create tiny feet:
Use a needle tool to make two tiny indents at the front of each foot to suggest toes. -
Smooth everything:
Give the entire piece a final check. I like to dip my finger in a tiny bit of baby oil or clay softener to gently rub away any fingerprints before baking.
Loose Hardware?
If the eye screw falls out after baking, don’t worry. Just dab a tiny drop of super glue or E6000 onto the screw threads and twist it back into the hole.
Step 3: Hardware & Baking
-
Insert the eye screw:
Take a metal eye screw and gently twist it into the very center of the top of the head. Screw it in deep enough so just the loop is visible. -
Secure the hardware:
If the screw feels loose, you can remove it, add a drop of liquid clay or Bake & Bond to the threads, and re-insert it. -
Bake carefully:
Place your frogs on a ceramic tile or baking sheet lined with parchment paper. Bake according to your clay manufacturer’s instructions (usually around 275°F/135°C for 15-30 minutes depending on thickness). -
Cool down:
Let the charms cool completely in the oven or on a wire rack before handling them, as warm clay is fragile.
Step 4: Painting & Assembly
-
Paint the eyes:
Using a dotting tool or the back of a paintbrush dipped in black acrylic paint, create two wide-set eyes on the front of the face below the eye bumps. -
Add the smile:
Dip a very fine liner brush or a needle tool into black paint. Draw a tiny, thin ‘U’ shape between the eyes for a simple smile. -
Add rosy cheeks:
Dip a fresh dotting tool into coral or pink paint. Place a small dot on the outer edge of each eye, slightly lower than the pupil, to give the frog a blushing look. -
Highlight the eyes (Optional):
Once the black paint is dry, you can add a microscopic white dot to the eyes for a reflection, though the example image keeps them solid black. -
Attach keychain:
Open a jump ring using two pairs of pliers. Thread it through the frog’s eye screw and the keychain loop, then twist the jump ring closed securely.
Now you have a charming little amphibian friend ready to tag along on your keys or backpack


Cat Paw Trinket Dishes
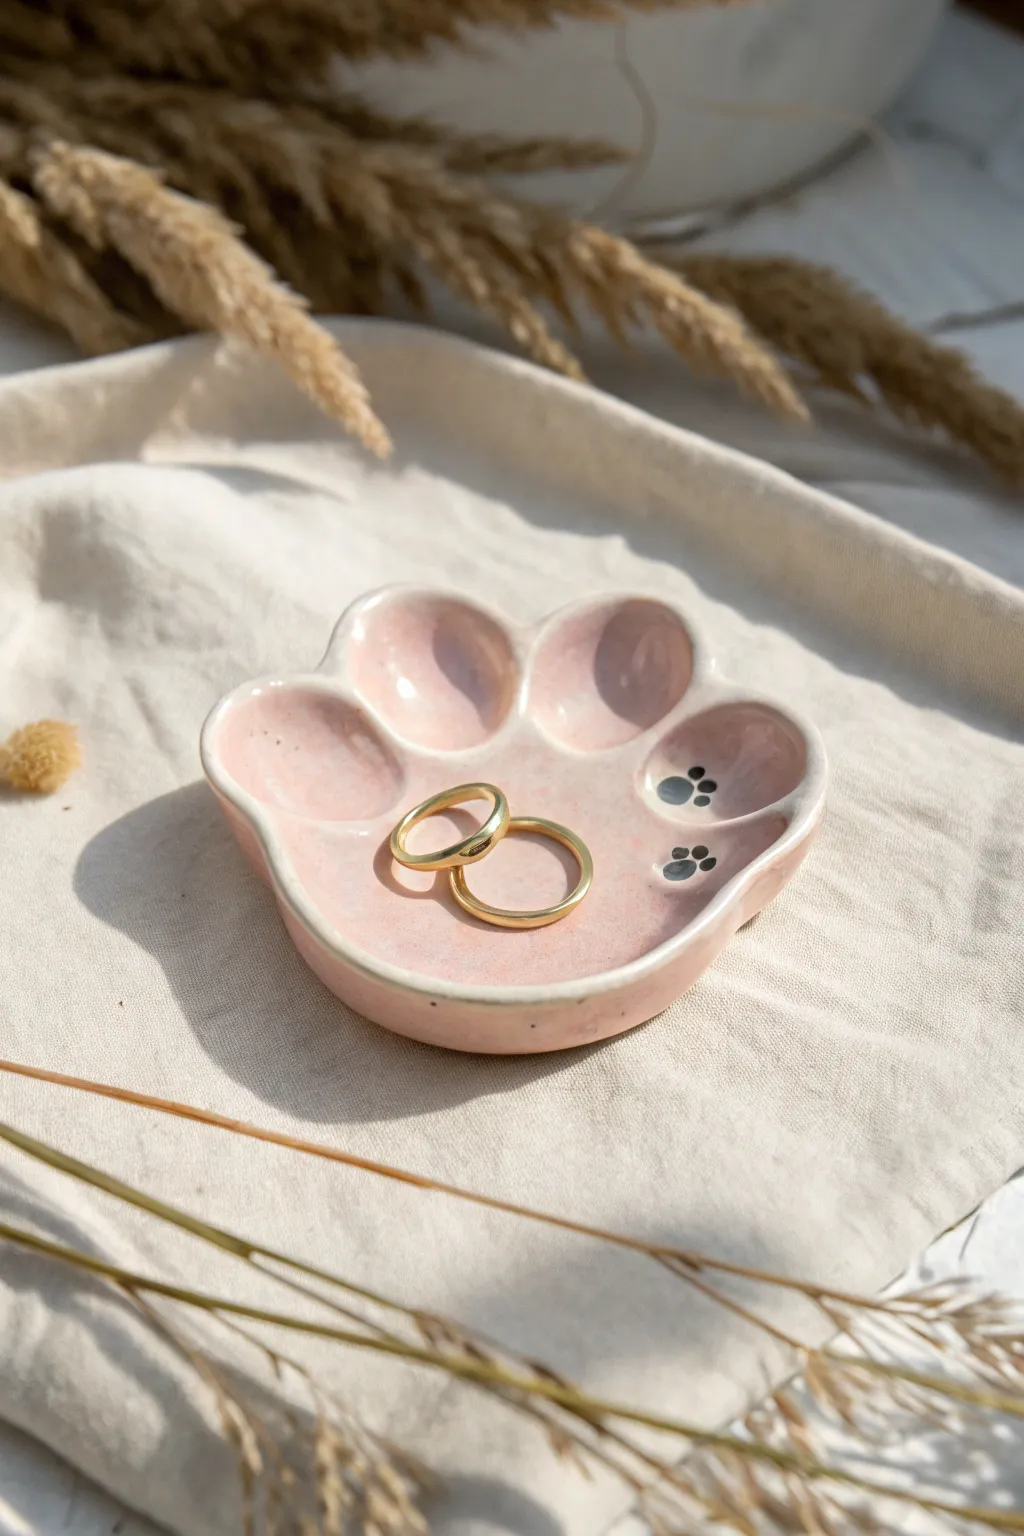
This adorable cat paw trinket dish features soft pink glazing and delicate painted details, making it the perfect spot to rest your favorite rings. Its gentle curves and glossy finish give it a high-end, handmade ceramic feel.
Detailed Instructions
Materials
- Air-dry clay or polymer clay (white)
- Acrylic rolling pin
- Clay sculpting tools (ball tool being essential)
- Craft knife or scalpel
- Fine sandpaper (400-600 grit)
- Acrylic paints: Blush pink, black
- High-gloss varnish or resin
- Small round paintbrush
- Water and sponge for smoothing
- Parchment paper
Step 1: Shaping the Paw
-
Prepare the base:
Start by conditioning your clay until it is soft and pliable. Roll it into a smooth ball to remove any air bubbles. -
Flatten the form:
Using your acrylic roller, flatten the ball into a thick disc, approximately 1/4 inch thick. Aim for an oval or slightly rounded-square shape rather than a perfect circle. -
Outline the toes:
With a needle tool or the tip of your knife, lightly sketch the outline of a paw shape directly onto the clay. You want four distinct toe sections at the top and a wider base. -
Cut the shape:
Carefully cut along your sketched lines with a craft knife. Don’t worry if the edges look sharp right now; we will smooth them later. -
Deepen the toes:
Use a sculpting tool to press into the notches between the ‘toes’ to define them clearly, separating each rounded section. -
Smooth the edges:
Dip your finger in a little water (for air-dry clay) or baby oil (for polymer) and run it along the cut edges. Round them over so the paw looks soft and puffy, not geometric.
Step 2: Creating Dimensions
-
Create the toe beans:
Using a large ball tool or just your thumb, gently press into each of the four top toe sections to create shallow, concave dishes. These will hold small earrings. -
Form the main pad:
Press firmly into the center of the palm area to create the largest indentation. This should be deep enough to hold rings securely. -
Refine the rim:
Go around the perimeter one last time, slightly pinching the rim upward to ensure the dish has a raised lip all around. -
Dry or Bake:
Follow your specific clay’s instructions. If baking polymer, use an oven thermometer. If air-drying, let it sit for 24-48 hours until completely hard and white. -
Sand for perfection:
Once fully cured, use fine sandpaper to gently buff away any fingerprints or rough textures on the rim and underside.
Uneven drying?
If your air-dry clay curls up at the edges while drying, gently flip the piece over halfway through the drying process to ensure airflow reaches both sides evenly.
Step 3: Painting and Glazing
-
Apply base color:
Mix a soft blush pink acrylic paint. Cover the entire top surface of the dish. I like to dilute the paint slightly so it washes into the clay rather than sitting thick on top. -
Add the details:
Using a very fine detail brush and black paint, create two tiny paw prints on the right side of the palm pad. Use simple dots: one larger dot for the pad and three tiny dots for toes. -
Clean up edges:
If you want a cleaner look, you can leave the very rim white or paint it white to create a contrast, though painting the whole piece pink creates the soft aesthetic shown here. -
Seal the piece:
Apply a thick coat of high-gloss varnish. This mimics the look of fired ceramic glaze and protects the paint from scratching. -
Second coat:
Once the first coat is dry, add a second layer of gloss, pooling it slightly in the indentations to create that liquid, glassy shine visible in the photo.
Add some sparkle
Mix a tiny pinch of gold mica powder or ultrafine glitter into your final gloss varnish layer. It adds a subtle shimmer that catches the light beautifully.
Place your favorite rings in the center pad and enjoy your handmade organizer


Tiny Mushroom Buddy Ornaments

Bring a touch of forest charm to your tree or garland with this adorable, smiley mushroom ornament. Featuring a textured, wood-rain stem and a glossy red cap, this little friend combines rustic details with sweet character design.
Step-by-Step
Materials
- Polymer clay (white, red, tan/beige)
- Hanging loop or eye pin hardware
- Sculpting tool or needle tool
- Acrylic paint (black, pink)
- Small detail paintbrush
- Glaze or varnish (glossy)
- Jute twine or string
- Aluminum foil (optional for core)
- Oven for baking (if using polymer clay)
Step 1: Sculpting the Stem
-
Form the Base Shape:
Start by conditioning a generous amount of white polymer clay until it is soft and pliable. Roll it into a thick cylinder, approximately 1.5 to 2 inches tall, rounding the bottom edge so it looks soft and inviting. -
Add Texture:
Using a needle tool or a sharp toothpick, gently drag vertical lines down the length of the cylinder to mimic wood grain. I find varying the pressure creates more realistic, natural-looking grooves. -
Adjust the Shape:
If the cylinder became misshapen during texturing, gently roll it back into form without smoothing out your new wood grain details. Ensure the top is flat to support the cap later.
Step 2: Creating the Cap
-
Shape the Cap Core:
Take a ball of tan or beige clay and flatten it into a thick disc. Press this onto the top of your white stem, letting it overhang significantly like a mushroom cap. -
Add Cap Texture:
Use a toothbrush or a ball of crumpled foil to texture the underside of the tan disc, giving it a porous, spongy appearance similar to real fungi. -
Form the Red Top:
Roll a smooth dome of red clay. Carefully place this over your tan disc, smoothing the edges so the red just barely wraps over the tan rim. -
Insert Hardware:
Press a metal eye pin or a small wire loop firmly into the absolute center of the red cap. Ensure it goes deep enough to be secure.
Uneven Glaze?
If your glaze pools around the dots or edges, brush it out immediately with a dry brush. Apply two thin coats rather than one thick one.
Step 3: Adding Details
-
Create Polka Dots:
Roll tiny, varied sizes of white clay into balls and flatten them into thin circles. Press these randomly all over the red cap. -
Integrate the Dots:
Gently roll the top of the cap against your palm or a smooth surface to ensure the white dots sit flush with the red surface rather than sticking out. -
Bake the Clay:
Follow your specific clay manufacturer’s instructions for baking temperature and time. Usually, this is around 275°F (135°C) for 15-30 minutes. -
Cool Down:
Allow the mushroom to cool completely before moving to the painting stage. The clay is fragile while hot.
Keep it Clean
Red clay pigment loves to stain white clay. Wash your hands thoroughly or use baby wipes between handling the red cap and the white stem.
Step 4: Finishing Touches
-
Paint the Face:
Using a very fine detail brush and black acrylic paint, add two small oval eyes wide apart on the stem. Paint a tiny ‘U’ shape between them for a smile. -
Add Cheeks:
Dip the back end of your paintbrush into pink paint and dot it onto the cheeks just below the eyes for perfect circular blushes. -
Glaze the Cap:
Once the paint is dry, coat ONLY the red cap and white dots with a glossy varnish. Leave the stem matte to maintain that woody texture. -
String It Up:
Thread a piece of rustic jute twine through the metal loop at the top and knot it securely.
Now your cheerful forest friend is ready to hang out and bring smiles to everyone who spots him

The Complete Guide to Pottery Troubleshooting
Uncover the most common ceramic mistakes—from cracking clay to failed glazes—and learn how to fix them fast.
Smiley Face Fridge Magnets
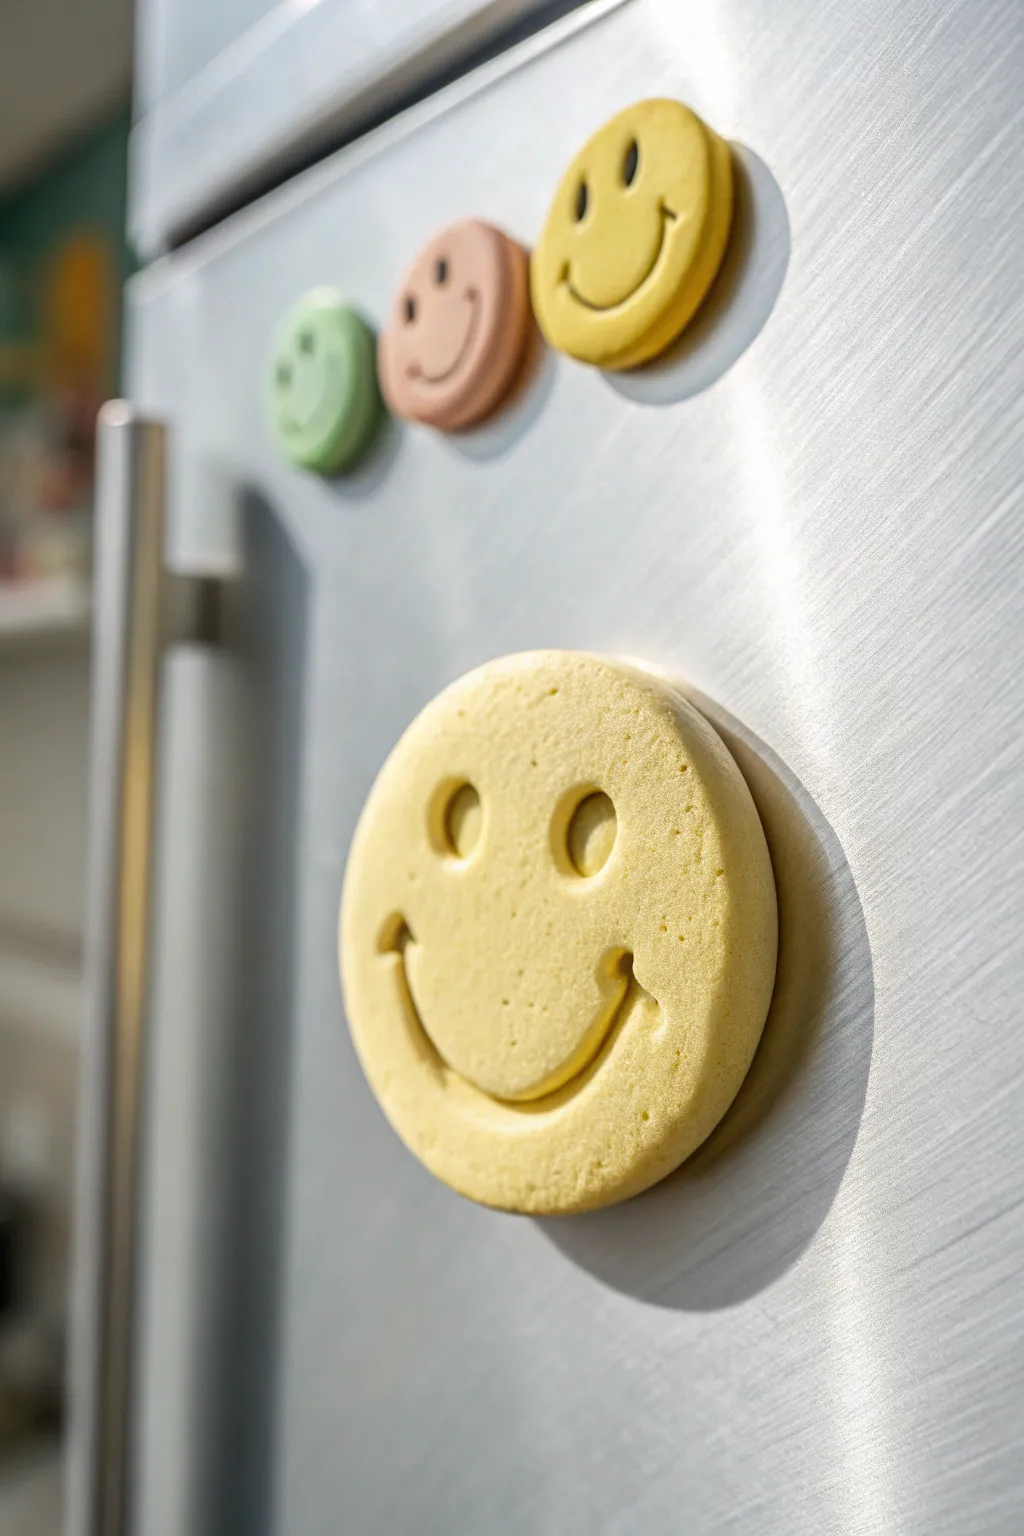
Brighten up your appliance with these chunky, cheerful magnets that look good enough to eat but are definitely for holding up memories. Their textured, porous surface mimics the look of a sugar cookie or sponge cake, adding a delightful tactile element to your kitchen decor.
Step-by-Step Guide
Materials
- Air-dry clay (yellow, pastel pink, pastel green)
- Round cookie cutters (various sizes: large and small)
- Small round piping tip or a thick straw
- Modeling tool (curved spoon-shape or U-shape)
- Toothbrush or textured sponge
- Strong craft magnets
- Super glue or E6000 adhesive
- Rolling pin
- Parchment paper or non-stick mat
Step 1: Shaping the Base
-
Condition the clay:
Start by taking a generous amount of yellow air-dry clay and kneading it in your hands until it becomes soft, pliable, and free of cracks. -
Roll it out:
Place the clay on a non-stick surface or parchment paper. Use a rolling pin to flatten it, aiming for a consistent thickness of about 1/2 inch to 3/4 inch. You want these quite chunky. -
Texture the surface:
Before cutting, create the ‘biscuit’ texture. Gently press a clean toothbrush or a textured sponge all over the surface of the clay. Don’t drag it; use an up-and-down tapping motion. -
Cut the primary shape:
Use your largest round cookie cutter to punch out the main face shape. Lift the cutter straight up to keep the edges clean. -
Soften the edges:
If the edges look too sharp from the cutter, gently tap them with your finger to round them off slightly, maintaining that soft, baked-good aesthetic. -
Repeat for smaller versions:
Repeat the rolling and texturing process with smaller amounts of pink and green clay, using smaller cookie cutters to create the little background magnets.
Texture Master Tip
For an ultra-realistic sugary texture, mix a tiny bit of baking soda into your clay before rolling, or press real sugar onto the surface (seal it later with matte varnish).
Step 2: Creating the Expression
-
Make the eyes:
Find the center of the yellow circle. Press a small round piping tip or a thick straw into the clay to create two deep indentations for eyes. Don’t punch all the way through; just create deep sockets. -
Draft the smile:
Use a curved modeling tool or the edge of a spoon to lightly mark where the smile will go. I find it helps to verify the symmetry before committing to the deep cut. -
Carve the mouth:
Press the curved tool firmly into the clay along your guide line to create a wide, deep U-shaped smile. -
Create cheek indentations:
At the very ends of the smile curve, press slightly deeper and create small vertical indents, which gives the face that classic ‘dimple’ look. -
Refine the features:
Go back over the eyes and mouth with your toothbrush or sponge to texture the inside of the indentations so they match the rest of the face. -
Add alternate expressions:
For the smaller magnets, try different faces, like the winking face shown on the yellow magnet in the background. You can achieve this by carving a small crescent shape instead of a round eye.
Step 3: Finishing Up
-
Initial drying:
Transfer the clay pieces carefully to a wire rack or leave them on parchment paper in a cool, dry place. -
Flipping the pieces:
After about 12 hours, flip the faces over. Since these are thick, the bottom needs exposure to air to dry evenly. -
Full cure:
Let them dry completely for at least 24 to 48 hours. The clay should feel light and hard, with no cool sensation to the touch. -
Prepare the magnet:
Once dry, check the back of your clay piece. If it’s uneven, you can lightly sand it flat so the magnet will adhere better. -
Apply adhesive:
Place a dab of strong super glue or E6000 onto the back of a strong craft magnet. -
Attach and set:
Press the magnet firmly onto the center of the back of the smiley face. Hold it for 30 seconds to ensure a good initial bond, then let the glue cure according to the package instructions.
Level Up: Scented Magnets
Knead a drop of essential oil (like lemon or vanilla) into the air-dry clay before shaping. Your fridge will smell like a bakery every time you walk by!
Pop these cheerful characters onto your refrigerator door and enjoy an instant mood boost
Fruit Slice Coasters With Faces
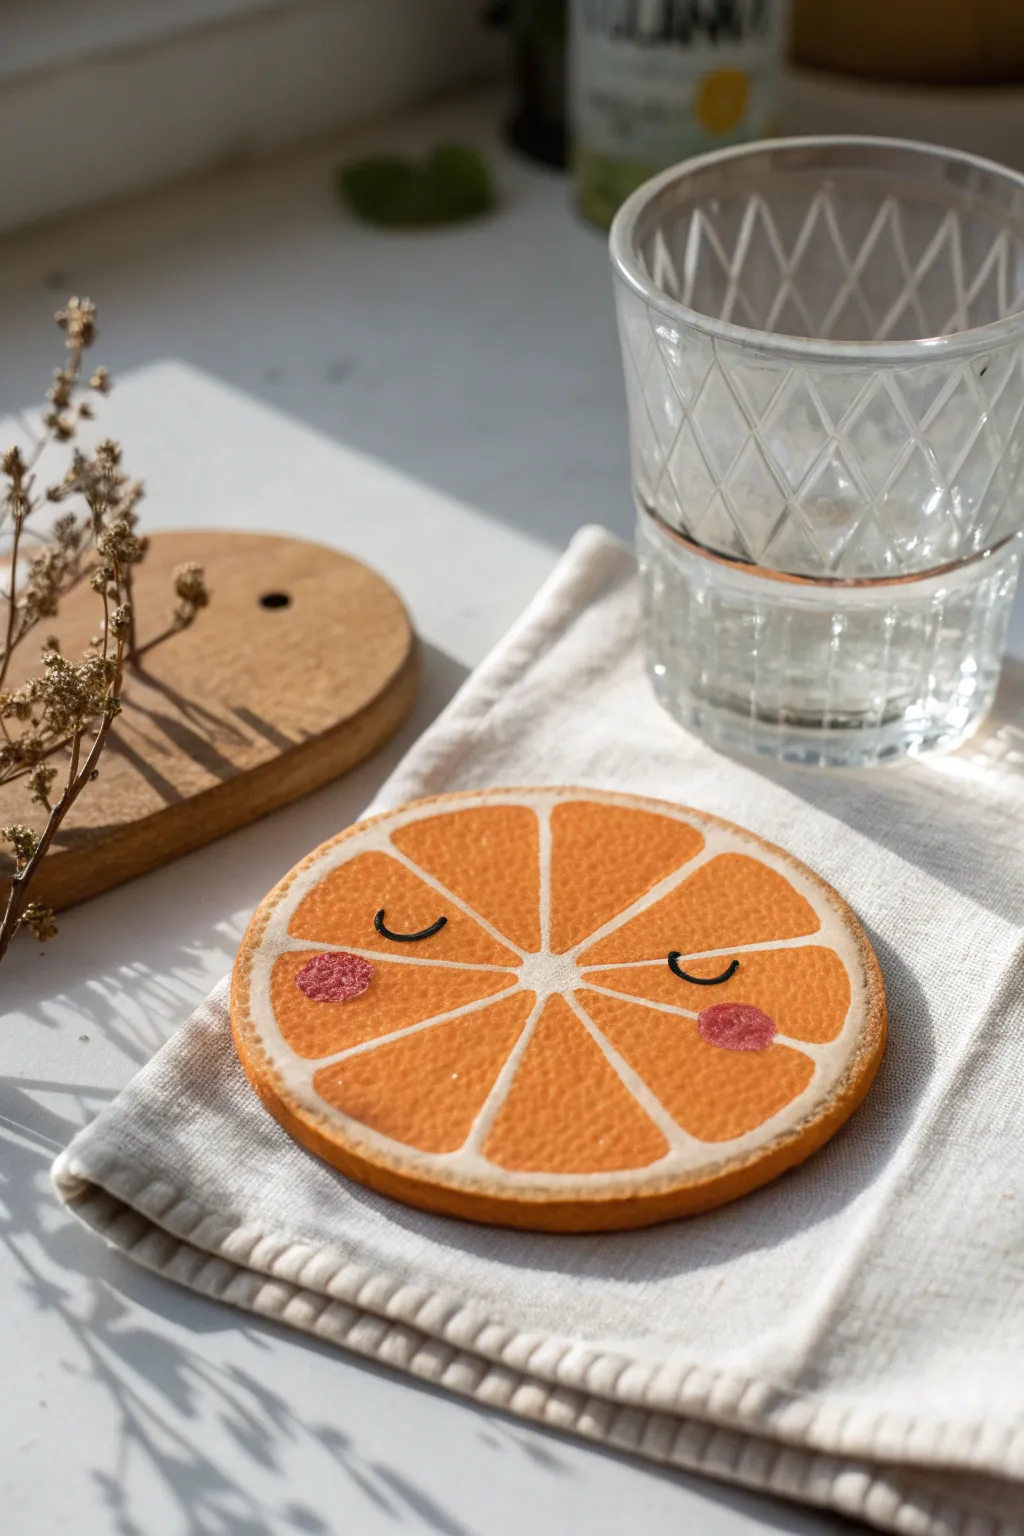
Brighten up your coffee table with a slice of sunshine. This cheerful clay coaster mimics the texture of a real orange and features an adorable, sleepy face that’s sure to make you smile with every sip.
Step-by-Step
Materials
- Air-dry clay or polymer clay (white)
- Circle cookie cutter (approx. 3.5 inches)
- Acrylic paints: Orange, White, Cream, Pink, Black
- Rolling pin
- Sandpaper (fine grit)
- Small flat brush
- Fine liner brush or black paint marker
- Texture tool (like a toothbrush, sponge, or sandpaper)
- Ruler
- Pencil
- Spray sealant or Mod Podge (gloss or matte)
Step 1: Shaping the Base
-
Condition the clay:
Start by taking a handful of white clay and kneading it until it is soft, pliable, and free of cracks. -
Roll it out:
Use your rolling pin to flatten the clay to an even thickness of about 1/4 inch. If you want a perfectly level surface, place two pencils creating a track on either side of your clay as guides for the rolling pin. -
Cut the circle:
Press your circle cookie cutter firmly into the clay. Lift away the excess clay before removing the cutter to keep the edges sharp. -
Smooth the edges:
Dip your finger in a tiny bit of water and run it along the perimeter to smooth out any roughness from the cutting process.
Warping Woes?
If the clay starts curling up while drying, place a heavy book on top of it once it’s partially dry but not sticky. Sanding later also helps level it.
Step 2: Adding Texture and Details
-
Create the segments:
Using a ruler and a dull pencil or sculpting tool, lightly impress lines to divide the circle. Start with a vertical line, then a horizontal one, then divide those quadrants to create eight equal pie slices. -
Add fruity texture:
This is the secret to realism. Gently press a clean toothbrush, a piece of coarse sandpaper, or a texture sponge onto the ‘fruit flesh’ areas inside the pie slices. Leave the dividing lines smooth. -
Let it dry:
Allow the clay to dry completely according to the package instructions. Flip it over halfway through the drying process to prevent warping. -
Sand for perfection:
Once bone dry, use fine-grit sandpaper to gently smooth the rim and any rough spots on the surface, wiping away the dust afterwards.
Make a Set
Create a whole fruit salad set! Use yellow paint for lemons, green for limes, and pink with black seeds for grapefruit slices.
Step 3: Painting the Design
-
Base coat:
Paint the entire top surface with a cream or off-white color. This acts as the ‘pith’ color and ensures your orange looks bright. -
Paint the segments:
Mix a vibrant orange acrylic paint. Using a small flat brush, carefully fill within the textured pie slice areas, leaving thin lines of the cream base visible between them. -
Define the rim:
Using the same orange, paint the outer vertical edge of the coaster and bring a thin line of color onto the very top edge to create the peel. -
Add dimension:
I find that dabbing a slightly lighter shade of orange (mix orange with a tiny dot of white) onto the center of the segments highlights the texture we made earlier.
Step 4: The Cute Face
-
Draft the face:
Lightly sketch the position of the eyes and cheeks with a pencil. Aim for the center-left and center-right segments for a symmetrical look. -
Paint the eyes:
Use a fine liner brush with black paint, or a black paint marker, to draw two small ‘u’ shapes for the sleepy closed eyes. Add tiny eyelashes if you like. -
Add rosy cheeks:
Dip the tip of a round brush or a Q-tip into pink paint. Dab it gently just below the outer corner of each eye to create soft, round blush marks. -
Seal the deal:
Once the paint is fully dry, apply a coat of waterproof sealant. This is crucial for coasters to protect them from moisture and condensation.
Set your finished coaster on your desk and enjoy the cheerful vibe it adds to your space


What Really Happens Inside the Kiln
Learn how time and temperature work together inside the kiln to transform clay into durable ceramic.
Bubble Tea Cup Keychain Charms
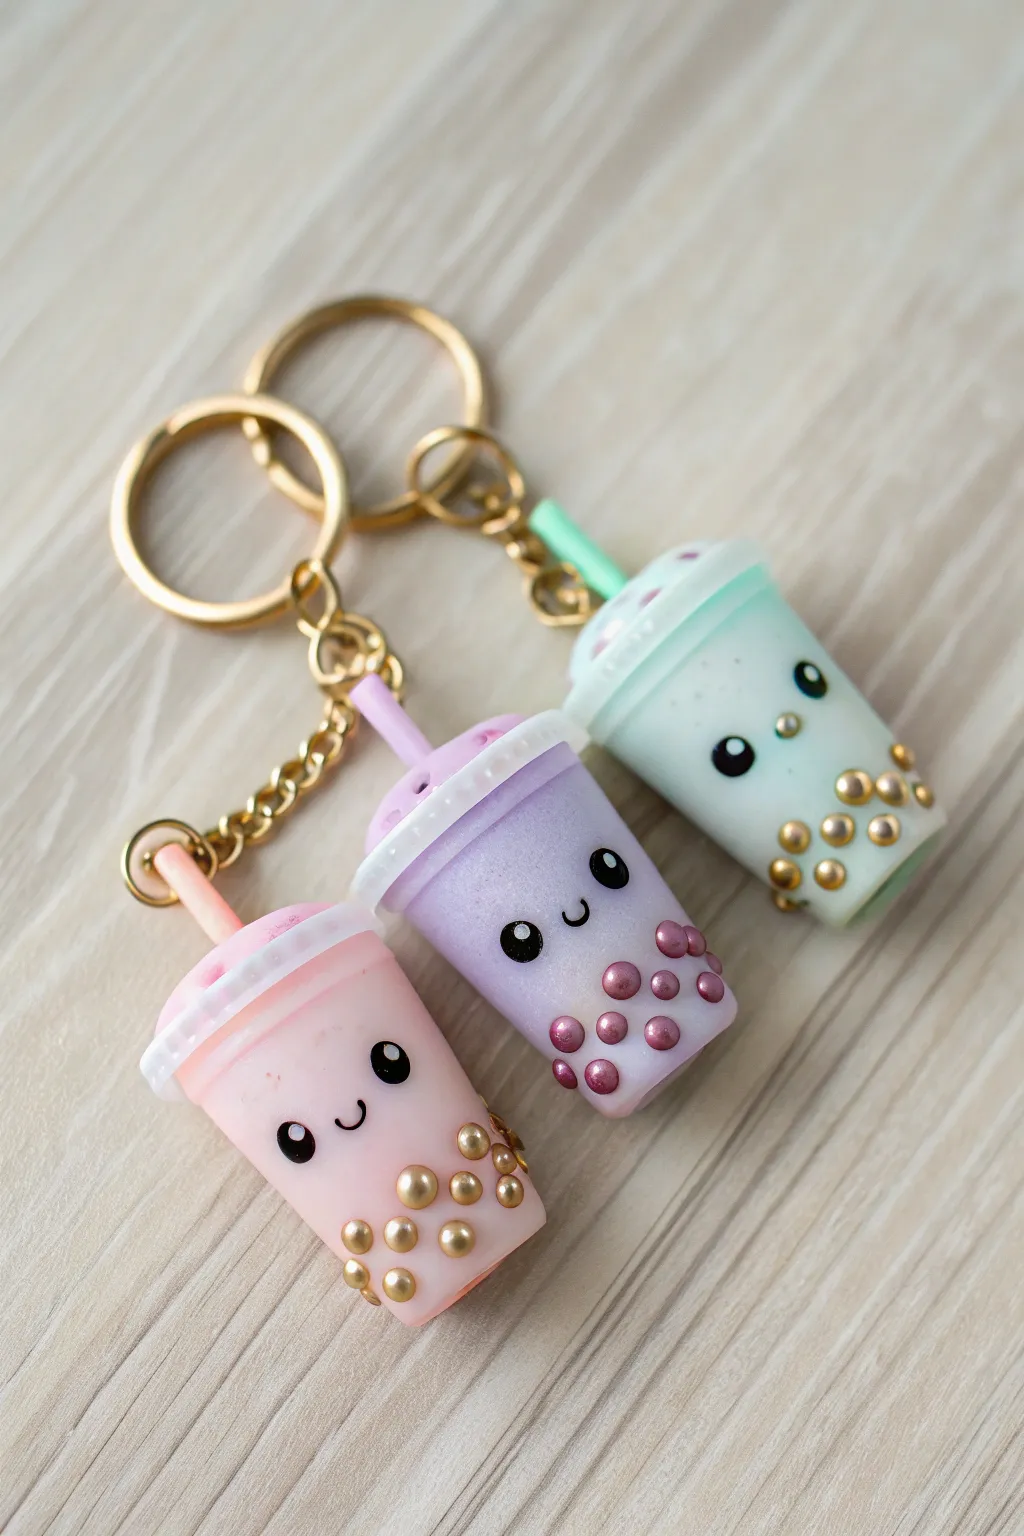
These adorable bubble tea keychains are the perfect bite-sized project for polymer clay enthusiasts. With their pastel colors, tiny tapioca pearls, and sweet little faces, they make charming accessories for your bag or keys.
How-To Guide
Materials
- Polymer clay (pastel pink, pastel purple, mint green, white, black, tan/gold)
- Translucent liquid polymer clay (optional)
- Gloss glaze or UV resin
- Keychain rings with chain and screw eye pins
- Clay roller or pasta machine
- Circle cutters (small)
- Needle tool or toothpick
- Dotting tools
- Blade or craft knife
- Oven for baking
Step 1: Shaping the Cup
-
Mix Your Base Color:
Start by conditioning your chosen pastel clay—pink, purple, or mint. If you want that slightly frosty look seen in the photo, mix in a small amount of translucent clay with your pastel color. -
Form the Base Cylinder:
Roll the clay into a smooth cylinder about 1 inch tall. Taper it slightly so the bottom is just a tiny bit narrower than the top, mimicking a real plastic cup shape. -
Flatten the Top:
Gently press the cylinder onto your work surface to flatten the bottom, then flip it over and carefully flatten the top surface so it’s level. Smooth out any fingerprints. -
Add the Lid Rim:
Roll out a thin sheet of white clay. Cut a strip that is just slightly wider than regular ribbon. Wrap this strip around the very top edge of your cup to serve as the lid’s rim, trimming the excess where the ends meet. -
Texture the Rim:
Using a blunt tool or the back of a knife, press vertical indentations all around the white rim to create a ribbed texture.
Step 2: Adding the Boba & Face
-
Create the Tapioca Pearls:
Roll tiny spheres using tan, gold, or dark purple clay depending on your style. The charms in the photo use a metallic gold or mauve tone for a fancy look. -
Attach the Boba:
Press these tiny balls onto the bottom third of the cup. For the best look, cluster them densely near the bottom and have a few ‘floating’ slightly higher. -
Indent the Eyes:
Use a medium-sized dotting tool to make two shallow indentations where you want the eyes to sit. This helps the black clay stay flush with the surface. -
Insert the Eyes:
Roll two very small balls of black clay and press them into the sockets you just made. -
Add Eye Highlights:
This is crucial for the ‘kawaii’ look: place a microscopic dot of white clay in the upper right corner of each black eye. -
Make the Smile:
Roll a tiny, hair-thin snake of black clay. Shape it into a small ‘U’ and gently press it between the eyes using a needle tool.
Sticky Pearl Tip
If your tiny boba pearls aren’t sticking to the cup base, use a tiny drop of liquid polymer clay or ‘Bake & Bond’ as an adhesive before pressing them on.
Step 3: The Lid and Assembly
-
Form the Dome Lid:
Take a ball of the same color as your cup (or white) and flatten it into a dome shape that fits perfectly inside the white rim you made earlier. -
Make the Straw:
Roll a small snake of a contrasting color (like pink or green). Cut a short segment and insert it into the center of the dome lid. -
Attach Hardware:
While the clay is still raw, screw a metal eye pin securely into the top of the charm, right near the straw. I prefer to add a dab of liquid clay to the threads for extra grip. -
Bake:
Bake your creations according to the package instructions for your specific brand of clay. Usually, this is around 275°F (135°C) for 15-20 minutes.
Fingerprint Fix
Is your smooth cup full of prints? Before baking, lightly brush the raw clay with a little baby oil or cornstarch to smooth out any unwanted textures.
Step 4: Finishing Touches
-
Cool Down:
Let the charms cool completely before handling them. They are fragile when warm. -
Glaze:
Apply a coat of gloss glaze or UV resin to the entire cup. This gives it that shiny, plastic-like bubble tea cup appearance and protects the face details. -
Assemble Keychain:
Once the glaze is dry, use pliers to attach the chain and keyring to the eye pin loop.
Start a collection in every flavor and share a few with your best friends
Heart Ring Cones With Blush Cheeks
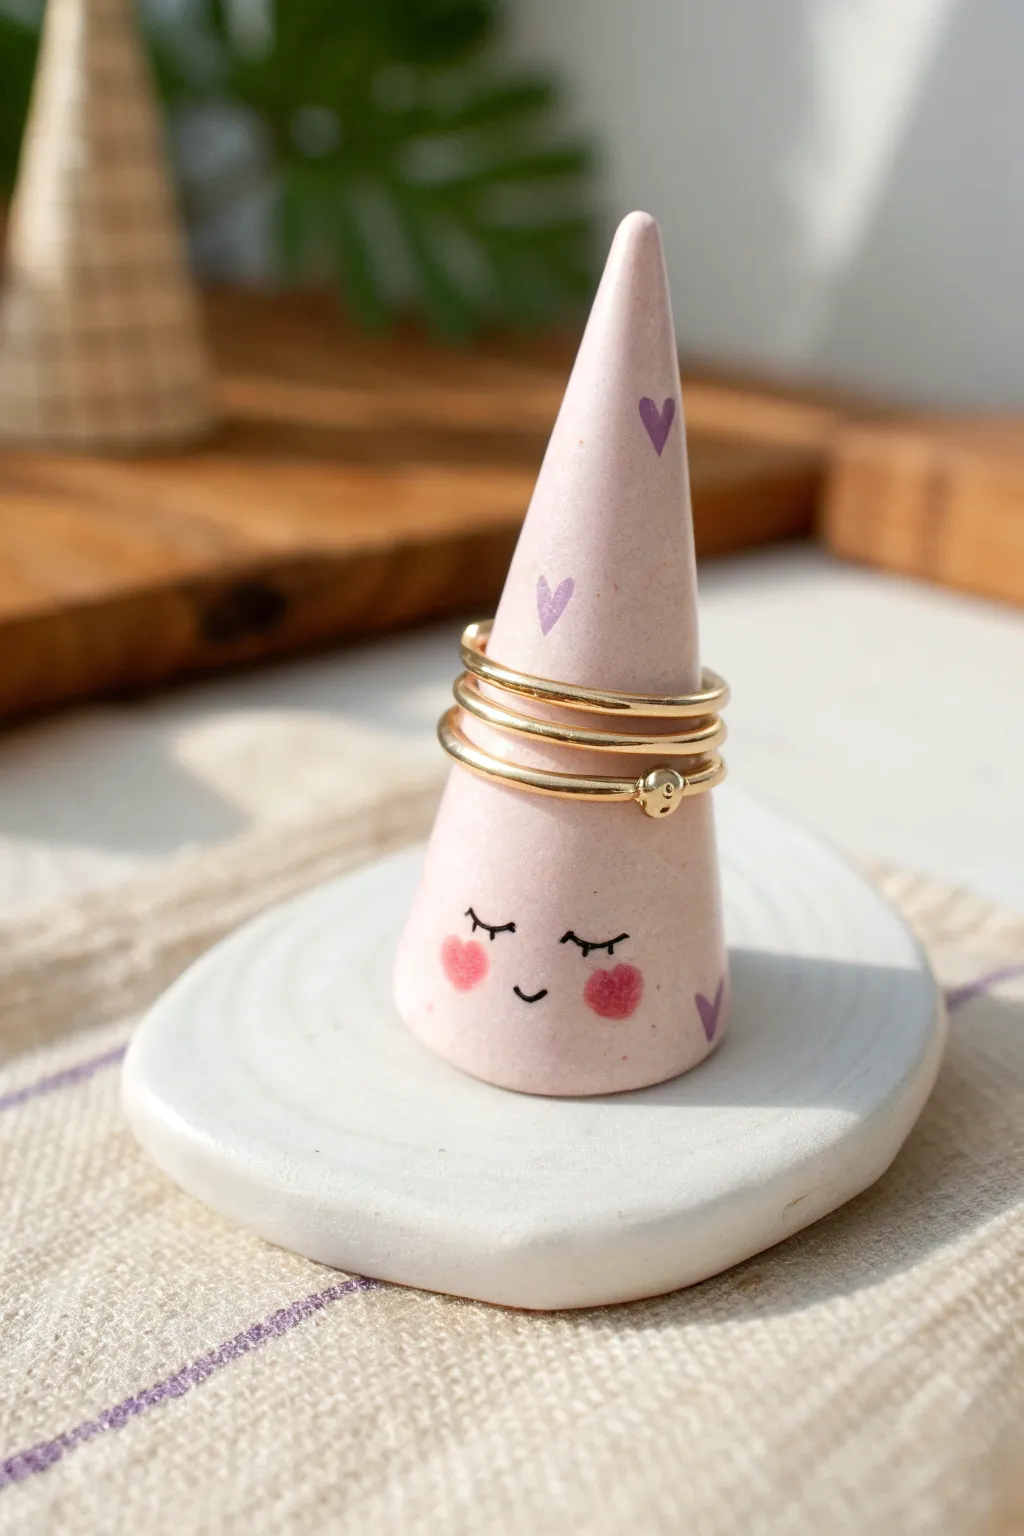
Keep your favorite rings organized with this adorable, blushing cone companion. Its soft pink hue and hand-painted details make it a sweet addition to any vanity or bedside table.
Step-by-Step Tutorial
Materials
- Polymer clay (white and soft pink)
- Acrylic rolling pin
- X-acto knife or clay blade
- Fine-grit sandpaper
- Fine detail paintbrush
- Acrylic paints (black, purple, berry pink)
- Gloss or matte varnish (optional)
- Baking sheet and parchment paper
- Oven
Step 1: Shaping the Base and Cone
-
Condition the white clay:
Start by kneading a chunk of white polymer clay until it is soft and pliable. Roll it into a smooth ball to remove any air bubbles. -
Form the base slab:
Using your acrylic roller, flatten the white ball into a sheet about 1/4 inch thick. Aim for an organic, slightly irregular oval shape rather than a perfect circle for a handcrafted look. -
Smooth the edges:
Run your finger gently along the rim of the white base to soften any sharp cuts or rough textures. Set this piece aside on your parchment-lined baking sheet. -
Create the pink cone:
Condition your soft pink clay. Roll it into a smooth ball, then begin rolling it back and forth on one side to taper it into a cone shape. -
Refine the height:
Stand the cone up and check its height. I like to make mine about 2.5 to 3 inches tall so it can hold multiple rings comfortably. Gently tap the bottom on your work surface to flatten it. -
Attach cone to base:
Place the pink cone onto the center of your white base. Press down firmly but gently to adhere the clays together without distorting the shapes. You can use a tiny bit of liquid clay as glue if needed. -
Bake the form:
Bake the assembled piece according to your clay package instructions (usually 275°F/135°C for 15-30 minutes). Let it cool completely before painting.
Wobbly Cone?
If your cone leans while baking, secure it by creating a temporary ‘nest’ of crumpled aluminum foil around the base for support.
Step 2: Painting the Details
-
Sketch the face (optional):
If you’re nervous about freehanding, use a very light pencil to mark where the eyes and mouth will go. Place the face low on the cone. -
Paint the lashes:
Using your finest detail brush and black acrylic paint, create two small curves for closed eyes. Add three tiny ticks to each curve for the eyelashes. -
Add the smile:
Paint a small, simple ‘u’ shape directly between and slightly below the eyes for a sweet little smile. -
Create rosy cheeks:
Dip a brush into berry pink paint and dab off most of the excess. Stipple two round circles on either side of the smile to create that blushing look. -
Paint the hearts:
Mix a soft purple shade. Paint small hearts randomly around the cone. Some can be floating near the top, others near the base. -
Dry and seal:
Allow the paint to dry fully. For longevity, coat the entire piece with a thin layer of matte or gloss clay varnish to protect your design from scratches.
Level Up
Add a touch of luxury by painting the very tip of the cone with liquid gold leaf or metallic gold paint after baking.
Now you have a charming little spot to keep your treasures safe and sound

TRACK YOUR CERAMIC JOURNEY
Capture glaze tests, firing details, and creative progress—all in one simple printable. Make your projects easier to repeat and improve.
Octopus Toothbrush Holder Cup
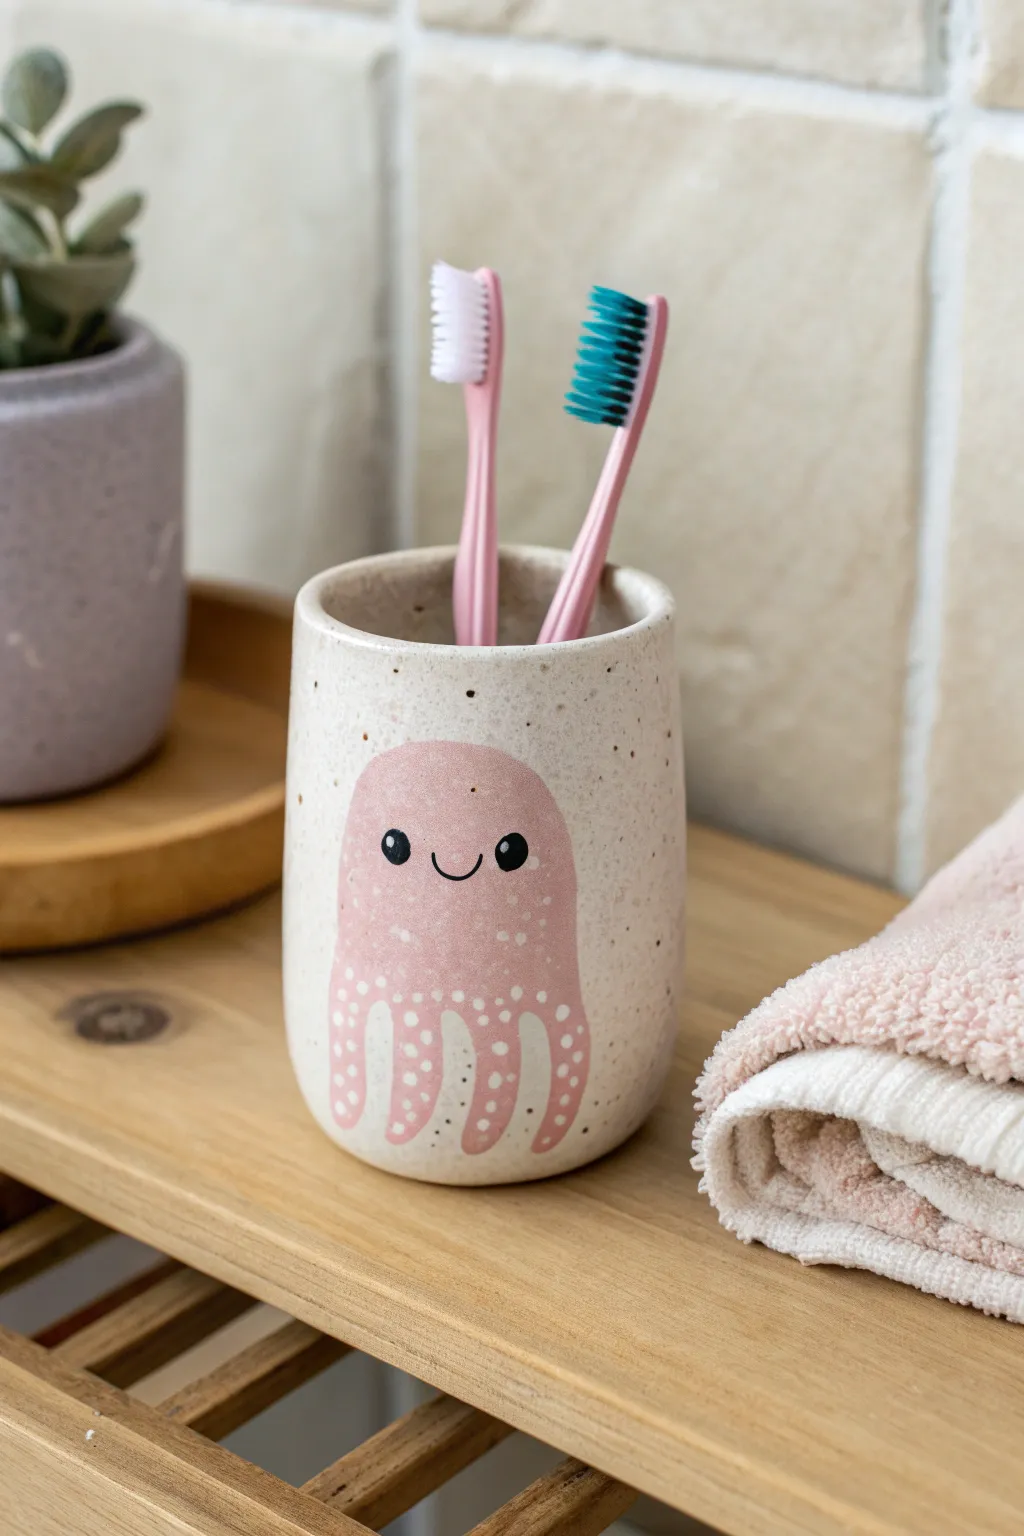
Bring a splash of ocean charm to your bathroom counter with this adorable speckled ceramic cup. Featuring a minimal, smiling pink octopus design, this functional piece is perfect for keeping your toothbrushes organized and tidy.
Step-by-Step Guide
Materials
- White or light beige stoneware clay (speckled clay recommended for texture)
- Slab roller or rolling pin
- Pottery wheel (optional, can be hand-built)
- Cylindrical mold (if hand-building)
- Scoring tool and slip
- Underglaze (Soft Pink, Black)
- Small round paintbrush
- Fine detail liner brush
- Clear transparent glaze
- Kiln
Step 1: Forming the Cup
-
Prepare the Clay:
Begin by wedging your speckled stoneware clay thoroughly to remove any air bubbles. This ensures your cup won’t crack during firing. -
Create the Base Slab:
Roll out a slab of clay to an even thickness of about 1/4 inch. If you want that specific speckled look shown in the photo, ensure your clay body has grog or speckles pre-mixed. -
Cut the Shape:
Cut a rectangular strip for the walls (approx. 4 inches high by 9 inches long) and a circular piece for the base. Use a ruler to get straight, clean edges on your rectangle. -
Assemble the Cylinder:
Score the short edges of your rectangle and apply a generous amount of slip. Bring the edges together to form a cylinder, pressing the seam firmly to bond it. -
Attach the Base:
Score and slip the bottom edge of your cylinder and the outer edge of your circular base. Press them together, smoothing the clay on the outside and inside to make the seam invisible. -
Smooth the Rim:
Use a damp sponge or chamois to round off the top rim of the cup. It should be smooth to the touch, not sharp. -
Refine the Surface:
Let the cup dry to a leather-hard state. Once firm, use a rib tool to smooth out any imperfections on the exterior walls, creating a canvas for your octopus.
Oops! Seam showing?
If the vertical seam on your cup keeps cracking open while drying, score it deeper next time and use a small coil of soft clay to ‘stitch’ the gap together before smoothing.
Step 2: Painting the Octopus
-
Outline the Shape:
Lightly sketch the outline of the octopus head and tentacles onto the leather-hard clay using a dull pencil. The pencil marks will burn off in the kiln. -
Fill the Base Color:
Using a soft pink underglaze, fill in the octopus shape. Apply 2-3 even coats, letting each layer dry slightly before adding the next to get an opaque finish. -
Add the Tentacles:
Extend the pink paint down into wavy, rounded tentacle shapes. Vary the lengths slightly for a natural, playful look. -
Paint the Face:
Once the pink base is completely dry, use a fine liner brush dipped in black underglaze to paint two small, solid circles for eyes and a simple U-shape for the smile. -
Create the Spots:
Now for the texture details. Using white underglaze (or by leaving negative space if your clay is white), add tiny dots across the lower half of the octopus and the tentacles. I find dipping the non-brush end of a paintbrush in paint creates perfect uniform dots. -
Add Eye Highlights:
Place a teeny-tiny dot of white underglaze in the upper right corner of each black eye pupil. This small detail brings the character to life.
Step 3: Firing and Glazing
-
Bisque Fire:
Load your thoroughly dried cup into the kiln for a bisque fire (usually Cone 04). This hardens the clay and makes it ready for glazing. -
Apply Clear Glaze:
Dip the entire cup into a clear, transparent glaze. Ensure the coat is even so it doesn’t cloud your cute design. -
Clean the Foot:
Wipe the bottom of the cup clean with a wet sponge to prevent it from sticking to the kiln shelf. -
Final Firing:
Fire the piece again to the maturation temperature of your specific clay and glaze (often Cone 5 or 6 for stoneware). Let it cool completely before removing.
Make it a Set
Create a matching soap dish featuring a crab or a starfish using the same pink underglaze to make a complete ocean-themed vanity set.
Now you have a charming, handmade home for your toothbrushes that makes morning routines a little brighter
Sleepy Succulent Pot With a Face
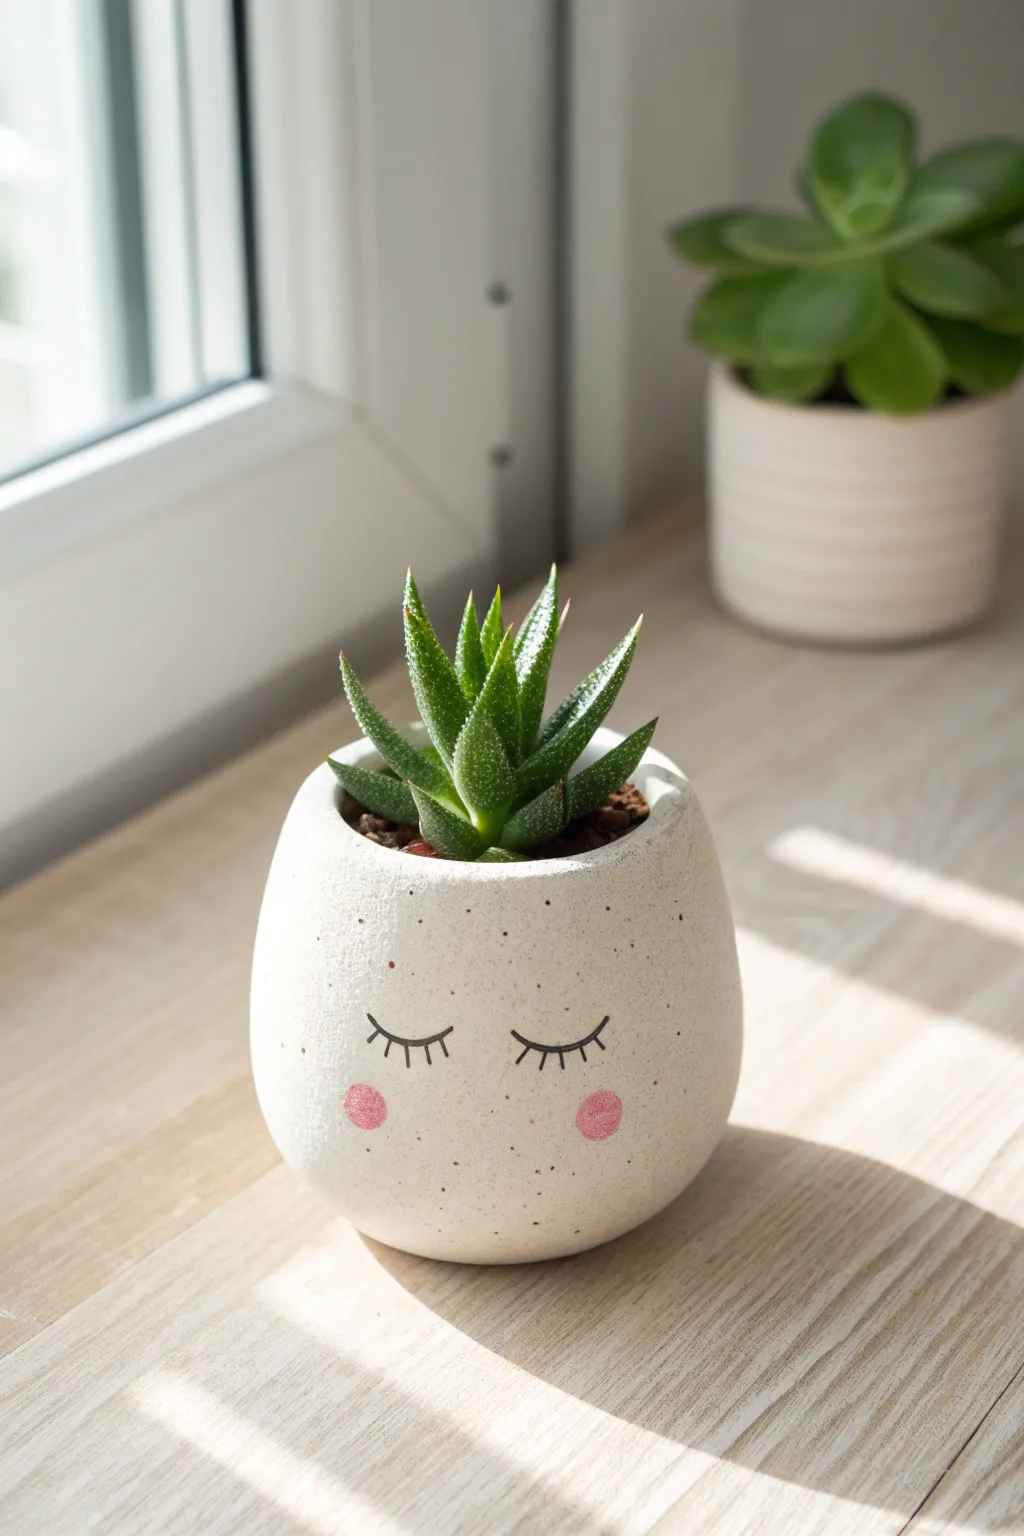
Transform a simple lump of clay into this adorable, sleepy-looking planter that’s perfect for holding small succulents. The finished piece features a rounded, organic shape with a speckled stone finish and charming painted details.
How-To Guide
Materials
- Air-dry clay (white or light grey)
- Acrylic rolling pin
- Pottery sponge
- Small bowl or cup (about 3-inch diameter) to use as a mold or template
- Potter’s needle tool or toothpick
- Fine-grit sandpaper (220 grit)
- Acrylic paints: Black, Soft Pink, and Speckled Stone/Granite effect spray (optional) or thinned brown/grey paint
- Very fine detail paintbrush
- Small round paintbrush
- Clear matte sealant spray
Step 1: Shaping the Pot Base
-
Prepare the Clay:
Begin by conditioning a handful of air-dry clay. Knead it in your hands until it becomes warm, soft, and pliable, which helps prevent cracks later on. -
Form a Sphere:
Roll the clay into a smooth ball. I like to slap it back and forth between my palms to knock out any trapped air bubbles. -
Start the Pinch Pot:
Push your thumb into the center of the ball, leaving about a half-inch of clay at the bottom for the base. -
Pinch the Walls:
Gently pinch the clay between your thumb and fingers, rotating the ball as you go. Aim for an even thickness of about 1/4 inch all around. -
Shape the Curve:
Instead of flaring the walls out, gently curve them slightly inward at the top to create that rounded, egg-like shape seen in the photo. -
Flatten the Base:
Tap the bottom of the pot gently on your work surface to create a flat, stable base so it won’t wobble. -
Smooth the Surface:
Dip your finger or a pottery sponge in a tiny bit of water and run it over the exterior to smooth out fingerprints and slight imperfections.
Creating Perfect Circles
For perfectly round pink cheeks, dip the eraser end of a standard pencil into the paint and stamp it onto the clay like a dotting tool.
Step 2: Refining and Drying
-
Add Texture (Optional):
If you want the texture built-in rather than painted, lightly dab the surface with an old toothbrush or stiff bristle brush while the clay is distinct damp. -
Create Drainage (Important!):
Use a straw or a tool to poke a small hole in the very center of the bottom for drainage if you plan to plant directly in the pot. -
Initial Drying:
Set the pot aside to dry. Cover it loosely with plastic wrap for the first 12 hours to slow drying and prevent cracking, then uncover it. -
Sanding:
Once bone dry (usually 24-48 hours), use fine-grit sandpaper to gently buff the surface until it is smooth and matte.
Step 3: Painting the Details
-
Base Speckling:
To achieve the stone look, dip a toothbrush in thinned grey or brown paint and flick the bristles to splatter tiny specks across the white clay. Alternatively, use a stone-effect spray paint. -
Sketch the Face:
Lightly trace the lash lines and cheek placement with a pencil to ensure they are symmetrical before you commit with paint. -
Paint the Eyelashes:
Using your finest detail brush and black acrylic paint, create two downward curves for closed eyes. Add 4-5 small vertical dashes below each curve for the lashes. -
Add the Cheeks:
Dip a small round brush or even a Q-tip into soft pink paint. Dab two circular blush spots just below and to the outside of the eyes. -
Seal the Pot:
Once the paint is fully dry, apply 2-3 coats of clear matte sealant spray inside and out to protect the clay from moisture.
Fixing Hairline Cracks
If small cracks appear during drying, make a ‘slip’ paste of clay and water. Fill the crack, smooth it over, and let it dry again before sanding.
Now you have a charming little friend to hold your favorite succulent
Snail Friends Using Real Shells
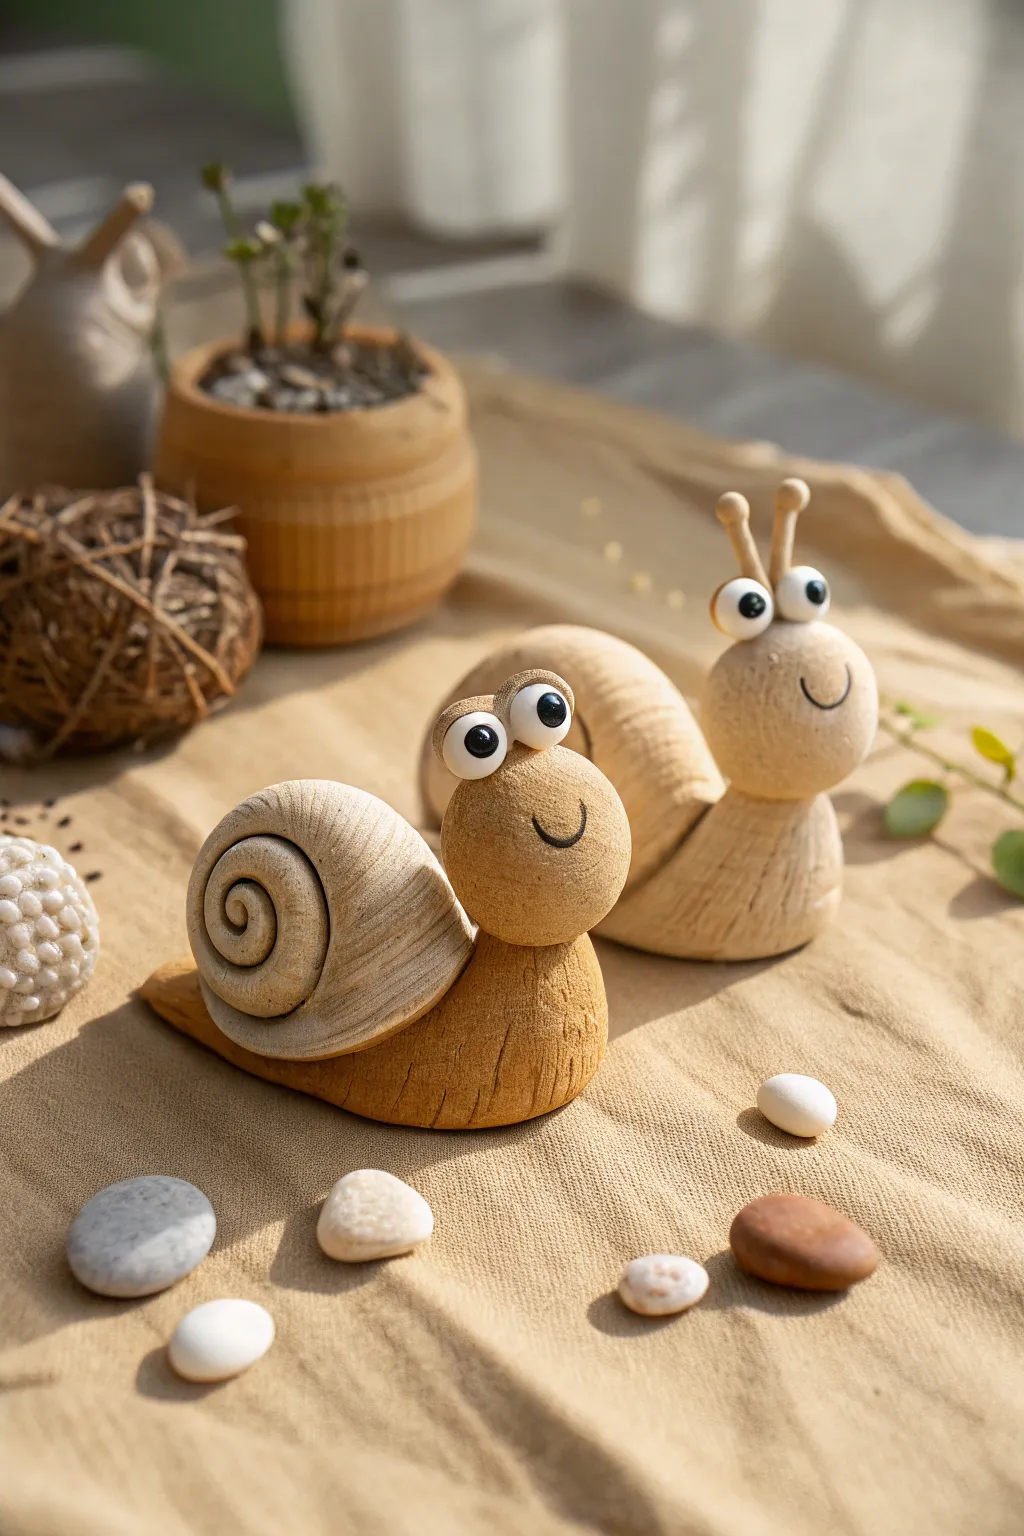
These charming snail friends combine the organic texture of real seashells with the versatility of polymer clay. By mimicking a carved wood finish, you create a rustic, heartwarming duo perfect for adding character to your plant shelf or desk.
Detailed Instructions
Materials
- Light brown/tan polymer clay
- Real snail shells (clean and dry)
- White polymer clay (small amount)
- Black polymer clay (tiny amount)
- Small wooden toothpicks or twigs
- Sculpting tools (needle tool, curved modeling tool)
- Coarse bristled brush or toothbrush
- Dark brown acrylic paint (for antiquing)
- Paper towel
- Strong craft glue (e.g., E6000)
- Oven for baking clay
Step 1: Sculpting the Body
-
Prepare the Clay:
Start by conditioning your tan polymer clay until it is soft and pliable. Roll it into a smooth ball, then elongate it into a thick, teardrop-shaped log. -
Shape the Base:
Flatten the bottom of the log slightly so it sits stable on your work surface. This will be the foot of the snail. Keep the front end thicker for the head and taper the back end to a point. -
Form the Head:
Roll a separate, smaller sphere of tan clay for the head. It should be proportional to the shell you intend to use. -
Attach Head to Body:
Press the head firmly onto the thicker, raised end of the body log. Use a sculpting tool to blend the clay at the seam so the neck connects smoothly. -
Test the Shell Fit:
Take your real snail shell and press it gently onto the back of the clay body to create an indentation. This ensures a snug fit later, but remove the shell for now so it doesn’t get baked or painted accidentally.
Wood Grain Pro-Tip
Make your brush strokes follow the curve of the body. If you brush straight lines on a curved surface, it looks artificial, but following the contour sells the carved wood illusion.
Step 2: Adding Details & Texture
-
Make the Face:
Roll two small balls of white clay for the eyes and press them onto the top of the head. Add tiny dots of black clay for the pupils. -
Create the Antennae:
Cut two small tips off a toothpick or use tiny twigs. Insert them into the top of the head behind the eyes. You can wrap a tiny coil of clay around the base if needed for security. -
Carve the Smile:
Using a curved tool or the side of a needle tool, press a simple, curved smile into the face. Make it deep enough to hold the antique wash later. -
Texturize the Surface:
To achieve that faux-wood look, drag a coarse brush or a toothbrush vertically along the body and head. I like to make the lines slightly wavy to mimic wood grain. -
Add Deep Grain Lines:
Enhance the wood effect by using a needle tool to scratch deeper, irregular lines parallel to your brush marks, especially along the sides of the snail’s foot. -
Bake the Clay:
Place your sculpted snails (without the shells) on a baking sheet. Bake according to your polymer clay manufacturer’s instructions, usually around 275°F (135°C) for 15-30 minutes.
Step 3: Finishing Touches
-
Apply Antique Wash:
Once the clay has cooled completely, mix a little dark brown acrylic paint with water. Brush it over the entire clay body, ensuring it gets into the crevices. -
Wipe Away Excess:
Immediately use a paper towel to wipe off the surface paint. The dark color will stay in the textured lines and the smile, emphasizing the wood-carved appearance. -
Dry the Paint:
Let the paint dry fully, which should only take a few minutes since the layer is thin. -
Attach the Shell:
Apply a generous dab of strong craft glue to the indentation you made earlier on the snail’s back. -
Secure the Shell:
Press the real shell firmly into the glue. Hold it in place for a minute to ensure it grabs, then let it set according to the glue’s cure time.
Level Up: Mossy Snails
After baking and gluing, dab tiny bits of craft glue on the shell or base and press on dried preserved moss. It makes them look like ancient forest dwellers.
Now you have a pair of rustic little companions ready to explore your garden or bookshelf
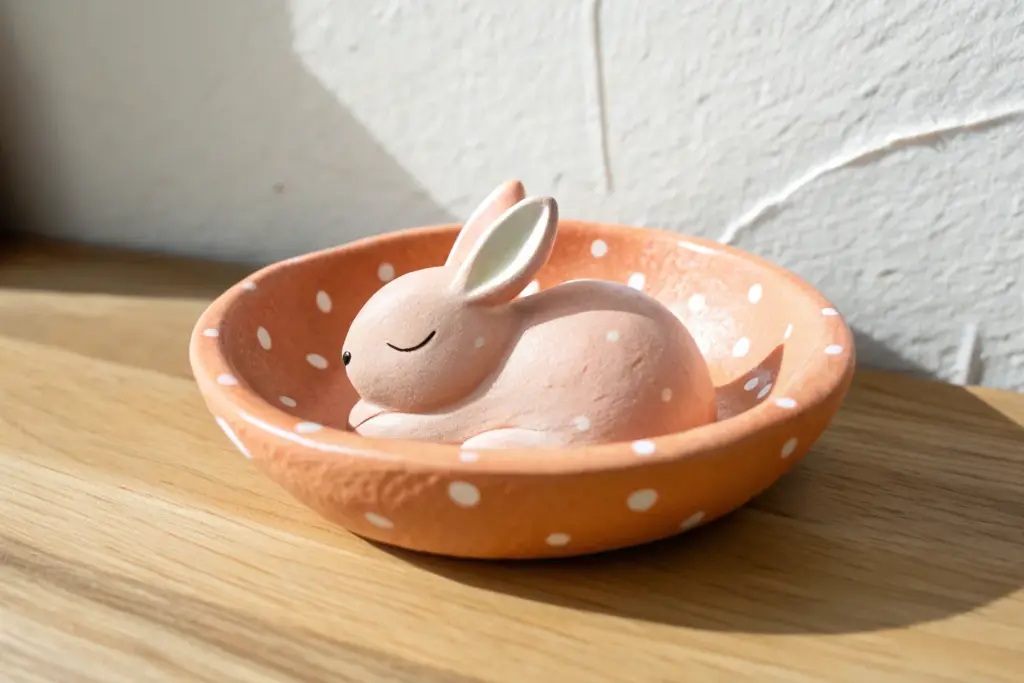
Mini Bear in Bed Diorama
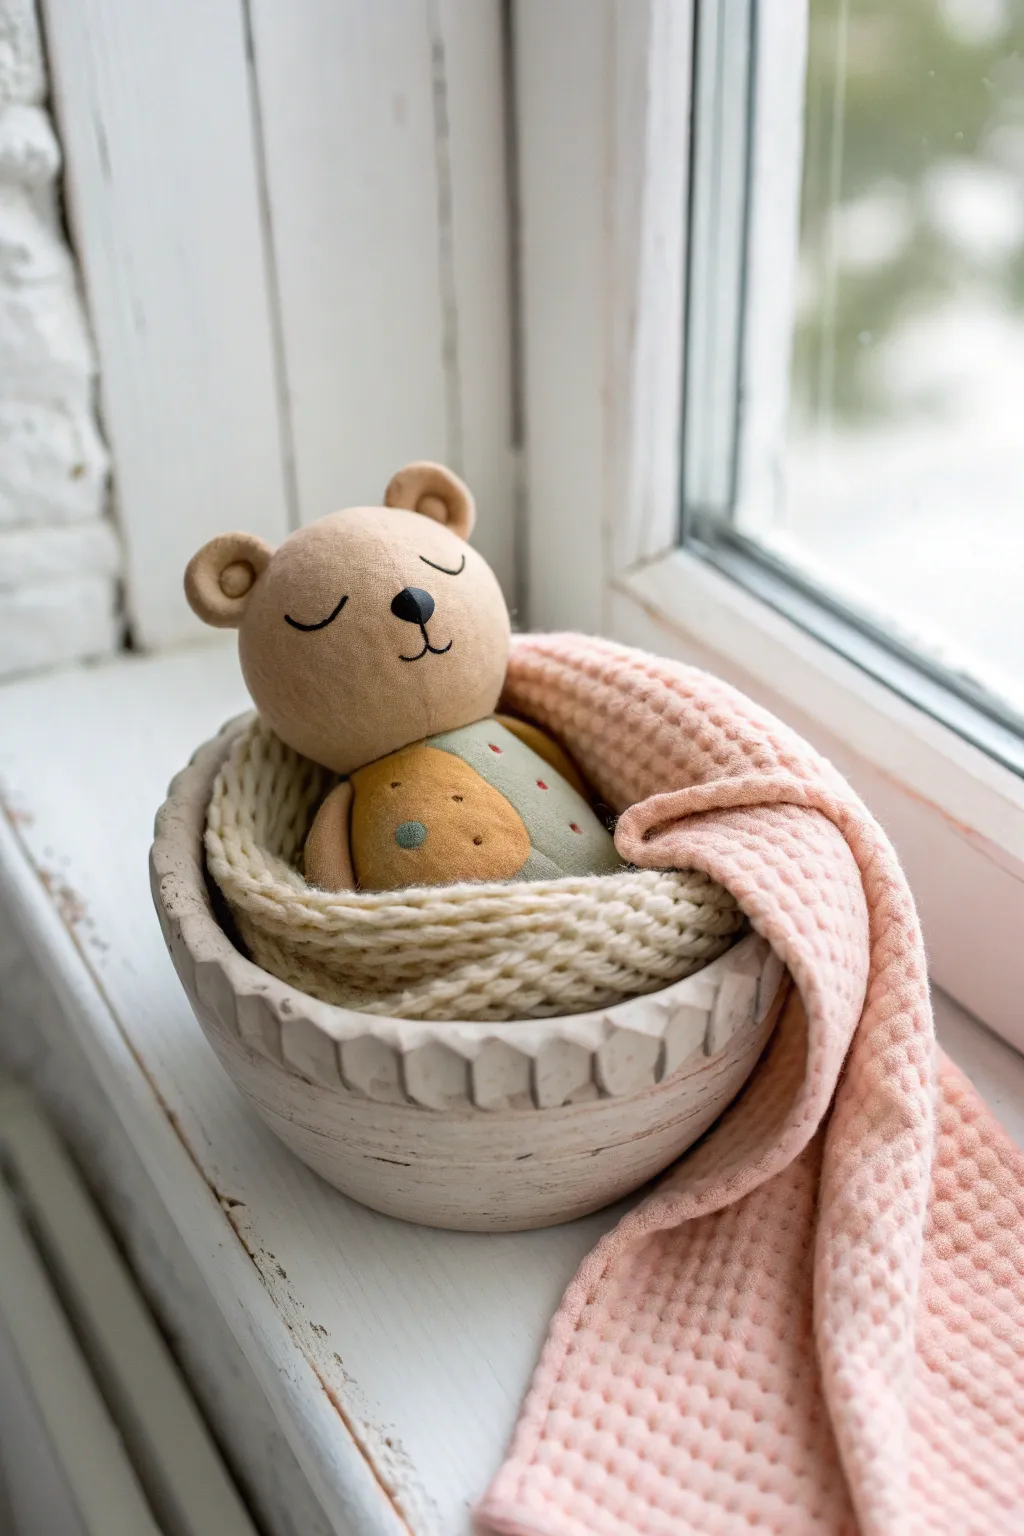
Create a heartwarming miniature scene featuring a sleepy clay bear tucked snugly into a textured bowl “bed.” This project combines simple sculpting techniques with charming textile-like details for a finished piece that brings a sense of calm and comfort to any shelf.
Step-by-Step Guide
Materials
- Polymer clay (Tan/Beige, Mustard Yellow, Sage Green, White)
- Acrylic paint (Black, Brown, Cream/Off-white)
- Fine detail paintbrush
- Sculpting tools (needle tool, ball stylus)
- Small round texture tool (or a real woven fabric scrap)
- Sandpaper (fine grit)
- Matte varnish or sealant
- A small piece of pink textured fabric or muslin (for the blanket)
- Small rolling pin
Step 1: Sculpting the Bed & Basket
-
Form the bowl base:
Start with a large ball of white or cream clay. Press your thumb into the center and pinch the walls upwards to form a deep, rustic bowl shape. Keep the walls relatively thick for stability. -
Add exterior texture:
Using a blunt sculpting tool or the back of a knife, press vertical indentations around the outside rim of the bowl to mimic a carved wooden or ceramic texture. Smooth any harsh ridges with your finger. -
Create the woven liner:
Roll out a long snake of cream clay. Flatten it slightly and twist it gently to look like yarn. Coil this inside the bowl to create a cozy, knitted nest look. -
Refine the knit texture:
Use a needle tool to scratch tiny ‘V’ shapes or hatch marks into the coiled clay to enhance the illusion of a chunky knit texture. Bake this base according to your clay’s package instructions so it provides a solid foundation.
Uneven Seams?
If the clay ‘fabric’ seams on the body look rough, roll a tiny snake of clay and press it over the join, then texture it to look like decorative stitching.
Step 2: Creating the Sleepy Bear
-
Shape the head:
Roll a smooth ball of tan clay for the head. Slightly flatten the front to create the face area. -
Attach the ears:
Make two tiny balls of the same tan clay. Press them onto the top of the head and use a small ball stylus to indent the centers, creating a cupped ear shape. -
Form the body:
Shape a rounded, slightly flattened oval for the body. It should be proportional to the head—plump and cuddly. -
Create the patchwork shirt:
I prefer to use thin sheets of colored clay here. Roll out small pieces of mustard yellow and sage green clay very thinly. Cut curved shapes that fit over the front of the body like a shirt tailored from two fabrics. -
Apply the shirt:
Gently press the colored clay pieces onto the body, smoothing the seams so they are flush with the surface. Add tiny balls of tan clay for arms resting at the sides. -
Add shirt details:
Use a needle tool or dotting tool to impress tiny dots or ‘buttons’ onto the shirt. You can also press tiny bits of contrasting colored clay into these indents for a polka-dot effect. -
Assemble the bear:
Insert a small piece of wire or toothpick into the body and attach the head securely. Place the bear into the pre-baked bowl to ensure it fits snugly before the final bake. -
Final Bake:
Bake the entire assembly (bear inside the bowl) according to the clay manufacturer’s instructions. Let it cool completely.
Step 3: Painting & Finishing Touches
-
Paint the face:
Using a very fine brush and black acrylic paint, carefully paint two closed, curved eyelids with lashes. Paint a small triangular nose and a simple anchor-shape mouth. -
Highlight the nose:
Add a tiny speck of white paint to the black nose to give it a ‘wet’ shine and dimension. -
Weather the bowl:
Mix a watery wash of brown paint. Brush it over the white bowl, getting into the crevices, and immediately wipe off the excess with a paper towel. This antiquing makes the carving look deeper. -
Seal the piece:
Apply a coat of matte varnish to the bear to stick with that soft, fabric-toy look. You can use a satin varnish on just the nose if you like extra contrast. -
Add the blanket:
Take your small piece of pink textured fabric. Fold it naturally and drape it over the edge of the bowl, tucking one corner under the bear’s arm to complete the scene.
Textured Fur Trick
Before baking, gently tap the tan clay parts with an old toothbrush or stiff paintbrush to give the bear a soft, velvety texture instead of a smooth plastic look.
Place your little snoozing bear near a window or on a stack of books for an instant touch of coziness
Pancake Stack Tealight Holder
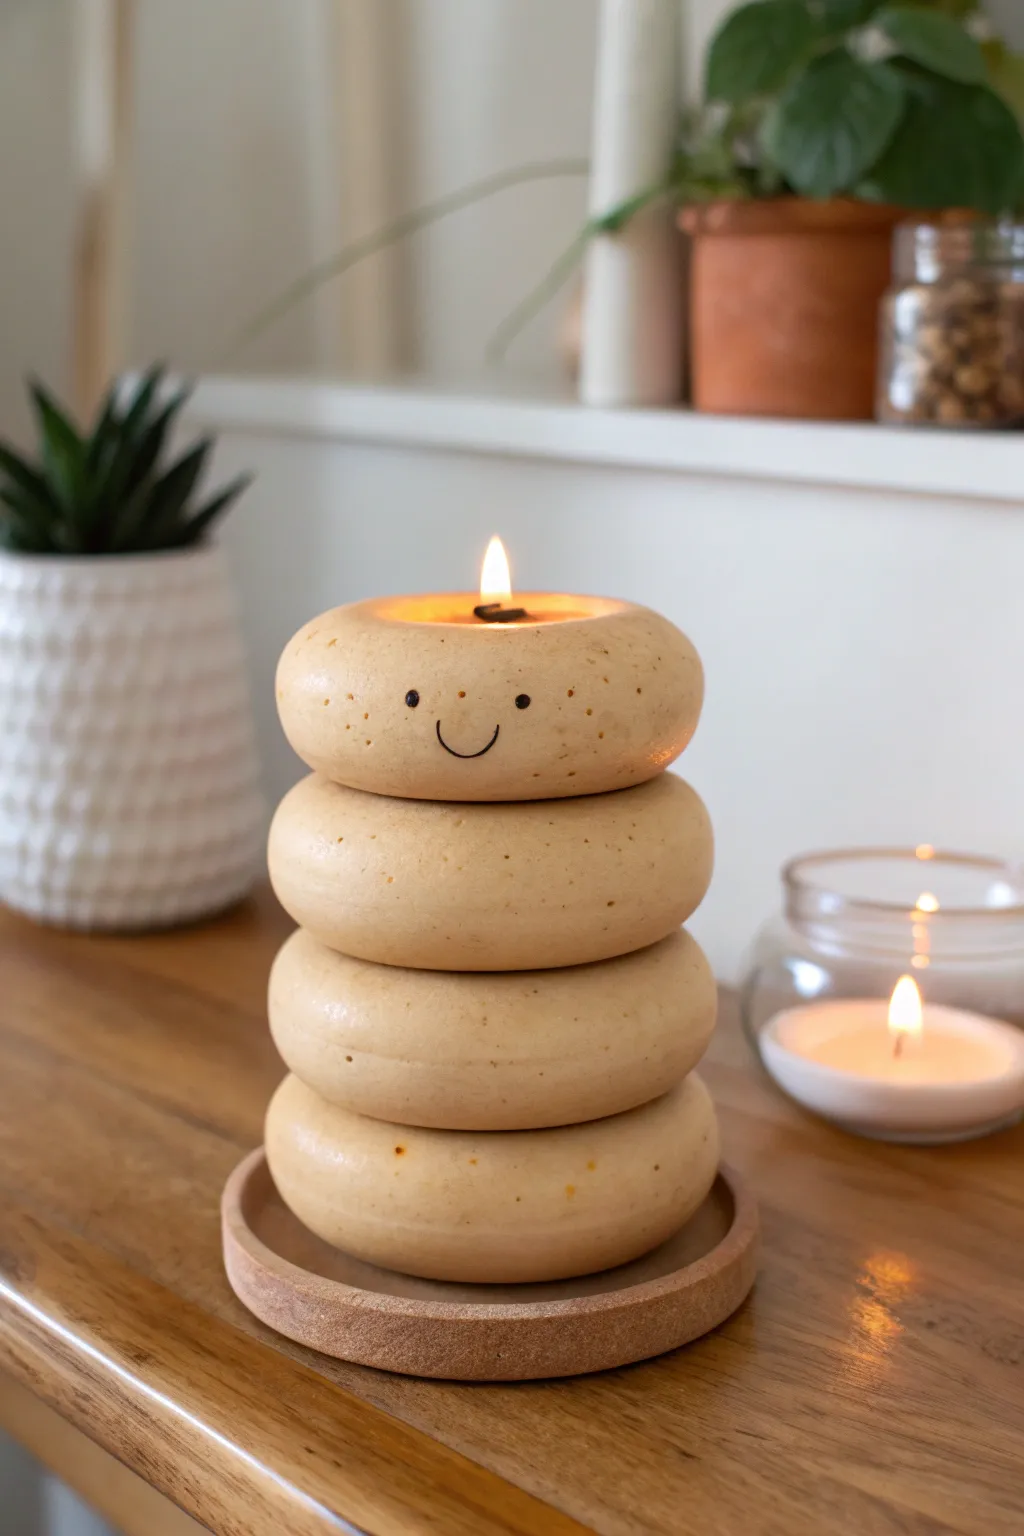
Brighten up your cozy corner with this adorable stack of fluffy pancake tealight holders, complete with a friendly little smile. This project layers four smooth clay discs to create a charming, food-inspired decor piece that adds warmth to any room.
Step-by-Step Tutorial
Materials
- Polymer clay or air-dry clay (light beige/tan color)
- Acrylic paint (black for the face, soft orange/brown for toasted effect)
- Tealight candle (for sizing)
- Rolling pin
- Circle cutter (slightly larger than your tealight)
- Texture sponge or toothbrush
- Soft paintbrush
- Sculpting tool or toothpick
- Translucent liquid clay or strong craft glue
- Matte varnish (optional)
Step 1: Shaping the Pancakes
-
Prepare the clay:
Begin by conditioning your beige clay until it is soft and pliable. If you want a more realistic ‘batter’ color, you can mix a tiny amount of yellow and brown into white clay. -
Divide portions:
Divide your clay into four equal portions. Roll each portion into a smooth ball in the palms of your hands to eliminate any initial cracks. -
Flatten the discs:
Gently press each ball down onto your work surface using your palm or a rolling pin until it forms a thick, rounded disc. You want them to look like fluffy, thick pancakes, not thin crepes, so keep them about 2-3 cm tall. -
Round the edges:
Use your fingers to smooth and round off the edges of each disc. The goal is a soft, organic shape rather than a sharp cylinder. -
Create the candle recess:
Take one of your discs—this will be the top pancake. Press a tealight candle (or a circle cutter of the same size) into the center to create an indentation. Make sure it’s deep enough for the candle to sit safely.
Uneven Stack?
If your pancakes slide around while stacking, insert a piece of raw spaghetti or a toothpick through the center of the bottom three layers to act as an invisible internal dowel.
Step 2: Texturing and Stacking
-
Add texture:
For a realistic baked look, lightly tap the surface of all four pancakes with a texture sponge or an old toothbrush. This mimics the porous nature of cooked batter. -
Dry fit the stack:
Stack the three solid pancakes on top of each other, finishing with the candle-holder pancake on top. Adjust them slightly so they aren’t perfectly aligned; a little offset makes the stack look more natural. -
Secure the layers:
Once you are happy with the arrangement, separate them and apply a thin layer of liquid clay or craft glue between the layers. Press them back together firmly. -
Blend the seams (optional):
If you want the stack to be very sturdy, you can gently blend the clay on the underside where the pancakes touch, though keeping the distinct layers visible is key to result.
Step 3: The Charming Details
-
Sculpt the smile:
On the top pancake, use a small sculpting tool or the end of a paintbrush to gently press in a small, curved smile line. Position it centrally on the ‘front’ side. -
Form the eyes:
Using a dotting tool or a rounded toothpick end, make two small indentations above the smile for the eyes. -
Baking or Drying:
If using polymer clay, bake the stack according to the manufacturer’s instructions. If using air-dry clay, allow it to dry completely for 24-48 hours.
Syrup Drizzle Idea
Mix translucent liquid clay with brown alcohol ink or paint. Drizzle it over the top pancake and let it run down the sides for a realistic maple syrup effect.
Step 4: Finishing Touches
-
Paint the toasted edges:
Create a dry-brush mix of soft orange and light brown paint. Very lightly brush this onto the rounded edges of each pancake to give them a golden-brown, toasted appearance. -
Paint the face:
Using a fine detail brush and black acrylic paint, carefully fill in the eye indentations and the smile line. A steady hand is helpful here. -
Add speckles:
To enhance the texture, I like to flick a tiny bit of watered-down brown paint onto the clay using a toothbrush for subtle speckling. -
Create the base:
For the saucer shown in the image, you can either create a flat clay disc with a slightly raised rim painted brown/cork color, or simply use a small wooden coaster. -
Seal the piece:
Finish by applying a coat of matte varnish to protect your paint job and give the pancakes a soft, non-shiny finish.
Now you have a sweet little companion to hold your candles during cozy evenings
Tiny Monster Page Buddy Clips

Create a whimsical little reading companion to guard your favorite books with this adorable polymer clay project. This round, pink monster features charming details like a spotted turquoise belly, tiny horns, and an infectious single-toothed grin.
Step-by-Step Guide
Materials
- Pink polymer clay
- Turquoise or light blue polymer clay
- White polymer clay
- Black polymer clay
- Dark grey or brown polymer clay (for horns)
- Dotting tool or ball stylus
- Needle tool or toothpick
- Clay knife or blade
- Acrylic rolling pin
- Oven and baking sheet
Step 1: Shaping the Body and Face
-
Form the base shape:
Start by conditioning a chunk of pink clay until it is soft and pliable. Roll it into a smooth ball about the size of a large walnut, then gently flatten the bottom so it stands upright. Slightly taper the top to create a soft egg-like dome shape. -
Create the belly patch:
Take a small amount of turquoise clay and flatten it into a thin pancake. Use a small circular cutter or your fingers to shape it into a perfect circle. -
Attach the belly:
Press the turquoise circle gently onto the lower center of the pink body. Use your finger to smooth the edges so it sits flush against the main shape. -
Add belly texture:
Using a very small dotting tool or a needle, gently press tiny indentations into the turquoise belly to create a subtle polka-dot texture. I like to vary the pressure slightly for a more organic look. -
Position the eyes:
Roll two small balls of white clay for the eyes. Flatten them slightly and press them onto the upper third of the face, ensuring they are touching each other. -
Add pupils:
Roll two much smaller balls of black clay. Place these onto the white eye bases, positioning them slightly inward to give the monster a cute, cross-eyed expression. Add a tiny speck of white to each black pupil for a life-like highlight. -
Sculpt the smile:
Roll an extremely thin snake of black clay. Curve it into a gentle U-shape and press it onto the face just below the eyes. -
Add the tooth:
Shape a tiny cone of white clay and attach it to the left side of the mouth, pointing downwards, to create a snaggletooth.
Clean Clay Tip
Keep baby wipes nearby to clean your hands between colors. Dark clay like black or brown can easily smudge onto the lighter pink and white clay.
Step 2: Adding Limbs and Horns
-
Form the feet:
Roll two small balls of pink clay. Flatten them slightly into oval shapes. Use a knife tool to make two small indentations on the front of each oval to suggest toes. -
Attach the feet:
Place the body on top of the two feet, positioning them slightly apart so the monster stands stably. -
Create the arms:
Roll two small logs of pink clay. Round off one end of each log. Use your knife tool to cut a small notch into the rounded end to create a simple thumb shape. -
Attach the arms:
Press the arms onto the sides of the body. You can angle them slightly away from the body to give the monster a bit of movement. -
Shape the horns:
Take the dark grey or brown clay and roll two small cones. Gently curve the tips to give them a slight hook shape. -
Mount the horns:
Press the horns firmly onto the top of the monster’s head, spacing them evenly apart. -
Add hair details:
Roll tiny, thin strands of pink clay. cluster three of them between the horns at the very top of the head for a tuft of hair. -
Final smooth check:
Before baking, check for any fingerprints. You can smooth them out very gently with a drop of baby oil on your finger. -
Bake the monster:
Place your creation on a baking sheet lined with parchment paper. Bake according to your polymer clay package instructions (usually around 275°F/135°C for 15-30 minutes depending on thickness). -
Cool and finish:
Allow the figure to cool completely in the oven before moving it to prevent cracking.
Make it a Bookmark
Want a functional buddy? Before baking, insert a large paperclip halfway into the bottom of the monster so it can clip onto your book pages.
Now you have a charming little friend ready to keep you company during your reading sessions