Whenever I’m stuck for inspiration, I remind myself that clay sculpture is basically just storytelling in 3D. Here are my favorite clay clay sculpture ideas, starting with the classics and drifting into the fun, weird stuff I can’t stop making in my studio.
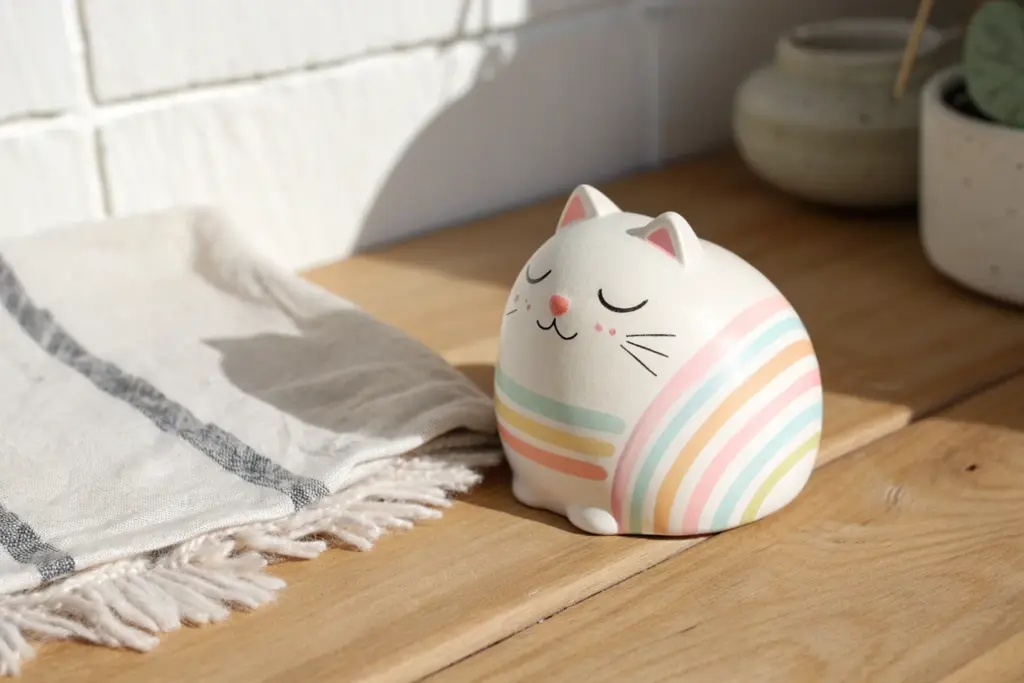
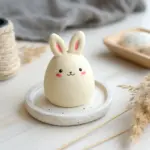
Mini Animal Figurines
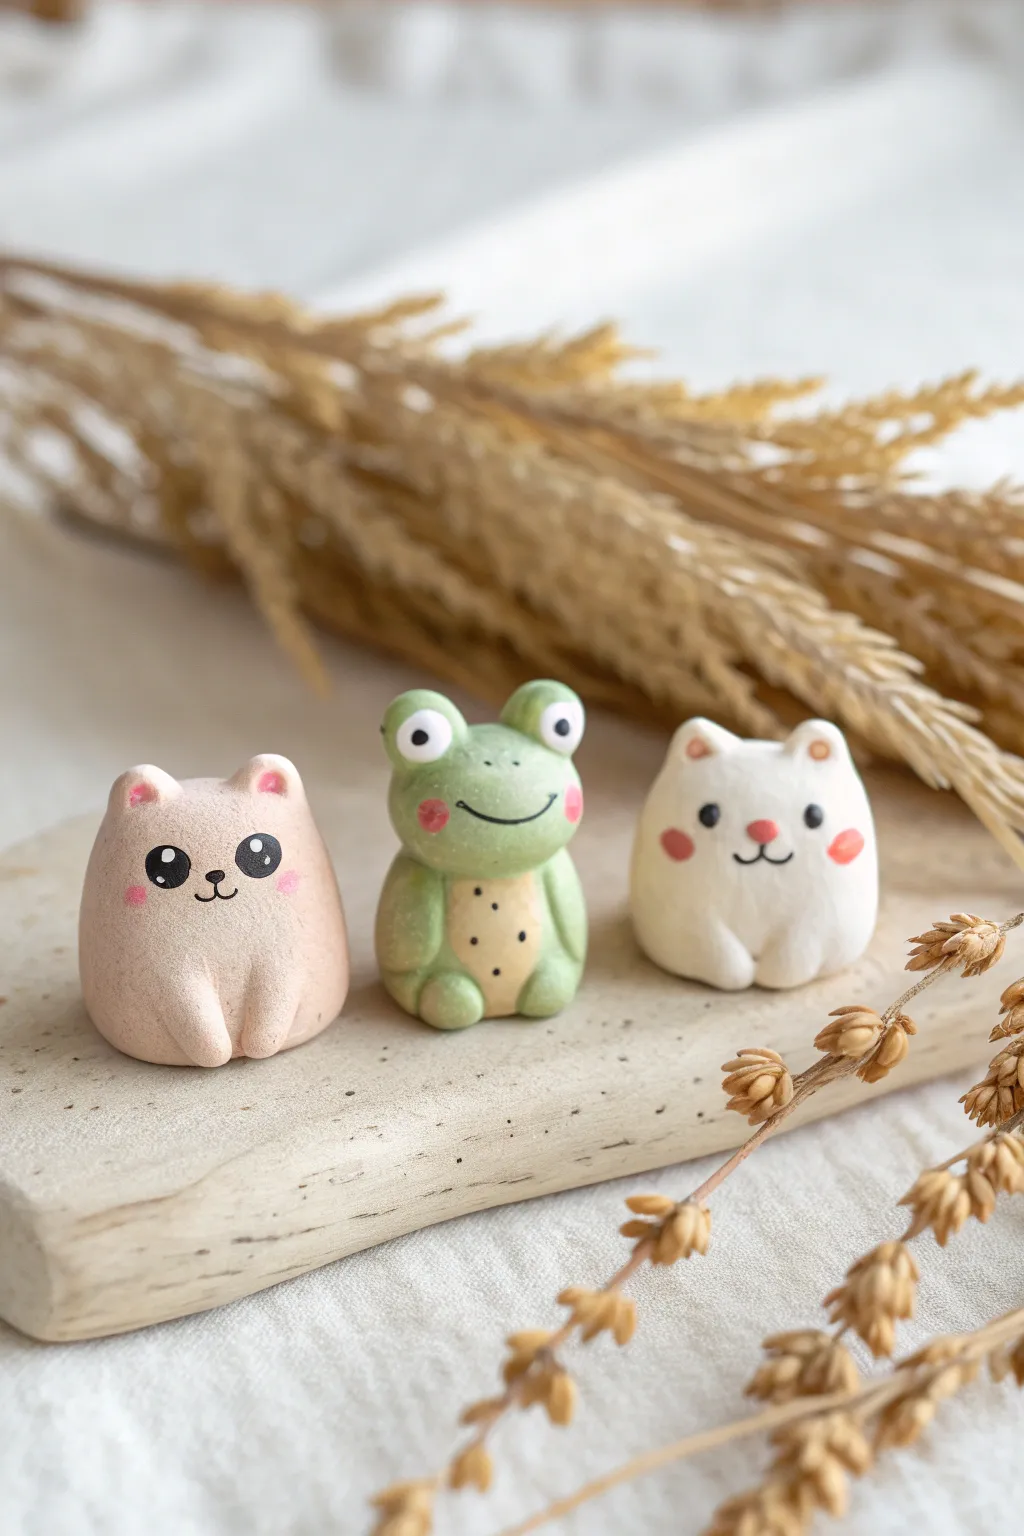
These adorable miniature figurines—a gentle pink bear, a cheerful frog, and a blushing white kitty—capture the charm of simplified, kawaii-style sculpture. Their smooth matte finish and gentle pastel details make them perfect as desk companions or sweet handmade gifts.
Detailed Instructions
Materials
- Polymer clay (Soft pink, Leaf green, White, Beige/Light Brown)
- Acrylic paints (Black, Pink, White)
- Fine detail paintbrush (000 size)
- Dotting tools or ball stylus (various sizes)
- Clay sculpting tools (needle tool, rubber shaper)
- Clean work surface (ceramic tile or glass mat)
- Oven (for baking)
- Matte varnish (optional)
Step 1: Sculpting the Pink Bear
-
Body Base:
Start by conditioning a golf-ball-sized amount of soft pink clay until pliable. Roll it into a smooth sphere, then gently flatten the bottom and slightly tap the top to create a rounded, gumdrop shape. -
Forming Ears:
Pinch the top left and right corners of the head gently to pull up two small, rounded ear shapes. Use your finger or a ball stylus to create a small indentation inside each ear for depth. -
Adding Arms:
Instead of attaching separate arms, roll two small sausages of pink clay. Press them vertically onto the front of the body, blending the top seam smooth so they look like they are resting on the bear’s belly.
Clean Clay Tip
White clay picks up dust easily. I always keep a pack of baby wipes nearby to clean my hands and tools thoroughly before switching to the white clay for the kitty.
Step 2: Sculpting the Cheerful Frog
-
Green Foundation:
Roll a slightly smaller ball of lemon-lime green clay. Shape it into a chubby oval, keeping it slightly wider at the bottom for stability. -
Prominent Eyes:
Roll two small balls of green clay for the eye sockets and place them on top of the head. Press a slightly flattened white clay disc onto the front of each green mound to create the whites of the eyes. -
Belly Patch:
Roll a very thin sheet of beige or light yellow clay. Cut a small oval and press it gently onto the frog’s stomach area, smoothing the edges so it sits flush. -
Froggy Limbs:
Create two teardrop shapes for arms and press them to the sides of the body. For the feet, make two small flattened balls and attach them at the base, angled slightly outward.
Make Them Charms
Before baking, insert a screw eye pin into the top center of each head. After baking, you can attach jump rings to turn these figurines into adorable keychains or phone straps.
Step 3: Sculpting the White Kitty
-
Round Shape:
Condition white clay and roll it into a sphere similar to the pink bear, but keep it slightly rounder and plumper. Flatten the base so it sits securely. -
Pointed Ears:
Pinch two small triangles at the top of the head. Unlike the bear’s rounded ears, keep these slightly more pointed at the tips to distinguishing it as a cat. -
Simple Paws:
Roll two tiny Tic-Tac shapes of white clay. Attach them low on the front of the body, close together, implying the cat is sitting politely with paws tucked in.
Step 4: Baking and Painting Details
-
Baking:
Place all three figurines on a ceramic tile or baking sheet. Bake according to your clay manufacturer’s instructions (usually 275°F for 15–30 minutes). Let them cool completely before handling. -
Bear Face:
Using a dotting tool dipped in black paint, create two large, wide-set eyes. Use a fine brush to paint a tiny nose and a ‘w’ mouth. Add pink blushes to the cheeks and inside the ears with diluted paint. -
Frog Face:
Dot black pupils onto the white clay eyes. Use a fine liner brush to paint a wide, curved smile connecting the cheeks. Add tiny black dots on the beige belly patch and pink circles for blush. -
Kitty Face:
Paint two small black eyes wide apart. Add a small pink nose in the center, and draw a simple anchor-shape mouth descending from it. Finish with bright reddish-pink oval cheeks. -
Eye Highlights:
Once the black eye paint is dry, use your smallest dotting tool or a toothpick to add a tiny white reflection dot to the eyes of the bear and kitty to bring them to life. -
Finishing:
If you want to protect the paint, apply a thin coat of matte varnish over the figures, avoiding glossy finishes to maintain that soft, bisqueware look.
Enjoy arranging your trio of friends on a windowsill or gifting them to someone special


Tiny Dinosaurs With Big Personality
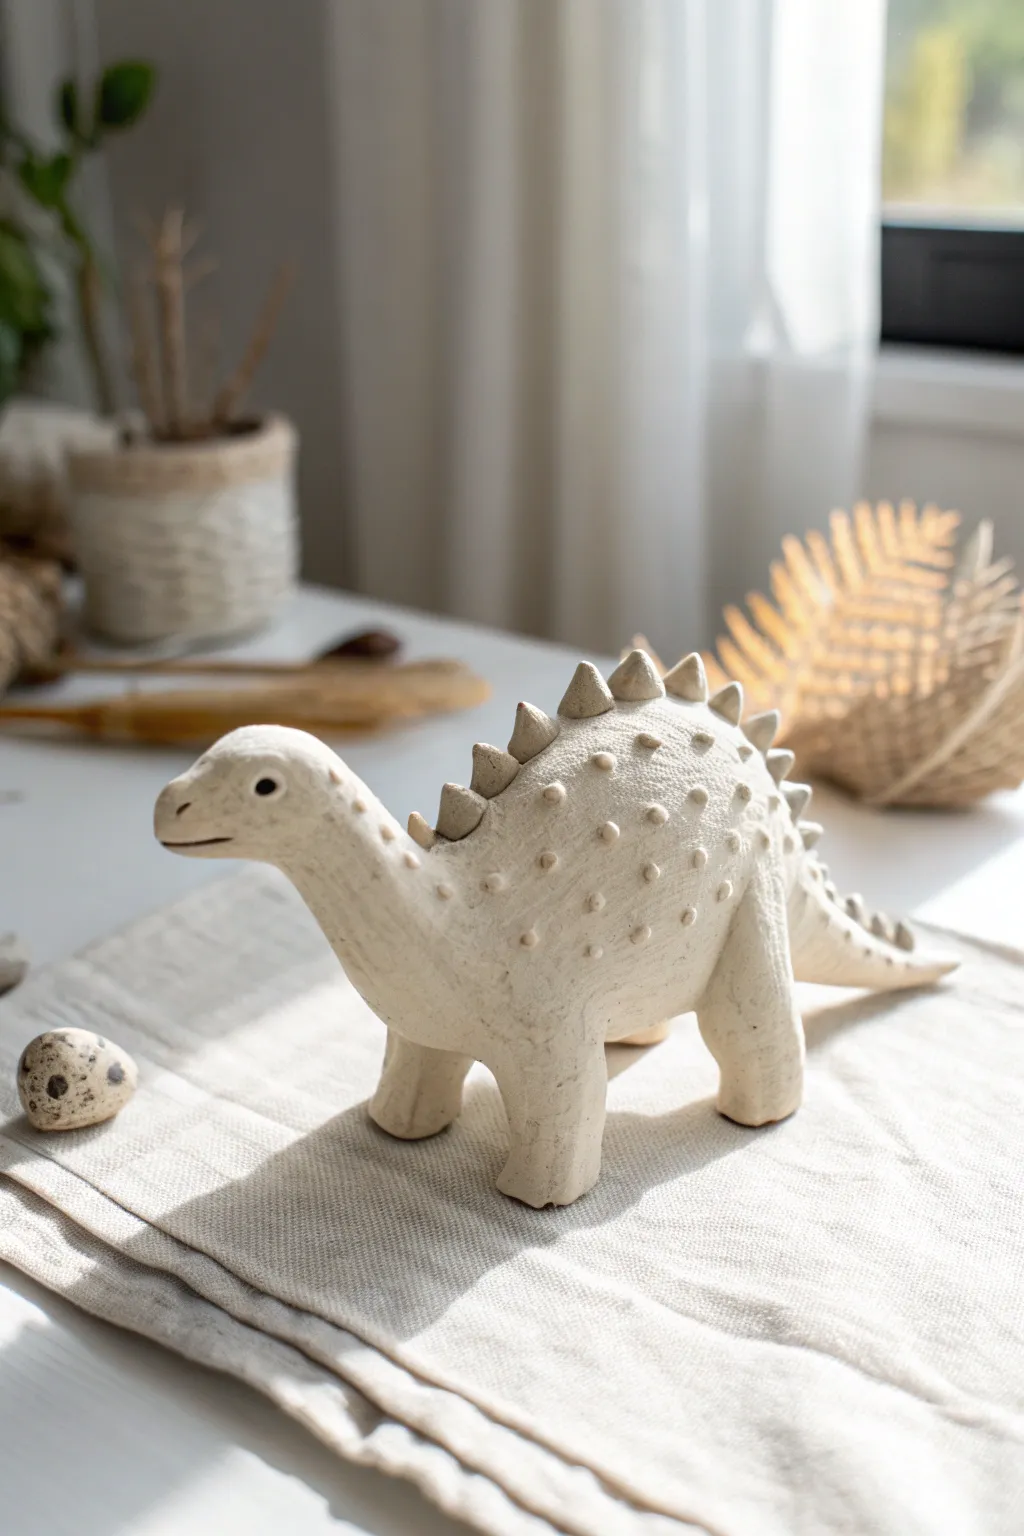
Bring the Jurassic era to your tabletop with this charmingly rustic dinosaur sculpture. With its gentle curve, dotted texture, and whimsical spine plates, this cream-colored clay creation captures a sweet, handmade aesthetic perfect for nursery decor or a desk companion.
How-To Guide
Materials
- Air-dry clay (white or cream)
- Aluminum foil (for armature)
- Needle tool or toothpick
- Ball stylus tool (small)
- Rubber shaping tool or soft paintbrush
- Small cup of water
- Rolling pin
- Acrylic paint (optional wash)
- Matte varnish
Step 1: Forming the Core Body
-
Build the armature:
Crumple a piece of aluminum foil into a tight oval shape for the main body tone. Create a smaller, elongated foil roll for the neck and head, and a tapered roll for the tail. -
Connect the foil core:
Twist the foil pieces together securely or use a bit of masking tape to hold them in a dinosaur shape: a long neck curving upward, a sturdy body, and a tail trailing behind. -
Roll out the clay:
Knead your clay until pliable, then roll it into a flat sheet about 1/4 inch thick. It needs to be thick enough to cover the foil without tearing. -
Wrap the armature:
Drape the clay sheet over your foil skeleton. Gently press the clay onto the foil, trimming away excess with your needle tool. Smooth the seams together with a wet finger so the joins disappear completely. -
Shape the legs:
Roll four sturdy cylinders of solid clay for the legs. They should be slightly thicker at the top than the bottom. -
Attach the limbs:
Score the body where the legs will go and score the tops of the leg cylinders. Add a dab of water or slip, then press them firmly onto the body. Blend the clay upwards onto the torso using a rubber tool to ensure a seamless connection. -
Refine the posture:
Stand the dinosaur up gently. Adjust the legs so it stands balanced on its own. I like to slightly bend one knee or tilt the head at this stage to give it a bit more life and movement.
Step 2: Adding Details & Texture
-
Sculpt the face:
Smooth the head into a rounded shape. Use a small ball tool to press indentations for the eyes on either side. Use a knife or needle tool to carve a simple, horizontal line for the mouth. -
Create the spine plates:
Roll small balls of clay in varying sizes—larger for the back, smaller for the neck and tail. Pinch each ball into a flattened triangular or cone shape. -
Attach the ridge:
Starting at the top of the head and working down to the tail tip, attach the plates in a single row along the spine. Score and slip each one, blending the base into the body clay so they don’t pop off later. -
Add the spikes:
For the end of the tail, shape tiny, sharper cones and attach them in a cluster, just like a real Stegosaurus tail. -
Poke the texture:
Using a small, blunt tool or the end of a paintbrush handle, press shallow dots all over the upper body and neck. Vary the spacing to keep it looking organic and handmade. -
Detail the dots:
For added dimension, roll tiny, poppy-seed-sized balls of clay. Place these into some of the indentations you just made, letting them protrude slightly like bumpy warts or scales. -
Final smoothing:
Dip your finger in water and gently run it over the smooth areas (belly and legs) to remove fingerprints, but be careful not to flatten your spinal plates.
Cracks Appearing?
If small cracks appear while drying, mix a small amount of fresh clay with water to make a paste (slip). Fill the cracks with this paste and smooth it over with a damp finger.
Step 3: Finishing Touches
-
Dry thoroughly:
Let the sculpture dry for at least 24-48 hours. Turn it over gently halfway through so the belly and feet dry evenly. -
Sand imperfections:
Once bone dry, use fine-grit sandpaper to gently smooth any rough patches on the feet or underbelly. -
Optional wash:
To enhance the texture, you can mix a tiny bit of brown paint with water and brush it over the textured areas, wiping it back immediately with a cloth so paint only remains in the crevices. -
Seal the piece:
Apply a coat of matte varnish to protect the clay and give it a finished, professional look without making it too shiny.
Jurassic Jazz-Up
For a playful twist, paint the spinal plates in a soft pastel gradient (like sage green to pale yellow) before sealing, leaving the body natural cream for a modern look.
Place your prehistoric friend on a shelf or desk where its friendly face can greet you every day


Coil Creatures (Snakes, Worms, Caterpillars)
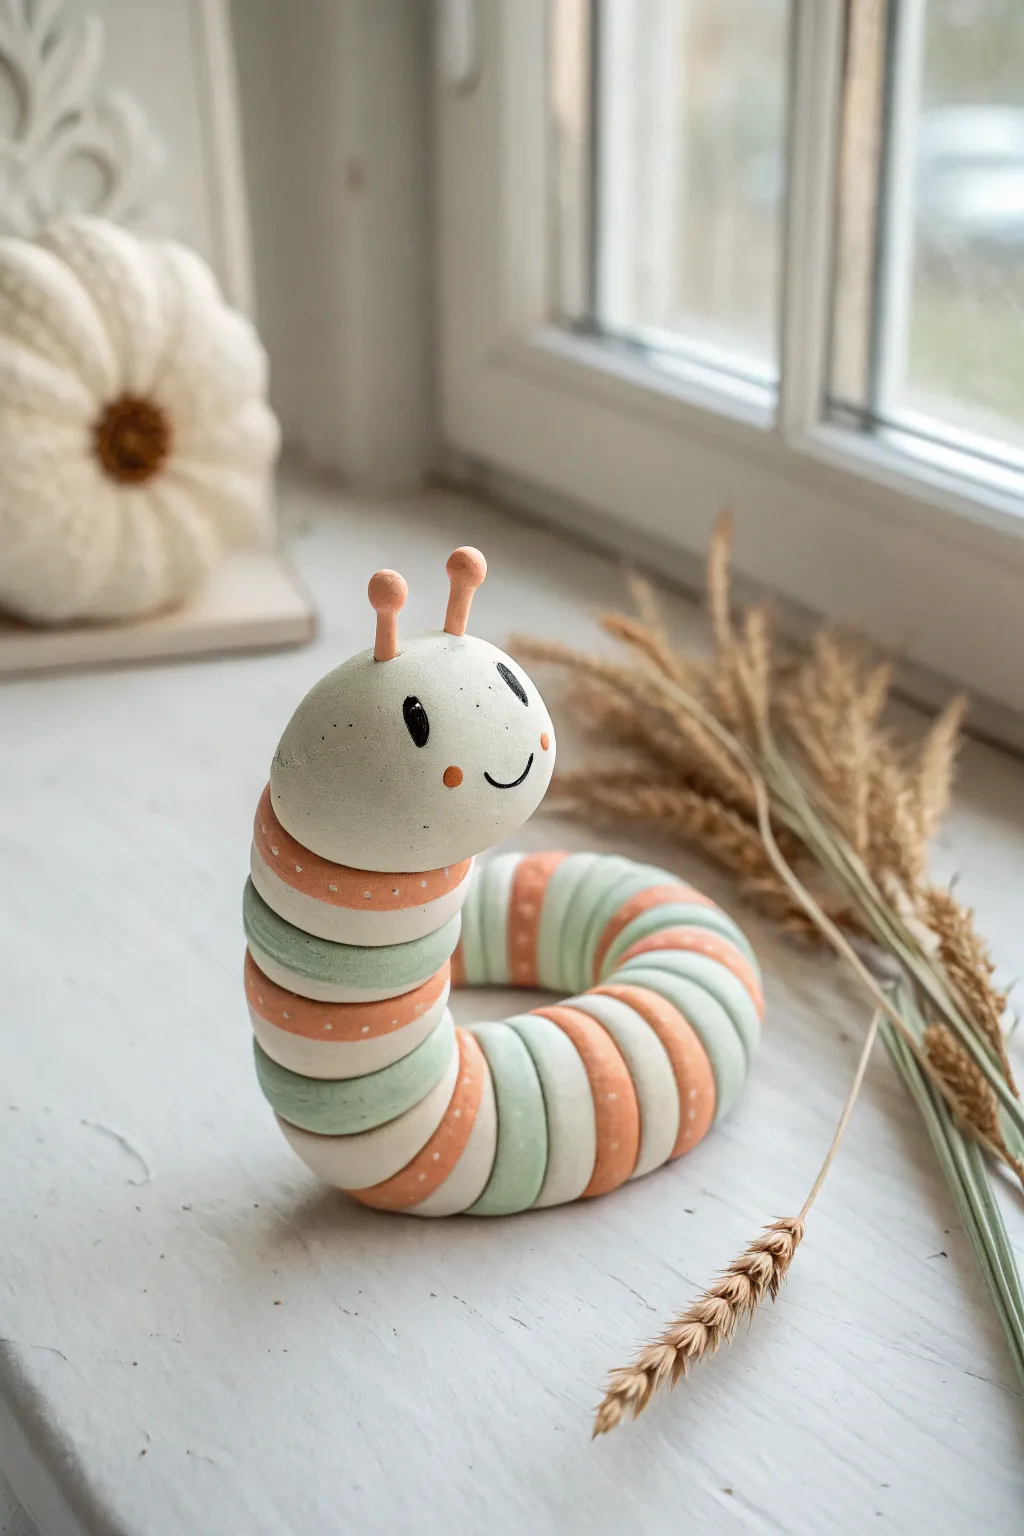
This friendly terracotta creature breaks the mold of traditional coil pots with its smooth, segmented body and cheerful painted face. The alternating bands of soft peach, sage green, and cream create a charming, vintage aesthetic perfect for a windowsill display.
Step-by-Step
Materials
- Air-dry clay or polymer clay (white base recommended)
- Acrylic paints (peach/salmon, sage green, cream/off-white, black)
- Small round sculpting tool or ball stylus
- Rolling pin
- Clay knife or craft blade
- Water for smoothing (if using air-dry clay)
- Fine grit sandpaper
- Small detail paintbrush
- Medium flat paintbrush
- Matte varnish or sealant
Step 1: Forming the Segments
-
Roll the main coil:
Begin by conditioning your clay and rolling out a long, consistent snake approximately 1 inch thick. Keep the pressure even to avoid lumps. -
Cut uniform segments:
Instead of coiling immediately, cut your snake into roughly 15-20 individual discs or ‘coins’ of equal thickness. They should look like thick slices of a banana. -
Stack and curve:
Start pressing the discs together side-by-side to reform the long body shape. As you connect them, gently curve the line of discs into a ‘C’ or ‘U’ shape to create the caterpillar’s crawling posture. -
Blend the underside:
To ensure the caterpillar holds together, flip it over carefully and smear the clay across the seams on the bottom only. This locks the segments together while keeping the segmented look on top. -
Round the edges:
Use your finger or a little water to smooth the top edges of each disc, making them look like distinct, puffy rings rather than sharp slices.
Make Joints Stronger
Insert a short piece of wire or a toothpick between the head and the first body segment. This internal armature prevents the heavy head from falling off later.
Step 2: Sculpting the Head
-
Shape the head:
Roll a separate ball of clay slightly larger than your body segments. Gently flatten the bottom so it can rest securely on the front of the body. -
Attach the head:
Score the connection points (scratch cross-hatch marks) and add a dab of water or liquid clay. Press the head initially onto the front segment, tilting it slightly upward for a cheerful gaze. -
Create antennae:
Roll two tiny, thin stems of clay and attach small bead-like balls to the ends. These are delicate, so handle with care. -
Mount antennae:
Poke two small pilot holes on top of the head using a stylus. Insert your antennae stems, blending the clay at the base slightly to secure them. -
Dry completely:
Allow the sculpture to dry fully according to your clay’s instructions. I usually rotate the piece gently every few hours during the first day to prevent flat spots.
Step 3: Painting and Finishing
-
Sand for smoothness:
Once fully cured, use fine-grit sandpaper to gently buff the surface, particularly the face area, to ensure a porcelain-smooth finish. -
Apply base colors:
Paint the head cream. For the body, paint the segments in an alternating pattern: peach, cream, sage green, cream. Repeat this sequence down the entire length. -
Add stripe details:
On the peach segments, paint tiny cream dots. On the green segments, you can leave them plain or add very faint vertical stripes for texture. -
Paint the face:
Using your smallest detail brush and black paint, add two oval eyes and a simple U-shaped smile. Add small peach circles for rosy cheeks. -
Highlight the eyes:
Dip the non-brush end of your paintbrush in white paint and dab a tiny speck into the black of each eye to add a ‘sparkle’ of life. -
Paint the antennae:
Carefully paint the antennae peach to match the body segments. -
Seal:
Finish with a coat of matte spray varnish to protect the paint without making the caterpillar look shiny or plastic-like.
Fixing Cracks
If cracks appear between segments as it dries, make a ‘slurry’ of clay and water (paste consistency). Fill the cracks with this paste and smooth it out with a damp finger.
Place your finished caterpillar near a sunny window or plant pot for a sweet, nature-inspired companion


Pinch Pot Penguins And Owls
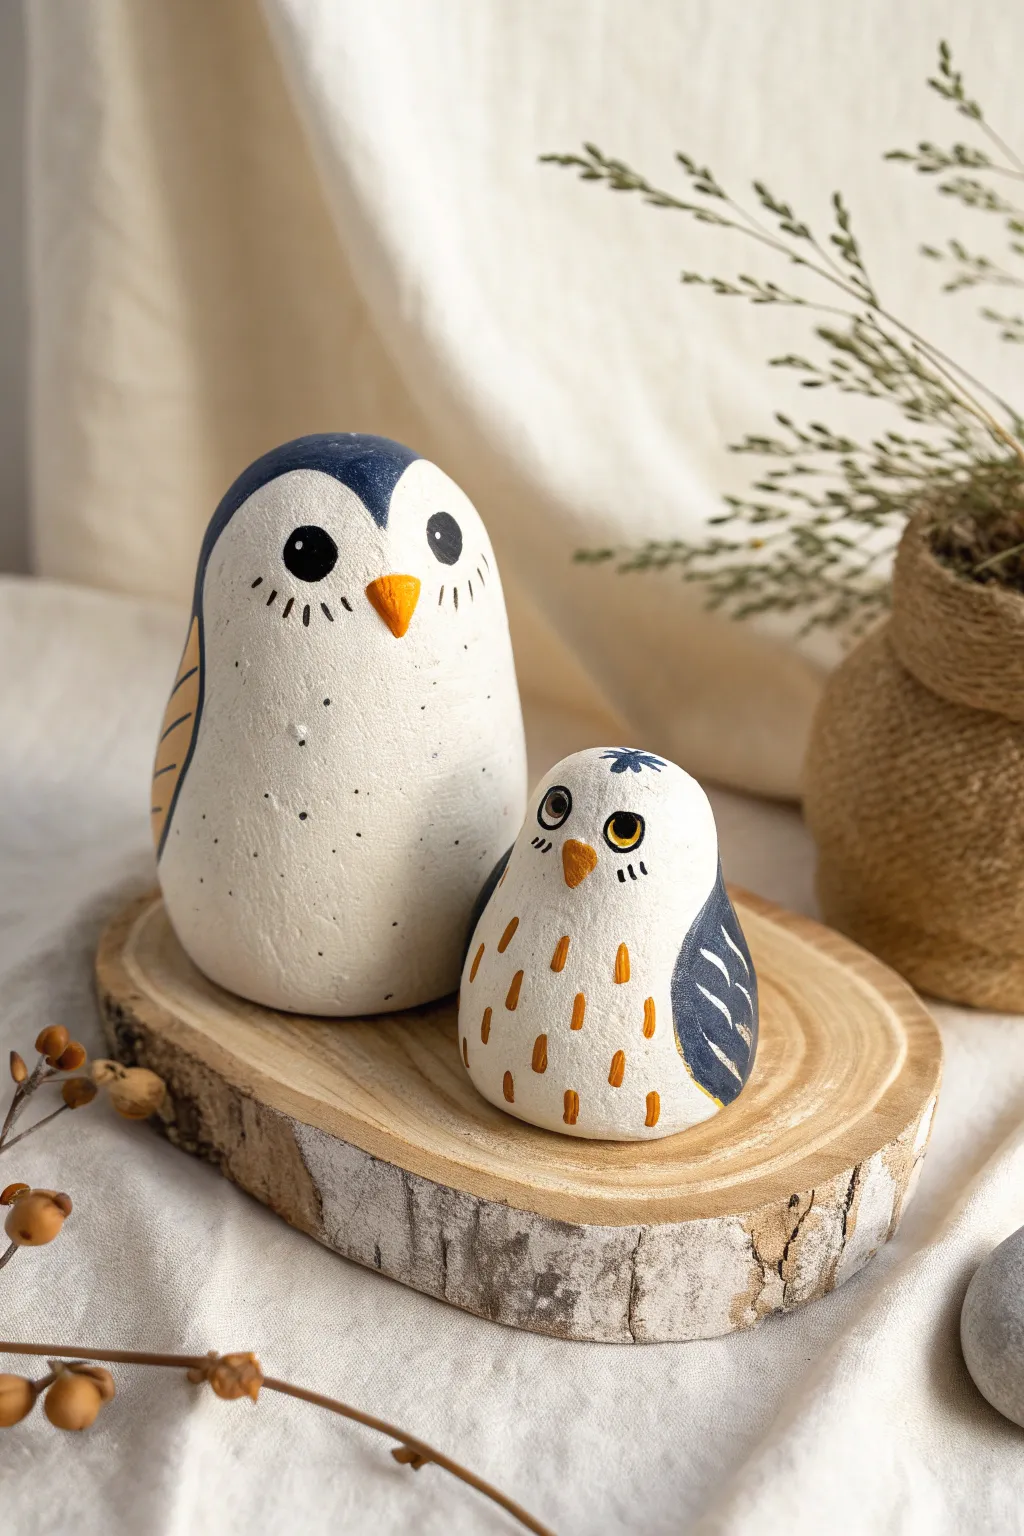
These charming, minimalist birds are crafted from smooth clay forms and brought to life with simple yet expressive painted details. The pair features a larger, serene penguin-like figure and a smaller, patterned owl, perfect for adding a touch of whimsy to any shelf.
Detailed Instructions
Materials
- Air-dry clay or polymer clay (white)
- Acrylic paints (navy blue, white, mustard yellow/orange, black)
- Fine detail paintbrushes (size 0 and 00)
- Medium flat paintbrush
- Water cup and palette
- Fine-grit sandpaper
- Matte varnish or sealant (optional)
- Pencil for sketching
Step 1: Shaping the Forms
-
Shape the large body:
Start with a fist-sized ball of white clay. Roll it between your palms to smooth it out, then gently gently flatten the bottom so it stands upright. Taper the top slightly to create a rounded, egg-like dome shape for the larger bird. -
Shape the small body:
Take a smaller amount of clay, roughly half the size of the first. create a shorter, stouter mound shape. This one should feel a bit more like a rounded pebble, wider at the base and slightly flatter on top. -
Smooth the surfaces:
Dip your finger in a tiny bit of water and rub away any fingerprints or cracks. The goal is a seamless, stone-like finish. I find that spending extra time here makes painting much easier later. -
Initial sculpt drying:
Allow the clay shapes to dry completely according to your clay’s package instructions. Air-dry clay usually needs 24-48 hours. If using polymer clay, bake and cool it now. -
Sand for perfection:
Once fully dry, use fine-grit sandpaper to buff out any remaining bumps, focusing on the curve of the ‘head’ area.
Cracked Clay?
If small cracks appear as air-dry clay cures, mix a tiny bit of fresh wet clay with water to make a paste (slip) and fill the cracks. Smooth over and let dry again.
Step 2: Painting the Large Bird
-
Sketch the design:
Lightly sketch the face outlines with a pencil. Draw a heart-shaped widow’s peak for the forehead and mark the wing curves on the sides. -
Paint the head cap:
Using the navy blue paint and a medium brush, fill in the top of the head, following the widow’s peak line you drew. Extend this color down the back of the figure. -
Add the wings:
Paint a long, curved wing shape on the left side using a mustard yellow tone. Add thin navy lines across it for feather texture. -
Detail the face:
Switch to a fine detail brush. Paint two solid black circles for eyes. Just below them, add a small, inverted orange triangle for the beak. -
Add facial texture:
Using thinned black paint or a very fine marker, draw tiny radiating lines under the eyes to suggest cheeks or eyelashes. Add small speckles across the white chest for a natural, speckled egg look.
Step 3: Painting the Owl
-
Base coat the wings:
On the smaller bird, paint curved wing shapes on the sides using the navy blue paint. -
Add wing details:
Once the blue is dry, paint small white dashes or scallop shapes inside the blue wings to create a feathered pattern. -
Paint the beak and flower:
Paint a small orange triangle beak in the center of the face. At the very top of the head, add a tiny blue stylized flower or star shape. -
Paint the eyes:
Paint two circles. For the owl, you can make them expressive by painting a yellow iris with a black pupil, or simple black circles with white highlights. Outline the eyes with thin black lines. -
Create the chest pattern:
Using the mustard orange paint, make small vertical dashes in staggered rows across the white belly area to mimic chest feathers. -
Final touches:
Add tiny black dashes under the eyes for texture. -
Seal the work:
Once all paint is completely dry, apply a coat of matte varnish to protect your finish without making the birds look too glossy.
Make it a Set
Create a whole family by varying the sizes! Try making a tiny third bird that fits in your palm, painted with green accents instead of blue for variety.
Set your finished clay birds on a wooden slice or a windowsill to enjoy their quiet companionship

The Complete Guide to Pottery Troubleshooting
Uncover the most common ceramic mistakes—from cracking clay to failed glazes—and learn how to fix them fast.
Pocket-Sized Octopus Sculptures
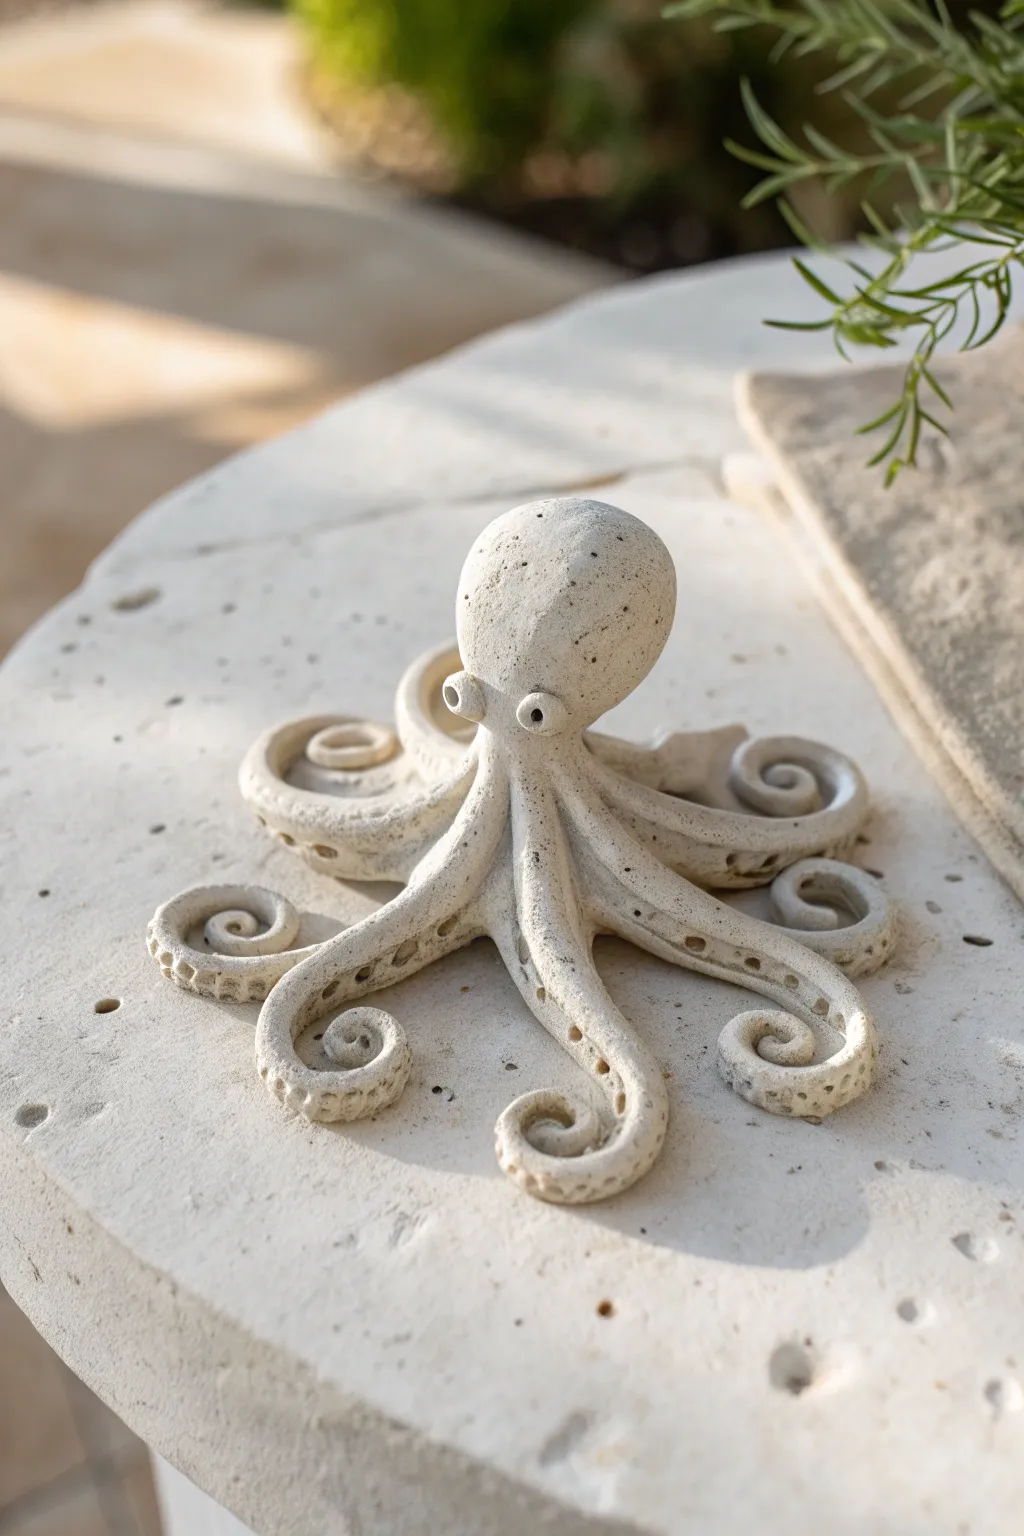
Create a charming, pocket-sized companion with this simple yet detailed clay project. The finished sculpture features curled tentacles, a smooth bulbous head, and a delightful speckled stone texture that gives it a timeless, rustic feel.
Step-by-Step Tutorial
Materials
- White polymer clay or air-dry clay (approx. 2-3 oz)
- Speckled clay additive or dried coffee grounds/black pepper
- Basic sculpting tools (ball stylus, needle tool)
- Smooth work surface (ceramic tile or acrylic sheet)
- Foil for armature (optional, to save clay)
- Sandpaper (fine grit)
- Acrylic matte varnish (optional)
Step 1: Preparing the Clay Body
-
Condition and Speckle:
Begin by conditioning your white clay until it is soft and pliable. To achieve the stone-like look seen in the photo, knead in a tiny pinch of ‘speckled clay’ additive, dried coffee grounds, or coarse black pepper until visually distributed. -
Form the Head:
Roll a sphere of clay regarding the size of a walnut. Gently pinch the bottom to create a slight teardrop shape, forming the octopus’s mantle (head). -
Create the Base:
Flatten a separate, smaller ball of clay into a thick disk. This will serve as the hub where all the tentacles connect and will support the head.
Step 2: Sculpting the Tentacles
-
Roll the Coils:
Roll out eight tapered snakes of clay. Aim for them to be thicker at the base and gradually thinning out to a point at the end. -
Attach to Base:
Press the thick ends of the tentacles onto the underside of your central disk. Arrange them like the spokes of a wheel, smoothing the seams so they become one solid unit. -
Mount the Head:
Place the head atop the central disk. Use a sculpting tool or your thumb to drag clay downwards from the head to the tentacle ring, blending firmly so the neck seam disappears completely. -
Shape the Curls:
Gently lift each tentacle and curl the tips inward or outward. I like to vary the tightness of the spirals to give the creature a sense of movement and life.
Stone Texture Secret
Mix black pepper into white clay for easy ‘granite’. The pepper won’t burn at standard polymer clay baking temps.
Step 3: Detailing and Texturing
-
Add the Eyes:
Roll two very small balls of clay. Press them onto the ‘face’ area, slightly protruding. Use a small ball stylus to poke a deep indentation in the center of each for the pupil. -
Create Suction Cups:
This step requires patience. Using a very small ball tool or a dull pencil point, press rows of indentations along the underside of each lifted tentacle. -
Refine the Cups:
For the larger suction cups near the base, you can press a tiny ring of clay into the indentation to create that raised rim effect. -
Texture the Skin:
If your clay is too smooth, lightly tap the surface with an old toothbrush or a piece of crumpled foil to mimic the porous texture of natural stone.
Tentacles falling off?
Score the clay surfaces (make scratch marks) and add a drop of water (for air-dry) or liquid clay (for polymer) before joining.
Step 4: Finishing Touches
-
Final Check:
Look at the sculpture from all angles. Ensure the head is balanced and the spiral tentacles are resting securely on the work surface. -
Curling Adjustments:
Re-check the tentacle tips; sometimes they droop while you work on other parts. Prop them up with bits of foil if they need support during drying or baking. -
Dry or Bake:
Follow the manufacturer instructions for your specific clay. If baking polymer clay, tent it with foil to prevent scorching the white surface. -
Sanding:
once fully cured or dried, use fine-grit sandpaper to gently smooth out any fingerprints or sharp edges, enhancing the worn stone aesthetic. -
Protect:
Apply a very thin coat of matte varnish if you want to seal the speckles, though leaving it raw often looks more like natural rock.
Now you have a serene little sea creature perfect for a desk ornament or garden accent
Mushroom Cluster Forest Sculptures
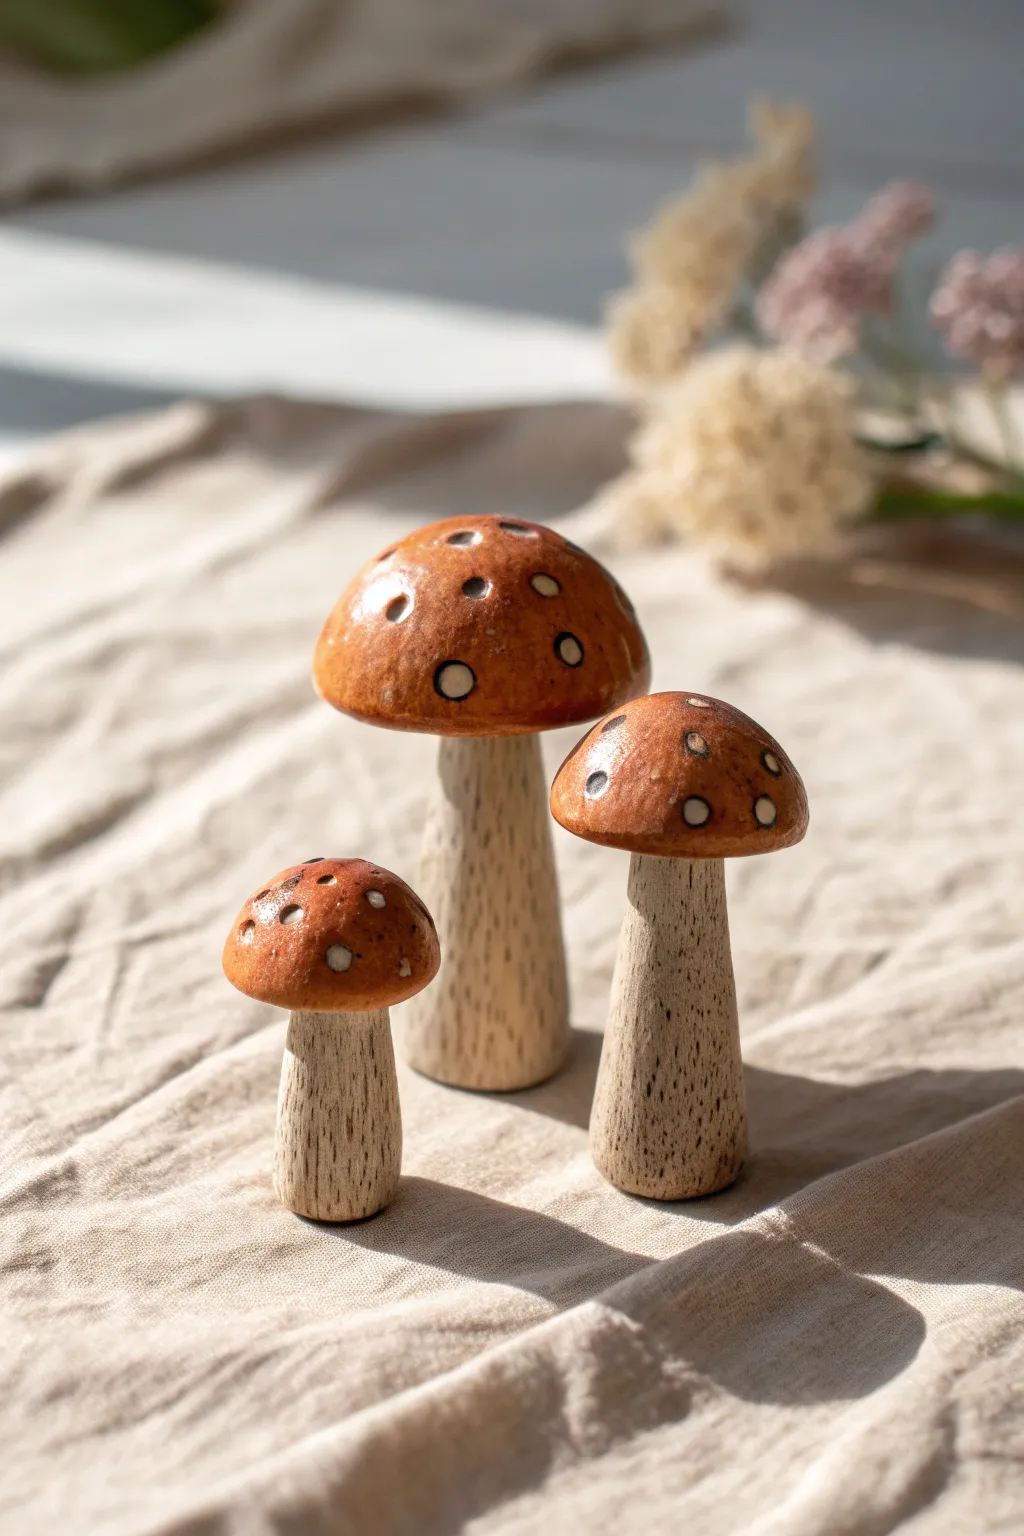
Bring a touch of the forest floor into your home with these charming clay mushroom sculptures, featuring glossy speckled caps and textured stems. This project balances rustic textures with polished finishes, creating a delightful trio perfect for a mantelpiece or shelf display.
How-To Guide
Materials
- White polymer clay or air-dry clay
- Aluminum foil
- Toothpicks or thick craft wire
- Sculpting tools (needle tool, small ball stylus)
- Acrylic paints: Burnt Sienna, Raw Umber, Cream/Beige, White, Black
- Gloss varnish or clear resin
- Matte varnish
- Paintbrushes (small round and flat)
- Sandpaper (fine grit)
Step 1: Forming the Armatures
-
Core Prep:
Begin by crumpling aluminum foil into three distinct shapes for the mushroom caps: one large dome, one medium dome, and one smaller, slightly flatter dome. -
Stem Structure:
Roll three logs of aluminum foil for the stems, varying their heights and thicknesses to match the intended cap sizes. The largest stem should be the thickest. -
Connection:
Insert a toothpick or a short length of sturdy wire halfway into the top of each foil stem. Push the corresponding foil cap onto the exposed end of the wire to secure the two parts together.
Smooth Moves
Before baking, brush a tiny amount of baby oil or clay softener over the smooth caps to remove fingerprints and achieve a flawless surface.
Step 2: Sculpting the Clay forms
-
Conditioning:
Condition your white clay until it is soft and pliable. If using polymer clay, the warmth of your hands will make this easier. -
Stem Covering:
Roll out a sheet of clay or flatten it by hand. Wrap the clay around the foil stem, smoothing the seams so they disappear completely. The base should flare out very slightly for stability. -
Cap Construction:
Cover the foil caps with a generous layer of clay. Smooth the clay down over the edges and blend it seamlessly into the top of the stem. -
Refining the Shape:
Roll the entire mushroom gently between your palms or on your work surface to ensure the stem is cylindrical and the cap is symmetrical. -
Adding Texture:
Use a needle tool to scratch vertical, slightly irregular lines up and down the stems. This mimics the fibrous texture of real mushroom stalks. -
Creating Spots:
With a small ball stylus or the round end of a paintbrush, press small indentations into the mushroom caps. Vary the sizes slightly for a natural look. I like to group a few close together.
Step 3: Baking and Base Painting
-
Curing:
Bake the mushrooms according to your clay package instructions (usually 275°F/135°C for 15-30 minutes for polymer clay) or let them dry fully if using air-dry clay. -
Sanding:
Once cool, lightly sand any bumps on the caps to ensure a smooth surface for the glossy finish later. -
Stem Color:
Paint the stems with a base coat of cream or beige acrylic paint. Let this dry completely. -
Stem Wash:
Mix a very watery wash of Raw Umber paint. Brush it over the textured stem and immediately wipe off the excess with a paper towel. The dark paint will stay in the grooves, highlighting the texture. -
Cap Base:
Paint the caps with a solid coat of Burnt Sienna or a warm, reddish-brown. You may need two coats for full opacity.
Mossy Magic
Glue small bits of dried moss or lichen to the very bottom of the stems after sealing to make them look like they were just plucked from the earth.
Step 4: Detailing and Sealing
-
Dot Details:
Using a tiny detail brush, fill the indentations on the caps with white or light cream paint. For a dimensional look, add a tiny dot of black or dark brown in the center of a few larger spots. -
Matte Finish:
Apply a matte varnish to the stems only. This preserves the natural, woody look of the textured clay. -
Gloss Finish:
Apply a thick coat of high-gloss varnish or UV resin to the caps. This gives them that ceramic-like, wet look shown in the inspiration photo. -
Final Dry:
Allow the varnish to cure fully in a dust-free area before handling or displaying your new forest friends.
Arranging your trio together creates a lovely little narrative scene on your shelf


What Really Happens Inside the Kiln
Learn how time and temperature work together inside the kiln to transform clay into durable ceramic.
Whistle Creature Sculptures
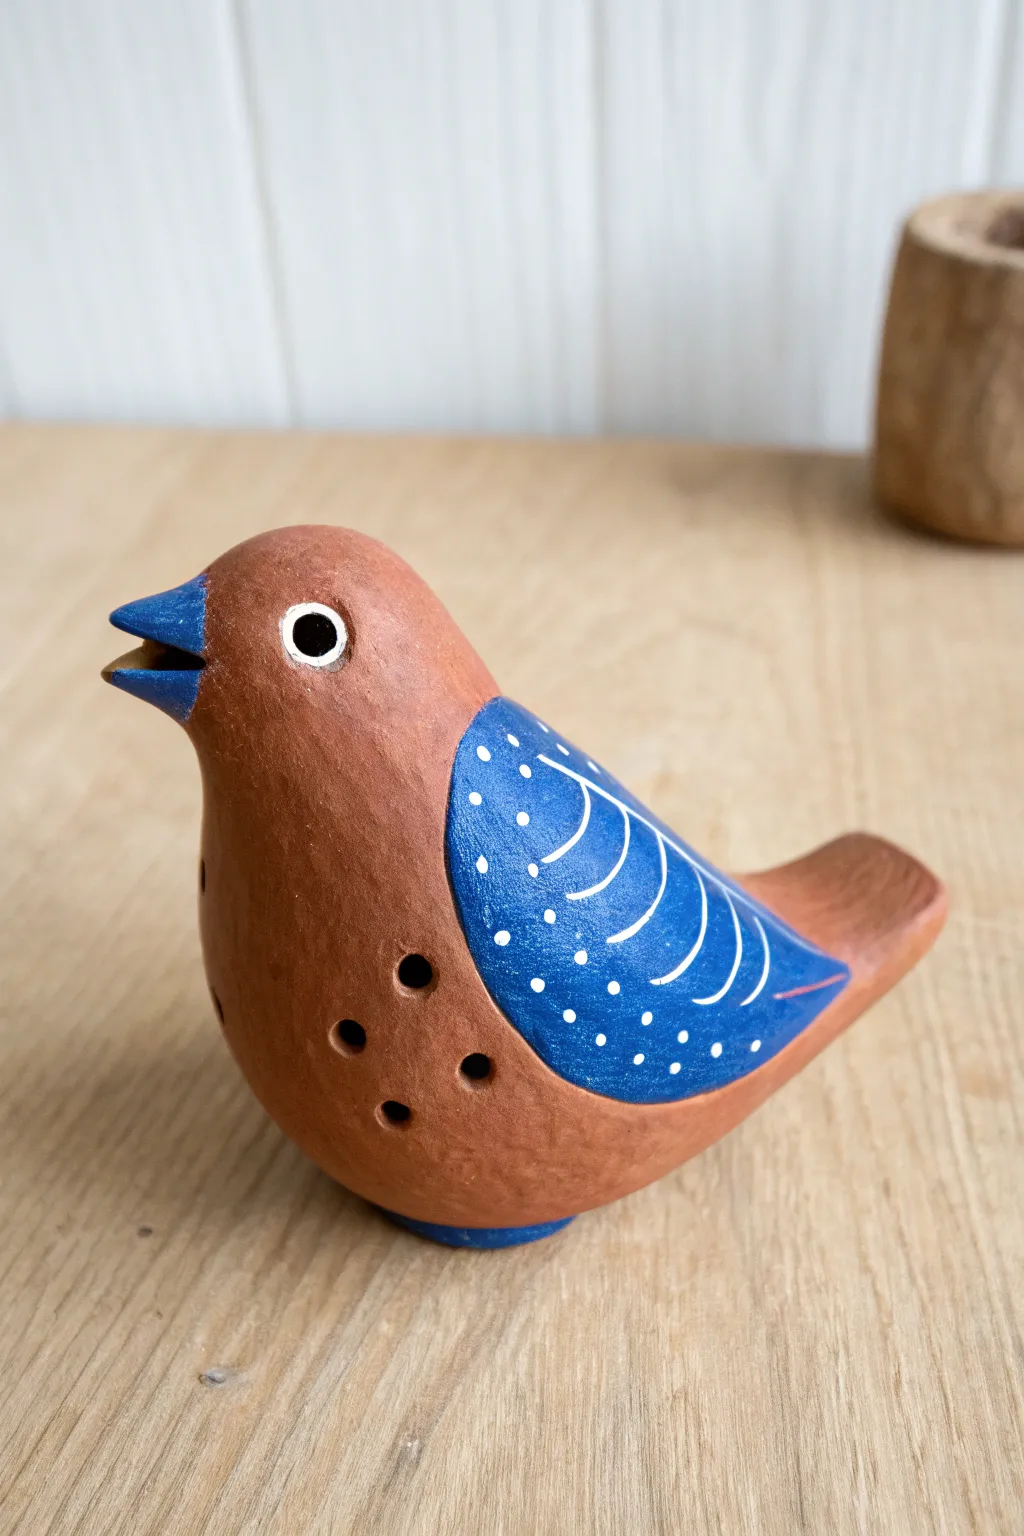
Bring music to life with this charming bird-shaped clay whistle featuring a rustic terracotta finish and vibrant cobalt blue detailing. This functional sculpture is as delightful to play as it is to admire on a shelf.
How-To Guide
Materials
- Air-dry clay or low-fire earthenware clay (terracotta color recommended)
- Popsicle stick or wooden modeling tool
- Small round loop tool
- Fettling knife
- Slip (clay mixed with water)
- Cobalt blue acrylic paint
- White acrylic paint
- Fine detail paintbrushes
- Clear matte sealant or varnish
- Water cup and sponge
Step 1: Sculpting the Form
-
Shape the body:
Start with a ball of clay about the size of a lemon. Gently pinch and pull one side to form a rounded, slightly upturned tail. -
Form the head:
On the opposite side from the tail, pull and shape a rounded head, smoothing the neck area so it flows seamlessly into the body. -
Create the beak:
Pinch a small triangular beak onto the front of the face. Use your knife to carefully slice the beak open horizontally to create a mouth. -
Hollow the body:
Carefully slice the bird in half horizontally or use a loop tool from the bottom to hollow out the inside, leaving walls about 1/4 inch thick. If you sliced it, score and slip the edges to reassemble the halves securely. -
Construct the whistle mechanism:
At the tail end, insert a flat popsicle stick horizontally into the clay to create the windway. At the base of the tail on the underside, cut a rectangular window with a sharp angled edge (the fipple) that aligns perfectly with your windway stick. -
Test the sound:
With the stick removed, blow gently through the tail. Adjust the sharpness of the fipple edge until you achieve a clear whistle sound. -
Drill finger holes:
Using a small drill bit or round tool, poke four distinct holes on the side of the bird’s belly to create the musical notes. Make sure to clear away any clay burrs from the inside. -
Smooth the surface:
Use a damp sponge to wipe down the entire bird, smoothing away fingerprints and joining marks. Let the clay dry completely according to package instructions.
Step 2: Painting and Finishing
-
Base prep:
Ensure the clay surface is dust-free. If you used white clay, paint the entire bird with a terracotta or reddish-brown acrylic base coat and let it dry. -
Paint the wings:
Using cobalt blue paint, outline a teardrop shape on the side to represent the folded wing. Fill this area in completely with opaque blue coverage. -
Detail the beak and base:
Paint the beak blue to match the wings. I also like to add a small patch of blue on the very bottom of the belly for balance. -
Add wing patterns:
Dip a fine liner brush into white paint. Add curved white lines following the wing’s contour to suggest feathers. -
Stipple the dots:
Use the non-brush end of a paintbrush, dip it in white paint, and stamp small dots around the wing edges for a decorative folk-art look. -
Paint the eyes:
Create the eye by painting a white circle, letting it dry, and then adding a large black pupil in the center. -
Seal the work:
Once fully dry, apply a coat of matte sealant to protect the paint and give the bird a finished, professional sheen.
Silent Whistle?
If no sound comes out, the splitting edge (fipple) isn’t sharp enough or isn’t aligned with the air channel. Carefully sharpen the wedge and re-align.
Clean Tunings
When punching the four tuning holes, twist the tool as you pull it out. This prevents jagged clay bits from hanging inside the chamber and ruining the airflow.
Enjoy the simple melodies you can create with your new handcrafted instrument
Textured Fish Sculptures

This charming fish sculpture combines the warmth of terracotta clay with crisp white detailing for a folk-art aesthetic. The technique relies on carving through a layer of white slip or underglaze to reveal the rich red clay body beneath, creating striking contrast and texture.
Step-by-Step Guide
Materials
- Terracotta clay (or red earthenware)
- White underglaze or white slip
- Loop tool (small)
- Needle tool
- Sponge
- Rib tool (kidney)
- Scoring tool or old fork
- Slip (red clay slurry)
- Soft brush
- Kiln (or air-dry alternative if using air-dry clay)
Step 1: Shaping the Body
-
Form the base:
Start with a distinct lump of terracotta clay about the size of a large mango. Roll and pat it into a smooth, elongated oval shape that tapers slightly at both ends to mimic a fish’s body. -
Smooth the surface:
Using a slightly damp sponge, wipe over the entire surface to remove any fingerprints or cracks. Follow up with a rib tool to compress the clay and create a nice, burnished finish. -
Create the mouth:
At the rounded front end, use the handle of a tool or your finger to press a small indentation for the mouth. gently pinch the clay around this indentation to form slightly protruding lips.
Slip Consistency
For the crispest lines, ensure your white slip is the consistency of heavy cream. If it’s too watery, it will run into the red clay pores; too thick, and it will chip off during carving.
Step 2: Adding Fins and Details
-
Shape the fins:
Roll out three flat slabs of clay. Cut one large triangle for the dorsal (top) fin, a fan shape for the tail, and a smaller rounded shape for the pectoral (side) fin. -
Attach the dorsal fin:
Score the top ridge of the fish body and the bottom edge of the dorsal fin. Apply a dab of red slip and press the fin firmly onto the back, blending the clay downwards with your thumb to secure it seamlessly. -
Attach the tail:
Repeat the scoring and slipping process for the tail fin at the tapered back end. Ensure the transition is smooth so the tail looks like an extension of the body, not just stuck on. -
Add the pectoral fin:
Attach the small side fin to the flank of the fish, positioning it roughly one-third of the way back from the head. Smooth the edges down. -
Leather hard stage:
Set the fish aside to dry until it reaches a ‘leather hard’ state. This is crucial; the clay should be firm enough to handle without deforming but still hold moisture.
Functional Twist
Make the fish hollow! Before attaching the fins, cut the body in half, hollow it out, and rejoin it. Leave the mouth open to turn it into a bud vase or flower stem holder.
Step 3: Creating the Contrast
-
Apply white underglaze:
Using a soft brush, apply 2-3 coats of white underglaze or slip specifically to the areas you want highlighted: the dorsal fin, the tail, the side fin, and the curve of the gill line. Let each coat dry to the touch before adding the next. -
Carve the fins:
Once the white layer is visibly dry but the clay is still leather hard, use a needle tool or small loop tool to carve lines into the fins. Cut through the white layer to reveal the red clay underneath, creating a ribbed texture. -
Scale outline:
With a needle tool, gently sketch the grid or pattern for your scales on the main red body. You don’t need to carve deep yet; just map out the spacing. -
Carve the scales:
Using a small U-shaped loop tool, carve the scale pattern. Instead of removing clay, I sometimes like to press and drag slightly to create a white-filled accumulation in the groove if I’m using slip inlay, but for this look, you are carving deep grooves into the red clay. -
Highlighting scales:
Carefully paint white underglaze into the carved grooves of the scales. Alternatively, paint the whole body white and carve the scales away to reveal red, but the image shows white grooves on red clay. To achieve the image exactly: Paint the scale lines with a fine brush using white underglaze. -
Define the face:
Carve a curved line to separate the head from the body. Paint this line with white underglaze. -
Add the eye:
Carve a circular eye with a center pupil. Fill the carved lines with white underglaze to make the eye pop against the terracotta face.
Step 4: Finishing
-
Clean up:
Use a barely damp sponge to gently wipe away any stray flecks of white underglaze that landed on the smooth red areas, keeping the lines crisp. -
Dry slowly:
Loosely cover the fish with plastic to let it dry very slowly. This prevents the fins, which dry faster than the thick body, from cracking. -
Fire:
Once bone dry, bisque fire the piece. Applying a clear matte glaze is optional if you want to seal it, or leave it unglazed for a raw, tactile finish.
Place your finished fish on a shelf near some sunlight to let the natural clay tones warm up the room

TRACK YOUR CERAMIC JOURNEY
Capture glaze tests, firing details, and creative progress—all in one simple printable. Make your projects easier to repeat and improve.
Mini Food Sculptures (Sweet Or Savory)
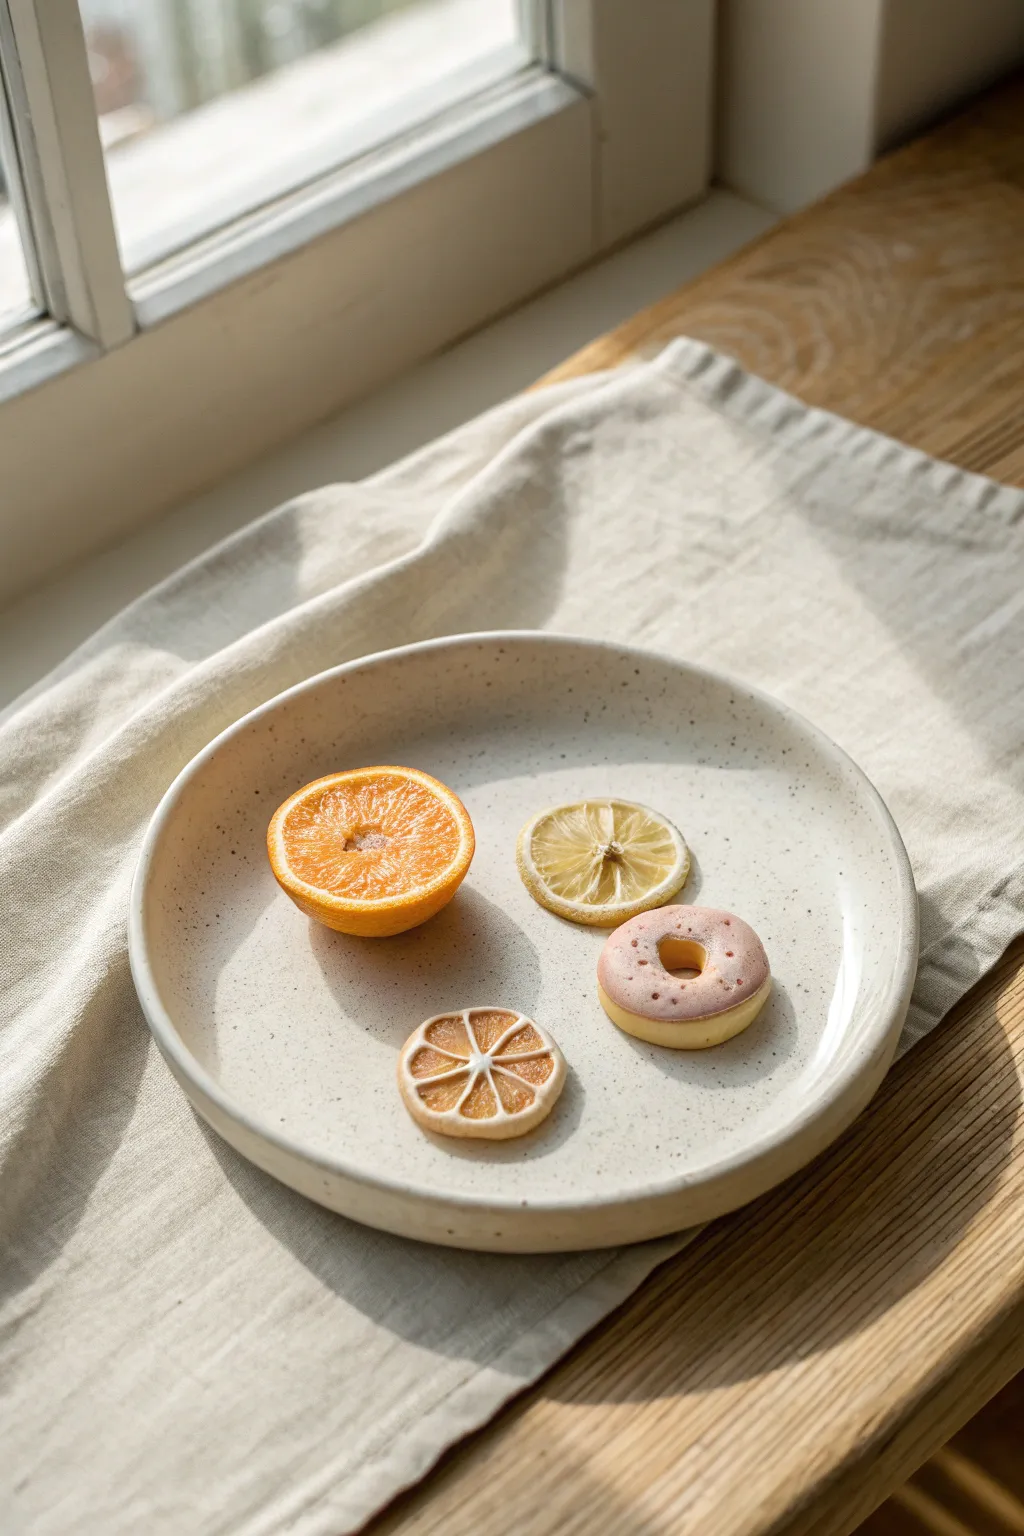
This delightful mini food collection features realistic citrus fruits alongside their stylized cookie counterparts, creating a playful contrast between nature and confection. Using polymer clay and careful texturing, you’ll sculpt a fresh orange half, a dried lemon slice, and two sweet treats perfect for a miniature display.
How-To Guide
Materials
- Polymer clay (translucent, white, orange, yellow, beige/ecru, pink)
- Liquid polymer clay (white and translucent)
- Needle tool or toothpick
- Soft pastel chalks/powders (orange, yellow, brown)
- Small paintbrush
- Round cutters (various small sizes)
- Texturing tool (stiff brush, toothbrush, or crumpled foil)
- Acrylic rolling pin
- Gloss glaze or UV resin (optional for wet look)
- X-acto knife or clay blade
- Oven for baking
Step 1: Sculpting the Realistic Orange Half
-
Mix the citrus color:
Blend translucent clay with a small amount of orange clay. The goal is a semi-transparent ‘juicy’ look, so don’t overpower the translucency with too much pigment. -
Form the segments:
Roll the orange mix into a log and cut it into 8-10 equal wedges. Roll paper-thin sheets of white clay and place them between the wedges to create the pith (the white membrane lines). -
Assemble the core:
Press the wedges together into a round orange shape. Wrap the entire bundle in a slightly thicker sheet of white clay for the inner rind, then a final layer of textured orange clay for the outer skin. -
Texture the flesh:
Cut the sphere in half to reveal your segments. Use a needle tool to rigorously prick and pull at the orange flesh, creating a rough, fibrous texture that mimics juice sacs. -
Finish the rind:
Roll the outside of the orange over sandpaper or tap it with a stiff brush to create the dimpled skin texture.
Sticky Situation?
If your white clay ‘pith’ lines are smearing into the orange color when you slice the cane, your clay is too warm. Pop the cane in the fridge for 15 minutes to firm it up before cutting.
Step 2: Creating the Translucent Lemon Slice
-
Prepare the lemon cane:
Similar to the orange, create a cane using translucent yellow clay separated by thin white lines. Slice a thin wafer from this cane. -
Dry it out:
To achieve the ‘dried’ look, texture the surface with a toothbrush so it isn’t perfectly smooth. Pinch the edges slightly to make them irregular/roughly circular. -
Add shading:
Dust the edges of the white pith lines with a tiny bit of brown pastel powder to make it look aged and dehydrated.
Step 3: Crafting the Citrus Cookie
-
Cut the base:
Roll out beige or cookie-colored clay to about 3mm thickness. Use a small round cutter to stamp out a circle. -
Create the segments:
Take a small ball of orange clay, flatten it onto the cookie base, leaving a rim of cookie visible. -
Add icing details:
Roll incredibly thin snakes of white clay. Place one around the orange circle and several across the center to create wheel-spoke segments, mimicking royal icing lines. -
Texture the cookie:
Gently tap the exposed beige edges with a toothbrush to simulate a baked crumb texture.
Realism Trick
For the realistic orange skin, mix a tiny speck of green clay into your orange. Real fruit skins are rarely perfectly monochrome; the subtle variation adds immense depth.
Step 4: Forming the Glazed Donut Cookie
-
Shape the ring:
Cut another beige circle, slightly thicker this time. Use a smaller cutter or a straw to remove the center hole. -
shade the dough:
Brush pale yellow and light brown pastels around the edges of the beige clay to give it a golden-baked appearance. -
Apply the frosting:
Mix pink clay with a drop of liquid clay or water (if using air dry) or use liquid polymer clay tinted pink. Drizzle or spread this over the top, letting it naturally stop before the edge. -
Add sprinkles:
I like to grate a tiny bit of cured dark pink or red clay into dust and sprinkle it over the wet frosting for a realistic berry speckle.
Step 5: Baking and Finishing
-
Bake:
Bake your pieces according to the clay manufacturer’s instructions (usually 275°F/130°C for 15-30 minutes). -
Glaze the fruit:
Once cool, apply a high-gloss glaze or UV resin only to the flesh of the realistic orange half to make it look wet and juicy. Leave the cookie and dried lemon matte.
Arrange your freshly baked miniatures on a small dish and enjoy the permanent freshness of your work
Mini Bust Sculptures For Beginners
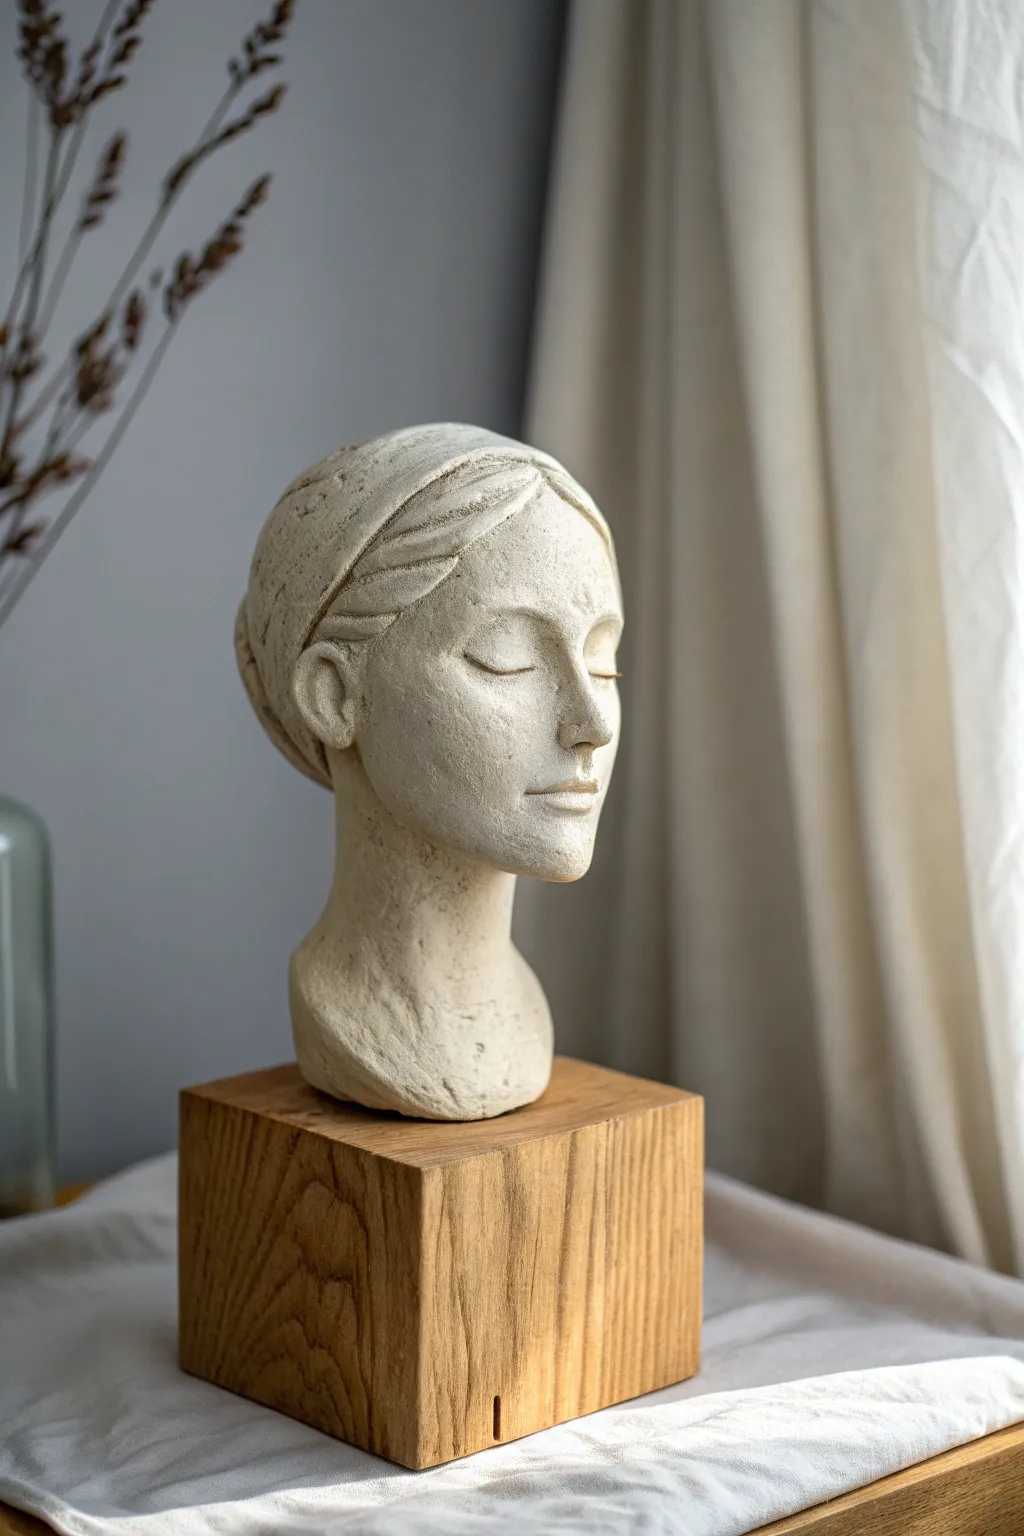
Capture the quiet elegance of classical sculpture with this beginner-friendly mini bust project. You will learn to form meditative facial features and create a textured, stone-like finish that looks beautiful displayed on a simple wooden block.
Step-by-Step
Materials
- Air-dry clay (stone or white color)
- Wooden block base (approx. 4×4 inch cube)
- Strong adhesive (E6000 or epoxy)
- Basic sculpting tools (loop tool, needle tool)
- Sponge and water bowl
- Wire armature (aluminum wire) & foil
- Wooden skewer or dowel
- Fine-grit sandpaper
- Acrylic paint (cream, beige, white)
- Paintbrush (stiff bristle)
Step 1: Building the Core
-
Prepare the armature:
Begin by twisting aluminum wire into a simple loop (for the head) with a long stem (for the neck). Wrap crumpled aluminum foil tightly around the loop to form an egg shape, roughly the size of a large orange. This saves clay and reduces drying time. -
Anchor the form:
Insert the wire stem into a temporary working base (like a block of styrofoam or a lump of scrap clay) to keep it upright. Cover the foil egg and wire neck completely with an even layer of clay about 1/4 inch thick so no foil shows. -
Shape the rough silhouette:
Add bulk to the neck area to create a tapered cylinder. Add more clay to the back of the head to elongate the skull shape, ensuring the profile view looks proportional.
Step 2: Sculpting Features
-
Mark the guidelines:
Using a needle tool, lightly draw a vertical centerline down the face and a horizontal line halfway down the head for the eyes. Mark the nose base halfway between the eye line and chin. -
Form the nose:
Roll a small wedge of clay and blend it onto the face at the center mark. Smooth the sides down into the cheeks, keeping the bridge straight and the tip slightly upturned for a delicate look. -
Create the eye sockets:
Use your thumbs to gently press into the area just below the brow line to create shallow recesses. This naturally forms the brow bone above. -
Add the eyelids:
Roll two small, flat ovals of clay. Place them in the sockets to represent closed eyelids. Smooth the edges carefully into the surrounding skin so they look peaceful and shut, not bulging. -
Sculpt the lips:
Add a small, flattened oval below the nose. Use a sculpting tool to press a horizontal line across the center, creating the mouth separation. Keep the corners neutral or slightly upturned for a serene expression. -
Refine the jawline:
Add strips of clay along the jaw area if needed to create a smooth curve from the ear area down to the chin. The transition to the neck should be seamless.
Cracking Issues?
If small cracks appear while drying, don’t panic. Mix a small amount of fresh clay with water to make a paste (slip) and fill the cracks. Smooth over with a finger and let dry again.
Step 3: Hair and Finishing
-
Add hair volume:
Roll a flat sheet of clay and drape it over the top and back of the head. I find it easiest to work in sections, smoothing the seams as I go. -
Detail the hair texture:
Use a tool to carve sweeping lines back from the forehead, simulating pulled-back hair. Add a slightly raised band of clay across the top to mimic a headband or braid, carving diagonal texture into it. -
Add the ears:
Form two small C-shapes and attach them on the sides of the head, aligned roughly between the eye and nose level. Blend the back edges into the head, leaving the front edges distinct. -
Create surface texture:
Before the clay fully dries, take a rough sponge or a stiff brush and stipple the surface of the ‘skin’ gently. This removes tool marks and gives it that aged stone appearance. -
Dry and mount:
Allow the sculpture to dry completely (24-48 hours). Once dry, sand the bottom of the neck flat. Apply strong adhesive to the neck base and center it on your wooden block. -
Paint for patina:
Mix a beige acrylic wash (paint diluted with water). Brush it over the entire bust and wipe away excess with a rag, letting pigment settle in the textures to enhance the stone look.
Antique Finish
For a truly ancient look, mix a tiny drop of dark brown or grey into your final clear matte sealer. It will settle into the crevices of the hair and eyes, deepening the shadows.
Place your finished sculpture near a window to let the natural light highlight those serene features