Whenever a team comes through my studio, someone asks for a bracelet that screams volleyball but still feels easy and wearable. Here are my favorite volleyball clay bead bracelet ideas using clay heishi beads, sporty details, and lots of room for your own team spirit.
Classic Team Colors With a Volleyball Bead
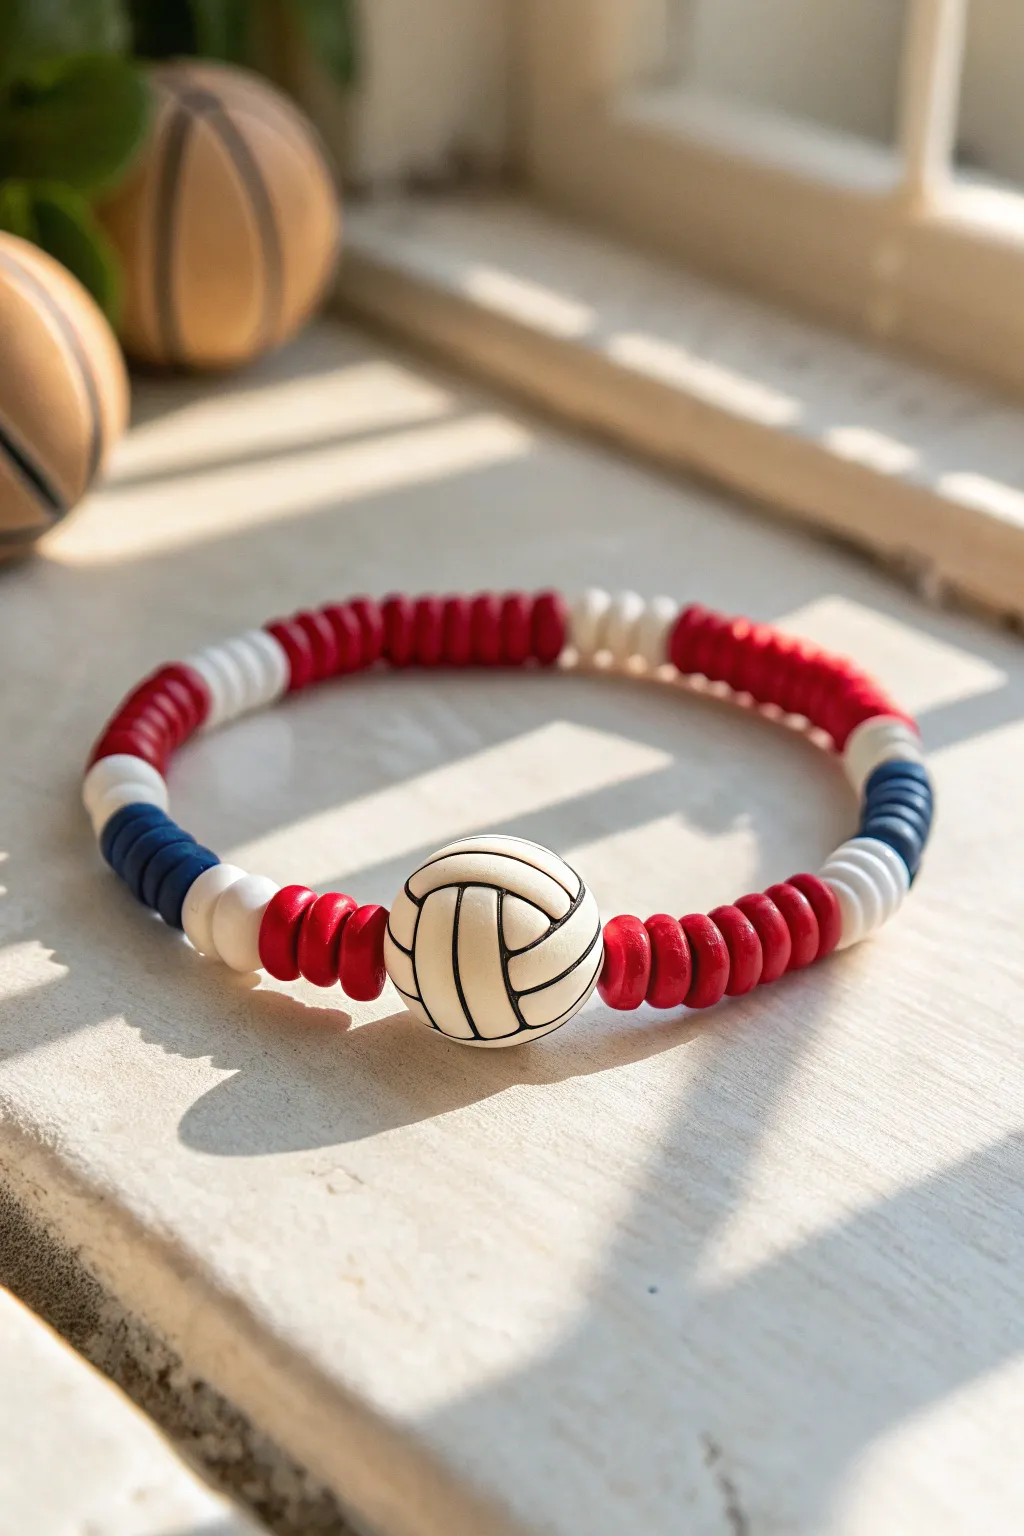
Celebrate team spirit on and off the court with this striking red, white, and blue beaded accessory. Featuring classic clay heishi discs and a prominent volleyball focal bead, it captures the perfect sporty aesthetic.
How-To Guide
Materials
- Red polymer clay heishi beads (6mm)
- White polymer clay heishi beads (6mm)
- Navy blue polymer clay heishi beads (6mm)
- Large volleyball focal bead (approx. 10-12mm)
- Elastic stretch cord (0.8mm clear)
- Scissors
- Jewelry glue or clear nail polish
- Bead stopper or tape
- Ruler or measuring tape
Step 1: Preparation and Setup
-
Measure the Cord:
Cut a length of elastic cord about 10-12 inches long. Having extra length makes tying the knot much easier later. -
Pre-stretch:
Gently pull on the elastic cord a few times to pre-stretch it. This helps prevent the bracelet from sagging after you wear it a few times. -
Secure the End:
Place a bead stopper or a piece of tape on one end of the cord to stop your beads from sliding off while you work.
Step 2: Creating the Pattern
-
Start with Red:
Begin threading your beads with the red clay discs. String approximately 8-10 red beads onto the cord. -
Add a White Accent:
Follow the red section with a small block of white. Thread on about 4-5 white heishi beads. -
Introduce the Blue:
Next, add a section of navy blue beads. Use about 4-5 beads here to match the white section’s length. -
Repeat the Pattern:
Continue this pattern around the first half of the bracelet. A good sequence based on the photo is Red (long section) -> White (short) -> Blue (short) -> White (short). -
The Focal Point:
Once you have reached the halfway point of your desired length, thread the large volleyball bead onto the cord.
Knot Hiding Trick
Use a bead reamer or a needle to slightly widen the hole of the bead next to your knot, making it easier to hide.
Step 3: Completing the Loop
-
Mirror the Design:
Now, recreate the pattern in reverse on the other side of the volleyball to ensure symmetry. Start with a short red section immediately next to the volleyball. -
Continue the Sequence:
Add a short white section, then a short blue section, mirroring what you did on the first side. -
Finish the Length:
Fill in the rest of the length with a longer section of red beads until the bracelet fits comfortably around your wrist. I usually check the fit against my wrist before tying. -
Check Consistency:
Lay the bracelet flat on your workspace to ensure the color blocks look balanced on either side of the volleyball.
Colors Look Uneven?
Clay beads vary slightly in thickness. Count beads by measuring length in millimeters rather than number of discs for perfect symmetry.
Step 4: Finishing Touches
-
Preparing the Knot:
Remove the bead stopper or tape carefully, bringing the two ends of the elastic cord together. -
Tie the Knot:
Tie a surgeon’s knot (a square knot with an extra loop through) to secure the bracelet. Pull it tight, but be careful not to snap the elastic. -
Secure with Glue:
Apply a tiny dab of jewelry glue or clear nail polish directly onto the knot. This prevents it from unraveling over time. -
Hide the Knot:
While the glue is still slightly tacky but not wet, you can try to gently pull the knot inside one of the adjacent clay beads to hide it. -
Trim the Ends:
Once the glue is fully dry, use your scissors to trim the excess cord close to the knot.
Now you have a custom piece of team spirit ready to wear for the next big game


“Volleyball” Word Strip Heishi Bracelet
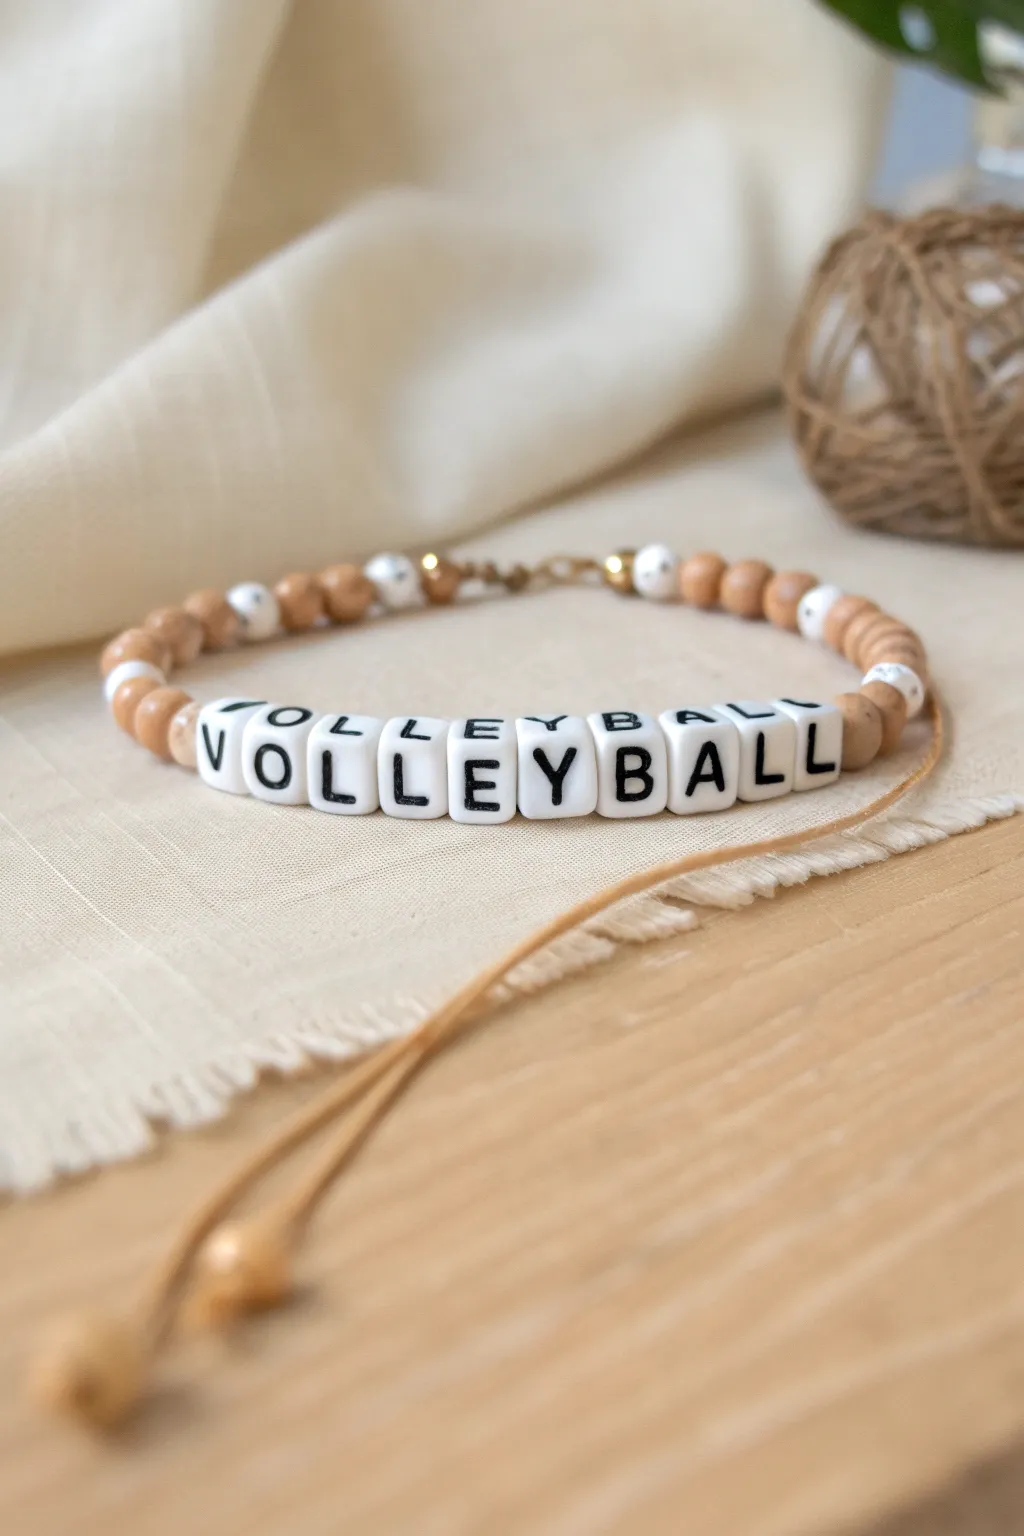
Embrace a natural, earthy aesthetic with this charming beaded bracelet featuring prominent letter beads. The combination of light wood tones, speckled white accents, and bold black-and-white lettering creates a versatile accessory perfect for any volleyball enthusiast.
Step-by-Step Tutorial
Materials
- Stretch cord (0.8mm or 1mm thickness)
- Square white alphabet beads with black letters spelling ‘VOLLEYBALL’
- 8mm round wood beads (light brown/tan)
- 6mm or 8mm white speckled or terrazzo-style round beads
- Small gold spacer beads (optional)
- Scissors
- Bead stopper or tape
- Super glue or clear jewelry adhesive
Step 1: Preparation
-
Measure the cord:
Cut a piece of stretch cord about 10-12 inches long. This gives you plenty of extra room to work with for tying knots later without the beads sliding off. -
Secure the end:
Attach a bead stopper to one end of your cut cord. If you don’t have a stopper, a piece of masking tape folded over the end works perfectly to keep beads from escaping. -
Sort your letters:
Find all the letters needed to spell ‘VOLLEYBALL’ and lay them out in order on your workspace. Double-check that you have two L’s for the middle and two L’s for the end.
Knot Security
Use a flexible jewelry glue like G-S Hypo Cement rather than rigid super glue. It allows the knot to flex with the stretch cord, preventing it from snapping over time.
Step 2: Creating the Centerpiece
-
Start the word:
Thread the first letter ‘V’ onto the cord. Make sure it is facing the correct direction relative to how you want to read it. -
Add middle letters:
Continue adding ‘O’, ‘L’, ‘L’, ‘E’, ‘Y’ in sequence. I prefer to slide them down near the stopper to keep them organized. -
Finish the word:
Thread the remaining ‘B’, ‘A’, ‘L’, ‘L’ beads. Once all letters are on, hold the cord taut to check the spelling one last time. -
Check spacing:
Ensure the square beads sit flush against each other without gaps for a clean, block-text look.
Step 3: Designing the Sides
-
Right side pattern:
On the right side of the word, thread one wood bead. -
Add accent bead:
Follow the wood bead with one white speckled bead. This adds a nice textural contrast to the smooth wood. -
Continue right pattern:
Add three to four more wood beads. You can intersperse a gold spacer or another speckled bead depending on your wrist size. -
Left side symmetry:
Repeat the exact same pattern on the left side of the word: one wood bead, one speckled bead, then the remaining wood beads. -
Add gold accents:
To mimic the image, place small gold spacer beads near the closure area or between the speckled beads for a touch of shine. -
Size check:
Wrap the unfinished strand around your wrist. The wooden beads should wrap around the sides comfortably, leaving just enough room to tie the knot.
Team Spirit Upgrade
Swap the white speckled beads for beads in your specific team colors (like navy or crimson) to personalize this neutral design for game day support.
Step 4: Finishing Touches
-
Pre-stretch the cord:
Gently pull tightly on both ends of the cord a few times. This pre-stretching prevents the bracelet from loosening up significantly after the first wear. -
Tie the first knot:
Remove the bead stopper or tape carefully. Bring the two ends together and tie a simple overhand knot, pulling it tight against the beads. -
Secure with a surgeon’s knot:
Tie a second knot, but this time loop the cord end through the loop twice (a surgeon’s knot) before pulling tight. This creates a much stronger hold. -
Apply adhesive:
Place a tiny dot of super glue or jewelry cement directly onto the knot. Let it dry for a minute or two. -
Hide the knot:
If one of your wood beads has a larger hole, gently tug the cord so the knot slides inside that bead, hiding it from view. -
Trim excess:
Use your scissors to trim the excess cord ends close to the knot (or the bead hiding the knot), being careful not to nick the main structural cord.
Now you have a stylish and supportive accessory to wear to the next big game or practice


Color-Block Volleyball Bracelet Segments
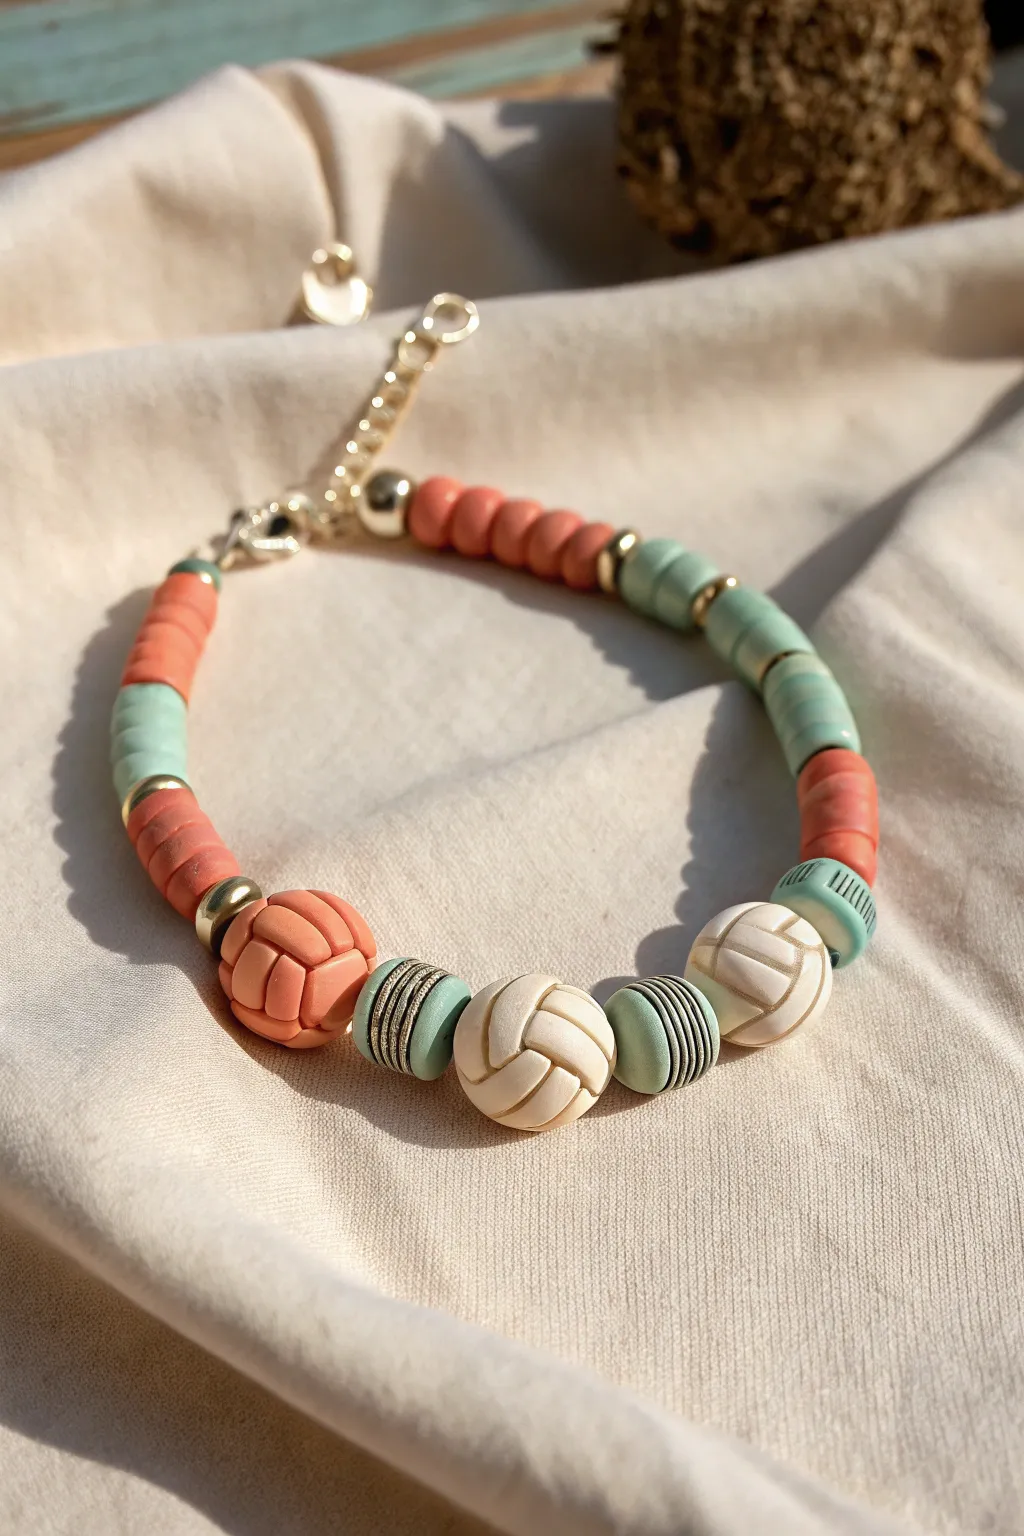
Bring your love for the game to your accessory collection with this sophisticated, color-blocked volleyball bracelet. Featuring textured clay focal beads and elegant gold accents, this design balances sporty enthusiasm with chic style.
Step-by-Step
Materials
- Polymer clay heishi disc beads (matte coral/salmon)
- Polymer clay heishi disc beads (matte mint green)
- 3 large round volleyball-textured beads (cream/white)
- 1 large round knotted-texture bead (coral/salmon)
- 4 metallic silver or pewter spacers with ribbed texture
- Small gold metallic spacer beads (smooth rounds or wavy discs)
- Gold tone lobster clasp
- Gold tone jump rings
- Gold tone extender chain
- Elastic beading cord (0.8mm) or beading wire with crimps
- Scissors or wire cutters
- Jewelry pliers (flat nose and chain nose)
Step 1: Planning Your Pattern
-
Measure and cut:
Begin by measuring your wrist to determine the needed length. Cut a piece of elastic cord or beading wire about 10 inches long to give yourself plenty of room for tying knots or attaching crimps later. -
Secure the end:
If using beading wire, crimp one end to a jump ring attached to your extender chain now so beads don’t slide off. If using elastic, simply place a piece of tape over one end as a temporary stopper. -
Establish the focal point:
This design centers around the volleyball beads. Lay out your three creamy white volleyball beads and the textured coral bead in the center of your workspace to visualize the main attraction.
Keep it Centered
Since the focal beads are heavy, they naturally slide to the bottom of the wrist. Ensure your color block sections are equal length on both sides so the clasp stays hidden underneath.
Step 2: Creating the Central Section
-
Start the center sequence:
Thread on one silver ribbed spacer bead followed by the first cream volleyball bead. -
Add the middle bead:
Next, slide on another silver ribbed spacer, followed by the second cream volleyball bead. -
Complete the white trio:
Add a third silver ribbed spacer and the final cream volleyball bead. -
Transition to color:
Place the last silver ribbed spacer next to the volleyball bead. This separates the white section from the colorful accents coming next. -
Add the coral texture:
String the large, knotted-texture coral bead. This asymmetrical pop of color balances the white beads beautifully. -
Gold accent:
Slide on a decorative gold spacer bead immediately after the knotted coral bead to add a touch of shine.
Team Spirit Swap
Swap the mint and coral heishi beads for your specific team colors (e.g., navy and gold, or red and black) to make this a custom spirit-wear accessory for game day.
Step 3: Building the Color Blocks
-
First coral segment:
String approximately 5-7 coral heishi disc beads. The number will depend on the thickness of your discs, but aim for a segment about 1/2 inch long. -
Mint transition:
Add a gold spacer bead, followed by a segment of mint green heishi beads. Make this section roughly the same length as your coral section. -
Continue the pattern:
Add another gold spacer, then switch back to a segment of coral heishi beads. I like to check the length against my wrist frequently at this stage to ensure the focal beads stay centered. -
Opposite side symmetry:
Go back to the other side of your central focal beads. Repeat the color blocking pattern in reverse: start with mint green heishi beads (separated by a silver spacer from the white volleyballs), then a gold spacer, then coral beads. -
Check fit:
Wrap the unfinished strand around your wrist. The ends should meet comfortably without gaps, but not be too loose.
Step 4: Finishing Touches
-
Attach the clasp:
If using beading wire, thread the loose end through a crimp bead and into the loop of your lobster clasp. Feed the wire back through the crimp and flatten it securely with pliers. -
Knotting option:
If using elastic, tie a strong surgeon’s knot (right over left, left over right), pull it tight, and secure with a tiny dab of superglue before trimming the excess cord. -
Add the extender:
If you used beading wire, use your pliers to open a jump ring and attach the extender chain to the opposite end of the bracelet if you haven’t already. -
Final trim:
Trim any excess wire or cord close to the beads, being careful not to snip the main strand.
Enjoy wearing your sporty chic creation to the next big match


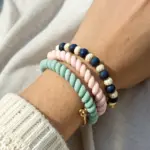
Matching Teammate Volleyball Bracelet Set
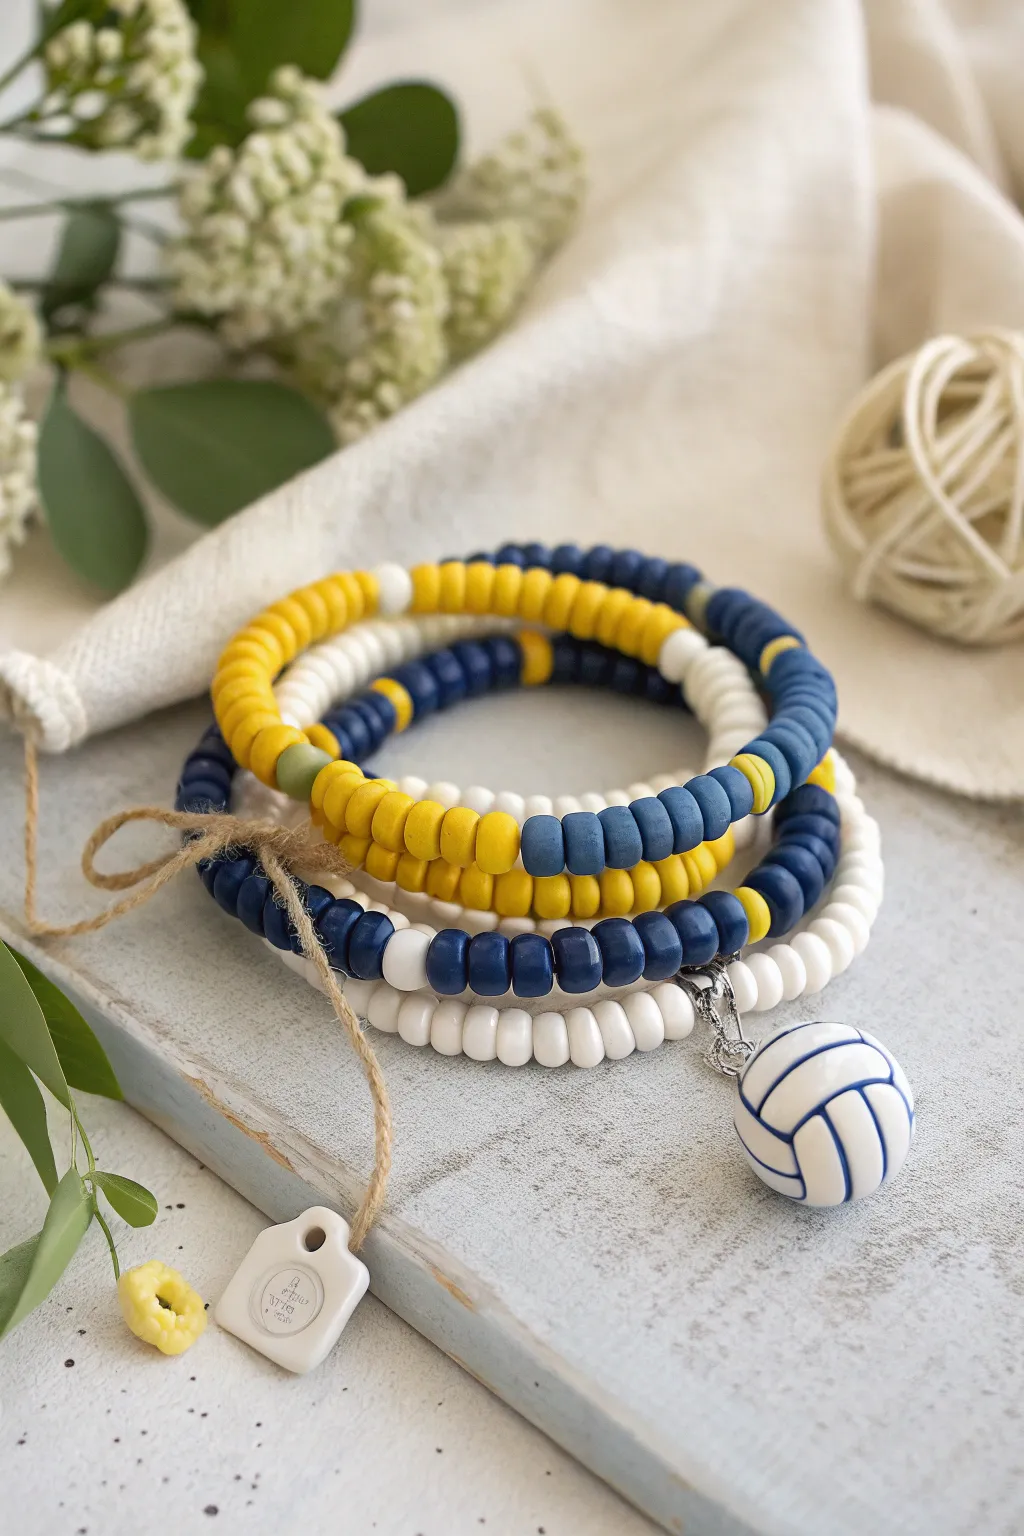
Show off your team spirit with this striking stack of three coordinated bracelets featuring matte clay disc beads in a classic sports palette of navy blue, yellow, and white. The set is finished with a cute, thematic volleyball charm that dangles playfully from the wrist.
How-To Guide
Materials
- 6mm Polymer clay heishi beads (Navy Blue)
- 6mm Polymer clay heishi beads (Mustard Yellow)
- 6mm Polymer clay heishi beads (White)
- Small round silver spacer bead or jump ring (for the charm)
- Volleyball charm (ceramic or polymer clay)
- 0.8mm Elastic stretch cord (clear)
- Jewelry glue or clear nail polish
- Scissors
- Tape or binder clip
- Ruler
Step 1: Preparation & Sizing
-
Measure and Cut:
Begin by measuring your wrist circumference. Cut three pieces of elastic cord, each about 10-12 inches long. You want plenty of extra length for knotting later. -
Secure the Ends:
Pre-stretch your elastic slightly by pulling on it gently a few times; this prevents the bracelets from stretching out later. Tape down one end of each cord or use a binder clip to stop beads from sliding off while you work.
Knot Slipping?
If your elastic knot feels insecure, try the ‘stretch and tighten’ method: pull the cord ends firmly away from each other after the first loop, then tie the second loop. This locks the friction of the cord.
Step 2: Designing the Navy & Yellow Pattern
-
Start the First Strand:
For the first bracelet (bottom in the stack), start by threading on a long section of navy blue heishi beads. Aim for about 2 inches of solid blue. -
Create the Color Breaks:
Add a small accent section: 2 white beads, followed by a 1-inch block of yellow beads, and then 2 more white beads. This breaks up the solid blue creates movement. -
Continue the Pattern:
Switch back to navy blue for the majority of the remaining length, occasionally interspersing small segments of yellow (5-7 beads) flanked by single white beads until you reach the desired wrist size usually around 6.5 to 7 inches.
Pro Tip: Seamless Look
Use a bead reamer or a thick needle to slightly widen the hole of the bead next to your knot. This makes it much easier to pull the knot inside, hiding it completely for a professional finish.
Step 3: Designing the Yellow & Blue Pattern
-
Start the Second Strand:
For the middle bracelet, let yellow be the star. Thread on a dominance of mustard yellow beads, creating a solid block of color for about half the bracelet’s length. -
Add Contrast Sections:
Interrupt the yellow with a section of navy blue (about 15 beads), followed by a single lime green or lighter yellow bead for a quirky asymmetrical touch if you have one, then back to the main yellow color. -
Mirror the Ends:
Ensure the ends of this strand have mirroring patterns—perhaps a small segment of 3 blue beads and 1 white bead—so the knot will hide seamlessly in a colorful section.
Step 4: Creating the Charm Bracelet
-
Base of White:
For the top bracelet, use white heishi beads as your primary base. Thread roughly 3 inches of white beads onto your final cord. -
Integrate Color Accents:
Add visual interest by threading a pattern of: 5 blue beads, 3 yellow beads, 5 blue beads. Then return to the white beads for the rest of the strand. -
Attach the Jump Ring holder:
Find the center point of your white bead section. Thread on a silver jump ring or a bead loop connector where your charm will hang. I usually like to place this opposite the colorful section for balance. -
Check the Fit:
Wrap this strand around your wrist to confirm it sits comfortably with the others. Add or remove white beads as necessary.
Step 5: Finishing Touches
-
Attaching the Charm:
Open a jump ring using pliers (or your fingers if it’s soft metal) and loop it through the top of your volleyball charm. Attach this to the connector you placed on the white bracelet and close the ring securely. -
The Surgeon’s Knot:
Remove the tape or clip from your first bracelet. Bring the ends together and tie a surgeon’s knot: loop right over left, then left over right, looping it through twice on the second pass for extra grip. -
Tighten and Glue:
Pull the elastic tight to secure the knot. Apply a tiny dot of jewelry glue or clear nail polish to the knot itself. Let it dry for a few minutes before trimming the excess string close to the knot. -
Repeat for All:
Repeat the knotting and gluing process for the remaining two bracelets. Once dry, you can gently tug the knot inside a neighboring bead to hide it. -
Optional Packaging:
To mimic the photo, you can bundle them with a piece of rustic twine and attach a small clay tag or paper label if gifting.
Now you have a custom spirit stack ready for the next big game, perfect for cheering from the sidelines or wearing on the court

The Complete Guide to Pottery Troubleshooting
Uncover the most common ceramic mistakes—from cracking clay to failed glazes—and learn how to fix them fast.
Volleyball Net Pattern Feature Bead
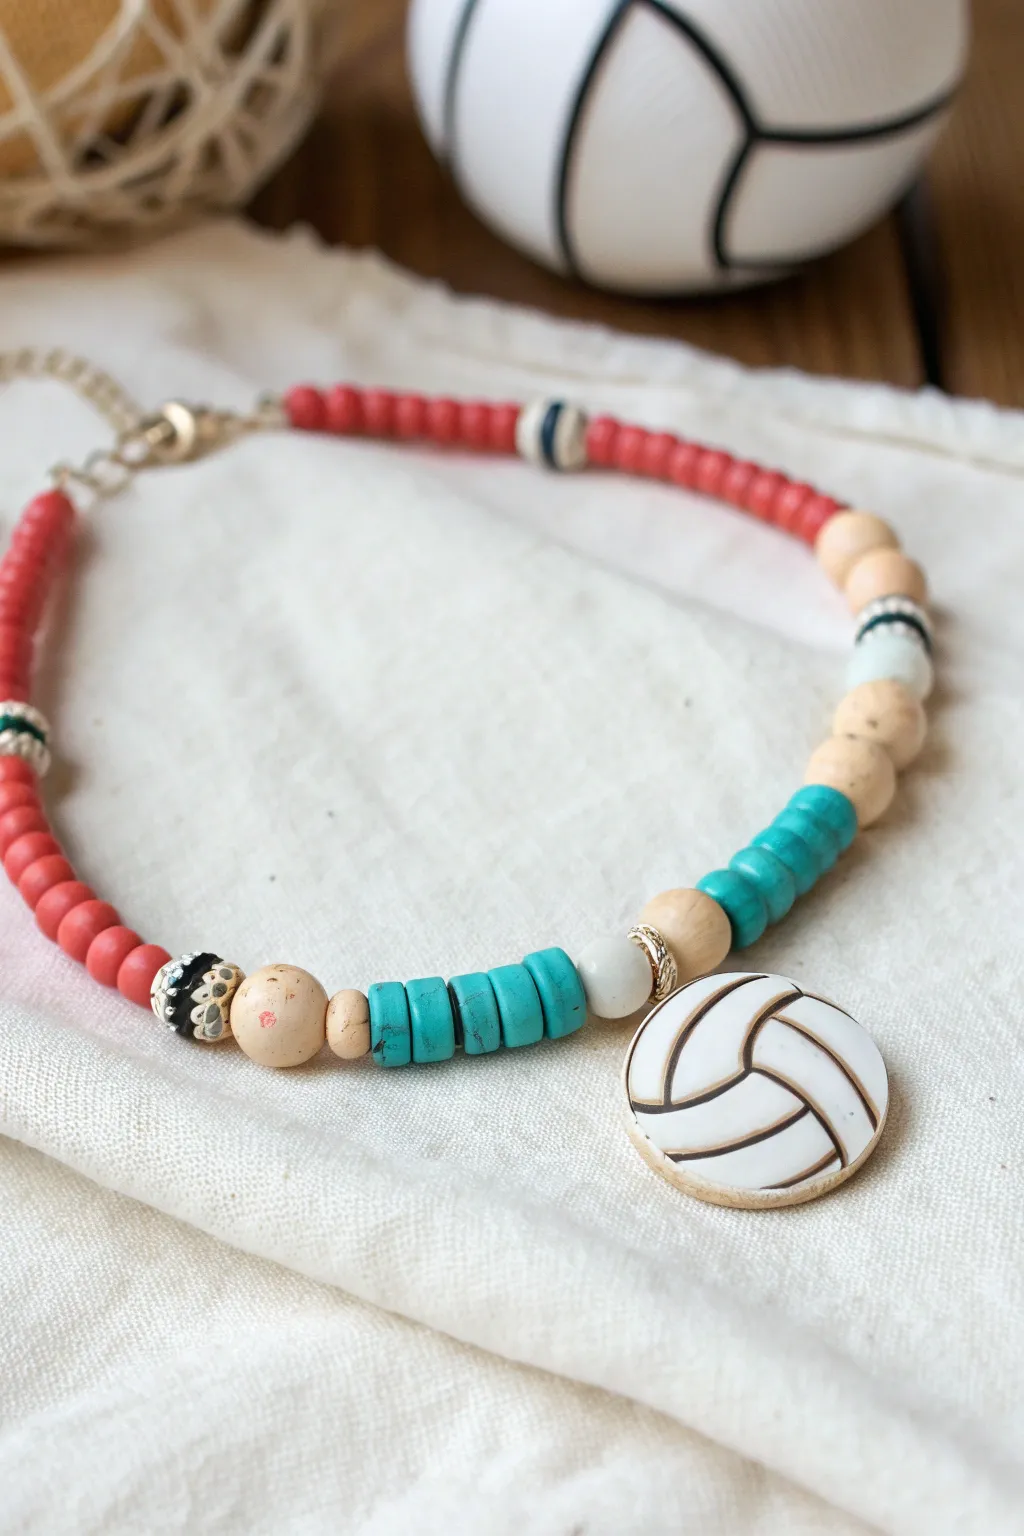
Celebrate your love for the game with this unique mixed-media choker, featuring a custom-made clay volleyball pendant. The combination of vibrant coral, turquoise heishi beads, and natural wood accents creates a sporty yet bohemian aesthetic perfect for game day or everyday wear.
How-To Guide
Materials
- White polymer clay
- Brown acrylic paint
- Clear glaze or sealant (glossy)
- Small round cookie cutter (approx 1 inch)
- Black fine-tip detail brush or clay tool
- Coral/red clay heishi disk beads
- Turquoise clay tube or heishi beads
- Natural light wood round beads (8mm and 10mm)
- White or cream round beads
- Decorative spacer beads (silver or gold tone, patterned)
- Gold or silver jump rings
- Beading wire
- Lobster clasp and extension chain
- Crimp beads
- Jewelry pliers (flat nose and round nose)
- Toothpick or needle tool
Step 1: Crafting the Volleyball Pendant
-
Condition the Clay:
Begin by taking a chunk of white polymer clay and kneading it in your hands until it becomes soft, pliable, and free of any air bubbles. -
Roll and Cut:
Roll the clay out on a clean, flat surface to a thickness of about 1/4 inch. Use your small round cookie cutter to punch out a perfect circle. -
Create the Texture:
To mimic the look of a real volleyball, gently smooth the edges of your circle so it looks slightly domed rather than sharp-edged. -
Score the Lines:
Using a needle tool or a dull knife, carefully press the classic volleyball pattern into the clay. Start with a curved central line, then add perpendicular curved lines on the sides to create the signature panel sections. -
Add the Hole:
Before baking, use a toothpick or thick needle tool to pierce a horizontal hole through the top edge of the volleyball (from side to side) so it can hang as a connector or pendant. -
Bake:
Place your pendant on a baking sheet lined with parchment paper and bake according to your polymer clay package instructions (usually 275°F for 15-30 minutes). -
Paint the Details:
Once fully cooled, use a very fine brush and brown acrylic paint to trace inside the indented lines you created earlier. Wipe away excess paint on the surface with a damp paper towel to leave the dark color only in the grooves. -
Seal:
Apply a coat of glossy clear glaze to the pendant to protect the paint and give it a finished, professional shine.
Step 2: Assembling the Necklace
-
Prepare the Wire:
Cut a length of beading wire approximately 18-20 inches long, allowing extra room for securing the ends. -
Start the Sequence:
Attach one end of the wire to a crimp bead and a jump ring (connected to your clasp), crimping it securely. -
String the First Side:
Begin stringing your coral heishi beads. Thread about 3-4 inches of red beads, adding a decorative spacer bead occasionally for variety. -
Transition Area:
After the red section, add a patterned spacer bead, followed by one or two natural wood beads to start transitioning toward the center colors. -
Add Accent Beads:
String a few cream or white round beads, followed by a section of turquoise heishi or tube beads. I find that grouping about 5-8 turquoise beads creates a nice block of color. -
Center Focus:
Place a larger natural wood bead and a metal spacer bead right before the center. String your handmade volleyball pendant onto the wire. -
Mirror the Pattern:
Repeat the previous steps in reverse order: metal spacer, wood bead, turquoise section, cream beads, patterned spacer, and finally the coral heishi section. -
Secure the End:
Once you’ve reached your desired length, thread the end of the wire through a crimp bead and into the final jump ring attached to the extension chain. -
Crimp and Trim:
Use flat nose pliers to flatten the crimp bead tight against the wire. Trim any excess wire tail flush with the beads.
Clean Lines
If painting the grooves is messy, try using a fine-tip permanent marker instead of paint for cleaner, sharper lines inside the clay indentations.
Team Spirit
Swap the coral and turquoise beads for your specific team colors. Add tiny letter beads to spell out a jersey number or team name near the clasp.
Wear your new customized volleyball accessory proudly to the next match or practice
Marbled Volleyball Swirl Clay Beads
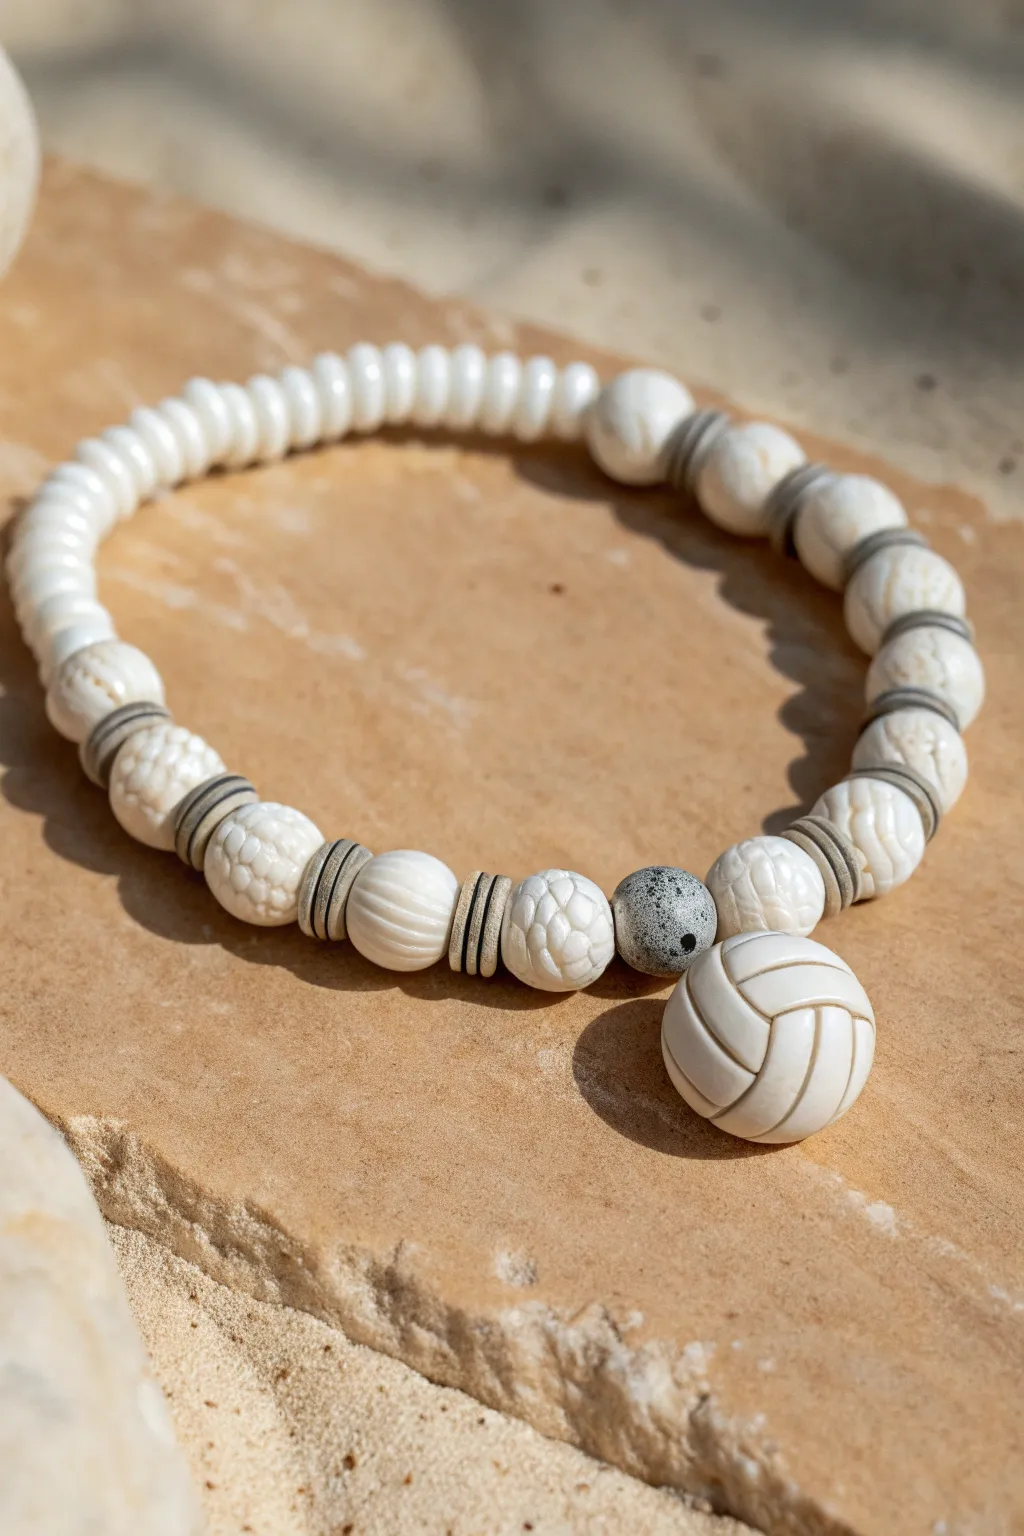
Capture the essence of a beach day with this textured, monochromatic volleyball bracelet. Combining smooth white discs, carved focal beads, and a striking volleyball charm creates a sporty yet organic accessory perfect for game day or everyday wear.
Detailed Instructions
Materials
- White elastic beading cord (0.7mm or 0.8mm)
- White polymer clay heishi beads (flat discs)
- Small grey spacer beads (heishi style or small washers)
- White carved round bone or acrylic beads (approx. 8-10mm)
- One grey speckled round bead (stone or clay, approx. 8mm)
- One large white volleyball charm bead (round, grooved pattern)
- Jewelry adhesive (e.g., G-S Hypo Cement)
- Scissors
Step 1: Setting the Scene
-
Measure and Cut:
Begin by cutting a length of your elastic cord to about 12 inches. This gives you plenty of extra room for tying knots later without losing your beads. -
Pre-stretch the Cord:
Gently pull on the elastic strand a few times. Pre-stretching prevents the finished bracelet from sagging or expanding too much after you wear it for a while. -
Secure the End:
Place a bead stopper or simply a piece of tape on one end of the cord so your beads don’t slide right off while you work.
Knot Strength Trick
When tightening your final knot, pull on the elastic cord ends AND the beaded strand itself simultaneously. This ‘four-way pull’ locks the knot securely.
Step 2: Stringing the Texture
-
Start the Pattern:
Looking at the right side of the bracelet in the image, begin by threading on one of the textured white round beads. -
Add Spacers:
Immediately follow the white bead with three flat grey spacer discs. These act as contrast dividers between the larger statement beads. -
Repeat the Sequence:
Continue this alternating pattern: one textured white round bead, followed by three grey spacers. Do this for about 6 or 7 repetitions, creating the ‘feature’ side of the bracelet. -
Insert the Accent Bead:
After your last set of grey spacers, thread on the single grey speckled round bead. This asymmetric touch sits right next to the focal point.
Step 3: Adding the Focal Point
-
The Main Event:
Slide on the large white volleyball bead. Ensure the hole is oriented horizontally so the ball sits flush with the rest of the bead line, rather than dangling like a pendant. -
Balance the Design:
On the other side of the volleyball, add one more textured white round bead, followed by a set of three grey spacers to mirror the pattern slightly.
Team Spirit Upgrade
Keep the volleyball centerpiece but swap the grey spacers for your team’s colors (like navy or crimson) to turn this into game-day spirit wear.
Step 4: Completing the Loop
-
Switch to Heishi Beads:
For the back section of the bracelet (the part that sits on the underside of your wrist), switch your materials. Pick up your white flat heishi disc beads. -
Fill the Gap:
String a long continuous run of these white discs. I usually string about 2 to 3 inches worth, or however many act as a comfortable bridge around the rest of the wrist. -
Check the Size:
Wrap the unfinished strand around your wrist to check the fit. It should sit comfortably without pinching, but not be too loose that it spins constantly.
Step 5: Final Assembly
-
Prepare the Knot:
Remove your tape or bead stopper carefully, holding both ends of the elastic firmly. -
Tie it Off:
Tie a surgeon’s knot (right over left, left over right, and loop through an extra time). Pull the elastic tight to secure the knot. -
Secure with Glue:
Dab a tiny drop of jewelry adhesive onto the knot. Let it dry for a moment before trimming the excess cord close to the knot. -
Hide the Evidence:
If hole size permits, gently tug the bracelet so the knot slides inside the hole of the nearest large bead to hide it from view.
Now you have a stylish, customized accessory ready to serve up some style on or off the court


What Really Happens Inside the Kiln
Learn how time and temperature work together inside the kiln to transform clay into durable ceramic.
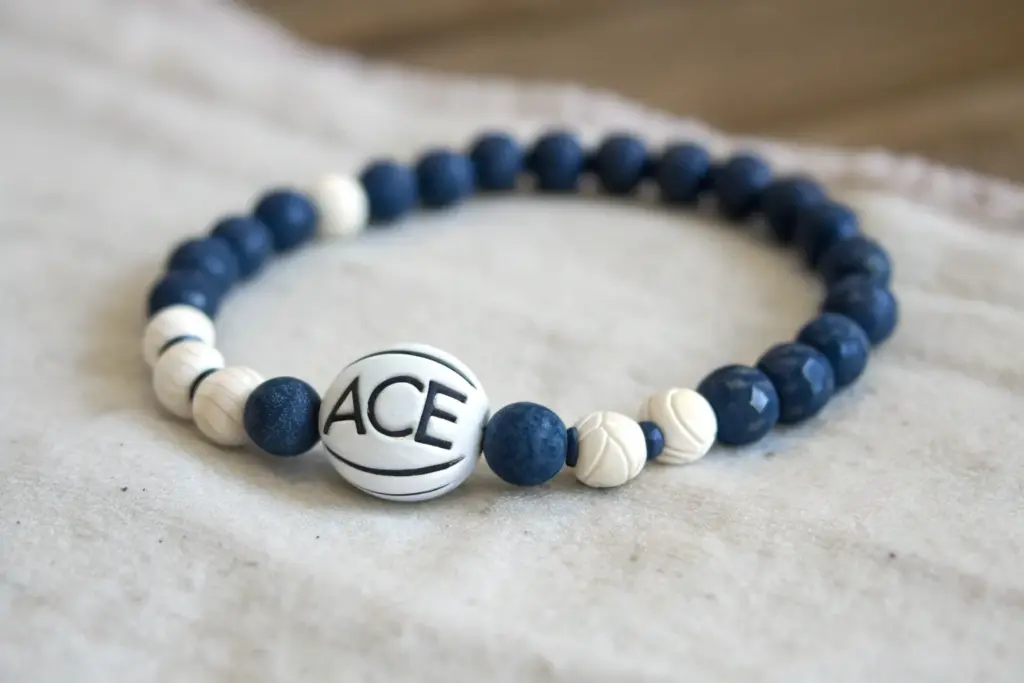
Metallic-Tone Spacer Volleyball Heishi Bracelet
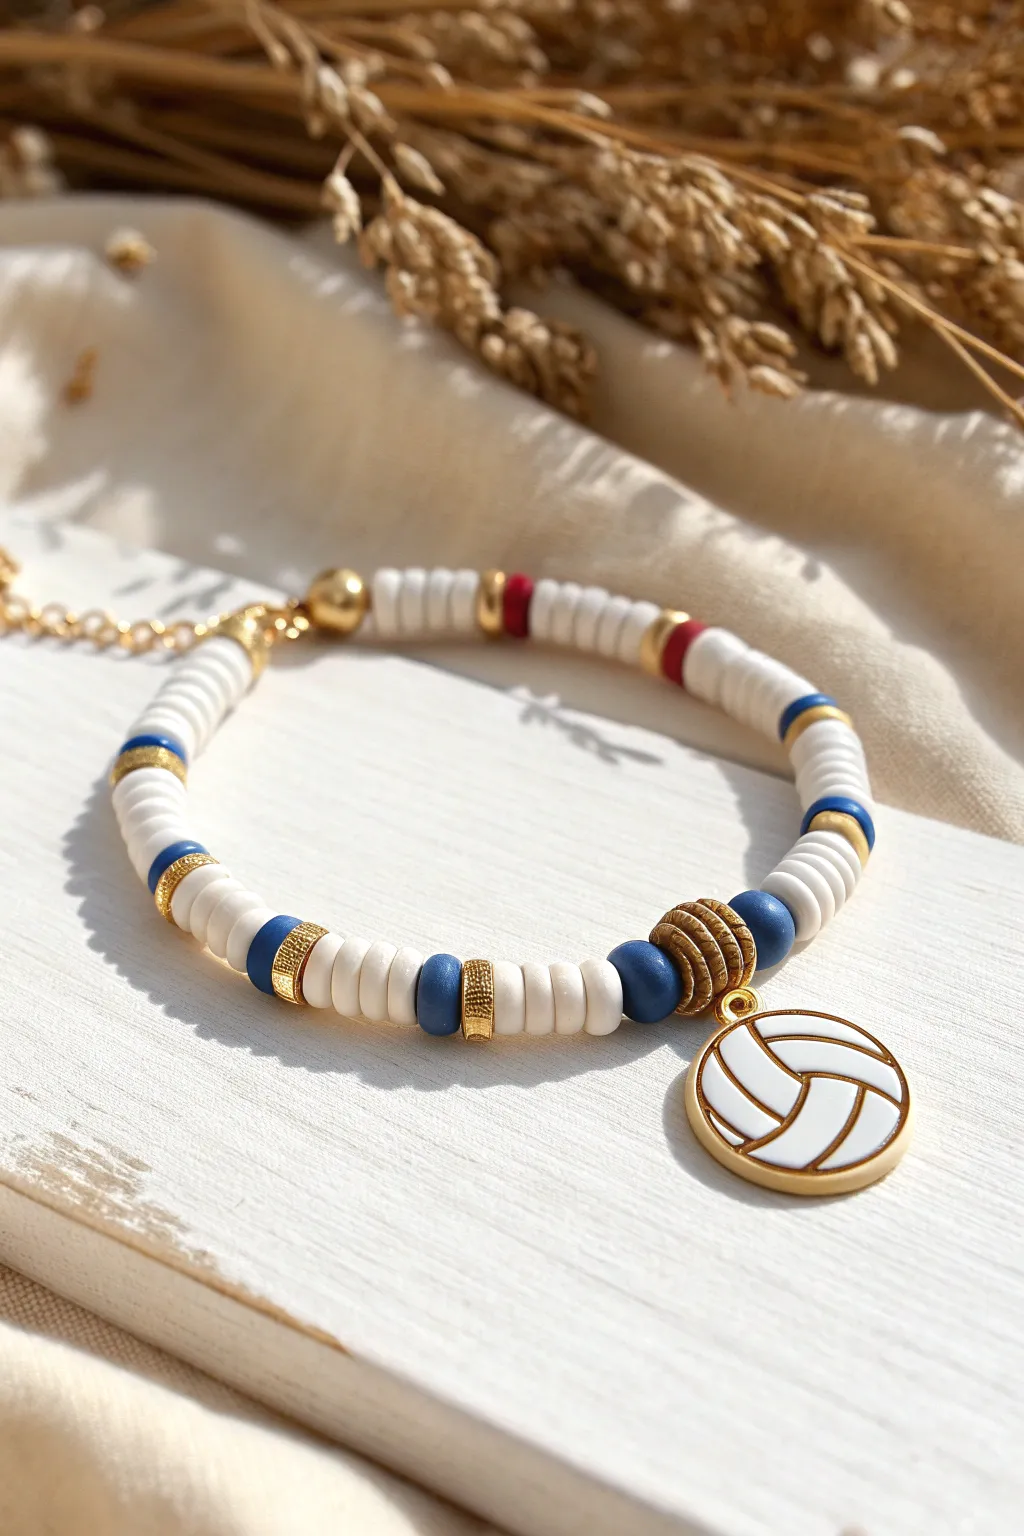
Celebrate your love for the game with this chic bracelet that balances sporty vibes with elegant metallic touches. The mix of crisp white heishi beads, patriotic accents, and a distinctive volleyball charm creates a fan-favorite accessory perfect for game day or everyday wear.
Step-by-Step
Materials
- White polymer clay heishi beads (6mm)
- Matte navy blue round beads (6mm)
- Red heishi or tiny cylinder beads
- Gold-tone textured spacer beads (flat disc style)
- Gold-tone textured spacer beads (rondelle style)
- Gold tone crimp beads and covers
- Gold-tone lobster clasp and jump rings
- Extension chain
- Gold-tone and white enamel volleyball charm
- Clear elastic beading cord or beading wire (0.8mm recommended)
- Jewelry pliers (round nose and flat nose)
- Scissors or wire cutters
- Beading board (optional but helpful)
Step 1: Planning and Prep
-
Measure your wrist:
Wrap a flexible measuring tape around your wrist to find your size. Add about 0.5 inches for a comfortable fit, or rely on the extension chain for adjustability. -
Cut the cord:
Cut a length of beading wire or elastic cord approximately 10 inches long. This gives you plenty of extra room to manipulate the ends without worrying about beads sliding off. -
Secure the start:
If using beading wire, thread on a crimp bead and one half of your clasp. Loop the wire back through the crimp bead and use flat nose pliers to squash it tight. Cover with a crimp cover for a polished look.
Step 2: Creating the Pattern
-
Start with the base:
Begin stringing a section of white heishi beads. For the section near the clasp, I like to use about 10-12 white discs to establish a clean foundation. -
Add the first accent:
Slide on a gold textured disc spacer, followed by a single red bead, and another gold textured spacer. This creates the subtle pop of red seen on the right side. -
Resume the white base:
String another substantial section of white heishi beads. Aim for roughly 10 beads here to create separation before the next color block. -
Introduce the blue and gold:
Thread on a thick gold washer-style spacer, followed by a navy blue round bead. Add another gold washer spacer immediately after the blue bead. -
Repeat the white section:
Add another segment of 8-10 white heishi beads. Consistency in these white sections keeps the bracelet looking symmetrical. -
Build the second blue accent:
Repeat the blue sequence: one gold washer spacer, one navy blue bead, and one gold washer spacer. -
String more white beads:
Add a slightly shorter section of white heishi beads now, perhaps 6-8 discs, as we approach the focal point. -
Third blue accent:
Create one more blue accent segment using the gold washer spacer, navy bead, and gold washer spacer pattern. -
Pre-charm section:
String a final small group of 4-6 white heishi beads leading up to the center.
Spacer Strategy
If the gold spacers are flipping around, try using two thinner spacers glued together or opt for slightly heavier metal beads to add weight.
Step 3: The Focal Point
-
Add the center structure:
Thread on one navy blue round bead. Next, slide on three textured gold rondelle spacers—these should be thicker and more detailed than the previous spacers. -
Attach the charm:
Using your pliers, carefully open a jump ring and attach the volleyball charm to the center of the three gold rondelle beads you just strung. Alternatively, if the charm has a large enough bail, slide it directly onto the cord between the second and third gold bead. -
Complete the center:
Finish the focal section by adding one more navy blue round bead on the other side of the gold cluster.
Pro Tip: Centering
To ensure the volleyball charm stays face-up, attach it with a small secondary jump ring to restrict its rotation on the cord.
Step 4: Finishing the Bracelet
-
Mirror the pattern:
Continue beading the second half of the bracelet, mirroring the pattern you created on the first side (white sections, blue accents, culminating in the red accent near the end). -
Check the length:
Wrap the unfinished strand around your wrist to verify the size. Add or remove a few white heishi beads at the very end to adjust the fit perfectly. -
Secure the end:
Thread on a crimp bead and the jump ring or loop for your extension chain. Loop the wire back through the crimp bead. -
Final crimp:
Pull the wire tight (but not stiff), flatten the crimp bead with pliers, and trim the excess wire. Apply a crimp cover if desired. -
Attach extension chain:
If you didn’t attach the chain directly in the previous step, use a jump ring to connect the extension chain to the end loop now.
Now you have a stylish piece of jewelry that keeps your favorite sport close at hand
Heart-and-Volleyball Clay Bead Bracelet
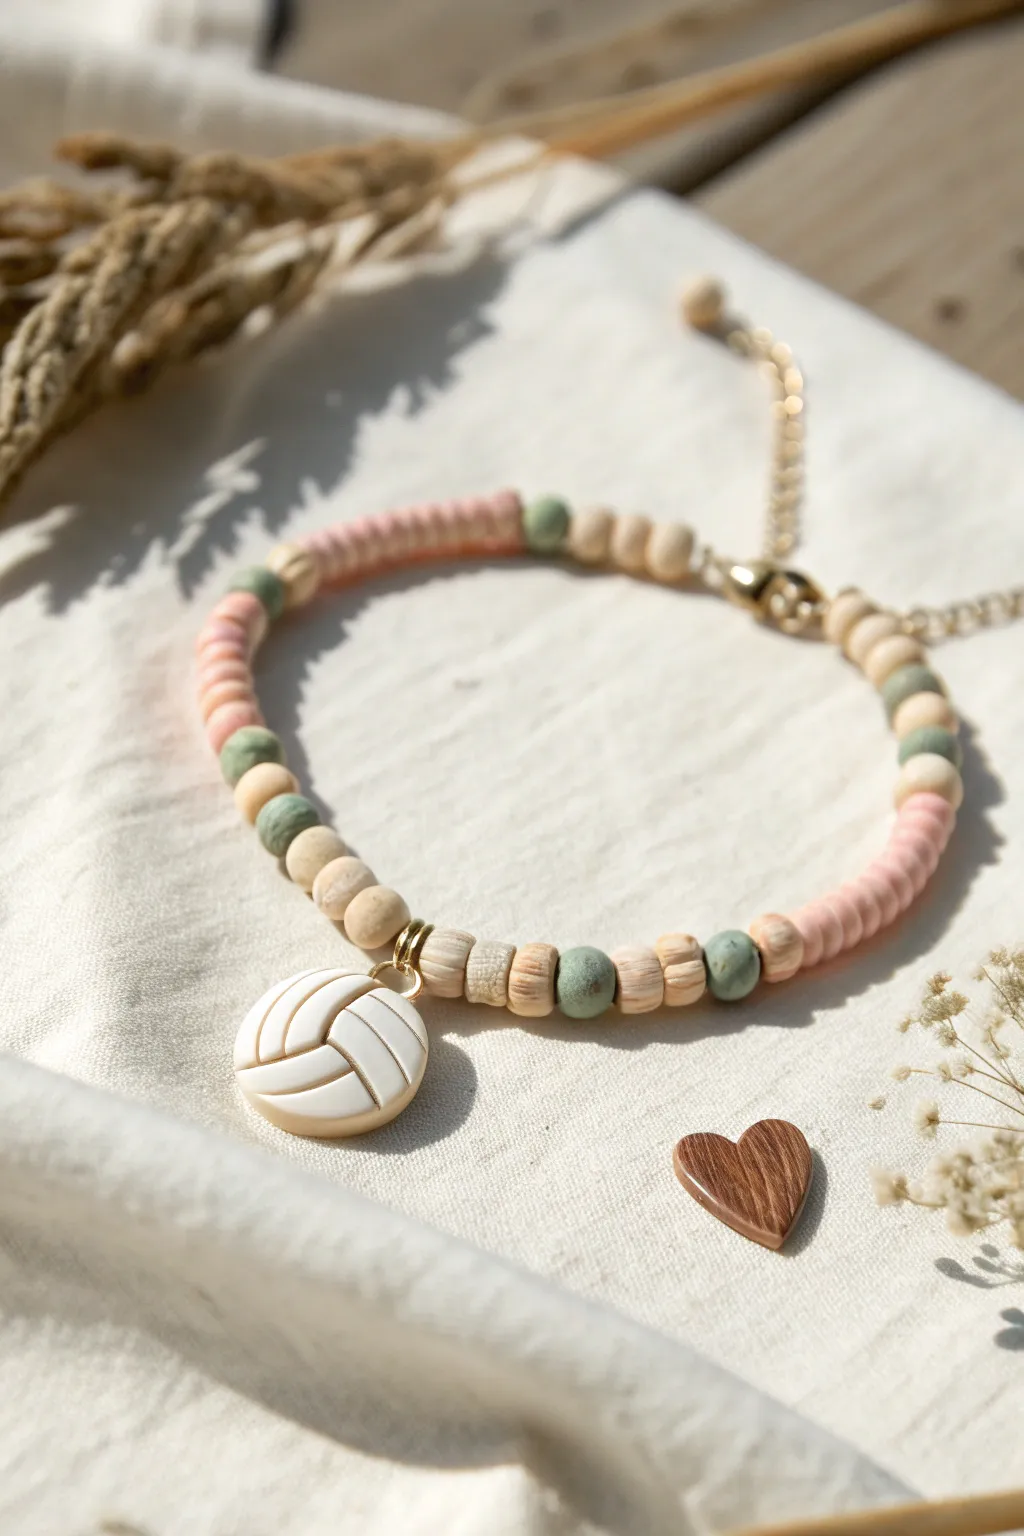
This rustic, beach-inspired bracelet blends muted clay discs and natural wooden accents to create a relaxed accessory for any volleyball enthusiast. The centerpiece is a dimensional volleyball charm, beautifully complemented by soft pinks, dusty greens, and earth tones.
How-To Guide
Materials
- Polymer clay heishi disc beads (muted pink)
- Small round wooden spacer beads (light beige/tan)
- Rondelle beads (dusty sage green, textured/matte)
- Flat disc wooden/coconut shell beads (natural brown)
- Volleyball charm (enamel or acrylic with gold loop)
- Gold jump ring (4-6mm)
- Elastic beading cord (approx 0.8mm clear)
- Gold crimp beads or knot covers
- Gold finish lobster clasp
- Gold finish extender chain
- Jewelry pliers (flat nose)
- Scissors
- Beading needle (optional)
Step 1: Preparation and Charm Attachment
-
Measure and cut cord:
Cut a piece of elastic cord about 10-12 inches long. This generous length gives you plenty of room to knot and finish the ends without frustration. -
Secure the start:
Attach a piece of tape or a bead stopper to one end of the cord to prevent your beads from sliding off while you design your pattern. -
Prepare the charm:
Using your flat nose pliers, carefully open the gold jump ring by twisting the ends away from each other laterally. -
Attach the charm:
Slide the volleyball charm onto the open jump ring, then close it securely with your pliers. Ensure the loop is fully sealed so the cord doesn’t slip through the gap later. -
Thread the centerpiece:
Slide the jump ring (with charm attached) onto the center of your elastic cord.
Step 2: Creating the Bead Pattern
-
Start the central sequence:
On the immediate left side of the charm, thread on three thin, flat wooden/coconut shell disc beads. -
Mirror the right side:
Repeat this on the right side of the charm, adding three matching wooden disc beads so the volleyball sits symmetrically between them. -
Add first accent beads:
Place one dusty green rondelle bead on each side of the wooden discs. -
Build the texture block:
Next, add a block of two or three round wooden spacer beads on each side. These add a nice height variation compared to the flat discs. -
Insert color stops:
Add another single dusty green rondelle bead on both sides to bookend the wooden spacer section. -
Create the pink sections:
Thread on a long sequence of the muted pink heishi clay beads. You’ll want about 1 to 1.5 inches of pink beads on each side. I find counting them helps keep things perfectly even—aim for roughly 15-20 discs per side. -
Repeat the accent pattern:
After the pink section, replicate the earlier pattern: one green bead, three wooden rounds, one green bead, and a final small section of pink clay discs to finish the length.
Loose Pattern?
If gaps appear between beads when the elastic stretches, string your beads tighter before knotting. Using pre-stretched elastic cord helps prevent sagging over time.
Step 3: Finishing the Bracelet
-
Check sizing:
Wrap the unfinished strand around your wrist to check the fit. Add or remove pink heishi beads at the ends until it sits comfortably. -
Attach the clasp:
Thread one end of your cord through a crimp bead (if using) and then through the loop of the lobster clasp. Loop the cord back through the crimp bead. -
Secure the crimp:
Use your pliers to flatten the crimp bead tightly, securing the clasp. Trim the excess tail close to the crimp. -
Attach the extender chain:
Repeat the crimping process on the other end of the bracelet, this time attaching the gold extender chain instead of the clasp. -
Final inspection:
Give the bracelet a gentle tug to ensure your crimps are holding firm and the elastic has settled before wearing it.
Team Spirit Swap
Swap the pink clay discs and green accents for your specific team colors (like navy and gold) to turn this boho accessory into game-day spirit wear.
This charming bracelet is now ready to stack with your other favorites for a sporty, beachy look

TRACK YOUR CERAMIC JOURNEY
Capture glaze tests, firing details, and creative progress—all in one simple printable. Make your projects easier to repeat and improve.
Tournament Tag Volleyball Bracelet
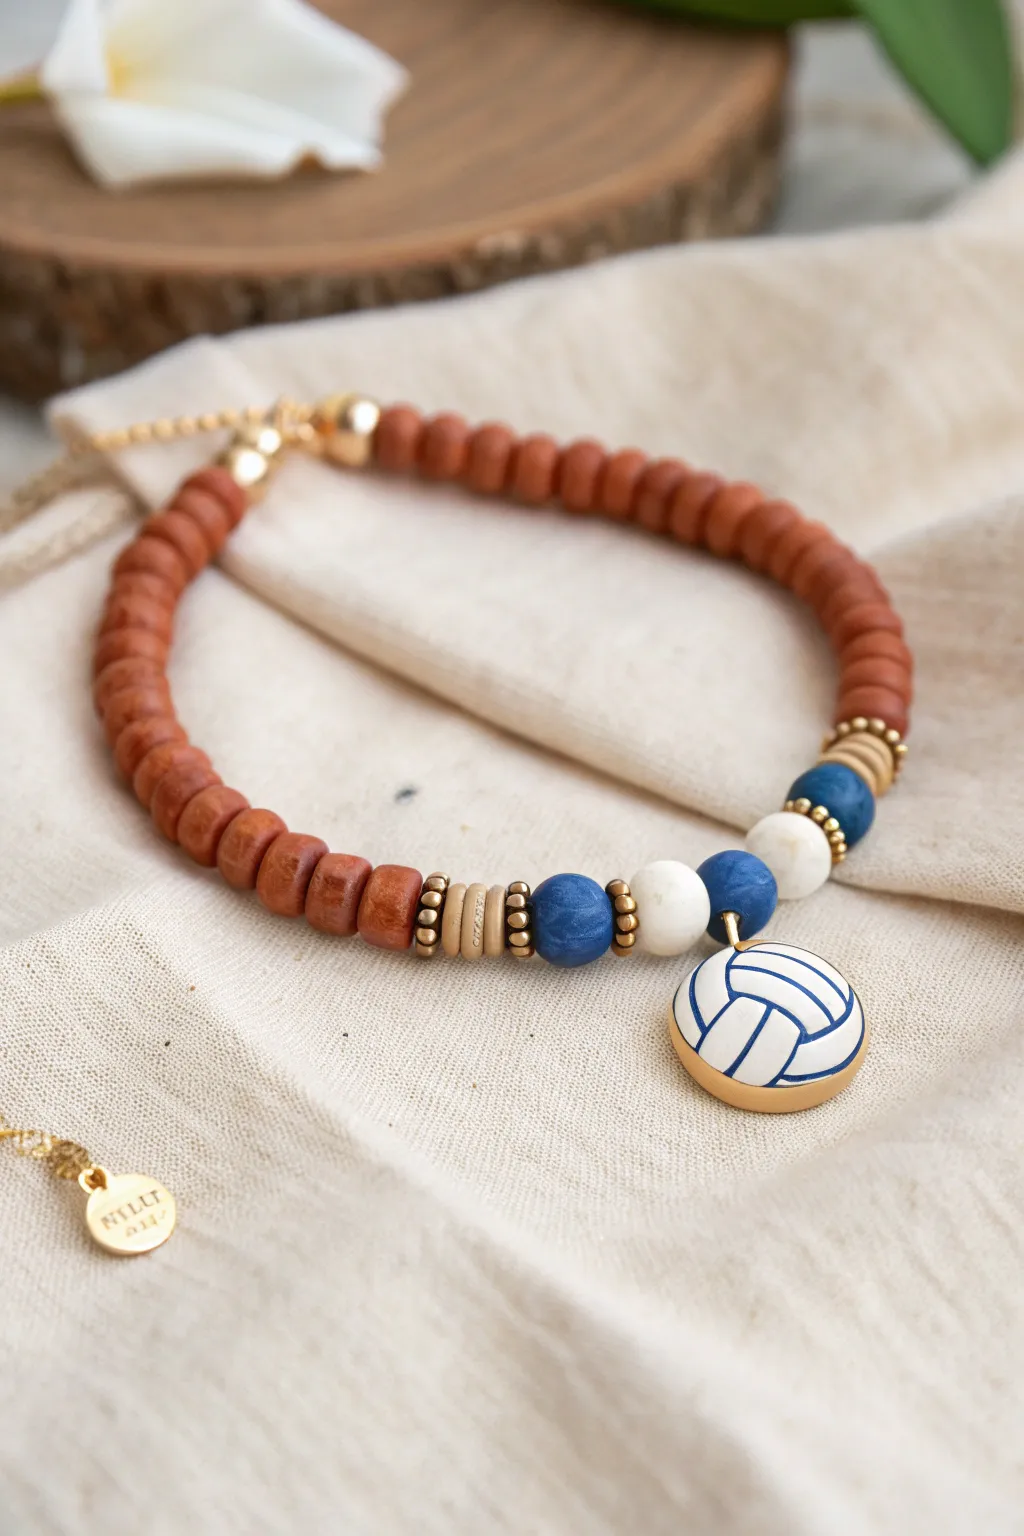
Celebrate your team spirit with this sophisticated take on a sports accessory, featuring warm terracotta tones and a striking enamel volleyball charm. The mix of natural textures and gold accents gives this piece a polished finish perfect for tournament days or everyday wear.
Step-by-Step Tutorial
Materials
- Reddish-brown heishi clay beads (approx. 4-6mm)
- White or cream round clay or stone beads (8mm)
- Navy blue round clay or stone beads (8mm)
- Small gold spacer beads (metal or hematite)
- Gold disc spacer beads (heishi style)
- Gold-rimmed enamel volleyball charm with jump ring
- Elastic beading cord (0.8mm)
- Gold crimp covers (optional but recommended)
- Jewelry glue
- Scissors
Step 1: Planning and Preparation
-
Measure the cord:
Cut a piece of elastic cord about 10-12 inches long. I always like to leave plenty of extra room on the ends so tying the final knot isn’t a struggle. -
Pre-stretch the elastic:
Gently pull on both ends of the cord a few times. This helps prevent the bracelet from stretching out and becoming loose after you wear it for the first time. -
Secure the end:
Attach a bead stopper or simply place a piece of tape on one end of the cord to stop your beads from sliding off while you work.
Keep It Centered
Count your heishi beads carefully on both sides. Even a difference of two or three beads can make the heavy charm slide to the underside of your wrist constantly.
Step 2: Creating the Central Focus
-
Start with the charm:
Slide your volleyball charm onto the center of the cord. Ensure the jump ring moves freely. -
Add the first accent beads:
On the immediate right side of the charm, thread one navy blue round bead. Repeat this on the left side so the charm is framed symmetrically. -
Insert spacers:
Place a small gold spacer bead next to each of the blue beads you just added. -
Add the cream beads:
Thread a white or cream round bead onto both the left and right sides. -
Second spacer layer:
Add another small gold spacer bead next to each cream bead. -
Final accent beads:
finish the central focal section by adding one more navy blue bead to each side.
Knot Slipping?
If your elastic knot feels insecure, try a drop of clear nail polish if you don’t have jewelry glue handy. Let it dry completely before trimming the ends.
Step 3: Building the Band
-
Transition segment:
On each side, add a sequence of three gold disc spacers followed by one more small gold round spacer. This creates a metallic cuff effect before the main bead strand begins. -
Thread the main beads:
Begin threading the reddish-brown heishi beads onto both sides of the cord. Continue adding these until the bracelet reaches your desired length. -
Check the fit:
Wrap the unfinished strand around your wrist to check the size. Ideally, the ends should touch comfortably without stretching the elastic too much. -
Ensure symmetry:
Double-check that you have roughly the same number of heishi beads on both sides so the charm stays centered on your wrist.
Step 4: Finishing Touches
-
Tie the knot:
Remove the tape or stopper. Bring the two ends together and tie a surgeon’s knot (loop the cord through twice before pulling tight). -
Secure with glue:
Apply a tiny drop of jewelry glue directly onto the knot. This is crucial for longevity. -
Hide the knot:
If hole size permits, gently tug on the cord to pull the knot inside one of the adjacent heishi beads. -
Trim excess:
Once the glue is dry, use sharp scissors to trim the excess cord as close to the bead as possible without cutting the knot itself. -
Add metal accents (optional):
If you want a more commercial look, you can add a gold crimp cover over the knot instead of hiding it inside a bead.
Now you have a stylish, custom accessory that looks great in the stands or on the court
Multi-Sport Athlete Volleyball Mix Bracelet
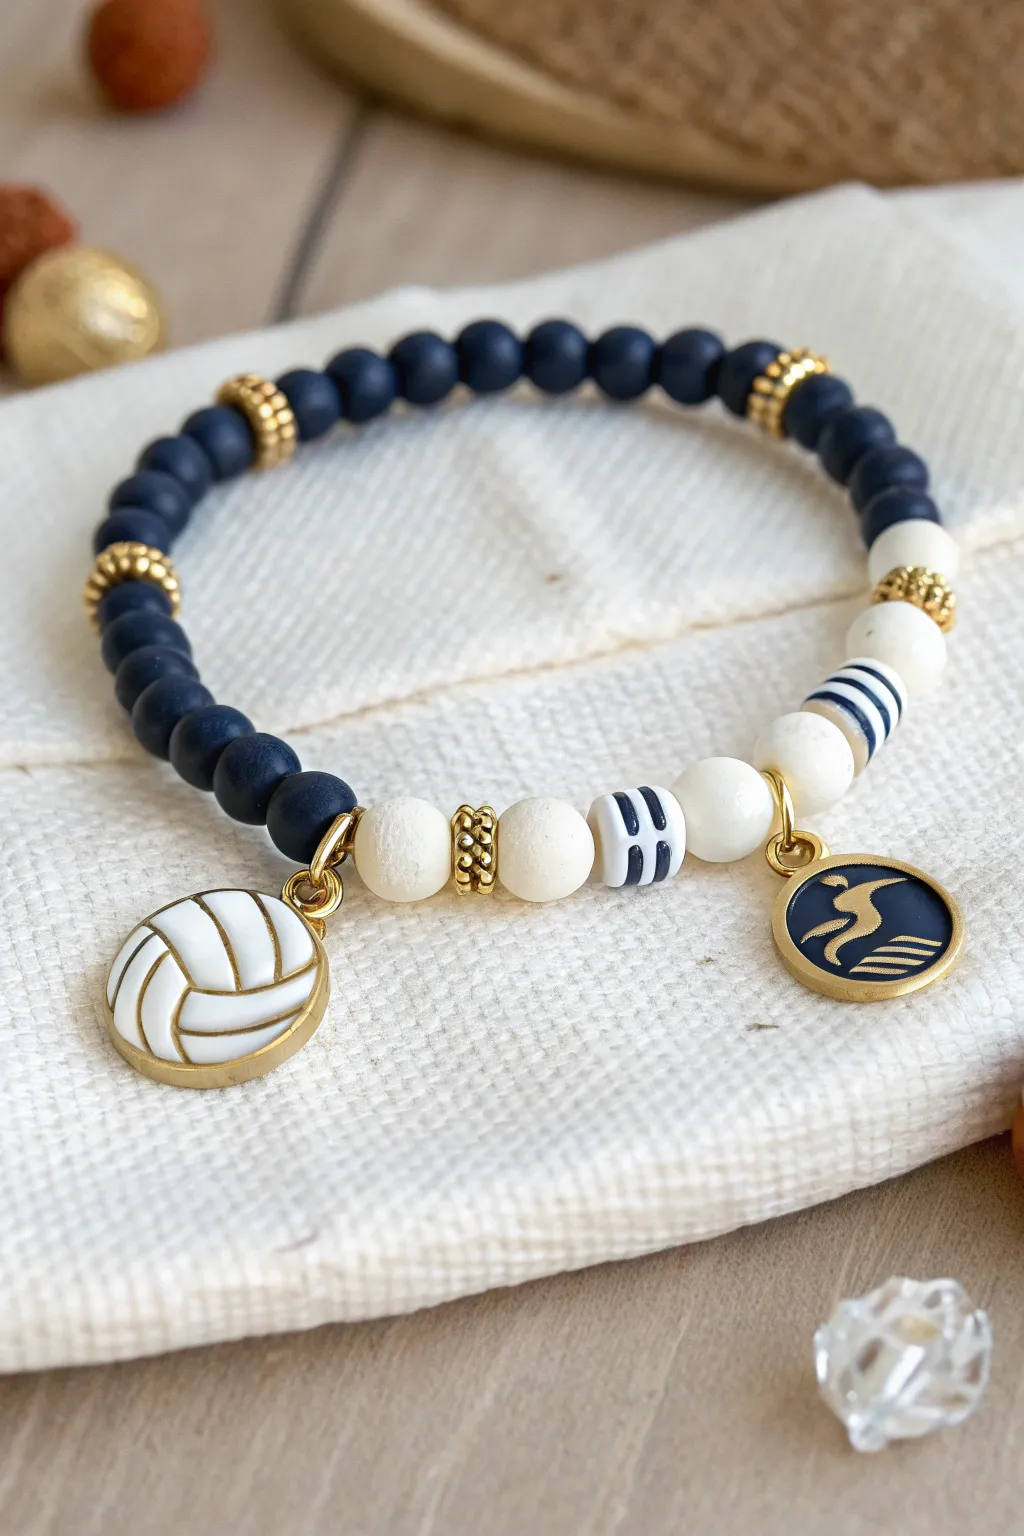
Celebrate the versatility of a multi-sport athlete with this sophisticated navy and gold bracelet. Featuring matte beads, striped accents, and dual charms for volleyball and swimming, it’s a stylish way to wear your team spirit on your wrist.
Step-by-Step
Materials
- Elastic jewelry cord (0.8mm or 1mm)
- Matte navy blue round beads (6mm)
- White or cream round beads (8mm or 10mm)
- Gold-toned spacer beads with texture (approx. 4-6mm)
- White beads with navy blue stripes (approx. 8mm)
- Gold jump rings (6mm or 8mm)
- Gold round volleyball charm with white enamel
- Gold round swimmer charm with navy enamel
- Super glue or jewelry cement
- Scissors
Step 1: Planning and Setup
-
Measure your wrist:
Cut a piece of elastic cord about 10-12 inches long. This generous length gives you plenty of room to knot securely without struggling to hold the ends. -
Secure one end:
Place a piece of tape or a bead stopper on one end of the cord so your beads don’t slide off while you are designing the pattern. -
Pre-stretch the cord:
Gently tug on the elastic cord a few times. This pre-stretching helps prevent the bracelet from sagging or loosening up immediately after you’ve made it.
Knot Security Tip
A surgeon’s knot is best for elastic. Pull all four strands (two tails, two loop sides) tight to lock it in place before gluing.
Step 2: Beading the Pattern
-
Start the navy section:
Begin by threading on the matte navy blue beads. You will need a solid run of about 12 to 14 beads, depending on your wrist size. -
Add gold accents:
After your navy section, slide on one textured gold spacer bead. -
Attach the volleyball charm:
Using your pliers, open a jump ring and attach the volleyball charm to the elastic cord right next to the gold spacer. Alternatively, slide the jump ring onto the cord directly if it’s already closed. -
Transition to white:
Add one large white round bead immediately after the charm. -
Insert a center spacer:
Place a textured gold spacer bead after the first white bead to separate it from the next section. -
Add a plain white bead:
Thread on another solid white bead. -
Add a striped detail:
Slide on a white bead featuring navy blue stripes. This adds a nice sporty visual break. -
Continue the pattern:
Add one plain white bead followed by the second striped bead. -
Attach the swimmer charm:
Slide on the swimmer charm (attached via jump ring) so it balances the design opposite the volleyball charm. -
Finish the white section:
Thread on two more plain white beads to complete the lighter half of the bracelet. -
Close the loop design:
Add one final gold textured spacer bead, followed by about 4-6 more navy beads to connect back to the start of your navy run.
Step 3: Securing the Bracelet
-
Check the fit:
Wrap the beaded cord around your wrist to ensure it fits comfortably. Add or remove navy beads at the ends if adjustments are needed. -
Tie the knot:
Remove the tape or stopper. Tie a standard surgeon’s knot: cross right over left, then left over right, looping the cord through twice on the second pass for extra grip. -
Add adhesive:
Place a tiny drop of super glue or jewelry cement directly onto the knot. I find using a toothpick helps apply the glue precisely without making a mess. -
Hide the knot:
While the glue is still tacky but not wet, pull the knot gently inside one of the larger white beads or the adjacent navy bead to hide it. -
Trim the ends:
Once the glue is fully dry, trim the excess elastic cord close to the bead hole using your scissors.
Team Color Swap
Swap the navy beads for your specific school colors (like maroon or forest green) to make this a true team spirit accessory.
Now you have a custom accessory that perfectly represents your athletic passions
Hidden Lucky Volleyball Bead Bracelet
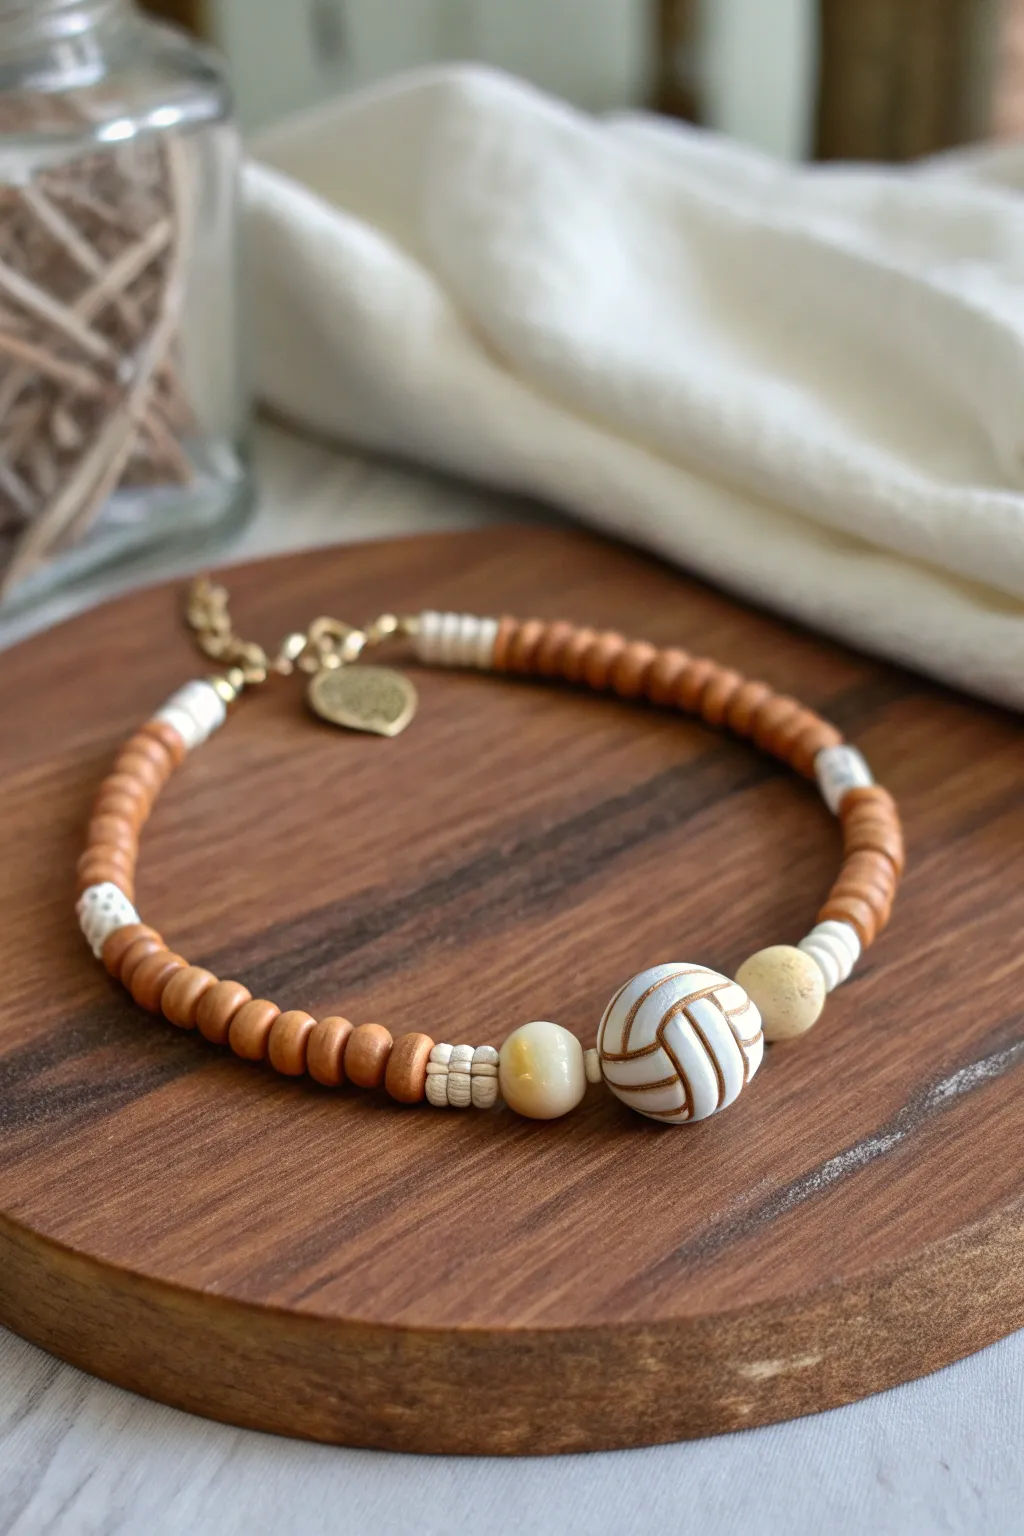
This stylish bracelet combines natural textures with a sporty theme, featuring warm wooden accents and a detailed volleyball charm centerpiece. It’s the perfect understated accessory for showing team spirit while keeping a grounded, organic aesthetic.
How-To Guide
Materials
- Polymer clay volleyball bead (white with gold detailing)
- Small beige round beads (approx. 6mm or 8mm)
- Heishi clay disc beads in brown/tan (approx. 4-6mm)
- Heishi clay disc beads in white (approx. 4-6mm)
- Gold beading wire or strong elastic thread (0.8mm)
- Gold lobster clasp and jump rings
- Gold crimp beads
- Gold textured heart charm
- Flat nose pliers
- Wire cutters
- Bead design board (optional)
Step 1: Planning the Design
-
Measure your wrist:
Cut a length of beading wire or elastic cord that is about 3-4 inches longer than your wrist circumference to allow ample room for knotting or crimping. -
Lay out the centerpiece:
Place your focal volleyball bead in the center of your workspace or bead board to serve as the anchor for the symmetric design. -
Arrange flanking beads:
On either side of the volleyball bead, plan for one round beige bead to frame it gently.
Keep it fluid
Don’t pull the wire too tight before crimping. Leave a hairline of space so the bracelet drapes naturally around the wrist rather than staying rigid.
Step 2: Stringing the Center
-
Start the stringing:
Thread the white volleyball bead onto the center of your cord. -
Add round accents:
Slide one beige round bead onto the cord on right side of the volleyball, and repeat on the left side to create symmetry. -
Begin the disc transitions:
On both sides, add a small stack of white heishi disc beads. Aim for about 3-4 discs per side to create a crisp contrast against the brown beads to come. -
Check the spacing:
Ensure the beads are pushed flush against the centerpiece but aren’t too tight, which can cause the bracelet to stiffen.
Step 3: Building the Length
-
Add the brown sections:
String the brown/tan heishi beads onto one side until you’ve covered about a third of the remaining length needed for your wrist. -
Insert a white accent:
Break up the monotony of the brown section by adding a secondary small stack of 3-4 white heishi discs. -
Finish the first side:
Continue stringing brown heishi beads until that side matches precisely half of your total desired bracelet length. -
Mirror on the second side:
Repeat the exact pattern on the other side of the bracelet: a long section of brown, a small white stack accent, and finishing with brown beads. -
Verify sizing:
Wrap the unfinished strand around your wrist to check the fit. Remember the clasp will add about half an inch of length.
Make it yours
Swap the brown heishi beads for your specific team colors, keeping the white accents to maintain that classic volleyball aesthetic.
Step 4: Finishing Touches
-
Attach the first crimp:
Slide a gold crimp bead onto one end of the wire, followed by a jump ring or the loop of your lobster clasp. -
Secure the wire:
Feed the wire tail back through the crimp bead and pull it taut, leaving just a tiny bit of slack so the beads can move. -
Flatten the crimp:
Use your flat nose pliers to firmly squash the crimp bead flat, securing the loop. -
Finish the other end:
Repeat the crimping process on the other end, attaching the receiving jump ring or chain extender. -
Add the charm:
Open a small jump ring using pliers, slide on the gold textured heart charm, and attach it to the clasp end of the bracelet for a dangling detail. -
Trim excess:
Snip off any excess wire tails close to the crimp beads for a clean, professional finish.
Now your custom accessory is ready to wear to the next big game or practice