Whenever I’m stuck on what to make, I start with a simple circle slab—it’s the easiest shape to roll out and the quickest to turn into something cute and useful. These circle clay ideas are all about taking that basic round shape and giving it personality with texture, color, and a few smart finishing touches.
Classic Round Clay Coasters
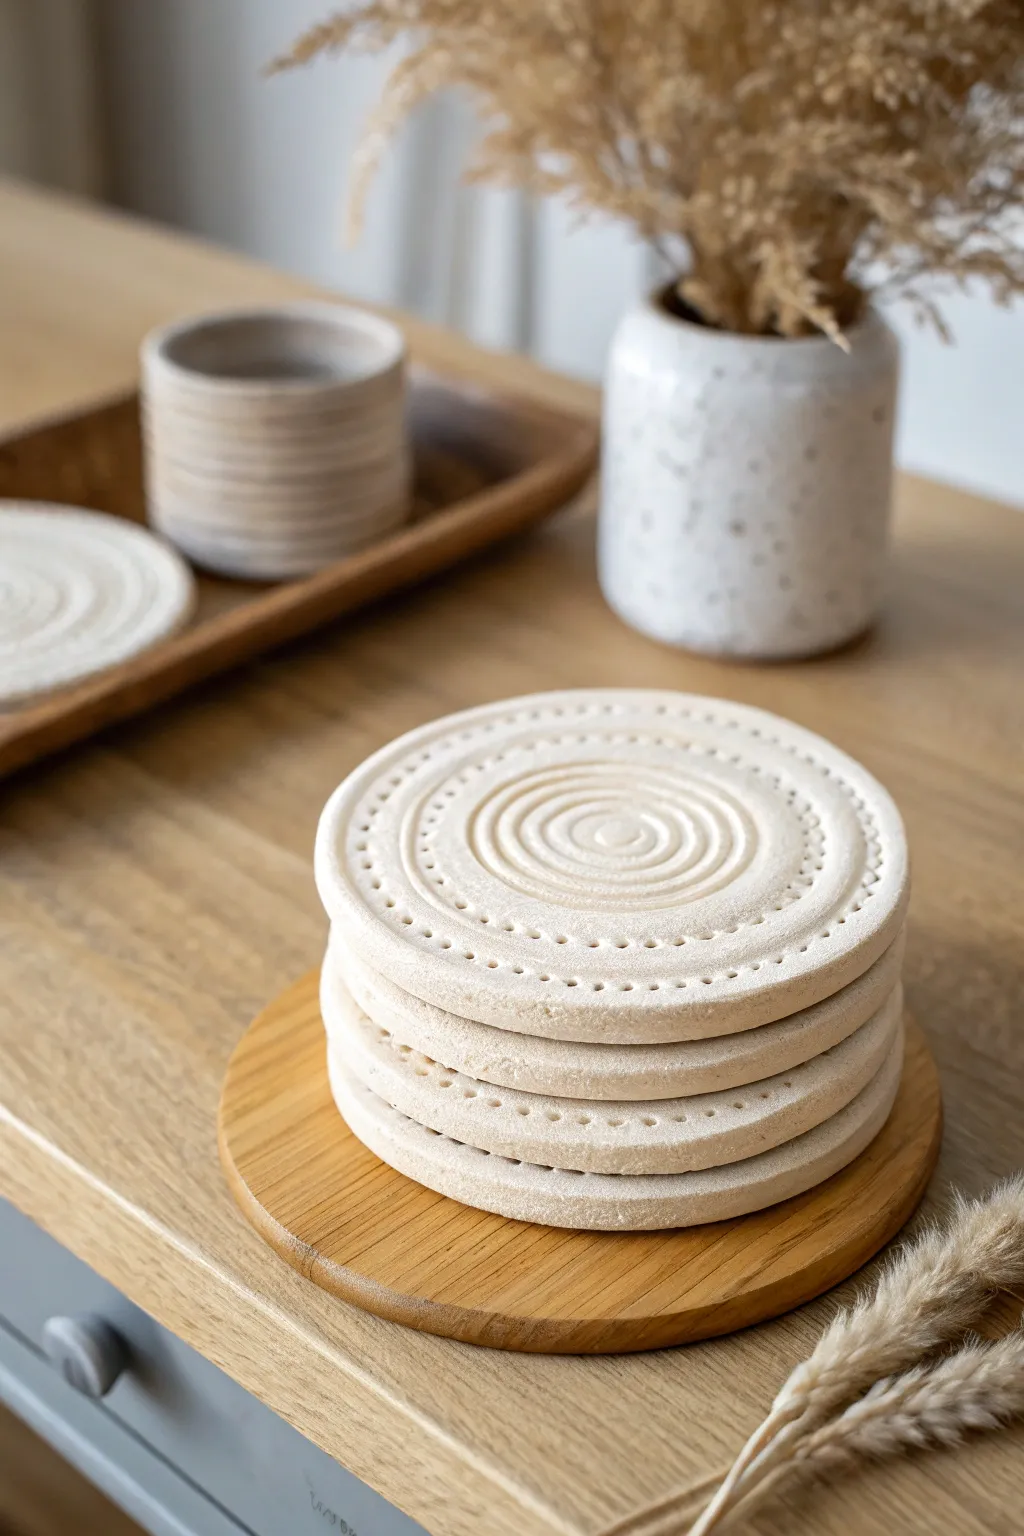
These minimalist coasters combine the rustic charm of unglazed clay with precise geometric detailing. With their soothing spiral centers and delicate dotted borders, they bring an earthy, artisanal touch to any coffee table while protecting your surfaces.
How-To Guide
Materials
- Air-dry clay (white or light beige)
- Circular cookie cutter (approx. 4 inches) or a bowl to trace
- Rolling pin
- Two guide slats (1/4 inch thick)
- Small circular object for impressing spirals (like a marker cap or custom stamp)
- Stylus tool, toothpick, or chopstick
- Fine-grit sandpaper
- Canvas mat or parchment paper
- Matte spray sealer
Step 1: Preparation and Shaping
-
Prepare your workspace:
Lay down a piece of canvas or parchment paper on a flat, stable surface. This prevents the clay from sticking and picking up unwanted textures from your table. -
Condition the clay:
Take a large chunk of air-dry clay and knead it in your hands until it becomes soft, pliable, and free of air bubbles. If it feels too dry, you can wet your hands slightly. -
Roll out the slab:
Place your clay ball between two 1/4-inch guide slats. Using these guides ensures your coasters will be perfectly uniform in thickness, which is crucial for even drying. -
Cut the circles:
Use your circular cutter or trace around a bowl to cut out your coaster shapes. Create as many as you need for a set, usually four or six. -
Smooth the edges:
Dip your finger in a little water and gently run it along the cut edge of each circle to soften any sharp ridges left by the cutter.
Step 2: Adding the Design
-
Mark the center:
Lightly find the visual center of your clay circle. You don’t need to mark it deeply, just have a reference point for where your spiral will begin. -
Create the central spiral:
To achieve the concentric ring look seen in the photo, press a series of concentric circular objects into the center. Alternatively, use a modeling tool to carefully carve a tight spiral starting from the center and working outward about 1.5 inches. -
Refine the spiral grooves:
Go back over your spiral or concentric rings to ensure the grooves are deep enough to be visible but not so deep that they weaken the coaster. -
Mark the outer border:
Lightly trace a guideline circle about half an inch from the outer edge of the coaster. This will help keep your dot pattern perfectly round/aligned. -
Add the dotted texture:
Using a blunt stylus, the end of a chopstick, or a specialized dotting tool, press small holes along your guideline. Space them evenly, leaving a small gap between each indentation.
Stamp Hack
Don’t have a steady hand for the spiral? Find a large button, a specific bottle cap, or a decorative medallion with a spiral pattern and use it as a stamp for instant uniformity.
Step 3: Drying and Finishing
-
Initial drying:
Place your coasters on a wire rack or a clean, dry absorbent board. I find it helpful to gently flip them every few hours during the first day to prevent warping. -
Flattening:
If you notice the edges starting to curl up as they dry, place a light book on top of them (sandwich them between parchment paper first) to encourage flatness. -
Complete drying:
Allow the clay to dry completely for 24 to 48 hours. The clay should turn a lighter color and feel hard and room temperature to the touch, not cool. -
Sand the surface:
Once fully dry, take fine-grit sandpaper and very gently sand the top surface and the edges. This removes any tiny burrs and gives that professional, stone-like matte finish. -
Dust off debris:
Use a soft, dry paintbrush or a cloth to wipe away all the clay dust created by sanding. -
Seal the coasters:
Apply a clear, matte spray sealer to protect the clay from moisture. Since these are coasters, apply two to three thin coats, letting them dry in between, to ensure water from cups doesn’t ruin your work.
Color Wash Effect
Before sealing, dilute some acrylic paint with water and brush it into the grooves. Wipe the surface clean immediately to leave color only in the spiral and dots for high contrast.
Stack your new creations on your coffee table for a functional piece of decor that looks effortlessly chic


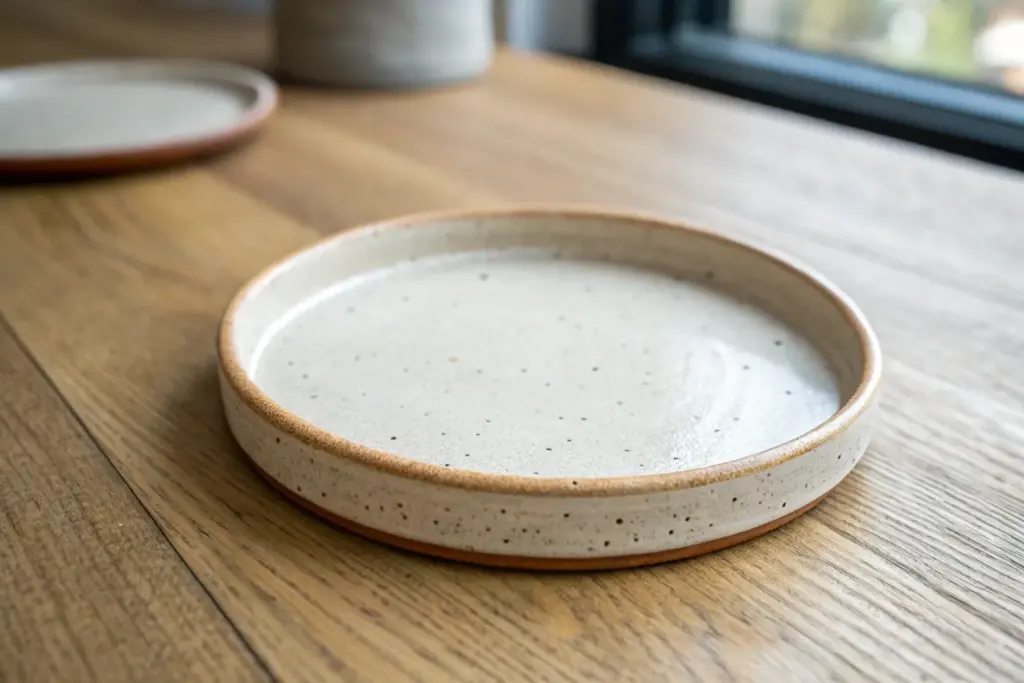
Simple Circle Trinket Dish
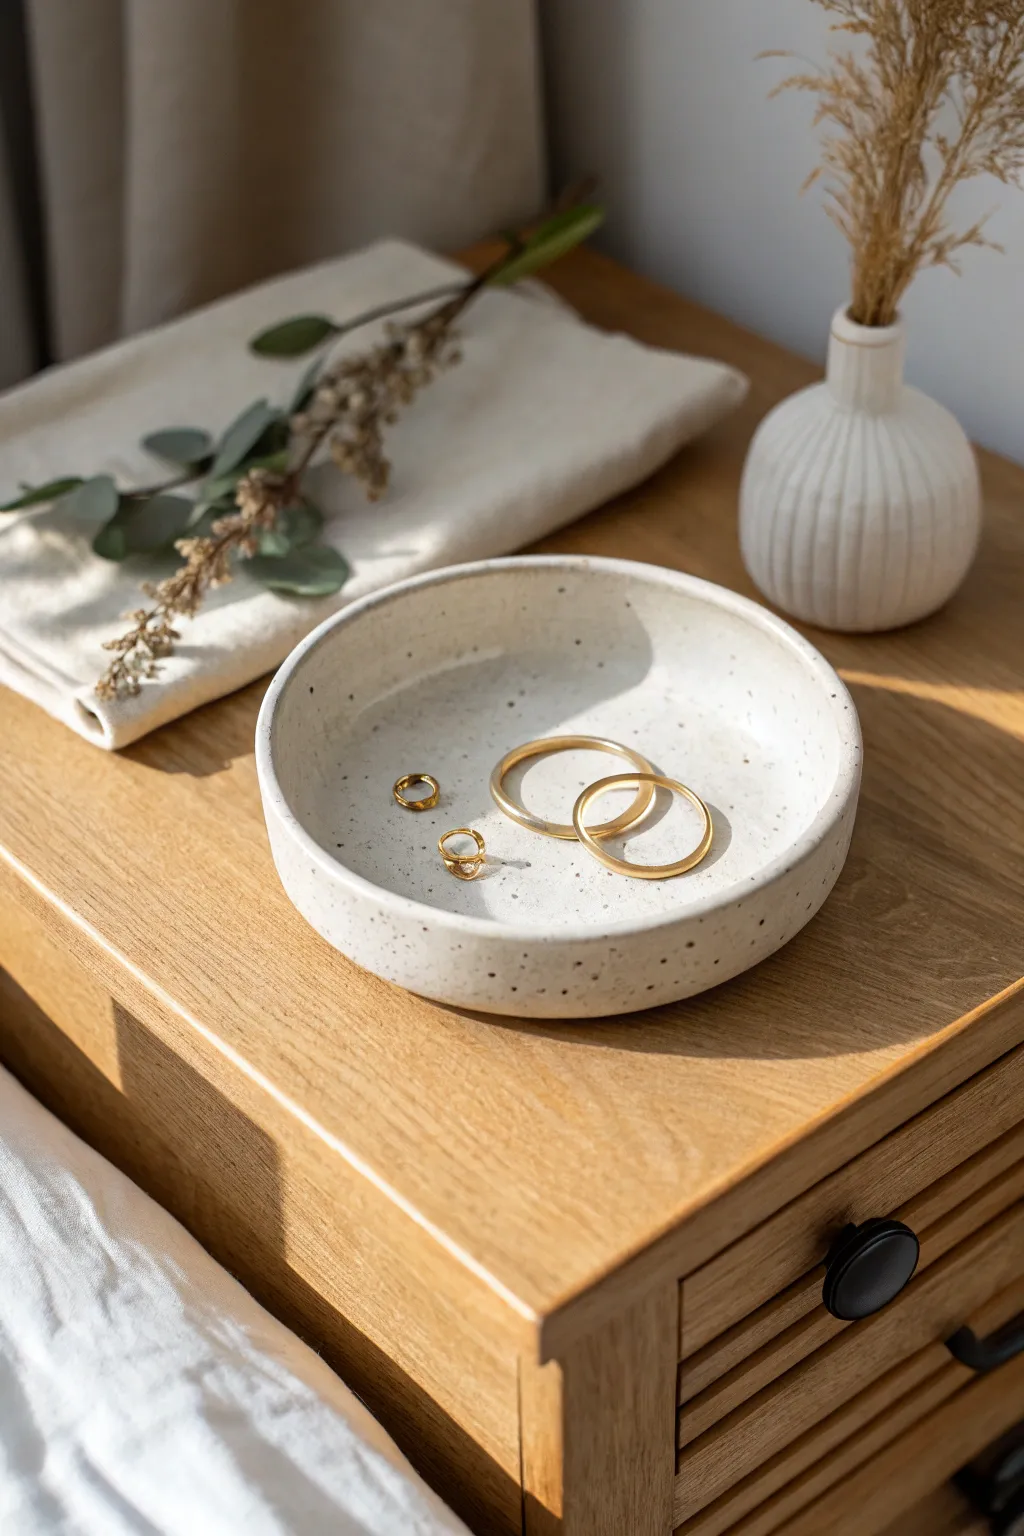
Embrace the beauty of minimalism with this handcrafted speckled clay dish, perfect for keeping daily jewelry organized. Its organic white finish and subtle texture bring a modern, earthy touch to any nightstand or vanity.
Step-by-Step Tutorial
Materials
- White stoneware clay with speckles (or plain white clay)
- Black coarse sand or grog (if adding speckles manually)
- Rolling pin
- Two wooden guide strips (approx. 1/4 inch thick)
- Circular template (bowl, lid, or paper cutout approx 5-6 inches)
- Needle tool or fettling knife
- Sponge
- Rib tool (flexible rubber or metal)
- White satin or glossy glaze
- Kiln (or oven, if using polymer/air-dry alternatives)
Step 1: Preparing the Slab
-
Wedge the clay:
Begin by thoroughly wedging a ball of white stoneware clay to remove any air bubbles. If your clay isn’t pre-speckled, kneading in a small amount of black coarse sand during this stage will achieve that lovely peppered look. -
Set up guides:
Place your wooden guide strips on either side of the clay ball on your canvas work surface. These will ensure your slab has a perfectly even thickness. -
Roll the slab:
Roll the clay out firmly until the rolling pin rests flat against the guide strips. Rotate the clay occasionally to ensure it stretches evenly in all directions. -
smooth the surface:
Take a damp sponge or a soft rib tool and gently compress the surface of the slab. This aligns the clay particles and removes any canvas texture left from the rolling process.
Warping Woes?
If the bottom isn’t sitting flat, dry it slower next time. Weighing the center down with a sandbag while drying can help keep it perfectly level.
Step 2: Shaping the Dish
-
Cut the circle:
Place your circular template onto the smooth slab. Hold your needle tool vertically and trace around the template to cut out a clean circle. -
Soften the rim:
Remove the excess clay. Run a slightly damp finger or sponge along the freshly cut edge to round it off, eliminating sharpness before you start shaping. -
Lift the edges:
Gently lift the edges of the clay circle. You want to create a vertical wall, roughly 1 inch high. You can do this by pinching lightly or using a foam mold underneath. -
Define the wall:
If hand-building without a mold, slowly work your way around the perimeter, pressing the base down while pulling the wall up to create that sharp 90-degree angle seen in the reference. -
Refine the form:
Use a flexible rubber rib on the inside of the dish to smooth the transition from the floor to the wall. I find this step crucial for getting that professional, seamless interior curve. -
Check symmetry:
Spin the dish slowly on a banding wheel or piece of paper to check that the walls are even in height. Trim any high spots carefully with your needle tool.
Step 3: Finishing and Glazing
-
Dry slowly:
Cover the dish loosely with plastic and let it dry slowly to the leather-hard stage. This prevents the flat bottom from warping or curling up. -
Bisque fire:
Once bone dry, fire the piece in the kiln to bisque temperature (usually cone 04). This hardens the clay and prepares it for glazing. -
Apply glaze:
Dip or brush on a white satin or semi-gloss glaze. The glaze should be translucent enough to let the natural clay speckles show through, or opaque white if the speckles are in the glaze itself. -
Wipe the foot:
Use a wet sponge to wipe the bottom of the dish completely clean of glaze. This prevents it from fusing to the kiln shelf during final firing. -
Final lettering:
Fire the piece again to the maturation temperature of your specific clay and glaze combination (usually cone 5 or 6 for stoneware).
Gold Rim Accent
For extra luxury, apply a thin line of gold luster to the rim after the glaze firing. Refire at a lower temperature (Cone 018) to set the gold.
Place your finished dish on a bedside table to catch your favorite rings and treasures as you unwind


Round Pinch-Rim Ring Holder Plate
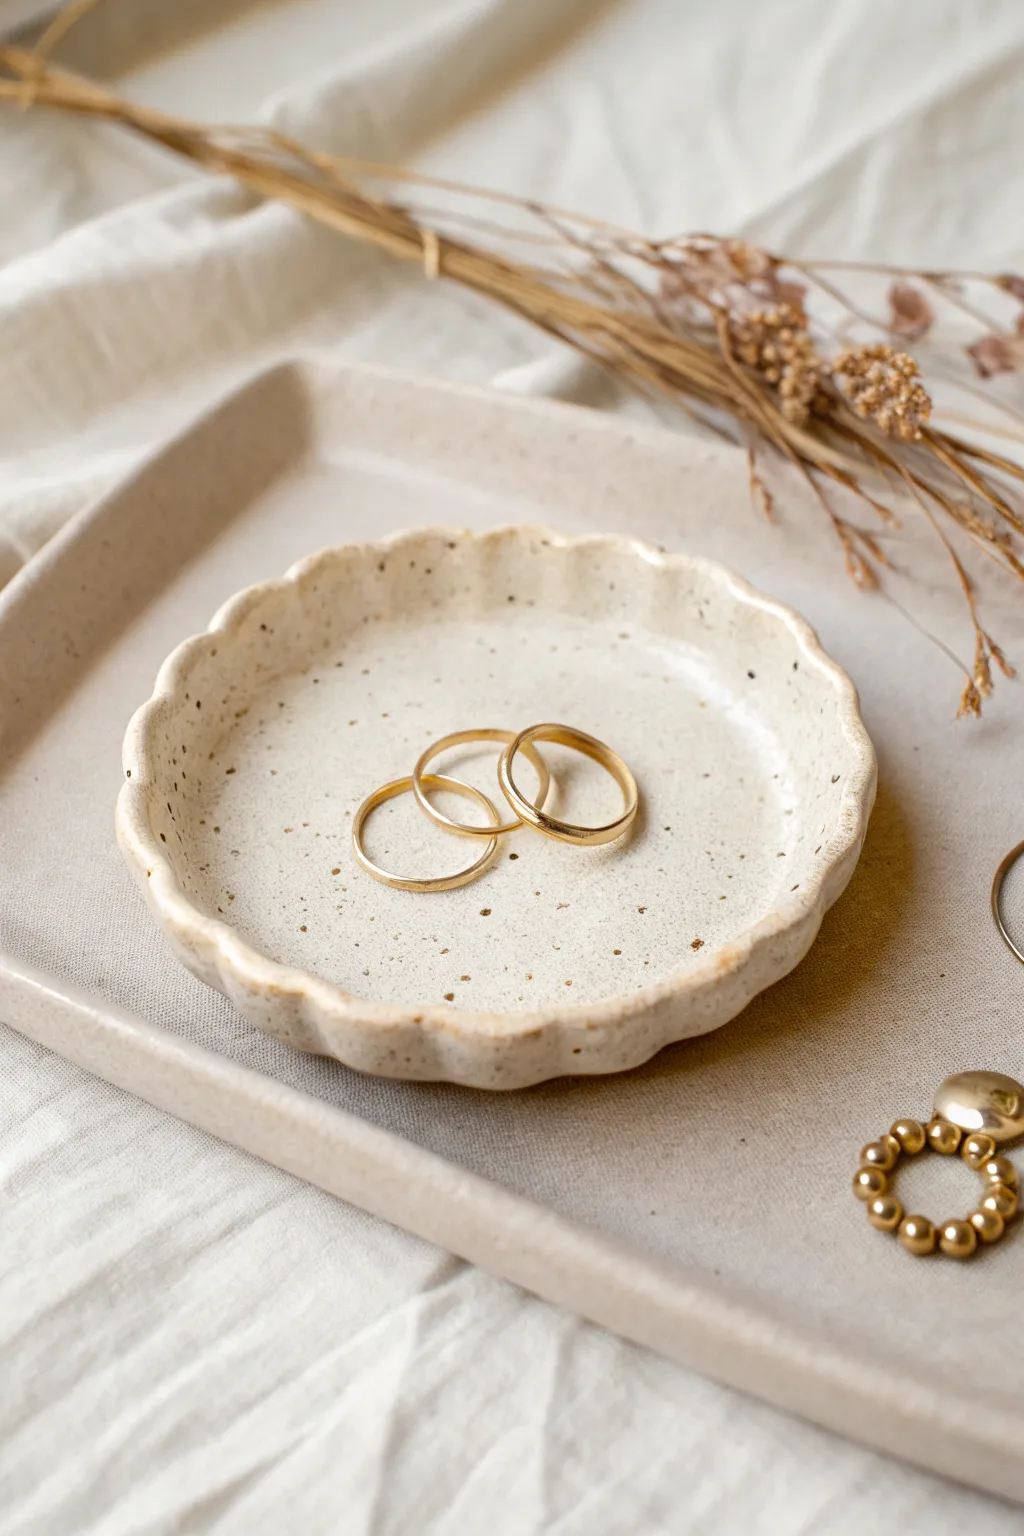
This charming, petite jewelry holder features a gentle scalloped edge and a natural speckled finish that feels organic and handcrafted. It creates the perfect elevated spot for your daily rings and studs, blending minimal design with a touch of texture.
How-To Guide
Materials
- White polymer clay or air-dry clay
- Dried ground coffee or black pepper (for speckling)
- Acrylic rolling pin
- Circle cookie cutter (approx. 3-4 inches)
- Small bowl or sponge (for drying shape)
- Smoothing tool or your finger
- Gloss varnish or resin (optional)
- Fine-grit sandpaper
Step 1: Preparing the Clay Body
-
Condition the Clay:
Start by warming up a ball of white polymer clay in your hands. Knead it thoroughly until it is soft, pliable, and free of any cracks. -
Add Texture:
To achieve that beautiful faux-ceramic speckled look, sprinkle a small pinch of dried ground coffee or coarse black pepper onto your clay ball. Fold the clay over the grounds and knead again until the specks are evenly distributed throughout the white base. -
Roll it Out:
Place your clay on a smooth work surface. Use your acrylic roller to flatten the ball into an even sheet. Aim for a thickness of about 1/8 to 1/4 inch—not too thin, or the rim might be fragile.
Step 2: Shaping the Plate
-
Cut the Circle:
Press your circular cookie cutter firmly into the rolled clay. Remove the excess clay from around the edges before lifting the cutter to ensure a crisp, clean edge. -
Smooth the Edges:
Run your finger or a damp smoothing tool gently around the circumference of your clay circle. This softens the sharp cut angle and makes the finished piece look more like thrown pottery. -
Initial Shaping:
Gently lift the clay circle. Using your thumbs, slightly depress the center while curbing the edges upward to create a very shallow bowl shape. -
Create the Scallops:
This is the signature detail. Use the pad of your index finger to support the rim from the inside. With your thumb and middle finger on the outside, gently pinch the clay to create a protruding ‘wave.’ Repeat this pinching motion rhythmically around the entire border. -
Refine the Ruffles:
Go back around the rim and adjust the spacing. You want soft, undulating curves rather than sharp pleats. If one looks too flat, give it another gentle pinch.
Fixing Cracks
If you see tiny cracks on the rim while shaping, dip your finger in a tiny bit of water (for air-dry) or baby oil (for polymer) and smooth them over immediately before curing.
Step 3: Finishing Touches
-
Drying Support:
To maintain the slightly cupped shape, place your dish into a shallow curved object, like a large spoon rest or a wide bowl lined with parchment paper, while it firms up. -
Bake or Cure:
If using polymer clay, bake according to the package instructions (usually 275°F for 15-30 minutes). If using air-dry clay, let it sit undisturbed for 24-48 hours until fully white and hard. -
Cool Down:
Allow the piece to cool completely in the oven before removing it. This prevents thermal shock and cracking. -
Sand for Smoothness:
Check the rim for any sharp bits or fingerprints. I like to take a piece of fine-grit sandpaper and lightly buff the edges to make them buttery smooth. -
Seal (Optional):
For a glossy finish like the inspiration photo, brush on a thin layer of gloss varnish or UV resin. This also seals in the coffee/pepper specks and protects the surface.
Rim Variations
Instead of a continuous scallop, try pressing the side of a paintbrush handle into the rim every half-inch. This creates a uniform fluted edge instead of a ruffled one.
Place your favorite rings inside your new custom dish and enjoy the handmade elegance on your dresser


Circle Tile Candle Catcher
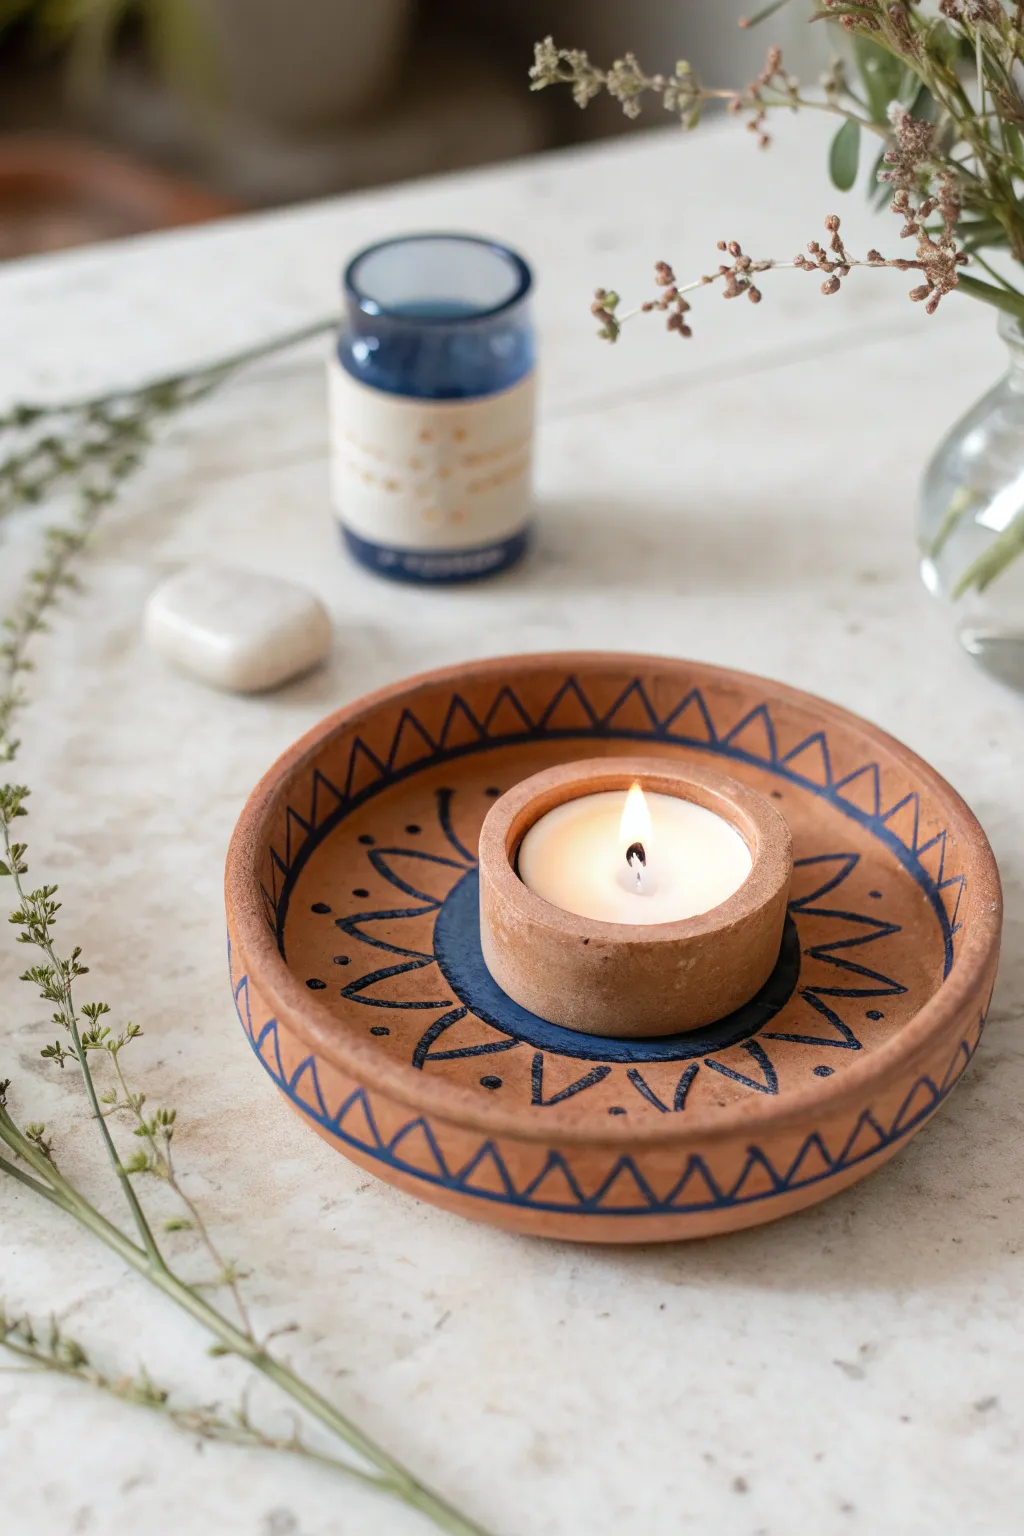
This rustic, bohemian-inspired candle holder combines natural terra-cotta tones with striking indigo patterns. It features a wide catch-all dish and a central elevated cup perfect for holding tea lights or small pillar candles securely.
Detailed Instructions
Materials
- Terra-cotta air-dry clay or polymer clay
- Rolling pin
- Circle cutters (large approx. 5-6 inches, small approx. 2 inches)
- Ruler
- Clay knife or needle tool
- Small bowl of water (for smoothing)
- Sponge
- Fine grit sandpaper
- Deep blue acrylic paint or ceramic paint
- Fine tip paintbrush
- Matte sealer or varnish
Step 1: Shaping the Base Dish
-
Prepare the slay:
Begin by conditioning a large ball of terra-cotta clay in your hands until it is pliable and warm, ensuring there are no air bubbles trapped inside. -
Roll the slab:
On a smooth, clean surface, roll out the clay to a uniform thickness of about 1/4 inch. If you want perfectly even sides, place two magazines or wooden slats on either side of your roller as guides. -
Cut the main circle:
Use your large circle cutter or trace around a bowl (approx. 5-6 inches diameter) with your needle tool to cut out the base shape. -
Create the rim:
Roll a long, thin snake of clay, approximately the thickness of a pencil. This coil needs to be long enough to go around the entire circumference of your base circle. -
Attach the rim:
Score the outer edge of your base circle and the underside of the coil using your needle tool. Apply a little water or slip to the scored areas and press the coil firmly onto the edge. -
Blend the seams:
Use your thumb or a modeling tool to smear the clay from the coil down onto the base, both on the inside and outside, until the seam disappears completely. -
Refine the shape:
Smooth the walls with a damp sponge to create a seamless, slightly curved rim. I like to run a wet finger along the top edge to soften it so it isn’t sharp.
Keep it centered
To find the exact center for your candle cup, lightly trace an ‘X’ across the main dish before attaching the cup. This visual guide ensures symmetry.
Step 2: Forming the Candle Cup
-
Cut the center base:
Roll out a small amount of clay again and cut a smaller circle, roughly 2 inches in diameter. This will sit inside the larger dish. -
Build the cup walls:
Create a wider, flat strip of clay (about 1 inch tall). Wrap this strip around the small circle base to form a cylinder. -
Join the cylinder:
Score and slip the joining edges where the strip meets itself and where it touches the base. Blend the clay well to ensure the cup is watertight and sturdy. -
Center the cup:
Score the bottom of your new cup and the exact center of the large dish. Press the cup firmly into the center of the dish. -
Smooth connections:
Use a small tool to blend the bottom of the cup into the floor of the dish, creating a tiny fillet of clay to reinforce the join. -
Dry the piece:
Allow the entire structure to dry completely. For air-dry clay, this may take 24-48 hours; for polymer clay, bake according to the package instructions.
Step 3: Designing the Details
-
Sand imperfections:
Once fully dry or cured, check for any rough spots. Gently sand the rims and surface with fine-grit sandpaper for a professional finish. -
Paint the inner ring:
Using deep blue paint, create a solid ring of color on the floor of the dish, closely hugging the base of the central cup. -
Outline the rim:
Paint a thin blue line along the very outer vertical edge of the main dish to define the border. -
Draw the zig-zag border:
With a fine-tip brush, paint a continuous zig-zag pattern just inside the rim of the dish. Try to keep the peaks and valleys consistent in size. -
Create the sunburst:
Paint elongated petals or sun rays extending outward from the central blue ring. Add a small dot between the tip of each ray and the zig-zag border for a tribal touch. -
Add rim details:
Finish the design by painting a simple zig-zag line on the exterior vertical wall of the dish, mirroring the pattern inside. -
Seal the piece:
Once the paint is fully dry, apply a coat of matte sealer to protect the clay and paint from candle wax or soot.
Cracking clay?
If air-dry clay cracks while drying, fill the fissures with a mixture of fresh clay and water (slip), smooth it over, and let it dry slowly away from direct heat.
Place your favorite tea light inside and enjoy the warm glow against the earth tones

The Complete Guide to Pottery Troubleshooting
Uncover the most common ceramic mistakes—from cracking clay to failed glazes—and learn how to fix them fast.
Polymer Clay Circle Stud Earrings
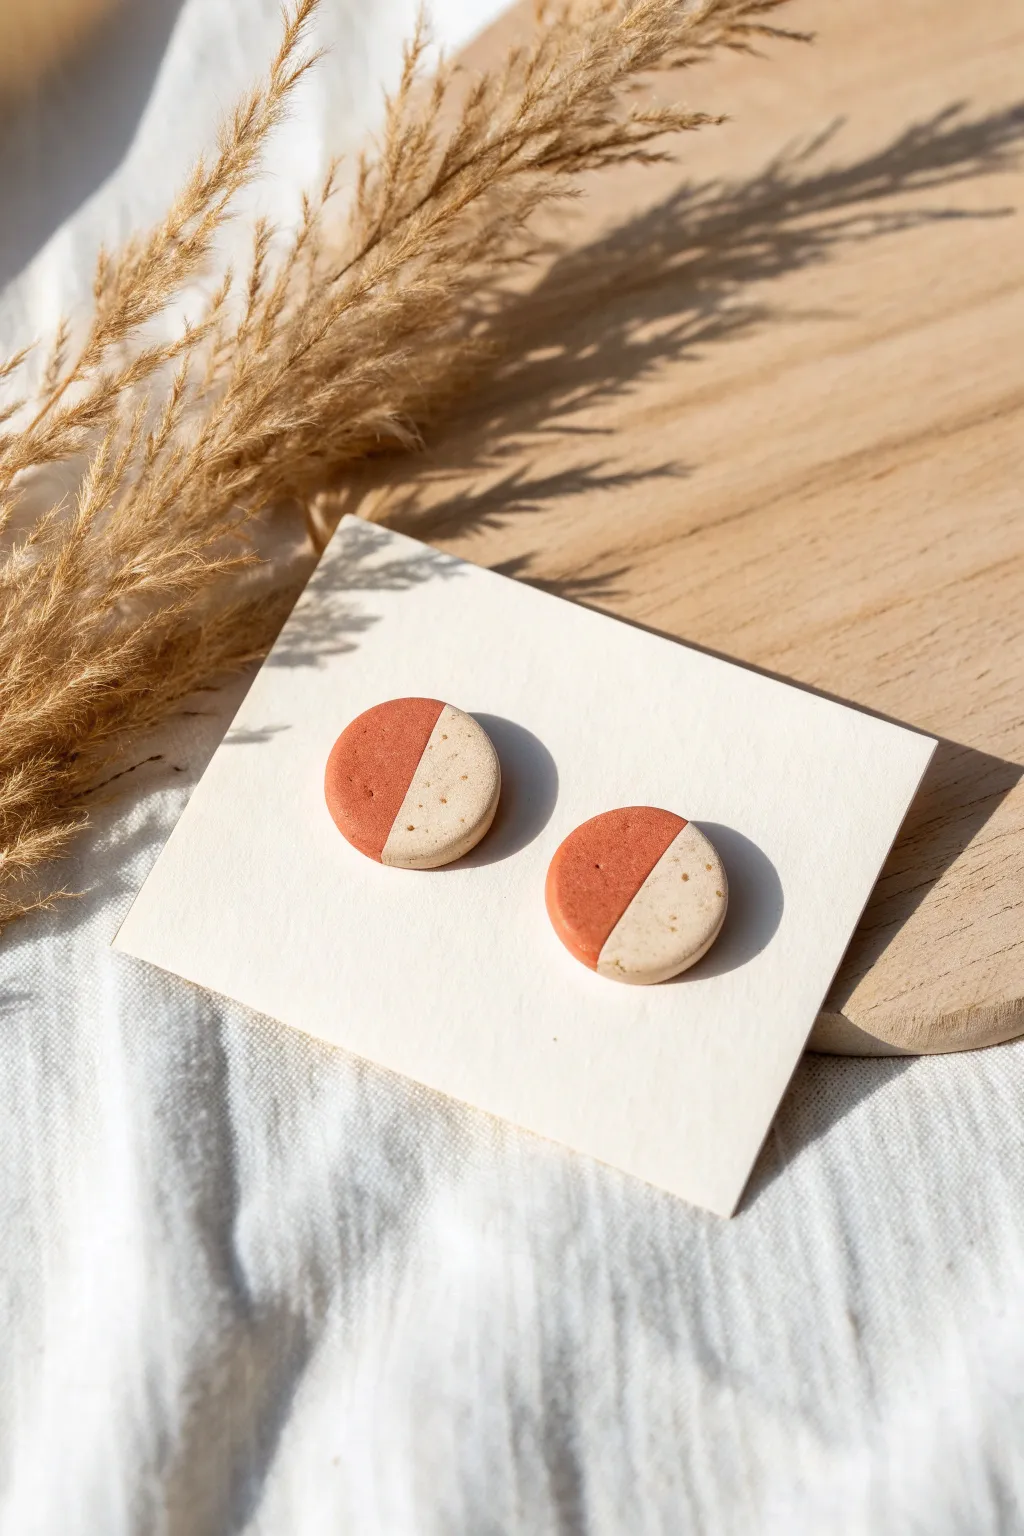
These minimalist circle studs feature a stylish split design combining earthy terracotta tones with a sandy, speckled beige. The matte finish and seamless fusion of the two colors give them a sophisticated, handcrafted look perfect for everyday wear.
Step-by-Step
Materials
- Terracotta or rust-colored polymer clay
- Beige or sand-colored polymer clay
- Black pepper or dried coffee grounds (for speckling)
- Small circle clay cutter (approx. 10-12mm)
- Acrylic roller or pasta machine
- Tissue blade or craft knife
- Flat baking tile or parchment paper
- Medium grit sandpaper (for texture)
- Earring posts
- Superglue or liquid clay
- Hand drill or pin vibe (optional)
Step 1: Preparing the Clay
-
Condition the terracotta:
Start by thoroughly kneading your terracotta polymer clay until it is soft and pliable. This conditioning step is crucial to prevent cracks later on. -
Mix the speckled beige:
If you don’t have pre-speckled clay, take your plain beige clay and knead in a tiny pinch of ground black pepper or very finely ground dried coffee. Mix until the speckles are evenly distributed, creating a stone-like effect. -
Roll out sheets:
Roll both the terracotta and the speckled beige clay into sheets of equal thickness. -
Ensure even thickness:
Aim for a thickness of about 3mm to 4mm. Using depth guides or the same setting on a pasta machine ensures your final seam will be perfectly flush.
Step 2: Creating the Split Slab
-
Cut straight edges:
Use your tissue blade to cut a perfectly straight, clean edge on one side of both clay sheets. -
Join the colors:
Lay the two sheets side-by-side on your work surface, pushing the two straight edges together gently but firmly. -
Secure the seam:
To ensure the bond is strong, you can lay a piece of parchment paper over the seam and gently rub over it with your finger or a roller. Be careful not to thin the clay out too much or distort the straight line. -
Check the underside:
Flip the joined slab over carefully to ensure the seam is tight on the back as well. If there are gaps, gently push the clays together again.
Seam Separation?
If the two colors separate after baking, use a tiny amount of liquid clay or ‘Bake & Bond’ on the straight edges before pressing them together next time.
Step 3: Cutting and Refining
-
Position the cutter:
Take your small circle cutter and position it over the seam. I usually aim for a 50/50 split, but you can offset it slightly for a different look. -
Cut the shapes:
Press the cutter down firmly through the clay slab. Give it a tiny wiggle before lifting to ensure a clean cut. -
Smooth the edges:
Gently lift the circles. If there are any jagged bits on the edges, smooth them carefully with your finger tip. A distinctive feature of this look is the soft, rounded edge, so gently tap the sharp corners down. -
Add texture (optional):
For a more organic, matte feel, you can gently press a piece of sandpaper or a textured sponge onto the surface before baking.
Plastic Wrap Trick
Place a piece of cling film (plastic wrap) over the clay before using your cutter. This creates naturally rounded, domed edges known as a ‘pillow effect’ without needing sanding.
Step 4: Baking and Assembly
-
Bake carefully:
Place your clay circles on a ceramic tile or a baking sheet lined with plain paper. Bake according to your brand of clay’s specific instructions (usually around 275°F/130°C for 30 minutes). -
Cool down:
Let the pieces cool completely. They will be slightly flexible when warm but will harden fully once cool. -
Sand the back:
If the back of your earrings feels uneven, lightly sand it flat so the earring post will sit flush. -
Attach posts:
Apply a drop of superglue to the flat pad of an earring post and press it firmly onto the back of the clay circle. -
Secure the post:
For extra durability, I recommend adding a small amount of liquid polymer clay over the post pad (avoiding the stick part) and baking again for a few minutes to seal it in place.
Now you have a chic, geometric pair of earrings that highlight simple color blocking elegantly
Layered Circle Dangle Earrings
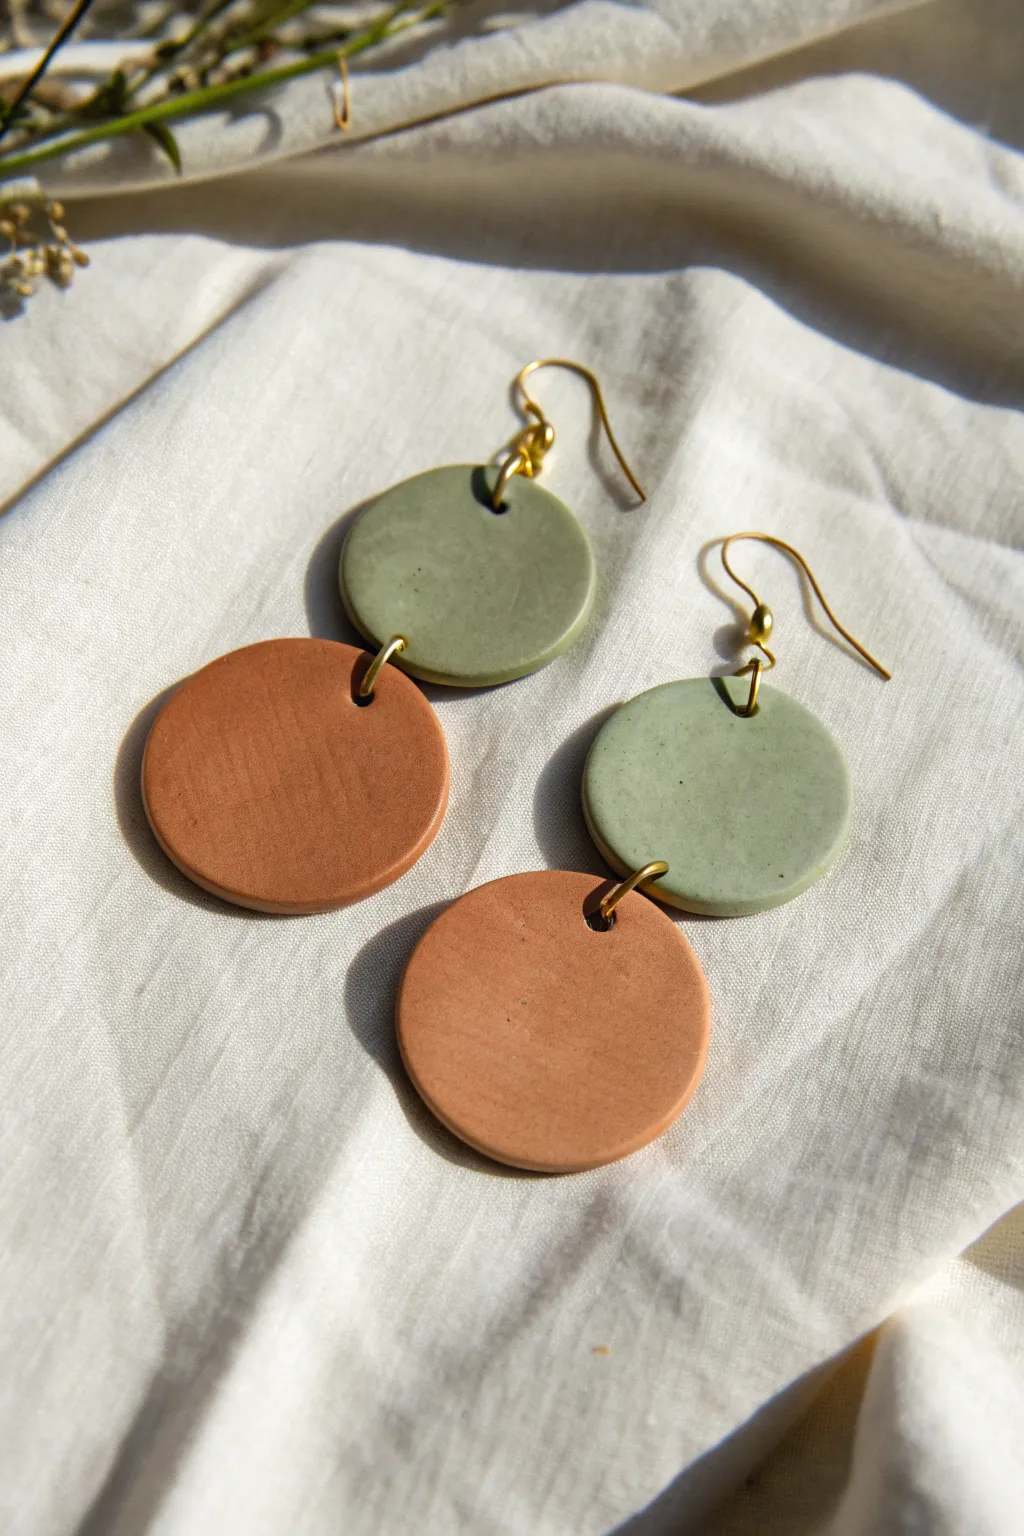
These minimalist dangle earrings combine earthy sage green and warm terracotta tones for a modern, grounded aesthetic. The design relies on two perfectly round discs joined by gold hardware, creating a swaying movement that feels both elegant and casual.
Detailed Instructions
Materials
- Polymer clay (sage green and terracotta/burnt orange)
- Acrylic rolling pin or clay conditioning machine
- Circle clay cutters (two sizes: approx. 15mm and 25mm)
- Small jump rings (gold finish)
- Earring hooks (gold finish)
- Needle tool or small drill bit
- Flat-nose jewelry pliers (two pairs recommended)
- Parchment paper or ceramic tile
- Fine grit sandpaper (optional for finishing)
- Oven
Step 1: Shaping the Discs
-
Condition the clay:
Begin by warming the sage green clay in your hands, kneading it until it becomes soft and pliable. Repeat this process separately for the terracotta clay to prevent color transfer. -
Roll out the slabs:
Place the clay on a smooth surface or parchment paper. Use your acrylic roller to flatten the sage green clay into an even slab, aiming for a thickness of about 3mm. Do the same for the terracotta clay. -
Cut the top circles:
Using the smaller circle cutter, press firmly into the sage green slab to cut two identical shapes. Twist slightly before lifting the cutter to ensure clean edges. -
Cut the bottom circles:
Switch to the larger circle cutter and cut two shapes from the terracotta slab. These will form the heavier, bottom portion of the earring. -
Add connection holes:
Using a needle tool, carefully pierce a hole near the top edge and the bottom edge of the sage green circles (at 12 o’clock and 6 o’clock positions). Ensure the hole is large enough for your jump rings. -
Pierce the bottom discs:
Make a single hole near the top edge of the terracotta circles. Double-check that it aligns nicely when held below the green circle. -
Smooth the surfaces:
Before baking, lightly run your finger with a tiny drop of baby oil or cornstarch over the clay surface to remove any visible fingerprints or dust specks.
Clean Edges Tip
Place a piece of cling wrap over the clay before using your cutter. This creates a soft, domed pillow effect on the edges, minimizing the need for sanding later.
Step 2: Baking and Assembly
-
Bake the pieces:
Transfer your cut circles onto a ceramic tile or baking sheet lined with parchment. Bake according to your brand of clay’s instructions—usually around 275°F (135°C) for 30 minutes. -
Cool and inspect:
Allow the clay to cool completely inside the oven or on a wire rack. Once cool, check the edges; if they feel sharp, sand them gently with fine-grit sandpaper. -
Open the jump rings:
Using two pairs of pliers, grip a jump ring on either side of the split. Twist one hand forward and the other backward to open the ring sideways—never pull them apart horizontally. -
Connect the clay pieces:
Slide the open jump ring through the bottom hole of the sage green circle and the top hole of the terracotta circle. Close the jump ring securely using the reverse twisting motion. -
Check movement:
Hold the pieces up to ensure the circles swing freely. If they are stiff, your jump ring might be too small for the thickness of the clay. -
Attach the ear wire:
Open the loop at the base of your ear hook (or use a separate small jump ring). Thread it through the top hole of the sage green circle. -
Final closure:
Close the ear wire loop securely. Repeat the entire assembly process for the second earring to complete the pair.
Troubleshooting Bubbles
If you see air bubbles after rolling, slice into them carefully with a blade and smooth the clay back down. Ensure you condition the clay thoroughly to prevent this.
Wear your new creations with pride, showcasing the beautiful balance of color and geometry


What Really Happens Inside the Kiln
Learn how time and temperature work together inside the kiln to transform clay into durable ceramic.
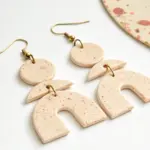
Round Pendant Medallion Necklace
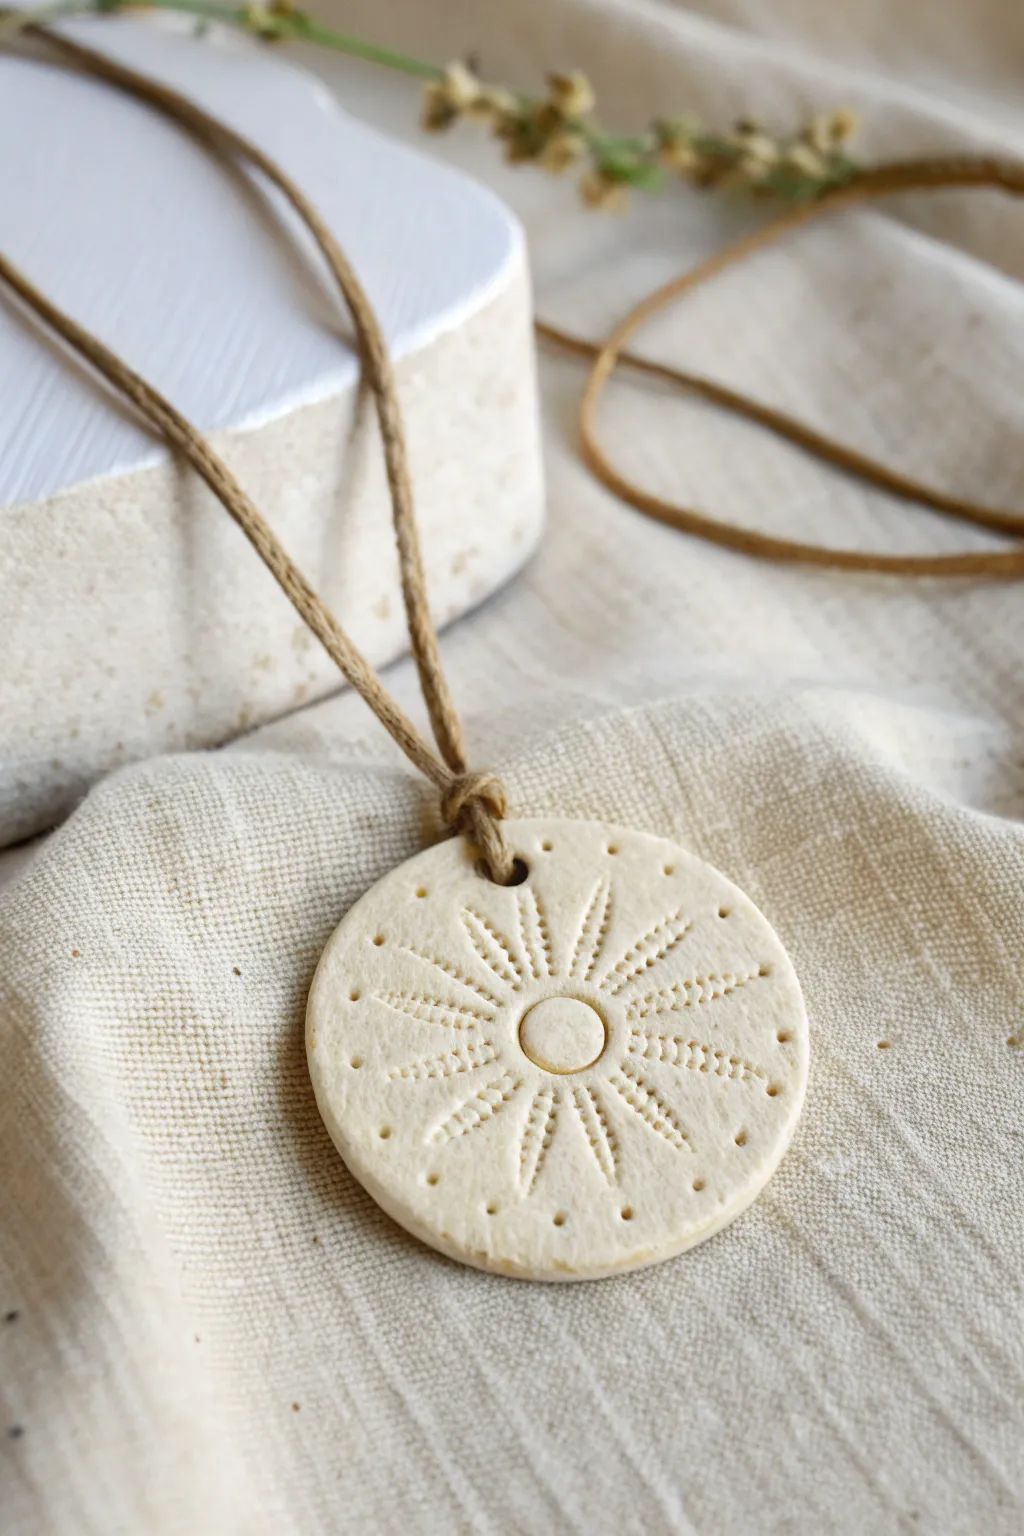
This rustic, earthy medallion necklace captures the warmth of the sun in a simple clay circle. With its textured radiating lines and natural off-white finish, it makes for a versatile accessory that feels both ancient and modern.
How-To Guide
Materials
- Air-dry clay or polymer clay (white or beige)
- Circle cutter (approx. 2 inches diameter)
- Modeling tool with a pointed tip or a wooden skewer
- Small straw or cocktail stick (for the stringing hole)
- Small round piping tip or pen cap (for the center circle)
- Rolling pin
- Sandpaper (fine grit)
- Waxed cotton cord or hemp twine (brown)
- Parchment paper or clay mat
Step 1: Shaping the Base
-
Prepare the Clay:
Start by kneading a chunk of clay until it is soft, pliable, and free of air bubbles. If you are using air-dry clay, keeping your hands slightly moist can help prevent cracks. -
Roll the Slab:
Place your clay on a piece of parchment paper to prevent sticking. Use the rolling pin to flatten the clay into an even slab, aiming for a thickness of about 1/4 inch (6mm). -
Cut the Circle:
Press your circle cutter firmly into the clay to create a clean, round disc. Lift away the excess clay from the edges before removing the cutter to keep the shape undistorted. -
Smooth the Edges:
Dip your finger in a little water (for air-dry clay) or baby oil (for polymer) and gently run it around the circumference of the disc to smooth out any sharp edges or cutting marks.
Cracking Up?
If air-dry clay cracks while drying, fill the fissures with a ‘slip’ mixture of clay and water, smooth it over, and let it dry again slowly away from direct heat.
Step 2: Creating the Design
-
Mark the Center:
Find the approximate center of your circle. Take your small round piping tip or a smooth pen cap and press it gently into the middle to create an embossed ring. Don’t push all the way through. -
Create the Rays:
Using a pointed modeling tool or skewer, press lines radiating outward from the center circle. Start by marking the cardinal directions (North, South, East, West) to ensure spacing stays even. -
Fill the Pattern:
Add two diagonal lines between each cardinal line. Imprint these lines with a bit of texture by pressing the tool down repeatedly to create a dotted or dashed effect, rather than dragging it. -
Add Outer Details:
Use the very tip of your tool or a needle to poke small, single dots around the outer perimeter of the medallion, placing one dot at the end of every other ray for a balanced look. -
Refine the Imprints:
Go back over your sunburst lines if needed to deepen the texture, ensuring the design will remain visible once the clay dries. -
Pierce the Hanger:
Use a small straw or cocktail stick to punch a hole near the top edge of the pendant. Ensure the hole is large enough for your chosen cord to pass through easily.
Step 3: Finishing and Assembly
-
Dry or Bake:
If using air-dry clay, let the piece sit undisturbed on a flat surface for 24-48 hours until fully hardened. For polymer clay, bake according to the manufacturer’s instructions on the package. -
Sand the Edges:
Once the pendant is completely hard, use fine-grit sandpaper to gently buff the edges and the back surface. This gives the piece a professional, finished feel. -
Clean the Dust:
Wipe the pendant down with a slightly damp cloth to remove any sanding dust. I prefer to do this ensuring no white powder remains in the textured grooves. -
Cut the Cord:
Measure a length of brown waxed cotton cord or twine. A length of about 30 inches usually works well for an adjustable necklace. -
Lark’s Head Knot:
Fold your cord in half to find the midpoint. Push the folded loop through the hole in the pendant from front to back. -
Secure the Pendant:
Pull the loose ends of the cord through the loop you just pushed through the hole and pull tight. This creates a secure Lark’s Head knot right at the pendant’s top. -
Final Tie:
Tie the ends of the cord together using a simple overhand knot or adjustable sliding knots to complete your necklace.
Antique Effect
Rub diluted brown acrylic paint into the grooves and wipe the surface clean with a damp cloth. The dark paint stays in the recesses, making the sun pattern pop.
Now you have a handmade piece of earthy jewelry ready to wear or gift to a friend
Circle Keychain Tag Discs

Capture the magic of the cosmos with these elegant, stamped polymer clay keychains. Featuring a deep teal sunburst disc and a warm terracotta moon charm, this project brings celestial beauty to your everyday essentials.
Detailed Instructions
Materials
- Polymer clay in teal/forest green and terracotta/brick red
- Rolling pin or acrylic roller
- Circle clay cutter (approx. 2 inch diameter)
- Small circle cutter or straw (for hole punching)
- Texture stamps or carving tools (sun, moon, and star shapes)
- Gold mica powder or gold acrylic paint
- Small soft paintbrush
- Brass keyrings and jump rings
- Needle nose pliers
- Oven and baking sheet
- Bonus: Small decorative brass charm (optional)
- Sandpaper / Wet-dry sandpaper (400-1000 grit)
Step 1: Preparing the Clay Bases
-
Condition the clay:
Begin by warming up your polymer clay in your hands. Knead the teal and terracotta blocks separately until they are soft, pliable, and free of cracks. -
Roll the slabs:
Using an acrylic roller or rolling pin, roll each color out onto a clean work surface. Aim for a consistent thickness of about 4mm—thick enough to be sturdy but not bulky. -
Cut the circles:
Press your 2-inch circle cutter firmly into the rolled clay slabs. Cut one circle from the teal clay and one from the terracotta clay. -
Smooth the edges:
Before removing the cut circles from your work surface, gently run your finger around the rim to smooth out any sharp edges left by the cutter. -
Create the hanging hole:
Use a small circle cutter or a sturdy straw to punch a hole near the top edge of each disc. Ensure the hole is not too close to the edge to prevent tearing later.
Clean Cut Tip
To avoid fingerprints or distortion when lifting the raw geometric shapes, place a piece of plastic wrap over the clay before using your cutters.
Step 2: Adding Celestial Details
-
Stamp the sun design:
On the teal disc, press your sun design stamp or use carving tools. Create a large central circle on the left side, then carefully carve or stamp radiating lines extending outward. Add small dots or dashes at the ends of the rays for extra detail. -
Stamp the moon design:
On the terracotta disc, stamp or carve a crescent moon shape in the center. Surround it with small starbursts or twinkling star stamps. -
Highlight with gold (Option 1: Mica Powder):
If using decorative mica powder for a subtle shimmer, dip a dry finger or soft brush into the gold powder and gently swipe it over the raised areas before baking. -
Texture the edges:
I like to add a tiny bit of texture to the very rim of the circle using a toothbrush or sandpaper for a more stone-like finish, though leaving it smooth is perfectly fine too.
Step 3: Baking and Finishing
-
Bake the pieces:
Place your clay discs on a baking sheet lined with parchment paper. Bake according to your specific brand’s package instructions (usually around 275°F/135°C for 15-30 minutes). -
Cool down:
Allow the clay pieces to cool completely on the baking sheet. They are fragile while hot, so resist the urge to move them. -
Highlight with gold (Option 2: Acrylic Paint):
If you didn’t use mica powder, you can now gently brush gold acrylic paint into the stamped grooves. Wipe away excess paint on the surface with a damp paper towel to leave gold only in the recessed lines. -
Sand for smoothness:
Use wet/dry sandpaper to gently buff the edges and back of your discs under running water for a professional, polished feel. -
Seal the surface (Optional):
Apply a thin layer of matte or satin clay varnish if you want to protect the gold details, though baked polymer clay is durable on its own.
Fixing Bubbles
See an air bubble on the surface before baking? Gently pierce it with a needle and smooth the air out with your finger to flatten it.
Step 4: Assembly
-
Prepare the hardware:
Open your large brass jump rings using two pairs of pliers. Twist the ends away from each other (front to back), never pull them apart sideways. -
Connect the clay:
Slide the open jump ring through the hole in your clay tag, then loop it onto the main keyring. -
Add charms:
If you have a decorative brass key charm or similar accent, attach it to the keyring using a smaller jump ring. This adds a lovely jingle and vintage feel. -
Close the rings:
Use your pliers to twist the jump rings back into a closed position, ensuring the ends meet perfectly flush so the clay doesn’t slip off.
Attach your keys and enjoy carrying around a little piece of the sky with you wherever you go

TRACK YOUR CERAMIC JOURNEY
Capture glaze tests, firing details, and creative progress—all in one simple printable. Make your projects easier to repeat and improve.
Mini Circle Fridge Magnets
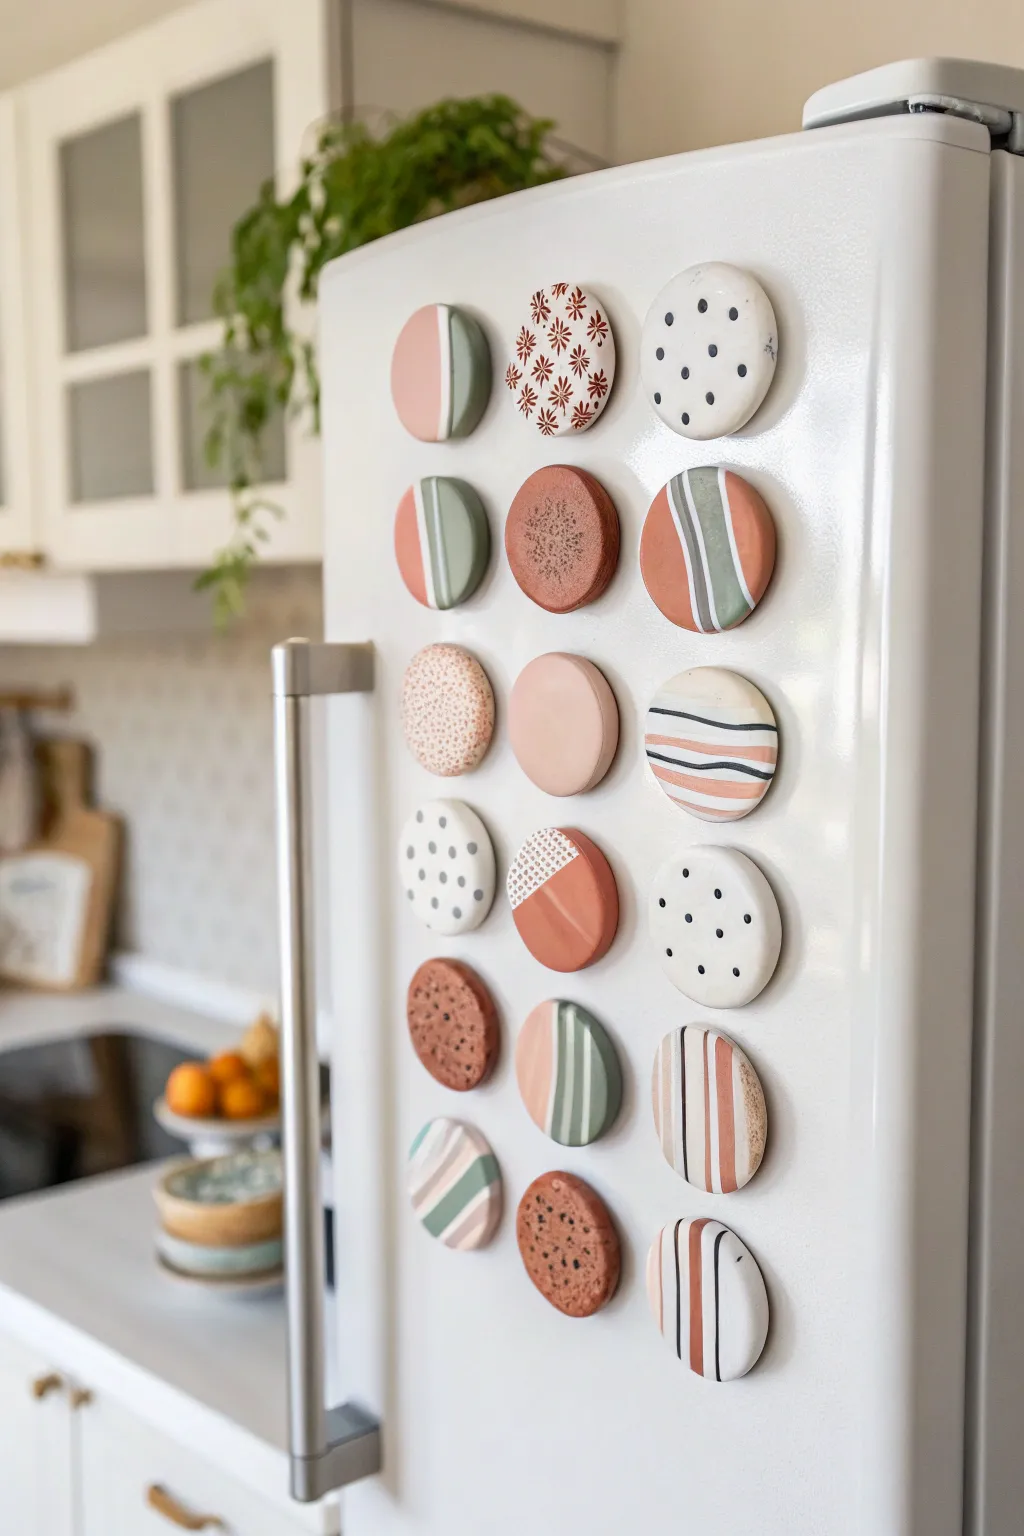
Transform your refrigerator into a gallery of mini art with these earthy, patterned circle magnets. Using polymer clay and simple painting techniques, you’ll create a cohesive collection featuring terrazzo, geometric stripes, and delicate floral motifs.
Step-by-Step
Materials
- White polymer clay (oven-bake)
- Acrylic rolling pin
- Circle cookie cutter (approx. 1.5 – 2 inches)
- Acrylic paints (terracotta, sage green, black, cream/beige)
- Fine detail paintbrushes (size 0 and size 2)
- Round magnets (strong ferrite or neodymium)
- Super glue or E6000
- Sandpaper (fine grit)
- Matte varnish or sealant
- Optional: Texture stamps or lace
- Toothpick or dotting tool
- Parchment paper-lined baking sheet
Step 1: Shaping the Clay Base
-
Condition the Clay:
Start by warming the white polymer clay in your hands, kneading it until soft and pliable to prevent cracking during baking. -
Roll Out the Sheet:
Using your acrylic roller, flatten the clay into an even sheet. Aim for a thickness of about 1/4 inch (6mm) to ensure the magnets are sturdy but not too heavy. -
Cut the Circles:
Press your circle cutter firmly into the clay sheet to create your magnet bases. You’ll need about 18-20 circles to recreate the full set shown. -
Smooth the Edges:
Gently run your finger around the cut edge of each circle to soften any sharp ridges left by the cutter. -
Add Texture (Optional):
For the textured designs, lightly press a floral stamp or a piece of textured fabric into a few of the raw clay circles before baking. -
Bake the Clay:
Place the circles on a parchment-lined baking sheet and bake according to the manufacturer’s instructions (usually 275°F/135°C for 15-30 minutes). -
Cool and Sand:
Allow the clay pieces to cool completely. If there are any rough spots or fingerprints, lightly sand them smooth with fine-grit sandpaper.
Step 2: The Art of Painting
-
Base Coat:
Paint some circles entirely in solid colors like cream, terracotta, or sage. For the patterned ones, start with a solid white or cream base coat and let it dry. -
Create the Color Palette:
Prepare your palette with earthy tones. Mix a burnt orange (terracotta), a muted green (sage), a soft beige, and keep pure black handy for details. -
Design 1: Color Blocking:
For the split-circle designs, use painter’s tape or a steady hand to paint one vertical half in a color like sage or pink, leaving the other half neutral. -
Design 2: Geometric Stripes:
Using your finest brush, paint thin, parallel lines across the circle. Vary the line thickness and combine curved and straight lines for visual interest. -
Design 3: Terrazzo Speckles:
Dip a toothpick or small brush into terracotta paint and dab irregular spots onto a cream base. Repeat with black microp-dots to mimic stone texture. -
Design 4: Polka Dots:
Use the back end of a paintbrush or a dotting tool to create evenly spaced black or colored dots on a white background. -
Design 5: Floral Accents:
If you didn’t texture the clay earlier, paint tiny, simple star-burst flowers using a fine brush in a reddish-brown hue. -
Drying Time:
Allow all paint to dry thoroughly. I personally like to wait at least an hour to ensure colors don’t smear during the sealing process.
Smooth Surface Secret
Wipe raw clay with a little baby oil or cornstarch before baking to smooth out fingerprints effortlessly.
Step 3: Assembly and Finish
-
Seal the Artwork:
Apply a thin layer of matte varnish over the painted surface. This protects the paint from chipping and gives the magnets a professional finish. -
Attach the Magnets:
Flip the clay circles over. Apply a small dab of strong glue (like E6000) to the center of the back. -
Press and Set:
Press the round magnet firmly into the glue. Let the adhesive cure for 24 hours before placing them on your fridge.
Fixing Uneven Lines
If your painted stripes look shaky, outline them with a thin Posca paint pen for a cleaner, sharper edge.
Arrange your new collection on the fridge to add an instant touch of modern warmth to your kitchen
Hanging Circle Ornaments

Embrace simplicity with this beautifully understated hanging ornament, featuring a smooth, circular shape reminiscent of a modern stone pendant. Its matte white finish and rustic jute twine create a serene, Scandinavian-inspired look perfect for year-round decor.
Detailed Instructions
Materials
- White polymer clay (or air-dry clay)
- Circle cutter (approx. 3 inches diameter)
- Small circle cutter (approx. 1 inch diameter)
- Rolling pin
- Parchment paper or non-stick mat
- Fine-grit sandpaper (400 grit)
- Needle tool or toothpick
- Natural jute twine
- Scissors
Step 1: Shaping the Clay
-
Condition the Clay:
Begin by taking a handful of white polymer clay. Knead it thoroughly in your warm hands until it becomes soft, pliable, and free of cracks. -
Roll the Slab:
Place your conditioned clay on a sheet of parchment paper. Use a rolling pin to roll it out into an even slab. -
Check Thickness:
Aim for a thickness of about 1/4 inch (6mm). This thickness gives the ornament a substantial, high-quality feel without being too heavy. -
Cut the Outer Circle:
Press your larger circle cutter firmly into the clay slab. Twist slightly to ensure a clean cut, then lift the cutter away. -
Cut the Center Hole:
Position the smaller circle cutter exactly in the center of your large clay circle. Press down to cut out the inner hole, creating a donut shape. -
Create the Hanging Hole:
Use a needle tool or a toothpick to poke a small hole near the top edge of the ring. Make sure it’s large enough for your twine to pass through. -
Smooth the Edges:
Dip your finger in a little water (for air-dry clay) or baby oil (for polymer clay) and gently run it along any sharp cut edges to round them off softly.
Stone Effect Hack
Mix black pepper into the white clay before rolling. The tiny specks will mimic the look of natural stone or terrazzo effortlessly.
Step 2: Baking and Refining
-
Bake the Ornament:
Transfer the clay circle on its parchment paper to a baking sheet. Bake according to your specific clay package instructions—usually around 275°F (135°C) for 15-30 minutes. -
Cool Completely:
Once baking is complete, remove the tray from the oven and let the clay cool down fully before handling. It hardens as it cools. -
Initial Sanding:
Take your fine-grit sandpaper and gently buff the surface of the clay. Focus on any fingerprints or uneven spots. -
Edge Refinement:
Sand the inner and outer edges carefully to ensure the silhouette is perfectly round and smooth. -
Creating Texture (Optional):
If you want that slightly speckled, stone-like look seen in the photo, you can lightly tap the surface with a coarse brush or sandpaper before the final wipe-down. -
Clean Up:
Wipe the ornament with a slightly damp cloth to remove all sanding dust, revealing a pristine matte finish.
Uneven Surface?
If your clay isn’t rolling flat, place two wooden rulers on either side of the clay to guide your rolling pin for perfect, even thickness.
Step 3: Assembly
-
Prepare the Twine:
Cut a piece of natural jute twine roughly 12 inches long. -
Thread the Loop:
Instead of using the small drilled hole you made, we will loop the twine through the large center hole for a bolder look. Fold your twine in half. -
Attach via Larks Head Knot:
Pass the folded loop end through the large center hole. Pull the two loose ends of the twine through this loop and tighten it against the top of the clay ring. -
Secure the Knot:
Alternatively, you can thread the twine through the smaller hanging hole you made earlier if you prefer it to hang more delicately. Tie a secure double knot at the base. -
Create the Hanging Loop:
Tie the two loose ends of the twine together in an overhand knot near the top to create a loop for hanging. -
Trim Excess:
Snip off any excess twine above the knot for a tidy finish.
Hang your modern clay creation on a branch or in a window to enjoy its calm, organic beauty
Moon-Phase Circle Garland
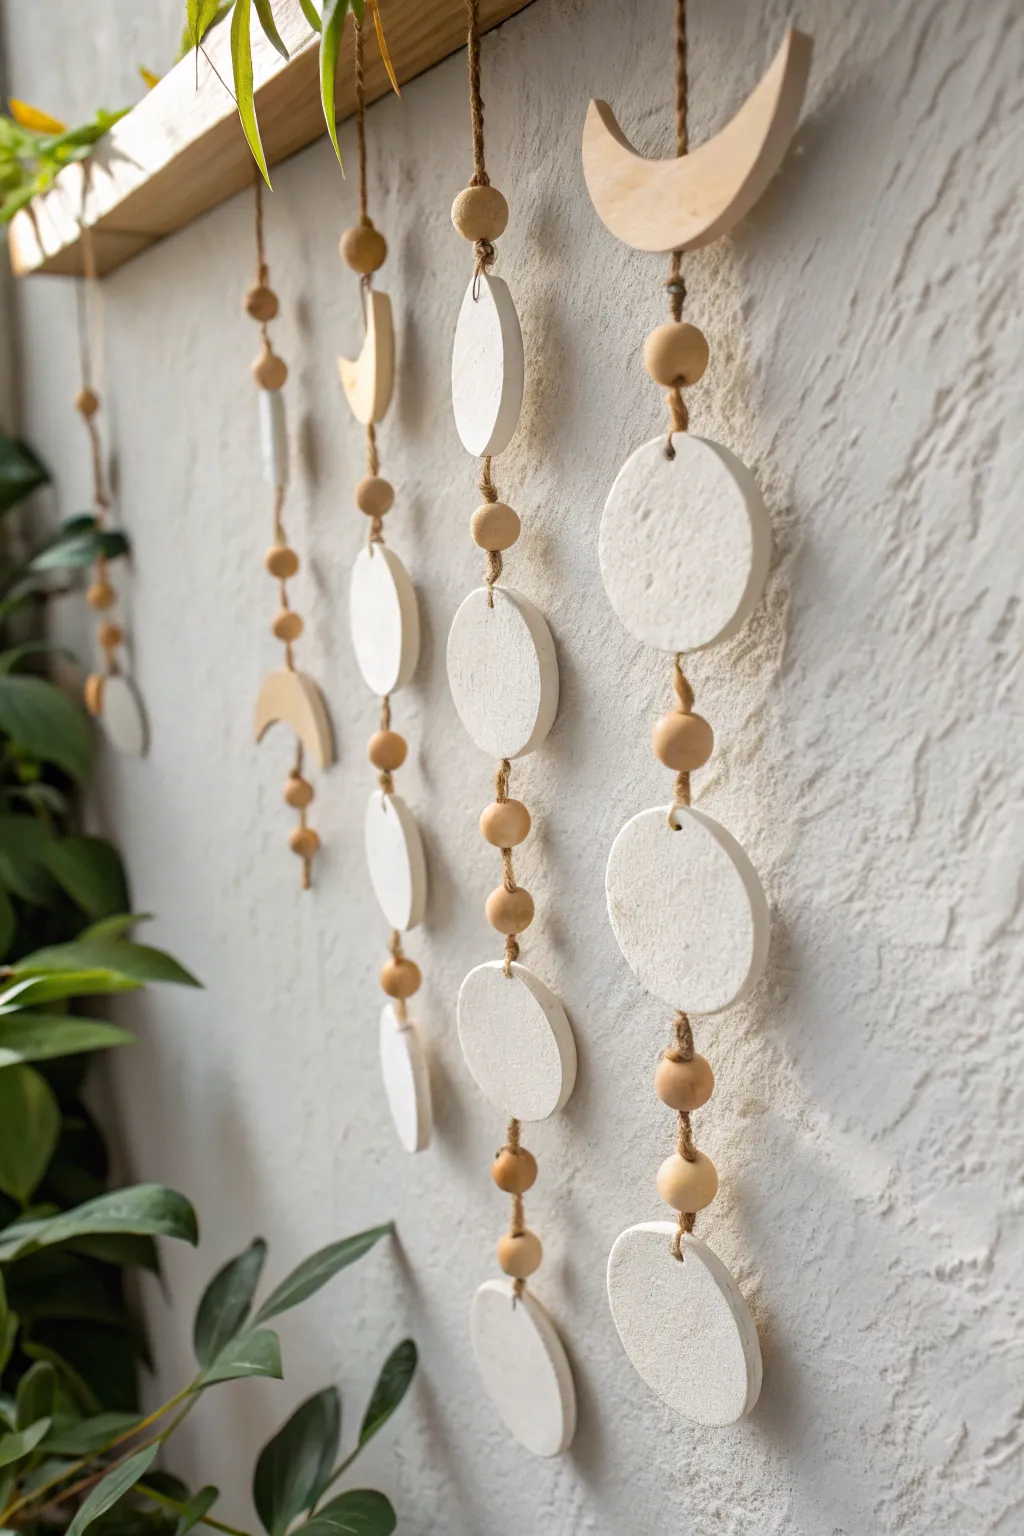
Bring the calming influence of the moon cycle into your home with this textured clay garland. Featuring organic white clay circles, gentle crescents, and natural wooden beads, this vertical hanging adds immediate boho charm to any wall space.
Step-by-Step
Materials
- Air-dry clay (white)
- Rolling pin
- Circle cookie cutters (approx. 2.5-3 inches)
- Crescent moon cutter (or a knife and template)
- Wooden beads (assorted sizes, mostly naked wood)
- Jute twine or hemp cord
- Drinking straw or skewer (for holes)
- Fine-grit sandpaper
- Wooden dowel or flat slat for hanging
Step 1: Shaping the Clay Elements
-
Condition the clay:
Begin by taking a large chunk of air-dry clay and kneading it in your hands until it is warm and pliable. This prevents cracking later on. -
Roll out the slab:
Roll the clay out on a smooth surface or canvas mat until it is about 1/4 inch thick. Try to keep the thickness consistent so all pieces dry at the same rate and hang evenly. -
Cut the circles:
Use your circle cutter to punch out approximately 12 to 15 full circles. Press straight down and lift up to get a clean edge. -
Create the moons:
Cut out your crescent shapes. If you don’t have a specific cutter, you can use the same circle cutter twice—once to make a circle, and again to take a ‘bite’ out of it, forming a crescent. -
Pierce holes:
Before the clay dries, use a drinking straw or a skewer to poke holes. For the circles, you need a hole at the very top and very bottom. For the crescents, place holes at the top and bottom center points. -
Smooth the edges:
Dip your finger in a little water and run it gently along the cut edges of your shapes to smooth down any rough clay burrs.
Fixing Cracks
If you see hairline cracks while drying, make a ‘slip’ paste of clay and water. Rub it into the cracks and let dry again before sanding.
Step 2: Finishing and Assembly
-
Let them dry:
Lay all your pieces flat on a piece of parchment paper or a wire rack. Allow them to dry completely according to the package instructions, usually 24-48 hours. Flip them halfway through to prevent curling. -
Sand for texture:
Once bone dry, take fine-grit sandpaper and lightly sand the surfaces. I prefer to leave a little texture rather than making it perfectly smooth, as it adds to the organic look shown in the photo. -
Cut the suspension cords:
Cut four to five lengths of jute twine. Make them long enough to hold your desired number of shapes plus extra for tying knots—about 3 to 4 feet per strand is a safe bet. -
Attach to the mount:
Tie one end of each twine strand securely onto your wooden dowel or slat. Space the strands evenly apart. -
Start the first strand:
Thread a wooden bead onto the first string and push it up to the knot. Tie a knot underneath the bead to hold it in place. -
Add a clay element:
Thread the string through the top hole of a clay circle or crescent, then out through the bottom hole. The string will run along the back of the shape. -
Secure the shape:
Slide a wooden bead onto the string immediately after the clay shape and tie a knot below it to support the weight of the clay. -
Continue the pattern:
Repeat the process down the string: leave a few inches of bare twine, tie a knot, add a bead, add a clay shape, add a bead, and knot again. -
Vary the design:
Create visual interest by varying the order of shapes on each strand. Mix full circles with crescents, or create strands that are just circles while others feature the moon phases. -
Finish the ends:
Once you reach the bottom of a strand, finish with a final clay piece or a heavy bead, tie a secure double knot, and trim the excess twine.
Add Gold Accents
For a luxe touch, paint the edges of just the crescent moons with gold leaf paint, leaving the full circles natural white.
Hang your finished garland near a window where the natural light can highlight the beautiful texture of the clay
Stacked Circle Wall Mobile
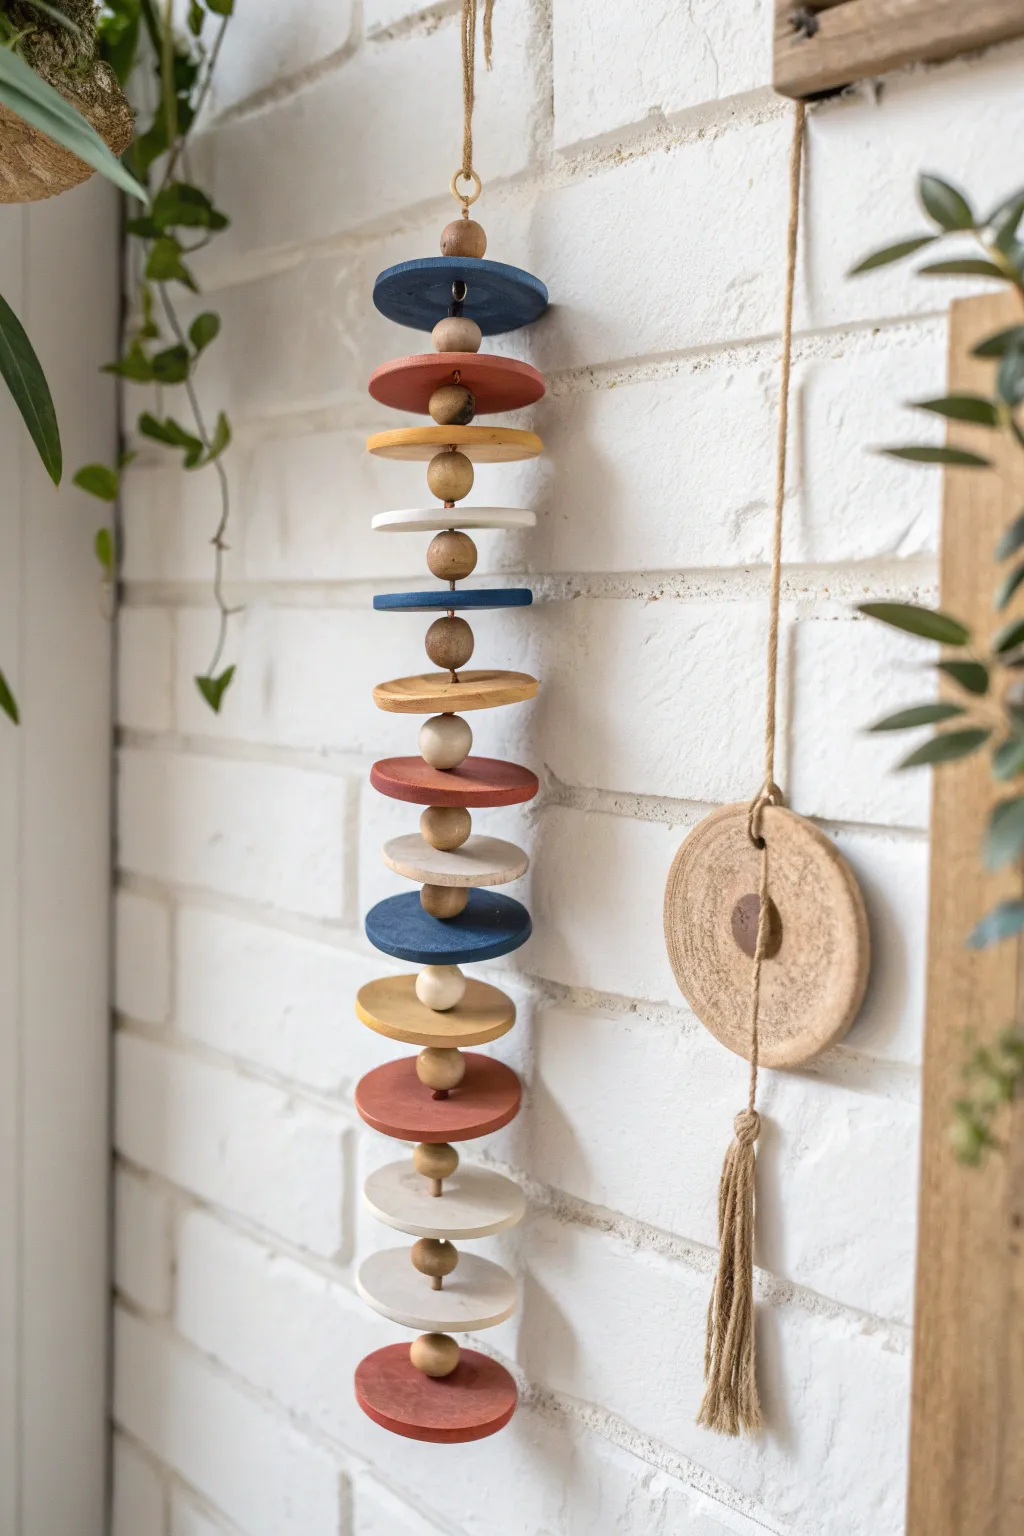
Bring earthy charm to your space with this stacked clay mobile, featuring alternating discs of rich navy, rust, mustard, and creamy white. Suspended on natural jute twine and spaced with wooden beads, this textural piece adds a perfect touch of handmade warmth to any blank wall.
Detailed Instructions
Materials
- Air-dry clay or polymer clay (white)
- Rolling pin
- Circle cookie cutter (approx. 2.5 – 3 inches diameter)
- Small straw or skewer (for making holes)
- Acrylic craft paints (Navy Blue, Terracotta, Mustard Yellow, Cream/White)
- Paintbrushes
- Wooden beads (various sizes, natural finish)
- Jute twine or heavy hemp cord
- Brass ring or loop (for hanging)
- Sandpaper (fine grit)
- Parchment paper or craft mat
Step 1: Shaping the Clay Discs
-
Condition the Clay:
Begin by kneading your clay until it is soft, pliable, and free of cracks. If you are using polymer clay, the warmth of your hands will help condition it; for air-dry clay, just ensure it’s smooth. -
Roll Out the Clay:
Place the clay on parchment paper or a craft mat. Roll it out to an even thickness of about 1/4 inch. Try to keep the thickness consistent so the discs have a uniform look when stacked. -
Cut the Circles:
Use your circle cookie cutter to punch out approximately 12-14 discs. Press firmly and twist slightly to get a clean cut, then carefully lift away the excess clay. -
Smooth the Edges:
Dip your finger in a little bit of water (for air-dry clay) or baby oil (for polymer) and gently run it around the cut edges of each circle to smooth out any roughness or sharp corners. -
Create Center Holes:
Use a straw or a skewer to poke a hole directly in the center of each disc. Ensure the hole is large enough for your jute twine to pass through comfortably, factoring in a little shrinkage if using air-dry clay. -
Dry or Bake:
Follow the manufacturer’s instructions for your specific clay. If baking polymer clay, place the discs on a baking sheet. If using air-dry clay, leave them on a flat surface to dry completely for 24-48 hours, flipping them occasionally to prevent warping.
Keep it Straight
While drying air-dry clay, place a heavy book on top (with parchment paper in between) during the final stages of drying. This prevents the edges from curling upward as moisture evaporates.
Step 2: Decorating & Painting
-
Sand Imperfections:
Once fully cured or dried, inspect your discs. Use fine-grit sandpaper to lightly buff away any remaining rough edges or uneven textures on the surface. -
Plan Your Palette:
Arrange your discs in the order you plan to string them to visualize the color pattern. The example uses a repeating sequence involving navy, rust, yellow, and white. -
Apply Base Coats:
Paint the faces of the discs. You may need two coats for the lighter colors like mustard and cream to get opaque coverage. I usually paint the edges first, then smooth the paint over the flat surfaces. -
Seal (Optional):
If you want a different finish or extra durability, apply a matte or satin varnish over the dry paint. This step is optional but helps the colors pop.
Step 3: Assembly
-
Prepare the Cord:
Cut a long length of jute twine, about 4 feet long. Fold it in half to find the center, then tie it securely onto your brass ring or loop using a lark’s head knot. -
Start Stringing:
Thread both ends of the twine through a needle if needed, or tape the ends to make threading easier. Start by sliding on a small wooden bead and push it all the way up to the knot at the ring. -
First Disc:
Thread your first painted clay disc onto the twine. Slide it up so it sits snugly against the wooden bead. -
Secure the Position:
Tie a simple overhand knot in the twine directly underneath the clay disc. This knot will act as a stopper for the next bead and keep the disc from sliding down too far. -
Add a Spacer Bead:
Slide on another wooden bead. This bead will sit on top of the knot you just made. This spacing technique gives the mobile its distinct ‘floating’ structure. -
Repeat the Pattern:
Continue this pattern: Clay Disc -> Knot -> Wooden Bead. Ensure your knots are placed roughly the same distance apart if you want uniform spacing, or vary them slightly for an organic look. -
Finish the Strand:
Once all your discs are strung, tie a secure double knot after the final piece. Trim any excess twine or leave a short tassel at the bottom for a decorative finish.
Texture Play
Before drying, press distinct textures into a few discs using lace, stamps, or canvas fabric. The paint will settle into the grooves, adding subtle dimension to your stack.
Hang your new mobile near a window or against a plain wall where the colors can truly stand out
Organic Clay Ring Wall Hanging
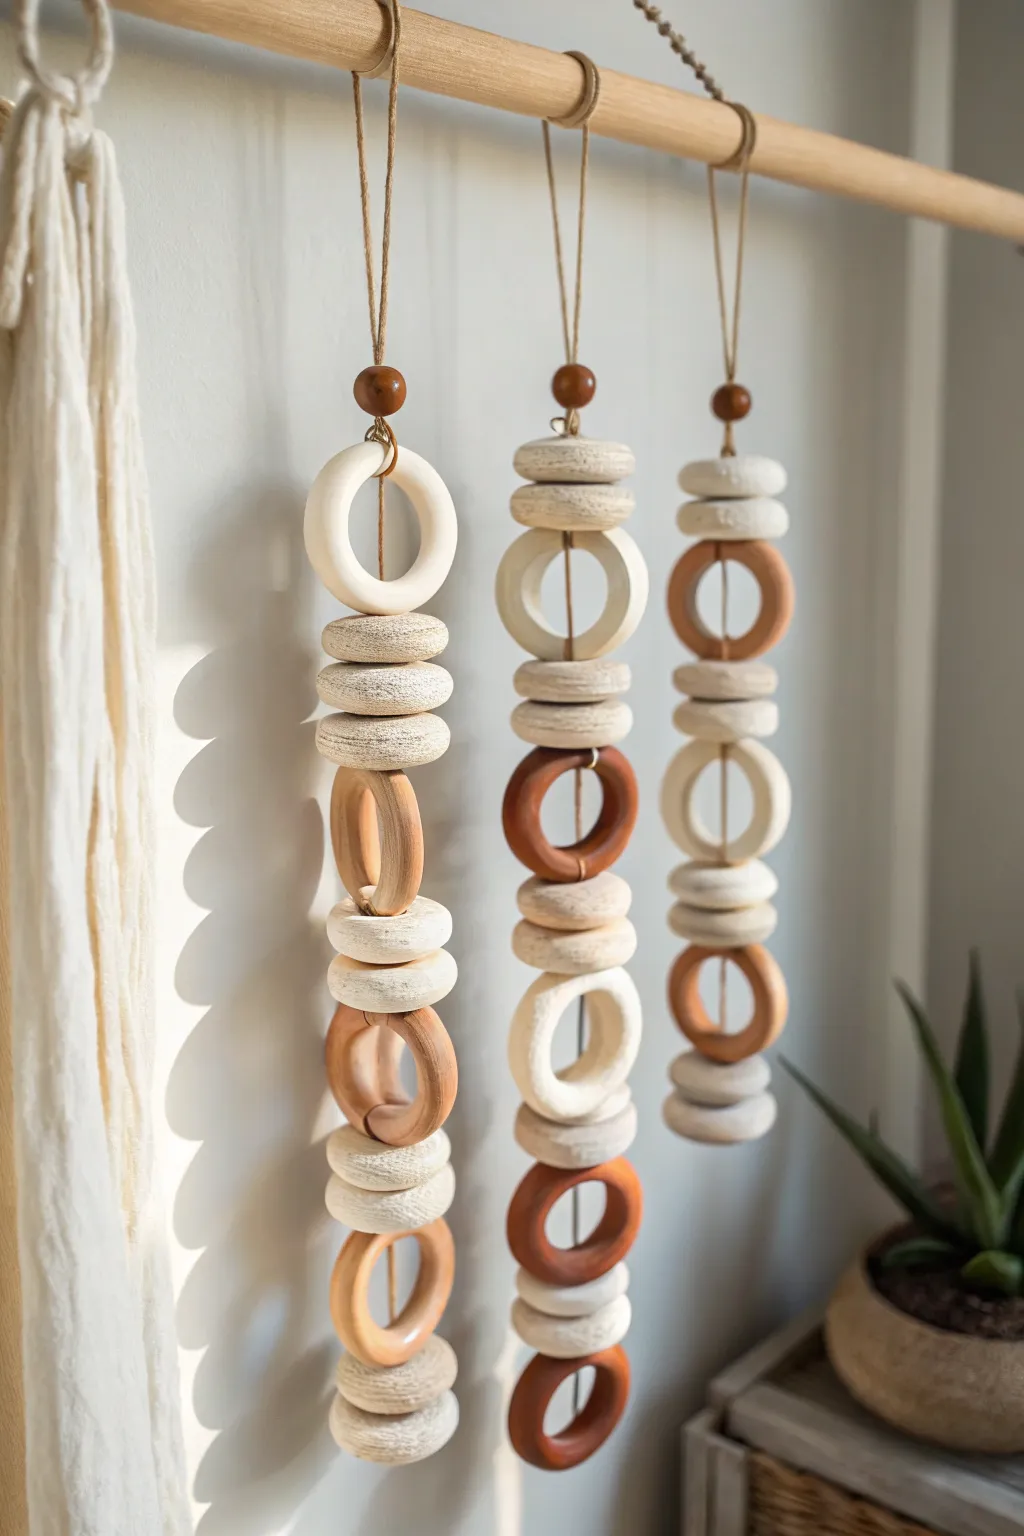
This stunning, organic wall hanging combines earthy terracotta tones with creamy whites to create a sophisticated focal point. By alternating smooth rings with textured discs, you’ll build visual rhythm and depth that looks professionally crafted but is surprisingly simple to assemble.
Step-by-Step Guide
Materials
- Air-dry clay (white and terracotta/brown)
- Rolling pin
- Circle cutters (various sizes: approx. 3-inch, 2-inch, and 1-inch)
- Wooden dowel (approx. 18-24 inches)
- Jute twine or natural hemp cord
- Wooden spacer beads (approx. 15mm with large holes)
- Toothbrush or wire brush (for texture)
- Sandpaper (fine grit)
- Needle tool or skewer
- Water and sponge
- Acrylic matte varnish (optional)
Step 1: Sculpting the Rings
-
Roll the larger rings:
Begin by rolling out a thick slab of white air-dry clay, about 1/2 inch thick. Use your largest circle cutter to punch out a disc, then use a smaller interior cutter to remove the center, creating a thick, donut-like ring. Create several of these in white. -
Create contrast rings:
Repeat the rolling process with your terracotta or brown clay. Cut out rings of similar size to your white ones. Smooth the edges of all rings with a damp finger to remove any sharp cutting lines. -
Form the connectors:
For the interlocking look, not all rings need to be cut open, but if you want true interlocking links without strings, you’d need to cut one ring, loop it, and reseal it. However, for this specific project shown, the components appear strung through their centers. Simply ensure all rings are smooth and uniform.
Cracking Clay?
If your thick textured beads crack while drying, you can repair them by mixing a small amount of clay dust (from sanding) with white glue to create a paste. Fill the crack, smooth, and dry again.
Step 2: Creating Textured Beads
-
Shape the chunky discs:
Roll balls of white clay and flatten them slightly into thick, rounded discs or ‘saucers’ rather than flat cut-outs. These should be roughly 1.5 to 2 inches in diameter. -
Add organic texture:
Take an old toothbrush or a stiff wire brush and firmly tap the surface of these thick clay discs. I find that rotating the brush slightly while tapping creates that realistic, stone-like pitting seen in the photo. -
Pierce the holes:
Using a skewer or needle tool, pierce a generous hole directly through the vertical center of these textured discs. Make the hole slightly larger than your twine, as clay shrinks when drying. -
Dry thoroughly:
Lay all your clay pieces—rings and textured discs—on a flat board. Let them dry for 24-48 hours, flipping them occasionally to ensure even drying and prevent warping.
Step 3: Assembly
-
Sand and prep:
Once fully dry, lightly sand any rough edges on the smooth rings. Leave the textured discs rough to maintain their organic character. You can seal them with a matte varnish now if desired. -
Start the first strand:
Cut a long length of jute twine, double the length of your desired hanging. Fold it in half to create a loop at the top. -
Attach to the dowel:
Use a lark’s head knot to secure your twine to the wooden dowel. To do this, place the folded loop over the dowel and pull the loose ends through the loop, tightening it securely. -
Add the top bead:
Thread both ends of the twine through a wooden spacer bead. Push it up near the dowel to secure the knot. -
Thread the first ring:
Pass the twine through the center of a large smooth ring (e.g., a white one). To hold it in place, you can tie a knot below it or simply let it rest on the next component if stacking tightly. -
Stack the texture:
Thread on two or three of your textured clay discs. These will act as spacers and visual breaks between the larger rings. -
Continue the pattern:
Alternate between large smooth rings (switching colors between white and terracotta) and stacks of textured discs. Replicate the pattern from the photo: Ring, Disc Stack, Ring, Disc Stack. -
Secure the end:
Once the strand reaches your desired length, tie a large, sturdy double knot at the bottom. Trim the excess twine, or leave a small tassel if you prefer. -
Repeat for remaining strands:
Create two more strands following similar steps. Vary the order of the rings (e.g., start one with a textured stack instead of a ring) to create movement and interest across the piece. -
Hang the project:
Tie a long piece of twine to both ends of the wooden dowel to create the main hanger. Adjust the balance so the dowel hangs straight.
Paint Effects
To enhance the texture on the white discs, apply a watered-down brown paint wash. Wipe it off immediately with a rag so the color remains only in the pits and crevices.
Hang your finished piece in a well-lit spot to let shadows play across the beautiful textures you created
Leaf-Imprint Circle Medallions
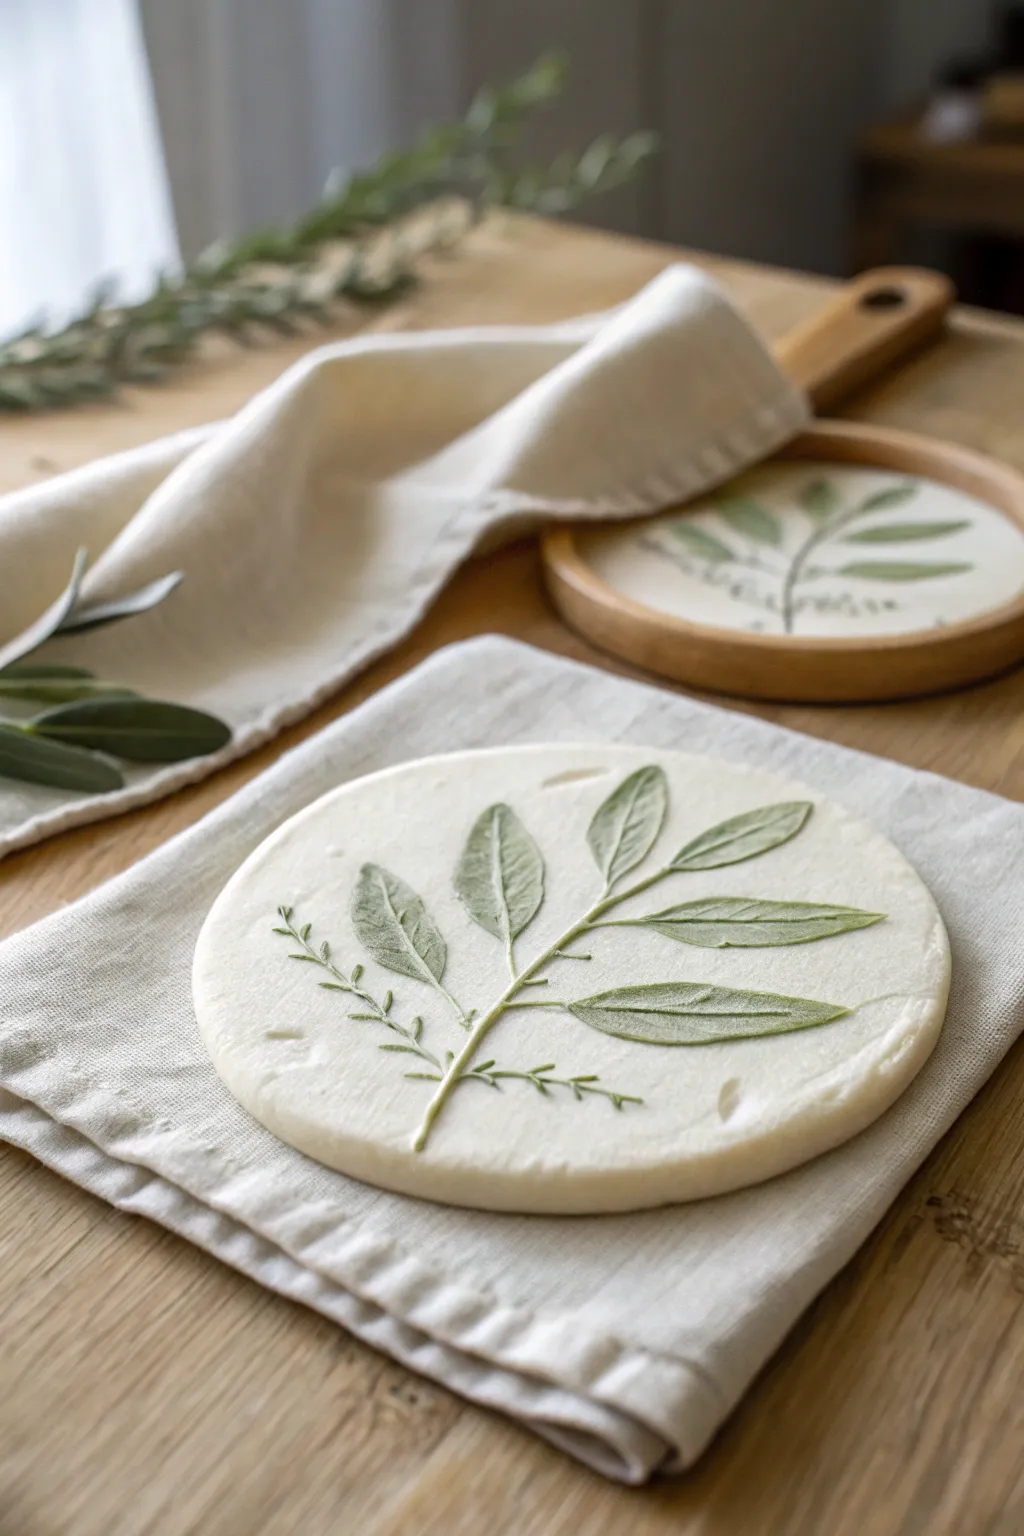
Capture the delicate details of nature with these elegant, botanical-inspired clay circles that bring a touch of the outdoors inside. This project uses fresh foliage to create stunning, textured relief patterns on smooth white clay, perfect for coasters or decorative wall hanging.
Step-by-Step Tutorial
Materials
- White smooth air-dry clay (or polymer clay)
- Fresh leaves with distinct veins (sage, olive, or fern)
- Rolling pin
- Circle cookie cutter (approx. 4-5 inches diameter)
- Fine-grit sandpaper (400-600 grit)
- Small rolling tool or brayer (optional)
- Green acrylic paint or watercolor (muted olive tone)
- Fine detail paintbrush
- Matte spray varnish or sealant
- Wax paper or craft mat
- Water and sponge for smoothing
Step 1: Preparing the Base
-
Condition the clay:
Start by kneading a handful of your white clay until it is warm, soft, and pliable. Getting rid of air bubbles now is crucial for a smooth final surface. -
Roll it out:
Place the clay on a sheet of wax paper or a dedicated craft mat. Roll it out evenly until it’s about 1/4 inch thick. Try to keep the thickness consistent so it dries flat. -
Smooth the surface:
Dip your finger in a tiny bit of water and gently glide it over the clay surface to remove any rolling pin marks or tiny imperfections. Let this sit for about 5 minutes to firm up just slightly.
Step 2: Creating the Botanical Impression
-
Select your foliage:
Choose a fresh leaf sprig that fits nicely within your intended circle size. Stiffer leaves with prominent veins on the backside work best for clear impressions. -
Position the leaf:
Place your chosen leaf face-down onto the clay slab. This ensures the raised veins on the back of the leaf press firmly into the soft clay. -
Roll the imprint:
Using your rolling pin or a small brayer, gently but firmly roll over the leaf once. Apply even pressure so the entire leaf structure embeds into the clay surface without distorting the slab’s shape. -
Remove the botanical:
Carefully find the stem of the leaf and slowly peel it away from the clay. You should see a crisp, deep impression of the veins and outline left behind. -
Add secondary details:
I often like to take smaller sprigs or tiny fern tips and press them lightly around the main leaf to fill empty space, creating a more balanced composition.
Fixing Curled Edges
If your clay circle starts curling up at the edges while drying, gently flip it over every few hours. Putting a light book on it once it’s ‘leather hard’ creates perfect flatness
Step 3: Shaping and Refining
-
Cut the circle:
Center your circle cutter over the leaf design. Press straight down through the clay to cut a clean round shape. Lift the cutter and peel away the excess clay from the outside. -
Smooth the edges:
Dip your finger in water again and run it along the cut edge of the circle. This softens the sharp corner left by the cutter, giving it a more finished, ceramic look. -
Dry properly:
Place the medallion on a flat drying rack or a piece of parchment paper. If using air-dry clay, loosely cover it with plastic wrap for the first 24 hours to prevent curling, then uncover to finish drying completely. -
Sand imperfections:
Once fully dry and hard, use fine-grit sandpaper to gently buff the edges or any rough spots on the surface. Wipe away the dust with a barely damp cloth.
Level Up: Gilded Edges
For a luxe touch, run a gold leaf pen along the outer rim of the dried circle. The metallic shine contrasts beautifully with the organic, matte green leaf design
Step 4: Painting and Finishing
-
Prepare the wash:
Mix a small amount of olive green acrylic paint with water to create a semi-transparent wash. You want the color to settle into the crevices, not coat it thickly like plastic. -
Apply the color:
Paint the wash carefully inside the leaf impression. Focus on the indented areas where the veins are. The watery paint will naturally pool in the deeper textures. -
Wipe back excess:
Immediately use a damp paper towel or sponge to lightly wipe the surface of the raised areas. This leaves the green pigment in the deep veins while revealing the white clay on top. -
Add definition:
If you want more contrast, use a finer brush with slightly darker green paint to accentuate the central stem or major veins. -
Seal the piece:
Finish by applying a coat of matte varnish or spray sealant. This protects the clay from moisture and preserves the delicate paint job.
Now you have a serene piece of botanical art that captures the stillness of the garden forever
Lace-Texture Circle Tiles
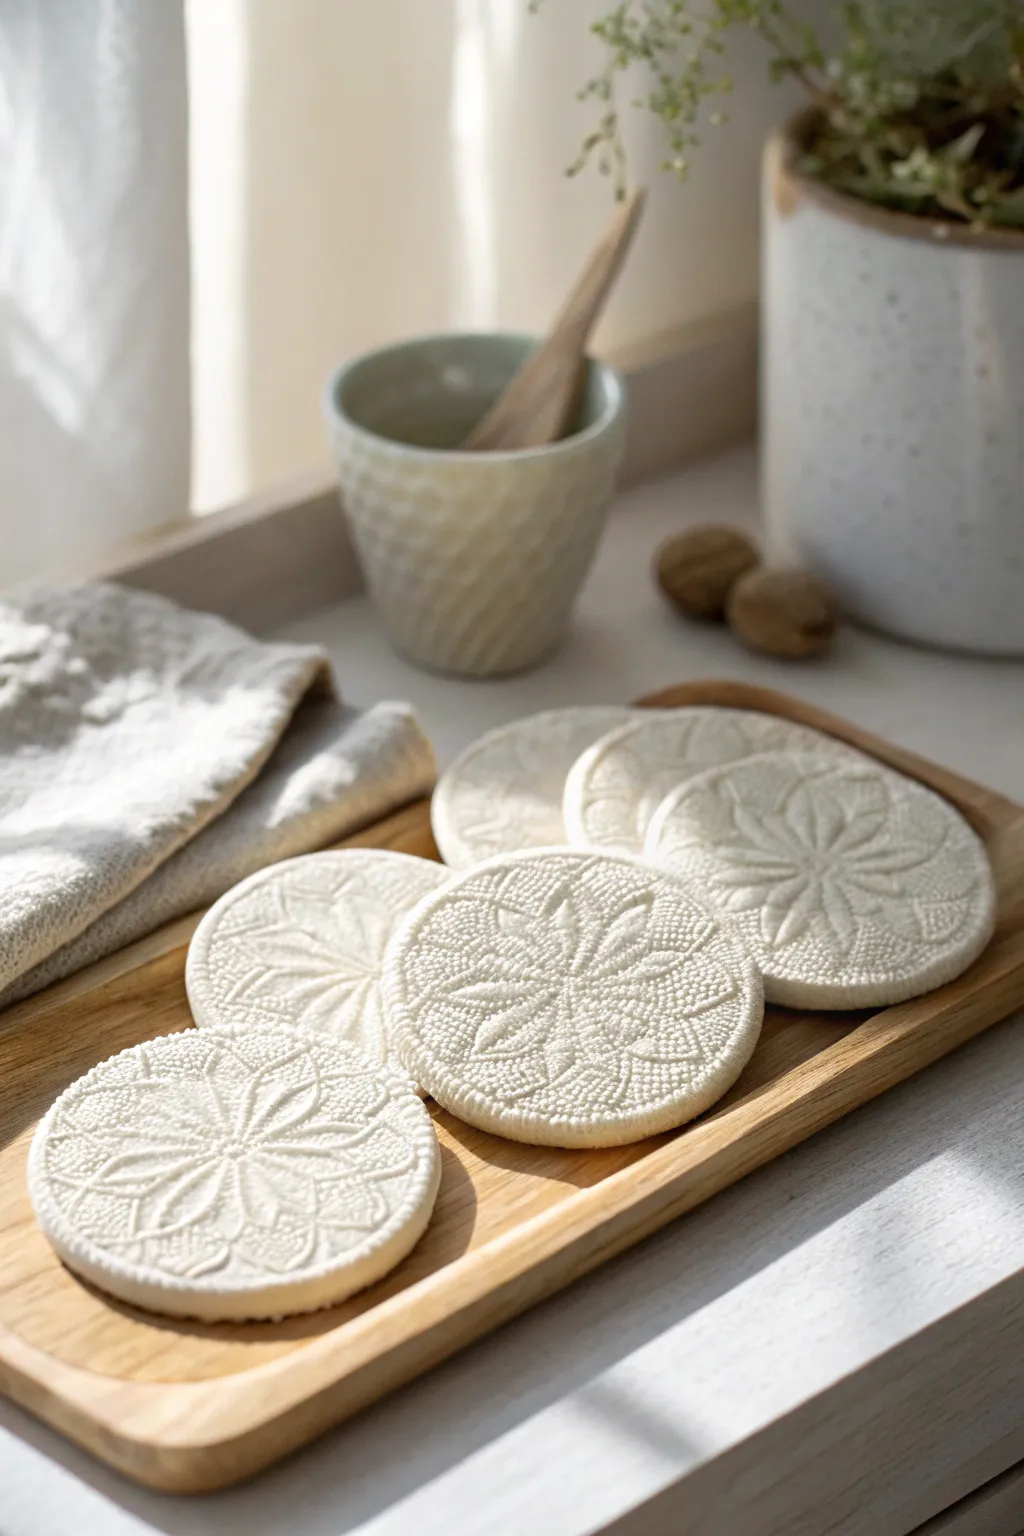
Capture the delicate beauty of vintage textiles in permanent form with these stunning clay circle tiles. The stark white finish highlights every intricate thread of the lace impression, resulting in sophisticated decor pieces that look beautiful on a coffee table or wall.
Step-by-Step
Materials
- Air-dry clay (white) or polymer clay
- Rolling pin
- 2 pieces of wooden slats (approx. 1/4 inch thick) for depth guides
- Circular cookie cutter (approx. 3-4 inches diameter)
- Vintage lace doilies or textured silicone texture mats
- Large cutting mat or parchment paper
- Fine-grit sandpaper (220-400 grit)
- Small bowl of water
- Matte acrylic varnish or clay sealant
- Soft synthetic brush
Step 1: Preparing the Clay Base
-
Condition the Clay:
Begin by taking a generous amount of white clay and kneading it thoroughly in your hands. This warms up the material, making it pliable and preventing cracks from forming during the rolling process. -
Set Up Guides:
Place your parchment paper or smooth work mat on a flat surface. Position your two wooden slats parallel to each other, slightly wider than the width of your clay ball. -
Roll to Thickness:
Place the clay ball between the slats. Use your rolling pin to flatten the clay, resting the ends of the pin on the wooden slats as you roll. This ensures a perfectly even thickness across the entire slab. -
Smooth the Surface:
Inspect the rolled slab for any air bubbles or lint. Gently smooth the surface with a slightly damp fingertip if you find any imperfections, but be careful not to introduce too much water.
Pattern popping trick
Before impressing, lightly dust your lace with cornstarch. This acts as a release agent so the fabric won’t stick to the tacky clay.
Step 2: Creating the Texture
-
Position the Lace:
Select your favorite section of a lace doily. Lay it carefully over the smooth clay slab, ensuring the textured side is facing down against the clay. -
Impress the Pattern:
Using the rolling pin, roll firmly over the lace one single time. Do not roll back and forth, as this can cause a ‘ghost’ image. I find that standing up while rolling gives me better leverage for a deep, crisp impression. -
Reveal the Design:
Locate the corner of the lace fabric and very slowly peel it back from the clay to reveal the embossed pattern. -
Cut the Shape:
Position your circular cutter over the most attractive part of the pattern. Press straight down firmly, give a tiny twist to separate the edges, and lift the cutter. -
Release the Disc:
Peel away the excess scrap clay from around the circle first, then carefully slide a thin blade or spatula under the disc to lift it without warping the shape. -
Smooth the Edges:
Dip your finger in a tiny bit of water and run it gently along the cut edge of the circle to create a clean, rounded finish.
Step 3: Finishing Touches
-
Initial Drying:
Place the clay circle on a clean board or wire rack to dry. If creating multiple tiles, repeat the process with the remaining clay. -
Preventing Warping:
For air-dry clay, loosely cover the pieces with plastic wrap for the first 12 hours to slow drying time, which helps prevent curling edges. -
Flip and Dry:
After the first day, flip the tiles over to allow the bottom to dry completely. Full drying may take 24-48 hours depending on humidity. -
Sanding:
Once fully cured and hard, check the edges for any sharp spots. Use fine-grit sandpaper to gently buff the rim until it feels silky smooth. -
Dusting Off:
Wipe the tile with a dry, soft cloth or use a fluffy brush to remove any clay dust from the sanding process, ensuring it doesn’t get trapped in the lace grooves. -
Sealing:
Apply a thin coat of matte acrylic varnish to protect the surface from moisture and stains. A matte finish preserves the natural, stone-like look better than a gloss finish.
Fixing warped edges
If your tile curls while drying, slightly dampen the concave side and place it under a heavy book overnight to flatten it back out.
Arrange your beautiful new textured tiles on a tray or string them up as ornaments to enjoy that touch of handmade elegance every day
Marbled Circle Slab Dishes
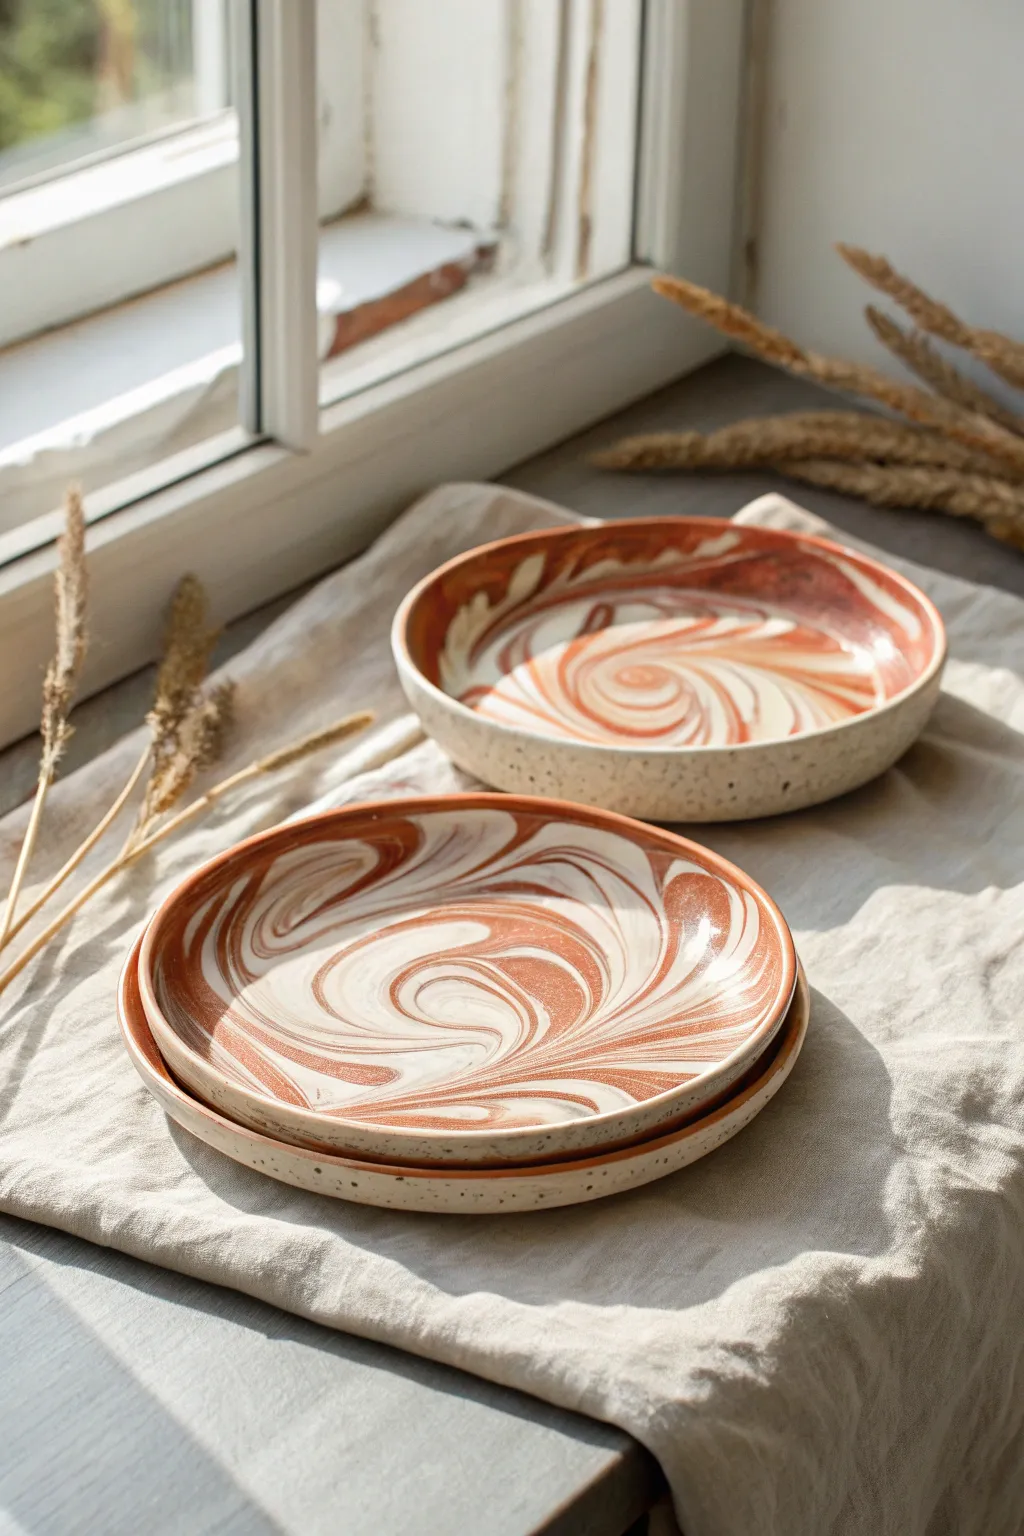
Capture the organic beauty of swirling distinct clays together with these marbled circle slab dishes. The result is a stunning, agate-like pattern of warm terracotta and creamy white stoneware that turns simple functional ware into a statement piece for your table.
Step-by-Step Tutorial
Materials
- Red earthenware clay (terracotta)
- White stoneware clay
- Rolling pin
- Canvas board or heavy fabric (for rolling)
- Circle template (paper or plastic)
- Needle tool or fettling knife
- GR Pottery Form (or a large plaster mold)
- Large yellow sponge
- Rib tool (metal or rubber)
- Serrated rib tool
- Wire clay cutter
- Clear glossy glaze
Step 1: Preparing the Marbled Slab
-
Prepare Clay Logs:
Begin by wedging both your red earthenware and white stoneware clays separately to remove any air bubbles. Roll each clay body into a thick log, roughly the thickness of your forearm. -
Divide and Conquer:
Using your wire cutter, slice the thick logs into smaller, uneven chunks. You want a variety of sizes to create a more natural, organic marble pattern later. -
Combine the Colors:
Slam the mixed chunks of red and white clay together into a single, large mound. I like to alternate the colors randomly as I stack them to ensure a diverse mix. -
The Twist:
Pick up this new combined lump and twist it like a towel being wrung out. This twisting action is crucial—it’s what creates those beautiful, elongated swirls rather than just spots. -
Initial Wedge:
Gently wedge the twisted clay just a few times. Be careful not to over-wedge, or the colors will blend into a muddy pink instead of staying distinct.
Clay Compatibility
Ensure your red and white clays have the same shrinkage rate and firing temperature range. Mismatched shrinkage causes cracking during drying or firing.
Step 2: Forming the Dishes
-
Roll the Slab:
Place the marbled clay on your canvas. Using a rolling pin, roll the clay out into a slab approximately 1/4 inch thick. Make sure to roll in multiple directions to stretch the marble pattern outward. -
Compress the Surface:
Take a rubber rib tool and firmly drag it across the surface of your slab. This compresses the clay particles to prevent cracking and reveals the pattern more clearly by smoothing out textures. -
Cut the Circle:
Lay your circle template gently on top of the slab. Trace around the edge with a needle tool or fettling knife to cut out a perfect circle. -
Soften the Edges:
Run a damp sponge or your finger along the cut edge of the circle to round it off. Sharp edges can become very brittle and sharp after firing. -
Shape the Form:
Carefully lift your clay circle and drape it over your pottery form or mold. Press firmly but gently to ensure it takes the shape of the mold without distorting the pattern. -
Refine the Rim:
If you are making a set of stacked plates, use a ruler or guide to ensure the rim height is consistent across all pieces while the clay is on the mold. -
Drying Phase:
Let the clay sit on the mold until it reaches leather-hard. This usually takes a few hours or overnight, loosely covered with plastic.
Step 3: Finishing and Firing
-
Remove and Smooth:
Once leather-hard, pop the dish off the mold. Use a damp sponge to smooth out any marks on the bottom or rim left during the forming process. -
Bisque Fire:
Allow the pieces to dry completely (bone dry) before loading them into the kiln for a bisque fire. Fire according to the schedule for your specific clay bodies. -
Glazing:
Apply a clear glossy glaze to the entire piece. A clear glaze is essential here because it intensifies the contrast between the red and white clays without hiding the pattern. -
Final Fire:
Fire the glazed pieces to the final maturity temperature of your highest-fire clay. Since stoneware and earthenware mature at different temps, ensure your firing schedule accommodates both safely.
Adding Texture
Leave the outer rim unglazed or use a matte clear glaze for a lovely tactile contrast against the smooth, glossy interior of the bowl.
Enjoy using your new set of custom swirled dishes for your next cozy meal
Terrazzo Confetti Circle Coasters
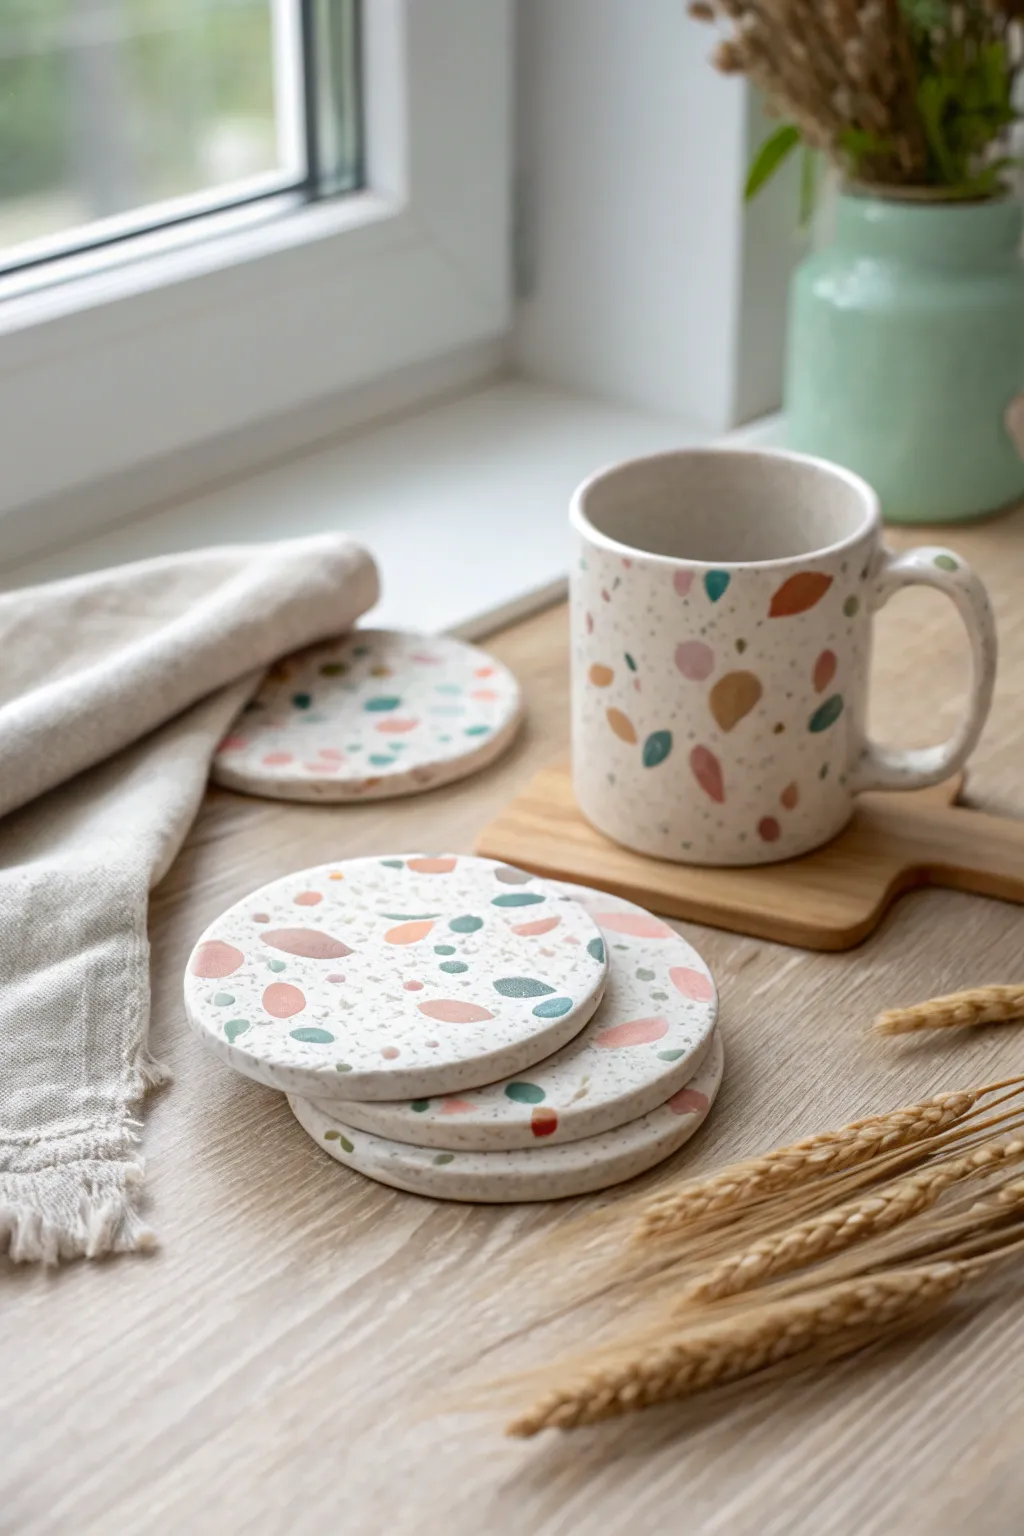
Bring a splash of modern, playful design to your coffee table with these charming clay coasters. Featuring jagged chips of teal, mustard, blush, and rust embedded in white clay, this terrazzo-style project is deceptively easy to master.
Step-by-Step
Materials
- Polymer clay (white, teal, mustard yellow, blush pink, rust/terracotta)
- Acrylic roller or pasta machine
- 9cm Circular clay cutter or cookie cutter
- Craft knife or tissue blade
- Parchment paper or ceramic tile (for baking)
- Sandpaper (grits 400, 800, 1000)
- Gloss or matte varnish (optional)
- Oven
Step 1: Prepping the Confetti
-
Condition the colors:
Start by conditioning your colored clays (teal, mustard, blush, rust) individually until they are soft and pliable. Roll each color out into very thin sheets, about 1mm thick. -
Bake the sheets:
Place these thin colored sheets on parchment paper and bake them for about 10–15 minutes according to the package instructions. You want them partially cured so they are firm enough to chop. -
Create the chips:
Once the colored sheets have cooled completely, use your craft knife or tissue blade to chop them into small, irregular fragments. Aim for a variety of shapes—some triangular, some jagged, and different sizes for a natural terrazzo look.
Sticky Situation?
If your clay sticks to the cutter, dip the cutter in cornstarch or water before pressing down. This acts as a release agent for clean edges.
Step 2: Creating the Base
-
Condition the white clay:
Take a large block of white polymer clay and condition it thoroughly. It needs to be warm and soft to accept the chips. -
Initial rolling:
Roll the white clay out into a thick slab, roughly 5mm to 6mm thick. This will be the foundational thickness for your coasters. -
Scatter the confetti:
Take your chopped colored chips and sprinkle them generously over the white slab. Don’t be afraid to overlap them slightly or leave some white space. -
Pressing them in:
Use your acrylic roller to gently press the chips down into the white clay. I like to roll in different directions to ensure the chips are embedded evenly without distorting the slab’s shape too much. -
Smooth the surface:
Continue rolling until the surface is completely flat and the chips are flush with the white clay. The slab should end up around 4mm thick.
Step 3: Cutting and Finishing
-
Cut the circles:
Place your circular cutter on the most attractive parts of the patterned slab. Press down firmly to cut out your coaster shapes. -
Remove excess:
Peel away the excess clay from around the circles. You can save these scraps to make a marbled bead or pendant later. -
Smooth the edges:
Dip your finger in a little cornstarch or water and gently run it around the rim of each circle to smooth out any sharp cutting ridges. -
Speckle effect (optional):
To mimic the tiny speckles seen in the photo, you can flick a toothbrush loaded with diluted grey or brown paint lightly over the raw clay, though actual crushed peppercorns mixed into the clay works too. -
Final Bake:
Place your cut circles on a baking tray lined with parchment paper. Bake for the full duration recommended by the clay manufacturer (usually 30 minutes per 6mm of thickness) to ensure durability. -
Cooling down:
Allow the coasters to cool completely inside the oven or on a flat surface. Moving them while hot can cause warping. -
Sanding for stone effect:
Wet sand the surface starting with 400 grit sandpaper, moving to 800, and finishing with 1000. This reveals the sharp edges of the chips and gives that smooth, stone-like feeling. -
Buff and seal:
Rinse off any sanding residue and dry. You can leave them matte for a natural look or apply a thin layer of matte varnish to protect them from coffee stains.
Level Up: The Mug
Use the same technique to cover an oven-safe mug! Apply a thin layer of liquid clay (Bake & Bond) to the ceramic, then wrap your terrazzo sheet around it.
Now you have a stunning set of custom coasters ready for your next tea break
Concentric Circle Abstract Wall Plaque
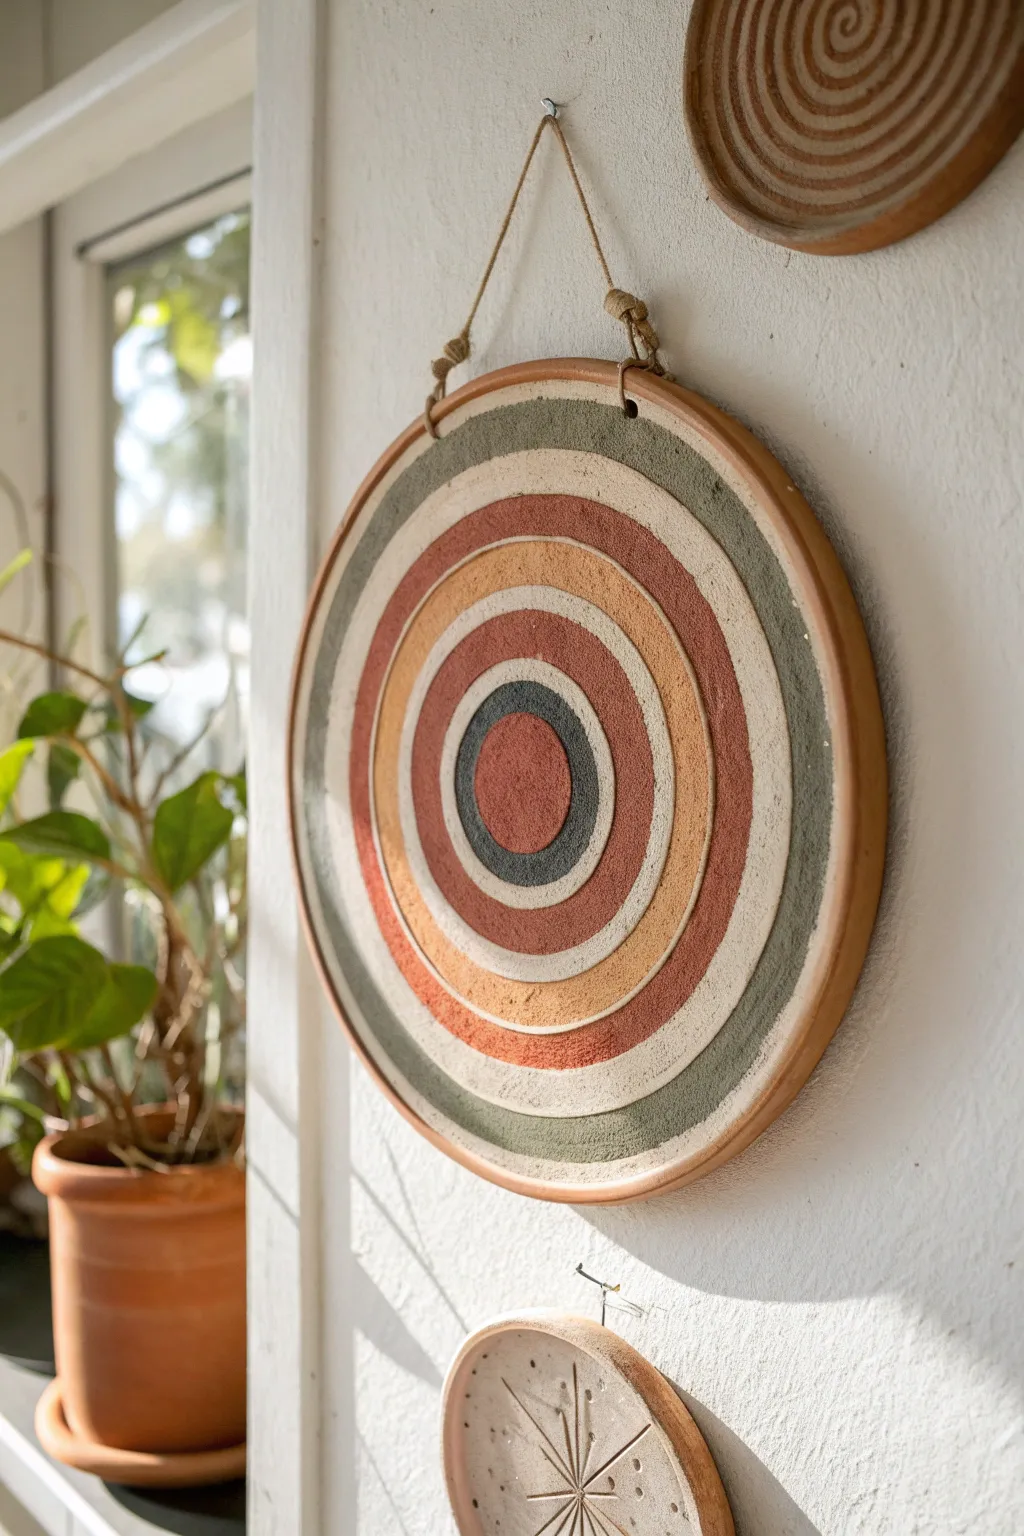
Bring the warmth of the desert into your home with this stunning concentric circle wall plaque. Featuring bands of earthy rust, mustard, sage, and charcoal set within a classic terracotta rim, this textured piece adds organic modern charm to any vertical space.
Detailed Instructions
Materials
- Large round terracotta saucer (10-12 inches diameter)
- Acrylic paints (terracotta/rust, mustard yellow, sage green, cream/off-white, charcoal grey)
- Fine sand or texture medium
- Painter’s tape (various widths) or a compass tool
- Paintbrushes (flat shader and fine liner)
- Power drill with masonry or ceramic bit
- Jute twine or natural rope
- Clear matte sealant spray
- Pencil
- Ruler
Step 1: Preparation & Drilling
-
Sourcing the base:
Begin with a clean, unglazed terracotta plant saucer. The rim creates a natural frame, so ensure it is free of chips or cracks. -
Marking the holes:
Measure about 1 inch down from the top edge of the saucer. Mark two distinct points for your hanging holes, spacing them roughly 3 to 4 inches apart to ensure stability. -
Drilling safely:
Place a piece of scrap wood underneath the rim where you plan to drill. Using a masonry or ceramic bit, carefully drill the two holes. Go slowly and let the drill do the work to prevent cracking the clay. -
Cleaning up:
Wipe away all terracotta dust with a damp cloth. Let the saucer dry completely before moving on to the design phase.
Clean Lines Hack
Don’t have a steady hand? Use various sizes of bowls or plates as templates. Place them over the dry center sections and trace around them to get perfect circles for your next color band.
Step 2: Designing the Circles
-
Mixing texture:
To achieve that gritty, stone-like finish seen in the photo, mix a ratio of 2 parts acrylic paint to 1 part fine sand for each of your colors. Alternatively, mix a batch of texture medium into your white base before tinting. -
Mapping the center:
Find the exact center of your saucer and mark it lightly with a pencil. This will be the anchor for all your concentric rings. -
Drawing guidelines:
Using a compass or by tracing various circular household objects (like bowls or lids), lightly draw your concentric rings outward from the center. You want approximately 7 distinct bands, varying slightly in width for visual interest. -
Leaving the negative space:
Remember to leave the outermost rim unpainted. The raw terracotta color acts as the final ‘frame’ for the artwork.
Step 3: Painting the Bands
-
The center point:
Start from the very middle. Paint the central circle with your textured rust/terracotta mixture. Use a small flat brush to keep the edges crisp. -
The dark ring:
Moving outward, paint the next ring in charcoal grey. I find it helpful to rotate the saucer itself while holding my brush hand steady to get a smoother curve. -
Adding cream contrast:
Paint the third ring in a textured cream or off-white. This high-contrast band helps separate the darker center from the colorful outer rings. -
The rust ring:
Apply the rust color again for the fourth ring. Apply the paint generously so the texture stands up; you want it to look almost like inlaid stone. -
Sunny mustard layer:
Paint the fifth ring in a warm mustard yellow. If your texture mix is thick, dab it on rather than stroking it to enhance the granular look. -
Second cream band:
Repeat the cream color for the sixth ring. This repetition creates a rhythm in the design. -
Sage border:
Finish the painted area with a final wide band of sage green. Ensure this meets the unpainted terracotta rim cleanly.
Level Up: Raised Relief
Instead of just sand, use puff paint or piping gel for the dividing lines between colors. Let it dry, then paint over it to create physical ridges that define each concentric ring.
Step 4: Finishing Touches
-
Touch-ups:
Once dry, inspect your lines. Use a fine liner brush to neaten any unsteady edges where colors meet. The texture is forgiving, but clean lines make it professional. -
Sealing the work:
Spray the entire piece with a clear matte sealant. This protects the textured paint from chipping and deepens the terracotta color slightly. -
Adding the hanger:
Cut a length of jute twine about 18 inches long. Thread each end through the drilled holes from back to front. -
Securing the knots:
Tie a sturdy overhand knot on the front side of each hole. The bulky knot adds a rustic detail that complements the textured paint.
Now hang your desert-inspired creation near a window to let the texture catch the afternoon light