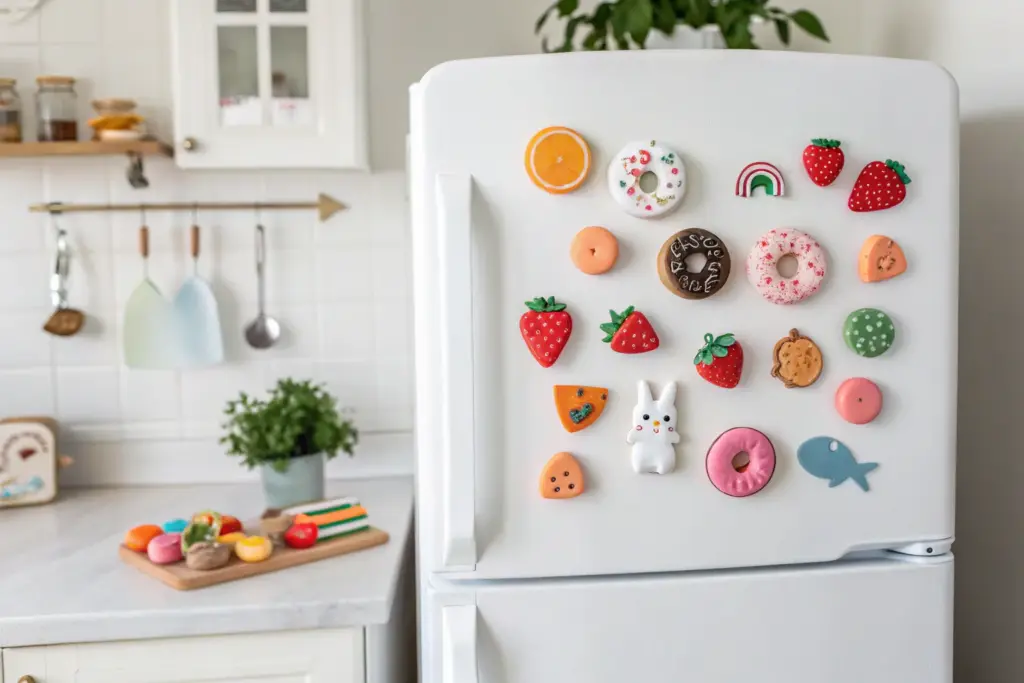
There’s something so satisfying about making tiny air-dry clay magnets—quick little wins that still feel like real art. If you’re craving projects that are cute, functional, and totally giftable, these ideas will keep your fridge looking like your own mini gallery.
Citrus Slice Magnets
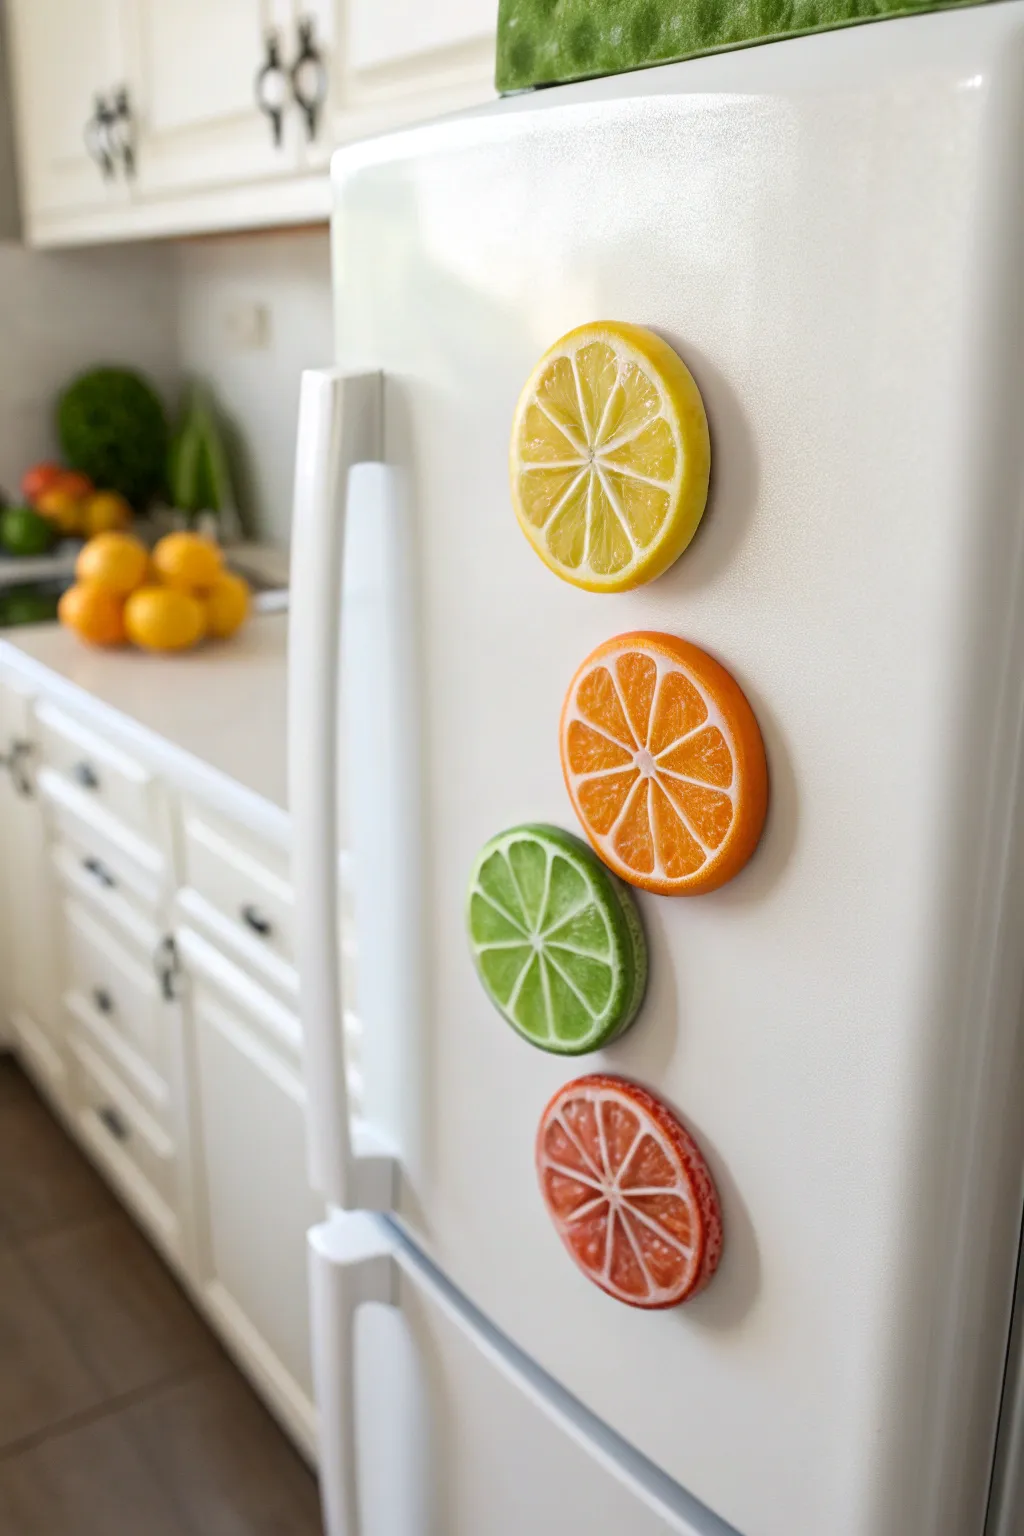
Brighten up your kitchen with these realistic, juicy-looking citrus slice magnets. Made from simple air clay, they capture the vibrant translucency and texture of fresh lemons, limes, oranges, and grapefruits.
Step-by-Step Guide
Materials
- White air-dry clay (or polymer clay)
- Acrylic paints (Yellow, Orange, Green, Red, White)
- Clear gloss varnish or UV resin
- Round cookie cutters (approx. 2-3 inches diameter)
- Modeling tools (needle tool and small ball tool)
- Small magnets
- Strong craft glue (E6000 or super glue)
- Rolling pin
- Parchment paper
- Fine grit sandpaper
Step 1: Shaping the Base
-
Condition and Roll:
Start by taking a chunk of your white air-dry clay and kneading it until it is soft and pliable. Roll it out on parchment paper to a uniform thickness of about 1/4 inch. -
Cut the Circles:
Using your round cookie cutter, punch out four distinct circles. These will become your lemon, orange, lime, and grapefruit slices. Smooth the edges with a wet finger to remove any rough cuts. -
Create the Rind:
For the outer peel, roll a very thin snake of clay. Wrap this around the circumference of each circle, blending the seam gently so it looks like a continuous outer skin. This gives the slice a realistic, slightly raised edge.
Juicy Texture Trick
When texturing the fruit segments, prick the clay deeply and irregularly. When paint settles into these deeper holes, it creates natural shadows and depth.
Step 2: Sculpting the Segments
-
Mark the Center:
Find the exact center of your clay circle and make a small indentation with your needle tool. This will serve as the anchor point for all your segment lines. -
Divide the Pie:
Use a dull knife or clay tool to lightly score lines dividing the circle into equal wedges. Aim for 8 or 9 segments for a natural citrus look. -
Define the Pith:
Using a needle tool, press firmly along your scored lines to create deep grooves. Do not cut all the way through; you want to create the illusion of the white pith separating the juicy fruit sections. -
Texture the Fruit:
This is the secret to realism. Taking a small ball tool or the tip of a toothpick, gently stipple and prick the surface of the clay inside each wedge. This mimics the tiny juice vesicles found in real fruit. -
Round the Corners:
Use your tool to slightly round off the inner corners of each wedge where they meet the rind. Real citrus segments aren’t perfect triangles; they curve slightly near the skin. -
Dry Completely:
Set your sculpted slices on a flat surface to dry. Air clay usually takes 24-48 hours depending on thickness. I usually rotate them halfway through so the bottom dries evenly.
Make it a Set
Create varying sizes for different fruits—make the lime slightly smaller and the grapefruit slightly larger than the others for realistic scale.
Step 3: Painting and Finishing
-
Sand for Smoothness:
Once fully cured, use fine-grit sandpaper to briefly gently sand the back of the magnet flat and smooth the outer rim if needed. -
Base Coat the White:
Paint the dividing lines (the pith) and the thin inner rim with white acrylic paint. You need a steady hand here, but it makes the colors pop later. -
Paint the Segments:
Paint the textured inner wedges. Use bright yellow for the lemon, orange for the orange, lime green for the lime, and a reddish-pink wash for the grapefruit. You can water down the paint slightly so it settles into the texture. -
Paint the Rind:
Paint the outer edge (the skin) to match the interior fruit color usually, perhaps a slightly darker or more opaque shade for contrast. -
Highlighting:
Mix a tiny bit of white into your main fruit color and dry brush the very center of the fruit segments. This adds a ‘sunburst’ effect mimicking light passing through the center. -
Add the Gloss:
Apply a thick coat of high-gloss varnish or UV resin over just the colored fruit segments. Leave the white pith lines matte if possible. The gloss creates that wet, juicy appearance typical of fresh slices. -
Attach the Magnet:
Flip the dried artwork over. Apply a dot of strong craft glue to the center of the back and press your magnet firmly into place. Let the glue cure completely before sticking it to your fridge.
Now you have a refreshing set of fruit slices to hold your grocery lists and photos


Breakfast Set Mini Magnets
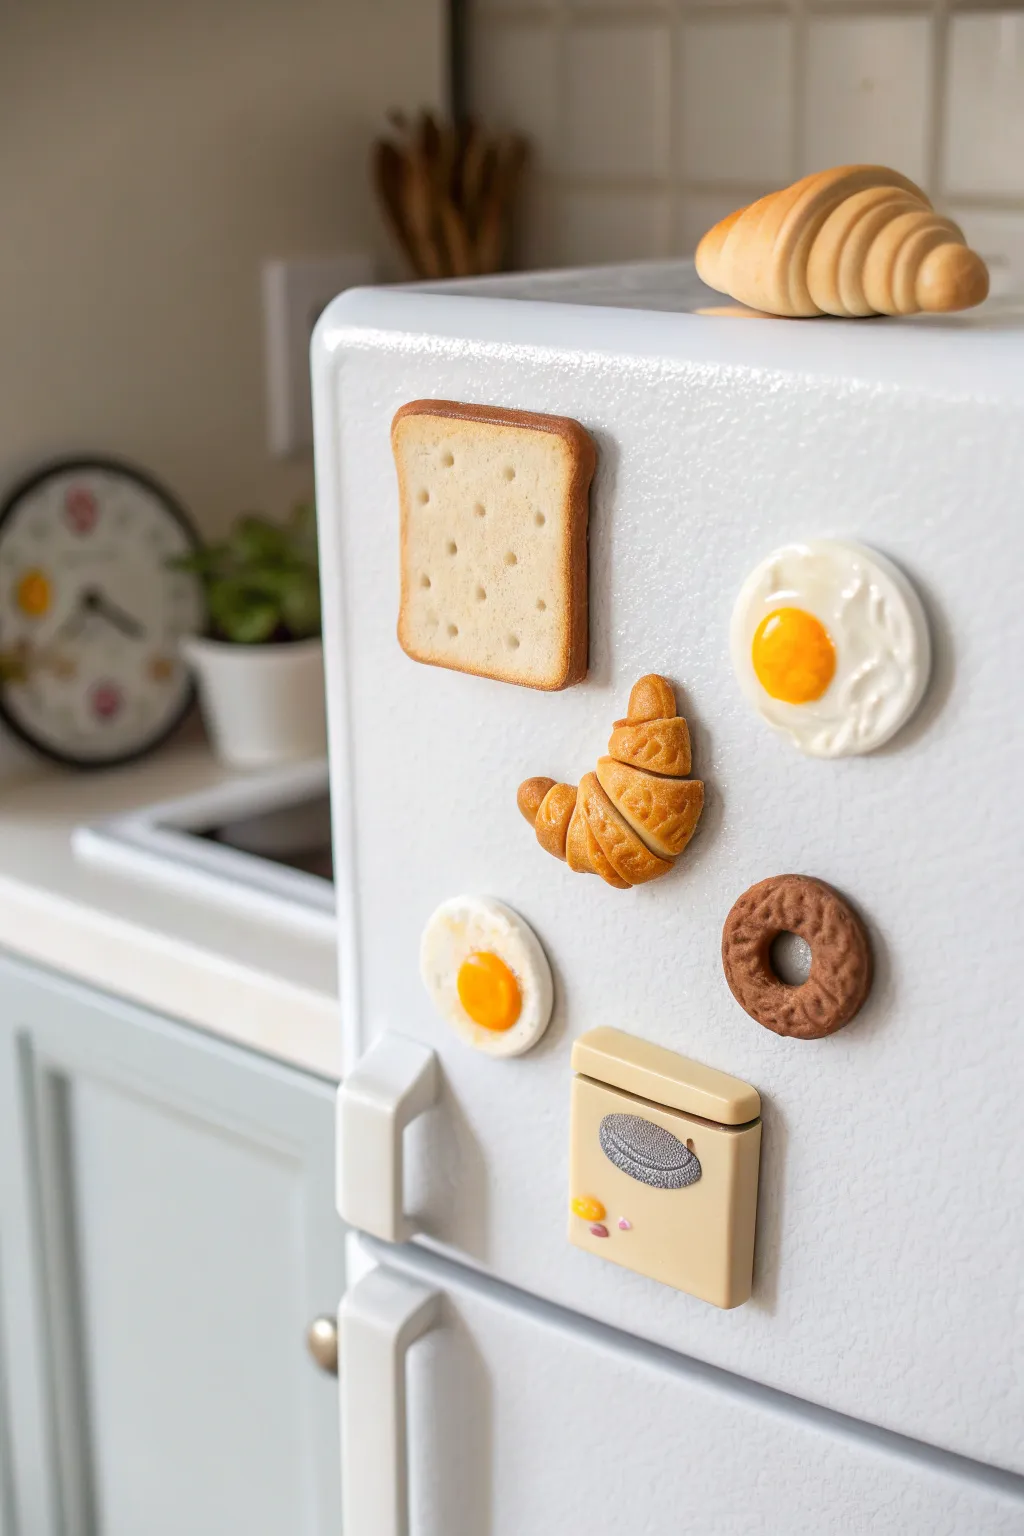
Transform your fridge into a charming breakfast nook with these adorable air-dry clay magnets. This set features realistic-looking toast, eggs, pastries, and a tiny toaster, all crafted with simple texturing techniques to achieve that fresh-baked look.
Step-by-Step Tutorial
Materials
- White air-dry clay
- Acrylic paints (white, yellow, orange, browns, tan, black, silver)
- Small round magnets
- Super glue or strong craft glue
- Clay sculpting tools (needle tool, ball tool)
- Small piece of aluminum foil (for texturing)
- Toothbrush (for texturing)
- Gloss varnish or clear nail polish
- Paintbrushes (fine detail and flat)
- Rolling pin
Step 1: Sculpting the Toast & Croissant
-
Form the toast base:
Roll out a small square of clay, about 1/4 inch thick. Use a blade to trim the edges slightly to create that classic bread slice shape, rounding the top corners just a bit. -
Texture the bread:
Take an old clean toothbrush and tap it gently all over the surface of your clay square to mimic the texture of bread. Using a needle tool, poke evenly spaced holes in rows to create a cracker or toast pattern. -
Shape the croissant:
Roll a small sausage of clay that tapers at both ends. Flatten the center slightly and roll it up from the middle, curbing the ends inward to form a crescent shape. -
Detail the pastry layers:
Use a knife tool to gently score lines across the rolled sections of the croissant, emphasizing the flaky layers of the dough.
Clay Cracking?
If small cracks appear as the clay dries, mix a tiny amount of fresh clay with water to make a paste (slip) and fill the cracks. Smooth it over with a damp finger.
Step 2: Creating the Eggs & Donut
-
Make the egg whites:
Flatten irregular circles of white clay. Don’t worry about being perfect; real fried eggs have wavy, uneven edges. Use your finger to slightly depress the center where the yolk will sit. -
Add the yolks:
Roll small balls of clay and flatten them slightly into domes. Press these firmly into the depressions you made in the egg whites. I like to use a tiny bit of water to help them stick. -
Sculpt the donut:
Roll a snake of clay and join the ends to form a ring. Smooth the seam completely with your finger or a tool so it’s invisible. -
Texture the donut:
crumple a small ball of aluminum foil and roll it gently over the donut’s surface. This gives it a realistic, baked cake texture.
Step 3: Building the Toaster
-
Form the toaster body:
Shape a thick rectangle of clay. Round off the corners slightly so it isn’t too blocky. Add a thin, slightly wider distinct slab on top for the lid or slot area. -
Add toaster details:
Attach a small, flat oval of clay to the front face for the dial or window. Create tiny buttons by rolling microscopic balls of clay and pressing them onto the lower corner.
Make it a Menu
Expand your set by sculpting other breakfast items like bacon strips, a carton of milk, or a clay avocado half to add some green to your fridge layout.
Step 4: Painting & Finishing
-
Base coat the bread:
Once fully dry (24-48 hours), paint the toast a pale cream color. Mix a golden brown and sponge it carefully around the very edges to create a perfectly toasted crust. -
Paint the croissant:
Paint the croissant a golden yellow. While the paint is wet, wash over it with a watered-down light brown, letting the darker color settle into the crevices of the visible layers. -
Color the eggs:
Paint the yolks a bright, sunny orange-yellow. Leave the whites unpainted or add a tiny touch of white pearl if you want a glossy look. -
Paint the chocolate donut:
Cover the donut entirely in a rich chocolate brown paint. Ensure you get the paint into all the little foil-textured nooks. -
Detail the toaster:
Paint the toaster body a retro cream or beige. Paint the oval detail silver or grey, and use a fine brush to add black grid lines for a vent look. Pick out the buttons in yellow or pink. -
Gloss the yolks:
Apply a coat of gloss varnish or clear nail polish specifically to the egg yolks. This makes them look wet and freshly fried. -
Attach magnets:
Flip all your dry, painted pieces over. Apply a drop of super glue to the back of each and press a round magnet firmly into place. Let the glue cure completely.
Now you have a delicious-looking spread ready to brighten up your kitchen every morning


Simple Flower Blossom Magnets
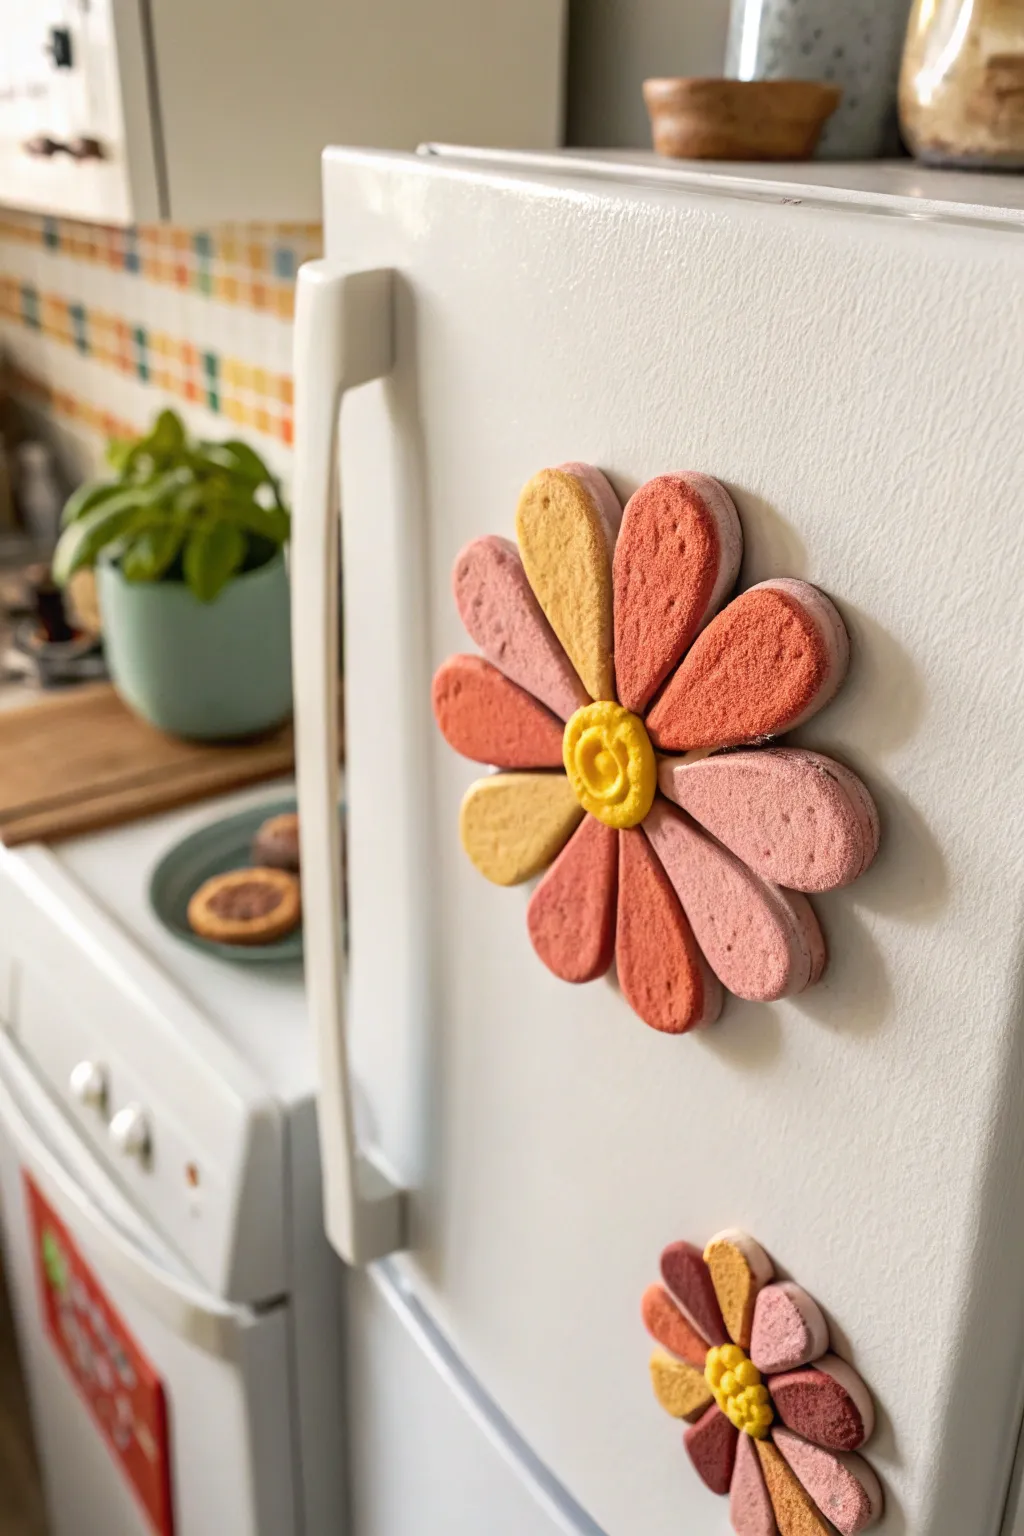
Brighten up your kitchen with these charming, textured flower magnets that capture a cozy, retro aesthetic. The design relies on assembling individual clay petals to create a dimensional, chalky-finish bloom that pops against any appliance.
Step-by-Step Guide
Materials
- White smooth air-dry clay (foam clay or paper clay work best for this texture)
- Acrylic paints (pastel pink, terracotta, mustard yellow, coral)
- Small round magnet discs
- Rolling pin
- Teardrop-shaped cutter (or a knife)
- Toothpick or needle tool
- Super glue or strong craft adhesive
- Fine-grit sandpaper (optional)
- Matte sealant spray
Step 1: Shaping the Clay
-
Condition the clay:
Start by kneading your white air-dry clay until it is soft and pliable. If it feels too sticky, you can dust your hands lightly with cornstarch. -
Roll out the slab:
Roll the clay out on a flat surface to a uniform thickness of about 1/4 inch. You want the petals to be chunky enough to have dimension but light enough for a magnet. -
Cut the petals:
Use a teardrop-shaped cookie cutter to punch out 8 to 10 petals for one flower. If you don’t have a cutter, outline a teardrop shape on cardstock, cut it out, and use it as a template to trace and cut with a craft knife. -
Soften the edges:
Dip your finger in a little bit of water and gently smooth the sharp edges of every cut petal to give them a rounded, organic look. -
Create the center:
Roll a small ball of clay, roughly the size of a marble, and flatten it slightly into a thick disk. This will be the flower’s pistil. -
Add center details:
Using a toothpick or a sculpting tool, gently press a spiral or concentric circle pattern into the center disk for extra visual interest. -
Texture the surface:
To mimic the porous, stone-like look in the photo, take a stiff-bristled toothbrush or a ball of tin foil and gently tap the top surface of all your wet clay pieces.
Petals Falling Off?
If dry petals detach, don’t panic. Air-dry clay often shrinks. Simply reattach loose pieces with high-quality super glue or epoxy for a permanent bond.
Step 2: Assembly and Drying
-
Arrange the first layer:
Lay down a small, thin circle of scrap clay to act as a base. Press four or five petals onto this base in a star shape. I find using a tiny dab of water acts nicely as a slip to bond them. -
Layer the second row:
Place the remaining petals in the gaps between the first layer’s petals, pressing them down gently so they adhere to the base and the neighboring petals. -
Attach the center:
Place your textured center disk right in the middle, covering the messy join where all the petals meet. Press firmly but carefully. -
Let it dry entirely:
Leave the assembled flower on a flat, parchment-lined surface to dry. Depending on humidity and clay brand, this usually takes 24 to 48 hours.
Scented Blooms
Knead a drop of essential oil (like lavender or citrus) into the clay before shaping. Your magnets will act as passive diffusers for weeks.
Step 3: Painting and Finishing
-
Mix your palette:
Prepare matte acrylic paints in warm tones: mustard yellow for the center, and a mix of coral, dusty pink, and terracotta for the petals. -
Paint the petals:
Paint the petals individually. Alternating colors creates a vibrant look, or you can do half the petals in pink and half in terracotta for that retro vibe. -
Paint the center:
Carefully paint the center disk yellow, using a fine brush to get into the spiral grooves you carved earlier. -
Create a chalky finish:
Once the base paint is dry, dry-brush a tiny amount of white paint over the textured tops of the petals. This highlights the ‘stone’ texture we created. -
Seal the work:
Spray the entire piece with a matte sealant. Avoid glossy sprays, as they will ruin the natural, earthy aesthetic. -
Attach the magnet:
Flip the dried flower over. Apply a drop of strong super glue to the back and press your magnet firmly into place.
Pop these onto your fridge and enjoy the burst of warm, cheerful color every time you grab a snack


Leaf And Herb Sprig Magnets
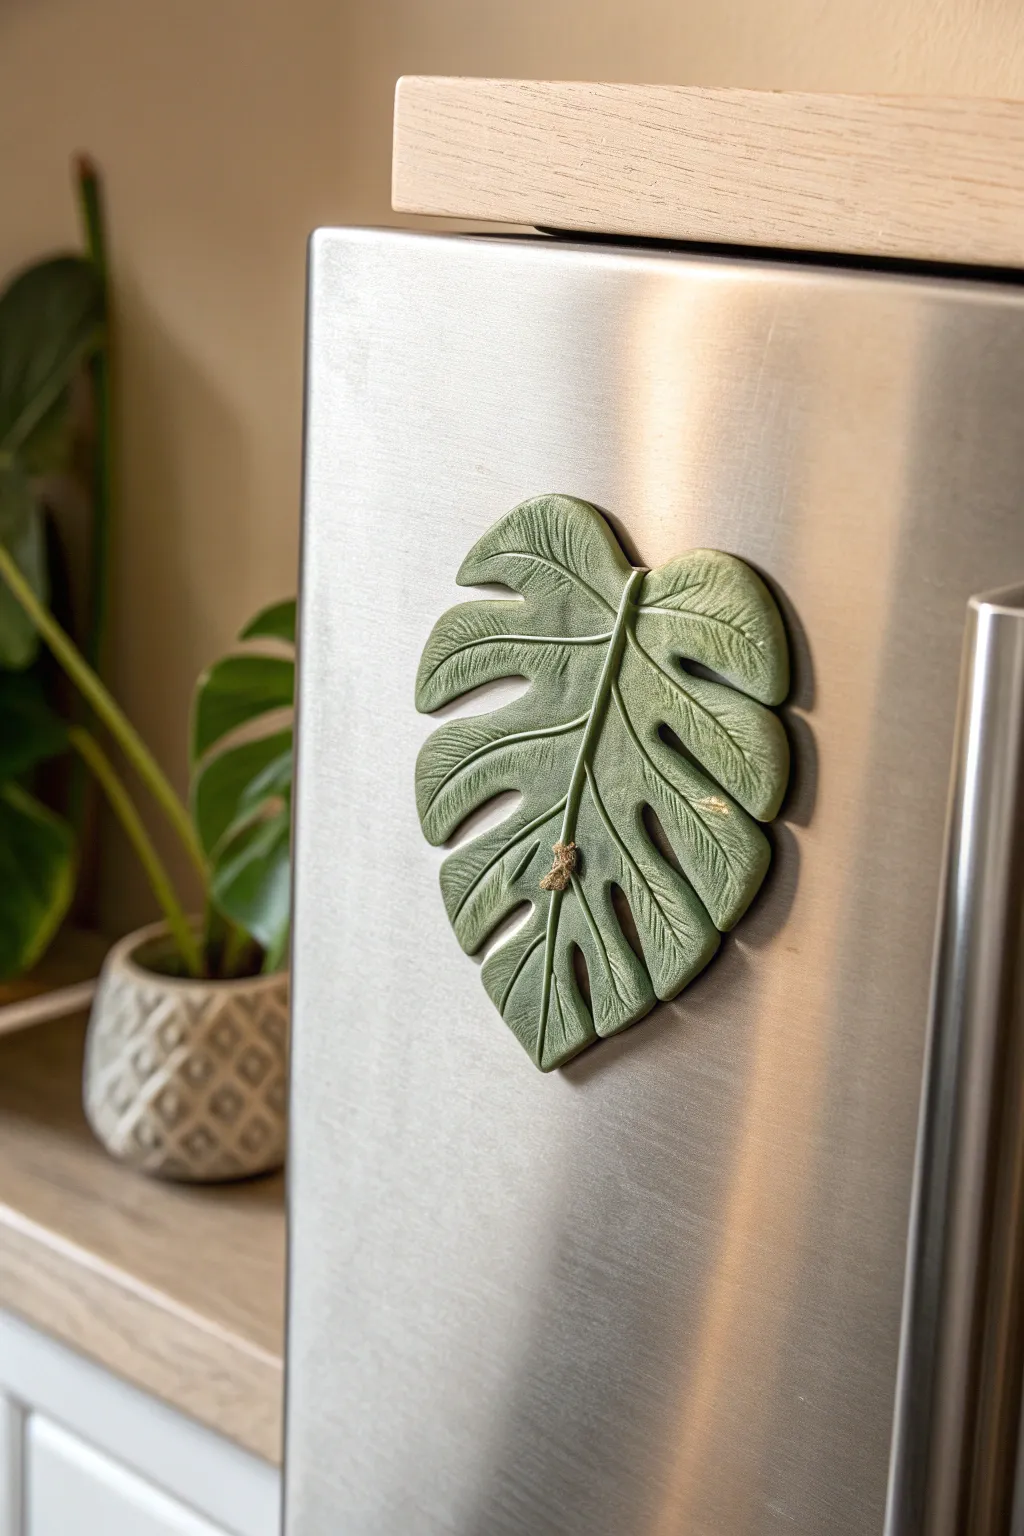
Bring a touch of botanical charm to your kitchen with this realistic Monstera leaf magnet. Modeled from flexible air-dry clay and finished with varied green tones, this durable piece captures the organic beauty of nature right on your refrigerator door.
How-To Guide
Materials
- White or terracotta air-dry clay (approx. 50g)
- Small rolling pin
- Sculpting needle tool or toothpick
- Monstera leaf template (optional)
- Small sponge or foam dabber
- Acrylic paints: Sage green, forest green, and a touch of brown
- Matte finish sealant or varnish
- Strong round craft magnet (neodymium recommended)
- Industrial strength adhesive (like E6000)
- Wax paper or silicone mat (work surface)
Step 1: Shaping the Leaf
-
Prepare the Clay:
Begin by kneading a walnut-sized ball of air-dry clay until it is warm and pliable. This conditioning step prevents cracking later on. -
Roll the Slab:
Place the clay on your wax paper or silicone mat. Roll it out evenly to a thickness of about 1/4 inch (6mm). Avoid going too thin, or the magnet might be fragile. -
Create the Outline:
Use your needle tool to lightly sketch a heart shape onto the clay slab. If you aren’t confident freehanding, you can lightly press a paper template onto the clay and trace around it. -
Refine the Form:
Cut out the basic heart shape using the needle tool. Smooth the rough edges gently with a slightly damp fingertip to remove any burrs. -
Add Fenestrations:
To give it that classic Monstera look, cut deep notches and oval holes into the sides of the leaf. Create 3-4 deep indentations on each side, curving slightly inward toward the center vein. -
Sculpt Dimensions:
Gently lift the edges of the leaf and curve them slightly. I like to elevate the center rib area just a bit so the leaf isn’t perfectly flat, giving it a more lifelike, 3D appearance.
Fixing Cracks
If small cracks appear while drying, mix a tiny bit of fresh clay with water to make a ‘slip’ paste. Fill the crack, smooth it over, and let it dry again.
Step 2: Adding Texture and Detail
-
Score the Veins:
Using your needle tool, draw a strong central vein from the bottom stem notch to the tip. Press firmly but don’t cut all the way through. -
Detail Secondary Veins:
Draw lateral veins branching out from the center line towards the edges of each leaf section. These lines should curve slightly to mimic organic growth. -
Create Fine Texture:
Take a stiff-bristled brush or a crumpled piece of aluminum foil and very lightly tap it over the surface. This creates a subtle pitting texture similar to a real leaf’s surface. -
Attach the Stem Stub:
Roll a tiny coil of clay and attach it to the base of the central vein to look like a cut stem. Score the back of the leaf and the coil, use a dab of water, and press them together securely. -
Dry Completely:
Let the clay dry for 24-48 hours. Turn it over halfway through the drying process to ensure even evaporation from both sides.
Step 3: Painting and Finishing
-
Base Coat Application:
Once bone dry, paint the entire front surface with a muted sage green acrylic paint. Let this base layer dry completely. -
Add Depth with a Wash:
Mix a small amount of forest green paint with water to create a thin wash. Brush this over the veins and recessed areas, then quickly wipe the high points with a paper towel to leave the darker color in the crevices. -
Highlighting:
Using a dry brush technique with a very light green or yellow-white, gently graze over the raised sections and edges to make the texture pop. -
Seal the Project:
Apply a coat of matte sealant to protect the paint and clay from moisture. Avoid glossy finishes if you want to maintain the natural, matte look seen in the photo. -
Attach the Magnet:
flip the dry leaf over. Apply a strong dab of industrial adhesive to the center and press your magnet firmly into place. Let the glue cure according to the package instructions.
Pro Tip: Realistic Texture
Press a real leaf (of any kind with strong veins) into the wet clay before cutting your shape. It transfers authentic biological patterns instantly.
Now your kitchen has a permanent touch of greenery that never needs watering

What Really Happens Inside the Kiln
Learn how time and temperature work together inside the kiln to transform clay into durable ceramic.
Mini Animal Face Magnets

Transform your fridge into a charming menagerie with these adorable, pastel-toned animal faces. Made from lightweight air-dry clay and finished with sweet painted details, these chunky magnets add a touch of whimsy to any kitchen.
Step-by-Step
Materials
- White air-dry clay (lightweight foam type recommended)
- Acrylic paints (white, pastel pink, soft brown, black)
- Small round paintbrushes (fine detail brush)
- Round cookie cutter or a drinking glass (approx. 2-3 inches)
- Strong craft magnets (ceramic or neodymium)
- Super glue or heavy-duty craft glue
- Rolling pin
- Parchment paper or non-stick mat
- Sandpaper (fine grit, optional)
- Matte sealant or varnish
Step 1: Shaping the Clay Base
-
Prepare your workspace:
Lay down a sheet of parchment paper or a non-stick mat to protect your table and prevent the clay from sticking. -
Condition the clay:
Take a generous handful of white air-dry clay and knead it well until it feels soft, warm, and pliable. If you want colored bases like the brown bear, mix a tiny drop of brown acrylic paint directly into the white clay now until the color is uniform. -
Roll it out:
Use your rolling pin to flatten the clay into an even slab. Aim for a thickness of about 1/4 to 1/2 inch so the magnets have a nice, chunky profile. -
Cut the circles:
Press your round cookie cutter or glass firmly into the clay to create clean circles for the heads. Gently push the clay out of the cutter if it sticks. -
Smooth the edges:
Dip your finger in a tiny bit of water and run it along the cut edges of your circles to smooth out any roughness or sharp corners.
Smooth Seams Pro-Tip
To erase the seam where ears attach, use a wet paintbrush like an eraser. Gently brush back and forth over the joint to blend the clay perfectly.
Step 2: Adding Ears and Details
-
Shape the bunny ears:
For the bunny, roll two small logs of white clay, tapering them slightly at the top. Flatten them gently. -
Attach the bunny ears:
Score the bottom of the ears and the top of a white circle base lightly with a sculpting tool. Add a dab of water (or slip) and press the ears firmly onto the back edge of the head, smoothing the seam so they look like one solid piece. -
Create bear ears:
For the bears and other animals, roll tiny balls of clay—brown for the bear, pink for the cat—and press them onto the top corners of their respective circles. Use your finger to blend the clay downward into the head. -
Dry thoroughly:
Place all your formed animal heads on a flat surface to dry. I find that flipping them over halfway through the drying process helps them dry evenly and prevents warping. This usually takes 24-48 hours depending on humidity.
Step 3: Painting and Finishing
-
Sand for smoothness:
Once fully dry, check for any rough spots. You can lightly sand the edges with fine-grit sandpaper for a professional, matte finish. -
Sketch the faces:
Lightly sketch the eyes, nose, and mouth placement with a pencil. Keep the features centered and low on the face for that ‘kawaii’ cute look. -
Paint the base colors:
If you didn’t tint the clay earlier, paint the entire circle in your desired base color (soft pink, beige, or leaving it white) now. Let this dry completely. -
Add the inner ears:
Using pink paint and a small brush, paint the inner sections of the bunny and cat ears. -
Detail the rosy cheeks:
Dip a brush or a cotton swab into pink paint, dab most of it off onto a paper towel, and gently stipple bright pink circles onto the cheeks. The dry-brush technique gives it a soft, textured look. -
Draw the features:
Using a very fine liner brush and black paint (or a black permanent marker if you have a steady hand), carefully draw the sleepy U-shaped eyes, the small nose, and the mouth lines. -
Seal the work:
Apply a coat of matte varnish over the front and sides of each animal. This protects the paint from kitchen grease and moisture. -
Attach the magnet:
Flip the dried, sealed animals over. Apply a strong dot of super glue to the back center and press your magnet firmly into place. Hold for 30 seconds to ensure a good bond.
Level Up: Texture
While the clay is wet, gently tap a clean toothbrush over the surface of the bear ears to create a realistic ‘fuzzy’ fur texture before drying.
Let the glue cure completely before sticking your new friends onto the fridge to hold your favorite photos and notes
Frog And Pond Friend Magnets
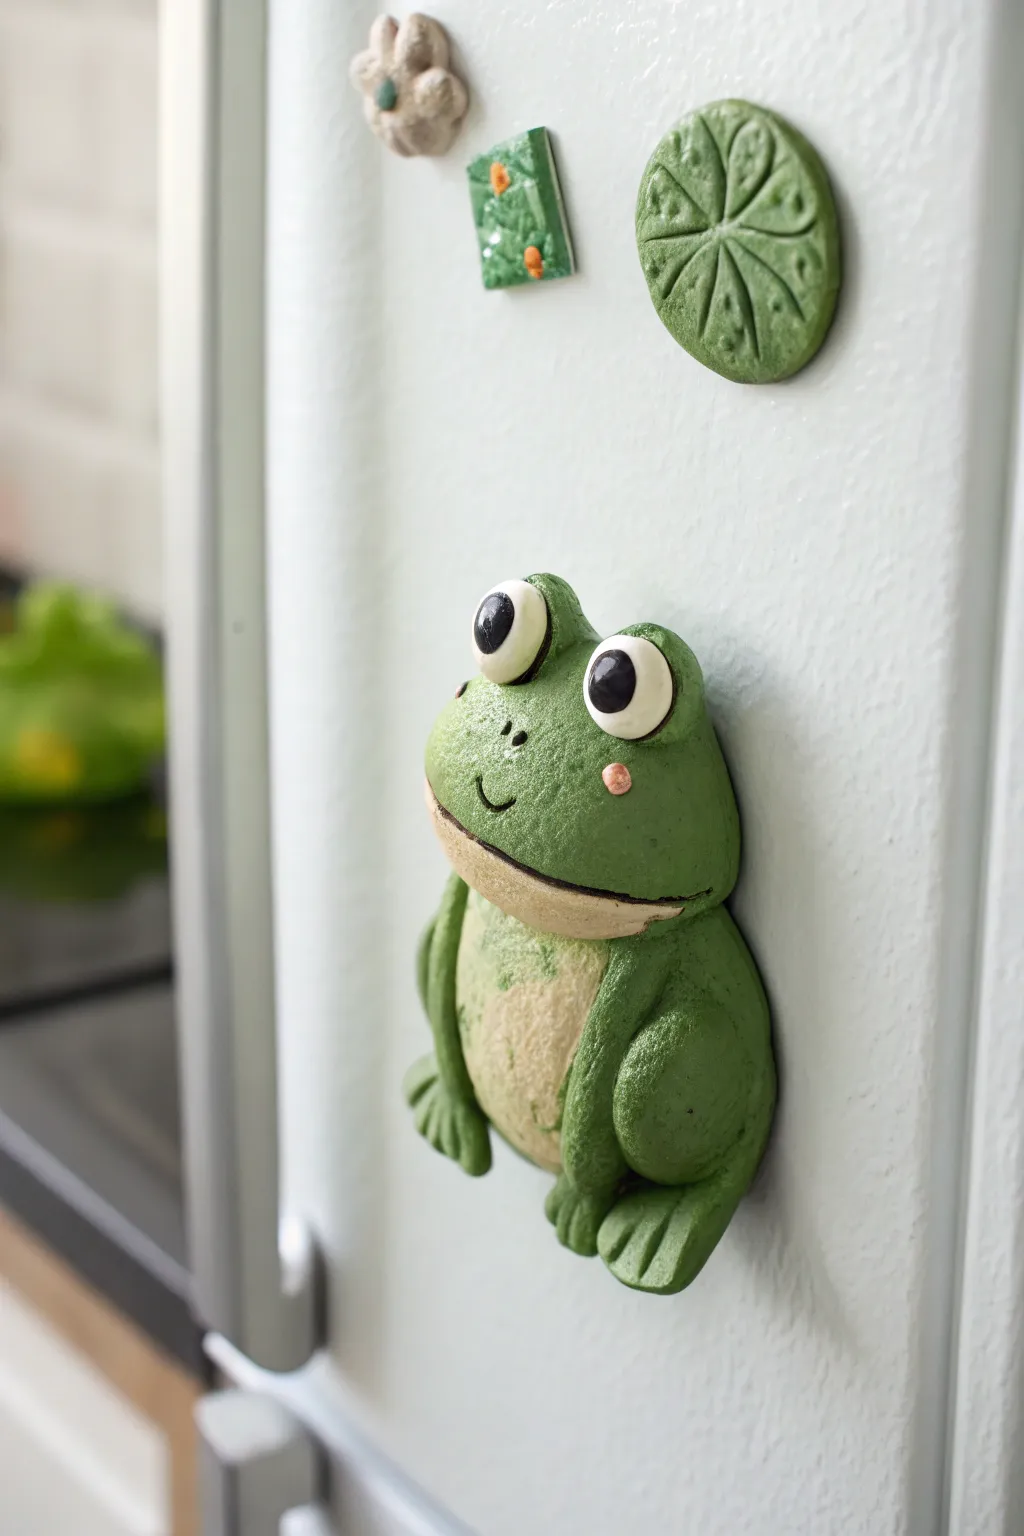
Bring a touch of the pond to your kitchen with this utterly charming sculpted frog magnet. With its distinct texture and adorable oversized eyes, this air clay project adds a whimsical pop of nature to any magnetic surface.
Step-by-Step Tutorial
Materials
- White air-dry clay
- Acrylic paints (Forest Green, White, Black, Light Pink, Cream/Beige)
- Strong round ceramic or neodymium magnet
- Sculpting tools (needle tool, small ball tool)
- Super glue or strong craft adhesive
- Clear matte varnish or sealant
- Detail paintbrush
- Medium paintbrush
- Small piece of textured sponge or stiff brush (for texturing)
Step 1: Sculpting the Base Form
-
Shape the body:
Begin with a ball of clay roughly the size of a golf ball. Flatten it slightly into a rounded pear shape to form the main body, ensuring the back remains completely flat for the magnet. -
Add the head:
Roll a slightly smaller, flattened oval for the head. Attach this firmly to the top of the body piece, blending the clay at the seam on the backside so it becomes one solid unit. -
Form the limbs:
Roll two thick sausage shapes for the legs. Curve them into a ‘C’ shape and press them against the sides of the body to create the crouched frog legs. -
Create the feet:
Flatten the bottom ends of the legs slightly. Use a needle tool or knife to cut two notches into each foot, creating three distinct toes. Gently round the edges of each toe. -
Sculpt the arms:
This frog sits politely, so roll two thinner tubes for arms. Attach them so they rest vertically against the belly, blending the shoulders into the body. Score the hands to make fingers just like the feet.
Texturing Tip
If you don’t have a texture sponge, a crumpled ball of aluminum foil rolled gently over the wet clay creates fantastic organic skin bumps.
Step 2: Adding Details and Texture
-
Create the eye sockets:
Using your thumb or a large ball tool, press two indentations into the top of the head where the eyes will sit. This helps integrate the bulging eyes naturally later. -
Make the eyes:
Roll two balls of white clay. Place them into the indentations you made, pressing gently so they stick but remain protruding and buggy. I prefer to make one slightly larger for a quirky expression. -
Define the mouth:
Use a needle tool to carve a wide, curved smile across the face. Deepen the line slightly to create a shadow later. -
Add texture:
Gently tap a coarse sponge or a stiff-bristled brush over the green parts of the skin (head, back, legs) to create a bumpy, realistic amphibian texture. Leave the belly area smooth. -
Embed the magnet:
Flip the frog over. Press your magnet into the flat back to create a perfect indentation, then remove the magnet. Let the clay dry completely for 24-48 hours before gluing the magnet into that spot.
Magnet Adhesion
If the magnet pops off after gluing, score both the clay back and the magnet surface with sandpaper to give the glue more grip.
Step 3: Painting and Finishing
-
Base coat the green:
Once fully dry, paint the entire frog (except the eyes and belly) with a solid coat of forest green acrylic paint. You may need two coats for full opacity. -
Paint the belly:
Mix a warm cream or beige color. Carefully paint the smooth belly area and chin, blending the edges softly where it meets the green skin. -
Detail the face:
Paint the eyes pure white. Once dry, add large black pupils. Use a very fine brush to add two tiny black dots for nostrils above the mouth. -
Add rosy cheeks:
Dip a small blunt tool or the end of a paintbrush handle into light pink paint. Dot it gently onto the cheeks for a cute blush effect. -
Highlight the texture:
Dry brush a lighter shade of green very lightly over the textured areas (knees, head) to catch the raised bumps and add dimension. -
Seal the piece:
Apply a clear matte varnish over the entire frog to protect the paint. For extra life, add a dot of gloss varnish just to the eyeballs to make them look wet.
Now your little green friend is ready to guard your grocery lists with a smile


The Complete Guide to Pottery Troubleshooting
Uncover the most common ceramic mistakes—from cracking clay to failed glazes—and learn how to fix them fast.
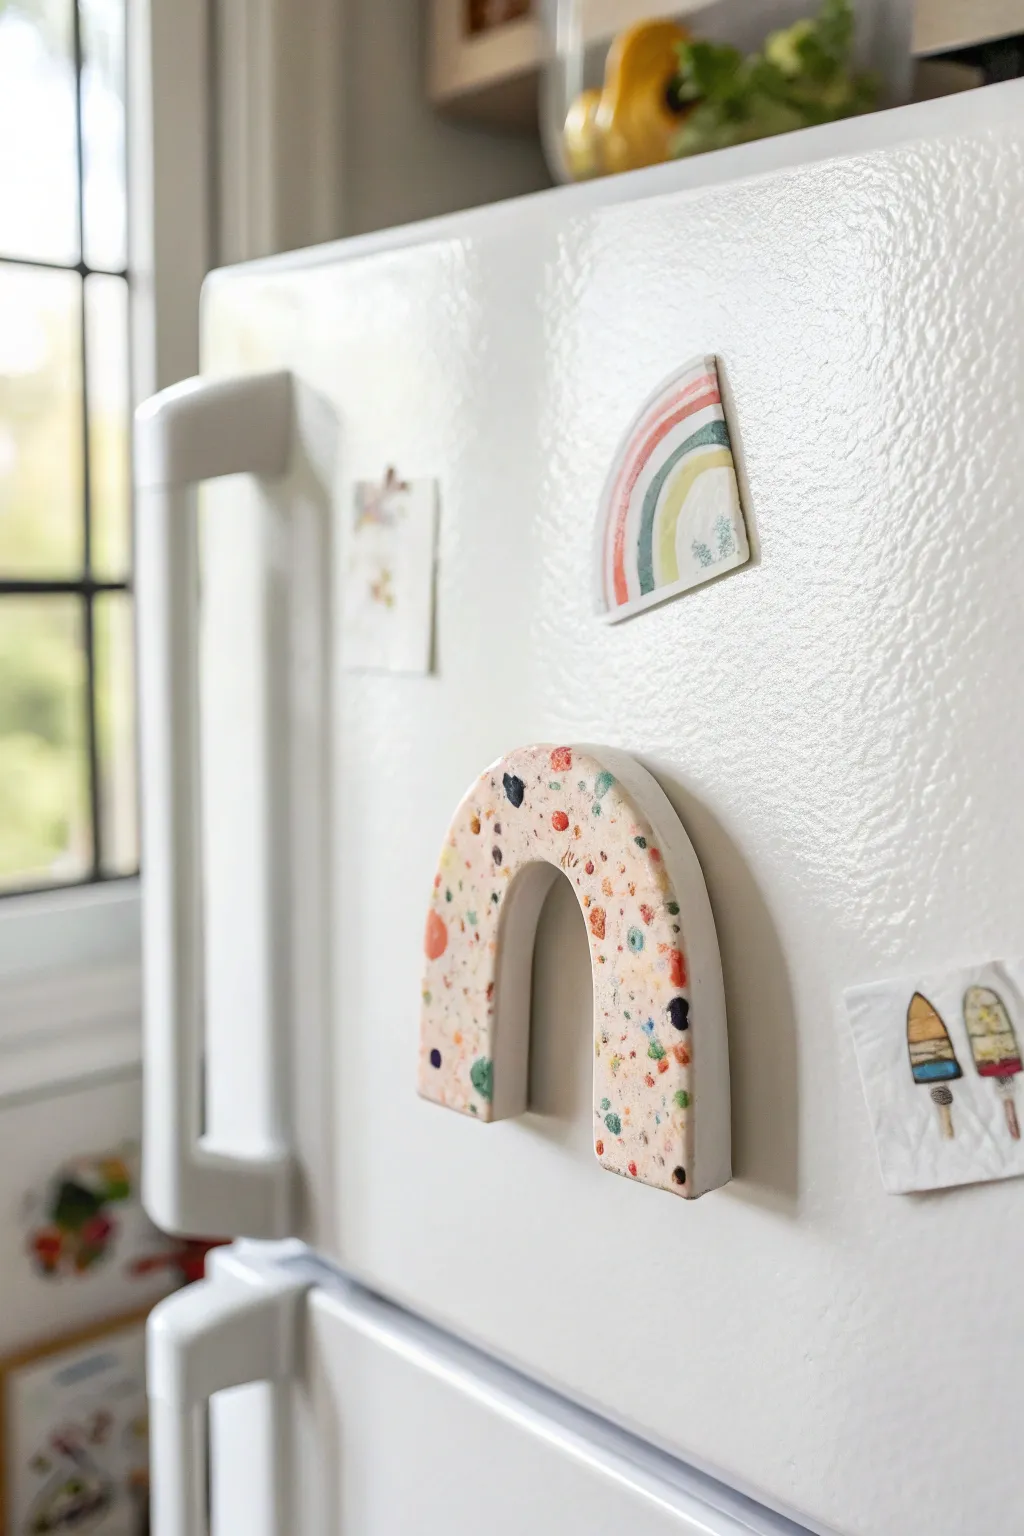
Heart And Star Patch Magnets
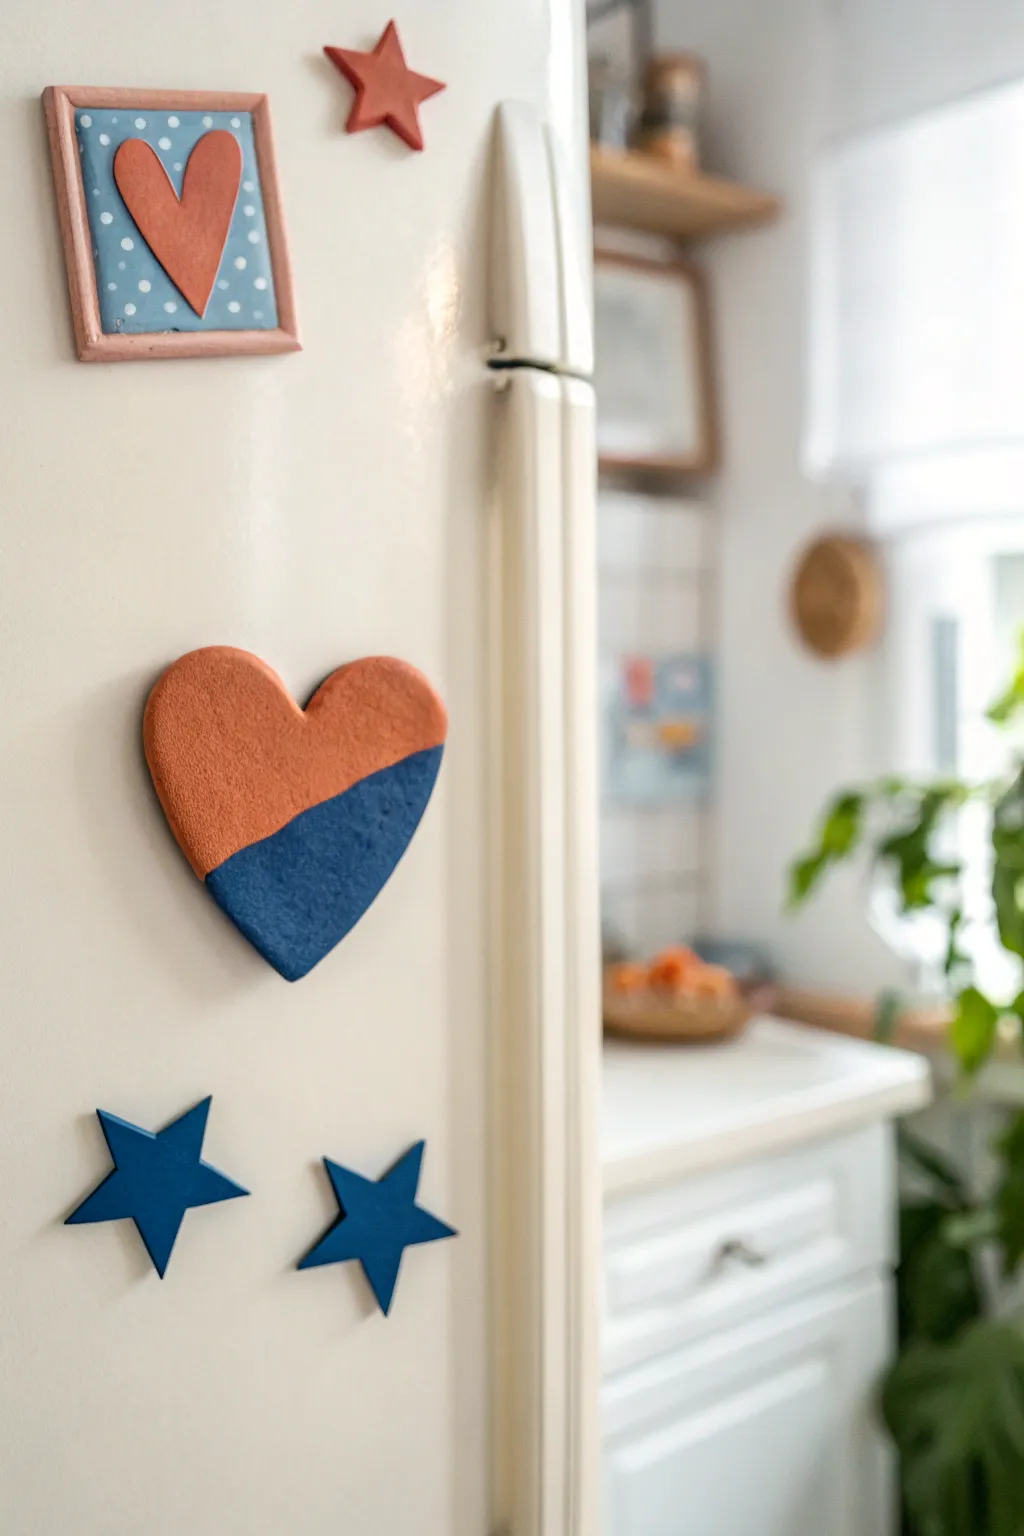
Brighten up your kitchen with these charming, textured magnets featuring simple geometric shapes and bold color blocking. The matte finish and slight grit of the clay give them a lovely artisanal feel that looks great on any fridge.
Step-by-Step Guide
Materials
- Air-dry clay (white or terracotta)
- Acrylic paints (terracotta orange, deep blue, white)
- Small rolling pin
- Heart and star cookie cutters
- Strong craft magnets
- Super glue or E6000
- Fine-grit sandpaper
- Paintbrushes (flat and detail)
- Masking tape or painter’s tape
- Small craft knife
- Parchment paper
Step 1: Shaping the Clay
-
Prepare your workspace:
Lay down a sheet of parchment paper to prevent sticking. Take a handful of air-dry clay and knead it briefly until it is pliable and smooth. -
Roll out the slab:
Use your rolling pin to flatten the clay to an even thickness of about 1/4 inch. Try to keep the thickness consistent so the magnets look uniform. -
Cut the shapes:
Using your cookie cutters, press firmly into the clay to create your hearts and stars. For value variety, I like to make a few different sizes of stars if you have a nested cutter set. -
Create the framed piece:
For the framed magnet, cut a rectangle base first. Then, roll thin ‘snakes’ of clay and press them gently onto the border to create a frame effect. Cut a smaller heart to fit inside this frame. -
Check the edges:
Carefully lift your shapes. Dip your finger in a little water and smooth out any rough edges or stray crumbs on the sides of your shapes. -
Dry thoroughly:
Place all pieces on a flat surface to dry. Allow them to cure for at least 24-48 hours, flipping them once halfway through to ensure even drying.
Step 2: Painting and Finishing
-
Sand for smoothness:
Once fully dry, lightly sand the surface and edges with fine-grit sandpaper to remove any imperfections. -
Base coat the stars:
Paint the star shapes fully in deep blue or terracotta orange. You may need two coats for opaque coverage. -
Tape the two-tone heart:
For the split-color heart, apply a piece of masking tape diagonally across the shape. Press the edge of the tape down firmly to prevent bleed-under. -
Paint the first half:
Paint the exposed half of the heart with your terracotta orange paint. Let it dry to the touch, then carefully peel off the tape. -
Paint the second half:
Use a steady hand or a fresh piece of tape (once the orange is fully cured) to paint the bottom section in deep blue. -
Detail the framed magnet:
Paint the background of the rectangular piece blue. Once dry, use the handle end of a paintbrush dipped in white paint to dot on the polka pattern. -
Assemble the frame:
Paint the frame border and the inner heart in terracotta. Glue the small heart into the center of the polka-dot background. -
Attach the magnets:
Flip all your dry, painted pieces over. Apply a dab of super glue or E6000 to the back of a magnet and press it firmly onto the center of the clay shape.
Uneven Edges?
If your paint lines aren’t crisp after removing the tape, use a fine detail brush with a tiny bit of water to gently clean up the edge while the paint is fresh.
Textured Finish
To get the gritty texture seen in the photo, mix a pinch of baking soda into your acrylic paint before applying. It creates a matte, ceramic-like finish.
Now you have a custom set of geometric magnets ready to hold up your grocery lists and photos
Stamped Texture Coin Magnets
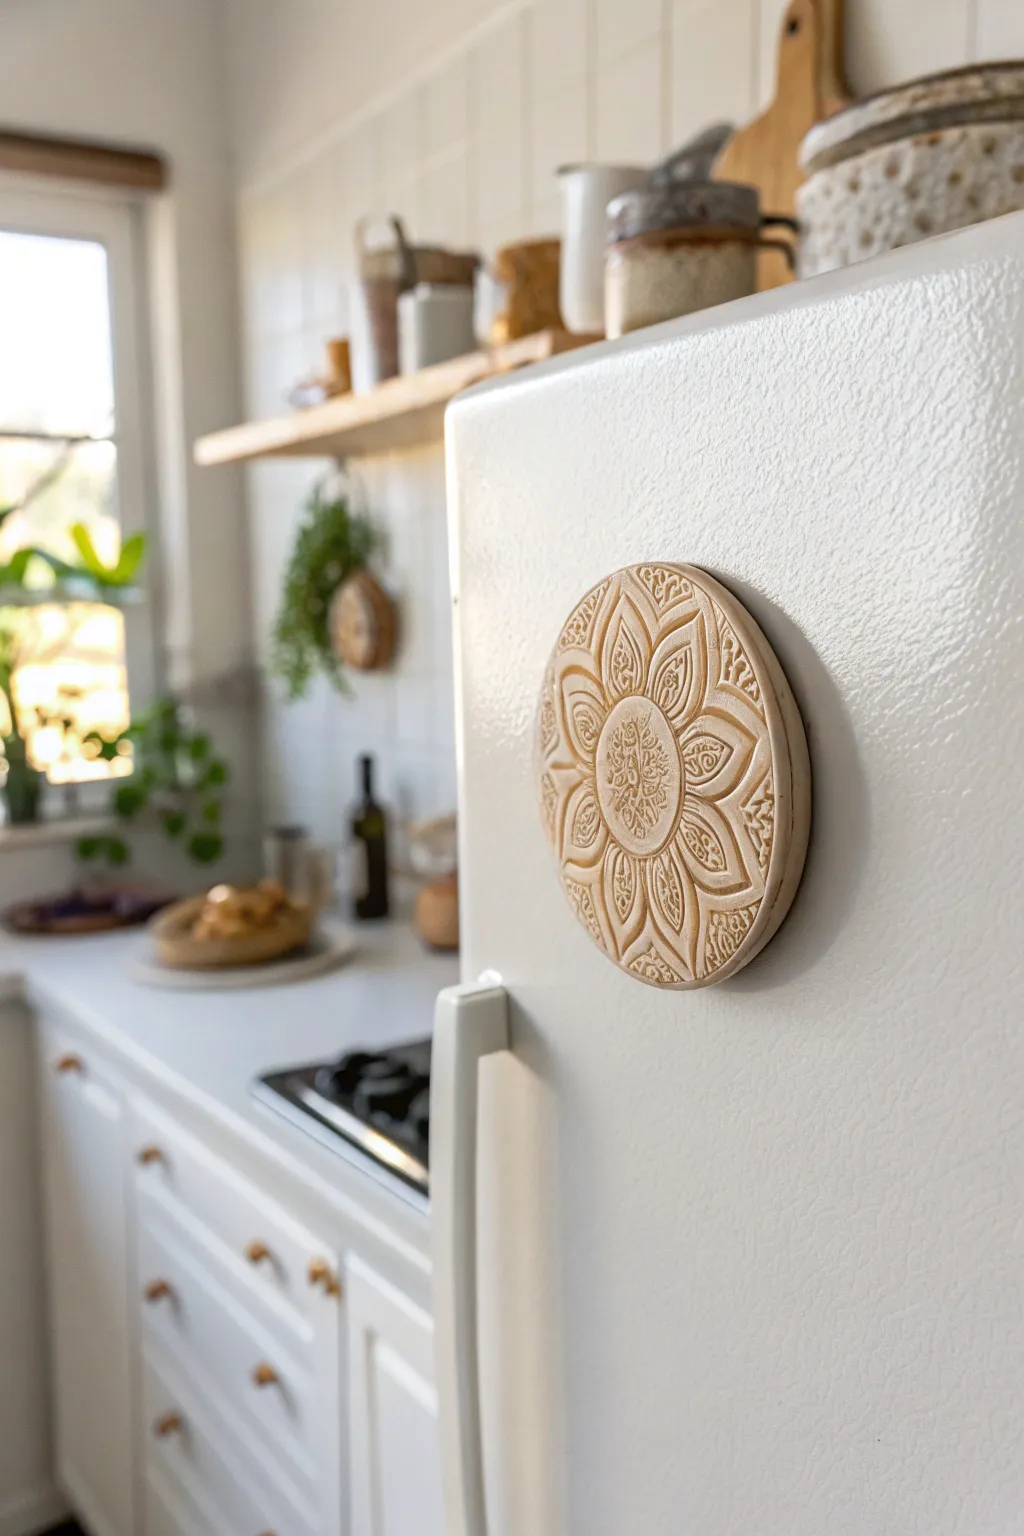
Transform simple air-dry clay into an elegant piece of kitchen decor with this textured coin magnet project. The natural, creamy finish and intricate mandala relief create a sophisticated look that mimics carved stone or ceramic without the need for a kiln.
How-To Guide
Materials
- White or natural air-dry clay
- Rolling pin
- Parchment paper or silicone mat
- Round cookie cutter (approx. 3-4 inches diameter)
- Rubber mandala stamp or texture sheet
- Fine-grit sandpaper (400 grit)
- Small disk magnet or magnetic strip
- Strong craft adhesive (e.g., E6000)
- Clear matte acrylic sealer (spray or brush-on)
- Optional: Antique wax or watered-down brown acrylic paint
Step 1: Preparation & Shaping
-
Condition the clay:
Begin by taking a handful of air-dry clay and kneading it in your hands for a minute or two. This warms up the material and ensures it is pliable and free of air bubbles or dry cracking spots. -
Roll out the slab:
Place your clay on a sheet of parchment paper to prevent sticking. Use your rolling pin to flatten the clay into an even slab, aiming for a thickness of about 1/4 inch (6mm). Avoid going too thin, as the clay needs depth to accept the stamp impression. -
Check for smoothness:
Run your finger lightly over the surface. If there are any wrinkles or cracks, smooth them out with a tiny bit of water on your fingertip before proceeding.
Step 2: Stamping & Cutting
-
Prepare the stamp:
Lightly dust your rubber mandala stamp with cornstarch or baby powder. This acts as a release agent so the intricate rubber details don’t pull up the wet clay. -
Impress the design:
Position the stamp over the center of your clay slab. Press down firmly and evenly, ensuring you apply pressure to all outer edges of the stamp design, not just the middle. -
Reveal the texture:
Gently lift the stamp straight up to reveal the pattern. If you see any shallow areas, you can try to carefully re-align and press again, but it’s often safer to smoothen the clay and restart if the impression is too light. -
Cut the shape:
Position your round cookie cutter over the stamped design. Center it perfectly so the mandala pattern is symmetrical within the circle, then press down firmly to cut the shape. -
Remove excess clay:
Peel away the scrap clay from outside the ring before lifting the cutter. This prevents the circle from warping when you try to move it. -
Smooth the edges:
Dip your finger in a little water and gently run it around the cut edge of the circle to soften the sharp angle left by the cutter.
Preventing warping
If your clay circle curls up while drying, place a lightweight book on top of it once it’s leather-hard (partially dry) to gently force it flat.
Step 3: Drying & Finishing
-
Begin drying:
Let the clay disk sit on the parchment paper in a cool, dry place. Avoid direct sunlight or heat sources, which can cause cracking. -
Flip occasionally:
After about 12 hours, I usually gently flip the piece over to let the backside dry evenly. This helps prevent the coin from curling up at the edges. -
Sand edges:
Once fully dry (usually 24-48 hours depending on humidity), take your fine-grit sandpaper and lightly buff the outer rim to remove any lingering roughness or fibers. -
Enhance texture (Optional):
To get the look in the photo, where the crevices are slightly darker, mix a tiny drop of brown paint with water (a wash). Brush it over the texture and immediately wipe the surface with a damp paper towel, leaving pigment only in the deep lines. -
Seal the piece:
Apply a thin coat of clear matte acrylic sealer. This protects the clay from moisture and kitchen grease without making it look plasticky.
Add a golden touch
After the clay is dry, use your finger to rub a tiny amount of gold gilding wax over the raised parts of the pattern for a luxurious metallic highlight.
Step 4: Assembly
-
Attach the magnet:
Apply a pea-sized amount of strong adhesive to the center of the back of the dried clay disk. -
Secure and cure:
Press your magnet firmly into the glue. Let the adhesive cure fully according to the manufacturer’s instructions (often overnight) before placing it on your fridge.
Enjoy styling your refrigerator with these chic, custom-made accents that look lovely in groups of three

TRACK YOUR CERAMIC JOURNEY
Capture glaze tests, firing details, and creative progress—all in one simple printable. Make your projects easier to repeat and improve.
Terrazzo Speckle Magnets
Embrace the trendy terrazzo aesthetic with this chunky, speckled arch magnet. By mixing colorful clay chips into a white base, you’ll create a sophisticated stone-like effect that adds an artistic touch to your fridge door.
Detailed Instructions
Materials
- White air-dry clay (main base)
- Air-dry clay in assorted colors (bright pink, yellow, blue, turquoise, orange, black)
- Acrylic rolling pin
- sharp craft knife or X-Acto blade
- Sandpaper (medium and fine grit)
- Glossy varnish or sealant (Mod Podge or resin)
- Strong craft glue (E6000 or super glue)
- Round ceramic magnets or strong button magnets
- Parchment paper or silicone mat
- Small bowl of water
Step 1: Creating the Color Chips
-
Roll Colored Clays:
Begin by taking small pinches of your colored clays. Roll each color out individually on your workspace until they are very thin, almost paper-thin sheets. -
Dry the Sheets:
Set these thin colored sheets aside to dry completely. Because they are so thin, this usually only takes about 20-30 minutes, or you can speed it up with a hair dryer. -
Crush into Chips:
Once the colored sheets are brittle and dry, break them up into small, irregular chips. You want a variety of sizes, from tiny specks to slightly larger chunks, to mimic real terrazzo stone.
Clean Cuts Only
Wipe your craft knife blade with a damp paper towel between cuts. Sticky clay residue on the blade creates drag and ruins the clean edges of your thicker arch shape.
Step 2: Forming the Arch
-
Prepare the Base Clay:
Take a generous lump of white air-dry clay and condition it by kneading it in your hands until it is soft, pliable, and free of cracks. -
Roll a Slab:
Roll the white clay into a thick slab, approximately 1/2 inch thick. Keep the shape rough for now; you just need enough surface area for your arch. -
Embed the Color:
Sprinkle your dried colored chips generously over the top of the white slab. Press them gently into the surface. -
Secure the Chips:
Fold the clay over on itself to trap the chips inside, then knead gently just a few times to distribute them. Don’t over-knead, or the colors might streak and turn muddy. -
Final Roll Out:
Roll the clay out again into a slab. Aim for a thickness of about 1/2 inch to 3/4 inch to achieve that chunky look seen in the photo. -
Cut the Outer Shape:
Using your craft knife, cut out a U-shaped arch. Start by cutting the straight bottom edges, then curve up and around for the top. -
Cut the Inner Arch:
Carefully cut a smaller U-shape out of the center to create the negative space. Take your time to keep the arch walls relatively even in width. -
Smooth the Edges:
Dip your finger in a little bit of water and run it along all the cut edges to smooth out any sharpness or knife drag marks.
Glow in the Dark
Swap the white base clay for glow-in-the-dark polymer clay (baked method) or mix glow powder into your air-dry clay for a functional magnet that doubles as a nightlight guide.
Step 3: Finishing Touches
-
Dry Completely:
Let the arch dry on a flat surface lined with parchment paper. Turn it over halfway through the drying process to ensure evenness. This may take 24-48 hours depending on humidity. -
Sand to Reveal:
This is the magic step. Once bone dry, use medium-grit sandpaper to sand the top surface. Sanding removes the top layer of white clay and reveals the bright, sharp edges of the colored chips underneath. -
Refine the Surface:
Switch to fine-grit sandpaper to smooth out any scratches from the previous step, leaving the surface silky to the touch. -
Seal:
Apply a coat of glossy varnish or sealant. This will make the colors pop vibrantly and protect the white clay from getting dirty. -
Attach Magnet:
Flip the arch over. Apply a dab of strong craft glue to the back and press your magnet firmly into place. -
Final Cure:
Allow the glue to cure fully according to the package instructions before placing your new art piece on the fridge.
Now your fridge has a stylish, modern update that looks just like expensive home decor stone
Marbled Swirl Magnets
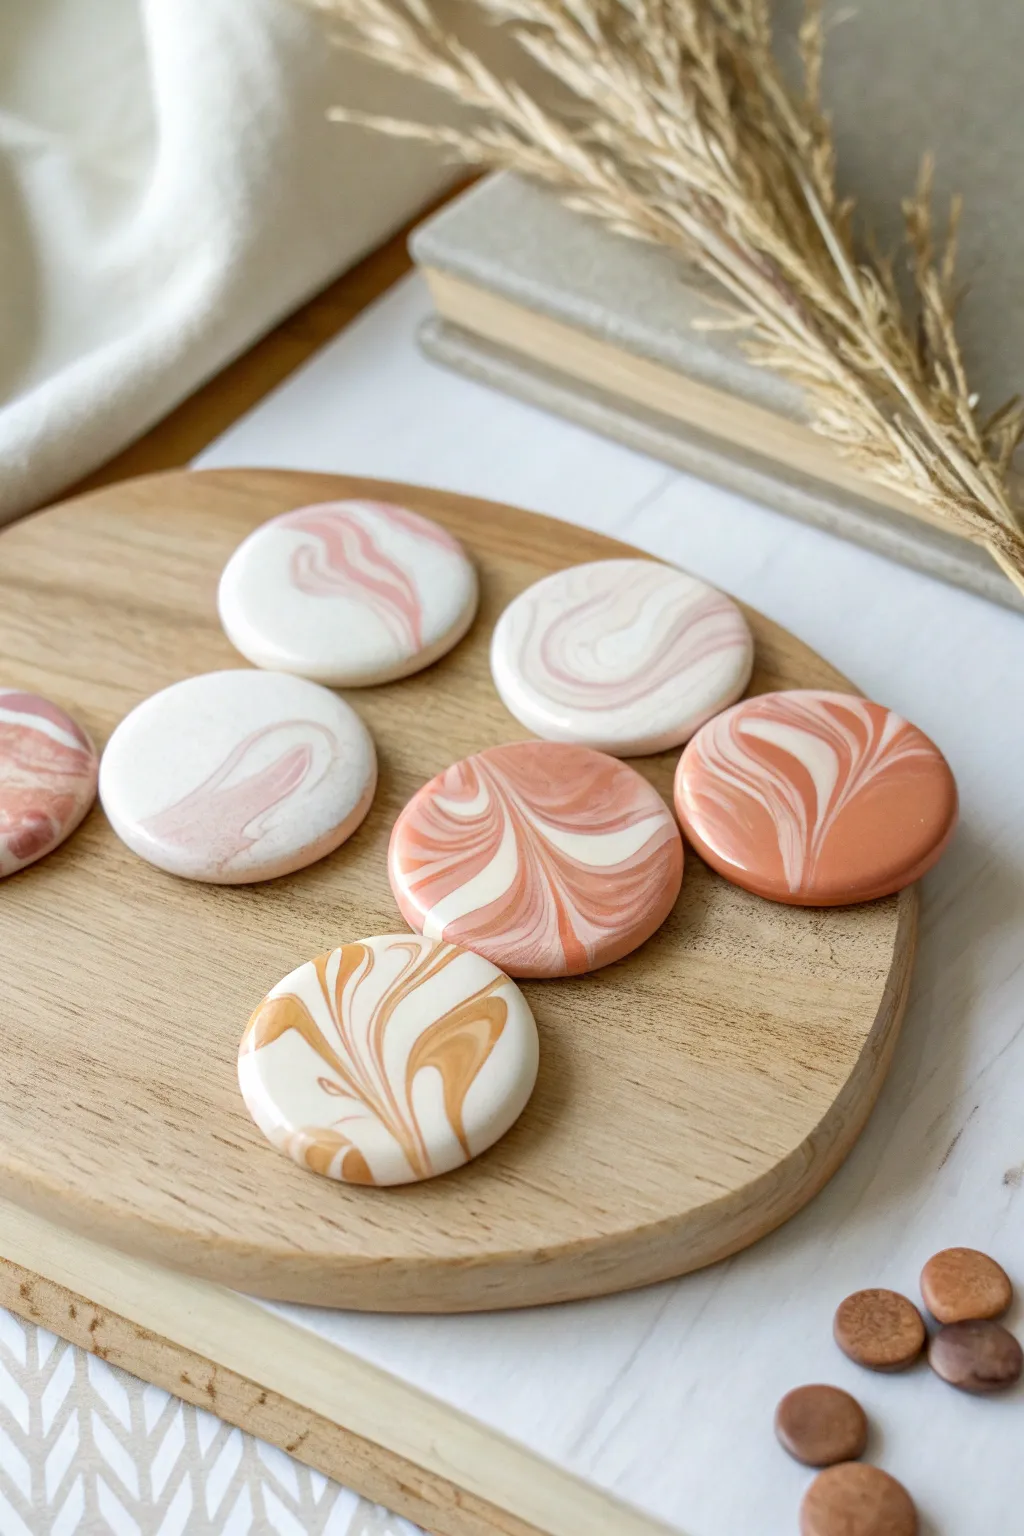
These elegant magnets feature a mesmerizing marbled effect that looks incredibly high-end but is simple to achieve. With soft swirls of white, terracotta, and dusty pink, they add a touch of modern art to your fridge or magnetic board.
How-To Guide
Materials
- White air-dry clay
- Acrylic paints (terracotta, dusty pink, mocha)
- Small rolling pin
- Round cookie cutter (approx. 2 inches)
- Small round adhesive magnets
- Gloss varnish or sealant (optional)
- Sandpaper (fine grit)
- Wax paper or craft mat
Step 1: Prepping the Clay
-
Condition the base:
Begin by taking a large chunk of white air-dry clay. Knead it in your hands for a minute until it is soft, pliable, and free of any cracks. -
Portion for coloring:
Divide your clay into three uneven balls. Keep the largest ball white—this will be your base color and should be about half the total volume. -
Mix your colors:
Take the second ball of clay and add a small drop of terracotta acrylic paint. Fold and knead the clay repeatedly until the color is fully incorporated and uniform. Repeat with the third ball using a dusty pink or mocha shade. -
Create logs:
Roll each colored ball (white, terracotta, and pink) into long, snake-like logs about 5-6 inches long.
Step 2: Creating the Marble Effect
-
Twist together:
Lay the three logs side by side. Twist them together into one large rope, like a candy cane, so the colors start to intertwine. -
Fold and roll:
Take your twisted rope, fold it in half, and roll it out into a snake again. I find doing this 2-3 times is the sweet spot; over-mixing will muddy the distinct lines. -
Form a ball:
Once you see a marble pattern you like in the rope, ball the entire mixture up firmly, smoothing any seams with your thumb. -
Flatten the slab:
Place the marbled ball on wax paper. Using your rolling pin, roll the clay out into a slab about 1/4 inch thick. Rotate the clay as you roll to ensure even thickness. -
Cut the shapes:
Position your round cutter over the most attractive swirled sections of the slab. Press down firmly to cut out your circles. -
Smooth the edges:
Lift the circles gently. Dip your finger in a tiny bit of water and run it around the circumference of each disc to smooth out any rough cutting edges.
Clean Cuts Pro-Tip
Before cutting your circles, place a sheet of cling wrap over the clay slab. Press the cutter down through the plastic. This creates softly rounded ‘pillow’ edges instead of sharp ones.
Step 3: Finishing Touches
-
Dry completely:
Lay the clay discs on a flat, clean surface to dry. Air-dry clay usually takes 24-48 hours depending on humidity. Flip them over halfway through to ensure the bottom dries evenly. -
Sand for perfection:
Once fully cured and hard, use fine-grit sandpaper to gently buff the edges or surface if there are any bumps. Wipe away the dust with a slightly damp cloth or paper towel. -
Seal the surface:
For a glossy, ceramic-like finish similar to the photos, apply a coat of gloss varnish or mod podge. Let this dry completely before handling. -
Attach the magnets:
Peel the backing off your adhesive magnets and stick one firmly to the center of the back of each clay disc. If your magnets aren’t self-adhesive, a dab of superglue works perfectly.
Level Up: Gold Veins
Mix a tiny amount of gold mica powder or gold leaf flakes into the white clay before marbling. The subtle metallic shimmer adds an incredible luxury feel to the finished swirls.
Now you have a set of chic, functional art pieces ready to organize your notes with style