Any time I want instant summer vibes, I reach for beachy clay bead bracelets—they’re bright, easy, and feel like a mini vacation on your wrist. Here are my favorite beachy beachy clay bead bracelet ideas that capture ocean color, salty-air texture, and that relaxed coastal glow.
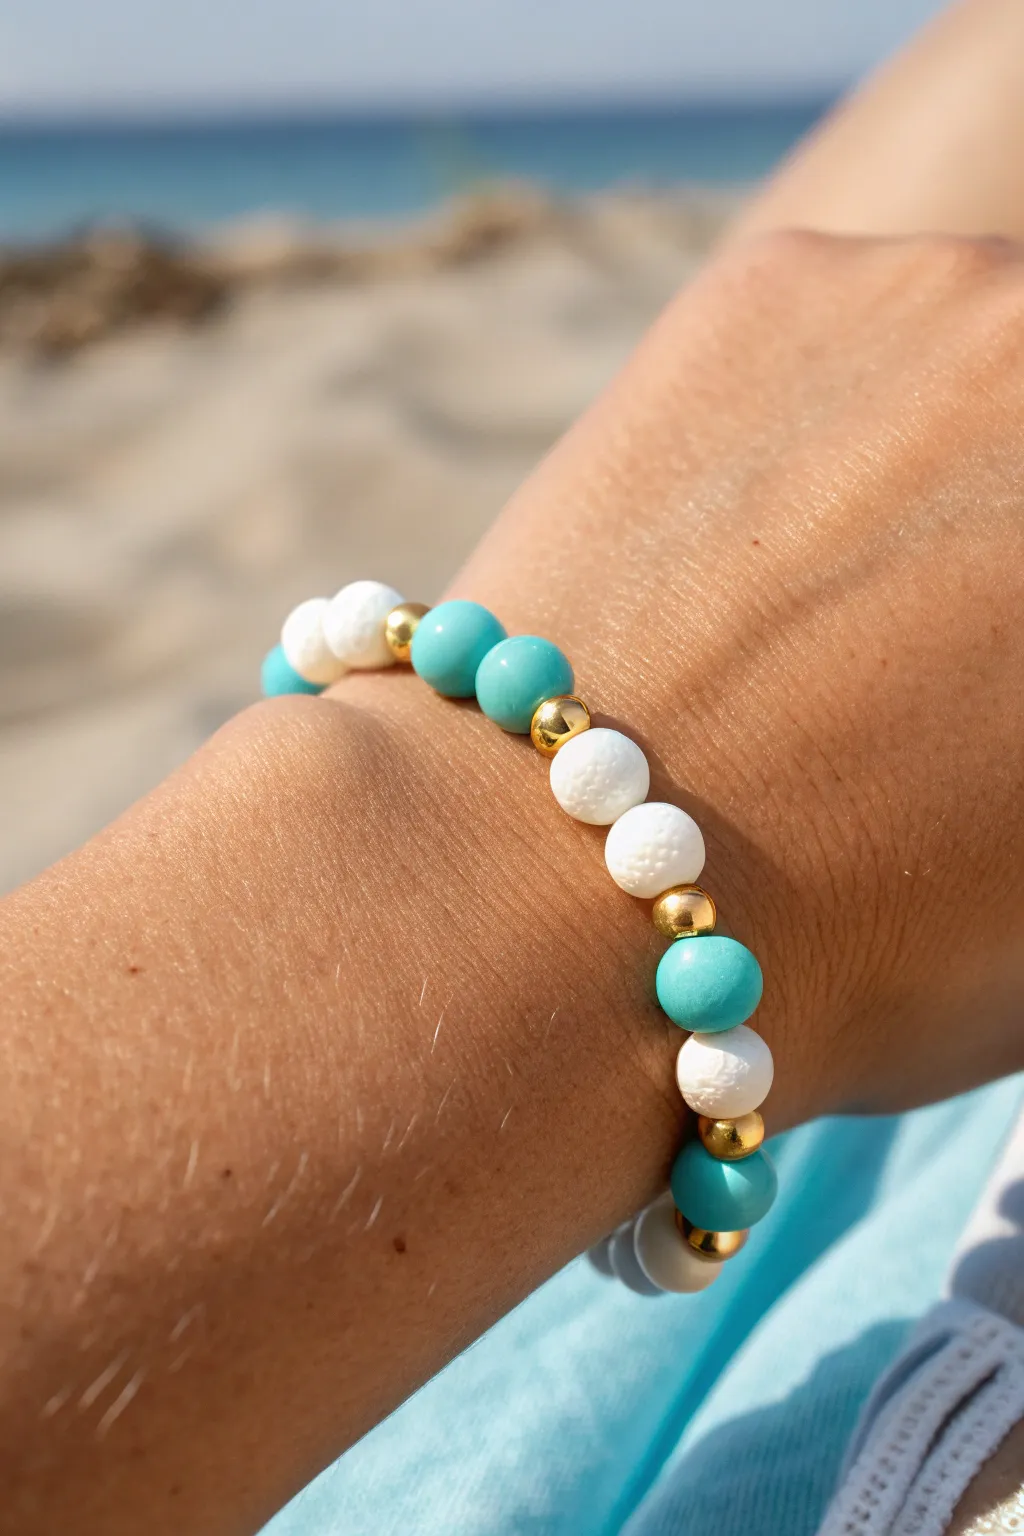
Ocean-Blue Heishi Bracelet Stack
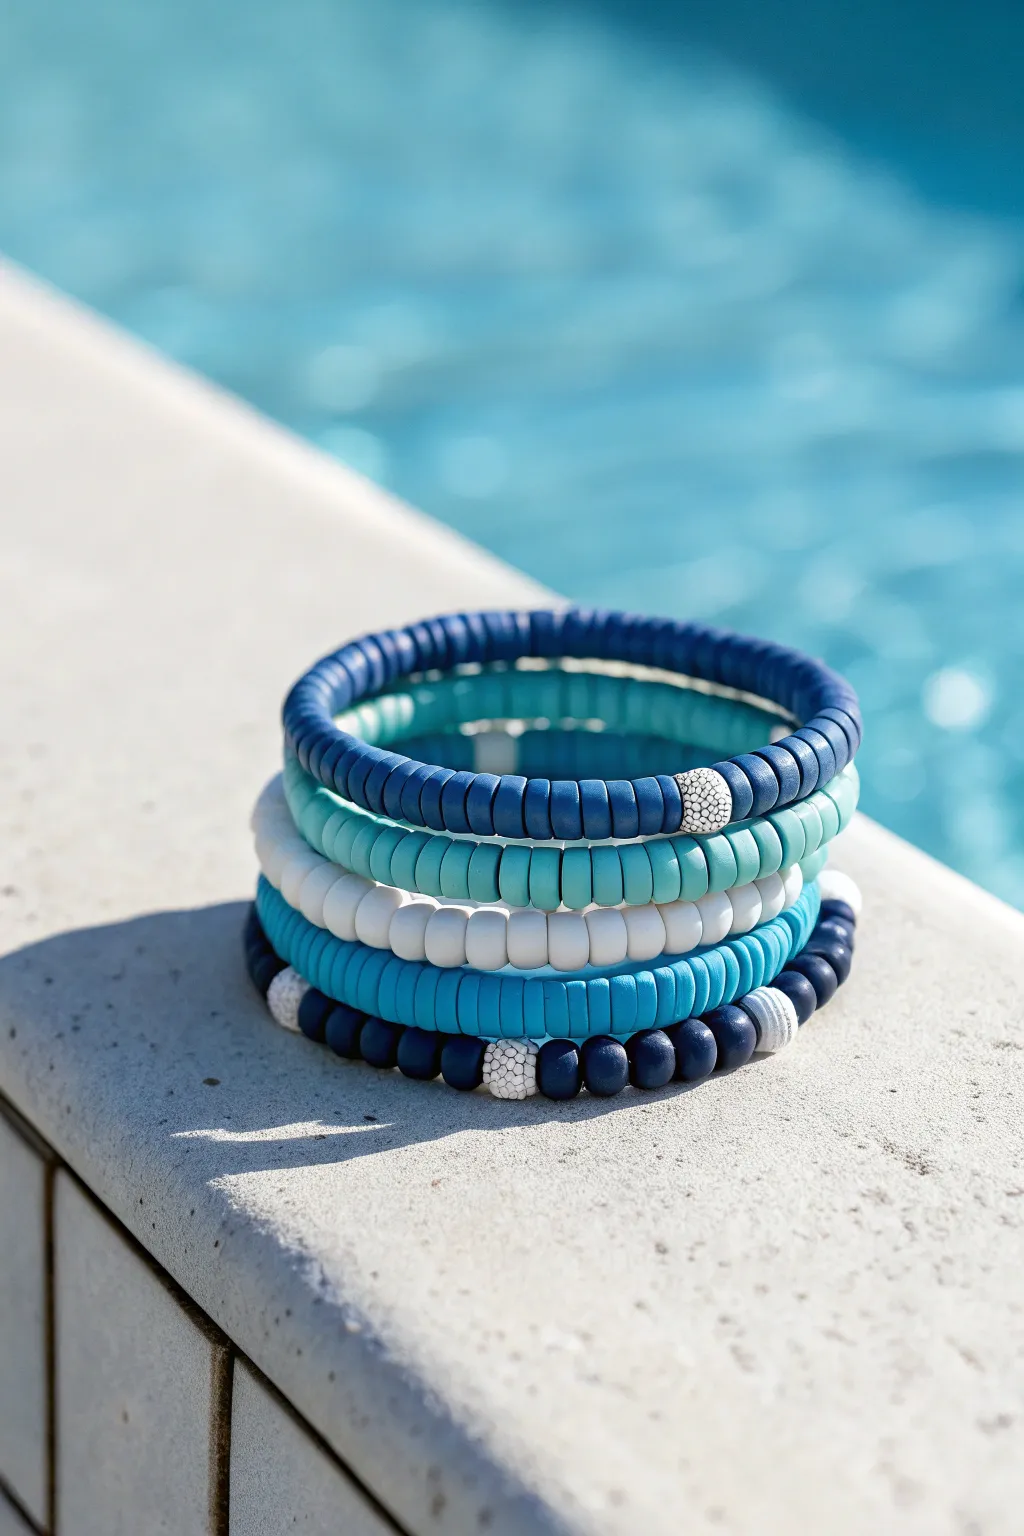
Capture the essence of sparkling swimming pools and deep ocean waves with this coordinated stack of five heishi bead bracelets. Featuring a refreshing gradient of blues from bright turquoise to crisp white and deep navy, these stretchy bands are perfect for mixing and matching all summer long.
Detailed Instructions
Materials
- 6mm polymer clay heishi beads (Navy blue)
- 6mm polymer clay heishi beads (Teal/Turquoise)
- 6mm polymer clay heishi beads (Light blue/Aqua)
- 6mm polymer clay heishi beads (Bright white)
- 6mm polymer clay heishi beads (Cerulean blue)
- Textured white spacer beads (round or disco ball style)
- Silver or white flat spacer discs
- 0.8mm clear elastic cord (stretch magic or similar)
- Jewelry glue (GS Hypo Cement)
- Scissors
- Bead stopper or tape
- Measuring tape
Step 1: Preparation
-
Measure your wrist:
Wrap a measuring tape specifically around the part of your wrist where you want the stack to sit. Add about half an inch to this measurement to ensure the bracelets roll on comfortably without pinching. -
Cut the elastic:
Cut five strands of elastic cord, each about 10-12 inches long. Having this extra length makes tying the final knots much easier than struggling with short ends. -
Secure the ends:
Place a bead stopper or a piece of masking tape on one end of each elastic strand to prevent your beads from sliding off while you design.
Knot Slipping?
If your elastic knots feel slippery, tighten them by pulling the individual cords apart after the first loop, then tie again. A dab of clear nail polish works in a pinch if you lack glue.
Step 2: Designing the Solid Bands
-
Create the top navy band:
For the first bracelet, string navy blue heishi beads onto your cord until you reach your desired length. -
Add the focal bead:
Halfway through stringing the navy beads, slide on one textured white round bead. This creates a pop of contrast against the dark blue. -
Create the teal band:
For the second bracelet, use your teal or turquoise heishi beads. This layer is kept simple and solid to bridge the darker and lighter tones. -
Create the white center band:
The third bracelet acts as a palate cleanser. String only bright white heishi discs for a clean, minimalist look that makes the blues pop adjacent to it. -
Create the cerulean band:
String the fourth strand using cerulean or medium-blue clay beads. I find this specific shade really creates that ‘pool water’ vibe essential to the stack.
Texture Play
Mix up the finishes for a more dynamic look. Use matte clay beads for the navy strand but slightly glossy or pearlescent ones for the teal strand to mimic water reflecting sunlight.
Step 3: Designing the Mixed Bottom Strand
-
Begin the pattern:
The bottom bracelet is the most complex. Start stringing with a repeating pattern of navy blue beads, breaking them up occasionally with lighter accents. -
Insert texture accents:
Place a textured white bead every 2 inches or so. Flank these textured beads with a few flat silver or white spacer discs to highlight them. -
Check consistency:
Hold all five strands up next to each other. Ensure the bottom mixed strand complements the solid colors above without clashing.
Step 4: Finishing the Stack
-
Pre-stretch the cord:
Before tying, gently give each bracelet a little tug. This pre-stretching prevents the elastic from sagging the first time you wear it. -
Tie the surgeon’s knot:
Remove the bead stopper and crossover the ends like a normal knot, loop it through a second time, and pull tight. Repeat this knotting process two to three times for security. -
Secure with glue:
Apply a tiny dab of jewelry glue specifically to the knots. Be careful not to get glue on the colored clay beads, as it can discolor them. -
Hide the knot:
If the hole of your textured bead or a nearby heishi bead is large enough, gently pull the knot inside to hide it immediately. -
Trim the excess:
Allow the glue to dry completely according to the package instructions, then trim the excess elastic cord close to the knot.
Slide these onto your wrist and enjoy the cool, coastal vibes they bring to your outfit


Sand and Seafoam Neutral Mix

Capture the essence of a tranquil coastline with this beautiful beaded bracelet. Combining creamy wooden textures with splashes of seafoam green and turquoise, this piece offers a sophisticated, earthy accessory perfect for layering or wearing solo.
Step-by-Step Tutorial
Materials
- Cream/off-white polymer clay heishi beads (approx. 4-6mm)
- Round light wood beads (approx. 6mm)
- Turquoise or seafoam green heishi spacer beads (polymer clay or stone)
- Blue-green speckled/textured round beads (stone, recycled glass, or ceramic)
- Gold beading wire or strong nylon cord
- 2 Gold wire guards
- 2 Gold crimp beads
- Gold lobster clasp
- Gold extension chain
- Wire cutters
- Flat nose pliers
- Crimping pliers
Step 1: Preparation & First Connection
-
Cut the Wire:
Measure your wrist and cut a length of beading wire approximately 4 inches longer than your measurement to allow plenty of room for finishing the ends. -
Secure the First End:
Thread a gold crimp bead onto one end of the wire, followed by a gold wire guard. -
Loop Through Clasp:
Slip the loop of your gold lobster clasp into the U-shape of the wire guard. -
Close the Crimp:
Pass the tail of the wire back through the crimp bead. Use your crimping pliers to flatten the crimp bead securely, locking the wire in place. Use flat nose pliers to gently squeeze the wire guard tips together if needed.
Stiff Bracelet?
If the bracelet feels rigid, you crimped too tightly. Leave a tiny bit of slack (about 1mm) between the final crimp and the beads so the bracelet can drape naturally around your wrist.
Step 2: Creating the Pattern
-
Begin the Base:
Start by threading about 1.5 to 2 inches of the solid cream-colored heishi beads. This section will sit near the clasp on the side of your wrist. -
Transition Bead:
Add a single light wood bead to mark the beginning of the focal pattern. -
Start the Focal Section:
Thread two seafoam green heishi spacers followed by one round wooden bead. -
Add Texture:
Slide on one of the textured blue-green speckled beads. These add a wonderful organic feel that mimics sea glass. -
Repeat the Sequence:
Add a round wood bead, followed by two seafoam spacers. -
Continue the Pattern:
Repeat this central sequence: wood bead, two seafoam spacers, wood bead, textured blue-green bead. Do this 3-4 times depending on your wrist size, ensuring the pattern remains symmetrical. -
Finish the Pattern:
Conclude the focal section with a final round wood bead. -
Complete the Circle:
Finish the strand by adding another 1.5 to 2 inches of the cream heishi beads, mirroring the starting section. Check the length against your wrist now.
Step 3: Finishing Touches
-
Add the Second Crimp:
Thread a crimp bead onto the open end of the wire, followed by the second wire guard. -
Attach Extension Chain:
Loop the wire guard through the first link of your gold extension chain. -
Secure the End:
Pass the wire tail back through the crimp bead and pull it tight so there is no gap in the beads, but leaving enough flexibility for the bracelet to curve. -
Final Crimp:
Crimping firmly, secure the bead in place. -
Trim Excess:
Thread the remaining tail into the first few adjacent beads to hide it, then snip off any excess wire flush with the beads.
Pro Tip: Wire Color
Since heishi beads can sometimes show the cord underneath, use gold-colored beading wire. It blends perfectly with the neutral tones and gold hardware, making the gaps invisible.
Pair this serene bracelet with a flowy linen shirt for the ultimate beach-chic look


Sunset Coral Color-Block Strands
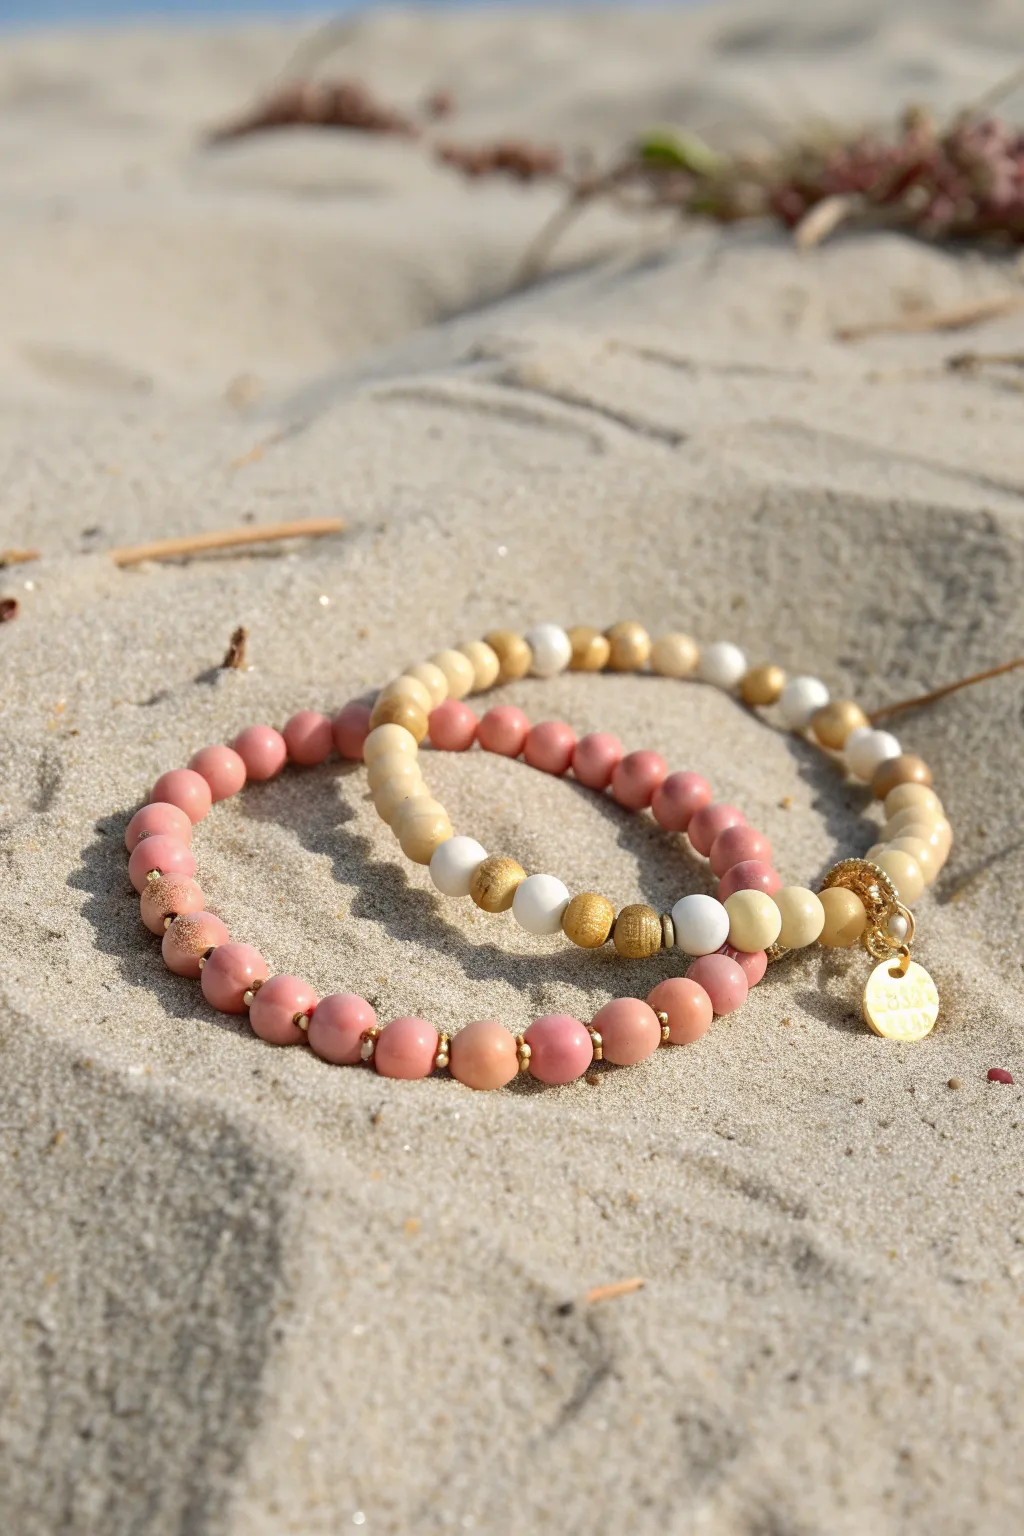
Capture the essence of a warm beach evening with this pair of complementary stretch bracelets featuring earthy wood tones and soft coral hues. The mix of matte, polished, and speckled textures creates a sophisticated yet casual accessory perfect for stacking.
Detailed Instructions
Materials
- 0.8mm clear elastic stretch cord
- 6mm-8mm round coral pink beads (matte finish)
- 6mm-8mm round light wood beads
- 6mm-8mm round white faceted or smooth accent beads
- Small gold spacer beads (discs or tiny rounds)
- Gold tone jump rings (4mm or 5mm)
- Small gold decorative charm (coin or logo tag)
- Hypo-cement or clear jewelry glue
- Scissors
- Bead stopper or painter’s tape
- Jewelry pliers (flat nose)
Step 1: Planning Your Design
-
Measure your wrist:
Wrap a flexible measuring tape around your wrist to find your size, then add about 1/2 inch to that measurement for a comfortable fit. -
Cut the cord:
Cut two lengths of elastic cord, each about 10-12 inches long. This extra length makes tying the finishing knots much easier. -
Secure the end:
Attach a bead stopper or simply place a piece of folded tape at one end of each cord to prevent your beads from sliding off while you work. -
Sort your beads:
Lay out your beads on a soft surface or bead mat. Separate the pink coral beads, the light wood beads, the white accents, and the gold spacers.
Step 2: The Coral & Gold Strand
-
Start the pattern:
Begin threading the coral pink beads onto your first cord. Aim for a pattern of roughly 5-6 coral beads followed by a gold spacer bead. -
Add texture variation:
Intersperse a few speckled or slightly textured pink beads among the smooth ones if you have them, creating a subtle organic look. -
Create the focal section:
Once you have strung about two-thirds of the bracelet length in pink, switch to a mixed section. Thread on a pattern like: wood bead, gold spacer, white bead, gold spacer, wood bead. -
Check the length:
Wrap the strand around your wrist to check the fit. Add or remove pink beads as needed until the ends meet comfortably without stretching the cord.
Knot Security Tip
Use a surgeon’s knot instead of a simple square knot for elastic. Loop the cord through twice on the first pass for extra friction holding.
Step 3: The Sand & Wood Strand
-
Begin with wood:
On the second cord, start by threading the light wood beads. These will form the majority of this bracelet’s ‘sand’ look. -
Insert color pops:
After every 4-5 wood beads, place a single coral pink bead to tie the two designs together visually. -
Design the charm area:
Near the center of the strand, create a focal point by threading a gold spacer, a white bead, a gold spacer, and then two or three special textured gold beads. -
Add the charm connector:
Slide a gold jump ring directly onto the elastic cord in the middle of your focal section. We will attach the charm to this later. -
Finish stringing:
Continue the wood bead pattern until this second bracelet matches the length of the first one.
Level Up: Scent Infusion
Since you’re using unfinished wood beads, add a drop of essential oil (like sandalwood or coconut) to them for a scented aromatherapy bracelet.
Step 4: Finishing Touches
-
Pre-stretch the cord:
Before tying, gently pull on both ends of the elastic cord for each bracelet. This ‘pre-stretching’ helps prevent the bracelet from sagging later. -
Tie the knot:
Remove the tape or stopper. Tie a square knot (right over left, left over right) securely. Pull the cord tight. -
Secure with glue:
Apply a tiny dab of jewelry glue or Hypo-cement to the knot. Let it dry for a few minutes before trimming the excess cord. -
Hide the knot:
Ideally, your knot is next to a large-hole bead. I prefer to gently tug the elastic so the knot slides inside an adjacent bead, hiding it from view. -
Attach the charm:
Using your flat nose pliers, open the jump ring that is already on the wood bracelet. Slide on your gold coin charm and close the ring securely.
Now you have a stunning set of beach-ready bracelets to wear all summer long


Sea Turtle Charm Centerpiece
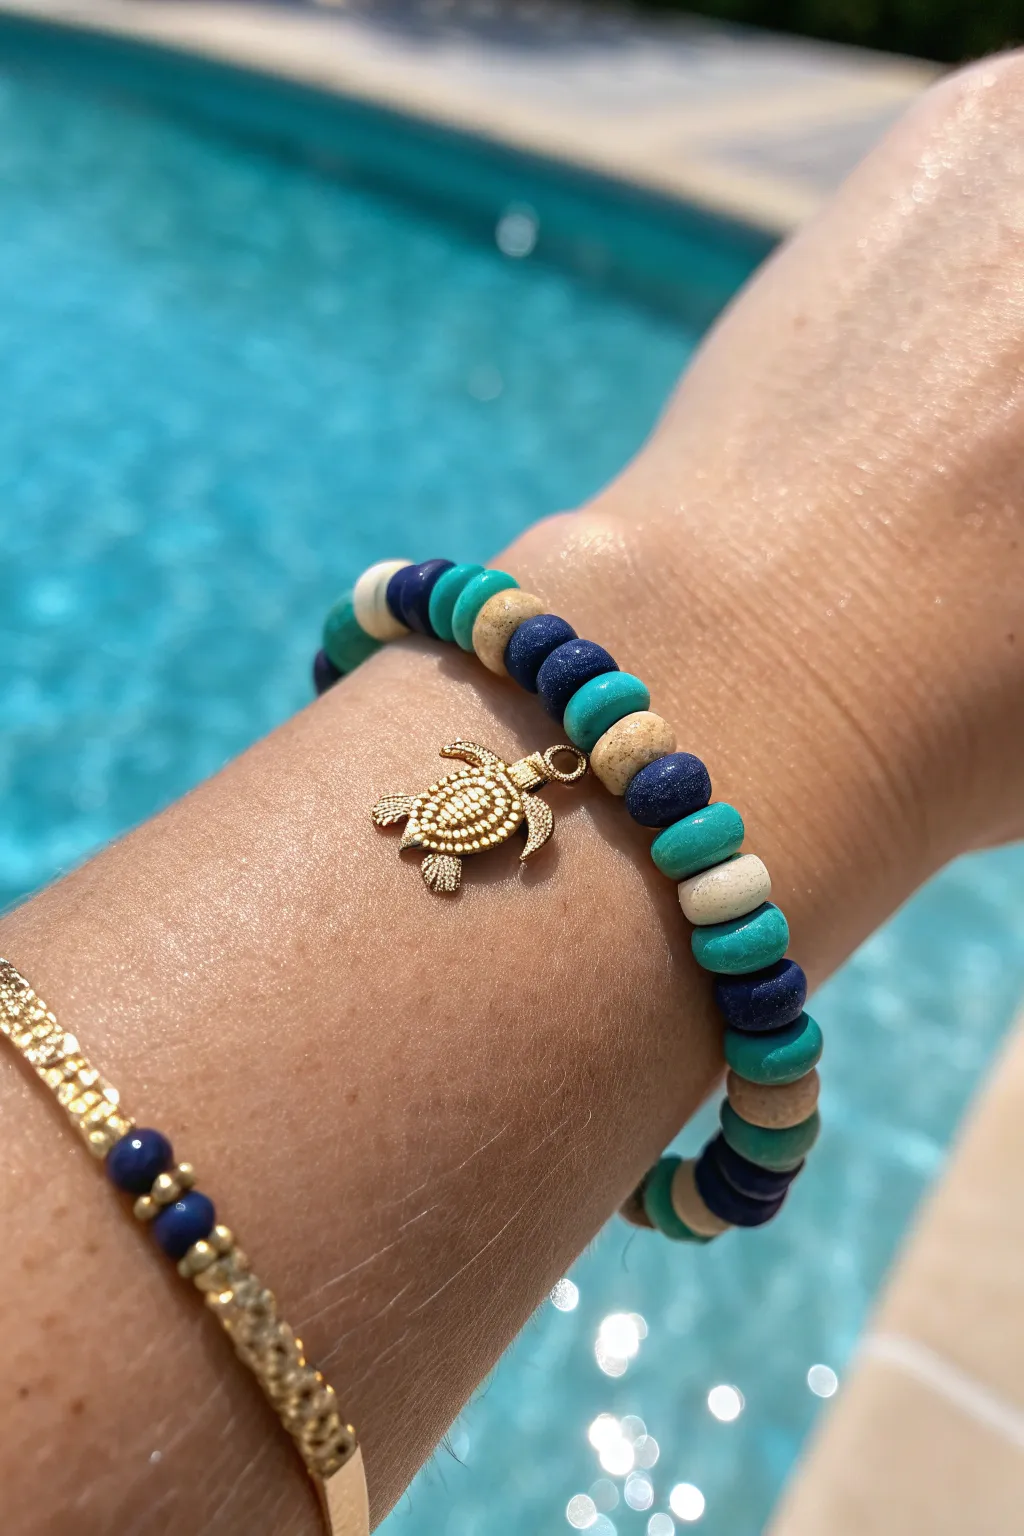
Capture the spirit of the ocean with this charming beaded bracelet characterized by its soothing palette of teal, navy, and sandy beige. The centerpiece is a delightful gold sea turtle that adds a touch of whimsy and elegance to your wrist stack.
Step-by-Step Tutorial
Materials
- Elastic stretch cord (0.8mm or 1mm)
- 6mm Heishi polymer clay beads (teal/turquoise)
- 6mm Heishi polymer clay beads (navy blue)
- 6mm Heishi polymer clay beads (sand/beige speckled)
- Gold sea turtle charm with top loop
- Gold jump ring (4mm or 6mm)
- Scissors
- Hypo-cement or clear jewelry glue
- Tape or binder clip (optional stopper)
Step 1: Preparation
-
Measure your wrist:
Wrap the elastic cord loosely around your wrist to determine the desired length. Add about 3-4 inches of extra cord on each side to make tying the knot easier later. -
Cut the cord:
Cut your elastic cord to the measured length using your scissors. -
Secure the end:
Attach a piece of tape or a binder clip to one end of the cord. This acts as a stopper so your beads don’t slide off while you are working. -
Prepare the charm:
Open a gold jump ring using pliers or your fingers. Slide the sea turtle charm onto the ring, then close the ring securely. This makes the charm ready to slide onto the cord smoothly.
Knot Slipping?
If your elastic knot feels loose, pull it very tight until you see the cord become slightly thinner and transparent. This tension locks the elastic molecules in place.
Step 2: Creating the Pattern
-
Establish the color sequence:
The pattern follows a repeating sequence: 1 beige, 2 teal, 2 navy. Lay out a small pile of each color to make stringing faster. -
Start stringing:
Begin sliding beads onto the cord. Start with the beige bead, followed by the two teal beads, and then the two navy beads. -
Build the first half:
Continue repeating this 5-bead pattern (Beige – Teal x2 – Navy x2) until you have covered approximately half of the length needed for your wrist. -
Check the midpoint:
I like to wrap the partial strand around my wrist to ensure the halfway point sits right where I want the charm to rest.
Step 3: Adding the Centerpiece
-
Place the charm:
Slide the jump ring holding your gold sea turtle onto the cord. It should sit directly after a completed color segment or bead sequence. -
Position the charm:
Ensure the turtle is facing the direction you prefer. In the photo, the turtle is placed between a navy section and a beige bead. -
Resume the pattern:
Immediately continue your pattern on the other side of the charm. If you ended with navy beads before the charm, start with a beige bead after it to maintain continuity. -
Finish the strand:
Continue adding beads in the pattern until you reach your full desired wrist size. Double-check the fit by wrapping it around your wrist one last time; it should be snug but comfortable.
Gold Accents
Replace the beige clay beads with gold spacer beads every third interval. This adds extra sparkle and coordinates perfectly with the golden turtle charm.
Step 4: Finishing Touches
-
Pre-stretch the cord:
Before tying, gently pull on both ends of the elastic cord to pre-stretch it. This crucial step prevents the bracelet from stretching out permanently after wearing it. -
Tie the knot:
Remove the tape or clip. Tie a surgeon’s knot (right over left, left over right, looping through twice on the second pass) to secure the bracelet. -
Secure with glue:
Apply a tiny dab of jewelry glue or Hypo-cement directly onto the knot. Let it dry completely as per the glue’s instructions. -
Hide the knot:
Once dry, trim the excess cord ends close to the knot. Gently pull on the beads to slide the knot inside the hole of a neighboring bead to hide it.
Now you have a serene, ocean-inspired accessory ready for your next beach day

The Complete Guide to Pottery Troubleshooting
Uncover the most common ceramic mistakes—from cracking clay to failed glazes—and learn how to fix them fast.
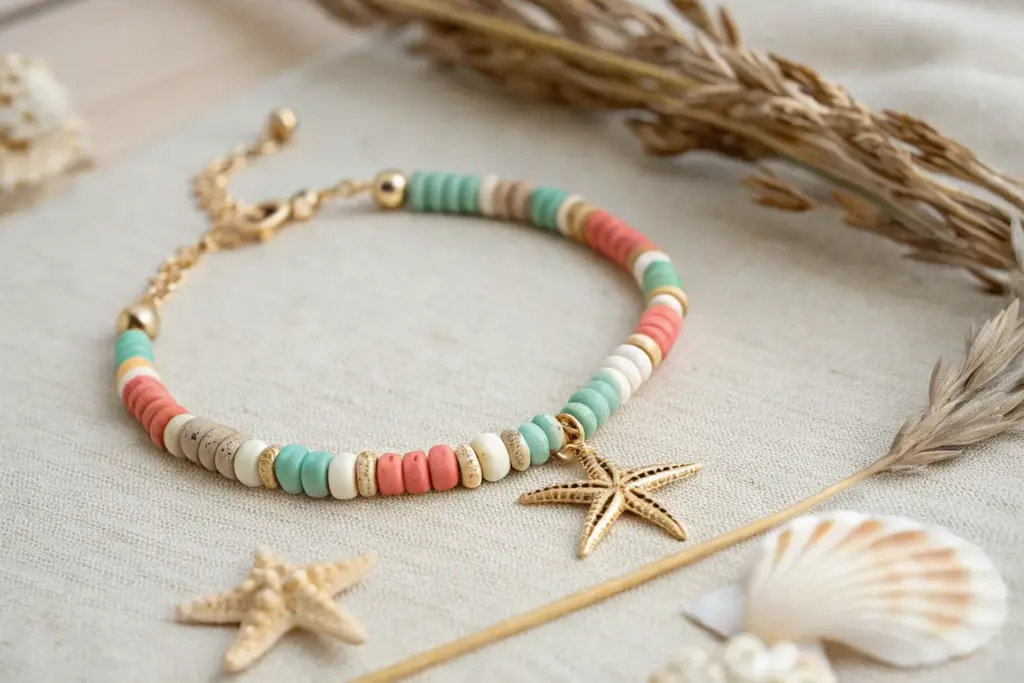
Starfish and Wave Charm Cluster
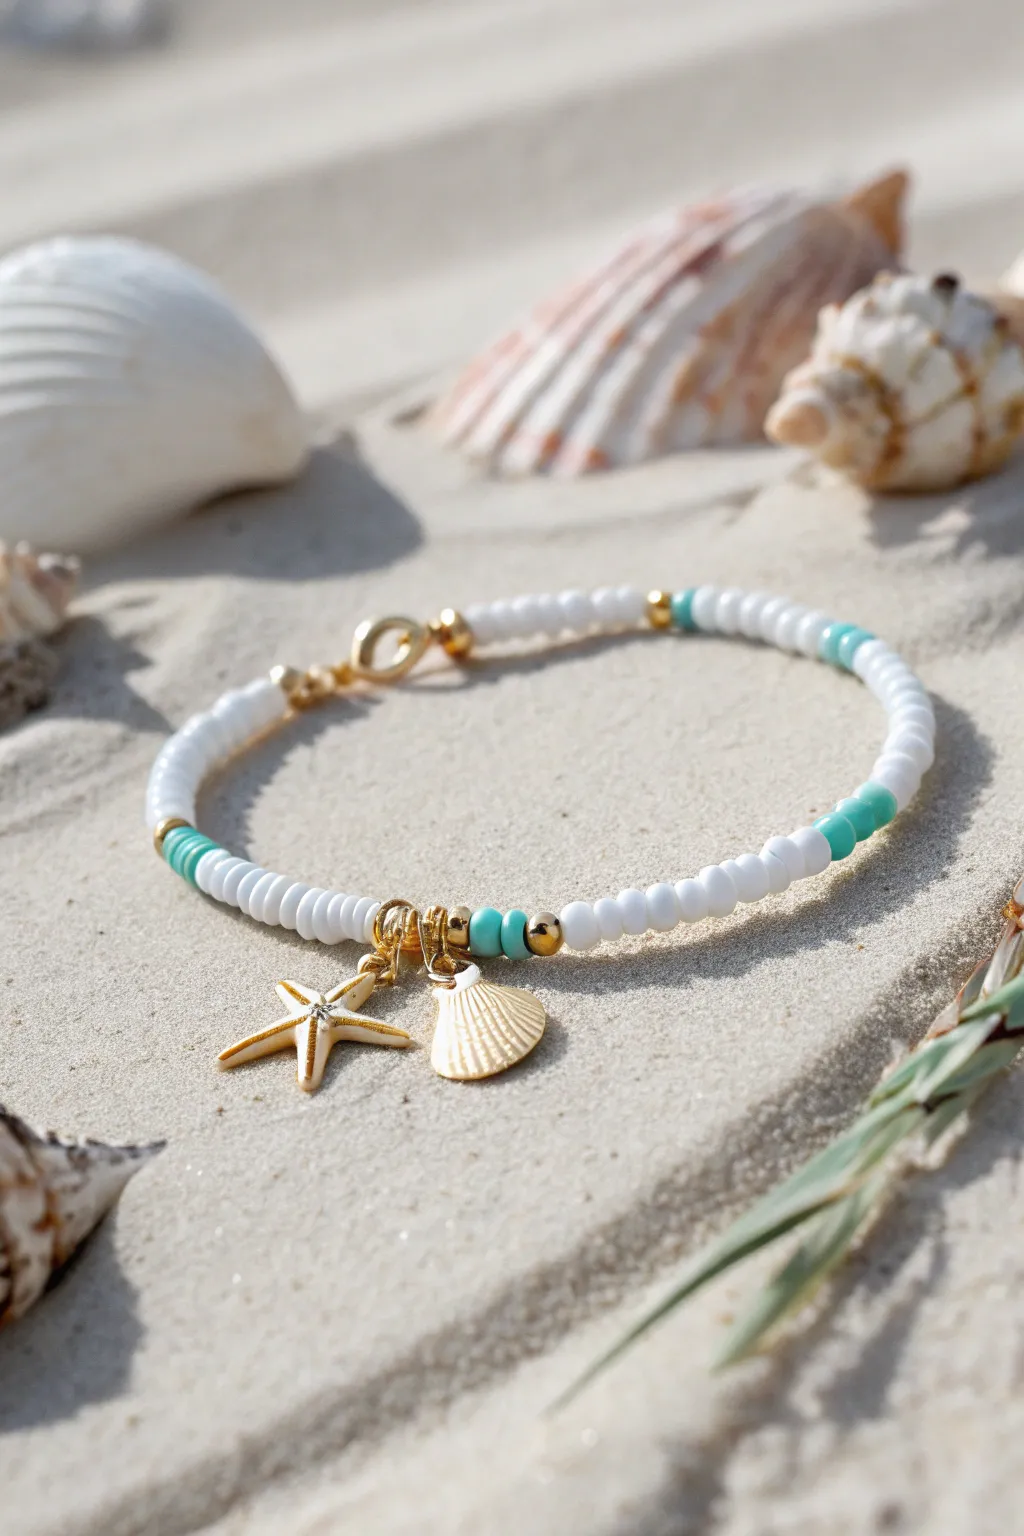
Capture the essence of a tranquil shoreline with this elegant beaded bracelet featuring delicate sea-inspired charms. The combination of crisp white beads, accents of turquoise, and gold hardware creates a timeless accessory perfect for sunny days.
Step-by-Step
Materials
- White seed beads (size 6/0 or 8/0) or small Heishi clay beads
- Turquoise or aqua seed beads (size 6/0 or 8/0)
- Gold tone spacer beads (small rounds)
- Gold tone crimp beads
- Gold tone jump rings (4mm or 5mm)
- Small gold starfish charm
- Small gold scallop shell charm
- Gold tone lobster clasp
- Gold tone closed jump ring or split ring (for the clasp catch)
- Beading wire (flexible, coated)
- Jewelry pliers (flat nose and round nose)
- Wire cutters
Step 1: Stringing the Beads
-
Prepare your wire:
Cut a length of beading wire approximately 10 inches long. This gives you plenty of room to work with the ends without beads slipping off. -
Secure the first end:
Thread a crimp bead onto one end of the wire, followed by the closed jump ring or split ring that will serve as the clasp catch. -
Create the loop:
Loop the wire back through the crimp bead, creating a snug fit around the ring, but leaving just enough wiggle room for movement. -
Crimp firmly:
Use your flat nose pliers to flatten the crimp bead securely. I like to give a gentle tug to ensure it’s locked in place before proceeding. -
Start the pattern:
Begin stringing your white beads. Add about 1 to 1.5 inches of solid white beads to start one side of the bracelet. -
Add first color accent:
Slide on a gold spacer bead, followed by three turquoise beads, and another gold spacer bead. -
Continue the base:
String a longer section of white beads. This section should cover the majority of the bracelet’s length, leading up to the center focal point. -
Create the center focal section:
When you reach the middle of the bracelet, add a gold spacer bead, followed by three turquoise beads. -
Add the charm holders:
Thread on two gold jump rings directly onto the wire. These will hold your charms later so they dangle freely. -
Finish the focal point:
Add three more turquoise beads and finish this section with a final gold spacer bead. -
Complete the beading:
Resume stringing white beads until the bracelet reaches your desired length minus the clasp size. Mirror the first accent pattern (gold-turquoise-gold) if you wish, or keep it asymmetrical as shown.
Loosey-Goosey?
If your bracelet feels stiff, you crimped too tightly. Leave a tiny gap (about 1mm) of bare wire before crimping the second end to allow the beads to curve naturally around your wrist.
Step 2: Finishing Touches
-
Attach the clasp:
On the unfinished end, thread a crimp bead followed by the lobster clasp. -
Secure the end:
Loop the wire back through the crimp bead and through the first few beads on the strand to hide the tail. -
Final crimp:
Pull the wire taut so there are no gaps between beads, but not so tight the bracelet stays stiff. Flatten the crimp bead with your pliers. -
Trim excess wire:
Use wire cutters to snip off any remaining wire tail close to the beads. -
Prepare the charms:
Using two pairs of pliers, carefully twist open the two jump rings currently sitting in the center of your bracelet. -
Attach the starfish:
Slide the loop of the starfish charm onto the first jump ring and gently twist the ring closed until the ends meet perfectly. -
Attach the shell:
Repeat the process with the second jump ring, sliding on the scallop shell charm and closing the ring securely.
Secure Charms
For extra security on the charm jump rings, apply a tiny dot of clear jewelry glue or clear nail polish over the seam where the ring closes to prevent it from pulling open.
Slip on your new bracelet and enjoy the subtle seaside vibes it adds to your outfit
Cowrie Shell Focal Bead Bracelet

Capture the calm hues of the shoreline with this elegant beaded bracelet, featuring a mix of matte white, soft turquoise, and natural wood tones accented by gleaming gold. Resting perfectly on a large scallop shell for display, this piece evokes the feeling of a relaxing day by the ocean.
Step-by-Step Guide
Materials
- Matte white round beads (approx. 6-8mm)
- Light turquoise/aqua round beads (approx. 6-8mm)
- Natural wood round beads (approx. 6-8mm)
- Textured gold or tan fabric-covered beads (feature beads)
- Gold rondelle spacer beads (textured/ribbed)
- Small gold round spacer beads (2-3mm)
- Gold lobster clasp
- Gold jump rings (open and closed)
- Beading wire (flexible, 7-strand or similar high quality)
- Crimp beads or crimp tubes
- Crimping pliers
- Wire cutters
- Measuring tape
Step 1: Preparation and Start
-
Measure and Cut:
Begin by measuring your wrist to determine the desired length of your bracelet. Add about 1-2 inches to this measurement for ease of clasping and bead bulk. Cut a length of beading wire accordingly using your wire cutters. -
Secure the End:
Thread a crimp bead onto one end of the wire, followed by a closed jump ring or the loop of your clasp hardware. Loop the wire back through the crimp bead. -
Crimp the Wire:
Using your crimping pliers, flatten the crimp bead to secure the wire loop. Ensure it is tight but leave just a tiny bit of slack so the clasp can move freely. -
Add a Starter Bead:
String a small gold spacer bead first; this acts as a nice transition from the hardware to the main pattern and helps hide the crimped wire tail.
Natural Texture
Mix smooth glass beads with matte unpolished stone or wood beads. The contrast in finish mimics the variety of textures found on a sandy beach.
Step 2: Creating the Pattern
-
Establish the Rhythm:
The beauty of this bracelet lies in its varied but balanced pattern. Start with a sequence like: one wood bead, one turquoise bead, and one white bead. -
Introduce Gold Accents:
After your first color block, slide on a textured gold rondelle spacer. These metal accents add a touch of luxury and separate the sections. -
Place Feature Beads:
Now, thread on one of the larger textured beads (the tan/gold fabric-look spheres). I find these add a lovely tactile element that contrasts with the smooth stone or glass. -
Mirror the Spacers:
Follow the feature bead immediately with another gold rondelle spacer to frame it perfectly. -
White and Turquoise Section:
Add a white bead, followed by a turquoise bead to continue the oceanic palette. -
Mid-Bracelet Variation:
Change up the rhythm slightly as you approach the middle. Thread a wood bead, sandwiched by small gold round spacers on either side for detail. -
Central Focal Area:
Create the center section by repeating the sequence: white bead, textured rondelle, feature bead, textured rondelle, white bead. This creates a visual anchor. -
Continue the Pattern:
Mirror the first half of the bracelet design to finish the second half. Add turquoise, wood, and white beads in reverse order, interspersed with your gold accents. -
Check Length:
Pause periodically to wrap the strand around your wrist. Beads take up inner circumference, so make sure it isn’t becoming too tight.
Stiff Wire?
If the bracelet feels rigid after crimping, you pulled the wire too tight. Leave a millimeter of slack before the final crimp to allow beads to roll.
Step 3: Finishing the Bracelet
-
Final Bead:
End the beading sequence with a small gold spacer bead, just like you started. -
Prepare the Clasp End:
Thread a crimp bead onto the wire, followed by the gold lobster clasp (or a jump ring if you put the clasp on the start). -
Loop and Thread Back:
Take the wire tail and pass it back through the crimp bead and into the first couple of beads on the strand. -
Tension Check:
Pull the wire snug, ensuring there are no large gaps between beads, but the bracelet remains flexible and fluid, not stiff. -
Final Crimp:
Use the crimping pliers to crush the crimp bead securely. Trim the excess wire tail close to the bead hole with sharp flush cutters. -
Display:
Your bracelet is complete. For a photo-ready look like the example, drape it gently inside the grooves of a clean white scallop shell.
Slip this bracelet on to carry a little piece of summer with you everywhere you go


What Really Happens Inside the Kiln
Learn how time and temperature work together inside the kiln to transform clay into durable ceramic.
Pearl and Clay “Coastal Chic”
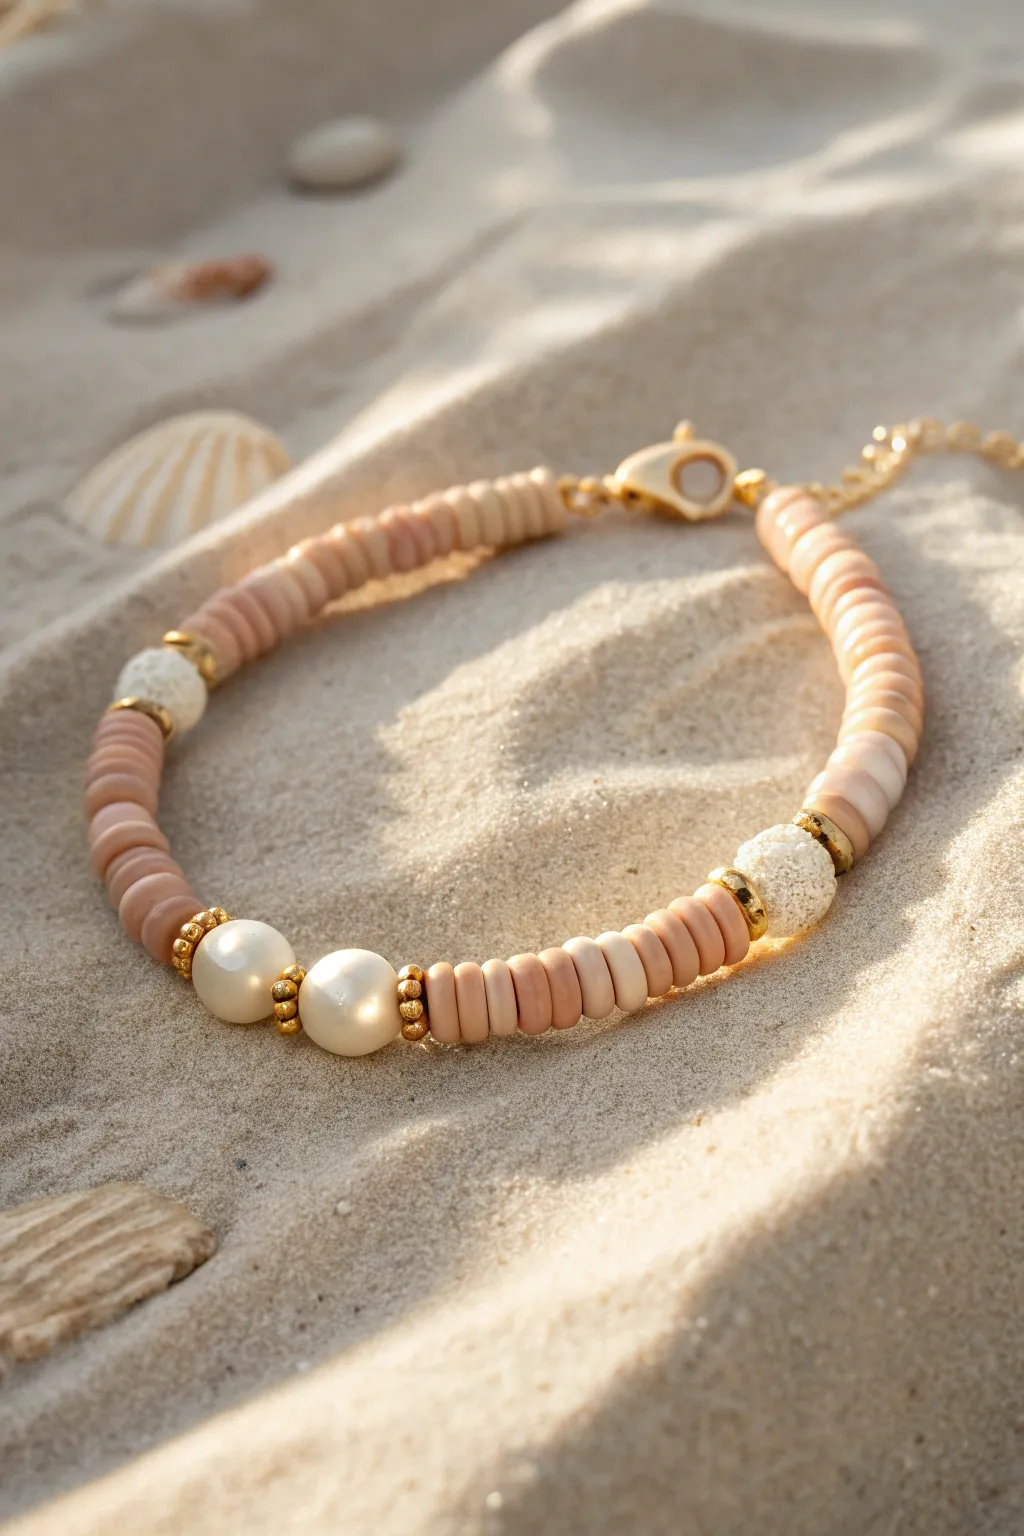
Capture the essence of a sun-drenched shoreline with this elegant bracelet that blends matte textures and pearlescent shine. Combining peach clay heishi beads with organic lava stones and classic pearls creates a sophisticated, beach-ready accessory.
Detailed Instructions
Materials
- 6mm flat clay heishi beads in peach or soft terracotta
- 2 large (8-10mm) freshwater or faux pearls
- 3 white lava stone beads (approx. 8mm)
- Small gold disc spacer beads or gold heishi beads
- Gold tone crimp beads and covers
- Gold lobster clasp
- Gold jump rings
- Gold extender chain
- Beading wire (flexible, 7-strand or 19-strand)
- Wire cutters
- Flat nose pliers
- Crimping pliers
Step 1: Preparation & Centerpiece
-
Measure and cut:
Begin by cutting a piece of beading wire approximately 10-12 inches long. This generous length gives you plenty of room to work with the ends without struggling. -
Secure the end:
Thread a crimp bead onto one end of the wire, followed by a jump ring attached to your extender chain. Loop the wire back through the crimp bead and use your crimping pliers to flatten it securely. Cover with a crimp cover for a polished look. -
Start the pattern:
String about 1.5 to 2 inches of the peach clay heishi beads. This section will sit near the clasp, sitting comfortably on the underside of your wrist. -
Add first accent:
Slide on a gold spacer bead, followed by one white lava stone bead, and another gold spacer. Ensure the gold accents sit flush against the textured lava stone. -
Mid-section spacing:
Thread on a section of peach clay beads about 1 inch long. You can adjust this length depending on your wrist size, but keep it consistent for symmetry. -
Create the focal point:
Now for the centerpiece: add a gold spacer, then string the two white pearls side-by-side. I like to place a gold spacer between the two pearls as well to define them individually. -
Complete the center:
Finish the focal section with one final gold spacer bead after the second pearl.
Uneven Tension?
If the bracelet feels stiff, you crimped too tightly against the beads. Leave a 1-2mm gap of exposed wire at the end before crimping to allow the bracelet to drape naturally.
Step 2: Completing the Strand
-
मिरर the pattern:
String another 1-inch section of the peach heishi beads to match the section before the pearls. -
Add second lava bead:
Place a gold spacer, a white lava bead, and another gold spacer on the wire. -
Continue the pattern:
Add a third section of peach clay beads, roughly 1 inch long. -
Final accent:
Add your last set comprising a gold spacer, the third white lava bead, and a gold spacer. -
Finish the strand:
String the final section of peach heishi beads, measuring about 1 inch or until the bracelet reaches your desired total length (usually 6.5 to 7 inches excluding the clasp). -
Check the fit:
Wrap the unfinished bracelet around your wrist to check the sizing. Remember the clasp will add about half an inch to the final length.
Scent Diffuser
The porous white lava beads are perfect for aromatherapy. Add a drop of coconut or sea salt essential oil to them for a sensory beach experience that lasts all day.
Step 3: Finishing Touches
-
Attach the clasp:
Thread a crimp bead onto the open end of the wire. Follow this with the gold lobster clasp. -
Loop and secure:
Feed the wire back through the crimp bead and pull it taut, leaving just a tiny bit of wiggle room so the clasp can move freely. -
Crimp it closed:
Use your crimping pliers to squash the crimp bead firmly. Give the wire a gentle tug to ensure it is completely secure. -
Hide the hardware:
Place a gold crimp cover over the flattened crimp bead and gently close it with your flat nose pliers until it looks like a round gold bead. -
Trim excess wire:
Using your flush cutters, trim the excess tail of the beading wire as close to the bead as possible without nicking your work.
Slip on your new creation and enjoy the sophisticated coastal vibe it adds to your outfit
Gold Spacer “Sun-Kissed” Shine
Capture the essence of a warm beach day with this elegant combination of vibrant turquoise, textured white lava stone, and brilliant gold accents. This design balances cool ocean tones with a metallic warmth that glows beautifully against sun-tanned skin.
How-To Guide
Materials
- 8mm Turquoise or dyed Howlite round beads
- 8mm White Lava Stone round beads (porous texture)
- 4mm or 5mm Gold-plated round spacer beads
- 0.8mm clear elastic stretch cord
- Jewelry adhesive or clear nail polish
- Scissors or jewelry nippers
- Bead stopper or masking tape
- Optional: Measuring tape
Step 1: Preparation & Design
-
Measure your wrist:
Before you begin, wrap a measuring tape comfortably around your wrist. Add about half an inch to this measurement to ensure the bracelet isn’t too tight. -
Cut the cord:
Cut a length of clear elastic cord about 10-12 inches long. Having this extra length makes tying the final knot much easier than fighting with short ends. -
Pre-stretch the elastic:
Hold the cord firmly at both ends and give it several gentle tugs. This distinct pre-stretching step helps prevent the finished bracelet from sagging or loosening after you wear it a few times. -
Secure the end:
Attach a bead stopper to one end of your cord, or simply use a piece of masking tape folded over the end. This saves your beads from sliding off while you work.
Aromatic Touch
Apply a drop of essential oil to the porous white lava beads. They will absorb the oil and act as a personal diffuser, releasing scent throughout the day.
Step 2: Stringing the Pattern
-
Start the sequence:
Begin stringing your beads. The pattern relies on groups of texture and color separated by gold. Start with two Turquoise beads. -
Add the gold accent:
Slide on one gold spacer bead next. Its smaller size and smooth finish act as a perfect visual break between the larger stone beads. -
Introduce the white texture:
Now, thread on two white lava stone beads. These have a pitted, matte surface that contrasts wonderfully with the smooth turquoise and shiny gold. -
Repeat the gold spacer:
Add another gold spacer bead after the white pair. This completes one full pattern segment: 2 Turquoise, 1 Gold, 2 White, 1 Gold. -
Continue the pattern:
Repeat this specific sequence (2 Turquoise, 1 Gold, 2 White, 1 Gold) continuously. -
Check for length:
I like to periodically wrap the strand around my wrist as I go to check the fit. Stop adding beads when the ends touch comfortably without stretching the elastic. -
Check symmetry:
Try to end your stringing so the pattern flows seamlessly when connected. For example, if you started with turquoise, try to end after a gold bead following a white pair.
Create a Stack
This design looks great layered. Make a second bracelet using just the gold spacers and white lava beads for a monochromatic companion piece.
Step 3: Finishing Touches
-
Prepare to tie:
Remove the bead stopper or tape carefully, holding both ends of the elastic securely so no beads escape. -
Tie the first knot:
Cross the ends and tie a simple overhand knot, pulling it down tight against the beads to remove any slack in the line. -
Tie a surgeon’s knot:
For the main security knot, form a loop and pass one end through it twice (instead of once like a regular knot). Pull this tight. -
Secure with glue:
Dab a tiny drop of jewelry adhesive or clear nail polish directly onto the knot. This prevents the slick elastic from untying itself over time. -
Hide the knot:
Ideally, your knot is near one of the larger hole beads (like the lava stone). While the glue is still tacky but not wet, pull the elastic so the knot slides inside the adjacent bead. -
Trim the excess:
Once the glue is fully dry, use your scissors to trim the excess cord as close to the bead hole as possible without cutting the main knot.
Slip on your new creation and enjoy the subtle shine it adds to your beach-ready look

TRACK YOUR CERAMIC JOURNEY
Capture glaze tests, firing details, and creative progress—all in one simple printable. Make your projects easier to repeat and improve.
Tide Ombre Gradient Strand
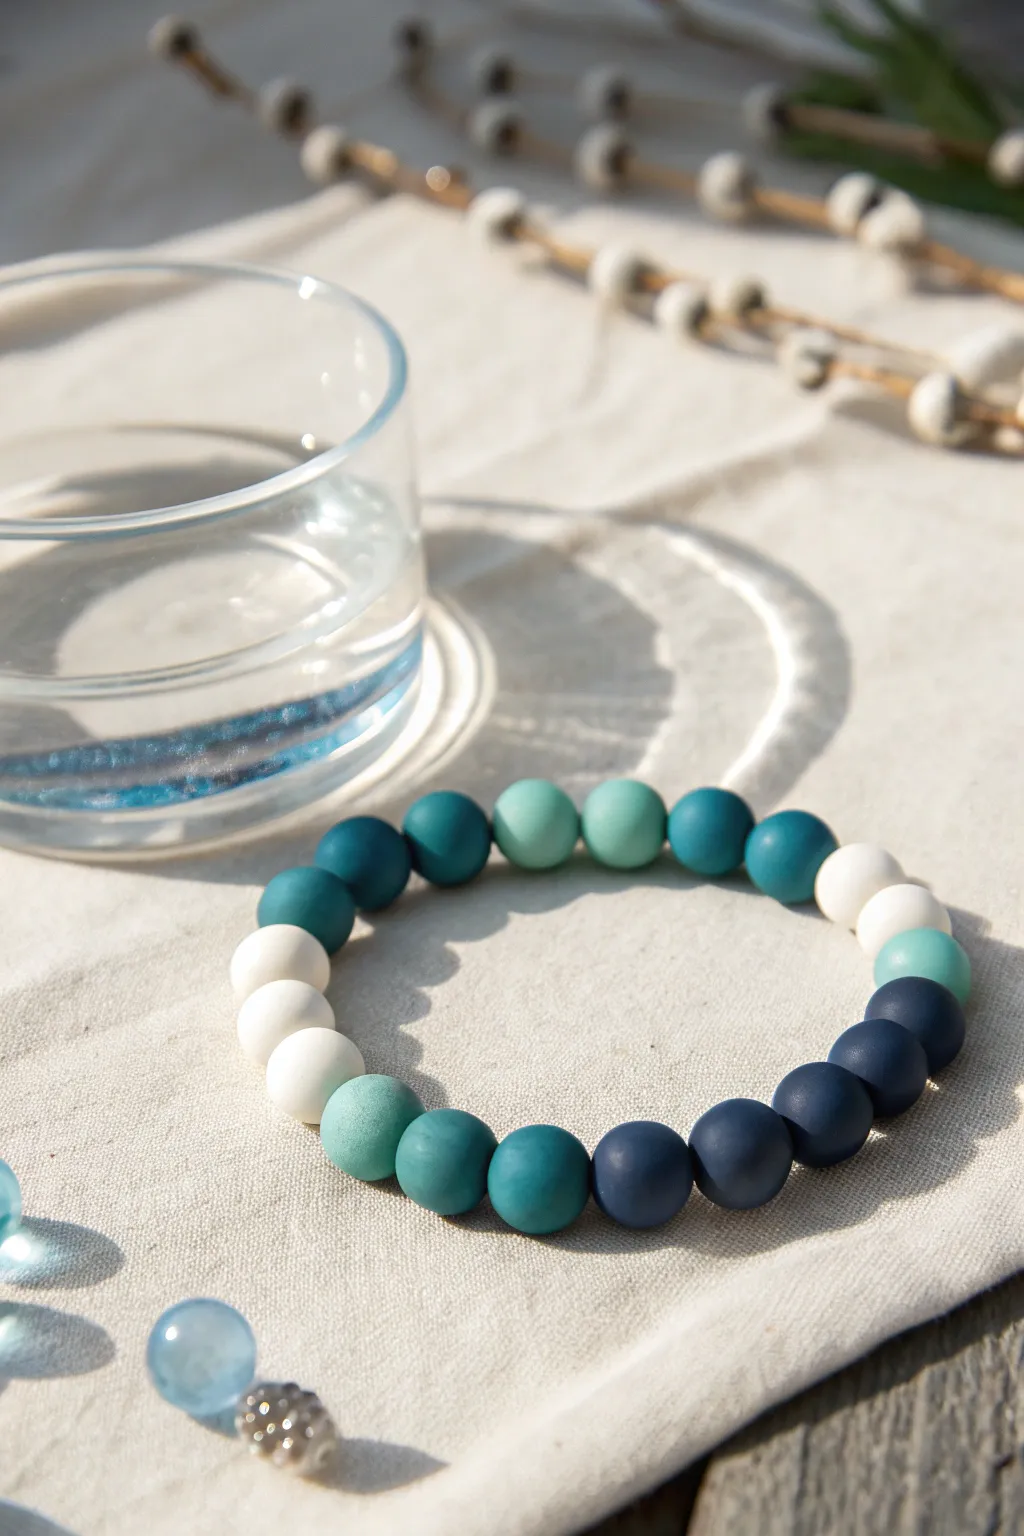
Capturing the serene shift of ocean colors as waves hit the sand, this polymer clay bead bracelet features a stunning gradient design. The seamless ombre transition from sandy white to deep navy creates a sophisticated yet grounded accessory perfect for everyday wear.
Step-by-Step
Materials
- Polymer clay in White, Teal/Turquoise, and Navy Blue
- Elastic cord (0.8mm or 1mm thickness)
- Bead roller tool or acrylic block
- Pin tool or toothpick (for piercing holes)
- Ruler
- Super glue or jewelry knot cement
- Clay slicing blade
- Optional: Clay conditioning machine
- Baking tray and parchment paper
- Oven
Step 1: Mixing the Gradient Colors
-
Condition the base clays:
Start by thoroughly kneading your three main clay blocks—white, teal, and navy—until they are soft, pliable, and free of cracks. -
Create the pure color beads:
Set aside a portion of pure white, pure teal, and pure navy clay. These will serve as the extreme ends and middle point of your ombre spectrum. -
Mix the first transition shade:
Combine a large chunk of white clay with a very small amount of teal. Knead them together until the color is uniform to create a very pale, milky aqua shade. -
Mix the mid-tone transition:
Take equal parts of your white clay and the teal clay. Blend them to create a soft, seafoam green that sits perfectly between the white and the pure teal. -
Create the deep transition:
Now, mix the teal with a small amount of navy blue. You want a dark petroleum teal color that bridges the gap between the bright turquoise and the dark blue. -
Refine the palette:
Lay out small balls of each mixed color in a line. If the jump between any two colors feels too abrupt, mix a new intermediate shade to smooth out the gradient.
Smooth Surface Trick
Before baking, lightly roll your raw clay beads in a bit of cornstarch. It prevents fingerprints and gives that soft, matte, beach-glass finish shown here.
Step 2: Forming and Baking
-
Portion the clay:
Roll each color mixture into a uniform log or snake of the same thickness. Use your slicing blade to cut equal-sized segments from each log to ensure all your beads end up the same size. -
Roll the spheres:
Take each segment and roll it between your palms or use a bead roller to create perfectly smooth, round spheres. Aim for a diameter between 8-10mm. -
Pierce the holes:
Gently hold a bead without squishing it and use a pin tool or toothpick to twist a hole through the center. I find twisting the tool while pushing prevents the bead from deforming. -
Clean up fingerprints:
Lightly buff the surface of each raw bead with a tiny bit of cornstarch or baby oil on your fingertip to smooth away any prints before baking. -
Bake the beads:
Arrange the beads on a parchment-lined baking tray. Bake according to your brand of polymer clay’s specific temperature instructions (usually around 275°F/135°C for 15-30 minutes). -
Cool down:
Allow the beads to cool completely on the tray before handling. They are slightly fragile while warm but harden fully as they cool.
Add Spacer Beads
For a luxe touch, add small gold or silver disc spacers between every third clay bead. The metallic flash looks beautiful against the matte clay.
Step 3: Assembly
-
Measure the cord:
Cut a length of elastic cord about 10-12 inches long. This gives you plenty of extra room for tying the knot later. -
Pre-stretch the elastic:
Give the elastic cord a few firm tugs. This pre-stretching step is crucial to prevent the bracelet from loosening up after you wear it a few times. -
Arrange the pattern:
Lay out your beads on your work surface in the gradient order: White -> Pale Aqua -> Seafoam -> Teal -> Dark Teal -> Navy -> Dark Teal… and reverse back, or do a continuous loop depending on your preference. -
String the beads:
Thread the beads onto the elastic cord, following your laid-out pattern. Check the fit around your wrist periodically to ensure you have enough beads. -
Tie the knot:
Tie a surgeon’s knot (right over left, left over right, and loop through an extra time). Pull it tight so the beads sit snugly against each other. -
Secure and finish:
Dab a tiny drop of super glue or jewelry cement onto the knot. Let it dry, then trim the excess cord ends and gently tug the knot inside the hole of a neighboring bead to hide it.
Slip on your new bracelet and enjoy the calming coastal vibes it brings to your outfit
Confetti Surf Mix Bracelet
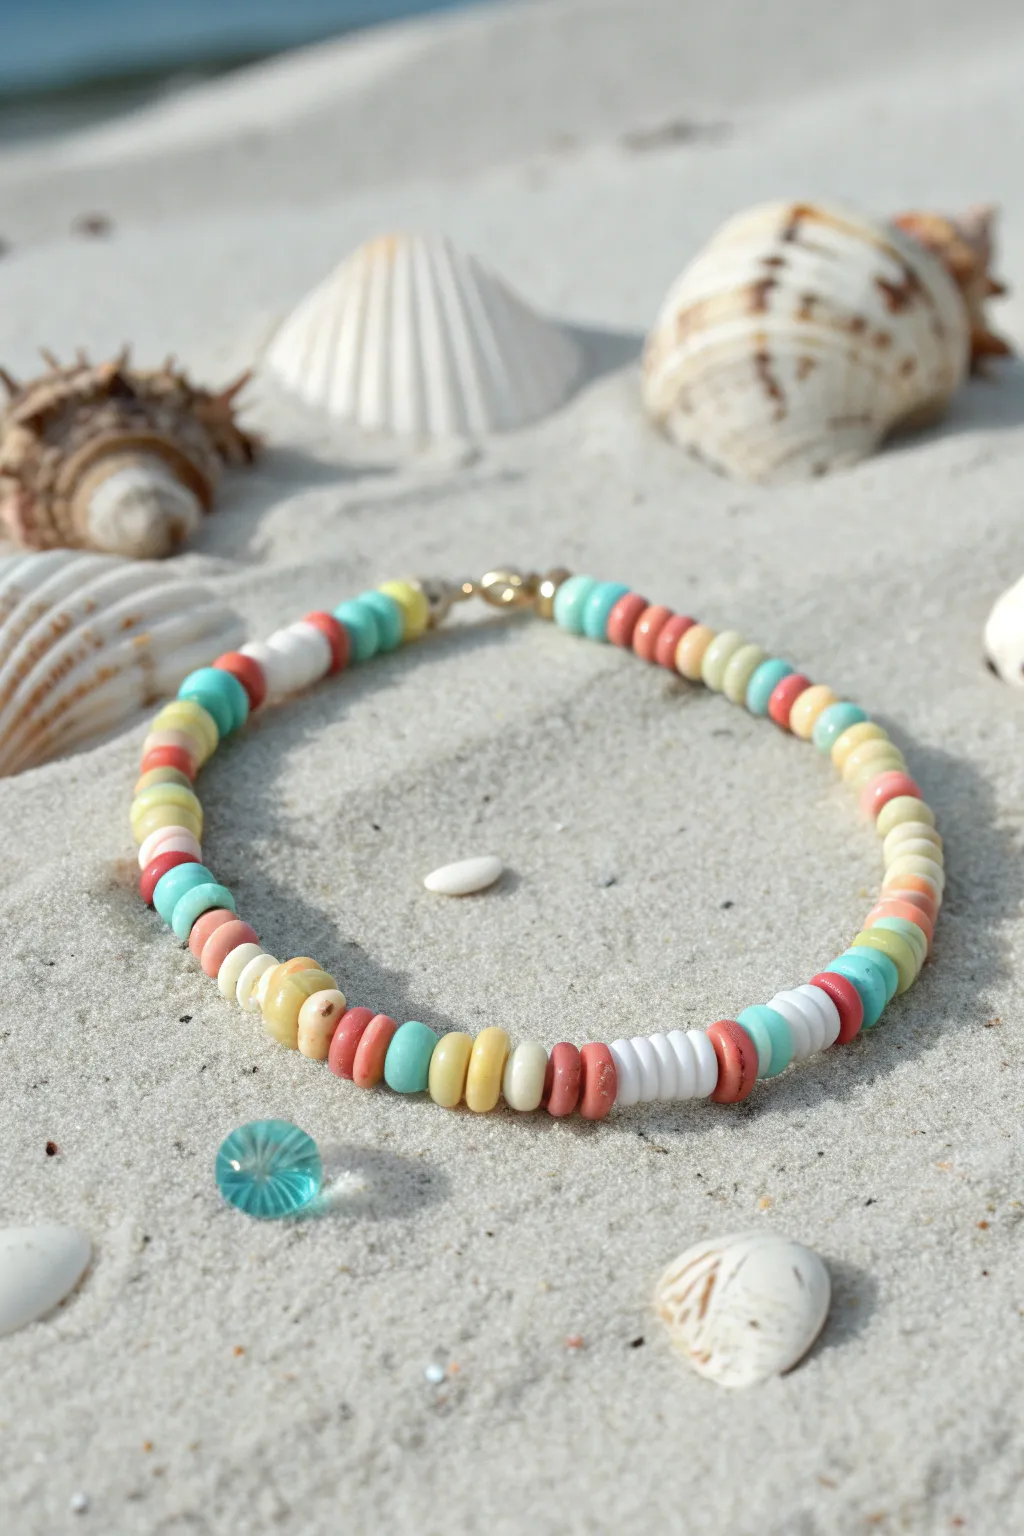
Capture the essence of a sun-soaked afternoon with this vibrant, easy-to-make heishi bead bracelet. The playful mix of coral, teal, cream, and yellow disc beads creates a random ‘confetti’ look that feels both relaxed and perfectly beach-ready.
Step-by-Step Guide
Materials
- Polymer clay heishi beads (flat disc beads) in the following colors: Coral/Salmon, Teal/Aqua, Cream/White, Sunny Yellow
- Elastic beading cord (0.8mm crystal string works best)
- Gold tone crimp beads or tiny spacer beads (optional)
- Small gold lobster clasp
- Gold jump rings
- Jewelry glue (like G-S Hypo Cement)
- Scissors
Step 1: Planning and Stringing
-
Measure your wrist:
Before cutting any string, wrap the elastic cord loosely around your wrist to find the perfect fit. Add about 4-5 inches of extra length to allow room for tying knots later. -
Secure the end:
To prevent beads from sliding off while you work, place a piece of tape over one end of your cut elastic cord, or attach a bead stopper if you have one. -
Set up your palette:
Pour small piles of your coral, teal, cream, and yellow heishi beads onto a bead mat or tray. Seeing them all mixed together helps visualize the random ‘confetti’ pattern we are aiming for. -
Begin the beading pattern:
Start threading beads onto the elastic. The key to this ‘Surf Mix’ look is organized chaos. Don’t create a strict repeating pattern (like 1 red, 1 blue, 1 white). -
Create color blocks:
Instead of single beads, group them in small, irregular clusters. Try stringing three coral beads, followed by one yellow, then two teal. Varying the numbers keeps it organic. -
Incorporate the cream beads:
Use the cream or white beads as ‘spacers’ or palette cleansers between the brighter colors. You can see in the photo that sometimes a stack of 4-5 white beads looks great to break up the color. -
Mix up the thickness:
Notice how some sections are chunky color blocks while others alternate quickly. Thread a single teal bead between two thick sections of coral to add visual interest. -
Check the length:
Periodically wrap the strand around your wrist. Clay heishi beads sit flat against the skin, so you want a snug fit without it being tight. Continue adding beads until you reach your desired circumference. -
Add gold accents (optional):
If you want a hint of glimmer, slide a tiny gold spacer bead in between a few of your color transitions, though the main look relies on the matte clay texture.
Step 2: Finishing the Bracelet
-
Prepare for the clasp:
Once beading is complete, remove the tape or stopper. Thread a crimp bead onto one end of the elastic, followed by a gold jump ring. -
Create the first loop:
Loop the elastic back through the crimp bead to create a small loop holding the jump ring. Squeeze the crimp bead flat with pliers to secure it. -
Attach the clasp:
On the other end of the bracelet, repeat the process: slide on a crimp bead, then the small lobster clasp. Loop the elastic back through the crimp bead. -
Check the tension:
Before flattening the second crimp bead, ensure there is no slack in the bead line, but don’t pull it so tight that the bracelet becomes stiff. The beads should be able to rotate slightly. -
Secure the second end:
Flatten the second crimp bead firmly. I like to add a tiny drop of jewelry glue inside the crimp bead before flattening for extra peace of mind. -
Hide the tails:
Thread the excess tail of the elastic back through the first 2-3 clay beads next to the crimp. -
Trim the excess:
Carefully snip the remaining elastic tail close to the beads so it disappears inside the bead channel. -
Alternative knot finish:
If you don’t have clasps, you can simply tie the two ends together using a strong surgeon’s knot, add a dab of glue, and hide the knot inside one of the bead holes.
Randomize It
To get a truly random look, put all colors in a bowl and pick them out blindly without looking while stringing.
Prevent Stiffness
If the bracelet feels stiff or kinks up, your knot is too tight against the beads. Leave a tiny 1mm gap before tying.
Slip on your new creation and enjoy the summery vibes of your custom beach jewelry
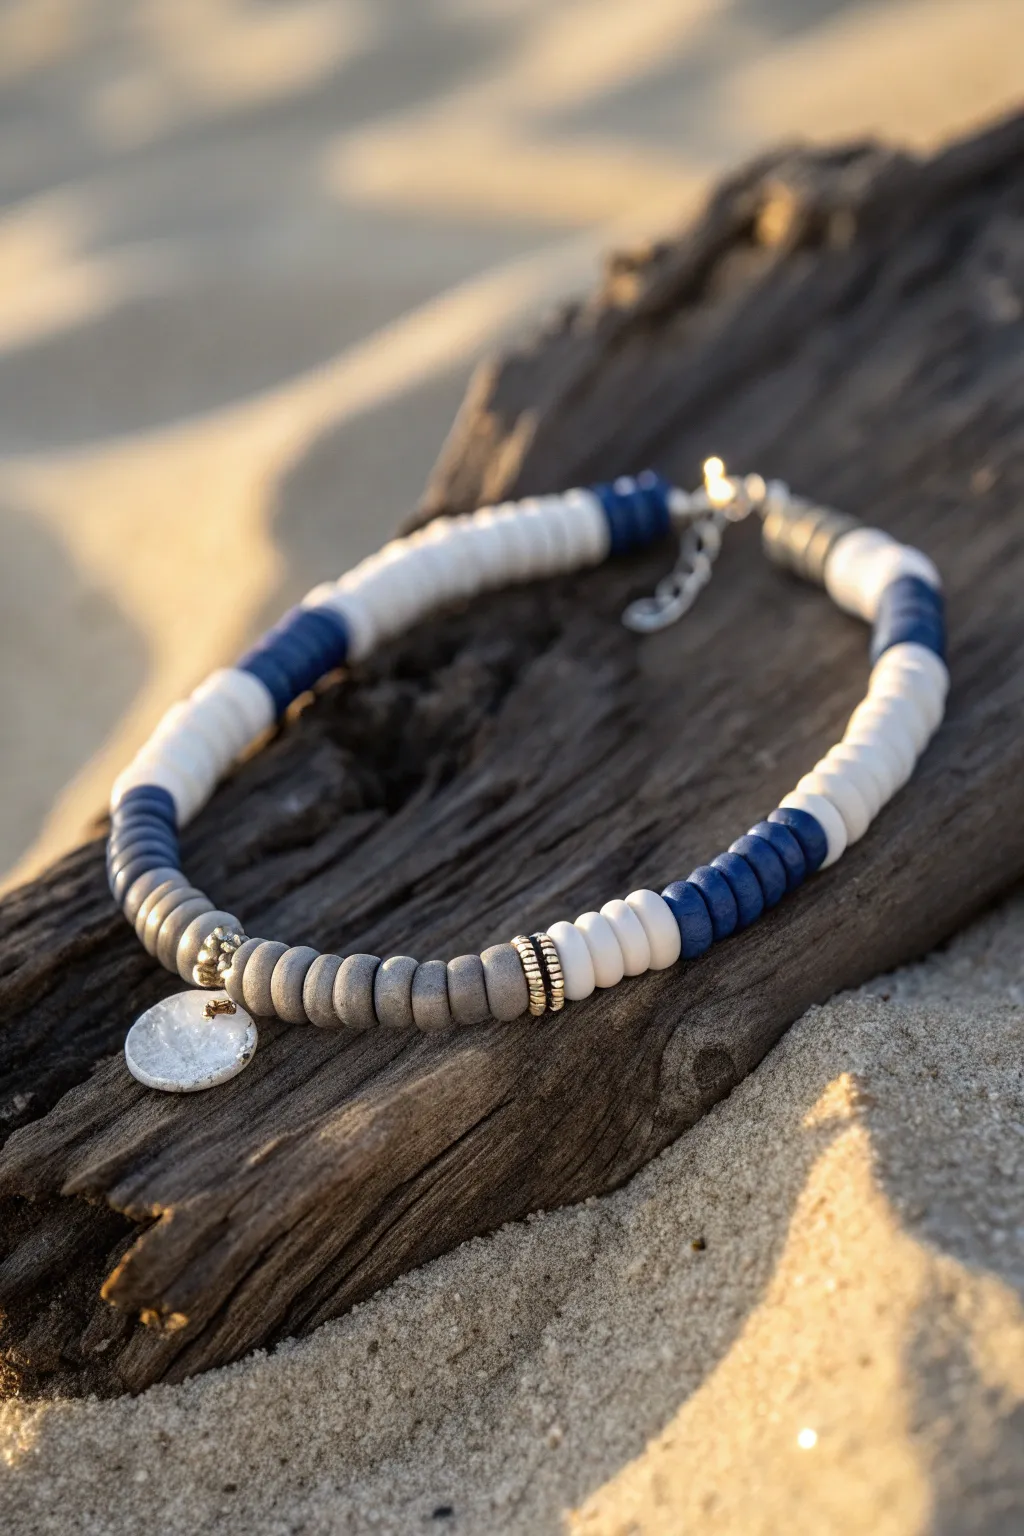
Nautical Stripe Pattern Bracelet
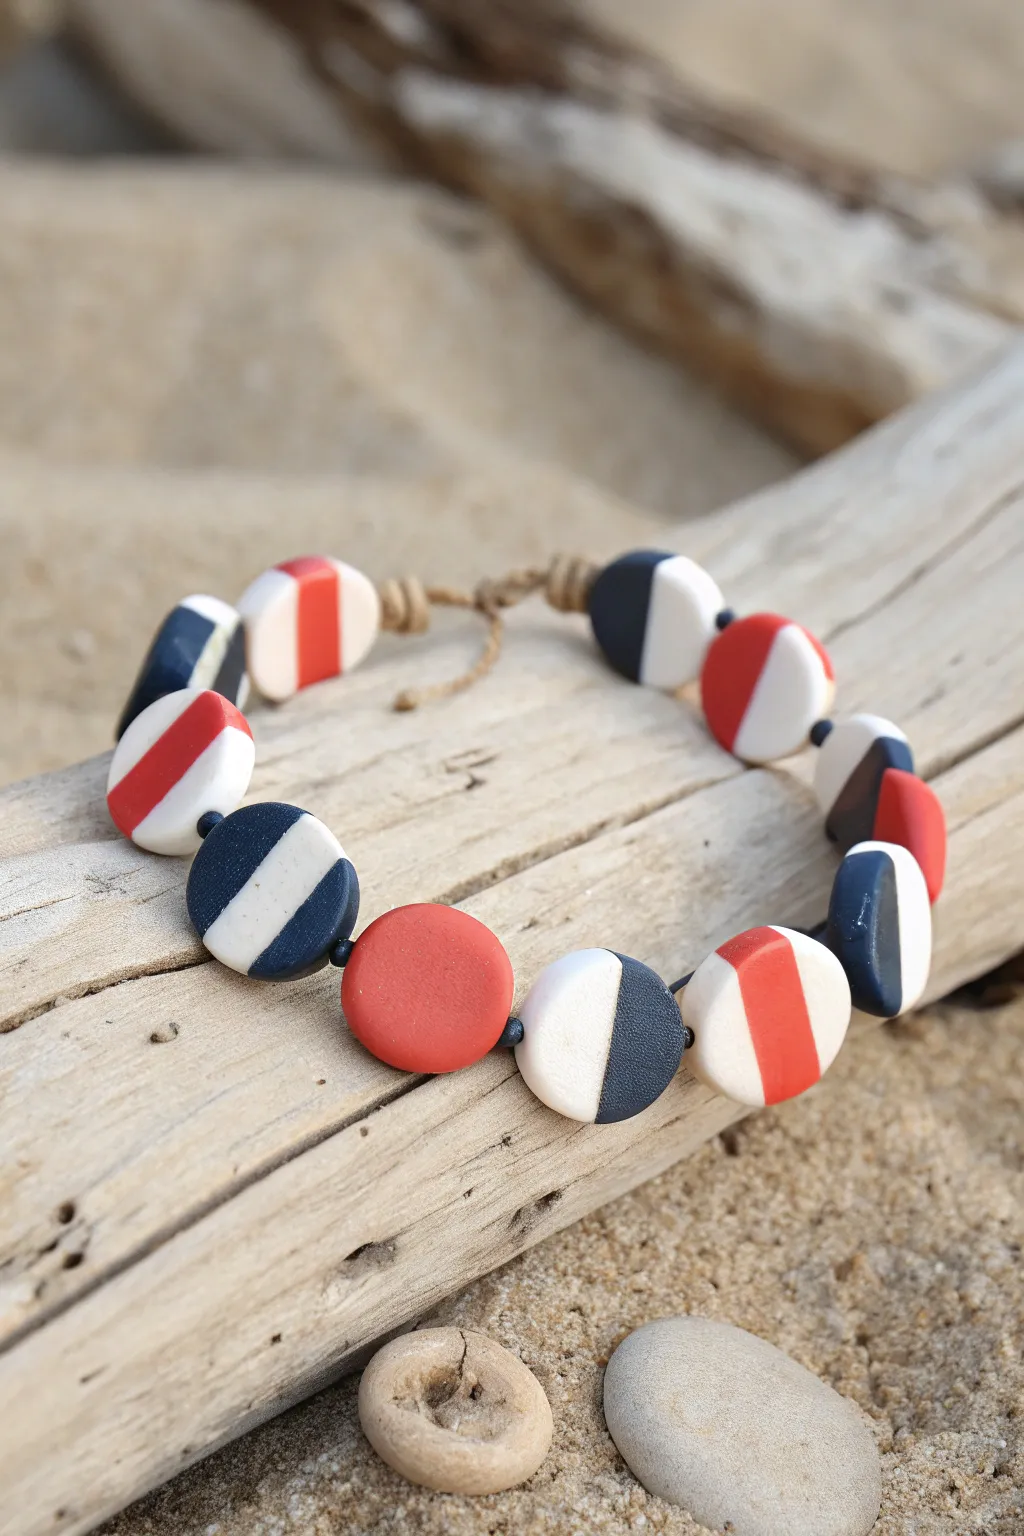
Capture the essence of the coastline with this crisp, nautical-inspired bracelet featuring custom-made polymer clay beads. The classic navy, white, and coral-red palette, combined with clean geometric stripes, makes for a timeless accessory that feels right at home by the sea.
Step-by-Step Tutorial
Materials
- Polymer clay (Navy Blue, White, Coral Red)
- Bead piercing pins or toothpicks
- Tissue blade or sharp craft knife
- Acrylic rolling pin or pasta machine
- Circle cutter (approx. 1.5 – 2 cm diameter)
- Hemp cord or waxed linen thread (natural color)
- Oven for baking
- Wet/dry sandpaper (400-800 grit)
- Small piece of glass or ceramic tile (work surface)
Step 1: Preparing the Clay Slabs
-
Condition the Clay:
Begin by thoroughly kneading your three colors of polymer clay separately until they are soft and pliable. This prevents cracks later on. -
Roll Out Sheets:
Roll each color into a sheet of equal thickness, aiming for about 3mm thick. If you have a pasta machine, use a medium setting; otherwise, use an acrylic roller with depth guides. -
Cut Stripe Components:
Using your tissue blade, cut straight, clean strips from your clay sheets. You’ll want varying widths—some thick bands of white, thinner bands of navy, and solid sections of red. -
Assemble the Striped Block:
Press the edges of different colored strips together on your work surface to create new, striped sheets. For example, join a navy strip to a white strip to create a dual-tone slab.
Clean Cuts Only
Chill your clay sheets in the fridge for 10 minutes before slicing stripes. Cool clay is firmer and won’t drag or smear when dragged with a blade.
Step 2: Shaping the Beads
-
Cut the Circles:
Use your circle cutter to punch shapes out of your various clay sheets. Cut some from the solid red, some from the solid navy, and others from your newly created striped sections to mimic the pattern in the photo. -
Smooth the Edges:
Pick up a cut circle and gently smooth the outer rim with your finger to remove any sharp edges from the cutter. -
Create the Lentil Shape:
Place a clay circle on your palm. Using a flat acrylic block or a piece of glass, gently rotate it over the clay in a circular motion. This rounds the distinct edges, creating a puffy, lentil-like disc shape. -
Pierce the Beads:
Carefully insert a bead pin or toothpick through the center of the bead edge. Rotate the pin as you push to avoid distorting the circular shape. -
Double Check Holes:
Here I prefer to poke the hole from one side, stop halfway, and then meet it from the other side to ensure the exit hole is neat and centered. -
Bake:
Arrange your beads on a baking sheet or tile. Bake according to your specific brand of polymer clay’s instructions (usually 275°F/135°C for 15-30 minutes). -
Cool and Finish:
Allow the beads to cool completely. Once cool, use wet/dry sandpaper under running water to buff away any fingerprints or lint, creating a matte, beach-glass finish.
Textured Touch
Before baking, lightly roll your raw beads over coarse sandpaper or a clean stone to give them a pitted, weathered texture like real sea stones.
Step 3: Assembly
-
Prepare the Cord:
Cut a length of natural hemp cord, approximately 12 inches long, to allow plenty of room for knotting. -
String the Beads:
Thread your beads onto the cord. Refer to the image for the pattern: looking closely, notice how solid colors often alternate with the striped beads for visual balance. -
Add Spacer Knots (Optional):
If you want the beads to sit apart slightly, you can tie small overhand knots between specific beads, though the inspiration image shows them sitting snugly together. -
Create the Closure Loop:
On one end of the cord, fold the tip back about an inch and tie an overhand knot to create a loop large enough for your closure bead to pass through. -
Form the Sliding Knot or Button:
On the other end, tie a large, sturdy knot (or attach a specific ‘button’ bead) that fits securely through the loop you just made. -
Trim Ends:
Trim any excess cord leaving a small tail, and if the cord is synthetic, carefully singe the end; for natural hemp, a dab of glue works well to prevent fraying.
Wear your nautical creation with your favorite denim or linen outfit for effortless seaside style
Mini Sand Dollar Disc Bead Details
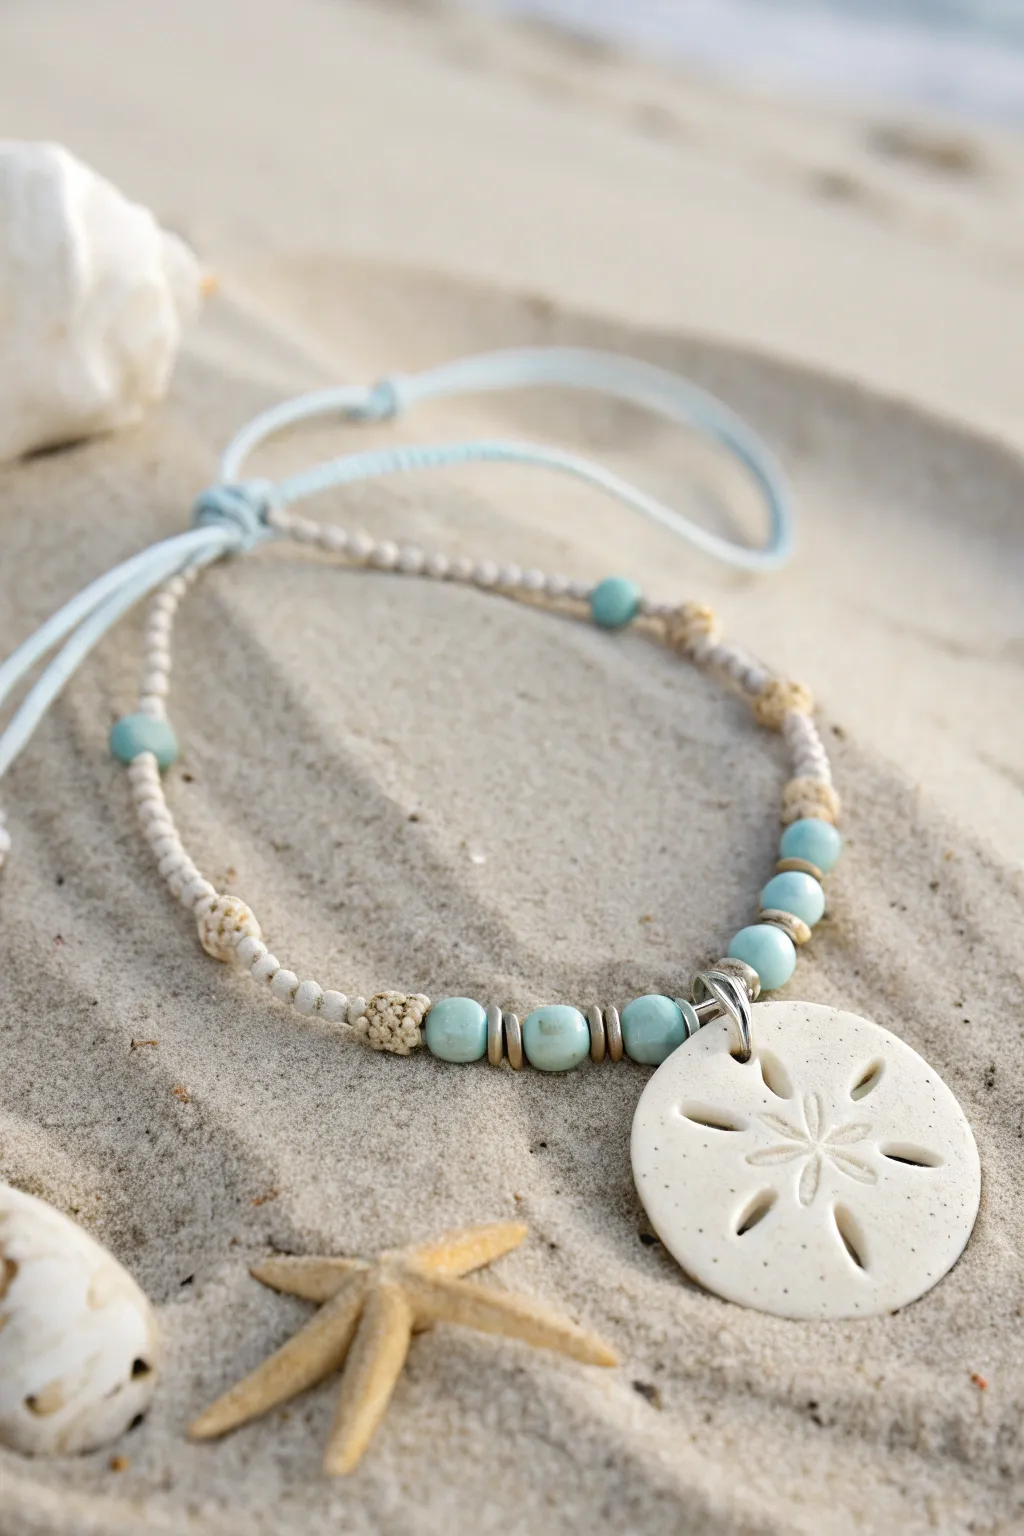
Capture the essence of a serene shoreline with this beautifully textured anklet, featuring a focal clay sand dollar and soothing turquoise tones. The combination of knotting techniques and mixed bead sizes creates a lovely organic rhythm that feels like tiny treasures washed up on the sand.
Step-by-Step Tutorial
Materials
- White or cream polymer clay
- Sand dollar shaped texture stamp or sculpting tool
- Light blue hemp cord or waxed cotton cord (1mm)
- Small white seed beads (size 11/0 or 8/0)
- Larger turquoise ceramic or clay round beads (approx. 6mm)
- Medium turquoise tube or rondelle beads
- Textured cream melon beads or spacer beads
- Silver spacer discs or heishi beads
- Silver jump ring (6-8mm)
- Toothpick or awl
- Scissors
Step 1: Crafting the Sand Dollar
-
Condition the clay:
Start by kneading a small amount of white polymer clay until it is soft and conditioned. Roll it into a smooth ball about the size of a large marble. -
Form the disc:
Flatten the ball gently between your palms or on a work surface to create a thick disc shape. Smooth out the edges so they are rounded, mimicking a real sand dollar. -
Add texture:
I like to use an old toothbrush or a piece of coarse sandpaper to gently tap the surface of the clay, giving it a porous, sandy texture. -
Create the star pattern:
Using a sculpting tool or a dull knife, press five tear-drop shapes into the center to form the iconic flower pattern. Add small slits or holes around these petals for authentic detail. -
Pierce the hole:
Use a toothpick or awl to create a hole at the very top edge of the sand dollar for the jump ring. Wiggle it slightly to ensure the opening is distinct. -
Bake the charm:
Bake the clay piece according to the manufacturer’s instructions for the brand you are using. Let it cool completely before handling.
Step 2: Stringing the Design
-
Prepare the cord:
Cut a length of light blue cord roughly 16 inches long. Fold it in half to create a loop at one end and tie an overhand knot to secure the loop. -
Start the bead pattern:
Thread a sequence of small white seed beads onto the cord. Continue until you have about an inch of delicate white texture. -
Add visual interest:
Slide on one of the textured cream melon beads. Secure it in place by tying a simple overhand knot with the cord immediately before and after the bead. -
Continue the sequence:
Resume threading small white seed beads for another inch or so, then add a medium turquoise round bead, flanking it with knots just like the cream bead. -
Build the center section:
As you approach the middle, switch to the larger beads. Thread a textured cream bead, followed by a turquoise tube bead, a silver spacer, another turquoise tube, and a silver spacer. -
Attach the focal point:
Open your silver jump ring and loop it through the baked sand dollar charm. Slide the jump ring onto the cord right in the center of your bead arrangement. -
Mirror the design:
Complete the central section by mirroring the beads you just placed: silver spacer, turquoise tube, silver spacer, turquoise tube, and finally a textured cream bead. -
Finish the strand:
Complete the second half of the bracelet by repeating the seed bead sections, knotted turquoise accents, and knotted cream accents to match the first side symmetry. -
Secure the end:
Tie a sturdy knot at the end of the last bead section. Leave enough tail cord to serve as ties for the bracelet.
Sticky Situation
If your clay sticks to the sculpting tool/knife, dip the tool in a bit of cornstarch or water before pressing into the clay for a clean release.
Beachcomber Look
Before baking, lightly dust the unbaked sand dollar with brown chalk pastel shavings. This adds an aged, sandy dimension to the crevices.
Now you have a piece of wearable art that brings a bit of the ocean with you wherever you go
Marbled Ocean Swirl Statement Beads
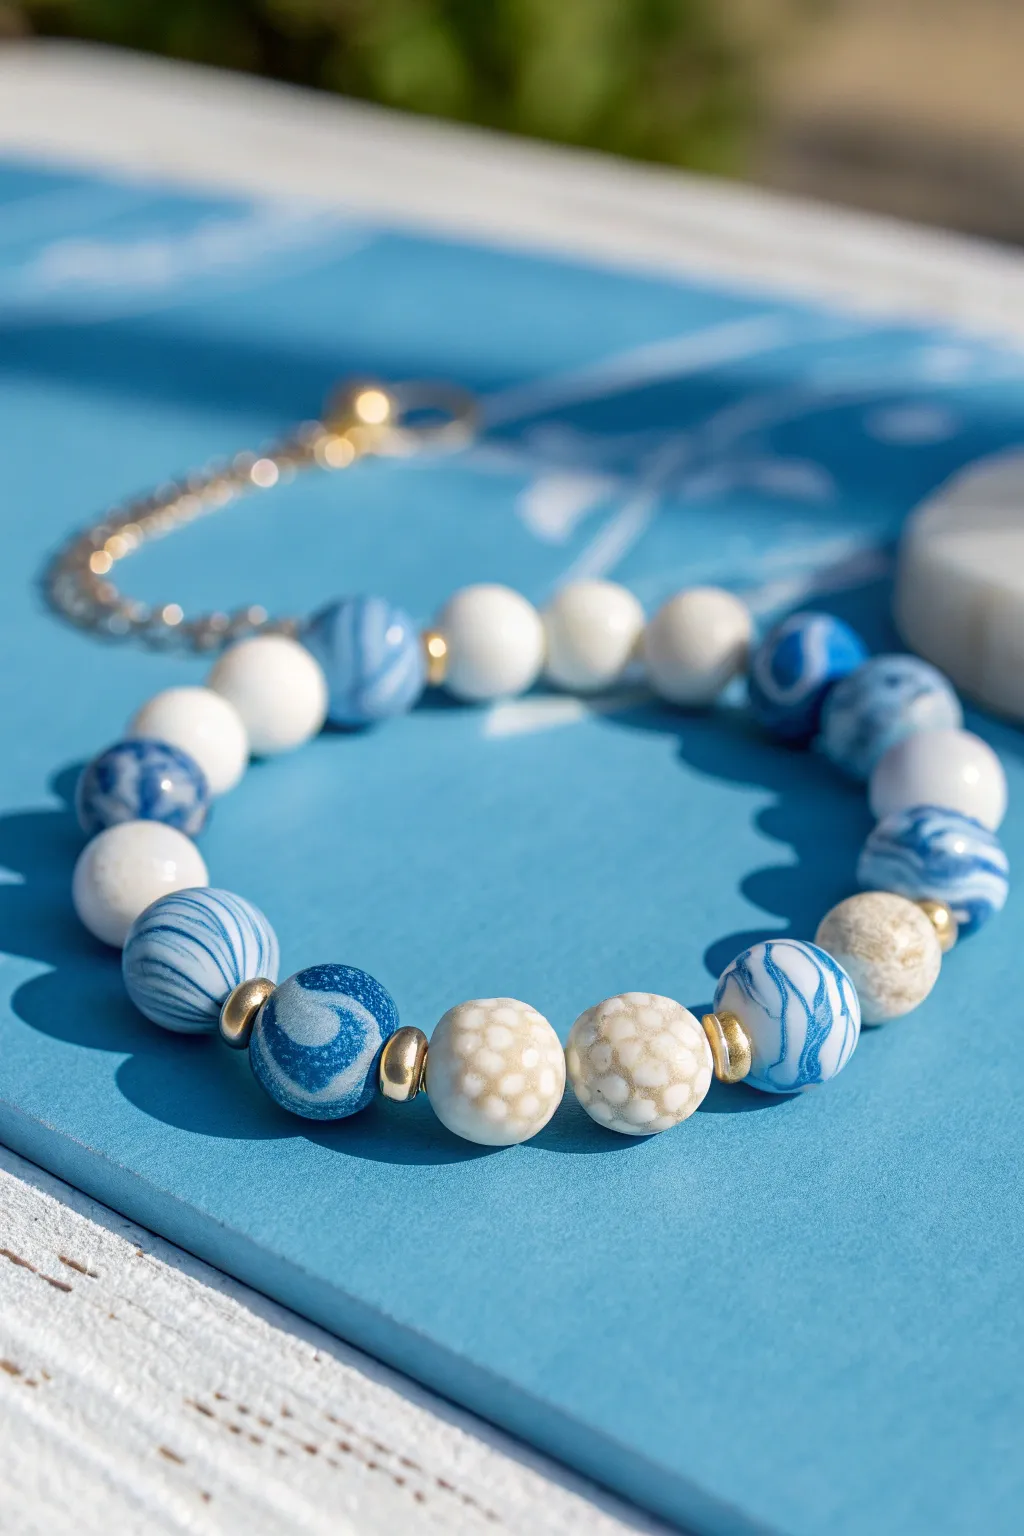
Capture the essence of crashing waves with this stunning polymer clay bracelet. Featuring hand-rolled marbled beads in deep ocean blues alongside textured sandy accents, this piece brings the beach directly to your wrist.
Step-by-Step Guide
Materials
- Polymer clay in ocean blue, royal blue, translucent, and white
- Gold accent paint or gold mica powder
- Gold spacer beads (small rondelles)
- Gold chain extender and lobster clasp
- Beading wire (flexible nylon-coated)
- Crimp beads and crimp covers
- Bead roller (optional)
- Toothpick or bead piercing pin
- Texture tool (small netting or sandpaper)
- High-gloss glaze or UV resin (optional)
- Needle-nose pliers and wire cutters
Step 1: Creating the Ocean Marbled Beads
-
Prepare the clay palette:
Condition your ocean blue, royal blue, and white polymer clays until they are soft and pliable. Create pencil-thick logs of each color. -
Twist the colors:
Take one log of white and one log of blue, twist them together like a candy cane, and then fold the twist in half. Repeat this twisting and folding process carefully. -
Stop mixing early:
Be careful not to over-mix; you want distinct swirls, not a solid light blue. Stop when you see beautiful ribbons of color defining the ‘ocean waves’ within the clay. -
Form the marbled beads:
Pinch off equal-sized portions of your swirled log. Roll each portion between your palms or use a bead roller to create smooth, round spheres. Aim for about 10-12mm in diameter. -
Pierce the holes:
Using a bead piercing pin or a toothpick, gently bore a hole through the center of each bead while twisting the tool to avoid flattening the sphere.
Muddy Swirls?
If your colors are blending into a single muddy shade, you are over-mixing. Use cooler clay and stop twisting significantly sooner to keep the lines crisp.
Step 2: Crafting the Textured ‘Sand’ Beads
-
Roll spheres:
Condition plain white or ecru clay and roll several beads of the same size as your marbled ones to serve as the ‘sand’ elements. -
Apply texture:
Gently roll these white beads over a textured surface, like a piece of coarse sandpaper or a mesh screen, to create a pitted, organic surface. -
Add gold speckles:
Lightly brush gold mica powder over the raised textured areas, or wait until after baking to dry-brush gold acrylic paint onto the surface for a shimmering sun-kissed look. -
Bake the clay:
Arrange all your pierced beads on a baking sheet lined with parchment paper. Bake according to your clay manufacturer’s instructions (usually 275°F for 15-30 minutes) and let them cool completely. -
Glaze (Optional):
For a ‘wet’ look on the ocean beads, coat only the marbled blue beads with a high-gloss glaze or a thin layer of UV resin and cure.
Sea Glass Effect
Mix translucent clay into your blue marble log. After baking, the translucent parts will let light through, mimicking real sea glass found on the shore.
Step 3: Assembly
-
Layout the design:
Lay your finished beads on a bead board. Alternate between the marbled blue beads, plain white spacer beads (if you made them), and the textured gold-flecked beads. -
Interspace with gold:
Place a small gold spacer bead between the larger clay focal beads. This separates the patterns and adds a luxurious metallic flash. -
String the beads:
Cut a length of beading wire about 10 inches long. Secure one end with a piece of tape or a bead stopper, then string your pattern onto the wire. -
Secure the first end:
I prefer to finish one end completely before cutting the wire. Slide on a crimp bead, loop the wire through the lobster clasp, and thread it back through the crimp bead. -
Crimp firmly:
Use your crimping pliers to flatten the crimp bead securely, locking the clasp in place. Cover the crimp with a gold crimp cover for a professional finish. -
Finish the second end:
Repeat the crimping process on the other end, attaching the jump ring or extension chain. Ensure the beads aren’t strung too tightly so the bracelet remains flexible. -
Trim excess wire:
Snip off any excess tail wire with your flush cutters, tucking the tiny end into the adjacent bead hole if possible.
Enjoy wearing your new handmade ocean treasures that carry the spirit of the sea
Textured “Wet Sand” Clay Bead Finish
Capture the essence of a walk on the beach with this textured clay bracelet. By achieving a unique ‘wet sand’ finish on polymer clay, you’ll create a durable piece of jewelry that looks like it was gathered straight from the tide line.
How-To Guide
Materials
- Polymer clay (beige/tan, white, turquoise)
- Coarse salt or sandpaper (for texture)
- Brown acrylic paint (burnt umber or similar)
- Paper towels or wet wipes
- Beading elastic cord (0.8mm)
- Clay roller or pasta machine
- Basic clay sculpting tools
- Toothpicks or bead piercing pins
- Small paintbrush
- Oven for baking clay
- Gloss glaze (optional for focal beads)
- Gold tone metallic spacer bead or charm (optional)
Step 1: Creating the Sand Beads
-
Condition the clay:
Start by thoroughly conditioning your beige or tan polymer clay until it is soft and pliable. If the color is too uniform, you can mix in a tiny pinch of white or brown to create subtle marbling. -
Form the base spheres:
Pinch off equal-sized pieces of the beige clay. Roll each piece between your palms to create uniform spheres, aiming for about 10-12mm in diameter for a chunky look. -
Apply the texture:
This is the key step. Roll the unbaked clay spheres gently over a piece of coarse sandpaper or into a small pile of coarse salt. Press just hard enough to imprint the surface with pockmarks and irregular dents without deforming the round shape. -
Pierce the holes:
Use a toothpick or a dedicated bead piercing pin to create a hole through the center of each bead. Be careful to twist the tool as you push it through to avoid squashing your newly textured bead. -
Smooth the openings:
Check the entry and exit points of the hole. Gently smooth away any jagged bits of clay that may have been pushed out during piercing so the bead sits flush later.
Step 2: Making the Focal Beads
-
The white contrast bead:
Take a piece of bright white polymer clay and roll it into a sphere slightly smaller than your sand beads. Keep this one perfectly smooth—do not texture it. -
Piercing the white bead:
Create a center hole in the white sphere. I like to re-roll it gently after piercing to ensure it stays perfectly round. -
The turquoise disc:
Condition a small amount of turquoise clay. Roll it into a small ball, then flatten it slightly into a thick disc or ‘rondelle’ shape. -
Final hole punch:
Pierce the center of the turquoise disc, ensuring the hole is large enough for your elastic cord.
Natural Speckle Trick
Mix black pepper or used dried coffee grounds directly into the beige clay before rolling. This adds permanent, organic speckles that look incredibly realistic once baked.
Step 3: Baking and Antiquing
-
Bake the clay:
Arrange all your beads on a baking sheet or tile. Bake according to the manufacturer’s instructions for your specific brand of clay (usually around 275°F/130°C for 15-30 minutes). Let them cool completely. -
Prepare the wash:
Dilute a small amount of brown acrylic paint with water. You want a thin, watery consistency, not a thick coat. -
Apply the wash:
Brush the diluted paint generously over the textured beige beads, ensuring the liquid settles into all the tiny pits and crevices. -
Wipe away excess:
Immediately wipe the surface of the beads with a damp paper towel. The paint will stay in the textured ‘pores’ like sand, while the high points will return to the original beige color. -
Let it dry:
Allow the paint to dry completely. This creates the realistic weathered stone effect.
Paint Dries Too Fast?
If acrylic paint dries before you wipe it off, dampen the bead with water first. This increases working time and helps the paint flow into the texture better.
Step 4: Assembly
-
Arrange the pattern:
Lay your beads out on a bead board or towel. Place the white bead and turquoise spacer next to each other as the focal point, then fill the rest of the strand with your textured sand beads. -
Stringing:
Cut a length of elastic cord about 10 inches long. Thread the beads onto the cord in your arranged order. -
Adding metallic accents:
If you wish to match the photo exactly, you can add a gold metallic bead or charm near the focal point or at the back of the bracelet. -
Tying the knot:
Tie the elastic in a strong surgeon’s knot (right over left, left over right). Pull tight to secure. -
Hide the knot:
Add a dab of super glue to the knot for security, trim the excess cord, and gently tuck the knot inside one of the larger beads.
Wear your new bracelet stacked with others for a relaxed, coastal summer vibe
“Moonlit Shore” Night-Blue and Silver Mix
Capture the serene transition from sandy days to ocean nights with this sophisticated clay bead bracelet. Combining crisp whites, deep navy, and matte grey with a focal silver charm creates a piece that feels both rustic and refined.
Step-by-Step
Materials
- 6mm Polymer clay heishi beads: White
- 6mm Polymer clay heishi beads: Navy Blue
- 6mm Polymer clay heishi beads: Matte Grey
- Small textured silver or pewter coin charm
- Silver spacer beads (ridged or textured)
- Small silver jump rings (4mm and 6mm)
- Beading wire (0.38mm or 0.45mm)
- Your choice of clasp (lobster claw recommended)
- Small extension chain
- Crimp beads (2mm)
- Crimping pliers
- Wire cutters
- Flat nose pliers
Step 1: Setting the Scene
-
Measure and Cut:
Start by measuring your wrist and adding about an inch for comfort and finishing. Cut a length of beading wire accordingly, usually around 8-9 inches is a safe bet for a standard adult size. -
Secure the End:
Before you start threading, string a crimp bead and one half of your clasp onto one end of the wire. Loop the wire back through the crimp bead to create a secure anchor. -
Crimp It Down:
Use your crimping pliers to flatten the crimp bead firmly, ensuring the wire won’t slip. I like to trim any tiny excess tail of wire right at the crimp for a clean start.
Pro Tip: Bead Sorting
Before stringing, lay your pattern out on a bead board or a towel. This prevents beads from rolling away and lets you visualize the color balance before committing to the wire.
Step 2: Beading the Pattern
-
Start with Grey:
Begin your pattern near the clasp with a section of grey beads. Thread on approximately 4-5 grey heishi beads to establish a neutral base. -
Add Metallic Accents:
Slide on one of your textured silver spacer beads. These act as dividers between color blocks, catching the light like glimmers on the water. -
White Segment:
Now, thread on a longer section of white beads. About 8-10 white beads usually create a nice, bright contrast against the darker tones. -
Navy Block:
Follow the white section with a block of navy blue beads. Use about 5-6 navy beads here to introduce that deep ocean color. -
Repeat the Pattern:
Continue this pattern: grey section, spacer, white section, navy section. Adjust the lengths of each color block slightly if you want a more organic, less rigid look. -
Center Point Preparation:
Once you have reached the halfway point of your desired length, prepare to add the focal point. This is where the charm will hang.
Troubleshooting: Stiff Wire
If the finished bracelet feels too stiff and holds a circle shape when laid down, you crimped too tightly. Leave a tiny gap (1mm) of slack wire before the final crimp.
Step 3: Creating the Focal Point
-
Charm Assembly:
Open a small matching jump ring using two pairs of flat nose pliers. Twist the ring open sideways rather than pulling it apart to maintain its shape. -
Attach the Coin:
Slide your silver coin charm onto the open jump ring and close it securely. This ensures the charm hangs freely. -
Threading the Charm:
Thread a larger spacer bead or a specific bail bead onto your main wire, then hang the charm’s jump ring over the wire immediately next to it, or simply thread the wire through the jump ring itself. -
Balance the Design:
Add another metallic spacer bead on the other side of the charm to frame it perfectly within the beadwork.
Step 4: Finishing Touches
-
Complete the Pattern:
Resume your beading pattern (grey, spacer, white, navy) until you reach your measured length. Check the fit around your wrist one last time. -
Add the End Crimp:
Thread a crimp bead onto the end of the wire, followed by the end ring of your extension chain. -
Pre-Crimp Tension:
Loop the wire back through the crimp bead and pull it snug against the last clay beads. Be careful not to pull it too tight; the bracelet needs a little wiggle room to drape naturally. -
Final Crimp:
Flatten the crimp bead securely with your pliers. Give it a gentle tug to ensure everything is locked in place. -
Trim and Polish:
Use your wire cutters to snip the excess wire tail as close to the crimp bead as possible. Your seaside accessory is now ready to wear.
Enjoy wearing your handcrafted piece of the shoreline wherever you go
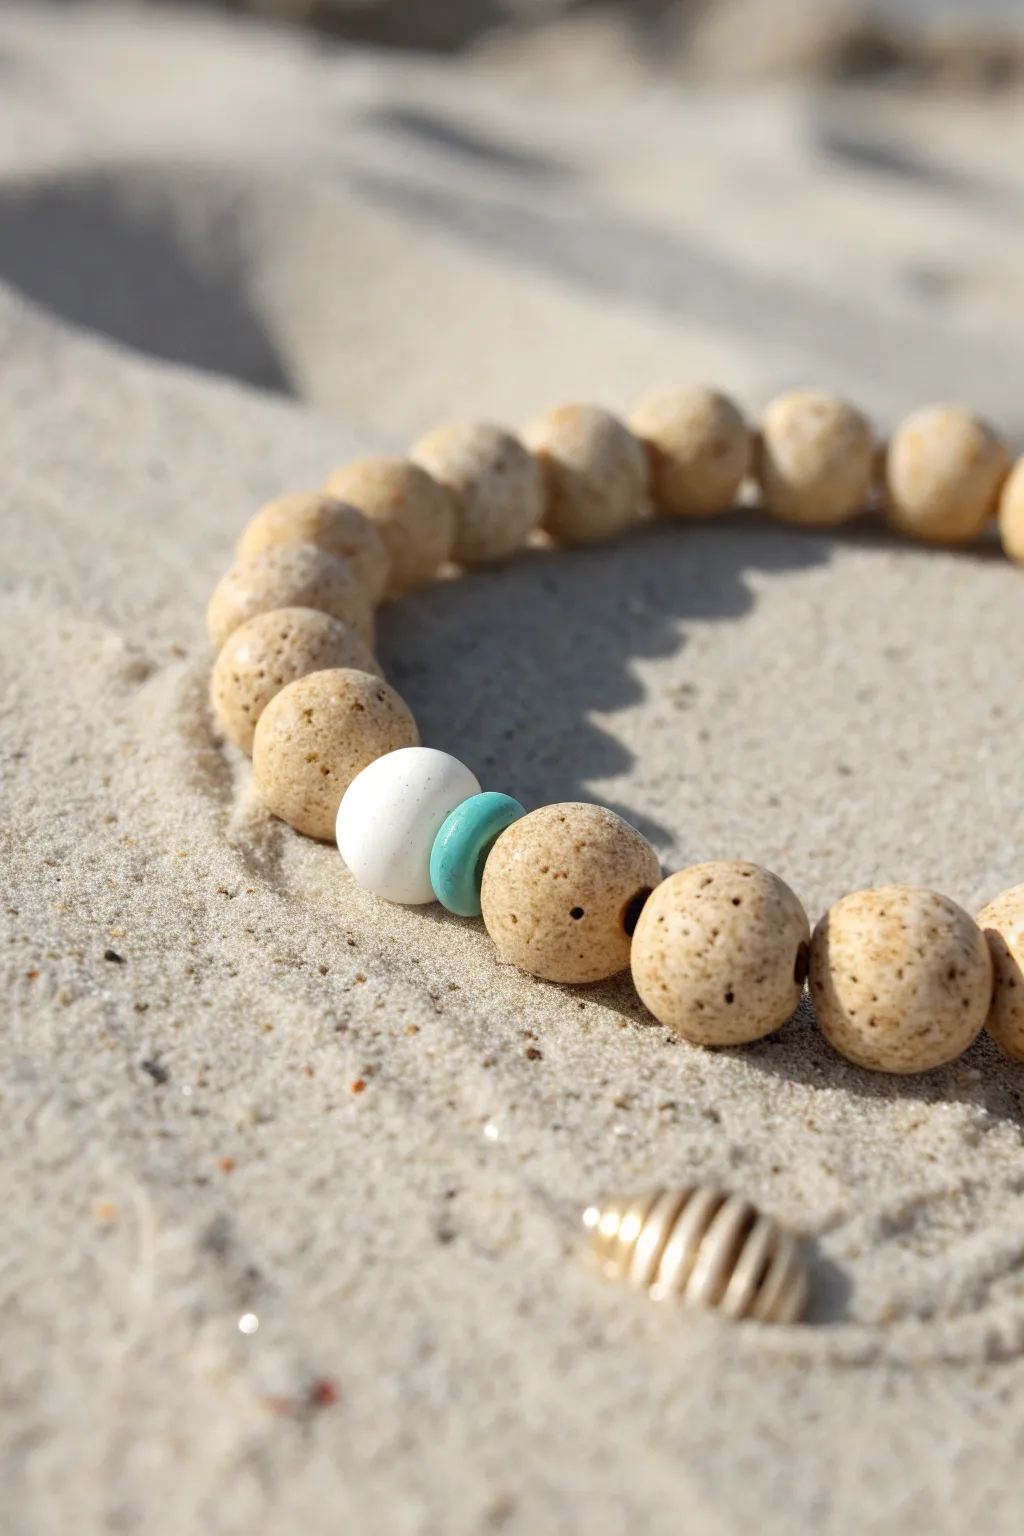
Boardwalk Browns and Ocean Teals Stack
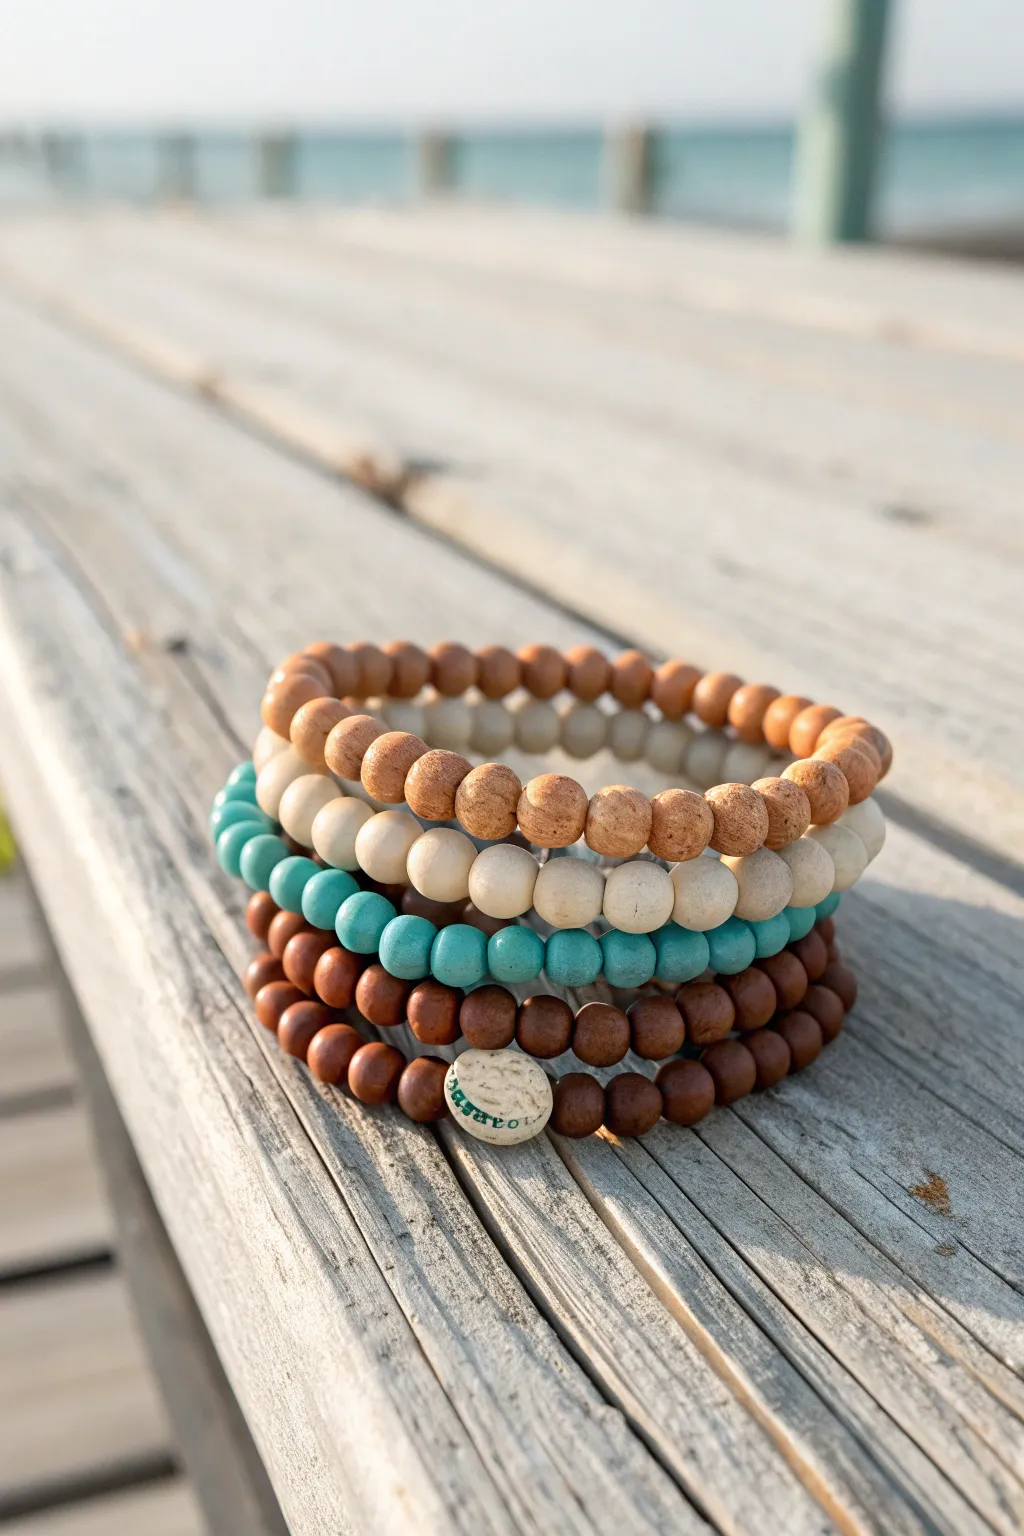
Capture the essence of a serene walk along the pier with this four-piece bracelet stack. Combining earthy wooden tones with a pop of matte turquoise, this set perfectly balances rustic texture with coastal color.
Step-by-Step Guide
Materials
- Stretch cord (0.7mm or 0.8mm transparent elastic)
- 8mm light tan wood beads
- 8mm cream or white wood (or bone) beads
- 8mm matte turquoise or teal dyed wood beads
- 8mm dark brown wood beads
- One rustic focal bead (white textured disc or coin bead)
- Bead stopper or masking tape
- Jewelry glue (optional)
- Scissors
Step 1: Planning and Measuring
-
Measure your wrist:
Wrap a flexible measuring tape around your wrist to find your size. For a comfortable fit, add about half an inch to that measurement. -
Cut the cord:
Cut four pieces of stretch cord, each about 10-12 inches long. This extra length makes tying the knots much easier later. -
Prepare the cord:
Pre-stretch each piece of elastic by pulling it firmly a few times. This prevents the bracelet from loosening up after you wear it. -
Secure the ends:
Place a bead stopper or a piece of masking tape on one end of each cord to stop beads from sliding off while you work.
Step 2: Creating the Solid Color Strands
-
String the light tan strand:
Begin your first bracelet by threading on the light tan wood beads until you reach your desired length. -
Check the fit:
Wrap the beaded strand around your wrist to verify the size before tying off. -
String the cream strand:
Repeat the process for the second bracelet using the cream-colored wood or bone beads. I find creating slight variations in bead texture here adds nice visual interest. -
String the teal strand:
Create the third bracelet using only the matte turquoise beads. This will be the colorful centerpiece of your stack.
Wood Bead Wisdom
Wood beads can have rough interiors. Use a bead reamer or a thick needle to smooth out the holes before stringing to prevent fraying your elastic over time.
Step 3: The Focal Bead Bracelet
-
Start the dark brown base:
Thread on approximately half of the dark brown wood beads required for the final bracelet. -
Add the focal bead:
Slide on your rustic white disc bead. If it has a specific orientation or writing, make sure it faces the direction you want. -
Finish the dark strand:
Continue adding the rest of the dark brown beads until this bracelet matches the length of the others.
Knot Coming Undone?
If your slippery elastic won’t hold a knot, try a dab of clear nail polish instead of glue, or roughen the cord ends slightly with sandpaper before tying.
Step 4: Finishing Touches
-
Tie the knots:
For each bracelet, remove the stopper and tie a strong surgeon’s knot (right over left, left over right, looping through twice). -
Tighten securely:
Pull the cord ends firmly from all four directions to cinch the knot largely inside the bead hole if possible. -
Add security (optional):
Place a tiny dot of jewelry glue on the knot for extra durability, being careful not to glue the bead to the cord. -
Trim the ends:
Once the glue is dry, use your scissors to trim the excess cord close to the knot. -
Hide the knot:
Gently tug the bracelet to slide the knot inside the nearest bead hole for a seamless professional finish.
Slide on your new stack and enjoy the warm, breezy vibes they bring to any outfit
Pool-Day Waterproof-Look Bracelet Set

Capture the essence of a tranquil afternoon by the pool with this coordinated four-piece bracelet set. Combining matte stone textures, polished gold accents, and a statement shell charm creates a versatile stack that looks just as good with swimwear as it does with a summer dress.
Step-by-Step
Materials
- Stretch cord (0.8mm or 1mm)
- Gold-plated wire cuff bracelet blank with loops
- Large scallop shell charm or pendant (cream/beige)
- Gold jump rings (6mm or 8mm)
- Matte Amazonite beads (8mm, varied blue/green/tan tones)
- Matte Coral or Peach Sunstone beads (6mm)
- Polished White Tridacna or Howlite beads (6mm)
- Gold textured spacer beads (small)
- Gold crimp beads or jewelry glue
- Scissors
Step 1: The Shell Cuff
-
Prepare the Charm:
Begin by selecting your large scallop shell charm. If it doesn’t already have a bail (a connector loop), carefully attach a sturdy gold jump ring through the pre-drilled hole at the top of the shell. -
Attach to Cuff:
Locate the loop on one end of your gold wire cuff bracelet. Open your jump ring using two pliers to twist it sideways (never pull apart) and hook it onto the cuff’s loop. -
Secure the Shell:
Close the jump ring tightly so the shell dangles freely but securely. This simple cuff acts as the anchor for your stack.
Knot Security
Hide your final knot inside the hole of a neighboring bead. Gently tug until the knot pops inside, making it invisible.
Step 2: The White Strand
-
Measure the Cord:
Cut a piece of stretch cord about 10-12 inches long. I like to prestretch the cord by pulling on it gently a few times; this prevents the bracelet from loosening up later. -
String Basics:
String your polished white beads (Tridacna or Howlite work beautifully) onto the cord. -
Add Gold Accents:
Interject a textured gold spacer bead every 5-6 white beads to mimic the glimmer of sun on water. Continue until the strand fits comfortably around your wrist. -
Knot and Glue:
Tie off the bracelet using a surgeon’s knot (right over left, left over right). Add a tiny dab of jewelry glue to the knot before trimming the excess cord.
Step 3: The Coral Strand
-
Select Color Palette:
For the middle layer, use the matte coral or peach sunstone beads. The matte finish contrasts nicely with the shiny white beads next to them. -
String the Beads:
Thread the coral beads onto a new piece of prepared stretch cord. Keep this strand simple without metallic spacers to potentialize the pop of color. -
Finish the Strand:
Once you reach the desired length, repeat the surgeon’s knot and glue process. Let the glue cure for a few minutes before wearing.
Ocean Ombré Upgrade
Use beads that gradient from white to dark teal on one single strand for a rolling wave effect within the stack.
Step 4: The Amazonite Adjustable Tie
-
Mix the Textures:
For the final bracelet (the one furthest up the arm), use larger 8mm matte Amazonite beads. The variation in size adds visual weight to the top of the stack. -
Create a Pattern:
String the multi-toned blue, green, and tan beads. Arrange them so the colors are randomized, giving it that natural, organic stone look. -
Closing Idea:
You can finish this with a standard knot like the others, or for an adjustable flair, leave longer tails and use a macramé square knot closure if you are familiar with braiding cord. -
Final Arrangement:
Stack the bracelets on your wrist starting with the gold cuff near the hand, followed by the white, then coral, and finally the amazonite strand.
Now you have a stunning, waterproof-look set ready for glorious days by the water