Clay pins are the perfect little project when you want something cute, wearable, and totally doable in one craft session. I love how a few simple shapes in polymer clay or air-dry clay can turn into a whole mini collection you’ll actually want to show off.
Kawaii Toast Faces
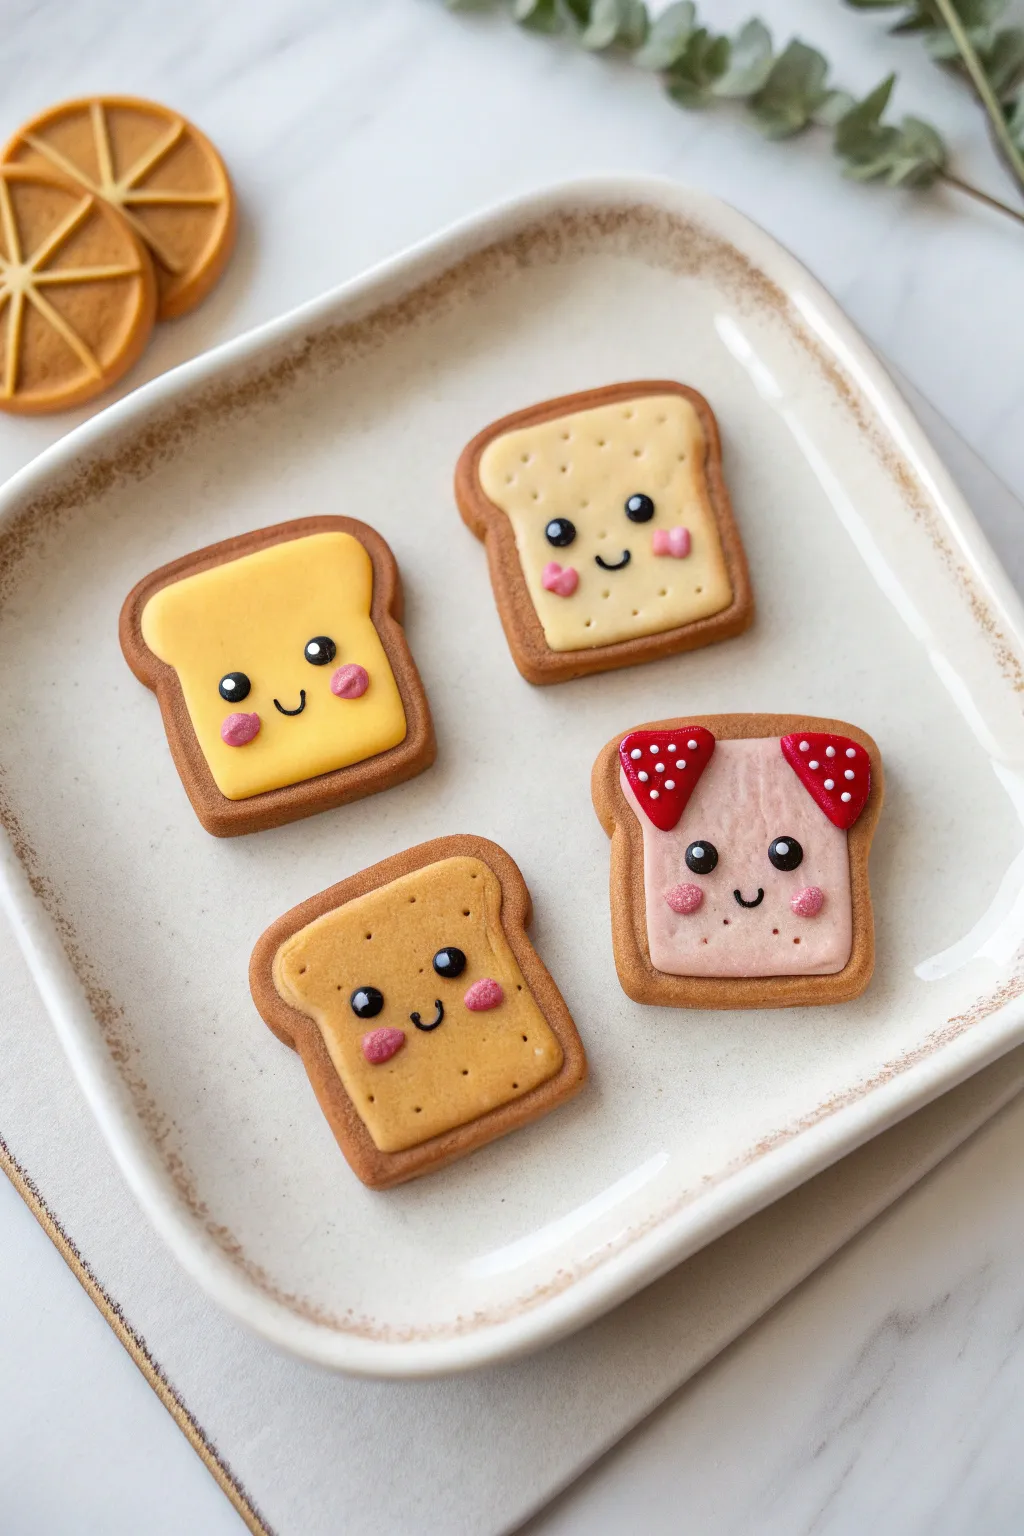
Start your day with a smile by crafting this adorable set of four toast-inspired clay pins. These miniature breakfast treats feature sweet, smiling faces and variations like melty butter, strawberry jam, and classic crusts.
Step-by-Step
Materials
- Polymer clay (tan/brown, light beige, pale yellow, pink, red, black, white)
- Clay roller or pasta machine
- Square cookie cutter (approx. 1 inch) or craft knife
- Dotting tools or ball stylus tool
- Needle tool
- Soft pastel chalks (brown, reddish-brown) and a fluffy brush
- Liquid clay (TLS) or heavy gloss glaze
- Pin backs or magnet discs
- Super glue (E6000 recommended)
Step 1: Baking the Bread Base
-
Mix the Dough Color:
Mix a small amount of tan clay into a larger lump of light beige clay to create a warm, baked bread color. You want a realistic dough shade, not too dark. -
Roll and Cut:
Roll your clay out to a thickness of about 1/4 inch (6mm). Using a small square cutter or a sharp blade, cut out four identical squares. Gently round the top two corners with your finger to give them that classic loaf shape. -
Add the Crust:
Roll a long, thin snake of darker brown clay. Wrap this strip around the edges of each toast slice, pressing it gently to adhere. Smooth the seam at the bottom so it looks seamless. -
Texture the Bread:
To mimic the porous texture of bread, take a toothbrush or a ball of crinkled aluminum foil and tap it gently over the surface of the beige clay. -
Pastel Shading:
Shave some brown soft pastel chalk into a powder. Use a dry, fluffy brush to dust the edges of the bread (the beige part) right next to the crust to create a toasted gradient effect.
Sticky Situation?
If your clay gets too soft and fingerprints are showing, pop the raw pieces in the fridge for 10 minutes to firm them up before smoothing.
Step 2: Adding Toppings & Personalities
-
The Butter Slice:
For the butter toast, roll a thin sheet of pale yellow clay. Cut a sloppy, uneven square that is slightly smaller than the bread face and press it onto the first toast. -
The Plain & Speckled:
For the plain toasts, keep the surface bare. If you want the speckled cracker look seen in the top right toast, use a needle tool to poke a grid of tiny shallow holes across the surface. -
The Jam Swirl:
For the jam toast, roll a thin piece of light pink clay and press it onto the center. Then, shape two small red triangles with rounded corners for the ‘strawberry chunks’ at the top corners. -
Jam Details:
Add tiny white clay dots onto the red strawberry triangles to represent seeds. -
Adding Eyes:
Roll tiny balls of black clay for the eyes and press them firmly onto each face. Space them widely apart for maximum cuteness. Add microscopic white specks to the eyes for a reflective glint. -
Sweet Smiles:
Roll extremely thin threads of black clay for the mouths. Curve them into ‘U’ shapes and press them between the eyes. I find using a silicone tool helps place these delicate pieces without smushing them. -
Cheeky Details:
For the cheeks, add small ovals of pink clay under the eyes. For the butter toast, simulate melting butter by adding a tiny pink drip on one cheek.
Level Up: Bite Marks
Use a small scalloped cutter (or a straw with a side cut out) to remove a ‘bite’ from the corner of one toast before baking for a playful touch.
Step 3: Baking and Finishing
-
Bake:
Bake the pieces according to your polymer clay package instructions (usually 275°F/135°C for 15-30 minutes). Let them cool completely before handling. -
Attach the Hardware:
Turn the toasts over. Apply a drop of strong glue (like E6000) to the back of a pin clasp or magnet and press it firmly onto the center of the baked clay. -
Glossy Finish:
For a wet look, apply a coat of gloss glaze or UV resin specifically over the ‘jam’ and ‘butter’ sections, leaving the bread matte for contrast.
Now you have a whole bakery tray of breakfast friends ready to brighten up your denim jacket or fridge


Mini Donut Pin Set
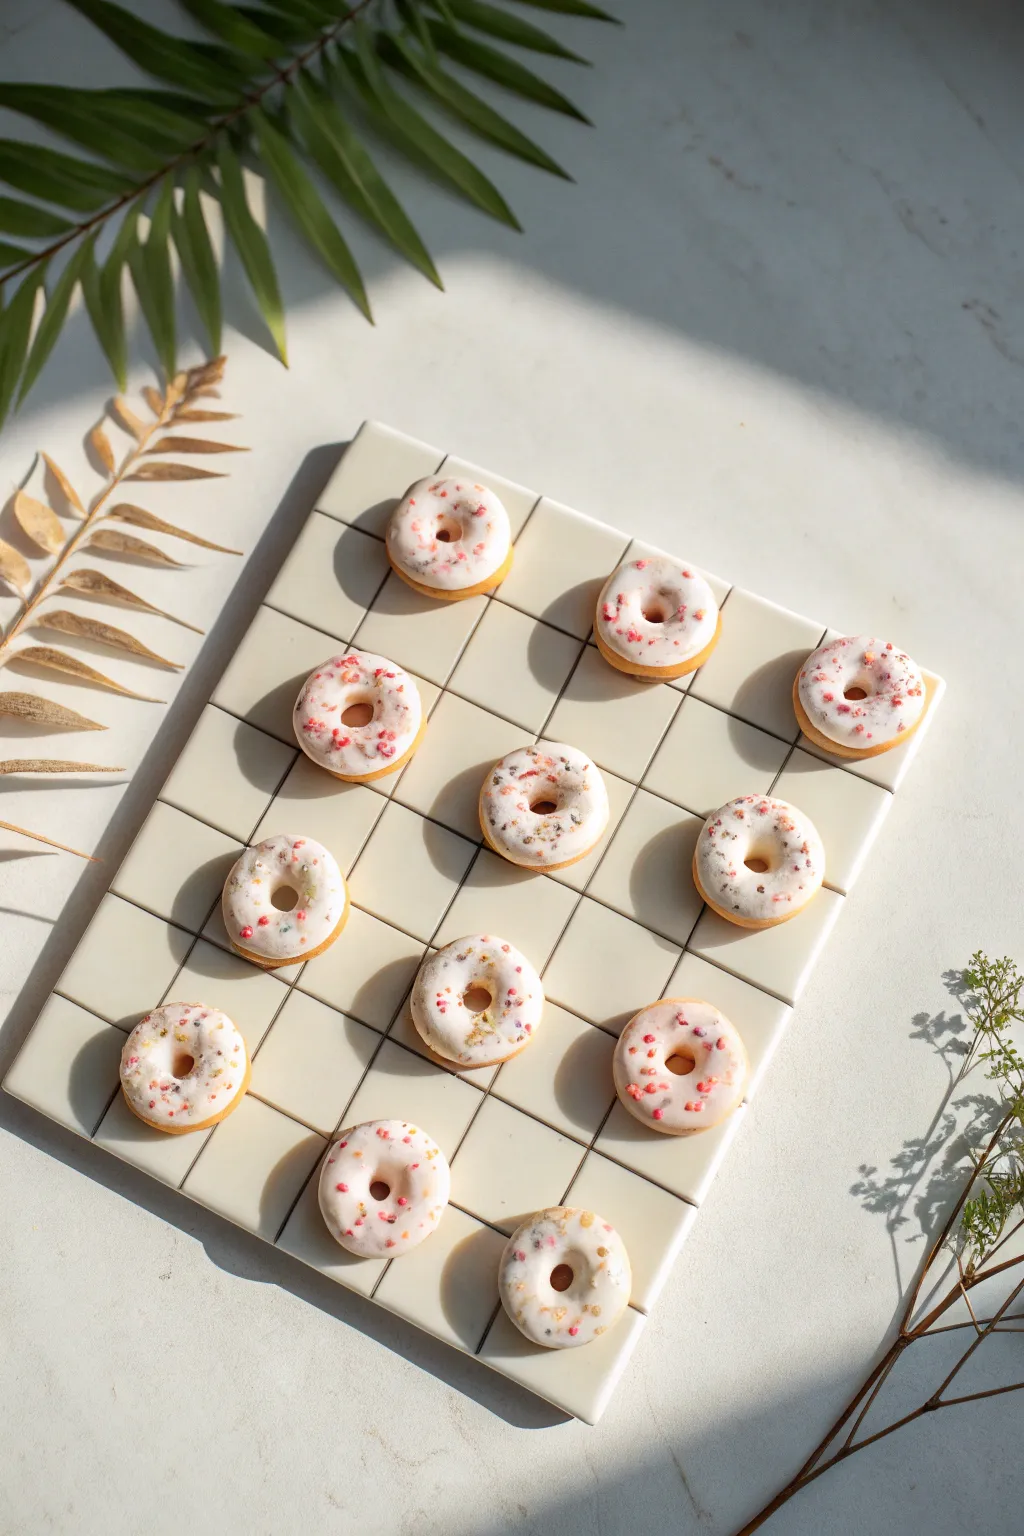
Transform tiny lumps of clay into delectable wearable art with this mini donut pin set. These charming accessories feature realistic golden-brown dough, glossy icing, and delicate sprinkles for a treat that looks good enough to eat but lasts forever.
How-To Guide
Materials
- Polymer clay (translucent, white, beige/ecru, and assorted colors for sprinkles)
- Liquid polymer clay (translucent and white)
- Soft artist pastels (yellow ochre, burnt umber, orange)
- Small paintbrush (for shading)
- Pin backings (butterfly clutch or safety pin style)
- Strong craft glue (E6000 or similar super glue)
- Dotting tool or a small rounded sculpting tool
- Ceramic tile or baking surface
- Gloss glaze (polyurethane or resin based)
- X-Acto knife or clay blade
- Small round cutter (straw or metal tube)
Step 1: Shaping the Dough
-
Mix the perfect dough color:
Begin by conditioning your polymer clay. Mix a 2:1 ratio of white to beige, adding a tiny pinch of translucent clay to give the ‘dough’ a realistic depth rather than a flat plastic look. -
Form the base shapes:
Roll the mixed clay into a snake about 1/2 inch thick, then slice it into equal segments to ensure uniform donut sizes. -
Create the signature shape:
Roll each segment into a smooth ball between your palms, flattening it slightly into a thick disc. -
Punch the center hole:
Use a small round cutter or a drinking straw to punch a hole directly in the center of each disc. Gently smooth the edges of the cut with your finger so they look baked, not sharp. -
Texture the surface (optional):
For added realism, gently roll a soft toothbrush or crumpled aluminum foil over the surface to mimic the texture of fried dough.
Step 2: Baking Effect & Icing
-
Prepare the shading pastels:
Scrape some powder from your yellow ochre, orange, and burnt umber chalk pastels onto a sheet of paper. -
Apply the ‘baked’ look:
Using a dry, soft paintbrush, pick up the pastel powder. Dust the edges and bottom of each donut heavily with ochre and orange, leaving a lighter ‘ring’ around the center to mimic how donuts fry. -
Initial bake:
Place the un-frosted donuts on your tile and bake according to your clay manufacturer’s instructions (usually 275°F/135°C for 15-20 minutes). Let them cool completely. -
Mix the glaze:
In a small cup, mix liquid polymer clay with a small amount of white solid clay to create a thick, opaque white icing. -
Thicken slightly:
If the icing is too runny, let it sit for a few minutes or add more solid white clay. You want it to hold its shape without dripping completely off the sides. -
Frost the donuts:
Carefully apply the liquid clay mixture to the top of each cooled donut using a dotting tool, letting it naturally pool and drip slightly down the sides while keeping the center hole clear.
Uneven Glaze?
If your liquid clay glaze tends to run off entirely, let the liquid clay sit open to air for 30 minutes to thicken, or mix in a tiny bit of cornstarch.
Step 3: Sprinkles & Assembly
-
Create the sprinkles:
While the icing is still wet, you have two options: use pre-baked clay crumbs or create new ones. I prefer shaving tiny bits of cured pink and red clay with a blade to make varied ‘sugar’ flakes. -
Apply the topping:
Gently press your clay shavings or sprinkles into the wet liquid clay. Distribute them unevenly for a natural, hand-dipped appearance. -
Final cure:
Return the decorated donuts to the oven for a second bake, typically 10-15 minutes, to set the liquid clay frosting. Monitor closely so the white icing doesn’t scorch. -
Cool down:
remove from the oven and allow the donuts to cool completely before handling. -
Add the shine:
Brush a coat of gloss glaze over just the icing and sprinkles area. This makes the glaze look wet and sugary while keeping the dough matte. -
Attach the hardware:
Flip the donuts over. Apply a strong dab of E6000 glue to the flat back of your pin hardware and press firmly onto the back of the donut. -
Final drying time:
Allow the glue to cure for at least 24 hours to ensure the pin back doesn’t snap off during wear.
Scented Pins
Mix a tiny drop of vanilla or cake batter fragrance oil into the clay dough before baking to make your pins smell as sweet as they look.
Pin these sweet treats to your denim jacket or backpack for an instant pop of color and personality


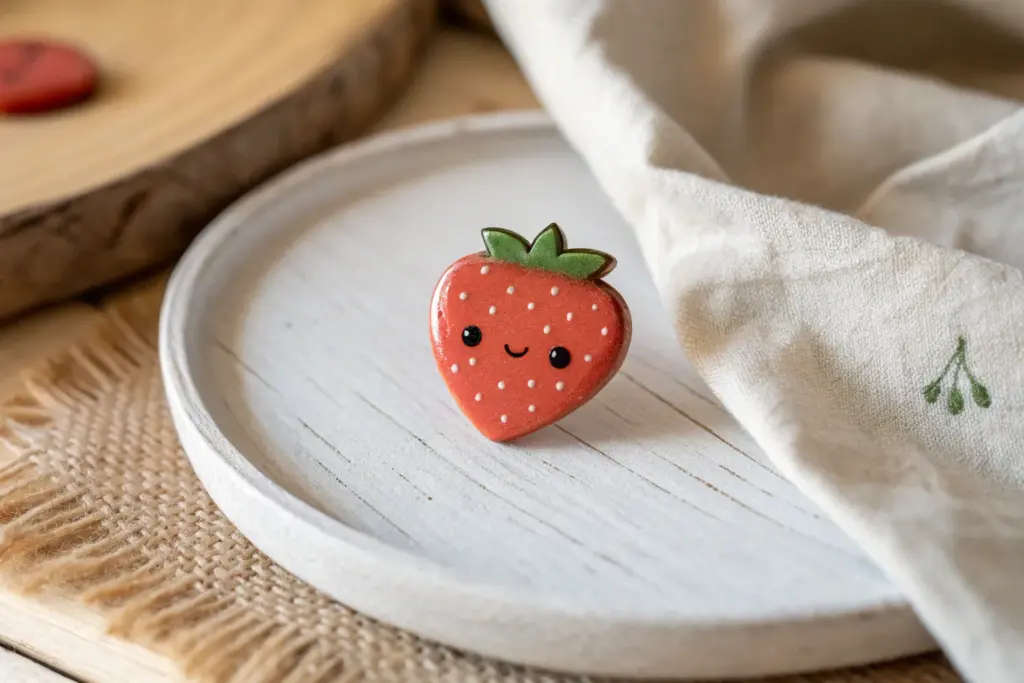
Strawberry Smiley Pins
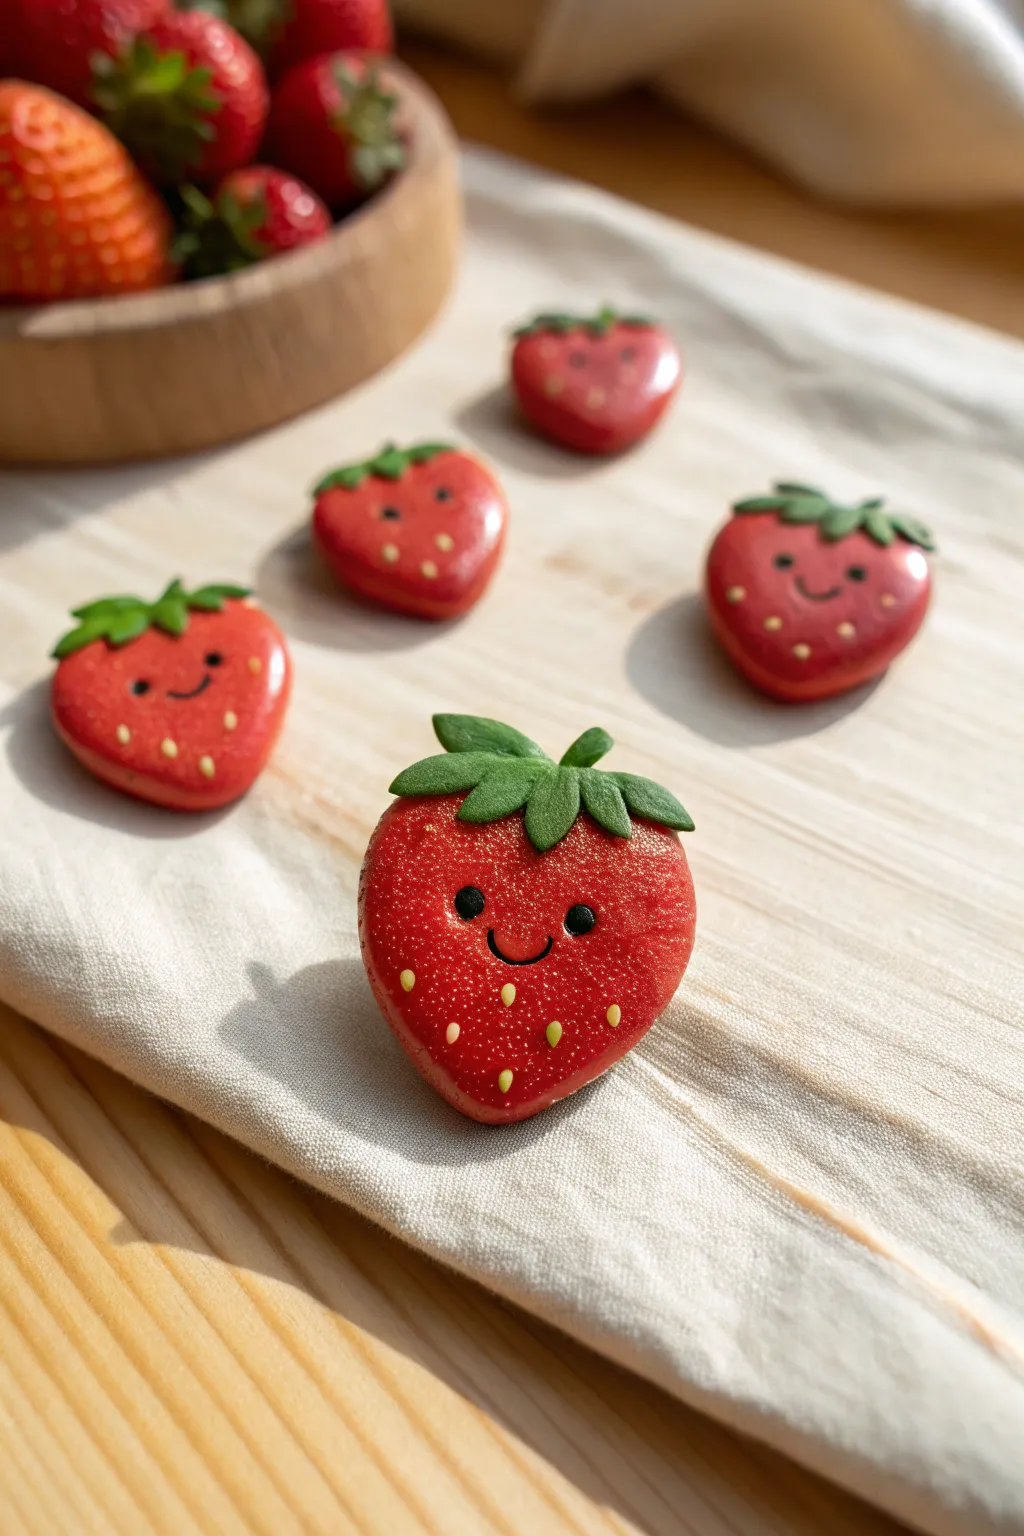
Brighten up any tote bag or jacket with these adorable, glossy strawberry pins made from polymer clay. Their cheerful little faces and vibrant red color make for a charming afternoon project that results in professional-looking accessories.
Detailed Instructions
Materials
- Red polymer clay (opaque)
- Green polymer clay (leaf shade)
- Black polymer clay
- Yellow or white acrylic paint (fine tip)
- Glossy polyurethane varnish or UV resin
- Clay sculpting tools (needle tool, small ball tool)
- Heart-shaped clay cutter (optional)
- Pin backings
- Super glue or E6000
- Oven for baking
- Small paintbrush
Step 1: Shaping the Base
-
Condition the clay:
Start by warming up a chunk of red polymer clay in your hands. Knead it thoroughly until it is soft, pliable, and free of any air bubbles. -
Form the strawberry body:
Roll the red clay into a smooth ball about the size of a large grape. Gently flatten it into a thick disc. -
Refine the shape:
Pinch the bottom of the disc to create a soft point, forming a rounded triangular shape. You can also use a small heart cutter and soften the top cleft to get that perfect strawberry silhouette. -
Smooth firmly:
Use your thumb to ensure the surface is slightly domed and completely smooth, removing any fingerprints. -
Repeat for multiple pins:
If you are making a set like in the photo, repeat this process for 3-4 berries, keeping the sizes relatively consistent.
Step 2: Adding Details
-
Create the greenery:
Condition a small amount of green clay. Roll it into a very thin sheet or press it flat with your fingers. -
Cut the leaves:
Using a craft knife or needle tool, cut out a small 3-5 pointed star shape or individual teardrop shapes for the calyx (the green leafy top). -
Attach the leaves:
Gently press the green leaves onto the top center of your red strawberry. I like to use a needle tool to impress a subtle center line down each leaf for added texture. -
Make the stem:
Roll a tiny sausage of green clay for the stem and attach it vertically to the center of the leaves, blending the bottom slightly so it sticks. -
Create eye sockets:
Use a small ball tool to make two tiny indents where the eyes will go. This helps the black clay sit flush with the surface. -
Add the eyes:
Roll two microscopic balls of black clay. carefully place them into the indents you just made and press gently to secure them. -
Sculpt the smile:
Roll an extremely thin thread of black clay. Cut a tiny U-shape and press it onto the face between the eyes to create a smile.
Clean Clay Tip
Red clay stains easily! Wash your hands thoroughly or use baby wipes before switching to the green clay to keep your colors bright and unmuddy.
Step 3: Finishing and Assembly
-
Add texture:
Before baking, lightly texture the red surface with a tool or toothbrush if you want a more organic look, though smooth is perfect for that kawaii style. -
Bake:
Bake the pieces according to your clay package instructions (usually 275°F/135°C for 15-30 minutes). Let them cool completely. -
Paint the seeds:
Once cool, use a very fine brush or toothpick dipped in yellow or pale white acrylic paint to dot on the strawberry seeds. Keep them small and spaced evenly. -
Seal and glaze:
Apply a thick coat of gloss varnish or UV resin over the entire front of the strawberry. This gives it that delicious, candy-like shine seen in the photo. -
Cure the glaze:
Allow the varnish to dry fully or cure the resin under a UV lamp until hard and non-tacky. -
Attach the backing:
Flip the strawberry over. Apply a strong dab of super glue or E6000 to the flat side of a pin backing and press it firmly onto the center of the clay. -
Final dry:
Let the glue cure for at least 24 hours to ensure the bond is permanent before wearing.
Bubbles in Glaze?
If you use UV resin and see bubbles, quickly run a lighter flame over the surface before curing. This pops trapped air for a glass-like finish.
Now you have a handful of cheerful berries ready to pin onto your favorite denim jacket


Avocado Half Besties
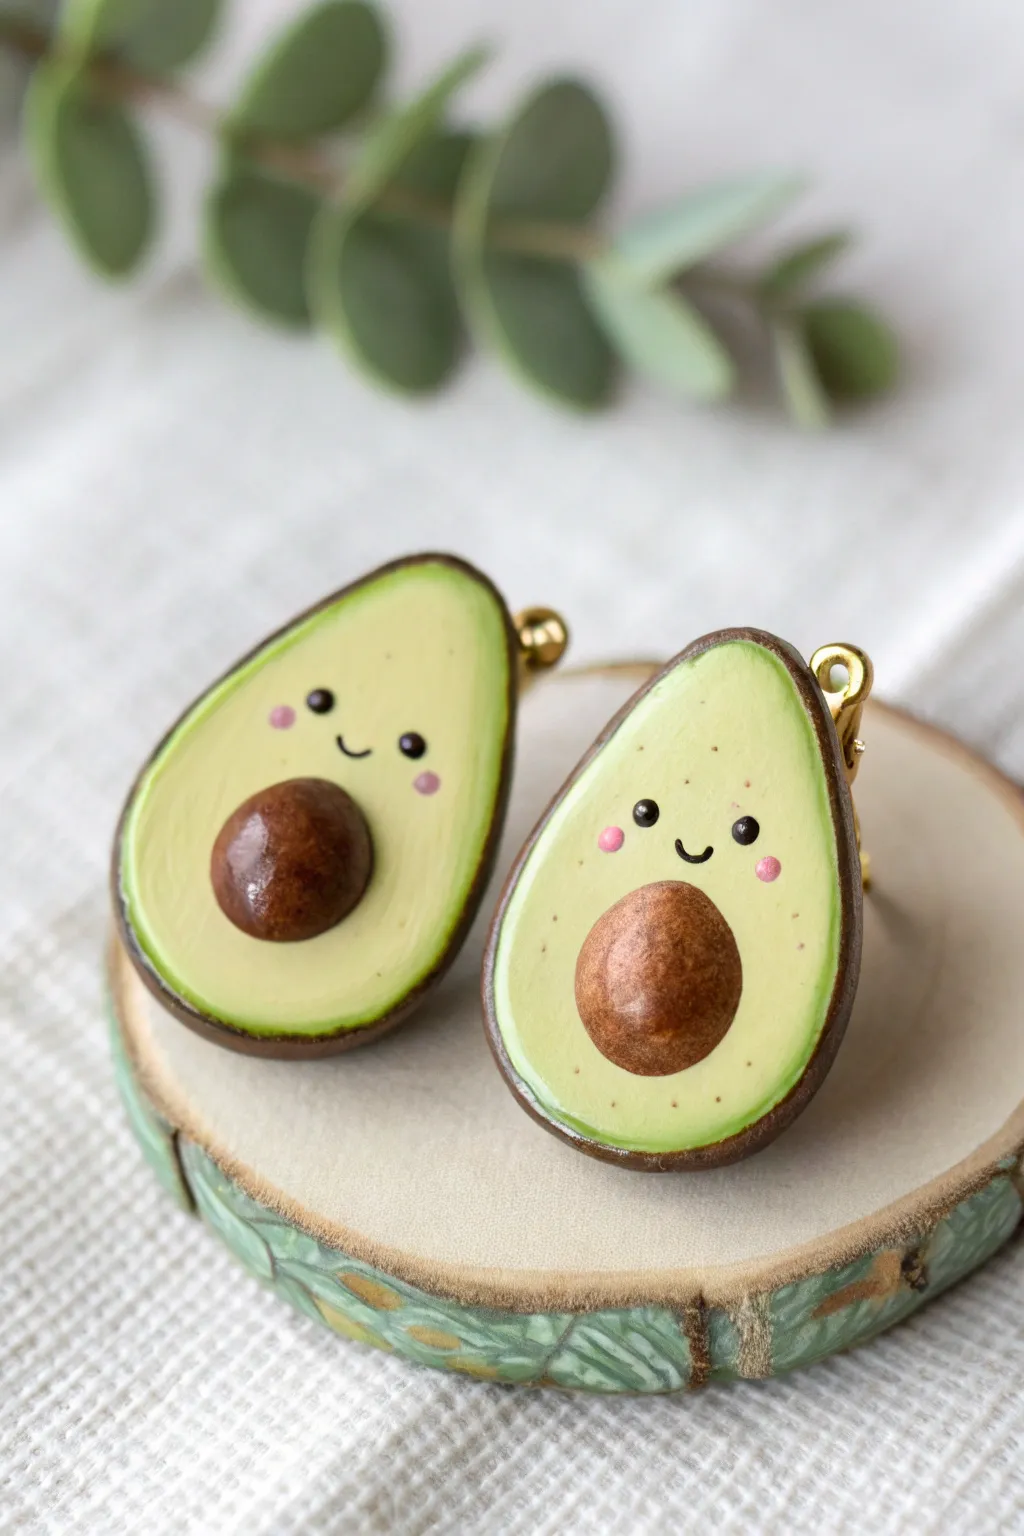
These adorable avocado halves feature sweet smiling faces and warm, earthy tones that make them perfect as a matching set for you and a best friend. The blend of realistic textures on the ‘skin’ and ‘pit’ combined with the kawaii expression creates a charming piece of wearable art.
Step-by-Step Tutorial
Materials
- Polymer clay (dark brown, light yellow-green, dark green)
- Acrylic paints (brown, pink, black, white)
- Dotting tools or toothpicks
- Fine detail paintbrush (size 0 or 00)
- Gloss varnish or UV resin
- Clay roller or pasta machine
- Teardrop-shaped cutter (approx. 1 inch) or craft knife
- Sandpaper or nail buffer (optional)
- Earring posts or pin backs
- Strong craft glue (e.g., E6000)
Step 1: Shaping the Base
-
Condition the clay:
Start by conditioning your light yellow-green clay until it is soft and pliable. Roll it into a smooth sheet about 4-5mm thick. -
Cut the shapes:
Use a small teardrop-shaped cutter to punch out two identical avocado shapes. If you don’t have a cutter, sketch the shape on paper, cut it out, and use it as a template with a craft knife. -
Soften the edges:
Gently rub the edges of your cutouts with your finger or a silicone tool to round them off so they look organic rather than sharp. -
Create the skin:
Roll out a thin sheet of dark brown clay. Place your light green avocado shapes on top of the brown sheet and gently press them down so they adhere. -
Trim the skin:
Cut around the green shape, leaving a tiny rim of brown visible around the edges to represent the avocado skin. Smooth the seam where the two colors meet.
Step 2: Creating Dimensions
-
Form the pits:
Take the dark brown clay and roll two small balls. Flatten them slightly into domes to serve as the avocado pits. -
Texture the pits:
Before attaching them, lightly tap the surface of the brown domes with an old toothbrush or a crumpled piece of aluminum foil to give them a realistic, woody texture. -
Attach the pits:
Press one pit firmly into the lower center of each avocado half. I like to use a tiny drop of liquid clay here to ensure a permanent bond during baking. -
Add shading (optional):
For extra depth, use soft pastel chalk shavings in a darker green. Brush this powder around the very outer edges of the light green clay to create a ripe gradient. -
Bake the clay:
Bake your pieces according to the manufacturer’s instructions for your specific brand of polymer clay. Let them cool completely before painting.
Sticky Dust Woes?
If dust gets stuck in your light green clay before baking, dip a cotton swab in rubbing alcohol or nail polish remover and gently wipe the surface to clean it.
Step 3: Painting the Details
-
Paint the eyes:
Using a small dotting tool or the end of a toothpick, dip into black acrylic paint and place two small dots widely spaced on the upper half of the avocado for the eyes. -
Add the smile:
With your finest detail brush and black paint, carefully draw a tiny, curved ‘u’ shape between the eyes for the mouth. -
Rosy cheeks:
Mix a very light pink paint. Use a fresh toothpick or a smaller dotting tool to add tiny pink circles just below and outside the eyes. -
Highlight the pit:
Dry brush a tiny amount of lighter tan or white paint gently over the textured brown pit to highlight the bumps. -
Speckle details:
Dilute a bit of brown paint with water and flick it lightly onto the green area with a toothbrush for organic speckles, or add tiny controlled dots with a needle tool.
Gradient Pro-Tip
For a perfect gradient, mix a tiny bit of dark green clay into your light green scraps, roll a thin snake, and wrap it around the avocado edge before smoothing.
Step 4: Finishing Touches
-
Seal the piece:
Apply a coat of gloss varnish or UV resin over the entire front surface. This protects the paint and gives the avocado a fresh, moist look. -
Attach hardware:
Once the varnish is fully cured, flip the pieces over. Use strong craft glue to attach earring posts or pin backs to the center of the back.
You now have a charming set of avocado friends ready to wear or gift to your favorite person

The Complete Guide to Pottery Troubleshooting
Uncover the most common ceramic mistakes—from cracking clay to failed glazes—and learn how to fix them fast.
Lemon Slice Pins
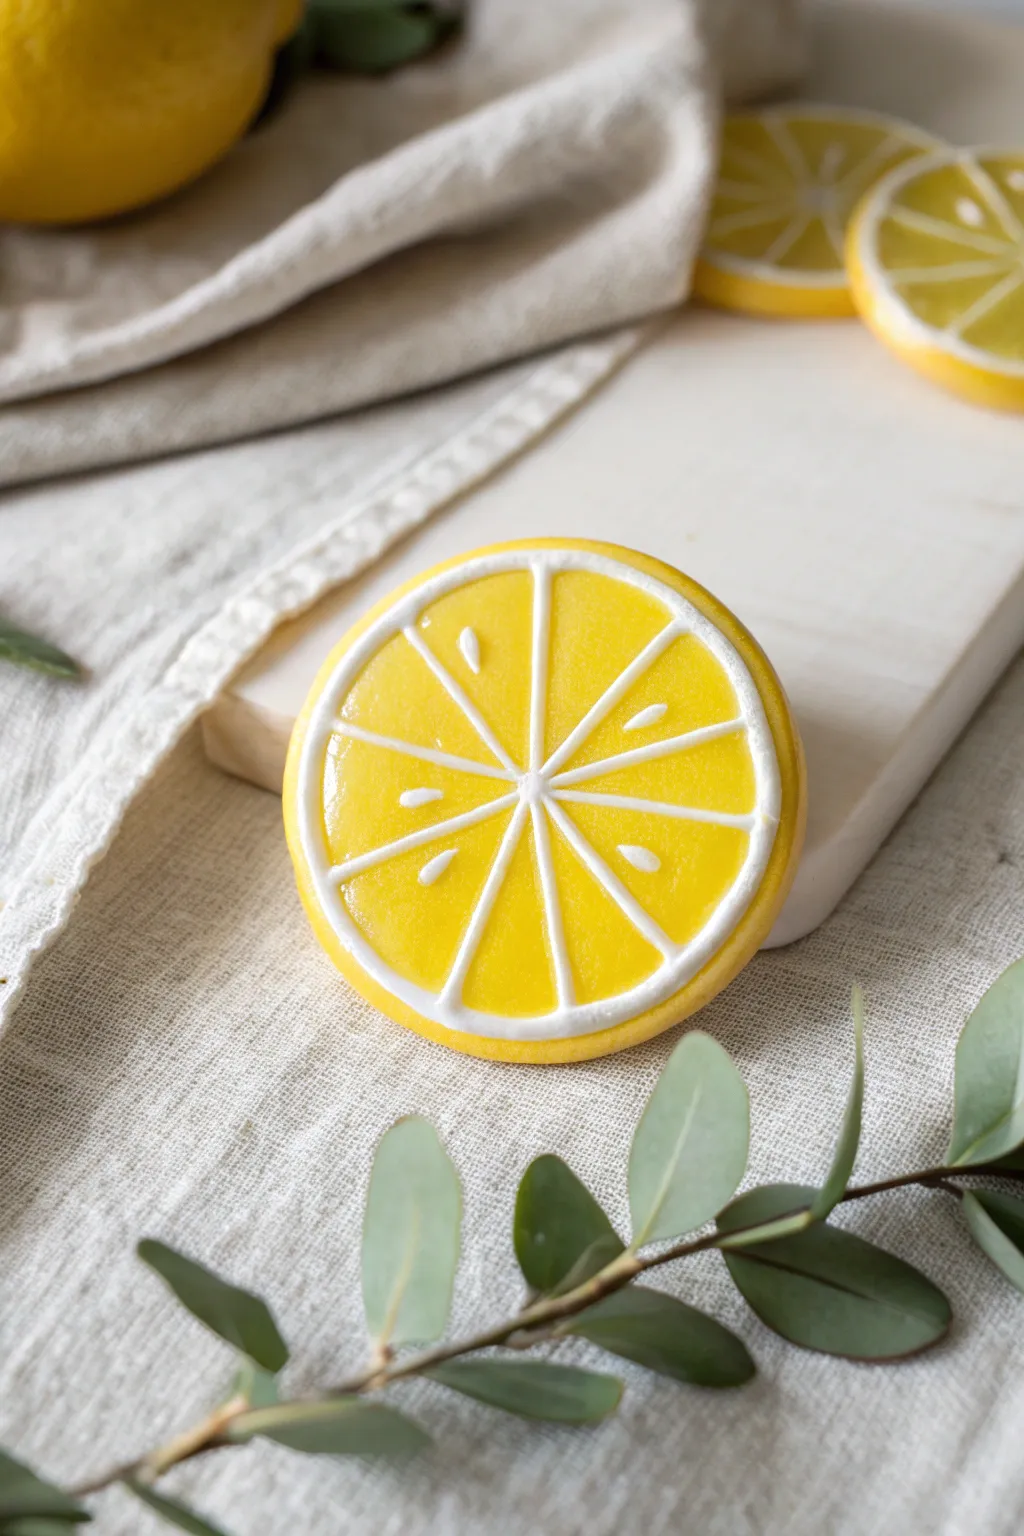
Brighten up your tote bag or lapel with this refreshingly realistic lemon slice made from polymer clay. The glossy resin finish gives it a juicy, wet look that perfectly mimics the sheen of freshly cut citrus.
How-To Guide
Materials
- Yellow polymer clay (lemon yellow)
- White polymer clay
- Translucent polymer clay
- Liquid polymer clay (optional, for adhesion)
- Rolling pin or pasta machine
- Circle cutters (approx. 1.5 inch and slightly smaller)
- X-Acto knife or sharp tissue blade
- Needle tool or toothpick
- UV resin or gloss glaze
- UV lamp (if using UV resin)
- Small paintbrush
- Pin back or brooch finding
- E6000 glue or strong adhesive
Step 1: Creating the Segments
-
Mix the citrus color:
Begin by conditioning your yellow polymer clay. For a more realistic pulp look, I like to mix about one part translucent clay into three parts yellow clay; this adds a slight depth rather than a flat, matte yellow. -
Form the log:
Roll the yellow mixture into a thick log, approximately 1 inch in diameter. -
Wrap in pith:
Roll out a thin sheet of white clay on a medium setting. Wrap this white sheet entirely around your yellow log, trimming any excess so the seam meets neatly. -
Shape the cane:
Gently squeeze and roll the log to elongate it slightly. Then, pinch one side of the log along its entire length to create a teardrop shape in the cross-section. This forms the shape of a single fruit segment. -
Slice and arrange:
Cut the teardrop log into 8 equal lengths. Inspect the ends to ensure the teardrop shape is maintained. -
Assemble the wheel:
Arrange the 8 segments in a circle with the pointed ends meeting in the center. The white ‘pith’ wrapping should now create the radiating white lines separating the yellow fruit. -
Add the center:
Roll a very small snake of white clay to fill the tiny gap in the absolute center where all points meet, pressing it in gently.
Cold Clay Tip
If your lemon cane feels squishy or distorts when you try to slice it, pop it in the freezer for about 10-15 minutes. The firm clay will slice cleanly without smearing the white lines.
Step 2: Adding the Rind and Details
-
Wrap the rind:
Roll out another thin sheet of white clay and wrap it around the entire circumference of your assembled wheel. Follow this with a slightly thicker sheet of yellow clay for the outer skin. -
Compress the cane:
Gently compress the entire wheel from the outside in to ensure all the clay layers fuse together. Roll it lightly on your work surface to smooth the outside, keeping the cylindrical shape. -
Slice the pin bases:
Using a very sharp tissue blade, slice a cross-section of your cane about 1/4 inch thick. This slice is your pin base. -
Texture the surface:
Using a needle tool, gently tap the yellow segments to create a slight pitted texture, mimicking the juice vesicles of a lemon. -
Add seeds:
Roll tiny, teardrop-shaped bits of white clay. Press two or three of these gently onto the surface of the yellow segments, scattering them randomly for a natural look. -
Bake:
Bake the clay pieces according to your manufacturer’s instructions (usually 275°F for 15-30 minutes). Let them cool completely.
Step 3: Finishing Touches
-
Glaze the front:
For that wet, juicy appearance shown in the photo, apply a layer of UV resin over the top surface. Use a toothpick to guide the resin to the edges without letting it drip over the sides. -
Cure the resin:
Cure under a UV lamp for 1-2 minutes until hard and glossy. If you don’t have resin, a thick coat of gloss glaze works too, though it takes longer to dry. -
Attach the hardware:
Flip the lemon slice over. Apply a dab of E6000 glue to the back of a pin finding and press it firmly onto the center of the clay. -
Secure the back:
For extra durability, you can place a small piece of scrap clay over the pin bar (if using polymer clay adhesive) and bake again briefly, or just let the glue cure fully for 24 hours.
Make it a Lime
Swap the yellow clay for a vibrant bright green to make lime slices, or use orange and translucent orange for tangerine pins. A bowl of mixed citrus pins looks amazing together.
Pin your fresh slice of summer onto a denim jacket and enjoy the zest it adds to your outfit
Classic Toadstool Mushroom Pins
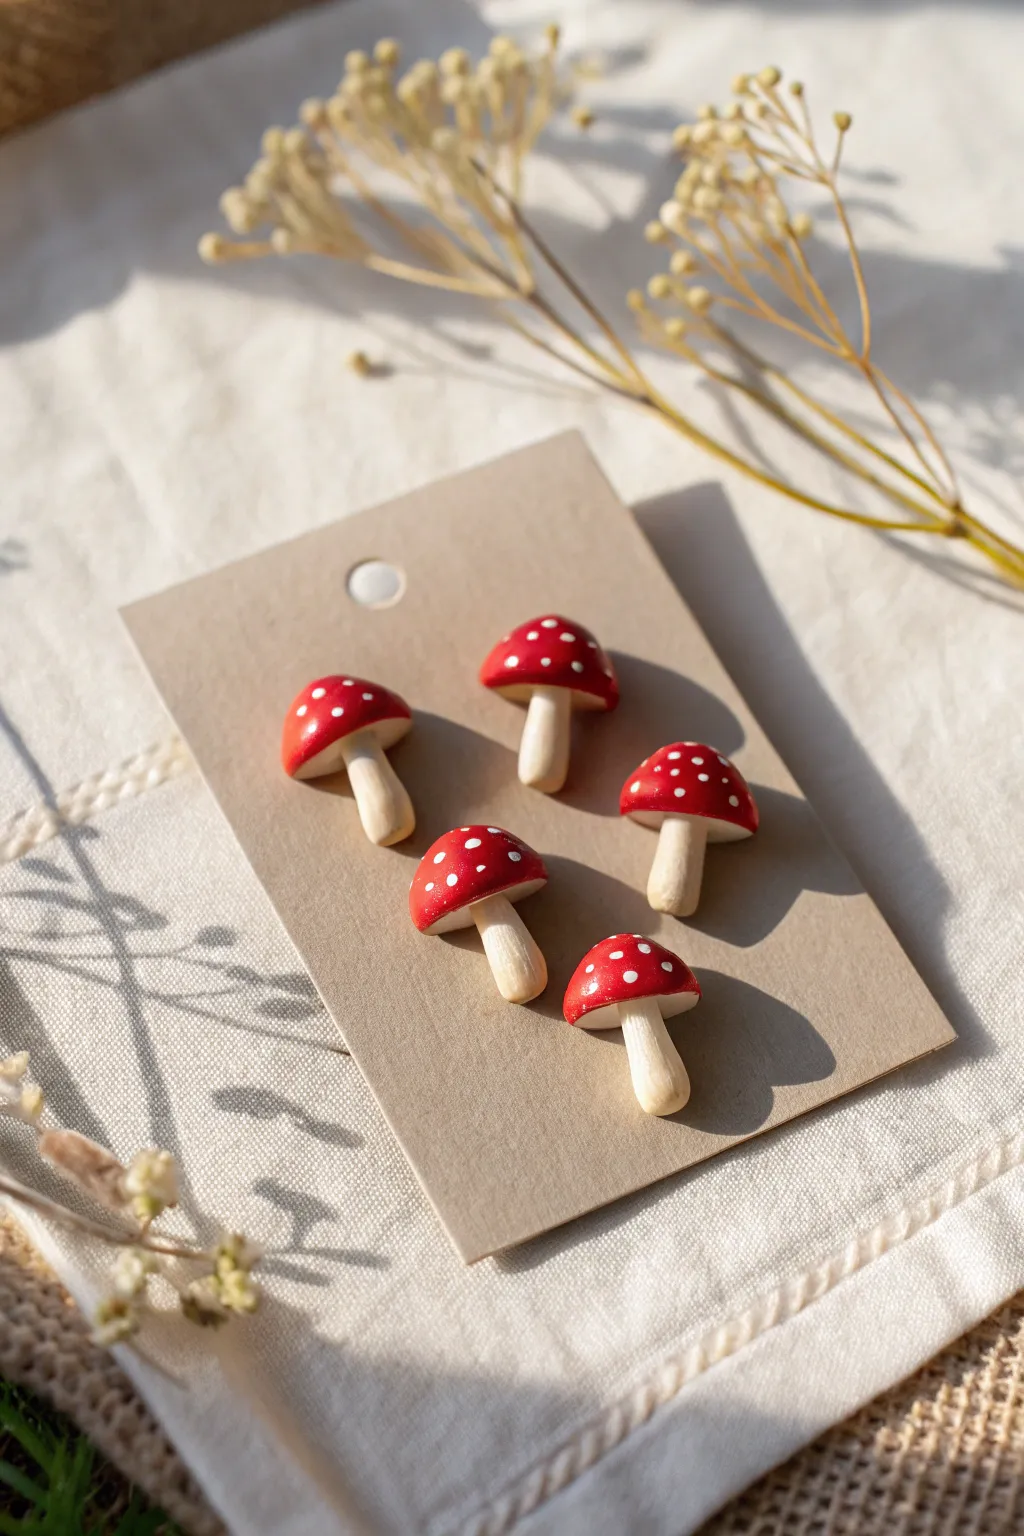
Capture the magic of the forest floor with these charming miniature toadstool mushroom pins. With their glossy red caps and classic white spots, these little clay creations are perfect for adding a touch of cottagecore style to any jacket or bag.
Step-by-Step Tutorial
Materials
- Red polymer clay (oven-bake)
- White or beige polymer clay
- Liquid polymer clay (translucent) or gloss glaze
- White acrylic paint
- Fine detail paintbrush or dotting tool
- Pin backs (metal tack pins with clutch)
- Super glue or E6000 adhesive
- Sculpting tools (needle tool)
- Clean ceramic tile or baking sheet
- Parchment paper
Step 1: Sculpting the Shapes
-
Condition the white clay:
Start by warming up a small amount of white or beige polymer clay in your hands until it’s soft and pliable. This will form the stems of your mushrooms. -
Form the stems:
Roll small logs of the white clay, approximately 1/4 inch thick. Cut them into lengths of about 1/2 inch to 3/4 inch. -
Shape the base:
Gently pinch one end of each log to taper it slightly, keeping the top end flat. You want a slightly organic, imperfect cylinder shape. -
Prepare the red clay:
Clean your hands thoroughly to avoid color transfer, then condition the red polymer clay until soft. -
Create the caps:
Roll small balls of red clay, slightly larger than a pea. Flatten the bottom of each ball against your work surface to create a dome shape. -
Refine the dome:
Use your fingers to smooth the dome, making sure it isn’t too perfectly round—real mushrooms have character. I like to press the edges down slightly to give it that classic umbrella look. -
Attach cap to stem:
Place the red dome onto the flat top of a white stem. Press gently to adhere the two pieces without smashing the shape. -
Secure the bond:
If the clay feels dry, you can use a tiny dab of liquid polymer clay between the stem and cap to ensure a permanent bond.
Step 2: Adding Details and Baking
-
Texturize the stem:
Use a needle tool or a stiff brush to gently gently scratch vertical lines up the stem if you want a more realistic texture, or leave it smooth for a cartoon look. -
Bake the clay:
Place your mushrooms on a parchment-lined baking sheet or ceramic tile. Bake according to your specific clay package instructions (usually around 275°F or 135°C for 15-30 minutes). -
Cool down:
Allow the clay pieces to cool completely before moving to the painting phase. The clay hardens fully as it cools.
Clean Clay Trick
Red pigment bleeds easily! Always use baby wipes or wash hands with soap between handling the red clay and the white clay to keep your stems pristine.
Step 3: Painting and Assembly
-
Add the spots:
Dip a fine dotting tool or the tip of a toothpick into white acrylic paint. Carefully apply small dots scattered randomly across the red caps. -
Vary dot sizes:
Make some dots tiny and others slightly larger to mimic the natural pattern of a fly agaric mushroom. -
Apply gloss finish:
Once the paint is fully dry, brush a coat of gloss glaze or polyurethane varnish over the entire mushroom to give it a shiny, ceramic-like finish. -
Attach the hardware:
Turn the mushroom over. Apply a drop of strong adhesive (like E6000) to the flat pad of a metal pin back. -
Final cure:
Press the pin firmly onto the back of the mushroom stem or cap (depending on balance) and let the glue cure for the full time recommended on the glue label.
Glow Up
Mix glow-in-the-dark powder into your white paint for the spots. Your mushrooms will look cute by day and magically luminescent when the lights go out.
Pin these onto a denim jacket or cardstock backing for an adorable woodland gift.


What Really Happens Inside the Kiln
Learn how time and temperature work together inside the kiln to transform clay into durable ceramic.
Tiny Daisy and Leaf Pins
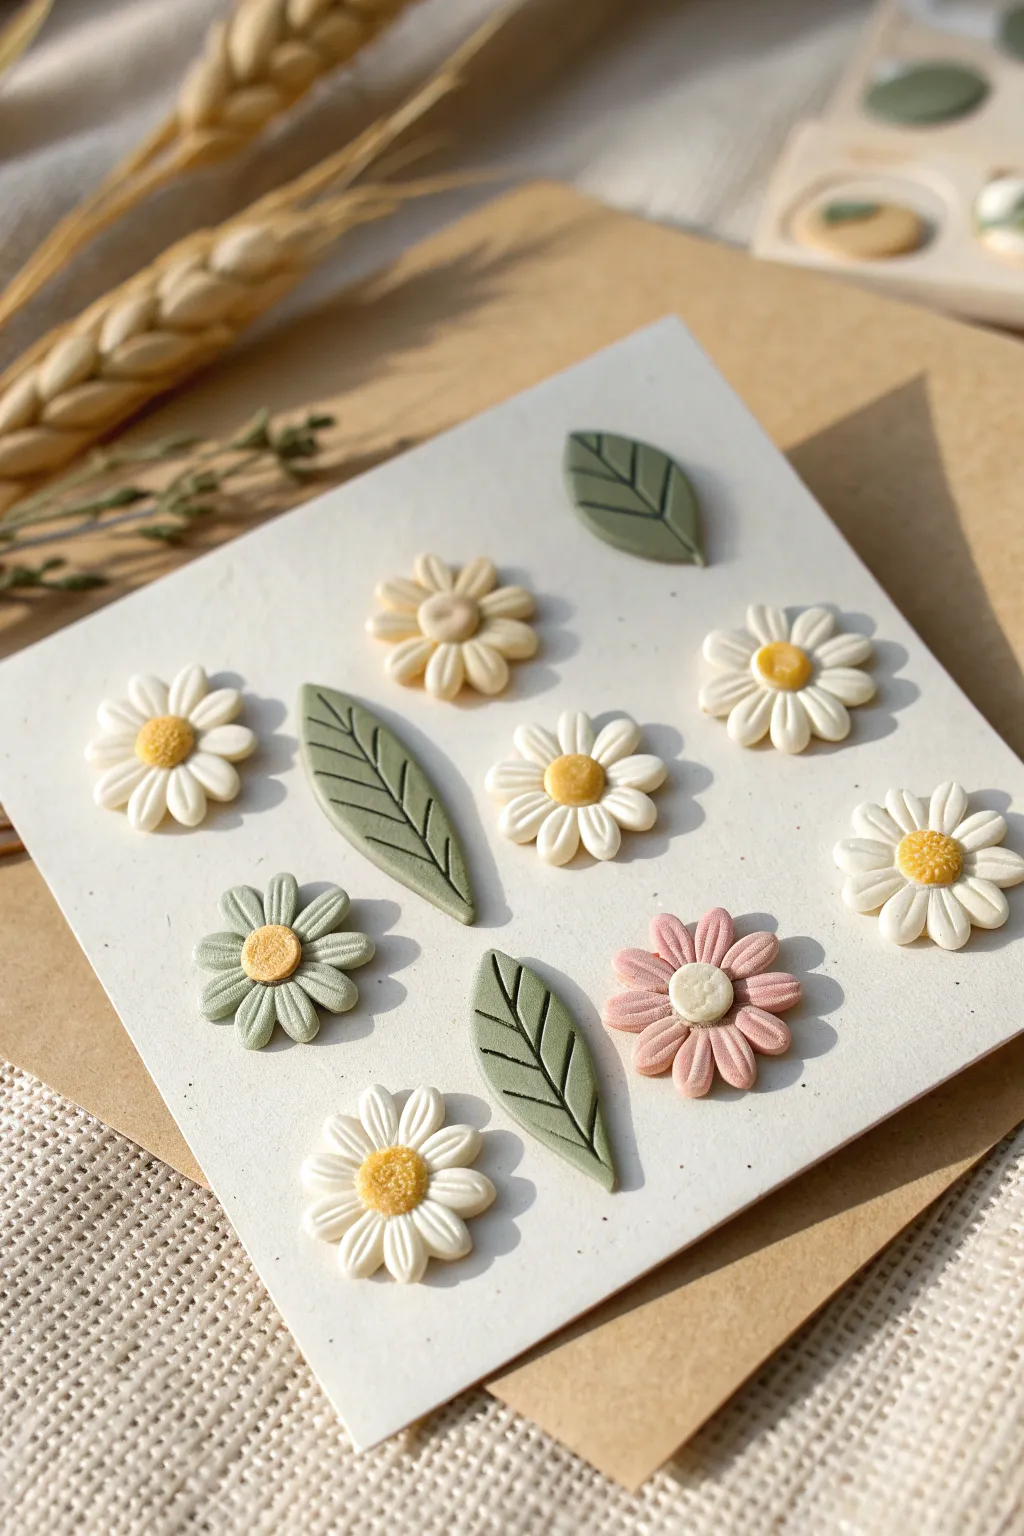
Capture the charm of a sun-drenched field with this delicate set of polymer clay daisies and leaves. These tiny, textured pieces feature soft matte finishes and earthy tones like sage, cream, and dusty pink, perfect for adorning jackets or bags.
How-To Guide
Materials
- Polymer clay (white, beige, sage green, dusty pink, mustard yellow)
- Clean ceramic tile or glass work surface
- Ball stylus tool (small)
- Needle tool or toothpick
- X-acto knife or clay blade
- Soft pastel chalks (golden yellow/orange)
- Small soft paintbrush
- Pin backs or clutch posts
- Strong craft glue (e.g., E6000) or UV resin
- Oven for baking
Step 1: Shaping the Daisies
-
Condition the white clay:
Begin by thoroughly conditioning your white polymer clay until it is soft and pliable. Roll it into a thin log, approximately 3-4mm in diameter. -
Cut petal segments:
Using your blade, slice the log into equal tiny segments. You will need 8-10 segments per flower to create a full bloom. -
Form teardrops:
Roll each small segment into a ball between your fingers, then pinch one end to form a teardrop shape. Flatten distinct teardrops gently on your work surface. -
Create the flower base:
Using a tiny flattened ball of scrap clay as a base, arrange the teardrop petals in a circle with the pointed ends meeting in the center. Press them gently to adhere. -
Add petal details:
Take your needle tool or a dull knife blade and press a single indentation down the center of each petal to give it that classic daisy texture. -
Make the center:
Roll a small ball of mustard yellow or beige clay. Flatten it slightly and press it into the center of your arranged petals, covering the joining points. -
Texture the center:
Use a needle tool or a clean toothbrush to stipple the yellow center, giving it a realistic, pollen-like texture. -
Create color variations:
Repeat this process using beige clay for the petals with a matching center, and dusty pink clay with a cream center, as shown in the inspiration photo. -
Add shading:
I like to scrape a little golden pastel chalk into a powder. Use a soft brush to dust the very center of the yellow cores to add depth and a ‘toasted’ look.
Clean Slate Pro Tip
White clay picks up everything! Wipe your hands and work surface with a baby wipe or alcohol swab before touching light colors to keep them pristine.
Step 2: Crafting the Leaves
-
Condition green clay:
Condition your sage green clay. Mix in a tiny dot of black if you want a deeper, moodier green tone. -
Shape the leaf:
Roll a medium-sized ball of green clay and flatten it into a long oval shape. Pinch both ends to create sharp points. -
Refine the edges:
Press the leaf flat onto your tile. Use your fingertips to smooth the edges so they are rounded and neat. -
Score the center vein:
Using your needle tool, draw a curved line down the center of the leaf, starting from one tip almost to the other. -
Add vein details:
Make small, diagonal indentations branching out from the center line to create the vein pattern. Keep the pressure light so you don’t cut all the way through. -
Create a varied green flower:
For the green daisy shown, use sage green for the petals and a yellow center to tie the color palette together.
Fixing Fingerprints
If you see fingerprints on your petals before baking, lightly brush them with a little cornstarch or baby oil to smooth the surface without distorting the shape.
Step 3: Baking and Assembly
-
Bake the pieces:
Bake your clay pieces according to the manufacturer’s instructions (usually 275°F/135°C for 15-30 minutes). Let them cool completely on the tile. -
Prepare the backs:
Once cool, lightly sand the back of each flower and leaf to create a rough surface for better glue adhesion. -
Attach pin backs:
Apply a dab of strong glue to the flat pad of a pin back and press it firmly onto the center of the clay piece. -
Secure the bond:
For extra durability, you can place a small disk of fresh clay over the glue and pin pad (before baking) and bake again, or simply rely on high-strength glue after baking. -
Final cure:
If you used glue, allow it to cure fully for 24 hours before wearing your new accessories.
Arrange your finished pins on a cute card or attach them to your denim jacket for a touch of handmade nature
Round Frog Pins
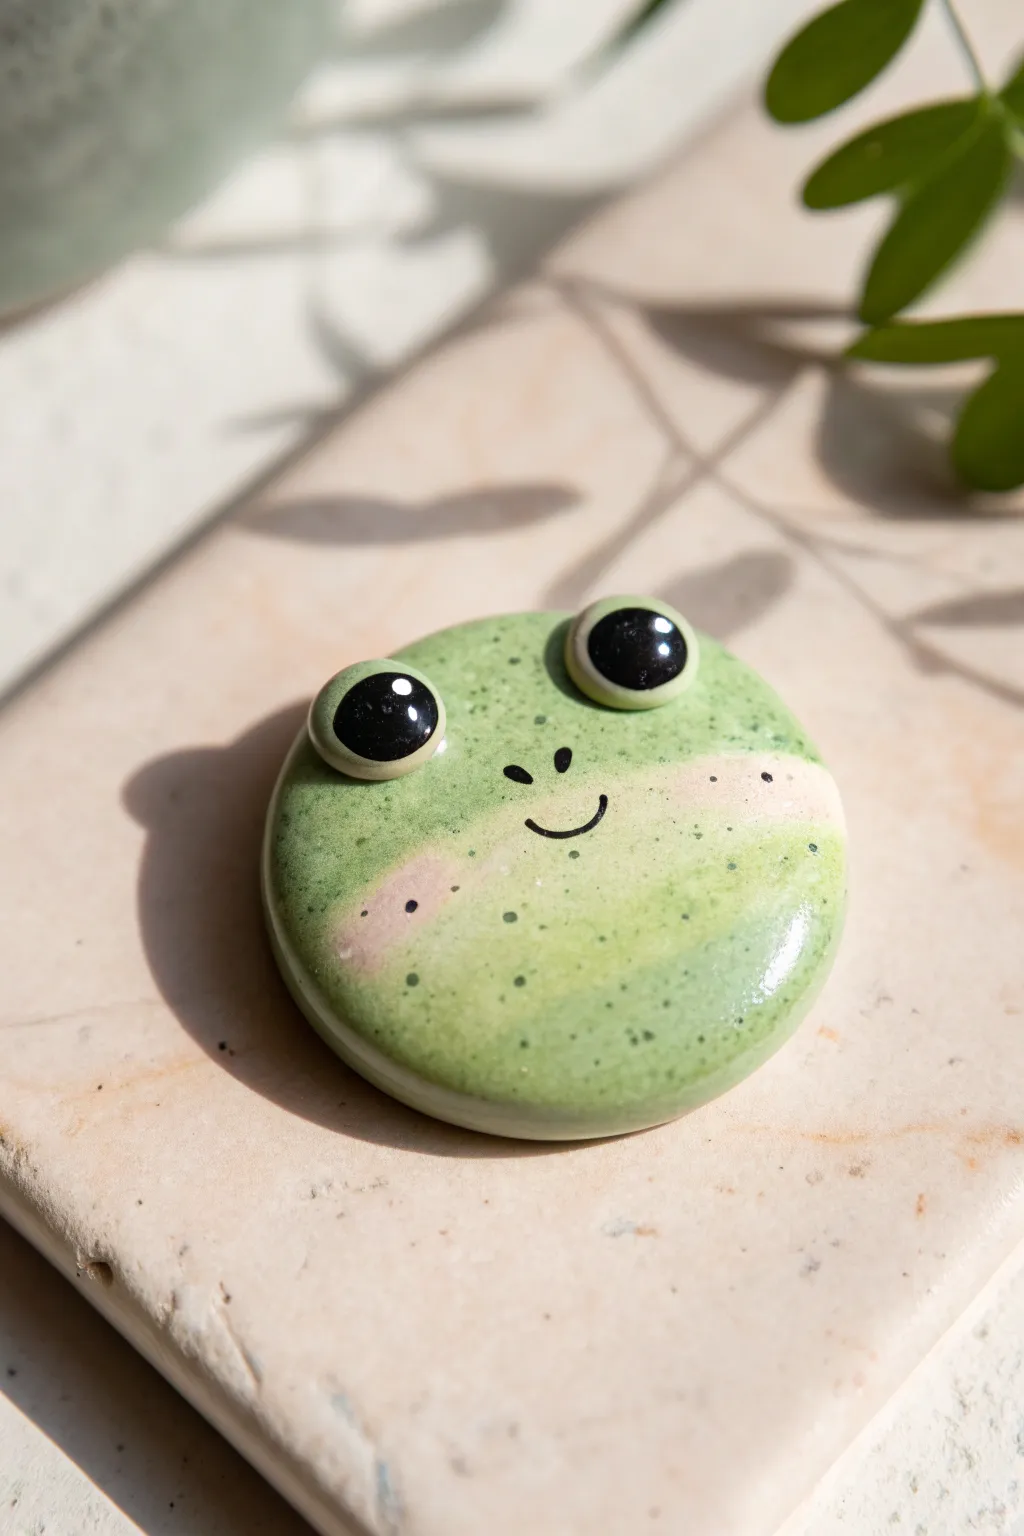
This adorable round frog pin features a gentle marbled green finish and big, expressive eyes that pop right off the surface. The high-gloss glaze gives it a professionally polished look perfect for brightening up any jacket or tote bag.
Step-by-Step Tutorial
Materials
- Polymer clay (light green, white, and a tiny bit of pink)
- Black polymer clay (for the pupils)
- Acrylic rolling pin or clay machine
- Circle clay cutter (approx. 1.5 inches)
- Dotting tools or ball stylus
- Black acrylic paint
- Fine detail paintbrush
- UV resin or gloss glaze (polyurethane)
- UV lamp (if using resin)
- Pin back attachment
- Strong adhesive (E6000 or superglue)
- Ceramic tile or parchment paper for baking
Step 1: Shaping the Base
-
Prepare the green mix:
Start by conditioning your light green clay until it is soft and pliable. To achieve the subtle mottled look seen in the photo, mix in a very small amount of white clay but stop kneading before it is fully blended, leaving faint streaks. -
Create the blush strip:
Take a small pinch of white clay and mix it with a speck of pink to create a very pale, milky pink shade. Roll this into a thin snake. -
Embed the strip:
Flatten your green clay slightly. Lay the pale pink snake across the middle of the green clay. Fold the green clay over it and roll it out flat again with your acrylic roller so the pink becomes a soft, horizontal band integrated into the green surface. -
Cut the circle:
Place your clay sheet on your working surface. Use your circle cutter to punch out a clean, round shape. Smooth the edges with your finger to remove any sharp cuts or stray bits.
Uneven Glaze?
If your resin pulls away from the edges while curing (doming), add a second thin layer. Surface tension can sometimes cause divots near the rim.
Step 2: Adding the Features
-
Form eye bases:
Roll two small balls of the light green clay mix. These should be roughly proportional to the frog’s head. Place them on the top edge of the circle, spacing them slightly apart so they perch on the ‘forehead.’ -
Blend the eyes:
Using a blending tool or the back of a smooth tool, gently merge the bottom of the eye balls into the main circle base so they are firmly attached but retain their distinct spherical shape. -
Add the pupils:
Roll two slightly smaller balls of black clay. Flatten them gently into discs and press them onto the green eye mounds. -
Create the shine:
Roll two microscopic balls of white clay. Press one onto the upper right side of each black pupil. This ‘catchlight’ brings the character to life. -
Bake the piece:
Place your frog on a ceramic tile or baking sheet lined with parchment paper. Bake according to your polymer clay package instructions (usually around 275°F/135°C for 15-30 minutes). Let it cool completely.
Magnetize It
Skip the pin back and glue a strong neodymium magnet to the rear instead. Now you have a cheerful froggy fridge magnet or needle minder.
Step 3: Detailing and Finishing
-
Paint the face:
Dispense a small amount of black acrylic paint. Using your finest detail brush, carefully paint two small vertical ovals for nostrils between the eyes. -
Add the smile:
Paint a simple, thin curved line for the mouth just below the nostrils. I find resting my pinky on the table helps stabilize my hand for these fine lines. -
Speckle effect:
Dilute a drop of darker green or greyish paint with water. Dip a stiff brush or toothbrush into it and flick the bristles with your thumb to create tiny, random speckles across the frog’s face. -
Dry the paint:
Allow the paint to dry fully. If you rush this step, the glaze applied next might smear your hard work. -
Apply the glaze:
Pour a small amount of UV resin or high-gloss varnish onto the center of the frog. Using a toothpick or brush, spread it to the very edges, ensuring the eyes and sides are coated evenly. -
Cure or dry:
If using UV resin, place the piece under a UV lamp for 2-3 minutes until hard and tack-free. If using varnish, let it air dry in a dust-free area for 24 hours. -
Attach the pin back:
Flip the cured frog over. texture the back surface slightly with sandpaper for better grip. Apply a dab of strong adhesive (like E6000) and press the metal pin back firmly into place. -
Final cure:
Let the glue cure for the recommended time (often 24 hours for maximum strength) before wearing.
Once the glue is set, your glossy frog friend is ready to hop onto your favorite bag

TRACK YOUR CERAMIC JOURNEY
Capture glaze tests, firing details, and creative progress—all in one simple printable. Make your projects easier to repeat and improve.
Minimal Cat Face Pins
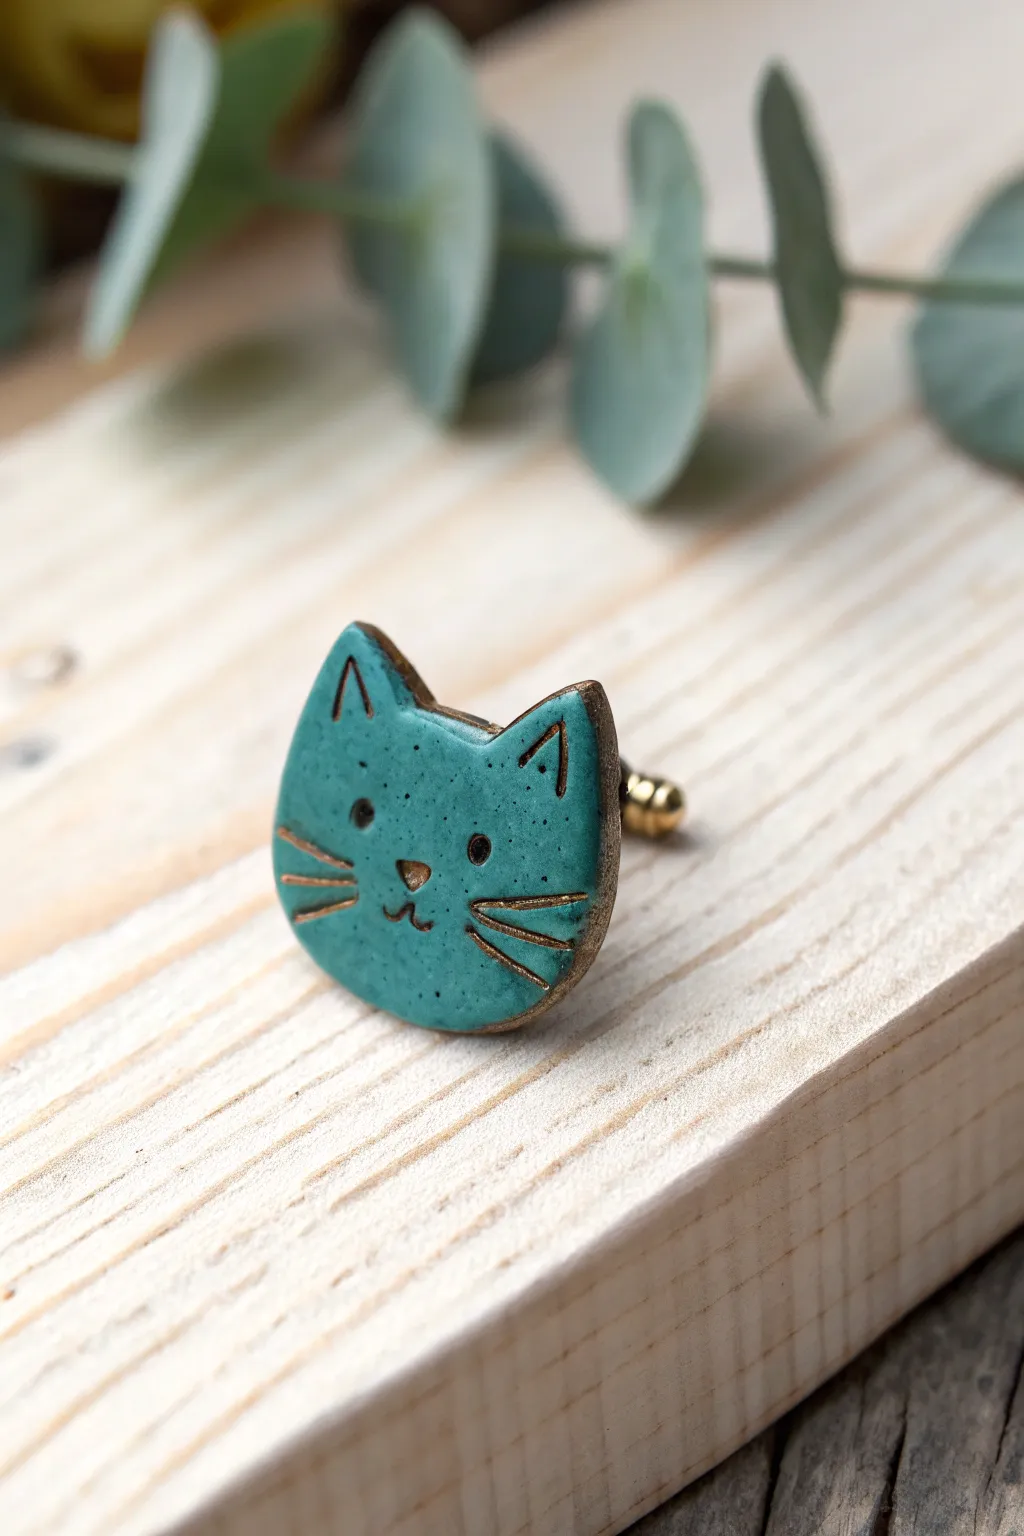
Capture a touch of feline charm with this minimalistic teal cat face pin, featuring rustic bronze-colored accents that outline the whiskers and ears. This project uses carving techniques to create depth before finishing with a glossy, speckled glaze effect.
Detailed Instructions
Materials
- Polymer clay (white or light grey)
- Teal acrylic paint or ceramic-effect glaze
- Bronze or antique gold metallic acrylic paint
- Fine point carving tool or needle tool
- Small round clay cutter (optional, for base shape)
- X-acto knife
- Rolling pin
- Fine grit sandpaper
- Glossy varnish or UV resin
- Pin back gluing pad
- Strong craft glue (E6000)
- Small detail paintbrush
- Black acrylic paint (for eyes)
Step 1: Shaping the Clay Base
-
Condition the clay:
Begin by thoroughly conditioning your polymer clay until it is soft and pliable. This prevents cracks during baking. -
Roll out the slab:
Roll the clay out to a uniform thickness, approximately 1/4 inch (4-5mm). You want it thick enough to be sturdy but light enough to wear. -
Cut the basic shape:
If you have a cat-shaped cutter, perfect! If not, use a small round cutter for the head and gently pinch the top corners to form ears, or freehand cut the silhouette with your X-acto knife. -
Refine the silhouette:
Smooth any jagged edges with your finger. Ensure the ears are slightly pointed but rounded at the very tips for that soft, handmade ceramic look.
Clean Grooves Make It Pop
If teal paint floods your carved lines, wipe the surface gently with a damp cloth before it dries. This leaves paint on top but clears the grooves for the gold.
Step 2: Carving Details
-
Sketch the features:
Before committing to deep cuts, lightly trace the triangles for the ears, the eyes, nose, mouth, and three whiskers on each side using the very tip of your needle tool. -
Engrave the lines:
Once satisfied with the placement, press your needle tool deeper into the clay. Go over the ear triangles, whiskers, nose, and mouth lines to create distinct grooves. These channels will later hold the gold paint. -
Create the eyes:
For the eyes, press the broad end of a small tool or brush handle into the clay to make small circular indentations. They don’t need to be deep, just distinct. -
Texture the surface:
To mimic the speckled stoneware look in the photo, gently poke erratic, tiny pinpricks across the surface, avoiding the carved features. -
Bake carefully:
Bake the piece according to your clay manufacturer’s instructions. Usually, this is around 275°F (135°C) for 15-30 minutes. Let it cool completely.
Step 3: Painting & Finishing
-
Apply base color:
Paint the entire front and sides with your teal paint. I like to use a slightly watered-down acrylic to prevent it from clogging the carved lines too much, but ensure full coverage. -
Add speckles:
Mix a tiny drop of water into black or dark grey paint. Load a stiff brush and flick the bristles to create a fine mist of speckles over the teal base, imitating ceramic glaze. -
Highlight the grooves:
Once the teal base is fully dry, take a fine detail brush loaded with bronze or antique gold paint. Carefully paint inside the carved lines of the ears, whiskers, nose, and mouth. -
Paint the eyes:
Use a dotting tool or the tip of a brush handle to place a small dot of black paint into the eye indentations. -
Define the edges:
Paint the outer rim or edge of the pin with the same bronze color used for the whiskers. This frames the face and gives it a finished, professional look. -
Seal the piece:
Apply a coat of glossy varnish or UV resin over the top. This mimics the shine of a fired ceramic glaze and protects the paint work. -
Attach the hardware:
Flip the pin over. Sand the back lightly to create texture for adhesion. Apply ample strong glue to the pin back pad and press it firmly onto the center of the cat face.
Try A Faux-Stone Look
Instead of painting, use ‘granite’ polymer clay which has speckles built-in. Use a translucent liquid clay mixed with alcohol ink for a glazing effect.
Now you have a charming little companion ready to adorn your favorite denim jacket or tote bag
Sweet Bear Head Pins
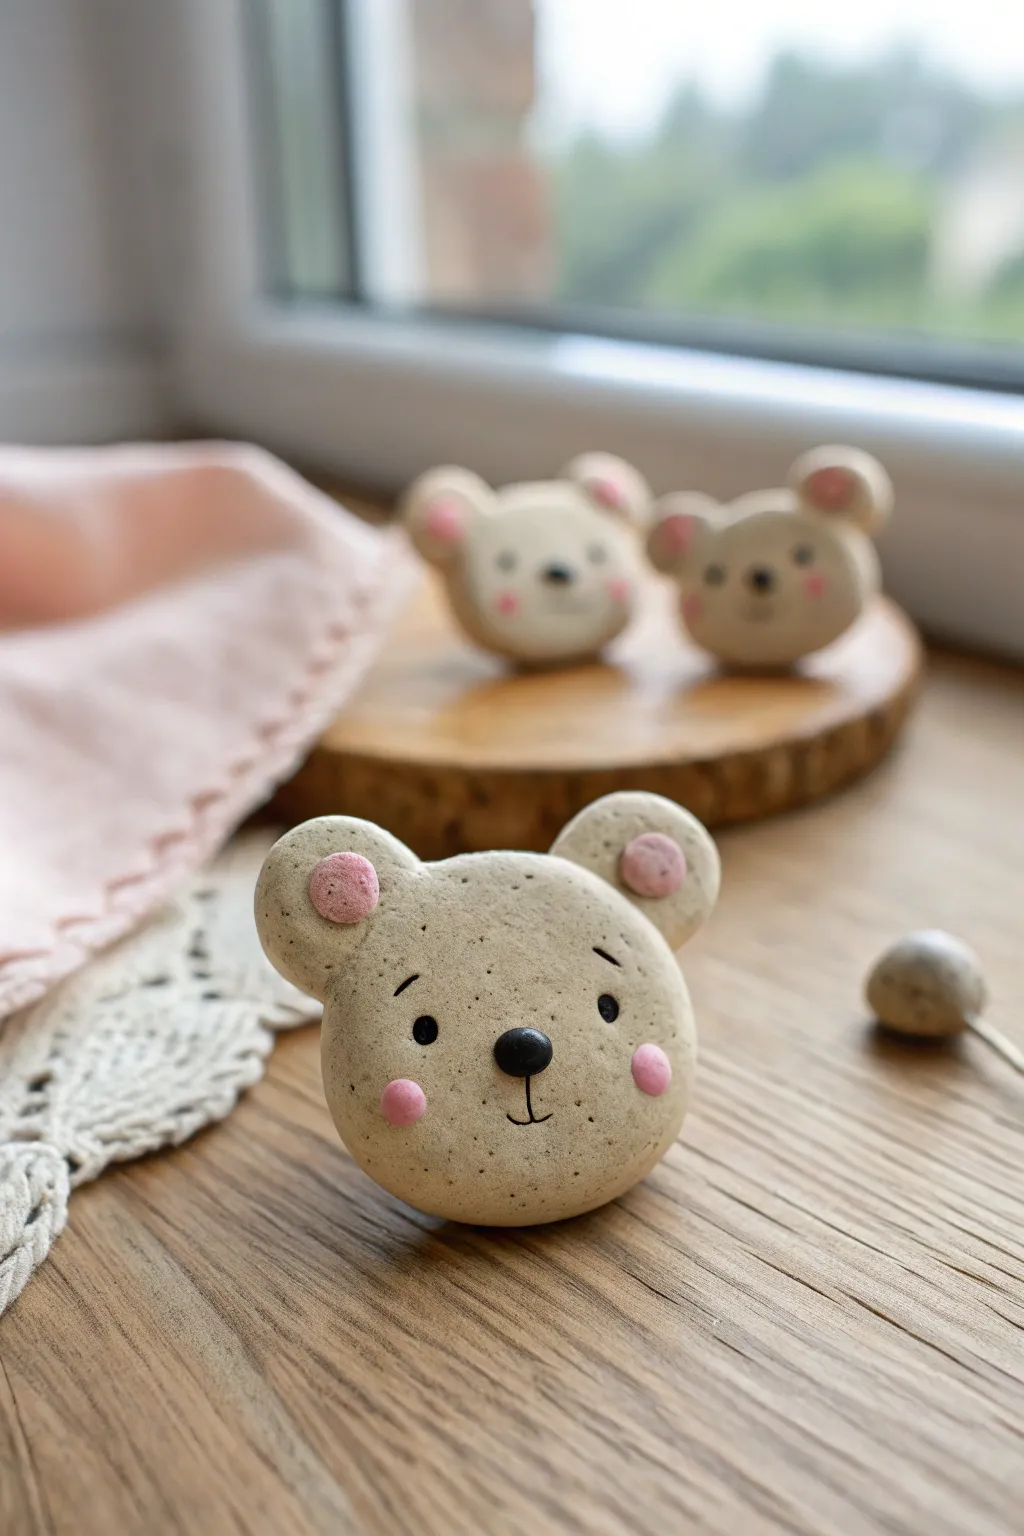
These adorable bear head pins feature a charming, speckled texture that mimics natural stone or ceramic glazes. With their sweet expressions and soft pastel accents, they make perfect little companions for your jacket lapel or tote bag.
Step-by-Step
Materials
- Beige polymer clay with granite/speckle effect (e.g., Fimo Effect or Premo Granite)
- Small amount of soft pink polymer clay
- Black polymer clay
- Pin backs or brooch findings
- Liquid polymer clay or bake-and-bond
- Dotting tools (various sizes)
- Needle tool or toothpick
- Small round cutter (approx. 1 inch)
- Tiny round cutter (approx. 1/4 inch, flexible)
- Clean ceramic tile or baking surface
- Oven
Step 1: Shaping the Base
-
Condition the Clay:
Begin by thoroughly conditioning your speckled beige clay until it is soft and pliable. This particular clay type can sometimes be crumbly, so take your time warming it up in your hands. -
Form the Head:
Roll the clay into a smooth ball, free of cracks. Flatten it gently against your work surface or tile to create a thick, rounded disc. You want it to be dome-shaped, not perfectly flat like a cookie. -
Refine the Shape:
Use your fingers to smooth out the edges. If you notice any fingerprints, a light brush of cornstarch or baby oil can help buff them away without distorting the shape. -
Create Ear Indentations:
Using a large ball tool or the rounded end of a paintbrush, press two shallow indentations into the top left and right curves of the head where the ears will sit.
Step 2: Adding Features
-
Create the Ears:
Roll two small balls of the beige clay for the ears. They should be sized proportionally to the head. Flatten them slightly into thick discs. -
Attach the Ears:
Place a tiny drop of liquid clay into the indentations you made earlier. Press the beige ear discs firmly into place, blending the seam at the back of the head with a sculpting tool if needed for durability. -
Add Pink Inner Ears:
Roll two very tiny balls of pink clay inside your palm. Flatten them and press them onto the front center of the beige ears. I like to use a small ball tool to press these in, which helps adhere them without squishing the shape. -
Form the Cheeks:
Create two more small balls of pink clay for the cheeks. Position them lower down on the face, spaced widely apart, and press them gently so they look like soft blushes on the surface.
Fixing Cracks
If you see tiny fissures in the clay while shaping, your clay is too dry. Mix in a drop of clay softener or baby oil and re-condition until smooth.
Step 3: Creating the Expression
-
Make the Eyes:
Roll two tiny specks of black clay into balls. Place these just above the cheek line, ensuring they are symmetrical. Press them in slightly so they embed into the beige clay rather than just sitting on top. -
Add the Nose:
Form a slightly larger oval or rounded triangle from black clay for the nose. Place it in the center of the face, slightly lower than the eyes. -
Sculpt Eyebrows:
Using a very sharp needle tool, gently drag curved lines into the clay above the eyes to create eyebrows. Keep the touch light so you don’t tear the surface. -
Sculpt the Mouth:
Directly under the nose, impress a vertical line, then curve it outwards at the bottom to form the classic bear smile. A steady hand is key here. -
Add Paint Details (Optional):
If you prefer a drawn look over sculpted lines, you can bake the piece first and add the mouth and eyebrows later with a fine-tip permanent marker or acrylic paint.
Glaze It Up
For a shiny, ceramic look, apply a coat of UV resin or glossy polyurethane varnish to the eyes and nose after baking. It makes them pop
Step 4: Baking and Assembly
-
Pre-Bake Check:
Look over your bear for any lint or dust particles. Since the clay is speckled, some dust hides well, but remove any large fibers with a piece of tape or a needle tool. -
Bake:
Bake the bear heads according to the manufacturer’s instructions for your specific brand of polymer clay. Usually, this is around 230°F to 275°F (110°C to 135°C) for 30 minutes. -
Cool Down:
Allow the pieces to cool completely in the oven or on a wire rack. Do not try to attach the hardware while the clay is still warm. -
Attach Pin Back:
Flip the cooled bear over. Apply a strong adhesive like E6000 or resin to the back of a pin finding and press it firmly onto the center of the bear’s back. -
Secure the Backing:
For extra durability, you can place a small specialized clay piece over the metal bar of the pin back and re-bake for 10 minutes, or simply let the strong glue cure for 24 hours.
Once the glue is fully set, your charming speckled bear pin is ready to be worn or gifted.
Smiling Cloud Pins
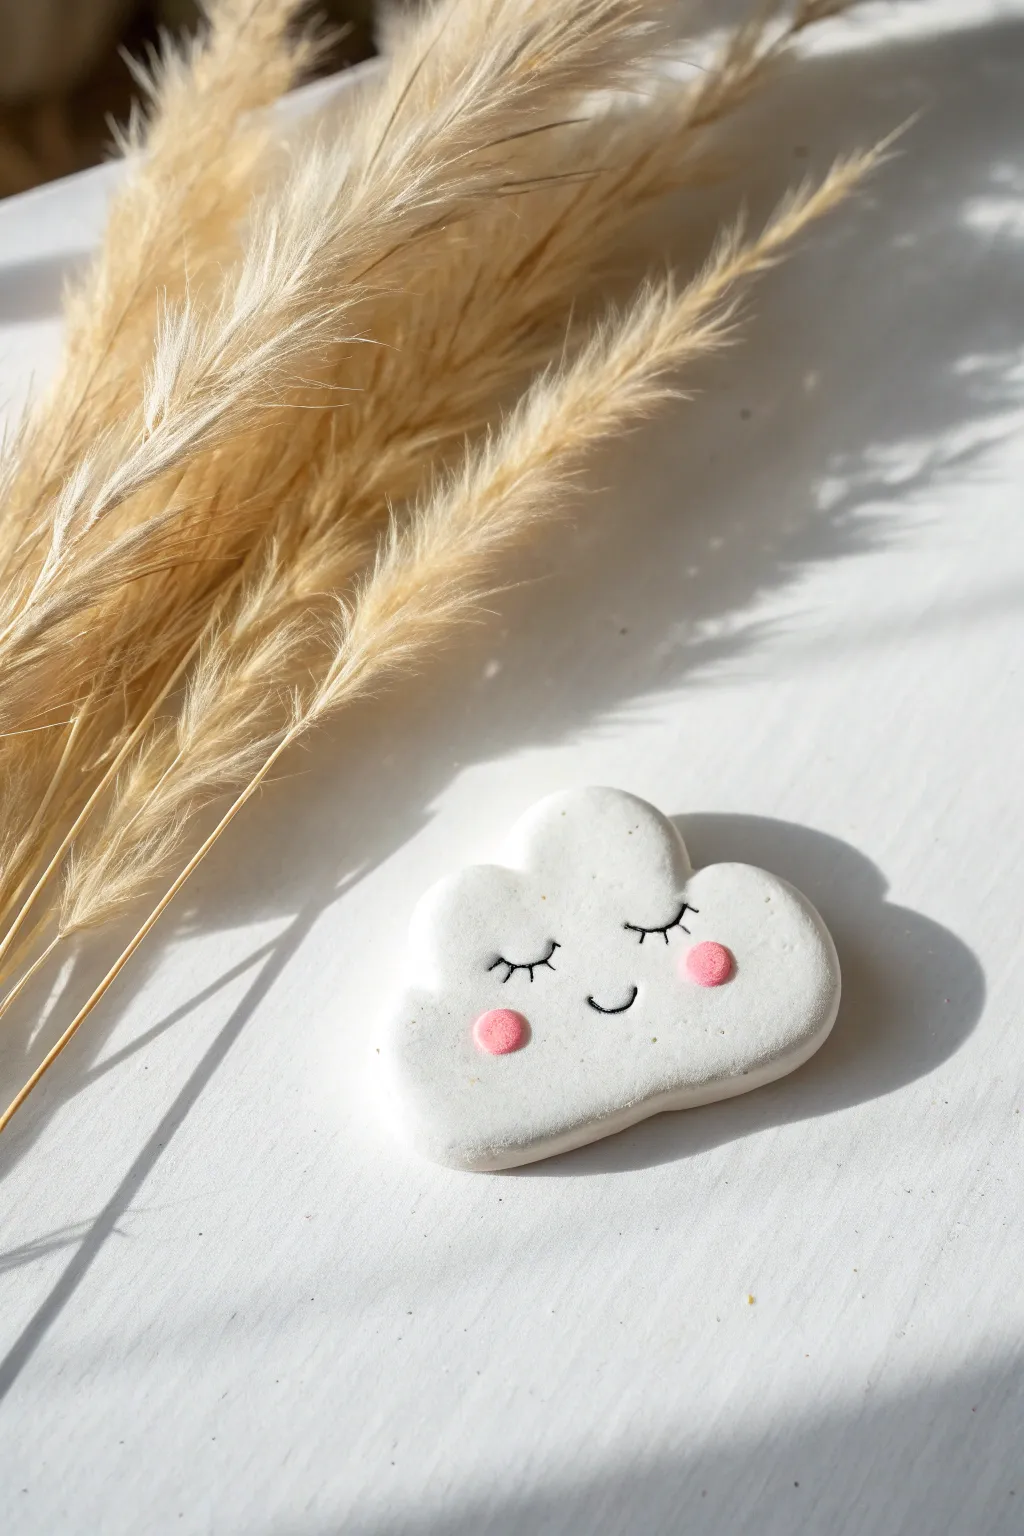
Bring a little piece of the sky down to earth with this adorable clay cloud pin. Its sweet, sleeping expression and soft rosy cheeks make it a gentle accessory that adds charm to any jacket or tote bag.
Step-by-Step Guide
Materials
- White polymer clay
- Pink polymer clay (or soft pastels)
- Black acrylic paint
- Fine detail paintbrush or needle tool
- Cloud-shaped cookie cutter (optional)
- Rolling pin or pasta machine
- Pin backing
- Instant glue (e.g., E6000)
- Glaze or varnish (matte or gloss)
Step 1: Shaping the Base
-
Condition the clay:
Start by taking a chunk of white polymer clay and kneading it in your hands until it becomes soft, pliable, and free of cracks. -
Create a smooth slab:
Roll your conditioned clay out on a clean surface. Aim for a thickness of about 1/4 inch (6mm) so the pin feels substantial but not too heavy. -
Cut the cloud content:
If you have a cloud cutter, press it firmly into the clay. If working freehand, use an X-Acto knife or needle tool to trace and cut a fluffy, undulating cloud shape. -
Refine the edges:
Gently embrace the edges with your finger to smooth out any sharp angles or cutting debris. You want the cloud to look soft and pillowy, not jagged.
Step 2: Adding the Details
-
Prepare the cheeks:
Take a tiny amount of pink clay and roll two very small, equal-sized spheres. These will become the rosy cheeks. -
Place the cheeks:
Position the pink spheres on the lower half of the cloud, spacing them apart to leave room for the smile. Gently flatten them against the white clay so they adhere without losing their round shape. -
Mark the face guides:
Before painting, I sometimes like to use a needle tool to very lightly impress where the eyes and mouth will go to ensure symmetry. -
Bake the clay:
Place your cloud on a baking sheet lined with parchment paper. Bake according to your specific clay manufacturer’s instructions (usually 275°F/135°C for 15-30 minutes). -
Cool down:
Let the piece cool completely before handling. It remains slightly soft while hot and hardens as it returns to room temperature.
Fixing Fingerprints
Did you leave prints on the white clay? lightly brush the raw clay with a little baby oil or cornstarch before baking to smooth them away instantly.
Step 3: Painting and Finishing
-
Paint the eyes:
Using a very fine brush and black acrylic paint, carefully draw two downward-curving arcs for the closed eyes directly above the pink cheeks. -
Add eyelashes:
With the lightest touch, add three tiny vertical dashes to each eye arc to create sweet eyelashes. -
Paint the smile:
Draw a small, simple ‘U’ shape right in the center between the cheeks for a happy little smile. -
Let the paint dry:
Allow the black paint to dry completely. If you make a mistake, you can gently scrape it off with a damp toothpick before it sets. -
Apply varnish:
Coat the front and sides of the cloud with a water-based varnish. A matte finish looks soft and natural, but gloss adds a nice durability. -
Attach the backing:
Flip the cloud over once the glaze is dry. Apply a strong adhesive like E6000 to the flat pad of a metal pin backing. -
Secure the pin:
Press the pin firmly onto the center of the back of the cloud and let the glue cure for at least 24 hours for maximum strength.
Make it Sparkle
For a magical touch, mix a pinch of iridescent glitter into your white clay or dust the raw cheeks with pearl ex powder before baking.
Now you have a whimsical little companion ready to brighten up your denim jacket or backpack
Pastel Star and Moon Pins
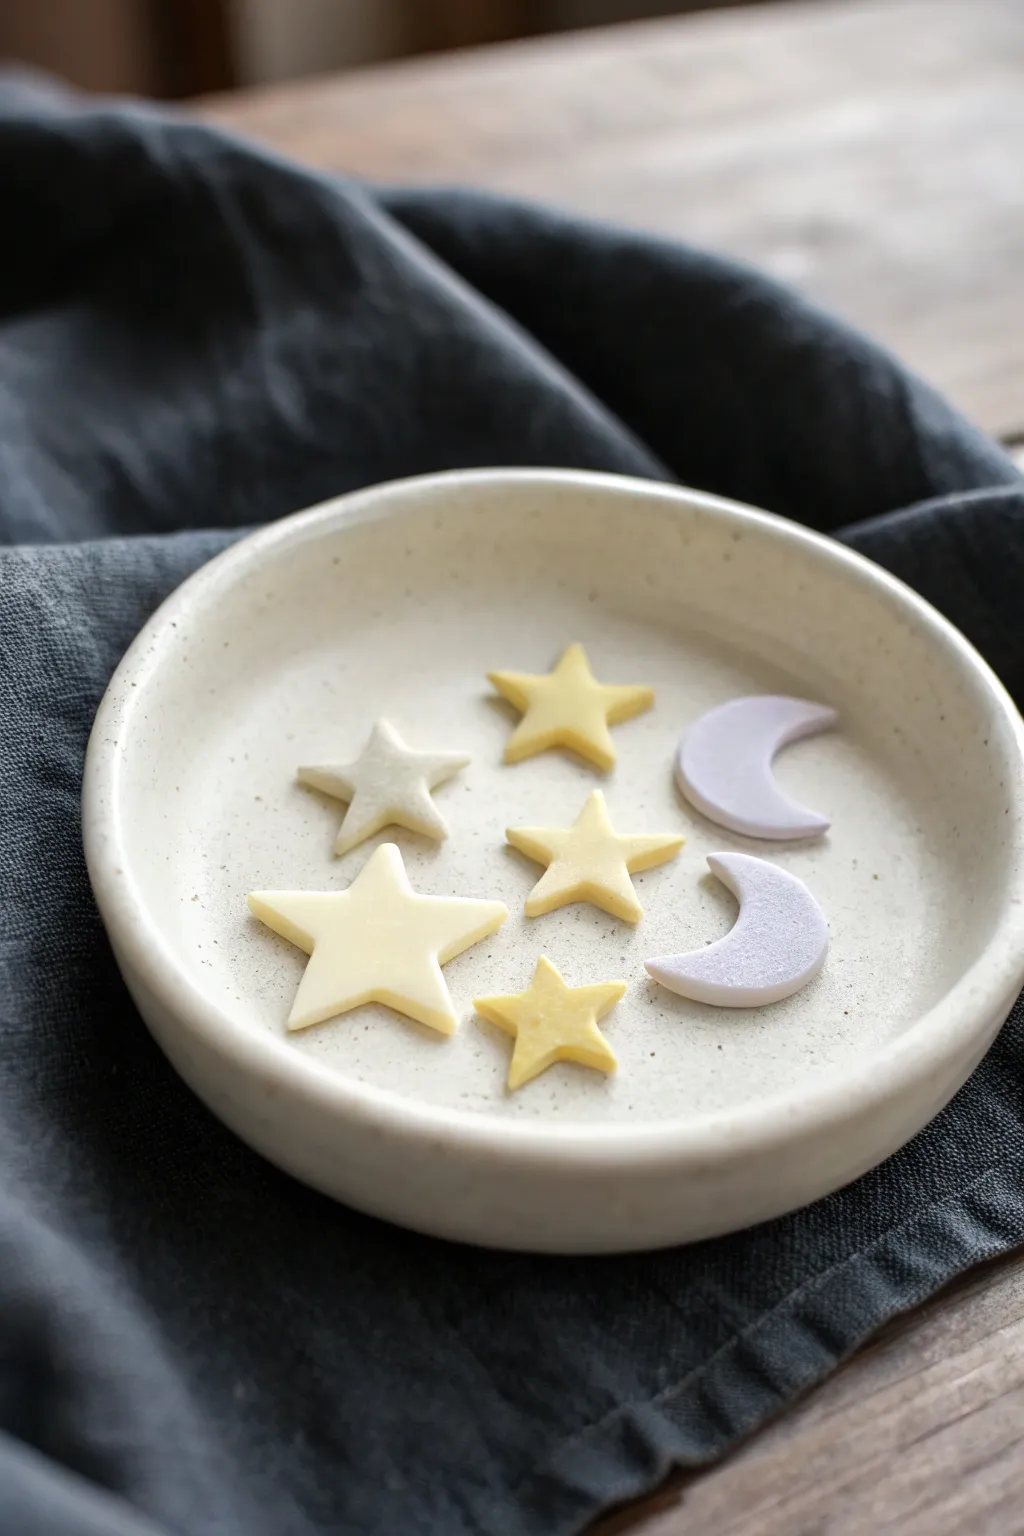
Capture the magic of a twilight sky with these delicate pastel clay pins. Featuring soft buttery yellow stars and dreamy lavender moons, these minimalist shapes are perfect for adding a touch of whimsy to your lapel or tote bag.
Step-by-Step Guide
Materials
- Polymer clay (white, pastel yellow, pastel purple/lavender)
- Small star-shaped clay cutters (varying sizes)
- Small moon or circle cutter (for the crescents)
- Rolling pin or acrylic roller
- Parchment paper or ceramic tile for baking
- Super glue or E6000
- Pin backs or clutch pins
- Optional: Gloss or matte glaze
- Clay slicing blade
Step 1: Color Mixing and Prep
-
Condition the Clay:
Begin by taking your polymer clay blocks and kneading them in your hands. You want the clay to be warm and pliable so it doesn’t crack when you roll it out. -
Mix Custom Yellows:
To achieve the varied tones seen in the photo, create two shades of yellow. Keep one pastel yellow as is, and mix a second batch by combining equal parts white and pastel yellow for a creamy, lighter star color. -
Soften the Lavender:
If your purple clay is too dark, mix in white clay gradually until you achieve a soft, dusty lavender hue that complements the yellow stars. -
Roll Smooth Sheets:
Place the clay on a clean, flat surface. Using your acrylic roller, flatten each color into a sheet about 3mm to 4mm thick. Aim for a consistent thickness so all pieces bake evenly.
Clean Cuts
To prevent clay from sticking to your cutters, dip the cutter into a small pile of cornstarch or water before pressing it into the clay sheet.
Step 2: Cutting the Shapes
-
Cut the Stars:
Using your star cutters, press firmly into the yellow sheets. Cut a mix of sizes—larger stars in the creamy light yellow and smaller ones in the slightly deeper pastel yellow. -
Refine Star Edges:
After lifting the cutter, if the clay sticks inside, gently push it out. Use your finger to softly tap the points of the stars to round them off slightly, giving them the soft, not-too-sharp look shown in the image. -
Create Crescent Moons:
For the moons, you can use a specific moon cutter. If you don’t have one, use a small circle cutter to cut a round shape, then offset the cutter and cut again to slice away a crescent shape. -
Smooth the Moons:
Gently smooth the inner curve of the crescent with the side of a modeling tool or your fingertip to remove any sharp ridges created by the cutter. -
Final Shape Check:
Lay out all your cut pieces on a ceramic tile or baking sheet lined with parchment paper. Check that they lie flat and haven’t warped during handling.
Step 3: Baking and Assembly
-
Bake the Clay:
Preheat your oven according to the manufacturer’s instructions on your specific brand of clay (usually around 275°F/135°C). Bake the pieces for approximately 15-20 minutes. -
Cool Down:
Once baked, turn the oven off and open the door slightly. I like to let the pieces cool completely inside the oven to prevent thermal shock cracks. -
Sand Edges (Optional):
If there are any rough spots on the sides of your stars or moons, use fine-grit sandpaper to gently buff them smooth. -
Clean Surface:
Wipe the back of each clay piece with a little rubbing alcohol to ensure it is free of dust and oils, which helps the glue adhere better. -
Apply Glue:
Place a small dot of strong adhesive (like E6000) onto the flat pad of your pin back. -
Attach Backing:
Press the pin back firmly onto the center of the clay shape. Ensure the pin mechanism is oriented correctly so the star or moon hangs the way you want it to. -
Cure Time:
Allow the glue to cure fully—usually 24 hours—before trying to wear the pins. -
Finishing Coat:
If you prefer a shiny finish, brush on a thin layer of gloss glaze. For the matte look in the photo, you can leave the clay raw or apply a matte varnish for protection.
Sparkle Upgrade
Before baking, lightly dust the raw clay with pearlescent mica powder or press in tiny rhinestones for a magical, shimmering galaxy effect.
You can now arrange your sky-themed collection on a jacket or gift them to a stargazer friend
Friendly Ghost Pins
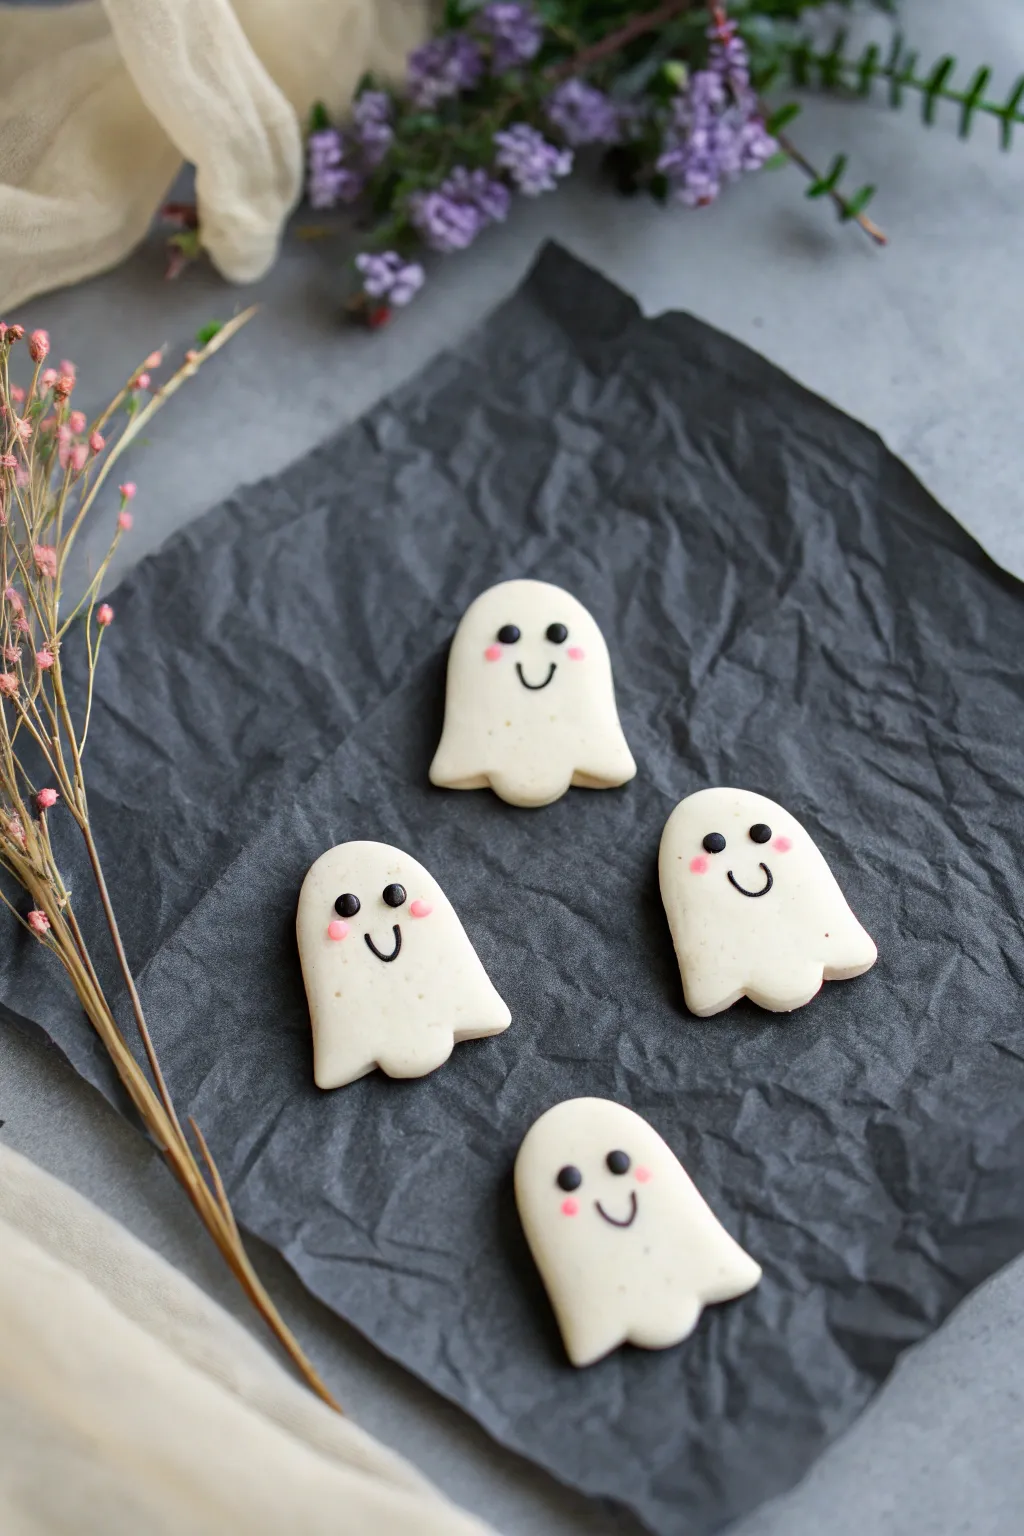
These adorable spectral companions are more sweet than scary, featuring blushing cheeks and a simple, classic shape. Their smooth, matte finish makes them perfect for subtle Halloween flair on collars or backpacks.
Detailed Instructions
Materials
- White polymer clay
- Black polymer clay (very small amount)
- Pink polymer clay or soft chalk pastels
- Rolling pin or acrylic roller
- Ghost-shaped clay cutter (or exacto knife and paper template)
- Needle tool or toothpick
- Liquid polymer clay (optional, for adhesion)
- Oven-bake clay adhesive
- Metal flat-pad pin backs
- Super glue (E6000 or gel formula recommended)
- Gloss glaze (optional, for eyes only)
- Baking tray and parchment paper
Step 1: Shaping the Bodies
-
Condition the white clay:
Start by kneading your white polymer clay until it is soft, pliable, and free of air bubbles or cracks. The warmth of your hands will help make it workable. -
Roll out the slab:
Using an acrylic roller, flatten the clay into a smooth slab about 1/4 inch thick. This thickness ensures the pins are sturdy but not too heavy to wear. -
Cut the shapes:
Press your ghost-shaped cutter firmly into the clay. If you don’t have a cutter, place a small paper template on the clay and carefully trace around it with a sharp craft knife. -
Smooth the edges:
Gently run your finger along the cut edges of each ghost to soften any sharp corners or clay burrs left by the cutter. This gives the finished piece a professional, polished look. -
Create the scalloped bottom:
If your shape needs more definition, use the side of a needle tool to gently indent the bottom edge, creating a wavy ‘sheet’ effect.
Dirty Clay Blues
White clay picks up everything! Keep a pack of wet wipes or baby wipes nearby. Clean your hands and tools often, especially after touching the black clay.
Step 2: Adding the Faces
-
Condition the accent colors:
Prepare a very tiny amount of black clay for the eyes and mouth, and a tiny amount of pink for the cheeks. Clean your hands thoroughly before handling the black clay to avoid staining the white bodies. -
Form the eyes:
Roll two minuscule balls of black clay. They should be no larger than a pinhead. Place them on the upper third of the ghost’s face, spacing them somewhat wide apart for a cute expression. -
Flatten the eyes:
Gently press the black balls flat against the white clay so they adhere. If they don’t stick well, a tiny dot of liquid clay acts as a great glue. -
Roll the smile:
Roll an extremely thin ‘snake’ or thread of black clay. Cut a tiny segment, about 3-4mm long. -
Shape the smile:
Curve the little black thread into a ‘U’ shape using your needle tool. Carefully place it centered below the eyes. -
Secure the expression:
Once you are happy with the placement, press the mouth gently into the white clay to bond it. I usually use the flat side of a tool to avoid leaving fingerprints. -
Add the blush:
Roll two tiny balls of pink clay, smaller than the eyes. Flatten them onto the cheeks on either side of the smile. Alternatively, if using chaulk pastels, shave a little pink dust and brush it onto the raw clay cheeks with a small paintbrush.
Glow Up
Swap the standard white clay for glow-in-the-dark polymer clay. Your pins will look normal by day but become eerie little beacons when the lights go out.
Step 3: Baking and Assembly
-
Prepare for baking:
Place your ghosts on a parchment-lined baking sheet. Double-check for any lint or dust on the white clay; you can remove specks with a cotton swab dipped in rubbing alcohol. -
Bake:
Bake according to your clay package instructions. Typically, this is around 275°F (135°C) for 15-30 minutes, depending on thickness. -
Cool completely:
Allow the clay pieces to cool fully on the tray. Do not handle them while warm, as the clay is fragile until it cures and hardens. -
Attach the pin back:
Turn the ghost over. Apply a drop of strong cyanoacrylate glue (super glue) or E6000 to the flat pad of the metal pin back. -
Secure the backing:
Press the pin back firmly onto the upper center of the ghost’s reverse side. Let the glue cure for at least 24 hours for maximum hold. -
Optional gloss:
For extra shine, add a tiny drop of UV resin or polyurethane gloss varnish specifically to the black eyes and let it dry.
Enjoy wearing your new ghostly pals on your favorite denim jacket or tote bag
Mix-and-Match Pin Collection Grid
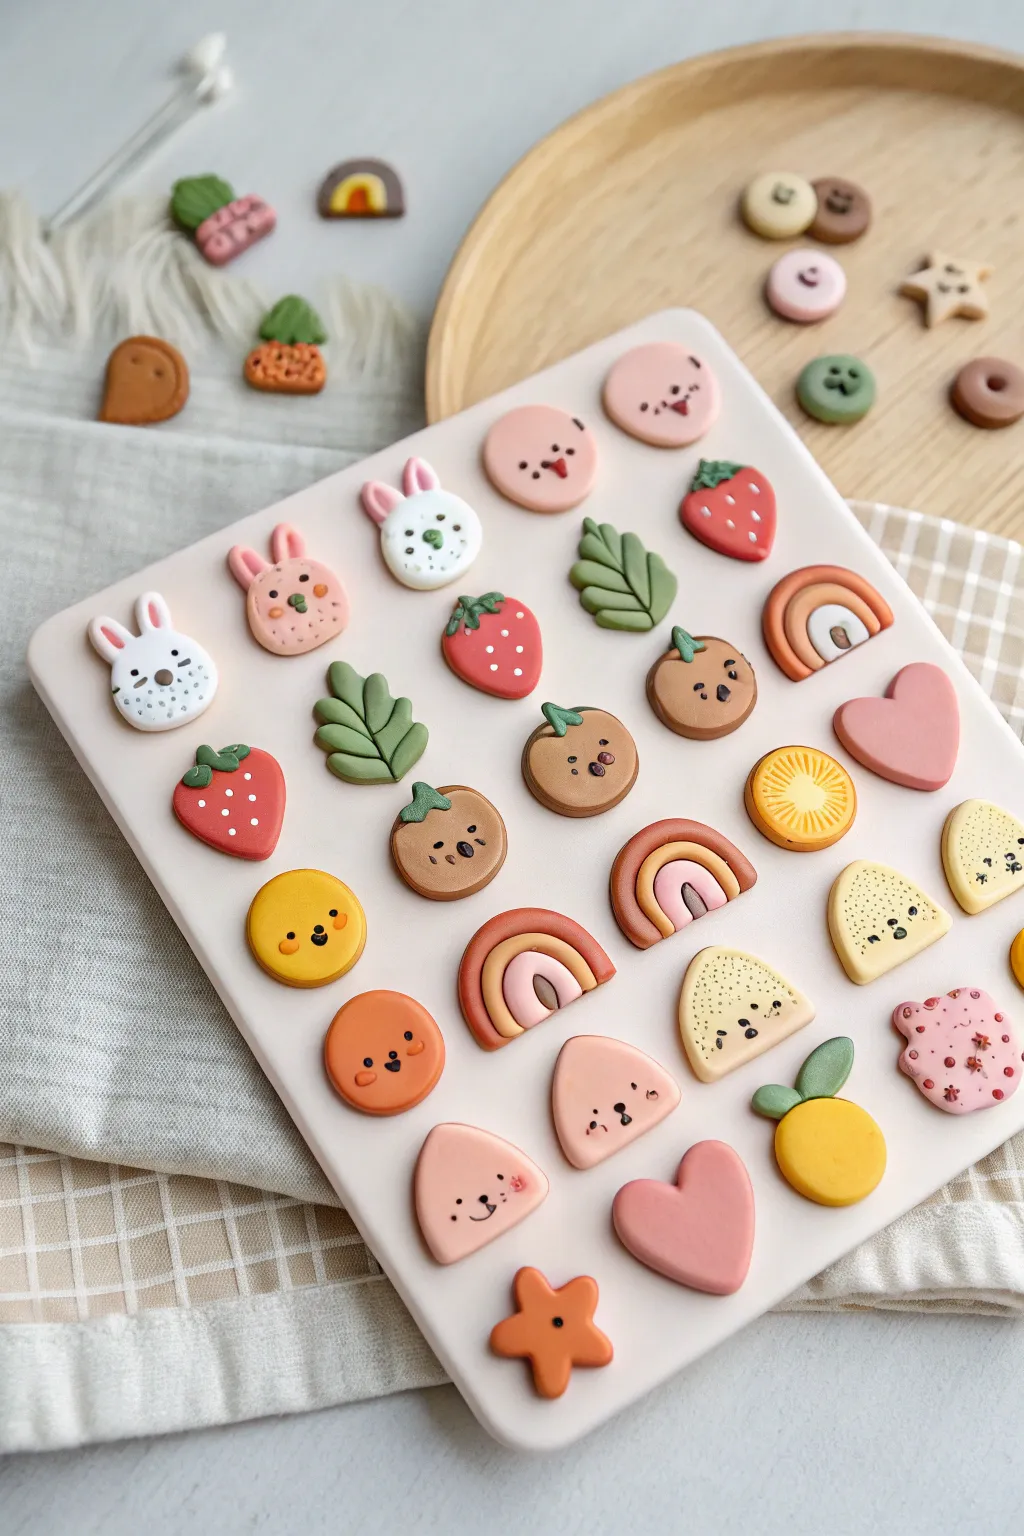
Create an adorable assortment of miniature clay pins featuring sweet motifs like bunnies, fruit, rainbows, and smiling faces. This collection relies on a cohesive pastel color palette and simple shapes to build a grid of charming accessories perfect for swapping and sharing.
Step-by-Step
Materials
- Polymer clay in pastel pink, coral, yellow, light green, dark green, brown, and white
- Rolling pin or pasta machine
- Small circular, heart, and star shape cutters (or cutting templates)
- Needle tool or toothpick
- Small ball tool
- Liquid polymer clay (optional, for adhesion)
- Black acrylic paint or fine-tip permanent marker
- Matte or satin glaze
- Pin backings
- Super glue or E6000
- Baking sheet and parchment paper
- Sandpaper (fine grit)
Step 1: Prepping the Palette
-
Conditioning the Clay:
Begin by kneading each color of clay until soft and pliable. If your colors are too vibrant, mix in small amounts of white or beige to achieve the muted, desaturated pastel look seen in the photo. -
Rolling Out Base Sheets:
Roll your clay out to a consistent thickness, roughly 1/8 to 1/4 inch thick. A uniform thickness helps all the pins look like a cohesive set.
Step 2: Shaping the Bunnies
-
Cutting the Head:
Use a small circle cutter to stamp out white, pink, or beige rounds for the bunny heads. Gently press down on the top edge to slightly flatten it. -
Adding Ears:
Roll two tiny tear-drop shapes in matching clay for each bunny. Press them onto the top of the head using a small blending tool or the back of your needle tool to merge the seams seamlessly. -
Face Details:
For the dotted bunny, use a needle tool to lightly texture the face area. You can fill these divots later with paint.
Clean Edges Pro Tip
Before baking, adhere a piece of clear plastic wrap over your clay slab. Press your cutters down through the plastic. This creates a beautifully domed, rounded edge often called a ‘pillow effect.’
Step 3: Forming the Fruits
-
Strawberry Bases:
Shape red or pink clay into a soft, rounded triangle. Gently round the edges so it looks puffy rather than sharp. -
Adding Leaves:
Create tiny green teardrops, flatten them, and press them onto the top of the strawberries or oranges. Use a needle tool to impress a central vein down each leaf. -
Orange Slices:
Cut a yellow circle and wrap the outer edge with a thin strip of slightly darker orange clay for the rind. Use a needle tool to score radial lines from the center outward to mimic citrus segments. -
The Orange Whole:
Roll a simple ball of orange-yellow clay and flatten it slightly into a disc. Add two small green leaves at the very top for a stem look.
Level Up: Texture
Mix inclusions like black pepper or dried tea leaves into yellow or beige clay to create a speckled ‘stone’ or ‘cookie’ texture, perfect for the simple geometric shapes.
Step 4: Rainbows & Decor
-
Building Arches:
Roll thin snakes of three coordinating colors (e.g., rust, peach, blush). Curve the smallest snake into a U-shape, then wrap the next color around it, and finally the outer color. -
Trimming the Rainbow:
Use a sharp blade to slice the bottom of the arches straight across so the rainbow sits flat. I find slicing quickly prevents the clay from squishing. -
Simple Shapes:
Cut out the remaining filler shapes like simple hearts, stars, and triangles. Smooth the edges with your finger to remove any cutter burrs.
Step 5: Adding Personality
-
Baking:
Arrange all your pieces on a parchment-lined baking sheet. Bake according to your clay manufacturer’s instructions (usually around 275°F or 130°C for 15-30 minutes). -
Painting Faces:
Once fully cooled, use a fine dab of black acrylic paint or a tiny brush to add the eyes and mouths. Keep the features low on the shapes for that distinct ‘kawaii’ proportion. -
Adding Seeds and Cheeks:
Paint tiny white seeds on the strawberries. Use a very dry brush with pink pastel chalk or diluted pink paint to dab rosy cheeks onto the characters. -
Sealing:
Apply a thin coat of matte or satin glaze to protect the paint. Avoid glossy finishes if you want to maintain the soft, ceramic-like appearance. -
Attaching Backings:
Flip the pieces over and glue a metal pin post to the center of each one using strong adhesive like E6000. Let cure for 24 hours.
Now you have a whole tray of delightful minis ready to brighten up any backpack or jacket