If you’re just starting with foam clay, you’re in for the most satisfying kind of crafting: quick wins that still look adorable. I love how lightweight, air-dry foam clay lets you build cute shapes fast without needing fancy sculpting skills.
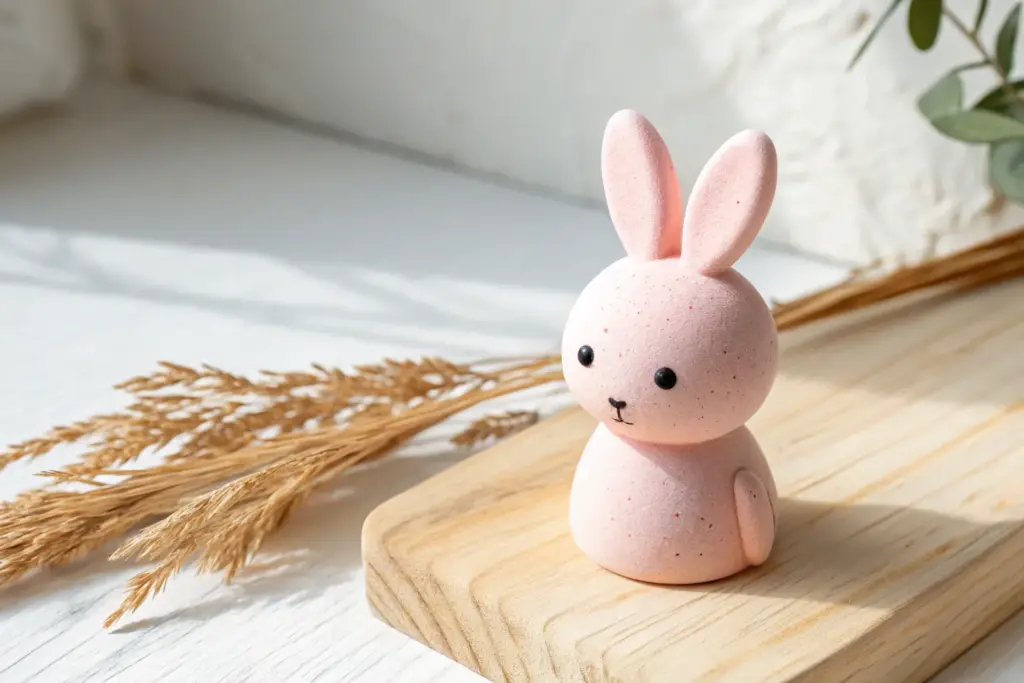
Round Kawaii Animal Figurines
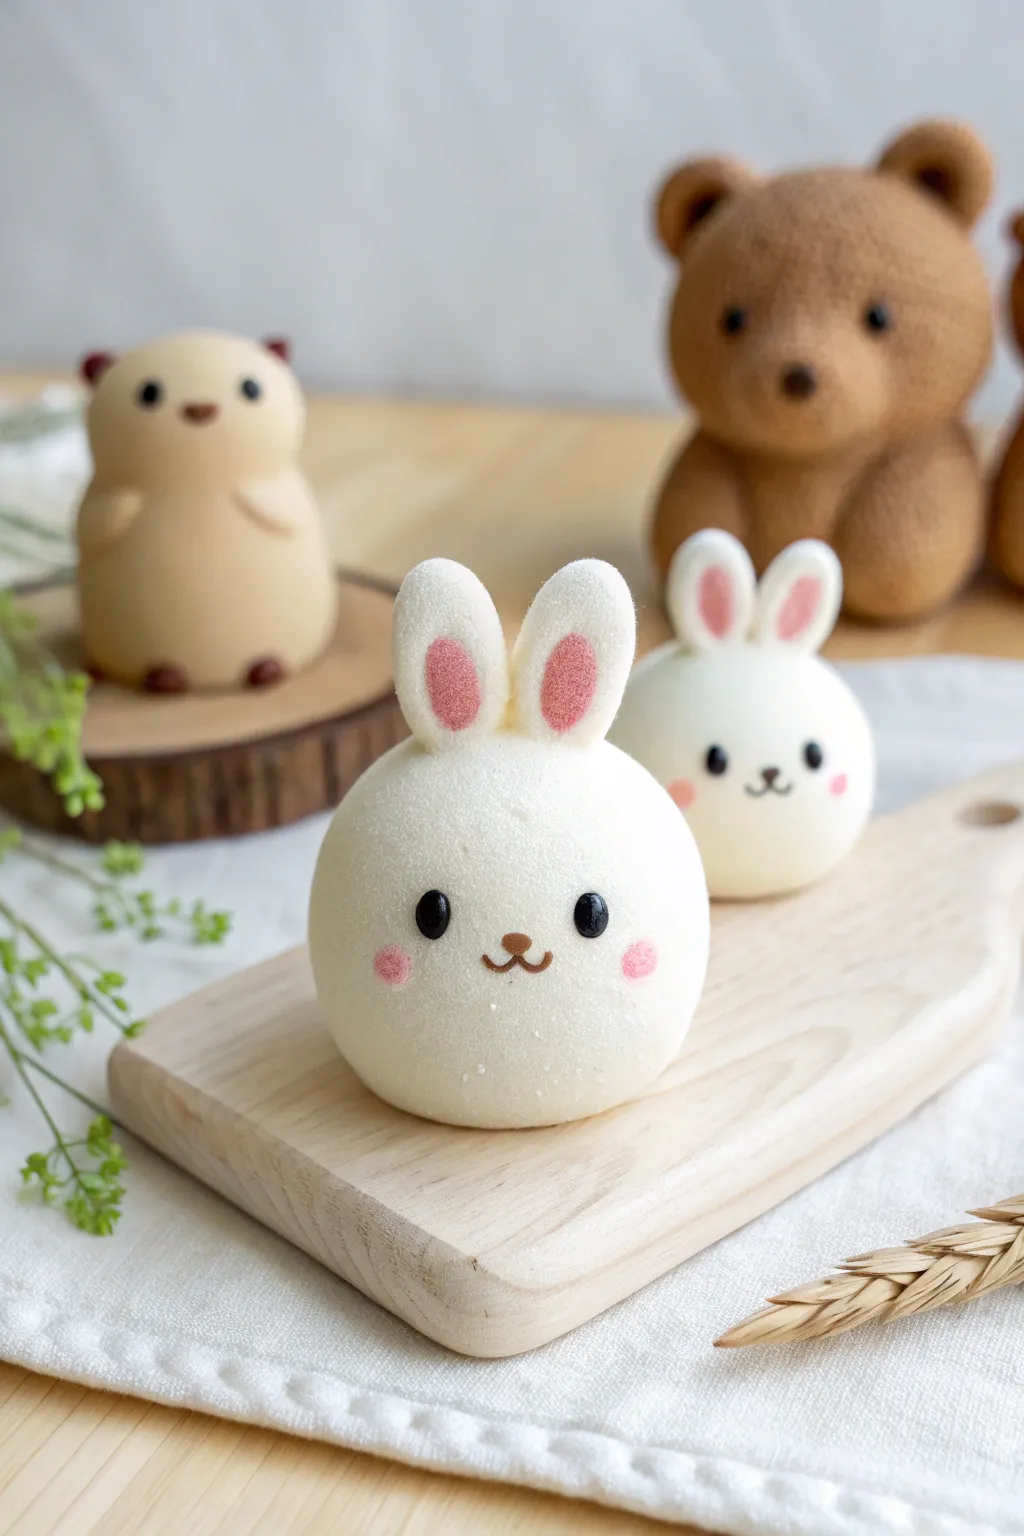
These delightfully spherical bunnies capture the essence of kawaii design with their simple shapes and sweet expressions. The project uses the airy, marshmallow-like texture of foam clay to create figurines that look soft enough to squish but dry to a firm, lightweight finish.
Detailed Instructions
Materials
- White lightweight foam clay (air-dry)
- Small amounts of pink, black, and brown foam clay
- Ball tool or modeling tool set
- PVA glue or clay glue (optional but helpful)
- Chalk pastels (pink)
- Soft makeup brush or paintbrush
- Clean work surface (silicone mat recommended)
Step 1: Shaping the Base
-
Prepare the clay:
Start by kneading a golf-ball-sized amount of white foam clay. Kneading warms it up and ensures the texture is smooth and uniform without cracks. -
Roll the sphere:
Place the clay between your palms and roll it into a perfect sphere. Apply even pressure and keep rolling until the surface is completely smooth and free of seams. -
Create the base:
Gently tap the bottom of your sphere against your work surface. You want to create a small flat spot so the bunny sits upright without rolling away, but keeps its overall roundness.
Step 2: Crafting the Ears
-
Form cylinder shapes:
Take two smaller equal pieces of white clay. Roll them into small, thick logs or cylinder shapes with rounded ends for the ears. -
Make the inner ear details:
Take a tiny amount of pink clay and roll two very small, thin ovals. These will be the inner ear coloring. -
Assemble the ears:
Press the small pink ovals gently onto the white ear shapes you made earlier. Flatten them slightly so they become one cohesive piece. -
Attach to the head:
Place the ears on top of the main sphere. You can use a tiny dab of water or PVA glue to secure them, though fresh foam clay usually sticks to itself well. Position them close together for a cuter look.
Smooth Operator
If your clay starts cracking while rolling, add a tiny drop of water to your fingers and knead it in. Just a drop—too much water makes foam clay sticky and impossible to handle.
Step 3: Adding the Face
-
Position the eyes:
Roll two tiny glossy balls of black clay. Press them gently into the face area, spacing them somewhat wide apart to achieve that kawaii aesthetic. -
Create the nose and mouth:
Roll a extremely thin ‘snake’ of brown clay. Shape a tiny ‘Y’ or a curved ‘3’ shape for the mouth. Place a speck of brown clay above it for the nose. -
Attach the mouth:
Carefully transfer the mouth piece to the center of the face using a needle tool or toothpick. Press lightly to adhere it without squashing the delicate lines. -
Add blush:
Scrape a little pink chalk pastel into a powder. Using a dry, soft brush, gently dust pink circles onto the cheeks. I like to build this color up slowly so it doesn’t look too harsh. -
Blushing details:
If you want a more defined blush spot like the image, you can also use tiny flattened circles of pink clay instead of the pastel powder.
Fixing Squished Ears
If the ears droop before drying, prop them up from behind with a small piece of folded paper or cardboard. Remove the prop once the clay has set for about an hour.
Step 4: Variations: The Bear & Hamster
-
Making the Bear:
Follow the same sphere steps using light brown clay. Instead of long ears, stick two small semi-circles on top of the head. -
Bear snout detail:
Add a small oval of lighter clay on the face to create a snout area before adding the black nose and mouth. -
Making the Hamster:
Use beige clay for an oval-shaped body rather than a perfect sphere. Add tiny brown feet at the bottom and tiny triangular ears. -
Final drying:
Allow your figurines to sit undisturbed in a dry area for 24-48 hours. The foam clay will harden but remain lightweight and slightly spongy to the touch.
Enjoy displaying your adorable foam clay menagerie on your desk or shelf


Smiley Face Fridge Magnets

Add a pop of positivity to your kitchen with these incredibly simple foam clay magnets. These cheerful faces feature a smooth, matte finish and vibrant colors that look charming against a white tile backdrop.
Detailed Instructions
Materials
- Foam clay in yellow, purple, cyan, and coral red
- Rolling pin (acrylic or plastic)
- Round cookie cutter (approx. 1.5 – 2 inches diameter)
- Black fine-point permanent marker or black acrylic paint pen
- Small round magnets
- Strong craft glue (like E6000) or hot glue gun
- Parchment paper or non-stick craft mat
Step 1: Shaping the Base
-
Prepare your workspace:
Lay down a sheet of parchment paper or a non-stick craft mat to prevent the foam clay from sticking to your table while you work. -
Condition the clay:
Start with the yellow foam clay. Take a walnut-sized amount and knead it thoroughly in your hands to warm it up and ensure the texture is consistent and pliable. -
Roll it out:
Place the ball of clay on your mat and use the rolling pin to flatten it. You want an even thickness of about 1/4 inch so the magnet will be sturdy but not too heavy. -
Cut the circle:
Press your round cookie cutter firmly into the rolled clay. If the clay sticks to the cutter, gently push it out from the back, being careful not to warp the circle shape. -
Smooth the edges:
Dip your finger in a tiny bit of water and run it along the cut edge of the circle to smooth out any roughness or sharp lines left by the cutter. -
Repeat for all colors:
Repeat the kneading, rolling, and cutting process for the purple, cyan, and coral red clay colors. You should now have four colorful discs. -
Initial drying:
Let the discs sit on the parchment paper for at least 24 hours to air dry completely. Foam clay needs to be fully cured before drawing on it.
Step 2: Adding Personality
-
Check for dryness:
Touch the center of the discs. They should feel firm and lightweight, almost like hardened foam. If they are still squishy, give them more time. -
Draft the face:
If you’re nervous about freehanding, lightly sketch the eyes and mouth with a pencil first. Aim for wide-set oval eyes and a broad U-shaped smile. -
Draw the eyes:
Using your black permanent marker or paint pen, draw two solid vertical ovals for the eyes. I find that placing them slightly higher than the center line makes them look cuter. -
Create the smile:
Draw a smooth, curved line connecting the area below the eyes. Add small, upward-curved tick marks at the ends of the smile line to create dimples or cheeks. -
Let the ink set:
Allow the marker or paint to dry for about 10 minutes to prevent smudging while handling.
Wrinkle Rescue
If your dried foam clay looks slightly wrinkled on top, you can sand it very gently with a fine-grit nail buffer to smooth it out before drawing the face.
Step 3: Magnet Assembly
-
Prepare the back:
Flip all four faces over so the blank side is facing up. -
Apply adhesive:
Place a pea-sized dot of strong craft glue or hot glue onto the center of the back of each foam disc. -
Attach the magnet:
Press a round magnet firmly into the glue. Hold it there for a few seconds to ensure it grabs onto the foam texture. -
Final cure:
Let the glue cure completely according to the package instructions before sticking them onto your fridge.
Glossy Upgrade
For a sleek, store-bought look, coat the front of the finished faces with a layer of UV resin or glossy Mod Podge after the ink has fully dried.
Enjoy arranging your colorful new crew on the refrigerator to brighten up your kitchen


Mini Succulent Toppers
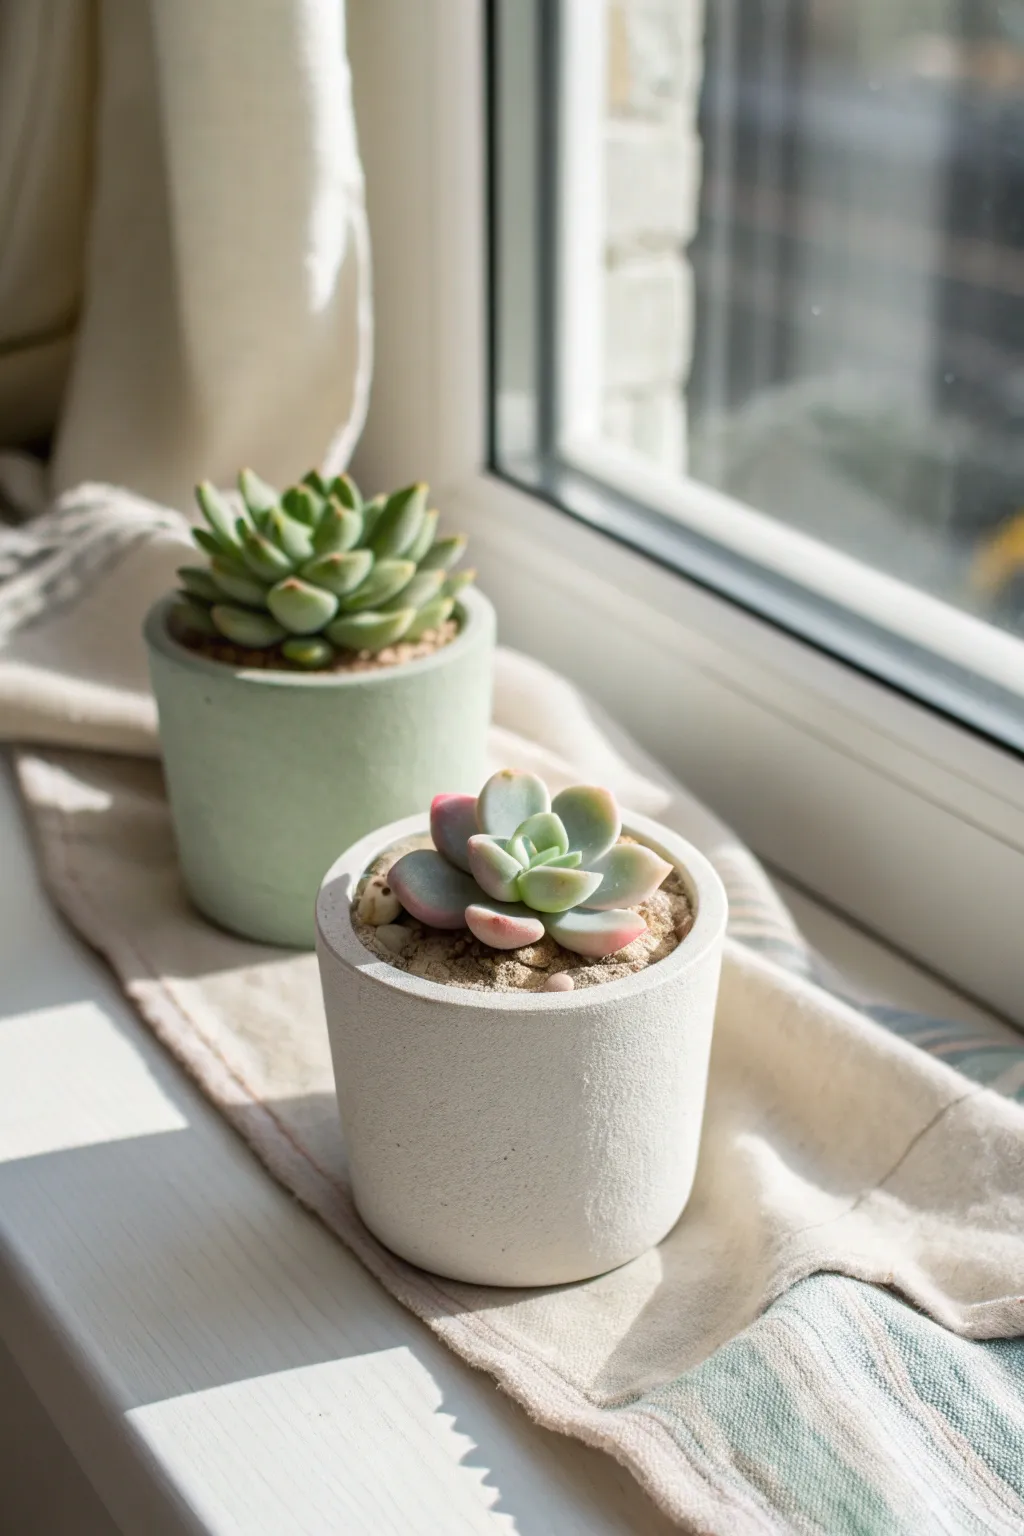
Create everlasting greenery for your windowsill with these incredibly realistic foam clay succulents. By layering translucent colors and shaping delicate leaves, you can mimic the waxy, plump texture of real plants without ever needing to water them.
Step-by-Step Guide
Materials
- White foam clay
- Light green foam clay or acrylic paint
- Soft pastels (pink, deep green, burgundy)
- Small fluffy paintbrush
- Detailing tool or needle tool
- Small terracotta or concrete pots
- Sand or small pebbles for filling
- Tacky glue or PVA glue
- Clear matte varnish (optional)
Step 1: Coloring and Base Prep
-
Mix your greens:
Start with white foam clay. Mix in a very small amount of green acrylic paint or knead in colored clay to achieve a pale, minty green shade. For the spikier succulent, aim for a darker, forest green tone. -
Create the core:
Roll a small ball of your green clay, about the size of a large marble. This will be the center where you attach the leaves. -
Prepare the pot:
Fill your small pot almost to the top with foam clay scraps or aluminum foil to save material. Top it off with a layer of brown or tan clay textured to look like soil, or simply leave space to add real sand later.
Step 2: Shaping the Rosette (Front Plant)
-
Form the leaf buds:
Pinch off tiny pieces of your pale green clay. Roll them into small teardrop shapes, about the size of a grain of rice for the center leaves. -
Flatten and shape:
Gently press the teardrop between your fingers to flatten it slightly. The leaf should remain thick in the middle but taper to thin edges. -
Curve the leaf:
Use your thumb to create a slight spoon-like curve in the leaf. I like to pinch the very tip to make a tiny point, characteristic of Echeveria succulents. -
Build the center:
Attach three small leaves together in a tight cluster at the top of your core ball. Use a tiny dab of water if the clay has started to act dry. -
Add the middle rows:
Make slightly larger teardrops for the next row. Attach them in a circle around the center cluster, positioning each new leaf in the gaps between the previous ones. -
Create the outer leaves:
Form the largest leaves for the bottom row. These should be broader and flatter. Attach them at the base, angling them slightly outward to create that open rosette look.
Sticky Situation?
If clay gets too sticky, let it sit for 5 minutes or dust your hands lightly with cornstarch. If it’s too dry/cracking, knead in a drop of water.
Step 3: Shaping the Spiky Succulent (Back Plant)
-
Form elongated leaves:
Using the darker green clay, roll teardrops that are longer and narrower than the previous plant. These should look more like spikes. -
Assemble the structure:
Starting from the center and working outward, stack these pointed leaves in tight, upward-facing layers. Keep the formation dense. -
Detail the tips:
Use your needle tool to very gently press a tiny indentation or crease down the center of the larger leaves for added realism.
Pro Tip: Translucency
Mix a tiny amount of translucent or ‘natural’ foam clay into your green. This makes the leaves look less like plastic and more like real plant tissue.
Step 4: Realistic Shading and Assembly
-
Prepare pastels:
Scrape a little bit of pink and burgundy soft pastel into a fine powder. -
Blush the tips:
Using a soft, dry brush, pick up a tiny amount of pink powder. Gently dust the very tips and edges of the pale green rosette leaves. This mimics sun-stress coloring. -
Deepen the shadows:
For the darker plant, use a deep green or brown pastel powder. Brush this into the crevices between the leaves to create depth and shadow. -
Secure the plant:
Apply a dot of tacky glue to the bottom of your finished succulents and press them firmly into the center of your prepared pots. -
Add the substrate:
Brush a layer of glue around the base of the plant, covering the ‘soil’ surface in the pot. Carefully pour sand or small pebbles over the glue. -
Final texture check:
Use a dry brush to sweep away any stray sand grains that stuck to the clay leaves. -
Protective coat:
Once fully dry (usually 24 hours), I recommend brushing on a thin layer of matte varnish. This seals the pastel powder and gives the succulent a realistic waxy sheen.
Place these charming little pots in a sunny spot and enjoy the greenery that never fades


Initial Letter Bag Charms
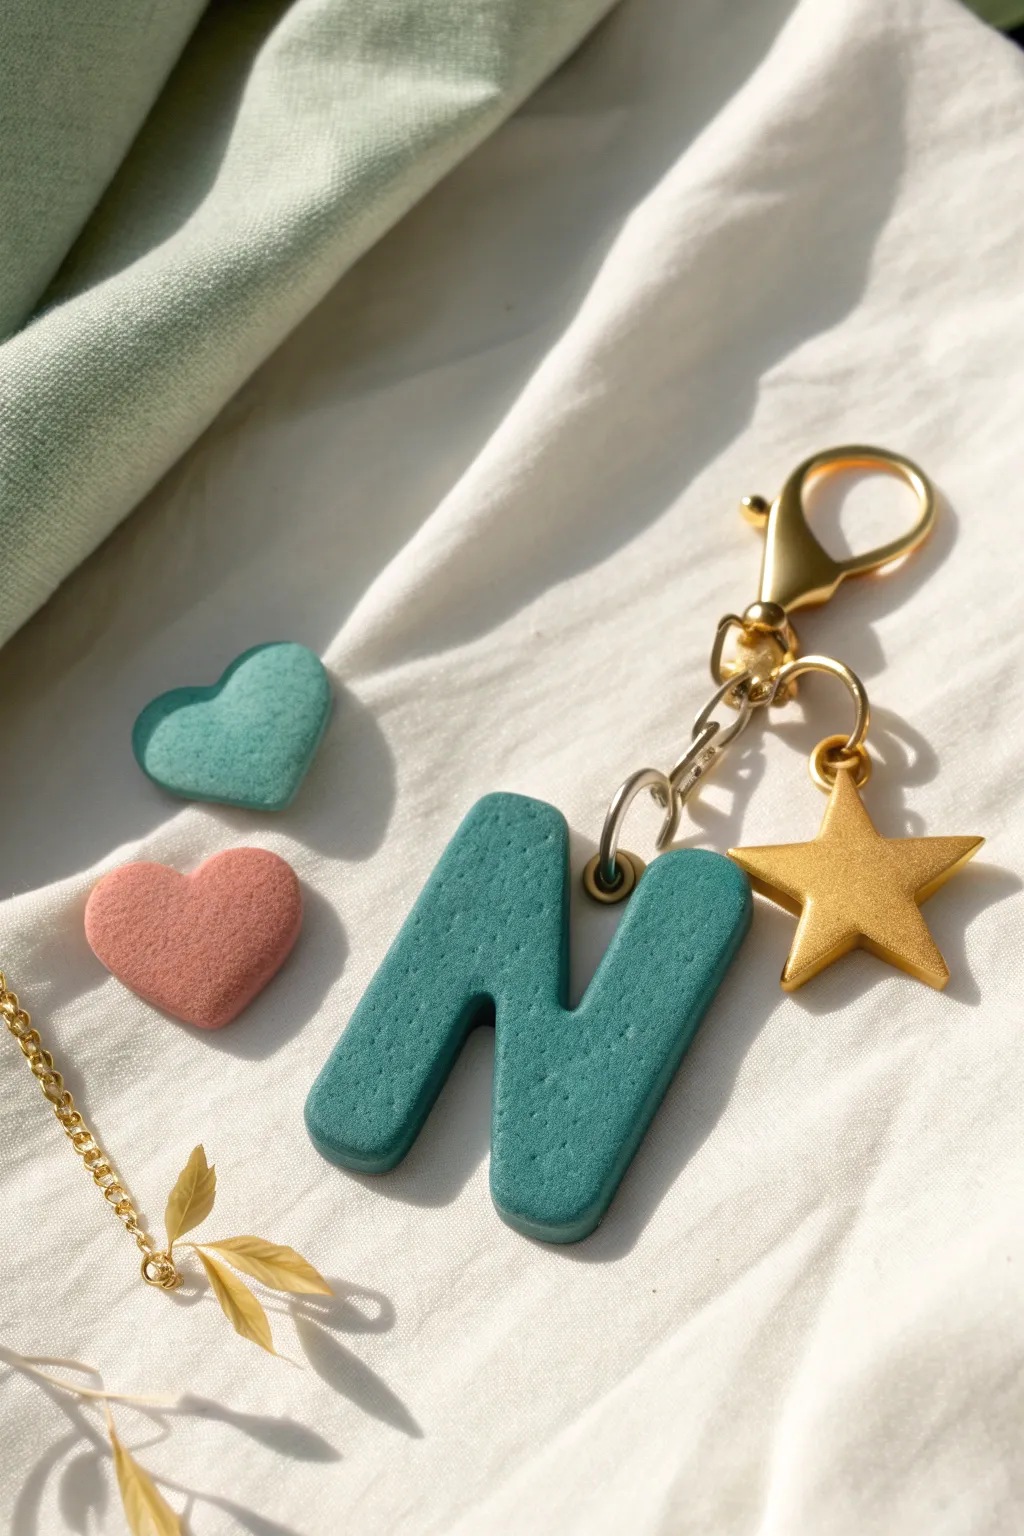
Create a personalized accessory that pops with this thick, textured initial bag charm. Featuring a matte teal finish and shimmering gold accents, this project is perfect for beginners looking to make something both durable and stylish.
Step-by-Step
Materials
- Teal foam clay
- Pink foam clay (small amount)
- Small eye screw (gold)
- Gold lobster clasp keychain hardware
- Gold jump rings
- Gold star charm
- Rolling pin or smooth round tool
- Clay carving tools or a craft knife
- Alphabet cookie cutter (optional but recommended)
- Needle nose pliers
- Sandpaper or nail file (fine grit)
Step 1: Shaping the Letter
-
Condition the clay:
Start by taking a generous amount of teal foam clay and kneading it in your hands. Warmth and movement help activate the clay, making it smoother and easier to shape without cracking. -
Roll the slab:
Place the clay on a non-stick surface and use your rolling pin to flatten it. You want a nice, thick slab—aim for about 1/4 to 1/2 inch thickness to give the letter that chunky, substantial look seen in the photo. -
Cut the letter:
Press a festive ‘N’ (or your chosen letter) cookie cutter firmly into the clay. If you don’t have a cutter, print a template, lay it on the clay, and carefully trace around it with a craft knife. -
Refine the edges:
Gently push the letter out of the cutter. Using your fingers or a flat sculpting tool, tap down any sharp ridges or stray bits of clay along the sides to create a soft, rounded edge. -
Add texture:
For that subtle, stone-like texture, take a stiff-bristled toothbrush or a texturing tool and very lightly tap the surface of the wet clay. Don’t press too hard; you just want tiny surface dimples.
Step 2: Creating the Hearts
-
Shape the teal heart:
Take a small scrap of the leftover teal clay. Roll it into a ball, flatten it slightly, and either use a tiny cutter or pinch the bottom and indent the top to form a small heart shape. -
Shape the pink heart:
Repeat the previous step using a small amount of pink foam clay. Try to make this heart roughly the same size as the teal one for a balanced set of accent pieces. -
Smooth the surfaces:
Rub your finger gently over both hearts to ensure they are smooth and free of fingerprints. Set them aside on parchment paper to dry.
Smooth Operator
If your dried clay has rough edges, use a tiny amount of water on your finger to smooth them, or lightly buff with a fine-grit nail file.
Step 3: Assembly & Hardware
-
Insert the eye pin:
While the main letter is still wet, carefully screw the gold eye screw into the top corner of the letter. I find twisting it in slowly prevents the clay from tearing. -
Secure the pin:
Once the eye screw is in place, gently pinch the clay around the base of the screw to ensure it is tight and secure. This prevents the hardware from pulling out later. -
Let it cure:
Allow all your foam clay pieces to dry completely. Depending on the humidity and thickness, this usually takes 24 to 48 hours. The clay will feel firm and lightweight when ready. -
Open the jump ring:
Using two pairs of pliers (or one pair and your fingers), twist a gold jump ring open sideways. Never pull it apart horizontally, as this weakens the metal. -
Attach the keychain:
Thread the open jump ring through the eye screw on your dried letter. Add the gold lobster clasp assembly to the ring before closing it back up securely. -
Add the star charm:
Open a second, smaller jump ring. Slide your gold star charm onto it. Locate a link on the keychain chain (or attach it to the same main jump ring) and close the ring to let the star dangle freely. -
Final inspection:
Double-check that all jump rings are fully closed so your charms don’t slip off. Your custom initial charm is now ready.
Go for Gloss
Coat the finished letter with UV resin or a high-gloss varnish to make it shine and protect it from scratches and dirt.
Clip your new charm onto your favorite tote or backpack for an instant pop of personality

The Complete Guide to Pottery Troubleshooting
Uncover the most common ceramic mistakes—from cracking clay to failed glazes—and learn how to fix them fast.
Mini Bows and Toppers Set
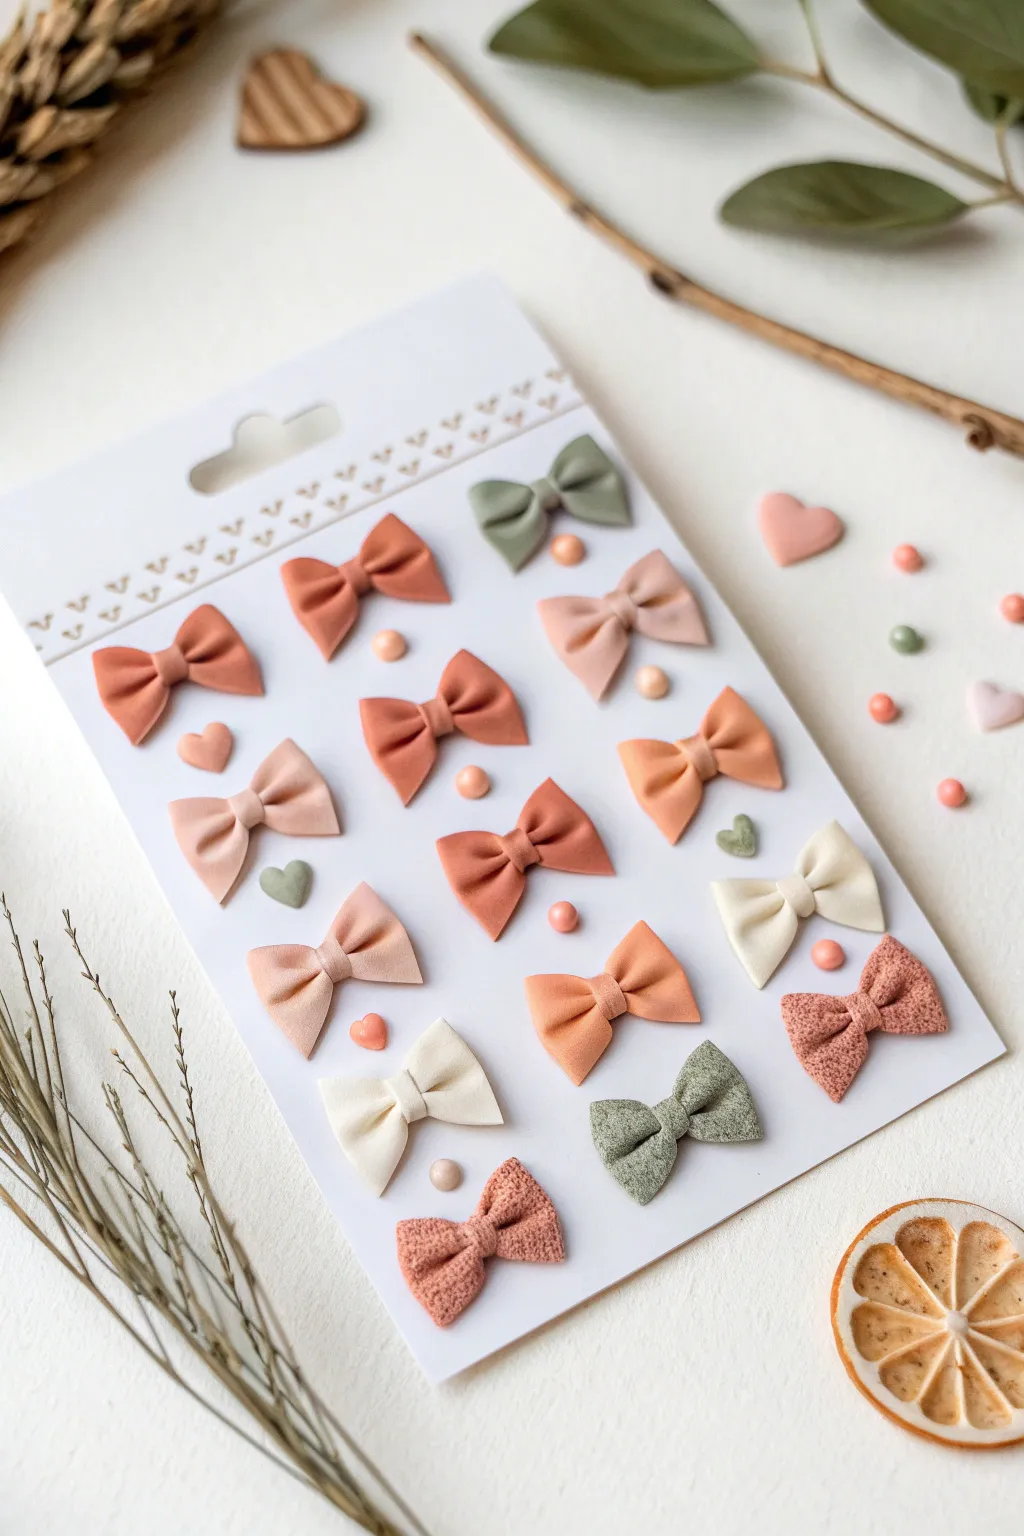
These charming, miniature bows are perfect for adding a sweet touch to planners, hair clips, or scrapbooks. Using soft foam clay, you’ll create a palette of earthy peaches, muted greens, and creams to form a cohesive, professional-looking sticker sheet.
Detailed Instructions
Materials
- Foam clay (peach, sage green, terracotta, cream, pink)
- Clean non-stick work surface or silicone mat
- Rolling pin (acrylic or plastic)
- X-acto knife or clay blade
- Small dotting tool or toothpick
- Texturing tool (clean toothbrush or sandpaper)
- White cardstock sheet
- Adhesive dots or craft glue
Step 1: Prepping the Clay & Sheet
-
Condition the clay:
Start by kneading each color of foam clay separately until it is warm, pliable, and free of cracks. If you want custom shades, mix colors now—adding a tiny bit of brown to pink creates that lovely dusty rose. -
Prepare the backing card:
Cut your white cardstock into a rectangular shape to serve as the display backing. You can punch a hole at the top or use a patterned border punch to create decorative edges similar to the reference photo.
Step 2: Creating Smooth Bows
-
Roll out the clay:
Take a small ball of peach clay and roll it out into a thin, even strip, approximately 2-3mm thick. -
Cut the base strip:
Use your clay blade to cut a clean rectangle about 1.5 inches long and 0.5 inches wide. Trim the ends cleanly. -
Fold the ends:
Gently fold the two ends of the rectangle inward so they meet in the exact center. Do not press them flat; you want to maintain the loop’s volume. -
Create the center knot:
Cut a very thin, small strip of clay in the same color. Wrap this vertically around the center where the two ends meet to hide the seam. -
Pinch and shape:
Gently pinch the center ‘knot’ to cinch the bow, creating dimples on either side. Adjust the loops so they look symmetrical and puffy. -
Dry placement:
Set this finished smooth bow aside on your non-stick surface to begin setting while you make others in various smooth colors like sage and cream.
Cracking Clay?
If the clay creates cracks when you fold the bow loops, it’s too dry. Knead in a tiny drop of water or baby lotion to restore elasticity before rolling.
Step 3: Creating Textured ‘Sugar’ Bows
-
Texture the clay slab:
Roll out a slab of terracotta or light pink clay. Before cutting, press a clean toothbrush or piece of coarse sandpaper gently onto the surface to create a stippled, sugary texture. -
Cut and form:
Just like with the smooth bows, cut a rectangle from this textured slab. Be gentle when handling so you don’t smudge the pattern you just created. -
Assemble the textured bow:
Fold the ends to the center and wrap with a small textured strip. I find using the dull side of a knife to press the center strip down helps keep the texture intact.
Pro Tip: Perfect Centers
Use a dotting tool to press the clay strip into the center of the bow from the back side. This secures the knot without flattening the front puff.
Step 4: Final Details & Assembly
-
Make mini hearts:
With tiny leftover scraps of clay, form small balls and indentation firmly with a needle tool to create microscopic hearts. -
Create clay ‘pearls’:
Roll extremely small spheres of peach or pink clay to mimic pearl accents. -
Arrange on cardstock:
Once the clay pieces are surface-dry (finishing drying usually takes 24 hours), apply a small dot of glue or use double-sided adhesive to stick them onto your prepared cardstock. -
Secure the arrangement:
Place the bows in neat rows, alternating colors and textures. Fill the empty spaces between bows with your tiny clay hearts and pearls for a playful scattering effect.
Enjoy using your custom adorable embellishments on your next stationery project
Striped Rainbow Bead Shapes
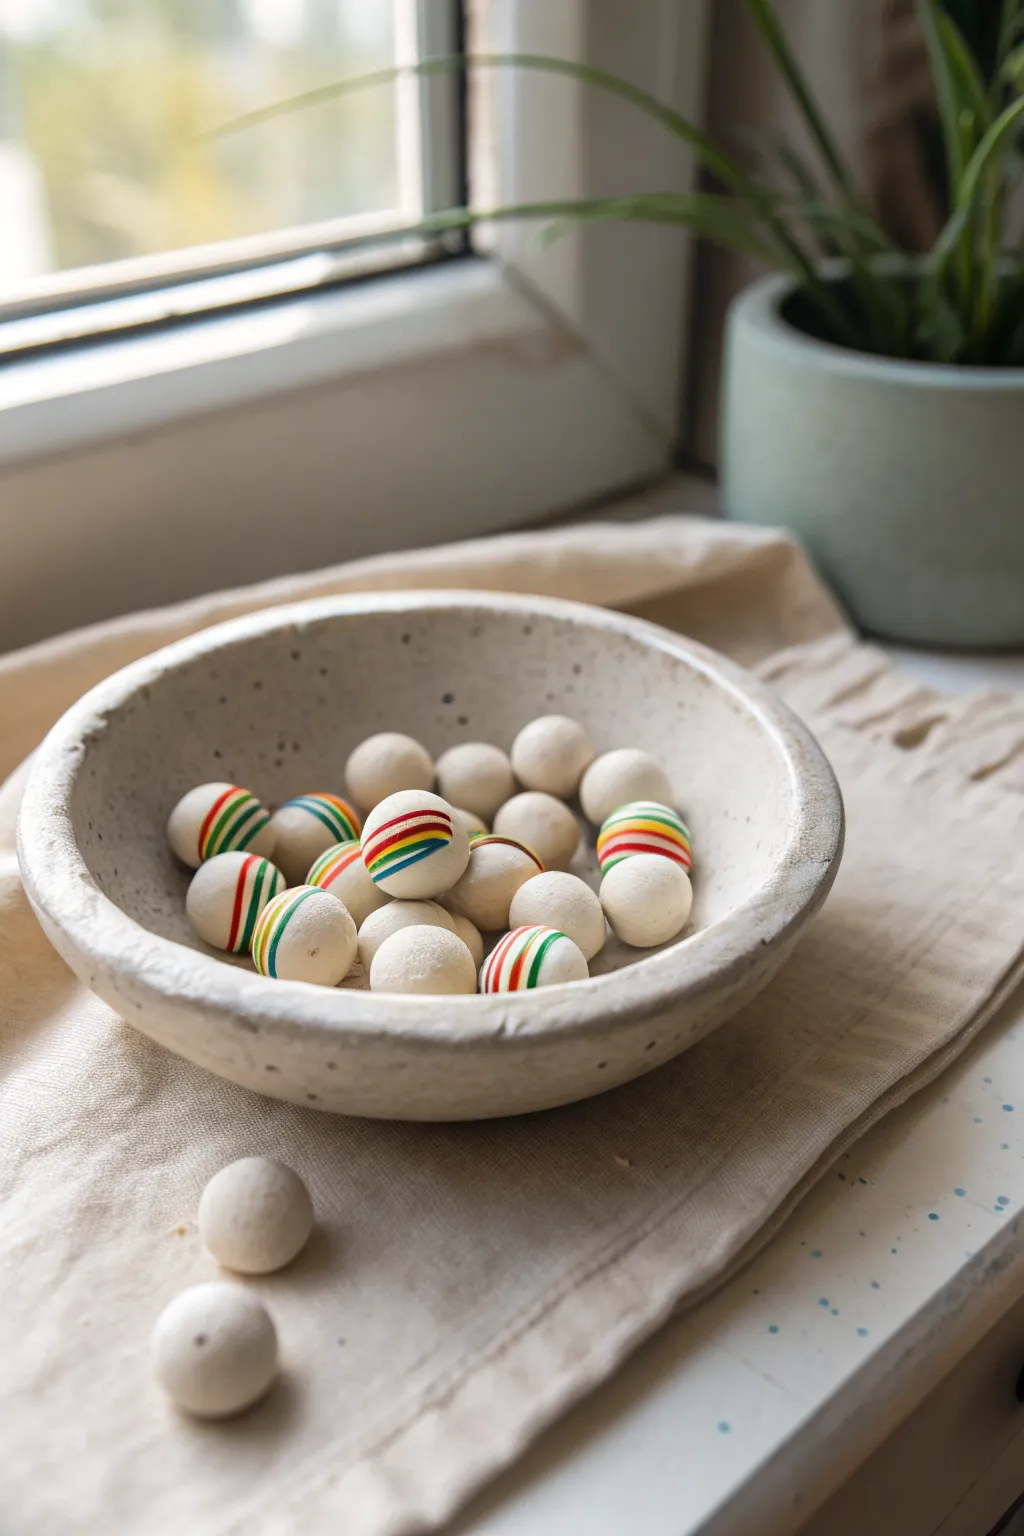
These charming, lightweight beads bring a touch of minimalist whimsy to any bowl or garland project. Using foam clay creates a smooth, matte finish that mimics unglazed ceramic, while the vibrant stripes add a playful pop of color.
How-To Guide
Materials
- White air-dry foam clay
- Fine-grit sandpaper (optional)
- Acrylic paint markers (fine tip: Red, Yellow, Green, Blue)
- Bamboo skewers or toothpicks
- Styrofoam block or floral foam (for drying)
- Clean rolling surface (like a silicone mat)
Step 1: Shaping the Beads
-
Condition the clay:
Begin by taking a chunk of white foam clay from the package. Knead it thoroughly in your hands for about a minute. The warmth from your palms helps activate the polymers, making the clay smoother and less prone to cracking as it dries. -
Portioning:
Pinch off small pieces of clay, roughly the size of a large marble or a gum ball. Try to keep the portions consistent if you want uniform beads, or vary them slightly for a more organic look. -
Rolling spheres:
Place a portion of clay between your palms. Roll it in a circular motion, applying gentle, even pressure. Continue until you have a perfectly smooth sphere with no visible seams or wrinkles. -
Creating the hole:
While the sphere is still soft, gently pierce the center with a toothpick to create a bead hole. I find that twisting the toothpick as you push it through prevents the spherical shape from distorting. -
Smoothing the exit:
Check the side where the toothpick exited; the clay might have puckered slightly. Gently tap that area with your finger or roll it lightly against your mat to smooth the rim of the hole. -
Repeat the process:
Continue rolling and piercing until you have your desired number of beads. For the look in the photo, you will want a mix of about 60% plain white beads and 40% striped beads. -
Initial drying:
Place the beads on a Styrofoam block by sticking the toothpicks into the foam, allowing air to circulate around the entire sphere. Let them dry for at least 24 hours until they feel firm and lightweight.
Smooth Operator
If your dried clay feels slightly textured or has fingerprints, gently buff it with fine-grit sandpaper before painting. This creates a perfect, porcelain-like matte surface.
Step 2: Adding the Stripes
-
Select your canvas:
Once dry, pick out the smoothest beads for your striped designs. Leave the others plain white to create visual rest in your final arrangement. -
First stripe: Red:
Using a red fine-tip acrylic paint marker, draw a single line around the circumference of the bead. It doesn’t need to be perfectly straight; a hand-drawn wobble adds character. -
Second stripe: Yellow:
Draw a yellow line directly next to the red one. Try to keep the spacing tight so the colors touch or nearly touch. -
Third stripe: Green:
Add a green stripe next to the yellow. Rotate the bead slowly in your fingers to maintain a consistent line weight. -
Fourth stripe: Blue:
Finish the sequence with a blue line. Ensure the paint is fully opaque; if the marker looks translucent, let it dry for a minute and add a second pass. -
Painting variations:
Vary the patterns on different beads. On some, paint a single bold rainbow band around the equator. On others, try painting two separate bands of stripes on opposite sides of the sphere. -
Drying the paint:
Let the paint marker ink dry completely. Because foam clay is slightly porous, this should happen very quickly, usually within 5 to 10 minutes.
Cracked Clay?
If cracks appear while drying, fill them with a tiny smear of fresh, wet foam clay mixed with a drop of water. Smooth it over with your finger and let it dry again.
Arrange your finished beads in a simple stoneware bowl for a modern, artistic display


What Really Happens Inside the Kiln
Learn how time and temperature work together inside the kiln to transform clay into durable ceramic.
Chubby Octopus Desk Buddy
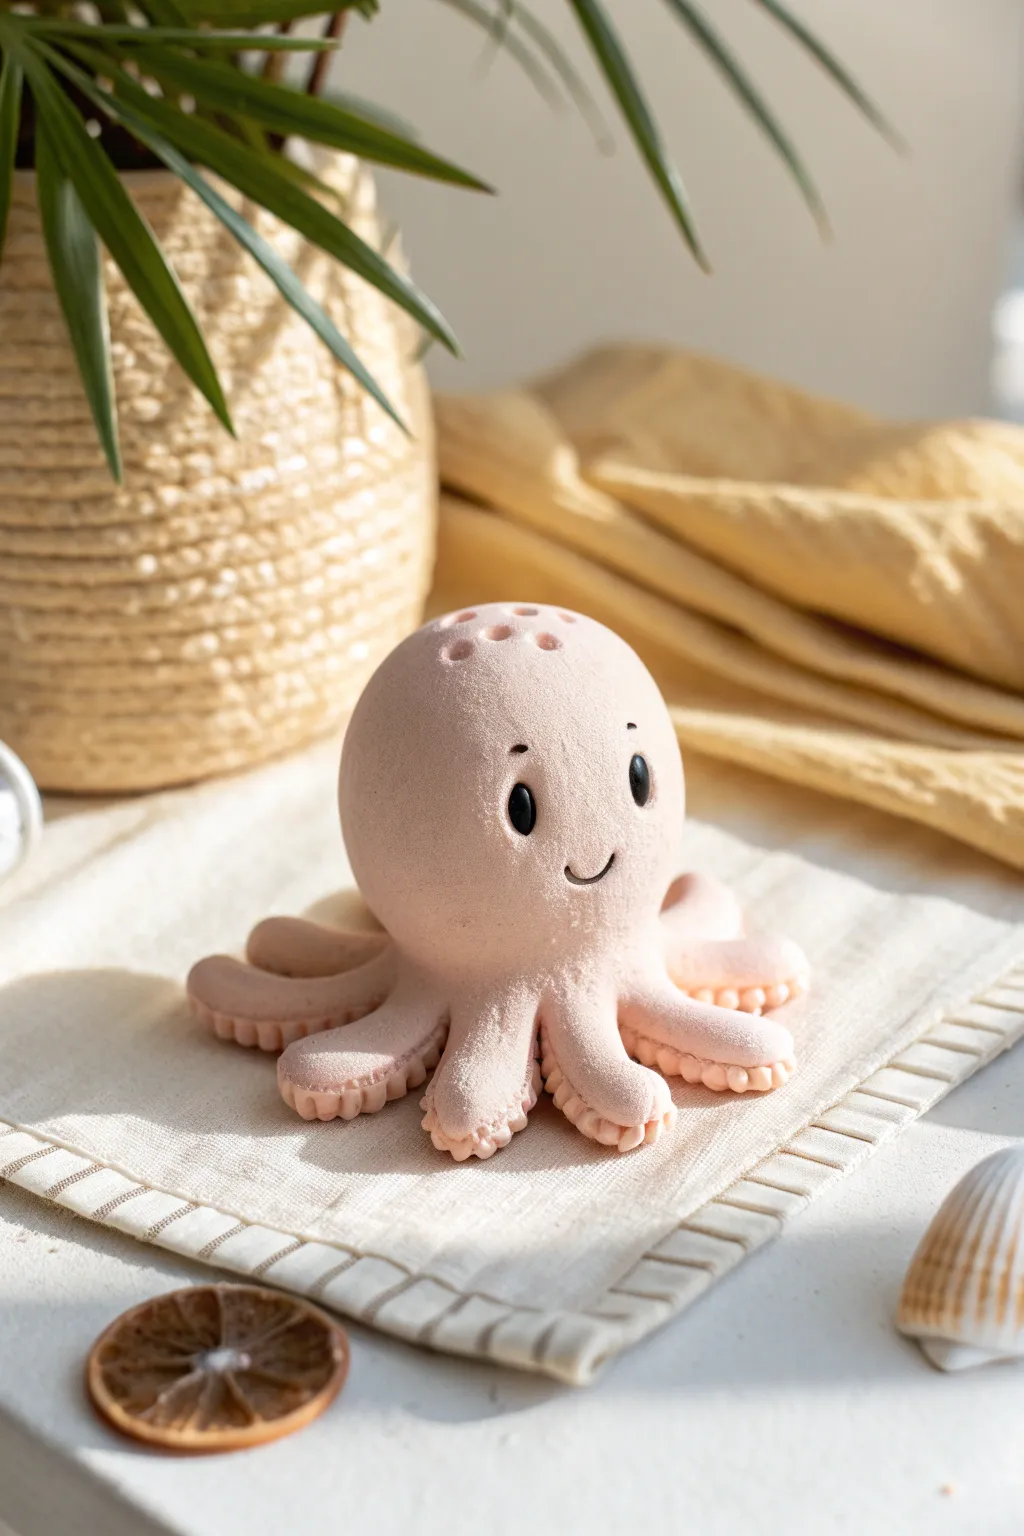
This adorable desk companion features a soft, velvety texture that only foam clay can provide. With its cheerful smile and detailed suckers, this pudgy pink octopus brings a touch of seaside whimsy to any workspace.
Step-by-Step
Materials
- Pale pink or peach foam clay
- Small amount of black foam clay
- Ball stylus tool (medium size)
- Plastic modeling tool or butter knife
- Toothpick or needle tool
- A clean, non-stick work surface
Step 1: Forming the Body
-
Condition the clay:
Start by taking a large handful of your pink foam clay. Knead and stretch it thoroughly in your hands to activate the binder and remove any air bubbles. -
Shape the main mass:
Roll the clay into a smooth, seamless ball. If you see cracks, keep rolling it between your palms until the surface is perfect. -
Create the dome shape:
Gently press the ball onto your work surface to flatten the bottom slightly. Use your palms to taper the top slightly, creating a soft gumdrop or rounded dome shape for the head.
Sticky Situation?
If the clay is too sticky, let it sit exposed to air for 5-10 minutes. If it’s too dry and cracking, knead in a single drop of water to rehydrate it.
Step 2: Sculpting the Tentacles
-
Prepare tentacle portions:
Pinches off eight equal-sized pieces of pink clay, each roughly the size of a large marble, and roll them into small balls. -
Roll out logs:
Roll each small ball into a tapered log shape, about 2 inches long. One end should remain slightly thicker (to attach to the body) while the other end tapers to a gentle point. -
Attach the first legs:
Press four of the tentacles onto the underside of the main body, spacing them out like a compass (North, South, East, West). Smooth the connection point upward into the body using your thumb. -
Fill the gaps:
Attach the remaining four tentacles in the spaces between the first set. This ensures even spacing without crowding legs at the end. -
Pose the tentacles:
Gently curve the tips of the tentacles upward. I like to give a few of them a slight S-curve so the octopus looks like it is resting comfortably rather than stiffly.
Make It a Planter
Before the clay dries, press a small air plant into the top of the head to create a dent. Once dry, glue the plant in for a living hair-do.
Step 3: Adding Details
-
Create sucker indentations:
Flip the octopus gently or lift the tentacles. Use a ball stylus tool to press a row of circles into the underside of each tentacle. -
Form the suckers:
Roll extremely tiny balls of pink clay. Place one tiny ball into each indentation you just made. -
Texture the suckers:
Using a smaller tool or the back of a toothpick, press into the center of each tiny added ball to create the suction cup ring effect. -
Make the eyes:
Roll two small, peppercorn-sized balls of black foam clay. Press them gently into the center of the face, spacing them wide apart for a cute look. -
Add highlights:
Take a microscopic speck of white clay (or pink if you want a subtle look) and add a tiny reflection dot to the top corner of the black eyes. -
Carve the smile:
Use the edge of your modeling tool or a curved motion with a toothpick to impress a simple, U-shaped smile right between the eyes. -
Detail the head:
Using a toothpick, poke a few random, shallow holes on the very top of the head to mimic natural sea sponge textures or pores. -
Final smoothing:
Dip your finger in a tiny drop of water and lightly run it over any fingerprints on the head to erase them before drying. -
Let it cure:
Allow the octopus to air dry completely for 24-48 hours. The foam clay will harden but remain lightweight and slightly squishy.
Set your new squishy friend on a shelf or desk where its cheerful face can brighten your workday
Foam Clay Bookmark Toppers
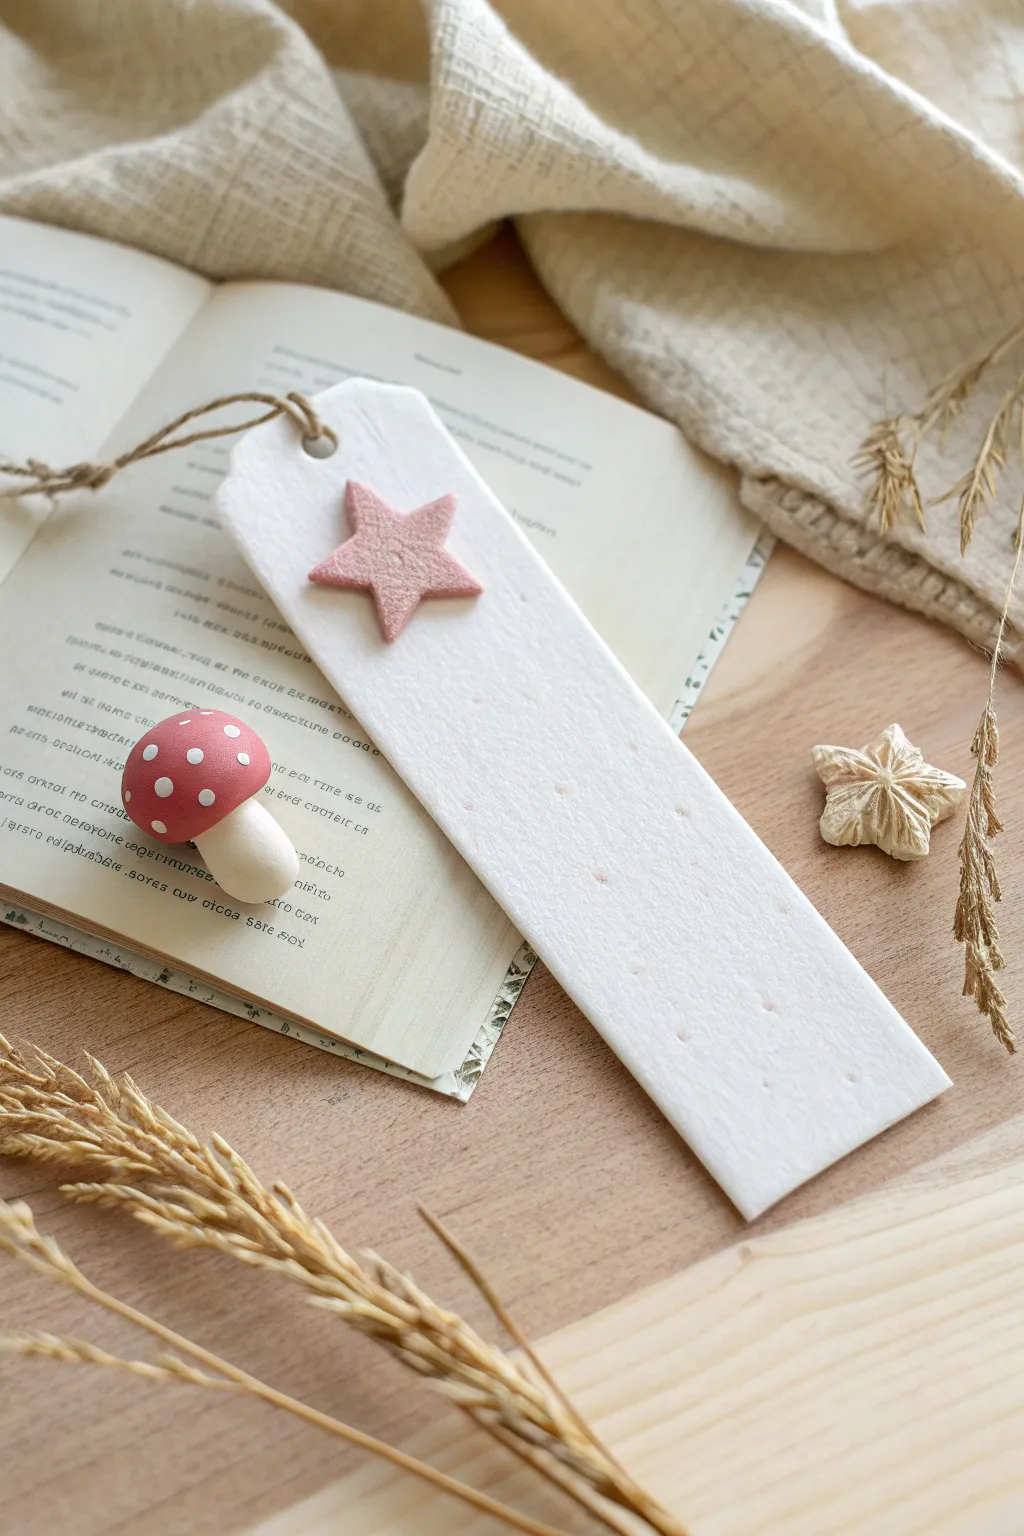
Create a dreamy, textured reading companion with this minimalist foam clay bookmark project. Featuring a soft white base with subtle stippling and a charming pink star accent, it adds a gentle handmade touch to your favorite books.
Step-by-Step Tutorial
Materials
- White foam clay
- Pink foam clay (or white mixed with a drop of pink acrylic paint)
- Rolling pin or smooth cylindrical object
- Craft knife or bookmark-shaped cookie cutter
- Small star-shaped cookie cutter
- Natural jute twine
- Skewer or toothpick (for texturing)
- Drinking straw or round tool (for the hole)
- Parchment paper or silicone mat
Step 1: Shaping the Base
-
Prepare the workspace:
Lay down a sheet of parchment paper or a silicone mat to prevent the clay from sticking to your table. -
Condition the white clay:
Take a generous handful of white foam clay and knead it thoroughly in your hands to ensure it is warm, pliable, and free of air bubbles. -
Roll out the slab:
Place the clay on your mat and use a rolling pin to flatten it into an even slab, aiming for a thickness of about 3-4mm. Ensure it’s thick enough to be sturdy but thin enough to not damage book spines. -
Cut the rectangle:
Using a craft knife and a ruler (or a large rectangular cutter if you have one), cut a long, clean rectangle. The typical size is about 1.5 inches wide by 6 inches long. -
Refine the edges:
Gently tap the cut edges with your finger to smooth out any sharpness or roughness left by the knife, giving it a finished look. -
Shape the top punch:
Use a craft knife or scissors to snip the top two corners at an angle, creating a tag-like shape at the top of the bookmark. -
Create the hanging hole:
While the clay is still soft, press a drinking straw or a similar round tool through the top center of the tag shape to create a clean hole for the twine.
Uneven Drying?
If the bookmark starts curling as it dries, place a light book on top of it (with parchment paper in between) after the first few hours to keep it perfectly flat.
Step 2: Applying Texture
-
Stipple the surface:
Take a toothpick or a skewer and gently press the blunt end into the surface of the white clay repeatedly. Don’t push all the way through; just create small dimples for a subtle, porous texture. -
Smooth if necessary:
If the dimples pull up too much clay, gently pat the surface with your finger to knock down any high ridges while keeping the indentations.
Step 3: Adding the Star
-
Roll out the pink clay:
Takes a small ball of pink foam clay—I usually mix a tiny bit of red into white if I don’t have pastel pink—and roll it out slightly thinner than your base. -
Cut the star shape:
Use a small star cutter to punch out a perfect star shape. If the edges catch, smooth them gently with your fingertip. -
Attach the accent:
Place the pink star onto the upper third of the white bookmark base. Since foam clay adheres to itself while wet, simply press it down gently to bond the two pieces. -
Texture the star:
To match the aesthetic, give the pink star a very light quick texturing with your tool or an old toothbrush to remove the smooth, synthetic plastic look.
Go Botanical
Before the clay dries, press dried wildflowers or lavender buds into the white base instead of using the pink star for a lovely cottagecore variation.
Step 4: Finishing Touches
-
Allow to dry:
Let the bookmark sit flat on the parchment paper to cure. Foam clay can take 24-48 hours to dry completely depending on humidity. Flip it over halfway through to ensure the back dries evenly. -
Cut the twine:
Once fully dry and hardened, cut a piece of natural jute twine about 8 inches long. -
Knot the tassel:
Fold the twine in half, push the loop through the hole from front to back, and pull the tails through the loop to create a secure lark’s head knot.
Slide this soft, textured creation into your current read and enjoy a moment of handmade calm

TRACK YOUR CERAMIC JOURNEY
Capture glaze tests, firing details, and creative progress—all in one simple printable. Make your projects easier to repeat and improve.
Mini Character Tile Wall Art

Create a charming piece of wall decor with this grid of mini foam clay tiles featuring sweet weather motifs. The soft, matte finish of foam clay combined with earthy, muted tones gives this project a trendy, bohemian nursery vibe that looks surprisingly high-end.
Detailed Instructions
Materials
- Foam clay in white, terracotta, dusty pink, mustard yellow, and teal
- Square wooden mounting board (approx. 6×6 or 8×8 inches)
- Ruler
- Rolling pin or smooth acrylic roller
- Craft knife or clay blade
- Small circle cutter (optional, for suns)
- Modelling tools (ball stylus, needle tool)
- Star and heart cookie cutters (small)
- Strong craft glue or hot glue
- Fine-grit sandpaper (optional)
- Black fine-tip marker (optional, for eyes)
- Parchment paper
Step 1: Preparing the Base Tiles
-
Color Mixing:
Begin by preparing your color palette. Foam clay is easily mixable, so blend primary colors with plenty of white to achieve those soft, dusty pastel shades like terracotta, sage teal, and muted mustard. Create a speckled ‘stone’ effect for the white tiles by mixing in tiny flecks of brown or black clay. -
Rolling Out:
Roll out each colored clay onto parchment paper to a uniform thickness, aiming for about 1/4 inch thick. Try to keep the thickness consistent across all colors so your grid lies flat. -
Cutting Squares:
Using a ruler and a sharp craft knife or square cutter, cut out nine identical squares. Measure your wooden board first to determine the perfect size for your grid, leaving a small gap between pieces. -
Smoothing Edges:
While the squares are technically cut, foam clay invites softening. Gently tap the cut edges of each square with your finger to round them slightly, giving them a handmade ceramic tile look rather than a sharp geometric feel.
Clay Shrinkage
Foam clay shrinks slightly as it dries! Verify your squares are cut just a tiny bit larger than you need them so gaps don’t become too wide on the final board.
Step 2: Sculpting the Motifs
-
Embossed Sun Designs:
For the sun tiles, press a small circle cutter gently into the center to create the sun’s face boundary. Use a needle tool or the edge of a ruler to impress radiating lines around the circle for rays. -
Adding Relief Stars:
For the teal center tile, roll out a small amount of teal clay slightly thinner than the base. cut a star shape using a cutter or knife. Adhere this directly onto the square base; foam clay sticks to itself easily while fresh. -
Creating Clouds:
Roll small balls of white clay and press them together into a cluster on top of a pink base tile. Flatten them gently to form a puffy cloud shape. Repeat this for the second cloud tile. -
Indented Hearts:
On the terracotta tile, gently press a heart-shaped cutter about halfway through the clay to create an outline indented design. Alternatively, use a styling tool to draw the heart shape deeply into the foam. -
Raised Heart:
For the white tile with the heart, reverse the process. Cut a heart shape from white clay and press it onto the center of the tile for a raised 3D effect. -
The Minimalist Face:
For the top-left pink tile, simply use a small ball tool to indent two eyes. Use a larger curved tool or the side of a dismantled pen casing to press a gentle smile into the clay.
Step 3: Final Details & Assembly
-
Adding Expressions:
Go back to your suns and clouds. Use the small ball tool or a needle to add tiny smiling faces to these characters. Simplicity is key here—just two dots and a small curve work best. -
Drying Time:
Allow all nine tiles to dry completely on a flat surface. Foam clay can take 24-48 hours to fully cure depending on thickness. Flip them over halfway through if possible to ensure even drying. -
Refining:
Once hardened, foam clay can be slightly spongy but sandable. If you have any rough distinct edges, smooth them very gently with fine-grit sandpaper. -
Layout Check:
Arrange your tiles on the wooden board to finalize the pattern. I like to take a photo at this stage so I remember exactly which color goes where before gluing. -
Gluing:
Apply a dab of strong craft glue to the back of each tile. Press them firmly onto the wood, using your ruler to ensure the spacing between tiles remains even. -
Finishing Touches:
If you want a glossier finish, you can seal the tiles with a water-based varish, though the matte finish is more traditional for this boho style.
Clean Lines Pro Tip
When making indented rays or smiles, lightly coat your tool in a tiny bit of cornstarch or baby oil. This prevents the sticky clay from dragging and keeps your lines crisp.
Hang your cheerful new mini-mosaic in a nursery or entryway to add a spot of sunshine to your day