
If you’ve got a stack of terracotta pots sitting around, you’ve basically got instant Halloween decor waiting to happen. I love how a little paint (and maybe a saucer or two) can turn plain clay into spooky-cute characters, candy holders, and porch-ready displays.
Jack-o’-Lantern Candy Pot
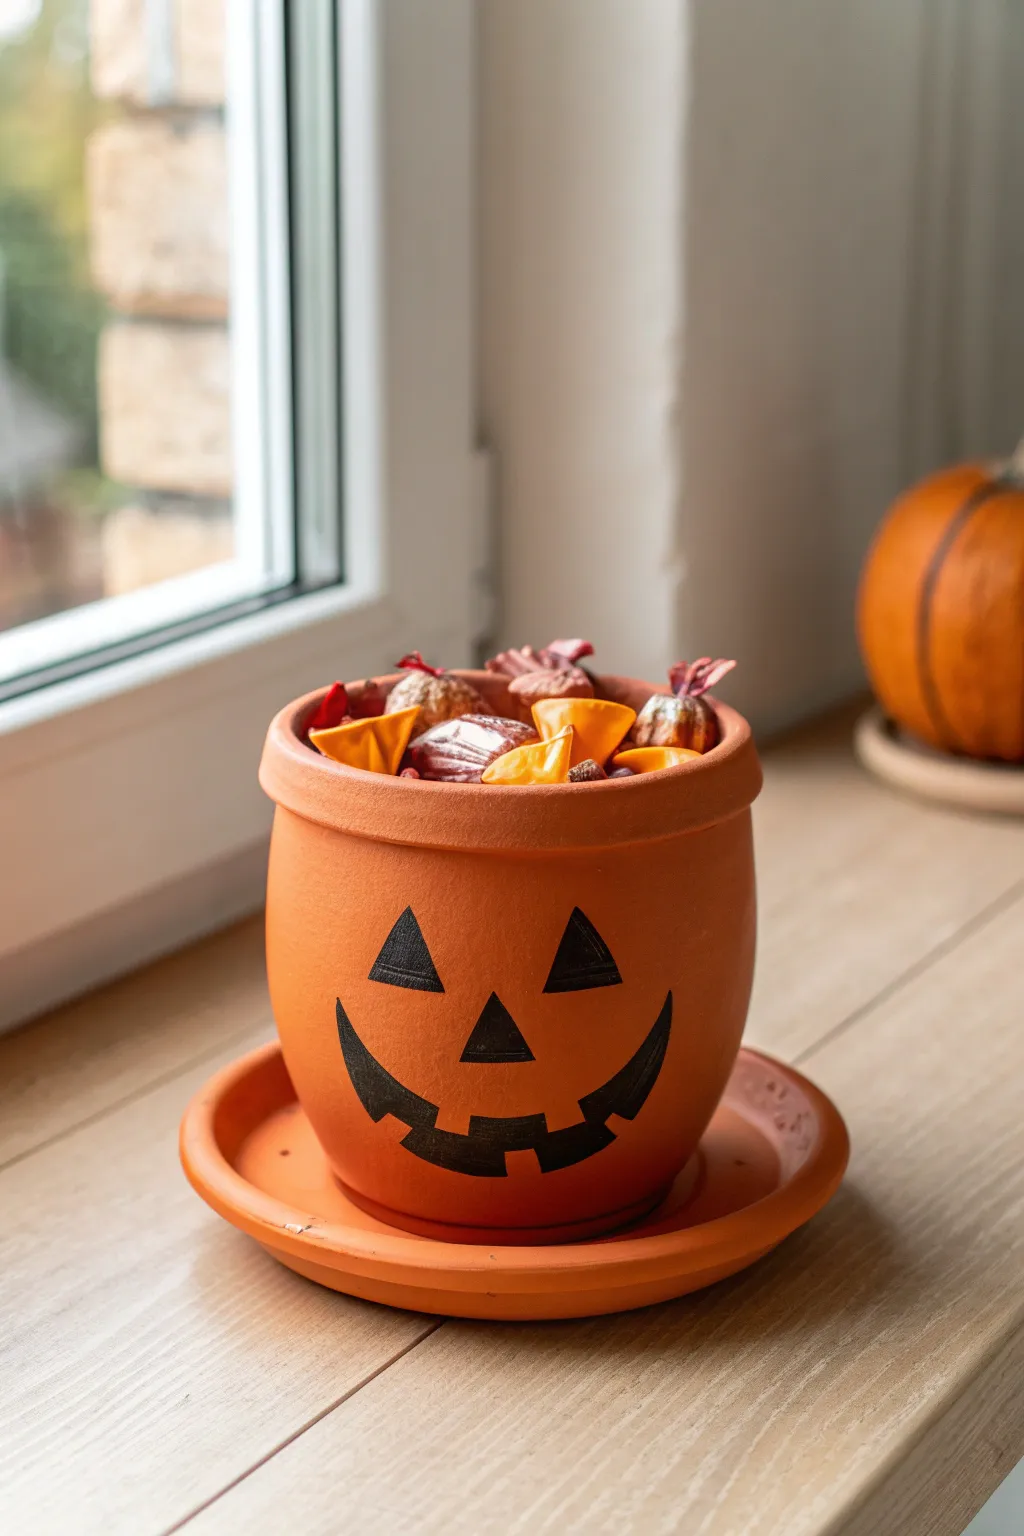
Transform a simple garden pot into a festive centerpiece with this charming Jack-o’-Lantern candy holder. The warm orange finish and classic grinning face make it a perfect, low-effort decoration for your windowsill or Halloween party table.
Step-by-Step Tutorial
Materials
- Terracotta clay pot (standard 4-6 inch size)
- Matching terracotta saucer
- Orange acrylic paint (matte finish)
- Black acrylic paint
- Wide flat paintbrush
- Small fine-tip paintbrush or black paint marker
- Pencil
- Bowl of water and paper towels
- Matte spray sealer (optional)
- Small wrapped candies for filling
Step 1: Base Preparation
-
Clean the pot:
Before starting, ensure your terracotta pot and saucer are completely clean and free of dust or sticker residue. Wipe them down with a damp cloth if needed and let them dry fully. -
Seal the inside (optional):
If you plan to put unwrapped food directly in, you’ll need a food-safe sealant. However, for wrapped candies like those shown, painting just the exterior is fine. I usually give the inside rim a quick coat of orange so the clay color doesn’t peek through. -
Mix your orange:
Squeeze out a generous amount of orange acrylic paint. If the color feels too bright or neon, mix in a tiny drop of brown or burnt sienna to achieve that earthy, pumpkin-like tone seen in the image. -
First coat:
Using your wide flat brush, apply the first layer of orange paint to the exterior of the pot. Don’t forget to paint the top rim. -
Paint the saucer:
While the pot dries, paint the top and sides of the terracotta saucer with the same orange mixture. This creates a cohesive look when they enter stack together. -
Second coat:
Terracotta is very porous and soaks up paint quickly. Once the first layer is dry to the touch, apply a second coat to ensure solid, opaque coverage without streaks. -
Let it cure:
Allow both the pot and saucer to dry completely. This usually takes about 30 minutes, but check your paint bottle for specific instructions.
Keep it Clean
Use a black oil-based paint marker instead of a brush for the face. It offers way more control for sharp corners and dries faster than acrylics.
Step 2: Designing the Face
-
Draft the face:
Using a pencil, lightly sketch your Jack-o’-Lantern face directly onto the painted pot. Draw two triangles for eyes, a smaller triangle for the nose, and a wide, curved smile. -
Detail the mouth:
Add the tooth details to your smile sketch. In the example, there is one square tooth on the bottom and two spaces on the top. Keep the lines simple and bold. -
Check symmetry:
Take a step back and look at your pencil sketch. Adjust the positioning if the eyes aren’t level or the smile is too far to one side. Erasing lightly is fine, just be gentle on the paint. -
Outline the shapes:
Switch to your fine-tip brush or a black paint marker. Carefully trace over your pencil lines to create a crisp outline for the eyes, nose, and mouth. -
Fill in the eyes:
Use the brush to fill in the triangular eyes with solid black paint. I find it helpful to start in the center and push the paint outward toward the lines to keep the corners sharp. -
Fill the nose:
Fill in the nose triangle, ensuring the bottom edge is parallel to the imaginary line connecting the bottom corners of the eyes. -
Fill the mouth:
Paint the inside of the mouth shape black. Be extra careful around the ‘teeth’ areas to keep those square shapes distinct. -
Touch ups:
If your hand slipped, wait for the black paint to dry completely, then dab a little orange over the mistake to conceal it.
Top it Off
For a complete pumpkin look, find a saucer that fits on top of the pot as a lid, paint it orange, and glue a small piece of branch on top as a stem.
Step 3: Finishing and Filling
-
Seal the work:
Once the face is completely dry, you can spray the pot with a clear matte sealer. This protects the paint from chipping and makes the pot easier to dust later, though the matte finish keeps that natural clay look. -
Assemble the set:
Place the painted saucer on your table or windowsill, and set the finished pot on top of it. -
Fill with treats:
Load up your new candy bowl with an assortment of individually wrapped chocolates or hard candies. The foil wrappers add a nice sparkle against the matte orange.
Now you have a timeless and reusable decoration that brings a touch of Halloween spirit to any corner of your home


Friendly Ghost Mini Pots

These adorable mini pots transform industrial cement into friendly little specters perfect for holding Halloween treats. With their textured, stone-like finish and simple painted expressions, they bring a minimalist modern charm to your spooky decor.
How-To Guide
Materials
- White cement or fine white concrete mix
- Water
- Small plastic mixing bowl
- Stirring stick or spoon
- Silicone mini pot molds (rounded tumbler shape)
- Cooking spray or mold release
- Fine-grit sandpaper (220 grit)
- Black acrylic paint
- Small round paintbrush (size 2 or 3)
Step 1: Mixing and Casting
-
Prepare the workspace:
Cover your work area with plastic sheeting or newspaper, as cement can be messy. Ensure your silicone molds are clean and dry. -
Apply mold release:
Lightly mist the inside of your silicone mold with cooking spray or a specialized mold release. Wipe away any excess pools of oil with a paper towel so the surface is just barely slick. -
Measure the mix:
Pour your white cement powder into the mixing bowl. I usually start with about a cup of powder for small pots like these, but check your mold’s volume. -
Add water gradually:
Slowly add water while stirring constantly. The goal is a consistency similar to thick pancake batter or melted milkshake—pourable but not watery. -
Remove air bubbles:
Let the mixture sit for about a minute, then tap the bowl gently on the table to help initial bubbles rise to the surface before pouring. -
Fill the molds:
Pour the cement mixture into the silicone mold. Fill it almost to the top, leaving just a sliver of space to prevent overflow. -
Tap to settle:
This is crucial for that smooth finish: lift the filled mold slightly and drop it gently onto the table repeatedly for about 30-60 seconds to force trapped air bubbles up and out. -
Let it cure:
Place the molds on a flat, level surface where they won’t be disturbed. Allow them to cure for at least 24 hours (or according to your package instructions) until hard and cool to the touch.
Bubbles Won’t Budge?
If tapping doesn’t release air bubbles, run a toothpick around the inside edges of the liquid cement to manually dislodge them before curing.
Step 2: Demolding and Finishing
-
Remove from mold:
Gently pull the silicone sides away from the hardened concrete. Push from the bottom to pop the pot out slowly to avoid chipping the rim. -
Inspect the surface:
Check for any sharp edges or rough seams left by the mold. The natural little pinholes add character, so don’t worry about filling those. -
Sand the rim:
Place a sheet of fine-grit sandpaper on a flat surface. Invert the pot and rub the rim in a circular motion to flatten and smooth the top edge. -
Wipe clean:
Use a barely damp cloth to wipe away all concrete dust from the sanding process. The surface needs to be completely dust-free for the paint to stick.
Step 3: Painting the Face
-
Plan the expression:
Visualize where the face should go. For these ghosts, the eyes sit slightly lower than the vertical center, spaced widely apart for a cuter look. -
Paint the first eye:
Dip your small round brush into black acrylic paint. Simply press the tip down and gently swirl it in a tiny circle to create a solid black oval. -
Paint the second eye:
Paint the second oval to match the first. Don’t worry if they aren’t mathematically identical; slight asymmetry makes the ghost look friendlier. -
Add the smile:
Using just the very tip of the brush, paint a small, thin ‘U’ shape between and slightly below the eyes. -
Dry completely:
Let the paint dry for 15-20 minutes before filling your new ghost pot with candy corn or treats.
Use White Cement
Make sure to buy white cement or white mortar mix, not standard grey concrete. Grey will dry too dark and ruin the ghostly effect.
Set your trio of ghosts on a wooden board and enjoy the charming simplicity they bring to the season


Black Cat Whisker Pot

Transform a simple round vessel into a sleek, minimalist cat planter perfect for quirky Halloween decor or year-round use. The matte black finish paired with subtle etched details gives this project a modern, sophisticated look.
Step-by-Step Tutorial
Materials
- Small round terracotta pot or clay bowl
- Air-dry clay (or polymer clay if baking fits your base pot)
- Matte black acrylic paint
- Wide flat paintbrush
- Fine-grit sandpaper
- White or silver paint pen (fine tip)
- Ruler or straight edge
- Water cup for smoothing clay
- Strong craft glue (optional)
Step 1: Sculpting the Silhouette
-
Prep the Surface:
Ensure your base pot is clean and dry. If using a glossy ceramic pot, lightly sand the rim where the ears will attach to create a better grip for the clay. -
Shape the Ears:
Pinch off two equal balls of air-dry clay, roughly the size of a walnut. Roll them smooth and then flatten them slightly into thick triangle shapes. -
Refine the Triangles:
Using your fingers, sharpen the top points of the triangles and curve the base slightly so it matches the curve of your pot’s rim. -
Create the Inner Ear:
Press a smaller, indented triangle into the center of each clay ear to give it dimension, leaving a thick raised border around the edges. -
Attach the First Ear:
Press the first ear firmly onto the back rim of the pot. Use a little water on your finger to blend the clay downward into the pot’s surface until the seam disappears. -
Attach the Second Ear:
Place the second ear opposite the first, ensuring they are symmetrical. Repeat the blending process, smoothing the clay so the ears look like an extension of the pot itself. -
Let it Cure:
Allow the clay to dry completely according to the package instructions. This usually takes 24 hours for air-dry clay. I like to prop the ears up with small cardboard scraps if they start to droop while wet.
Uneven Paint?
If your paint looks streaky, switch to a sponge brush for the final coat. Use a dabbing motion rather than dragging to build a solid, velvet-like texture.
Step 2: Painting and Detailing
-
Sand for Smoothness:
Once the clay is rock hard, take your fine-grit sandpaper and gently sand the transition area between the clay ears and the pot to make it seamless. -
Apply Base Coat:
Dip your wide flat brush into the matte black acrylic paint. Apply a thin, even layer over the entire exterior of the pot, including the new clay ears. -
Paint the Inside Rim:
Don’t forget to paint the top inch or so of the inside rim and the back of the ears so the original pot color doesn’t peek through. -
Second Coat:
Let the first coat dry fully, then apply a second coat to achieve that deep, opaque matte finish. Let this dry completely before touching it again. -
Mark the Face:
Use a pencil to very lightly mark where you want the eyes, nose, and whiskers. Center the nose about halfway down the pot. -
Draw the Eyes:
Using your fine-tip white or silver paint pen, draw two small, widely spaced circles for eyes. Keep them simple and open. -
Draw the Nose:
Draw an inverted triangle specifically with rounded corners for the nose. Add a small vertical line coming down from the bottom point, curving slightly into a ‘J’ shape for the mouth. -
Add Whiskers:
Draw three straight lines radiating outward from each cheek area. Try to keep them somewhat parallel but slightly fanned out for a classic cat look.
Glow Up
Use glow-in-the-dark paint for the eyes and whiskers instead of white. During the day it looks subtle, but at night your kitty will eerily stare back at you.
Now you have a charmingly spooky vessel ready for your favorite succulent or Halloween candy stash


Vampire Fangs Treat Cup
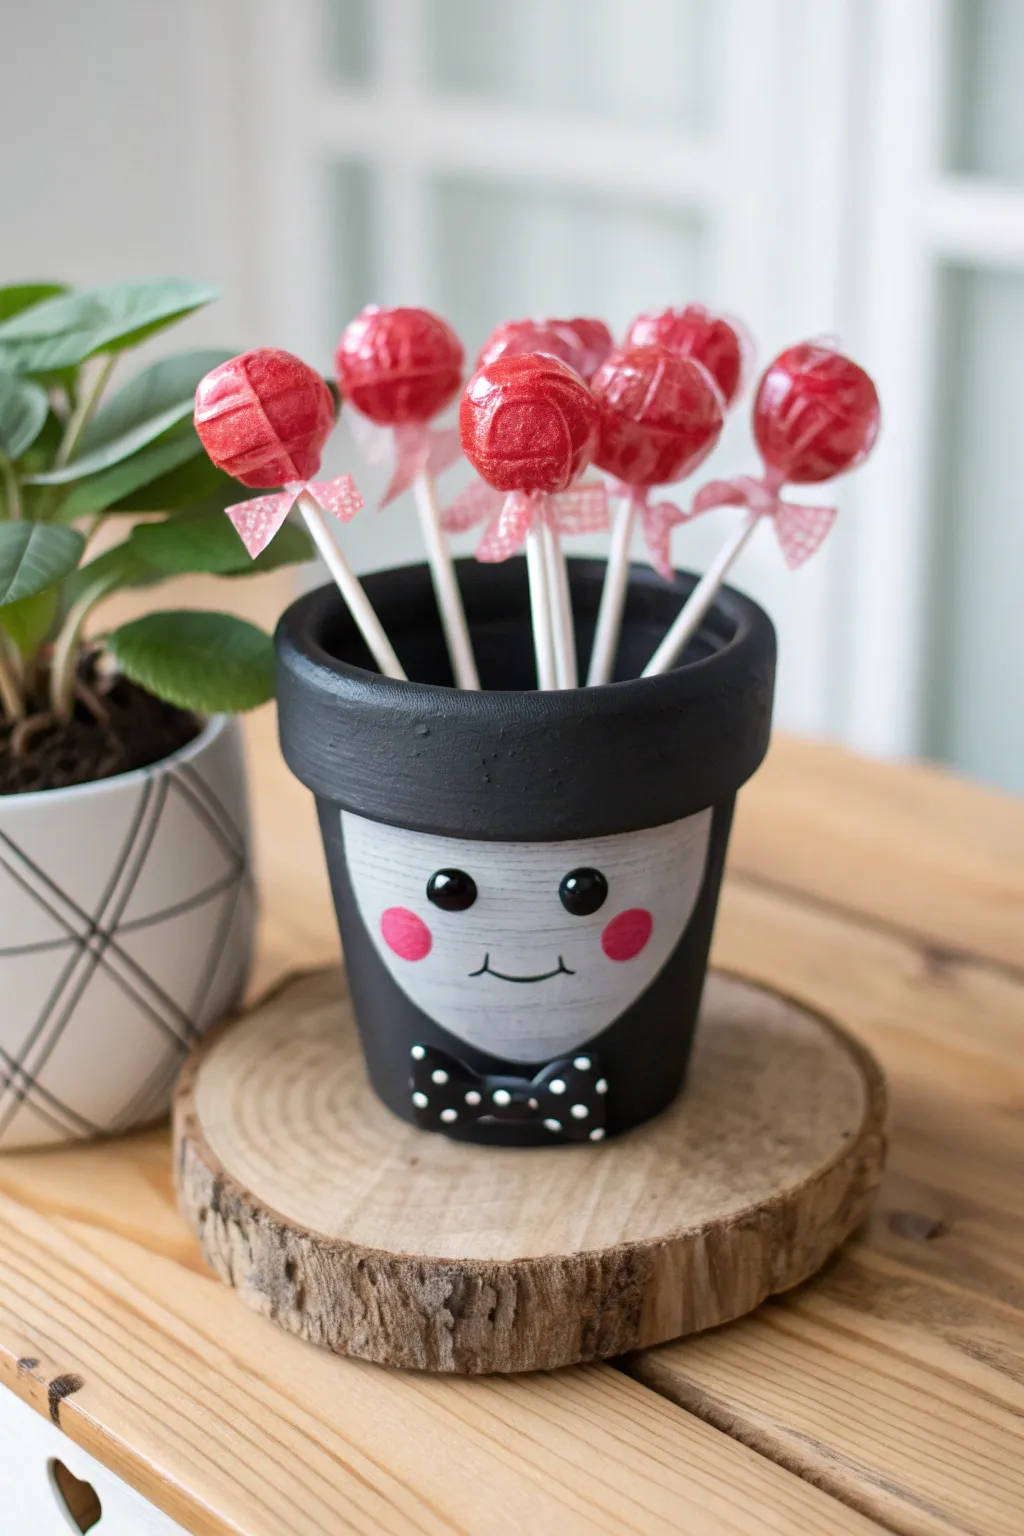
Turn a simple terracotta pot into a spooky-sweet vampire decoration perfect for holding Halloween treats. With a dashing painted tuxedo and a charming little face, this project is more cute than scary and makes for an adorable party favor or centerpiece.
Step-by-Step Tutorial
Materials
- Small terracotta pot (3-4 inches)
- Black acrylic paint (matte)
- White or very light grey acrylic paint
- Pink acrylic paint
- Mod Podge or satin varnish
- Flat paintbrushes (medium and small)
- Fine detail paintbrush or black paint pen
- Small pre-made black bow tie (polka dot or plain)
- Hot glue gun and glue sticks
- Pencil
- Red lollipops (for filling)
Step 1: Painting the Base Look
-
Clean the pot:
Wipe down your terracotta pot with a damp cloth to remove any dust or debris. Let it dry completely so the paint adheres properly. -
Map out the face area:
Using a pencil, lightly sketch a wide ‘U’ shape on the front of the pot. This curved line will separate the vampire’s pale face from his black tuxedo collar. -
Paint the face:
Fill in the ‘U’ shape with white or very pale grey paint. Since terracotta is porous, you will likely need 2-3 coats to get solid, opaque coverage. Let each coat dry for about 15 minutes. -
Paint the tuxedo:
Paint the rest of the pot’s exterior black, carefully following the curved line you sketched earlier. Extend the black paint up and over the rim, painting the inside rim about an inch down for a finished look. -
Refine the edges:
Once the base colors are dry, use a small flat brush to touch up the line where the black and white meet, ensuring a crisp, clean edge for his spirited outfit.
Uneven Face Shape?
If your curved face line looks wobbly, use a piece of painters tape (curved slightly) or trace a round object like a jar lid lightly with pencil before painting.
Step 2: Adding Facial Features
-
Create the eyes:
Dip the handle end of a paintbrush into black paint to create two perfect circles for eyes. Place them in the upper third of the white face area. -
Add eye highlights:
Once the black eye dots are tacky or dry, use a toothpick or a very fine tool to add a tiny white dot to the upper corner of each eye. This ‘catchlight’ brings the character to life. -
Paint rosy cheeks:
Using a small round brush or a sponge dobber, dab two soft pink circles onto the cheeks, slightly lower and wider than the eyes. -
Draw the mouth:
Using a fine liner brush or a black paint pen, draw a simple, small curved smile between the cheeks. -
Add the fangs:
Carefully paint two tiny white triangles pointing downward from the smile line. If you’re using a paint pen, ensure the black smile is totally dry first so it doesn’t smear.
Level Up: Cape Effect
Glue a small piece of red and black felt to the back rim of the pot to create a stiff, high-collared vampire cape that frames the pot.
Step 3: Final Details
-
Seal the paint:
Apply a coat of Mod Podge or satin varnish over the entire painted exterior. This protects the paint from chipping and gives it a nice finished sheen. -
Attach the bow tie:
Apply a small dab of hot glue to the back of your mini bow tie. Press it firmly onto the center of the pot, right where the ‘chin’ of the white face meets the black tuxedo body. -
Prepare the treats:
While your pot finishes drying, wrap some red lollipops with small ribbons or bows to match the theme. -
Fill the cup:
Place your lollipops inside the pot. If they sit too low, you can crumble some tissue paper or put a small piece of foam in the bottom to prop them up.
Place your dapper vampire pot near the candy bowl to greet your guests with a smile

The Complete Guide to Pottery Troubleshooting
Uncover the most common ceramic mistakes—from cracking clay to failed glazes—and learn how to fix them fast.
Candy Corn Stripe Pots
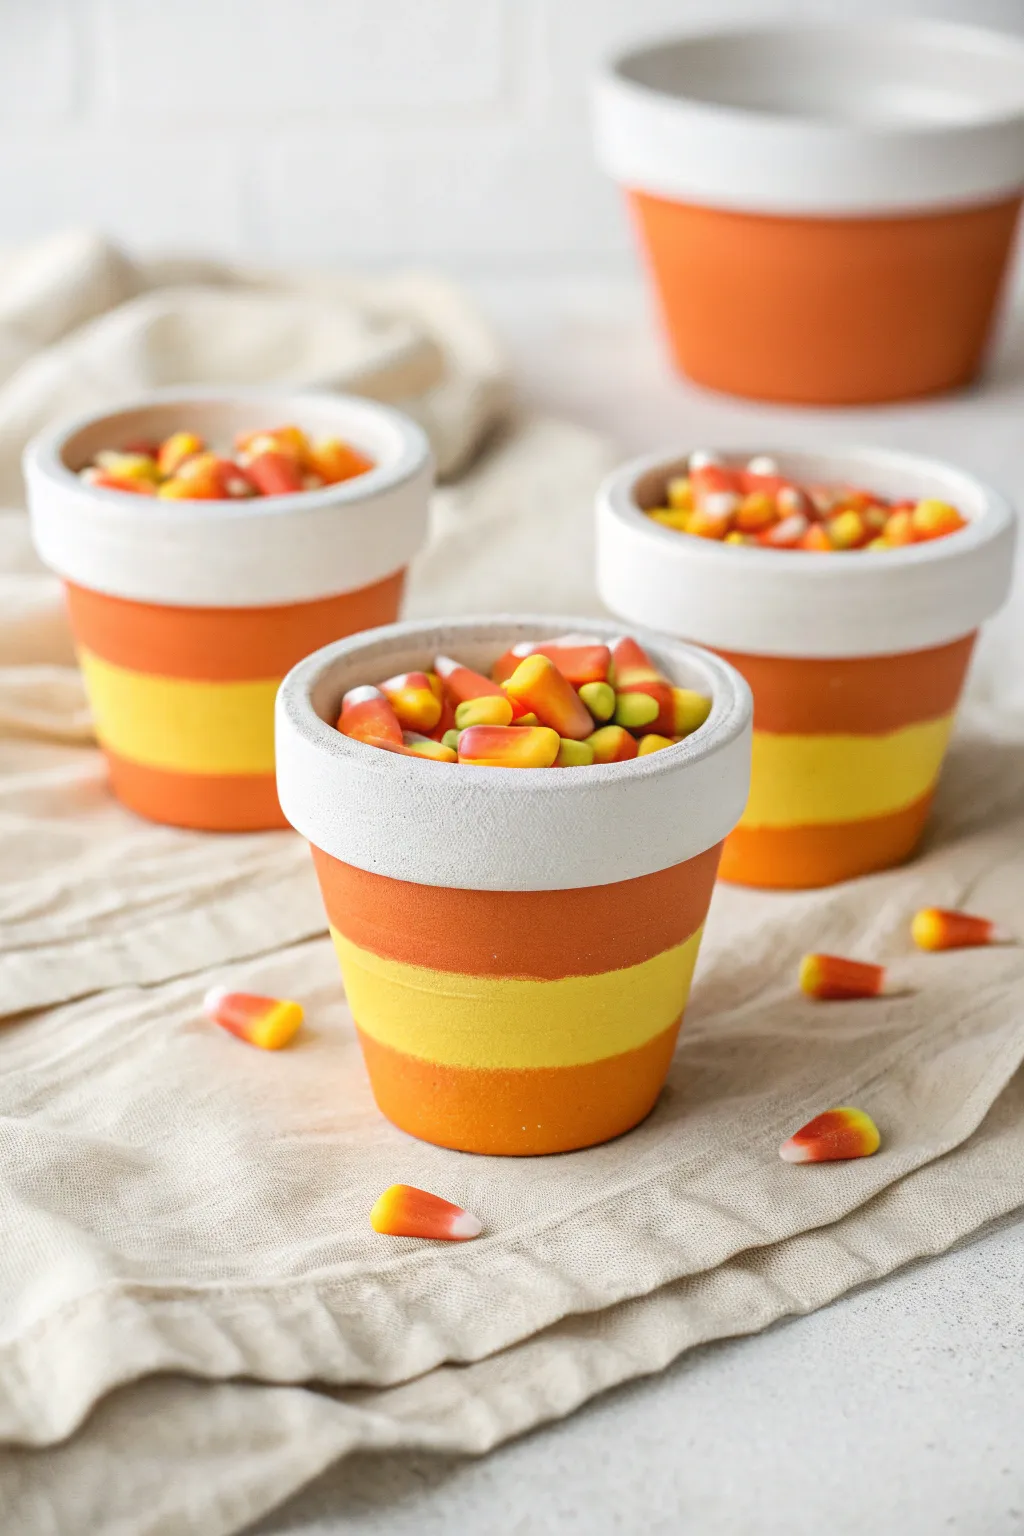
Transform basic terra cotta pots into festive Halloween vessels with this sweet and simple candy corn design. With their bright layers of white, orange, and yellow, these pots make adorable candy dishes or seasonal succulent planters.
How-To Guide
Materials
- Small terra cotta pots (2-inch or 3-inch size)
- White acrylic craft paint
- Orange acrylic craft paint (pumpkin shade)
- Yellow acrylic craft paint (bright lemon)
- Painter’s tape or masking tape (optional)
- Flat paintbrush (medium size)
- Small detail brush
- Clear matte sealant spray (optional)
- Newspaper or drop cloth
Step 1: Preparation and Base Coat
-
Clean the pots:
Start by wiping down your terra cotta pots with a damp cloth to remove any manufacturing dust or loose clay particles. Let them dry completely, which usually only takes a few minutes. -
Paint the rim white:
Dip your flat brush into the white acrylic paint. Paint the entire outer rim of the pot with a solid coat of white. -
Extend the white:
Bring the white paint slightly over the top lip and just inside the inner rim for a polished look, even if you plan to fill it later. -
Second coat for the rim:
Terra cotta is very absorbent, so once the first layer is dry to the touch, apply a second coat of white to ensure it is bright and opaque.
Clean Lines Hack
For ultra-crisp lines, apply painter’s tape around the pot. Press the tape edge down firmly with a fingernail to prevent bleed-through before painting.
Step 2: Painting the Candy Corn Layers
-
Visualize the zones:
Look at the remaining unpainted body of the pot below the rim. You need to divide this space mentally into three roughly equal horizontal sections. -
Paint the top orange section:
Using the orange paint, create a band immediately below the white rim. This should cover the top third of the pot’s body. -
Refine the edge:
Use a steady hand or a smaller detail brush to get a clean line right up against the bottom of the white rim. I prefer doing this freehand for a softer, organic look, but you can tape it off if you need perfect precision. -
Paint the bottom orange section:
Skip the middle section for now. Paint the bottom third of the pot with the same orange paint, going all the way down to the base edge. -
Fill the yellow center:
Once your orange sections are dry enough that you won’t smudge them, paint the remaining middle band with your bright yellow paint. -
Blend the transitions:
Carefully paint up to the orange borders. It’s okay if there is a tiny bit of overlap; it often makes the transition look cleaner than leaving a gap. -
Check for opacity:
Yellow paint often requires more layers than darker colors. Let the first yellow coat dry completely, then apply a second or even third coat until the clay color no longer shows through.
Patchy Yellow Paint?
If the yellow looks streaky or transparent after drying, paint a base layer of white over that section first. The white primer makes the yellow pop.
Step 3: Finishing Touches
-
Touch up lines:
Inspect your stripes. If any paint dripped or lines look too wobbly, go back in with a small brush and the appropriate color to tidy up the edges. -
Dry completely:
Allow the pots to sit undisturbed for at least an hour to ensure all layers of acrylic paint are fully cured. -
Seal the project:
If you plan to use these outdoors or with real plants that need watering, take the pots outside and give them a light coat of clear matte sealant spray. -
Fill and display:
Once the sealer is dry and odor-free, fill your festive new pots with actual candy corn for a sweet display.
Group these cheerful pots on a tray for a centerpiece that captures the colors of the season
Goofy One-Eyed Monster Pot
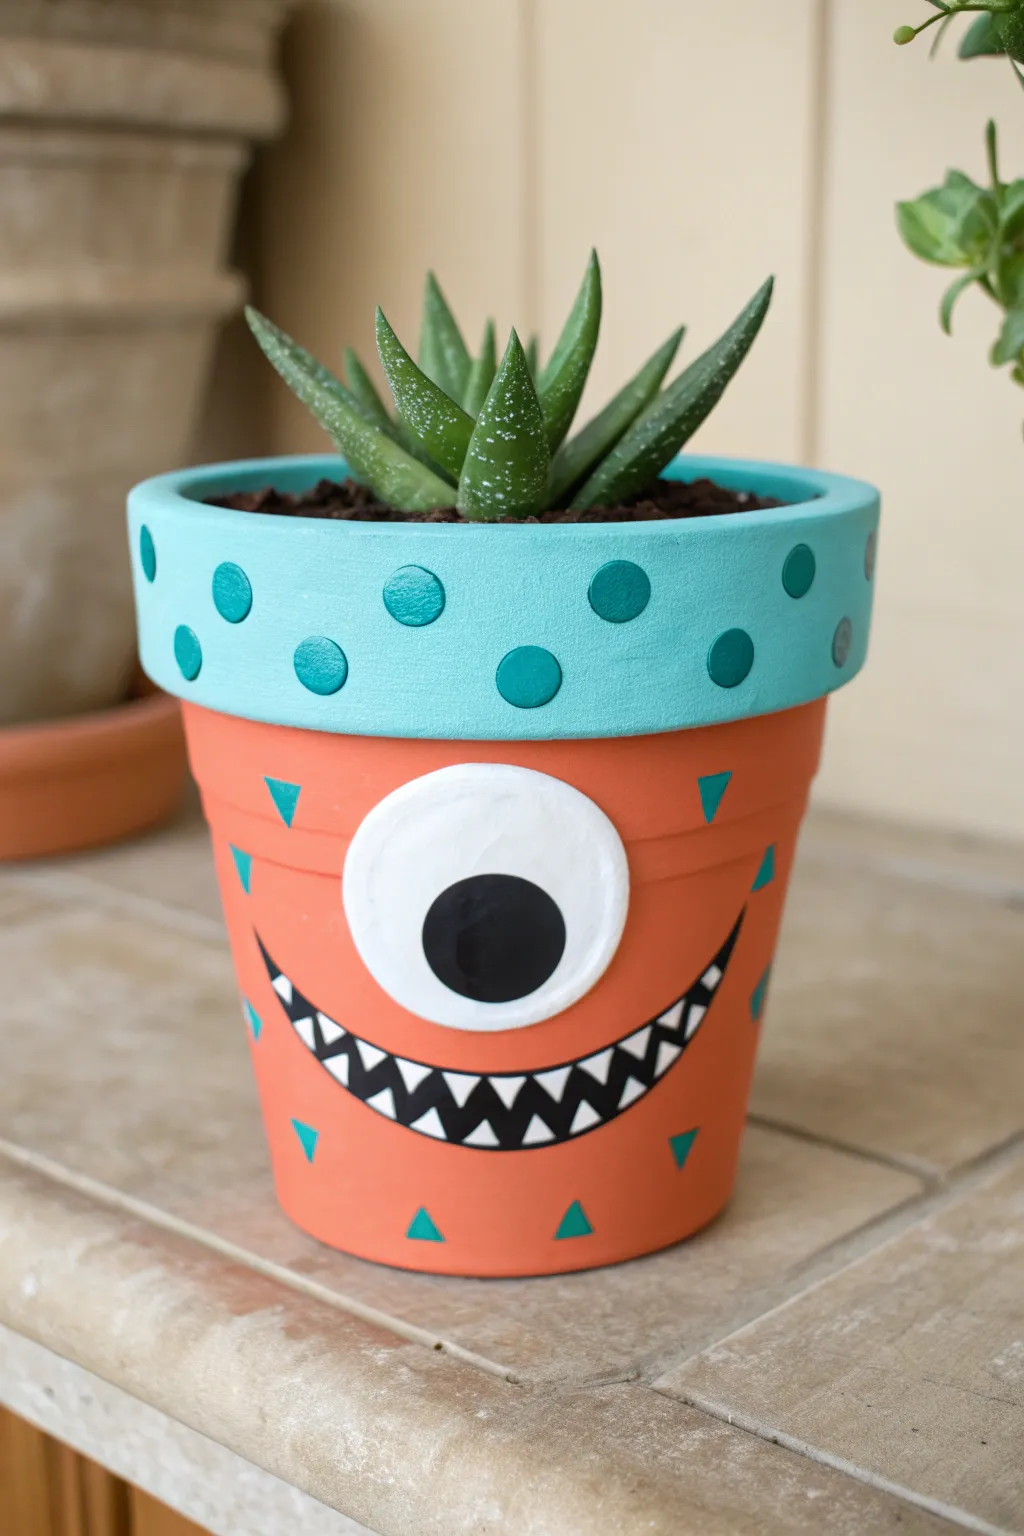
Transform a plain terracotta vessel into a whimsical, cheeky character perfect for spooky season. With its oversized sculpted eye and toothy grin, this bright orange and teal monster planter adds a splash of fun color to your Halloween decor.
Detailed Instructions
Materials
- Standard terracotta pot (4-6 inch diameter)
- White air-dry clay or polymer clay
- Acrylic craft paint: Bright Orange
- Acrylic craft paint: Teal/Turquoise
- Acrylic craft paint: Black
- Acrylic craft paint: White
- Flat paintbrush (medium)
- Detail paintbrush (fine)
- Round sponge pouncer (small)
- Clear spray sealant (matte or glossy)
- Hot glue gun or strong craft glue
- Succulent and potting soil
Step 1: Sculpting the Eye
-
Form the base:
Start by taking a chunk of white air-dry clay, about the size of a golf ball. Roll it between your palms until it is perfectly smooth and round. -
Flatten into a disc:
Press the ball onto a flat surface to create a thick disc shape. You want it to be slightly domed on top but flat on the back so it adheres well to the pot. -
Size check:
Hold the clay disc up to your terracotta pot to ensure the proportions look goofy and exaggerated; it should take up a significant portion of the pot’s front. -
Let it cure:
Set the clay aside to dry completely according to the package instructions. I usually let mine sit overnight to ensure it’s rock hard before painting.
Smoother Clay Hack
Before the clay dries, dip your finger in a tiny bit of water and rub it gently over the surface of the eye. This smooths out fingerprints and cracks for a porcelain-like finish.
Step 2: Painting the Base
-
Base coat the body:
While the clay dries, paint the main body of the terracotta pot (below the rim) with your bright orange acrylic paint. -
Second coat:
Let the first layer dry for about 10 minutes, then apply a second coat of orange to get a solid, opaque finish that hides the clay color underneath. -
Paint the rim:
Switch to your teal paint and cover the entire upper rim of the pot. Use a steady hand at the ridge where it meets the orange to keep a clean line. -
Add rim details:
Once the teal rim is dry, use a slightly darker shade of teal (or mix a tiny drop of black into your original teal) and a round sponge pouncer to stamp varied polka dots all around the rim.
Step 3: Face Details
-
Attach the eye:
Once your clay eye and painted pot are fully dry, use hot glue or strong craft adhesive to secure the white disc to the center of the orange section. -
Paint the pupil:
Using black paint and a small round brush, paint a large black circle in the center of the white clay disc. You can make it slightly off-center if you want a sillier expression. -
Draft the mouth:
Use a pencil to lightly sketch a wide, curved ‘U’ shape for the mouth directly under the eye. -
Fill the mouth shape:
Paint the entire curved shape black using your detail brush. This serves as the background for the teeth. -
Add the teeth:
Using white paint and a very fine brush, carefully paint sharp triangles along the top and bottom edges of the black mouth shape to create a jagged, toothy grin. -
Detail the body:
Dip your fine brush into the teal paint again and add small, scattered triangles all over the orange section of the pot, pointing in different directions for a confetti-like effect.
Level Up: 3D Teeth
Instead of painting the teeth, sculpt tiny triangles out of leftover clay. Glue them onto the black mouth area for a textured, 3D bite that really pops.
Step 4: Finishing Touches
-
Clean up lines:
Look over your design for any smudges. You can easily touch up the orange background or the black mouth outlines now that the main layers are dry. -
Seal the project:
Take the pot to a well-ventilated area and spray the entire exterior with a clear acrylic sealer. This protects the paint from water damage when you water your plant. -
Planting:
Once the sealer is no longer tacky, fill the pot with soil and plant a spiky succulent, like a Haworthia, to give your monster a ‘hairdo’ that matches his personality.
Place your new monster friend on a sunny windowsill or porch step to greet visitors with a grin


What Really Happens Inside the Kiln
Learn how time and temperature work together inside the kiln to transform clay into durable ceramic.
Witch Hat Pot With Saucer Lid
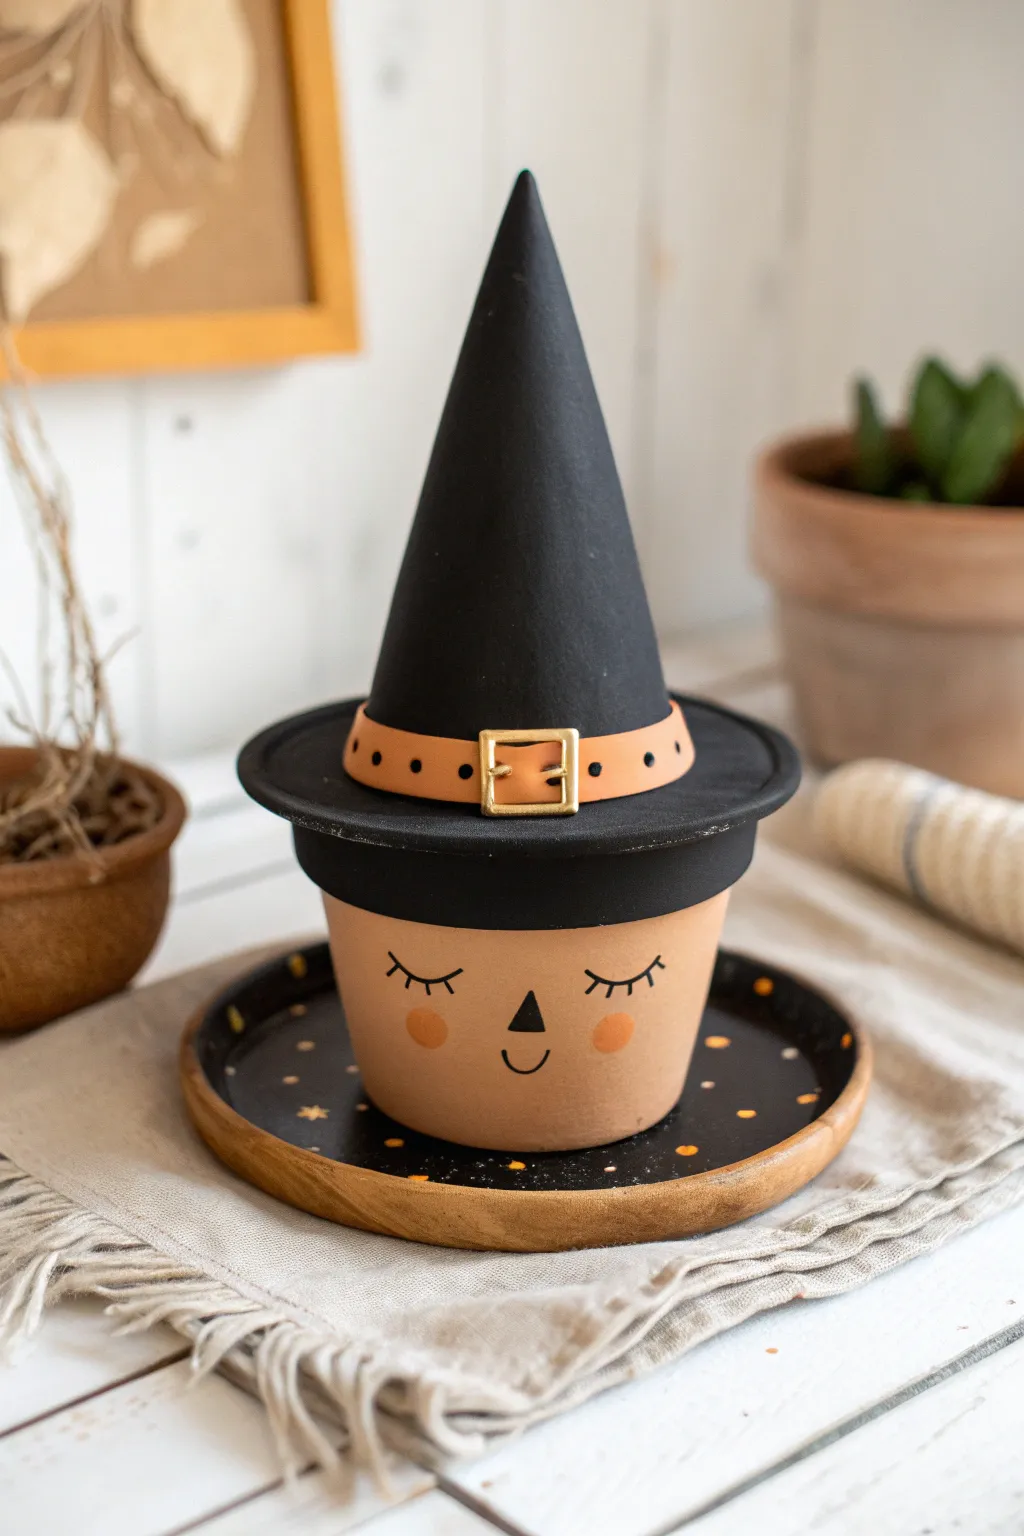
Transform a simple terracotta planter into an adorable witch storage jar featuring a hand-painted sleepy face and a clever saucer-turned-hat. This project doubles as sweet seasonal decor and a functional hiding spot for Halloween treats.
Step-by-Step Tutorial
Materials
- Standard terracotta pot
- Terracotta saucer (sized to fit inverted on top of the pot)
- Paper maché cone or sturdy black cardstock
- Acrylic paints: matte black, peach/flesh tone, coral, gold
- Fine detail paintbrush
- Sponge dauber
- Hot glue gun
- Tan craft foam or faux leather strip
- Gold wire or small craft buckle
- Wooden plate or tray (optional base)
Step 1: The Base Layers
-
Prime the surface:
Wipe down your terracotta pot and saucer with a damp cloth to remove any clay dust and let them dry completely. -
Paint the complexion:
Mix a peach or soft flesh-tone acrylic paint. Coat the main body of the pot below the rim, applying two layers for a smooth, opaque finish that hides the rough clay texture. -
Darken the rim:
Using a flat brush, paint the thick upper rim of the pot with matte black acrylic paint to simulate the witch’s hairline. -
Prepare the hat brim:
Take the terracotta saucer and flip it upside down to test the fit on the pot. Paint the entire top surface and rim solid black. -
Create the hat peak:
If using a paper maché cone, paint it matte black to match the saucer. Alternatively, roll black cardstock into a tall cone shape and secure it with glue.
Bleeding Lines?
Terracotta is porous and can make paint bleed. If your lines look fuzzy, seal the raw pot with a coat of matte Mod Podge or clear acrylic spray before you start painting the colors.
Step 2: Face & Details
-
Sketch the features:
Once the peach base is fully dry, lightly sketch the facial features with a pencil to ensure everything is centered. -
Paint the eyes:
Using your finest detail brush and black paint, create two wide U-shapes for the sleepy closed eyes. -
Add lashes:
Flick three tiny, curved lines outward from the corner of each eye to create delicate eyelashes. -
Nose and mouth:
Paint a small, sharp triangle for the nose and a simple curved smile line directly beneath it. -
Rosy cheeks:
I like to use a round sponge dauber or the back of a large paintbrush handle dipped in coral paint to stamp perfect circles for the cheeks.
Step 3: Accessories & Assembly
-
Assemble the hat:
Apply a ring of hot glue to the bottom edge of your black cone and center it onto the inverted black saucer. -
Fashion the belt:
Cut a strip of tan craft foam or leather about half an inch wide, long enough to wrap around the base of the cone. -
Add a buckle:
Bend a small piece of gold wire into a square shape, or cut a square frame from gold cardstock, and thread it onto the belt strip. -
Secure the belt:
Glue the belt around the base of the cone, trimming any excess at the back. -
Add detail dots:
Use a black fine-tip marker to draw tiny dots along the belt strip to mimic stitching holes. -
Prepare the tray:
If creating the base shown, take a small circular wooden tray and paint the interior surface black, leaving the rim natural. -
Add stardust:
Dip the tip of a sewing pin or toothpick into gold paint and add tiny, random dots and stars onto the black tray surface. -
Final display:
Place the pot on the starry tray and set the saucer-hat lid on top to complete your witch.
Level Up: Hidden Treats
Since the hat works as a removable lid, fill the inside of the pot with wrapped candies or a battery-operated LED pillar candle to turn the witch into a functional luminary or candy jar.
Now you have a charming little witch to watch over your Halloween goodies.
Bat Wing Clay Pot
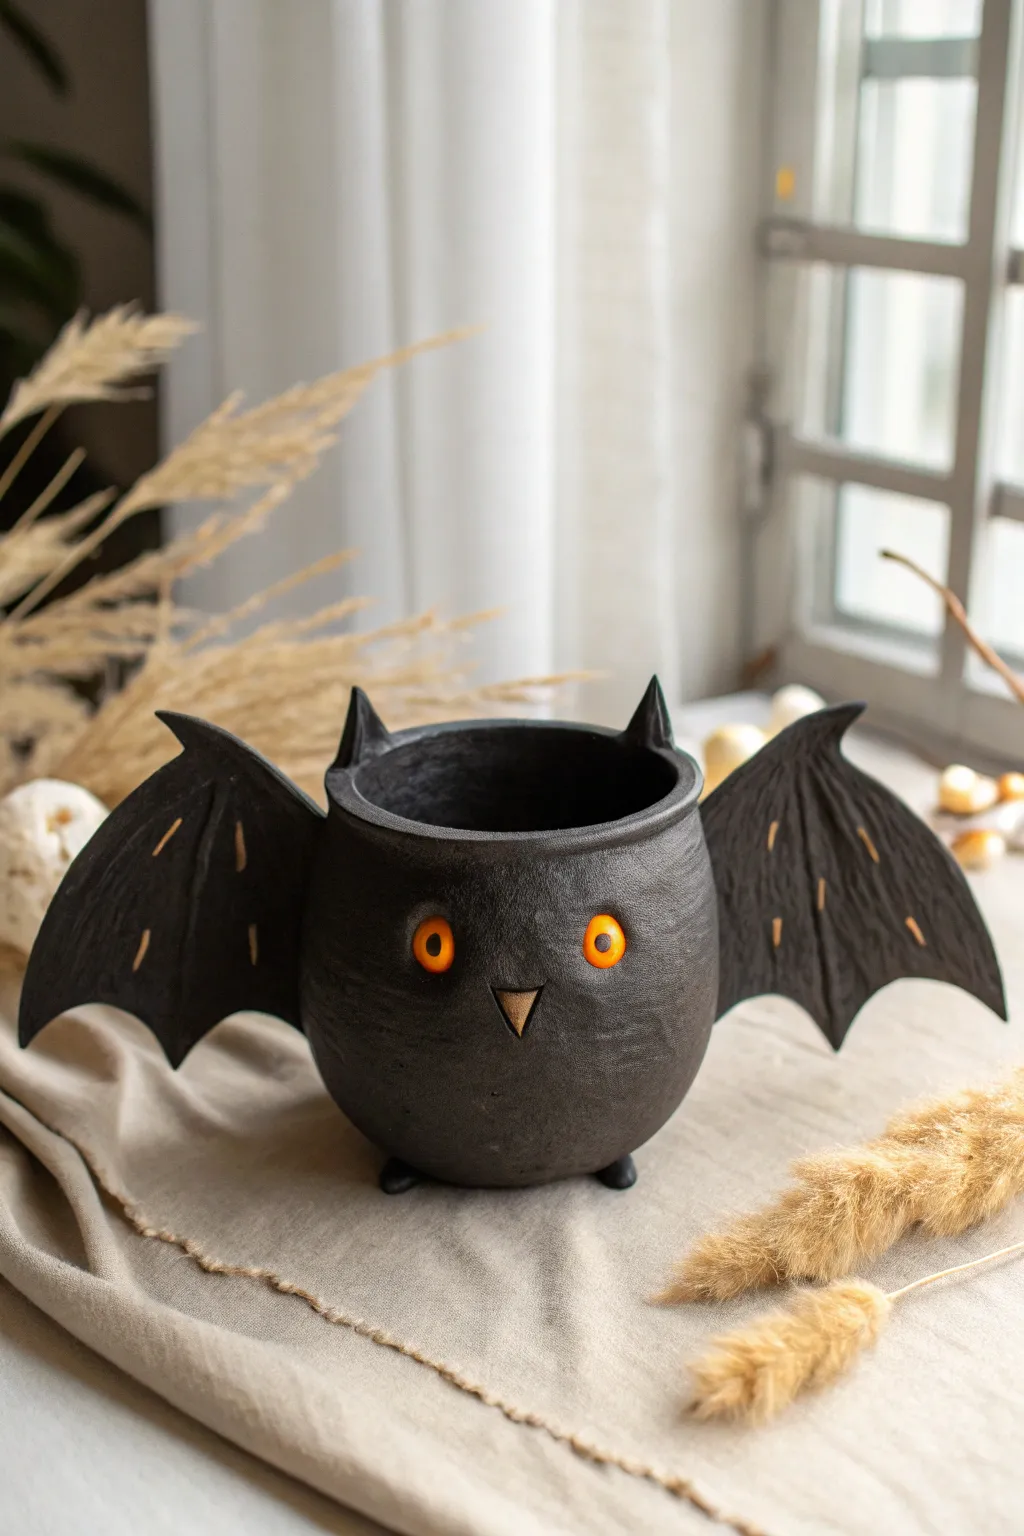
Transform a simple lump of clay into this adorable, wide-eyed bat planter that’s perfect for Halloween succulents or candy. With its textured black finish and striking orange eyes, this little creature brings a whimsical, gothic charm to any windowsill.
Step-by-Step Guide
Materials
- Air-dry clay (black or white)
- Small bowl or round mold (approx. 4-5 inches)
- Plastic wrap
- Rolling pin
- Clay sculpting tools (knife tool, needle tool)
- Water and sponge for smoothing
- Acrylic paint (Matte Black, Bright Orange, Metallic Gold/Bronze)
- Fine detail paintbrush
- Medium flat paintbrush
- Cardboard or stiff paper (for wing templates)
- Varnish (matte finish)
Step 1: Shaping the Bat Body
-
Prepare the Mold:
Begin by covering your small bowl or round mold with plastic wrap. This prevents the clay from sticking and makes removing the form much easier later on. -
Roll the Base:
Roll out a slab of clay to about 1/4 inch thickness. You want it sturdy enough to hold soil but not so heavy that it collapses. -
Form the Pot:
Drape the clay slab over your wrapped mold. Gently press and smooth the clay down the sides to create a rounded cup shape. Trim the excess clay at the rim with a knife tool to make an even edge. -
Refine the Surface:
Use a damp sponge to smooth out any fingerprints or cracks on the outside of the pot. While smoothing, I like to gently tap the bottom against the table to create a flat surface so the pot sits securely. -
Add Little Feet:
Roll two small marble-sized balls of clay. Attach them to the bottom front of the pot to act as tiny stabilizing feet. Score and slip (scratch the surface and add water) to ensure they stick well.
Wings Won’t Stay Up?
If wings droop while drying, support them with balled-up plastic bags or small cardboard boxes underneath. Leave these props in place until the clay is 100% bone dry and rigid.
Step 2: Sculpting the Features
-
Create Wing Templates:
Sketch a bat wing shape on cardboard to use as a template. The wings should be fairly large relative to the body, curving upward with pointed tips at the bottom. -
Cut the Wings:
Roll out another slab of clay, slightly thicker than the body. Use your template to cut out two identical wings. Keeping them thicker at the base helps them stand upright. -
Attach the Wings:
Score the sides of the pot and the attachment edge of the wings heavily. Apply a bit of water or slip, then press the wings firmly onto the sides. You might need to prop the wings up with crumpled paper or foam while they dry to keep them from drooping. -
Form the Ears:
Shape two small triangles for the ears. Attach them to the rim of the pot, just above where the eyes will go. Smooth the seams downward so they look like they grow naturally from the head. -
Add Wing Details:
Using a needle tool or a dull knife, gently carve vertical lines into the wings to mimic the bat’s wing structure (the finger bones). Don’t cut all the way through; just create indentations. -
Make the Beak:
Roll a tiny cone of clay and flatten it slightly into a triangular beak shape. Attach it to the center of the face, pointing downward. -
Eyes and Texture:
Press a small round tool or the back of a paintbrush into the clay to create two recessed sockets for the eyes. Then, take a stiff-bristled brush or crumpled foil and dab it all over the body to create a rough, skin-like texture.
Step 3: Painting and Finishing
-
Dry Completely:
Allow the clay to dry fully. This usually takes 24-48 hours depending on humidity. The clay will turn a lighter color and feel hard to the touch. -
Base Coat:
Paint the entire sculpture inside and out with matte black acrylic paint. You may need two coats to get a solid, opaque finish that covers the clay color completely. -
Paint the Eyes:
Using a small brush, carefully paint the recessed eye circles with bright orange. Add a tiny vertical slit in the center with black paint or a marker for pupils, then a tiny white dot for a highlight. -
Highlight the Beak:
Paint the triangular beak with a metallic bronze or gold color. This gives it a nice contrast against the matte black body. -
Accent the Wings:
Mix a tiny bit of gold or light grey into your black paint (or use the bronze). Dry-brush this lighter color casually over the raised lines on the wings to make the details pop. -
Seal the Project:
Once all paint is dry, apply a coat of matte varnish. This protects the paint and seals the clay, which is especially satisfying when you see the colors deepen slightly.
Glow-in-the-Dark twist
Paint the eyes with phosphorescent paint instead of standard orange. During the day they look white or pale green, but at night they will glow eerily from the dark pot.
Place a small air plant or succulent inside your new bat friend and enjoy the spooky vibe it brings to your shelf

TRACK YOUR CERAMIC JOURNEY
Capture glaze tests, firing details, and creative progress—all in one simple printable. Make your projects easier to repeat and improve.
Spiderweb Rim Candy Pot
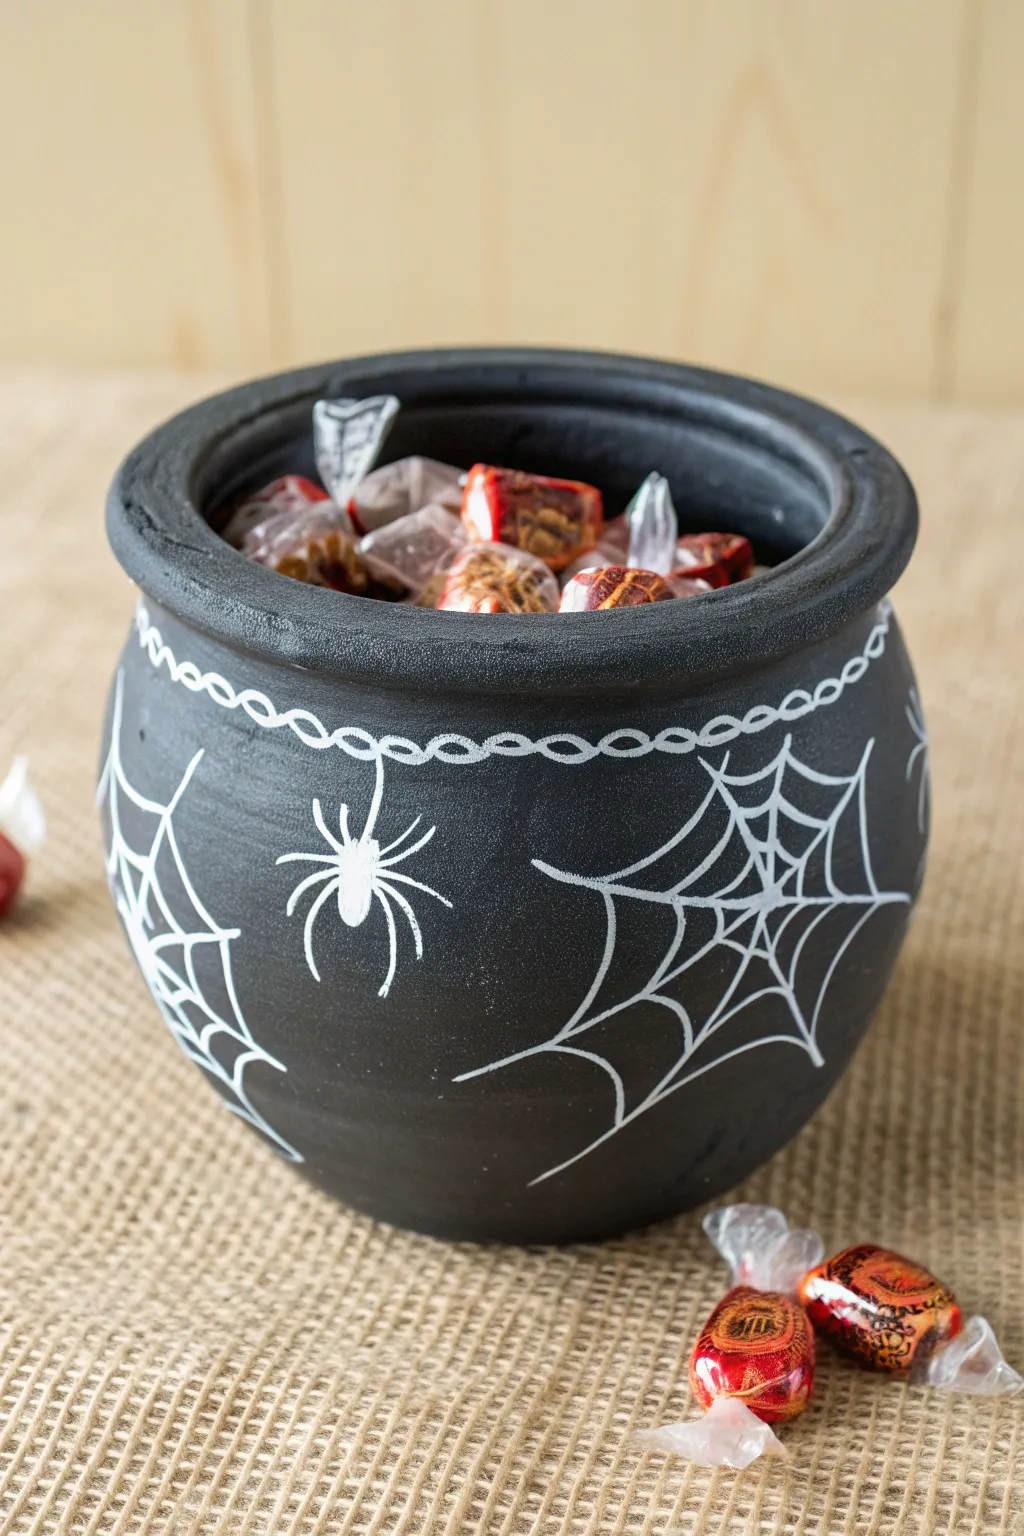
Transform a standard terracotta pot into a witchy candy cauldron perfect for trick-or-treaters. The stark contrast of white paint pens on a matte black background makes the spiderweb design pop with festive flair.
How-To Guide
Materials
- Terracotta pot (medium size)
- Black acrylic craft paint (matte finish)
- Wide flat paintbrush
- Foam brush
- White paint marker (fine or medium tip)
- Clear acrylic sealer spray (matte or satin)
- Newspaper or drop cloth
- Pencil (optional)
Step 1: Base Coat Preparation
-
Clean the surface:
Before starting, wipe down your terracotta pot with a damp cloth to remove any dust or debris. Let it dry completely so the paint adheres properly. -
Set up your workspace:
Lay down newspaper or a drop cloth to protect your table from accidental spills. -
Apply the first coat:
Using a wide flat paintbrush or a foam brush, apply a generous layer of matte black acrylic paint to the entire exterior of the pot. -
Don’t forget the rim:
Make sure to paint the top rim and go about two inches down the inside of the pot. Since you’ll be filling this with candy, the deep interior doesn’t necessarily need full coverage. -
Let it dry:
Allow the first coat to dry until it is no longer tacky specifically to the touch. This usually takes about 20-30 minutes depending on humidity. -
Apply the second coat:
Add a second coat of black paint to ensure full opacity. Turn the pot upside down to catch any spots you might have missed near the bottom edge. -
Full cure:
Let the black base coat dry completely for at least an hour. A bone-dry surface is crucial for the paint marker step to prevent the nib from clogging.
Pro Tip
If you make a mistake with the white marker, simply paint over the error with a little black paint, let it dry, and try again.
Step 2: Painting the Design
-
Prime your paint marker:
Shake your white paint marker well and press the tip on a scrap piece of paper until the ink flows smoothly. -
Start the rim chain:
Begin just under the lip of the pot. Draw a series of connected oval loops to create a chain-link effect that circles the entire circumference of the pot. -
Draw vertical web lines:
Select 3 or 4 points along the chain pattern. From these points, draw long, slightly curved lines extending downward toward the bottom of the pot. These serve as the main anchors for your webs. -
Connect the webbing:
Between your vertical anchor lines, draw inward-curving horizontal lines (scallops) connecting them. Repeat this moving down the web to create the classic spiderweb look. -
Create the spider body:
Choose an empty spot between two webs for your spider. Draw a small oval for the head and a larger oval directly below it for the abdomen, filling them in solid white. -
Add the spider legs:
Draw four legs coming out from each side of the body. I like to make the front two reach forward and the back two reach backward for a creepy-crawly effect. -
Attach the spider:
Draw a single straight line from the chain rim down to the spider’s head, making it look like it’s dangling from a silk thread. -
Touch-ups:
Look over your design. If any white lines look thin or transparent, retrace them gently with the marker once the first layer is dry to brighten them up.
Level Up
Glue small plastic spiders onto the painted webs for a 3D effect, or use glow-in-the-dark paint specifically for the web lines.
Step 3: Finishing Touches
-
Seal the project:
Take the pot to a well-ventilated area. Spray it with a clear acrylic sealer to protect the paint from chipping and to give it a finished look. -
Dry and fill:
Once the sealer is fully dry and the smell has dissipated, fill your new cauldron with wrapped candies.
Place your spooky creation by the door and watch the candy disappear
Skull Face Clay Pot
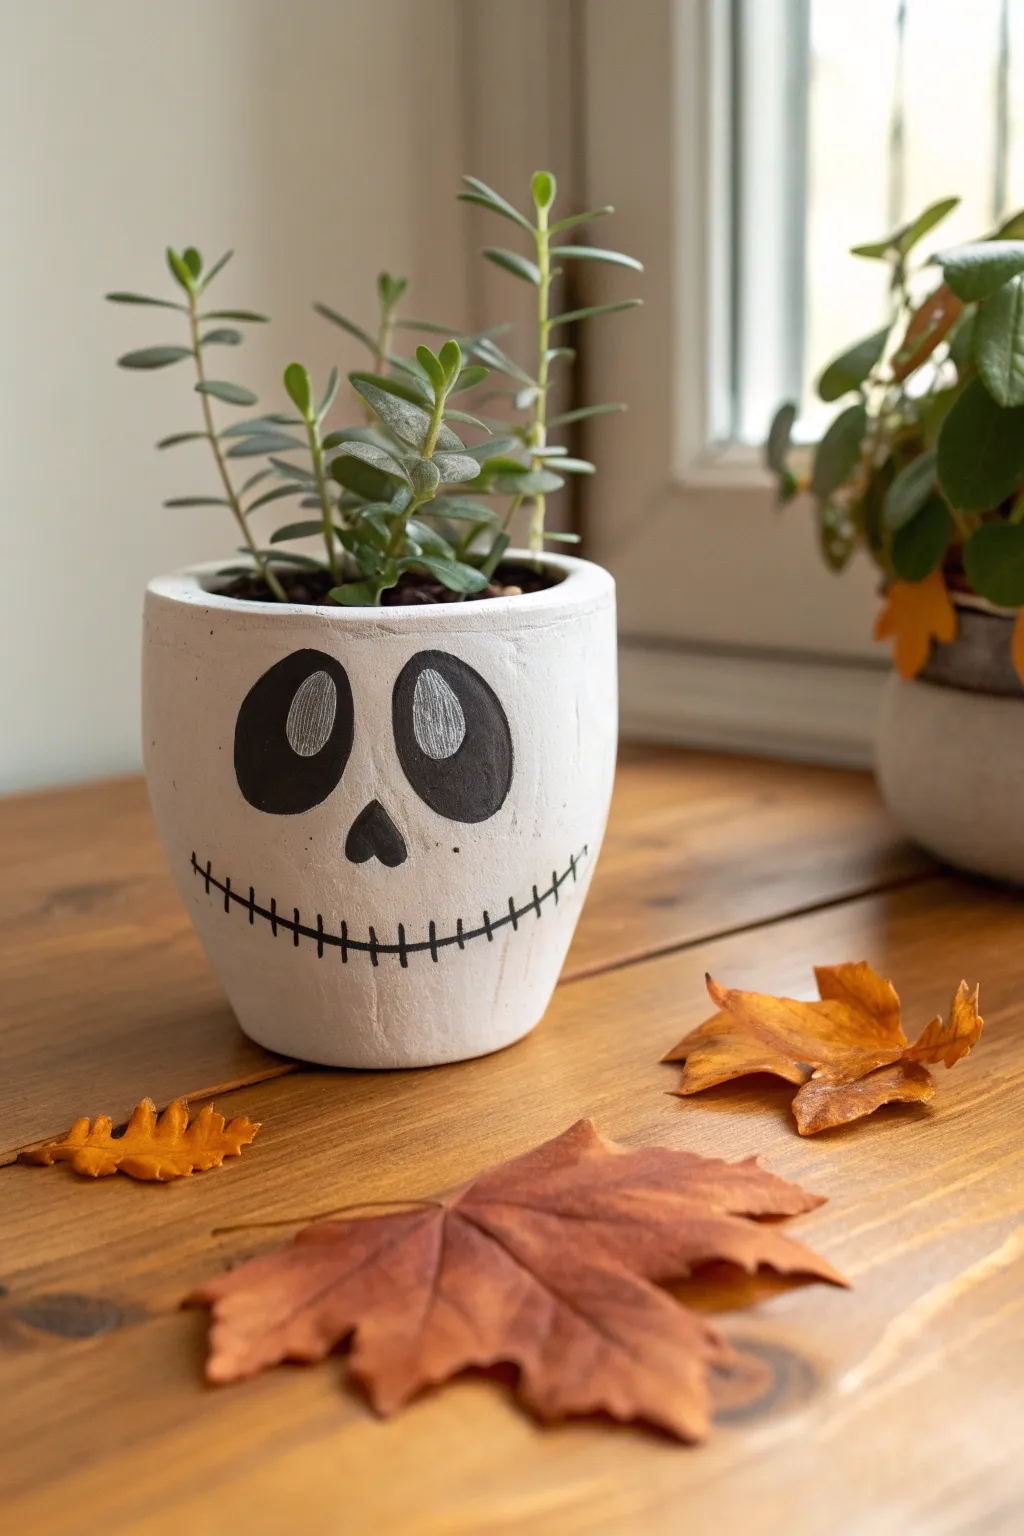
Transform a standard terracotta pot into a charmingly creepy skull planter perfect for your Halloween decor. This minimalist black-and-white design offers a stark, modern take on spooky season styling.
Detailed Instructions
Materials
- Small terracotta pot (4-6 inch diameter)
- White acrylic craft paint (matte finish)
- Black acrylic craft paint
- Silver or grey acrylic paint pen (fine tip)
- Flat paintbrush (medium size)
- Small round detail brush
- Pencil
- Succulent of choice
- Potting soil
Step 1: Base Coat Prep
-
Clean surface:
Before painting, ensure your terracotta pot is clean regardless of whether it is new or reused. Wipe it down with a damp cloth to remove any dust or oils that might prevent the paint from sticking, then let it dry completely. -
Apply first white layer:
Load your medium flat brush with white matte acrylic paint. Apply a smooth, even coat over the entire exterior of the pot, including the rim. -
Let it cure:
Allow this first coat to dry fully to the touch, which usually takes about 20 minutes. -
Add second coat:
Apply a second layer of white paint to ensure opacity. Terracotta is porous and dark, so a second coat is crucial for that stark, bone-white finish visible in the photo. -
Check for streaks:
Inspect the pot for brush strokes. If you see streaks, a third thin coat applied perpendicular to the previous one can help create a flawless finish.
Clean Lines Hack
If you’re shaky with a brush, use a black permanent marker or paint pen for the outline of the eyes and the mouth stitches. It offers much more control than a wet brush.
Step 2: Face Design
-
Sketch the features:
Using a pencil, lightly sketch two large oval shapes for the eye sockets. Place them slightly higher on the pot to leave room for the mouth. -
Add nose and mouth:
Draw a small, inverted heart or triangle shape for the nose cavity. Below that, lightly sketch a long, curved smile line that stretches across the width of the pot. -
Paint the eye sockets:
Using the black acrylic paint and a small round brush, carefully fill in the two large oval eye shapes. Keep your edges as crisp as possible. -
Fill the nose:
Fill in the small nose cavity shape with the same black paint. -
Draw the mouth line:
With the very tip of your detail brush or a black paint pen, trace over your pencil smile line. -
Stitch the mouth:
Add the vertical ‘stitches’ across the mouth line. Start with a center line, then add evenly spaced vertical dashes working your way outward on both sides. I find shorter dashes look neatest here. -
Dry details:
Let the black facial features dry completely before moving to the next step to avoid smudging.
Step 3: Final Touches & Planting
-
Add eye highlights:
Take your silver or grey paint pen (or a very fine brush with grey paint) and draw a smaller oval shape inside each black eye socket. This mimics the hollow depth seen in the original project. -
Scribble texture:
Roughly fill in these grey highlights with vertical scribbles rather than solid color to give it a textured, sketched look. -
Optional sealing:
If you plan to keep this outdoors, apply a clear matte sealant spray over the entire painted surface. -
Prepare for planting:
Once everything is dry, fill the bottom of the pot with a little succulent-appropriate potting soil. -
Plant the greenery:
Gently remove your succulent from its nursery pot and nestle it into the skull planter. The tall, thin stems of a succulent like the one shown add a fun, spiky ‘hair’ effect. -
Top off soil:
Fill in the gaps around the roots with more soil and press down gently to secure the plant.
Glow Up
Paint the eye highlights with glow-in-the-dark paint instead of grey. During the day it looks normal, but at night your skull will have an eerie, glowing stare.
Place your new skeletal friend on a windowsill near some autumn leaves to complete the mood
Creepy Eyeball Cluster Pot
Transform a plain terracotta pot into a spooky serving vessel that looks back at you. This simple painting project combines a matte charcoal finish with eerie, bloodshot eyes for the perfect Halloween candy dish.
Step-by-Step
Materials
- Terracotta pot (medium size like 4-6 inch)
- Matte chalkboard paint or dark charcoal acrylic paint
- Acrylic paints: White, Red, Black, and Orange
- Flat paintbrush (medium)
- Fine detail paintbrush or liner brush
- Pencil
- Matte spray sealer (optional)
- Foil-wrapped candies (green)
- White gum balls or round candies
- Edible food markers or fine brushes for candy details
Step 1: Painting the Base
-
Clean the pot:
Wipe down your terracotta pot with a damp cloth to remove any dust or debris, then let it dry completely so the paint adheres properly. -
Apply base coat:
Using a flat medium brush, paint the entire exterior of the pot with matte charcoal or chalkboard paint. I like to use criss-cross strokes for better coverage. -
Paint the rim:
Don’t forget to paint the top rim and just inside the upper lip of the pot, roughly one inch down, so the terracotta doesn’t show when filled. -
Second coat:
Allow the first layer to dry for about 20-30 minutes. If the terracotta color is still peeking through, apply a second coat for a solid, opaque finish.
Step 2: Drawing the Face
-
Sketch the eyes:
Once the base paint is fully dry, use a pencil to lightly sketch two almond-shaped eyes on the front of the pot. Ensure they are level and spaced evenly. -
Outline the lids:
Draw faint curved lines above and below the almond shapes to indicate eyelids and wrinkles, giving the face a tired or spooky expression. -
Paint the iris base:
Using your fine brush, paint a round circle in the center of each eye with bright orange paint. You may need two thin layers to make the color pop against the dark background. -
Add the pupil:
Carefully paint a small black dot in the center of your orange irises. For a reptile or cat-like look, you could make these vertical slits instead. -
Define the eye shape:
With a very fine liner brush and black paint (or a fine-tip paint marker), outline the entire almond eye shape. -
Add wrinkle details:
Using the same fine black line, trace over your pencil wrinkle lines above and below the eyes to deepen the expression. -
Create the bleeding effect:
Switch to red acrylic paint and a fine brush. Paint vertical dripping lines extending downward from the bottom eyelid, varying the lengths for a natural look. -
Add bloodshot texture:
While you have the red paint out, add tiny, jagged veins inside the corners of the eyes and near the iris if desired, though the main image keeps the eyes mostly dark and moody. -
Seal (Optional):
If you plan to use this year after year, give the outside of the pot a quick coat of clear matte spray sealer to protect your detailed paint job.
Clean Lines Tip
If you aren’t confident with a fine brush for the black outlines, use an ultra-fine tip black permanent marker or paint pen over the dry base paint.
Step 3: Creating the Eyeball Filler
-
Prep the white candies:
Take your white gumballs or round white candies to create the edible eyeballs. -
Draw the iris:
With a red edible marker, draw a scribbled circle or dotted ring on the candy to form the outer edge of the iris. -
Fill the pupil:
Use a black edible marker or black gel food coloring to fill in a solid pupil in the center of your red ring. -
Add veins:
Draw squiggly red lines radiating outward from the iris toward the back of the candy to simulate blood vessels. -
Fill the pot:
Mix your homemade candy eyeballs with green foil-wrapped chocolates. Fill the pot to the brim so the contents mound up slightly.
Glow Up Idea
Use glow-in-the-dark acrylic paint for the white parts of the homemade eyeballs or the orange irises on the pot to make them shine when lights go out.
Place your spooky new candy dish near the entryway to give guests a little fright before they grab a treat
Potion Cauldron Clay Pot
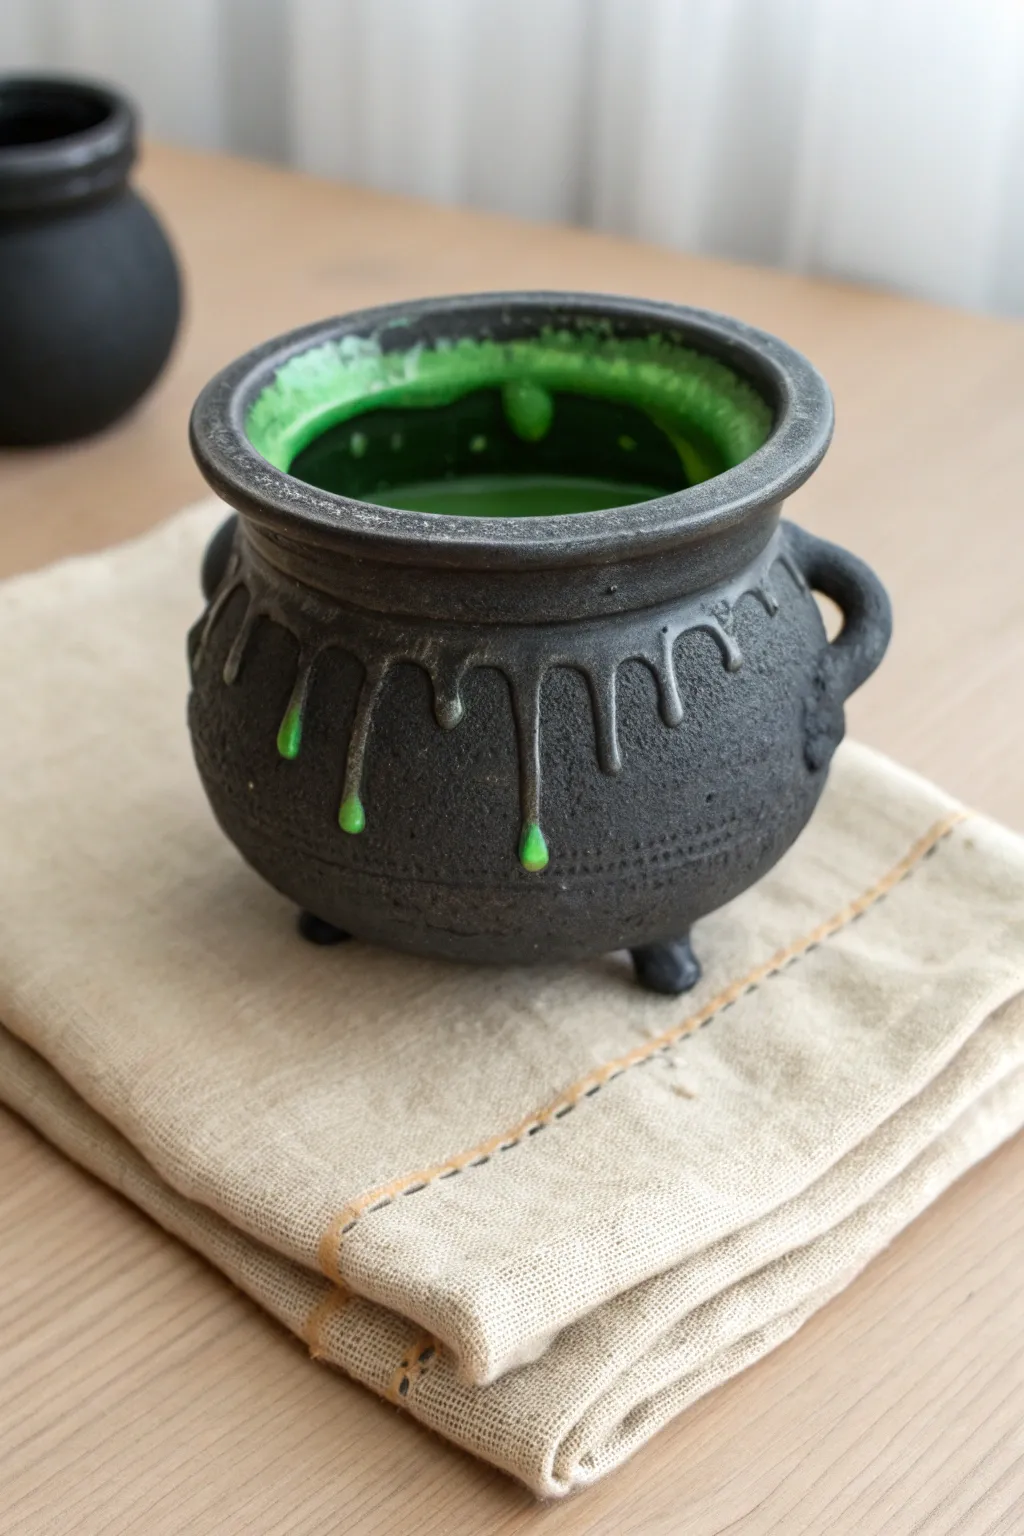
Transform a simple round clay vessel into a bubbling cauldron of spooky potion with this clever painting and sculpting project. The textured green drips and rustic black finish give it an authentic cast-iron look that’s perfect for Halloween decor.
Detailed Instructions
Materials
- Round terra cotta or ceramic pot (bowl-shaped)
- Air-dry clay or epoxy sculpt clay
- Hot glue gun and glue sticks
- Matte black acrylic paint
- Dark grey acrylic paint
- Bright lime green acrylic paint
- Emerald green acrylic paint
- Gloss varnish or decoupage medium
- Sea sponge or stiff bristle brush
- Fine detail paintbrush
- Water and palette
Step 1: Sculpting the Cauldron Shape
-
Prep the base:
Start with a clean, dry round pot. If your pot doesn’t have little feet like a traditional cauldron, roll three small balls of clay and adhere them to the bottom in a tripod formation to elevate it. -
Add handles:
Roll two small snakes of clay, roughly 2 inches long. Curve them into ‘C’ shapes and attach them to opposite sides of the pot rim to create the cauldron’s loop handles. -
Smooth the seams:
Use a little water or slip to blend the clay handles and feet seamlessly onto the pot body so they look like one piece of cast iron. Let the clay dry completely according to package instructions. -
Create the drip texture:
Using a hot glue gun, carefully squeeze a generous ring of glue just under the rim of the pot. Let gravity work for you—allow the hot glue to slowly drip down the sides in irregular rivulets. -
Form the bubbling rim:
Add extra blobs of hot glue inside the rim and right at the top edge to simulate the potion bubbling over. Vary the size of these droplets for a more realistic effect.
Step 2: Creating the Cast Iron Finish
-
Base coat:
Paint the entire exterior and the rim with matte black acrylic paint. Cover the hot glue drips completely with the black paint as well. -
Inside darkness:
Paint the interior walls of the pot black, going down about an inch or two into the pot so no raw clay shows where the potion will sit. -
Dry time:
Allow the base coat to dry fully. I usually give it at least 30 minutes to ensure the next layers don’t lift the black paint. -
Stipple texture:
Mix a tiny amount of black with a drop of dark grey. Use a sea sponge or stiff brush to dab this mixture lightly over the pot’s belly, creating a textured, stony cast-iron appearance. -
Highlight the metal:
Dry brush a faint amount of light grey or metallic gunmetal silver just on the raised ridges of the handles and the middle of the pot to suggest worn metal.
Sticky Situation
If your hot glue strings get messy, wait until they are completely cool and hard, then blast them quickly with a hair dryer to melt them away.
Step 3: Painting the Toxic Potion
-
Base green layer:
Paint the hot glue drips and the bubbling areas inside the rim with a dark emerald green. This creates a shadow base for the glowing liquid. -
Brighten the brew:
Once the emerald is dry, layer your bright lime green paint over the raised parts of the glue drips. Leave the edges darker to create depth. -
Painting the liquid surface:
Paint the interior bottom of the pot (or the visible surface if you filled it partially) with a mix of emerald and lime green, swirling them slightly while wet for a murky look. -
Adding highlights:
Use a fine detail brush and a mix of lime green and white to add tiny specular highlights to the very tips of the drips. This makes them look wet and viscous. -
Gloss finish:
Once all paint is dry, apply a coat of high-gloss varnish strictly to the green painted areas (the drips and the liquid inside). This contrasts beautifully with the matte black pot.
Glowing Potion
Mix glow-in-the-dark medium into your lime green paint for the final topcoat. The drip tips will eerie glow when the lights go out.
Now you have a delightfully dreary vessel ready for your display shelf
Upside-Down Haunted House Pot
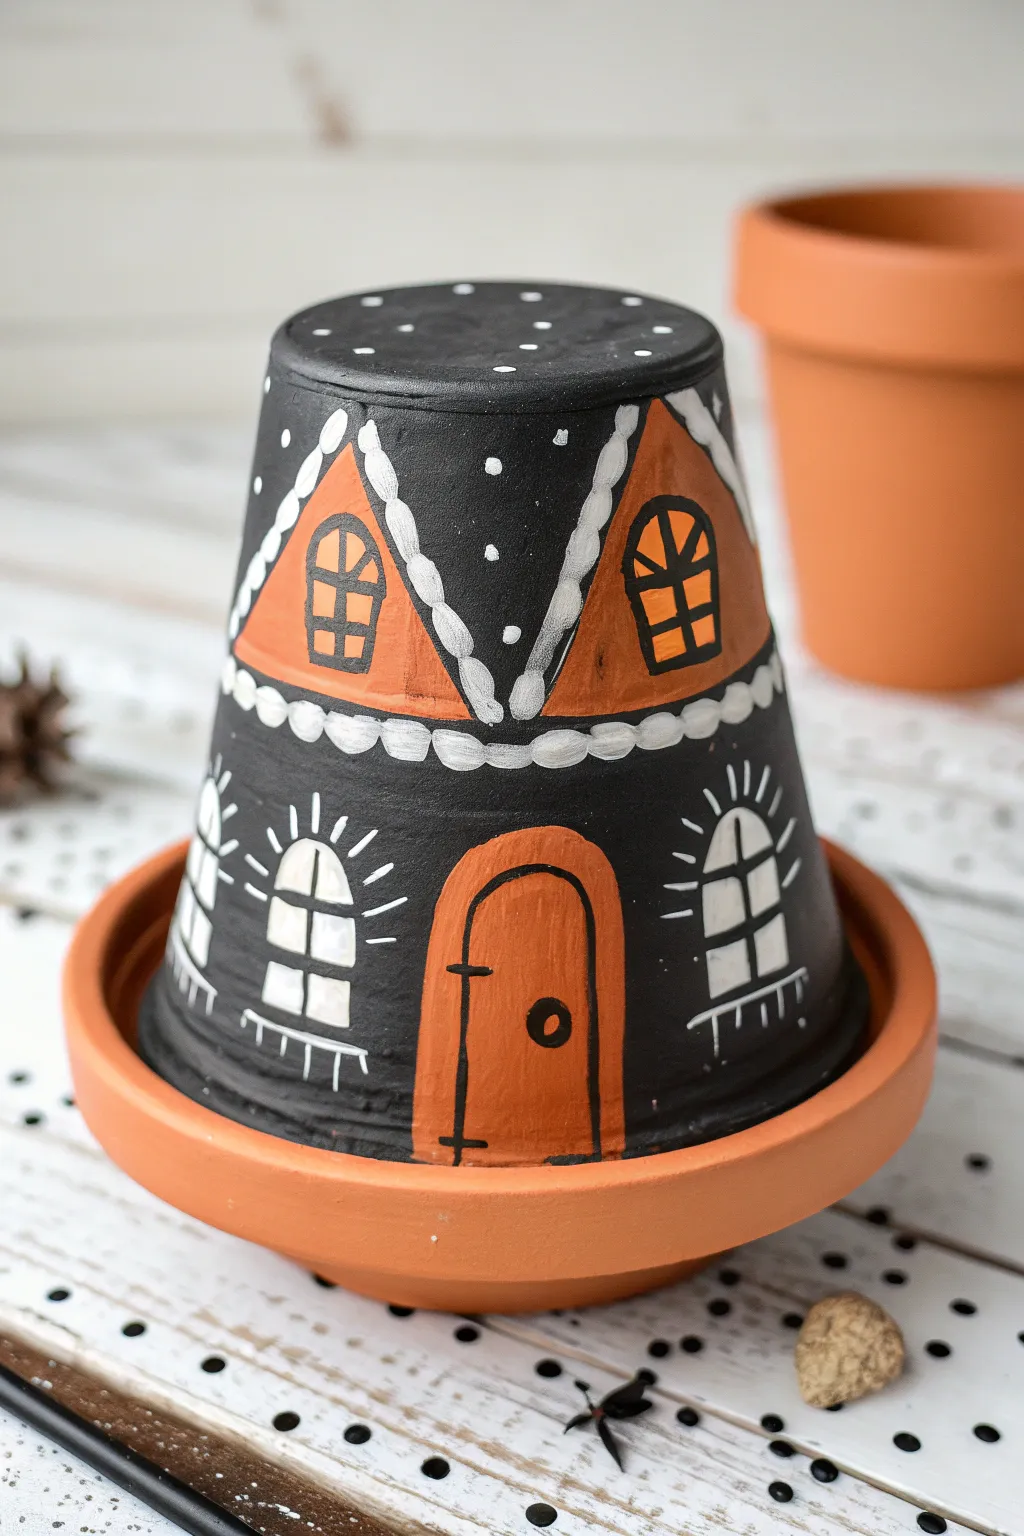
Turn a simple clay pot upside down to reveal a charmingly spooky abode perfect for your Halloween display. This project uses the natural orange of the terracotta as a key design element, framing it with bold black paint and crisp white details.
How-To Guide
Materials
- Small to medium terracotta pot
- Matching terracotta saucer
- Black acrylic paint
- White acrylic paint
- Medium flat paintbrush
- Fine detail paintbrush (liner brush)
- Pencil
- Water cup and paper towels
- Matte sealer (optional)
Step 1: Preparation and Base Coat
-
Clean the surface:
Ensure your terracotta pot and saucer are completely clean and dry. Wipe away any dust with a slightly damp cloth and let it air dry so the paint adheres properly. -
Invert the pot:
Flip the pot upside down and place it in the center of the saucer. This will be the orientation for the entire project, so get comfortable with this shape. -
Sketch the design:
Using a pencil, lightly sketch your house design directly onto the terracotta. Draw a central arched door at the bottom rim. Add arched windows on either side of the door. -
Add roof details:
Above the main rim of the pot (in the middle section), sketch two triangular roof peaks. Inside each triangle, draw a small arched window. -
Paint the background black:
Using your flat brush and black acrylic paint, fill in all the negative space around your pencil sketches. Leave the door, the lower windows, and the triangular roof peaks unpainted so the natural terracotta color shows through. -
Cover the top:
Don’t forget to paint the flat top (formerly the bottom) of the pot completely black. Paint the rim of the pot black as well, carefully cutting in around your pencil lines. -
Paint the window interiors:
Inside the triangular terracotta roof peaks, use the black paint to carefully fill in the small window shapes you sketched earlier. This creates the illusion of dark rooms inside the illuminated house.
Fixing Smudges
If you accidentally paint black over a ‘terracotta’ area, don’t panic. Let it dry completely, then paint over the mistake with an orange acrylic paint that matches the pot’s clay tone.
Step 2: Detailing the Architecture
-
Outline the door:
Switch to your fine detail brush and black paint. Outline the terracotta door shape to sharpen the edges. Add a vertical line for the door jamb, horizontal hinge lines, and a small circle for a knob. -
Define the upper windows:
Inside the black ‘windows’ you painted on the roof peaks, use fine lines of terracotta paint (or leave negative space if you were very precise) to create window panes. If you painted them solid black, you can use orange paint to add the grid lines back in. -
Add white roof scallops:
Clean your fine brush and load it with white paint. Paint a scalloped line along the ridge where the pot’s rim meets the main body. This acts as decorative trim separating the floors. -
Highlight the roof peaks:
Paint white scalloped lines along the edges of the triangular roof peaks. This gives the appearance of shingles or gingerbread trim. -
Create the lower windows:
For the windows on the bottom level, paint a white grid over the terracotta shape to form window panes. I find a liner brush works best for keeping these lines thin. -
Add radiating light:
Using short, quick strokes of white paint, add small dash marks radiating outward from the top of the lower windows. This simple touch makes the house look like it’s glowing. -
Detail the base:
Paint a few horizontal and vertical white lines under the lower windows to suggest a sill or brickwork. -
Paint a starry sky:
Dip the back end of your paintbrush handle into white paint. Dot it randomly on the black areas of the roof and the flat top of the pot to create a starry night sky or falling snow.
Protecting Your Art
Since terracotta is porous, seal your finished house with a clear matte spray sealer if you plan to keep it on a porch where it might encounter damp air.
Now you have a spooky little cottage ready to inhabit your window sill or table centerpiece
Glow-in-the-Dark Silhouette Pots
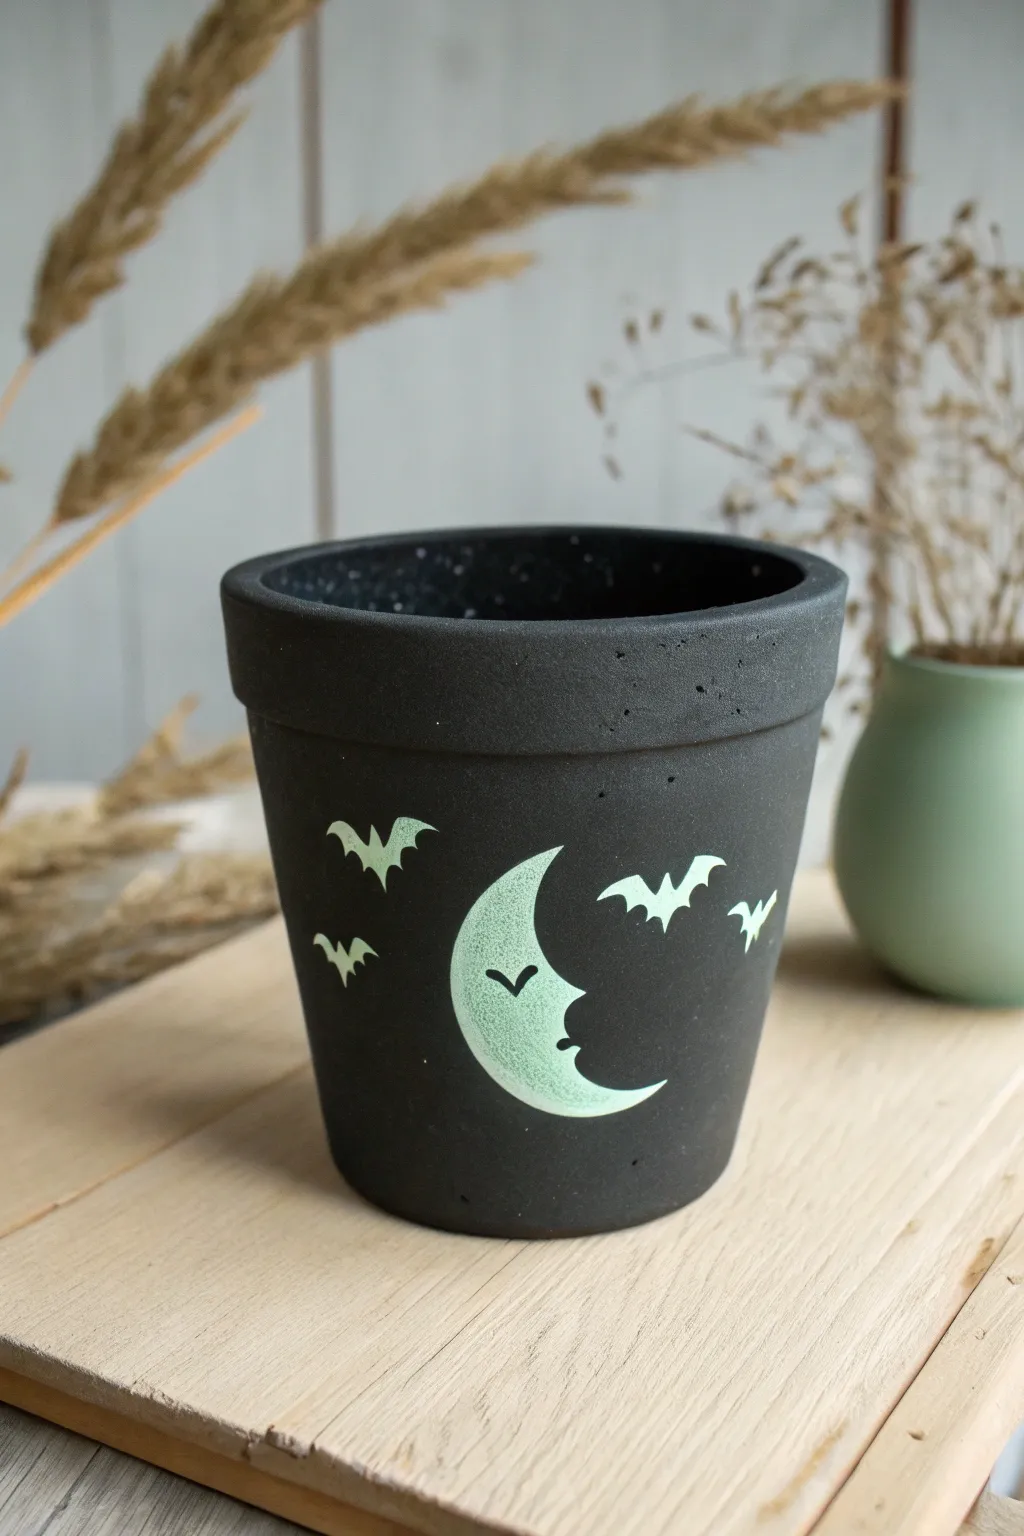
Transform a plain terra cotta pot into a spooky centerpiece with this matte black design featuring a crescent moon face and fluttering bats. The high-contrast look is perfect for Halloween, and using glow-in-the-dark paint adds a secret surprise when the lights go out.
Step-by-Step
Materials
- Terra cotta pot (standard 4-6 inch size)
- Matte black acrylic craft paint
- Glow-in-the-Dark acrylic paint (green tint)
- White acrylic paint (as a primer)
- Flat paintbrush (medium size)
- Fine detail paintbrush (round size 0 or 1)
- Pencil or white chalk pencil
- Cardstock or paper for stencils (optional)
- Scissors
- Water cup and paper towels
- Clear matte sealer spray
Step 1: Base Coat Preparation
-
Clean the surface:
Begin by ensuring your terra cotta pot is free of dust and debris. Wipe it down with a slightly damp cloth and let it dry completely before starting to paint. -
Apply the first black coat:
Using your medium flat brush, apply a generous layer of matte black acrylic paint to the entire exterior of the pot. Don’t forget to paint the top rim and just inside the lip for a finished look. -
Check for coverage:
Let the first coat dry for about 15-20 minutes. Terra cotta is porous and often absorbs the first layer, so you will likely see streaks. -
Apply the second black coat:
Apply a second, smooth layer of black paint. Focus on getting an opaque, solid finish that completely hides the orange clay underneath. Allow this to fully harden for at least an hour.
Glow Troubles?
If the glow is too dim, the white primer layer was likely too thin. Apply another thick layer of white, let dry, and re-apply the glow paint.
Step 2: Sketching the Design
-
Outline the moon:
Using a white chalk pencil or a regular pencil (gently), sketch a large crescent moon shape on the center of the pot. Give the inner curve a nose and lip profile to create a ‘man in the moon’ face. -
Add the eye detail:
Draw a small closed eye with a lash or two inside the moon shape, positioned near the nose. -
Sketch the bats:
Surround the moon with several small bat silhouettes. Draw about four or five bats in varying sizes, banking left and right, to create a sense of movement in the night sky. -
Create paper templates (optional):
If I’m not confident freehanding the bats, I’ll cut small bat shapes out of cardstock first and trace them onto the pot with the pencil.
Step 3: Painting the Silhouettes
-
Prime with white paint:
This step is crucial: Use your fine detail brush to fill in the moon and bat shapes with plain white acrylic paint first. Glow paint is translucent and won’t show up well directly on black. -
Navigate the details:
Be very careful around the eye detail on the moon—leave that sketch line black, or paint around it carefully so the black background shows through as the eye. -
Let the primer dry:
Allow the white silhouette layer to dry completely. It doesn’t need to be perfectly smooth, but it must be dry to the touch so it doesn’t muddy the glow paint. -
Apply the first glow layer:
Load your clean detail brush with the glow-in-the-dark paint. Apply a layer over the white primed areas of the moon and bats. -
Refine the edges:
Use the tip of the brush to keep the edges of the bats sharp and the curve of the moon smooth. If you go over the lines, you can touch up with black later. -
Build up the glow:
Glow paint often requires volume. Apply a second and possibly third coat, letting each dry in between, until the color looks a pale, milky green in the daylight. -
Texture the moon:
For the moon, you can stipple the paint slightly (dab it on) rather than brushing it smooth. This gives it a crater-like texture that looks great when glowing.
Starry Night Upgrade
Use an old toothbrush dipped in diluted white glow paint to flick tiny ‘stars’ across the black background for a full galaxy effect.
Step 4: Finishing Touches
-
Correct mistakes:
Once the designs are dry, take a small brush with black paint and tidy up any messy edges where the green might have strayed onto the background. -
Seal the project:
Take the pot to a well-ventilated area and spray it with a clear matte sealer. This protects the paint from chipping and moisture without making the pot too shiny. -
Charge the paint:
Place your finished pot under a bright light or in direct sunlight for a few hours to charge the glow pigment before displaying it in the dark.
Now you have a spooky vessel ready to hold festive candy or a prickly cactus.