If you’re craving that sweet, sunny look that only a flower clay bead bracelet can pull off, you’re in the right place. I’m sharing my favorite ways to make a 5-petal flower bead shine—mostly by playing with color, spacing, and those satisfyingly stackable Heishi beads.
Classic Daisy Centerpiece
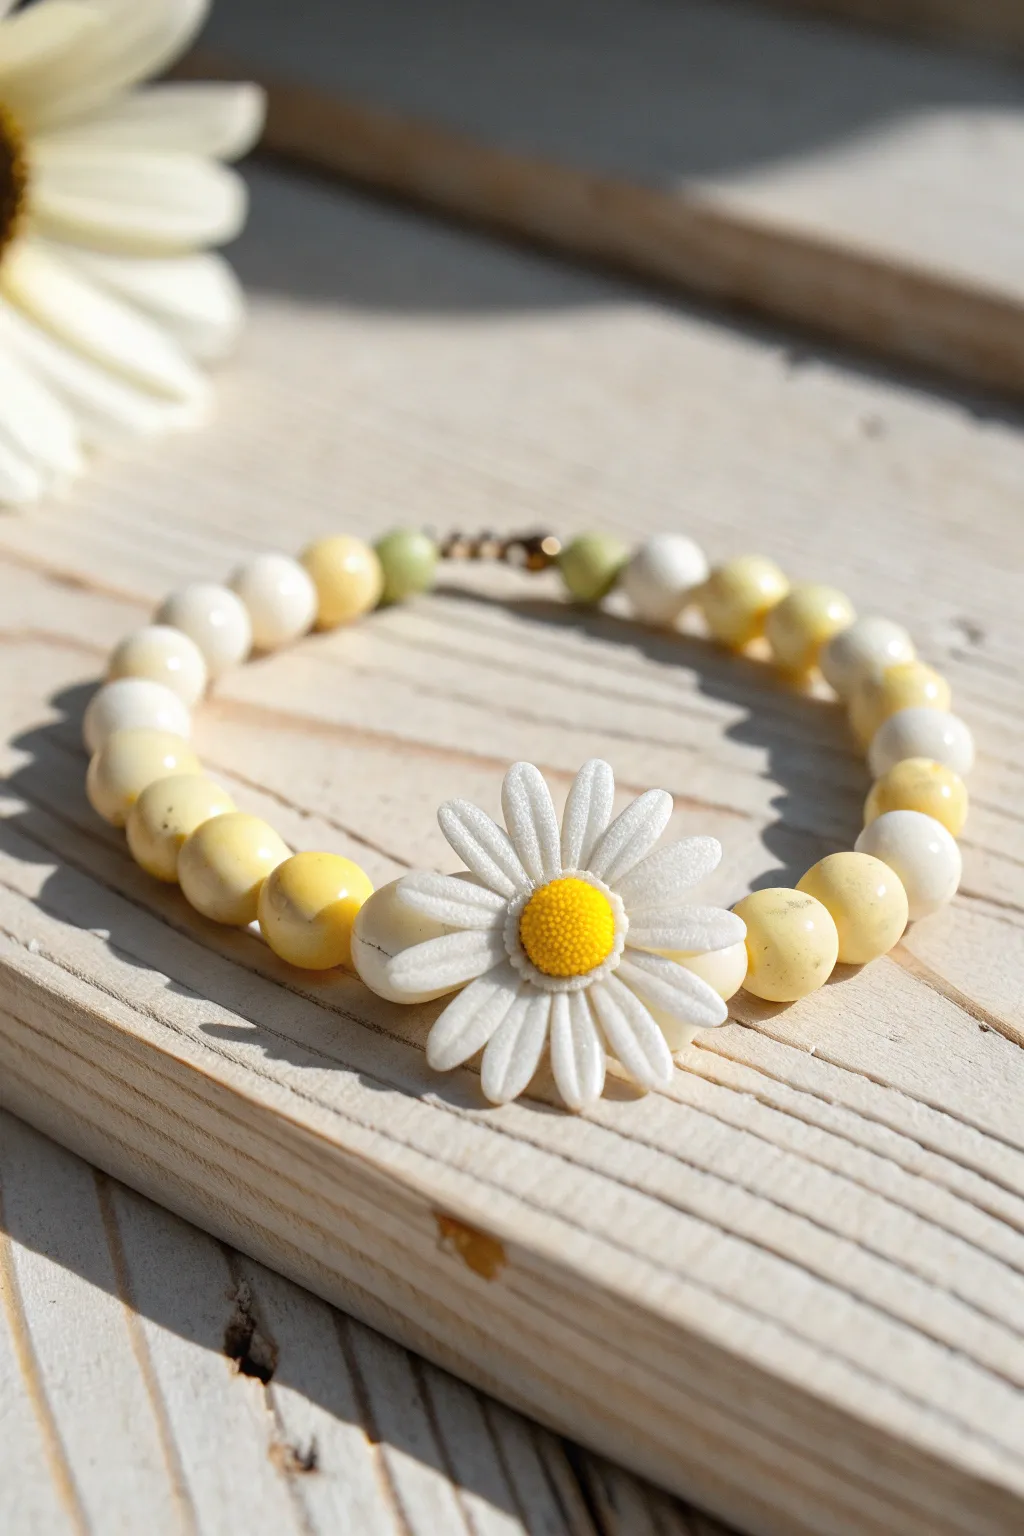
Brighten your wrist with this cheerful, sunny bracelet that celebrates the simplicity of a classic daisy. Featuring mellow yellow and cream hues accented by a striking clay flower centerpiece, this design perfectly captures the essence of a lazy summer afternoon.
Detailed Instructions
Materials
- Large white polymer clay daisy charm (approx. 20mm) with horizontal hole
- 8mm round beads (opaque creamy white stone or glass)
- 8mm round beads (opaque pale yellow stone or acrylic)
- 6mm round spacer beads (light olive green glass or stone)
- Gold-tone crimp beads (2mm)
- Gold-tone wire guardians
- Gold-tone lobster clasp and jump ring
- Beading wire (0.38mm or 0.45mm)
- Crimping pliers
- Wire cutters
- Bead design board (optional but helpful)
Step 1: Preparation & Design
-
Measure your wrist:
Before you begin, wrap a measuring tape around your wrist to determine the desired length. Add about 1/2 inch to this measurement to account for the bulk of the larger 8mm beads. -
Cut the wire:
Cut a piece of beading wire roughly 10 inches long. I find having a few excess inches makes finishing the ends much less frustrating than working with a short tail. -
Secure one end:
Thread a crimp bead and a wire guardian onto one end of the wire. Loop the wire back through the crimp bead to secure the guardian. -
Attach the clasp:
Attach your gold lobster clasp to the wire guardian loop before tightening the wire. -
Crimp the end:
Use your crimping pliers to flatten the crimp bead securely, locking the clasp in place. Trim the excess short tail of wire, or leave a tiny bit to tuck into the first bead.
Pro Tip: Petal Position
If your daisy spins too much, use slightly smaller 6mm beads right next to it. They nestle under the petals better, stabilizing the flower so it always faces up.
Step 2: Stringing the Beads
-
Start the pattern:
Begin stringing from the clasp side. Thread on two of the small green 6mm spacer beads first. -
Build the side section:
Add your creamy white 8mm beads and pale yellow 8mm beads in a random or alternating pattern. To match the photo, aim for about 8-10 beads on this first side, mixing the shades for a natural look. -
Prepare the centerpiece:
Select two pale yellow 8mm beads to flank the flower. Slide one yellow bead against your strung section. -
Add the daisy:
Thread the wire through the horizontal hole of your large polymer clay daisy charm. Ensure the flower faces outward correctly. -
Secure the flower:
Slide the second flanker yellow bead onto the wire immediately after the daisy. This sandwiches the flower and keeps it centered. -
Complete the second side:
Mirror the bead count from the first side. Add another 8-10 mixed yellow and white 8mm beads to finish the length of the bracelet. -
Finish with spacers:
End the stringing pattern with two small green 6mm spacer beads, just like the beginning.
Troubleshooting: Stiff Wire
If the bracelet feels rigid, you pulled the wire too tight before crimping. Leave a tiny 1-2mm gap of slack near the clasp to allow the beads to roll and curve comfortably.
Step 3: Finishing Touches
-
Check the fit:
Wrap the unfinished strand around your wrist to verify the size. Add or remove side beads if necessary. -
Add final hardware:
Thread on a crimp bead and the second wire guardian. -
Create the closure loop:
Pass the wire back through the crimp bead to form a loop with the guardian. Attach a jump ring to this guardian loop. -
Tighten the strand:
Pull the wire taut so there are no gaps between the beads, but keep it flexible enough to drape nicely. -
Final crimp:
flatten the last crimp bead securely using your pliers. -
Trim and hide:
Trim the excess wire close to the crimp bead. If possible, tuck the sharp end into the adjacent green bead for a polished finish.
Enjoy wearing your new floral accessory that brings a touch of spring to any outfit.


Pearl Pop Next to the Flower
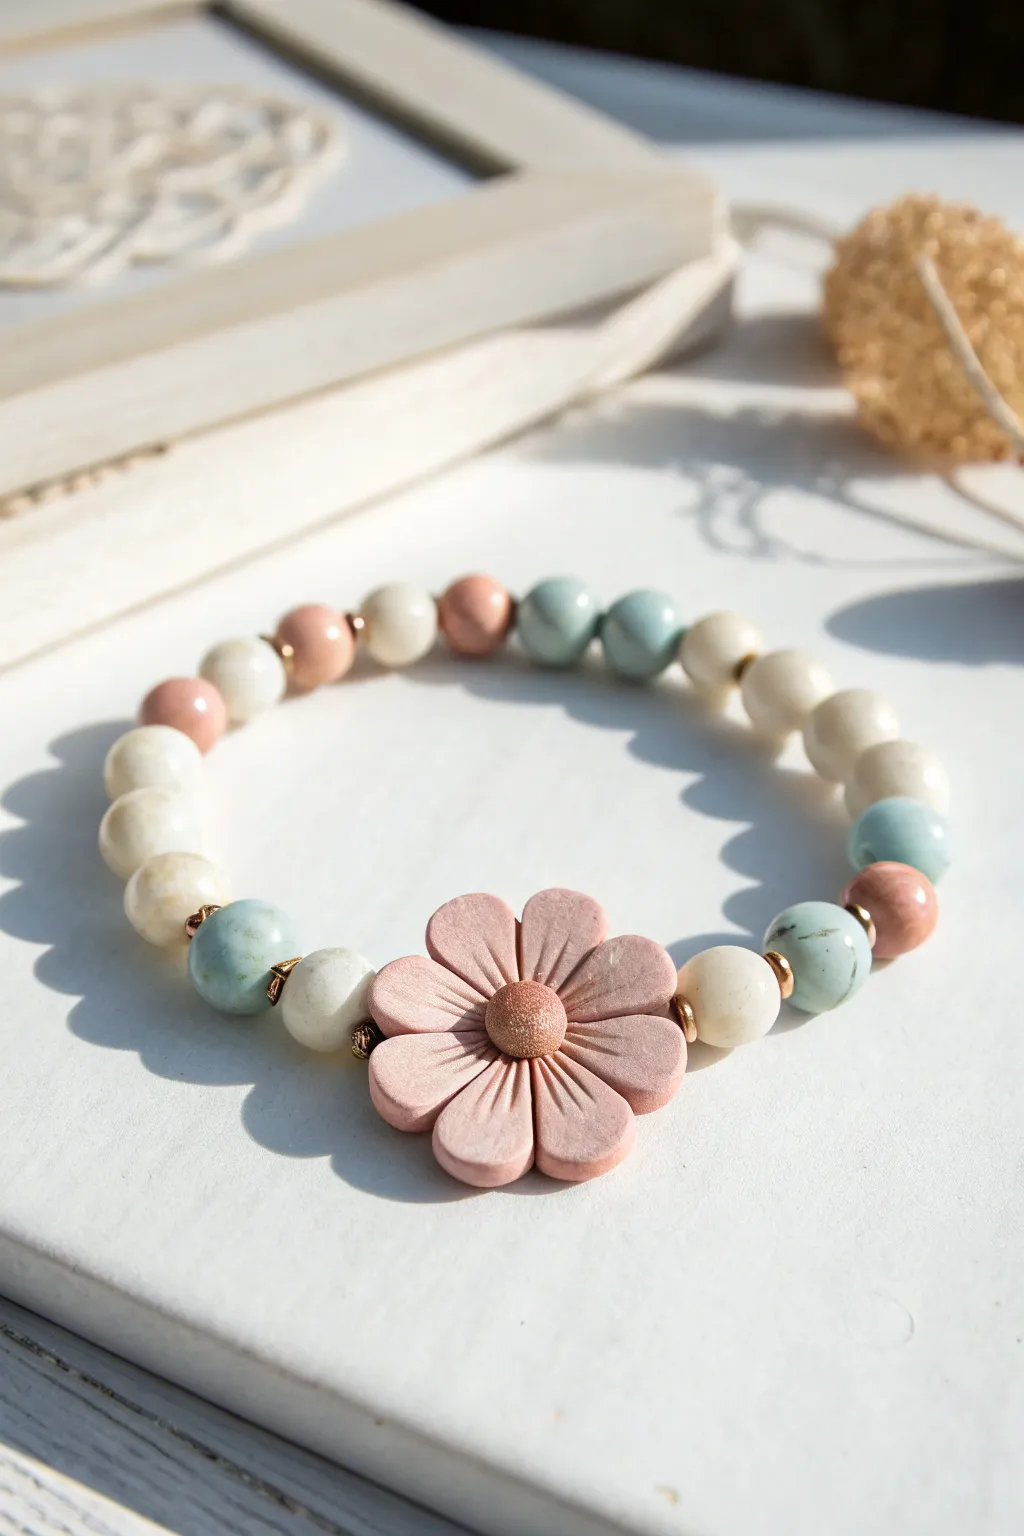
This elegant bracelet balances a rustic clay flower focal bead with the polished sheen of gemstone rounds in a soothing palette of cream, muted teal, and soft peach. It’s a perfect spring accessory that combines different textures for a sophisticated yet earthy look.
Step-by-Step Tutorial
Materials
- Large polymer clay flower bead (approx. 20-25mm, dusty pink)
- 8mm round beads (Cream/Off-White Jade or Moonstone)
- 8mm round beads (Muted Teal/Turquoise Amazonite or similar)
- 8mm round beads (Peach/Rose Quartz or similar)
- Small gold daisy spacers or rondelles (approx. 3-4mm)
- Strong elastic stretch cord (0.8mm or 1mm)
- Jewelry glue (GS Hypo Cement recommended)
- Scissors or bead snips
- Bead stopper or tape
Step 1: Preparation & Planning
-
Cut the Cord:
Start by cutting a piece of elastic cord about 10-12 inches long. This gives you plenty of extra room for tying knots later without struggling with short ends. -
Pre-stretch the Elastic:
Give the cord a few firm tugs to pre-stretch it. This prevents the bracelet from loosening up significantly after your first few wears. -
Secure the End:
Place a bead stopper or a piece of masking tape on one end of the cord so your beads don’t slide off while you design your pattern. -
Lay Out the Beads:
Before stringing, lay your beads out on a bead board or soft cloth. Place the large flower bead in the center as your focal point.
Step 2: Stringing the Design
-
Start the Sequence:
To the immediate left and right of the flower, plan for one cream-colored bead to make the pink color pop. -
Thread the Focal Bead:
Thread the elastic through the large pink flower bead first; check that it sits horizontally if the hole runs side-to-side. -
Add Gold Accents:
Slide one small gold spacer bead onto the cord on one side of the flower, followed by a cream bead. -
Finish the Focal Section:
Repeat on the other side of the flower: one gold spacer, then one cream bead. The gold spacers act as tiny frames for your centerpiece. -
Begin the Teal Pattern:
Next to the cream bead, add a gold spacer followed by a teal bead on both sides. This introduces the cool tone to balance the warmth. -
Continue the Pattern:
The pattern visible in the image generally follows an alternating rhythm. After the teal bead, add a peach bead, then a cream bead. -
Check the Rhythm:
Continue stringing beads, roughly following a ‘Teal – Peach – Cream – Teal – Peach’ sequence. I prefer to keep the pattern slightly random or organic rather than strictly mathematical for this style. -
Separate with Spacers:
Note that not every bead needs a spacer. In the reference, spacers are used primarily near the focal bead and sporadically between color changes. Add them where you want a touch of shine. -
Measure the Length:
Wrap the beaded strand around your wrist to check the fit. For an average wrist, you’ll need about 6.5 to 7 inches of beads. -
Adjust if Needed:
Add or remove the 8mm background beads until the ends meet comfortably without gaps, ensuring the flower stays centered.
Hiding the Knot
If the hole of the nearest bead is too small for the knot, gently ream it out slightly with a bead reamer tool before stringing.
Step 3: Finishing Touches
-
Tie the Knot:
Remove the bead stopper. Bring the two ends of the elastic together and tie a surgeon’s knot (loop the cord through twice before pulling tight). -
Secure with Glue:
Apply a tiny dab of jewelry glue directly onto the knot. Be careful not to get glue on the beads themselves, as it can cloud the finish. -
Hide the Knot:
While the glue is still tacky, gently pull the knot inside the hole of the nearest large bead (the cream bead next to the flower works well for this). -
Trim the Excess:
Once the glue has fully dried (wait at least 15 minutes), trim the excess elastic cord close to the bead hole carefully.
Style Upgrade
Swap the round gemstone beads for faceted glass or crystal beads in the same colors to give the bracelet a dressier, sparkling finish.
Now you have a charming floral accessory ready to wear with your favorite spring outfit


Gold Spacer Halo Around the Bloom
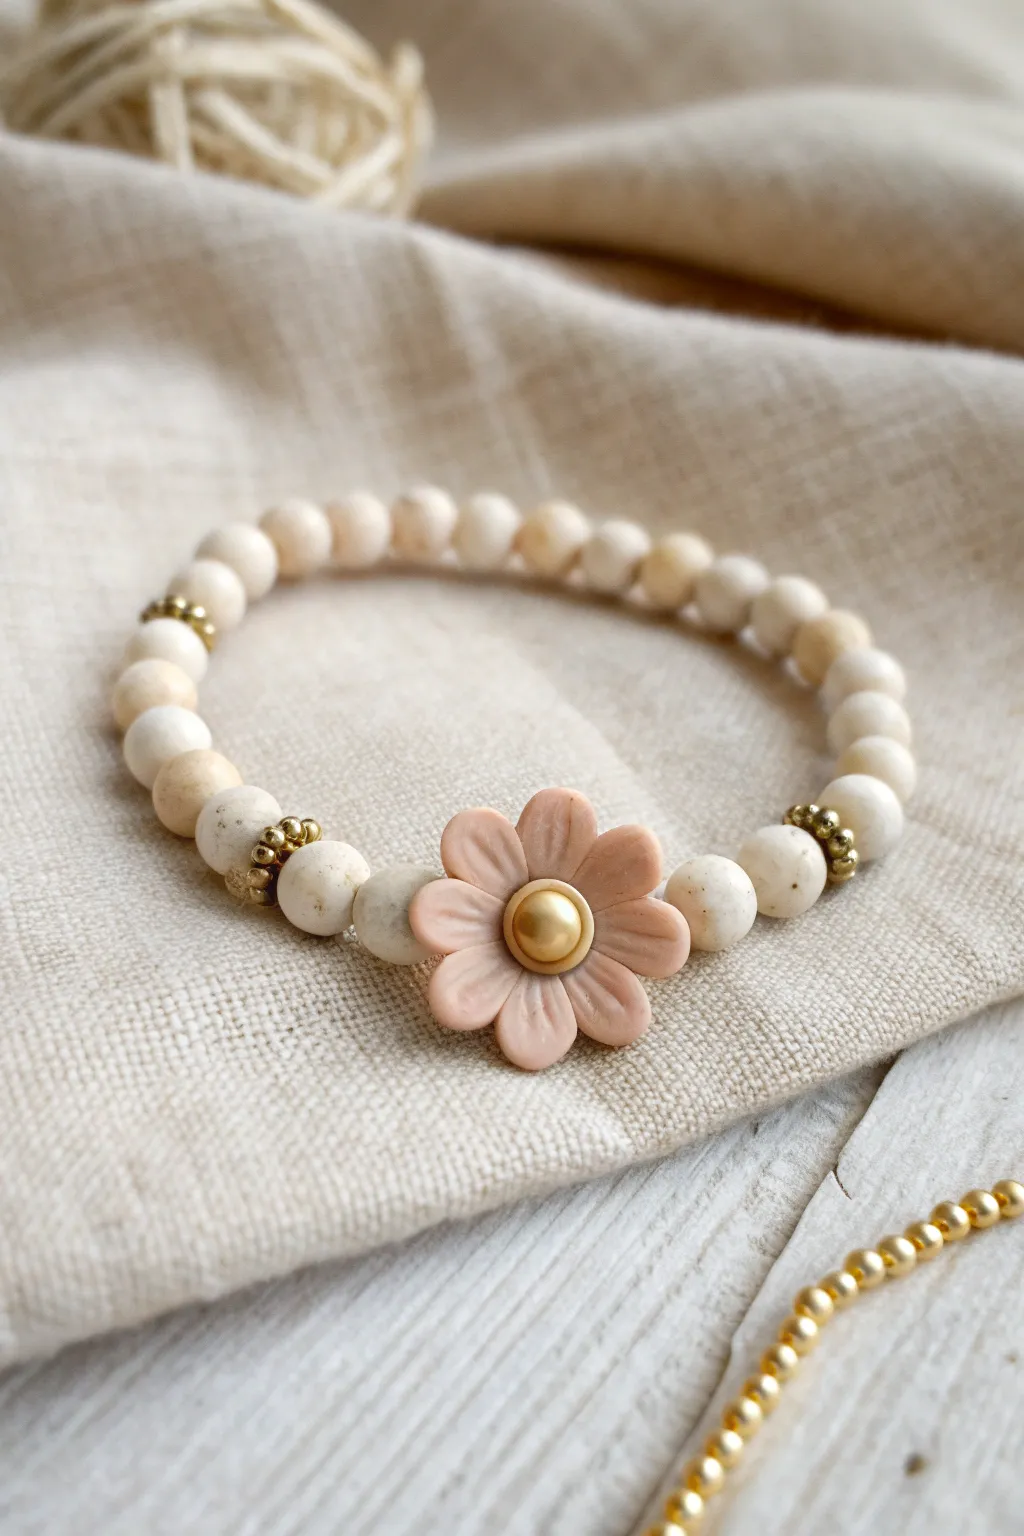
This elegant bracelet pairs the rustic charm of creamy, speckled stone beads with the delicate beauty of a polymer clay flower. The central bloom is highlighted by glowing golden accents, creating a sophisticated piece perfect for everyday wear.
Step-by-Step
Materials
- Elastic jewelry cord (0.5mm clear)
- 6-8mm round cream/beige gemstone beads (e.g., fossil jasper, river stone, or white jade)
- Pink polymer clay (e.g., Fimo Soft ‘Pale Pink’ or Premo ‘Blush’)
- Gold polymer clay or metallic gold acrylic paint
- Small gold bead (3-4mm) for the flower center
- Gold tone daisy spacers or small heishi spacer beads
- Gold crimp bead cover (optional for finishing)
- Jewelry glue (E6000 or Super New Glue)
- Needle or bead reamer
- Clay sculpting tool or toothpick
- Small circle cutter (approx. 1.5cm) or a bottle cap
- Scissors
Step 1: Creating the Clay Flower
-
Condition the clay:
Start by kneading a small amount of pink polymer clay until it is soft and pliable. This conditioning step prevents cracks during baking. -
Form the petals:
Roll the pink clay into 7 or 8 tiny, equal-sized balls, each about the size of a peppercorn. -
Shape the teardrops:
Gently roll one end of each ball between your fingers to form a teardrop shape. -
Flatten the petals:
Press each teardrop flat onto your work surface using your thumb or a flat tool. They should look like little paddles now. -
Arrange the bloom:
Arrange the petals in a circle with the pointed ends meeting in the center. Gently press the points together so they bond. -
Texture the petals:
Using a needle tool, a toothpick, or the back of a knife, press a single indentation down the center length of each petal to give it a realistic vein look. -
Add the center:
Take your small gold bead and press it firmly into the center of the flower where all the petals meet. Press deep enough so it won’t pop out later. -
Create the hole:
You need a channel for the string. Carefully pierce the side of the flower horizontally, going underneath the gold bead center. Wiggle the needle slightly to ensure the hole is wide enough for your elastic. -
Bake the bead:
Bake the flower according to your clay manufacturer’s instructions (usually 230°F-275°F for 15-30 minutes). Let it cool completely before handling.
Fragile Flowers?
If your petals break after baking, the clay was likely too dry or under-baked. Knead longer next time and ensure your oven temperature is accurate with an oven thermometer.
Step 2: Assembling the Bracelet
-
Measure the elastic:
Cut a piece of elastic cord about 10-12 inches long. I like to pre-stretch the cord by pulling on it firmly a few times; this prevents the bracelet from loosening up after you wear it. -
Start stringing:
Thread about 10-12 of your cream stone beads onto the cord. You can use a piece of tape or a bead stopper at the end to keep them from sliding off. -
Add the first accent:
Add a gold spacer bead, followed by one more cream stone bead, and then another gold spacer bead. -
Place the focal bead:
Thread your cooled clay flower onto the cord. Orient it so the petals sit nicely against the adjacent beads. -
Complete the pattern:
Mirror the accent pattern on the other side of the flower: one gold spacer, one cream bead, and one final gold spacer. -
Finish stringing:
Continue adding the rest of your cream stone beads until the bracelet reaches your desired length (standard is usually 7 inches). -
Tie the knot:
Tie a secure surgeon’s knot (right over left, left over right twice). Pull the elastic tight so there are no gaps between beads. -
Secure the ends:
Add a tiny drop of jewelry glue to the knot. Let it dry for a distinct moment before trimming the excess cord close to the knot. If the hole of a nearby bead is large enough, gently tuck the knot inside to hide it.
Pro Tip: Custom Colors
Mix a tiny pinch of translucent clay into your pink clay before shaping. This gives the petals a semi-sheer, waxy look that mimics real flower petals beautifully.
Slip this bracelet on your wrist for an instant touch of handcrafted elegance.


Monochrome Blossom Bracelet
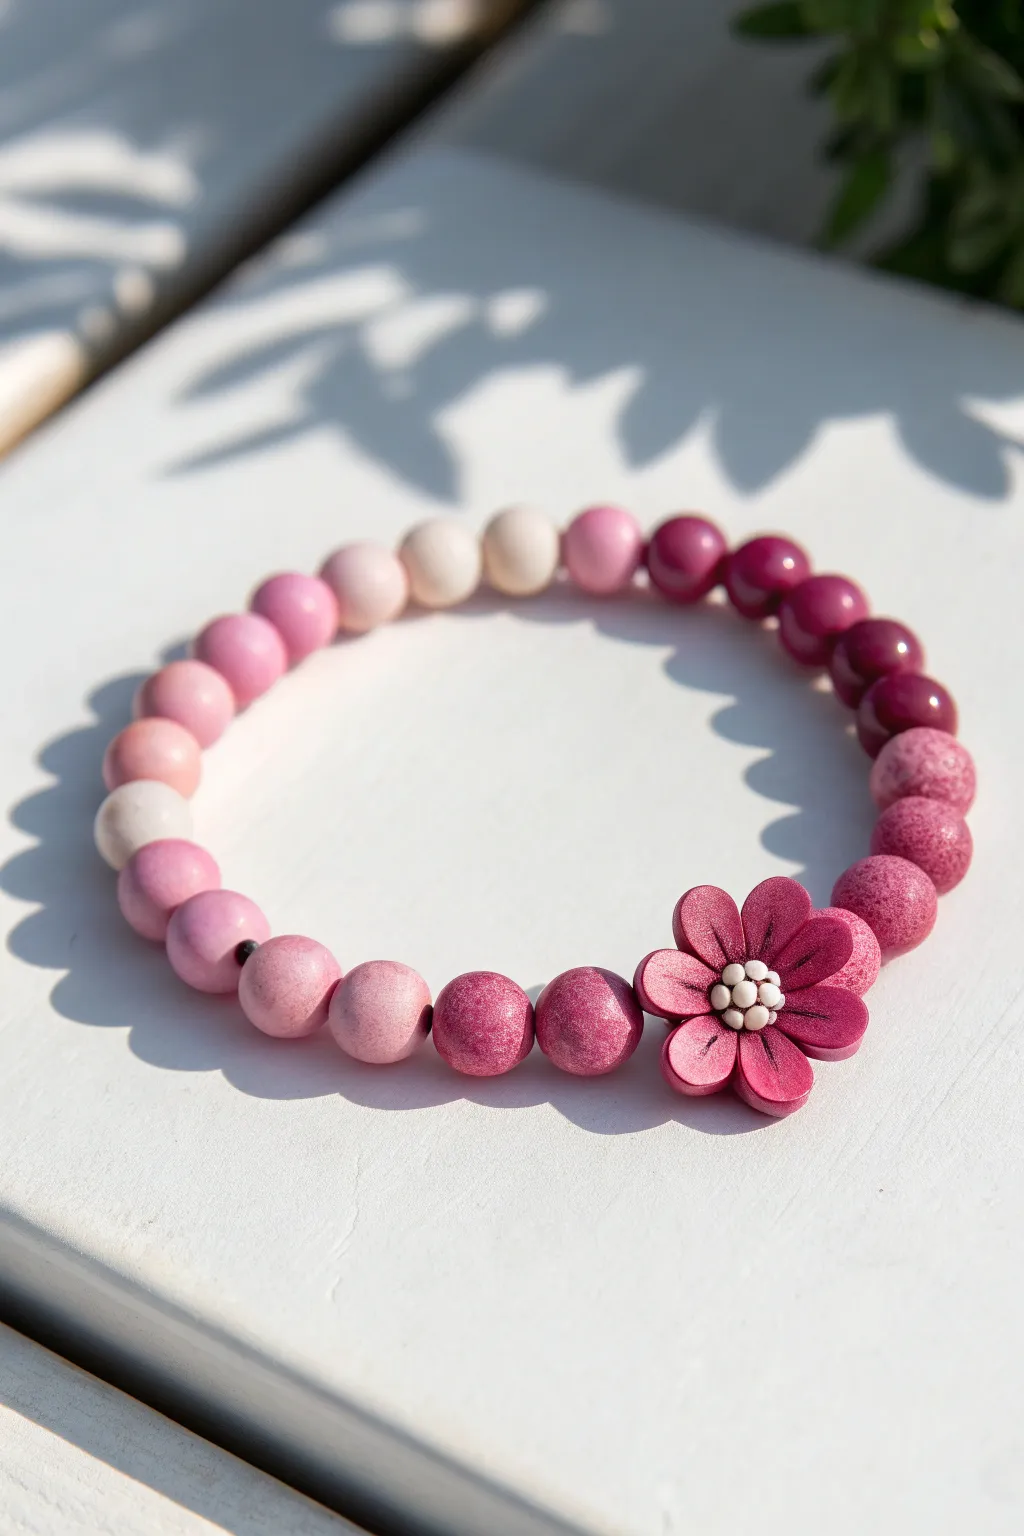
Embrace the soft beauty of an ombre sunrise with this handcrafted polymer bracelet. Featuring a sculpted central blossom and a carefully curated gradient of handmade clay beads, this piece captures the elegance of a monochrome garden in full bloom.
How-To Guide
Materials
- Polymer clay in varying shades: deep magenta, berry pink, dusty rose, pale peach, and translucent white
- Acrylate roller or pasta machine
- Small round bead roller tool (optional but helpful for consistency)
- Needle tool or bead piercing pins
- Small flower petal cutter or craft knife
- Ball stylus tool
- Strong elastic cord (0.8mm)
- Super glue or jewelry cement
- Tile or baking sheet
- Parchment paper
- Oven
- Fine-grit sandpaper (optional)
Step 1: Sculpting the Gradient Beads
-
Prepare the Color Palette:
Start by conditioning your clay. You want to create a spectrum of pinks. Mix white with your magenta to create four distinct shades: pure magenta, medium berry, soft dusty pink, and a very pale peach-pink. -
Portion the Clay:
Roll each color into a uniform log. Cut equal-sized segments from each log to ensure your finished beads are roughly the same size. -
Roll the Rounds:
Take each segment and roll it firmly between your palms to create spheres. A bead roller tool is great here for getting perfectly round shapes, but hand-rolling works beautifully for an organic feel. -
Create Texture (Optional):
For the speckled, stone-like effect seen in the darker beads, gently roll the uncured magenta spheres onto a piece of coarse sandpaper or texturing sponge before baking. -
Pierce the Beads:
Using a bead piercing pin or a needle tool, carefully poke a hole through the center of each sphere. Gently twist the pin as you push through to avoid deforming the round shape. -
Bake the Beads:
Arrange the pierced beads on a tile lined with parchment paper. Bake according to your polymer clay manufacturer’s instructions (usually 275°F/135°C for 15-30 minutes). Let them cool completely.
Step 2: Crafting the Focal Flower
-
Form the Petals:
Roll out a small sheet of the deep berry-pink clay. Use a small teardrop cutter or cut 6 small teardrop shapes freehand with a craft knife. -
Shape the Petals:
Place a petal in your palm and gently cup it. Use a needle tool to impress a single line down the center of each petal for realistic vein detail. -
Assemble the Blossom:
Arrange the six petals in a circle, points meeting in the center. Press them gently together so they bond. -
Add the Center:
Roll tiny spheres of white or very pale pink clay. Place one slightly larger ball in the very center, and surround it with 6-7 tinier dots to create the stamen cluster. -
Pierce the Flower:
This is the tricky part. Carefully pierce a hole horizontally through the side of the flower base (under the petals) so it can slide onto the elastic later. Ensure the channel is wide enough for your cord. -
Final Bake:
Bake the flower separately, perhaps propped on a bit of polyester batting to keep the petals lifted and curved while curing.
Smooth Operator
To remove fingerprints from your raw clay beads, lightly brush them with a drop of baby oil or cornstarch before baking for a flawless matte finish.
Step 3: Assembly
-
Layout the Gradient:
Once all clay pieces are cool and hard, lay them out on a bead board or towel. Organize them from darkest magenta to lightest peach to create the ombre effect. -
Thread the Elastic:
Cut a piece of elastic cord about 10 inches long. Pre-stretch it by pulling firmly on both ends a few times; this prevents the bracelet from loosening later. -
String the Beads:
Thread the beads onto the elastic, following your gradient pattern. Slide the clay flower on at the point where the darkest beads meet the berry tones for high contrast. -
Check the Fit:
Wrap the strand around your wrist to check the sizing. Add or remove beads to ensure a comfortable fit. -
Secure the Knot:
Tie a surgeon’s knot (a square knot with an extra loop through). Pull it tight. -
Final Touches:
Apply a tiny dot of super glue or jewelry cement to the knot for security. Let it dry, then trim the excess cord and tuck the knot inside the hole of the nearest bead.
Sparkle Upgrade
Mix a tiny pinch of translucent glitter or mica powder into the darkest pink clay to give the deep berry beads a subtle, granite-like shimmer.
Wear your new floral creation as a reminder that handmade beauty is always in season

The Complete Guide to Pottery Troubleshooting
Uncover the most common ceramic mistakes—from cracking clay to failed glazes—and learn how to fix them fast.
Complementary Color Flower Pop
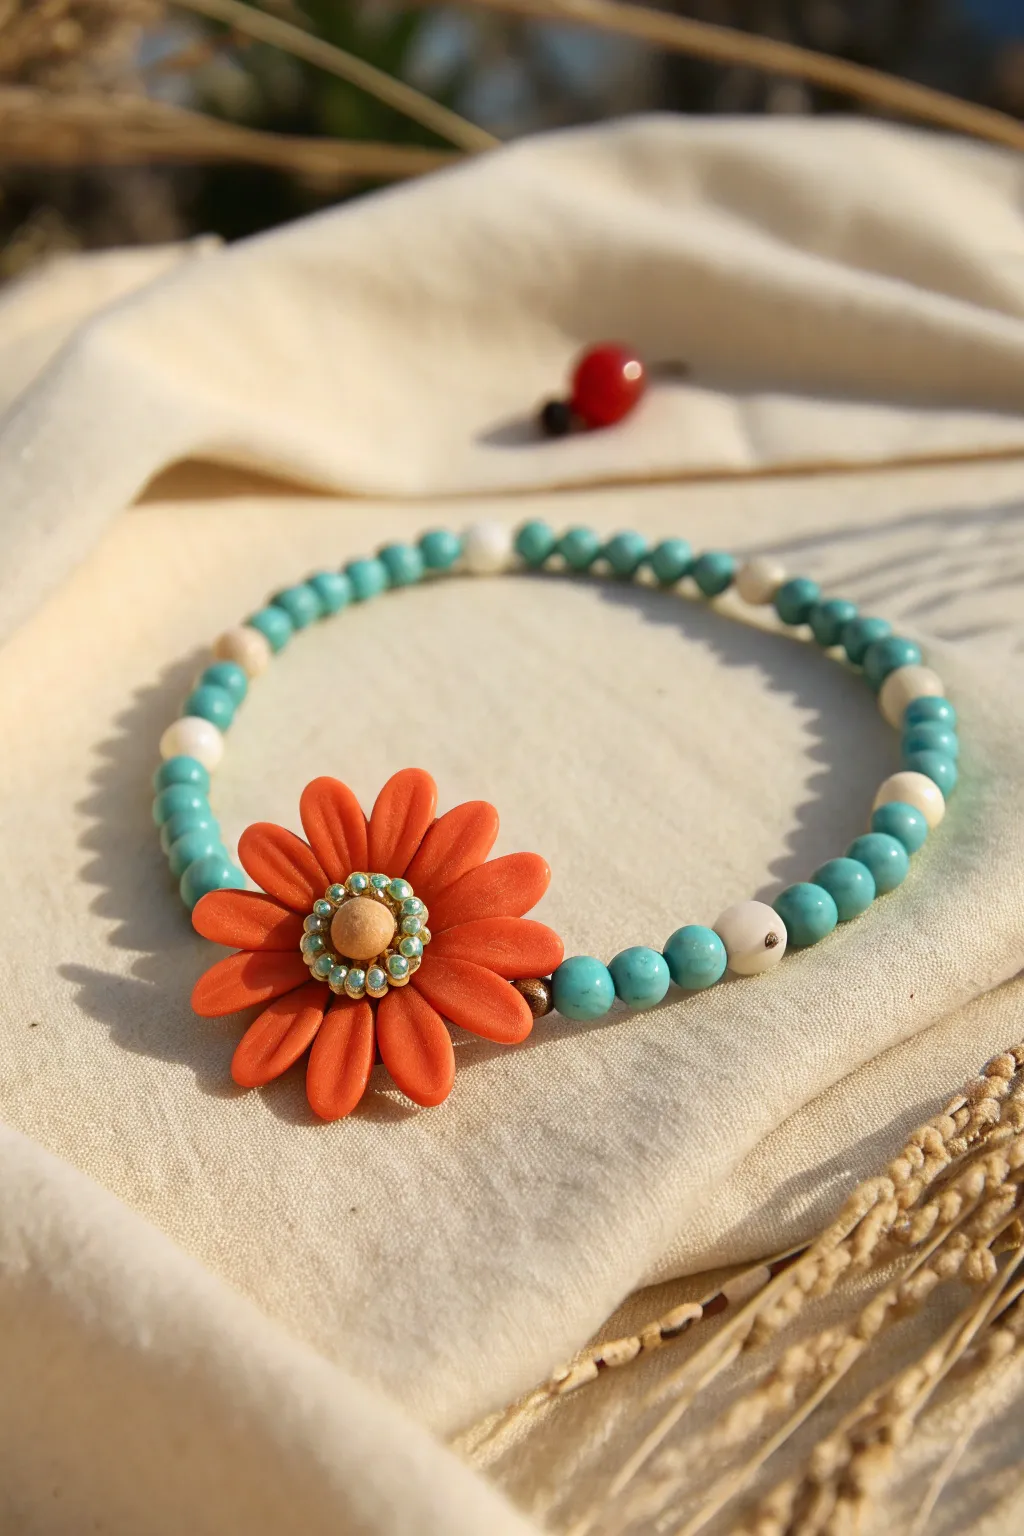
Embrace the warmth of nature with this striking clay bead bracelet, featuring a handcrafted terracotta flower against a cool backdrop of turquoise and cream beads. The contrast creates a visual pop that is both bohemian and refreshingly modern, perfect for stacking or wearing solo.
Detailed Instructions
Materials
- Polymer clay (Terracotta orange)
- Small round beads (Turquoise/teal stone or glass, approx. 4-6mm)
- Accent beads (Cream/white round beads, slightly larger, approx. 6mm)
- Seed beads (Metallic gold and pearlescent pale blue/green)
- Beige polymer clay or a large wooden bead (for the flower center)
- Stretch cord (0.7mm or 0.8mm)
- Super glue or jewelry cement
- Clay sculpting tools (needle tool, small ball tool)
- Baking sheet and parchment paper
- Oven (for curing clay)
- Scissors
Step 1: Sculpting the Clay Centerpiece
-
Prepare the petals:
Begin by conditioning your terracotta polymer clay until soft. Roll it into a thin log and slice off about 10-12 equal-sized segments. Roll each segment into a small ball, then flatten and elongate them into teardrop shapes to form individual petals. -
Texture the petals:
Using a needle tool or the back of a knife, gently press a single line down the center of each petal. This adds realism and dimension without needing complex molds. -
Form the base:
Flatten a small scrap piece of clay into a disc to serve as the base. Arrange your petals in a circle on top of this disc, pressing the pointed ends towards the center so they bond together. -
Create the center dome:
Roll a ball of beige clay (or use a smooth wooden bead if you prefer a natural texture) and press it firmly into the center of your flower. If using clay, I like to texture it slightly with a sponge or sandpaper for a pollen-like look. -
Add the seed bead detail:
Before baking, carefully press a ring of alternating gold and pearlescent seed beads into the clay around the central dome. Push them in just enough so the clay grips them, but make sure the holes are visible. -
Create the stringing hole:
This is crucial: Using a needle tool or a thick pin, pierce a horizontal channel through the side of the flower base (under the petals) or through the back. Ensure the hole is wide enough for your stretch cord to pass through twice if needed. -
Bake the flower:
Place your finished flower on a parchment-lined baking sheet. Bake according to your polymer clay package instructions (usually 275°F/135°C for 15-30 minutes). Let it cool completely before handling.
Baking Support
To give the flower a natural, slightly cupped shape, bake it on a curved surface—like the outside of a glass bowl or a crumpled foil mound—rather than a flat tray.
Step 2: Stringing and Assembly
-
Measure the cord:
Cut a piece of stretch cord about 10-12 inches long. This generous length gives you plenty of room to tie knots without struggling. -
Pre-stretch the cord:
give the cord a few gentle tugs. This helps prevent the bracelet from stretching out permanently after the first few wears. -
Start the pattern:
Begin stringing your beads. The pattern shown uses a rhythm of approximately three or four turquoise beads followed by one cream accent bead. Repeat this sequence for about half the desired bracelet length. -
Add the centerpiece:
Thread the cord through the channel you created in your cured clay flower. You might want to add a small gold spacer bead or a single turquoise bead immediately before and after the flower to help it sit comfortably against the wrist. -
Finish the bead pattern:
Continue the pattern on the other side of the flower—three or four turquoise beads, then one cream bead—until the bracelet reaches the correct size for your wrist. -
Check the fit:
Wrap the beaded strand around your wrist to ensure the flower sits centered and the fit is snag but comfortable. Add or remove a few turquoise beads near the ends if adjustment is needed. -
Secure the knot:
Tie a surgeon’s knot (right over left, left over right twice). Pull the cord tight. -
Final touches:
Apply a tiny dot of jewelry cement or super glue to the knot. Let it dry for a moment, then trim the excess cord ends, tucking the knot inside a nearby bead if the hole is large enough.
Glazed Finish
For a ceramic look, coat the baked clay flower with a high-gloss varnish or UV resin. This makes the terracotta color deeper and protects the seed beads.
Now you have a stunning, nature-inspired accessory ready to brighten up any outfit
Ombre Beads That Match the Petals
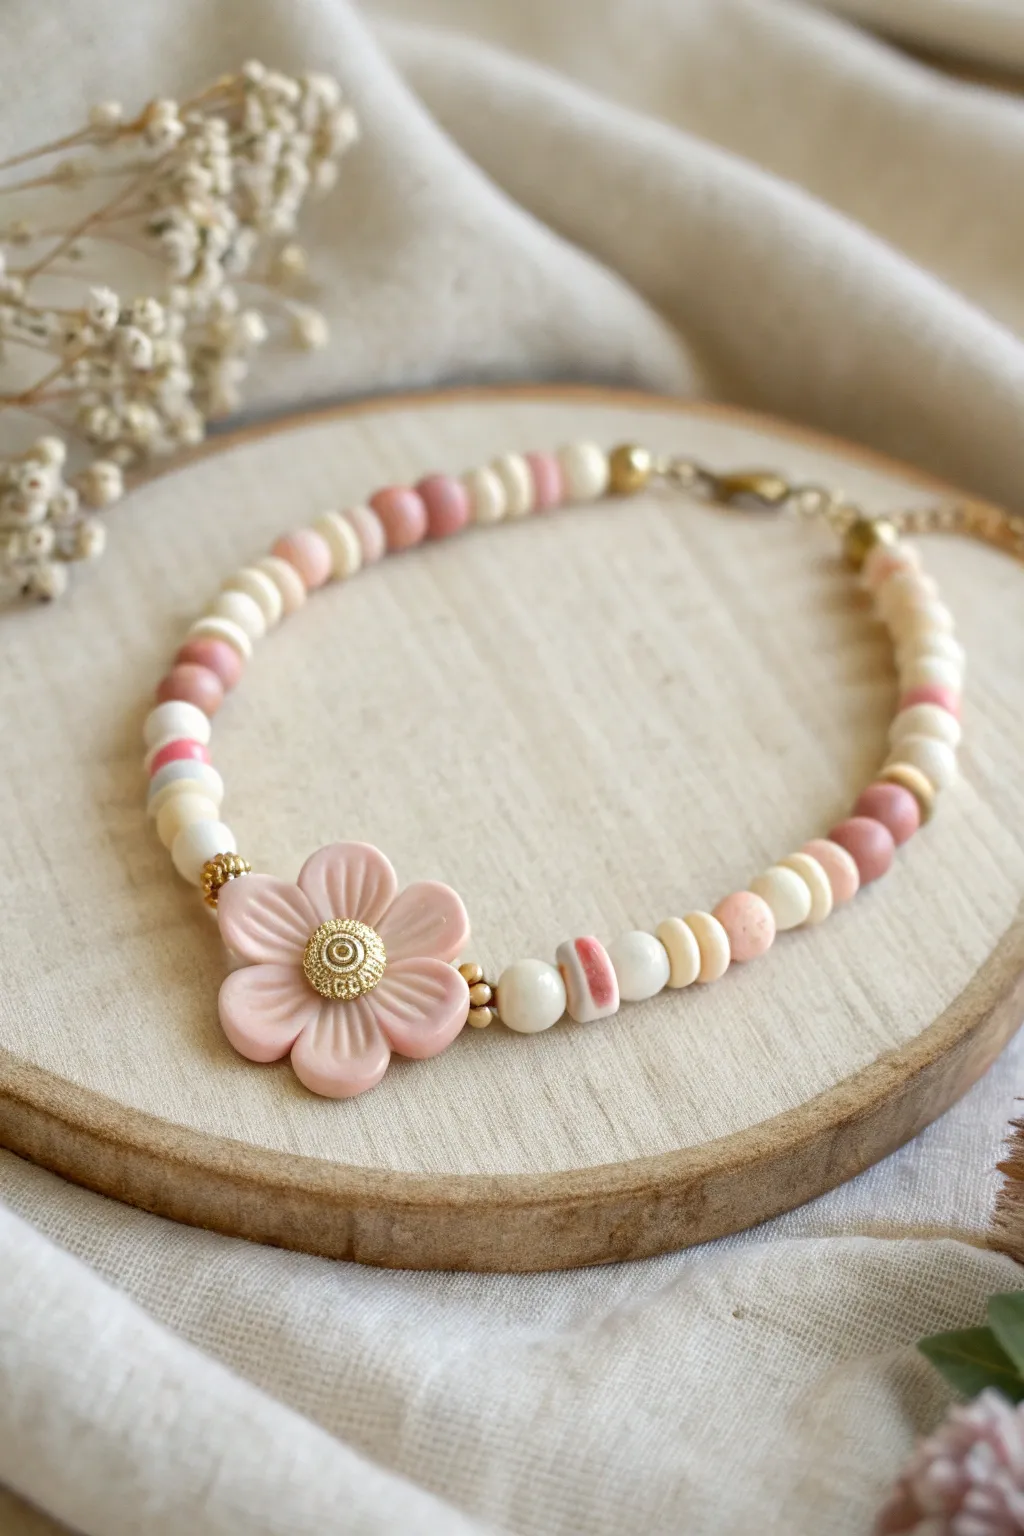
Soft pinks and creamy whites come together in this delicate bracelet that mimics the natural shading of flower petals. Centered around a sculpted clay bloom with a golden heart, the surrounding beads create a gentle ombre effect that looks elegant on any wrist.
Step-by-Step Guide
Materials
- Polymer clay (shades: dark dusty rose, light pink, peach, cream, white)
- Gold tone crimp beads and lobster clasp
- Gold finish chain extender
- Gold decorative flower center bead (small textured metal rondelle)
- Gold seed beads or tiny spacer beads
- Beading wire (flexible, medium weight)
- Small pliers (flat nose and round nose)
- Wire cutters
- Baking sheet and parchment paper
- Toothpick or bead piercing tool
- Clay sculpting tool or small knife
Step 1: Sculpting the Focal Flower
-
Form the petals:
Start by taking your light pink polymer clay and rolling it into six equal-sized small balls, roughly pea-sized. -
Flatten and shape:
Gently press each ball flat into a teardrop shape to form petals, ensuring they remain slightly thick for durability, about 2-3mm. -
Assemble the bloom:
Arrange the six petals in a circle, pressing their pointed ends together at the center so they stick to one another. -
Add detail:
Use a clay tool or the back of a knife to gently press a central groove down the middle of each petal for a realistic floral look. -
Create the hole:
Carefully pierce a hole horizontally through the side of the flower, ensuring it goes through the connected center area without distorting the petals. -
Baking time:
Place your flower on a parchment-lined baking sheet and bake according to your specific clay brand’s temperature instructions (usually around 275°F/135°C for 15-30 minutes), then let it cool completely.
Step 2: Preparing the Ombre Beads
-
Mix your colors:
To achieve the ombre look, you’ll need a gradation of color. If you only have solid blocks, mix white into your dark rose clay in increasing amounts to create medium pink, light peach, and cream shades. -
Roll the beads:
Roll small, consistent spheres of clay for each shade in your gradient: white, cream, peach, pink, and mauve. -
Flatten slightly:
Gently press each sphere into a ‘rondelle’ or thick disc shape rather than a perfect ball. -
Pierce and bake:
Use your toothpick to create center holes in all your beads, then bake them alongside or after your flower.
Flower drooping?
If the heavy flower spins backward when worn, string the wire through a second hole higher up on the back of the flower to stabilize its center of gravity.
Step 3: Stringing the Design
-
Start the wire:
Cut a length of beading wire about 10-12 inches long. Thread a crimp bead onto one end, loop it through one side of your clasp or jump ring, pass it back through the crimp bead, and flatten firmly with pliers. -
Begin the pattern:
Start threading your clay rondelles in a random or repeating ombre pattern. I like to alternate groups—like three mauve, then two pink, then white—to keep it organic. -
Insert gold accents:
Occasionally place a gold spacer bead or a contrasting striped bead between your clay rondelles to add visual rhythm. -
Position the flower:
Once you reach the halfway point of your desired bracelet length, thread on a gold spacer, then your large clay flower bead. -
Secure the flower center:
Before moving past the flower, place a decorative gold rondelle or textured bead directly into the center depression of the flower (gluing it later is optional but helpful). -
Finish the strand:
Thread a second gold spacer on the other side of the flower, then continue your ombre bead pattern to mirror the first half. -
Closing up:
Add a final crimp bead and your chain extender loop. Thread the wire back through the crimp and a few adjacent beads, pull tight, and crush the crimp bead flat.
Petal perfection
Before baking, lightly brush the tips of the raw clay petals with white mica powder or soft pastel chalk dust for a realistic, sun-kissed fade effect.
Enjoy wearing your handcrafted floral bracelet that captures the softness of spring no matter the season


What Really Happens Inside the Kiln
Learn how time and temperature work together inside the kiln to transform clay into durable ceramic.
Color-Block Sides With a Flower Center
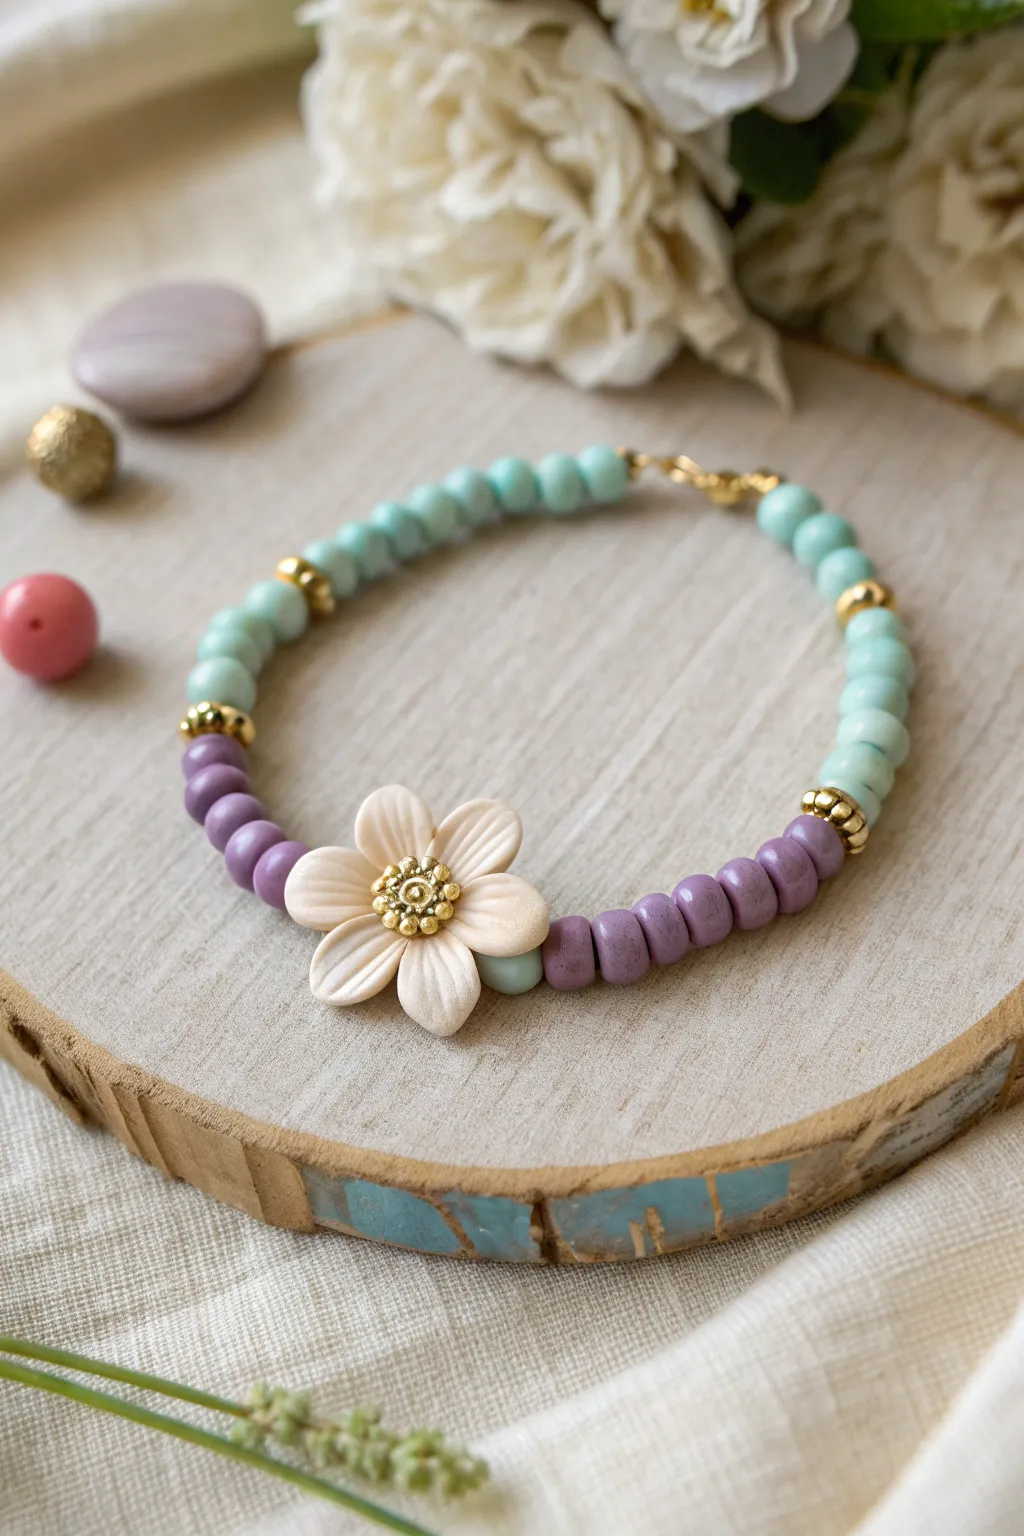
This charming project combines soft pastel color-blocking with a stunning focal point to create a piece that feels both vintage and fresh. The central white clay flower anchors the design, separating strands of calming mint and muted lavender beads for a balanced, symmetrical look.
Step-by-Step Guide
Materials
- White polymer clay (for the flower)
- Small amount of gold polymer clay or gold acrylic paint
- Mint green round beads (approx. 6mm, wood or matte glass)
- Muted purple/lavender round beads (approx. 6mm, wood or matte glass)
- 4 Gold spacer beads (rondelle or decorative wheel shape)
- Clear elastic bead cord (0.8mm or 1mm)
- Jewelry glue or clear nail polish
- Small clay sculpting tool or toothpick
- Oven for baking clay
- Optional: Gold crimp beads (if not using a knot)
- Gold tone clasp and jump rings (optional, if not making it stretchy)
Step 1: Sculpting the Central Flower
-
Form the petals:
Start by conditioning a small piece of white polymer clay until it is soft. Roll it into a thin log and slice off six equal portions to form the petals. -
Shape the teardrops:
Roll each of the six small pieces into a ball, then pinch one end to create a teardrop shape. Flatten them gently with your thumb. -
Add detail:
Using a needle tool or toothpick, gently press a central line down the length of each petal to create a vein texture. -
Assemble the bloom:
Arrange the six petals in a circle with the pointed ends touching in the center. Gently press them together so they fuse. -
Create the center:
Take a tiny amount of gold clay (or white clay you plan to paint later) and roll seven tiny balls. Arrange one in the middle and surround it with the other six to create a textured pistil. -
Attach the center:
Press this cluster of gold dots firmly into the center of your flower petals. -
Prepare the stringing hole:
Here I prefer to carefully pierce the flower horizontally through the side petals before baking. Ensure the hole is wide enough for your elastic cord. -
Bake the clay:
Place your flower on a baking sheet or cardstock. Bake according to your clay manufacturer’s instructions (usually 275°F/135°C for 15-30 minutes).
Step 2: Stringing the Design
-
Measure your cord:
Cut a piece of elastic cord about 10-12 inches long. This gives you plenty of slack for tying knots later. -
Start with the center:
Thread your cooled clay flower onto the center of the cord. -
Add the first spacers:
On the immediate left side of the flower, thread one single mint green bead. Then, place a gold spacer bead next to it. Flanking the flower with gold adds a professional finish. -
Begin the purple section:
On the right side of the flower (the side opposite the single mint bead), string approximately 8-10 purple beads. -
Cap the purple section:
Finish the purple segment by adding a gold spacer bead. -
Begin the mint section:
Go back to the left side (where you placed the single mint bead). String the rest of your mint beads, aiming for about 12-14 beads total on this side so it balances the length of the purple side. -
Final gold accents:
Ensure you place a gold spacer bead near the ends of both color sections to break up the pattern, mirroring the design shown in the image. -
Check the fit:
Wrap the unfinished strand around your wrist. Add or remove beads from the ends to ensure the flower stays centered on top of your wrist.
Hole Placement
If horizontal drilling is too hard on the raw clay, bake the flower first. Then, glue a flat bead or loop to the back to act as the stringing channel.
Step 3: Finishing the Bracelet
-
Connect the ends:
Bring the two ends of the elastic cord together. If you are using a clasp, crimp the ends to the hardware now. If making a stretch bracelet, prepare to knot. -
Tie the knot:
Tie a strong surgeon’s knot (right over left, left over right). Pull tight to secure the tension. -
Seal the deal:
Apply a tiny dot of jewelry glue or clear nail polish to the knot to prevent it from slipping. -
Hide the knot:
Once the glue is tacky but not fully hard, tug the cord gently to slide the knot inside the hole of the nearest bead. -
Trim excess:
Snip the excess cord close to the bead hole, being careful not to cut the main knot.
Texture Twist
Mix bead finishes for depth! Use matte beads for the purple side and glossy or frosted glass beads for the mint side to add tactile variety.
Enjoy wearing your handcrafted floral accessory with your favorite spring outfits
Double-Flower Symmetry Bracelet

Embrace soft, romantic tones with this delicate polymer clay bracelet featuring sculpted dual flowers as the centerpiece. The mix of matte round beads, textured accents, and metallic gold touches creates a perfectly balanced accessory that feels both vintage and modern.
How-To Guide
Materials
- Polymer clay in dusty rose, cream/beige, and translucent
- Gold mica powder or very fine gold glitter
- Gold acrylic paint
- Gloss glaze or varnish (optional)
- Beading wire or strong elastic cord
- Gold lobster clasp and extender chain
- 2 small gold crimp beads (if using wire)
- 2 gold wire guards (optional, for wire)
- Needle tool or toothpick
- Dotting tool
- Bead reamer or small drill bit
- Oven for baking
Step 1: Sculpting the Clay Flowers
-
Prepare the flower clay:
Condition your cream-colored polymer clay until it is soft and pliable. Roll it into a thin log, approximately 5mm in diameter. -
Form the petals:
Cut five equal segments from the log for each flower (you need two flowers total). Roll these segments into small balls, then flatten them into teardrop shapes to form the petals. -
Assemble the blooms:
Arrange five petals in a circle with the pointed ends meeting in the center. Use a dotting tool to gently press the center of each petal, creating a subtle indentation and bonding them together. -
Add detail:
Use a needle tool to press two or three lines into each petal, radiating from the center outwards, to mimic natural vein texture. -
Create the center:
Roll a tiny ball of clay for the flower center. I like to mix a pinch of gold mica powder into this bit of clay before rolling for extra sparkle. Press it firmly into the middle of your flower. -
Pierce the flowers:
Carefully poke a hole horizontally through the entire flower. You may need to wiggle the needle tool gently to ensure the channel is wide enough for your cord without distorting the petals.
Step 2: Creating the Beads
-
Mix your colors:
Create a palette of beads. You’ll need solid cream, dusty rose, and a special textured mix. For the textured mix, blend a little translucent clay with rose and add tiny speckles of gold glitter. -
Roll the main beads:
Hand-roll approximately 14-16 cream beads and 10-12 dusty rose beads. Keep them modest in size, around 6-8mm, to ensure the flowers remain the focal point. -
Make the textured accent beads:
Roll two special round beads using your dusty rose mixture. Use a small stylus to stipple the surface, giving it a porous, berry-like texture. -
Make the ribbed accent beads:
Create two smaller rose-colored beads. Use the edge of a credit card or a dull knife to press vertical indentations around the side, creating a pumpkin or melon shape. -
Pierce and bake:
Poke holes through the center of all your round beads. Arrange all clay pieces on a tile or parchment paper and bake according to your manufacturer’s instructions (usually 275°F/135°C for 15-30 minutes). Let them cool completely. -
Gold accents:
Once cool, use a fine brush to dab a tiny dot of gold paint onto the center of each flower if you didn’t use mica powder earlier. You can also lightly brush the textured ‘berry’ beads with gold to highlight the stippling.
Hole distortion?
If your flower distorts when piercing the hole, let the clay sit in the fridge for 10 minutes to firm up before trying again. Or, bake it first and drill later.
Step 3: Assembly
-
Start the stringing:
Cut a length of beading wire. Secure one end to a gold clasp using a crimp bead (and wire guard if you have one). String 2-3 dusty rose beads to start near the clasp. -
Build the pattern:
Begin your alternating pattern: one cream bead, one rose bead. Continue until you are about a third of the way through the bracelet length. -
Place the first focal section:
Thread on a ribbed melon bead, followed by one of your large clay flowers. -
Create the center bridge:
Between the two flowers, string a specific sequence: one rose bead, one textured ‘berry’ bead, one cream bead, and one more cream bead. This asymmetry adds visual interest. -
Finish the symmetry:
Add the second flower and the second ribbed melon bead. Finish the rest of the strand with your alternating cream and rose pattern. -
Secure the end:
Thread on a crimp bead and the jump ring or extender chain. Loop the wire back through the crimp bead and pull tight (but not rigid). Flatten the crimp bead with pliers and trim excess wire.
Level Up: Scented Clay
Mix a single drop of essential oil (like rose or lavender) into the clay during the conditioning phase. Your bracelet will carry a faint, lovely scent when worn.
Now you have a charming, symmetrical floral piece ready to compliment any spring or summer outfit

TRACK YOUR CERAMIC JOURNEY
Capture glaze tests, firing details, and creative progress—all in one simple printable. Make your projects easier to repeat and improve.
Tiny Flower Beads All the Way Around
This charming bracelet combines soft pastel hues with delicate handmade polymer clay flowers for a whimsical, spring-inspired accessory. The mix of matte clay textures and shining gold accents creates a piece that feels both playful and elegant.
Step-by-Step
Materials
- Polymer clay (lavender, pastel yellow, light blue, soft pink)
- Small gold seed beads or micro beads (for flower centers)
- Round pastel beads (approx. 6mm – pink, blue, lavender, cream)
- Round gold spacer beads (approx. 6mm)
- Beading wire or strong elastic cord
- Sculpting tools (needle tool or toothpick)
- Clay blade or craft knife
- Pin drill or thick needle (for piercing beads)
- Oven for baking clay
- Crimp beads and crimping tool (if using wire)
- Clasp (lobster claw) and jump rings
Step 1: Sculpting the Flower Beads
-
Condition the Clay:
Begin by kneading your polymer clay colors until they are soft and pliable. You will need small amounts of purple, yellow, and blue for the flowers. -
Shape Petals:
For the first flower, roll five to six tiny balls of purple clay, each about the size of a peppercorn. Flatten them slightly into teardrop shapes to form individual petals. -
Assemble the Flower:
Press the narrow ends of the petals together in a circle to create the flower shape. Gently smooth the joins on the back so the flower holds together securely. -
Add the Center:
Take a tiny pinch of yellow clay (or use additional gold beads later) and press it into the center. Use a needle tool to stipple the center, giving it a pollen-like texture. -
Embed Gold Accents:
For the specific look in the photo, gently press tiny gold micro beads into the center of the textured area before baking. This adds that crucial sparkle. -
Create the Beading Hole:
Carefully insert a pin or needle piercing tool horizontally through the side of the flower. Ensure the hole is wide enough for your elastic or wire but doesn’t distort the flower shape. -
Repeat for All Flowers:
Create three more flowers: one yellow, one blue, and another purple. Try to keep them roughly the same size for a balanced centerpiece. -
Bake the Clay:
Place your finished flower beads on a baking tile or parchment-lined tray. Bake according to the manufacturer’s instructions for your specific brand of polymer clay.
Baking Pro-Tip
Bake your flowers on a bed of cornstarch or baking soda. This cushions the curved shapes, preventing flat spots on the back of the petals.
Step 2: Stringing the Design
-
Prepare the Cord:
Cut a length of elastic cord or beading wire about 10 inches long to give yourself plenty of room to work. I usually tape one end down to stop beads from sliding off. -
String the Centerpiece:
Thread your baked and cooled flower beads onto the middle of the cord. Arrange them in the order: purple, yellow, blue, purple. -
Start the Side Pattern:
On the right side of the flowers, add a sequence of pastel round beads. Alternate colors like pink, cream, lavender, and blue. -
Incorporate Gold Spacers:
Place a gold spacer bead between every 1-2 pastel beads. This breaks up the matte colors and ties in with the gold centers of your flowers. -
Mirror the Pattern:
Repeat the same beaded pattern on the left side of the flowers to ensure the bracelet is symmetrical. -
Check the Length:
Wrap the unfinished strand around your wrist to check the fit. Add or remove round beads from the ends until it sits comfortably.
Step 3: Finishing Touches
-
Secure the Ends (Elastic Method):
If using elastic, tie a strong surgeon’s knot. Pull it tight, add a dab of jewelry glue to the knot, and trim the excess cord once dry. -
Secure the Ends (Wire Method):
If using wire, thread a crimp bead on one end, followed by one half of the clasp. Loop the wire back through the crimp bead and use crimping pliers to flatten it. -
Attach the Clasp:
Repeat the crimping process on the other end with a jump ring or the other half of the clasp. Trim any excess wire close to the crimp bead. -
Final Polish:
Gently wipe the flower beads with a soft cloth to remove any fingerprints and ensure the gold centers are shining brightly.
Style Level-Up
Use pearl-effect polymer clay instead of solid colors for the petals to give the flowers a shimmering, high-end porcelain look.
Now you have a blooming lovely accessory perfect for brightening up any outfit
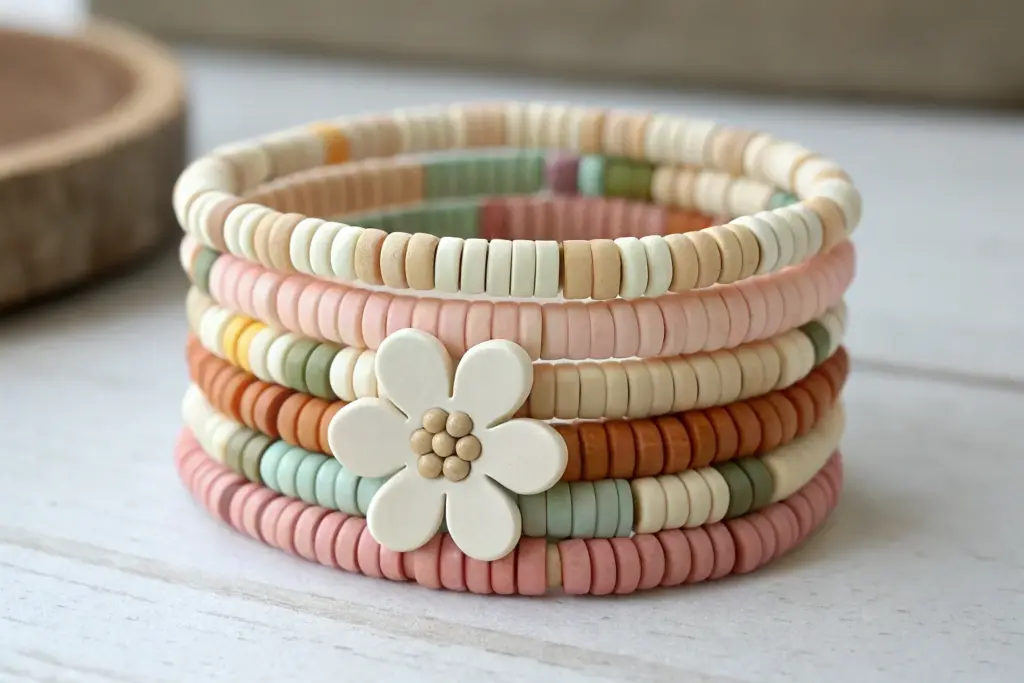
Stackable Set With One Feature Flower
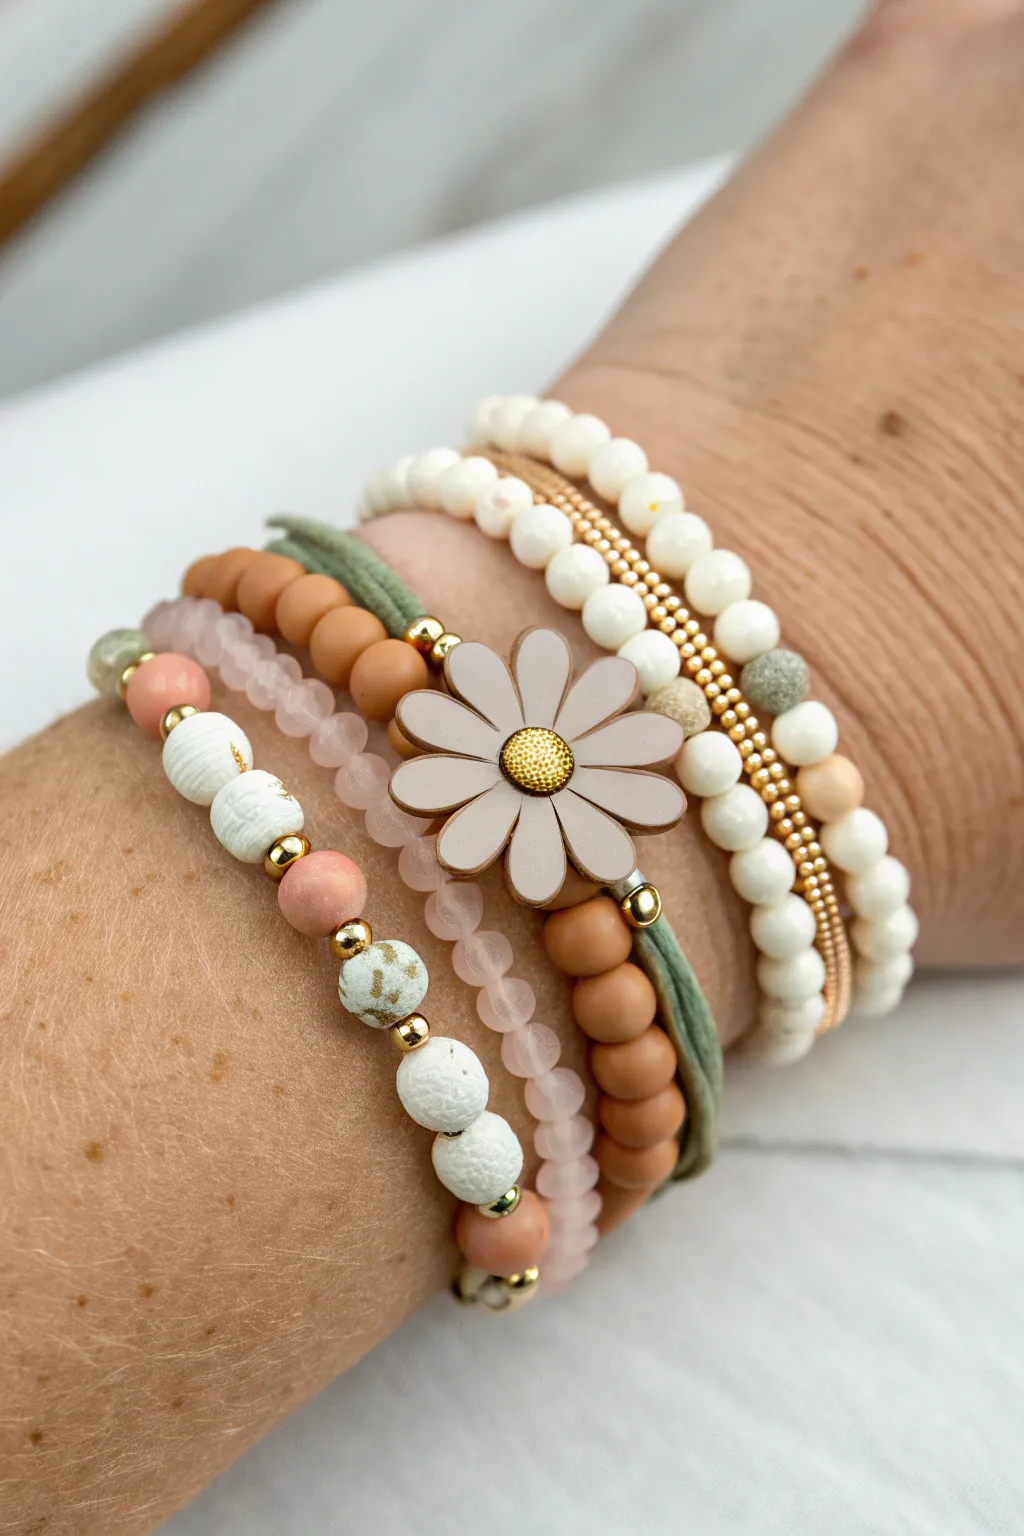
Embrace a soft, nature-inspired palette with this charming five-bracelet stack featuring a prominent daisy focal point. Mixing textures like matte clay, faceted glass, gold spacers, and natural cord creates a layered look that feels effortless and Bohemian chic.
Detailed Instructions
Materials
- Elastic beading cord (0.7mm or 0.8mm)
- Beige/taupe flat polymer clay daisy charm (approx. 20-25mm) with two holes
- Soft green suede or faux suede cord (approx. 3mm wide)
- White round beads (6mm and 8mm, likely gemstone like white turquoise or smooth stone)
- Peach/salmon round beads (6mm)
- Small gold seed beads or Heishi spacers
- Gold ball spacer beads (3mm and 4mm)
- White/grey speckled beads with gold flecks (8mm)
- Small gold faceted beads (2mm or 3mm)
- Translucent frosty pink glass beads (4mm or 6mm)
- Caramel brown matte acrylic or clay round beads (6mm)
- Jewelry glue (e.g., G-S Hypo Cement)
- Scissors
Step 1: The Feature Daisy Bracelet
-
Cut cords:
Cut two lengths of elastic cord, each about 10-12 inches long to give yourself plenty of working room. -
Prepare the flower:
This central bracelet uses a dual-strand technique. Thread one elastic cord through the top hole of your daisy charm and the second cord through the bottom hole. -
String the beads:
On the right side of the flower, string caramel brown matte beads onto both cords simultaneously. Repeat this on the left side until the beaded section covers about half of your wrist circumference. -
Add the suede accent:
Cut two small strips of green suede cord (about 2 inches each). Position one strip horizontally across the elastic cords on the right side, right next to the last bead. -
Secure the suede:
Fold the suede strip over the elastic strands and wrap a piece of gold wire or use a crimp bead to secure the folded loop, creating a tassel-like effect that hides the transition to the back of the bracelet. -
Finish the band:
Continue beading the rest of the band with the caramel beads until it fits your wrist comfortably, then tie off firmly with a surgeon’s knot.
Knot Security
Pre-stretch your elastic cord before stringing beads. Give it a few firm tugs; this prevents the bracelet from stretching out and becoming loose after the first few wears.
Step 2: The Gold & White Layers
-
Create the all-white bracelet:
On a new piece of elastic, string 6mm white round beads. This simple strand acts as a foundational layer to brighten the stack. -
Create the gold spacer bracelet:
For the metallic texture shown in the image, string a full length of tiny 2mm gold faceted beads. If you want breaks in the pattern, you can alternate every 10 beads with a small white seed bead. -
Make the mixed white textural bracelet:
Combine your 8mm white beads with smaller spacer beads. A nice pattern is three large white beads followed by one small gold spacer to create rhythm.
Step 3: The Accent Color Strands
-
Start the pink mix:
Cut another length of elastic. Thread on a pattern of white textured beads, gold ball spacers, and salmon/peach accent beads. -
Establish the pattern:
Recreate the specific pattern seen on the left: one large white textured bead, a gold spacer, a peach bead, a gold spacer, and repeat. I find this alternating size adds great dimension. -
Create the frosted pink strand:
For the softest layer, string your translucent frosty pink glass beads. These are smaller (around 4mm), so you will need more of them to complete the circumference. -
Tie and glue:
Once all strands are beaded to size, tie each off with a strong surgeon’s knot (right over left, left over right). Apply a tiny dab of jewelry glue to each knot. -
Hide knots:
Where possible, gently tug the elastic so the knotted section slips inside the hole of a neighboring large bead to hide it from view.
Wonky Flower?
If the daisy charm flips over or twists while wearing, your elastic might be too loose. Restring that specific bracelet slightly tighter so it hugs the wrist curve.
Slide on your new stack to enjoy a floral touch that feels like carrying a bit of spring with you everywhere
Birth Month Colorway Flower Bracelets
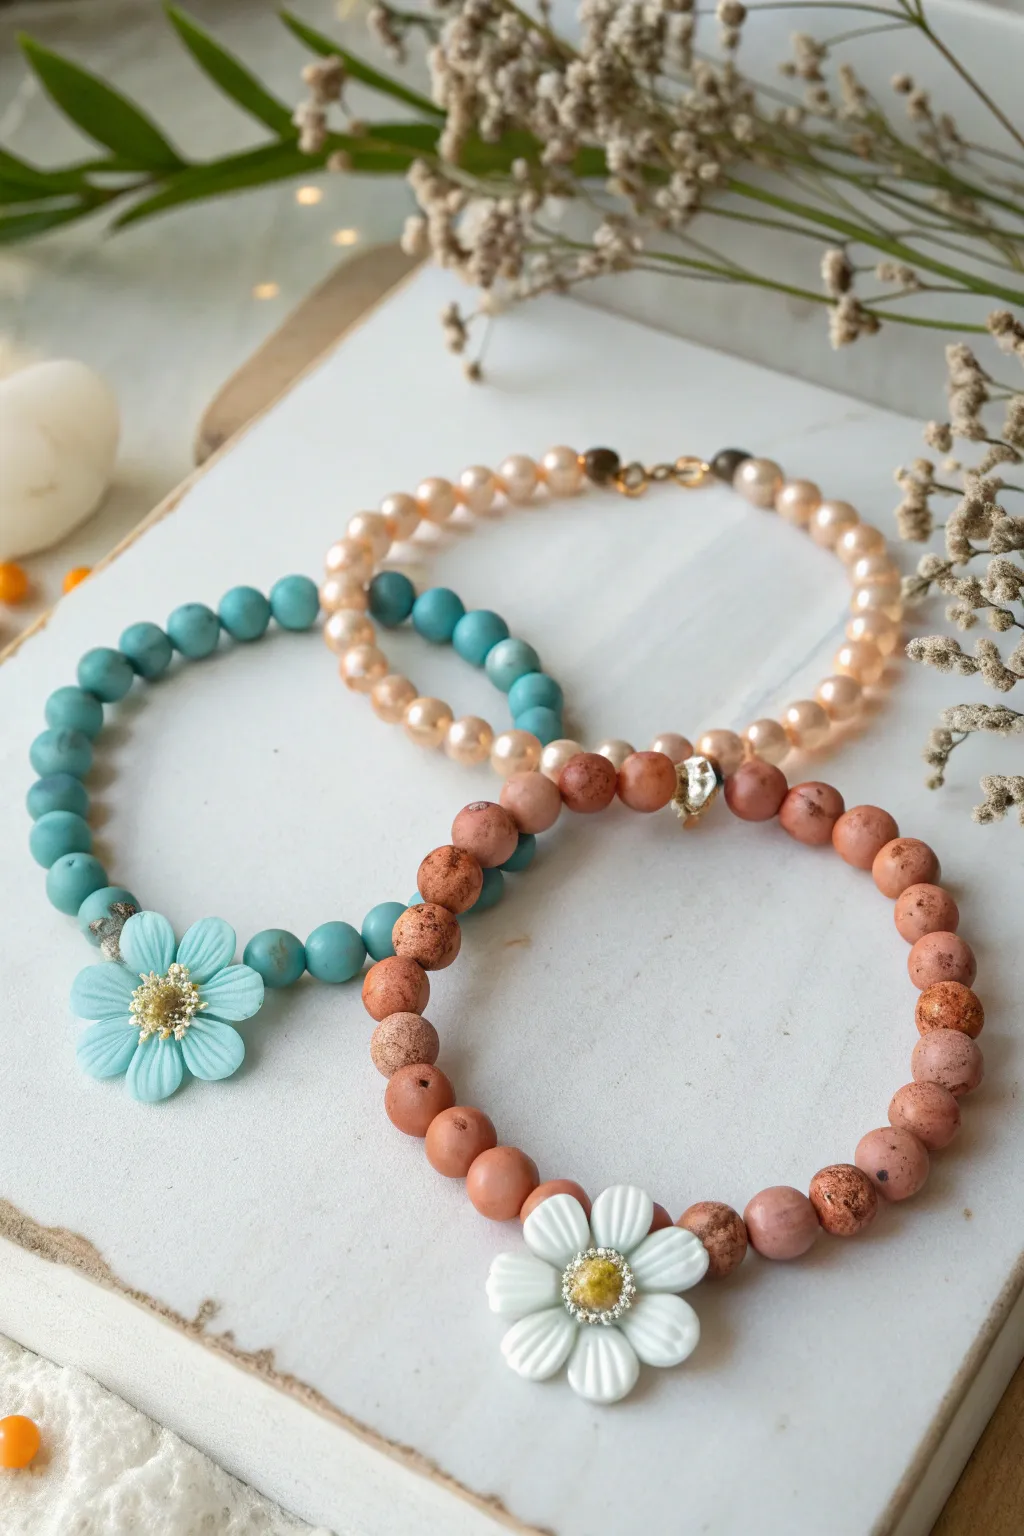
Celebrate personality and season with these charming beaded bracelets featuring delicate clay flower accents. The combination of matte stone beads, shimmering pearls, and sculpted florals creates a textured, personalized stack perfect for gifting or keeping.
Step-by-Step Guide
Materials
- Matte turquoise stone beads (6mm or 8mm)
- Matte terracotta/red jasper stone beads (6mm or 8mm)
- Peach/champagne glass pearl beads (6mm)
- Small polymer clay flower beads (light blue and white)
- Gold finish crimp beads
- Gold finish lobster clasp and jump rings
- Strong beading wire or clear elastic cord
- Jewelry pliers (round nose and flat nose)
- Wire cutters
- Small gold accent spacer beads (optional)
- Jewelry glue (optional for knots)
Step 1: Preparation & Pearl Strand
-
Measure your wrist:
Wrap a flexible measuring tape around your wrist to find your size. Add about half an inch to this measurement to ensure the bracelet fits comfortably without being too tight against the skin. -
Cut the wire:
Cut a length of beading wire approximately 10 inches long. This gives you plenty of extra room to manipulate the ends and attach the clasp without frustration. -
Secure the start:
Thread a crimp bead onto one end of the wire, followed by a jump ring or the loop of your lobster clasp. Loop the wire back through the crimp bead and use your flat nose pliers to squash it flat, securing the clasp. -
String the pearls:
For the simplest layer, string your peach or champagne glass pearls one by one until you reach your desired length. Check the fit against your wrist occasionally. -
Finish the pearls:
Add a final crimp bead and the receiving jump ring for the clasp. Loop the wire back through the crimp and a few adjacent pearls. Flatten the crimp bead firmly and trim any excess wire flush with the beads.
Sticky Situation
If your polymer clay flower won’t lay flat against the wrist, try adding tiny seed beads on either side of it. These act as buffers, allowing the flower to rotate less freely.
Step 2: Turquoise Flower Bracelet
-
Start the second strand:
Cut another 10-inch piece of wire or elastic cord. If using elastic, pre-stretch it slightly to prevent sagging later. -
Plan the pattern:
For the blue bracelet, we want the flower to be the focal point. String roughly half of your measured length using the matte turquoise beads. -
Add a spacer:
Slide on a small, textured silver or gold spacer bead. This acts as a visual cap for the flower and adds a touch of metallic shine. -
Position the flower:
Thread your light blue polymer clay flower onto the cord. Ensure the flower faces outward correctly. -
Complete the beading:
Add a second metallic spacer bead on the other side of the flower, then continue stringing the rest of the turquoise beads until the total length matches your first bracelet. -
Tie it off:
If using elastic, tie a strong surgeon’s knot (right over left, left over right). Pull tight. I like to add a dab of jewelry glue to the knot before trimming the ends. If using wire, repeat the crimping process used for the pearl strand.
Personal Touch
Customize the stack by adding gold letter beads spelling out a name or birth month alongside the flower. Place them opposite the clasp so they sit on top of the wrist.
Step 3: Terracotta Flower Bracelet
-
Select your stones:
For the warm-toned bracelet, pick out matte red jasper or terracotta beads that have interesting natural speckling or variations. -
Design the focal point:
Just like before, string your beads until you reach the midway point. The textured, earthy beads look fantastic contrasting against the smooth white flower. -
Add the center bloom:
Thread on a metallic spacer followed by the white clay daisy. The yellow center of the daisy pops beautifully against the reddish stone. -
Finish the strand:
Complete the circle with the remaining terracotta beads. Double-check that all three bracelets are the same size by stacking them on a sizing cone or your wrist. -
Secure the final knot:
Tie off your elastic or crimp the wire securely. If you have a large-hole bead next to the knot, try to slide the knot inside it to hide the mechanics for a professional finish.
Wear your stack together for a bohemian look or separate them to match specific outfits
Checkerboard Heishi Pattern With a Flower
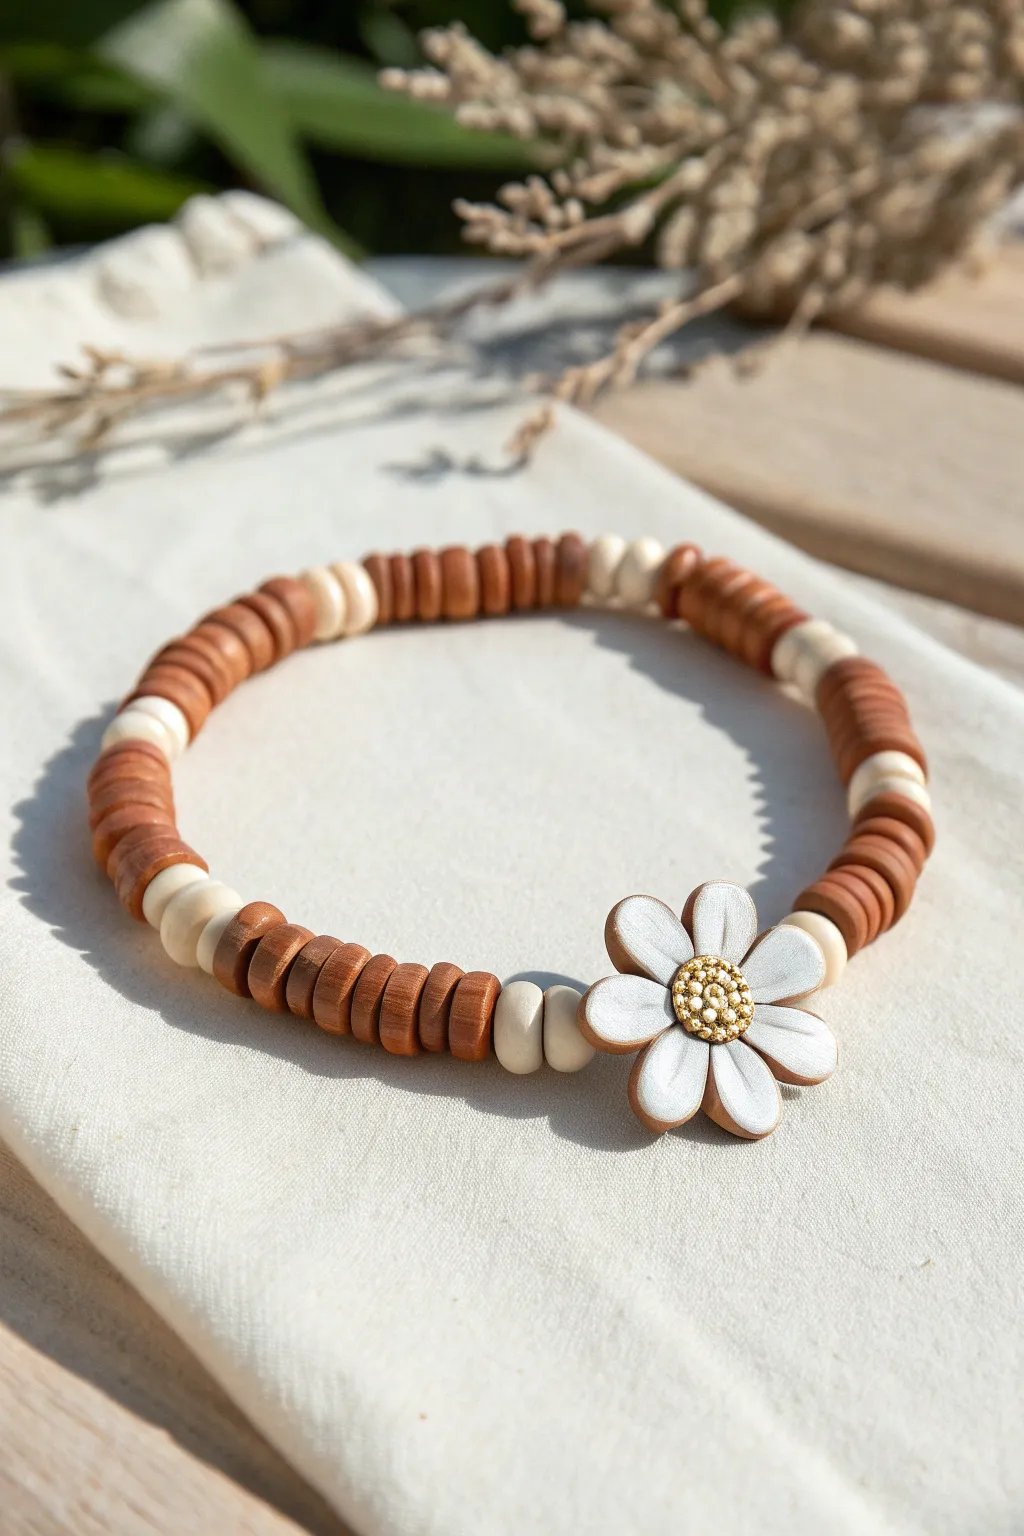
Embrace a warm, natural aesthetic with this charming heishi bead bracelet. Featuring rich terracotta tones balanced by cream accents and a focal daisy charm, this accessory brings a touch of rustic beauty to any outfit.
Step-by-Step
Materials
- 6mm terracotta/rust polymer clay heishi beads (flat disc beads)
- 4mm or 6mm cream/off-white wooden or acrylic round spacer beads
- 1 large white daisy flower bead (polymer clay or acrylic) with a gold center
- Strong elastic bead cord (0.8mm or 1mm recommended)
- Beading needle (optional, but helpful)
- Scissors
- Super glue or jewelry cement
- Tape or bead stopper
Step 1: Preparation
-
Measure your wrist:
Wrap a piece of string around your wrist to find your size, then add about half an inch for a comfortable fit. Cut your elastic cord to this length plus an extra 4-5 inches for tying knots. -
Secure the end:
Attach a piece of tape or a bead stopper to one end of your elastic cord so your beads don’t slide off while you work. I find a simple piece of masking tape works wonders here. -
Plan your pattern:
Lay out a small section of beads on your workspace to test the rhythm. The pattern consists of segments of terracotta heishi beads separated by pairs of cream round beads.
Knot Slipping?
If using slippery elastic, coat the knot area with a little clear nail polish or specialized knot cement before tightening it fully for extra grip.
Step 2: Stringing the Beads
-
Start the sequence:
Begin by threading on a set of terracotta heishi beads. For this specific look, aim for a stack of about 6 to 8 flat discs. -
Add the spacers:
Slide on two of the cream-colored round spacer beads. These create a lovely textural contrast against the flat clay discs. -
Continue the rhythm:
Repeat this pattern—6-8 terracotta discs followed by 2 cream rounds—until you have completed about half of the bracelet’s length. -
Add the focal point:
Thread your large white daisy flower bead onto the cord. Ensure the flower faces outward if the bead hole runs horizontally through the petals. -
Resume the pattern:
Immediately following the flower, add two cream round beads to mirror the spacers on the other side of the pattern. -
Complete the length:
Continue adding your segments of terracotta heishi beads and cream spacers until you reach your desired total length. -
Last adjustment:
Check the fit around your wrist one last time. The ends should meet comfortably without stretching the elastic too tight.
Use a Needle
Heishi beads have tiny holes that can be tricky. A collapsible eye needle helps capture multiple flat discs at once, speeding up the process significantly.
Step 3: Finishing Up
-
Pre-stretch the cord:
Gently pull on both ends of the elastic cord to pre-stretch it. This crucial step prevents the bracelet from sagging or loosening after you wear it a few times. -
Tie the knot:
Remove the tape or bead stopper. Cross the ends and tie a square knot (right over left, left over right). Pull it tight. -
Make it secure:
Tie a second overhand knot on top of the square knot for extra security. Pull the elastic firmly to lock the knots in place. -
Apply adhesive:
carefully apply a tiny drop of super glue or jewelry cement directly onto the knot. Let it dry completely for a minute or two. -
Hide the knot:
Once the glue is dry, trim the excess cord close to the knot. If possible, gently tug the bracelet so the knot slides inside one of the larger cream beads or the flower bead to hide it.
Enjoy styling your new daisy bracelet stacked with other textures or simply on its own for a minimalist statement
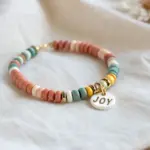
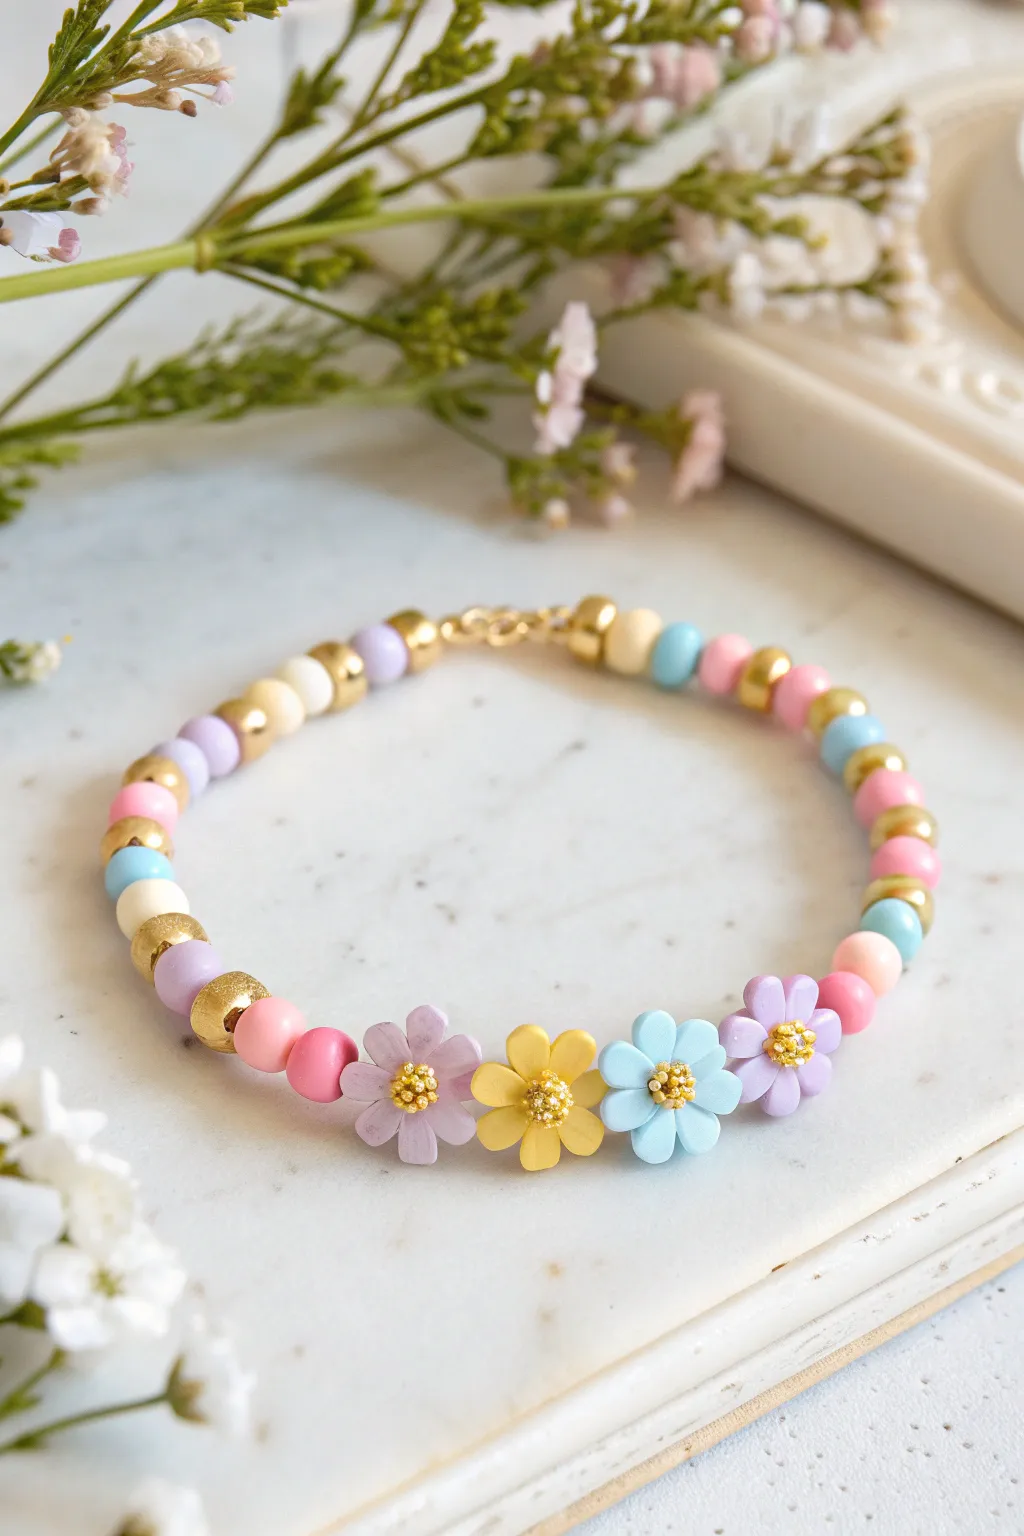
Pastel Rainbow With White Flower Center
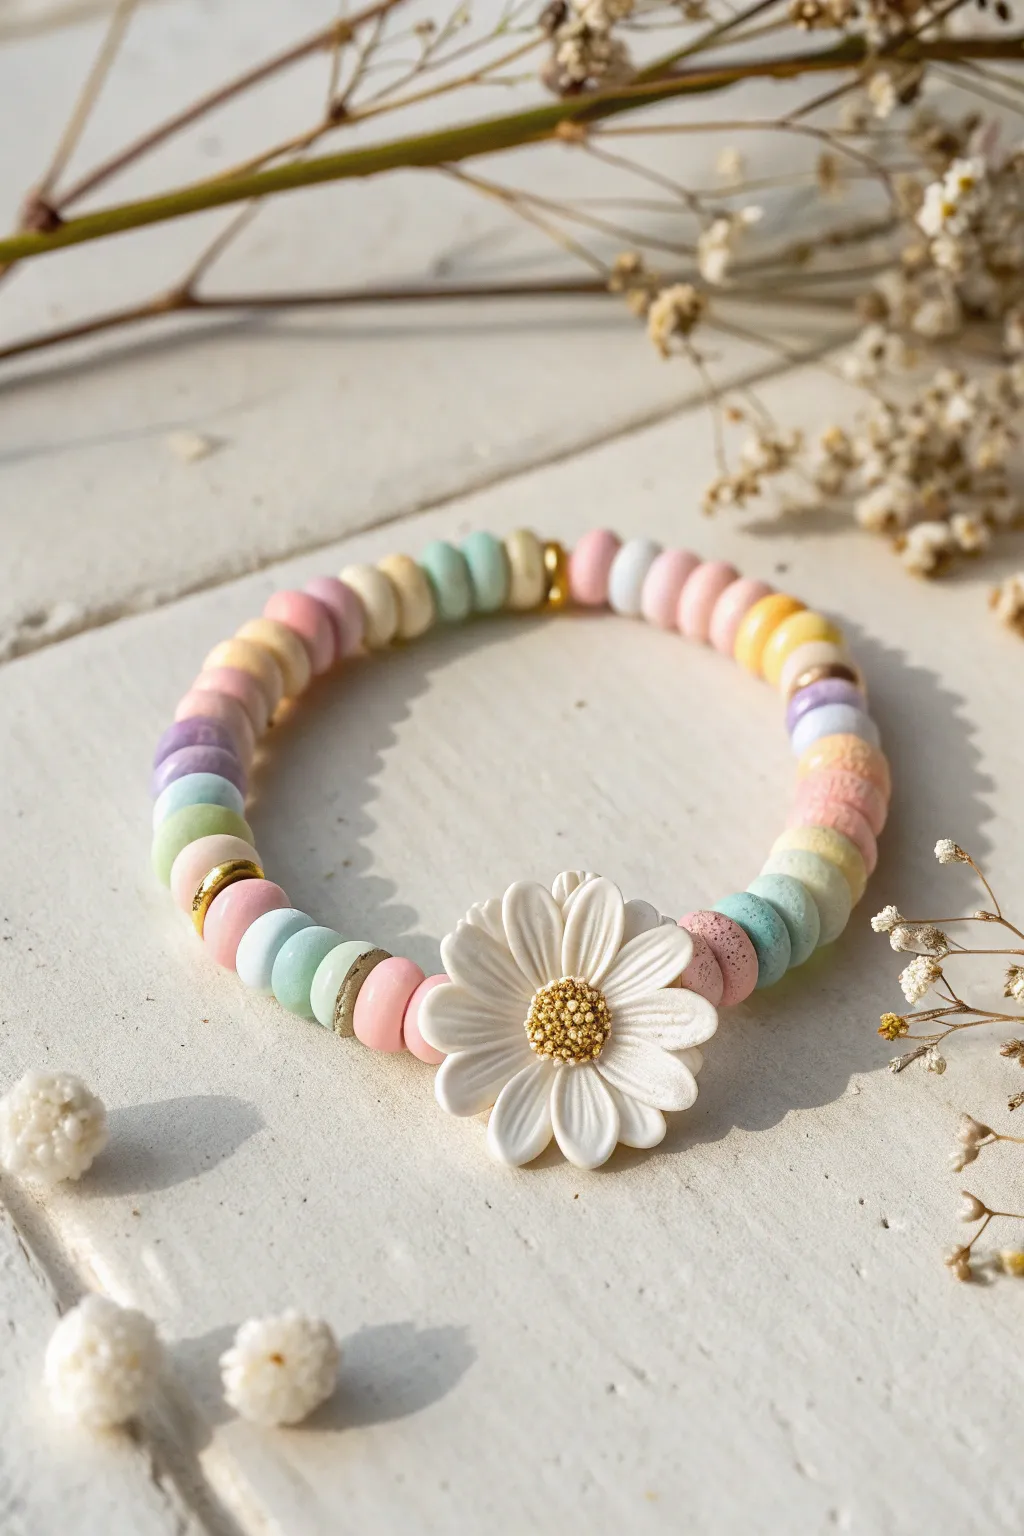
This charming bracelet combines soft pastel polymer clay heishi beads with a striking white daisy focal point for a sweet, summery accessory. The uneven, handmade look of the beads adds organic texture, making it a perfect casual piece for stacking.
Step-by-Step Tutorial
Materials
- Polymer clay heishi beads (approx. 6mm) in pastel pink, peach, cream, lavender, light blue, and mint green
- Large white polymer clay daisy flower bead (approx. 20mm) with textured yellow center
- Small gold spacer beads or gold heishi beads
- Elastic stretch cord (0.7mm or 0.8mm)
- Beading needle (collapsible eye works best)
- Jewelry glue (GS Hypo Cement or similar)
- Scissors or precision cutters
- Bead design board or masking tape
- Ruler or measuring tape
Step 1: Planning Your Pattern
-
Measure your wrist:
Wrap a measuring tape loosely around your wrist to determine the desired length. Add about 0.5 to 1 inch to this measurement to ensure a comfortable fit that isn’t too tight. -
Prepare your workspace:
Lay out your bead design board or simply place a strip of masking tape on your table sticky-side up to catch loose beads. This helps prevent them from rolling away while you work. -
Sort your colors:
Organize your pastel heishi beads into piles by color. Having them separated makes the patterning process much faster and more intuitive. -
Establish the color sequence:
This design uses a random but balanced pastel rainbow. A good sequence to follow is pink, peach, cream, mint, blue, lavender. Lay out a few inches of this pattern to test how the colors flow together.
Color Harmony
To get that soft look, choose beads with a matte finish rather than glossy. If buying a mix, pick out any dark or neon hues beforehand.
Step 2: Stringing the Beads
-
Cut the cord:
Cut a piece of elastic cord about 10-12 inches long. This generous length gives you plenty of room to tie the knot later without struggling. -
Pre-stretch the cord:
Give the elastic cord a few firm tugs. Pre-stretching prevents the bracelet from loosening up and sagging after the first few times you wear it. -
Secure the end:
Tape one end of the cord to your work surface or clamp it with a binder clip so your beads don’t slide off the back end as you string them. -
Start the first segment:
Thread your needle and begin stringing the heishi beads. Group beads of the same color together in chunks of 3 to 4 beads to create defined blocks of color rather than a single-bead stripe. -
Add gold accents:
Every inch or so, insert a single gold spacer bead or a gold heishi bead. This adds a little bit of shine and breaks up the matte texture of the clay. -
Continue the pattern:
Keep stringing until you have reached approximately half of your desired length. Check your progress against a ruler regularly.
Wonky Bead Fix
Clay heishi beads are often uneven thickness. If one side of the bracelet looks thinner, double up on thin beads to match the thickness of thicker ones.
Step 3: Adding the Focal Point
-
Position the flower:
Thread the large white daisy bead onto the cord. Ensure the textured yellow center is facing ‘out’ or up, depending on how the hole is drilled. -
Flank the flower:
I like to add a specific color block immediately before and after the flower to make it pop—pink or cream works especially well here. -
Finish the second half:
Continue stringing the rest of your pastel heishi beads and gold spacers in your established pattern until the full bracelet length is achieved. -
Check the fit:
Wrap the unfinished strand around your wrist. The ends should meet comfortably without stretching the elastic visible between the beads.
Step 4: Securing the Bracelet
-
Remove the needle:
carefully take off the needle and remove the tape or clip from the other end of the cord. -
Tie the surgeon’s knot:
Cross the ends, wrap one side around the other twice, and pull tight. Repeat this process to create a secure surgeon’s knot. -
Apply adhesive:
Dab a tiny drop of GS Hypo Cement or super glue onto the knot. Be careful not to get glue on the clay beads themselves, as it can stain them. -
Hide the knot:
While the glue is still slightly tacky but not wet, pull the knot gently inside one of the adjacent heishi beads or the larger flower bead hole if possible to conceal it. -
Trim excess cord:
Once the glue is fully dry (wait at least 15 minutes), use your precision scissors to trim the excess cord as close to the bead hole as possible.
Slip on your new pastel creation and enjoy the lightweight, summery vibe it adds to your outfit
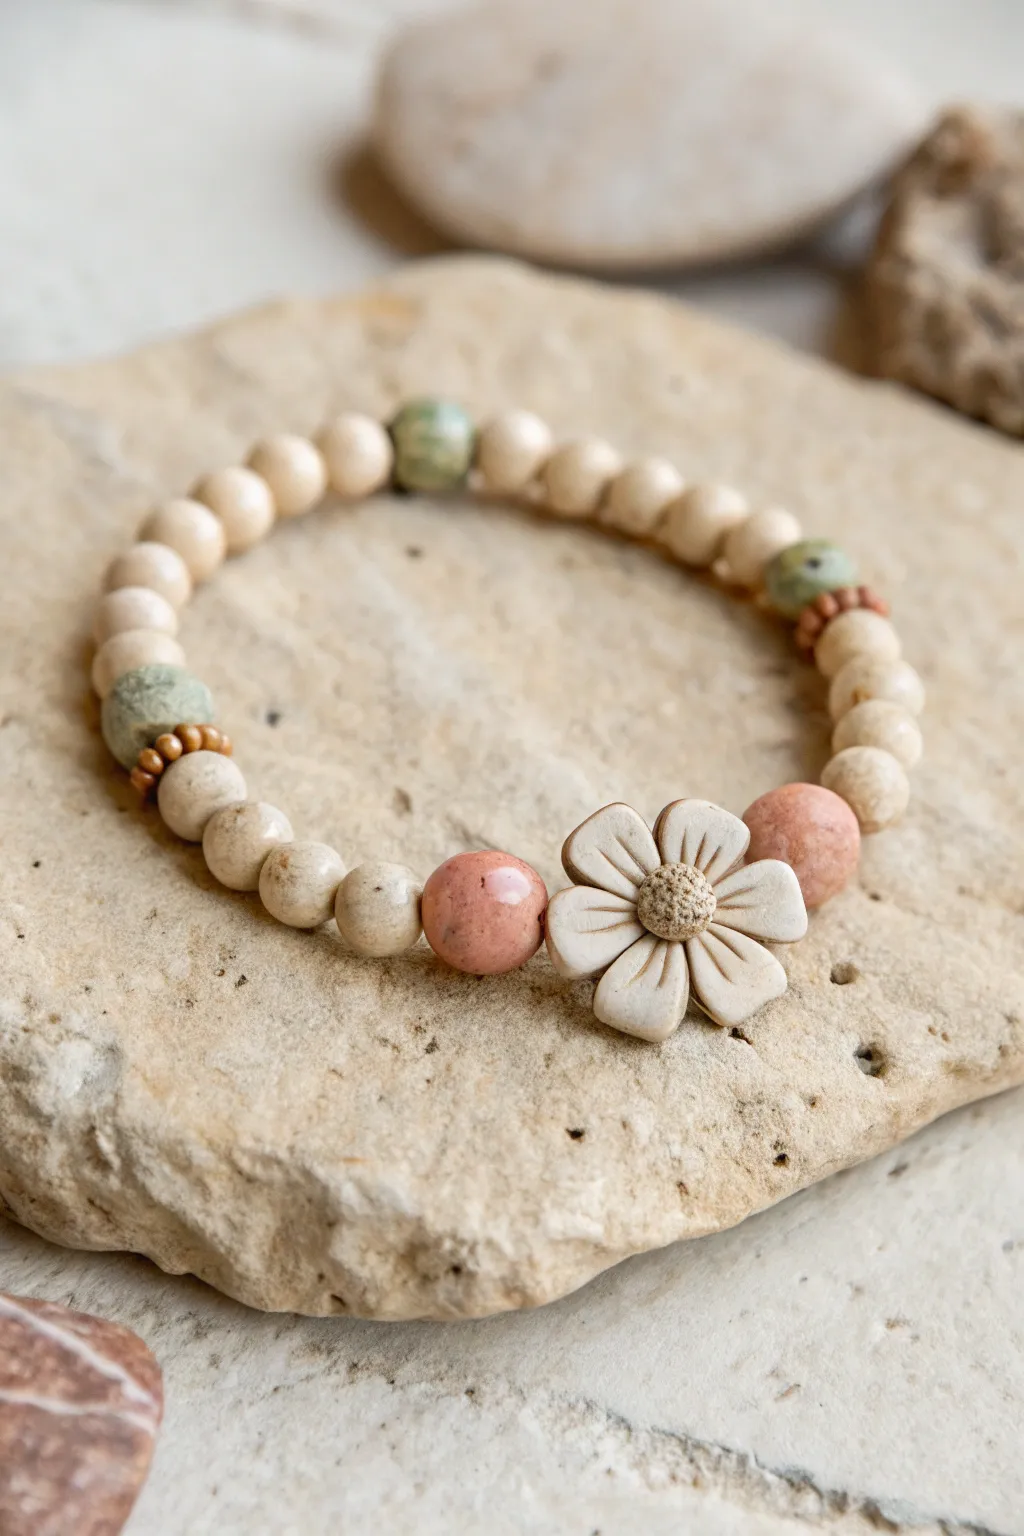
Earthy Wildflower Neutrals
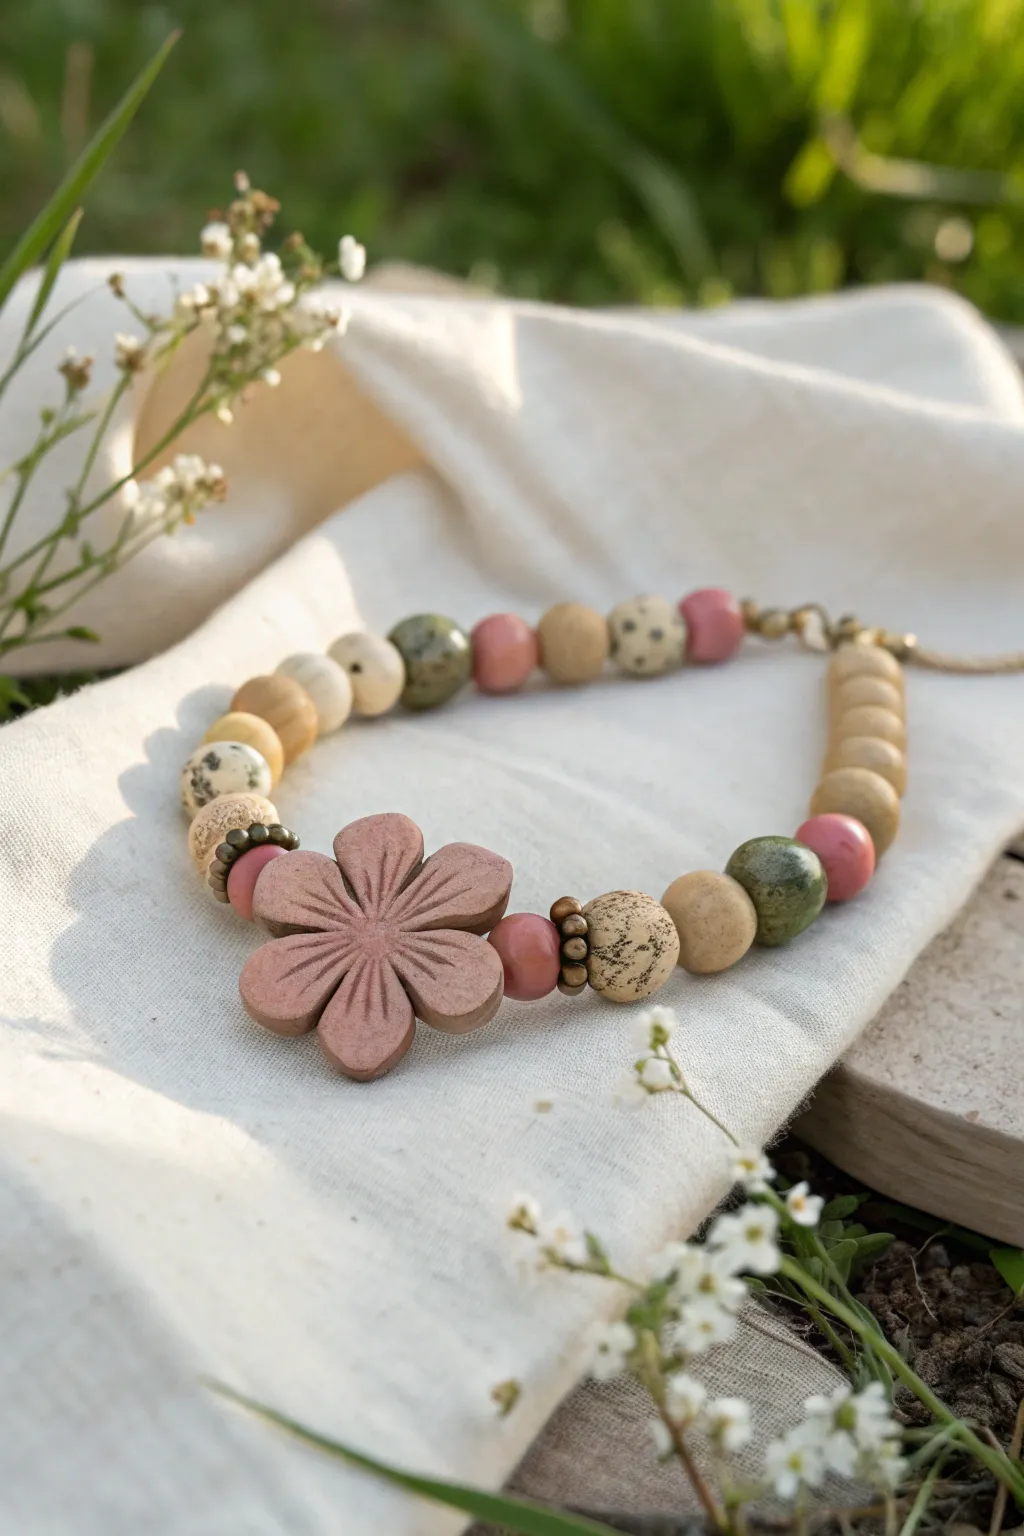
Embrace the soft hues of a meadow in bloom with this beautifully textured bracelet. Combining a focal clay flower with speckled, matte, and wood-toned beads creates a natural, grounded aesthetic perfect for everyday wear.
How-To Guide
Materials
- Large pink polymer clay bead (flower shaped/roughly 20mm)
- Small pink round beads (polymer clay or wood/approx. 6mm)
- Beige speckled round beads (polymer clay or stone/approx. 8mm)
- Olive green round beads (polymer clay or stone/approx. 8mm)
- Plain light wood beads (approx. 8mm)
- Small brass or antique gold spacer beads (daisy spacer style)
- Beading wire (0.38mm or 0.45mm)
- 2 Crimp beads
- 2 Crimp bead covers (antique gold)
- Clasp set (lobster claw and jump ring, antique gold)
- Checkers or flat-nose pliers
- Wire cutters
Step 1: Planning and Preparation
-
Lay out the design:
Before stringing anything, arrange your beads on a bead board or a piece of cloth. Place the large pink flower bead directly in the center to serve as your focal point. -
Arrange the flanking beads:
On the immediate left and right of the flower, place one small pink round bead. This helps transition from the large flat flower to the rounder beads. -
Add metallic accents:
Next to those small pink beads, place your brass daisy spacers. I like to use three spacers stacked together on each side to create a textured, metallic cuff look. -
Create the pattern:
For the rest of the strand, create an asymmetrical yet balanced mix. Moving outward from the spacers, layout a speckled beige bead, a plain wood bead, then perhaps an olive bead. Repeat or vary this pattern until you reach your desired length, aiming for about 6.5 to 7 inches total.
Pattern Rhythm
Don’t fret if your pattern isn’t perfectly symmetrical. Grouping earthy tones randomly often looks more organic and natural.
Step 2: Stringing the Beads
-
Cut the wire:
Cut a piece of beading wire approximately 10-12 inches long. This gives you plenty of extra room to work with the clasp without things getting tight. -
Secure the first end:
Thread a crimp bead onto one end of the wire, followed by the jump ring component of your clasp. Loop the wire back through the crimp bead. -
Crimp firmly:
Use your pliers to flatten the crimp bead securely, locking the loop in place. Trim the excess short tail of wire, but leave a tiny bit (about 1/4 inch) to tuck into the first few beads. -
Attach crimp cover:
Place an antique gold crimp cover over the flattened crimp bead and gently close it with your pliers until it looks like a round metal bead. -
Begin stringing:
Start threading your beads, following the pattern you laid out. Ensure the first few beads slide over the small wire tail you left in step 3 to hide it. -
Position the focal bead:
Continue stringing until you reach the center. Thread on your first set of stacked spacers, the small pink transition bead, and then the large flower bead. -
Complete the strand:
Follow the flower with the second small pink bead and the second stack of spacers, then finish stringing the remaining beads for the other side.
Step 3: Finishing Touches
-
Check the fit:
Before closing the bracelet, wrap it around your wrist to verify the size. Add or remove the wooden beads at the ends if adjustments are needed. -
Add final crimp bead:
Thread a crimp bead onto the remaining wire end, followed by the lobster claw clasp. -
Loop and tighten:
Thread the wire back through the crimp bead and down through the last 2-3 beads of your design. -
Tension check:
Pull the wire snug so there are no large gaps between beads, but not so tight that the bracelet becomes stiff—it needs to drape naturally. -
Final Secure:
Flatten the final crimp bead with your pliers to lock everything in place. -
Cover and trim:
Apply the second crimp bead cover over the flattened crimp. Finally, use your flush cutters to trim the excess wire as close to the beads as possible without nicking your work.
Scent Infusion
Use unfinished wood beads for the ends of the bracelet—you can add a drop of essential oil to them for a wearable diffuser.
Now you have a charming piece of jewelry that captures the gentle essence of a wild garden path
Matte Beads With a Glossy Flower Accent
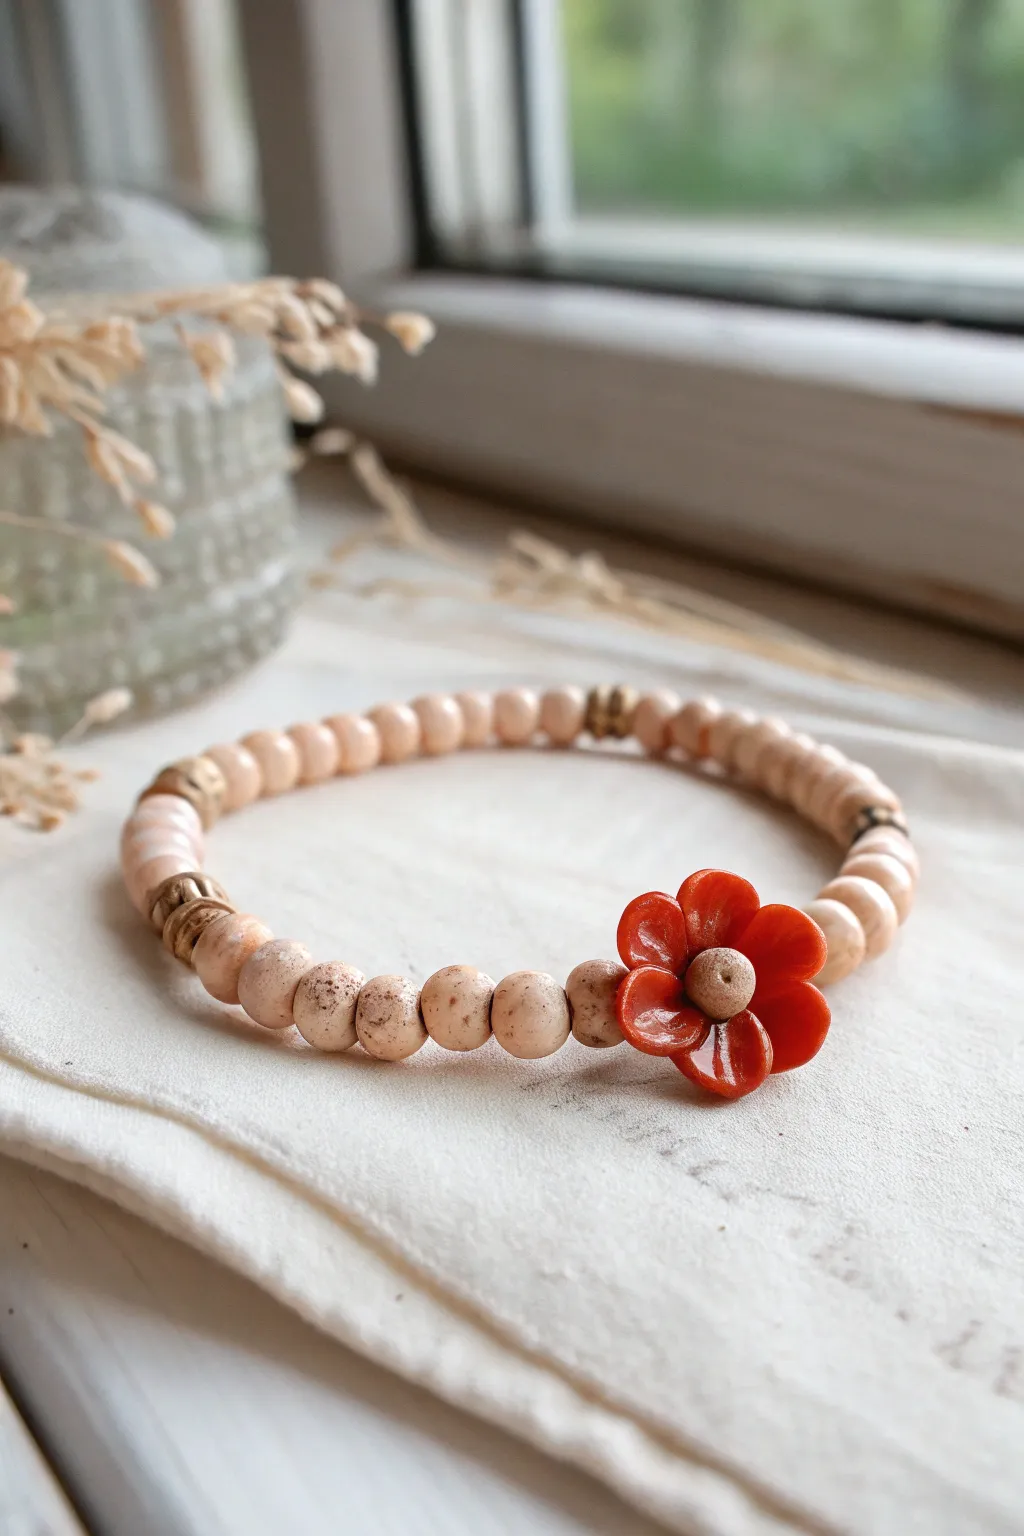
Contrast is everything in this elegant design, pairing earthy, unglazed speckled beads with a striking high-gloss red flower focal point. The mix of natural textures and shining finishes creates a sophisticated piece that feels organic yet polished.
Step-by-Step Tutorial
Materials
- Beige polymer clay (e.g., Fimo Soft Sahara or Sculpey Soufflé Latte)
- Red polymer clay (e.g., Carmine or Cherry Red)
- Ground black pepper or dried coffee grounds (for speckling)
- Elastic stretch cord (0.7mm or 0.8mm)
- Gold tone heishi spacer beads (textured/ribbed)
- High-gloss polyurethane varnish or UV resin
- Bead rolling tool (optional but helpful)
- Toothpick or bead piercing pin
- Small paintbrush
- Oven for baking
- Super glue (gel formula)
Step 1: Creating the Matte Beads
-
Condition and speckle:
Start by conditioning your beige polymer clay until it is soft and malleable. To achieve that organic, stony look, knead in a small pinch of ground black pepper or very finely ground coffee. Don’t overmix; you want the specks visible. -
Portion the clay:
Roll the clay into a long snake about the thickness of a marker. Slice this snake into equal segments to ensure your beads will be uniform in size. -
Roll into spheres:
Take each segment and roll it between your palms to create a smooth sphere. Aim for beads that are roughly 6-8mm in diameter. I find a bead roller helps keep them perfectly round, but hand-rolling works just fine too. -
Pierce the holes:
Using a toothpick or a bead piercing pin, carefully poke a hole through the center of each sphere. Rotate the bead as you push the tool through to prevent distorting the round shape. -
Smooth the openings:
Inspect the exit hole on each bead. If the clay has puckered out, gently tap it back down with your finger to ensure the bead sits flush on the string later. -
Bake the beads:
Arrange the beads on a baking sheet or dedicated bead rack. Bake according to the manufacturer’s instructions for your specific brand of clay—usually around 275°F (130°C) for 30 minutes.
Step 2: Sculpting the Flower Focal
-
Form the petals:
Condition your red polymer clay and roll five or six small balls, roughly pea-sized. -
Shape teardrops:
Pinch one side of each red ball to create a teardrop shape. Flatten them slightly with your thumb to look like petals. -
Assembling the bloom:
Arrange the petals in a circle with the pointy ends meeting in the center. Use a modeling tool or toothpick to gently blend the clay at the center point so they stick together. -
Add detail lines:
Using the side of a toothpick or a blunt knife tool, press a gentle indentation down the center length of each petal to give it dimension. -
Create the center bead:
Take a small amount of your speckled beige clay (leftover from the beads) and roll a tiny ball. Press this firmly into the center of the red flower. -
Pierce the flower:
This step is crucial: You need to pierce a hole horizontally through the base of the flower (behind the center dot) so it can be strung. Carefully twist your pin through the side of the flower structure. -
Bake the focal:
Bake the flower separately or with your beads, following the same temperature and time guidelines. Let everything cool completely.
Keep it Clean
Use baby wipes to clean your hands thoroughly between handling the red clay and the beige clay. Even a tiny smear of red pigment can ruin the clean look of the beige beads.
Step 3: Finishing and Assembly
-
Apply the gloss:
Once cool, paint the red petals of the flower with a high-gloss varnish or UV resin. Be very careful to avoid getting gloss on the beige center dot—keeping that matte creates the beautiful texture contrast we want. -
Cure or dry:
Let the varnish dry fully or cure the UV resin under a lamp until it is hard and glassy. -
Plan the layout:
Cut a length of elastic cord about 10 inches long. Pre-stretch the cord by pulling it firmly a few times to prevent it from sagging later. -
Stringing:
Thread your beads onto the elastic. I like to insert a gold textured spacer bead every 4 to 6 clay beads to break up the pattern. Slide the flower focal bead onto the center. -
Check the fit:
Wrap the strand around your wrist to check the size. Add or remove beige beads as needed for a comfortable fit. -
Knot and secure:
Tie a strong surgeon’s knot (right over left twice, then left over right). Add a tiny dot of super glue to the knot, let it dry for a moment, and then trim the excess cord ends.
Shiny or Sticky?
If your gloss finish remains tacky after drying, your varnish might be expired or incompatible with polymer clay. Try wiping it with rubbing alcohol or recoating with UV resin.
Now you have a stunning accessory that perfectly balances rustic texture with a pop of high-shine color
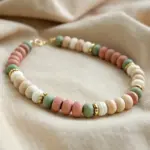
Marbled Petal Flower With Coordinated Beads
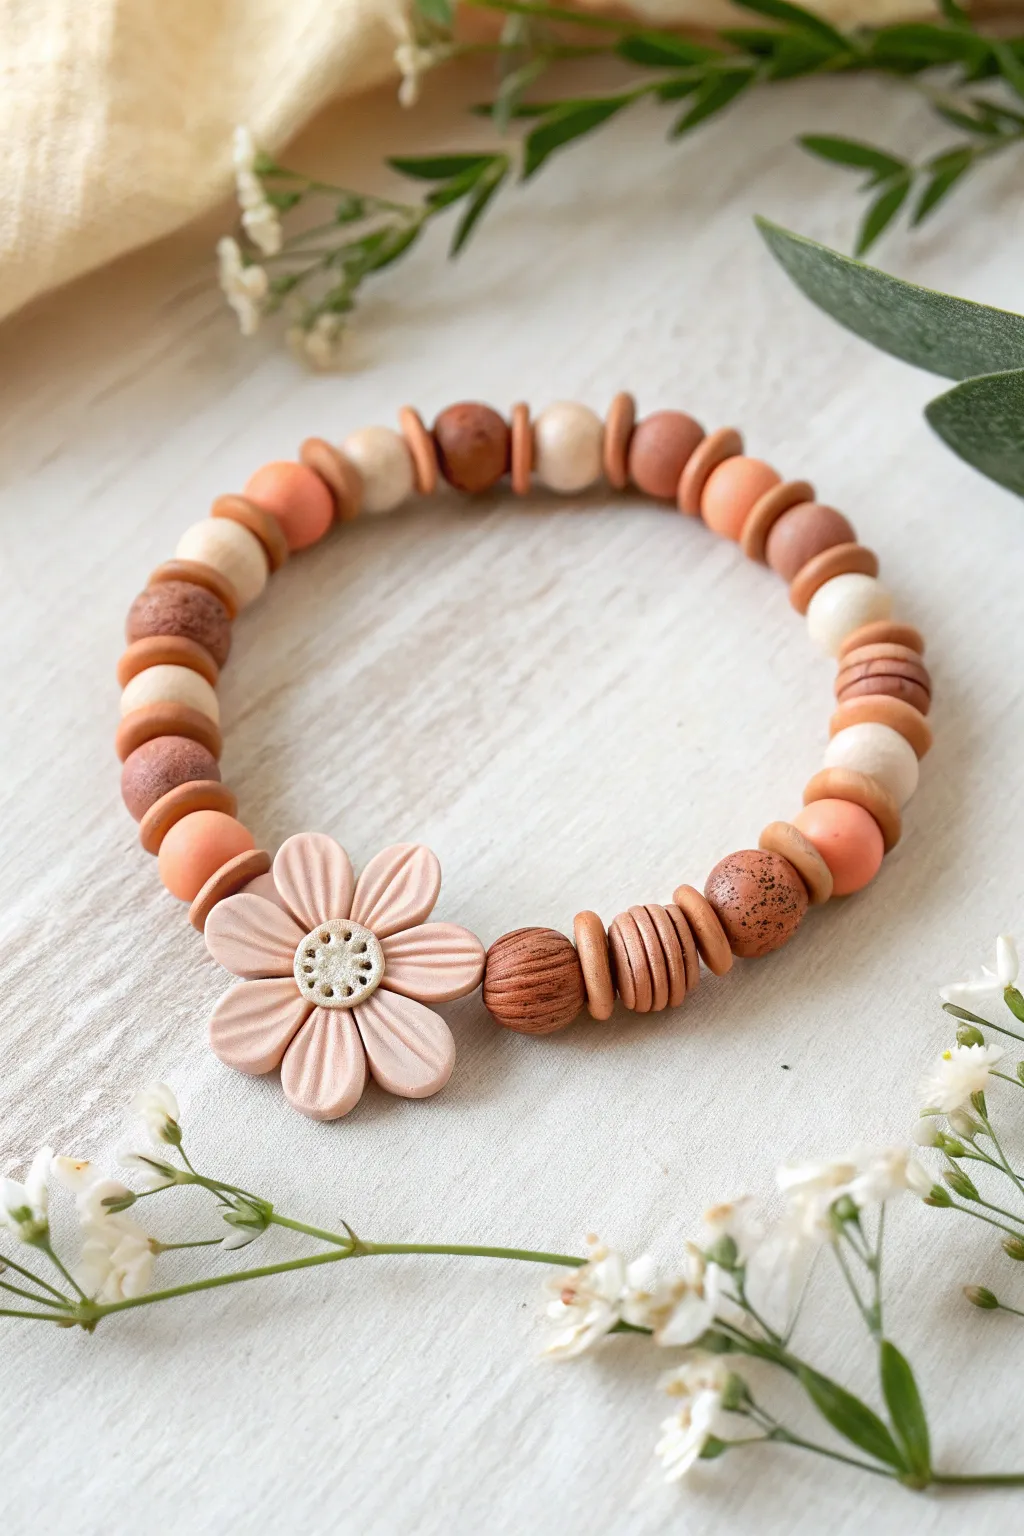
Embrace earthy elegance with this handcrafted bracelet featuring a central polymer clay flower and a rhythm of natural textures. The soft palette of dusty rose, terracotta, and cream creates a versatile accessory perfect for everyday wear.
How-To Guide
Materials
- Polymer clay (Dusty Rose, White, translucent)
- Small round cutter or clay tools
- Beading elastic cord (0.8mm)
- Needle tool or toothpick
- Beige round beads (8mm and 10mm, wooden or silicone)
- Terracotta speckled beads (10mm)
- Flat disc spacer beads (clay or wood)
- Natural wood ridged/textured beads
- Super glue or jewelry cement
Step 1: Sculpting the Flower Focal Bead
-
Mix the petal color:
Start by conditioning your dusty rose polymer clay until smooth. If you want the subtle marbled look seen in the photo, mix in a tiny pinch of white or translucent clay, but don’t blend it completely—leave faint streaks visible. -
Form the petals:
Roll the clay into eight small, equal-sized balls, each about the size of a pea. Flatten each ball gently into a teardrop shape to form the individual petals. -
Texture the petals:
Use a needle tool or a dull knife to press a central indentation down the length of each petal. This gives them a realistic, slightly folded appearance. -
Create the center:
Roll a small ball of white or cream clay for the center. Flatten it slightly into a disc. -
Detail the center:
Using your needle tool, poke a ring of small holes around the edge of the center disc to create a textured, pollen-like effect. -
Assemble the flower:
Arrange the eight petals in a circle, pressing their pointed ends together. Place the textured white center on top of the junction point and press gently to adhere everything together. -
Pierce the bead channel:
Carefully insert a needle tool or toothpick horizontally through the side of the flower, going behind the petals near the center. Wiggle it slightly to ensure the hole is wide enough for your elastic cord. -
Bake the bead:
Bake your clay flower according to the manufacturer’s instructions (usually 275°F/135°C for 15-30 minutes). I like to bake mine on a bed of cornstarch to prevent flat spots. Let it cool completely.
Sticky Situation
Clay stuck to your workspace? Use a ceramic tile or piece of glass as your work surface. If it still sticks, lightly dust the surface with cornstarch before rolling your petals.
Step 2: Stringing the Design
-
Prepare the elastic:
Cut a piece of elastic cord about 10-12 inches long. This gives you plenty of slack for tying knots later. -
Start the pattern:
Thread your cooled flower bead onto the center of the cord. This will be your anchor point. -
Flank the flower:
On the immediate right side of the flower, add a dark wood round bead, followed by a flat disc spacer, then a textured/ridged wooden bead, and another spacer. -
Build the rhythm:
Continue the pattern on this side: add a speckled terracotta bead, a spacer, a smooth coral/pink bead, spacer, cream bead, spacer. Repeat this alternating pattern of round beads and flat spacers to build texture. -
Mirror the design:
Repeat the exact same sequence on the left side of the flower so the bracelet is symmetrical. The varying textures—smooth, speckled, and ridged—are key to this look. -
Check the size:
Wrap the unfinished strand around your wrist to check the fit. Add or remove the final few spacer beads at the ends if necessary to get the perfect circumference. -
Tie the knot:
Pull the elastic tight to remove gaps between beads. Tie a surgeon’s knot (looping the elastic through twice before pulling tight) to secure the bracelet. -
Secure and trim:
Add a tiny drop of super glue to the knot for extra security. Once dry, hide the knot inside the hole of a neighboring large bead and trim the excess cord.
Pro Tip: Surface Smoothing
Before baking, lightly brush your clay flower with a tiny amount of baby oil or clay softener on your finger. This removes fingerprints and gives the petals a professional, smooth finish.
Slip on your new customized bracelet and enjoy the tactile mix of natural elements and handmade art
Asymmetrical Flower Placement for a Modern Look
Embrace a touch of whimsy with this earthy, nature-inspired bracelet that features a standout focal flower. By gathering unique beads and arranging them slightly off-center, you’ll create a modern accessory that feels both organic and thoughtfully designed.
Step-by-Step
Materials
- Cream/beige polymer clay flower bead (approx. 20mm)
- Beige speckled agate or jasper beads (8mm)
- Pink rhodonite or terracotta beads (10mm)
- Green earthy turquoise/jasper beads with inclusions (8mm)
- Small copper or brown spacer beads
- Strong elastic cord (0.8mm or 1mm)
- Jewelry glue (e.g., G-S Hypo Cement)
- Scissors
- Bead stopper or tape
- Beading tray or soft cloth
Step 1: Planning the Layout
-
Prepare your workspace:
Lay out your beading tray or a soft cloth to prevent beads from rolling away. Having a clear visualization of your pattern is key to achieving that intentional asymmetrical look. -
Measure the cord:
Cut a length of elastic cord about 10-12 inches long. This generous length gives you plenty of room to tie secure knots later. Pre-stretch the cord by gently pulling it a few times to prevent sagging after wear. -
Secure the end:
Place a bead stopper or a piece of tape on one end of the cord so your beads stay put while you work. -
Design the focal section:
Identify your ‘centerpiece’ cluster. For this design, the flower bead is the star, flanked immediately by two larger pink rhodonite beads. Set these aside as your starting group.
Natural Texture
Use unpolished or matte beads for the beige sections. The lack of shine mimics natural stone and keeps the focus on the flower’s shape.
Step 2: Stringing the Pattern
-
Start with the main stones:
Thread one 10mm pink bead, followed by your focal flower bead, and then the second 10mm pink bead onto the cord. Slide them down to the stopper. -
Build the first side:
On the right side of the pink bead, add three of the beige speckled 8mm beads. This creates a soft transition away from the focal point. -
Add color contrast:
Thread a single green earthy bead next. Follow this with a small copper spacer, then another copper spacer, and finish this small segment with a second green bead. -
Continue the neutral run:
Add approximately 6-8 beige speckled beads. This long run of neutrals is crucial for the modern, understated vibe. -
Create the second green accent:
Interrupt the beige run by adding a single green earthy bead. This asymmetry prevents the bracelet from looking too uniform. -
Finish the strand:
Fill the rest of the length with the remaining beige speckled beads until the bracelet reaches your desired wrist size (standard is usually around 7 inches). Add a small group of 2-3 copper spacers right at the end for a final bit of texture.
Scent Diffuser
If you use porous lava stone or raw wood beads instead of agate, you can add a drop of essential oil to turn this into a diffuser bracelet.
Step 3: Finishing Touches
-
Check the fit:
Carefully wrapp the strand around your wrist to check the size. If it feels too tight, add one more beige bead; if loose, remove one. -
Tie the surgeon’s knot:
Remove the bead stopper. Bring the two ends together and cross right over left, then left over right, looping the top cord through twice. Pull tightly to secure. -
Secure with glue:
Apply a tiny drop of flexible jewelry glue directly onto the knot. I find waiting about 30 seconds for the glue to get tacky helps it set better. -
Hide the knot:
While the glue is still slightly wet, gently pull the knot inside the large hole of one of the adjacent pink beads or the flower bead if possible. -
Trim the excess:
Once the glue is fully dry (refer to your glue’s package instructions), use sharp scissors to trim the excess cord as close to the bead hole as possible without cutting the knot.
Now you have a serene, nature-inspired accessory ready to complement any casual outfit