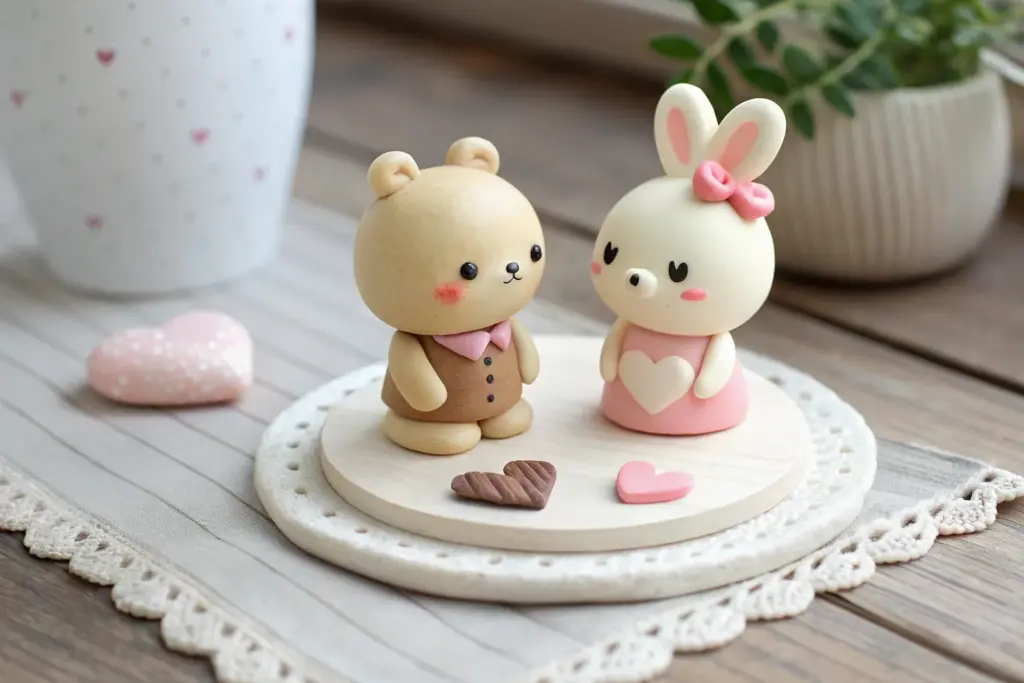
A polymer clay date is my favorite kind of low-pressure hangout because you get to talk, laugh, and make something adorable at the same time. These ideas are all about sweet little keepsakes you can finish in one cozy night and actually want to keep around.
Tiny Food Pair: Fries and Burger
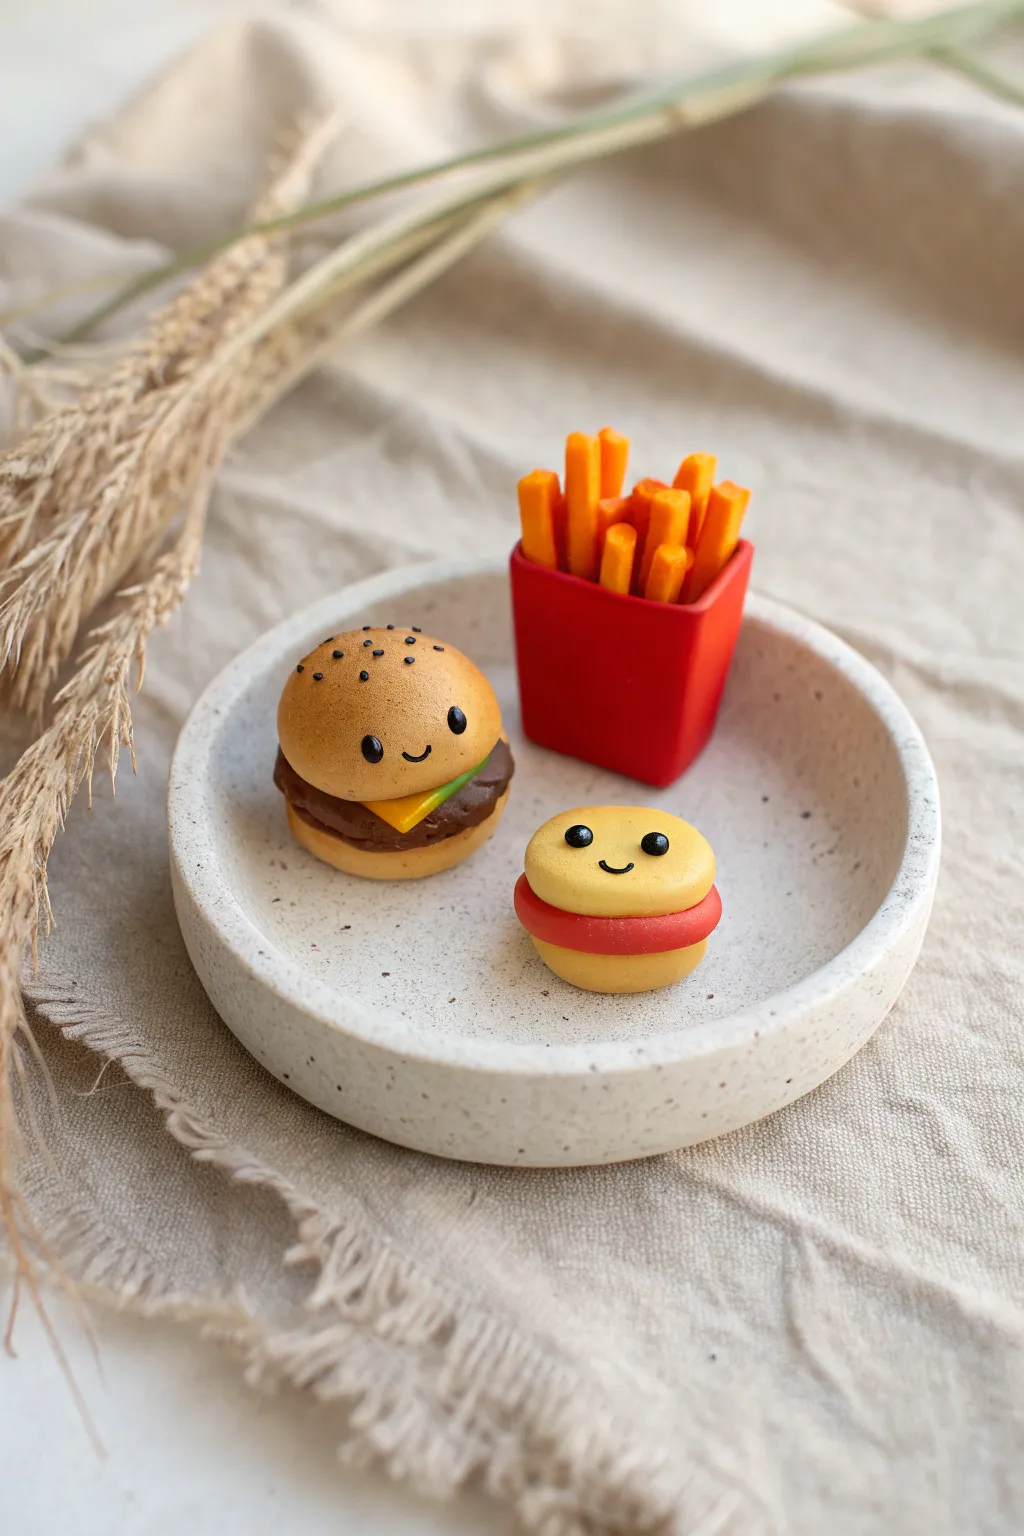
This adorable miniature set features a happy burger, a tray of golden fries, and a sweet little sandwich cookie, all brought to life with tiny smiles. Perfect for a cozy crafting date, these tiny food friends are sculpted with simple shapes and charming details.
Step-by-Step Guide
Materials
- Polymer clay (beige/tan, dark brown, yellow, green, red, orange)
- Black liquid polymer clay or black acrylic paint
- Soft pastels (browns/ochres for shading)
- Needle tool or toothpick
- Ball stylus tool
- Small craft knife
- Gloss glaze (optional)
- Small paintbrush
Step 1: Sculpting the Happy Burger
-
Form the buns:
Mix beige clay with a tiny touch of brown to get a baked bread color. Roll two balls, flattening the bottom one slightly and doming the top one into a classic bun shape. -
Create the patty:
Take a small portion of dark brown clay and flatten it into a thick disc. Use a needle tool to texture the edges, giving it a rough, meaty look, then place it on the bottom bun. -
Add cheese and lettuce:
Roll out a very thin sheet of yellow clay and cut a small square for the cheese. Drape it over the patty so the corners peek out. Add a tiny ruffle of green clay underneath for a hint of lettuce. -
Assemble the burger:
Place the top bun gently over the fillings. Press down lightly to secure the stack without squashing the details. -
Shade the bun:
Use a dry brush to dust shaved brown pastel chalk onto the top of the bun to create a realistic toasted effect. I like to focus on the very center for that oven-baked look. -
Add the face and seeds:
Use a needle tool or small ball stylus to indent eyes and a smile. Fill the eye sockets with black liquid clay or paint. Add tiny dots of black clay or paint to the top bun for sesame seeds.
Step 2: Crafting the Fries
-
Make the container:
Shape a block of red clay into a rectangular prism. Use a tool to hollow out the top slightly, creating a space for the fries to sit, and smooth the outer walls. -
Cut the fries:
Roll orange clay into a thick sheet or log, then use a blade to cut several thin, rectangular sticks. Vary the lengths slightly just like real fries. -
Fill the container:
Arrange the clay sticks into the red container, placing longer ones in the back and shorter ones in the front to create a full, overflowing look. -
Toast the fries:
Lightly dust the tips of the orange clay sticks with orange or light brown pastel chalk to make them look crispy and fried.
Pastel Shading Tip
Apply pastel shading *before* baking. The chalk powder bonds with the raw clay during the curing process, making the toasted effect permanent and smudge-proof.
Step 3: Making the Sweet Cookie
-
Shape the cookie halves:
Create two small, equal-sized discs using a pale yellow or beige clay. Smooth the edges so they are rounded and soft. -
Add the filling:
Roll a ball of red clay and flatten it into a disc slightly smaller than the cookie, but thick enough to be visible. Sandwich it between the two yellow discs. -
Give it personality:
Just like the burger, use a needle tool to mark the eye and mouth placement. Fill the eyes with black details and paint a tiny curved smile.
Turn Them into Charms
Insert a metal eye pin into the top of the burger bun or the fries before baking. Once cooled, you can attach them to keychains, earrings, or a friendship necklace.
Step 4: Finishing Touches
-
Baking:
Bake all three pieces according to the instructions on your specific brand of polymer clay. Let them cool completely before handling. -
Glazing:
If desired, apply a thin coat of gloss glaze to the burger patty, cheese, and the ‘jam’ filling of the cookie to make them look moist and appetizing.
Now you have a trio of delightful desk companions ready to brighten your day


Big-and-Little Animal Buddies
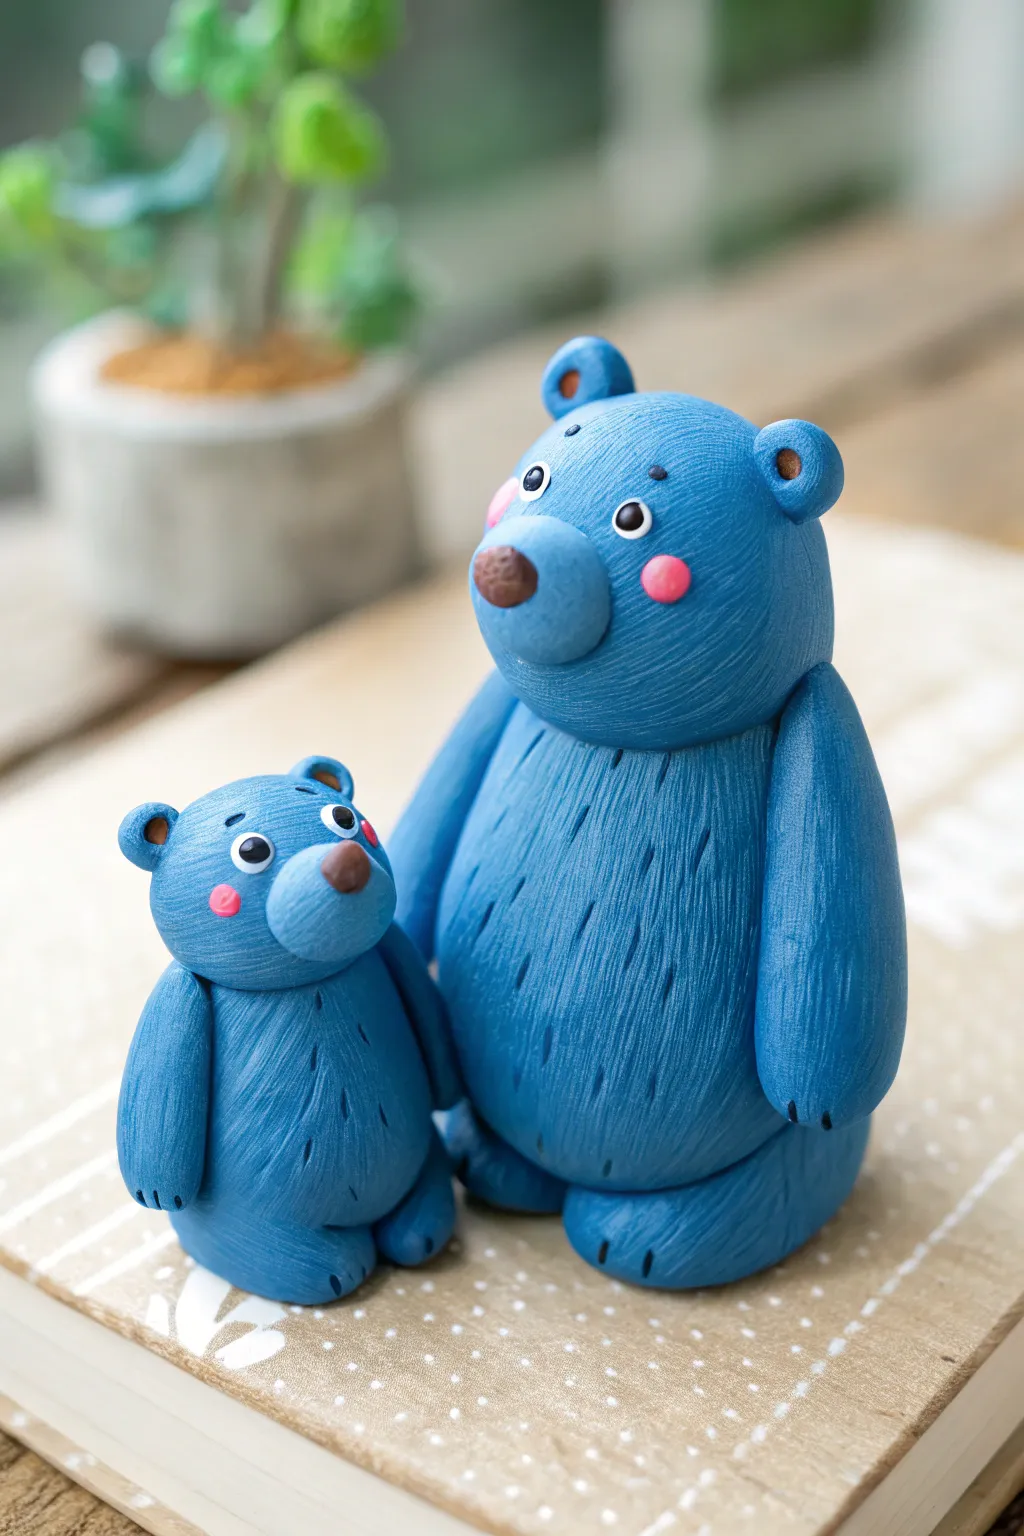
Create an adorable duo of blue bear figurines that are perfect for a couple’s crafting date, representing a big and a little companion. These charming bears feature textured fur, rosy cheeks, and expressive eyes, making them a keepsake you’ll cherish on your shelf.
How-To Guide
Materials
- Polymer clay (medium blue, light pink, dark brown, white, black, light brown)
- Needle tool or stiff toothbrush (for texturing)
- Ball stylus tools (various sizes)
- Clay knife or blade
- Acrylic roller
- Baking sheet
- Oven
Step 1: Shaping the Bodies
-
Mix the blue:
Start by conditioning your medium blue clay until it is soft and pliable. If the blue is too dark, mix in a little white to achieve the soft matte blue shown in the photo. -
Form the main shapes:
Divide the blue clay into two portions: a larger amount for the big bear and a smaller amount for the little bear. Roll each portion into a smooth, egg-shaped oval. The bottom should be slightly wider to help the figures stand upright. -
Create the legs:
For each bear, roll two small sausages of blue clay for the legs. Gently press them onto the bottom sides of the egg body, blending the seams at the back and underneath so they look integrated, creating a seated posture. -
Attach the arms:
Roll two longer, tapered logs of blue clay for the arms. Attach them to the sides of the body, starting just below where the neck would be. Let them hang naturally, curving slightly inward towards the belly. -
Add the claws:
Before adding texture, use a small needle tool or knife to gently press tiny indentations into the ends of the paws and feet to suggest claws.
Sticky Texturing
If the needle tool pulls the clay up creating unwanted ‘burrs’ while texturing, dip the tip in a tiny bit of water (for water-based finishes) or cornstarch periodically to keep the lines clean.
Step 2: Heads and Texturing
-
Sculpt the heads:
Roll two spheres of blue clay for the heads. Make sure the size is proportional to the bodies. Gently flatter the bottom of the sphere where it will attach to the body. -
Add the snouts:
Take a small ball of the same blue clay (or slightly lighter if you prefer contrast) and flatten it into an oval. Press this onto the lower center of the face for the muzzle. -
Attach the ears:
Make tiny balls of blue clay and flatten them slightly. Press a smaller ball of brown or dark orange clay into the center of each ear depression. Attach these to the top of the heads. -
Create the fur texture:
This is the most important step for the look. Take a needle tool and drag short, vertical lines all over the blue surfaces of the body and head. Vary the length and try to follow the contour of the shape. I find working in rows from bottom to top keeps the texture looking neat. -
Connect head to body:
Once textured (avoiding the connection points), press the heads firmly onto the bodies. You can insert a small piece of toothpick or wire inside the neck area for extra stability before baking.
Step 3: Bringing Them to Life
-
Add the noses:
Roll tiny triangles of dark brown clay. Press these firmly onto the top of the muzzles, rounding the corners slightly for a soft look. -
Create the eyes:
Use a ball tool to make small indentations for eye sockets. Fill these with small flattened balls of white clay. Add a smaller black pupil on top, and a tiny catchlight speck of white on the pupil to make them look alive. -
Apply rosy cheeks:
Take extremely small amounts of pink clay and flatten them into thin circles. Press these onto the cheeks, just below the eyes. -
Refine the details:
Use your needle tool to add tiny eyebrows above the eyes—just simple short dashes usually work best for a cute expression. -
Final inspection:
Check for any fingerprints that might have smoothed out your texture. Re-texture spots if needed with the needle tool. -
Bake:
Place both bears on a baking sheet. Bake according to your polymer clay manufacturer’s instructions (usually around 275°F/130°C for 15-30 minutes depending on thickness). Let them cool completely before handling.
Scarves or Bow Ties
Personalize your date-night bears by making tiny accessories. Add a thin red clay scarf or a bowtie to distinguish them, or etch your initials into the bottom of the feet.
Set your finished bears side-by-side on a desk or shelf as a sweet reminder of your crafting time together


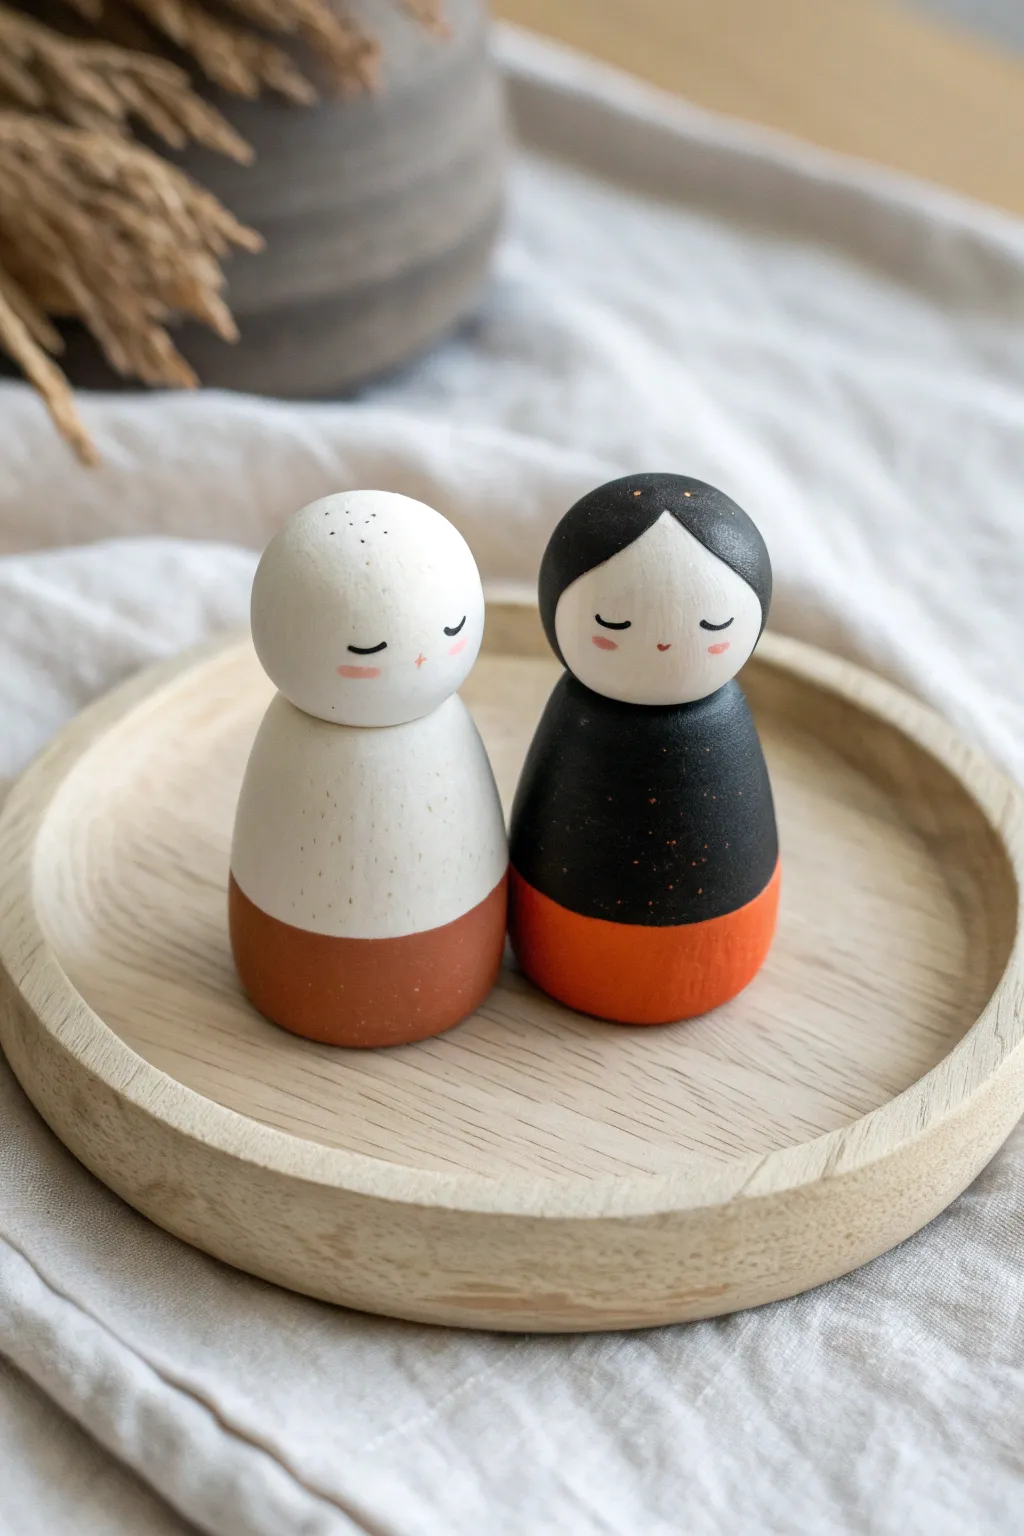
Pick-a-Character Set Challenge
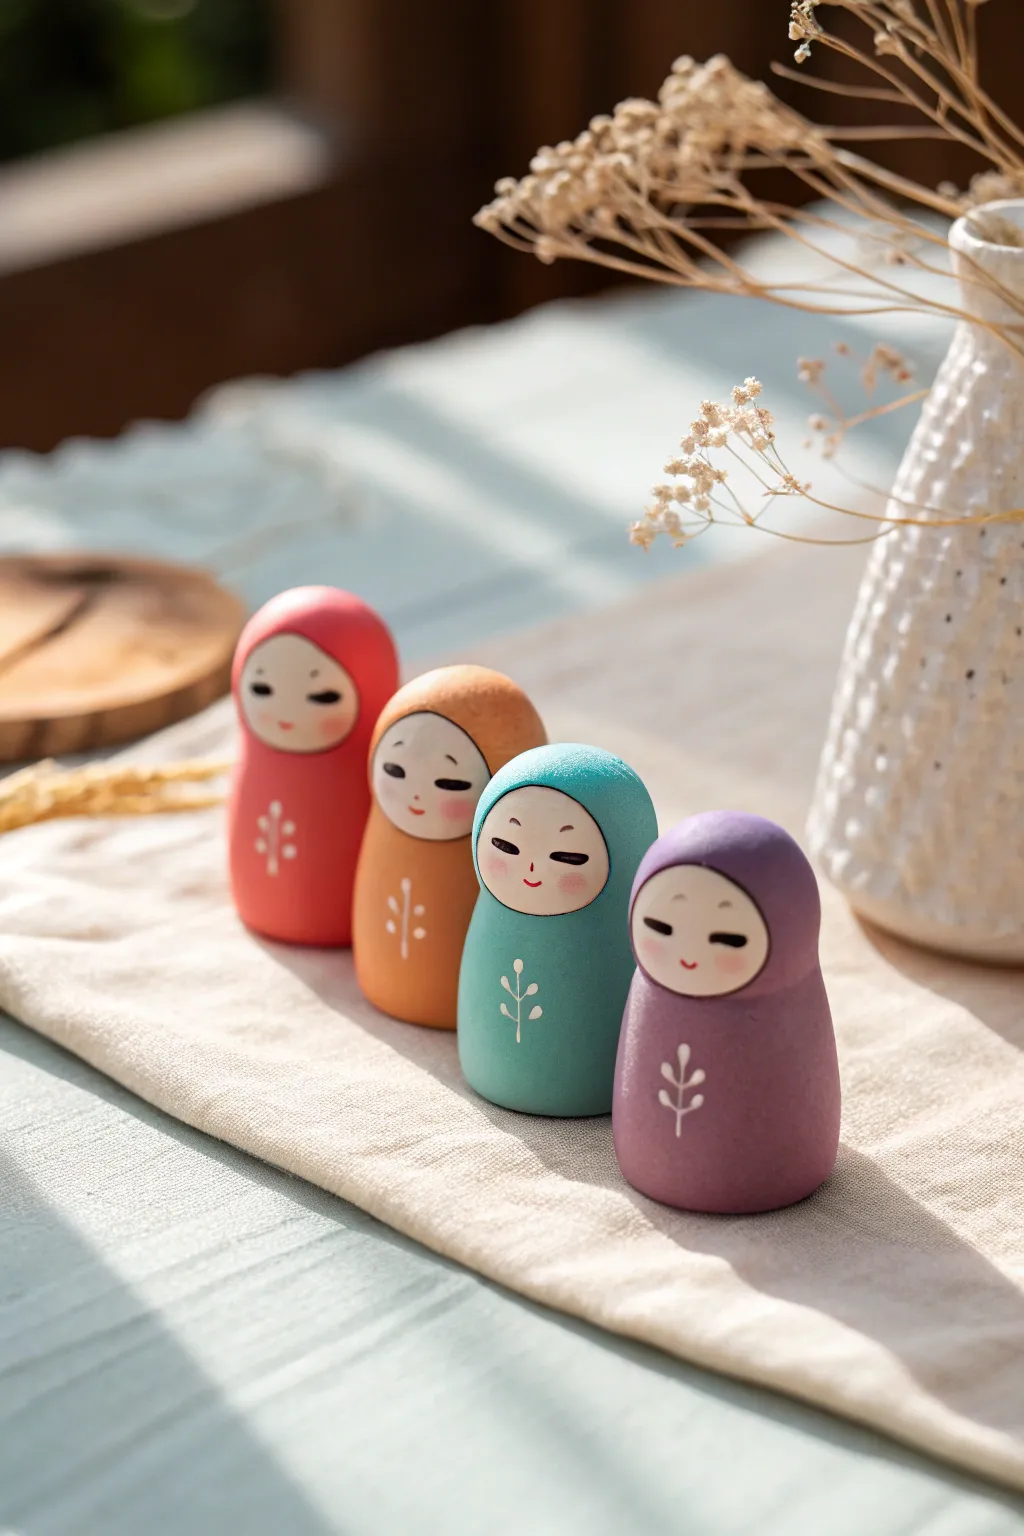
These charming, minimalist figures take inspiration from traditional Japanese Kokeshi dolls, featuring serene expressions and a soft, matte finish. This is a perfect couple’s project because each person can sculpt their own character while sticking to a unified, harmonious color palette.
Step-by-Step Guide
Materials
- Polymer clay (Red, Orange, Teal, Purple, Skin Tone, White)
- Acrylic roller or pasta machine
- Blade or craft knife
- Small ball stylus tool
- Fine detail paintbrush (00 or 000 size)
- Black and Red acrylic paint
- Cornstarch or baby powder (optional)
- Matte varnish or sealant
- Oven and baking sheet
Step 1: Sculpting the Base
-
Condition the clay:
Start by thoroughly conditioning your colored clays until they are soft and pliable. You’ll need four distinct colors for the bodies: a deep red, a warm orange, a muted teal, and a plum purple. -
Form the body:
Take a walnut-sized amount of the red clay and roll it into a smooth ball. Gently roll one side slightly narrower to create a tapered cylinder shape, slightly wider at the bottom for stability. -
Round the top:
Smoothly round off the top of the cylinder where the head will sit. The shape should look like a little hooded figure or a tall gumdrop. -
Repeat for all colors:
Repeat this process for the orange, teal, and purple clays, ensuring all four bodies are roughly the same height and width for a cohesive set. -
Create the face indentation:
Using your thumb or a large ball tool, gently press a shallow, circular indentation into the upper front of each body shape. This is where the face insert will go.
Fingerprint Fixer
Before baking, lightly brush your figures with a little baby oil or cornstarch to smooth out any accidental fingerprints left during sculpting.
Step 2: Adding the Faces
-
Prepare skin tone:
Roll out a small sheet of skin-tone clay. It should be relatively thin, about 2-3mm. -
Cut face circles:
Use a small circle cutter or your craft knife to cut four circles that match the size of the indentations you made on the bodies. -
Insert the faces:
Gently press a skin-tone circle into the indentation on each body. Use your finger to smooth the seams so the face looks like it’s peeking out from a hood, rather than just stuck on top. -
smooth the transition:
I find it helpful to roll the entire figure gently between my palms for just a second to help the clay merge seamlessly. -
Bake the figures:
Place your four figures on a baking sheet lined with parchment paper or cardstock. Bake according to your clay manufacturer’s instructions (usually 275°F/135°C for 15-30 minutes per 1/4 inch thickness). -
Cool down:
Allow the figures to cool completely before moving on to painting. The clay must be room temperature for the paint to adhere properly.
Face Fit Tip
If the face circle won’t sit flush, trim the back of the skin-tone circle slightly so it’s thinner in the center and thicker at the edges.
Step 3: Painting the Details
-
Paint the eyes:
Using your finest detail brush and black acrylic paint, carefully paint two curved lines for sleeping eyes or small arcs for open eyes. Keep the lines thin and delicate. -
Add eyebrows:
Paint tiny, floating eyebrows just above the eyes. These should be very subtle to maintain the serene expression. -
Blush the cheeks:
Dip a dry brush or a cotton swab into a tiny bit of red pastel chalk or very watered-down red paint. Gently dab it onto the cheeks to create a soft, rosy glow alongside the eyes. -
Paint the mouth:
With a steady hand and red paint, add a minuscule smile right in the center of the face. -
Add floral motifs:
Using white paint (or a contrasting light color), paint a simple vertical branch with leaves on the belly of each figure. A ball tool works great for dotting the leaves if you aren’t confident with a brush. -
Seal the work:
Once the paint is fully dry, coat the figures with a matte varnish. This protects the paint and gives the dolls that velvety, ceramic-like texture seen in the photo.
Arrange your little family on a shelf or windowsill to bring a sense of peace to your space


Mystery Swap: Sculpt for Each Other
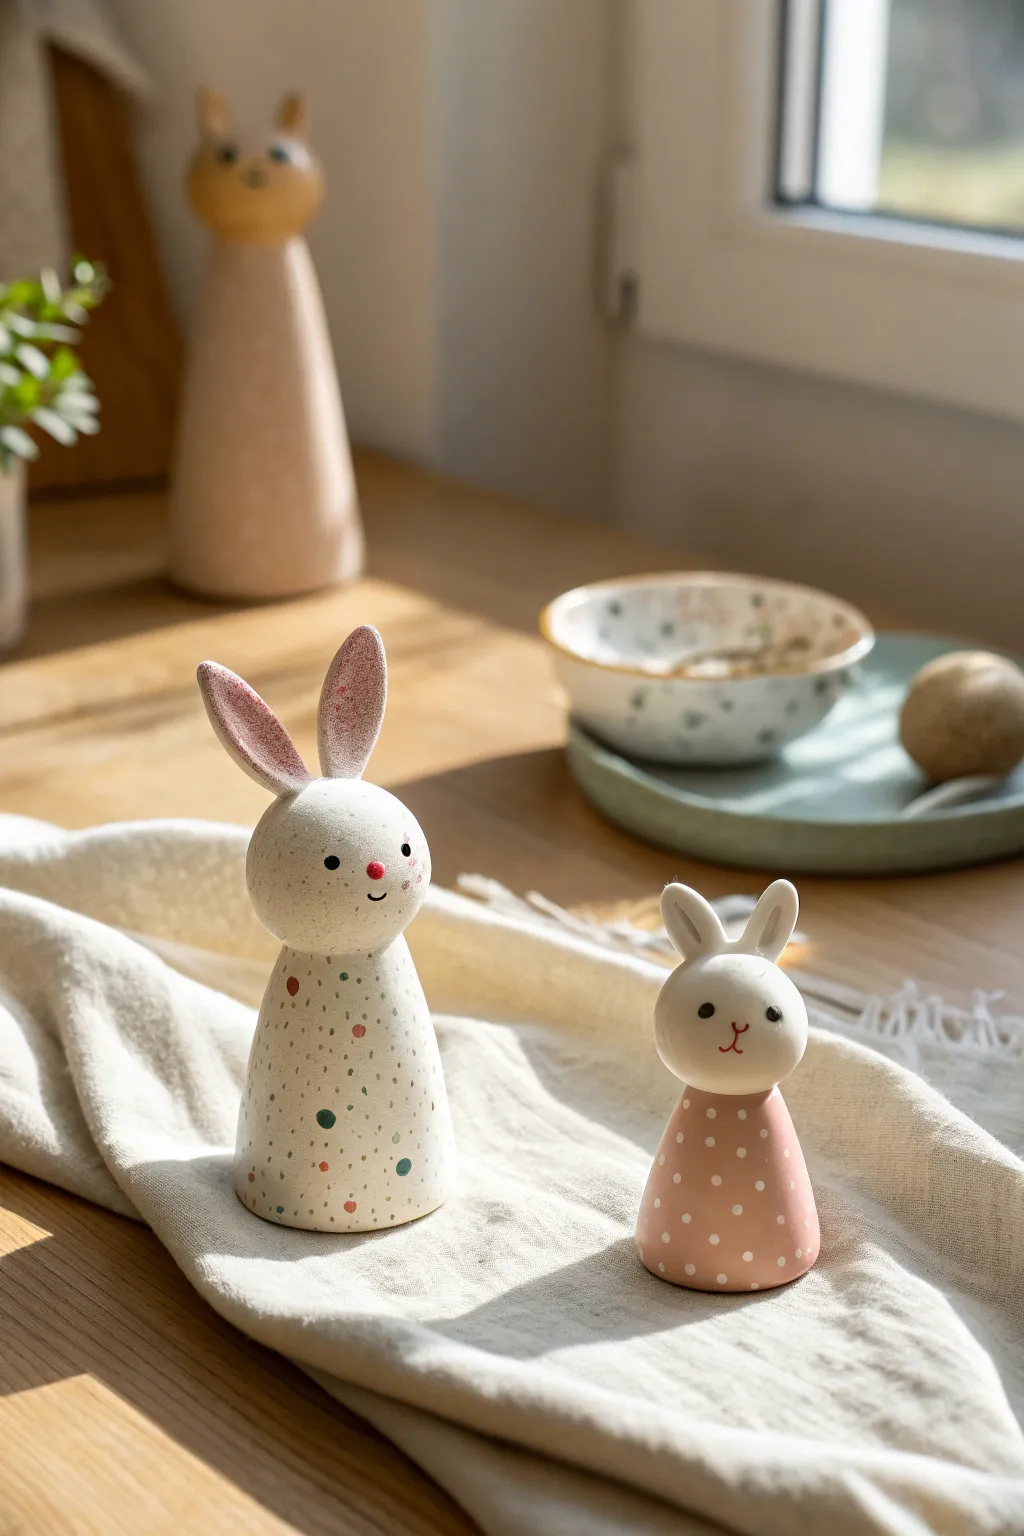
These charming minimalist bunnies rely on simple geometric shapes to create a modern, scandi-style look perfect for shelves or table settings. You’ll create a trio of characters featuring speckled textures and sweet, understated expressions.
How-To Guide
Materials
- Polymer clay (White, Pink, Tan/Beige)
- Acrylic paints (Black, Red, Teal, Mustard Yellow, Soft Pink)
- Small detail paintbrush
- Ball stylus tool or toothpick
- Aluminum foil (for armature core)
- Gloss or matte glaze (optional)
- Rolling pin or pasta machine
- Blade or craft knife
- Oven and baking sheet
Step 1: Forming the Base Bodies
-
Prepare the foil cores:
To keep the clay light and save material, scrunch aluminum foil into tight cone shapes. Make one tall cone (about 4-5 inches) and two smaller, stouter cones (2-3 inches). Compress the foil tightly so it is solid. -
Condition the clay:
Knead your white, tan, and pink clays separately until they are soft and pliable. Use the tan for the tall bunny, white for the medium speckled bunny, and pink for the smallest one. -
Sheet the clay:
Roll your conditioned clay into sheets about 1/4 inch thick. I find using a pasta machine ensures an even thickness, but a rolling pin works perfectly well too. -
Wrap the cones:
Wrap the clay sheets around your foil cones. Smooth the seams with your fingers or a smoothing tool until they disappear completely. Roll the cone gently on your work surface to ensure a smooth, round finish. -
Flatten the bottoms:
Press the base of each cone firmly onto your work surface to ensure they stand upright without wobbling.
Uneven Seams?
If the seam where you wrapped the clay around the cone is visible, roll the cone vigorously on a piece of paper. The friction helps smooth the line completely away.
Step 2: Heads and Ears
-
Roll the heads:
Create three spheres of clay corresponding to your body colors. The head for the tall bunny should be slightly oval, while the medium and small bunnies need perfectly round spheres. -
Attach heads to bodies:
Place the spheres on top of the cones. Blend the clay slightly at the neck seam to secure it, or insert a short piece of toothpick or wire between the body and head for extra stability. -
Shape the ears:
For the medium bunny, shape two long, thin teardrops from white clay. Flatten them slightly and use a tool to make an indentation in the center. Fill this indentation with a tiny smear of pink clay or pink chalk pastel for the inner ear. -
Create smaller ears:
Repeat the ear process for the small pink bunny using just the base pink clay, making them shorter and rounder. For the tall tan bunny, make small, upright triangular ears. -
Attach the ears:
Press the ears firmly onto the heads. Use a blending tool to smooth the clay where the ears meet the skull so they don’t pop off after baking.
Mix & Match Swap
Make the heads removable! Bake the bodies with a protruding wire and the heads with a hole underneath so you can swap expressions between the different bodies.
Step 3: Details and Patterning
-
Texture the medium bunny:
The white bunny features a speckled look. You can achieve this by pressing tiny, irregular bits of colored clay (teal, mustard, red) into the surface now, or paint them later. For a smooth finish, roll the body gently after applying clay specks. -
Pattern the small bunny:
For the polka-dotted pink bunny, press tiny, uniform balls of white clay onto the pink body and flatten them flush. -
Inspect and smooth:
Check all your figures for fingerprints. A little baby oil on your finger can help buff these out before baking. -
Bake carefully:
Bake the trio according to your clay manufacturer’s instructions (usually 275°F/130°C for 15-30 minutes). Use an oven thermometer to ensure you don’t scorch the white clay. -
Cool completely:
Let the bunnies cool fully before handling. Polymer clay is slightly soft when hot and hardens as it cools.
Step 4: Painting the Faces
-
Dot the eyes:
Using a ball stylus or the back of a paintbrush dipped in black acrylic paint, place two small dots for eyes on each face. Keep them wide-set for a cute expression. -
Paint the noses and mouths:
Use your finest detail brush to paint a tiny ‘Y’ shape or a simple dot for the nose and mouth. Use pink for the white bunny and red or dark brown for the others to ensure visibility. -
Add colored specks:
If you didn’t add the confetti pattern with clay earlier, use a toothpick to dab tiny dots of teal, mustard, and red paint all over the white bunny’s body. -
Final touches:
Add tiny pink cheeks with watered-down paint or chalk pastel powder. Once the paint is fully dry, seal your work with a matte varnish if desired.
Arranging these three together creates a lovely little family scene on any windowsill or mantle

The Complete Guide to Pottery Troubleshooting
Uncover the most common ceramic mistakes—from cracking clay to failed glazes—and learn how to fix them fast.
Inside-Joke Meme Mini Sculptures
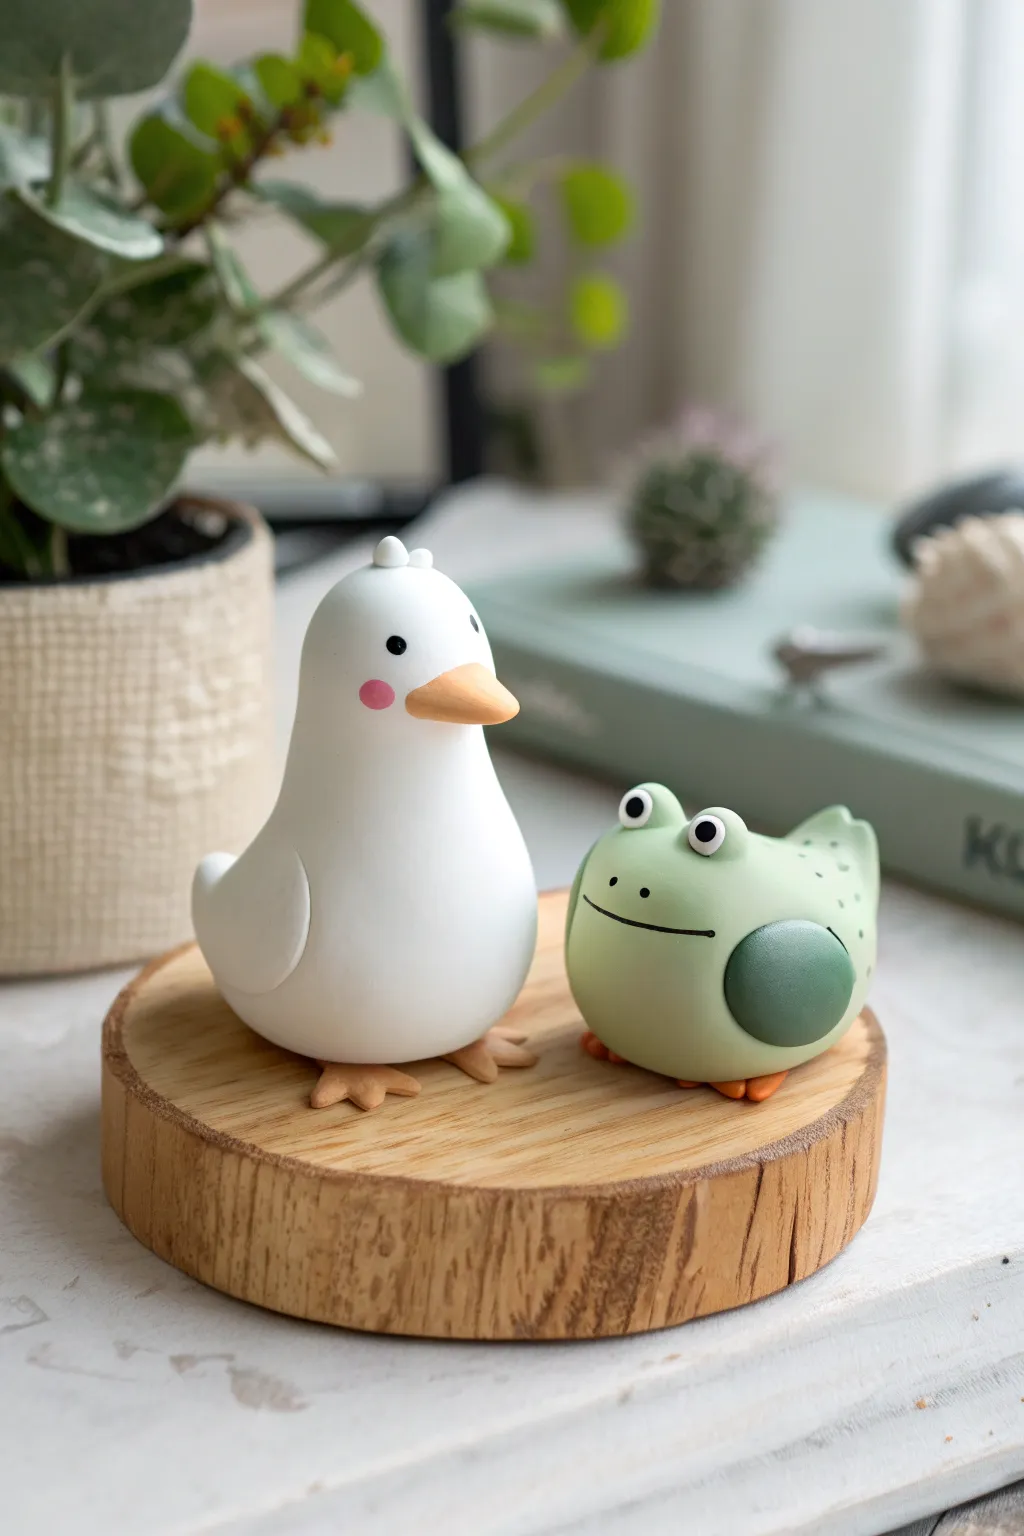
These two minimalist clay friends bring instant charm to any desktop with their smooth, matte finish and hilariously blank stares. The white duck features a classic rounded body while the round green frog sits low and grumpy, making them the perfect pair for a quirky crafting date.
Step-by-Step
Materials
- White polymer clay
- Light green polymer clay
- Dark green polymer clay
- Orange/yellow polymer clay
- Pink polymer clay or soft pastels
- Black polymer clay or black acrylic paint
- Modeling tools (ball stylus, needle tool)
- Small rolling pin
- Baking sheet and parchment paper
- Wooden coaster slice (optional base)
Step 1: Shaping the Duck Base
-
Create the main body:
Start with a large ball of white clay. Gently roll it into a pear shape, keeping the bottom wide for stability and tapering the top upwards to form the neck and head. -
Refine the head:
Smooth out the neck area so it transitions seamlessly into the head. The head should be slightly rounded but flush with the neck, not a separate ball. -
Add the tail:
Pinch the back lower portion of the body gently to create a small, upturned tail point. -
Attach the wings:
Flatten two small teardrops of white clay. Press these firmly onto the sides of the body, curving them slightly to follow the roundness of the duck’s belly.
Step 2: Adding Duck Details
-
Make the beak:
Mix orange and a tiny bit of yellow clay. Shape a small cone, flatten the end slightly, and press it onto the face. Use a needle tool to scribe a tiny line on the top for dimension. -
Create the eyes:
Roll two minuscule balls of black clay. Position them wide apart above the beak to achieve that signature blank stare. Alternatively, you can paint these on after baking. -
Add rosy cheeks:
Take the tiniest speck of pink clay, flatten it into a circle, and press it onto the cheek area. I like to press this in flush with the surface for a smooth finish. -
Form the feet:
Shape two small bits of orange clay into flat triangles. Use a knife tool to cut two notches in each for webbing, then press the duck’s body onto them so they stick out the front. -
Top feathers:
Roll two extremely small white balls and stick them to the very top of the head for a tuft of feathers.
Keep it Clean
White clay attracts dust like a magnet. Keep a pack of baby wipes nearby and clean your hands and tools thoroughly before shaping the duck.
Step 3: Sculpting the Round Frog
-
Form the frog body:
Roll a medium ball of light green clay. Gently press it onto your work surface so the bottom flattens and the frog sits stable. -
Add definition:
Using a large ball tool or your thumb, create slight indentations on the sides where the legs will go. -
Create the eye stalks:
Roll two small balls of light green clay and attach them to the top of the head. Add flattened white circles to the front of these mounds, followed by tiny black pupils. -
Make the mouth:
Use a needle tool or flexible blade to slice a wide, straight line across the face for the mouth. Curve the ends up very slightly if you want a subtle smile. -
Attach the legs:
Roll dark green clay into a thick circle, flatten it into a dome, and press it onto the side of the body for the retracted leg look. Repeat on the other side. -
Tiny feet:
Make tiny orange feet using the same method as the duck, just smaller. Tuck them slightly under the frog’s front edge. -
Back texture:
Use a needle tool or small dotting tool to add tiny texture dots on the frog’s back for a realistic skin effect.
Head Too Heavy?
If the duck’s neck starts drooping while you work, insert a crumpled ball of aluminum foil into the center of the body as an armature to reduce weight.
Step 4: Baking and Finishing
-
Pre-bake check:
Check for fingerprints. Use a little baby oil on your finger to gently buff out any smudges before the clay hardens. -
Bake the figures:
Place both figures on parchment paper. Bake according to your clay package’s instructions (usually 275°F for 15-30 minutes depending on thickness). -
Cool down:
Let them cool completely in the oven with the door cracked to prevent cracking from thermal shock. -
Optional varnish:
If you prefer a glossy look, apply a polymer clay glaze. For the matte look in the photo, leave them raw or use a matte varnish.
Place your new ceramic-like friends on a wooden slice or next to your computer for a daily dose of cuteness
Couples’ Pet Look-Alike Charms
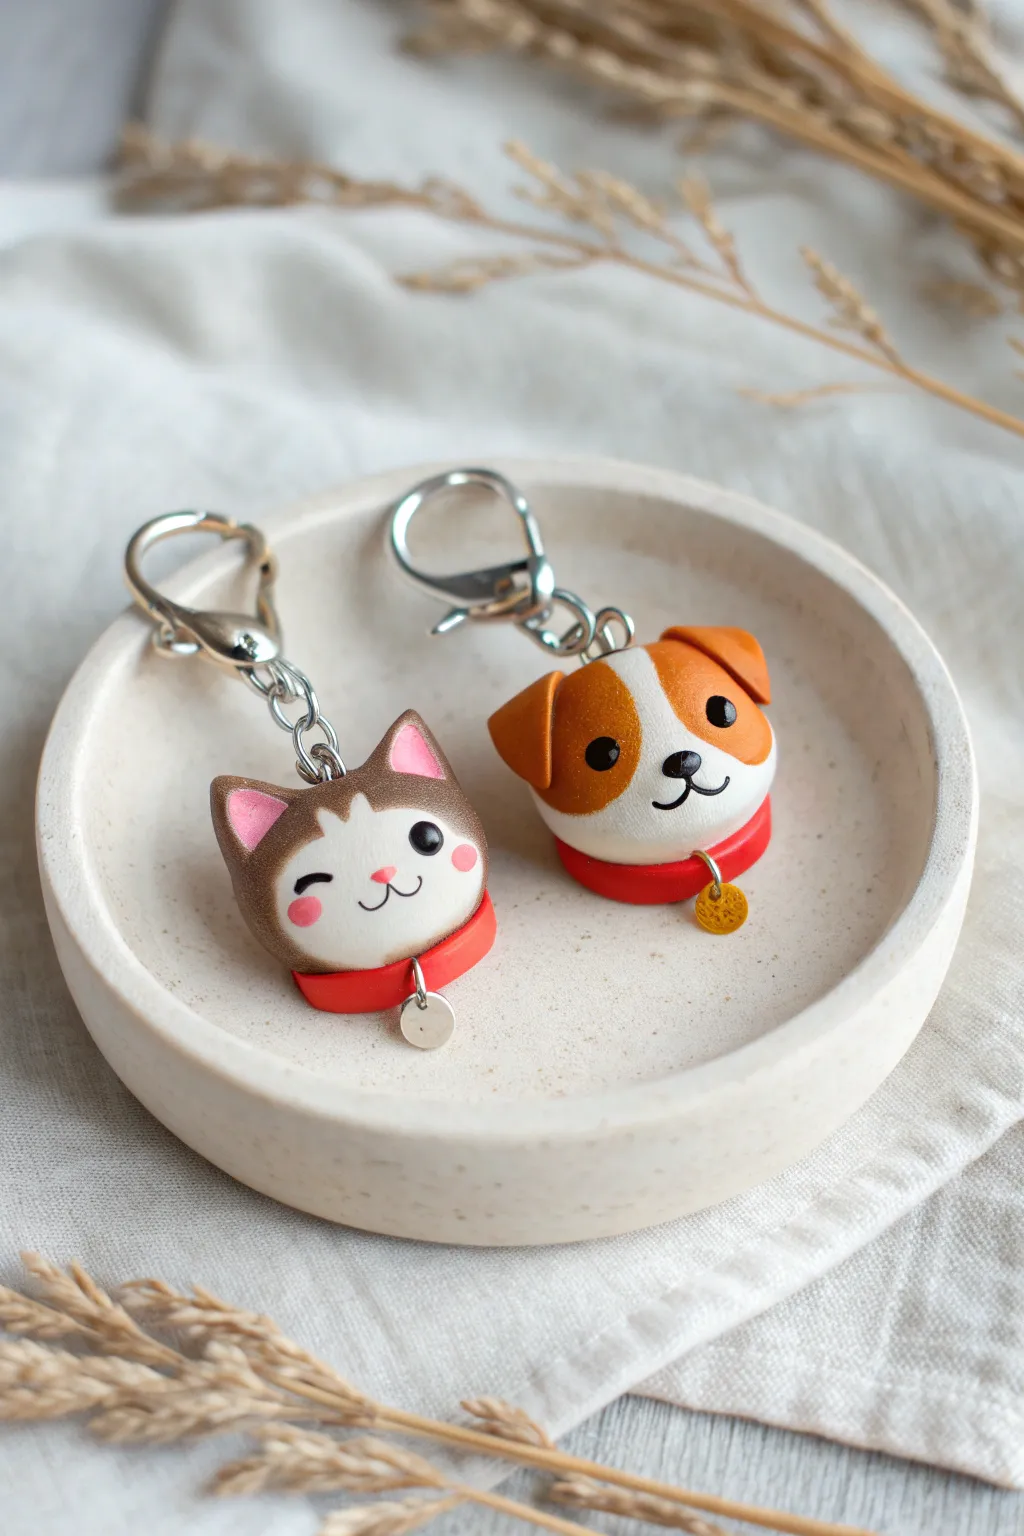
Immortalize your furry better half or create a matching set of your own pets with these adorable, stylized polymer clay charms. These miniature cat and dog heads feature smooth, blended fur patterns, tiny red collars, and sweet facial expressions that make them perfect for a crafty date night.
Detailed Instructions
Materials
- Polymer clay (white, chocolate brown, tan/orange, red, pink, black)
- Lobster clasp keychain findings with eye pins
- Liquid polymer clay (translucent or white)
- Small round jump rings and metal stamping tags (gold and silver)
- Clay sculpting tools (needle tool, ball stylus)
- Acrylic rolling pin
- Blade or craft knife
- Gloss glaze or UV resin (optional for shining eyes)
- Wet wipes (for cleaning hands between colors)
- Oven
Step 1: Shaping the Base Heads
-
Create the core shape:
Start by conditioning your white clay until it’s soft and pliable. Roll two equal-sized balls, roughly 1 inch in diameter, to serve as the base for both the cat and dog heads. Gently flatten the bottom of each sphere against your work surface to create a stable, slightly rounded-off base. -
Prepare colored clays:
Condition the chocolate brown clay for the cat and the tan/orange clay for the dog. Roll these into thin sheets using your acrylic roller or pasta machine on a medium setting. -
Cut the face patterns:
Use your craft knife to cut curved shapes from the colored sheets. For the cat, you want a shape that covers the ears and forehead, dipping down in the center. For the dog, create a patch that covers the ears and one side of the face, or a symmetrical mask pattern like the example. -
Apply the markings:
Gently lay the colored clay shapes onto the white base balls. Use your fingers to smooth the seams where the colors meet, blending the clay gently until the transition feels seamless and the added layer sits flush with the white base.
Step 2: Sculpting Ears & Features
-
Form the cat ears:
Shape two small triangles from the brown clay. Carefully press a smaller pink triangle into the center of each for the inner ear. Attach these to the top of the cat head, blending the back seams down into the head with a sculpting tool so they don’t break off later. -
Form the dog ears:
Create two teardrop shapes from the tan clay. Flatten them slightly and attach them to the sides of the dog’s head. Fold the top third of the teardrop downward to create that cute floppy ear look. -
Insert the hardware:
Take your metal eye pins. If they are long, trim them slightly. Dip the end of the pin into a little liquid polymer clay (which acts as a glue) and insert it straight down into the center top of each head. -
Smooth the surfaces:
Before adding tiny details, give the entire head a gentle rub with your finger or a little cornstarch to remove any fingerprints.
Dirty Clay Disaster?
White clay picks up lint easily. Keep a scrap piece of white clay nearby and roll it in your hands before starting to pull dust off your skin. Use baby wipes to clean tools.
Step 3: Faces & Accessories
-
Add the collars:
Roll a thin snake of red clay. Flatten it slightly into a strip. Wrap this strip around the very bottom of each head to form a collar. Trim the excess at the back and blend the seam. -
Create the noses:
Roll tiny specks of black clay into ovals. Press one onto the center of the dog’s face and one onto the cat’s face. For the cat, I find a smaller, more triangular nose looks best. -
Sculpt the mouths:
Roll extremely thin threads of black clay for the mouths. Shape them into a ‘3’ shape or a simple anchor shape on your work surface first, then gently transfer them onto the faces using your needle tool. -
Add the eyes:
For the open eyes, roll small balls of black clay, flatten them, and press them onto the face. For the winking cat eye, roll a thin black thread and curve it into a ‘U’ shape. Add tiny pink circles for blush cheeks just below the eyes. -
Refine the eyes:
To make the eyes look alive, add a microscopic dot of white clay to the upper corner of each black eye pupil as a reflection highlight.
Pro Tip: Seamless Blending
When adding colored patches to the white face, gently roll the handle of your craft knife over the seam. This merges the layers without flattening the head shape.
Step 4: Baking & Assembly
-
Bake the charms:
Place your charms on a ceramic tile or baking sheet lined with parchment paper. Bake according to your clay package directions (usually 275°F/135°C for 15-30 minutes depending on thickness). -
Cool and verify:
Let the pieces cool completely inside the oven or on the counter. Do not handle them while hot as the clay is still fragile. -
Attach the tags:
Using pliers, open a small jump ring and thread on a tiny metal tag. Loop this jump ring around the red clay collar (if loose enough) or attach it to a small metal loop embedded in the collar if you added one earlier. -
Connect the keychains:
Open the jump ring on your lobster clasp keychain assembly. Loop it through the eye pin sticking out of the top of the head and close the jump ring securely. -
Glaze (Optional):
For extra durability and shine, brush a thin layer of gloss glaze or UV resin over the eyes and nose. Cure or dry as directed to give them a wet, glassy look.
Now you have a charming pair of pet keepsakes to carry with you everywhere.


What Really Happens Inside the Kiln
Learn how time and temperature work together inside the kiln to transform clay into durable ceramic.
Mini Magnet Mementos for the Fridge
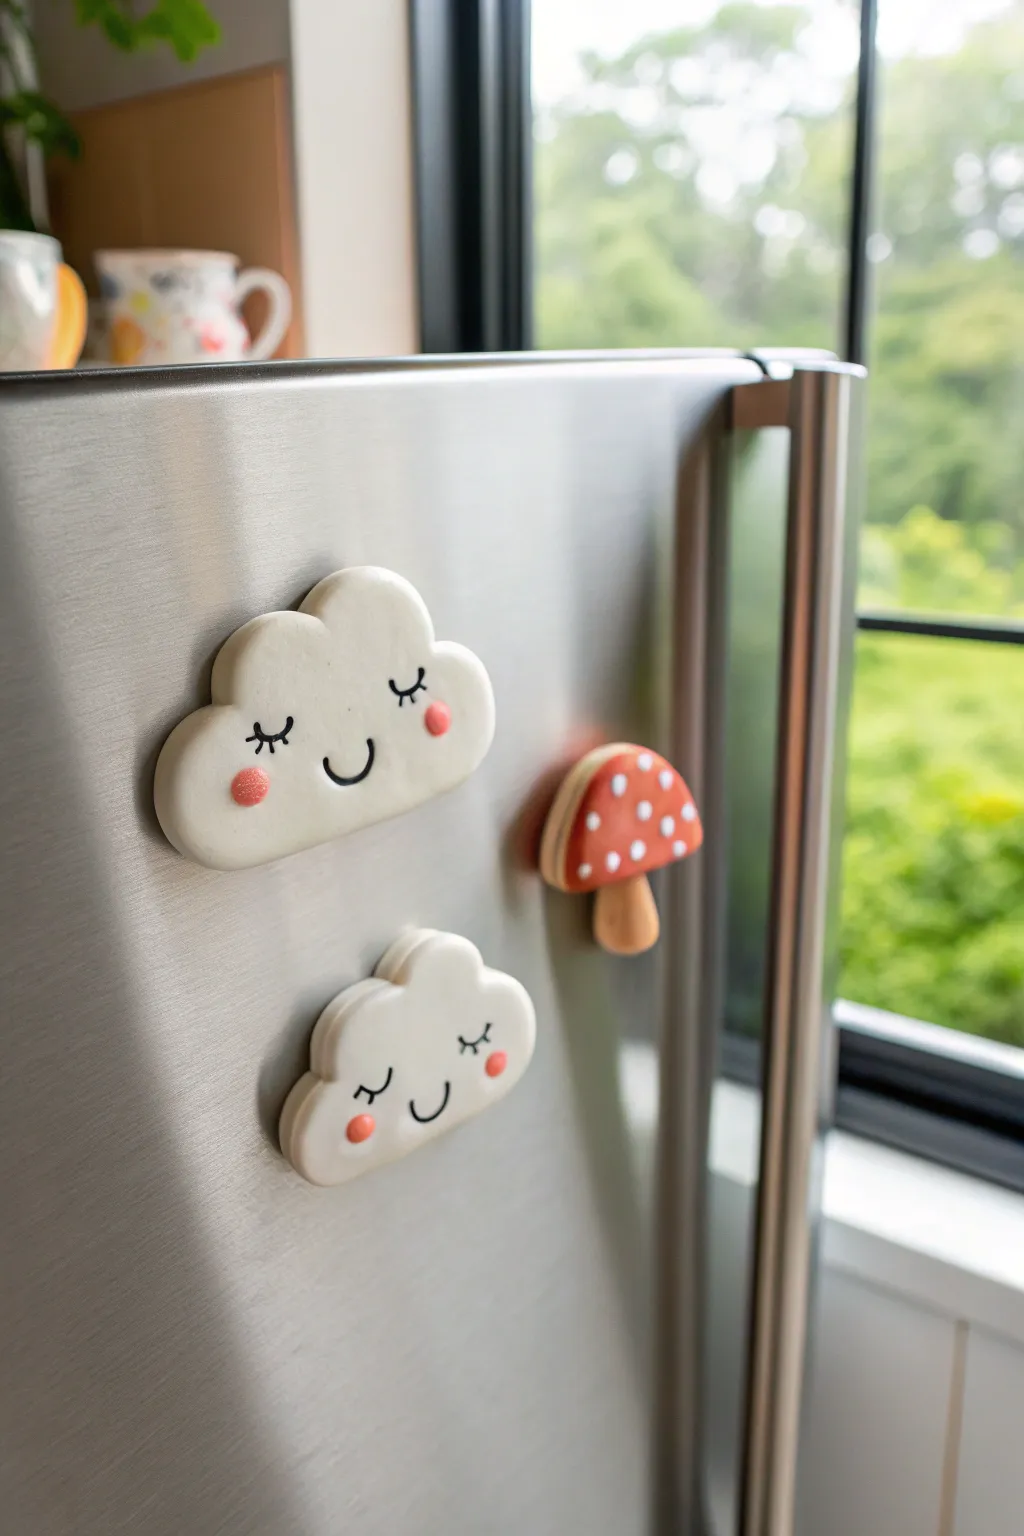
Brighten up your appliance with these adorable, kawaii-inspired fridge magnets. The smooth, matte finish of the clouds pairs perfectly with the rustic charm of the mushroom for a sweet, mismatched set.
Step-by-Step
Materials
- White polymer clay
- Red polymer clay
- Beige or tan polymer clay
- Black acrylic paint or fine-tip permanent marker
- Pink acrylic paint or pink clay (for cheeks)
- Small round magnets (neodymium recommended)
- Super glue or E6000
- Clay roller or pasta machine
- Cloud-shaped cookie cutters (two sizes)
- Dotting tools or toothpicks
- Needle tool
- Glaze (optional, matte or satin)
Step 1: Shaping the Clouds
-
Condition the clay:
Start by thoroughly conditioning your white polymer clay until it is soft and pliable. This prevents cracks and ensures a smooth surface later. -
Roll it out:
Roll the white clay into a flat slab, approximately 1/4 inch thick. You want them chunky enough to hold the magnet firmly without being too heavy. -
Cut the shapes:
Use your cloud-shaped cookie cutters to punch out your shapes. Create two different sizes for variety, just like in the photo. -
Soften the edges:
Gently rub your finger along the cut edges of the clouds to round them off. This removes the sharp ‘cookie cutter’ look and makes them look pillowy. -
Add rosy cheeks:
Take tiny pinched amounts of pink clay (or mix a speck of red into white) and roll them into small balls. Flatten them slightly onto the cloud faces for cheeks.
Step 2: Forming the Mushroom
-
Create the stem:
Roll a piece of beige or tan clay into a short, thick cylinder. Slightly taper the top where the cap will sit and round off the bottom. -
Shape the cap:
Condition red clay and roll it into a ball. Flatten the bottom and gently dome the top with your thumbs to create the mushroom cap shape. -
Attach the parts:
Press the red cap firmly onto the beige stem. I sometimes use a tiny drop of liquid clay here for a secure bond, though firm pressure usually works. -
Add the spots:
Roll tiny spheres of white clay. Press these randomly all over the red cap, flattening them so they become flush with the surface. -
Flatten the back:
Since this is a magnet, turn the mushroom over and gently press the back against your work surface to create a flat plane for the magnet to adhere to.
Uneven Surface?
If your white clay picks up dust or fingerprints, wipe the raw clay gently with a Q-tip dipped in rubbing alcohol or baby oil before baking to smooth it out.
Step 3: Baking and Finishing
-
Bake the pieces:
Place all your clay pieces on a ceramic tile or baking sheet lined with parchment paper. Bake according to your specific clay brand’s instructions (usually 275°F for 15-30 minutes). -
Cool completely:
Let the pieces cool down inside the oven or on the counter until they are room temperature. Don’t rush this, as warm clay is fragile. -
Draw the faces:
Using a very fine black permanent marker or a thin brush with black acrylic paint, carefully draw the sleepy eyes and smiling mouths on the clouds. -
Detail the lashes:
Add tiny flicks to the corners of the closed eyes to create eyelashes. Keep your hand steady and use very light pressure. -
Attach magnets:
Flip the cured pieces over. Apply a dab of strong glue (like E6000) to the flattest part of the back. -
Secure the magnets:
Press your round magnets into the glue. If using E6000, wait a few minutes for the glue to get tacky before pressing the magnet on to prevent sliding. -
Final dry time:
Allow the glue to cure fully (often 24 hours) before placing them on your fridge to ensure the heavy clay doesn’t slide off the magnet.
Make it Sparkle
Before baking, lightly brush pearl ex powder or mica powder onto the white clouds to give them a shimmering, magical finish.
Now your fridge has a little extra personality and charm to greet you every time you reach for a snack
Miniature “Date Night” Scene in a Tin
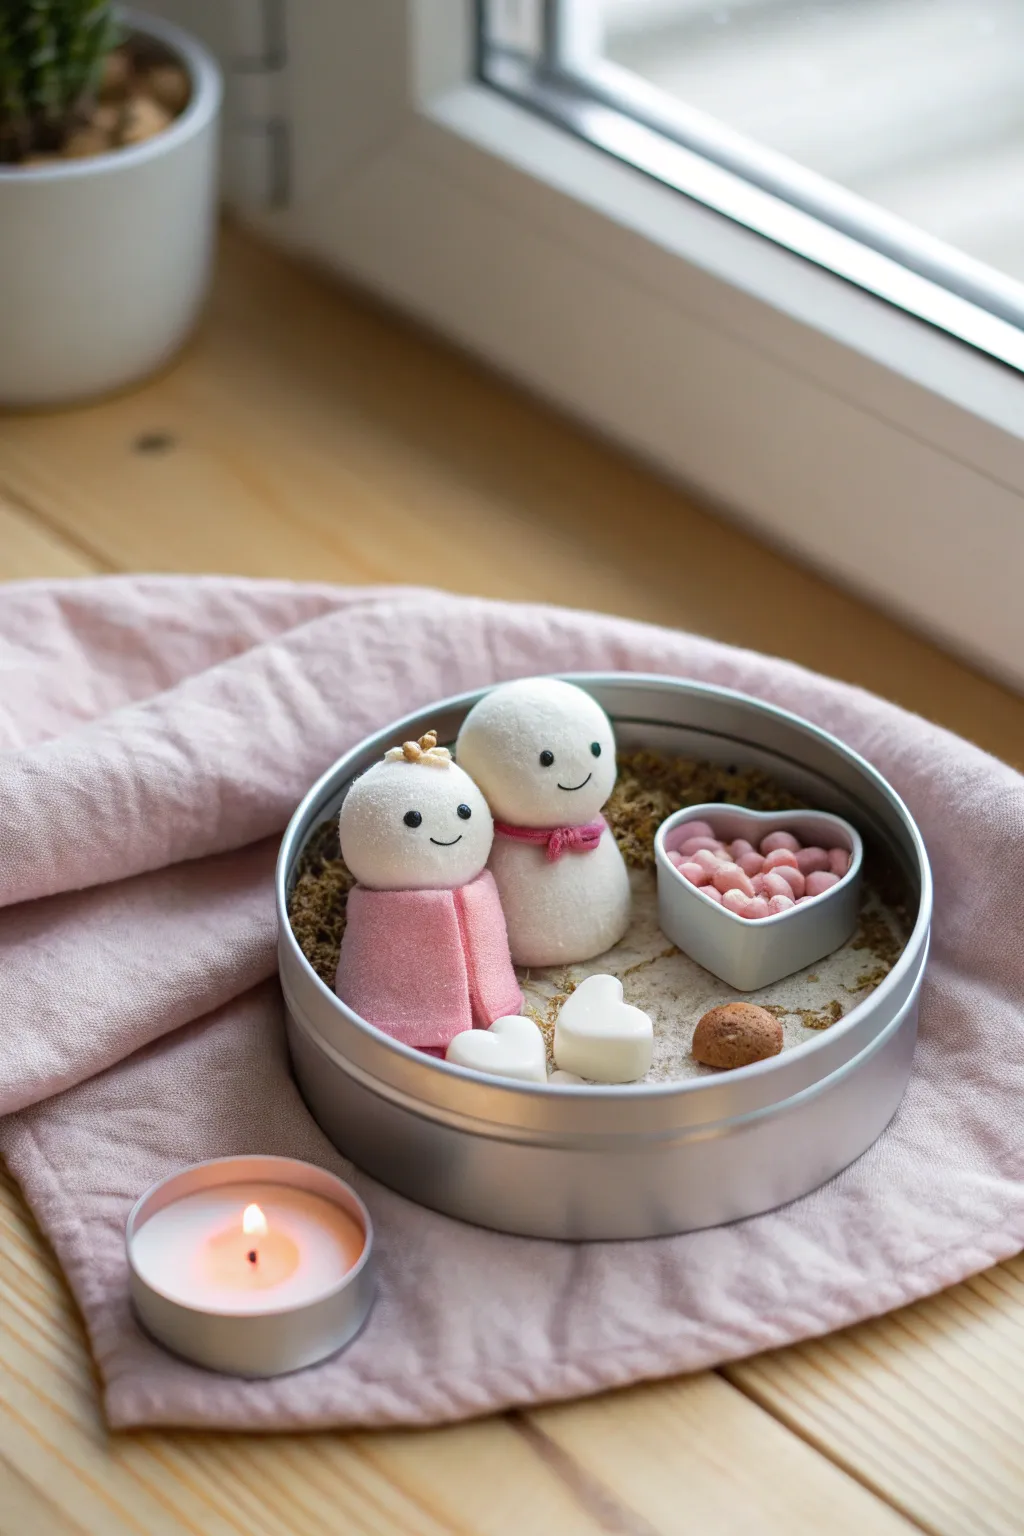
Capture a sweet moment of togetherness inside a portable keepsake tin. This miniature diorama features two adorable figures enjoying a cozy date night, complete with tiny heart-shaped accessories and a sprinkle of romance.
Detailed Instructions
Materials
- White, pink, and brown polymer clay
- Silver round metal tin (shallow travel tin)
- Small heart-shaped cutter or mold
- Silver heart-shaped bezel or tiny baking tin
- Dried moss or faux grass flocking
- White craft sand or glitter snow
- PVA glue
- Sculpting tools (needle tool, ball tool)
- Black glass seed beads (for eyes)
Step 1: Creating the Figures
-
Shape the bodies:
Start with white polymer clay. Roll two medium-sized balls for the bodies—one slightly wider for the sitting figure and one slightly taller for the standing figure. Flatten the bottoms gently so they sit stable on your work surface. -
Form the heads:
Roll two smaller spheres of white clay for the heads. Gently press them onto the bodies. You can use a small piece of toothpick or wire inside the neck area for extra stability if you like. -
Add the faces:
Use a needle tool to gently etch a simple, curved smile onto each face. For the eyes, press two small black glass seed beads into the clay. Alternatively, mark the eye spots with a tool and paint them black after baking. -
Dress the first figure:
Roll out a thin sheet of pink clay. Cut a rectangular strip and drape it over the body of the sitting figure (the one on the left) to look like a cape or blanket. Creating soft folds near the bottom makes the fabric look realistic. -
Accessorize the second figure:
For the standing figure (on the right), roll a very thin snake of darker pink clay. Wrap it around the neck area like a scarf and crisscross the ends at the front. -
Add tiny details:
Create a tiny gold or tan knot/bow for the top of the first figure’s head using a speck of clay. Smooth any fingerprints with a drop of baby oil on your finger.
Clean Clay Tip
White clay picks up dust easily. Keep a pack of wet wipes nearby and clean your hands thoroughly before handling the white clay to keep your snowmen bright.
Step 2: Crafting the Scenery
-
Make the candy bowl:
Take your tiny heart-shaped metal bezel or form a small heart dish from silver clay. Fill it with tiny balls of light and dark pink clay to represent little candies or pebbles. -
Create scattered hearts:
Using white clay, shape two small, puffier heart shapes. These will sit loosely on the ground like cushions or decorations. Smooth the edges so they look soft. -
Form the cookie:
Take a small ball of brown clay and flatten it slightly into a dome. Texture the surface with a toothbrush or ball of foil to make it look like a baked cookie. -
Pre-bake arrangement check:
Place all your clay components inside the metal tin to ensure everything fits comfortably without crowding. Once satisfied, remove them carefully for baking. -
Bake the clay:
Bake all your clay pieces according to the manufacturer’s instructions (usually 230°F – 275°F for 15-30 minutes). I prefer to bake them on a tile to keep the bottoms flat.
Make it a Locket
Add a magnet to the bottom of the figures instead of gluing them down. This lets you reposition them or take them out to display on a shelf.
Step 3: Assembly
-
Base layer:
Coat the bottom of the metal tin with a thin layer of PVA glue. Sprinkle a mix of dried moss (around the edges) and white craft sand (in the center) to create a snowy or sandy clearing. -
Position the figures:
Glue the two main figures into the center of the tin, nesting them slightly into the sand or moss. The cape of the left figure should brush against the floor material. -
Place the props:
Glue the heart-shaped candy bowl to the right of the figures. Place the white heart cushions in the foreground and the brown cookie nearby. -
Final touches:
Adjust the moss around the figures to make them look settled in. Let the glue dry completely before moving the tin.
Close the lid to keep your secret scene safe or leave it open to display on your desk

TRACK YOUR CERAMIC JOURNEY
Capture glaze tests, firing details, and creative progress—all in one simple printable. Make your projects easier to repeat and improve.
Seasonal Spooky Pair: Ghosts and Bats
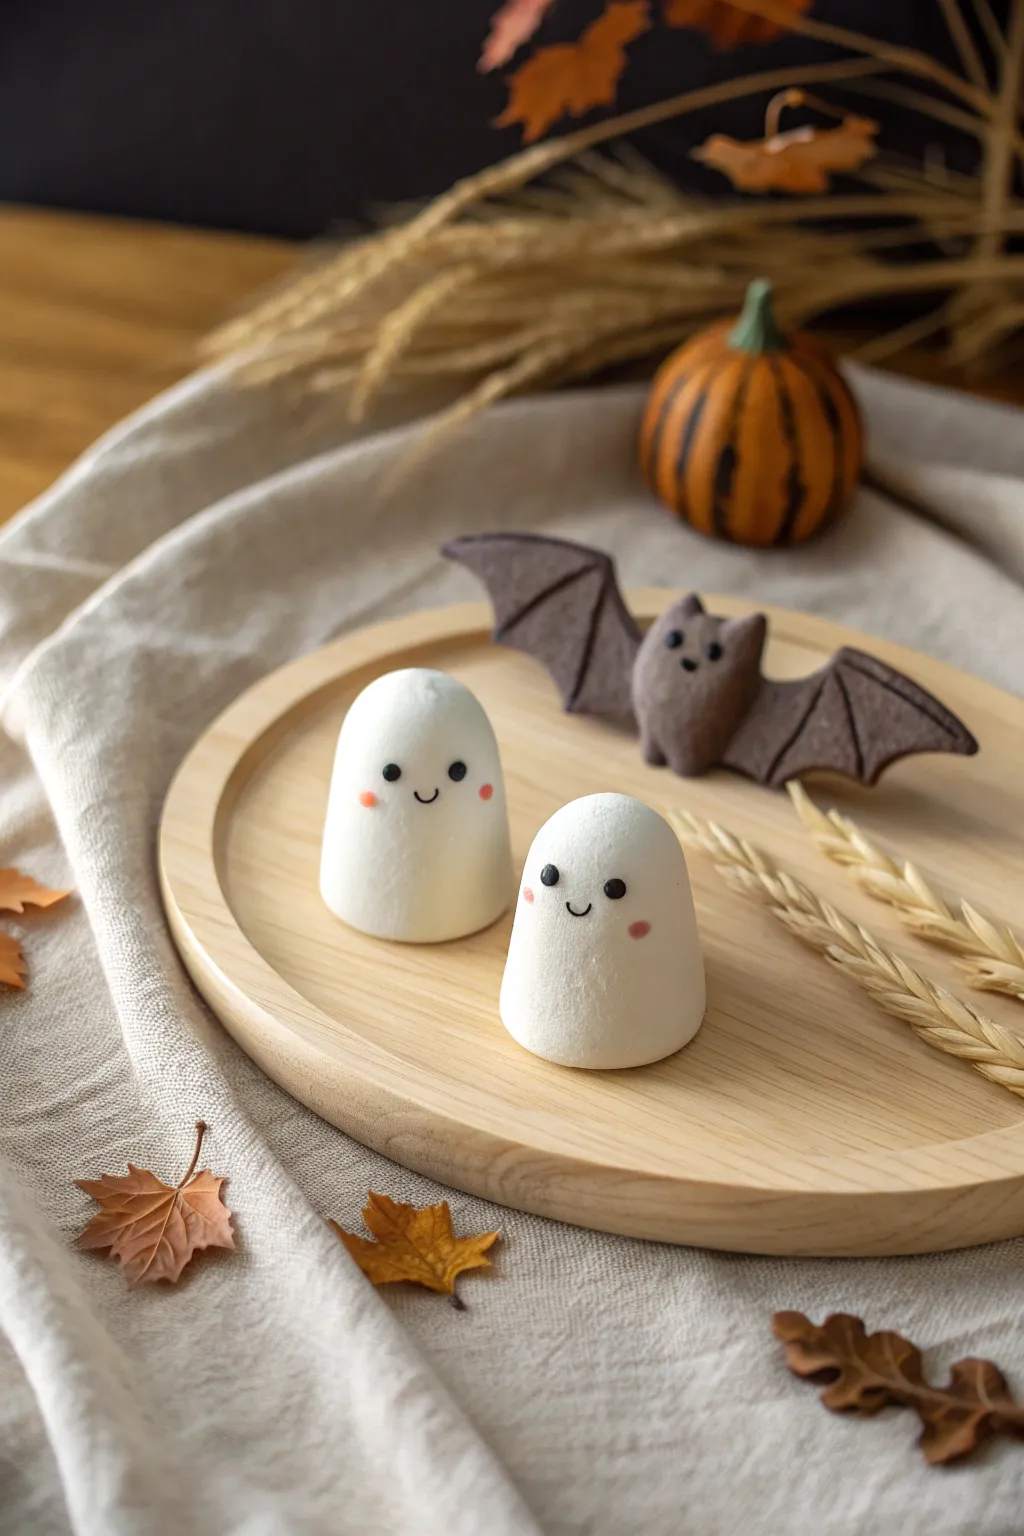
Create a charming Halloween vignette perfect for a cozy date night crafting session. These minimalistic white ghosts and their textured bat companion make for adorable seasonal decor that sits perfectly on a wooden tray or shelf.
How-To Guide
Materials
- White polymer clay
- Dark grey or brown polymer clay
- Black polymer clay (tiny amount for details)
- Pink soft pastel chalk (for blush)
- Small paintbrush
- Pointed sculpting tool or toothpick
- Texture sponge or toothbrush
- Blade or craft knife
- Baking sheet and parchment paper
- Oven
Step 1: Shaping the Ghosts
-
Condition the white clay:
Begin by kneading a block of white polymer clay until it is soft, pliable, and free of cracks. Ensure your hands are very clean to keep the white pristine. -
Form the bodies:
Divide the white clay into two balls, making one slightly larger than the other. Roll them between your palms until smooth. -
Create the dome shape:
Gently press the bottom of each ball against your work surface to flatten it. Use your fingers to shape the top into a rounded, dome-like cylinder, ensuring the sides are relatively vertical but soft. -
Add subtle texture:
To mimic the soft, marshmallow-like appearance in the photo, gently pat the surface of the ghosts with a texture sponge or an old toothbrush. This removes the shiny fingerprint look.
Keeping White Clay Clean
White clay picks up lint easily. Keep a scrap piece of white clay nearby to roll in your hands periodically—it pulls off dust before you touch your project.
Step 2: Ghostly Expressions
-
Prepare the eyes:
Roll two incredibly tiny balls of black polymer clay for each ghost. Press them gently onto the upper half of the face, spacing them apart for a cute, wide-set look. -
Create the smile:
Roll a hairline-thin snake of black clay. Cut a tiny segment and curve it into a ‘U’ shape. Carefully place this between the eyes using a needle tool or toothpick. -
Apply rosy cheeks:
Scrape a small amount of pink pastel chalk into a fine powder. I like to use a small, dry paintbrush to lightly dust this powder onto the clay cheeks just below the eyes.
Step 3: Crafting the Bat
-
Form the bat body:
Take a small portion of dark grey or brown clay. Roll it into an oval for the body and pinch the top slightly to form ears. -
Create the bat wings:
Roll out a flat sheet of the same dark clay (about 3mm thick). Use a blade to cut out two majestic wing shapes with scalloped bottom edges. -
Texture the wings:
Use a needle tool or the back of your blade to press lines radiating from the body to the wing 3tips, simulating the bat’s wing structure. -
Texture the body:
Using your toothbrush or needle tool, stipple the bat’s body to give it a furry appearance, contrasting with the smoother wings. -
Assemble the bat:
Press the wings firmly onto the back of the body. You can use a dab of liquid polymer clay or bake-and-bond if you have it to ensure a secure connection. -
Add bat face details:
Just like the ghosts, add two tiny black eyes and a small nose or mouth using minuscule bits of black clay.
Glow Up
Use glow-in-the-dark polymer clay for the ghosts instead of standard white. They will look normal in daylight but spooky when the lights go out.
Step 4: Baking and Finishing
-
Pre-bake check:
Give your figures a final inspection. Smooth out any accidental fingerprints and ensure the ghosts are standing straight. -
Bake the figures:
Place your creations on a piece of parchment paper on a baking sheet. Bake according to your brand of polymer clay instructions (usually 275°F/135°C for 15-30 minutes). -
Cool down:
Allow the figures to cool completely in the oven with the door slightly ajar to prevent cracking from sudden temperature changes.
Set your new spooky friends on a wooden display tray to enjoy your handcrafted Halloween scene
Mini “Lucky Charms” for Each Other
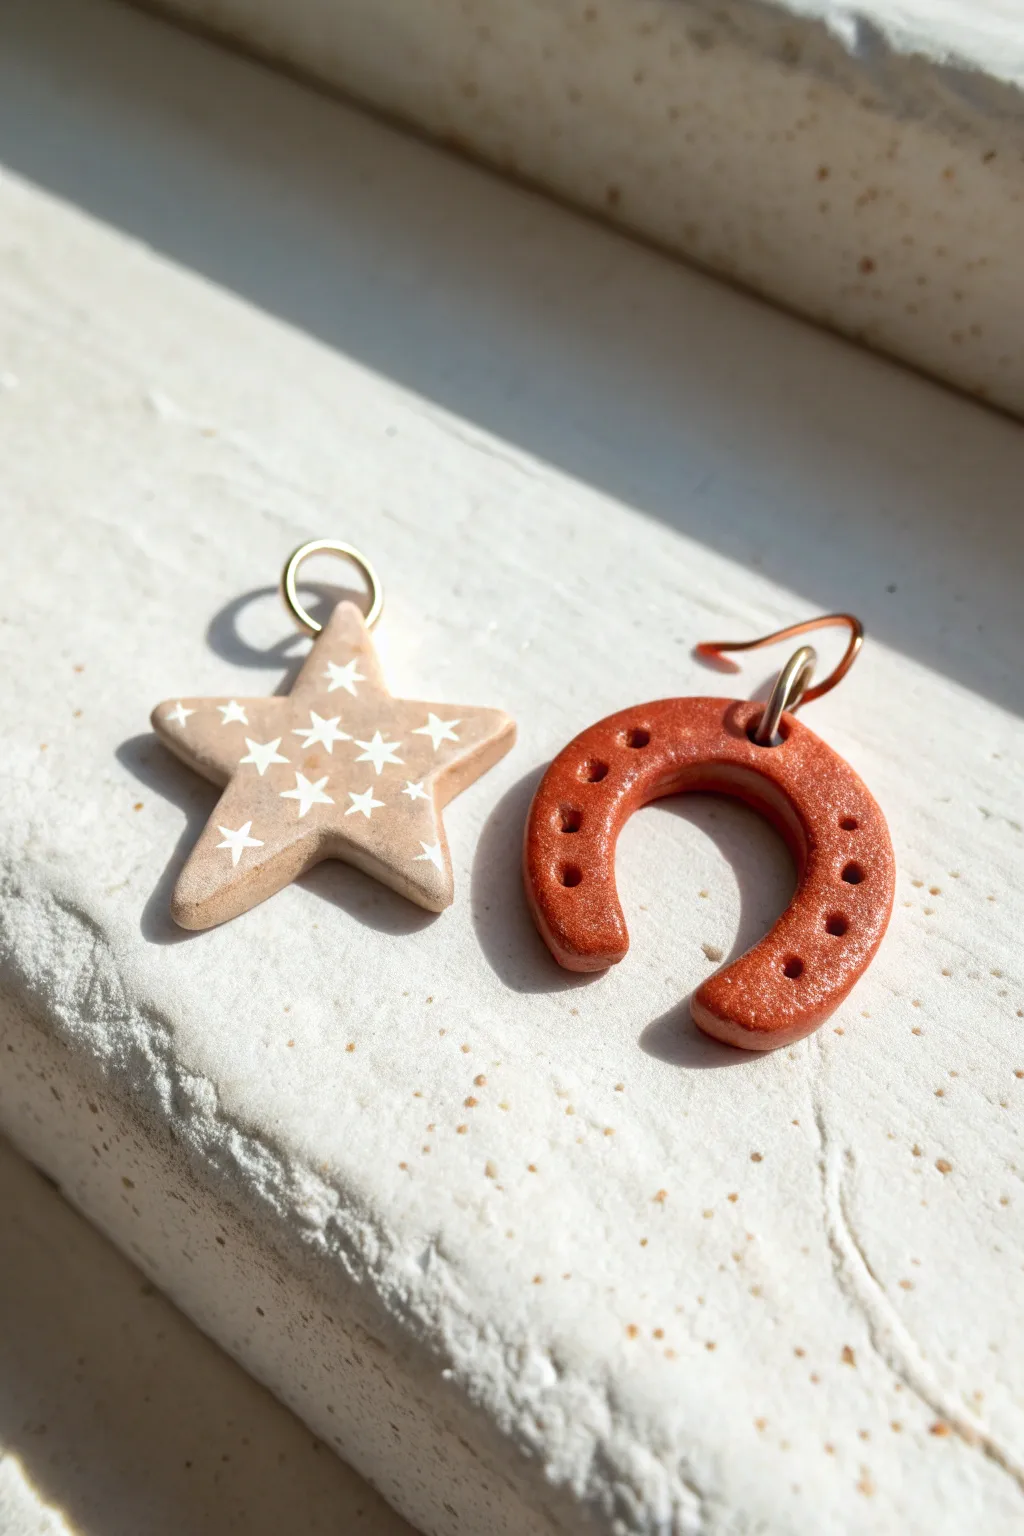
Create a sweet, tangible reminder of your bond with these miniature lucky charms made from polymer clay. This project features a celestial star and a classic lucky horseshoe, both crafted with warm, glittering tones for a subtle, earthy finish.
Step-by-Step
Materials
- Polymer clay (beige/tan and rust/terracotta with glitter or mica)
- Small star-shaped clay cutter
- Rolling pin or pasta machine
- White acrylic paint
- Fine detail paintbrush or toothpick
- Needle tool or awl
- Jump rings (gold or brass finish)
- Earring hooks (optional, if making earrings)
- Gloss or matte glaze (optional)
- Small round cutter or straw (for the horseshoe shape)
- Clay slicing blade
Step 1: Shaping the Clay Base
-
Condition the beige clay:
Start with the beige or tan polymer clay for the star charm. Knead it in your warm hands until it is soft, pliable, and easy to work with. -
Roll out the slab:
Using your rolling pin, flatten the beige clay into a slab. Aim for a thickness of about 3-4mm so the charm feels substantial but not heavy. -
Cut the star shape:
Press your star-shaped cutter firmly into the beige slab. Wiggle it slightly to ensure a clean cut, then lift the cutter away and carefully remove the excess clay. -
Smooth the edges:
Inspect the edges of your star. If there are any jagged bits, use your finger to gently gently smooth them down for a professional finish. -
Condition the rust clay:
Now, take the rust or terracotta-colored clay (preferably one with a bit of shimmer or mica) for the horseshoe. Condition it thoroughly until soft. -
Form a clay snake:
Roll a small portion of the rust clay into a smooth log or ‘snake’ about 5mm thick. Try to keep the thickness consistent along the length. -
Shape the horseshoe:
Curve the clay log into a ‘U’ shape. Gently flatten the top surface slightly with your finger so it isn’t perfectly round, giving it a more defined face. -
Trim the ends:
Use your slicing blade to cut the ends of the horseshoe straight across so they are even and symmetrical.
Paint Smudges?
If you mess up a painted star, don’t panic. Gently scratch the dried acrylic paint off the baked clay with a craft knife or fingernail, or wipe it with a little rubbing alcohol before it dries.
Step 2: Adding Details & Finishing
-
Indent the horseshoe:
Take your needle tool or a small blunt point. Press a series of small, evenly spaced dots along the curve of the horseshoe to mimic nail holes. I usually aim for about three or four on each side. -
Pierce holes for hardware:
At the top of the star (one of the points) and the top of one horseshoe arm, carefully pierce a hole straight through the clay using your needle tool. Make sure the hole is big enough for your jump ring. -
Bake the pieces:
Place your charms on a baking sheet lined with parchment paper. Bake according to your brand of clay’s instructions—usually around 275°F (135°C) for 15–30 minutes. -
Cool down completely:
Once baked, remove the charms from the oven and let them cool completely. They will harden fully as they return to room temperature. -
Paint the star pattern:
Dip a very fine paintbrush or the tip of a toothpick into white acrylic paint. Carefully paint tiny five-pointed stars onto the beige charm, starting from the center and scattering them outward. -
Let the paint dry:
Allow the white paint to dry fully. If you want extra protection, brush a thin layer of glaze over the painted surface. -
Attach the hardware:
Use pliers to gently twist open a jump ring. Thread it through the hole you made in the clay charr. -
Secure the finding:
Before closing the jump ring, add your earring hook or necklace chain. Twist the jump ring closed securely so the gap disappears.
Smoother Surfaces
Before baking, lightly brush your unbaked clay with a tiny amount of baby oil or cornstarch. This helps remove fingerprints and creates a silky smooth finish on your charms.
Give one half of the pair to your partner as a lucky token they can carry everywhere
Two-Palette Challenge: Limited Colors Only
These charming, minimalist wooden figurines make a perfect date night project for beginners. Using a limited color palette and simple geometric shapes, you’ll transform plain wooden pegs into a stylish, serene decorative pair.
How-To Guide
Materials
- 2 unfinished wooden peg dolls (classic shape)
- Acrylic paints: white, black, burnt sienna (brown), bright orange
- Small flat paintbrush
- Fine detail paintbrush (size 00 or 000)
- Washi tape or painter’s tape
- Matte sealant or varnish (spray or brush-on)
- Old toothbrush (for speckling)
- Pencil and eraser
- Palette or small dish for mixing
Step 1: Preparation & Blocking Colors
-
Tape the base:
Begin by deciding how tall you want the colored ‘dipped’ look at the bottom of the dolls. Wrap a piece of masking or washi tape around the bottom third of each wooden peg. Ensure the tape edge is firmly pressed down to prevent paint bleeding. -
Paint the first base colors:
On the first doll, paint the exposed bottom section below the tape with burnt sienna. On the second doll, paint the bottom section bright orange. You likely need two coats for full opacity. -
Remove tape and paint bodies:
Once the bases are dry to the touch, peel off the tape slowly. Now, carefully hand-paint the middle section of the bodies. Paint the brown-based doll white from the color line up to the neck. Paint the orange-based doll black from the color line up to the neck. -
Clean up the lines:
If your hand was a little shaky, use a fine brush to tidy up the horizon line where the bottom color meets the body color. A crisp line here really elevates the minimalist look.
Clean Lines Hack
Burnish the edge of your tape with a fingernail or credit card. Apply a tiny bit of clear matte medium over the tape edge first to seal it perfectly.
Step 2: Painting the Heads
-
Sketch the faces:
Before painting, lightly sketch the facial features on the raw wood heads with a pencil. Keep them simple: two sleepy crescents for eyes and a tiny mouth. -
Paint the white hood:
For the left doll, paint the entire spherical head white. This creates a cohesive look with the body. It might take 2-3 thin layers to cover the wood grain completely. -
Create the hair shape:
For the right doll, use black paint to create a distinct hair shape. Paint the back of the head and bring two curved sections forward over the forehead, leaving a heart-shaped or oval space of raw wood exposed for the face. -
Whitewash the face:
On the black-haired doll, gently paint the exposed face area white. Be very careful around the black hairline edges, or do this step first before adding the black hair.
Level Up: Accessories
Create tiny felt scarves or use polymer clay to sculpt little beanie hats or flowers to glue onto the heads for extra dimensionality and seasonal flair.
Step 3: Detailing & Finishing
-
Add delicate faces:
Using your tiniest detail brush, paint the closed eyes and small mouths. Use black or dark grey for the white doll, and black for the doll with hair. Keep the strokes incredibly light; I sometimes practice on paper first to get the pressure right. -
Apply blush:
Mix a tiny drop of orange or pink with a lot of water to create a glaze. Dab two small dots on the cheeks of both dolls for a soft, blushing effect. -
Add speckle texture:
This is the fun part. Dip an old toothbrush into slightly watered-down paint (brown for the white body, orange for the black body). Run your thumb over the bristles to flick tiny speckles onto the body sections. Avoid the faces. -
Refine the speckles:
If any speckles land where you don’t want them (like the face), quickly wipe them away with a damp Q-tip before they dry. -
Paint head details:
Add tiny decorative dots to the top of the heads if desired—small speckles on the white head or tiny gold or orange dots on the black hair add texture. -
Seal the work:
Allow the paint to cure fully, preferably overnight. Once dry, apply a coat of matte varnish to protect the finish without making them too shiny.
Set your finished pair on a small tray or shelf to enjoy their quiet, minimalist charm
Tiny “We Met Here” Landmark Keepsakes
Commemorate a special location with this charming miniature signpost, perfect for displaying map coordinates or city names from your love story. The rustic, pale green finish and delicate lettering make it a timeless addition to any tiny vignette.
Detailed Instructions
Materials
- Polymer clay (brown, moss green, grey)
- Liquid clay or bake and bond
- Aluminum crafting wire (16 or 18 gauge)
- Acrylic paint (black/dark grey)
- Fine detail paintbrush (000 size)
- Texture tool or needle tool
- X-acto knife or clay blade
- Dried moss (optional)
- Sandpaper
Step 1: Building the Base and Pole
-
Create the heavy base:
Start with a ball of brown clay about the size of a walnut. Flatten it into a thick disc to create a sturdy foundation so your sign won’t tip over. Texture the sides slightly with a needle tool to mimic wood grain or bark. -
Prepare the internal structure:
Cut a piece of crafting wire to your desired height, approximately 4-5 inches. Insert this wire vertically into the center of your clay base. -
Wrap the pole:
Roll a thin snake of brown clay. Carefully wrap this around the wire, smoothing the seam so the wire is completely covered. This forms the main post of your sign. -
Texture the wood:
Use a needle tool or clay blade to drag vertical lines down the post, giving it the appearance of weathered timber. I like to add a few knots for extra realism.
Stamp for Success
Can’t paint tiny letters? Use a miniature letter stamp set designed for leather or metal stamping to gently impress words into the raw clay before baking.
Step 2: Crafting the Arrows
-
Mix your vintage green:
Blend moss green clay with a small amount of grey or white to achieve that muted, sun-bleached mint color seen in the reference. -
Roll and cut strips:
Roll your green mixture into a flat sheet, about 2-3mm thick. Cut long, narrow rectangles using your blade. -
Shape the arrowheads:
On one end of each rectangle, trim the corners at a 45-degree angle to create a point. Leave the other end square or trim it similarly for a double-pointed look. -
Add separation details:
Use a dull blade to gently press indented lines near the base of the arrow, mimicking where separate planks of wood might be joined together. -
Pre-bake the components:
To make assembly easier without squishing your work, bake the base/pole and the flat arrows separately for 15 minutes at the temperature recommended on your clay package.
Make it Personal
Look up the exact mileage between where you live now and where you met. Paint these numbers on the signs alongside the location names for a romantic touch.
Step 3: Assembly and Painting
-
Attach the signs:
Once cool, use a dab of liquid clay or strong super glue to attach the arrows to the post. Arrange them pointing in different directions for a whimsical, crossroads effect. -
Final bake:
If you used liquid clay for attachment, bake the entire assembled piece again for 20 minutes to set the bond. -
Base coat the lettering:
Dilute a small drop of black acrylic paint with water until it’s inky. Using your finest brush, carefully paint the names of cities, streets, or coordinates onto the arrows. -
Distress the edges:
Lightly brush a darker brown or grey paint along the edges of the green arrows to simulate age and weathering. -
Apply the ‘moss’:
Dab glue onto the brown base disc. Sprinkle dried craft moss or finely chopped green clay crumbs over the glue to create a grassy texture. -
Add accent stones:
Roll tiny balls of grey clay to look like pebbles. Glue two or three at the base of the pole where it meets the ‘grass’ for a polished finish.
Place your finished signpost on a shelf or desk as a daily reminder of where your journey began