If you want a low-pressure clay date that doesn’t require “artist skills,” I’ve got you. These beginner-friendly, easy clay models are made for two people crafting side-by-side and ending the night with something you’ll actually want to keep.
Matching Pinch-Pot Trinket Bowls
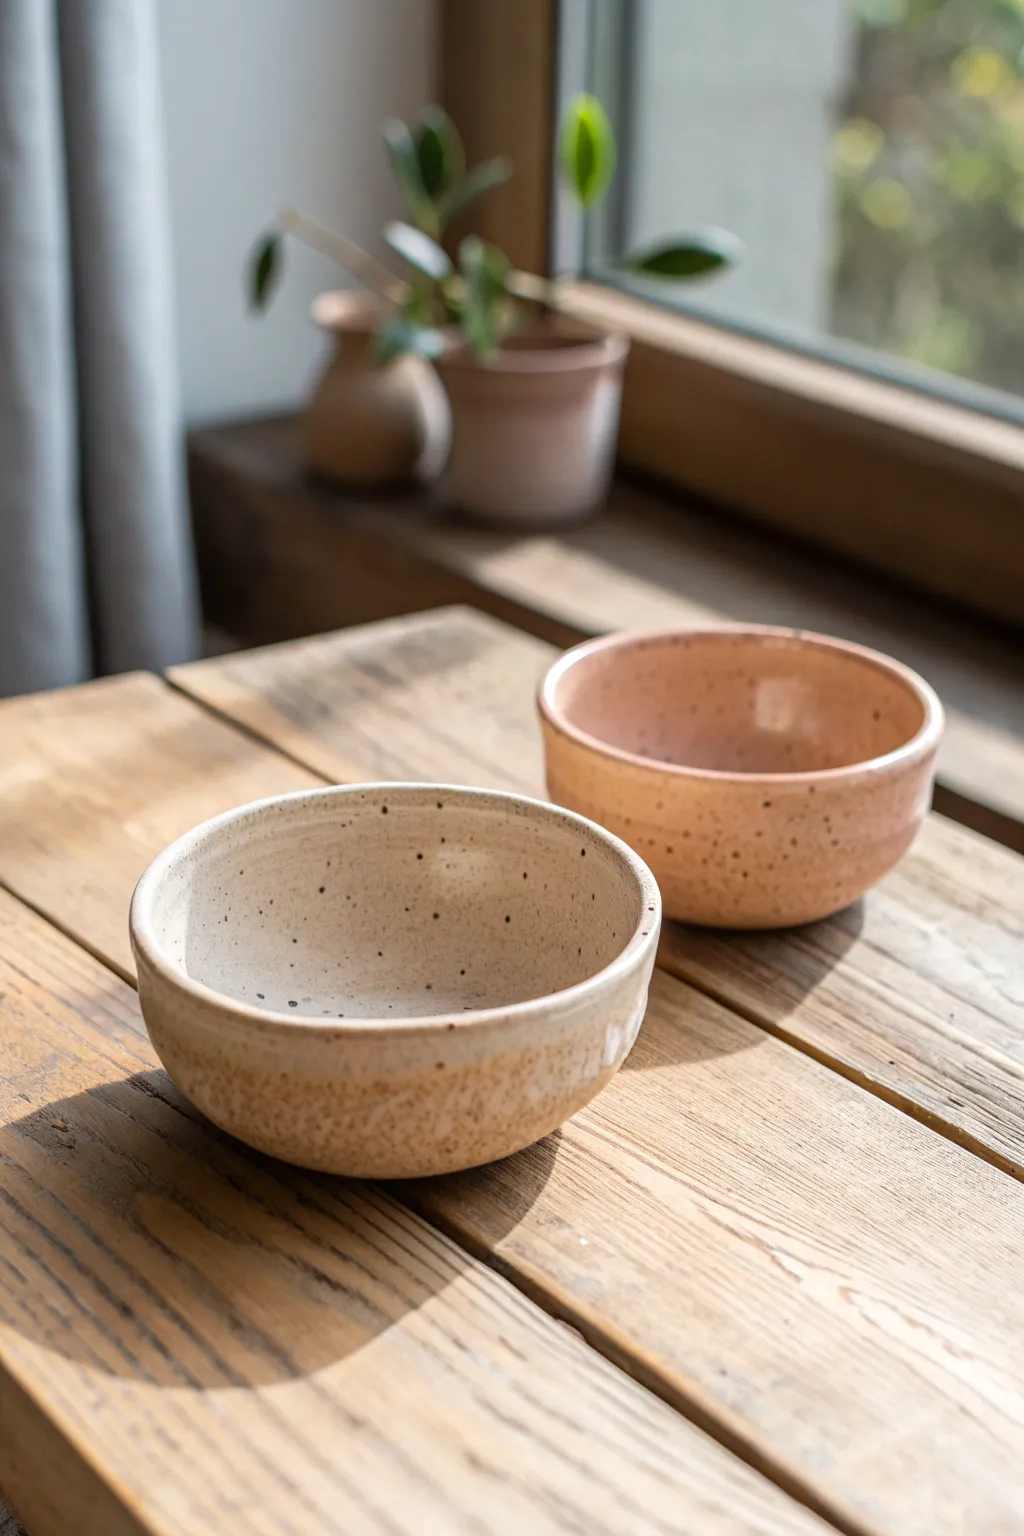
Create a cozy pair of matching trinket bowls that sit perfectly together on any tabletop. These simple pinch pots feature a delightful speckled glaze finish and organic rims, making them an ideal beginner project for a relaxing craft date.
Step-by-Step
Materials
- Air-dry clay or low-fire earthenware clay (white or cream)
- Speckled pottery glaze (cream and blush pink)
- Clear acrylic sealant (if using air-dry clay)
- Sponge
- Small cup of water
- Pottery rib or old credit card
- Paintbrushes (soft bristle)
- Canvas mat or parchment paper
Step 1: Shaping the Clay
-
Prepare the portions:
Start by slicing your clay block into two equal cubes. Roll each cube firmly between your palms until you have two smooth, crack-free spheres roughly the size of a tennis ball. -
Open the form:
Hold one sphere in your non-dominant hand. Gently press your thumb into the center of the ball, pushing down until you are about half an inch from the bottom. Avoid pushing all the way through. -
Pinch the walls:
Begin rotating the ball while rhythmically pinching the clay between your thumb (inside) and fingers (outside). I like to start at the bottom and work my way up to ensure an even thickness. -
Widen and shape:
Continue pinching and turning until the walls are about a quarter-inch thick. Gently flare the rim outward slightly to create that open, welcoming bowl shape seen in the reference. -
Flatten the base:
To ensure the bowl sits flat, gently tap the bottom of your pot against your work surface. You can press down slightly from the inside to level it out. -
Smooth the interior:
Dip a small piece of sponge into water—squeeze it out so it’s just damp—and wipe the inside of the bowl to remove any heavy fingerprint marks or cracks. -
Refine the exterior:
Use a pottery rib or an old credit card to smooth the outside walls. Hold the tool at an angle and scrape gently to unify the surface while keeping that handmade character. -
Repeat for the partner bowl:
Follow the same steps for the second ball of clay. Try to match the height and width of the first bowl, comparing them side-by-side as you work.
Smooth Operator
Keep a small bowl of vinegar water nearby if using air-dry clay. Dipping your finger in it helps smooth out stubborn cracks better than plain water.
Step 2: Finishing and Glazing
-
Dry partially:
Let the bowls sit for about 20-30 minutes until they are ‘leather hard.’ This makes them sturdy enough for final touch-ups without warping. -
Clean the rim:
Run a damp finger along the top rim of both bowls to soften any sharp edges or rough bits left from shaping. -
Full drying:
Allow your clay to dry completely. For air-dry clay, this takes 24-48 hours. If using kiln clay, this is when you would bisque fire. -
Apply base color:
For the cream bowl, apply a speckled cream glaze or acrylic paint. Use long, even strokes. If using paint, mix in some faux specks by flicking a toothbrush with brown paint lightly over the wet base. -
Apply accent color:
For the pink bowl, use a blush or coral speckled glaze. Apply 2-3 coats, letting each layer dry to the touch before adding the next for solid coverage. -
Add texture:
If your glaze or paint doesn’t have pre-mixed speckles, use a fine stiff brush to fleck dark brown or iron oxide paint onto the surface to mimic that ceramic stoneware look. -
Seal or fire:
If using air-dry clay, coat the fully dry paint with a glossy acrylic sealant to protect it. For real ceramic clay, fire the bowls in a kiln according to your glaze instructions.
Stamp It
Before drying, use letter stamps to press initials or a date into the bottom of the bowls for a secret, personalized anniversary detail.
Place your finished bowls on a sunny windowsill or use them to hold your favorite jewelry pieces


Two-Part Heart Keepsake Dish
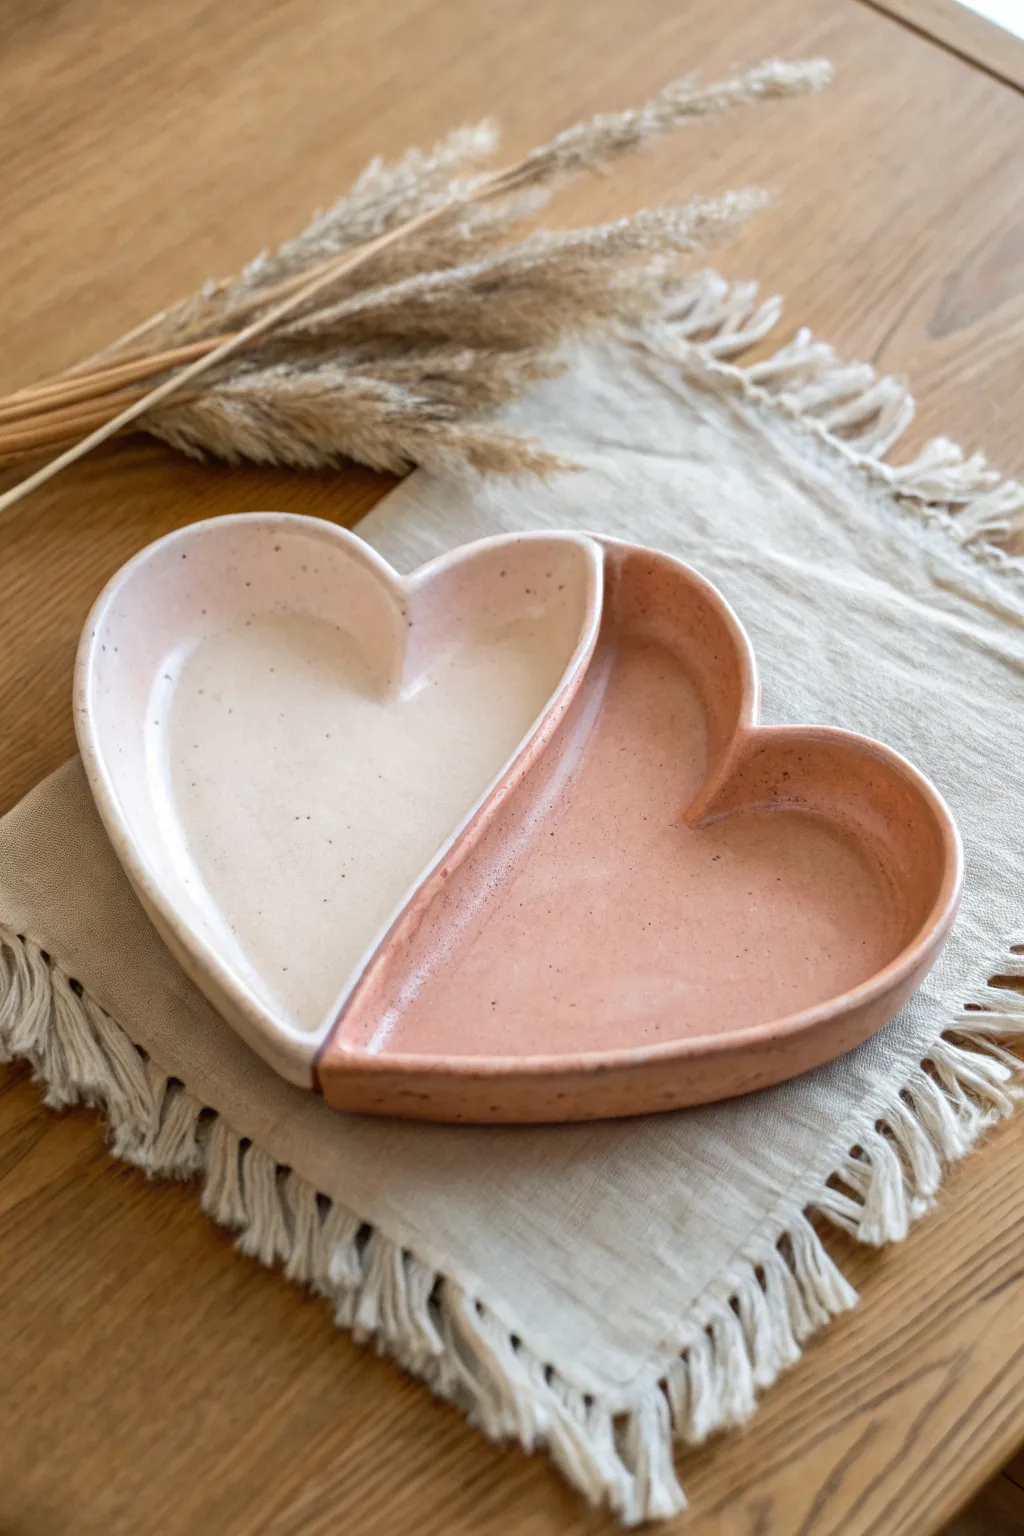
This charming two-toned catch-all dish features two distinct heart halves joined together, perfect for holding jewelry or trinkets. With its speckled finish and soft, complementary glaze colors, it makes a thoughtful handmade gift or specific memento for a special date night.
How-To Guide
Materials
- Air-dry clay or polymer clay (white base)
- Rolling pin
- Heart-shaped paper templates (two sizes or slightly offset shapes)
- Clay knife or craft blade
- Small bowl of water (for smoothing)
- Sponge
- Acrylic paints (Cream/Beige and Terracotta/Dusky Pink)
- Brown acrylic paint (for speckles)
- Old toothbrush
- Glossy varnish or sealant
- Fine grit sandpaper
Step 1: Shaping the Base
-
Roll the slab:
Begin by taking a substantial chunk of white clay and kneading it until soft and pliable. Roll it out on a flat surface to an even thickness of about 1/4 inch. -
Cut the shapes:
Place your two heart templates on the clay. You want two elongated heart shapes that look like they nestle together. Cut around them carefully using your clay knife. -
Create the walls:
Roll out long, thin snakes of clay to create the sidewalls. These coils should be about the thickness of a pencil. -
Attach the coils:
Score (scratch) the edges of your heart bases and dampen them slightly. Place the coils along the perimeter, pressing them gently onto the base. -
Build the center divider:
For the joined section in the middle, ensure you run a coil down the center line to create two distinct compartments, just like in the photo. -
Blend the seams:
Using your thumb or a modeling tool, drag the clay from the coil down into the base to seal the gap. Do this on both the inside and outside of the walls. -
Smooth everything out:
Dip your sponge or finger in a little water and run it over all surfaces to remove fingerprints and bumps. I find this step crucial for getting that professional ceramic look. -
Dry completely:
Let the piece dry for 24-48 hours. If using oven-bake polymer clay, follow the manufacturer’s baking instructions instead.
Cracking Up?
If you see small cracks appearing as your air-dry clay dries, mix a tiny bit of fresh clay with water to make a paste and fill them in immediately.
Step 2: Decorating and Finishing
-
Sand imperfections:
Once fully cured and dry, gently sand any rough edges or sharp points with fine-grit sandpaper until the rim feels smooth to the touch. -
Prime the surface:
Paint the entire dish with a coat of white acrylic paint if your clay isn’t naturally bright white. This helps the top colors pop. -
Paint the left heart:
Mix a very light cream or oatmeal color. Carefully paint the left heart section, covering both the inside basin and the outer rim. -
Paint the right heart:
Mix a muted terracotta or dusky pink shade. Paint the right heart section, ensuring a clean line where the two colors meet in the middle divider. -
Create the speckled effect:
Dilute a small mount of dark brown paint with water. Dip an old toothbrush into it, hold it over the dish, and run your thumb across the bristles to flick tiny specks onto the surface. -
Let paint dry:
Allow the paint and speckles to dry completely before moving to the final step. -
Seal the piece:
Apply two coats of glossy varnish to mimic the look of glazed ceramic. This also protects the paint from chipping.
Make it a Set
Create a third, smaller heart dish that nests inside one of the larger sections to hold tiny stud earrings or rings securely.
Place your finished keepsake dish on a bedside table to hold your daily treasures


Mini Initial Keychain Charms
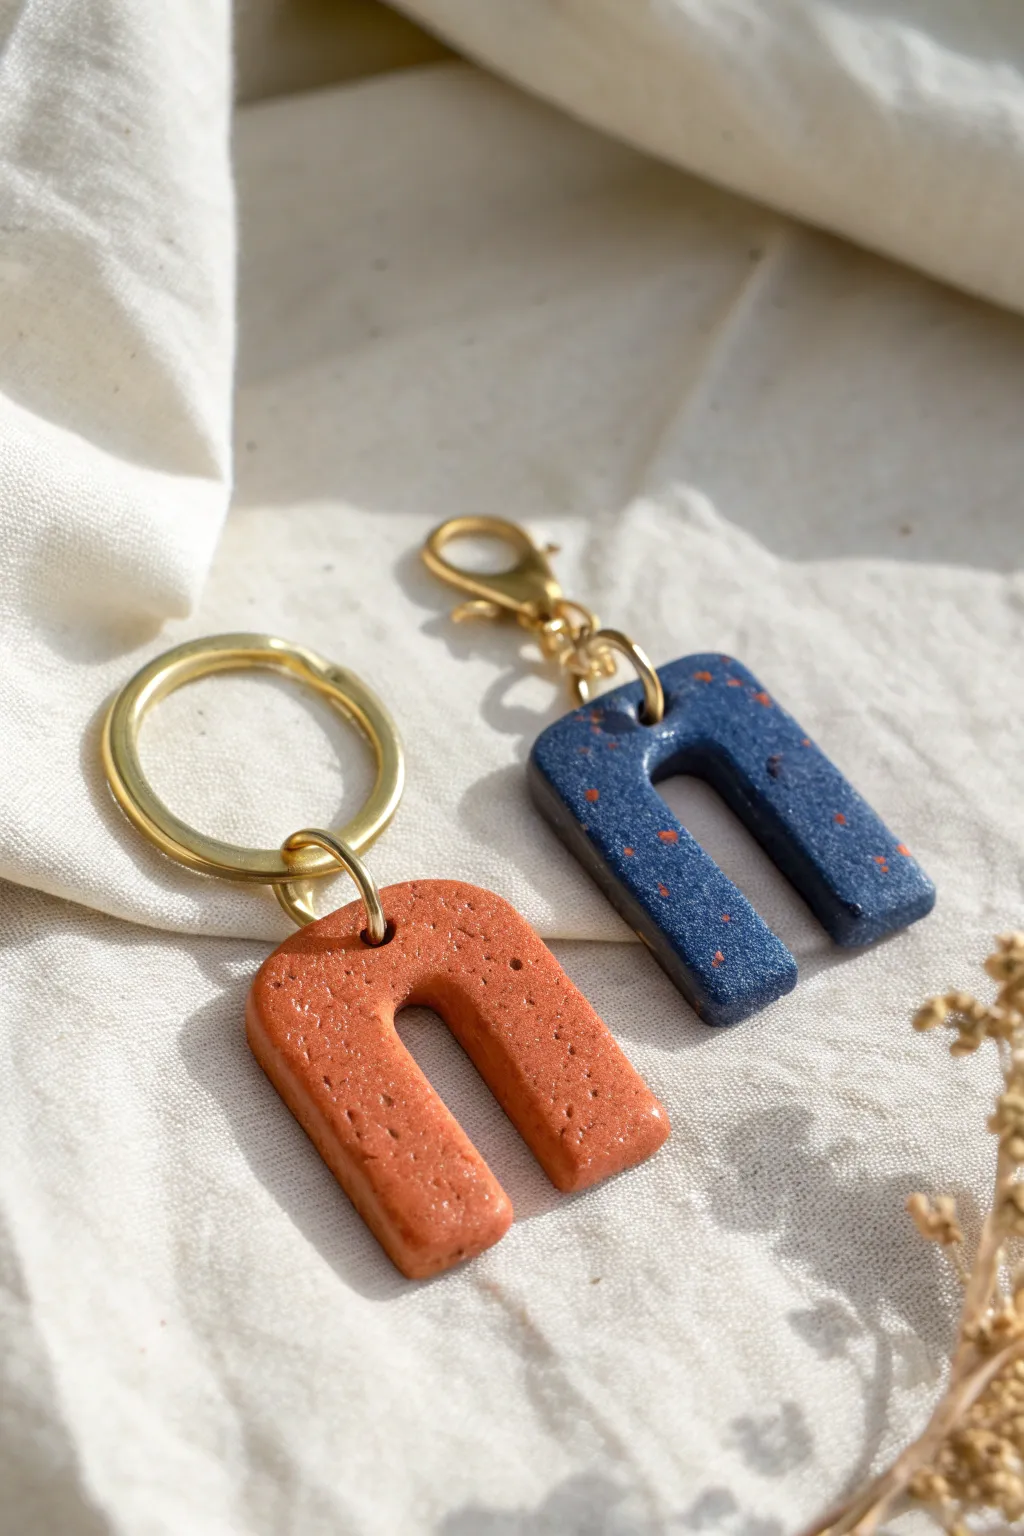
Create these minimalist, U-shaped keychain charms that make perfect personalized gifts or stylish additions to your own bag. The speckled finish on the clay gives them a sophisticated, stone-like texture that feels far more expensive than it actually is.
Step-by-Step Guide
Materials
- Polymer clay (terracotta or rust color)
- Polymer clay (navy blue with black speckles or granite effect)
- Acrylic rolling pin or glass jar
- Tissue blade or X-Acto knife
- U-shaped cutter (optional, can freehand)
- Small circle cutter (approximately 1/4 inch) or drinking straw
- Sandpaper (fine grit)
- Oven and baking sheet
- Parchment paper
- Gold tone jump rings (large)
- Gold tone keyring findings
- Gold tone lobster clasp findings
- Two pairs of jewelry pliers
Step 1: Shaping the Clay Arches
-
Condition the Clay:
Begin by warming the polymer clay in your hands. Knead it thoroughly until it is soft, pliable, and free of any cracks or air bubbles. -
Roll it Out:
Using your acrylic roller, flatten the clay slab on a smooth work surface. Aim for a consistent thickness of about 4-5mm (roughly 1/4 inch) so the final charm feels sturdy. -
Cut the Basic Shape:
If you have a customized U-shaped clay cutter, press it firmly into the slab. If creating this freehand, use your blade to cut a rectangle roughly 1.5 inches wide by 2 inches tall. -
Refine the Arch:
For the freehand method, use a small round cutter or bottle cap to remove the bottom center area, creating the legs of the arch. Round off the top outer corners with your blade to soften the silhouette. -
Smooth the Edges:
Dip your finger in a tiny bit of baby oil or water and gently run it along the cut edges. This smooths out any harsh drag marks from the blade before baking. -
Pierce the Hole:
Use a small circle cutter, a straw, or a toothpick to punch a hole at the very top center of the arch. Ensure the hole is large enough for your heavy-gauge jump ring to pass through freely.
Step 2: Baking and Finishing
-
Bake the Pieces:
Transfer your clay shapes onto a baking sheet lined with parchment paper. Bake according to your specific clay package instructions—usually around 275°F (135°C) for 15-30 minutes. -
Cool Down:
Once the baking time is up, turn off the oven but I prefer to let the pieces cool inside with the door slightly ajar. This gradual cooling helps prevent brittleness. -
Sanding for Texture:
Once fully cool, take your fine-grit sandpaper and gently buff the surface and edges. This enhances the matte, stone-like finish and removes any fingerprints. -
Wash and Dry:
Rinse the charms under water to remove the fine sanding dust. Pat them completely dry with a lint-free cloth or paper towel.
Uneven Surfaces?
If your clay surface looks bumpy or has fingerprints before baking, lightly roll over it with a sheet of parchment paper on top to smooth it out without adding texture.
Step 3: Assembly
-
Prepare the Jump Ring:
Using two pairs of pliers, grip a large gold jump ring on either side of the split. Twist one hand forward and one backward to open the ring sideways (never pull it apart). -
Attach the Clay Charm:
Slide the open jump ring through the hole you created at the top of your clay arch. -
Add the Hardware:
Before closing the ring, loop on your keyring attachment or lobster clasp mechanism depending on your preference. -
Secure the Closure:
Use the pliers to twist the jump ring back into position. Wiggle the ends slightly until they are perfectly flush and make a clicking sound, ensuring the charm won’t slip off.
Add Speckles
Don’t have granite clay? Mix black pepper or dark glitter into solid colored clay before rolling it out to mimic that trendy terrazzo stone look.
Clip your new handmade charm onto your keys or backpack for an instant pop of color


Smiley Face Magnet Pair
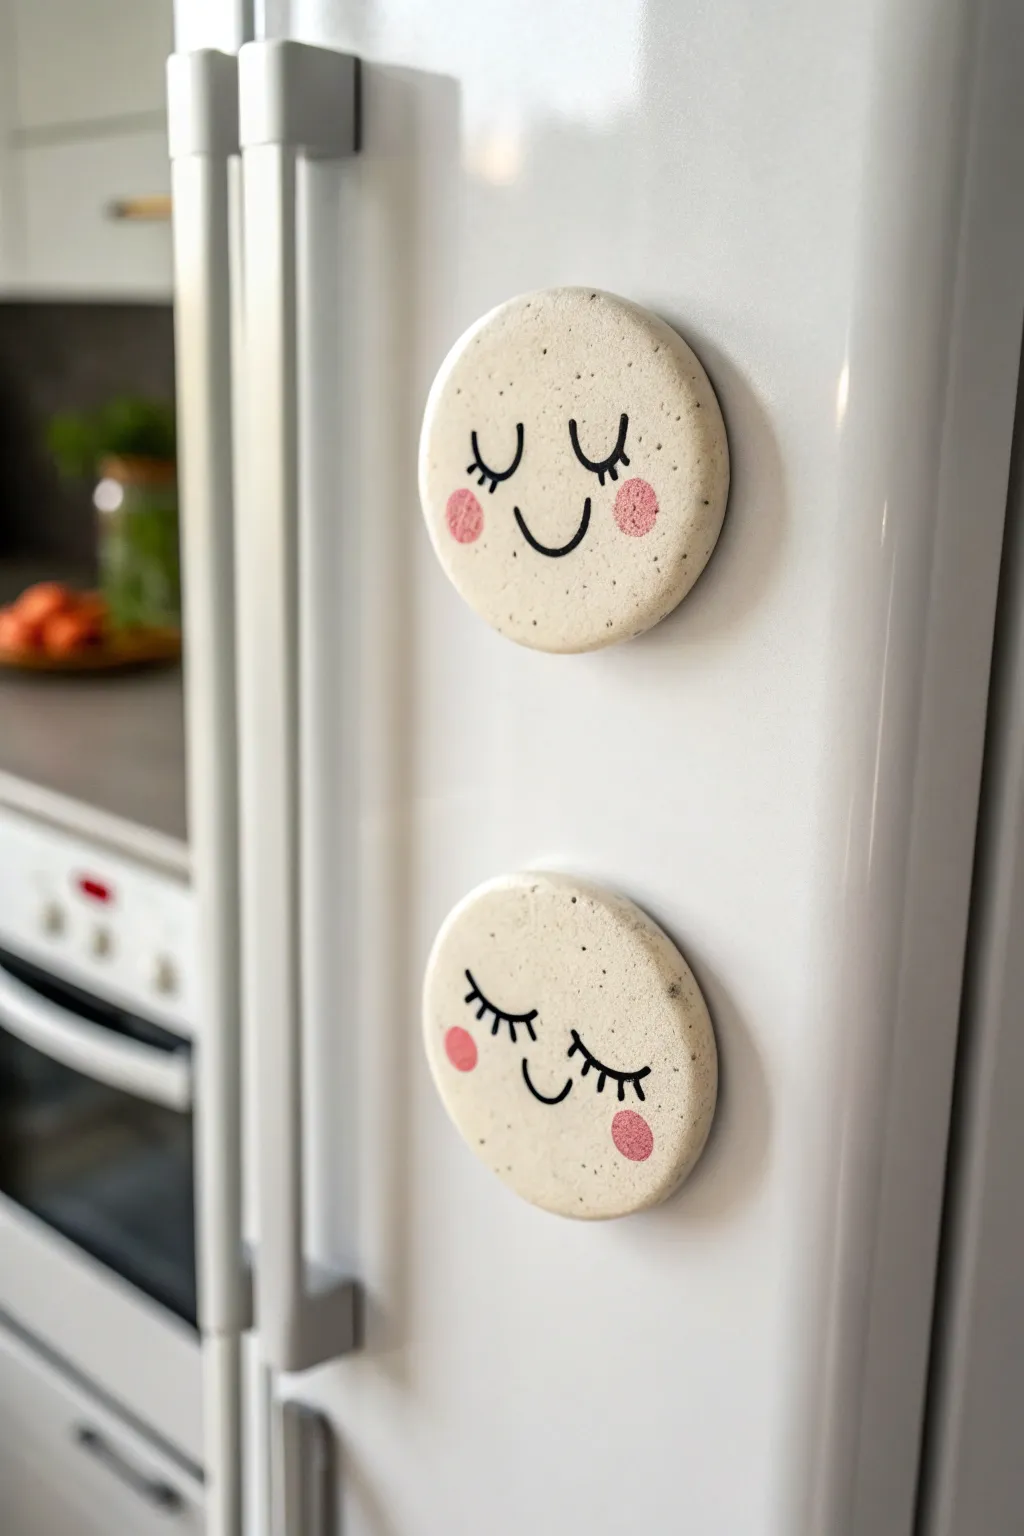
These adorable fridge magnets add a touch of whimsy to your kitchen with their simple, happy expressions and natural stone texture. The speckled clay finish gives them a modern, organic look that pairs perfectly with the minimalist line art faces.
Step-by-Step Guide
Materials
- White polymer clay (approx. 2oz)
- Black pepper or dried coffee grounds (for speckling)
- Round cookie cutter or drinking glass (approx. 2-3 inches)
- Acrylic rolling pin
- Parchment paper
- Fine-point black paint pen or permanent marker
- Pink acrylic paint
- Small round sponge dobber or Q-tip
- Strong round craft magnets
- Super glue (cyanoacrylate)
- Baking sheet
- Oven
Step 1: Shaping the Clay Base
-
Condition the clay:
Begin by kneading your white polymer clay in your hands until it becomes soft, warm, and pliable. This step prevents cracking later on. -
Create the speckles:
Flatten the clay slightly and sprinkle a small pinch of ground black pepper or very dry coffee grounds onto it. If you have speckled clay pre-bought, you can skip this, but I love the DIY method. -
Integrate the texture:
Fold the clay over the speckles and continue kneading until the particles are evenly distributed throughout the white dough. -
Roll out the slab:
Place the clay between two sheets of parchment paper to prevent sticking. Use your acrylic roller to flatten the clay to an even thickness of about 1/4 inch (6mm). -
Cut the circles:
Press your round cookie cutter firmly into the clay slab. Wiggle it slightly to ensure a clean cut, then lift away the excess clay. -
Smooth the edges:
Dip your finger in a tiny bit of water or baby oil and gently run it around the circumference of the cut circles to smooth out any sharp ridges or rough spots.
Sticky Situation?
If clay sticks to your cutter, dip the cutter in cornstarch before pressing down. This acts as a release agent for clean edges.
Step 2: Baking and Decorating
-
Bake the rounds:
Transfer the parchment paper with your clay circles onto a baking sheet. Bake according to your specific clay package instructions (usually around 275°F/135°C for 15-30 minutes). -
Cool down:
Remove the tray from the oven and let the clay discs cool completely. Do not attempt to paint them while they are still warm. -
Draft the face:
Lightly sketch the position of the eyes and mouth with a pencil if you’re nervous about freehanding. Aim for the center to keep it symmetrical. -
Line the eyes:
Using your fine-point black paint pen, draw two U-shapes for the closed eyes. Add three small lashes to the outer corner of each eye. -
Draw the smile:
Draw a simple, small curve centered below the eyes for the smile. Keep the line weight consistent with the eyes. -
Add rosy cheeks:
Dip a small sponge dobber or a Q-tip into pink acrylic paint. Dab off most of the paint onto a paper towel until it’s almost dry. -
Apply the blush:
Gently press the sponge onto the clay at the outer corners of the smile to create soft, round pink cheeks. Repeat for the second magnet. -
Attach the magnet:
Flip the finished face over. Apply a drop of super glue to the center of the back and press your round magnet firmly into place. -
Final dry:
Let the glue set for at least an hour before placing your new cheerful friends on the refrigerator.
Make it a Mood
Make a whole set with different expressions—winking, laughing, or surprised—to change the fridge ‘mood’ daily.
Enjoy your charming new kitchen companions

The Complete Guide to Pottery Troubleshooting
Uncover the most common ceramic mistakes—from cracking clay to failed glazes—and learn how to fix them fast.
Bead-Edge Coaster Set for Two
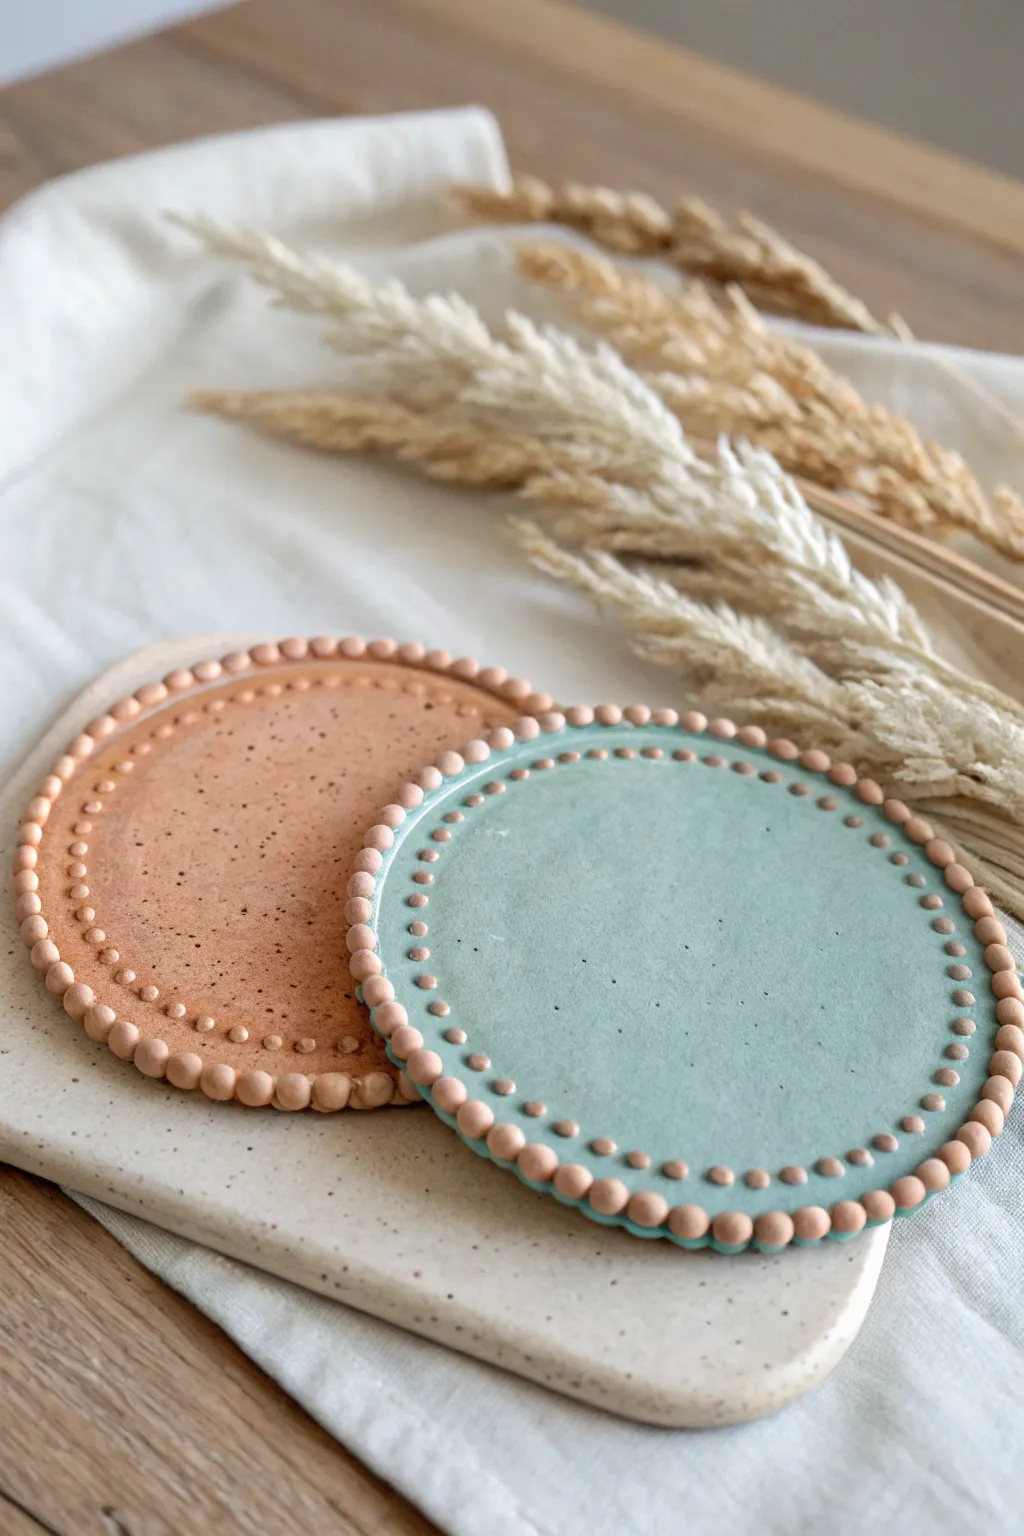
These charming coasters combine a minimalist aesthetic with a playful touch of texture. Featuring a smooth, speckled clay body and a delicate rim of hand-rolled beads, this set is perfect for a cozy clay date night.
Step-by-Step
Materials
- Polymer clay or air-dry clay (terracotta, sage green, and white for speckles)
- Acrylic rolling pin
- Circle cookie cutter (approx. 3.5 inches)
- Coarse black pepper or dried coffee grounds (optional for speckling)
- Liquid clay or slip (depending on clay type)
- Needle tool or toothpick
- Fine-grit sandpaper
- Matte varnish or sealant
Step 1: Preparing the Base
-
Mix Your Colors:
Start by conditioning your clay. You’ll need two main colors: a warm terracotta and a soft sage green. If you don’t have pre-colored clay, mix white clay with acrylic paint or clay pigments until you achieve these earthy tones. -
Add the Speckles:
To achieve that natural, stoneware look, knead a very small amount of coarse black pepper, dried coffee grounds, or tiny bits of black clay into your colored clay. Work it until the speckles are evenly distributed. -
Roll the Slabs:
Roll out each ball of clay onto a smooth surface using your acrylic roller. Aim for a thickness of about 1/4 inch to ensure your coasters are sturdy enough for daily use. -
Cut the Circles:
Press your circle cutter firmly into the clay slabs. If the clay sticks to the cutter, wiggle it slightly before lifting. Smooth the cut edges gently with your fingertip to remove any sharpness.
Beads falling off?
If beads detach during drying, use strong super glue to reattach them post-baking. For air-dry clay, score the surfaces deeper and use more slip next time.
Step 2: Creating the Beaded Rim
-
Roll Tiny Spheres:
Pinch off tiny pieces of the terracotta-colored clay (use this color for the beads on *both* coasters, as shown in the photo). Roll them between your thumb and forefinger to create small, uniform spheres about the size of a peppercorn. -
Prepare the Edge:
Use a needle tool to lightly score the top outer rim of your coaster bases. If using air-dry clay, dab a tiny bit of water here; for polymer clay, a very thin line of liquid clay acts as perfect glue. -
Attach First Beads:
Gently press the clay beads onto the rim, spacing them snugly against each other. I find it easiest to place four beads at the cardinal points (North, South, East, West) first to ensure even spacing. -
Fill the Gaps:
Continue placing beads around the entire circumference. If you reach the end and the space is too tight or too wide, gently adjust the spacing of the previous few beads to make it work. -
Secure the Beads:
Once all beads are placed, use the back of a spoon or your finger to press them down *very* gently, just enough so they adhere firmly to the base without losing their round shape.
Try a marble effect
Instead of solid colors, twist ropes of white and sage clay together before rolling out your slab for a gorgeous, swirled marble effect on the base.
Step 3: Finishing Touches
-
Smooth the Surface:
Check the main surface of the coaster for any accidental fingerprints or dents. Lightly buff them out with a drop of baby oil (for polymer) or water (for air-dry). -
Bake or Dry:
Follow the instructions for your specific clay. For polymer clay, bake on a tile or parchment paper. For air-dry clay, let them sit in a cool, dry place for 24-48 hours, flipping occasionally to prevent warping. -
Sand the Edges:
Once fully cured or dry, inspect the bottom edges. If they feel sharp, gently sand them with fine-grit sandpaper until smooth. -
Seal for Protection:
Since these are coasters, protection is key. Apply two thin coats of a waterproof matte varnish, allowing the first coat to dry completely before applying the second.
Now you have a stylish set of coasters ready to hold your morning coffee or evening tea
Tiny Plant Pot and Matching Saucer

This charming little planter features a vibrant, glassy teal glaze on a simple cylindrical form, paired with a classic terracotta-colored saucer. It’s the perfect size for propagating a tiny succulent pup and adds a lovely pop of color to any sunny windowsill.
How-To Guide
Materials
- Air-dry clay or oven-bake polymer clay (terracotta or white color)
- Clay roller or rolling pin
- Circle cutters (two sizes) or a craft knife and template
- Small bowl of water (for smoothing)
- Modeling tools or a butter knife
- Fine-grit sandpaper
- Acrylic paints: Teal/Emerald Green, Gloss Medium (or high-gloss varnish), Burnt Sienna (optional)
- Paintbrushes: Flat brush and fine detail brush
Step 1: Shaping the Pot and Saucer
-
Prepare the clay base:
Start by conditioning your clay until it is soft and pliable. Roll a portion of it out to a uniform thickness of about 1/4 inch. -
Cut the bases:
Using your circle cutters or a knife, cut two circles. One will be the base of your pot (smaller) and the other will be the saucer (slightly larger). -
Create the saucer rim:
Roll a thin snake or coil of clay. Place this coil around the edge of the larger circle to form the lip of the saucer. -
Blend the saucer:
Use your thumb or a modeling tool to blend the inside seam of the coil down into the base so it becomes one solid piece. Smooth the outside seam as well. -
Form the pot walls:
Roll out a rectangular strip of clay. The length should be equal to the circumference of your smaller circle base, and the height is up to you—usually about 2-3 inches for a mini pot. -
Assemble the cylinder:
Wrap the rectangular strip around the smaller circle base. Join the two ends of the strip together by blending the clay until the seam disappears. -
Secure the bottom:
Blend the bottom edge of the wall into the circle base. Take your time here to ensure a watertight seal, smoothing both the inside and outside seams. -
Create the rim detail:
Gently flare the top rim outward just a tiny bit, or roll a very thin coil and blend it onto the top edge to give it that slightly thickened, handcrafted look seen in the photo. -
Smooth and dry:
Dip your finger in a little water and smooth out any fingerprints or cracks on both the pot and saucer. Let them dry completely according to your clay package instructions (or bake if using polymer).
Step 2: Glazing and Finishing
-
Sand for smoothness:
Once fully dry or cured, use fine-grit sandpaper to gently remove any sharp edges or bumps, particularly around the rim and the join lines. -
Base coat the saucer:
Paint the entire saucer with a terracotta-colored paint or Burnt Sienna mixed with a touch of orange. I find two thin coats work better than one thick one. -
Base coat the pot rim:
Paint the very top rim of the pot with a brownish-bronze or dark terracotta color. This simulates the exposed clay often seen on glazed ceramics. -
Apply the teal color:
Paint the body of the pot with your deep teal or emerald green paint. Carefully bring the paint up to the rim but leave that thin brown line at the very top exposed. -
Create the glaze effect:
To mimic the reactive glaze look, mix a tiny drop of lighter blue or white into your teal and dry-brush subtle vertical streaks or a patchy texture near the top. This adds depth. -
Add high gloss:
This is the most important step for realism. Apply 2-3 coats of a high-gloss varnish or gloss medium over the teal paint only. Do not gloss the saucer; keep that matte to look like raw terracotta. -
Final drying:
Let the varnish cure completely—usually overnight—before placing your plant inside.
Sticky Situation?
If your clay is sticking to the table while rolling, lay down a piece of parchment paper or wax paper first. This makes peeling up those thin circle bases much easier without distortion.
Pro Tip: Faux Drainage
Since air-dry clay dissolves with water, don’t plant directly in it. Instead, size your pot to fit a tiny plastic nursery pot inside, or coat the interior with waterproof sealant.
Place your tiny succulent inside and enjoy the handmade warmth on your windowsill


What Really Happens Inside the Kiln
Learn how time and temperature work together inside the kiln to transform clay into durable ceramic.
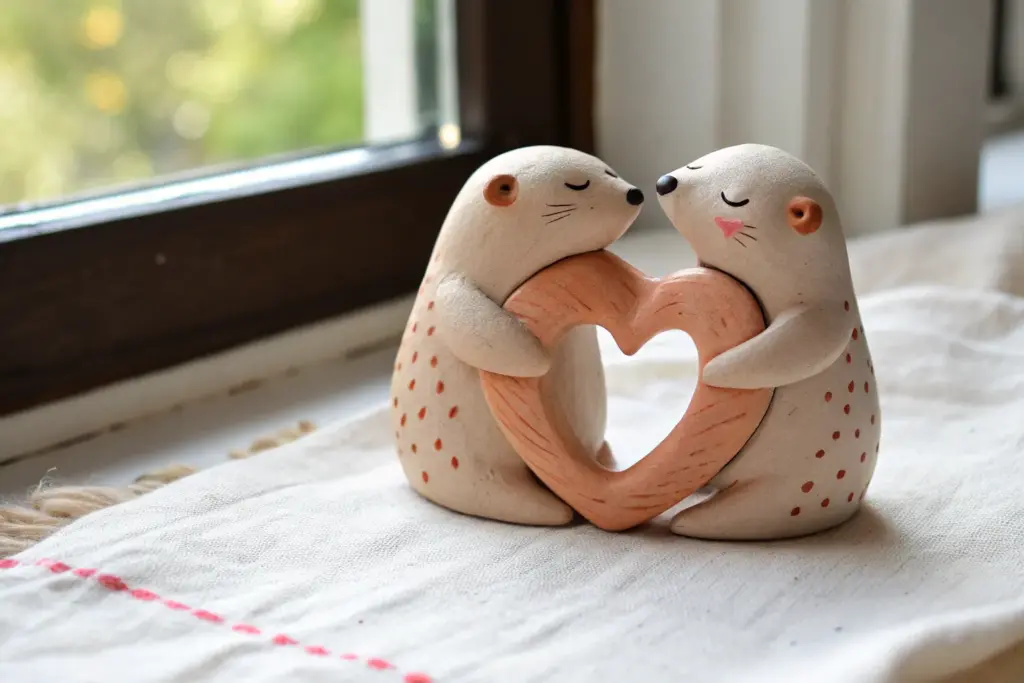
Couple Cat Blobs With Painted Faces
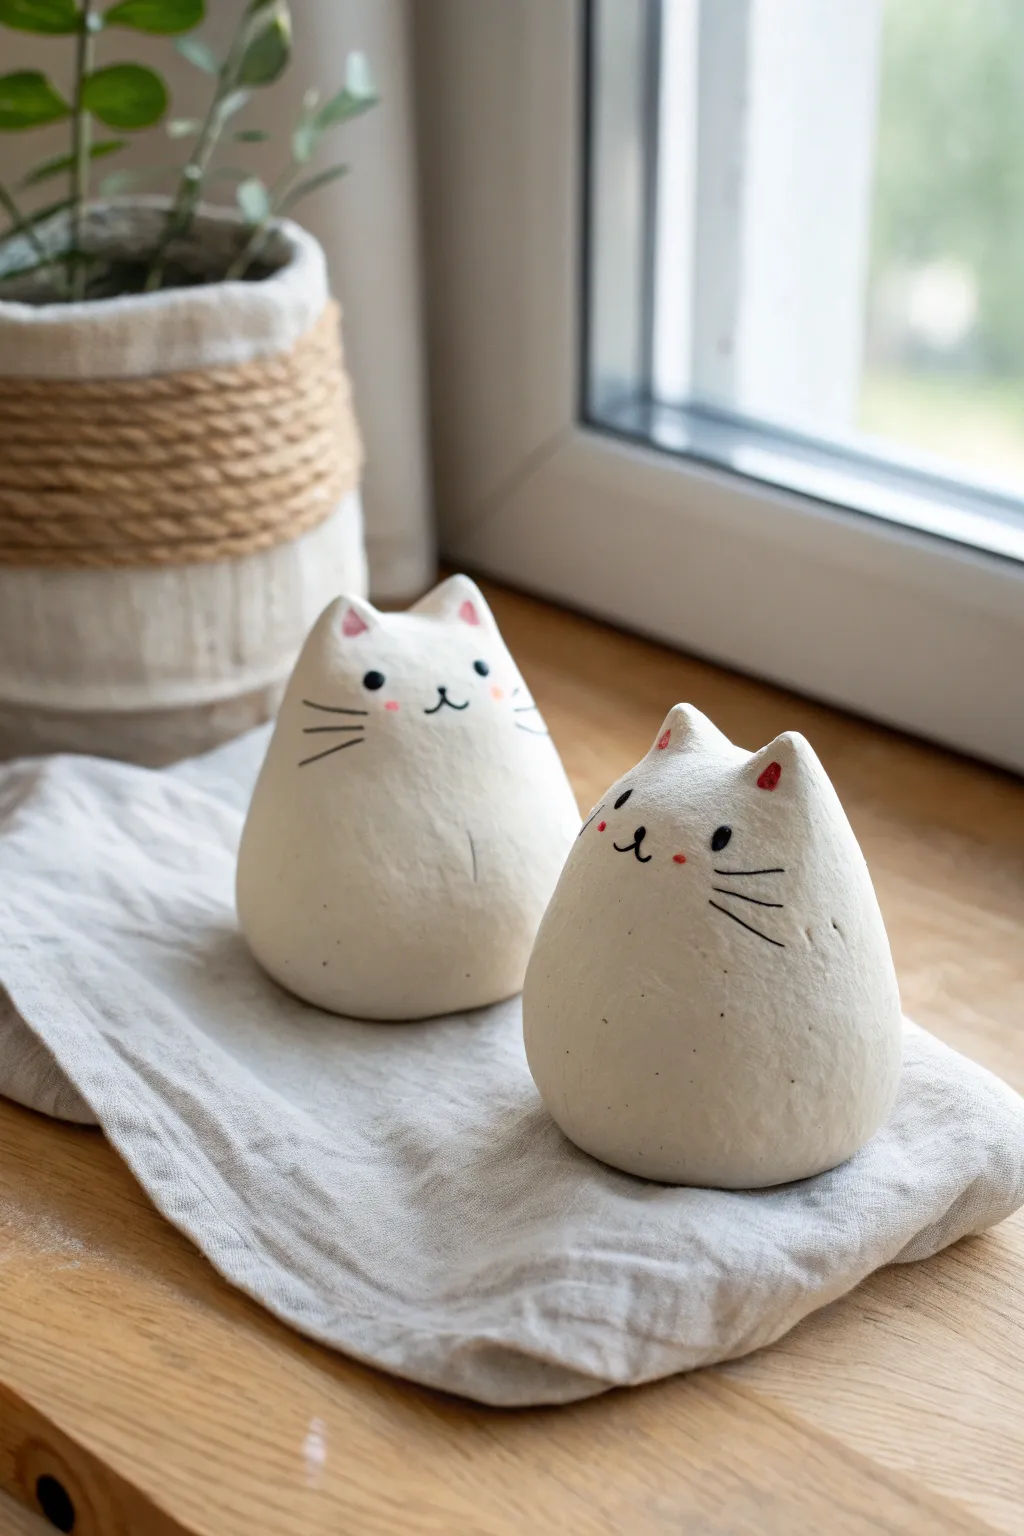
These charmingly rotund feline friends are the ultimate low-stress sculpting project, perfect for a cozy creative date night. Their smooth, minimalist shape and sweet, hand-painted expressions give them a modern, whimsical look that brightens up any windowsill.
Step-by-Step
Materials
- Air-dry clay (white)
- Small cup of water
- Parchment paper or work mat
- Fine-grit sandpaper (optional)
- Acrylic paints (black, pink/red)
- Fine-tipped paintbrush (0 or 00 size)
- Toothpick or sculpting tool
- Matte spray varnish (optional)
Step 1: Sculpting the Base Form
-
Portion the clay:
Start by grabbing a chunk of white air-dry clay roughly the size of a tangerine or golf ball. Knead it in your hands for a minute to warm it up and make it pliable. -
Roll a smooth sphere:
Place the clay between your palms and roll it into a ball. Aim for the smoothest surface possible, using a tiny drop of water on your finger to smooth out any stubborn cracks or seams. -
Create the teardrop shape:
Place the ball on your work surface. Gently press and roll just the top half of the sphere between your hands to taper it slightly, creating a fat teardrop or egg shape with a wide, stable bottom. -
Flatten the base:
Pick up your teardrop and tap the bottom firmly against the table a few times. This creates a flat surface so your cat sits upright without wobbling.
Cracks Appearing?
If small fissures appear while drying, mix a tiny bit of fresh clay with water to make a paste (slip) and fill the cracks, then smooth over.
Step 2: Adding Ears and Details
-
Pinch the ears:
At the very top of your tapered shape, use your thumb and forefinger to gently pinch the clay upwards on the left and right sides. This pulls the clay directly from the main body to form two small, triangular ears. -
Refine the ear shape:
Smooth the area between the ears with a wet fingertip so the head looks rounded rather than pointy. The ears should look like subtle peaks integrating seamlessly into the body. -
Smooth everything out:
Do a final check of the surface. Dip your finger in water—just a tiny bit—and run it over the entire sculpture to erase fingerprints. I find this sets you up for a much cleaner paint job later. -
Let it dry completely:
Set your cat aside on parchment paper. Depending on the thickness and brand of clay, this could take 24 to 48 hours. The clay should be uniformly white and hard to the touch. -
Optional sanding:
Once bone dry, you can lightly buff any rough spots or bumps with fine-grit sandpaper for that professional, ultra-smooth ceramic look.
Make It a Set
Create a whole family by vary the sizes! Make a tiny ‘kitten’ version or a tall, slender cat to sit alongside your original round blob.
Step 3: Painting the Faces
-
Plan the face:
Before painting, visualize where the features will go. The eyes and nose should sit slightly higher than the middle of the ‘blob’ to give it that cute, looking-up appearance. -
Paint the ears:
Mix a soft pink or reddish paint. Using your finest brush, paint small triangles inside the ear indentations. You can also dab two tiny spots on the cheeks for blush. -
Add the nose and mouth:
Switch to black acrylic paint. In the center of the face, paint a tiny upside-down triangle or dot for the nose. Connect two small curved lines underneath to form the ‘w’ mouth shape. -
Dot the eyes:
Paint two small black oval or circle eyes on either side of the nose. Keep them wide-set for extra cuteness. -
Draw the whiskers:
With a very steady hand and barely any paint on the brush, flick three thin lines outward from each cheek. Quick, confident strokes work best here. -
Seal (Optional):
If you want to protect your paint, give the finished piece a light coat of matte spray varnish once the paint is fully dry.
Set your new duo on a shelf where they can keep each other company
Frog Buddies With Big Simple Eyes
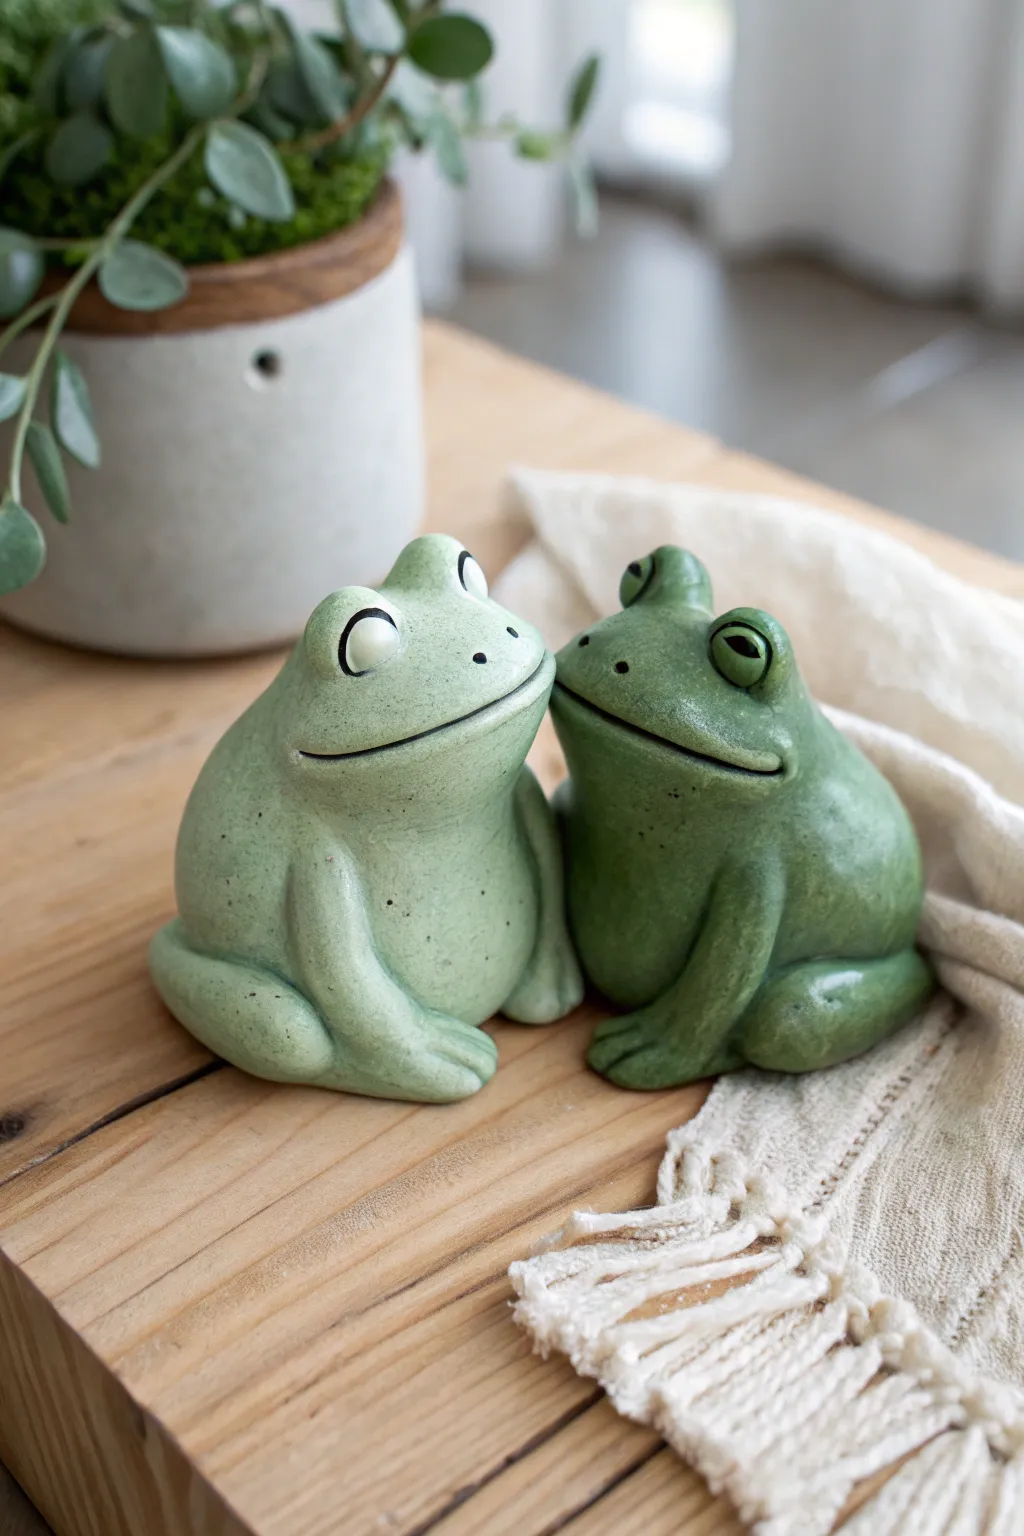
These charming frog buddies make for a perfect beginner sculpting project with their smooth, rounded forms and expressive faces. Creating two distinct characters allows you to experiment with slightly different poses and shades of green.
Step-by-Step Tutorial
Materials
- Air-dry clay (white or light grey) or polymer clay
- Acrylic paints (pale sage green, moss green, black, white)
- Clay sculpting tools (needle tool, smoother, ball stylus)
- Small cup of water (for smoothing)
- Aluminum foil (for armature core)
- Fine-grit sandpaper
- Paintbrushes (flat shader and fine detail liner)
- Gloss varnish or sealant
Step 1: Forming the Base Bodies
-
Create the core:
Crumple a small piece of aluminum foil into a tight, rounded pear shape. This saves clay and keeps the sculpture lighter. Make two cores if you plan to make both frogs at once. -
Cover with clay:
Flatten a sheet of clay to about 1/4 inch thickness. Wrap it entirely around your foil core, pressing the seams together firmly so no foil shows. -
Shape the torso:
Roll the clay-covered form between your palms to smooth it out. Gently tap the bottom on your work surface to create a flat base so the frog sits independently without tipping over. -
Refine the posture:
For the left frog, keep the body slightly more upright and bulbous. For the right frog, angle the upper body slightly toward its partner, creating a sense of interaction.
Step 2: Adding Facial Features
-
Attach the eyes:
Roll two small balls of clay for the eyes. Score the top of the head (scratch the surface) and add a tiny dab of water or liquid clay. Press the eye balls firmly onto the head, positioning them high up. -
Blend the eyes:
Use a small modeling tool or your finger to smooth the clay from the bottom of the eye socket into the top of the head, so the eyes look integrated rather than just stuck on. -
Sculpt the eyelids:
Roll tiny snakes of clay and flatten them. Place these over the top half of the eyeballs to create heavy, sleepy eyelids, giving them a relaxed expression. -
Carve the mouth:
Use a needle tool or a thin blade to slice a long, wide smile across the face. Curve the ends slightly upward toward the eyes. -
Soften the smile:
Take a damp brush or a smoothing tool and run it along the cut of the mouth to round off the sharp edges, making the lips look soft and fleshy. -
Add nostrils:
Poke two very small, shallow indentations between the eyes for nostrils using a small ball stylus.
Cracks Appearing?
If you see small cracks as air-dry clay cures, mix a tiny bit of fresh clay with water to make a paste (slip) and fill them in before painting.
Step 3: Sculpting Limbs
-
Form the hind legs:
Roll two thick sausages of clay for the back legs. Bend them into a ‘V’ shape. Attach them to the sides of the body, blending the upper thigh area seamlessly into the torso. -
Create front arms:
Roll two thinner cylinders for the front arms. Attach them just below the chin area, letting them hang down entirely almost to the ground. -
Detail the feet:
Flatten the ends of the limbs slightly. Use a knife tool to press indentations that separate the toes. I like to gently round each toe tip so they look soft.
Speckled Texture
To get that realistic stone-like texture shown in the photo, dip an old toothbrush in dark green paint and flick fine speckles over the dried base coat.
Step 4: Finishing Touches
-
Final smoothing:
Dip your finger in a little water and run it over the entire sculpture to remove fingerprints. Let the clay dry completely according to package instructions (usually 24-48 hours for air-dry clay). -
Sand imperfections:
Once fully dry, lightly sand any bumps or rough patches with fine-grit sandpaper for a ceramic-smooth finish. -
Base coat painting:
Paint the left frog in a pale sage green and the right frog in a deeper moss green. You may need two coats for opaque coverage. -
Detail tight spots:
Use a black wash (black paint diluted heavily with water) to run into the mouth crevice, darkening it effortlessly. -
Paint the eyes:
Paint the eyeballs white. Once dry, add large black pupils. For the left frog, paint the pupils looking sideways; for the right frog, paint half-lidded sleepy eyes. -
Seal the work:
Finish with a coat of gloss varnish to give them a wet, amphibian look and protect the paint.
Place your new ceramic friends near a potted plant or on a windowsill to keep each other company

TRACK YOUR CERAMIC JOURNEY
Capture glaze tests, firing details, and creative progress—all in one simple printable. Make your projects easier to repeat and improve.
Cozy Marshmallows by a Tiny Campfire
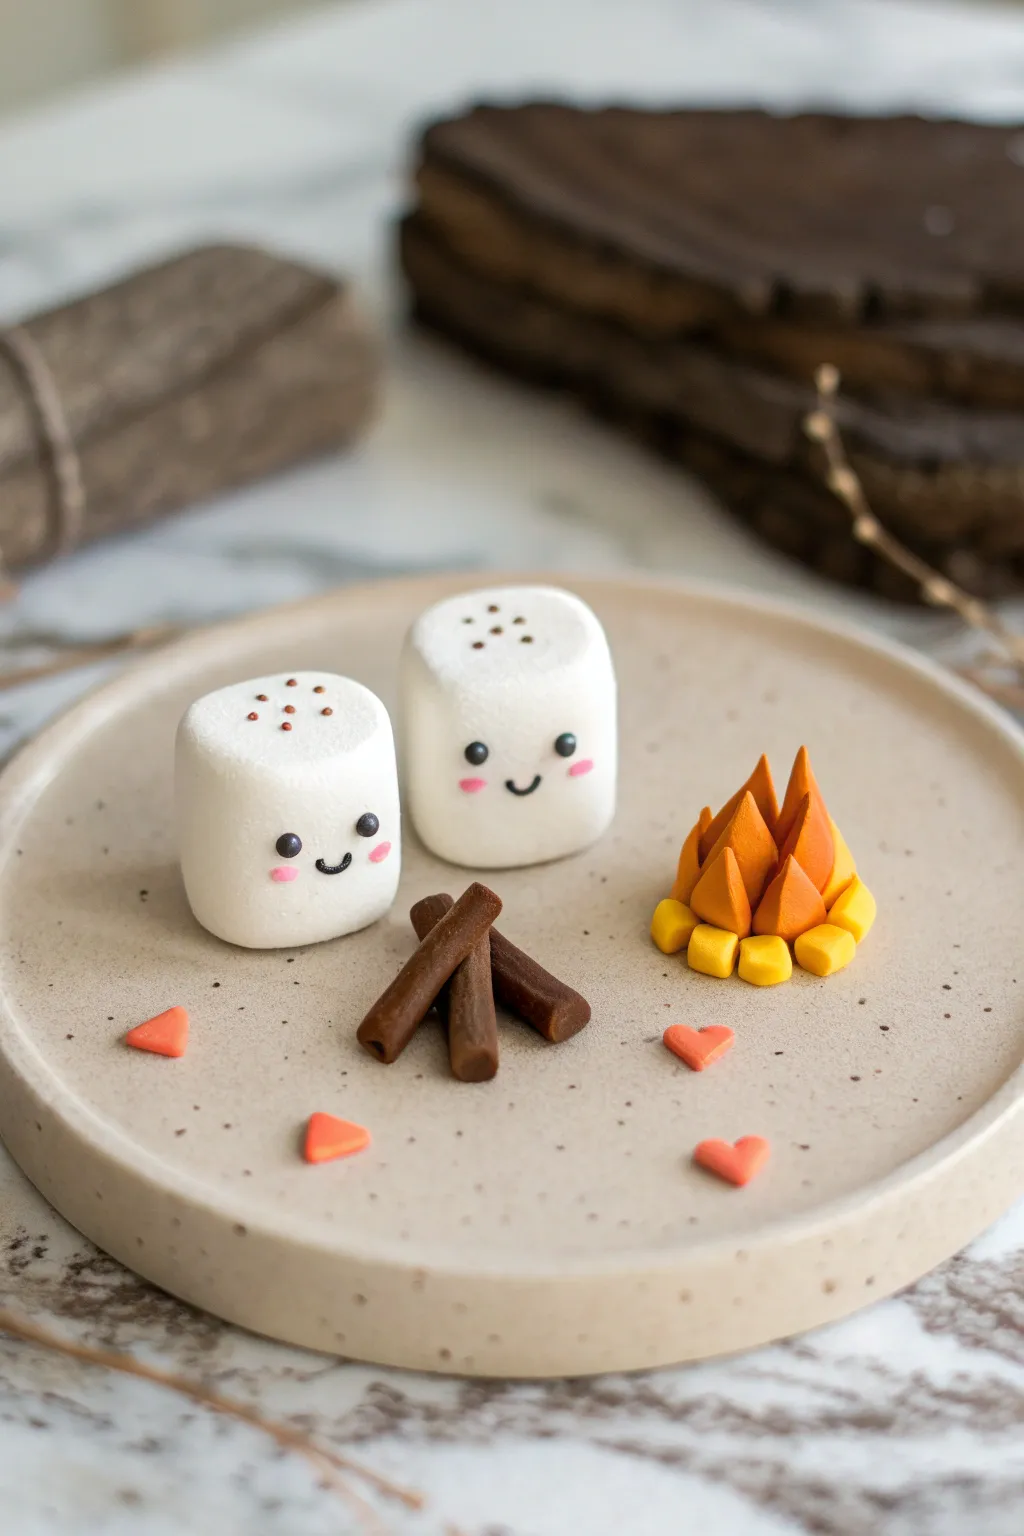
Capture the warmth of a romantic camping date with this adorable polymer clay scene featuring two blushing marshmallows and a stylized miniature fire. This project is perfect for beginners because it relies on simple geometric shapes to create a heartwarming display.
Step-by-Step
Materials
- White polymer clay
- Orange, yellow, and red polymer clay
- Dark brown polymer clay
- Black polymer clay (tiny amount for eyes)
- Pink polymer clay or soft pastels (for cheeks)
- Needle tool or toothpick
- Small blade or craft knife
- Clean ceramic plate or tile (for baking)
Step 1: Making the Marshmallows
-
Shape the bodies:
Start by conditioning a chunk of white clay until it’s soft and pliable. Divide it into two equal portions and roll them into smooth balls initially, making sure there are no cracks. -
Form the cylinders:
Gently press each ball against your work surface and flatten the sides with your fingers to create a soft, rounded cube or cylinder shape. They should look squishy and puffed, just like real marshmallows. -
Add texture:
Use a needle tool or an old toothbrush to lightly texture the top surface if you want a realistic sugary look, or keep them smooth for a cartoon style. I prefer keeping the sides smooth so the faces stick better. -
Create the faces:
Roll tiny specks of black clay into balls for the eyes and press them onto the marshmallows. Roll extremely thin snakes of black clay to form the small U-shaped smiles. -
Add the blush:
Apply two tiny flattened circles of pink clay for cheeks. Alternatively, you can brush on a little pink soft pastel dust using a small paintbrush for a softer, airbrushed effect. -
Detail the tops:
Using a needle tool, poke a few random shallow holes on the top of each marshmallow to mimic the texture of roasted sugar or sprinkled spices.
Sticky Finger Prints?
White clay shows every speck of dust and fingerprint. Wipe your hands with a baby wipe before handling white clay and smooth prints with a drop of baby oil.
Step 2: Building the Campfire
-
Create the flames:
Mix orange and a bit of red clay to get a fiery hue. Roll small amounts into cone shapes, then flatten them slightly to look like tongues of flame. Make 5-7 of these in varying heights. -
Assemble the fire core:
Cluster these flame shapes together, pressing them gently at the base so they stand up as a single unit. Use a blending tool to smooth the clay where they join at the bottom. -
Make the fire stones:
Roll small balls of bright yellow (or grey if you prefer realism) clay. You will need about 8-10 tiny stones. -
Set the ring:
Flatten the yellow balls slightly into ‘cubes’ or rounded stones and arrange them in a tight circle around the base of your flame cluster.
Step 3: Logs and Finishing Touches
-
Roll the logs:
Take your dark brown clay and roll a snake about the thickness of a pencil. Cut this snake into three equal segments, roughly an inch long each. -
Texture the wood:
Use your needle tool to scratch lengthwise lines into the brown logs to mimic bark texture. Leave the cut ends smooth. -
Stack the wood:
Arrange the three logs in a classic campfire stack or teepee formation near the marshmallows. They don’t need to be glued; gravity will hold them for now. -
Make tiny hearts:
Flatten a small piece of red or coral clay. Use a tiny cutter or your craft knife to cut out 4-5 miniature hearts to scatter around the scene. -
Final Arrangement:
Place all your components—marshmallows, fire, logs, and hearts—onto a ceramic saucer or baking tile exactly how you want them displayed. -
Bake:
Bake the entire scene according to your clay package instructions (usually 275°F/135°C for 15-30 minutes). Let it cool completely before touching.
Make it Functional
Turn this into a photo holder! Before baking, insert a piece of twisted craft wire into the top of one marshmallow to hold a polaroid of your date.
Place your finished miniature scene on a shelf or desk as a sweet reminder of cozy nights together
Matching Tiny Octopus Buddies
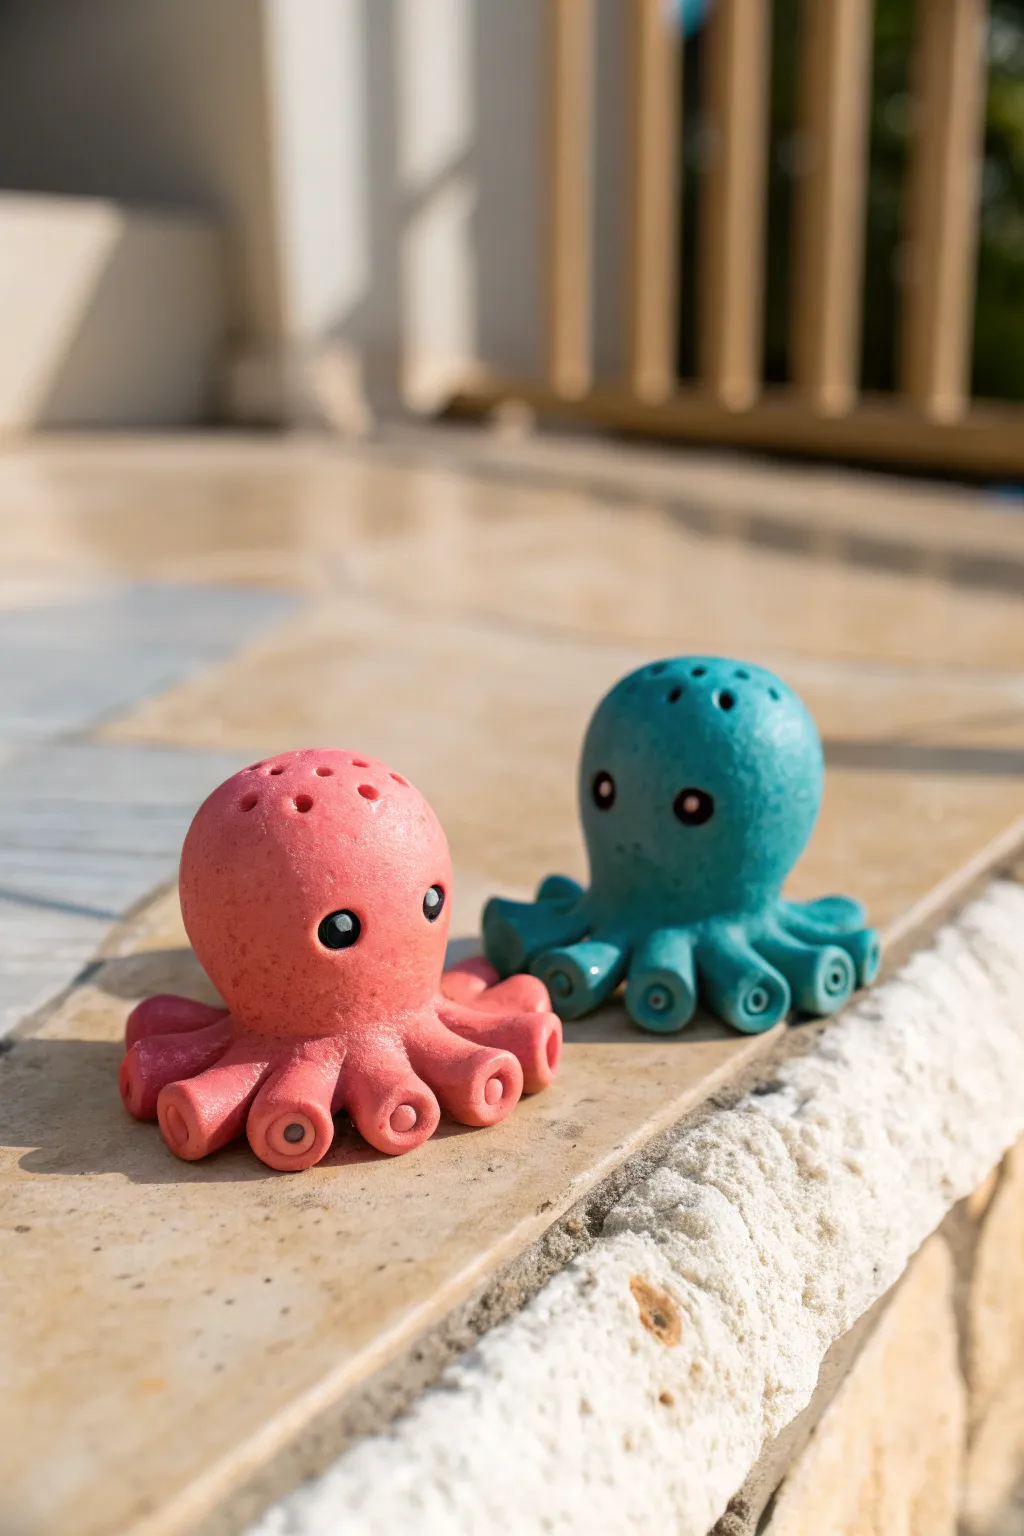
Create an adorable pair of tiny desk companions with this simple clay modeling project. These charming octopuses feature expressive eyes, textured tentacles, and a matte finish that gives them a soft, whimsical look perfect for gifting.
Detailed Instructions
Materials
- Polymer clay (dusty pink and teal/turquoise)
- Black polymer clay (tiny amount for eyes)
- White or light grey acrylic paint (for eye highlights)
- Ball stylus tool or a round-ended pen cap
- Needle tool or toothpick
- Fine-grit sandpaper (optional)
- Clear matte varnish (optional)
- Baking sheet and parchment paper (if using polymer clay)
Step 1: Shaping the Head
-
Prepare the clay:
Start by conditioning your pink clay until it is soft and pliable. Roll a piece about the size of a walnut into a smooth, seamless ball. -
Form the dome:
Gently press the ball onto your work surface to flatten the bottom slightly, creating a rounded dome shape for the head. Smooth out any fingerprints. -
Add breathing holes:
Using a needle tool or toothpick, gently poke 6-8 small, random holes near the top center of the head. Don’t go too deep; these are just decorative pores.
Sticky Fingerprints?
If your clay is picking up fingerprints, lightly dust your fingertips with cornstarch before smoothing. You can also brush baby oil on the uncooked clay to melt away prints.
Step 2: Creating Tentacles
-
Roll spheres:
Roll eight smaller balls of pink clay, each roughly the size of a pea. Try to keep them consistent in size. -
Elongate into teardrops:
Roll each small ball slightly between your fingers to create a short, stubby teardrop or cone shape. -
Attach the first tentacle:
Press the wider end of a teardrop under the edge of the head dome. Use your thumb to blend the clay of the tentacle into the bottom of the head so they join securely. -
Complete the circle:
Continue attaching the remaining seven tentacles around the base of the head, ensuring they are evenly spaced. The tips should curl slightly outward. -
Curl the tips:
Gently curl the very end of each tentacle upward. This gives the octopus a cute, active stance rather than looking flat.
Step 3: Adding Details
-
Indent the suckers:
Use a medium-sized ball stylus or the round end of a pen cap to press a circular indentation into the curled-up tip of each tentacle. This creates the suction cup look. -
Create eye sockets:
halfway down the head, use a smaller ball tool to press two indentations where the eyes will go. Space them widely apart for a cute expression. -
Insert the eyes:
Roll two tiny specks of black clay into balls. Press them firmly into the eye sockets you just created. Flatten them slightly so they don’t bulge out too much. -
Add texture (Optional):
For the pink octopus, I like to gently tap the surface with an old toothbrush or stiff bristle brush to give it that subtle, speckled skin texture seen in the photo.
Accessorize Them!
Make tiny accessories like a top hat, a bow tie, or a miniature clay flower to place on their heads before baking for extra personality.
Step 4: Finishing Up
-
Repeat for the blue buddy:
Follow the same steps using your teal clay to create the second octopus. You can vary the tentacle curl slightly to give them individual personalities. -
Bake:
Place both figures on a parchment-lined baking sheet. Bake according to your polymer clay package instructions (usually around 275°F/130°C for 15-20 minutes). -
Cool down:
Let the figures cool completely on the baking tray before handling them to avoid warping the clay while it’s still soft. -
Paint highlights:
Dip a toothpick in white acrylic paint and add a tiny dot to the upper corner of each black eye. This ‘catchlight’ brings them to life. -
Seal:
Once the paint is dry, apply a thin coat of matte varnish if you want to protect the surface without making it glossy.
Enjoy displaying your new little sea creatures on a sunny shelf or gifting one to a special partner
Punny Food Duo: Hot Dog and Bun
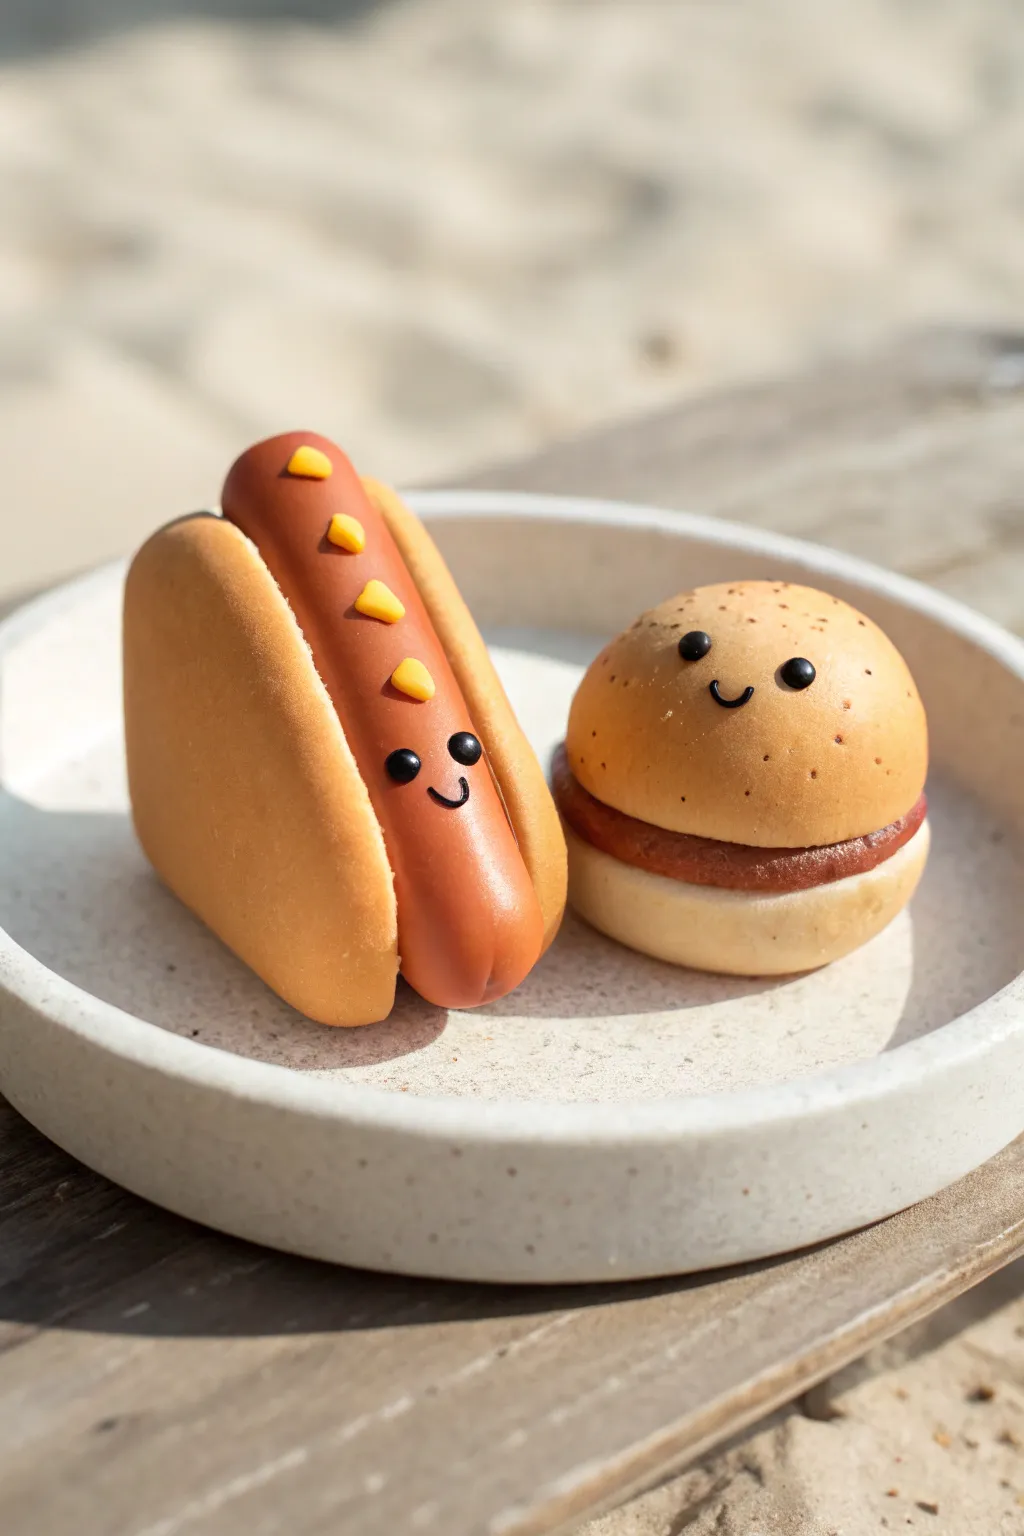
Create the perfect clay picnic date with this adorable duo of happy fast food friends. These miniature sculptures feature smooth, matte finishes and charming kawaii faces that are deceptively simple to achieve.
How-To Guide
Materials
- Polymer clay (Tan/Beige, Red-Brown, Dark Brown, Black, Yellow)
- Clay sculpting tools (dotting tool, needle tool)
- Rolling pin or pasta machine
- Soft pastel chalks (orange, brown) for shading
- Small paintbrush
- Oven for baking polymer clay
- Clean work surface (tile or glass)
Step 1: Shaping the Hot Dog
-
Mix the Bun Color:
Start by mixing translucent clay with a bit of yellow and white to get a realistic bread dough color, or use a pre-made beige. -
Form the Bun Base:
Roll the beige clay into a thick cylinder, about 2 inches long. Smooth out any fingerprints gently. -
Create the Opening:
Using a modeling tool or your finger, press a deep indentation down the center of the cylinder lengthwise, but don’t cut all the way through. It should look like a taco shell. -
Shape the Frank:
Take your red-brown clay aka the ‘hot dog’ color. Roll it into a smooth log that is slightly longer than your bun. -
Round the Ends:
Gently tap and roll the ends of the sausage log to make them rounded and smooth, not flat. -
Assemble:
Nestle the sausage inside the bun opening. The sausage should poke out just slightly from the top curvature of the bun. -
Add Mustard Details:
Roll very tiny bits of yellow clay into small triangles or rounded squares. Press 4-5 of these along the top spine of the sausage to mimic mustard drops.
Clean Clay Only
White and beige clays pick up dust easily. Keep a pack of baby wipes nearby to clean your hands and tools before handling light colors.
Step 2: Building the Burger
-
Form the Top Bun:
Using the same beige clay mix, roll a ball for the top bun. Flatten the bottom against your work surface so it becomes a dome. -
Form the Bottom Bun:
Make a slightly smaller, flatter disc of beige clay for the bottom bun. It should be the same diameter as the top. -
Create the Patty:
Roll a dark brown piece of clay into a ball, then flatten it into a thick disc. Place this directly onto the bottom bun. -
Texture the Meat:
Use a needle tool or an old toothbrush to gently texture the edges of the brown patty for a meaty look. Stack the top bun dome onto the patty. -
Shade the Buns:
Scrape some orange and brown soft pastel chalk into a powder. Using a dry brush, gently dust the top of the burger bun and the outside of the hot dog bun to give them a ‘baked’ appearance.
Saucy Gloss
After baking, apply a layer of UV resin or glossy glaze just to the ‘mustard’ pieces or the ‘meat’ patty to make them look juicy and fresh.
Step 3: Bringing Them to Life
-
Make Eye Sockets:
Use a small ball tool to press two tiny indentations where the eyes will go on both the hot dog (about 1/3 up from the bottom) and the burger (centered on the top bun). -
Add Eyes:
Roll extremely tiny balls of black clay. Place them into the sockets and press gently to flatten them slightly. -
Create the Smiles:
Roll a microscopic thread of black clay. Cut a tiny u-shape and carefully press it between the eyes using a needle tool. -
Add Seeds:
For the burger, take a needle tool and prick tiny dots all over the top dome to simulate sesame seed indentations. -
Final Polish:
give everything one last check for lint or dust. I sometimes use a bit of baby oil on my finger to smooth out final imperfections. -
Bake:
Bake the pieces according to your specific brand of clay’s instructions (usually 275°F for 15-30 minutes). Let them cool completely.
Now you have a charming pair of food friends ready to sit on your desk or shelf
Two Tiny Tea Light Holders
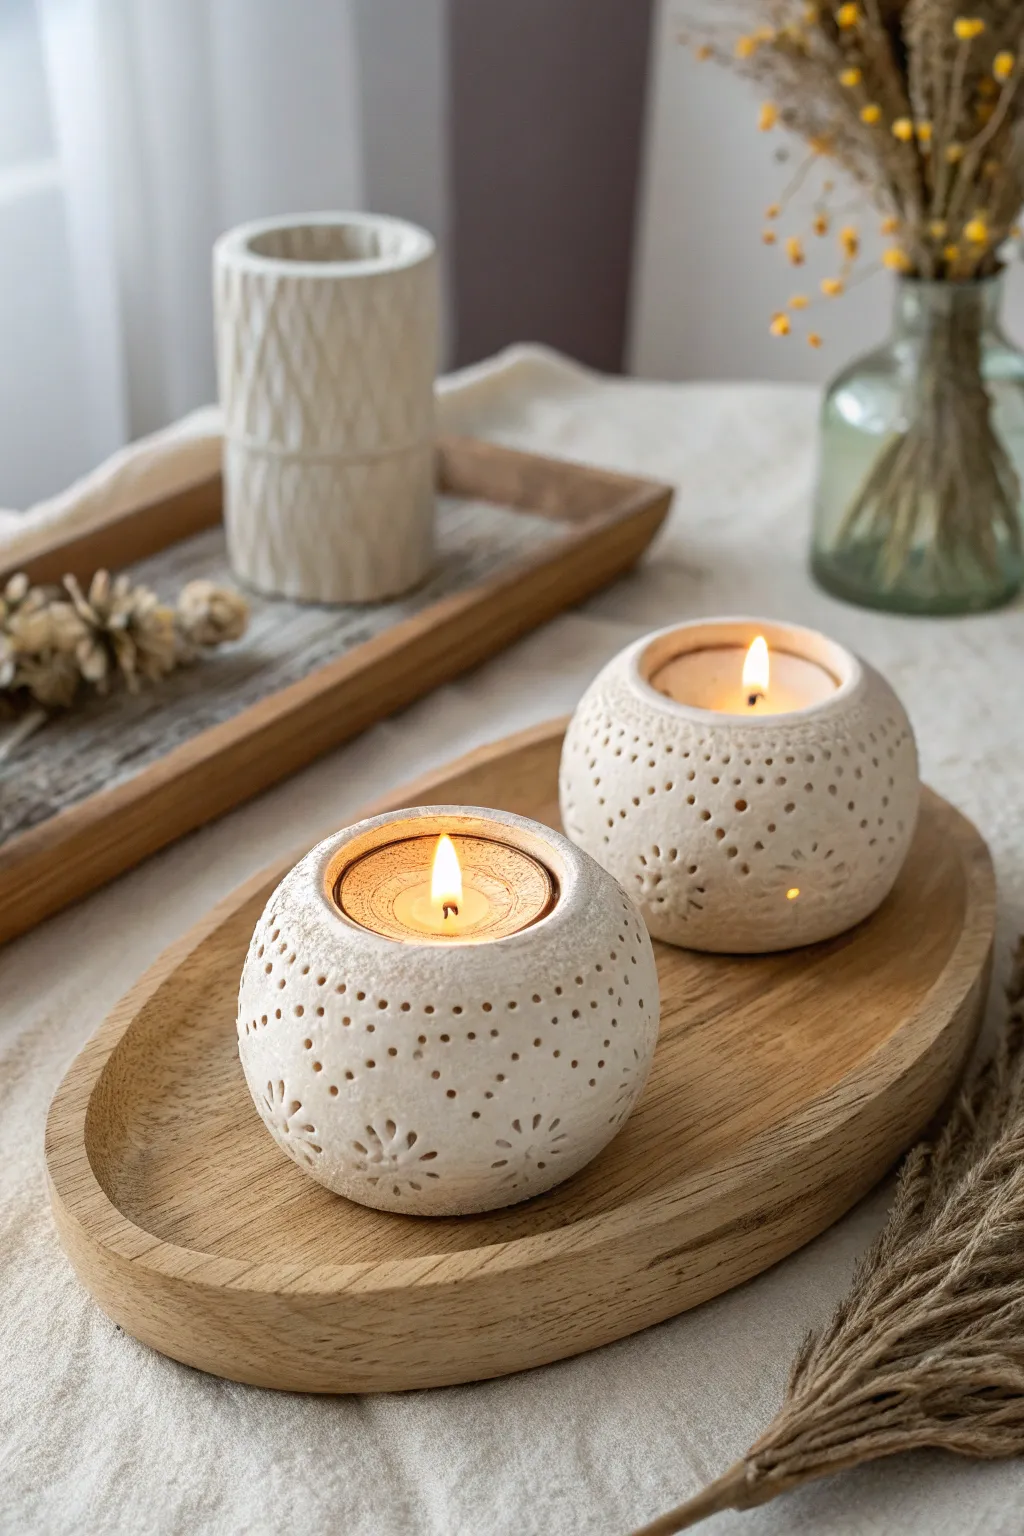
These charming, globe-shaped tea light holders add a cozy warmth to any date night table setting. Made from air-dry clay with a stone-like texture, they feature delicate perforated patterns that let the candlelight dance through.
Step-by-Step Guide
Materials
- White air-dry clay (stone texture preferred)
- Two plain wooden or Styrofoam balls (approx. 3 inches diameter) to use as forms
- Rolling pin
- Small round cookie cutter or a glass (approx. 2.5 inches diameter)
- Parchment paper or canvas mat
- Basic clay sculpting tools (needle tool, smoothing sponge)
- Fine grit sandpaper
- Various poking tools (toothpicks, skewers, empty ballpoint pen casing)
- Small flower-shaped stamp or fondant plunger cutter
- Tea light candles for testing fit
Step 1: Shaping the Clay Globes
-
Prepare the workspace:
Lay down your parchment paper or canvas mat to prevent the clay from sticking to your table. If using wooden balls as forms, lightly wrap them in cling film to make removal easier later. -
Roll out the clay:
Take a generous handful of air-dry clay and knead it briefly to warm it up. Roll it out into an even slab, aiming for a consistent thickness of about 1/4 inch. -
Cut the circles:
Using a large round cutter or a bowl as a guide, cut out two large circles of clay. These need to be big enough to drape over your spherical forms, covering about two-thirds of the ball. -
Form the shape:
Gently drape the clay circle over your spherical form. Using your palms, smooth the clay downward to hug the curve of the ball. I prefer to work slowly here to avoid thinning the clay too much at the top. -
Create the opening:
The ‘bottom’ of the clay on the form will actually become the top opening. Use your round cutter or a knife to trim the uneven edges evenly, creating a clean circular opening that is large enough for a tea light to drop in easily. -
Flatten the base:
While the clay is still on the form, gentle press the very top of the sphere (which will be the bottom of your holder) against a flat surface to create a stable base so it won’t roll away. -
Initial smoothing:
Dip your finger or a sponge in a tiny bit of water and smooth out any fingerprints or cracks on the surface of the clay.
Clay sticking?
If the clay refuses to release from your form, put the whole thing in the freezer for 15 minutes. The cold often causes the clay to contract slightly differently than the form, popping it loose.
Step 2: Adding the Pattern
-
Mark the guide:
Lightly trace a faint line around the circumference of the globe with a needle tool if you want your pattern to be perfectly straight, though a freehand approach adds rustic charm. -
Create the flower motifs:
Using a small flower stamp or tool, press indentations into the bottom third of the holder. Space them evenly around the perimeter. -
Pierce the petals:
Use a needle tool or toothpick to poke holes completely through the clay in the center of the flower petals. This allows the light to shine through. -
Add the upper texture:
For the upper section, use a blunt tool (like the back of a paintbrush or a stylus) to press rows of small dots into the clay. Do not pierce all the way through; these are just for surface texture. -
Detail with vertical lines:
Between your rows of dots, use a skewer to poke slightly deeper, larger holes in vertical columns. Varying the size of your poking tools creates that intricate lace-like effect. -
Check the rim:
Smooth the rim of the opening one last time with a damp finger to ensure it is soft and rounded, not sharp.
Refining the glow
After poking holes, re-insert your tool from the *inside* of the globe gently. This pushes any jagged clay bits to the outside where they are easier to sand off later.
Step 3: Drying and Finishing
-
Wait for leather-hard stage:
Let the clay sit on the form until it is ‘leather hard’—firm to the touch but still slightly cool. This usually takes a few hours. -
Remove the form:
Carefully wiggle the spherical form out of the clay shell. If you leave it in until fully dry, the clay might shrink and crack around the rigid form. -
Full dry:
Set the hollow clay spheres aside to dry completely. This typically takes 24 to 48 hours depending on humidity. Rotate them occasionally so the bottom dries too. -
Sand the surface:
Once fully dry and chalky white, use fine-grit sandpaper to gently buff away any rough bumps. Be gentle around your pierced holes. -
Clean up dust:
Wipe away all sanding dust with a dry cloth or a soft brush. -
Optional sealing:
If you want to protect the finish, apply a matte varnish. However, leaving the raw stone texture mimics the reference image best.
Place a tea light inside your new creations and watch how the flickering flame casts beautiful shadows through your hand-carved patterns
Pocket Tokens: Yes and No Coins
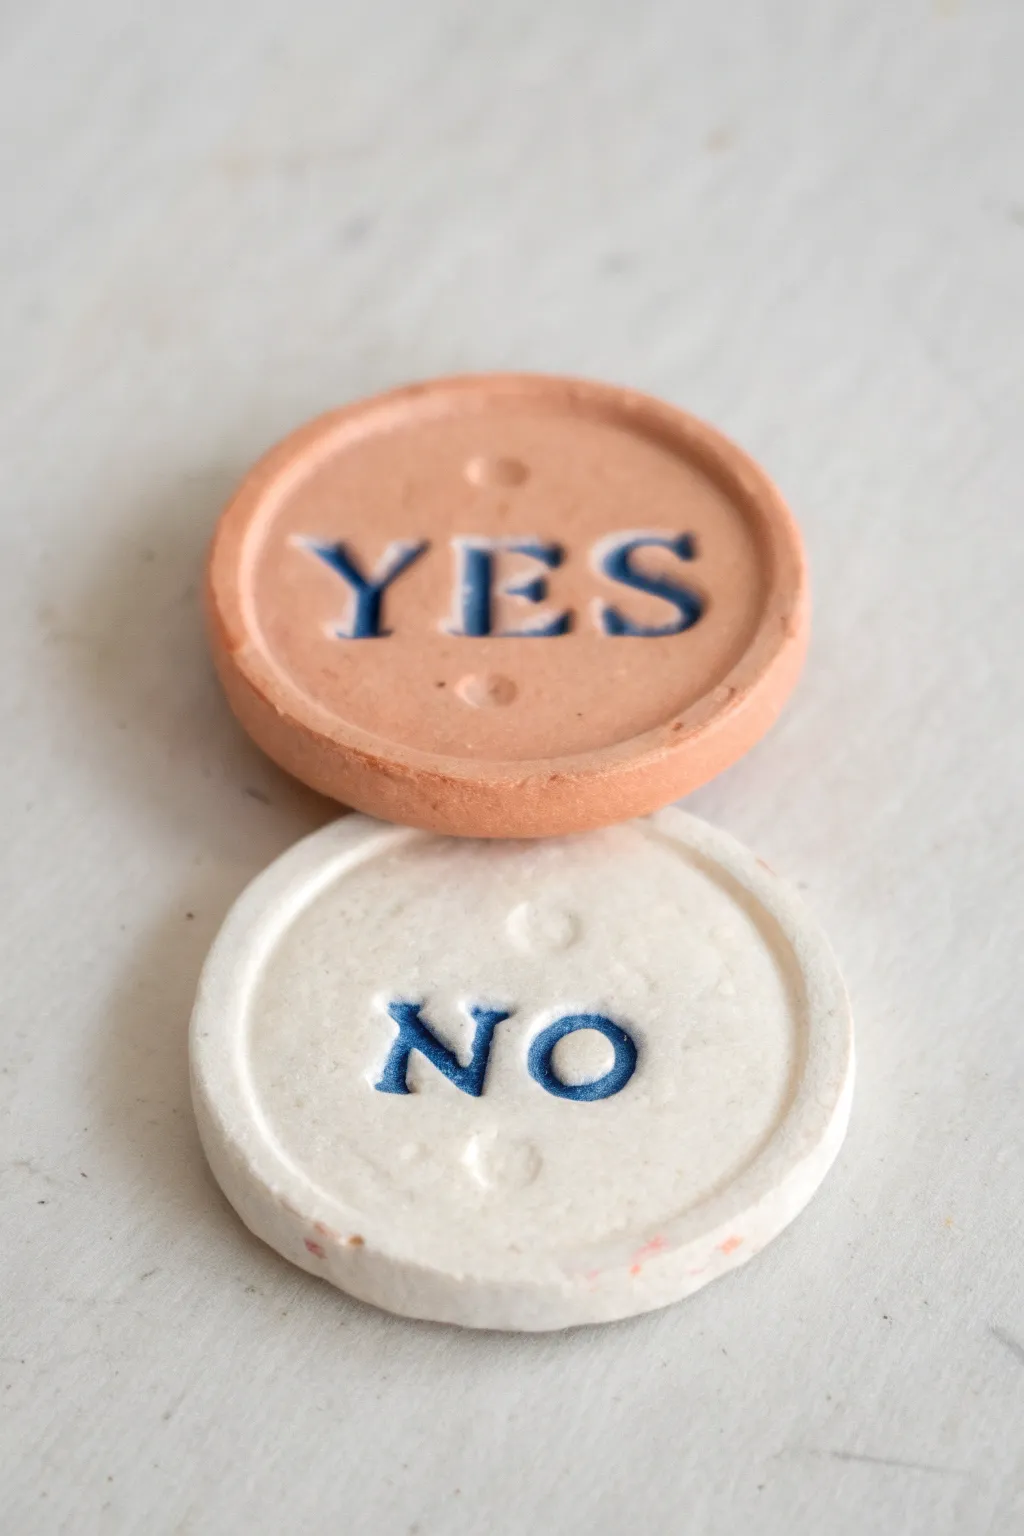
Embrace spontaneity with these charming handmade decision coins, perfect for those moments when you and your partner can’t agree on a plan. Crafted from air-dry or polymer clay, these tactile tokens feature a classic terracotta and white finish with crisp, stamped lettering that gives them a vintage game piece feel.
Step-by-Step
Materials
- Air-dry clay (terra cotta and white colors)
- Small rolling pin or acrylic roller
- Round cookie cutter (approx. 1.5 – 2 inches)
- Small alphabet stamps
- Navy blue acrylic paint
- Fine-grit sandpaper
- Small round tool (like the end of a paintbrush)
- Matte sealant or varnish
- Small detail paintbrush
- Paper towel or baby wipe
Step 1: Shaping the Tokens
-
Condition the Clay:
Start by taking a small ball of the terra cotta clay and a separate ball of the white clay. Knead them warm in your hands until they are soft, pliable, and free of cracks. -
Roll it Out:
Using your roller, flatten each ball onto a smooth work surface. You want a thickness of about 1/4 inch—substantial enough to hold a stamp, but not too chunky. -
Cut the Circles:
Press your round cookie cutter firmly into the rolled clay to create your coin shapes. If the clay sticks, you can gently push it out from the back of the cutter. -
Smooth the Edges:
Dip your finger in a tiny bit of water and run it around the circumference of the fresh cut. This smooths out any sharp ridges left by the cutter. -
Create a Raised Rim:
Gently pinch around the very edge of the coin between your thumb and forefinger, or press down slightly in the center with a flat object to create a subtle lip around the border.
Stamp Cleanliness
Dust your rubber stamps or plastic letters with a tiny bit of cornstarch before pressing into the clay. This prevents sticking and ensures the letters come out clean every time.
Step 2: Stamping and Details
-
Position the Text:
Arrange your alphabet stamps for ‘YES’ and check the spacing against the clay coin before pressing down. -
Stamp the Letters:
Press the stamps firmly into the center of the terra cotta coin. Ensure you press straight down and pull straight up so the impression is deep and clean. -
Stamp the Second Coin:
Repeat the process with the white clay coin using the ‘NO’ letters. I like to double-check my alignment here so the text sits right in the middle. -
Add Decorative Dots:
Using the small rounded end of a paintbrush or a dotting tool, press a small indentation directly above and below the center of the text on both coins for a decorative touch. -
Allow to Dry:
Set your coins aside on a flat surface to dry completely. For air-dry clay, this usually takes 24-48 hours. Flip them halfway through to ensure even drying. -
Sand Imperfections:
Once fully hard, inspect the edges. Use fine-grit sandpaper to gently buff away any remaining roughness or fingerprints.
Step 3: Adding Color
-
Paint the Impressions:
Dip a fine paintbrush into navy blue acrylic paint. Fill the stamped letters and the dot indentations generously with paint. -
Wipe the Excess:
Wait just a few seconds for the paint to settle into the grooves, then take a slightly damp paper towel or baby wipe and swipe across the surface. -
Clean the Surface:
Continue wiping gently until the surface of the clay is clean, leaving the paint only inside the recessed letters. This creates that crisp, professional inlaid look. -
Seal the Project:
Protect your coins from wear and tear by applying a thin coat of matte sealant or varnish over the entire surface. -
Final Cure:
Let the sealant dry completely according to the bottle instructions before tossing these into your pocket for your next date night dilemma.
Make it Magnetic
Glue small neodymium magnets to the back of the coins after they dry. Now they can live on your fridge, ready to solve ‘what’s for dinner’ debates instantly.
Keep these handy tokens nearby to turn everyday indecision into a playful game
Two-Piece Puzzle Heart Charm
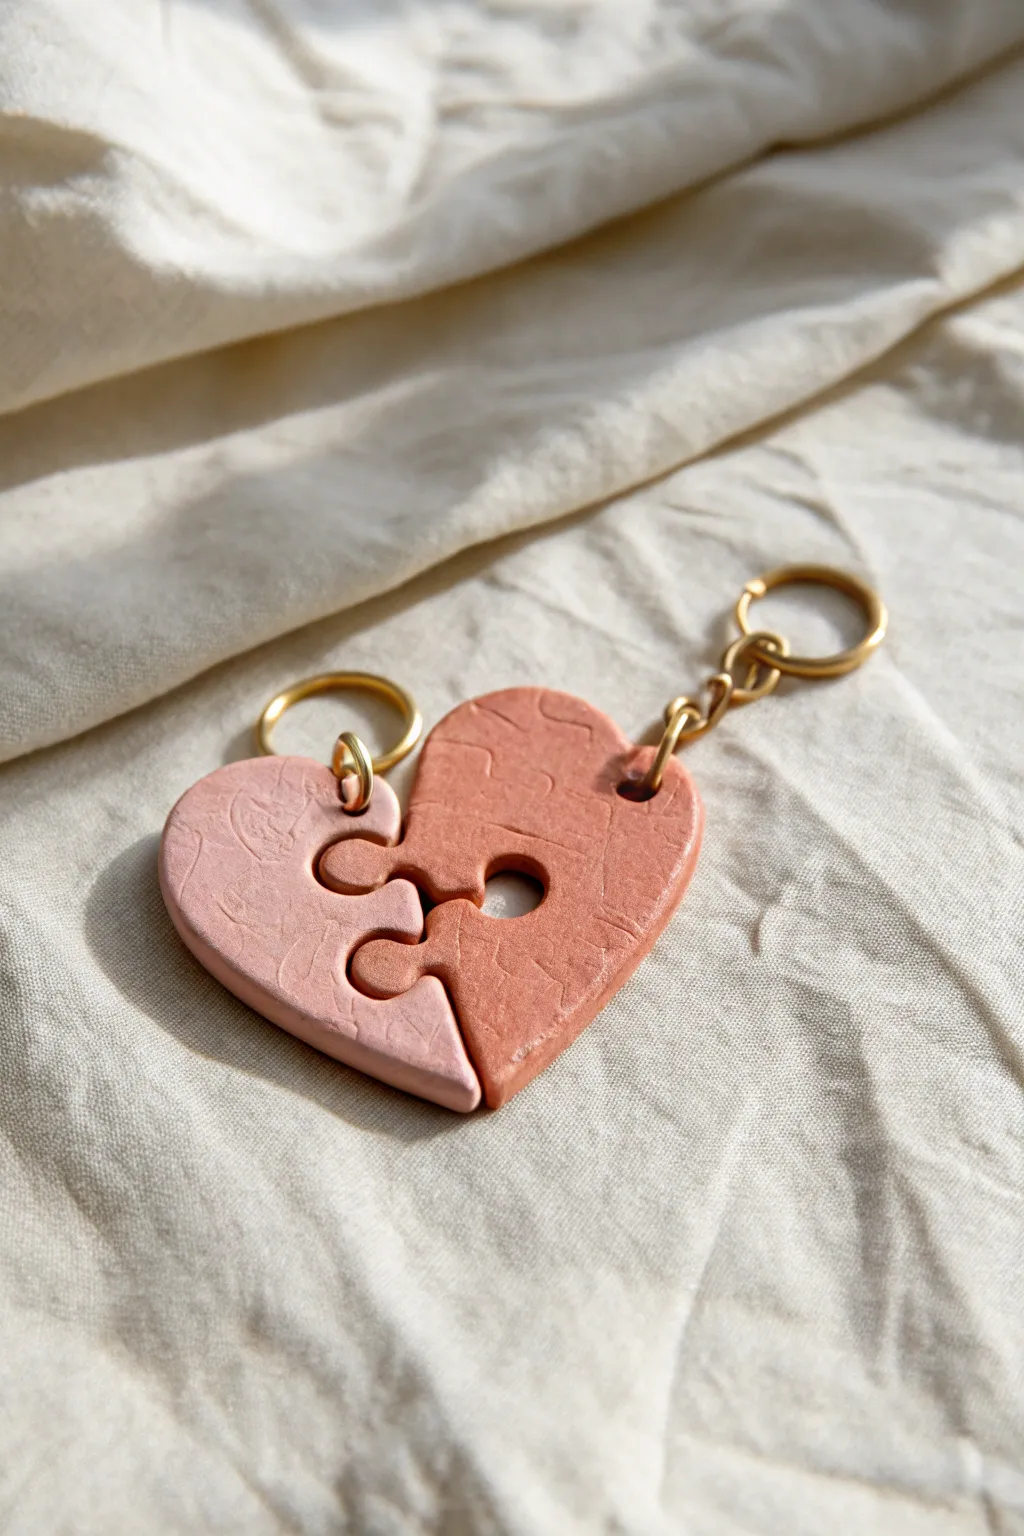
Create a sweet, shared keepsake with these interlocking puzzle heart keychains, perfect for couples or best friends. The soft, textured finish gives them a modern, handmade feel while the warm terracotta and blush tones complement each other beautifully.
Detailed Instructions
Materials
- Polymer clay (terracotta/rust color)
- Polymer clay (pale blush/beige color)
- Acrylic roller
- Tissue blade or X-Acto knife
- Small heart-shaped cutter (approx. 2 inches wide)
- Needle tool or toothpick
- Sandpaper (fine grit) or a textured fabric/canvas for imprinting
- 2 small gold jump rings (6-8mm)
- 2 gold keychain attachments
- Jewelry pliers
- Baking sheet and parchment paper
- Oven (for curing)
Step 1: Shaping the Base
-
Condition the clay:
Begin by kneading both the terracotta and blush polymer clay blocks separately until they are soft, pliable, and easy to work with. -
Create a slab:
Roll out each color of clay into a slab that is roughly 1/4 inch thick. You want it substantial enough to be durable as a keychain. -
Add surface texture:
Before cutting, lay a piece of textured fabric or canvas over your clay slabs and roll over it gently once. This imprints that lovely, organic surface texture seen in the photo. -
Cut the hearts:
Press your heart-shaped cutter firmly into each color of clay. You will need one full heart of each color, though we will be swapping halves later.
Uneven Edges?
If your puzzle cuts look rough after baking, use a high-grit sandpaper or a nail file to gently smooth the inner curves until they slide together easily.
Step 2: Creating the Puzzle Fit
-
Draw the puzzle line:
Using a needle tool, lightly sketch a jig-saw puzzle line down the center of one clay heart. Include a rounded tab protruding on one side and an indentation on the other. -
Making the cut:
Carefully use your tissue blade or X-Acto knife to cut along this sketched line. Try to keep the blade perpendicular to the work surface for a clean, straight edge. -
Use as a template:
Take one of the cut pieces (for example, the left terracotta side) and gently place it over the uncut blush heart to use as a guide. -
Cut the second heart:
Trace and cut the matching puzzle line on the second heart so the two colors will interlock perfectly. -
Smooth the edges:
I like to gently run a finger along the cut edges to soften any sharpness without distorting the puzzle shape.
Step 3: Assembly and Finishing
-
Check the fit:
Slide the blush left side and the terracotta right side together to ensure they lock. Do the same for the remaining pair if you are making two complete sets. -
Pierce the holes:
Use a straw or a needle tool to punch a hole near the top outer curve of each heart half. Make sure the hole is large enough for your jump rings but not too close to the edge. -
Bake the clay:
Place your heart halves on a parchment-lined baking sheet. Bake according to your clay manufacturer’s instructions (usually 275°F/135°C for 15-30 minutes). -
Cool down:
Let the pieces cool completely on the tray. Polymer clay hardens fully as it cools, so don’t handle them while hot. -
Open jump rings:
Using two pairs of pliers, twist your gold jump rings open sideways (never pull them apart outward). -
Attach hardware:
Loop the open jump ring through the hole in the clay heart and then through the bottom link of the keychain hardware. -
Secure the charm:
Twist the jump ring closed again securely so no gap remains. -
Final test:
Bring the two complete keychains together to clip the heart into a whole unit one last time to admire your work.
Personalize It
Before baking, use small letter stamps to impress initials or a special date onto the back of each heart half for a hidden sentimental touch.
Now you have a matching set of accessories that keep you connected wherever you go
Mini House Facade Ornament
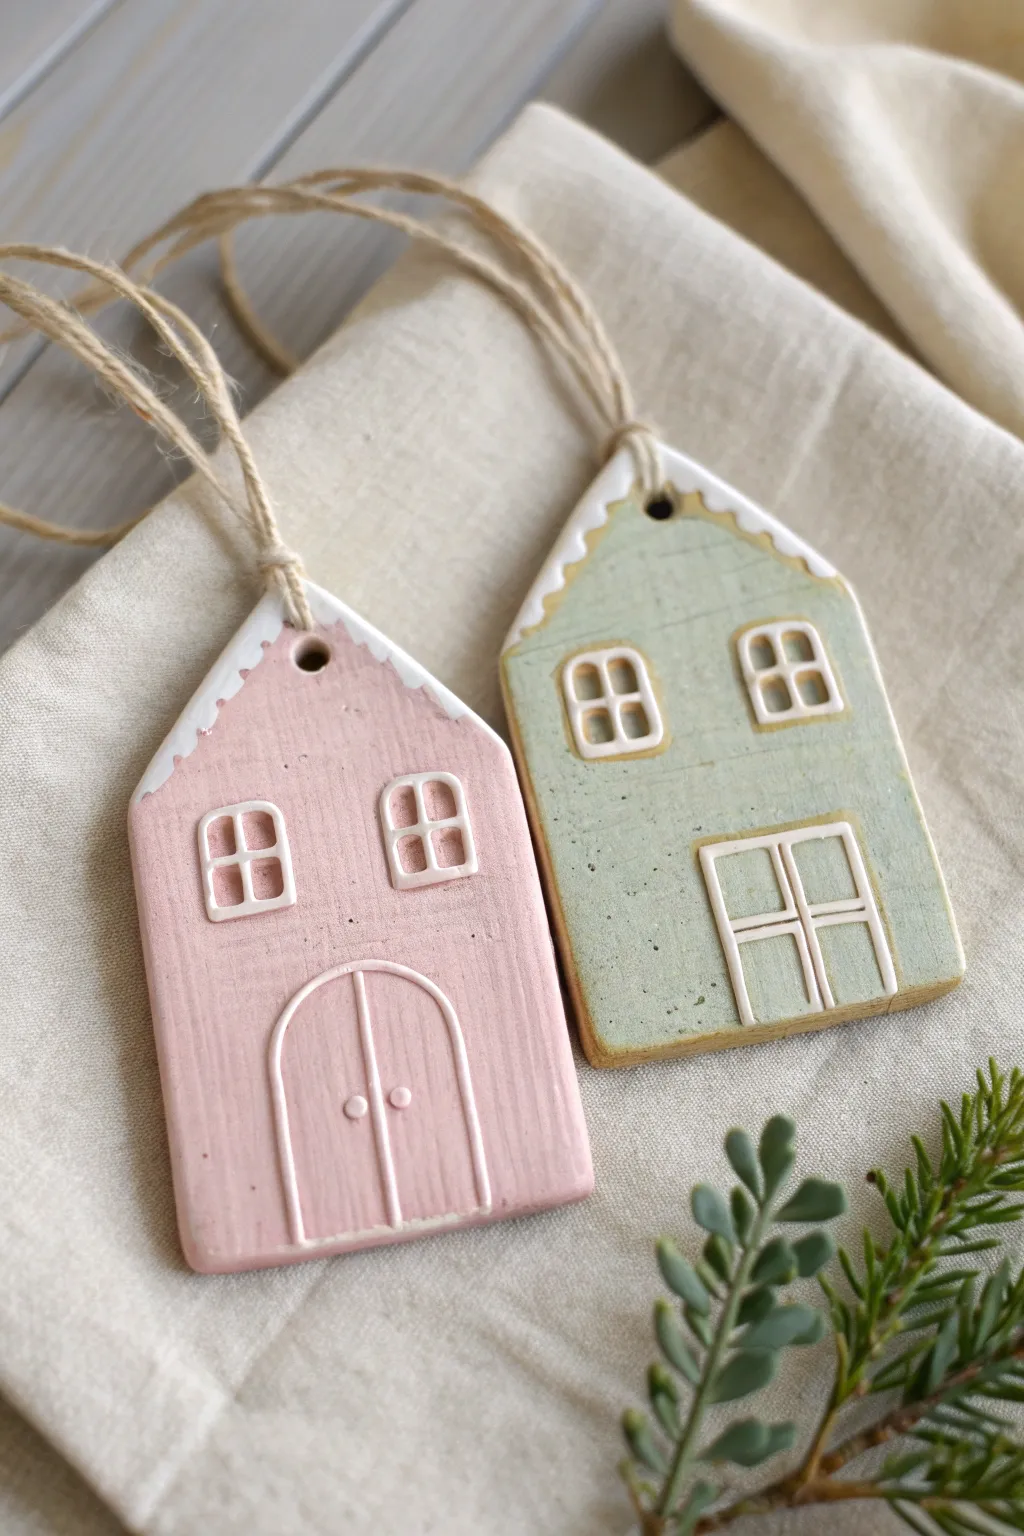
These charming mini house facades bring a touch of cozy Scandi style to your decor with their gentle pastel hues and simple white piping details. They make for a perfect, low-pressure creative date night project that results in sweet keepsakes you can hang anywhere.
Step-by-Step
Materials
- Air-dry clay (white or terra cotta)
- Rolling pin
- House-shaped cookie cutter (or craft knife and ruler)
- Sandpaper (fine grit)
- Acrylic paints (Soft Pink, Sage Green, White)
- Fine detail paintbrushes
- Small straw or skewer (for hole punching)
- Jute twine or rustic string
- Water cup and paper towels
- Varnish or sealant (optional)
Step 1: Shaping the Base
-
Roll out the slab:
Begin by taking a chunk of air-dry clay and kneading it until soft. Roll it out on a flat surface to an even thickness of about 1/4 inch (6mm). If the clay sticks, lay down a piece of parchment paper first. -
Cut the house shapes:
Use a house-shaped cookie cutter to stamp out your forms. If you don’t have a cutter, simply use a ruler and craft knife to cut a rectangle, then trim off the top corners to create a peaked roof. Smooth the cut edges with a damp finger to remove any jagged bits. -
Add the hanging hole:
While the clay is still wet, take a straw or a skewer and punch a small hole near the peak of the roof. Make sure it goes all the way through and has enough space above it so the clay won’t break later. -
Texture (Optional):
If you want a slightly rustic look like the green house in the image, you can gently press a piece of canvas or textured fabric onto the surface before the clay dries. It adds a lovely subtle grain. -
Dry thoroughly:
Place your houses on a flat drying rack. Air-dry clay usually takes 24-48 hours to fully cure depending on thickness and humidity. Flip them over halfway through so both sides dry evenly and don’t curl. -
Sand until smooth:
Once fully hard, inspect the edges. Use fine-grit sandpaper to gently buff away any rough spots or sharp corners, giving the piece a refined finish.
Puffy Paint Trick
To get that raised, ‘icing’ look on the windows and doors easily, use a bottle of white dimensional fabric paint instead of a brush.
Step 2: Painting and Detailing
-
Base coat application:
Mix a soft, chalky pink for one house and a muted sage green for the other. Apply an even coat over the entire front face and sides. I like to let this dry briefly and add a second coat for opaque, solid coverage. -
Distressing the finish:
To mimic the slightly weathered look in the photo, you can take a very dry, clean brush or a piece of fine sandpaper and lightly scuff the edges of the painted surface once it’s dry, revealing a tiny bit of the raw clay underneath. -
Outline the windows:
Using your finest detail brush and white acrylic paint, carefully draw small squares for the windows. The pink house features two upper windows; the green house has two upper windows and a larger lower window. -
Add window panes:
Inside your white squares, paint a cross shape to create the four window panes. Keep the paint relatively thick here; looking closely at the original work, the white lines almost have a raised texture, similar to icing on a cookie. -
Paint the doors:
For the pink house, paint an arched doorway outline at the bottom using the same thick white lines. Add a vertical line down the center for double doors and two tiny dots for knobs. The green house uses a large rectangular window-style door instead. -
Snowy roof detail:
Dab white paint along the slanted roof edges. Instead of a straight line, use a stippling motion or small scallops to make it look like a dusting of snow or decorative gingerbread icing. -
Seal (Optional):
If you want these to last longer, apply a matte varnish over the top. This protects the paint from scratching without making the ornaments look too glossy or plastic.
Step 3: Finishing Touches
-
String it up:
Cut a length of natural jute twine, approximately 8 inches long. -
Create the loop:
Fold the twine in half and push the looped end through the hole from front to back. Pull the tails through the loop to create a secure lark’s head knot, or simply tie a standard knot at the top.
Personalize It
Paint your own house number on the door or add the year on the back to commemorate when you made them.
Hang your miniature neighborhood on a branch or wrapped gift for a sweet handmade touch
Book Page-Holder Thumbs for Two
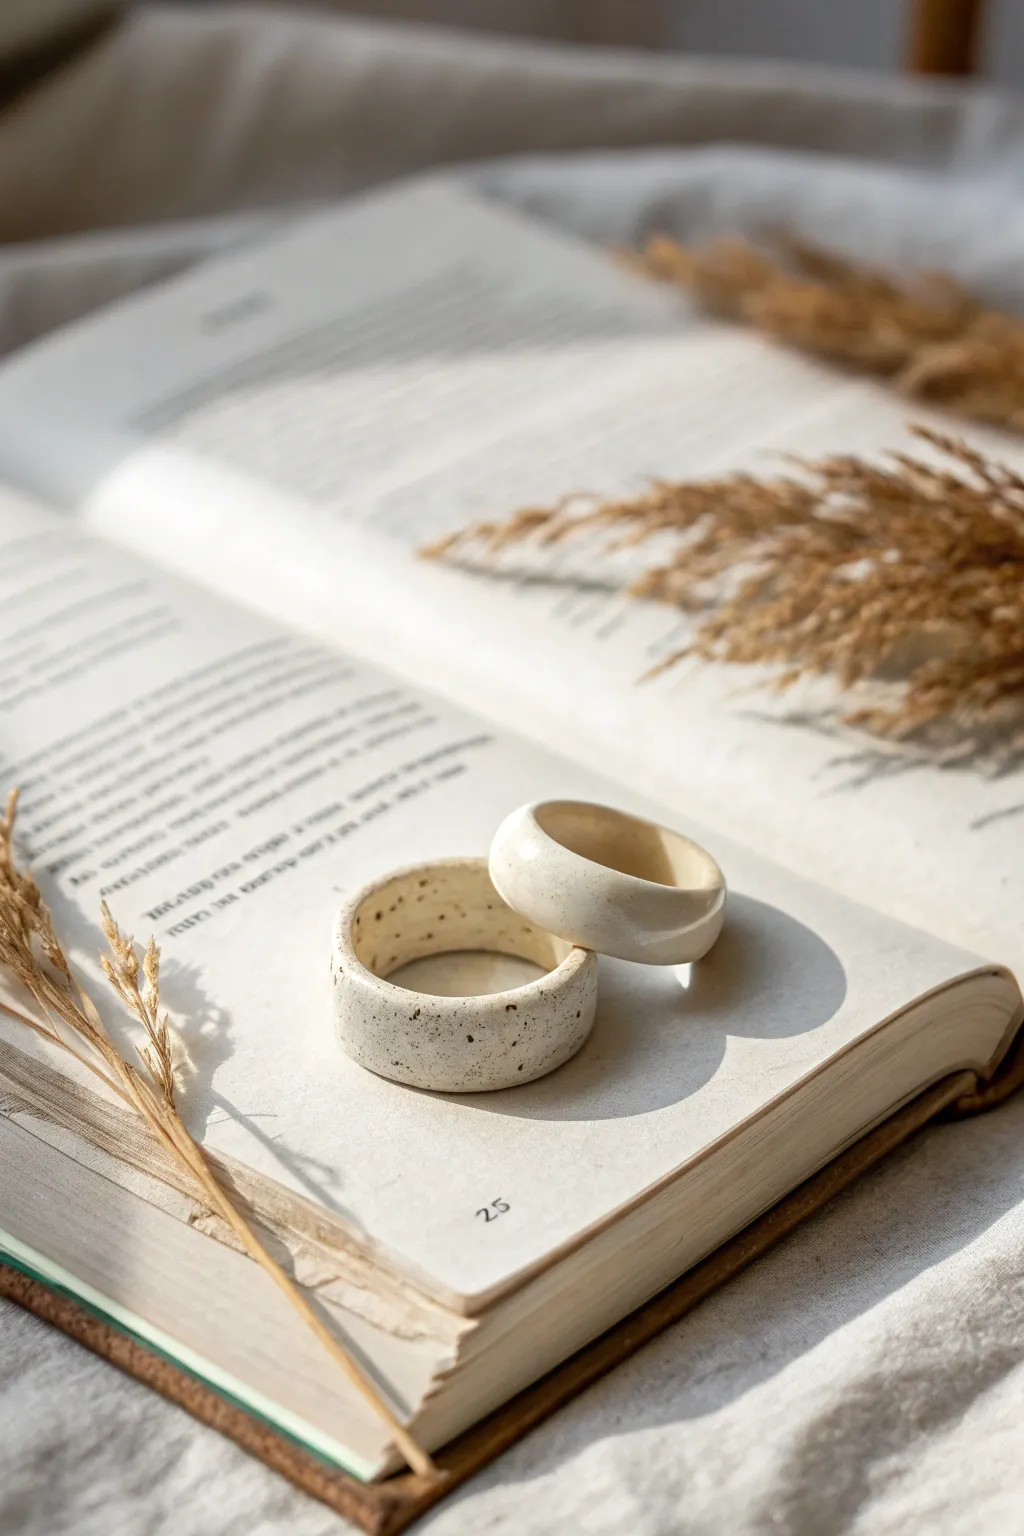
These charming, chunky rings aren’t just jewelry; they act as clever page holders to keep your book open comfortably with one hand. With a natural, speckled finish on one and a smooth cream glaze on the other, this pair makes for a calming and creative date night project.
Step-by-Step Tutorial
Materials
- White air-dry clay or polymer clay
- Rolling pin or smooth glass jar
- Measuring tape or strip of paper
- Clay knife or craft blade
- Small bowl of water
- Smoothing sponge
- Fine-grit sandpaper (220-400 grit)
- Speckled tan/brown acrylic paint (for faux ceramic effect)
- Old toothbrush or stiff bristle brush
- Clear gloss varnish or glaze
- Soft paintbrush
Step 1: Sizing and Shaping
-
Measure your thumb:
Using a strip of paper or flexible measuring tape, measure the circumference of your thumb where the ring will sit. It should be loose enough to slide on easily but snug enough to stay put. -
Prepare the clay:
Condition your clay by kneading it in your hands until it is warm, pliable, and free of cracks. -
Roll a slab:
Roll out a portion of the clay into a thick slab, aiming for about 5-6mm thickness. These are meant to be sturdy, chunky rings, so don’t go too thin. -
Cut the strips:
Cut a rectangular strip for each ring. The length should match your thumb measurement plus a tiny bit for overlap, and the width should be roughly 1.5cm depending on how chunky you want them. -
Form the circle:
Bring the ends of the clay strip together to form a ring shape. Ensure the inside is smooth ensuring a comfortable fit. -
Join the seam:
Blend the seam where the ends meet. If using water-based clay, use a dab of water to slip and score the edges. For polymer clay, smudge the clay across the join line delicately with your thumb. -
Refine the edges:
Gently tap the ring on your work surface to flatten the top and bottom edges just slightly, giving it that modern, cylindrical profile seen in the photo.
Seamless Joining Tip
Cut the ends of your clay strip at a 45-degree angle rather than bluntly. This creates a larger surface area for the join, making the seam stronger and much easier to hide during smoothing.
Step 2: Smoothing and Detailing
-
Initial smoothing:
Dip your finger in a little water (for air-dry) or baby oil (for polymer) and run it over the entire surface to remove fingerprints and imperfections. -
Create the rounded profile:
Use a damp sponge to soften the sharp corners on the rim of the ring. You want a soft, rounded lip rather than a sharp geometric edge. -
Dry or bake:
Follow the instructions for your specific clay. Air-dry clay will need 24-48 hours to dry fully, while polymer clay needs baking in an oven. -
Sand for perfection:
Once fully cured or dry, take your fine-grit sandpaper and gently buff the entire ring. This is crucial for that high-end ceramic look.
Step 3: Faux Ceramic Finish
-
Base coat (optional):
If your clay isn’t already the desired off-white color, paint the entire ring with a creamy white acrylic paint and let it dry completely. -
The speckled effect:
For the speckled ring, mix a small amount of water with brown acrylic paint. Dip an old toothbrush into this mixture and run your thumb across the bristles to flick tiny specks onto the ring. -
Control the speckle:
I prefer to do a test spray on a piece of paper first to ensure the droplets aren’t too large. Rotate the ring to get even coverage. -
Seal the deal:
Once all paint is dry, apply two coats of clear gloss varnish. This mimics the glazed finish of fired pottery and protects your page holder from wear.
Cracking While Drying?
If using air-dry clay, minor cracks can appear as moisture leaves. Make a paste of clay and water (slip) and fill the cracks, then smooth over. Dry slowly away from direct heat to prevent this.
Now you have a custom set of reading accessories ready for your next chapter together
Mini Date Table Scene on a Base
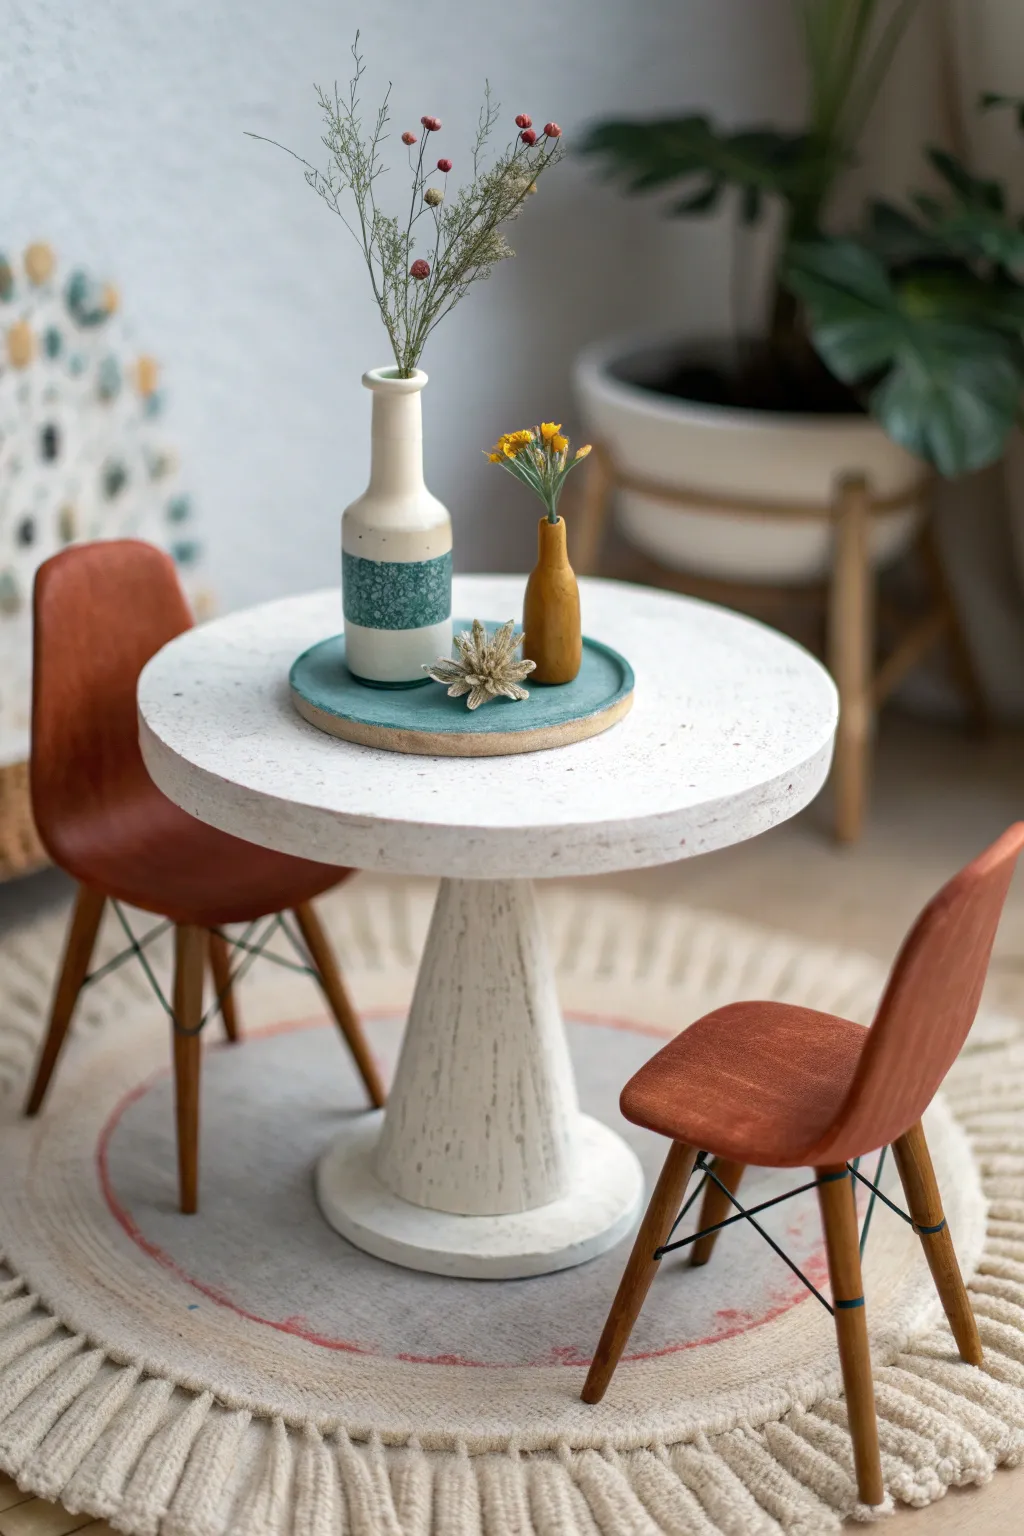
Create a charming, tiny romantic setting with this mid-century modern inspired table and chair set. This beginner-friendly project uses basic geometric shapes to build a surprisingly realistic miniature scene perfect for display.
Detailed Instructions
Materials
- White or granite-effect polymer clay
- Terracotta or reddish-brown polymer clay
- Teal or turquoise polymer clay
- Mustard yellow polymer clay
- Thick crafting wire (20 gauge)
- Black acrylic paint
- Fine detail paintbrush
- Clay rolling pin
- Circle cutters (various sizes)
- Craft knife or scalpel blade
- Liquid polymer clay (bake and bond)
- Gloss glaze (optional)
- Dried baby’s breath or miniature faux flowers
- Textured fabric scrap (for the rug pattern)
- Toothpicks or needle tool
Step 1: Sculpting the Table Base
-
Form the pedestal:
Start by conditioning a chunk of white or granite-effect clay. Roll it into a thick cone shape, flattening the top and bottom so it stands upright securely. -
Create the support base:
Roll out a flat disk of white clay, approximately 4-5mm thick. Use a medium circle cutter to create a clean round base. -
Texture the pedestal:
Before assembling, use a needle tool to gently scratch vertical lines up and down the cone shape. This mimics a wood-grain or stone-carved texture. -
Assemble the bottom:
Apply a tiny drop of liquid clay to the center of the flat disk and press the textured cone firmly onto it. Smooth the seam if necessary with a rubber sculpting tool.
Step 2: Making the Tabletop & Accessories
-
Cut the tabletop:
Roll out a large slab of the same white clay, keeping it quite thick (about 5-6mm) for stability. Cut a perfect circle using your largest cutter or a jar lid. -
Attach the top:
Apply liquid clay to the top of the pedestal cone. Center the large tabletop disk and press down gently, ensuring it remains level. -
Create the centerpiece tray:
Roll a thin sheet of teal clay. Cut a small circle about half the diameter of your table. Add a tiny snake of clay around the rim to create a raised edge. -
Sculpt tiny vases:
Form two tiny teardrop shapes—one in white and one in mustard yellow. For the white vase, wrap a thin strip of teal clay around the middle for decoration. -
Hollow the vases:
Use a needle tool or toothpick to create a small hole in the top of each vase neck, deep enough to hold your dried flowers later.
Wire Stability Trick
Bake the wire legs ‘naked’ first, pushed into the raw clay seat. Once hard, pull them out, superglue them back in, and paint them brown to look wood-like.
Step 3: Crafting the Chairs
-
Shape the seats:
Condition the terracotta-colored clay. Create two organic, rounded ‘L’ shapes. I like to smooth the edges with my finger to give them that molded plastic chair look. -
Texture the chair surface:
Lightly brush a piece of scratchy fabric or sandpaper over the chair surfaces to give them a subtle matte texture resembling upholstery or wood. -
Prepare the legs:
Cut eight equal lengths of thick crafting wire (about 1.5 inches each). Cover each wire with a very thin layer of terracotta clay, rolling them smooth. -
Attach legs to seats:
Poke four holes into the underside of each chair seat. Dip the clay-covered wire ends in liquid clay and insert them at slight outward angles. -
Bake the scene:
Arrange all your pieces on a baking tile. Bake according to your clay manufacturer’s instructions (usually 275°F/135°C for 15-30 minutes). Let cool completely.
Level Up: Texture
Mix black pepper or dried tea leaves into your white clay before rolling. This creates a convincing speckled granite or terrazzo stone effect for the table.
Step 4: Finishing Details
-
Add the Eiffel base wires:
Once cool, use a fine brush and black acrylic paint to draw thin ‘X’ patterns connecting the chair legs. This simulates the metal cross-bracing found on this style of furniture. -
Make the rug:
Cut a circle from cream-colored felt or heavy fabric. Fray the edges by pulling out threads to create a fringe. -
Paint the rug details:
Using diluted reddish paint, add a subtle ring around the inner part of your fabric rug to match the photo. -
Final Assembly:
Place the rug down first. Position the table and chairs on top. Finally, glue your dried baby’s breath flowers into the tiny vases and place the tray on the table.
Now you have a cozy miniature scene ready to be inhabited by tiny figurines or simply admired on a shelf