When I’m in the mood for something fun and instantly recognizable, I always reach for football clay ideas—that classic oval shape and those little laces never get old. Here are my favorite ways to turn a bit of clay into handmade football-themed projects you can gift, decorate with, or actually use.
Mini Football Sculptures
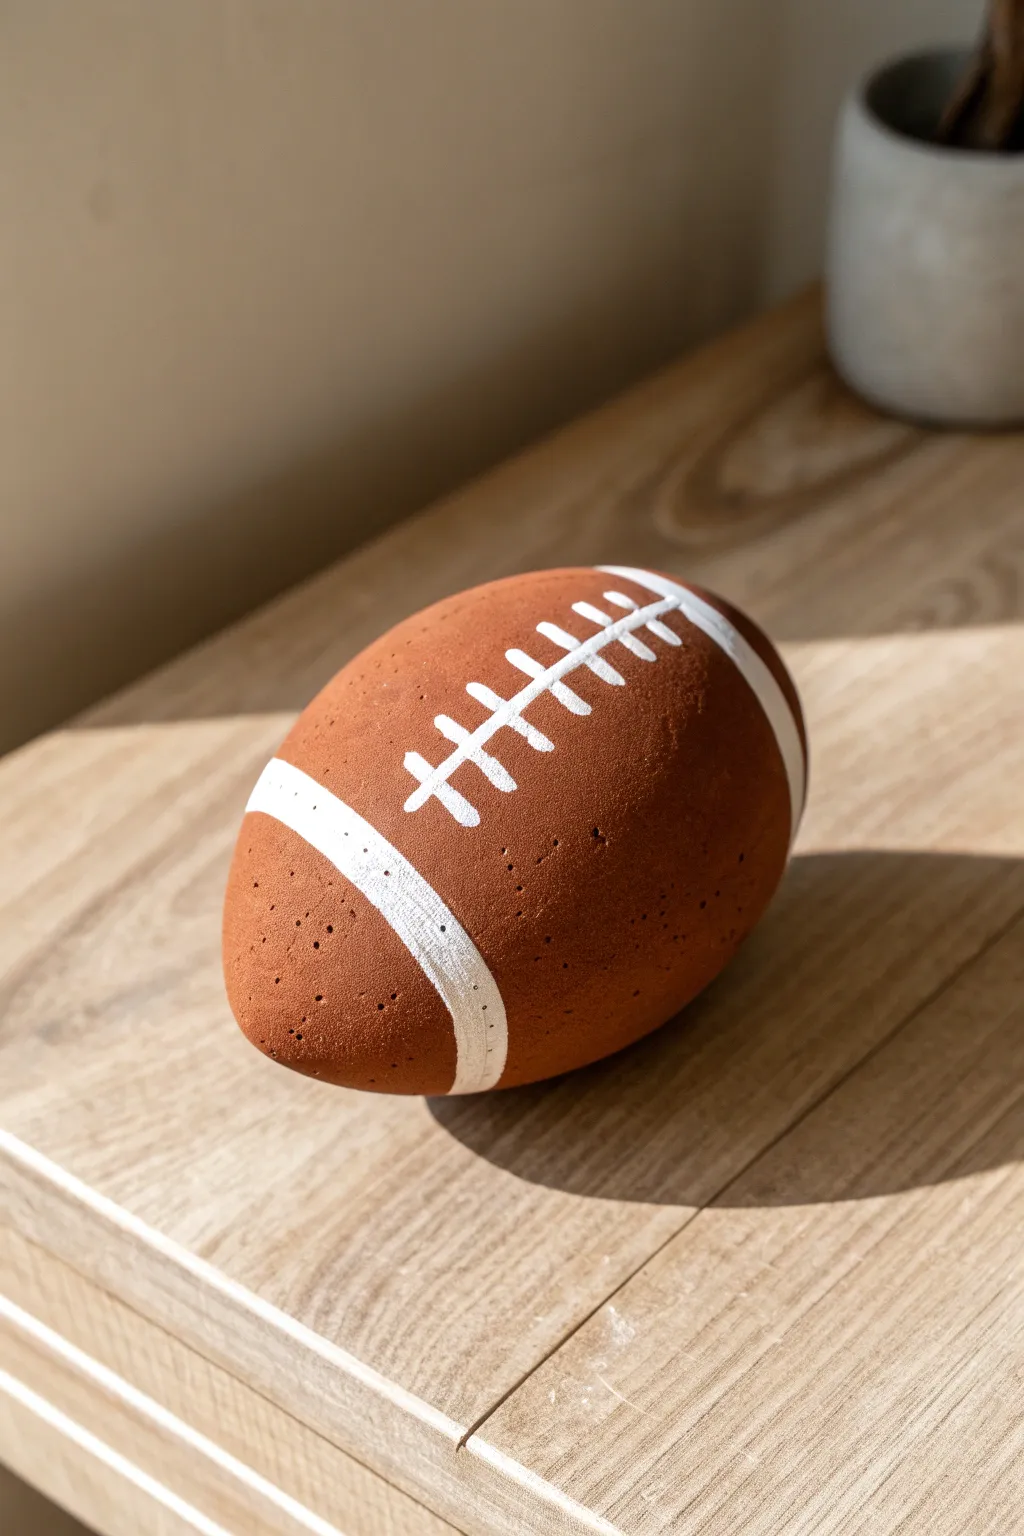
This charming mini football sculpture captures the spirit of the game with a sophisticated, earthy twist. Using air-dry clay or polymer clay with a terracotta finish, you’ll create a textured, durable piece perfect for a desk, bookshelf, or game day centerpiece.
Step-by-Step Guide
Materials
- Terracotta-colored air-dry clay (or polymer clay)
- White acrylic paint
- Fine-grit sandpaper (optional)
- Small flat paintbrush
- Fine detail paintbrush
- Water cup
- Sculpting tool or plastic knife
- Toothbrush or stiff bristle brush (for texturing)
- Matte sealant spray
Step 1: Shaping the Core
-
Prepare the Clay:
Begin with a fist-sized ball of terracotta clay. Knead it thoroughly in your hands until it becomes warm, pliable, and free of any air pockets, which helps prevent cracking later. -
Form the Prolate Spheroid:
Roll the clay into a smooth sphere first. Then, place it on your work surface and gently roll it back and forth while applying pressure to the sides to elongate it into a classic football shape. -
Refine the Points:
Cup your hands around the ends of the shape to gently taper them. You want distinct points, but not so sharp that they become fragile. Ensure the middle section remains the thickest part. -
Check Symmetry:
Look at the football from all angles—top, side, and down the barrel. Gently pat and smooth any lumpy areas so the curve is consistent all the way around.
Cracked Clay?
If small cracks appear as the clay dries, mix a tiny bit of fresh clay with water to make a paste (slip) and fill the cracks. Smooth over with your finger.
Step 2: Texturing and Drying
-
Add Surface Texture:
To mimic the pigskin texture or give it a stone-like appearance, take a toothbrush or a stiff bristle brush and firmly tap it all over the surface of the clay. Don’t drag the brush; just stipple it to create tiny pores. -
Enhance Imperfections:
I like to poke a few slightly larger holes with a needle tool or toothpick randomly to give it that weathered, rustic concrete look seen in the photo. -
Initial Drying Phase:
Place your sculpture on a piece of parchment paper. If using air-dry clay, let it sit for about 24-48 hours. Rotate it every few hours so the bottom doesn’t stay flat or damp. -
Sanding (Optional):
Once fully dry, if there are any sharp ridges or uneven bumps you dislike, gently sand them down with fine-grit sandpaper. Wipe away the dust with a slightly damp cloth.
Step 3: Painting the Details
-
Map Out the Stripes:
Lightly sketch where the two white end stripes will go using a pencil. They should curve around the body of the football, roughly an inch or so from each tip. -
Paint the Stripes:
Using your small flat brush and white acrylic paint, carefully fill in the stripe areas. You may need two coats to get a solid, opaque white against the dark terracotta background. -
Draft the Laces:
On the top center of the football (between the stripes), lightly pencil in a long central line for the laces, crossed by about eight shorter perpendicular lines. -
Paint the Central Line:
Switch to your fine detail brush. Paint the long central spine of the laces first. Take your time to keep the line relatively straight. -
Paint the Cross Stitches:
Paint the horizontal stitches across the central line. Make them thick enough to look like laces but crisp at the edges. Since the surface is textured, you might need to dab the paint into the little pores. -
Clean Up Edges:
If any white paint smudged onto the clay, use a damp Q-tip immediately to wipe it away, or touch it up with a bit of terracotta paint if you have a color match.
Vintage Vibe
For an aged look, mix a drop of brown paint into your white before painting stripes. It creates a creamy, antique off-white rather than a stark modern bright white.
Step 4: Finishing Touches
-
Seal the Piece:
To protect the paint and clay, take the football outside (or to a well-ventilated area) and spray it with a clear matte sealant. A glossy finish usually looks too artificial for this rustic style. -
Let it Cure:
Allow the sealant to dry completely according to the can’s instructions before handling or displaying your new sculpture.
Place your finished football on a wooden stand or nestle it among books for a subtle nod to your favorite sport


Classic Lace-and-Stripe Detailing

This rustic, sporty ornament captures the classic look of a pigskin football with charming handmade details. The textured, speckled finish gives it a vintage athletic feel, while the crisp white laces and stripes make it unmistakably iconic.
Step-by-Step Tutorial
Materials
- Polymer clay (terracotta or reddish-brown)
- Polymer clay (white)
- Acrylic paint (black)
- Old toothbrush
- Rolling pin
- Clay knife or craft blade
- Needle tool or toothpick
- Sandpaper or a rough stone (for texturing)
- Cream satin ribbon (1/4 inch width)
- Baking sheet and parchment paper
- Small eye pin (optional, for hanging)
Step 1: Shaping the Base
-
Condition the clay:
Start by kneading the reddish-brown polymer clay in your hands until it becomes soft, pliable, and free of cracks. Warm clay is much easier to shape without leaving fissures. -
Form the oval:
Roll the clay into a smooth ball, then gently elongate it between your palms to create an egg-like oval. It should be slightly pointed at both ends but fuller in the middle. -
Refine the football shape:
Gently tap the pointed ends against your work surface to blunt them just slightly, creating that recognizable prolate spheroid shape. Smooth out any fingerprints with a light touch. -
Add surface texture:
To mimic the grip of real leather, gently press a piece of coarse sandpaper or a rough stone against the entire surface of the brown clay. Don’t press too hard; you just want a subtle, pitted texture. -
Create the hanging point:
Use a needle tool or toothpick to pierce a hole through one of the pointed ends for the ribbon. Make sure the hole is wide enough for your ribbon to pass through later.
Texturing Tip
If you don’t have sandpaper, rolling the unbaked football gently over a clean piece of denim creates a fantastic, realistic leather grain texture.
Step 2: Adding the Details
-
Prepare the white clay:
Clean your hands thoroughly before switching colors. Condition the white clay and roll it out into a thin, even sheet, about 1-2mm thick. -
Cut the end stripes:
Using your craft blade, slice two thin strips from the white sheet. These will become the signature stripes near the nose of the football. -
Apply the stripes:
Wrap one white strip around each end of the football, roughly half an inch from the tip. Press them down gently to adhere them to the brown base without smashing the texture. -
Make the laces base:
Cut a slightly wider, shorter strip of white clay. Place this longitudinally directly in the center of the football’s top face to serve as the vertical spine of the laces. -
Form the cross-laces:
Roll a very thin snake of white clay. Cut it into 6-8 tiny, equal segments. -
Attach the laces:
Lay the small segments across the vertical spine like rungs on a ladder. Space them evenly. I like to use the flat side of a knife to gently press them down so they look sewn in rather than just resting on top. -
Add stitching texture:
Using your needle tool, poke tiny rows of holes along the edges of the white end stripes to simulate stitching marks.
Step 3: Finishing Touches
-
Bake the project:
Place your football on a parchment-lined baking sheet. Bake according to your polymer clay package instructions (usually 275°F/135°C for 15-30 minutes per 1/4 inch of thickness). -
Cool down:
Allow the ornament to cool completely before handling. The clay hardens fully as it returns to room temperature. -
Prepare the speckle paint:
Dilute a small amount of black acrylic paint with water until it is quite runny and ink-like. -
Apply the speckles:
Dip an old toothbrush into the watered-down paint. Running your thumb over the bristles, flick a mist of fine black specks over the brown parts of the football. This creates that aged, gritty texture visible in the photo. -
Dry the paint:
Let the paint dry completely. Since the layer is thin, this should only take a few minutes. -
Attach the ribbon:
Thread your cream satin ribbon through the hole you made earlier. Tie a secure knot at the end to form a loop for hanging.
Team Spirit
Customize the ornament by swapping the classic white laces and stripes for clays in your favorite team’s colors, or paint a jersey number on the side.
Now you have a rugged little keepsake perfect for the sports fan in your life


Textured Pigskin Finish Trick
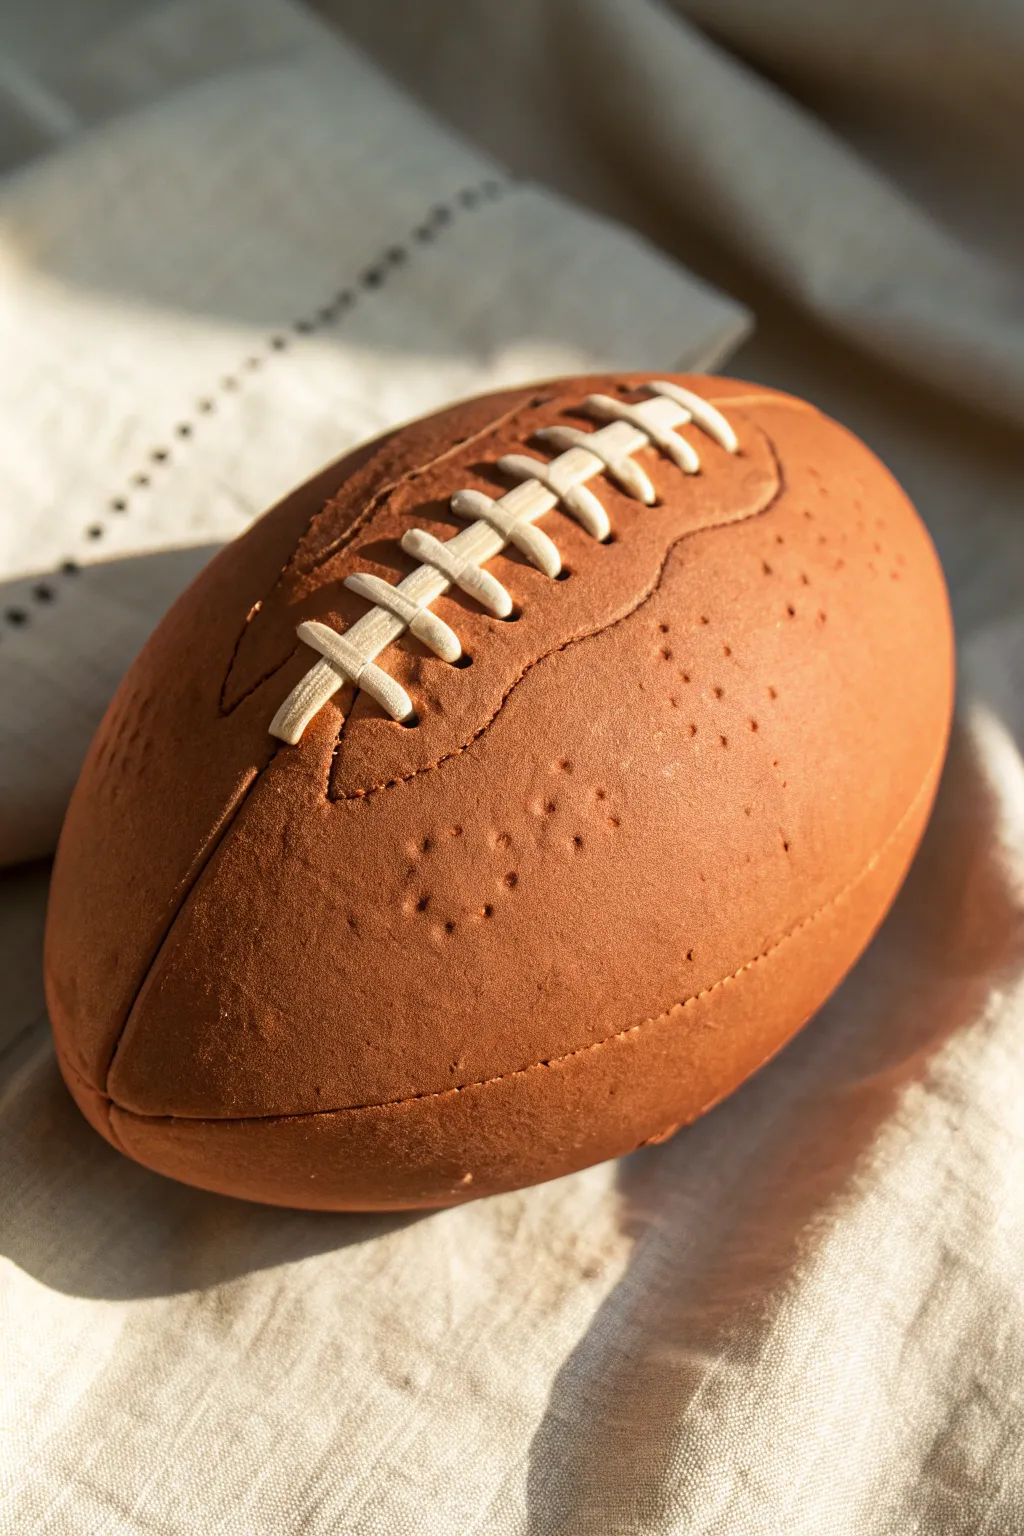
Achieve an incredibly lifelike finish on your clay football sculpture with this simple yet effective texturing method. The result captures the classic dimpled leather look perfectly, making your piece indistinguishable from the real thing at a glance.
How-To Guide
Materials
- Polymer clay (terracotta or burnt orange)
- White polymer clay
- Sculpting tools (needle tool, ball stylus)
- Clean toothbrush or stiff stippling brush
- Aluminum foil
- Rolling pin or pasta machine
- Clay blade
- Oven (for baking)
- Matte varnish (optional)
Step 1: Forming the Base
-
Prepare the foil core:
To save clay and ensure even baking, tightly crunch a sheet of aluminum foil into an elongated oval shape. Compress it firmly against a hard surface to smooth out sharp ridges until it resembles a rough football shape. -
Condition the clay:
Knead your terracotta or burnt orange polymer clay until it is soft and pliable. If the color feels too bright, you can mix in a tiny pinch of brown to deepen the leather tone. -
Sheet the clay:
Roll the clay out into a medium-thickness sheet, about 1/4 inch thick. It needs to be substantial enough to cover the foil without tearing during the texturing phase. -
Cover the form:
Wrap the clay sheet around your foil core. Gently press the seams together and smooth them over with your thumb until the entire surface is seamless and uniform. -
Refine the shape:
Roll the clay football gently between your palms or on your work surface to taper the ends into points, creating that classic prolate spheroid shape.
Texture Secret
Use a piece of actual sandpaper (around 80 grit) to press into the clay alongside the toothbrush. This adds a microscopic grit texture that mimics worn leather perfectly.
Step 2: Detailing and Stitching
-
Mark the panels:
Using a needle tool, lightly score a curved line running from one tip of the football to the other. Repeat on the opposite side to define the main leather panels. -
Add the grip strips:
Score two parallel curved lines near the top center where the laces will go. This creates the visual illusion of the reinforced panel found on real game balls. -
Create seam detailing:
Along your scored panel lines, use a small needle tool to make tiny, evenly spaced indentations that mimic the heavy manufacturing stitching holding the leather together. -
Prepare the laces:
Roll out a thin snake of white clay. Flatten a section of it to create the base strip for the laces, and cut it into a rectangular shape with your blade. -
Attach the lace base:
Place the white rectangular strip onto the top of the football between your parallel score lines. Press it down gently to adhere it to the orange clay. -
Create the crossover laces:
Cut 8 small strips from your white clay snake. Lay them horizontally across the base strip, spacing them evenly. Press the ends down firmly to secure them.
Game Day Ready
After baking, dilute some dark brown acrylic paint with water. Brush it over the whole ball and immediately wipe it off. The dark paint stays in the dimples for an aged look.
Step 3: The Pigskin Finish
-
Initial texturing:
This is the signature step. Take a clean toothbrush or a stiff stippling brush and firmly press the bristles into the orange clay. Do this over the entire surface, rotating your brush angle frequently to avoid a uniform pattern. -
Refine the dimples:
For deeper texture variation, go back over random areas with a medium-sized ball stylus or a toothpick, pressing individual pores into the ‘leather’ surface. -
Check the seams:
If your texturing has blurred your panel lines or stitching details, gently re-trace over them with your needle tool to make them pop again. -
Clean the laces:
If any orange clay dust or texture transferred onto your white laces, carefully wipe them clean with a cotton swab dipped in a little rubbing alcohol. -
Bake the project:
Bake the football according to your specific clay manufacturer’s instructions. Usually, this is around 275°F (130°C) for 15-30 minutes per 1/4 inch of thickness. -
Final finish:
Once cool, inspect your work. I sometimes like to brush on a very thin layer of matte varnish to seal the piece without making it look glossy or plastic.
Your textured clay football is now ready to be the centerpiece of your fall decor or a perfect gift for a sports fan


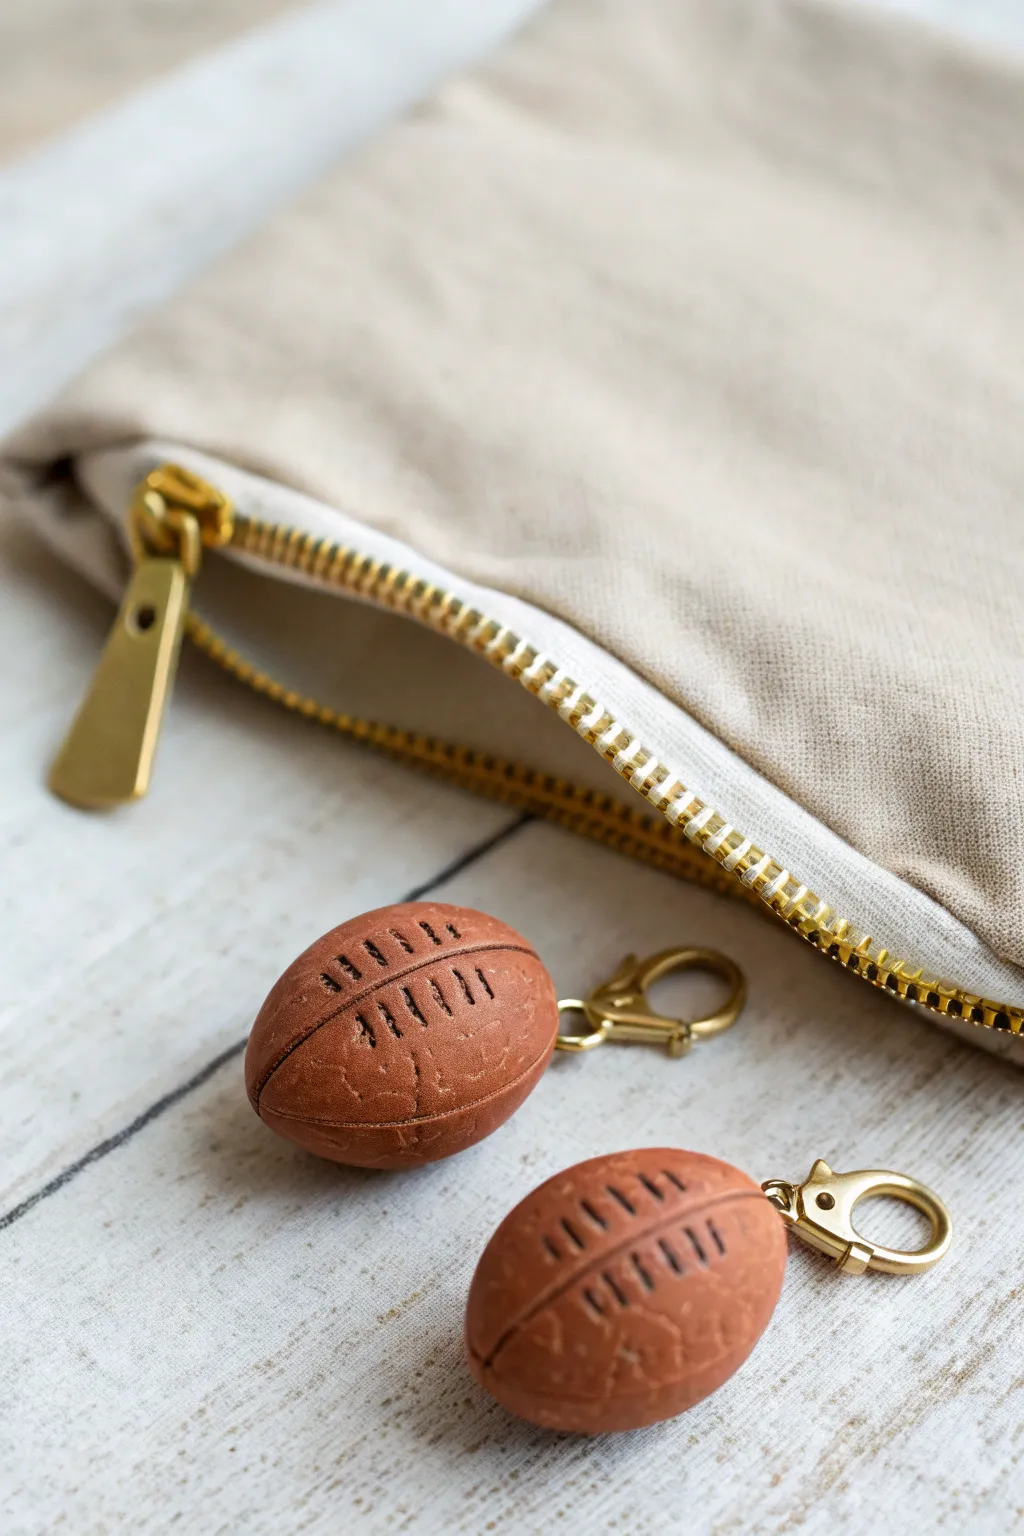
Football Charm Keychains
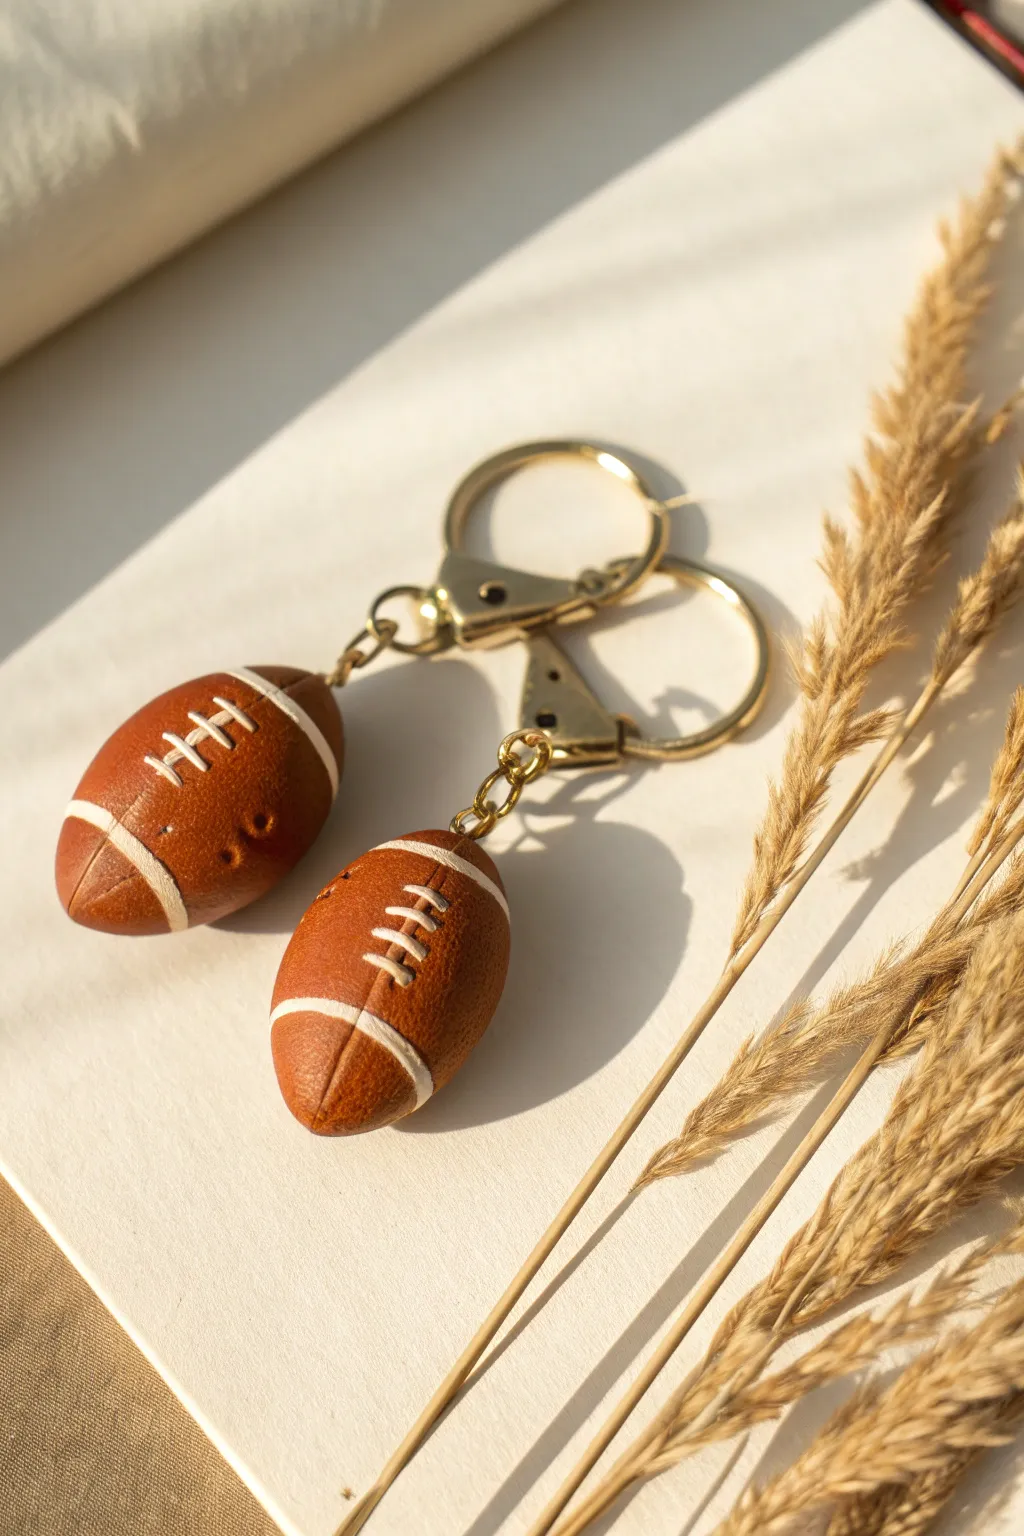
These charming keychains feature incredibly realistic miniature footballs complete with a faux leather texture and crisp white lacing. They make perfect gifts for sports fans and look high-end thanks to the gold hardware and dimensional detailing.
Step-by-Step
Materials
- Polymer clay (burnt sienna or leather brown)
- Polymer clay (white)
- Texture tool (rough sponge, sandpaper, or stiff toothbrush)
- Clay sculpting tools (needle tool, small ball stylus)
- Liquid polymer clay (clear or translucent)
- Gold screw eye pins (2 small)
- Gold lobster clasp keychains (2)
- Jump rings (gold)
- Pliers (flat nose and needle nose)
- Oven for baking
Step 1: Shaping the Base
-
Condition the clay:
Start by taking your brown polymer clay and conditioning it in your hands until it is soft and pliable. If the color isn’t quite right for a football, try mixing a touch of black into burnt orange clay. -
Form the basic shape:
Roll the clay into a smooth ball about the size of a large grape. Slowly gently pinch and roll the two opposite ends to create a classic prolate spheroid (football) shape. It should be slightly tapered but still rounded. -
Smooth imperfections:
Lightly roll the shape on your work surface to ensure it is symmetrical. Use your finger to buff out any fingerprints, as we want a clean base before texturing.
Step 2: Adding Texture and Hardware
-
Create the leather texture:
This is the secret to realism. Gently press a rough sponge, a piece of coarse sandpaper, or the bristles of a stiff toothbrush all over the surface of the brown clay. Don’t press too hard; you want a pebbled surface, not deep divots. -
Insert the eye pin:
Select one of the tapered ends to be the top. Carefully screw a small gold eye pin into this end. Adding a dab of liquid clay to the threads before inserting will act as a glue once baked. -
Refine the texture:
Holding the clay by the new eye pin, check your texture again. Assuming some areas got smoothed over while inserting the pin, gently re-texture those spots now.
Realism Pro Tip
To accent the leather texture, lightly brush a tiny amount of darker brown chalk pastel powder over the surface before baking. It settles into the crevices for depth.
Step 3: Detailing the Laces
-
Add the white stripes:
Roll out a very thin snake of white polymer clay. Cut two small pieces and wrap one around each end of the football, creating the signature rings. Gently press them flat into the brown clay so they don’t look like they are floating on top. -
Make the center lace panel:
Roll a slightly thicker snake of white clay and cut a short segment for the main vertical lace line. Press this onto the top center of the football, lengthwise between the two white rings. -
Create the cross stitches:
Roll an incredibly thin snake of white clay—think thread-thin. Cut 5-8 tiny pieces for the horizontal stitches. -
Apply the stitches:
Using a needle tool or tweezers, carefully place these tiny white strips across the vertical white line. Space them evenly. I tend to press the ends of each stitch down firmly with a needle tool to mimic the look of thread going into the leather. -
Add faux dimples:
For extra detail, use a small needle tool to poke two tiny holes on either side of the laces, mimicking the air valve or leather seam indentations often found on real balls.
White Clay Caution
White clay picks up dirt instantly. Always wash your hands or wipe them with a baby wipe before handling the white clay to keep those laces crisp and bright.
Step 4: Baking and Assembly
-
Bake the charms:
Preheat your oven according to the specific manufacturer’s instructions on your package of clay. Typically, this is around 275°F (135°C). Place the footballs on a baking sheet or ceramic tile. -
Cool down:
Bake for the recommended time (usually 15-30 minutes depending on thickness). Once done, remove them and let them cool completely before handling to ensure durability. -
Prepare the keychain hardware:
Grab your gold lobster clasp keychains. Use your pliers to open a gold jump ring by twisting the ends sideways (never pull them apart). -
Attach the charm:
Loop the open jump ring through the eye pin on your baked football and through the bottom loop of the keychain hardware. -
Close the loop:
Use your pliers to twist the jump ring back into a closed position, ensuring the gap is tight so the charm doesn’t slip off.
Now you have a sturdy, stylish accessory to support your favorite team all season long

The Complete Guide to Pottery Troubleshooting
Uncover the most common ceramic mistakes—from cracking clay to failed glazes—and learn how to fix them fast.
Football Zipper Pulls
These mini football zipper pulls are the perfect blend of sporty and chic, featuring realistic leather-like textures and polished gold hardware. They are sturdy enough to hang on a backpack, pencil case, or purse, making them a fantastic DIY gift for sports fans.
How-To Guide
Materials
- Terracotta or reddish-brown polymer clay
- Dark brown or black acrylic paint
- Gold lobster clasp keychains with small screw eyes (or separate screw eyes)
- Small needle tool or toothpick
- Texturing tool (stiff bristle brush, sandpaper, or crumpled foil)
- Blade or X-Acto knife
- Wet wipes or paper towels
- Oven for baking
- Super glue (optional)
Step 1: Shaping the Clay
-
Condition the clay:
Begin by working a small amount of terracotta polymer clay in your hands until it becomes soft and pliable. This conditioning stage prevents cracks later on. -
Form a ball:
Roll a piece of clay about the size of a large marble or a small walnut into a smooth, crack-free sphere. -
Shape the football:
Gently gently roll the ball back and forth between your palms, applying slightly more pressure on the outer edges to taper the ends. You want that classic prolate spheroid shape—pointed at the tips and round in the middle. -
Insert hardware:
Take a gold screw eye pin and push it carefully into one of the pointed ends of the football. Twist it slightly to help it grip the raw clay.
Step 2: Adding Details & Texture
-
Draw guide lines:
Use your needle tool to very lightly sketch two curved lines running lengthwise along the top center of the ball. These will guide your stitching placement. -
Create the texture:
This is the secret to the realistic look. Pat the surface of the clay gently with a stiff bristle brush, coarser sandpaper, or a ball of crumpled foil. Cover the entire surface except for the space between your two guide lines. -
Impress the laces:
Using the needle tool or a small flat tool, press short, firm horizontal lines between your guide lines to create the look of laces. Press vertical lines on either side of the laces to define the stitching area. -
Smooth the seams:
With your finger, gently rub out any harsh ridges caused by the texture tool so the surface looks like worn leather rather than scratched mud. -
Second texture pass:
I find doing a very light second pass with your texture tool helps blend the edges of the smooth lacing area into the rougher leather sections.
Hardware Loose?
If the screw eye keeps spinning in the raw clay, bake the clay without it. Drill a small hole after baking, add super glue, and screw the hardware in then.
Step 3: Baking & Finishing
-
Bake the clay:
Preheat your oven according to your polymer clay package instructions (usually around 275°F or 130°C). Bake the footballs on a baking sheet/tile for about 15-20 minutes. -
Cool down:
Remove them from the oven and let them cool completely. The clay hardens fully only after it returns to room temperature. -
Secure the hardware:
Once cool, unscrew the eye pin. Add a tiny drop of super glue to the threads, and screw it back into the hole for a permanent hold. -
Apply the wash:
Dilute a small amount of dark brown or black acrylic paint with water. Brush this wash liberally over the entire football, ensuring it gets into the textured crevices and lace impressions. -
Wipe away excess:
Immediately use a wet wipe or damp paper towel to gently wipe the paint off the surface. The dark paint will stay stuck in the texture and laces, highlighting the details, while the raised areas return to the terracotta color. -
Attach the clasp:
Use small jewelry pliers to attach your gold lobster clasp to the loop of the screw eye.
Level Up: White Laces
For a classic look, roll tiny snakes of white clay and press them into the lace impressions before baking, instead of relying on the antique paint effect.
Let the paint dry completely before clipping your new charm onto your favorite bag
Football Stud Earrings
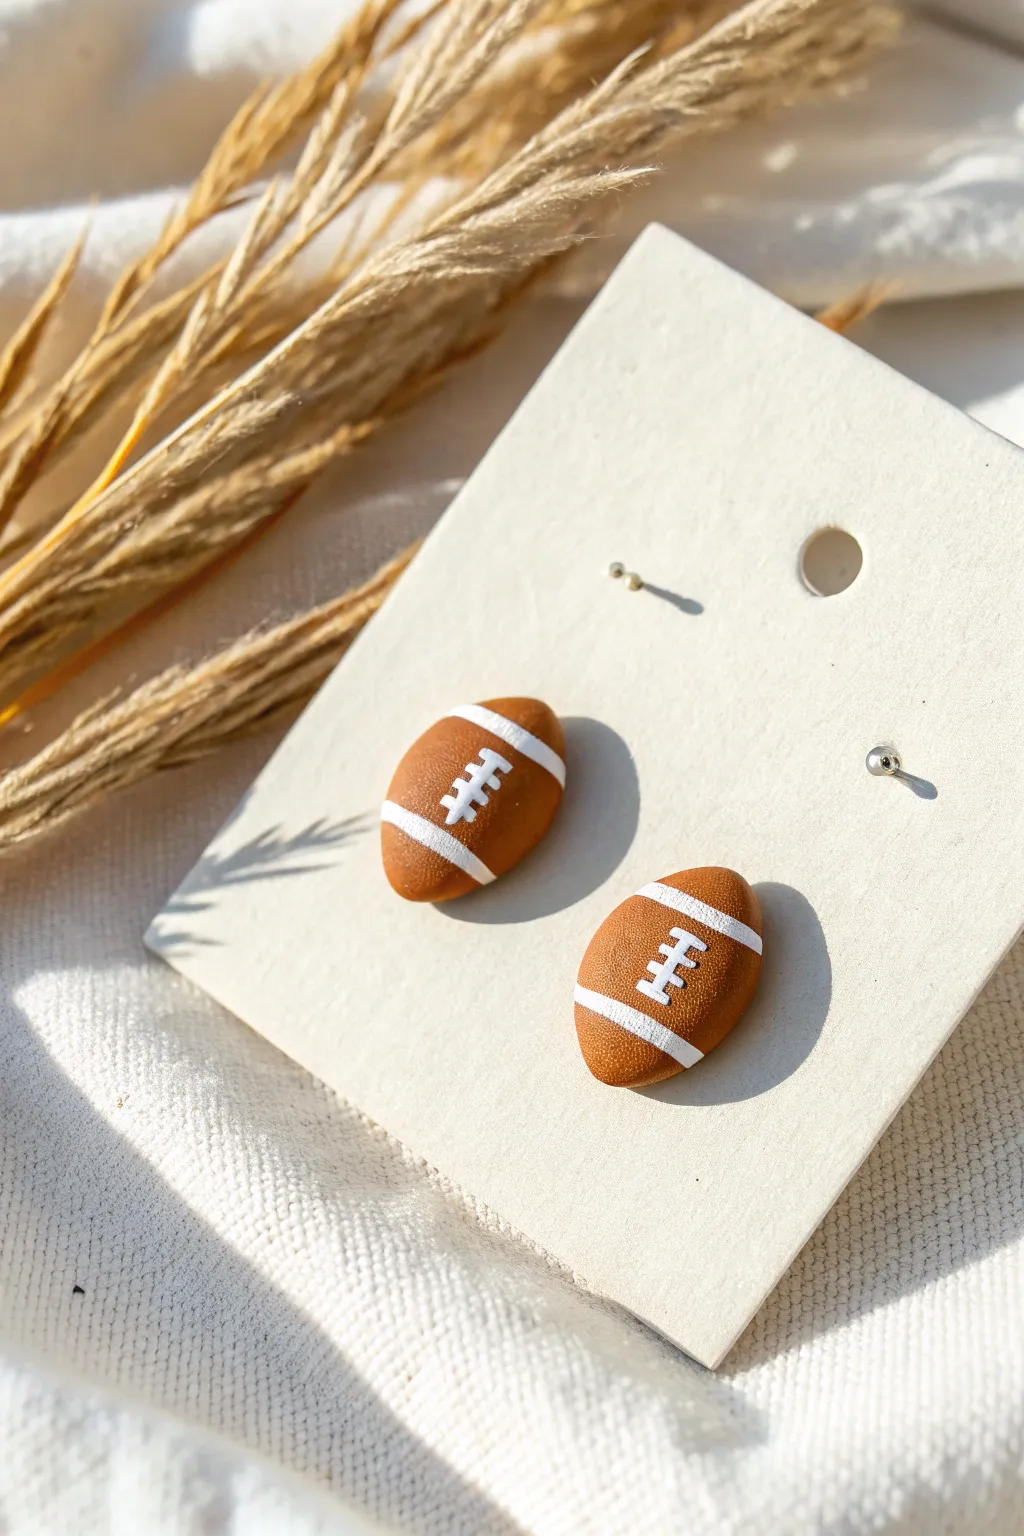
Get ready for game day with these incredibly cute polymer clay football earrings, perfect for showing off your team spirit in a subtle way. Their realistic texture and crisp white detailing make them look just like miniature versions of the real thing.
Step-by-Step Guide
Materials
- Brown polymer clay (leather brown shade)
- White polymer clay
- Liquid polymer clay (translucent or Bake & Bond)
- Sandpaper or a toothbrush (for texturing)
- Earring stud posts (stainless steel or gold-plated)
- Super glue (E6000 or Loctite Gel)
- Clay blade or craft knife
- Rolling pin or acrylic roller
- Oven for baking
Step 1: Shaping the Base
-
Condition the clay:
Start by warming up a small amount of brown polymer clay in your hands. Knead it thoroughly until it is soft, pliable, and easy to work with. -
Roll spheres:
Pinch off two equal-sized pieces of the brown clay. Roll each piece between your palms to form smooth, consistent spheres about the size of a small pea. -
Form the football shape:
Gently gently lengthen the spheres by rolling just the sides back and forth. Then, pinch the ends slightly to create that classic tapered, pointed oval football silhouette. -
Check for symmetry:
Place both footballs side-by-side to ensure they are the same size. Gently press them onto your work surface to flatten the back slightly, which helps the earring post sit flush later. -
Add texture:
To mimic the look of pigskin leather, lightly tap the surface of the clay with a piece of coarse sandpaper or the bristles of a clean toothbrush. Be careful not to distort the shape you just perfected.
Clean Hands Tip
White clay picks up dust instantly. Always wipe your hands and tools with a baby wipe or alcohol swab before switching from the brown clay to the white detailing.
Step 2: Adding the Details
-
Prep the white clay:
Condition a very small amount of white clay. Roll it out into an extremely thin snake or use an extruder to get fine, hairlike strands. -
Apply the stripes:
Cut four tiny pieces from your white strand for the stripes. I find it easiest to use a needle tool to pick these up. Place two stripes on either end of each football, wrapping them slightly around the curve. -
Start the laces:
Cut a slightly thicker, short strip of white clay and place it vertically in the center of the football, between the two end stripes. -
Finish the stitching:
Cut three or four minuscule pieces of the thin white coil. Lay them horizontally across the central vertical strip to create the laces. Use your blade to gently press them down so they adhere well. -
Smooth the seams:
If the white clay stands up too high, very gently tap it with your finger or a flat tool to embed it slightly into the brown clay without smashing the texture.
Step 3: Baking and Assembly
-
Bake the pieces:
Place your finished footballs on a ceramic tile or a baking sheet lined with parchment paper. Bake according to the manufacturer’s instructions for your specific brand of clay—usually around 275°F (135°C) for 15-30 minutes. -
Cool down:
Once baken, remove them from the oven and let them cool completely. The clay hardens fully as it cools, so don’t try to attach hardware while they are still warm. -
Attach the posts:
Flip the footballs over. Apply a small dot of strong super glue (like E6000) to the flat pad of your earring post. -
Secure the backing:
Press the glued post firmly onto the back of the clay football. Hold it in place for a few seconds to ensure a good initial bond. -
Reinforce (optional):
For extra durability, you can add a tiny drop of liquid clay over the earring pad (not the post stem) and bake the earrings again for 10 minutes, essentially trapping the metal in plastic.
Game Day Custom
Swap the traditional white stripes for your favorite team’s colors! Use yellow, red, or blue clay for the stripes to create custom spirit-wear accessories.
Wear these sporty studs to your next tailgate and enjoy the compliments on your handiwork


What Really Happens Inside the Kiln
Learn how time and temperature work together inside the kiln to transform clay into durable ceramic.
Football Fridge Magnets
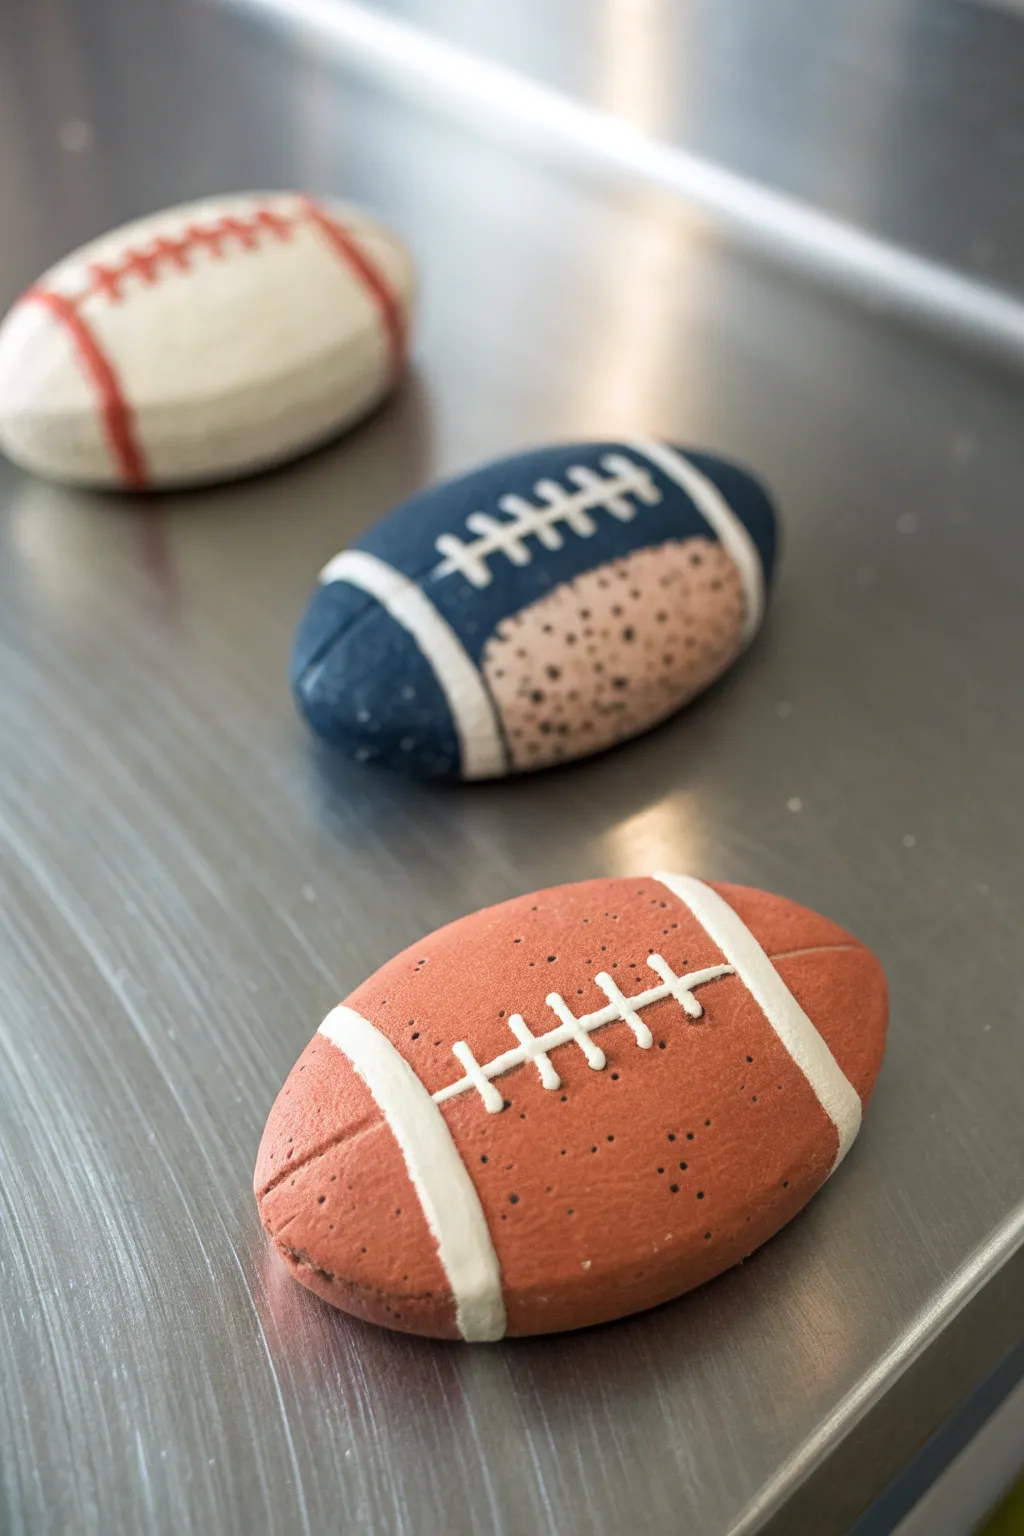
These charming football magnets are a perfect way to show team spirit right on your refrigerator door. Crafted from polymer clay with textured details and crisp piping, they feature both classic leather looks and fun custom team color combinations.
How-To Guide
Materials
- Polymer clay (terracotta/brown, white, navy blue, light tan)
- Acrylic rolling pin
- Oval cutter (or craft knife)
- Clay sculpting tools (needle tool/toothpick)
- Liquid clay or Bake and Bond (optional)
- Strong magnets
- Super glue (E6000 recommended)
- Soft paintbrush or toothbrush (for texture)
- Dark brown acrylic paint (optional for speckling)
- Oven for baking
Step 1: Shaping the Base
-
Condition the clay:
Begin by kneading your chosen clay colors—classic terracotta, navy blue, or white—until they are soft and pliable. This conditioning step prevents cracks during baking. -
Create the oval form:
Roll the clay into a smooth ball, then gently flatten it into a thick disc. Use your fingers to taper the ends, creating the pointed oval shape of a football. You want a nice, domed top surface, not a completely flat pancake. -
Add surface texture:
For the realistic leather look seen on the brown football, gently tap a clean toothbrush or a crumpled ball of aluminum foil over the entire surface of the unbaked clay. This creates a subtle, porous texture. -
Create the two-tone look:
For the blue and tan football, create two separate balls of clay. Slice them at an angle and press the cut sides together to form the oval. Smooth the seam with your finger so it becomes one solid piece before texturing. -
The speckled effect:
To recreate the speckled look on the blue football’s tan section, incorporate tiny flecks of black or dark brown clay into the tan clay before shaping, or gently spatter it with watered-down acrylic paint after the base shape is formed.
Step 2: Adding Details
-
Roll the stripes:
Roll out a very thin snake of white clay (or red clay for the white football) to create the signature stripes. Uniformity is key here, so try to keep the pressure even as you roll. -
Apply the stripes:
Lay the thin clay snake across the football shape, roughly where the curve begins on each end. Gently press it down so it adheres to the base without flattening completely. Trim the excess at the bottom edges. -
Form the laces base:
Roll a slightly thicker, short piece of white clay for the central spine of the laces. Place this vertically in the center of the football between the two stripes. -
Create the cross-laces:
Roll minuscule pieces of white clay for the horizontal stitches. Carefully lay 5-6 of these distinct little lines across the vertical spine. I find using a needle tool helps to position these tiny pieces precisely without squishing them. -
Refine the edges:
Use a silicone styling tool or your finger to gently smooth the connection points where the white clay meets the colored base, ensuring everything is bonded well. -
Add decorative indents:
Using a needle tool, press faint lines or small dots near the tips of the football to mimic stitches or seams found on real balls.
Clean Lines Pro Tip
For ultra-crisp white stripes, use a clay extruder. It produces perfectly uniform strands that rolling by hand can rarely match.
Step 3: Finishing
-
Final inspection:
Check for any fingerprints. If you find any, you can buff them out using a tiny amount of baby oil on your finger or use the texturing tool again to disguise them. -
Bake the clay:
Place your footballs on a parchment-lined baking sheet. Bake according to your clay manufacturer’s specific instructions (usually 275°F/135°C for 15-30 minutes per 1/4 inch thickness). -
Cool down:
Let the pieces cool completely inside the oven with the door slightly ajar. This gradual cooling helps prevent the clay from becoming brittle. -
Attach the magnet:
Once fully cooled, flip the footballs over. Apply a drop of strong adhesive like E6000 to the back and press your magnet firmly into place. Let the glue cure for at least 24 hours.
Level Up: Jersey Numbers
Personalize the magnets by adding a tiny clay number to the side of the football to represent your favorite player’s jersey number.
Now your kitchen is ready for the season kickoff with these durable little custom creations
Football Cupcake Picks

These charming football cupcake picks are the perfect finishing touch for any Super Bowl party or sports-themed celebration. A simple brown ellipsoid shape is elevated with careful white detailing to create an instantly recognizable and festive decoration.
Detailed Instructions
Materials
- Polymer clay (football brown/terracotta)
- Polymer clay (white)
- Wooden skewers or sturdy toothpicks
- Rolling pin or acrylic roller
- Precision craft knife (X-Acto)
- Clean work surface (tile or silicone mat)
- Needle tool or toothpick
- Oven and baking tray (for polymer clay)
- Liquid clay or strong craft glue (optional)
Step 1: F forming the Base
-
Condition the clay:
Start by taking a chunk of your brown polymer clay. Knead it thoroughly in your hands until it becomes soft, pliable, and free of cracks. This conditioning step is crucial to prevent breakage later. -
Shape the ball:
Roll the conditioned brown clay into a smooth sphere about the size of a walnuts, or roughly 1.5 inches in diameter, ensuring there are no visible seams. -
Refine the form:
Gently gently lengthen the sphere by rolling it between your palms, applying slightly more pressure on the outer edges than the center. You want that classic prolate spheroid shape—tapered on both ends and plump in the middle. -
Insert the pick:
Take your wooden skewer or toothpick. Carefully insert the sharp end into what will be the bottom point of your football. Push it in about halfway through the clay shape to ensure it stays secure. -
Smooth the connection:
Sometimes the clay bulges slightly where the wood enters. Use your finger to smooth the clay back down around the stick for a tight seal. I like to add a tiny dot of liquid clay on the stick before inserting it for extra hold.
Step 2: Adding the Details
-
Prepare the white details:
Clean your hands or switch to a fresh workspace to avoid staining the white clay. Roll out a small piece of white clay into a very thin, flat sheet, about 1mm thick. -
Cut the stripes:
Using your precision craft knife, cut two thin, long strips from the white sheet. These should be about 2-3mm wide and long enough to wrap halfway around the football. -
Apply the stripes:
Place one white strip near the top pointed end of the football and the other near the bottom end. Wrap them gently around the curve, pressing lightly so they adhere to the brown clay without smashing the shape. -
Create the lace base:
Cut a slightly wider and shorter strip of white clay. Place this vertically in the center of the football, running lengthwise between the two horizontal stripes you just applied. This is the background for the laces. -
Make the laces:
Roll an incredibly thin snake of white clay. Cut it into tiny segments, maybe 4 or 5 pieces, each just a few millimeters long. -
Attach the laces:
Carefully lay these tiny segments horizontally across the vertical white strip. Space them evenly to mimic the stitching. Use the flat side of your knife to gently press them flat so they bond. -
Texture the leather (Optional):
For a more realistic look, lightly stipple the brown areas with a clean toothbrush or a balled-up piece of aluminum foil to simulate the texture of pigskin leather.
Sticky Situation?
If your white clay is getting dirty from the brown clay residue on your hands, use baby wipes or hand sanitizer/alcohol to clean your fingers thoroughly between colors.
Step 3: Baking and Assembly
-
Prepare for baking:
Preheat your oven according to the specific temperature instructions on your package of polymer clay (usually around 275°F or 135°C). -
Support the toppers:
To prevent flat spots, you don’t want to lay these down. Stick the wooden ends into a ball of scrap foil or a dedicated bead baking rack so the footballs stand upright. -
Bake carefully:
Bake the toppers for approximately 15-20 minutes depending on thickness. Keep a close eye on them so the white clay doesn’t scorch or yellow. -
Cool down completely:
Remove from the oven and let them cool completely before handling. The clay is fragile while warm and hardens as it cools. -
Final check:
Once cool, check if the football is loose on the stick. If it wiggles, pull it off, add a dab of super glue or vigorous craft glue, and slide it back on.
Team Spirit Upgrade
Swap the traditional white laces for colors matching your favorite team’s jersey. You can even use a fine-tip edible marker to write a jersey number on the side.
Now you are ready to stick these onto your favorite cupcakes and kick off the party

TRACK YOUR CERAMIC JOURNEY
Capture glaze tests, firing details, and creative progress—all in one simple printable. Make your projects easier to repeat and improve.
Football Place Card Holders

Add a sporty touch to your table setting with these realistic clay football place card holders. With their leather-like texture and crisp white lacings, they are sturdy enough to hold name cards while looking charmingly handmade.
Step-by-Step
Materials
- Brown polymer clay (terra cotta or leather brown shade)
- White polymer clay
- Texture tool (or a piece of real leather/sandpaper)
- Needle tool or toothpick
- Fine-point black marker or black acrylic paint pen
- Wire place card holder clip or stiff craft wire
- Clay roller or pasta machine
- Baking sheet and parchment paper
- Sculpting tool set
- Oven (for baking polymer clay)
Step 1: Sculpting the Football Base
-
Condition the brown clay:
Start by kneading the brown polymer clay until it is soft and pliable. This ensures there are no air bubbles trapped inside, which could cause cracking during baking. -
Form the initial oval:
Roll the conditioned clay into a smooth ball about the size of a lemon, then gently elongate it between your palms to create an egg shape. -
Refine the pointed ends:
Gently taper both ends of the oval to create the distinctive football points, ensuring the main body remains plump and round. -
Add leather texture:
To mimic the look of pigskin, gently press a texturing tool, a piece of coarse sandpaper, or even a crumpled ball of aluminum foil over the entire surface of the football. Press just hard enough to leave an imprint without deforming the shape.
Cracking Clay?
If your clay cracks while texturing, it likely wasn’t conditioned enough. Add a drop of clay softener or baby oil and knead it until it stretches without breaking.
Step 2: Adding the Laces and Details
-
Create the white strips:
Roll out a very thin sheet of white polymer clay. Use a craft knife to cut two thin, long strips for the stripes (optional) and one wider rectangle for the backing of the laces. -
Apply the lace backing:
Place the small white rectangle on the top center of the football. This will serve as the base where the ‘threads’ will cross. -
Create the threads:
Roll a very thin snake of white clay. Cut short, even segments to act as the individual laces. -
Attach the threads:
Lay the small white segments across the rectangle backing in a parallel ladder pattern. Press them down gently so they adhere without smashing them flat. -
Define the seams:
Using a needle tool, gently score a curved line running lengthwise alongside the laces to suggest the seam of the football panels. -
Form the decorative grip lines:
On the side of the football, separate from the white laces, use your needle tool to impress a vertical line with several small horizontal dashes crossing it, mimicking the decorative grip stitching often seen on vintage balls. -
Darken the grip lines:
Carefully trace these impressed grip lines with a fine-point black marker or a very fine brush with black paint to make them stand out against the brown clay.
Team Spirit
Swap the standard white laces for your favorite team’s colors to make custom game-day decor. You can even paint the team logo on the side.
Step 3: Finishing and Assembly
-
Insert the card holder:
Take your wire place card clip (or a small wooden stick if you prefer the look in the photo) and insert it firmly into the top of the football, just behind the white laces. Ensure it goes deep enough to be stable. -
Check for balance:
Set the football down on your work surface to ensure it sits flat and doesn’t roll over. If it rolls, gently press the bottom against the table to create a small flat spot. -
Bake the project:
Place the footballs on a parchment-lined baking sheet. Bake according to your specific polymer clay package instructions (usually around 275°F or 135°C for 15-30 minutes per 1/4 inch of thickness). -
Cool down:
Allow the clay to cool completely in the oven with the door slightly ajar. This gradual cooling helps prevent cracks. -
Optional matte finish:
I prefer a natural look, but if you want to protect the paint, apply a very thin coat of matte varnish over the painted black stitches once everything is cool.
Set your finished card holders at each seat for a winning game day presentation
Football Mini Planter
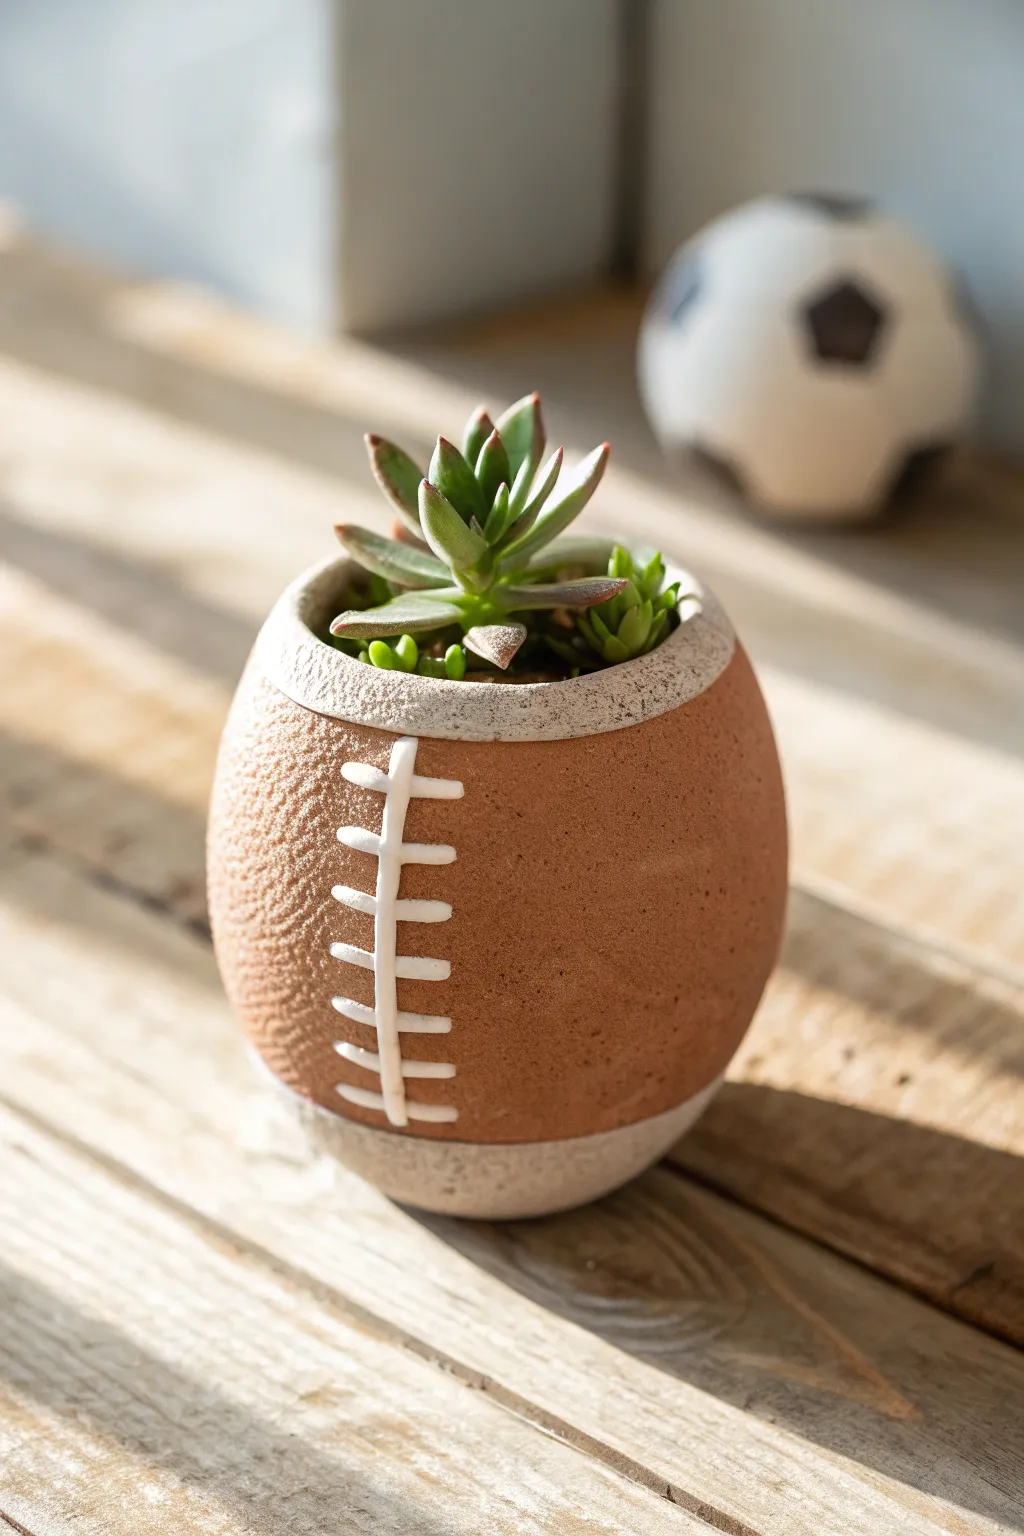
Bring your love of the game to your indoor garden with this charming miniature football planter. Its textured surface and classic stitching details make it the perfect home for a small succulent or cactus.
Step-by-Step Tutorial
Materials
- Terracotta-colored polymer clay (or air-dry clay)
- White polymer clay
- Ball of aluminum foil (approx. 3-inch diameter)
- Clay roller or rolling pin
- Texture sponge or stiff-bristled toothbrush
- Clay knife or scalpel
- Small round cookie cutter (approx. 2 inches)
- Needle tool
- Liquid clay (optional, for adhesion)
- Oven (if using polymer clay)
- Matte varnish (optional)
Step 1: Forming the Base
-
Create the core:
Start by crumpling aluminum foil into a tight ball, then gently squeeze two opposite sides to elongate it into a rough football oval shape. This will act as a lightweight armature and save clay. -
Cover the core:
Roll out a slab of terracotta-colored clay to about 1/4 inch thickness. Wrap this sheet fully around your foil armature, smoothing the seams together with your fingers until the foil is completely hidden. -
Refine the shape:
Roll the clay-covered form gently on your work surface to smooth out bumps. Use your palms to taper the top and bottom ends slightly, reinforcing that classic prolate spheroid football shape. -
Create the opening:
Press a small round cutter into the top center of the football shape to mark your opening. Carefully cut this circle out and scoop out the foil from just this top section to create a cavity for the plant. -
Smooth the rim:
Use your finger or a smoothing tool to round off the cut edge of the opening so it looks finished and deliberate rather than sharp. -
Add the base:
Gently tap the bottom of the football against your table to flatten it slightly. This ensures the planter will sit stable and upright without rolling away.
Step 2: Texturing and Details
-
Initial texturing:
Take a texture sponge or a clean, stiff toothbrush and press it repeatedly all over the terracotta surface. This mimics the rough, pebbled texture of real pigskin leather. -
Create the stripes:
Roll out a thin snake of white clay. Flatten it slightly with your roller to create a ribbon about 1/4 inch wide. -
Apply the rim stripe:
Wrap this white ribbon around the top rim of the planter opening. Press it gently into the clay so it sits flush. I like to re-texture the terracotta right next to the white clay to blend the seam. -
Apply the base stripe:
Repeat this process for the bottom, adding a white stripe near the base where the football shape begins to taper. -
Texture the white stripes:
Lightly tap the white stripes with your texture tool. They should look unified with the rest of the ball, not like smooth plastic stickers sitting on top.
Leather Texture Trick
For ultra-realistic leather texture, gently press a piece of medium-grit sandpaper into the clay before baking.
Step 3: The Laces
-
Form the main lace:
Roll a very thin snake of white clay and cut a piece about 2 inches long. Place this vertically on the side of the football, centered between the top and bottom stripes. -
Add the stitches:
Cut 8 small pieces of the same thin white snake, each about 1/2 inch long. Lay these horizontally across the vertical lace, spacing them evenly. -
Secure the laces:
Gently press these small pieces down so they bond with the terracotta clay underneath. If you are struggling with adhesion, a tiny dab of liquid clay here helps keep everything reliable. -
Baking:
Bake the planter according to your clay package instructions (usually 275°F for 15-30 minutes for polymer clay). If using air-dry clay, let it sit for 24-48 hours. -
Finishing touches:
Once cool or dry, you can apply a matte varnish to protect the surface. Finally, fill the cavity with a small amount of soil and your favorite succulent.
Clay Won’t Stick?
If the white laces keep falling off the textured base, rub a tiny drop of baby oil or liquid clay on the attachment points.
Enjoy your sporty new planter and the touch of greenery it adds to your space
Football Pen Holder
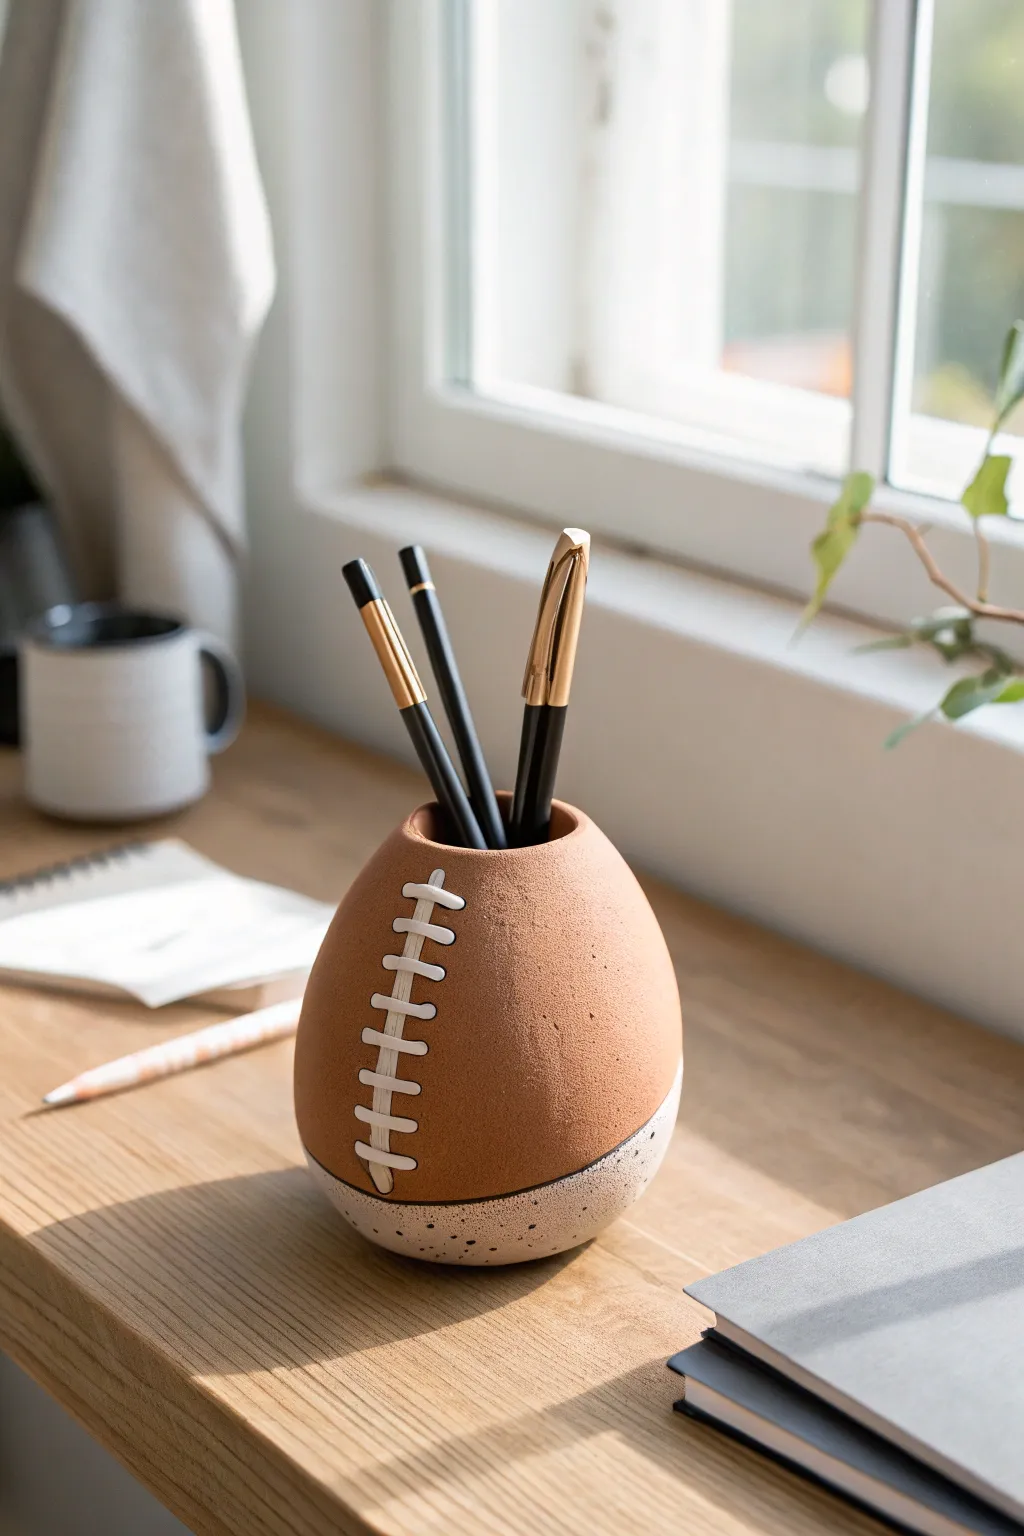
Add some sporty flair to your workspace with this charming, two-toned ceramic pen holder. Shaped like a standing football, it features classic white laces and a speckled terrazzo base for a modern, handcrafted look.
Step-by-Step Guide
Materials
- Air-dry clay (terracotta color)
- Air-dry clay (white or cream)
- Rolling pin
- Clay knife or craft blade
- Slip (clay mixed with water)
- Sponge
- Small paintbrush
- Black acrylic paint
- White acrylic paint (if using white clay for laces)
- Clear matte sealant or varnish
- Sandpaper (fine grit)
- Toothbrush (optional, for texturing)
Step 1: Shaping the Base
-
Form the pinch pot:
Start with a ball of terracotta-colored clay roughly the size of a large orange. Insert your thumb into the center and gently pinch the walls upward while rotating the ball to create a hollow pot. -
Refine the football shape:
Instead of leaving the pot round, gently squeeze the upper rim on opposite sides to create an oval opening. Imagine the general silhouette of a football standing upright. -
Close the top slightly:
Curve the upper walls inward, smoothing the clay so the opening becomes smaller—just wide enough to hold a handful of pens comfortably. -
Prepare the bottom addition:
Take a smaller amount of the white or cream clay. Flatten it slightly into a thick disk that matches the diameter of the bottom of your terracotta pot. -
Score and slip:
Use your knife to scratch cross-hatch marks (scoring) onto the bottom of the terracotta shape and the top of the white disk. Apply a little water or slip to these rough areas to act as glue. -
Join the sections:
Press the white disk firmly onto the bottom of the terracotta shape. Smooth the seam with your finger or a modeling tool until the transition between the two colors is flush and seamless.
Texturing Tip
For ultra-realistic leather texture, gently press a piece of real sandpaper against the wet terracotta clay before adding the laces.
Step 2: Adding Details & Texture
-
Create the speckle effect:
If your white clay isn’t pre-speckled, you can knead in tiny bits of dried black clay or black sand now, or wait to paint speckles later. The base should look like stone or terrazzo. -
Smooth the surface:
Dip a sponge in a little water and wipe it over the entire piece to remove fingerprints and bumps. I find this really helps unify the shape before moving on to details. -
Texture the football:
For a realistic pigskin look, gently tap the terracotta section with a dry sponge or a toothbrush. This creates a subtle, leather-like pore texture. -
Roll out the laces:
Roll a small piece of white clay into a very thin snake. Cut one long strip (about 2 inches) and several very short strips (about 1/2 inch) for the cross-laces. -
Attach the main lace:
Score a vertical line down the center of the football shape. Apply a dab of water and press the long white clay strip onto it vertically. -
Add the cross-laces:
Place the short strips horizontally across the long strip, spacing them evenly. Press them down gently so they adhere without flattening completely.
Cracking Clay?
If tiny cracks appear while drying, mix a small amount of clay with water to make a paste and fill them in, then sand smooth once dry.
Step 3: Finishing Touches
-
Let it dry:
Allow the project to dry completely for 24-48 hours. Keep it away from direct heat sources to prevent cracking as the moisture evaporates. -
Sand for smoothness:
Once fully dry, use fine-grit sandpaper to gently smooth out any rough edges on the rim or the bottom base. -
Paint the speckles:
If you didn’t mix speckles into the clay, dip a toothbrush into watered-down black acrylic paint. Run your thumb over the bristles to flick tiny black dots onto the bottom white section only. -
Seal the piece:
Apply a coat of clear matte sealant or varnish to protect the clay from moisture and give it a finished, professional look.
Now your desk is game-day ready with a stylish organizer that catches every eye
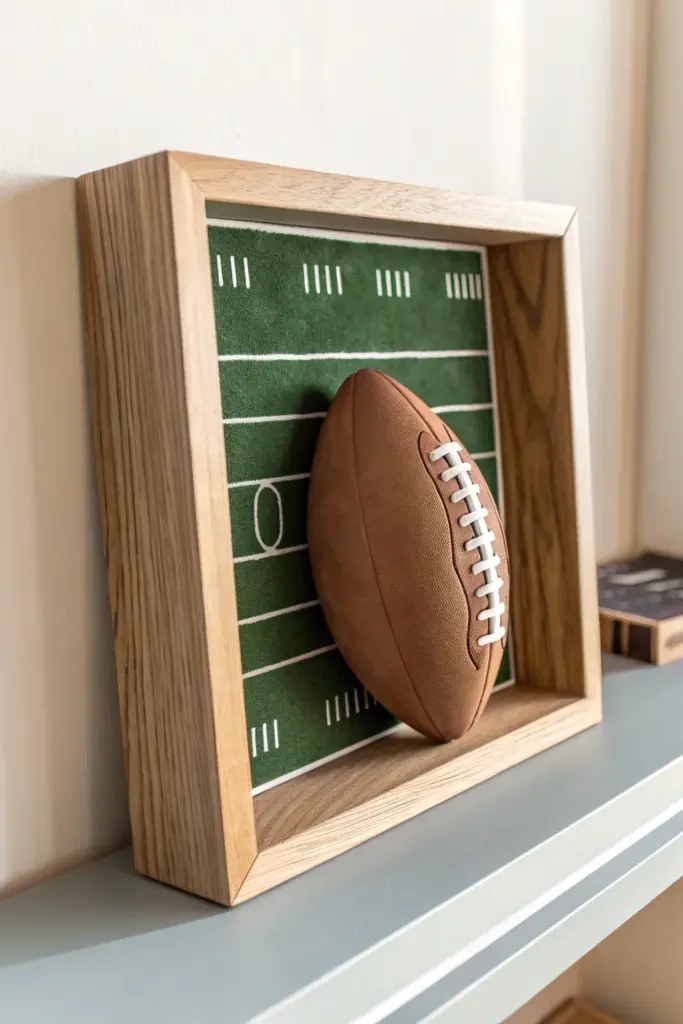
Football Field-and-Ball Shadow Box

This striking piece of dimensional art brings the gridiron to your shelf with a textural football field background and a remarkably realistic clay football bursting from the frame. The combination of velvet-finish green backing and the warm leather look of the clay creates a sophisticated, sporty accent piece.
Step-by-Step Guide
Materials
- Polymer clay (burnt umber/terra cotta color)
- White liquid clay or white polymer clay
- Deep shadow box frame (natural wood finish)
- Green velvet paper or self-adhesive flocking sheet
- White paint pen (fine tip)
- Ruler
- Texture sponge or stiff bristle brush
- Clay sculpting tools (needle tool, ball stylus)
- Aluminum foil
- Strong craft glue (E6000 or similar)
- Cardstock or mat board (to fit frame)
- Oven and baking sheet
Step 1: Creating the Football
-
Form the core:
Crumple aluminum foil into a tight, elongated oval shape to serve as the armature; this saves clay and keeps the sculpture lightweight. -
Condition the clay:
Knead your brown polymer clay until it is soft and pliable, ensuring there are no air bubbles trapped inside. -
Cover the core:
Roll the clay into a sheet about 1/4 inch thick and wrap it completely around your foil armature, smoothing the seams so they disappear. -
Refine the shape:
Roll the clay form gently on your work surface to create a symmetrical prolate spheroid shape, tapering the ends slightly. -
Flatten the back:
Press one side of the football gently against the table to create a flat surface; this is where it will adhere to the backboard later. -
Add leather texture:
Using a texture sponge, a piece of sandpaper, or a stiff brush, tap firmly all over the curved surface of the clay to mimic the pebbled texture of pigskin. -
Carve the seams:
Use a needle tool to gently score two curved lines running lengthwise where the white stripes would usually be, though we are keeping this version monochromatic for a modern look. -
Create the lace area:
Flatten a small, thin strip of brown clay and press it onto the top center curve for the lace base, blending the edges into the main body. -
Add the laces:
Roll tiny snakes of white clay (or use white liquid clay carefully piped) to create the eight cross-stitches and the two long anchor lines of the laces. -
Add detail to laces:
If using solid clay for laces, use a sculpting tool to press them slightly into the ‘leather’ so they look embedded rather than just sitting on top. -
Bake the clay:
Bake the football according to your clay package instructions (usually 275°F for 15-30 minutes), treating it carefully so it doesn’t develop flat spots.
Paint Pen Bleeding?
If the paint pen bleeds on the velvet paper, try dabbing the paint on rather than dragging the tip. Alternatively, use thin strips of white vinyl or thinly rolled white clay for crisp lines.
Step 2: Constructing the Field
-
Prepare the backing:
Cut your cardstock or mat board to the exact interior dimensions of your shadow box frame. -
Apply the turf:
Adhere the green velvet paper or flocking sheet to the cardstock, smoothing out any air bubbles for a pristine playing surface. -
Mark the yard lines:
Using a ruler, lightly mark horizontal spacing for the yard lines to ensure perfectly parallel placement. -
Draw the main lines:
Take your white paint pen and draw sold horizontal lines across the field; go slowly to ensure the ink sinks into the velvet texture without bleeding. -
Add hash marks:
Draw small vertical hash marks between the main yard lines. I find it helpful to mark the center first to keep perfectly symmetrical spacing. -
Draw the numbers (optional):
If you want the specific ‘0’ shown in the example, carefully outline the number in the center yard line zone with the paint pen.
Make it Personal
Add your favorite player’s jersey number or the projected score of a big game to the scoreboard area using tiny wooden numbers painted white.
Step 3: Final Assembly
-
Test the position:
Once the clay football is completely cool, place it onto the field background to find the most dynamic angle. -
Glue the football:
Apply a generous amount of strong craft glue (like E6000) to the flat back of the football and press it firmly onto the green field. -
Let it cure:
Allow the glue to cure flat for at least 24 hours to ensure the heavy clay piece doesn’t slide down. -
Frame it:
Clean the glass of your shadow box (or remove it for an open textural look), insert your completed field assembly, and secure the back clips.
Hang your new 3D masterpiece and enjoy the touch of athletic elegance it adds to the room.