When I want quick, satisfying wins at my worktable, I reach for polymer clay—it’s perfect for small, cute projects that actually get finished. Here are my favorite polymer clay ideas to spark your next little crafting session, from classic charms to quirky desk-friendly makes.
Kawaii Face Charms
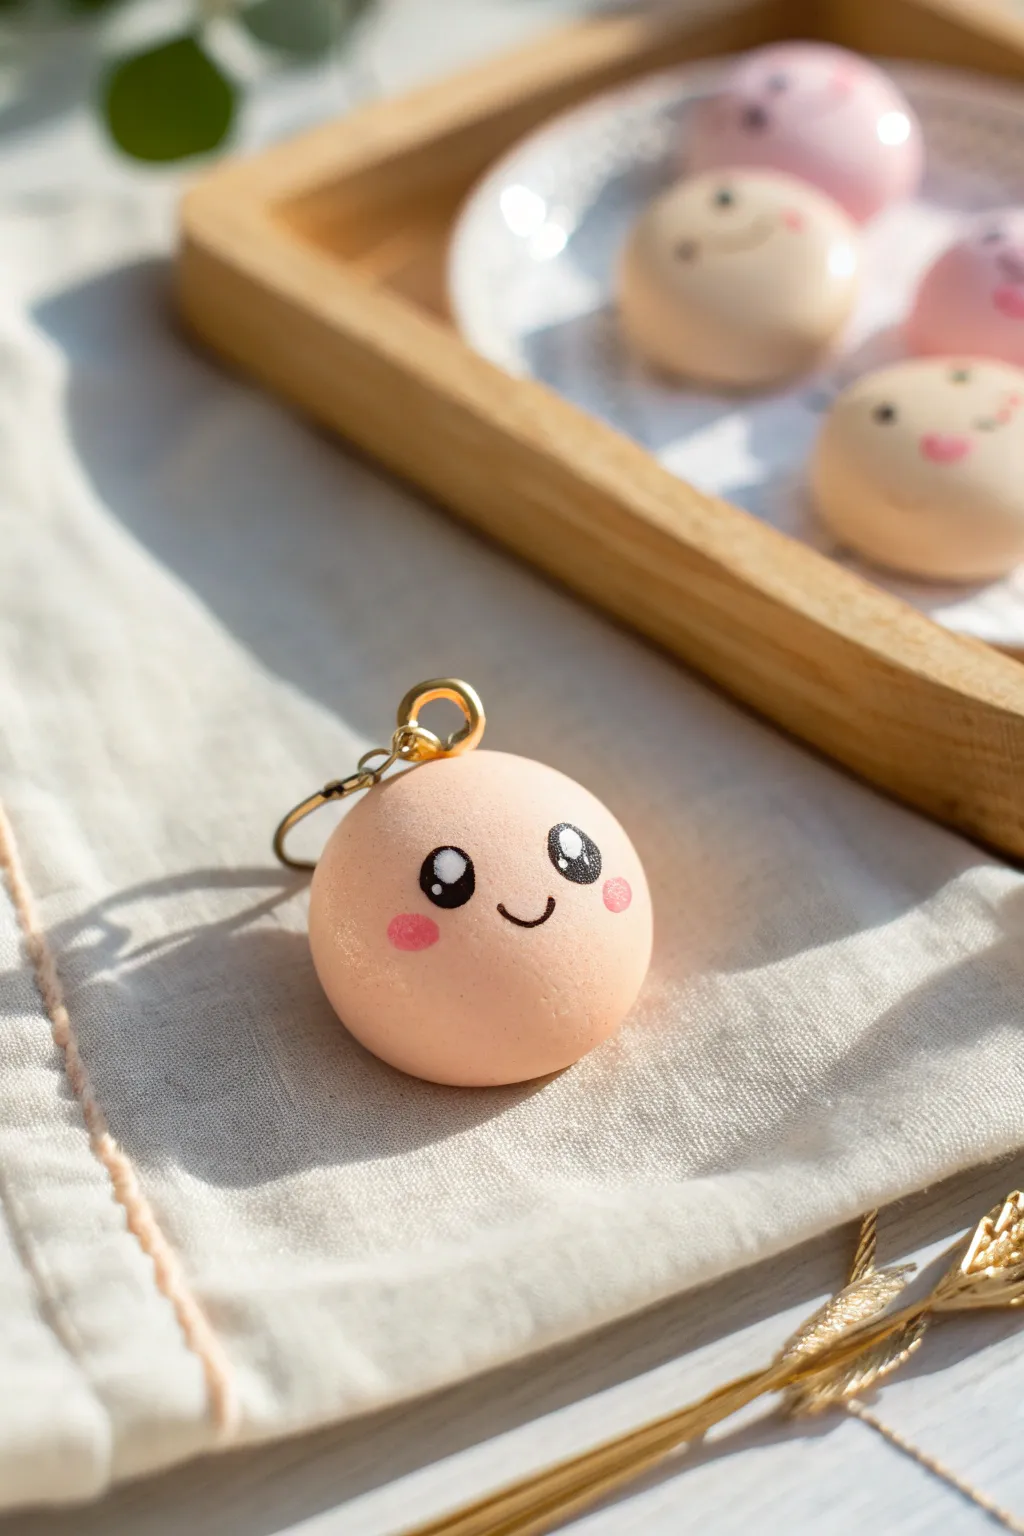
Capture the sweetness of a fresh peach bun with this adorable polymer clay charm. Its perfectly round shape and sparkling eyes make for an irresistibly cute accessory that looks just like soft, squishy mochi.
Detailed Instructions
Materials
- Polymer clay (pale peach or flesh tone)
- Black acrylic paint
- White acrylic paint
- Pink acrylic paint or soft pastels
- Fine detail paintbrush (000 size)
- Dotting tools (various sizes)
- Eye pin or screw eye
- Gloss glaze or UV resin (optional)
- Rolling tool or acrylic sheet
- Wet wipes (for cleaning hands)
Step 1: Shaping the Base
-
Condition the Day:
Begin by thoroughly conditioning your pale peach clay. Knead it in your hands until it is warm, soft, and pliable. This step is crucial to prevent cracks later on. -
Roll a Ball:
Roll a portion of the conditioned clay between your palms to form a smooth, seamless sphere. Aim for a size roughly 1 to 1.5 inches in diameter. -
Flatten Slightly:
Gently press the sphere down onto your work surface just enough to create a stable bottom base so it doesn’t roll away, while keeping the top nice and domed. -
Smooth Imperfections:
Check the surface for any fingerprints or lint. I like to lightly brush the clay with a tiny bit of baby oil on my finger to smooth everything out perfectly. -
Insert Hardware:
Take your eye pin, trim it if it’s too long, and push it straight down into the top center of your sphere. You can add a dab of liquid clay or Bake & Bond to the pin first for extra security.
Smooth Surface Secret
Before baking, lightly dust the raw clay with cornstarch. This allows you to smooth out fingerprints easily without the clay sticking to your skin.
Step 2: Painting the Face
-
Bake First (Optional):
At this point, you can choose to bake the plain sphere according to your clay package instructions. Painting on hardened clay is often easier and prevents accidental squishing, which is what I usually prefer to do. -
Outline the Eyes:
Using a small dotting tool dipped in black acrylic paint, place two large, solid black circles on the upper half of the face. Space them widely apart for that classic kawaii look. -
Refine the Shape:
If the dots aren’t perfectly round, use your fine detail brush to carefully smooth out the edges of the black circles while the paint is still wet. -
Draw the Mouth:
With your finest brush and black paint, draw a tiny, simple ‘u’ shape right between the eyes, slightly lower than center. Keep the line thin and delicate. -
Add Cheeks:
Dip a larger dotting tool into pink paint, or use a dry brush with scraped pink soft pastel dust. Dab two rosy circles just below and to the outside of each eye. -
Highlight the Eyes:
Once the black paint is fully dry, dip a small dotting tool in white paint. Add a medium-sized white dot in the upper right of each black eye. -
Secondary Sparkle:
Using an even smaller tool or a toothpick, add a tiny second white dot in the lower left of the black eye. These highlights bring the character to life.
Step 3: Finishing Touches
-
Final Bake:
If you painted on raw clay, bake the piece now according to the manufacturer’s directions (usually 275°F/135°C for 15-30 minutes depending on thickness). -
Cool Down:
Allow the charm to cool completely before handling. Polymer clay is slightly fragile when hot. -
Seal the Charm:
To protect the paint from scratching off, apply a thin coat of water-based gloss glaze over the entire piece. Alternatively, use UV resin for a durable, glass-like finish. -
Attach Findings:
Open a jump ring with pliers and loop it through the eye pin on top of your charm. Attach it to a keychain, phone strap, or necklace chain.
Design Twist
Try making a trio of charms with different expressions—one winking, one sleeping, and one laughing—to create a full ’emoticon’ set for your bag.
Now you have a charming little companion ready to brighten up your keychain or bag


Mini Food Charms and Keychains
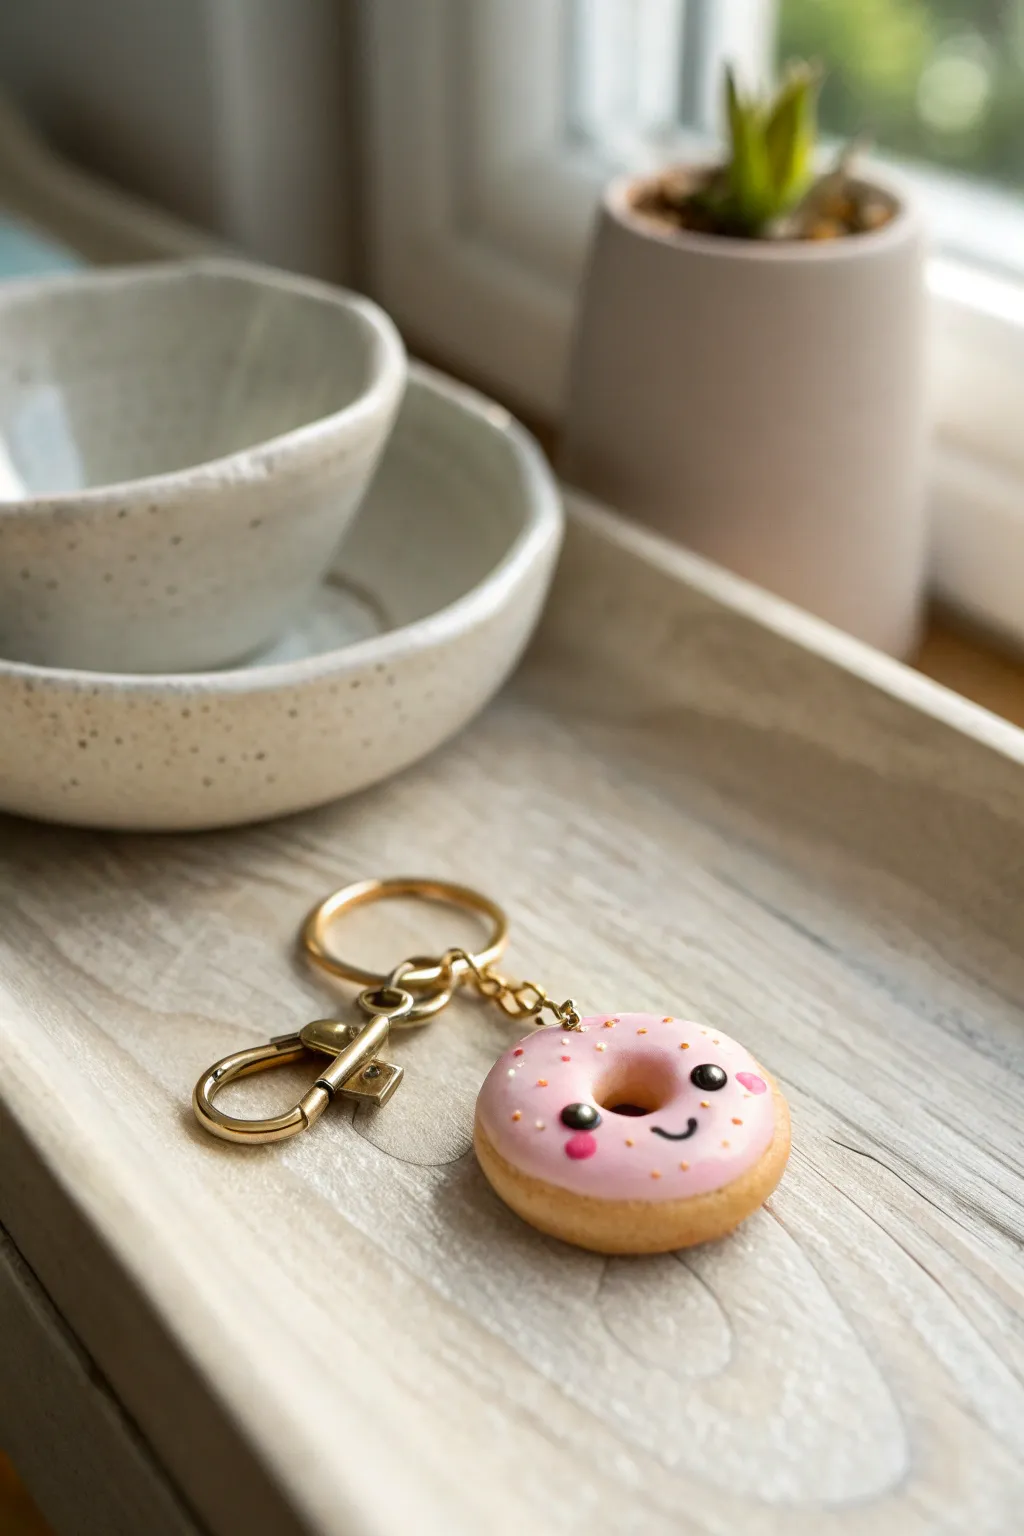
Brighten up your keys with this impossibly cute polymer clay donut charm, featuring sweet pink frosting and a friendly little face. This mini food project is perfect for beginners and results in a sturdy, adorable accessory that adds a touch of whimsy to your day.
Step-by-Step Tutorial
Materials
- Polymer clay (dough color/beige, soft pink, black)
- Small eye pin or screw eye
- Gold keychain hardware (split ring and lobster clasp)
- Jump rings
- Sculpting tools (needle tool, ball tool)
- Translucent liquid polymer clay (optional but helpful for frosting)
- Glaze or UV resin (glossy)
- Soft pastel chalks (orange/brown for shading)
- Paintbrush (soft)
- Pliers (round nose and flat nose)
- Oven for baking
Step 1: Shaping the Base
-
Mix the dough color:
Start by conditioning your beige or dough-colored clay until it is soft and pliable. If the color looks too flat, you can mix in a tiny speck of translucent or white clay to give it a more realistic baked-good appearance. -
Form the donut shape:
Roll the clay into a smooth ball, approximately 1 inch in diameter. Slowly flatten it between your palms or on your work surface until it resembles a thick, rounded disc. -
Create the center hole:
Use the back of a paintbrush or a ball tool to verify the center. Gently press through the middle to create the iconic donut hole, smoothing the edges with your finger so they round inward rather than creating sharp cliffs. -
Add texture and baking tones:
Take a toothbrush or a texturing tool and gently tap the surface of the dough to mimic a baked texture. Then, shave some orange and brown soft pastel chalk into a powder. With a soft dry brush, dust the edges and bottom of the donut to simulate a golden-brown bake.
Donut Texture Trick
Use a crumpled ball of aluminum foil to texture the ‘dough’ part of the clay. It creates perfect, random nooks and crannies that look just like fried dough.
Step 2: Frosting and Face
-
Prepare the frosting:
Condition your soft pink clay. Roll it out into a thin sheet, or for a more realistic drip effect, mix the pink clay with a few drops of liquid polymer clay until it reaches a sticky, gum-like consistency. -
Apply the frosting:
Lay the pink clay sheet over the top of your donut, gently stretching the edges down the sides to create organic, wavy ‘drips’. Use a tool to poke the hole through the center again, blending the pink clay slightly into the hole. -
Smooth the edges:
Carefully press the edges of the pink ‘glaze’ so they adhere completely to the dough base. You want it to look like it was dipped, so avoid sharp, cut edges. -
Add the eyes:
Roll two tiny spheres of black clay. Press them gently into the pink frosting, spacing them widely apart for that classic kawaii look. Flatten them slightly so they aren’t bulging too much. -
Create the smile:
Roll a very thin ‘snake’ of black clay. Cut a tiny U-shape segment and place it centered between the eyes. Use a needle tool to gently curve it into a perfect smile. -
Add cheeks and highlights:
For the rosy cheeks, apply two tiny flattened dots of darker pink clay under the eyes. Add a microscopic dot of white clay or white acrylic paint (after baking) to the black eyes for a sparkle. -
Insert the hardware:
Insert a screw eye or eye pin into the top of the donut. I prefer to add a dab of liquid clay or Bake & Bond to the threads before inserting to ensure it doesn’t pull out later. -
Sprinkle details:
Scatter extremely tiny dots of orange or yellow clay on the remaining pink area to act as subtle sprinkles, keeping them away from the face features.
Scented Charm
Mix a tiny drop of vanilla or strawberry fragrance oil into the clay before baking. Your keychain will smell just as sweet as it looks for weeks!
Step 3: Finishing Up
-
Bake the charm:
Bake the donut according to your clay manufacturer’s instructions (usually 275°F/130°C for 15-30 minutes). Let it cool completely before handling. -
Apply glaze:
Once cool, coat the frosting area and the face with a glossy glaze or UV resin. This makes the ‘glaze’ look wet and sugary while protecting the tiny facial details. -
Attach the keychain:
Using your pliers, open a jump ring and thread it through the eye pin on the donut and the loop of your gold keychain hardware. -
Secure the jump ring:
Close the jump ring tightly using two pairs of pliers to twist it shut, ensuring there is no gap for the charm to slip through.
Now you have a delightful little companion to keep your keys organized and looking sweet


Chubby Animal Figurines
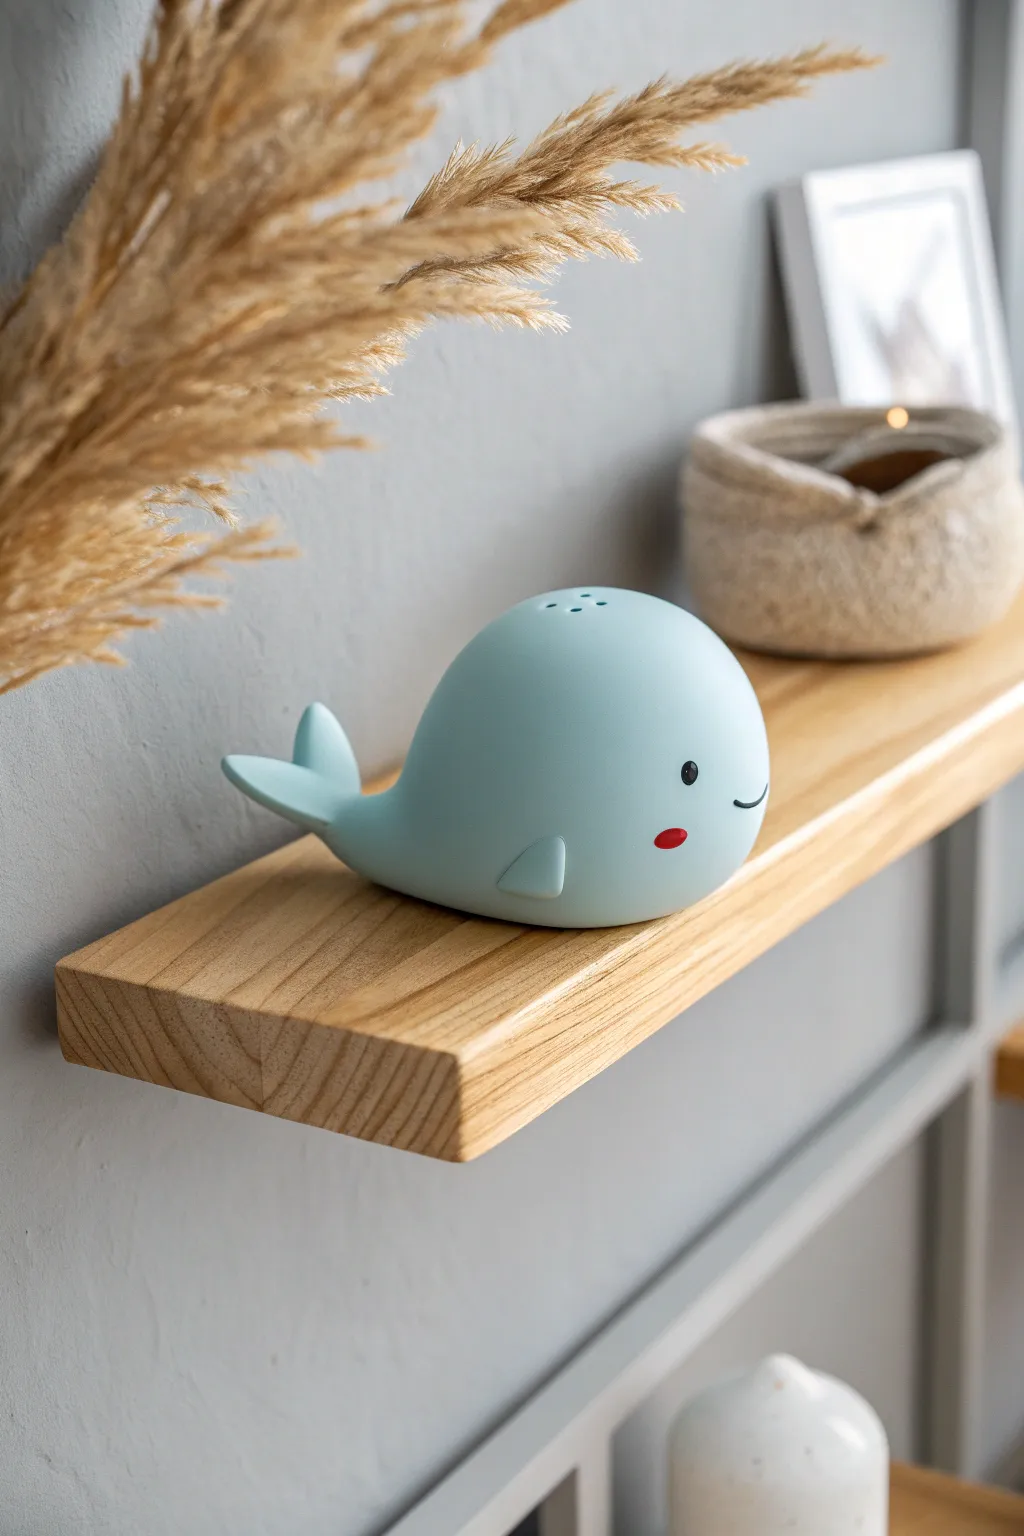
This ridiculously cute whale brings a splash of charm to any shelf with its matte pastel blue finish and simple, rounded features. The minimalist ‘chubby’ style makes it perfect for beginners learning to shape smooth, organic forms.
Step-by-Step Tutorial
Materials
- Polymer clay in pastel blue, black, and red
- Rolling pin or pasta machine
- Blade or craft knife
- Needle tool or toothpick
- Small ball tool
- Smoothing oil (baby oil or clay softener)
- Oven for baking
- Varnish (optional, matte finish recommended)
Step 1: Shaping the Body
-
Start with a ball:
Condition your pastel blue clay until it is soft and pliable. Roll a large amount into a smooth, crack-free ball about the size of a tangerine. -
Form the teardrop:
Gently roll one side of the ball to elongate it slightly into a fat teardrop shape. This will become the whale’s tapering tail section. -
Flatten the base:
Press the bottom of the shape gently onto your work surface to create a flat belly. The whale should sit stably without rolling over. -
Round the head:
Use your palms to smooth and round the larger end of the teardrop, creating a distinct, bulbous forehead area.
Smooth Surface Secret
Before baking, wipe the clay gently with a baby wipe or a brush dipped in rubbing alcohol. This removes lint and creates a porcelain-smooth finish.
Step 2: Adding Fins and Tail
-
Create the flukes:
Take two smaller balls of blue clay and flatten them into teardrop shapes. Flatten them slightly more than the body. -
Attach the tail:
Attach the narrow ends of these teardrops to the tapered end of the body. Blend the seams seamlessly using a clay shaper or your finger so the tail looks like one solid piece. -
Curve the tail:
Gently curve the tail flukes upward for a jaunty, swimming look. -
Make side fins:
Form two small, flattened triangles for the side fins. Round off the corners so they aren’t sharp. -
Position the fins:
Press the fins onto the lower sides of the body, roughly one-third of the way back from the front. Blend the seam at the shoulder only, leaving the tip of the fin free.
Step 3: Facial Details
-
Indent the eye sockets:
Using a small ball tool, press a tiny indentation where you want the eye to go. This helps the eye sit flush with the face. -
Add the eye:
Roll a tiny speck of black clay into a ball, flatten it slightly, and press it into the socket you created. -
Create the cheek:
Roll a slightly larger ball of red clay, flatten it into a thin disk, and press it below and slightly behind the eye for a rosy cheek. -
Carve the smile:
Use the edge of a small spoon tool or a curved blade to gently impress a small smile line near the eye. I like to curve it up at the end for extra cheerfulness. -
Make the blowhole:
Using a needle tool, poke five or six small holes in a circular pattern on the very top of the head to represent the blowhole.
Turn it into a Nightlight
Use translucent polymer clay for the body and hollow out the inside. Place it over a battery-operated LED tea light for a glowing nursery decoration.
Step 4: Finishing Up
-
Smooth fingerprints:
Lightly brush the entire surface with a drop of baby oil or clay softener to remove any fingerprints or dust specks. -
Bake:
Bake according to your clay manufacturer’s instructions, usually around 230°F to 275°F (110°C – 135°C) for 30 minutes per 1/4 inch of thickness.
Once cooled, your chubby whale is ready to swim onto your bookshelf


Tiny Mushroom Charms
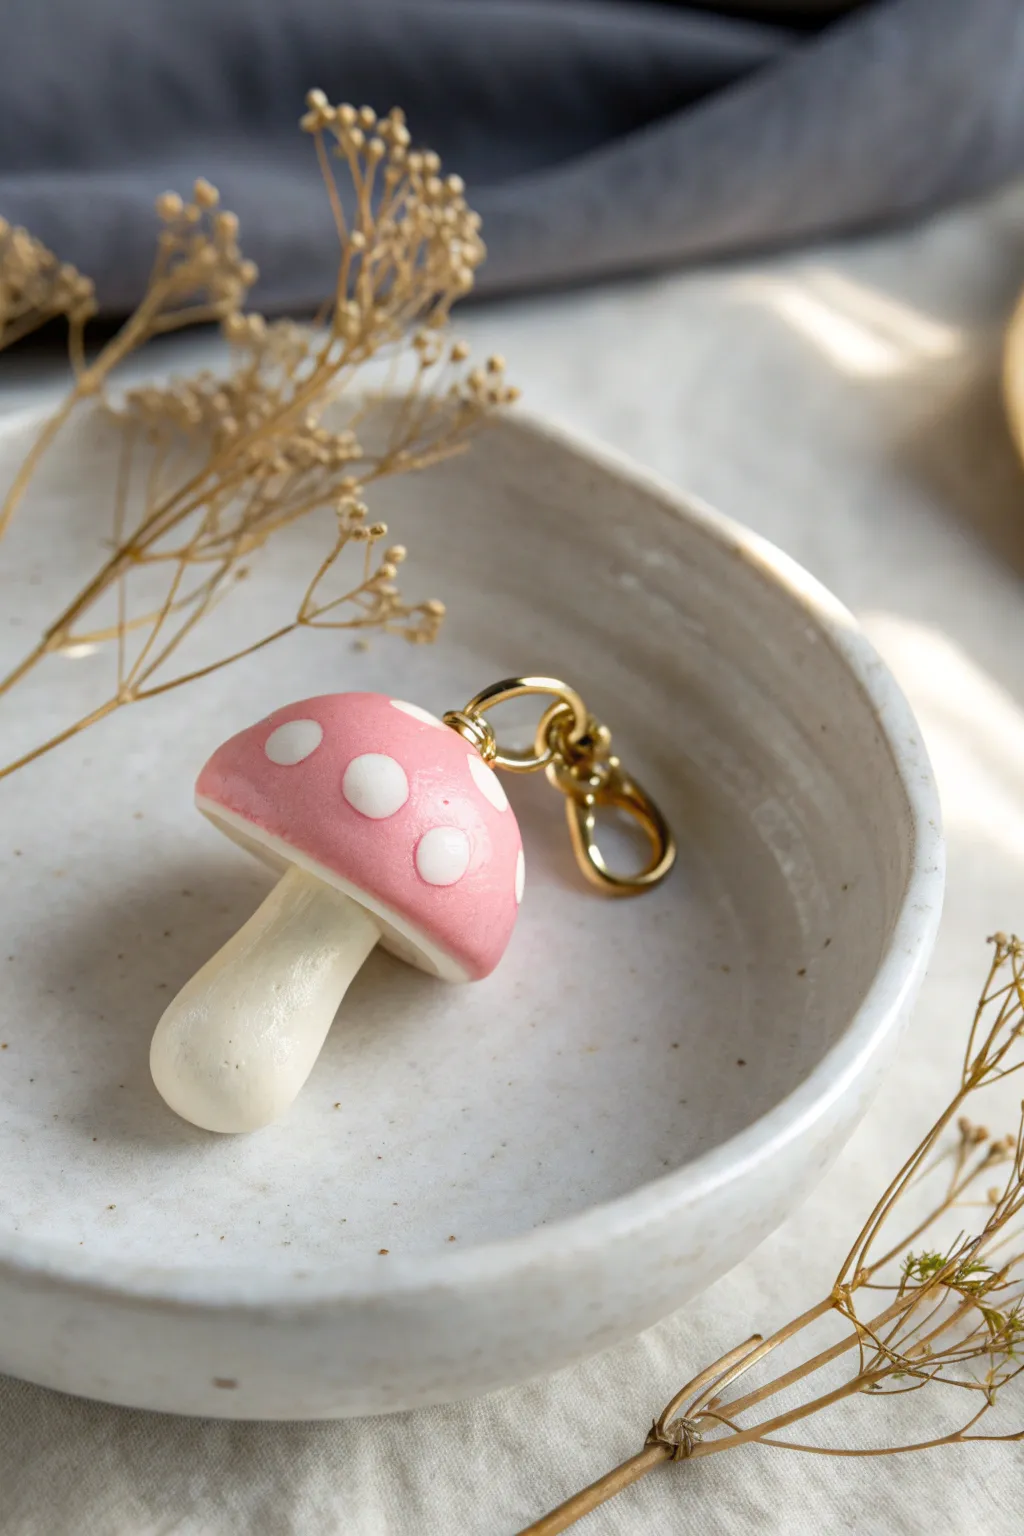
Capture the magic of the forest floor with this adorable pink mushroom charm, complete with classic white polka dots. Its glossy finish and gold hardware make it a durable and stylish addition to any keychain or zipper pull.
How-To Guide
Materials
- Polymer clay (Soft Pink, White, Translucent)
- Small eye pin (gold)
- Gold keychain clasp with jump ring
- Liquid polymer clay (translucent)
- UV resin or glossy glaze
- Small UV lamp (if using resin)
- Needle tool or toothpick
- Dotters or ball tools
- Ceramic tile or glass work surface
- Oven for baking
Step 1: Shaping the Cap
-
Condition the clay:
Start by warming a chunk of soft pink polymer clay in your hands. Knead and roll it until it’s pliable and free of cracks. -
Form a ball:
Roll the pink clay into a smooth sphere approximately the size of a large marble, or about 2cm in diameter. -
Create the dome:
Gently press the ball onto your work surface to flatten the bottom. Use your thumb to smooth the top into a rounded, dome-like mushroom cap shape. -
Hollow the underside:
Turn the cap over. Use a round ball tool or your thumb to create a slight indentation in the center of the flat bottom where the stem will eventually attach.
Step 2: Creating the Stem
-
Mix the stem color:
Mix a small amount of white clay with a tiny bit of translucent clay. I find this gives the stem a more organic, less starkly opaque look. -
Roll the stem shape:
Roll your mixed clay into a thick log. Shape it so it’s slightly wider at the bottom (the base) and tapers gently toward the top. -
Round firmly:
Smooth out the bottom of the stem so it is rounded and bulbous, mimicking the natural growth of a mushroom. -
Connect the pieces:
Place a tiny drop of liquid polymer clay into the indentation of the cap. Press the tapered end of the stem firmly into the cap to bond them.
Smooth Surface Secret
Before baking, lightly brush the clay with a little baby oil or cornstarch. This removes fingerprints and helps smooth out accidental tool marks.
Step 3: Adding Details
-
Make the dots:
Roll out very thin sheets or tiny balls of pure white clay. Flatten these small balls into thin circles of varying sizes. -
Apply the spots:
Gently press the white circles onto the pink cap. Arrange them randomly, placing some near the edges and some near the top. -
Flush the surface:
Roll the entire cap very gently in your palm or lightly press the dots with your thumb to ensure they sit flush with the pink surface rather than sticking out. -
Insert the hardware:
Trim a gold eye pin to about 1cm long. dip the end in liquid clay, and insert it directly into the top center of the mushroom cap.
Loose Eye Pin?
If the eye pin pulls out after baking, simply add a drop of super glue or E6000 to the pin shaft and push it back into the existing hole.
Step 4: Baking and Finishing
-
Bake:
Bake the charm according to your clay package instructions (usually around 275°F/135°C for 15-30 minutes). Let it cool completely. -
Glaze preparation:
Once cool, wipe the surface with a lint-free cloth to remove any oils. -
Apply finish:
Coat the entire mushroom with a layer of UV resin or glossy glaze to protect the clay and give it that ceramic-like shine shown in the photo. -
Cure or dry:
Cure under a UV lamp for 2-3 minutes, or let the air-dry glaze sit for 24 hours until hard and non-tacky. -
Attach keychain:
Use pliers to open the jump ring on your gold keychain clasp. Loop it through the eye pin on the mushroom and close securely.
Clip this delightful charm onto your bag and enjoy your handmade slice of nature

What Really Happens Inside the Kiln
Learn how time and temperature work together inside the kiln to transform clay into durable ceramic.
Mini Icon Refrigerator Magnets
Brighten up your fridge with this adorable collection of polymer clay tile magnets featuring cheerful summer motifs like fruit, rainbows, and sunshine. These uniform squares combine pastel bases with raised, vibrant icons for a clean, modern look that’s perfect for organizing notes or photos.
Step-by-Step
Materials
- Polymer clay (white, pink, yellow, mint green, red, brown, black)
- Square clay cutter (approx. 1 inch)
- Small round piping tip or tiny circular cutter
- Rolling pin or pasta machine
- Detail needle tool or toothpick
- Liquid polymer clay (optional, for bonding)
- Strong craft glue (E6000 or similar)
- Small round ceramic magnets
- Acrylic roller
- Baking sheet with parchment paper
- Gloss glaze (optional)
Step 1: Creating the Tile Base
-
Condition the clay:
Start by thoroughly conditioning your base colors—light pink, mint green, yellow, white, and light blue—until they are soft and pliable. This prevents cracks during baking. -
Roll out the sheets:
Roll each color into a thick, even sheet, approximately 3-4mm thick. Using a pasta machine on a medium setting ensures all your tiles will be exactly the same height. -
Cut the squares:
Use your square cutter to punch out multiple tiles from each color. Gently smooth the edges with your finger to remove any sharp cutting lines.
Step 2: Sculpting the Icons
-
Make the citrus slices:
For the lemon and lime slices, press a small ball of yellow or white clay flat onto a contrasting square. Use a needle tool to impress radial lines, dividing the circle into wedges. -
Craft the strawberries:
Shape a small red triangle with rounded corners. Add tiny green leaves at the top using small teardrop shapes, and use your needle tool to poke small seeds into the red fruit. -
Build the rainbows:
Roll very thin snakes of red, orange, yellow, green, and blue clay. Arch them snugly against each other. Trim the ends cleanly with a blade and place them onto a pink square. -
Form the pineapple:
Shape a yellow oval and flatten it slightly. Use a knife or needle tool to score a cross-hatch diamond pattern. Add tiny green spikes of clay to the top for the crown. -
Create the watermelon slice:
Flatten a small red semi-circle. Add a thin snake of white and then green along the curved edge for the rind. Poke small holes or add tiny black clay specks for seeds. -
Design the sun and heart:
For the sun, place a red circle in the center of a pink tile and use a tool to indent dots around it. For the heart, simply flatten a small red ball and indent the top center to create the lobes. -
Construct the tree:
Place a green circle on a blue tile. Use a dark brown snake for the trunk and branches, layering them over the green circle. Add texture to the green area with a needle tool if desired. -
Add a text tile:
To recreate the ‘NOY’ tile or add a name, use a precision needle tool to scratch letters into the clay, or use tiny alphabet stamps. Add multicolor micro-dots around the text for confetti.
Clean Edges Only
Fingerprints showing up on your smooth tiles? Lightly brush the unbaked clay with a little cornstarch or baby oil, or wipe gently with rubbing alcohol before baking.
Step 3: Baking and Assembly
-
Secure the pieces:
If the clay parts aren’t sticking well on their own, a tiny dab of liquid polymer clay between the icon and the base tile acts as a strong adhesive. -
Bake the batch:
Arrange the finished tiles on a parchment-lined baking sheet. Bake according to your brand’s instructions (usually 275°F/135°C for 15–30 minutes). -
Cool down:
Allow the tiles to cool completely before handling. I usually leave them on the tray for an hour so they harden fully without warping. -
Attach magnets:
Flip the tiles over. Apply a drop of strong craft glue to the center of each square and press a round magnet firmly into place. Let the glue set for 24 hours.
Make it Glossy
For a ceramic tile look, wait until baked and cooled, then coat just the raised fruit and icons with UV resin or a high-gloss polyurethane varnish.
Arrange your colorful grid on the fridge and enjoy your custom mini art gallery
Cute Jar Lid Toppers
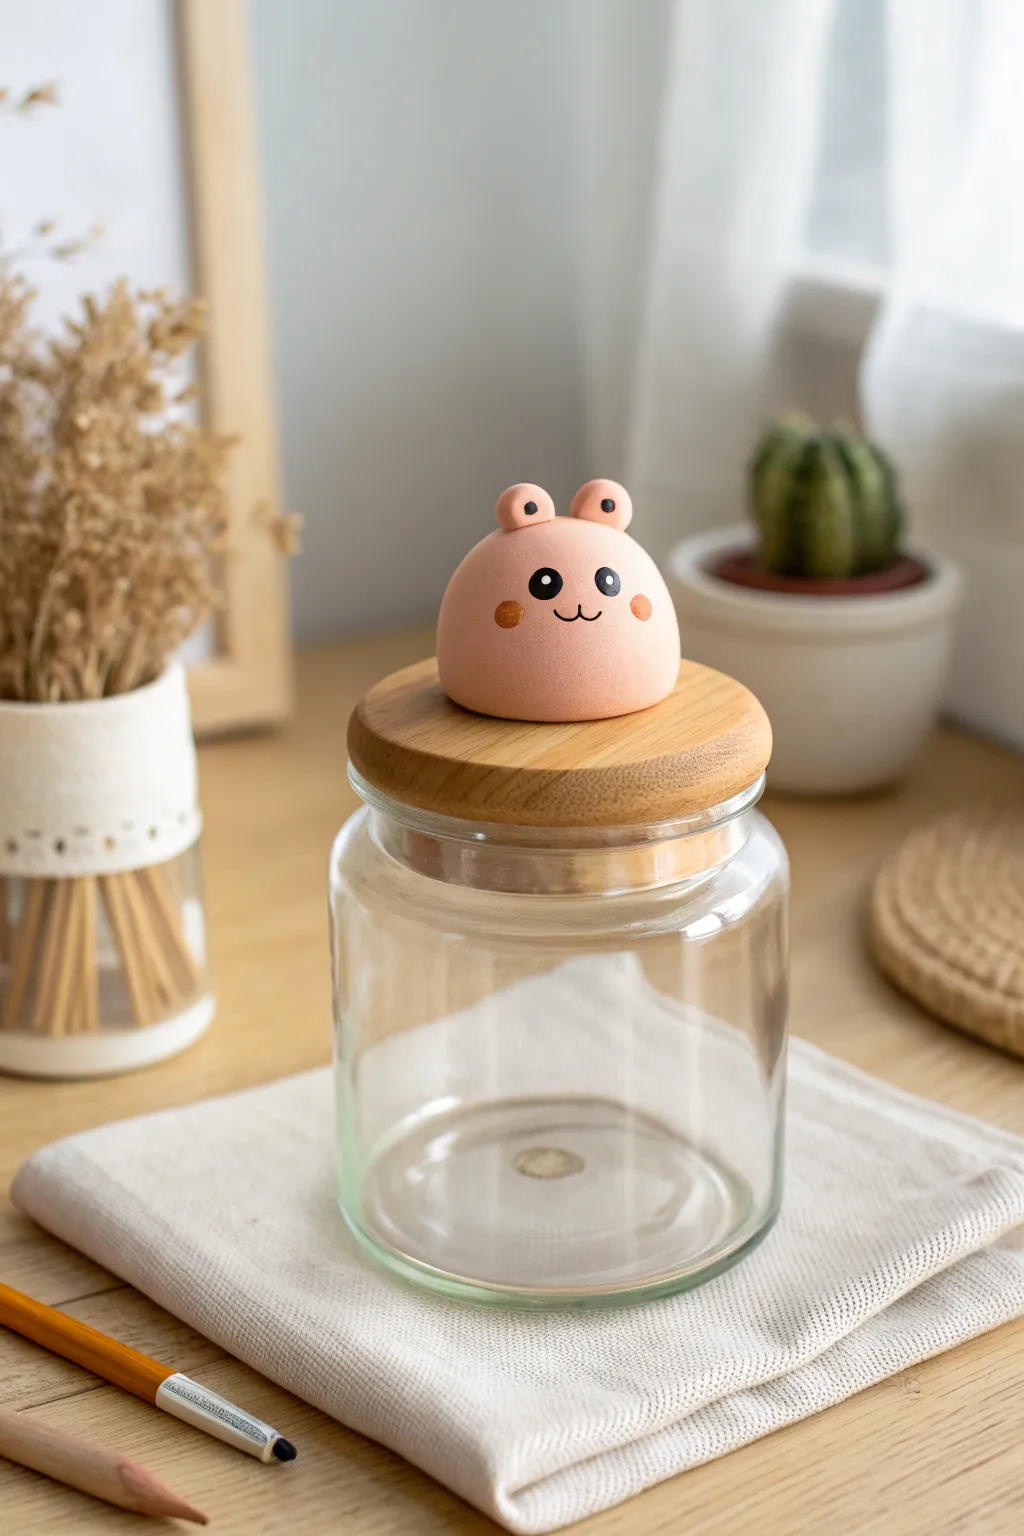
Transform a plain glass storage jar into an adorable desk companion with this simple polymer clay project. This smooth, peach-colored character adds a touch of whimsy to your organization and is perfect for beginners learning to shape basic forms.
How-To Guide
Materials
- Glass jar with a flat wooden lid
- Peach or light pink polymer clay
- Black acrylic paint
- Terracotta or dark orange acrylic paint
- Two-part epoxy glue or strong craft adhesive
- Fine detail paintbrush or dotting tool
- Clay roller or acrylic rolling pin
- Ball stylus tool
- Flexible clay blade or knife
- Aluminum foil (optional, for bulking)
- Gloss glaze (optional)
Step 1: Shaping the Base
-
Condition the clay:
Begin by conditioning your peach polymer clay until it is soft and pliable. Warm clay is much less likely to crack during baking. If you are mixing custom colors, I like to blend a tiny bit of white into orange to get that soft pastel peach tone. -
Form the main body:
Roll a large ball of clay, roughly the size of a tangerine or large enough to sit comfortably in the center of your jar lid. To save clay and reduce weight, you can create a core of tightly scrunched aluminum foil and wrap the clay around it. -
Create the dome shape:
Place the ball on your work surface and gently press it down to flatten the bottom. Use the palm of your hand to smooth the top into a perfect, seamless dome. -
Check the fit:
Place your clay dome onto the actual wooden lid to ensure the size looks proportional. It should look centered with a visible rim of wood around the outside.
Sticky Situation
If the clay won’t stick to the wood long-term, try roughing up the bottom of the baked clay and the spot on the lid with sandpaper before gluing. This creates ‘teeth’ for the glue to grab.
Step 2: Adding Details
-
Make the ears:
Roll two small balls of the same peach clay, each about the size of a pea. Try to get them exactly the same size for symmetry. -
Attach the ears:
Place the two small balls on top of the dome, spacing them slightly apart. Press them down gently so they adhere. -
Blend the seams:
Using a clay tool or your finger, gently smooth the clay where the ears meet the head so they look like one continuous piece rather than just stuck on. This makes the figure stronger. -
Indent the ears:
Take a ball stylus tool (or the rounded end of a paintbrush) and press a small indentation into the front center of each ear. This gives them depth and cuteness. -
Smooth the surface:
Before baking, give the entire piece a final check. Use a tiny bit of baby oil on your finger to gently buff away any fingerprints or dust specks on the smooth dome.
Step 3: Baking and Painting
-
Bake the clay:
Place your clay piece on a baking sheet or ceramic tile. Bake according to the manufacturer’s instructions for your specific brand of clay—usually around 275°F (130°C) for 15-30 minutes depending on thickness. -
Cool down completely:
Let the piece cool completely before handling. Polymer clay is slightly soft when hot and hardens as it returns to room temperature. -
Paint the eyes:
Using a dotting tool or the back end of a paintbrush dipped in black acrylic paint, create two solid black circles for the eyes. Space them widely for that signature kawaii look. -
Add eye highlights:
Once the black paint is dry, use a toothpick to add a tiny white dot in the upper corner of each eye. This brings the character to life. -
Paint the mouth:
With an ultra-fine detail brush and black paint, carefully draw a small ‘w’ shape between the eyes for the smile. Keep the lines thin and delicate. -
Add rosy cheeks:
Dip a round tool or brush into your terracotta/orange paint and dab a round circle on each cheek, just below and to the outside of the eyes. -
Seal the face (optional):
If you want to protect the paint, apply a thin layer of matte or gloss glaze over the painted features once they are fully dry.
Color Pop
Instead of painted cheeks, intricate small circles of darker pink clay into the face before baking. This creates a permanent, smooth finish that won’t chip over time.
Step 4: Assembly
-
Prepare the adhesive:
Mix a small amount of two-part epoxy glue in a disposable tray. This provides a much stronger bond than super glue for attaching clay to wood. -
Attach to lid:
Apply the glue to the center of the wooden jar lid and press the clay figure firmly into place. Wipe away any excess glue immediately. -
Let it cure:
Allow the glue to cure undisturbed for the time recommended on your adhesive package (usually 24 hours) before lifting the jar by the lid.
Now your sweet little storage jar is ready to hold trinkets or treats while brightening up your room