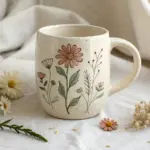
When I’m staring at a fresh piece of clay pottery, the shape is only half the fun—the design is where it starts to feel like yours. Here are my favorite pottery design ideas that look awesome on everything from mugs to planters, whether you’re painting, carving, or building details right into the clay.
Two-Tone Dipped Color
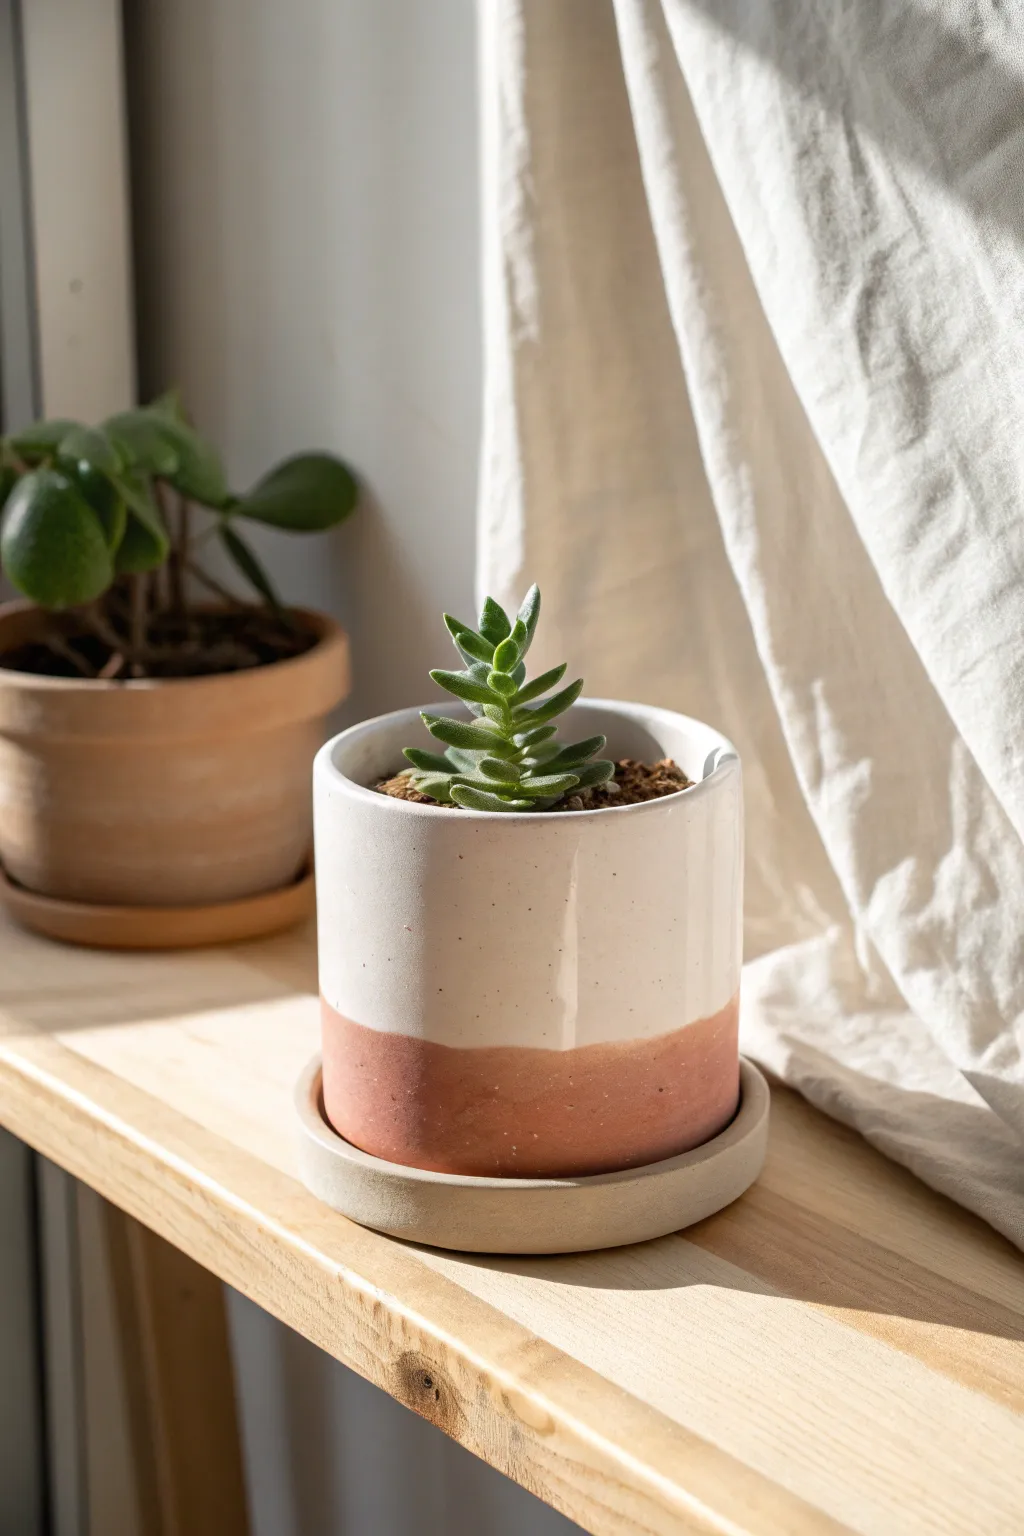
This elegant planter combines the raw warmth of exposed clay with the clean, modern look of a glossy white glaze. The subtle speckled finish adds organic texture, making it a perfect home for small succulents or cacti.
Step-by-Step Tutorial
Materials
- White stoneware clay body (with grog/speckles preferred)
- Pottery wheel
- Throwing tools (sponge, wire cutter, ribs)
- Trimming tools
- Bisque kiln
- Glaze kiln
- Glossy white glaze (cone 6 or appropriate for your clay)
- Wax resist
- Brush for wax
- Sandpaper
Step 1: Throwing the Form
-
Prepare Clay:
Begin by wedging about 1-1.5 lbs of speckled stoneware clay until it is uniform and air bubbles are removed. -
Center on Wheel:
Secure the clay to the wheel head and center it using firm pressure and water for lubrication. -
Open the Clay:
Drill down into the center, leaving about 1/4 to 1/2 inch at the bottom for the base. -
Pull the Walls:
Pull the clay upward into a cylinder. Aim for straight vertical walls with an even thickness throughout. -
Refine the Shape:
Use a metal rib on the exterior while supporting the interior with your fingers to smooth the surface and ensure the walls are perfectly straight. -
Define the Rim:
Compress the rim with a chamois or your sponge to make it smooth and rounded. -
Throw the Saucer:
With a smaller amount of clay (approx 0.5 lbs), throw a low, wide dish with a slightly raised lip to serve as the matching saucer. -
Cut and Dry:
Wire the pieces off the wheel head and set them aside to dry until leather-hard.
Step 2: Trimming and Finishing
-
Center and Trim:
Place the leather-hard cylinder upside down on the wheel. Secure it with clay lugs and trim the bottom to create a flat, clean foot. -
Trim the Saucer:
Repeat the trimming process for the saucer, ensuring the foot ring mirrors the style of the pot. -
Smooth the Surface:
Gently sponge the exterior of both pieces to remove any trimming lines or rough textures, preparing the surface for the unglazed portion. -
Dry and Bisque Fire:
Allow both pieces to dry completely to the bone-dry stage, then load them into the kiln for a bisque firing.
Fixing Drippy Glaze
If the glaze runs onto the raw clay area during firing, clean it up post-firing with a diamond sanding pad or a grinding bit on a rotary tool for a clean edge.
Step 3: Glazing the Design
-
Clean Bisque Ware:
Wipe the fired pieces with a damp sponge to remove any dust that might interfere with glaze adhesion. -
Mark the Dip Line:
Decide on your dip line height. I usually mark a faint pencil line around the bottom third of the pot to guide my waxing. -
Apply Wax Resist:
Paint a coat of wax resist on the bottom third of the cylinder (below your pencil line) and the entire bottom face. Also wax the underside of the saucer. -
Dip the Pot:
Using tongs or your hand, submerge the cylinder upside down into the white glaze. Stop exactly where the wax resist begins so the glaze beads off that section. -
Glaze the Interior:
Pour glaze inside the pot, swirl it to coat the entire interior, and pour out the excess. -
Clean Up:
Use a damp sponge to wipe away any stray glaze droplets that are sitting on top of the waxed areas to ensure a crisp line. -
Final Firing:
Place the pieces in the kiln for the glaze firing, making sure they don’t touch each other.
Clean Lines
For a truly razor-sharp line between the glaze and the raw clay, use automotive detailing tape instead of freehand wax resist before dipping.
Once cooled, pot your favorite succulent and enjoy the sleek contrast found in your new handmade planter


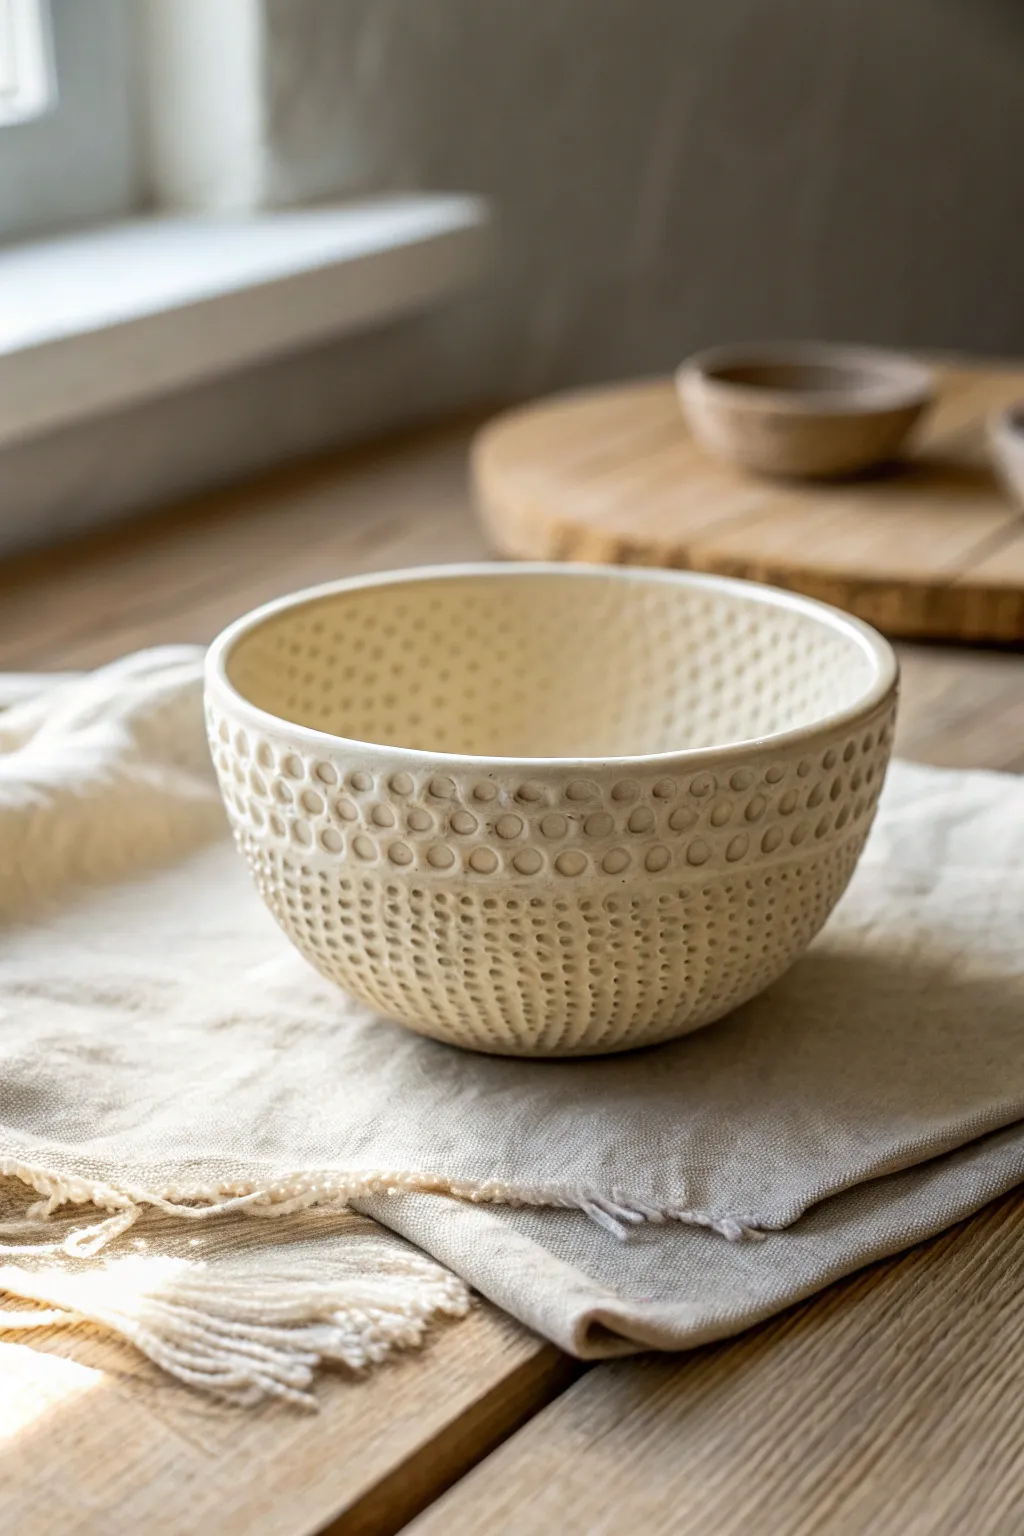
Playful Polka Dot Patterns
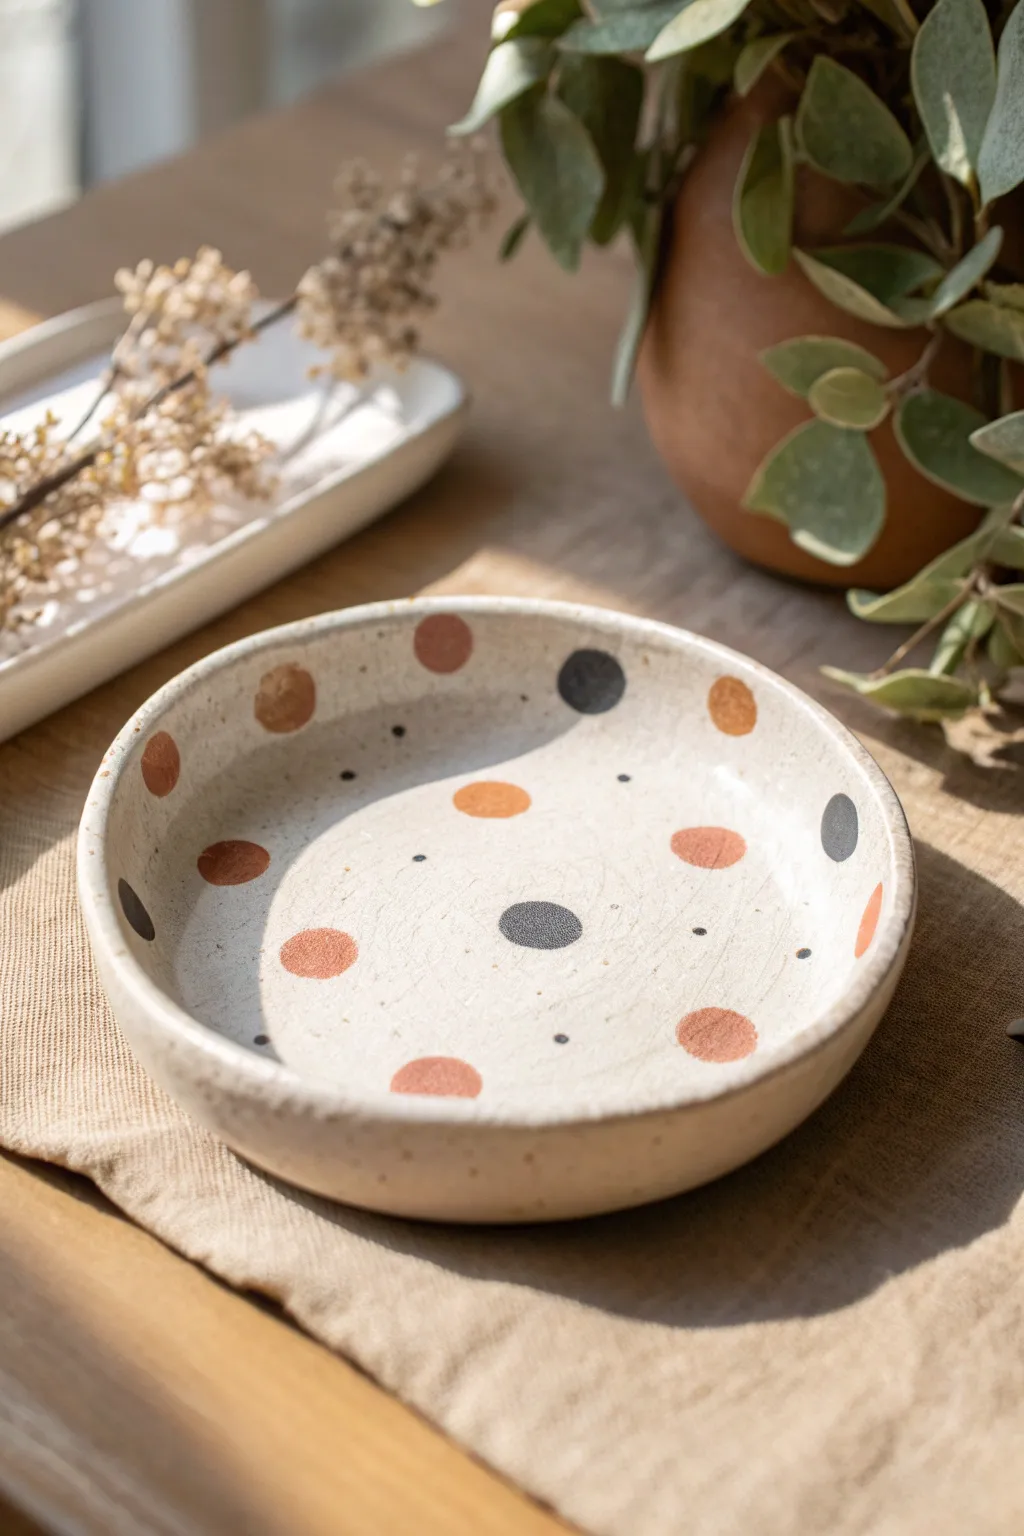
This charming shallow bowl combines the rustic warmth of speckled stoneware with a playful geometric twist. The design features a modern, randomized pattern of terracotta and charcoal polka dots that dance across a creamy, matte-glazed surface.
Detailed Instructions
Materials
- Speckled stoneware clay (buff or white)
- Pottery wheel (or slab roller/rolling pin for hand-building)
- Rib tool (metal or rubber)
- Sponge
- Trimming tools
- Underglazes: Terracotta/Rust and Charcoal/Dark Grey
- Small round paintbrush
- Small detail brush or needle tool handle
- Clear matte glaze (food-safe)
- Kiln
Step 1: Forming the Bowl
-
Wedge the clay:
Start by wedging a ball of speckled stoneware clay thoroughly to remove air bubbles. You’ll want about 1.5 to 2 pounds for a bowl this size. -
Center on the wheel:
Secure the clay to the wheel head and center it using firm pressure. Ensure the mound is perfectly symmetrical before opening. -
Open and widen:
Press down into the center to open the clay, leaving about a half-inch floor. Pull the floor outward to create a wide, flat base, as this is a shallow, plate-like bowl. -
Pull the walls:
Pull up the walls to a height of about 2-3 inches. Keep the walls relatively thick and sturdy, curving them gently inward just slightly to hold the form. -
Shape the rim:
Use a chamois or a wet sponge to compress the rim. Aim for a slightly rounded, organic edge rather than a sharp one, matching the rustic aesthetic. -
Smooth the interior:
Run a rubber rib across the interior floor and up the walls to remove throwing lines and create a smooth canvas for your dot pattern later. -
Wire off and dry:
Wire the bowl off the bat and set it aside to dry until it reaches a leather-hard state.
Uneven is Better
Don’t measure the spacing between dots. The appeal of this design lies in its asymmetry and ‘scattered’ confetti look.
Step 2: Trimming and Decorating
-
Trim the foot:
Once leather-hard, center the bowl upside down on the wheel. Trim away excess clay from the bottom and carve a neat foot ring to give the piece visual lift. -
Clean the surface:
Wipe the unfired piece gently with a barely damp sponge to smooth any trimming marks and remove dust. -
Paint large dots (Rust):
Using a small round brush loaded with terracotta or rust-colored underglaze, paint circles of varying sizes. Place them randomly—some near the rim, some in the basin. -
Refine the circles:
If your circles look messy, I like to tidy the edges with a clean, damp brush, though a little irregularity adds to the hand-painted charm. -
Add charcoal dots:
Switch to your charcoal or dark grey underglaze. Paint a few similar-sized circles dispersed among the orange ones to create contrast. -
Add micro-dots:
Dip the handle end of a paintbrush or a needle tool into the dark grey underglaze. Dot tiny speckles into the negative spaces between the larger circles. -
Bisque fire:
Allow the bowl to dry completely (bone dry) before loading it into the kiln for a bisque fire (usually Cone 04 or 06 depending on your clay body).
Make it a Set
Create a matching mug or smaller side plate using the same dot colours but inverted—grey big dots and orange speckles.
Step 3: Glazing and Finishing
-
Wax resist (optional):
If you want the raw clay texture to remain on the foot ring, apply wax resist to the bottom after bisque firing. -
Apply clear glaze:
Dip the entire bowl into a clear matte glaze. A matte finish is crucial here to achieve the soft, natural look seen in the photo rather than a high gloss. -
Wipe the foot:
Even if you waxed, use a sponge to ensure no glaze remains on the very bottom contact point, or it will stick to the kiln shelf. -
Glaze fire:
Fire the piece again to the maturation temperature of your clay and glaze (typically Cone 5 or 6 for stoneware). -
Sand the foot:
Once cooled and removed from the kiln, use wet sandpaper to smooth the unglazed foot ring so it won’t scratch your table.
Now your table is ready for a cozy, artisan meal served on your own handmade pottery


Simple Stripe Bands
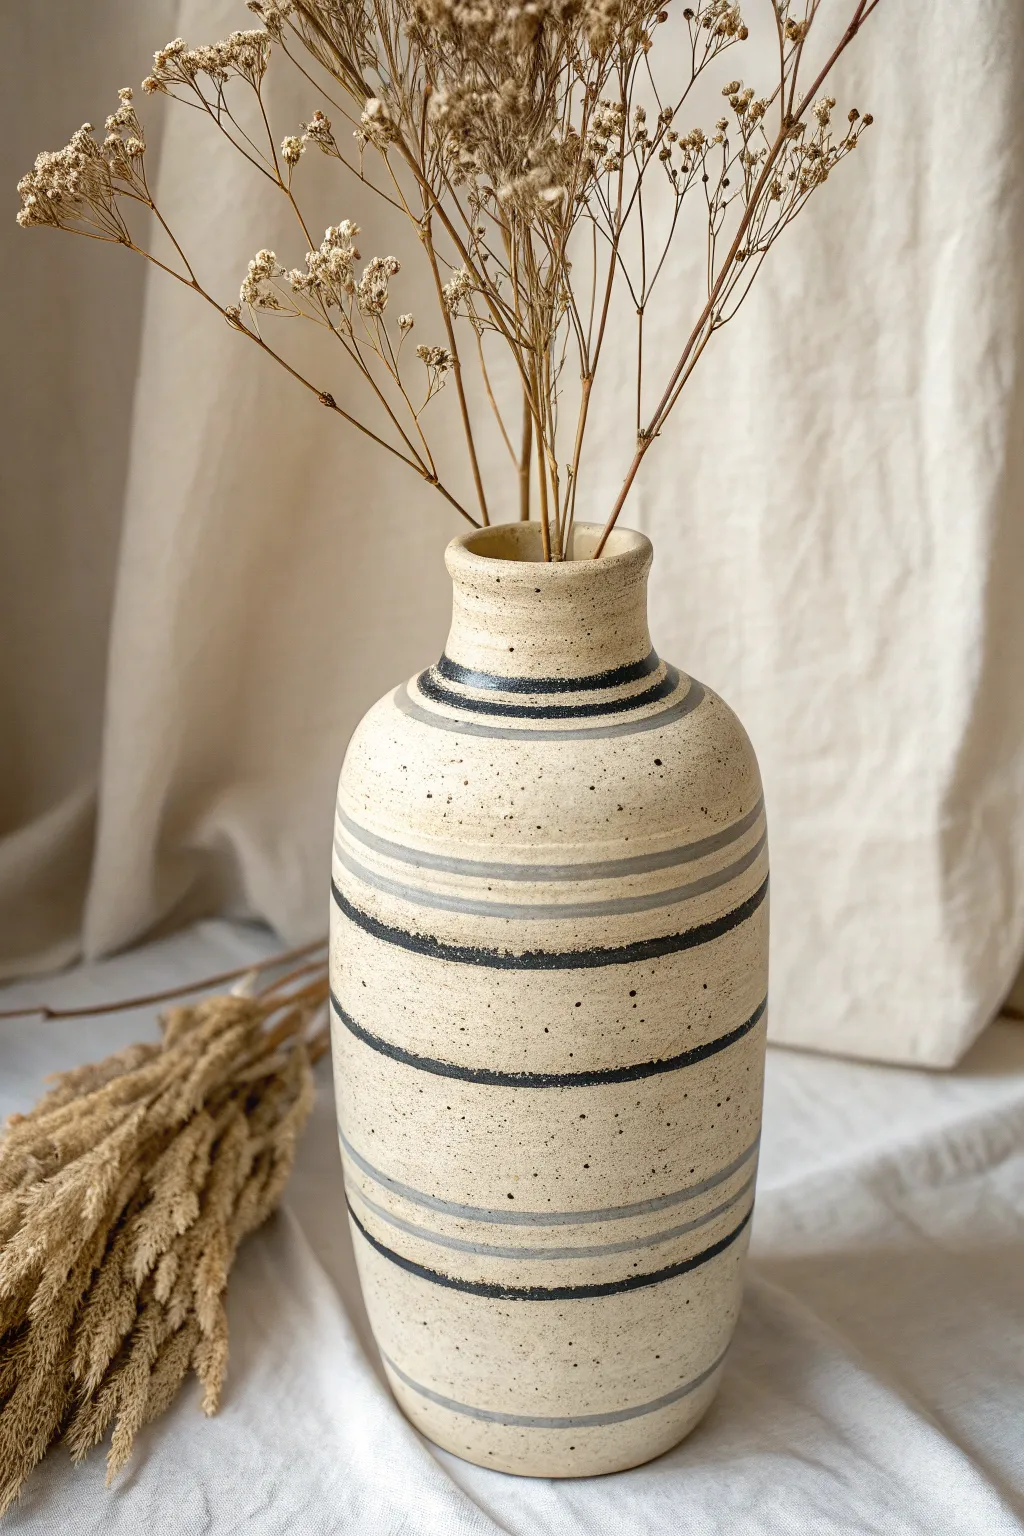
This rustic, minimalist vase combines the warmth of speckled clay with modern, geometric banding. The alternating rhythm of charcoal and soft grey stripes against a creamy background creates a piece that feels both grounded and elegant.
Step-by-Step Guide
Materials
- Speckled cream clay body (or standard white stoneware with grog)
- Pottery wheel and throwing tools
- Trimming tools (ribs, loop tools)
- Fettling knife
- Sponge
- Underglaze (black or dark charcoal)
- Underglaze (light grey)
- Clear matte or satin glaze
- Paintbrush (medium round)
- Banding wheel (essential for the lines)
- Pottery kiln
Step 1: Throwing the Form
-
Center and open:
Begin with about 2-3 lbs of clay. Center it firmly on your wheel head and open the clay to establish the interior floor, leaving about a half-inch of thickness at the bottom. -
Pull the cylinder:
Pull the walls up into a tall cylinder. Focus on keeping the walls even from bottom to top. You want a decent height here, aiming for at least 8-9 inches. -
Shape the belly:
From the inside, gently push the belly of the vase out to create a subtle curve. Don’t go too wide; this design relies on a fairly straight, upright profile with just soft swelling in the middle. -
Collar the neck:
As you move upward, gently collar the clay inward at the shoulder to narrow the form. Compress the clay frequently to prevent rushing or buckling. -
Refine the rim:
Create a distinct neckline that flares out slightly at the very top. Use a chamois or your fingertips to smooth and round the rim so it’s pleasant to touch. -
Cut and dry:
Wire the pot off the wheel head. Let it dry to a solid leather-hard state. It needs to be firm enough to handle without warping but soft enough to carve.
Wobbly Lines?
Rest your painting hand on a steady object (like a brick or stack of books) next to the wheel. Keep the brush fixed and let the spinning wheel draw the line for you.
Step 2: Trimming and Surface Prep
-
Trim the foot:
Secure the leather-hard vase upside down on the wheel. Trim a clean, defined foot ring, removing excess weight from the bottom section. -
Smooth the exterior:
While the pot adheres to the wheel, use a smooth metal rib to burnish the surface slightly. This pushes any grog back in and creates a perfect canvas for your stripes. -
Bisque fire:
Once fully bone dry, fire the piece to bisque temperature (usually Cone 06/04). This sets the shape and prepares it for glazing.
Step 3: Applying the Design
-
Set up the banding wheel:
This is crucial for straight lines. Place your bisque-fired vase in the center of a manual banding wheel. Spin it to ensure it’s centered. -
Load the brush:
Start with your black or dark charcoal underglaze. Dilute it slightly with water so it flows smoothly but stays opaque. Load your brush fully. -
Apply the thick black bands:
While spinning the banding wheel at a steady pace, hold your hand very steady against a support (like a jar or stick). Touch the brush to the pot to create the dark bands. Vary the thickness slightly for organic appeal. -
Add the grey stripes:
Switch to your grey underglaze. Apply these bands between the black ones. I personally like to leave small gaps of raw clay showing between some stripes to let the speckled clay body breathe. -
Accent the neck:
Add a specific stripe detail around the junction where the neck meets the shoulder. This emphasizes the vase’s anatomy. -
Clean up details:
If any lines wobbled significantly, you can gently scratch away the excess dried underglaze with a needle tool or a damp cotton bud. -
Dip in clear glaze:
Once the stripes are dry, dip the entire vase into a clear matte or satin glaze. A glossy finish works too, but a matte finish enhances the ‘stone’ look. -
Final wipe:
Wipe the foot of the vase completely clean of glaze with a damp sponge to prevent it from sticking to the kiln shelf. -
Glaze fire:
Fire the vase to the maturity temperature of your clay and glaze (likely Cone 5 or 6). Let it cool slowly in the kiln.
Texture Twist
Before bisque firing, use a carving tool to incise the lines into the clay surface. Fill the grooves with glaze later for a tactile, inlaid effect.
Fill your finished vase with dried pampas grass or wheat stems to complete the earthy aesthetic.


Modern Color Blocking
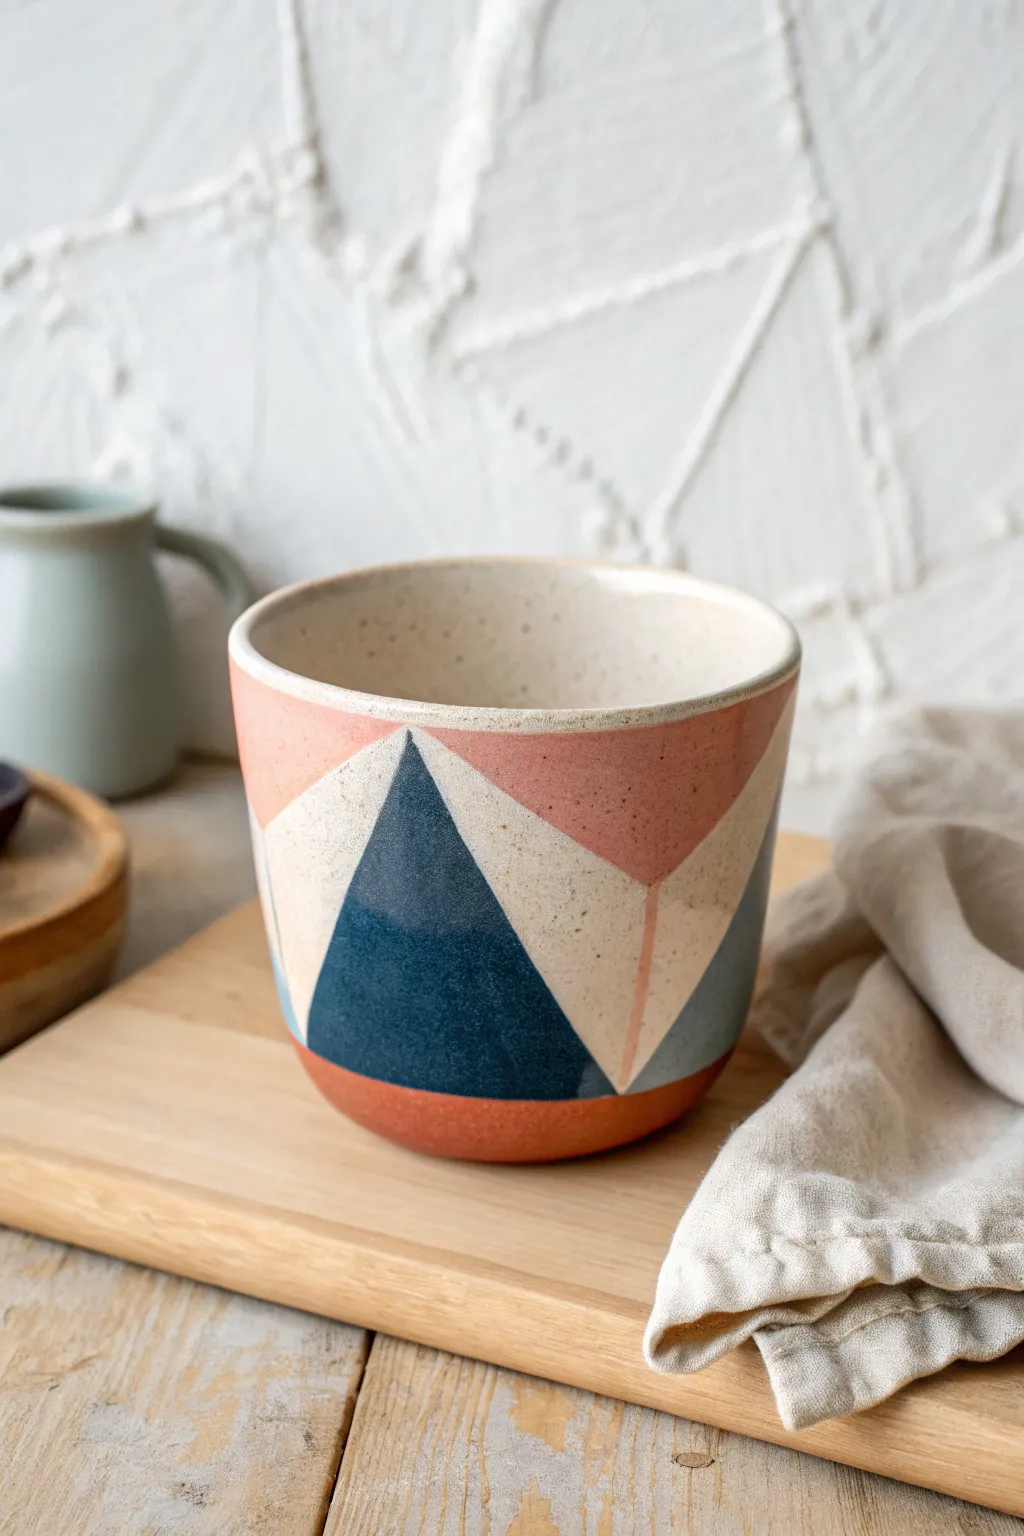
Embrace the sleek appeal of mid-century aesthetics with this modern color-blocking project. By combining sharp geometric angles with a soft, speckled clay body, you’ll create a functional piece of art that feels perfectly balanced.
How-To Guide
Materials
- Speckled stoneware clay body
- Pottery wheel (or slab roller for hand-building)
- Rib tool (metal and rubber)
- Needle tool
- Underglazes: Navy Blue, Muted Pink, Rusty Orange
- Thin painter’s tape (1/8 inch or 1/4 inch width)
- Small flat synthetic brushes
- Clear transparent glaze
- Sponge
- Wire cutter
- Kiln access
Step 1: Forming the Base
-
Wedge and Center:
Begin by thoroughly wedging about 1 to 1.5 lbs of speckled stoneware clay to remove air bubbles. Throw the ball firmly onto the wheel head and center it using steady pressure and water for lubrication. -
Open and Pull:
Open the clay to create a flat interior floor, leaving about a half-inch thickness at the bottom. Pull the walls upward into a cylinder shape, aiming for relatively straight vertical sides with a slight taper near the base. -
Shape the Curve:
Using a rib tool on the inside, gently push the belly of the pot out slightly to create a soft curve at the bottom, while keeping the top rim stable and even. Smooth the rim with a chamois or your finger. -
Refine the Surface:
Run a metal rib up the exterior while the wheel spins to remove slip and create a smooth canvas for your design. Use a wire cutter to separate the pot from the bat, then set it aside to dry until leather-hard. -
Trim the Foot:
Once leather-hard, center the pot upside down on the wheel. Trim away excess weight from the bottom and define a clean foot ring. I like to smooth the trimmed area with a damp sponge immediately to reveal the speckles.
Fuzzy Lines?
If underglaze bleeds under tape, wait until the pot is bone dry. Then, gently scrape the excess paint away with a sharp X-Acto knife to sharpen the edge.
Step 2: Designing the Grid
-
Clean Application Surface:
Wipe the exterior of your leather-hard pot with a barely damp sponge to ensure no dust interferes with the tape adhesion. -
Map the Base Line:
Apply a strip of thin painter’s tape horizontally around the bottom of the pot, creating a border for the rusty orange base section. -
Create Triangles:
Apply strips of tape diagonally, starting from your base line and moving upward to form large triangle peaks. Create intersecting lines to form the multi-faceted geometric pattern seen in the reference. -
Seal the Edges:
Run a fingernail or the back of a spoon firmly over the tape edges. This is crucial to prevent underglaze from bleeding underneath and ruining your crisp lines.
Step 3: Applying Color
-
Paint the Base:
Apply the Rusty Orange underglaze to the bottom section below your first horizontal tape line. Use long, even strokes to minimize brush marks. -
Fill the Navy Sections:
Select specific triangles for the Navy Blue. Apply two to three coats, letting each coat dry until matte before adding the next to ensure opacity. -
Add the Pink Accents:
Fill the remaining designated triangles with the Muted Pink underglaze. Be careful near the tape intersections to avoid pooling paint in the corners. -
Leave Negative Space:
Crucially, leave some triangle sections unpainted. This raw clay space allows the natural speckle of the stoneware to become part of the design. -
Peel and reveal:
Once the underglaze is touch-dry (but not bone dry), carefully peel away the tape. Pull the tape at a sharp angle away from the painted edge for the cleanest line.
Textural Twist
Before glazing, use a needle tool to scratch thin sgraffito lines through the colored triangles, revealing the speckled clay body beneath for added texture.
Step 4: Firing and Finishing
-
Bisque Fire:
Let the piece dry completely to the bone-dry stage. Load it into the kiln for a bisque firing (typically Cone 04 or 06) to harden the clay. -
Wax the Foot:
After the bisque fire, wipe the piece down with a damp sponge to remove dust. Apply wax resist to the bottom foot ring to prevent glaze from sticking to the kiln shelf. -
Clear Glaze Application:
Dip the entire cup into a clear, transparent glaze. Shake it gently to remove drips. The clear glaze will darken the underglaze colors and seal the raw clay sections. -
Glaze Fire:
Fire the piece again to the maturation temperature of your specific stoneware (typically Cone 5 or 6). Allow the kiln to cool naturally before unloading.
Enjoy your morning coffee in a custom tumbler that highlights the beautiful contrast between geometric precision and organic clay texture.

The Complete Guide to Pottery Troubleshooting
Uncover the most common ceramic mistakes—from cracking clay to failed glazes—and learn how to fix them fast.
Hand-Painted Floral Motifs
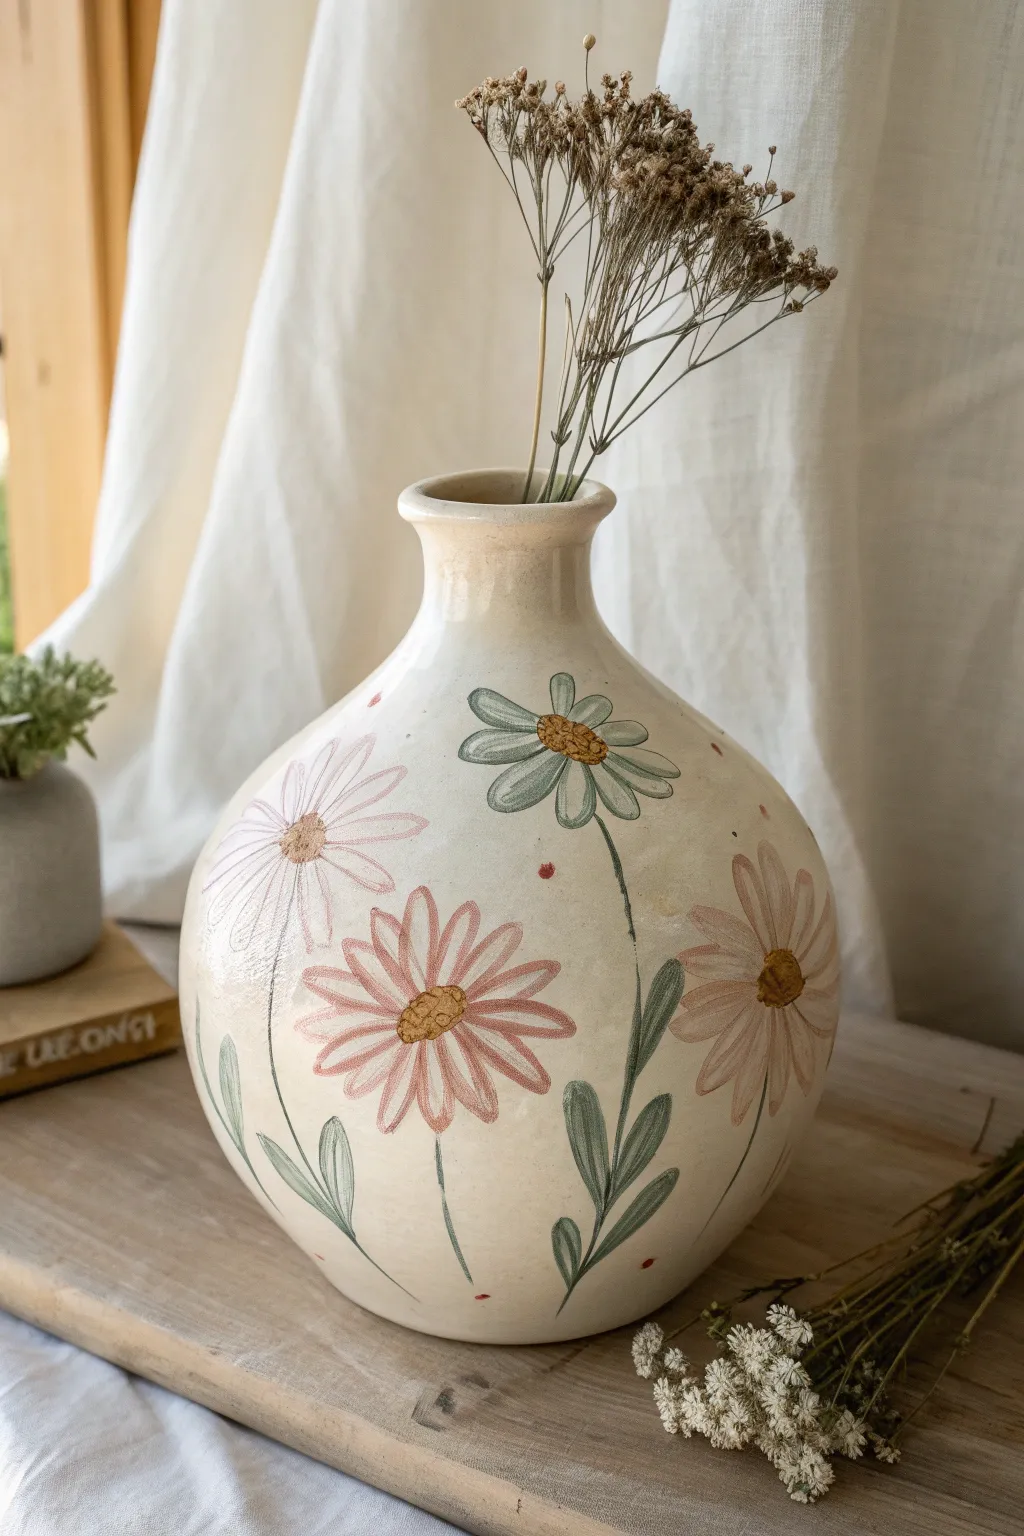
Bring a touch of cottagecore charm to your pottery collection with this hand-painted daisy vase. This project combines simple linework with soft, dusty glazes to create a timeless, folk-art inspired vessel perfect for dried bouquets.
Step-by-Step
Materials
- Bisque-fired stoneware vase (bulbous shape with narrow neck)
- Underglazes: Dusty Rose, Peach, Sage Green, Teal, Mustard Yellow, Red
- Fine liner brush (size 0 or 00)
- Small round brush (size 2)
- Pencil (for sketching)
- Clear transparent glaze (dipping or brushing)
- Sponge and water
- Kiln
Step 1: Preparation and Sketching
-
Wipe down the bisque:
Start with your bisque-fired vase. Take a damp sponge and gently wipe the entire surface to remove any kiln dust or oil from your fingers, which can resist glaze. -
Plan composition:
Using a regular pencil, lightly sketch the placement of your flower heads. Draw large circles for the blossoms scattered around the belly of the vase. Don’t worry about erasing; the graphite will burn off in the kiln. -
Add stems and direction:
Sketch long, curving lines for the stems. Vary the heights—have some reaching high towards the neck and others curving around the curve of the pot to create movement.
Step 2: Painting the Blooms
-
Base petals – Pink:
Load your round brush with Dusty Rose underglaze. Paint the petals for a few of the flowers in a radial pattern. Start from the center and pull the brush outward to create a tapered petal shape. -
Base petals – Peach:
Switch to the Peach underglaze and paint another set of flowers. I find that alternating the warm colors keeps the design feeling balanced but distinct. -
Base petals – Teal/Green:
For the unique blue-green flower shown near the neck, mix a little Teal underglaze with the Sage Green to get that muted tone. Paint these petals slightly flatter and wider than the others. -
Layering petals:
If your underglaze looks thin, apply a second coat to the petals once the first is dry to the touch. This ensures the color remains opaque after firing. -
Adding centers:
Dip your round brush into Mustard Yellow underglaze. Dab a textured, circular center onto each flower head. Stipple the brush slightly to give the center a pollen-like texture.
Smudged Lines?
If underglaze smears during the clear glaze dip, sponge it off gently, let it dry, fix the line, and re-dip. Next time, bisque fire the underglaze first to lock it in.
Step 3: Detailing and Foliage
-
Painting stems:
Using the fine liner brush and Sage Green underglaze, trace over your pencil lines for the stems. Keep these lines fairly thin and delicate. -
Adding leaves:
Add leaves branching off the stems, particularly at the base. Use a ‘press and lift’ motion with the round brush to create almond-shaped leaves that point upwards. -
Outlining the petals:
This is a crucial step for the illustrative look. With a very fine liner brush and a slightly darker mix (perhaps mixing a tiny bit of black or brown into your petal colors), loosely outline the petals. Don’t make it perfect; broken lines add character. -
Defining the flower centers:
Add small shadow lines or defining dots within the yellow centers using a thinned-down brown underglaze to give them dimension. -
Adding filler details:
Dip the back end of your brush (the handle) into Red underglaze. Use it to dot small red accents into the negative spaces between the flowers to fill awkward gaps.
Make it Vintage
Instead of a bright clear glaze, use a ‘honey’ or slightly tinted transparent glaze. This gives the creamy clay body an aged, antique ceramic look.
Step 4: Finishing
-
Final drying:
Let all your underglaze decoration dry completely. It should look chalky and matte. -
Interior glazing:
Pour clear glaze inside the vase, swirl it around to coat the interior fully, and pour the excess out. This makes the vase functional and water-tight. -
Exterior glazing:
Dip the exterior of the vase into a clear transparent glaze, or brush on three smooth coats if using brush-on glaze. Ensure you don’t smear your artwork. -
Firing:
Fire the piece in the kiln according to the clay and glaze manufacturer’s cone rating (typically Cone 5 or 6 for stoneware).
Once cooled, fill your new vase with dried wildflowers to complete the rustic aesthetic
Leaf Silhouettes and Sprigs
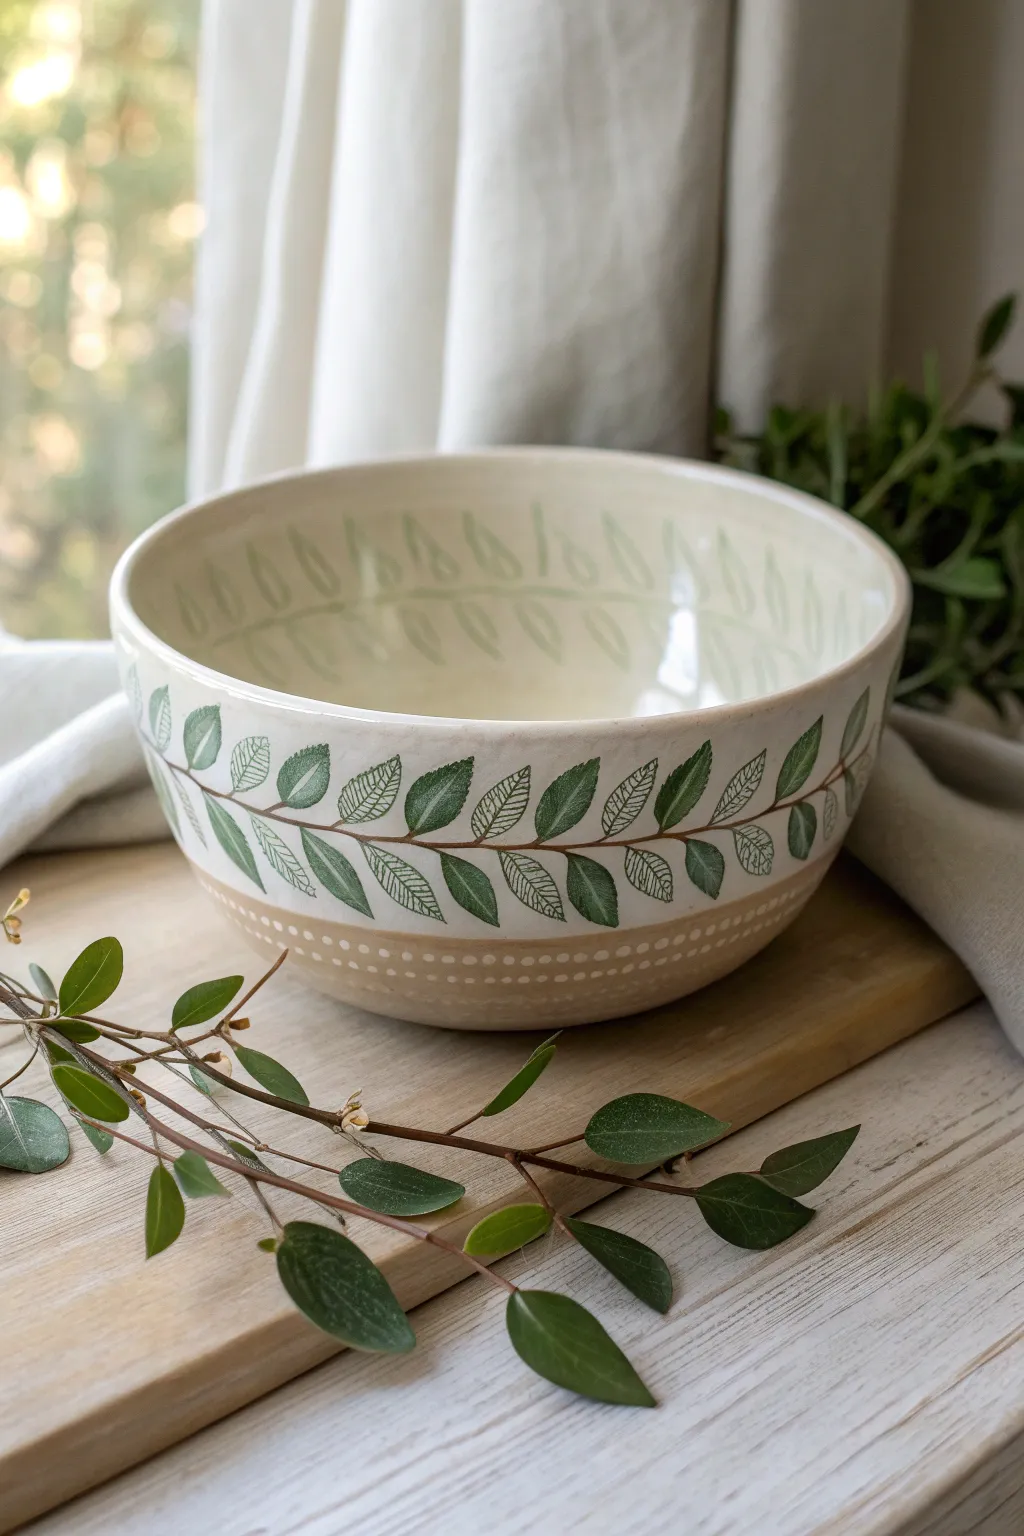
Capture the serenity of a forest walk with this hand-built or wheel-thrown ceramic bowl featuring mixed-technique botanical designs. The fusion of solid glazed leaves, delicate sgrafito-style line work, and raw clay texture creates a stunningly organic centerpiece.
How-To Guide
Materials
- Stoneware clay body (buff or speckle recommended)
- Pottery wheel or slab roller/molds for hand-building
- Underglazes: Dark Forest Green, Leaf Green, White
- Carving tool or sgraffito stylus
- Fine detail paintbrush (liner or spotter)
- Medium round paintbrush
- Wax resist
- Clear transparent food-safe glaze
- Sponge and bucket of water
- Slip trailer (with fine nozzle)
- Small brush for slip
Step 1: Forming the Base Vessel
-
Throw or Build the Bowl:
Start by creating a medium-sized bowl using your preferred method. If throwing on the wheel, aim for a gentle curve that widens significantly at the rim to allow the interior pattern to be seen. A wall thickness of about 1/4 inch is ideal. -
Define the Foot:
Trim a defined foot ring that creates a visual separation at the bottom. This lower band will remain unglazed to showcase the raw clay texture, so ensure the surface here is smoothed with a rib tool. -
Prepare for Leather Hard:
Allow the bowl to dry slowly until it reaches a firm leather-hard stage. It needs to be sturdy enough to handle carving but moist enough to accept slip or underglaze without cracking.
Smudged Lines?
If your underglaze lines smudge while handling the bowl, gently scrape the mistake away with an X-Acto knife or needle tool once dry, rather than wiping it wet, which stains the clay.
Step 2: Interior Decoration
-
Draft the Inner Pattern:
Using a very light touch or a water-soluble pencil, mark out a garland of leaves circling the interior rim. These should face vertically, like tall grass. -
Apply Pale Green Detail:
Mix a small amount of Leaf Green underglaze with a bit of white slip or water to create a semi-translucent wash. Carefully paint the simple outline of the interior leaves. You want these to look like faint shadows or watercolors. -
Refine the Inner Leaves:
Once the wash is dry to the touch, use a very fine brush or a thin slip trailer to add simple vein lines in the same pale green tone for subtle texture.
Try Mishima
For the ‘sketch’ leaves, try the Mishima technique: carve the lines first, fill with black underglaze, and wipe the surface clean for an inlaid look that feels smooth to the touch.
Step 3: Exterior Botanical Design
-
Paint the Central Stem:
On the outside, roughly two-thirds of the way down the side, use your liner brush and Dark Forest Green underglaze to paint a continuous, undulating stem line encircling the bowl. -
Block in Solid Leaves:
Using the medium round brush, paint solid green leaf shapes alternating along the stem. Aim for an almond shape. Leave space between every other solid leaf for the ‘sketch’ style leaves. -
Create the Line-Art Leaves:
For the alternating leaves, use your fine liner brush to paint just the outline of the leaf shape in Dark Forest Green. These should match the size and angle of the solid painted leaves. -
Add Veining Detail:
Once the solid green leaves are touch-dry, paint a thin central vein line in black or a darker green mix. For the outlined ‘sketch’ leaves, paint intricate cross-hatching or vein patterns inside the empty space to create a delicate contrast. -
Dotted Border Application:
Below the leafy branch, mix white underglaze to a creamy consistency. Using a slip trailer or the back end of a paintbrush, dot two horizontal rows around the bowl. Keep them consistent and rhythmic.
Step 4: Finishing and Glazing
-
Bisque Fire:
Allow the bowl to bone dry completely. This can take several days depending on humidity. Once bone dry, fire the piece to bisque temperature (usually Cone 04 or 06). -
Wax the Raw Base:
Apply wax resist to the bottom third of the bowl, covering the dotted section and the foot ring completely. This ensures the sandy, raw clay aesthetic remains after the final firing. -
Clear Glaze Application:
Dip the entire bowl into a clear, food-safe glaze. Because of the wax resist, the glaze will bead off the bottom section. Wipe away any stray droplets on the waxed area with a damp sponge. -
Final Firing:
Load the kiln and glaze fire to the maturation temperature of your specific clay body (e.g., Cone 5/6). Ensure the foot is wiped clean so it doesn’t stick to the kiln shelf.
Once cooled, your bowl is ready to bring a touch of botanical elegance to your table setting


What Really Happens Inside the Kiln
Learn how time and temperature work together inside the kiln to transform clay into durable ceramic.
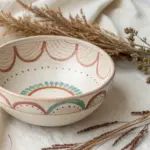
Mandala Dot Details
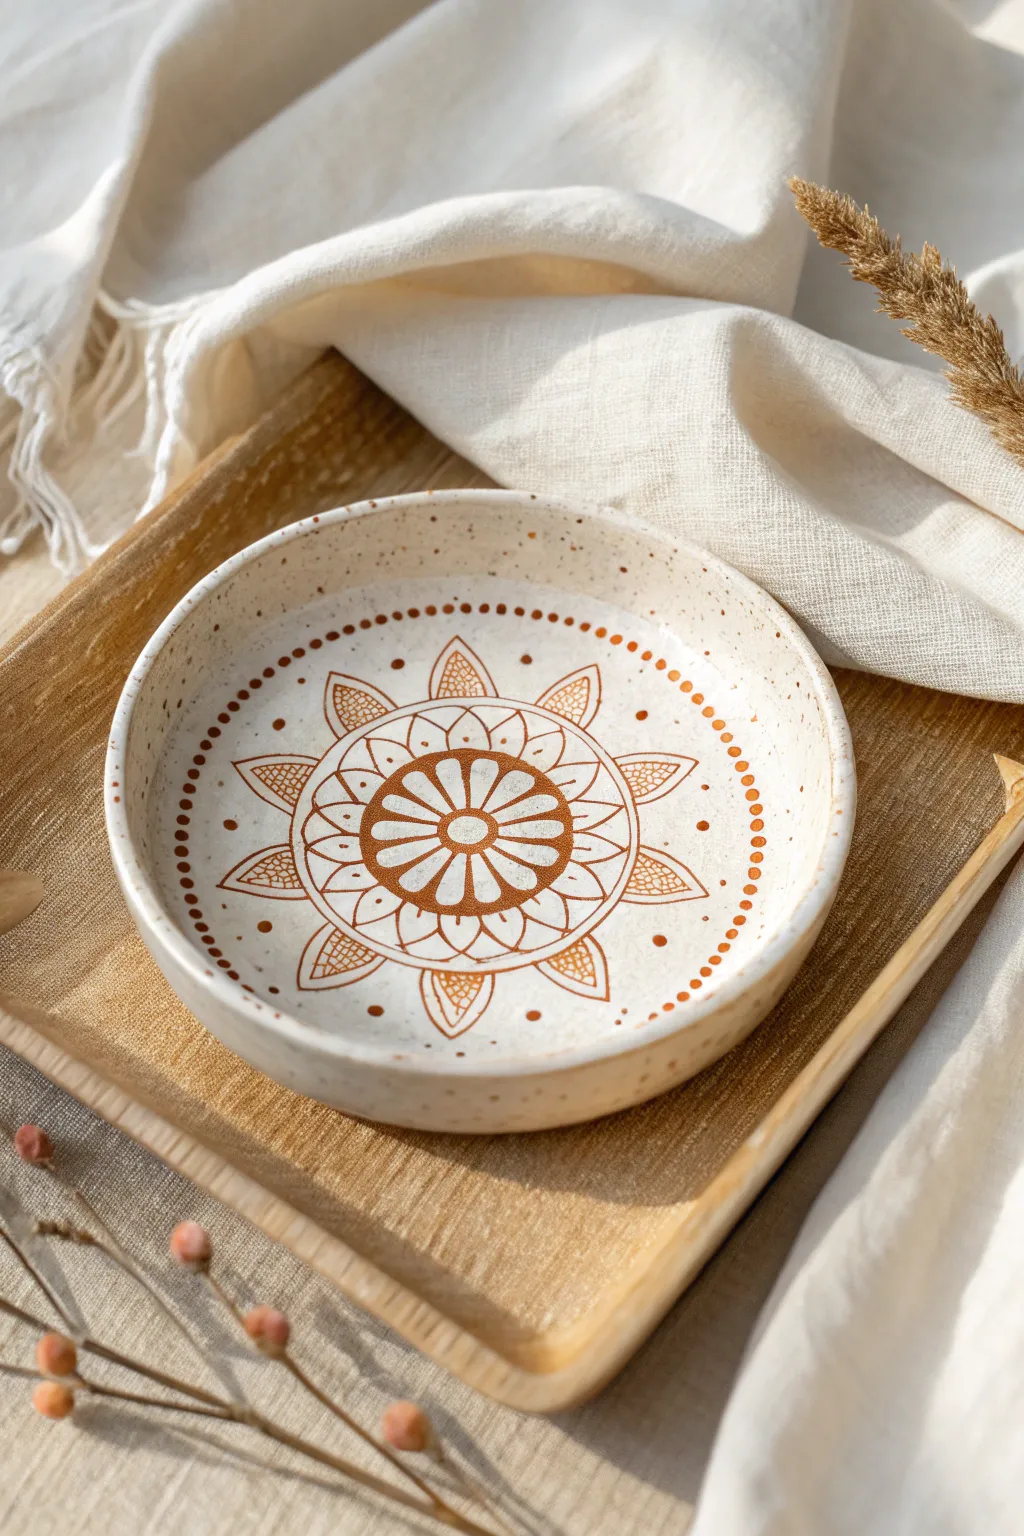
This project combines the rustic charm of speckled stoneware with the precision of mandala art, creating a piece that feels both grounded and intricate. The design features a radiant central flower motif surrounded by delicate dotted borders, all painted in warm, earthy terracotta tones.
Step-by-Step Guide
Materials
- Speckled stoneware clay (white or light beige base)
- Pottery wheel or rolling pin and slump mold (for hand-building)
- Sponge
- Rib tool
- Loop tool for trimming
- Terracotta-colored underglaze (or iron oxide wash)
- Fine liner brush (size 0 or 00)
- Small round brush (size 2)
- Dotting tools (various sizes)
- Clear matte or satin glaze
- Kiln
Step 1: Forming the Vessel
-
Prepare the Clay:
Begin by wedging your speckled stoneware clay thoroughly to remove air bubbles. Ensure the clay is a light, neutral tone so the speckles will show through clearly after firing. -
Shape the Bowl:
Throw a low, wide bowl on the wheel. Aim for a flat interior bottom that transitions gently into short, slightly upright walls. If hand-building, roll a slab and press it into a shallow slump mold. -
Refine the Rim:
While the wheel is spinning slowly, use a chamois or your finger to smooth and round the rim. This softness complements the organic feel of the final design. -
Dry to Leather Hard:
Allow the piece to dry slowly until it reaches a leather-hard state. It should be firm enough to handle without deforming but still have some moisture content. -
Trim the Foot:
Flip the bowl over and center it on the wheel. Use a loop tool to trim away excess weight from the base, creating a defined foot ring if desired. -
Smooth the Surface:
Wipe the interior surface with a slightly damp sponge to remove any grog or rough texture. A smooth canvas is crucial for the fine line work coming next.
Steady Hands
Rest your painting hand on a steady object, like a jar or a mahl stick, placed across the bowl. This bridge prevents smudging.
Step 2: Painting the Mandala
-
Center the Design:
Find the exact center of the bowl’s interior. You can mark this lightly with a pencil if needed; the graphite acts as a guide and will burn off in the kiln. -
Paint the Central Circle:
Using the terracotta underglaze and a small round brush, paint a solid circle in the center, leaving a small negative space dot in the very middle. -
Create the Flower Petals:
Switch to your fine liner brush. Draw elongated oval petals radiating outward from the central circle. Fill these solid with the terracotta color. -
Outline the Inner Ring:
Draw a thin concentric circle around the tips of the solid petals. This creates a boundary for the next layer of detail. -
Draw the Outer Petals:
Sketch a series of larger, pointed petals (resembling sunflower leaves) extending from the ring you just painted. Leave the interior of these petals unpainted for now. -
Add Cross-Hatching Texture:
Inside each large pointed petal, use the very tip of your liner brush to create tiny mesh-like cross-hatching. I find holding my breath for a moment helps steady my hand for these delicate lines. -
Frame the Outer Petals:
Draw a larger, slightly thicker circle that connects the tips of the pointed petals, enclosing the main mandala flower. -
Add Decorative Dots:
Dip a medium-sized dotting tool into the underglaze. Place a single dot between the peaks of each large petal, just inside the outer boundary circle. -
Create the Dotted Border:
Moving further out towards the rim (about an inch from the edge), create a large ring entirely made of dots. Use a consistent dotting tool size and try to keep the spacing uniform. -
Intersperse Small Dots:
To specific areas inside the bowl that feel empty, add random, singular tiny dots. This mimics pollen or drifting seeds and adds to the whimisical feel. -
Bisque Fire:
Once the underglaze is completely dry, load the bowl into the kiln for a bisque firing (usually Cone 04 or 06, depending on your clay body).
Burnished Finish
Instead of glazing, try burnishing the bare clay with a smooth stone before firing for a soft, natural sheen on the unpainted areas.
Step 3: Glazing and Finishing
-
Clear Glaze Application:
Wipe the bisqued piece with a damp sponge to remove dust. Dip the entire bowl into a clear matte or satin glaze. A glossy glaze might obscure the subtle texture of the clay. -
Wipe the Foot:
Ensure the bottom foot ring is completely free of glaze using a wax resist beforehand or wiping it clean with a sponge. -
Final Fire:
Fire the piece to the maturity temperature of your clay (likely Cone 5 or 6 for stoneware). This will melt the glaze and vitrify the clay.
Now you have a stunning, food-safe vessel perfect for serving or display, carrying the warmth of the sun in its design
Ocean Wave Brush Swirls
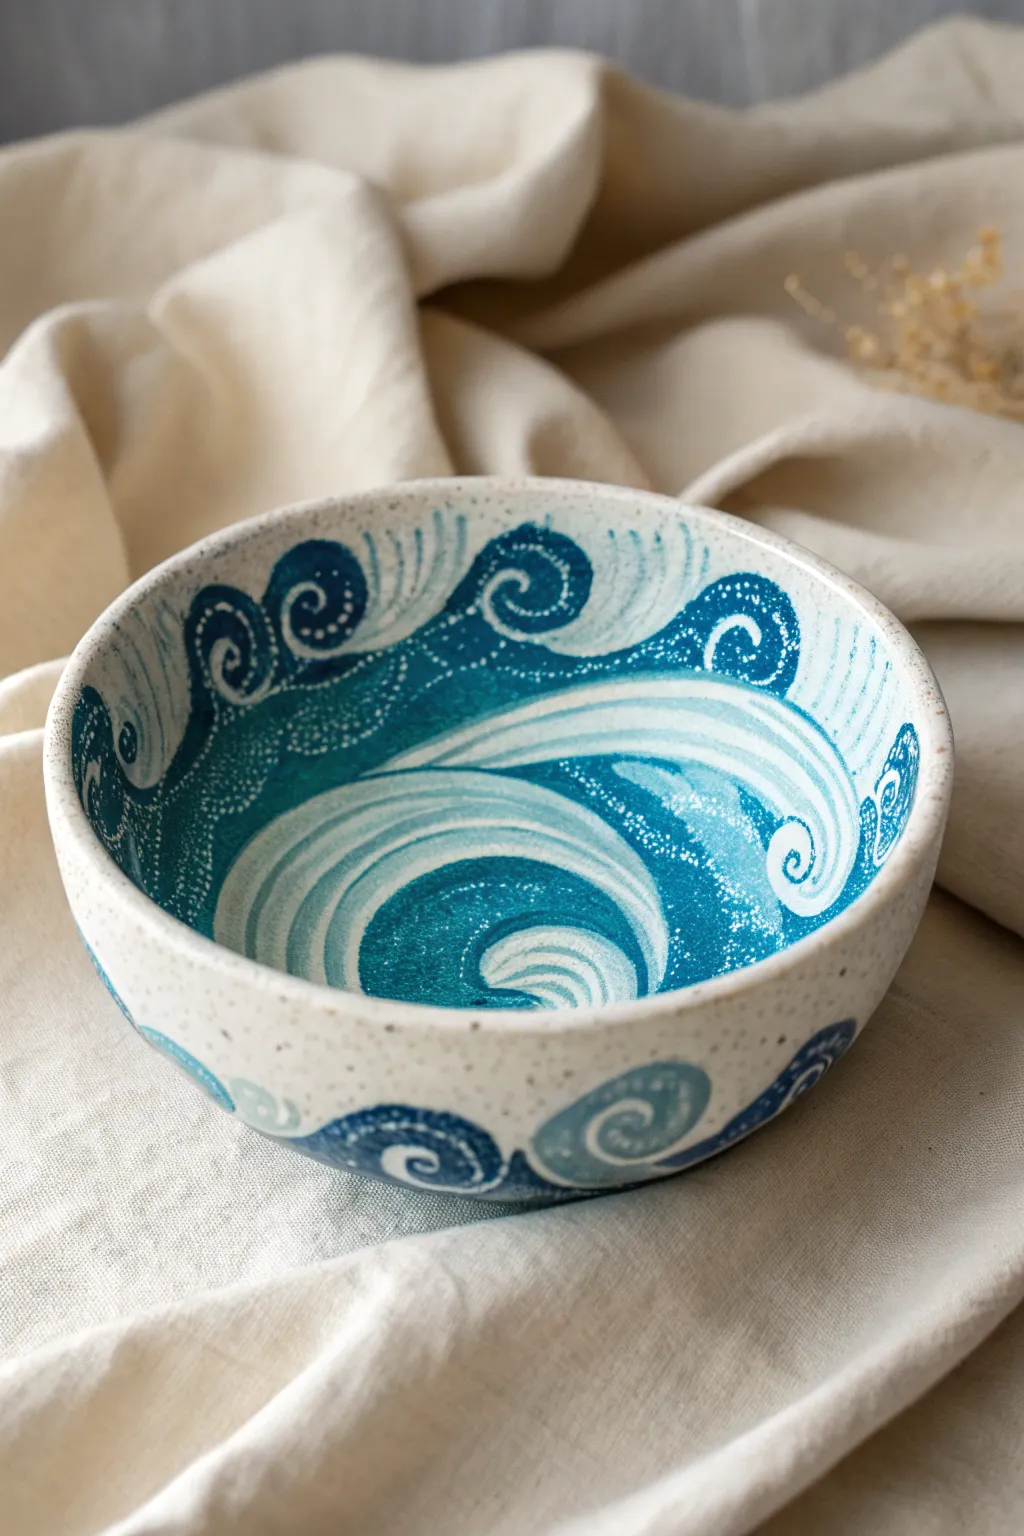
Capture the rhythmic energy of the ocean with this dynamic pottery project, featuring swirling waves that crash across both the interior and exterior of a speckled clay bowl. The interplay of deep teals, navy blues, and crisp white foam details creates a distinct sense of movement and depth.
How-To Guide
Materials
- Speckled buff stoneware clay
- Pottery wheel (or slab roller/slump mold/coils for hand-building)
- Rib tools (wood and metal)
- Sponge
- Trimming tools
- Ceramic underglazes: Deep Navy, Teal/Turquoise, Sky Blue, and Bright White
- Round brushes (sizes 2, 4, and 6)
- Fine liner brush (size 0 or 00)
- Clear transparent glaze (glossy)
- Kiln
Step 1: Forming the Canvas
-
Prepare the Clay:
Begin by wedging about 1.5 to 2 lbs of speckled buff clay. Wedging is crucial to remove air bubbles and align the clay particles, ensuring a smooth throwing experience. -
Throw the Bowl:
Center the clay on your wheel and open it up to a wide curve. Aim for a classic hemispherical bowl shape with distinct walls that curve gently inwards at the rim. -
Refine the Interior:
Use a flexible metal rib to compress the interior surface. This not only strengthens the bottom against cracking but also creates the ultra-smooth surface needed for detailed painting later. -
Smooth the Rim:
Thicken slightly and round off the rim using a chamois or a damp sponge. A rounded rim feels better on the lips and resists chipping better than a sharp edge. -
Leather Hard Drying:
Allow the bowl to dry slowly to a leather-hard state. It should be firm enough to hold its shape without distorting when handled, but still cool to the touch. -
Trim the Foot:
Invert the bowl on the wheel head and trim a clean foot ring. Smooth out any turning lines on the exterior with a damp sponge so the outside is just as canvas-ready as the inside.
Step 2: Painting the Ocean
-
Sketch the Flow:
Lightly trace the main crests of your waves with a pencil directly onto the leather-hard clay. The pencil lines will burn off in the kiln, so don’t worry about being perfect. -
Base Color Blocking:
Using a size 6 brush, apply your Sky Blue underglaze. Block in large, sweeping curved areas that will serve as the water’s body. I like to keep the brush strokes loose here to mimic water. -
Deepening the Depths:
Switch to Teal and Deep Navy. Paint powerful, thick spirals (the ‘curls’ of the waves) over the lighter blue, focusing on where the wave breaks and rolls over. Layering these colors creates a sense of volume. -
Exterior Continuity:
Don’t forget the outside! Carry the wave motif over the rim or start new swells near the base of the bowl, ensuring the design feels continuous as you turn the piece. -
Adding Texture:
While the underglaze is still slightly damp, stipple some Deep Navy into the Teal areas with a drier brush to create a mottled, foamy texture within the dark water.
Brush Control Secret
Load your liner brush with watered-down underglaze for the long white lines. This improves flow, allowing for unbroken, sweeping strokes without the brush dragging.
Step 3: Creating Movement & Foam
-
Line Work:
Using your fine liner brush and Bright White underglaze, paint long, thin sweeping lines following the curve of your blue shapes. These lines define the current and water direction. -
Dotting the Spray:
Dip the back end of a small brush or a dotting tool into White underglaze. Add clusters of dots at the crests of the waves and inside the dark spirals to replicate sea spray and bubbles. -
Highlighting the Crests:
Add thicker white strokes along the very tops of the wave shapes to separate the foreground waves from the background ‘water’. -
Bisque Fire:
Once the underglaze is completely dry, load the bowl into the kiln for a bisque firing (usually Cone 04 or 06, depending on your clay). -
Glazing:
After the bisque fire, wipe the piece with a damp sponge to remove dust. Dip the entire bowl into a clear, glossy glaze. The gloss will make the blues pop and look like wet water. -
Final Fire:
Fire the bowl to the final maturity temperature for your clay and glaze (typically Cone 5 or 6). Let the kiln cool completely before opening.
Oceanic Depth
Leave some of the speckled raw clay showing between the waves. The natural specks look like sand and provide a warm contrast to the cool blue tones.
Now you have a functional piece of art that brings the calming rhythm of the sea right to your table

TRACK YOUR CERAMIC JOURNEY
Capture glaze tests, firing details, and creative progress—all in one simple printable. Make your projects easier to repeat and improve.
Bold Checkerboard Statements
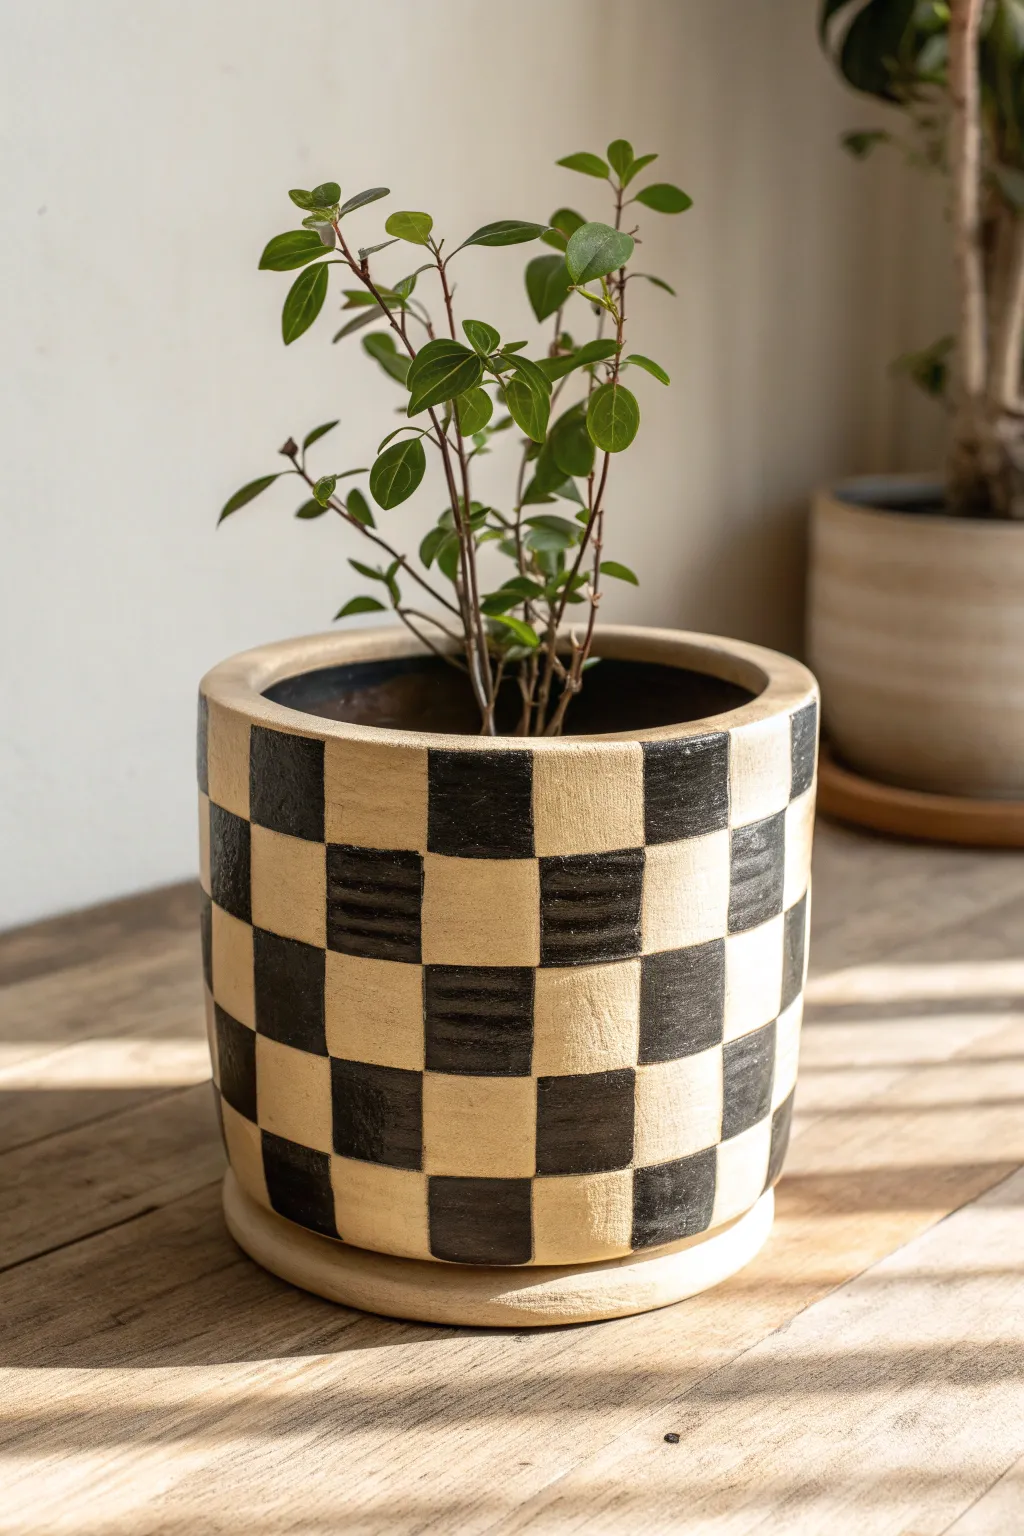
Transform a simple cylindrical terracotta or ceramic pot into a modern statement piece with this bold geometric design. The high-contrast black and cream pattern brings a playful yet sophisticated energy that works beautifully with lush green foliage.
Step-by-Step Tutorial
Materials
- Cylindrical terracotta or ceramic pot (approximately 6-8 inches)
- Matching clay saucer
- Gesso or white acrylic primer
- Cream or beige matte acrylic paint
- Black matte acrylic paint or black glaze
- Flat shader brush (squares size)
- Small round detail brush
- Pencil
- Flexible measuring tape
- Ruler
- Matte spray sealer or varnish
Step 1: Preparation and Base Coat
-
Clean the Surface:
Begin by wiping down your clay pot and saucer with a damp cloth to remove any dust or manufacturing residue. Let it dry completely. -
Prime the Surface:
Apply a coat of gesso or white primer to the exterior of the pot and the rim. This seals the porous clay and ensures your lighter paint colors will pop without soaking in. -
Apply the Base Color:
Once primed, paint the entire exterior surface with your cream or beige matte acrylic paint. Don’t forget to paint the saucer to match. -
Add a Second Coat:
Let the first layer dry to the touch, then apply a second coat of cream paint for full, opaque coverage. I find that brushing in the opposite direction of the first coat helps minimize visible streaks.
Grid Tape Trick
If you have trouble painting straight lines, use thin washi tape or painter’s tape to mask off the grid. Burnish edges well to prevent bleed.
Step 2: Drafting the Grid
-
Measure Circumference:
Use a flexible measuring tape to find the circumference of your pot. Divide this number by an even number (like 8 or 10) to determine the width of your squares. -
Mark Vertical Lines:
Using a pencil, make small tick marks around the rim according to your calculated width. Use a ruler to extend these marks lightly down the length of the pot to create vertical guides. -
Mark Horizontal Lines:
Measure the height of the pot and divide it into equal sections, aiming for a square shape. Lightly draw horizontal rings around the pot to complete your grid. -
Plan the Pattern:
Place a small ‘X’ lightly in every other square to mark which ones will be painted black. This prevents confusion once you start painting.
Step 3: Painting the Checkers
-
Outline the Squares:
Load a small detail brush with black matte paint. Carefully outline the inside edges of a square marked with an ‘X’ to create a crisp boundary. -
Fill in the Color:
Switch to your flat shader brush to fill in the center of the square. The flat edge of the brush helps maintain straight lines against your border. -
Work in Sections:
Continue painting the black squares row by row. It is best to work your way around the pot to avoid smudging wet paint with your hand. -
Refine Edges:
Once the black paint is dry, check your lines. If any edges look wobbly, use the cream paint and a tiny brush to touch up and straighten them out. -
Paint the Rim:
Decide if you want the rim to be black or cream. In the reference, the top rim coordinates with the top row of checkers, creating a clean finish into the interior.
Try Scraffito Style
For a textural twist, paint the whole pot black over cream, then scratch off the black squares while wet to reveal the light color underneath.
Step 4: Texture and Sealing
-
Create Texture (Optional):
To mimic the rustic look in the photo, you can dry-brush a tiny amount of black paint horizontally across the black squares to give them a slightly worn, woven appearance. -
Seal the Project:
Once all paint is fully cured (give it at least 24 hours), spray the entire pot and saucer with a matte clear acrylic sealer. -
Double Seal for Durability:
Apply a second light coat of sealer to ensure the paint is protected against water drips when you water your plant.
Now you have a stunning, architecturally inspired home for your favorite houseplant
Soft Ombre Gradients
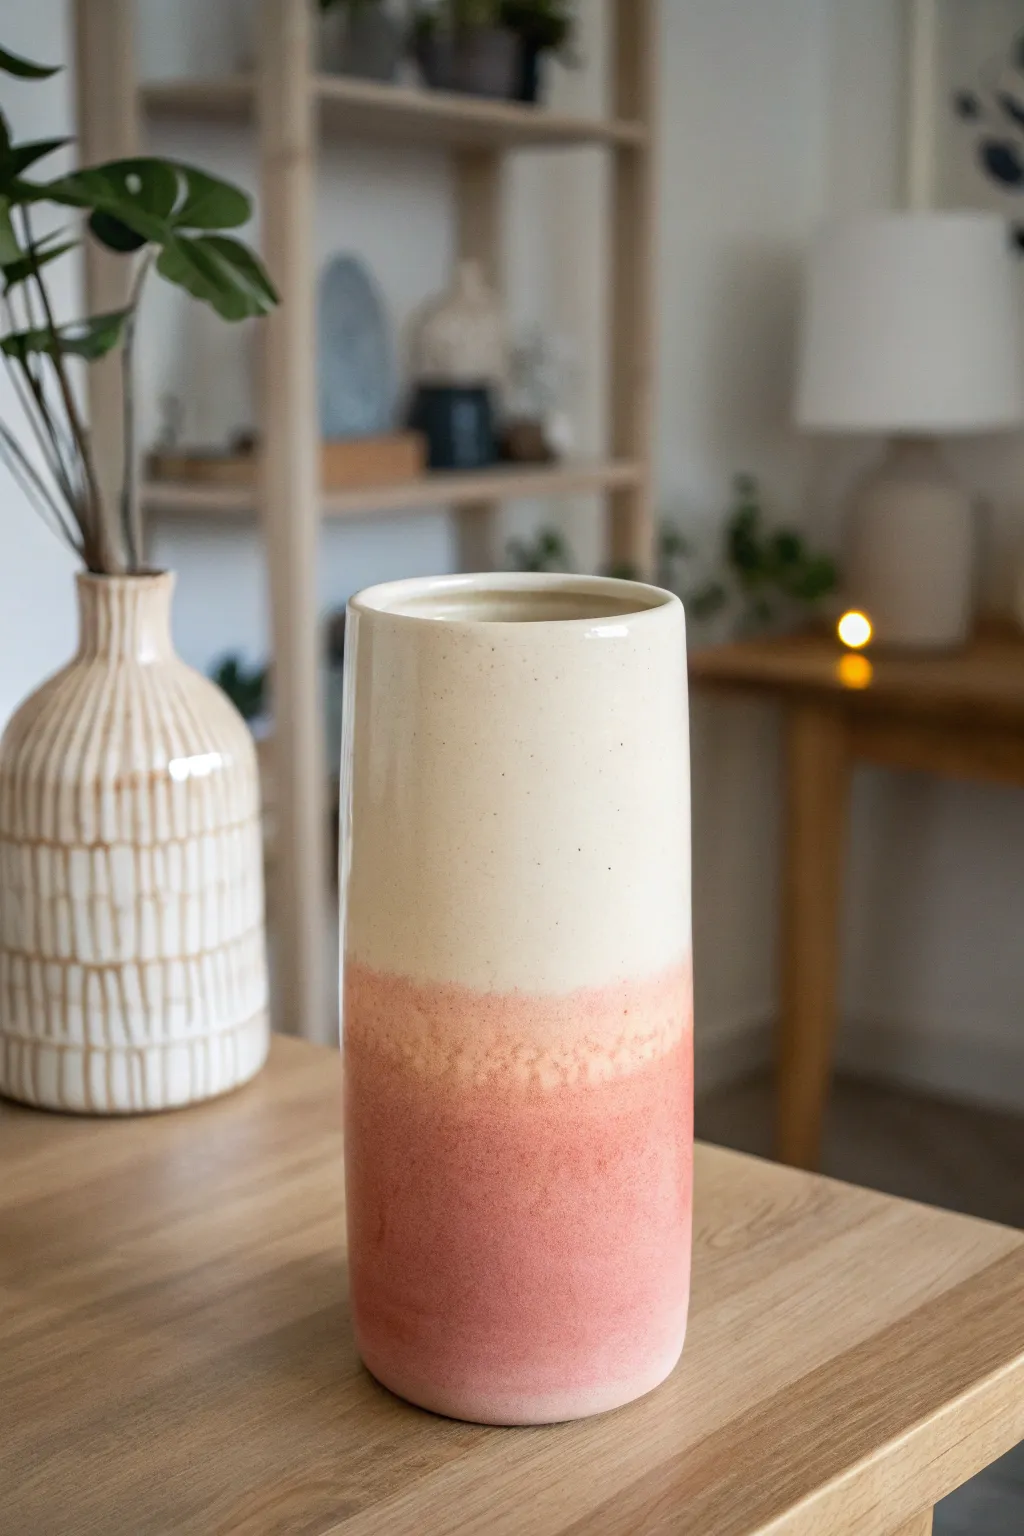
Achieve a dreamy, soft transition of color with this tall cylindrical vase project. The subtle blend from creamy white to a warm, peachy pink mimics the gentle hues of a morning sky, perfect for showcasing minimal floral arrangements.
Step-by-Step
Materials
- White or speckled stoneware clay (approx. 3-4 lbs)
- Pottery wheel
- Throwing tools (sponge, rib, wire cutter)
- Trimming tools
- Bisque firing kiln
- Glossy Cream or Clear glaze (dipping or brushing)
- Peachy-Pink or Coral glaze (dipping or brushing)
- Glaze tongs (optional, for dipping)
- Clean sponge and water bucket
- Large soft fan brush (if brushing)
Step 1: Throwing the Cylinder
-
Center the Clay:
Begin by firmly throwing your wedge of clay onto the wheel head. Seal the bottom edge and center the clay using steady pressure, coning it up and down until it runs perfectly smooth in your hands. -
Open the Form:
Open the centered mound, ensuring you leave at least a half-inch of clay for the floor. Compress the floor with a sponge or rib to prevent S-cracks later during drying. -
Pull the Walls:
This vessel relies on height, so take your time pulling walls upward. Keep your pulls steady and vertical, aiming for a consistent thickness from bottom to top. You want a straight-sided cylinder. -
Straighten and Refine:
Use a straight metal or wooden rib against the outside of the pot while supporting the inside. This removes throwing lines and ensures that perfect, modern cylindrical silhouette. -
Finish the Rim:
Compress the rim gently with a chamois or sponge. I like to thicken the rim just slightly to give it a visual ‘stop’ and extra durability. -
Wire Off:
Run a wire cutter underneath the pot to separate it from the wheel head. Let it firm up to leather-hard consistency before attempting to move or trim it.
Step 2: Trimming and Bisque
-
Trim the Base:
Once leather hard, center the pot upside down on the wheel. Trim the bottom flat, creating a clean 90-degree angle where the wall meets the table. A slight bevel can help create a floating effect. -
Smooth the Surface:
Before firing, burnish the surface slightly with a soft rib if you want a super smooth finish, or leave a bit of texture if preferred. Ensure all maker’s marks or sharp edges are smoothed away. -
Dry and Fire:
Allow the vase to dry slowly under loose plastic to prevent warping due to its height. Once bone dry, bisque fire it to Cone 04 (or your clay body’s recommendation).
Uneven Fade?
If the transition line looks too sharp, gently sponge the edge of the second glaze layer while it’s still damp to blur the line.
Step 3: Creating the Ombre Glaze
-
Clean the Bisque:
Wipe the bisque-fired vase with a damp sponge to remove any kiln dust. This ensures the glaze adheres properly without crawling. -
Apply the Base Coat:
Pour the cream or clear glaze into the interior of the vase, swirl to coat, and pour out. Then, dip the entire exterior into a bucket of the cream glaze. Let this layer dry completely. -
Prepare the Pink Glaze:
If your pink glaze is thick, thin it slightly with water. A thinner glaze allows for a softer, more misty gradient rather than a harsh line. -
Dip the Gradient:
Hold the vase upside down by the foot. Dip the top portion (which is actually the bottom of the vase) into the pink glaze. Lower it in quickly and pull it out slowly. -
Feather the Edge:
Immediately after dipping, while the glaze is still wet, you can create a softer transition. Use an airbrush or a very soft, dry brush to gently feather where the pink meets the cream. -
Alternative Spray Method:
If dipping is too tricky, use a spray bottle or airbrush to apply the pink glaze to the bottom third, letting the overspray drift upward to create the fade naturally. -
Clean the Foot:
Once the glaze is dry on the pot, diligently wipe the bottom of the vase and about 2mm up the side with a wet sponge. No glaze should touch the kiln shelf. -
Final Firing:
Load the kiln carefully. Fire to the maturation temperature of your glaze (usually Cone 5 or 6 for stoneware). Allow the kiln to cool completely before opening.
Spraying Tip
For the softest ombre, use a mouth atomizer or spray gun for the second color layer instead of dipping.
Place your finished vase near natural light to let the gentle gradient truly shine
Sgraffito Carved Illustrations
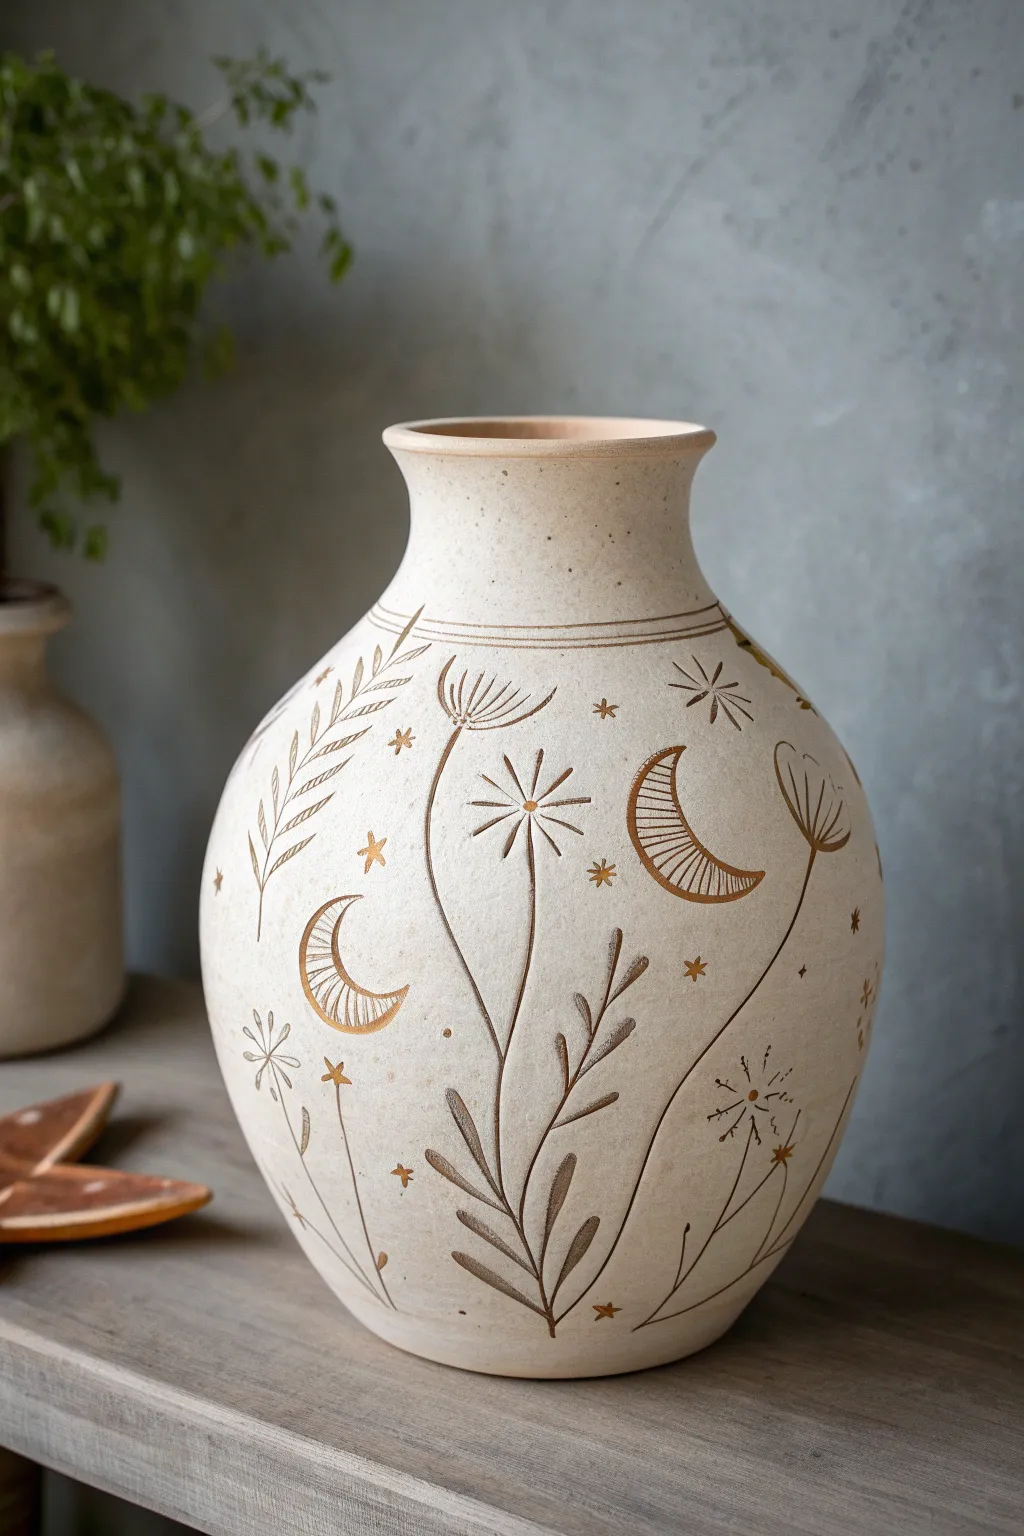
Embrace the magic of the night sky with this enchanting sgraffito project, featuring delicate botanical stems and crescent moons carved into creamy slip. The contrast between the speckled stoneware body and the smooth, matte surface creates a timeless, ethereal vessel perfect for dried bouquets.
Step-by-Step Guide
Materials
- Bisque ware vase or leather-hard clay vase (speckled stoneware recommended)
- Creamy white underglaze or slip
- Soft fan brush
- Sgraffito loop tool (small wire styling)
- Needle tool or fine stylus
- Carving tool for broader lines
- Gold luster or gold leaf paint (optional)
- Clear matte glaze
- Damp sponge
- Pencil (HB or lighter)
Step 1: Preparation & Application
-
Prepare the vessel:
Begin with a leather-hard clay vase. If you are throwing your own, a speckled buff clay adds beautiful character to the final carved lines. If using a pre-made bisque piece, wipe it down with a damp sponge to remove dust. -
Apply the background slip:
Using a soft fan brush, apply 3-4 even coats of creamy white underglaze or slip to the entire exterior. I like to let the slip become firm to the touch but not bone dry between coats to ensure good adhesion without flaking. -
Allow to stiffen:
Let the piece dry slightly until the surface is no longer tacky. It should feel like cold, hard chocolate—this is the perfect consistency for crisp carving lines without the clay crumbling.
Clean Lines Only
If slip chips off while carving, your clay sits too dry. Spray a fine mist of water and wrap in plastic for 30 minutes to rehydrate the surface before trying again.
Step 2: Designing the Motif
-
Draft the layout:
Lightly sketch your design directly onto the slip using a dull pencil. Start by placing the largest elements—the crescent moons—at opposite sides of the vase for balance. -
Add vertical flow:
Sketch long, flowing vertical lines for the main plant stems. Ensure they curve naturally, following the contour of the vase to accentuate its rounded form. -
Fill with details:
In the negative spaces, lightly mark locations for the starburst flowers, floating leaves, and small scattered stars.
Go for Gold
For a heat-free alternative to gold luster, use gold leaf size and sheets on the stars after the final firing. Seal with a varnish for a decorative-only finish.
Step 3: The Sgraffito Process
-
Carve the main stems:
Using a small wire loop tool, carve the central vertical stems. Apply gentle, consistent pressure to cut through the white slip and reveal the raw clay body underneath. -
Define the leaves:
Switch to a finer point tool to carve the leaf outlines attached to your stems. Use short, sweeping strokes to create the fern-like foliage seen on the left side of the design. -
Detail the moons:
Carve the outline of the crescent moons. Inside the moon shape, use a needle tool to create fine horizontal hatching lines, giving them texture and visual interest. -
Create starburst flowers:
For the dandelion-style flowers, carve a small central circle, then radiate straight lines outward. Depending on your tool, vary the thickness to differentiate the flower heads. -
Add celestial accents:
Scatter small 5-point stars and tiny dots throughout the empty spaces. These shouldn’t be perfect shapes; a slightly hand-drawn look adds to the charm. -
Carve the neck ring:
Identify the natural transition where the vase neck narrows. Carve two parallel horizontal lines around the circumference to frame the main illustration. -
Clean up burrs:
Once the carving is complete and the vase is fully dry (bone dry), use a stiff paintbrush to gently sweep away any clay crumbs or ‘burrs’ left from the tools. Avoid touching the design with your fingers to prevent smudging.
Step 4: Finishing Touches
-
Bisque fire:
Fire the piece to bisque temperature (usually Cone 04) to set the shape and the underglaze design permanently. -
Glaze application:
Dip or brush a clear matte glaze over the entire exterior. A matte finish is crucial here to maintain the gentle, stone-like aesthetic of the illustration. -
Final firing:
Glaze fire the piece according to your clay body’s specifications (typically Cone 5 or 6 for stoneware). -
Add optional gold luster:
If you want the metallic pop seen on the stars or moon, apply gold luster over the fired glaze on specific accents. Note that this requires a third, low-temperature firing.
Now step back and admire how the raw clay texture brings your celestial garden to life
Raised Slip-Trailed Lines
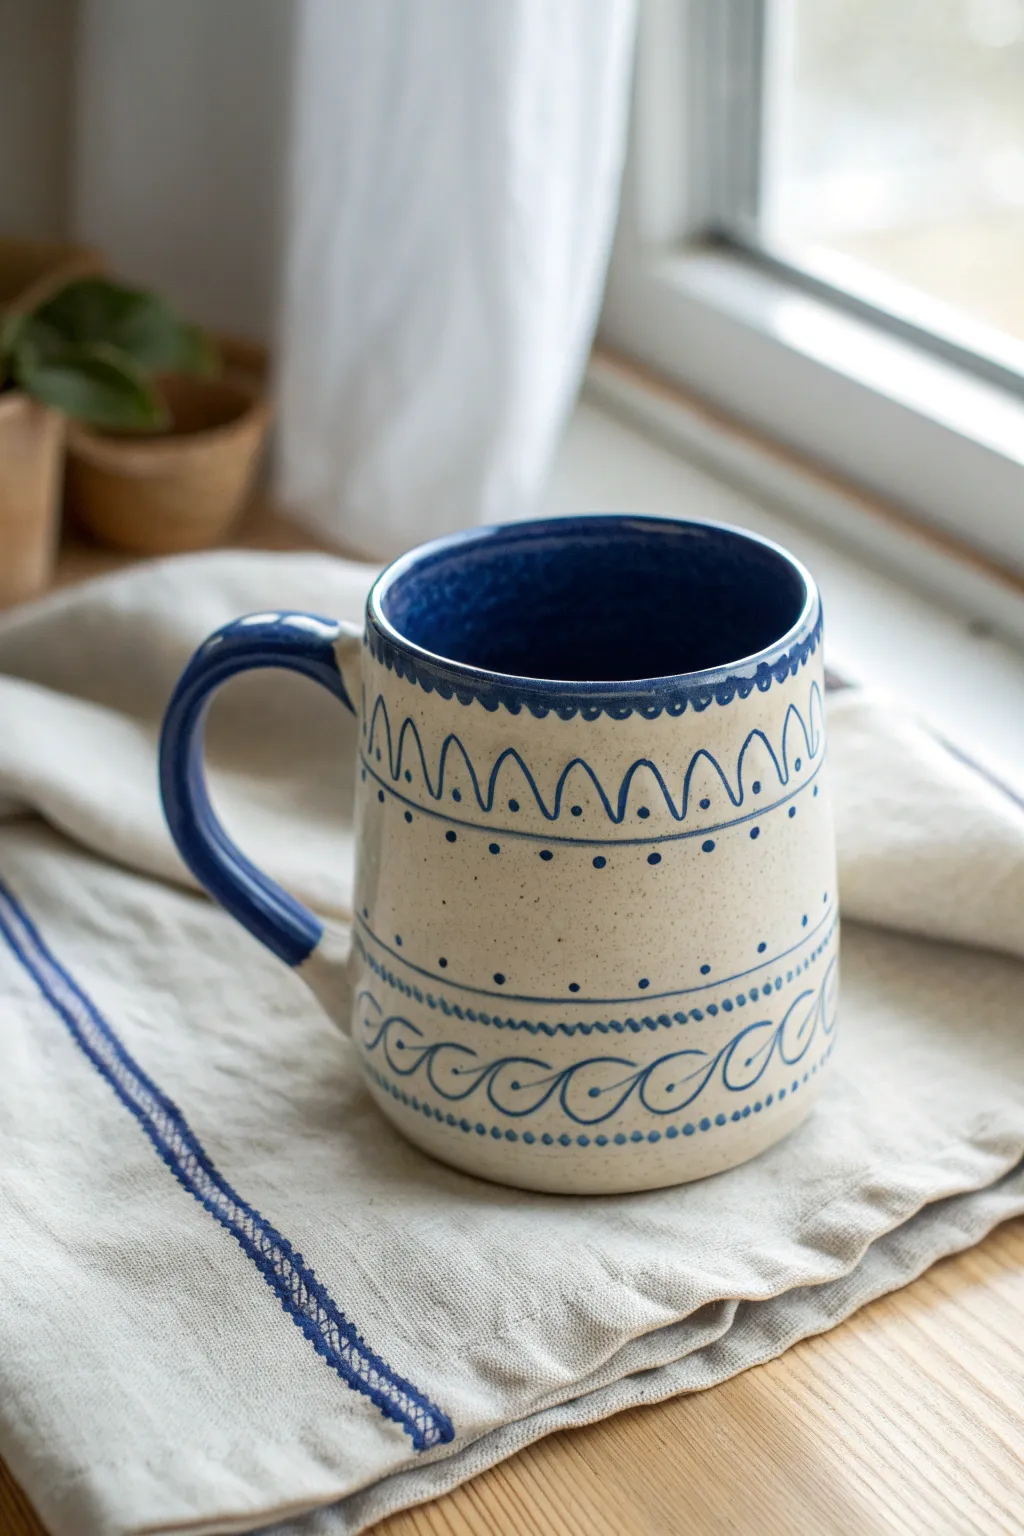
This charming handmade mug features raised, textural designs created with slip trailing, offering a delightful tactile experience with every sip. The contrast between the speckled oatmeal clay body and the deep cobalt blue slip creates a timeless, folk-art aesthetic that feels both rustic and refined.
Step-by-Step Tutorial
Materials
- Stoneware clay (speckled or buff)
- Pottery wheel
- Throwing tools (sponge, rib, wire cutter)
- Trimming tools
- Cobalt blue decorative slip (or underglaze)
- Slip trailer bulb with fine detail nib
- Clear gloss or satin glaze
- Paintbrush (soft bristle)
- Needle tool (for cleanup)
Step 1: Forming the Base
-
Throw the cylinder:
Begin by centering about 1-1.5 lbs of speckled stoneware clay on your wheel. Open the center and pull the walls up to create a simple, straight-sided cylinder, aiming for an even thickness throughout. -
Shape the belly:
Using a rib tool on the inside, gently push the walls outward to create a slight curve or ‘belly’ near the bottom, while tapering slightly at the rim to keep the drinking edge comfortable. -
Refine the rim:
Compress the rim with your chamois or sponge. I like to make the rim slightly rounded to match the softness of the slip trailing that will come later. -
Pull the handle:
While the body sets up, pull a handle from a lug of clay. Aim for a comfortable C-shape curve that will fit two or three fingers. Set it aside to stiffen into an arch. -
Trim and attach:
Once the mug is leather hard, trim the foot ring on the wheel. Afterwards, score and slip the attachment points and firmly attach your handle, smoothing the seams so they disappear.
Step 2: Applying the Design
-
Prepare the slip:
Ensure your cobalt blue slip is the consistency of heavy cream or yogurt. It needs to hold its shape when trailed but flow smoothly without clogging the tip. -
Fill the trailer:
Load your slip trailer bulb, tapping it gently on the table to release any air bubbles that could cause splatter later. -
Paint the handle and interior:
Before doing the delicate line work, use a soft brush to coat the entire handle and the interior of the mug with the blue slip. You may need two coats for full opacity. -
Mark your guides:
Place the mug on a banding wheel. Lightly scratch horizontal guide lines into the clay with a needle tool where you want your pattern bands to sit. -
Trail the top scallops:
Starting near the rim, squeeze the bulb with consistent pressure to draw a continuous wavy line, creating a scallop pattern characterized by high loops. -
Accentuate the scallops:
Add a single dot of slip in the center of each loop, and trail a straight horizontal line beneath the waves to fence them in. -
Draw the bottom waves:
Move to the bottom section. Trail a series of connected swirls or ‘C’ shapes that mimic ocean waves. Keep the pressure steady so the lines remain raised and rounded. -
Add lower details:
Frame the wave pattern with horizontal straight lines above and below. Finish by adding a row of small, tight dots along the very bottom horizontal line. -
Clean up:
If you make a mistake, wait for the slip to dry slightly and flake it off with a needle tool rather than smearing it while wet.
Clogged Trailer?
If slip stops flowing, don’t squeeze harder or the top will pop off! Use a fine sewing needle to clear the tip, or thin your slip slightly with a drop of vinegar.
Step 3: Glazing and Firing
-
Bisque fire:
Once the slip is bone dry, load the mug into the kiln for a bisque firing (usually cone 04 or 06). This sets the slip permanently onto the clay. -
Wax the foot:
Apply wax resist to the bottom foot ring to prevent glaze from adhering to the kiln shelf. -
Clear glaze application:
Dip the entire mug into a clear transparent glaze. A clear glaze is crucial here to let the speckled clay and the vibrant blue slip show through clearly. -
Final firing:
Fire the piece to maturity (Cone 5, 6, or 10 depending on your clay body). The clear glaze will melt over the raised slip, softening the texture slightly but leaving it touchable.
Level Up: Sgraffito
Coat a band solid blue, let it dry to leather hard, and carve the wave pattern *through* the blue to reveal the white clay beneath for an inverted effect.
Now you have a stunning, functional piece of art that invites you to trace the patterns with your fingertips
Stamped Texture Patterns
This project explores the interplay between bold geometric impressions and subtle, repetitive patterns on a simple curved form. The result is a tactile, cream-colored bowl that feels both rustic and meticulously crafted.
Detailed Instructions
Materials
- Stoneware clay (smooth, light-colored body)
- Pottery wheel (or slab roller for hand-building)
- Small wooden throwing ribs
- Sponge
- Wire cutter
- Circular stamping tool (e.g., the end of a chopstick, dowel, or hollow tube)
- Textured mesh, burlap, or a grid-pattern texture roller
- Clear or transparent matte glaze
- Kiln
Step 1: Forming the Base
-
Prepare the Clay:
Begin by thoroughly wedging about 2-3 pounds of stoneware clay to remove air bubbles and ensure a uniform consistency. -
Center and Open:
Secure the clay on the wheel head. Center it perfectly before opening the mound to establish the interior floor of your bowl. -
Pull the Walls:
Pull the clay walls upward and outward to create a gentle, hemispherical curve. Aim for walls slightly thicker than usual (approx. 1/4 to 3/8 inch) to accommodate the depth of the stamping later. -
Refine the Shape:
Use a wooden rib on the interior while supporting the outside with your hand to create a smooth, continuous curve. Compress the rim to prevent cracking. -
Dry to Leather Hard:
Cut the bowl from the wheel and allow it to dry slowly until it reaches a sturdy leather-hard stage. It needs to be firm enough to handle but soft enough to take an impression without cracking.
Cracks appearing?
If the clay cracks while stamping, it’s too dry. Mist the surface lightly with water, wrap it in plastic and let it sit for an hour to rehydrate before trying again.
Step 2: Applying the Textures
-
Initial Trimming:
Place the bowl back on the wheel (upside down) to trim the foot. Ensure the exterior surface is smooth and even before texturing. -
Plan the Zones:
Lightly mark a horizontal guideline halfway down the exterior of the bowl using a needle tool to separate your two texture zones. -
Stamp the Upper Rows:
Using a blunt circular tool (like a dowel end), press firmly into the clay near the rim. Create ordered rows of circles, staggering them slightly like a honeycomb or stacking them directly, depending on your preference. -
Refine the Circles:
Continue pressing these larger circles until you reach your divider line. If the clay bulges slightly on the inside, support the interior wall with a curved rib or your hand while pressing. -
Apply Lower Texture:
For the bottom half, use a textured roller or press a piece of coarse mesh fabric into the clay. I find rolling a textured tool vertically from the bottom up to the divider line creates the cleanest seam. -
Blend the Seam:
Use a damp finger or a small modeling tool to gently soften the transition line where the large circles meet the finer grid pattern. -
Smooth the Rim:
Check the rim once more. The stamping process might have distorted the roundness; gently reshape it if necessary and smooth it with a chamois.
Clean Impressions
Dust your stamping tools lightly with cornstarch before pressing them into the clay. This prevents the tool from sticking and pulling up the clay, keeping edges sharp.
Step 3: Firing and Glazing
-
Bisque Fire:
Allow the bowl to dry completely (bone dry) before loading it into the kiln for a bisque firing (usually Cone 06 or 04). -
Clean the Bisque:
Wipe the fired bowl with a damp sponge to remove any dust, which ensures the glaze adheres properly. -
Glaze Application:
Pour a transparent or semi-opaque cream glaze inside the bowl, swirl to coat, and pour out the excess. Dip the exterior quickly to avoid soaking the clay too much. -
Check Texture Clarity:
Ensure the glaze isn’t too thick on the exterior. If it pools in the stamped circles, it will obscure the texture. Gently dab excess glaze out of the deep impressions with a brush if needed. -
Final Fire:
Fire the piece to the maturation temperature of your specific clay and glaze combination (typically Cone 5/6 or Cone 10).
Once cooled, your bowl is ready to bring a touch of handcrafted elegance to your table
Mishima Inlaid Linework
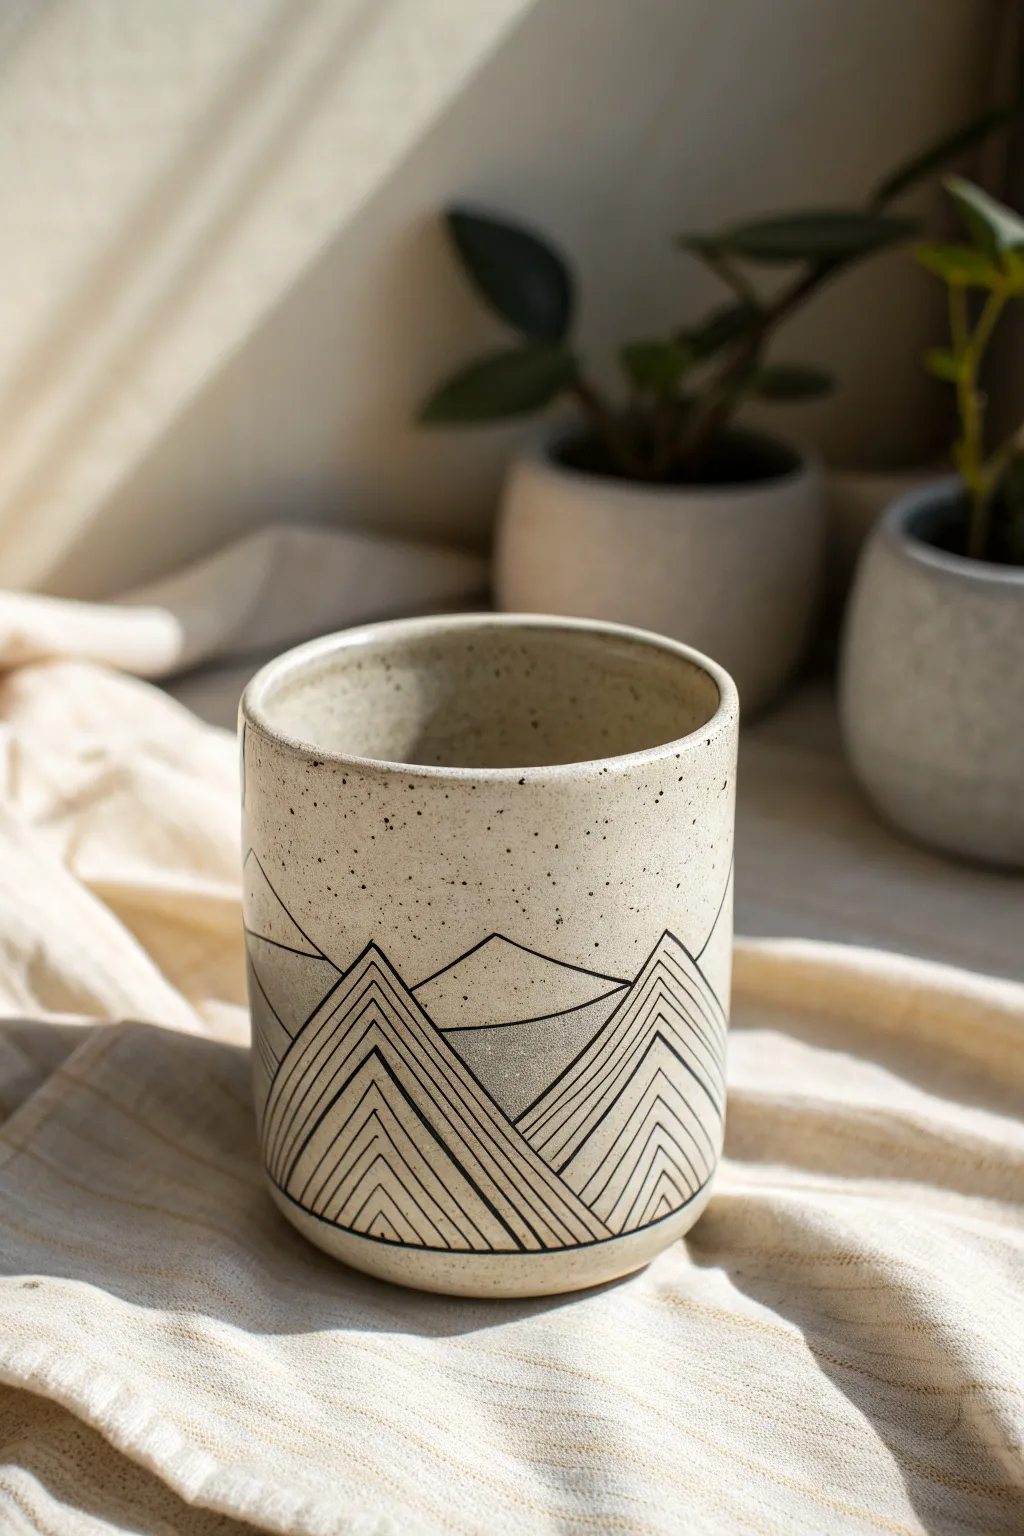
This project showcases the crisp, illustrative power of mishima inlay on a lovely speckled stoneware body. The design features geometric, striated mountains set against a clean clay background, perfect for a modern tea cup or small planter.
Step-by-Step Guide
Materials
- Speckled stoneware clay body (cone 5/6)
- Black underglaze or black slip
- Pottery wheel (or slab rollers for handbuilding)
- Needle tool or X-Acto knife
- Small carving loop tool (optional)
- Wax resist
- Soft sponge
- Metal rib
- Clear matte glaze
- Paintbrush
Step 1: Foming the Vessel
-
Throw the cylinder:
Begin by centering about 1 lb of speckled stoneware clay on the wheel. Open and pull the walls to form a simple, straight-sided cylinder with a slightly rounded bottom. -
Refine the shape:
Use a metal rib to smooth the outside walls, ensuring they are perfectly vertical and free of throwing lines. A smooth canvas is essential for the inlay work. -
Dry to leather hard:
Allow the piece to dry slowly until it reaches a solid leather-hard state. It should be firm enough to carve without warping, but soft enough to cut cleanly. -
Trim the foot:
Place the cup back on the wheel to trim the bottom. Create a subtle, rounded foot that mirrors the curve of the vessel’s base.
Sharper Lines Pro-Tip
For ultra-crisp lines, use a razor blade or X-Acto knife instead of a needle tool. The thin blade cuts deeper with less drag, making the cleaning process much easier.
Step 2: Carving the Design
-
Wipe the surface:
Before carving, give the surface a very light wipe with a damp sponge to remove any loose dust. -
Coat with wax resist:
Apply a thin, even coat of wax resist over the entire exterior surface where you plan to carve. I find this helps protect the negative space from staining during the slip application later. -
Let wax cure:
Wait for the wax to dry completely. It should feel tack-free to the touch. -
Sketch the mountains:
Using a very fine needle tool, gently scratch your mountain outlines through the wax. Don’t go deep yet; just mark the peaks and valleys. -
Carve the main outlines:
Using a sharp carving tool or needle tool, incise the main compositional lines—the large triangles of the mountains and the horizon line. Cut clearly through the wax and into the clay. -
Add geometric details:
Inside the foreground mountains, carve the repeating angled lines (chevrons) that create the striated texture. Keep the spacing as even as possible for a neat look. -
Detail the background:
Carve the finer, simpler lines for the distant mountains. Varying the line weight slightly between the foreground and background adds depth. -
Clean up burrs:
Typically, carving leaves little clay burrs. Gently brush these away with a soft, dry brush, being careful not to smudge the wax.
Fixing Smears
If you smear black slip into the clay pores where you don’t want it, let it dry completely, then gently sand that specific spot with fine-grit sandpaper after bisque firing.
Step 3: Applying the Inlay (Mishima)
-
Fill with slip:
Generously paint black underglaze or black slip over all your carved lines. Don’t worry about being neat; the wax will protect the uncarved areas. -
Ensure full coverage:
Scrub the slip into the grooves slightly with your brush to ensure no air bubbles are trapped at the bottom of the carved lines. -
Let it stiffen:
Allow the black slip to dry until it loses its sheen and becomes leather hard. This usually takes 20-30 minutes. -
Scrape the excess:
Using a sharp metal rib or a clean loop tool, carefully scrape away the excess slip from the surface. The slip should remain only inside the incised lines. -
Final wipe:
Once the majority of slip is scraped off, use a clean, barely damp sponge to wipe away any lingering haze. Rotate the sponge partially after every wipe to avoid dragging black smears.
Step 4: Finishing
-
Bisque fire:
Once the cup is bone dry, fire it to bisque temperature (usually cone 04). -
Glaze interior and rim:
Pour clear glaze inside the cup and dip the rim if desired. For the exterior, you can brush on a thin coat of clear matte glaze to seal the clay without obscuring the speckles. -
Final wipe down:
Clean the foot of the pot with a sponge to ensure no glaze sticks to the kiln shelf. -
Glaze fire:
Fire the piece to maturity (cone 5 or 6 depending on your clay body) to vitrify the stoneware and melt the glaze.
Now you have a stunning, modern piece of ceramic art ready for your favorite beverage
Faceted Carved Surfaces
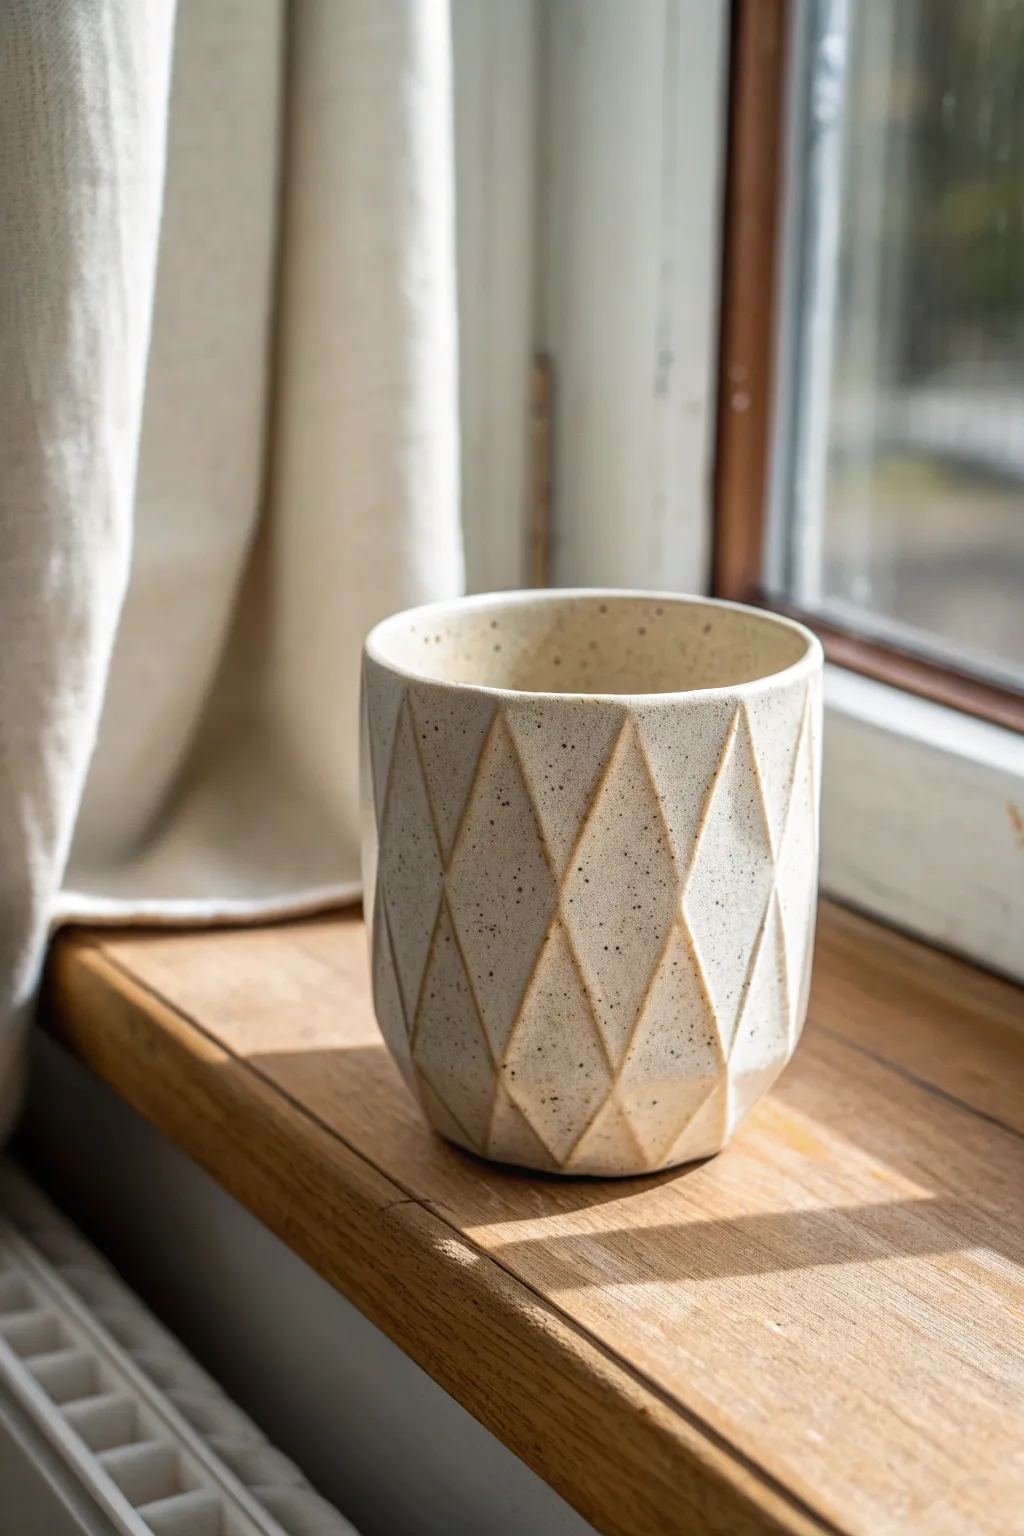
This project explores the satisfying technique of faceting clay to create a modern, textural vessel. The result is a stunning diamond-patterned cup with sharp relief that beautifully catches the light, especially when finished with a speckled matte glaze.
Detailed Instructions
Materials
- Stoneware clay (preferably with grog for structure)
- Pottery wheel
- Throwing tools (sponge, rib, wire cutter)
- Sharp trimming tool or loop tool (small to medium)
- Fettling knife
- Smoothing sponge
- Ruler or flexible measuring tape
- Needle tool
- Speckled cream or oatmeal matte glaze
- Kiln
Step 1: Throwing the Cylinder
-
Prepare the Clay:
Wedge about 1 to 1.5 lbs of stoneware clay thoroughly to remove air bubbles. Center the clay on the wheel head, ensuring a strong, wide base. -
Open and Pull:
Open the clay and pull up the walls to form a cylinder. Aim for walls that are slightly thicker than a standard mug (about 1/4 to 3/8 inch) to accommodate the deep carving you will do later. -
Shape the Form:
Shape the cylinder with a slight curve if desired, but keep the sides relatively straight and vertical to act as a proper canvas for the geometric pattern. Clean up the rim with a chamois. -
Dry to Leather Hard:
Wire the pot off the bat but leave it on a ware board. Allow it to dry slowly until it reaches a sturdy leather-hard stage. It needs to be firm enough to hold its shape against pressure, but soft enough to carve cleanly.
Uneven Facets?
If your diamonds look lopsided, practice your grid marking. Use a paper template wrapped around the cylinder to poke pinholes for perfect spacing before carving.
Step 2: Carving the Facets
-
Mark the Grid:
Using a needle tool and a flexible ruler, lightly scribe a horizontal line around the circumference near the top rim and another near the base. Divide the rim into an even number of sections (e.g., 8 or 10) and mark them vertically. -
Connect the Points:
Lightly sketch diagonal lines connecting your top marks to the bottom marks to create a diamond grid pattern. This doesn’t have to be deep; it’s just a guide. -
Start Carving:
Here I prefer to use a sharp ribbon tool or a straight-edged trimming tool. Place the tool at the top point of a diamond and slice downward and outward towards the widest part of the diamond. -
Complete the Diamond:
Reverse the direction from the bottom point of the diamond, slicing upward to meet the middle. The goal is to create a pyramid-like recession where the deepest point is the center of the vertical line. -
Refining the Edges:
Continue this process around the entire vessel. Go back and sharpen the ridges between the diamonds. Crisp, sharp transitions are key to this look. -
Cleaning Residue:
Once all facets are carved, use a slightly damp sponge to gently wipe away clay burrs or crumbs. Be careful not to round over your sharp edges.
Go Geometric
Try leaving the indented facets unglazed (raw clay) and only glazing the raised ridges and interior for a striking contrast in texture and color.
Step 3: Glazing and Firing
-
Bisque Fire:
Allow the piece to bone dry completely before loading it into the kiln for a bisque firing (usually Cone 04 or 06). -
Wax the Foot:
Apply wax resist to the bottom of the cup and up the side about 1/4 inch to prevent glaze from running onto the kiln shelf. -
Apply Glaze:
Pour a speckled cream or oatmeal matte glaze into the interior, swirl to coat, and pour out. Then, dip the exterior into the glaze bucket. A matte glaze works best to highlight the shadows of the carving. -
Clean the Rim:
Check the rim for any sharp glaze drips and smooth them with a finger. Ensure the coating is even but not too thick, as you want the clay texture to show through. -
Glaze Fire:
Load the kiln for the final glaze firing (often Cone 5/6 or Cone 10, depending on your clay body). Ensure good ventilation if reducing.
Enjoy your morning coffee while admiring the way light plays across the tactile surface you created
Whimsical Creature Planters
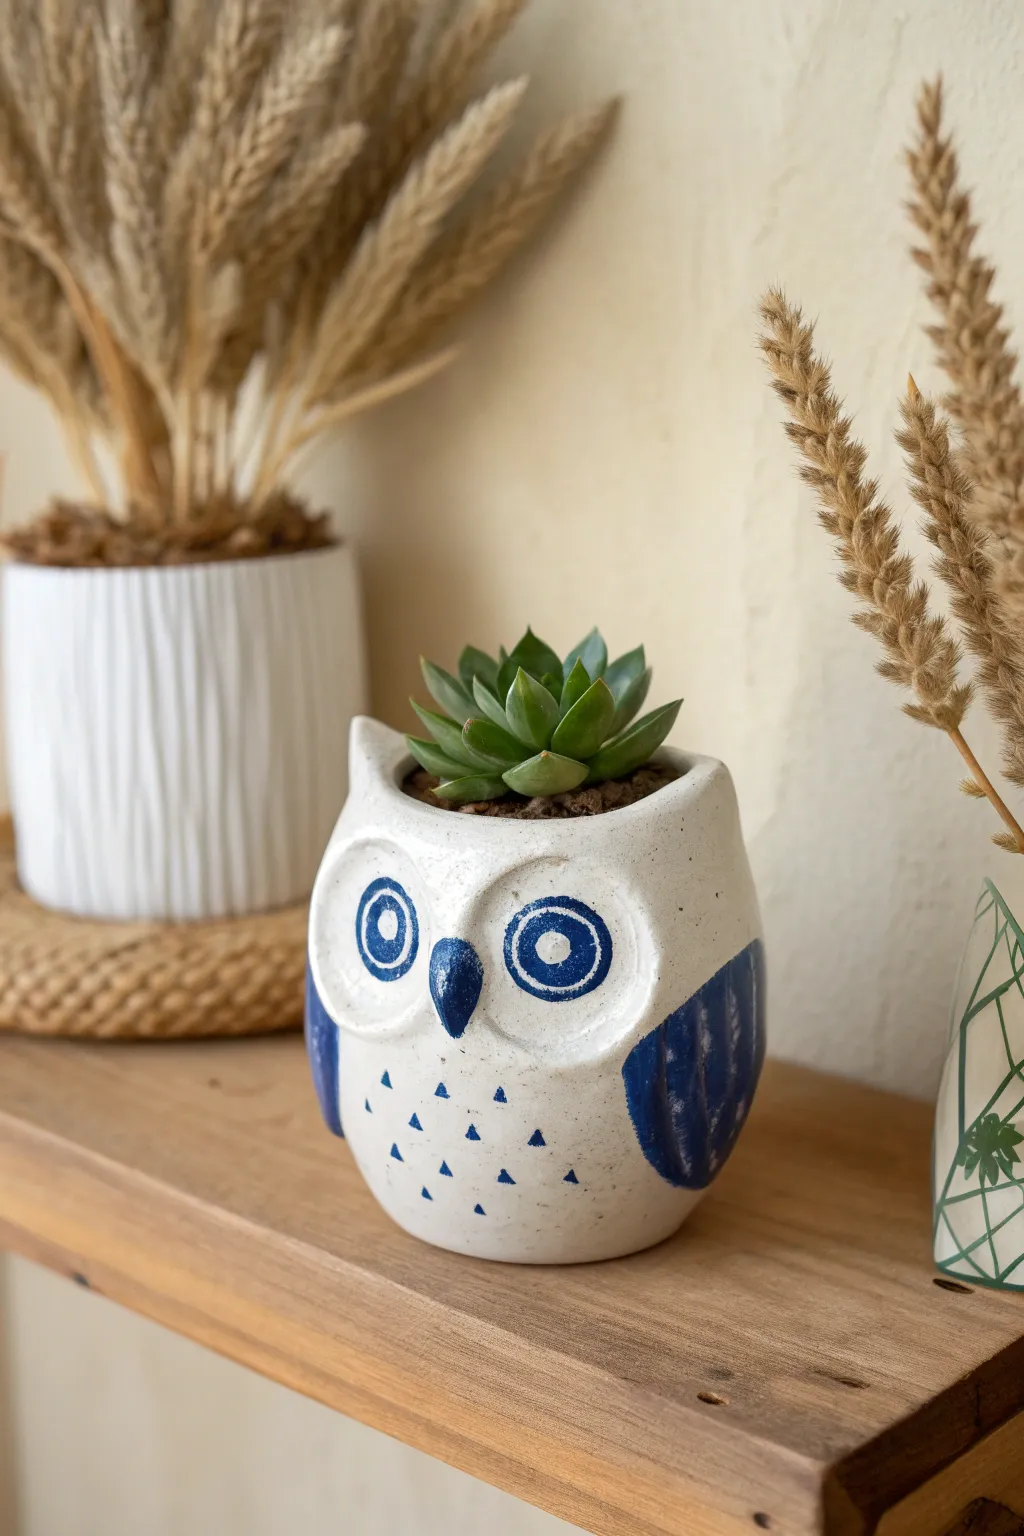
Bring wisdom and charm to your indoor garden with this hand-sculpted owl planter. Its milky white glaze, rustic blue accents, and endearing expression make it the perfect little guardian for your favorite rosette succulent.
Step-by-Step
Materials
- White earthenware clay or air-dry clay (approx. 1 lb)
- Pottery tools (needle tool, sponge, rib tool)
- Rolling pin
- Slip (clay and water mixture)
- Underglaze (Cobalt Blue)
- Clear transparent glaze (if firing) or high-gloss varnish (if air-drying)
- Small round paintbrushes (sizes 0 and 2)
- Succulent potting mix
- Small rosette succulent (like an Echeveria)
Step 1: Forming the Body
-
Start with a ball:
Begin by wedging your clay to remove air bubbles, then roll it into a smooth ball slightly larger than a tennis ball. -
Open the pot:
Hold the ball in one hand and press your thumb into the center about three-quarters of the way down. Gently pinch and rotate the clay to open up the walls, creating a basic pinch pot shape. -
Refine the shape:
Use a rib tool or your dampened fingers to smooth the exterior walls. Aim for a slightly tapered cylinder that is wider at the bottom and slightly narrower at the rim, resembling an owl’s body. -
Create the ears:
At the top rim, gently pinch two sections of clay upward and outward on opposite sides to form pointed ear tufts. Smooth the ‘forehead’ area between them so it dips slightly. -
Flatten the base:
Tap the pot gently on your work surface to create a flat, stable bottom so your owl won’t tip over.
Clean Lines
Use a wax resist over your blue painted areas before dipping into the clear glaze. This prevents the blue pigment from running or smudging during glazing.
Step 2: Sculpting the Features
-
Define the eyes:
Roll two small balls of clay and flatten them into discs. Score and slip the back of these discs, then attach them firmly to the upper front of the pot to serve as large eye areas. -
Mold the beak:
Roll a tiny cone of clay. Attach it vertically between the lower portion of the eye discs, blending the top edge smoothly into the face while leaving the pointy tip distinct. -
Attach the wings:
Roll out a small slab and cut two elongated teardrop shapes for wings. I prefer to curve these slightly before attaching them to the sides of the body with score and slip, pressing them flat against the pot. -
Smooth everything:
Use a slightly damp sponge to go over the entire piece, softening any rough edges or fingerprints, especially around the attachment points of the eyes and wings. -
Dry partially:
Allow the clay to dry to the leather-hard stage before moving on to decoration. This prevents the shape from distorting while you paint.
Add Texture
Before painting the wings blue, press a small loop tool into the clay to carve actual feather patterns for the glaze to pool into.
Step 3: Painting and Finishing
-
Paint the eyes:
Using your size 2 brush and cobalt blue underglaze, paint a thick ring inside the eye discs. Add a smaller, solid blue pupil in the center. -
Color the beak and wings:
Paint the entire beak blue. For the wings, fill them in with solid blue, following the teardrop shape you sculpted earlier. -
Add belly texturing:
With the size 0 brush, paint small, triangular specks in a staggered pattern across the owl’s belly area to suggest feathers. -
Bisque fire:
If using ceramic clay, let the piece bone dry completely, then fire it in the kiln to bisque temperature (usually cone 04). -
Apply clear glaze:
Dip the entire pot into a transparent clear glaze. Wipe the foot (bottom) clean with a sponge. -
Final firing:
Fire the piece again to the glaze temperature appropriate for your clay body to achieve that shiny, glassy finish. -
Planting:
Once cool, fill the owl with succulent soil and nestle your green rosette succulent into the top opening.
Now your wise little friend is ready to brighten up any shelf or windowsill