Whenever I need a quick, satisfying project, I reach for air dry clay and make a little plate—part decor, part catch-all, totally addictive. Here are my favorite air dry clay plate ideas that look special on a nightstand, vanity, or desk without being fussy.
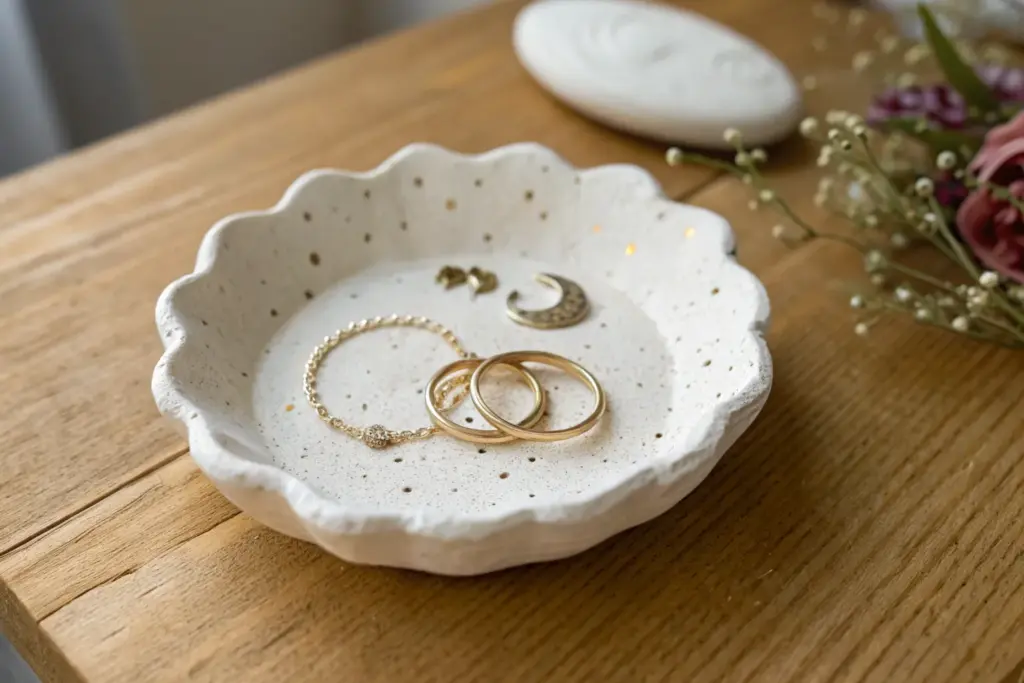
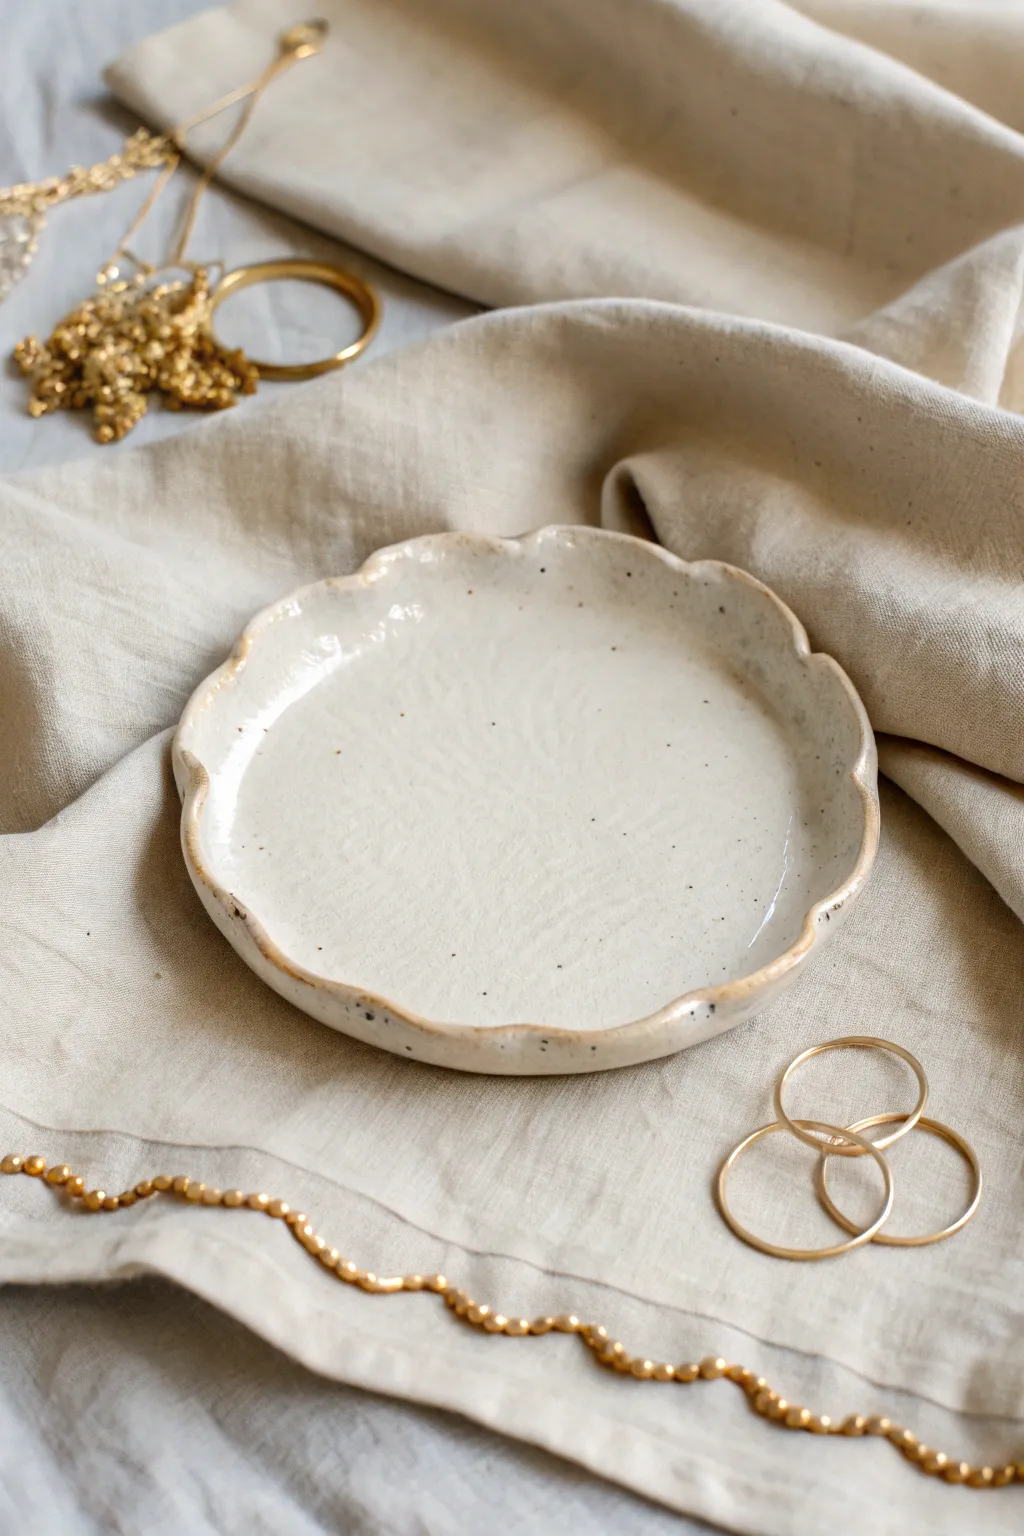
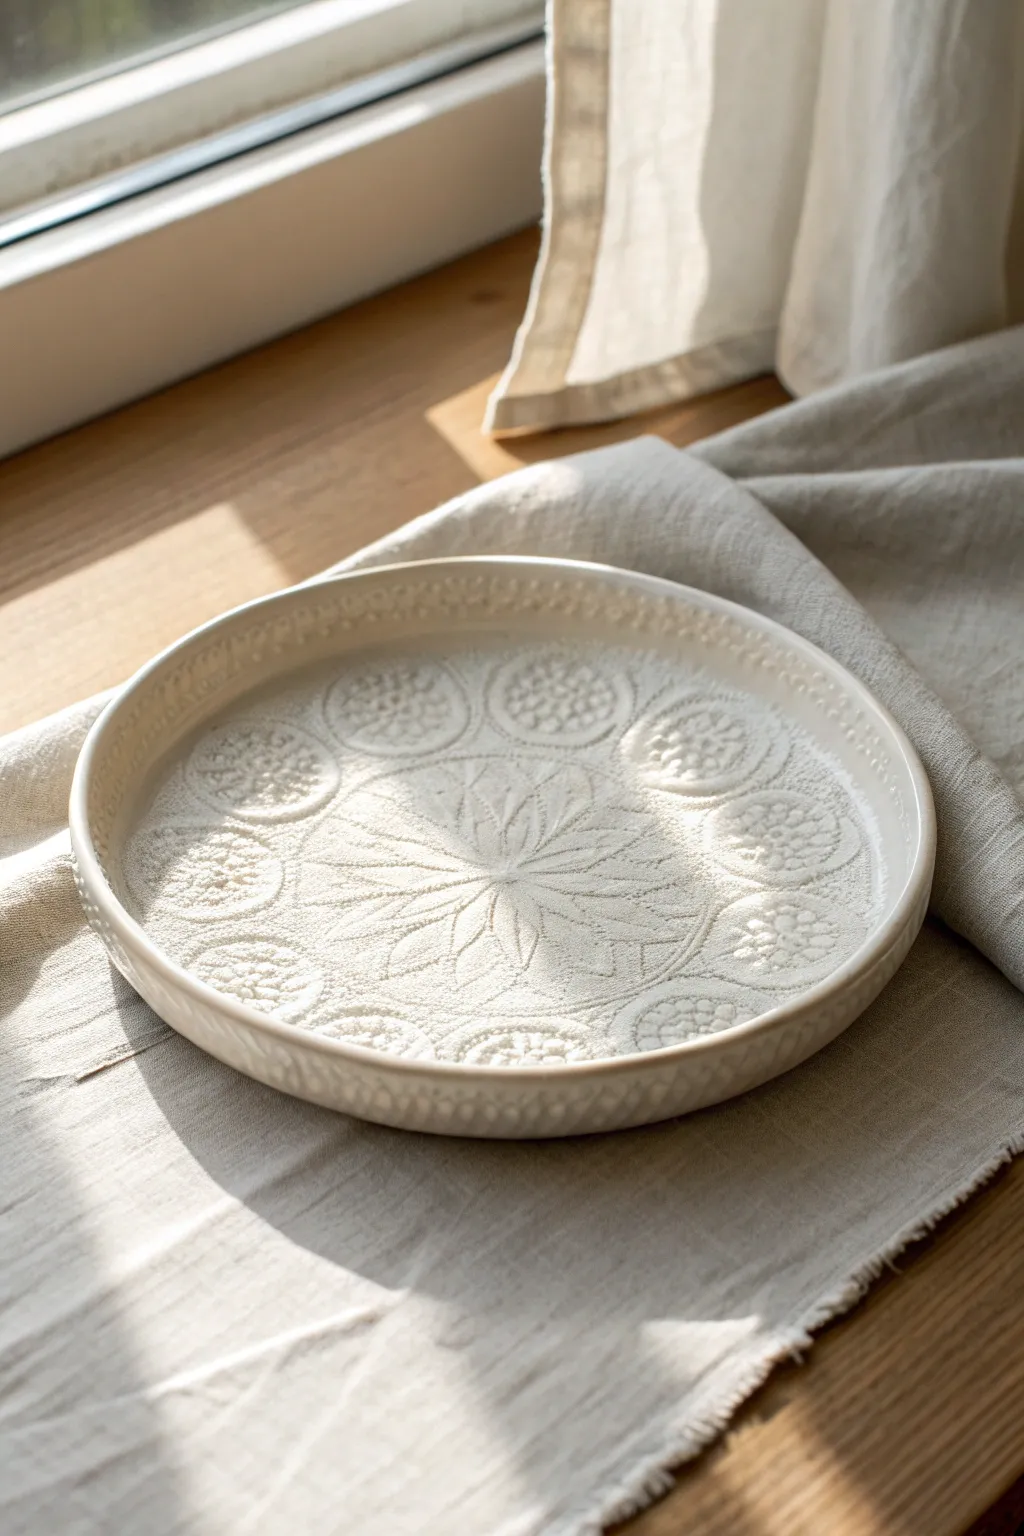
Scalloped Rim Plate
This charming, shallow dish features a distinctively fluted or scalloped rim with delicate stamped details along the inner border. Finished in a soft, blush-beige glaze, it makes a perfect catch-all tray for jewelry or a minimalist decorative accent.
How-To Guide
Materials
- Air dry clay (white or terra cotta)
- Rolling pin
- Two wooden guide slats (approx. 1/4 inch thick)
- Round template (paper plate or bowl)
- Clay knife or needle tool
- Sponge and water
- Small round piping tip or marker cap (for scalloping)
- Patterned stamp or embossing tool
- Fine-grit sandpaper
- Acrylic paint (blush/beige)
- Gloss varnish or sealant
- Paintbrushes
Step 1: Shaping the Base
-
Prepare your workspace:
Lay down a piece of canvas or parchment paper to prevent the clay from sticking to your table. Take a large ball of air dry clay and knead it well to remove air bubbles and warm it up. -
Roll the slab:
Place your wooden guide slats on either side of the clay ball. Roll the clay out into a smooth, even slab until the rolling pin rests flat on the slats, ensuring a consistent thickness throughout. -
Cut the circle:
Place your round template (a bowl works perfectly here) onto the clay. Using your needle tool or clay knife, trace around the template to cut out a perfect circle. -
Smooth the edges:
Dip your finger in a little bit of water and run it along the cut edge of the circle to smooth out any sharpness or roughness left by the knife. -
Create the rim form:
To give the plate its shallow concave shape, gently lift the clay circle and place it inside a slightly larger shallow bowl or a curved plate mold. Press it gently so it takes the subtle curve.
Smooth Operator
Use a damp paintbrush instead of your finger to smooth hard-to-reach crevices inside the stamped patterns or between tight scallops without smudging the details.
Step 2: Adding the Scalloped Detail
-
Mark the scallops:
Using a tool with a rounded edge—like the back of a marker, a large piping tip, or simply your thumb—begin pressing gently into the outer top edge of the rim to create evenly spaced indentations. -
Define the fluting:
I prefer to use a slightly rocking motion as I press down, creating that distinct ‘fluted’ look where the clay pushes outward between your finger presses. -
Refine the shape:
Go around the rim a second time to ensure the scallops are uniform. Smooth the valleys of the scallops with a damp sponge so they look organic rather than sharp. -
Stamp the inner border:
Take your patterned stamp or an embossing tool. Press a small motif just below each scallop on the inner face of the plate. The image shows a repeating triangle or leaf-like texture. -
Initial smoothing:
Before setting it aside to dry, do one final pass with a barely damp sponge across the flat center to ensure no fingerprints remain visible.
Gold Rim Upgrade
For an elegant twist, paint just the very top edge of the scallops with liquid gold leaf or metallic acrylic paint after the base color has dried.
Step 3: Drying and Finishing
-
Let it dry slowly:
Allow the plate to dry in the mold for at least 24 hours. Keep it away from direct heat or sunlight to prevent warping. -
Flip to dry the bottom:
Once the top feels leather-hard and holds its shape, carefully remove it from the mold and flip it over onto a wire rack to let the bottom dry completely (another 24-48 hours). -
Sand imperfections:
When bone dry, use fine-grit sandpaper to gently smooth the rim and any rough spots on the surface. Wipe away the dust with a dry cloth or brush. -
Mix your paint:
Mix white acrylic paint with a tiny drop of brown and a hint of pink to achieve that soft, earthy blush-beige tone seen in the reference photo. -
Apply the base coat:
Paint the entire plate, top and bottom. You may need two coats for full opacity, letting each layer dry in between. -
Highlight the texture:
If you want the stamped details to pop, mix a slightly darker wash (paint diluted with water) and brush it over the rim, then immediately wipe the surface with a paper towel, leaving pigment in the recessed designs. -
Seal the piece:
Finish with a coat of gloss or satin varnish. This mimics the look of fired ceramic glaze and protects the paint from chipping.
Place your beautiful new dish on a side table to catch the sunlight and admire your handiwork


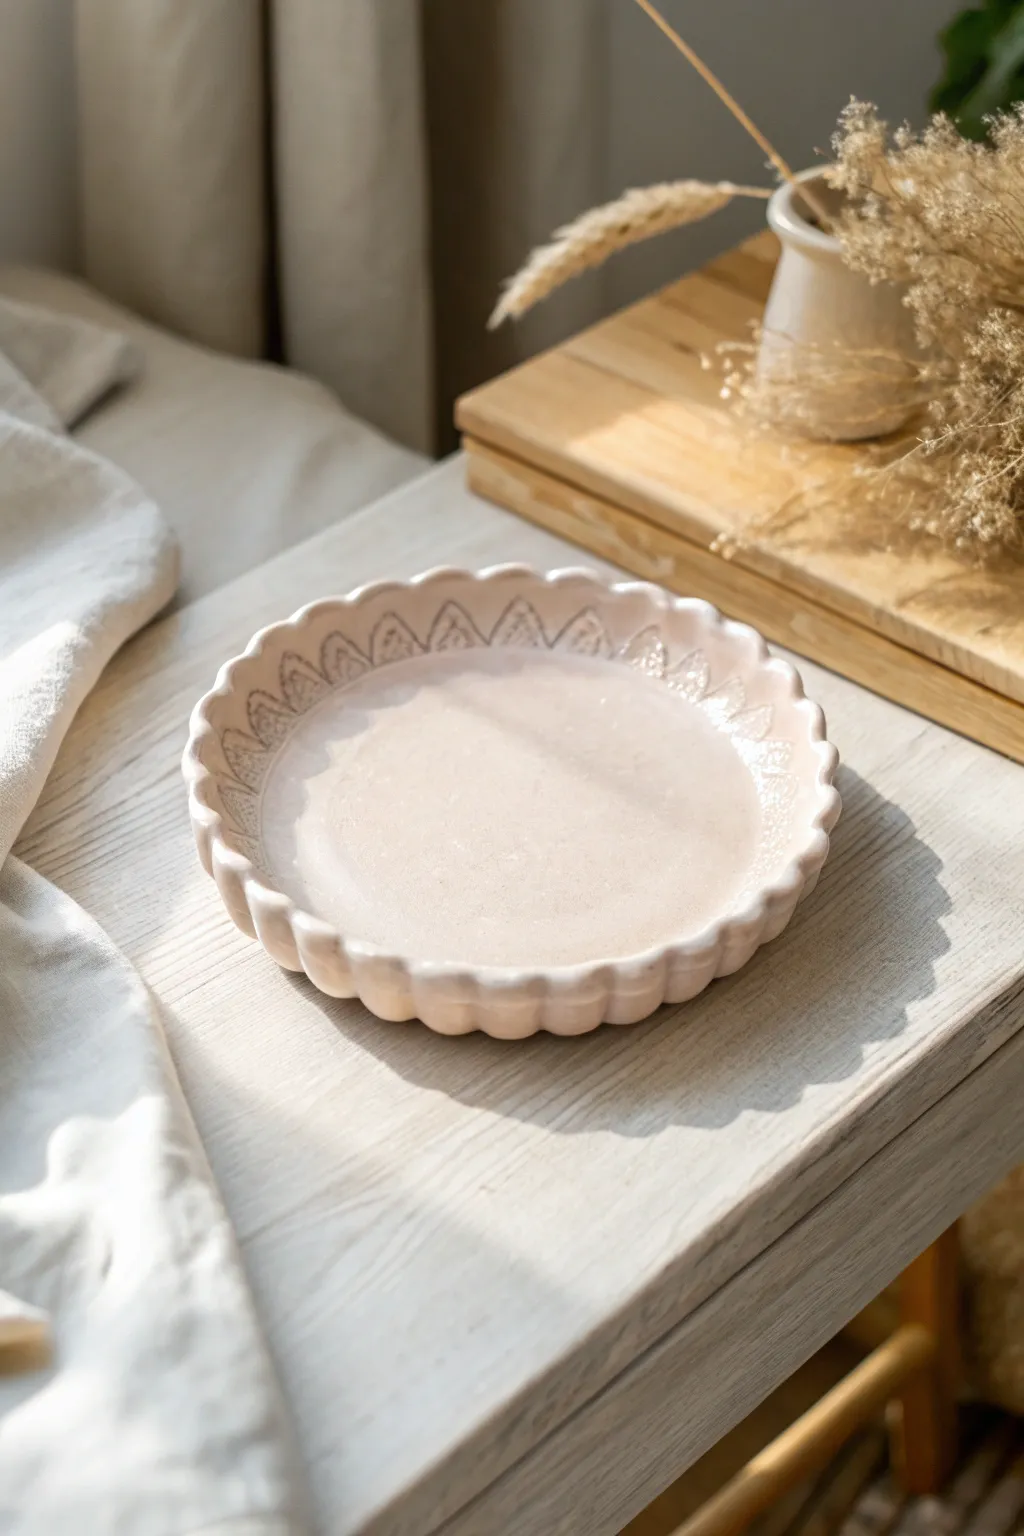
Wavy Organic Rim Plate
This charming trinket dish combines a soft, milky white finish with a delicate, organic shape that feels effortlessly handmade. The gently scalloped rim and subtle speckling mimic the look of high-end ceramic stoneware without needing a kiln.
Step-by-Step
Materials
- White air dry clay
- Rolling pin
- Canvas mat or parchment paper
- Circle template or bowl (approx. 5-6 inches)
- Craft knife or clay needle tool
- Small sponge
- Water
- Sandpaper (fine grit)
- Glossy acrylic varnish or glaze
- Cream or off-white acrylic paint
- Dark brown acrylic paint (for speckles)
- Metallic bronze or gold paint
- Old toothbrush
- Fine detail brush
Step 1: Shaping the Base
-
Condition the Clay:
Begin by taking a handful of white air dry clay and kneading it in your hands until it becomes warm and pliable. This conditioning step is crucial to prevent cracks later on. -
Roll the Slab:
Place the clay on a canvas mat or parchment paper. Use a rolling pin to flatten it into an even slab, aiming for a thickness of about 1/4 inch (6mm). Turn the clay over once or twice while rolling to ensure both sides are smooth. -
Cut the Circle:
Place your circle template or an inverted bowl gently onto the clay slab. Using a craft knife or needle tool, trace around the edge to cut out a perfect circle. -
Smooth the Edges:
Dip your finger in a little water and run it along the cut edge of the circle. This softens the sharp cut lines and prepares the rim for shaping. -
Form the Curve:
Carefully lift the clay circle. To give it a dish shape, you can either slump it inside a shallow bowl lined with plastic wrap or simply pinch the edges upward gently with your fingers to create a slight lip.
Step 2: Creating the Organic Rim
-
Pinch the Scallops:
Using your thumb and forefinger, gently pinch the rim at regular intervals. I like to space these about an inch apart. Don’t worry about being mathematically perfect; the goal is a casual, organic wave. -
Refine the Waves:
Go back around the rim and smooth the transitions between your pinch points. Use a damp sponge to soften any fingerprints, ensuring the edge looks fluid rather than jagged. -
Check Symmetry:
Rotate the plate and look at it from eye level. Adjust any sections of the rim that look too low or too high compared to the others. -
Dry Completely:
Place the formed dish in a safe, dry spot away from direct sunlight. Let it dry for at least 24-48 hours. Carefully flip it over halfway through the drying process to let the bottom breathe. -
Sand for Smoothness:
Once bone dry, take a piece of fine-grit sandpaper and lightly sand the entire surface. Pay special attention to the rim to ensure it feels smooth to the touch. Wipe away dust with a slightly damp cloth.
Fixing Warp
If the edges curl up too much while drying, place a small, light beanbag or a bag of rice in the center of the plate to gently weigh it down.
Step 3: Painting and Finishing
-
Base Coat:
Mix a small amount of white acrylic paint with a tiny drop of yellow or brown to create a warm cream color. Apply two thin coats to the entire dish, letting the first coat dry before adding the second. -
Create the Speckles:
Dilute a small dab of dark brown paint with water until it’s quite runny. Dip an old toothbrush into this mixture. -
Splatter Technique:
Hold the toothbrush over the plate and run your thumb across the bristles to flick tiny specks of paint onto the surface. Practice on a scrap piece of paper first to control the density of the speckles. -
Gild the Rim:
Using a fine detail brush and your metallic bronze or gold paint, carefully paint the very edge of the wavy rim. The line should be thin and slightly uneven to enhance the hand-formed look. -
Seal the Dish:
Wait for all paint to be completely dry. Apply two coats of glossy varnish or glaze to seal the clay and give it that ceramic-like sheen. -
Final Cure:
Let the varnish cure according to the manufacturer’s instructions, usually unrelated to drying time, before placing any jewelry on the surface.
Glaze Hack
For an ultra-glassy finish that looks like kiln-fired pottery, use a two-part epoxy resin instead of standard varnish. It’s thicker and much more durable.
Now you have a beautiful, specialized spot for your favorite rings and necklaces to rest.


Geometric Stamped Pattern Plate
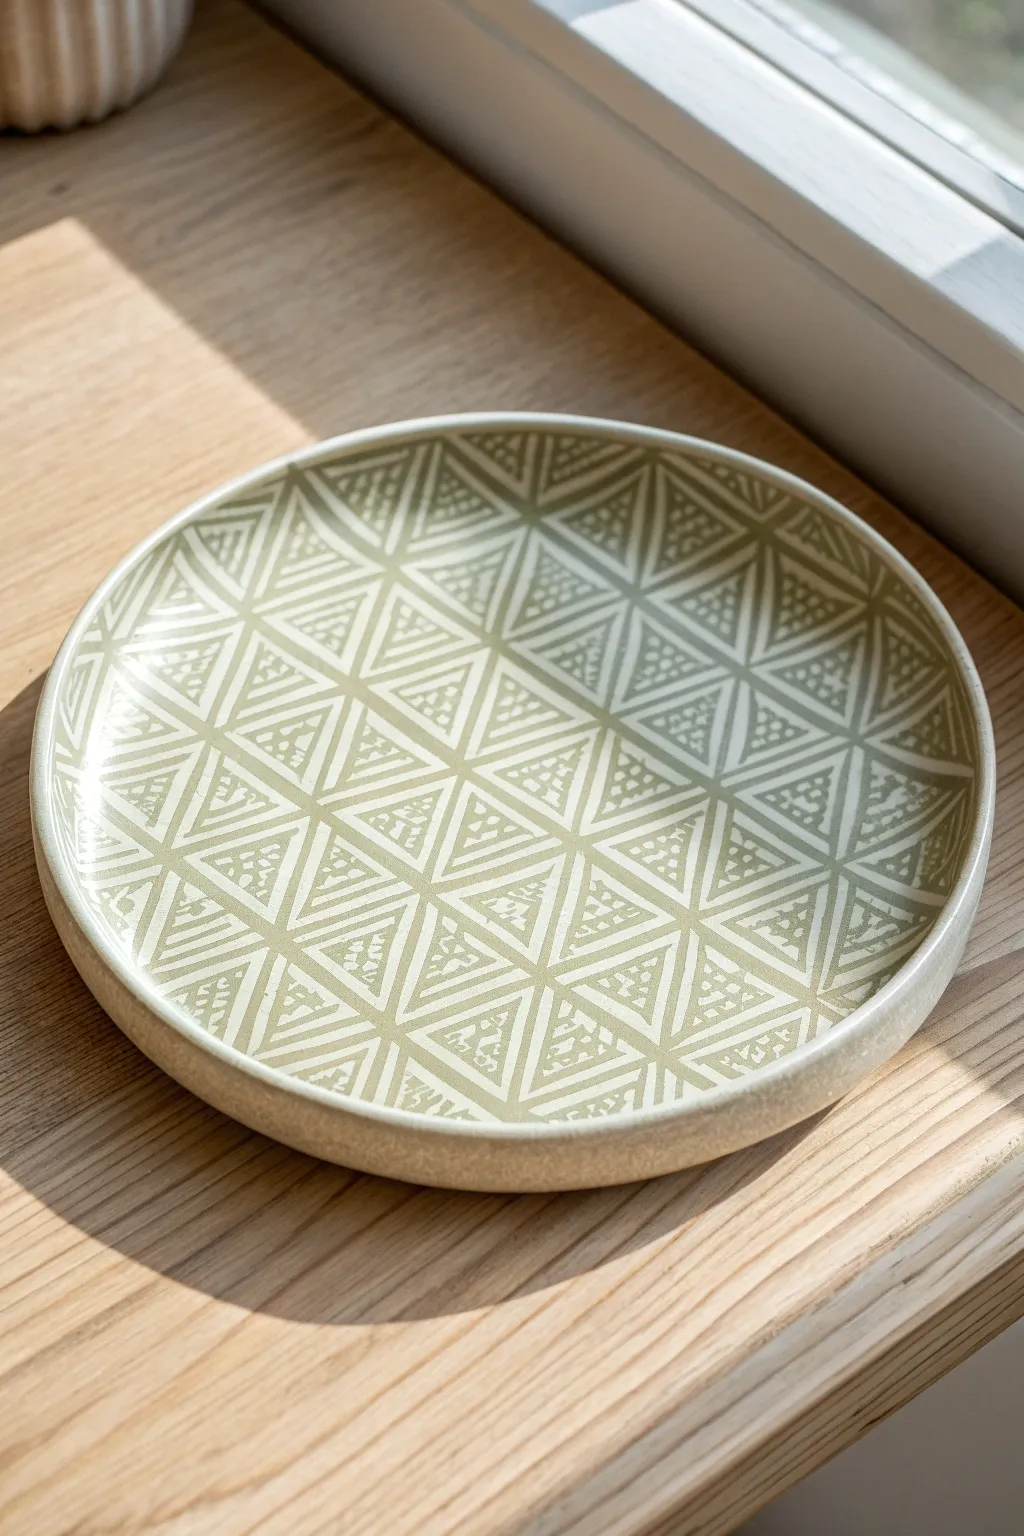
For a sleek, modern addition to your home decor, try crafting this geometric stamped plate using air dry clay. The repeating triangle pattern creates a sophisticated texture that looks surprisingly professional, perfectly accented by a warm, creamy glaze finish.
Step-by-Step Tutorial
Materials
- Air dry clay (white or light grey)
- Non-stick rolling pin
- Rolling guides or wooden slats (approx. 5-7mm thick)
- Round template (bowl, lid, or paper template)
- Craft knife or needle tool
- Triangle stamp (or a carved eraser/potato)
- Sandpaper (fine grit)
- Acrylic paint (warm cream/beige and white)
- Gloss varnish or sealant
- Small sponge or foam brush
- Bowl for shaping
- Plastic wrap
Step 1: Shaping the Base
-
Prepare your workspace:
Lay down a piece of canvas or parchment paper on your table to prevent sticking. Knead a large ball of air dry clay until it feels pliable and warm in your hands. -
Roll the slab:
Place your clay between two wooden slats or rolling guides. Roll the clay out into an even slab; the guides will ensure the thickness is perfectly consistent, which helps prevent cracking later. -
Cut the circle:
Place your round template on top of the smooth clay slab. Using a needle tool or craft knife held vertically, trace around the edge to cut out a perfect circle. -
Smooth the edges:
Dip your finger in a tiny bit of water and run it along the cut rim of the circle to smooth out any sharp or jagged edges.
Uneven Stamping?
If you make a mistake stamping, don’t panic. Dip your finger in water and smooth the clay back over to ‘erase’ the impression, let it dry briefly, then re-stamp.
Step 2: Creating the Pattern
-
Plan your center:
Lightly mark the absolute center of your clay circle. This will serve as the anchor point for your geometric spiral. -
Begin stamping:
Using your triangle stamp, press the first shape near the center. Apply firm, even pressure, but don’t push through to the other side. -
Create the spiral:
Stamp the next triangle directly adjacent to the first, rotating it slightly to follow the curve. Continue stamping in concentric circles, working your way outward toward the rim. -
Tighten the gaps:
Try to keep the spacing between triangles as minimal as possible. The beauty of this design lies in the dense, tesselated look of the geometry. -
Handle the rim:
When you reach the outer edge, let the pattern fall off naturally. It’s okay if you only stamp a partial triangle at the very rim; this makes the pattern look continuous.
Make Your Own Stamp
Don’t have a triangle stamp? You can easily carve a simple geometric triangle shape out of a raw potato or a large block eraser using a craft knife.
Step 3: Forming and Finishing
-
Shape the curvature:
Carefully lift your clay circle. Place a piece of plastic wrap inside a shallow serving bowl, then gently lay your clay circle inside it to take on the curved shape. -
Define the lip:
I like to gently press the edges upward to create a slight vertical lip, giving the plate a more distinct profile. -
Let it dry:
Allow the clay to dry inside the bowl for at least 24-48 hours. Keep it away from direct heat sources to prevent warping. -
Sand for smoothness:
Once fully dry and white, remove the plate from the bowl. Use fine-grit sandpaper to gently buff the rim and any rough spots on the underside. -
Apply the wash:
Mix a warm beige acrylic paint with a little water to create a semi-transparent wash. Brush this over the entire textured surface. -
Highlight the texture:
While the paint is still damp, wipe the surface gently with a barely damp sponge. This removes paint from the raised areas while leaving color in the stamped depressions. -
Seal the piece:
Finish by applying two coats of gloss varnish to protect the clay and give it that ceramic-like sheen shown in the photo.
Place your finished dish on a sunny windowsill or shelf to let the light play off those beautiful geometric textures


Botanical Leaf-Imprint Plate
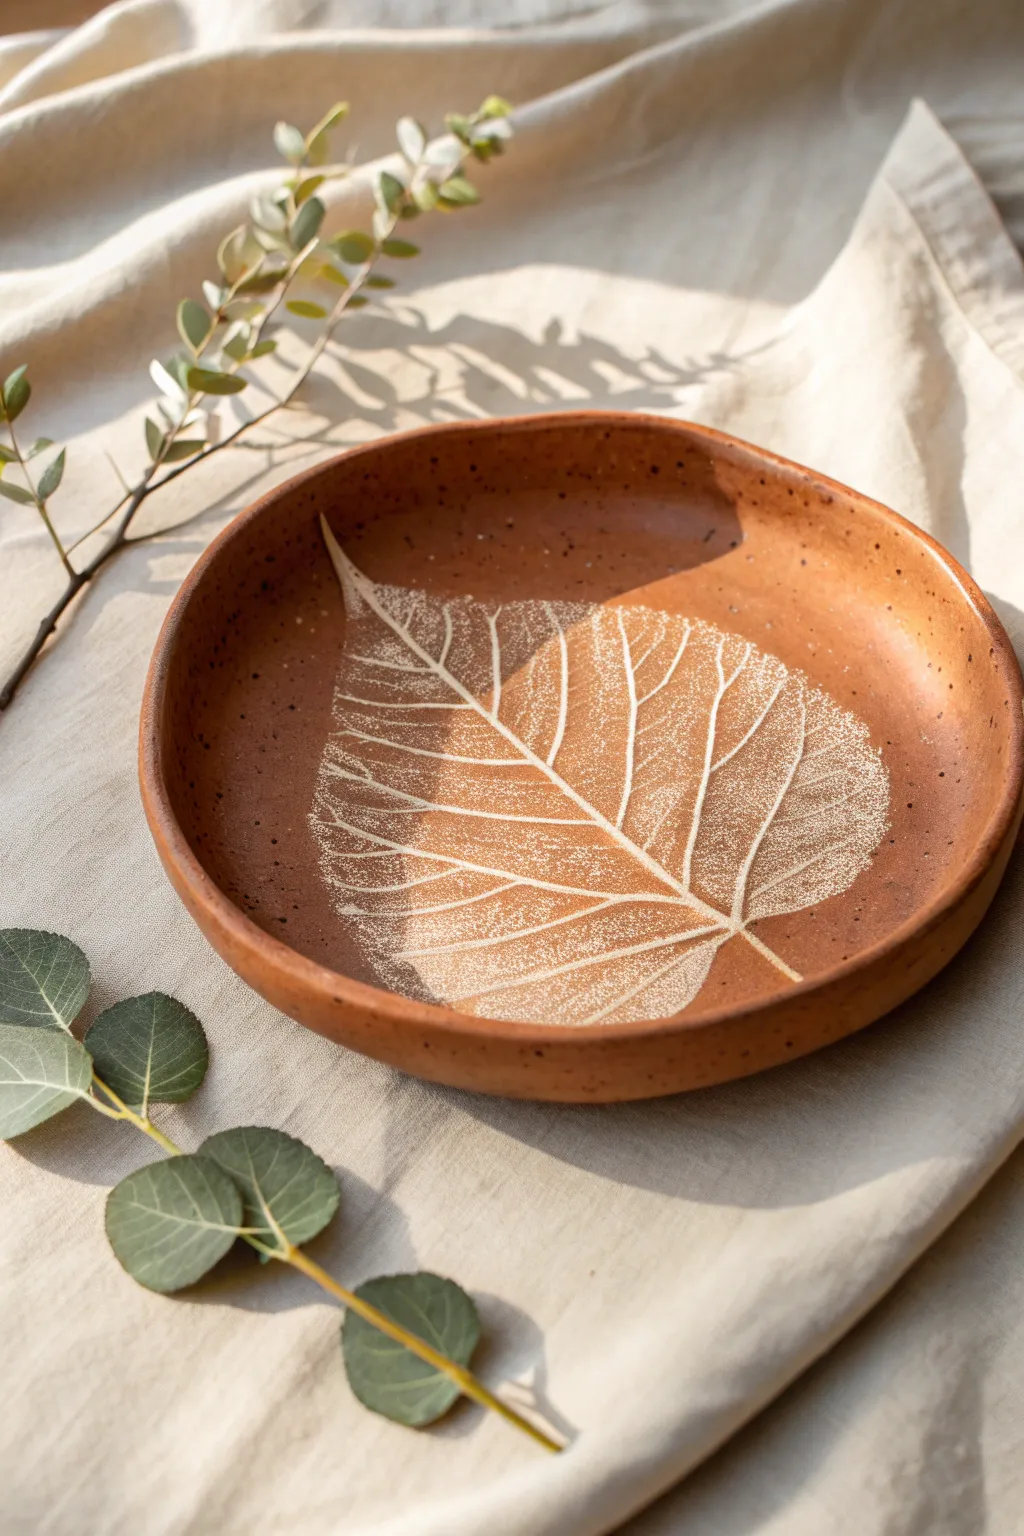
This rustic, nature-inspired dish combines the warmth of terracotta-toned clay with the delicate intricacy of a skeleton leaf. The result is a stunning decorative piece that captures the fragile beauty of botanical veins against a rich, earthy background.
Detailed Instructions
Materials
- Terracotta-colored air dry clay
- Rolling pin
- Two wooden guide slats (approx. 5mm thick)
- Artificial or real skeleton leaf (sturdy enough to press)
- Sharp crafting knife or clay needle tool
- Small bowl or curved mold (for shaping)
- Sponge and water
- White or cream acrylic paint
- Stiff bristle brush or toothbrush
- Fine-grit sandpaper
- Matte varnish or sealant
Step 1: Preparing the Base
-
Condition the clay:
Begin by taking a handful of terracotta air dry clay and kneading it thoroughly in your hands. You want it to be warm, pliable, and free of any air pockets before you start rolling. -
Roll the slab:
Place your clay on a flat working surface or canvas mat. Set your wooden guide slats on either side of the clay ball to ensure an even thickness. Roll the clay out until the rolling pin rests on the slats, creating a smooth slab about 5mm thick. -
Smooth the surface:
Before cutting, take a slightly damp sponge and gently wipe the surface of the clay slab. This removes any canvas texture marks or fingerprints and creates a pristine canvas for your leaf.
Pro Tip: Skeleton Leaves
If your skeleton leaf is brittle, soak it in warm water for 5 minutes before pressing. It becomes pliable and won’t crack under the rolling pin.
Step 2: Creating the Impression
-
Position the leaf:
Carefully lay your skeleton leaf onto the center of the clay slab. Take your time to align it exactly where you want the focal point to be, ensuring the stem and tip are positioned pleasingly. -
Imprint the design:
Use the rolling pin to gently but firmly roll over the leaf once. Apply enough pressure to embed the veins into the clay surface without distorting the overall shape of the slab. Don’t roll back and forth; one confident pass is best. -
Remove the leaf:
Using a needle tool or tweezers, very carefully lift the edge of the skeleton leaf and peel it away. You should be left with a crisp, detailed indentation of the leaf structure. -
Cut the shape:
Freehand cut a circle around your leaf design using a needle tool or knife. For an organic look like the photo, don’t worry about making it perfectly round; a slightly wavy, hand-formed edge adds character.
Step 3: Shaping and Drying
-
Soften the edges:
Dip your finger in a little water and run it along the cut rim of the plate. Smooth out any sharp angles or rough crumbs left by the knife to give it a finished, professional pottery look. -
Form the curve:
Lift your clay circle and gently place it into a shallow bowl or slump mold. Press it lightly so it adopts the curved concave shape. I usually place a layer of cling film or tissue in the bowl first to prevent sticking. -
Initial dry:
Let the plate dry in the mold for about 24 hours. The terracotta clay will lighten slightly in color as the moisture evaporates. -
Flip and finish drying:
Once the plate is firm enough to hold its shape, remove it from the mold and flip it over onto a wire rack. This allows air to circulate underneath and ensures the bottom dries completely.
Level Up: Gilded Veins
Instead of white paint, rub gold gilding wax into the leaf impression for a luxurious, shimmering finish that catches the light beautifully.
Step 4: Revealing the Design
-
Sand edges:
Once fully bone dry, use fine-grit sandpaper to gently smooth the rim one last time, removing any sharp burrs. -
Apply the wash:
Mix a small amount of white or cream acrylic paint with water to create a thin wash. Paint this over the entire leaf impression area, ensuring the liquid settles into the deep veins. -
Wipe back:
Immediately take a damp sponge or cloth and wipe strictly the surface of the clay. The paint will wipe off the high smooth points but remain trapped in the indented veins of the leaf, revealing the white design. -
Add speckles:
To mimic the natural clay texture in the photo, dip a toothbrush (or stiff brush) in watered-down dark brown or black paint. Run your thumb over the bristles to flick tiny speckles across the dish randomly. -
Seal the piece:
Finish by applying two coats of matte varnish. This seals the porous clay, protects your paint work, and deepens the terracotta color to a rich, warm tone.
Place your finished dish on a linen cloth or side table to bring a touch of earthy elegance to your home decor

The Complete Guide to Pottery Troubleshooting
Uncover the most common ceramic mistakes—from cracking clay to failed glazes—and learn how to fix them fast.
Lace-Texture Plate
This elegant air-dry clay project captures the delicate beauty of vintage textiles in a permanent, functional form. By pressing intricate lace or a doily into rolled clay, you’ll create a sophisticated embossed plate perfect for holding jewelry or keys.
Step-by-Step Tutorial
Materials
- White air-dry clay
- Rolling pin
- Canvas mat or parchment paper
- Vintage lace doily (circular pattern)
- Bowl (for using as a mold/template)
- Craft knife or clay cutter
- Small sponge
- Water
- Fine-grit sandpaper (400-grit)
- Clear matte varnish or sealant
Step 1: Preparing the Base
-
Condition the clay:
Begin by taking a generous chunk of white air-dry clay. Knead it in your hands for several minutes until it feels soft, warm, and pliable. -
Roll it out:
Place the clay on your canvas mat or parchment paper. Use your rolling pin to flatten it into a large circle. -
Check thickness:
Aim for a uniform thickness of about 1/4 inch (approx. 6mm). It needs to be thick enough to take a deep impression without tearing but thin enough to look delicate. -
Smooth the surface:
Dip your finger or a small sponge lightly in water and run it over the surface of the clay to remove any rolling pin marks or tiny cracks.
Fixing Warping
If the edges curl up while drying, weigh the center down lightly with a small bag of rice or sand during the first 12 hours of drying.
Step 2: Adding the Texture
-
Position the lace:
Take your lace doily and center it carefully over the smoothest side of your rolled clay slab. -
First press:
Use your hands to gently pat the lace down so it sticks slightly to the moist clay surface and doesn’t shift. -
Roll the pattern:
Take your rolling pin and roll firmly over the lace. I find that one confident pass with firm pressure works better than rolling back and forth multiple times, which can create a ghost image. -
Reveal the design:
Find the edge of the lace and peel it back slowly and carefully to reveal the embossed pattern underneath.
Dark Wash Effect
Dilute brown acrylic paint with water and brush it into the grooves, then wipe the surface clean. The dark paint stays in the recesses, highlighting the lace pattern.
Step 3: Shaping the Plate
-
Cut the circle:
Place a bowl or a circle template over the patterned area you like best. Use a craft knife to cut straight down around the edge to create a clean circle. -
Smooth the edges:
Dip your finger in water again and run it along the cut rim to soften the sharp edge left by the knife. -
Create the curve:
Pick up the clay circle carefully and gently press it into a shallow bowl that fits the size. The bowl acts as a mold to give your plate a raised rim. -
Refine the rim:
While in the mold, check that the pattern isn’t distorted. You can gently press the clay against the sides of the bowl to ensure a smooth, upward curve. -
Dry partially:
Let the clay sit in the bowl for about 24 hours until it holds its shape but isn’t fully bone dry. -
Remove and flip:
Carefully remove the plate from the bowl and flip it over onto a drying rack. This allows the bottom to dry completely, which usually takes another 24-48 hours.
Step 4: Finishing Touches
-
Sand the imperfections:
Once fully dry, use fine-grit sandpaper to gently smooth the rim or any rough spots on the underside. Avoid sanding the textured area. -
Clean dust:
Wipe the piece with a slightly damp cloth or a dry soft brush to remove any clay dust from sanding. -
Apply sealant:
Apply a thin coat of clear matte varnish to protect the clay from moisture and dirt. -
Final dry:
Allow the varnish to cure completely according to the manufacturer’s instructions before using your new tray.
Now you have a stunning, textured piece that brings a touch of handcrafted elegance to any surface
Minimal Line-Art Plate
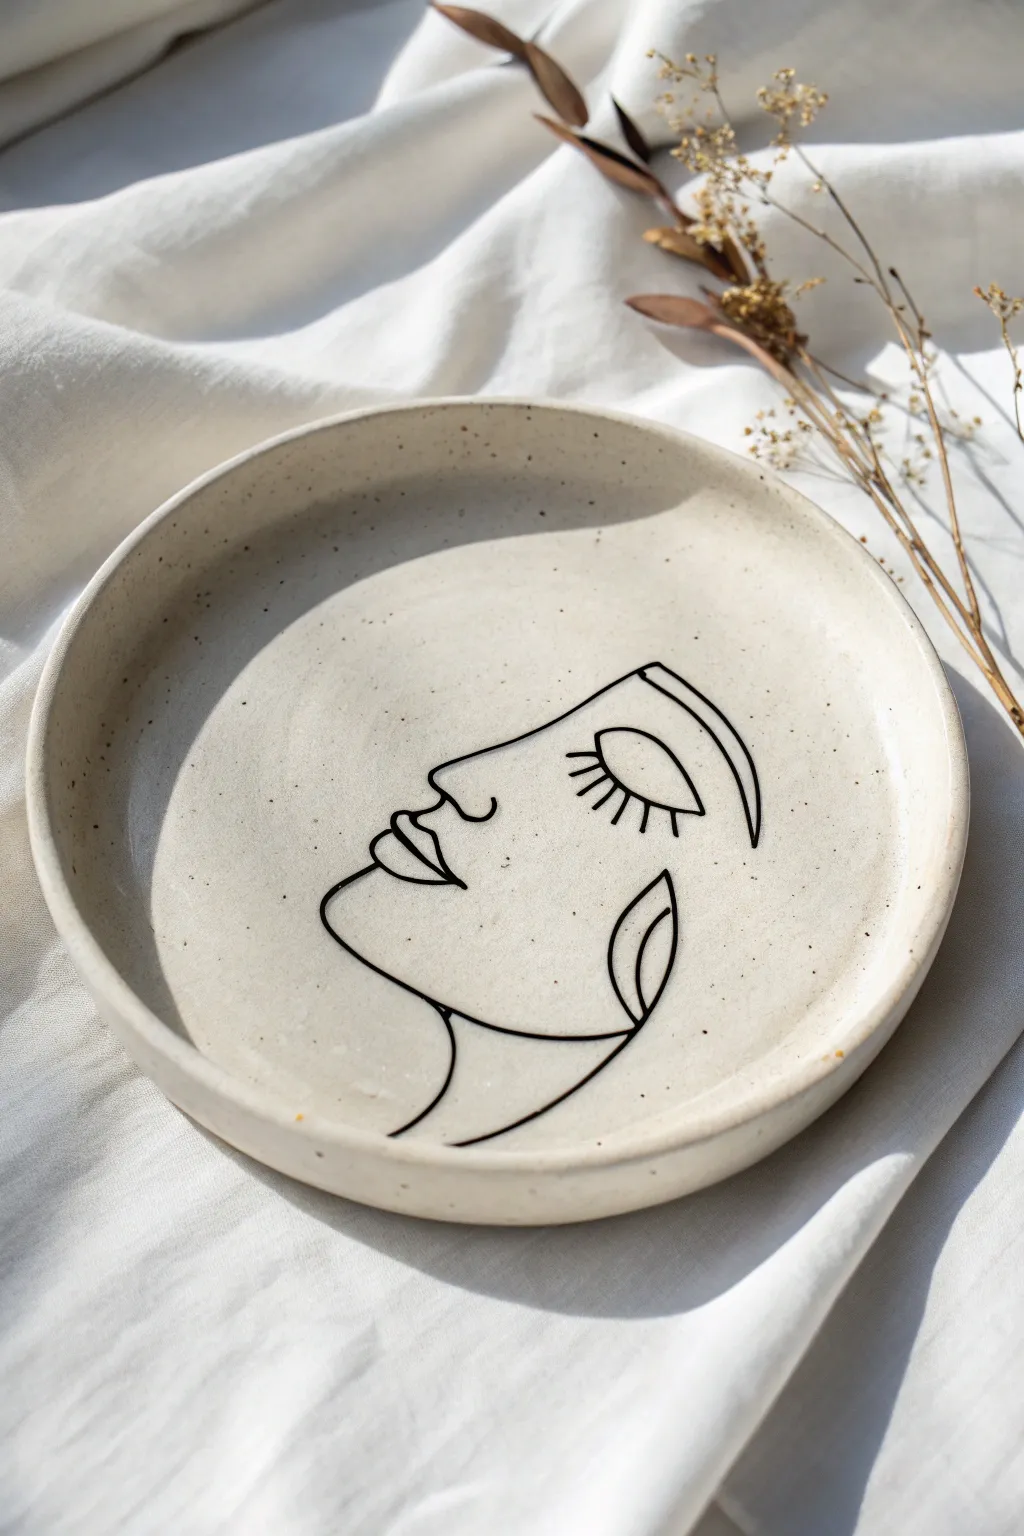
Embrace the beauty of simplicity with this elegant air dry clay dish featuring a continuous-line style facial profile. The natural speckled finish and bold black illustration create a modern, minimalist piece perfect for holding jewelry or acting as standalone decor.
Step-by-Step Guide
Materials
- White or light grey air dry clay
- Rolling pin
- Rolling guides (approx. 0.5 cm thick)
- Small bowl or plate (approx. 6-7 inches) to use as a template
- Craft knife or scalpel blade
- Small sponge
- Cup of water
- Fine grit sandpaper (220-400 grit)
- Black acrylic paint or black paint pen (fine tip)
- Fine detail paintbrush (if using liquid paint)
- Dried oregano or used coffee grounds (optional for speckle effect)
- Clear acrylic varnish or sealant (matte finish)
Step 1: Shaping the Base
-
Prepare the speckled clay:
If you want the speckled ceramic look shown in the photo, take your white air dry clay and knead in a small pinch of dried oregano or used coffee grounds. Continue kneading until the specks are evenly distributed throughout the lump. -
Roll out the slab:
Place your clay on a smooth surface or canvas cloth. Using rolling guides to ensure an even thickness, roll the clay out until it is a uniform slab, roughly 0.5 cm thick. -
Cut the circle:
Place your bowl or plate template upside down onto the clay slab. Use your craft knife to carefully trace around the edge, cutting out a perfect circle. -
Smoothen the edges:
Dip your finger or a small sponge into a little water and run it along the cut edge of the circle. This softens the sharp cut marks and gives it a more finished, ceramic feel. -
Create the rim:
To form the raised edge, you can either gently mold the edges upward with your fingers or slump the clay circle inside a shallow bowl lined with plastic wrap. Ensure the bottom remains flat. -
Refine the lip:
Once shaped, go back around the top rim with your damp sponge. I find spending extra time here really elevates the final look, making the rim smooth and rounded rather than jagged. -
Let it dry completely:
Allow the plate to dry in a cool, dry place for 24-48 hours. Turn it over halfway through the drying process to ensure the bottom dries evenly and doesn’t warp.
Step 2: Adding the Art
-
Sand for a smooth canvas:
Once fully dry, lightly sand the entire surface, paying special attention to the rim. Wipe away all dust with a slightly damp cloth or dry brush. -
Draft the design:
Lightly sketch the face profile onto the center of the plate using a soft pencil. Start with the nose and lips to center the composition, then add the eye and flowing hair line. -
Outline the profile:
Using a fine-tip black paint pen or a thin brush loaded with black acrylic paint, begin tracing over your pencil lines. Keep your wrist steady and try to use long, fluid strokes rather than short, scratchy ones. -
Add facial details:
Carefully paint the closed eye with eyelashes. The lashes should fan out slightly. Ensure the line weight is consistent with the rest of the profile. -
Draw the hair accent:
Complete the drawing by adding the curved line that suggests hair or a headscarf shape framing the face. This balances the negative space on the plate. -
Clean up errors:
If you make a mistake with the paint, wait for it to dry completely, then gently scrape it off with a craft knife or sand that specific spot lightly before trying again.
Warped Plate?
If the edges curl up while drying, place a light book on top (with parchment paper in between) once the clay is semi-dry but still flexible to flatten it.
Step 3: Finishing Touches
-
Apply the first coat of varnish:
Once the black ink is totally dry, apply a thin layer of matte varnish across the top surface. Brush in one direction to avoid streaking the artwork. -
Seal the back:
After the top is dry to the touch, flip the plate and seal the bottom and sides. This protects the clay from moisture and makes it more durable. -
Final cure:
Give the plate a final coat of varnish if desired for extra protection, then let it cure according to your sealant’s instructions before placing any jewelry on it.
Gloss it Up
For a true ceramic look, swap the matte varnish for a high-gloss glaze or resin. This makes the speckles pop and mimics a kiln-fired finish perfectly.
You now have a chic, artisan-style dish ready to display your favorite trinkets


What Really Happens Inside the Kiln
Learn how time and temperature work together inside the kiln to transform clay into durable ceramic.
Half-Dipped Color Block Plate
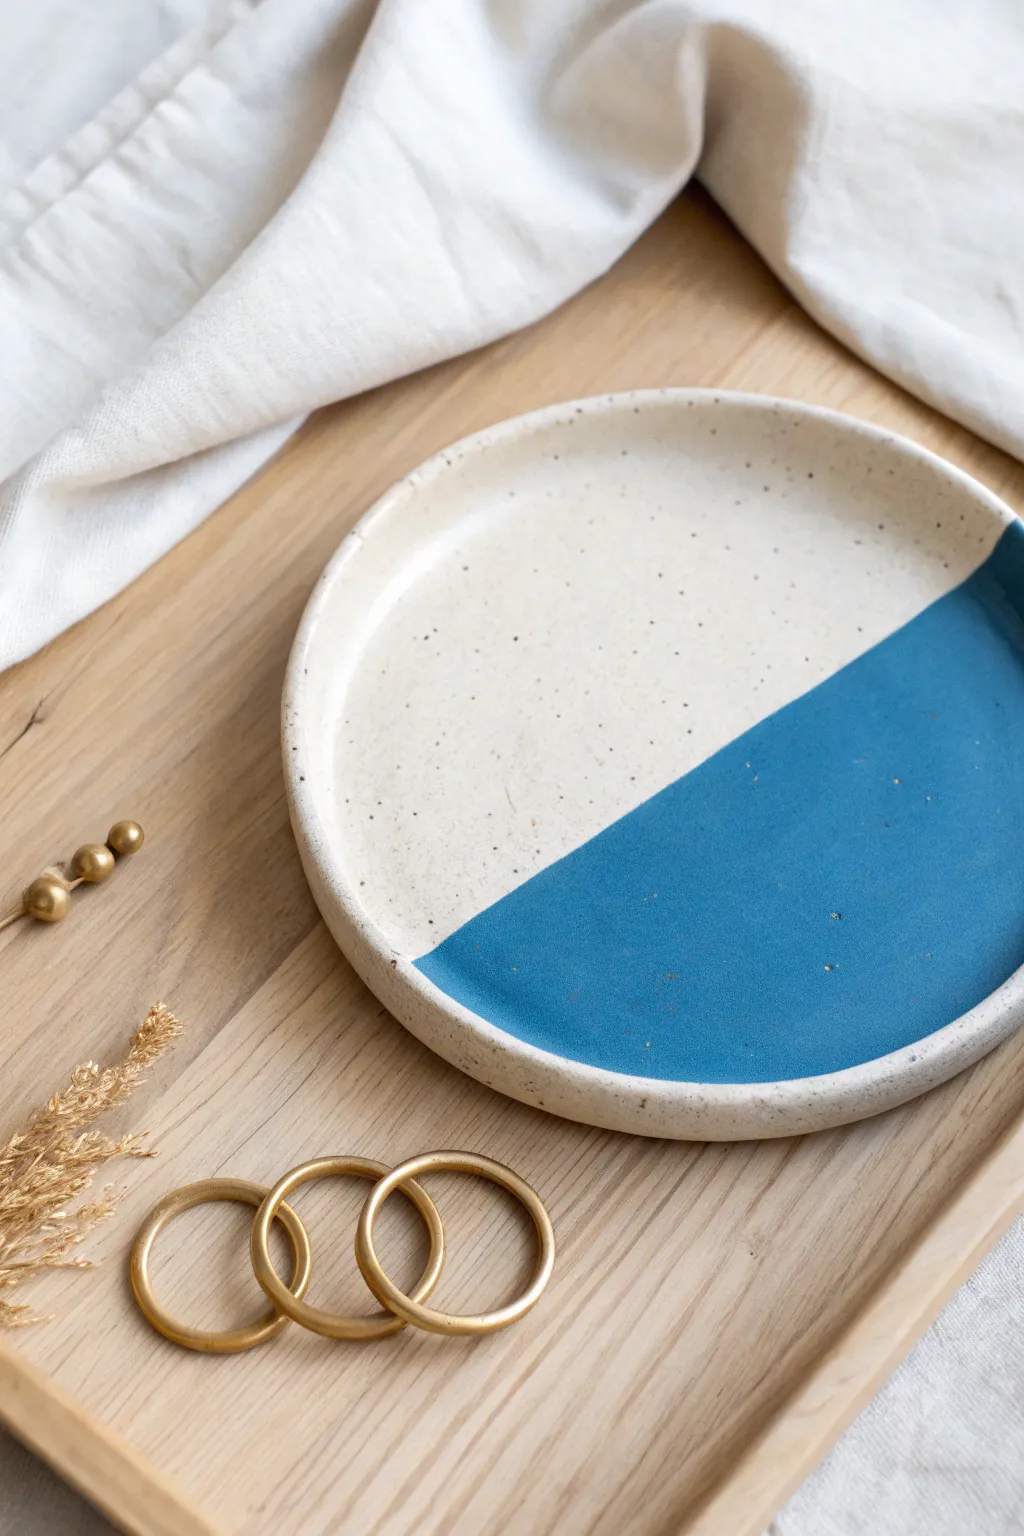
Achieve the high-end look of wheel-thrown ceramics without a kiln using this simple air dry clay technique. The crisp diagonal line between the creamy speckled base and the rich teal dip creates a stunning, modern piece perfect for holding jewelry or keys.
Step-by-Step Tutorial
Materials
- Air dry clay (white)
- Rolling pin
- Rolling guides or two wooden slats (approx. 1/4 inch thick)
- Circle template (bowl or plate)
- Craft knife or needle tool
- Sponge
- Sandpaper (medium and fine grit)
- Acrylic paint (cream/off-white and deep teal/blue)
- Old toothbrush
- Stiff paintbrush
- Low-tack painter’s tape or masking tape
- Glossy varnish or sealant (water-based polycrylic works well)
- Small jar of water
Step 1: Shaping the Plate
-
Prep your surface:
Lay down a canvas cloth or non-stick mat to prevent the clay from sticking. Knead a ball of white air dry clay until it is soft, pliable, and free of air bubbles. -
Roll the slab:
Place your wooden guides on either side of the clay ball. Use your rolling pin to roll the clay out into an even slab, ensuring the thickness is consistent across the entire surface. -
Cut the circle:
Place your circular template (like a dessert plate or bowl) upside down onto the clay. Trace around it carefully with a craft knife or needle tool to get a clean circle, then peel away the excess clay. -
Create the lip:
Gently curve the edges of the circle upward to create a shallow rim. I find that pinching lightly around the circumference helps define the lip while keeping that organic, handmade look. -
Smooth the imperfections:
Dip a small sponge or your finger into water and run it along the rim and surface of the plate. This erases any tiny cracks or fingerprints before the drying stage begins. -
Dry the plate:
Set the plate aside in a draft-free area to dry completely. This usually takes 24-48 hours depending on humidity. Flip it over halfway through the process to ensure the bottom dries evenly.
Fixing fuzzy lines
If paint bled under the tape, wait for it to dry perfectly. Then, use a fine detail brush and your base cream color to carefully touch up the edge and straighten the line.
Step 2: Refining and Painting
-
Sand for smoothness:
Once fully dry and hard, use medium grit sandpaper to level out any bumps on the rim. Follow up with fine grit sandpaper over the entire surface for a silky finish. Wipe away all dust with a barely damp cloth. -
Base coat:
Paint the entire plate using the cream or off-white acrylic paint. You may need two to three thin coats to get solid, opaque coverage. Let each coat dry fully before adding the next. -
Add the speckles:
Dilute a tiny drop of brown or black paint with water. Dip an old toothbrush into this mixture, aim it at the plate, and run your thumb across the bristles to flick tiny speckles across the surface. Let this dry completely. -
Tape the line:
Apply a strip of low-tack painter’s tape diagonally across the plate. Press the edge of the tape down firmly with your fingernail to ensure no paint bleeds under it. -
Apply the color block:
Paint the exposed half of the plate with your deep teal acrylic paint. Stroke away from the tape edge rather than into it to help keep the line sharp. -
Second coat:
Apply a second coat of teal if the first one looks streaky. While the paint is still slightly wet on the final coat, carefully peel back the tape at a 45-degree angle to reveal a crisp line. -
Seal the piece:
Finish by applying two coats of glossy varnish over the entire plate. This deepens the colors and gives it that shiny, ceramic-glaze appearance.
Make it functional
Since air dry clay isn’t food safe, stick to using this as a trinket dish. For extra durability, use a resin topcoat instead of varnish for a glass-like finish.
Place your new plate on a side table to beautifully catch your keys or jewelry at the end of the day
Marbled Swirl Plate
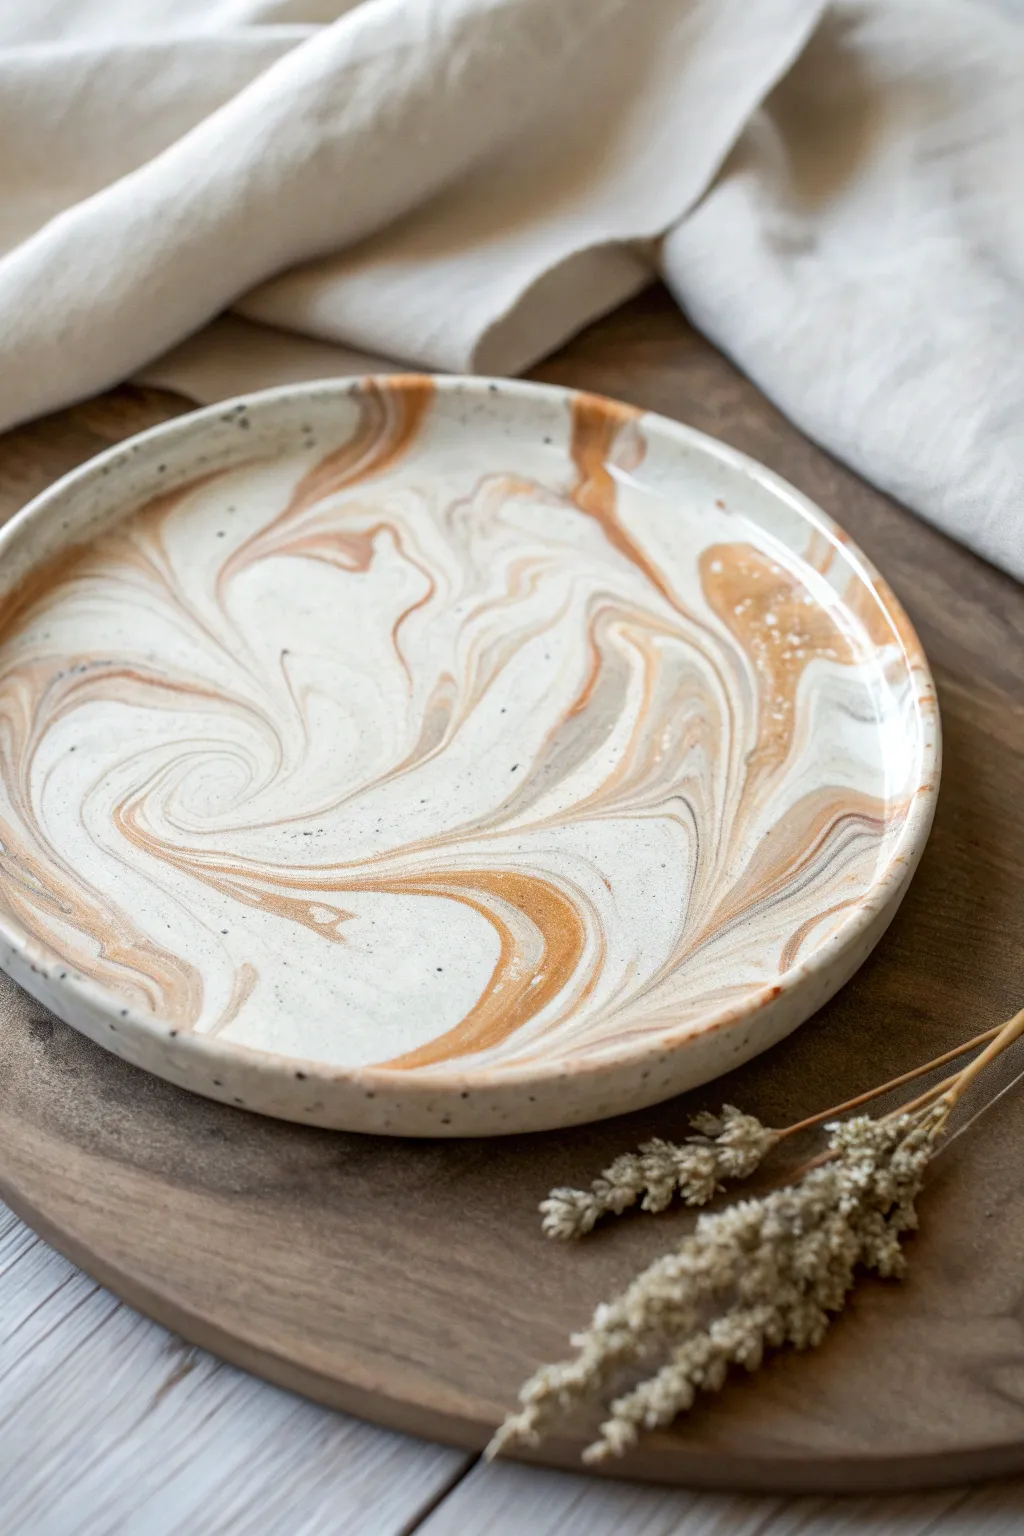
This elegant plate mimics the organic flow of desert sands with its swirling caramel and cream tones. By marbling different shades of air-dry clay, you’ll create a sophisticated, speckled piece perfect for holding jewelry or decorative dried florals.
How-To Guide
Materials
- White or cream air-dry clay
- Terra cotta or brown air-dry clay
- Black speckled clay (optional, or mix black pepper/sand into white clay)
- Acrylic rolling pin
- Circle clay cutter or a bowl and craft knife
- Small bowl or curved form (for drying)
- Sandpaper (fine grit)
- Glossy varnish or sealant
- Sponge or soft brush
- Water in a small dish
Step 1: Preparing the Clay Palette
-
Portion the bases:
Begin by grabbing a large chunk of your white or cream clay; this will be the dominant color in your marble mix. Take a smaller, golf-ball-sized amount of terra cotta or brown clay. -
Add speckling:
To achieve the stony, organic look seen in the photo, knead a pinch of black sand, cracked pepper, or pre-made speckled clay bits into your white base until evenly distributed. -
Create clay snakes:
Roll both the white base and the terra cotta clay into long, thin snakes on a clean, smooth surface. -
Twist and combine:
Lay the brown snakes next to the white ones and twist them together into a single, thick rope. Fold the rope in half and twist again. -
Control the marble:
I usually repeat the fold-and-twist motion about three or four times. Be careful not to over-twist, or the colors will blend into a solid muddy beige instead of distinct swirls. -
Form a ball:
Once you see a nice separation of colors in the rope, smoosh the clay together into a tight ball, ensuring there are no trapped air pockets.
Muddy Colors?
If your swirl looks like a solid brown blob, you over-kneaded. Stop mixing sooner next time—stop twisting when you still see distinct, thick stripes of color.
Step 2: Shaping the Plate
-
Start rolling:
Place your marbled ball on a flat surface or canvas mat. Use your acrylic rolling pin to flatten it, rolling from the center outwards in all directions. -
Check thickness:
Aim for an even thickness of about 1/4 inch (approx. 5-6mm). If it’s too thin, the edges might curl excessively; too thick, and it will be heavy. -
Cut the circle:
Place your circular cutter or an upside-down bowl onto the rolled slab. Look for the area with the most pleasing swirl pattern before pressing down to cut your shape. -
Refine the edges:
Remove the excess clay. Dip your finger in a little water and gently run it along the cut edge to smooth out any sharpness or roughness. -
Create the lip:
To get that slight rim, gently pinch the very edge of the circle upwards all the way around, or press the center of the plate gently into a shallow, curved bowl form.
Pro Tip: Hidden Strength
Add a few drops of white PVA glue into your clay while kneading initially. It helps prevent cracking during the drying process and adds flexibility.
Step 3: Finishing Touches
-
Slow drying:
Place the plate on a porous surface or wire rack to dry. If you used a bowl form, let it sit for 24 hours before removing it to finish drying completely. -
Monitor warping:
Air dry clay likes to warp. Keep an eye on it as it dries, and gently weight it down with a light book if the center starts puffing up. -
Sand it smooth:
Once fully cured (bone dry), take your fine-grit sandpaper and lightly buff the edges and surface to remove any fingerprints or bumps. -
Clean dust:
Wipe the entire piece with a slightly damp sponge or tack cloth to remove all sanding dust before sealing. -
Apply sealant:
Apply a coat of glossy varnish or sealant. This not only protects the clay but makes those caramel swirls pop and gives the surface a ceramic-like sheen. -
Final cure:
Allow the varnish to dry according to the bottle instructions, and then add a second coat for extra durability.
Enjoy styling your beautiful new faux-ceramic tray on a coffee table or vanity

TRACK YOUR CERAMIC JOURNEY
Capture glaze tests, firing details, and creative progress—all in one simple printable. Make your projects easier to repeat and improve.
Terrazzo Confetti Plate
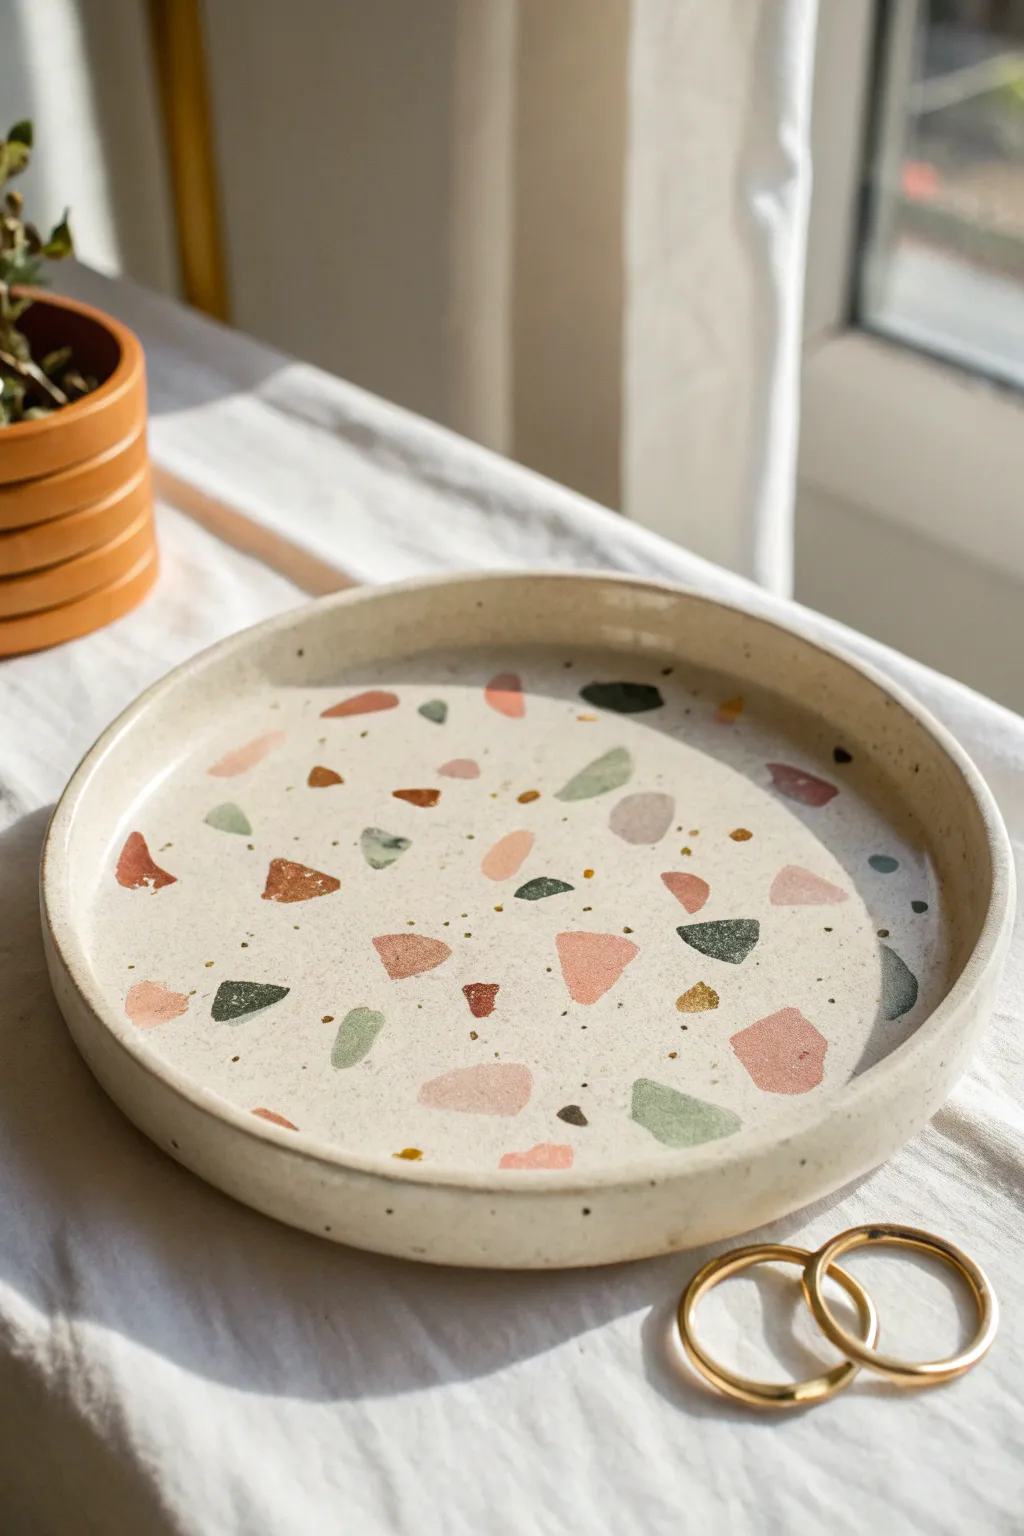
This trendy trinket dish captures the playful elegance of terrazzo stone without the heavy lifting merely by using air dry clay. The speckled ‘confetti’ look is achieved by embedding colored clay chips into a neutral base, resulting in a smooth, polished finish perfect for holding jewelry.
Detailed Instructions
Materials
- White polymer clay or air dry clay (primary base)
- Small amounts of colored clay (terracotta, sage green, blush pink, black, brown, gold)
- Rolling pin or acrylic roller
- Circle cutter or circular template (bowl/plate)
- Sharp craft knife or clay blade
- Sanding sponge or fine-grit sandpaper
- Gloss varnish or sealant
- Paintbrush for sealing
- Small bowl or curved mold for shaping
- Parchment paper or silicone mat
Step 1: Preparing the Confetti
-
Condition the colors:
Start by taking your small bits of colored clay—terracotta, sage, pink, black, and brown. Knead each color individually until they are soft and pliable to prevent cracking later. -
Flatten the colors:
Roll out each colored piece into a very thin, irregular sheet. You don’t need these to be perfect; thinness is the key here so they embed easily into the base. -
Create the heavy chips:
Using your craft knife, cut random, angular shapes from these flattened sheets. Aim for small triangles, trapezoids, and jagged shards rather than perfect squares. -
Add metallic accents:
Take a tiny bit of gold clay or gold leaf flecks and break them into minuscule pieces. These will act as the tiny metallic sparkles seen in the reference image. -
Set aside confetti:
Group your cut shapes into a pile. Prepare slightly more than you think you need, as the rolling process will spread them out quite a bit.
Step 2: Creating the Base
-
Roll the base slab:
Take a large ball of white or cream-colored clay. Roll it out on parchment paper to a thickness of about 1/4 inch (6mm). Ensure the surface is smooth and even. -
Sprinkle the design:
Gently scatter your prepared colored confetti chips onto the rolled white slab. I like to arrange larger pieces first, then fill the gaps with the tiny specks. -
Embed the chips:
Once you are happy with the distribution, take your rolling pin and gently roll over the slab again. Apply even pressure to press the colored chips flat into the white clay until the surface is level. -
Flip and repeat (optional):
If you want the pattern on both sides, carefully flip the slab over and repeat the scattering and rolling process on the reverse side. -
Cut the circle:
Place your circular template or bowl onto the patterned slab. Use your craft knife to trace around the edge, cutting out a clean, perfect circle.
Cracks appeared?
If small cracks form while drying, mix a tiny bit of fresh clay with water to make a paste. Fill the cracks, smooth with a finger, and let dry again.
Step 3: Shaping and Finishing
-
Smooth the edges:
Dip your finger in a little water (for pottery clay) or mineral oil (for polymer) and run it along the cut edge to smooth out any sharpness or drag marks. -
Add the rim:
To create the raised rim shown in the artwork, gently lift the edges of the circle upwards with your fingers, pinching lightly to create a vertical wall about 1/2 inch high. -
Refine the shape:
Place the clay circle inside a slightly larger bowl to help it hold its curved shape while drying. Ensure the bottom remains flat so the finished plate won’t wobble. -
Drying time:
Allow the clay to dry completely according to the package instructions. For air dry clay, this usually takes 24-48 hours. Turn it occasionally for even airflow. -
Sanding for smoothness:
Once fully dry (and cured, if using polymer), take fine-grit sandpaper and gently sand the surface. This reveals the crisp edges of the confetti chips and removes any haziness. -
Wipe clean:
Use a slightly damp cloth or tack cloth to remove every speck of sanding dust. Any dust left behind will be trapped in the varnish. -
Apply varnish:
Apply a coat of gloss varnish to the top and sides. This brings out the vibrancy of the colored chips and gives it that polished ceramic look. -
Final dry:
Let the varnish dry completely in a dust-free area before using your new terrazzo plate for jewelry or keys.
Make it Luxe
Paint the very top edge of the rim with liquid gold leaf after the clay is dry. This creates a refined, high-end gold border.
Enjoy styling your new handmade terrazzo piece on your dresser or coffee table
Playful Shaped Statement Plate
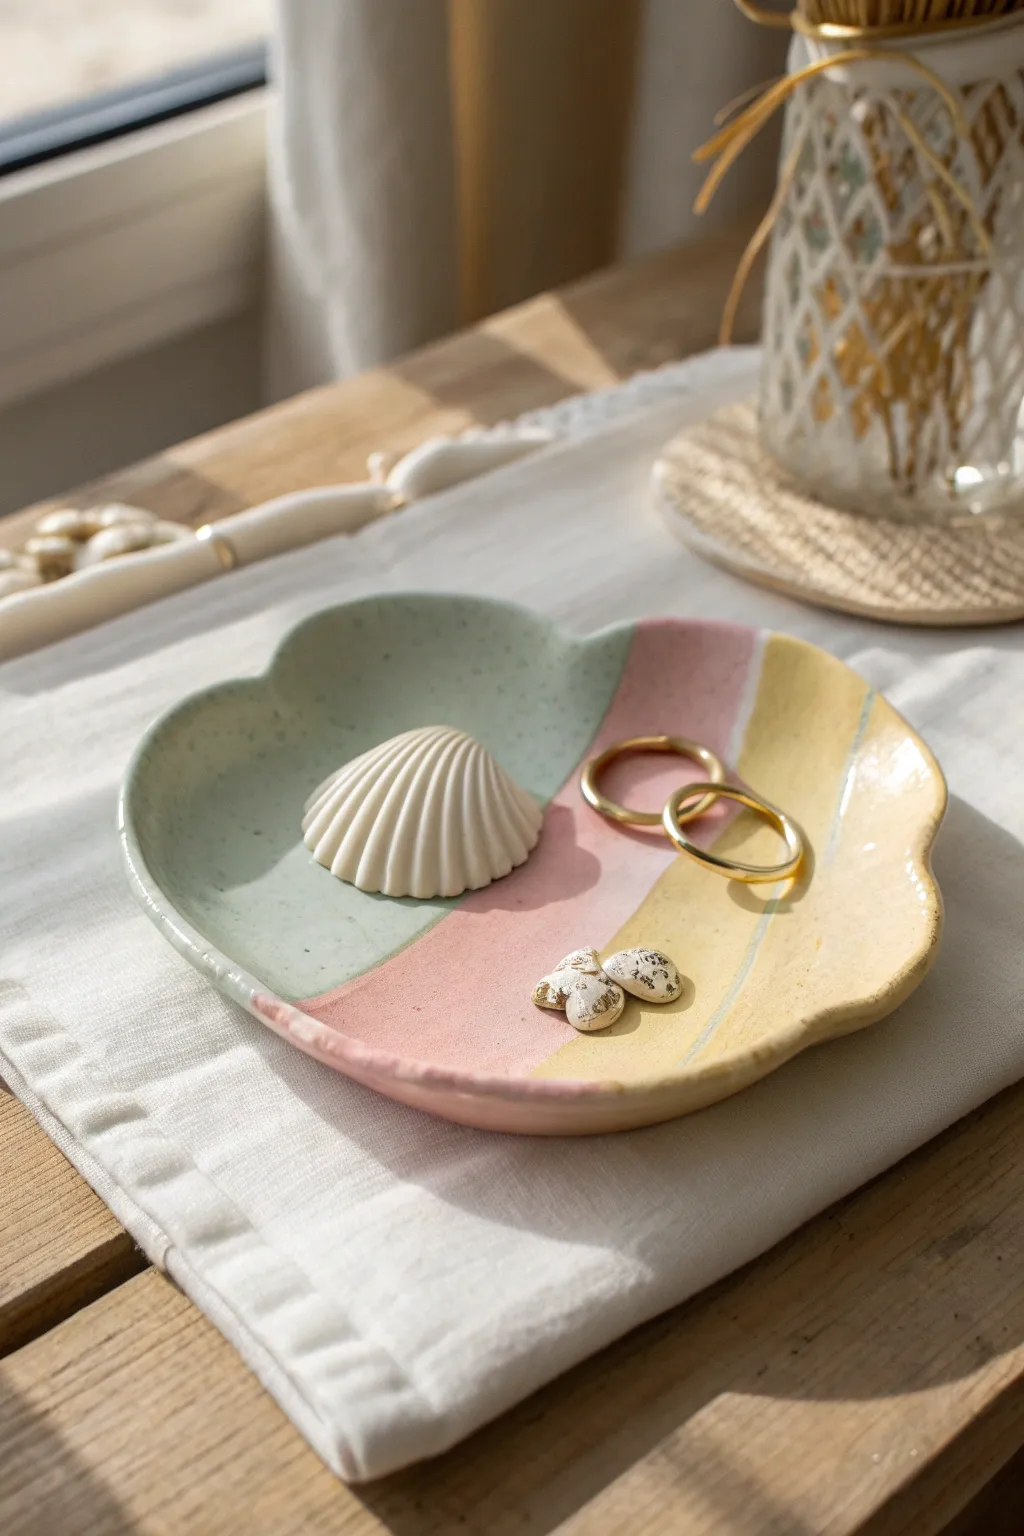
This whimsical, cloud-shaped tray uses a soft, tri-color palette to create a dreamy spot for your favorite rings and trinkets. The organic shape and speckled pastel finish give it a high-end ceramic look without needing a kiln.
How-To Guide
Materials
- Air dry clay (white)
- Acrylic paints (pale sage green, dusty rose pink, buttercream yellow)
- Tan or brown acrylic paint (for speckles)
- Rolling pin
- Parchment paper or canvas mat
- Craft knife or clay needle tool
- Paper template (cloud shape)
- Small bowl with water
- Sponge or fine-grit sandpaper
- Flat paintbrush
- Old toothbrush (for speckling)
- Clear gloss varnish or sealant
Step 1: Shaping the Cloud
-
Prepare your workspace:
Lay down a piece of parchment paper or a canvas mat to prevent the clay from sticking to your table. Take a large handful of air dry clay and knead it briefly until it is warm and pliable. -
Roll out the slab:
Using a rolling pin, flatten the clay into an even slab. Aim for a thickness of about 1/4 inch (6mm). If you want a perfectly even surface, playing cards stacked on either side of the clay can act as depth guides for your rolling pin. -
Cut the shape:
Place your paper cloud template on top of the clay lightly. Use a craft knife or needle tool to trace around the template, cutting the cloud shape out cleanly. Peel away the excess clay and save it for future projects. -
Soften the edges:
Dip your finger into a small bowl of water and run it along the cut edges of the clay. Smooth out any sharp angles or rough bits left by the knife, rounding the rim gently. -
Create the curvature:
To turn this flat shape into a shallow dish, gently pinch and lift the edges upwards. Work your way around the perimeter, using your thumb to create a slight lip while smoothing the interior curve with your fingers.
Use Water Wisely
Don’t use too much water when smoothing raw clay, as it can cause cracks later. A just-damp finger or sponge works best to bind the clay particles.
Step 2: Drying and Refining
-
Initial drying:
Place the plate on a clean sheet of parchment paper in a safe spot away from direct heat. Let it dry for about 24 to 48 hours. Flipping it over halfway through the drying process helps prevent warping. -
Sand for smoothness:
Once the clay is bone dry and turns a chalky white, check for any rough spots. Use a fine-grit sanding sponge or sandpaper to gently buff the surface and edges until they feel completely smooth to the touch. -
Wipe clean:
Use a barely damp cloth or a dry soft brush to remove all sanding dust from the plate. This step is crucial for getting a clean paint job.
Gilded Edges
For a luxe touch, paint the very rim of the plate with liquid gold leaf or metallic gold acrylic paint after the base colors dry.
Step 3: Painting the Design
-
Mark the sections:
Lightly sketch two curved lines across the face of the plate using a pencil. These don’t need to be perfectly straight; organic curves look better tailored to the cloud shape. -
Paint the green section:
Mix a pale sage or seafoam green acrylic paint. Using a flat brush, fill in the first section of the plate. Extend the color over the rim and slightly onto the bottom for a professional finish. -
Add the pink stripe:
Clean your brush and switch to a dusty rose pink. Paint the middle section, carefully meeting the edge of the green paint without overlapping too much. I like to do two thin coats for opaque coverage. -
Finish with yellow:
Paint the final section with a buttercream yellow. Ensure the colors touch cleanly. Let the base coats dry completely before moving on. -
Add the speckled effect:
Dilute a tiny amount of tan or light brown paint with water. Dip an old toothbrush into the mixture, aim it at the plate, and run your thumb across the bristles to flick tiny speckles across the surface. This mimics ceramic clay bodies. -
Seal the piece:
Once all paint is totally dry, apply a coat of clear gloss varnish. This protects the clay from moisture, gives it a ceramic-like shine, and makes the colors pop.
Place this charming tray on your nightstand or vanity to keep your daily treasures safe and stylish