Polymer clay is my go-to for wall art because it lets me build color, texture, and those satisfying little 3D details that paint just can’t do. Grab a few blocks of polymer clay, and let’s walk through a bunch of ideas you can actually hang up and admire every day.
Botanical Leaf Wall Hanging
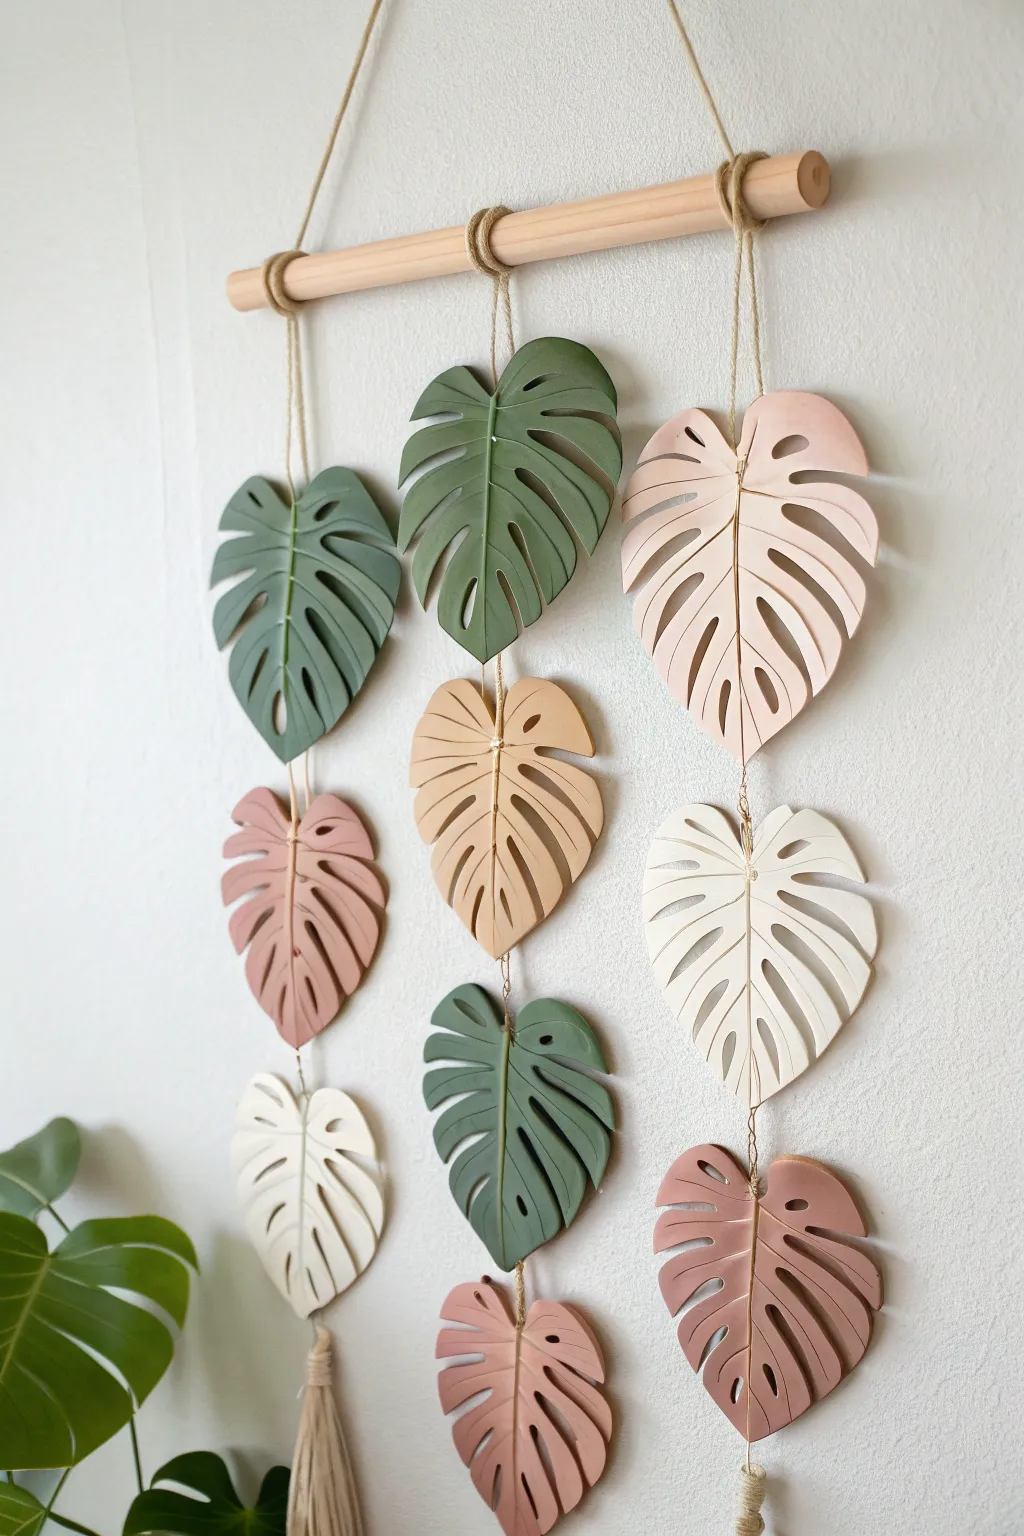
Bring the serene beauty of the botanical world indoors with this modern polymer clay wall hanging. Featuring stylized Monstera leaves in a soothing palette of sage, blush, and terra cotta, this piece adds a perfect touch of organic texture to any room.
Detailed Instructions
Materials
- Polymer clay in sage green, deep green, blush pink, cream, and terra cotta
- Rolling pin or pasta machine
- Paper template of a Monstera leaf (approx. 3-4 inches wide)
- X-Acto knife or clay craft knife
- Needle tool or toothpick
- Smooth wooden dowel (12-15 inches long)
- Natural jute twine or hemp cord
- Parchment paper or baking tile
- Oven
- Drill with a small bit (1/16 inch) or a thick piercing tool
- Sandpaper (fine grit, optional)
- Matte finish varnish (optional)
Step 1: Prepping The Leaves
-
Condition the clay:
Begin by thoroughly kneading your polymer clay colors until they are soft and pliable. If the clay is too stiff, add a tiny drop of clay softener or baby oil; if it’s too soft, leach it between sheets of plain paper for an hour. -
Roll out the slabs:
Roll each color out to a uniform thickness of about 1/4 inch (6mm). You want these relatively thick so they have weight and don’t curl easily. A pasta machine on a medium setting ensures consistency, but a rolling pin with guide rings works perfectly well too. -
Cut the shapes:
Place your paper Monstera template onto the rolled clay slab. Using your craft knife, trace around the perimeter cleanly. You will need roughly 3-4 leaves per vertical strand, so aim for 9-11 leaves total in varying colors. -
Smooth the edges:
Once cut, gently run your finger dipped in a little cornstarch or water along the raw edges of the clay to smooth out any sharpness or drag marks from the knife. This saves time on sanding later.
Clean Cuts Pro-Tip
Chill your rolled clay sheets in the fridge for 10 minutes before cutting. The firmness helps the knife glide cleanly without dragging or distorting the leaf shape.
Step 2: Detailing and Sculpting
-
Create the center vein:
Using a needle tool or an elongated modeling tool, gently press a line down the center of each leaf, starting from the top and stopping just before the bottom tip. Do not cut all the way through; simply create an indentation. -
Add side veins:
Press angled lines radiating from the center vein outward toward the leaf edges. These stylized veins give the leaf its dimension and character. -
Carve the fenestrations:
To create the classic Monstera look, use your knife or a small oval cutter to remove clay sections between the veins. Create a mix of deep slits and enclosed holes. Varying the placement makes the leaves look more organic. -
Piece holes:
Using a toothpick or a small straw, poke holes at the very top and very bottom of every leaf *except* the bottom-most leaves (which only need a top hole). Ensure the holes are large enough for your twine to pass through. -
Create variation:
I like to gently lift and curve the edges of a few leaves just slightly before baking. This prevents the final piece from looking too flat and manufactured.
Step 3: Baking and Assembly
-
Bake the clay:
Arrangement the leaves on a parchment-lined baking sheet or ceramic tile. Bake according to your specific brand’s instructions—usually around 275°F (135°C) for 30 minutes per 1/4 inch of thickness. Allow them to cool completely in the oven to prevent cracking. -
Cut the hanging cords:
Cut three lengths of jute twine. They should be roughly twice the length of your desired final hanging height to allow plenty of room for knotting. -
Attach to the dowel:
Attach the three cords to your wooden dowel using a lark’s head knot. Space them evenly apart. The two outer cords should hang slightly lower than the middle one if you want a staggered look, or keep them level as shown in the image. -
String the first leaf:
Take the first cord and thread it through the top hole of your top leaf. Tie a simple overhand knot or a double knot immediately above the hole to secure it in place. -
Connect the next tier:
Thread the cord through the bottom hole of that first leaf, then through the top hole of the second leaf. Leave about 1-2 inches of slack between them so the leaves hang freely without clumping. -
Secure the connections:
Create a knot behind the top hole of the second leaf to keep it suspended at the right height. Repeat this process until all leaves are attached to their respective cords. -
Add tassels (optional):
For the bottom-most leaves, you can either tie a simple finishing knot behind the leaf or attach a premade tassel to the bottom hole for extra bohemian flair. -
Add the main hanger:
Cut a final piece of thick twine or rope for the main hanger. Tie it securely to both ends of the wooden dowel, double-knotting to ensure it can hold the weight.
Fixing Fingerprints
If you notice fingerprints on your leaves before baking, brush them lightly with a tiny amount of baby oil or acetone on a soft paintbrush to smooth them away instantly.
Hang your new botanical artwork in a sunny spot and enjoy the custom texture it adds to your wall


Geometric Tile Grid Panel
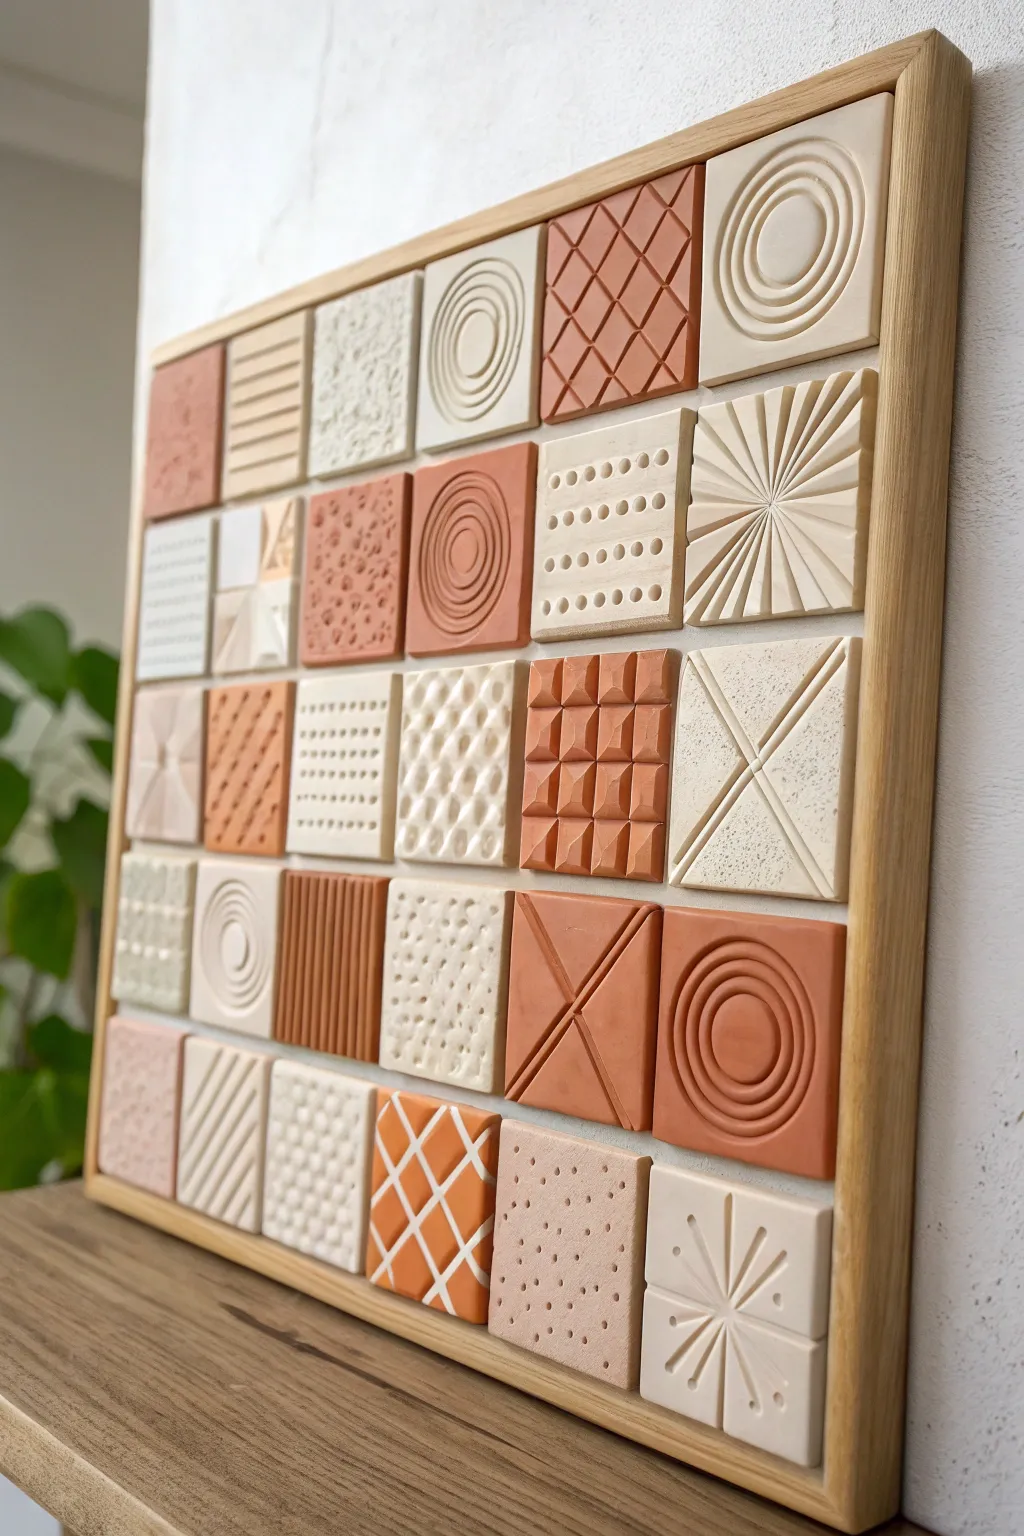
Create a striking piece of statement art by combining organic textures with precise geometric forms in a warm, earthy palette. This tutorial guides you through crafting a grid of unique polymer clay tiles, each boasting its own relief pattern, arranged within a clean wooden frame.
How-To Guide
Materials
- Polymer clay in terracotta, beige, cream, and white
- Square clay cutter (approx. 2×2 inches)
- Acrylic rolling pin
- Texture tools: texture mats, dotting tools, plastic knife, comb, stamps
- Wooden shadow box frame or flat wooden panel with trim
- Strong craft adhesive (e.g., E6000)
- Oven for baking clay
- Baking sheet and parchment paper
- Sandpaper (fine grit)
- Ruler
Step 1: Preparing the Clay Base
-
Color Mixing:
Begin by conditioning your polymer clay blocks. You want a cohesive palette, so mix your terracotta with small amounts of white to create lighter coral tones, and mix beige with white for creamy off-white shades. Aim for about 4-5 distinct but harmonious colors. -
Rolling Sheets:
Roll out your conditioned clay into even slabs. Thickness is key here—aim for about 1/4 inch (6mm) thick so the tiles have substantial weight and the relief patterns can be deep. -
Cutting Blanks:
Using your square cutter, press firmly into the rolled clay to cut out your tile blanks. You will need enough squares to fill your frame plus a few extras for testing textures. Keep the edges clean.
Step 2: Texturing the Tiles
-
Concentric Circles:
For the bullseye patterns, select a few terracotta and cream squares. Use various sizes of circular cutters or lids, pressing them gently into the wet clay to create nesting rings without cutting all the way through. -
Creating Grids:
Take a plastic knife or the edge of a ruler to press grid lines into several squares. For the ‘waffle’ look, press deep horizontal and vertical lines to create raised pyramids in the center of the intersections. -
Radiant Lines:
On a few cream tiles, use a modeling tool to score lines radiating from the center point out to the edges, creating a sunburst effect. Vary the depth of the lines for visual interest. -
Stippling and Dots:
Use a dotting tool or the blunt end of a paintbrush to create ordered rows of indentations on some tiles. For others, use a rough stone or crumpled foil to press a completely organic, pitted texture into the surface. -
Linear Grooves:
Use a comb or the side of a credit card to press parallel lines across the entire surface of selected tiles. You can alternate the direction (vertical vs. horizontal) when you eventually arrange them. -
Diamond Geometric:
Score a large ‘X’ across a tile, then add internal parallel lines to create triangular or diamond geometric sections. This adds a sharp architectural feel to the mix. -
Refining Edges:
Once all tiles are textured, gently smooth the cut edges with your finger to remove any sharp burrs or distortion caused during the texturing process.
Clean Lines
To prevent fingerprints on your smooth tiles, lightly dust your fingers with cornstarch before handling, or wear latex finger cots during the texturing phase.
Step 3: Baking and Assembly
-
Baking:
Arrange the tiles on a parchment-lined baking sheet. Bake according to your clay manufacturer’s specific instructions (usually 275°F/135°C for 15-30 minutes depending on thickness). I prefer to tent foil over them to prevent scorching the lighter colors. -
Cooling and Sanding:
Allow the tiles to cool completely in the oven. Once hard, check the backs; if they aren’t perfectly flat, give them a quick rub on a sheet of fine-grit sandpaper placed on a flat surface. -
Planning the Layout:
Place your wooden frame flat on a table. Arrange your fired tiles inside without glue first to find the most pleasing composition. Balance the colors so the terracotta focal points are evenly distributed among the neutral tones. -
Measuring the Grid:
If your frame is larger than the tiles combined, use a ruler to lightly mark the backing board where each tile should sit to ensure perfect spacing and straight gaps. -
Gluing Down:
Apply a dab of strong craft adhesive (like E6000) to the back of the first corner tile. Press it firmly onto your mark. Continue row by row. -
Final Press:
Once all tiles are placed, place a clean heavy book on top of the assembly (with a protective paper layer in between) to ensure they bond flat while the glue cures.
Color Pop
Before baking, brush a tiny amount of mica powder or pastel chalk dust into the deepest grooves of the textured tiles to accentuate the 3D relief shadows.
Hang your new textured masterpiece in a well-lit spot where shadows will play across the relief patterns throughout the day


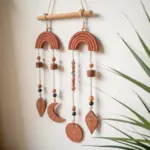
Dreamcatcher-Style Hoop With Clay Charms
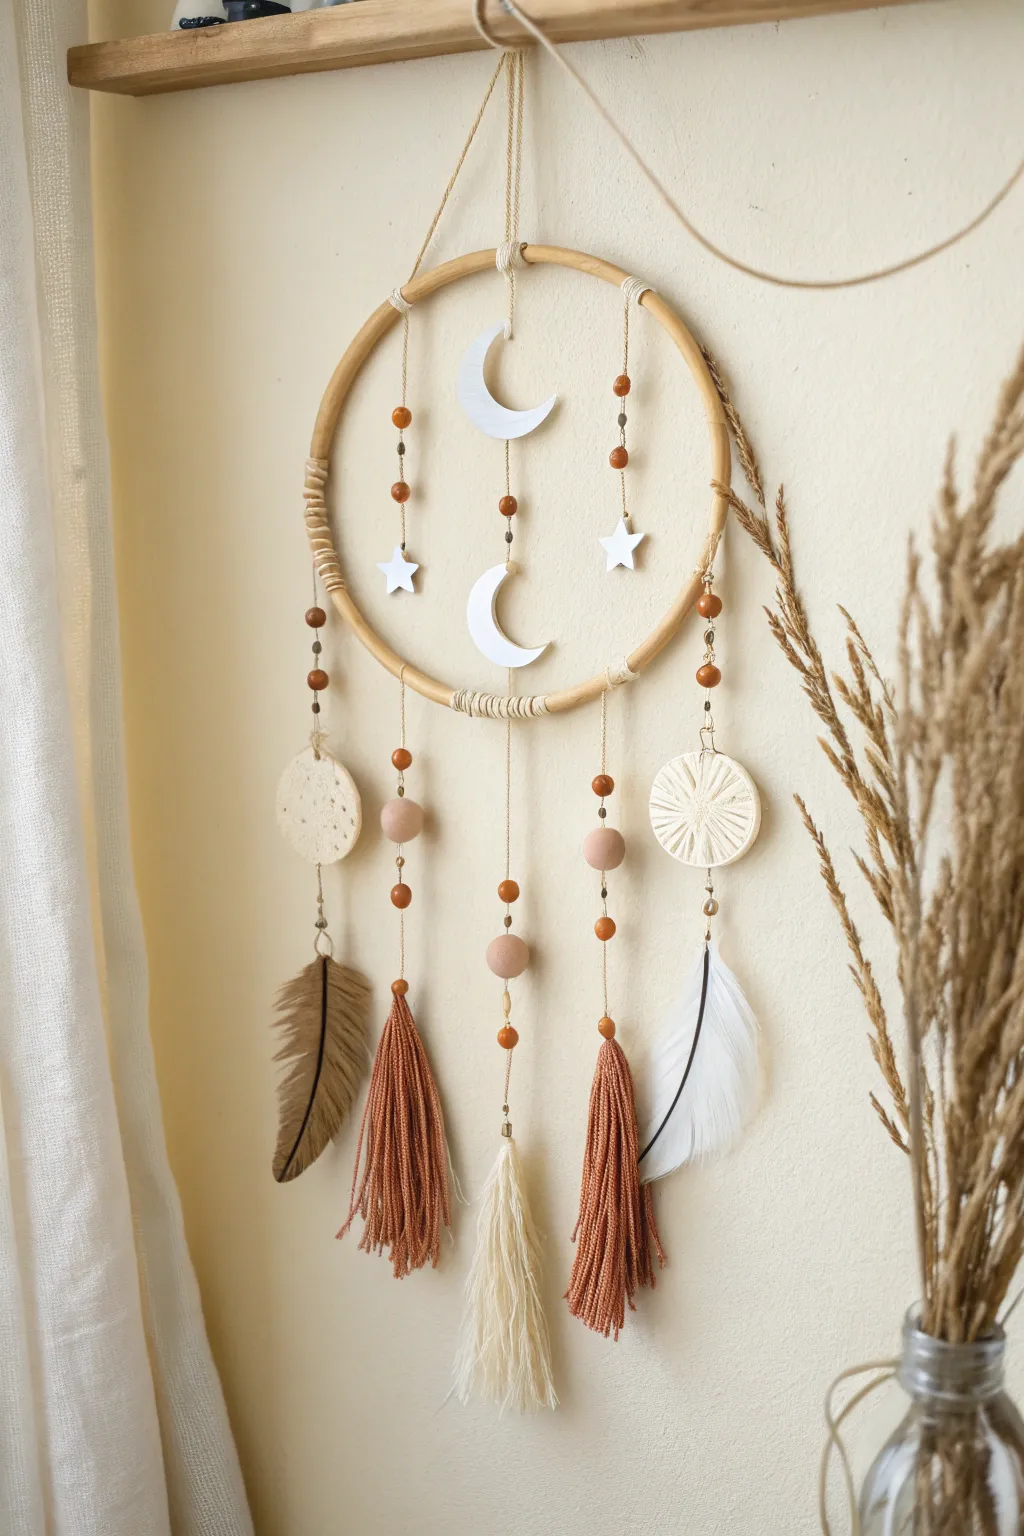
This gentle, bohemian-inspired wall hanging combines the natural warmth of wood and fiber with custom-crafted polymer clay elements. Featuring delicate moons, stars, and textured charms, it brings a peaceful, dreamy vibe to any bedroom or nursery wall.
How-To Guide
Materials
- White polymer clay
- Beige or tan polymer clay (for the feather)
- Wooden embroidery hoop (approx. 8-10 inches)
- Natural jute twine or thin hemp cord
- Wooden beads (assorted sizes: small spacer beads and large round beads)
- Terra cotta or rust-colored yarn
- Cream or off-white yarn
- Real white feather (optional, or make a second clay one)
- Clay roller (or rolling pin)
- Clay cutters (crescent moon, star, small circle)
- Clay sculpting tools (needle tool, knife)
- Texturing tool (stamp, lace, or toothpick)
- Baking sheet and parchment paper
- Strong craft glue or hot glue gun
- Scissors
Step 1: Crafting the Clay Charms
-
Condition and Roll the Clay:
Begin by warming the white polymer clay in your hands until it’s pliable. Roll it out on a smooth surface to a uniform thickness of about 1/4 inch. -
Cut Celestial Shapes:
Use your cookie cutters to punch out two crescent moon shapes and two small stars. Smooth the edges with your finger to remove any stray bits of clay. -
Create Textured Discs:
Using the white clay, cut out two circular discs (approx. 2 inches wide). On one disc, gently press a piece of lace or a texture stamp into the surface to create a pattern. On the other, use a needle tool to score radial lines from the center outward, mimicking a sunburst or woven pattern. -
Sculpt the Clay Feather:
Switch to your beige or tan clay. Roll a small log, flatten it into a long oval shape, and pinch one end to form the quill. Use a needle tool to press a central vein down the middle, then score angled lines outward on both sides to resemble feather barbs. Carefully cut small notches into the edges for a realistic, wind-ruffled look. -
Create Holes for Hanging:
Before baking, use a toothpick or needle tool to poke a hole at the top of every charm. For the larger moons and circular discs, create holes at both the top and the bottom, as these will act as connectors in the strands. -
Bake the Clay:
Arrange all your pieces on a parchment-lined baking sheet. Bake according to your clay manufacturer’s specific temperature and time instructions—usually around 275°F (135°C) for 15-30 minutes. Let them cool completely before handling.
Smooth Operator
Before baking, use a cotton swab dipped in a tiny bit of rubbing alcohol or baby oil to gently wipe your clay pieces. This removes fingerprints and dust for a professional finish.
Step 2: Preparing the Hoop and Hangers
-
Wrap the Hoop:
Take the inner ring of your embroidery hoop. Cut a long piece of cream yarn or jute. Wrap the top 2 inches and bottom 2 inches of the hoop tightly with the cord to add texture and cover the wood slightly, securing the ends with a dab of glue. -
Create the Vertical Strands:
Cut five long lengths of thin jute twine (about 24 inches each). Tie them securely to the bottom arc of the hoop, spacing them out evenly. The central strand should hang lowest, with the outer strands slightly shorter. -
Attach the Upper Center Strands:
Cut three shorter lengths of twine for the inside of the circle. Tie them to the top arc of the hoop. These will hold the floating moons and stars.
Step 3: Assembly and Finishing
-
Thread the Floating Charms:
On the central upper strand, thread a small wooden bead, then tie on the larger white moon. On the two flanking upper strands, thread small wooden beads followed by the white stars. Knot the twine securely behind each charm. -
Assemble the Lower Strands:
Work on the five hanging strands one by one. I find it easiest to lay the hoop flat on a table for this. Thread wooden beads onto the twine, varying the pattern—try mixing small spacer beads with larger geometric or round wooden beads. -
Attach the Main Charms:
Tie your baked clay elements into the strands. Place the textured white discs on the outer left and right strands. Place the second moon in the very center strand. -
Make the Yarn Tassels:
Wrap the terra cotta yarn around your hand or a piece of cardboard about 20 times. Slide the loop off, tie a piece of yarn tightly around the top third to create a ‘head,’ and cut the bottom loops open. Repeat to make two rust-colored tassels and one cream tassel. -
Final Assembly:
Attach the tassels to the bottom of the central and mid-range strands using the loops you created. Attach the clay feather to the far left strand and the real white feather to the far right strand. -
Add the Hanger:
Cut a final piece of sturdy twine. Tie a loop at the very top of the hoop frame so your artwork is ready to hang.
Glow Up
Mix glow-in-the-dark polymer clay with your white clay for the stars and moons. By day they look classic white, but at night they act as a gentle nightlight.
Hang your beautiful celestial creation where it can catch the light and inspire sweet daydreams


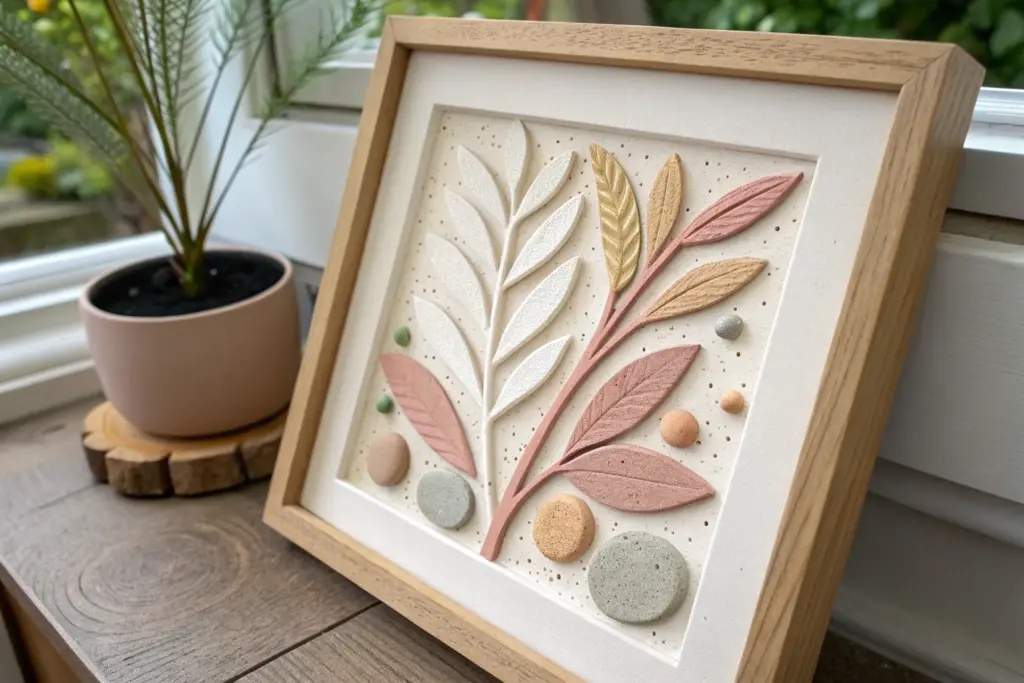
High-Relief Floral Wall Plaque
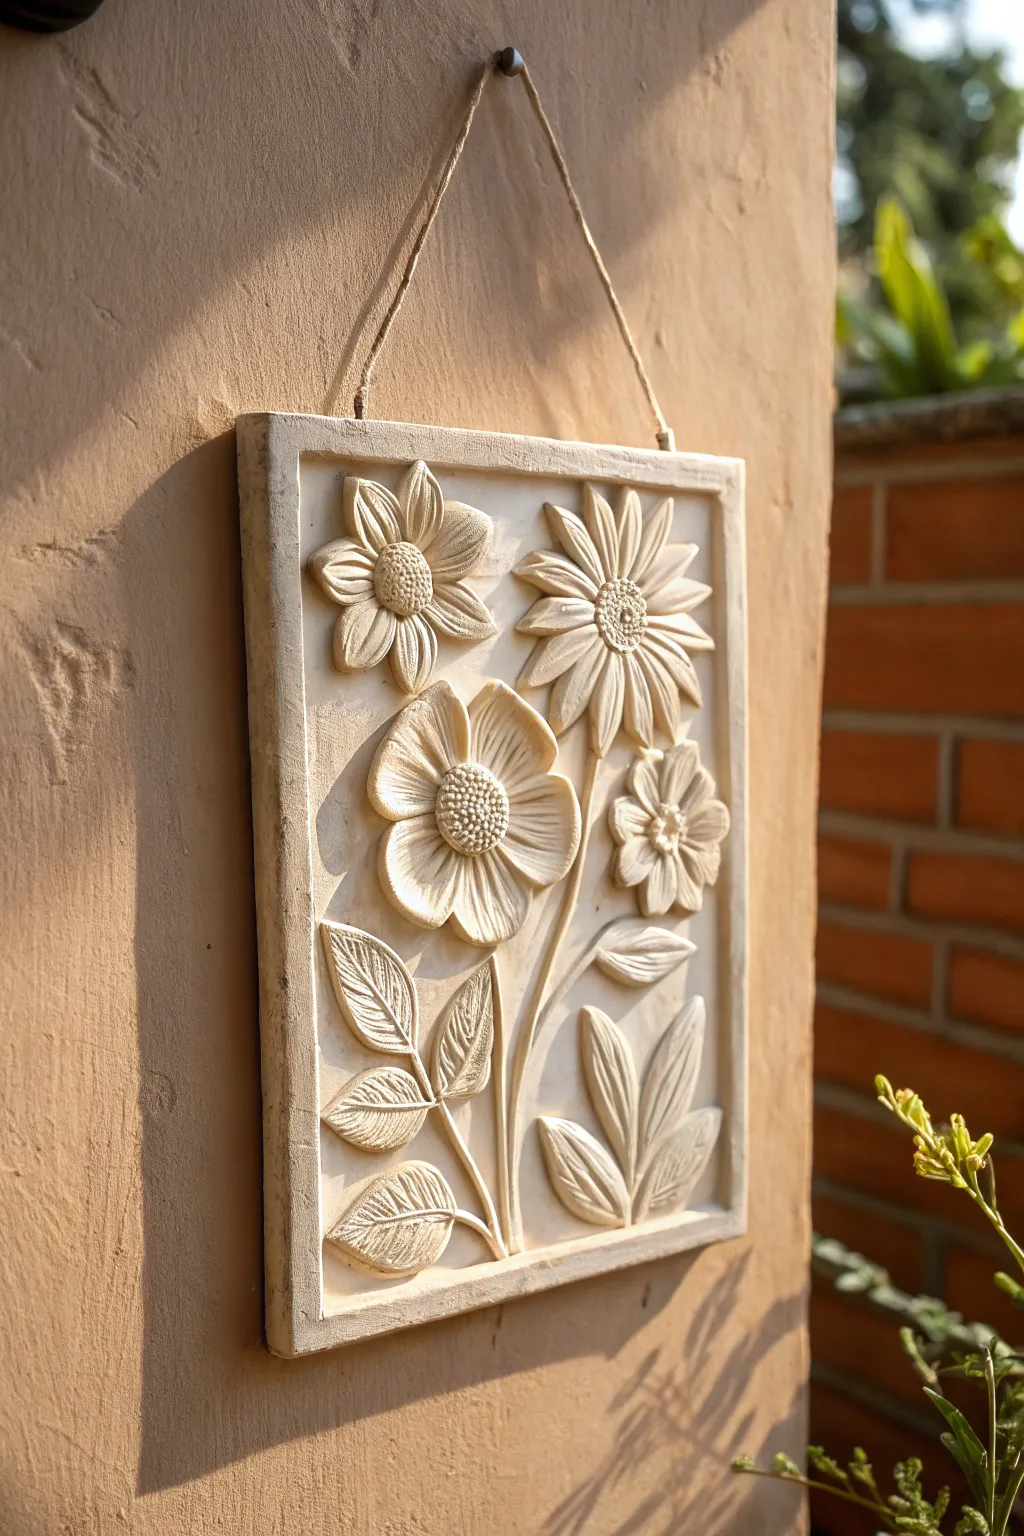
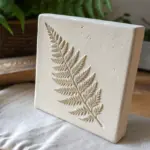
Capture the timeless elegance of carved stone with this monochromatic polymer clay project. This high-relief plaque features delicate blooms and textured leaves in a soothing cream palette, perfect for adding a touch of rustic charm to any wall.
Step-by-Step Guide
Materials
- White or cream polymer clay (large block, ~1lb)
- Translucent liquid polymer clay
- Rolling pin or pasta machine
- Rectangular clay cutter or ruler and craft knife
- Sculpting tools (needle tool, ball stylus, rubber shaper)
- Texture sponge or stiff brush
- Wooden board or ceramic tile (oven-safe)
- Jute twine
- Strong craft glue (E6000)
- White acrylic paint (optional for dry brushing)
- Matte varnish
Step 1: Base Construction
-
Prepare the canvas:
Condition a large portion of your cream clay until it is soft and pliable. Roll it out into a flat, even slab approximately 1/4 inch thick. This will be the backboard of your plaque. -
Cut to size:
Using a rectangular cutter or a ruler and craft knife, cut the slab into a clean rectangle, roughly 5×7 inches. Smooth the edges with your finger to remove any sharp cutting lines. -
Create the frame:
Roll four long snakes of clay for the frame border. Flatten them slightly into strips about 1/2 inch wide. Apply a thin line of liquid clay around the perimeter of your base slab and attach these strips to create a raised border. Miter the corners for a neat finish. -
Add texture:
To mimic the look of stone or plaster, gently press a texture sponge or a stiff-bristled brush over the entire surface of the base and frame. This subtle pitting adds realism to the ‘carved’ look. -
Prepare hanging holes:
At the top edge of the frame, use a large needle tool or a straw to pierce two holes for the hanging twine. Ensure they are evenly spaced and large enough for your jute to pass through later.
Step 2: Sculpting the Botanicals
-
Form the large flower:
Start with the prominent flower at the bottom center. Roll five teardrop shapes for petals. Flatten them and use a needle tool to impress delicate lines radiating from the center to the tip. -
Assemble the bloom:
Arrange these petals in a circle on the lower left of the plaque, securing them with a dab of liquid clay. Create a textured center by pressing a ball of clay into a sieve or poking it repeatedly with a needle tool, then place it in the middle. -
Sculpt the sunburst flower:
For the top right flower, roll thinner, longer teardrops to create daisy-like petals. Layer them slightly to give the flower volume and movement, making it look like it’s reaching toward the sun. -
Add the small filler:
Create a smaller, simple four-petal flower for the middle right section. I like to keep this one slightly flatter to create a sense of depth, making the other flowers pop more. -
Stem structure:
Roll very thin snakes of clay for stems. Gently curve them to connect your flowers, pressing them firmly onto the background. Don’t worry if they aren’t perfectly smooth; organic bumps look more natural. -
Leaf details:
Fashion several leaves by flattening oval shapes. Use a knife to score a central vein and angled side veins. Attach these to the stems and fill empty spaces, especially at the bottom. -
Refine the relief:
Go back over your sculpted elements with a rubber shaping tool. Smooth out any fingerprints and lift the edges of petals and leaves slightly to enhance the high-relief 3D effect.
Texturing Tip
Before baking, lightly dust the raw clay surface with cornstarch or baby powder. This prevents your tools from sticking and adds a soft, matte
Step 3: Finishing Touches
-
Baking:
Bake the entire piece according to your clay manufacturer’s instructions (usually 275°F for 15-30 minutes depending on thickness). Use an oven thermometer to ensure precise temperature and avoid scorching the light clay. -
Cooling:
Allow the plaque to cool completely in the oven. This slow cooling process mimics the annealing of glass and helps prevent the clay from becoming brittle or cracking. -
Optional aging:
If you want an even more weathered stone look, lightly dry-brush a tiny amount of white acrylic paint over the highest points of the texture. This highlights the relief work. -
Sealing:
Apply a coat of matte varnish to protect the surface from dust and give it a unified sheen. Avoid glossy finishes if you want to maintain the natural stone aesthetic. -
Attach the hanger:
Thread a length of jute twine through the holes you created earlier. Tie sturdy knots on the front side or secure them on the back with a dab of strong glue.
Cracking Issues?
If hairline cracks appear after baking, fill them with a mix of liquid clay and a tiny bit of cream clay, then re-bake for 10 minutes to seal.
Hang your handcrafted botanical relief in a sunny spot to let the shadows play across the textured surface

The Complete Guide to Pottery Troubleshooting
Uncover the most common ceramic mistakes—from cracking clay to failed glazes—and learn how to fix them fast.
Textured Abstract Wall Panel
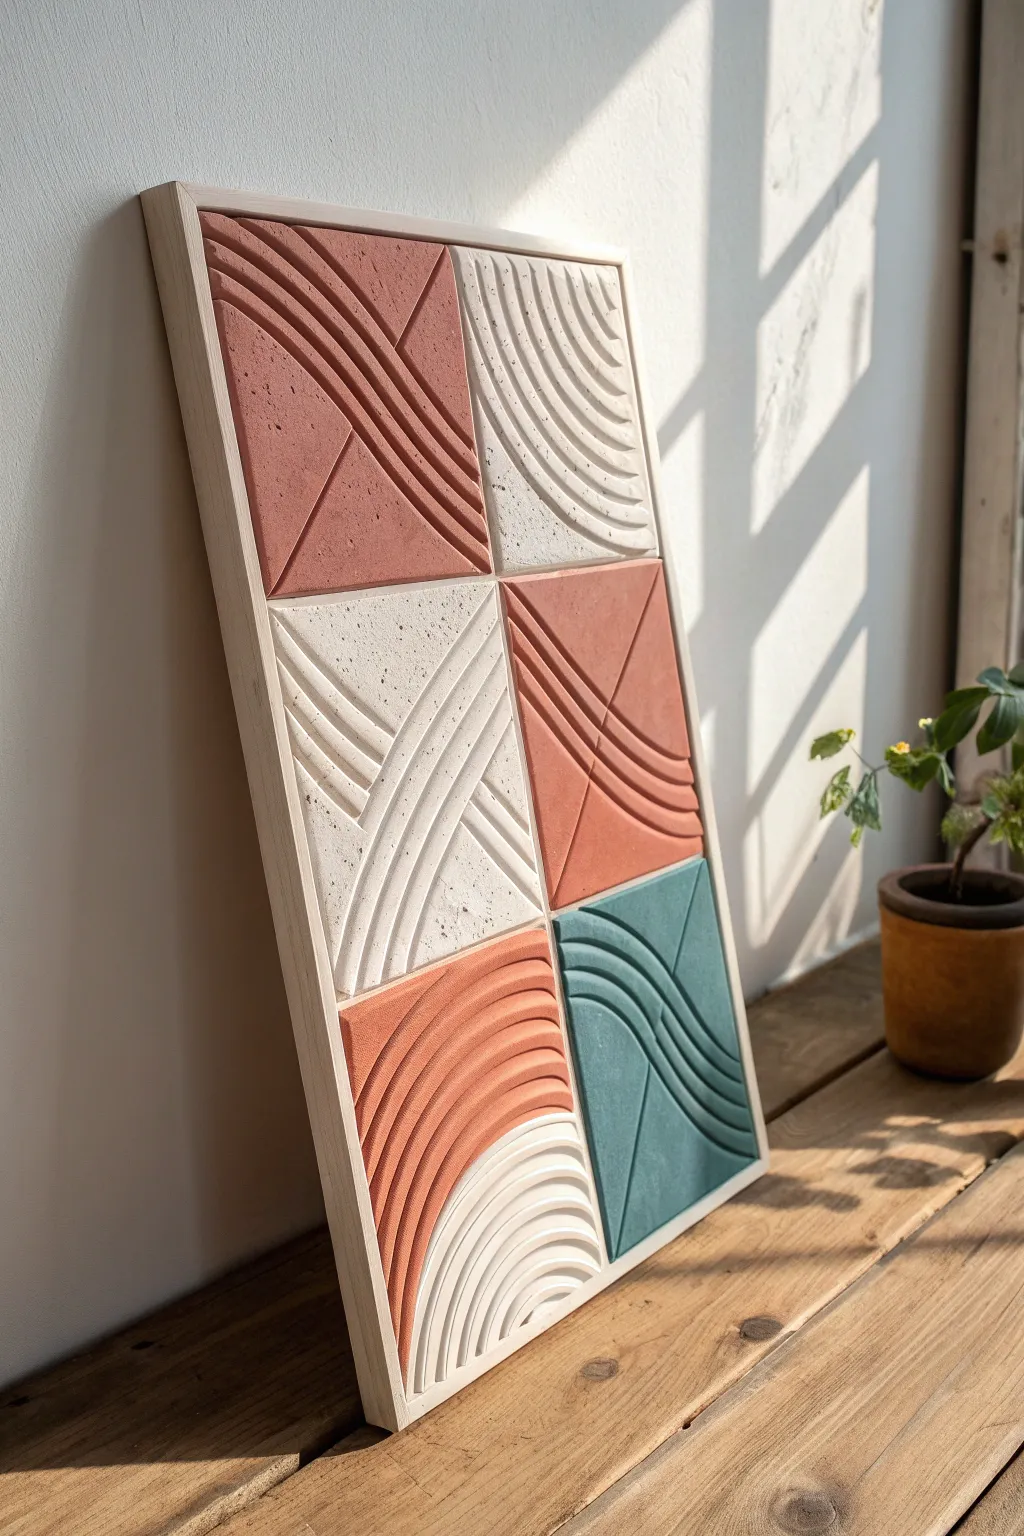
Create a striking modern centerpiece for your home with this modular textured wall panel. By combining smooth architectural lines with earthy tones like terracotta and teal, you’ll craft a finished piece that feels both organic and delightfully structured.
How-To Guide
Materials
- Polymer clay in terracotta, teal/sage, white, and beige colors
- Wooden canvas frame or deep-set shadow box (rectangular)
- Rigid backing board (MDF or plywood) cut to fit inside the frame
- Rolling pin or clay pasta machine
- Clay blades or a sharp craft knife
- Sculpting loop tools or dental tools (for carving grooves)
- Ruler and protractor/set square
- Strong craft adhesive (e.g., E6000) or epoxy
- Sandpaper (fine grit)
- Matte varnish or sealant (spray or brush-on)
- Parchment paper or a dedicated baking tile
Step 1: Preparation & Base Creation
-
Measure the frame space:
First, measure the exact inner dimensions of your wooden frame. Divide this space into six equal sections—two columns and three rows—to determine the exact size each clay tile needs to be. -
Condition the clay:
Warm up your polymer clay by kneading it thoroughly. You need four distinct colors: a deep terracotta, a lighter peach-terracotta, a speckled white/sand, and a deep teal. Mix in a pinch of black pepper or craft sand into the white clay to achieve that stone-like speckled effect. -
Roll the slabs:
Roll out your clay into thick, even slabs, approximately 1/4 inch thick. A pasta machine is best for uniformity, but a rolling pin with guide rings works well too. Make enough of each color to cut your squares later. -
Cut the tiles:
Using your measurements from step one, cut six perfect squares from the clay slabs. You will need: two terracotta, one peach-terracotta, two speckled white, and one teal.
Step 2: Texturing the Design
-
Plan the geometric flow:
Lightly sketch the design onto the raw clay tiles with a needle tool. The design features intersecting arcs and straight lines that flow from one tile to the next, so layout the tiles side-by-side on your work surface to ensure the lines connect continuously across the borders. -
Carve the first arcs:
Start with the top-left terracotta tile. Use a loop tool to carve deep, wide, curved channels that mimic concentric rainbows. Keep the ridges between canals sharp and uniform. -
Detail the white tiles:
For the white tiles, create texture by pressing slightly rougher indentations. I find that gently tapping the surface with a coarse sanding sponge or toothbrush before carving the lines adds a nice ‘concrete’ realism. -
Create the diagonal splits:
Several tiles, like the top left and middle right, feature a diagonal line separating smooth areas from grooved areas. Use a ruler to press a deep, definitive straight line, then carve the curved grooves only on one side of that partition. -
Sculpt the bottom gradient:
For the bottom-left tile, you are essentially making a split tile. Cut a curved section of white clay and fit it snugly against a curved cut of the peach-terracotta clay. Smooth the seam on the back, or simply adhere them tightly together on the baking surface so they fuse during curing. -
Refine the teal tile:
Carve the teal tile with flowing, S-shaped curves. ensure the depth of the grooves matches the other tiles for visual consistency. -
Smooth the edges:
Check the perimeter of every square. If handling the clay deformed the straight edges, use your long blade to trim them back to perfect squares so they will fit flush in the frame.
Clean Carving Tip
Chill your clay slabs in the fridge for 15 minutes before carving. Cold clay is firmer, allowing the loop tool to cut crisp, clean channels without dragging.
Step 3: Baking & Assembly
-
Bake the tiles:
Transfer the tiles carefully to a baking sheet lined with parchment paper. Bake according to your polymer clay package instructions—usually around 275°F (135°C) for 30-45 minutes depending on thickness. -
Cool under weight:
As soon as the tiles come out of the oven, place a heavy book or flat board on top of them while they cool. This prevents the corners from curling up, ensuring they lie flat in the frame. -
Sand and finish:
Once fully cool, lightly sand the edges to remove any sharpness. Apply a coat of matte varnish to protect the surface and enhance the richness of the terracotta and teal colors. -
Prepare the backing:
Take your rigid backing board (which fits inside your wooden frame). Test fit the layout of your tiles on the board to make sure gaps are minimal. -
Glue the tiles:
Apply a strong adhesive like E6000 to the back of each tile. Press them firmly onto the backing board, ensuring the geometric lines flow seamlessly from one tile to the next. -
Frame the art:
Insert the backing board with the attached tiles into the wooden frame. Secure it from the back using framing points or strong tape.
Level Up: Grout Lines
Leave a tiny 1-2mm gap between tiles when gluing them down. Fill this gap with actual grout or colored clay paste for a true architectural mosaic finish.
Hang your new textured masterpiece near a window where natural light can play across the ridges and changing shadows
Terrazzo-Style Clay Mosaic Art
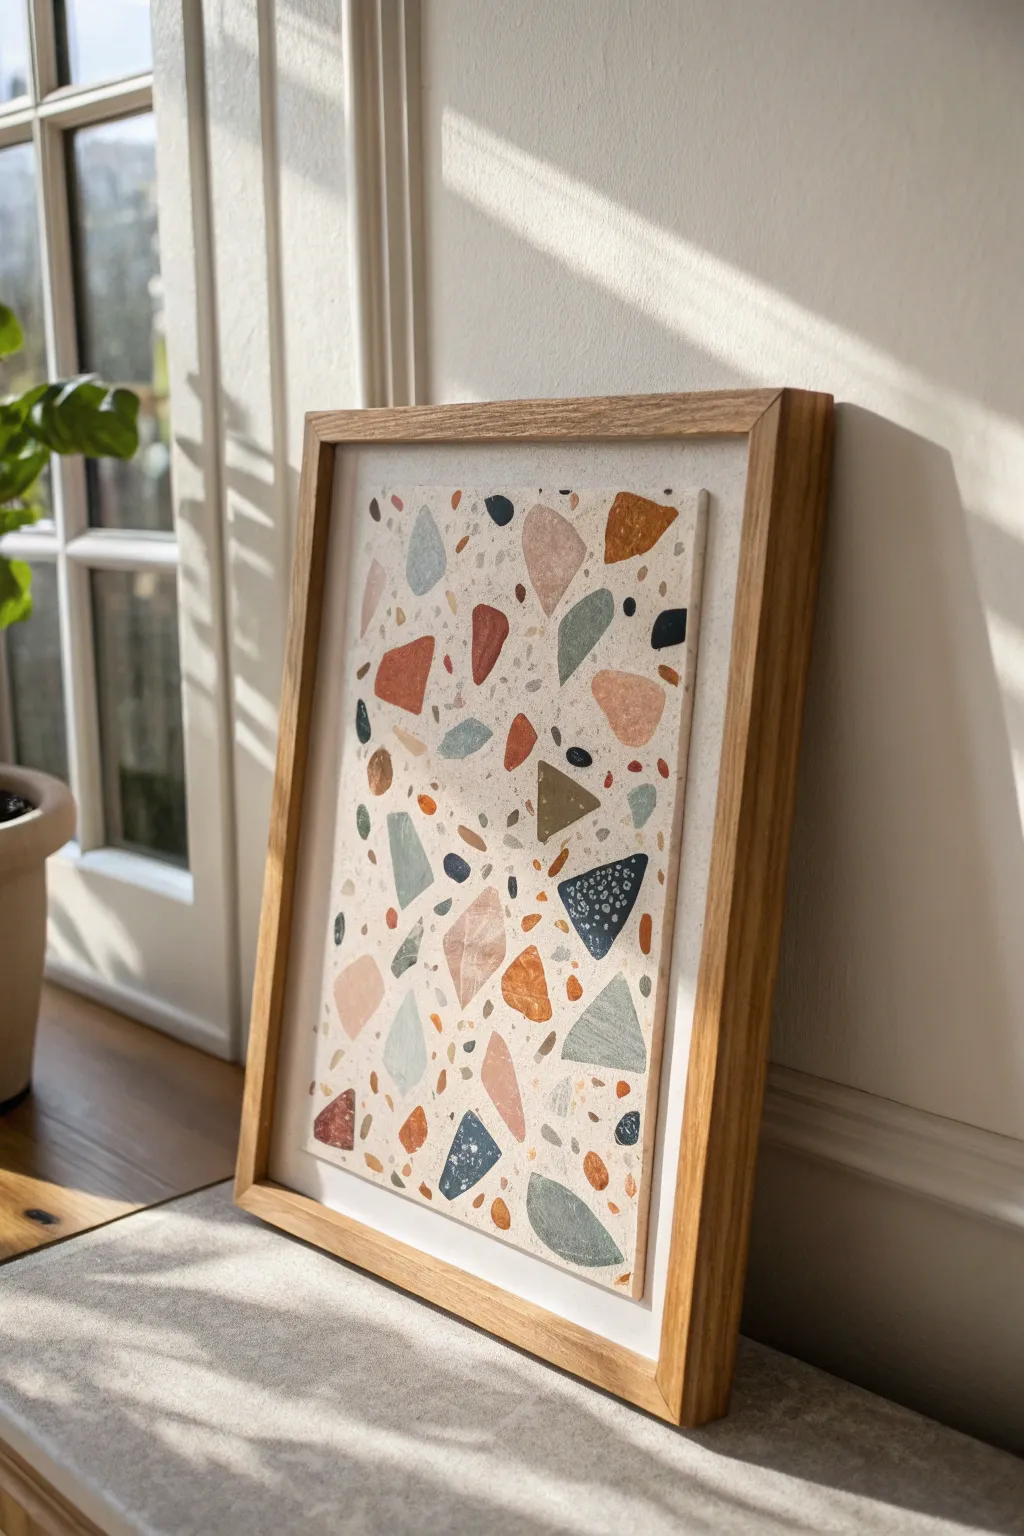
Capture the trendy, sophisticated look of terrazzo stone without the heavy weight using thin polymer clay shards. This project features a chic palette of earth tones like sage, rust, and navy set against a textured white ground, creating a modern dimensional piece perfect for a sunny shelf.
Step-by-Step
Materials
- Polymer clay in various colors: white, terracotta, sage green, navy blue, mustard yellow, and dusty pink
- Coarse black pepper or dried used coffee grounds (for texture)
- Wide acrylic rolling pin or pasta machine
- Craft knife or tissue blade
- Parchment paper
- Baking sheet
- Thick white cardstock or art board (cut to frame size)
- Spackling paste or white texture medium
- Palette knife
- Gloss glaze (optional for some chips)
- Wooden shadow box frame
Step 1: Prepping the Chips
-
Condition the colors:
Begin by conditioning each block of colored clay separately until it is soft and pliable. Keep your hands clean between colors to avoid muddying the lighter shades. -
Create speckles:
Take a small portion of your white and Navy clay. Mix a tiny pinch of coarse pepper or dried coffee grounds into the clay to create a faux-stone speckled effect. -
Roll out sheets:
Roll each color out into a thin sheet, approximately 2mm to 3mm thick. I prefer varying the thickness slightly between colors to give the final mosiac more physical depth and interest. -
Initial cut:
Using your craft knife, slice the raw clay sheets into random geometric shapes. Think triangles, irregular polygons, and soft-edged trapezoids. -
Add detail:
For the navy blue pieces, consider pressing bright white clay crumbs onto the surface and rolling over them once more to mimic the speckled ‘galaxy’ look seen in the photo. -
Bake the clay:
Arrange all your cut shapes on a parchment-lined baking sheet. Bake according to your specific clay brand’s instructions (usually 275°F/135°C for 15-30 minutes). -
Cool down:
Allow the pieces to cool completely. Once hard, you can use fine-grit sandpaper to smooth any rough edges on your shapes.
Step 2: Assembling the Mosaic
-
Prepare the base:
Cut your sturdy art board or cardstock to fit exactly inside your wooden frame. -
Apply texture:
Using a palette knife, spread a thin, even layer of spackling paste or white texture medium over the board. This acts as both the grout and the adhesive. -
Stipple the surface:
Tap the flat side of your palette knife or a stiff brush over the wet paste to create a rough, stone-like texture. -
Plan your layout:
Before the paste dries, gently lay your baked clay chips on top of the surface without pressing them in yet. Arrange them to balance the colors—don’t group all the rust or blues in one spot. -
Embed the large pieces:
Once happy with the arrangement, press the larger geometric shapes firmly into the wet texture paste. -
Fill the gaps:
Take your smaller shards and tiny ‘pebbles’ of baked clay and scatter them into the empty spaces between the large shapes to mimic the aggregate found in real terrazzo. -
Let it cure:
Allow the texture paste to dry completely, which usually takes overnight depending on the thickness of your layer. -
Optional gloss:
If you want contrast, brush a little gloss glaze on just a few of the darker chips (like the navy or rust ones) to make them pop against the matte background. -
Framing:
Place the finished artwork into the wooden shadow box frame. Using a shadow box is important because the raised clay pieces need clearance behind the glass (or remove the glass entirely).
Clean Edges Pro-Tip
Before baking, gently rub a tiny bit of cornstarch on your blade. It prevents the raw clay from dragging or sticking, giving you much sharper, cleaner geometric cuts.
Level Up: Metallic Veins
Mix gold leaf flakes into translucent clay before rolling and baking. These semi-clear, sparkly shards add a high-end luxury quartz vibe to your terrazzo mix.
Hang your textured masterpiece in a spot where the side light will catch the wonderful dimension of the chips


What Really Happens Inside the Kiln
Learn how time and temperature work together inside the kiln to transform clay into durable ceramic.
Shadow Box Mini Scene
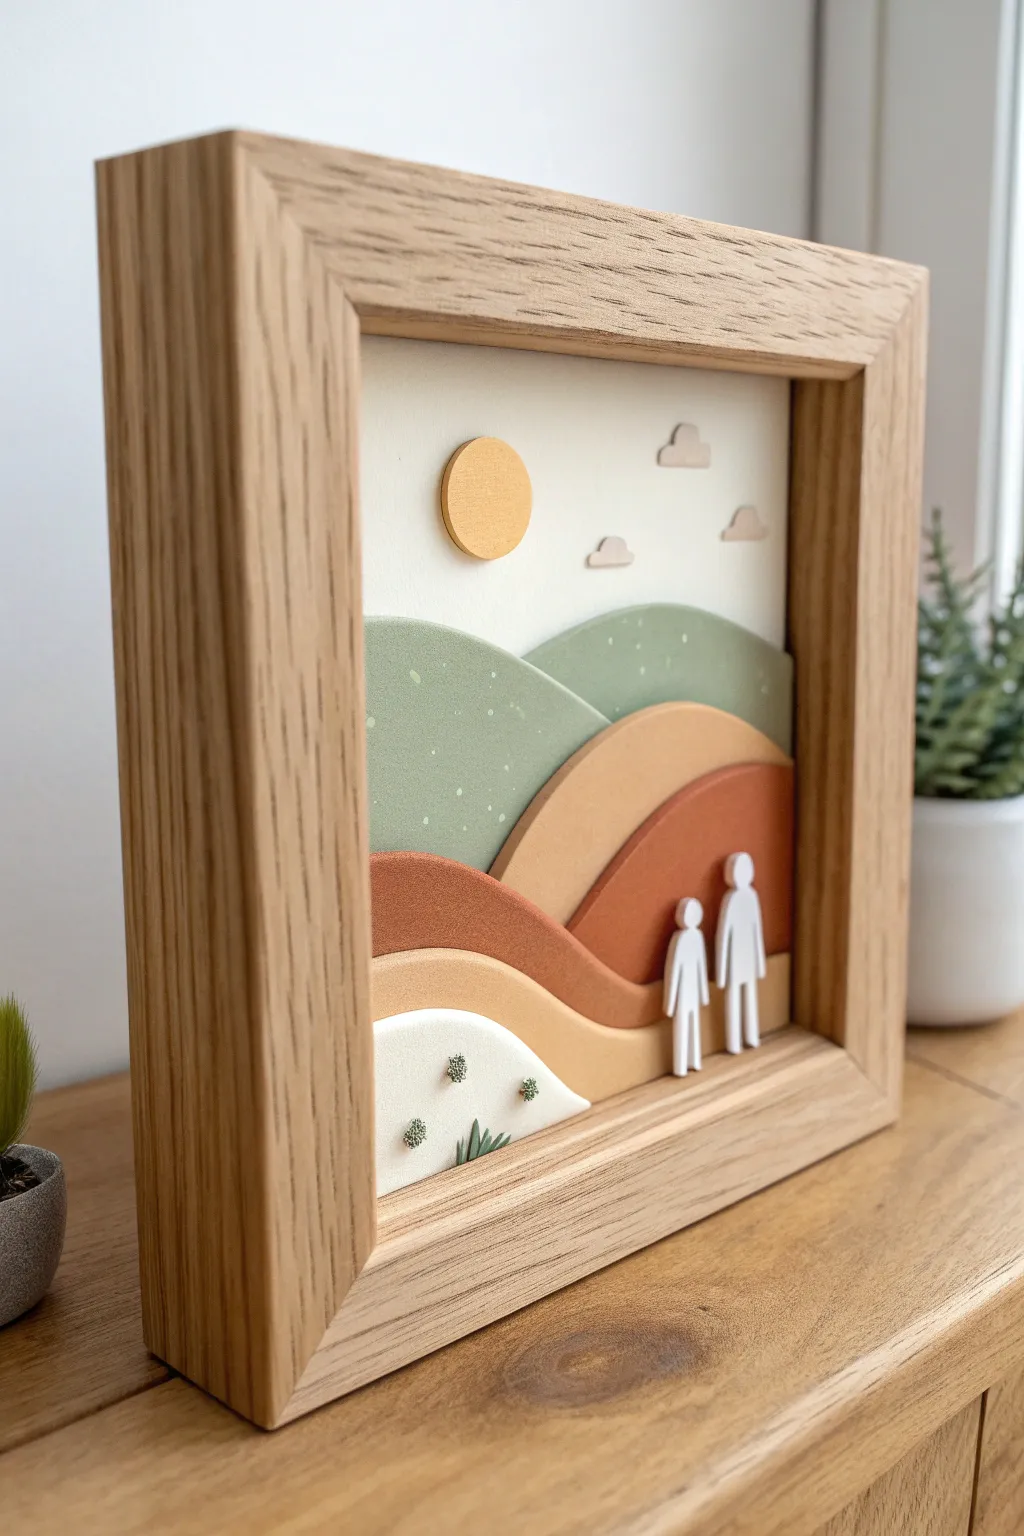
Capture the serenity of a sun-drenched valley with this dimensional polymer clay landscape. By layering soft, muted tones of clay within a deep frame, you create a charming scene featuring rolling hills, a glowing sun, and two tiny, stylized figures.
Step-by-Step
Materials
- Polymer clay (white, sage green, terracotta, mustard yellow, beige, peach)
- Deep shadow box frame (oak or light wood finish, approx. 6×6 inch)
- Acrylic roller or pasta machine
- Craft knife or scalpel (X-Acto)
- Smooth work surface (ceramic tile or glass)
- Cardstock or heavy paper (for templates)
- Pencil and scissors
- Liquid polymer clay (Bake and Bond or similar)
- Super glue (cyanoacrylate)
- Small dotting tool or toothpick
- Tiny dried moss or green clay bits (optional for texture)
- Oven for baking
Step 1: Planning and Prep
-
Measure the frame insert:
Remove the back panel of your shadow box frame. Measure the interior dimensions accurately, as this will be the canvas size for your clay layers. Cut a piece of heavy white cardstock to this exact size to serve as your backing guide. -
Sketch the landscape layers:
Sketch your design directly onto the cardstock guide. Draw four distinct hill shapes increasing in height from front to back, leaving space at the top for the sky. Include the sun position and small cloud shapes. -
Color mixing:
Condition your clay by kneading until soft. Mix your colors to achieve the muted palette shown: Sage green for the back hills, a soft peach/mustard for the middle, deep terracotta, and a lighter beige for the foreground.
Smooth Operator
Before baking, dampen your finger with a tiny amount of baby oil and run it over the clay edges. This erases fingerprints and creates that professional, matte finish.
Step 2: Creating the Hills
-
Roll the clay sheets:
Roll out each of your mixed colors into flat sheets. Aim for a consistent thickness of about 3-4mm for the hills to create nice depth without being too heavy. Use playing cards as guides on either side of your roller if you don’t have a pasta machine. -
Cut the back hill:
Place your ‘back hill’ template (cut from your sketch) onto the sage green clay. Use your craft knife to trace and cut the waving hill shape. Smooth the cut edges with your finger to remove sharpness. -
Cut the middle layers:
Repeat the process for the middle layers using the peach and terracotta clays. Ensure the curves complement each other—when stacked, you want parts of the back layers to peek through the valleys of the front layers. -
Create the foreground:
Cut the smallest, front-most hill from white or very light beige clay. This piece will sit at the bottom left. -
Add texture:
For the green back hill, gently press a few tiny indentations with a dotting tool to simulate distant vegetation. On the white foreground hill, press in tiny holes where you plan to ‘plant’ miniature succulents or bushes later.
Step 3: Figures and Sky
-
Form the sun:
Roll a small ball of mustard yellow clay and flatten it into a perfect circle. You can use a small round cutter or a bottle cap to get a clean edge. It should be slightly thinner than the hills. -
Cut the clouds:
Roll out a very thin sheet of beige clay. Freehand cut three tiny, irregular cloud shapes with flat bottoms. Keep them minimal and stylized. -
Sculpt the figures:
Roll two thin ‘snakes’ of white clay for the bodies. Use a knife to split the bottom half of each snake to create legs. Add tiny balls for heads. Make one figure slightly taller than the other. I find it easiest to assemble these directly on a ceramic tile.
Warping Worries?
If your flat hill pieces curl up slightly after baking, reheat them briefly with a hair dryer and press them under a heavy stack of books until cool.
Step 4: Assembly and Baking
-
Pre-bake alignment check:
Lay your clay pieces onto the backing cardstock (or a ceramic tile cut to size) to check the fit. Don’t press them down firmly yet; just ensure the layers sit nicely without gaps at the side edges. -
Adding details:
If adding tiny plants to the white hill, use tiny specks of green clay or bake the hill first and glue dried moss later. For clay plants, shape tiny green spikes and press them into the pre-made holes. -
Baking:
Bake all component pieces flat on a ceramic tile according to your clay package instructions (usually 275°F/130°C for 15-30 minutes). Baking them flat and separate ensures they don’t warp. -
Cooling:
Allow the pieces to cool completely inside the oven or under a heavy book to ensure they stay perfectly flat.
Step 5: Final Mounting
-
Secure the background:
Cut a fresh piece of high-quality white cardstock or mat board for the final background. Glue this securely into the back of the shadow box frame. -
Layering the hills:
Using strong super glue, attach the hills one by one, starting from the back (green) and working forward. Apply glue only to the back of the clay pieces. -
Attaching sky elements:
Glue the sun and clouds into the open sky area. Placing the sun slightly off-center creates a more natural composition. -
Placing the figures:
Apply a tiny dot of glue to the back of the figures and place them standing on the terracotta hill layer, referencing the original image for placement. -
Close the frame:
Clean the glass of your shadow box thoroughly on the inside. Place the frame over your artwork and secure the back clips.
Hang your miniature world on the wall and enjoy the peaceful view.
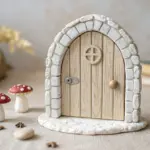
Whimsical Tiny House Plaque
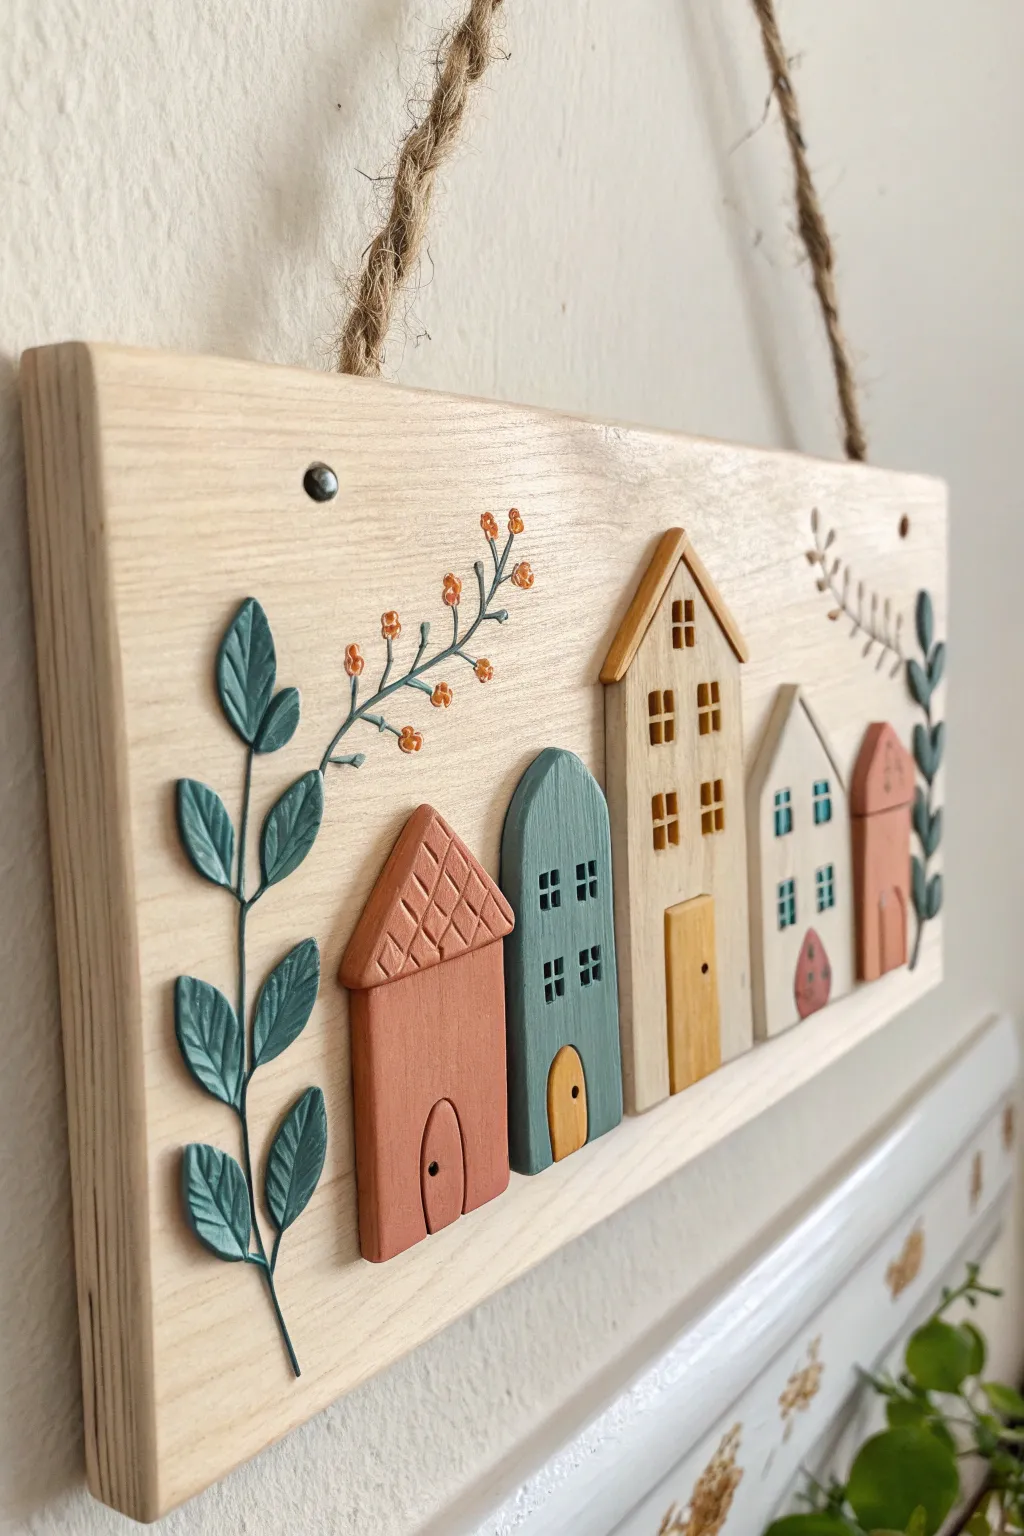
Transform a simple plank of wood into a cozy, rustic neighborhood scene using relief modeling techniques with polymer clay. This charming wall hanging combines the warmth of natural wood grain with soft, matte clay colors for a delightful piece of dimensional art.
Step-by-Step Guide
Materials
- Light wood plaque (rectangular, approx. 6×10 inches)
- Polymer clay (terracotta, teal blue, beige, white, muted pink, sage green)
- Liquid polymer clay (bakeable adhesive)
- Rolling pin or pasta machine
- Blade or craft knife
- Needle tool or toothpick
- Small dotting tool
- Needle nose pliers
- Jute twine
- Acrylic paint (burnt orange/rust)
- Fine detail paintbrush
- Matte varnish (optional)
- Super glue (optional reinforcement)
Step 1: Preparing the Base
-
Prep the wood:
Start with a clean, smooth wooden plaque. If necessary, sand down any rough edges with fine-grit sandpaper. Wipe away dust with a slightly damp cloth and let it dry completely. -
Drill hanging holes:
If your plaque doesn’t have holes pre-drilled, mark two spots near the top corners. Carefully drill small holes for the jute twine later. -
Plan the layout:
Sketch your village design lightly directly onto the wood with a pencil. Mark where the five houses will sit to ensure they are centered and spaced nicely.
Adhesion Hack
If a piece pops off after baking, don’t panic. Just use a drop of gel super glue (cyanoacrylate) to reattach it. It bonds clay to wood instantly and strongly.
Step 2: Sculpting the Houses
-
Condition the clay:
Thoroughly knead your polymer clay colors until they are soft and pliable. This prevents cracking during the baking process. -
Create the terracotta house:
Roll out a slab of terracotta clay to about 3mm thickness. Cut a rectangle for the base and a triangle for the roof. Use a needle tool to scratch a diagonal grid pattern onto the roof piece for texture. -
Form the teal house:
Roll out teal clay. Cut a tall, narrow rectangle but curve the top into an arch shape rather than a pointy roof. This adds architectural variety to your row. -
Build the central beige house:
Use beige clay to make the tallest house in the center. Cut a steep pitch for the roof using a slightly darker or golden-toned clay to simulate wooden shingles. -
Add the smaller houses:
Create the final two smaller houses on the right—one in white with a simple triangle roof, and a small pinkish-terracotta annex on the far end. -
Cut windows and doors:
Using a blade, cut tiny squares for windows out of the house bodies. Alternatively, you can use a small square cutter. For doors, cut small arched or rectangular slabs in contrasting colors (like yellow ochre or dark wood tone) and press them onto the house fronts. -
Add door details:
Use a needle tool or the smallest dotting tool to poke tiny holes for doorknobs on each door. -
Attach to wood:
Apply a thin layer of liquid polymer clay (Bake & Bond) to the back of each clay house component. Press them firmly onto your pencil guides on the wood plank. The liquid clay acts as the glue.
Make It Seasonal
Swap the color palette for the seasons! Use pastels for spring, deep reds/greens for Christmas, or add white flocking powder to the roofs for a snowy winter village.
Step 3: Adding Flora & Finishing
-
Sculpt the leaves:
Roll out sage green clay thinly. Use a small leaf cutter or cut freehand teardrop shapes. Use a blade to gently press a central vein into each leaf. I find curving the leaf tips slightly makes them look more natural. -
Arrange the greenery:
Using liquid clay, attach the leaves in a climbing vine pattern on the left side of the plaque, and a smaller cluster on the far right edge. -
Paint the stems:
With a fine detail brush and dark green or grey-brown acrylic paint, connect the clay leaves by painting thin stem lines directly onto the wood. -
Add berries:
For the delicate floral sprig above the houses, paint thin stems. Then, roll tiny balls of orange clay and press them onto the painted twig ends using liquid clay. -
Bake the project:
Place the entire wooden plaque with the clay attached into the oven. Bake according to your clay manufacturer’s instructions (usually 275°F/130°C for 15-30 minutes). Wood is safe in the oven at these low temps. -
Cool down:
Turn off the oven and open the door slightly, letting the project cool down inside slowly. This helps prevent the clay from popping off the wood due to thermal shock. -
Add hanging twine:
Once fully cool, thread a length of thick jute twine through the top holes. Tie chunky knots on the front side to secure it. -
Varnish (Optional):
If you want extra protection, brush a coat of matte varnish over the clay parts only.
Hang your new miniature village in an entryway or kitchen for a touch of handmade warmth

TRACK YOUR CERAMIC JOURNEY
Capture glaze tests, firing details, and creative progress—all in one simple printable. Make your projects easier to repeat and improve.
Character Portrait Medallion Set
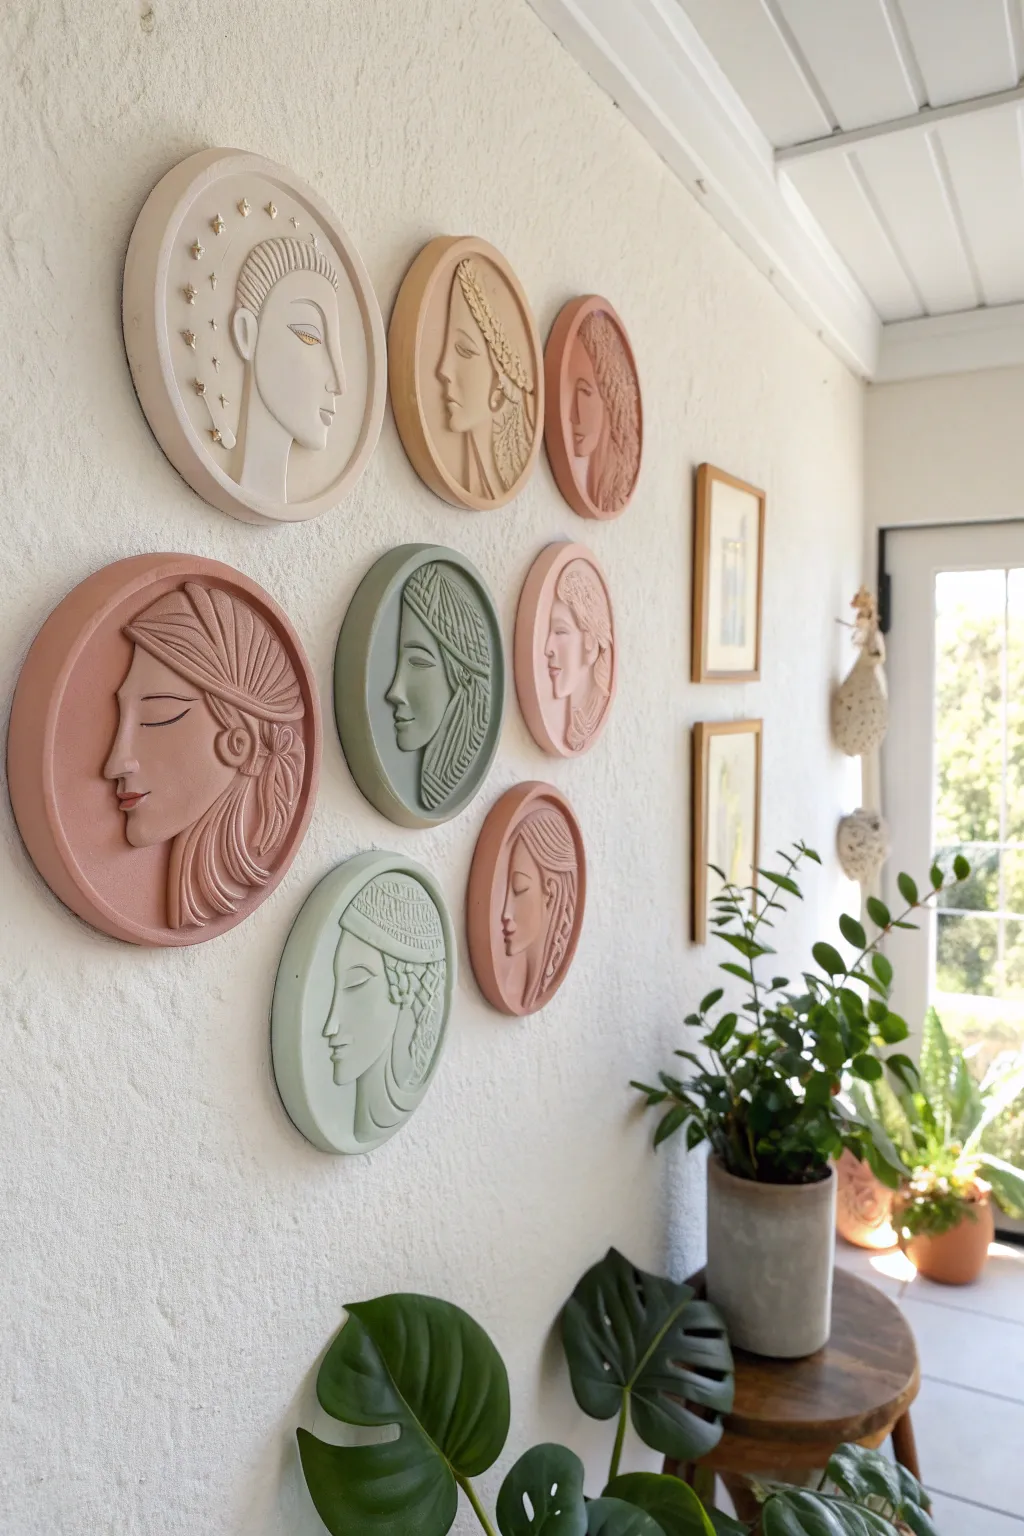
Bring a touch of antiquity to your walls with these stunning bas-relief cameo portraits. Using muted, earthy tones and simple sculpting techniques, you’ll create a gallery wall that feels like a modern museum collection.
Step-by-Step Tutorial
Materials
- Polymer clay (terracotta, sage green, cream, blush pink, beige)
- Round cookie cutters (various sizes: 4-6 inches)
- Acrylic rolling pin
- Sculpting tool set (needle tool, ball stylus, rubber shaper)
- Texture sheets or lace (optional)
- Parchment paper
- Oven-safe baking sheet
- Liquid gold leaf or gold acrylic paint
- Fine detail paintbrush
- Strong craft glue or heavy-duty mounting tape
- Gloss varnish (optional)
Step 1: Prepping the Base
-
Condition the clay:
Start by thoroughly conditioning your chosen color of polymer clay until it is soft and pliable. You want to avoid any air bubbles or cracks. -
Roll the slab:
Roll out the clay on parchment paper to a uniform thickness of about 1/4 inch (6mm). This will be the background of your medallion. -
Cut the circle:
Use your large round cutter to punch out a perfect circle. Leave the clay on the parchment paper so you don’t distort the shape while moving it. -
Create the rim:
Roll a long snake of clay in the same color. Flatten it slightly into a strip and wrap it around the edge of your circle to create a raised framed border. Smooth the seam where the strip meets the base using a rubber shaper tool so it looks like one solid piece.
Smooth Operator
To get that matte, plaster-like finish, lightly sand the baked clay with very fine grit sandpaper (1000+) under running water. This removes any final sheen.
Step 2: Sculpting the Profile
-
Sketch the outline:
Lightly etch a side profile silhouette onto the clay base using a needle tool. This serves as your guide for placement. -
Building the face:
Roll a flat sheet of clay slightly thinner than the base. Cut out the general silhouette shape (head, neck, shoulder) and gently press it onto your outlined area. -
Refining features:
Use your fingers and a rubber shaping tool to smooth the edges of the silhouette into the background, creating a seamless transition. Build up the cheekbone and brow slightly by adding tiny bits of clay if you want more dimension. -
Sculpting the nose and lips:
Use a small ball stylus to carefully indent the nostrils and define the lips. I find it helpful to look at a reference photo of a classical statue while doing this to get that stylized look. -
Adding the eyes:
Instead of sculpting a realistic eye, etch a simplified, stylized almond shape with a closed eyelid line to mimic the peaceful expression seen in the original art.
Level Up: Gemstones
Embed small, heat-safe glass crystals or dried flowers into the clay before baking for a mixed-media 3D effect that catches the light.
Step 3: Adding Details & Texture
-
Hair base:
Add flattened distinct shapes of clay for the hair. For some medallions, this might be a headscarf shape; for others, flowing locks. -
Texturing the hair:
Use a needle tool or a fine comb tool to drag lines through the hair clay to simulate strands. For a braided look, twist two small snakes of clay together and press into place. -
Decorative accents:
For variety, create different headpieces. You can press small clay balls to look like beads, or use a texture sheet on a thin piece of clay before cutting it into a headwrap shape. -
Smooth and clean:
Dip a cotton swab in a little rubbing alcohol and gently wipe over the clay surface to remove any fingerprints or dust specks before baking.
Step 4: Finishing Touches
-
Baking:
Bake the medallions according to your clay package instructions (usually 275°F/135°C for 15-30 minutes per 1/4 inch of thickness). Let them cool completely on the baking sheet. -
Gilding:
Once cool, use a fine brush to apply touches of liquid gold leaf to specific details like earrings, hair beads, or the stars on the background. -
Mounting:
Apply strong mounting tape or adhesive strips to the back of each medallion. Arrange them on your wall in a clustered gallery format for maximum impact.
Step back and admire your classical-inspired gallery wall, looking perfectly serene in the afternoon light
Faux Stained Glass Clay Suncatcher
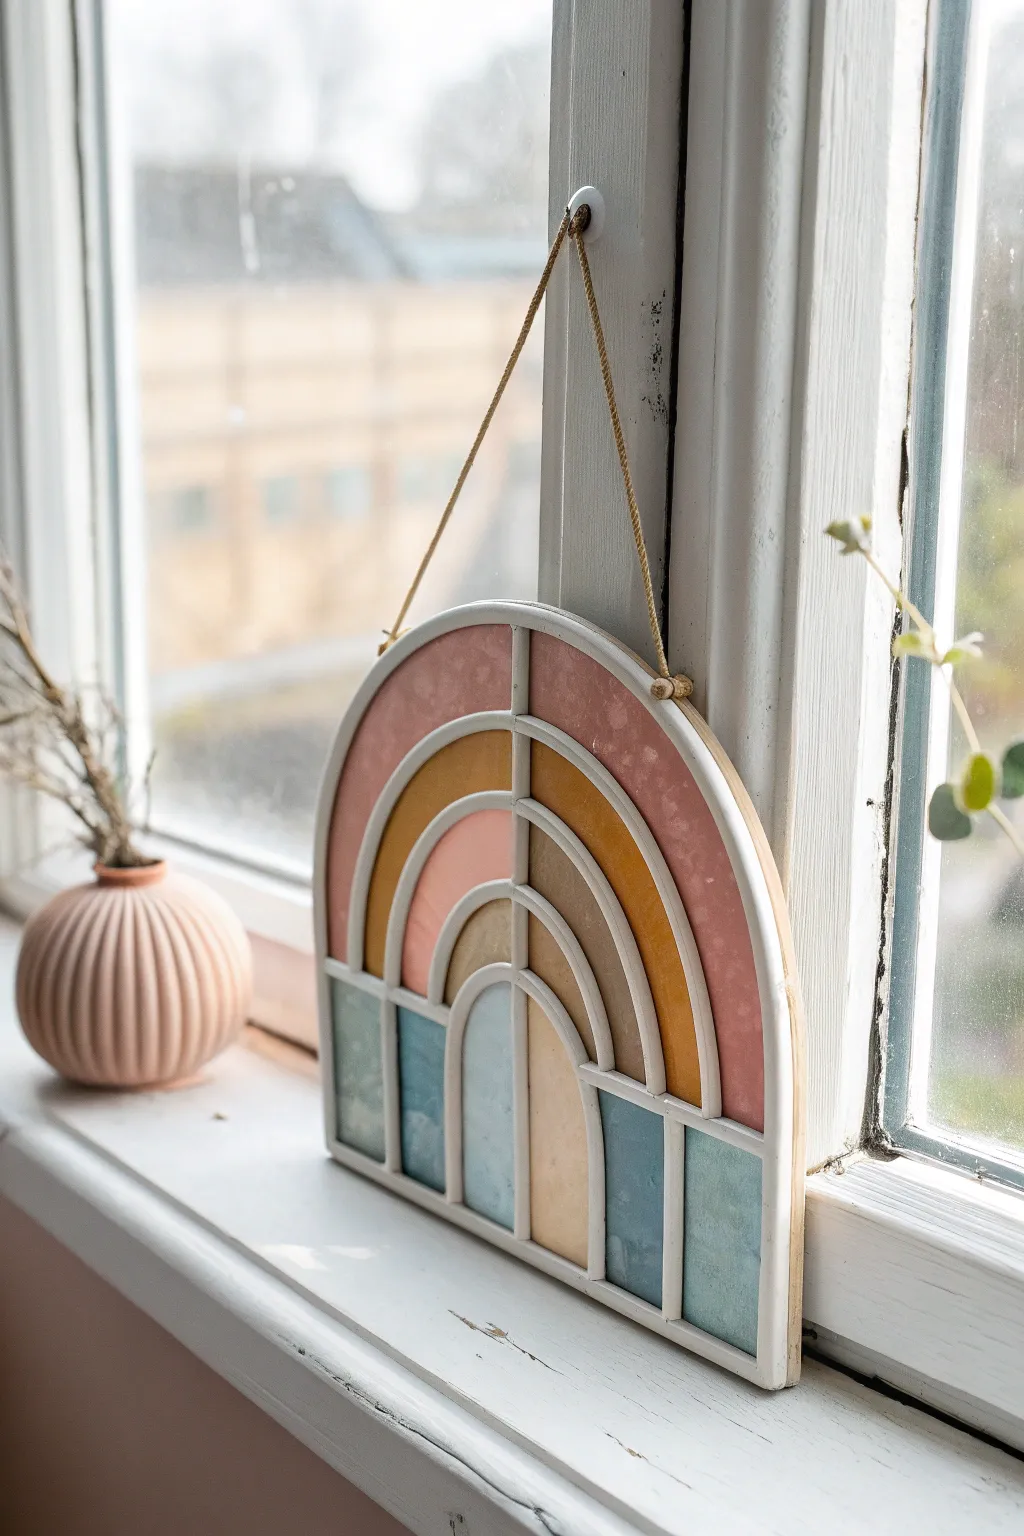
Capture the soft glow of a stained glass window without soldering a single piece of lead. This polymer clay project mimics the look of leaded glass using white clay outlines and translucent liquid clay to create a beautiful, light-catching rainbow decoration.
Step-by-Step
Materials
- White polymer clay (firm block)
- Translucent liquid polymer clay
- Alcohol inks (Pink, Amber/Ochre, Teal/Blue)
- Glass or ceramic tile (as a work surface and baking base)
- Clay extruder or clay slicer
- Needle tool or craft knife
- Rolling pin or pasta machine
- Small mixing cups and stirring sticks
- Jute twine or cord for hanging
- Drill with small bit (optional)
- UV resin (optional, for extra shine)
Step 1: Creating the Frame
-
Prepare the base outline:
Begin by conditioning your white polymer clay until it is pliable but firm. Roll it into a long, even snake, or use a clay extruder with a square or round die to create consistent strips. -
Form the outer arch:
On your glass tile work surface, shape the longest strip into a smooth arch shape with a flat bottom. This will define the size of your suncatcher, so ensure the bottom line is perfectly straight. -
Add vertical dividers:
Cut a vertical strip of clay to create the center line of the rainbow. Place it starting from the top center of the arch down to the bottom base line, pressing the ends gently to join them. -
Create the inner arches:
Roll out more strips and carefully form two smaller, concentric arches inside the main frame. These will create the separate color sections for your rainbow design. -
Connect the grid:
Add horizontal or vertical cross-pieces to separate the bottom ‘legs’ of the rainbow from the curved sections, creating the distinct window-pane look shown in the photo. -
Secure the joints:
Use a needle tool or your finger to smooth the clay where the strips meet. It’s crucial that these connections are watertight so the liquid clay doesn’t leak out later. -
Pre-bake the frame:
Bake the white frame on the tile according to the clay manufacturer’s instructions (usually 275°F/135°C for 15-30 minutes). Let it cool completely before moving to the next phase.
Seal the Deal
Perform a ‘water test’ before pouring color. Hold the frame up to a light to check for tiny gaps in the joints. Patch them with a tiny bit of raw white clay to prevent leaks.
Step 2: Adding the Faux Glass
-
Mix the colors:
Pour small amounts of translucent liquid polymer clay into separate mixing cups. Add a single drop of alcohol ink to each cup to tint them—you’ll need a dusty pink, a golden amber, and a muted teal. -
Fill the top sections:
Start with the dusty pink mixture. Carefully pour it into the outermost arch sections of your cooled frame. Use a needle tool to guide the liquid into the corners, ensuring it touches the white walls. -
Fill the middle sections:
Pour the amber/golden mixture into the middle arch section. If bubbles appear, pop them immediately with your needle tool or a quick pass of a lighter flame. -
Fill the bottom sections:
Fill the lowest panels (the legs of the rainbow) with the teal mixture. I like to underfill slightly rather than overfill to prevent spilling over the white lines. -
Create texture (optional):
If you want the textured look seen in the photo, wait about 10 minutes for the liquid clay to settle, then gently dab the surface with a coarse sponge or a crumpled piece of plastic wrap. -
Final bake:
Bake the entire piece again on the tile. Liquid clay often requires a higher temperature or longer time to become fully transparent, so check the bottle instructions. Typically, 300°F (149°C) for 20-30 minutes works well.
Make it Shine
For a glossy, wet-glass look, apply a thin layer of UV resin over the cured colored sections and cure under a UV lamp. This adds depth and rigidity to the piece.
Step 3: Finishing Touches
-
Cooling and removing:
Allow the piece to cool completely on the tile. Once cool, the liquid clay will be solid and the whole piece can be carefully popped off the glass surface with a rigid blade. -
Drilling holes:
Using a small hand drill or rotary tool, carefully drill two holes into the top curve of the white frame, spacing them equally from the center line. -
Adding the hanger:
Thread a piece of jute twine through the holes. Tie knots securely on the front side (as seen in the image) creates a nice rustic detail. -
Hanging:
Find a sunny window and hang your new suncatcher using a small suction cup or hook.
This simple technique opens up a world of faux stained glass possibilities for every window in your home
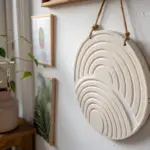
Moon Phase Wall Hanging
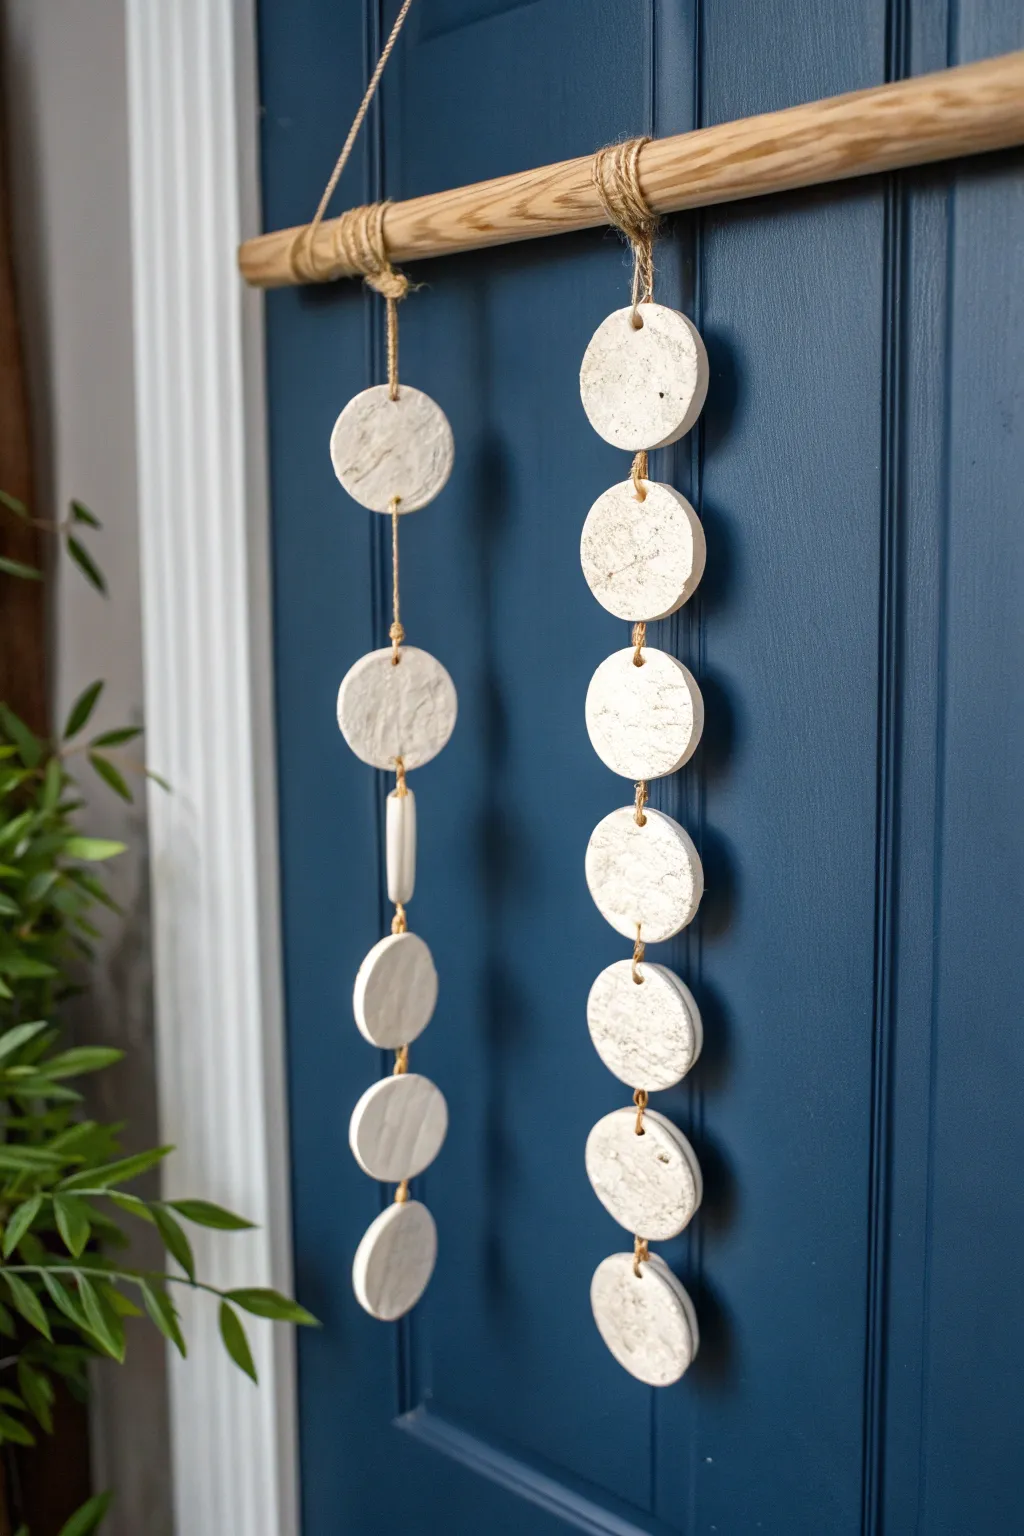
This rustic, minimalist wall hanging combines the natural warmth of wood and jute with the sleek, modern look of stone-effect polymer clay. Its elegantly simple design features cascading discs with a subtle marbled texture, making it a perfect statement piece for any door or nook.
Step-by-Step Guide
Materials
- White polymer clay (approx. 2-3 blocks)
- Grey or granite-effect polymer clay (small amount for marbling)
- Wooden dowel or natural branch (approx. 12-18 inches long)
- Natural jute twine
- Rolling pin or acrylic roller
- Circle cookie cutter (approx. 2-3 inch diameter)
- Toothpick or skewer
- Parchment paper
- Baking sheet
- Scissors
- Sandpaper (fine grit)
Step 1: Preparing the Clay
-
Condition the Main Color:
Begin by thoroughly kneading your white polymer clay until it is soft and pliable. This step helps prevent cracking later on. -
Add Texture:
Take a very small amount of the grey or granite clay and chop it into tiny, crumb-like bits. Mix these sparingly into the white clay. -
Create the Marble Effect:
Twist and fold the clays together just enough to create streaks, but don’t overmix. Stop when you see swirls of grey running through the white, mimicking natural stone. -
Roll the Sheet:
Place the clay ball onto parchment paper and roll it out to an even thickness of about 1/4 inch. I find that using guides on either side helps keep the thickness consistent.
Natural Stone Look
Mix in ground black pepper or dried tea leaves into your white clay instead of grey clay for an organic speckled ceramic effect.
Step 2: Shaping the Elements
-
Cut the Circles:
Using your circle cutter, press firmly into the clay sheet to cut out at least 13 discs. You will need 6 for one strand and 7 for the other, plus extras just in case. -
Form the Tubular Bead:
Take the excess clay trimming and roll a small cylinder shape, approximately 1.5 inches long, to act as the spacer bead seen on the left strand. -
Texturize Surfaces:
For that rugged, organic look, gently tap a crumpled ball of aluminum foil or a stiff-bristle toothbrush over the surface of each cut shape. -
Pierce Hanging Holes:
Use a toothpick or skewer to poke a hole near the top and bottom edge of 11 circles. Note that the very bottom circle on each strand only needs one top hole. -
Pierce the Tube:
Carefully run your skewer lengthwise through the center of the cylindrical bead bit to create a channel for the string.
Holes Closing Up?
If the clay distorts while poking holes, bake the pieces first and drill the holes afterward with a small hand drill.
Step 3: Baking and Assembly
-
Bake:
Transfer the parchment paper with your shapes onto a baking sheet. Bake according to your brand’s specific package instructions (usually around 275°F for 15-30 minutes). -
Cool and Sand:
Allow the clay pieces to cool completely before handling. If there are rough edges, lightly sand them with fine-grit sandpaper for a polished finish. -
Prepare the Branch:
If using a natural branch, ensure it is clean and dry. Tie a length of jute twine to both ends to create the main hanger for the wall. -
Start the Left Strand:
Cut a long piece of jute twine particularly for the left strand. Tie the top end securely around the wooden branch. -
Knot the Discs:
Thread the twine through the top hole of the first disc, run it down the back, and out the bottom hole. Tie a knot underneath the disc to hold it in place. Repeat this for the first two discs. -
Add the Spacer:
After the second disc on the left strand, thread on the cylindrical tube bead, knotting underneath it to secure its position. -
Finish Left Strand:
Continue adding the remaining three discs below the tube, knotting beneath each one to maintain even spacing. -
Create the Right Strand:
Repeat the tying process for the right strand, this time using 7 continuous discs with even spacing between each, omitting the tube bead. -
Final Adjustments:
Trim any excess twine tails near the bottom knots for a neat appearance and adjust the hanging loops on the branch so the strands hang straight.
Hang your new clay mobile near a window or door where the natural light can highlight the textures you created
Raised-Letter Quote Tile
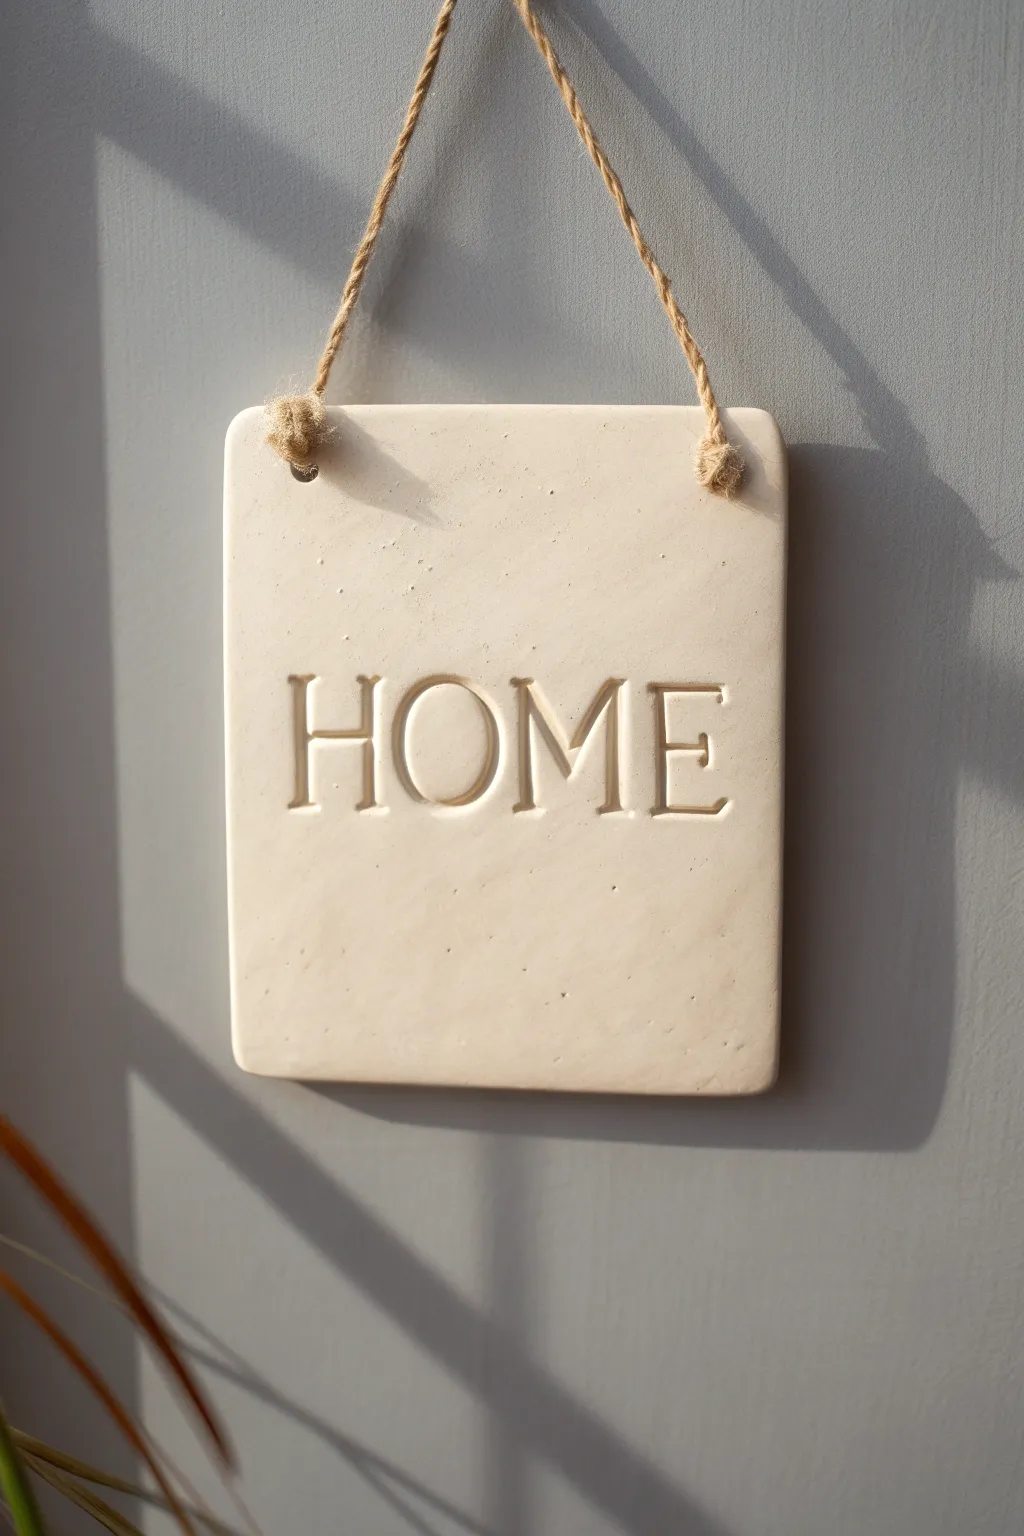
Achieve the high-end look of boutique ceramic art with this surprisingly simple polymer clay project. This creamy, stone-effect tile features crisp impressed lettering and rustic twine for a piece that blends perfectly with modern farmhouse or Scandinavian decor.
Detailed Instructions
Materials
- White polymer clay (large block, 2oz-4oz)
- Translucent polymer clay (small amount)
- Black pepper or dried speckle inclusions (optional)
- Acrylic roller or pasta machine
- Square clay cutter (approx. 4-5 inches) or craft knife and ruler
- Alphabet stamp set (serif font)
- Small circular cutter or staw (for hanging holes)
- Jute twine
- Fine grit sandpaper (400-600 grit)
- Parchment paper or ceramic tile
Step 1: Preparing the Clay Slab
-
Condition the clay:
Begin by thoroughly conditioning your white polymer clay until it is soft and pliable. If you want that realistic stone look shown in the photo, mix in a small amount of translucent clay and a tiny pinch of black pepper or craft sand specks now. -
Roll it out:
Roll the clay into a flat slab. You’ll want this to be fairly substantial to prevent warping, so aim for a uniform thickness of about 1/4 inch (6mm). Using depth guides or playing cards stacked on either side of your roller helps keep it even. -
Cut the shape:
Place your large square cutter onto the slab and press down firmly to cut your base shape. If you don’t have a cutter that size, simply measure a square with a ruler and slice cleanly with a craft knife. -
Soften the edges:
The project in the photo has lovely soft corners rather than sharp angles. Gently tap the corners of your square carefully with your finger to round them off slightly. Run your finger along the cut edges to smooth away any sharpness. -
Create hanging holes:
Use a small circular cutter or a sturdy drinking straw to punch two holes near the top corners. Ensure they are evenly spaced from the edges and large enough to accommodate your jute twine.
Fixing Stamping Mistakes
If you mess up the stamping, don’t try to spot-fix heavily. It’s often cleaner to ball up the clay, re-roll the slab, and start fresh for a pristine surface.
Step 2: Stamping and Finishing
-
Align your stamps:
Arrange your alphabet stamps to spell ‘HOME’. Before pressing them into the real clay, test the spacing on a scrap piece to ensure the word is centered and straight. -
Impress the letters:
Position the stamps horizontally across the center of your tile. Press the stamps straight down into the clay with firm, even pressure. I find it helpful to wiggle them ever so slightly to ensure a deep, clean impression before lifting them straight up. -
Clean up imperfections:
Inspect the letters and the surface. If the stamps left any raised ridges or fingerprints, gently smooth them out with a cornstarch-dusted fingertip or a rubber tipped tool. -
Bake:
Transfer the tile carefully to a baking sheet lined with parchment paper. Bake according to your clay package instructions, usually around 275°F (135°C) for 30-45 minutes. A longer bake makes the slab stronger. -
Cool and sand:
Allow the piece to cool completely in the oven to prevent cracking. Once cool, take your fine-grit sandpaper and wet-sand the edges and surface lightly to create that ultra-smooth, matte ceramic finish. -
Add the twine:
Cut a length of jute twine, about 12-14 inches long. Thread one end through the front of the left hole and tie a secure knot on the front side, trimming the excess tail close to the knot. -
Secure the other side:
Thread the other end of the twine through the right hole from back to front. Adjust the loop length to your liking, then tie the finishing knot on the front side to match the first one.
Faux Glazed Look
For a glossy ceramic look, coat the baked tile (avoiding the inside of the letters) with a layer of UV resin or glossy polyurethane varnish.
Hang your new clay artwork in a bright spot where the shadows will highlight the debossed lettering delightfully
Mini Wall Planter Backplate Art
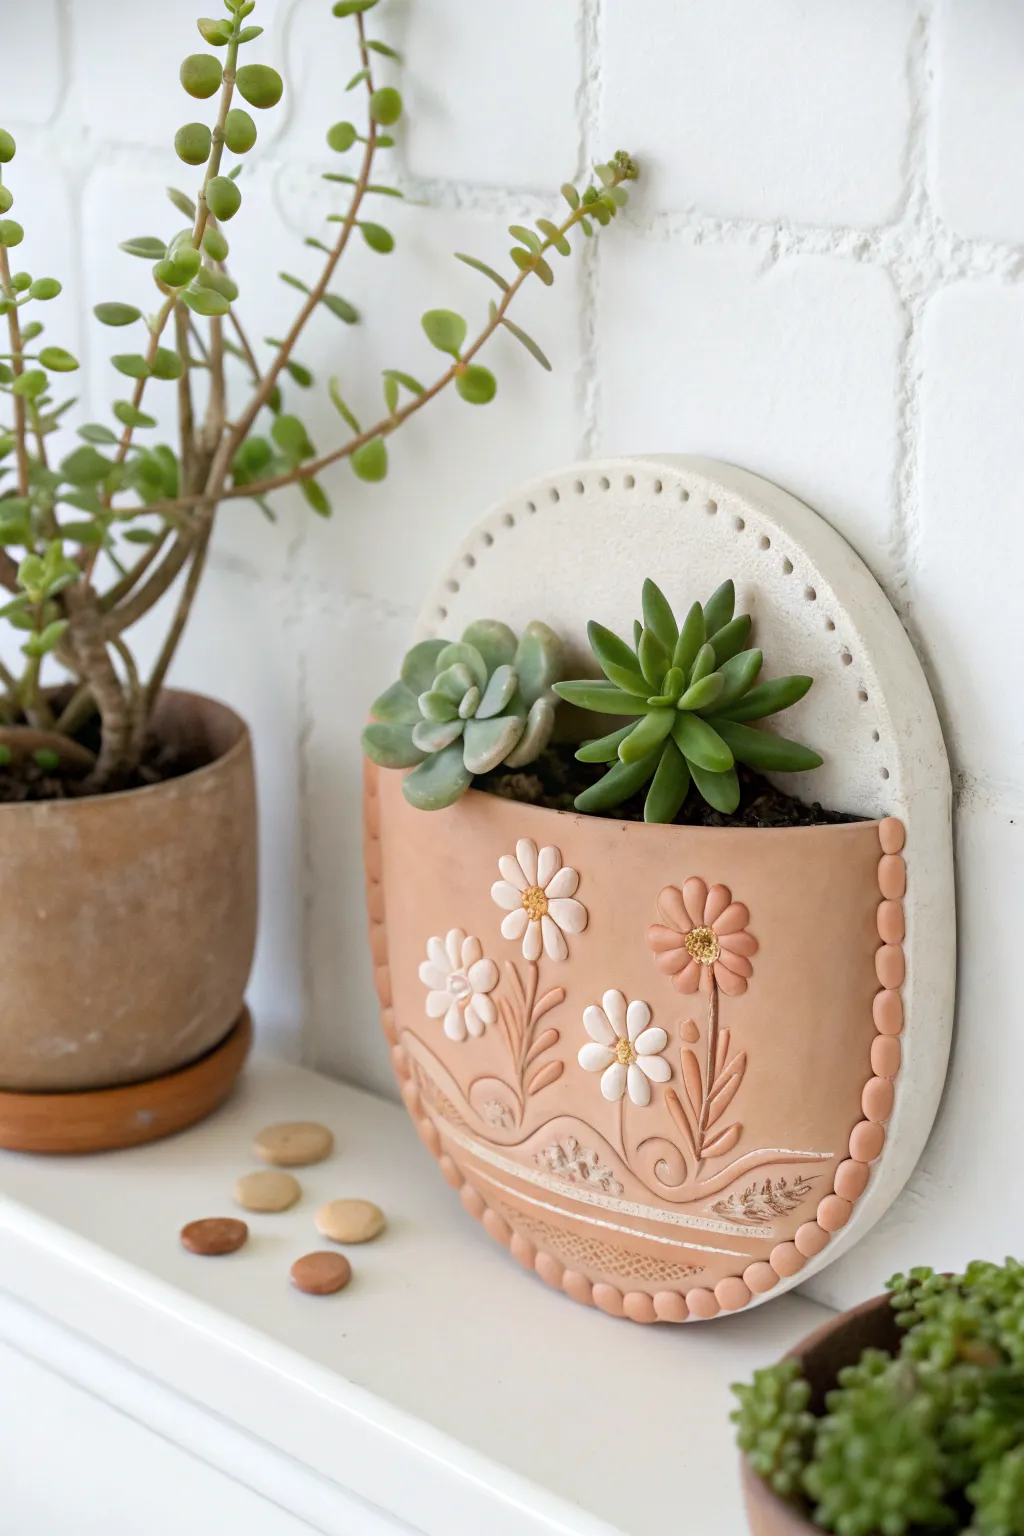
Bring a touch of whimsical garden charm indoors with this sweet polymer clay wall pocket. Featuring delicate embossed florals and a faux-stitched edge, this circular planter is perfect for showcasing your favorite tiny succulents.
Step-by-Step
Materials
- White or granite-effect polymer clay (for the backplate)
- Terracotta or peach-colored polymer clay (for the pocket)
- White polymer clay (for flowers)
- Light brown/tan polymer clay (for flower centers)
- Liquid polymer clay (translucent)
- Rolling pin or pasta machine
- Large circular cookie cutter (approx. 4-5 inches)
- Craft knife or scalpel
- Needle tool or toothpick
- Small flower petal cutters (optional)
- Small ball stylus tool
- Aluminum foil
- Oven-safe bowl (same curvature as your desired pocket)
- Strong craft glue (e.g., E6000) or 2-part epoxy
Step 1: Creating the Base Structure
-
Prepare the Clay:
Condition your white or granite-effect clay until it is soft and pliable. Roll it out into a slab approximately 1/4 inch thick. This needs to be sturdy enough to hold the weight of soil and plants. -
Cut the Backplate:
Use your large circular cutter to punch out a perfect circle. If you don’t have a cutter large enough, trace a bowl with a needle tool and cut carefully with a craft knife. -
Add Texture:
Using a small ball stylus or the blunt end of a skewer, press a series of evenly spaced dots around the upper perimeter of the circle to create a decorative, perforated look. -
Cut the Pocket Front:
Roll out the terracotta-colored clay to the same thickness. Cut a second circle identical to the first. Using a long blade or ruler, slice off the top third of this circle straight across to create the pocket shape. -
Create the Pocket Volume:
This is crucial: gently drape the terracotta pocket piece over a crumpled ball of foil or an oven-safe bowl that matches the curve of your backplate so it bakes in a convex shape, not flat. This creates the space for soil.
Step 2: Floral Details & Assembly
-
Design the Stems:
On the raw terracotta clay (while still draped on the form), lightly sketch your stem placement with a needle tool. Roll exceedingly thin snakes of terracotta clay and press them gently onto these lines. -
Petal Formation:
Make tiny teardrop shapes from white clay for the daisy petals. Flatten them slightly and press them onto the pocket in flower arrangements. Use the needle tool to indent a line down the center of each petal for texture. -
Flower Centers:
Roll tiny balls of light brown clay. Press a piece of textured fabric or sandpaper into them to create a pollen-like texture, then place them in the center of your daisies. -
Decorative Border:
To mimic the stitched leather look, roll small, uniform balls of terracotta clay. Press them gently around the curved edge of the pocket piece, flattening them slightly with your thumb. -
Bottom Accents:
Add extra horizontal lines of clay or incise patterns near the bottom curve using your needle tool. You can add texture by pressing a piece of lace or mesh into specific areas for contrast. -
First Bake:
Bake the backplate flat on a tile and the pocket piece curved over its support form according to your clay package instructions. Let them cool completely.
Slumping Pocket?
If the pocket shape flattens while working, support it from behind with cornstarch-dusted polyester fiberfill. It holds the dome shape without denting the clay from the inside.
Step 3: Final Construction
-
Dry Fit:
Once cool, check how the distinct pocket piece fits against the flat backplate. Sand edges gently if necessary to get a flush contact point along the rim. -
Reinforce Seams:
Apply a thin line of strong glue or liquid clay along the curved edge of the backplate where the pocket will sit. -
Attach Pocket:
Press the pocket firmly onto the backplate. If using liquid clay, you will need to bake the piece again for about 15-20 minutes to bond them permanently. -
Back Support:
For hanging, attach a strong sawtooth hanger to the back using super glue or by embedding a wire loop into a small scrap of clay and baking it onto the back. -
Finishing:
I prefer to brush a matte varnish over the floral details to protect them from dirt, leaving the background matte for that natural terracotta feel. Fill with a tiny amount of soil and your succulents.
Pro Tip: Seamless Join
Apply a snake of ‘bacon’ (liquid clay mixed with solid clay) between the pocket and backplate before the final bake. Smooth it out for an incredibly strong, waterproof bond.
Hang your new planter near a window and watch your tiny garden thrive in its handmade home