When I’m craving a quick, satisfying clay win, I reach for a cute little trinket dish—it’s small, forgiving, and instantly makes a space feel more put-together. Here are my favorite aesthetic clay dish ideas that look dreamy on a dresser, desk, or nightstand and still feel totally doable at home.
Classic Round Trinket Dish
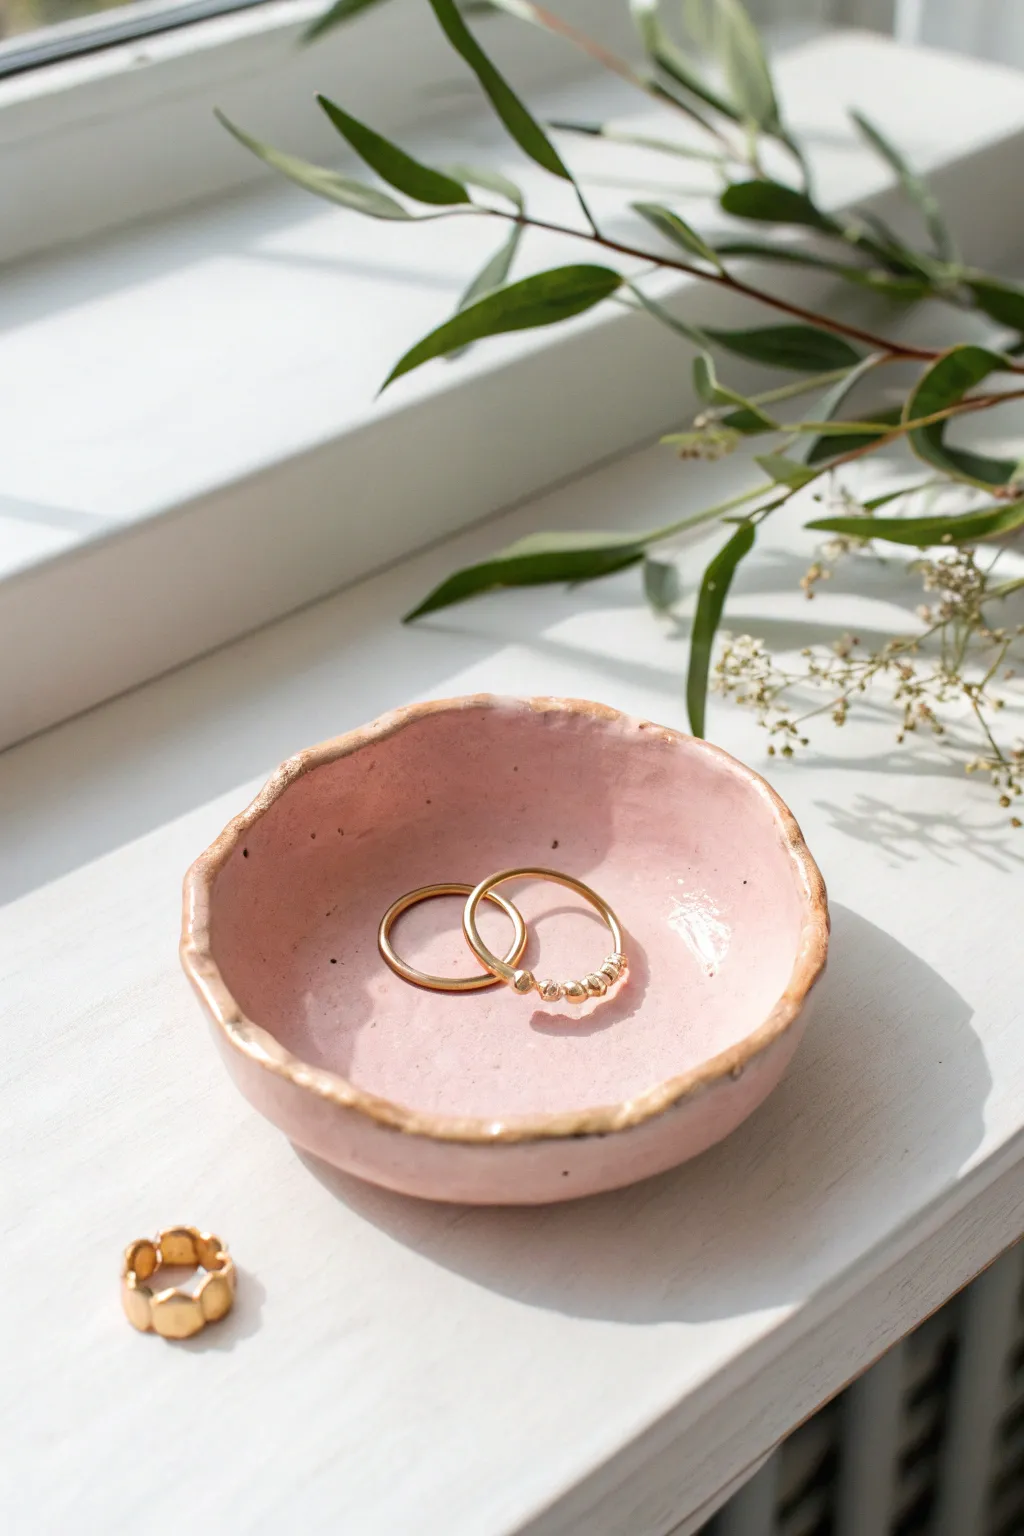
This delicate, handmade trinket dish features a soft pastel pink glaze and an elegant, organic gold rim. It’s the perfect size for holding your everyday rings or stud earrings on a windowsill or bedside table.
Detailed Instructions
Materials
- White air-dry clay or polymer clay
- Rolling pin
- Circle cutter or a small bowl (approx. 3-4 inches diameter)
- Small sponge
- Sandpaper (fine grit)
- Pale pink acrylic paint
- Liquid gold leaf or metallic gold acrylic paint
- Gloss varnish or glaze
- Small flat paintbrush
- Fine detail brush
- Water bowl
Step 1: Shaping the Clay
-
Prepare your clay:
Take a ball of white clay about the size of a golf ball. Knead it in your hands until it becomes soft, pliable, and free of cracks. -
Roll it out:
Place the clay on a clean surface. Use a rolling pin to flatten it into an even sheet, approximately 1/4 inch thick. Aim for a consistent thickness to ensure even drying. -
Cut the circle:
Press your circle cutter or place an inverted bowl onto the clay sheet. Using a craft knife if necessary, cut out a perfect circle. -
Create the curve:
Gently lift the clay circle. Using your thumbs, slowly press into the center while pulling up the edges to create a shallow bowl shape. -
Refine the edges:
For this organic look, pinch the rim slightly between your thumb and forefinger to create gentle waves or an uneven texture. Smooth any harsh fingerprints with a barely damp sponge. -
Let it dry:
Place your formed dish on a piece of parchment paper. If you want a more distinct curve, you can let it dry inside a small bowl. Allow it to dry completely according to package instructions—usually 24 to 48 hours.
Step 2: Sanding and Refining
-
Inspect for imperfections:
Once fully dry, check the surface for rough spots or sharp edges. -
Sand the surface:
Using fine-grit sandpaper, gently buff the entire dish. Focus on the rim to ensure it feels smooth to the touch, even if the shape is intentionally irregular. Wipe away dust with a slightly damp cloth.
Cracks appearing?
If tiny cracks appear while drying air-dry clay, mix a small amount of fresh clay with water to make a paste (slip) and fill them in before painting.
Step 3: Painting and Glazing
-
Base coat application:
Dip your flat brush into pale pink acrylic paint. Apply a thin, even coat to the inside and outside of the dish. -
Second coat:
Wait for the first layer to dry completely. I prefer to add a second coat for a more opaque, solid color finish. Let this dry thoroughly. -
Apply the gold rim:
Using a fine detail brush and liquid gold leaf (or metallic paint), carefully trace along the very edge of the rim. -
Enhance the organic feel:
Don’t worry about a perfect line. Allow the gold to dip slightly onto the inner and outer walls in some spots to emphasize the handmade texture. -
Seal the dish:
Once the paint is completely dry, apply a coat of gloss varnish over the entire dish. This gives it that ceramic-like shine shown in the photo and protects the paint. -
Final drying time:
Allow the varnish to cure fully before placing any jewelry inside. This usually takes another 24 hours to ensure it isn’t tacky.
Make it marble
Instead of painting pink, mix a tiny drop of pink paint into white clay before rolling it out. Stop kneading early to create a soft marble effect.
Place your new creation near natural light to watch that gold rim catch the sun


Wavy Rim Catchall Tray
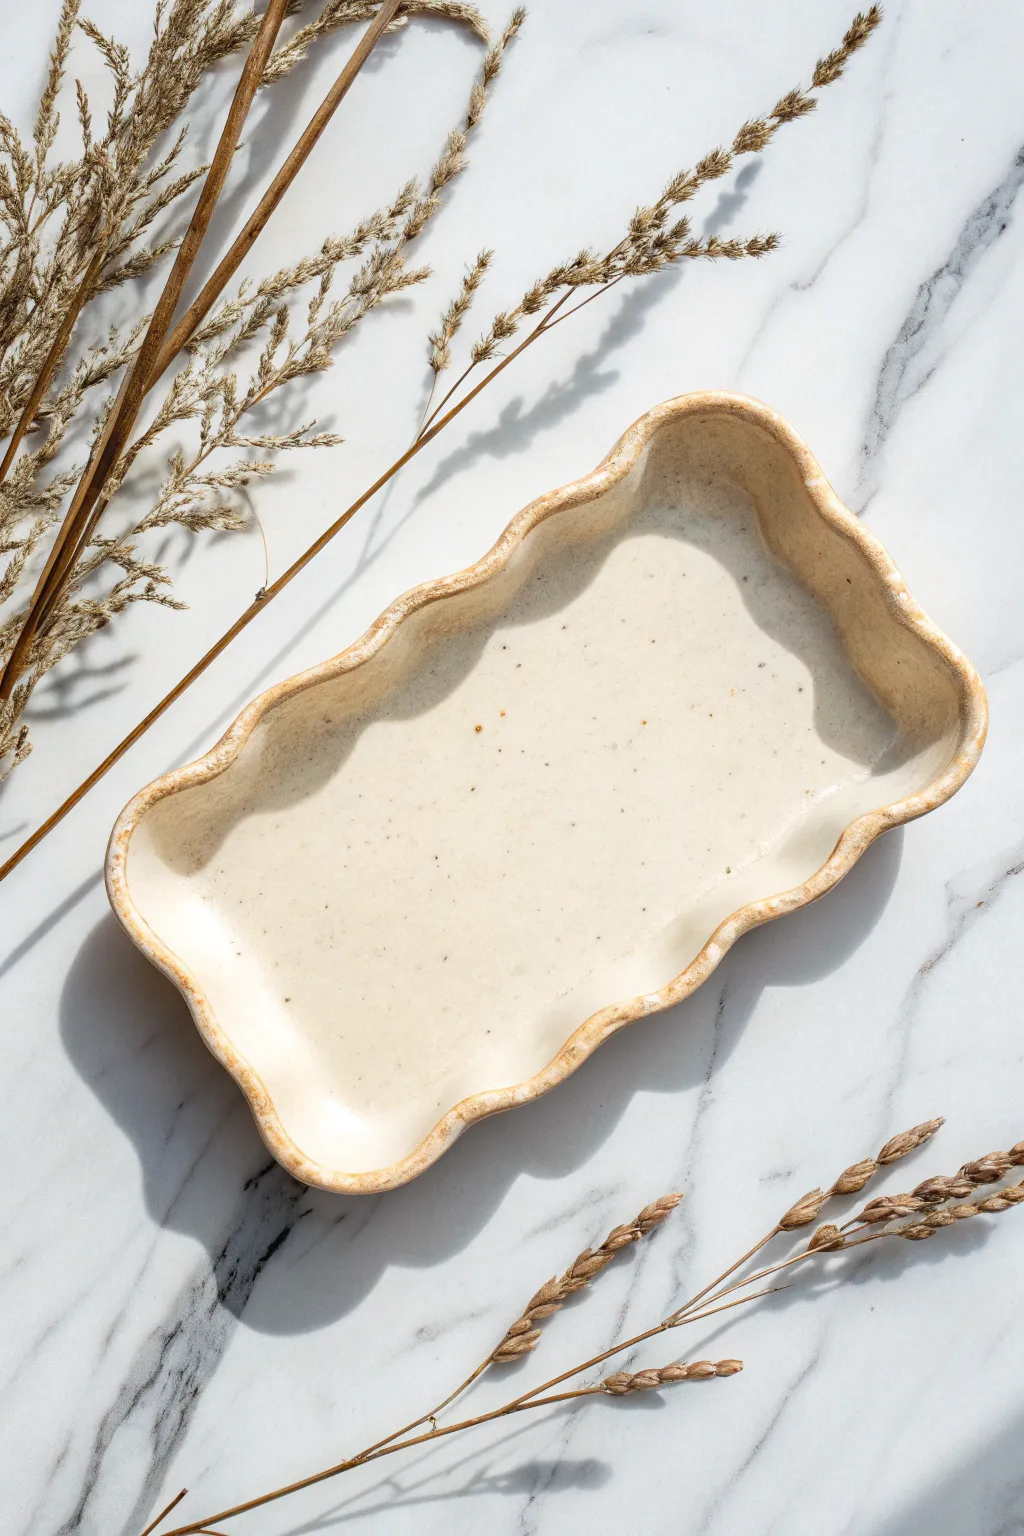
This charming, organically shaped catchall tray brings a touch of nature indoors with its gentle wavy rim and creamy, speckled finish. It’s the perfect minimalist piece for holding jewelry, keys, or dried botanicals.
How-To Guide
Materials
- White polymer clay (approx. 2oz)
- Granite effects or speckled polymer clay (or coarse black pepper/sand)
- Acrylic rolling pin or glass bottle
- Rectangle clay cutter or craft knife
- Parchment paper
- Small round dowel or paintbrush handle
- Cornstarch (optional release agent)
- Gloss or satin glaze varnish
- Soft paintbrush
- Oven & baking sheet (if using polymer clay)
Step 1: Preparing the Clay Body
-
Condition the clay:
Begin by warming the white polymer clay in your hands. Knead and fold it repeatedly until it becomes soft, pliable, and free of any cracks. -
Create the speckled effect:
Mix in a small amount of granite-effect clay to your white base. If you don’t have special effects clay, I like to knead in a pinch of coarse black pepper or fine sand for that authentic ceramic look. -
Roll out the slab:
Place your clay ball on a sheet of parchment paper. Using your acrylic roller, flatten the clay into an even slab about 1/4 inch thick. Aim for a consistent thickness to ensure even baking. -
Cut the base shape:
Use a rectangular cutter or a craft knife and a ruler to cut a clean rectangle. For the size shown, aim for approximately 4 inches by 6 inches.
Step 2: Forming and Shaping
-
Soften the edges:
Gently run your clean fingertip along the sharp cut edges of the rectangle to smooth them slightly. Use a tiny bit of cornstarch on your finger if the clay feels sticky. -
Lift the walls:
Carefully pinch and lift the outer 1/2 inch of the clay perimeter upwards to create the tray’s walls. Try to keep the height consistent all the way around. -
Create the waves:
Take a small round dowel or the handle of a paintbrush. Press the tool gently against the outside of the wall, pushing inward, while supporting the inside with your finger to create an indent. -
alternate the pressure:
Move the tool an inch over and reverse the action: press from the inside out while supporting the outside. Repeat this alternating pattern around the entire rim to form the organic wave structure. -
Refine the rim:
Once the basic waves are formed, use your fingers to gently smooth out any tool marks. You want the curves to look soft and flowing, not mechanical or sharp. -
Check the symmetry:
Look at the tray from above. Adjust the corners so they round off naturally rather than meeting at sharp angles, enhancing the fluid aesthetic.
Clean Edges Pro-Tip
Dip your finger in a little baby oil before smoothing the final rim. It melts the clay slightly, erasing all fingerprints for a professional glass-like finish.
Step 3: Finishing Touches
-
Add texture (optional):
To enhance the earthy feel, you can lightly tap the surface with a piece of sandpaper or a toothbrush to remove distinct fingerprints. -
Prepare for baking:
Transfer the parchment paper with the tray onto a baking sheet. Double-check that none of the waves have collapsed; prop them up with small bits of scrap paper if needed. -
Bake the piece:
Bake according to your specific clay brand’s instructions (usually 275°F for 15-30 minutes). Do not overbake, or the white clay may yellow. -
Cool down:
Let the tray cool completely in the oven with the door slightly ajar. This prevents thermal shock and potential cracking. -
Apply the wash:
Dilute a tiny drop of brown acrylic paint with water. Brush it over the rim and quickly wipe it back with a paper towel, leaving just a hint of color in the crevices to mimic a toasted ceramic edge. -
Seal the surface:
Apply a thin coat of satin or gloss varnish to the inside and rim of the tray. This protects the faux speckles and gives it that fired glaze appearance.
Level Up: Gold Rim
After baking and cooling, paint the very top edge of the wavy rim with liquid gold leaf or a metallic paint marker for a luxurious, high-end accent.
Enjoy styling your new handmade tray on a coffee table or vanity for an instant decor upgrade


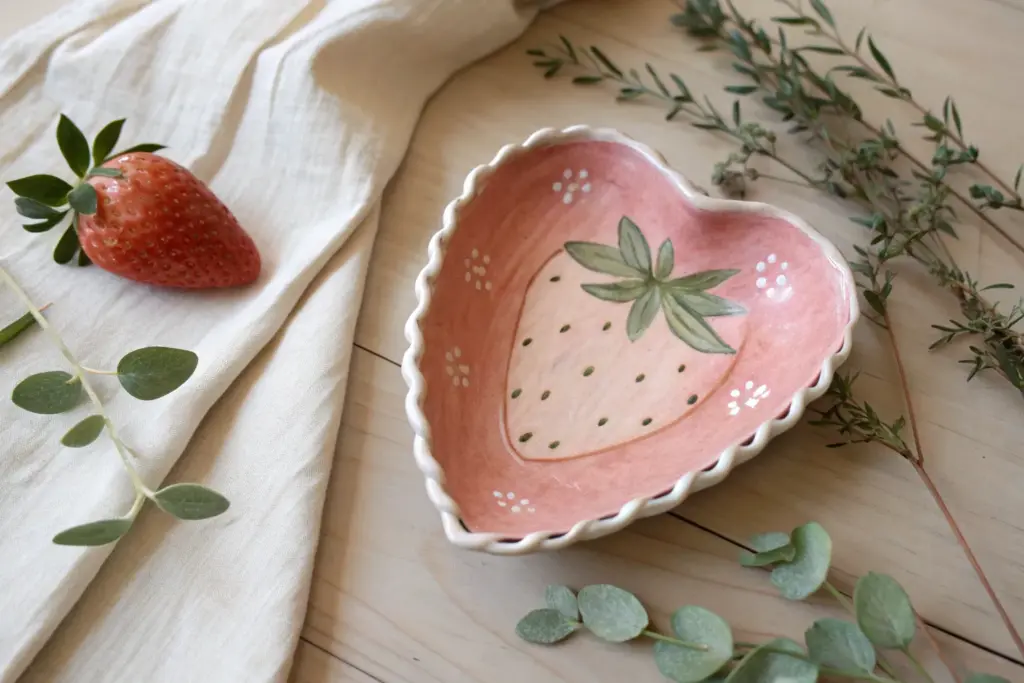
Scalloped Flower Petal Dish
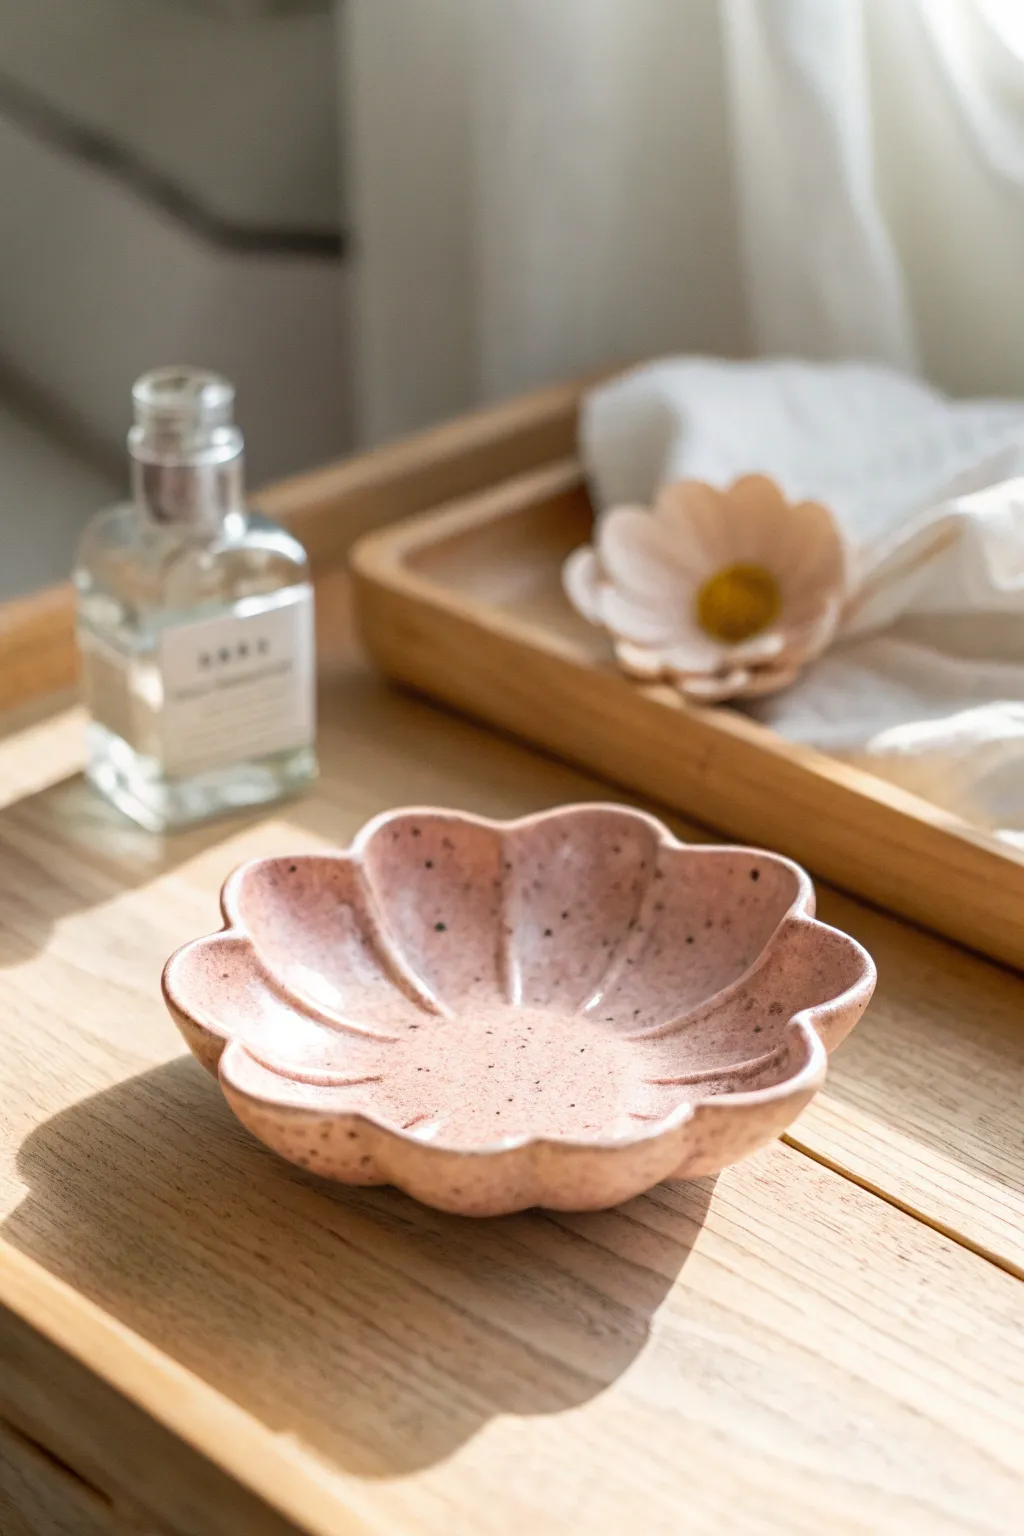
This charming, scalloped bowl captures the delicate beauty of a blooming flower with its soft, upward-curved petals and whimsical texture. Finished with a speckled peach glaze, it serves as a lovely catch-all for jewelry or a standalone decorative accent.
Step-by-Step Tutorial
Materials
- Air-dry clay (white) or polymer clay
- Rolling pin
- Flower-shaped cookie cutter (large, approx. 4-5 inches)
- Small bowl or sphere for molding
- Sandpaper (fine grit)
- Acrylic paints (peach, pink, brown/black)
- Glossy varnish or sealant
- Old toothbrush
- Sponge or soft paintbrush
- Water cup
Step 1: Shaping the Flower
-
Prepare the Clay:
Start by kneading your clay until it is soft, pliable, and free of air bubbles. If using air-dry clay, keep your hands slightly moist to prevent cracking. -
Roll the Slab:
Roll the clay out onto a smooth surface to an even thickness of about 1/4 inch. Aim for a consistent thickness so the petals dry evenly. -
Cut the Shape:
Press your large flower-shaped cutter firmly into the rolled clay. If you don’t have a cutter, you can print a flower template, place it on the clay, and carefully trace around it with a craft knife. -
Smooth the Edges:
Dip your finger in a little water and gently run it along the cut edges of the clay petals. This softens the sharp cuts and gives the piece a more organic, ceramic look. -
Define the Petals:
Use the side of a modeling tool or a dull knife to gently press indentations radiating from the center of the flower out to the dip between each petal. Do not cut through; just create a soft groove to mimic veins. -
Form the Bowl:
Carefully lift your clay flower and drape it inside a small bowl or over a sphere mold. Gently press the center down so the petals curve upward naturally.
Pro Tip: Smooth Curves
Use a damp sponge to smooth the clay surface *before* shaping it into the bowl. This removes fingerprints instantly and saves you lots of sanding time later.
Step 2: Refining and Drying
-
Adjust the Petals:
While in the mold, gently shape the tips of the petals with your fingers to ensure they look uniform and hold a pleasing curve. -
Let it Dry:
Allow the clay to dry completely according to the package instructions. For air-dry clay, this usually takes 24-48 hours. I find flipping the piece halfway through the drying process helps the bottom dry thoroughly. -
Sand Imperfections:
Once fully cured, use fine-grit sandpaper to smooth out any rough edges or bumps on the rim and surface. Wipe away the dust with a slightly damp cloth.
Step 3: Painting and Finishing
-
Mix the Base Color:
Mix pink and peach acrylic paints to achieve a soft, warm pastel shade similar to the reference photo. You want a dusty rose or salmon hue. -
Apply Base Coat:
Paint the entire dish, ensuring you get into the grooves of the petals. Apply 2-3 thin coats for opaque coverage, letting each layer dry in between. -
Create the Speckles:
Dilute a small amount of dark brown or black acrylic paint with water until it is runny. Dip an old toothbrush into this mixture. -
Splatter Technique:
Hold the toothbrush over the dish and run your thumb across the bristles to flick tiny droplets of paint onto the surface. Practice on a paper towel first to control the spray size. -
Seal the Dish:
Wait until the paint is bone dry. Apply a coat of high-gloss varnish to protect the surface and give it that fired ceramic shine. -
Final Cure:
Let the varnish cure completely in a dust-free area before using the dish for your trinkets.
Level Up: Gilded Rim
Once the speckles extend to the edge, carefully paint the very top rim of the petals with liquid gold leaf or metallic gold paint for an elegant, high-end finish.
Now you have a serene, nature-inspired dish ready to brighten up your bedside table


Minimal Oval Jewelry Tray

This elegant oval tray combines a muted mint green interior with a rustic, toasted rim for a sophisticated, earthy aesthetic. The speckled finish mimics traditional stoneware, making it the perfect minimalist catch-all for your daily rings and earrings.
Step-by-Step
Materials
- White polymer clay (or stoneware clay if you have kiln access)
- Acrylic rolling pin
- Oval template (printed paper or cookie cutter)
- Craft knife or clay blade
- Sandpaper (fine grit)
- Glossy glaze or polyurethane varnish
- Acrylic paint: Sage Green/Mint
- Acrylic paint: Burnt Sienna or Rust Brown
- Black pepper or black coarse sand (for faux speckles)
- Small flat paintbrush
- Detail brush
Step 1: Shaping the Base
-
Condition the Clay:
Begin by warming your white clay between your hands, kneading it thoroughly until it is soft and pliable. If the clay is too stiff, add a tiny drop of clay softener or baby oil. -
Roll the Slab:
Place the clay on a smooth work surface. Use your acrylic roller to flatten the clay into an even slab, aiming for a consistent thickness of about 1/4 inch. -
Create the Oval Shape:
Lay your oval paper template onto the clay slab. Using a sharp craft knife, trace around the template carefully to cut out the base shape. -
Prepare the Wall Strip:
Roll out a long, thin strip of clay from your remaining scraps. This strip should be slightly taller than you want the final rim to be, as you’ll be smoothing it down. -
Attach the Walls:
Place the long strip on top of the oval base, following the perimeter. Gently press it onto the edge of the base to join them. -
Blend the Seams:
Using a modeling tool or your fingertip, drag the clay from the wall down into the base on the inside, and from the base up into the wall on the outside. This creates a seamless, watertight bond.
Stone Effect Secret
Mix dried basil or oregano into the clay itself before baking. After sanding, the herbs create tiny, organic textured pits that look just like real speckled stoneware clay.
Step 2: Refining and Baking
-
Smooth the Surfaces:
Dip your finger in a little water (or baby oil for polymer clay) and run it over the entire piece to remove fingerprints and tool marks. Pay close attention to the rim—I prefer to gently pinch it to create that slightly organic, uneven look seen in the photo. -
Bake the Clay:
Follow the instructions on your specific package of clay for baking times and temperatures. Place the tray on a ceramic tile or baking sheet and bake until fully cured. -
Sand for smoothness:
Once the piece has cooled completely, use fine-grit sandpaper to buff out any remaining sharp edges or bumps, particularly around the top rim.
Make it Functional
Before baking, press a small, crumpled ball of aluminum foil into one side of the tray’s floor. This creates a subtle raised mound perfect for keeping stud earrings separated.
Step 3: The Faux-Ceramic Finish
-
Mix the Speckled Base:
Mix your sage green paint with a tiny amount of water to thin it slightly. To get that authentic stoneware look, mix in a pinch of ground black pepper or very fine black sand directly into the paint. -
Apply the Base Coat:
Paint the entire dish, inside and out, with your speckled green mixture. You may need two to three coats for full opacity, allowing the paint to dry fully between layers. -
Create the Rustic Rim:
Dip a detail brush into dry Burnt Sienna paint. Wipe most of the paint off on a paper towel so the brush is nearly dry. -
Detail the Edge:
Gently drag the bristle tips along the very top edge of the rim. The goal is a broken, organic line that mimics the toasted edge of fired pottery, rather than a perfect stripe. -
Add Subtle Splatters:
For extra depth, dilute a tiny bit of dark brown paint with water. Flick the bristles of an old toothbrush over the dish to add a few more random, larger speckles. -
Seal the Dish:
Once all paint is bone dry, apply a thick coat of high-gloss varnish. This replicates the shiny, vitrified look of a ceramic glaze and protects your jewelry tray.
Now you have a stunning faux-ceramic tray that brings a calm, natural vibe to your dresser.

The Complete Guide to Pottery Troubleshooting
Uncover the most common ceramic mistakes—from cracking clay to failed glazes—and learn how to fix them fast.
Gold-Trimmed Rim Dish
This project captures the quiet elegance of modern rustic pottery with a creamy, speckled clay body and a refined metallic rim. The subtle gold detailing catches the light just enough to transform a simple pinch pot into a sophisticated catch-all dish.
Detailed Instructions
Materials
- Speckled stoneware clay (or white clay with speckle additive)
- Pottery wheel (or can be hand-built)
- Rib tool
- Sponge
- Wire cutter
- Loop tool for trimming
- Clear or transparent gloss glaze
- Gold overglaze (luster) or gold leaf paint (for non-food use)
- Fine liner brush
- Kiln (if using stoneware)
Step 1: Forming the Bowl
-
Prepare the clay:
Start by wedging a pound of speckled stoneware clay to remove air bubbles. This specific look relies on the natural speckles within the clay body, so ensure your clay type matches the aesthetic. -
Center on the wheel:
Throw the clay onto the wheel head and center it. If you don’t have a wheel, you can achieve a similar shape using the pinch pot method, smoothing the walls carefully. -
Open the form:
Press into the center to open the clay, pulling the floor out to about 3-4 inches wide. Aim for a flat interior bottom that transitions gently into the walls. -
Pull the walls:
Pull the clay walls up to create a shallow bowl shape, roughly 2 inches high. Keep the walls relatively thick at the bottom and slightly tapered at the top for that sturdy, handcrafted feel. -
Shape the rim:
Use a chamois or a wet sponge to compress the rim thoroughly. You want a rounded, smooth edge that will eventually hold the gold accent. -
Refine the curve:
Take a rib tool to the interior of the bowl to smooth out any throwing lines. I find this step crucial for getting that clean, minimalist surface.
Wobbly Gold Lines?
Use a potter’s wheel or a banding wheel to spin the bowl slowly while you hold your brush hand steady against a support to get a perfect circle.
Step 2: Trimming and Firing
-
Dry to leather hard:
Allow the piece to dry until it is leather hard—firm enough to hold its shape but soft enough to carve. -
Trim the foot:
Invert the bowl on the wheel and use a loop tool to trim a neat foot ring. This elevates the visual weight of the piece. -
Smooth the exterior:
Use a damp sponge to smooth away any trimming marks, ensuring the speckled texture remains consistent. -
Bisque fire:
Fire the bowl in the kiln to bisque temperature (usually Cone 04 or 06) to prepare it for glazing.
Step 3: Glazing and Gilding
-
Apply clear glaze:
Dip the entire bowl into a clear or transparent gloss glaze. This will seal the clay while allowing the beautiful natural speckles to show through clearly. -
Wipe the foot:
Clean the glaze off the foot ring with a wax resist or a damp sponge so it doesn’t stick to the kiln shelf. -
Glaze fire:
Fire the piece again to the maturity temperature of your clay and glaze (often Cone 5 or 6 for stoneware). -
Prepare the gold:
Once the piece has cooled completely, prepare your gold overglaze (luster). Work in a well-ventilated area as lusters have strong fumes. -
Paint the rim:
Using a very fine liner brush, carefully paint a thin, steady line of gold along the very top edge of the rim. A steady hand is key here. -
Third firing:
Fire the piece a third time at a much lower temperature (usually Cone 018) to set the gold luster permanently.
No Kiln Option
Use air-dry clay mixed with coffee grounds for speckles. Finish with acrylic gloss varnish and use gold leaf paint on the rim (decorative only).
Now you have a stunning, minimalistic piece that looks like it came straight from a boutique studio
Marbled Swirl Mini Dish
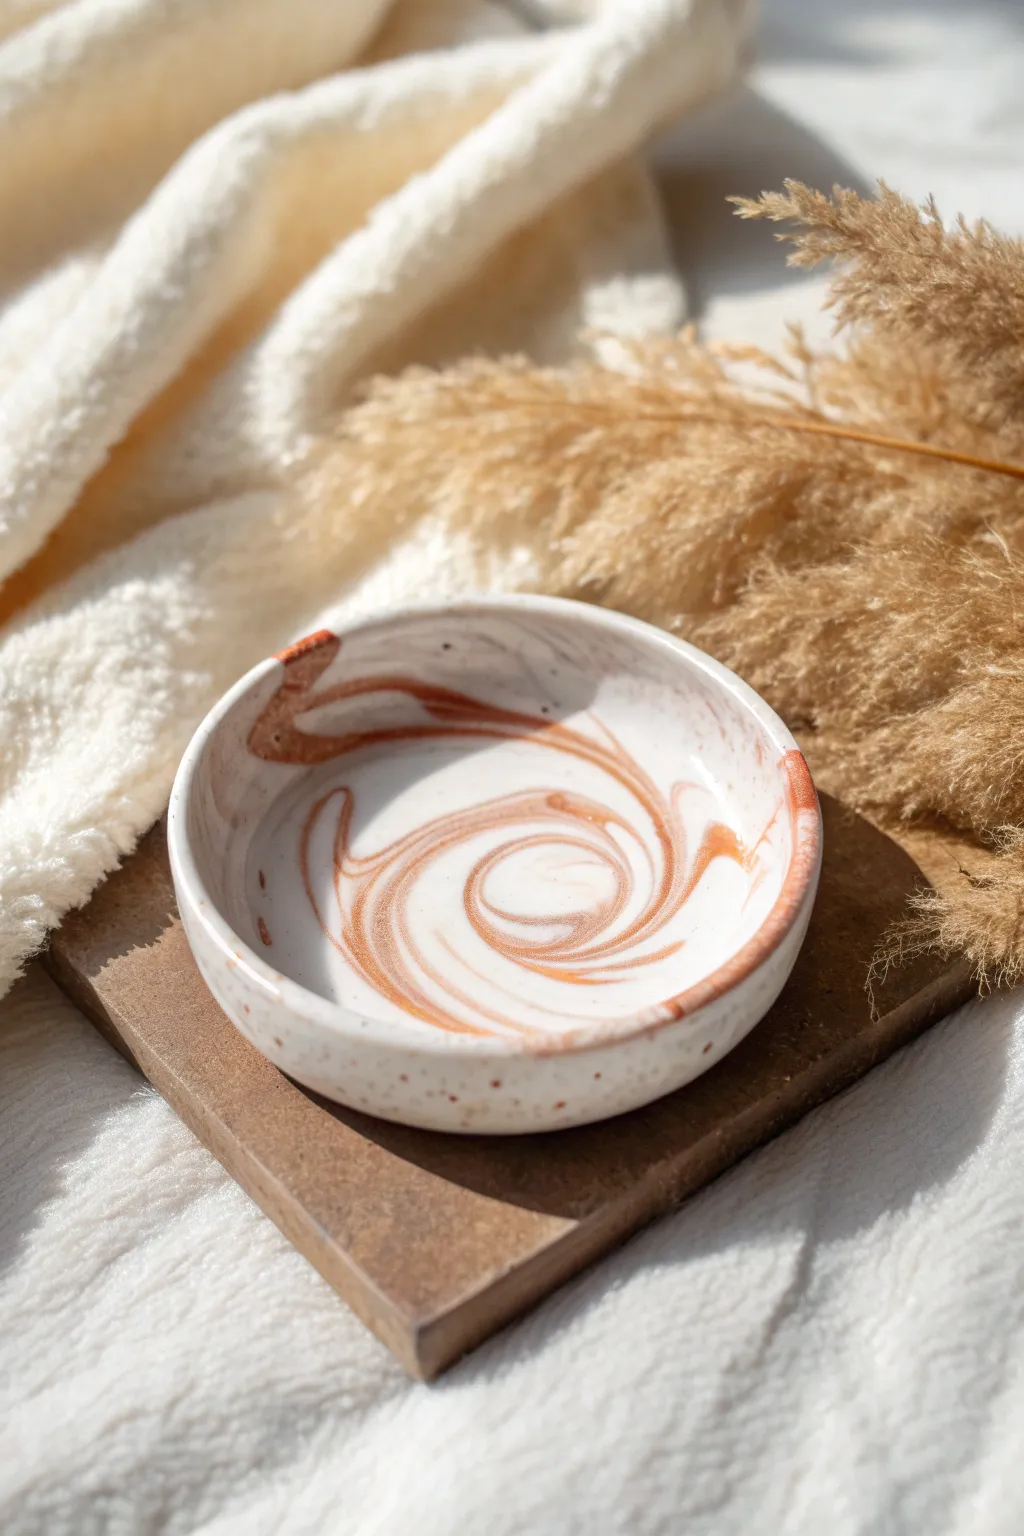
This elegant trinket dish combines a minimal speckled base with a mesmerizing swirl of copper-toned marble. It’s the perfect size for jewelry or keys and adds a warm, earthy touch to any bedside table.
Step-by-Step Tutorial
Materials
- White polymer clay
- Translucent polymer clay
- Copper or metallic bronze polymer clay
- Fine grit sandpaper (400-600 grit)
- Black pepper or dried coffee grounds (for speckling)
- Acrylic rolling pin
- Round cookie cutter or bowl (approx. 4-5 inches)
- Small oven-safe bowl (for shaping)
- Gloss glaze (optional)
Step 1: Preparing the Clay Base
-
Condition the white clay:
Begin by taking a block of white polymer clay and kneading it in your hands until it becomes soft and pliable. This conditioning step is crucial to prevent cracks later on. -
Create the speckle effect:
Flatten the white clay slightly and sprinkle a very small pinch of black pepper or dried coffee grounds onto it. Fold the clay over and knead it thoroughly until the specks are evenly distributed throughout the white base. -
Add translucency:
Mix in a small amount of translucent polymer clay (about a 1:4 ratio to the white). This gives the finished piece a more stone-like, ceramic quality rather than looking like flat plastic. -
Roll into a log:
Once mixed, roll your speckled white clay into a thick log shape, about 4 inches long.
Step 2: Marbling the Pattern
-
Prepare the copper clay:
Condition a small amount of copper or bronze metallic clay. Roll this into a very thin, long snake, significantly thinner than your white log. -
Apply the color:
Lay the thin copper snake lengthwise along your white log. You can add a second, very thin strand if you want more intense color, but remember that less is often more with marbling. -
Twist the clays:
Pick up the log by both ends and twist it in opposite directions, like you are wringing out a towel. Continue twisting until you have a tight, candy-cane spiral. -
Fold and roll:
Fold the twisted log in half, bringing the ends together. Roll it back into a smooth log on your work surface. Repeat this twist, fold, and roll process 2-3 times to create complex layers. -
Form the ball:
Roll your marbled log into a smooth ball. You should see the copper lines swirling around the surface.
Don’t Overmix!
Stop twisting and folding sooner than you think. If you mix too much, the copper will blend into the white, turning the whole piece a muddy light brown instead of distinct swirls.
Step 3: Shaping and Finishing
-
Flatten the slab:
Place the ball on your work surface and use the acrylic rolling pin to flatten it into a disk about 1/4 inch thick. Roll in multiple directions to keep the circular shape and distribute the swirl pattern. -
Check the swirl:
Look at your marble pattern. If you want a more distinct spiral like the photo, you can gently twist the clay slightly as you flatten it, guiding the copper streaks into a central vortex. -
Cut the circle:
Use your round cookie cutter or a bowl as a template to cut a clean, perfect circle from your rolled slab. -
Smooth the edges:
Dip your finger in a tiny bit of water (or baby oil if using polymer clay) and run it along the cut edge to smooth out any roughness or sharp angles. -
Create the curve:
Gently lift your clay circle and place it inside a small oven-safe bowl. Press it down lightly so it takes on the curved shape of the bowl’s interior. -
Bake the dish:
Preheat your oven according to the clay manufacturer’s instructions (usually around 275°F or 130°C). Bake the clay while it is still inside the shaping bowl for 15-20 minutes. -
Cool and remove:
Let the dish cool completely inside the bowl before trying to pop it out. Removing it while hot can warp the shape. -
Sand for smoothness:
Once cool, lightly sand the edges and surface with fine-grit sandpaper under running water. This wet-sanding technique creates an incredibly smooth, professional finish. -
Seal (Optional):
I prefer a matte look, but if you want that glossy ceramic shine, apply a thin coat of polyurethane gloss glaze to the inside of the dish and let dry.
Gold Leaf Accents
After baking but before glazing, press small flakes of gold leaf onto the copper veins. Seal with glaze to lock them in for an extra luxurious, glimmering finish.
Now you have a chic, handmade vessel ready to hold your favorite rings or simply look beautiful on your shelf


What Really Happens Inside the Kiln
Learn how time and temperature work together inside the kiln to transform clay into durable ceramic.
Terrazzo Speckle Trinket Dish

Bring a trendy, modern touch to your dresser with this easy-to-make faux terrazzo dish. Using polymer clay, you can perfectly mimic the look of speckled stone while customizing the color chips to match your home decor.
Detailed Instructions
Materials
- White or cream polymer clay (approx. 2oz)
- Small amounts of colored polymer clay (terracotta, slate blue, sage green, light pink)
- Black polymer clay or black pepper/dried geometric spices
- Rolling pin or pasta machine
- Circle cookie cutter or bowl (approx. 4-5 inches)
- Oven-safe bowl (for shaping)
- Craft knife or clay blade
- Sandpaper (wet/dry, various grits from 400 to 1000)
- Gloss or matte varnish (optional)
- Parchment paper
Step 1: Prepping the ‘Chips’
-
Roll thin sheets:
Take your colored clays (terracotta, slate blue, sage, pink) and condition them until soft. Roll each color out into a very thin, flat sheet, about 1mm thick or less. -
Bake the sheets:
Place these thin colored sheets on parchment paper and bake them for just 10-15 minutes at the temperature recommended on your clay package. They should be hard but not burnt. -
Create the terrazzo chips:
Once cool, crumble the baked clay sheets into small, irregular shards. Some pieces should be larger wedges and others tiny crumbs to create a realistic variety.
Color Contrast Tip
For a bold terrazzo look, ensure your colored chips are fully baked before mixing. Raw chips will smear into the white base, looking like marble instead of stone.
Step 2: Creating the Base
-
Condition the base clay:
Take your white or cream clay and knead it thoroughly until it is warm and pliable. -
Incorporate the chips:
Flatten the white clay slightly and sprinkle your baked colored chips onto it. If you want the tiny black speckles seen in the photo, grate a tiny amount of raw black clay over it or sprinkle in some cracked black pepper. -
Mix and repeat:
Fold the clay over the chips and roll it out, then fold again. Repeat this process several times to ensure the colored chips are distributed throughout the entire block of clay, not just on the surface.
Level Up: Gold Leaf
Mix small flakes of gold leaf into the raw white clay along with your colored chips. After sanding, you’ll have metallic glints embedded in the stone texture.
Step 3: Shaping the Dish
-
Roll the final slab:
Roll your mixed terrazzo clay out into a smooth slab, approximately 1/4 inch thick. I find using guides or playing cards on either side helps keep the thickness even. -
Cut the circle:
Use your large circle cutter or trace around a bowl with a craft knife to cut out a perfect round shape. -
Create the rim:
Prepare a long strip of the same terrazzo clay mix, about 1/2 inch tall. Carefully attach this strip around the edge of your circle base, blending the seam on the inside and outside with a smoothing tool to make it seamless. -
Alternative shaping method:
Alternatively, you can gently slump the flat circle into a shallow, oven-safe bowl to create a curved dish shape without a distinct rim.
Step 4: Refining and Finishing
-
Smooth the surface:
Before baking, run your roller gently over the surface one last time to press the chips flat and unsure the surface is level. -
Bake the dish:
Place your formed dish (or the bowl it’s resting in) into the oven. Bake for 30-45 minutes according to package directions. Longer baking makes the clay stronger. -
Cool down:
Let the dish cool completely inside the oven or on a rack before handling it further. -
Start sanding:
This is the most crucial step. Under running water or in a bowl of water, sand the dish using 400 grit sandpaper. Sand until the top layer of clay is removed and the colored chips underneath are clearly revealed. -
Fine sanding:
Progress to 600, then 800, and finally 1000 grit sandpaper to get an ultra-smooth finish. -
Clean and dry:
Wash off any milky sanding residue and dry the piece thoroughly with a lint-free cloth. -
Seal (Optional):
If you want a glossy, ceramic-like look, apply a thin coat of polyurethane varnish or UV resin. For a matte stone look, you can leave it raw or use a matte sealer.
Place your everyday jewelry in your new dish and admire the unique, stone-like pattern you created
Stamped Texture Dish
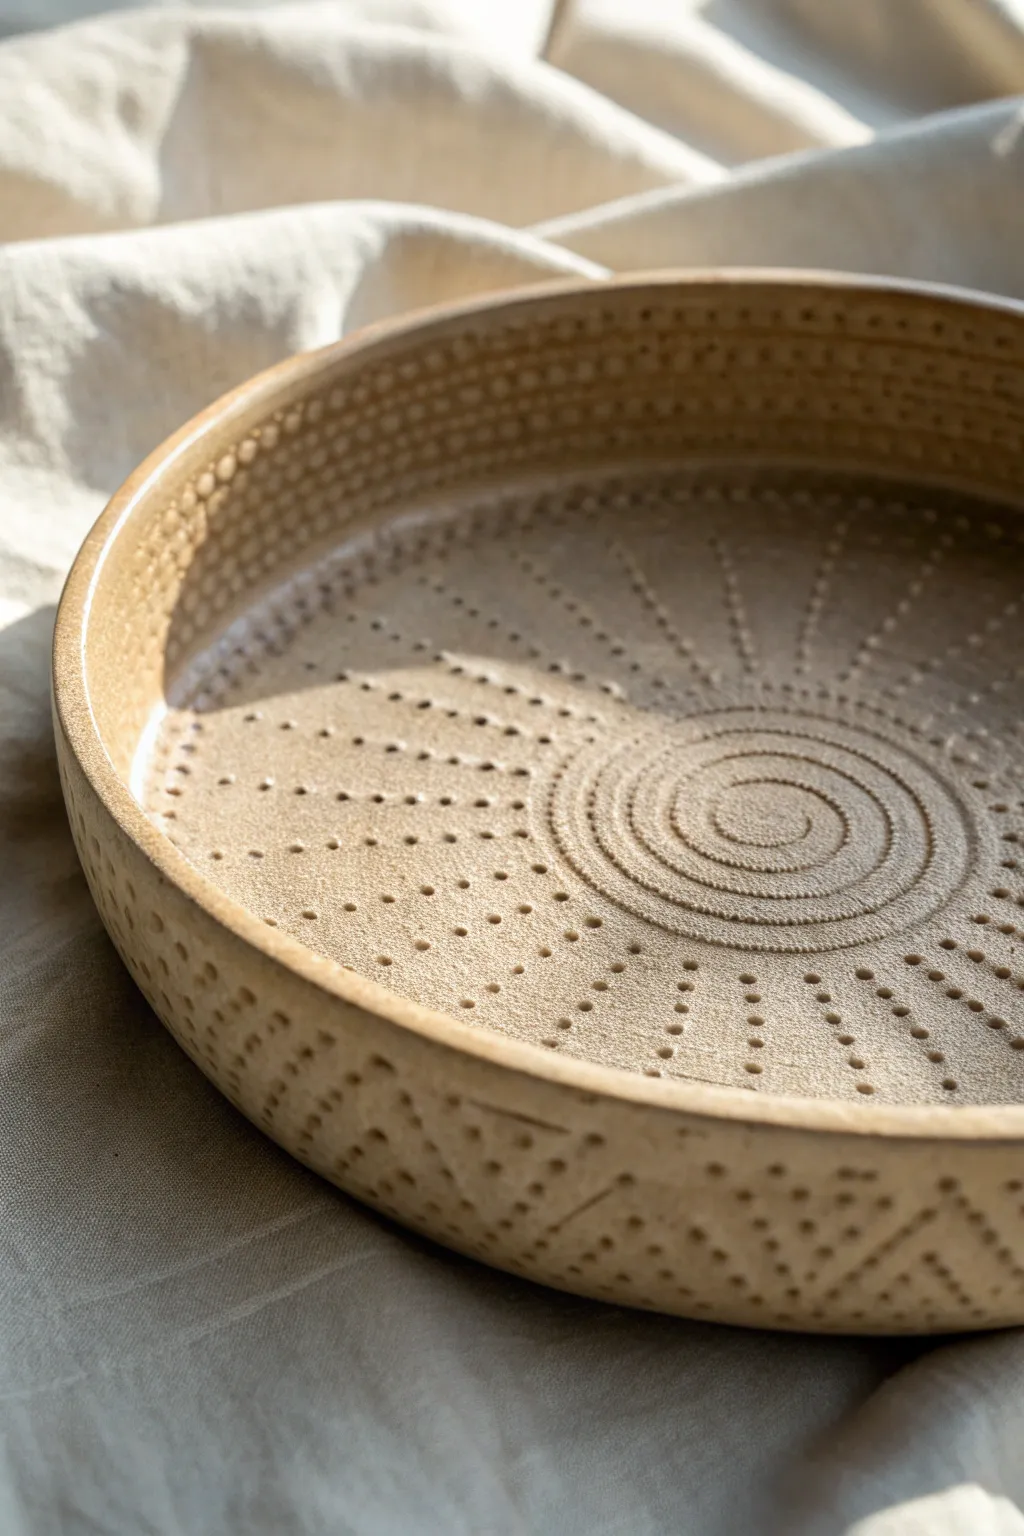
This stunning dish features a mesmerizing radial pattern created entirely with simple dotted textures, evoking the warmth of a glowing sun. The natural clay tone and tactile finish make it a perfect centerpiece or catch-all tray for your coffee table.
Step-by-Step Tutorial
Materials
- Stoneware clay (smooth or lightly grogged)
- Rolling pin
- Two wooden guide slats (approx. 1/4 inch thick)
- Round slump mold or a shallow bowl/plate to use as a mold
- Needle tool or fettling knife
- Small round stylus tools (various sizes) or a blunt skewer
- Pottery sponge
- Rib tool (flexible metal or rubber)
- Clear matte or satin glaze
- Kiln access
Step 1: Preparing the Slab
-
Wedge the clay:
Begin by thoroughly wedging your clay to remove any air bubbles and ensure an even consistency, forming it into a smooth ball. -
Flatten and roll:
Press the ball flat with your palm. Place your wooden guide slats on either side of the clay to ensure consistent thickness. -
Roll the slab:
Use your rolling pin to roll the clay out until the pin rests flat on the guide slats. Flip the clay occasionally to prevent sticking. -
Smooth the surface:
Take your flexible rib tool and compress the surface of the clay slab. This not only smooths the texture but aligns the clay particles to prevent warping later. -
Cut the circle:
Select a circle template or bowl slightly larger than your final desired size (to account for shrinkage and depth). Trace and cut out a perfect circle using your needle tool.
Depth Precision
Don’t press your stylus all the way through! Aim for 50% depth into the slab. Too deep creates weak spots; too shallow gets lost under glaze.
Step 2: Texturing the Design
-
Mark the center:
Find the exact center of your clay circle. I like to make a tiny, faint impression here to guide the entire radial design. -
Create the central spiral:
Using a small stylus tool, press a series of dots starting from the center and spiraling outward. Keep the dots close together to form a tight, continuous coil effect. -
Start the radial lines:
Once the spiral reaches about 2-3 inches in diameter, stop spiraling. Switch to creating straight lines of dots radiating outward from the spiral’s edge toward the rim. -
Vary the density:
As the circle widens, add interstitial lines of dots between the main sunrays so the pattern stays dense and uniform without large gaps. -
Texture the outer rim area:
For the outermost inch of the flat slab (which will become the vertical wall), change the pattern slightly. Create distinct geometric rows or a zig-zag pattern of dots to define the border.
Add an Oxide Wash
Before glazing, wipe a dark iron oxide wash over the bisque and sponge it off. The dark color stays in the dots, making the texture pop.
Step 3: Forming and Finishing
-
Slump the form:
Gently lift your textured slab and place it into your slump mold or inside a shallow bowl lined with plastic wrap. Press gently so it takes the curved shape. -
Shape the rim:
Ensure the outer edge stands vertically to create that distinct dish wall seen in the photo. You may need to smooth the very top edge with a damp sponge. -
Refine the exterior:
While the clay is leather-hard in the mold, you can also add texture to the outside wall if accessible, or wait until it’s stiff enough to hold its shape outside the mold. -
Dry slowly:
Cover the dish loosely with plastic to let it dry slowly. This helps maintain the flatness of the bottom and prevents the rim from warping. -
Bisque fire:
Once completely bone dry, load the piece into the kiln for a bisque firing. -
Glaze application:
Dip or brush on a clear matte or semi-transparent satin glaze. This is crucial because an opaque glaze would hide all your hard work with the dots. -
Final firing:
Fire the piece again to the temperature required by your specific clay and glaze combination.
Enjoy the tactile beauty of your handmade dish as it catches the morning light on your table

TRACK YOUR CERAMIC JOURNEY
Capture glaze tests, firing details, and creative progress—all in one simple printable. Make your projects easier to repeat and improve.
Cloud-Shaped Dreamy Dish
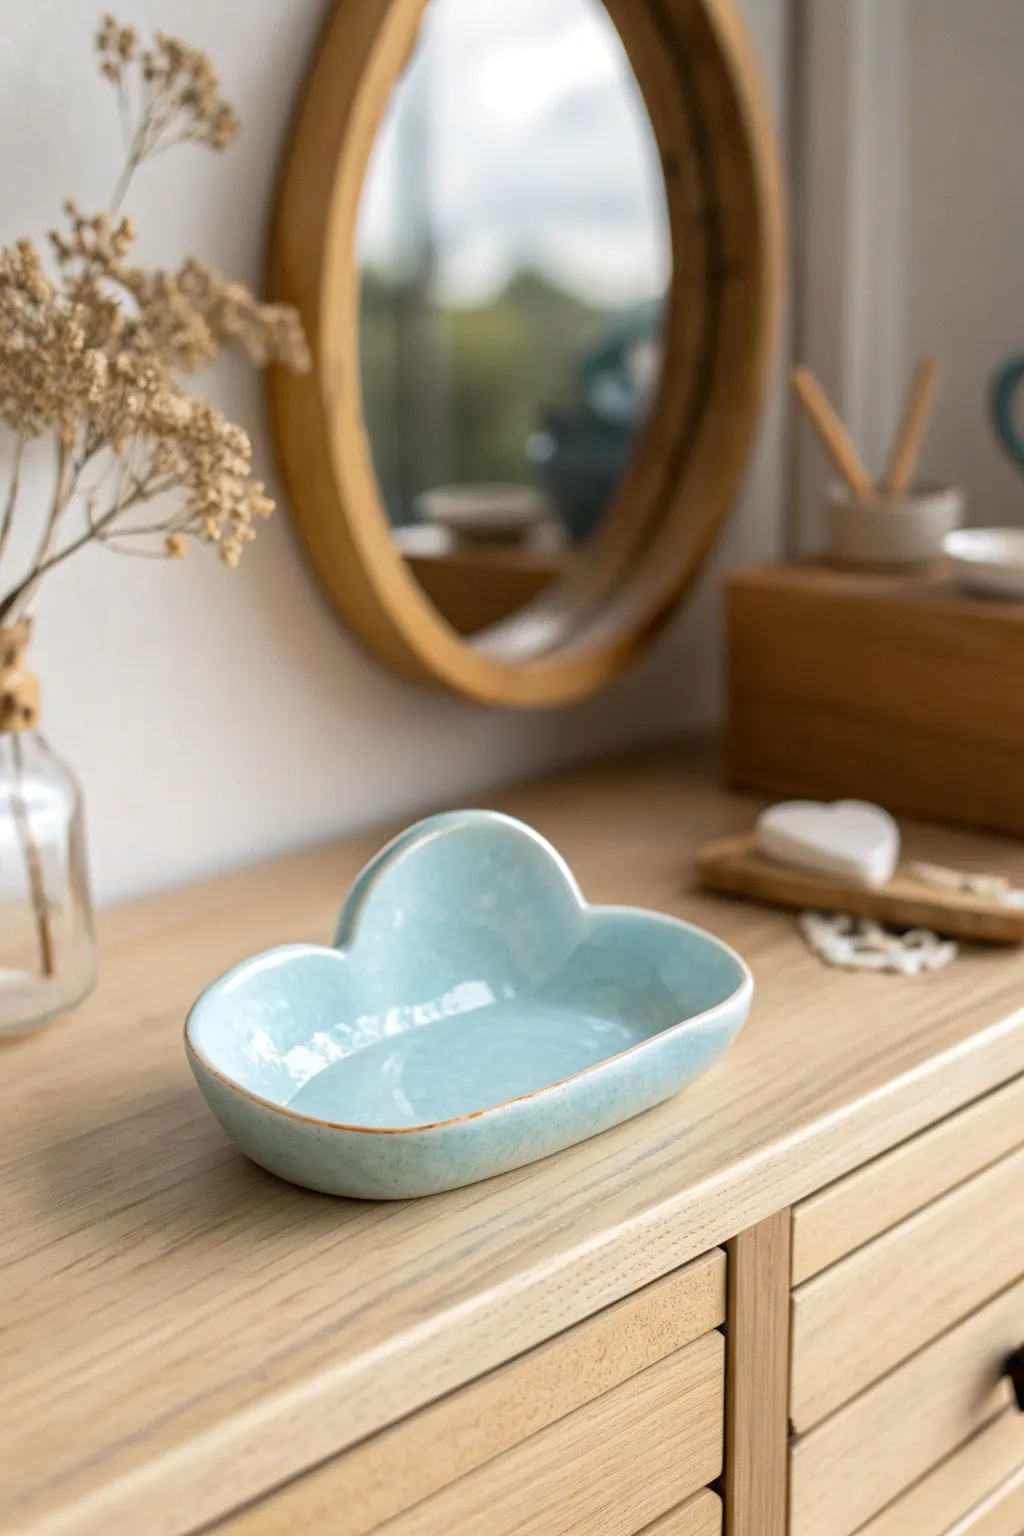
Capture the whimsy of the sky with this charming cloud-shaped trinket dish, perfect for holding your favorite rings or keys. The soft baby blue glaze and organic, hand-shaped edges give it a dreamy, boutique pottery feel right from your own home.
Detailed Instructions
Materials
- Air-dry clay or white earthenware clay
- Rolling pin
- Two wooden guide strips (approx. 1/4 inch thick)
- Needle tool or X-Acto knife
- Paper and pencil (for template)
- Small bowl of water
- Sponge
- Fine-grit sandpaper
- Glossy light blue acrylic paint (or glaze if kiln-firing)
- Brown acrylic paint (for rim detailing)
- Clear high-gloss varnish (for air-dry clay)
- Soft synthetic brushes
Step 1: Shaping the Cloud
-
Create your template:
Sketch a simple cloud shape on a piece of paper. Aim for a flat bottom edge if you want it to stand vertically, or a rounded organic shape for a flat dish. The cloud in the image has three distinct upper bumps. Cut this shape out with scissors. -
Prepare the clay slab:
Take a ball of clay and place it between your two wooden guide strips on a dedicated work surface or canvas cloth. These guides ensure your clay is rolled to a perfectly even thickness. -
Roll it out:
Using your rolling pin, press down and roll the clay across the guides until the pin rests on the wood and the clay is smooth and flat. -
Cut the shape:
Place your paper template lightly onto the clay slab. Using your needle tool or knife, trace around the paper, holding the tool vertically to get a clean, straight edge. -
Lift the edges:
To create the dish form, gently lift the edges of your cloud shape upwards. You are essentially pinching the perimeter to create a shallow wall, roughly 1 inch high. -
Smooth the transition:
Use your thumb to smooth the inside curve where the wall meets the base, ensuring there are no sharp creases. I find dipping my finger in a tiny bit of water helps blend the clay seamlessly here. -
Refine the rim:
Go around the top edge of the wall. Dampen a small sponge and gently wipe the rim to soften any sharp angles left by the cutting tool, giving it that pillowy, soft aesthetic. -
Dry completely:
Set the dish aside in a cool, dry place. If using air-dry clay, let it sit for 24-48 hours until bone dry and white. If kiln firing, proceed with your bisque firing schedule.
Cracks while lifting?
If the clay creates small fissures as you bend the walls up, your clay might be too dry. Smooth a drop of water over the crack immediately to reseal it.
Step 2: Glazing and Finishing
-
Sand imperfections:
Once fully dry, lightly sand any rough spots or fingerprints with fine-grit sandpaper. Wipe away the dust with a slightly damp cloth. -
Base coat application:
Apply your light blue paint or glaze. Cover the entire interior and exterior of the dish. You may need 2-3 coats to get an opaque, solid color, letting each coat dry in between. -
Create the rustic rim:
To mimic the stoneware look in the photo, take a very small brush with watered-down brown paint. Carefully run it along the very top edge of the rim. -
Blend the rim (optional):
Immediately after applying the brown line, you can gently dab it with a clean, damp brush or your finger to feather it slightly, making it look like natural clay showing through glaze. -
Apply varnish:
If using air-dry clay, apply two coats of high-gloss varnish. This mimics the shine of ceramic glaze and seals the paint. -
Final cure:
Allow the varnish or final glaze to cure completely according to the manufacturer’s instructions before placing any jewelry inside.
Make it shimmer
Mix a tiny pinch of white pearlescent powder into your final clear glossy coat. It adds an ethereal, magical sheen perfect for a cloud.
Place this lovely little dish on your nightstand to keep your treasures safe in the clouds
Celestial Moon and Stars Dish
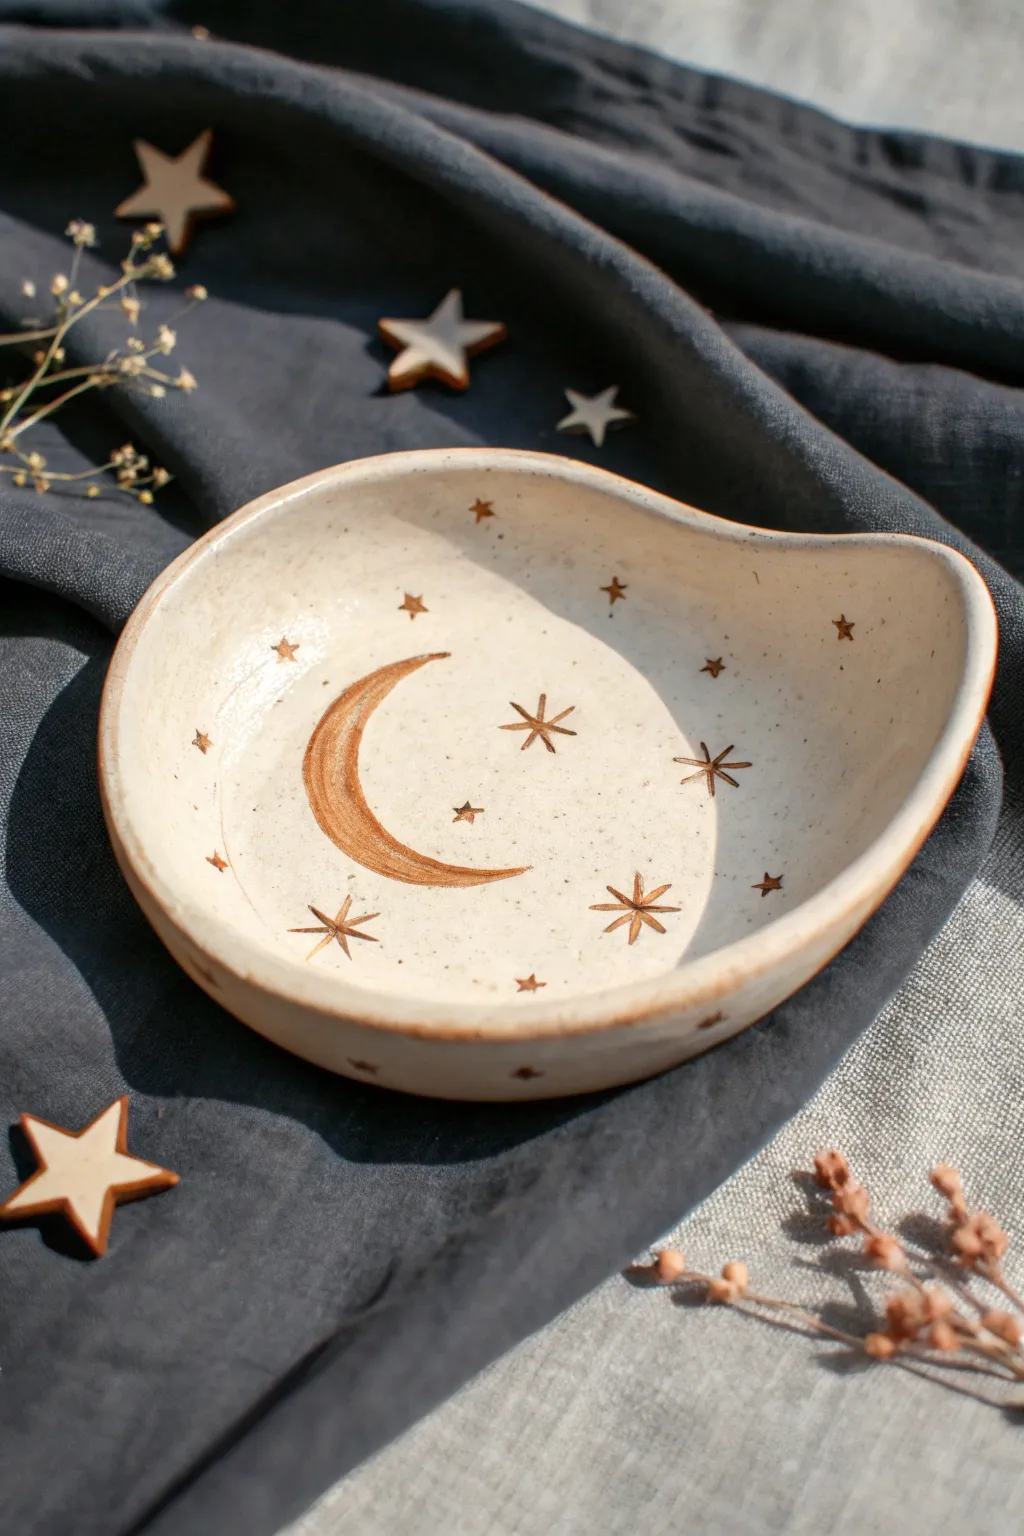
Bring the magic of the night sky into your home with this dreamy, organic trinket dish. Featuring a hand-painted crescent moon and scattered stars on a speckled cream base, it’s the perfect spot for your favorite jewelry pieces.
How-To Guide
Materials
- Air-dry clay or polymer clay (white or cream)
- Acrylic rolling pin
- Rolling guides or wooden slats (approx. 1/4 inch thick)
- Craft knife or clay needle tool
- Small bowl of water and sponge (for smoothing)
- Fine-grit sandpaper
- Acrylic paints (metallic copper/gold, dark brown)
- Fine detail paintbrush (size 0 or 00)
- Gloss varnish or resin (optional for ceramic look)
- Small star stamps (optional)
Step 1: Shaping the Clay
-
Condition the Clay:
Begin by taking a handful of clay and kneading it in your hands until it becomes warm, pliable, and free of cracks. If you are using air-dry clay, keep your hands slightly damp to prevent sticking. -
Roll it Out:
Place the clay between two rolling guides to ensure an even thickness. Roll it out into a smooth slab, roughly 1/4 inch thick. Aim for an organic, slightly oval shape rather than a perfect circle. -
Cut the Shape:
Using your needle tool or craft knife, freehand cut a soft, asymmetrical round shape. You can make one side slightly elongated to mimic the teardrop-like shape in the reference, or keep it oval. -
Form the Rim:
Gently lift the edges of the slab with your fingers to create a raised rim. I like to pinch and smooth the clay simultaneously to curve the walls upward, creating a shallow bowl depth of about half an inch. -
Refine the Edge:
Dip your finger in a little water and run it along the rim to smooth out any cracks or rough cuts. The rim should look soft and rounded, not sharp. -
Add Texture (Optional):
To mimic the speckled ceramic look of the original, you can gently flick a stiff toothbrush with brown paint onto the wet clay now, or wait to do this during the painting phase. -
Dry the Piece:
Set the dish aside to dry completely. For air-dry clay, this usually takes 24-48 hours. Turn it over halfway through the process to ensure the bottom dries evenly.
Smooth Surface Secret
Use a damp sponge to smooth the clay *before* it dries. It’s much easier to fix imperfections on wet clay than to sand them away later.
Step 2: Painting and Finishing
-
Sand for Smoothness:
Once bone dry, gently sand any rough spots on the rim or surface using fine-grit sandpaper. Wipe away all dust with a slightly damp cloth or dry brush. -
Apply Base Coat:
Paint the entire dish with a creamy off-white acrylic paint. You might need two coats for full opacity. To achieve the speckled look seen in the photo, mix a tiny drop of sand into the paint or flick diluted brown paint over the dry cream base. -
Draft the Design:
Using a very light pencil touch, sketch the large crescent moon on the left side of the dish. Add small dots where you want your stars to be placed. -
Paint the Moon:
Load your brush with metallic copper or bronze paint. Carefully fill in the crescent moon shape. The texture in the image looks slightly washed, so you can dilute the paint slightly for a watercolor effect, layering it to build depth on the curve. -
Add the Stars:
Using a fine detail brush and the same metallic paint, create the stars. Draw a simple cross first, then add smaller diagonal lines between the main arm to create an eight-point starburst. Vary the sizes, making some large focal stars and some tiny twinkling dots. -
Detail the Rim:
Run the side of your brush along the very edge of the rim with the metallic paint. This creates a beautiful, defined border that frames the artwork. -
Seal the Dish:
Once all paint is fully dry, apply a coat of gloss varnish. This will protect the paint and give the dish that shiny, glazed ceramic appearance.
Galaxy Glitter
Mix ultra-fine gold glitter into your varnish before applying it over the moon and stars for a subtle shimmer that catches the light.
Now you have a stunning celestial catch-all perfect for holding your rings by the bedside
Leaf-Shaped Nature Tray
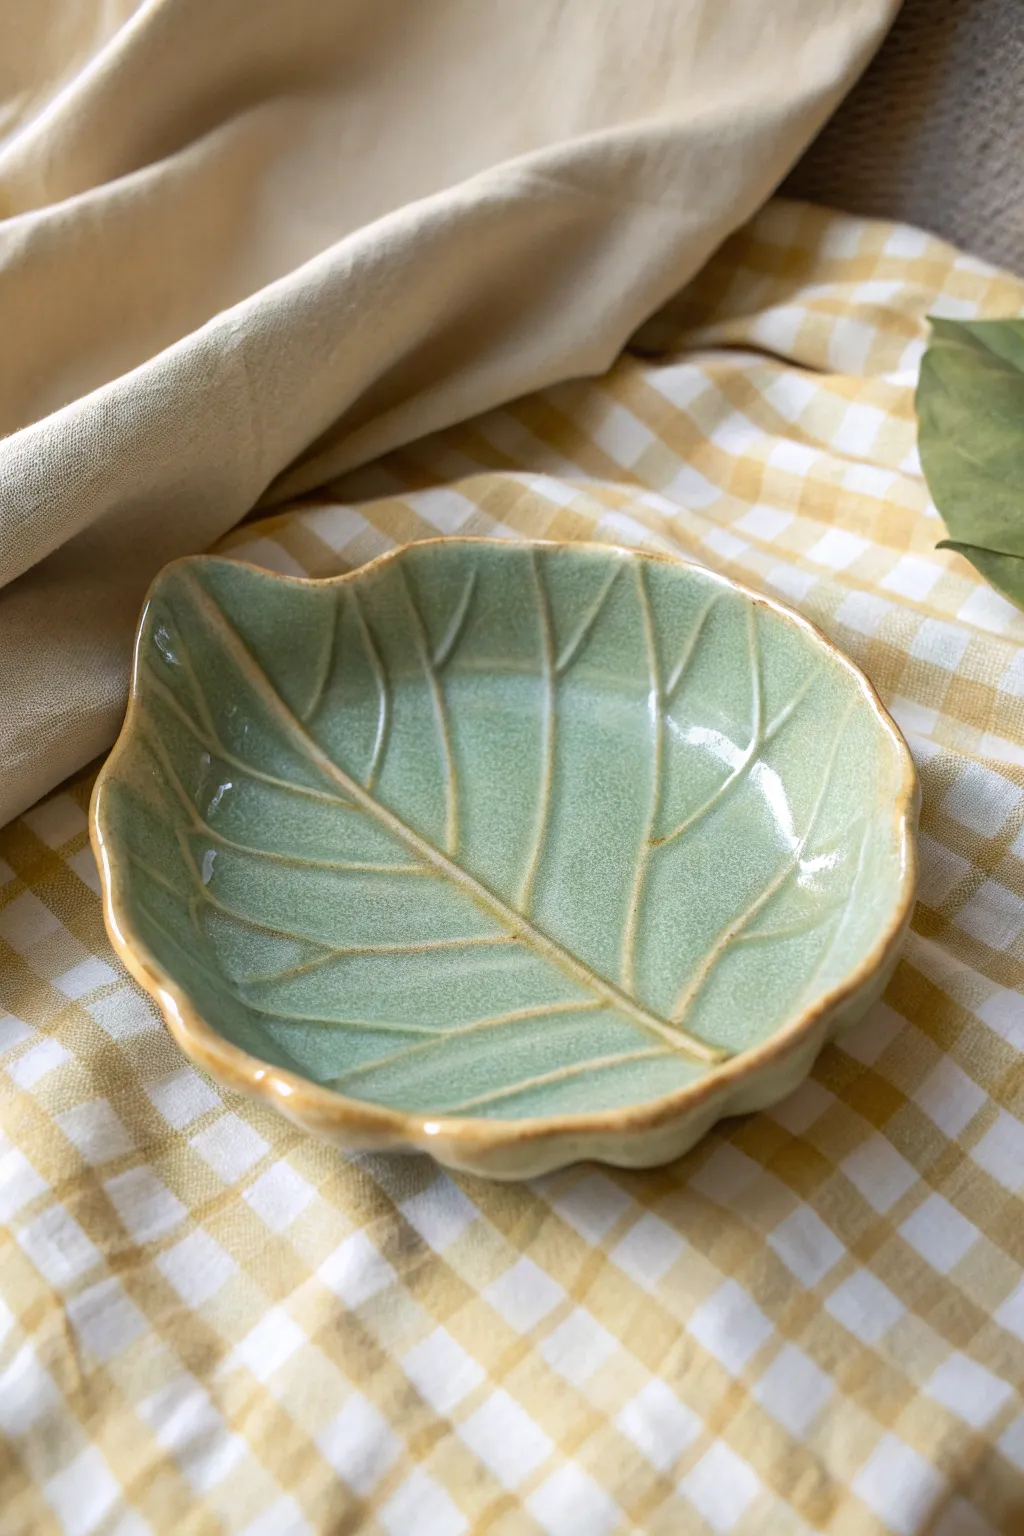
This charming trinket dish captures the organic beauty of nature with a subtle, glossy crackle glaze that highlights every vein. The soft sage green interior contrasts beautifully with the warm, unglazed rim, making it a perfect spot for your favorite rings or earrings.
Detailed Instructions
Materials
- White or light buff earthenware clay
- Rolling pin
- Real large leaf (like a hydrangea or hosta) or a paper template
- Needle tool or fettling knife
- Small sponge
- Modeling tool (rounded tip)
- Celadon or transparent green crackle glaze
- Iron oxide wash (optional, for the rim)
- Small paintbrush
- Kiln (or access to a pottery firing service)
Step 1: Shaping the Clay
-
Prepare the slab:
Begin by wedging your clay to remove air bubbles, then roll it out into an even slab about 1/4 inch thick. I like to roll it on a piece of canvas to prevent sticking. -
Compress the surface:
Take a rubber rib tool or a smooth sponge and gently compress the surface of the slab. This aligns the clay particles and creates a smoother canvas for your leaf texture. -
Place the leaf:
Lay your real leaf face down onto the clay so the prominent veins press into the surface. If using a paper template, place it lightly on top. -
Transfer the impression:
Gently roll your rolling pin over the leaf one more time. Use firm, even pressure to ensure the veins leave a deep, distinct impression in the clay. -
Cut the outline:
Using a needle tool held vertically, carefully cut around the edge of the leaf. Remove the excess clay and verify your cut edges are clean. -
Lift the edges:
Peel away the real leaf or template. Gently lift the edges of your clay leaf upwards, curving them slightly to create a shallow bowl shape. -
Support the form:
Place pieces of foam or balled-up newspaper under the lifted edges to help the clay hold its curved shape while it dries to leather-hard. -
Smooth the rim:
Dip a small sponge in water and run it along the cut edge of the rim. This softens the sharp cut marks and gives the finished piece a more professional, rounded feel.
Fixing Flatness
If your leaf edges slump while drying, the clay was too wet. Prop them up with more foam support immediately, or let the slab firm up on a plaster bat before shaping next time.
Step 2: Refining and Veining
-
Enhance the veins:
Once the clay is leather-hard, inspect the vein impressions. Use a rounded modeling tool to deepen the main center vein and side tributaries if they look too faint. -
Add texture:
Using a needle tool, you can scratch in tiny, faint lines between the major veins to mimic the microscopic texture of a real leaf surface. -
Bisque fire:
Allow the dish to dry completely (bone dry). Fire it in a kiln to cone 04 (or your clay’s specific bisque temperature).
Step 3: Glazing and Finishing
-
Clean the bisque:
Wipe the bisque-fired piece with a damp sponge to remove any kiln dust, which can prevent the glaze from adhering properly. -
Apply the rim oxide:
Dip a small brush into iron oxide wash and carefully paint just the very edge of the rim. Wipe it back slightly with a sponge so it stains the clay a warm brown without being opaque. -
Glaze the interior:
Pour a celadon or translucent sage green glaze into the center of the leaf. Swirl it to coat the entire interior surface, then pour out the excess. -
Clean the base:
Ensure the bottom of the dish is completely free of glaze. You can brush wax resist on the bottom beforehand or wipe it clean with a sponge. -
Glaze firing:
Fire the piece again, this time to the maturity temperature of your glaze (typically Cone 5 or 6). Let the kiln cool naturally before removing your new tray.
Make It Sparkle
For added visual depth, rub a darker green underglaze into the deep vein grooves and wipe away the excess before applying the top clear green glaze.
Place your finished leaf tray on a sunny windowsill where the light can catch the glossy texture
Toast and Butter Trinket Tray
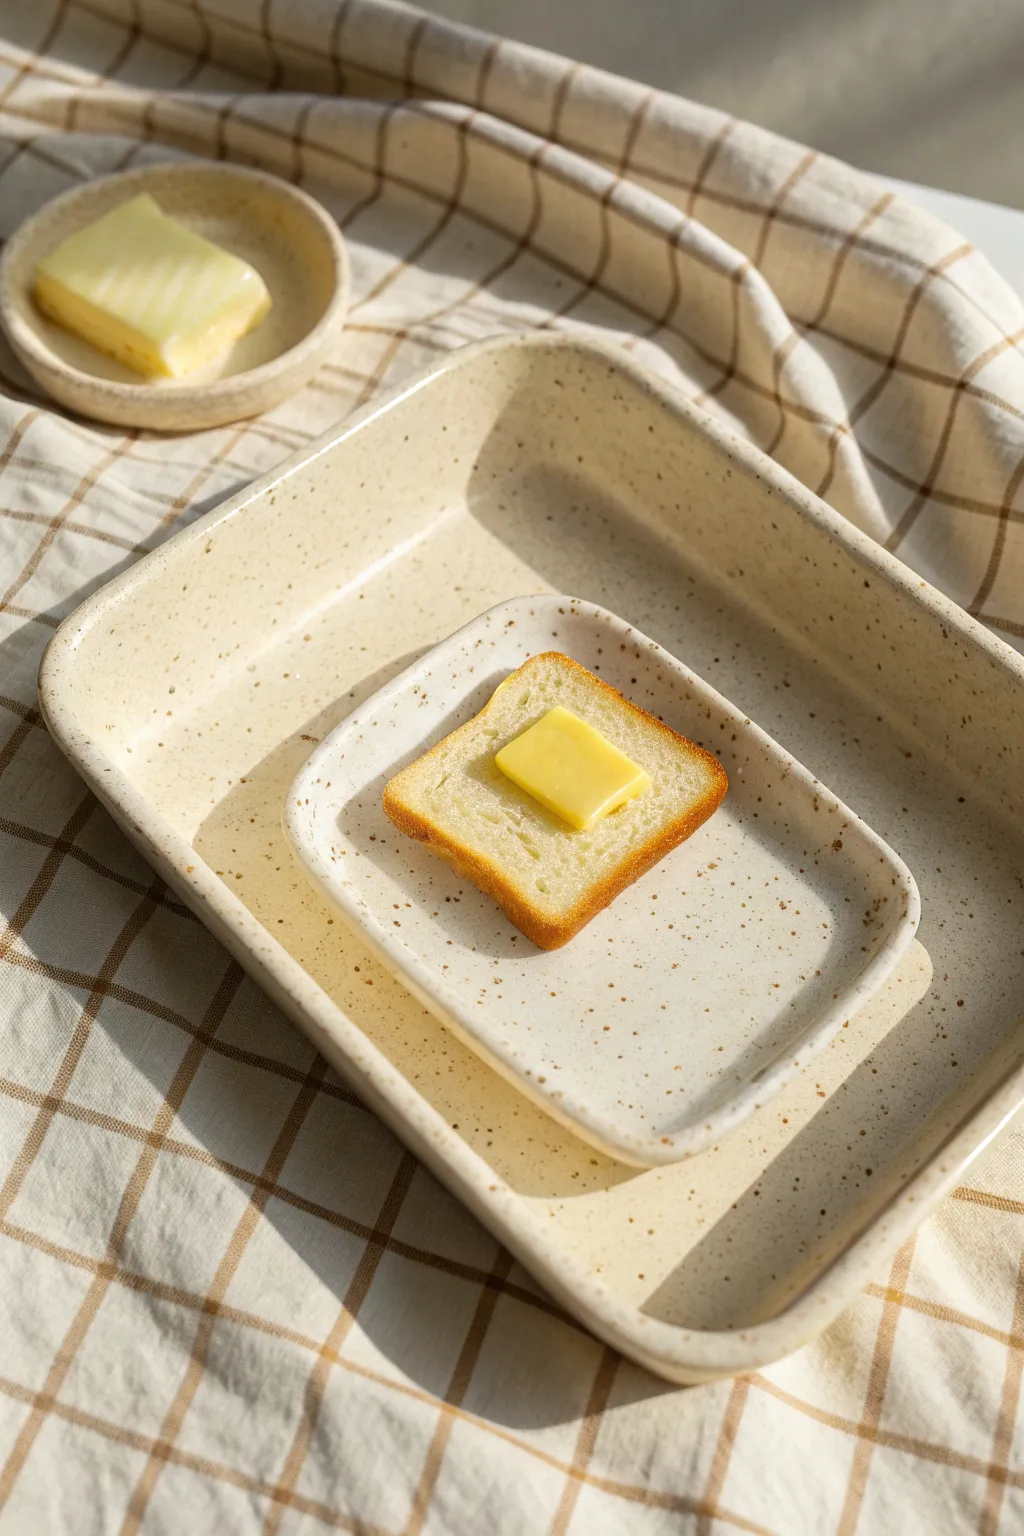
This charming trinket dish set captures the cozy feeling of a lazy Sunday morning with its clever toast-shaped center and buttery details. The speckled cream finish ties everything together, creating a functional yet whimsical spot for jewelry or keys.
How-To Guide
Materials
- Polymer clay (white and translucent)
- Acrylic paints (Yellow Ochre, Burnt Sienna, Raw Umber, Cream)
- Rolling pin
- Craft knife or clay blade
- Texture sponge or toothbrush
- Soft pastel chalks (oranges and browns)
- Soft paintbrush
- Gloss glaze or resin
- Sandpaper (fine grit)
- Speckled clay effect paint (optional, or mix black pepper/sand into clay)
Step 1: Shaping the Trays
-
Prepare the Base Clay:
Start by conditioning your white polymer clay. To achieve that beautiful speckled pottery look right from the start, mix in a small amount of black pepper or fine sand, kneading until evenly distributed. Roll it out to a consistent 1/4 inch thickness. -
Cut the Large Tray:
Cut a large rectangle (approx. 6×4 inches) for the main catch-all dish. Smooth the edges with your finger to remove any sharp cut lines. -
Form the Tray Walls:
Gently lift the edges of the rectangle and pinch the corners to create a raised rim. Smooth the pinched corners so they curve naturally rather than forming sharp angles, mimicking a ceramic baking dish. -
Create the Nested Tray:
Repeat the rolling and cutting process to make a smaller rectangle that fits comfortably inside the larger one. Raise the edges slightly less than the main tray for a lower profile. -
Sculpt the Butter Dish:
Use a small amount of the remaining speckled clay to form a shallow, round dish. Press your thumb into a ball of clay and pinch outwards to create the walls.
Step 2: Creating the Toast & Butter
-
Shape the Bread Slice:
Mix a tiny amount of yellow ochre into white clay to get a pale dough color. Shape a flat square, then indent the top edge slightly to create the classic bread loaf dip. -
Texture the Bread:
Using a toothbrush or a coarse texture sponge, tap the surface of the bread slice vigorously. This creates the porous, airy texture of real bread. -
Add the Crust:
Shave some brown and orange soft pastels into a powder. Use a soft brush to dust the outer edges of the toast, shading it to look perfectly golden-brown baked. -
Make the Butter Pats:
Mix yellow and a touch of translucent clay to create a realistic butter color. Cut two small squares. I like to soften the corners just a tiny bit so it looks like it’s starting to melt. -
Assemble the Pieces:
Place the textured toast slice into the center of the smaller rectangular tray. Press down gently to adhere it. -
Attach the Butter:
Place one butter pat in the center of the toast and the other into the small round dish. Use a drop of liquid clay or translucent bake-and-bond to ensure they stick permanently.
Melting Effect
For a ‘hot toast’ look, use a little liquid translucent clay mixed with yellow around the base of the butter pat before baking. It mimics melted butter pooling.
Step 3: Finishing Touches
-
Bake the Set:
Place all pieces on a ceramic tile or baking sheet. Bake according to your clay package instructions (usually 275°F for 15-30 minutes depending on thickness). -
Cool and Sand:
Let the pieces cool completely. Use fine-grit sandpaper to smooth any rough edges on the rims of the trays, being careful not to scratch the toast texture. -
Painting the Speckles:
If you didn’t mix pepper into the clay earlier, dilute some brown acrylic paint with water. Dip a stiff brush in it and flick the bristles to splatter tiny speckles over the entire set for that ceramic finish. -
Glazing the Butter:
Apply a coat of high-gloss glaze or a small drop of UV resin specifically to the butter pats. This gives them that wet, melting appearance. -
Sealing the Rest:
Finish the rest of the trays with a matte or satin varnish to protect the clay while maintaining a realistic pottery look.
Scented Surprise
Mix a drop of vanilla or bread-scented essential oil into the clay before baking. Your trinket tray will smell like a bakery for weeks!
Set this adorable trio on your nightstand and enjoy a guilt-free breakfast scene every morning.
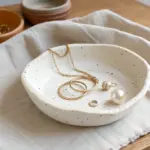
Mini Diorama Ring Holder Dish
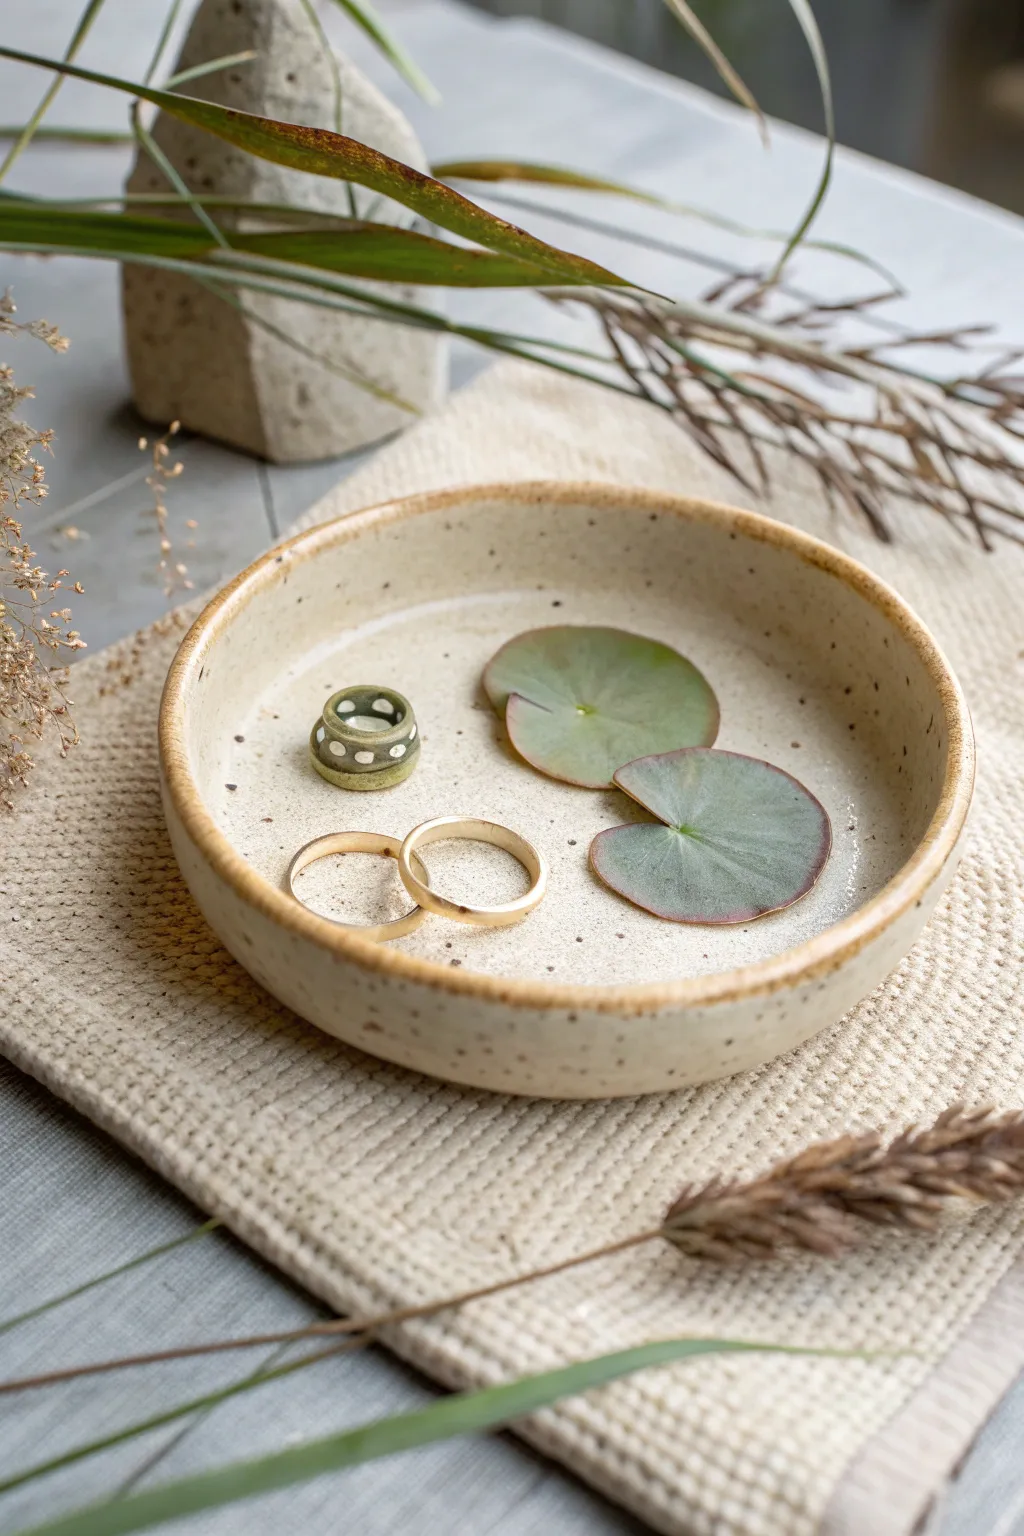
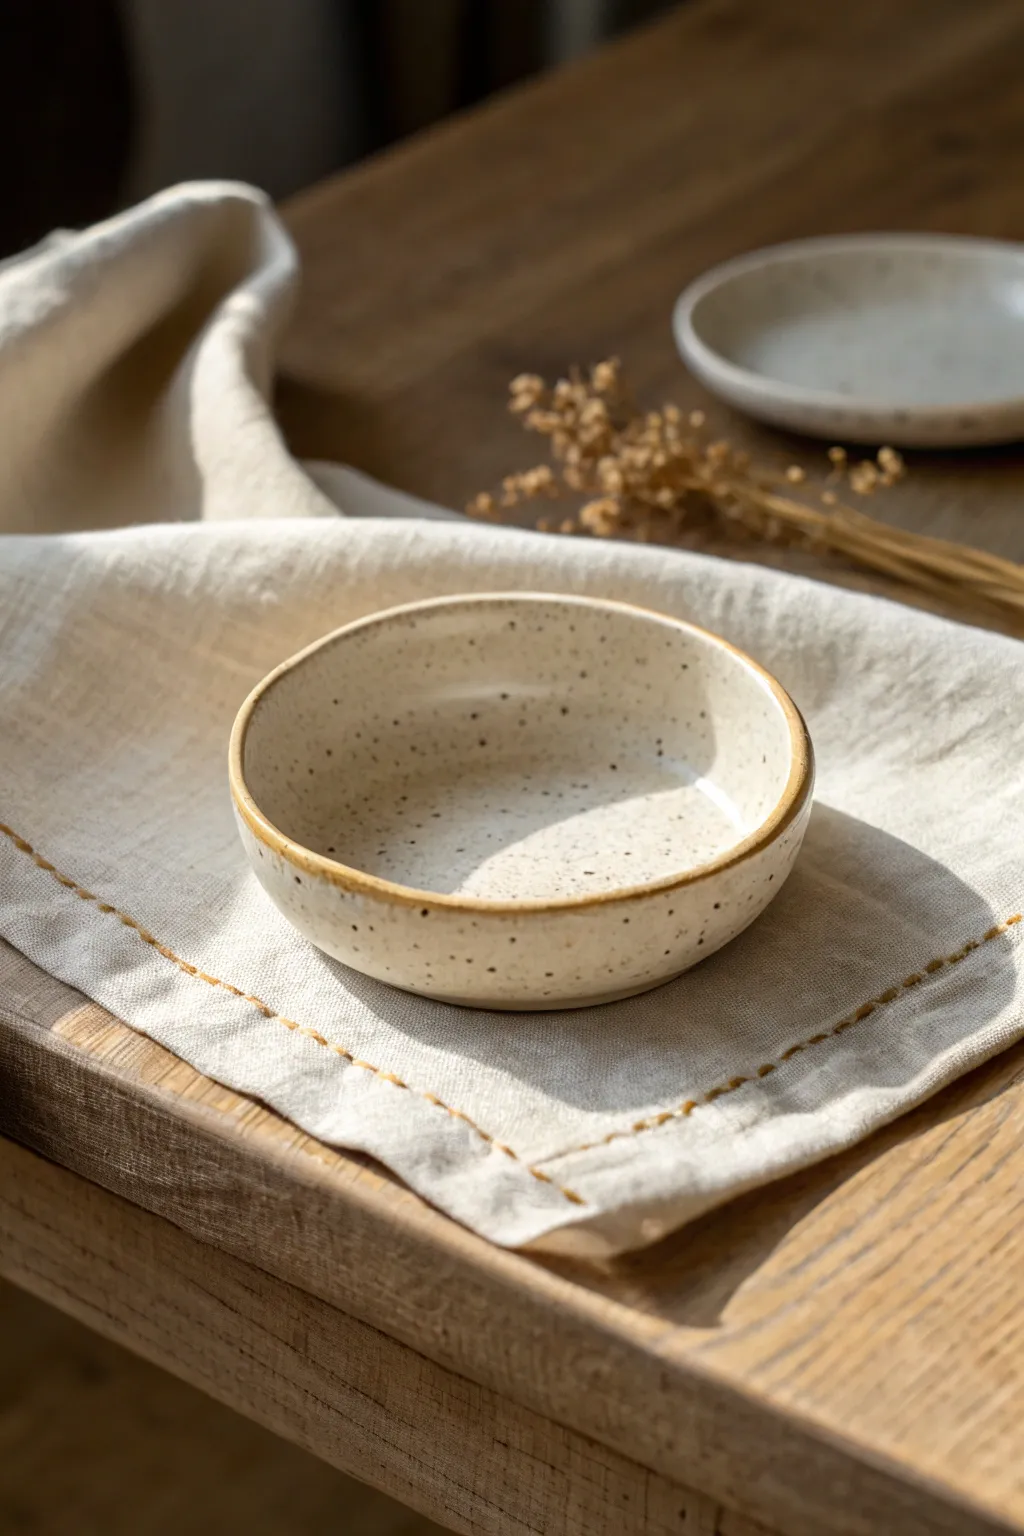
Embrace the beauty of imperfection with this handcrafted ring dish that mimics the look of stoneware pottery. With its subtle speckled finish and gentle, organic curves, it provides a serene resting place for your favorite jewelry pieces.
Detailed Instructions
Materials
- Air-dry clay (white or light beige)
- Rolling pin
- Circle cutter or a small bowl (approx. 4-5 inches diameter)
- Craft knife
- Sponge
- Water
- Fine-grit sandpaper
- Acrylic paint (cream/beige, brown, black)
- Old toothbrush
- Gloss or matte varnish
- Small paintbrush
- Palette or paper plate
Step 1: Shaping the Clay
-
Condition properly:
Begin by taking a handful of air-dry clay and kneading it in your hands until it feels warm and pliable. If the clay feels dry or crumbly, incorporate a tiny drop of water to smooth it out. -
Roll it out:
Place the clay on a smooth surface or a silicone mat. Use your rolling pin to flatten it into an even sheet, aiming for a consistent thickness of about 1/4 inch. -
Cut the base:
Press your circle cutter or inverted bowl onto the clay sheet to define the shape. Use the craft knife to trace around the edge if using a bowl, then remove the excess clay. -
Smooth the edges:
Dip your finger in a little water and run it along the cut edge of the clay circle to remove any sharpness or roughness, creating a soft, rounded perimeter. -
Create the rim:
Gently curve the outer edges of the circle upward to form a shallow bowl shape. I like to target a rim height of roughly half an inch. -
Refine the form:
Use a slightly damp sponge to smooth out the interior and exterior walls. Pay special attention to where the flat bottom transitions into the raised walls to ensure a seamless curve.
Natural Texture
Before the clay dries, gently press a piece of linen fabric into the surface to give the dish a subtle woven texture underneath the paint.
Step 2: Finishing and Decoration
-
Let it dry:
Set the dish aside in a cool, dry place for at least 24-48 hours. Turn it over halfway through the drying process to ensure the bottom dries evenly. -
Sand for smoothness:
Once fully cured, gently sand the entire surface with fine-grit sandpaper to remove any fingerprints or bumps. Wipe away the dust with a clean, dry cloth. -
Base coat application:
Mix a small amount of brown paint into your white or cream paint to create a warm, sandy beige tone. Apply an even coat to the entire dish and let it dry. -
Mix the speckle paint:
Thicken a small amount of dark brown or black acrylic paint with a tiny bit of water. It should be fluid but not dripping wet. -
Splatter effect:
Dip an old toothbrush into this dark paint mixture. Hold the brush over the dish and run your thumb across the bristles to flick tiny speckles onto the surface. Practice on paper first to control the spray. -
Rim detailing:
Using a small detail brush and a slightly darker shade of beige-brown, carefully paint along the very top edge of the rim to define the shape and give it a fired pottery look. -
Seal the piece:
Wait for all paint to dry completely. Apply a coat of gloss or matte varnish to seal the clay and protect it from moisture and scratches. -
Add nature elements:
To recreate the specific look in the photo, place two small, round leaves (like Pilea or Nasturtium) inside the dish before displaying your rings, though fresh leaves will need replacing.
Uneven Drying?
If the edges curl up too much while drying, weigh down the center of the dish with a small bag of rice or beans to keep the base flat.
Place your creation on a textured mat and enjoy the minimalist charm of your new jewelry holder