When I’m staring at a plain mug or plate, the quickest way to make it feel like “mine” is adding a repeatable pattern that wraps the form. These pottery patterns ideas are meant to be easy to copy, easy to tweak, and totally doable even if you’re still building brush confidence.
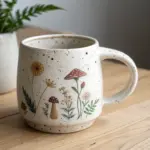
Polka Dot Scatter
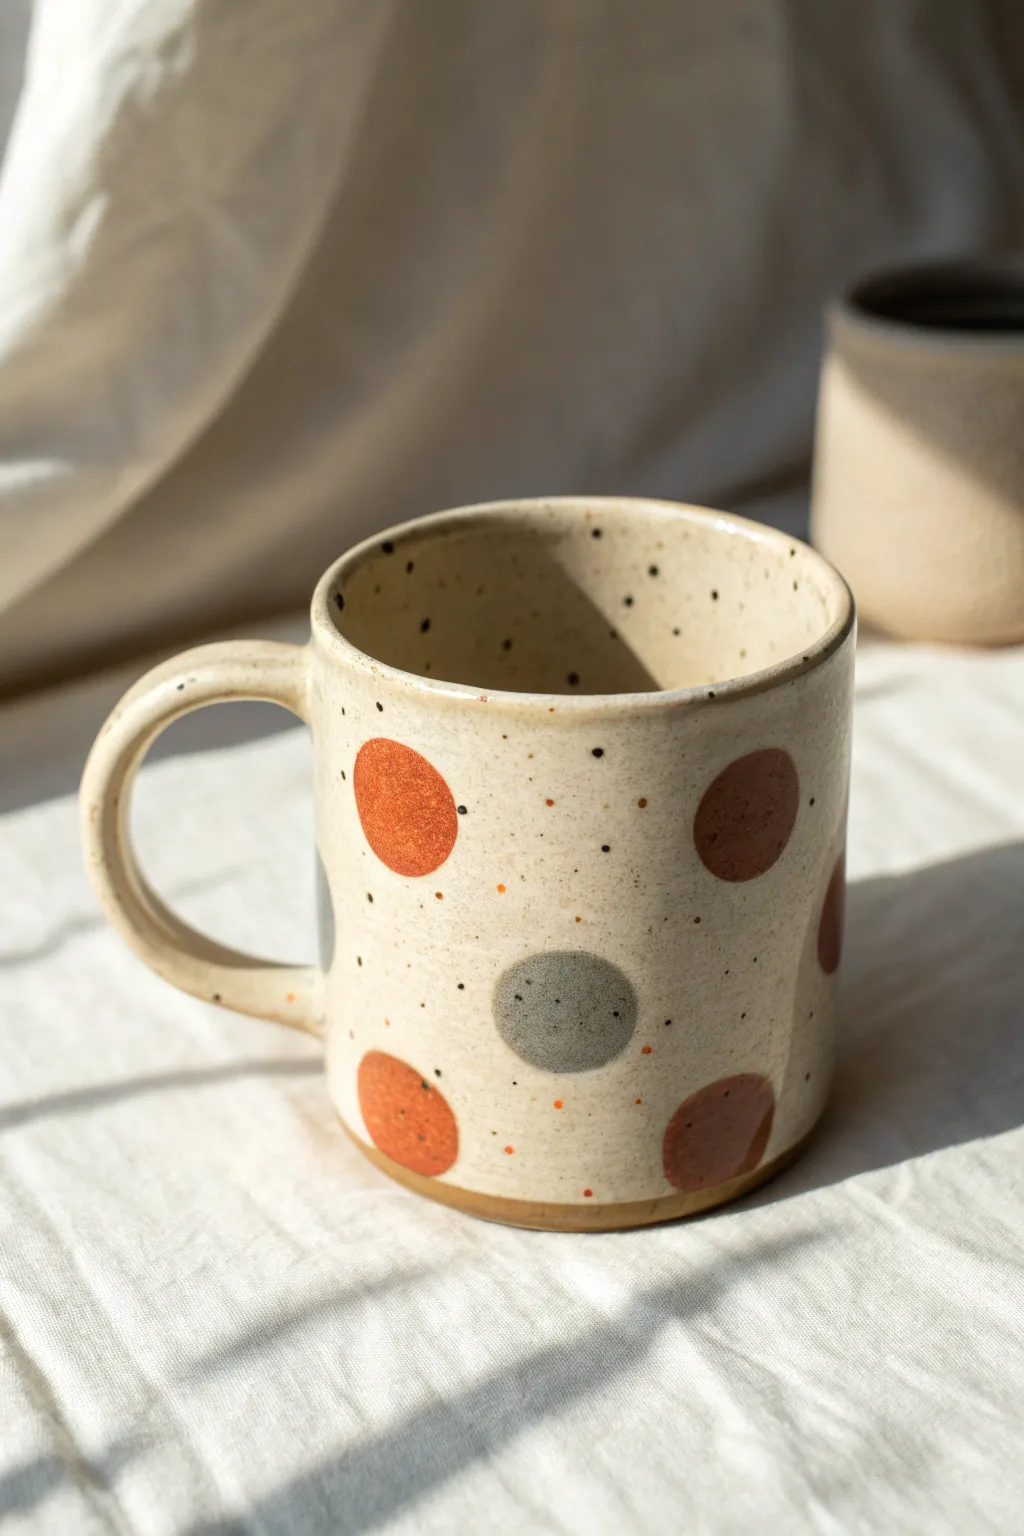
Embrace the imperfect beauty of hand-building with this charming speckled mug featuring large, earthy polka dots. The combination of a creamy, speckled glaze with rust and slate-grey circles creates a warm, vintage aesthetic perfect for your morning coffee.
Step-by-Step Tutorial
Materials
- Stoneware clay (buff or speckled)
- Pottery wheel (or rolling pin for hand-building)
- Rib tool
- Sponge
- Wire cutter
- Loop trimming tool
- Creamy matte or satin white glaze (speckled)
- Wax resist
- Underglazes (Rust/Terracotta and Slate Grey)
- Round fan brush or large dotting tool
- Fine detail brush (for extra speckles, optional)
- Kiln
Step 1: Forming the Body
-
Throw the Cylinder:
Center about 1 pound of clay on the wheel. Open and pull the walls to create a straight-sided cylinder, approximately 4 inches tall. -
Refine the Shape:
Use a rib tool to smooth the exterior walls, removing throwing rings to create a perfect canvas for your pattern. -
Trim the Base:
Once leather hard, trim a defined foot ring at the bottom of the mug. This elevates the form and adds sharpness to the design. -
Pull the Handle:
Pull a strap handle from a lug of clay. Aim for a comfortable thickness that tapers slightly. I like to let this stiffen just a bit before attaching so it holds its curve. -
Attach Handle:
Score and slip the contact points on both the mug and handle. Attach firmly, blending the clay smoothly for a seamless connection. Allow the entire piece to dry slowly to bone dry. -
Bisque Fire:
Load the bone-dry mug into the kiln and bisque fire to Cone 04 (or your clay body’s specific bisque temperature).
Bleeding Edges?
If your underglaze dots looked blurry after firing, ensure the wax resist was completely dry before dipping, and don’t thin your underglaze too much.
Step 2: Applying the Pattern
-
Clean the Bisqueware:
Wipe the fired mug with a damp sponge to remove any dust, which ensures the glaze adheres properly. -
Plan the Layout:
Visualize where your large dots will go. A scattered, non-uniform arrangement often looks more organic and pleasing than a perfect grid. -
Apply Wax Resist Circles:
Using liquid wax resist and a round brush, paint large circles directly onto the raw bisque where you want your colored dots to be. The wax will repel the base glaze. -
Glaze the Interior:
Pour your creamy speckled glaze inside the mug, roll it around to coat the entire interior surface, and pour out the excess. -
Dip the Exterior:
Holding the mug by the foot (or using tongs), dip the exterior into the same creamy glaze. The wax circles will resist the glaze, revealing the bare bisque underneath. -
Clean the Resist:
Use a damp sponge or your fingertip to gently wipe any beads of glaze remaining on top of the waxed circles. -
Fill the Dots:
Once the base glaze is dry to the touch, fill in the exposed bisque circles with your underglazes. Use Rust/Terracotta for most dots and save the Slate Grey for one or two accent spots. -
Add Extra Speckles:
If your base clay or glaze isn’t naturally speckled enough, dip a stiff toothbrush into thinned black or iron oxide wash and flick tiny splatters over the surface. -
Clean the Foot:
Wipe the very bottom of the foot ring clean with a sponge to prevent the pot from sticking to the kiln shelf.
Step 3: Final Firing
-
Glaze Fire:
Fire the mug to the maturity temperature of your clay and glaze (typically Cone 5 or 6 for stoneware). -
Cool and Inspect:
Allow the kiln to cool completely before unloading. Check that the glaze has melted smoothly and the underglaze dots have a nice, crisp edge.
Raw Clay Texture
Skip the underglaze on the dots entirely! Use a clear liner glaze inside and leave the ‘polka dots’ as bare, unglazed clay for a tactile, rustic feel.
Enjoy your morning brew in a piece of art that feels as good to hold as it looks


Simple Stripes and Bands
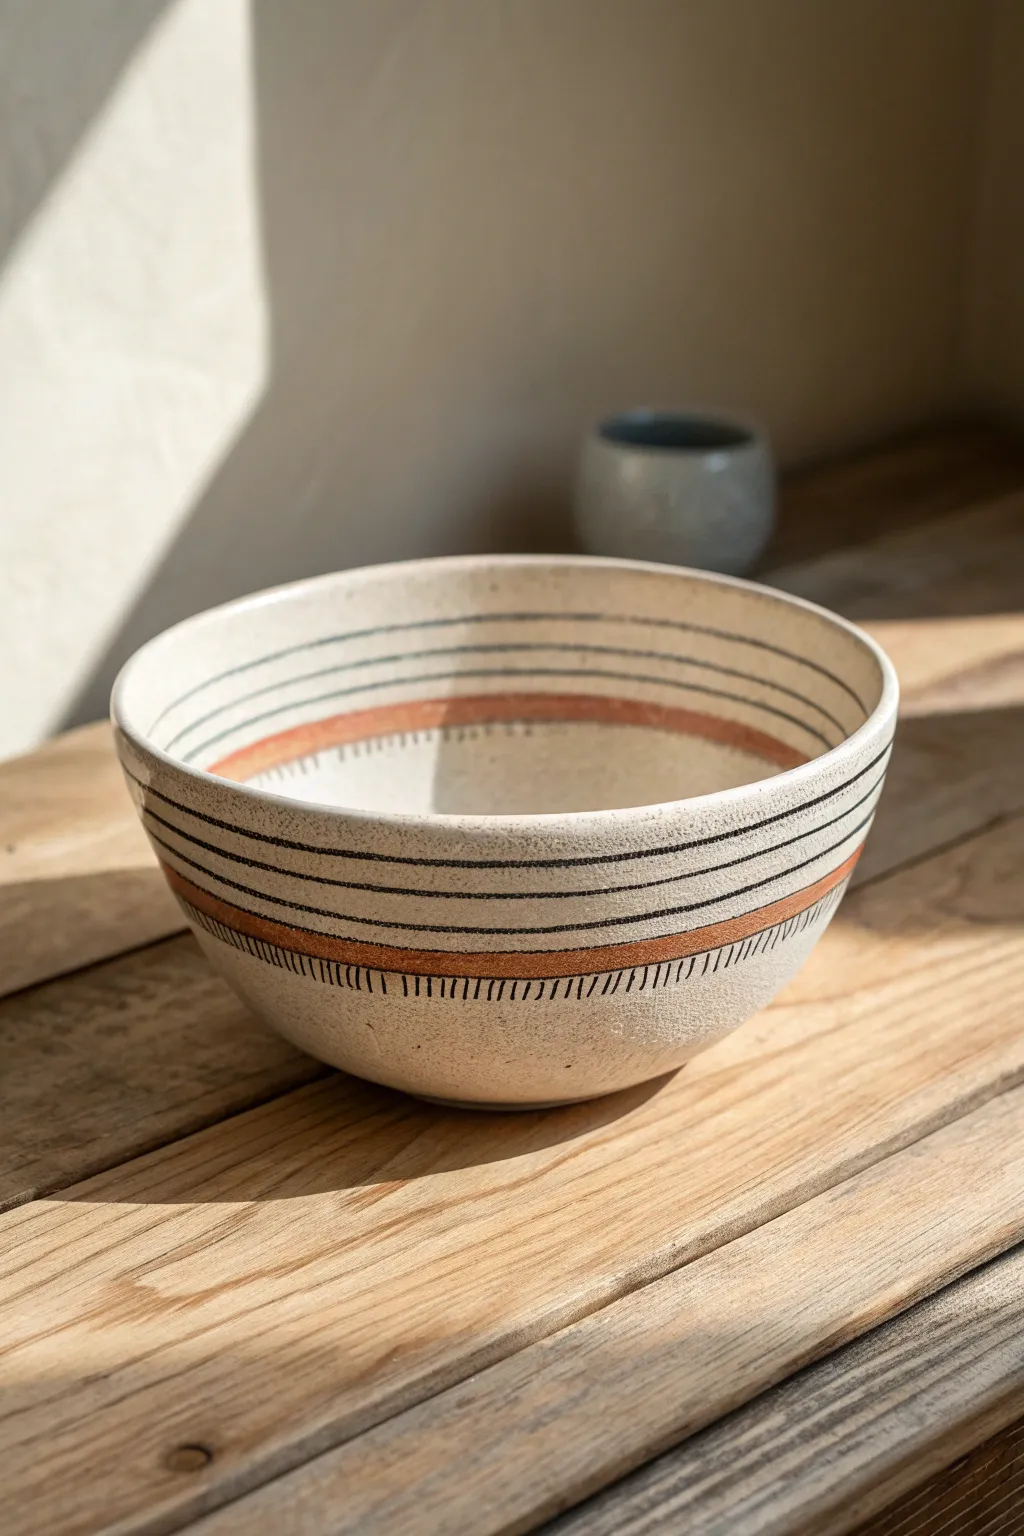
This project embraces the beauty of minimalism with clean, repeating lines that enhance the natural contours of a hand-thrown form. The combination of stark black banding and warm terracotta tones creates a timeless, rustic aesthetic perfect for everyday use.
How-To Guide
Materials
- Bisque-fired stoneware bowl (wheel-thrown or hand-built)
- Black underglaze
- Terracotta or rust-orange underglaze
- Banding wheel
- Fine liner brush (size 0 or 1)
- Medium round brush (size 4 or 6)
- Satin or matte clear glaze (cone 5/6 appropriate)
- Sponge
- Clean water
Step 1: Preparation and Planning
-
Surface Prep:
Begin by wiping your bisque-fired bowl with a damp sponge. This removes any kiln dust or oils from your hands that might resist the underglaze application. -
Centering:
Place your bowl upside down on the banding wheel first to work on the exterior. Spend a moment centering it perfectly; spin the wheel to ensure the bowl doesn’t wobble, as this is crucial for straight lines.
Step 2: Painting the Exterior
-
First Black Band:
Load your fine liner brush with black underglaze. Spin the banding wheel at a steady, medium pace. Gently touch the tip of the brush to the bowl about an inch below the rim to create your first definitive line. -
Add Parallel Lines:
Repeat this process to add two or three more thin black lines below the first one. Keep them closely spaced but allow the natural clay body to show clearly between them. -
The Terracotta Band:
Switch to your medium round brush and load it with the terracotta/rust underglaze. Position this band below your set of black lines. Apply a slightly heavier pressure to create a wider stroke, spinning the wheel consistently to maintain an even thickness. -
Lower Boundary Line:
Clean your fine liner brush and switch back to black underglaze. Paint one final thin black line directly beneath the terracotta band to frame it. -
Adding the Hash Marks:
Stop the banding wheel. Using just the very tip of your fine liner brush, paint short, vertical dash marks hanging down from that bottom black line. I find it helps to maximize contrast by keeping these spacing fairly tight and uniform.
Steady Hands Pro-Tip
Rest your painting arm against a stable stack of books or a jar while spinning the banding wheel. This provides an anchor point, eliminating shake for crisper lines.
Step 3: Painting the Interior
-
Flip and Re-center:
Carefully flip the bowl right-side up on the banding wheel. Check your centering again to ensure the interior concentric circles will be even. -
Interior Rim Lines:
With the wheel spinning, apply two thin black lines near the upper rim of the interior using the fine liner brush, mirroring the placement on the outside. -
Interior Color Band:
Apply the terracotta band on the inside. Aim to place it at roughly the same height as the exterior band so the design feels cohesive when viewing the bowl from an angle. -
Dashing the Inside:
Add a final thin black line below the interior terracotta band. Stop the wheel and add the small vertical hash marks distinctively along this line, just as you did on the exterior.
Level Up: Wax Resist
For ultra-crisp edges on the thick terracotta band, apply thin lines of wax resist above and below where the band will go. This acts as a stencil, keeping the color perfectly contained.
Step 4: Glazing and Finishing
-
Drying:
Allow the underglaze decoration to dry completely. It should look chalky and matte when ready. -
Clear Glaze Application:
Dip or brush on a clear satin or matte glaze over the entire piece. A matte finish works beautifully here to preserve that tactile, earthy feel of the raw clay and underglaze texture. -
Wipe the Foot:
Use a damp sponge to meticulously wipe any glaze off the foot ring of the bowl to prevent it from fusing to the kiln shelf. -
Final Fire:
Fire the bowl to the temperature appropriate for your specific clay and glaze combination (typically Cone 5 or 6 for stoneware).
Now you have a beautifully banded bowl ready to add warmth to your table setting


Grid Lines and Crosshatch
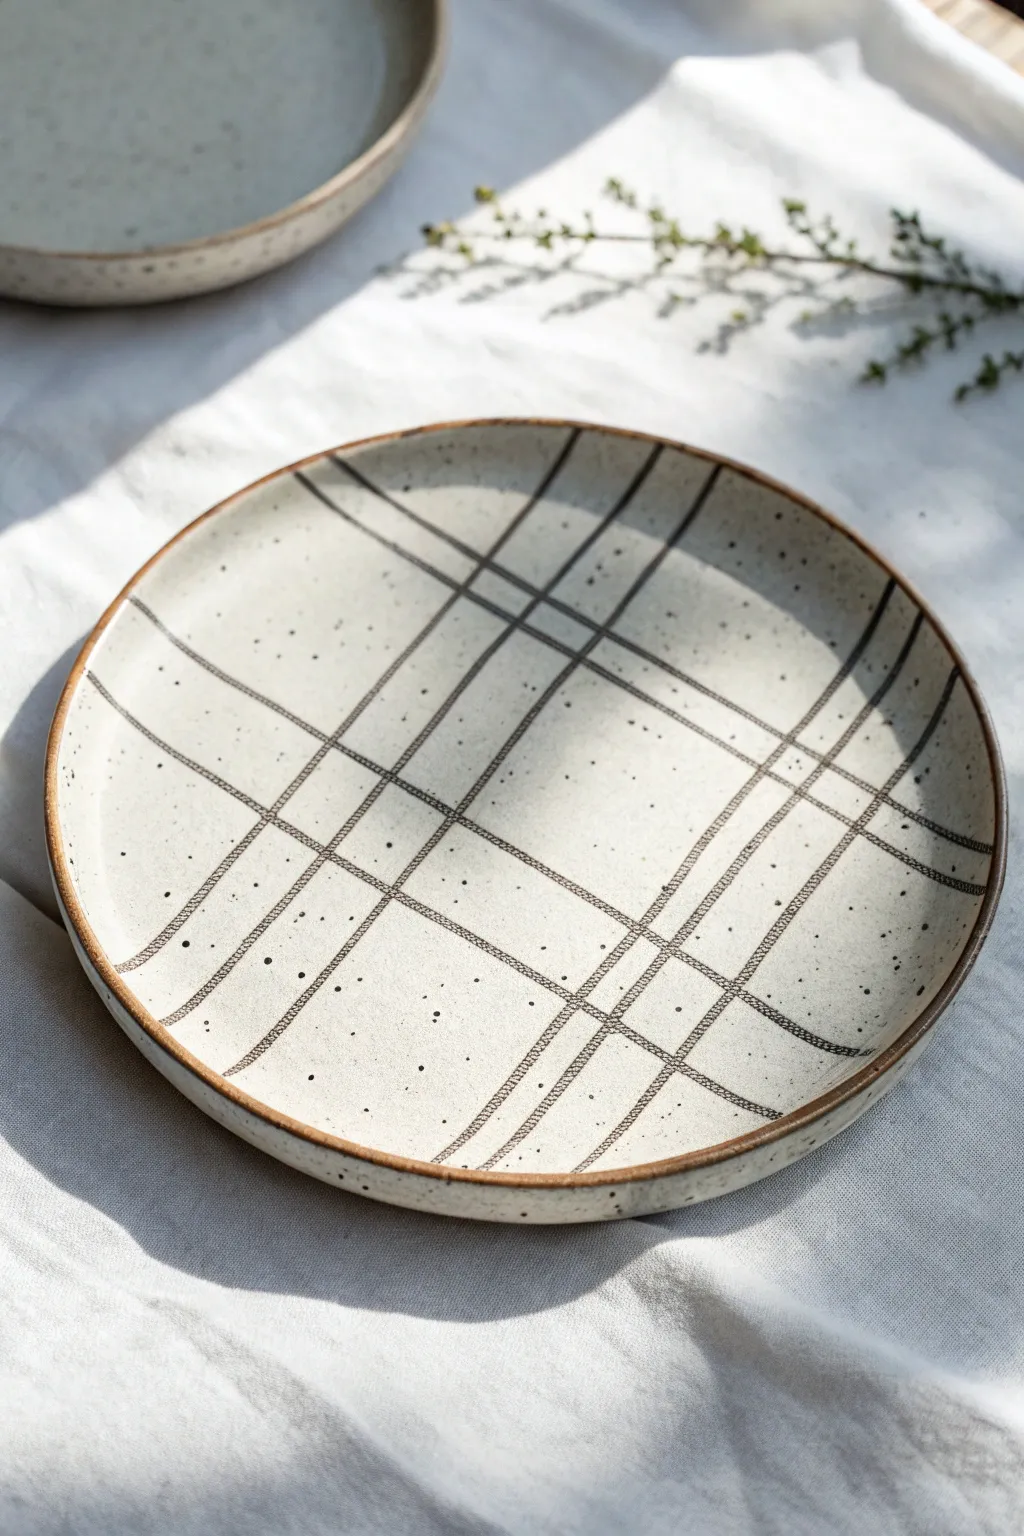
This project embraces the beauty of imperfection, featuring a minimalist grid pattern that looks effortlessly hand-drawn. The combination of creamy speckled glaze and raw clay edges creates a modern rustic aesthetic perfect for everyday dining.
Step-by-Step Tutorial
Materials
- Stoneware clay (speckled or buff)
- Pottery wheel or slab roller (and template)
- Trimming tools
- Underglaze pencil (black or dark brown) or slip trailer with fine tip
- Sponge
- Clear or semi-transparent matte white glaze
- Wax resist
- Rib tool
- Needle tool
- Kiln
Step 1: Forming the Plate
-
Prepping the clay:
Begin by wedging about 1-1.5 lbs of stoneware clay to remove air bubbles. If you want that lovely speckled look shown in the image but only have plain clay, you can wedge in some granular manganese or iron oxide, though buying pre-speckled clay is easier. -
Throwing or building:
If throwing, center your clay and open it wide to form a flat plate floor. Compress the bottom thoroughly to prevent cracking. Pull up a short rim, angling it slightly outward. If hand-building, roll a slab to 1/4 inch thickness and use a plate mold or form the rim by hand. -
Refining the rim:
While the wheel is spinning slowly (or carefully by hand), use a chamois or a damp sponge to smooth the rim. This compression makes the edge durable and pleasant to touch. -
Drying to leather hard:
Allow the plate to dry slowly until it reaches a leather-hard state. It should be firm enough to handle without warping but still hold moisture. -
Trimming the foot:
Place the plate upside down on the wheel. trim a neat foot ring. This lifts the plate and gives it a professional profile. Smooth any grog or rough spots with a rib.
Line Consistency Tip
If your slip trailer lines are sputtering, tap the bottle nozzle on the table to release air bubbles. For underglaze pencils, keep a sharpener nearby for crisp lines.
Step 2: Applying the Design
-
Cleaning the surface:
Wipe the interior surface with a slightly damp sponge to remove dust. A clean surface is crucial for the lines to adhere properly. -
Planning the grid:
Visualize a Tic-Tac-Toe board or tartan pattern. The charm of this piece lies in the varied spacing—some lines are close together (creating double lines), and others are wide apart. -
Drawing the first lines:
Using a dark underglaze pencil or a very fine slip trailer, draw your first set of parallel lines across the plate. Don’t use a ruler; the slight wobble of a hand-drawn line adds character. -
Crossing the lines:
Rotate the plate 90 degrees. Draw intersecting lines to create the grid. Vary the pressure slightly; looking at the reference, you’ll see some lines are darker and others fade, which mimics a sketch. -
Bisque firing:
Once bone dry, load the plate into the kiln for a bisque fire (usually Cone 06 or 04). This sets the shape and the underglaze decoration.
Level Up: Texture
Lightly incise the grid lines with a needle tool before applying black wash. The glaze will pool slightly in the grooves, adding tactile depth to the pattern.
Step 3: Glazing and Finishing
-
Waxing the rim:
This is the most critical stylistic step for this specific look. Apply wax resist carefully to the very edge of the rim. This prevents glaze from sticking there, revealing the raw, toasted clay color after firing. -
Waxing the foot:
Flip the plate and wax the foot ring as well to protect your kiln shelves. -
Selecting the glaze:
Choose a semi-transparent or transparent matte glaze. A ‘satin matte white’ works beautifully here as it softens the black grid lines without obscuring them. -
Dipping:
Using glazing tongs, dip the entire plate into your glaze bucket for about 3 seconds. Pull it out and let the excess drip off. The wax on the rim will repel the glaze. -
Cleaning the rim:
Even with wax, small droplets can cling. Use a damp sponge to wipe the rim perfectly clean, ensuring that crisp brown line will emerge in the final firing. -
Final smooth:
I like to gently rub the dry glaze surface with a clean fingertip to smooth out any pinholes or drip marks before it goes into the kiln. -
Glaze firing:
Fire the plate to the maturity temperature of your clay and glaze (typically Cone 6 for stoneware). This melts the glaze and vitrifies the clay.
Unload your kiln to reveal a modern, sophisticated plate that highlights simple geometry and natural materials


Classic Checkerboard
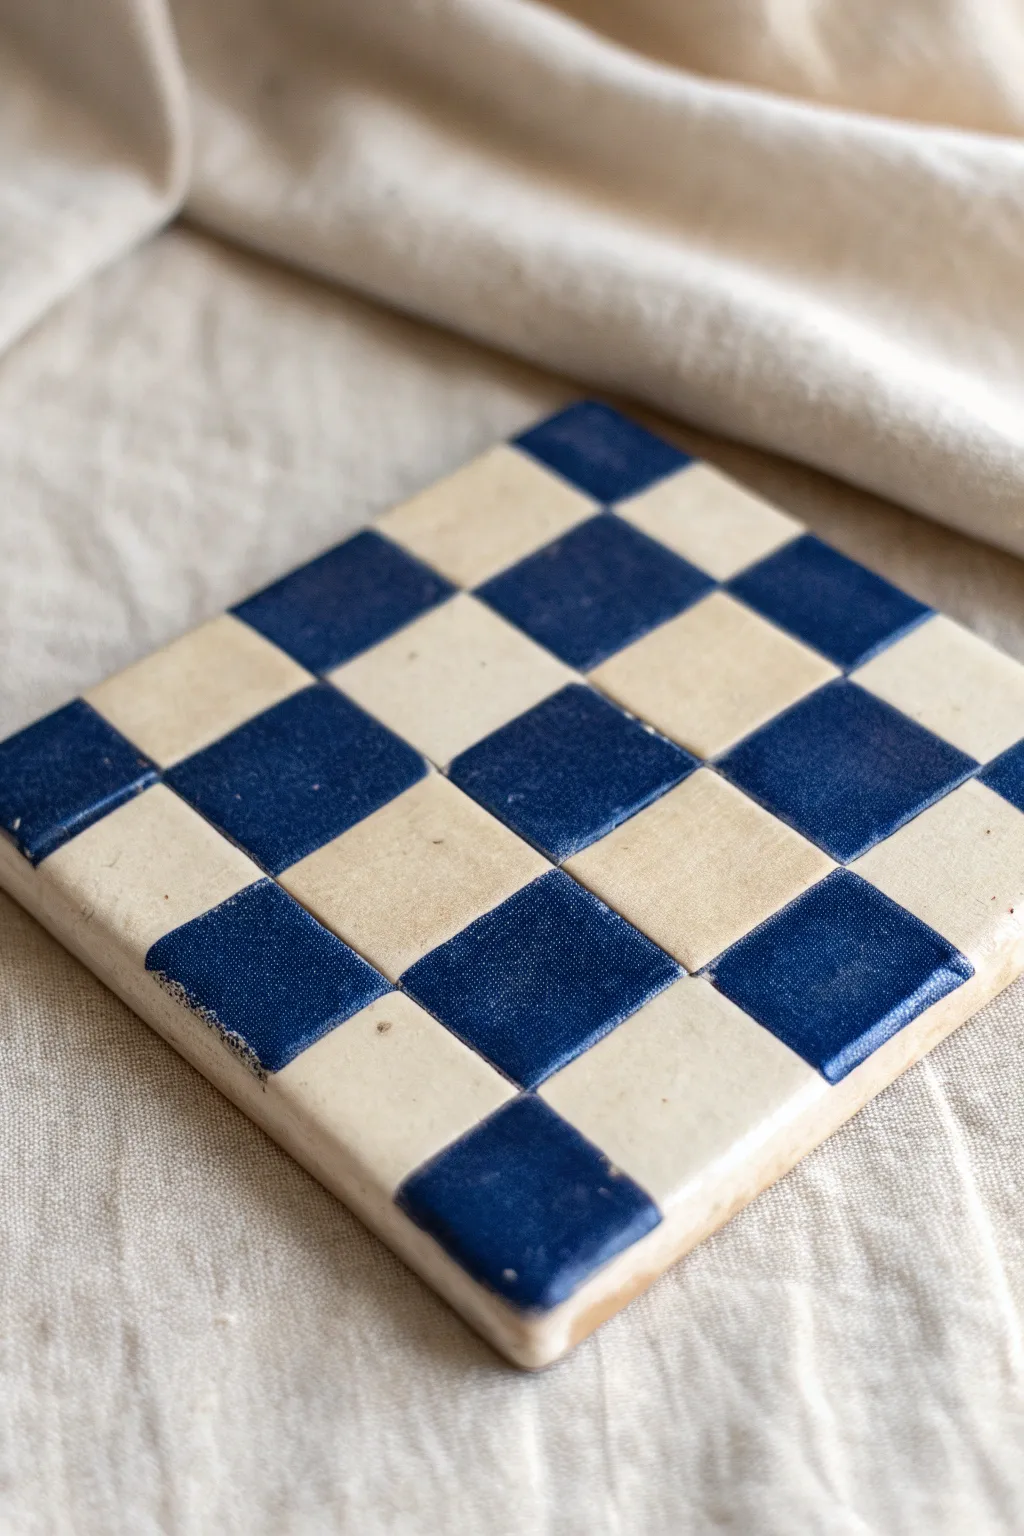
This project creates a charming, handcrafted ceramic tile featuring a classic blue and cream checkerboard pattern. The slightly uneven, organic lines and glossy finish give it a lovely vintage feel perfect for a coaster or trivet.
Step-by-Step
Materials
- White or speckled stoneware clay body
- Rolling pin
- Canvas working surface
- Two 1/4-inch wooden thickness slats
- Square template (4×4 inches or 5×5 inches)
- Fettling knife
- Ruler
- Needle tool
- Cobalt blue underglaze
- Clear transparent glaze
- Small flat synthetic brush (size 4 or 6)
- Small sponge
- Kiln access
Step 1: Slab Construction
-
Prepare the Clay:
Begin by wedging a baseball-sized amount of white stoneware clay to remove air bubbles and align the particles. -
Roll the Slab:
Set up your canvas workspace with the 1/4-inch thickness slats on either side. Place the clay in the center and roll it out until it is perfectly flat and even with the guides. -
Compress the Slab:
Using a rib tool, gently compress the surface of the clay slab in multiple directions. This strengthens the clay and creates a smoother canvas for your pattern later. -
Cut the Shape:
Place your square paper or cardboard template onto the slab. Using a fettling knife held vertically, cut straight down around the template to create a clean square tile. -
Smooth the Edges:
Once cut, use a slightly damp sponge to soften the sharp corners and edges. I like to gently round them over to give the final piece a more comfortable, handmade feel. -
Dry to Leather Hard:
Place the tile between two pieces of drywall or wooden boards to dry slowly until it reaches the leather-hard stage. This prevents warping.
Uneven Glaze Lines?
If you struggle with straight lines, use thin automotive masking tape (pinstriping tape) to mask off the squares before applying underglaze. Remove before firing.
Step 2: Creating the Grid
-
Measure the Grid:
Using a clean ruler, lightly mark the intervals for your checks along the edges of the leather-hard tile. For a 5×5 pattern like the example, divide the total width by five. -
Scribe the Lines:
Gently connect your marks using a needle tool and the ruler. Don’t dig too deep; you just want a faint guideline for your painting. -
Bisque Fire:
Once the tile is completely bone dry, fire it in the kiln to bisque temperature (usually Cone 04 or 06, depending on your clay).
Step 3: Glazing and Finishing
-
Clean the Bisque:
Wipe the fired tile with a damp sponge to remove any kiln dust, which could prevent the glaze from adhering properly. -
Define the First Checks:
Using the flat synthetic brush, carefully fill in the first blue square with cobalt blue underglaze. Work diagonally to maintain the pattern. -
Complete the Pattern:
Continue painting alternating squares. Aim for crisp edges, but don’t worry if they aren’t machine-perfect; the hand-painted look adds character to this piece. -
Apply Second Coat:
Once the first layer of blue is dry to the touch, apply a second coat to ensure the color is deep and opaque after firing. -
Clean Up Mistakes:
If any blue strayed into a ‘white’ square, use a clean, stiff brush dipped in water or a scratching tool to carefully remove the speck. -
Clear Glaze Application:
Dip the entire tile into a clear transparent glaze using glazing tongs, or brush on three even coats of brushing clear glaze. -
Wipe the Base:
Ensure the bottom of the tile is completely free of glaze. You can use a wax resist before dipping or sponge it clean afterward. -
Final Firing:
Fire the tile a second time to the glaze temperature recommended for your specific clay body (e.g., Cone 5/6).
Make it a Set
Create four tiles but vary the check sizes on each one—start with large 2×2 checks and work down to a tiny, intricate grid for a dynamic coaster set.
Now you have a durable, classic piece of pottery that brings artistic flair to any table surface

The Complete Guide to Pottery Troubleshooting
Uncover the most common ceramic mistakes—from cracking clay to failed glazes—and learn how to fix them fast.
Scalloped Rim Border
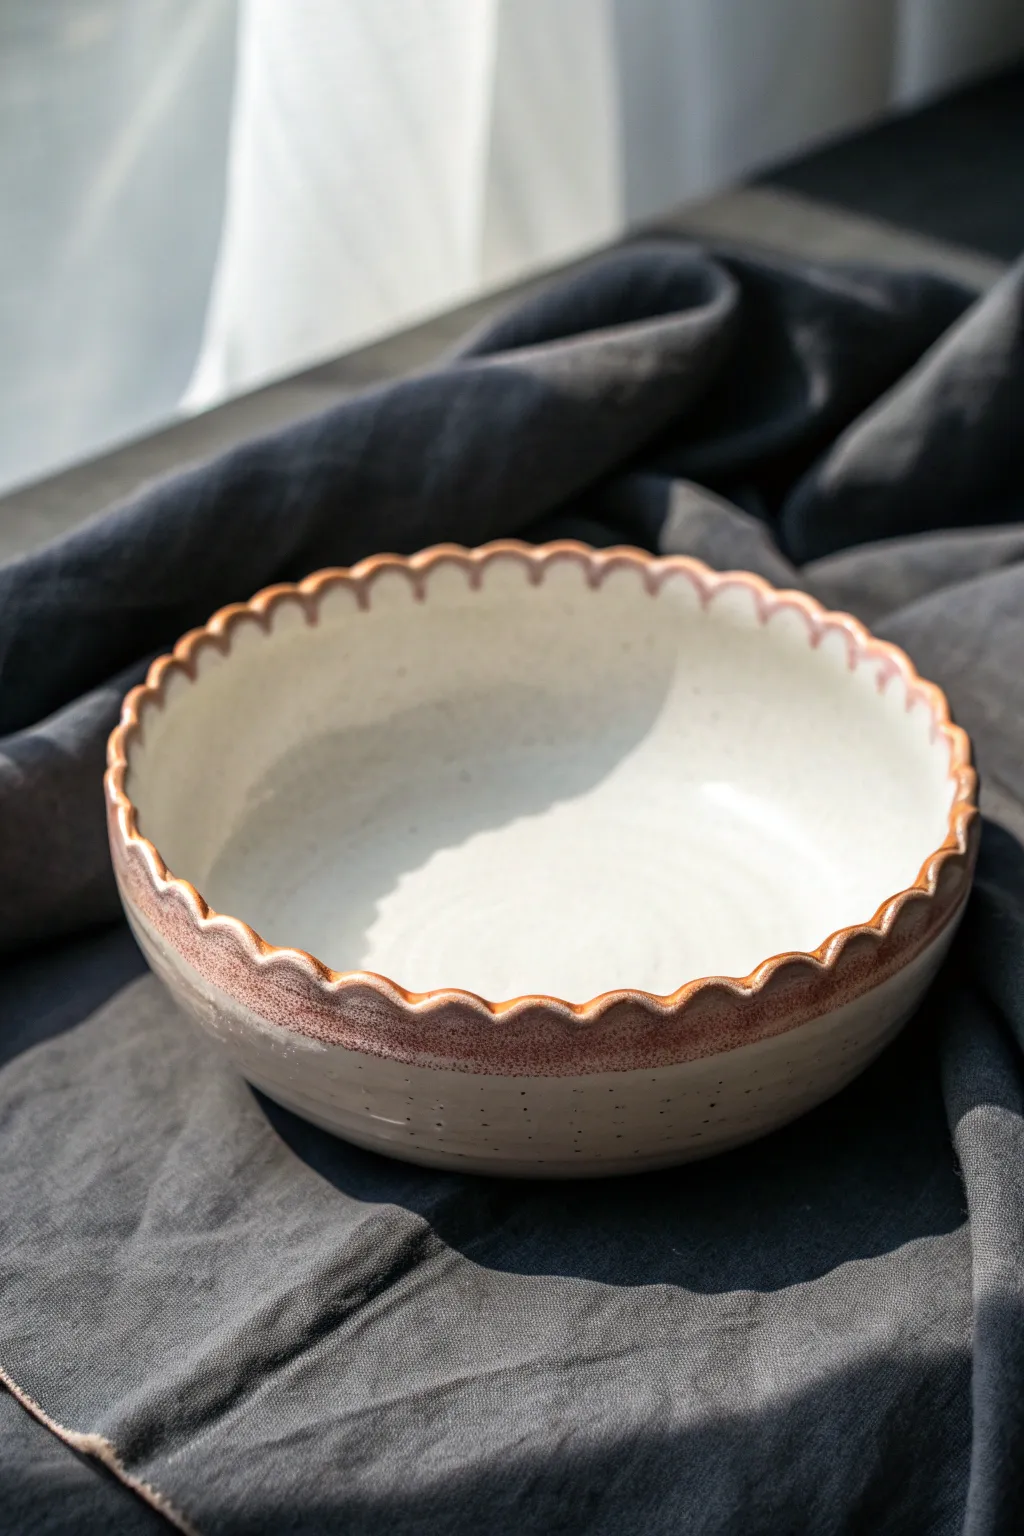
This charming shallow bowl combines a modern, organic form with a vintage-inspired scalloped edge. The contrast between the speckled creamy white body and the rustic terracotta rim creates a warm, inviting piece perfect for serving or display.
Detailed Instructions
Materials
- Speckled stoneware clay (mid-fire)
- Pottery wheel
- Throwing tools (sponge, wooden rib, wire cutter)
- Needle tool
- Fettling knife
- Round trimming tool or loop tool
- Wooden sculpting tool (rounded end)
- Sanding sponge
- Wax resist
- Clear or Satin White glaze
- Terracotta colored slip or iron oxide wash
Step 1: Throwing and Shaping
-
Center the clay:
Begin with about 2-3 pounds of speckled stoneware clay. Center it firmly on the wheel head, ensuring it feels balanced and steady before proceeding. -
Open the form:
Open the clay into a wide, low curve rather than a tall cylinder. You are aiming for a shallow bowl shape, so keep the floor broad. -
Pull the walls:
Pull the walls outwards and upwards gently. Aim for an even thickness of about 1/4 inch, leaving just a slightly thicker rim to accommodate the scalloping later. -
Refine the curve:
Use a wooden rib on the interior to compress the floor and create a smooth, continuous interior curve. This removes throwing lines and strengthens the piece. -
Cut from the wheel:
Wire the bowl off the wheel head, but leave it on the bat or a ware board to firm up until it reaches leather-hard consistency.
Consistent Waves
Use a circular object, like a large jar lid or cookie cutter, to gently impress guide curves on the rim before carving. This keeps every scallop identical in width.
Step 2: Creating the Scalloped Rim
-
Trim the foot:
Once leather hard, flip the bowl and trim a clean foot ring. This elevates the bowl and gives it a professional finish. -
Mark the intervals:
Turn the bowl right-side up. Using a needle tool, lightly mark even intervals creating a guide around the rim. I like to space them about an inch apart for a dense ruffle. -
Carve the scallops:
Use a rounded wooden sculpting tool or your fingertip to firmly press down at the midpoint between your marks. Push the clay downward to create the concave part of the scallop. -
Refine the peaks:
As you press down, the adjacent clay will rise. Gently pinch these rising points to sharpen the ‘peaks’ of the scallop, creating a wave-like rhythm. -
Smooth the edge:
Run a damp sponge or your finger along the newly cut rim to soften any sharp angles. The transition should feel flowing and organic, not jagged. -
Slow drying:
Cover the piece loosely with plastic to allow it to dry slowly. Uneven drying at the rim can cause warping or cracking in the scallops.
Texture Play
Before glazing, gently wipe the exterior with a damp sponge to expose more of the clay’s natural speckles, enhancing the rustic connection to the terracotta rim.
Step 3: Glazing and Finishing
-
Bisque fire:
Load the bone-dry bowl into the kiln for a bisque firing (typically Cone 04 or 06). -
Clean the surface:
Wipe the bisque-fired bowl with a damp sponge to remove any kiln dust ensuring the glaze adheres properly. -
Apply the rim color:
Dip a brush into your terracotta slip or iron oxide wash. Carefully paint a band along the scalloped rim, letting the color bleed slightly down the exterior texture. -
Wax the rim:
Apply a line of wax resist over the painted terracotta rim if you want it to remain matte and unglazed, or skip this if you want the main glaze to coat it. -
Glaze the body:
Dip the entire bowl into a Satin White or Clear glaze. If you waxed the rim, wipe away any glaze beads that sit on top of the wax. -
Clean the foot:
Use a sponge to wipe the foot ring completely clean of glaze to prevent it from sticking to the kiln shelf. -
Final firing:
Fire the bowl to maturity (typically Cone 5 or 6 for stoneware). Let the kiln cool completely before unloading to avoid thermal shock.
Enjoy using your new handmade bowl for salads or fruit displays, letting the rhythmic edge add a touch of grace to your table
Speckled Confetti Dots
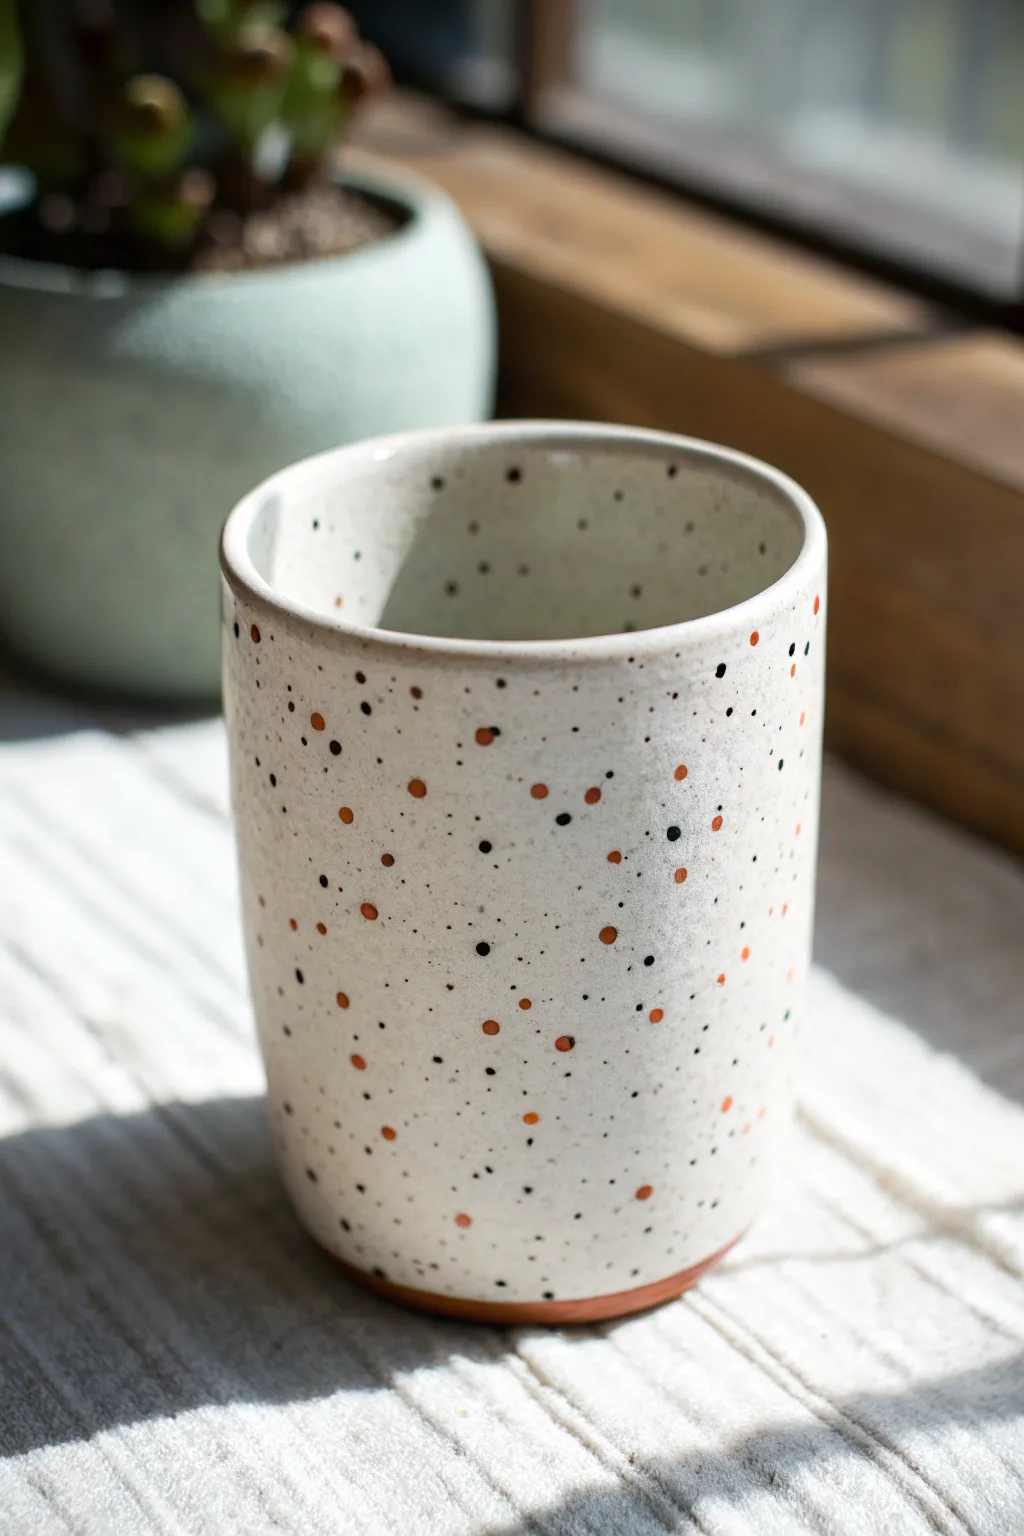
Capture the playful energy of confetti in durable stoneware with this speckled tumbler project. The creamy white glaze serves as the perfect canvas for scattered warm orange dots and fine black speckles, creating a modern yet handmade aesthetic.
Step-by-Step Tutorial
Materials
- Stoneware clay (red or brown body recommended)
- Pottery wheel
- Throwing tools (rib, sponge, wire cutter)
- Trimming tools
- Semi-matte or satin white glaze
- Orange underglaze or slip
- Black mason stain or iron oxide wash
- Small round paintbrush (size 2 or 4)
- Stiff bristle brush (e.g., toothbrush)
- Kiln
Step 1: Throwing and Trimming
-
Center the clay:
Start with about 1 pound of stoneware clay. Wedge it thoroughly to remove air bubbles, then slam it onto the center of your wheel head. Use your palms and weight to cone the clay up and down until it is perfectly centered and spinning without wobble. -
Open the form:
Press your thumbs into the center to open the clay, leaving about a quarter-inch for the floor. Pull the floor out to establish the width of your tumbler, compressing the bottom with a flat rib to prevent cracking later. -
Pull the walls:
Using a steady pincer grasp, pull the walls upward. I like to keep the cylinder straight with no curve at first, aiming for an even thickness of about 3/16th of an inch from bottom to top. -
Shape the lip:
Once you have your height, gently compress the rim with a chamois or sponge. Create a slightly rounded, comfortable lip for drinking, ensuring it’s level. -
Dry to leather hard:
Wire the pot off the wheel and set it aside. Wait until the clay reaches a ‘leather hard’ state—stiff enough to handle without deforming but still cool to the touch. -
Trim the foot:
Place the tumbler upside down on the wheel. Secure it with clay lugs. Trim away excess weight from the bottom, carving a neat foot ring. Leave a small unglazed band at the very bottom edge to create the contrast seen in the photo.
Step 2: Decorating and Glazing
-
Bisque fire:
Load your trimmed and dried tumbler into the kiln for a bisque firing (usually Cone 04 or 06). This prepares the ceramic canvas for glazing. -
Apply base glaze:
Wipe the bisque ware with a damp sponge to remove dust. Pour your white satin glaze inside the cup, swirl to coat, and pour out. Dip the exterior into the white glaze, stopping just short of the foot to leave that sliver of raw clay exposed. -
Clean the foot:
Immediately wipe away any glaze drips on the foot ring or the exposed clay band with a damp sponge. -
Prepare the orange dots:
Pour a small amount of orange underglaze onto a palette. The consistency should be like heavy cream; if it’s too thin, the dots will run. -
Apply orange confetti:
Using the tip of your small round brush, dab random dots of orange onto the unfired white glaze. Vary the spacing—some clustered, some isolated—but keep the dot size relatively uniform. -
Prepare the black speckle:
Mix a small amount of black mason stain or iron oxide with water. You want a very watery, wash-like consistency here. -
Flick the speckles:
Dip a stiff bristle brush (an old toothbrush works perfectly) into the black wash. Hold it near the cup and run your thumb across the bristles to flick a fine mist of black speckles over the white glaze and orange dots. -
Check density:
Rotate the cup to ensure even coverage. The black speckles should be much smaller and more numerous than the orange dots, creating a texture like vanilla bean ice cream. -
Final wipe:
做 one last check of the foot ring to ensure no underglaze or oxide has splashed onto the kiln shelf contact area. -
Glaze fire:
Load the kiln for your final glaze firing (e.g., Cone 5 or 6, depending on your clay and glaze). Ensure the pots don’t touch.
Smudged Dots?
If your orange dots are smearing into the white glaze, the base glaze is likely still too wet. Let the dipped white layer dry completely to the touch before applying underglaze.
Go Geometric
Instead of random flicks, use a paper stencil or painter’s tape to mask off clear geometric shapes (like triangles) before flicking the speckles for a structured confetti look.
Now you have a cheery, speckled vessel ready for your morning coffee


What Really Happens Inside the Kiln
Learn how time and temperature work together inside the kiln to transform clay into durable ceramic.
Triangle and Diamond Geometry
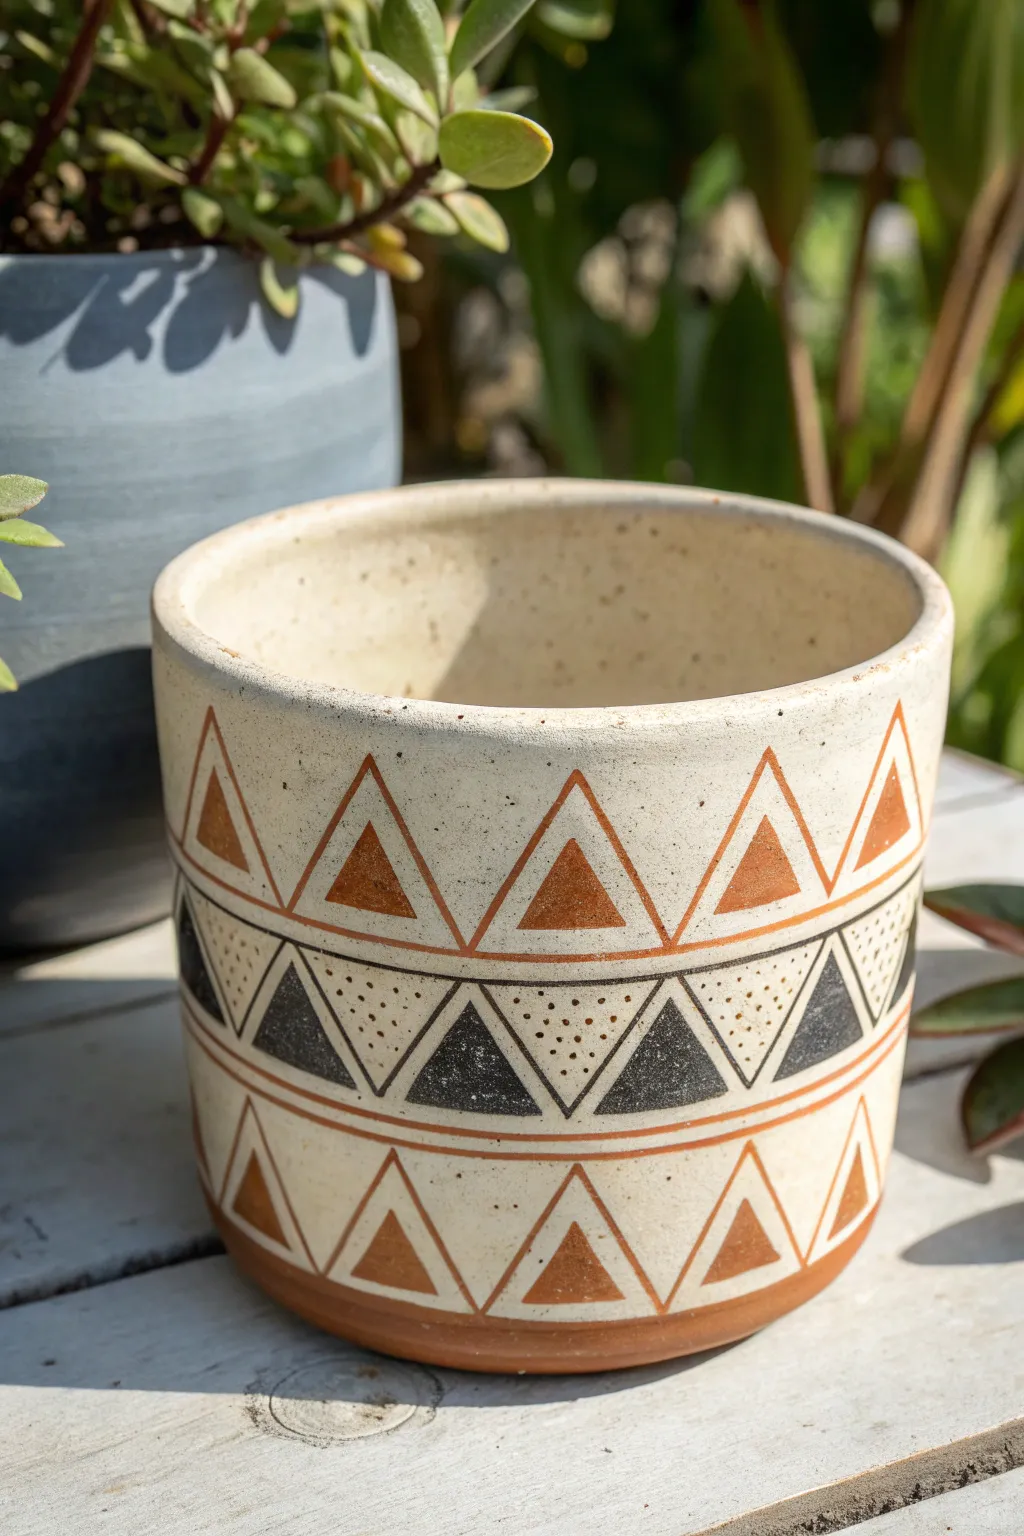
Embrace the timeless appeal of Southwest-inspired geometry with this hand-painted ceramic planter. Featuring three distinct bands of alternating triangles in warm rust and bold black, this design brings a structured yet earthy aesthetic to your indoor garden.
Detailed Instructions
Materials
- Bisque-fired cylindrical planter (white stoneware or light clay body)
- Underglaze (Rust/Terracotta color)
- Underglaze (Black)
- Clear matte or satin glaze
- Fine liner brush (size 0 or 00)
- Small flat shader brush (size 2 or 4)
- Pencil (light graphite)
- Flexible ruler or measuring tape
- Banding wheel (optional but helpful)
- Bowl of water and sponge
Step 1: Preparation & Mapping
-
Clean surface:
Begin by wiping down your bisque-fired pot with a slightly damp sponge to remove any kiln dust or oils from handling. This ensures the underglaze adheres properly. -
Measure the bands:
Using a pencil and a flexible ruler, lightly mark the circumference of the pot into three equal main sections. You want a top band, a middle band, and a bottom band, separated by thin spacers. -
Draw horizontal guides:
Spin the banding wheel slowly and drag your pencil to create continuous horizontal lines around the pot. You need four main lines: one near the rim, two in the middle to define the central band, and one near the base. -
Mark vertical intervals:
Measure the circumference and divide it by the number of triangles you want (e.g., every 2 inches). Mark these intervals on the top and bottom lines of each band to guide your points. -
Sketch the triangles:
Connect your interval marks to form the triangle peaks. For the top and bottom bands, draw upright triangles. For the middle band, draw a zigzag line to create alternating upright and inverted triangles.
Step 2: The Rust Bands
-
Outline the top triangles:
Load your liner brush with rust-colored underglaze. Carefully outline the larger triangles in the top band. Keep your hand steady and rest your pinky on the pot for stability. -
Fill the inner triangles:
Inside each large outlined triangle, paint a smaller solid triangle. Leave a consistent gap of raw clay between the outline and the solid fill. -
Mirror the bottom band:
Repeat this process for the bottom band: outline the large triangles and paint a solid rust triangle in the center of each. I find doing the top and bottom sequentially helps keep the color consistency effectively matched. -
Add boundary lines:
Using the liner brush, paint thin, continuous rust lines along the horizontal pencil guides you drew earlier. This frames the top and bottom sections. -
Paint the rim and foot:
Apply a band of rust underglaze to the very bottom edge (the foot) and a thin line along the rim to frame the entire composition.
Wobbly Lines?
If your hand shakes while lining, try holding your breath for the stroke, or use a mesmerizing wheel. Brace your painting arm against your body.
Step 3: The Central Black Band
-
Outline the zigzag:
Switch to your black underglaze and a clean liner brush. Trace the zigzag pattern in the central band, creating the framework for the alternating triangles. -
Fill the upright triangles:
Identify the triangles that point upwards. Paint a smaller, solid black triangle inside each of these, leaving a negative space border just like you did with the rust sections. -
Dot the inverted triangles:
For the downward-pointing triangles in this middle band, do not fill them solid. instead, use the tip of your brush to tap rows of small black dots, filling the shape with a stippled texture. -
Define the middle borders:
Paint thin black horizontal lines above and below this central band to separate it distinctly from the rust sections. This high contrast creates a crisp look.
Crisp Triangles
Use tape to mark off your triangles for ultra-sharp edges. Remove the tape while the underglaze is still slightly damp to avoid chipping the paint.
Step 4: Finishing
-
Clean up smudges:
Allow the underglaze to dry until it’s chalky and matte. If you have any pencil lines showing or small smudges, gently scratch them away with a cleanup tool or a stiff brush. -
Bisque fire (optional):
If your underglaze is thick, you might want to do a second bisque firing to set the design. If not, proceed straight to glazing. -
Dip in clear glaze:
Apply a clear matte or satin glaze over the entire piece. A glossy glaze can work, but a matte finish preserves the earthy, stoneware feel of the design better. -
Final firing:
Fire the pot to the recommended temperature for your clay and glaze combination (likely Cone 5 or 6).
Once fired, pot your favorite succulent and enjoy the modern, geometric warmth this piece adds to your shelf
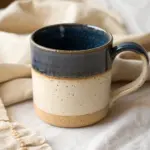
Color-Block with Crisp Edges
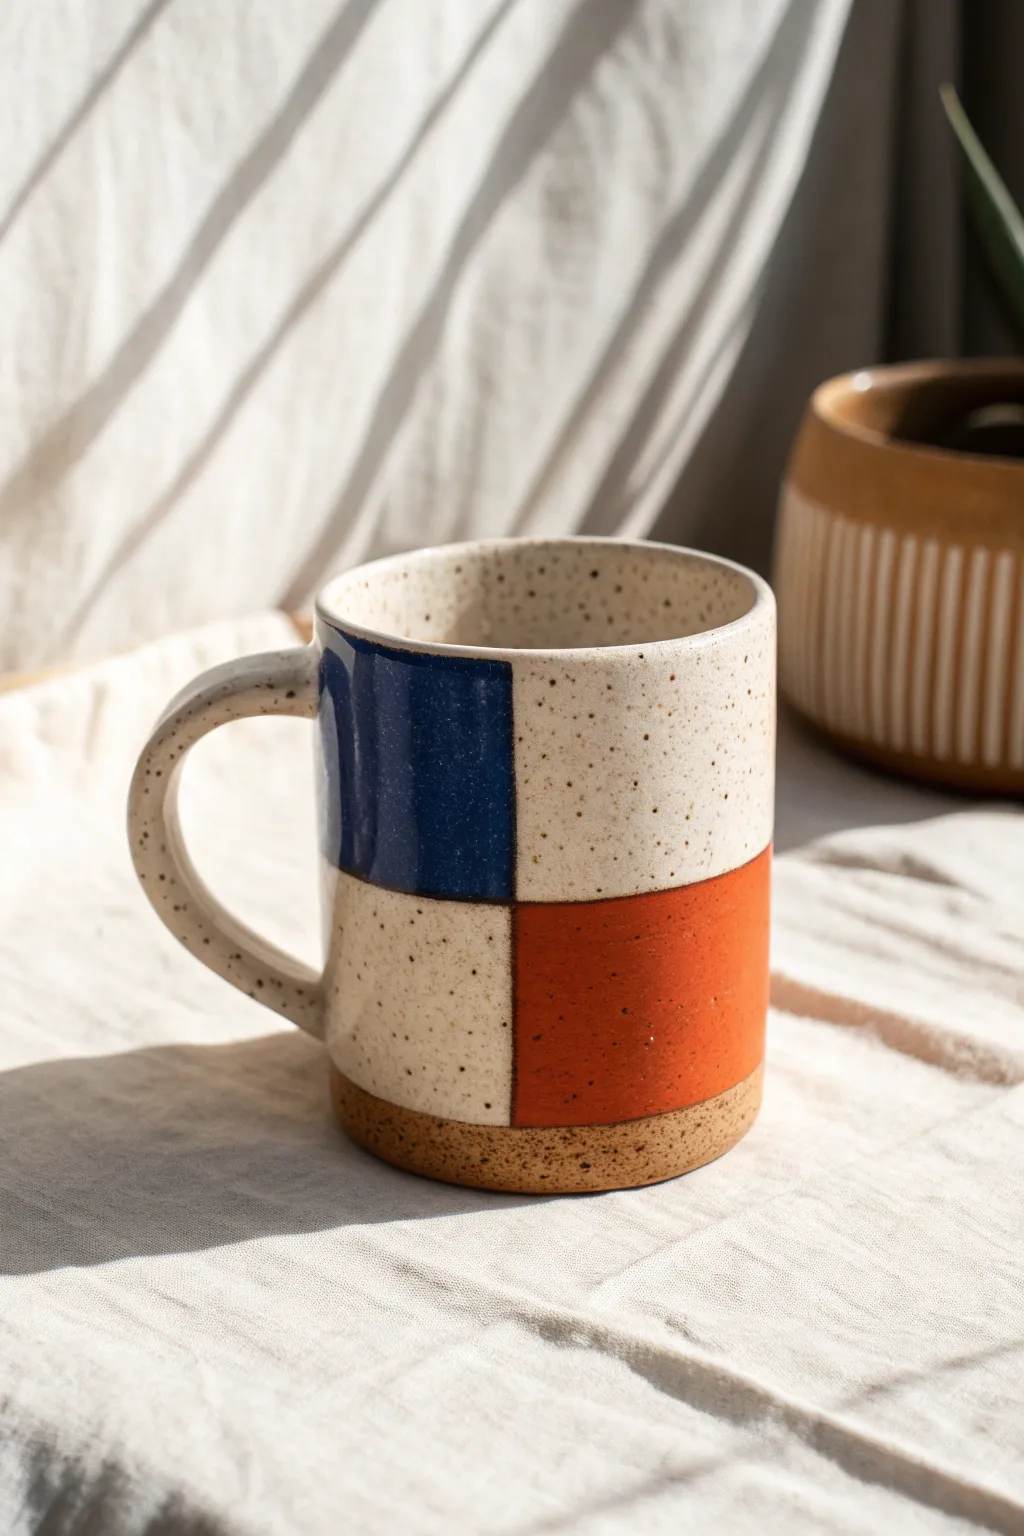
Embrace the crisp, bold aesthetic of modern design with this color-blocked mug. Featuring a simple checkerboard pattern in deep navy and burnt orange against natural speckled clay, this project perfectly balances raw texture with glossy glaze.
Step-by-Step Guide
Materials
- Speckled stoneware clay (approx. 1 lb)
- Pottery wheel
- Throwing tools (sponge, rib, wire cutter)
- Trimming tools
- Needle tool
- Soft fan brush or high-quality glaze brush
- Masking tape (1/4 inch or wider depending on preference)
- Wax resist (optional)
- Ruler or measuring tape
- Glossy navy blue cone 6 glaze
- Glossy burnt orange/rust cone 6 glaze
- Clear transparent glaze
Step 1: Throwing and Trimming
-
Prepare the Clay:
Wedge your speckled stoneware clay thoroughly to remove air bubbles. Center the ball of clay on your wheel head. -
Throw a Cylinder:
Open the clay and pull up the walls to create a straight-sided cylinder. Aim for a height of about 4-5 inches and an even wall thickness. -
Shape the Profile:
Using a rib tool, smooth the outside walls to ensure they are perfectly vertical and straight, which is crucial for the geometric pattern later. -
Refine the Rim:
Compress the rim with a chamois or your sponge to make it smooth and pleasant to drink from. -
Add the Handle:
Once the cylinder is leather hard, pull a C-shaped handle and attach it securely. Score and slip the connection points and smooth the seams. -
Trim the Foot:
Turn the mug over and trim a defined foot ring. I like to leave a small band of unglazed clay at the bottom, so define that line clearly now. -
Bisque Fire:
Allow the mug to dry completely, then load it into the kiln for a bisque firing to cone 04.
Bleeding Lines?
If glaze creeps under your tape, use an X-Acto knife or a firm rubber tool to gently scrape back the excess to a straight line once it’s dry but before firing.
Step 2: Mapping the Pattern
-
Clean the Bisque:
Wipe the bisqued mug with a damp sponge to remove any dust that could interfere with glaze adhesion. -
Mark Vertical Lines:
Using a pencil (the graphite will burn off), lightly mark a vertical centerline directly opposite the handle. Mark another vertical line on the handle side. -
Mark Horizontal Lines:
Measure the height of the mug body. Lightly mark a horizontal line exactly halfway up the mug. -
Apply Tape:
Apply masking tape carefully along your pencil lines. Alternatively, you can use wax resist for a more organic line, but tape ensures that super-crisp edge we want. -
Protect the Raw Clay Zones:
Decide which squares will remain unglazed (raw clay). You can cover these areas entirely with tape or wax resist to prevent accidental glaze splashes.
Mix It Up
Try using colored clay slips instead of glaze for the colored blocks strictly on the outside. This creates a matte, textural contrast against a glossy clear interior liner.
Step 3: Glazing
-
Apply Navy Glaze:
Select the top-left quadrant (relative to the handle). Apply 2-3 smooth coats of the navy blue glaze. Let each coat dry before applying the next. -
Apply Orange Glaze:
Move to the bottom-right quadrant (diagonal to the navy). Apply 2-3 coats of the burnt orange glaze. -
Glaze the Interior:
Pour a clear transparent glaze into the inside of the mug, swirl it to coat entirely, and pour out the excess. This showcases the speckles inside. -
Remove Tape:
Carefully peel away the masking tape while the glaze is still slightly damp to avoid chipping the edges. -
Clean Up:
Use a damp brush or sponge to tidy up any glaze that bled under the tape or got onto the ‘raw’ squares. The lines should be razor sharp. -
Glaze the Handle (Optional):
You can leave the handle raw speckled clay or apply a clear glaze. For this look, leaving it raw or with a thin clear coat works best. -
Final Firing:
Load the mug into the kiln for the glaze firing (usually cone 6). Ensure no glaze touches the kiln shelf.
Once cooled, your mug is ready for a warm brew, showing off that beautiful contrast between matte clay and glossy color

TRACK YOUR CERAMIC JOURNEY
Capture glaze tests, firing details, and creative progress—all in one simple printable. Make your projects easier to repeat and improve.
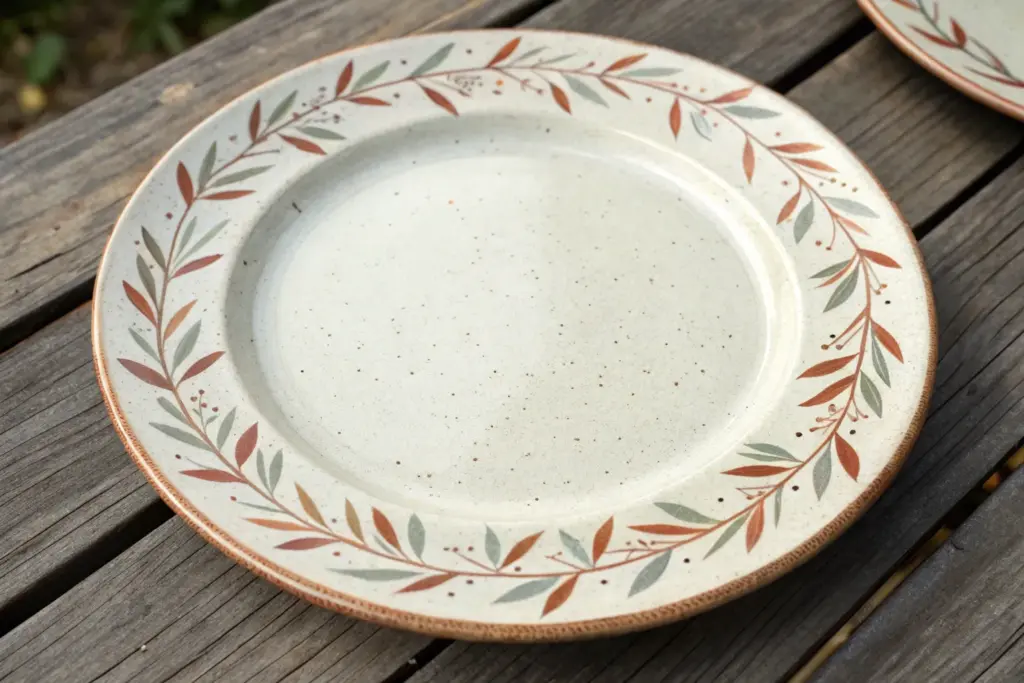
Daisy Chain Repeat
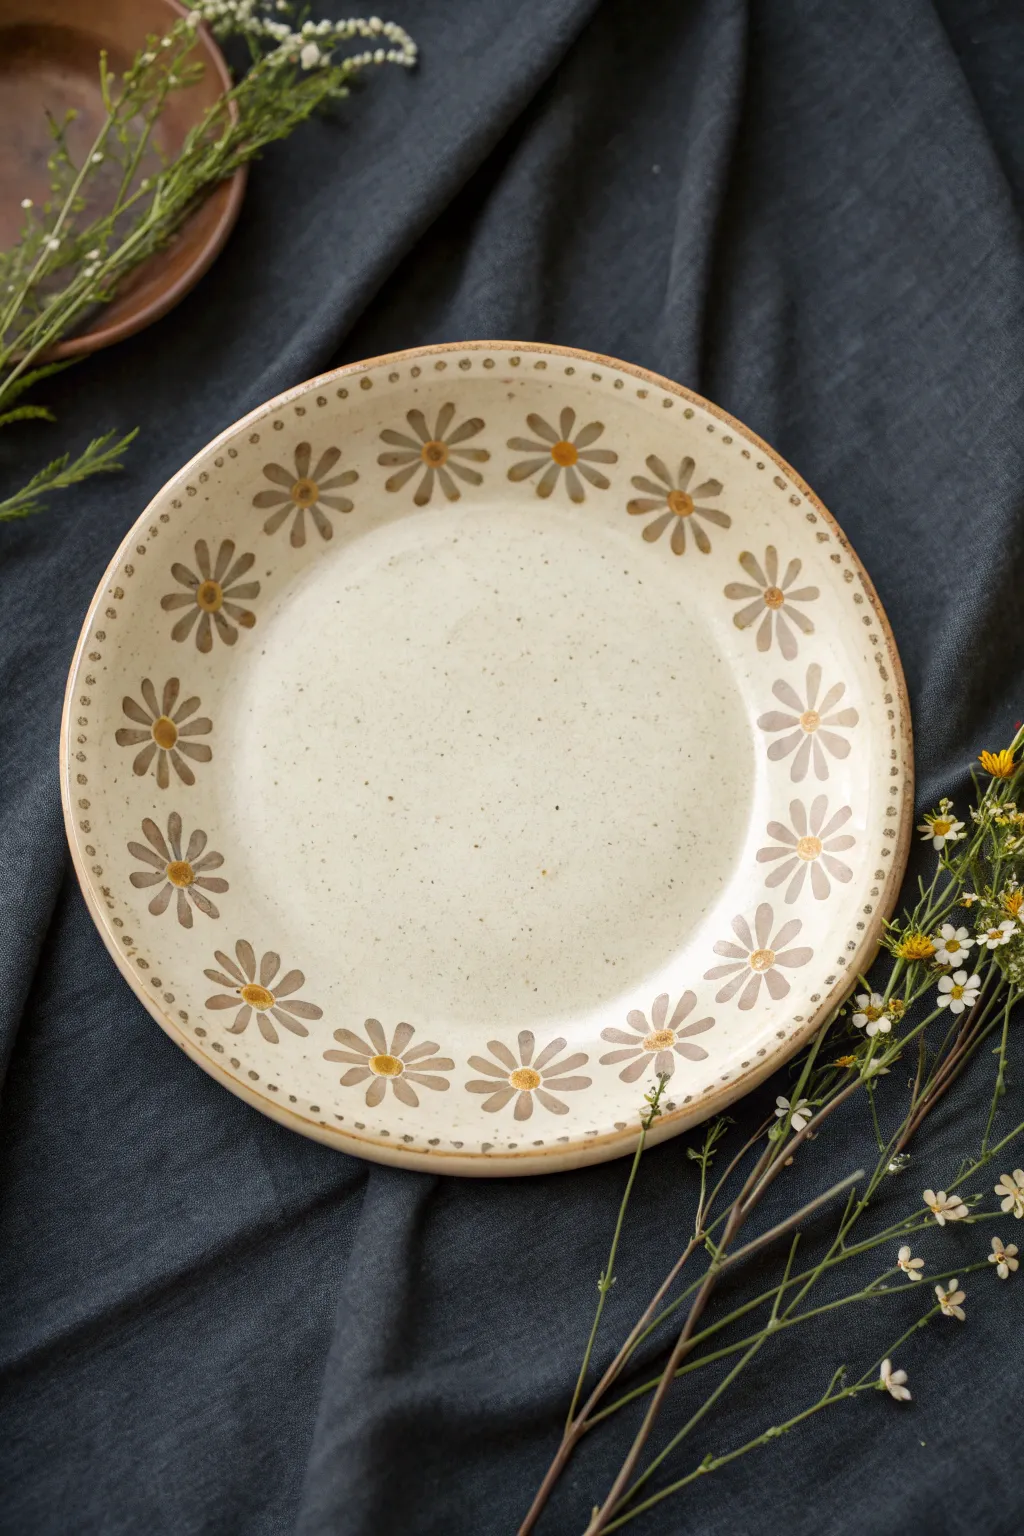
This charming plate design combines rustic warmth with a classic floral motif, perfect for adding a touch of whimsy to your table setting. The speckled creamy base provides a natural canvas for the repeating daisy pattern along the rim.
Step-by-Step Tutorial
Materials
- Bisque-fired ceramic plate (flat rim preferred)
- Creamy white speckled glaze (underglaze or dipping glaze)
- Underglaze in warm grey or soft brown
- Underglaze in muted yellow or ochre
- Small round detail brush (size 2 or 4)
- Fine liner brush (size 0 or 00)
- Sponge
- Clear transparent glaze (if using underglazes)
- Pencil (optional for marking)
- Small bowl of water
Step 1: Base Preparation
-
Clean the bisque:
Start by wiping your bisque-fired plate with a damp sponge. This removes any dust that could prevent the glaze from adhering properly. -
Base glazing:
Apply your base coat. If using a dipping glaze that creates the speckled effect shown, dip the plate now and let it dry completely. If using a brush-on speckled underglaze, apply three even coats, allowing drying time between each layer. -
Plan the spacing:
Once the base is dry to the touch, lightly mark the center placement for each flower around the rim using a dull pencil. Space them evenly so the petals will nearly touch but not overlap.
Glaze Consistency
For crisp petals without running, ensure your underglaze isn’t too watery. Test a stroke on a spare tile; it should hold its shape immediately.
Step 2: Painting the Daisies
-
Load the brush:
Using your warm grey or soft brown underglaze, load a small round detail brush. The consistency should be like heavy cream for opaque coverage. -
Paint the first petal:
Start at the 12 o’clock position of your first pencil mark. Press the belly of the brush down to create the wide part of the petal, then lift as you pull toward the center to create a tapered point. -
Complete the flower:
Continue painting petals around the center point in a clock-like fashion. Aim for 7-8 petals per flower, keeping them roughly symmetrical but embracing slight organic variations. -
Finish the chain:
Move to the next marked spot and repeat the process around the entire rim. I find that rotating the plate or wheel as I work helps keep my hand angle consistent. -
Add the centers:
Clean your brush or switch to a fresh one. Dip into the ochre or muted yellow underglaze. -
Dot the middles:
Place a firm, round dot of yellow in the center of each flower where the petal tips meet. Ensure the grey petals are dry enough so the colors don’t smear together.
Uneven Spacing?
If you reach the end of the rim and the gap is too small or large for the final flower, slightly adjust the size of the last 2-3 flowers to blend the difference visually.
Step 3: Rim Details & Finishing
-
Prep for dots:
Switch to your fine liner brush or the very tip of your detail brush. Re-load with the brown/grey underglaze you used for the petals. -
Apply rim dots:
Paint tiny, evenly spaced dots along the very outer edge of the rim. These frame the design beautifully and mimic the speckled nature of the clay body. -
Inner accent (optional):
If you wish, add a very subtle, thin line or another row of tiny dots along the inner edge of the rim where the flat center begins. -
Double check:
Review your work for any accidental splashes or smudges. You can gently scrape these away with a needle tool or stiff brush once the underglaze is dry. -
Final clear glaze:
If you painted with underglazes on top of the base, carefully apply a coat of clear transparent glaze over the entire piece. If you painted over an unfired dipping glaze (maiolica style), skip this step. -
Fire the piece:
Load the plate into the kiln for the final glaze firing according to the temperature requirements of your chosen clay and glaze materials.
Once fired, you will have a lovely, durable piece of tableware ready to hold your favorite meals
Leafy Vine Wraparound
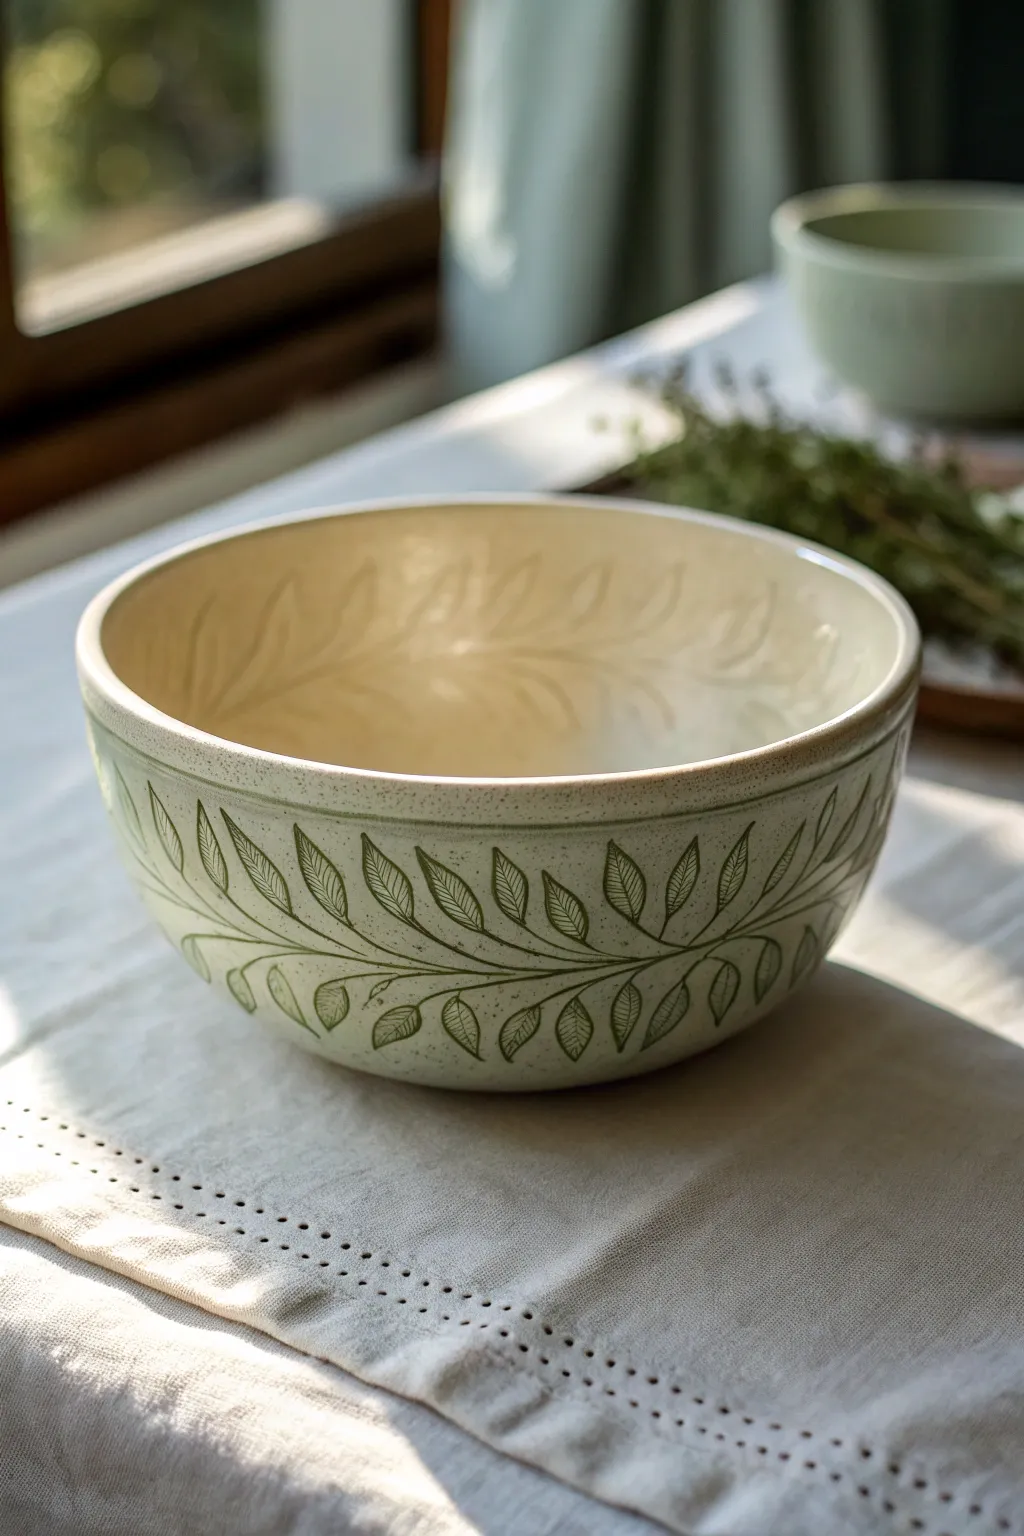
Bring nature to your table with this elegantly detailed ceramic bowl featuring a continuous, flowing vine motif. Using the mishima (inlay) technique, you’ll achieve crisp, organic lines that wrap seamlessly around the cream-colored form for a timeless botanical look.
Step-by-Step
Materials
- Prepared clay bowl (stiff leather-hard stage)
- Needle tool or fine sgraffito tool
- Dark green colored slip or underglaze
- Rubber kidney rib (soft)
- Metal kidney rib (smooth edge)
- Sponge and bucket of water
- Banding wheel
- Soft fan brush for clear glaze
- Clear transparent glaze
- Pencil (optional)
Step 1: Planning & Carving the Design
-
Center and sketch:
Place your leather-hard bowl upside down on a banding wheel to ensure stability. While slowly spinning the wheel, lightly sketch a horizontal guideline around the middle of the bowl’s exterior with a pencil to serve as the central ‘vein’ of the vine. -
Draw the main stem:
Using your needle tool, carve the central undulating line of the vine over your pencil guide. Create a gentle wave pattern that rises and falls rhythmically as it wraps around the circumference. -
Map leaf placement:
Before committing to deep cuts, lightly mark where your leaves will extend from the stem. Aim for pairs or alternating leaves that angle gracefully upwards and backwards, following the flow of the vine. -
Carve the leaf outlines:
firmly incise the outline of each leaf using your chosen carving tool. The lines should be deep enough to hold slip—about 1-2mm is ideal—and crisp enough to read clearly. -
Add internal details:
Inside each leaf outline, carve a central vein and tiny, delicate branching veins. These lines can be slightly shallower than the main outline to create visual hierarchy in the design. -
Clean up the burrs:
Once the carving is complete, gently run a finger or a dry sponge over the surface to knock off the rough clay ‘crumbs’ or burrs created by the tool. Don’t smooth it too much yet; we want those channels open.
Step 2: Inlaying the Color (Mishima)
-
Apply the green slip:
Using a soft brush, generously paint your dark green slip or underglaze directly over the carved lines. Don’t worry about staying in the lines; you want to completely fill the carved channels. -
Let it set:
Allow the slip to dry until it is no longer shiny and has reached the same leather-hard consistency as the bowl. If you wipe too soon, you’ll pull the color out of the grooves. -
Do the initial scrape:
Take your metal kidney rib and gently scrape the surface of the bowl. Hold the rib at a 45-degree angle and move across the design to shave off the excess slip sitting on the high points. -
Wipe to reveal crisp lines:
Dampen a sponge (wring it out very well so it’s barely moist) and gently wipe away any remaining surface haze. I find wiping perpendicular to the carved lines helps prevent dragging color out of the deeper incisions. -
Repeat for the interior:
If you wish to replicate the effect inside the bowl (as seen in the photo), repeat the carving and inlay process on the interior surface, ensuring the leaves flow in the same direction as the exterior.
Smudged Lines?
If slip smears across the clay body during cleanup, your sponge is too wet. Let the pot dry for 10 minutes, wring the sponge thoroughly, and try wiping again.
Step 3: Finishing & Glazing
-
Bisque fire:
Once the bowl is bone dry, load it into the kiln for a bisque firing. This will set the clay and the inlaid underglaze permanently. -
Clean the bisque:
Wipe the bisqued piece with a damp sponge to remove any kiln dust ensuring the glaze adherence is perfect. -
Apply clear glaze:
Using a soft fan brush or dipping tongs, apply a coat of glossy transparent glaze over the entire piece. A cream-tinted transparent glaze works best to achieve the warm, vintage look in the photo. -
Final fire:
Fire the bowl to the maturity temperature of your clay body (likely cone 5 or 6 for stoneware). The clear glaze will melt, sealing the green inlay and giving the bowl a smooth, food-safe finish.
Wax Resist Method
Paint wax resist over the high points before carving. When you paint the slip on later, it wipes off the un-carved areas instantly, saving cleanup time.
Enjoy using your new botanical bowl for salads or simply as a beautiful centerpiece on your table
Tiny Fruit Repeat Print
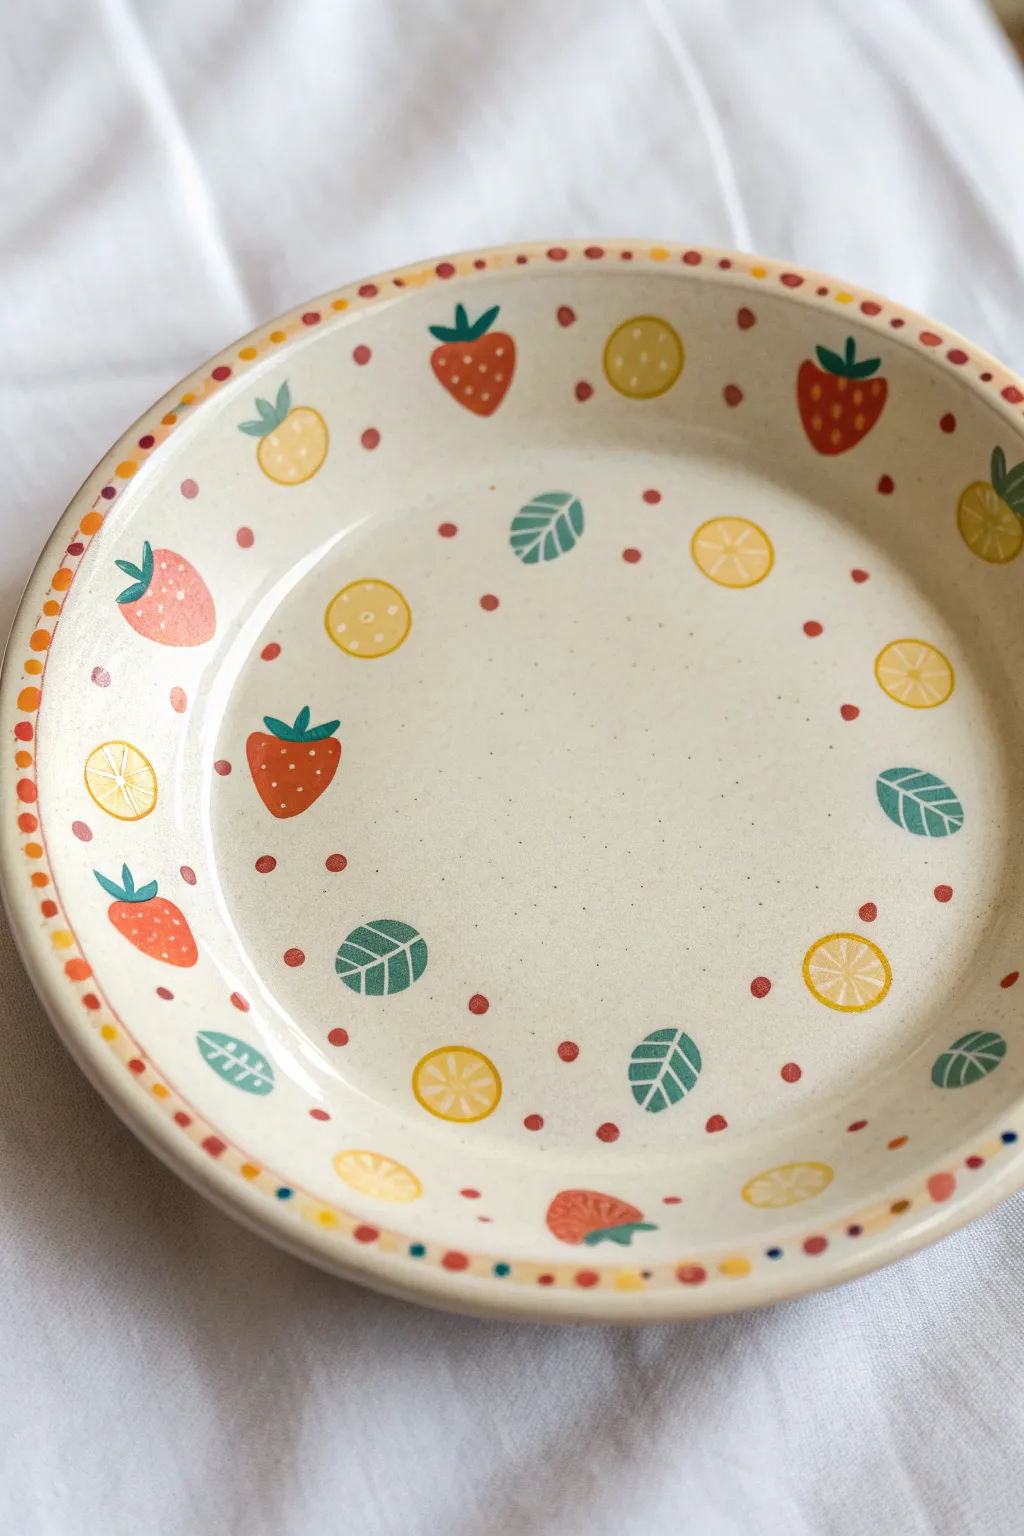
Brighten up your table settings with this delightful hand-painted pottery design featuring tiny, repeating fruits. The combination of juicy strawberries, zesty lemon slices, and teal leaves creates a fresh, playful pattern that feels both vintage and modern.
Step-by-Step Tutorial
Materials
- Bisque-fired ceramic plate (cream or speckled clay recommended)
- Underglazes: Bright Red, Golden Yellow, Leaf Green, Teal/Blue-Green
- Fine detail brushes (liners and small rounds)
- Pencil (for sketching)
- Clear transparent glaze
- Sponge and water
- Small palette or ceramic tile for mixing
Step 1: Planning and Sketching
-
Prep the surface:
Wipe down your bisque plate with a damp sponge to remove any dust or oils, ensuring a clean canvas for your design. -
Map the layout:
Lightly sketch the placement of your main fruit icons using a regular pencil. Since the pencil marks will burn off in the kiln, focus on spacing rather than perfect drawings. Aim for a random scatter, leaving plenty of negative space. -
Sketch the rim:
Mark out the spacing for the rim pattern. You can alternate between tiny dots and small dashes or fruit shapes.
Keep it Steady
Rest your pinky finger on the plate surface as a pivot point while painting fine details. This stabilizes your hand for crisp lines.
Step 2: Painting the Fruit Base
-
Strawberry shapes:
Using a small round brush loaded with Bright Red underglaze, paint the triangular strawberry shapes. Keep the top slightly curved and the bottom pointed. -
Lemon rounds:
Switch to your Golden Yellow underglaze. Paint simple circles for full lemons and half-circles for wedges scattered among the berries. -
Teal leaves:
With the Teal or Blue-Green underglaze, paint simple leaf shapes. These should be oval with pointed ends, floating independently near the fruits. -
Apply second coats:
Once the first layer is dry to the touch, apply a second coat to all solid shapes to ensure the colors pop after firing.
Mix It Up
Don’t stop at strawberries! Try swapping the red berries for purple grapes or dark blue blueberries to create a whole fruit salad set.
Step 3: Adding Details
-
Strawberry tops:
Use a liner brush and Leaf Green underglaze to add the calyx (leafy top) to each strawberry. Three small flicks of the brush usually do the trick. -
Strawberry seeds:
Dip the very tip of a detail brush or a needle tool into cream or white underglaze. Dot tiny seeds onto the red strawberry bodies. -
Lemon segments:
Using a very fine liner brush and white or cream underglaze, paint the internal segments on the yellow circles. Make an asterisk shape or simple cross-hatching to suggest the citrus interior. -
Leaf veins:
With the same white/cream, add subtle veins to the teal leaves. A simple central line with diagonal branches works best.
Step 4: Finishing Touches
-
Polka dot filler:
Dip the end of a paintbrush handle into Red underglaze and stamp small dots into the empty spaces between the fruits to tie the pattern together. -
Rim decoration:
Paint the rim pattern you sketched earlier. Alternating colors like red dots and yellow dashes creates a nice frame. I find rotating the wheel or banding wheel while holding the brush steady helps with the rim line consistency. -
Clear glaze application:
Allow the underglaze to dry completely (usually 24 hours). Carefully dip the plate into a clear transparent glaze, ensuring even coverage. -
Final wipe:
Clean the foot of the plate with a wet sponge to prevent it from sticking to the kiln shelf. -
Firing:
Fire the piece in the kiln according to the clay and glaze specifications (typically Cone 5 or 6 for stoneware).
Once fired, you will have a cheerful, custom piece of pottery perfect for summer snacks or morning toast
Ocean Wave Swirls
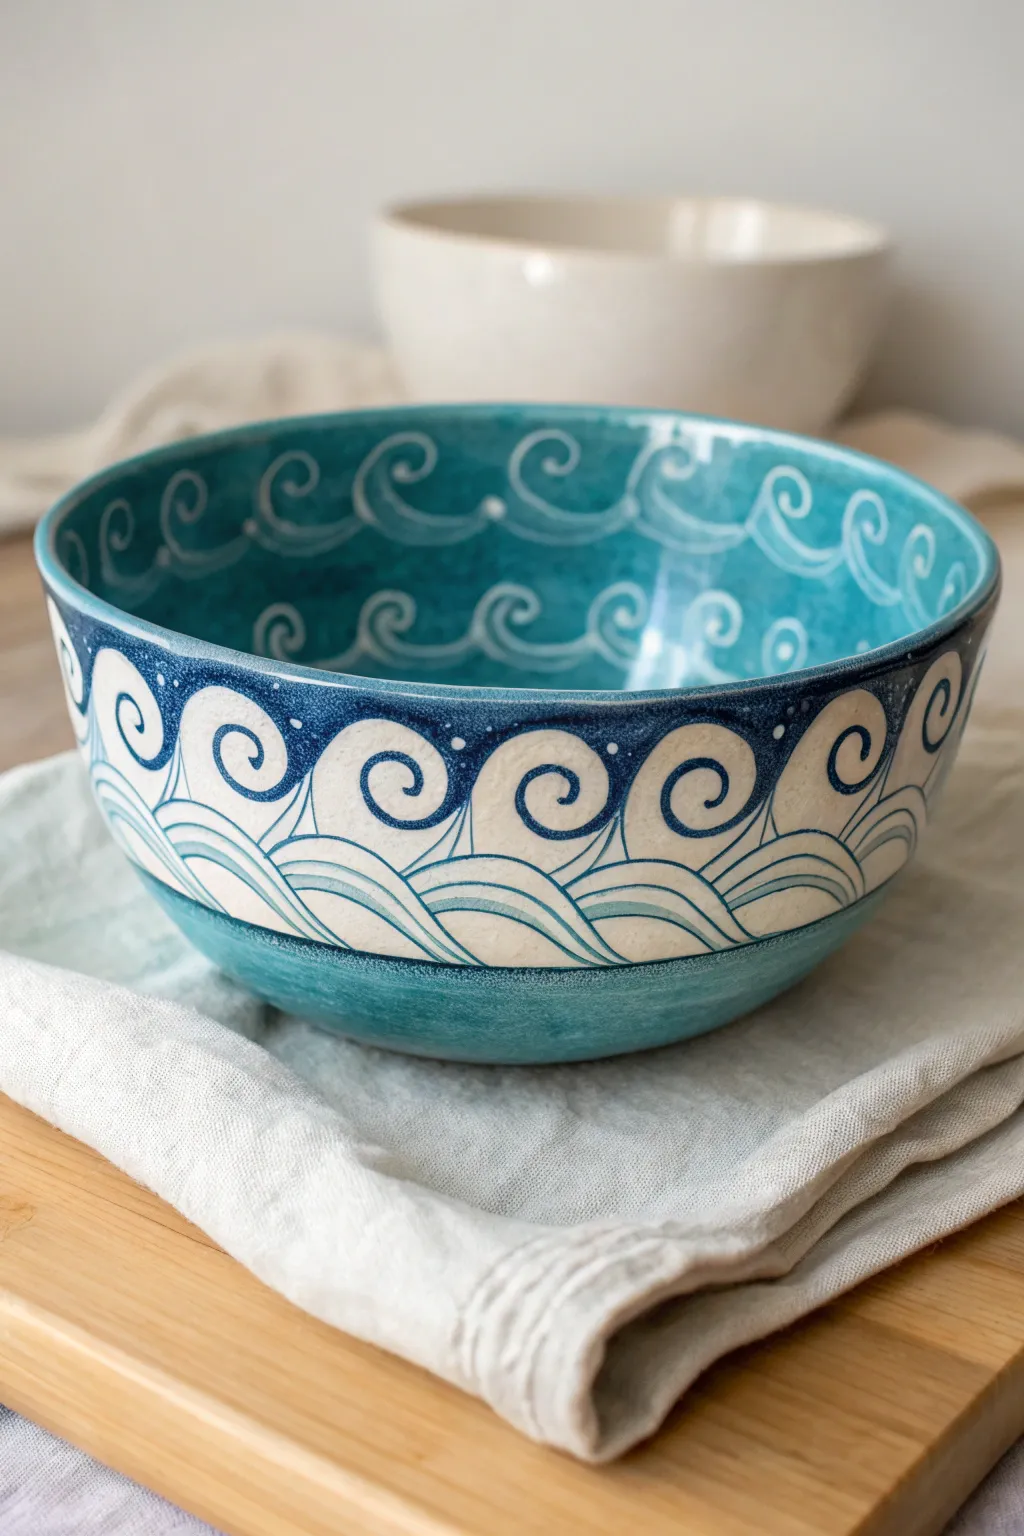
Capture the rhythm of the ocean with this beautifully detailed ceramic bowl featuring stylized wave motifs. The design combines deep turquoise glazes with crisp line work to create a piece that feels both ancient and refreshingly modern.
How-To Guide
Materials
- Bisque-fired ceramic bowl (wheel-thrown or hand-built)
- Underglaze pencil (blue or black) or graphite pencil
- Wax resist emulsion
- Deep turquoise gloss glaze
- Dark blue underglaze
- White underglaze (if using dark clay body)
- Clear transparent glaze
- Fine liner brush (00 or 0)
- Medium soft fan brush
- Sponge
- Banding wheel
Step 1: Base Preparation & Design
-
Surface Prep:
Begin with your clean bisque-fired bowl. Wipe it down with a slightly damp sponge to remove any dust, which ensures your glaze adheres properly. -
Marking Guidelines:
Place the bowl on a banding wheel. Using a graphite pencil, lightly mark a horizontal line about one-third up from the bottom foot, and another line just below the outer rim. This creates the central band for your main wave design. -
Sketching the Waves:
Within that central band, sketch a series of rolling wave shapes. Draw large, crashing curls that hook to the right, leaving negative space in between for the background. -
Adding Lower Ripples:
Below the main crashing waves, sketch smaller, elongated arch shapes to represent the lower ripples of the water. Let these flow seamlessly into the base of the larger waves.
Fixing Smudges
If blue underglaze smudges onto the white background, scrape it gently with an X-Acto knife or needle tool exactly where the mistake is rather than wiping, which spreads pigment.
Step 2: Detailed Wave Decoration
-
Outlining in Blue:
Using a fine liner brush and dark blue underglaze, carefully trace over your pencil lines. Focus on creating variable line width—thicker at the base of the wave and tapering to a fine point at the curl. -
Inner Spirals:
Paint a tight spiral inside the head of each wave. I find it helps to steady my hand against the table surface for these precise curves. -
Defining the Layers:
Add interior lines to the lower ripples, following the curve of the arches to give the water volume and movement. -
Background Color (Optional):
If your clay body is dark, paint the inside of the wave shapes with white underglaze to make the design pop. If your clay is light, leave it raw for a natural contrast. -
Wax Resist Application:
Once the underglaze design is bone dry, carefully apply wax resist over the entire central wave band. This protects your hard work from the dipping glaze later.
Add Dimension
Use a slip trailer instead of a brush for the white interior rim swirls. This creates a tactile, raised texture that you can feel when running your fingers inside the bowl.
Step 3: Interior & Glazing
-
Interior Glazing:
Pour deep turquoise glaze inside the bowl. Roll it around to coat the entire interior surface evenly, then pour out the excess. -
Rim Detail Prep:
While the interior glaze is still unfired but dry to the touch, you can employ a sgraffito-like technique or overlay method. For this look, we will overlay. -
Painting Interior Waves:
Using a slightly thicker white underglaze or a white glaze trailing bottle, paint a series of freehand scrolls and loops just below the inner rim, sitting directly on top of the unfired turquoise glaze. -
Outer Glazing:
Dip the bottom third of the bowl (the foot area) into the same turquoise glaze. The wax resist will stop the glaze from running up into your wave drawing. -
Rim Glazing:
Carefully brush or sponge the turquoise glaze onto the top rim, ensuring it meets the waxed edge of the central band cleanly. -
Cleanup:
Use a damp sponge to wipe away any random beads of glaze that may be sitting on top of the waxed central band. -
Final Clear Coat:
Apply a coat of clear transparent glaze over the central wave band to seal the underglaze illustration and make it food safe. -
Final Fire:
Fire the piece in the kiln according to the specific temperature guidelines of your chosen glaze (usually cone 5 or 6 for stoneware).
Now you have a stunning vessel perfect for serving or display, carrying the energy of the sea
Stitched Dash Motif
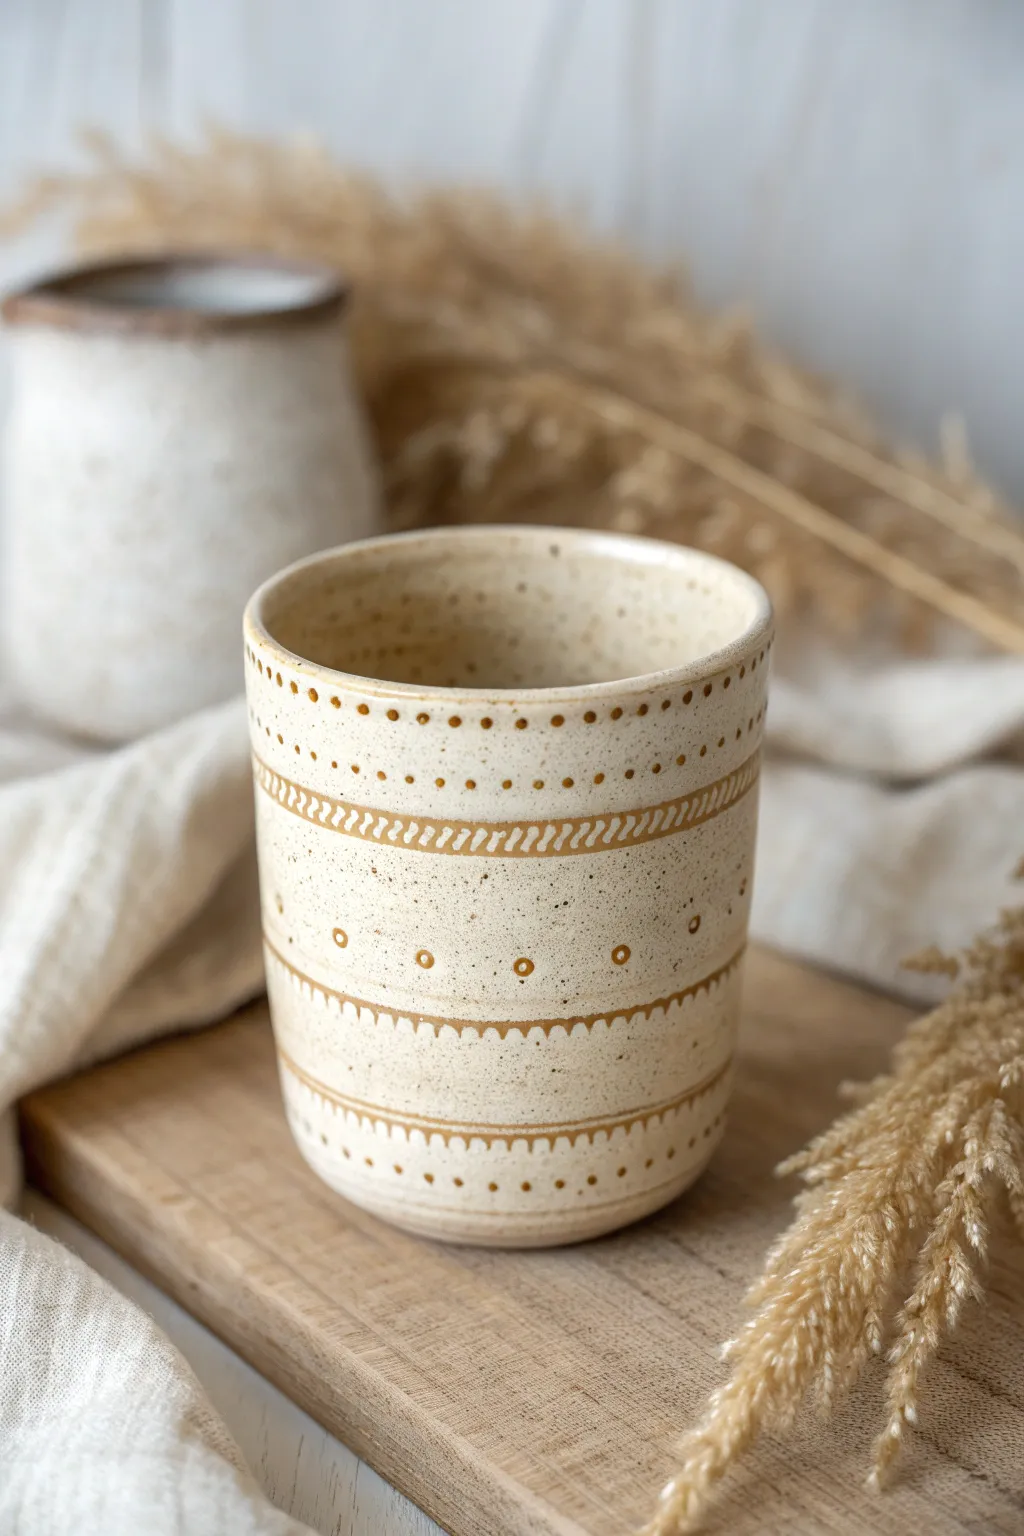
Embrace the warmth of handmade ceramics with this cozy tumbler project, featuring delicate stitch-like patterns that circle the form. The speckled clay body provides a rustic canvas for the golden-brown underglaze details, creating a piece that feels both folk-inspired and modern.
Step-by-Step
Materials
- Speckled stoneware clay (e.g., Laguna Speckled Buff)
- Pottery wheel (or slab roller/rolling pin for hand-building)
- Kidney rib tool
- Wire cutter
- Sponge
- Golden-brown underglaze (e.g., Amaco Velour Maple or similar)
- Fine-point detail brush (size 0 or 00)
- Clear transparent glaze (cone 5/6)
- Banding wheel
- Wax resist (optional)
Step 1: Forming the Tumbler
-
Prepare the Clay:
Begin by wedging about 1 to 1.5 pounds of speckled stoneware clay to ensure it is free of air bubbles and has an even consistency. -
Throw the Cylinder:
Center the clay on the wheel and open it up. Pull the walls up to create a simple, straight-sided cylinder without a handle, aiming for a height of about 4-5 inches. -
Shape the Profile:
Gently curve the bottom inward slightly to create a pleasant, tucked foot, and ensure the rim is rounded and smooth for comfortable sipping. -
Smooth the Surface:
While the wheel is spinning slowly, run a kidney rib up the exterior to remove throwing lines. Smooth surfaces are crucial for this pattern so the delicate lines don’t get lost in texture. -
Leather Hard Stage:
Wire the pot off the bat and let it dry slowly to a leather-hard state. It should be firm enough to handle without warping but still cool to the touch. -
Trimming:
Center the leather-hard cup upside down on the wheel and trim the bottom to create a clean, defined foot ring.
Step 2: Applying the Stitched Scallop Design
-
Horizontal Guides:
Place your cup on a banding wheel. Using a soft pencil or a very lightly pressed needle tool, mark faint horizontal rings around the cup to serve as guidelines for your pattern bands. -
Top Rim Dots:
Dip your fine-point brush into the golden-brown underglaze. Start about half an inch below the rim and paint a row of small, evenly spaced dots all the way around. -
Simple Dashes:
Below the first row of dots, paint a simple dashed line. Try to keep your hand steady and let the banding wheel do the work by spinning it slowly while you hold the brush in one place. -
The Herringbone Stitch:
Create the thickest band near the top third. Paint short, diagonal strokes next to each other to create a “stitched” or herringbone texture. I find it easiest to do all the left-slanting strokes first, then go back and do the opposing angles if needed, though this design uses a single directional hatch. -
Open Circles:
In the middle section, paint small open circles (like tiny donuts) spaced widely apart. Add a tiny dot in the center of the negative space between them for balance. -
Scalloped Line:
Below the circles, paint a horizontal line. Along the bottom edge of this line, paint small, downward-facing triangles or scallops to mimic a decorative hem finish. -
Bottom Repeat:
Repeat the dashed line and the scalloped line sequence near the bottom of the cup to bookend the design. -
Final Dots:
Finish the pattern with a final row of dots just above the foot of the cup.
Clean Lines
If your brush strokes look blobs or uneven, your underglaze might be too thick. Thin it slightly with water until it has the consistency of heavy cream or melted ice cream.
Step 3: Glazing and Firing
-
Bisque Fire:
Once the underglaze is completely dry, fire the piece to cone 04 (bisque). This sets the shape and makes the underglaze permanent. -
Wax the Foot:
After the kiln cools, wipe the bisque with a damp sponge to remove dust. Apply wax resist to the bottom foot ring to prevent glaze from sticking to the kiln shelf. -
Clear Glaze Application:
Dip the entire cup into a clear, transparent glaze. A dipping glaze works best here to ensure an even coat that doesn’t streak. -
Check Thickness:
Ensure the clear glaze isn’t too thick, or it might cloud up and obscure your delicate brushwork. If it looks thick, quickly shake off the excess. -
Glaze Fire:
Fire the final piece to cone 5 or 6 (depending on your clay body specifications) to vitrify the clay and melt the glaze into a glossy finish.
Carved Variant
Instead of painting, try using a sgraffito tool to carve these same patterns through a layer of colored slip before bisque firing for a textured, tactile finish.
Once cooled, your tumbler is ready to add a touch of handcrafted charm to your morning coffee routine
Radiating Mandala Rings
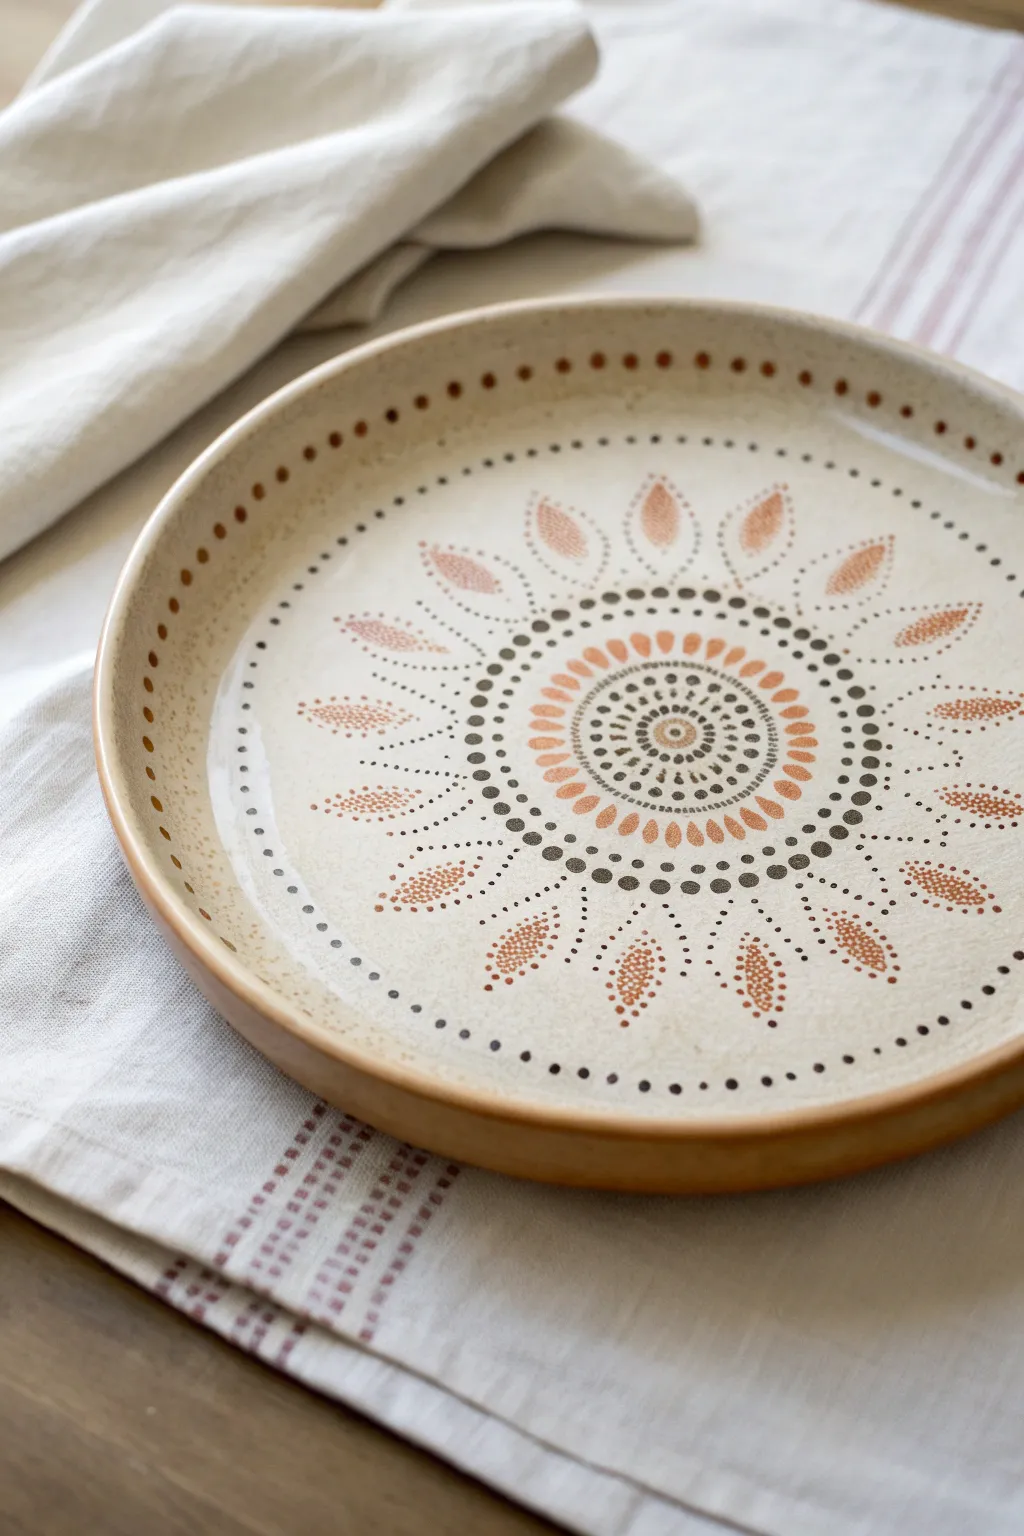
This project transforms a simple ceramic plate into a piece of art with a warm, earthy mandala design that radiates outward like a sunburst. By using precise dotting and tear-drop strokes in rust and deep brown tones, you can achieve a sophisticated, rhythmic pattern on a speckled cream glaze base.
Step-by-Step Tutorial
Materials
- Bisque-fired ceramic dinner plate (with a raised rim)
- Speckled cream or oatmeal matte glaze (base coat)
- Underglaze (Dark Brown or Espresso)
- Underglaze (Rust or Terracotta)
- Glaze trailer bottles with fine precision tips
- Small round detail brush (size 0 or 1)
- Pottery wheel or banding wheel (for spinning)
- Clear transparent glaze (optional, for finish)
- Damp sponge
Step 1: Base Preparation
-
Clean the bisque:
Start by wiping your bisque-fired plate with a damp sponge to remove any kiln dust or oils from handling. This ensures your glaze adheres perfectly without crawling. -
Apply base glaze:
Dip or brush on your speckled cream base glaze. Apply 2-3 even coats if brushing, allowing each layer to dry until it’s chalky to the touch. Ensure the surface is smooth and free of visible brushstrokes. -
Center on the wheel:
Place your glazed plate on a banding wheel or pottery wheel. Spend a moment centering it perfectly; this is crucial for the concentric circles you’ll be creating.
Steadiness Pro Tip
Rest your elbow on a table or stable stack of books while applying dots. This anchors your arm and allows your wrist to make precise, shaking-free movements.
Step 2: Core Mandala Structure
-
Find the center point:
Using your dark brown underglaze in a fine-tip trailer, place a single, neat dot in the absolute center of the plate. -
First ring of dots:
Create a tight circle of tiny brown dots immediately surrounding the center point. Keep these dots very small and closely spaced. -
Second ring expansion:
Move slightly outward and create a second ring of slightly larger brown dots. The spacing between dots should remain consistent for a clean look. -
Third ring definition:
Add a third ring of even larger brown dots. I find that increasing the pressure on the bottle slightly helps achieve this graduated size increase. -
The rust accent ring:
Switch to your rust-colored underglaze. Instead of simple dots, paint small, teardrop shapes radiating outward. The pointed end of the tear should face the center.
Clogged Tip Fix
If your trailer bottle spits or stops, poke the nozzle with a fine needle tool. Never squeeze harder to force it, or you’ll get a glaze explosion.
Step 3: Expanding the Pattern
-
Dotted border ring:
Return to the dark brown underglaze. Create a very distinct ring of dots just outside the rust teardrops to frame the central motif. -
Main rust petals:
This is the largest element. Use the rust underglaze to paint larger, elongated oval or ‘seed’ shapes. Imagine these as flower petals spanning outward from the previous dotted ring. Space them evenly around the circle first before filling in. -
Detailing the petals:
Once the rust petals are dry enough not to smear, use the trailer to add tiny brown stippling or texture inside them if desired, though solid color works beautifully too as shown. -
Outer dot frame:
Create a new ring of dark brown dots just beyond the tips of your rust petals. This acts as a container for the main sunburst design. -
Secondary dot ring:
Add one final ring of smaller brown dots outside the previous one, creating a double-dotted border effect that separates the center design from the rim.
Step 4: Rim and Finish
-
Rim decoration:
Move your attention to the rising edge of the plate. Using the dark brown glaze, place evenly spaced dots around the inner wall of the rim. -
Check spacing:
Spin the wheel slowly to check the symmetry of your rim dots. They should align visually with the rhythm of the central pattern. -
Final drying:
Allow all underglaze decoration to dry completely. It should look matte and chalky. -
Clear coating (optional):
If your base glaze isn’t self-sealing or glossy enough, apply a thin layer of clear transparent glaze over the entire piece to protect the design and make it food-safe. -
Final firing:
Fire the plate in the kiln according to your clay and glaze specifications (usually Cone 5 or 6 for stoneware) to melt the layers into a smooth, durable surface.
Once fired, the matte texture and precise concentric rings make this plate a stunning centerpiece for any table setting
Playful Animal Spot Prints
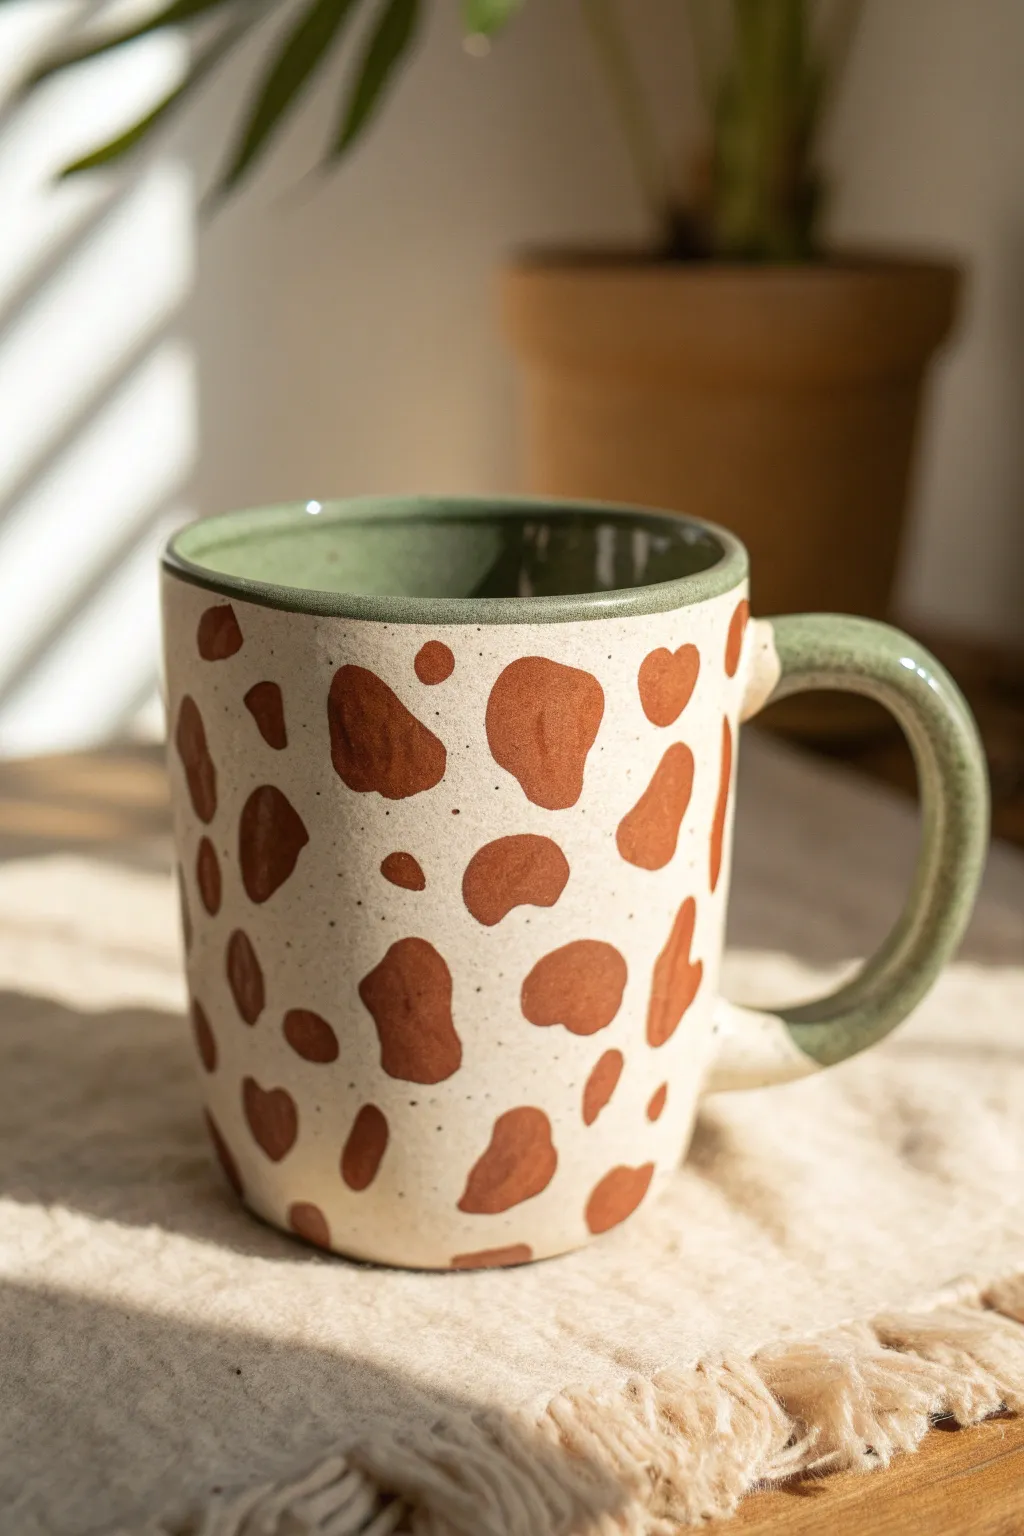
Embrace a touch of whimsy with this delightful animal-print mug, featuring an organic cow-spot pattern in warm brown tones against a speckled cream canvas. The earthy sage green interior and handle ground the playful design, making it a sophisticated addition to any pottery collection.
Detailed Instructions
Materials
- White stoneware clay body (speckled clay works best)
- Pottery wheel (or rolling pin for hand-building)
- Loop tools for trimming
- Sponge and bucket of water
- Sage green glaze
- Warm brown underglaze
- Cream or off-white matte glaze (translucent if using speckled clay)
- Small round paintbrush
- Medium flat paintbrush
- Wax resist
- Kiln
Step 1: Forming the Body
-
Prepare the Clay:
Begin by thoroughly wedging about 1-1.5 lbs of speckled white stoneware clay to remove air bubbles and ensure consistency. -
Throw the Cylinder:
Center your clay on the wheel and open it up. Pull the walls up into a uniform cylinder, aiming for a height of about 4-5 inches. I like to keep the walls slightly thicker than usual to give the mug a cozy, substantial feel. -
Shape the Profile:
Using a rib tool, gently curve the walls if you prefer a rounded bottom, or keep them straight for a modern cylinder look like the reference. Compress the rim with a chamois piece to make it smooth for drinking. -
Trimming:
Once leather hard, trim away excess weight from the bottom and crave a neat foot ring to define the base.
Step 2: Handle and Assembly
-
Pull the Handle:
Pull a strap of clay for the handle. For this specific look, aim for a medium thickness that curves into a simple ‘C’ or ear shape. -
Attach the Handle:
Score and slip the attachment points on both the mug body and the handle. Press firm to attach, smooth the seams with a modeling tool, and wipe away excess slip with a damp sponge. -
Bisque Fire:
Allow the mug to dry completely to the bone-dry stage. Load it into the kiln for a bisque firing (usually Cone 04 or 06).
Rim Technique
To get that perfect green rim, dip the top 1/2 inch of the mug into the green glaze *first*, then wax over it before dipping the main body.
Step 3: Glazing and Decoration
-
Interior Glazing:
Pour sage green glaze into the interior of the mug. Roll it around quickly to coat the entire inside and pour out the excess. Wipe any drips off the rim immediately. -
Handle Glazing:
Carefully brush the same sage green glaze onto the handle. Be precise where the handle meets the body to create a clean line, or use wax resist on the body connection points beforehand. -
Exterior Base Coat:
Dip the exterior of the mug into your cream or off-white glaze. If your clay is naturally speckled, a semi-translucent white matte glaze allows those specks to show through beautifully. -
Apply Wax Resist (Optional):
If you want the rim to remain green, carefully apply a line of wax resist over the dried green rim before dipping the exterior. -
Mapping the Spots:
Once the base glaze is dry to the touch, visualizes the placement of your spots. You want irregular sizes and spacing—avoid symmetry. -
Painting the Pattern:
Using a small round brush and warm brown underglaze (or a stable brown glaze), hand-paint the organic spot shapes directly over the cream glaze. Varing heavy and light pressure creates natural looking, blob-like shapes. -
Refining the Shapes:
Ensure the edges of your spots are relatively smooth but not perfect circles. Look at the reference; some spots are kidney-bean shaped, others are small ovals. -
Rim Detail:
If you didn’t wax the rim earlier, take a very small brush with the sage green glaze and touch up the lip of the mug to ensure a solid green band frames the top.
Runny Glaze Watch
If your brown spot glaze is fluid, leave extra space near the bottom. Gravity will pull the spots down during firing, potentially ruining your shelf.
Step 4: Final Firing
-
Clean the Foot:
Sponge the bottom foot ring completely clean of any glaze to prevent the mug from sticking to the kiln shelf. -
Glaze Fire:
Fire the mug to the maturity temperature of your clay and glazes (typically Cone 5 or 6 for stoneware). -
Cooling:
Let the kiln cool naturally before removing your new favorite mug.
Now brew your morning coffee and enjoy the tactile joy of your handmade creation
Minimal Line-Doodle Icons
Embrace the imperfect charm of hand-drawn art with this delightful pottery project. Using simple underglaze pencils or fine liner bottles, you’ll create a whimsical landscape of indigo hearts, stars, and flowers on a classic speckled cream clay body.
Step-by-Step Tutorial
Materials
- Bisque-fired ceramic bowl (speckled clay body recommended)
- Small sponge
- Water
- Dark blue underglaze pencil or fine-tip underglaze applicator (e.g., Duncan or Amaco)
- Clear dipping glaze (cone 5/6 or suitable for your clay)
- Clean towel
- Sketch paper and pencil (for practice)
Step 1: Preparation and Planning
-
Clean the Bisque:
Start with your bisque-fired bowl. Any dust or oils from handling can repel glaze, so gently wipe the entire surface inside and out with a damp, clean sponge. Let it dry completely for a few minutes. -
Practice Your Doodles:
Before you touch the clay, grab a scrap piece of paper. Practice drawing loose, open hearts, five-pointed stars, and simple six-petaled flowers. -
Refining the Style:
Aim for a ‘sketchy’ vibe rather than perfect geometry. Overlap lines slightly or leave gaps; this adds to the organic, hand-drawn aesthetic seen in the photo.
Smudge Alert
Underglaze pencil marks are powdery and smear easily before firing. Handle the bowl by the foot or rim only, and avoid touching the drawings until after the clear glaze is applied.
Step 2: Drawing the Interior
-
Start the Interior Base:
Begin at the very bottom center of the bowl. Draw your first icon—perhaps a small star or heart. This anchors the design and helps you spiral outwards. -
Move Up the Walls:
Work your way up the interior walls. Space your main icons (hearts and stars) about an inch apart. Don’t worry about perfect alignment; randomness is key here. -
Vary the Shapes:
Alternate between open hearts, simple asterisk-style stars, and flower shapes. I like to rotate the bowl constantly in my hand to ensure the icons are facing different directions, preventing a stiff, patterned look. -
Fill the Gaps:
Once the large icons are placed, look for empty negative spaces. Add small dots or tiny clusters of three dots to fill these voids without overcrowding the design.
Sharpen Up
Treat underglaze pencils like soft pastels. Keep a sharpener nearby, but don’t sharpen to a needle point—it will break. A slightly blunt tip creates that perfect marker-style line.
Step 3: Decorating the Exterior
-
Flip and Repeat:
Turn the bowl over to work on the outside. Start near the rim and work your way down toward the foot. -
Mind the Curve:
Drawing on a convex surface can be tricky. Use your pinky finger as a bridge or stabilizer against the bowl while you draw to keep your hand steady. -
Create Continuity:
Try to replicate the density of the interior pattern on the outside. Include the same mix of hearts, stars, and filler dots so the piece feels cohesive. -
Check the Rim:
Inspect the rim area. If a heart or star naturally flows over the edge, let it sit slightly below the rim, but avoid drawing directly on the sharp edge where the glaze might thin out. -
Clean Up Mistakes:
If you make a massive error or smudge a line badly, you can gently sand it off with a green kitchen scouring pad or very fine sandpaper once the underglaze is dry. Do not wet it, or you’ll smear the pigment.
Step 4: Glazing and Firing
-
Set the Underglaze:
If you used an underglaze pencil, you may need to lightly mist the bowl with water or a fixative to set the powder so it doesn’t smear during dipping. If using liquid underglaze, let it dry completely. -
Prepare the Glaze:
Stir your clear glossy glaze thoroughly. A transparent glaze is crucial here so your blue drawings show through clearly and the natural speckles of the clay remain visible. -
Dip the Bowl:
Using glazing tongs or a swift hand-dip motion, submerge the bowl into the clear glaze. Hold for a count of three (or per manufacturer instructions) and lift out steadily. -
Shake and Dry:
Give the bowl a gentle shake to remove excess drips. Let the glaze dry until it is powdery to the touch. -
Wipe the Foot:
Use a damp sponge to meticulously wipe all glaze off the bottom foot ring of the bowl. This prevents it from fusing to the kiln shelf. -
Final Fire:
Load the bowl into the kiln and fire to the maturity temperature of your clay and glaze (likely Cone 5 or 6). Once cooled, your doodles will be permanently sealed beneath a glassy surface.
Enjoy your morning cereal in a custom bowl that radiates hand-drawn warmth and creativity
Sgraffito Scratch-Reveal Designs
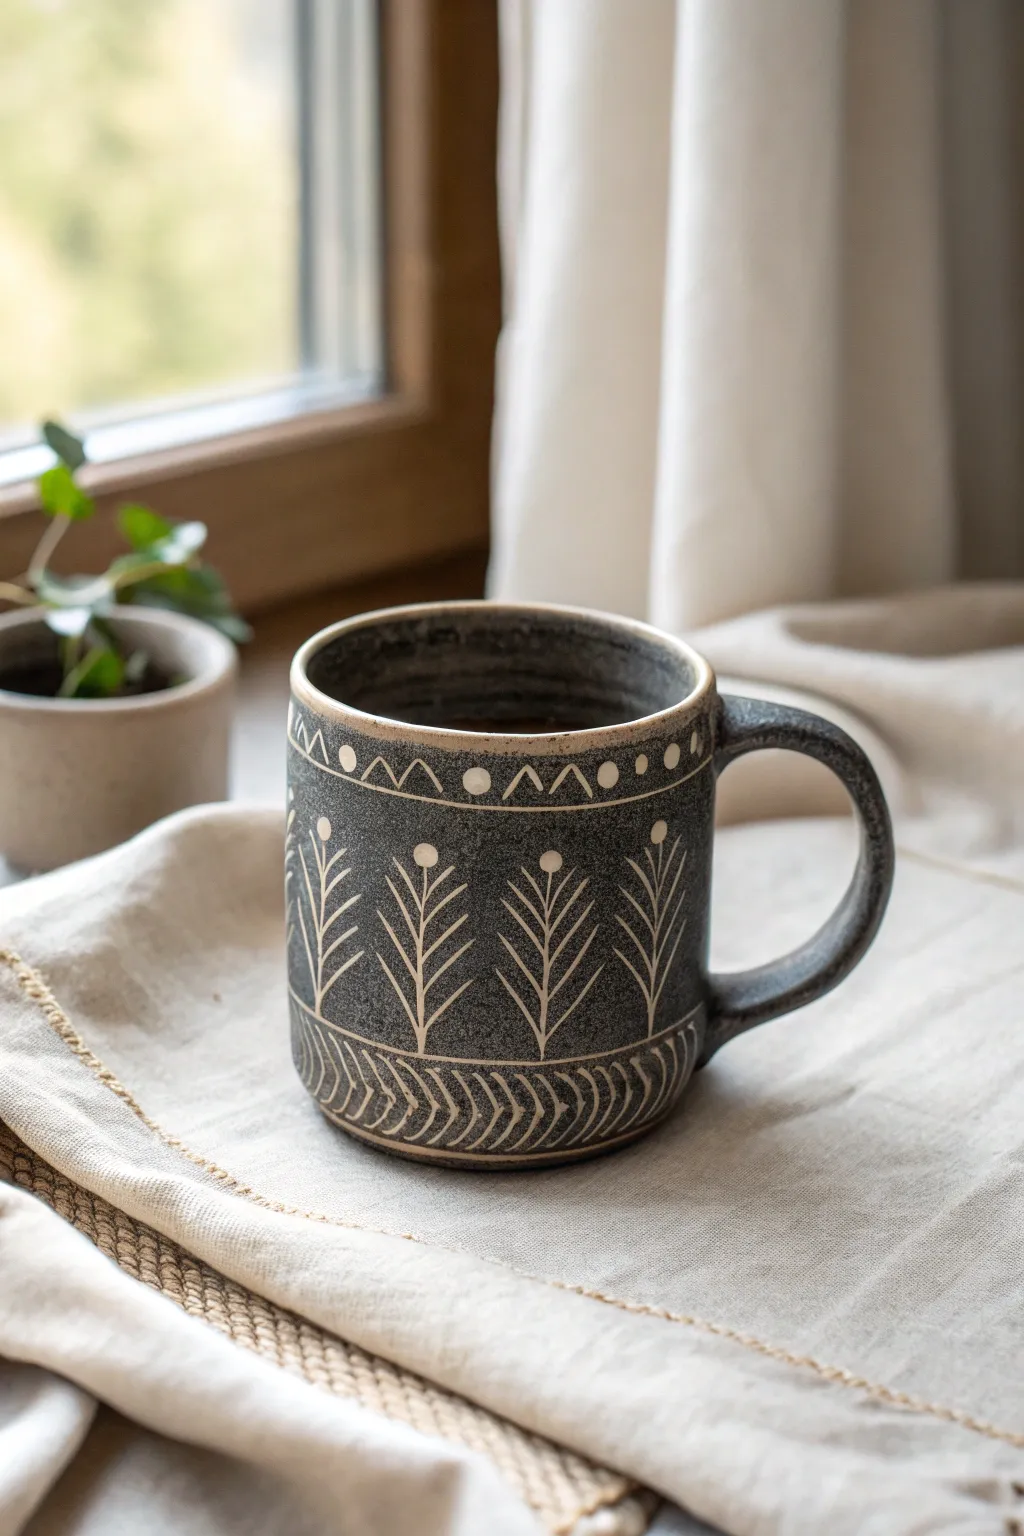
This rustic, nature-inspired mug features stylized fern fronds and geometric borders carved through a dark layer of slip to reveal the warm clay body underneath. The contrasting black and tan palette gives it a cozy, timeless feel perfect for your morning brew.
How-To Guide
Materials
- Stoneware clay body (buff or light brown)
- Black underglaze or decorative slip
- Pottery wheel (or slab roller for hand-building)
- Rib tool (metal or wood)
- Sgraffito loop tool (small/fine point)
- Carving needle tool
- Soft brush (hake or fan brush)
- Clear matte or satin glaze
- Sponge
Step 1: Forming and Prepping
-
Throw the cylinder:
Begin by throwing a straight-sided cylinder on the potter’s wheel with about 1 pound of clay. Aim for a slightly taller, narrower form to allow room for the vertical fern designs. -
Refine the shape:
Using a rib tool, smooth the sides and compress the walls. Create a slightly defined rim by gently compressing the lip with a chamois or your thumb. -
Trim the foot:
Once the piece is leather-hard, trim a clean foot ring. This elevates the mug and gives you a definitive stopping point for your design at the bottom. -
Attach the handle:
Pull a simple, C-shaped handle and attach it securely. The handle should have a comfortable curve that mimics the organic lines we will carve later. -
Dry to leather hard:
Let the mug dry slowly until it is a firm leather hard. It needs to be sturdy enough to handle the carving pressure but still contain enough moisture to carve smoothly without chipping.
Clean Lines
Keep your carving tool sharp. A dull tool pushes the clay rather than slicing it, resulting in ragged edges that ruin the crispy sgraffito effect.
Step 2: Applying the Contrast
-
Apply the underglaze:
Using a soft brush, apply 2-3 even coats of black underglaze or black slip to the exterior of the mug. Extend the color just over the rim and slightly onto the handle for a cohesive look. -
Let the surface set:
Allow the underglaze to dry until it is no longer tacky to the touch. I usually wait until the shine has turned completely matte before touching it. -
Mark the bands:
Place the mug on a banding wheel. Using a needle tool, lightly scratch two horizontal rings around the top (about 1 inch down from the rim) and two around the bottom to create your borders.
Step 3: Carving the Design
-
Carve the top border:
In the top band, use a small loop tool to carve a zig-zag or chevron pattern. Between each ‘V’ shape, carve a small solid circle to add rhythmic interest. -
Outline the ferns:
Using the needle tool, lightly sketch the central vertical stems of the ferns in the main middle section. Space them evenly around the circumference of the mug. -
Carve the fern stems:
Deepen the central vertical lines with your carving tool. Top each stem with a small carved circle, similar to a spore or berry. -
Add the leaves:
Carve downward-curving strokes extending from the central stem to create the fern leaves. Keep your strokes fluid and confident to mimic natural growth. -
Add intermediate details:
Between the main fern fronds, carve simplified, smaller leaf shapes or single strokes to fill the negative space without overcrowding the design. -
Create the bottom texture:
In the bottom border area, carve repeated curved lines that mimic a woven basket or fishbone pattern. This heavier texture grounds the visual weight of the mug. -
Detail the rim:
Carefully carve a very thin line right at the transition where the rim meets the body, framing the entire illustration.
Smearing Issues?
If the black slip smears into your white lines while brushing off crumbs, the slip wasn’t dry enough. Let it sit longer or use a soft, dry brush only.
Step 4: Finishing Touches
-
Clean up crumbs:
Use a soft, dry brush to gently sweep away all the clay burrs and crumbs created by carving. Do not use water, or you’ll smear the black slip back into your clean lines. -
Bisque fire:
Once the mug is bone dry, fire it to bisque temperature (usually cone 04) to set the shape and the underglaze. -
Glaze application:
Dip the entire mug into a clear matte or satin glaze. A glossy glaze can sometimes cause glare that obscures fine sgraffito lines, so matte is often preferred. -
Final firing:
Fire the piece to its final maturity temperature (e.g., cone 5 or 6). This will seal the clay and make the mug food safe and durable.
Now you have a piece of functional art that brings a touch of the forest into your home
Slip-Trailed Raised Lace
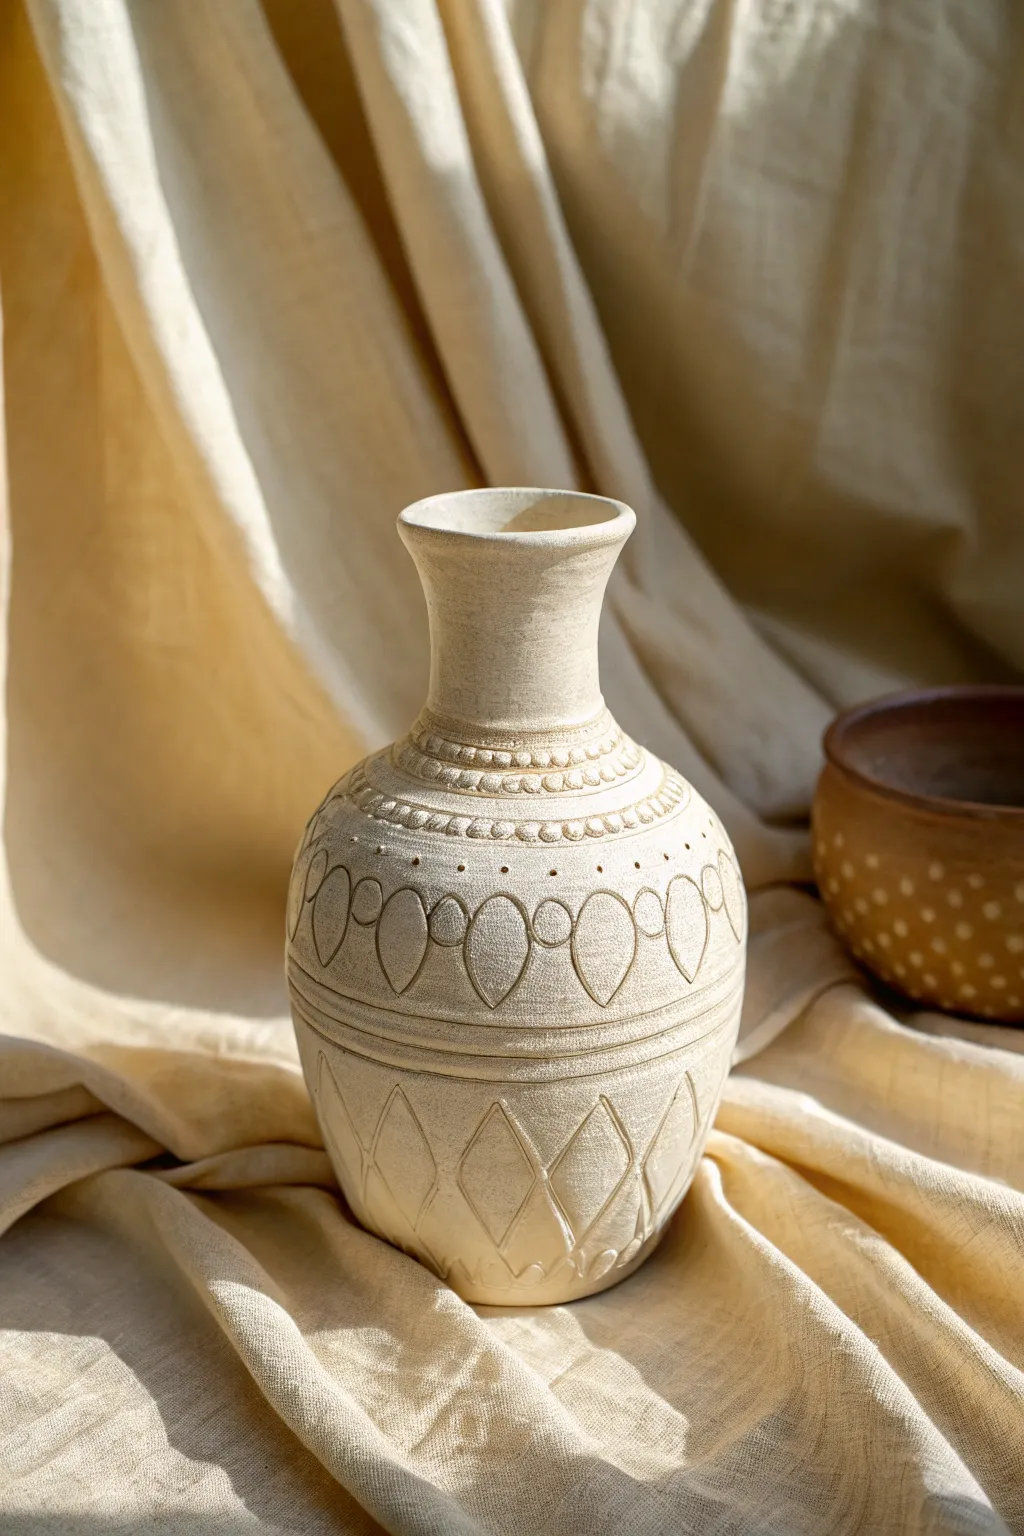
This project transforms a simple wheel-thrown or coil-built vessel into an heirloom-quality piece using the art of slip trailing. The result is a creamy, matte-finished vase featuring delicate raised patterns of beads, teardrops, and geometric diamonds that mimic the texture of vintage lace.
Step-by-Step
Materials
- White or buff stoneware clay (plastic consistency)
- Pottery wheel or coil-building supplies
- Slip trailer bottle with fine and medium tips
- Thickened slip (same clay body as your vase)
- Needle tool
- Rib tool (metal or rubber)
- Sponge
- Matte cream or transparent glaze
- Carving tool or sgraffito loop tool (optional)
- banding wheel (optional)
Step 1: Forming the Vessel
-
Create the base form:
Begin by throwing a medium-sized cylinder on the wheel, approximately 8-10 inches tall. Alternatively, build up a cylinder using coils and smooth the walls thoroughly. -
Shape the belly:
Gently push the walls outward from the inside to create a rounded belly, tapering the form inward as you move toward the neck. -
Refine the neck:
Collar the clay in at the neck to create a narrow opening, then flare the rim outward slightly for a trumpet shape. Smooth the surface with a rib tool to remove throwing lines, providing a clean canvas for your design. -
Leather hard stage:
Allow the vase to dry slowly until it reaches a leather-hard state. It should be firm enough to handle without deforming but still hold moisture.
Slip Consistency Trick
Add a few drops of deflocculant (like sodium silicate) to your slip. This allows it to flow smoothly like liquid while maintaining a high clay content for raised relief.
Step 2: Drafting the Design
-
Mark geometric zones:
Place your vase on a banding wheel. Using a needle tool, lightly incise horizontal guide rings around the neck, the shoulder, the belly, and the lower section to segment your design areas. -
Sketch the motifs:
Lightly scratch or sketch your pattern directly onto the clay. Plan for rows of dots at the neck, teardrops around the shoulder, and tall diamonds at the base.
Step 3: Slip Trailing & Carving
-
Prepare the slip:
Ensure your slip is the consistency of thick yogurt or icing. It needs to hold its shape when piped but flow smoothly from the trailer. -
Pipe the neck detail:
Using a medium tip, squeeze small, consistent dots of slip between the two uppermost guide lines on the neck to create a beaded appearance. -
Create the shoulder scallops:
Switch to a finer tip if desired. Carefully trail lines to outline the teardrop or scallop shapes along the shoulder. I find it helpful to anchor my elbow on the table for steadier lines. -
Add texture within shapes:
For the interior of the teardrops, you can either stipple the clay with a tool for a rough texture or pipe a finer inner line to echo the shape. -
Detail the mid-section:
Below the teardrops, define the central horizontal band with two strong, parallel slip-trailed lines encompassing the circumference of the vase. -
Form the base diamonds:
On the lower section, pipe large diamond shapes. To add depth, you can use a carving tool to gently subtract clay from the center of these diamonds instead of adding slip, creating a negative relief contrast. -
Clean up edges:
Once the slip has stiffened slightly (but isn’t bone dry), gently knock down any sharp peaks with a soft, slightly damp finger or a brush.
Clogged Trailer Tips?
If your slip trailer keeps jamming, strain your slip through a fine mesh sieve or an old pair of pantyhose before filling the bottle to remove tiny hard lumps.
Step 4: Finishing and Glazing
-
Slow drying:
Cover the piece loosely with plastic to ensure the added slip and the main body dry at the same rate preventing cracks. -
Bisque fire:
Load the bone-dry vase into the kiln and bisque fire to cone 04 (or your clay body’s specifications). -
Glaze application:
Apply a matte cream or sheer white glaze. A dipping application works best to get into the crevices of the slip trailing without obscuring the details. -
Final wipe down:
Sponge the foot of the vase clean to prevent it from sticking to the kiln shelf. -
Glaze fire:
Fire the piece to cone 5 or 6 (mid-range) to achieve the durable, stoneware finish shown in the example.
Once fired, the subtle play of light over the raised textures will give your vase a timeless, tactile elegance