
Whenever I need a quick creative win, I reach for clay and make a few tiny accessories that instantly feel special. These ideas are all about small, giftable projects—easy to personalize, fun to batch-make, and totally doable at your kitchen table.
Modern Geometric Drop Earrings
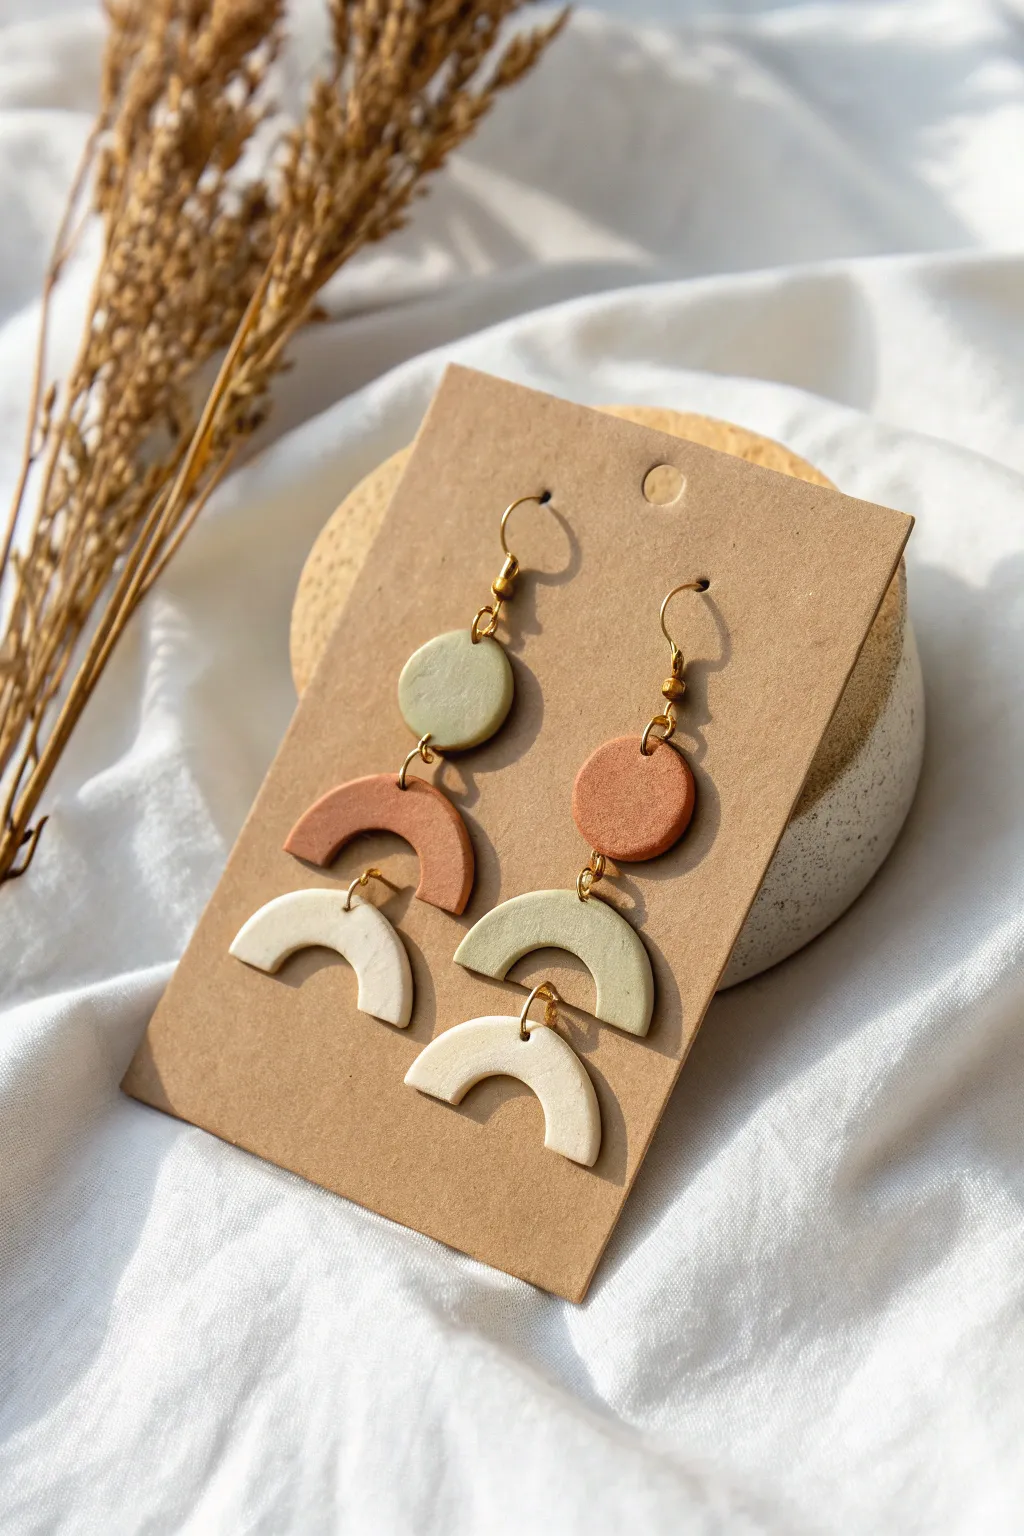
These understated drop earrings combine soft earth tones with clean geometric shapes for a modern, asymmetrical look. The matte finish and organic palette make them a versatile accessory perfect for everyday wear.
How-To Guide
Materials
- Polymer clay in olive green, terracotta, and soft white/cream
- Rolling pin or acrylic clay roller
- Clay cutters: small/medium circles and arch shapes
- Parchment paper or ceramic tile
- Craft blade or X-ACTO knife
- Hand drill or piercing tool
- Gold-tone jump rings (6-8mm)
- Gold-tone earring hooks
- Needle nose pliers
- Fine-grit sandpaper (optional)
- Baking sheet/oven
Step 1: Shaping the Clay Components
-
Condition the clay:
Begin by warming the polymer clay in your hands, kneading each color separately until it becomes soft and pliable. This conditioning stage prevents air bubbles and cracks later on. -
Create a slab:
Roll out the olive green clay on a piece of parchment paper or a smooth tile. Aim for an even thickness of about 3mm (1/8 inch) so the earrings have some durability but remain lightweight. -
Repeat rolling:
Repeat the rolling process for the terracotta and white clay, ensuring all slabs are matching in thickness for a cohesive look. -
Cut the shapes:
Using your cutters, press firmly into the clay. You will need one small green circle, one medium terracotta circle, one medium green arch, one medium terracotta arch, and one small and one medium white arch. -
Refine the edges:
Gently lift the cut shapes. If there are any ragged edges, use your finger or a soft brush with a tiny bit of cornstarch to smooth them down now while the clay is raw. -
Pierce holes:
Before baking, use a piercing tool or toothpick to poke holes at the top and bottom of the connecting pieces, and just the top of the final bottom arches. Ensure the hole is large enough for your jump rings but not too close to the edge.
Bubbles in your clay?
If you see air bubbles after rolling, gently pierce them with a needle and smooth the air out with your finger. Baking on plain paper (not wax) can also help prevent shiny spots on the back.
Step 2: Baking and Assembly
-
Bake the pieces:
Arrange your shapes on a parchment-lined baking sheet. Bake according to your brand of clay’s specific instructions—usually around 275°F (135°C) for 15-30 minutes. -
Cool and sand:
Let the pieces cool completely. If you notice any fingerprints or sharp edges after baking, lightly sand them with fine-grit sandpaper for a professional matte finish. -
Clean the surface:
Wipe the sanded pieces with a damp cloth or a baby wipe to remove any white dust residue, restoring the clay’s true color. -
Open jump rings:
Using your pliers, twist the jump rings open sideways (not pulling them apart outward). This maintains the circle shape when you close them later. -
Assemble the left earring:
Connect the small green circle to the terracotta arch using a jump ring. Then, connect the bottom of that arch to the small white arch using a second jump ring. -
Assemble the right earring:
Connect the terracotta circle to the green arch, and then attach the white arch to the bottom, creating a mismatched but balanced pair. -
Attach earring hooks:
Finally, attach an earring hook to the top hole of the uppermost circle on each earring using a small jump ring. -
Final check:
Gently wiggle the earrings to make sure all jump rings are closed tightly so components don’t slip off during wear.
Texture Trick
For a subtle stone effect, mix black pepper or dried herbs into your white clay before rolling. It adds organic speckling that mimics ceramic stoneware.
Enjoy styling these modern, custom-made accessories with your favorite outfit


Sweet Little Stud Earrings
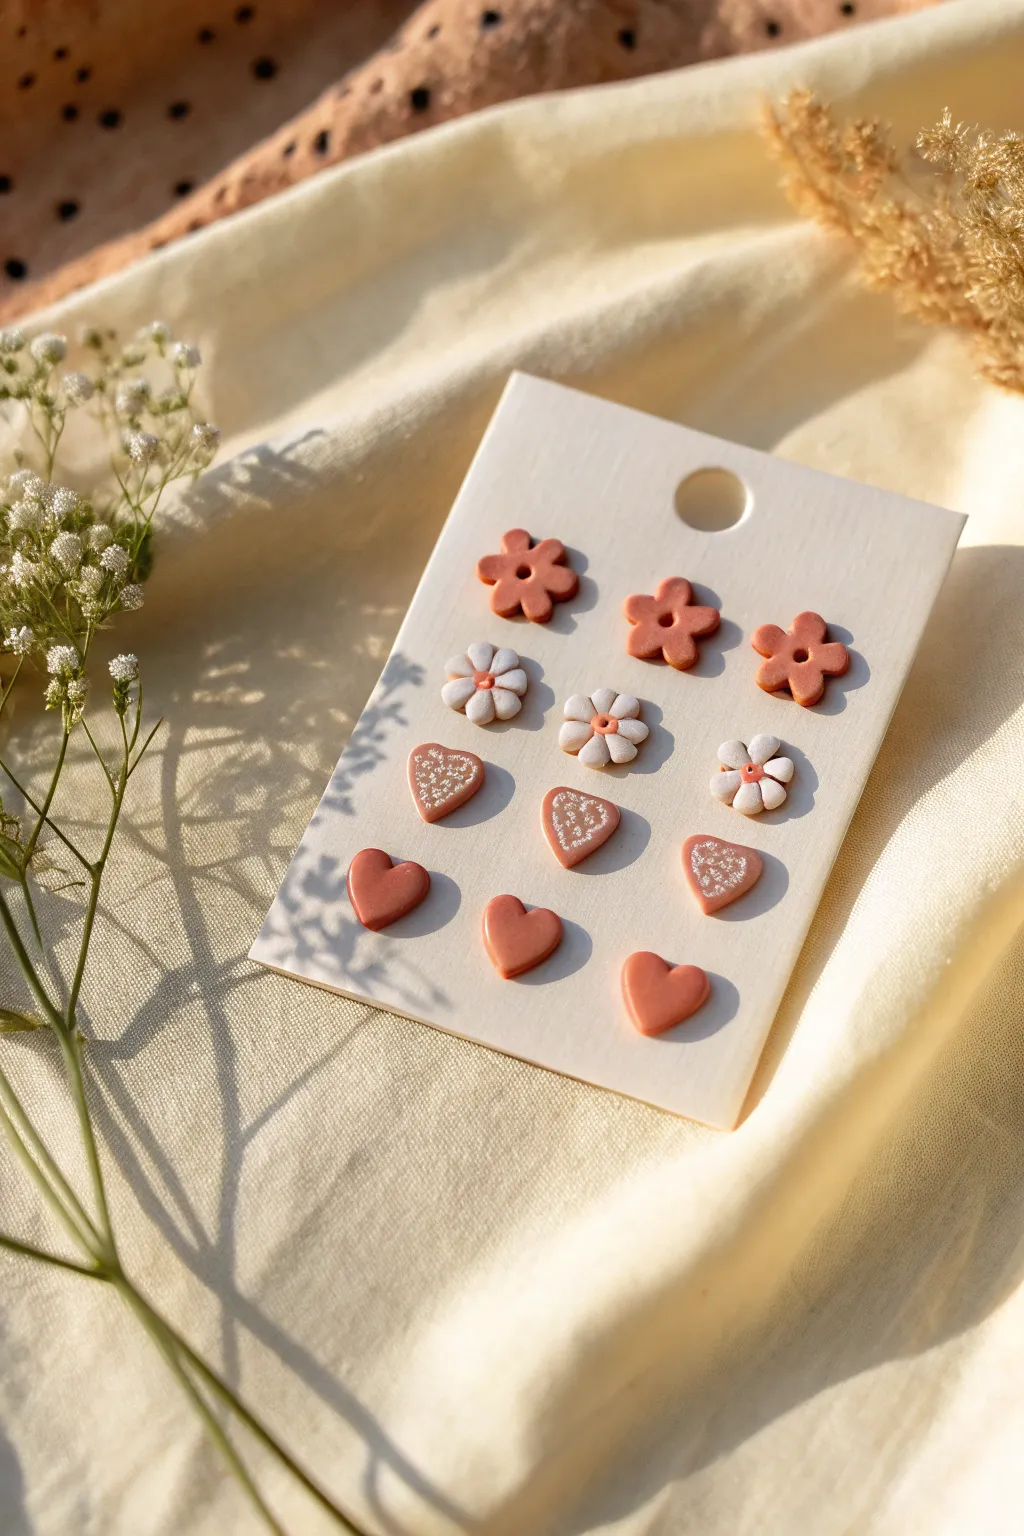
This charming collection of stud earrings features a cohesive warm color palette perfect for everyday wear. You will create four distinct styles using just two colors of clay, ranging from simple shapes to detailed speckled designs.
Step-by-Step Tutorial
Materials
- Polymer clay in terracotta/rust color
- Polymer clay in white
- Small flower shaped cutter (approx 1 cm)
- Small heart shaped cutter (approx 1 cm)
- Small ball stylus tool
- Acrylic rolling pin
- Flat blade or tissue blade
- White acrylic paint
- Fine detail paintbrush or toothpick
- Earring posts and backs
- Strong jewelry glue (E6000 or similar)
- Ceramic tile or glass sheet for baking
- Wet wipes
- Oven
Step 1: Preparation & Condition
-
Condition the clay:
Begin by thoroughly kneading your terracotta clay until it is soft and pliable. Do the same for the white clay, but be sure to wash your hands or wipe them clean between colors to avoid transferring pigment. -
Roll out sheets:
Using your acrylic rolling pin, roll both chunks of clay into even sheets. Aim for a thickness of about 3mm—thick enough to be sturdy but light on the ear.
Fixing Fingerprints
If you notice fingerprints on your raw clay shapes, dip a Q-tip in a tiny amount of rubbing alcohol or acetone and gently brush it over the surface to smooth them out before baking.
Step 2: Creating the Solid Flowers
-
Cut the shapes:
Press your small flower cutter into the terracotta sheet to create three identical flower shapes. I always cut one extra just in case of an accident. -
Refine the edges:
Gently gently utilize your finger or a soft tool to smooth the raw edges left by the cutter, softening the look of the petals. -
Add the center:
Take your small ball stylus and press it into the exact center of each flower to create a neat indentation.
Step 3: Creating the Daisy Studs
-
Cut white petals:
Using the same flower cutter, cut three shapes from your white clay sheet. -
Create terracotta centers:
Roll tiny balls of terracotta clay between your fingers. These should be small enough to fit comfortably in the center of the white flowers. -
Attach the centers:
Use the ball stylus to press into the center of the white flower first, then place the terracotta ball into the divot. Gently press the stylus into the center of the terracotta ball to secure it.
Add Texture
Before baking the solid hearts or flowers, press a piece of coarse sandpaper or a clean sponge gently onto the clay surface. This gives a lovely stone-like texture that hides imperfections.
Step 4: Crafting the Hearts
-
Cut heart shapes:
Using the heart cutter on the terracotta sheet, cut out six heart shapes total. Three will remain plain, and three will be decorated. -
Smooth the forms:
Carefully lift the hearts and smooth the edges with your fingertip to ensure a rounded, professional finish. -
Bake the pieces:
Arrange all your cut pieces—solid flowers, daisies, and all hearts—on a ceramic tile. Bake according to your brand of polymer clay’s instructions (usually 275°F/135°C for 15-30 minutes). Let them cool completely.
Step 5: Detailing & Assembly
-
Paint the speckled hearts:
On three of the baked rust hearts, use a fine brush or toothpick to dab tiny, irregular dots of white acrylic paint. Concentrate the dots on one side for an ombre effect, or scatter them evenly. -
Dry the paint:
Allow the acrylic paint to dry fully. If you want extra durability, apply a thin coat of matte varnish over the painted hearts. -
Prepare the posts:
Apply a small dot of strong jewelry glue to the flat pad of an earring post. -
Attach the hardware:
Press the glued post firmly onto the back of each clay piece. Ensure it is centered but slightly closer to the top edge so the earring sits well on the lobe. -
Final cure:
Let the glue cure for at least 24 hours before wearing to ensure maximum bond strength.
Once the glue is fully set, mount your beautiful handmade set on a card for gifting or pop them straight into your jewelry box


Statement Clay Bead Necklace
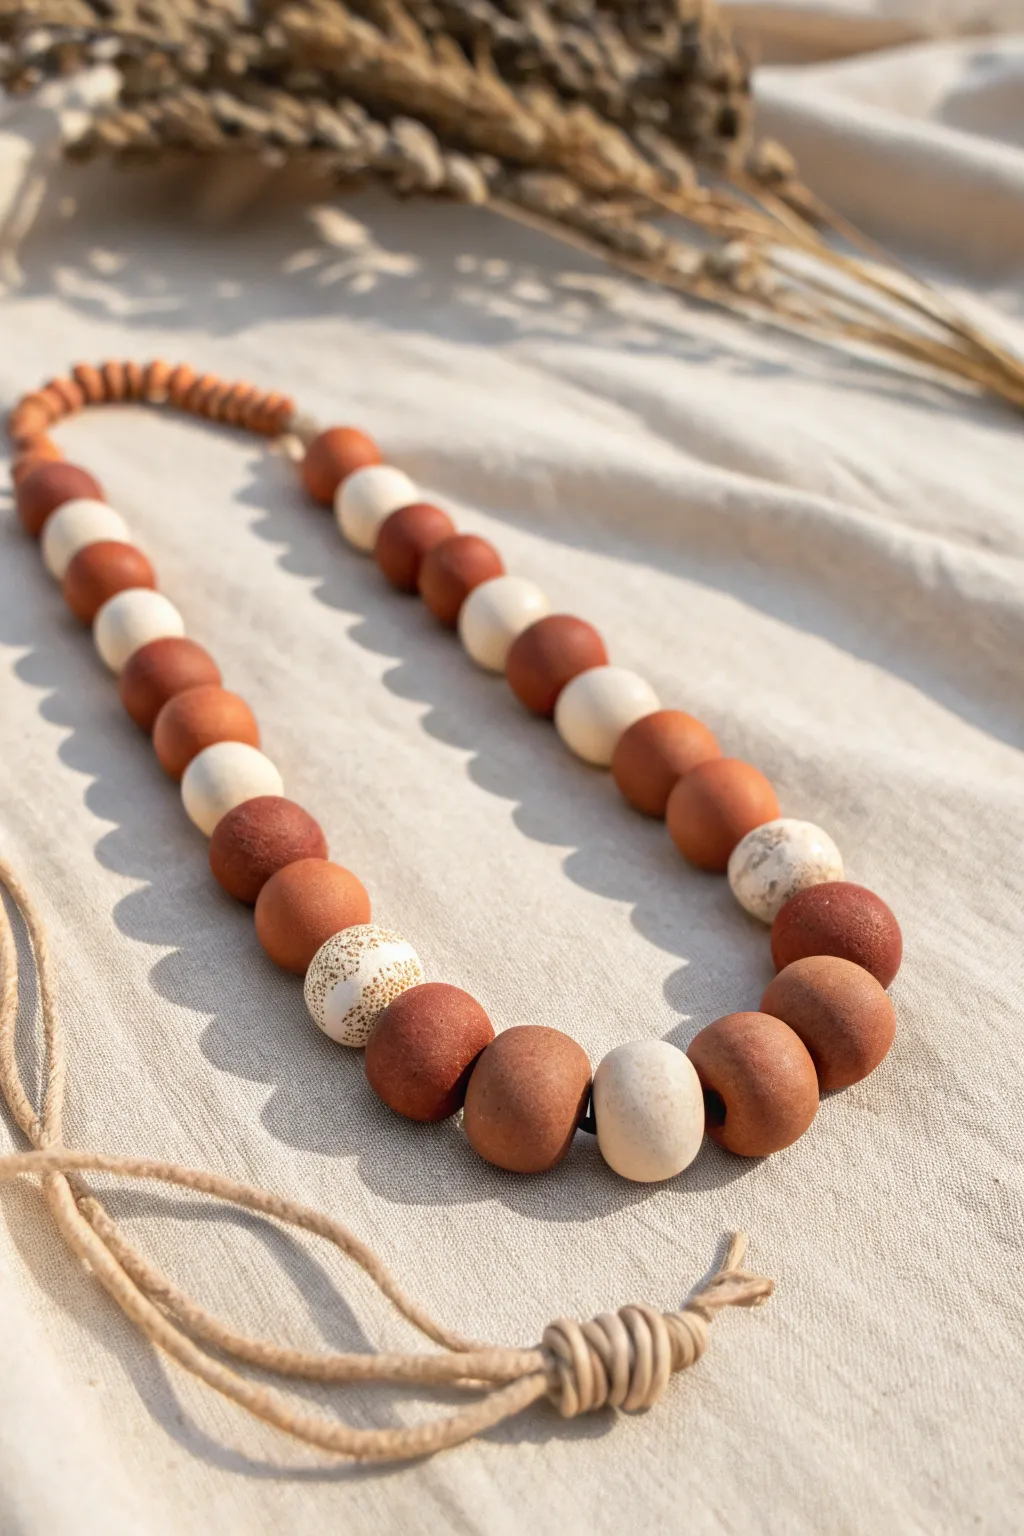
This rustic statement piece combines the warmth of earthy terracotta tones with creamy, speckled accents. The chunky, oversized beads give it a modern organic feel, making it the perfect accessory for casual linen outfits or cozy knits.
Detailed Instructions
Materials
- Polymer clay (terracotta/burnt orange color)
- Polymer clay (cream/ecru color)
- Coarse black pepper or dried coffee grounds (for speckling)
- Faux suede or leather cord (beige, approx. 1 meter)
- Bead piercing tool or skewer
- Sandpaper (fine grit)
- Clay roller or pasta machine
- Oven for baking
- Ruler
- Matte spray varnish (optional)
Step 1: Creating the Clay Base
-
Condition the clay:
Begin by warming the terracotta clay in your hands, kneading it until it is soft, pliable, and free of any air bubbles. Do the same for the cream-colored clay, but wash your hands in between to avoid color transfer. -
Mix the speckles:
Take about half of your conditioned cream clay. Sprinkle a small pinch of coarse black pepper or dry coffee grounds onto it. Fold and knead the clay repeatedly until the speckles are evenly distributed throughout the white base. -
Portion the terracotta:
Roll the terracotta clay into a thick log. Use a slicing blade to cut equal segments for the main beads. You will need about 20-24 medium-sized portions for the main strand. -
Portion smaller segments:
Cut much smaller slivers of the terracotta clay to create the tiny disc beads that will sit at the back of the neck. -
Portion the cream clay:
Divide both the plain cream clay and your speckled cream mixture into segments roughly the same size as your main terracotta portions. You’ll need about 6-8 of these accent beads.
Uneven Holes?
If the exit hole looks messy after piercing, gently smooth the clay back over the exit point with your finger before baking, or pierce halfway from both sides.
Step 2: Shaping and Baking
-
Roll spheres:
Roll each clay segment between your palms to form smooth, round spheres. Applying gentle, even pressure helps eliminate fingerprints. -
Refine the shape:
For a slightly more organic look like the original piece, you can gently flatten the poles of the spheres just a tiny bit, so they sit flush against each other. -
Create the mini-discs:
Take the small terracotta slivers and roll them into balls, then squash them flat between your thumb and forefinger to create the small disc spacer beads. -
Pierce the holes:
Using a bead resizing tool or a skewer, carefully pierce a hole through the center of each bead. I like to twist the tool as I push through to prevent the bead from squashing. -
Check fit:
Ensure the hole is wide enough for your suede cord. If it seems tight, wiggle the tool to slightly widen the channel. -
Bake the beads:
Arrange the beads on a baking sheet lined with parchment paper. Bake according to your clay manufacturer’s instructions (usually around 275°F/135°C for 15-30 minutes). -
Cool down:
Allow the beads to cool completely in the oven with the door cracked open. This gradual cooling helps prevent cracking.
Texture Twist
Before baking, roll your terracotta beads lightly over a piece of coarse canvas fabric or sandpaper to give them a stone-like, pitted texture.
Step 3: Finishing and Assembly
-
Sand imperfections:
Once cool, inspect your beads. Use fine-grit sandpaper to gently buff away any fingerprints or lint that might have stuck to the surface. -
Seal (Optional):
If you want extra durability, lightly mist the beads with a matte spray varnish. Let them dry completely before stringing. -
Start stringing:
Cut your suede cord to length. String the small terracotta disc beads first, creating a row of about 10-12 discs. This section will rest comfortably at the back of the neck. -
Add the pattern:
Begin threading the larger beads. Alternate between the terracotta and cream beads. A good pattern to follow is two terracotta, one cream, then repeat, mixing in the speckled beads randomly for visual interest. -
Create the focal point:
As you reach the center of the necklace, place the largest or most uniquely speckled beads to serve as the focal point. -
Finish the strand:
Mirror the pattern on the other side of the necklace, finishing with another set of the small terracotta disc beads. -
Knot the ends:
Tie a simple overhand knot at each end of the bead strand to keep them in place. -
Create the closure:
Tie the two loose ends of the cord together using a sliding knot or a decorative looped knot, leaving tails that add to the bohemian aesthetic.
Now you have a stunning, handcrafted necklace ready to wear or gift


Tiny Charm Pendants for Layering
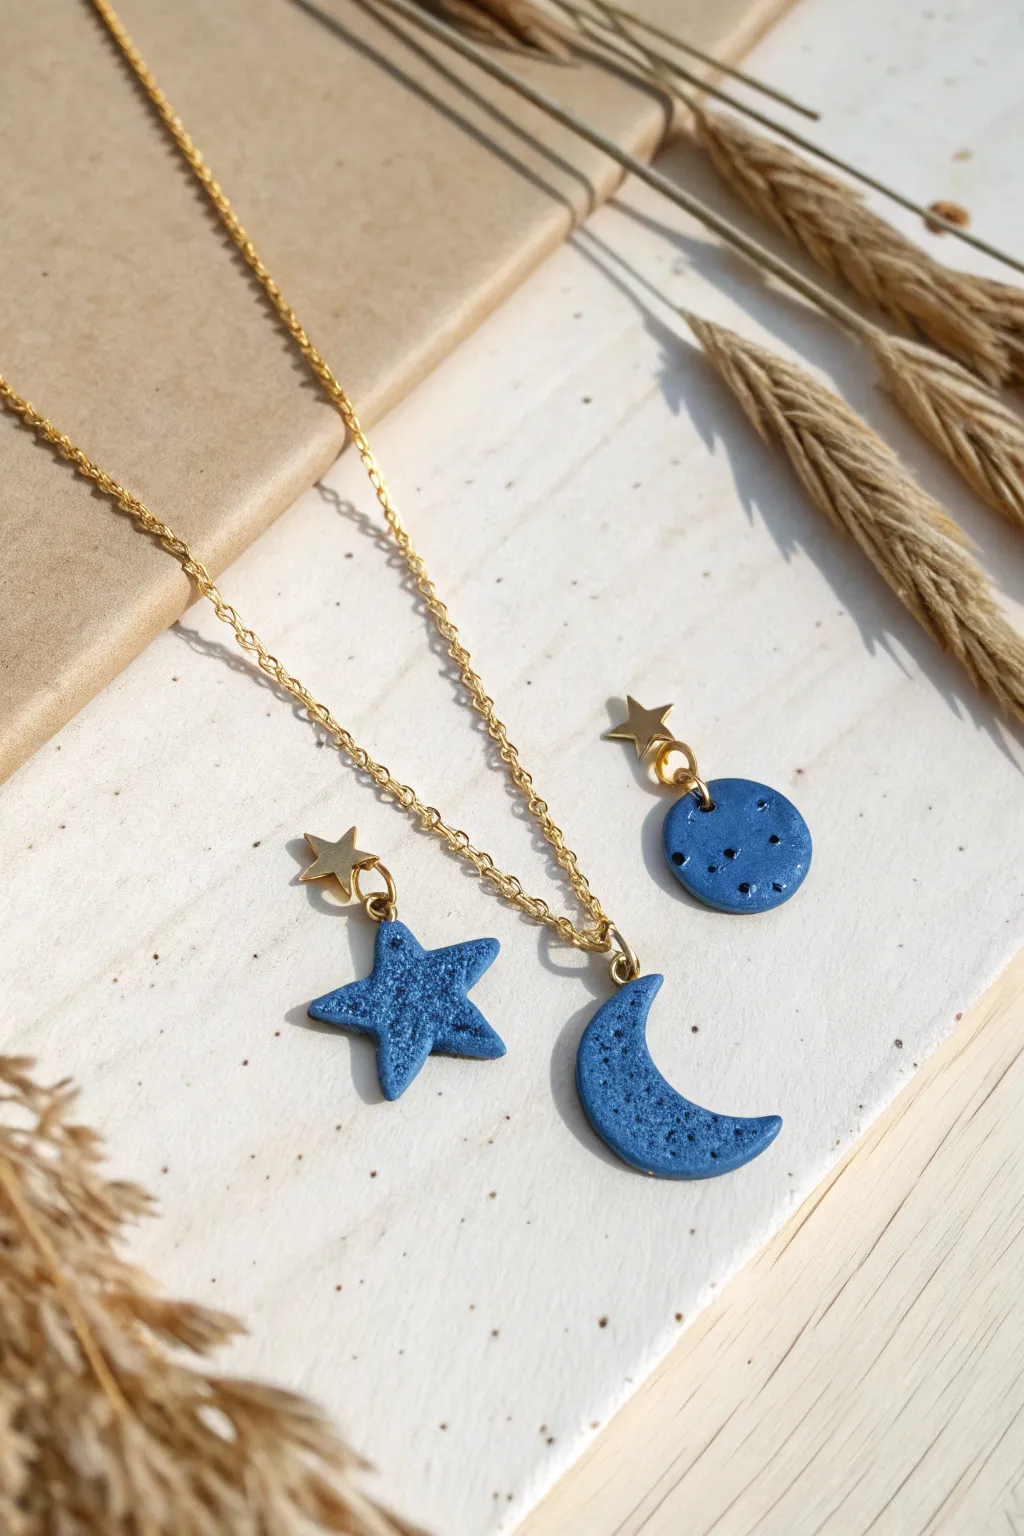
Create a starry night sky you can wear with these delicate, deep blue charms featuring a textured, celestial finish. This project includes a crescent moon, a classic star, and a full moon, all accented with gold hardware for a high-end look.
How-To Guide
Materials
- Navy blue polymer clay (e.g., Fimo or Sculpey)
- Black pepper or coarse black sand (for texture)
- Small star-shaped cookie cutter
- Small round cutter
- Craft knife or scalpel
- Rolling pin or pasta machine
- Gold eye pins (small size)
- Gold jump rings
- Gold star charms (metal findings)
- Gold necklace chain
- Gloss varnish or resin (optional)
- Small pliers (round nose and flat nose)
- Oven for baking
Step 1: Preparing the Galaxy Clay
-
Condition the base:
Begin by thoroughly kneading your navy blue polymer clay until it is soft and pliable. This prevents cracking later. -
Add the stardust texture:
Sprinkle a generous pinch of finely ground black pepper or very fine black craft sand onto the flattened clay. This creates the speckled stone effect seen in the photo. -
Mix and flatten:
Fold the clay over the inclusions and knead again to distribute the specks evenly throughout the block. -
Roll out the slab:
Roll the clay out to a uniform thickness, approximately 3-4mm roughly. You want it sturdy enough to hold hardware but thin enough to be delicate.
Stone Effect Secret
Don’t use paint for the specks! Using real ground black pepper mixed into the clay creates a natural, stone-like texture that won’t rub off.
Step 2: Shaping the Charms
-
Cut the star:
Press your star-shaped cutter firmly into the clay slab and wiggle slightly to ensure a clean cut before removing. -
Cut the full moon:
Use a small round cutter to stamp out a simple circle shape for the full moon charm. -
Create the crescent:
Cut a larger circle first. Then, overlap the cutter slightly off-center on that same circle and cut again to remove a portion, leaving behind a perfect crescent moon shape. -
Smooth the edges:
Gently run your finger along the raw edges of each cut shape to soften any sharp corners or clay burrs.
Make it Shine
Add tiny flecks of gold leaf onto the raw clay surface before baking. Roll over them gently to embed the gold for a true galaxy shimmer effect.
Step 3: Adding Hardware & Baking
-
Insert eye pins:
Trim your metal eye pins to be shorter than the height of your charms. Carefully push the straight end into the top of each clay shape, ensuring the loop sits flush against the clay edge. -
Secure the pins:
I always gently pinch the clay around the inserted pin to close the gap and secure the metal inside. -
Bake the charms:
Place your pieces on a parchment-lined baking sheet or ceramic tile. Bake according to your specific clay brand’s instructions (usually 230°F – 275°F for 15-30 minutes). -
Cool down:
Allow the pieces to cool completely in the oven with the door cracked, which helps prevent thermal shock and brittleness.
Step 4: Assembly
-
Varnish (Optional):
For a glassy look, apply a thin coat of gloss varnish or UV resin to the cooled pieces. The matte texture shown here is beautiful too, so this step is up to your preference. -
Attach the metal stars:
Using your pliers, open a small jump ring. Thread on one of the tiny gold metal star findings. -
Connect to the clay:
Hook that same jump ring (with the metal star attached) through the eye pin loop of your clay charm. Close the jump ring securely. -
Add to chain:
Thread your finished crescent moon pendant directly onto the gold chain. The smaller star and full moon charms can be added to earring hooks or used as extra dangles.
Pair your new celestial set with a simple white tee to let the deep blue pop against the fabric

The Complete Guide to Pottery Troubleshooting
Uncover the most common ceramic mistakes—from cracking clay to failed glazes—and learn how to fix them fast.
Speckled Initial Keychains

These trendy, minimalist keychains mimic the look of speckled ceramic or granite but are surprisingly lightweight and durable. The high-contrast black initial against the creamy, speckled clay creates a sophisticated accessory perfect for personalizing your keys or gifting to a friend.
Step-by-Step Tutorial
Materials
- Polymer clay (beige or sand color)
- Polymer clay (black)
- Acrylic rolling pin
- Square clay cutter (approx. 1.5 – 2 inches) with rounded corners
- Small circle cutter or straw (for the hole)
- Letter stamp or black acrylic paint and a fine brush
- Gold tone classic split key ring
- Gold tone large jump ring
- Jewelry pliers (flat nose and round nose)
- Ceramic tile or baking sheet
- Parchment paper
- Sandpaper (fine grit, optional)
- Gloss or matte varnish (optional)
Step 1: Prepping and Modeling
-
Condition the base clay:
Start by taking a block of your beige or sand-colored polymer clay. Knead it in your hands until it is warm, soft, and pliable to ensure it won’t crack during baking. -
Prepare the speckles:
Take a very small amount of black polymer clay. Pinch off tiny, jagged crumbs of clay; the more irregular the sizes, the more organic the stone effect will look. -
Incorporate the pattern:
Sprinkle the black crumbs randomly over your ball of beige clay. Gently fold the clay over once or twice, but don’t over-mix, or the black will streak into gray. -
Roll the slab:
Place the clay on a clean surface or ceramic tile. Use your acrylic roller to flatten the clay into a slab that is about 1/4 inch thick. I like to keep it slightly thick for durability. -
Cut the shape:
Position your square cutter over a section of the slab that has a pleasing distribution of speckles. Press down firmly to cut out the main tag shape. -
Soften the edges:
Gently lift the square from your work surface. Use your finger to softly tap and smooth the cut edges to remove any sharpness or drag marks from the cutter. -
Create the hardware hole:
Using a small circle cutter or a sturdy straw, punch a hole centered near the top edge of the square. Ensure there is at least 3-4mm of clay between the hole and the edge so it doesn’t break later.
Smudged Speckles?
If your black specks are dragging or smearing when you roll, your clay might be too warm or soft. Pop the clay in the fridge for 10 minutes before rolling again.
Step 2: Adding the Letter & Baking
-
Add the initial:
If using a rubber stamp and ink, press the ‘A’ (or your chosen letter) firmly into the center of the unbaked clay. If you prefer painting, wait until after baking. -
Optional: Texture check:
Inspect the surface for fingerprints. If you see any, lightly brush them away with a bit of cornstarch or baby oil. -
Baking:
Place the piece on a parchment-lined baking sheet. Bake according to your specific clay brand’s instructions (usually 275°F for 15-30 minutes). -
Cooling:
Once baked, remove from the oven and let the piece cool completely on a flat surface. Do not try to flex it while it’s still warm.
Step 3: Finishing Touches
-
Painting (if stamping wasn’t used):
If you didn’t stamp the letter earlier, use a fine detail brush and black acrylic paint to carefully paint a serif ‘A’ in the center now. -
Fixing imperfections:
If there are any rough spots on the edges, you can lightly wet-sand them with fine-grit sandpaper under running water. -
Sealing:
While polymer clay is durable on its own, a thin coat of matte varnish can help protect the painted letter from scratching off over time. -
Open the jump ring:
Using two pairs of pliers, grip the gold jump ring on either side of the split. Twist one hand forward and one back to open it laterally (never pull it apart). -
Attach hardware:
Slide the open jump ring through the hole in your clay square. Before closing it, hook on the large split keyring. -
Secure the closure:
Use your pliers to twist the jump ring back into a closed circle, ensuring the two ends meet perfectly flush so the ring doesn’t slip off.
Make it Luxe
Add gold leaf flakes into the raw clay alongside the black specks before rolling. The metallic flecks will add a chic shimmer that matches the hardware.
Now you have a custom, boutique-style accessory ready to organize your keys or attach to a bag
Bag Charms and Zipper Pulls
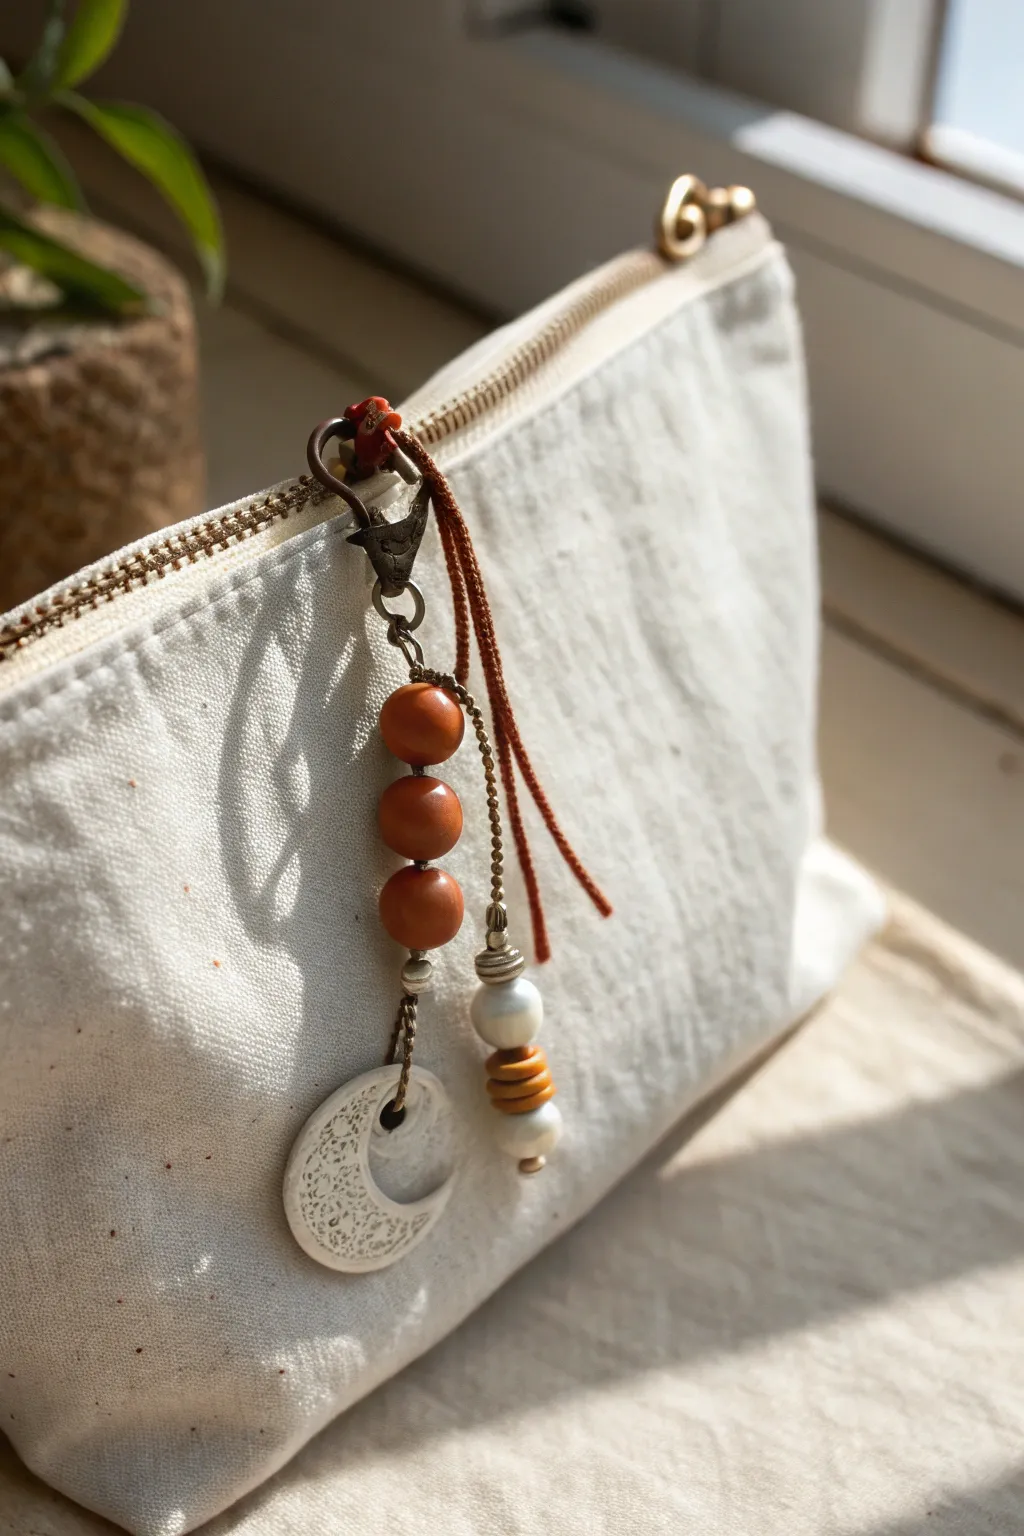
This earthy yet elegant bag charm combines textured clay with warm wooden tones for a perfect bohemian accent. The centerpiece is a hand-stamped clay moon paired with a tassel-style beaded dangle that adds movement and personality to any simple pouch.
Step-by-Step
Materials
- White air-dry clay or polymer clay
- Small circle cutter (approx. 1.5 inch)
- Lace fragment or texture mat
- Drinking straw or small cutter (for hole)
- Sandpaper (fine grit)
- Dark brown waxed cotton cord (approx. 12 inches)
- Thin gold chain (approx. 3 inches)
- 3 large reddish-brown wooden beads (round)
- 2 white pearlescent beads (cylindrical or round)
- 2 flat mustard-yellow spacers or beads
- Lobster clasp with swivel
- Jump rings (antique brass finish)
- Silver spacer beads/caps
- Pliers and scissors
Step 1: Crafting the Clay Moon
-
Roll and texture:
Roll out a small slab of white clay to about 1/4 inch thickness. Place a piece of lace or a texture stamp over the clay and press firmly with your rolling pin to imprint the pattern. -
Cut the shape:
Use your circle cutter to punch out a textured round. Carefully move the cutter slightly to the side to cut a crescent moon shape from that circle, or simply cut a circle and slice a crescent shape freehand. -
Create the hole:
Use a straw or small tool to punch a hole near the top, centered on the thickest part of the crescent, ensuring it’s large enough for your jump ring. -
Refine edges:
Smooth the cut edges with a damp finger to remove any jagged bits. I like to check the back side too, ensuring it’s neat. -
Cure the clay:
Bake (for polymer) or let dry (for air-dry) according to package directions until hard. -
Antiquing (Optional):
Once cured, you can lightly brush a diluted mix of brown acrylic paint over the texture and wipe it off quickly with a cloth. This makes the lace pattern pop.
Sticky Situation?
If your clay sticks to the texture mat or lace, lightly dust the clay surface with cornstarch or baby powder before pressing. It acts as a release agent.
Step 2: Assembling the Wood Bead Strand
-
Prepare the cord:
Cut a length of brown waxed cord roughly 10 inches long. Fold it in half to create a loop at the top. -
Knot and thread:
Tie a secure overhand knot about 1 inch down from the fold to create the loop that attaches to the hardware. -
Add main beads:
Thread the three reddish-brown wooden beads onto both strands of the cord simultaneously, pushing them up against the knot. -
Attach the moon:
Attach a large jump ring through the hole in your cured clay moon. Thread the cord ends through this jump ring. -
Secure the end:
Tie a double knot beneath the jump ring to hold the moon in place. Trim the excess cord, leaving about 2-3 inches hanging as a tassel feature.
Step 3: Creating the Chain Dangle
-
String the accent beads:
Take a headpin or a piece of wire and thread on: one small silver spacer, a white pearlescent bead, two mustard spacer beads, and another white bead. -
Create a wire loop:
Using round-nose pliers, bend the top of the wire into a small loop and wrap it closed to secure the bead stack. -
Connect to chain:
Open a small jump ring and attach your beaded stack to one end of the thin gold chain. -
Add a connector:
Attach the top of the chain to a jump ring or directly to the main clasp mechanism.
Level Up
Add a few drops of essential oil to the wooden beads or the unglazed back of the clay moon to turn your zipper pull into a portable aromatherapy diffuser.
Step 4: Final Assembly
-
Linking elements:
Open the large ring on your lobster clasp swivel. Slide on the loop from the wooden bead strand. -
Adding the chain:
Slide the chain dangle onto the same main clasp ring so it hangs slightly longer than the wood beads. -
Closing up:
Use pliers to securely close the main jump ring or clasp hook, ensuring no cords can slip out. -
Double check security:
Give a gentle tug on both the moon and the bead strands to make sure all knots and rings are secure before attaching to your bag.
Now clip your new charm onto a favorite pouch and enjoy the handmade touch every time you reach for your zipper


What Really Happens Inside the Kiln
Learn how time and temperature work together inside the kiln to transform clay into durable ceramic.
Color-Blocked Hair Barrettes
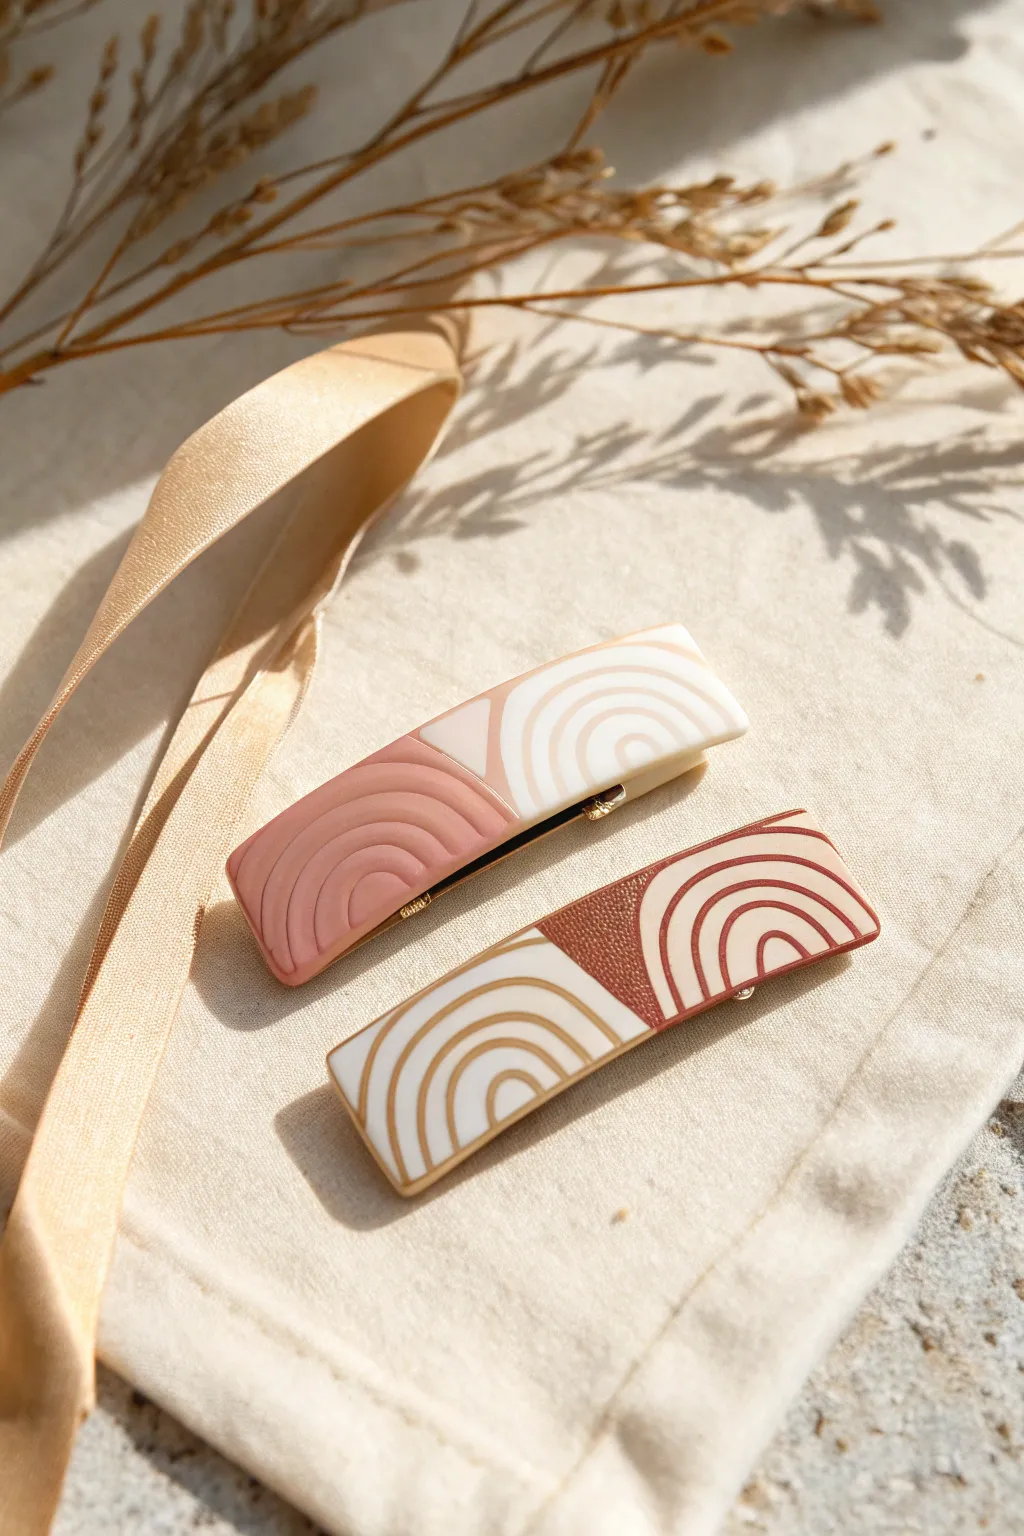
These stylish, modern hair clips feature a sophisticated color-blocked design with organic arch details. The blend of matte textures and warm, earthy tones makes them a perfect minimalist accessory for any season.
Detailed Instructions
Materials
- Polymer clay in white, dusty pink, and terracotta/rust
- Metal alligator hair clip blanks (approx. 2-3 inches)
- Clay roller or pasta machine
- Liquid polymer clay (optional but recommended for bonding)
- Tissue blade or sharp clay knife
- Needle tool or small ball stylus
- Clay extruder (optional, for even coils)
- Ruler
- Fine-grit sandpaper (400-800 grit)
- Strong craft adhesive (like E6000) or 2-part epoxy
- Oven for baking
Step 1: Preparing the Base
-
Condition the clay:
Begin by thoroughly conditioning your white, pink, and terracotta clays until they are soft and pliable. This prevents cracking later. -
Roll out sheets:
Roll each color into a sheet about 3mm thick. If you have a pasta machine, use a middle setting so the clay is sturdy but not chunky. -
Cut the rectangles:
Measure your metal clip blank. Cut rectangles from your clay sheets that are slightly larger than the clip surface (e.g., 0.75″ x 2.5″) to allow for later sanding. -
Create the diagonal cut:
Take a white rectangle and a colored rectangle (pink for one clip, terracotta for the other). Use your tissue blade to slice them diagonally at an angle you find pleasing. -
Assemble the color block:
Swap the pieces to create a two-tone rectangle. Gently press the diagonal seams together. You can use a tiny bit of liquid clay on the edge to help them fuse. -
Smoothing the seam:
Lay a piece of parchment paper over the clay and gently roll over it with your acrylic roller to flatten the seam and bond the two colors.
Uneven Seams?
If the clay pieces don’t join perfectly at the diagonal, lay a sheet of paper over them and burnish firmly with the back of a spoon to meld the clay together.
Step 2: Creating the Arch Design
-
Making the ‘noodles’:
Extrude or hand-roll very thin, even snakes of clay. For the white section, use the contrasting color (pink or terracotta). For the colored section, you can use the same color for a monochromatic raised look, or white for contrast. -
Placement strategy:
Start with the smallest inner arch. Gently lay the clay snake onto the base rectangle, curving it into a semi-circle or arch shape. Press lightly to adhere. -
Building the pattern:
Continue adding concentric arches, leaving a small, consistent gap between each line. I like to trim the excess clay flush with the edge of the rectangle as I go for a cleaner look. -
Texture variation:
Notice in the reference that some sections have raised clay lines (on the right side) and others appear to have impressed lines (on the left side). For the impressed look, use a needle tool to gently carve arches instead of adding clay snakes. -
Final trim:
Once your pattern is complete, use your tissue blade to trim the outer edges of the rectangle again to ensure perfectly straight, sharp lines.
Step 3: Baking and Assembly
-
Bake carefully:
Place your clay pieces on a ceramic tile or parchment-lined baking sheet. Bake according to your clay manufacturer’s instructions (usually around 275°F/135°C for 30 minutes). -
Cooling down:
Allow the pieces to cool completely in the oven or on a flat surface. Handling them while hot can warp the shape. -
Sanding edges:
Once cool, use fine-grit sandpaper to gently smooth the edges and corners. This gives the barrette a professional, finished feel. -
Attaching the clip:
Mix a small amount of 2-part epoxy or use a strong adhesive like E6000. Apply it to the flat side of the metal alligator clip. -
Setting the bond:
Press the metal clip firmly onto the back of your clay rectangle. Clamp it lightly or rest it upside down (clay side down) so gravity helps the bond set while drying.
Smoother Cuts
Chill your clay sheet in the fridge for 10 minutes before cutting the final rectangle shape. Cold clay distorts less when sliced, giving you sharper corners.
Clip these into a messy bun or side part to add an instant touch of handcrafted elegance to your hairstyle
Clay-Topped Bobby Pins
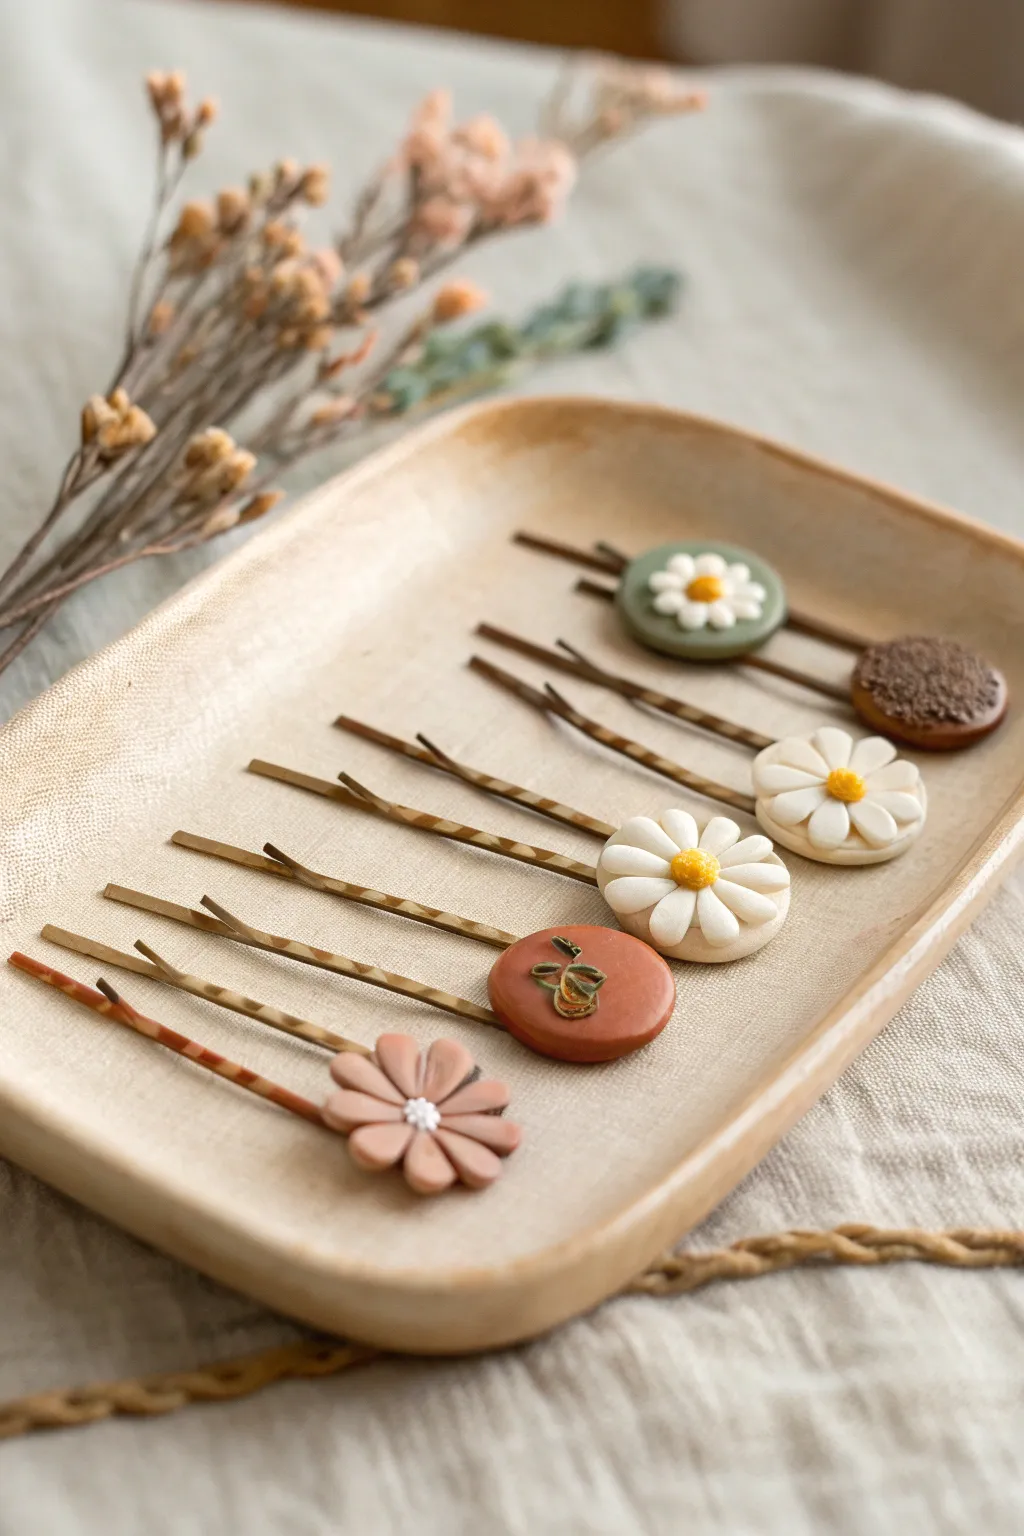
These sweet, nature-inspired hair accessories add a touch of whimsy to any hairstyle with their muted earth tones and delicate floral details. You’ll learn to sculpt three distinct designs—a full bloom, a simple daisy, and a botanical leaf medallion—all resting securely on patterned bobby pins.
Step-by-Step Guide
Materials
- Polymer clay in muted tones: dusty pink, terracotta, sage green, white, yellow, and dark brown
- Gold-tone bobby pins with flat pad bases (around 8-10mm)
- Liquid polymer clay (Translucent or Bake and Bond)
- Small dotting tools or ball stylus set
- Needle tool or toothpick
- Soft pastel chalks in brown or orange (for shading)
- Small soft paintbrush
- Texture sponge or coarse sandpaper
- Gloss glaze (optional)
- Super glue (cyanoacrylate gel)
Step 1: Prepping the Base
-
Condition the clay:
Begin by thoroughly kneading your clay colors until they are soft and pliable. This prevents cracking and makes the small details easier to manipulate. -
Create base discs:
For the circular designs (terracotta, green, and brown), roll small balls of clay about 1/2 inch in diameter. Flatten them gently into discs using your thumb or an acrylic roller. -
Texturizing:
For the brown textured pin shown at the back, gently press a piece of coarse texture sponge or sandpaper onto the surface of the clay disc to create that rough, organic finish.
Clean Fingerprints
Before baking, brush a tiny amount of baby oil or clay softener over the surface of your pieces. This magically smooths out any accidental fingerprints left behind.
Step 2: Sculpting the Daisies
-
Form the petals:
For the large white daisies, roll 8-10 tiny balls of white clay. Roll each slightly into a teardrop shape. -
Arrange the flower:
Place the teardrops in a circle, points facing inward, pressing them gently together. Use your needle tool to press an indentation down the center of each petal for a realistic look. -
Add the center:
Roll a small ball of yellow clay and press it into the center of the petals. Use a needle tool to stipple the yellow surface, creating a pollen texture. -
Miniature accent daisy:
For the sage green pin, repeat the daisy process but on a much smaller scale using tiny specs of clay, assembling it directly on top of the green base disc.
Step 3: Creating the Terracotta Leaf & Pink Bloom
-
Sculpt the leaf motif:
On the terracotta disc, roll a very thin snake of sage green clay. Curl it into a loose loop shape to form a leaf outline and press it gently onto the surface. -
Leaf detailing:
Add a tiny stem segment connecting to the leaf loop. I like to use the needle tool here to ensure the green clay bonds well with the terracotta background. -
The pink bloom:
For the dusty pink flower, flatten a small ball of clay into a disc. Use a craft knife to cut slits around the perimeter towards the center, creating petals. -
Refine the petals:
Pinch the edges of each cut section slightly to round them off. Use a dotting tool to depress the center. -
Add the white center:
Place a tiny ball of white clay in the depression and gently poke a hole in the middle with your needle tool.
Glazed Finish
After baking, apply a layer of UV resin or gloss varnish specifically to the flower centers or the ‘leaf’ design to deeper colors and a high-end ceramic look.
Step 4: Baking and Assembly
-
Shading:
Before baking, use a dry paintbrush to dust a little shaved brown pastel chalk into the crevices of the flowers and around the edges of the discs for antique depth. -
Bake:
Place all clay pieces on a ceramic tile or baking sheet. Bake according to your polymer clay package instructions (usually 275°F/135°C for 15-30 minutes). -
Cool down:
Allow the clay pieces to cool completely. They are fragile when hot but harden as they return to room temperature. -
Prepare the adhesion:
Apply a small drop of super glue (gel type works best as it doesn’t run) to the pad of the bobby pin. -
Attach the clay:
Press the baked clay piece firmly onto the glue-covered pad. Hold it still for 30 seconds to ensure an initial bond sets. -
Reinforce:
For extra durability, I recommend flipping the pin over once the glue is dry and adding a tiny dab of UV resin or liquid clay over the pad-to-clay connection, then curing it.
Once the glue has fully cured, your custom botanical clips are ready to be styled or gifted to a friend

TRACK YOUR CERAMIC JOURNEY
Capture glaze tests, firing details, and creative progress—all in one simple printable. Make your projects easier to repeat and improve.
Cute Brooch Pins With Simple Icons
This charming, muted-tone rainbow brooch features a delightful mix of dusty rose, beige, and teal with sweet polka-dot accents. It’s a perfect beginner-friendly project that results in a stylish accessory for jackets or tote bags.
Detailed Instructions
Materials
- Polymer clay (Dusty Rose, Beige/Sand, Deep Teal, Mustard Yellow)
- Clay roller or pasta machine
- Tissue blade or craft knife
- Needle tool or small dotting tool
- Liquid polymer clay (optional but helpful)
- Jewelry glue (like E6000)
- Brooch pin back
- Ceramic tile or baking sheet
- Oven
Step 1: Preparing the Arches
-
Condition the clay:
Start by thoroughly conditioning your three main colors—dusty rose, beige, and deep teal—until they are soft and pliable. This prevents cracks later on. -
Roll the logs:
Roll each color into a smooth, even snake or log. Aim for a thickness of about 5-6mm for a chunky look. -
Shape the first arch:
Take the smallest log (teal) and gently bend it into a tight ‘U’ shape on your ceramic tile. This forms the innermost arch. -
Add the middle arch:
Position the beige log snugly over the teal arch. Press them gently together along the seam so they adhere without deforming the round profile. -
Create the outer arch:
Place the dusty rose log over the beige one, repeating the process of gently pressing them together to form a solid unit. -
Trim the base:
Using a sharp tissue blade, cut straight across the bottom of the rainbow legs to create a clean, flat base.
Uneven Arches?
If gaps appear between arches while bending, brush a tiny amount of liquid polymer clay or ‘Bake and Bond’ between the logs before pressing them together.
Step 2: Adding Details
-
Prepare yellow accents:
Condition a very small amount of mustard yellow clay. Roll it into an extremely thin snake, thinner than a toothpick. -
Slice tiny dots:
Use your craft knife to slice tiny, equal-sized bits from the yellow snake. These will become your polka dots. -
Apply outer dots:
Gently place the yellow bits onto the pink outer arch, spacing them evenly. Lightly press them down so they stick but remain slightly raised. -
Apply inner dots:
Repeat the process for the teal inner arch, placing the yellow dots in a neat line following the curve. -
Texture the middle:
For the beige middle arch, use a needle tool to poke small, shallow holes down the center line to create a textured, stitched effect. -
Make the stars:
Flatten a small piece of the remaining yellow clay. Use a tiny star cutter or carefully cut two small stars with your knife. -
Smooth the edges:
Gently tap the edges of your stars to soften them, removing any sharp angles from cutting.
Step 3: Baking and Assembly
-
Pre-bake check:
Look over your piece for any lint or fingerprints. You can gently wipe the surface with a little baby oil on your finger to smooth it out. -
Bake carefully:
Bake the rainbow and the separate loose stars according to your clay package instructions. I usually tent foil over them to prevent the light colors from scorching. -
Cool down:
Let the pieces cool completely on the tile before handling them to ensure they harden fully. -
Secure the pin:
Flip the rainbow over. Apply a strong jewelry glue to the flat side of a pin back and press it firmly onto the center of the rainbow. -
Reinforce the back:
For extra durability, you can place a small strip of clay over the pin’s metal bar (avoiding the mechanism) and bake again briefly, or just let the glue cure for 24 hours.
Add Some Sparkle
Mix a pinch of translucent clay with glitter into your main colors before rolling for a subtle shimmer, or brush pearlex powder over the dots before baking.
Now you have an adorable, handmade accessory ready to pin onto your favorite denim jacket
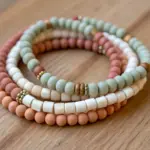
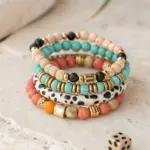
Stretch Bracelets With Handmade Beads
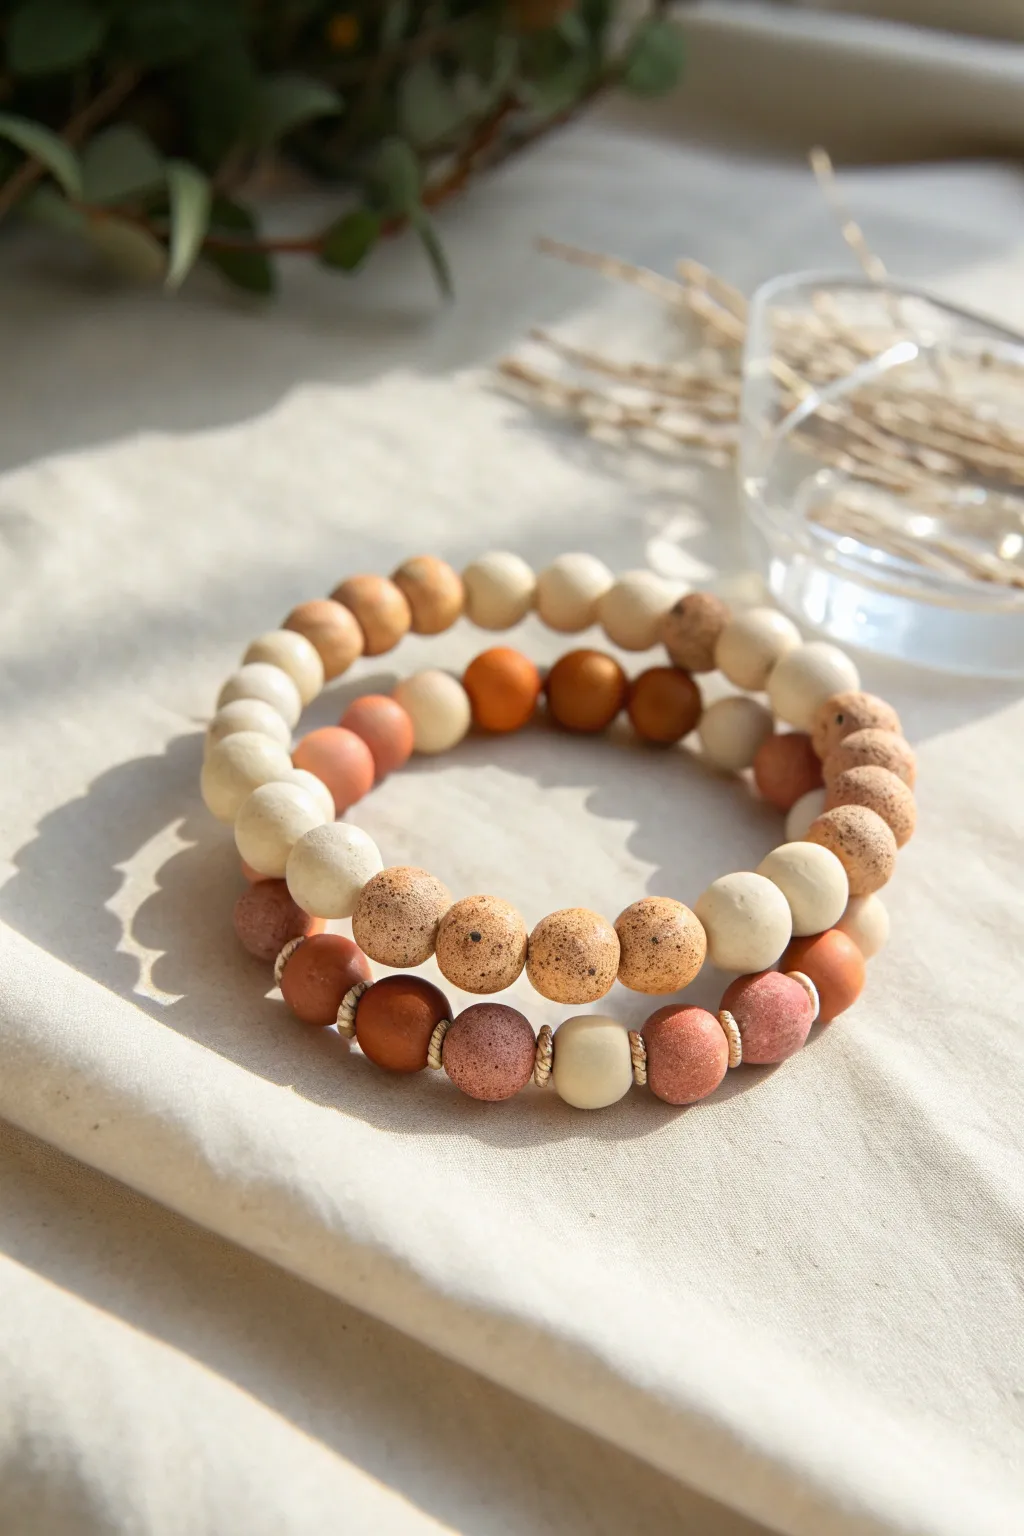
Embrace organic textures and warm, natural tones with these handmade polymer clay stretch bracelets. The mix of smooth matte finishes, speckled stone effects, and subtle metallic spacers creates a sophisticated yet boho-chic accessory perfect for stacking.
How-To Guide
Materials
- Polymer clay (cream/white, terracotta, dark brown, and beige)
- Granite or speckled polymer clay (or black acrylic paint/pepper for DIY speckles)
- Elastic jewelry cord (0.7mm or 0.8mm)
- Gold or brass tone spacer beads (small discs)
- Bead piercing pins or toothpicks
- Baking sheet and parchment paper
- Fine grit sandpaper (400-600 grit)
- Jewelry glue (optional)
- Wet wipes
- Acrylic rolling pin (optional)
- Clay slicer or craft knife
Step 1: Prepping the Clay Colors
-
Condition the clay:
Start by warming the polymer clay in your hands, kneading each color separately until it is soft and pliable. This prevents cracking later. -
Mix your custom shades:
To achieve the organic palette shown, mix a bit of beige into the terracotta to mute it. Create a soft pinkish-stone shade by mixing a large amount of white with a tiny pinch of terracotta. -
Create the stone effect:
For the speckled beads, you can use pre-made ‘granite’ effect clay. Alternatively, take a ball of beige clay and mix in coarse ground black pepper or tiny shavings of black clay for a natural stone look.
Clean Fingerprints
Before baking, lightly brush each bead with cornstarch or baby powder. This smooths out any fingerprints and leaves a lovely soft matte finish after baking.
Step 2: Forming the Beads
-
Roll a uniform log:
Roll your conditioned clay into long, even snakes on a clean work surface. Aim for a thickness of about 1cm. -
Slice equal portions:
Using your clay slicer, cut the log into equal segments. Keeping these slices consistent ensures your finished beads will be the same size. -
Roll into spheres:
Take each segment and roll it between your palms to create a smooth, round ball. I find a light touch helps keep them perfectly spherical. -
Make the larger focal beads:
For the larger speckled beads seen in the front bracelet, cut slightly larger segments of your granite-colured clay and roll them into 1.2cm spheres. -
Create variation:
Keep some beads solid cream, others terracotta, and plenty of the speckled variety. The beauty is in the mix.
Step 3: Piercing and Baking
-
Pierce the holes:
Gently twist a bead piercing pin or toothpick through the center of each sphere. Rotate the bead as you push to avoid squashing the round shape. -
Refine the exits:
Inspect the hole where the pin exited; if the clay pushed out, gently smooth it back down with your finger. -
Arrange for baking:
Place all your beads on a baking sheet lined with parchment paper. You can leave them on the pins if you have a bead rack, or carefully slide them off. -
Bake the clay:
Bake according to your clay package instructions (usually around 275°F/135°C for 15-30 minutes). Let them cool completely before handling.
Textured Finishes
For a rustic look, roll your raw clay beads over a piece of coarse sandpaper or a clean stone before baking to imprint a realistic rock texture onto the surface.
Step 4: Finishing and Assembly
-
Sand for texture:
Once cool, lightly buff the beads with fine-grit sandpaper if you want a matte, stone-like texture. Wipe away dust with a wet wipe. -
Cut the cord:
Cut a piece of elastic cord about 10-12 inches long. This gives you plenty of room to tie the knot later. -
Pre-stretch the elastic:
Give the elastic cord a few firm tugs to pre-stretch it. This crucial step prevents the bracelet from sagging after the first wear. -
String the design:
Thread your beads onto the cord. Experiment with the pattern—try alternating speckled beads with solid colors, and place gold spacer beads between focal points for a touch of shine. -
Check the sizing:
Wrap the strung beads around your wrist to check the fit. Add or remove beads until it feels comfortable but snug. -
Tie the knot:
Tie a surgical knot (left over right, right over left, loop through twice) and pull it very tight. Secure with a tiny dot of jewelry glue. -
Hide the knot:
Once the glue is dry, trim the excess cord and gently tug the knot inside one of the larger clay beads to hide it.
Stack your new creations together or gift one to a friend for a personalized touch
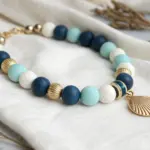
Essential Oil Diffuser Jewelry
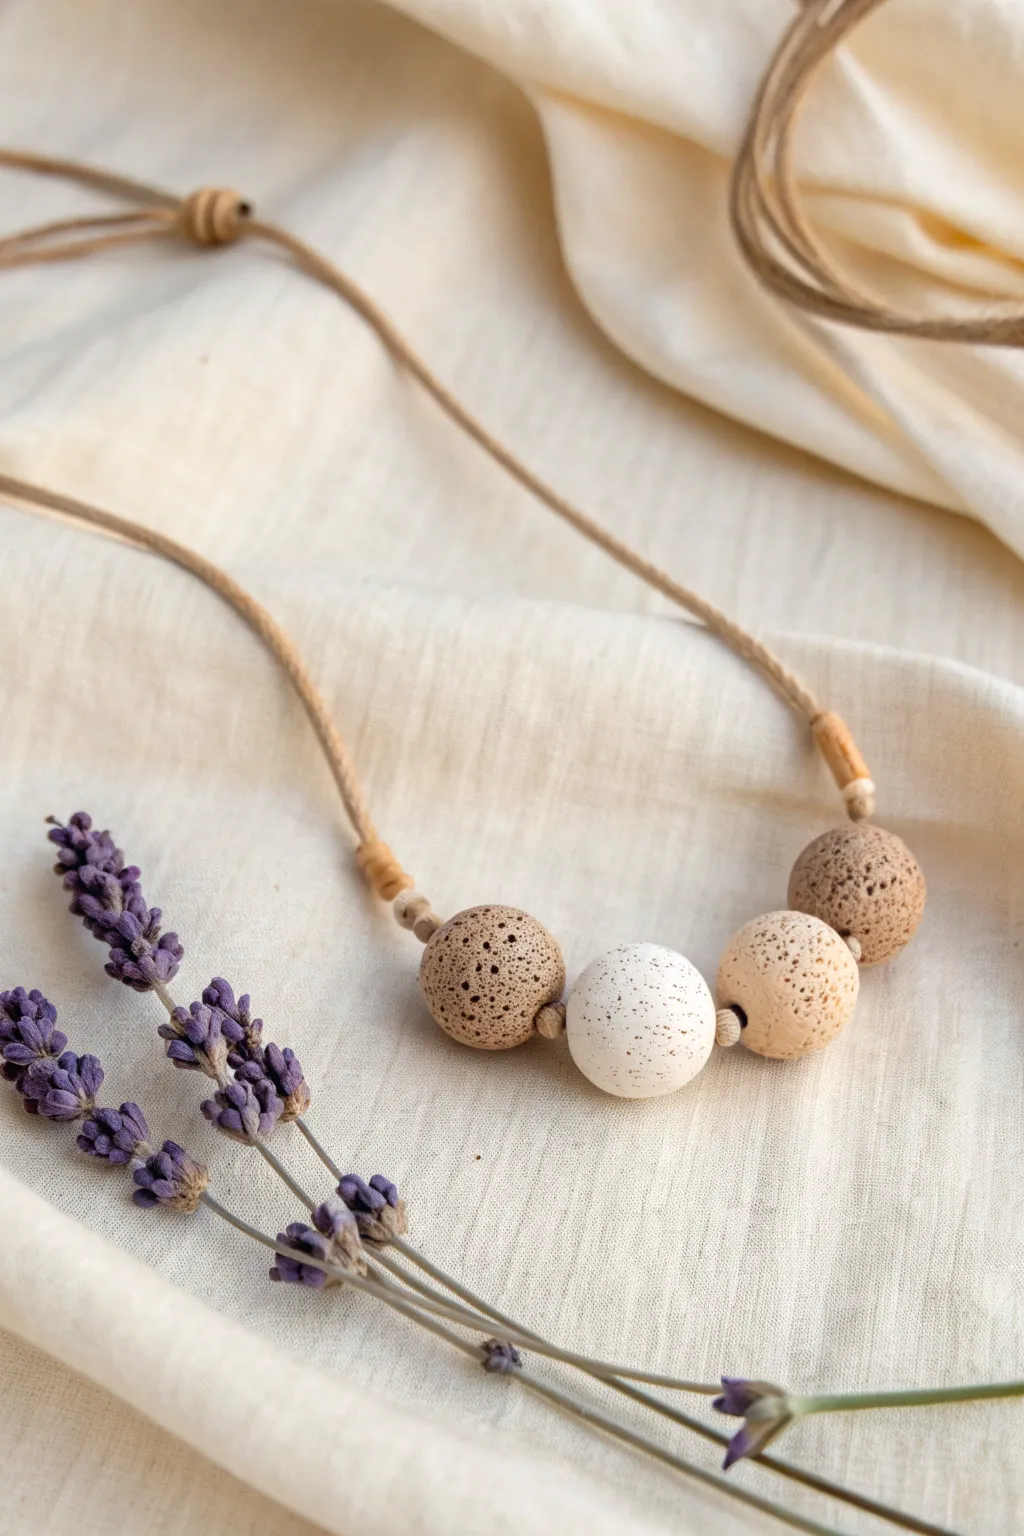
Combine natural aesthetics with aromatherapy benefits in this simple yet elegant necklace project. Using porous clay textures, you’ll create beads that can hold and diffuse your favorite essential oils throughout the day.
Detailed Instructions
Materials
- Air-dry clay (terra cotta and white) or polymer clay
- Porous clay additive (optional: fine sea salt or sand)
- Black acrylic paint (watered down)
- Toothbrush or stiff bristle brush
- Toothpicks or skewers
- Tan waxed cotton cord or hemp twine (approx. 1mm thick)
- Small wooden accent beads (optional)
- Needle tool or awl
- Sandpaper (fine grit)
- Matte varnish (optional for the white bead only)
Step 1: Creating the Textured Beads
-
Mix the clay:
Begin by conditioning your terra cotta or brown clay until it is soft and pliable. If you want a more natural, porous lava-rock effect that absorbs oil better, knead in a small amount of fine sea salt or sand into the clay body. -
Form the spheres:
Roll three equal-sized balls of the brown clay, approximately 1 inch in diameter. Try to keep them as spherical as possible by rolling them gently between your palms. -
Texturize the surface:
Take a stiff toothbrush or a ball often used for foil texturing and firmly press it all over the surface of the three brown beads. You want deep, irregular pitting to mimic volcanic rock. -
Add larger craters:
For extra dimension, use the tip of a toothpick or a needle tool to poke individual, slightly larger holes randomly across the surface. This variety makes the texture look organic. -
Create the bead holes:
Carefully pierce the center of each bead with a skewer or thick toothpick. Rotate the skewer as you push through to prevent squashing the sphere shape. Ensure the hole is wide enough for your cord to pass through twice if needed.
Step 2: Creating the Speckled White Bead
-
Form the focal bead:
Take a portion of white clay, slightly larger than the brown beads, and roll it into a smooth, perfect sphere. -
Pierce the white bead:
Create a central hole using the same method as before, ensuring it aligns straight through the center. -
Dry or bake:
If using polymer clay, bake all four beads according to the package instructions (usually 275°F for 15-30 minutes). If using air-dry clay, let them sit in a dry, warm spot for 24-48 hours until fully hardened. -
Speckle the white bead:
Once dry, mix a tiny drop of black acrylic paint with water. Dip an old toothbrush into this mixture and run your thumb across the bristles to flick a fine mist of speckles onto the white bead. I find doing this inside a cardboard box keeps the mess contained. -
Seal the focal bead (Optional):
Since the white bead isn’t necessarily for diffusing oil, you can seal it with a matte varnish to protect the speckles. Leave the brown beads unsealed so they remain porous.
Natural Texture Hack
Press raw clay against a real rock or piece of coral to get an instant, ultra-realistic organic texture without manual tooling.
Step 3: Assembly & Finishing
-
Prepare the cord:
Cut a length of tan waxed cotton cord, measuring about 30 inches depending on your desired length. -
String the beads:
Thread the beads onto the cord in this order: brown, brown, white, brown. If the holes are large enough, you can add small wooden spacers or knots between them. -
Create spacing knots:
To keep the beads clustered but separated, tie a simple overhand knot tightly against the outer edge of the first and last brown beads. This secures the central design. -
Add accent wraps:
For the decorative finish shown in the image, take a shorter piece of cord and wrap it tightly around the main cord just above the bead cluster. Secure distinct ends with a flexible glue. -
Finish the closure:
Tie the two ends of the necklace cord together using a sliding knot mechanism. This allows the necklace length to be adjustable and avoids the need for metal clasps. -
Prime with scent:
Place a drop of essential oil onto the porous brown beads and let it soak in before wearing.
Level Up: Color Gradient
Create an ombre effect by mixing slightly different amounts of white clay into your brown clay for each of the three textured beads.
Enjoy the calming benefits of your personal aromatherapy accessory throughout your day