If you’re making a clay heart model for a science project, the trick is balancing “looks real” with “easy to understand.” Here are some of my favorite project directions—from classic anatomy models to creative display ideas that still teach the real human heart structure.
Classic Full Anatomical Heart Model
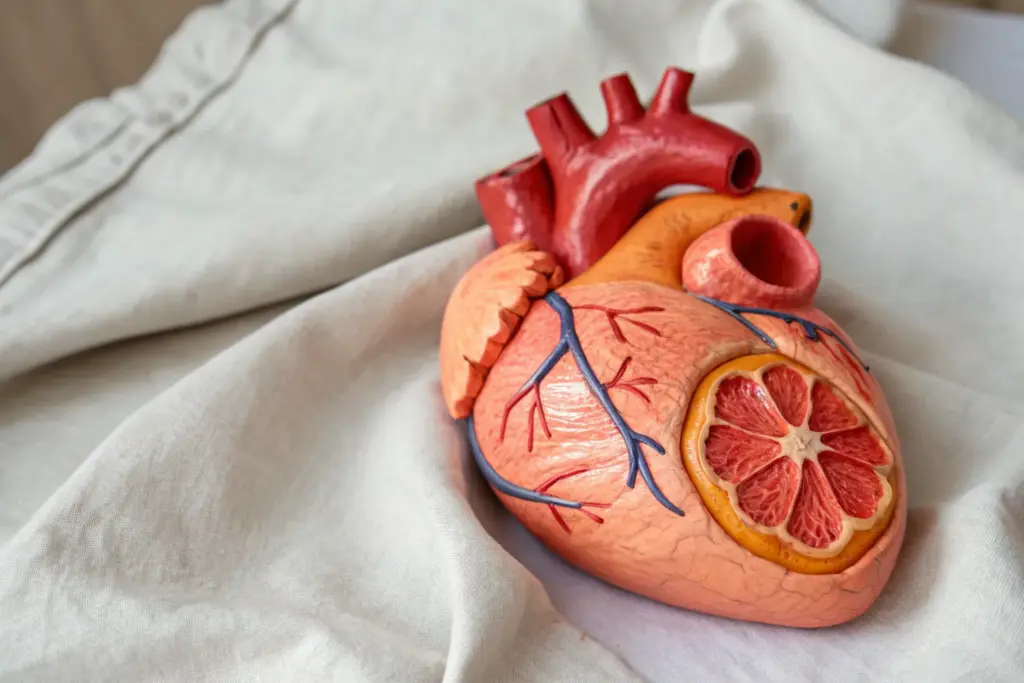
Sculpt a striking anatomical heart model that balances realism with an artistic, handcrafted feel. This project captures the organ’s complex muscular structure, branching arteries, and major vessels using smooth stoneware clay for a stunning display piece.
Step-by-Step
Materials
- Reddish-brown stoneware or polymer clay (approx. 2-3 lbs)
- Wooden base plinth (approx. 5×5 inches)
- Thick gauge armature wire or aluminum foil core
- Pointed sculpting tool (needle tool)
- Loop tool for smoothing
- Slip (liquid clay) for joining
- Scoring tool or old toothbrush
- Sponge and water
- Small rolling pin
Step 1: Planning and Core Shaping
-
Prepare the Base:
Begin by rolling out a thick, irregular slab of clay, roughly half an inch thick, and press it firmly onto your wooden plinth to create a foundational texture. -
Form the Core Mass:
Create the main body of the heart by balling up aluminum foil into an inverted pear shape, slightly flattened on one side. This saves clay and reduces weight. -
Cover with Clay:
Roll out a large sheet of clay and wrap it completely around your foil core. Smooth the seams together with your thumbs until you have a seamless, solid form. -
Define the Ventricles:
Using your hands, gently squeeze the lower section of the form to taper it slightly into the ‘apex’ or point of the heart. Indent the vertical center slightly to suggest the separation between the left and right ventricles.
Step 2: Adding Major Vessels
-
Create the Aorta Arch:
Roll a thick coil of clay. Attach it to the top center of the heart, curving it slightly to the left to form the aortic arch. Use plenty of slip and score both surfaces for a strong bond. -
Form the Vena Cava:
Roll two smaller, vertical tubes. Attach one standing straight up on the right side (superior vena cava) and blend the clay downwards into the main heart body. -
Sculpt the Pulmonary Artery:
Create a distinct tube that emerges from the front center of the heart, crossing underneath the aortic arch. This adds crucial depth and realism to the anatomy. -
Hollow the Openings:
Use the back of a paintbrush or a specialized shaping tool to carefully press into the ends of these tubes, creating the hollow openings of the vessels. -
Add the Pulmonary Veins:
Make small, short tubes and attach them to the rear left side of the heart body. Blend the edges seamlessly so they look like they emerge naturally from the muscle.
Cracking Vessels?
If the tube openings start cracking as you widen them, your clay might be too dry. Dab a tiny amount of water on the rim and let it sit for a minute before trying again.
Step 3: Detailing and Veins
-
Add the Atria:
Sculpt two small, ear-shaped flaps of clay (the auricular appendages) and attach them on either side of the major vessels near the top. I like to give these a rougher texture to differentiate them. -
Roll Vein Filaments:
Roll out several very thin, worm-like strings of clay to serve as the coronary arteries and subtle surface veins. -
Map the Pathways:
Lay the primary artery diagonally across the front of the heart, following the indentation you made earlier between the ventricles. -
Branch Outwards:
Attach smaller vein branches forking off the main artery. Make them wander organically across the surface, getting thinner as they move away from the center. -
Blend the Veins:
Use a small modeling tool to gently smear the edges of the veins onto the heart surface, so they look embedded under a layer of tissue rather than just sitting on top. -
Texture the Muscle:
Lightly scratch directional lines across the main body of the heart using a needle tool to simulate striated muscle fiber texture.
Level Up: Glazing
After bisque firing, apply a glossy, deep red glaze to the main muscle but leave the arteries unglazed or matte to make the intricate vascular details pop visually.
Step 4: Finishing and Mounting
-
Smooth the Surfaces:
Take a slightly damp sponge and lightly wipe down the highest points of the clay coils and the main vessels to remove harsh tool marks. -
Mount to Base:
Score the bottom of the heart and the clay slab on the wooden base. Apply slip and press the heart firmly onto the slab. -
Add Support Props:
If the heart feels top-heavy, wedge a small, unobtrusive piece of clay underneath the back or side to act as a hidden kickstand while it dries. -
Final Inspection:
Check all vessel openings one last time to ensure they are round and haven’t collapsed during handling.
Allow your anatomical masterpiece to dry slowly under plastic before firing or sealing.


Chunky Kid-Friendly Heart With Big Vessels

This project creates a smooth, simplified anatomical heart that feels substantial in your hands and looks great on a shelf. With its exaggerated vessels and soft, matte finish, it strikes the perfect balance between scientific accuracy and artistic style.
How-To Guide
Materials
- Air-dry clay (white or terracotta)
- Acrylic paints (pastel pink, teal/turquoise, dark grey, red)
- Small round paintbrush
- Sculpting tools (or a plastic knife/toothpick)
- Water for smoothing
- Matte sealant spray (optional)
- Small cup of water
Step 1: Sculpting the Base
-
Form the main mass:
Start with a large ball of clay about the size of a tennis ball. Roll it firmly between your palms to eliminate cracks. -
Shape the ventricles:
Gently taper the bottom of the ball into a dull point, creating a strawberry-like shape. This represents the main ventricles of the heart. -
Add the right atrium:
Take a smaller lump of clay and flatten it slightly. Press this onto the upper left side (your left, looking at the model) of the main mass to create the distinct bulge of the right atrium. -
Smooth the seams:
Dip your finger in water and rub the connection point between the atrium and the main ventricle mass until the clay merges seamlessly. -
Create the left atrium:
Add a smaller, distinct rounded shape to the upper right side, sitting slightly behind the main mass.
Use Water Sparingly
When smoothing joints, keep your finger just barely damp. Too much water can make air-dry clay slimy and prone to cracking as it dries.
Step 2: Adding the Great Vessels
-
Form the aorta arch:
Roll a thick coil of clay. Attach it to the top center, arching it slightly backward. Use a tool to hollow out the opening at the top. -
Create the pulmonary artery:
Roll a second, slightly smaller coil. Attach this so it comes out from the front of the heart, crossing in front of the aorta and angling to the left. -
Sculpt the superior vena cava:
Add a vertical tube-like structure on the far left side, next to the right atrium, creating a prominent vessel. -
Add branching exits:
For added realism, attach two or three very small ‘stumps’ branching off the top of the aorta arch. -
Hollow the vessels:
Use the rounded end of a paintbrush or a sculpting tool to press into the tops of all vessel tubes, making them look like open pipes.
Step 3: Detailing & Painting
-
Add surface veins:
Roll tiny, thin spaghetti-like strings of clay. Gently press these onto the surface of the heart in a branching pattern, mimicking the coronary arteries. -
Refine the texture:
Use a damp sponge or finger to smooth the entire surface one last time, removing fingerprints but keeping the texture of the muscles visible. -
Let it cure:
Allow the clay to dry completely according to package instructions (usually 24-48 hours). -
Base coat color:
Paint the main body of the heart with a flesh-toned or light pink acrylic paint. It may need two coats for opaque coverage. -
Paint the atria:
Use a darker grey-blue paint for the small lump on the right side to distinguish that chamber. -
Color the major vessels:
Paint the large protruding tubes (aorta and pulmonary artery) in a striking teal or turquoise color. -
Highlight the veins:
I like to carefully trace the raised clay veins on the surface. Paint some red and some teal (matching the top vessels) to represent oxygenated and deoxygenated blood flow. -
Seal the work:
Once the paint is fully dry, apply a matte clear coat to protect the finish without making it too shiny.
Make It Interactive
Before drying, embed small magnets into the different sections. This lets you pull the heart apart to see the chambers inside.
Your finished model is now ready to serve as a hands-on learning tool or a unique piece of sculptural art


External Anatomy With Coronary Vessels
Sculpt a strikingly realistic model of the human heart, complete with intricate coronary vessels and major arteries. This project combines tactile sculpting with detailed painting techniques to create an educational piece that looks professional enough for a science classroom or medical display.
Step-by-Step
Materials
- Air-dry clay (white or terra cotta)
- Wire armature or aluminum foil
- Sculpting tools (needle tool, small loop tool)
- Acrylic paints (primary red, dark blue, yellow ochre, burnt sienna, white)
- Small detail brushes (sizes 0 and 2)
- Medium flat brush
- Water cup and palette
- Clear matte varnish (optional)
Step 1: Forming the Base Structure
-
Build the core armature:
Crumple a ball of aluminum foil into a rough pear shape, slightly flattened on one side. This saves clay and keeps the model lightweight. -
Cover with clay:
Roll out a slab of air-dry clay to about 1/4 inch thickness. Wrap this completely around your foil core, smoothing the seams together with a bit of water until you have a solid, seamless shape. -
Shape the ventricles:
Mold the bottom point (the apex) so it curves slightly to the left. Define the separation between the left and right ventricles with a subtle groove running diagonally down the front. -
Attach the Atria:
Add two smaller, ear-shaped lumps of clay to the top sides of the main body to represent the atria. Blend the edges seamlessly into the main mass.
Crack Control
If small cracks appear while drying, mix a slurry of clay and water (slip) and fill them in with a brush. Let dry again before painting.
Step 2: Adding Arteries and Veins
-
Form the Aorta:
Roll a thick snake of clay. Attach it to the top center, curving it into an arch that goes behind the pulmonary artery. Smooth the connection point firmly. -
Add the branching vessels:
Create three small, short tubes coming off the top of the aortic arch (the brachiocephalic trunk, carotid, and subclavian arteries). Attach them securely. -
Sculpt the Vena Cava and Pulmonary Artery:
Roll a slightly thinner snake for the Superior Vena Cava and attach it vertically on the right side. Add the Pulmonary Artery trunk emerging from the right ventricle and crossing in front of the aorta. -
Create surface texture:
Use a sponge or a stiff brush to gently tap the surface of the ventricles, creating a slightly organic, muscle-fiber texture rather than a perfectly smooth finish.
Step 3: Reference Details & Drying
-
Define the fat pads:
Lightly etch or press in areas near the top of the ventricles where fatty deposits naturally occur. I find using a small loop tool works best to suggest this distinct texture. -
Dry the model:
Let the sculpture sit in a dry, ventilated area for 24-48 hours. Turn it occasionally to ensure even drying.
Scientific Accuracy
Create a cut-away view by slicing a section out of the ventricle before drying to reveal the chambers and valves inside.
Step 4: Painting the Anatomy
-
Base coat:
Paint the main ventricles with a vibrant red. You may need two coats for solid coverage. -
Color the major vessels:
Paint the Vena Cava and Pulmonary Artery intricate tone of blue mixed with a touch of grey. Paint the Aorta the same red as the heart body, perhaps slightly lighter. -
Paint the fat deposits:
Mix burnt sienna with a little yellow ochre and white. Apply this tan color to the ‘fat pad’ areas near the atria and coronary grooves. -
Outline the texture:
Use a darker brown wash (diluted paint) over the tan fat areas to settle into cracks, adding depth.
Step 5: Detailing Coronary Vessels
-
Draft the vessel lines:
Using your finest brush, lightly sketch the paths of the coronary arteries and veins winding down the surface of the heart. -
Paint the blue veins:
Paint the cardiac veins using a bright blue. Make the lines branch out like tree roots, getting thinner as they move toward the apex. -
Add yellow arteries:
Paint the coronary arteries using a bold yellow. Let these lines flow alongside or cross over the red muscle texture. -
Add highlights:
Mix a tiny amount of white into your red base color and dry-brush it lightly over the highest points of the muscle texture to make the form pop. -
Final seal:
Once fully dry, apply a matte varnish to protect the paint and give the model a finished, museum-quality feel.
Display your finished anatomical model proudly on a shelf or use it for your next biology presentation


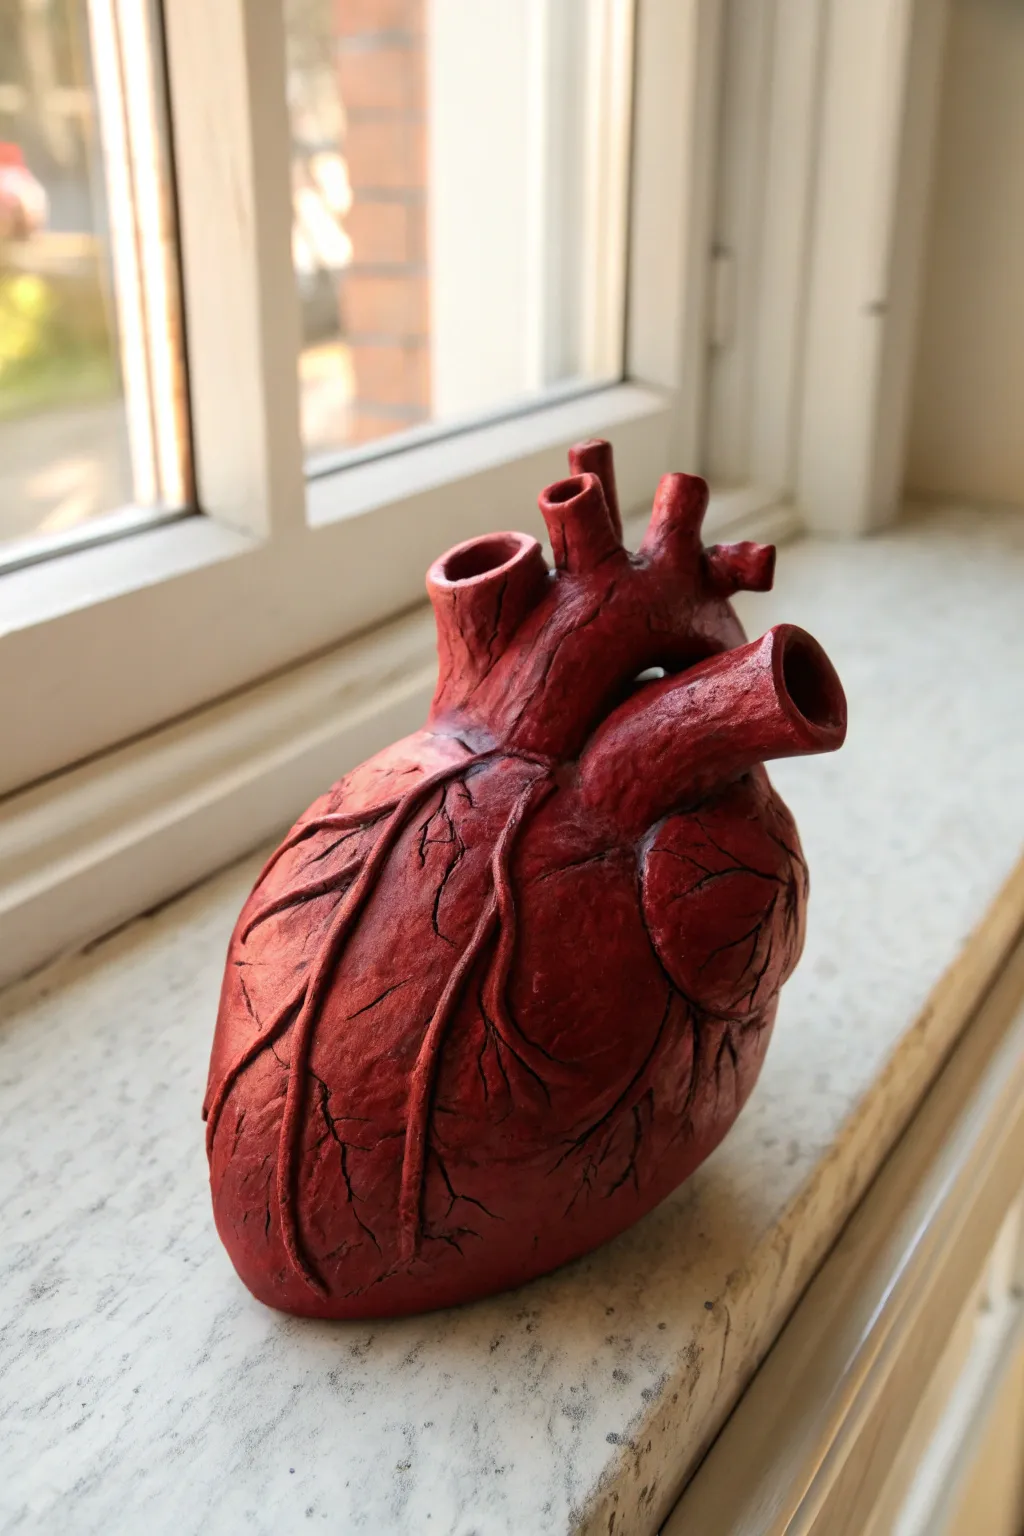
Heart Cutaway Showing Four Chambers
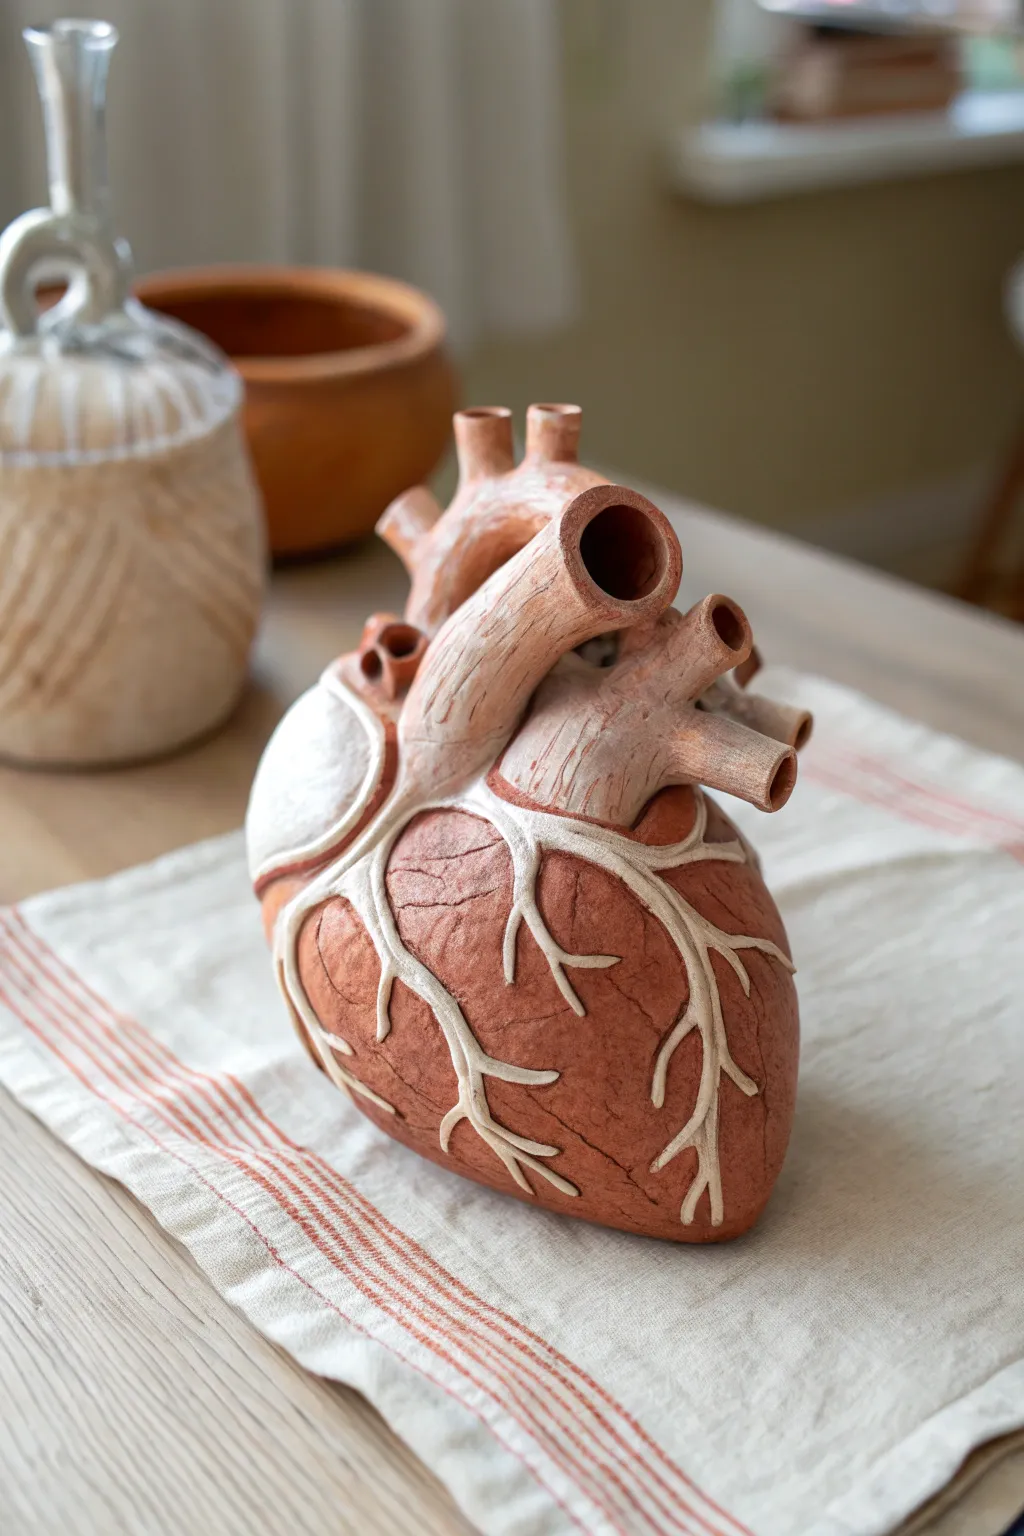
Sculpt a striking and scientifically inspired anatomical heart using rich terracotta clay. The finished piece features realistic texturing and contrasting white details for the coronary arteries, creating a sophisticated display object.
Step-by-Step Guide
Materials
- Terracotta air-dry clay (or polymer clay)
- White air-dry clay (or white acrylic paint)
- Basic sculpting tools (loop tool, needle tool)
- Water and sponge for smoothing
- Aluminum foil
- Wire armature (optional but recommended for stability)
- Texture sponge or stiff brush
- Clear matte varnish
Step 1: Forming the Base
-
Build the armature:
Begin by crumpling aluminum foil into a tight, dense fist-sized shape that mimics the general tapered form of a human heart. This saves clay and keeps the sculpture lightweight. -
Cover with clay:
Roll out a slab of terracotta clay to about 1/4 inch thickness. Wrap this slab entirely around your foil core, pressing firmly to remove air pockets. -
Smooth the seams:
Dip your fingers in a little water and smooth out any seams where the clay slab joins together. The surface should be continuous and organic. -
Refine the shape:
Gently mold the clay to define the apex (the bottom point) and the broader base at the top. It shouldn’t be perfectly symmetrical; lean into the natural asymmetry of the organ.
Step 2: Sculpting the Vessels
-
Add the aorta:
Form a thick coil of terracotta clay. Attach it to the top center of the heart, arching it slightly. Use a modeling tool to blend the base of the coil seamlessly into the main body. -
Create the superior vena cava:
Role a slightly shorter, thinner tube and attach it to the right side of the top section (your right, the heart’s left). Hollow out the opening with the back of a paintbrush handle to create depth. -
Add pulmonary arteries:
Create two smaller tubular offshoots emerging from under the aorta arch. Position them so they point outward, creating a branching silhouette. -
Hollow the tubes:
Carefully insert a round tool into the openings of all your vessel tubes to make them look like functional pipes. Smooth the rims so they aren’t sharp. -
Create surface texture:
Instead of leaving the clay perfectly smooth, lightly dab the main body with a texture sponge or coarse brush to mimic organic muscle tissue. I find this creates a much more realistic finish than smooth clay.
Cracking Clay?
If surface cracks appear while drying, don’t panic. Mix a small amount of fresh clay with vinegar to make a paste and fill the cracks. The vinegar helps the new clay bond to the dry sculpture.
Step 3: Adding the Veins
-
Roll fine coils:
Take your white clay (or lighter terracotta mix) and roll it into very thin, snake-like noodles. These will become the coronary arteries and veins. -
Map the main arteries:
Lay the thickest white coil diagonally across the front of the heart, starting near the aorta and branching down toward the apex. -
Create branching capillaries:
Add smaller, thinner white coils branching off the main artery. Twist and turn them slightly so they look organic, not like straight lines. -
Embed the veins:
Gently press these white coils into the terracotta body so they look embedded in the tissue rather than just sitting on top. Use a needle tool to feather the edges if needed. -
Apply a wash (Optional):
If you are using painted details instead of white clay, wait until the terracotta is dry and paint the veins with a fine brush using off-white acrylic.
Pro Tip: Rustic Texture
To get that weathered ‘museum artifact’ look, lightly dust the finished textured areas with a bit of flour or cornstarch before sealing. It highlights the grooves and adds visual age.
Step 4: Finishing Concetps
-
Initial drying:
Let the sculpture sit in a cool, dry place away from direct sunlight to prevent cracking. Rotate it occasionally. -
Refining cracks:
Once leather-hard, check for any unwanted drying cracks. Patch them with a small amount of slip (watered-down clay) and smooth over. -
Final cure:
Allow the piece to dry completely, which may take 24-48 hours depending on humidity and clay thickness. -
Seal to protect:
Apply a coat of clear matte varnish. This deepens the terracotta color and protects the white vein details without making the heart look unnaturally glossy.
Place your anatomical heart on a linen cloth or wooden stand to admire its organic beauty

The Complete Guide to Pottery Troubleshooting
Uncover the most common ceramic mistakes—from cracking clay to failed glazes—and learn how to fix them fast.
Valve-Focused Heart Interior Model

Dive deep into anatomy with this impressive cross-section model that reveals the inner workings of the heart. Using layered polymer clay, you’ll sculpt distinct chambers and vibrant blue vessels to create a piece that is as educational as it is artistic.
How-To Guide
Materials
- Polymer clay (Red, Light Pink, Teal/Blue, White, Translucent)
- Aluminum foil
- Sculpting tools (needle tool, ball stylus, clay shapers)
- Craft knife
- Rolling pin or pasta machine
- Liquid polymer clay (optional)
- Acrylic paints (Red oxide, deep crimson, burnt umber)
- Gloss varnish or resin
- Fine grit sandpaper
Step 1: Forming the Base Structure
-
Create the Core Armature:
Ball up a significant amount of aluminum foil into a rough heart shape—narrow at the bottom and wider at the top. This saves clay and keeps the model lightweight. -
Establish the Cross-Section Plane:
Using a sharp blade or knife, slice the front third of your foil heart off to create a completely flat surface. This will vary the ‘cut’ view of the model. -
Cover with Base Clay:
Sheet out a mix of red and translucent clay to a medium thickness. Cover the foil entirely, smoothing the seams so the foil is hidden. Press firmly against the flat cut face to ensure it remains level.
Fixing Smudged Colors
If red clay stains your light pink walls while sculpting, use a Q-tip dipped in a tiny amount of rubbing alcohol or baby oil to gently wipe the surface clean before baking.
Step 2: Sculpting the Interior Chambers
-
Define the Chamber Walls:
Roll out thick snakes or slabs of a light fleshy-pink clay. Lay these onto the flat surface to map out the four chambers (atria and ventricles), building up the ‘septum’ or dividing wall in the center. -
Build the Outer Rim:
Trace the outer perimeter of the heart face with a thicker band of the light pink clay to represent the heart wall thickness, smoothing it into the red exterior base. -
Add Depth to the Cavities:
Inside the outlines you just made, gently press inwards with a large ball stylus to create concave depressions for the chambers. Use small bits of red clay to line the back of these depressions for depth. -
Texture the Muscle:
Take a needle tool and scratch fine, fibrous lines into the interior red walls of the ventricles. This mimics the trabeculae carneae texture found in real heart muscle.
Step 3: Vessels and Exterior Details
-
Shape the Superior Vena Cava and Aorta:
Form tubes using teal clay for the veins and pink clay for the arteries. Attach the large teal vessel (superior vena cava) to the top right and the curved pink aorta arching over the center. -
Refine the Vessel Openings:
Use a dotting tool to widen the openings of these tubes, ensuring they look hollow. Smooth the clay where the tubes meet the main body of the heart. -
Create the Vein Network:
Roll very thin, branching snakes of teal clay. Introduce these into the interior chambers, pressing them gently against the red background to look like embedded vascular structures. -
Sculpt the Fat Layer:
Mix white and translucent clay. Apply textured patches of this ‘fatty’ tissue near the top of the heart and around the base of the major vessels using a small spatula tool. -
Add Exterior Texture:
On the rounded outside of the heart (the non-cut side), use a toothbrush or stiff brush to lightly stipple the surface, giving it an organic, tissue-like finish.
Pro Tip: Realistic Veins
For the thin blue veins inside the chambers, use liquid polymer clay tinted blue. Pipe it directly onto the baked or raw surface for a raised, organic look that defies gravity.
Step 4: Refining and Finishing
-
Clean the Cut Face:
Before baking, I like to take a very sharp straight blade and lightly skim the flat surface of the cross-section walls to ensure they are perfectly flush and crisp. -
Bake the Model:
Bake your heart according to the polymer clay package instructions. Use an oven thermometer to ensure correct temperature to prevent scorching the light pink areas. -
Apply an Antique Wash:
Once cool, mix burnt umber acrylic paint with water. Brush it over the entire piece, then immediately wipe most of it off with a paper towel. This stays in the crevices and accentuates the muscle textures. -
Seal with Varnish:
Apply a gloss varnish to the interior red chambers and the teal veins to make them look wet’ and realistic. Leave the outer walls and fatty tissue matte for contrast.
Display your finished model on a stand to show off the complex inner world you have sculpted
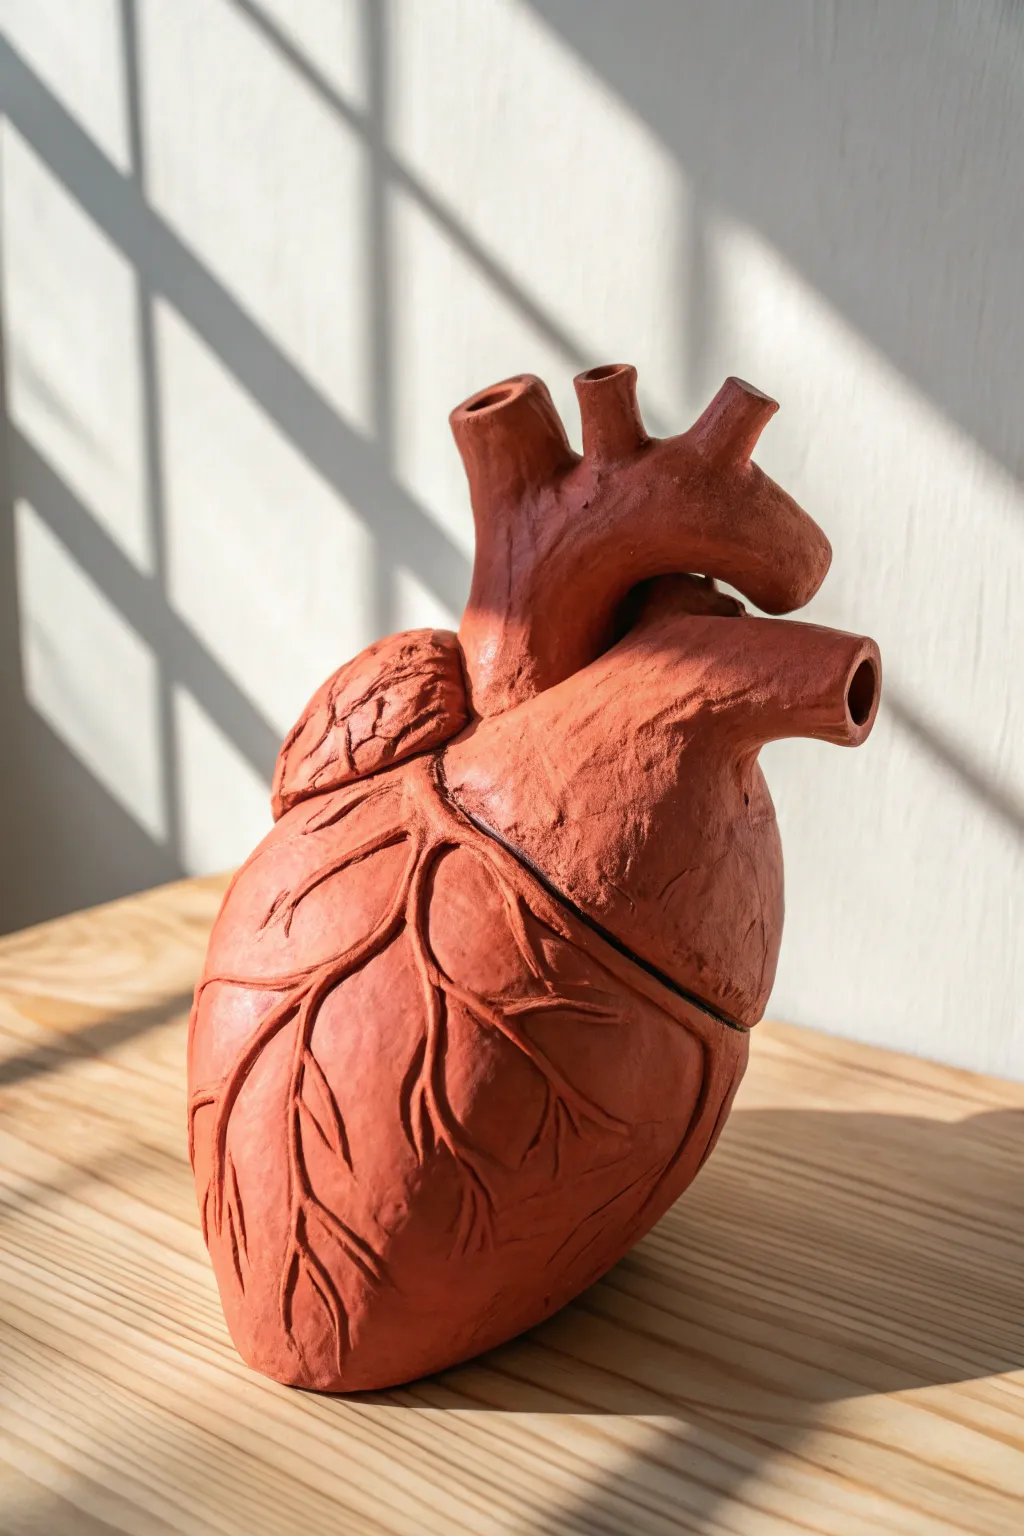
Labeled Heart Model With Flag Pins
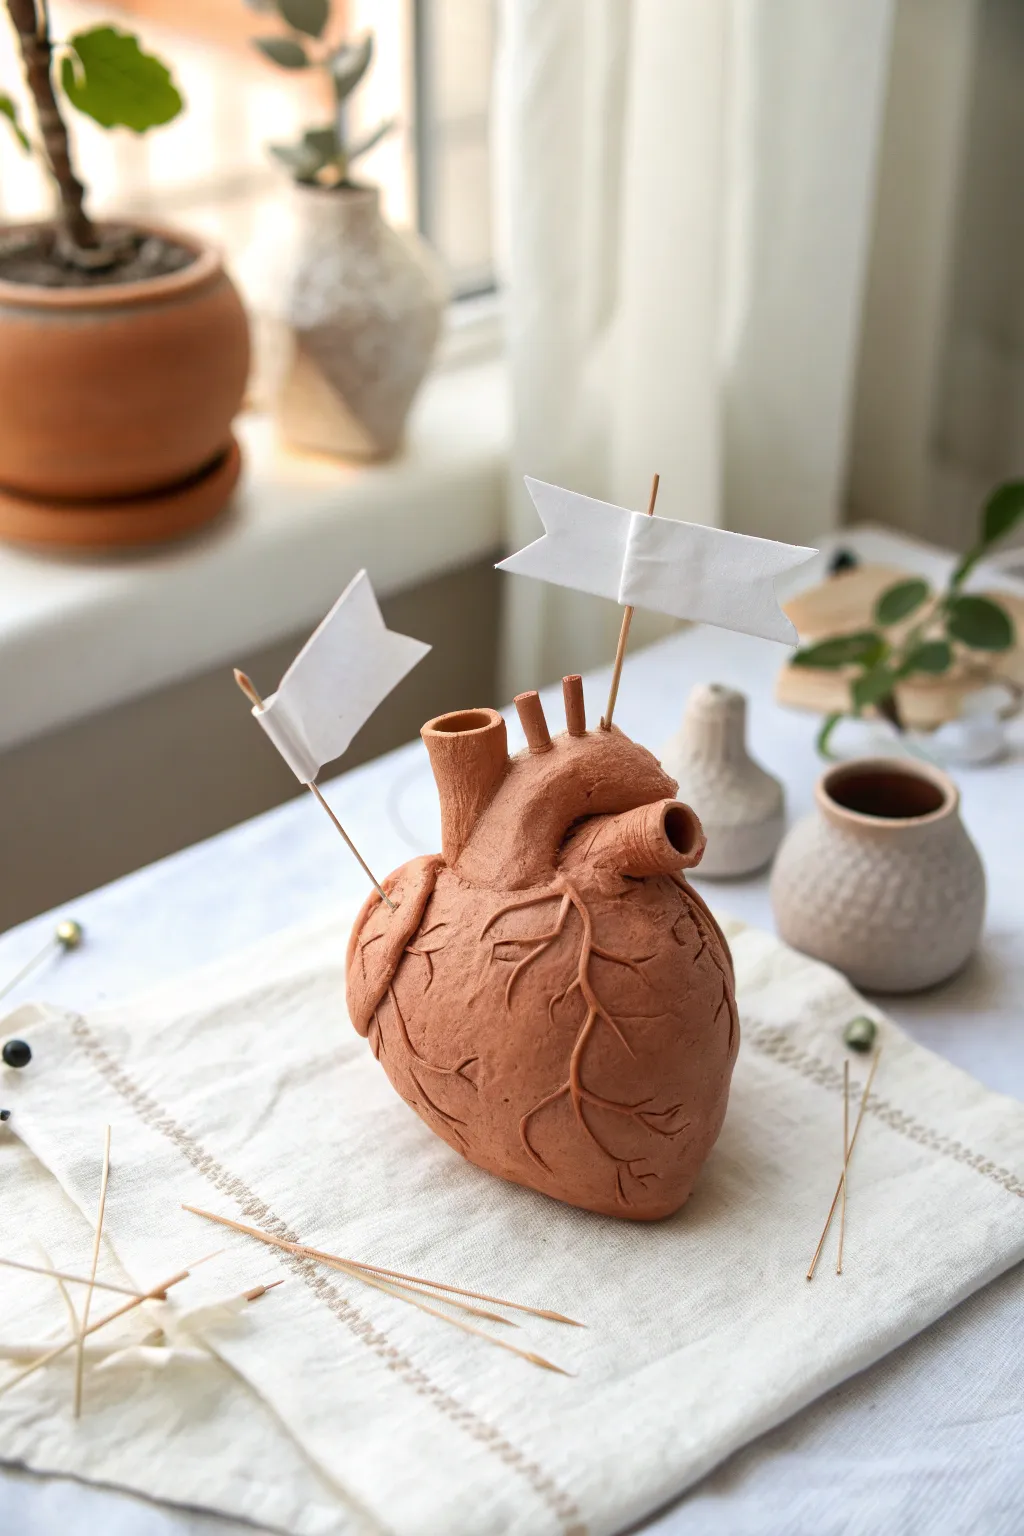
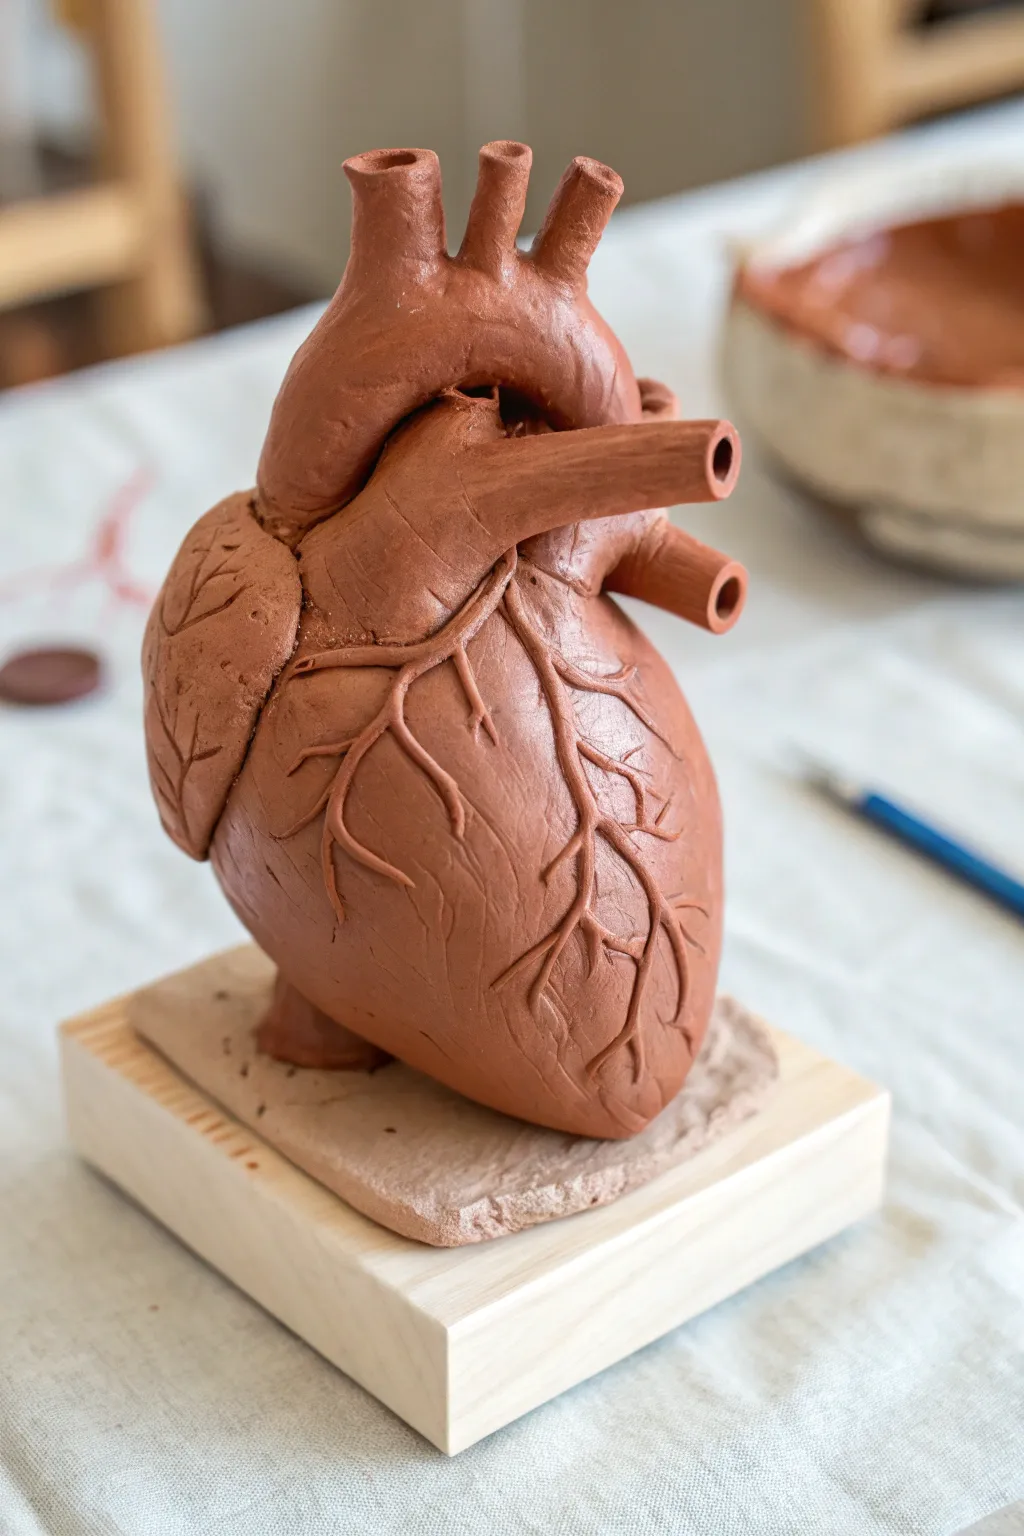
This project transforms simple modeling clay into a striking, rust-colored anatomical heart that serves perfectly as a sculptural study aid or unique decor piece. The finished model features realistic vein textures and a distinct, earthy finish reminiscent of classic pottery.
Step-by-Step Guide
Materials
- Terracotta-colored air-dry clay (or polymer clay)
- Wooden skewers
- Sculpting tools (needle tool, small loop tool)
- Small bowl of water
- Aluminum foil
- White paper
- Craft glue
- Scissors
Step 1: Forming the Base
-
Create the core:
Begin by crumpling aluminum foil into a tight oval shape, roughly the size of a fist. This saves clay and ensures the heart isn’t too heavy. -
Cover with clay:
Roll out a slab of terracotta clay to about 1/4 inch thickness. Wrap this slab entirely around your foil core, pressing the seams together until they disappear. -
Shape the heart:
Using your hands, smooth the clay into an anatomical heart shape. It should be slightly pointed at the bottom (apex) and broader at the top. -
Smooth the surface:
Dip your fingers in a little water and run them over the clay to remove fingerprints and bumps. I like to keep a damp sponge nearby to keep my hands from getting too sticky.
Cracking Clay?
If small cracks appear while drying, mix a tiny bit of fresh clay with water to make a paste (slip) and fill them in with a brush.
Step 2: Adding Arteries and Veins
-
Form the aorta:
Roll a thick coil of clay about the width of your thumb. Attach it to the top center of the heart, curving it slightly to the left to mimic the aorta arch. -
Add the pulmonary vein:
Create a second, slightly smaller tube shape. Attach this to the top right shoulder of the heart, ensuring the opening faces outward. -
Add smaller vessels:
Roll two very small, short cylinders of clay. Stick these upright between the main arteries to represent the smaller superior vessels. -
Blend the seams:
Use a sculpting tool or your finger to smooth the clay where the tubes meet the main body, ensuring a strong bond so they don’t pop off later. -
Hollow the tubes:
Use the back end of a paintbrush or a pinky finger to gently widen the openings of the top vessels, giving them a realistic hollow look.
Step 3: Detailing and Texture
-
Roll vein coils:
Roll out very thin, worm-like strands of clay. These should be uneven in thickness to look organic. -
Attach the surface veins:
Lay the thin strands across the surface of the heart in a branching pattern, starting thick near the top and tapering down toward the apex. -
Blend the veins:
Use a small modeling tool to blend the edges of these strands into the main heart body, leaving the center of the strand raised for a 3D effect. -
Carve fine details:
Take a needle tool and lightly scratch fine branching lines extending from the larger veins to add intricate texture. -
Refine the texture:
Gently sponge the surface again to soften any sharp carving lines, giving the heart a more natural, fleshy appearance.
Level Up: Antique Look
Once dry, brush on diluted dark brown acrylic paint and wipe it off immediately with a rag. The dark color stays in the crevices.
Step 4: Finishing Touches
-
Create flag pins:
Cut small rectangular strips of white paper. Fold a small ‘V’ into one end to create a banner shape. -
Assemble the flags:
Wrap the straight end of the paper strip around the top of a wooden skewer and secure it with a dot of glue. -
Insert mounting holes:
Before the clay dries completely, carefully poke a few small guide holes where you want your flags to sit later. This prevents cracking the dry clay. -
Dry the model:
Allow the heart to air dry for 24-48 hours. Turn it occasionally to ensure the bottom dries evenly. -
Final assembly:
Once fully hardened, insert your labeled flag pins into the pre-made holes to complete your anatomical display.
Place your finished sculpture on a linen cloth or wooden stand to admire your scientific handiwork


What Really Happens Inside the Kiln
Learn how time and temperature work together inside the kiln to transform clay into durable ceramic.
Oversized Classroom Demo Heart
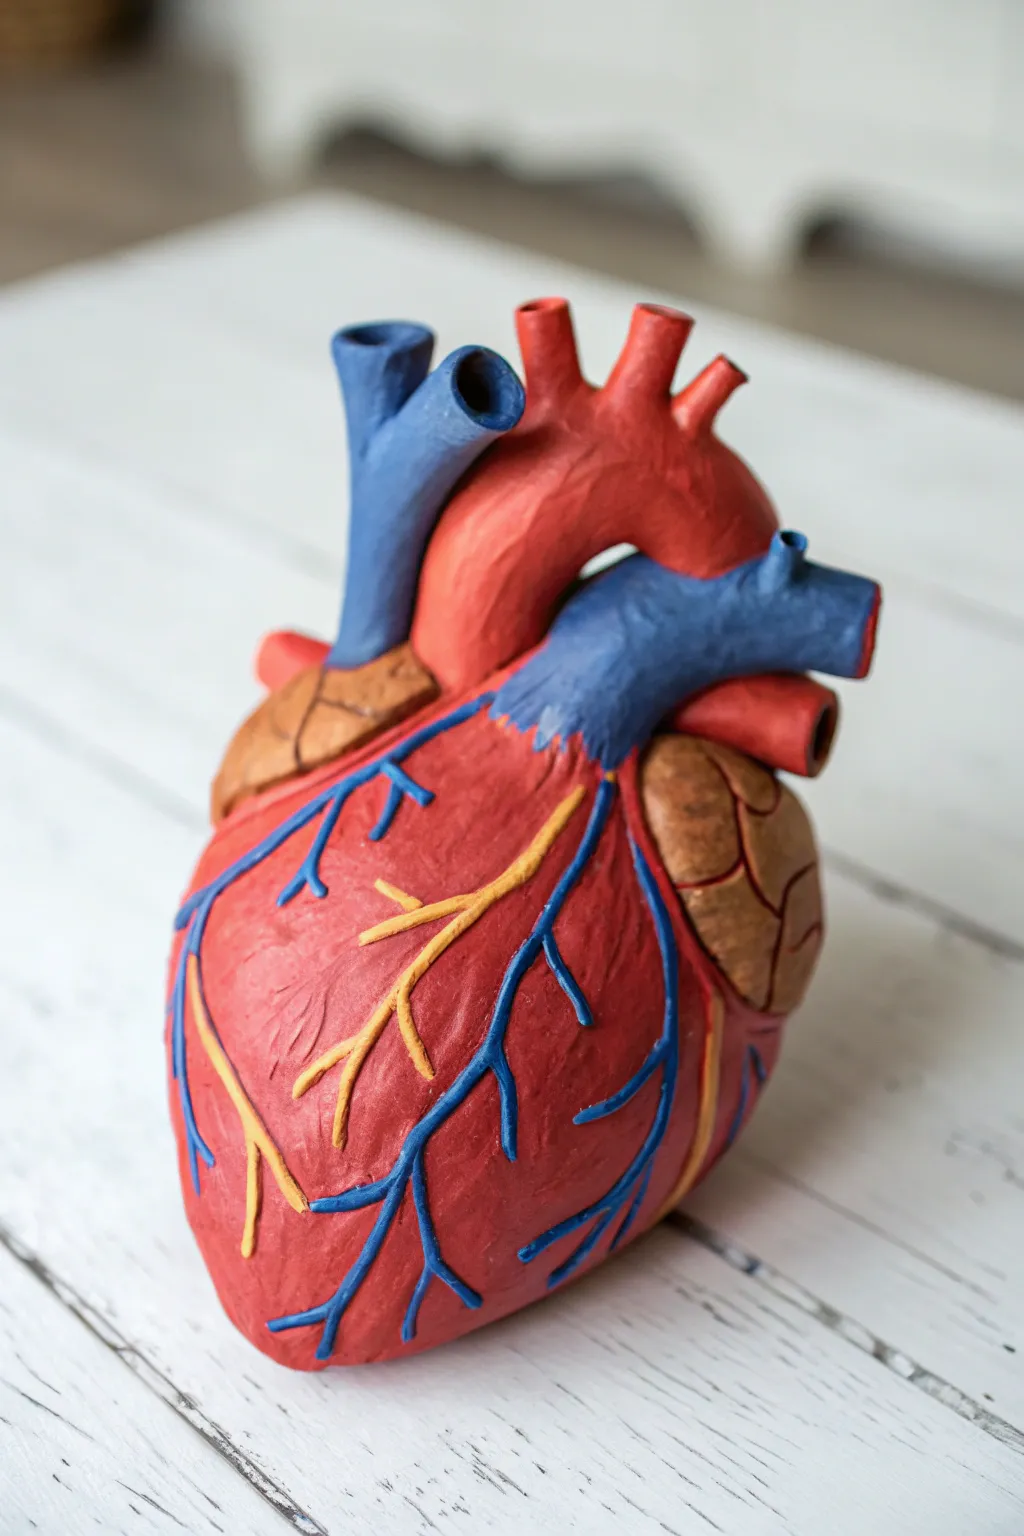
Bring anatomy to life with this striking oversized heart model, sculpted from terracotta air-dry clay for a natural, earthy finish. Its detailed texture and prominent veins make it an engaging tactile tool for biology lessons or a dramatic piece of medical decor.
Detailed Instructions
Materials
- Terracotta air-dry clay (approx. 2-3 lbs)
- Aluminum foil (heavy duty is best)
- Masking tape
- Sculpting tools (needle tool, loop tool, wooden modeling tool)
- Small cup of water
- Sponge
- Rolling pin
- Clear matte acrylic sealer (optional)
Step 1: Armature Construction
-
Form the core:
Begin by crumpling aluminum foil into a large, dense ball roughly the size of a grapefruit. Squeeze it tightly to remove air pockets, aiming for a vague, tapered oval shape that mimics the general mass of a heart without any detail. -
Add vessel structures:
Twist smaller strips of foil into thick, short tubes. Tape these onto the top of your main foil ball to represent the aorta, superior vena cava, and pulmonary artery. Reference the image to get the angles right—the aorta shouid arch slightly. -
Secure the form:
Wrap the entire foil structure completely in masking tape. This smooths out the sharp crinkles of the foil and gives the clay a better surface to adhere to than slick metal. Ensure the vessel stumps are firmly attached.
Cracking Clay?
If small cracks appear while drying, mix a tiny bit of clay with water into a paste (slip) and fill the cracks. Smooth over with a damp finger immediately.
Step 2: Applying the Clay
-
Prepare the slabs:
Roll out your terracotta clay into a slab about 1/4 inch thick. I find it helpful to roll it out on a canvas cloth to prevent sticking. -
Cover the base:
Drape the clay slab over the main body of the heart. Press it firmly against the taped form, smoothing out any trapped air bubbles beneath. Trim excess clay at the top near the vessels. -
Detail the vessels:
Wrap small rectangular strips of clay around the foil armatures for the aorta and arteries. Blend the seams where these tubes meet the main body using your thumb or a wooden tool so the transition looks organic and muscular. -
Smooth the surface:
Dip a sponge lightly in water and run it over the entire model. You want a relatively smooth base before adding texture, though it doesn’t need to be perfect since hearts have organic irregularities.
Step 3: Sculpting Anatomy
-
Define the chambers:
Use a modeling tool to gently press an indentation creating a dividing line that hints at the separation between the left and right ventricles. This diagonal line usually runs from top-left to bottom-right. -
Add the auricles:
Form small, flattened pads of clay and attach them near the base of the vessels to represent the atrial appendages (auricles). These should look slightly more wrinkled or textured than the main ventricles. -
Roll vein coils:
Roll out several very thin, worm-like coils of clay. These will become the coronary arteries and veins that traverse the surface. -
Attach the vasculature:
Score the surface of the heart lightly where you want the veins to go, add a drop of water as slip, and press the coils onto the surface. Follow a branching pattern, starting thick and splitting into thinner branches. -
Blend the veins:
Using a small modeling tool, blend the edges of your clay coils into the main body. The veins should look like they are bulging from underneath the surface, not just sitting on top of it. -
Create surface texture:
Taking a stiff bristle brush or a textured sponge, lightly tap the surface of the clay (avoiding the smooth veins) to give the heart muscle a realistic, slightly porous texture. -
Deepen the shadows:
Use a needle tool or small loop tool to carve slightly deeper undercut lines around the auricles and under the major vessels to enhance the three-dimensional look.
Make it Interactive
Before the clay dries, insert small magnets into the different chambers. You can then create removable labels with matching magnets for a quiz-style learning tool.
Step 4: Finishing
-
Refine the openings:
Use the handle of a paintbrush or a dowel to neatly open up the holes at the top of the aorta and arteries, ensuring they look like hollow tubes rather than solid stumps. -
Final smoothing:
Do a final pass with a barely damp finger to smooth out any unintentional tool marks or sharp ridges on the veins. -
Controlled drying:
Loosely cover the model with a plastic bag for the first 24 hours to prevent it from drying too fast and cracking. Remove the bag and let it air dry completely for another 2-3 days.
Once fully dry, your heart model is ready to serve as a stunning educational centerpiece or an artistic shelf display
Mini Desk-Size Study Heart
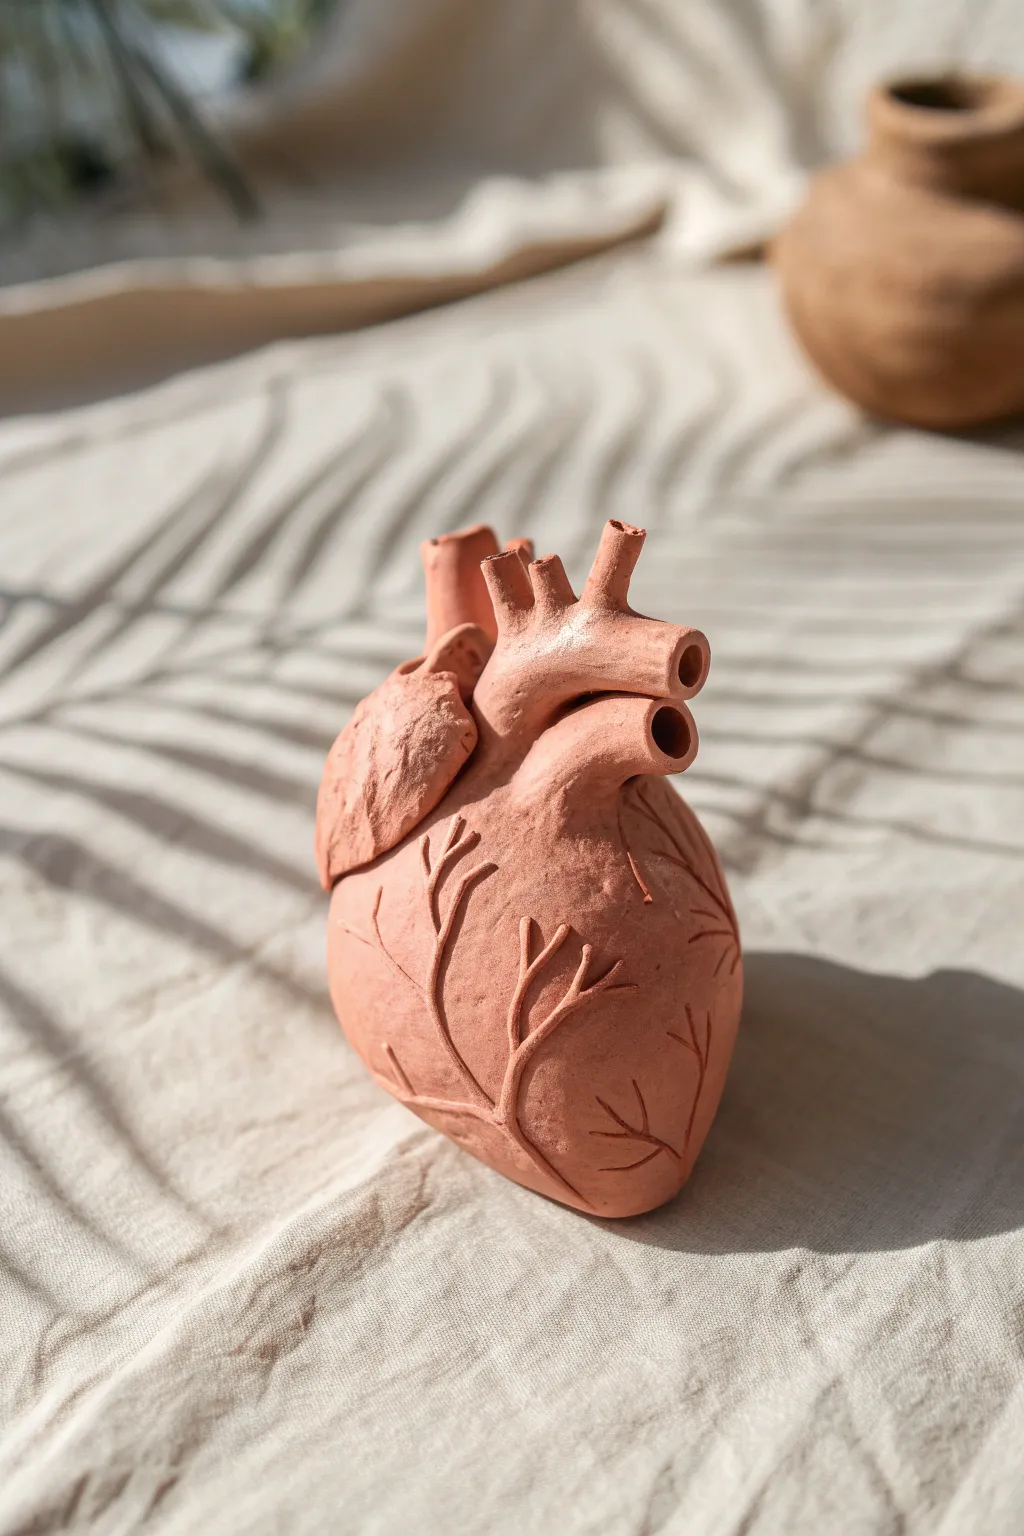
Blend scientific curiosity with artistic flair by crafting this stunning anatomical heart sculpture. Using earthy terracotta clay, you will create a piece that features delicate surface veining and stylized arterial tubes, perfect for a desk or shelf display.
How-To Guide
Materials
- Terracotta air-dry clay (or polymer clay in terracotta)
- Small rolling pin
- Sculpting tools (needle tool, small loop tool)
- Water cup and sponge
- Slip (clay mixed with water) for joining
- Smoothing tool or old spoon
- Various diameter straws or cylindrical tools (for the arteries)
- Fine grit sandpaper
Step 1: Forming the Base
-
Shape the core:
Start by grabbing a handful of terracotta clay, roughly the size of a large orange. Roll it into a smooth ball between your palms to remove any air pockets and warm up the material. -
Refine the heart shape:
Gently taper the bottom of the sphere into a dull point, creating the classic anatomical heart silhouette—wider at the top and narrowing downward, slightly asymmetrical. -
Smooth the surface:
Dip your fingers in a tiny bit of water and rub the surface of the main body to remove fingerprints and bumps. You want a matte, organic texture, but no harsh creases yet.
Keep it clean
Work with clean hands! Terracotta stains easily, but more importantly, oils from your hands can create shiny spots. Wipe hands frequently for that matte finish.
Step 2: Adding the Arteries
-
Create the aorta tubes:
Roll out a thick coil of clay, roughly the width of your pinky finger. Cut it into three or four segments of varying lengths, between 1 to 2 inches long. -
Hollow the vessels:
Using a straw or a cylindrical tool, press into the center of each coil segment to create the hollow opening of the arteries. This gives the sculpture its distinct functional look. -
Score and slip:
Use a needle tool to scratch cross-hatch marks (scoring) on the top of the heart base and the bottom of your tube segments. Apply a dab of clay slip to these rough areas. -
Attach the main vessels:
Press the tubes firmly onto the top of the heart base. Blend the clay from the bottom of the tubes downward into the main body so they look like they grow seamlessly out of the heart. -
Add the side atrium:
Form a smaller, slightly flattened lump of clay and attach it to the upper left side of the heart to represent the atrium. Texture this piece slightly differently, perhaps with small indentations, to distinguish it from the smooth muscle. -
Create the small branch:
Add one smaller, thinner tube coming off the main aorta cluster or the side atrium, angling it slightly outward for visual balance.
Make it a vase
Waterproof the inside of the main vessel tubes with a sealant or resin. You can then place tiny dried floral stems inside for a surreal, blooming heart display.
Step 3: Detaling and Refining
-
Sketch the veins:
With a needle tool, very lightly scratch the path of the coronary arteries/veins across the surface of the heart. Think of them like lightning bolts or tree branches spreading from the center. -
Carve the relief:
Using a small loop tool or the needle tool, carve deeper along your sketched lines. I find it helpful to vary the pressure—press harder at the base of the vein and lift up as the vein branches out to make it thinner. -
Soften the edges:
Take a slightly damp sponge or your finger and gently trace over the carved lines. This softens the sharp burrs of clay left by the carving tool, making the veins look embedded in the tissue. -
Check the openings:
Re-insert your cylindrical tool or straw into the top openings to ensure they haven’t been squashed during the handling process. Rotate the tool slightly to ensure a perfect circle. -
Texture the atrium:
Go back to that side lump (the atrium) and stipple it with a stiff brush or the tip of a tool to give it a rougher, more muscular texture compared to the smooth ventricles.
Step 4: Drying and Finishing
-
Initial dry:
Set the heart aside in a cool, dry place away from direct sunlight. Let it dry slowly for 24 to 48 hours to prevent cracking. -
Sanding:
Once fully dry and hard, use fine-grit sandpaper to gently buff the main body of the heart. This enhances that soft, matte terracotta finish seen in the photo. -
Final dust off:
Wipe away any sanding dust with a dry brush or cloth. If you want a deeper color, you can apply a very thin wash of watered-down terracotta acrylic paint, but the natural clay usually looks best.
Your finished sculpture now stands as a beautiful fusion of biology and art, ready to add a thoughtful touch to your workspace

TRACK YOUR CERAMIC JOURNEY
Capture glaze tests, firing details, and creative progress—all in one simple printable. Make your projects easier to repeat and improve.
Textured Muscle Heart Surface Technique
This project moves beyond cartoon hearts to create a stunningly realistic anatomical model with deep textures and rich coloring. The result is a weighted, organic-looking sculpture perfect for medical study, Halloween decor, or a striking art piece.
Step-by-Step Guide
Materials
- Polymer clay (red, brown, and translucent)
- Aluminum foil
- Thick wire or armature wire
- Needle tools and ball stylus tools
- Texture sponge or stiff bristle brush
- Acrylic paints (dark red, crimson, brown, black)
- Matte varnish or glaze
- Sculpting tools
- Oven (for baking polymer clay)
Step 1: Armature and Base Form
-
Build the core:
Start by scrunching aluminum foil into a tight, dense egg shape. This saves clay and ensures the sculpture isn’t too heavy. -
Shape the anatomy:
Modify the foil shape by pressing one side flatter and creating slight indentations where the major vessels will eventually attach. The overall form should mimic a human heart, tapering to an apex at the bottom. -
Cover with clay:
Condition your red polymer clay until pliable. Roll it into a sheet about 1/4 inch thick and wrap it completely around your foil core, smoothing the seams so no foil shows.
Problem: Cracks appeared?
If you find cracks after baking, fill them with a mix of liquid clay and red clay, smooth over, and re-bake for a short period.
Step 2: Sculpting the Vessels
-
Form the aorta:
Roll a thick snake of clay and hollow out one end. Attach this to the top center of the heart, curving it slightly to form the aortic arch. Blend the base seamlessly into the main body. -
Add secondary vessels:
Create three smaller tubes for the branches coming off the aorta (brachiocephalic trunk, carotid, subclavian) and attach them to the top of the arch. -
Create the pulmonary artery:
Fashion a second large vessel that emerges from the front of the heart and tucks under the aortic arch. Open the end so it looks like a hollow tube. -
Hollow the openings:
Use a ball tool or the handle of a paintbrush to deepen the openings of all the arteries and veins, ensuring the walls of the clay aren’t too thin at the rim.
Level Up: Wet Look
For extreme realism, mix a drop of red food coloring into clear epoxy resin and coat just the open arteries for a fresh biological effect.
Step 3: Texturing and Veining
-
Map the surface veins:
Roll very thin snakes of clay for the surface coronary arteries. Lay them diagonally across the heart’s surface, starting thick near the top and branching out thinner toward the bottom. -
Blend the veins:
Use a silicone tool or your finger to gently blend the edges of these veins into the muscle wall so they look like they are bulging from underneath the skin, not just sitting on top. -
Create muscle texture:
Take a stiff bristle brush or a rough texture sponge and stipple the entirely of the surface. Don’t be afraid to be aggressive; this creates that organic, fibrous muscle look. -
Refine the details:
Use a needle tool to scratch fine, directional lines along the major muscle masses to simulate muscle striation. I find lightly cross-hatching helps break up any smooth spots. -
Initial darkening:
Dust the deep crevices and the areas around the veins with a bit of powdered brown pastel or pigment before baking to add instant depth. -
Bake the model:
Bake the clay according to the manufacturer’s instructions. Usually, this is around 275°F (130°C) for 15-30 minutes per 1/4 inch of thickness. Let it cool completely.
Step 4: Painting and Finishing
-
Apply a base wash:
Mix dark brown and black acrylic paint with water to create a thin wash. Brush this over the entire heart, ensuring it gets into every texture crevice. -
Wipe back:
Immediately wipe the high points with a paper towel. The dark paint will remain in the textured pits and cracks, instantly revealing the muscle detail. -
Dry brushing:
Take a lighter crimson red on a dry brush (very little paint) and gently brush over the raised surfaces and vein tops to bring back the vibrancy of the organ. -
Seal the piece:
Finish with a matte varnish to protect the paint. If you want it to look ‘fresh,’ use a satin or gloss varnish instead for a wet look.
Now you have a strikingly detailed anatomical model ready for display
Two-Part Model Comparing Healthy vs. Blocked Artery
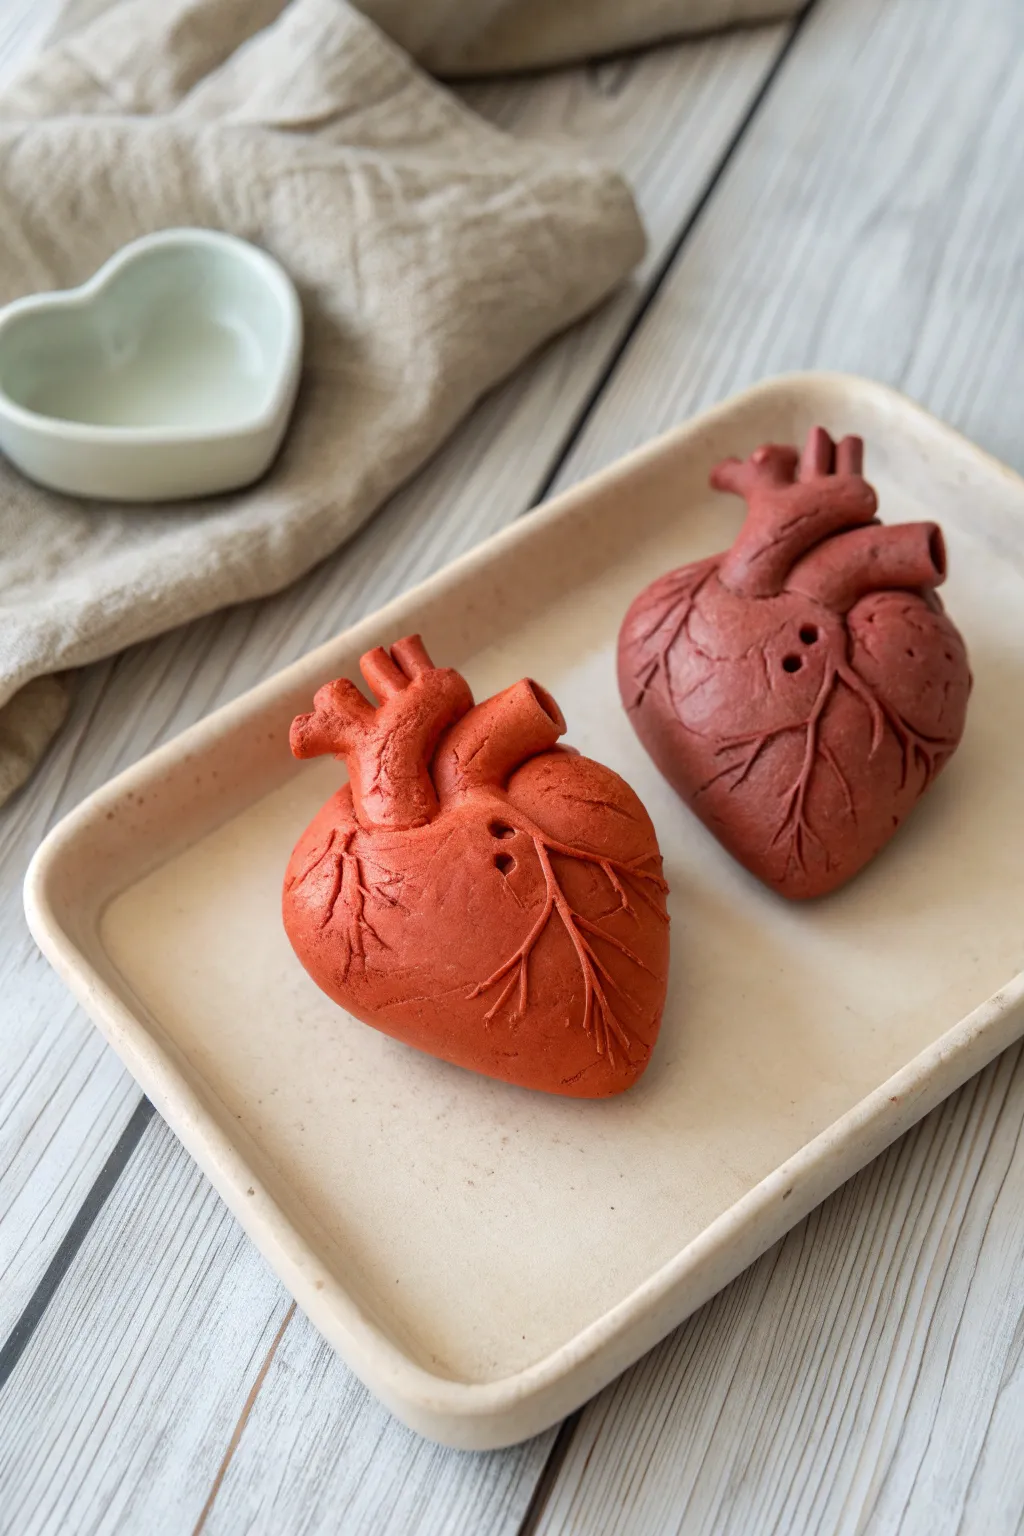
Sculpt a pair of strikingly realistic anatomical heart models, perfect for comparing healthy and unhealthy arterial systems. Using polymer or air-dry clay, you’ll create textured, matte-finished organs with intricate vein details and distinguishable coloring to represent different health states.
How-To Guide
Materials
- Red polymer clay (or air-dry clay)
- Brown acrylic paint (if tinting)
- Orange acrylic paint (if tinting)
- Sculpting tools (needle tool, ball stylus)
- Aluminum foil
- Rolling pin
- Soft paintbrush
- Matte varnish or sealant
- Rectangular ceramic or clay tray for display
Step 1: Forming the Base Structure
-
Create the armatures:
Begin by crumpling aluminum foil into two tight, egg-shaped balls roughly the size of a fist. Taper the bottom of each slightly to mimic the apex of a heart. This saves clay and keeps the models lightweight. -
Prepare the clay colors:
Condition your red clay until it is pliable. Divide it into two portions. For the ‘healthy vs. blocked’ look seen in the photo, mix a small amount of orange into one portion for a brighter red, and a touch of brown or black into the other for a deeper, darker crimson. -
Cover the armatures:
Roll sheets of your clay to about 1/4 inch thickness. Wrap a sheet fully around each foil armature, smoothing the seams together with your thumbs until the foil is completely hidden and the surface is uniform. -
Refine the shape:
Mold the clay-covered forms with your hands. Ensure the top borders are somewhat flattened to accept the aorta and veins later, and sharpen the point at the bottom apex slightly.
Cracks Appearing?
If air-dry clay cracks while drying, mix a small amount of fresh clay with water to make a paste (slip). Fill the cracks with this paste and smooth it over with a wet finger.
Step 2: Sculpting Anatomical Details
-
Form the major vessels:
Roll thick coils of clay for the aorta and pulmonary artery. Attach these to the top center of each heart model. Use a blending tool or your finger to smooth the base of the coils seamlessly into the main heart body. -
Create the auricles:
Add smaller, ear-shaped lumps of clay on either side of the main vessels to represent the atria. Texture them slightly more than the main body to show their muscular nature. -
Hollow the vessels:
Take a rounded tool or the back of a paintbrush handle and gently press into the tops of the aorta and arteries to create openings. This adds depth and realism to the sculpture. -
Map the coronary arteries:
Roll very thin, worm-like strands of clay. Lay them across the surface of the heart, starting from the top and branching downward diagonally across the front. -
Blend the veins:
Using a small silicone tool or a toothpick, blend the edges of these thin strands into the heart body so they look like they are bulging from underneath the surface, rather than just sitting on top. -
Add surface texture:
Lightly stipple the surface of the heart using a stiff bristle brush or a textured sponge. This removes fingerprints and mimics organic tissue. Avoid texturing the veins themselves too heavily; keep them relatively smooth. -
Differentiate the models:
For the darker model, consider making the veins slightly more bulging or twisted to visually suggest strain or blockage, while keeping the brighter model’s veins smoother and more streamlined.
Pro Texture Tip
Roll a ball of aluminum foil over the surface of the raw clay before baking. It creates a perfect, subtle organic skin texture that looks incredible once the wash is applied.
Step 3: Finishing Touches
-
Simulate pores:
Use a needle tool to create tiny incidental pores or divots near the top connection points between the vessels and the heart wall. -
Bake or dry:
If using polymer clay, bake according to the package directions (usually around 275°F/135°C for 15-30 minutes per 1/4 inch). If using air-dry clay, allow it to sit in a dry location for 24-48 hours. -
Apply a wash (Optional):
To enhance the texture, I like to mix a very watered-down brown acrylic paint and brush it over the entire model. Wipe it off immediately with a paper towel, leaving the dark pigment only in the crevices and textures. -
Seal the surface:
Once fully dry or cooled, apply a matte varnish. A glossy finish tends to look unrealistic for this specific style, so stick to matte or satin to maintain that clay-sculpture aesthetic. -
Display setup:
Arrange your finished hearts side-by-side on a simple, neutral-colored rectangular tray to emphasize their color differences and details.
Now you have a compelling visual aid to display the differences in heart health