A clay ocarina is one of those magical projects where sculpture and sound meet in the middle. If you’re craving fresh shapes and fun ways to hide finger holes and blend in a clean mouthpiece, these ideas will get your hands moving.
Classic Bird Ocarina
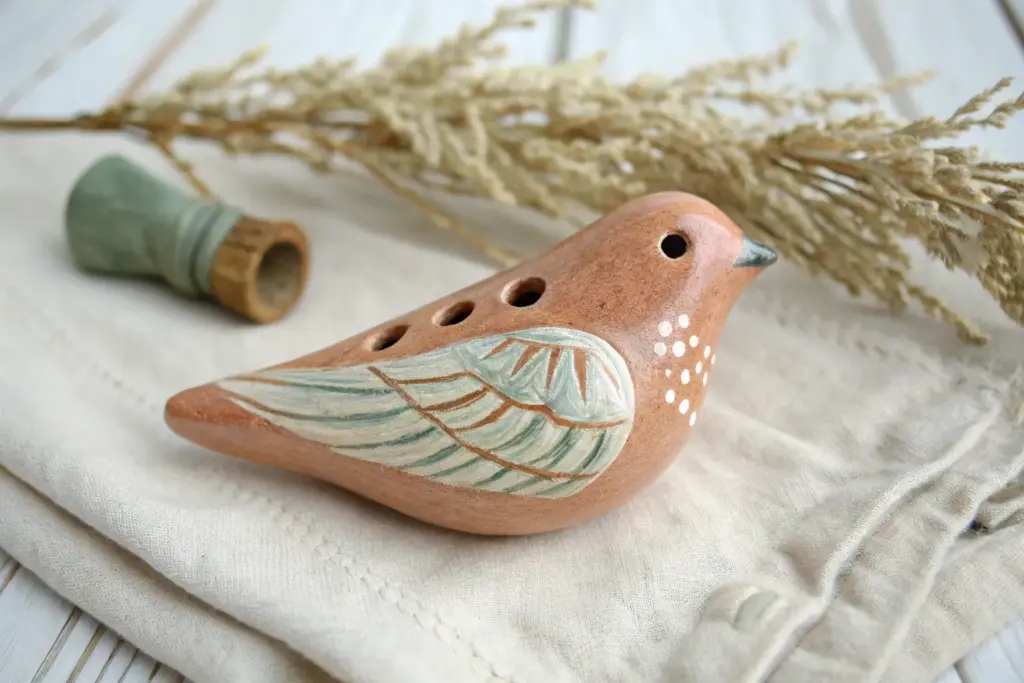
This charming, speckled clay ocarina captures the simple elegance of a dove, combining sculptural beauty with functional music-making. Its smooth, rounded form and delicately carved wing details make it a delightful project for intermediate potters looking to explore wind instruments.
Step-by-Step Guide
Materials
- White stoneware clay with speckles (or plain white clay)
- Popsicle stick or wooden modeling tool
- Fettling knife
- Needle tool
- Loop tool (for hollowing, if using solid method)
- Slip (clay mixed with water)
- Sponge
- Clear matte glaze
- Fine-grit sandpaper (for dry greenware)
- Kiln
Step 1: Forming the Body
-
Shape the clay core:
Begin with a ball of clay roughly the size of a large orange. Create a pinch pot by inserting your thumb and pressing the walls out until they are about 1/4 inch thick. -
Close the form:
Gently collar the clay inwards to close the pinch pot, trapping the air inside. This creates a hollow sphere that maintains its shape. -
Model the bird shape:
While the air is trapped, gently manipulate the sphere. Pull one side slightly to form the head and beak area, and taper the opposite side to create a tail. -
Refine the surface:
Use a smooth kidney rib or your thumb to smooth out any lumpy areas, ensuring the transition from the rounded chest to the tail is continuous and graceful.
No Sound?
If it sounds airy, the splitting edge (the ramp in the window) is likely misaligned. It must split the air stream exactly in half. Use a flat tool to gently adjust the angle.
Step 2: Creating the Sound Mechanism
-
Cut the airway:
On the underside of the tail, use a popsicle stick to press a rectangular airway channel into the clay. This is the fipple. -
Make the voicing window:
Flip the bird over. Where the airway ends, carefully cut a small square hole with a bevelled edge facing the mouthpiece. This is the most critical step for sound. -
Test the whistle:
Blow gently through the tail mouthpiece. Adjust the angle of the bevel (the splitting edge) until you get a clear, sharp whistling sound.
Step 3: Tuning and Detailing
-
Punching finger holes:
Using a specifically sized hole cutter or drill bit, punch four to six holes on the top of the body. I find placing them in slight arcs fits the hand more naturally. -
Tune the notes:
As you create each hole, blow into the ocarina to check the pitch. Enlarge holes slightly to sharpen the note; keep them smaller for flatter notes. -
Clean the holes:
Once the holes are cut, use a damp sponge or brush to smooth the edges so they are comfortable for your fingers to cover completely.
Level Up: Tuned Scales
Use a digital tuner app while cutting holes to create a specific musical scale. Start with the lowest note (holes covered) and tune upwards one hole at a time.
Step 4: Sculptural Details
-
Define the beak:
Pinch the head area to sharpen the beak. Use a needle tool to create a horizontal mouth line for expression, giving the bird a calm demeanor. -
Add the eyes:
Press a small round tool or the end of a paintbrush into the head to indent the eyes. Paint the inside of these indentations black later or leave them as shadows. -
Etch the wings:
Using a needle tool or sgraffito tool, gently carve three or four sweeping, curved lines along the side of the body to suggest folded wing feathers. -
Add texture:
If your clay isn’t naturally speckled, you can lightly flick iron oxide or a dark slip over the surface with a stiff toothbrush for that organic, spotted look.
Step 5: Firing and Finish
-
Bisque fire:
Allow the clay to dry very slowly to prevent cracking around the holes. Fire to bisque temperature (usually cone 04). -
Glaze application:
Apply a clear matte glaze to the entire bird, being extremely careful not to clog the voicing window or finger holes. -
Final smooth:
Wipe the foot of the bird clean and fire to the glaze temperature appropriate for your clay body (likely cone 5 or 6 for stoneware).
Enjoy the meditative process of finding the right song hidden within the earth


Simple Egg-Shaped Ocarina
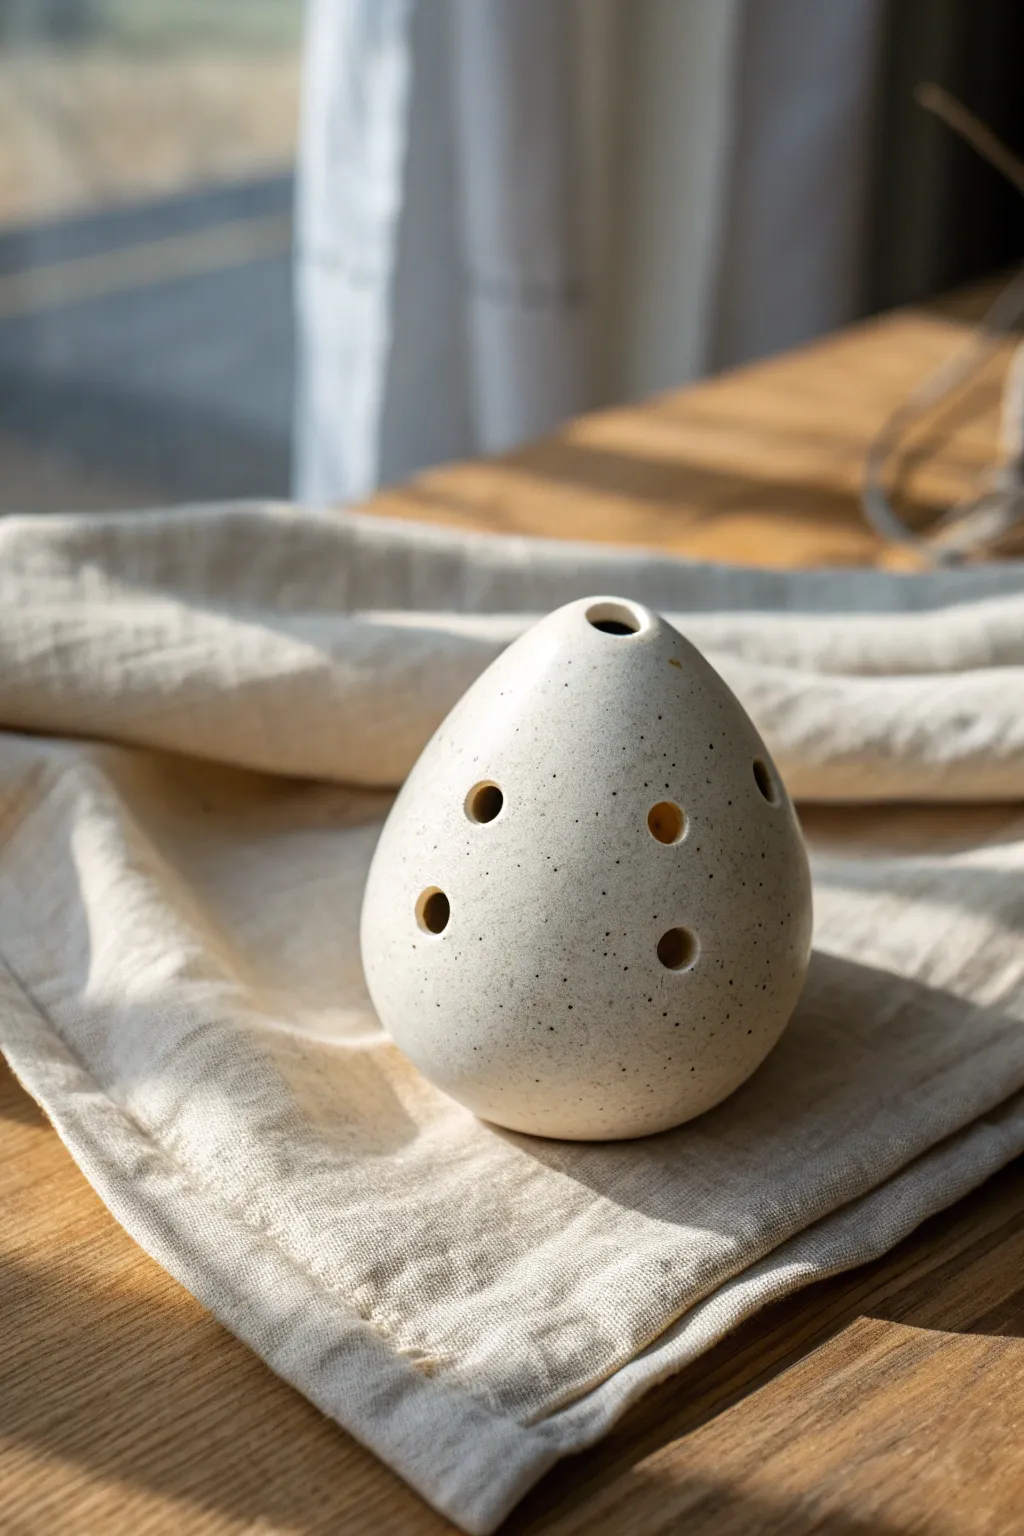
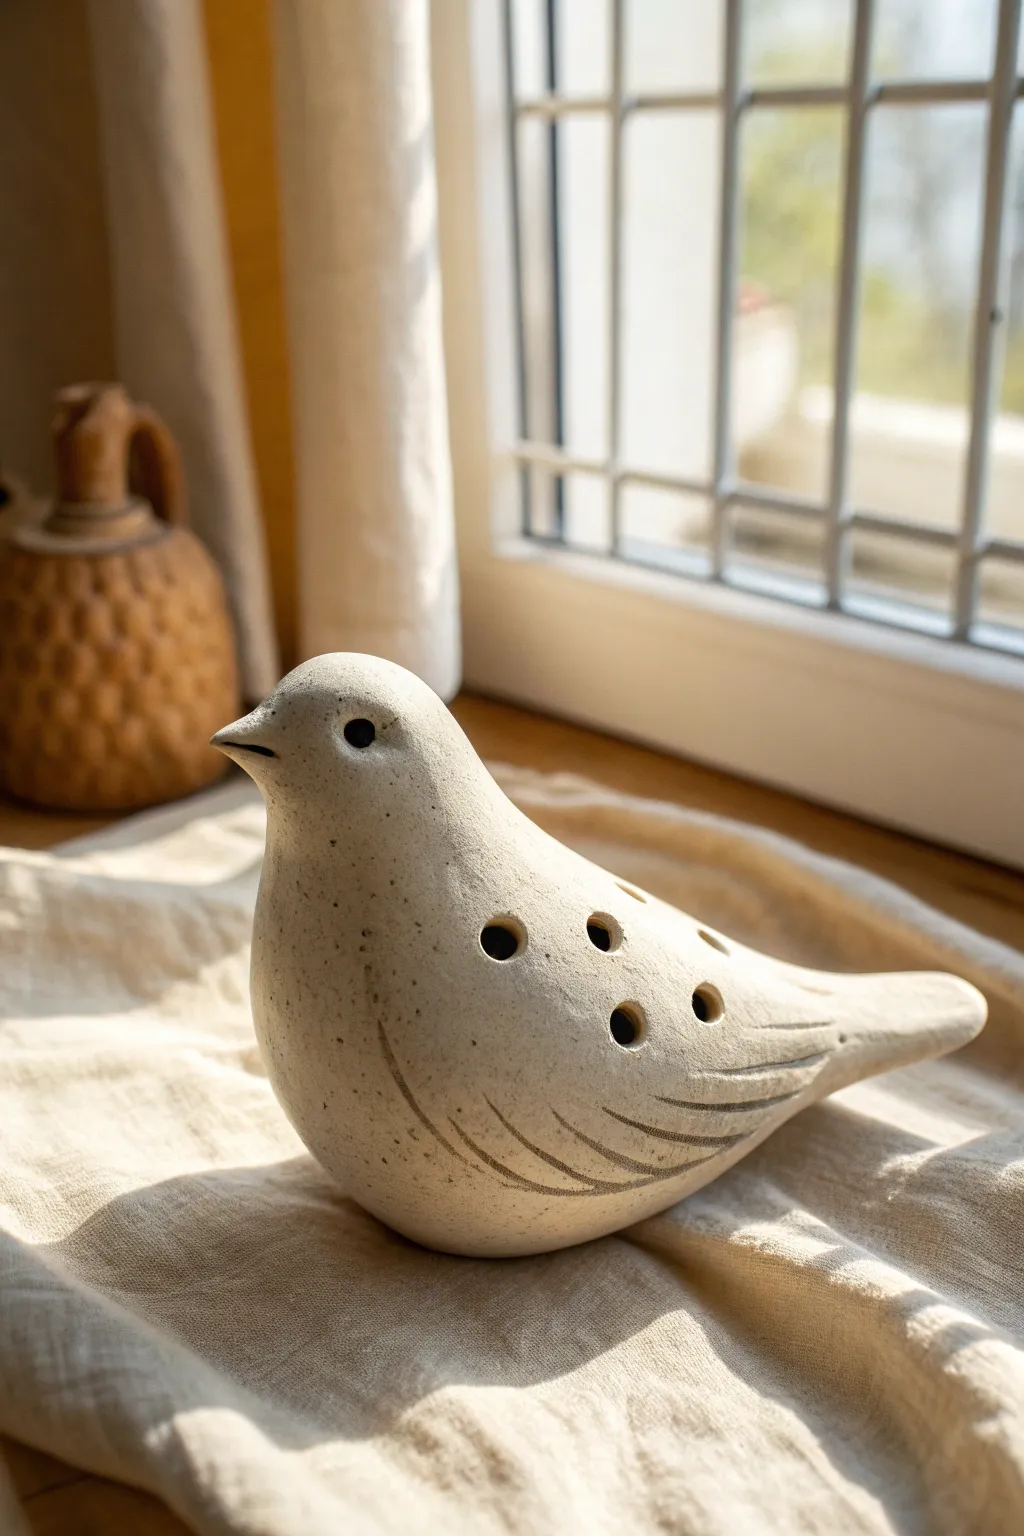
This charming, handheld instrument merges the organic beauty of a speckled egg with the melodic potential of a wind instrument. Its smooth, rounded form fits perfectly in the palm, featuring a deceptively simple design that produces sweet, earthy whistles.
How-To Guide
Materials
- Speckled cream stoneware clay (e.g., Laguna Speckled Buff or similar)
- Popsicle stick or wooden voicing tool
- Various drill bits or hole cutters (3mm – 8mm)
- Needle tool
- Metal rib
- Soft sponge
- Smooth wooden paddle (optional)
- Small bowl of water
- Clear matte glaze (optional, for fired finish)
Step 1: Forming the Hollow Body
-
Prepare the clay:
Begin with a ball of speckled stoneware clay slightly larger than a tennis ball. Wedge it thoroughly to remove any air bubbles, which is critical for a closed form. -
Pinch the basic shapes:
Divide the clay into two equal halves. Using the pinch pot method, gently press your thumb into the center of each ball and pinch the walls to an even thickness of about 1/4 inch. -
Join the halves:
Check that the two pinch pots match in diameter. Score the rims of both pots with your needle tool and apply a small amount of water or slip. -
Seal the seam:
Press the two halves together firmly. Use your thumb to drag clay across the seam on the outside, creating a sealed sphere. Do not trap too much air pressure yet as we still need to shape it. -
Shape into an egg:
Roll the sphere gently on your work surface or between your hands to elongate one end slightly, mimicking the natural taper of an egg. Gently paddle the surface if you need to compress the walls.
No Sound?
The splitting edge (labium) must be perfectly aligned with the air stream. Re-insert the stick and ensure it points exactly at the sharp edge.
Step 2: Creating the Voicing Mechanism
-
Flatten the voicing area:
Decide which end will be the mouthpiece (usually the slightly more tapered end). Press a small flat spot on the underside where your lips will rest. -
Cut the airway:
Insert your popsicle stick or a designated voicing tool horizontally into the flattened area to create the windway. This channel directs your breath. -
Cut the window:
On the top surface, directly above where your airway tool ends inside the clay, cut a small square or rectangular hole. This is the ‘window’ where the sound is produced. -
Form the labium:
Carefully angle the edge of the window opposite the mouthpiece. bevel this edge (the labium) until it is sharp like a knife edge. This splits the air to create sound. -
Test the sound:
With the airway tool removed, blow gently. If it doesn’t whistle, adjust the angle of the sharp labium edge slightly up or down until you get a clear tone.
Step 3: Tuning and Refining
-
Mark hole placement:
Hold the egg comfortably in your hands. Mark where your fingers naturally fall to determine the placement of the pitch holes—typically four on top and one or two underneath for thumbs. -
Create the finger holes:
Using hole cutters or drill bits, carefully punch out the holes. I prefer to start with smaller holes, as you can always widen them to raise the pitch later. -
Clean the edges:
Use a damp sponge or your finger to smooth the rims of all the holes. Sharp edges on the holes can make the instrument uncomfortable to play. -
Refine the surface:
Once the clay is leather hard, use a metal rib to scrape away any unevenness on the body, enhancing that perfect egg silhouette. -
Polish (Burnishing):
For a smooth, stone-like feel similar to the reference photo, rub the surface with a polished stone or the back of a spoon. This compresses the clay particles. -
Slow drying:
Let the ocarina dry very slowly under loose plastic. Rapid drying can cause cracks around the delicate window area. -
Final wipe down:
Before firing, gently wipe the surface with a barely damp sponge to reveal the gritty texture of the speckles. -
Firing:
Fire the piece according to your clay body’s instructions (likely Cone 5 or 6 for stoneware). A clear matte glaze is optional but preserves the natural clay look beautifully.
Add a Pendant Look
Before drying, add a horizontal hole through the very top (solid clay area) to string a leather cord, turning your instrument into wearable art.
Once fired, you’ll have a beautiful, minimalist instrument that feels as good to hold as it does to play


Turtle Shell Ocarina
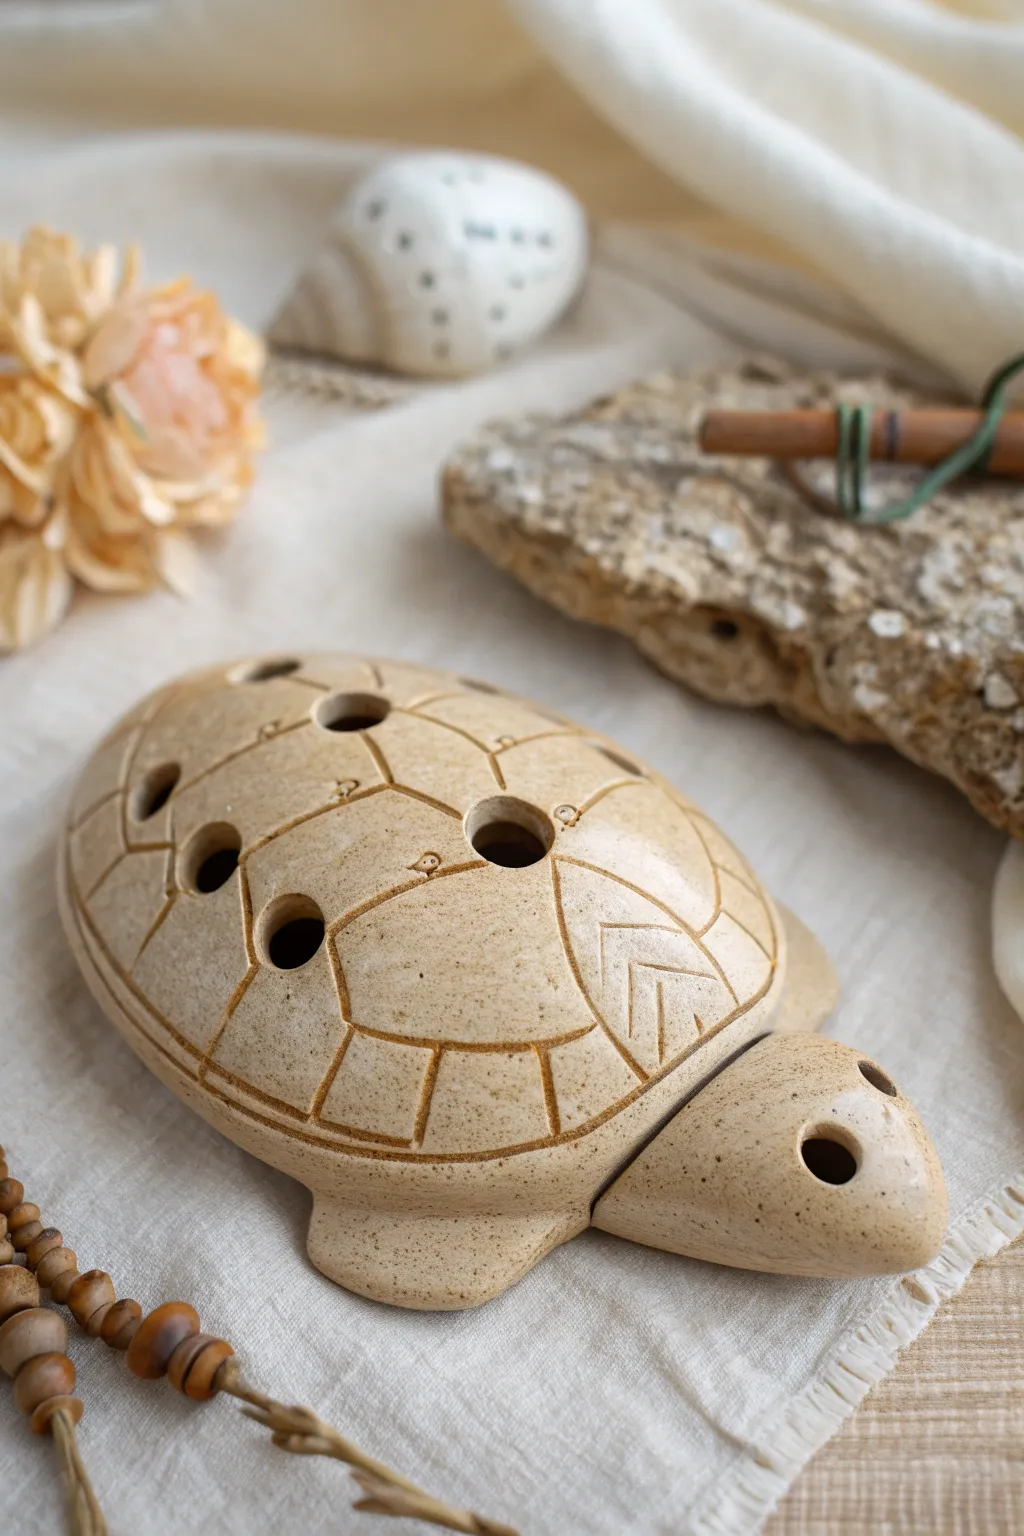
Craft a charming musical companion with this turtle shell ocarina project, featuring a smooth, speckled beige finish and intricate shell carvings. This functional ceramic whistle doubles as a delightful sculpture, perfect for playful melodies or shelf display.
Detailed Instructions
Materials
- Stoneware clay (speckled or buff)
- Pinch pot tools (fingers, ribs)
- Wooden sculpting tools
- Popsicle stick or fettling knife
- Loop tool
- Needle tool
- Drill bits or hole cutter tools (various sizes)
- Slip and score tool
- Sponge and water
- Clear or matte transparent glaze
Step 1: Forming the Body
-
Roll the Primary Clay Ball:
Begin with a fist-sized amount of speckled stoneware clay. Roll it firmly between your palms until you have a smooth, crack-free sphere. -
Create a Pinch Pot:
Insert your thumb into the center of the sphere and gently pinch the walls while rotating the clay. Aim for a uniform thickness of about 1/4 inch, creating a deep bowl shape that will become the turtle’s shell. -
Shape the Shell Dome:
Place the open side of your pinch pot onto a flat surface. Gently pat and smooth the exterior into an elongated oval dome, resembling a tortoise shell. -
Close the Form:
Instead of leaving the bottom open, pinch the rim of the pot inward to close the form completely, trapping air inside. This trapped air provides resistance, allowing you to refine the shape without it collapsing. -
Refine the Surface:
Using a flexible rib tool or a smooth stone, compress the clay surface to remove fingerprints and create that polished, pebble-like texture seen in the photo.
Clear The Airway
After glazing but before firing, ensure no glaze has dripped into the windway or voicing hole. Use a pipe cleaner to clear these crucial areas.
Step 2: Creating the Sound Mechanism & Appendages
-
Fashion the Head:
Roll a smaller, teardrop-shaped piece of clay for the head. It should be proportional to the body, slightly elongated to house the mouthpiece. -
Attach the Head:
Score and slip both the wider end of the head and the front of the shell body. Press them firmly together, smoothing the seam until the joining line disappears completely. -
Adding Feet and Tail:
Shape four small, flat flippers and a tiny triangular tail. Attach these to the underside of the body using the score-and-slip method, ensuring the turtle sits level on a table. -
Create the Airway:
carefully insert a flat popsicle stick or fettling knife into the mouth of the turtle, pushing it straight back towards the body to create the windway. -
Cut the Voicing Window:
On the underside of the neck (or wherever you prefer the sound mechanism), cut a small square hole with a bevelled edge (the labium). The air from the windway must split exactly on this sharp edge to produce sound. -
Test the Whistle:
Before adding finger holes, blow gently into the mouthpiece. If it doesn’t whistle, adjust the angle of the labium or clear the airway until you get a clear tone.
Step 3: Detailing and Tuning
-
Drill Finger Holes:
Using hole cutters or drill bits, carefully bore holes into the top of the shell. The image shows six visible holes of varying sizes. Start small; you can always widen them to tune the pitch higher. -
Clean the Holes:
Use a small sponge or brush to smooth the edges of every hole. ragged edges can disrupt airflow and affect the sound quality. -
Sketch the Shell Pattern:
Lightly trace the hexagonal ‘scute’ pattern onto the shell with a needle tool. Use the photo as a reference, creating a central ridge of shapes flanked by side panels. -
Carve the Grooves:
Go over your traced lines with a V-tip carving tool or the edge of a wooden tool to deepen the grooves, giving the shell distinct segments. -
Add Texture Details:
For the front section of the shell, I like to carve the chevron arrow pattern shown in the reference image to add visual interest near the head. -
Define the Eyes:
Press a small hollow tube or round tool into the sides of the head to create deep, expressive eye sockets. -
Bisque Fire:
Allow the turtle to dry slowly under plastic to prevent cracking. Once bone dry, bisque fire the piece in a kiln to approximately Cone 04. -
Glaze and Finish:
Apply a thin layer of transparent or light matte glaze to highlight the clay’s natural speckling. Fire again to the clay body’s maturity temperature (likely Cone 5 or 6 for stoneware).
Tune It Up
Use a tuner app while drilling holes. Larger holes raise the pitch. Start with the lowest note (all holes covered) and tune upwards one hole at a time.
Now you have a serene, musical turtle ready to play its earthy song


Frog Belly Ocarina
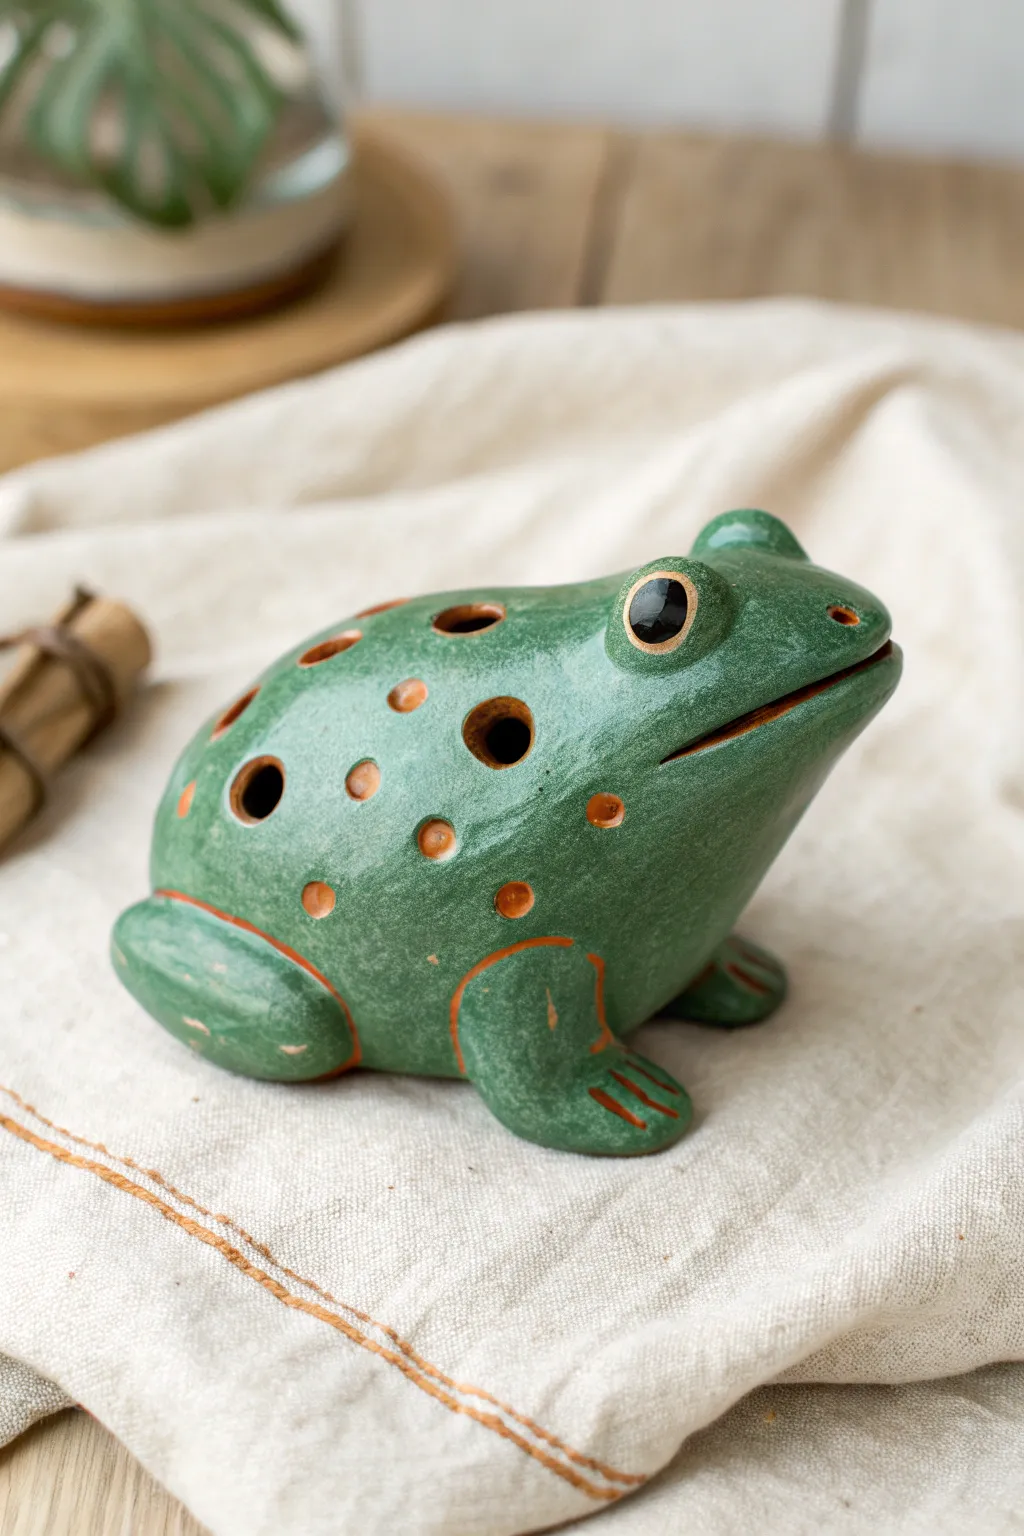
This charming musical instrument doubles as a delightful sculpture, featuring a rounded, resonant body and a glossy, speckled green finish. The design creates a sturdy, palm-sized ocarina perfect for beginners to clay whistling.
How-To Guide
Materials
- Earthenware or stoneware clay body
- Popsicle sticks (standard and jumbo size)
- Fettling knife
- Loop tools for carving
- Needle tool
- Small drill bits or hole cutter set
- Slip and scoring tool
- Sponge
- Dark green ceramic underglaze
- Rust/orange ceramic underglaze
- Clear glossy glaze
- Thin paintbrush
Step 1: Sculpting the Base Form
-
Form the pinch pot:
Start with a ball of clay about the size of a tennis ball. Press your thumb into the center and rotate, pinching the walls evenly to create a hollow, egg-shaped pinch pot. This will be the resonating chamber. -
Close the form:
Gently gently taper the rim of your pot inward until it closes completely. Trap the air inside; this trapped air helps maintain the round, inflated belly shape while you work on the exterior. -
Shape the frog body:
Roll the closed form on your work surface to smooth it. Paddle it gently into a slightly elongated tear-drop shape, where the wider end will be the frog’s rear and the narrower end the head. -
Add the legs:
Roll two thick coils for the rear legs. Flatten them slightly and attach them to the sides of the rear body using the score and slip method. Blend the seams so they disappear into the main body. -
Sculpt the feet:
Shape small tabs of clay into webbed feet and attach them to the bottom of the legs. Use a needle tool to lightly impress lines for the toes. -
Create the eyes:
Roll two small balls of clay. Score and slip them onto the top of the head area. Use a small loop tool to carve out a slight depression around them, making them look bulging and alert.
No Sound?
If the whistle is simply rushing air, the ‘blade’ (ramp) is likely too dull or misaligned. Sharpen the edge carefully with a knife and check alignment.
Step 2: Creating the Whistle Mechanism
-
Flatten the mouthpiece:
On the mouth end of the frog, gently flatten a small area to create a stable place for the mouthpiece. I find it helpful to let the clay struggle up a bit here so it doesn’t deform. -
Insert the airway stick:
Insert a flat popsicle stick horizontally into the mouth area to create the windway. Push it in until it reaches the hollow interior. -
Cut the voicing window:
On the underside of the frog (below the mouth), measure about an inch back from the lip. Cut a small square window with a vertical back wall and a 45-degree angled ramp leading up to the surface. -
Align the fipple:
With the popsicle stick still in the airway, ensure the air exiting the stick hits the sharp edge of the angled ramp exactly in the middle. This splitting of the air is what creates sound. -
Test the sound:
Remove the stick carefully. Blow gently. If it doesn’t whistle, adjust the angle of the ramp (the blade) or clear debris from the windway. Don’t proceed until you have a clear tone.
Variable Pitch
Make the holes different sizes! Larger holes raise the pitch more than small ones. This allows you to tune the ocarina to play a simple major scale.
Step 3: Tuning and Decoration
-
Drill finger holes:
Once the whistle works, use your hole cutters to create the tuning holes on the frog’s back. Start with small holes; you can widen them to raise the pitch if you are tuning to a specific scale. -
Refine the mouth:
Carve a gentle line extending from the windway opening along the sides of the head to simulate a wide frog mouth, giving it character. -
Smooth the surface:
Use a barely damp sponge to wipe down the entire piece, removing any clay crumbs from the drilling and smoothing any rough tool marks. -
Bisque fire:
Allow the frog to dry completely (bone dry) before firing it to bisque temperature (usually cone 04) in a kiln.
Step 4: Glazing and Finishing
-
Apply base color:
Paint the entire exterior with three coats of the dark green underglaze. Wipe back slightly with a sponge if you want a more weathered look. -
Detail the spots:
Dip a small round brush into the rust/orange underglaze. Paint rings around the finger holes and add random circular spots across the back and legs. -
Paint the eyes:
Use a tiny dot of black underglaze for the pupils and outline the eye rims with the rust color for contrast. -
Clear glaze application:
Once the underglaze is dry, dip the frog into a clear glossy glaze. Ensure you blow through the airway and finger holes immediately after dipping to clear any glaze blockages. -
Final firing:
Fire the piece again to the maturity temperature of your clay and glaze (often cone 5 or 6) to achieve that shiny, glassy finish.
Now you have a wonderful amphibian friend ready to sing with you

The Complete Guide to Pottery Troubleshooting
Uncover the most common ceramic mistakes—from cracking clay to failed glazes—and learn how to fix them fast.
Dolphin-Inspired Ocarina
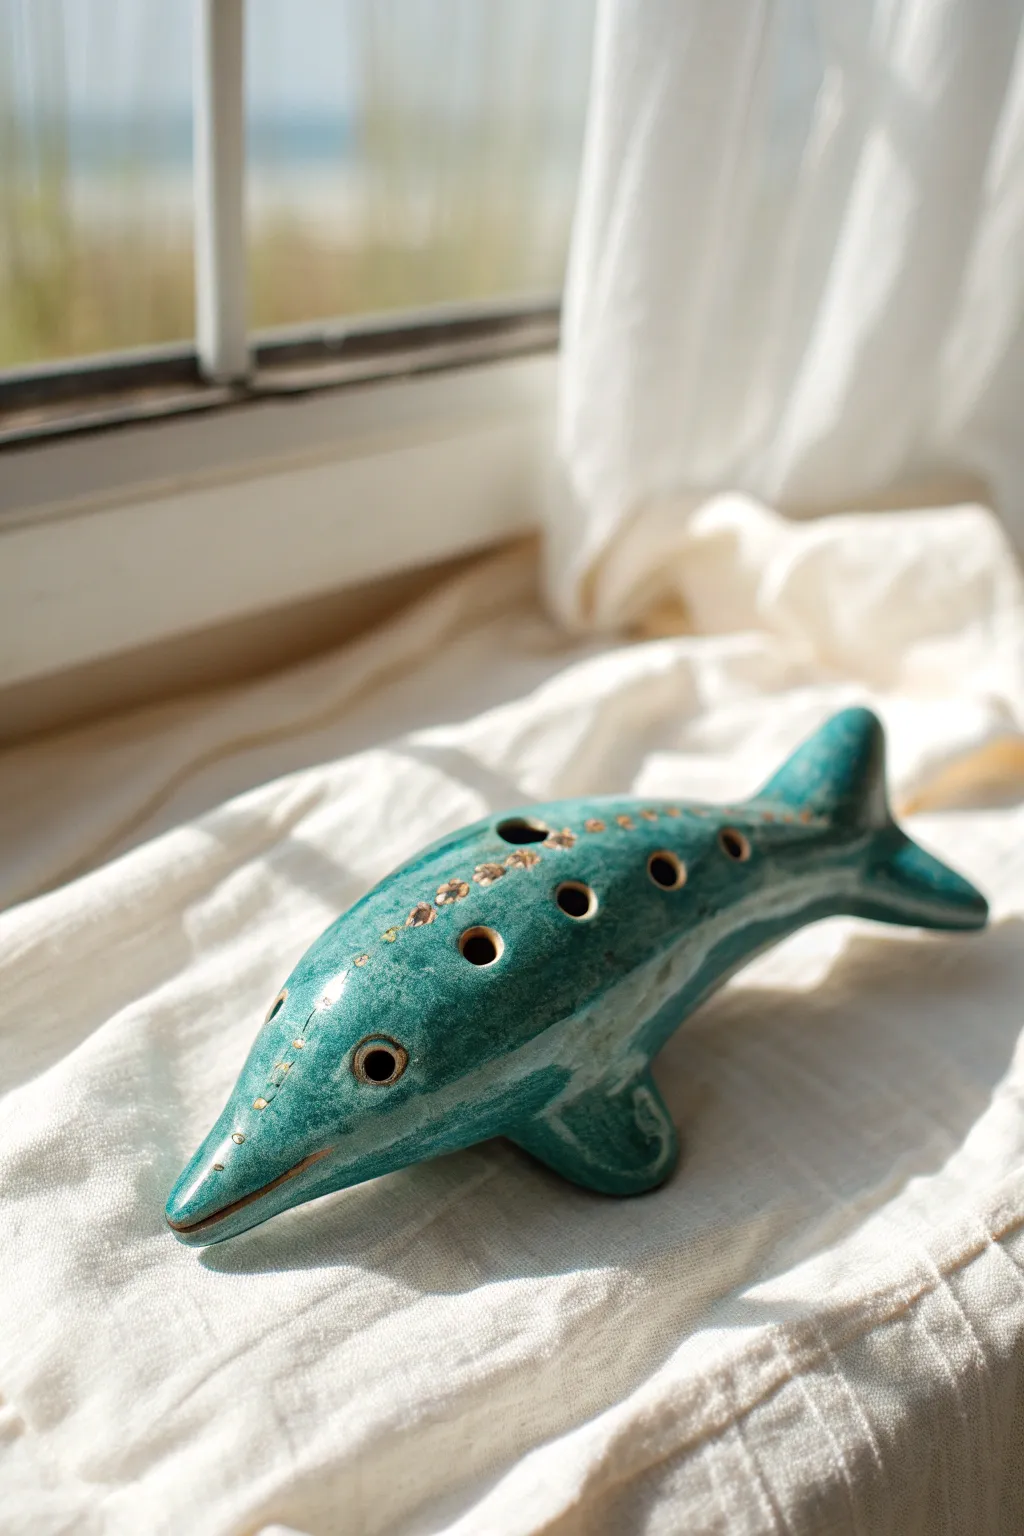
Capture the spirit of the ocean with this charming dolphin-shaped ocarina, finished in a deep teal glaze with delicate golden accents. This project combines sculptural hand-building with the precision mechanics needed to create a functional musical instrument.
Step-by-Step Tutorial
Materials
- Low-fire white earthenware clay
- Popsicle stick or flat sculpting tool
- Fettling knife
- Loop tool for hollowing
- Slip and scoring tool
- Small drill bits or hole cutter tools (approx 3/8 inch)
- Ocarina voicing tool (rectangular brass tube or flattened stick)
- Teal celadon or transparent colored glaze
- Gold luster or gold acrylic paint (for non-fired decoration)
- Sponge and water
- Kiln (if firing)
Step 1: Sculpting the Form
-
Form the body:
Start with a ball of clay about the size of a large orange. Roll it into a smooth, elongated teardrop shape, slightly thicker at one end for the head and tapering down for the tail. -
Define the snout:
Gently pinch and pull the wider end to create a distinct, slightly upturned snout for the dolphin’s nose. Smooth the transition so it looks organic. -
Split and hollow:
Once the clay is leather-hard, carefully slice the dolphin in half horizontally with a fettling knife. Use a loop tool to hollow out both halves, leaving walls about 1/4 inch thick throughout. -
Rejoin the halves:
Score the edges of both hollowed halves and apply slip. Press them firmly back together to seal the air chamber inside. Smooth the seam completely on the outside so it disappears. -
Add fins and tail:
Fashion small triangular slabs of clay for the dorsal fin and two pectoral fins. Score and slip to attach them. Flatten the tail end horizontally and shape it into flukes.
Silent Dolphin?
If you get only rushing air and no whistle, the splitting edge (labium) is likely dull or misaligned. Re-sharpen the bevel and ensure the airway aims exactly at the edge, not above or below it.
Step 2: Creating the Sound
-
Cut the mouthpiece:
Decide if you want a tail-blown or side-blown instrument. For this shape, create a rectangular airway slot near the tail or under the belly, inserting your voicing stick straight into the air chamber. -
Create the fipple:
Where the airway stick enters the chamber, cut a small square window (the sound hole) on the underside. I usually bevel the edge of this window at a sharp 45-degree angle—this ‘labium’ splits the air to make sound. -
Test the whistle:
Before adding finger holes, blow gently into the mouthpiece. If it doesn’t whistle, adjust the sharpness of the bevel or the angle of the airway stick until you get a clear tone. -
Drill finger holes:
carefully drill four to six holes along the top ridge of the dolphin’s back. Start small; larger holes create higher pitches. Ensure the shavings don’t fall back inside the chamber. -
Sculpt the eyes:
Add small clay rings for the eyes on either side of the head, blending the edges smooth so they look integrated into the face.
Step 3: Glazing and Finishing
-
Bisque fire:
Allow the dolphin to dry completely slowly over several days to prevent cracking. Fire it to cone 04 (or your clay’s specified bisque temperature). -
Apply teal glaze:
Brush or dip the bisqued ocarina in a vibrant teal or sea-green glaze. A semi-transparent glaze works beautifully here as it pools in the crevices around the fins and eyes, highlighting the details. -
Clear the airway:
Before the glaze dries, double-check that no glaze has clogged the airway or the sharp bevel edge of the sound hole, as this will ruin the sound. -
Glaze fire:
Fire the piece again to the glaze’s maturity temperature, often cone 05 or 06 for earthenware. -
Add gold accents:
For the finishing touch seen in the image, use a gold luster (requires a third, low-temp firing) or a high-quality gold enamel paint to add small dots along the spine and highlight the eyes.
Tuning Trick
While the clay is soft, use a digital tuner app. Enlarge holes slowly to raise pitch. Remember, firing shrinks the clay, which will raise the overall pitch slightly, so tune a tiny bit flat.
Now you have a beautiful sea-inspired instrument ready to play a melody
Alligator Snout Mouthpiece Ocarina
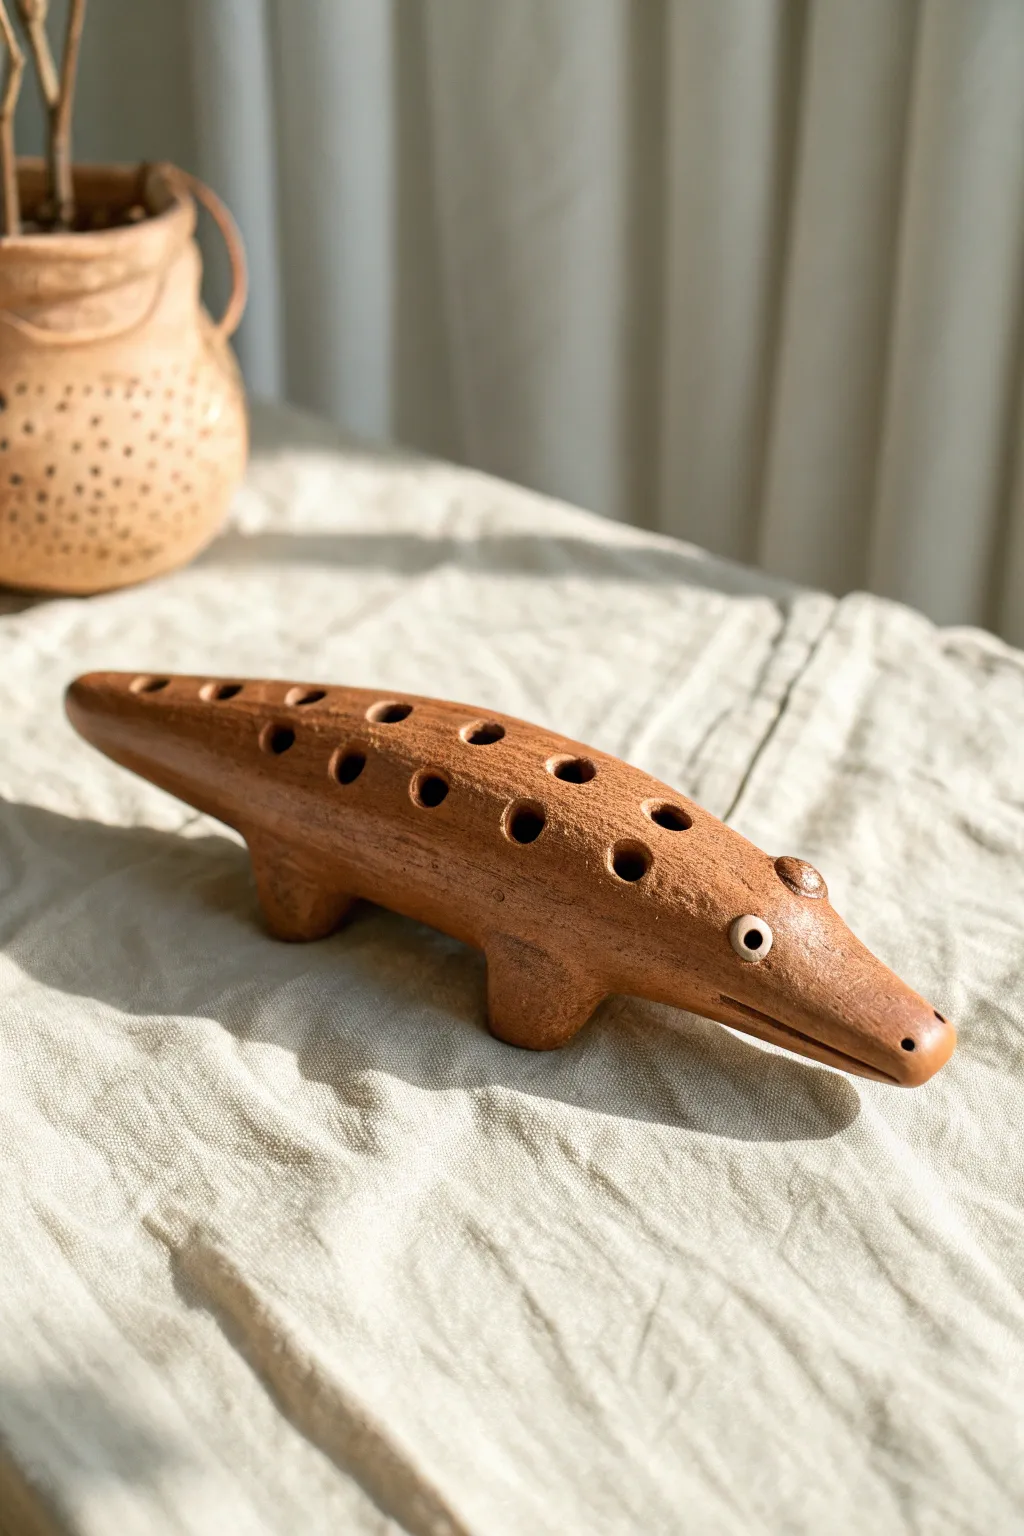
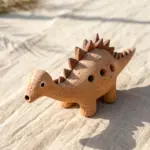
Transform a simple lump of clay into a charming, musical reptile with this alligator snout mouthpiece ocarina. This project results in a warm, terracotta-toned instrument that feels organic to hold and produces earthy, mellow tones.
How-To Guide
Materials
- Terracotta or earthenware clay
- Wooden sculpting tools (various shapes)
- Popsicle stick or flat fettling knife
- Small loop tool
- Drill bits or hole cutters (various sizes)
- Sponge and water
- Slip (clay mixed with water)
- Scoring tool or needle tool
Step 1: Forming the Body
-
Establish the Basic Shape:
Start with a solid, evenly wedged block of clay. Roll it into a thick, elongated log that tapers significantly at one end for the tail and slightly less at the other for the head. -
Curving the Spine:
Gently bend the log to give the alligator a subtle, organic curve along its back. This slight arch not only looks natural but gives your hands a comfortable place to rest while playing. -
Hollow the Form:
Carefully slice the alligator in half horizontally with a wire cutter. Use a loop tool to hollow out both halves evenly, leaving the walls about 1/4 inch thick. Leave the snout area solid for now to carve the mouthpiece later. -
Reassemble the Halves:
Score the edges of both hollowed halves and apply slip generously. Press them back together firmly, smoothing the seam on the outside until it is invisible. Compress the clay well to prevent cracking.
Airy or Weak Sound?
If the whistle is breathy, the splitting edge (labium) is likely blunt or misaligned. Sharpen it carefully and ensure it lines up perfectly with the windway.
Step 2: Creating the Mouthpiece & Voicing
-
Create the Windway:
Insert a flat popsicle stick or a specialized vomiting stick into the alligator’s snout. Push it straight back towards the hollow chamber to create a rectangular channel. -
Cut the Window:
On the underside of the snout (the alligator’s jaw area), carefully cut a small square hole—the ‘window’—that intersects with your windway channel. This requires precision. -
Refine the Labium:
Using a sharp tool, angle the back edge of the window (the edge closest to the body) to create a sharp splitting edge or ‘labium.’ This edge must splits the air stream cleanly to produce sound. -
Test the Sound:
Before moving on, blow gently through the snout. If you don’t hear a clear whistle, adjust the angle of the labium or clear any debris from the windway.
Step 3: Sculpting Details & Tuning
-
Add the Legs:
Roll four small, sturdy cylinders of clay. Score and slip them onto the belly of the alligator as feet. Flatten the bottoms slightly so the instrument stands stable on a table. -
Sculpt the Face:
Add small balls of clay for the eyes, pressing a hollow center into each for pupils. Use a needle tool to create small nostril indentations at the very tip of the snout. -
Drill Finger Holes:
Using hole cutters or drill bits, create a series of holes along the alligator’s back. I start with smaller holes and enlarge them slowly while checking the pitch with a tuner. -
Create Texture:
For the scaly texture seen in the reference, use the rounded end of a small tool to press subtle indentations along the spine, avoiding the finger holes. -
Smooth the Surface:
Wipe the entire piece down with a slightly damp sponge to remove sharp burrs and smooth the transition areas around the legs and eyes. -
Dry Slowly:
Cover the ocarina loosely with plastic to let it dry very slowly over several days. This prevents warping that could ruin the sound quality. -
Bisque Fire:
Fire the piece in a kiln to the appropriate temperature for your specific clay body (usually Cone 04-06 for terracotta). -
Listen to the result:
Once cool, your unglazed terracotta alligator is ready to play. The porous clay absorbs moisture, making it a joy to play for extended periods.
Burnished Finish
Before firing, rub the leather-hard clay with the back of a spoon. This compresses the surface, creating a smooth, naturally shiny finish without glaze.
Enjoy the deep, primitive sound of your new swamp-dwelling friend


What Really Happens Inside the Kiln
Learn how time and temperature work together inside the kiln to transform clay into durable ceramic.
Ladybug Dot Hole Ocarina
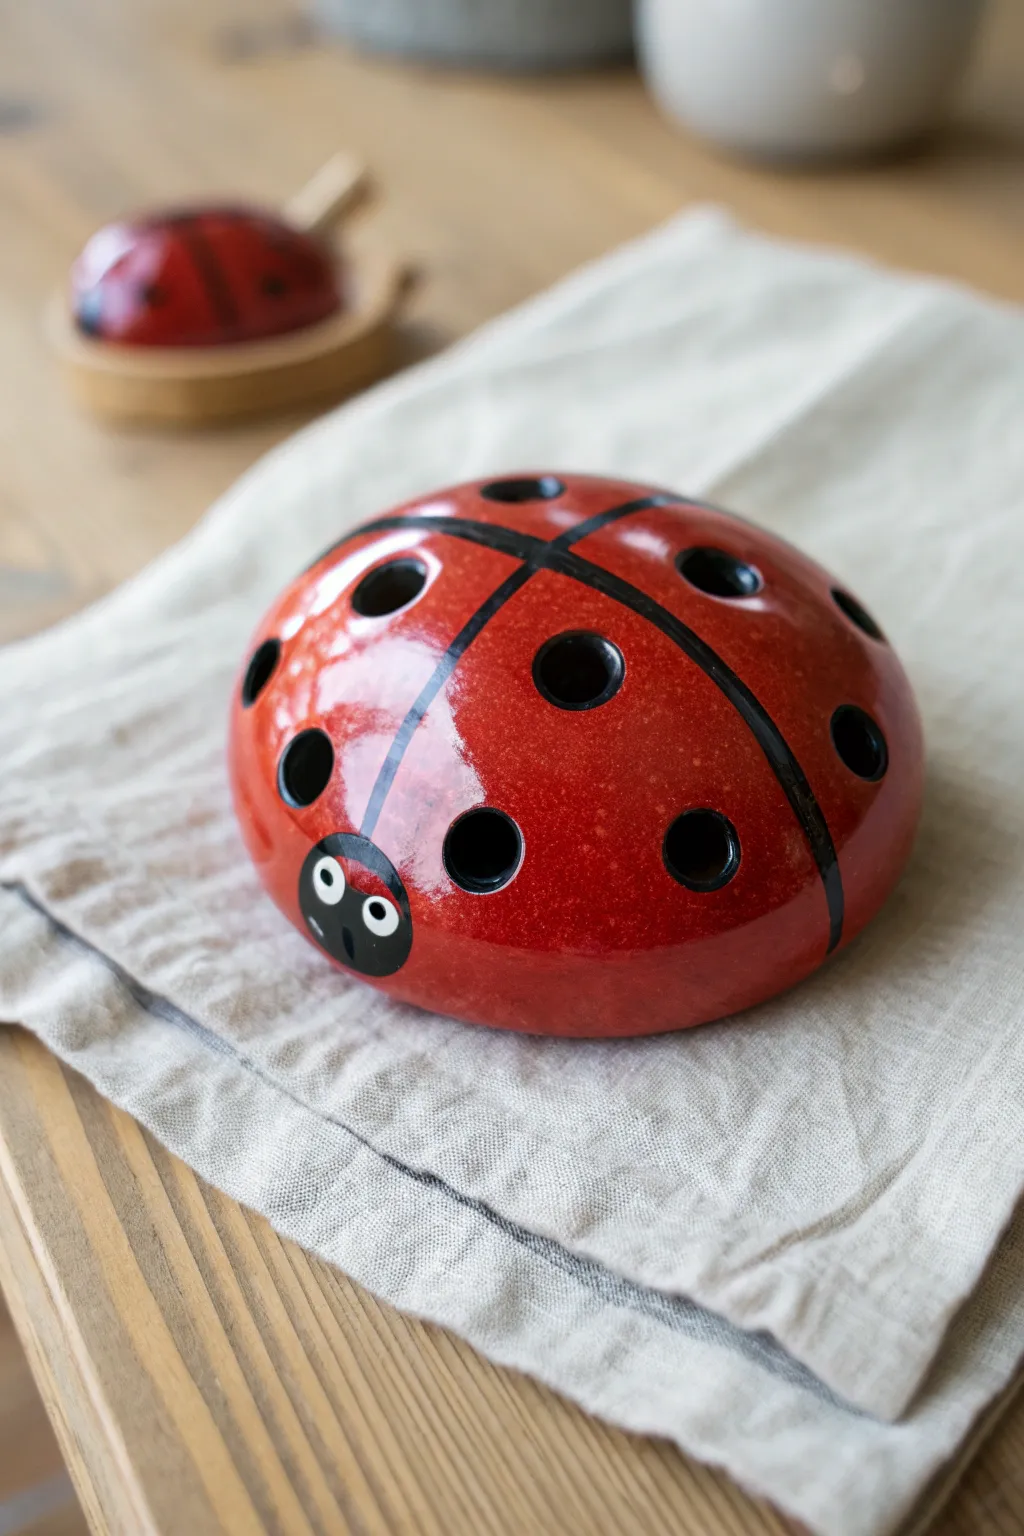
Transform a simple pinch pot into a delightful musical instrument with this ladybug ocarina project. Its vibrant red glaze, contrasting black details, and playful spotted design make it as charming to look at as it is fun to play.
Detailed Instructions
Materials
- Earthenware or stoneware clay (low-fire recommended)
- Pinch pot tools (ribs, sponge)
- Fettling knife
- Popsicle stick or wooden modeling tool (beveled edge)
- Drill bits or hole cutter tools (various sizes)
- Underglaze (bright red, black, white)
- Clear glaze
- Small paintbrushes
- Kiln access
Step 1: Forming the Body
-
Create a clay ball:
Start with a lump of clay about the size of a tennis ball. Roll it firmly in your hands or on a canvas surface until you have a smooth, crack-free sphere. -
Pinch the pot:
Insert your thumb into the center of the ball and gently pinch the walls while rotating the clay. Aim for an even thickness of about 1/4 inch all around without making the opening too wide. -
Close the form:
Slowly collar the rim of the pinch pot inwards until the opening closes completely. Trap the air inside, which will support the shape as you work. -
Shape the dome:
Gently paddle the closed hollow ball on your work surface to flatten the bottom. Use a flexible rib to smooth the top into a perfect, rounded dome shape reminiscent of a beetle.
Lost Your Tune?
If the whistle stops working after glazing, glaze likely clogged the airway. Use a pipe cleaner to carefully clear the windway before firing.
Step 2: Creating the Sound Mechanism
-
Form the mouthpiece:
Add a small, rectangular tab of clay to one side of the dome for the mouthpiece. Blend it seamlessly into the body so it looks like a natural extension. -
Cut the airway:
Insert a flat popsicle stick through the mouthpiece tab to create the windway. Carefully cut a square window on the underside of the ocarina body where the stick ends. -
Refine the fipple:
Using a bevel-edged tool, sharpen the edge of the window (the splitting edge) so it splits the air stream. This is the most critical part for sound; test by blowing gently until you get a clear whistle. -
Tune the instrument:
Once the whistle works, use your hole cutters to create the fingering holes. Start with smaller holes and enlarge them slowly to tune the notes. Unlike the reference image where the dots are open, these holes will be functional.
Garden Variation
For a ‘Level Up,’ make a leaf-shaped stand for your ocarina. Use green glaze and carve veins into a slab of clay for a perfect display base.
Step 3: Sculpting Details
-
Define the head:
Since the mouthpiece is usually at the back or side, choose the opposite end for the ladybug’s face. Using a modeling tool, slightly depress an area to suggest the separation between the head and wings. -
Add decorative holes:
This specific design features large, distinct black ‘spots’ that look like holes. Use a large hole cutter to remove clay for these aesthetic spots, but be careful not to ruin the acoustic chamber if they aren’t meant to be finger holes. If you want it exactly like the photo, these large holes might be purely decorative on a non-functional vessel, but for an ocarina, treat these as your tuning holes. -
Smooth the surface:
Use a slightly damp sponge to wipe down the entire piece, removing any harsh burrs from the hole cutting and ensuring the surface is ready for glazing.
Step 4: Glazing and Finishing
-
Bisque fire:
Allow the ladybug to dry slowly under plastic to prevent warping, then bisque fire it according to your clay body’s specifications. -
Apply base color:
Brush three coats of bright red underglaze over the entire top surface of the shell. I prefer to leave the bottom unglazed or use stilts so it doesn’t stick to the kiln shelf. -
Paint the lines:
With a fine liner brush and black underglaze, paint a straight line down the center of the back to divide the wings. -
Detail the head:
Paint a curved black semi-circle at the front for the head. Add the eyes by painting small white circles, letting them dry, and dotting black pupils in the center. -
Update the spots:
If you drilled actual holes, paint the inner rims black to emphasize depth. If you didn’t drill holes, paint large solid black circles to mimic the craters shown in the image. -
Clear coat and fire:
Once the underglaze is dry, apply a coat of clear glaze over the entire piece to give it that glossy, hard shell finish. Fire for the final time.
Enjoy the sweet, earthy tunes from your little garden friend
Owl Face Ocarina
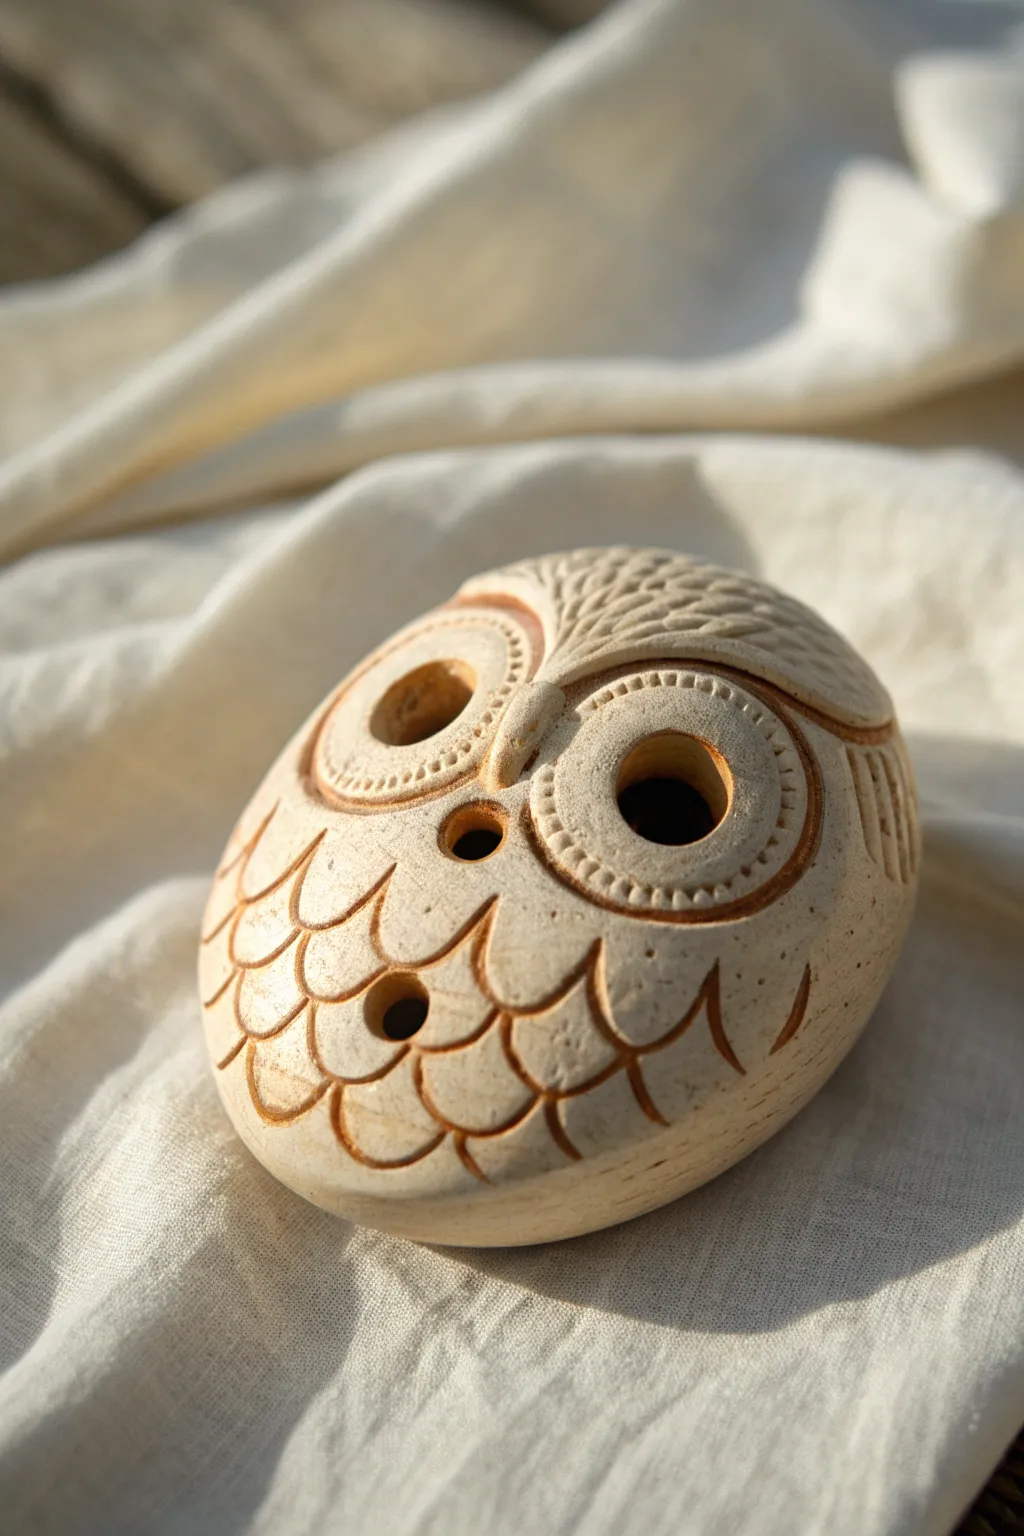
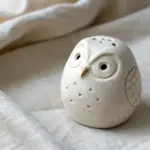
Sculpt a charming, pocket-sized musical companion with this owl face ocarina tutorial. The light, creamy clay body features intricately carved feathers and large, expressive eyes that double as part of the sound mechanism.
Step-by-Step Tutorial
Materials
- Light-colored stoneware or polymer clay (oven-bake)
- Popsicle stick or flat sculpting tool used as a voicing blade
- Loop tool for hollowing (if using solid clay method)
- Needle tool or toothpick
- Ball stylus tool
- Smoothing sponge
- Fine grit sandpaper
- Small drill bit or straw (for finger holes)
Step 1: Forming the Sound Body
-
Shape the Base:
Begin with a ball of clay roughly the size of a tangerine. Gently flatten and stretch it into a rounded oval shape, resembling a smooth river stone. This will be the main body of your owl. -
Hollow or Pinch:
If working with solid clay, cut the oval in half, hollow out the inside with a loop tool until walls are roughly 1/4 inch thick, and score/slip to rejoin. Alternatively, use the pinch pot method to create a single hollow chamber. -
Refine the Surface:
Use a damp sponge or your fingers to smooth out the seam completely. The owl’s face needs a flawless, convex canvas, so take your time erasing any bumps or join marks. -
Create the Airway:
Form a rectangular mouthpiece at the bottom edge. Insert your voicing stick (popsicle stick) horizontally into the clay to create the windway. Carefully carve a square or rectangular window (the fipple) on the underside, angling the inner edge sharp like a ramp to split the air. -
Test the Sound:
Before adding decorative details, blow gently into the mouthpiece. Adjust the angle of the ramp until you get a clear, whistle-like tone. This is the most crucial mechanical step.
Step 2: Sculpting the Owl Features
-
Draft the Eyes:
Lightly sketch two large circles using a needle tool on the upper half of the ocarina face. These should be prominent and symmetrical. -
Add Dimension:
Roll two thin coils of clay and attach them over your sketched circles to form the raised rims of the eyes. Blend the outer edges into the face but keep the inner edges distinct. -
Detail the Irises:
Press a smaller circle indentation inside the rims using a tool handle or cap. I like to then use a needle tool to add tiny, radiating hash marks around this inner ring for texture. -
Carve the Pupil Holes:
Carefully punch a hole in the center of the right eye—this serves as one of the sound holes. Do the same for the left eye if your tuning requires it, or simply recess it deeply for a dark, shadow-filled look. -
Form the Beak:
Add a small, teardrop-shaped piece of clay between the eyes. Smooth it down so it flows naturally from the forehead but protrudes slightly at the tip. -
Add the Third Hole:
Place a small finger hole directly beneath the beak, centered in the forehead area. Ensure the edges are clean and smooth for comfortable playing.
Clear Whistle Tip
Keep the ‘ramp’ edge of the whistle window incredibly sharp and clean. Even a tiny burr of clay here can make the sound airy or mute it entirely.
Step 3: Texturing the Plumage
-
Outline the Forehead:
Carve a gentle, curving line above the eyes to separate the face mask from the top heat feathers. This creates a brow-like structure. -
Feather the Crown:
On the top section (the forehead), use a small loop tool or V-gouge to carve repeating ‘U’ shapes or dashes, creating a dense, fluffy texture. -
Create Chest Feathers:
Below the eyes and beak, carve larger, overlapping scallop shapes. Press deeper at the top of each curve and shallower at the bottom to simulate layerd feathers. -
Add Side Details:
On the sides of the ocarina, carve long, vertical lines to suggest the wing feathers tucked against the body. -
Refine and Clean:
Go over your carvings with a soft brush to remove clay crumbs. Check that no debris has fallen into the heavy sculpted areas or, more importantly, the air window. -
Final Surface Check:
Use a slightly damp finger to smooth any sharp burrs created by the carving tools, softening the look to resemble the referenced ceramic finish. -
Dry and Fire:
Allow the clay to dry slowly (if ceramic) or bake according to package instructions (if polymer). If firing ceramic, a clear matte glaze or a light brown wash before firing can enhance the carved textures.
Antique Wash Effect
After baking/firing, rub diluted brown acrylic paint over the piece and wipe it off quickly. The dark paint stays in the grooves, making the feathers pop.
Once fired and cooled, your earthy owl is ready to play its first hooting tune

TRACK YOUR CERAMIC JOURNEY
Capture glaze tests, firing details, and creative progress—all in one simple printable. Make your projects easier to repeat and improve.
Dragon Egg Scale Ocarina
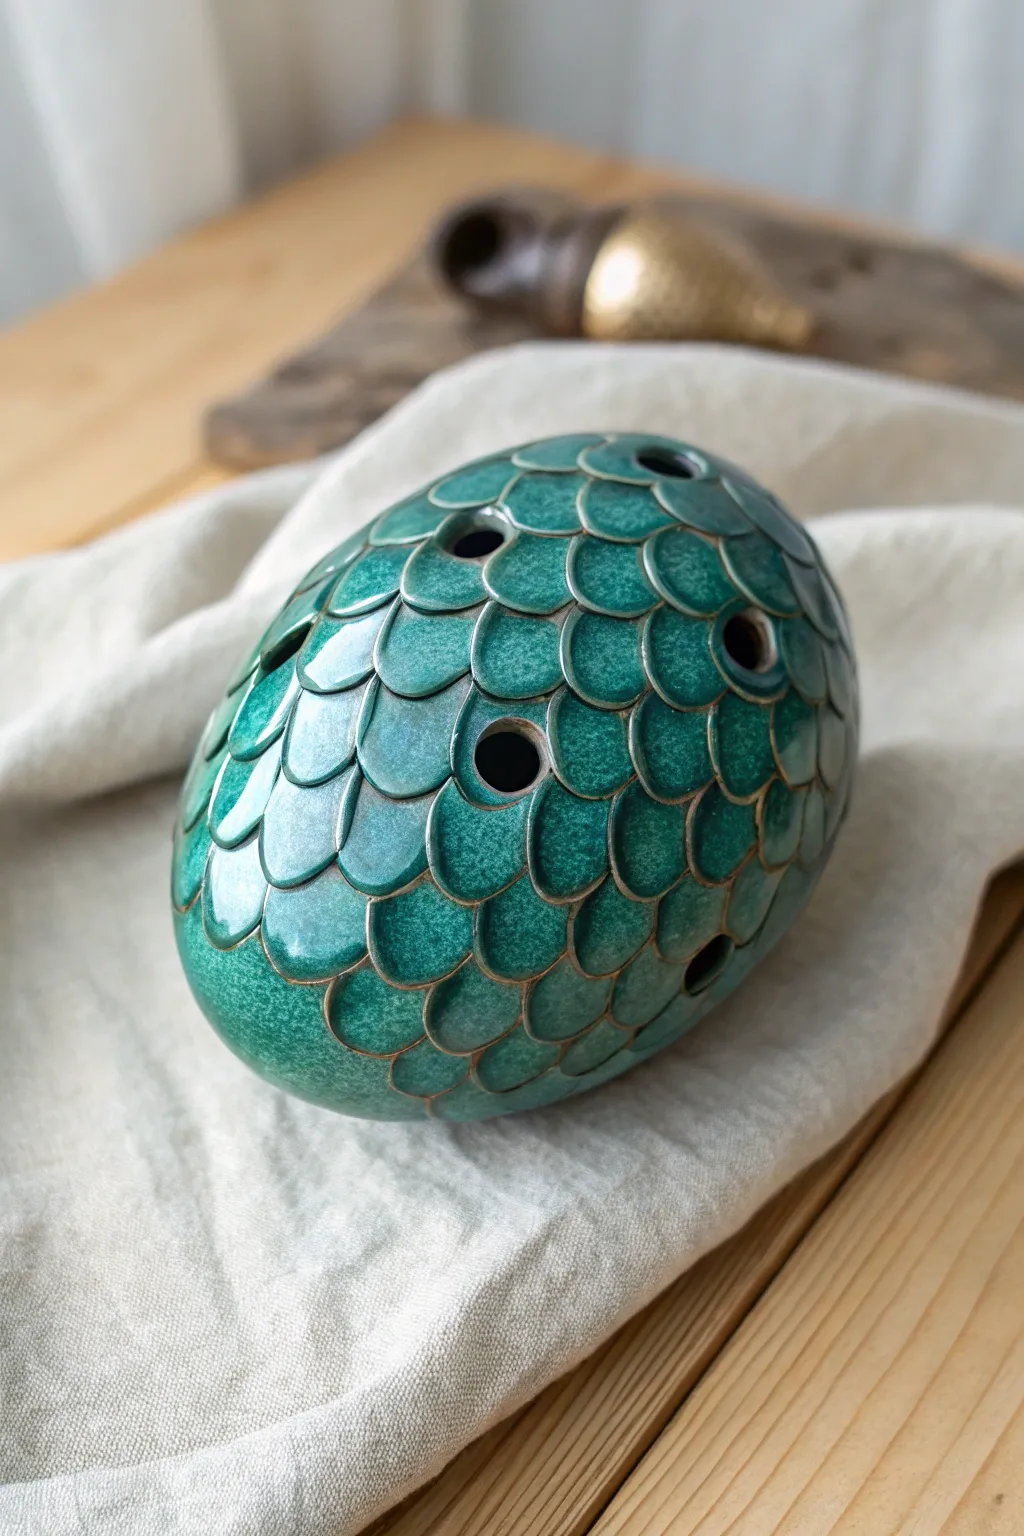
This project transforms a simple vessel flute into a mythical artifact with a stunning overlapping scale texture. The deep teal glaze breaks beautifully over the relief, giving it an ancient, magical appearance perfect for fantasy lovers.
Step-by-Step Guide
Materials
- Stoneware clay (smooth body)
- Ocarina voicing tool (smooth popsicle stick or specialized tool)
- Needle tool
- Loop tool for hollowing (if using solid construction)
- Small round cutter or specialized scale tool
- Slip and scoring tool
- Drill bits or hole cutters (assorted sizes)
- Teal/Turquoise breaking glaze
- Sponge
- Kiln
Step 1: Forming the Egg Base
-
Prepare the Clay:
Start by wedging a pound of smooth stoneware clay thoroughly to remove any air bubbles. Form it into a rough ball in your hands. -
Pinch Pot Construction:
Divide the clay into two equal halves. Create two pinch pots by pressing your thumb into the center and pinching walls of even thickness, aiming for an egg-like curve on both. -
Join the Halves:
Score the rims of both pinch pots and apply slip aggressively. Press them together firmly to form a hollow enclosed egg shape. -
Refine the Shape:
Gently paddle the joined form with a wooden paddle or your hands to smooth the seam completely and perfect the oval, egg-like silhouette. The walls should be firm but not dry. -
Create the Mouthpiece:
Form a small rectangle of clay for the mouthpiece. Attach it to one narrower end of the egg, blending the clay seamlessly so it looks like a natural extension of the form.
Airway clogged?
If the whistle sounds breathy after glazing, glaze may be thick in the windway. Use a small twisted piece of sandpaper to gently clear the airway after firing.
Step 2: Voicing and Tuning
-
Cut the Airway:
Carefully insert your voicing tool into the mouthpiece to create the windway. Cut the window (the square opening) on the underside of the egg where the windway exits. -
Shape the Labium:
Refine the edge of the window (the labium) until it is sharp and splits the air stream perfectly. Test the sound frequently; you want a clear, clean whistle before proceeding. -
Drill Finger Holes:
Once the whistle is working, decide on your tuning system (e.g., 4-hole, 6-hole). Using hole cutters, carefully punch the finger holes. Support the wall from the outside to prevent collapsing.
Pro Tip: Texturing scales
Instead of adding clay scales, try carving them directly into leather-hard clay with a U-gouge tool for a ‘negative’ scale texture that’s lighter to hold.
Step 3: Sculpting the Scales
-
Map the Pattern:
Lightly sketch a few guide lines around the egg to ensure your rows of scales stay relatively straight. I find starting from the bottom and working up yields the best layering effect. -
Form Individual Scales:
Roll many small balls of clay and flatten them into teardrop or shield shapes. Keep them consistent in size but allow slight organic variation. -
Apply the Base Layer:
Score and slip the bottom of the egg. Attach the first row of scales, pressing the top edge of each scale firmly into the body while leaving the bottom edge slightly lifted for texture. -
Layer Upwards:
Continue adding rows of scales, overlapping the previous row like roof shingles. Ensure you offset them (brick-pattern) to cover the gaps. -
Navigate the Holes:
When you reach a finger hole, carefully trim the scales to fit around the circumference. You can smooth the clay of the scale down into the hole slightly for a polished rim. -
Finish the Top:
As you reach the top of the egg, gradually reduce the size of the scales so they converge neatly at the apex. -
Refine Edges:
Once all scales are applied, go back with a modeling tool or damp brush to smooth any harsh attachment marks, ensuring the ‘free’ edge of each scale is clean and defined.
Step 4: Glazing and Firing
-
Bisque Fire:
Allow the ocarina to dry slowly to prevent cracking. Fire it to bisque temperature (usually cone 04) once bone dry. -
Apply Glaze:
Select a breaking teal or turquoise glaze. These glazes pool in the recesses (darker) and thin out on the raised edges (lighter), accentuating the scale texture perfectly. -
Wipe the Holes:
After dipping or brushing the glaze, meticulously clean out any glaze that has dripped into the finger holes or the windway. A clogged airway will ruin the sound. -
Glaze Fire:
Fire the piece to the maturity temperature of your clay and glaze (e.g., cone 5/6). Stilt the ocarina in the kiln so the glazed bottom doesn’t stick to the shelf.
Hold your finished dragon egg and play a tune to test its magical resonance.
Mushroom Cap Ocarina
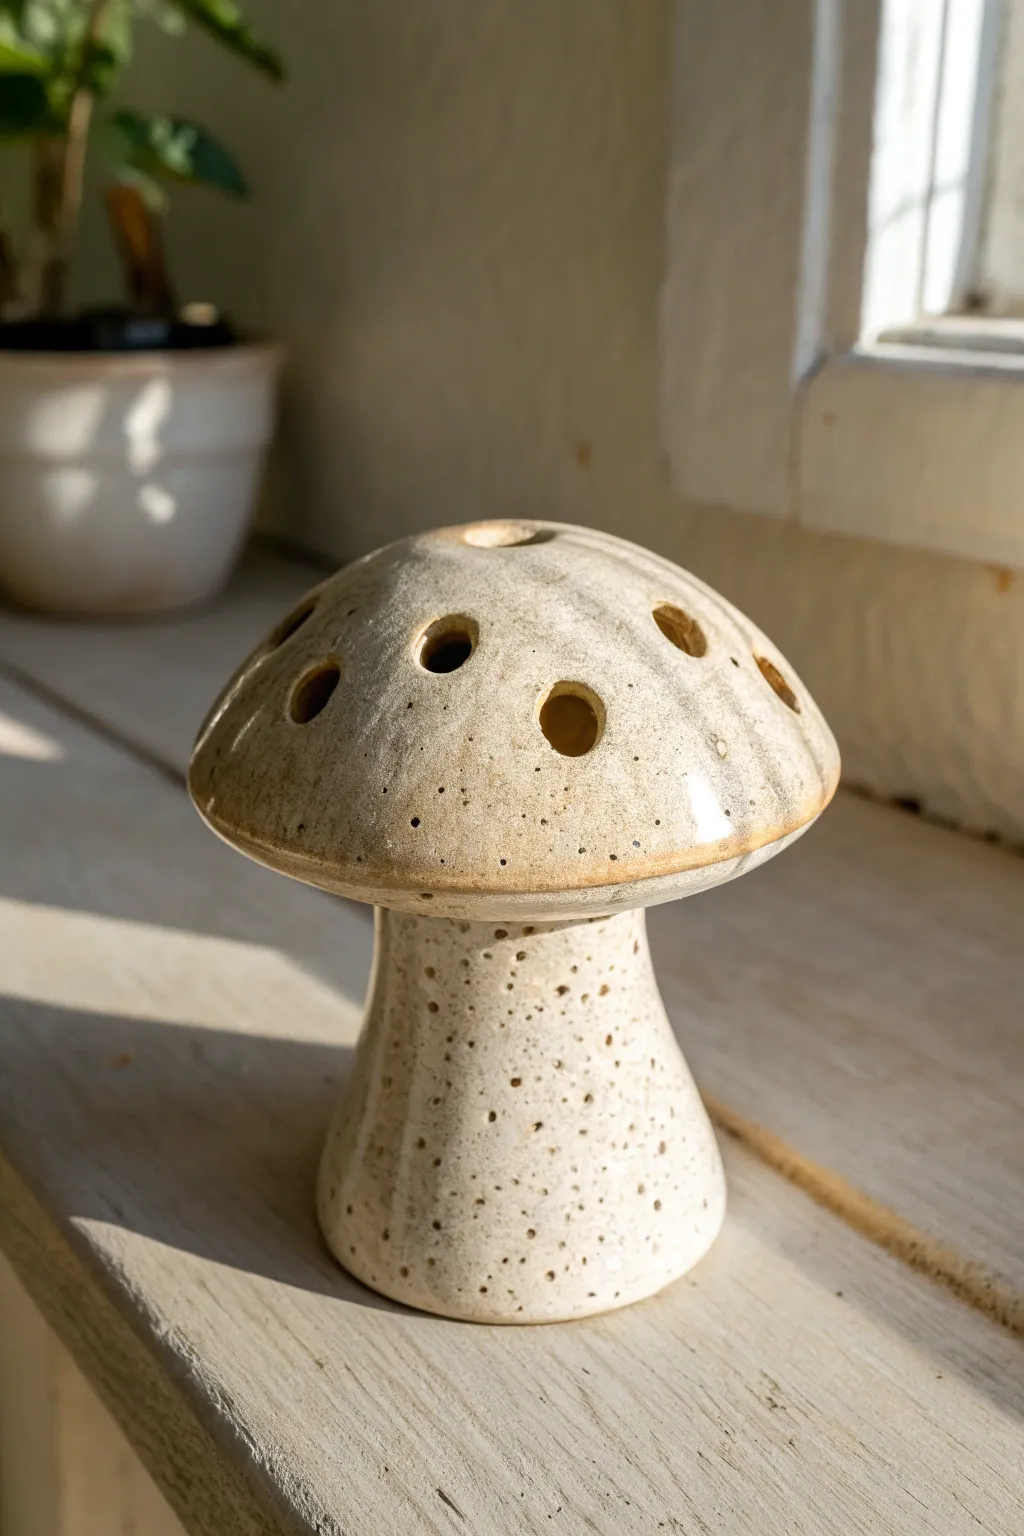
This charming project disguises a functional musical instrument as an earthy, speckled mushroom sculpture perfect for a woodland vignette. The finished piece features a rounded cap with finger holes that double as natural spots, resting on a sturdy, flared stem with a lovely stoneware finish.
Step-by-Step Tutorial
Materials
- Stoneware clay (medium grog)
- Small wooden sculpting tools (spoon or loop tool)
- Needle tool
- Fettling knife
- Popsicle stick or specialized voicing tool
- Drill bits or hole punch set (various sizes)
- Slip and scoring tool
- Sponge
- Speckled oatmeal or cream glaze (stoneware)
- Kiln
Step 1: Forming the Body
-
Pinch the cap:
Begin with a ball of clay roughly the size of a tennis ball. Insert your thumb and start pinching the walls to create a hollow hemisphere. Aim for a consistent wall thickness of about 1/4 inch, smoothing the curve so it resembles a classic mushroom cap. -
Create the stem base:
Roll a thick coil of clay into a cylinder that flares slightly at the bottom for stability. This needs to be hollow as well, but leave the top edge open to connect to the cap later. -
Close the form:
Before attaching the stem, you need to turn the cap into a closed vessel for the air chamber. Roll a slab of clay, score and apply slip to the rim of your pinched cap, and attach the slab. Trim the excess clay flush with the sides. -
Smooth into a dome:
Gently paddle or smooth the sealed cap until the bottom is flat and the top is perfectly domed. This sealed hollow shape is the resonator for your ocarina. -
Attach the stem:
Score and slip the top of your hollow stem and the bottom center of the sealed cap. Press them firmly together. Use a small coil to reinforce the seam where the stem meets the cap, blending the clay until the transition is seamless.
Step 2: Voicing the Instrument
-
Cut the airway:
This is the most critical step. On the underside of the cap (near the stem joint), create a rectangular airway using a popsicle stick or voicing tool. The air needs to split against a sharp edge to create sound. -
Create the fipple:
Carefully cut a bevel into the clay body directly opposite your airway exit. This sharp edge, or ‘labium,’ splits the air stream. I find it helpful to constantly check alignment by blowing gently through the airway; you should hear a whistle. -
Tune the holes:
Once you have a clear whistle, begin adding finger holes to the top of the mushroom cap. Start with small holes using a needle tool or small drill bit. Test the sound after each hole is pierced. -
Enlarge for pitch:
Slowly enlarge the holes to reach specific notes if you are tuning to a scale. Notice in the example image how the holes vary in size; larger holes produce higher pitches. Position them ergonomically where your fingers naturally rest. -
Clean the internals:
Ensure no clay crumbs are stuck inside the chamber, as these will ruin the sound. Shake them out or use a small loop tool to clean up the interior edges of the holes.
Clearer Sound Tip
Keep the ‘labium’ (the splitting edge) extremely sharp and clean. A dull edge creates a breathy sound. Burnish this specific edge with a plastic bag while leather hard for crisp notes.
Step 3: Texture and Glazing
-
Refine the surface:
Once the clay is leather hard, use a slightly damp sponge to smooth the entire surface. Pay special attention to the rim of the cap and the flare of the stem. -
Bisque fire:
Allow the mushroom to bone dry completely (usually 3-5 days depending on humidity) before seeking a slow bisque fire to cone 04. -
Apply glaze:
Select a speckled cream or oatmeal stoneware glaze. Dip the entire piece or brush on 2-3 even coats, ensuring you don’t clog the airway or finger holes with thick glaze. -
Wipe the holes:
Immediately use a small brush or twisted paper towel to clear any excess glaze from the finger hole rims and the critical sound hole area to ensure the instrument plays clearly after firing. -
Final fire:
Fire the piece to the temperature recommended for your specific clay and glaze combination (typically Cone 5 or 6 for stoneware). The heat will bring out the lovely iron speckles seen in the reference photo.
Lost the Whistle?
If the whistle stops working after adding finger holes, check for debris inside the airway. Sometimes a tiny crumb of clay blocks the airflow. Use a feather or needle to clear it.
Now you have a whimsical piece of ceramic art that brings a bit of musical magic to your garden or shelf.
Cactus Texture Ocarina
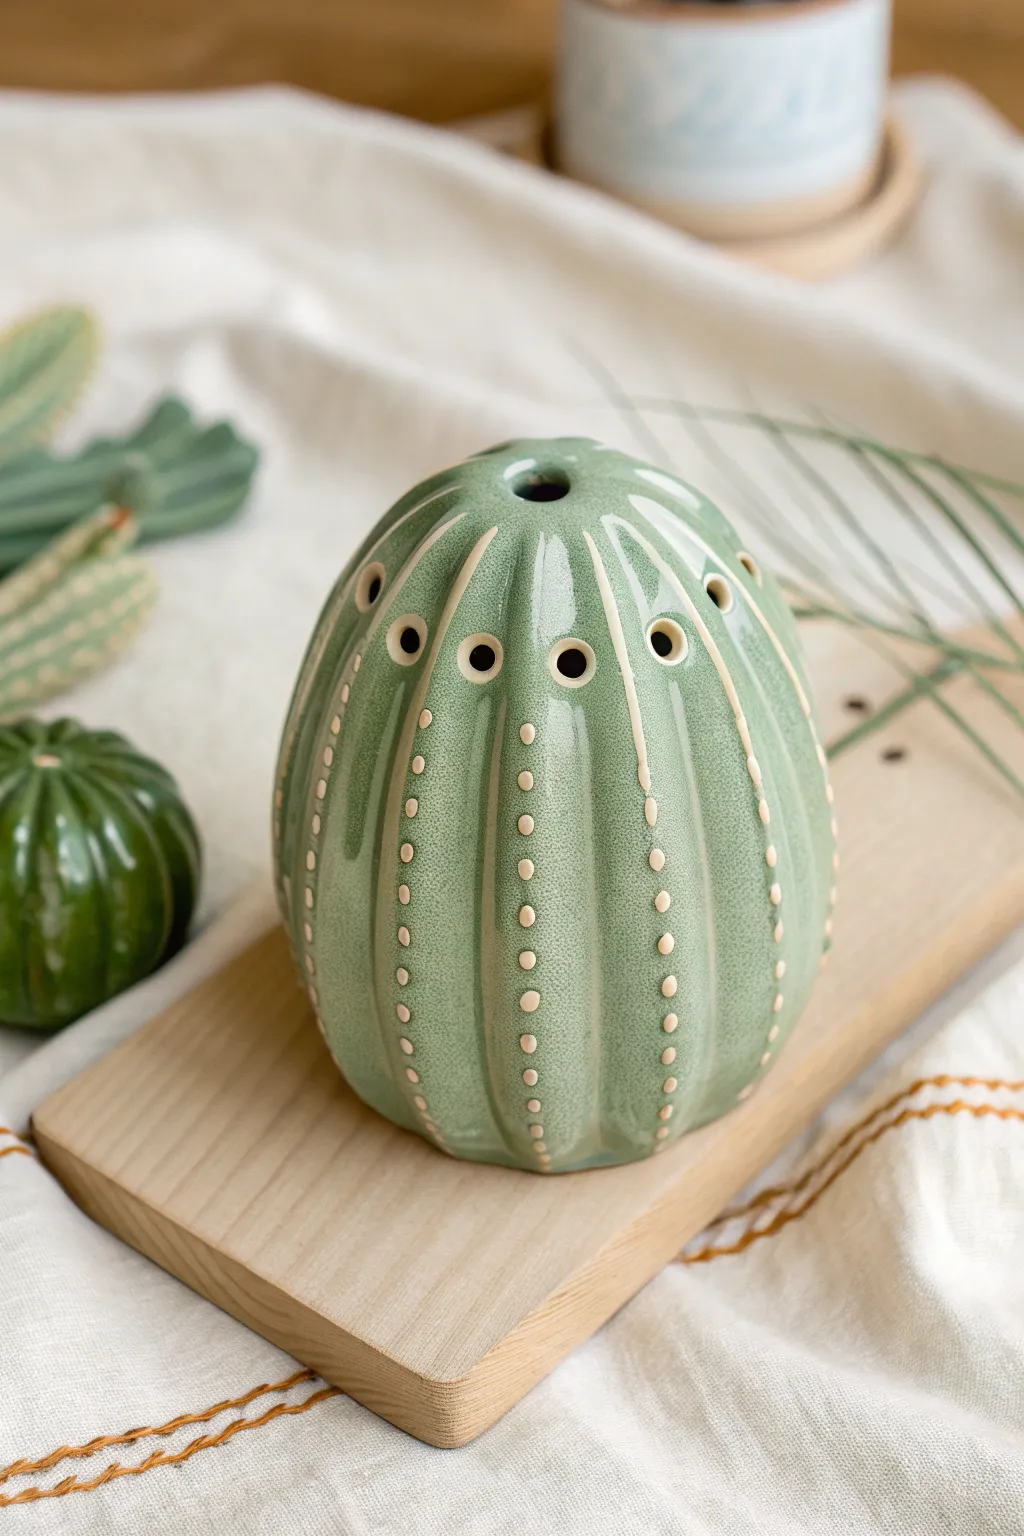
Bring desert charm to your clay creations with this delightful cactus-shaped ocarina. Featuring a smooth, celadon-green glaze and delicate raised ‘spines’ for grip and texture, this project combines instrument making with whimsical sculpting.
How-To Guide
Materials
- White stoneware or porcelain-style polymer clay
- Pottery tools (needle tool, modeling tool)
- Popsicle stick or wooden voicing tool
- Slip (clay and water mixture)
- Celadon green ceramic glaze
- Wax resist (for the dots)
- Small paintbrush
- Sponge
Step 1: Forming the Hollow Body
-
Preparation:
Start with a ball of well-wedged clay about the size of a large orange. Ensure there are no air bubbles, as these can ruin the sound chamber later. -
Pinch pot method:
Divide the clay into two equal halves. Using your thumbs, press into the center of each ball and pinch the walls evenly to create two matching bowl shapes. -
Join the halves:
Score the rims of both pinch pots with a needle tool and apply a liberal amount of slip. Press the halves together firmly to create a sealed hollow egg shape. -
Refine the shape:
Gently paddle or roll the joined sphere on a table to elongate it slightly into a cactus shape—wider at the bottom and slightly tapered at the top. Smooth over the seam completely until invisible.
Lost Your Sound?
If the whistle stops working after glazing, a droplet likely clogged the airway. Use a pipe cleaner to carefully swab the windway before firing.
Step 2: Creating the Sound Mechanism & Tuning
-
Cut the mouthpiece:
Decide where the top back of your cactus will be. Form a small rectangular protrusion for the mouthpiece, or simply flatten a small area at the top curve. -
Make the windway:
Carefully insert a flat popsicle stick or voicing tool horizontally into the flattened mouthpiece area to create the windway. It should aim towards the sharp edge we will cut next. -
Cut the voicing edge:
On the underside of the ocarina, below where your stick is inserted, cut a small square window. The edge of this window (the labium) must be split exactly in half by the airstream coming from the windway. -
Clean the airway:
Remove any burrs or crumbs of clay from inside the hole. Test the whistle repeatedly as you work; getting a clear tone now is crucial before adding details. -
Drill finger holes:
Using a hole cutter or drill bit, create four to six tuning holes on the front face of the cactus. Place them where your fingers naturally rest when holding the shape.
Desert Bloom
Make a small clay flower and attach it near the top hole. Glaze it pink or yellow to mimic a cactus bloom, adding a pop of contrasting color.
Step 3: Adding Cactus Textures
-
Carve ridges:
Using a modeling tool, gently press vertical indentations running from the top center down to the base. This creates the lobed look of a barrel cactus. -
Smooth the lobes:
Use a damp sponge to soften the edges of your indented lines, giving the cactus sections a puffy, organic appearance rather than sharp cuts. -
Create the spines:
Roll tiny, uniform balls of clay. Slip and score them onto the high points of your ridges in vertical rows. Alternately, use slip trailing to pipe raised dots directly onto the surface. -
Refine the holes:
The sculpting process might have distorted your finger holes. Go back and clean up the edges of each hole, ensuring they have a smooth, beveled rim for comfortable playing. -
Final drying:
Allow the clay to dry slowly under plastic to prevent cracking, especially around the delicate sounding mechanism.
Step 4: Glazing and Finishing
-
Bisque fire:
Fire the piece to cone 04 (or according to your clay body’s instructions) to harden it for glazing. -
Wax the spines:
Apply wax resist carefully to each raised spine dot. This prevents the glaze from adhering to them, leaving the raw, creamy clay body exposed against the green. -
Apply glaze:
Dip the entire ocarina into a translucent celadon green glaze. Pour the glaze out quickly from the inside so it doesn’t clog the whistle, but ensure the interior is coated. -
Clear the airway again:
Before the glaze dries, double-check that no glaze is blocking the windway or the voicing edge. I always keep a feather or thin tool handy to clear this critical area. -
Final wipe:
Wipe the bottom of the ocarina clean so it doesn’t stick to the kiln shelf. -
Glaze fire:
Fire the piece to the maturity temperature of your glaze (e.g., cone 5 or 6). Let it cool completely before playing.
Once fired, you will have a beautiful instrument that looks as lovely on a shelf as it sounds in your hands
Heart-Shaped Pocket Ocarina
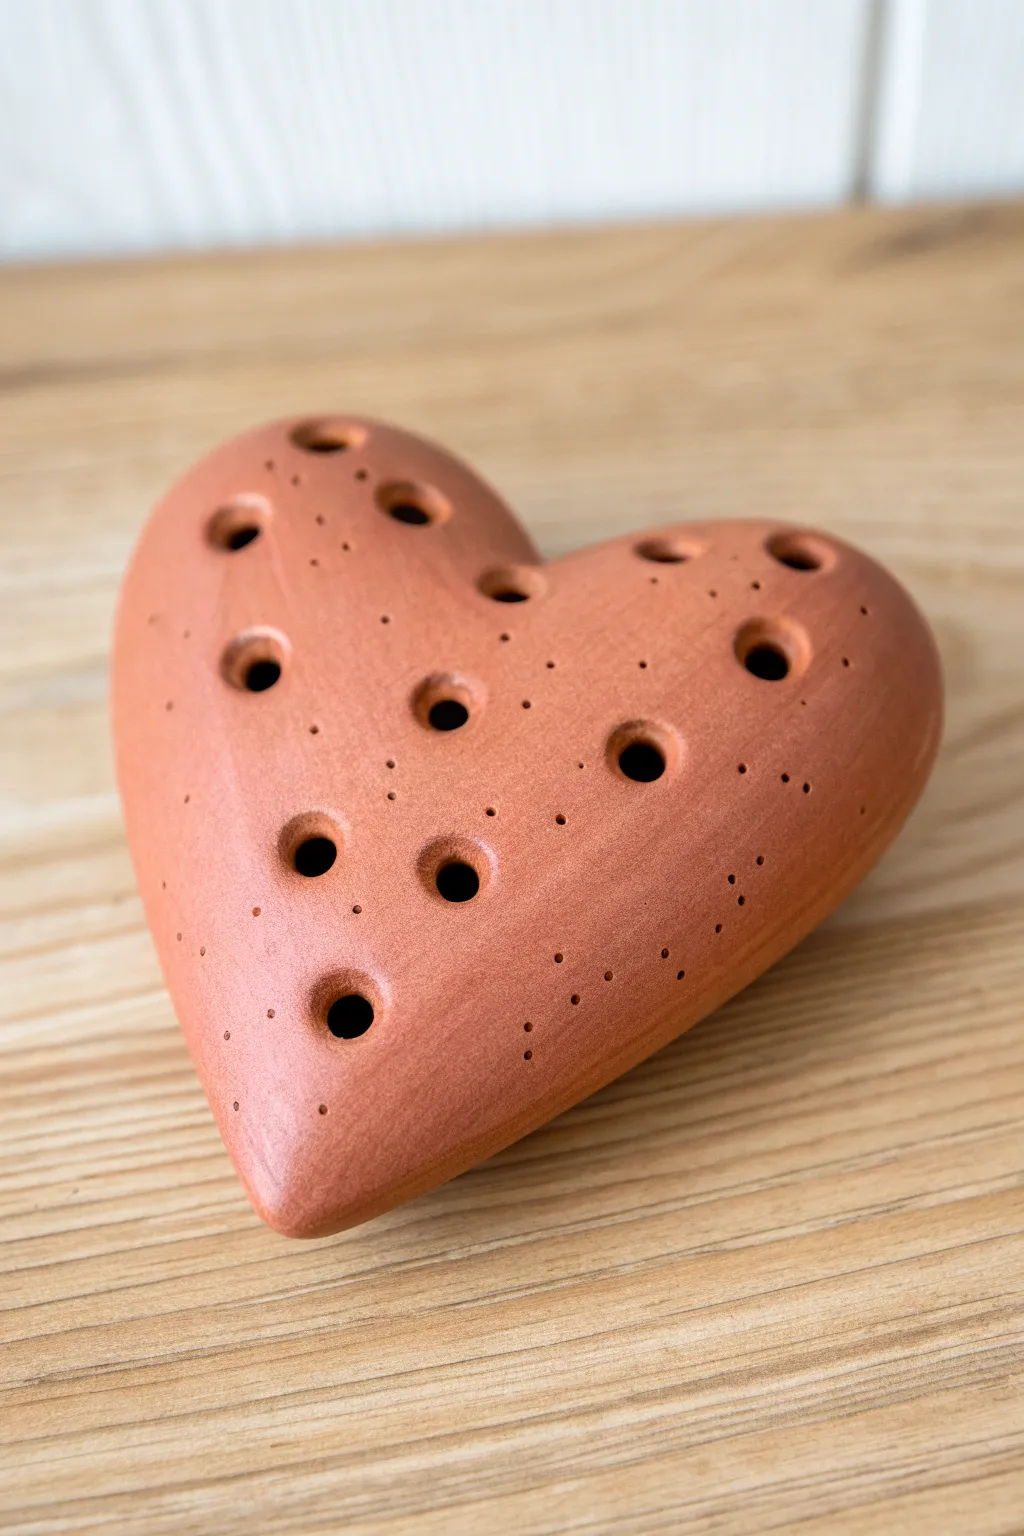
Craft a charming musical instrument that fits right in your palm with this heart-shaped pocket ocarina. Made from smooth terracotta clay, this piece features a traditional multi-hole fingering system and delicate decorative stippling across its warm, burnished surface.
Step-by-Step
Materials
- Terracotta clay (or preferred impressive clay body)
- Popsicle sticks/craft sticks
- Wooden sculpting tools
- Fettling knife
- Small drill bits or hole cutter tools
- Needle tool
- Slip (clay mixed with water)
- Sponge
- Sandpaper (fine grit for finishing)
Step 1: Forming the Heart Body
-
Prepare the Clay:
Start with a ball of clay roughly the size of a large lemon. Wedge it thoroughly to remove air bubbles, which is crucial for any hollow form intended to be fired. -
Create a Pinch Pot:
Press your thumb into the center of the ball and pinch the walls evenly as you rotate the clay. Aim for a consistent wall thickness of about 1/4 inch. -
Shape the Heart:
Once you have a round hollow form, gently squeeze the top to create the dip of the heart and taper the bottom into a point. Since this is an ocarina, it needs to be fully enclosed, so gently pinch the opening shut until you have a sealed, hollow heart puff. -
Smooth and Refine:
Paddle the shape gently with a wooden spoon or smooth it with your fingers to ensure the heart shape is symmetrical and the surface is free of lumps.
Clear the Airway
A perfect sound relies on a clean windway. After removing the popsicle stick, carefully run a feather or a thin strip of paper through the airway to remove any tiny clay crumbs.
Step 2: Constructing the Mouthpiece
-
Form the Airway Block:
Add a small rectangle of clay to one of the rounded lobes of the heat (this will be the mouthpiece). Score and slip it securely onto the main body. -
Create the Windway:
Insert a flat popsicle stick through the mouthpiece addition and into the hollow body. This creates the ‘windway’ where your breath goes. Leave the stick in place for a moment. -
Carve the Voicing Window:
On the underside of the heart (flip it over), measure about an inch down from the mouthpiece opening. Carve a small square hole with a bevelled edge facing the mouthpiece. This is the ‘window’ where sound is produced. -
Align the Fipple:
This is the trickiest part. The air coming from the popsicle stick channel must hit the sharp edge of your window exactly. Adjust the angle carefully until you get a clear whistle sound when blowing gently.
Step 3: Tuning and Decoration
-
Map the Finger Holes:
With the whistle working, flip the heart back to the front side. Lightly mark where you want your finger holes. The image shows a pattern of varying sizes scattered across the surface, roughly adhering to standard 4 or 6-hole ocarina placements. -
Punch the Main Holes:
Using a hole cutter or drill bit, carefully create the larger finger holes. Start small; you can always make them larger to raise the pitch while tuning. -
Clean the Edges:
Smooth the rims of every hole with a damp sponge or finger. Sharp or ragged clay edges can disrupt the airflow and make the instrument uncomfortable to play. -
Add Stippled Details:
To recreate the texture seen in the photo, take a needle tool and gently prick surface patterns around the finger holes. Vary the density of the dots – some clustered, some sparse – to create an organic look. -
Burnish the Surface:
For that smooth, leather-hard finish, I like to rub the surface (avoiding the sharp voicing edge) with the back of a spoon or a polished stone as the clay stiffens. -
Final Dry:
Let the ocarina dry slowly under loose plastic for a day or two before uncovering it completely. This prevents cracking at the seams. -
Fire:
Bisque fire the piece according to your clay’s specific temperature requirements.
Wearable Art
Before the clay dries, create a small, separate tunnel loop near the top or side of the heart. Thread a leather cord through it after firing to turn your instrument into a necklace.
Once fired, your terracotta heart is ready to play warm, earthy tunes for anyone who will listen
Pendant Mini Ocarina
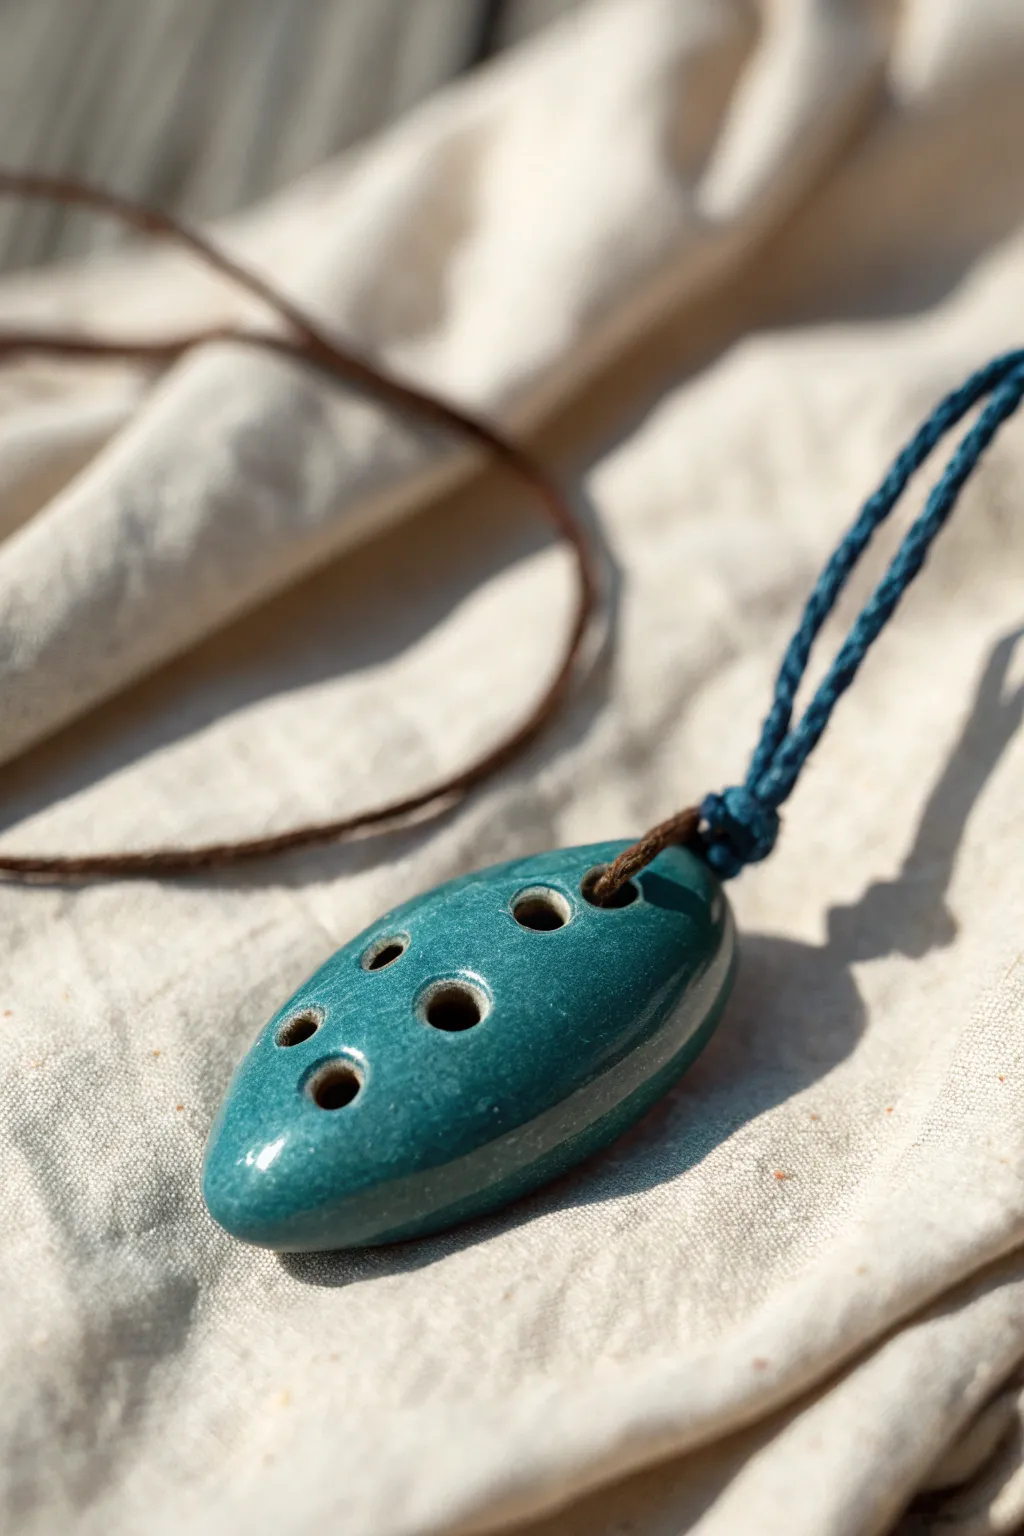
Craft a beautiful, wearable instrument with this sleek teal ocarina pendant. Shaped like a smooth river stone and finished with a glossy glaze, this mini vessel flute is as lovely to look at as it is to play.
Step-by-Step Tutorial
Materials
- White earthenware or stoneware clay
- Fettling knife or clay sculpting tool
- Wooden popsicle sticks (for voicing)
- Small loop tool
- Drill bits or hole cutters (various small sizes)
- Teal artistic glaze (glossy finish)
- Clear transparent glaze (optional)
- Kiln (or access to firing services)
- Sandpaper or sponge for smoothing
- Leather cord or waxed cotton string
- Blue macrame cord (for the decorative knot)
Step 1: Shaping the Body
-
Form the pinch pot:
Start with a ball of clay about the size of a golf ball or slightly larger. Gently insert your thumb and pinch while rotating to create a hollow, even pinch pot. -
Close the form:
Pinch the edges of the pot inward until they meet, trapping the air inside. Seal the seam completely by smoothing the clay over it with your thumb. -
Shape the stone:
Gently paddle or roll the hollow ball between your palms to elongate it into a smooth, oval shape. It should resemble a flattened river stone, tapering slightly at both ends. -
Refine the surface:
Use a damp sponge or a flexible rib tool to smooth out any bumps or fingerprints. The goal is a uniform, organic curve.
Clear Airway Trick
Keep the popsicle stick inside the airway while shaping and refining the body. This prevents the channel from collapsing under pressure.
Step 2: Creating the Sound Mechanism
-
Cut the airway:
At the wider end of the oval, insert a flattened popsicle stick horizontally into the clay wall to create the windway. Aim straight towards the opposite inner wall. -
Create the fipple window:
On the underside (which will be the playing side), carefully cut a small square window about an inch away from the mouthpiece opening. The popsicle stick should be visible through this hole. -
Sharpen the labium:
This is the critical part: carefully angle the clay on the side of the window opposite the mouthpiece. It needs to be a sharp wedge (the labium) that splits the air stream from the windway. -
Test the sound:
Gently blow into the windway. If it doesn’t whistle, adjust the angle of the labium or clear debris from the airway. I find small adjustments here make a huge difference.
Step 3: Tuning and Drilling
-
Drill finger holes:
Using hole cutters or drill bits, create four finger holes on the top surface. Place them comfortably where your fingers naturally rest when holding the stone shape. -
Drill the thumb holes:
Flip the ocarina over and add two smaller holes on the back for your thumbs, if desired, or stick to a simple 4-hole pentatonic layout on top. -
Tune the instrument:
As you drill each hole, the pitch will rise. Enlarge holes slowly to raise their pitch to the desired note, checking with a tuner frequently. -
Add a suspension hole:
Carefully drill a horizontal hole through the solid clay at the very top (narrow end) of the pendant for the cord to pass through later.
Textured Grip
Before glazing, gently press a piece of lace or a leaf into the clay surface on the back side. It looks great and adds grip while playing.
Step 4: Finishing and Firing
-
Smooth the holes:
Clean up any rough clay burrs around the finger holes and the main window using a damp brush or sponge. -
Bisque fire:
Allow the clay to dry completely (bone dry) before firing it in a kiln to the bisque temperature appropriate for your clay type. -
Apply glaze:
Dip or brush your teal glaze onto the bisque-fired ocarina. Be very careful to keep glaze out of the airway and the fipple window; use wax resist or a pipe cleaner to protect these areas. -
Glaze fire:
Fire the piece a second time to melt the glaze into a glossy, protective glass surface. -
Stringing the pendant:
Cut a length of blue macrame cord. Pass it through the suspension hole and tie a secure knot. -
Looping the necklace:
Attach a longer leather or waxed cord to the macrame loop using a larks head knot or simple tie to complete the necklace.
Wear your new musical creation with pride and enjoy playing tunes wherever you go
Faceted Geometric Ocarina
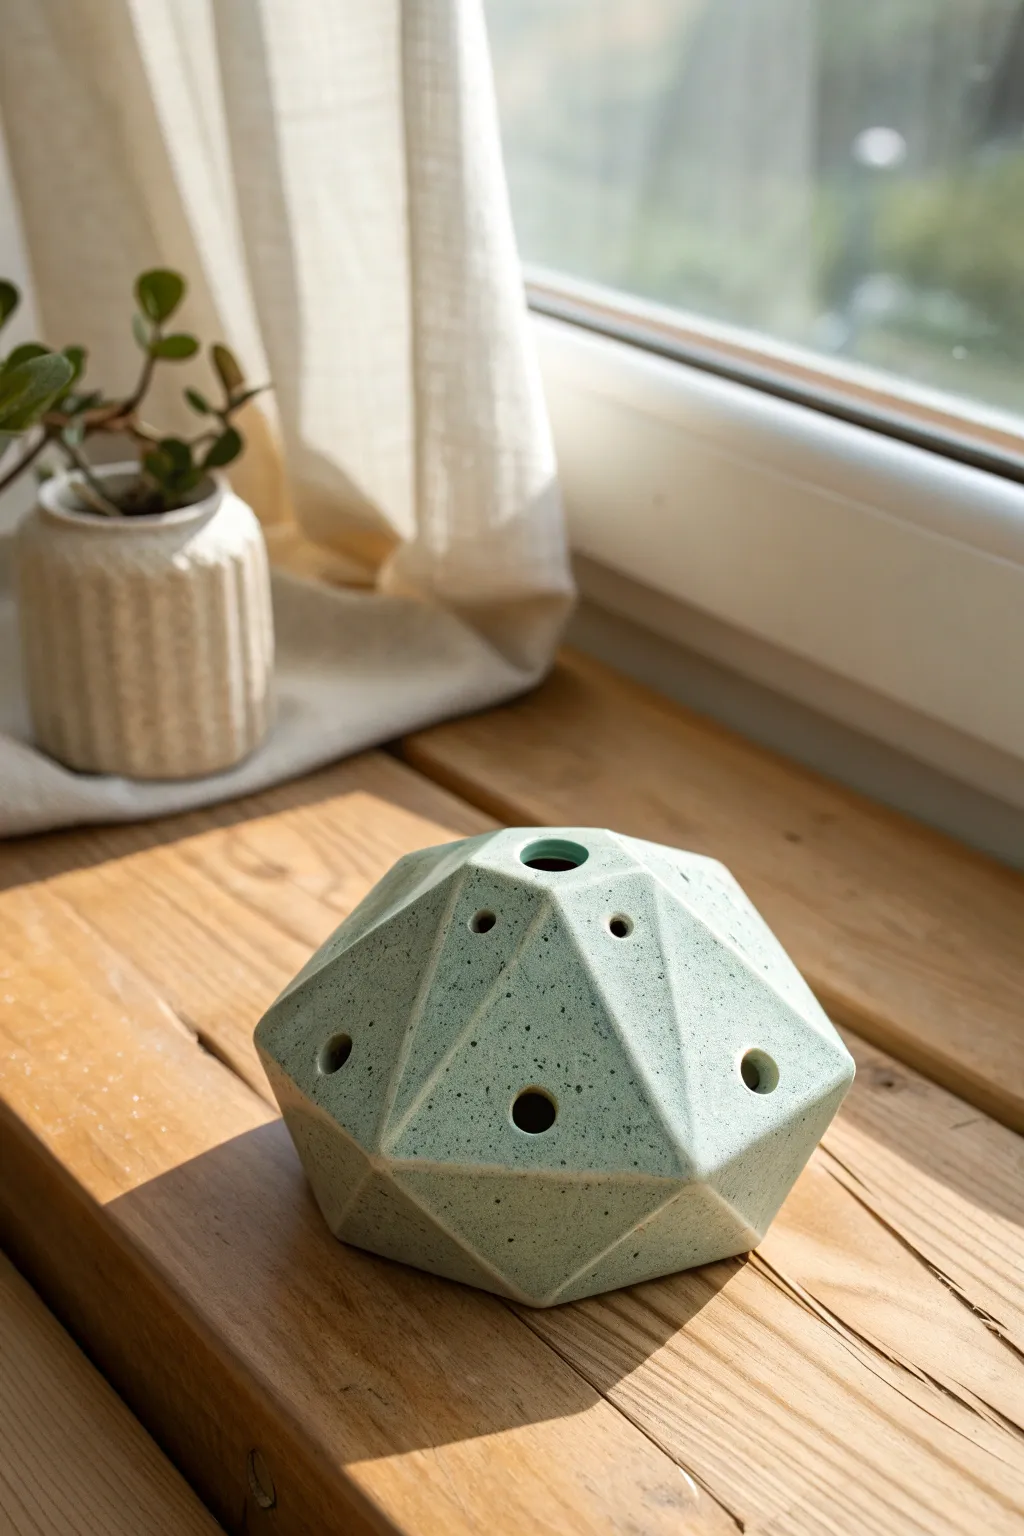
Move beyond traditional rounded shapes with this stunning faceted ocarina that resembles a carved gemstone. The sharp angles and speckled celadon glaze create a modern, architectural feel while maintaining the warm resonance of a traditional clay flute.
Step-by-Step Guide
Materials
- High-quality stoneware clay (smooth body)
- Pottery knife or scalpel
- Fettling knife
- Rib tool (metal or rubber)
- Loop tool for hollowing
- Pin tool
- Drill bits or hole cutters (various sizes)
- Popsicle stick (sharpened)
- Sponge
- Speckled matte green/teal glaze
- Kiln
Step 1: Forming the Base
-
Wedge the Clay:
Begin by thoroughly wedging your clay to remove any air pockets, which is crucial for an enclosed form like an ocarina. Aim for a ball about the size of a large orange. -
Shape a Pinch Pot:
Press your thumb into the center of the ball and gently pinch the walls upward and outward. You want a thick-walled, enclosed pinch pot. Don’t worry about being perfectly round; thickness is key here. -
Close the Form:
Gradually collar the clay inward at the top until the hole closes completely. Seal the seam well and smooth it over, trapping the air inside the hollow sphere. -
Refine the Sphere:
Using a paddle or just your hands, gently pat the form until it is roughly uniform. Let this stiffen to a firm leather-hard state; if it’s too soft, the faceting step will collapse the shape.
Sharp Ridges
To keep edges crisp after glazing, wipe the very peaks of the ridges with a damp sponge before firing. This thins the glaze there and highlights the geometry.
Step 2: Faceting the Design
-
Plan the facets:
Visualize a low-profile dome shape. You can lightly mark guide lines with a pin tool if you want symmetry, or work freestyle for an organic crystal look. -
Slice the Bottom:
Take your wire cutter or a very sharp fettling knife and slice a flat plane for the base so the ocarina sits stable. -
Carve the Side Planes:
Using a sharp knife or wire tool, slice away flat sections of clay around the perimeter. Aim for triangular or trapezoidal shapes that interlock. -
Define the Top Dome:
Continue slicing facest towards the center top, creating a peak or a flat plateau. The goal is to have sharp, crisp ridges where the planes meet. -
Smooth the Planes:
Use a firmly held metal rib to burnish and flatten each facet face. This cleans up knife marks and sharpens the edges between planes.
Step 3: Voicing and Tuning
-
Create the Airway:
Decide which facet will hold the mouthpiece. Carefully insert a flat popsicle stick through the wall at an angle to create the windway. -
Cut the Window:
On the facet directly adjacent to your mouthpiece, cut a small square ‘window’ where the air will split. Ideally, the blade edge (labium) should be aligned perfectly with the airway. -
Sharpen the Labium:
Refine the edge of the window opposite the airway until it is knife-sharp. This splitting of the air is what produces the sound. -
Test the Sound:
Blow gently through the airway. You should get a clear whistle. If it’s airy, adjust the angle of the labium slightly. -
Drill Finger Holes:
Using hole cutters or drill bits, create 4-6 finger holes on the top facets. Place them where your fingers naturally rest when holding the geometric shape. -
Clean the Holes:
Smooth the edges of every hole with a sponge or damp chamois to ensure they seal perfectly against fingertips. -
Dry Slowly:
Cover the piece loosely with plastic to dry very slowly. The varying thickness of the faceted walls makes it prone to cracking if rushed.
Tuning Trick
Start with small finger holes. Blow into the ocarina while checking a tuner, and slowly enlarge the holes until you hit the precise note you want.
Step 4: Firing and Glazing
-
Bisque Fire:
Fire the bone-dry piece in the kiln to bisque temperature (usually cone 04). -
Apply Glaze:
Select a speckled, semi-matte glaze—like the celadon green shown. Dip the ocarina or brush on 2-3 even coats. I prefer dipping to avid brush strokes on the flat planes. -
Clear the Airways:
Vital step: Ensure absolutely no glaze is stuck in the airway or on the sharp labium edge. Clean these carefully with a pin tool or brush. -
Glaze Fire:
Fire to the maturity temperature of your clay and glaze (likely cone 5/6 for stoneware).
Listen to the earthy tones of your new instrument while admiring how the light catches every unique angle you carved
Double-Chamber Harmony Ocarina
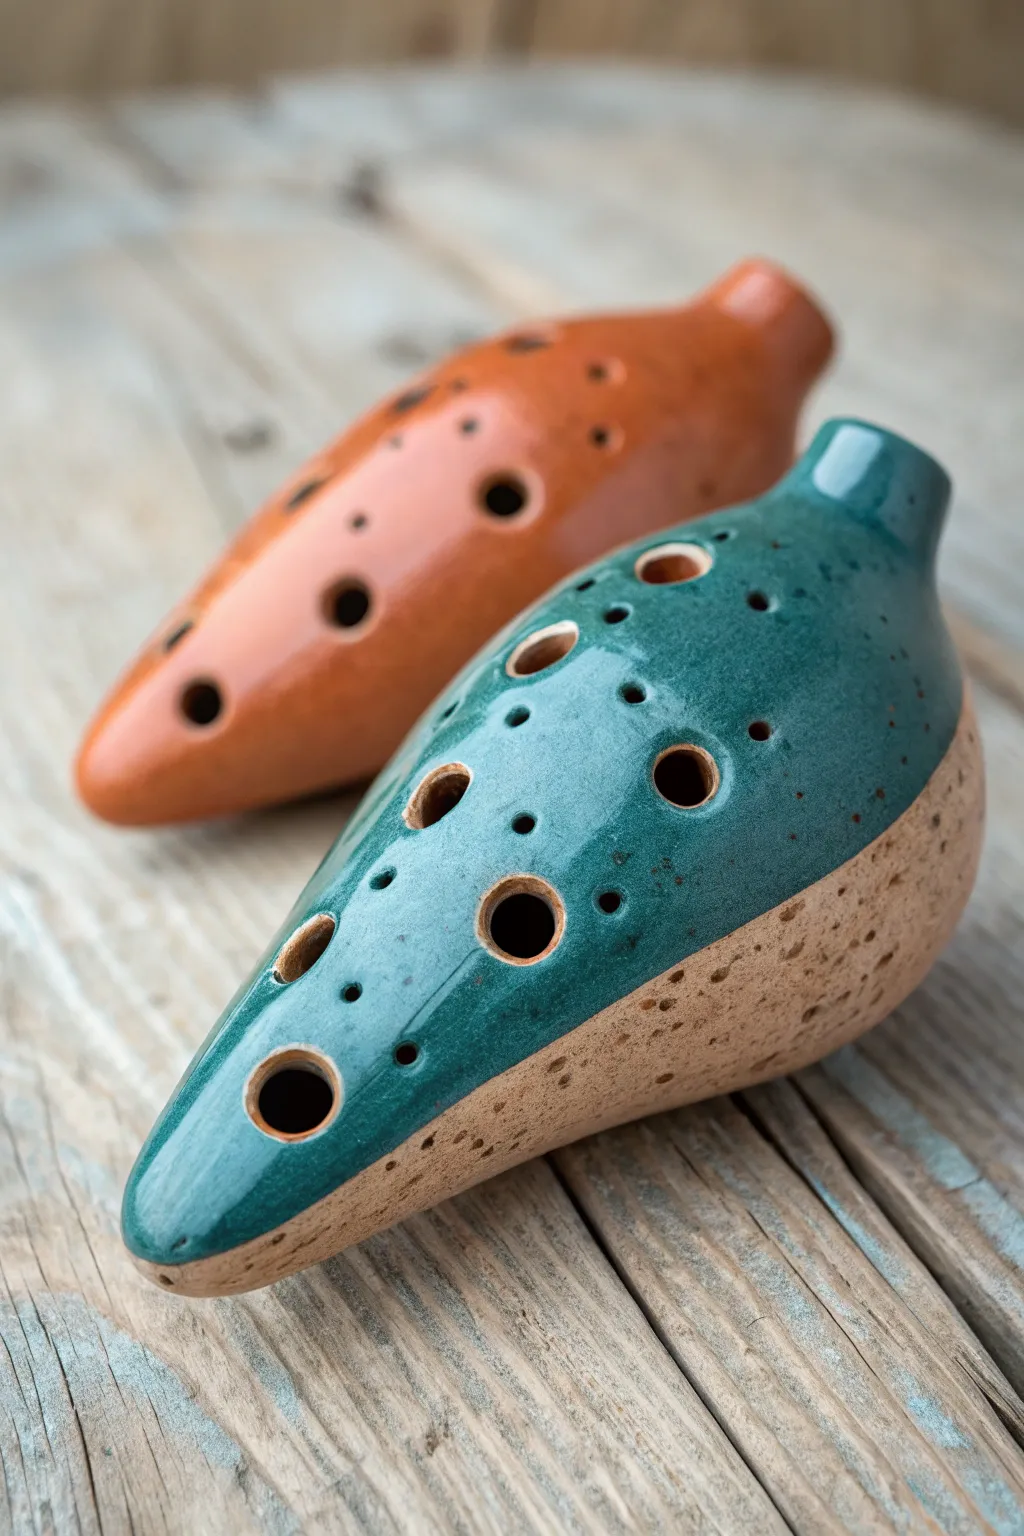
These handcrafted clay ocarinas combine rustic charm with musical functionality, featuring a distinct two-tone glaze on the primary vessel and a warm, earthy terracotta finish on the companion. Their organic, drop-like shape fits comfortably in the palms, inviting musicians to explore harmonies with an instrument born from the earth.
Step-by-Step Guide
Materials
- White or buff stoneware clay (smooth body)
- Terracotta clay (for the secondary ocarina)
- Popsicle sticks (sharpened)
- Fettling knife
- Loop tools for hollowing
- Drill bits or hole cutters (various sizes)
- Slip (clay mixed with water)
- Scoring tool or serrated rib
- Teal or turquoise reactive glaze
- Transparent or clear matte glaze
- Sponge and water
- Soft paintbrush
Step 1: Forming the Body
-
Wedge the clay:
Begin by thoroughly wedging your stoneware clay to remove air bubbles. This is crucial for wind instruments, as hidden air pockets can ruin the acoustics during firing. -
Shape the initial drop:
Roll a ball of clay roughly the size of a large orange. Gently taper one end to create an elongated teardrop shape, flattening the wider end slightly to form the playing chamber. -
Hollow the form:
Cut the teardrop in half distinctively along its length. Carefully scoop out the insides using a loop tool, aiming for a consistent wall thickness of about 1/4 inch throughout. -
Rejoin the halves:
Score the edges of both hollowed halves and apply a generous amount of slip. Press them back together firmly, smoothing the seam on the outside with your thumb so it disappears completely.
Airy or Weak Sound?
If the tone is breathy, the air blade (labium) isn’t splitting the air stream perfectly. Re-insert the stick and carefully realign the wedge so it cuts the air exactly in half.
Step 2: Constructing the Voicing
-
Create the mouthpiece:
On the tapered end, flatten a small area to serve as the mouthpiece. Insert a flat, sharpened popsicle stick into the clay to create the windway, aiming straight toward the opposite wall of the interior. -
Cut the sound hole:
On the underside of the vessel, measure where the popsicle stick ends inside the chamber. Cut a small, rectangular window (the labium) with a beveled edge that splits the air stream coming from the windway. -
Test the sound:
Before adding finger holes, blow gently through the mouthpiece. You should get a clear whistle tone. If it sounds airy, adjust the angle of the splitting edge (labium) slightly.
Step 3: Tuning and Detailing
-
Mark the holes:
Hold the ocarina as you would when playing. Mark comfortable spots for your fingers—four on top and usually one or two thumb holes on the bottom. -
Drill the finger holes:
Using various sizes of hole cutters, punch out the marked spots. I like to start small; you can always enlarge a hole to raise its pitch, but making it smaller is much harder. -
Tune the instrument:
Using a digital tuner, check the pitch of each hole. Enlarge holes gradually to sharpen the note until you hit the desired scale. -
Smooth the surface:
Once tuning is complete, use a damp sponge to smooth away any burrs around the holes and refine the overall shape. -
Dry slowly:
Let the greenware dry very slowly under loose plastic for several days to prevent cracking, then bisque fire according to your clay’s specifications.
Clean Hole Edges
After drilling holes, gently compress the edges with a minimal amount of water and a rounded tool. Smooth edges allow fingers to seal holes better, improving tone quality.
Step 4: Glazing Technique
-
Wax the finger holes:
Apply a small amount of wax resist inside the finger holes and the windway. This prevents glaze from clogging the critical openings and altering the sound. -
Apply the dip:
For the teal ocarina, prepare a bucket of turquoise reactive glaze. Hold the ocarina by the base and dip the top 2/3 into the glaze at an angle, creating a slanted, organic line. -
Clean the transition:
Use a damp sponge to wipe back any glaze drips that ventured too far down the unglazed base area. We want a sharp contrast between the glossy color and the raw clay texture. -
Enhance the speckle:
If your glaze doesn’t have iron speckles naturally, you can flick a toothbrush loaded with iron oxide wash over the glazed area for that spotted, rustic look. -
Terracotta variation:
For the second ocarina shown in the background, use a clear gloss glaze over the entire terracotta body to deepen that rich orange-red hue without hiding the clay itself. -
Final wipe:
Ensure the very bottom of the instrument is completely free of glaze so it doesn’t fuse to the kiln shelf. -
Glaze firing:
Fire the pieces to the maturity temperature of your glaze (likely Cone 5 or 6). Let the kiln cool completely before retrieving your new instruments.
Once fired, you’ll have a beautifully tuned instrument that looks as harmonious as it sounds.