If you’re planning a clay workshop, the best projects are the ones that feel fun right away and still teach a real skill. I pulled together my favorite clay workshop ideas—starting with the classics and ending with a few creative twists you’ll want to try with your group.
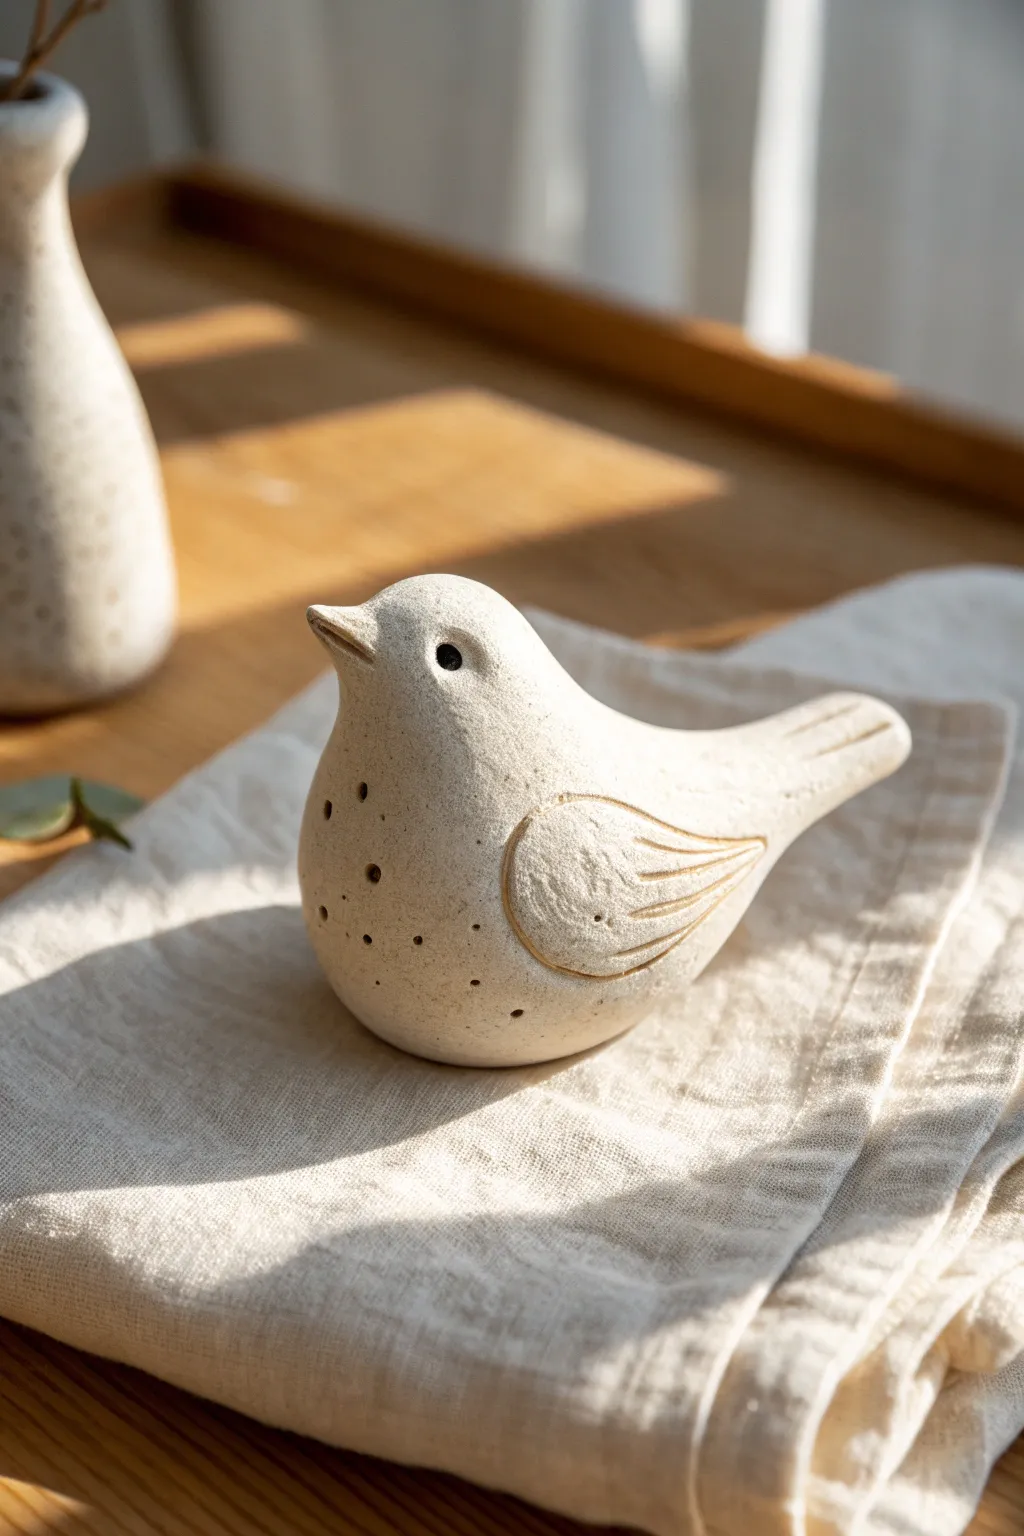
Pinch Pot Snack Bowls
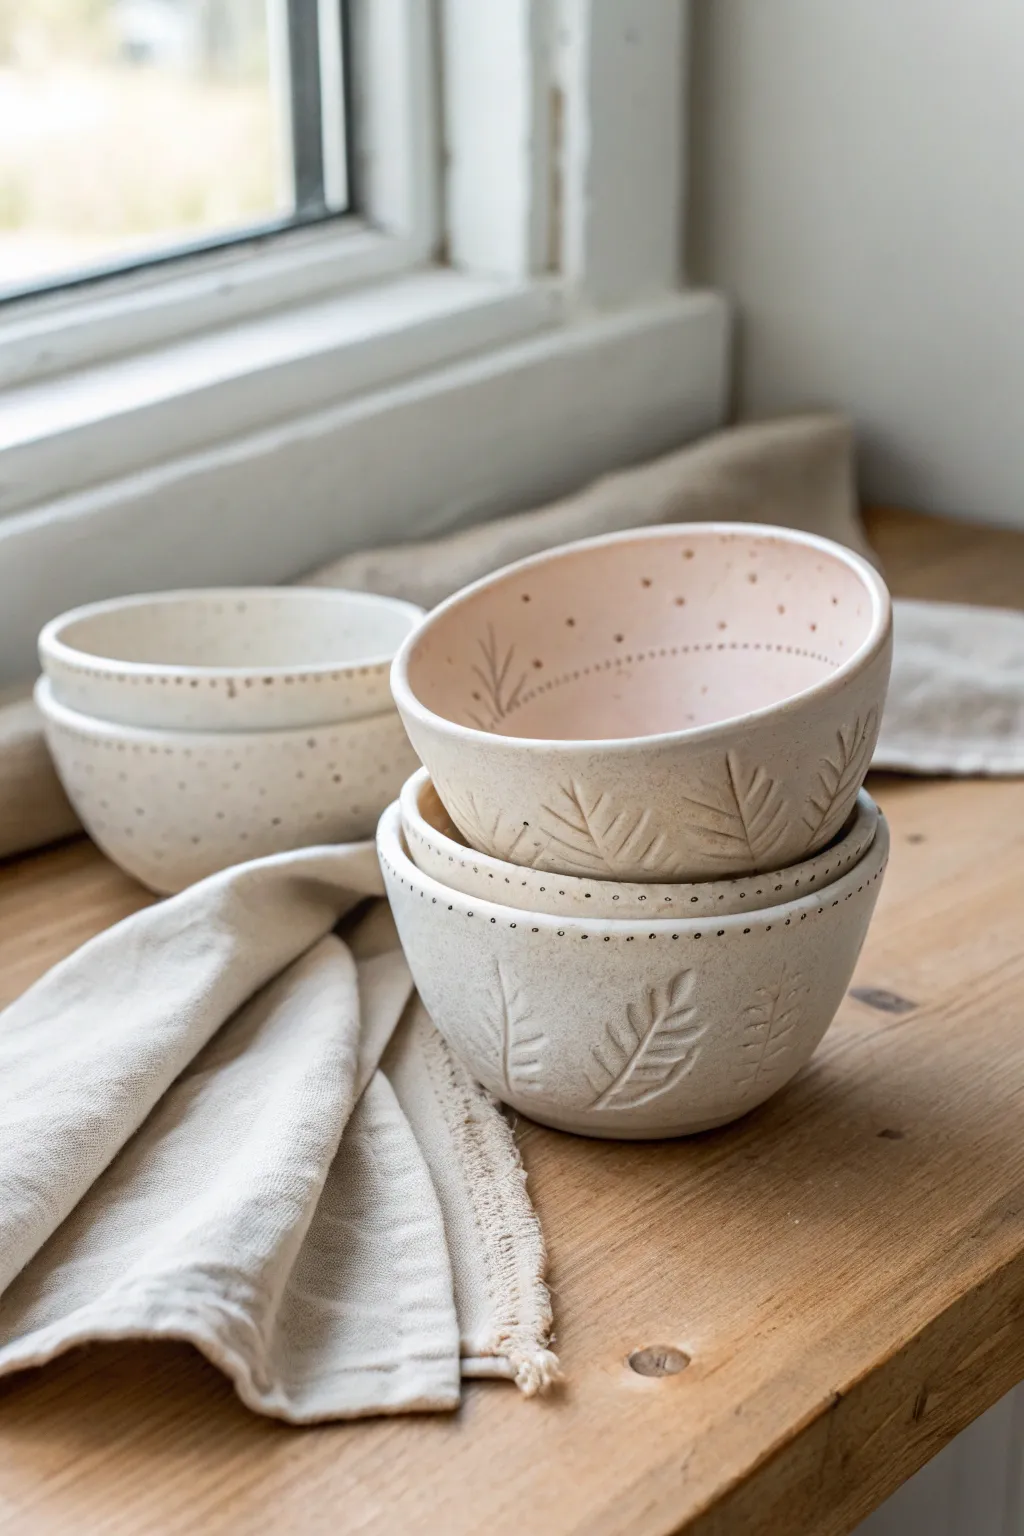
These charming, stackable snack bowls feature a lovely organic shape and delicate imprinted textures that evoke a cottage garden feel. Their creamy matte finish, accented by subtle leaf motifs and dotted rims, makes them perfect for holding berries, nuts, or trinkets.
Step-by-Step Tutorial
Materials
- Light-colored stoneware or earthenware clay (creamy white)
- Small bowl of water
- Sponge
- Needle tool or toothpick
- Carving tool or small wire loop tool
- Leaf stamp or actual small leaves (fern or similar)
- Clear matte glaze
- Soft pink underglaze (optional, for interior)
- Kiln access
Step 1: Forming the Base
-
Prepare the clay ball:
Start with a ball of clay roughly the size of a tennis ball. Pat it back and forth between your hands to round it out and compress the clay particles. -
Open the center:
Hold the ball in your non-dominant hand. Press your dominant thumb into the center, creating a depression, but stop about half an inch from the bottom to ensure a sturdy base. -
Pinch the walls:
Rotate the ball slowly while rhythmically pinching the clay between your thumb (inside) and fingers (outside). Work your way from the bottom up to the rim. -
Refine the shape:
Aim for an even wall thickness of about a quarter-inch. Don’t worry if it isn’t perfectly round; a slightly organic, wonky shape adds to the rustic charm seen in the photo. -
Smooth the surfaces:
Use a slightly damp sponge to wipe down the interior and exterior, smoothing out deep fingerprints or cracks. I like to keep the rim slightly rounded rather than sharp.
Step 2: Adding Texture & Detail
-
Dry to leather hard:
Let the bowls sit for an hour or two (or wrap loosely in plastic overnight) until they are leather hard—firm enough to handle without deforming, but still soft enough to carve. -
Plan the leaf motif:
Visualize where your leaf patterns will go. On the bowls in the image, the leaves rise from the base upward, spaced evenly around the exterior. -
Carve the stems:
Using a needle tool, lightly score a curved vertical line to serve as the central stem of your leaf. -
Carve the leaves:
For the leaf veins, use a small wire loop tool or the needle tool to press or carve V-shapes branching off the stem. Press deeper near the stem and lift out as you move away to create a tapered look. -
Add the rim detail:
Using the blunt end of a small paintbrush or a dedicated dotting tool, press a row of small, shallow holes just below the rim of the bowl. -
Interior details:
Repeat the dotting process on the *inside* rim if desired. You can also sketch very faint leaf shapes on the interior walls for added surprise. -
Clean up burrs:
Once the carving is done, gently brush away any little clay crumbs (burrs) with a soft dry brush. Don’t smear them with water.
Smoothing Secret
Use a flexible rubber rib tool on the outside of your pinch pot while the clay is still soft. It compresses marks and creates that professional, smooth matte surface.
Step 3: Firing & Glazing
-
Bisque fire:
Allow the bowls to dry completely (bone dry) for several days. Fire them in the kiln to bisque temperature (usually Cone 04 or 06 depending on your clay). -
Apply interior color:
To match the top bowl in the photo, brush a coat of diluted soft pink underglaze on the interior only. Wipe back any excess with a sponge if you want a wash effect rather than solid color. -
Glaze application:
Dip the entire bowl into a clear, matte glaze. This will seal the clay and make it food-safe while letting the natural cream color of the clay body shine through providing that earthy look. -
Wipe the foot:
Use a sponge to wipe all glaze off the very bottom of the bowl so it doesn’t stick to the kiln shelf. -
Final firing:
Fire the bowls again at the glaze setting appropriate for your clay and glaze combination (often Cone 5 or 6 for stoneware).
Natural Texture
Instead of carving, press fresh herbs like rosemary or lavender into the soft clay and peel them away to leave fossil-like impressions before firing.
Stack your finished set by a sunny window to enjoy the play of light on those beautiful carved textures


Slab Trinket Dishes With Texture
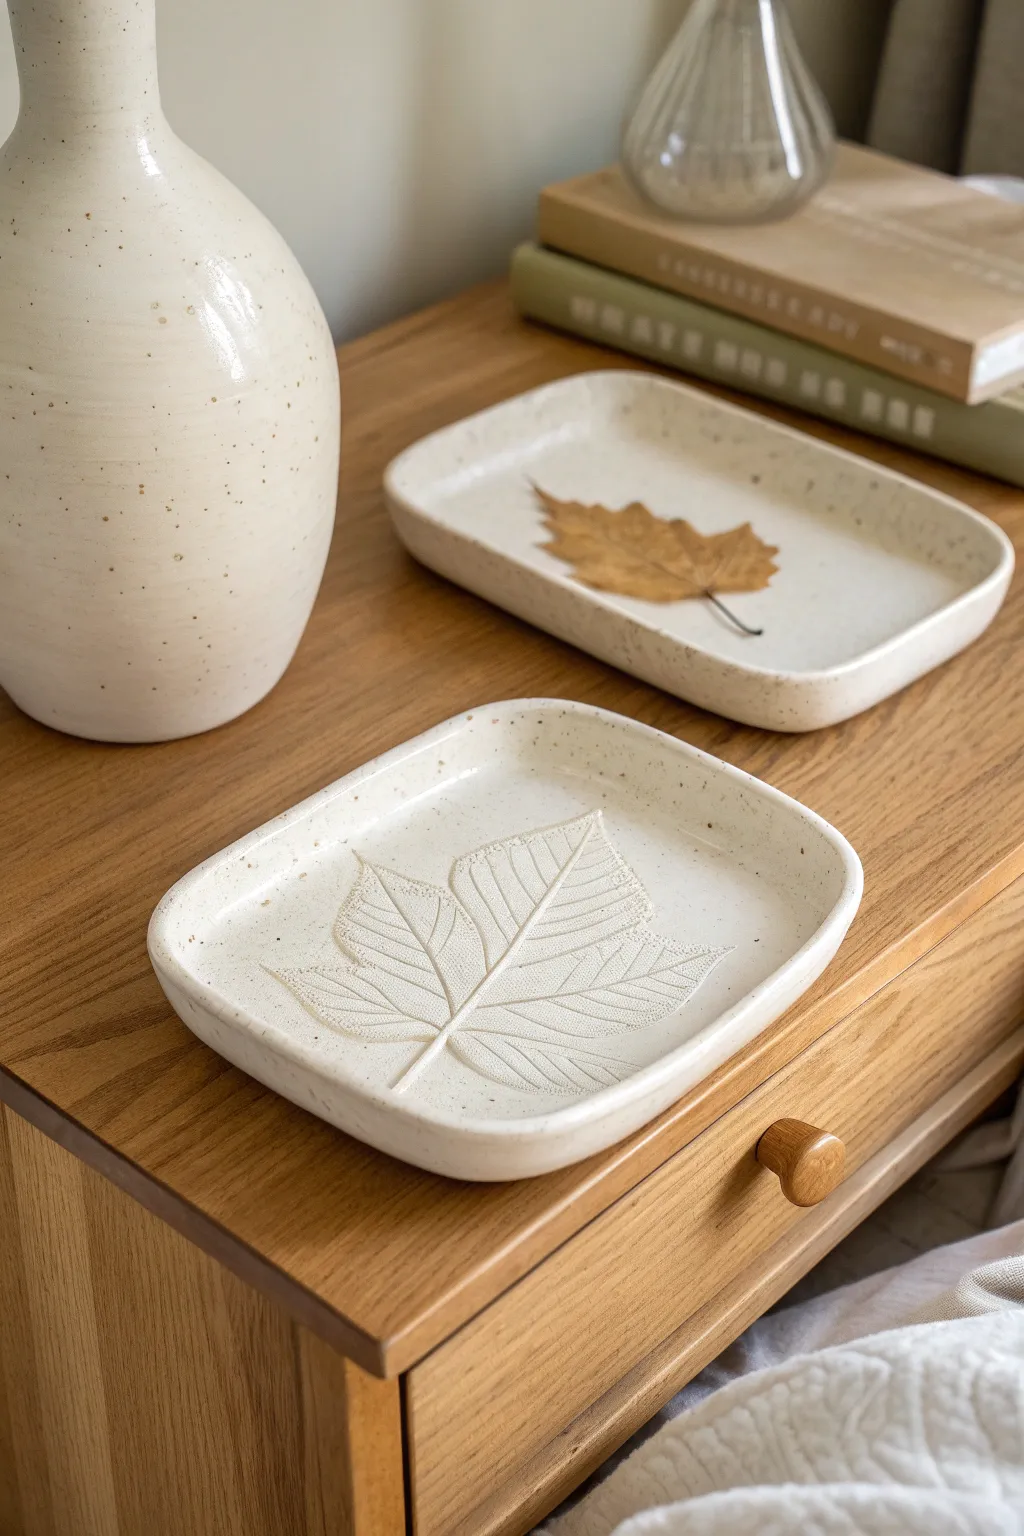
Capture the delicate details of nature with these minimalist slab-built trays. Using a real leaf to create a fossil-like impression, this project highlights the natural beauty of speckled clay for a sophisticated, organic finish.
Step-by-Step Guide
Materials
- Speckled stoneware clay (white or cream)
- Fresh, veiny leaf (maple or sycamore work well)
- Dough roller or slab roller
- Two wooden guide slats (approx. 1/4 inch thick)
- Fettling knife or needle tool
- Rectangular paper template (approx. 5×7 inches)
- GR Pottery Form or a shallow rectangular mold (for slump/drape)
- Sponge
- Rib tool (soft rubber)
- Clear matte or satin glaze
- Kiln
Step 1: Preparing the Slab
-
Wedge the clay:
Begin by thoroughly wedging a ball of speckled stoneware clay to remove any air bubbles and ensure the particles dependably align. -
Set up guides:
Place your wooden guide slats on either side of the clay on your canvas workspace. These will help you roll a perfectly even thickness. -
Roll the slab:
Use your rolling pin to flatten the clay until the roller rests on the guide slats. Roll in multiple directions to compress the clay platelets. -
Smooth the surface:
Run a soft rubber rib over the surface of the slab to remove the canvas texture and create a pristine, smooth canvas for your impression.
Vein Definition Tip
If your leaf is too flimsy to make a deep mark, brush the vein side with a tiny amount of cornstarch before rolling. This prevents sticking while getting a deeper press.
Step 2: Creating the Texture
-
Position the leaf:
Take your fresh leaf and place it vein-side down onto the smooth slab. I find that the underside of the leaf always provides the crispest vein definition. -
Embed the leaf:
Gently roll over the leaf with your rolling pin one time. Apply firm, consistent pressure to push the veins into the clay without making the slab too thin. -
Cut the shape:
Place your rectangular paper template over the slab, centering the leaf impression. Trace around it with a needle tool or fettling knife. -
Refine edges:
Remove the excess clay. Dampen a sponge slightly and smooth the cut edges of the rectangle to remove any sharpness or burrs. -
Remove the leaf:
Carefully peel back the leaf by the stem to reveal the embossed texture. If any small bits of organic matter remain, you can gently pick them out with a needle tool.
Add Color Depth
Before glazing, rub a dark iron oxide wash into the leaf veins and wipe away the excess with a damp sponge. This will make the fossil details pop dramatically.
Step 3: Forming and Finishing
-
Lift the slab:
Carefully lift your clay rectangle. If it feels too floppy, let it sit for 10-15 minutes to firm up slightly before moving completely. -
Shape the dish:
Place the slab onto your mold. You can drape it over a hump mold or slump it into a shallow dish mold depending on your equipment. -
Curve the corners:
Gently press the slab to conform to the mold’s shape. Use your fingers to round out the corners, ensuring they lift slightly to create a contained rim. -
Dry slowly:
Cover the piece loosely with plastic to allow it to dry slowly to the leather-hard stage. This prevents warping, especially with flat-bottomed pieces. -
Bisque fire:
Once bone dry, fire the piece to bisque temperature (usually cone 04 or 06) according to your clay body’s specifications. -
Glaze application:
Dip or brush a clear matte or satin glaze over the entire piece. Using a transparent glaze is crucial so the speckles and leaf texture remain visible. -
Glaze firing:
Fire the piece a final time to the glaze temperature (commonly cone 5 or 6 for stoneware). Let the kiln cool completely before unloading.
Place your finished tray on a bedside table or vanity to hold your favorite jewelry pieces


Coil-Built Planters
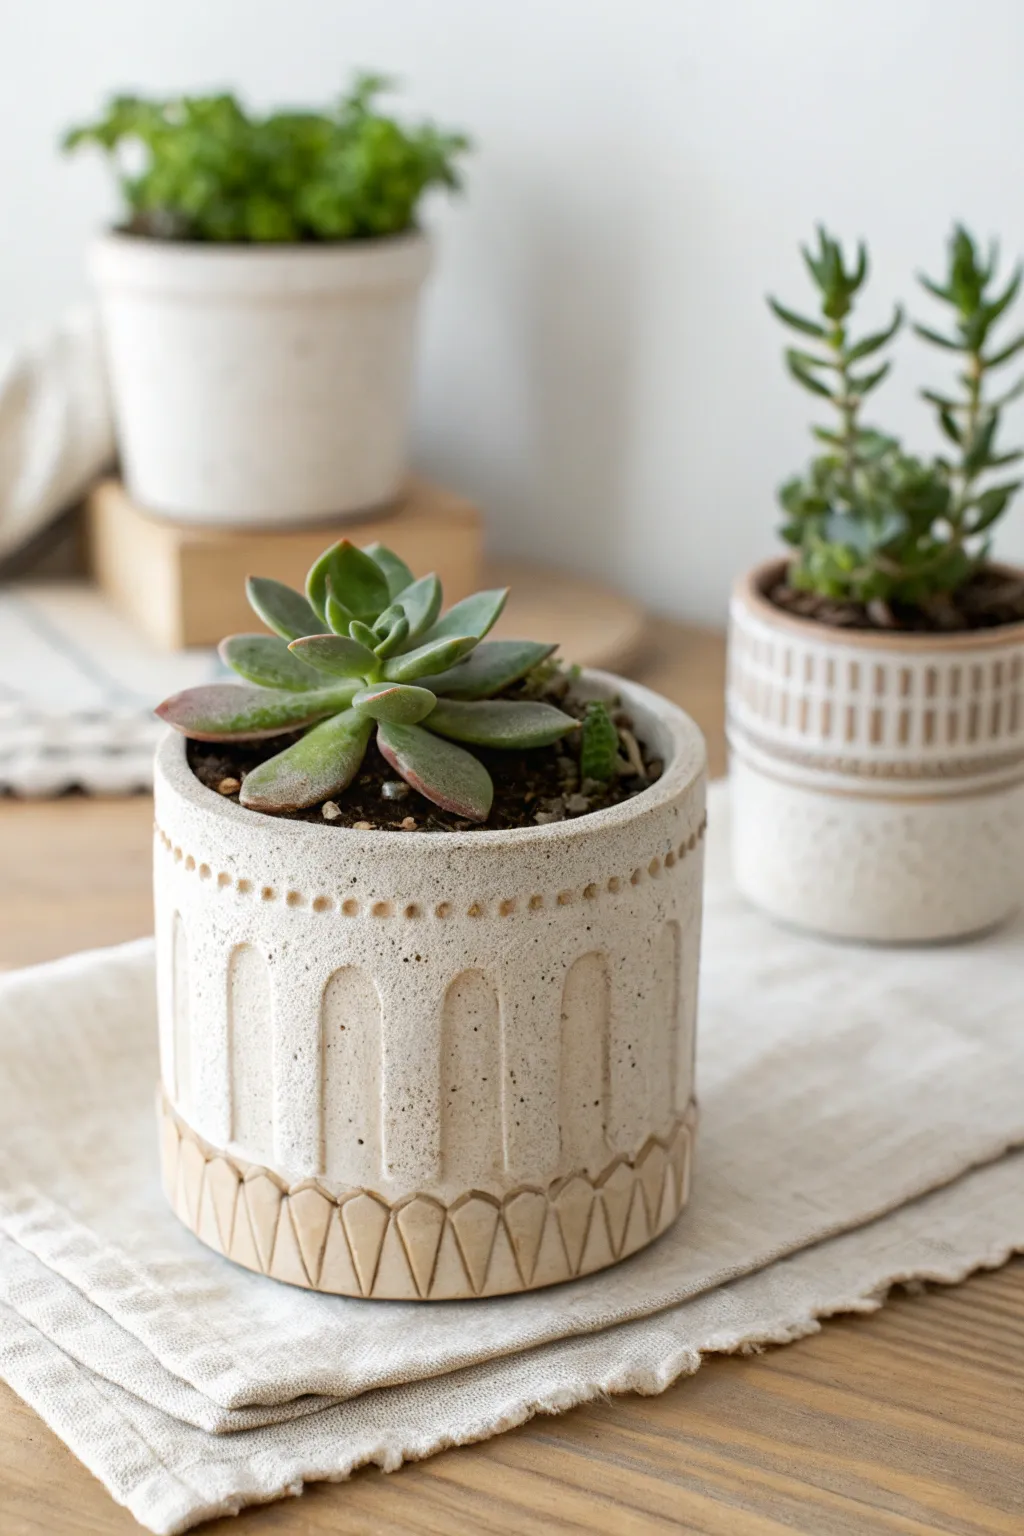
This charming, textured planter combines the organic feel of exposed raw clay with a creamy, speckled glaze finish. The design features a distinctive arch motif and continuous geometric base pattern that gives it a modern bohemian vibe perfect for your favorite succulents.
Detailed Instructions
Materials
- Stoneware clay (smooth or speckled)
- Clay scoring tool or fork
- Slip (clay mixed with water)
- Wooden modeling tool
- Fettling knife
- Rolling pin
- Metal rib scraper
- Sponge
- Loop carving tool (small U-shape)
- Needle tool
- Creamy white dipping glaze
- Wax resist
Step 1: Building the Form
-
Create the base:
Roll out a slab of clay to about 1/4 inch thickness. Use a round cookie cutter or a needle tool to cut a circle approximately 4 inches in diameter for the base. -
Roll the first coils:
Roll out several long ropes of clay, aiming for the thickness of your pinky finger. Keep them consistent to ensure even walls. -
Attached the first layer:
Score the outer edge of your base and apply a dab of slip. Place your first coil on top of the scored area, pressing it down gently. -
Build the walls:
Continue stacking coils one on top of another. Score and slip between each layer to ensure a strong bond. -
Blend the coils:
As you build upward, pause every few layers. Support the wall with one hand on the inside and use your thumb or a wooden tool to smudge the clay downwards on the outside to blend the coils together seamlessly. -
Smooth the exterior:
Once you have reached a height of about 4-5 inches, use a metal rib to scrape and smooth the outside walls, removing the coil texture completely for a flat, cylindrical canvas. -
Level the rim:
Use a needle tool to trim the top rim evenly while spinning the pot (or moving around it), then smooth the cut edge with a damp sponge.
Uneven Walls?
If your coil pot starts widening or leaning as you build, stop and let the clay stiffen for 30 minutes. Soft clay often sags under its own weight before it’s blended.
Step 2: Carving & Texturing
-
Mark the guide lines:
Lightly trace a horizontal line around the pot, about one inch from the bottom, to define where the base pattern will go. I find using a banding wheel helps keep this line straight. -
Carve the base triangles:
Using a fettling knife or carving tool, incise a series of continuous triangles or diamonds around that bottom one-inch section. Carve deeply enough to create relief but not through the wall. -
Create the vertical arches:
Above the base line, use a loop tool to carve vertical grooves that end in a rounded arch shape. Space them evenly around the cylinder. -
Add the dotted detail:
Just above the rounded tops of your arches, press a small, round tool (like the back of a drill bit or a small dowel) into the clay to create a row of decorative impressed dots. -
Clean up burrs:
Let the pot dry to a leather-hard state, then use a dry sponge or soft brush to gently remove any clay crumbs or sharp burrs left from carving.
Step 3: Glazing & Finishing
-
Bisque fire:
Fire the piece in a kiln to cone 04 (or your clay body’s bisque temperature) to prepare it for glazing. -
Apply wax resist:
Carefully paint wax resist over the bottom one-inch section where you carved the triangles. This will keep the raw clay exposed and create that beautiful two-tone look. -
Dip the pot:
Holding the pot by the base, dip it swiftly into a creamy white glaze. The wax will repel the glaze from the bottom section. -
Clean the foot:
Use a damp sponge to wipe away any droplets of glaze that may have beaded up on the waxed area or the very bottom of the pot. -
Glaze fire:
Fire the pot a second time to the maturation temperature of your glaze and clay (typically cone 5 or 6 for stoneware).
Crisp Carving Lines
Wait until the clay is ‘leather hard’ (like a block of cheddar cheese) before carving. Too wet, and the clay drags; too dry, and it chips.
Your finished planter is now ready to be the perfect new home for a heat-loving succulent


Wheel-Thrown Cylinder Practice Set
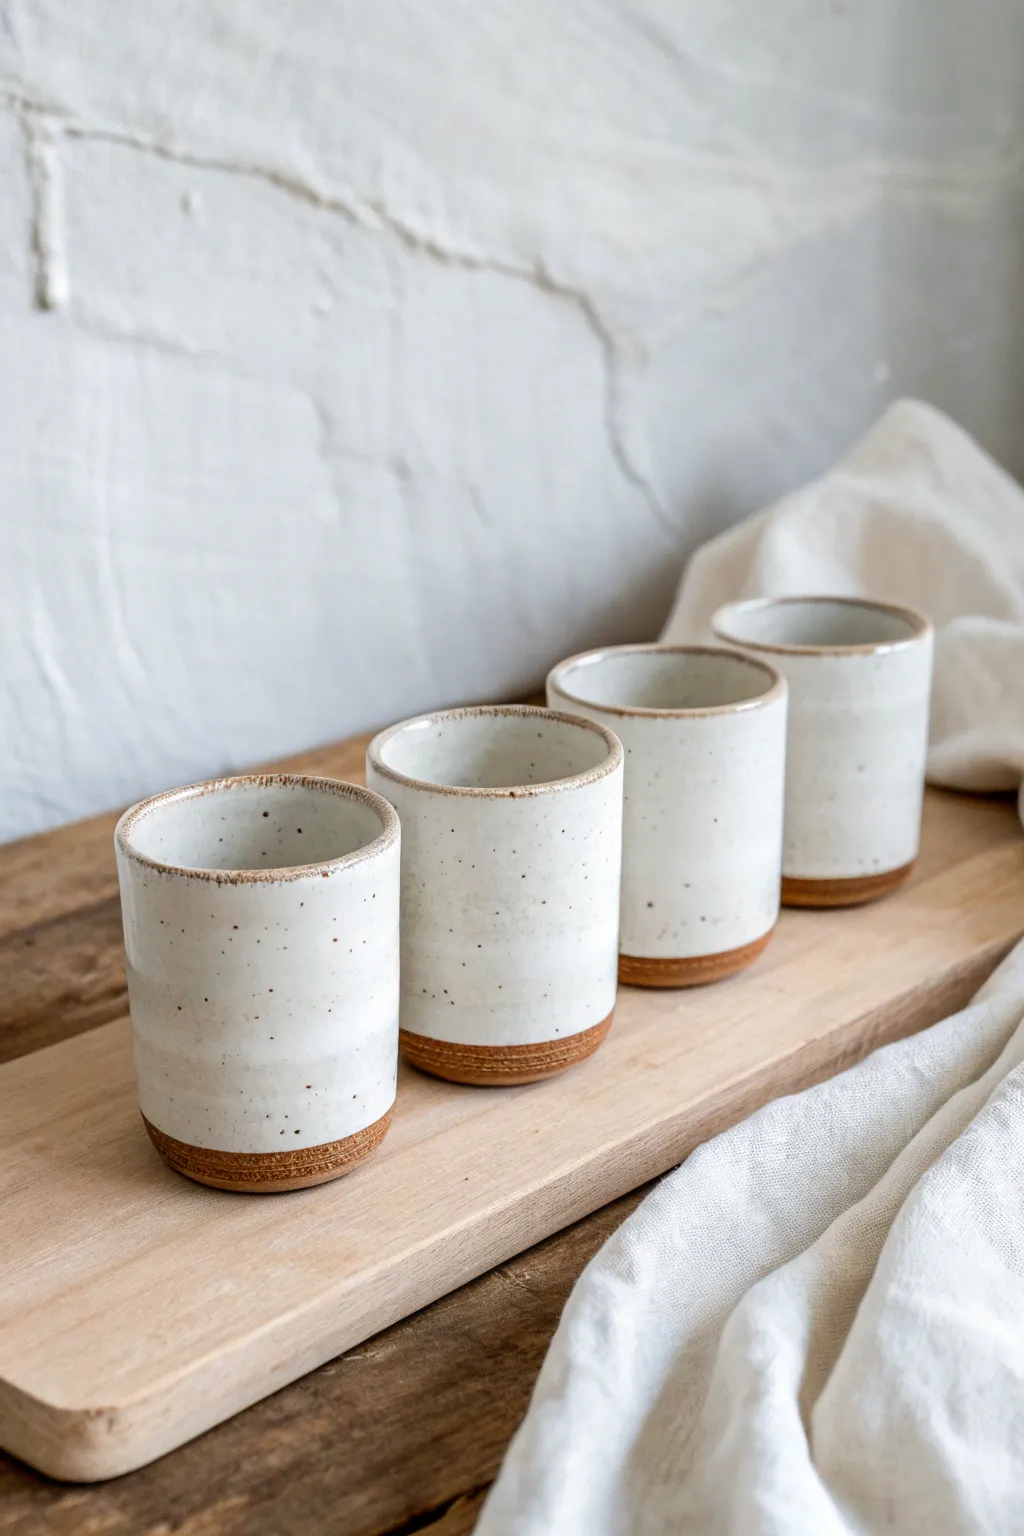
Master the fundamentals of wheel throwing with this set of identical tumbler cups, perfect for short coffees or juices. The design highlights the natural beauty of the clay with an exposed foot and a creamy, speckled glaze finish.
How-To Guide
Materials
- Stoneware clay body (speckled or buff)
- Pottery wheel
- Throwing sponge
- Wire cutter
- Pin tool
- Wooden throwing rib
- Trimming tools (loop tool)
- Speckled matte white glaze
- Kiln for bisque and glaze firing
Step 1: Throwing the Forms
-
Prepare Your Clay:
Ideally, you want to start with four balls of clay of equal weight, around 1 lb (450g) each. Wedging them thoroughly is crucial to remove air bubbles. -
Center the Clay:
Throw your first ball onto the wheel head. Use wet hands and steady pressure to cone the clay up and push it back down until it is perfectly centered. -
Open the Form:
Press your thumbs into the center of the mound to open it, stopping about 1/4 inch from the bottom. Pull the floor out until it’s about 2.5 inches wide. -
Compress the Floor:
Run your finger or a sponge from the center of the floor out to the wall multiple times to compress the clay, which prevents S-cracks later. -
Pull the Walls:
Using a sponge on the outside and fingers on the inside, gently squeeze and lift the clay upward. Aim for straight, vertical walls rather than a bowl shape. -
Refine the Cylinder:
Do a second and third pull to gain height. I prefer to keep the walls slightly thicker at the rim for durability. -
Straighten with a Rib:
Use a wooden rib against the outside of the spinning wall while supporting from the inside. This removes throwing lines and creates that crisp, straight silhouette. -
Clean Up:
Use a sponge to remove excess water from inside the cup. Cut the pot from the wheel with your wire tool and carefully set it aside on a ware board. -
Repeat the Process:
Throw the remaining three balls of clay, aiming to match the height and width of your first successful cylinder.
Wobbly Walls?
Issues with wall stability often come from uneven pulling speed. Move your hands up at the exact same speed as the wheel helps the clay spiral. Slow down the wheel as the walls get taller.
Step 2: Trimming and Finishing
-
Dry to Leather Hard:
Let the cylinders dry until they are firm enough to handle without deforming but still hold a fingernail mark (leather hard). -
Center for Trimming:
Place a cylinder upside down on the wheel. Secure it with ample clay lugs or use a Giffin Grip if you have one. -
Define the Foot:
Using a sharp loop tool, trim away the excess clay at the base. Create a clean line where the wall meets the future exposed clay foot. -
Smooth the Texture:
Run a damp sponge or a smooth rib over the trimmed area to burnish the grog back into the clay, ensuring the unglazed raw section feels nice to hold. -
Bisque Fire:
Once fully bone dry, load the cups into the kiln for a bisque firing (usually cone 04 or 06).
Step 3: Glazing
-
Wax Resist:
Paint a band of liquid wax resist along the bottom 1/2 inch of the cup. This masks off the area you want to leave as raw clay. -
Dip Glaze:
Stir your speckled white glaze thoroughly. Using tongs, dip the cup vertically into the bucket, holding it for 3 seconds for even coverage. -
Clean the Line:
Despite the wax, wipe the bottom edge with a damp sponge to ensure a crisp, straight line where the glaze ends. -
Final Fire:
Load the glazed pieces into the kiln and fire to the maturity temperature of your clay and glaze (typically cone 5 or 6).
Add a Dimple
Before the clay dries, gently press your thumb into the side of the cylinder to create a ‘thumb divot’. This acts as a subtle, ergonomic handle for more comfortable sipping.
Now you have a uniform set ready for your morning espresso or evening tea

The Complete Guide to Pottery Troubleshooting
Uncover the most common ceramic mistakes—from cracking clay to failed glazes—and learn how to fix them fast.
Spoon Rests and Soap Dishes
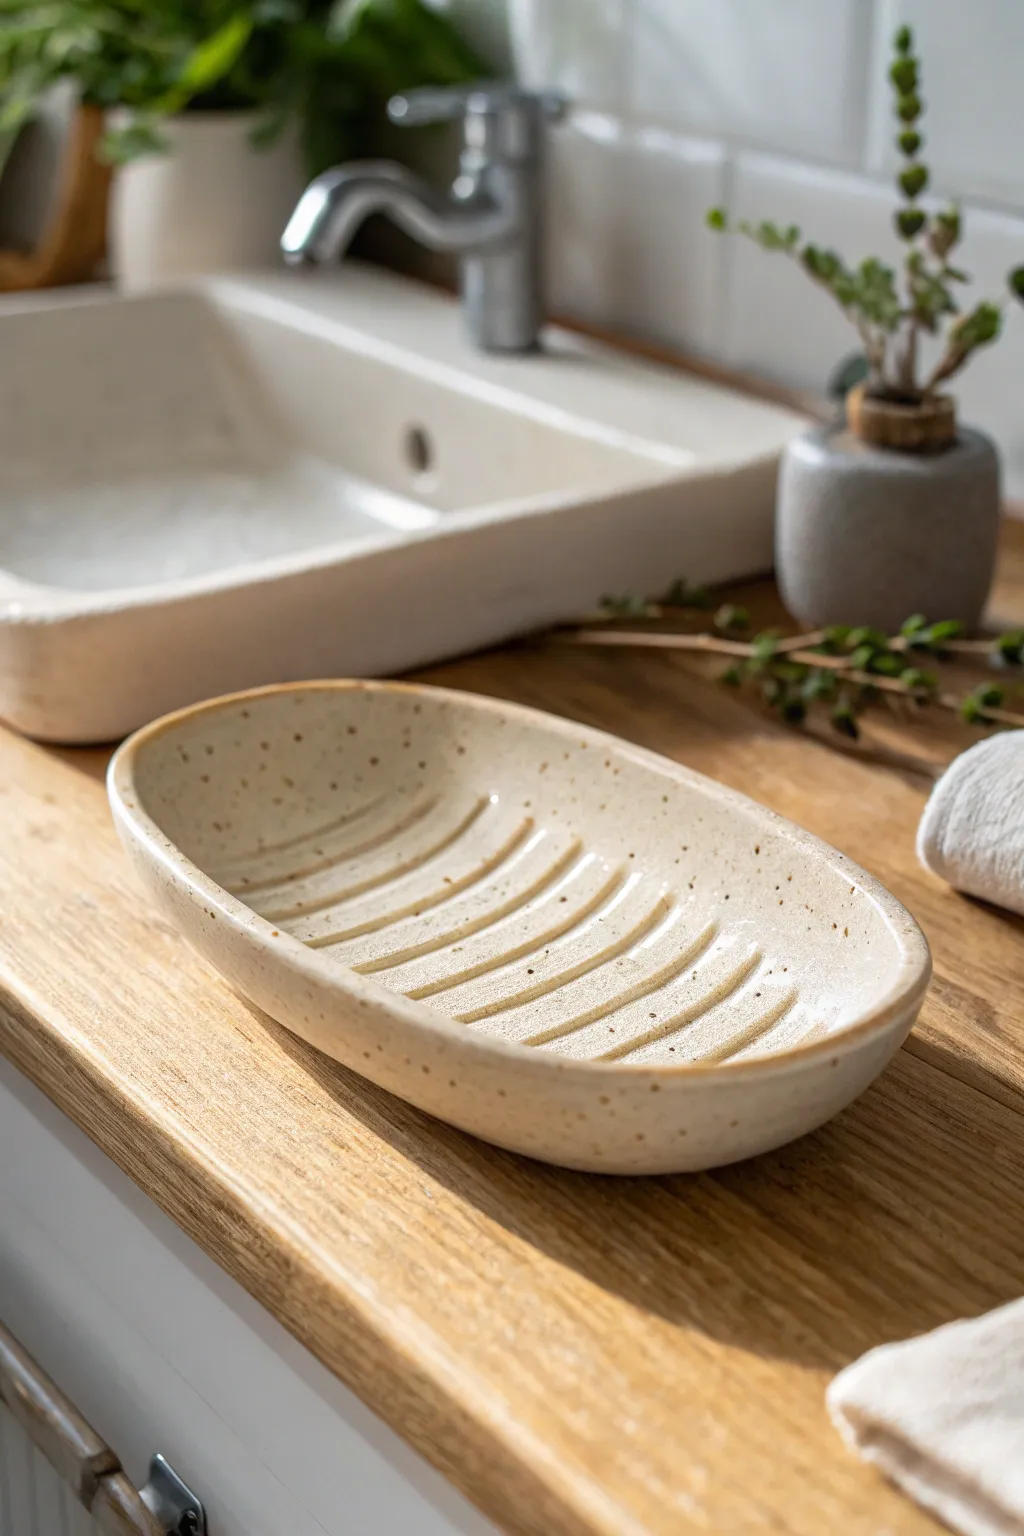
This elegant oval soap dish combines functional design with natural warmth, featuring a creamy speckled glaze and raised interior ridges that help your soap dry cleanly. Its organic shape and gentle curves make it a perfect beginner-friendly project that looks beautifully handmade on any bathroom vanity.
Step-by-Step
Materials
- Speckled buff stoneware clay (or white clay with added grog)
- Rib tool (kidney shaped)
- Small loop tool or carving tool
- Sponge
- Rolling pin
- Canvas working mat or slab mat
- Needle tool or fettling knife
- Oval paper template (approx. 5×3 inches)
- Small bowl with water
- Transparent or cream dipping glaze
Step 1: Forming the Base
-
Prepare the slab:
Begin by wedging your speckled stoneware clay to remove air bubbles. Roll it out into a smooth, even slab that is approximately 1/4 inch thick. Use guide sticks if you have them to ensure uniform thickness. -
Cut the oval:
Paper templates are your best friend for consistency. Place your oval template onto the clay slab and trace around it with a needle tool or fettling knife. Remove the excess clay. -
Smooth the edges:
Before shaping, take a damp sponge and gently run it around the cut rim of the oval. This softens the sharp angle left by the knife and prevents future chipping. -
Create the curve:
Place the clay oval on a piece of foam or hold it gently in your cupped hand. Using a damp sponge or a soft rib, press gently from the center outwards to create a shallow, concave bowl shape. The edges should curve up naturally, no more than an inch high.
Clean Lines
For sharper ridges, let the clay dry to a sturdy leather-hard state before carving. Soft clay drags and creates burrs; firmer clay cuts like cheese.
Step 2: Adding the Ridges
-
Mark the center:
Lightly mark a center vertical line on the inside of the dish to guide your carving. This ensures your ridges will be symmetrical. -
Carve the drainage grooves:
Using a loop tool, you are going to carve the spaces *between* the ridges. Start near the center line and carve a curved channel outwards toward the rim, stopping about half an inch before the edge. -
Repeat the pattern:
Continue carving parallel channels on both sides of the dish. I usually aim for 3 to 4 channels on each side of the center line. The clay remaining between these channels becomes the raised ridges that support the soap. -
Refine the ridges:
The carving process often leaves sharp burrs. Wait until the clay stiffens slightly to leather-hard, then use a damp sponge or your finger to smooth and round over the tops of the ridges so they look soft and organic.
Step 3: Finishing and Firing
-
Check the underside:
Flip the dish over carefully. If the carving distorted the bottom, gently tap it flat or use a rib to smooth it. You can stamp your maker’s mark here if desired. -
Slow drying:
Cover the dish loosely with plastic. Because the thickness varies due to the ridges, dry it slowly over several days to prevent warping. -
Bisque fire:
Once bone dry, fire the piece to bisque temperature (usually cone 04, depending on your clay body). -
Glazing:
Wipe the bisque ware with a damp sponge to remove dust. Dip the entire piece into a transparent or semi-opaque cream glaze. The iron speckles in the clay will burn through the glaze during the final firing, creating that lovely spotted texture. -
Wipe the foot:
Ensure the very bottom of the dish is wiped clean of glaze so it doesn’t fuse to the kiln shelf. -
Glaze fire:
Fire for a final time to the temperature recommended for your specific clay and glaze combination (often cone 5 or 6 for stoneware).
Warping Worries?
If the edges curl up too much while drying, weigh them down gently with small sandbags or dry the piece rim-down on a flat board.
Place your finished dish by the sink and enjoy how the simple ridges keep your soap dry and lasting longer
Tile Coaster Sets
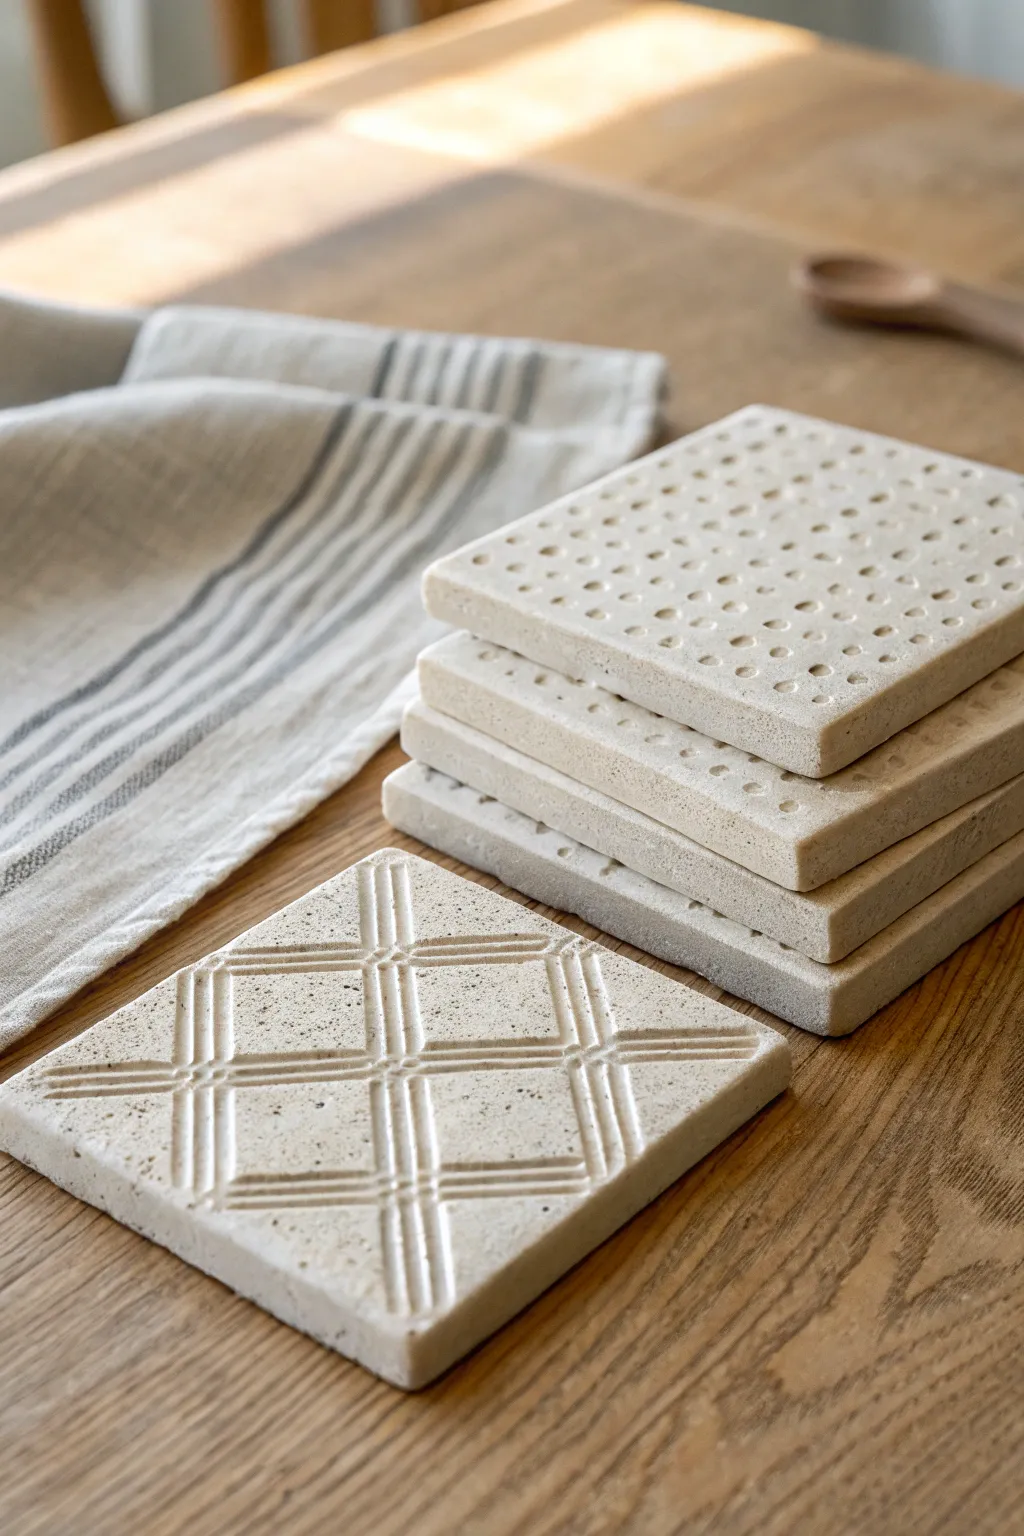
These substantial, minimalist coasters bring a sense of grounding calm to any table setting with their thick profile and tactile, unglazed finish. The design features two distinct textures—a rhythmic drilled grid and a deeply incised lattice pattern—that highlight the natural beauty of speckled stoneware clay.
Detailed Instructions
Materials
- Speckled sandstone or groggy white stoneware clay
- Rolling pin
- Two 3/8-inch wooden dowels (for thickness guides)
- Square cookie cutter (4-inch) or sharp knife and ruler
- Canvas or wooden board to work on
- Small drill bit or rounded skewer (approx 3-4mm diameter)
- Modeling tool with a small U-shaped loop or a fettling knife
- Straight edge/ruler
- Sponge and water
- Sandpaper
Step 1: Slab Preparation
-
Wedge the clay:
Begin by thoroughly wedging your speckled clay to remove air bubbles and ensure an even consistency. For a set of four coasters, you’ll need about 2-3 pounds of clay. -
Set up guides:
Place your wooden dowels on either side of your workspace. These will act as depth guides to ensure your slab is perfectly uniform. -
Roll the slab:
Roll the clay out between the dowels until the rolling pin rests on the wood. Aim for a generous thickness—these coasters have a chunky, stone-like aesthetic, so about 3/8-inch is ideal. -
Compress the surface:
Using a rib tool or hard card, smooth the surface of the clay in multiple directions. This compression helps prevent warping later and creates a nice canvas for your textures.
Warping Warriors
If corners curl up during drying, flip the coasters upside down and weight them gently with a sandbag or heavy book for a few hours.
Step 2: Shaping & Texturing
-
Cut the rough squares:
Using a 4-inch square cutter or a ruler and knife, cut out your coaster shapes. Don’t worry about perfect edges just yet; we will refine them. -
Design 1: The Perforated Grid:
For the dotted coasters, lay a ruler gently across the top surface to mark invisible lines. Using a handheld drill bit (twisting significantly) or the blunt end of a skewer, press indentations into the clay. -
Create the rhythm:
I find it helpful to work in rows, spacing the indentations about 1/4 inch apart. Press firmly but do not go all the way through the slab; you just want a surface texture. -
Design 2: The Lattice:
For the second design, use a ruler to lightly score a grid pattern. There are three horizontal lines and three vertical lines intersecting to create the window-pane effect. -
Carve the channels:
Using a small U-shaped carving tool, gouge out two parallel lines for every single line you scored. The clay between these parallel gouges forms a raised ‘rib’ that gives the piece visual structure. -
Clean the intersections:
Pay special attention to where the lines cross. Use a small knife to sharpen the corners so the raised diamonds in the center look crisp and intentional.
Make it Felt
Glue a square of cork or heavy felt to the bottom after firing. This adds a finished feel and protects delicate wood surfaces.
Step 3: Finishing & Firing
-
Dry slowly:
Place the coasters on a flat board. To prevent warping—the enemy of all coasters—place a sheet of drywall or a light wooden board on top of them while they dry. -
Refine the edges:
Once bone dry, use a slightly damp sponge to soften the sharp outer edges. Do not over-wet the clay, or you risk reviving the memory of the clay and causing warping. -
Bisque fire:
Fire the pieces to bisque temperature (usually Cone 04). Since we want a raw stone look, we won’t be applying a colored glaze. -
Sand the bottoms:
After firing, rub the bottom of each coaster against a piece of sandpaper on a flat surface to ensure they won’t scratch anyone’s table. -
High fire:
Fire the unglazed pieces to maturity (Cone 5, 6, or 10 depending on your clay body). This vitrifies the clay, making it non-porous and water-tight without needing glaze.
Stack your finished set and admire how the light catches the textures of your handcrafted stone tablets


What Really Happens Inside the Kiln
Learn how time and temperature work together inside the kiln to transform clay into durable ceramic.
Mini Bud Vases

Bring the serene beauty of the windowsill into your home with this trio of miniature vessels. By combining pinch pot techniques with different surface treatments—from raw, gritty textures to sleek, high-gloss glazes—you will create a harmonious yet varied collection perfect for dried sprigs.
Step-by-Step
Materials
- Stoneware clay (groggy/speckled for texture)
- Porcelain or smooth white stonewear (for the glazed vases)
- Pottery wheel (optional, can be hand-built)
- Needle tool
- Rib tool (wooden and metal)
- Sponge
- Cutting wire
- Turntable (banding wheel)
- Teal/Turquoise high-gloss glaze
- Sage green semimatte glaze
- Clear matte glaze (optional)
- Kiln
Step 1: Shaping the Central Textured Vase
-
Prepare the clay ball:
Start with a baseball-sized amount of groggy stoneware clay. Pat it into a smooth, round sphere to ensure even walls later. -
Open the pinch pot:
Hold the sphere in one hand and push your thumb deep into the center, stopping about a half-inch from the bottom. Gently pinch the clay between your thumb and fingers, rotating constantly to open up a round, bulbous shape. -
Refine the belly:
Continue pinching upward, keeping the belly of the pot wide and round. Don’t smooth the outside too much; the finger marks and clay grit add to the organic aesthetic shown in the photo. -
Collar the neck:
As you reach the top third, gently squeeze and collar the clay inward to form a narrow neck. You may need to trim excess clay from the rim with a needle tool to keep it even. -
Create the rim detail:
Flare the very top lip slightly outward. Using a wooden tool or your finger, create a subtle indentation or ‘step’ right where the neck creates a transition into the shoulder.
Cracks in the Neck?
If the narrow necks crack while drying, you likely compressed the clay too quickly or let the rim dry faster than the base. Next time, wrap the rim in a strip of damp paper towel while drying.
Step 2: Sculpting the Glazed Companions
-
Form the tall droplet vase:
For the teal vase, use smoother white clay. Whether throwing on a wheel or coiling by hand, aim for a wide base that tapers significantly into a long, elegant neck. -
Smooth the surface:
Unlike the textured pot, this one needs to be perfectly smooth. Use a metal rib tool to compress the exterior walls while the clay is leather hard, removing any fingerprints or grog. -
Construct the small cup:
For the small sage vessel, create a simple cylinder with slightly thick, straight walls. Use a damp sponge to round over the rim so it is soft to the touch. -
Dry slowly:
Place all three pieces under loose plastic to dry slowly. This is crucial for the narrow-necked vases to prevent cracking at the rim.
Step 3: Firing and Glazing
-
Bisque fire:
Once bone dry, fire your pieces to Cone 04 (or your clay body’s specific bisque temperature). Wipe them down with a damp sponge afterwards to remove dust. -
Mask the textured vase:
For the central beige vase, we want the raw clay to shine. Apply a wax resist to the bottom and leave the exterior unglazed, or apply a very thin wash of clear matte glaze just to seal it without hiding the texture. -
Glaze the tall vase:
Pour a high-gloss teal or turquoise glaze inside the tall vase, swirl, and pour out. Then, either dip the exterior or brush on three smooth coats. Leave a small unglazed ring at the foot. -
Glaze the small cup:
Dip the small cylinder into a semi-matte sage green glaze. I find dipping works best here to get that uniform, professional finish. -
Final wipe:
Clean up any glaze drips on the feet of your pots with a sponge to save your kiln shelves. -
Glaze fire:
Fire the pieces to maturity (usually Cone 5 or 6 for stoneware). Allow the kiln to cool completely before opening to prevent thermal shock.
Enhancing Texture
To get that gritty look on the central vase, mix a teaspoon of coarse sand or used coffee grounds into your clay body before shaping it. Sponge away the surface slip to reveal the grit.
Arrange your finished trio on a sunny sill with a few dried twigs to complete the look
Ring Cones and Jewelry Trays
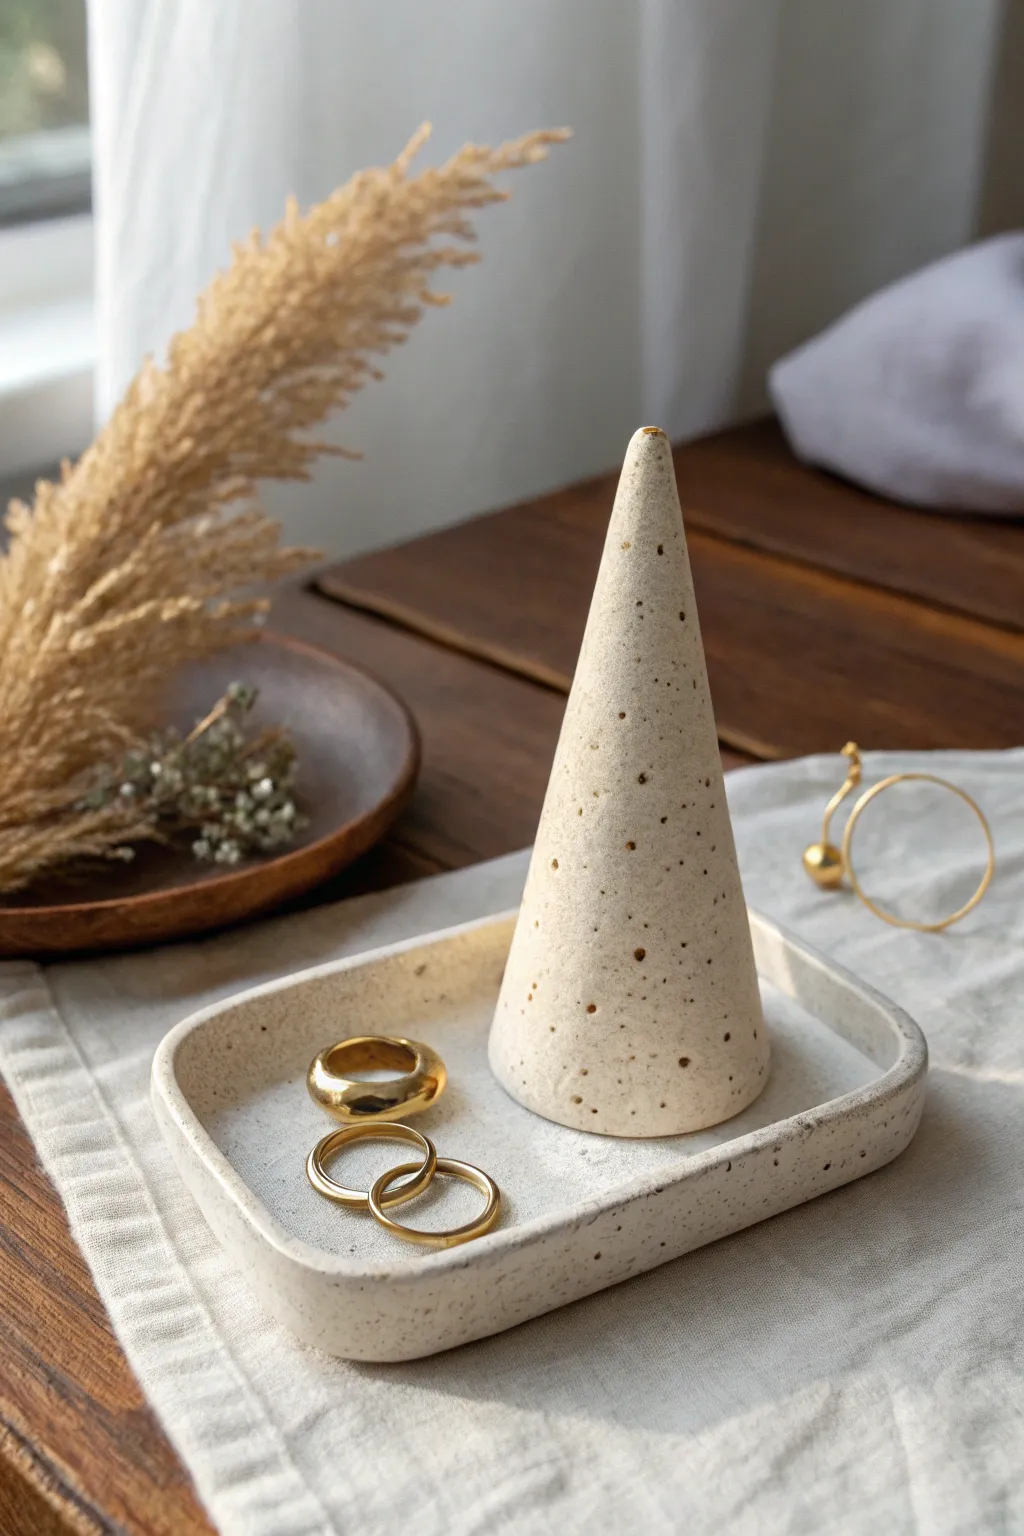
Capture the organic elegance of natural stone with this minimalist ring cone and matching tray set. The speckled cream finish provides a neutral, modern home for your favorite gold bands and delicate earrings.
Step-by-Step Guide
Materials
- White or cream polymer clay (approx. 4-6 oz)
- Speckled clay inclusion (e.g., Fimo Effect Granite or black pepper/ground coffee if DIYing)
- Acrylic rolling pin
- Self-healing cutting mat or smooth tile
- Sharp clay blade or craft knife
- Small square or rectangular cookie cutter (approx. 4×3 inches)
- Sandpaper (wet/dry, 400-800 grit)
- Oven (if using polymer clay) or kiln (if using ceramic)
- Matte spray varnish or glaze (optional)
Step 1: Preparing the Speckled Clay
-
Condition the base:
Begin by warming the white or cream clay in your hands, kneading it thoroughly until it creates a smooth, pliable ball without cracks. -
Create the speckled effect:
If you aren’t using pre-mixed granite clay, incorporate your speckles now. I like to mix a tiny amount of black or brown clay—about the size of a pea—into the white, chopping it into dust-like particles first. -
Blend the mixture:
Fold and roll the clay repeatedly to distribute the speckles evenly. Stop once the pattern looks completely random and natural, resembling real stone.
Step 2: Building the Ring Cone
-
Form the initial shape:
Pinch off about one-third of your clay block. Roll it into a ball, then begin rolling it back and forth on your work surface, applying more pressure to one side to create a tapered carrot shape. -
Refine the cone:
Stand the tapered coil up on its flat end. Gently roll it between your palms while keeping the base planted to smooth the sides and create a symmetrical point at the top. -
Level the base:
Use your sharp blade to slice a thin layer off the bottom of the cone. This ensures it sits perfectly flush with the tray later without wobbling. -
Smooth the surface:
Lightly run your finger over the clay to remove any fingerprints. If the tip feels too sharp or fragile, give it a tiny tap to round it off slightly.
Natural Speckles
For a truly organic look, knead dried coffee grounds or cracked black pepper into white clay. The texture mirrors real ceramic glaze perfectly.
Step 3: Crafting the Catch-All Tray
-
Roll out the slab:
Take the remaining clay and roll it out into an even sheet, approximately 1/4 inch thick. Aim for a consistent thickness to ensure even baking. -
Cut the tray base:
Use your rectangular cutter or a template with a craft knife to cut the base shape. For the rounded corners seen in the photo, smooth the sharp angles with your fingertip. -
Create the rim coil:
Roll a long, thin snake of clay, ensuring it’s long enough to go around the entire perimeter of your rectangle base. -
Attach the rim:
Place the coil on top of the edge of your base. If using polymer clay, press firmly to bond; for air-dry or ceramic clay, score and slip the connection points. -
Blend the seams:
Using a modeling tool or your finger, blend the inside seam where the coil meets the base until the transition is seamless and invisible. -
Shape the walls:
Pinch the coil upwards to form a low wall. Gently press down on the rim to flatten it slightly, creating that modern, squared-off lip shown in the example.
Gold Dipped Tip
Use liquid gold leaf or metallic acrylic paint to cover just the very tip of the cone for a luxurious, high-end boutique finish.
Step 4: Finishing Touches
-
Final inspection:
Check both pieces for stray lint or jagged edges. Smooth them out now, as it is much harder to fix imperfections after hardening. -
Bake or cure:
Place your pieces on a ceramic tile or baking sheet. Bake according to your specific clay package instructions—usually around 275°F (135°C) for polymer clay. -
Cool down:
Allow the pieces to cool completely in the oven with the door slightly ajar. This prevents thermal shock and cracking. -
Sand for stone texture:
Once cool, briefly wet-sand the pieces with fine-grit sandpaper. This removes any shine and enhances the matte, stone-like quality.
Arrange your new set on a bedside table to keep your everyday jewelry safe and stylishly displayed

TRACK YOUR CERAMIC JOURNEY
Capture glaze tests, firing details, and creative progress—all in one simple printable. Make your projects easier to repeat and improve.
Face Planters With Personality

Bring character to your plant collection with this charming hand-built planter featuring a peaceful, meditating visage. The combination of speckled clay, dimensional nose details, and simple line work creates an organic, earthy feel perfect for trailing succulents.
Step-by-Step Tutorial
Materials
- Speckled stoneware clay (mid-fire)
- Pottery wheel (or slab roller/rolling pin for hand-building)
- Needle tool
- Rib tool (kidney)
- Small painting brush
- Underglaze (dark brown or black)
- Underglaze (terracotta or reddish-orange)
- Clear matte glaze
- Slip and scoring tool
- Sponge
Step 1: Forming the Base
-
Create the vessel:
Begin by throwing a rounded, bowl-shaped cylinder on the wheel. Aim for a gently curving belly that tapers slightly inward at the rim. Alternatively, coil-build or pinch a similar spherical form if you are hand-building. -
Refine the shape:
While the clay is still plastic but supportive, use a rib tool to smooth the exterior walls, removing any throwing rings to create a clean canvas for the face. -
Add a foot ring:
Trim a defined foot at the bottom of the pot. This elevates the ‘head’ slightly and adds a finished look. If working with slabs, attach a coil ring to the base. -
Dry to leather hard:
Allow the pot to dry slowly until it reaches a leather-hard state. It needs to be firm enough to handle carving and attachments without warping.
Step 2: Sculpting the Features
-
Shape the nose:
Take a small nugget of fresh clay and shape it into a long, narrow triangular distinct nose shape. It should look like a long teardrop. -
Attach the nose:
Score the center of the face area and the back of your clay nose. Apply slip and press the nose firmly onto the pot. Use a modeling tool to smooth the seams so it looks integrated, not just stuck on. -
Create the golden frame:
Using a small brush and yellowish-brown underglaze (or a slip trailer), create vertical lines of small dots on the left and right sides of the face. These act like beaded hair strands or a decorative frame. -
Sketch the eyes:
Lightly trace the curves for the closed eyelids and eyebrows with a needle tool first to ensure symmetry. The eyes should be peacefully shut, positioned on either side of the nose bridge.
Uneven Eyes?
Before painting, sketch the eyes on paper first to practice the curve. You can also lightly trace the shape onto the clay with a pencil; the graphite burns off in the kiln.
Step 3: Painting and Glazing
-
Paint the lines:
Using a fine liner brush and dark brown underglaze, carefully paint over your traced lines for the eyebrows, eyelids, and eyelashes. Keep the touch light for crisp lashes. -
Define the mouth:
Paint a simple, almond-shaped mouth below the nose. Outline it in the dark brown, perhaps leaving the center empty or shading it lightly. -
Add blush:
Dilute a terracotta or reddish-orange underglaze slightly. Dab a round circle on each cheek area to give the face a rosy, warm glow. I like to sponge this slightly for a softer edge. -
Add nose definition:
Apply a wash of the yellow-brown underglaze onto the sculpted nose to highlight its dimension against the speckled clay body. -
Bisque fire:
Once the underglaze is completely dry, fire the piece to cone 04 (or your clay’s bisque temperature). -
Apply clear glaze:
Dip or brush a clear matte glaze over the entire exterior and interior. The matte finish preserves the natural stony look of the speckled clay. -
Final wipe:
Wipe the foot ring clean with a damp sponge to prevent it from sticking to the kiln shelf. -
Glaze fire:
Fire the piece to maturity (usually cone 5 or 6 for stoneware). Be careful not to over-fire if you want to maintain the specific underglaze colors.
Speckle Savvy
If you don’t have speckled clay, mix 2-3% granular manganese or ilmenite into plain white stoneware. Wear a mask when mixing dry materials!
Finally, pot up your favorite trailing plant to give your new friend a wild, green hairdo
Animal Whistles as Sculptures
This charming bird sculpture combines the simplicity of a hand-held form with delicate textural details. Its soft white finish and subtle speckling give it a timeless, organic look that fits perfectly on a sunlit sill.
Step-by-Step Guide
Materials
- White stoneware clay (preferably with fine grog or speckles)
- Clay wire cutter
- Pin tool or needle tool
- Small kidney scraper (metal or rubber)
- Wooden modeling tool
- Small sponge
- Scoring tool (or serrated rib)
- Slip (clay mixed with water)
- Matte white or transparent glaze
Step 1: Forming the Body
-
Prepare the Clay:
Start by wedging a fist-sized ball of clay to remove any air bubbles. Pat it into a smooth, oval egg shape. -
Shape the Pinch Pot:
Since this is a whistle-style sculpture, it needs to be hollow. Push your thumb into the center of the ball and gently pinch the walls while rotating the clay until you possess a uniform hollow bowl. -
Close the Form:
Gently gently curve the edges of your pinch pot inward until they meet. Score the edges, apply a dab of slip, and seal the form completely to create a hollow air-trapped sphere. -
Sculpt the Tail and Head:
While holding the hollow sphere, gently pull and coax one end to elongate it into a tapered tail section. Smooth the other end to define the roundness of the head. -
Create the Beak:
Pinch a small amount of clay at the front of the head to form a triangular beak. Use your thumb to smooth the transition where the beak meets the face so it looks seamless. -
Refine the Surface:
Use a kidney scraper or a damp sponge to smooth over the entire surface, erasing your fingerprints and ensuring the curves flow naturally from head to tail. I prefer to let the clay firm up slightly here before moving to details.
Clean Lines
After carving lines for feathers, wait for the clay to become bone dry, then gently brush with a soft, dry paintbrush to remove little clay burrs.
Step 2: Adding Details & Texture
-
Define the Wings:
Use a needle tool or wooden modeling tool to lightly outline a teardrop-shaped wing on the side of the bird. Don’t cut through; just mark the placement. -
Carve the Wing Relief:
To make the wing stand out, gently carve away a tiny bit of clay around the outline, or press the surrounding area down slightly so the wing appears raised. -
Add Wing Feathers:
Using a sharp tool, carve three or four curved lines inside the wing shape to represent feathers. Vary the pressure to give the lines an organic feel. -
Sculpt the Eye:
Press the blunt end of a small drill bit or the back of a paintbrush into the head to create a deep, round indentation for the eye. Repeat on the other side. -
Create Chest Texture:
Using a fine needle tool, poke a series of small, random holes across the breast of the bird. These decorative dots mimic the speckled texture of feathers. -
Detail the Tail:
Press linear indentations along the top of the tail to suggest tail feathers, matching the style of the lines you carved into the wings. -
Air Release Hole:
Since this is a sealed hollow form, use a needle tool to poke a discreet hole underneath the bird. This allows expanding air to escape during firing so the piece doesn’t explode.
Air Trap Hazard
If the bird cracks in the kiln, you likely forgot the air vent hole. Always pierce the bottom of hollow forms to let expanding hot air escape.
Step 3: Finishing & Firing
-
Slow Drying:
Loosely cover your bird with plastic and let it dry slowly over several days to the bone-dry stage. This prevents cracking at the beak or tail. -
Bisque Fire:
Fire the piece in a kiln to cone 04 (or your clay body’s recommended bisque temperature). -
Glazing:
Dip the bird into a matte white or semi-transparent glaze. If your clay has speckles, a transparent glaze will let them show through beautifully. -
Wiping Back:
Using a damp sponge, gently wipe the glaze off the high points of the wing texture and beak. This emphasizes the carving and adds visual depth. -
Final Fire:
Fire the piece again to the final temperature required for your specific glaze and clay body.
Place your finished bird near a window where the light can catch the subtle curves and carved details of your handiwork
Wall Medallions and Relief Plaques
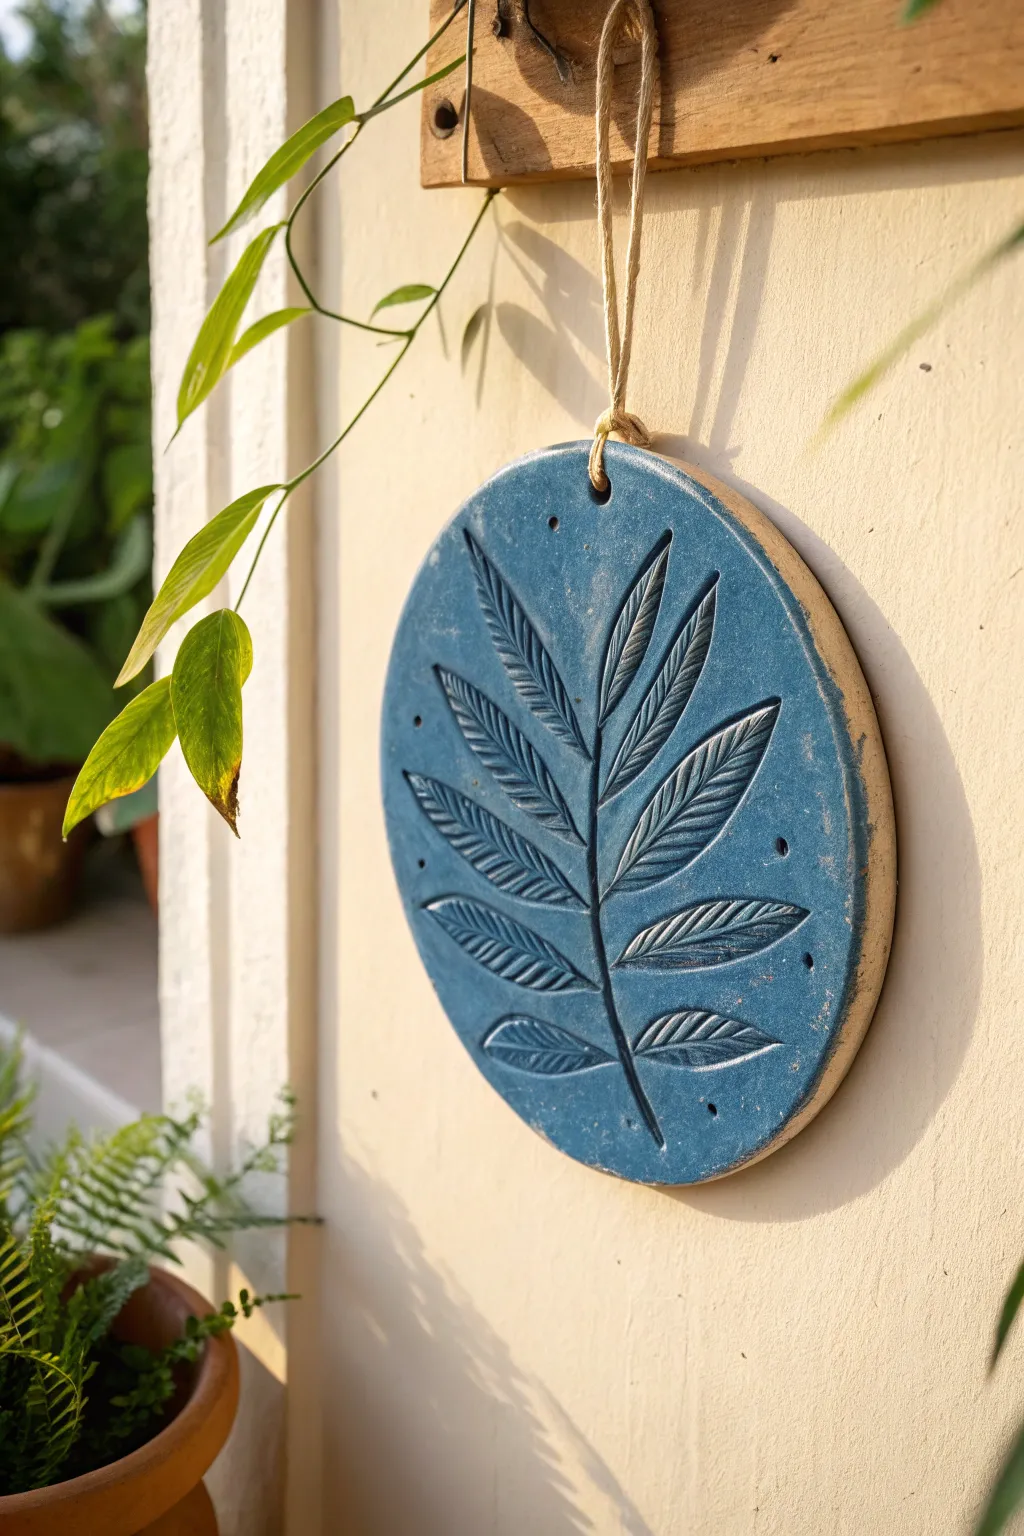
Capture the simple beauty of nature with this textured ceramic wall hanging, featuring a carved botanical design on a rustic clay round. The striking contrast between the deep cobalt blue glaze and the raw clay edge makes this a timeless piece for any patio or garden wall.
Step-by-Step
Materials
- Light-colored stoneware or earthenware clay body
- Rolling pin
- Two 1/4-inch wooden slats (guide sticks)
- Round cookie cutter or bowl (approx. 6-8 inches diameter)
- Needle tool
- Rib tool (rubber or metal)
- Texture carving tools (loop tool or a specialized sgraffito tool)
- Fettling knife
- Cobalt blue underglaze or matte glaze
- Sponge
- Twine or jute cord
- Kiln
Step 1: Forming the Base
-
Prepare the Clay:
Begin by wedging your clay thoroughly to remove any air bubbles. Form it into a smooth, manageable ball, ready for rolling. -
Roll the Slab:
Place your 1/4-inch guide sticks on either side of the clay ball. Roll the clay out into an even slab, ensuring the rolling pin rides on the sticks to maintain a consistent thickness throughout. -
Smooth the Surface:
Before cutting, take a rib tool and gently compress the surface of the slab. This aligns the clay particles to prevent warping and creates a pristine canvas for your carving. -
Cut the Circle:
Press your round cutter or a bowl firmly into the slab to define the shape. If using a bowl, trace around the edge with a needle tool held vertically. -
Create the Hanging Hole:
Decide where the top of your medallion will be. Use a drinking straw or a hole punch tool to remove a small circle of clay about 1/2 inch from the top edge. Wiggle it slightly to ensure the hole is clean. -
Refine the Edges:
Use a slightly damp sponge to smooth the cut edges of the circle. You want to soften any sharp corners that might chip after firing.
Step 2: Carving the Design
-
Sketch the Stem:
With a needle tool, very lightly scratch a curved central line for the stem. Don’t dig deep yet; this is just a guide to ensure your composition is centered. -
Outline the Leaves:
Lightly sketch the outline of the leaves branching off the stem. Aim for a symmetrical, stylized look rather than perfect realism to match the project style. -
Carve the Outlines:
Using a small V-tip carving tool or a sharp loop tool, carve out the main lines of the stem and the leaf outlines. Use confident, fluid strokes to remove curls of clay. -
Add Leaf Veins:
Inside each leaf outline, carve fine diagonal lines to represent veins. Varying the pressure slightly will give the veins a natural, organic feel. -
Add Decorative Dots:
To fill awkward empty spaces around the leaves, press the blunt end of a small paintbrush or tool into the clay to create small, distinct circular indentations. -
Clean Up Burrs:
Let the clay dry to a leather-hard state. Once firm, use a soft brush or a dry sponge to gently sweep away any clay crumbs or ‘burrs’ left from carving. Following this step produces the crispest lines.
Clean Lines Pro Tip
Carve your design when the clay is leather-hard rather than wet. The clay will flake away cleanly rather than dragging, creating much sharper details.
Step 3: Glazing and Finishing
-
Bisque Fire:
Place the bone-dry medallion in the kiln and fire to your clay body’s bisque temperature (usually Cone 04). This prepares the piece for glazing. -
Apply Blue Underglaze:
Brush a generous coat of cobalt blue underglaze over the entire front surface. Ensure the color gets deep into the carved recesses. -
Wipe Back (Optional):
If you want the texture to pop more, wait for the underglaze to dry slightly, then wipe the raised surfaces gently with a damp sponge. This leaves pigment in the lines while revealing the clay body on top. For a solid blue look like the photo, skip this step. -
Clear Glaze (Optional):
For a glossy finish, apply a clear glaze over the blue. The example image suggests a more matte or satin finish, so you might leave the underglaze as-is if it is designed to be fired without a topcoat. -
Glaze Fire:
Fire the piece again to the appropriate temperature for your glaze and clay body (e.g., Cone 5 or 6 for stoneware). -
Attach the Twine:
Once cool, cut a length of natural jute twine. Fold it in half, push the loop through the hole from front to back, and pull the tails through the loop to create a lark’s head knot.
Nature Stamping
Instead of hand-carving the veins, press real leaves into the soft clay slab before cutting your circle. The natural veins will create a perfect impression to glaze.
Hang your finished medallion in a spot where the changing light will play across the carved textures throughout the day
Wavy Slump Bowls With Organic Rims
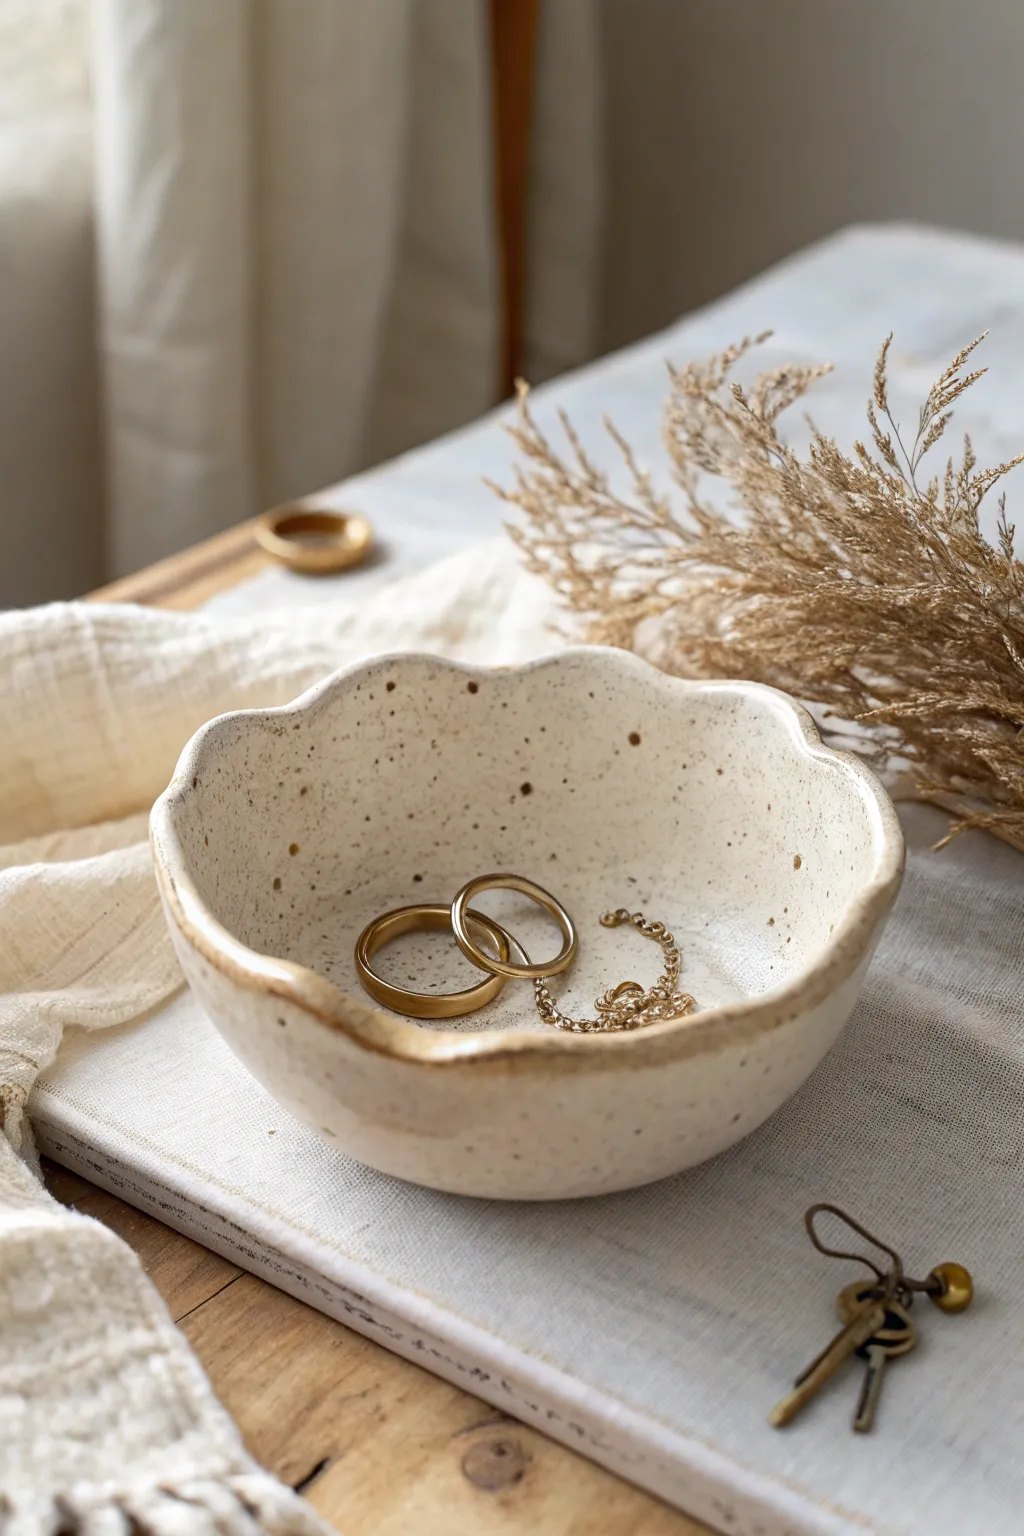
This charming, hand-formed bowl captures the essence of organic pottery with its gentle, flower-like undulations and warmly speckled surface. It is the perfect size for holding rings or delicate chains, making a beautiful addition to any bedside table or vanity.
Step-by-Step Guide
Materials
- Speckled buff stoneware clay
- Rolling pin
- Canvas mat or cloth
- Circular template (paper or bowl) approx. 5-6 inches
- Needle tool or fettling knife
- Small sponge
- Slump mold (a plaster mold, or a simple cereal bowl lined with plastic)
- Rib tool (soft silicone or rubber)
- Clear or transparent white glaze
- Kiln (for bisque and glaze firing)
Step 1: Preparing the Slab
-
Wedge the clay:
Begin by thoroughly wedging a ball of speckled buff clay to remove air bubbles and ensure an even consistency. -
Roll it out:
Place the clay on your canvas mat. Using a rolling pin, roll the clay out into an even slab. -
Check thickness:
Aim for a uniform thickness of about 1/4 inch (6mm). Too thin and the rim will be fragile; too thick and it will look chunky. -
Smooth the surface:
Take your soft rib tool and gently compress the surface of the slab. This aligns the clay particles and removes the canvas texture.
Step 2: Forming the Shape
-
Cut the circle:
Place your circular template onto the slab. Use your needle tool held vertically to cut out a clean circle. -
Initial smoothing:
Run a damp finger or a small, slightly moist sponge around the cut edge to soften the sharp angle left by the knife. -
Prepare the mold:
If using a plaster hump mold, ensure it’s clean. If using a household bowl as a slump mold, line it with a piece of plastic wrap or thin fabric to prevent sticking. -
Slump the clay:
Carefully lift your clay circle and drape it into your chosen mold. Gently press the center down so it conforms to the bottom curve.
Natural Texture
Don’t over-smooth the rim. The beauty of this piece lies in the slight irregularities that make it feel handmade and organic.
Step 3: Creating the Organic Rim
-
Create the waves:
With the clay sitting in the mold, use your fingers to gently push sections of the rim inward and other sections outward to create a scalloped, wavy effect. -
Refine the undulations:
I like to use my thumb and forefinger to pinch the high points of the waves slightly, varying the pressure to keep it looking organic rather than mechanically perfect. -
Soften the lip:
Use your damp sponge to wipe the rim again. The goal is a rounded, soft edge that is pleasant to touch, mimicking the image. -
Dry slowly:
Allow the clay to dry to a leather-hard state while still in the mold so it retains its shape.
Uneven Drying?
If the rim dries faster than the base, it might crack. Cover the rim loosely with plastic strips to slow its drying while the base catches up.
Step 4: Finishing and Firing
-
Remove and refine:
Once leather-hard, remove the bowl from the mold. Check the bottom and smooth any rough spots with a rib or sponge. -
Bone dry:
Let the piece dry completely until bone dry. It should feel room temperature to the touch, not cool. -
Bisque fire:
Load the piece into the kiln for a bisque firing (usually Cone 04 or 06, depending on your clay body). -
Glaze application:
Once bisque fired, wipe the piece with a damp sponge to remove dust. Dip or brush on a clear or semi-transparent white glaze. This transparency is crucial to let the clay’s natural speckles show through. -
Wipe the foot:
In the image, the rim has a warm, toasted look. Ensure the glaze is slightly thinner on the rim, or simply let the clay body do the work. Wipe the glaze off the bottom foot completely. -
Glaze fire:
Fire the piece again to the maturation temperature of your clay and glaze (often Cone 5 or 6 for stoneware).
Now you have a delicate, speckled vessel ready to cradle your favorite jewelry pieces
Lidded Keepsake Boxes
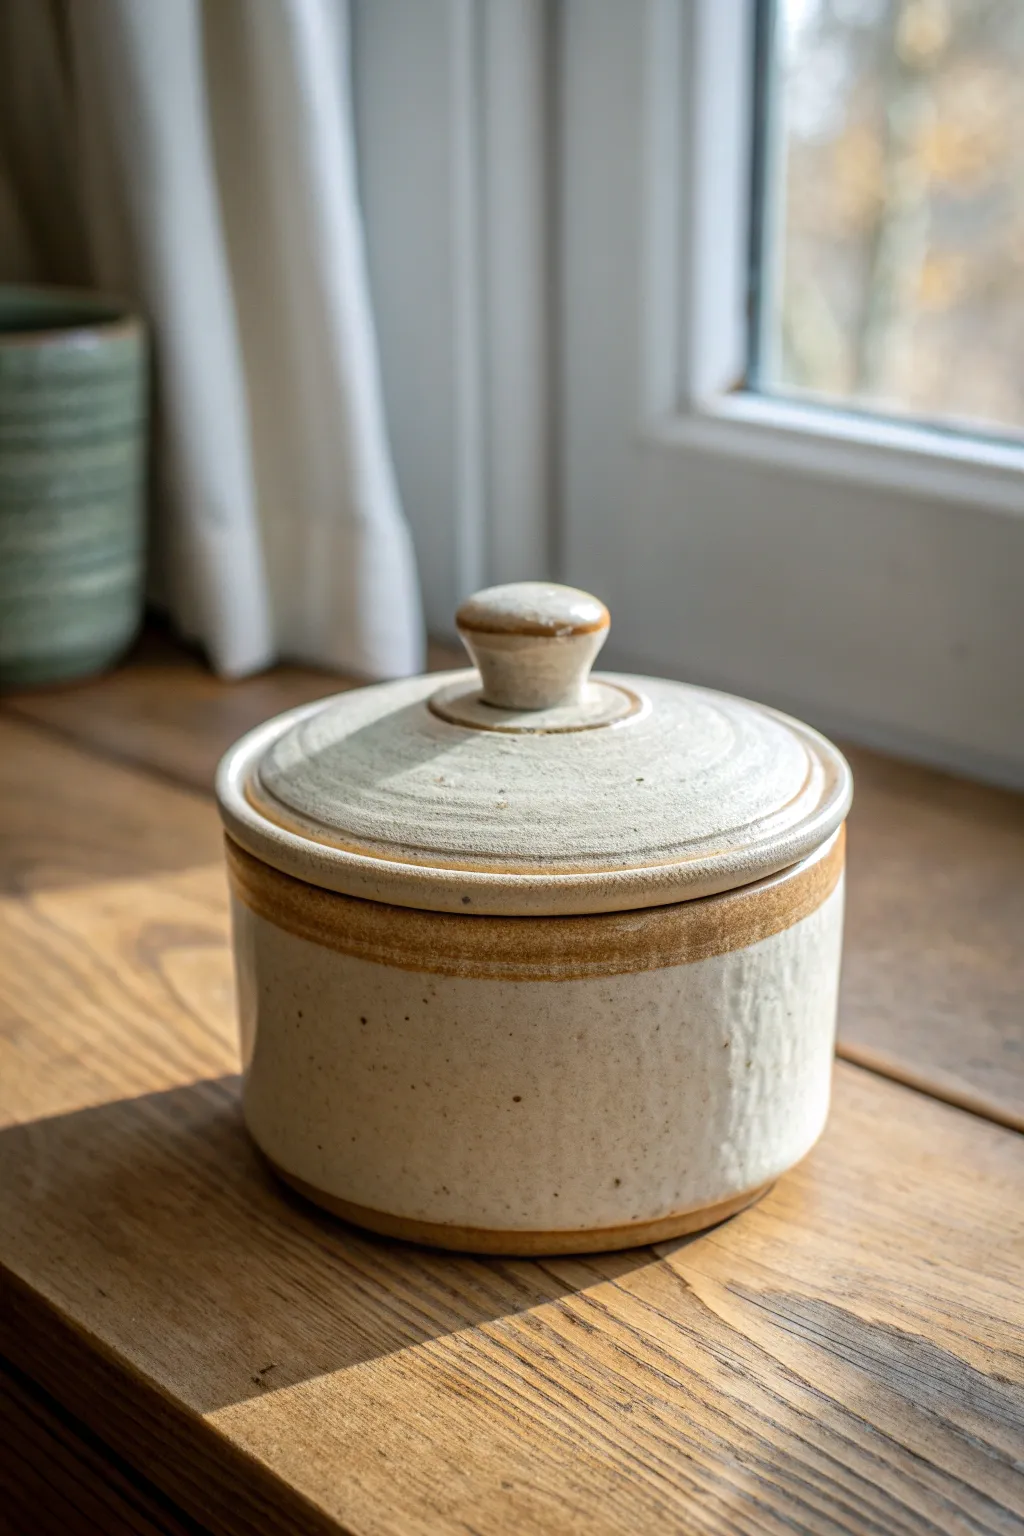
Embrace the warmth of natural textures with this charming lidded box, featuring a speckled clay body and a creamy overlapping glaze. Its sturdy, wheel-thrown form and distinctive unglazed bands create a timeless piece perfect for holding jewelry or kitchen treasures.
Step-by-Step
Materials
- Speckled stoneware clay (approx. 2 lbs)
- Potter’s wheel
- Throwing sponge
- Wooden throwing rib
- Metal kidney rib
- Cutting wire
- Calipers
- Needle tool
- Trimming tools (loop and ribbon)
- Speckled cream or oatmeal glaze
- Wax resist
- Kiln for bisque and glaze firing
Step 1: Throwing the Body
-
Center the clay:
Start with about 1.5 lbs of well-wedged speckled stoneware clay. Center it firmly on the wheel head, ensuring a wide, stable base rather than a tall cone. -
Open the form:
Open the clay to create a flat floor, leaving about a 1/2 inch thickness for the bottom. Smooth and compress the floor with your sponge to prevent S-cracks later. -
Pull the walls:
Pull the walls straight up to create a cylinder. Aim for vertical sides with a consistent thickness. The final shape shown is cylindrical with just a hint of a curve at the bottom. -
Create the gallery:
At the rim, gently split the clay or press down with a wooden tool to create a ‘gallery’—an internal shelf where the lid will rest. Ensure this shelf is flat and smooth. -
Refine the surface:
Use a wooden rib to smooth the exterior walls, removing throwing lines if you prefer the sleek look in the photo, or leave them subtle for texture. -
Measure closely:
Use your calipers to measure the exact inner diameter of the gallery shelf. Lock the calipers in place; you will need this measurement for the lid.
Pro Tip: Clean Lines
For the crisp unglazed band near the rim, use automotive striping tape instead of freehand wax. Peel it off before firing for a perfect straight edge.
Step 2: Throwing the Lid
-
Throw off the hump:
Using the remaining clay, center a small hump. Flatten the top into a disc shape slightly wider than your caliper measurement. -
Form the flange:
Carve or throw a flange on the underside of this disc that will fit inside the jar’s gallery. Check frequently with your calipers to ensure a snug fit. -
Shape the dome:
Shape the top of the lid into a gentle curve. I like to leave enough clay in the center to pull a small, solid knob directly from the form. -
Refine the knob:
Shape the knob into a comfortable, rounded button style with a slightly narrower neck, as seen in the reference image. -
Cut and release:
Cut the lid from the hump carefully with a needle tool or wire, ensuring you keep the flange intact.
Step 3: Trimming and Finishing
-
Leather hard stage:
Allow both pieces to dry to a leather-hard state. The clay should be firm enough to handle without deforming but soft enough to carve. -
Trim the jar:
Invert the jar on the wheel (use a chuck if necessary to protect the rim). Trim the bottom to define the foot ring and clean up the lower curve. -
Detailed trimming:
Trim the lid if necessary to remove excess weight or refine the curve. Test the fit with the jar; it should slide in easily but not rattle excessively. -
Bisque fire:
Let the pieces bone dry completely before loading them into the kiln for a bisque firing to cone 04 (or your clay’s specific bisque temperature).
Troubleshooting: Lid Fit
If the lid shrinks more than the pot and is too loose after firing, you can’t add clay back. However, a loose lid is better than one that won’t fit at all!
Step 4: Glazing
-
Wax resist application:
Apply wax resist to the foot ring and the gallery shelf where the lid touches. Also, apply a band of wax resist just below the rim on the outside to create that distinctive exposed clay stripe. -
Glaze the interior:
Pour your cream or oatmeal glaze inside the jar, swirl to coat evenly, and pour out the excess. -
Dip the exterior:
Hold the jar by the foot and dip the exterior into the glaze. The wax band near the rim will repel the glaze, leaving the raw clay exposed. -
Glaze the lid:
Dip the lid, holding it by the knob. Wipe any glaze off the contact points (the flange) to prevent it from fusing to the jar during firing. -
Final wipe:
Use a damp sponge to clean up any glaze drips on the waxed areas or the foot ring. -
High fire:
Fire the piece to maturity (likely cone 6 or 10, depending on your clay body). The heat will bring out the iron speckles through the creamy glaze.
Once cooled, the contrast between the smooth glaze and the toasted, raw clay band creates a visually striking finish for your new keepsake box
Cutout Lanterns for Cozy Light
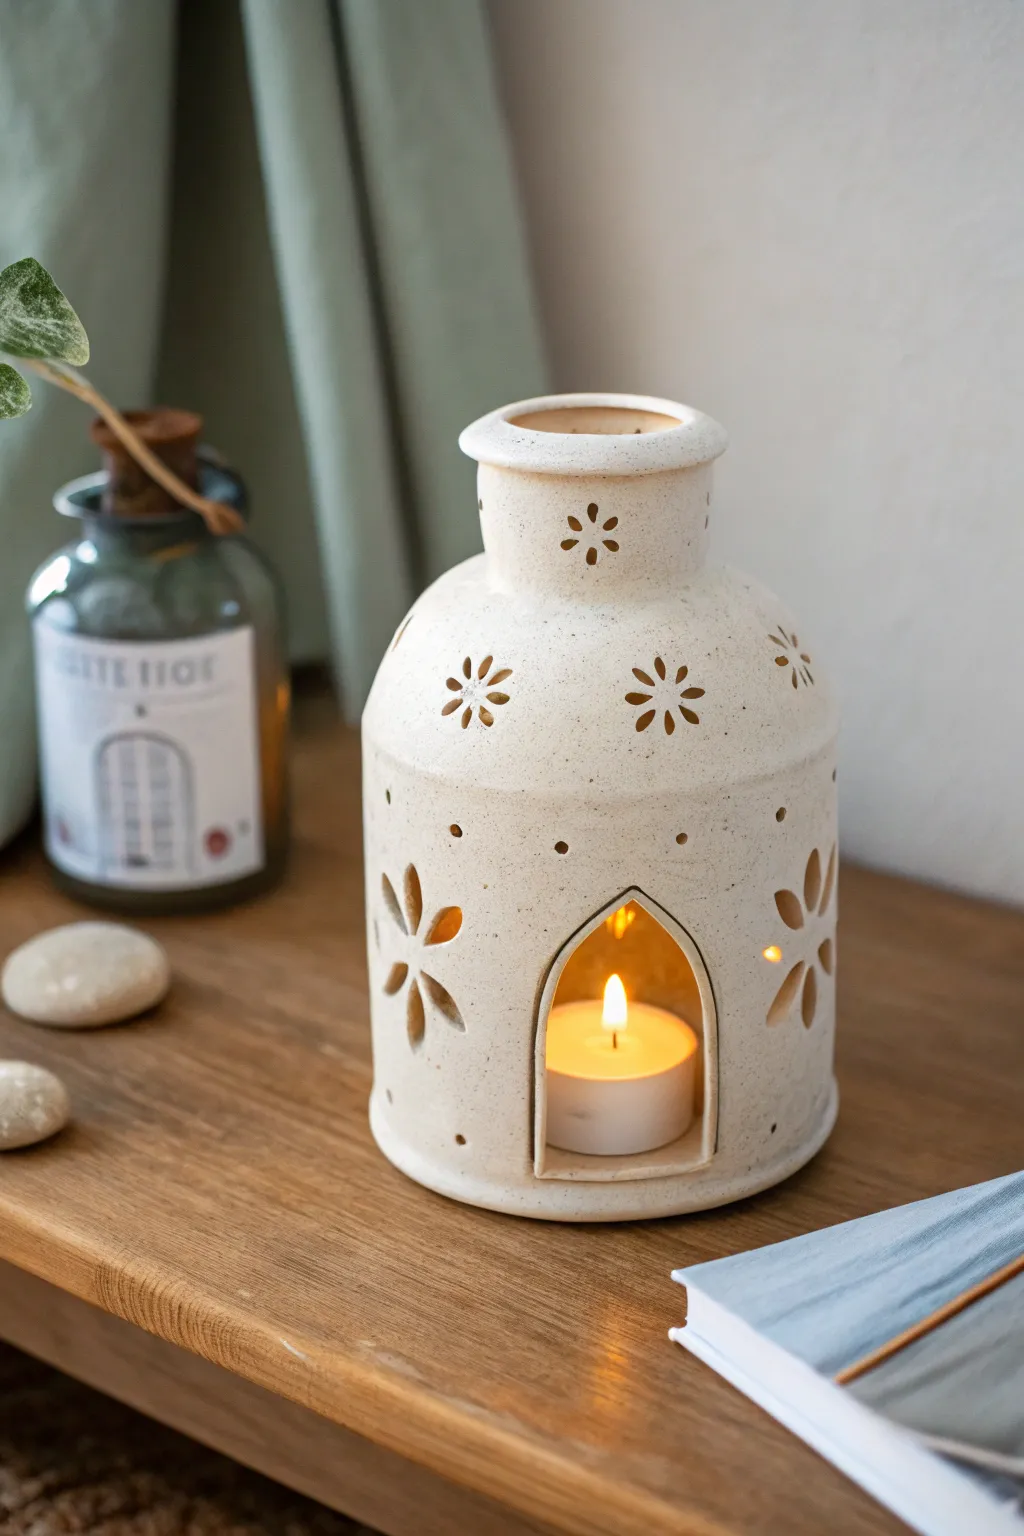
This charming, milk-bottle-shaped lantern uses cutouts to cast a warm, flickering glow. With its speckled clay body and delicate floral perforations, it brings a cozy, cottage-core aesthetic to any table setting.
How-To Guide
Materials
- Speckled stoneware clay (white or cream)
- Ruler
- Rolling pin
- Canvas work surface
- Fettling knife
- Needle tool
- Slip and scoring tool (or fork)
- Hole cutters (small and medium)
- X-Acto knife or sharp clay knife
- Sponge
- Clear matte glaze or transparent glaze
- Wide cardboard tube (optional, for support)
Step 1: Forming the Base
-
Roll the slab:
Begin by rolling out your speckled clay on a canvas surface until it is an even 1/4-inch thickness. You want it sturdy enough to stand but thin enough to cut easily. -
Cut the main cylinder:
Measure and cut a large rectangle. The length ideally should be about 10-12 inches and the height roughly 5 inches, though customization works here. -
Join the cylinder:
Score the short ends of your rectangle and apply slip. Gently curve the clay to form a circle, overlapping the scored ends, and press firmly to seal the seam. -
Cut and attach the floor:
Roll a small separate slab for the base. Place your cylinder on top, trace the circle, and cut it out. Score and slip to attach this disc to the bottom of your cylinder. -
Smooth the seams:
Using a rib tool or your finger, smooth the vertical seam and the bottom connection point on both the inside and outside so they disappear completely.
Step 2: Shaping the Neck
-
Create the shoulder:
Roll a flat ring (donut shape) of clay. The outer diameter should match your cylinder, and the inner hole should be about 2.5 inches wide. Score and slip this onto the top rim of your cylinder to create the ‘shoulder’. -
Add the neck:
Cut a smaller rectangle strip, roughly 2 inches tall. Curve this into a smaller cylinder that fits the inner hole of the shoulder ring you just attached. Join the seams. -
Attach neck to body:
Score and slip the bottom of this smaller cylinder onto the shoulder ring. Blend the clay downwards to ensure a strong potential bond. -
Form the rim:
Roll a small coil of clay. Attach this to the very top raw edge of the neck, smoothing it over to create a rounded, finished lip.
Slumping Walls?
If the clay walls buckle while you work, the slab is too wet. Stuff the inside lightly with newspaper or insert a cardboard tube to support the shape while it stiffens.
Step 3: Carving the Design
-
Plan the cutouts:
Once the form is leather-hard (stiff but still cool to the touch), lightly sketch your design with a needle tool. Mark the large archway door and the positions for the flowers. -
Cut the candle door:
Using a sharp fettling knife or X-Acto blade, carefully cut out the Gothic-style arch at the base. Save this piece of clay to test glazes later if needed. -
Punch the flower centers:
Use a small circular hole cutter to punch out the center dots for your flowers around the main body and the neck. -
Carve the petals:
I find using an X-Acto knife allows for the most precision here. Carve teardrop shapes radiating from your circular centers. Clean up any rough edges immediately with a damp brush. -
Add detail holes:
Use your smallest needle tool or drill bit to poke tiny decorative dots between the larger flower motifs for extra ventilation and sparkle.
Clean Cuts Pro-Tip
Wait until the clay is true leather-hard before cutting flowers. If it’s too soft, the knife will drag and warp the clay; too dry and it will crack or chip.
Step 4: Finishing
-
Final smooth:
Use a slightly damp sponge to wipe down the entire piece, softening the sharp edges of your cutouts without warping the design. -
Bisque fire:
Let the piece dry slowly under plastic for a few days before bisque firing to cone 04 (or according to your clay’s instructions). -
Glaze application:
Dip or brush a clear matte glaze over the entire piece. This highlights the natural speckles in the clay body. Wipe the bottom clean. -
Final Fire:
Fire again to the maturity temperature of your clay (likely Cone 5 or 6 for stoneware).
Place a tea light inside and enjoy the beautiful patterns cast on your walls
Mix-and-Match Dinnerware Mini Set
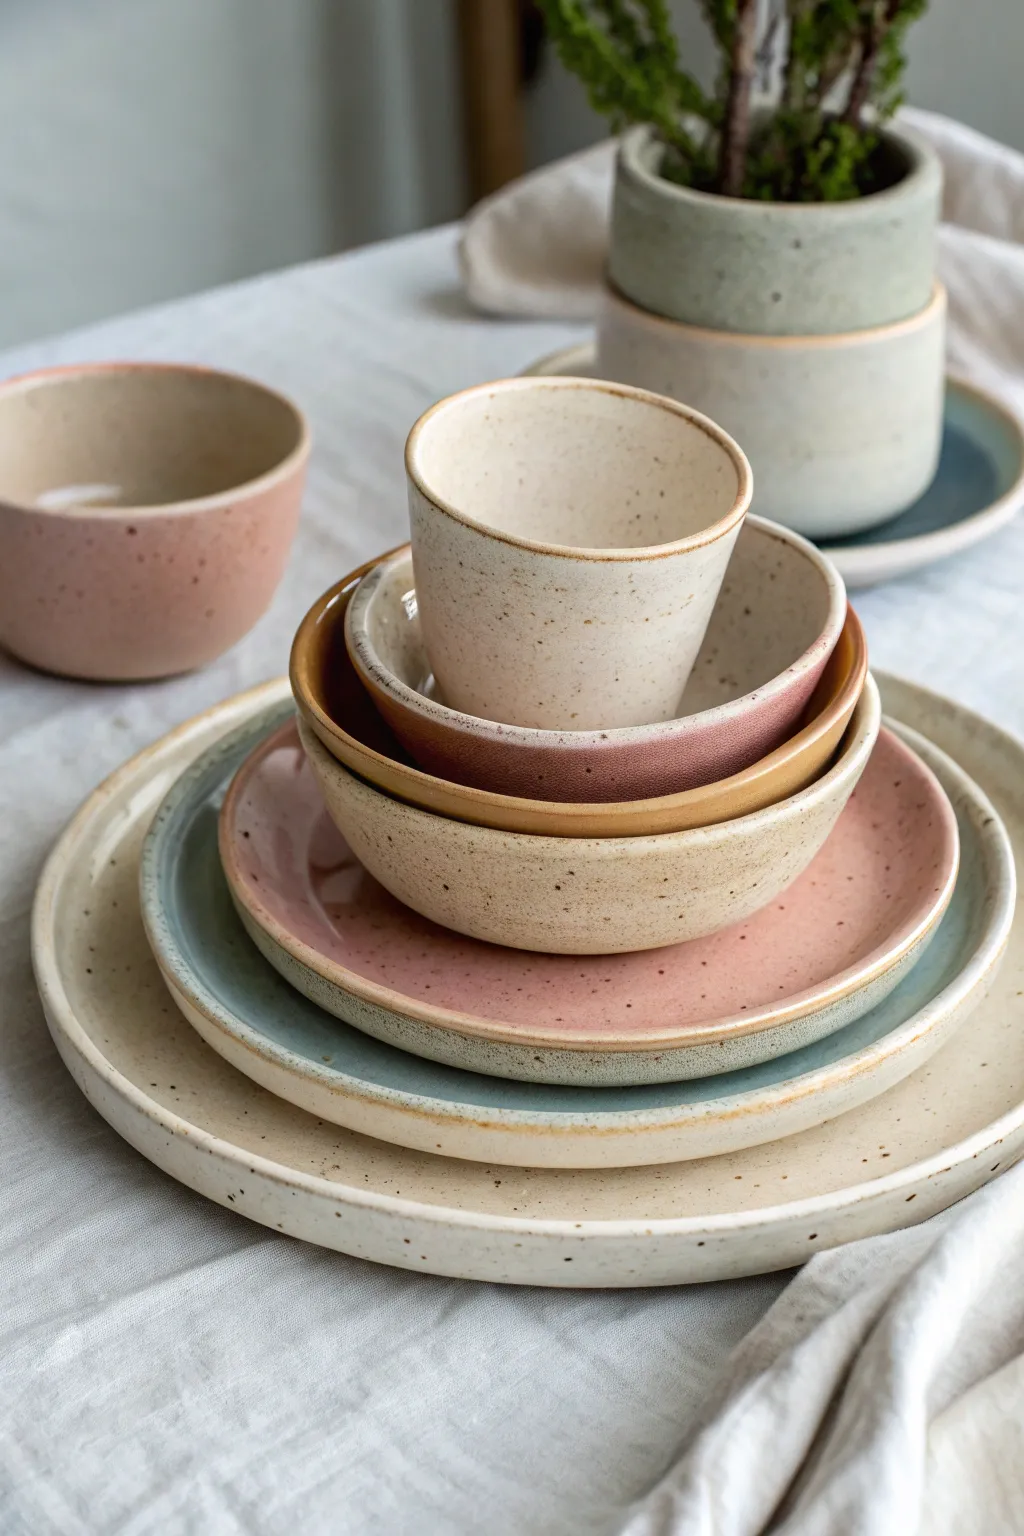
Create a unified yet eclectic table setting with this nesting dinnerware set, featuring gentle organic curves and a sophisticated speckled finish. By varying the clay bodies or glaze combinations, you’ll achieve a harmonious palette of creams, dusty pinks, and slate blues that look stunning stacked together.
Step-by-Step
Materials
- Speckled stoneware clay (white or light buff body)
- Pottery wheel
- Throwing tools (sponge, wire cutter, ribs)
- Trimming tools
- Bats for the wheel
- Rolling pin and guide strips (optional for slab variation)
- Damp box or plastic sheeting
- Bisque kiln and glaze kiln
- Satin matte glazes: Cream, Dusty Rose, Slate Blue, Mustard/Ochre
Step 1: Planning and Weighing
-
Calculate clay weights:
To get the nesting effect right, you need precise weights. For the large dinner plate, measure out 1.5kg of clay. For the salad plate, use 1kg. For the pasta bowl, 750g. For the tumbler, 400g. -
Wedge the clay:
Thoroughly wedge each ball of speckled clay to remove air bubbles and align the particles, ensuring smooth throwing later.
Rim Consistency
Use a wooden gauge or calipers while throwing to ensure the rim diameter of each nesting piece fits perfectly inside the one below it.
Step 2: Throwing the Stack
-
Throw the large plate:
Center the 1.5kg ball low and wide. Open it all the way to the bat, leaving just a thin floor. Compress the bottom thoroughly to prevent S-cracks. Pull the rim out flat, then gently lift the edge just slightly to create a very shallow, modern profile. -
Throw the nesting plates:
Repeat the process for the salad plate and pasta bowl, but allow the walls to curve upward slightly more on the smaller vessels. The key is to keep the rims slightly thickened and rounded for durability. -
Form the tumbler:
Center the 400g ball taller than the plates. Open a deep well and pull a cylinder. Gently shape it into a slight ‘V’ shape—wider at the top than the bottom—so it nestles visually into the bowls. -
Smooth the surfaces:
Before removing from the wheel, use a soft rib on the inside and outside of every piece. This brings the grog to the surface, enhancing the speckled look later, and removes throwing lines for a cleaner, modern aesthetic.
Step 3: Trimming and Drying
-
Slow drying:
Cover the pieces loosely with plastic and let them dry to a leather-hard state. I find that rushing this stage with flat plates often leads to warping. -
Trim foot rings:
Invert the pieces on the wheel. Trim a definitive foot ring on the plates and bowls. This elevates them off the table and adds a professional shadow line. -
Clean the edges:
Use a damp sponge to smooth any sharp edges on the foot rings or rims. Run a finger over the rim; if it feels sharp now, it will be razor-sharp after firing. -
Bisque fire:
Once bone dry, fire the greenware to cone 04 (or your clay’s specific bisque temperature).
Warped Plates?
Flat plates warp easily. Dry them very slowly and upside down on foam or drywall squares to keep the rims level as moisture evaporates.
Step 4: Glazing and Finishing
-
Wax the feet:
Apply wax resist to the foot rings and the very center of the bottoms to prevent them from sticking to the kiln shelves. -
Pour the interiors:
For the bowls and tumbler, pour the glaze inside, swirl to coat, and pour out. Use the cream glaze for the tumbler interior and the pink for the small bowl to replicate the photo. -
Dip the exteriors:
Dip the large plate entirely in cream/white matte glaze. For the middle plates, get creative—dip the salad plate in slate blue but leave the rim thin so the clay body shows through. -
Create the rim detail:
Where the clay body is naturally sandy, verify that your glaze breaks over the edges. If your glaze is too thick, wipe the very edge of the rims with a damp sponge to simulate that exposed clay lip seen in the sample. -
Glaze fire:
Load the kiln carefully, ensuring no pieces touch. Fire to cone 5 or 6 (mid-range stoneware) to mature the clay and melt the subtle speckles through the glaze. -
Sand the bottoms:
After firing, use wet sanding paper or a diamond pad to smooth the unglazed foot rings so they don’t scratch your table.
Enjoy styling your table with these beautiful, stackable handmade ceramics
Sgraffito Pattern Night on Simple Forms
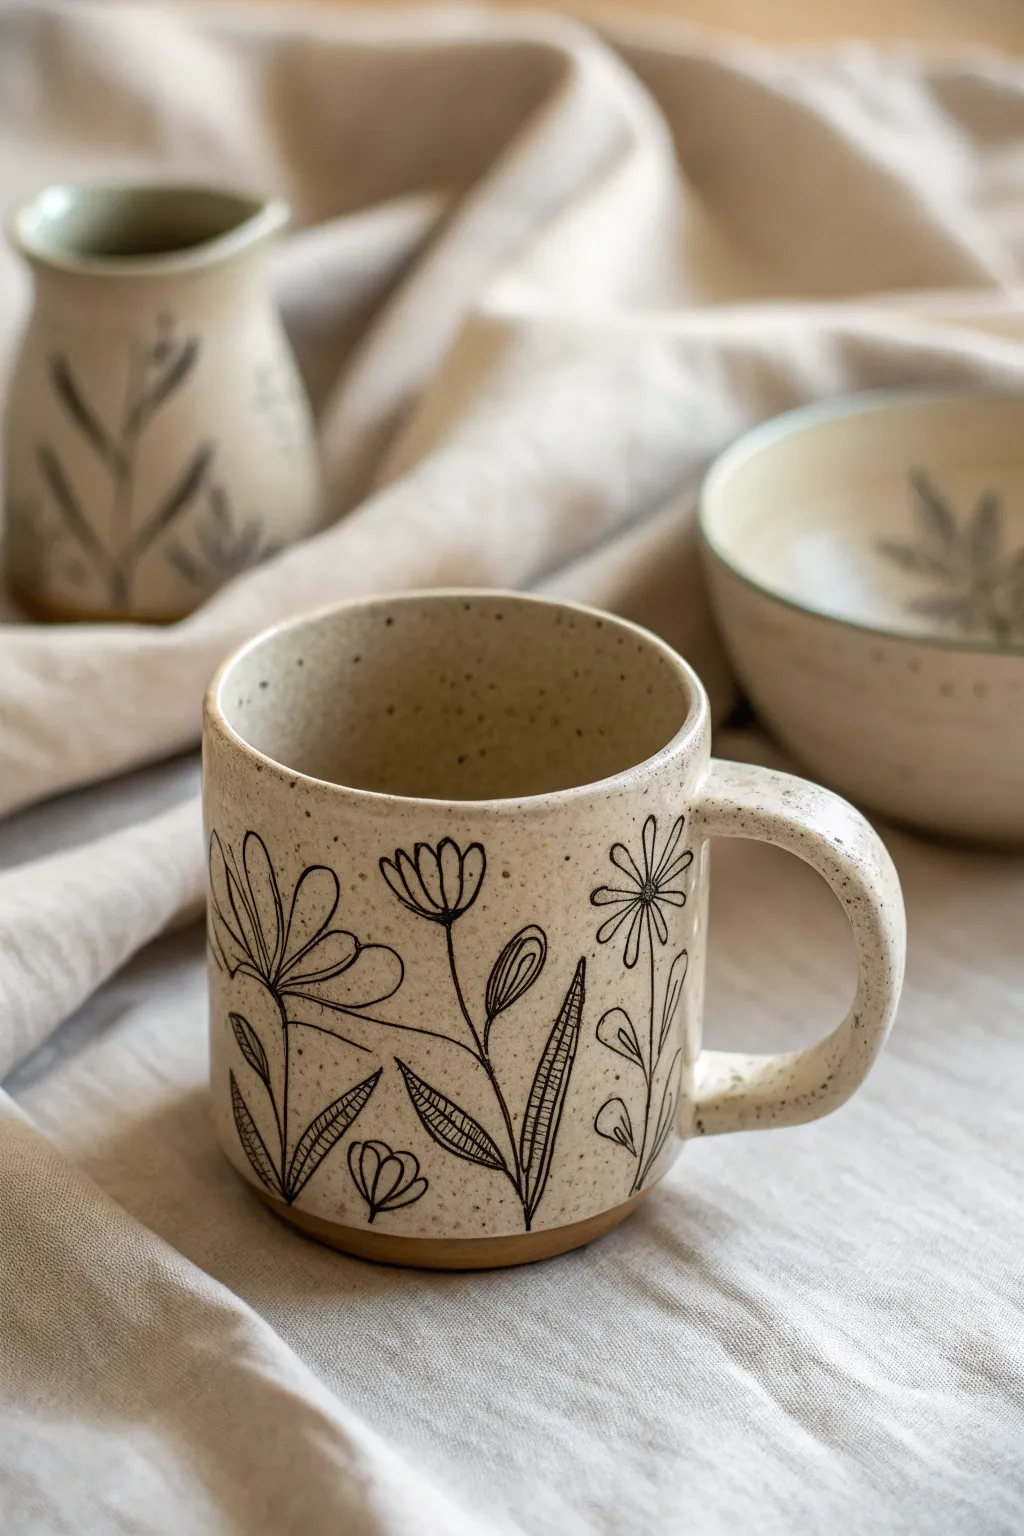
Embrace the beauty of hand-drawn lines with this speckled ceramic mug project that brings a sketchpad aesthetic to your morning coffee. Using a simple sgraffito-inspired inlay technique (Mishima) or underglaze pencil work on speckled clay, you’ll create lasting floral line art that feels organic and personal.
How-To Guide
Materials
- Speckled buff stoneware clay
- Pottery wheel (or slab roller/rolling pin for handbuilding)
- Throwing tools (sponge, rib, wire cutter)
- Black underglaze or slip (consistency of heavy cream)
- Fine-point sgraffito tool or needle tool
- Wax resist (optional)
- Soft fan brush
- Clear matte or satin glaze
- Kiln for bisque and glaze firing
Step 1: Forming the Mug
-
Prep the Clay:
Begin by wedging about 1 to 1.5 lbs of speckled buff clay. Ensure it is completely free of air bubbles, as this clay body will be the star of the show. -
Throw the Cylinder:
Center your clay on the wheel and open it up. Pull the walls to create a straight-sided cylinder, approximately 4 inches tall. Aim for a slightly thicker rim to give it that cozy, handmade feel. -
Refine the Shape:
Use a metal or wooden rib to smooth the exterior walls, removing any throwing rings. A smooth canvas is essential for the line work you’ll be doing later. -
Trim the Bottom:
Once the cylinder is leather hard, trim the bottom to create a neat foot ring. Leave a small band of raw clay at the very base, similar to the image, for a grounded look. -
Create the Handle:
Pull a strap handle from a fresh lug of clay. Let it set up briefly until it holds an arch without collapsing. -
Attach the Handle:
Score and slip the attachment points on both the mug and the handle. Press the handle firmly onto the mug, smoothing the seams with a damp sponge or modeling tool to ensure a seamless connection.
Clean Lines Pro-Tip
For the crispest lines, let the clay get to ‘stiff leather hard’ before carving. If it’s too soft, the tool drags; too dry, and it chips. The crumbs should fall away cleanly.
Step 2: Drawing and Inlay (Mishima)
-
Initial Sketching:
While the mug is at a firm leather-hard stage, lightly sketch your floral design using a dull pencil. The graphite will burn off in the kiln, so don’t worry about mistakes. Plan for three main flower types: a large open bloom, a daisy-like flower, and a tulip shape. -
Carving Section One: The Open Bloom:
Using a fine needle tool or a specialized carving tool, scratch into the clay surface following your sketch. Create the large open petals first, using confident, continuous lines. -
Carving Section Two: The Daisy:
Move to the daisy motif. Carve a small center circle, then radiate the petals outward. Keep the lines relatively thin but deep enough to hold underglaze. -
Carving Section Three: Leaves and Stems:
Connect your flowers with long, slightly curved stems. Add visual interest by cross-hatching the leaves; drawing tiny parallel lines inside the leaf outline creates that illustrative texture seen in the photo. -
Apply the Underglaze:
Once your carving is complete and clean of burrs (balls of clay crumbs), brush black underglaze liberally over the entire design. Ensure the liquid fills every carved line completely. -
Scraping Back:
Allow the underglaze to dry until it is no longer shiny. I usually wait about 15-20 minutes here. Then, gently scrape the surface with a metal rib or sharp loop tool to remove the excess surface black, revealing the clay body while leaving the black pigment trapped in the carved lines. -
Clean Up:
Wipe the surface with a slightly damp (not wet!) sponge to remove any remaining hazy black smears, sharpening the contrast between the speckled clay and the black lines.
Underglaze Smearing?
If the black smudges permanently into the clay pores while wiping back, your clay was likely too dry or absorbent. Try waxing the surface BEFORE carving to protect the raw clay.
Step 3: Glazing and Firing
-
Bisque Fire:
Load the bone-dry mug into the kiln and bisque fire it to Cone 04. This hardens the clay and prepares it for glazing. -
Wax the Foot:
Apply wax resist to the bottom foot ring and that small band of clay at the base to keep it raw and unglazed. -
Clear Glaze Application:
Dip the entire mug into a clear matte or satin glaze. A glossy glaze can sometimes cause the black lines to bleed, so a matte finish is safer and preserves the ‘paper sketch’ aesthetic. -
Final Polish:
Check the rim for any drips and smooth them out with your finger. Ensure the bottom is wiped clean of any glaze touches. -
Glaze Fire:
Fire the mug to the maturity temperature of your clay body (typically Cone 5 or 6 for stoneware). Once cool, sand the unglazed foot lightly if needed.
Now you have a stunning, functional piece of art that invites you to slow down and enjoy every sip.
Nesting Bowl Consistency Challenge
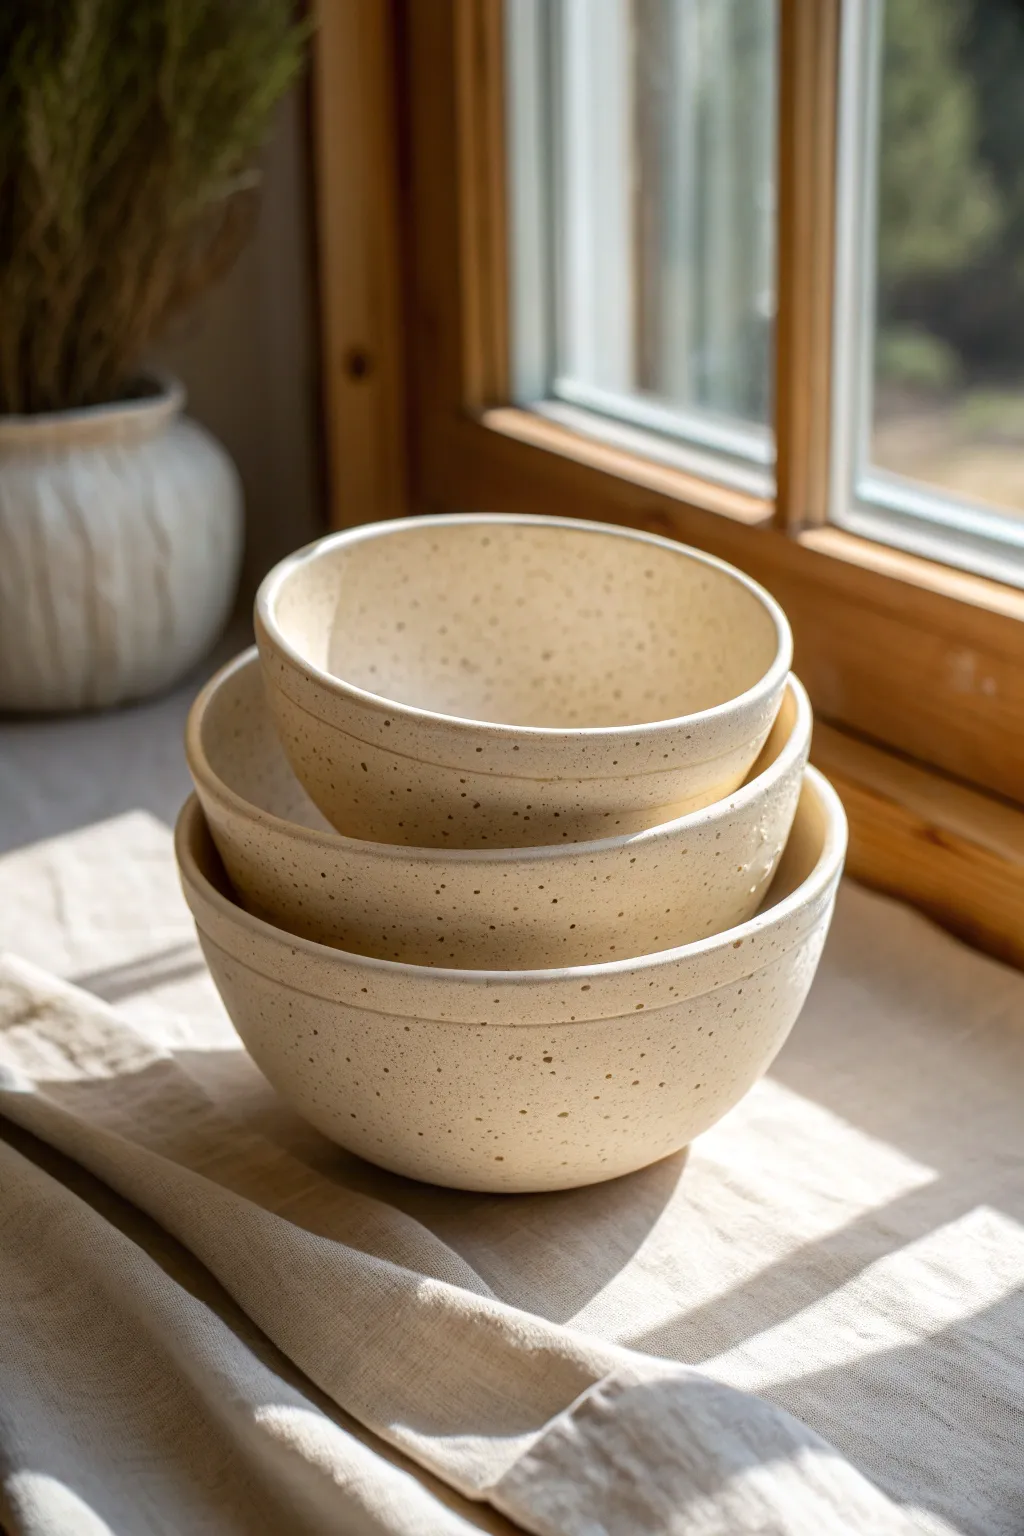
Master the art of size progression with this set of three nesting bowls, crafted from beautiful speckled clay. The challenge lies in creating identical profiles across different scales, resulting in a cohesive stack that looks as good stored away as it does on the table.
Step-by-Step Guide
Materials
- Speckled stoneware clay (approx. 4-5 lbs)
- Pottery wheel
- Throwing sponge
- Wire cutter
- Needle tool
- Wooden rib (kidney shape)
- Metal rib
- Trimming tools
- Calipers (optional but recommended for sizing)
- Clear matte or satin glaze
- Large wooden bat
Step 1: Planning and Prep
-
Weigh your clay:
Start by weighing out three balls of clay in graduating sizes. A good starting ratio is 1 lb, 1.5 lbs, and 2 lbs. Wedge each ball thoroughly to ensure the speckled particles are evenly distributed and air bubbles are removed. -
Visualize the profile:
Study the curve of the bowls in the image. Notice they have a gentle, rounded bottom that transitions into a slightly vertical rim. Keeping this specific curve in mind is crucial for the nesting effect.
Rim Wobble?
If rims are uneven, use a needle tool to trim the top while spinning slowly. Always re-compress heavily with a chamois afterwards to prevent cracking during firing.
Step 2: Throwing the Large Bowl
-
Center the largest ball:
Secure the 2 lb ball of clay onto the wheel head. Use water sparingly to avoid weakening the clay structure, and center it firmly. Since this is speckled clay, be mindful that excessive slip can wash away the surface specks slightly. -
Open the floor:
Open the clay to create a wide, curved interior bottom. Unlike a cylinder, you want a continuous curve from the center to the wall, avoiding a sharp corner at the base. -
Pull the walls:
Slowly pull the walls upward. As you lift, guide the clay outward to create volume, but bring the rim back to vertical at the very top. This vertical finish adds strength and style. -
Refine the curve:
Use a wooden rib inside the bowl to compress the clay and define that perfect hemispherical curve. This step removes throwing lines and ensures the inside is smooth for stacking. -
Define the rim:
Using a chamois or a wet fingertip, compress the rim. Create a subtle definition line just below the rim on the exterior using the corner of your wooden rib, echoing the detail seen in the photo. -
Measure and cut:
Measure the interior width of this bowl with calipers if you have them. Run a wire underneath and set aside to leather hard.
Step 3: Throwing the Medium and Small Bowls
-
Throw the middle bowl:
Center the 1.5 lb ball. Repeat the throwing steps, but aim for a slightly smaller version of the first curve. Check sizing frequently; hold the calipers (set to the large bowl’s interior) over this new bowl to ensure it will fit inside with breathing room. -
Throw the smallest bowl:
Repeat the process with the 1 lb ball. This one can be tricky because it’s smaller; rely on your fingertips rather than your whole hand for pulling. Ensure the rim thickness visual matches the larger two. -
Dry to leather hard:
Cover the bowls loosely with plastic. Allow them to dry slowly until they are firm enough to hold their shape without warping, usually overnight.
Speckle Pop
To make the iron specks stand out more, wipe the bisque-fired surface with a damp sponge before glazing. This exposes more raw clay spots through the glaze layer.
Step 4: Trimming and Finishing
-
Center for trimming:
Place the largest bowl upside down on the wheel. Use lugs of clay to secure it. Tap center to ensure it spins true. -
Trim the foot:
Trim away excess clay from the bottom, mirroring the interior curve on the outside. Carve a distinct foot ring so the bowl sits slightly elevated. Repeat for all three bowls. -
Smooth the surface:
I like to take a slightly damp sponge and run it over the exterior trim lines to soften the harshness of the grog or specks that might have been dragged by the trimming tool. -
Bisque fire:
Once fully bone dry, load the bowls into the kiln for a bisque firing to roughly cone 04. -
Glaze application:
Dip or pour a clear matte glaze over the pieces. A transparent glaze is essential here to let the natural speckles of the clay body, which gives that lovely rustic texture, show through clearly. -
Final firing:
Fire to the maturation temperature of your specific clay body (likely cone 6 or 10). Ensure the foot rings are wiped clean of glaze to prevent sticking to the kiln shelf.
Stack your finished set near a window to let the light catch those subtle curves and beautiful clay speckles.