If you’re craving a clay project that feels relaxing and actually turns into something useful, a simple beginner clay bowl is the perfect place to start. I’m sharing my favorite beginner clay bowl ideas that look impressive without needing a wheel, a kiln, or fancy tools.
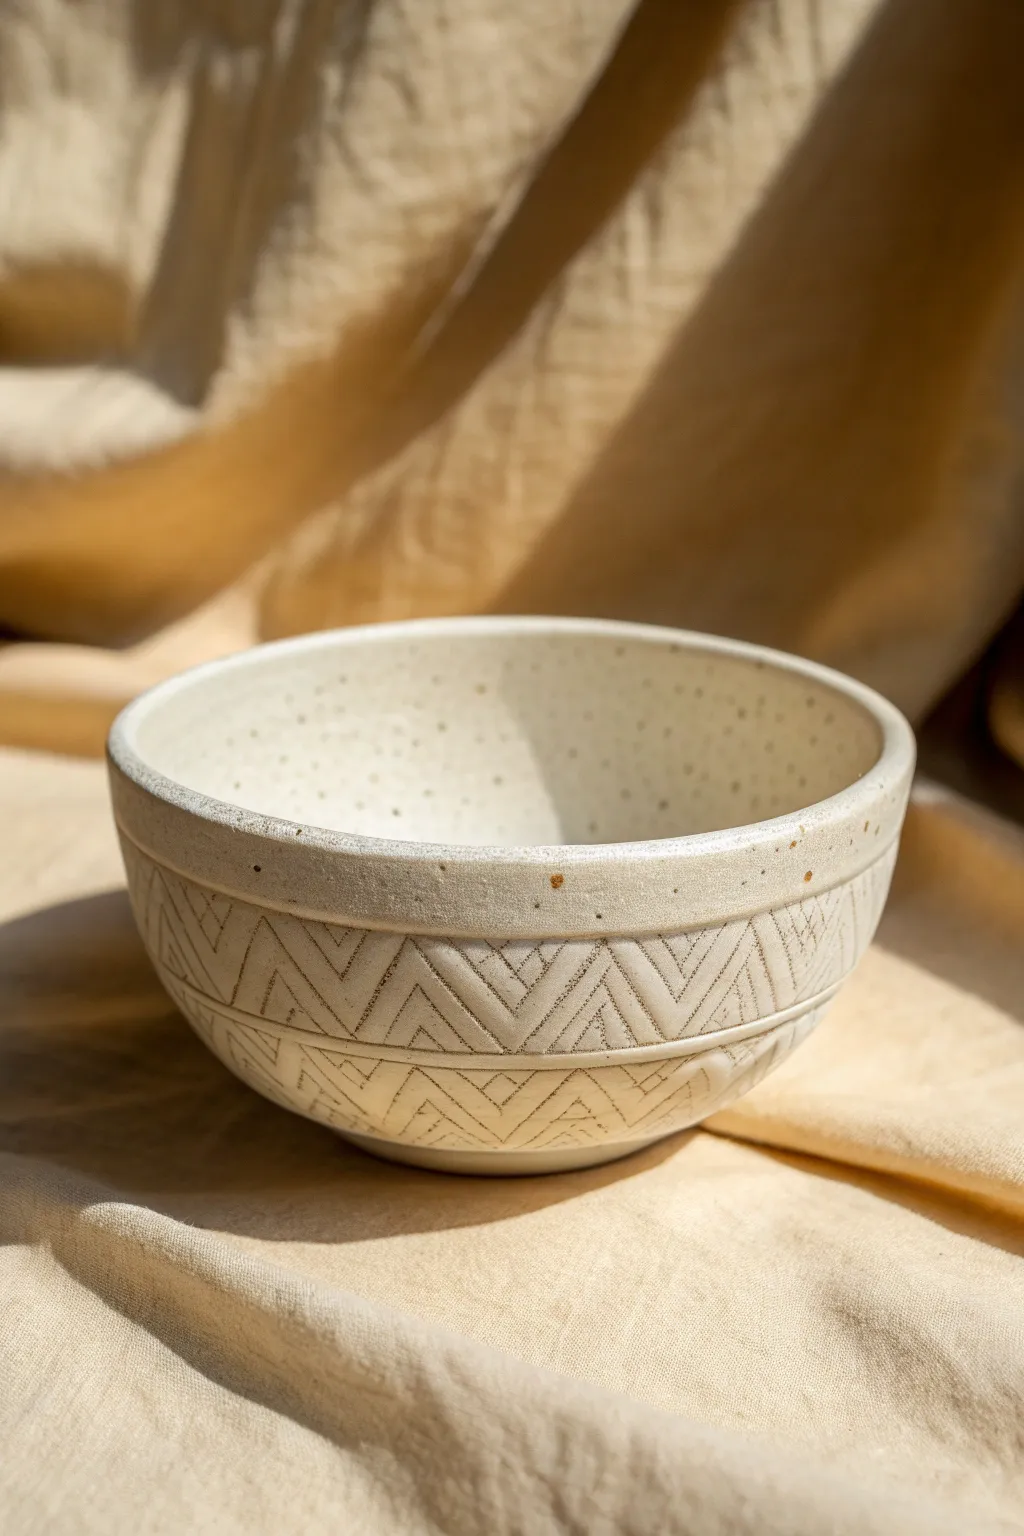
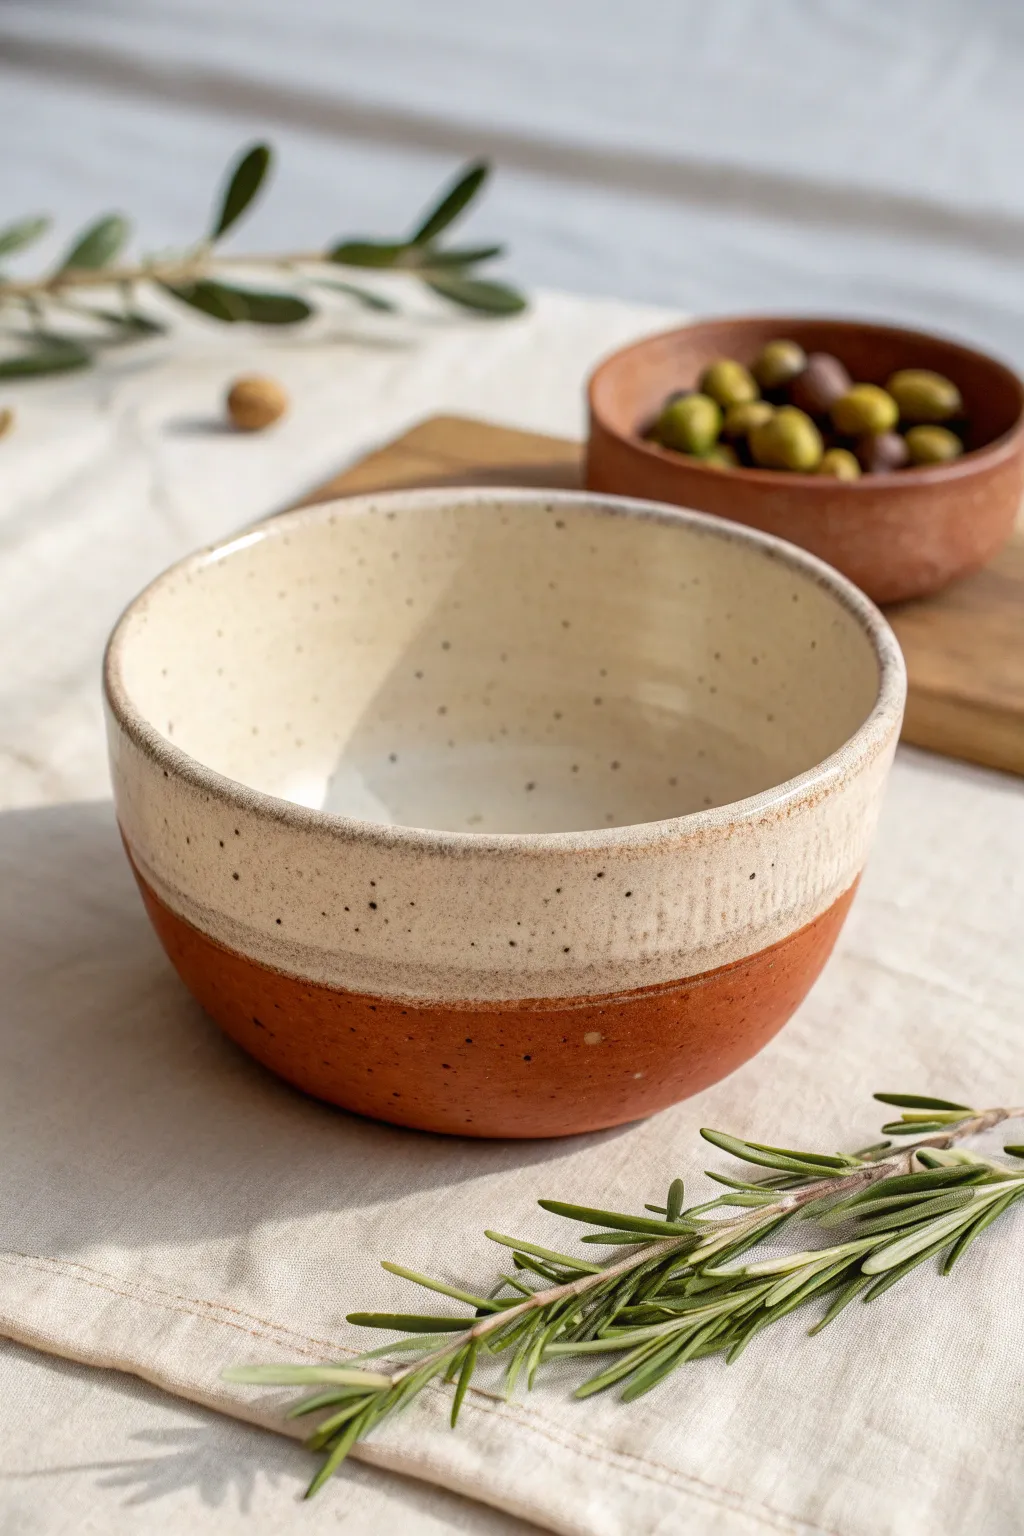
Classic Pinch Pot Bowl
Embrace the imperfect beauty of hand-building with this rustic, earthy pinch pot bowl. Featuring a creamy speckled glaze and a raw clay base, it perfectly balances organic texture with a polished finish.
How-To Guide
Materials
- Red stoneware or terracotta clay (mid-fire)
- Speckled cream white glaze (glossy or satin)
- Sponge
- Water cup
- Wooden rib tool
- Needle tool
- Fettling knife
- Scoring tool (or fork)
- Kiln access
Step 1: Forming the Base
-
Prepare the Clay:
Start with a ball of clay roughly the size of a large orange. Wedge it thoroughly to remove air bubbles, then pat it into a smooth, round sphere in your palms. -
Open the Pot:
Hold the clay sphere in your non-dominant hand. Press your thumb gently into the center, stopping about a half-inch from the bottom to ensure a sturdy base. -
Pinch the Walls:
Starting at the bottom, rhythmically pinch the clay between your thumb and fingers while slowly rotating the ball. Work your way up the walls in a spiral motion. -
Check Thickness:
Aim for an even thickness of about 1/4 inch throughout the bowl. Pay special attention to the transition from the floor to the wall, as this area tends to stay thick. -
Smooth the Interior:
Use a slightly damp sponge to wipe the inside of the bowl. This compresses the clay particles and removes any deep fingerprint marks, though leaving faint ridges adds character. -
Define the Rim:
Gently tap the rim with a flat wooden stick or paddle to level it if it creates uneven peaks, but keep the edge slightly rounded rather than sharp.
Don’t Overwork It
Work quickly when pinching the walls. Heat from your hands dries the clay out fast, leading to cracks. If it feels dry, sponge it lightly.
Step 2: Refining and Drying
-
Shape the Profile:
Use a wooden rib on the exterior while supporting the inside with your hand. Scrape gently upwards to refine the curve and remove loose bits of clay. -
Create the Foot:
flip the bowl over once it’s leather-hard. Use a loop tool to trim a small recessed ring into the bottom, or simply flatten the base so it sits without rocking. -
Clean Up:
Run a damp finger over any sharp edges created during trimming. You want the tactile experience of the finished bowl to be soft. -
Slow Dry:
Loosely cover the bowl with plastic for the first 24 hours to equate moisture, then uncover it to dry completely to the bone-dry stage. This usually takes 3-5 days. -
Bisque Fire:
Load your bone-dry bowl into the kiln for a bisque firing (typically Cone 04 or 06) to prepare it for glazing.
Step 3: Glazing and Finishing
-
Wipe Down:
After the bisque fire, wipe the bowl with a clean, damp sponge to remove any kiln dust that might repel the glaze. -
Wax the Base:
Apply wax resist to the bottom foot of the bowl and about a quarter-inch up the side. This creates the clean, raw clay line seen in the reference image. -
Glaze Application:
Pour your speckled cream glaze inside the bowl, roll it around to coat the interior, and pour out the excess. I usually wait a few minutes before doing the exterior. -
Dip the Exterior:
Hold the bowl by the foot—or use tongs—and dip the exterior into the glaze bucket, stopping right where the wax line begins. -
Clean Drips:
Use a sponge to wipe away any glaze droplets that may have beaded up on the waxed surface to ensure a clean line after firing. -
Glaze Fire:
Fire the piece again to the maturation temperature of your specific clay and glaze body (likely Cone 5 or 6 for stoneware). -
Sanding:
Once cool, use fine-grit sandpaper used wet (wet-sanding) to smooth the unglazed bottom foot so it won’t scratch your table.
Uneven Rim?
If the rim gets too wavy or thin, slice the top half-inch off with a needle tool while rotating the bowl, then re-smooth the new edge.
Now you have a timeless, functional vessel ready for your morning cereal or favorite soup


Bowl Draped Over a Kitchen Form
This project transforms a simple slab of clay into a functional, artisanal-style bowl using a common kitchen item as a mold. The finished piece features a beautiful, speckled matte glaze and distinct horizontal ridges that give it a wonderful tactile quality.
Step-by-Step Tutorial
Materials
- Stoneware clay (speckled or buff)
- Rolling pin
- Canvas or clay mat
- Large kitchen bowl (for the mold)
- Plastic wrap or old t-shirt
- Rubber rib tool
- Fettling knife or needle tool
- Serrated rib or old credit card
- Sponge
- Matte white or cream glaze
- Scoring tool
- Slip
Step 1: Preparing the Slab
-
Wedge the Clay:
Begin by thoroughly wedging your clay to remove air bubbles and ensure a consistent texture, which prevents cracking later. -
Roll out the Slab:
Roll your clay out on a canvas surface to a thickness of about 1/4 inch. Try to keep the thickness even, as thin spots can warp during firing. -
Smooth the Surface:
Use a soft rubber rib to compress the clay slab on both sides. This aligns the clay particles and creates a smooth starting canvas for your texture.
Texture Trick
If you don’t have a serrated rib, dragging the teeth of an old unwanted comb across the clay creates perfect parallel ridges.
Step 2: Adding Texture and Shaping
-
Create the Ribbed Texture:
Before molding, take a serrated rib or a notched tool and gently drag it horizontally across the entire slab. Varies the pressure slightly to create organic, uneven ridges like those in the photo. -
Prepare the Mold:
Select a large kitchen mixing bowl to use as your slump mold. Invert it and cover the outside with plastic wrap or a thin t-shirt to prevent sticking. -
Drape the Clay:
Carefully lift your textured slab and drape it over the inverted bowl. The textured side should be facing out (away from the bowl). -
Ease into Shape:
Gently press the clay against the bowl form with a sponge, working from the center (top) downward to avoid trapping air pockets. -
Trim the Rim:
Use a needle tool or fettling knife to cut away the excess clay at the base of your mold to establish the bowl’s rim height. -
Refine the Rim:
Smooth the cut edge with a damp sponge or chamois strip so the rim is rounded and comfortable to touch, not sharp.
Level Up: Speckles
If using plain white clay, look for a glaze labeled ‘speckled’ or ‘flecked’ to mimic the rustic iron spots seen in the reference image.
Step 3: Drying and Refining
-
Stiffening Phase:
Let the clay sit on the mold until it becomes leather hard. It should be firm enough to hold its shape but not bone dry. -
Remove from Mold:
Carefully lift the clay bowl off the kitchen mold and peel away the plastic wrap. Turn it right-side up. -
Smooth the Interior:
Inspect the inside of the bowl. Use a slightly damp sponge to smooth out any wrinkles or marks left by the plastic wrap. -
Refine Texture:
I like to go back over the exterior ridges lightly with a sponge to soften any sharp burrs while keeping the distinct lines visible. -
Slow Dry:
Place the bowl upside down on a drying rack and cover loosely with plastic to dry slowly for several days.
Step 4: Firing and Glazing
-
Bisque Fire:
Once bone dry, fire the piece to Cone 04 (or your clay’s specific bisque temperature) in the kiln. -
Wipe Down:
After the kiln cools, wipe the bisque ware with a damp sponge to remove any dust that might resist the glaze. -
Apply Glaze:
Dip or brush on a matte cream or white glaze. Make sure the glaze isn’t too thick, or it might fill in the ridges you worked hard to create. -
Wipe the Foot:
Clean the bottom of the bowl thoroughly with a sponge so no glaze touches the kiln shelf. -
Final Fire:
Fire the bowl to the final maturity temperature for your clay and glaze combination to achieve that durable, stone-like finish.
Enjoy using your new handcrafted bowl for fruit displays or serving warm meals


Simple Coil-Built Bowl
This project celebrates the natural beauty of clay by leaving the construction process visible as a design element. Create a sturdy, warm-toned bowl with distinct concentric ridges that catch the light beautifully.
Detailed Instructions
Materials
- Stoneware clay (groggy/sandy texture preferred)
- Canvas or heavy cloth working surface
- Spray bottle with water
- Serrated rib tool
- Wooden modeling tool
- Sponge
- Rolling pin (optional)
- Small bowl for slip
Step 1: Creating the Base
-
Prepare the slab:
Start by flattening a ball of clay about the size of a large orange. You can use your palm or a rolling pin to create a circular slab approximately 1/4 inch thick. -
Cut the circle:
Use a needle tool or knife to cut a perfect circle from your slab. A diameter of about 4-5 inches is a good starting size for the base. -
Score the edge:
Take your serrated rib tool or a fork and rough up the outer 1/4 inch of the circle’s top surface. This scoring is crucial for a strong join. -
Apply slip:
Dab a small amount of water or clay slip onto the scored area to act as glue for your first coil.
Cracking Coils?
If your coils are cracking while rolling, your clay is too dry. Spritz the clay chunk with water, wedge it thoroughly to redistribute moisture, and try rolling again.
Step 2: Building the Walls
-
Roll your first coils:
Roll out several long ropes of clay (coils) on your canvas. Aim for an even thickness, roughly like your pinky finger or a thick marker. -
Place the first ring:
Gently lay the first coil directly onto the slipped edge of your base. Cut the ends at an angle where they meet to avoid a lump. -
Blend the inside only:
Using your thumb or a wooden tool, smear the clay from the coil downward onto the base *only on the inside*. Leave the outside distinct to keep that ribbed look. -
Begin stacking:
Score the top of your first coil, apply a little slip, and stack the next coil on top. I find staggering the seams (where coil ends meet) adds strength. -
Angle the walls:
To flare the bowl outward like the photo, place each new coil slightly toward the outer edge of the coil beneath it. -
Maintain the texture:
As you build upward to about 4 or 5 inches high, continue smoothing only the interior joins. On the outside, press the coils firmly together but don’t smear them flat. -
Refine the interior:
Once the height is reached, run a damp sponge or a smooth rib tool firmly up the inside walls. This compresses the clay and removes the rough drag marks visible in the photo.
Even Thickness Tip
When rolling coils, extend your fingers and use your full palms, moving from the center of the clay rope outward to the ends to prevent flat spots.
Step 3: Finishing Touches
-
Address the rim:
Use a damp sponge to slightly round over the very top lip of the bowl. It should be smooth to the touch but still look consistent with the coiled aesthetic. -
Enhance the exterior lines:
If any outside coils got smudged during handling, gently redefine the grooves with a wooden modeling tool to make the concentric rings crisp. -
Dry slowly:
Cover the bowl loosely with plastic for the first day to let the moisture equalize. This helps prevent warping as the clay shrinks. -
Fire appropriately:
Once bone dry, bisque fire the piece. For the look in the image, you can leave the exterior unglazed or use a matte, sandy glaze before the final firing.
Let your finished bowl dry completely before firing to enjoy your handcrafted vessel


Stamped Pattern Bowl
This project features a beautifully sleek bowl that balances rustic texture with clean, modern lines. The design relies on a creamy white glaze over speckled clay, accenting a hand-carved geometric pattern that wraps around the exterior like a decorative band.
Step-by-Step
Materials
- Speckled stoneware clay (mid-fire)
- Pottery wheel (or rolling pin and slump mold for hand-building)
- Needle tool
- Trimming tools
- Sponge
- Flexible rib tool
- Sharp etching tool or sgraffito tool
- Ruler or measuring tape
- Matte or satin white glaze
Step 1: Forming the Bowl
-
Prepare the Clay:
Begin by wedging about 2-3 pounds of speckled stoneware clay to remove air bubbles and ensure consistency. -
Center and Open:
Center your clay on the wheel head. Open the clay to establish the interior floor, aiming for a smooth, curved transition from floor to wall. -
Pull the Walls:
Pull the cylinder upwards, gradually widening it into a bowl shape. Keep the walls relatively vertical near the bottom before curving out, creating a deep, substantial form rather than a shallow plate. -
Refine the Rim:
Compress the rim with a piece of chamois or your sponge to make it rounded and durable. This prevents chipping later. -
Dry to Leather Hard:
Wire cut the bowl from the bat, but leave it in place if possible, or move it carefully to a ware board. Let it dry until it reaches a sturdy leather-hard stage.
Uneven Spacing?
If your zig-zag pattern doesn’t meet up perfectly at the end, don’t panic. Simply widen or narrow the last 2-3 triangles slightly to bridge the gap; the eye won’t notice the subtle shift.
Step 2: Trimming and Defining Sections
-
Trim the Foot:
Center the leather-hard bowl upside down on the wheel. Trim excess clay from the base to create a defined foot ring that lifts the visual weight of the bowl. -
Smooth the Exterior:
Use a flexible rib to compress and smooth the outside walls, removing any throwing lines. This creates a blank canvas for your carving. -
Mark the Bands:
While the bowl is spinning slowly, use a needle tool to lightly incise two horizontal parallel lines around the mid-section of the bowl. These will serve as the boundaries for your geometric pattern. -
Divide the Space:
Stop the wheel. Using a ruler or by eye, make small tick marks along the horizontal lines to space out your zig-zags evenly comfortably.
Go Darker
For higher contrast, apply a black underglaze or iron oxide wash into the carved lines before glazing. Wipe away the excess on top so the dark color remains only deep in the crevices.
Step 3: Carving the Design
-
Draft the Zig-Zags:
With a needle tool, lightly sketch a continuous zig-zag line connecting your top and bottom horizontal bands. This creates a series of triangles pointing up and down. -
Carve the Main Lines:
Using your sharp etching or carving tool, go over your sketched zig-zag lines with firm pressure. I like to carve deep enough to create tactile texture but not so deep that I weaken the wall. -
Add Nested Triangles:
Inside each large triangle created by the zig-zag, carve smaller, nested ‘V’ shapes. Repeat this until the entire shape is filled with these echoing lines. -
Refine the Edges:
Depending on your tool, you might have small clay burrs. Wait for the pot to dry slightly more (bone dry is too brittle, but firm leather hard is good), then brush them away with a stiff paintbrush or smooth them with a slightly damp sponge or finger.
Step 4: Glazing and Finishing
-
Bisque Fire:
Once bone dry, bisque fire the bowl according to your clay body’s specifications (usually Cone 04 or 06). -
Wax the Foot:
Apply wax resist to the bottom foot ring to prevent glaze from sticking to the kiln shelf. -
Apply Glaze:
Dip the entire bowl into a matte or satin white glaze. A glossy glaze tends to pool in the textures and obscure the carving, so matte is best here. -
Reveal the Speckles:
The speckled clay will naturally show through a thinner white glaze. If the glaze is too thick, give the carved area a quick wipe with a damp sponge to slightly thin the coverage over the texture. -
Final Fire:
Glaze fire the piece to maturity (likely Cone 5 or 6). The heat will interact with the clay’s iron speckles, creating those lovely dark spots that break through the white surface.
Once cooled, your bowl is ready to hold fresh fruit or serve simply as a stunning centerpiece on your table

The Complete Guide to Pottery Troubleshooting
Uncover the most common ceramic mistakes—from cracking clay to failed glazes—and learn how to fix them fast.
Leaf-Imprint Bowl
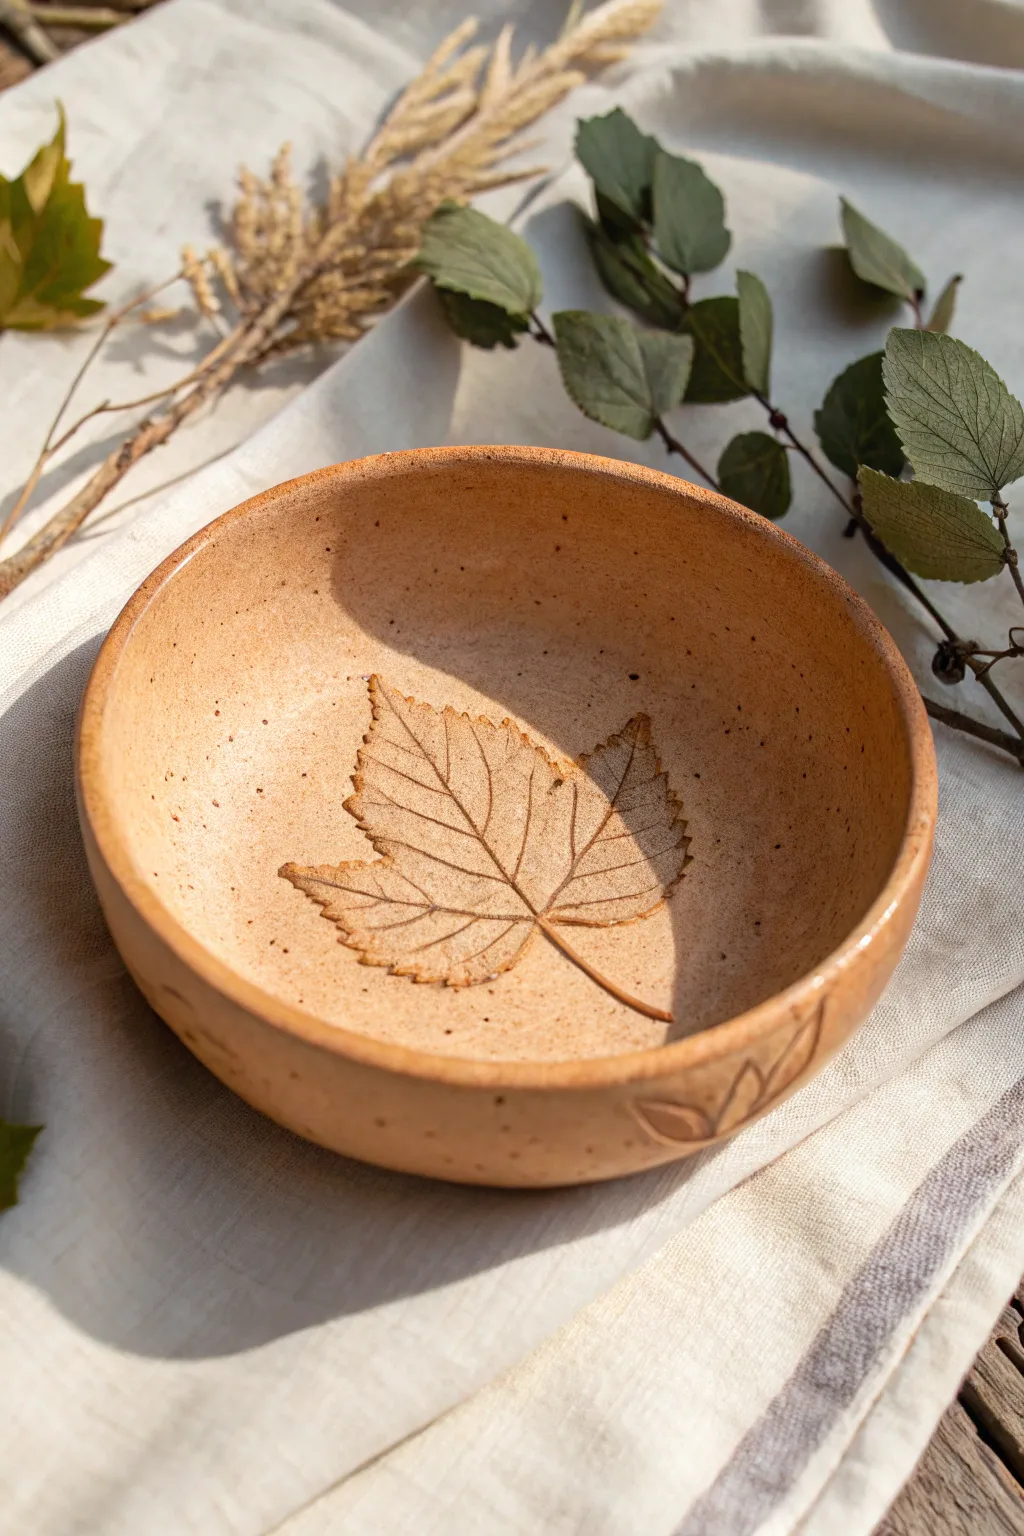
Capture the fleeting beauty of nature with this warm, speckled clay bowl featuring a delicate leaf fossilized in its center. The natural texture of the leaf veins creates a stunning focal point, while subtle carving on the exterior adds a handcrafted charm.
Step-by-Step Tutorial
Materials
- Speckled stoneware clay (mid-fire recommended for that toasty look)
- Fresh leaf with prominent veins (maple or sycamore work beautifully)
- Rolling pin
- Two wooden slats (1/4 inch thick) or guide sticks
- Bisque bowl mold (or a simple kitchen bowl covered in plastic)
- Needle tool
- Rib tool (kidney shaped, wood or rubber)
- Sponge
- Clear matte glaze
- Wire clay cutter
- Canvas working mat
Step 1: Preparing the Slab
-
Wedge the clay:
Start with a grapefruit-sized ball of speckled stoneware clay. Wedge it thoroughly to remove any air bubbles and ensure the moisture is consistent throughout. -
Flatten the ball:
Place the clay on your canvas mat and pat it down with your palm to create a thick pancake shape. This makes the rolling process easier. -
Roll the slab:
Place your wooden guide slats on either side of the clay. Using the rolling pin, roll the clay out until the pin rests on the slats, ensuring an even 1/4 inch thickness. -
Smooth the surface:
Take your rib tool and gently compress the surface of the slab. This aligns the clay particles and removes the canvas texture, giving you a smooth canvas for your leaf.
Sticky Leaf Syndrome
If the leaf refuses to peel out cleanly, let the clay dry a bit longer. As the clay shrinks during drying, it naturally wants to pop the leaf out for you.
Step 2: Imprinting the Leaf
-
Position the leaf:
Place your chosen leaf vein-side down exactly in the center of your slab. The vein side down is crucial—it’s what gives that deep, crisp impression. -
Roll the impression:
Gently roll your rolling pin over the leaf once. Apply firm, steady pressure so the leaf becomes flush with the clay surface, but don’t squash the slab too thin. -
Cut the circle:
Place a circular template or bowl (slightly larger than your mold) over the slab, centering the leaf. Use your needle tool to cut vertically around the template to create your bowl’s flat shape. -
Remove the excess:
Peel away the scrap clay from outside your cut line. Leave the leaf embedded in the clay for now; peeling it out too early can distort the impression.
Step 3: Shaping the Bowl
-
Transfer to mold:
Carefully lift your clay circle. If you’re using a convex mold (slump mold), gently drape the clay over it. If using a concave mold (press mold), ease the clay down into it. -
Secure the shape:
Press the clay gently against the mold to establish the curve. I like to use a small sandbag or a soft sponge to tap it down without ruining the smooth surface. -
Refine the rim:
While the clay is supported by the mold, use a damp sponge to round off the sharp edge of the rim. A rounded rim is much more pleasant to touch and less prone to chipping. -
Dry to leather hard:
Let the bowl sit on the mold until it reaches a leather-hard state. It should be firm enough to hold its shape but still cool to the touch.
Pro Tip: Contrast Boost
To make the veins pop, rub a little red iron oxide or dark subtle underglaze into the impression and wipe it back before the clear glaze step.
Step 4: Finishing Touches
-
Remove the leaf:
Once leather hard, carefully use the tip of your needle tool to lift the stem of the leaf and peel it away to reveal the fossil-like impression underneath. -
Add exterior details:
Flip the bowl over. Using a carving tool or needle, gently etch a simple leaf motif around the base or lower wall to mirror the interior design, just like the subtle carving seen in the example. -
Bisque fire:
Allow the bowl to bone dry completely before loading it into the kiln for a bisque firing (usually Cone 04 or 06). -
Glaze application:
Dip the bisqued bowl into a clear matte glaze. The clear glaze will protect the clay while letting the natural speckles and the darkened leaf impression shine through. -
Wipe the foot:
Use a sponge to wipe any glaze off the bottom foot of the bowl to prevent it from sticking to the kiln shelf. -
Final firing:
Fire the bowl to the maturity temperature of your clay body (likely Cone 5 or 6 for stoneware) to finish the piece.
Once fired, you’ll have a permanent fossil of the season to hold your trinkets or snacks.
Lace-Pressed Texture Bowl
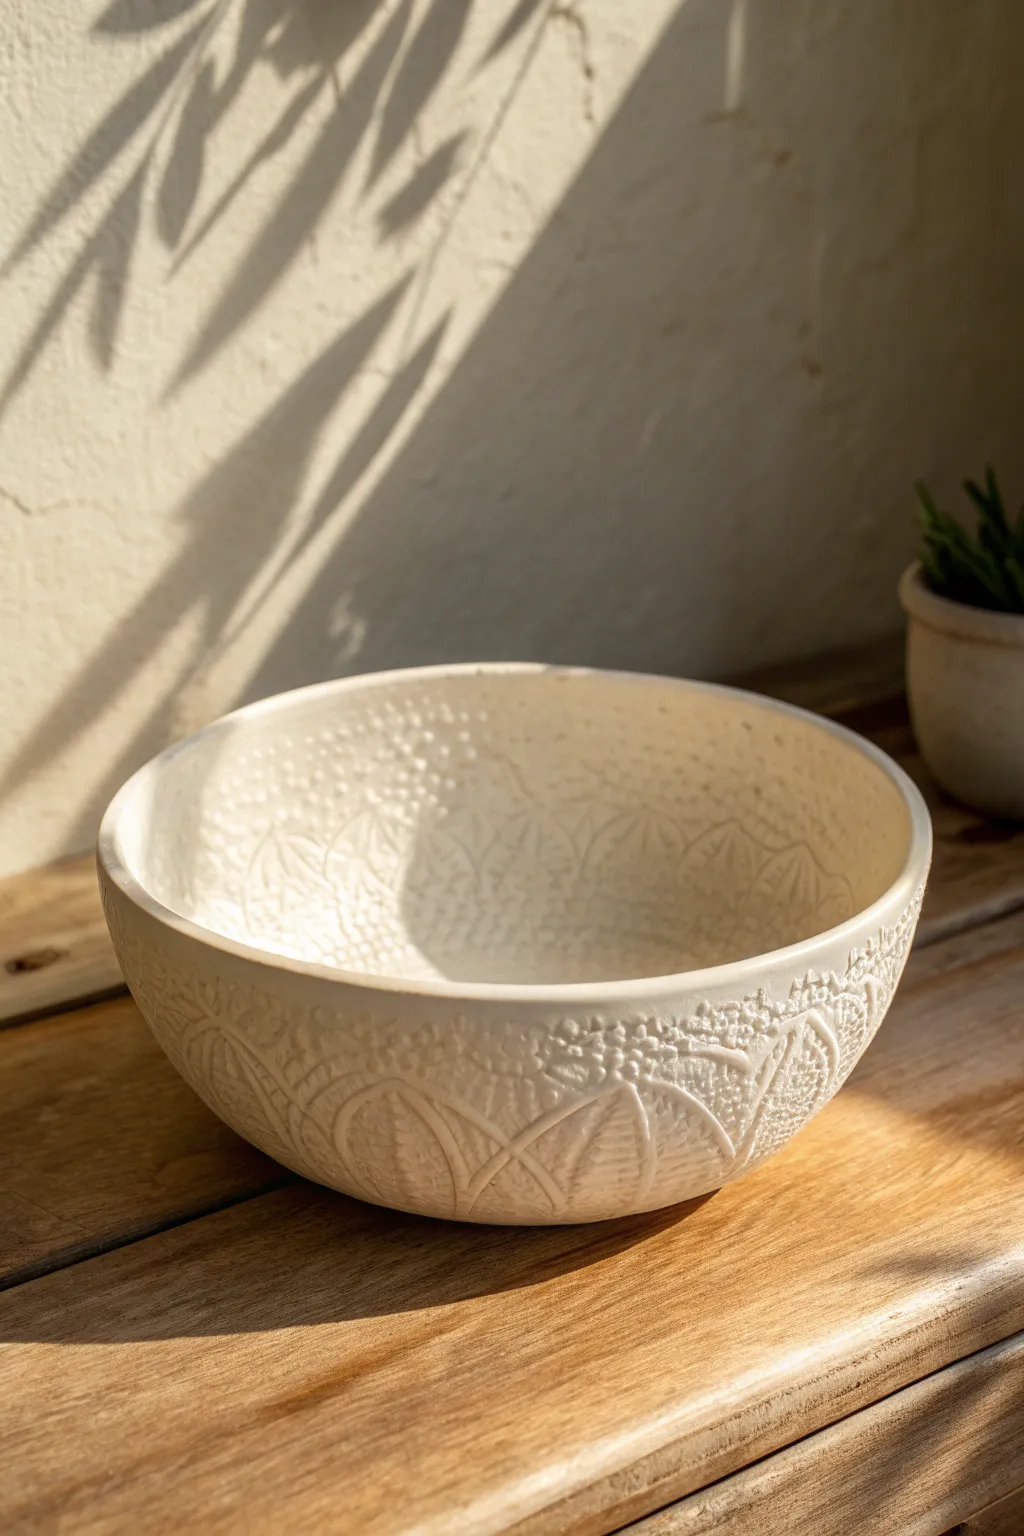
Transform a simple slab of white clay into a sophisticated piece of decor using nothing more than a vintage doily or lace scrap. The result is a beautifully textured vessel where intricate floral and geometric patterns create a delicate relief on both the inside and outside surfaces.
How-To Guide
Materials
- White air-dry clay or low-fire earthenware clay
- Rolling pin
- Canvas mat or non-stick rolling surface
- Textured lace doily (crocheted cotton works best)
- Small bowl for use as a mold (slump mold)
- Plastic wrap or cling film
- Fettling knife or needle tool
- Bowl of water and a sponge
- Fine-grit sandpaper
- Clear matte acrylic sealer (optional, for air-dry clay)
Step 1: Preparing the Slab
-
Prepare your workspace:
Lay down your canvas mat or non-stick surface. This is crucial to prevent the clay from sticking as you roll it out. -
Roll the clay:
Take a generous ball of white clay and begin rolling it out. Aim for an even thickness of about 1/4 inch (approx. 6mm). Rotate the clay frequently to ensure a uniform circle rather than an oval. -
Smooth the surface:
Before adding texture, take a slightly damp sponge and gently wipe the surface of the clay slab. This removes any rolling pin marks or canvas texture.
Smoother Texture
If the lace sticks to the clay, dust the clay surface lightly with cornstarch (for air-dry) or bisque powder before laying down the lace.
Step 2: Adding the Texture
-
Position the lace:
Place your chosen lace doily or fabric directly onto the clay slab. Ensure it is centered if you want a symmetrical design, or place it off-center for a more organic look. -
Roll the pattern:
With the lace in place, roll over it firmly with your rolling pin. Do this in a single, confident pass if possible to avoid ghosting or double images in the impression. -
Check the depth:
Lift a small corner of the lace to peek at the texture. You want the raised details of the lace to be deeply embedded, creating a crisp negative relief. -
Remove the lace:
Carefully peel back the lace from the clay. Do this slowly to ensure you don’t distort the shape of your slab.
Step 3: Shaping the Bowl
-
Prepare the mold:
Take the bowl you are using as a mold and flip it upside down (if draping over) or line the inside with plastic wrap (if pressing inside). For the look in the photo, draping the clay *inside* a larger bowl allows for better control of the exterior texture. -
Cut to size:
Place your mold bowl lightly over the textured clay to gauge size, then use your fettling knife or needle tool to cut a clean circle about 1 inch wider than the mold base to allow for the walls. -
Slump the clay:
Lift your textured clay circle and gently lower it into your plastic-lined mold bowl. Let gravity do most of the work, allowing the clay to settle into the curve. -
Press into shape:
Use a soft sponge or a ball of excess clay wrapped in plastic to gently press the slab against the mold walls. Be careful not to press so hard that you smooth out your beautiful lace texture. -
Refine the rim:
Trim any uneven excess clay from the rim with your needle tool. Use a wet finger to round off the cut edge so it looks finished and professional, rather than sharp.
Layered Look
Try overlapping two different lace patterns. Roll the first one, remove it, then offset a second, different piece of lace and roll again.
Step 4: Drying and Finishing
-
Slow drying:
Let the clay sit in the mold until it is leather-hard (firm but still cool to the touch). If using air-dry clay, this might take 24 hours. Don’t rush this step. -
Remove from mold:
Once firm enough to hold its shape, lift the bowl out of the mold using the plastic wrap edges. Peel away the plastic. -
Final drying:
Place the bowl upside down on a wire rack to allow air to circulate inside and out. Let it dry completely until bone dry. -
Sand edges:
Using fine-grit sandpaper, gently smooth any rough spots on the rim. I like to do this outside or over a bin to minimize dust. -
Sealing:
The image shows a matte, natural finish. To achieve this while protecting air-dry clay, apply a thin coat of matte acrylic sealer. If using ceramic clay, fire according to clay specifications with a clear matte glaze.
Place your new textured bowl in a spot where it can catch the sunlight to highlight those delicate reliefs


What Really Happens Inside the Kiln
Learn how time and temperature work together inside the kiln to transform clay into durable ceramic.
Scalloped Rim Bowl
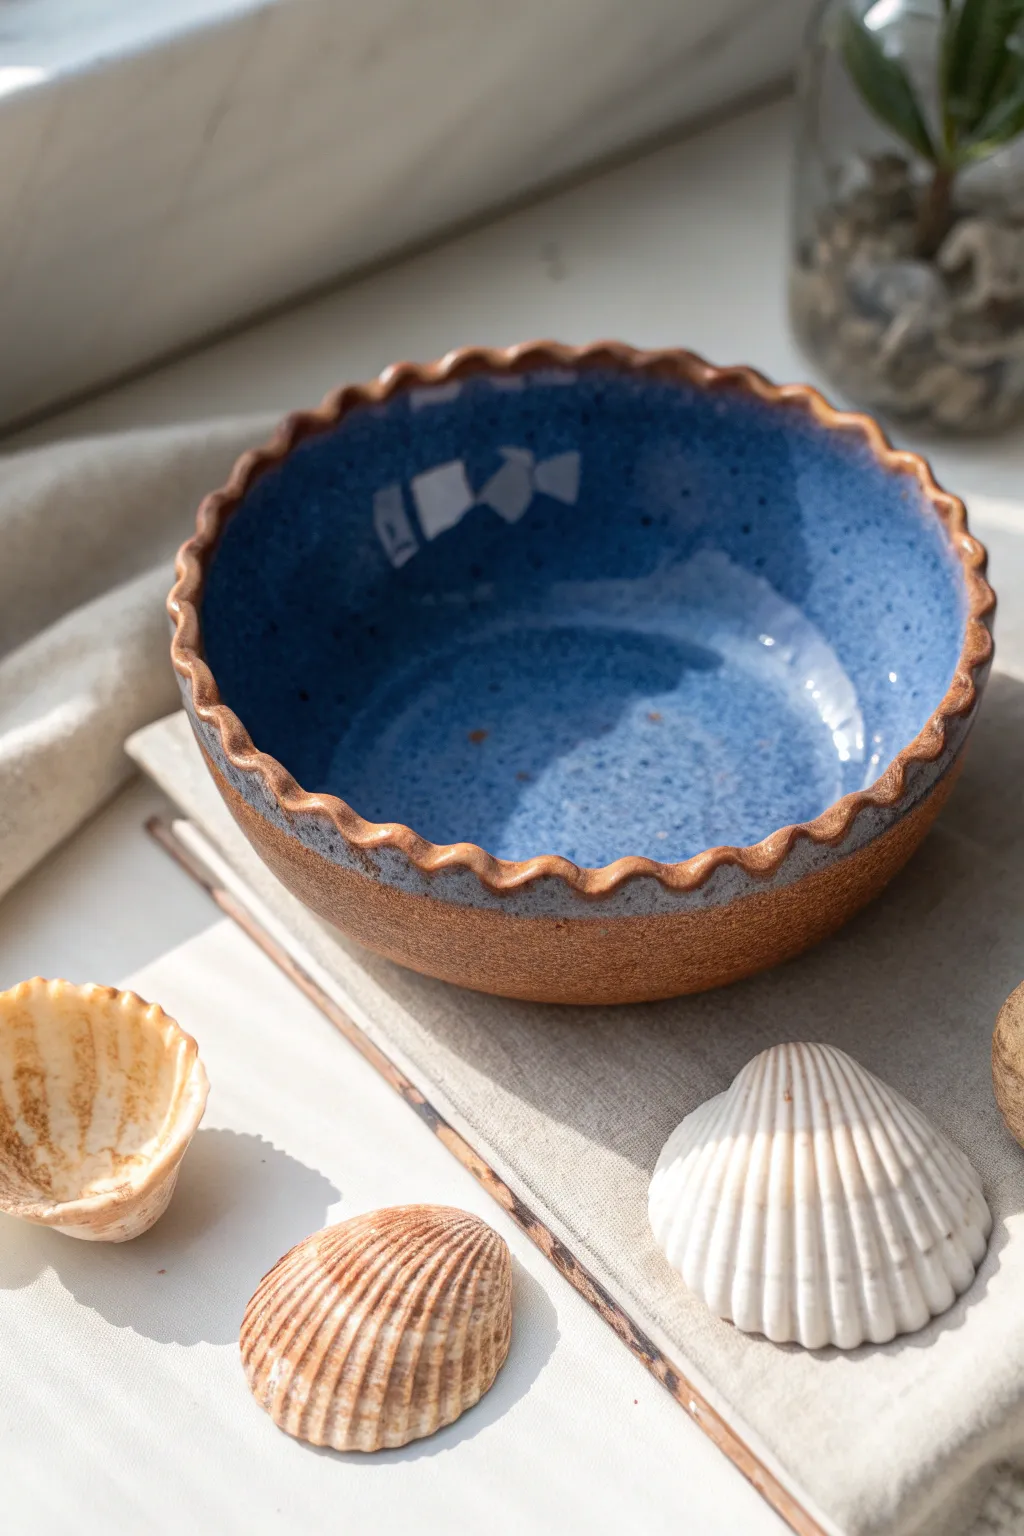
This charming bowl combines the warmth of earthy stoneware with a stunning, scalloped rim that mimics ocean waves. The contrast between the unglazed, toasted exterior and the glossy, speckled azure interior creates a delightful visual texture that feels both rustic and refined.
Step-by-Step Guide
Materials
- Speckled brown stoneware clay (e.g., cone 5/6)
- Potter’s wheel or slab roller (depending on method)
- Wooden rib tool
- Needle tool
- Sponge
- Loop tool or metal kidney scraper
- Glossy speckled blue glaze (cone 5/6)
- Wax resist (optional)
- Kiln for firing
Step 1: Forming the Bowl
-
Preparing the clay:
Begin by wedging about 1.5 to 2 pounds of speckled stoneware clay. Ensure it is completely free of air bubbles to prevent issues during firing. -
Centering and opening:
Throw the ball of clay onto your wheel head (or prepare a slab if hand-building). Center it firmly, then open the clay to establish the interior floor, keeping it slightly curved rather than flat. -
Pulling the walls:
Pull up the walls to form a classic U-shape. Aim for a height of about 3-4 inches and a width of 6 inches. Keep the walls even, but leave the rim slightly thicker than usual—this extra clay is crucial for the scalloping effect later. -
Smoothing the surface:
Use a damp sponge on the rim to compress it. Then, use a wooden rib on the interior to remove throwing lines and create that perfectly smooth bowl curve seen in the photo. -
Refining the exterior:
Clean up the base with a wooden knife or rib, smoothing the exterior walls. If you want the rustic, unglazed look shown, ensure the clay surface is burnished slightly with a soft rib.
Step 2: Creating the Scalloped Rim
-
Slowing down:
Bring the wheel to a complete stop. The scalloping is done entirely by hand on a stationary bowl. -
Positioning your fingers:
Place your left index finger gently on the inside of the rim. Place your right index finger and thumb on the outside of the rim, leaving a gap about the width of your finger between them. -
Pressing the wave:
Gently push outward with your inside finger while simultaneously pressing inward with your outside fingers. This creates the first valley and peak of the wave. -
Repeating the pattern:
Rotate the wheel slightly and repeat this motion directly next to the first scallop. Continue around the entire circumference. I find consistent spacing is key here, so try to keep your hand movements identical. -
Smoothing the edges:
Once the wave pattern is established, run a very slightly damp sponge or a piece of chamois leather over the peaks and valleys to soften any sharp edges.
Consistent Waves
Mark the rim lightly with a needle tool at 12, 3, 6, and 9 o’clock before scalloping. Subdivide these sections to ensure your waves are evenly spaced.
Step 3: Trimming and Drying
-
Drying to leather hard:
Allow the bowl to dry slowly until it reaches a leather-hard state. It should be firm enough to handle without warping. -
Trimming the foot:
Invert the bowl on the wheel. Secure it with clay lugs or a chuck. Use a loop tool to trim away excess weight from the base and carve a neat foot ring, which gives the bowl lift and elegance. -
Bisque firing:
Let the bowl dry completely to the bone-dry stage. Load it into the kiln for a bisque fire (usually cone 04) to prepare it for glazing.
Level Up: Texture Contrast
Before bisque firing, gently sand the exterior with a green kitchen scouring pad. This leaves the raw clay super smooth, heightening the contrast with the glossy interior.
Step 4: Glazing and Finishing
-
Waxing the exterior:
This project features a bare clay exterior. Apply wax resist to the entire outer wall and the bottom foot, stopping exactly at the lowest point of the scalloped rim waves. -
Applying the interior glaze:
Pour a glossy, speckled blue glaze into the bowl. Swirl it around quickly to coat the entire interior surface, then pour the excess back into your bucket. -
Dipping the rim:
Alternatively, hold the bowl upside down and dip it into the glaze just deep enough to cover the rim’s scallops, ensuring the glaze meets your wax line neatly. -
Cleaning up:
Use a damp sponge to wipe away any wayward glaze beads that may have stuck to the waxed exterior. The transition between the blue glaze and the raw clay needs to be crisp. -
Final firing:
Load the glazed bowl into the kiln for the final glaze firing (follow the temperature guide for your specific clay body, typically cone 5 or 6). Let the kiln cool naturally before unloading.
Once cooled, your scalloped bowl is ready to hold trinkets or snacks, showing off that beautiful blue glaze against the toasted clay
Speckled Paint Finish Bowl

This rustic, nature-inspired bowl combines a smooth, creamy speckled glaze with a textured band of raw, sandy clay. Perfect for beginners, this project balances polished finishes with an organic, tactile feel.
How-To Guide
Materials
- White or buff stoneware clay with manganese speckles (e.g., Speckled Buff)
- Pottery wheel (or slab roller for hand-building)
- Wooden rib tool
- Metal kidney scraper
- Trimming tools
- Sponge
- Masking tape or resist wax
- Glossy white or clear glaze
- Iron oxide wash (optional, for the textured band)
Step 1: Forming the Bowl
-
Wedge the Clay:
Begin by thoroughly wedging about 2-3 pounds of your speckled clay body. This removes air bubbles and ensures the clay particles are aligned, which prevents cracking later. -
Center on the Wheel:
Throw the ball of clay onto your pottery wheel and center it. Apply steady pressure with water until the mound runs completely smooth in your hands without wobbling. -
Open and Pull:
Open the centered clay and gently pull up the walls to form a deep, rounded V-shape. Keep the walls even, aiming for about a quarter-inch thickness throughout. -
Shape the Curve:
Use a wooden rib tool on the inside of the bowl while supporting the outside with your hand. Press gently to create a continuous, smooth curve from the bottom to the rim. -
Refine the Rim:
Before removing it from the wheel, use a chamois or a wet sponge to compress and smooth the rim, ensuring it’s comfortable to touch. -
Dry to Leather Hard:
Wire cut the bowl from the bat and let it dry slowly until it reaches a leather-hard state—firm enough to hold its shape but soft enough to carve.
Step 2: Trimming and Texturing
-
Center for Trimming:
Invert the bowl on the wheel head and secure it with clay lugs. Tap it into the center so the trimming tool cuts evenly. -
Trim the Foot:
Using a loop tool, trim away excess clay from the bottom to create a neat foot ring. This elevates the bowl and gives it a professional finish. -
Create the Textured Band:
Identify a section about an inch below the rim. Instead of smoothing this area, rough it up slightly with a serrated rib or a coarse sponge to expose the grit of the clay body. -
Apply Oxide (Optional):
I like to brush a very thin watered-down iron oxide wash onto this textured band now, then wipe most of it back with a sponge. This highlights the rough texture. -
Bisque Fire:
Allow the bowl to dry completely (bone dry) before loading it into the kiln for the bisque firing (usually Cone 06 or 04).
Glaze Crawling?
If the glaze pulls away leaving bare spots, your bisque ware might have been dusty or oily. Always wipe your pot with a damp sponge and let it dry briefly before glazing.
Step 3: Glazing
-
Clean the Bisque:
Wipe the fired bowl with a damp sponge to remove any kiln dust, which can cause glaze crawling. -
Mask the Band:
Apply wax resist or masking tape carefully over the textured band you created earlier. This ensures that the earthy, raw clay remains visible after the final firing. -
Glaze the Interior:
Pour a glossy white or clear glaze into the bowl, swirl it around to coat the entire inside, and pour the excess back out. -
Glaze the Exterior:
Dip the exterior of the bowl into the glaze (or brush it on), stopping right at the edge of your masked band. If you used wax, the glaze will naturally bead off that area. -
Clean Up:
Use a damp sponge to wipe any stray droplets of glaze off the textured band and completely clean the foot ring so it doesn’t stick to the kiln shelf. -
Final Fire:
Load the bowl into the kiln for the glaze firing (temperature depends on your specific clay and glaze, typically Cone 5-6). -
Cool Down:
Allow the kiln to cool completely before opening. The heat allows the specks in the clay to bleed through the white glaze, creating that signature spotted look.
Highlighting Texture
To make the raw band pop, rub a little Black Copper Oxide onto the raw clay before the final firing. It settles into the grooves and darkens the earth tones.
Once cooled, your bowl is ready to bring a touch of natural elegance to your table

TRACK YOUR CERAMIC JOURNEY
Capture glaze tests, firing details, and creative progress—all in one simple printable. Make your projects easier to repeat and improve.
Minimal Two-Tone Dip Bowl
This project embraces the natural beauty of red clay by leaving the base unglazed for a striking textural contrast. The creamy, speckled glaze on top creates a warm, rustic look that fits perfectly in any modern kitchen.
Step-by-Step Tutorial
Materials
- Red earthenware or terracotta clay (low to mid-fire)
- Pottery wheel (or rolling pin/slump mold for hand-building)
- Sponge
- Wire cutter
- Rib tool
- Trimming tools
- Creamy white speckled glaze (food safe)
- Wax resist (optional)
- Clean bucket for glazing
- Kiln access
Step 1: Forming the Bowl
-
Wedge the clay:
Start by thoroughly wedging about 1-1.5 lbs of red clay to remove air bubbles and ensure consistency, which is crucial for wheel throwing. -
Center on the wheel:
Slap your clay ball onto the center of the wheel head. Use wet hands to cone the clay up and down until it spins perfectly smooth and center without wobbling. -
Open the form:
Press your thumbs into the center of the mound, leaving about a half-inch of thickness for the floor. Gently pull the clay outward to establish the interior width of your bowl. -
Pull the walls:
Using your fingertips or a sponge, gently pull the clay walls upward. Aim for a simple, rounded curve rather than a straight cylinder. -
Shape the finish:
Use a rib tool on the inside curve to smooth out throwing lines and refine the bowl’s shape. I like to pay special attention to the rim here, compressing it with a piece of chamois or a sponge to prevent future cracks. -
Cut and dry:
Run a wire cutter underneath the pot to separate it from the wheel. Let the bowl dry until it reaches a ‘leather-hard’ state, where it is stiff but still cool to the touch.
Uneven Dip Line?
If your hand shakes during the dip, use masking tape or wax resist to create a perfect line before dipping. Peel tape immediately after dipping.
Step 2: Trimming and Bisque
-
Center for trimming:
Place your leather-hard bowl upside down on the wheel. Secure it with small coils of soft clay. -
Trim the foot:
Use a trimming tool to carve away excess clay from the bottom. Define a clean foot ring, as this unglazed area will be a key visual element of the finished piece. -
Smooth the exterior:
After trimming, run a damp sponge or a smooth rib over the raw clay exterior to burnish it slightly. This makes the unglazed portion feel pleasant to hold later. -
Bone dry:
Allow the bowl to dry completely until it is bone dry and lighter in color. -
Bisque fire:
Load the bowl into the kiln for the first firing (bisque fire), usually to cone 04 or 06, depending on your clay body.
Add Texture
Before the first firing, try carving vertical flutes or pressing a rough sponge into the lower raw clay section for tactile contrast.
Step 3: Glazing
-
Clean the bisque:
Wipe the fired bowl with a damp sponge to remove dust, which can prevent glaze from sticking properly. -
Prepare the glaze:
Stir your cream speckled glaze thoroughly. It should be the consistency of heavy cream. -
The dip:
Hold the bowl by the foot ring. Dip the bowl rim-first into the bucket, submerging it about 2/3 of the way down. Wait three seconds, then lift it straight out. -
Clean the dripline:
Once the glaze is dry to the touch, use a damp sponge to tidy up the line where the glaze meets the raw clay if it looks uneven. -
Glaze fire:
Load the bowl for the final glaze firing. Since the bottom is unglazed, you don’t need to use stilts.
Enjoy using your new bowl for breakfast or stews, knowing the natural clay base will ground your table setting with earthy warmth
Gold-Edge Look Bowl
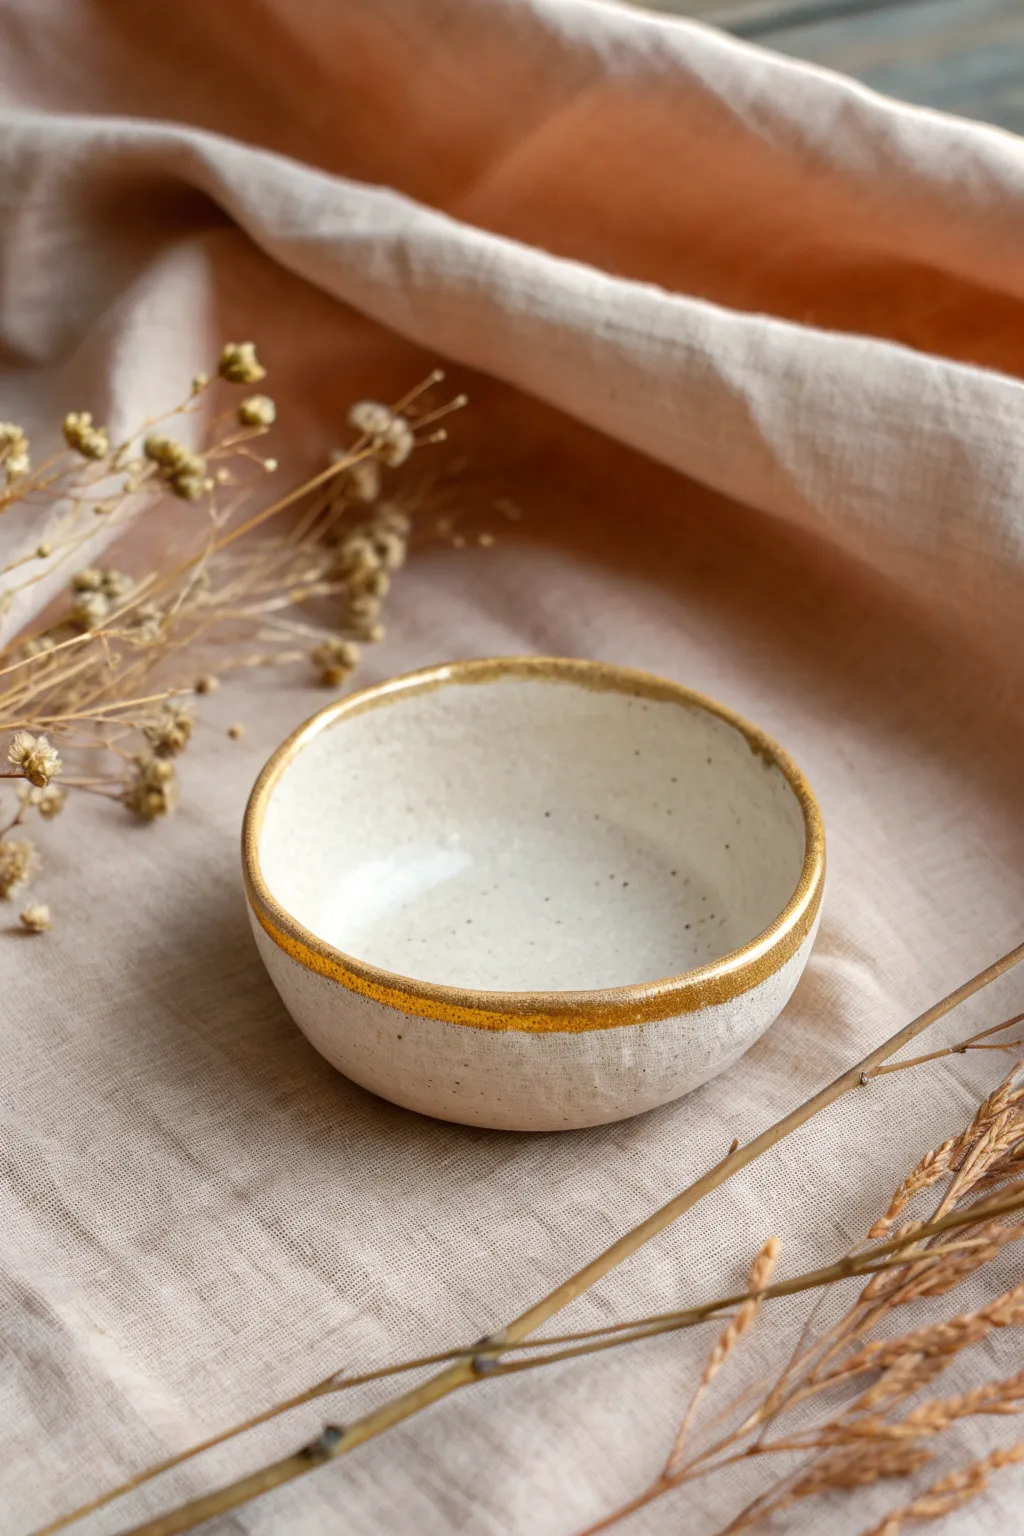
Elevate a simple pinch bowl into a piece of everyday luxury with this gold-edge technique. Using speckled clay or a clever glaze trick creates a rustic stone look, while the metallic rim adds a touch of modern elegance perfect for holding jewelry or trinkets.
Step-by-Step
Materials
- Speckled stoneware clay (or plain white clay)
- Pottery wheel (optional, can be hand-built)
- Rib tool
- Sponge
- Cutting wire
- White or clear food-safe glaze
- Gold luster (overglaze)
- Dedicated luster brush (small)
- Kiln
- Respirator/mask (for luster application)
Step 1: Forming the Base
-
Prepare the Clay:
Start with a ball of speckled stoneware clay about the size of a large orange. Wedge it thoroughly to remove air bubbles. -
Center and Open:
If throwing on a wheel, center the clay and open it up, creating a gentle U-shaped interior curve. -
Shape the Curve:
Pull the walls up, keeping them relatively thick at the bottom for stability. Aim for a rounded, organic shape rather than perfectly straight walls. -
Refine the Rim:
Compress the rim with a damp sponge or piece of chamois leather. Since we will be highlighting this area with gold later, ensure it is smooth and slightly rounded. -
Smooth the Surface:
Use a rib tool on the exterior while the wheel spins slowly to remove finger marks and create that clean, minimalist profile seen in the photo. -
Wire Off:
Run a cutting wire underneath the bowl to separate it from the bat. I usually like to let it firm up to leather-hard before flipping it for trimming.
Sticky Luster Brush?
Keep a dedicated brush for gold only. Instead of cleaning it with harsh solvents, wrap the bristles tightly in foil to keep them soft between sessions.
Step 2: Trimming and First Firing
-
Trim the Foot:
Once leather-hard, center the bowl upside down on the wheel. Trim away excess clay from the base to create a subtle foot ring or a clean flat bottom. -
Final Smoothing:
Wipe the entire piece down with a slightly damp sponge to remove any trimming crumbs or sharp edges. -
Dry Completely:
Allow the bowl to dry slowly under loose plastic for a day, then uncovered until bone dry. -
Bisque Fire:
Load the bone-dry bowl into the kiln for a bisque firing (usually to Cone 04 or 06, depending on your clay body).
Step 3: Glazing the Piece
-
Clean the Bisque:
Wipe the bisque-fired bowl with a damp sponge to remove kiln dust, which helps the glaze adhere properly. -
Apply Glaze:
Dip the bowl into a white semi-opaque or clear glaze. Because we used speckled clay, the dark spots will show through the glaze naturally. -
Wipe the Foot:
Clean off any glaze from the bottom of the foot so it doesn’t stick to the kiln shelf. -
Glaze Fire:
Fire the piece again to your clay’s maturity temperature (often Cone 5 or 6 for stoneware).
Faux Speckles
Using plain white clay? Mix granular ilmenite or manganese into your white glaze before dipping to manually create those beautiful dark spots.
Step 4: Applying the Gold Luster
-
Prepare for Luster:
Once the glaze firing is complete and the kiln has cooled, remove the bowl. Ensure the rim is perfectly clean and free of dust or oils from your hands. -
Load the Brush:
Dip a dedicated small brush into your gold luster. You don’t need much; a little goes a long way. -
Paint the Rim:
Steady your hand or use a banding wheel. Apply a smooth, even coat of gold luster specifically along the top edge of the rim. Let it naturally wobble slightly if you want an organic look. -
Refine the Line:
Check the thickness of the gold line. It should sit right on the lip, extending just a tiny bit down the exterior wall. -
Luster Fire:
Place the bowl back in the kiln for a third firing. This is a low-fire cycle, typically around Cone 018 or 019, to fuse the gold to the glaze.
Once the final firing cools, polish the gold gently with a soft cloth to reveal its full shine
Fruit Slice Painted Bowl
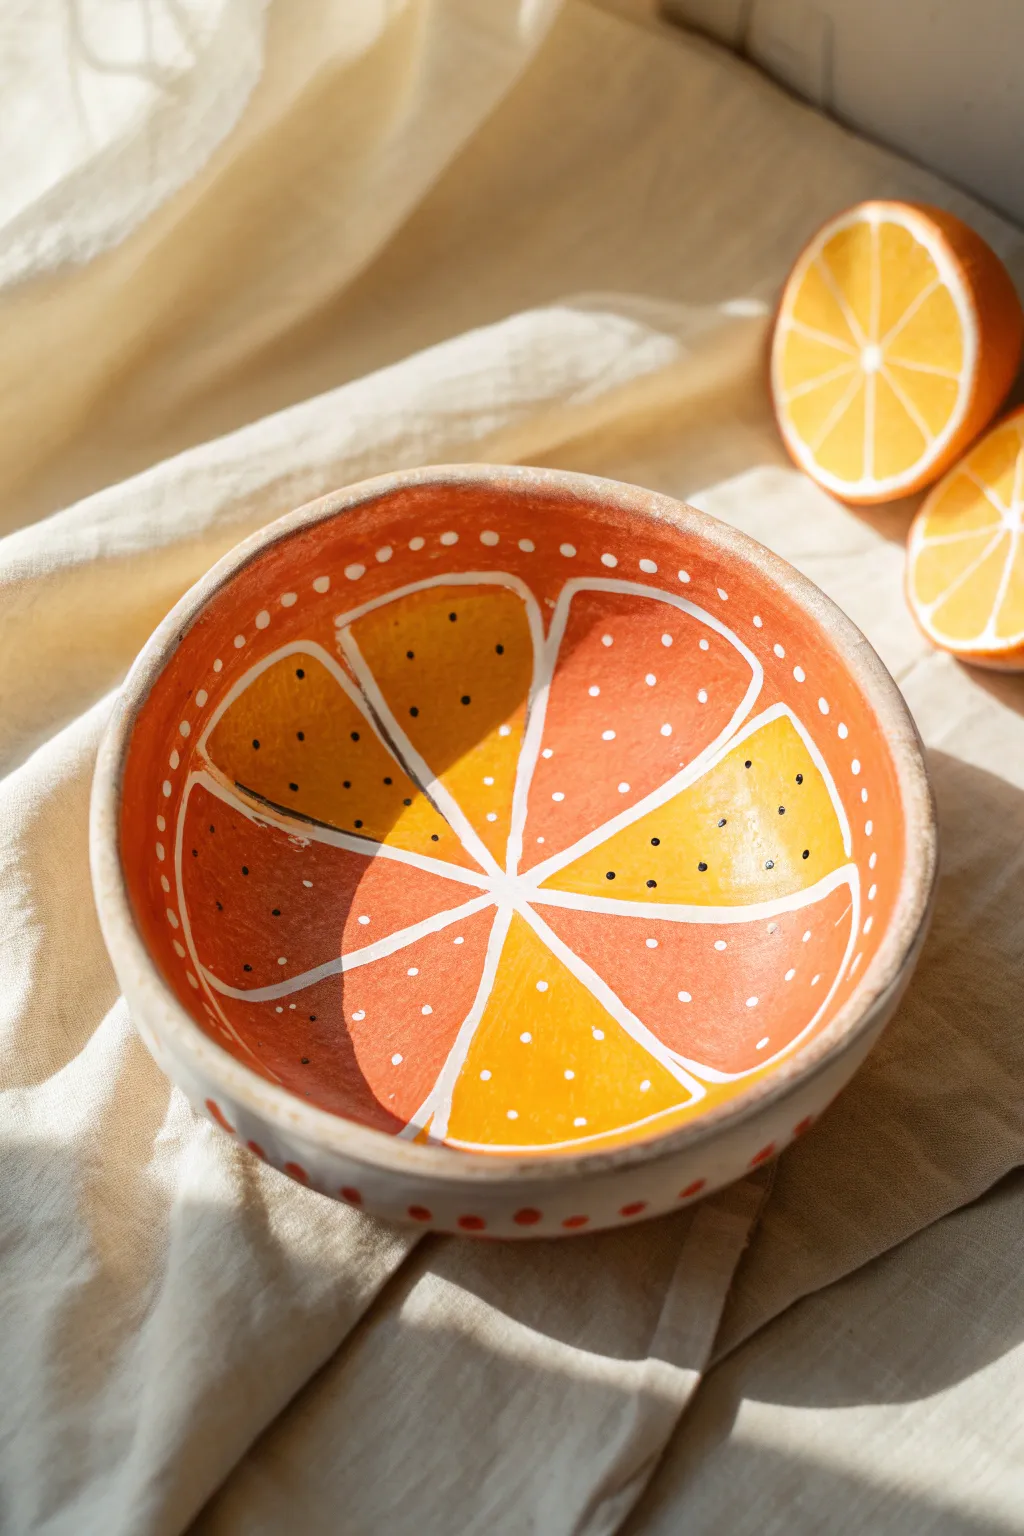
Bring a burst of summer into your home with this cheerful citrus-themed bowl made from air-dry clay. The design features alternating segments of sunny yellow and warm orange, separated by crisp white lines that mimicking the pith of a fresh orange.
Step-by-Step Guide
Materials
- Air-dry clay (white or terra cotta)
- Acrylic paints (bright orange, yellow, white)
- Small bowl for molding (optional)
- Rolling pin
- Potter’s sponge or sandpaper
- Fine-grit sandpaper
- Small round paintbrushes (sizes 0-2)
- Medium flat paintbrush
- Clay sculpting tools or a butter knife
- Matte or glossy varnish sealant
Step 1: Shaping the Bowl
-
Prepare the Clay:
Begin with a ball of air-dry clay roughly the size of a large grapefruit. Knead it in your hands to warm it up and remove any air bubbles, ensuring the consistency is smooth and pliable. -
Form the Base:
You can either use the pinch pot method—pushing your thumb into the center and pinching walls upwards—or roll out a slab about 1/4 inch thick and drape it into an existing bowl to create a uniform shape. -
Refine the Rim:
Once you have your basic bowl shape, gently pinch the rim between your thumb and forefinger to slightly flatten it. It doesn’t need to be perfectly mechanically round; a little organic wobble adds to the handmade charm. -
Smooth the Surface:
Dip your finger or a sponge in a tiny bit of water and run it over the interior and exterior of the bowl to smooth out fingerprints or cracks. Don’t use too much water, or the clay will become slimy. -
Dry Completely:
Set the bowl aside to dry. This usually takes 24-48 hours depending on humidity and thickness. Wait until the clay feels room temperature and is no longer cool to the touch. -
Sand for Smoothness:
Once fully dry, take a piece of fine-grit sandpaper and gently buff the inside surface of the bowl. This creates a better canvas for your detailed painting later.
Clean Lines Hack
If your hand is shaky, use the very tip of your pinky finger as an anchor on a dry part of the bowl while painting the fine white lines.
Step 2: Painting the Citrus Design
-
Base Coat:
Paint the entire interior rim and the upper 1/2 inch of the inside wall with a solid coat of orange. This creates the ‘rind’ of your fruit slice. -
Map the Segments:
Using a very light pencil sketch or a thin brush with diluted white paint, mark the center point at the bottom of the bowl. Draw 8 lines radiating outward from the center to divide the bowl into equal ‘pizza slice’ sections. -
Fill Orange Segments:
Select alternating sections and fill them with your bright orange acrylic paint. Leave a small gap (about 1/8 inch) between the paint and your guide lines, as well as a gap near the rim. -
Fill Yellow Segments:
Fill the remaining wedge sections with bright yellow paint. Painting two thin coats is often better than one thick coat to ensure vibrant, opaque color coverage. -
Paint the Pith Lines:
Using a fine liner brush and white paint, carefully draw the dividing lines between the segments. Connect these to a small white circle at the very bottom center of the bowl. -
Outline the Segments:
Continue with the white paint to outline the curved top edge of each fruit segment. This creates the separation between the juicy fruit and the outer rind. -
Add Texture Details:
Look closely at the reference image; notice the tiny dots. Use your smallest brush or a toothpick to add random speckles inside the fruit segments. Use orange dots on the yellow slices, and darker orange or black dots on the orange slices to simulate seeds and texture. -
Rim Decoration:
Paint a ring of small white dots or dashes just inside the orange rim area you painted in step one. This resembles the porous texture of the white pith found in real citrus fruit. -
Exterior Touches:
For the outside of the bowl, paint a simple pattern of red or orange dots along the bottom edge, mirroring the playful vibe of the interior. -
Seal the Project:
Allow all paint to dry completely for several hours. Finally, apply two coats of a clear varnish (matte or gloss depending on your preference) to protect the paint and seal the clay.
Fixing Mistakes
Smudged a line? Wait for the mistake to dry completely, then paint over it with the background color. Wet paint on wet paint just makes mud.
Now you have a zesty, custom catch-all bowl ready to hold your trinkets or brighten up your shelf