If you love the soft, gravity-made curves you get from a good drape mold, you’re in for a treat. These ideas are all about draping slabs in fresh ways—playing with rims, textures, and unexpected mold shapes to get forms that feel effortless but totally special.
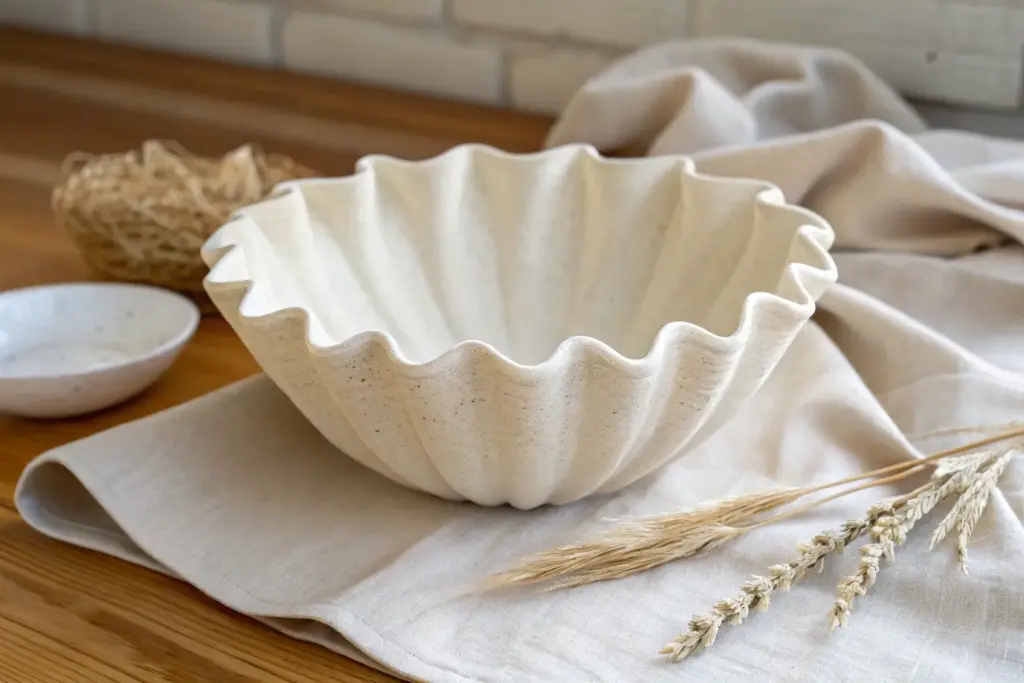
Classic Wavy-Rim Bowl
This elegant ceramic bowl features a gentle, rhythmic fluting that catches the light beautifully, accented by a warm, toasted rim. The creamy white glaze breaks over the texture to reveal the clay body underneath, creating a piece that feels both rustic and refined.
How-To Guide
Materials
- Stoneware clay (buff or speckled)
- Pottery wheel
- Throwing tools (sponge, rib, wire cutter)
- Fluting tool (wire loop or carving tool)
- Chamois or plastic sheet
- Drape mold (plaster or hump mold)
- Wooden paddle
- White breaking glaze
- Bisque kiln and glaze kiln
Step 1: Forming the Base
-
Prepare the Clay:
Begin by thoroughly wedging about 3-4 pounds of stoneware clay to remove air bubbles and ensure a consistent texture. -
Center on the Wheel:
Throw the clay onto the wheel head and center it using firm pressure. Having a perfectly centered mound is crucial for the symmetry of the flutes later. -
Open the Form:
Open the centered clay and pull out the floor to your desired width. For a bowl like this, a wide, gentle curve at the bottom works best. -
Pull the Walls:
Pull the walls up and out, aiming for a consistent thickness. Don’t worry about the final wide shape yet; keep it slightly more vertical to maintain strength. -
Shape the Curve:
Using a rib on the inside, gently push the walls outward while supporting the outside to create that classic volumetric bowl curve. Smooth the rim with a chamois.
Rim Cracks?
If the rim starts cracking while shaping the scallops, the clay is too dry. Mist it lightly and wrap it in plastic for an hour to rehydrate before continuing.
Step 2: Texturing and Shaping
-
Firming Up:
Let the bowl dry to a soft leather-hard stage. It needs to be firm enough to hold its shape but soft enough to accept deep texture. -
Create the Flutes:
Using a wire loo tool or a specialized fluting tool, carve vertical grooves from the bottom of the bowl up to the rim. I like to space these evenly by eye for a more organic feel. -
Refine the Grooves:
If the carving left sharp burrs, wipe them gently with a damp sponge. The texture should feel distinct but soft to the touch. -
Scallop the Rim:
The carving tool naturally creates dips in the rim. Emphasize this by gently pressing down between the flutes with your finger or a round tool to exaggerate the scalloped edge. -
Use the Drape Mold:
Carefully invert your bowl over a plaster hump mold or drape mold. This ensures the curve remains perfect while you do final shaping. -
Paddle for Definition:
While on the mold, gently paddle the exterior. This compresses the clay and can help sharpen the definition of the flutes against the mold underneath. -
Add a Foot Ring:
While inverted on the mold (or using a trimming chuck later), attach a coil and throw a foot ring, or trim a foot directly into the base.
Step 3: Finishing and Glazing
-
Bisque Fire:
Allow the piece to dry completely, slowly, to avoid warping. Fire it in a bisque kiln to prepare it for glazing. -
Select the Glaze:
Choose a reactive ‘breaking’ white glaze. These glazes are designed to be thinner on high points (showing the toasted clay color) and thicker in the valleys (appearing opaque white). -
Apply Glaze:
Dip or pour the glaze over the bowl. Ensure the coating is not too thick, or you will lose the beautiful definition of the fluting. -
Clean the Foot:
Wipe any glaze off the foot ring with a damp sponge to prevent it from sticking to the kiln shelf. -
Glaze Fire:
Fire to the temperature required by your clay and glaze combination (likely Cone 6 or Cone 10 for stoneware).
Highlight Contrast
After bisque firing, wipe a diluted iron oxide wash over the rim and ridges before glazing. This guarantees that warm, toasted brown edge pops through the white glaze.
Once cooled, your bowl is ready to hold fresh fruit or serve as a stunning centerpiece on your table


Handkerchief Corner Vase
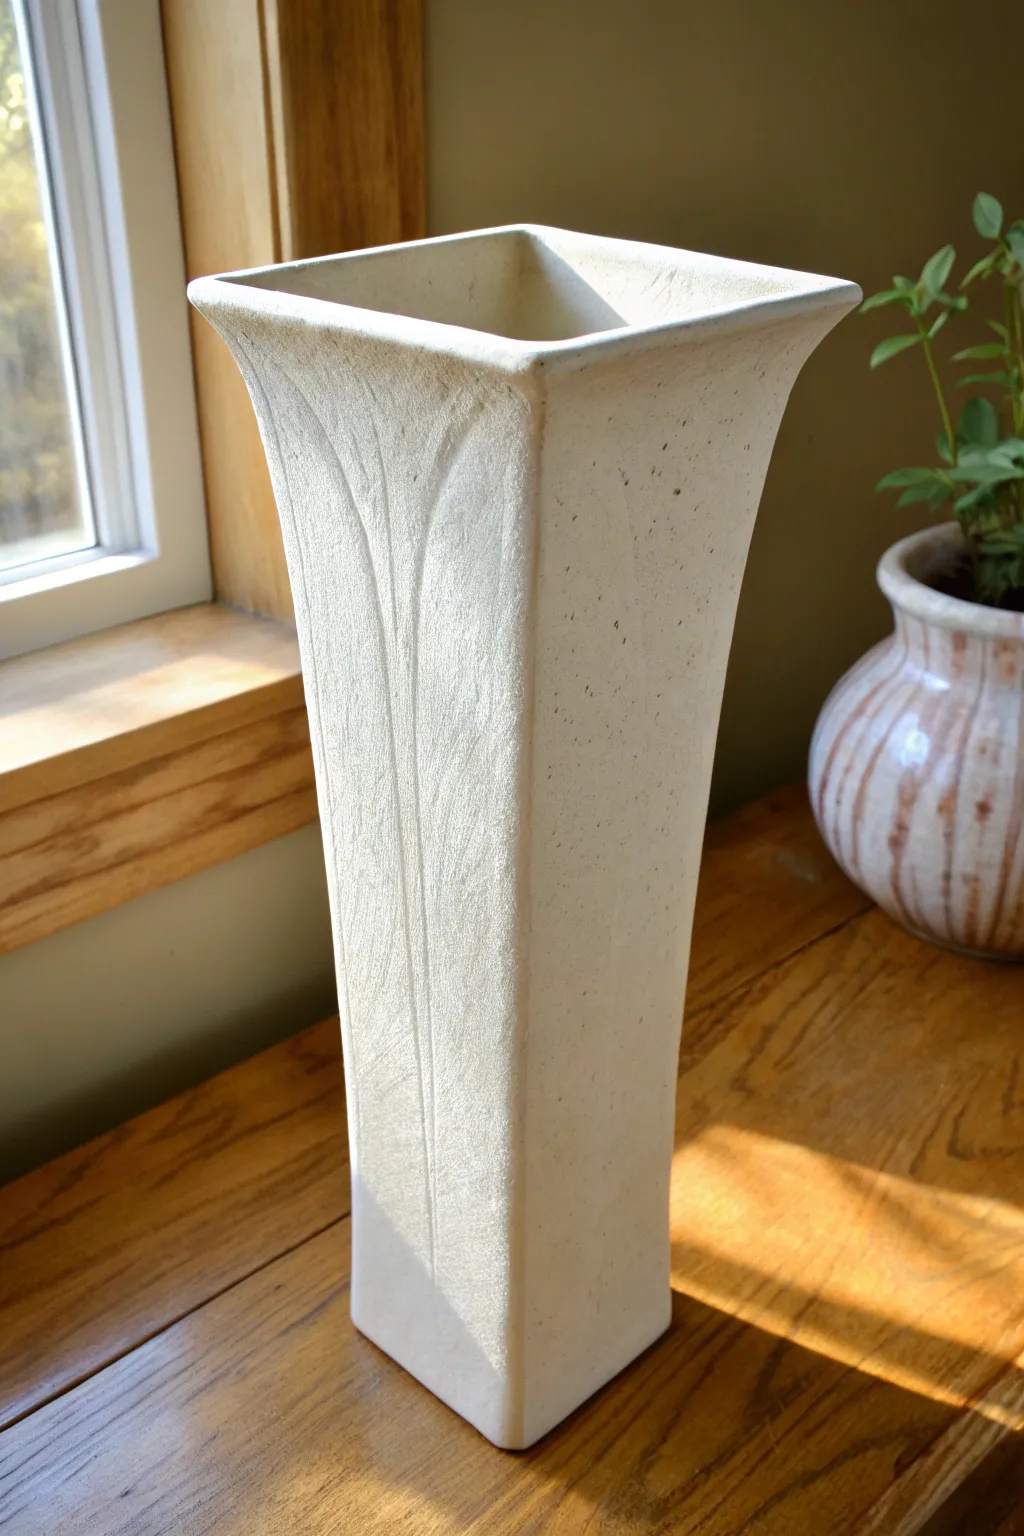
This elegant vase combines the soft, flowing curves of a handkerchief drape with a structured, architectural form. The finished piece features subtle embossed vertical lines and a creamy, speckled matte finish that catches the light beautifully.
Step-by-Step
Materials
- White stoneware clay body (speckled variety recommended)
- Tall, square wood or bisque mold (approx. 12-14 inches high)
- Rolling pin or slab roller
- Fettling knife
- Modeling tool or dull pencil
- Canvas or slab mat
- Scoring tool (serrated kidney or needle tool)
- Slip
- Large sponge
- Plastic sheet
- Matte white glaze
- Kiln
Step 1: Preparing the Slab
-
Roll the clay:
Begin by rolling out a consistent slab of speckled stoneware clay to approximately 1/4 inch thickness. Ensure the slab is large enough to drape over your tall square mold with some excess on all sides. -
Smooth the surface:
Use a flexible rib tool to compress the clay on both sides, removing any canvas texture and aligning the clay particles to prevent warping later. -
Measure the drape:
Roughly dry-fit the slab against your mold to ensure you have enough height. You want the clay to extend slightly past the bottom of the mold (which will become the top rim of the vase).
Soft Seams
Don’t over-compress the corner seams. Leaving them slightly rounded rather than sharp maintains the soft, fabric-like illusion of the handkerchief style.
Step 2: Forming the Vase
-
Prepare the mold:
Cover your tall square mold with a single layer of newspaper or thin plastic so the clay doesn’t stick to the form. -
Drape the slab:
Carefully lift your slab and center it over the top of the mold. The ‘top’ of the mold will actually form the bottom of your vase. -
Create the corners:
Gently press the clay against the four flat sides of the mold. Allow the excess clay at the corners to flare out naturally. Instead of cutting this excess off entirely, pinch these seams together to create the vertical structure. -
Refine the seams:
Once the four corners are pinched, use your fingers to smooth and soften the join. You want a distinct vertical edge, but not a sharp, jagged seam. -
Trim the base:
At the top of the mold (the vase bottom), flatten the clay. Trim any excess so it fits the square footprint of the mold perfectly. -
Add a foot (optional):
If desired, score and slip a small square slab onto the bottom for extra stability, or simply compress the existing bottom well.
Step 3: Detailing and Drying
-
Emboss the pattern:
While the clay is leather hard on the mold, use a modeling tool to gently press vertical, sweeping lines into each side face. Start from the bottom corners and curve upward toward the center. -
Shape the rim:
Pay special attention to the bottom area of the drape (the future top rim). As the clay stiffens, you can slightly flare these edges outward to exaggerate the ‘handkerchief’ look before the clay dries completely. -
Release from mold:
Once the clay is leather hard and can support its own weight, carefully slide the vase off the mold. I find it safest to do this upside down and let gravity help. -
Clean the interior:
Reach inside and smooth out any rough seams where the clay was joined. A damp sponge on a stick can be very helpful for these tall forms. -
Slow drying:
Loosely cover the vase with plastic to ensure slow, even drying. This is crucial for tall, slab-built forms to prevent warping or cracking at the seams.
Color Wash
Apply a black or iron oxide wash before glazing, then wipe it back. This will settle into the embossed lines and make the pattern pop significantly more.
Step 4: Finishing
-
Bisque fire:
Once bone dry, fire the piece to bisque temperature (usually cone 04) according to your clay body’s specifications. -
Glaze application:
Pour a matte white glaze into the interior, roll it around to coat, and pour out the excess. For the exterior, dipping constitutes the smoothest finish, but you can also spray the glaze. -
Reveal texture:
If your glaze is thick, wipe it back slightly on the embossed lines with a damp sponge to let the clay texture shadow through. -
Final firing:
Glaze fire the piece to maturity (Cone 5/6 or 10 depending on your clay). The heat will interact with the speckles in the clay, melting them through the white glaze.
Place near a sunlit window to let the texture and form create beautiful shadows


Flower-Petal Serving Platter
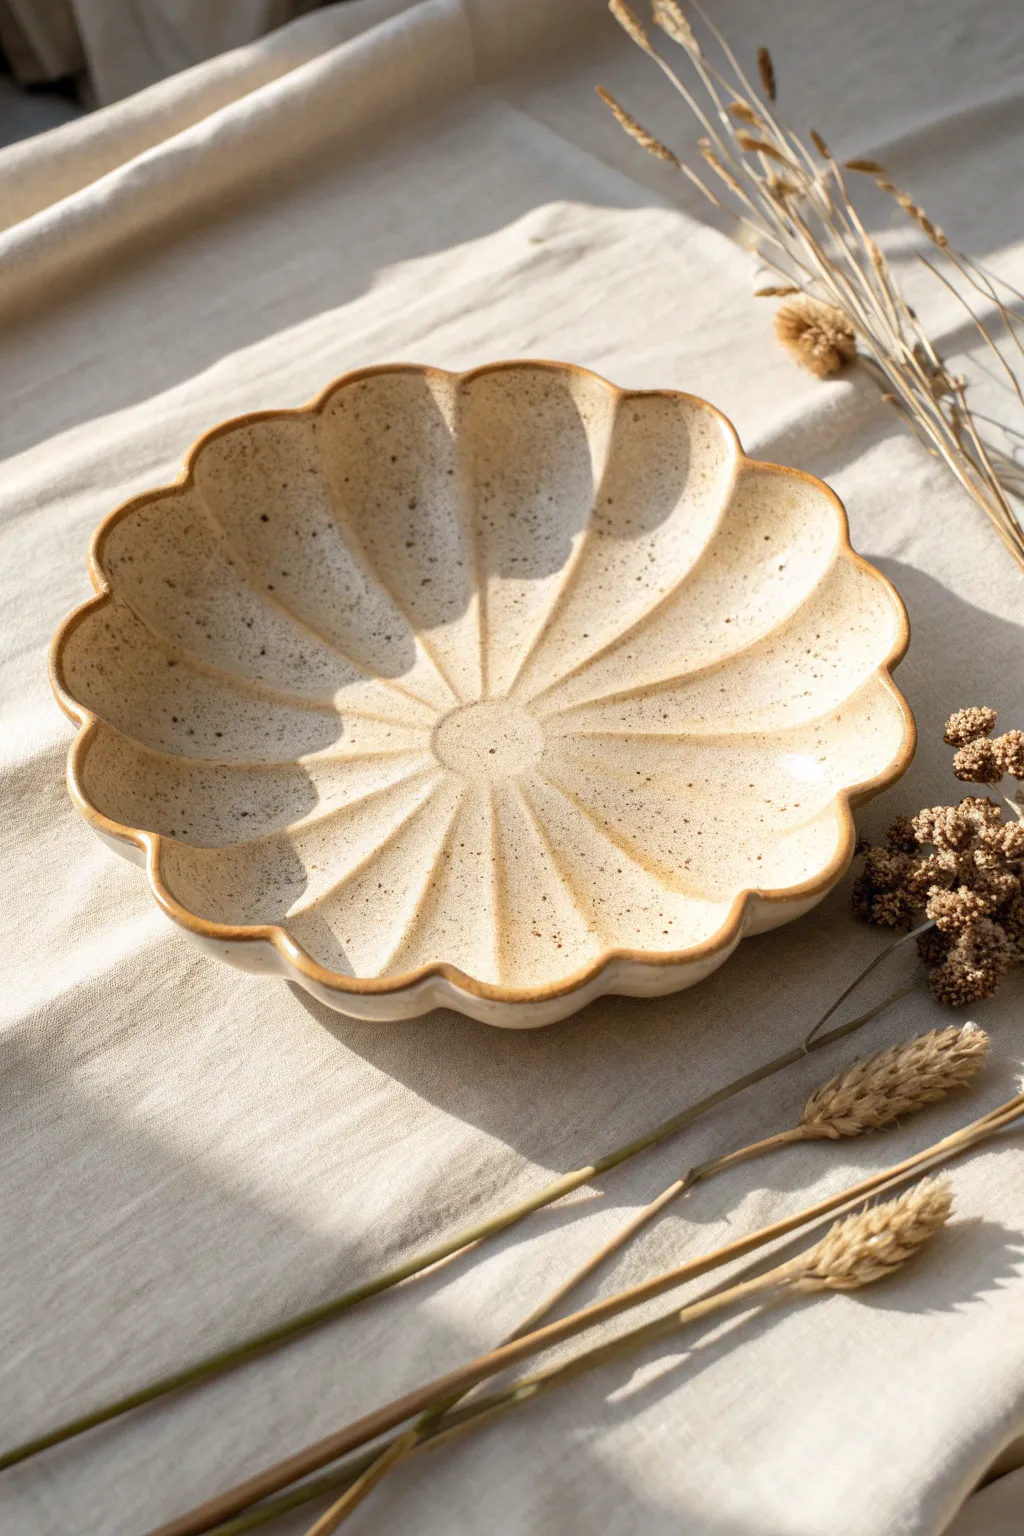
Capture the delicate beauty of a blooming flower with this lovely, scalloped stoneware bowl. Using a simple drape mold technique, you’ll create a functional piece with organic curves and a warm, speckled finish that feels like pure sunshine.
Step-by-Step Guide
Materials
- Speckled buff stoneware clay
- Rolling pin
- Canvas mat or slab roller
- Rib tool (smooth silicone or rubber)
- Fettling knife or needle tool
- Circular drape mold (plaster or bisque)
- Paper template (flower shape)
- Sponge
- Modeling tool (rounded end)
- Clear matte glaze
- Kiln
Step 1: Preparing the Slab
-
Wedge the clay:
Start by thoroughly wedging your speckled buff clay to remove air bubbles and ensure an even consistency. You’ll want a ball roughly the size of a grapefruit. -
Roll out the slab:
Roll your clay out into a smooth, even slab. Aim for a thickness of about 1/4 inch. If you want the edges to look refined, try to keep the thickness very consistent from the center to the perimeter. -
Compress the clay:
Using your smooth rib tool, compress the slab on both sides. This aligns the clay particles, preventing cracking later and giving you a pristine canvas for your flower shape.
Slumping Petals?
If petals droop too much off the mold, your slab might be too wet. Let the slab firm up to a soft leather-hard state before draping next time.
Step 2: Shaping the Flower
-
Apply the template:
Place your flower-shaped paper template gently onto the slab. You can trace around a large dinner plate first to get the size right, then sketch petals, or print a template if you prefer symmetry. -
Cut the outline:
With your fettling knife held vertically, carefully cut around the petal outlines. Remove the excess clay and smooth the raw edges with a damp sponge or your finger. -
Smooth the rim:
Take a moment to round off the sharp cut edges of each petal. A soft, rounded rim makes the finished bowl much more pleasant to hold and glaze.
Color Wash Accent
Before glazing, wipe a diluted iron oxide wash into the crevices between the petals. This adds depth and emphasizes the flower structure.
Step 3: Molding and Texturing
-
Drape the clay:
Carefully lift your clay flower and center it over your drape mold. Allow gravity to pull the petals down naturally over the curve of the mold. -
Secure the form:
Gently press the clay against the mold, starting from the center and working outward to ensure there are no air pockets trapped underneath. -
Define the petals:
Using a rounded modeling tool or just the side of your pinky finger, press into the ‘valleys’ between the petals. This emphasizes the fluted shape and creates those deep, radiating lines. -
Detail the center:
If you wish to create a defined center circle like the example, press a small jar lid or circle cutter gently into the very center, just enough to leave an impression without cutting through. -
Refine the curves:
Go back over each petal curve. I like to gently pinch the very edge of the rim upwards slightly to give it a bit of lift, enhancing the blooming effect. -
Dry slowly:
Cover the piece loosely with plastic. Let it dry on the mold until it is leather-hard. Removing it too soon can cause the petals to warp or slump.
Step 4: Finishing and Glazing
-
Bisque fire:
Once the piece is bone dry, load it into the kiln for a bisque firing (usually to Cone 04). This prepares the clay for glazing. -
Apply glaze:
Dip or brush a clear matte glaze over the entire piece. Using a clear glaze is crucial here because it allows the beautiful natural speckles of the clay body to shine through as the main decorative element. -
Wipe the foot:
Ensure the bottom footing of the bowl is completely free of glaze so it doesn’t fuse to your kiln shelf. -
Glaze fire:
Fire the piece again to the maturity temperature of your clay (likely Cone 5 or 6). This final firing will bring out the toasty color on the rim and seal the surface.
Once cooled, your durable stoneware flower is ready to hold fruit or stand alone as a centerpiece.


Leaf Bowl From Cutout Segments
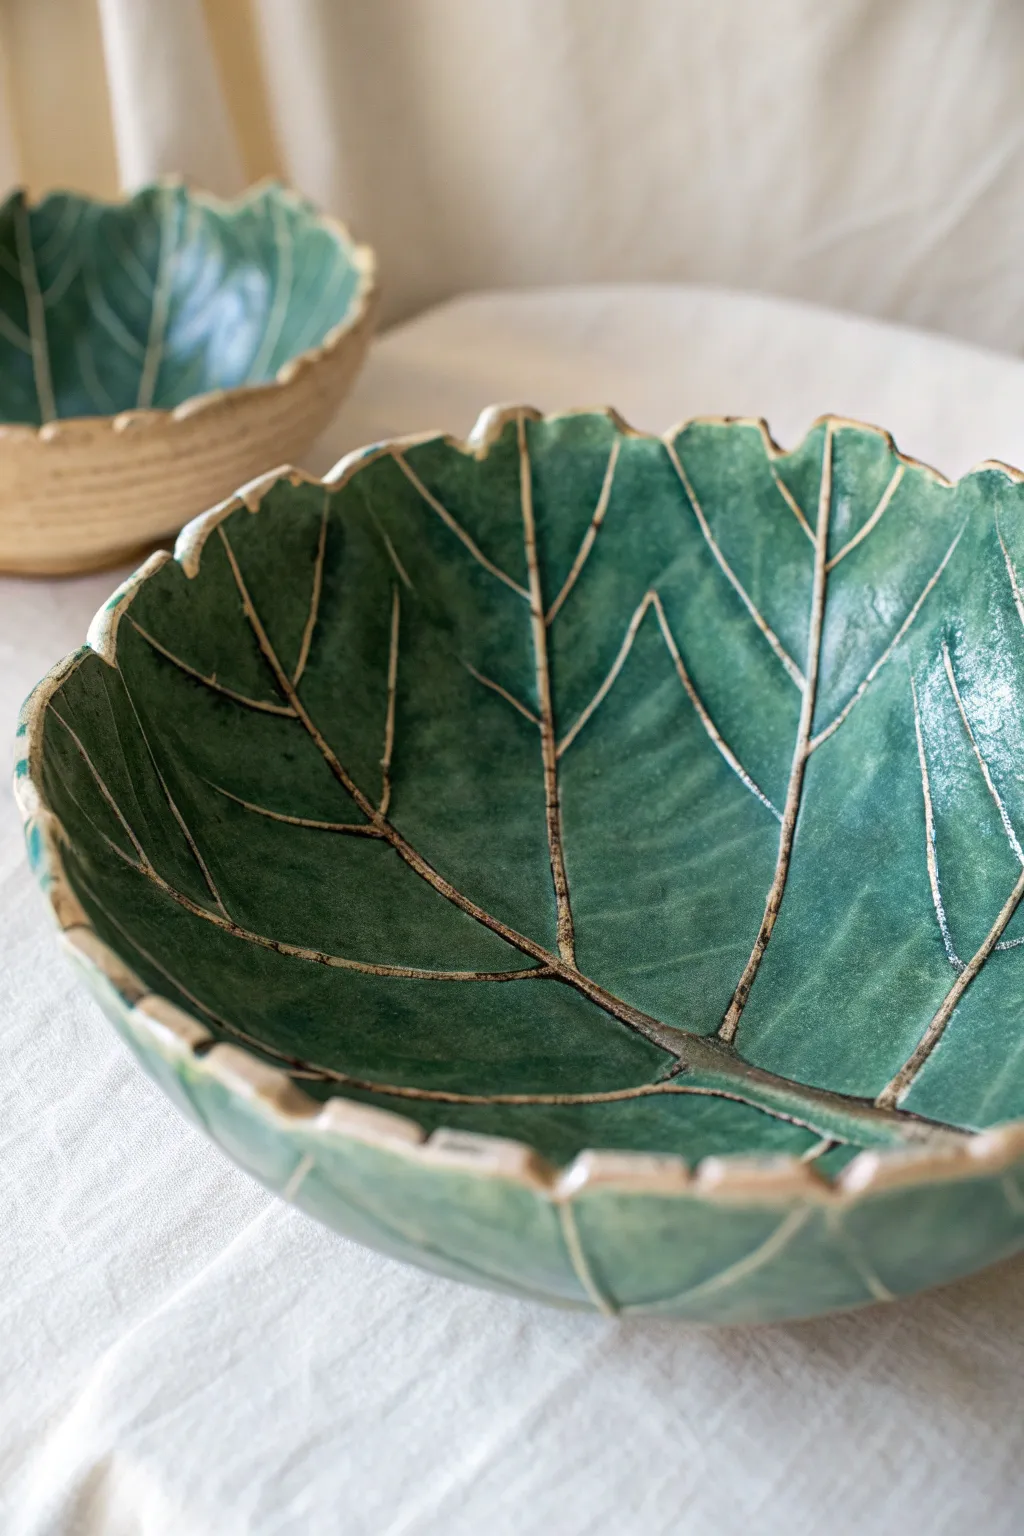
Bring the outdoors in with this stunning organic bowl that mimics the structure of a large leaf. With its deep, glossy green glaze and contrasting raw clay veins, this piece balances rustic charm with elegant design.
Step-by-Step
Materials
- Cone 5-6 buff or speckled stoneware clay
- Rolling pin with thickness guides (1/4 inch)
- Large real leaf (optional) or leaf template
- Needle tool
- Fettling knife
- Large drape mold (plaster or bisqued bowl)
- Cornstarch or cheesecloth
- Loop tool for carving
- Sponge
- Green celadon or breaking glaze (cone 5-6)
- Wax resist
- Kiln
Step 1: Prepping and Cutting
-
Roll the Slab:
Begin by wedging your clay to remove air bubbles, then roll out a smooth slab to an even 1/4-inch thickness. Compress both sides of the slab with a rib tool to align the clay particles, which helps prevent warping later. -
Create the Leaf Shape:
If you have a large garden leaf (like rhubarb or hosta), press it gently into the clay for texture. If not, lightly sketch a large, fan-like leaf shape directly onto the slab. Using your needle tool or fettling knife, cut out the perimeter, adding characteristic wavy or scalloped edges rather than a perfect circle. -
Segment the Leaf:
Using the ‘Cutout Segments’ technique referenced in the article, you can cut shallow darts (triangular wedges) into the clay where the leaf naturally curves. This removes excess bulk and allows the slab to curve deeply without folding over itself.
Fixing Warp
If the rim starts to warp or oval as it dries, place lightweight sandbags (small bags of rice work too) against the exterior walls to hold the shape until bone dry.
Step 2: Forming and Refining
-
Prepare the Mold:
Dust your drape mold liberally with cornstarch or cover it with cheesecloth to ensure the clay releases easily. A hump mold (where clay goes *over* the form) often works best for seeing the exterior texture, but a slump mold (clay *inside*) works well for smooth interiors. -
Draping:
Carefully lift your clay leaf and drape it over the mold. If you cut darts in the previous phase, join the cut seams now by slipping and scoring them together to create a continuous bowl shape. Gentle compression along these seams is crucial. -
Enhance the Rim:
While the clay is soft, use your fingers to gently push and lift sections of the rim, enhancing the natural, undulating look of a dried leaf. I like to smooth the sharp cut edge with a damp sponge to soften the look. -
Add Vein Texture:
If you didn’t press a real leaf, use a dull pencil or modeling tool to draw main vein lines radiating from the center. Press firmly enough to create a channel for glaze to interact with later. -
Drying:
Allow the piece to dry slowly to leather-hard stage while still on the mold. This prevents slumping.
Level Up: Oxide Wash
Before glazing, brush iron oxide into the veins and wipe it back. This darkens the raw clay lines for a more rustic, antique contrast against the bright green.
Step 3: Carving and Glazing
-
Carve the Veins:
Once leather hard, remove the bowl from the mold. Using a small loop tool, carve deeper channels along your vein lines. This exposes the raw clay body (which will remain unglazed) and creates the white lines seen in the reference image. -
Bisque Fire:
Let the bowl dry completely to the bone-dry stage. Fire it in the kiln to cone 04 (or your clay body’s bisque temperature). -
Wax Resist Application:
This is the secret step: carefully paint wax resist into the carved vein lines and along the very edge of the rim. This prevents the glaze from sticking to these specific areas, revealing the toasted clay color after firing. -
Glaze Dipping:
Dip the entire bowl into a glossy green glaze. A ‘breaking’ glaze or celadon is ideal because it will be translucent on high points and pool darker green in the low points, accentuating the texture. -
Clean Up:
Use a damp sponge to wipe any stray glaze droplets off the waxed veins and the foot of the bowl. The wax will resist most of it, but a little cleanup ensures crisp lines. -
Final Fire:
Fire the piece to cone 5 or 6 (mid-range), or according to your specific glaze and clay instructions.
Once cooled, your ceramic leaf bowl is ready to hold fresh fruit or stand alone as a sculptural centerpiece

What Really Happens Inside the Kiln
Learn how time and temperature work together inside the kiln to transform clay into durable ceramic.
Lace-Texture Drape Dish
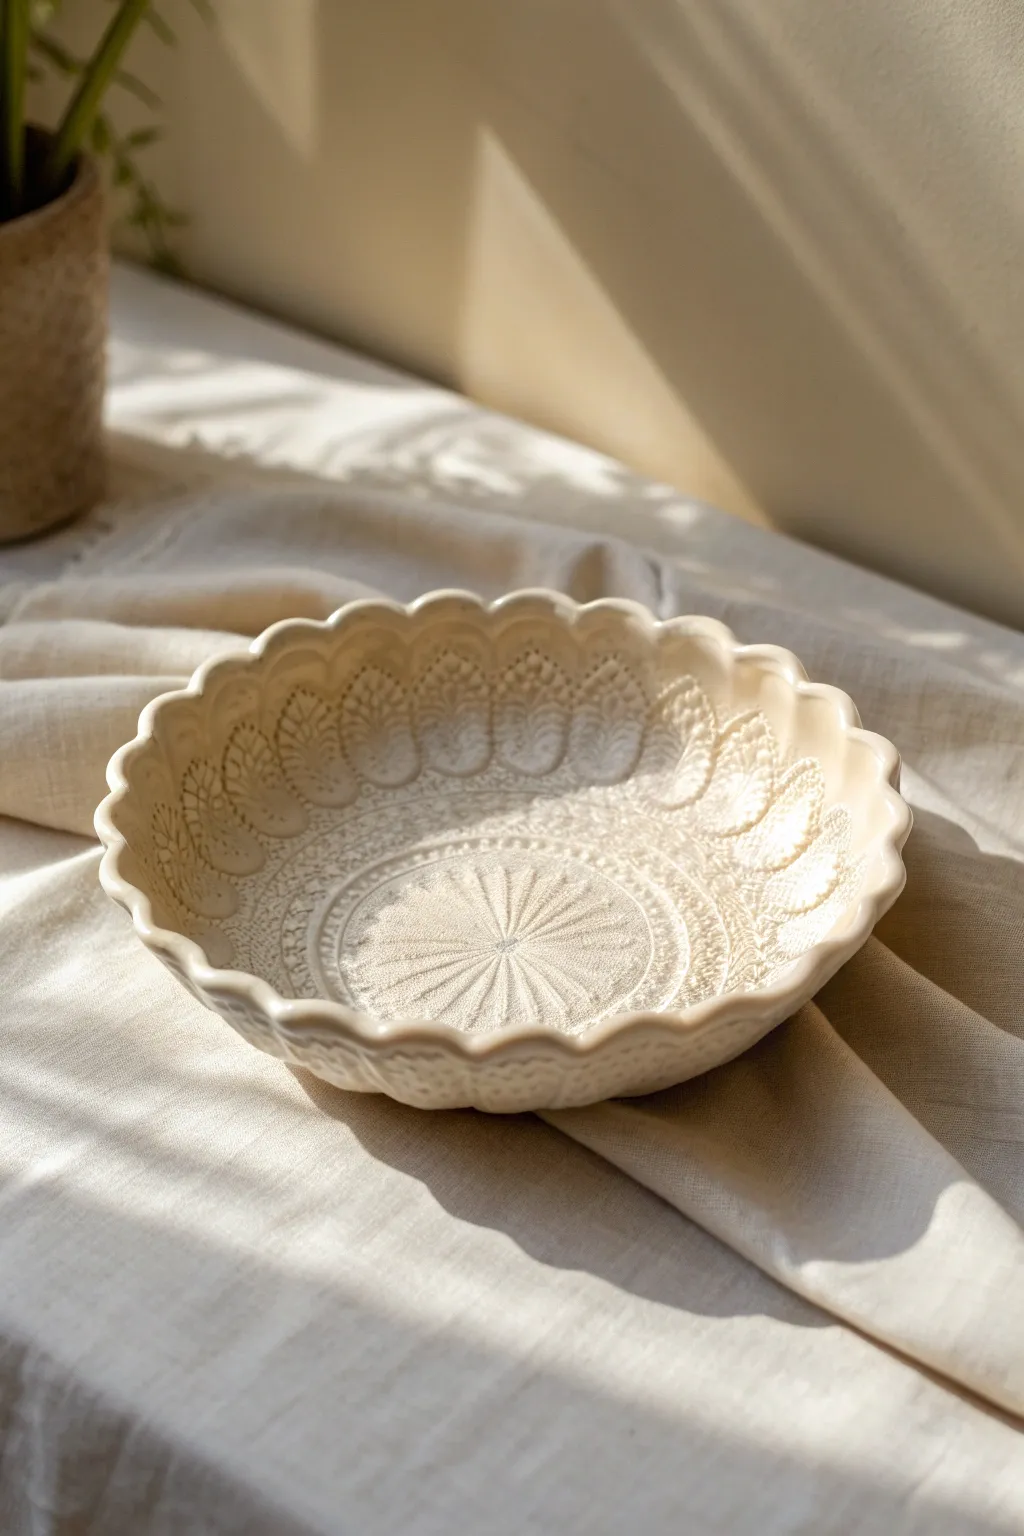
Transform a slab of clay into an elegant centerpiece by pressing vintage lace into the surface. This project captures intricate textile patterns forever in ceramic, resulting in a scalloped, organic bowl reminiscent of fine embroidery.
Detailed Instructions
Materials
- White stoneware or porcelain clay body
- Rolling pin
- Two wooden guide strips (approx. 1/4 inch thick)
- Canvas or heavy cloth for rolling
- Large vintage doily or lace fabric
- Large bowl or plaster hump mold (for shaping)
- Cornstarch (for release)
- Small sponge
- Fettling knife or needle tool
- Rib tool
- Clear or transparent cream glaze
- Kiln access
Step 1: Preparing the Slab
-
Wedge the clay:
Start by thoroughly wedging your clay to remove any air bubbles. You want a smooth, consistent consistency before you begin rolling. -
Prepare the rolling surface:
Lay down your canvas or heavy cloth on a sturdy table. Place your wooden guide strips on either side of the workspace, spaced wide enough to accommodate the final size of your bowl. -
Roll the slab:
Place the ball of clay between the guide strips. Using the rolling pin, roll the clay out until the pin rests on the wooden strips, ensuring an even thickness of about 1/4 inch across the entire slab. -
Smooth the surface:
Take a rubber or metal rib tool and gently compress the surface of the clay slab. This removes canvas texture and aligns the clay particles, preventing future cracking.
Clean Impressions
If your lace is sticking to the moist clay, lightly mist the fabric with water or dust a tiny amount of cornstarch over the clay slab before laying down the fabric.
Step 2: Adding Texture
-
Position the lace:
Carefully drape your doily or lace fabric over the smoothed clay slab. Choose a placement that centers the pattern’s main motif, like the central starburst seen in the example image. -
Impress the pattern:
Using your rolling pin, roll firmly over the lace one single time. Avoid rolling back and forth, as this can create a blurred or ‘ghost’ image. The goal is to embed the lace deeply enough to capture the texture but not so deep it thins the clay dangerously. -
Reveal the design:
Peel back the lace slowly from one corner to reveal the intricate impression left behind. If any clay stuck to the lace, clean it off gently before the next use.
Oxide Wash Tip
For an antique look, apply an iron oxide wash after bisque firing, wipe it back with a sponge so it stays only in the crevices, then apply a clear glaze over it.
Step 3: Shaping the Bowl
-
Determine the shape:
Find a circular template or bowl rim that is slightly larger than the mold you intend to use. Place it lightly over the textured clay to guide your cut. -
Cut the perimeter:
Using a needle tool or fettling knife, cut a wavy, scalloped line around the edge of the pattern. You don’t need a perfect circle; following the natural scallops of the lace pattern creates that lovely organic rim shown in the photo. -
smooth the edges:
Dip your finger or a small sponge in water and run it gently along the cut edge to soften any sharp corners or burrs left by the cutting tool. -
Prepare the mold:
Dust your hump mold (or an upside-down bowl) with a light layer of cornstarch. This acts as a release agent so your clay doesn’t stick to the form. -
Drape the clay:
Carefully lift your textured slab and drape it over the mold, texture side facing OUT / AWAY from the mold. Centering it accurately now is crucial for a balanced bowl. -
Form the curves:
Gently press the slab down onto the mold using a soft sponge. Start from the center and work outward to avoid trapping air pockets, encouraging the clay to take the mold’s shape. -
Accentuate the flutes:
I like to use my fingers to gently push the scalloped edges inward slightly, enhancing the ruffled effect of the rim as it hangs over the mold.
Step 4: Finishing
-
Dry slowly:
Cover the piece loosely with plastic to allow it to dry slowly to leather hard. Once leather hard, lift it off the mold so it can dry completely without shrinking against the form. -
Bisque fire:
Fire the bone-dry bowl in a kiln to bisque temperature (usually cone 04 or 06, depending on your clay). -
glazing strategy:
Apply a transparent or semi-transparent glaze. A clear glaze works best to highlight the texture, as darker or opaque glazes might obscure the fine lace details. -
Final firing:
Glaze fire the piece to the maturity temperature of your clay body (e.g., cone 5/6 or cone 10). The glaze should pool slightly in the recesses, emphasizing the lace pattern.
This beautiful bowl will serve as a permanent record of delicate textile art, perfect for holding fruit or simply catching the light on a table
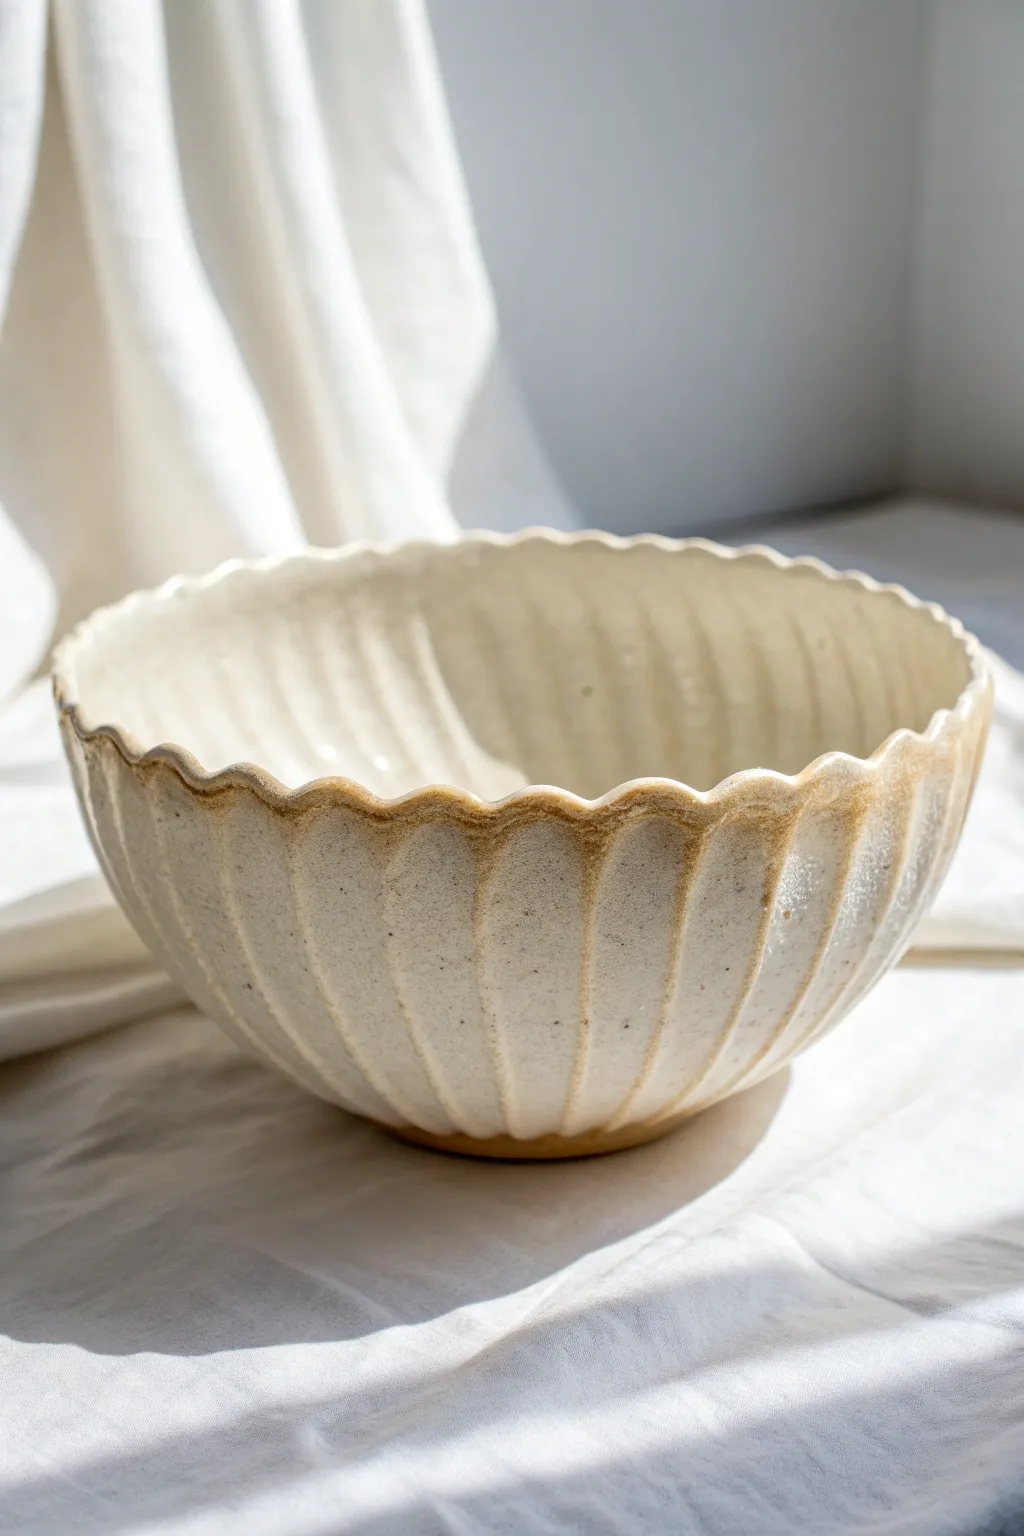
Fluted Rim With Pinched Waves
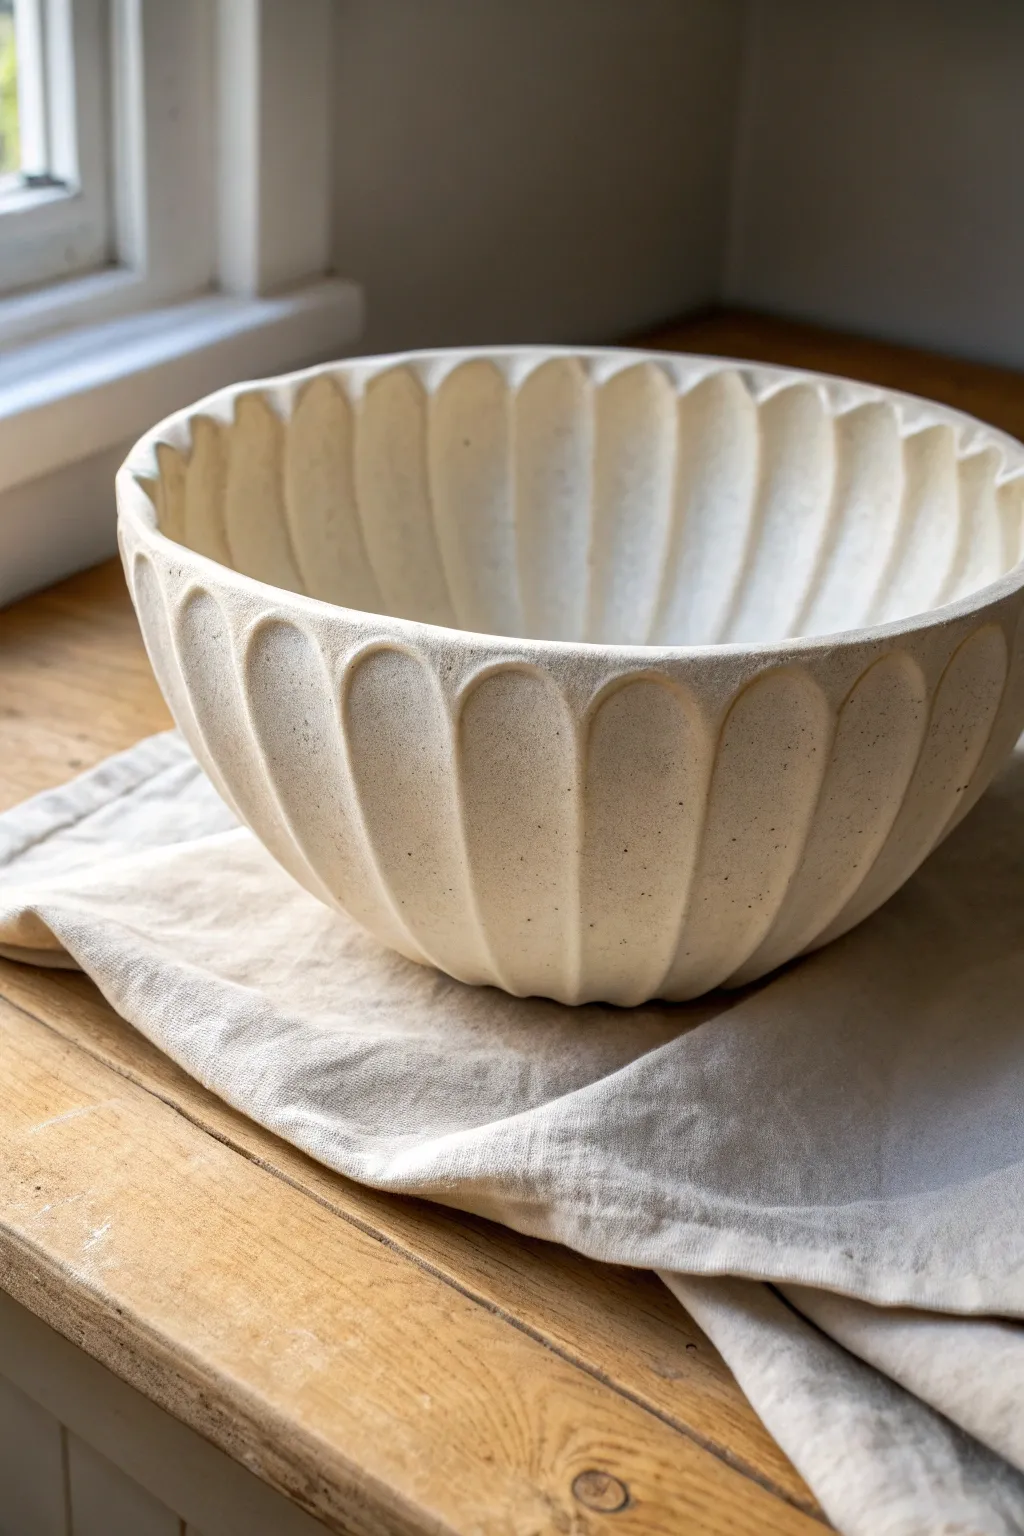
This project transforms a simple slab of clay into a deeply textured statement piece using a combination of drape molding and careful hand-sculpting. The finished bowl features rhythmic, vertical flutes that catch the light beautifully, giving it a timeless, architectural feel.
Step-by-Step Guide
Materials
- Stoneware clay (smooth or with light grog, cream/white color)
- Large plaster or bisque hump mold (hemisphere shape)
- Rolling pin
- Canvas work surface or slab roller
- fettling knife or needle tool
- Flexible rib (rubber or metal)
- Wooden modeling tool (rounded end)
- Carving loop tool (large U-shape)
- Sponge
- Slip and scoring tool
Step 1: Preparing the Slab
-
Roll out the clay:
Begin by wedging your clay thoroughly to remove air pockets. Roll out a large, even slab approximately 3/8-inch thick. You want it slightly thicker than a standard bowl to accommodate the deep carving texture later. -
Smooth the surface:
This is a crucial step often skipped—compress both sides of the slab using a flexible rib. This aligns the clay particles, preventing future warping, and creates that smooth, stone-like finish visible in the example. -
Cut the circle:
Measure your hump mold to determine the necessary diameter. Using a needle tool, cut a large circle from your slab, ensuring you have enough excess to drape fully down the sides of the mold.
Step 2: Draping and Shaping
-
Drape the clay:
Carefully lift your slab and center it over your hump mold. Gently let the clay slump down over the form. Avoid pulling or stretching the clay; instead, lift the edges and press them down against the mold to release trapped air. -
Secure the form:
Using a soft rubber rib, smooth the clay against the mold, starting from the center (the bottom of the bowl) and working outward toward the rim. This establishes the basic bowl shape. -
Trim the rim:
While the clay is still on the mold, use a needle tool or fettling knife to trim the excess clay at the bottom edge (which is actually the rim of your bowl) to create an even, level line. -
Wait for leather hard:
Allow the clay to dry on the mold until it reaches a sturdy leather-hard stage. It needs to be firm enough to hold its shape when removed, but soft enough to carve deeply without chipping.
Uneven Flutes?
Don’t panic if spacing gets wonky. Instead of forcing perfect symmetry, lean into the variation. Slightly different widths add organic character that makes handmade pottery feel authentic.
Step 3: Carving the Flutes
-
Remove from mold:
Gently pop the bowl off the mold and flip it right-side up. I like to place it on a banding wheel at this stage to make the carving process smoother. -
Mark vertical guides:
Using a needle tool, lightly sketch vertical lines around the exterior to guide your spacing. Aim for symmetrical sections or simply rely on your eye for a more organic look. -
Start the fluting:
Using a U-shaped loop tool, carve vertical channels from the rim down to the base. Start with shallow cuts to establish the rhythm, then go back to deepen them. -
Refine the ridges:
The beauty of this piece is the ‘soft’ ridge between each flute. Use a damp sponge or your finger to smooth the high points between your carved channels, rounding them over so they aren’t sharp. -
Mirror the interior:
For that fully integrated look, gently carve corresponding grooves on the inside of the bowl. Be careful not to carve too deeply where the outer grooves meet the inner ones, or the wall might become too thin. -
Sculpt the rim:
At the top rim where the inner and outer flutes meet, use a modeling tool to pinch and shape the clay into a scalloped wave pattern. This softens the transition between inside and outside.
Use a Paddle
Before carving, gently paddle the exterior while it’s still on the mold. This compresses the clay further and creates a flatter canvas for your carving tools to glide through.
Step 4: Finishing Touches
-
Texturize surface:
The example piece has a lovely matte, speckled stone appearance. If your clay is too smooth, you can gently dab the surface with a coarse sponge to bring up the grog or add subtle texture. -
Final smoothing:
Run a damp chamois strip over the rim one last time to ensure it is perfectly smooth for handling. -
Slow drying:
Cover the bowl loosely with plastic to let it dry very slowly. Because the wall thickness varies due to the fluting, fast drying can cause cracks. -
Firing:
Bisque fire the piece, then glaze. A matte white or satin cream glaze works best to highlight the shadows in the flutes without distracting with high gloss reflections.
Once fired, fill your bowl with fruit or simply let the light play across the sculpted ridges on your shelf


The Complete Guide to Pottery Troubleshooting
Uncover the most common ceramic mistakes—from cracking clay to failed glazes—and learn how to fix them fast.
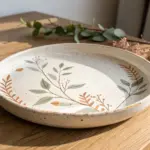
Scalloped Edge Cookie Plate
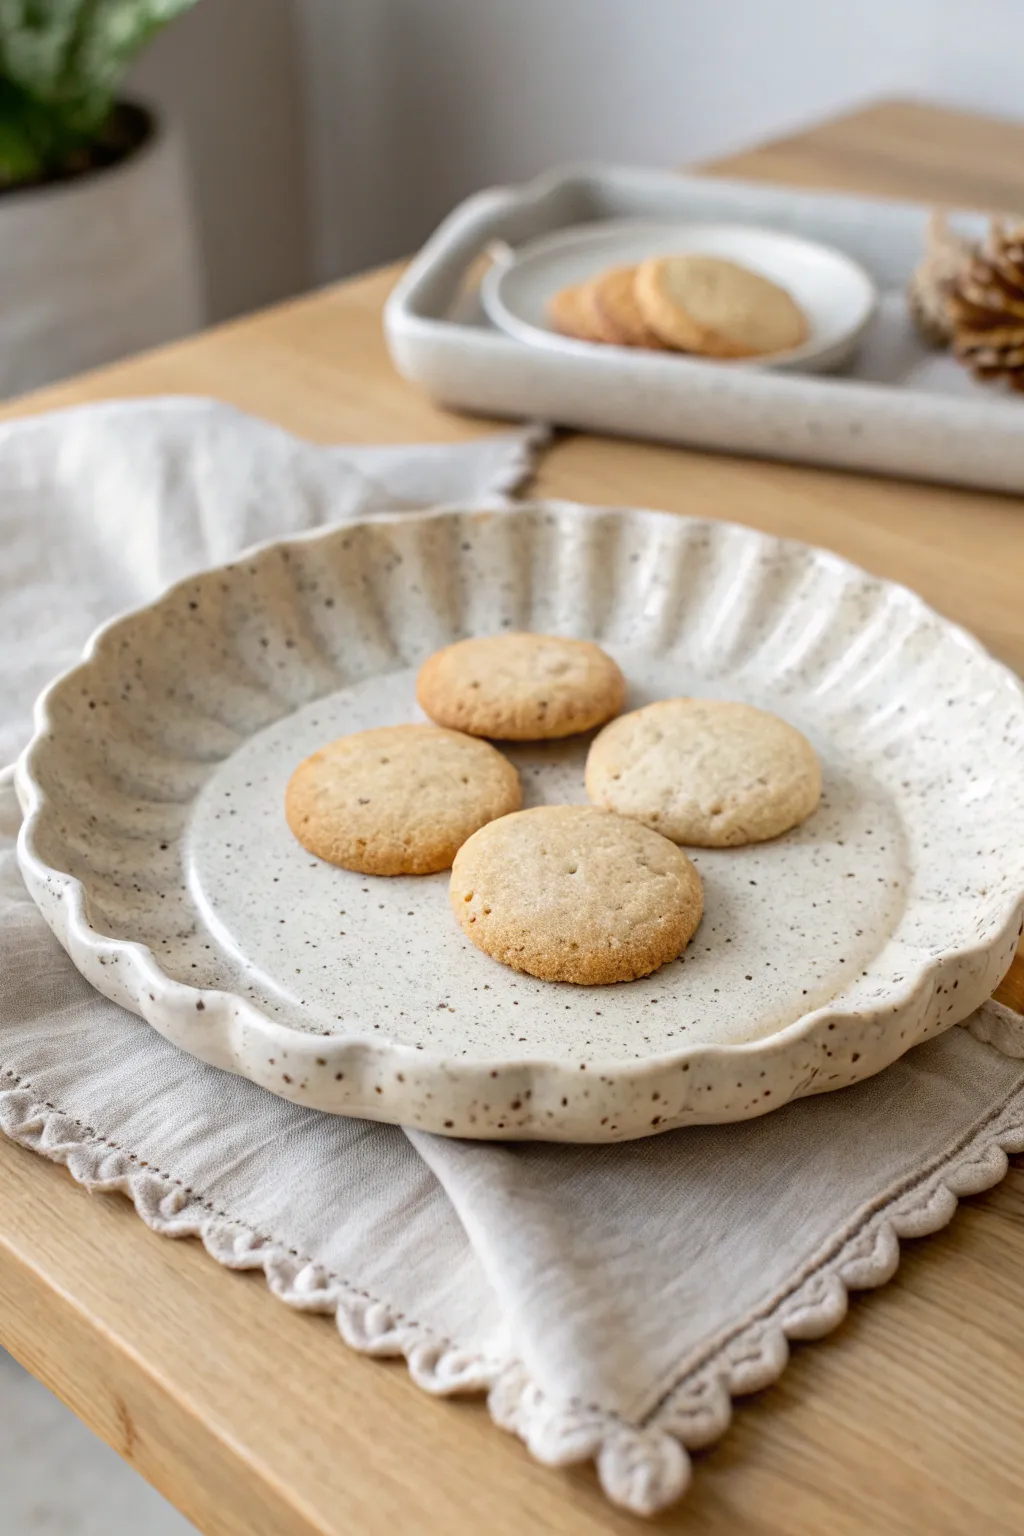
This charming ceramic plate features gentle, rhythmic scallops that mimic the classic fluted shape of a tart pan. Finished with a creamy, speckled glaze, it creates a warm and inviting backdrop for fresh-baked treats.
Step-by-Step
Materials
- White stoneware clay with grog or speckles
- Rolling pin
- Canvas work surface or slab mat
- Circular template (paper or flexible plastic, approx. 8-9 inches)
- Needle tool or fettling knife
- Large sponge drape mold or a hump mold
- Wooden modeling tool or rib
- Creamy white speckled glaze (cone 5/6 recommended)
- Kiln
- Smooth river stone or finishing sponge
Step 1: Creating the Slab
-
Prepare the Clay:
Begin by wedging your white stoneware clay thoroughly to remove air bubbles. Even if using fresh clay, a quick wedge ensures consistent particle alignment. -
Roll the Slab:
On your canvas surface, roll out a slab of clay. Aim for a thickness of about 1/4 inch. Keep your rolling pin pressure even, rotating the clay periodically to ensure a uniform thickness throughout -
Compress the Slab:
Take a rubber kidney or a slightly damp sponge and compress both sides of the slab. This aligns the clay particles, reducing the chance of warping later, and creates a smooth starting surface.
Even Scallops Trick
Mark your circle like a clock face (12, 3, 6, 9) before scalloping. Then divide those sections in half. This ensures your ruffles are perfectly spaced all around.
Step 2: Shaping the Plate
-
Cut the Circle:
Place your circular template onto the slab. Using your needle tool, cut cleanly around the edge. Remove the excess clay and set it aside for recycling. -
Prepare the Mold:
If you are using a plaster hump mold, ensure it is clean. If using a makeshift drape mold (like a large inverted bowl), cover it with a layer of plastic wrap or cheesecloth to prevent sticking. -
Drape the Clay:
Carefully lift your clay circle and drape it over your chosen mold. Gently press it down from the center outward to ensure it hugs the form without trapping air underneath. -
Form the Scallops:
This is the defining step. Use your thumb or the handle of a wooden spoon to press indentations into the rim at regular intervals. I find spacing them about an inch apart creates a nice rhythm. -
Refine the Flutes:
As you press down to create the ‘valley’ of the scallop, the clay between will naturally rise. Gently pinch these rising sections to define the fluted edge, ensuring the curves are soft and rounded like the reference photo. -
Smooth the Rim:
Run a damp chamois or a very smooth sponge along the entire edge. Sharp edges can become brittle after firing, so round them off nicely now.
Bottom Flattening
If the bottom puffs up while firing, tap the leather-hard plate gently on a flat board before drying to re-establish a flat foot, or trim a slight recess.
Step 3: Drying and Bisque Firing
-
Slow Drying:
Let the plate stiffen on the mold until it is leather hard. This usually takes a few hours to overnight, depending on humidity. -
Remove from Mold:
Once the plate holds its own shape, carefully remove it from the mold. Place it rim-down on a flat board to continue drying evenly. Weighting the center lightly with a sandbag can help keep the bottom flat. -
Final Sanding:
When bone dry, inspect the rim one last time. Use a green scrubby pad or fine sandpaper to gently smooth away any roughness. -
Bisque Fire:
Load the plate into the kiln for a bisque fire (typically Cone 04). Ensure it is well-supported on the shelf.
Step 4: Glazing and Finishing
-
Wipe Down:
After the bisque fire, wipe the plate with a damp sponge to remove any kiln dust. This helps the glaze adhere properly. -
Apply Glaze:
Select a creamy white glaze, preferably one with speckles. Pour the glaze into the interior of the plate, swirl it to coat, and pour out the excess. For the exterior, you can brush or dip depending on your setup. -
Clean the Foot:
Use a sponge to wipe the glaze completely off the bottom foot ring where it will touch the kiln shelf. Leave a gap of about 2-3mm up the side to account for any glaze movement. -
Glaze Fire:
Fire the plate to the maturity temperature of your clay and glaze combination (likely Cone 5 or 6). Allow the kiln to cool completely before opening. -
Polish the Foot:
Once cool, use a diamond sanding pad or wet/dry sandpaper to smooth the unglazed bottom foot, ensuring it won’t scratch your table.
Now your plate is ready to be loaded with warm cookies for a cozy afternoon treat
Textured Stripe Slab, Smooth Rim
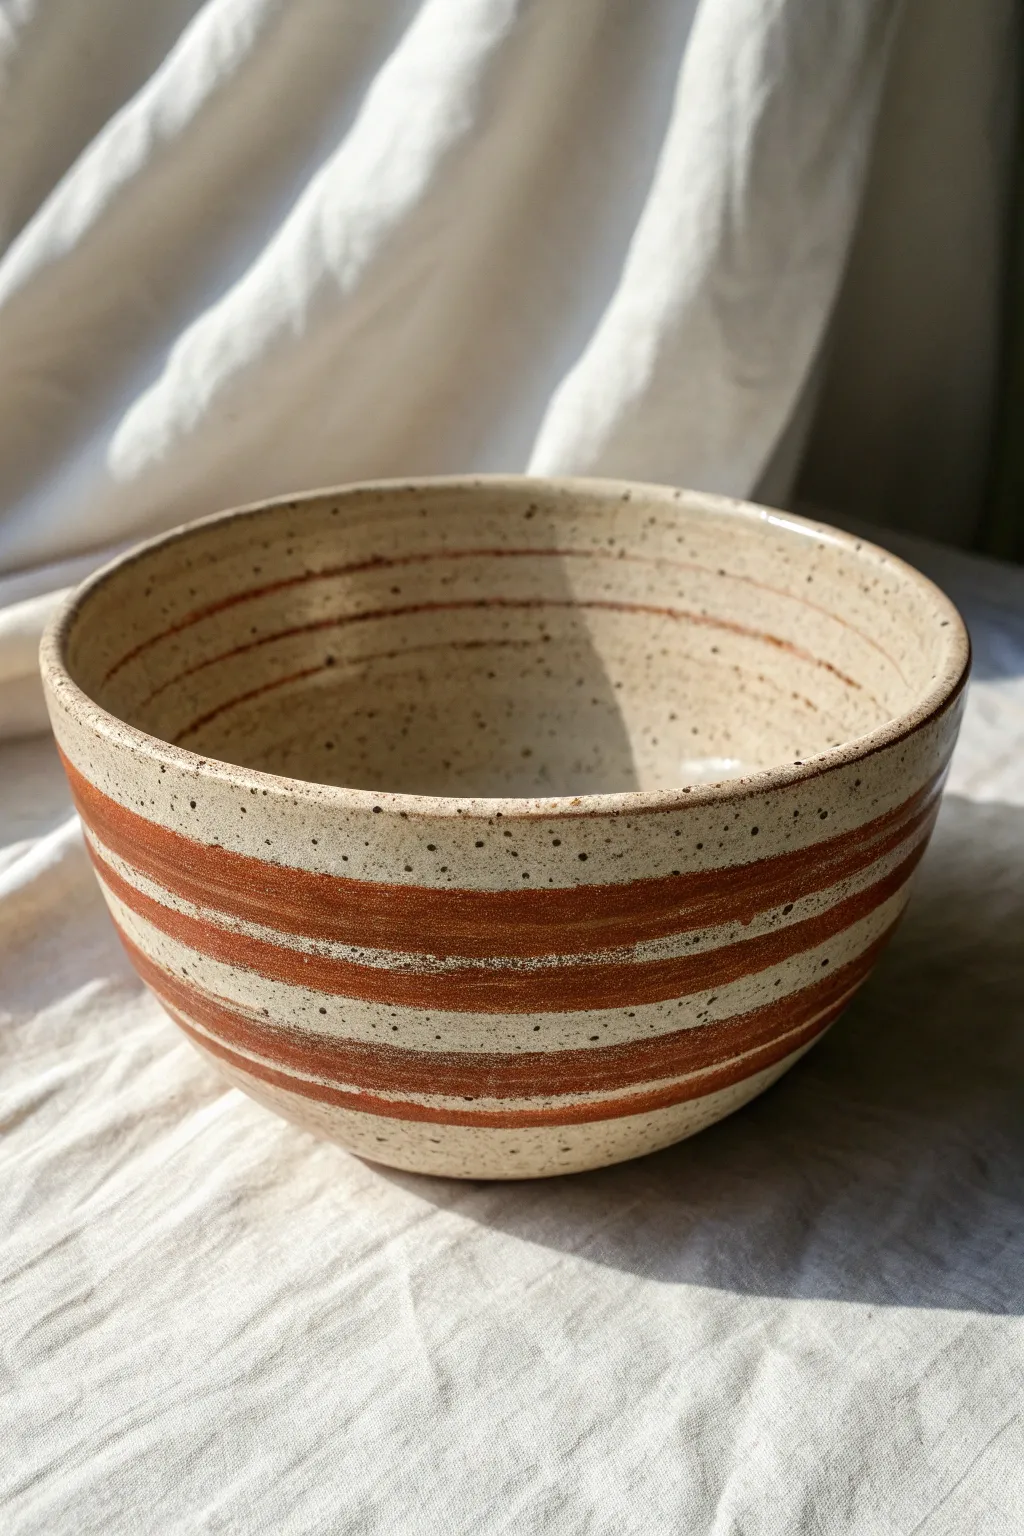
This project combines the organic warmth of speckled clay with precise, earthy stripes for a finish that feels both modern and rustic. By using a drape mold and slab construction, you’ll achieve a perfectly round form while maintaining a handmade touch.
Detailed Instructions
Materials
- Speckled stoneware clay (mid-fire)
- Red iron oxide wash or terracotta slip
- Rolling pin
- Guide strips or slab roller (approx. 1/4 inch thickness)
- Circular bat or template
- Sponge or trimming tool
- Soft brush for applying slip
- Pottery wheel (for banding) or banding wheel
- Drape mold (plaster or bisque)
- Rib tool
- Clear glaze (optional)
Step 1: Preparing the Slab
-
Roll out the clay:
Begin by rolling out your speckled stoneware clay into a large, even slab. Aim for a consistent thickness of about 1/4 inch to ensure the bowl is durable but not overly heavy. -
Cut the circle:
Place a circular template or bat over your slab that corresponds to the size of your drape mold. Use a needle tool to cut a clean circle around the template. -
Smooth the surface:
Before moving the clay, take a soft rubber rib and gently compress the slab on both sides. This aligns the clay particles to prevent cracking and creates a smooth canvas for your stripes. -
Drape over the mold:
Carefully lift your clay circle and center it over your drape mold. Gently press the clay down to conform to the shape of the mold, working from the center outward to avoid trapping air bubbles.
Clean Lines Pro-Tip
Keep your elbow tucked into your ribs while holding the brush. This anchors your arm, making it much easier to paint steady, straight lines as the banding wheel spins.
Step 2: Shaping and Refining
-
Secure the form:
Use your hands or a soft sponge to firmly pat the clay against the mold. Ensure the rim touches current evenly all the way around. -
Trim the excess:
If the slab hangs unevenly past the mold’s edge, use a needle tool or knife to trim the rim flush with the bottom of the mold for a level edge. -
Refine the rim:
Smooth the cut rim with a damp sponge or a chamois cloth. A rounded, compressed rim is stronger and more pleasant to hold than a sharp, square one. -
Let it firm up:
Allow the clay to dry to a soft leather-hard stage while still on the mold. It needs to be sturdy enough to hold its shape when flipped over, but not bone dry. -
Release the bowl:
Once leather hard, carefully lift the bowl off the drape mold. Turn it right-side up and place it on a banding wheel to inspect the interior curve.
Level Up: Texture
Before applying the red slip, lightly drag a serrated rib around the exterior. The slip will settle into the grooves, adding a tactile, woven feel to the stripes.
Step 3: Applying the Decoration
-
Prepare the banding wheel:
Center your leather-hard bowl upside down on a banding wheel. Centering is crucial here to ensure your stripes connect perfectly around the form. -
Mix your wash:
Prepare a small amount of red iron oxide wash or a terracotta-colored slip. It should be the consistency of heavy cream for opaque coverage. -
Load your brush:
Choose a soft, medium-sized brush that holds a good amount of liquid. I like to test the stroke width on a scrap piece of clay first. -
Paint the exterior bands:
While slowly spinning the banding wheel, hold your brush steady against the exterior of the bowl. Apply three distinct, thick bands of the red wash, leaving the natural speckled clay visible between them. -
Decorate the interior:
Flip the bowl over and re-center it. Repeat the banding process on the inside rim, creating delicate concentric circles that mirror the exterior design. -
Clean up edges:
If any slip dripped or smudged, gently scrape it away with a sharp tool once it has dried slightly, keeping the borders of your stripes crisp.
Step 4: Finishing
-
Bisque fire:
Allow the bowl to dry completely. Fire it to bisque temperature (usually Cone 04) to prepare it for glazing. -
Glaze application:
Apply a clear, glossy glaze over the entire piece. This will make the bowl food-safe while allowing the beautiful speckles and red stripes to show through clearly. -
Final firing:
Fire the bowl to the maturity temperature of your stoneware clay (likely Cone 5 or 6). Once cooled, sand the bottom foot if necessary to ensure it sits perfectly flat on a table.
The contrast between the warm red bands and the cool speckled clay creates a timeless piece perfect for daily use

TRACK YOUR CERAMIC JOURNEY
Capture glaze tests, firing details, and creative progress—all in one simple printable. Make your projects easier to repeat and improve.
Carved Pattern That Wraps the Form
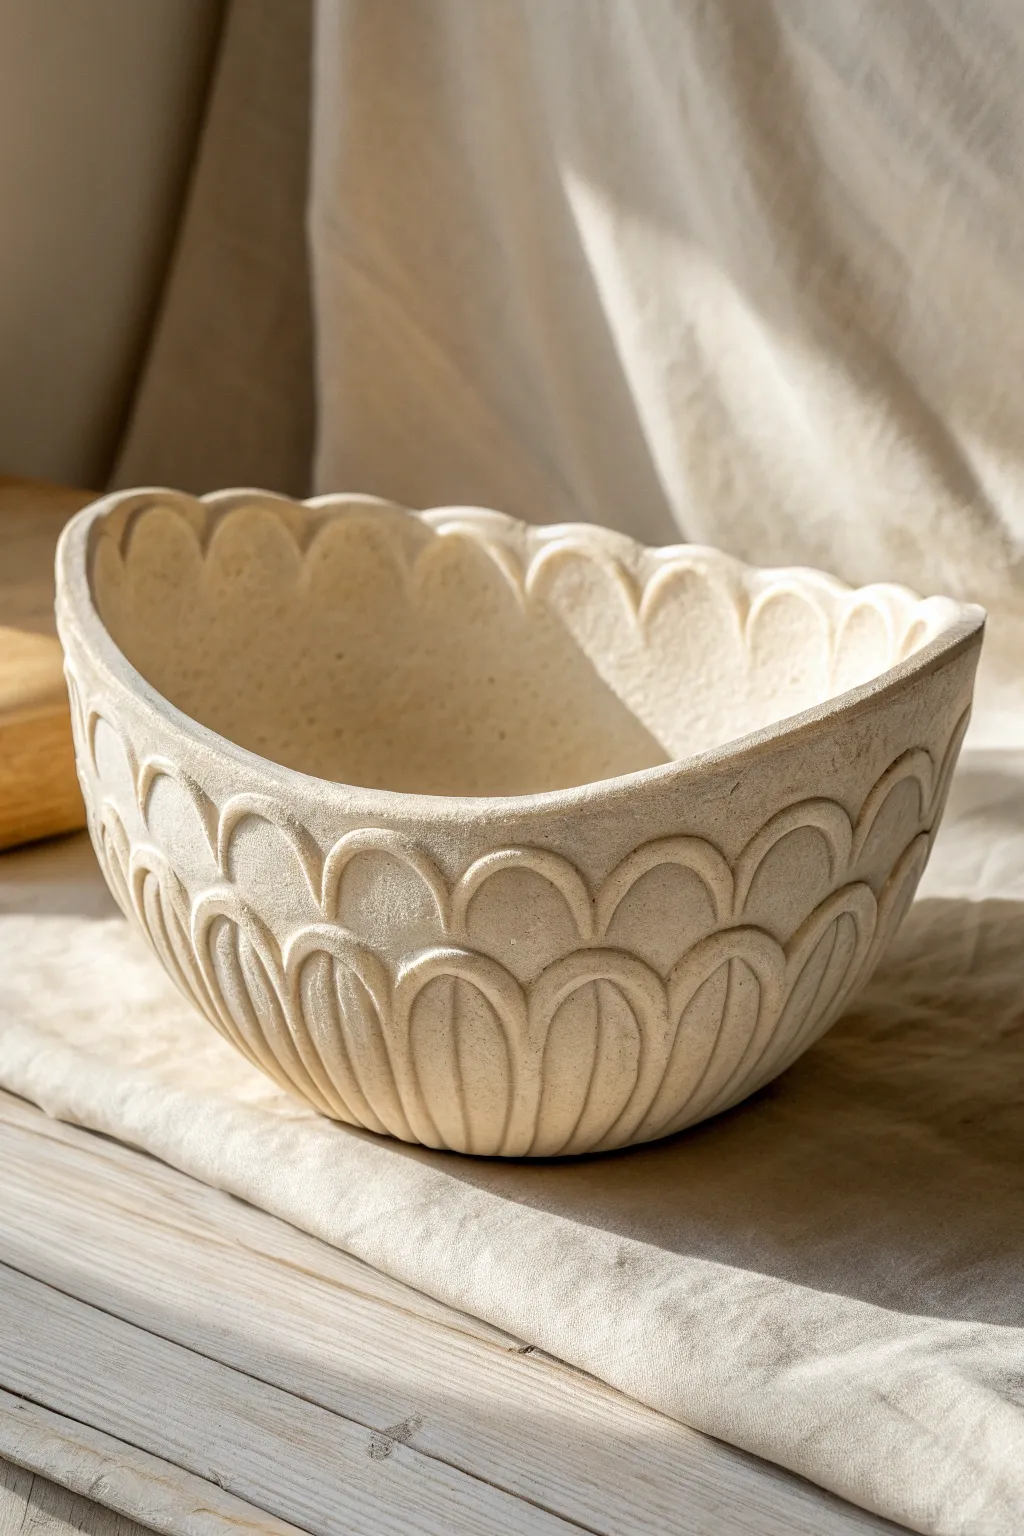
This project transforms a simple slab of clay into a wonderfully tactile vessel featuring a rhythmic, scalloped relief pattern. The gentle oval form is achieved using a drape mold, allowing the exterior texture to remain crisp and undisturbed while the inside stays smooth.
Step-by-Step Guide
Materials
- Stoneware clay (buff or white with fine grog)
- Drape mold (plaster, bisque, or a smooth wooden form)
- Rolling pin and canvas or slab roller
- Flexible metal rib
- Carving tools (loop tools or sgraffito loops)
- Fettling knife
- Wooden modeling tool
- Sponge
- Plastic wrap (if using a non-porous mold)
Step 1: Slab Preparation
-
Roll the slab:
Begin by wedging your clay thoroughly to remove air pockets. Roll out a consistent slab approximately 3/8-inch thick on your canvas. It’s important to keep this slightly thicker than usual to accommodate the deep carving later. -
Compress the surface:
Using a flexible metal rib, compress the clay on both sides. Run the rib smoothly across the surface at a shallow angle to align the clay particles, which helps prevent warping. -
Prepare the mold:
If you are using a plaster mold, the clay can go directly on it. If using a bowl from your kitchen or a wooden form, cover it tightly with a layer of thin plastic wrap or a piece of old t-shirt material to prevent sticking. -
Drape the form:
Lift your slab carefully and drape it over your chosen oval mold. Use your hands to gently coax the clay down the sides, ensuring there are no air pockets trapped between the clay and the mold. -
Initial trim:
Using a fettling knife held perpendicular to the mold, trim the excess clay around the base. I like to leave about half an inch of extra material at the rim for now, just to be safe.
Clean Curves Secret
When carving the arched outlines, pull the tool toward your body rather than pushing away. This gives you much greater control over curve consistency.
Step 2: Mapping and Carving
-
Leather hard stage:
Let the bowl dry on the mold until it reaches a soft leather-hard state. It needs to be firm enough to hold its shape when handled, but soft enough to carve easily without chipping. -
Release the form:
Carefully pop the bowl off the drape mold to ensure it isn’t stuck, then place it back on gently upside down. This is your canvas for carving. -
Draft the grid:
Lightly sketch a horizontal guideline around the middle of the bowl’s exterior wall using a needle tool or pencil. This will separate your two tiers of scallops. -
Sketch the arches:
Draw your scallop pattern. Start with the top row (closest to what will be the foot), drawing evenly spaced arches. Then, draw the second row below, interlocking them like brickwork or fish scales. -
Carve the outlines:
Using a small U-shaped loop tool, carve a shallow channel along the lines you just drew. This creates the raised ‘frame’ for each scallop. -
Relief excavation:
Switch to a slightly larger loop tool. Carefully remove material from the center of each scallop, tapering your depth so the edges remain high, creating a concave scoop inside each arch. -
Vertical detailing:
On the bottom row of scallops (near the rim), use a fine tool to carve a central vertical line inside the scoop. Then, carefully carve curved vertical flutes on either side of that line to intensify the texture.
Texture Alternative
Instead of carving away material, try adding small coils to the surface and blending them inward to build the relief up for a raised, embossed effect.
Step 3: Rim and Refining
-
Scallop the rim:
Ideally, your pattern should align so the rim can follow the curves of the bottom row of arches. Use your knife to cut the rim into a wavy, scalloped edge that mimics the carved pattern. -
Round the edges:
Take a damp sponge or a piece of chamois leather and run it over the cut rim. You want to soften the sharp angles into a comfortable, rounded lip. -
Smoothing the texture:
Inspect your carving for any sharp burrs or clay crumbs. Use a stiff paintbrush dipped slightly in water to ‘sweep’ the carved areas, smoothing the tool marks without losing definition. -
Final drying:
Place the bowl right-side up on a ware board. Let it dry slowly under a loose sheet of plastic for the first day to equalize moisture, then uncover to bone dry. -
Finishing options:
Bisque fire the piece. Because the texture is the star here, a translucent glaze or a simple oxide wash that settles into the crevices is often the best choice for the final firing.
Now you have a deeply textured bowl that feels as interesting as it looks
Two-Tone Slip Reveal on Curves
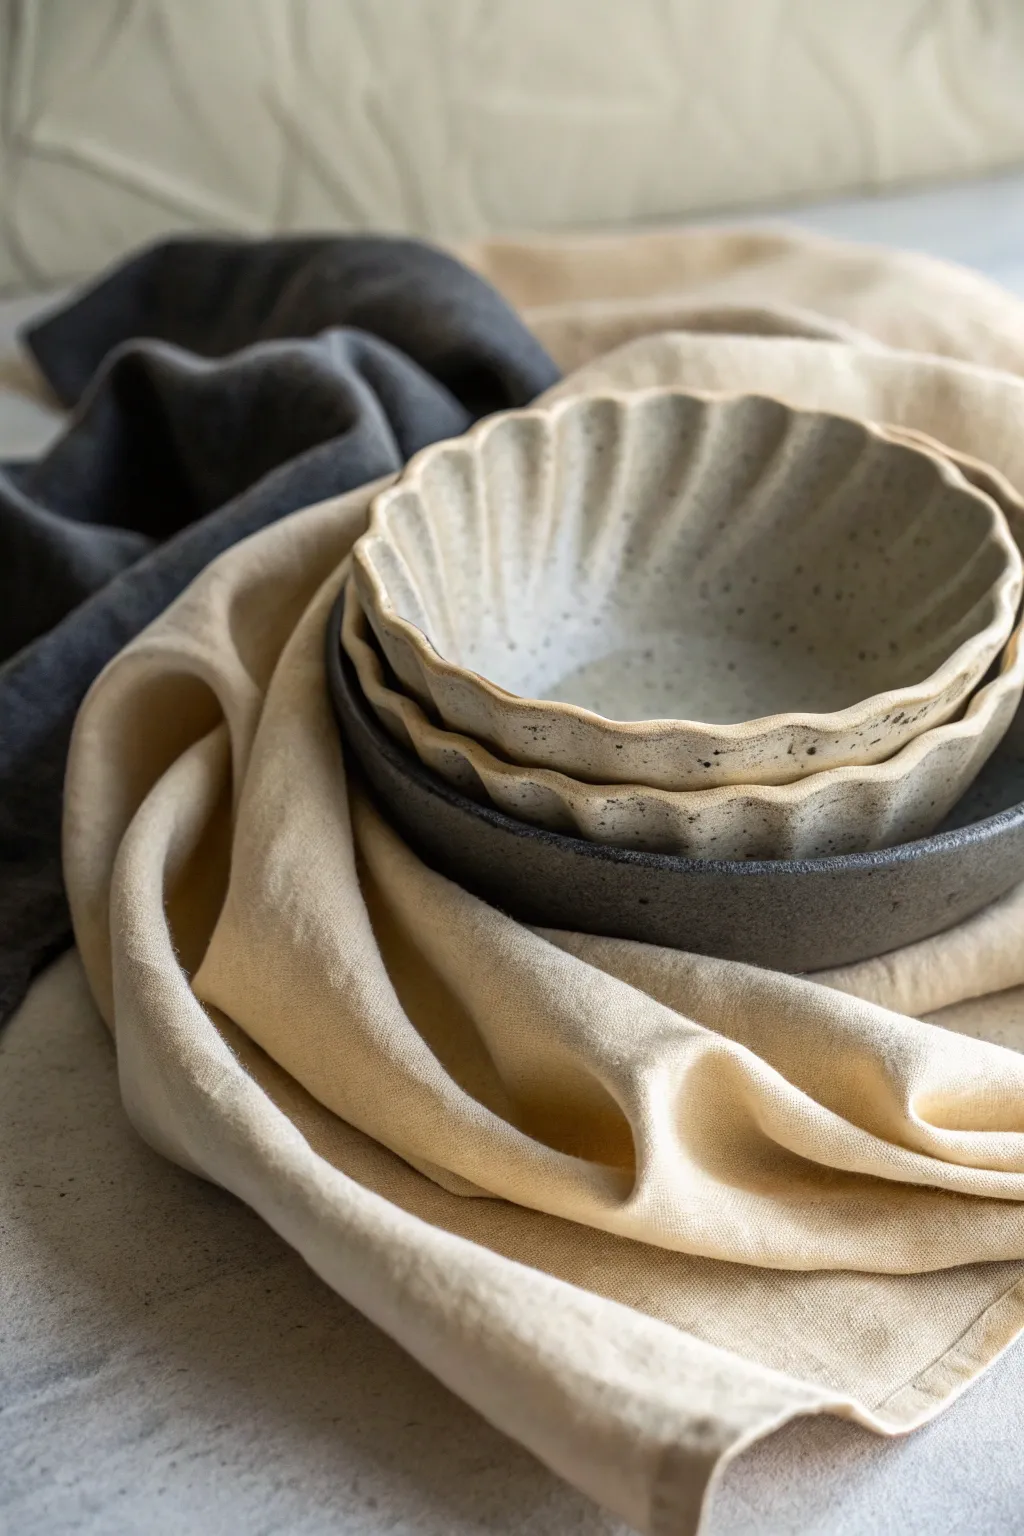
Create a stunning nesting set of organic, fluted bowls with a distinct speckled finish that mimics the look of natural sand. By combining drape molds with subtle texture and contrasting clay bodies, you’ll achieve elegant curves perfect for holding trinkets or serving dry snacks.
Step-by-Step
Materials
- Speckled stoneware clay (light beige/buff)
- Black stoneware clay (for the bottom bowl)
- Large plaster or bisque drape molds (various nesting sizes)
- Slab roller or rolling pin with thickness strips
- Heavy canvas sheet
- Rubber kidney rib
- Metal rib
- Fluting tool or wooden modeling tool
- Sponge
- Cutting wire
- Needle tool
- Matte transparent glaze
Step 1: Slab Preparation
-
Roll the clay:
Begin by wedging your speckled stoneware clay thoroughly to remove air bubbles. Roll out a consistent slab approximately ¼ inch (6mm) thick. Do the same with the black clay if you are making the contrasting base bowl. -
Compress the slab:
using a rubber kidney rib, firmly compress the clay on both sides. This aligns the clay particles to prevent warping later and gives you a smooth canvas for the speckled texture to shine through. -
Cut the rough shape:
Estimate the size needed for your mold and cut a rough circle from the slab, leaving at least 2 inches of excess clay around the perimeter to allow for the draping process.
Consistent Waves
Mark the rim with a needle tool at 12, 3, 6, and 9 o’clock before fluting. Divide these sections evenly to ensure your scallops are symmetrical all around.
Step 2: Forming the Bowl
-
Drape the clay:
Gently lift your slab and center it over your hump mold. Let gravity do the initial work, then softly smooth the clay down the sides of the mold with your hands, ensuring no air is trapped between the clay and the mold form. -
Trim the edge:
Once the clay is snug against the mold, use a needle tool to trim the excess clay at the base (which is currently the top) to establish your rim height. Keep this cut level. -
Create the flutes:
While the clay is still soft on the mold, use your fingers to gently press indents at regular intervals around the rim. I find that using a rhythmic ‘push and slide’ motion creates those organic, soft waves seen in the photo. -
Refine the scallops:
Enhance the fluted rim by running a damp sponge or a chamois cloth along the edge. This softens the cut marks and reinforces the wavy, scalloped profile without sharpening it too much. -
Stiffen the form:
Allow the clay to dry to a soft leather-hard stage while still on the mold. This prevents the fluted edges from collapsing when you eventually flip it over.
Step 3: Finishing and firing
-
Release and refine:
Gently remove the bowl from the mold. If the rim feels too sharp or slightly uneven, now is the time to gently smooth it with a moist sponge, paying attention to the valleys of the scallops. -
Bisque fire:
Once bone dry, load the bowls into the kiln for a bisque firing (typically Cone 04). Ensure they are not touching, especially the delicate rims. -
Glaze application:
Dip the bisque-fired bowls into a matte transparent glaze. This specific choice is crucial: it seals the piece while allowing the natural iron speckles and the raw color of the clay to remain the hero. -
Wipe the foot:
Clean the bottom of the bowl thoroughly with a wax resist or a wet sponge to prevent it from fusing to your kiln shelf. -
Final firing:
Fire onto the glaze maturity temperature for your specific clay body (likely Cone 5 or 6 for stoneware). The heat will draw out the iron impurities, creating that signature speckled aesthetic.
Cracking Rims?
If the scalloped edges crack while drying, you likely stretched the clay too thin over the mold. Compress the rim more during the smoothing phase to strengthen it.
Stack your finished set to display the beautiful interplay of contrasting tones and rhythmic curves
Faceted Drape Bowl With Fold Lines
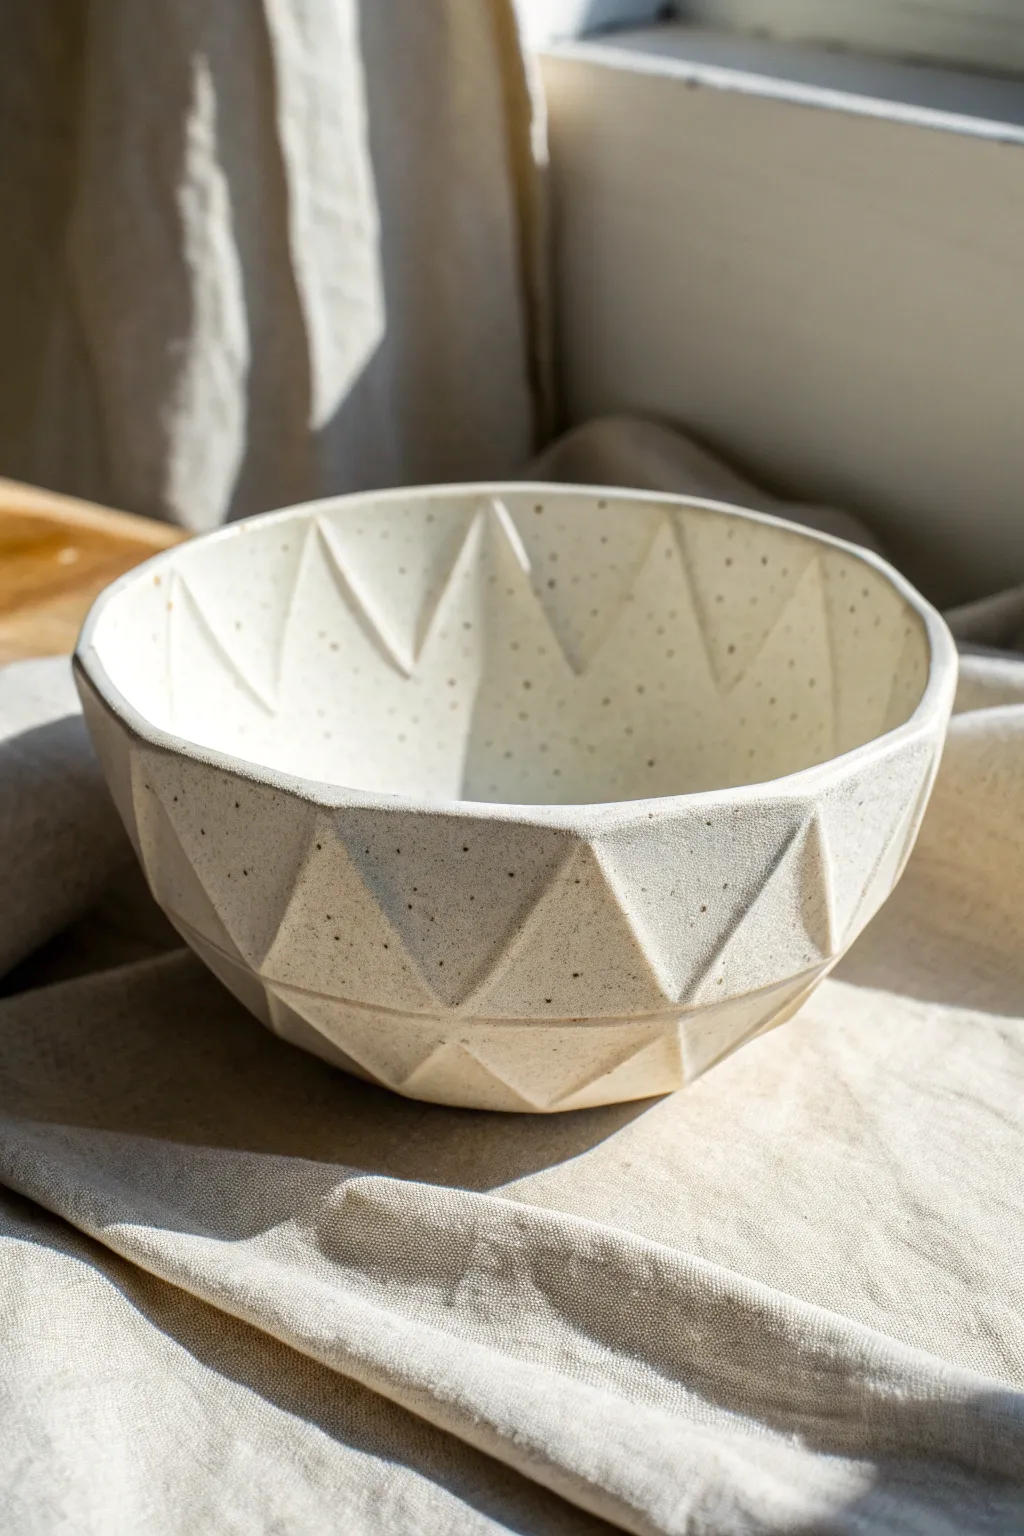
This project combines the simplicity of drape molding with sharp, modern geometry to create a stunning faceted bowl. The speckled clay body highlights the light and shadow play across the triangular reliefs, making it look far more complex than it actually is.
Step-by-Step Guide
Materials
- Speckled cone 6 stoneware clay
- Rolling pin and guide sticks (approx. 1/4 inch)
- Drape mold (a simple round plaster or bisque hump mold)
- Paper template (circle divided into geometric facets)
- Fettling knife or needle tool
- Ribs (metal and soft rubber)
- Dull pencil or blunt stylus tool
- Sponge
- Clear matte glaze
Step 1: Preparation and Template
-
Design your geometry:
Create a circular paper template the size of your intended slab. Draw a series of concentric circles and divide them with zig-zag lines to create a network of triangles. This will be your folding guide. -
Roll out the slab:
Roll your speckled clay into a smooth, even slab about 1/4 inch thick. Compress the clay on both sides with a rubber rib to align the particles and prevent warping later. -
Transfer the pattern:
Lay your paper template gently onto the fresh clay slab. Using a dull pencil or a blunt stylus, trace over your lines firmly enough to leave an impression but not so hard that you cut through the clay.
Step 2: Forming the Facets
-
Cut the perimeter:
Remove the paper template and use a fettling knife or needle tool to cut the circle out of the clay slab. -
Enhance the creases:
Go back over your traced impression lines. For the ‘valley’ folds (lines that will sink in), press slightly deeper with a modeling tool to encourage the clay to bend there. -
Pre-shape the facets:
Before putting it on the mold, gently lift the edges of the slab and press underneath the triangles to pop them outward slightly. You are essentially starting the 3D geometry while flat.
Cracks on the folds?
If clay splits at the fold lines, your slab was likely too dry before bending. Compress lines with a rib immediately after bending to heal micro-cracks.
Step 3: Draping and Refining
-
Place on the mold:
Carefully lift your slab and center it over your hump mold. Ideally, rest the mold on a banding wheel so you can turn it easily. -
Ease into shape:
Instead of smoothing the clay down tight against the mold immediately, gently press down only on the specific lines where your geometric pattern folds. -
Defining the planes:
Use a straight-edged tool or a small wooden paddle to flatten the triangular spaces between the lines. This creates that sharp, distinct ‘low-poly’ look rather than a smooth curve. -
Clean the rim:
While the clay is leather hard on the mold, use a surform tool or sponge to level the bottom rim (which is currently the top) so the bowl will sit flat later. -
Drying duration:
Allow the clay to stiffen to a firm leather hard state on the mold. I like to cover it loosely with plastic for the first few hours so the folding lines don’t crack from stress.
Level Up: Rim Variation
Instead of cutting a perfect circle, cut a zig-zag edge that follows the geometry of the outer triangles for a jagged, architectural rim.
Step 4: Finishing and Glazing
-
Remove and refine:
Pop the bowl off the mold. Check the interior; the folding lines should have created a beautiful reciprocal pattern inside. Smooth any sharp burrs with a damp sponge. -
Bisque fire:
Once fully bone dry, bisque fire the piece to the appropriate temperature for your clay body (usually cone 04 or 06). -
Glaze application:
Dip or spray the bowl with a clear matte glaze. A glossy glaze can sometimes cause glare that hides the facets, whereas a matte finish lets the shadows define the shape. -
Wipe the foot:
Clean the bottom of the bowl thoroughly with a sponge to ensure no glaze sticks it to the kiln shelf. -
Final firing:
Glaze fire to cone 6. The heat will melt the glaze, allowing the natural speckles of the clay to show through perfectly.
This bowl is now ready to hold fruit or stand alone as a sculptural centerpiece on your table
Drape Over a Ribbed Hump for Pleats
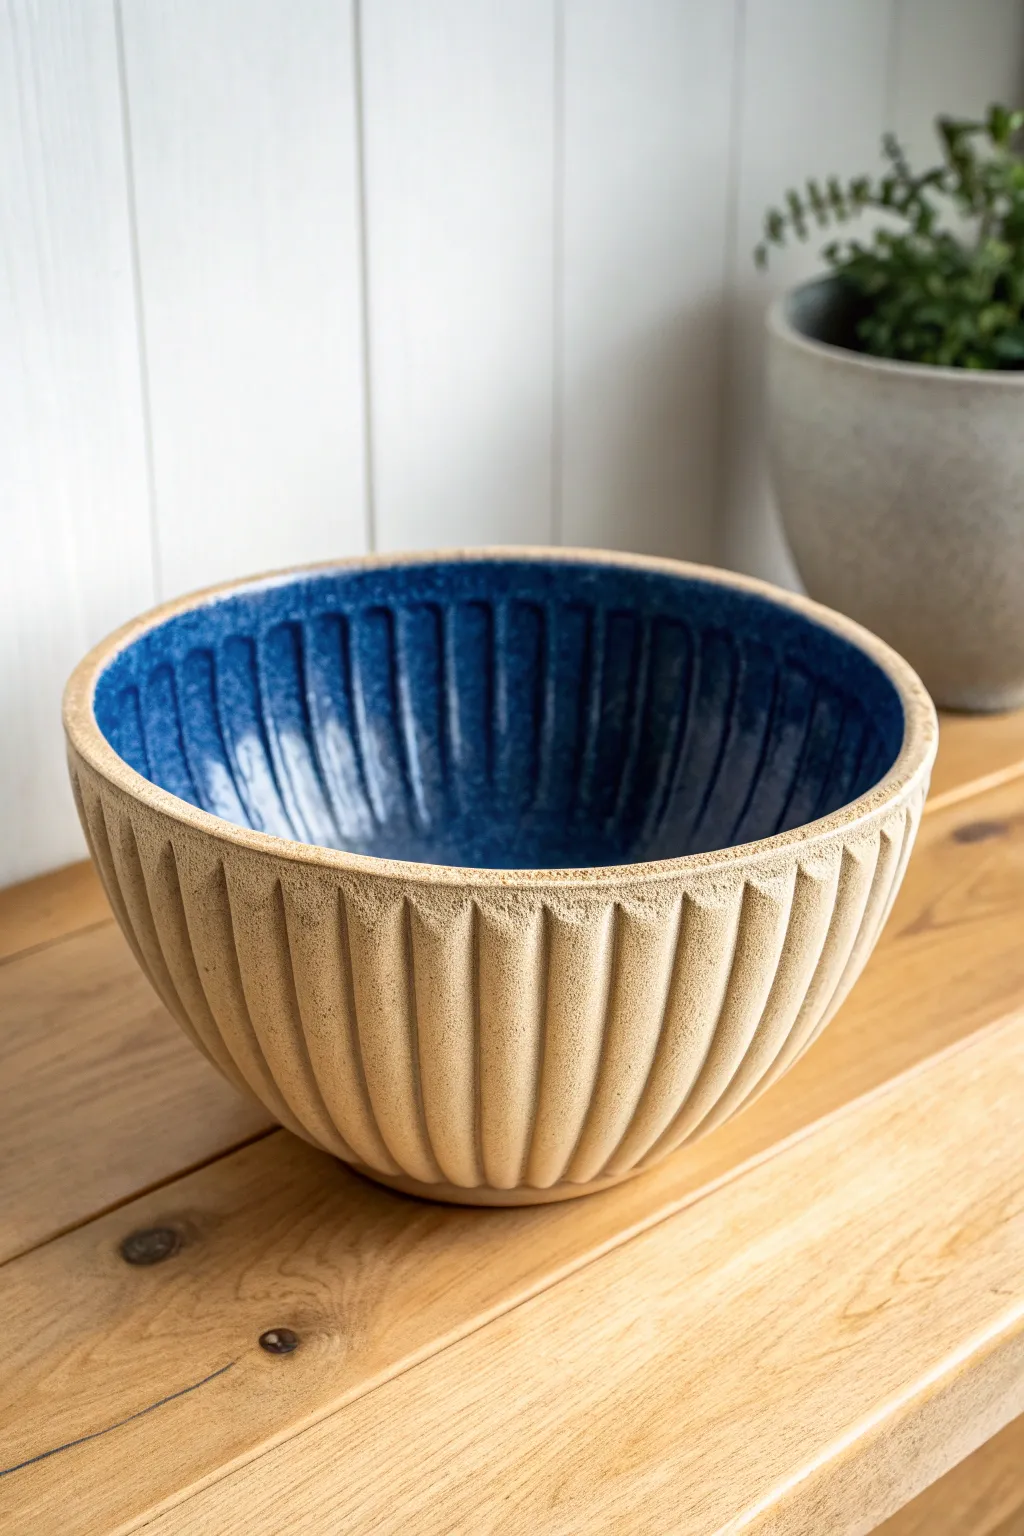
This stunning bowl combines rustic texture with rich color, featuring a deeply pleated exterior created by draping clay over a textured hump mold. The contrast between the raw, sandy clay body and the glossy, deep blue interior glaze makes this a standout piece for any table.
Step-by-Step
Materials
- Stoneware clay (groggy/sandy texture recommended)
- Ribbed hump mold (or a ribbed planter/bowl to use as a mold)
- Rolling pin
- Guide sticks (approx. 1/4 inch thickness)
- Canvas or slab mat
- Fettling knife
- Soft rubber rib
- Sponge
- Deep cobalt blue glossy glaze
- Wax resist
- Paintbrush
Step 1: Preparing the Slab
-
Prepare your workspace:
Lay out your canvas or slab mat on a flat, sturdy table. Place your guide sticks on either side of where you will roll the clay to ensure an even thickness. -
Roll the clay:
Take a generous ball of stoneware clay and begin rolling it out. I prefer to roll from the center outward, rotating the clay occasionally to keep a circular shape. Roll until the rolling pin rests on the guide sticks. -
Smooth the surface:
Before cutting, run a soft rubber rib gently over the surface of the slab. This compresses the clay particles and removes any canvas texture which might interfere with the final look. -
Cut the circle:
Place your intended mold upside down lightly on the slab to gauge the size, then cut a circle roughly 2 inches wider than the mold using a fettling knife.
Define Your Lines
If the clay doesn’t settle deeply enough into the mold grooves, run a wooden modeling tool gently down each valley on the exterior to sharpen the pleats.
Step 2: Forming the Bowl
-
Prepare the mold:
If you are using a non-porous object (like a plastic bowl) as your mold, cover it with a layer of thin plastic wrap or a piece of old t-shirt fabric to prevent sticking. If it’s a plaster or biscuits mold, you can use it directly. -
Drape the clay:
Carefully lift your clay slab and center it over the hump mold. Gently lower it down so the center of the slab touches the highest point of the mold first. -
Ease the clay down:
Using the palms of your hands, slowly smooth the clay down the sides of the mold. Don’t pull or stretch the clay; simply encourage it to gently gravity-drape over the form. -
Press the pleats:
This is the critical step for texture. Using your fingers or a soft sponge, firmly press the clay into the grooves of the underlying ribbed mold. Work your way around the bowl, ensuring the clay conforms tightly to the ridges to create that sharp pleated effect. -
Trim the rim:
Once the clay is fully formed against the mold, use your fettling knife or a needle tool to trim the excess clay at the bottom (which will become the rim of your bowl) to create a level edge. -
Create a foot ring (optional):
For better stability, you can score and slip a small coil of clay onto the very top (the bottom of the bowl) to form a foot ring, then smooth it into the main body.
Level Up: Oxide Wash
Before the final firing, apply a thin iron oxide wash to the exterior and wipe it back. It will settle in the crevices, highlighting the texture even more.
Step 3: Drying and Bisque
-
Initial firming:
Let the bowl sit on the mold until it is leather hard. If you remove it too soon, the pleats may warp or collapse. -
Release and dry:
Once firm, carefully lift the bowl off the mold. Turn it right-side up and smooth the rim with a damp sponge to remove any sharp cutting edges. Allow the piece to dry slowly under loose plastic to prevent uneven shrinkage. -
Bisque fire:
Load the bone-dry bowl into the kiln and bisque fire it according to your clay body’s specifications (usually Cone 04 or 06).
Step 4: Glazing and Finishing
-
Clean the bisque:
Wipe the bisque-fired bowl with a damp sponge to remove any kiln dust that could cause glaze crawling. -
Apply wax resist:
This project relies on the contrast between the glaze and the raw clay. Carefully paint wax resist over the entire exterior of the bowl, including the top edge of the rim. This ensures glaze won’t stick to the beautiful pleated texture. -
Pour the glaze:
Pour a generous amount of deep cobalt blue glaze into the interior of the bowl. Verify the glaze consistency is like heavy cream for best coverage. -
Roll and dump:
Roll the bowl in a circular motion to coat the entire interior surface evenly, then quickly pour the excess glaze back into your bucket. -
Clean up drips:
Despite the wax resist, check the exterior for any wayward beads of glaze and wipe them off cleanly with a damp sponge. -
Final firing:
Glaze fire the piece to the temperature required by your clay and glaze combination (likely Cone 5 or 6 for stoneware).
Now you have a striking vessel that invites touch with its ribbed surface and captivates the eye with its deep blue center
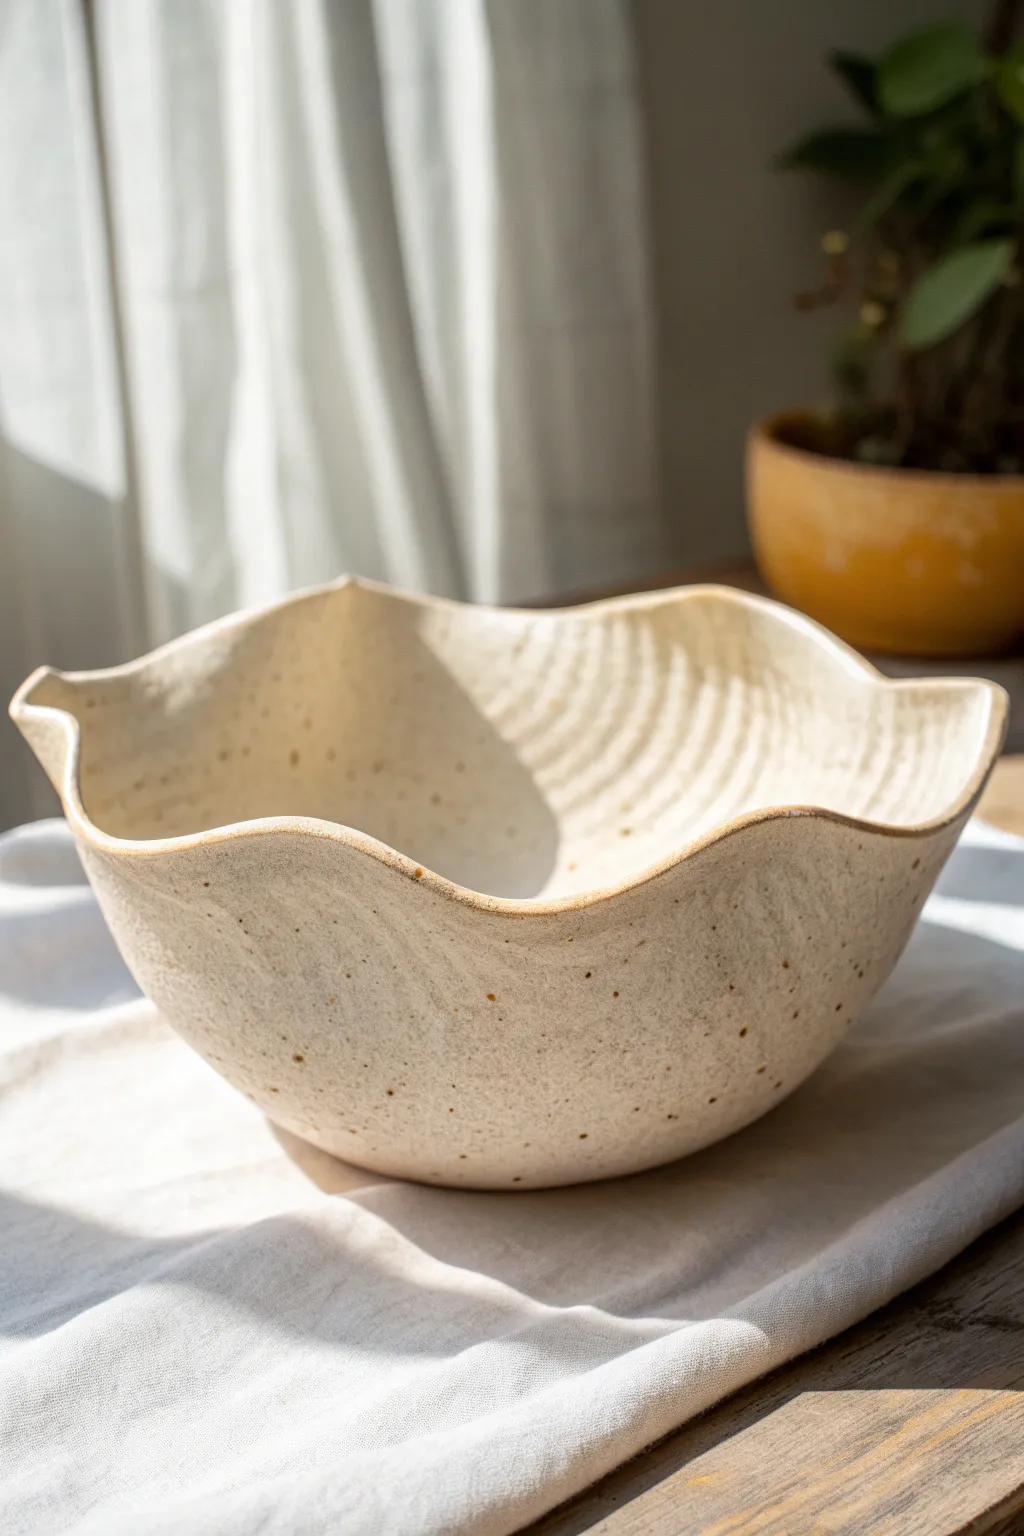
Nested Mold Stack for a Double Curve
Achieve a stunningly complex profile without a pottery wheel by using a clever nested mold technique. This project results in a creamy, speckled ceramic bowl featuring organic exterior ridges and a smooth, softly asymmetrical interior curve.
Detailed Instructions
Materials
- Speckled buff stoneware clay (or white clay with grog)
- Wide, shallow drape mold (or a large bowl)
- Smaller, deeper slump mold (or a smaller bowl)
- Clean rolling pin
- Canvas or linen mat for rolling
- Fettling knife or needle tool
- Soft flexible rib (rubber or silicone)
- Serrated rib tool
- Sponge
- Damp box or plastic sheeting
- Matte white or clear glaze
Step 1: Preparing the Slab
-
Wedge the clay:
Start by thoroughly wedging your speckled stoneware clay to remove any air pockets and ensure an even consistency. -
Roll out a slab:
On your canvas mat, roll the clay out into a large, consistent slab. Aim for a thickness of about 1/4 to 3/8 of an inch. -
Smooth the surface:
Before cutting, run a soft flexible rib firmly over the slab in multiple directions. This compresses the clay particles and aligns them, which helps prevent warping later. -
Cut the circle:
Measure the diameter needed to cover your mold setup and cut a rough circle from the slab using a needle tool.
Step 2: Creating the Double Curve
-
Set up the stack:
Place your smaller, deeper bowl upside down on your work surface. Then, balance the larger, wider bowl upside down on top of it. This creates the ‘nested stack’ that gives the final piece its unique height and width profile. -
Drape the clay:
Carefully lift your clay slab and center it over the top of your stacked mold assembly. -
Ease into shape:
Gently lower the edges of the slab down the sides of the mold. Gravity will do most of the work, but you can guide it with soft hands to avoid stretching the clay too thin. -
Define the rim:
Once the clay has taken the shape of the mold, trim the bottom edge (which will become the rim of your bowl) with a fettling knife to create that gentle, undulating wave seen in the image.
Uneven Drying
If the rim dries faster than the base, the bowl may warp. Keep the rim wrapped in plastic while the thicker base firms up to keep moisture levels even.
Step 3: Texturing and Refining
-
Add texture:
I find this is the best time to add character. Use a serrated rib or a textured paddle to gently press horizontal lines or grooves around the exterior while the clay is still supported by the mold. -
Soften the lines:
Go back over your texture lines with a slightly damp sponge or a soft finger to soften the sharp ridges, giving it that weathered, organic look. -
Initial firming:
Let the bowl sit on the mold until it reaches a soft leather-hard stage. It needs to be firm enough to hold its shape when flipped. -
Flip and finish:
Carefully remove the bowl from the mold stack and turn it right-side up. Using your soft rib, smooth the interior surface perfectly to contrast with the textured exterior. -
Compress the rim:
Run a damp piece of chamois or plastic over the top rim to compress it and ensure it’s comfortable to the touch.
Adding Feet
Before taking the bowl off the mold, score and slip three small clay balls onto the flat bottom area to create cute tripod feet for elevation.
Step 4: Firing and Glazing
-
Slow drying:
Loosely cover the bowl with plastic to let it dry slowly and evenly, preventing cracks. -
Bisque fire:
Bisque fire the piece according to your clay body’s specifications (usually Cone 04 or 06). -
Glaze application:
Apply a matte white or simple clear glaze. The goal is to let the darker speckles of the clay body bleed through, creating the freckled appearance. -
Glaze wiping:
If using a thicker white glaze, gently wipe it back with a sponge on the exterior ridges so the clay texture pops through more clearly. -
Final firing:
Glaze fire to the maturity temperature of your stoneware (typically Cone 5/6 or Cone 10).
You now have a beautifully organic, speckled bowl ready to display fruit or simply catch the light
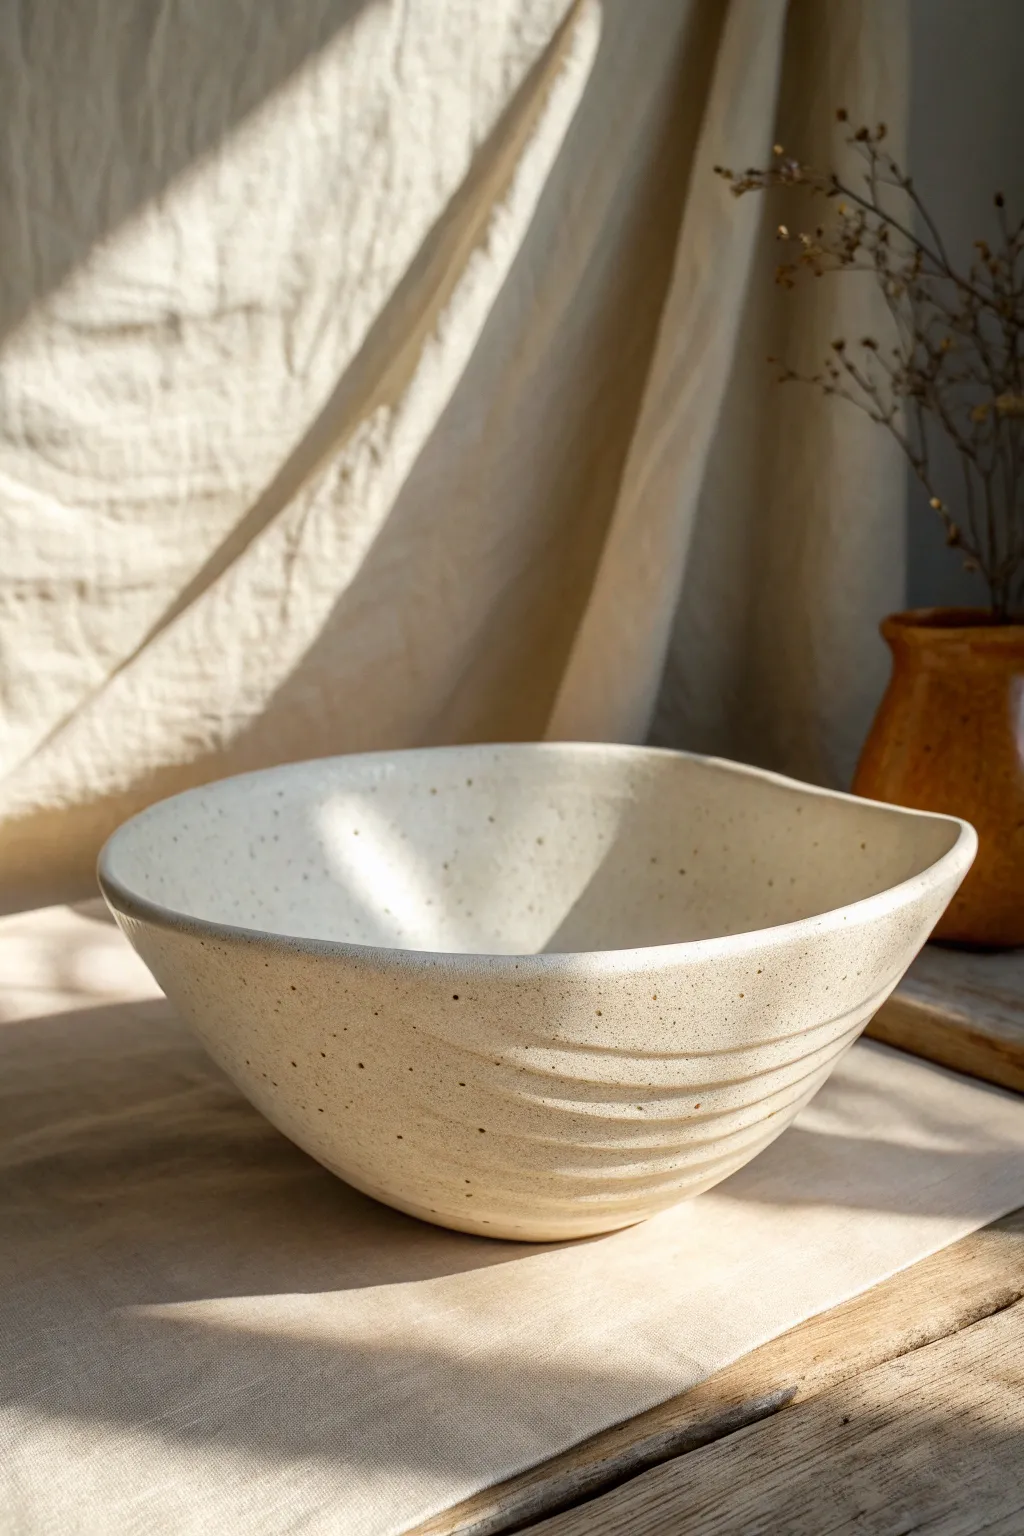
Asymmetrical Offset Drape for Movement
Embrace the natural fluidity of clay with this speckled stoneware bowl, featuring a gently undulating rim created through asymmetrical draping. The result is a piece that feels both modern and hand-touched, perfect for adding movement to your table setting.
Step-by-Step Tutorial
Materials
- Speckled stoneware clay (e.g., buff with manganese speckles)
- Rolling pin
- Canvas ware board or slab mat
- Wooden guide strips (approx. 1/4 inch thick)
- Large circular drape mold (or a large found bowl)
- Needle tool
- Soft rubber rib
- Smooth wooden rib
- Sponge
- Chamois strip
- Clear or matte white glaze (cone 5/6 recommended)
Step 1: Preparing the Slab
-
Wedge the clay:
Begin by thoroughly wedging about 3-4 pounds of speckled stoneware clay to remove any air bubbles. This ensures a consistent texture for rolling. -
Roll out the slab:
Set up your wooden guide strips on either side of your canvas board. Place the clay in the center and roll it out until the rolling pin rests flat on the guides, creating an even slab about 1/4 inch thick. -
Compress the slab:
Take your soft rubber rib and gently run it over the surface of the clay in multiple directions. This compression aligns the clay particles, preventing warping later, and erases the canvas texture. -
Cut the rough shape:
Using a needle tool, cut a freeform large circle. It doesn’t need to be geometrically perfect—in fact, a slightly organic outline helps the final look. Aim for a diameter about 2-3 inches wider than your intended mold. -
Smooth the edges:
Run a damp sponge or your finger along the cut edge of the slab to round it off. Sharp edges can chip easily after firing, so softening them now is crucial.
Don’t Rush the Drop
When draping, don’t force the clay down immediately. Let it rest for 5 minutes; gravity will create softer, more natural folds than your fingers can.
Step 2: Draping and Forming
-
Prepare the mold:
If using a plaster mold, no prep is needed. If using a plastic or metal bowl as a makeshift mold, cover it with a layer of thin plastic wrap or a piece of old t-shirt fabric to prevent sticking. -
Drape the slab:
Carefully lift your slab and place it over the mold. Instead of centering it perfectly, I like to offset it slightly so the overhang is uneven—this creates that dramatic high-low wave variation. -
Initial shaping:
Let gravity do the initial work. The heavy overhangs will naturally pull down, starting the wave formation. Gently guide the clay against the mold surface with your hands, ensuring no air is trapped underneath. -
Enhance the waves:
Look at where the clay naturally folds or buckles. Use your fingers to exaggerate these curves, gently pushing down in the valleys and pushing up under the peaks to define the undulating rim. -
Rib the exterior:
While the clay is on the mold, use a smooth wooden rib to compress the exterior surface again. This strengthens the walls and refines the curve of the bowl.
Step 3: Finishing Touches
-
Dry slowly:
Leave the bowl on the mold until it is leather hard. If you remove it too soon, the waves will collapse. Cover it loosely with plastic to ensure slow, even drying. -
Remove from mold:
Once stiff enough to hold its shape, carefully pop the bowl off the mold. Turn it right-side up and inspect the interior. -
Refine the rim:
Use a damp chamois strip to compress the rim one last time. This is the moment to verify the flow of the asymmetrical edge feels balanced to your eye. -
Flatten the base:
If the bowl rocks, gently tap the bottom against a flat board to create a stable resting point, or trim a shallow foot ring if you prefer a lifted look. -
Bisque fire:
Allow the piece to become bone dry before loading it into the kiln for a bisque firing (usually Cone 04 or 06). -
Glazing:
Apply a simple clear or matte white glaze. A translucent glaze is ideal here because it allows the beautiful natural speckles of the clay body to shine through. -
Final firing:
Fire the bowl to the maturity of your clay body (typically Cone 5 or 6). Ensure the rim doesn’t touch any kiln posts or other pots.
Rim Variation
Before the clay hardens, try using a damp sponge to slightly thin out just the very peaks of the waves to make the edge look delicate and petal-like.
Now you have a stunning, organic centerpiece created with just a simple slab and gravity
Found-Object Drape Mold Textures
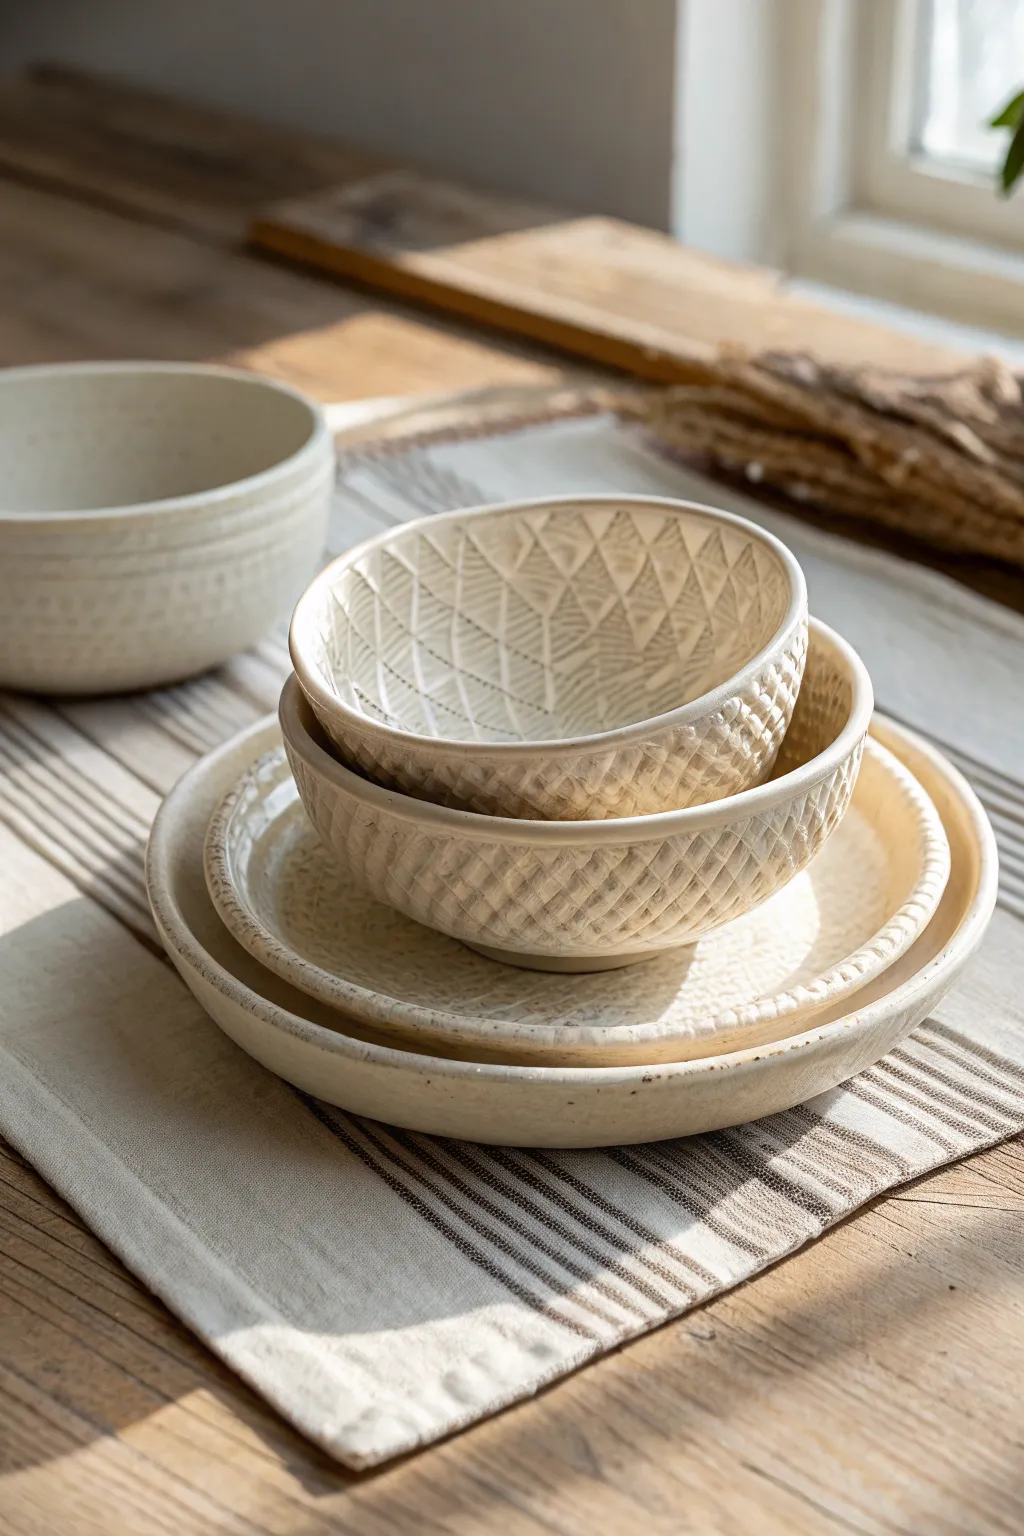
Transform soft clay into stunning, creamy-white dinnerware that mimics the cozy look of knit fabric or basketry. By using a textured drape mold technique, you can easily create this nesting set of bowls and plates with intricate, tactile surfaces.
How-To Guide
Materials
- Light-colored stoneware clay or porcelain (cone 5-6)
- Drape molds (plaster, bisque, or sturdy bowls)
- Heavy textured fabric (burlap, lace, or chunky knit placemats)
- Rolling pin
- Guide strips or slab roller
- Fettling knife or needle tool
- Rib tool (soft kidney)
- Sponge
- Matte white or transparent glaze
Step 1: Preparing the Textured Slabs
-
Prepare the workspace:
Clear a large, flat surface and cover it with canvas or a non-stick board to prevent sticking. Have your textured fabric clean and ready nearby. -
Roll the clay slab:
Cut a manageable wedge of clay and roll it out into a slab. Use guide strips to ensure an even thickness, ideally about 1/4 inch, which provides enough stability for dinnerware without being too heavy. -
Apply the texture:
Lay your chosen textured fabric—like a chunky knit placemat or heavy burlap—over the clay slab. I like to spritz the fabric lightly with cornstarch water if it tends to stick. -
Impress the pattern:
Roll firmly over the fabric with your rolling pin. Do this once with confident pressure rather than back-and-forth, which can engage ghost images. The goal is a deep, crisp impression. -
Reveal the design:
Carefully peel back the fabric to reveal your textured clay surface. Check for any air bubbles and smooth them gently with your finger if necessary without ruining the pattern.
Step 2: Molding the Forms
-
Select your molds:
Choose bowls or hump molds that match the size of the tableware you want to create. Dust them lightly with cornstarch to ensure the clay releases easily later. -
Cut to size:
Using a needle tool, cut circular shapes from your textured slab that are slightly larger than the diameter of your molds to account for the depth. -
Drape the clay:
Lift the clay circle carefully and center it over your mold, textured side facing out (away from the mold). Let gravity start the work. -
Form the shape:
Gently press the slab down onto the mold form. Start from the center bottom and work your way down the sides, smoothing with your hands to avoid trapping air pockets between the clay and the mold. -
Handle pleats:
If pleats form at the rim, you can smooth them into the design for a rustic look, or cut tiny darts and rejoin the clay for a cleaner edge. -
Trim the rim:
Once the clay is settled, use your fettling knife held parallel to the table surface to trim the excess clay at the base of the mold for a level rim.
Slumping Issues?
If your clay slumps too much or tears while moving it, your slab might be too thin. Try rolling it slightly thicker (3/8 inch) or letting the slab firm up on a board for 20 minutes before draping.
Step 3: Finishing and firing
-
Stiffen the form:
Let the pieces dry on the molds until they are leather hard. This usually takes a few hours depending on humidity; the clay should be firm enough to hold its shape but not bone dry. -
Remove from mold:
Gently lift the pieces off the molds. If they resist, let them dry a bit longer as the clay will shrink and release on its own. -
Refine the edges:
Use a damp sponge or a soft rib to smooth the rim of each bowl and plate. Sharp edges can become very sharp after firing, so soften them now. -
Bisque fire:
Load your bone-dry greenware into the kiln for the first firing (bisque fire), typically to cone 04. Stack carefully to avoid warping. -
Glaze application:
Apply a matte white or semi-transparent glaze. A transparent glaze works beautifully here as it pools in the texture, highlighting the ‘woven’ pattern. -
Final firing:
Fire the glazed pieces to the maturity temperature of your clay body (usually cone 6 for stoneware). Allow the kiln to cool completely before unloading.
Rim Variation
Instead of a straight cut, use a fluted pastry cutter or a wavy blade when trimming the rim. This adds a delicate, organic edge that complements the softness of the fabric texture.
Enjoy using your new handcrafted set for a cozy, rustic meal presentation
Figurative Hump Mold for Character Forms
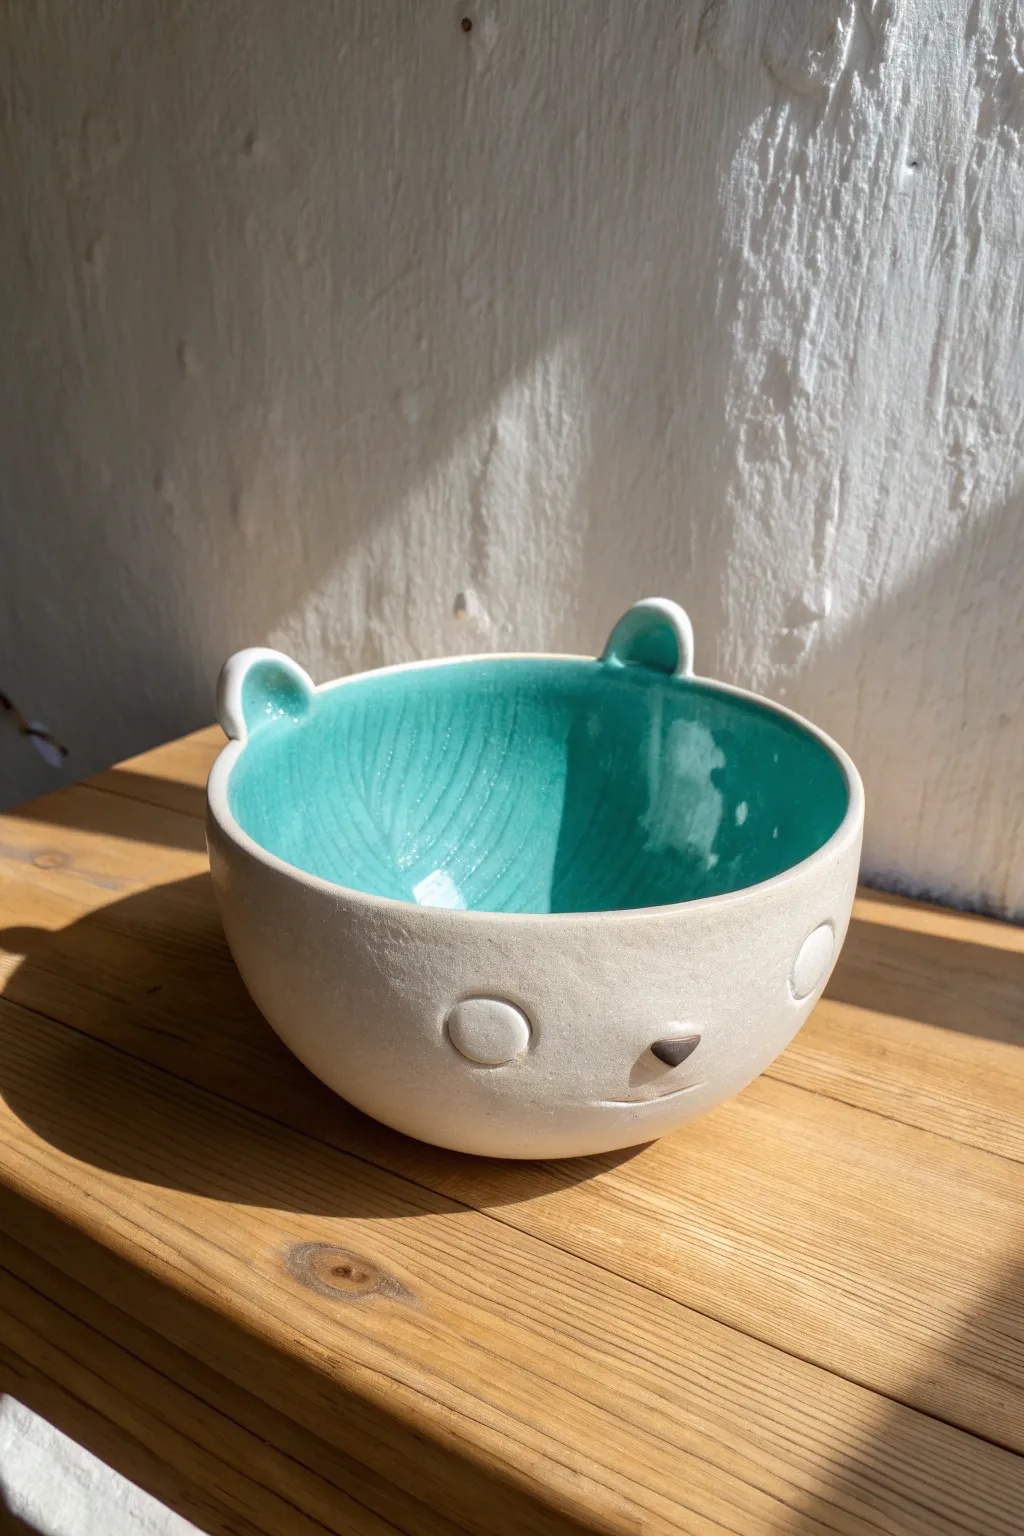
Transform a simple slab of clay into this charming character bowl using a hump mold technique. With its distinct turquoise interior featuring hidden leaf-vein textures and a smooth, unglazed matte face, this piece balances playful design with tactile sophistication.
Detailed Instructions
Materials
- White stoneware or porcelain clay body
- Plaster or bisque hump mold (hemisphere shape)
- Textured rolling pin or real leaves/stamps for interior texture
- Rolling pin and canvas or slab roller
- Fettling knife or needle tool
- Rubber kidney and serrated rib
- Slip and scoring tool
- Small circle cutter (approx. 1/2 inch) for eyes
- Sponge
- Turquoise or Teal glossy glaze
- Wax resist
- Kiln
Step 1: Creating the Base Form
-
Roll out the slab:
Begin by rolling out a slab of white stoneware clay to a uniform thickness of about 1/4 inch. Ensure both sides are compressed with a rib to prevent warping later. -
Add interior texture:
Before draping the clay, carefully press your chosen texture into the side that will become the inside of the bowl. For the look in the image, use a rolling pin with a leaf-vein pattern or gently press large, veined leaves into the slab and peel them away. -
Drape over the mold:
Gently lift your slab and drape it texture-side-down over your hump mold. Smooth the clay downward with your hands to conform to the mold’s shape, being careful not to smudge the texture on the underside. -
Trim the edge:
Once the clay has stiffened slightly (soft leather hard), use a fettling knife or needle tool to trim the excess clay around the base of the mold to create an even rim. I prefer holding the tool steady while rotating the banding wheel for a level cut. -
Smooth the exterior:
Use a soft rubber kidney to burnish and smooth the exterior surface of the bowl while it’s still on the mold. This ensures the outside will be perfectly smooth for the face details.
Slumping Issues?
If the bowl warps when you take it off the mold, you removed it too early. Wait until the clay is leather-hard—firm to the touch but still cool—before flipping it over.
Step 2: Sculpting Character Details
-
Form the ears:
Roll a small coil of spare clay and shape two rounded, semi-circle ears. They should be thick enough to stand up but tapered slightly at the top. -
Attach the ears:
Score the rim of the bowl where the ears will sit, and score the bottom of your ear pieces. Apply slip and press them firmly onto the rim. Smooth the connection point on the back and front so the seam disappears. -
Make the ear dimples:
Using your thumb or a rounded modeling tool, gently press into the center of each ear to create a concave inner ear shape. This adds dimension and matches the bowl’s form. -
Create the eyes:
Roll a very small slab of clay (slightly thinner than the bowl walls). Use a small circle cutter to punch out two identical discs. Score and slip the placement area on the bowl, then attach the discs as eyes, gently pressing them flat so they are slightly raised relief. -
Add the nose:
Shape a tiny triangle of clay for the nose. Attach it between and below the eyes using the score-and-slip method. The nose should protrude slightly more than the eyes. -
Carve the mouth:
Use a needle tool or a very thin carving tool to incise a simple, straight line for the mouth just below the nose. For a subtle smile, curve the very ends upward slightly.
Step 3: Finishing and Glazing
-
Slow drying:
Remove the bowl from the hump mold once it can support its own weight. Let it dry slowly under loose plastic to ensure the added features (ears, eyes) dry at the same rate as the bowl body to prevent cracking. -
Bisque fire:
Once bone dry, load the piece into the kiln and bisque fire it to Cone 04 (or your clay body’s recommendation). -
Apply wax resist:
To achieve the look in the photo, the entire exterior remains unglazed. Carefully paint wax resist over the entire outside of the bowl, including the ears and the rim. Be very precise at the rim line. -
Pour the glaze:
Pour a glossy turquoise or teal glaze into the interior of the bowl. Swirl it around to coat the entire inside surface and pour out the excess. Clean up any drips on the rim immediately with a damp sponge. -
Detail glaze the nose:
Using a small detail brush, carefully apply a dark brown or black underglaze or glaze just to the triangular nose. Leave the eyes unglazed to match the matte skin of the bowl. -
Final smooth:
Since the exterior is unglazed, give it a final check. If the bisque feels rough, you can lightly sand it with 400-grit sandpaper (wearing a mask) before the final firing for a buttery smooth touch. -
Glaze fire:
Fire the piece to maturity (likely Cone 5 or 6 depending on your clay and glaze combination).
Pro Tip: Define Texture
If using a celadon-type glaze inside, the texture needs to be deep. While the slab is flat, go over your leaf impressions firmly to ensure the glaze has somewhere to pool and break.
This adorable creature bowl is ready to hold your morning cereal or sit prettily on your shelf.