I never get tired of making air dry clay fairy houses because they’re small enough to finish in a weekend, but detailed enough to feel like a whole little world. Here are my go-to ideas—starting with the classic woodland looks and drifting into the more whimsical “how is this so cute?” designs.
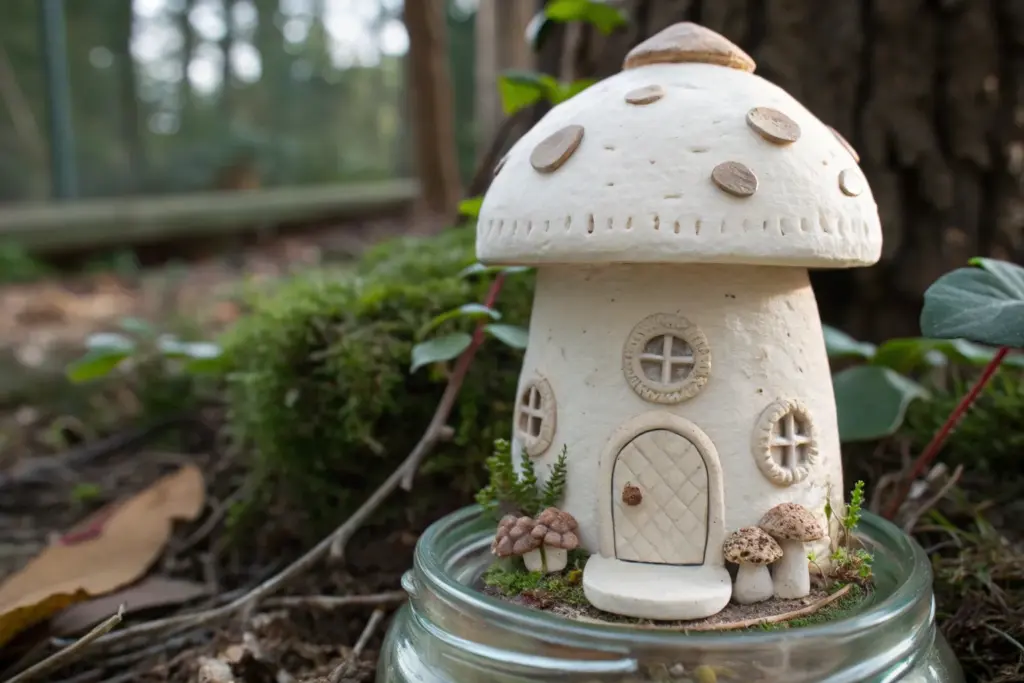
Classic Mushroom Cottage
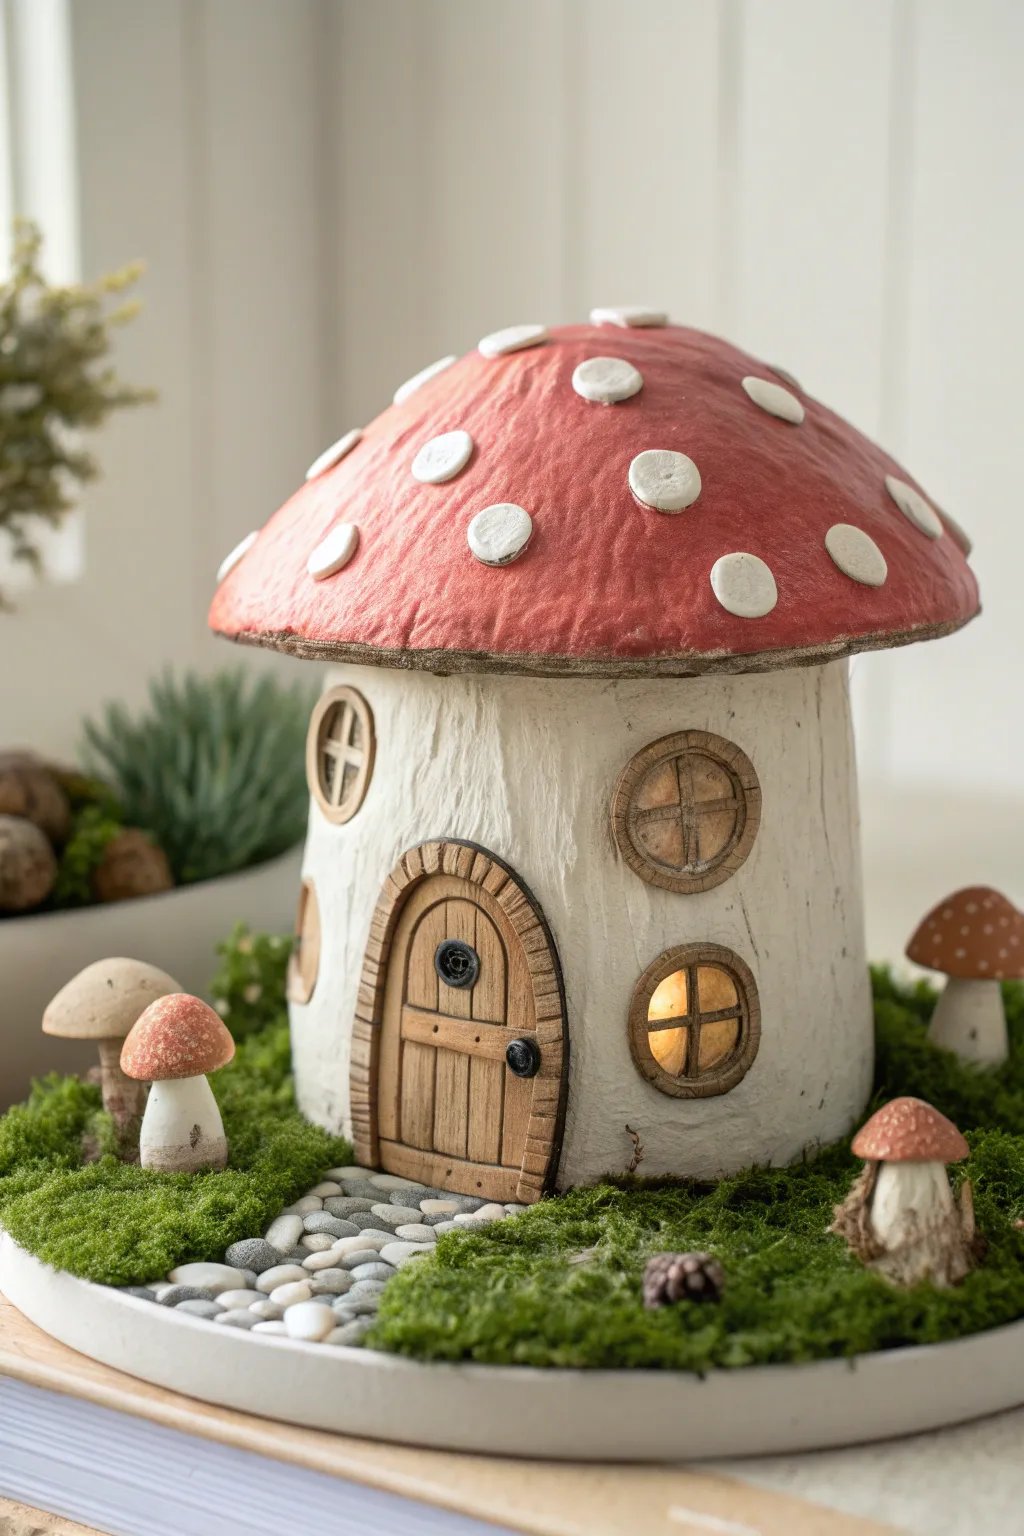
This charming fairy dwelling brings storybook magic to life with its textured white stalk and vibrant, polka-dotted roof. Nestled on a mossy base with a cobblestone path, it features a warm, glowing window that invites tiny guests inside.
Step-by-Step Guide
Materials
- Air dry clay (white)
- Aluminum foil (for armature)
- Cardboard or sturdy jar (for base structure)
- Acrylic paints (red, white, browns, black, yellow)
- Small LED tea light
- Pebbles or grey clay pieces
- Faux moss
- Circular craft base (wood or coaster)
- Sculpting tools (needle tool, knife tool)
- Mod Podge or varnish
- Hot glue gun
Step 1: Building the Stalk and Structure
-
Form the armature:
Create the core of your mushroom stalk using a sturdy cylinder like a recycled glass jar or a cardboard tube. For the mushroom cap, ball up aluminum foil into a wide, shallow dome shape that fits comfortably over your cylinder. -
Clay sheeting:
Roll out a slab of white air dry clay to about a 1/4 inch thickness. Wrap this sheet around your cylinder armature, smoothing the seam where the edges meet with a bit of water. -
Texturing the walls:
Take a texture tool or an old toothbrush and gently drag it vertically down the wet clay surface. This creates a realistic, fibrous bark texture that mimics a real mushroom stem. -
Cut the openings:
While the clay is still pliable, use a sharp craft knife to cut out an arched doorway and three circular windows. If you are using a jar armature, leave the glass behind these holes exposed so light can shine through later.
Texturing Trick
Use a stiff wire brush or even a crumpled ball of aluminum foil rolled over the wet clay to create instant, natural-looking organic textures on the mushroom stalk.
Step 2: Crafting the Red Cap
-
Cover the roof armature:
Drape a large, rolled-out circle of clay over your foil dome. Gently press it down to conform to the shape, curling the bottom edge slightly inward for a natural mushroom look. -
Refine the surface:
Smooth out the main surface of the cap with a little water on your finger, but don’t make it perfectly smooth—a little bumpiness adds organic character. -
Add the polka dots:
Roll small balls of clay and flatten them into discs of varying sizes. Press these securely onto the roof, spacing them irregularly. I find that varying the sizes makes it look less manufactured. -
Secure and dry:
Attach the roof to the stalk if you want a permanent bond, or keep them separate to easily access the tea light. Let all clay components dry completely for at least 24-48 hours.
Fairy Garden Magic
Add a tiny signpost made from a twig and a scrap of wood near the path, or glue a small snail shell onto the moss to hint at the fairy inhabitants.
Step 3: Details, Paint & Assembly
-
Sculpt the door and frames:
Create an arched door shape from a fresh slab of clay. Score vertical lines for wood planks and add a tiny clay snake around the edge for the frame. Make small circular frames with crossbars for the windows and glue them in place. -
Paint the stalk:
Paint the main body of the house with an off-white or cream acrylic. Once dry, protect it with a very light wash of watered-down brown paint, wiping it back immediately to highlight the textured grooves. -
Color the cap:
Paint the mushroom cap a deep, dusty red. Carefully paint the raised polka dots in bright white, ensuring clean edges. -
Detail the woodwork:
Paint the door and window frames with medium brown. Use a fine liner brush and black paint to add a tiny doorknob and hinges. -
Prepare the base:
Glue the dried mushroom house onto your circular base. Create a path leading to the door using small grey pebbles or flattened balls of grey clay. -
The mossy floor:
Apply craft glue over the remaining exposed areas of the base and press faux moss down firmly, ensuring it hugs the bottom of the house and the edges of the stone path. -
Scatter small mushrooms:
If you have leftover clay, sculpt tiny mini-mushrooms, paint them to match the main house, and glue them into the moss for extra scale and whimsy. -
Light it up:
Place your LED tea light inside the house. The glow will shine through the window openings, creating a cozy cottage vibe.
Now you have a magical centerpiece ready to spark the imagination of anyone who sees it


Glass Jar Lantern Fairy House
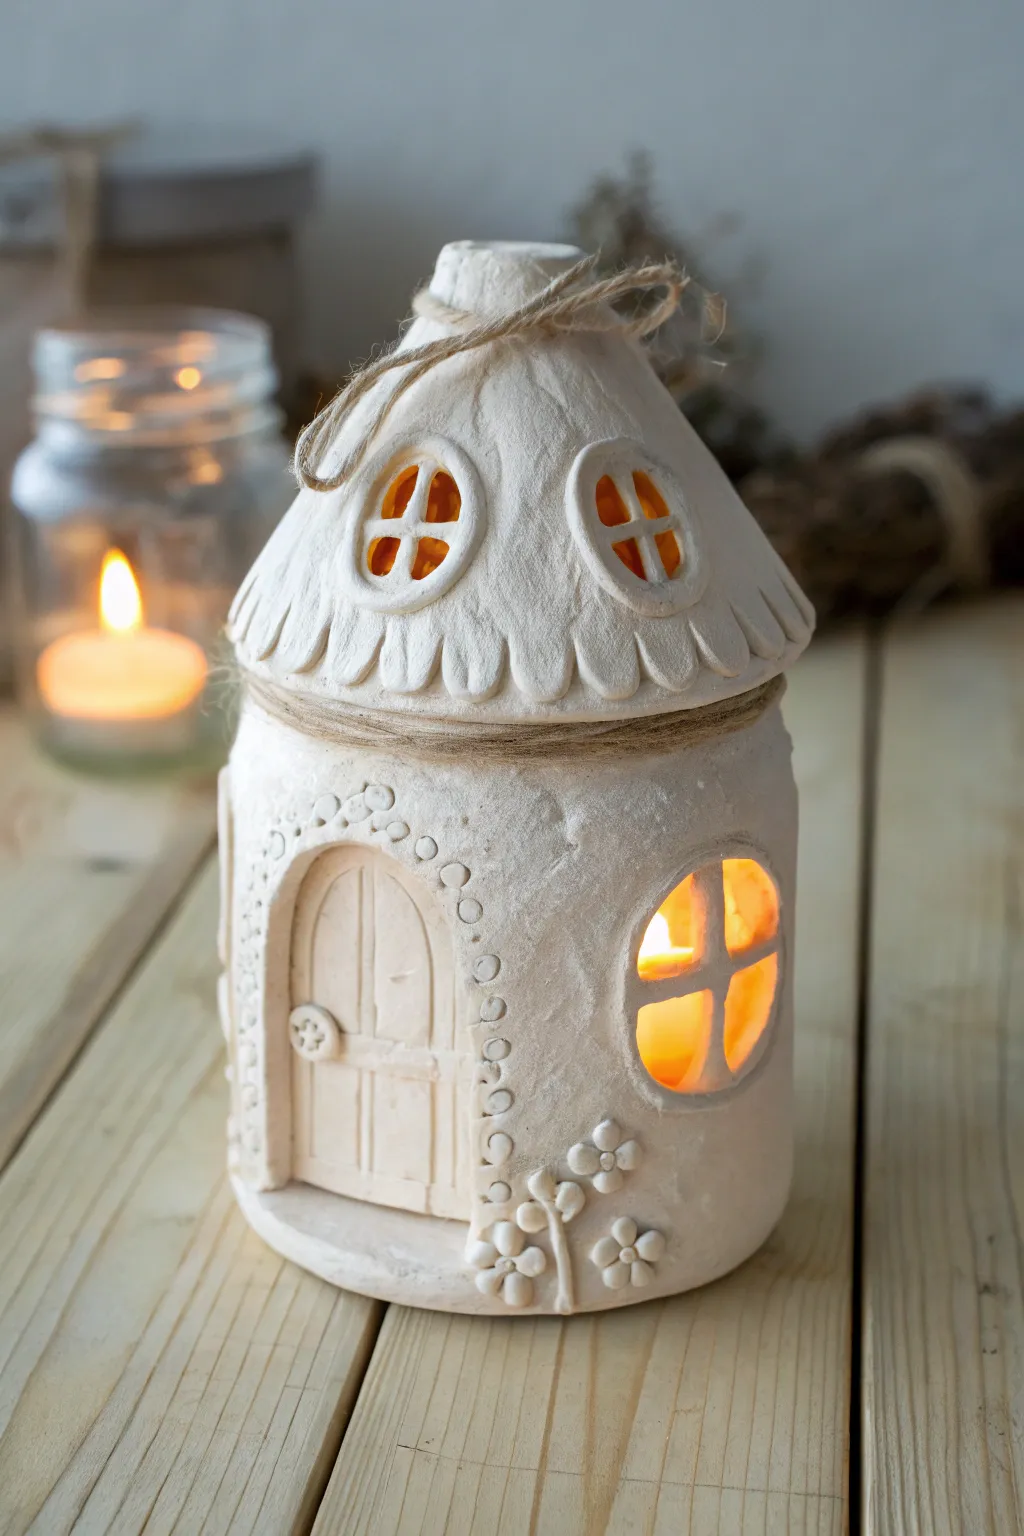
Transform a simple glass jar into an enchanting dwelling for garden sprites with this textured air-dry clay project. The rustic white finish and warm internal glow create a cozy cottage vibe perfect for a mantlepiece or sheltered patio.
How-To Guide
Materials
- Clean glass jar (e.g., salsa or mason jar)
- White or stone-colored air-dry clay
- Rolling pin
- Cardstock or thin cardboard (for roof structure)
- Craft knife or clay tools
- Water in a small cup
- Texturing tools (sponge, toothbrush)
- Jute twine
- Masking tape
- Battery-operated tea light
Step 1: Jar Preparation & Base Layer
-
Prepare the armature:
Clean and dry your glass jar thoroughly to remove any oils. If the jar has a label, soak it off completely. -
Roll the clay:
Roll out a slab of air-dry clay to about 1/4 inch thickness. You want a wide strip that is tall enough to cover the sides of the jar but stops just below the screw threads at the top. -
Wrap the jar:
Carefully lift your clay slab and wrap it around the glass jar. Press it firmly against the glass to ensure good adhesion, smoothing out any trapped air bubbles. -
Seal the seam:
Where the two ends of the clay meet, wet your finger slightly and smear the clay together to create a seamless join. Use the back of a spoon to smooth it out if needed.
Adhesion Trick
Brush a thin layer of PVA glue onto the glass before wrapping the clay. This prevents the clay from pulling away from the smooth jar surface as it shrinks during drying.
Step 2: Cutting Windows & Door
-
Outline the openings:
Using a needle tool or toothpick, lightly sketch where you want your round windows and the arched door to be. I find sketching lightly first prevents big mistakes later. -
Carve the windows:
Use a craft knife to carefully cut out the circular window shapes. Remove the excess clay to reveal the glass underneath. -
Add window mullions:
Roll tiny snakes of clay and cross them over the open window holes to create a pane effect. Secure them to the edges with a dab of water. -
Sculpt the door:
Instead of removing clay for the door, score lines into the clay to look like vertical wood planks. Press an arched indentation around it to define the frame. -
Detail the door:
Roll a tiny ball of clay, flatten it slightly, and press it onto the door for a doorknob. Use a toothpick to poke four holes in it so it resembles a button.
Fixing Cracks
If small hairline cracks appear while drying, don’t panic. Mix a small amount of fresh clay with water to make a paste (slip) and fill the cracks, then smooth over.
Step 3: Roof Construction
-
Create the roof cone:
Cut a circle from cardstock, cut a slit to the center, and overlap the edges to form a cone that sits nicely on top of your jar. Secure it with masking tape. -
Cover with clay:
Roll out another slab of clay and drape it over your cardstock cone. Trim the excess at the bottom, but leave a little overhang. -
Shape the eaves:
Use a modeling tool or knife to cut scalloped edges along the bottom rim of the roof to mimic shingles or thatch. -
Add roof windows:
Form two small oval rings of clay and attach them to the roof slope as dormer windows. Fill the centers with cross-shaped clay mullions similar to the main windows.
Step 4: Finishing Touches
-
Floral embellishments:
Make five tiny balls of clay for petals and one for a center. Press them together onto the house wall near the door to create molded flowers. Add thin snakes of clay for stems. -
Surface texture:
Take a damp sponge or an old toothbrush and gently dab the entire surface of the house to remove fingerprints and give it a stone-like texture. -
Drying time:
Let the jar and the roof dry separately for at least 24-48 hours. Keep them away from direct heat to prevent cracking. -
Twine accents:
Once fully dry, wrap jute twine around the neck of the jar (where the threads are) and glue it in place. Add a small bow to the very top of the roof structure. -
Light it up:
Place a battery-operated candle inside the jar and set the roof on top to see your cottage glow.
Enjoy the gentle flickering light from your new handcrafted cottage in the evening hours
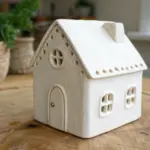

Thatched Roof Woodland Hut
Bring a touch of forest magic into your home with this charming fairy dwelling, featuring a highly textured, conical roof and inviting arched doorway. The rustic finish and mossy accents make it look as though it was just discovered in an ancient woodland clearing.
Step-by-Step Tutorial
Materials
- High-quality air dry clay (white or stone color)
- Wide glass jar or dense foam cone (for armature)
- Aluminum foil
- Rolling pin
- Clay sculpting tools (needle tool, knife tool)
- Texture tool (or an old toothbrush)
- Acrylic paints (browns, creams, ochre, dark grey)
- Detail paintbrushes
- Preserved craft moss
- Strong craft glue or hot glue
- wooden round or coaster (for base)
- Water and sponge (for smoothing)
Step 1: Building the Core Structure
-
Prepare the armature:
Begin by selecting your internal support. A small glass jar works perfectly for the round base. To create the tall, conical roof shape, tightly scrunch aluminum foil into a cone that fits securely on top of your jar lid. Secure it with tape if necessary. -
Roll out the base walls:
Roll out a slab of clay to about 1/4 inch thickness. Wrap this around the jar to form the walls of the hut. Using a little water on your finger, smooth the seam where the clay edges meet so it becomes invisible. -
Texture the walls:
Before the clay hardens, use a stiff brush or a crumpled ball of aluminum foil to gently dab the surface. This creates a realistic stucco or daub-and-wattle texture rather than a perfectly smooth finish. -
Cut openings:
Use your needle tool or a small clay knife to carefully cut out the arched doorway and the two small, rounded window openings. Remove the excess clay.
Crack Control
If small cracks appear during drying, make a ‘slurry’ of clay and water. Paint it into the cracks and smooth over. Let dry again.
Step 2: Thatching the Roof
-
Base layer for roof:
Cover your foil cone with a thin, even layer of clay to create a solid foundation for the shingles to adhere to. Score this surface lightly to help the next layers stick. -
Create individual shingles:
Roll out thin sausages of clay and flatten them slightly. Cut these into small rectangular or slightly tapered strips. These will become your thatch bundles. -
Start from the bottom:
Apply a row of these clay strips around the bottom edge of the roof cone. Use water or slip (clay mixed with water) to glue them down. Let the ends overhang slightly for a natural look. -
Add wood grain texture:
While the clay is soft, use a knife tool to score deep, vertical lines into each shingle. This mimics the look of dried reeds or split wood shakes. I find varying the pressure creates better depth. -
Layer upwards:
Continue adding rows of shingles, overlapping the previous row by about halfway. As you move higher up the cone, you may need to trim the shingles narrower to fit the reducing circumference. -
Cap the peak:
Once you reach the very top, mold a small cone of clay to cap the peak, blending it down over the final row of shingles so no foil or under-structure shows.
Step 3: Details & Assembly
-
Sculpt the door and frames:
Roll a small slab for the door that fits inside your archway. Score vertical lines for planks and add a diagonal cross-brace. Add a tiny ball of clay for the doorknob. -
Add stone trim:
Roll a thin snake of clay and press it around the door frame. Use a tool to indent lines, turning the strip into individual ‘stones’ bordering the entrance. -
Window details:
Create small cross-shapes from thin clay strips for the window mullions and press them gently inside the window openings. Add a thick clay border around the outside for the frame. -
Dry completely:
Allow the entire structure to dry thoroughly. This usually takes 24-48 hours depending on humidity. Flip it occasionally if the bottom is still damp.
Fairy Light Hack
Build the house over a battery-operated tea light instead of a solid jar. Leave the bottom open so you can turn the light on for a warm glow.
Step 4: Painting & Landscaping
-
Base coat:
Paint the walls a creamy off-white or light beige. For the roof and wooden details, start with a solid coat of dark walnut brown. -
Dry brush the roof:
Dip a dry brush into a lighter ochre or tan paint, wipe most of it off on a paper towel, and lightly brush over the roof texture. This catches the raised edges and makes the ‘thatch’ pop. -
Paint wood details:
Paint the door and window frames in a medium brown. Highlight the edges with a lighter honey wood tone to emphasize the planks. -
Attach the base:
Glue the finished house onto your wooden round helper base. This creates a platform for your garden. -
Apply greenery:
Apply glue around the base of the house and press clumps of preserved craft moss into it. Add a tiny flat stone in front of the door for a step.
Place your finished hut on a bookshelf or window ledge to invite a little imagination into your daily routine

Leaf-Shingle Roof Fairy House
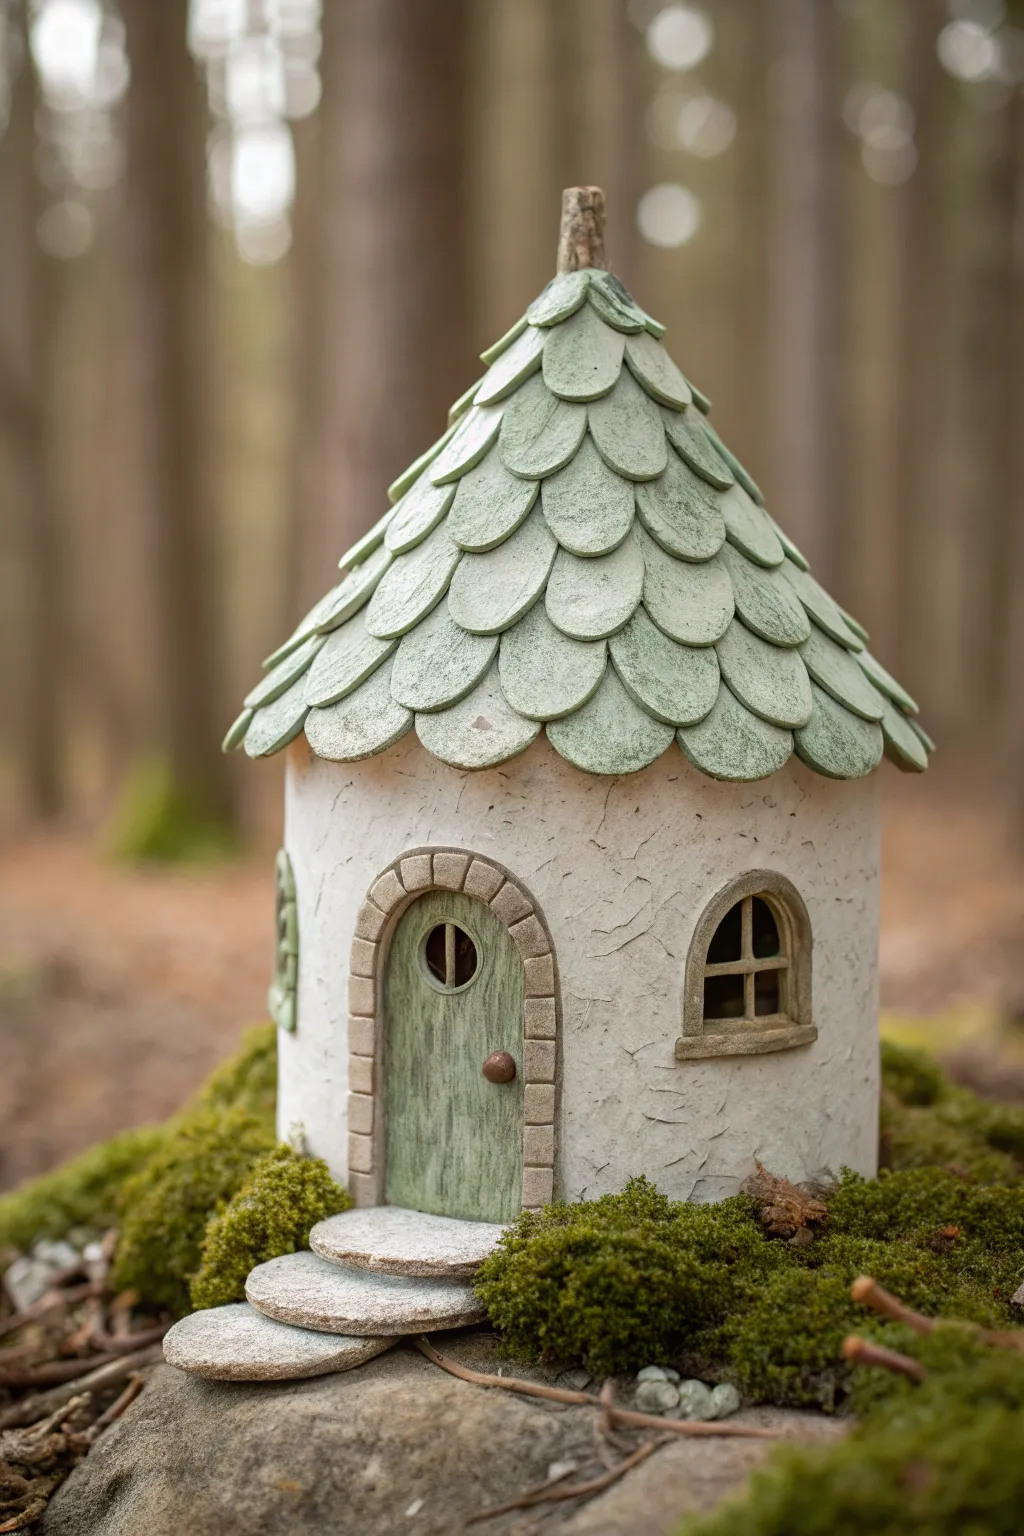
This charming fairy dwelling features distinct leaf-shaped shingles that curl playfully at the edges, sitting atop a sturdy, textured white base. The muted sage green tones and crackled wall finish give it an ancient, magical appearance perfect for nestling among moss.
Step-by-Step
Materials
- Air dry clay (white or stone color)
- Empty cylindrical jar or cardboard tube (for the armature)
- Aluminum foil
- Rolling pin
- Clay sculpting tools (needle tool, knife tool)
- Leaf-shaped cookie cutter (small) or teardrop cutter
- Acrylic paints: Sage green, antique white, dark brown, grey
- Texture tool (crumpled foil or sponge)
- PVA glue or clay slip
- Matte varnish or sealant
Step 1: Building the Structure
-
Prepare the armature:
Begin by selecting a sturdy cylindrical base, like a clean glass jar or a sturdy cardboard tube. Wrap the sides in a thin layer of rolled-out clay, ensuring the seam is smoothed completely so it is invisible. -
Shape the roof cone:
Form a cone shape using aluminum foil that fits perfectly atop your cylinder. Cover this foil cone with a smooth layer of clay, blending it onto the cylinder if you want a fixed roof, or keeping it separate if you want a removable lid. -
Texture the walls:
Before the wall clay dries, gently press a ball of crumpled foil or a stiff sponge against the surface. This creates a realistic stucco or stone texture. I find that twisting the foil slightly as you press creates the best organic patterns. -
Carve the crackle effect:
Use a needle tool or a sharp craft knife to lightly score jagged, crack-like lines into the textured walls. These fine details will catch the dark paint wash later.
Step 2: Crafting the Details
-
Create the door frame:
Roll a thin snake of clay and flatten it slightly. Arrange this in an arch shape on the lower wall to form the door frame. Use a knife to indent lines across it, mimicking separate stone blocks. -
Sculpt the door:
Fill the arch with a flat piece of clay. Use a needle tool to score vertical lines to resemble wooden planks. Add a tiny ball of clay for a doorknob and a small circular indentation near the top for a peephole window. -
Add the window:
On the side of the house, add a smaller arch of clay for a window frame. Fill the center with dark clay or paint, and lay thin strips of clay across it to create muntins (the cross bars). -
Form the steps:
Shape three flat, oval discs of clay in descending sizes. Stack them leading up to the door, pressing them firmly so they bond. Texture the tops to look like rough flagstones.
Clay Texture Trick
For rougher stone texture on the steps, press a piece of real sandpaper or a textured rock into the wet clay before painting.
Step 3: The Leafy Roof
-
Make the shingles:
Roll out a sheet of clay to about 3mm thickness. Use a small leaf or teardrop cutter to punch out dozens of identical shingles. If you don’t have a cutter, hand-cutting rounded triangles works too. -
Apply the first row:
Apply a little clay slip or water to the bottom rim of the roof cone. Press the first row of shingles on, letting the rounded ends hang slightly over the edge. -
Layering up:
Continue adding rows of shingles, working upward. Overlap each new row over the previous one, staggering the placement so the tip of the new leaf covers the gap between the two below it. -
Curling the tips:
As you place each shingle, gently use your thumb to curl the bottom edge outward slightly. This separation adds depth and whimsy to the silhouette. -
Cap the peak:
When you reach the very top, mold a small, twig-like piece of clay to act as a finial or chimney stem, blending the final top row of leaves into its base.
Make It Glow
Use a clear glass jar as your base armature. Keep the window area unpainted or cut out the clay there, then place an LED tea light inside for a warm glow.
Step 4: Painting and Finishing
-
Base coat the walls:
Once the clay is fully dry (24-48 hours), paint the walls with an antique white or cream acrylic paint. Ensure you get coverage in all the textured nooks. -
Paint the roof:
Paint the entire roof in a soft, muted sage green. Mixing a tiny bit of white into your green can help achieve that faded, weathered look shown in the image. -
Detail the woodwork:
Paint the door a deeper shade of green or brown, and paint the stone frame and steps in warm greys. -
Apply an antique wash:
Dilute dark brown paint with water until it is very runny. Brush this wash over the walls and door, then immediately wipe most of it off with a paper towel. The dark color will remain in the cracks and textures. -
Dry brush highlights:
Dip a dry brush into white paint, wipe almost all of it off on a towel, and lightly brush over the edges of the roof leaves and the stone steps to make the details pop. -
Seal the project:
Finish with a coat of matte varnish to protect your fairy house from moisture, especially if it will be placed near real plants or moss.
Place your finished cottage on a bed of preserved moss to complete the enchanting forest scene

What Really Happens Inside the Kiln
Learn how time and temperature work together inside the kiln to transform clay into durable ceramic.
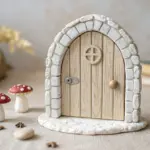
Arched Door With Faux Hinges
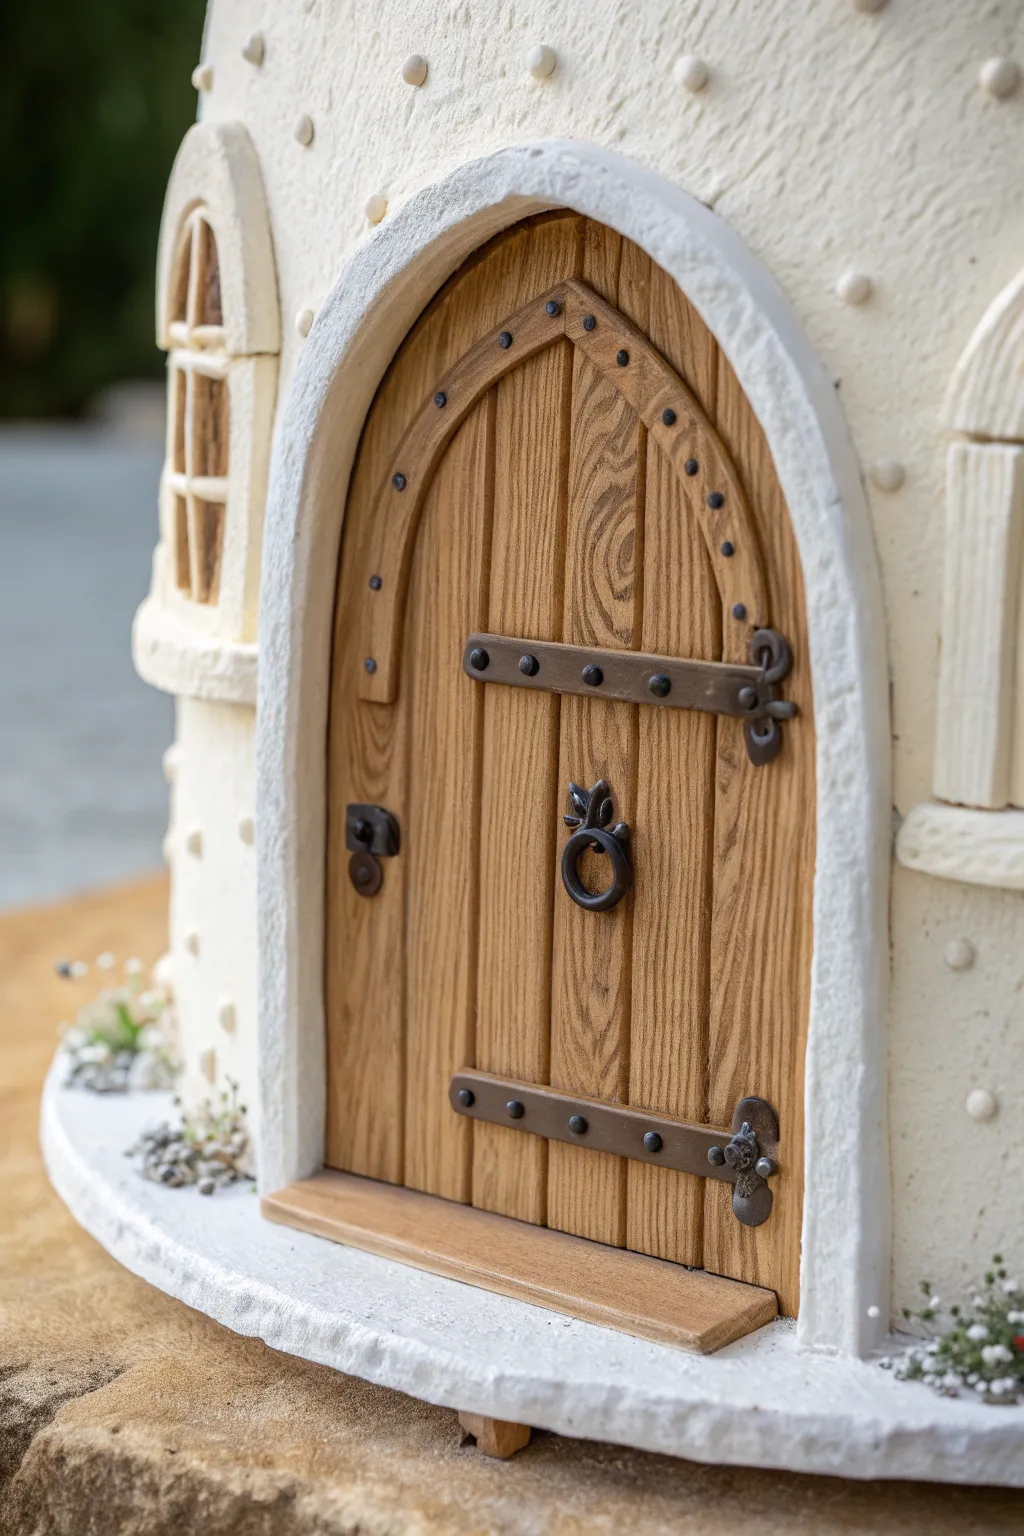
This project transforms simple air dry clay into an enchanting, realistic arched wooden door, complete with faux iron hardware. The textured wood grain and tiny rivet details give it a delightful, storybook quality perfect for any fairy garden centerpiece.
Step-by-Step Tutorial
Materials
- Air dry clay (white or terracotta)
- Clay texture tools (needle tool, knife tool)
- Rolling pin
- Parchment paper
- Acrylic paints (dark brown, tan, black, metallic bronze/silver)
- Small paintbrushes (fine tip and flat)
- Wood glue or heavy-duty craft glue
- Ball stylus tool
- Ruler
- Sandpaper (fine grit)
Step 1: Base Construction
-
Roll the Slab:
Begin by rolling out a smooth slab of air dry clay on parchment paper to an even thickness of about 1/4 inch. This will serve as the foundation for the door structure. -
Cut the Arch:
Using a blade or craft knife, cut out your main door shape. Start with a rectangle and carefully curve the top into a perfect arch. You can use a jar lid or circular object as a guide for a symmetrical curve. -
Define the Planks:
With the back of a knife or a needle tool, score vertical lines down the length of the door to simulate individual wooden planks. Make these depressions deep enough so paint can settle into them later. -
Add Wood Texture:
Take your needle tool and gently carve wood grain patterns into each plank. I find that creating varying knots and wavy lines makes the wood look much more organic and aged.
Wood Grain Pro Tip
Use a crumpled ball of aluminum foil to gently press patches of texture onto the clay planks. This creates instant, realistic surface imperfections.
Step 2: Adding the Frame & Details
-
Create the Door Frame:
Roll a long, thin snake of clay and flatten it slightly. Shape this strip around the top arch of the door to create the curved door frame. -
Texture the Frame:
Lightly press texture into this frame piece as well, perhaps using horizontal score lines to differentiate it from the vertical planks of the door itself. -
Add Rivets:
Roll tiny spheres of clay and press them gently into the arched frame at regular intervals using a flat tool or your finger to simulate structural bolts or nails. -
Sculpt the Hinges:
Cut two thin strips of clay for the horizontal strap hinges. Place one near the top and one near the bottom. Flare the ends slightly into a decorative shape, like a fleur-de-lis or simple scroll. -
Sculpt the Doorknocker:
Form a miniature ring and a small backplate from clay. Attach this assembly to the center of the door to create a tiny doorknocker, adding a small rivet at the top. -
Hinge Details:
Use a small ball stylus to press indentations onto the hinges, creating the look of hammered metal rivets. -
Dry Completely:
Allow the entire piece to dry fully, usually 24-48 hours depending on humidity. Flipping it halfway through helps prevent warping.
Step 3: Painting & Finishing
-
Base Coat:
Once dry, paint the entire wooden section with a warm brown acrylic paint. Ensure you get coverage deep into the grooves. -
Dry Brushing Wood:
Dip a dry brush into a lighter tan or ochre paint, wipe most of it off, and lightly brush over the raised grain to highlight the texture. -
Painting Hardware:
carefully paint the hinges, doorknocker, and rivets with black acrylic paint. Use a very fine tip brush for precision. -
Metallic Highlights:
Add a touch of metallic bronze or silver paint to the high points of the hardware to give it a realistic, forged iron sheen. -
Installation:
Glue the finished door onto your fairy house structure or display piece using strong craft glue, ensuring it sits flush against the surface.
Warping Woes?
If the door curls while drying, weigh it down gently with a heavy book placed over parchment paper once the surface is dry to the touch but the core is still damp.
Your tiny, enchanted doorway provides the perfect welcoming entrance for magical visitors to your garden
Cutout Windows for Cozy Glow
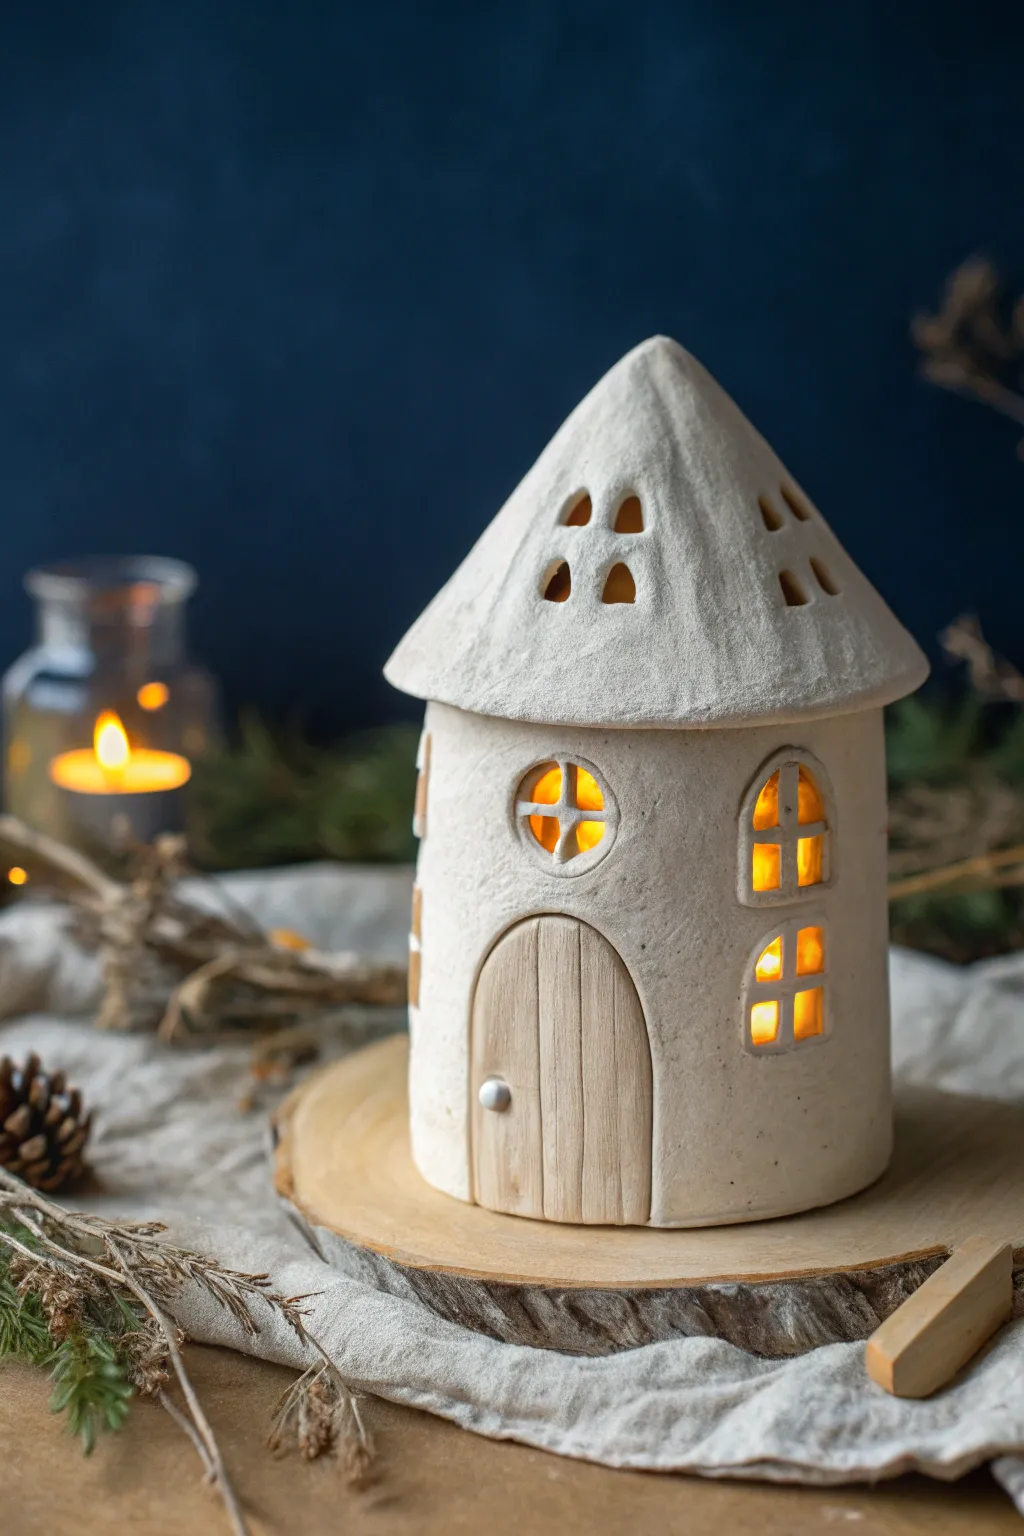
This charming cylindrical fairy house features a textured, peaked roof and inviting cutout windows that glow warmly from within. The natural creamy white finish of the clay combined with a rustic wooden door makes it a perfect cozy addition to any mantle or shelf.
Detailed Instructions
Materials
- Air dry clay (white or cream)
- Wide cardboard cylinder or jar (as a mold)
- Rolling pin
- Clay sculpting tools (knife, needle tool)
- Balsa wood or small craft sticks
- Wood glue or tacky glue
- Small bead (silvery or white for doorknob)
- Sandpaper (fine grit)
- LED tea light
- Water cup and sponge
- Acrylic rolling guide or rulers (optional)
Step 1: Forming the Base
-
Prepare the slab:
Begin by rolling out a substantial slab of air dry clay to an even thickness of about 1/4 inch. Using rolling guides can help ensure the walls are uniform, which prevents cracking later. -
Shape the cylinder:
Wrap your clay slab around your chosen cylindrical mold. If you are using a glass jar, wrap it in a layer of plastic wrap first so the clay releases easily. Cut the excess clay where the ends meet. -
Join the seam:
Score the edges where the clay meets with a needle tool, dab on a little water, and press them firmly together. Smooth the seam inside and out with your finger or a damp sponge until it disappears completely. -
Cut the door arch:
While the clay is still damp, use a sharp craft knife to cut a large arched doorway near the bottom. Remove this piece of clay, but save it—you can use it as a template for the wooden door later.
Step 2: Creating Windows
-
Design the windows:
Plan your window placement. This cottage features a circular window above the door and arched windows on the sides. You can lightly trace these shapes onto the clay with a needle tool before cutting. -
Carve the openings:
Carefully cut out the window shapes. For the cleanest lines, I find it helpful to wait until the clay has stiffened slightly (leather hard) before doing this detailed cutting. -
Add window panes:
Roll tiny, thin snakes of clay. Place these inside the window openings to create the cross-pane effect—one vertical and one horizontal. Secure them with a tiny bit of water and blend the edges into the interior wall. -
Smooth the edges:
Dip your finger in water and gently run it over all the cut edges of the windows and door frame to soften any sharpness.
Slumping Walls?
If your cylinder walls start to sag while working, leave the cardboard form or jar inside the clay while you cut the windows, just be careful not to cut into the mold.
Step 3: Roof and Assembly
-
Form the cone:
Roll out another slab of clay and cut a large circle. Cut a wedge (like a pizza slice) out of the circle, then bring the cut edges together to form a cone shape. Verify it fits atop your cylinder base. -
Cut roof vents:
Before attaching the roof, use a small cutter or knife to create small arched vents near the peak of the cone. These allow heat to escape if you use a real candle, though we recommend LEDs. -
Texture the roof:
Use a stiff brush or a crumpled ball of foil to press a rough, stucco-like texture into the surface of the roof cone for a rustic look. -
Attach the roof:
Score and slip the top rim of the house base and the bottom of the roof cone. Press them together gently. You can blend the seam or leave a slight overhang as shown in the photo. -
Drying time:
Let the entire structure dry slowly away from direct sunlight for 24-48 hours. Turn it occasionally to ensure even drying.
Pro Tip: Light Effect
Paste a small square of yellow tissue paper or tracing paper on the *inside* of the windows. This diffuses the LED light and hides the bulb for a softer glow.
Step 4: Finishing Touches
-
Sand for smoothness:
Once fully bone dry, use fine-grit sandpaper to smooth out any unwanted bumps on the walls while preserving the roof’s texture. -
Construct the door:
Cut pieces of balsa wood or craft sticks to fit vertically within your door opening. Glue them together side-by-side on a thin backing piece of cardstock or wood. -
Shape the door:
Sand the top of your wooden door assembly into a curve that matches the clay archway perfectly. -
Add hardware:
Glue a small silver bead or a tiny ball of dried clay painted silver to the wooden door to serve as the handle. -
Final installation:
Glue the wooden door into the opening. Place an LED tea light inside to see your cottage glow warmly.
Enjoy the cozy ambiance your new handcrafted cottage brings to your space


The Complete Guide to Pottery Troubleshooting
Uncover the most common ceramic mistakes—from cracking clay to failed glazes—and learn how to fix them fast.
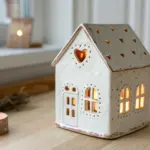
Mossy Base on a Wood Slice
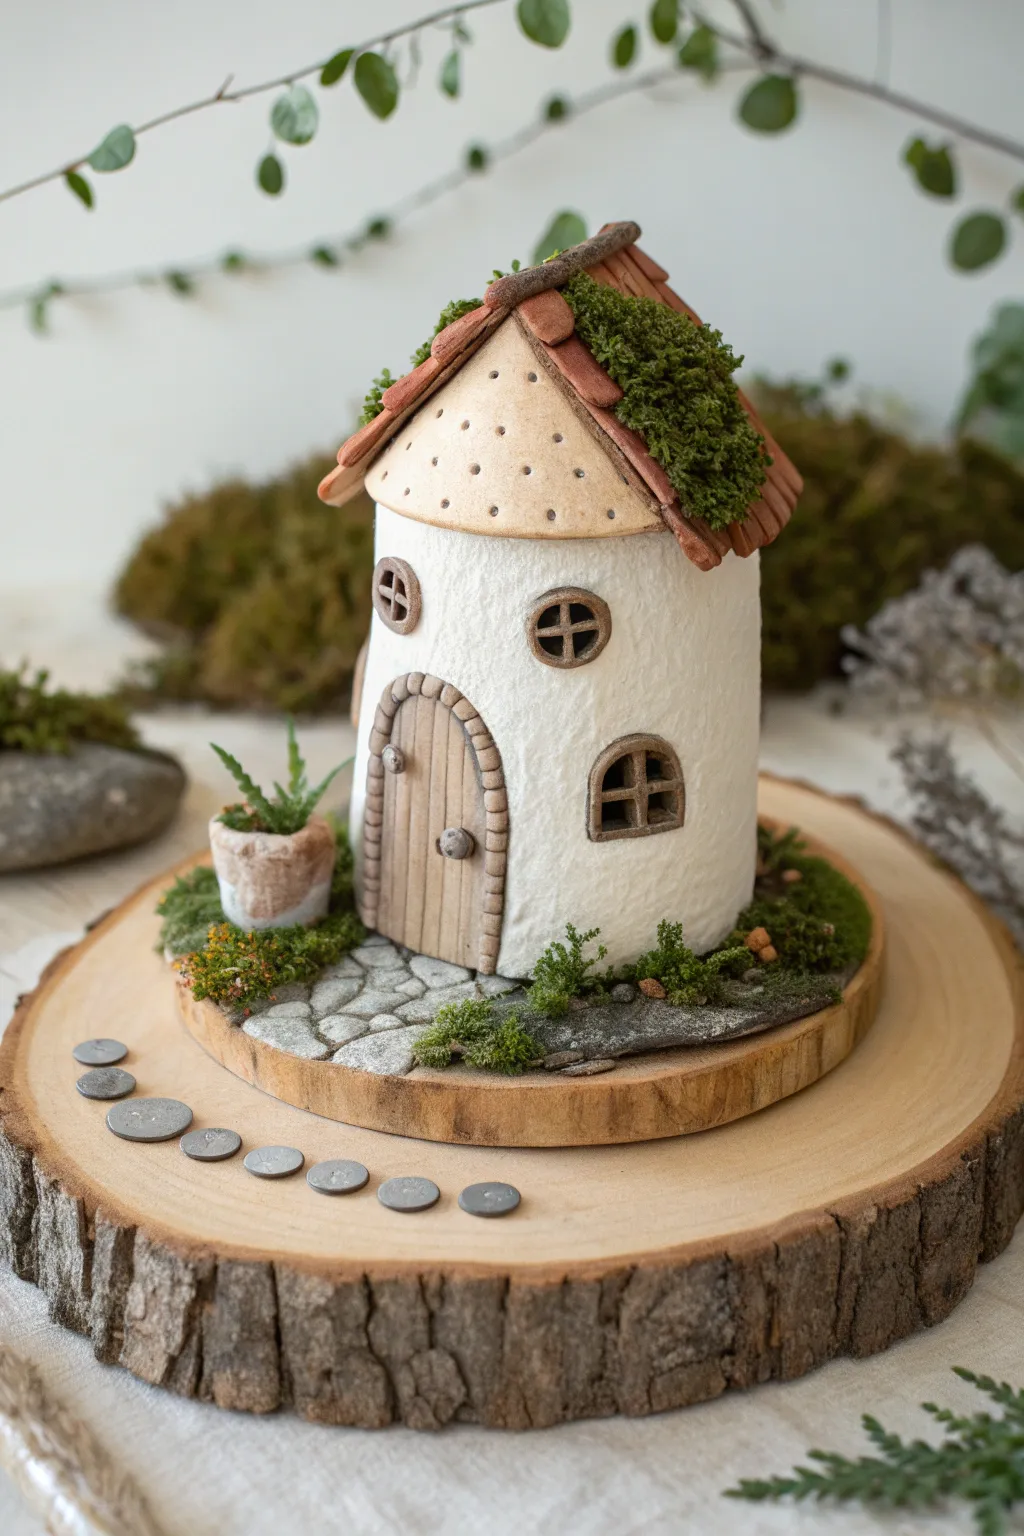
This project combines the rustic charm of natural wood slices with the delicate texture of air-dry clay to create a cozy fairy dwelling. The result is a magical centerpiece featuring a textured white cottage, a moss-draped roof, and a tiny stone pathway leading to the front door.
Step-by-Step
Materials
- Air-dry clay (white and terracotta colored)
- Large wood slice (base)
- Smaller wood slice (house platform, slightly smaller than the base)
- Texture tools (toothbrush, needle tool, ball stylus)
- Rolling pin
- Craft knife
- Acrylic paints (browns, greys, greens)
- PVA glue or tacky glue
- Preserved moss (artificial or stabilized natural)
- Small smooth stones or grey clay for the path
- Aluminum foil (for armature)
- Small flat stones or coins (for the outer path)
Step 1: Constructing the Core Structure
-
Prepare the base:
Start by selecting your two wood slices. Glue the smaller slice centrally on top of the larger slice using strong wood glue or tacky glue to create a tiered foundation. -
Form the armature:
Crumple aluminum foil into a cylinder shape with a slightly domed top. This will be the core of your house, saving clay and reducing weight. Ensure it fits well within the top wood slice. -
Roll out the walls:
Roll out a slab of white air-dry clay to about 1/4 inch thickness. Wrap this slab around your foil armature, smoothing the seam at the back with a bit of water. -
Texturize the walls:
Before the clay dries, take an old toothbrush or a stiff bristle brush and gently tap it all over the white clay surface to create a stucco-like texture.
Seamless Seams
To hide seams between clay pieces, mix a tiny bit of clay with water to make a paste (slip). Paint this over joints and smooth with your finger.
Step 2: Adding Architectural Details
-
Create the door:
Roll a small oval of brown clay (or white clay painted brown later). Use a needle tool to score vertical lines for wood planks. Add tiny clay balls for a handle and hinges, then press this onto the front of the house. -
Frame the door:
Roll a thin snake of grey or brown clay and wrap it around the door arch to create a stone frame. Use a tool to indent lines, making it look like individual bricks. -
Construct windows:
Form small circles of brown clay for the windows. Use a knife to cut out the inner sections or press deep indentations to simulate panes. Attach these to the walls with a dab of water. -
Build the roof base:
Fashion a cone or pyramid shape from foil for the roof and cover it with a sheet of terracotta-colored clay. Place this securely on top of the house walls. -
Apply roof tiles:
Cut small rectangles of clay for shingles. Layer them starting from the bottom edge of the roof, overlapping as you move upward. I like to leave some areas slightly uneven for a weathered look. -
Create the dormer roof:
Add a small, smooth curved piece of light brown or beige clay over the very front of the roof peak, poking small decorative holes with a needle tool for visual interest.
Internal Illumination
Before building, cut a hole in the bottom foil and wood slice. This lets you insert a battery LED tea light later to make the windows glow.
Step 3: Landscaping the Scene
-
Lay the stone path:
Roll tiny irregular balls of grey clay and flatten them onto the wood slice immediately in front of the door. Press them close together to mimic a cobblestone walkway. -
Add the potted plant:
Mold a tiny bucket shape from clay. Create minuscule spikey leaves from green clay (or painted white clay) and insert them into the pot. Glue this beside the door. -
Create the stepping stones:
Glue small flat grey stones, clay discs, or even painted coins in a curved line on the lower, larger wood slice leading up to the platform. -
Partial drying:
Allow the main clay components to firm up significantly before proceeding to the final decoration steps. This prevents accidental smudging.
Step 4: Finishing Touches
-
Paint and wash:
If you used white clay for everything, paint the details now. Apply a watered-down brown acrylic wash over the door and stone path, wiping away the excess to highlight the textures. -
Apply the roof moss:
Apply generous dabs of glue to sections of the roof tiles, specifically in the crevices where moisture would gather. Press small clumps of preserved green moss into the glue. -
Add ground greenery:
Glue patches of moss around the base of the house and along the edges of the stone path to soften the transition between the clay and the wood slice. -
Final assembly:
Ensure the house is firmly glued to the top wood slice if it wasn’t built directly onto it. Check that the stepping stones on the bottom tier are secure.
Place your finished fairy cottage on a shelf or near a window to invite a little everyday magic into your home.
Flower-Petal Roof Cottage
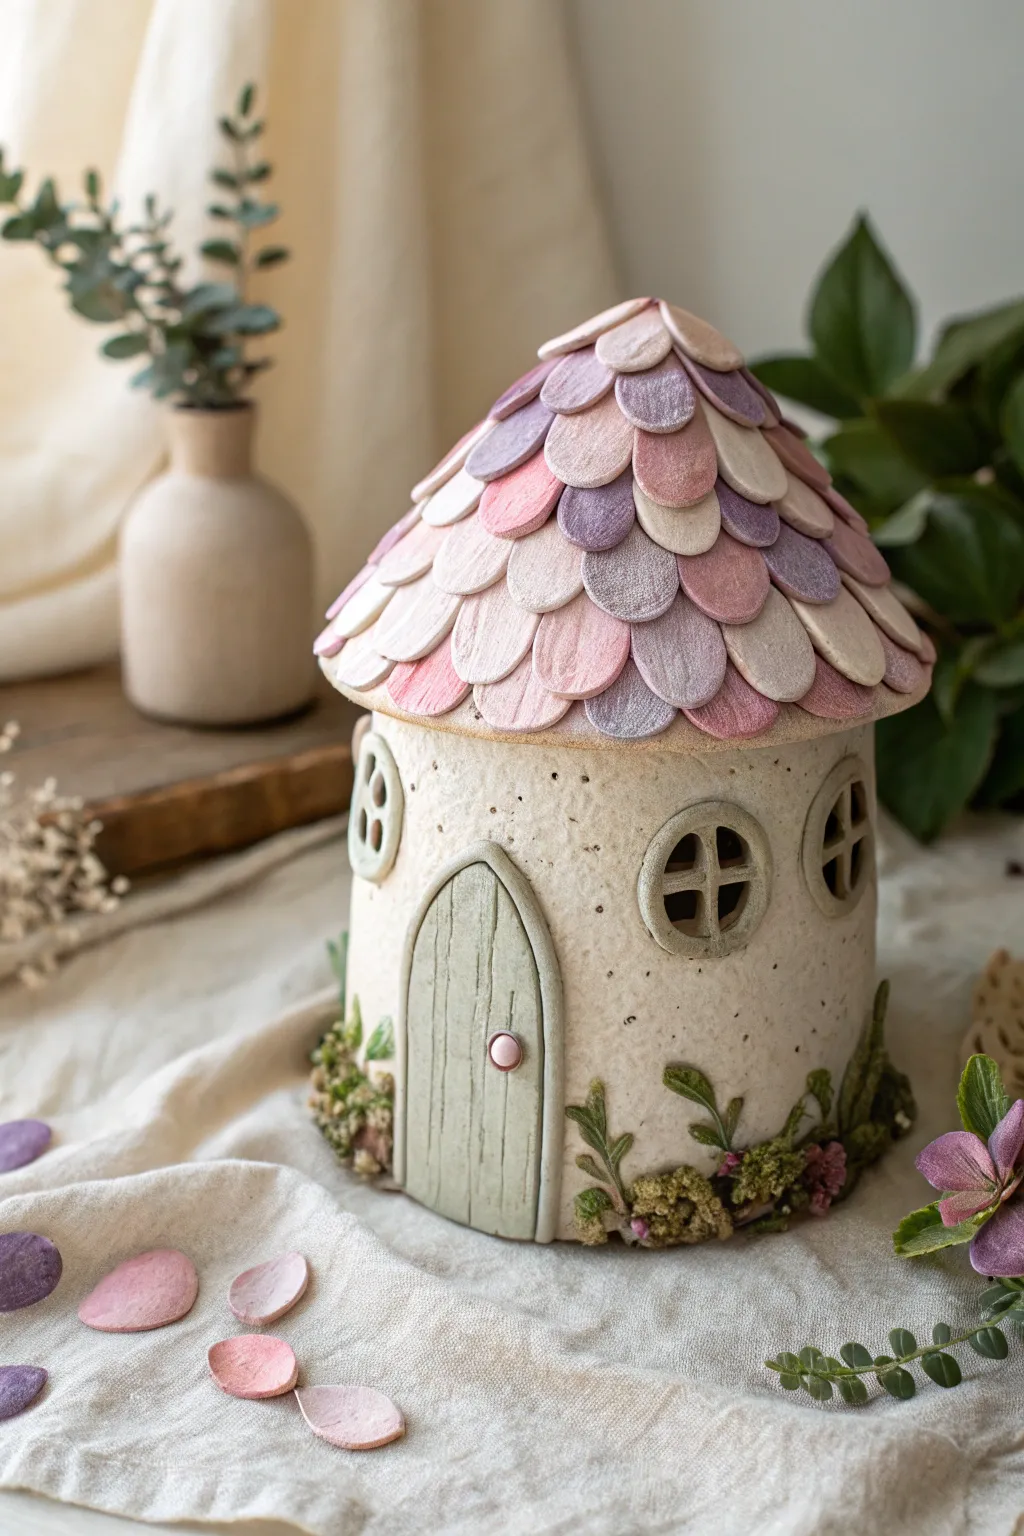
Bring a touch of magic to your shelf with this enchanting fairy house featuring a roof of layered pastel petals. The textured white walls and mossy base give it an organic, woodland feel that perfectly complements the soft pink and purple roof tiles.
Step-by-Step Guide
Materials
- Air dry clay (white)
- Acrylic paints (pale pink, lavender, warm purple, cream, sage green, brown)
- Small rolling pin
- Circle cutters (specifically a teardrop or petal cutter if available, otherwise a small round cutter)
- Texture tools (toothbrush, needle tool, crumpled foil)
- Empty glass jar or cardboard tube (for structure armature)
- PVA glue or clay slip
- Varnish (matte finish)
- Fine-grit sandpaper
- Paintbrushes (flat shader and fine detail)
Step 1: Building the Base Structure
-
Prepare the Armature:
Select a clean glass jar or a sturdy cardboard tube as your core. This provides instant stability and saves clay. If using a jar, you can leave the bottom open to put an LED tea light inside later. -
Roll out the Walls:
Roll out a slab of white air dry clay to about 1/4 inch thickness. Measure the height and circumference of your armature, cutting a rectangle of clay slightly larger than needed. -
Wrap and Texture:
Apply a thin layer of glue to the armature and wrap the clay sheet around it. Smooth the seam where the clay joins with water. Immediately texture the entire surface by gently pressing a clean toothbrush or crumpled foil into the clay to create a stony, stucco look. -
Cut Windows and Door:
Use a needle tool or craft knife to cut out arched openings for the door and circular holes for the windows. Keep the cut-out clay handy for later steps.
Smooth Seams
Keep a small bowl of water and a paintbrush nearby. When joining clay, a wet brush smoothes seams much better than fingers without leaving fingerprints.
Step 2: Creating the Roof
-
Form the Cone:
Create a cone shape from aluminum foil or cardboard that fits strictly over the top of your base. Cover this cone with a thin layer of rolled clay to create the foundation for your roof tiles. -
Make the Petal Tiles:
Roll out a fresh slab of clay. Use a teardrop cutter (or flatten small balls of clay into ovals) to create dozens of petal shapes. You’ll need enough to cover the entire roof in overlapping layers. -
Layering the Roof:
Starting at the very bottom edge of the roof cone, attach a row of petals using a dab of water or slip. Ensure they hang slightly over the edge. -
Building Upwards:
Continue adding rows of petals, moving upward. Offset each new row so the petal tip sits between the two petals below it, just like fish scales or shingles. Cover the very peak with a small clay cap or a final cluster of petals.
Step 3: Details & Assembly
-
Craft the Door:
Roll a slab of clay slightly thicker than the walls and cut an arch shape that fits inside your doorframe. Use a needle tool to score vertical wood grain lines into it. -
Add Window Frames:
Roll thin snakes of clay to create the window borders. Press them around the window openings. Add smaller cross-pieces inside the windows for the panes. -
Base Foliage:
Mix small scraps of clay with a tiny bit of water to make a paste, or use fresh clay clumps, and press them around the bottom of the house to simulate moss and rocks. Embed tiny balls of clay to look like budding flowers. -
Drying:
Allow the entire structure to dry thoroughly. This usually takes 24-48 hours depending on humidity. Rotate the piece occasionally so all sides dry evenly.
Glow Up
If you built your house around a glass jar, don’t paint the window panes! Leave the glass clear so you can place a battery tea light inside for a warm glow.
Step 4: Painting & Finishing
-
Painting the Walls:
Use a heavy wash of cream or off-white acrylic paint for the walls. Let the paint settle into the toothbrush texture, wipe away excess from the high points with a damp cloth to enhance the stone effect. -
Roof Gradient:
Paint the roof tiles in alternating soft shades. I like to mix a palette of dusty pink, lavender, and pale purple. Paint individual petals in different shades for a variegated look. -
Dry Brushing:
Once the roof base coat is dry, lightly dry-brush the edges of the petals with white paint. This highlights the texture and gives it a soft, frosted appearance. -
Detailed Features:
Paint the door a muted sage green and the knob a soft pink. Paint the mossy base with various greens and add touches of pink or purple to the tiny flowers. -
Speckling:
Dip an old toothbrush in watered-down brown paint. Run your thumb over the bristles to flick tiny speckles onto the white walls for an aged, realistic pottery look. -
Varnishing:
Seal your finished piece with a coat of matte spray varnish to protect the paint and give it a unified, professional finish.
Now you have a charming little hideaway ready to welcome its first fairy resident

TRACK YOUR CERAMIC JOURNEY
Capture glaze tests, firing details, and creative progress—all in one simple printable. Make your projects easier to repeat and improve.
Vine-Covered Garden Nook House
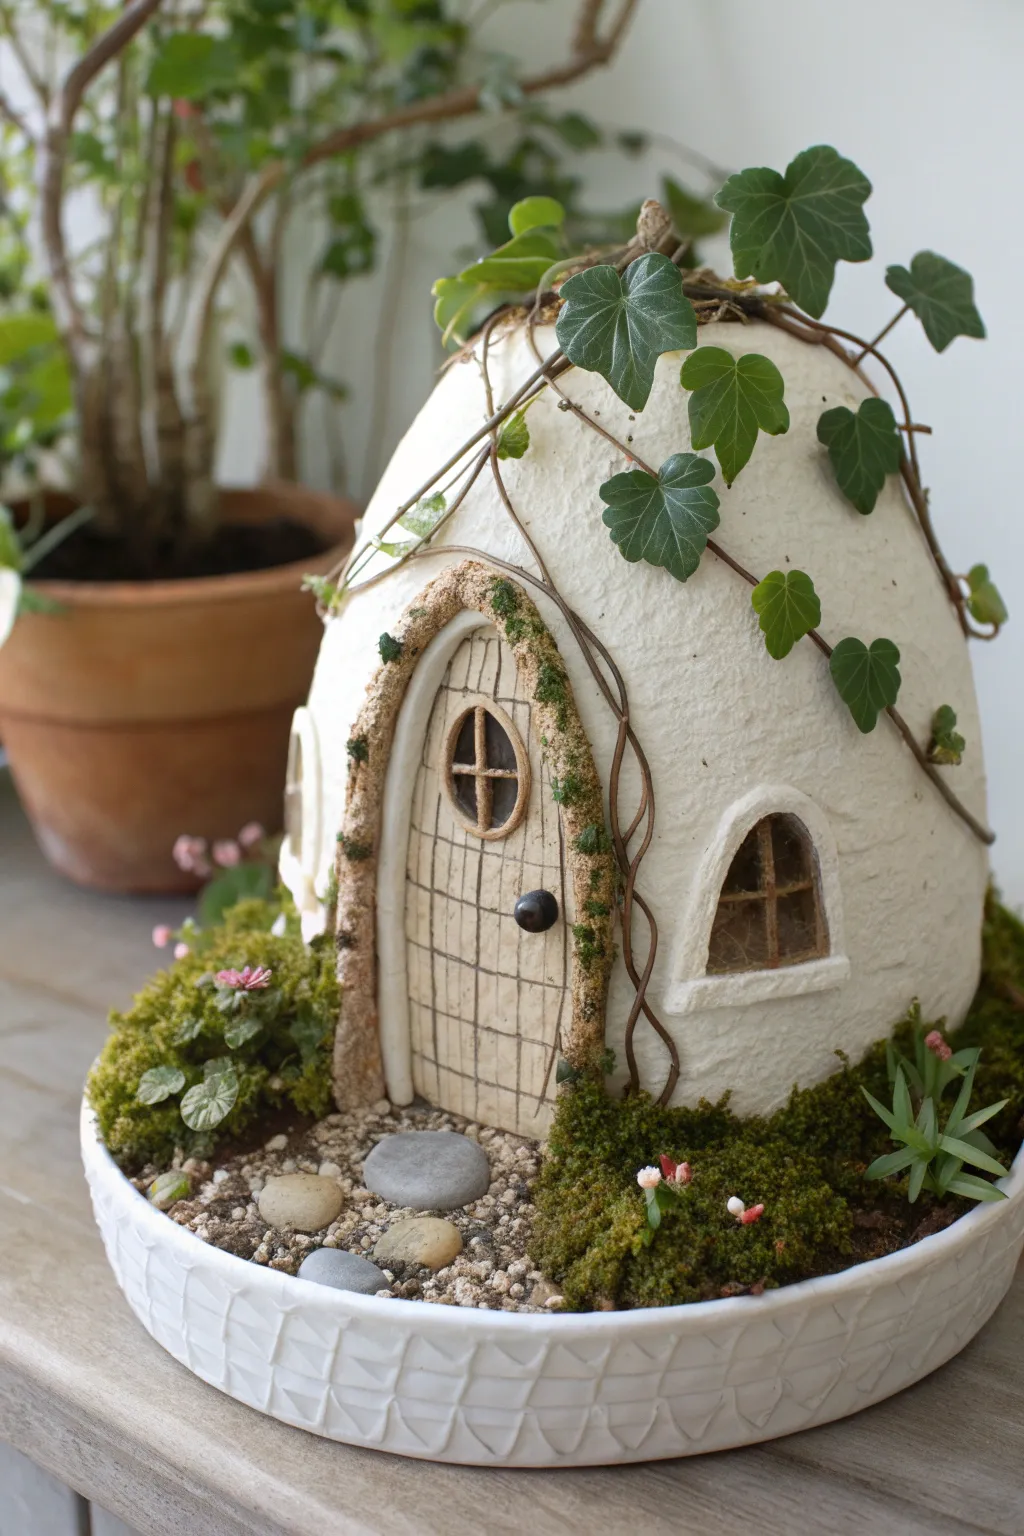
This enchanting project features a domed, organic fairy dwelling nestled in a shallow dish, surrounded by a miniature landscape of moss and stone. The white, textured clay walls provide a stark, beautiful contrast to the trailing ivy vines that hug the roof, creating a cozy sanctuary for garden sprites.
Step-by-Step Tutorial
Materials
- White air dry clay (preferably paper-based for texture)
- Shallow white ceramic dish or planter saucer (approx. 6-8 inches)
- Aluminum foil
- Rolling pin
- Sculpting tools (needle tool, small knife)
- Cardboard or cardstock
- Acrylic paints (browns, greys, black)
- Fine grit sandpaper
- Dried moss (sheet moss and tufts)
- Small pebbles and gravel
- Thin grapevine wire or floral wire
- Artificial ivy leaves or small silk leaves
- Strong craft glue or hot glue gun
Step 1: Sculpting the Structure
-
Build the armature:
Crumple aluminum foil into a large, dense egg shape. This will be the core of your house. Ensure the bottom is flattened so it stands stable on your work surface. -
Prepare the clay:
Roll out a slab of white air dry clay to about 1/4 inch thickness. Air dry clay can be sticky, so keeping your hands slightly damp helps when handling it. -
Cover the form:
Drape the clay sheet over your foil armature. Smooth the seams together where the clay meets, pressing firmly to remove air pockets. Don’t worry about perfect smoothness; a little texture adds to the rustic look. -
Add surface texture:
Use a ball of crumpled foil or a stiff-bristle toothbrush to gently tap the entire surface of the wet clay, creating a stucco-like, stone effect. -
create the door frame:
Roll a long snake of clay and flatten it slightly. Press this onto the front of the dome in an arch shape to create the door frame. Use a sculpting tool to drag the edges into the main wall for a seamless transition. -
Detail the door:
Inside the arched frame, use a needle tool to score vertical and horizontal lines, simulating wooden planks. Add a tiny ball of clay for the doorknob. -
Sculpt the windows:
Add small arches of clay for window frames on the sides and the door itself. You don’t need to cut all the way through; imply the window panes by cross-hatching the clay inside the frames. -
Dry the structure:
Allow the clay house to dry completely. This usually takes 24-48 hours depending on humidity. Rotate it occasionally so the bottom dries too.
Step 2: Painting and Planting
-
Paint the woodwork:
Mix a watery light brown acrylic paint (a wash). Paint the door and window frames, letting the paint settle into the scored crevices to highlight the texture. Wipe away excess from the raised areas. -
Highlight the handle:
Paint the tiny doorknob black or dark iron grey for contrast. -
Prepare the base:
Take your shallow white dish. If it needs drainage and you plan to use real plants later, drill holes now. For this dry display, simply fill the base with a layer of clay or soil to create ground level. -
Position the house:
Place your dried house into the dish, slightly off-center. Glue it down if you want it permanently fixed, or nestle it firmly into the base material. -
Lay the path:
Create a pathway leading to the door using flat, smooth river stones. Fill the gaps between the larger stones with fine gravel or coarse sand. -
Add the mossy lawn:
Surround the house and pathway with dried sheet moss. Tuck small tufts of darker moss near the base of the house to mimic overgrown vegetation. -
Plant succulents:
Insert small faux succulents or tiny cut dried flowers into the moss on the sides for a pop of extra color and garden realism.
Cracking Clay?
If you see hairline cracks as the clay dries, don’t panic. Mix a small amount of fresh clay with water to make a paste (slip) and smooth it into the cracks with your finger.
Step 3: The Vines
-
Create the vine structure:
Take thin, brown floral wire or grapevine wire. Twist it loosely to look gnarly and organic. Wrap these vines over the top of the house, letting some hang down the sides. -
Secure the vines:
Use tiny dabs of strong glue to tack the wire ‘vines’ to the clay roof so they stay in place. -
Attach the leaves:
Glue individual small silk ivy leaves along the wire vines. I find that grouping them in clusters of two or three looks more natural than spacing them evenly.
Light It Up
Before the clay dries, cut a hole in the bottom of the house. This allows you to place a battery-operated LED tea light underneath, making the windows glow at night.
Once the final ivy leaf is glued in place, you will have a serene little centerpiece ready for display
Terrarium-Ready Mini Fairy House
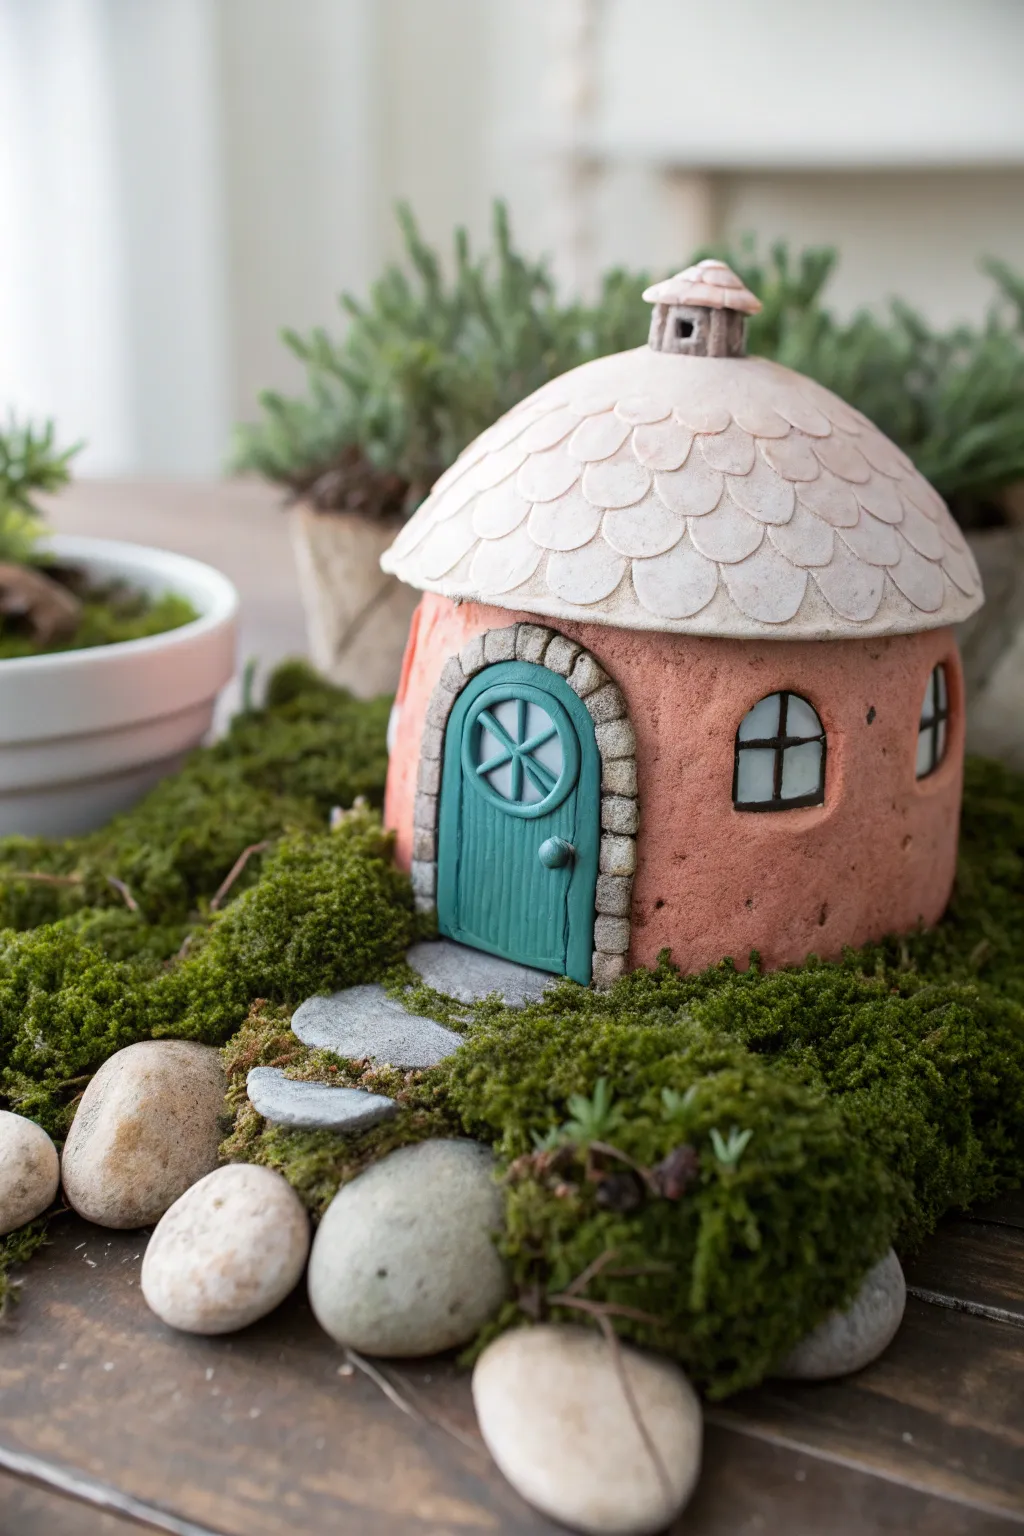
This enchanting little round dwelling features a soft terracotta finish, a charming teal door, and a scalloped roof that looks straight out of a storybook. Nestled on a bed of preserved moss and smooth river stones, it makes for a perfect, magical addition to any indoor terrarium or shelf display.
Step-by-Step Guide
Materials
- Air dry clay (white or terracotta colored)
- Acrylic paints (terracotta, teal, white, grey, black)
- Small rolling pin
- Clay sculpting tools (knife, needle tool)
- Aluminum foil
- Water and a small sponge
- Paintbrushes (flat and fine tip)
- Clear matte varnish or sealant
- Preserved sheet moss
- Smooth river stones
Step 1: Forming the Structure
-
Create the core:
Crumple a ball of aluminum foil into a tight sphere slightly smaller than you want your finished house to be. Flatten the bottom so it sits securely on your work surface. -
Cover with clay:
Roll out a slab of clay to about 1/4 inch thickness. Drape it over your foil ball, smoothing it down the sides to cover the foil completely. -
Refine the shape:
Trim any excess clay at the bottom. Use a damp sponge or your finger dipped in water to smooth out any cracks or fingerprints on the surface until you have a nice, uniform dome. -
Texture the walls:
Take a stiff bristle brush or a crumpled ball of foil and gently press it against the exterior walls to create a subtle, stony texture.
Step 2: Adding Architectural Details
-
Sculpt the door frame:
Roll a thin snake of clay and flatten it slightly. Form an arch shape on the front of the house for the doorway. Use a knife tool to press vertical lines into this arch to mimic individual stones. -
Create the door:
Fill the space inside the arch with a flat piece of clay. Use a needle tool to lightly score vertical wood grain lines. -
Window construction:
Cut out two small arched window shapes from the wall clay (or simply press indentations if you prefer not to cut through). Add tiny clay coils around them for frames and thin strips for the window mullions. -
Fashion the roof tiles:
Roll out a thin sheet of clay and use a small round cutter (a piping tip works great here) to punch out many small circles. These will be your scallops. -
Apply the roof:
Starting at the bottom edge of where you want the roof to begin, layer the clay circles in overlapping rows, working your way up to the apex of the dome. -
Top it off:
Create a tiny chimney or a final clay cap to cover the very top point where the tile rows meet. -
Dry partially:
Let the house sit for about an hour to firm up before painting if you are using wet-on-wet techniques, or let it cure completely (24-48 hours) for standard painting.
Cracking Issues?
If small cracks appear as the clay dries, simply mix a tiny bit of fresh clay with water to make a paste (slip) and fill in the cracks, then smooth over.
Step 3: Painting and Assembly
-
Base coat the walls:
Mix a warm terracotta color using orange, brown, and a touch of white. Paint the walls, avoiding the stone trim and roof. -
Paint the woodwork:
Paint the door a vibrant teal. Once dry, highlight the raised areas with a lighter mix of teal and white to show weathering. -
Detail the stones:
Paint the door frame stones and window frames with a light grey. Add a dark wash (watered down black paint) into the crevices to make the stonework pop. -
Roof coloring:
Paint the roof tiles a soft off-white or cream color. You can add a very faint wash of brown over them to age the tiles slightly. -
Seal the project:
Apply a coat of clear matte varnish to protect the clay from moisture, especially if it will be near real plants. -
Create the landscape:
Arrange your sheet moss on a base (like wood or a saucer). Nestle the house into the center. -
Lay the path:
Place flat, grey river stones leading up to the front door to create a welcoming walkway.
Add Glow
Cut out the window holes completely and place a battery-operated LED tea light underneath the hollow house to make windows glow warmly at night.
Enjoy finding the perfect spot for your new miniature sanctuary
Tiny Fairy Village Set
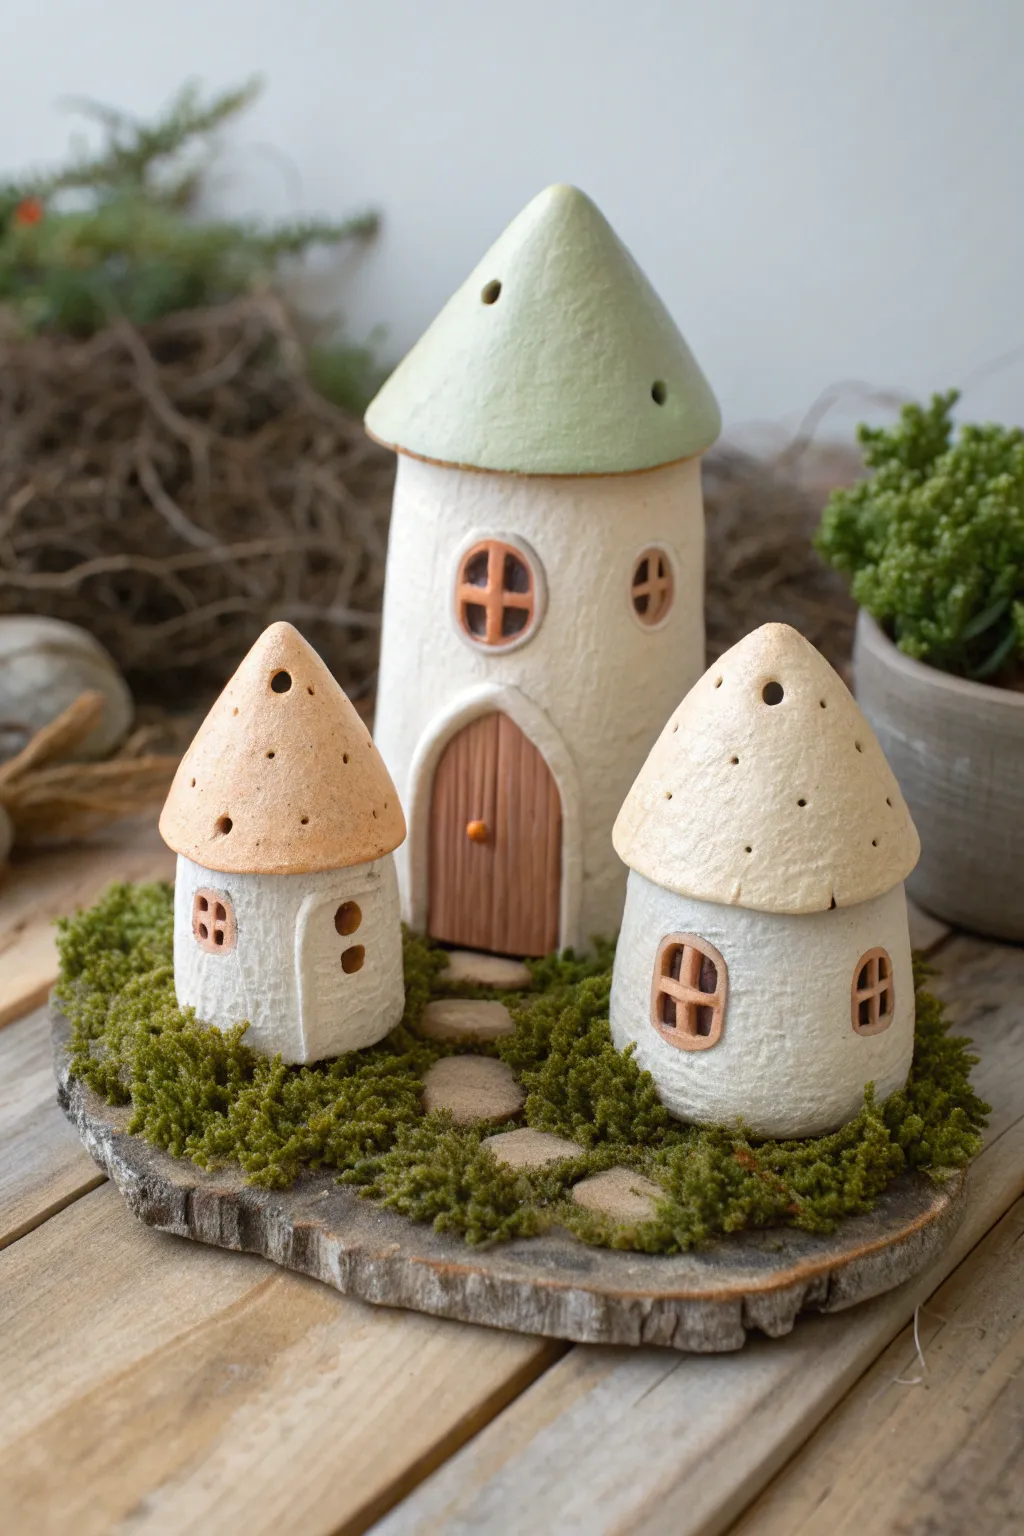
Create an enchanting miniature scene with this trio of textured clay cottages nestled on a mossy base. The rustic stucco finish and soft pastel roofs give this tiny village a cozy, lived-in feel perfect for a bookshelf or planter.
Detailed Instructions
Materials
- Air dry clay (white)
- Wooden slice base (approx. 8-10 inches)
- Rolling pin
- Aluminum foil
- Sculpting tools (needle tool, small knife)
- Old toothbrush or stiff bristle brush
- Acrylic paints (olive green, soft peach, cream, brown, terracotta)
- Faux preserved moss
- Craft glue or hot glue gun
- Matte sealant spray
Step 1: Shaping the Cottages
-
Form the Armatures:
Crumple aluminum foil into three distinct shapes: one tall cylinder with a domed top for the main house, and two shorter, squat domes for the smaller cottages. Prepare the foil tightly to save on clay and keep the structures lightweight. -
Roll Steps:
Roll out a slab of white air dry clay to about 1/4 inch thickness. I like to use guide sticks here to ensure the thickness is perfectly even. -
Cover the Foil:
Drape the clay slab over your foil armatures. Gently press and smooth the seams where the clay joins, ensuring the foil is completely hidden. Trim away excess clay at the bottom so they sit flat. -
Create the Texture:
Immediately after shaping, take an old toothbrush or a stiff bristle brush and firmly tap it all over the walls of the houses. This stippling motion creates that charming stucco-like finish seen in the photo.
Smoother Seams
Keep a small bowl of water nearby. If your clay cracks or seams won’t join, dip your finger in water and smooth it over the area to create a slip that bonds pieces.
Step 2: Adding Architectural Details
-
Sculpt the Roofs:
Shape three cones from solid clay for the roofs. The main house needs a taller cone, while the smaller houses need wider, squat cones. Gently pinch the edges to flare them out slightly like a mushroom cap. -
Mock-Up Assembly:
Test the fit of the roofs on the bases. Once satisfied, score and slip the contact points to join them permanently, or wait until dry to glue them. -
Add Roof Texture:
Using a needle tool, poke small random holes into the roof cones for a whimsical, porous look. Add a tiny ball of clay to the very peak of the main roof. -
Carve Windows:
Roll tiny snakes of clay to form window frames. Create circle windows for the main house and arched windows for the smaller ones. Attach them to the walls using a dab of water. -
Door Construction:
For the main door, cut a small arch shape from a flat piece of clay. Use a knife to score vertical wood grain lines into it. Attach this to the front of the tall house and add a tiny clay bead for a doorknob. -
Create the Path:
Roll out leftovers into flattened, irregular ovals to act as flagstones. You’ll need about 6-8 stepping stones. -
Drying Time:
Allow all clay components to dry completely. This usually takes 24-48 hours depending on humidity. Rotate them occasionally to ensure even drying.
Glow Up
Before attaching roofs, cut a hole in the bottom of the houses. Place battery-operated tea lights inside so light shines through the decorative roof holes.
Step 3: Painting and Assembly
-
Base Coat:
Paint the walls of all houses with a warm white or cream acrylic paint. Ensure you get the paint into all the textured grooves. -
Paint the Roofs:
Paint the main roof a soft sage green. For the two smaller cottage roofs, mix a light beige or peach tone. The colors should look matte and earthy. -
Detail Work:
Paint the window frames and the door frame in a terracotta or reddish-brown hue. Paint the door itself a medium brown. -
Stone Painting:
Paint your stepping stones a neutral beige-grey color. Once dry, arrange the houses on your wooden slice to finalize the layout. -
Gluing Down:
Using strong craft glue or hot glue, adhere the houses and the stone path to the wooden slice. -
Adding Greenery:
Apply glue generously to the exposed wood base around the houses and stones. Press clumps of varying shades of preserved moss into the glue to simulate grass. -
Final Seal:
Spray the clay components with a matte varnish to protect the paint and seal the clay against moisture.
Enjoy the peaceful vibe your new miniature neighborhood brings to your space
Tall Tower Fairy House
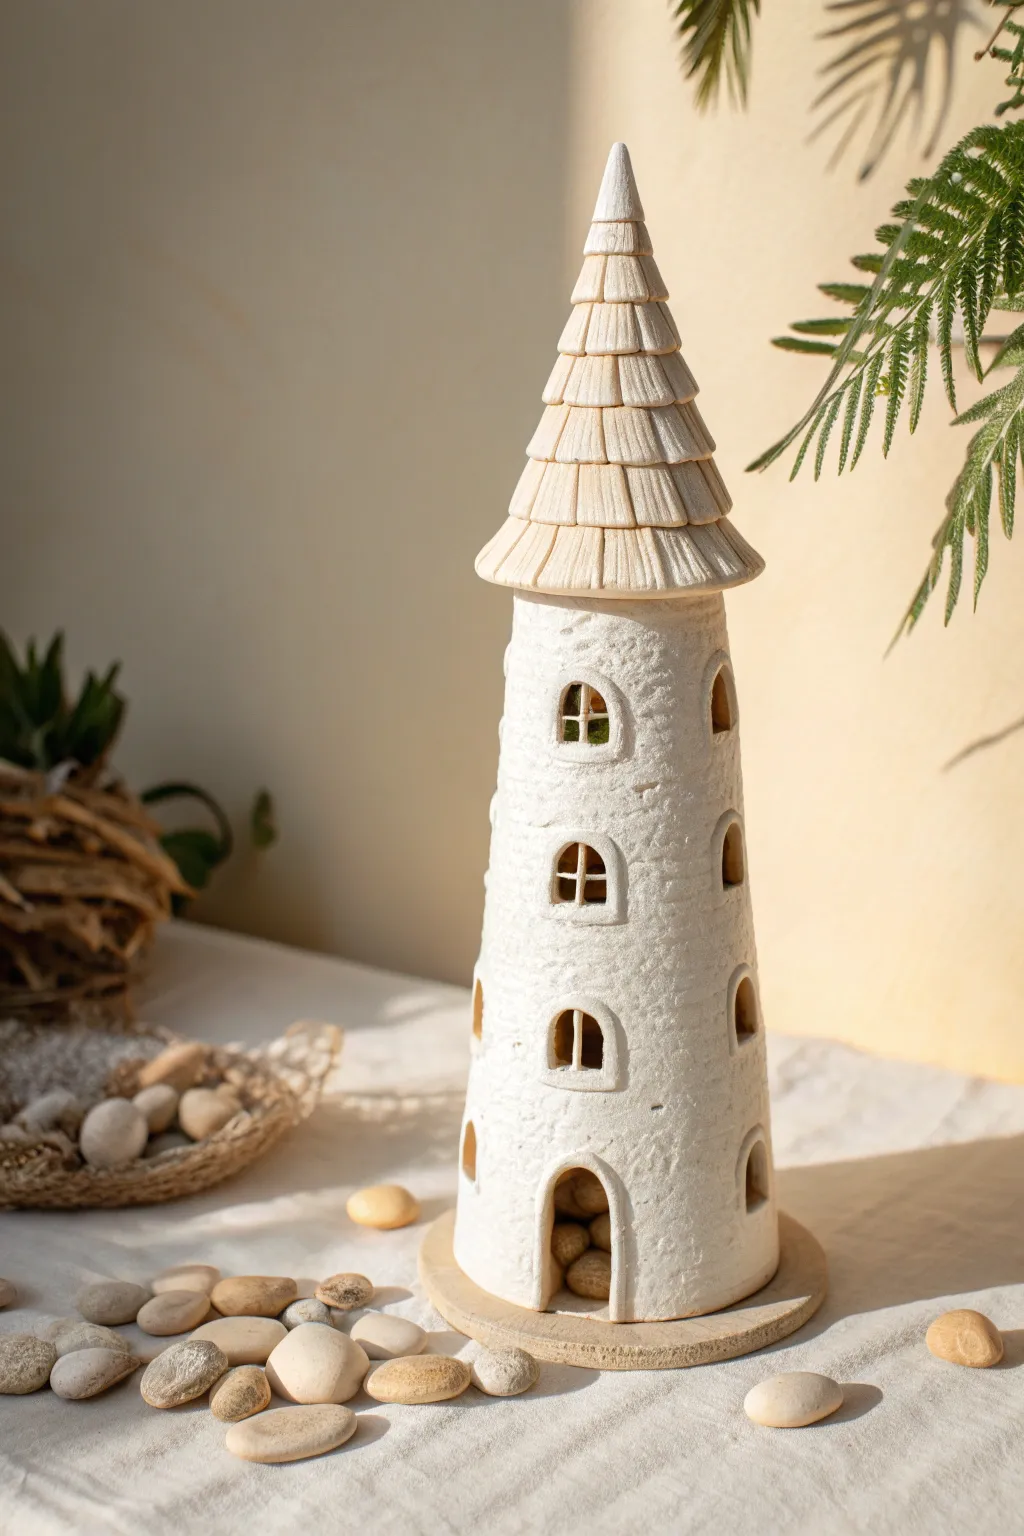
This enchanting tower is a minimalist yet detailed addition to any fairy garden, featuring a textured stone facade and a perfectly layered conical roof. Standing tall and slender, it offers a cozy lookout for your magical inhabitants with its arched windows and rustic charm.
Step-by-Step Tutorial
Materials
- White air dry clay
- Rolling pin
- Cardboard or poster board (for core structure)
- Masking tape
- Clay knife or craft knife
- Texture tools (or a crumpled ball of aluminum foil)
- Small cup of water for smoothing
- Clay slip (clay mixed with water)
- Scissors
Step 1: Building the Core Structure
-
Create the tower tube:
Cut a piece of cardboard or poster board into a rectangle approximately 8-10 inches tall. Roll it into a cylinder that is slightly tapered—wider at the bottom and narrower at the top—and secure it firmly with masking tape. -
Form the roof cone:
Cut a circle from your cardboard, remove a wedge, and pull the edges together to form a sharp cone shape that fits perfectly atop your cylinder. Tape it securely, but don’t attach it to the tower base just yet; working on them separately is often easier.
Texturing Secret
Use a real stone or piece of coral to stamp texture into the walls. It creates a much more realistic, random pattern than commercial plastic tools.
Step 2: Cladding the Tower
-
Roll out the clay slab:
Roll your white air dry clay into a large, even slab about 1/4 inch thick. Make sure it’s large enough to wrap around the entire cardboard cylinder. -
Wrap the cylinder:
Apply a little slip to the cardboard to help adhesion, then wrap the clay slab around the cylinder. Trim the excess clay where the edges meet. -
Seal the seam:
Use your fingers and a bit of water to smooth the vertical seam until it disappears completely, blending the clay into a seamless tube. -
Add stone texture:
Take a crumpled ball of aluminum foil or a coarse texture sponge and press it gently all over the surface of the wet clay. This creates that lovely organic, stucco-like stone effect seen in the photo.
Glowing Windows
Before adding the clay, cut a hole in the bottom of the cardboard base. This lets you place the finished tower over an LED tea light for a warm glow.
Step 3: Carving Windows and Door
-
Plan the fenestration:
Lightly mark the positions for the windows and the arched doorway. Notice how the windows align vertically but also appear on the sides for a spiraling staircase effect. -
Cut the openings:
Using a sharp craft knife, carefully cut out the arched shapes. Remove the clay plugs. You can leave the cardboard visible inside for stability or carefully cut through the cardboard too if you want to place a light inside later. -
Sculpt window details:
Create tiny, thin snakes of clay to form the ‘cross’ mullions inside the windows. Press these gently into the openings from the back or secure them to the edges with a dab of water. -
Add raised frames:
Roll thin coils of clay and outline each window arch and the main doorway. Flatten these coils slightly against the tower wall to create protruding frames. -
Refine the frames:
Smooth the edges of your frames so they look like cut stone rather than rolled coils. Use a modeling tool to keep the inside corners sharp.
Step 4: Constructing the Roof
-
Cover the cone:
Roll out a fresh slab of clay and cover your cardboard cone shape, trimming the excess at the bottom rim. -
Create roof tiles:
Instead of individual tiles, cut several strips of clay about 1 inch wide. Using your knife, score vertical lines onto these strips to mimic the look of shingles. -
Layer the shingles:
Starting at the bottom rim of the cone, wrap a clay strip around the roof. Place the next strip slightly above it, overlapping the first layer. Continue this process until you reach the tip. -
Detail the peak:
Mold a small, sharp point of clay to cap the very top of the roof, blending it into the highest tier of shingles for a clean finish. -
Define the texture:
I like to go back over the vertical score lines on the roof with a modeling tool to deepen them and ensure the separation between ‘shingles’ is distinct.
Step 5: Assembly and Finishing
-
Attach the roof:
Apply a generous amount of clay slip to the top rim of the tower and the underside of the roof. Press them together firmly but gently. -
Blend the join:
If there’s a gap, add a small coil of clay under the roof overhang to secure the connection, though the overhang usually hides the seam. -
Fill the interior:
For a whimsical touch identical to the photo, fill the doorway with small, smooth pebbles or clay ‘stones’ to suggest a blocked entrance or a stone floor. -
Detailed cleanup:
Do a final pass with a damp brush to smooth any unwanted fingerprints on the frames, while being careful not to erase the wall texture. -
Dry properly:
Let the tower dry upright in a cool, dry place for at least 24-48 hours. Avoid direct heat to prevent cracking.
Once fully dry, you can place this elegant tower among your houseplants to create an instant miniature kingdom
Pumpkin Cottage Fairy House
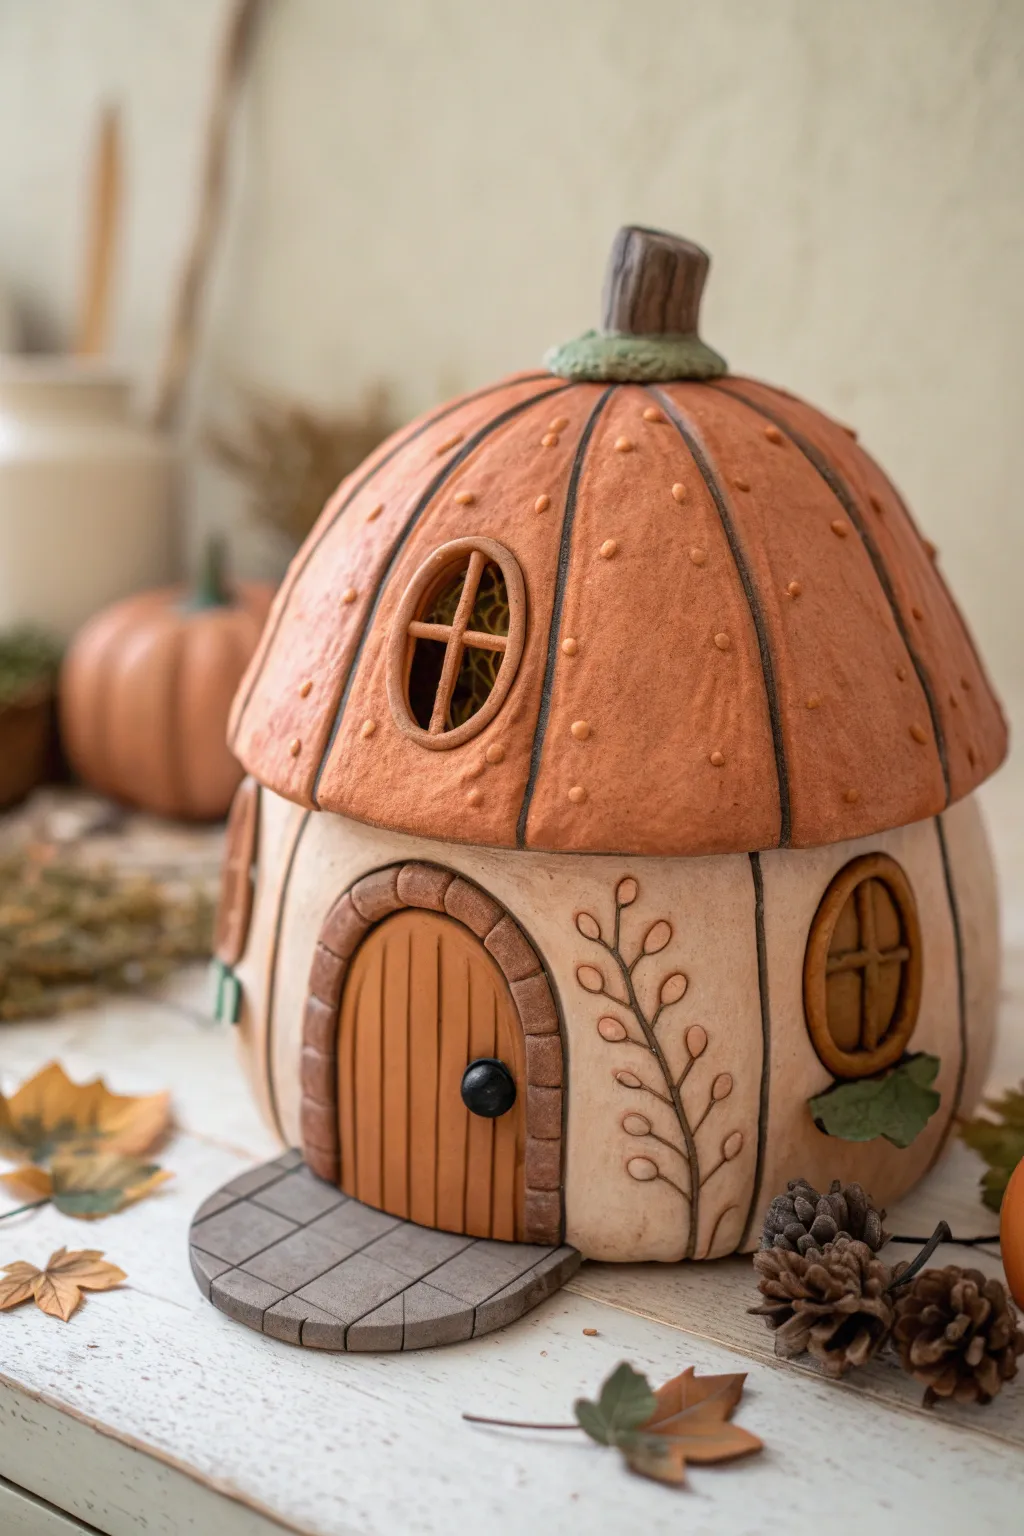
This charming fairy house combines the warmth of autumn with fairytale magic, featuring a plump orange roof and a sturdy cream base. With its delightful arched door and vine reliefs, it makes a perfect seasonal centerpiece or a year-round home for garden sprites.
Step-by-Step
Materials
- Air dry clay (white or terracotta)
- Acrylic paints (burnt orange, cream/off-white, various browns, forest green, deep yellow)
- Clay sculpting tools (needle tool, ball stylus, knife tool)
- Rolling pin
- Aluminum foil (for armature)
- Cardboard or sturdy cardstock (for base support)
- Water cup and sponge
- Fine grit sandpaper
- Paintbrushes (flat shader, fine detail liner)
- Matte varnish or sealant
Step 1: Forming the Base Structure
-
Create the core:
Begin by crumpling aluminum foil into two distinct shapes: a slightly flattened sphere for the base and a wider, domed hemisphere for the roof. These foil cores save clay and reduce drying time. -
Cover the base:
Roll out a slab of clay to about 1/4 inch thickness. Wrap it completely around the base foil sphere, smoothing the seams with a little water until you have a seamless, creamy-colored gourd shape. -
Shape the roof:
Cover the roof foil dome with a similarly rolled slab of clay. Ensure the edges overhang slightly to create eaves that will sit atop the base. -
Define the pumpkin ridges:
On the roof piece, use a modeling tool or the handle of a paintbrush to press deep vertical indented lines from the center top down to the rim, mimicking the segments of a pumpkin. Soften the edges of these lines with a damp sponge. -
Add texture:
While the clay is still soft, use a small tool to press tiny, random indentations all over the orange roof capability to give it an organic, skin-like texture.
Step 2: Sculpting Architectural Details
-
Carve the door opening:
Gently press an arched outline into the front of the base where you want the door. You don’t need to cut all the way through; just create a recessed area. -
Construct the door frame:
Roll a thin snake of clay and flatten it slightly. Press this around the door arch. Use a knife tool to score lines across it, turning the strip into individual ‘stone’ bricks. -
Make the wooden door:
Fill the arched recess with a flat piece of clay. Use a needle tool to score vertical wood grain lines. Roll a tiny ball of clay for the doorknob and attach it with a dab of water. -
Add windows:
Create small circular or oval frames for windows on the roof and base. Add cross-shaped strips of clay inside to mimic windowpanes. Position one window on the roof slope for a dormer effect. -
Vine details:
On the side of the house base, use a needle tool to lightly scratch a flowing vine pattern. Press small teardrop shapes of clay along the line to serve as embossed leaves. -
The stem chimney:
Fashion a thick, slightly twisted cylinder of clay for the stem. Attach it to the very top of the roof. Add a textured ‘cap’ of clay where the stem meets the fruit for realism. -
Create the porch:
Roll out a flat semi-circle of clay about the width of the door. Score lines across it to resemble wooden planks and place it directly in front of the threshold.
Clay Shrinkage Tip
Remember that air dry clay shrinks slightly as it dries. Make your door fittings and window overlays just a tiny bit larger than you think they need to be to prevent gaps.
Step 3: Painting and Finishing
-
Dry completely:
Allow the sculpture to air dry for 24-48 hours. I find that rushing this step can cause cracks, so patience is key. Sand any rough spots gently once hard. -
Base coat:
Paint the bottom section a warm cream or off-white color. Paint the roof a vibrant, earthy orange. Let these base coats dry. -
Detail the wood and stone:
Paint the door, window frames, and porch floor in varying shades of brown. Use a darker brown for the stone arch, perhaps stippling it for texture. -
Enhance the vines:
Carefully paint the etched vine stems brown and the embossed leaves a muted sage green. Painting the relief details helps them pop against the cream wall. -
Add depth and shadow:
Mix a watery wash of dark brown or black paint. Brush it into the grooves of the pumpkin roof and the door planks, then immediately wipe the surface with a paper towel. This leaves dark paint in the crevices for shadow. -
Highlighting:
Dry brush a little lighter orange or yellow on the raised parts of the roof to make the texture stand out. Dot tiny specks of lighter orange on the roof for extra detail. -
Seal the work:
Finish with a coat of matte varnish to protect the paint and give the house a unified, finished look.
Illumination Upgrade
Before the clay dries, cut a hole in the bottom of the base. Once finished, you can place a battery-operated LED tea light inside to make the windows glow warmly at night.
Now you have a cozy autumn cottage ready for its first fairy residents to move in
Fruit-Inspired Fairy House
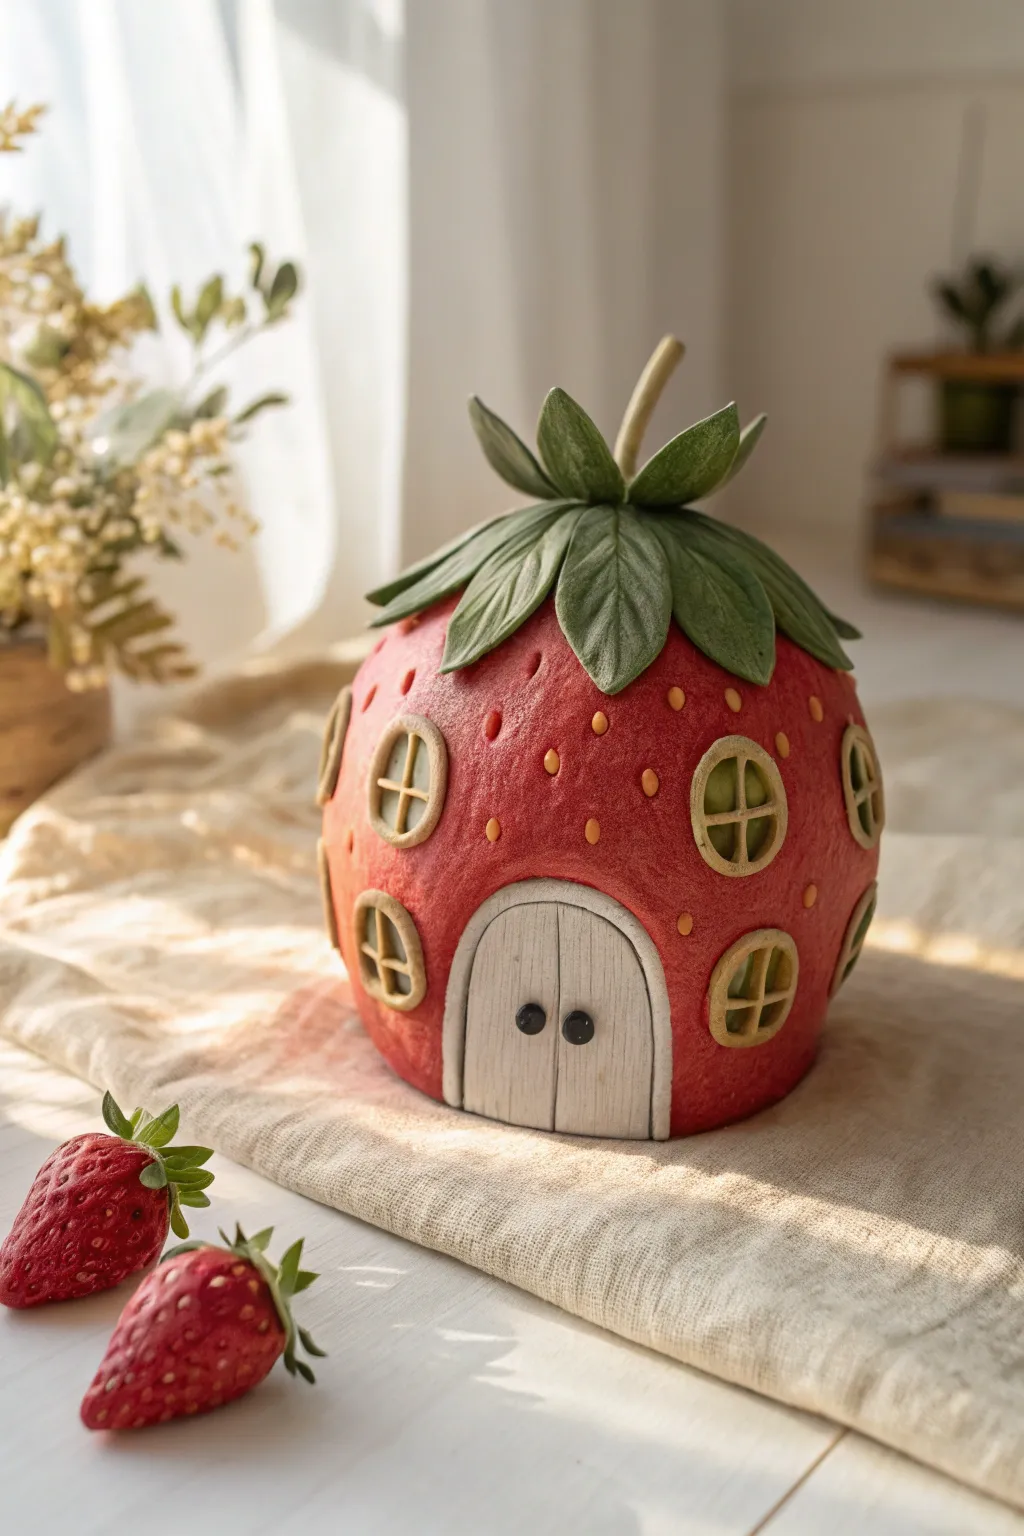
Transform a simple lump of clay into this delightful, fruit-inspired dwelling that looks like it was plucked straight from a magical garden. With its textured red walls, leafy green roof, and charming rounded windows, this strawberry house makes a perfect centerpiece for any fairy village.
Step-by-Step Tutorial
Materials
- Air dry clay (white)
- Aluminum foil
- Acrylic paints (red, deep green, light green, yellow-ochre, cream, dark brown)
- Sculpting tools (needle tool, ball stylus)
- Rolling pin
- Water and paintbrush for smoothing
- Texture sponge or toothbrush
- Matte varnish or sealant
Step 1: Forming the Base Structure
-
Create the core:
Crumple a large amount of aluminum foil into a fat, rounded teardrop shape. This saves clay and keeps the sculpture lightweight while providing the basic strawberry form. -
Cover with clay:
Roll out a sheet of white air dry clay to about 1/4 inch thickness. Draper it over your foil armature, pressing firmly to adhere it and trim away any excess at the bottom. -
Smooth and shape:
Wet your fingers slightly and smooth out all seams and wrinkles. Gently mold the clay to refine that classic strawberry shape—wider at the ‘shoulders’ and tapering slightly toward the bottom. -
Add texture:
Taking a rough texture sponge or an old toothbrush, gently stipple the entire surface of the fruit body. This creates a realistic organic skin texture rather than a perfectly smooth, plastic look.
Cracking Clay?
If small cracks appear as the clay dries, mix a tiny bit of fresh clay with water to make a paste (slip) and fill the cracks. Smooth over with a damp finger.
Step 2: Architectural Details
-
Carve the door space:
Use a needle tool to outline an arched doorway near the base. You don’t need to cut all the way through; just define the area where the door will sit. -
Sculpt the door:
Roll a small slab of clay and cut out an arch shape that fits your outline. Use a knife tool to score vertical wood grain lines into it, then attach it to the house using a bit of water or slip. -
Add door frame and handles:
Roll a thin snake of clay and frame the door arch. Add a central vertical line to create double doors, and press two tiny balls of clay in place for doorknobs. -
Create window frames:
Roll thin coils of clay and form them into circles. Attach these evenly around the strawberry body. I like to vary the placement slightly so it feels whimsical rather than perfectly symmetrical. -
Add window panes:
Place very thin cross-shapes of clay inside each circular frame to create the window panes. Smooth the connection points carefully with a small tool. -
Impress the seeds:
Use a teardrop-shaped loop tool or a small stylus to press indentations all over the red part of the strawberry. These shouldn’t be too deep, just enough to suggest where the seeds sit.
Go Miniature
Make tiny ladybugs or a snail from leftover clay and glue them onto a leaf or near the door for an adorable extra inhabitant.
Step 3: The Leafy Roof
-
Cut the leaves:
Roll out a fresh sheet of clay. Cut out several individual teardrop-shaped leaves—you’ll want about 6-8 of varying sizes. -
Texture the foliage:
Use a knife tool to score a central vein and smaller branching veins onto each leaf for realistic detail. -
Assemble the crown:
Attach the leaves to the very top of the strawberry, draping them downwards. Curl the tips of a few leaves upward to give the piece life and movement. -
Add the stem:
Roll a thick cylinder of clay for the stem. Attach it securely to the center where all the leaves meet, blending the clay at the base so it looks singular and sturdy.
Step 4: Painting and Finishing
-
Base coat:
Once fully dry (usually 24-48 hours), paint the main body a vibrant red. You might need two coats for full opacity. -
Paint the details:
Paint the leaves and stem a deep forest green. Use a cream or light wood color for the door and window frames to make them pop against the red fruit. -
Highlight the seeds:
Using a fine-tip brush, paint small dashes of yellow-ochre or gold into the seed indentations you made earlier. This tiny detail brings the whole fruit to life. -
Dry brushing:
Lightly dry brush a lighter green over the raised veins of the leaves to accentuate the texture. Do the same with a bit of dark brown wash on the door to enhance the wood grain effect. -
Seal:
Finish with a coat of matte varnish to protect your work and give it a soft, non-glossy finish that mimics real fruit skin.
Place your finished strawberry house on a mossy shelf or windowsill to invite a little everyday magic into your home
Snail Shell Fairy House Lamp
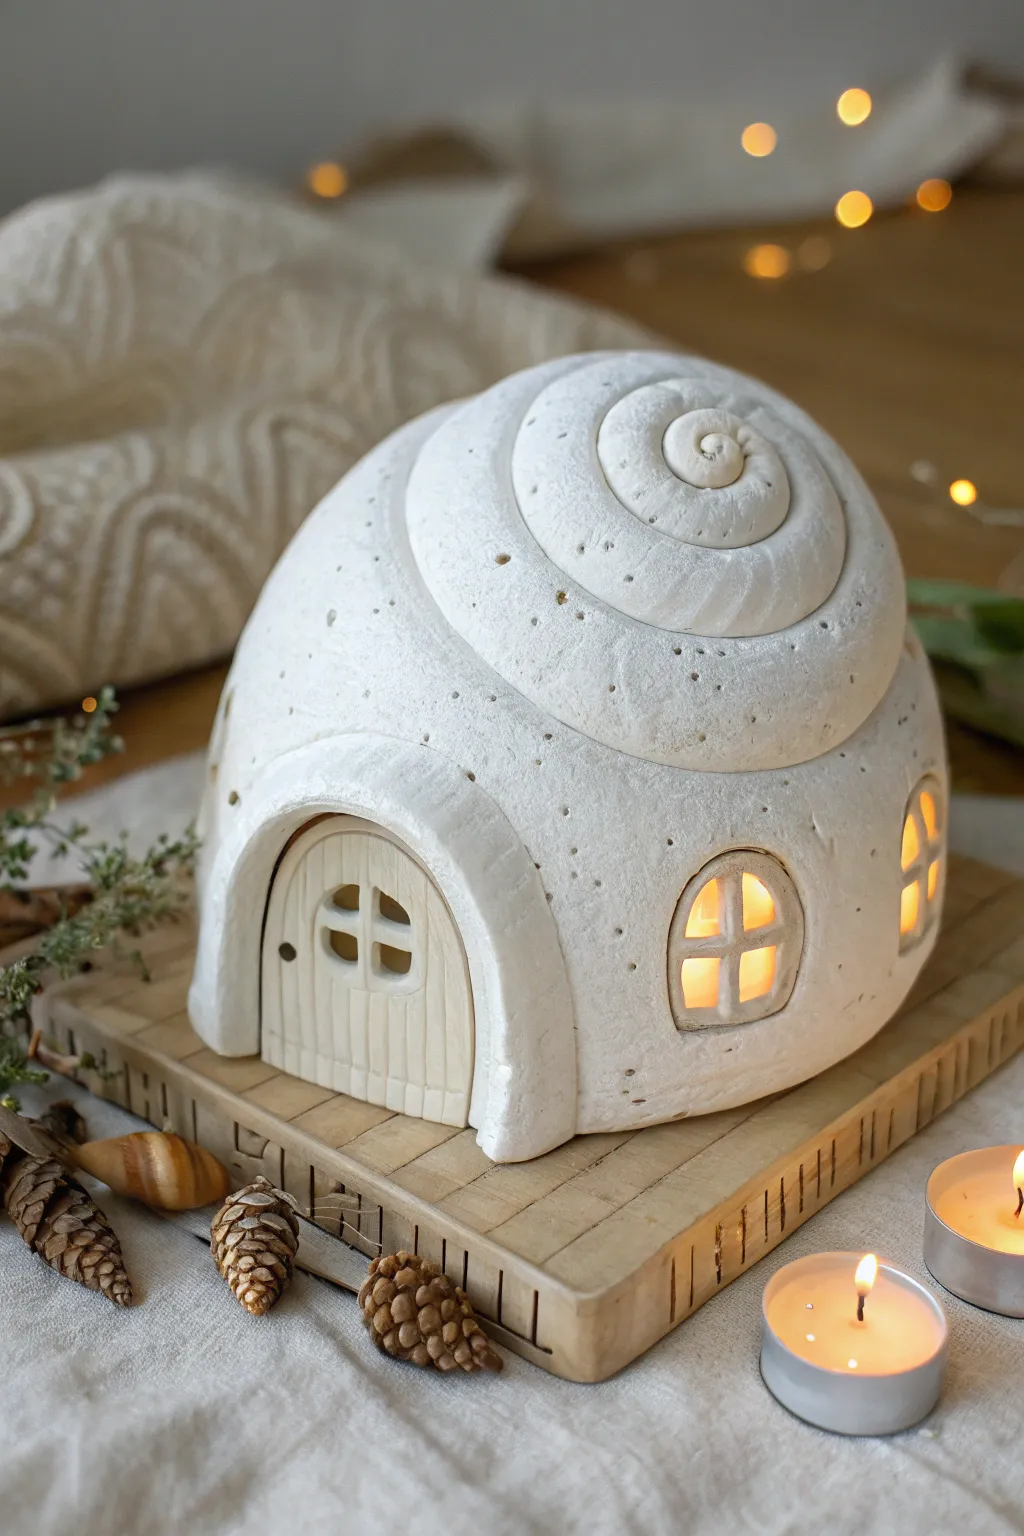
Transform simple white clay into a magical, glowing sanctuary with this snail shell fairy house. Its spiral structure and warm, inviting windows create a cozy atmosphere perfect for any mantle or fairy garden display.
How-To Guide
Materials
- White air dry clay (approx. 500g)
- Small rolling pin
- Clay sculpting tools (needle tool, blending tool)
- Aluminum foil
- LED tea light
- Craft knife
- Acrylic paints (cream/off-white, light brown)
- Textured sponge or toothbrush
Step 1: Forming the Core Structure
-
Build the armature:
Create the basic snail shape using crumpled aluminum foil. You want a large, rounded dome for the base and a gradually spiraling shape on top. This saves clay and keeps the structure lightweight. -
Prepare the clay:
Knead your air dry clay until it is soft and pliable. Roll it out into a large, even sheet about 1/4 inch thick. -
Cover the base:
Drape the clay sheet over your foil armature. Gently press and smooth the clay down, ensuring the foil is completely covered. Trim away any excess clay at the bottom to create a flat base.
Step 2: Sculpting the Shell
-
Define the spiral:
Roll a long, thick snake of clay. Starting from the top center of your dome, coil this snake downwards to create the distinct ridges of the snail shell spiral. -
Blend the seams:
Use a blending tool or your finger with a little water to smooth the edges of the coil into the main body. You want the spiral to look distinct but organically connected, not just stuck on. -
Create the entrance:
Add extra clay to one side to build out the arched doorway. Smooth it into the main shell shape so it looks like a natural extension.
Smooth Operator
Keep a small bowl of water nearby while sculpting. Dipping your finger in water helps smooth out cracks instantly.
Step 3: Adding Details & Windows
-
Carve the openings:
Using a craft knife, carefully cut out the arched doorway and the window shapes. Remove the clay and gently press the foil inside inward to create space for the light. -
Sculpt the door:
Roll a flat piece of clay to fit inside the door arch. Use a needle tool to score vertical lines for wood planks and cut out a small window. Attach this recessed inside the arch. -
Add window frames:
Roll very thin snakes of clay to create the cross-bars for the windows.Attach them carefully inside the window openings using a dab of water. -
Texture the surface:
To mimic the porous look of a real shell or stone, gently tap the surface with a textured sponge or an old toothbrush. I like to add tiny pinholes with a needle tool for extra character.
Glow Up
Line the inside with yellow tissue paper or thin vellum before adding the light to diffuse the glow and hide the bulb.
Step 4: Finishing Touches
-
Drying time:
Let the sculpture dry completely. This usually takes 24-48 hours depending on humidity. Turn it occasionally to ensure crucial airflow to the bottom. -
Remove the foil:
Once fully dry and hard, carefully reach underneath and pull out the aluminum foil armature. This creates the hollow cavity for your light. -
Base coat painting:
Paint the entire house with a creamy off-white acrylic paint. This unifies the color and seals the clay. -
Highlighting details:
Mix a very watery light brown wash. Brush it over the textured areas and quickly wipe it off with a paper towel. The color will settle into the pinholes and crevices, enhancing the texture. -
Cleaning up the light:
Place a battery-operated LED tea light underneath the house to see the warm glow radiate through the windows.
Now you have a charming little snail cottage ready to brighten up a cozy corner of your home
Hanging Floating Fairy House Ornament
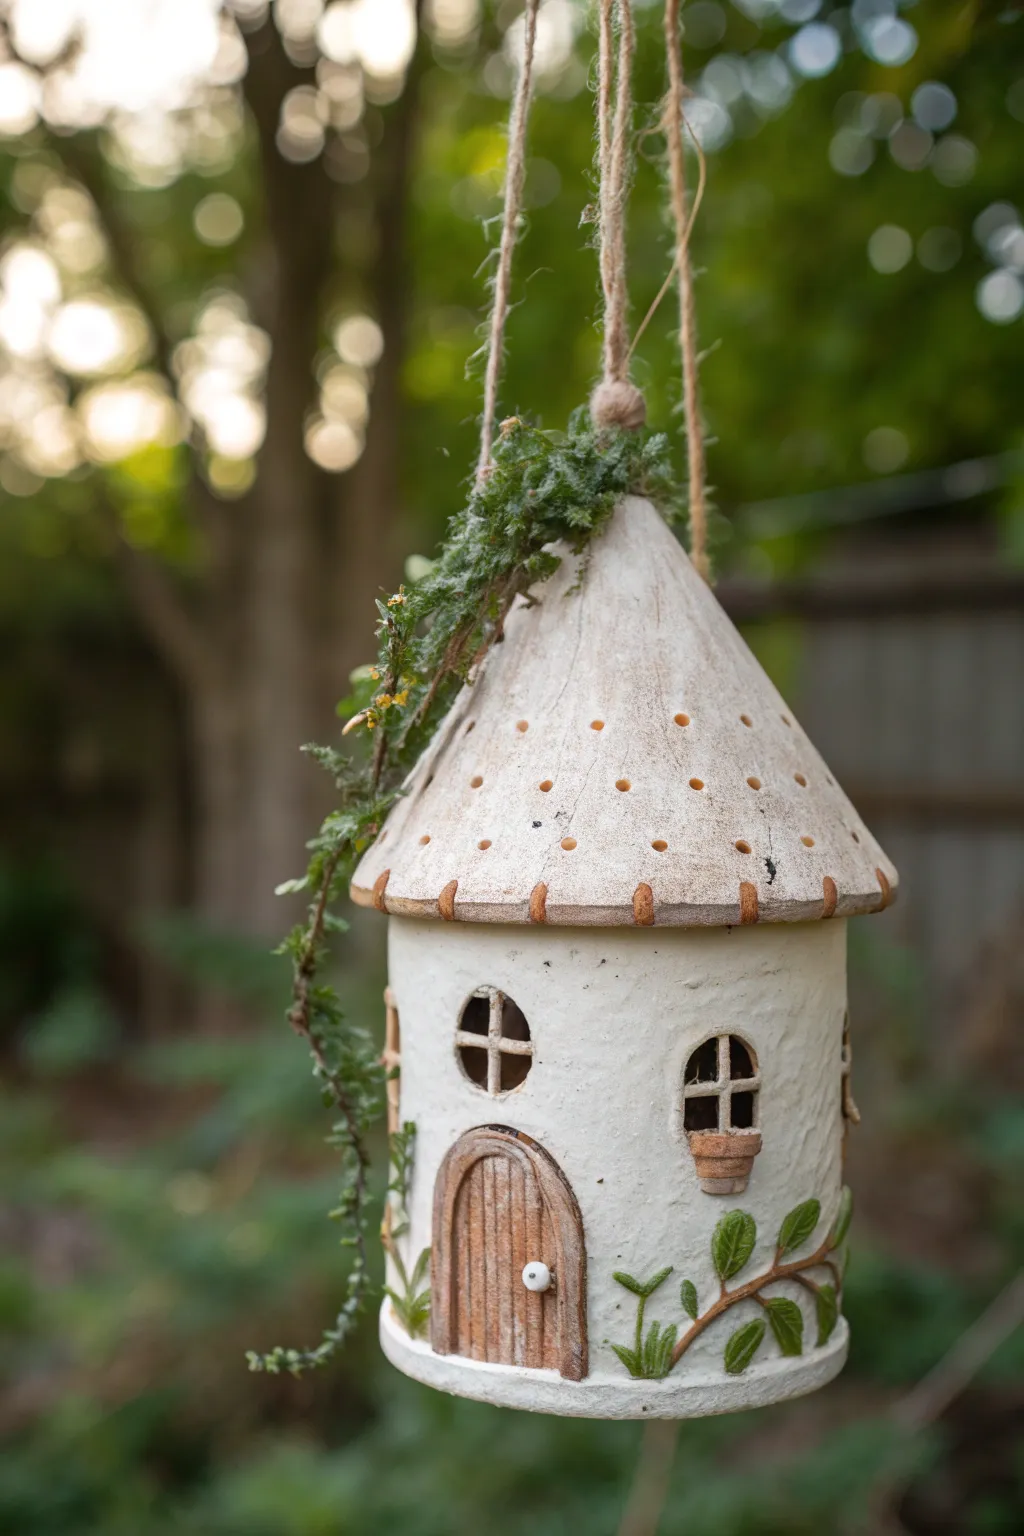
Bring a touch of magic to your garden or window with this enchanting floating fairy house, suspended by rustic twine. Its weathered white walls, petite arched door, and trailing moss accents create the illusion of a secret dwelling hidden among the leaves.
Step-by-Step Tutorial
Materials
- Air dry clay (white or terracotta)
- Acrylic rolling pin
- Empty plastic bottle or cardboard tube (for structure)
- Craft knife and sculpting tools
- Acrylic paints (white, brown, antique glazing medium)
- Jute twine
- Hot glue gun
- Faux moss and greenery stems
- Small paintbrush
- Sandpaper
- Water cup for smoothing
Step 1: Forming the Structure
-
Prepare the base:
Start by selecting a lightweight armature, like the top half of a small plastic bottle or a cardboard tube cut to roughly 4-5 inches tall. This reduces the weight for hanging. -
Roll out the walls:
Roll your air dry clay into a slab about 1/4 inch thick. Cut a rectangle large enough to wrap entirely around your armature. -
Wrap the cylinder:
Carefully wrap the clay sheet around the bottle. Score the overlapping edges with a needle tool, add a dab of water (slip), and press them together to seal the seam. Smooth the join with a wet finger so it’s invisible. -
Cut the openings:
Before the clay hardens, use your craft knife to cut out a generous arched doorway and two small arched windows on the upper half. -
Create the roof cone:
Fashion a separate cone shape for the roof. Roll a flat circle of clay, cut a slit to the center, and overlap the edges to form a cone that sits slightly wider than your house base. Don’t attach it permanently yet.
Step 2: Sculpting Details
-
Add the door frame:
Roll a thin snake of clay and press it around the door opening to create a frame. Use a needle tool to scratch vertical wood grain lines into the door itself (or create a separate clay slab for the door if you cut the opening completely out). -
Construct the windows:
Form tiny crosses from thin clay strips and place them inside the window openings. Add a small ‘flower box’ ledge beneath the right window for extra charm. -
Detail the roof:
Take your roof cone and use a small tool or straw to poke evenly spaced holes in rows around the surface. These add texture and look like whimsical ventilation holes. -
Attach the hanging mechanism:
Poke a hole through the very tip of the roof cone. Thread a loop of thick jute twine through it, knotting it securely on the inside before the clay dries. -
Sculpt the vines:
Roll very thin tapering snakes of clay and press them onto the bottom exterior of the house, looking like climbing vines. Use a sculpting tool to press leaf shapes directly into the vines. -
Final assembly and drying:
Score and slip the top rim of the house and the bottom of the roof, then press them together firmly. Add a small ‘stitch’ texture around the rim where the roof meets the walls. Let the entire piece dry completely for 24-48 hours.
Weight Saver
Use a ball of crumpled aluminum foil as the core for your roof cone. It keeps the top light so the house doesn’t tip when hanging.
Step 3: Painting and Finishing
-
Base coat:
Paint the entire house (except the door) with an off-white or cream acrylic paint. It doesn’t need to be perfect; a little streakiness adds character. -
Paint the woodwork:
Use a warm brown shade for the door and window crosses. I like to dry-brush a lighter tan over the brown once it’s dry to highlight the wood grain texture. -
Glazing for age:
Mix a tiny amount of brown paint with water or glazing medium. Brush this wash over the roof and walls, then immediately wipe most of it off with a paper towel. This leaves dark color in the holes and crevices for an antique look. -
Highlight the vines:
Paint the sculpted vines and leaves at the base with olive green, adding touches of lighter green on the raised areas. -
Add the greenery:
Using a hot glue gun, attach a draping piece of faux moss or a small preserved vine starting at the peak of the roof and trailing down the left side. -
Finishing touch:
Glue a tiny white bead on the door as a handle and ensure your hanging twine handles the weight securely.
Glow Up
Leave the bottom open or cut a hole in the base. Place a battery-operated LED tea light inside to make the windows glow at night
Hang your new floating cottage on a sturdy branch and wait for the fairies to move in