There’s something extra satisfying about making a tiny clay character when it has a buddy right beside it. These duo clay ideas are all about paired minis—cute, complementary, and perfect for gifts, charms, or little desk buddies.
Bacon and Eggs Besties
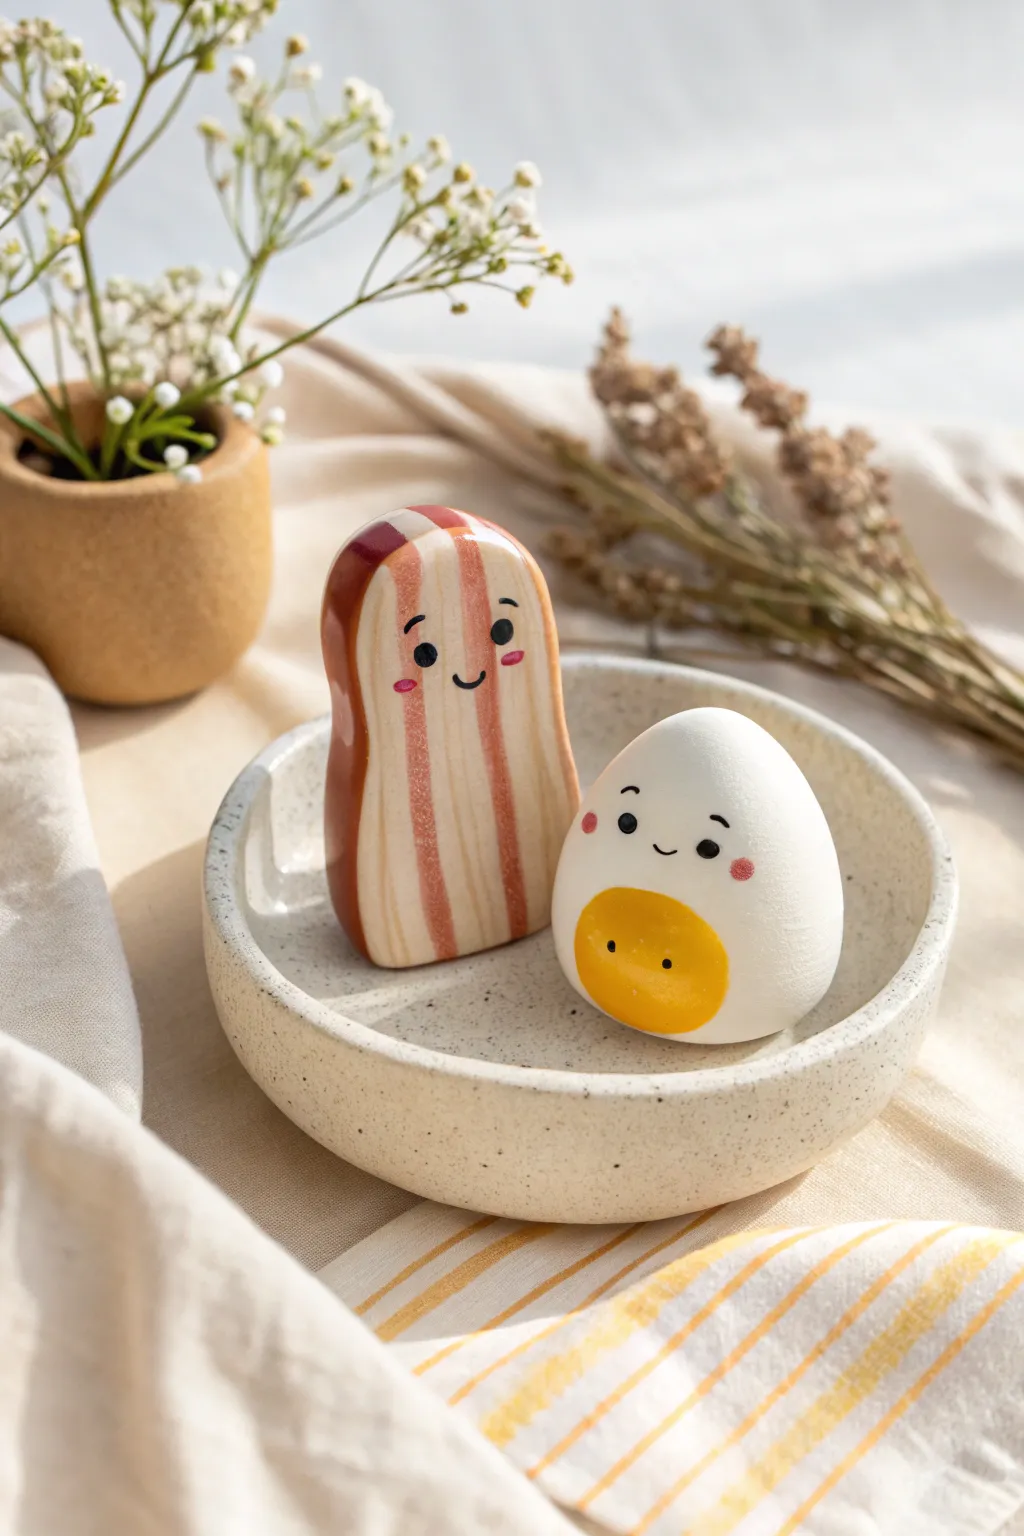
Start your day with a smile by crafting this adorable duo of breakfast staples. This project features a stylized strip of bacon and a perfectly plump egg, both sporting cheerful little faces that add a touch of whimsy to any desk or shelf.
How-To Guide
Materials
- Polymer clay (White, Red-Brown, Dark Brown, Yellow)
- Acrylic paint (Black, Pink, White)
- Fine detail paintbrush (00 or 000 size)
- Dotting tool or toothpick
- Clay roller or pasta machine
- Craft knife
- Aluminum foil (for armature)
- Glaze or satin varnish
- Sculpting tools
Step 1: Sculpting the Bacon
-
Create the base:
Start by conditioning a large piece of white polymer clay until it is soft and pliable. Roll it into a thick, elongated oval log that stands upright on its own. -
Flatten the shape:
Gently press the log to flatten it slightly, creating a rectangular slab with rounded corners. It should be about 2-3 inches tall and 1 inch thick. -
Shape the curve:
To give it that organic bacon look, gently curve the top edge downwards on one side and round off the bottom corners so it sits naturally. -
Prepare the stripes:
Take your red-brown clay and roll out thin, long snakes. Vary the thickness slightly for a natural meaty appearance. -
Apply the stripes:
Lay the red-brown snakes vertically down the front of your white base. Press them gently into the white clay so they adhere. -
Smooth the surface:
Use a rolling pin or your fingers to roll over the entire piece, embedding the stripes flush with the white clay until the surface is completely smooth and seamless. -
Add side details:
Don’t forget the sides; wrap a thinner strip of red-brown clay down the sides to continue the pattern, blending the seams carefully.
Seamless Stripes
When rolling the stripes into the bacon, roll vertically (with the grain) first, then horizontally. This stretches the colors naturally without distorting the straight lines.
Step 2: Sculpting the Egg
-
Form the egg white body:
Roll a ball of white clay into a smooth egg shape. Flatten the bottom so it sits securely without tipping over. -
Create the yolk:
Take a smaller piece of yellow clay and roll it into a ball. Slightly flatten the back of it. -
Attach the yolk:
Press the yellow circle onto the lower front of the egg shape. I like to blend the edges just a tiny bit so it looks integrated rather than just stuck on. -
Refine the shape:
Smooth out any fingerprints on both the white and yellow sections using a tiny bit of baby oil or clay softener if needed.
Step 3: Baking and Finishing
-
Bake the pieces:
Place both figures on a baking sheet lined with parchment paper or a ceramic tile. Bake according to your brand of clay’s specific instructions (usually 275°F/135°C for 15-30 minutes). -
Cool down:
Allow the pieces to cool completely inside the oven before removing them to prevent cracking. -
Paint the eyes:
Using black acrylic paint and a fine detail brush or dotting tool, dab two small, widely spaced eyes onto both the bacon and the egg. -
Add smiles:
With the finest brush tip, paint a tiny, curved smile between the eyes on each character. -
Cheeky details:
Dip a dotting tool into pink paint and add tiny rosy cheeks just below the eyes on both figures. -
Add yolk highlights:
To make the yolk look shiny, add two microscopic dots of black paint for eyes directly onto the yellow section as shown in the inspiration image. -
Seal the work:
Once the paint is fully dry, coat both pieces with a satin or matte varnish to protect the surface and give them a professional finished look.
Texture Play
Before baking, use a toothbrush to gently texture the ‘meat’ stripes on the bacon for a more realistic, cooked look contrasted against the smooth fat.
Display your new breakfast buddies together in a small dish for maximum cuteness


Avocado Half Couple
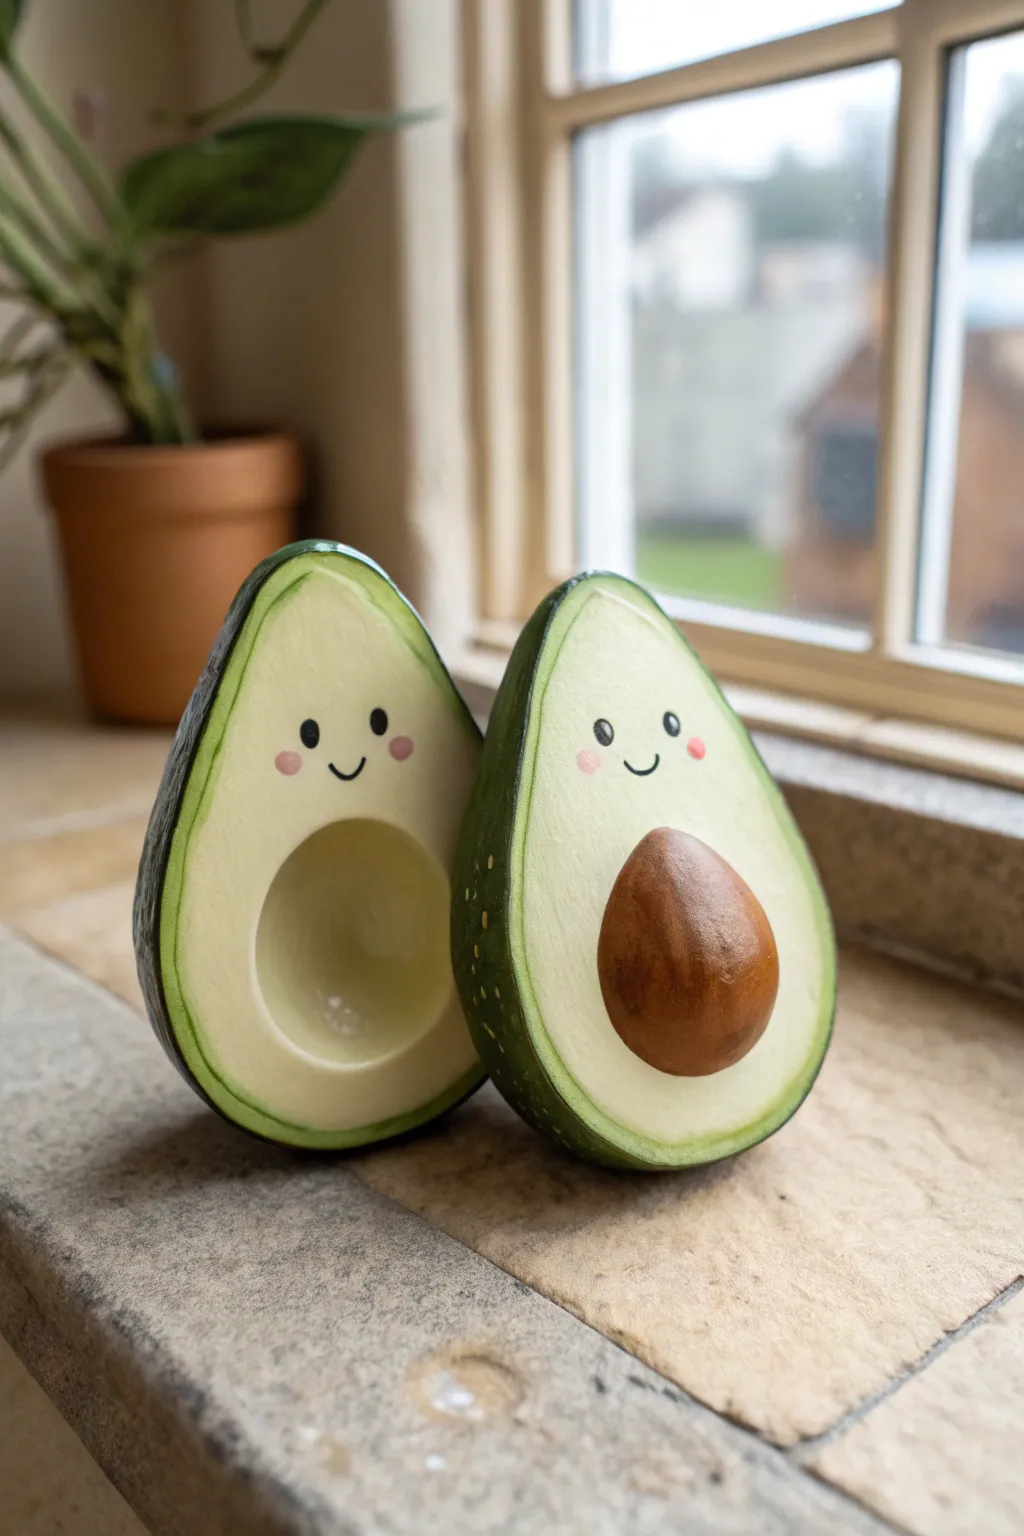
These adorable avocado halves are the perfect pair, featuring realistic textures and sweet little faces that fit together like a puzzle. One holds the seed while the other saves a spot for it, making them an ideal project for best friends or partners.
Step-by-Step Tutorial
Materials
- Polymer clay (translucent, white, dark emerald green, light yellow-green, brown)
- Acrylic paints (black, pink, light brown)
- Texture tool (sandpaper or stiff bristle brush)
- Dotting tool or toothpick
- Soft pastel chalks (dark green, brown)
- Gloss glaze or polyurethane varnish
- Sculpting tools (needle tool, ball tool)
- Oven for baking
Step 1: Flesh & Skin
-
Mix the internal color:
Start by mixing a large amount of white clay with a small amount of light yellow-green and a touch of translucent clay. You want a creamy, pale chartreuse color that mimics the inner flesh of an avocado. -
Shape the base:
Divide your mixed clay into two equal balls. Roll them in your palms and then gently pinch the top of each to form a teardrop or pear shape. Flatten the backs slightly so they can lie down or stand up if desired, but focus on keeping the front face flat. -
Create the skin layer:
Condition your dark emerald green clay until soft. Roll it out into a thin sheet, about 1-2mm thick. This will be the outer skin. -
Wrap the avocado:
Carefully wrap the dark green sheet around the curved back and sides of your pale green pear shapes. Trim the excess so the dark green stops exactly at the flat front edge. Smooth the seam where the two colors meet with your finger. -
Texture the skin:
To get that pebbled avocado skin look, gently press a piece of coarse sandpaper or a stiff toothbrush against the dark green exterior. Do this all over the back and sides.
Uneven Seams?
If the dark green skin looks messy where it meets the light green flesh, roll a thin snake of dark green clay and lay it over the seam. Blend it backward into the skin for a clean edge.
Step 2: The Pit & The Void
-
Create the pit indentation:
Choose which half will be the ’empty’ one. Use a large ball tool or your thumb to press a smooth, round hollow into the lower, wider part of the pale green face. Smooth it out so it looks like a clean scoop. -
Sculpt the seed:
Roll a ball of brown clay that fits perfectly into the hollow you just made. Test the fit, then set it aside. -
Attach the seed:
Take the second avocado half (the one without the hole) and press the brown ball onto its lower stomach area. Flatten the contact point slightly so it adheres well. Shape the protruding part into a nice, organic egg-like dome. -
Add realism with pastels:
Shave some dark green pastel chalk into a fine powder. Use a soft brush to gently dust the very edge of the pale green flesh, right where it meets the dark skin. This creates that realistic ripening gradient. -
Texture the seed:
Lightly brush the brown seed with a stiff brush to give it a woody texture. Adding a tiny bit of darker brown pastel powder to the crevices creates depth.
Step 3: Face & Finishing
-
Paint the faces:
Using a very fine detail brush or a toothpick dipped in black acrylic paint, draw two small, wide-set eyes on the upper portion of the pale green flesh for both halves. Add a tiny U-shaped smile between the eyes. -
Add rosy cheeks:
Dip a dotting tool or the end of a paintbrush handle into pink paint. Dab two small dots just below and to the outside of the eyes to give them a blushing look. -
Highlight the eyes:
Once the black paint is dry, use a sewing needle or the very tip of a toothpick to add a white spec to the eyes. I find this tiny reflection brings the whole character to life. -
Bake the clay:
Place your avocados on a baking sheet lined with parchment paper. Bake according to your brand of polymer clay instructions (usually 275°F/130°C for 15-30 minutes). Let them cool completely. -
Glazing:
For a final touch, apply a gloss glaze only to the brown seed to make it look waxy and polished. You can leave the flesh matte for contrast.
Make Them Keychains
Before baking, screw a small metal eye pin into the top of each avocado. Once baked and cooled, you can attach keyring hardware to make a matching set for you and a friend.
Display your charming duo on a windowsill or gift one half to someone special to complete the set


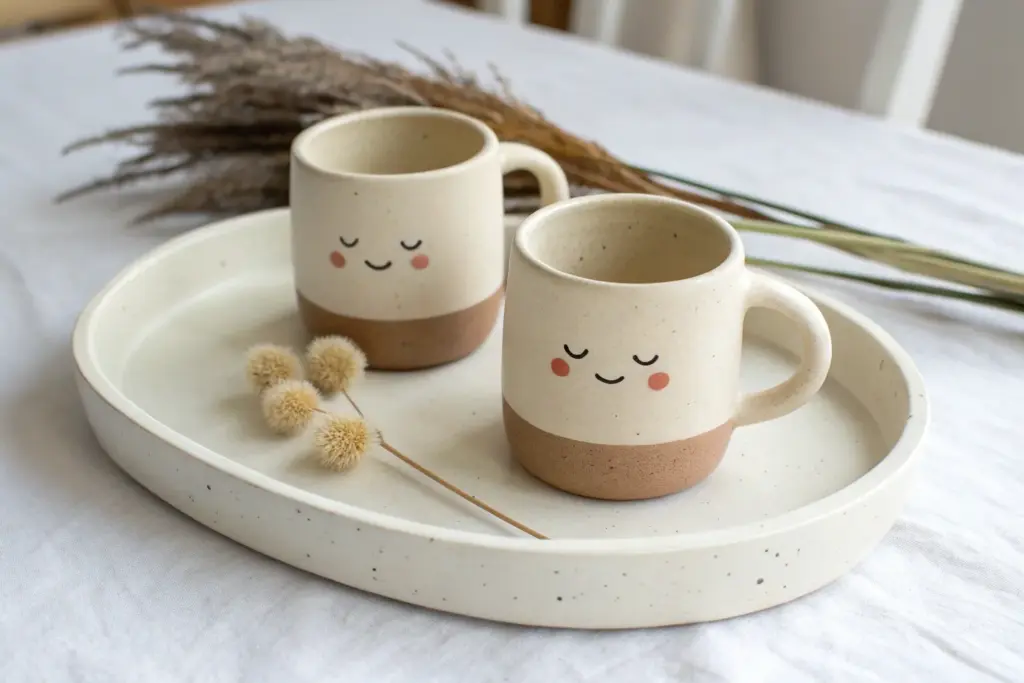
Sun and Moon Buddies
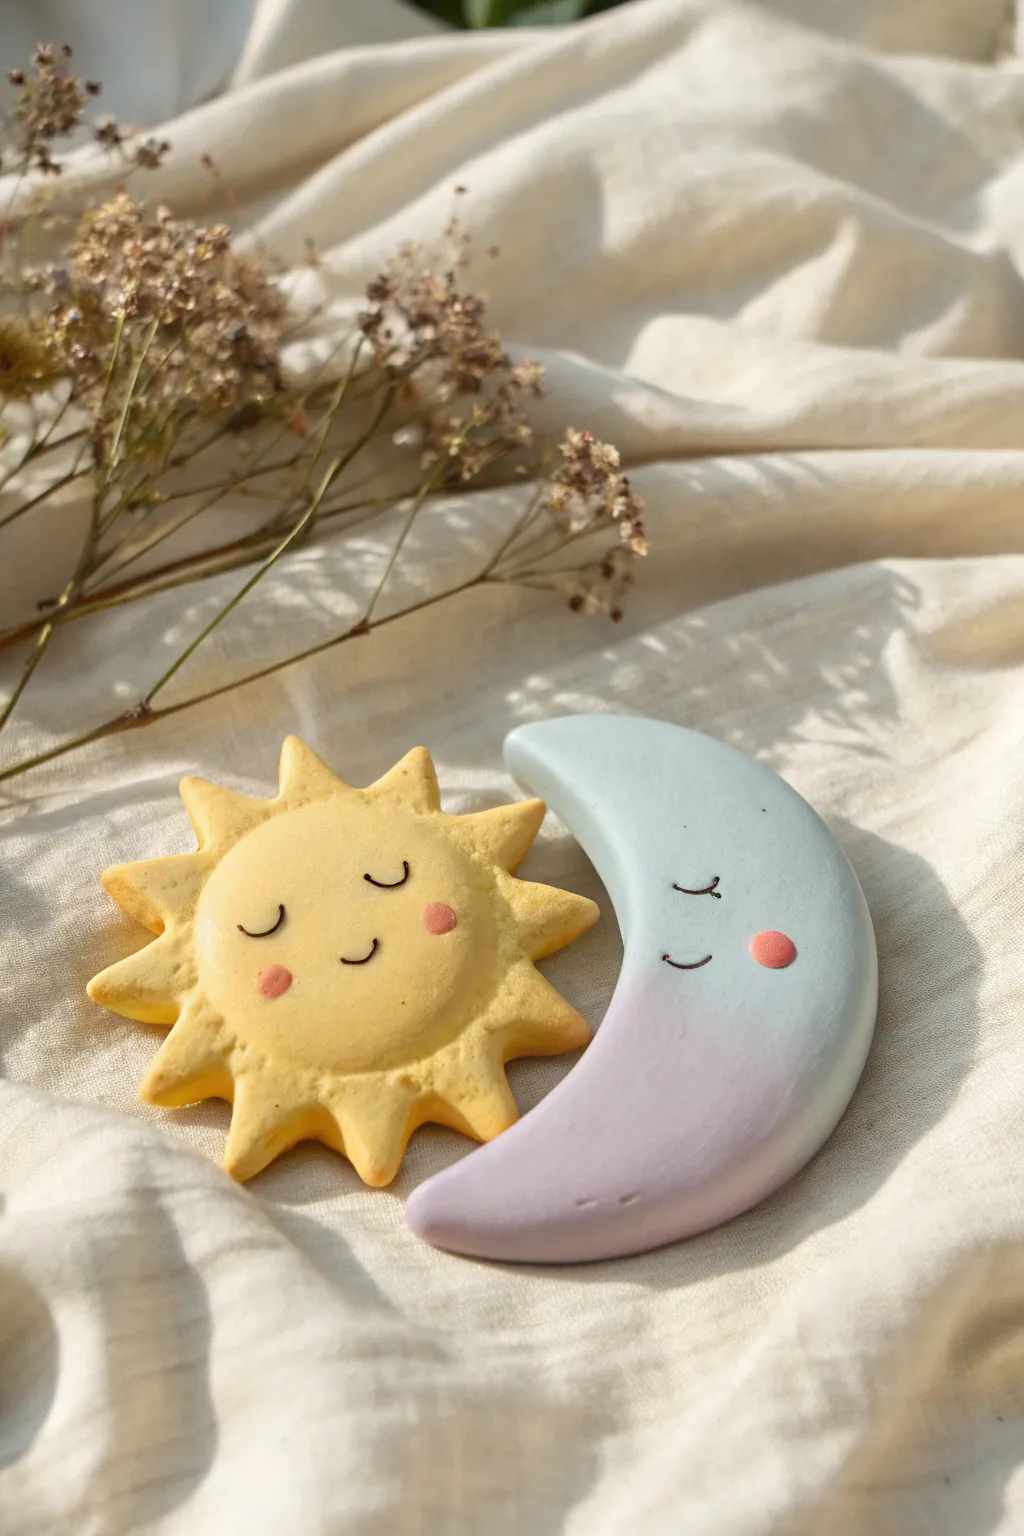
Create a charming set of sun and moon clay figures that radiate pure happiness. These kawaii-inspired buddies feature soft pastel tones and simple sleepy faces, making them perfect as nursery decor or cute desk companions.
Step-by-Step
Materials
- Polymer clay (yellow, white, light blue, lilac/purple)
- Black acrylic paint or fine-tip black marker
- Pink soft pastel chalk or blush powder
- Rolling pin
- Circle cutter (approx. 2-3 inches)
- Craft knife or scalpel
- Small paintbrush
- Dotting tool or toothpick
- Ball tool (optional)
- Baking sheet and parchment paper
- Matte varnish (optional)
Step 1: Shaping the Sun
-
Condition the Clay:
Begin by taking a chunk of yellow polymer clay. Knead it thoroughly in your hands until it becomes soft, warm, and pliable to prevent cracks later. -
Create the Base:
Roll the clay into a smooth ball, then flatten it gently with your palm or a rolling pin until it’s about 1/4 inch thick. Use your circle cutter to punch out a perfect round shape for the sun’s face. -
Form the Rays:
Take the excess yellow clay and roll it into a small log. Cut equal-sized small segments—you’ll need about 10-12 depending on your circle size. -
Shape the Triangles:
Roll each small segment into a ball, then pinch one side to form a teardrop or triangle shape. Flatten them slightly so they match the thickness of the face. -
Attach the Rays:
Arrange the triangles around the main circle. Gently press the wide base of each triangle into the edge of the circle. Smooth the seam on the back side with a modeling tool so they adhere securely.
Seamless Blending
For the moon’s two-tone look, run your blue and purple clay through a pasta machine together repeatedly to get a flawless gradient.
Step 2: Sculpting the Moon
-
Mix the Ombre Effect:
Technically, you can use solid light blue, but for the look in the photo, create a gradient. Take a piece of light blue clay and a piece of lilac clay. join them diagonally and roll them together slightly to blur the line where they meet. -
Cut the Crescent:
Roll out your blended clay slab. Use your circle cutter to cut a round shape first. Then, move the cutter slightly to the side—overlapping the circle you just cut—and cut again to slice away a crescent moon shape. -
Soften the Edges:
Use your finger to gently tap and round off the sharp cut edges of the crescent so it looks soft and pillowy, matching the friendly vibe of the sun.
Make Them Magnets
Glue round ceramic magnets to the back of the finished baked pieces to turn your fridge into a celestial gallery.
Step 3: Adding Faces and Finishing
-
Pre-Bake Detailing:
Before baking, give both figures a final check for fingerprints. Lightly brush them with a little cornstarch or baby oil if you need to smooth out imperfections. -
Add Cheeks:
Scrape a tiny bit of pink pastel chalk into a powder. Use a soft brush to gently dab pink circles onto where the cheeks will be. Do this on raw clay so the pigment sets during baking. -
Bake the Figures:
Place both pieces on parchment paper on a baking sheet. Bake according to your specific clay manufacturer’s instructions (usually 275°F/130°C for 15-30 minutes). -
Cool Down:
Let the pieces cool completely inside the oven with the door slightly ajar to prevent thermal shock cracks. -
Draw the Faces:
Once fully cool and hard, use a very fine brush with black acrylic paint (or a fine-tip permanent marker) to draw two sleepy ‘U’ shapes for eyes and a small curve for the smile on each figure. -
Highlight the Cheeks:
For extra cuteness, I like to mix a tiny drop of pink acrylic paint and dab a more solid dot in the center of the pastel blush area using a dotting tool. -
Seal (Optional):
If you want to protect the paint, apply a thin coat of matte varnish. Avoid glossy finishes to keep the soft, natural look shown in the image.
Place your little celestial pair together on a shelf to bring a calm and dreamy vibe to your room


Salt and Pepper Shakers
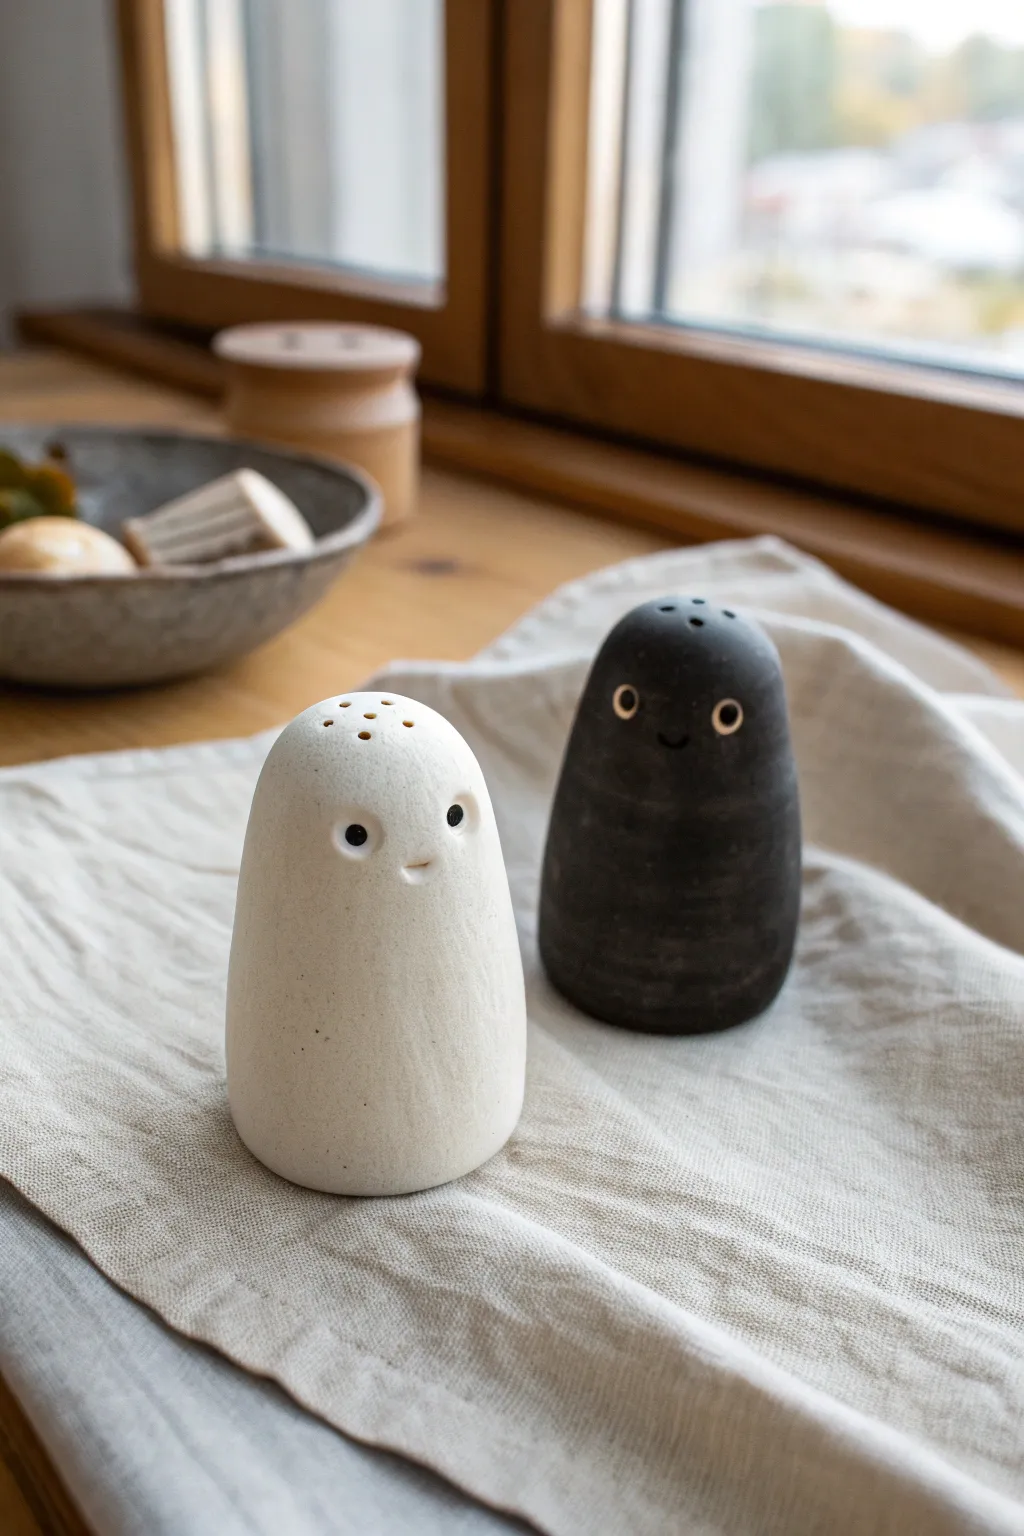
These charming, minimalist salt and pepper shakers resemble friendly little ghosts or spirits, adding a touch of personality to any dining table. With their smooth, organic shapes and expressive little faces, this duo project creates a functional pair of conversation starters using simple hand-building techniques.
Detailed Instructions
Materials
- White stoneware or porcelain clay body
- Black stoneware clay (or white clay stained with black mason stain)
- Pin tool or needle tool
- Small loop tool for hollowing
- Wooden modeling rib
- Metal kidney rib
- Sponge
- Slip (liquid clay)
- Scoring tool (or fork)
- Rubber stopper (cork) for the base hole
- Clear matte glaze (optional, for food safety inside)
- Fine drill bit or 2mm hole punch tool
Step 1: Shaping the Bodies
-
Prepare your clay:
Begin with two balls of clay, roughly the size of a large tangerine. One should be your white clay body, and the other your black clay body. Wedging the clay thoroughly is crucial here to remove air pockets. -
Form the base cylinder:
Gently roll the white ball on your work surface to elongate it slightly into a thick cylinder. You want the base to be wider than the top for stability. -
Shape the ghost silhouette:
Using your palms, gently taper the top third of the cylinder to create a rounded, dome-like head. The overall shape should feel organic and pebbly, not perfectly geometric. -
Repeat for the partner:
Do the same with the black clay ball. I find it helpful to place them side-by-side frequently to ensure they look like a related pair in terms of height and girth. -
Smooth the surfaces:
Use a slightly damp sponge to wipe away any fingerprints. Follow up with a wooden rib to compress the clay and create that smooth, stone-like texture seen in the photo.
Smooth Operator Pro-Tip
After the final firing, sand the unglazed exterior with 400-grit wet/dry sandpaper under running water. This makes the bare clay feel incredibly soft and buttery like a polished river stone.
Step 2: Hollowing and Refining
-
Let them firm up:
Allow the clay shapes to dry to a ‘leather-hard’ state. They should be firm enough to handle without deforming but still cool to the touch. -
Create the filling hole:
Flip the figures over carefully. Using a needle tool, mark a circle in the center of the base large enough for your chosen rubber stopper. -
Hollow the interior:
Using a small loop tool, carefully carve out the inside of the shaker through the base hole. Work slowly to maintain an even wall thickness of about 1/4 inch. -
Check density:
Hold the shaker up to a light source if possible; sometimes you can see thin spots. Ensure you haven’t carved too close to the surface where the face will go. -
Refine the base:
Smooth the opening of the bottom hole with a wet finger so the stopper will fit snugly without crumbling the edges.
Step 3: Adding the Details
-
Mark the faces:
Decide on the ‘front’ of your shaker. Use a pin tool to lightly mark where the eyes and mouth will sit. Keeping the features small and close together enhances the cute factor. -
Indent the eyes:
Use the blunt end of a small paintbrush or a specific ball stylus to press gentle indentations for the eyes. For the black shaker, you might inlay a tiny dot of white slip later, or simply leave the indentation. -
Carve the mouth:
With the very tip of your needle tool, carve a tiny, shallow curve for the smile. Keep it subtle. -
Add accent eyes (white shaker):
For the white ghost, take two tiny specs of black clay and press them firmly into the eye sockets. Smear the edges very slightly to bond the clays. -
Add accent eyes (black shaker):
For the black ghost, you can use a tiny bit of white clay or a ring of white slip to define the eyes, creating that ‘surprised’ look. -
Create shaker holes:
using a 2mm drill bit or hole cutter, pierce 3-5 holes in the very top of each head. Arrange them in a small cluster. -
Clean the exit points:
Turn the shaker over and make sure no clay burrs are blocking the interior of the shaker holes. Clear them with a needle tool.
Level Up: Mix & Match
Make a whole family of varying heights! Try marbling the black and white clays together for a third ‘gray’ shaker to hold a specialty spice like cumin or paprika.
Step 4: Firing and Finishing
-
Bisque fire:
Allow the pieces to dry completely (bone dry) before bisque firing them in the kiln to cone 04 (or your clay’s specific temperature). -
Glaze the interior:
Pour a small amount of food-safe clear glaze inside the shaker, swirl it around to coat the inner walls, and pour the excess out. -
Exterior finish:
To maintain the raw, matte look from the photo, leave the outside unglazed. If you prefer a sealed surface, apply a very thin coat of matte clear glaze. -
Final wipe:
Ensure the bottom feet are clean of any glaze before the final firing. -
Glaze fire:
Fire the pieces a second time to the maturity temperature of your clay body (likely cone 5 or 6 for stoneware).
Pop in your rubber stoppers, fill with your favorite seasonings, and enjoy your adorable new table companions

The Complete Guide to Pottery Troubleshooting
Uncover the most common ceramic mistakes—from cracking clay to failed glazes—and learn how to fix them fast.
Strawberry and Blueberry Pair
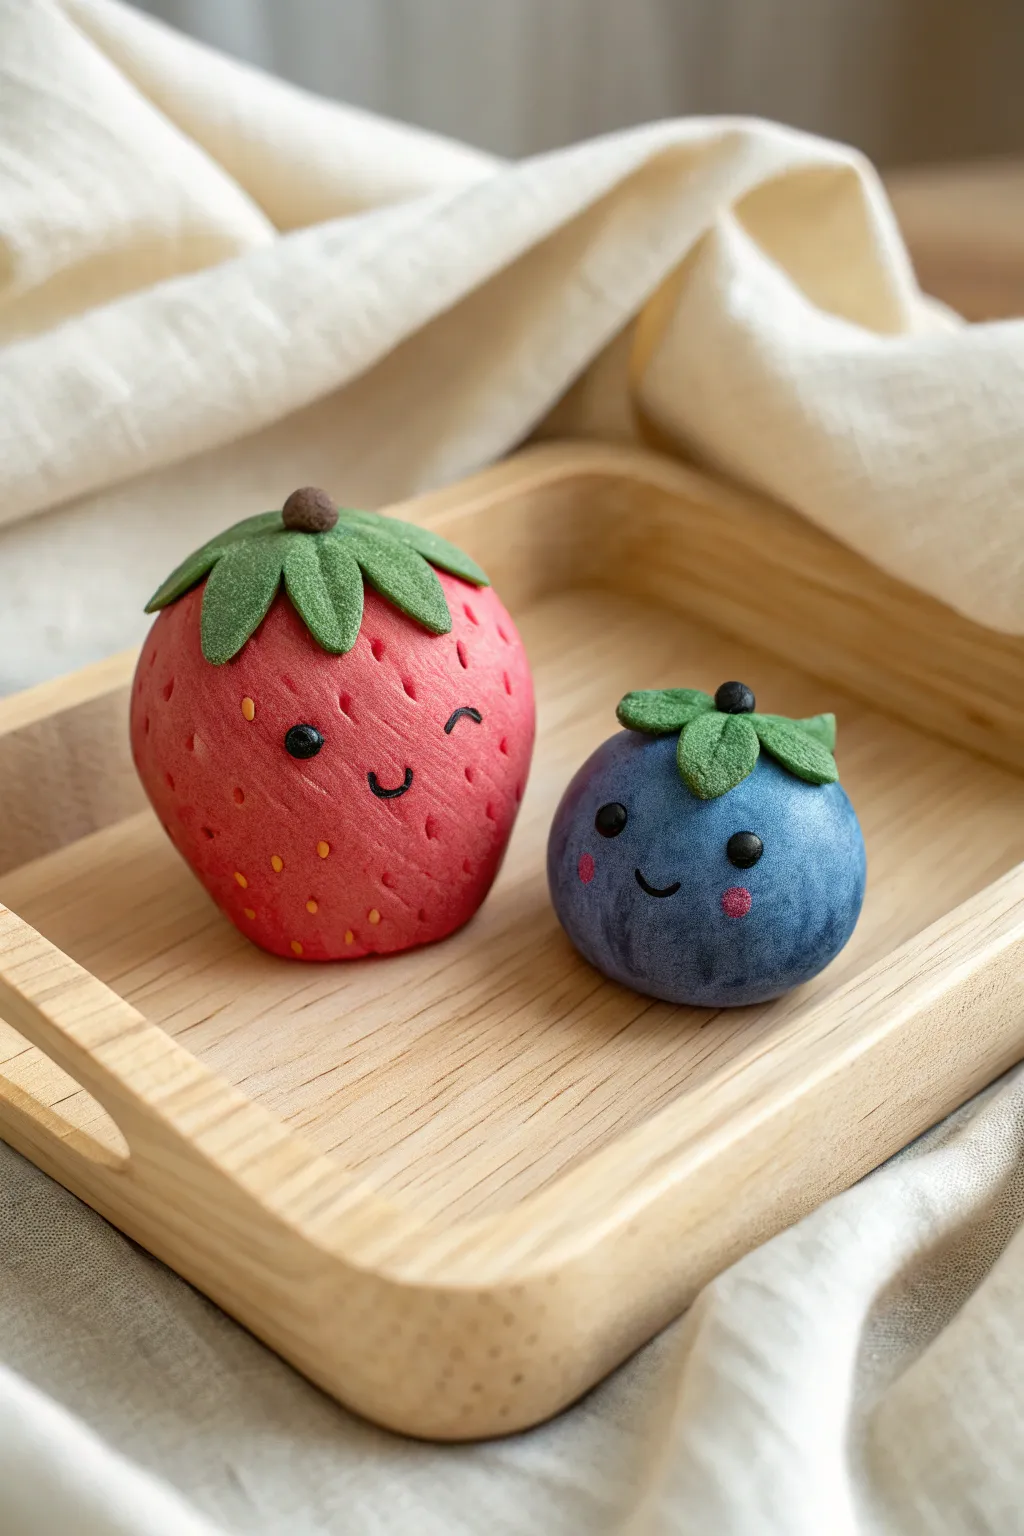
This adorable pair features a cheerful strawberry and a sweet little blueberry, both sculpted with a soft, matte finish that mimics the texture of premium clay or fondant. Their simple yet expressive faces make them perfect beginner-friendly desk companions or decorative magnets.
How-To Guide
Materials
- Red polymer clay
- Blue polymer clay (slightly marbled or mottled)
- Green polymer clay (matte, leafy shade)
- Brown polymer clay
- Black polymer clay
- Pink chalk pastel or blush
- Needle sculpting tool or toothpick
- Ball stylus tool (small)
- Clay roller or pasta machine
- Exacto knife or clay blade
- Soft brush for pastels
Step 1: Sculpting the Strawberry Base
-
Shape the body:
Begin with a generous amount of red clay, conditioning it until soft. Roll it into a smooth ball first, then gently tap the bottom against your work surface to flatten it slightly. Pinch the top portion gently to taper it, forming a classic, rounded strawberry cone shape. -
Texture the surface:
Using a needle tool, gently poke small indentations all over the red surface to mimic seeds. Don’t worry about being perfectly uniform; a random pattern looks more organic. -
Add seed details:
This step is optional but adds depth: take tiny, microscopic bits of yellow or orange clay and press them into the larger indentations, or simply leave the texture as is for a cleaner look. -
Form the leaves:
Roll out a small sheet of green clay. Using your blade or a small star cutter, cut out a five-pointed leafy calyx shape. Soften the edges with your fingertips so they aren’t too sharp. -
Attach the greenery:
Place the distinctive green star on top of your strawberry. Gently press the leaf tips down so they curve slightly over the rounded top of the fruit. -
Create the stem:
Roll a very small ball of brown clay and press it into the center of the green leaves to serve as the stem connection point.
Step 2: Crafting the Blueberry Buddy
-
Shape the berry:
Take your blue clay—I like to mix two shades of blue slightly incompletely to get that natural, dusty blueberry look—and roll it into a squat, rounded sphere. Flatten the bottom so it sits stable next to the strawberry. -
Construct the crown:
Create a much smaller set of green leaves compared to the strawberry. You can cut three or four small teardrop shapes and arrange them in a circle on top of the blueberry. -
Add the center detail:
Place a tiny black clay bead in the very center of the green leaves to finish the blueberry’s crown structure. -
Texture the leaves:
Use your needle tool to gently score a single vein down the center of each green leaf on both the strawberry and the blueberry for added realism.
Needle Tool Wisdom
When adding the smile, pre-indent the smile line with a tool first. Then, lay the black clay ‘snake’ into that groove. This prevents the smile from looking stuck-on.
Step 3: Bringing Faces to Life
-
Position the eyes:
For the strawberry, press two small indents where you want the eyes. Roll tiny balls of black clay and press them in. Add a microscopic white speck of clay to the top right of the left eye for a ‘wink’ effect if desired, or use a curved black snake for a winking eye. -
Add the strawberry mouth:
Roll an incredibly thin snake of black clay. Curve it into a ‘U’ shape and gently press it into the clay between the eyes using your needle tool. -
Create the blueberry face:
Repeat the process for the blueberry, placing the eyes slightly wider apart for a cuter look. Use two simple black dots for open eyes and a tiny smile in between. -
Apply rosy cheeks:
Shave a little pink chalk pastel into dust. Use a soft, dry brush to gently dub pink circles onto the blueberry’s cheeks. You can do the same for the strawberry, though it’s subtler against red clay. -
Final check:
Look over both figures for any fingerprints. Smooth them away with a drop of baby oil on your finger if necessary before baking. -
Bake carefully:
Bake closely following your clay manufacturer’s instructions. Since these shapes are thick, ensure they bake long enough to cure the center without scorching the leaves.
Make Them Functional
Before baking, press strong neodymium magnets into the backs or bottoms of the fruit. Secure them with a drop of superglue after baking for cute fridge decor.
Once cooled, your cheerful fruit duo is ready to brighten up any shelf or desk workspace
Cat and Dog Tiny Pals
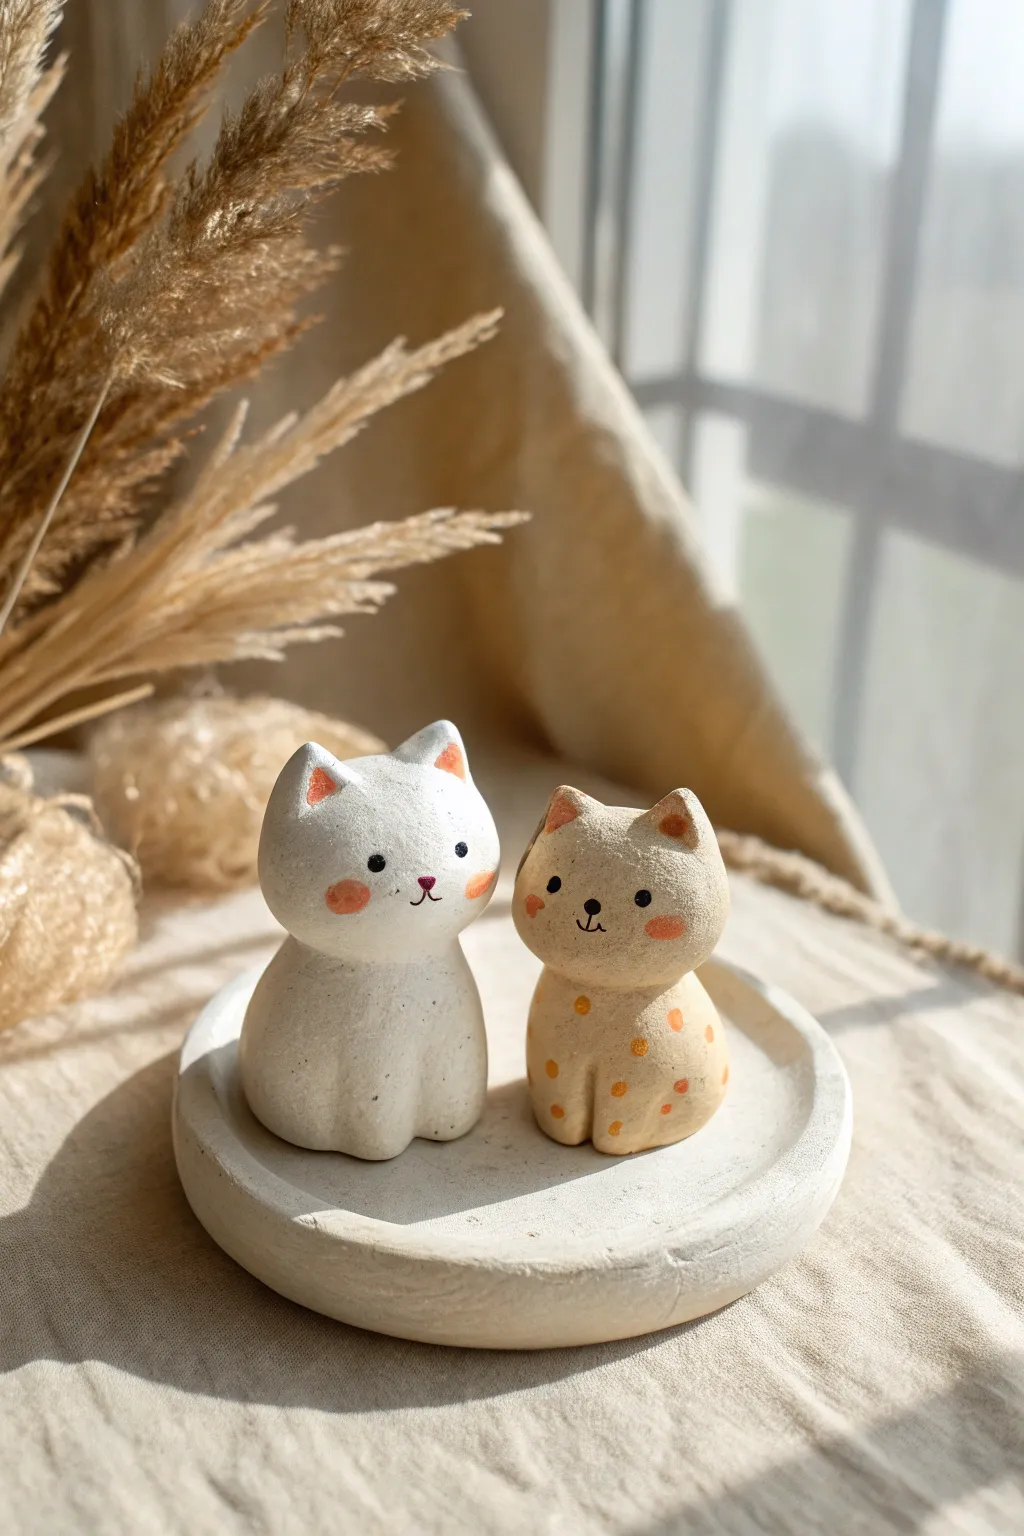
These charming miniature figurines capture the sweet simplicity of two feline friends sitting side by side on their own display dish. Their rounded forms and delicate painted details make them a perfect beginner friendly project for air-dry or polymer clay enthusiasts.
Step-by-Step
Materials
- White air-dry clay or polymer clay (white and beige)
- Small shallow dish for display (optional or can be handmade)
- Acrylic paints (black, pink, orange/terracotta, beige)
- Fine detail paintbrush (size 0 or 00)
- Water and sponge (for smoothing)
- Clay sculpting tools or a toothpick
- Ball stylus tool
- Matte varnish or sealant
Step 1: Sculpting the Forms
-
Analyzing portions:
Begin by dividing your clay into two main chunks for the bodies. You want these to be roughly golf-ball sized or slightly smaller. If using white clay for both, you will paint the beige one later. -
Shaping the base body:
Roll each piece of clay into a smooth ball to remove cracks. Gently taper the top of the ball slightly to create a pear shape, flattening the bottom so it sits stable on your work surface. -
Forming the ears:
Instead of attaching separate ears, gently pinch the top of the head on the left and right sides to pull up two small triangles. Smooth the clay between them so the transition looks seamless and organic. -
Refining the silhouette:
Use your fingers to round off the ear tips slightly; you don’t want them too sharp. The overall vibe should be soft and chubby. -
Defining the front legs:
using a modeling tool or the side of a toothpick, press a vertical line into the lower center of the body front. This suggests the separation of the two front paws without needing add-on pieces. -
Smoothing the surface:
If using air-dry clay, dip your finger in a tiny bit of water and rub away any fingerprints or micro-cracks. A smooth canvas is essential for the minimal painting style. -
Creating the base dish:
Roll out a separate slab of clay about 1/4 inch thick. Cut out a circle using a cookie cutter or jar lid. Create a small rim by pinching the edges upward to form a shallow saucer shape.
Step 2: Painting and Details
-
Base coating:
Allow the clay to dry completely (24-48 hours for air-dry clay). Paint one cat entirely with a warm beige or biscuit color. Leave the other white, or give it a fresh coat of white acrylic for brightness. -
Drafting the faces:
I usually like to mark the eye positions lightly with a pencil first to ensure they are symmetrical. Place them wide apart for that cute ‘kawaii’ look. -
Painting the eyes and nose:
Using your finest brush or a dotting tool, paint two small black dots for eyes. Add a tiny vertical line and an inverted ‘V’ shape for the mouth. Add a tiny pink nose just above the mouth. -
Adding blush:
Mix a soft coral or orange paint. brush most of the paint off onto a paper towel until the brush is almost dry, then gently stipple round cheeks onto both cats. -
Ear details:
Using the same coral/orange tone, paint small triangles inside the ears of the white cat. For the beige cat, use a slightly darker terracotta shade for contrast. -
Polka dot pattern:
For the beige cat, mix a light orange and a darker orange. Use the back of a paintbrush or a dotting tool to add random polka dots across the body. -
Finishing touches:
Once the paint is fully dry, coat both figurines and the dish with a matte varnish. This seals the porous clay and protects those tiny painted details. -
Final assembly:
Place your finished duo onto their clay dish. You can glue them down if you want a permanent display, or leave them loose to rearrange them.
Uneven Drying?
If using air-dry clay, rotate your figures every few hours while they dry. This prevents the bottom from staying damp and warping the flat base.
Texture Twist
Before drying, gently press a clean toothbrush against the clay surface. This creates a subtle ‘fur-like’ texture that catches paint beautifully.
Now you have a sweet little pair of desk companions ready to brighten up your workspace


What Really Happens Inside the Kiln
Learn how time and temperature work together inside the kiln to transform clay into durable ceramic.
Penguin Couple With Accessories
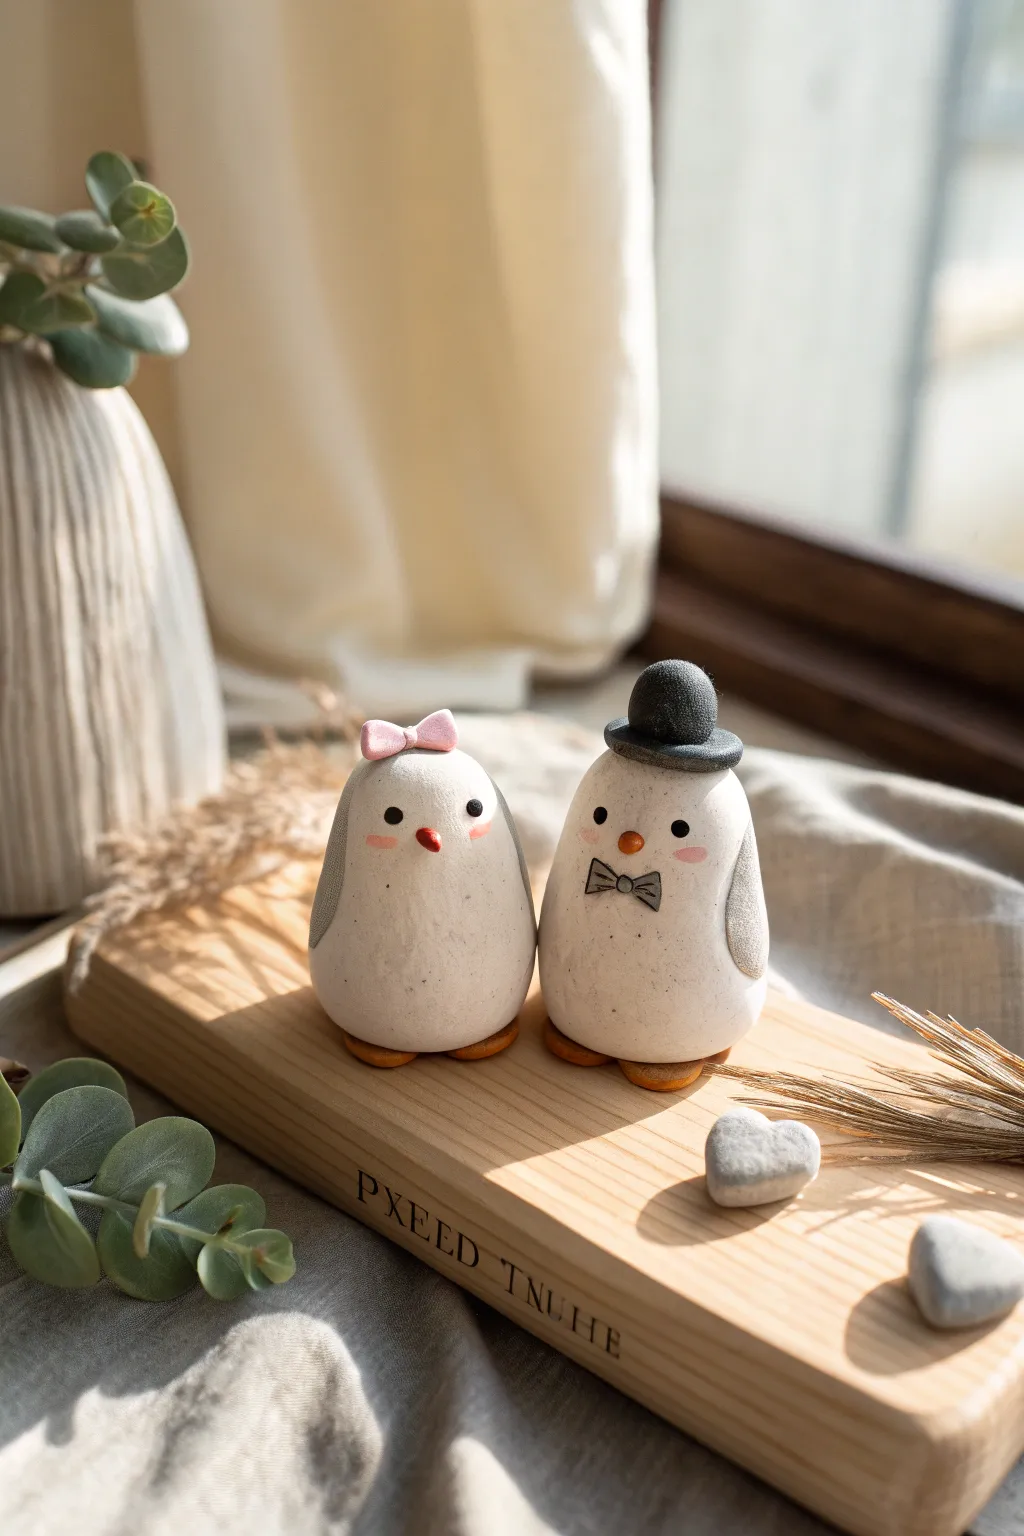
Sculpt this adorable couple of clay penguins, complete with a dapper top hat and a sweet pink bow. Their simple, rounded forms and charming facial details make for a delightful beginner-friendly project with a cozy, rustic finish.
Step-by-Step Guide
Materials
- White polymer clay (or air-dry clay)
- Black polymer clay
- Pink polymer clay (soft pastel shade)
- Orange polymer clay
- Grey polymer clay
- Sculpting tools (needle tool, small ball tool)
- Acrylic rolling pin
- Translucent liquid clay or bake-and-bond (if using polymer)
- Blush powder or pink chalk pastel
- Small soft brush
- Oven for baking (or sealant for air-dry)
Step 1: Basic Shape Building
-
Condition the clay:
Begin by kneading your white clay until it is soft, pliable, and free of air bubbles. Clean hands are crucial here to keep the white pristine. -
Form the bodies:
Roll two equal-sized balls of white clay, roughly 1.5 inches in diameter. Gently roll them into thick, rounded cone shapes with a wide bottom for stability. -
Smooth the surface:
Use your thumbs to smooth out any fingerprints. The shape should be slightly tapered at the top for the head but mostly continuous with the body, egg-like but flat at the base. -
Create the wings:
Take a small amount of grey clay and roll it into a thin sheet. Cut out four elongated teardrop shapes. Attaching them flat against the sides of the white bodies gives the impression of folded wings.
Dirty Clay Fix
White clay picks up dust easily. Keep baby wipes nearby to clean fingers between colors. If dust gets embedded, use a cotton swab with rubbing alcohol to gently lift it.
Step 2: Facial Features & Feet
-
Add the eyes:
Roll tiny specks of black clay into balls. Press them gently into the upper third of the face. Spacing them slightly far apart adds to their innocent look. -
Form the beaks:
Shape two tiny cones of orange clay. Press these horizontally between the eyes. For the female penguin, you might point it slightly downward; for the male, closer to the center. -
Blush the cheeks:
I like to use a soft brush to lightly dab pink chalk pastel powder underneath the eyes before baking. This embeds the color for a soft, natural blush effect. -
Make the feet:
Create four small, flat ovals from orange clay. Place two under each penguin body so just the tips peek out, anchoring them securely.
Texture Match
Mix a tiny pinch of black pepper or dried tea leaves into the white clay before sculpting. This creates a speckled, stone-like ‘granite’ mimicking natural pottery.
Step 3: Accessorizing the Couple
-
Sculpt the top hat:
For the male, roll a small ball of black clay and flatten it for the brim. Roll a cylinder for the hat’s crown and attach it to the center of the brim. -
Place the hat:
Set the finished hat atop the male penguin’s head, slightly tilted for a jaunty appearance. -
Add the bow tie:
With grey clay, form two tiny triangles and a small center dot. Assemble them below the beak to create a bow tie. Use a needle tool to press a small crease into each side of the bow for realism. -
Create the hair bow:
Take pink clay and form a similar bow shape, but slightly softer and puffier. Place this on the female penguin’s head, slightly off-center.
Step 4: Finishing Touches
-
Inspect the details:
Go over your figures one last time to remove lint or dust. Smooth any seams where clay colors meet. -
Texture the surface (optional):
If you want the stone-like texture seen in the photo, gently tap the white clay surface with a stiff toothbrush or crumpled foil. -
Bake or dry:
Follow the manufacturer’s instructions for your specific clay. If baking polymer clay, tenting foil over them prevents scorching. -
Cool and set:
Allow the figures to cool completely before handling. If you used air-dry clay, consider a matte varnish to protect them without adding too much shine.
Place your finished penguin pair on a shelf or windowsill to bring a little handmade joy to your room
Octopus Sweethearts
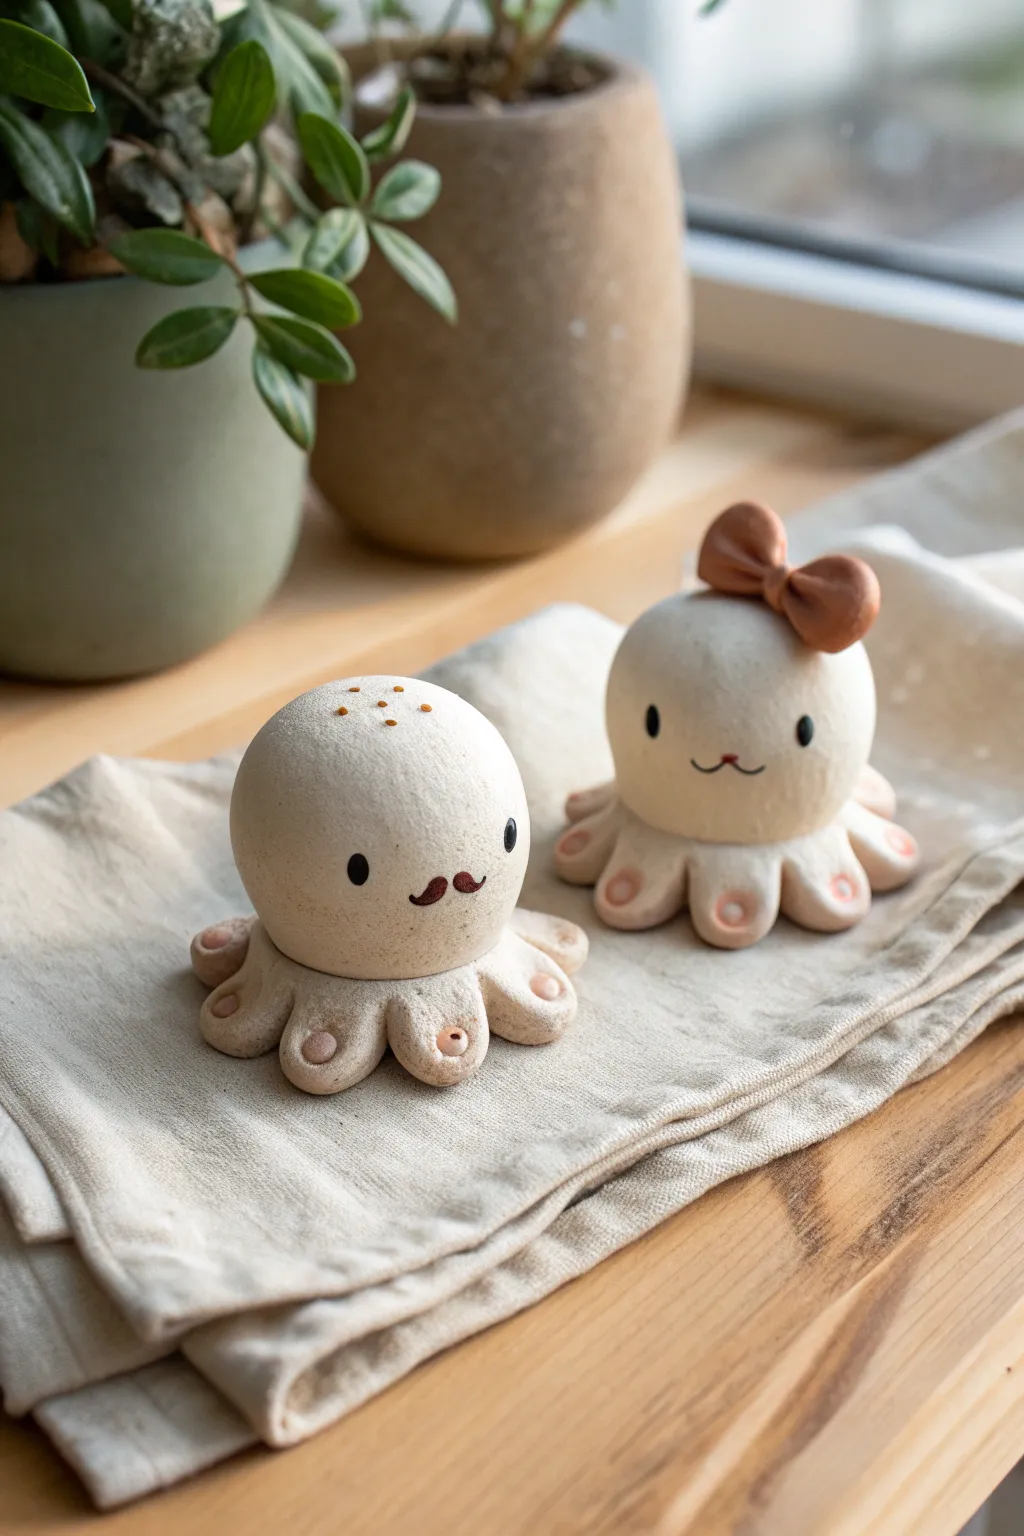
These adorable octopus figurines make for a charming duo, perfect for sitting on a shelf or acting as whimsical desk companions. With their smooth, matte finish and simple details, they capture a minimalist yet kawaii aesthetic that’s surprisingly easy to achieve.
Step-by-Step Tutorial
Materials
- Polymer clay (beige or light sand color)
- Small amount of dark brown clay
- Small amount of terracotta or rust-colored clay
- Ball stylus tools (various sizes)
- Needle tool or toothpick
- Acrylic roller
- Oven for baking
- Soft brush for smoothing
- Matte varnish (optional)
Step 1: Shaping the Bodies
-
Prepare the Base Clay:
Start by conditioning your beige polymer clay until it is soft and pliable. Divide it into two equal portions, rolling each into a smooth, crack-free ball about the size of a golf ball or slightly smaller. -
Form the Dome Shape:
Gently press the bottom of each ball against your work surface to flatten it significantly. You want a rounded dome shape for the head and body combined, rather than a perfect sphere. -
Refine the Surface:
Check for any fingerprints. I like to use a very light touch with a bit of cornstarch on my finger to buff away prints at this stage.
Clean Clay Tip
Keep baby wipes nearby to clean your hands when switching between the dark brown clay and the light beige body clay to avoid staining the light color.
Step 2: Creating Tentacles
-
Roll Small Spheres:
For each octopus, roll out eight small balls of the same beige clay. These should be roughly the size of dried peas. -
Attach the Tentacles:
Press these small balls around the base of the main body dome. Space them evenly so they encircle the entire bottom edge. -
Flatten and Blend:
Gently press down on each tentacle ball to flatten it slightly into the surface below. Use a modeling tool or your fingertip to lightly blend the top of the tentacle into the body just a tiny bit for a cohesive look. -
Add Sucker Details:
Take a very small amount of the terracotta-colored clay and make tiny balls. Press one into the center of each flattened tentacle. -
Indent the Suckers:
Use a medium-sized ball stylus to press into the center of each terracotta dot. This creates the suction cup look and secures the clay pieces together.
Step 3: The Gentleman Octopus
-
Create the Eyes:
For the left octopus, use a small ball tool to make two indentations for eyes. Insert tiny balls of dark brown clay and flatten them so they are flush with the face. -
Sculpt the Mustache:
Roll a very thin snake of dark brown clay. Cut two tiny pieces, taper the ends, and curve them upwards to form a handlebar mustache. Press this gently below the eyes. -
Add Freckles:
Using the needle tool and the tiniest specks of terracotta clay, apply a few ‘freckles’ or spots to the very top of his head for texture.
Level Up: Functional Shift
Make the bodies slightly larger and hollow them out underneath before baking (using a foil core you remove later) to turn these into egg cups or ring holders.
Step 4: The Lady Octopus
-
Form the Bow:
Using the terracotta clay, shape two small triangles and a tiny center oval. Join them together at the corners to create a bow shape. Use a needle tool to press crease lines into the loops. -
Attach the Accessory:
Press the finished bow onto the top right side of her head. Ensure it’s attached firmly. -
Add Facial Features:
Like the gentleman, add dark brown clay eyes. For her mouth, roll a microscopic thread of brown clay into a ‘w’ or shallow ‘u’ shape and press it between the eyes. -
Rosy Cheeks:
You can add extremely subtle blushes by dusting a little dry pastel chalk on her cheeks, though the clay detail alone is charming enough.
Step 5: Finishing Touches
-
Final Smoothing:
Inspect both figures for lint or dust. Use a soft brush with a tiny bit of baby oil or rubbing alcohol to smooth away imperfections before baking. -
Bake the Clay:
Bake the figures according to your polymer clay package instructions. This is typically around 275°F (130°C) for 15-30 minutes per 1/4 inch of thickness. -
Cool and Protect:
Let them cool completely in the oven. Once cool, you can leave them matte for a natural stone look or apply a matte varnish for protection.
Place your newly created pair on a linen napkin or wooden shelf to admire their sweet, handcrafted charm

TRACK YOUR CERAMIC JOURNEY
Capture glaze tests, firing details, and creative progress—all in one simple printable. Make your projects easier to repeat and improve.
Hugging Dino Duo
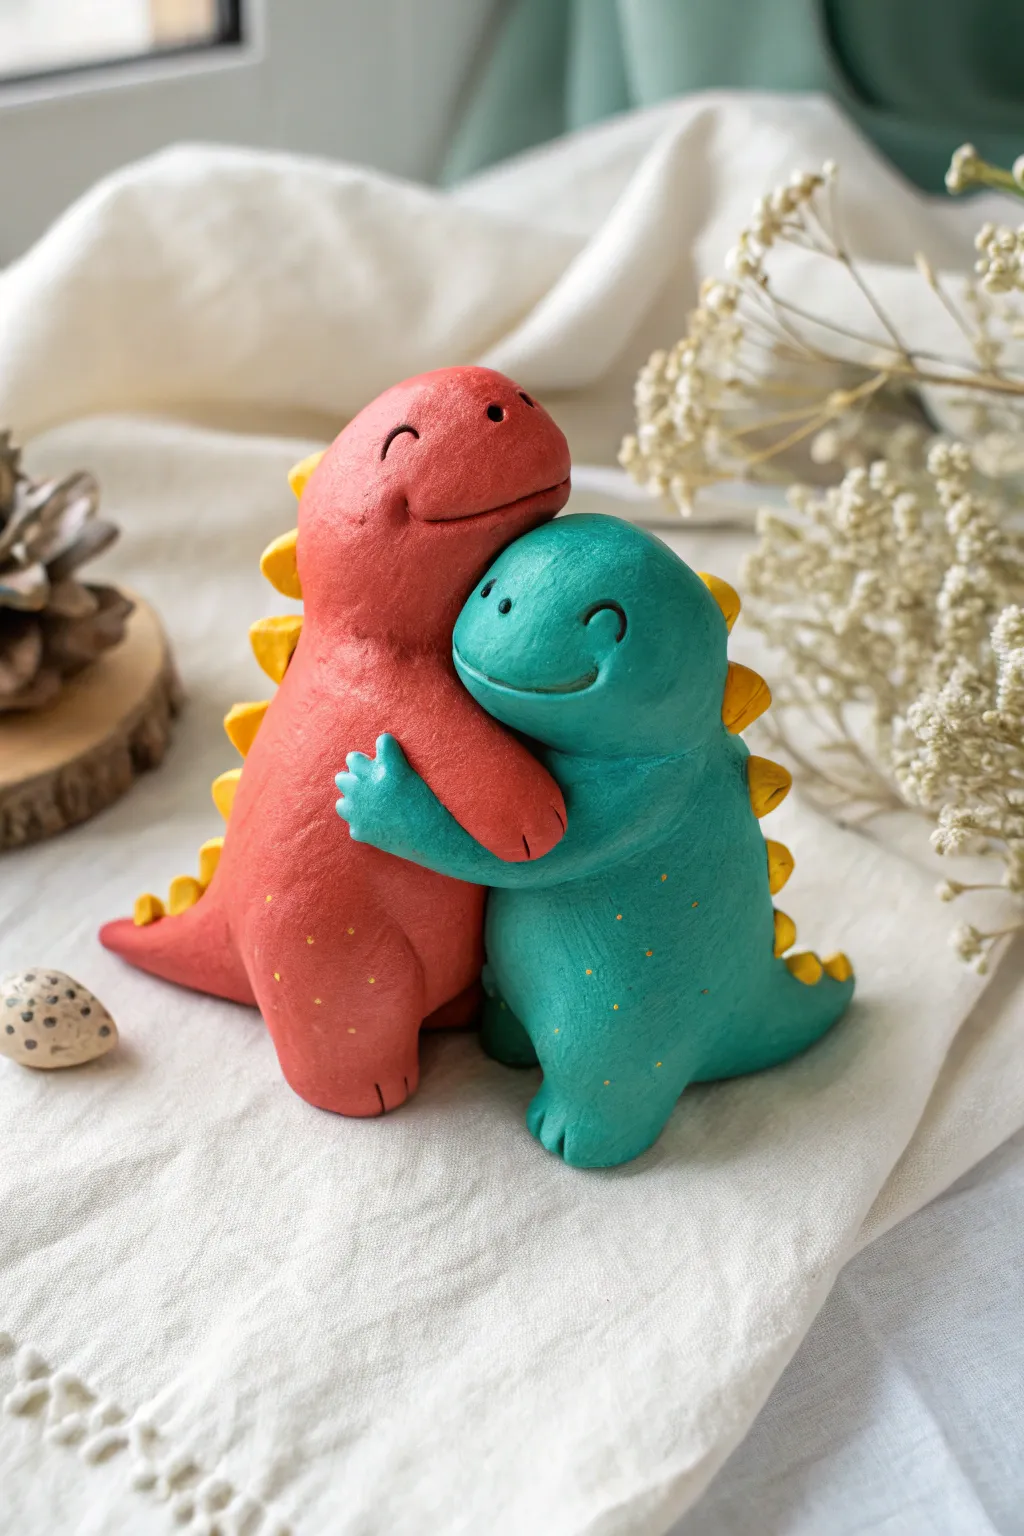
Sculpt a heartwarming embrace between two adorable clay dinosaurs, one in earthy red and the other in teal. This charming duo features simple shapes, happy expressions, and contrasting yellow spikes for a whimsical touch.
Step-by-Step
Materials
- Polymer clay (Red, Teal, Yellow, Black)
- Sculpting tools (needle tool, ball stylus)
- Rolling pin or pasta machine
- Aluminum foil (for core armature)
- Acrylic paint (gold or yellow ochre for dots)
- Fine detail paintbrush
- Oven for baking (as per clay instructions)
Step 1: Forming the Bodies
-
Create foil cores:
Crumple two small pieces of aluminum foil into egg-like shapes. One should be slightly taller for the red dinosaur. This saves clay and makes the figures lighter. -
Condition the clay:
Warm up your red and teal clay by kneading it in your hands until it is soft and pliable. -
Cover the cores:
Flatten sheets of red and teal clay and wrap them completely around their respective foil cores. Smooth out all seams with your thumbs until the surface is uniform. -
Shape the red dino:
Mold the red clay shape into a standing teardrop, slightly distinct at the top to suggest a head area, keeping the base wide for stability. -
Shape the teal dino:
Create a similar, slightly shorter teardrop shape with the teal clay. -
Position the hug:
Before adding details, press the two bodies together securely. The red dino should slightly lean over the teal one to create that snug hugging posture.
Seamless Blending
Use a silicone clay shaper or a tiny bit of baby oil on your finger to erase fingerprints and blend seams perfectly before baking.
Step 2: Adding Limbs and Tails
-
Make the tails:
Roll two cones of clay in matching colors. Attach the red tail to the back of the red figure and the teal tail to the teal figure, blending the clay seams downward so they look like one solid piece. -
Sculpt the legs:
Form small, stubby cylinders for legs. Attach two to the base of each dinosaur and blend the seams. Use a needle tool to press in three small lines for toes on each foot. -
Attach the arms:
Roll small sausages for arms. Position the red dino’s arm reaching around the teal’s back/shoulder. Position the teal dino’s arm hugging the red dino’s belly. -
Refine the embrace:
Gently press the arms into the bodies to ensure they stick. I like to curve them slightly to make the hug look tight and affectionate.
Step 3: Facial Features and Spikes
-
Sculpt the mouths:
Using a curved tool or a cut straw, impress a wide, curved smile into each face. Add a tiny vertical line at the corner of each smile for extra cuteness. -
Add the eyes:
Roll tiny specks of black clay (or puncture small holes to paint later) and place them widely apart above the smile for that innocent look. -
Create the spikes:
Roll a thin snake of yellow clay. Slice it into small triangular bits. -
Attach the spikes:
Starting from the top of the head down to the tail, attach the yellow triangles in a row on both dinosaurs’ backs. -
Texture the bodies:
Using a toothbrush or stiff brush, gently tap the surface of the clay to give it a subtle, stone-like texture, being careful not to smudge the faces.
Make it Functional
Before baking, insert a curved wire photo holder into the top of the taller dino to turn this cute sculpture into a bespoke photo stand.
Step 4: Finishing Touches
-
Bake the figures:
Bake your creation according to the polymer clay package instructions. Let them cool completely. -
Paint the dots:
Dip a fine paintbrush or a toothpick into gold or yellow ochre acrylic paint. Carefully dab tiny freckles or scales onto the bodies.
Place your warm hugging duo on a shelf where they can spread happiness
Monster Bestie Pair
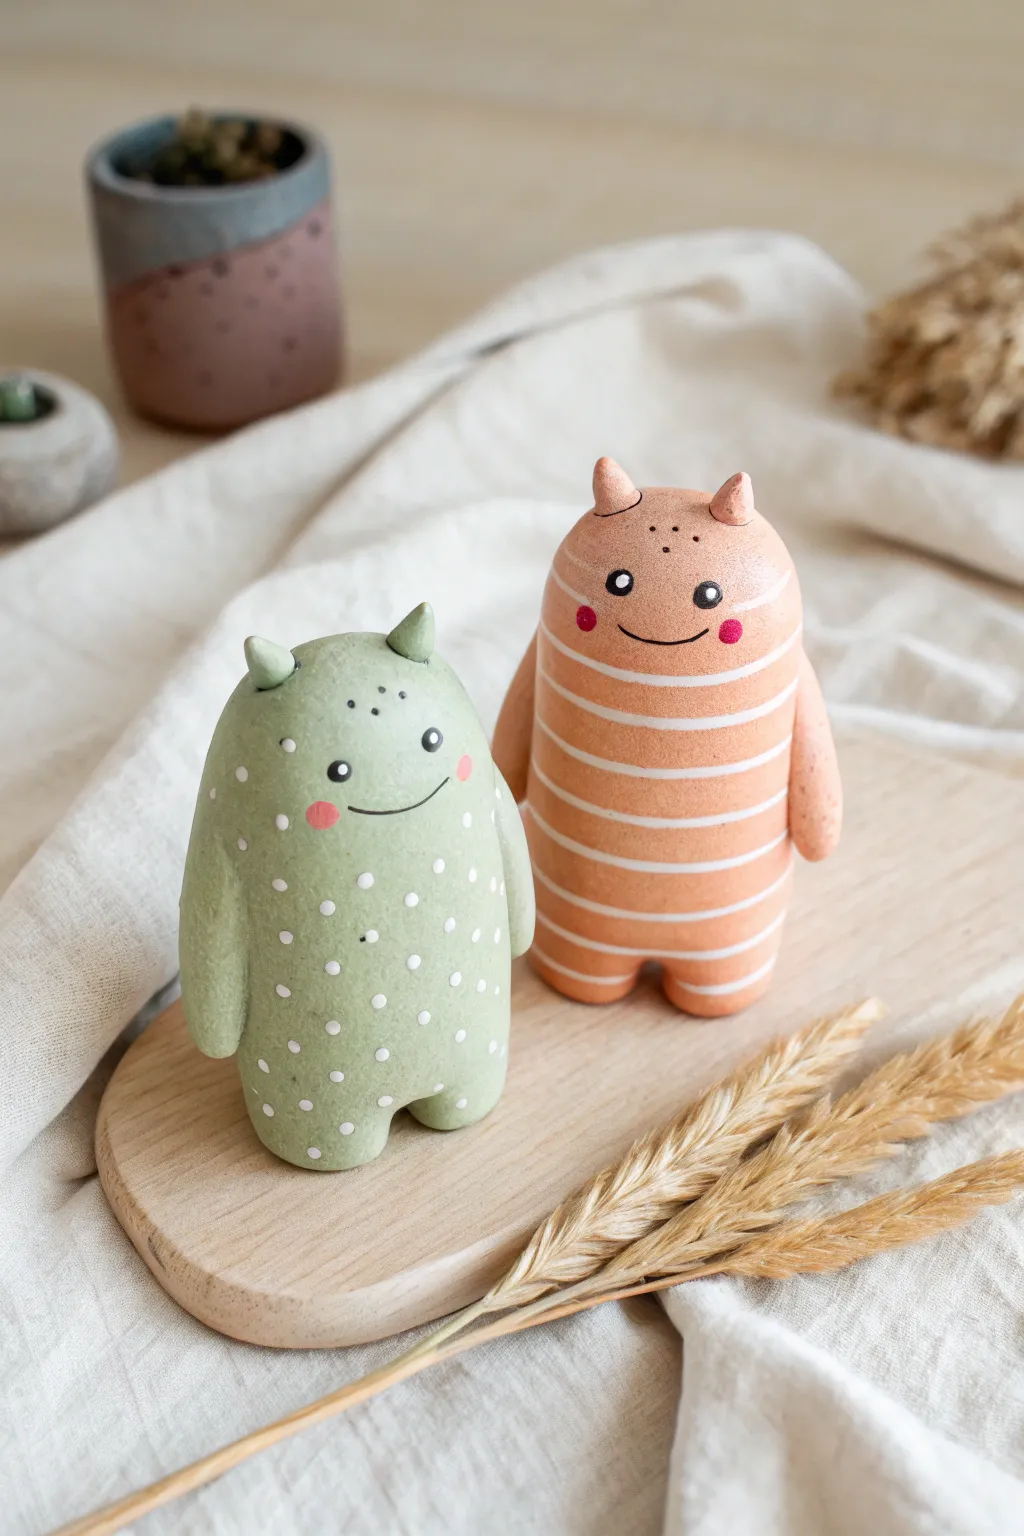
These adorable twin monster figurines are the perfect desk companions, sculpted with soft curves and minimalist charm. One sports a playful polka-dot pattern on sage green, while the other features classic stripes on peach, creating a complementary pair that’s simple to model and fun to paint.
Step-by-Step Tutorial
Materials
- Air-dry clay or polymer clay (white is best)
- Acrylic paints (sage green, peach/coral, white, black, pink)
- Small fine-point paintbrushes
- Dotting tool or toothpick
- Clear matte varnish or sealant
- Rolling pin
- Small cup of water (for smoothing)
- Fine-grit sandpaper (optional)
- Aluminum foil (for armature core, optional)
Step 1: Sculpting the Base Forms
-
Form the bodies:
Start by conditioning your clay until it’s pliable. Roll two equal-sized heavy balls of clay, then gently shape them into tall, thick cylinders with rounded tops, resembling smooth pebbles or capsules. They should be free-standing and sturdy. -
Define the legs:
At the bottom of each cylinder, use your thumb or a sculpting tool to create an indentation in the center. Gently push the clay on either side downwards to form two short, stubby legs, smoothing the ‘inseam’ so it looks seamless. -
Smooth the surfaces:
Dip your finger in a tiny bit of water and rub it over the entire surface of the monsters to remove fingerprints and cracks. The goal is a very smooth, matte texture before adding details.
Cracks Appearing?
If small cracks form while drying, mix a tiny bit of fresh clay with water to make a paste (slip) and fill the cracks. Smooth over and let dry again.
Step 2: Adding Features
-
Attach the arms:
Roll four small, elongated teardrop shapes for the arms. Press these gently onto the sides of the bodies, blending the shoulder joint into the main body so they hang naturally. I prefer to have them rest flush against the side for a streamlined look. -
Create tiny ears:
Pinch off tiny amounts of clay to make small triangles or cones. Attach two to the top of each monster’s head, spacing them slightly apart. Blend the seams carefully at the base so they look like they grew there. -
Refine and dry:
Give the figures one last smoothing pass. Check that they stand stable on a flat surface. Let the clay dry completely according to package instructions—this usually takes 24-48 hours for air-dry clay. -
Sand imperfections:
Once fully dry, if you notice any rough bumps or sharp edges, gently buff them away with fine-grit sandpaper for a professional finish.
Step 3: Painting & Patterning
-
Base coat application:
Paint one monster entirely in a sage green and the other in a soft peach or coral color. You may need two coats for full opacity, letting the paint dry between layers. -
Add the stripes:
On the peach monster, use a very fine liner brush and white paint to draw horizontal stripes. Start from the top and work your way down, keeping the lines thin and evenly spaced. Don’t worry if they aren’t perfectly straight; the wobble adds character. -
Add the polka dots:
For the green monster, use a dotting tool or the back of a paintbrush dipped in white paint. Create a random scatter of small dots all over the body, varying the spacing slightly for a natural look. -
Paint facial features:
Using a tiny detail brush or a black paint pen, draw two small circles for eyes and a simple curved line for a smile on each monster. Add tiny white highlight dots inside the black eyes for life. -
Apply finishing touches:
Dab a small circle of pink paint on the cheeks of both monsters for a rosy blush. Add tiny freckle dots near the ears or forehead if desired. -
Seal the set:
Protect your work with a coat of clear matte varnish. This unifies the sheen and prevents the acrylic paint from chipping over time.
Make Them Functional
Before the clay dries, gently press a pencil or air plant into the top of the head to turn these cute figurines into functional holders.
Place your finished monster duo on a shelf where their friendly smiles can greet you every day
Mushroom and Frog Duo
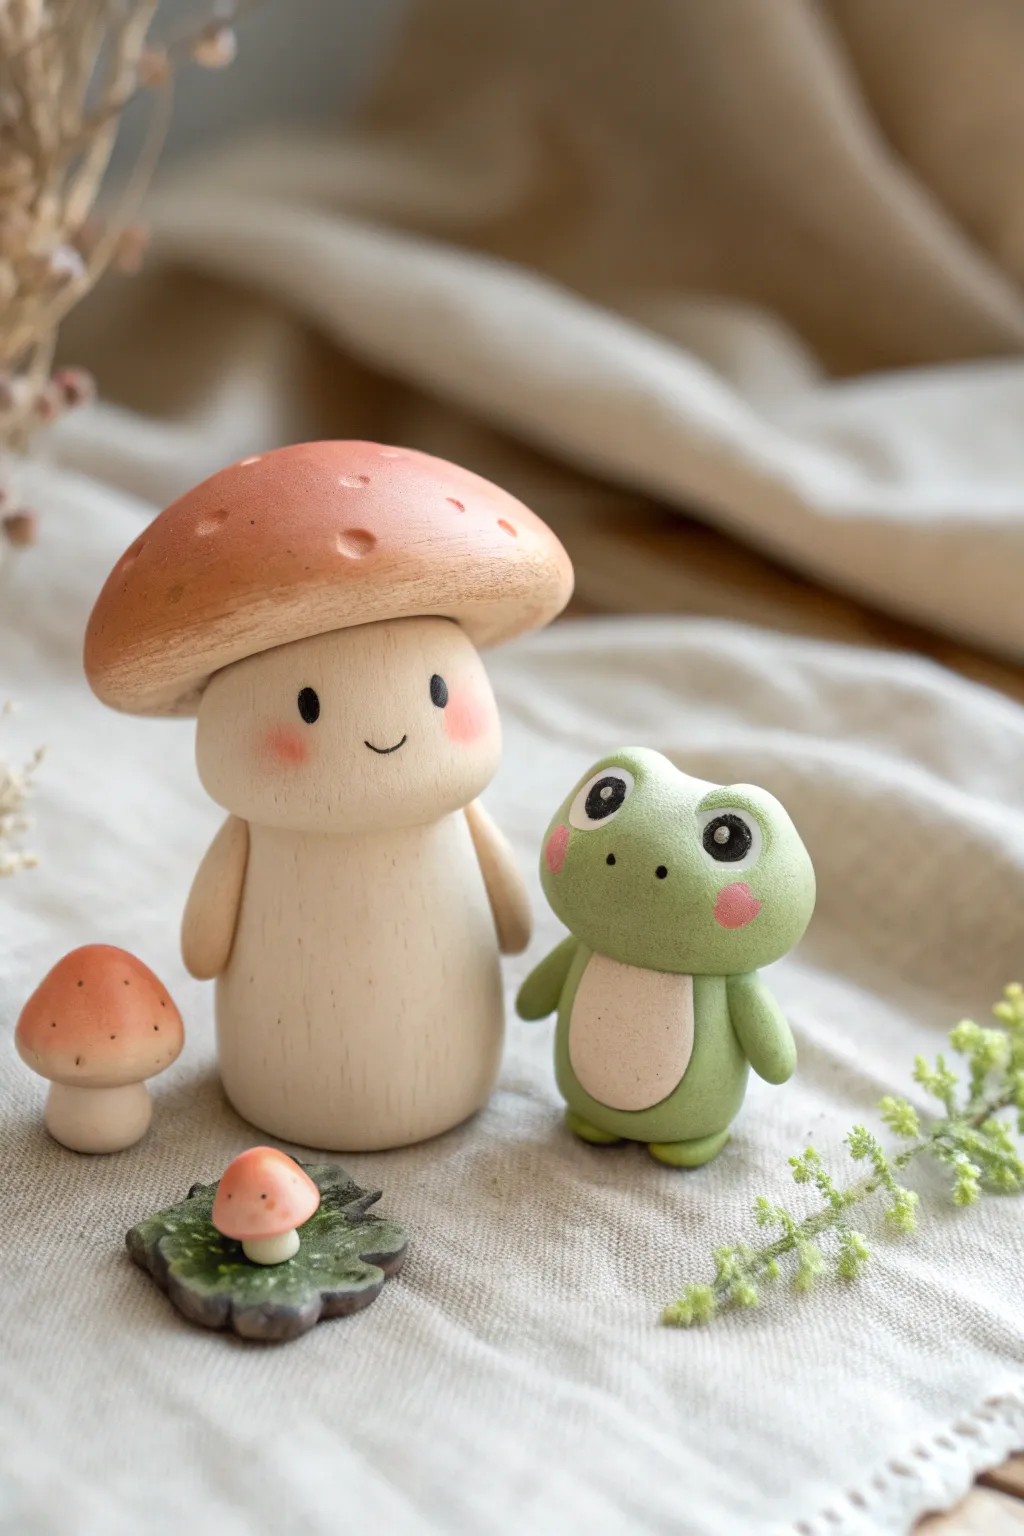
Bring a touch of woodland magic to your shelf with this adorable pair of clay figurines featuring a smiling mushroom with a wooden texture and his wide-eyed froggy companion. This intermediate project focuses on clean shapes, soft blushing, and achieving an organic, smooth finish.
Step-by-Step
Materials
- Polymer clay (Beige/Ecru, Terracotta/Light Brown, Leaf Green, White, Black, Pink)
- Aluminum foil (for armature core)
- Sculpting tools (ball styluses, needle tool, rubber shapers)
- Soft pastel chalks (pink, brown)
- Small fluffy brush
- Acrylic paint (white, black) – optional
- Baking sheet and oven
- Matte varnish
- Superglue
Step 1: Sculpting the Mushroom Friend
-
Form the Stem Core:
Ball up a small piece of aluminum foil into a cylinder shape to save clay and reduce weight. Cover this foil completely with a thick layer of beige or ecru clay, rolling it on your work surface to create a smooth, slightly tapered cylinder for the mushroom’s body. -
Shape the Head:
Roll a larger ball of ecru clay for the head. Press it gently onto the stem to ensure it fits proportionally. It should look like a rounded marshmallow sitting on the cylinder. -
Create the Cap:
Take a generous amount of terracotta or light brown clay. Roll it into a ball, then flatten the bottom and curve the top to creating a dome shape. Place this securely on top of the head piece, smoothing the underside connection with a tool so it looks like one cohesive mushroom cap. -
Texture the Cap:
Using a large ball tool or the rounded end of a paintbrush handle, gently press divots into the top of the mushroom cap to create a spotted texture. Vary the depth slightly for a natural look. -
Add Arms:
Roll two small sausage shapes from the beige clay. Attach these to the sides of the body, blending the clay at the shoulder attachment point so they hang naturally. -
Facial Features:
Use a small ball tool to make indentations for the eyes. Insert tiny balls of black clay and flatten them. Roll a very thin snake of black clay for the smile and press it gently into place between the eyes.
Clean Clay Tip
Keep separate baby wipes for cleaning hands between color changes. White and beige clay pick up lint easily; roll a scrap piece of clay in your hands first to remove dust.
Step 2: Crafting the Frog Companion
-
Body Base:
Roll a ball of leaf green clay for the frog’s head and body. This figure is more ‘chibi’ style, so keeping it slightly squat and round is key. -
Belly Patch:
Flatten a small oval of beige clay (the same shade as the mushroom stem). Press this onto the center of the green body for the frog’s belly. -
Limbs:
Create little stumpy arms and legs from green clay. Attach the legs at the bottom so the frog sits flat, and attach the arms on the sides, angled slightly inward. -
Eye Sockets forms:
The frogs eyes are raised. Add two small domes of green clay to the top of the head. Use a ball tool to create a large hollow in the front of each dome. -
Adding Eyes:
Fill the hollows with white clay, then add large black pupils in the center. Add a tiny white speck of clay to each pupil for a highlight.
Step 3: Accessories & Finishing Touches
-
Medium Mushroom:
Repeat the process for the mushroom friend but in miniature: a small beige stem and a terracotta cap with indented spots. No face is needed for this prop. -
Leaf Base & Tiny Shroom:
Flatten a piece of dark green or marbled clay into an irregular leaf shape. Texture the edges. Place a tiny mushroom (made of a white stem and pink cap) on top of the leaf. -
Apply Blush:
Before baking, use a blade to scrape a pink soft pastel into a fine dust. I like to use a small, soft brush to gently apply this powder to the cheeks of both the mushroom person and the frog for a rosy glow. -
Bake:
Bake all your pieces according to your clay package instructions. Usually, this is around 230°F–275°F (110°C–135°C) for 15-30 minutes. -
Varnish and Assembly:
Once cool, use superglue to attach the tiny mushroom to the leaf base if it wasn’t pressed on firmly. Apply a coat of matte varnish to protect the surface and seal in the pastel blush.
Head Heavy?
If the mushroom’s cap is too heavy and causes him to tip during baking, prop him up with a supportive pillow of polyester fiberfill or crumpled parchment paper.
Arrange your little duo together on a shelf or desk for an instant dose of joy
Yin-Yang Charm Pair
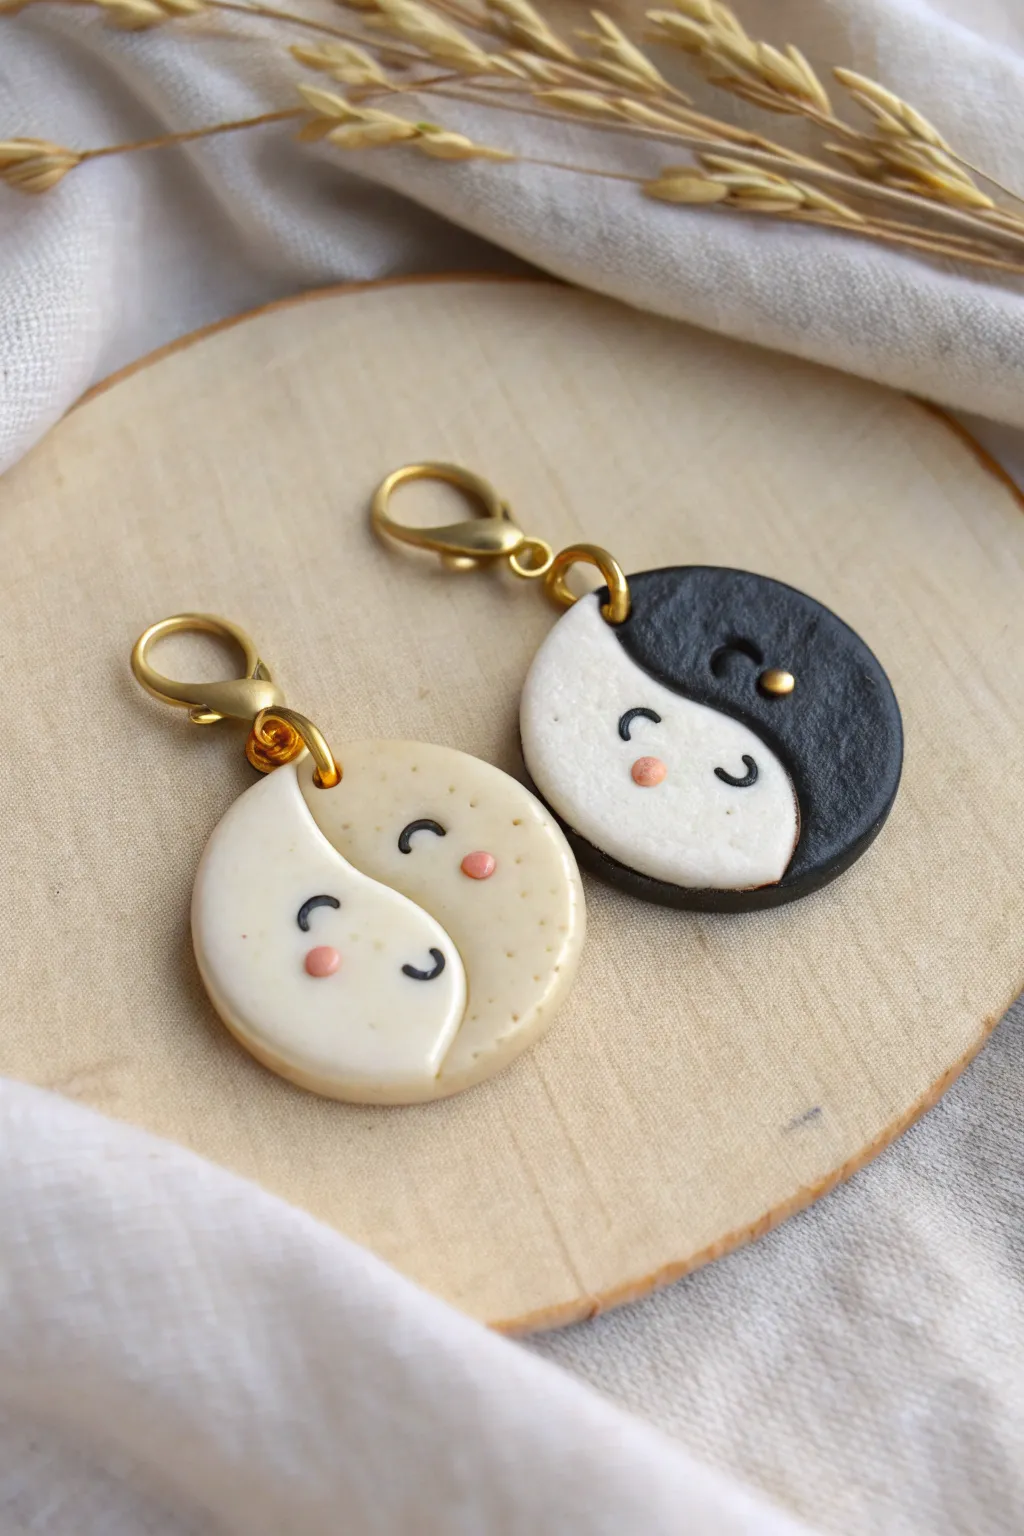
These adorable interlocking charms offer a playful twist on the classic yin-yang symbol, featuring sweet smiling faces instead of dots. Perfect for sharing with a best friend or keeping as a matching set, they combine soft organic textures with cute kawaii expressions.
Step-by-Step Guide
Materials
- Polymer clay (White, Black, Beige/Tan, Pink)
- Circle clay cutter (approx. 1-1.5 inch diameter)
- Clean crafting blade or X-Acto knife
- Dotting tool or ball stylus
- Rolling pin or pasta machine
- Gold clay (optional, for the small detail dot)
- Gold jump rings (6-8mm)
- Gold lobster clasps
- Jewelry pliers
- Oven/baking sheet
- Sandpaper (optional)
Step 1: Preparing the Base
-
Condition the clay:
Start by kneading your white, black, and beige polymer clay separately until they are soft and pliable. This prevents cracks during baking. -
Roll out sheets:
Roll each color into a flat sheet of equal thickness, about 3-4mm distinct. You want them substantial enough to be durable charms. -
Cut the circles:
Use your circle cutter to punch out two full circles: one from the white clay and one from the black clay. For the second charm, you’ll need another white circle and a beige circle.
Step 2: Creating the Yin-Yang Shape
-
First cut:
Take your first white circle. Using your blade, freehand a gentle ‘S’ curve cut right down the middle to separate it into two teardrop-like yin-yang halves. -
Creating the match:
Repeat this ‘S’ curve cut on the black circle and the beige circle. Try to keep the curve shape as consistent as possible across all pieces so they fit together well. -
Assemble the pairs:
Swap the halves. Fit one white half against a black half to form the first circle. Fit the other white half against a beige half for the second circle. Press the seams together gently to bond the raw clay. -
Re-cut for precision:
If the circle shape got distorted during assembly, use your cutter to punch the joined pieces again, creating a perfect round edge.
Sticky Seams?
If the two halves won’t bond, create ‘liquid clay’ by mixing a scrap of clay with baby oil. Brush this paste on the edges before pressing the halves together.
Step 3: Adding Details
-
Make the eyes:
Roll extremely thin ‘snakes’ of black clay. Cut tiny segments and curve them into ‘U’ shapes for sleeping eyes. -
Apply the faces:
Place two closed eyes on each half of the charms. Using a gentle touch helps keep the tiny clay snakes from flattening too much. -
Rosy cheeks:
Take a tiny amount of pink clay and roll it into four small balls. Flatten them slightly onto the ‘cheeks’ of the faces, just under the eyes. -
Tiny dot accents:
For the classic yin-yang look, place a tiny ball of gold clay on the black side, or simply indent a small dot on the beige side for texture. -
Insert hardware holes:
Use a needle tool or toothpick to poke a hole near the top edge of each charm. Ensure the hole is large enough for your jump rings.
Make it Sparkle
Add a coat of UV resin or glossy water-based glaze to the finished baked pieces. This protects the faces and gives the charms a professional, ceramic-like shine.
Step 4: Finishing
-
Bake:
Bake the charms according to your clay manufacturer’s instructions (usually 275°F/135°C for 15-30 minutes). I recommend tenting them with foil to prevent white clay from scorching. -
Cool and smooth:
Let the pieces cool completely. If any edges are rough, gently sand them with fine-grit sandpaper. -
Attach hardware:
Using pliers, open a jump ring and thread it through the hole in the clay charm. Slide on the lobster clasp before closing the ring securely.
Clip these onto your favorite bag zipper or key ring for a daily dose of balance and joy
Puzzle Piece Partners
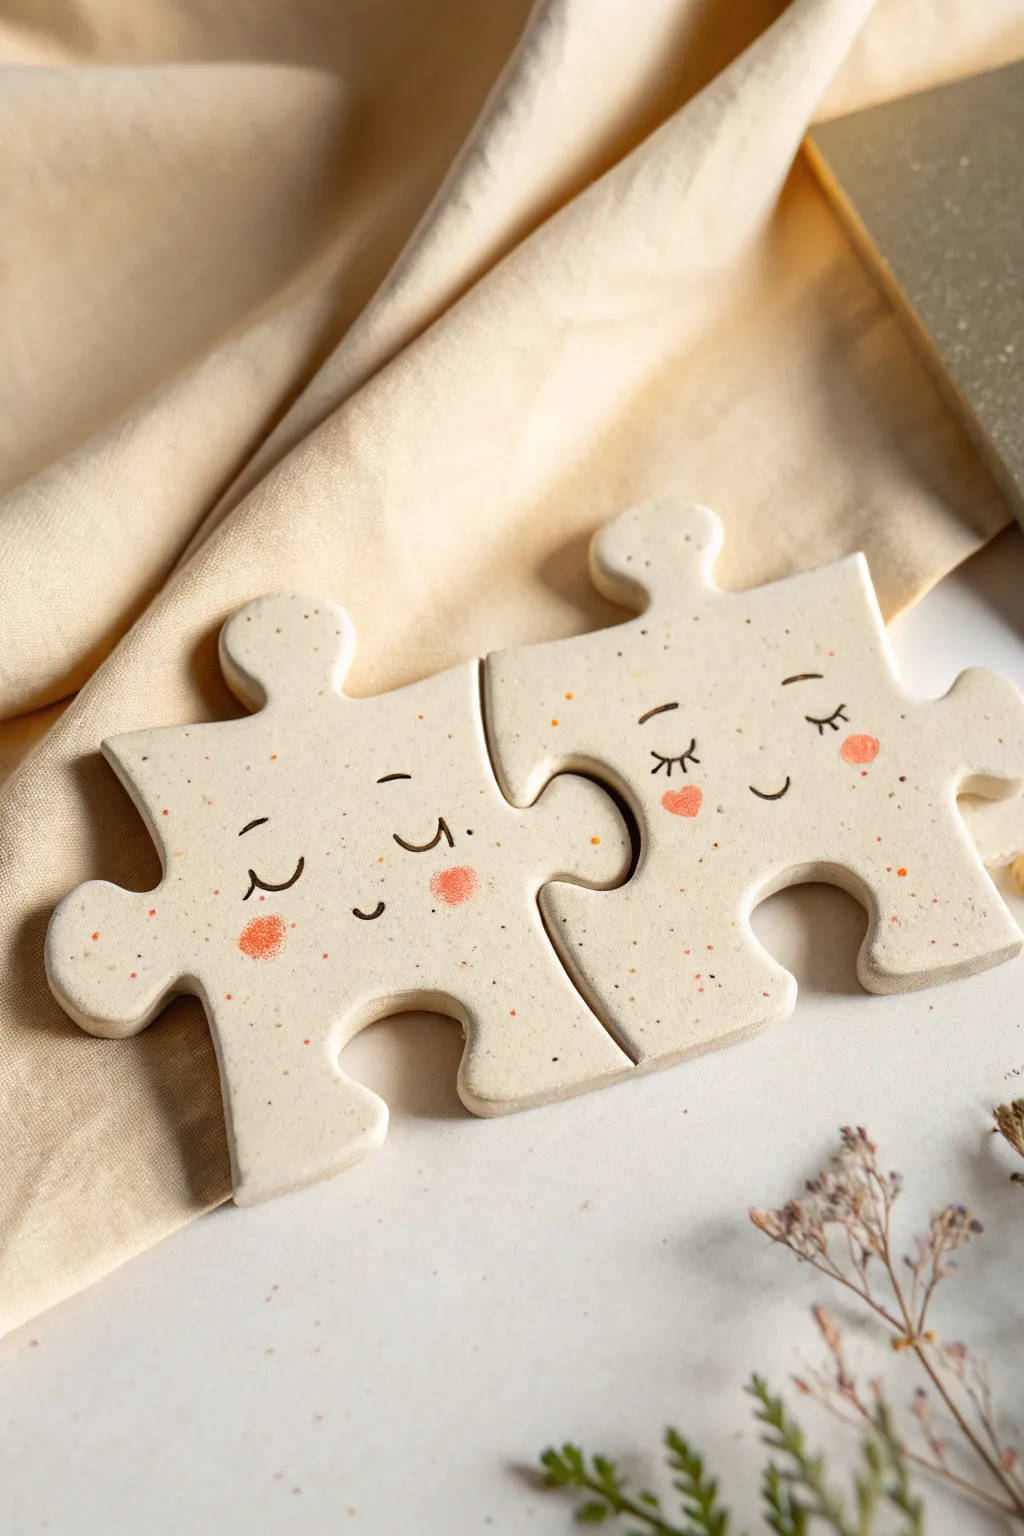
Celebrate connection with these adorable clay puzzle pieces that fit together perfectly. These charming partners feature sweet, sleepy expressions and speckled details, making them a heartwarming keepsake or gift for a best friend or loved one.
Step-by-Step
Materials
- Polymer clay (white or beige with speckles)
- Rolling pin or pasta machine
- Paper template or cardstock
- Precision craft knife (X-Acto)
- Fine-grit sandpaper
- Black acrylic paint
- Fine detail paintbrush (size 0 or 00)
- Blush pink or coral acrylic paint
- Small round sponge applicator or cotton swab
- Satin or matte varnish (optional)
- Toothpick or needle tool
- Wax paper or ceramic tile (work surface)
Step 1: Planning and Shaping the Clay
-
Prepare your template:
Sketch two interlocking puzzle pieces on cardstock or simple paper. Ensure the knob of one piece fits snugly into the socket of the other, then cut them out to use as stencils. -
Condition the clay:
Take your speckled beige polymer clay and knead it until it is soft and pliable. If you can’t find pre-speckled clay, simply mix tiny amounts of brown and black pepper into white clay for a similar effect. -
Roll out the slab:
Roll the clay onto a smooth surface using a rolling pin or pasta machine. Aim for a consistent thickness of about 1/4 inch (6mm) to ensure the pieces feel substantial and sturdy. -
Trace and cut:
Place your paper templates onto the rolled clay. Using a precision craft knife, carefully trace around the edges. I find it helpful to hold the blade straight up and down to avoid beveled edges. -
Test the fit:
Before baking, gently slide the two clay pieces together to ensure they interlock correctly. If the fit is too tight, trim a hairsbreadth of clay from the inner curve of the socket piece. -
Soften the edges:
Dip your finger in a little bit of water (or baby oil if the clay is sticky) and gently run it along the cut edges. This smooths out any sharpness left by the knife for a rounded, professional finish. -
Bake the pieces:
Transfer your pieces to a baking sheet lined with parchment paper. Bake according to the manufacturer’s instructions on your clay package, which is usually around 275°F (135°C) for 15-30 minutes.
Step 2: Painting and Finishing
-
Cool and sand:
Allow the pieces to cool completely after baking. If there are still any rough spots on the edges, lightly buff them away with fine-grit sandpaper. -
Outline the eyes:
Using a very fine detail brush and black acrylic paint, carefully paint two small, curved arches for closed eyes on each piece. Place them slightly wide-set for a cuter look. -
Add the lashes:
For the feminine piece (the ‘socket’ piece in the image), add three tiny, delicate lashes extending from the outer corner of each eye curve. -
Paint the smiles:
Paint a tiny, subtle ‘U’ shape between and slightly below the eyes for the mouth. Keep the line thin and delicate so it doesn’t overpower the face. -
Create rosy cheeks:
Dip a small sponge applicator or the tip of a cotton swab into coral or blush pink paint. Dab off most of the paint onto a paper towel until it stamps dryly. -
Apply the blush:
Gently press the sponge onto the clay just below the eyes to create soft, round cheeks. On the right-hand piece in our example, paint a tiny heart shape on one cheek for extra character. -
Add freckles:
Using the very tip of a toothpick or a clean brush, add tiny dots of the coral paint around the cheeks and forehead area to enhance the speckled texture. -
Let the paint dry:
Allow the acrylic paint to dry fully, which should take about 10–20 minutes depending on how thick the application was. -
Seal the work:
Finish by applying a thin coat of matte or satin varnish over the front face of the puzzle pieces to protect the painted details from scratching over time.
Uneven Surfaces?
If your clay surface isn’t smooth after baking, you likely trapped air bubbles or lint. Use sandpaper to buff the surface flat, then wipe with rubbing alcohol before painting.
Make Them Magnets
Glue strong neodymium magnets to the back of each piece with E6000 glue. Now your interlocking best friends can live on your fridge and hold up photos.
Display these charming pieces side-by-side to remind you that some things just fit perfectly together
Tiny Planter and Sprout Duo
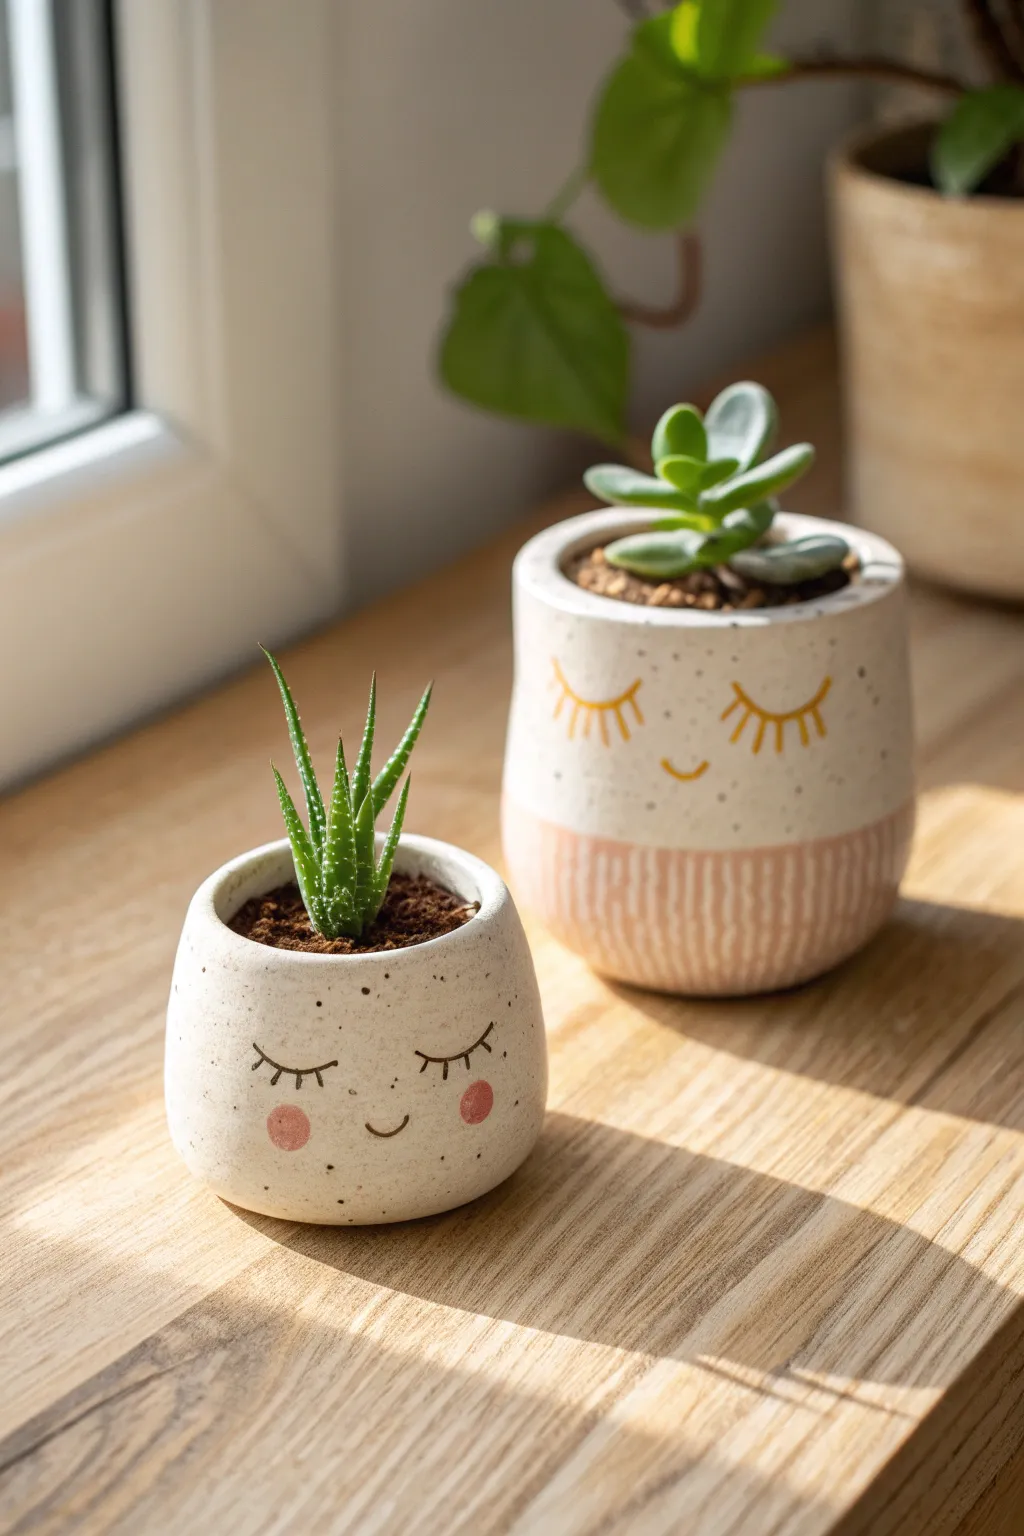
Bring a touch of serene charm to your windowsill with these adorable handmade clay pots. These mini planters feature sweet sleeping faces and simple, minimalist details that let your tiny succulents shine.
Step-by-Step Guide
Materials
- Air-dry clay (white) or polymer clay
- Rolling pin
- Clay sculpting tools (or a butter knife)
- Small circular cookie cutters or a glass
- Water bonding slip (if using air-dry clay)
- Fine-grit sandpaper
- Acrylic paints: Black, Soft Pink, Mustard Yellow
- Fine detail paintbrush
- Clear matte varnish or sealant
- Succulent potting mix
Step 1: Shaping the Pots
-
Prepare the bases:
Start by rolling out a slab of clay to about a 1/4-inch thickness. Use a circular cutter or a small glass to cut out two circles for your bases. One should be slightly larger if you want size variation, but identical sizes work perfectly too. -
Create the walls:
Roll out two long rectangular strips of clay. The width of these strips will determine the height of your pots, so make one strip wider for the tall planter and one narrower for the squat one. -
Form the cylinders:
Wrap the rectangular strip around the circumference of your base circle. Trim any excess clay where the ends meet so they butt up against each other perfectly flush. -
Blend the seams:
Using your thumb or a modeling tool, gently smudge the clay downward from the wall onto the base to fuse them together. Do the same for the vertical seam where the wall ends meet. I find that dipping my finger in a tiny bit of water helps smooth air-dry clay seamlessly. -
Smooth and refine:
Once the basic cup shape is formed, dampen your fingers slightly and run them over the entire surface to remove fingerprints and bumps. Gently round over the top rim so it looks soft and organic rather than sharp. -
Create drainage (optional):
If you plan to plant directly into these, use a straw to poke a single hole in the center of the base. If these are just cover pots for plastic nursery pots, you can skip this step. -
Drying time:
Let your pots dry completely. For air-dry clay, this usually takes 24-48 hours depending on humidity. Rotate them occasionally to ensure even drying.
Seamless Smoothness
Use a damp sponge rather than just fingers to smooth the clay before drying. It acts like a potter’s rib tool, erasing fingerprints and creating an incredibly professional, consistent surface texture.
Step 2: Refining and Decorating
-
Sanding down:
Once bone dry, take fine-grit sandpaper and gently buff the exterior. Focus on the rim and any areas where the seams might still be slightly visible to get that smooth, ceramic-like finish. -
Dust off:
Wipe the pots down with a slightly damp cloth or a dry brush to remove all the clay dust before painting. -
Speckled effect:
Dilute a tiny amount of black or brown paint with water on a toothbrush. Run your thumb over the bristles to flick tiny speckles onto the raw white clay for a natural, stone-like texture. -
Painting the tall pot base:
Mix a soft, muted pink color. Paint the bottom third of the taller pot. You don’t need a perfectly straight line; a slightly organic edge adds to the handmade charm. -
Detailing the tall pot stripes:
Once the pink base is dry, use a very fine brush (or a scratching tool if scratching away paint) to create vertical white lines or negative space stripes through the pink section. -
Drawing the faces:
Using your finest brush and black paint, carefully paint two closed, curved eyelids on the shorter pot. Add a small, simple ‘u’ shape for a smile. For the taller pot, paint the smile and eyelids in yellow/gold, adding little vertical dashes for eyelashes. -
Adding rosy cheeks:
On the shorter pot, dip the very tip of your finger or a round sponge dabber into the pink paint. Blot most of it off, then gently press circle cheeks onto the face. -
Sealing:
Finish by coating both pots inside and out with a matte varnish. This protects the clay from moisture, which is crucial for planters. -
Planting:
Add your succulent soil and tuck your tiny green friends into their new homes.
Cracking Issues?
If small cracks appear as the clay dries, don’t panic. Mix a small amount of fresh clay with water to make a paste (slip) and fill the cracks. Let it dry again, then sand it smooth before painting.
Now you have a sweet pair of sleepy friends ready to brighten up your morning light