If you’re hunting for clay projects that feel a little more rugged, practical, and straight-up fun, you’re in the right headspace. These ideas lean into useful, minimal, and humorously quirky makes that guys actually want to keep on their desk, shelf, or workbench.
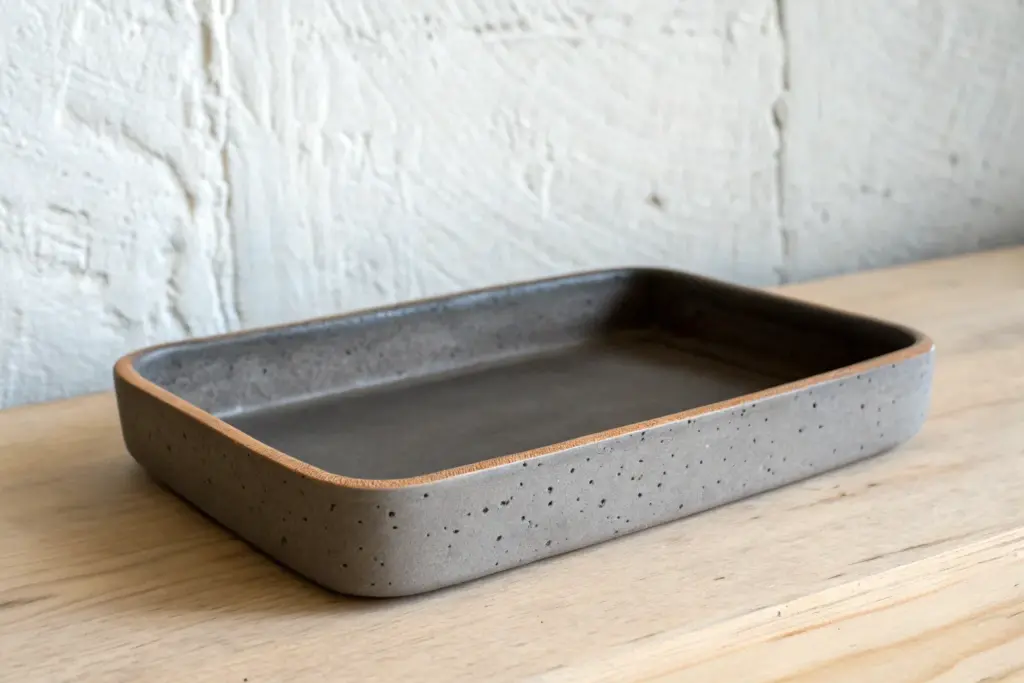
Pocket-Dump Catchall Tray
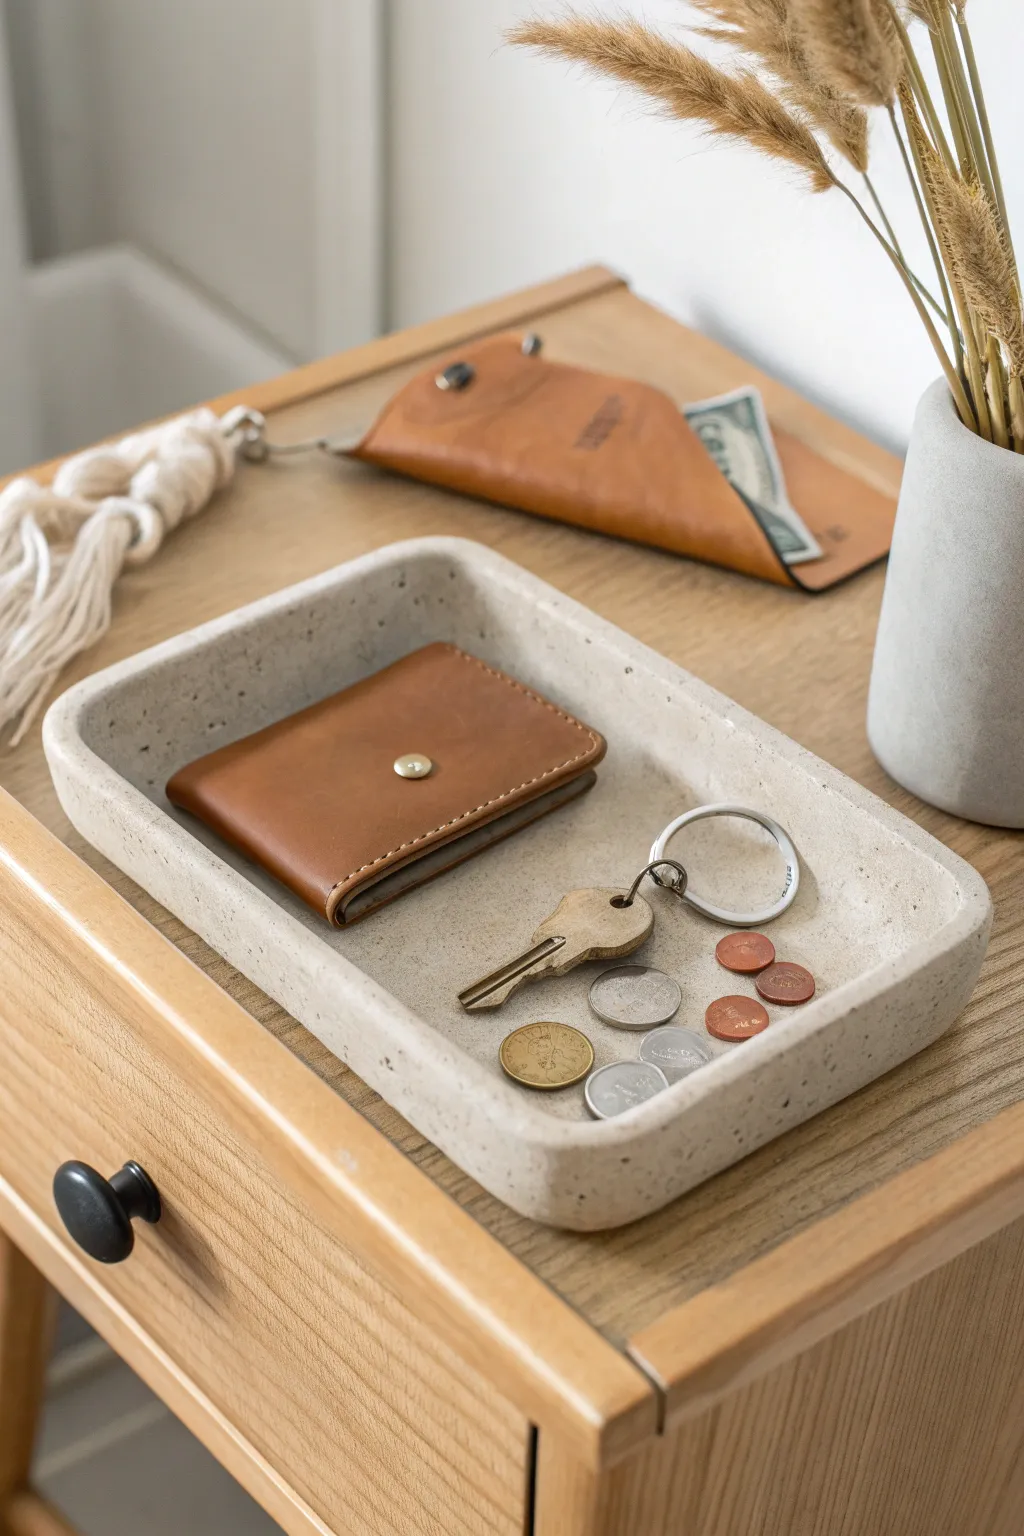
This minimalist catchall tray features a masculine, industrial aesthetic that perfectly mimics the look of raw concrete or speckled stone. With its clean lines and sturdy form, it provides a dedicated landing zone for daily essentials like wallets, keys, and loose change.
Step-by-Step Guide
Materials
- Air-dry clay (white or light grey)
- Rolling pin
- Two wooden guides (0.5 inch thick)
- Craft knife or clay slicer
- Ruler
- Rectangular plastic container (to use as a mold/template)
- Sandpaper (medium and fine grit)
- Acrylic paint (stone grey, black, white, and metallic bronze/brown)
- Old toothbrush
- Matte spray varnish
- Cup of water
- Sponge
Step 1: Shaping the Base
-
Prepare the Clay:
Cut off a generous block of air-dry clay and knead it in your hands until it becomes pliable and warm. If the clay feels too dry or cracks when you bend it, add a few drops of water and continue kneading. -
Roll out the Slab:
Place your clay between two wooden guide strips on a non-stick surface. Roll the clay out until the rolling pin rests on the guides, ensuring a perfectly even thickness of about half an inch. -
Cut the Base Rectangle:
Using your ruler and craft knife, cut a clean rectangle from the slab. A size of roughly 6×9 inches works well for a standard nightstand tray, or you can trace around the base of your plastic container for reference. -
Smooth the Edges:
Dip your finger in a little water and run it along the cut edges of the rectangle to smooth out any sharpness or drag marks from the knife.
Clean Corners Pro-Tip
To get super sharp inside corners without tools, wrap a credit card in a damp paper towel and gently drag it along the interior edges while the clay is still wet.
Step 2: Building the Walls
-
Create Height Coils:
Roll out long snakes of clay, roughly the thickness of your pinky finger. You will need enough length to go around the entire perimeter of your rectangular base. -
Score and Slip:
Use a needle tool or old fork to scratch up the top edges of your base and the bottom of your clay coils. Apply a little water or liquid clay (slip) to these roughened areas. -
Attach the Walls:
Press the coils firmly onto the perimeter of the base. For this tray design, we want the walls to be vertical, not flared, so check the angle as you attach them. -
Blend the Seams:
Using a modeling tool or your thumb, smear the clay from the coil down onto the base on both the inside and outside. Do this until the seam line completely disappears and the wall and base look like one solid unit. -
Refine the Shape:
Use a flat scraper or a ruler to gently paddle the outside walls to make them perfectly straight. I like to place a rectangular plastic container inside the tray briefly to help push the inside corners into a sharp 90-degree shape.
Level Up: Faux Concrete
Mix a small amount of fine sand or dried coffee grounds directly into your white clay before shaping. This gives it a genuine gritty texture instead of just a painted one.
Step 3: Refining and Finish
-
Final Smoothing:
Before setting it aside, use a slightly damp sponge to wipe the entire surface. This removes fingerprints and creates that smooth, stone-like texture we are aiming for. -
Let it Dry:
Place the tray in a cool, dry place away from direct sunlight. Let it dry for at least 24-48 hours. Turn it over halfway through the process to ensure the bottom dries evenly. -
Sand the Imperfections:
Once fully dry and hard, use medium-grit sandpaper to level the rim and remove any bumps. Finish with fine-grit sandpaper for a silky touch. -
Base Coat Painting:
Paint the entire tray with a mixture of light grey acrylic paint. You might need two coats to get full opaque coverage. -
Create the Speckle Effect:
Dilute a small amount of black or dark grey paint with water. Dip an old toothbrush into this mixture, aim it at the tray, and run your thumb across the bristles to flick tiny specks of paint onto the surface. -
Add Dimension:
Repeat the splatter technique sparingly with a tiny bit of metallic bronze or brown paint. This adds subtle warmth that mimics natural rock aggregations. -
Seal the Tray:
Once the paint is completely dry, take the tray outside and spray it with two light coats of matte varnish. This will protect the finish from scratches when metal keys are tossed in.
Place this sturdy tray on a dresser or entryway table to keep your daily carry organized in style


Minimal Desk Pen Block
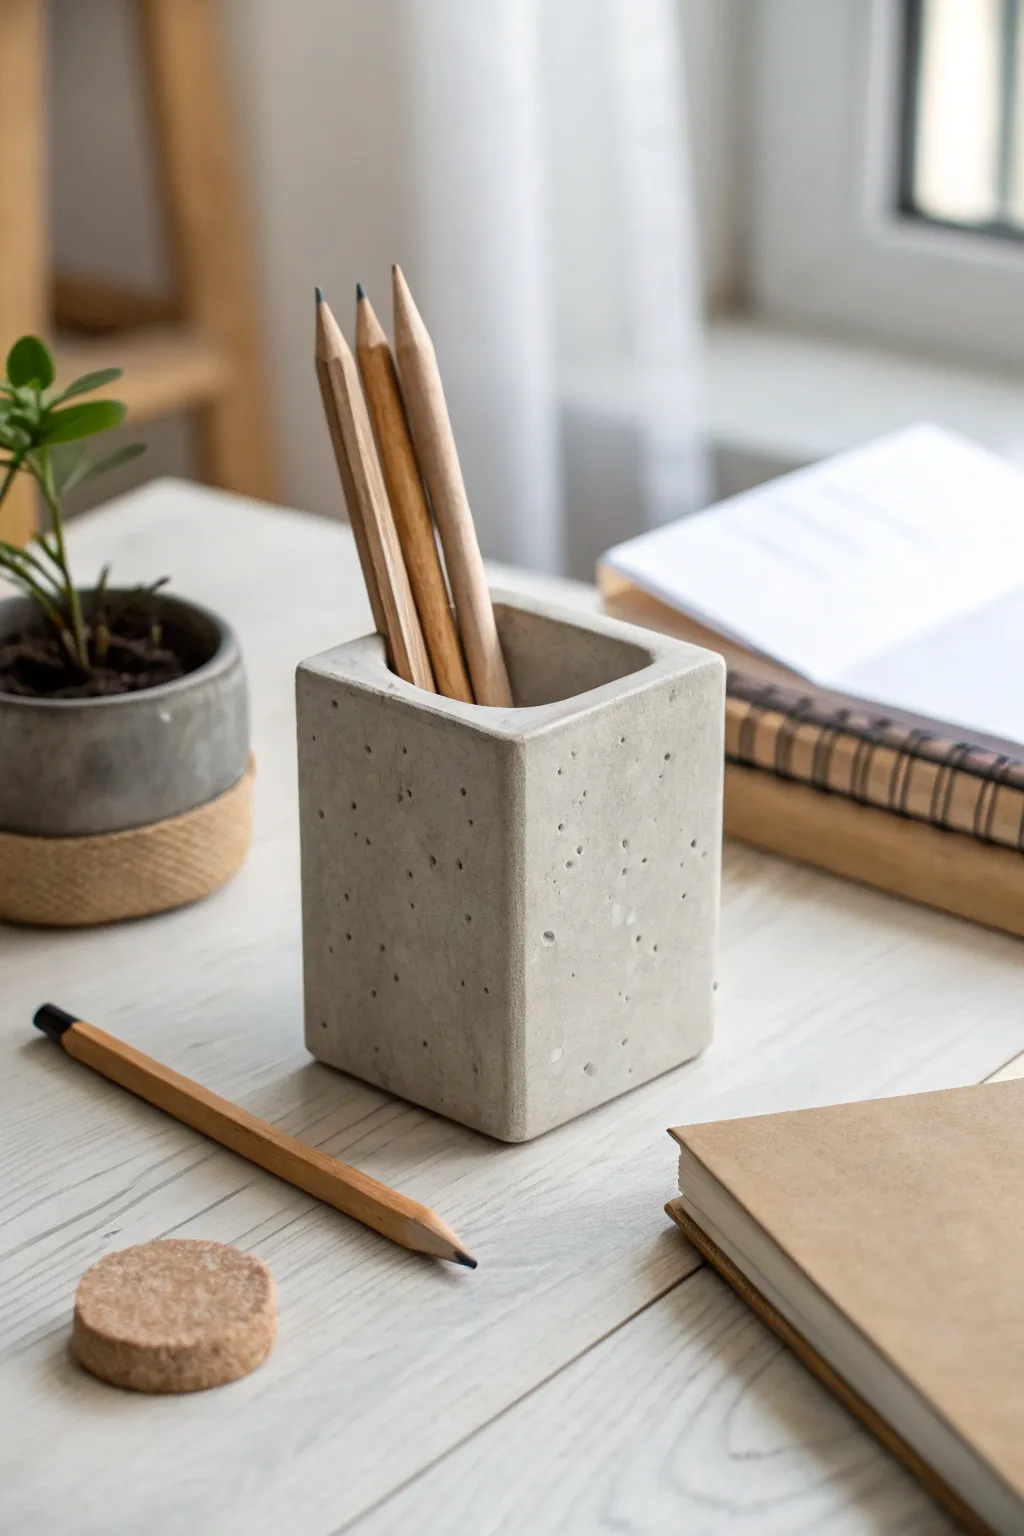
Bring an industrial, minimalist edge to any workspace with this sleek pen block that mimics the raw beauty of cast concrete. Its simple form and textured finish make it a masculine, understated accessory perfect for organizing essential writing tools.
Step-by-Step Tutorial
Materials
- Gray air-dry clay (or polymer clay)
- Rolling pin
- Ruler
- Craft knife or clay blade
- Small wooden block or cardboard form (for internal structure)
- Coarse sandpaper
- Toothbrush or stiff bristle brush
- Needle tool or toothpick
- Water
- Clear matte varnish
Step 1: Preparation & Shaping
-
Prepare the core:
To ensure perfectly straight sides and a deep well for pens, find a small rectangular object to use as a temporary mold. A small cardboard juice box cut to size or a wooden scrap block wrapped in plastic wrap works perfectly. -
Condition the clay:
Take a substantial amount of gray clay and knead it until it’s pliable and smooth. If you are using air-dry clay, keeping your hands slightly damp will prevent cracking. -
Roll out slabs:
Roll your clay out into a uniform slab, aiming for a thickness of about 1/4 inch to ensure the walls are sturdy enough to stand on their own. -
Measure and cut:
Using your core form as a guide, measure and cut five rectangular panels: four for the sides and one for the base. accuracy is key here for square corners. -
Construct the box:
Place the base slab down first. Score the edges of the base and the bottom of your side panels, applying a tiny bit of water or slip (clay slurry) to act as glue. -
Join the walls:
Assemble the four walls around your wrapped core form. Press the seams firmly together, blending the clay with your finger or a modeling tool so the joints disappear completely.
Step 2: Refining & Texturing
-
Smooth the surfaces:
Once the basic box is constructed, remove the internal form carefully. Use a flat tool or your finger to smooth out the initial shape, ensuring the walls remain straight. -
Round the rim:
Pay special attention to the top opening. Gently round over the sharp inner and outer edges for a softer, more finished look similar to cast concrete. -
Create the concrete texture:
Take a toothbrush or stiff brush and gently tap it all over the surface. This creates the subtle, porous grain found in real cement. -
Add imperfections:
I like to use a needle tool to poke random small holes of varying depths. Focus a few clusters near the corners to mimic air bubbles trapped during casting. -
Soften the corners:
Concrete blocks rarely have razor-sharp corners. Gently run your finger down the four vertical edges to slightly round them off. -
Initial drying:
Let the piece engage in a slow drying process away from direct heat or sunlight. Rotate it occasionally so all sides dry evenly.
Industrial Edge
Mix a tiny pinch of coarse black pepper or dry used coffee grounds into the clay before rolling. This adds internal speckling that mimics aggregate stone.
Step 3: Finishing Touches
-
Sand for realism:
Once bone dry (or baked, if using polymer), take coarse sandpaper and lightly sand the flat surfaces. This enhances the matte, stony texture. -
Optional wash:
If your clay looks too flat, create a very watery wash of darker gray or black acrylic paint. Brush it on and immediately wipe it off; the dark pigment will stay in the tiny holes and texture. -
Clean up dust:
Use a dry brush or tack cloth to remove all sanding dust from the pores and indentations. -
Apply protection:
Finish with a coat of clear matte varnish. Avoid glossy finishes, as the goal is to maintain that raw, industrial rock aesthetic.
Level Up: Weighted Base
Embed a few heavy metal washers or coins into the bottom slab during construction. The added weight makes the block feel substantial and high-quality.
Place this sturdy block on your desk for an instant upgrade in organization and style


Phone Stand With a Bold Shape
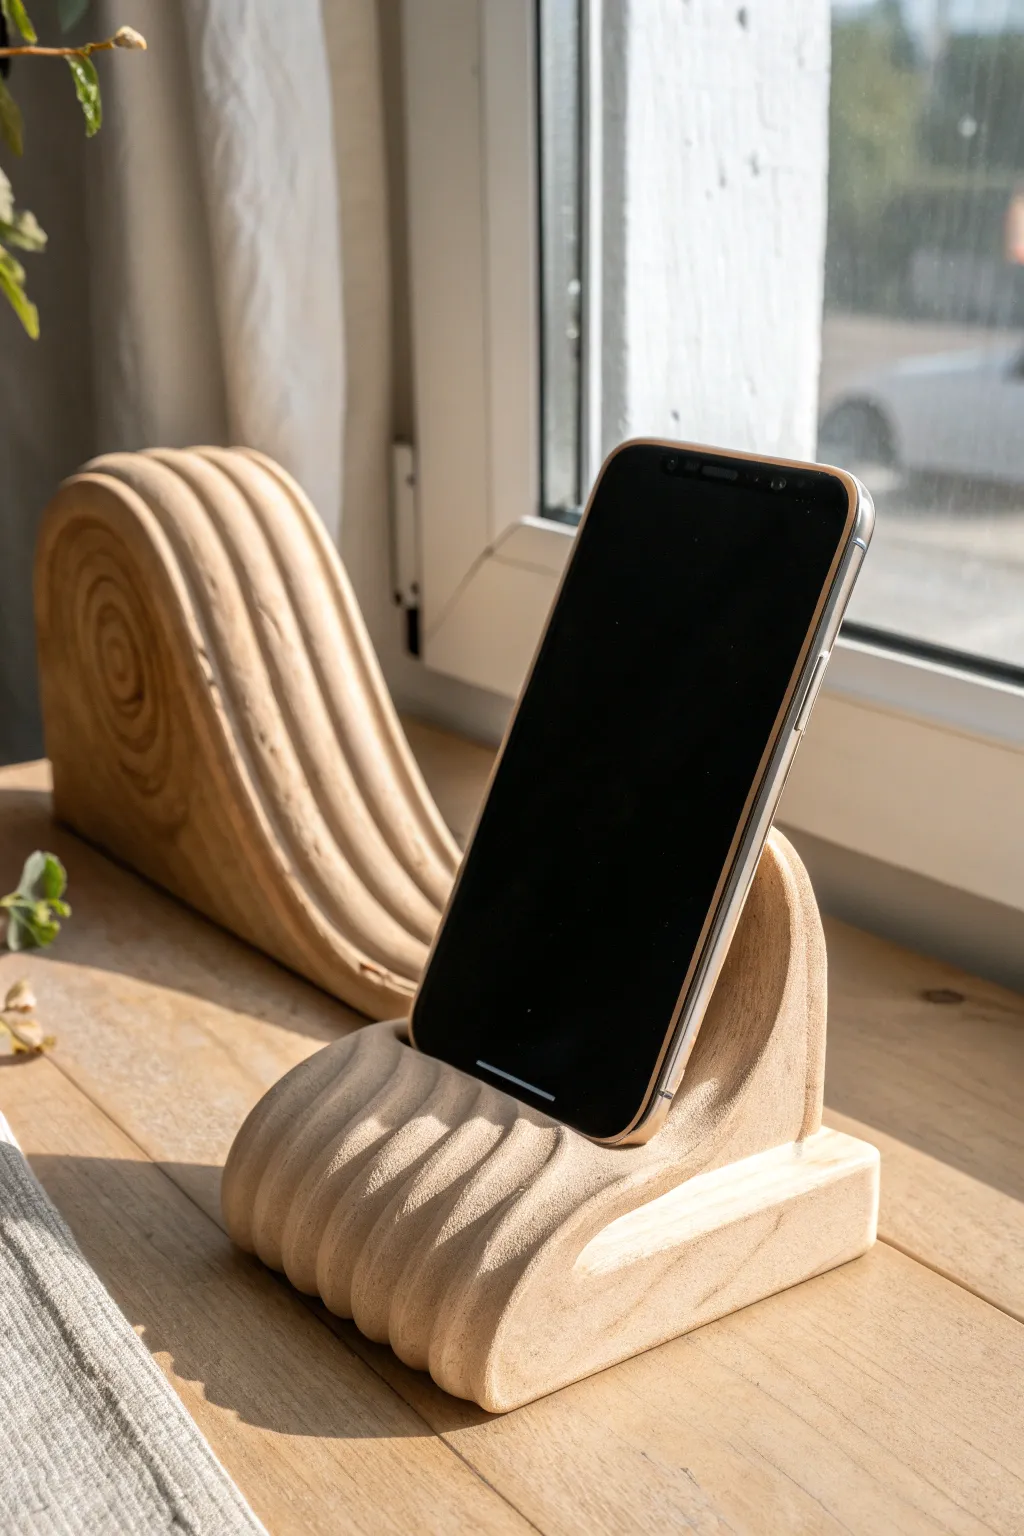
This phone stand combines sculptural aesthetics with everyday utility, featuring a distinctively ribbed, wave-like texture that evokes brutalist architecture. Its heavy, grounded form ensures stability for your device while serving as a striking desk accessory when not in use.
Detailed Instructions
Materials
- Air-dry clay or polymer clay (stone or granite color recommended)
- Clay rolling pin
- Wire clay cutter or fettling knife
- Loop tool or carving gouges (large size)
- Coarse and fine sandpaper (80, 150, and 220 grit)
- Ruler
- Small bowl of water
- Sponge
- Matte varnish or sealant
Step 1: Forming the Base Block
-
Prepare the Clay:
Start by conditioning your clay. If using polymer, knead it until warm and pliable. For air-dry clay, wedge it briefly to remove large air bubbles, but keep it a bit firm. -
Shape the Primary Wedge:
Form a large, solid block of clay. Using your hands and a flat surface, shape it into a distinct wedge shape—this will be the backbone of the stand. -
Define Dimensions:
Flatten the bottom completely so it sits flush on the table. The back should rise steeply, while the front face should have a gentler slope where the phone will eventually rest. -
Cut the Side Profile:
Use your wire cutter or knife to slice the sides cleanly. You want a consistent width of about 3 to 4 inches, wide enough to support a modern smartphone.
Cracking Repairs
If hairline cracks appear during drying, mix a small amount of fresh clay with water (or liquid polymer) to form a paste. Fill the cracks, smooth over, and let dry again.
Step 2: Carving the Texture
-
Outline the Ribs:
Lightly sketch curved, concentric lines along the sloped front face using a needle tool. These lines should curve downward from the top back edge toward the front bottom edge. -
Carve the Grooves:
Using a large loop tool, carve out the clay between your sketched lines. I find it easiest to pull the tool towards me in a smooth, continuous motion to create deep, rounded valleys. -
Round the Ridges:
Once the deep grooves are cut, gently use your fingers or a damp sponge to round over the high points (ridges). They should look like soft waves, not sharp peaks. -
Refine the Side Arc:
Ensure the side profile follows the curve of your carving. The top edge should round over smoothly into the back support.
Weight It Down
For a premium feel, hollow out the base slightly before drying and insert heavy washers or fishing weights. Cover them with a slab of clay so the stand feels solid.
Step 3: Creating the Phone Slot
-
Measure Your Device:
Check the thickness of your phone (including its case). You need a slot slightly wider than this measurement. -
Cut the Ledge:
Near the front third of the wave slope, cut a horizontal notch or ledge. This needs to be deep enough to hold the phone securely but not so deep it obscures the screen. -
Angle the Backrest:
Ensure the back of this notch is angled slightly backward. This prevents the phone from tipping forward. Test the angle carefully if the clay is firm enough.
Step 4: Finishing and Drying
-
Smooth the Surface:
Dip your finger in water and run it along all the cut grooves. Remove any clay burrs or crumbs created during carving. -
Slow Drying:
If using air-dry clay, cover the piece loosely with plastic for the first 24 hours to prevent cracking, then let it air dry completely (up to 48 hours more). -
Baking (Polymer Only):
If using polymer clay, bake according to the manufacturer’s instructions. Use an oven thermometer to ensure precise heat. -
Sanding for Texture:
Once fully cured or dry, sand the piece. Start with 80 grit to shape any uneven ridges, then move to higher grits for a smooth, stone-like finish. -
Seal the Piece:
Apply a coat of matte varnish. This mimics the raw stone look shown in the image while protecting the clay from oils and dirt.
Place it on your desk to add a touch of organic modernism to your workspace


Valet Dish With Stamped Texture
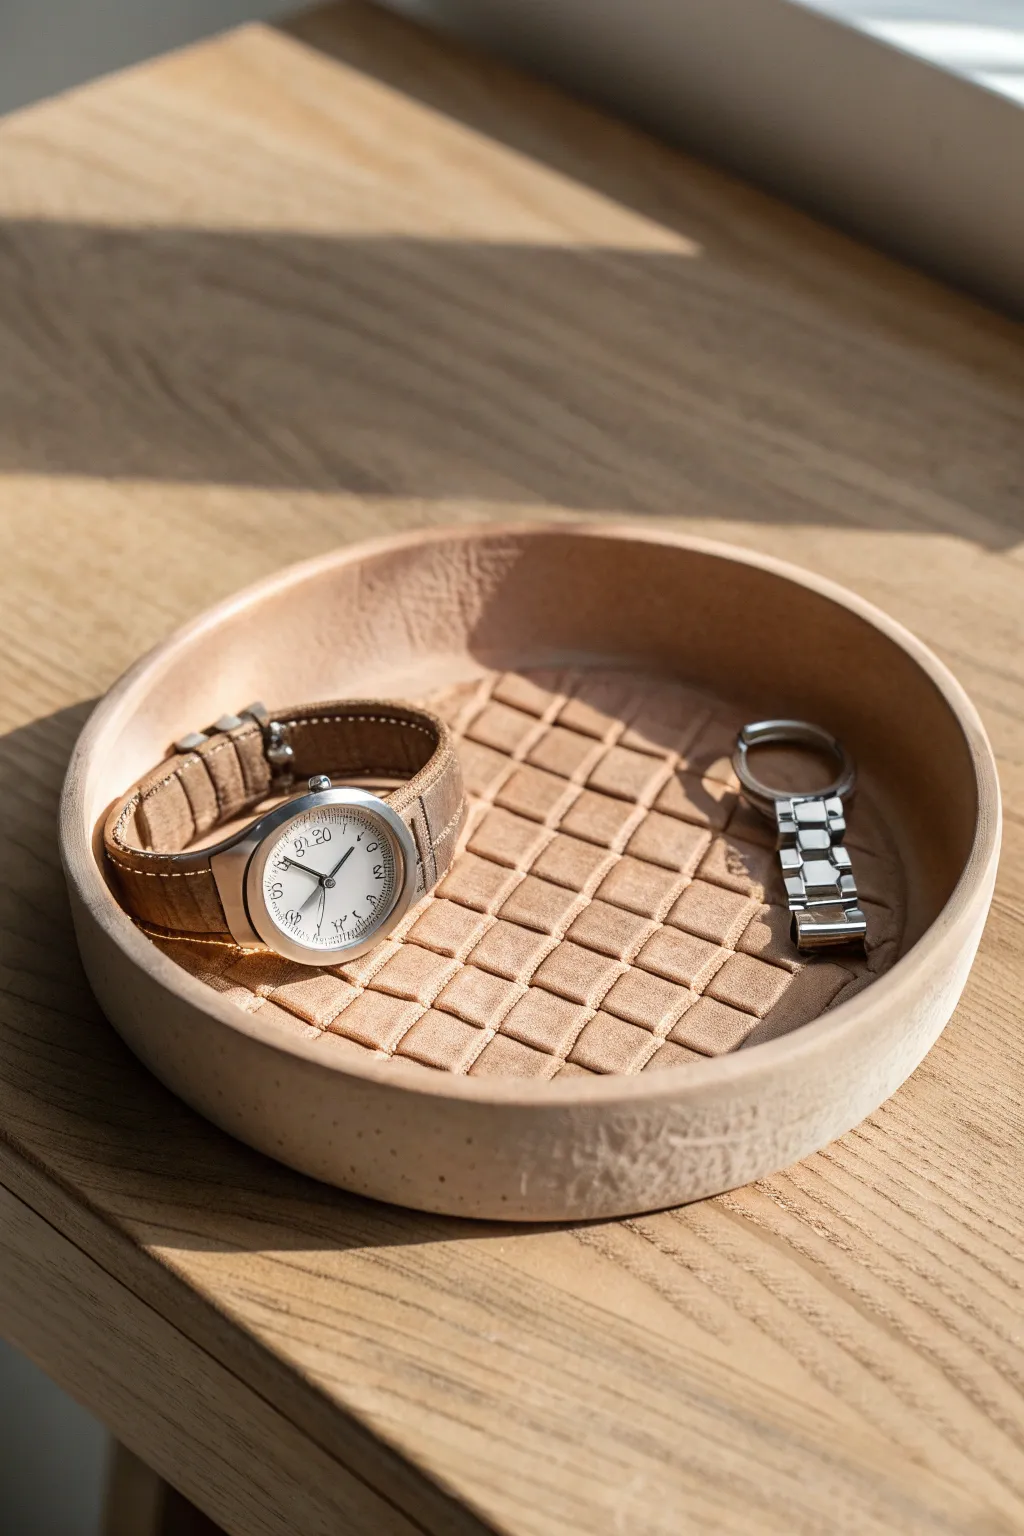
This masculine, minimalist valet dish features a rugged woven texture impressed into pale terracotta or tan stoneware. It’s the perfect catch-all for daily essentials like watches and keys, blending a refined shape with raw, earthy finishes.
Step-by-Step Tutorial
Materials
- Tan stoneware or terracotta air-dry clay
- Rolling pin
- Sharp craft knife or clay needle tool
- Circular guide (bowl or plate, approx. 6-8 inches)
- Square texture tool or stamp (handmade or purchased)
- Small sponge
- Bowl of water
- Sandpaper (fine grit)
- Matte clear sealant (optional)
Step 1: Preparation & Base Creation
-
Wedge the clay:
Begin by wedging your clay thoroughly to remove air bubbles, ensuring a smooth, consistent texture that won’t crack during drying. -
Roll out the slab:
Roll your clay out on a canvas or cloth surface to a uniform thickness of about 1/4 inch. I like to rotate the clay periodically to keep it from sticking. -
Create the texture tool:
If you don’t have a pre-made stamp, carve a simple square grid pattern into a small block of dried clay, cork, or even a potato to mimic the woven look seen in the photo. -
Stamp the center:
Press your texture tool firmly into the central area of the slab. Don’t worry about perfect alignment; a slight irregularity adds to the rustic, woven leather aesthetic. -
Cut the circle:
Place your circular guide over the stamped area and trace around it with a needle tool or knife to cut out a perfect circle.
Step 2: Forming the Dish
-
Smooth the edges:
Dip your finger in a little water and run it along the cut edge of the circle to smooth out any sharpness or loose clay crumbs. -
Prepare the rim strip:
Roll a long, separate strip of clay, roughly 1 inch tall and long enough to wrap around the circumference of your base circle. -
Bevel the edges:
Cut the ends of your strip at a 45-degree angle so they will overlap seamlessly when joined. -
Score and slip:
Score (scratch) the outer edge of the base circle and the bottom edge of the wall strip. Apply a dab of water or slip (clay paste) to both scored areas. -
Attach the wall:
Wrap the strip around the base, pressing it firmly onto the scored area. Ensure the wall stands vertical and straight. -
Blend the seams:
Use a modeling tool or your thumb to drag clay from the wall down onto the base on the inside, and from the base up onto the wall on the outside, completely hiding the seam.
Clean Stamping Tip
Dust your texture stamp lightly with cornstarch before pressing it into the clay. This acts as a release agent and prevents the stamp from pulling up clay or getting stuck.
Step 3: Refining & Finishing
-
Smooth the exterior:
Using a slightly damp sponge, smooth the outside walls to create that clean, matte finish visible in the example. -
Refine the rim:
Gently pinch and smooth the top rim of the dish to ensure it is level and uniform in thickness. -
Add texture to the rim (optional):
To match the photo perfectly, use a coarse sponge or a crumpled ball of foil to dab the outside of the wall, giving it a porous, stone-like appearance. -
Slow drying:
Cover the piece loosely with plastic wrap and let it dry slowly for 24-48 hours. Slow drying prevents warping. -
Sanding:
Once bone dry, specifically sand the top rim and outer walls to remove any sharp connection points or fingerprints. -
Sealing:
Apply a matte sealant to protect the surface from oils and stains, keeping the natural clay color intact.
Fixing Cracks
If small hairline cracks appear at the seam where the wall meets the base while drying, fill them immediately with a mixture of vinegar and soft clay, then smooth over.
Place this handsome dish on a dresser or entryway table to keep daily items organized in style

The Complete Guide to Pottery Troubleshooting
Uncover the most common ceramic mistakes—from cracking clay to failed glazes—and learn how to fix them fast.
Key Bowl With “Garage” Energy
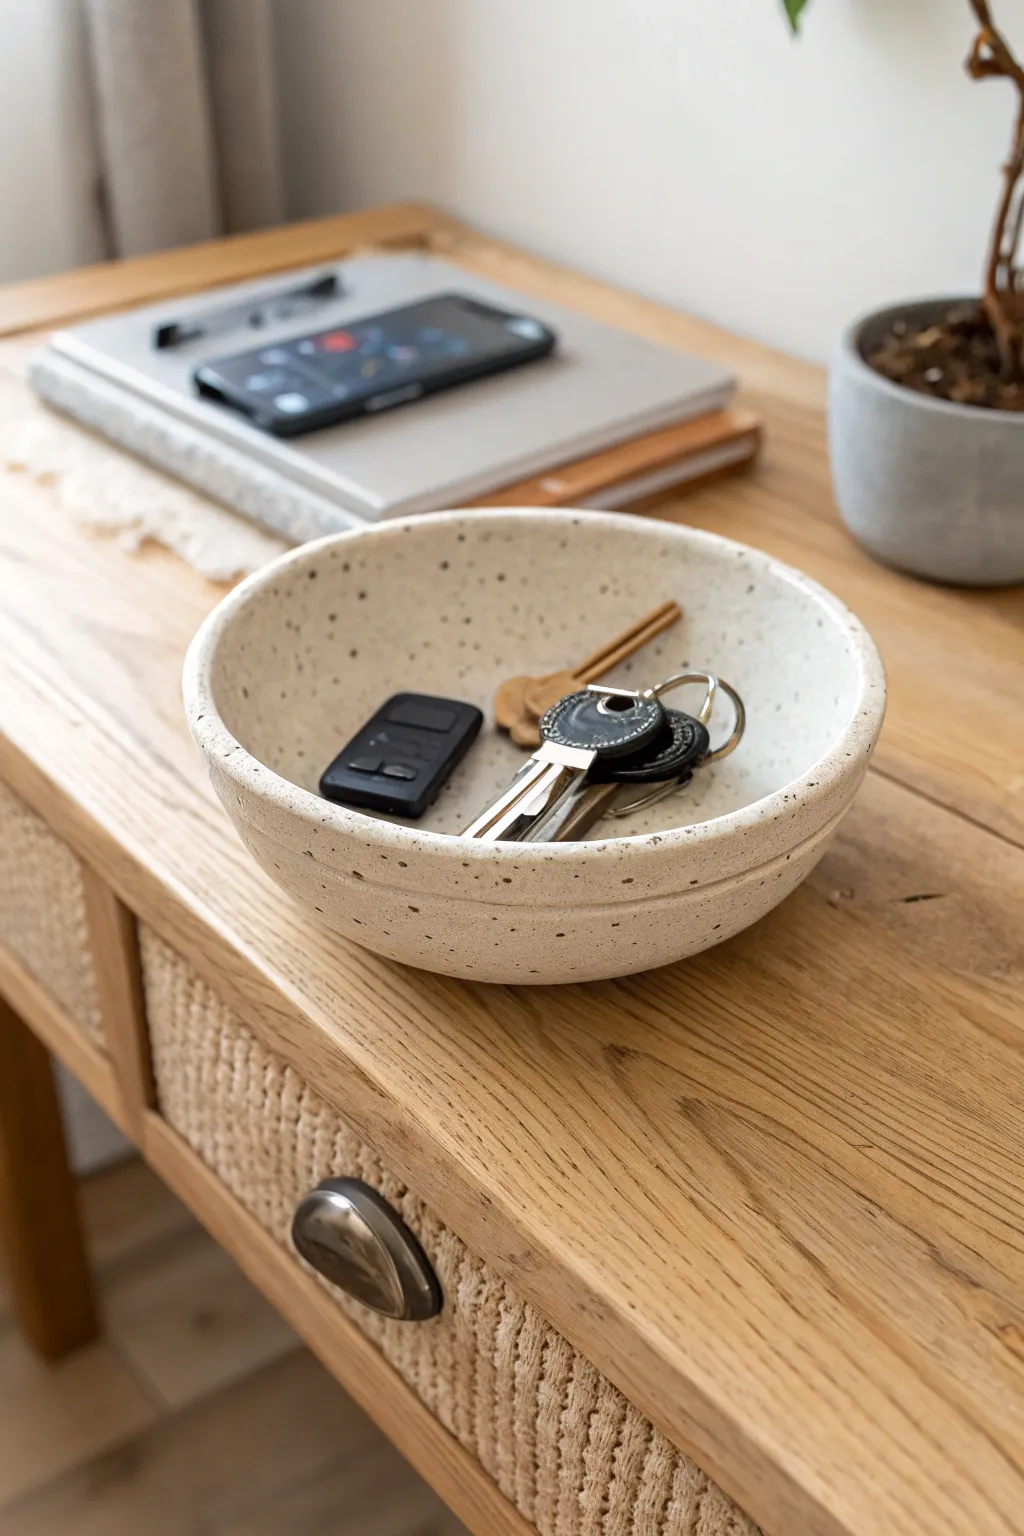
This project creates a functional, understated catchment for daily essentials like keys and wallets, featuring a rugged speckled clay body that feels masculine yet refined. The clean lines and satin finish give it a modern garage-meets-gallery aesthetic perfect for an entryway.
Detailed Instructions
Materials
- Speckled Stoneware Clay (e.g., Laguna Speckled Buff)
- Pottery Wheel (or banding wheel for hand-building)
- Sponge
- Wire Clay Cutter
- Wooden Rib Tool
- Metal Rib Tool
- Needle Tool
- Trimming Tools (loop tools)
- Clear Satin Glaze or Matte Transparent Glaze
- Kiln access
Step 1: Throwing the Form
-
Prepare the clay:
Start by wedging about 2-3 pounds of speckled stoneware clay. Since the speckles are the star here, ensure the clay is free of air bubbles for a smooth throwing experience. -
Center specifically:
Slam the ball onto your wheel head and center it. For this bowl, you want a wider, lower center of gravity, so flatten your centered mound into a puck shape rather than a tall cone. -
Open the floor:
Open usually, but establish a flat, wide floor immediately. Compress the floor thoroughly with your sponge to prevent S-cracks later, maintaining a thickness of about 3/8 inch. -
Pull the walls:
Pull the clay outward and upward. Unlike a cereal bowl, you want the walls to be relatively vertical with a gentle curve. Aim for a 45-degree angle that rises about 2 to 3 inches high. -
Refine the curve:
Use a wooden rib on the inside of the bowl while supporting the outside with your hand or a flexible metal rib. Press outward gently to create a continuous, smooth curve from the floor to the rim. -
Create the signature rim:
This bowl has a thick, substantial rim. Instead of thinning the top edge, compress it down with your thumb or a chamois cloth to keep it rounded and durable. -
Detailing the exterior:
While the wheel is spinning slowly, use the corner of your wooden rib to press a faint groove about an inch from the bottom edge. This little detail adds visual weight to the ‘garage’ aesthetic. -
Wire off:
Run your wire tool under the base to separate it from the wheel head. Carefully lift the bat or board and set it aside to dry to leather-hard.
Uneven Speckles?
If your clay isn’t showing enough speckles after firing, try wiping the bisque-ware with a damp sponge before glazing. This exposes the iron pyrite particles slightly more.
Step 2: Trimming and Finishing
-
Center for trimming:
Once leather-hard (firm enough to handle but not chalky), invert the bowl onto the wheel head. Center it and secure it with three small clay lugs. -
Define the foot:
Using a loop tool, trim away the excess clay from the bottom corners to reveal the bowl’s exterior curve. Carve a distinct foot ring that mirrors the sturdiness of the rim. -
Smooth the surface:
After trimming, run a damp sponge or a soft rubber rib over the entire exterior to smooth out the groggy texture. You want the speckles visible, but the surface shouldn’t feel rough like sandpaper. -
Slow drying:
Loosely cover the bowl with plastic to let it dry slowly for 2-3 days, then uncover it until bone dry. This prevents warping, which is crucial for a wide, open shape. -
Bisque fire:
Load the bone-dry bowl into the kiln for a bisque firing (usually Cone 04). This hardens the clay and prepares it for glazing.
Step 3: Glazing
-
Wax the foot:
Apply wax resist to the bottom of the foot ring. This saves you from having to wipe glaze off the very bottom later and ensures it doesn’t stick to the kiln shelf. -
Select the glaze:
Use a clear satin or clear matte glaze. I find that glossy glazes can sometimes obscure the natural texture of the clay, while a satin finish enhances that raw, industrial look. -
Dip application:
Dip the entire bowl into the bucket of clear glaze for about 3 seconds using dipping tongs. Pull it out and give it a quick shake to remove drips. -
Cleanup:
Once the glaze is dry to the touch, rub out any pinholes with a clean finger and sponge off any stray droplets on the waxed foot. -
Final firing:
Fire the bowl to the maturity temperature of your clay body (typically Cone 5 or 6 for speckled stoneware). Let the kiln cool completely before opening.
Rugged Banding
For more industrial flair, leave the exterior unglazed (raw clay) and only glaze the interior. This creates a striking contrast between the smooth inside and rough outside.
Place this sturdy vessel on a console table and enjoy a clutter-free entryway
Grill Master Salt Cellar
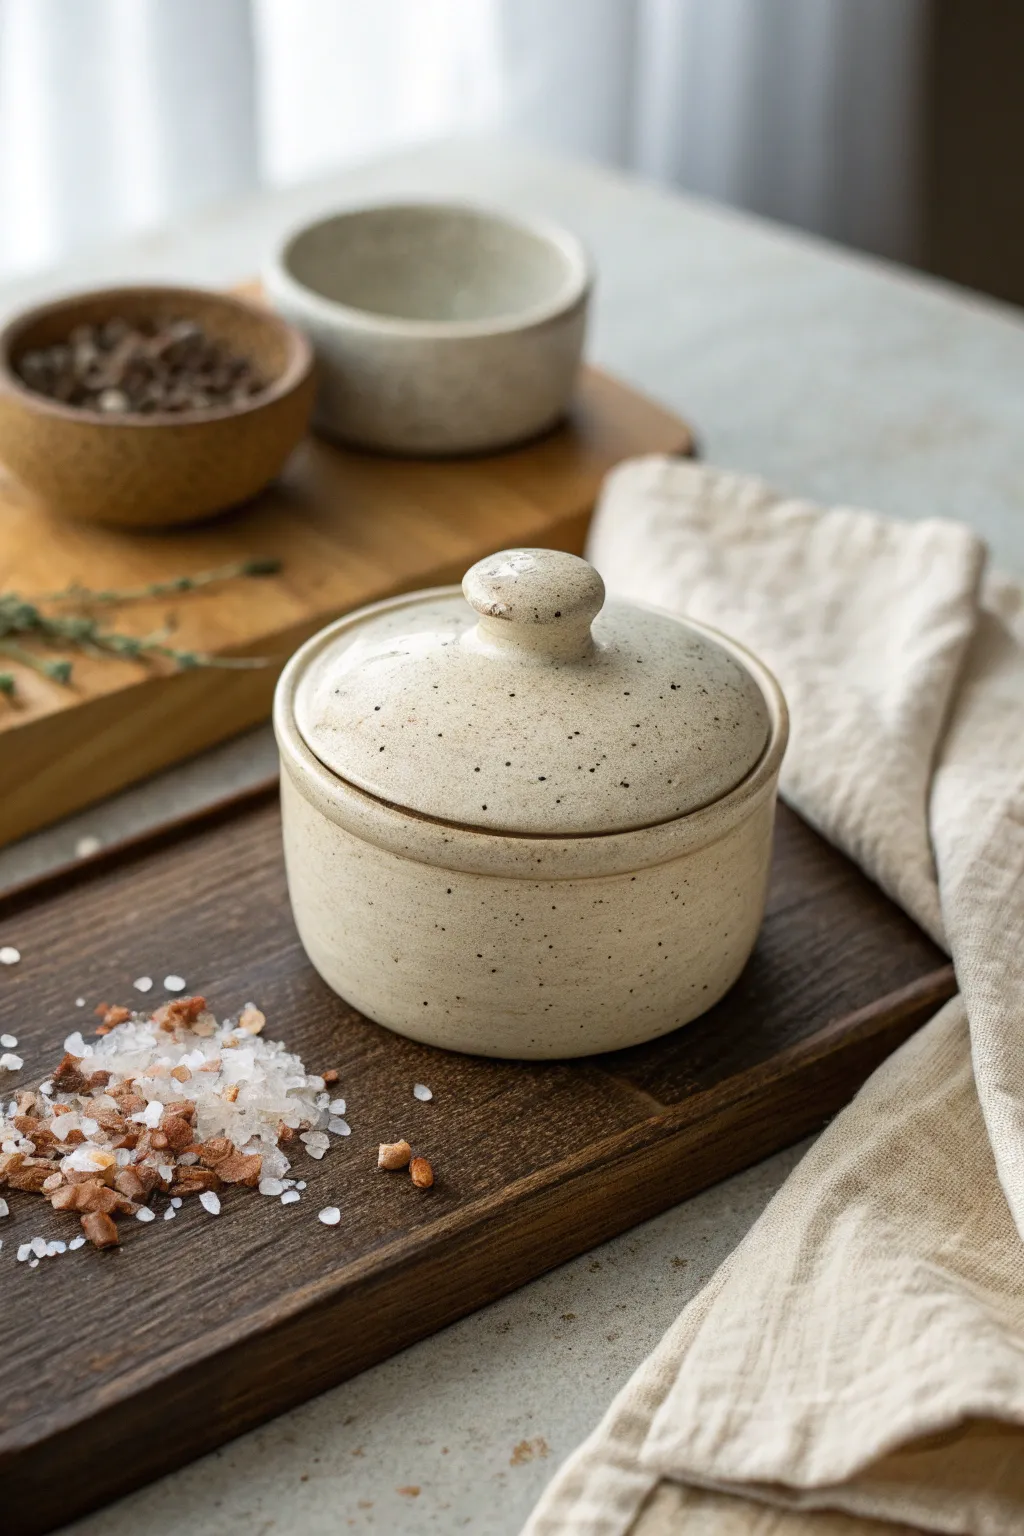
This sturdy, lidded salt cellar is the perfect companion for seasoned grillers, keeping coarse sea salts or specialty rubs close at hand. Its speckled, creamy finish and simple form give it a timeless, masculine appeal that fits right in next to the barbecue.
Step-by-Step Guide
Materials
- Speckled buff stoneware clay (approx. 1 lb)
- Pottery wheel
- Throwing tools (sponge, needle tool, rib, cut-off wire)
- Trimming tools (loop tool)
- Calipers
- Creamy matte white glaze
- Kiln
Step 1: Throwing the Body
-
Center and open:
Start with about 3/4 lb of wedged clay. Center it on the wheel head and open it up, keeping the floor flat and about 1/4 inch thick to ensure stability. -
Pull the walls:
Pull the walls up into a short cylinder shape. Aim for a height of about 2 to 2.5 inches. Keep the walls straight and vertical, avoiding any bulging outward. -
Refine the rim:
Compress the rim with a chamois or sponge. Using a rib tool, smooth the outside wall to remove throwing lines for that clean, modern look. -
Create the gallery:
This step is crucial for the lid fit. Use a wooden tool or your thumb to gently press the top rim down and inwards, creating a small internal ledge (gallery) where the lid will sit. Measure the diameter of this gallery with calipers immediately. -
Cut under and release:
Use a wooden knife tool to trim excess clay from the base while the wheel is spinning. Run your wire underneath and set the body aside to firm up.
Uneven Lid?
If your lid wobbles after firing, apply a tiny dab of grinding paste to the gallery ledge and twist the lid back and forth to grind them into a perfect match.
Step 2: Throwing the Lid
-
Center remaining clay:
Take your remaining clay (small amount) and center it on the wheel. You’ll be throwing this ‘off the hump’ or just using a small bat. -
Check measurements:
Use your calipers (locked to the measurement of the jar’s gallery) to guide the width of your lid. -
Define the lid shape:
flatten the clay into a disk shape that matches your caliper measurement. Creating a slight dome shape looks best. Leave a distinct knob in the center for easy lifting. -
Refine the fit:
Carefully trim the underside edge of the lid while it’s still on the wheel to ensure it will drop perfectly into the gallery ledge you created earlier. -
Cut and dry:
Cut the lid free. Allow both the body and the lid to dry to a leather-hard state under light plastic.
Level Up: Spoon Slot
Before drying, use a small round tool to carve a notch out of the rim/gallery. This creates a dedicated slot for a small wooden salt spoon to rest in.
Step 3: Trimming and Finishing
-
Trim the foot:
Center the leather-hard body upside down on the wheel. Use a sharp loop tool to trim the base, defining a clean foot ring. This lifts the form and gives it elegance. -
Smooth the surface:
If I notice any grog sticking out, I like to gently burnish the surface with a rubber rib or the back of a spoon to push it back in for a smoother feel. -
Test the fit:
Place the lid onto the pot. If it’s too tight, carefully sand or trim the edge of the lid now while it’s still workable. It should have a tiny bit of wiggle room to account for glaze later. -
Bisque fire:
Let the piece bone dry completely. Load it into the kiln and bisque fire to cone 04.
Step 4: Glazing
-
Wax the contact points:
Apply wax resist to the foot ring, the gallery ledge on the pot, and the underside rim of the lid. This prevents the lid from fusing to the pot during firing. -
Dip into glaze:
Using tongs, dip the entire body into a creamy matte white glaze. Repeat for the lid. Shake gently to remove drips. -
Clean up:
Sponge off any glaze droplets that may have landed on your waxed areas to ensure a clean break. -
Final firing:
Fire to cone 5/6 (or maturing temperature of your clay). The heat will draw out the iron speckles in the clay body through the semi-opaque glaze.
Fill it up with your favorite smoked salt rocks and set it next to the grill for your next cookout


What Really Happens Inside the Kiln
Learn how time and temperature work together inside the kiln to transform clay into durable ceramic.
Tool-Sized Spoon Rest
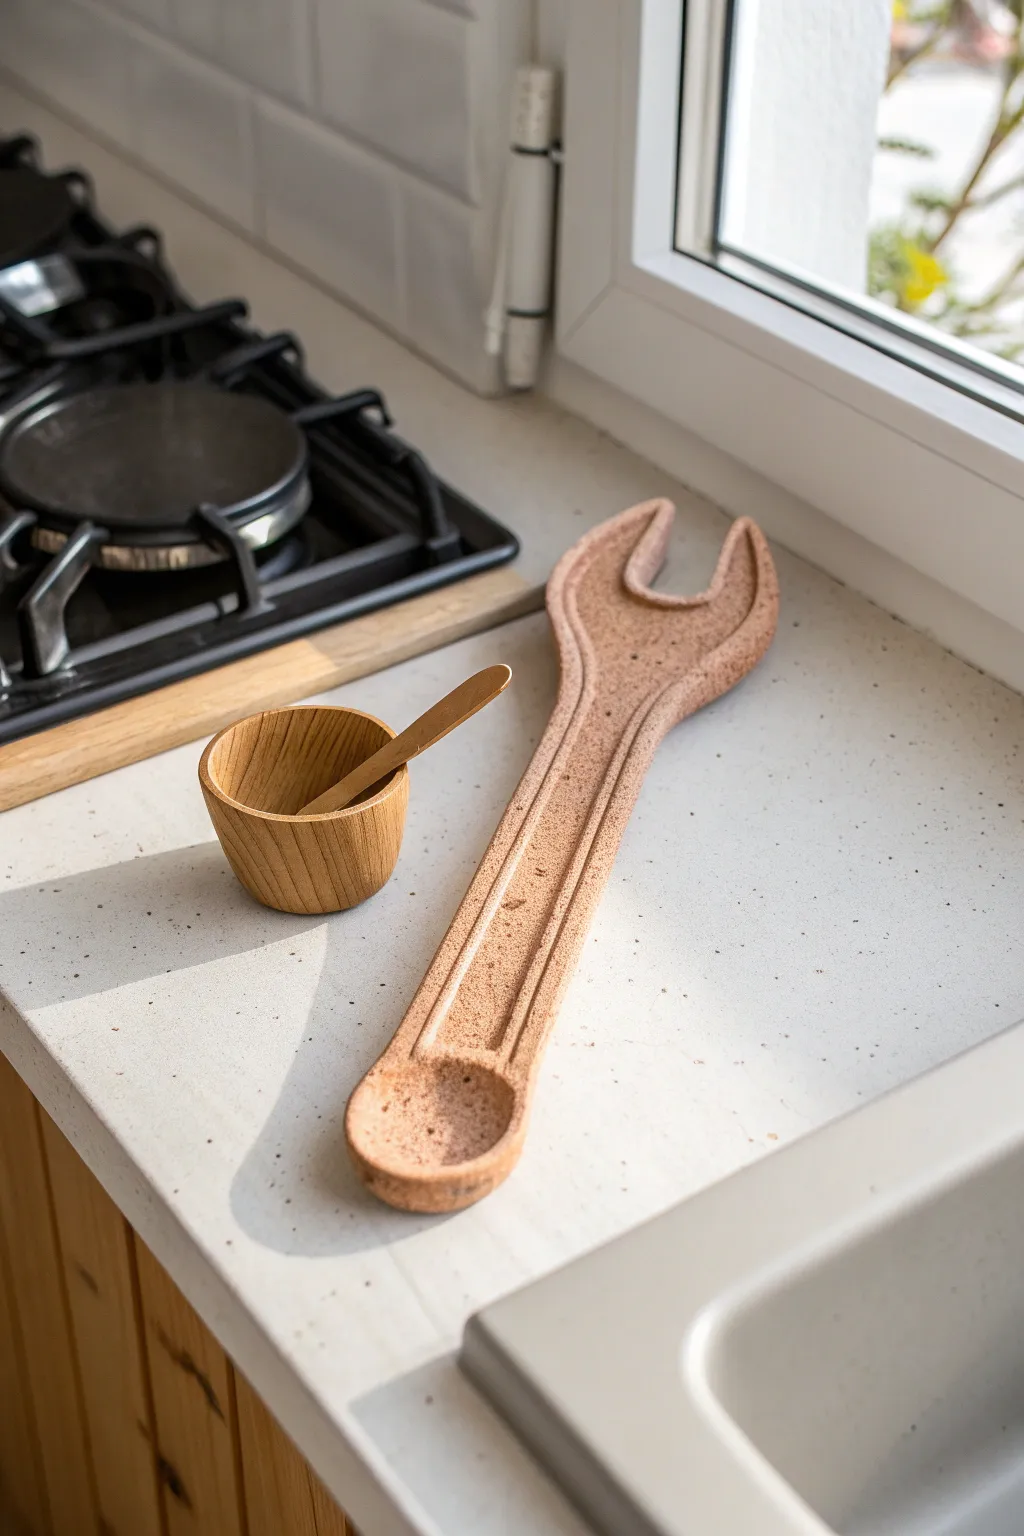
This clever spoon rest combines industrial charm with kitchen utility, featuring a classic wrench silhouette sculpted from speckled clay. Its long handle and wide jaw provide ample space for messy utensils, making it the perfect gift for the handyman chef in your life.
Step-by-Step
Materials
- Speckled stoneware clay (approx. 1 lb)
- Roller or rolling pin
- Request guide sticks or wooden slats (about 3/8 inch thick)
- Needle tool or fettling knife
- Wrench template (paper printout)
- Flexible rib (rubber or metal)
- Sponge
- Small carving loop tool
- Slip and scoring tool
Step 1: Slab Preparation
-
Wedge the Clay:
Start by thoroughly wedging your speckled clay to remove air bubbles and ensure consistency. This helps prevent cracking later on. -
Set Up Guides:
Place your wooden guide sticks on either side of your working surface. These ensure your slab rolls out to a perfect, even thickness. -
Roll the Slab:
Roll your clay out between the guides until it is smooth and flat, approximately 3/8 of an inch thick. I like to flip the slab once during rolling to keep the texture even on both sides. -
Smooth the Surface:
Take your flexible rib and compress the clay surface. Run it firmly over the slab to align the particles and create a polished, professional finish.
Warping Warning
Long, flat clay shapes love to warp. Dry very slowly between two pieces of drywall or weigh down the ends gently with sandbags during the drying phase to keep it straight.
Step 2: Cutting and Shaping
-
Apply Template:
Lay your paper wrench template gently onto the clay slab. Lightly trace the outline with a needle tool without cutting all the way through. -
Cut the Shape:
Using your needle tool or fettling knife, cut vertically through the clay following your traced lines. Remove the excess clay scraps. -
Refine Edges:
Wet your fingers slightly and run them along the cut edges to soften the harsh angles. You want a smooth, rounded edge that feels good to handle. -
Sculpt the Detail Lines:
Use a small loop tool or a modeling tool to carve distinct parallel grooves down the center of the handle, mimicking the reinforced structure of a real metal wrench.
Personalize It
Before the clay dries, use metal alphabet stamps to press a name, ‘Dad’s BBQ’, or a measurement size like ‘3/4 inch’ into the handle for a custom touch.
Step 3: Forming the Rest
-
Define the Jaw:
Carefully smooth the inside curve of the wrench ‘jaw’ (the open U-shape). This area needs to be particularly smooth so sauce doesn’t get trapped in crevices. -
Create the Spoon Bowl:
At the bottom end of the wrench (the handle base), use your thumb or a rounded rib to gently press a shallow indentation. This creates a resting spot for spoon handles or smaller utensils. -
Lift the Edges:
Gently curl the outer edges of the entire shape upwards just a millimeter or two. This subtle cupping helps keep liquids contained on the rest. -
Smooth Final Surfaces:
Do a final pass with a barely damp sponge to erase any fingerprints or sharp burrs created during the carving process.
Step 4: Drying and Firing
-
Slow Dry:
Place the piece on a flat board covered with newsprint or drywall. Cover loosely with plastic for the first day to ensure it dries slowly and stays flat. -
Bisque Fire:
Once bone dry, fire the piece to bisque temperature (usually cone 04) according to your clay body’s specifications. -
Glaze or Wash:
To maintain the raw clay look shown in the image, apply a matte clear glaze or simply wipe on an iron oxide wash to highlight the speckles, wiping back the excess. -
Final Fire:
Fire the piece a final time to maturity (cone 5 or 6 for most stoneware). Ensure the bottom is wiped clean of glaze before loading the kiln.
Once fired, this rugged utensil holder is ready to keep your countertops clean and add a touch of the workshop to your kitchen
Concrete-Look Coasters
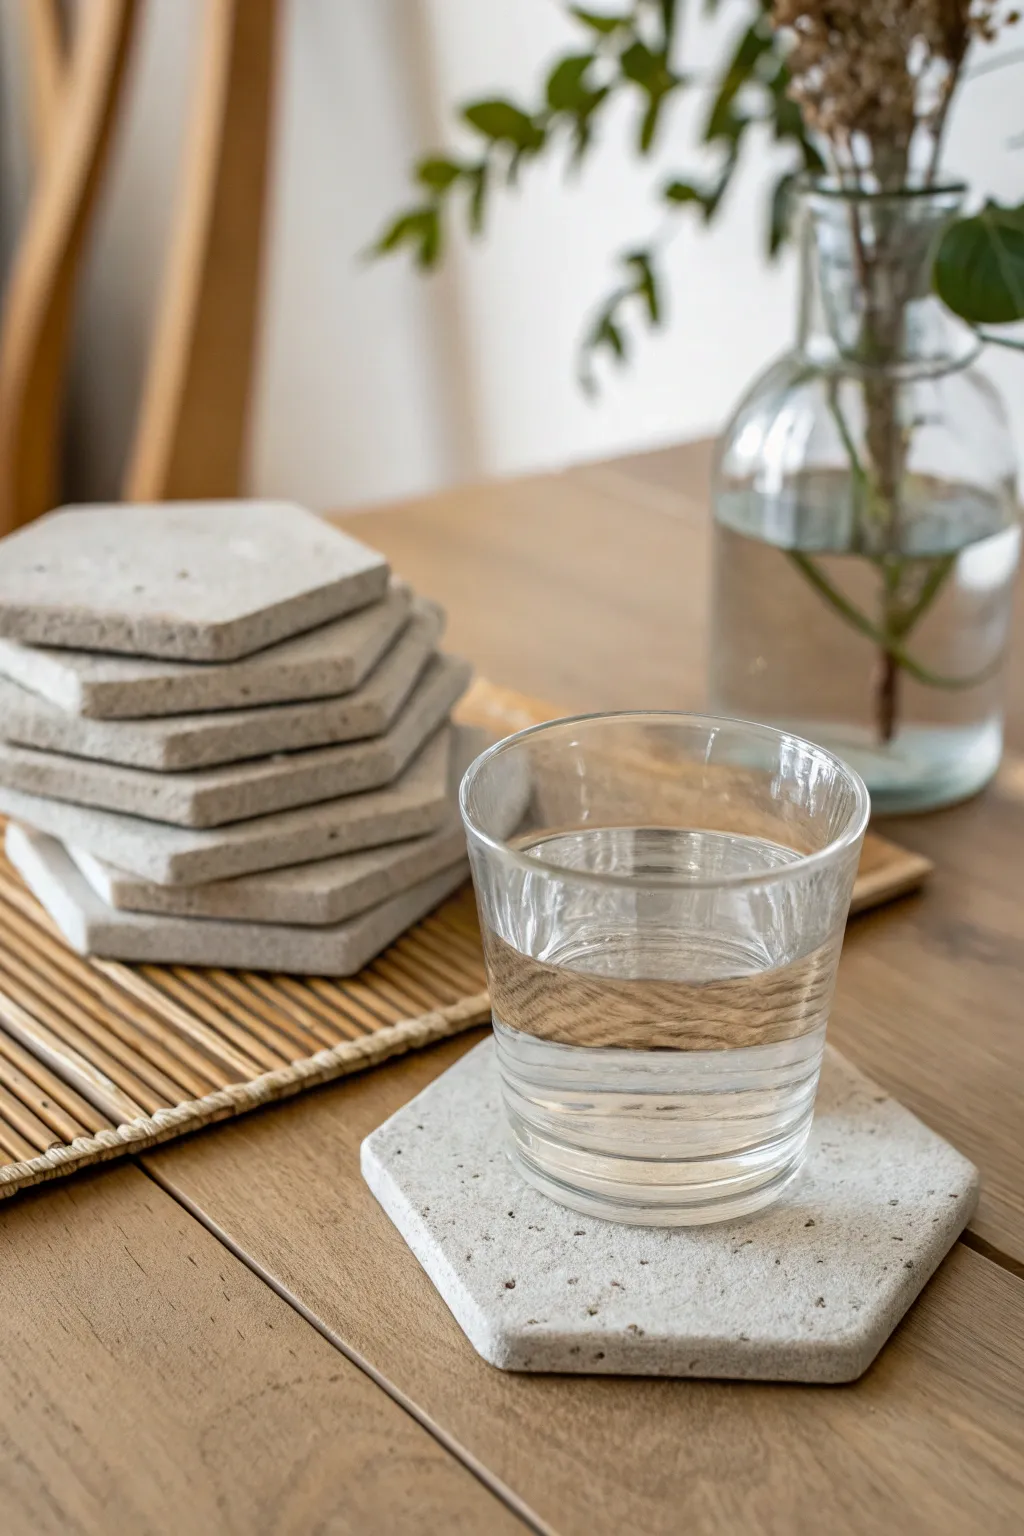
Achieve the minimalist, industrial aesthetic of concrete without the heavy mess of mixing cement by using specialized polymer clay. These hexagonal coasters feature a unique speckled texture and durable finish, perfect for a modern coffee table setup.
Step-by-Step Guide
Materials
- Granite or concrete-effect polymer clay (e.g., Fimo Effect or Sculpey)
- Acrylic rolling pin
- Hexagon cookie cutter (approx. 4 inches wide)
- Parchment paper or baking mat
- Fine-grit sandpaper (400 and 800 grit)
- Oven thermometer
- Flat baking sheet
- Ceramic tile or heavy book (for weighing down)
- Matte varnish or sealant (optional due to clay properties)
- Cork backing sheet (optional)
Step 1: Conditioning and Rolling
-
Prepare the workspace:
Lay down your parchment paper or baking mat on a smooth, flat surface. This prevents the clay from sticking and picking up unwanted dust. -
Condition the clay:
Take your block of granite-effect polymer clay and begin kneading it in your hands. The specialized effect clays can be a bit crumbly at first, so work it until it is warm and pliable. -
Form a ball:
Roll the conditioned clay into a smooth ball, ensuring there are no major cracks or air pockets trapped inside. -
Begin rolling out:
Place the ball on your work surface and use the acrylic rolling pin to flatten it. Roll from the center outwards in all directions. -
Check the thickness:
Aim for an even thickness of about 1/4 inch (6mm). If you have depth guides for your rolling pin, I prefer to use them here to ensure every coaster is identical.
Stone Effect Secret
Add a tiny pinch of black pepper or used dried coffee grounds into white clay if you can’t find granite-effect clay. It mimics stone perfectly.
Step 2: Cutting and Refining
-
Cut the shape:
Place your hexagon cutter onto the clay slab. Press down firmly and evenly. Give the cutter a slight wiggle before lifting to ensure a clean separation. -
Free the shape:
Peel away the excess clay from around the cutter first, then gently lift the cutter with the clay inside or push the clay shape out gently. -
Smooth the edges:
Inspect the edges of your hexagon. Use your finger to gently rub away any burrs or sharp ridges created by the cutter. -
Create the stack:
Repeat the rolling and cutting process until you have created your desired number of coasters (usually a set of 4 or 6). -
Texture check:
Look closely at the surface. If you want a rougher, more stone-like texture, lightly tap the surface with a stiff toothbrush or a ball of aluminum foil.
Gold Leaf Accents
Press flakes of gold leaf into one corner of the raw clay before rolling it smooth to create a luxurious, cracked-vein marble look.
Step 3: Baking and Finishing
-
Prepare for baking:
Transfer the clay hexagons onto a flat baking sheet lined with clean parchment paper. -
Weigh them down:
To prevent the corners from curling up during baking, place a second sheet of parchment paper on top of the clay, followed by a light ceramic tile or a flat, oven-safe object. -
Bake the batch:
Bake according to the manufacturer’s instructions (usually around 230°F/110°C to 275°F/135°C) for 30 minutes. Use an oven thermometer to ensure accuracy. -
Cool down:
Once baked, remove from the oven but keep the weights on top until the coasters are completely cool to lock in that perfect flatness. -
Sand the surface:
Wet your fine-grit sandpaper and gently sand the edges and flat surfaces. This brings out the ‘stone’ speckles and makes the surface satiny smooth. -
Add protection:
Although polymer clay is waterproof, applying a thin layer of matte varnish can help resist coffee stains over time. -
Attach backing (optional):
If you are worried about scratching your table, cut a hexagon of cork slightly smaller than the coaster and glue it to the bottom.
Now you have a durable, stylish set of coasters ready to handle your next cold drink

TRACK YOUR CERAMIC JOURNEY
Capture glaze tests, firing details, and creative progress—all in one simple printable. Make your projects easier to repeat and improve.
Golf Green Trinket Dish
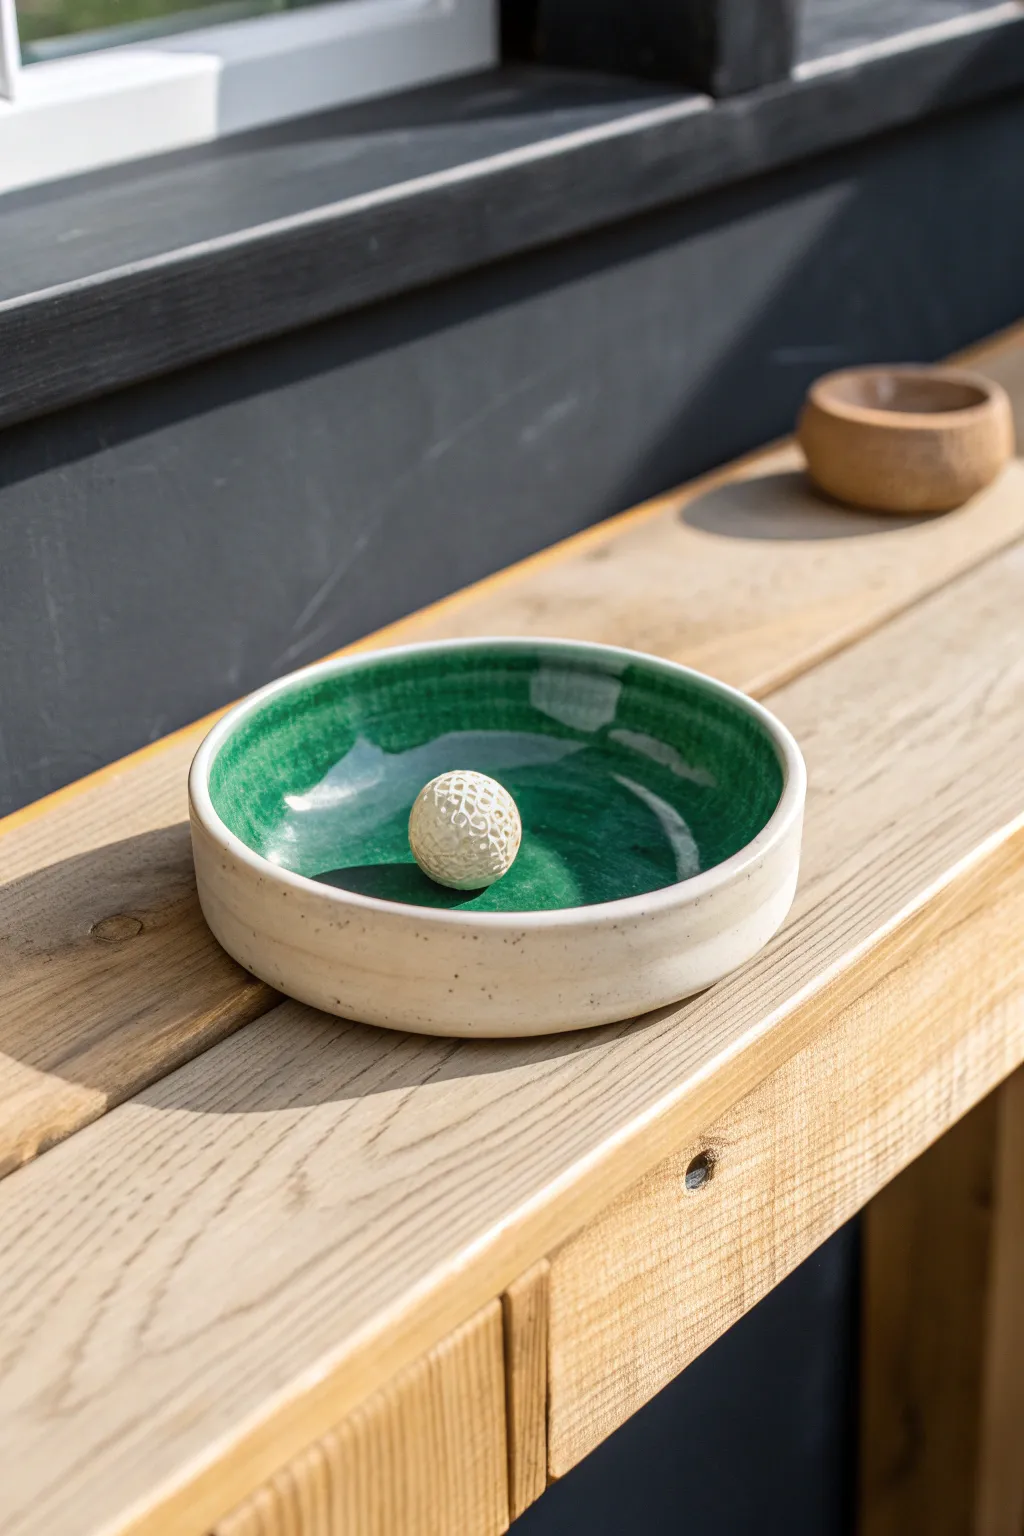
Create a handsome and clever catch-all for the golfer in your life with this ceramic “green” and ball set. The deep emerald glaze contrasts beautifully with the speckled stoneware clay, mimicking the lush grass of a well-kept course.
Step-by-Step
Materials
- Speckled stoneware clay (approx. 1-1.5 lbs)
- Deep emerald green glossy glaze (suited for your firing temperature)
- Clear glaze (optional, for the ball)
- Pottery wheel (or rolling pin and slab molds for hand-building)
- Needle tool
- Rib tool (wooden or silicone)
- Sponge
- Wire cutter
- Small carving tool or texture tool (for the ball)
- Glaze brushes
Step 1: Throwing or Forming the Dish
-
Prepare the Clay:
Begin by thoroughly wedging your speckled stoneware clay to remove any air bubbles. Separate a small walnut-sized piece for the ball later, and use the larger portion for the dish. -
Center on the Wheel:
Throw the larger lump of clay onto the wheel head. Use wet hands to center it, pushing down and inward until the mound spins perfectly smooth without wobbling. -
Open the Form:
Press your thumbs into the center of the mound to open it, leaving about a half-inch of thickness for the floor. This thickness is crucial so the dish feels substantial. -
Pull the Walls:
Gently pull the clay outward to widen the floor to about 5-6 inches. Then, pull the walls straight up. Keep the walls vertical and relatively short, creating a shallow cylinder shape rather than a bowl. -
Refine the Rim:
Compress the rim with a chamois or your sponge to make it smooth and rounded. A flat, vertical wall profile looks best for this modern design. -
Trim the Interior:
Use a rib tool to compress and smooth the interior floor perfectly flat. Any bumps here will disrupt the “golf green” illusion later. -
Cut from Wheel:
Run your wire cutter under the base of the dish and carefully set it aside on a ware board to stiffen to leather-hard.
Glaze Crawling?
If the green glaze pulls away leaving bare spots, your bisque might have been dusty or you applied the glaze too thickly. Wash it off, let dry, and re-apply thinner layers.
Step 2: Sculpting the Ball & Trimming
-
Trim the Dish Base:
Once the dish is leather-hard, flip it over on the wheel. Trim away excess weight from the bottom and carve a clean foot ring. I like to keep the walls thick enough to show off the clay’s speckles. -
Form the Ball:
Take the reserved walnut-sized piece of clay and roll it into a perfect sphere between your palms. -
Apply Golf Texture:
To mimic golf ball dimples, use a small, round-tipped tool or the head of a dull needle tool. Instead of pressing simple dots, try creating a honeycomb or lattice texture by overlapping small impressions slightly. -
Hollow or Vent:
A solid ball of this size might explode in the kiln. Either pierce a tiny inconspicuous hole with a needle tool to let air escape, or slice it in half, hollow it, and score-and-slip it back together. -
Dry Completely:
Allow both the dish and the ball to dry slowly under plastic, then fully uncovered, until they are bone dry. -
Bisque Fire:
Load both pieces into the kiln and fire to your clay body’s bisque temperature (usually roughly Cone 04).
Step 3: Glazing & Final Fire
-
Clean the Bisqueware:
Wipe both pieces down with a damp sponge to remove any kiln dust. This ensures the glaze adheres properly without crawling. -
Glaze the Interior:
Pour a generous amount of emerald green glaze into the dish. Swirl it around to coat the bottom and slightly up the inner walls, creating an uneven “grassy” edge, or brush it carefully for a controlled look. -
Create Depth:
If your glaze is translucent, apply a second coat to the floor of the dish to get that deep, swimming-pool green effect seen in the photo. -
Wipe the Exterior:
Keep the exterior walls and the rim completely unglazed. The raw speckled stoneware is a key design element. Ensure no green glaze has dripped over the edge. -
Glaze the Ball (Optional):
You can leave the ball raw and speckled, or dip it in a clear glaze or a crater white glaze for texture. If glazing, remember to wipe the contact point where it touches the kiln shelf. -
Adhere the Ball (Post-Glazing):
Place the ball loose inside the dish for firing if you want it permanently attached by the melting glaze (be very careful it doesn’t stick to the walls), or fire them separately and place the ball in after. -
Glaze Fire:
Fire the kiln to the maturity temperature of your clay and glaze (often Cone 5 or 6 for stoneware).
Pro Tip: Fusing Pieces
To permanently attach the ball during the glaze firing, place it on the wet glaze inside the dish. The melting glaze acts as glue, securing the ball forever.
This sophisticated little dish is now ready to hold tees, change, or keys while reminding everyone of their favorite fairway
Football-Shaped Snack Bowl
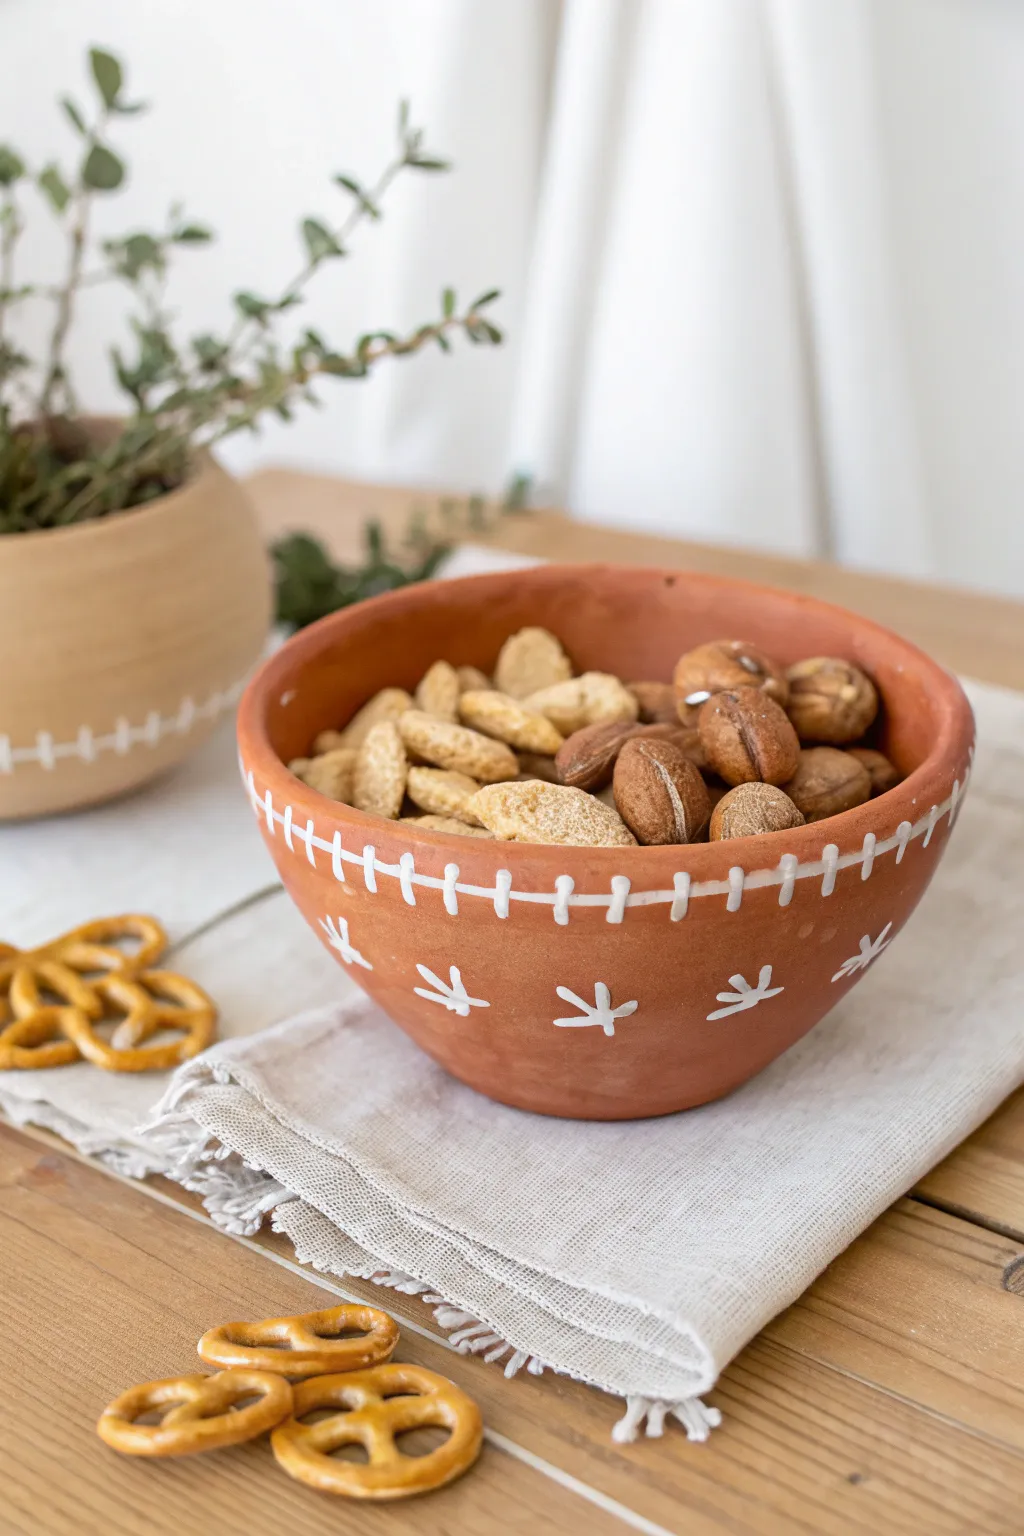
Transform a simple terracotta-colored clay bowl into a sporty game-day essential with just a few strokes of white paint. This rustic football-inspired design features classic stitching and spirited star motifs, making it the perfect vessel for pretzels or nuts during the big game.
Detailed Instructions
Materials
- Terracotta air-dry clay or polymer clay (red-brown color)
- Small bowl for molding (slump mold)
- Rolling pin
- Potter’s needle tool or craft knife
- Canvas mat or parchment paper
- Sponge
- Fine-grit sandpaper
- White acrylic paint
- Fine detail paint brush (size 0 or 1)
- Matte spray sealant (food safe sealant if using for unwrapped food)
Step 1: Forming the Bowl Base
-
Prepare the Clay:
Begin by conditioning your terracotta clay until it is soft and pliable. If using air-dry clay, wedge it well to remove air bubbles; for polymer, warm it in your hands. -
Roll the Slab:
Roll the clay out on your canvas or parchment paper to an even thickness of about 1/4 inch. Try to keep the thickness consistent so the bowl dries and fires evenly. -
Cut the Circle:
Place your mold bowl upside down on the clay slab. Using your needle tool held vertically, trace around the rim to cut a perfect circle. -
Creating the Shape:
Carefully lift your clay circle and drape it *inside* your mold bowl. Gently press the clay against the sides to verify it takes the shape without trapping air pockets. -
Refine the Rim:
While the clay is still soft, use a damp sponge or your finger to smooth the top rim. You want a clean, rounded edge rather than a sharp, cut one. -
Initial Drying:
Let the clay sit in the mold until it is leather-hard (firm enough to hold its shape but not fully dry). This usually takes a few hours for air-dry clay. -
Remove and Finish Drying:
Gently pop the clay bowl out of the mold. Set it on a wire rack to allow air to circulate around the entire piece until it is bone dry.
Clean Lines Pro-Tip
If you struggle with freehand painting, use a strip of masking tape as a guide for your horizontal ‘lace’ line. Remove it gently while the paint is still wet to keep edges sharp.
Step 2: Smoothing and Refinement
-
Sand the Surface:
Once completely dry (calculate 24-48 hours depending on humidity), inspect the bowl for rough spots. Use fine-grit sandpaper to gently smooth the rim and the exterior surface. -
Dust Clean:
Wipe the entire bowl down with a slightly damp cloth to remove all sanding dust. This ensures your paint adheres properly to the porous surface.
Step 3: Painting the Design
-
Mix the Paint:
Squeeze a small amount of white acrylic paint onto a palette. I like to add a tiny drop of water to improve the flow for fine lines. -
Paint the Vertical Stitches:
Using your fine detail brush, paint short, vertical vertical hash marks around the upper circumference of the bowl, spacing them about half an inch apart. Keep them loose and hand-painted for a rustic look. -
Connect the Laces:
Paint a horizontal line connecting the vertical hash marks, creating the look of football lacing running around the rim. -
Add the Star Accents:
Below the stitching line, paint simple asterisk-style stars. Start with a vertical line, cross it horizontally, and add two diagonal strokes to create an eight-point star. -
Space the Patterns:
Continue painting these stars around the mid-section of the bowl, trying to space them evenly relative to the stitching above. -
Dry and Seal:
Allow the white paint to dry completely. Finish by spraying the bowl with a matte sealant to protect the design. If you plan to serve food directly in it, ensure you use a certified food-safe glaze or sealant.
Go for the Textured Look
Before the clay dries, gently press a piece of rough fabric or burlap against the exterior. This adds a subtle ‘pigskin’ texture that looks amazing under the paint.
Now your bowl is ready to hold your favorite game-day snacks and add a touch of handcrafted charm to the table
Wildlife Magnet Set
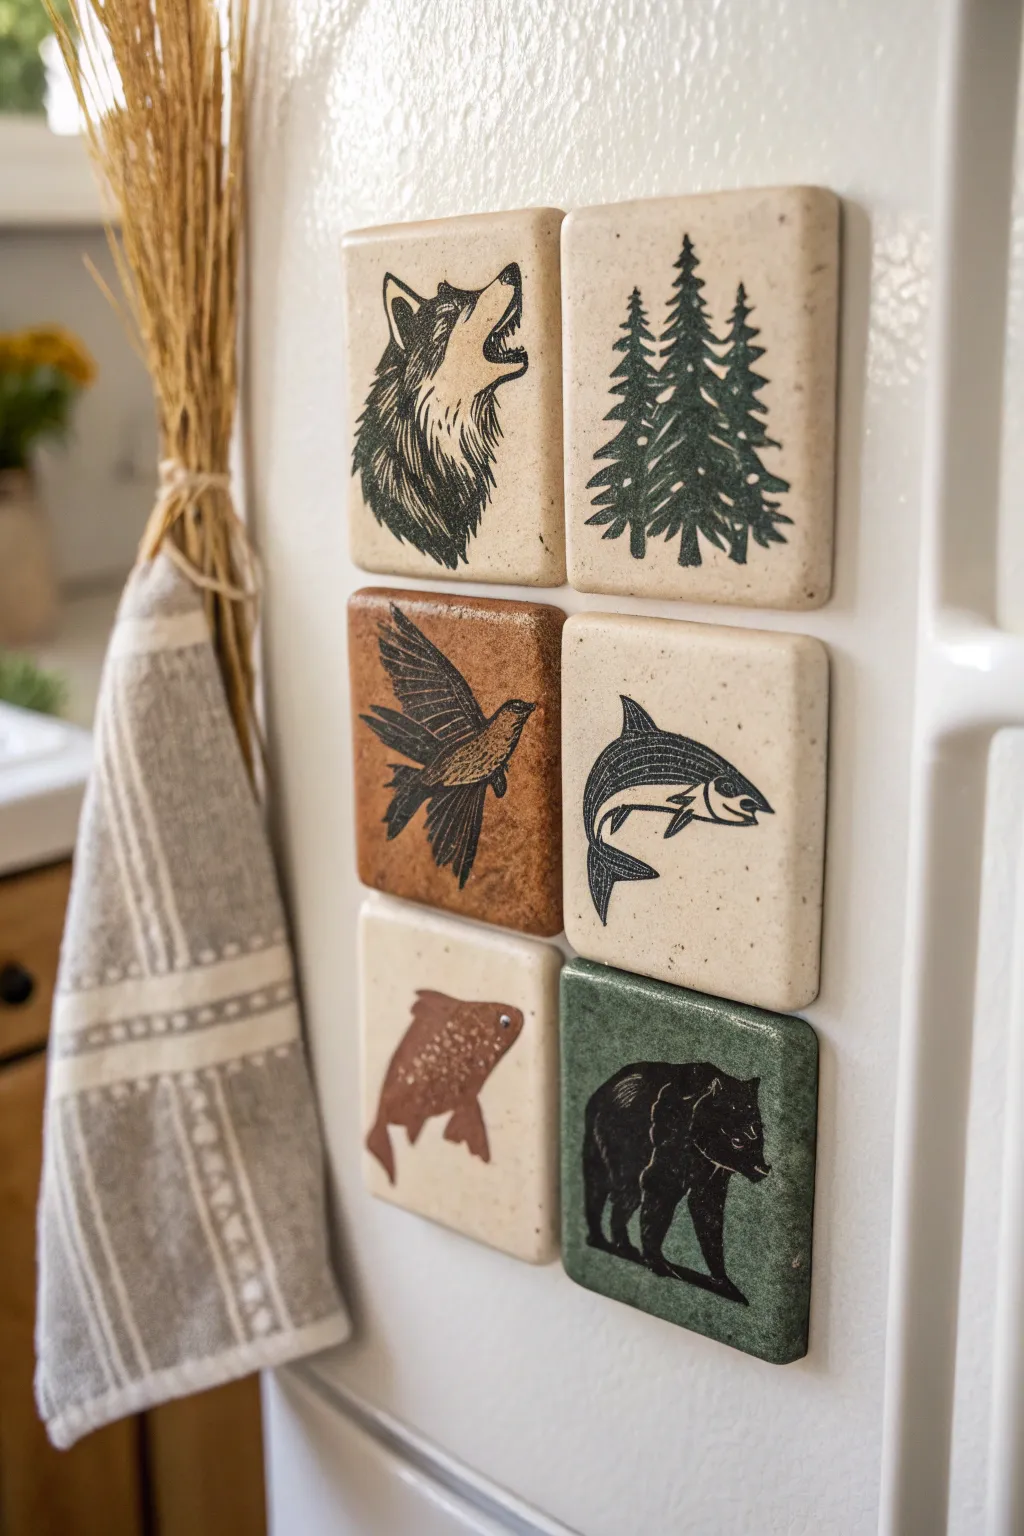
Bring the calming spirit of the outdoors into your kitchen with this set of handcrafted clay magnets. Featuring classic wildlife motifs like wolves, bears, and pine trees stamped onto earthy ceramic backgrounds, these rugged yet refined squares are perfect for holding up grocery lists or photos.
Detailed Instructions
Materials
- Polymer clay (granite/speckled beige, terracotta, and dark green)
- Square clay cutter (2-inch)
- Rolling pin or pasta machine
- Rubber wildlife stamps (wolf, trees, bird, fish, bear)
- Black StazOn ink pad (or other permanent, multi-surface ink)
- Small magnets (neodymium recommended)
- Strong craft glue (E6000 or heavy-duty super glue)
- Acrylic block for unmounted stamps
- Fine-grit sandpaper
- Oven and baking sheet
- Matte spray varnish (optional)
Step 1: Preparing the Base
-
Condition the Clay:
Begin by thoroughly kneading your chosen polymer clay colors. For the speckled look seen in the photo, use a ‘granite’ or ‘stone’ effect clay. You’ll also want a small amount of terracotta and dark green clay for variety. -
Roll It Out:
Roll the clay into a slab that is roughly 1/4 inch thick. You want them substantial enough to look like stone tiles, but not so heavy that they slide down the fridge. -
Cut the Squares:
Use your 2-inch square cutter to press out clean shapes. If you don’t have a cutter, measure a grid with a ruler and slice carefully with a sharp craft blade. -
Soften the Edges:
Gently tap the sharp corners and edges with your fingertip. The goal is to make them look like tumbled stone or ceramic tiles, so a slight rounding makes a big difference.
Clean Stamp Trick
Dust your raw clay lightly with cornstarch before stamping. This prevents the rubber from sticking to the clay while still allowing the permanent ink to transfer clearly.
Step 2: Stamping the Designs
-
Ink the Stamp:
Press your rubber stamp onto the black ink pad. Ensure the design is fully coated but not dripping with ink, as this can smudge on the raw clay. -
First Impression:
Press the inked stamp firmly into the center of a raw clay square. Apply even pressure so the ink transfers and leaves a slight debossed texture in the clay. Lift straight up to avoid blurring. -
Repeat for All Animals:
Continue this process for each tile, swapping stamps for the wolf, trees, bird, salmon, and bear. Make sure to clean stamps between uses if switching ink colors, though black works best for this high-contrast look. -
Create Variations:
Notice how the image has different background colors? Use your green clay for the bear and terracotta for the bird to mimic that mismatched, collected feel. -
Clean Up Mistakes:
If a stamp smudges badly, you can carefully wipe the raw clay with a little rubbing alcohol or simply ball it up, re-roll, and try again since the clay hasn’t been baked yet.
Level Up: Faux Stone
Mix black pepper or dried tea leaves into plain beige clay before rolling. This adds organic speckles and texture that looks exactly like real sandstone.
Step 3: Baking and Assembly
-
Bake the Tiles:
Arrange your stamped tiles on a baking sheet lined with parchment paper or cardstock. Preheat your oven according to the clay manufacturer’s instructions (usually around 275°F or 130°C). -
Cool Down:
Bake for the recommended time (typically 15-30 minutes depending on thickness) and let them cool completely inside the oven to prevent cracking. -
Sand the Edges:
Once hardened and cool, take a piece of fine-grit sandpaper to the edges. This removes any cutting burrs and enhances the stone-like finish. -
Seal the Surface (Optional):
If you want extra protection for the ink, spray a light coat of matte varnish over the top. Avoid glossy finishes, as they detract from the rustic, natural aesthetic. -
Attach the Magnets:
Flip the tiles over. Apply a dab of strong adhesive like E6000 to the center of the back. -
Press and Cure:
Press a strong magnet into the glue. I like to let these cure upside down for at least 24 hours to ensure the magnet never pulls loose from the heavy tile.
Now you have a rugged set of magnets that adds a touch of wilderness charm to any magnetic surface.
Minimal Succulent Planter With Attitude
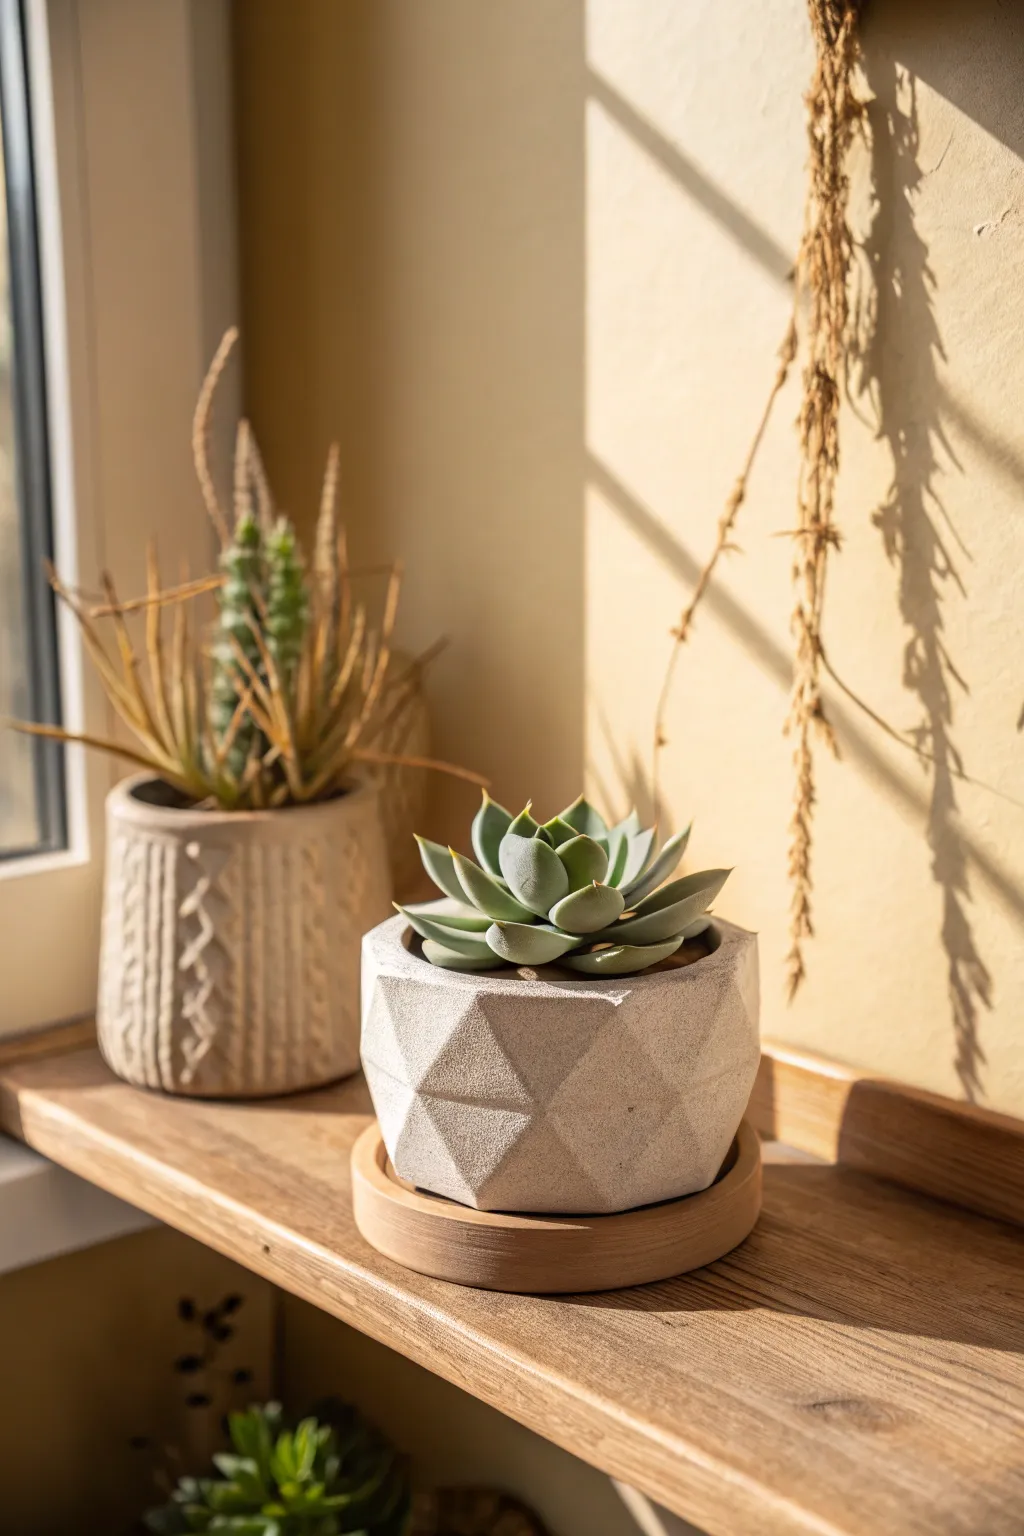
This angular, architectural planter brings a masculine edge to traditional greenery with its sharp facets and raw concrete texture. The geometric design catches the light beautifully, creating a dynamic interplay of shadows that changes throughout the day.
Step-by-Step
Materials
- Polymer clay (white or light grey) OR Air-dry clay
- Rolling pin
- Sharp craft knife or scalpel
- Ruler
- Cardstock or paper for templates
- Sandpaper (fine grit)
- Grey acrylic paint (optional, for faux concrete look)
- Matte sealant spray
- Small succulent potting soil
- Wooden coaster or saucer (for base)
Step 1: Designing the Shape
-
Draft the template:
Begin by sketching your geometric pattern on cardstock. For this specific look, you want a band of triangles pointing up and a band of triangles pointing down that interlock. The base should be a hexagon or octagon depending on how many facets you choose. -
Cut the templates:
Carefully cut out your paper shapes. You’ll need a specific template for the side walls (which can be a long strip of connecting triangles) and one for the base. -
Verify the fit:
Before touching the clay, tape your paper templates together to form a mock-up. This ensures your geometry works and the planter will actually close up correctly.
Sharp Edge Secret
After folding your facets, use a flat ruler to gently press against each triangle plane. This defines the creases crisply without leaving organic fingermarks.
Step 2: Forming the Planter Body
-
Condition the clay:
Knead your clay thoroughly until it is soft and pliable. If using polymer clay, this warms it up; if using air-dry, it ensures even moisture distribution. -
Roll out a slab:
Roll the clay out to a uniform thickness of about 1/4 inch. I find using chopsticks as guide rails on either side of the rolling pin helps keep the thickness perfectly consistent. -
Cut the clay strip:
Lay your long side-wall template onto the clay slab. Using a sharp craft knife and a ruler for guidance, cut widely around the shape first, then go back in for precise cuts along the edges. -
Score the fold lines:
This is crucial for the sharp geometric look: lightly score the clay where the triangles meet (the vertical lines and the diagonal lines inside the geometry) but do not cut all the way through. -
Fold the geometry:
Gently fold the clay along your scored lines. The clay should bend to create the faceted, 3D surface. Join the two ends of the strip together to form a ring. -
Connect the ends:
Blend the seam where the two ends meet on the inside of the pot so it disappears. On the outside, try to align the seam with one of the vertical facet lines to hide it.
Leaning Tower?
If the clay walls sag while drying or baking, lightly stuff the inside of the pot with polyester fiberfill or crumpled paper towels to support the shape from within.
Step 3: Attaching the Base
-
Cut the base:
Cut out the hexagonal or octagonal base piece from your remaining clay slab using your second template. -
Join base and walls:
Place the geometric ring onto the base piece. Use a small clay tool or your finger to smooth the clay from the base up onto the inside walls, creating a watertight seal. -
Reinforce the interior:
Roll a thin snake of clay and press it into the bottom interior seam for extra strength, smoothing it out completely. -
Check symmetry:
Look at the pot from above. Make sure the opening acts as a regular polygon and that the facets are popping out roughly equally.
Step 4: Refining and Finish
-
Smooth the surface:
Dip your finger in a little bit of water (for air-dry clay) or baby oil (for polymer clay) and smooth out any fingerprints, being careful not to flatten your sharp geometric creases. -
Bake or dry:
If using polymer clay, bake according to package instructions (usually 275°F for 15-30 mins). If using air-dry clay, let it sit for 24-48 hours until fully cured. -
Sanding:
Once fully hard, lightly sand the flat surfaces with fine-grit sandpaper. This sharpens the edges and enhances that stone-like appearance. -
Faux concrete effect:
To mimic the image’s texture, use a sponge to dab a mixture of white and light grey paint onto the surface. The dabbing motion creates a speckled, porous look. -
Seal the pot:
Spray the entire piece with a matte sealant. This protects the paint and, if you used air-dry clay, helps protect it from moisture during watering. -
Final assembly:
Place your finished pot onto a small wooden saucer or coaster to catch drainage, then plant your favorite Echeveria succulent inside.
Now you have a striking, modern vessel that looks like heavy stone but was crafted right at your desk
Bar Soap Tray With Drain Grooves
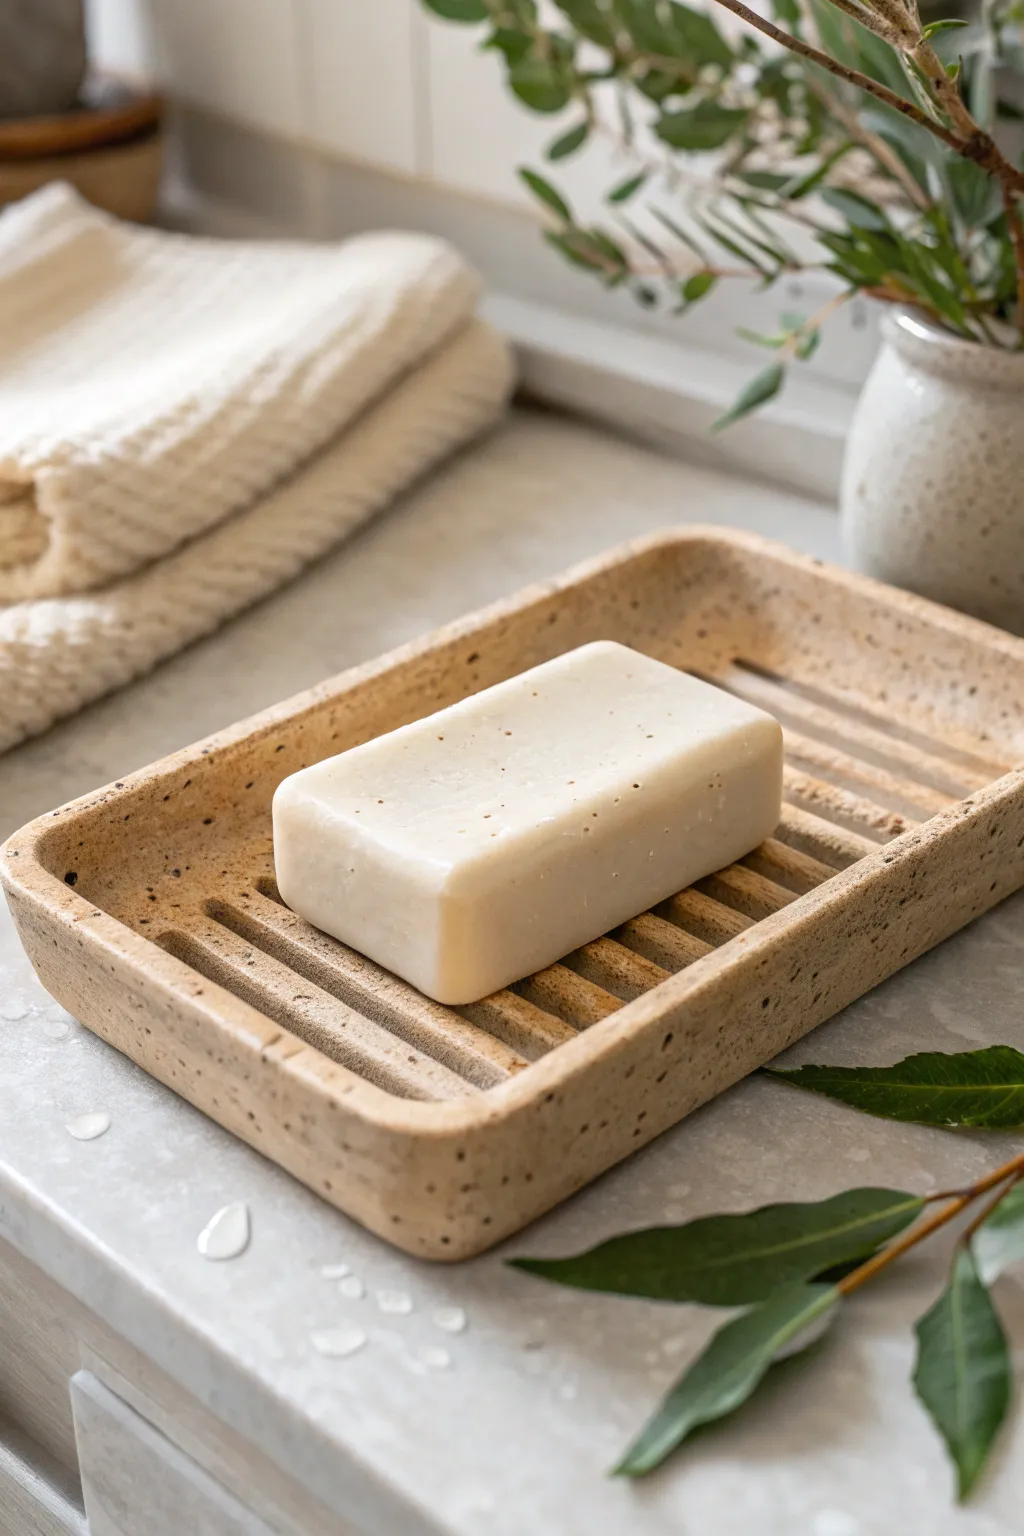
This handsome, minimalist soap tray combines a rugged stone aesthetic with practical design. Featuring deep drainage grooves and a speckled finish, it keeps your soap dry while adding an earthy, masculine touch to any bathroom counter.
Step-by-Step Guide
Materials
- Speckled stoneware clay (or polymer clay with granite effect)
- Roller or rolling pin
- Two 1/4 inch thick wooden slats (guide rails)
- Rectangular template (approx 4×6 inches)
- Fettling knife or clay cutter
- Modelling tool with a curved, rounded end (or a wooden dowel)
- Sponge
- Water slip (if using ceramic clay)
- Sandpaper (fine grit)
- Matte sealant or clear glaze
Step 1: Preparing the Slab
-
Wedge the clay:
Begin by wedging your speckled clay thoroughly to remove any air bubbles. A well-wedged ball of clay ensures a strong final piece without cracks. -
Set up guides:
Place your two wooden guide slats on your work surface, spaced slightly wider than your desired tray width. These will help you roll a perfectly even slab. -
Roll the slab:
Place the clay ball between the slats. Using your roller, flatten the clay until the roller rests on both wooden guides, creating a uniform 1/4 inch thickness. -
Smooth the surface:
Take a damp sponge or a rubber rib and gently compress the surface of the slab. This removes canvas texture and aligns the clay particles.
Warping Worries?
If the base curls up while drying, place a small weighted board on top of the rim (cushioned with foam) to hold it flat during the leather-hard stage.
Step 2: Shaping the Tray
-
Cut the rectangle:
Lay your rectangular template onto the slab. Using a fettling knife, cut straight down around the template to create your base shape. -
Soften the corners:
Use your finger or a small tool to gently press the four sharp corners inward, creating a soft, rounded radius rather than a sharp 90-degree angle. -
Create the rim:
Pinch the very edge of the slab upwards to create a small, raised lip around the perimeter. I find using my thumb on the inside and forefinger on the outside gives the best control here. -
Refine the walls:
Smooth the raised lip so it connects seamlessly to the base. The wall should be about 1/4 to 1/2 inch high to keep soapy water contained.
Step 3: Carving the Drainage
-
Mark the grooves:
Lightly trace parallel lines along the length of the inside of the tray where you want the drainage channels to go. Leave a border of smooth clay around the edge. -
Press the channels:
Using a modeling tool with a rounded tip or a wooden dowel, firmly press down along your traced lines to create deep indentations. Do not cut through the clay. -
Slope the grooves:
If you want water to run off specifically, you can press slightly deeper at the ends of the grooves, though a uniform depth works fine for elevating the soap. -
Clean up ridges:
Pressing the grooves will displace clay, creating small ridges. Smooth these ridges down gently with a damp sponge so the surface between grooves remains flat.
Clean Grooves
Dip your carving tool in a tiny bit of oil or water before pressing the grooves. This prevents the tool from dragging and creates a burnished, smooth channel instantly.
Step 4: Finishing Touches
-
Slow drying:
Cover the piece loosely with plastic and let it dry slowly over a few days. This caution prevents the flat base from warping as it shrinks. -
Sanding:
Once bone dry (or cured if using polymer), lightly sand the edges and the tops of the ribs to ensure they are smooth to the touch. -
Firing or baking:
Fire the piece in a kiln according to your clay body’s instructions, or bake in your home oven if using polymer clay. -
Sealing:
Apply a matte clear glaze or a water-resistant sealant to protect the surface. Ensure the sealant gets into the grooves but doesn’t pool there.
Place your finished tray by the sink and enjoy the satisfaction of a handmade piece that is as functional as it is stylish
Dungeon Dice Tray for Game Night
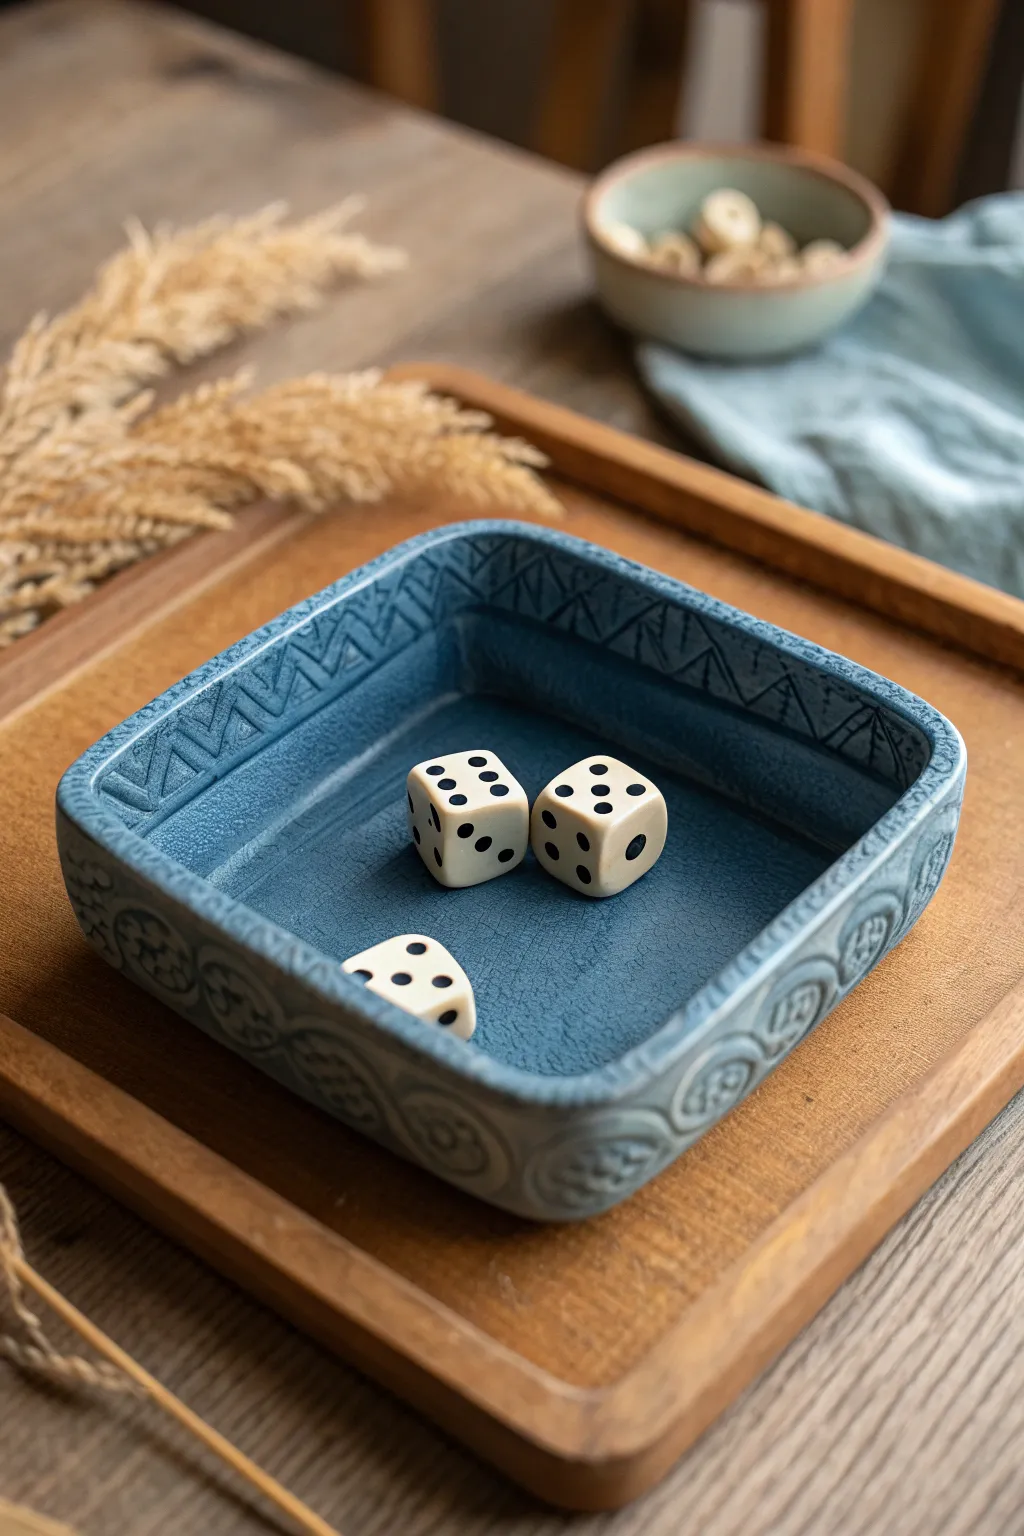
Elevate your tabletop adventures with this rugged yet refined dice tray, perfect for keeping critical rolls contained. Featuring ancient-inspired geometric carvings and a moody slate-blue crackle finish, this project combines practical gaming utility with the aesthetic of a long-lost artifact.
Detailed Instructions
Materials
- Stoneware clay or durable air-dry clay (approx. 2 lbs)
- Rolling pin
- Square template (6×6 inches)
- Wooden guide slats (1/4 inch thick)
- Needle tool or fettling knife
- Loop tool for carving
- Geometric texture stamp or carving gouge
- Slip and scoring tool
- Sponge
- Slate blue satin glaze
- Matte finish sealant (if using air-dry clay)
Step 1: Forming the Base Structure
-
Prepare your workspace:
Begin by setting up a clean, flat surface covered with canvas or a heavy cloth to prevent sticking. Wedging your clay thoroughly is crucial here to remove air bubbles, which ensures your tray won’t crack during drying or firing. -
Roll out the slab:
Place your clay between two 1/4 inch wooden guide slats. Use your rolling pin to create an even, consistent slab. I find that rolling in multiple directions helps compress the clay particles for a stronger base. -
Cut the base:
Lay your square template onto the slab. Using a needle tool, cut straight down into the clay to create a perfect 6×6 inch square base. Set aside the excess clay for the walls. -
Create wall strips:
From the remaining slab, cut four long strips that are approximately 1.5 inches tall. These will form the walls of your tray. Ensure they are slightly longer than the sides of your base to account for joining overlap. -
Score and slip:
Rough up the outer edges of your square base and the bottom of your wall strips using a scoring tool. Apply a generous amount of clay slip (liquid clay) to these scored areas to act as glue. -
Assemble the walls:
Attach the strips to the base, pressing them firmly into place. Miter the corners where the walls meet at a 45-degree angle for a cleaner seam. Use a small wooden tool to blend the clay across the seams on both the inside and outside until the joints are invisible.
Warped Walls?
If walls bow inward while drying, place a crumpled ball of newspaper inside the tray to gently support the shape until the clay stiffens.
Step 2: Carving and Detailing
-
Smooth the form:
Once the basic box shape is assembled, use a damp sponge to smooth out any fingerprints or rough edges. Pay special attention to the rim—it should be rounded slightly to prevent chipping later. -
Plan the interior border:
Lightly trace a guideline about half an inch down from the top rim on the inside of the tray. This will define the area for your geometric pattern. -
Carve the zigzag motif:
Using a small loop tool or a V-tip carving gouge, carve a repeating triangular zigzag pattern along the upper interior band. Press firmly enough to create deep relief, which will catch the glaze later. -
Detail the filler pattern:
Inside the triangles or between the zigzags, add smaller vertical hash marks or simple lines to add density to the design. This mimics the look of ancient rune stones. -
Carve the exterior swirls:
On the lower half of the *outside* walls, carve a repeating spiral or cloud motif. Use a wider loop tool here for broader, sweeping strokes that contrast with the sharp geometric lines interior. -
Add texture:
Gently tap the uncarved surfaces with a stiff bristle brush or a textured sponge to give the clay a stone-like, weathered appearance instead of a perfectly smooth finish.
Step 3: Finishing and Glazing
-
Slow drying:
Loosely cover your tray with plastic and let it dry slowly over several days. Slow drying prevents the corners from warping or lifting. Once bone dry, fire the piece to bisque temperature (if using kiln clay) or let cure fully (if using air-dry). -
Apply the base glaze:
For that moody dungeon look, brush on two coats of a slate blue glaze. If you want the carved details to pop, you can wipe back the second coat slightly with a damp sponge, revealing the clay texture on the high points. -
Create a wash effect:
Mix a very small amount of black underglaze or acrylic paint (depending on your clay type) with water. Wash this into the deep crevices of your carvings, then wipe the surface clean. This shadows the recesses immediately. -
Final firing or sealing:
Fire the piece to the glaze maturity temperature. If you used air-dry clay, seal the painted tray with a high-quality matte varnish to protect it from dice impacts and moisture. -
Add protective feet:
Once finished and fully set, stick small felt or cork pads to the bottom corners. This protects your table and gives the tray a solid, heavy feel during gameplay.
Quiet the Clatter
Level up by cutting a piece of leather or thick felt to line the interior floor. It silences loud dice rolls and looks incredibly premium.
Now you have a centerpiece worthy of your most legendary campaigns