Modeling clay is my favorite quick-win material—you can roll, pinch, and press it into something cute in minutes. Here are my go-to ideas to make with modeling clay that feel totally doable, even if you’re brand-new.
Easy Pinch-Pot Trinket Dish
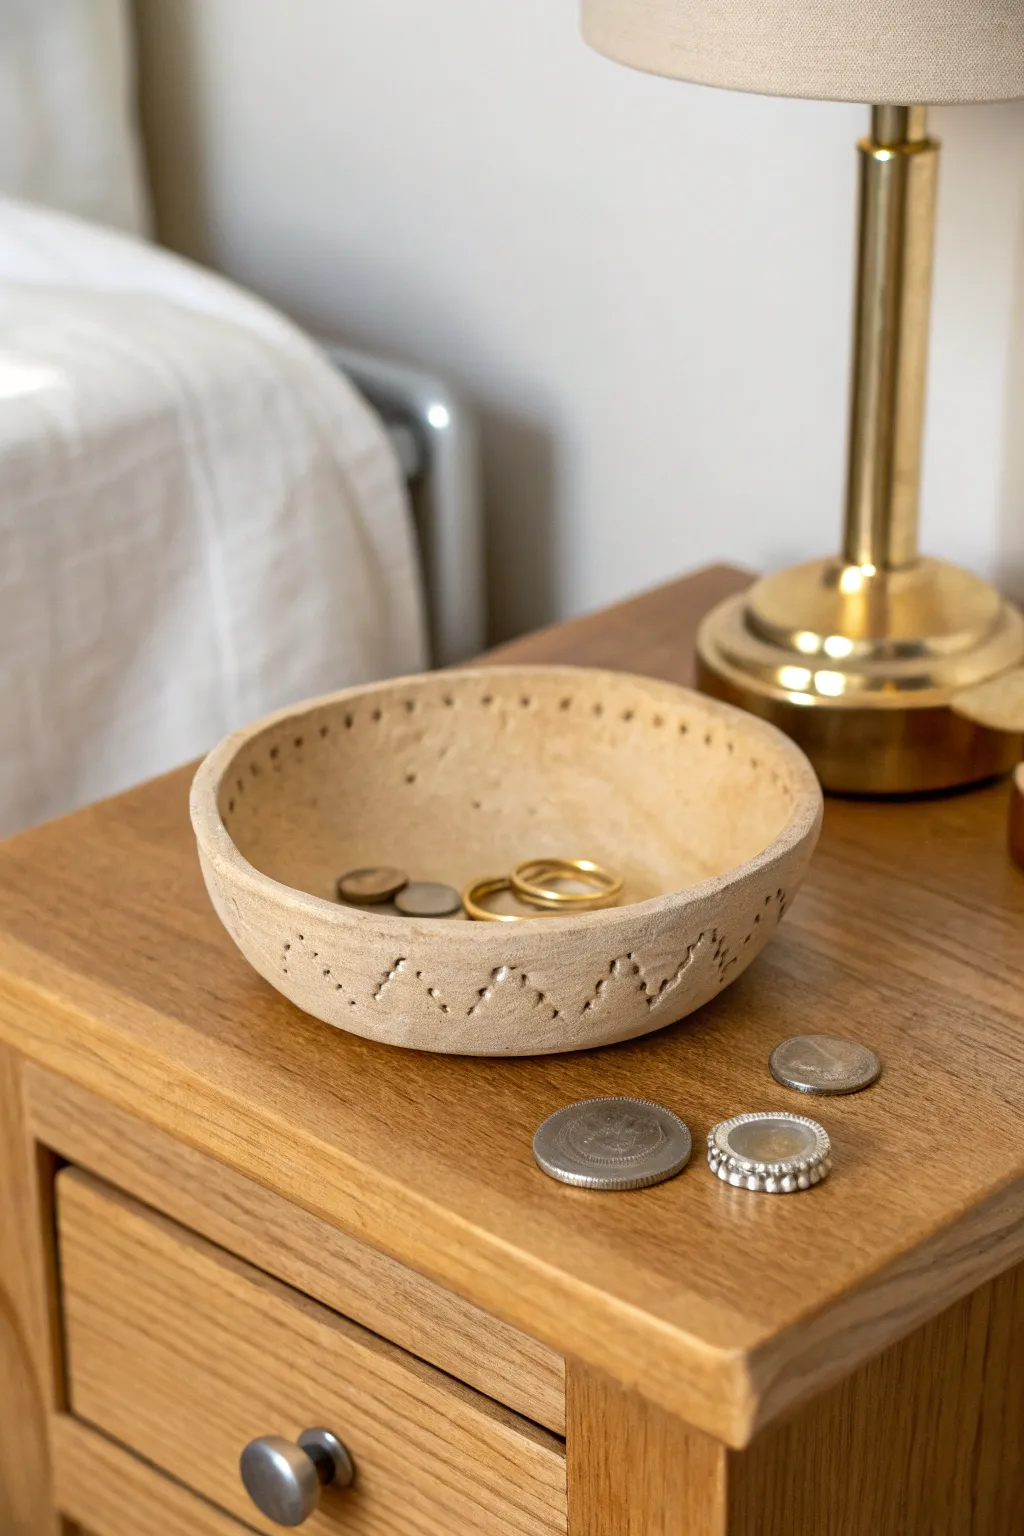
Create a charming, rustic catch-all that looks like boutique ceramic ware but is actually made from simple air-dry clay. With its natural tone and delicate pin-pricked zigzag details, this pinch pot is perfect for holding your bedside essentials like rings and loose change.
How-To Guide
Materials
- Air-dry modeling clay (white or beige)
- Acrylic paint (tan/beige/ochre mixture)
- Clear matte varnish or sealant
- Rolling pin
- Small bowl for water
- Wooden skewer or sturdy toothpick
- Medium paintbrush
- Fine-grit sandpaper
Step 1: Forming the Base
-
Prepare your clay:
Start with a ball of air-dry clay roughly the size of a tennis ball. Knead it in your hands for a minute to warm it up and ensure it’s pliable and free of air bubbles. -
Create the opening:
Hold the ball in one hand and push your thumb firmly into the center of the sphere. Press down until you are about half an inch from the bottom, being careful not to push all the way through. -
Pinch the walls:
Using your thumb and fingers, gently pinch the clay walls, rotating the ball as you go. Work from the bottom up to thin out the sides evenly. -
Shape the silhouette:
Continue pinching and pulling gently until you have a wide, shallow bowl shape. Aim for a wall thickness of about a quarter-inch for sturdiness. -
Refine the rim:
Tap the rim of the bowl gently against your table surface to flatten it slightly if desired, or smooth it with your finger for a rounded edge. I like to keep the rim slightly uneven to maintain that handmade charm. -
Smooth the surfaces:
Dip your finger in a little bit of water and run it over the inside and outside of the bowl. This will smooth out major cracks or fingerprints, though a little texture is part of the look. -
Level the bottom:
Place the bowl on a flat surface and press down gently on the inside bottom to ensure it sits flat without wobbling.
Clean Lines Tip
To keep your pin-pricked holes clean, twist the skewer slightly as you pull it out of the clay. This prevents the tool from dragging the clay outward.
Step 2: Adding the Details
-
Mark the rim:
Take your wooden skewer or toothpick. While the clay is still soft, press small dots into the very top edge of the rim, spacing them about a centimeter apart. -
Plan the zigzag:
Lightly visualize or very faintly scratch a zigzag line around the exterior of the bowl to guide your pattern placement. -
Poke the pattern:
Using the same skewer, firmly poke holes following your zigzag guide. Press deep enough to make a distinct indentation but be careful not to puncture all the way through the wall. -
Refine the holes:
If the clay pushes out slightly around the holes you just made, gently tap those raised spots back down with your finger for a cleaner finish. -
Dry completely:
Set the bowl aside in a dry area. Let it cure for at least 24-48 hours. The clay will turn lighter and feel distinctively hard once fully dry. -
Sand imperfections:
Once fully dry, take a piece of fine-grit sandpaper and lightly buff the rim and any rough patches on the exterior to soften the texture.
Creative Twist
Try painting the inside of the pinholes with gold metallic paint instead of dark brown. It adds a secret sparkle that catches the light beautifully.
Step 3: Painting and Finishing
-
Mix your color:
Combine white acrylic paint with a small drop of brown and a tiny touch of yellow oxide to create a natural, stone-like beige. -
Apply the base coat:
Paint the entire bowl, inside and out. Use a somewhat ‘dry brush’ technique—wiping most of the paint off the brush first—to emphasize the clay’s natural texture rather than covering it in a thick plastic-looking layer. -
Darken the details:
Mix a slightly darker, watered-down brown wash. Dab this into the pinholes you created, then quickly wipe the surface with a paper towel. This leaves the dark color inside the holes, making the pattern pop. -
Seal the piece:
After the paint is fully dry, apply a coat of clear matte varnish. This protects the clay from moisture and gives it a finished, ceramic feel. -
Final cure:
Let the varnish act according to the manufacturer’s drying time before placing any jewelry or coins inside.
Enjoy styling your new handmade dish on a nightstand to keep your treasures safe


Coil-Built Mini Planter
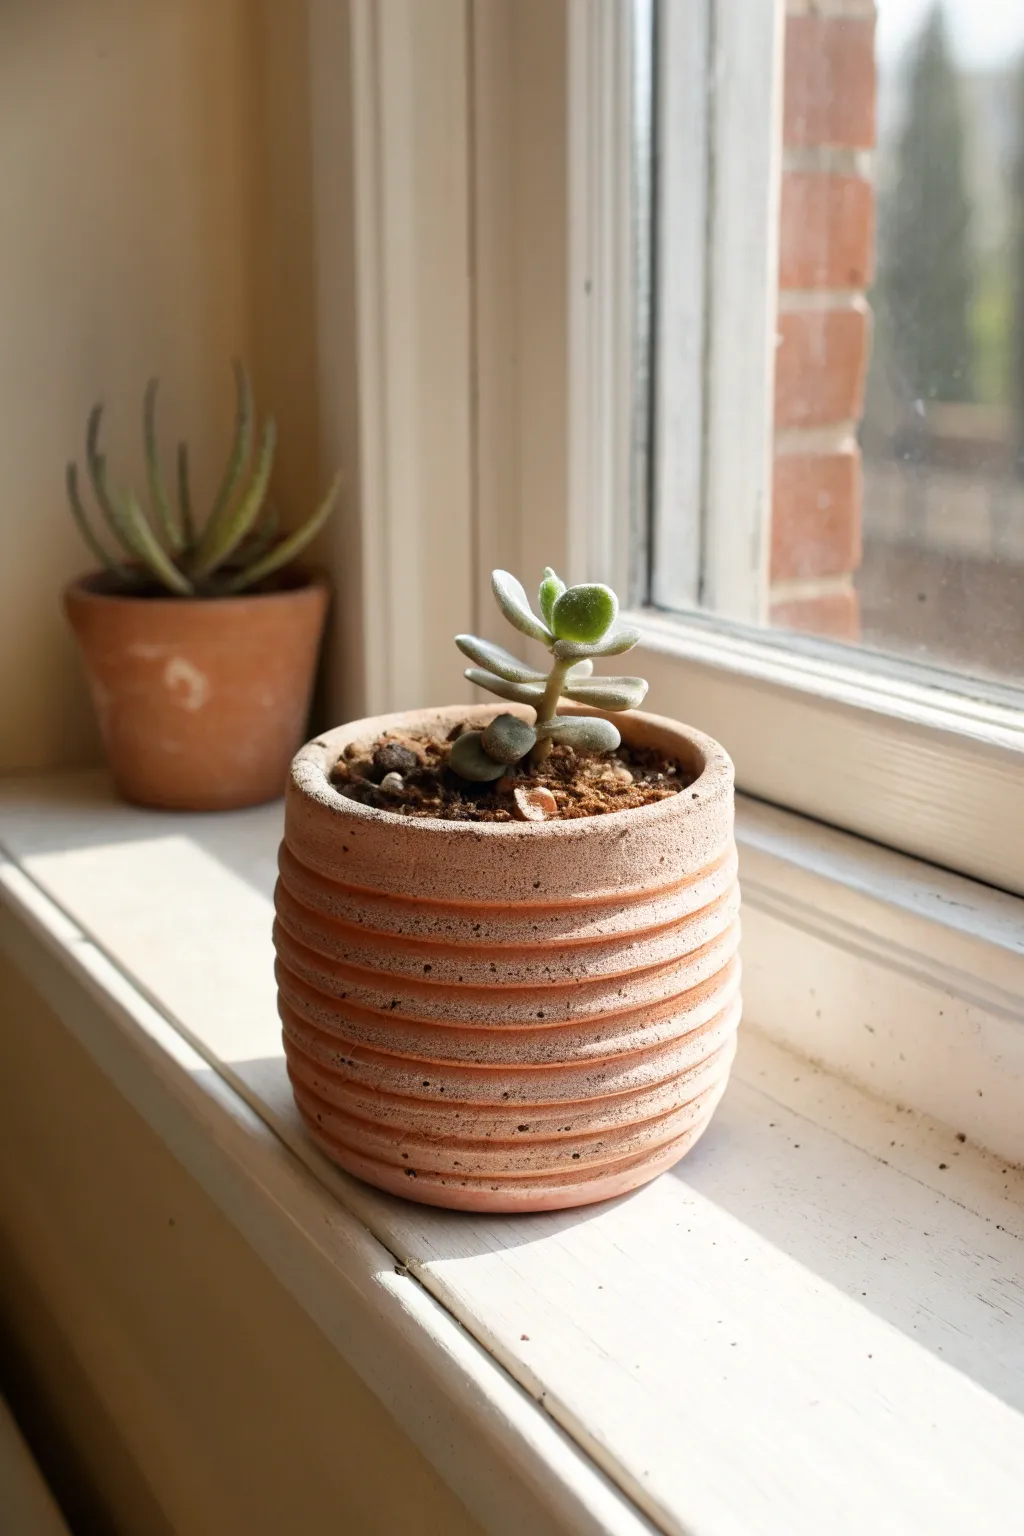
Bring a touch of organic warmth to your windowsill with this ribbed planter that mimics the look of real terra cotta. Using simple coil-building techniques, you can create a textured home for your favorite tiny succulent.
Step-by-Step Tutorial
Materials
- Terra cotta colored modeling clay (air-dry or polymer)
- Small circular cookie cutter or jar lid (approx. 2-3 inches)
- Needle tool or toothpick
- Rolling pin (acrylic or wooden)
- Modeling tool or old toothbrush (for scoring)
- Small bowl of water (if using air-dry clay) or slip
- Fine grit sandpaper
- Sealer or varnish (optional)
Step 1: Creating the Base
-
Condition the clay:
Begin by warming up a chunk of clay in your hands. Knead it thoroughly until it is pliable and free of cracks. -
Roll the slab:
Use your rolling pin to flatten the clay into an even slab, aiming for a thickness of about 1/4 inch. -
Cut the foundation:
Press your circular cutter or jar lid into the slab to create a perfect circle. This will serve as the strong bottom of your pot. -
Score the edges:
Using your needle tool or a toothbrush, gently scratch up the outer perimeter of the circle’s top surface. This rough texture helps the walls stick.
Step 2: Building the Walls
-
Roll the first coil:
Take a new piece of clay and roll it on your work surface into a long, even snake. Aim for a thickness slightly thinner than a pencil. -
Measurement check:
Lay the coil around the base to ensure it’s long enough to complete a circle, then trim the excess. -
Attach the first layer:
Place the coil onto the scored edge of the base. If using air-dry clay, dab a tiny bit of water on the scratched area first. -
Blend the interior:
Here I like to use a modeling tool or my thumb to smear the *inside* of the coil down onto the base. This seals the bottom without ruining the exterior texture. -
Continue coiling:
Roll out several more long coils of the same thickness. Consistency here is key for that uniform ribbed look. -
Stacking up:
Score the top of the previous coil, add a touch of moisture, and stack the next coil directly on top. -
Joining the ends:
Where the two ends of a coil meet, cut them at an angle and press them together firmly so there is no gap. -
Smoothing the inside:
After every 2-3 layers, pause to smooth the interior walls downward with your finger or tool to fuse the coils vertically. -
Finishing the height:
Continue stacking until the pot reaches about 2.5 to 3 inches tall. The image shows roughly 8 to 10 stacked coils.
Seamless Stacking
Stagger the seams where your coils join (don’t line them all up vertically) to make the structure much stronger.
Step 3: Refining and Finish
-
Rim perfection:
For the final coil at the rim, carefully smooth the top surface flat so it looks finished rather than rounded. -
Texture check:
Look at the exterior. If you want the ridges more defined like the photo, run a rounded tool gently between the coils to deepen the grooves. -
Drying or baking:
Let the pot dry completely (air-dry) or bake it according to your polymer clay package instructions. -
Sanding:
Once hardened, grab a piece of fine sandpaper and gently sand the rim or any rough spots to get that matte, stone-like quality. -
Dusting off:
Wipe away any clay dust with a slightly damp cloth to reveal the texture one last time. -
Sealing:
If you plan to put a real plant inside, apply a waterproof sealer to the interior to protect the clay from moisture.
Faux-Agave Look
After baking, dry-brush a tiny amount of white acrylic paint onto the ridges to mimic a weathered, chalky garden pot.
Pop in your favorite succulent and enjoy the natural charm this handmade vessel brings to your space


Mini Clay Charms for Keychains
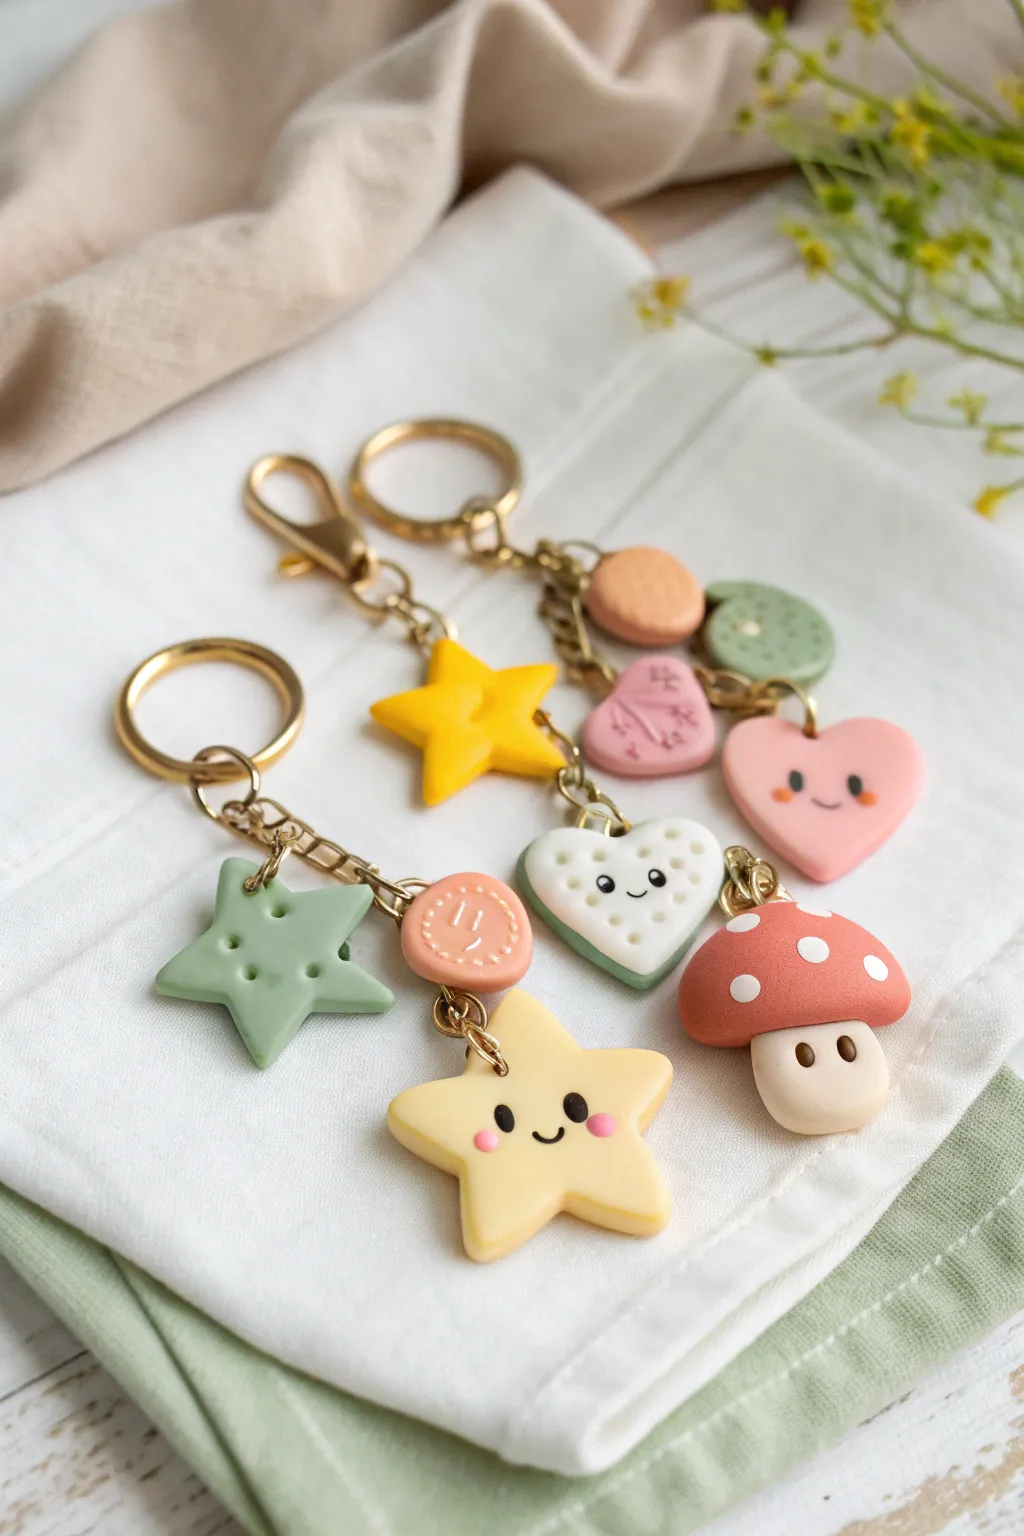
These adorable keychains feature a delightful mix of smiling stars, sweet hearts, and a charming little mushroom, all crafted from polymer clay. The soft pastel palette and simple faces give them a playful, kawaii aesthetic perfect for brightening up your keys or bags.
Detailed Instructions
Materials
- Polymer clay (yellow, pastel pink, mint green, white, terracotta/red, beige)
- Black and pink acrylic paint (or fine tip markers)
- Small dotting tool or toothpick
- Eye pins (gold)
- Jump rings (gold)
- Gold keychain clasps and chains
- Rolling pin or pasta machine
- Star and heart shaped mini cutters
- Needle tool
- Baking sheet and parchment paper
- Gloss glaze (optional)
Step 1: Prepping and Shaping Bases
-
Condition the clay:
Start by warming up your clay in your hands until it’s soft and pliable. I find that spending an extra minute here prevents cracks later on. -
Roll out sheets:
Roll your pastel yellow, mint green, and pink clays into even sheets, about 1/4 inch thick. You want them sturdy enough to hold the hardware. -
Cut the stars:
Use your star cutter to punch out shapes from the yellow and green clay. Smooth the edges gently with your finger to remove any sharp cutter marks. -
Create the hearts and cookies:
Cut heart shapes from pink and white clay. For the white heart ‘cookie’, layer a slightly smaller white heart on top of a mint green base, or simply shape a thick white heart. -
Sculpt the mushroom cap:
Roll a ball of terracotta or red clay and flatten the bottom to form a dome shape for the mushroom cap. -
Form the mushroom stem:
Roll a cylinder of beige clay for the stem, slightly wider at the bottom. Press it gently onto the underside of the cap to join them.
Step 2: Adding Details and Hardware
-
Texture the cookies:
For the green star and white heart ‘cookies’, use a needle tool to poke small indentations around the perimeter to mimic baked goods. -
Decorate the mushroom:
Press tiny, flat circles of white clay onto the red cap to create the classic spotted mushroom look. -
Add button details:
Create small round discs from pink or orange clay. Press two or four tiny holes in the center to make them look like buttons. -
Stamp subtle patterns:
If desired, lightly press a stamp or texture sheet into the plain heart or star charms before baking for extra surface interest. -
Insert eye pins:
Carefully trim your eye pins to size. Insert them into the top of each clay charm. A tiny dab of liquid clay or bake-and-bond on the pin helps secure it permanently.
Fingerprint Fix
To remove fingerprints from unbaked clay, lightly brush the surface with a little baby oil or cornstarch before baking. It smooths everything out perfectly.
Step 3: Baking and Assembly
-
Bake the charms:
Arrange your pieces on a parchment-lined baking sheet. Bake according to your specific clay package instructions (usually around 275°F or 135°C for 15-30 minutes). -
Cool down:
Let the pieces cool completely on the tray. They are fragile when hot, so patience is key here. -
Paint the faces:
Using a very fine dotting tool and black acrylic paint, add two small dots for eyes. Use a fine brush to paint a tiny U-shape smile between them. -
Add rosy cheeks:
Dip a larger dotting tool into pink paint and dab small circles just below the eyes for blushing cheeks. Let the paint dry fully. -
Seal (Optional):
If you want a shiny finish or extra protection for the paint, coat the charms with a thin layer of polyurethane gloss glaze. -
Attach jump rings:
Open your jump rings using two pairs of pliers (twist sideways, don’t pull apart). Thread a charm onto each ring. -
Assemble the keychain:
Attach the jump rings to the chain links of your keychain clasp. Mix and match shapes—try hanging a star with a button and a mushroom together for a clustered look.
Make it Sparkle
Mix a pinch of clear or hexagonal glitter into the translucent or white clay before shaping to give your cookies a sugary, frosted appearance.
Now clip your new handmade charms onto your backpack and enjoy the daily dose of cuteness


Simple Polymer Clay Earrings
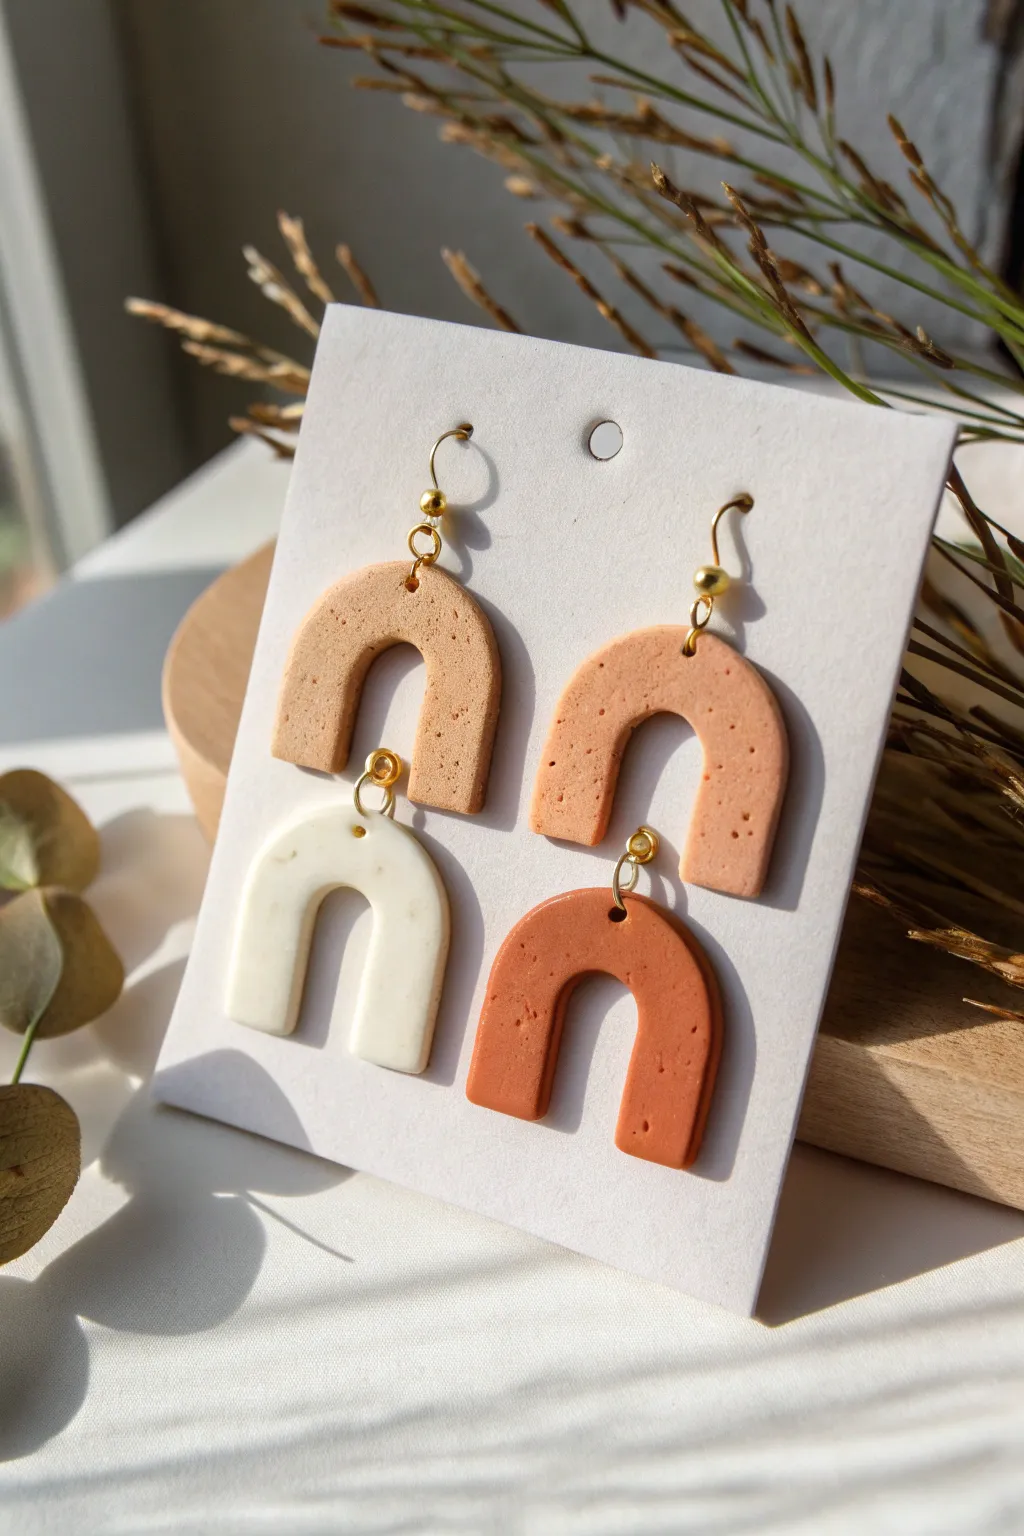
These trendy, bohemian-style earrings feature a double-arch design that is surprisingly simple to construct. The speckled, earthy color palette gives them a sophisticated, stone-like finish perfect for everyday wear.
Step-by-Step
Materials
- Polymer clay in neutral tones (beige, terracotta, cream, peach)
- Black pepper or dried coffee grounds (for speckling)
- Acrylic rolling pin
- U-shaped clay cutters (two sizes: medium and large)
- Needle tool or toothpick
- Parchment paper or ceramic tile
- Oven
- Jewelry pliers (round nose and flat nose)
- Gold tone jump rings (6mm or 7mm)
- Gold tone earring hooks
- Fine-grit sandpaper (optional)
Step 1: Preparing the Clay
-
Condition the clay:
Start by warming up your chosen colors of polymer clay in your hands. Knead each color separately until it is soft, pliable, and free of cracks. -
Create the speckled effect:
Take a small pinch of ground black pepper or dried coffee grounds and sprinkle it onto your flattened clay. Fold the clay over itself and knead thoroughly until the specks are evenly distributed throughout the material. -
Roll out the slab:
Place your conditioned clay on a ceramic tile or parchment paper. Use your acrylic roller to roll it out to a uniform thickness, ideally around 3mm (or 1/8 inch).
Fixing Fingerprints
Before baking, dampen a Q-tip with a tiny amount of rubbing alcohol or baby oil and gently brush over the clay surface to erase fingerprints.
Step 2: Cutting and Baking
-
Cut the shapes:
Using your U-shaped cutters, press firmly into the clay slab. For this design, you will need two larger arches for the top pieces and two slightly smaller arches for the bottom tiers. -
Smooth the edges:
Before lifting the shapes, gently run your finger along the cut edges to soften any sharp ridges left by the cutter. This saves sanding time later. -
Pierce holes for assembly:
Using a needle tool, carefully poke holes where the jump rings will go. You need one hole at the top center of the upper arch, one at the bottom center of the upper arch, and one at the top center of the lower arch. -
Ensure holes are large enough:
Wiggle the needle tool slightly to ensure the holes are wide enough to accommodate your jump rings freely. -
Bake the pieces:
Transfer your tile or parchment paper to a baking sheet. Bake according to the manufacturer’s instructions on your clay package—typically around 275°F (135°C) for 15-30 minutes. -
Cool and finish:
Allow the clay to cool completely before handling. If there are any rough spots, gently buff them away with fine-grit sandpaper.
Pro Tip: Thickness
Use playing cards as depth guides! Stack 3-4 cards on either side of your clay while rolling to ensure your slab is perfectly even.
Step 3: Assembly
-
Open the jump rings:
Using two pairs of pliers, twist a jump ring open sideways (never pull it apart outwards) to preserve its shape. -
Connect the tiers:
Slide the open jump ring through the bottom hole of the top arch and the top hole of the bottom arch. Close the ring securely by twisting it back into place. -
Attach earring hardware:
Open another jump ring or the loop on your earring hook. Thread it through the top hole of the upper arch. -
Secure the hook:
Close the loop securely with your pliers. Repeat the assembly process for the second earring to complete the pair.
Now you have a stylish, lightweight pair of custom earrings ready to gift or wear

The Complete Guide to Pottery Troubleshooting
Uncover the most common ceramic mistakes—from cracking clay to failed glazes—and learn how to fix them fast.
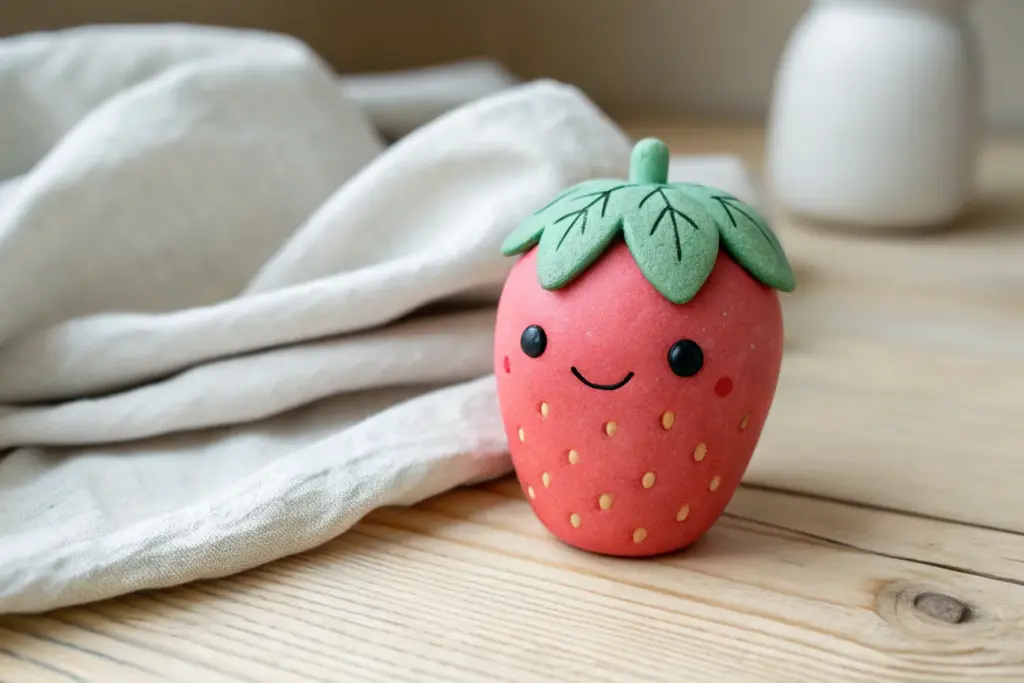
Smiling Strawberry or Cherry Charms
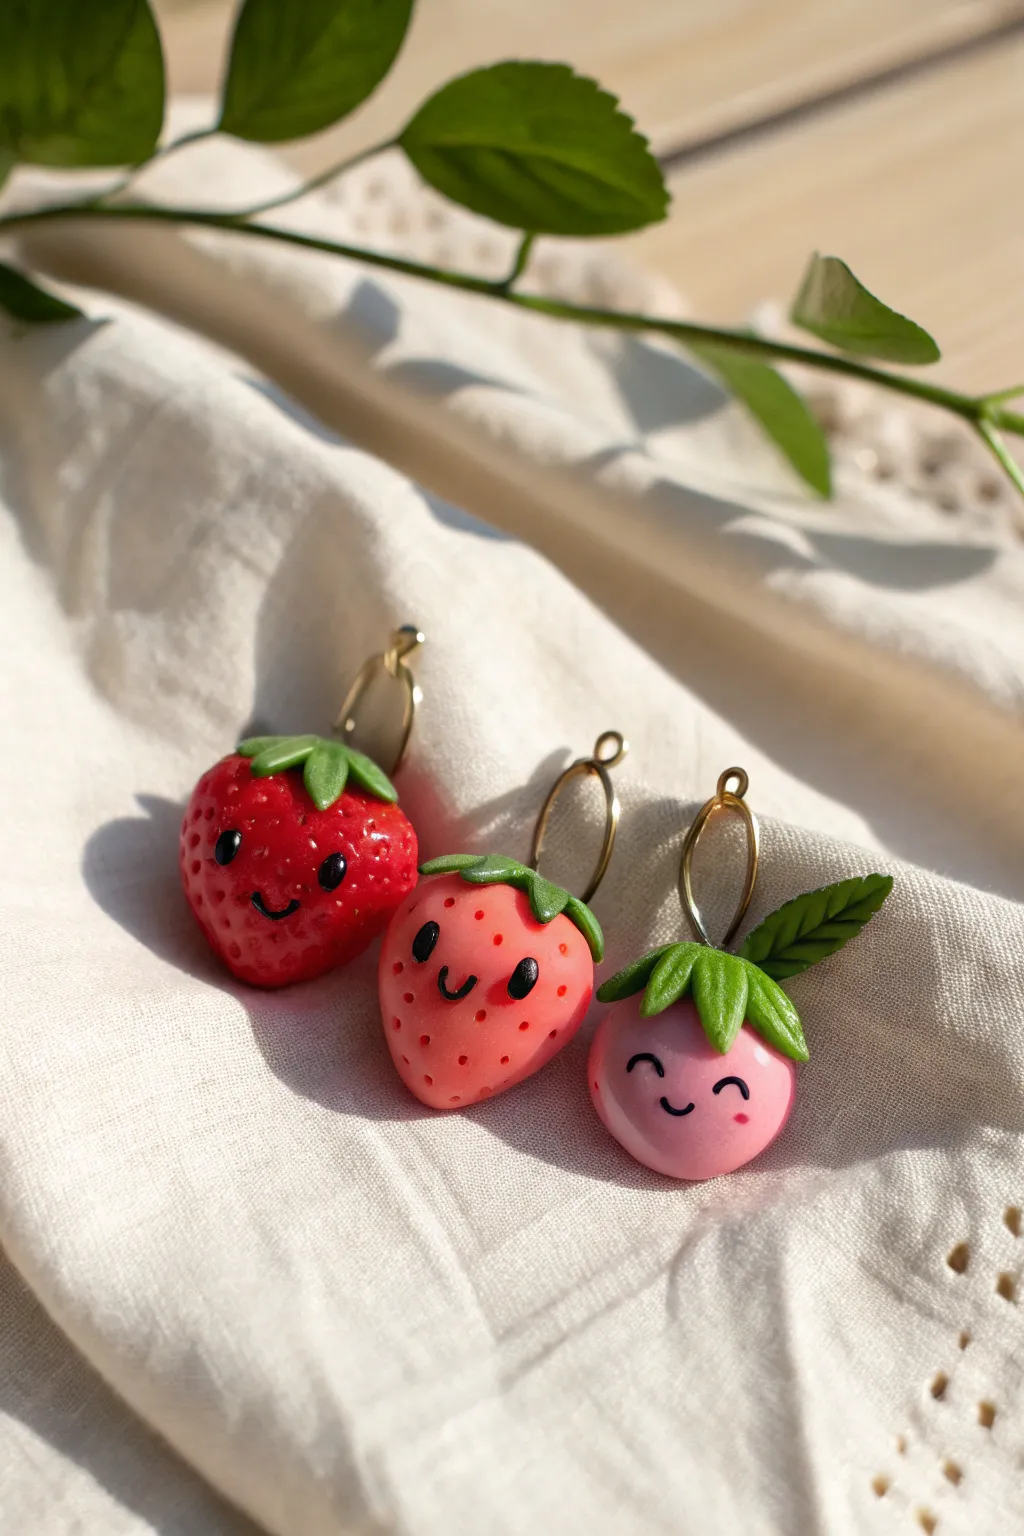
These adorable modeling clay charms bring a pop of sweetness to any jewelry collection with their kawaii-inspired faces and juicy colors. Whether you choose the classic red strawberry or the blushing pink cherry, these miniature berries are perfect for beginners looking to practice charming facial details.
Detailed Instructions
Materials
- Polymer clay (Bright Red, Coral Pink, Light Pink, Leaf Green)
- Black polymer clay
- Gold jump rings (6mm or 8mm)
- Headpins or eye pins
- Needle tool or toothpick
- Ball stylus tool (small)
- Clay blade or craft knife
- Gloss glaze or UV resin (optional for shine)
- Small paintbrush
Step 1: Shaping the Base
-
Mix your colors:
Begin by conditioning your clay. For the strawberries, you can use pure bright red or mix red with a touch of white for the coral shade. For the rounder berry, use a soft pink. -
Form the strawberry shape:
Roll a small ball of red or coral clay, about the size of a marble. Gently pinch one end and roll it between your fingers to create a tapered bottom, forming a rounded teardrop or strawberry shape. -
Form the cherry shape:
For the pink berry, simply roll your conditioned pink clay into a smooth, perfect sphere. Flatten the bottom ever so slightly so it doesn’t roll away while you work. -
Add texture:
Using a needle tool, gently press tiny indentations all over the surface of the strawberry shapes to mimic seeds. Keep the area where the face will go smooth and free of texture.
Step 2: Adding Greenery
-
Create the calyx:
Roll a tiny ball of green clay and flatten it into a thin disk. Use your craft knife to cut small triangular notches out of the edge to create a starburst shape with 5-6 points. -
Attach the leaves:
Place the green starburst on top of your berry. Gently press the points down so they curve over the rounded top of the fruit. -
Sculpt individual leaves:
For the round pink berry, instead of a starburst, shape small teardrops of green clay. Press them flat and use a needle tool to score a central vein down the middle of each. -
Make the stem:
Roll a very thin snake of green clay. Cut a short segment and attach it to the center of the leaves on top of each fruit to create a cute little stem.
Seed Detail Hack
Instead of poking holes for seeds, roll tiny tear-drop shapes of a darker red color and press them flat onto the berry surface for a dimensional look.
Step 3: Hardware & Baking
-
Insert the hardware:
Take a gold eye pin (or a jump ring passed through a loop of wire). Carefully push the straight wire end down through the center of the green stem and into the body of the fruit. -
Secure the pin:
I like to add a tiny dab of liquid clay or translucent liquid Sculpey on the pin before inserting it to ensure it bonds permanently during baking. -
Bake the charms:
Place your berries on a dedicated baking tile or parchment-lined tray. Bake according to your brand of clay’s instructions (usually 275°F/135°C for 15-30 minutes). Let them cool completely.
Jewelry Sets
Make matching pairs to create dangle earrings, or attach a lobster clasp to the jump ring to create an interchangeable zipper pull or stitch marker.
Step 4: Bringing them to Life
-
Add the eyes:
Roll incredibly tiny balls of black clay. Press them onto the smooth face area of the baked berries. If you prefer, you can paint these on with acrylic paint after baking instead. -
Create the mouth:
Roll a microscopic snake of black clay and curve it into a ‘U’ shape for a smile. Gently press it onto the face between the eyes. -
Add sweet cheeks:
Paint or use tiny flattened dots of pink clay to add blush marks just below the eyes for that extra kawaii effect. -
Add eye highlights:
Dip the tip of a toothpick into white acrylic paint and place a tiny dot on each black eye to create a playful sparkle. -
Seal the deal:
Once any paint is fully dry, coat the entire charm in a gloss glaze or UV resin to give it a fruit-like shine and protect the small details. -
Final assembly:
Open a large gold jump ring using pliers. Slide it through the eye pin loop on top of your charm, then close the ring securely to finish your pendant.
You now have a basket’s worth of eternal fruit ready to brighten up your accessories
Chubby Octopus Figurine
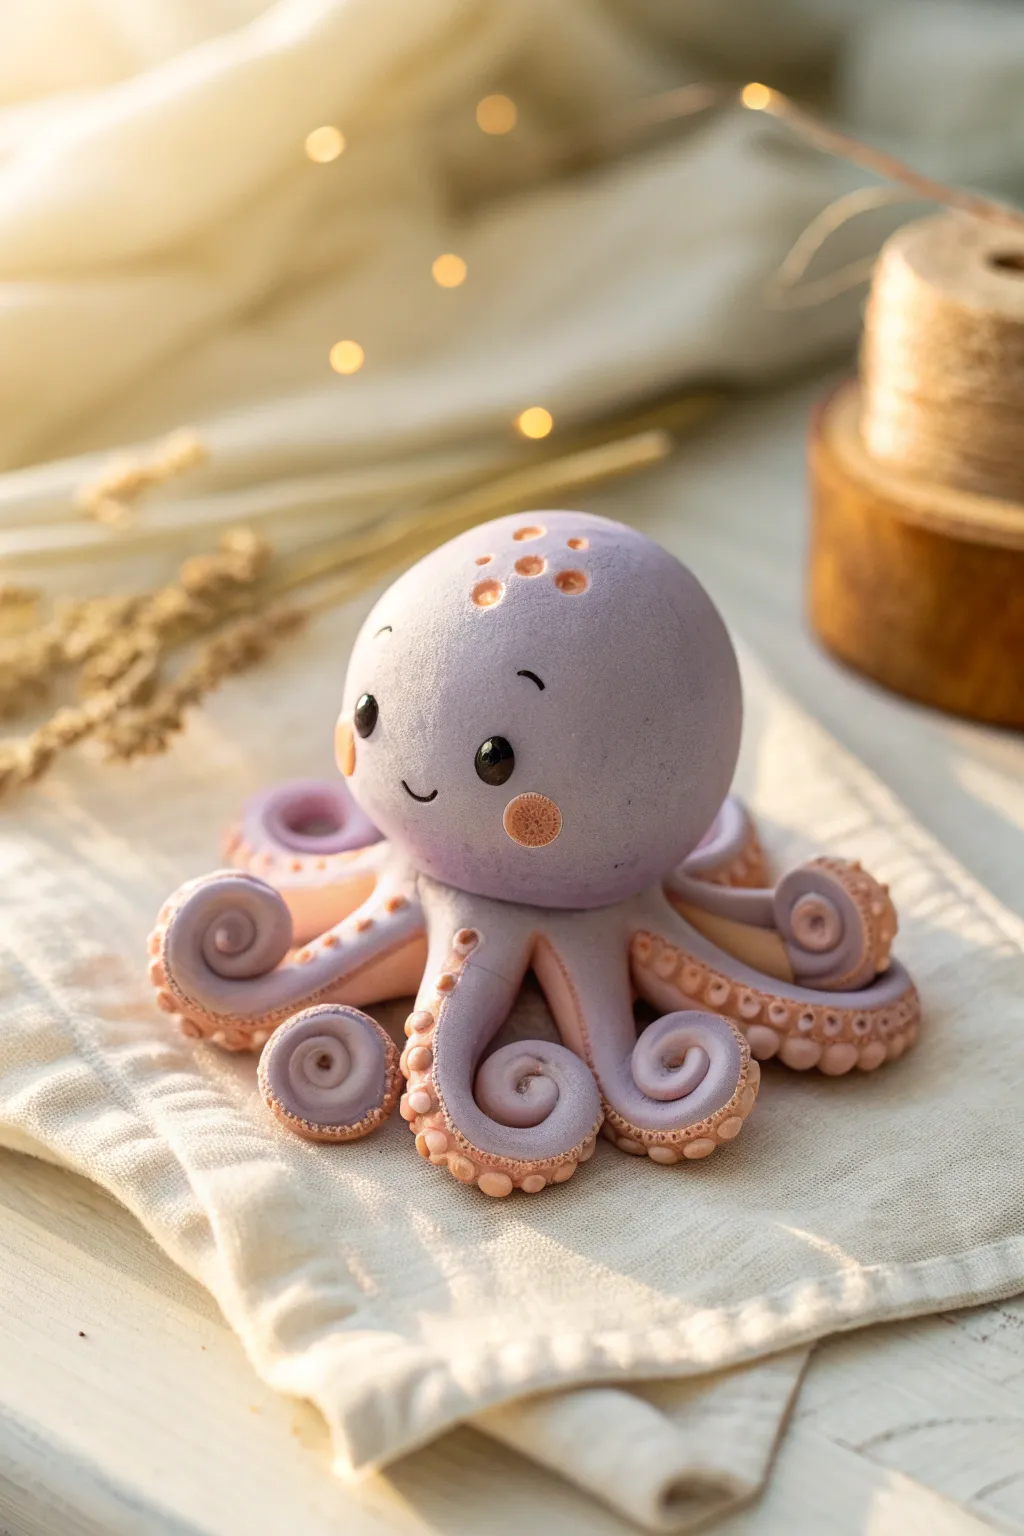
This adorable chubby octopus figurine brings a splash of whimsy to any desk or shelf with its soft lilac body and intricate peach-colored suckers. The matte finish and curled tentacles give it a gentle, tactile quality that makes you want to reach out and touch it.
Step-by-Step Tutorial
Materials
- Polymer clay (Lilac/Light Purple)
- Polymer clay (Pale Peach/Salmon Pink)
- Black polymer clay or small black beads (for eyes)
- Ball tool set (various sizes)
- Needle tool or toothpick
- Soft pastel chalks (pink) for blushing
- Small soft brush
- Acrylic rolling pin
- Baking sheet and parchment paper
- Gloss varnish (optional, for eyes only)
Step 1: Shaping the Base
-
Condition the Clay:
Begin by warming up a generous amount of the lilac clay and a smaller amount of the peach clay in your hands until they are soft and pliable. -
Form the Head:
Roll your lilac clay into a large, smooth sphere. This will be the main body and head of your octopus. Ensure there are no cracks or visible seams. -
Create Tentacle Logs:
Take more lilac clay and roll out eight individual sausage shapes. They should be thicker at one end (where they attach to the body) and taper gently to a point at the other. -
Curl the Tips:
Take the tapered end of each tentacle and carefully curl it inward into a spiral, creating that classic swirling octopus look. -
Attach Tentacles:
Arrange the eight curled tentacles in a radial circle on your work surface. Gently press them together at the center point so they fuse. -
Join Head and Body:
Place the large lilac sphere on top of the connection point of the tentacles. Use a blending tool or your finger to smooth the clay from the bottom of the head onto the tops of the tentacles for a secure bond.
Tentacle Trouble?
If the tentacles droop or lose their curl while you work on the head, prop them up with small pieces of crumpled facial tissue or polyester batting during the sculpting and baking process.
Step 2: Adding the Details
-
Prepare the Suckers:
Roll out many tiny balls of the peach-colored clay. You will need graduations in size: larger ones for the base of the tentacles and tiny ones for the curled tips. -
Apply Suckers:
Press the peach balls onto the underside and visible sides of the curled tentacles. I find it easiest to work from the body outward to keep the sizing consistent. -
Texture the Suckers:
Using a small ball tool, press into the center of each peach dot. This creates the suction cup indentation and secures the peach clay to the purple body. -
Add Head Markings:
Take a few medium-sized balls of peach clay and press them onto the top of the head in a random pattern. Indent these with your ball tool as well to mimic barnacles or spots. -
Create Eye Sockets:
Use a medium ball tool to make two indentations on the face where you want the eyes to sit. Spacing them widely apart adds to the cuteness factor. -
Insert Eyes:
Place two small balls of black clay into the sockets and flatten them slightly. Alternatively, insert your black beads. -
Add Highlights:
If using black clay for eyes, add a microscopic dot of white clay to the upper corner of each eye to bring the expression to life. -
Make the Smile:
Use your needle tool or a small curved tool to impress a tiny, subtle smile right between the eyes.
Level Up: Texture
Before baking, gently dab the entire lilac skin surface with an old toothbrush or stiff bristle brush. This removes the plastic shine and creates a realistic velvety skin texture.
Step 3: Finishing Touches
-
Rosy Cheeks:
Add two small flat circles of peach clay under the eyes for cheeks. Texture these with a needle tool or stiff brush to give them a rough, sponge-like look. -
Eyebrows:
Paint or draw very thin, tiny eyebrows floating above the eyes using a fine-tip marker or a thin roll of black clay. -
Final Smoothing:
Check the figurine for any fingerprints. You can dip your finger in a little baby oil or cornstarch to gently buff them away before baking. -
Bake:
Bake the figurine according to your specific clay manufacturer’s instructions (usually 230°F – 275°F for 15-30 minutes). Let it cool completely.
Enjoy your new delightful deep-sea friend on your display shelf.


What Really Happens Inside the Kiln
Learn how time and temperature work together inside the kiln to transform clay into durable ceramic.
Frog Toothbrush Holder
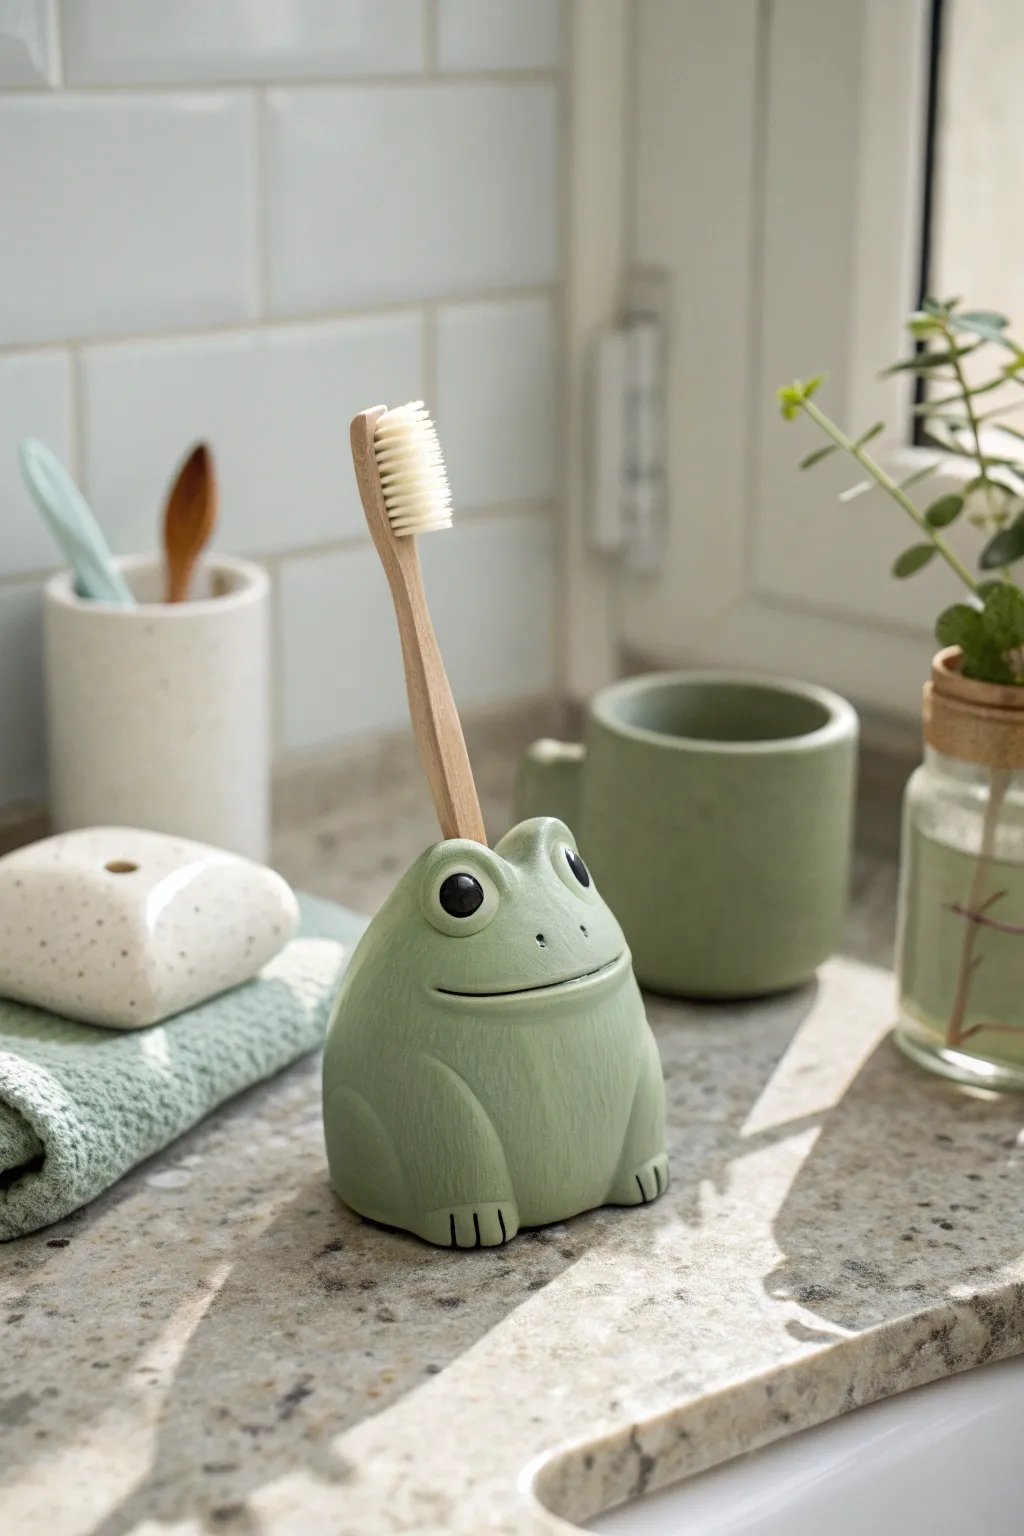
Bring a touch of whimsical pond life to your morning routine with this adorable frog toothbrush holder. Sculpted from modeling clay with a smooth matte green finish, this functional friend keeps your toothbrush upright and ready for action.
Step-by-Step
Materials
- Air-dry modeling clay or polymer clay (white or light grey)
- Acrylic paints (sage green, black, white)
- Clear matte varnish or sealant (water-resistant)
- Sculpting tools (needle tool, smoothing tool)
- Small paintbrush
- Aluminum foil (for armature core)
- A toothbrush (for sizing)
- Sandpaper (fine grit)
Step 1: Forming the Body
-
Create the core:
Start by crumpling a piece of aluminum foil into a tight ball, slightly flattened at the bottom. This saves clay and keeps the figurine lightweight. -
Roll the clay:
Condition your clay until it’s pliable, then roll it into a large sheet about 1/4 inch thick. -
Cover the core:
Wrap the clay sheet around your foil ball, pressing seams together and smoothing them out until you have a solid, rounded lump shape. -
Shape the silhouette:
Gently manipulate the clay to form a rounded pyramid shape. The base should be wide and stable, tapering slightly toward the head area. -
Create the holder hole:
Take your actual toothbrush handle and press it vertically into the top center of the head. Wiggle it slightly to make the hole just a bit larger than the brush to account for shrinkage or glaze later.
Step 2: Sculpting the Features
-
Define the eye sockets:
Use your thumbs to press slight indentations on either side of the upper head where the eyes will sit. -
Make the eyes:
Roll two medium-sized balls of clay. Place them into the indentations you made, blending the bottom edges into the head so they look integrated, not just stuck on. -
Add the ridge:
Roll a very thin snake of clay and blend it over the top of each eye to create a subtle brow ridge or eyelid. -
Carve the mouth:
Using a needle tool or a thin blade, slice a long, wide curve across the front of the face for the mouth. Enhance the corners with small dimples. -
Form the legs:
Roll two thick sausage shapes for the legs. Attach them to the sides of the body, blending the upper thigh into the torso while keeping the knee distinct. -
Sculpt the feet:
Flatten the ends of the leg rolls at the front base. Use a knife tool to cut vertical lines to separate three distinct toes on each foot. -
Smooth everything:
Dip your finger in a little water (for air-dry clay) or baby oil (for polymer) and run it over the entire surface to remove fingerprints and bumps.
Waterproofing Wisdom
Use a marine-grade varnish or two-part resin for the coating. Standard Mod Podge won’t survive the humidity of a bathroom for long.
Step 3: Finishing Touches
-
Dry or bake:
Follow part of the instructions on your specific clay package to either bake the piece or let it air dry completely. -
Sand imperfections:
Once fully cured, use fine-grit sandpaper to gently buff away any remaining rough spots for a stone-like texture. -
Base coat:
Paint the entire frog with a lovely sage green acrylic paint. You may need two coats for full opacity. -
Detail the eyes:
Paint the round protruding eyes solid black. Once dry, add a tiny white dot to each for a reflection. -
Highlight the mouth:
I like to run a very thin wash of darker green or deep grey into the mouth slit to give it depth. -
Seal for protection:
Since this will live in a bathroom, apply at least three coats of a water-resistant matte varnish to protect the clay from moisture.
Unstable Frog?
If he tips over with a toothbrush inserted, your base is too light. Glue a heavy washer or coin to the bottom before painting to add weight.
Place your new amphibian friend on the sink and enjoy a smile every time you brush your teeth
Panda Face Paperweight
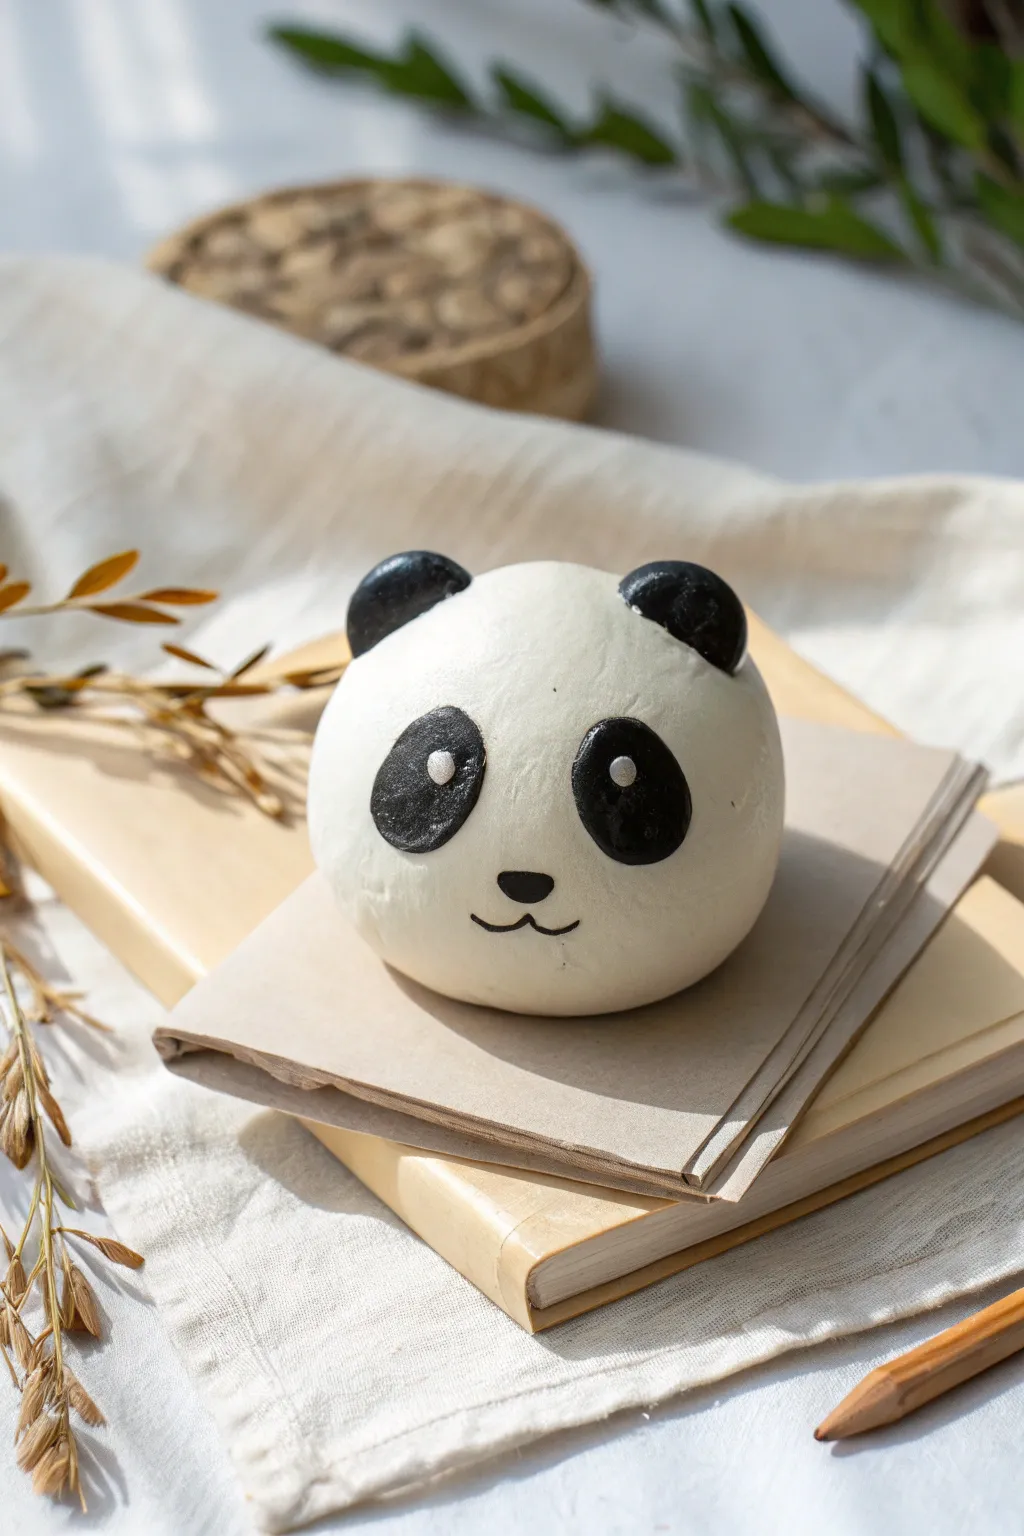
Brighten up your desk with this adorable panda face crafted from smooth modeling clay. Its simple, graphic design makes it a perfect beginner project that results in a functional and charming piece.
Step-by-Step Tutorial
Materials
- White air-dry clay or polymer clay
- Black air-dry clay or polymer clay
- Rolling pin
- Ball tool or rounded chopstick end
- Needle tool or toothpick
- Small craft paintbrush
- Black acrylic paint (optional)
- White acrylic paint
- Gloss varnish or sealant
- Sandpaper (fine grit)
Step 1: Shaping the Head
-
Condition the white clay:
Begin by taking a generous amount of white clay and kneading it thoroughly in your hands until it becomes warm, soft, and pliable. -
Form the base sphere:
Roll the white clay between your palms to create a smooth, tight ball. Aim for a size roughly slightly smaller than a tennis ball for a substantial paperweight. -
Flatten the base:
Gently press the ball onto your work surface to create a flat bottom. This ensures your paperweight won’t roll away once it faces the world. -
Refine the shape:
Smooth out any fingerprints or cracks on the dome surface using a drop of water on your finger.
Step 2: Adding the Ears
-
Create ear spheres:
Take a small amount of black clay and roll two equal-sized balls, each about the size of a marble or large blueberry. -
Flatten and shape:
Slightly flatten each black ball into a thick disc or semi-circle shape. -
Attach the ears:
Position the ears on the top left and right sides of the white dome. Press them firmly to adhere. -
Blend the seams:
Use a modeling tool or your finger to gently drag a little clay from the back of the ear downward onto the head to secure the bond without ruining the visible front curve.
Smooth Moves
Keep a small dish of water nearby. Dipping your finger in it and rubbing the clay surface lightly acts like ‘liquid sandpaper’ to remove fingerprints before drying.
Step 3: Creating the Face Details
-
Prepare the eye patches:
Roll two smaller balls of black clay. Flatten them into ovals, tapering one end slightly to look like a teardrop or egg shape. -
Place the patches:
Press these black ovals onto the front of the face, slanting them slightly downwards towards the center for that classic sad-panda look. -
Flatten the patches flush:
Gently roll over the applied patches with a smooth tool or finger so they feel integrated into the surface rather than just sitting on top. -
Form the nose:
Make a tiny, triangular piece of black clay with rounded corners. Press this into the center of the face, below the eyes. -
Scribe the mouth:
Instead of adding clay, use a needle tool or toothpick to gently incise a ‘w’ shape for the mouth. If you prefer a painted look, you can skip this and paint it later. -
Fill the mouth (optional):
If you scribed the line, you can roll a super-thin snake of black clay and press it into the groove, or simply paint the groove black after drying.
Level Up: Functional Weights
Use a core of aluminum foil wrapped around a heavy stone or large metal nut, then cover it with clay. This saves clay and makes the paperweight significantly heavier.
Step 4: Finishing and Painting
-
Allow to dry or bake:
Follow the manufacturer instructions for your specific clay. Air-dry clay may need 24-48 hours; polymer requires baking. -
Paint the eye highlights:
Dip the non-brush end of a paintbrush into white acrylic paint. Dot a large reflection spot onto the upper part of each black eye patch. -
Paint the mouth details:
If you didn’t use clay for the mouth, carefully paint a small anchor shape or simple curve beneath the nose using a fine liner brush and black paint. -
Seal the piece:
Once all paint is completely dry, apply a coat of gloss varnish. This protects the clay and gives it a finished, ceramic-like sheen.
Place your new panda friend on a stack of papers to keep your workspace tidy and cute

TRACK YOUR CERAMIC JOURNEY
Capture glaze tests, firing details, and creative progress—all in one simple printable. Make your projects easier to repeat and improve.
Pressed Flower Coasters
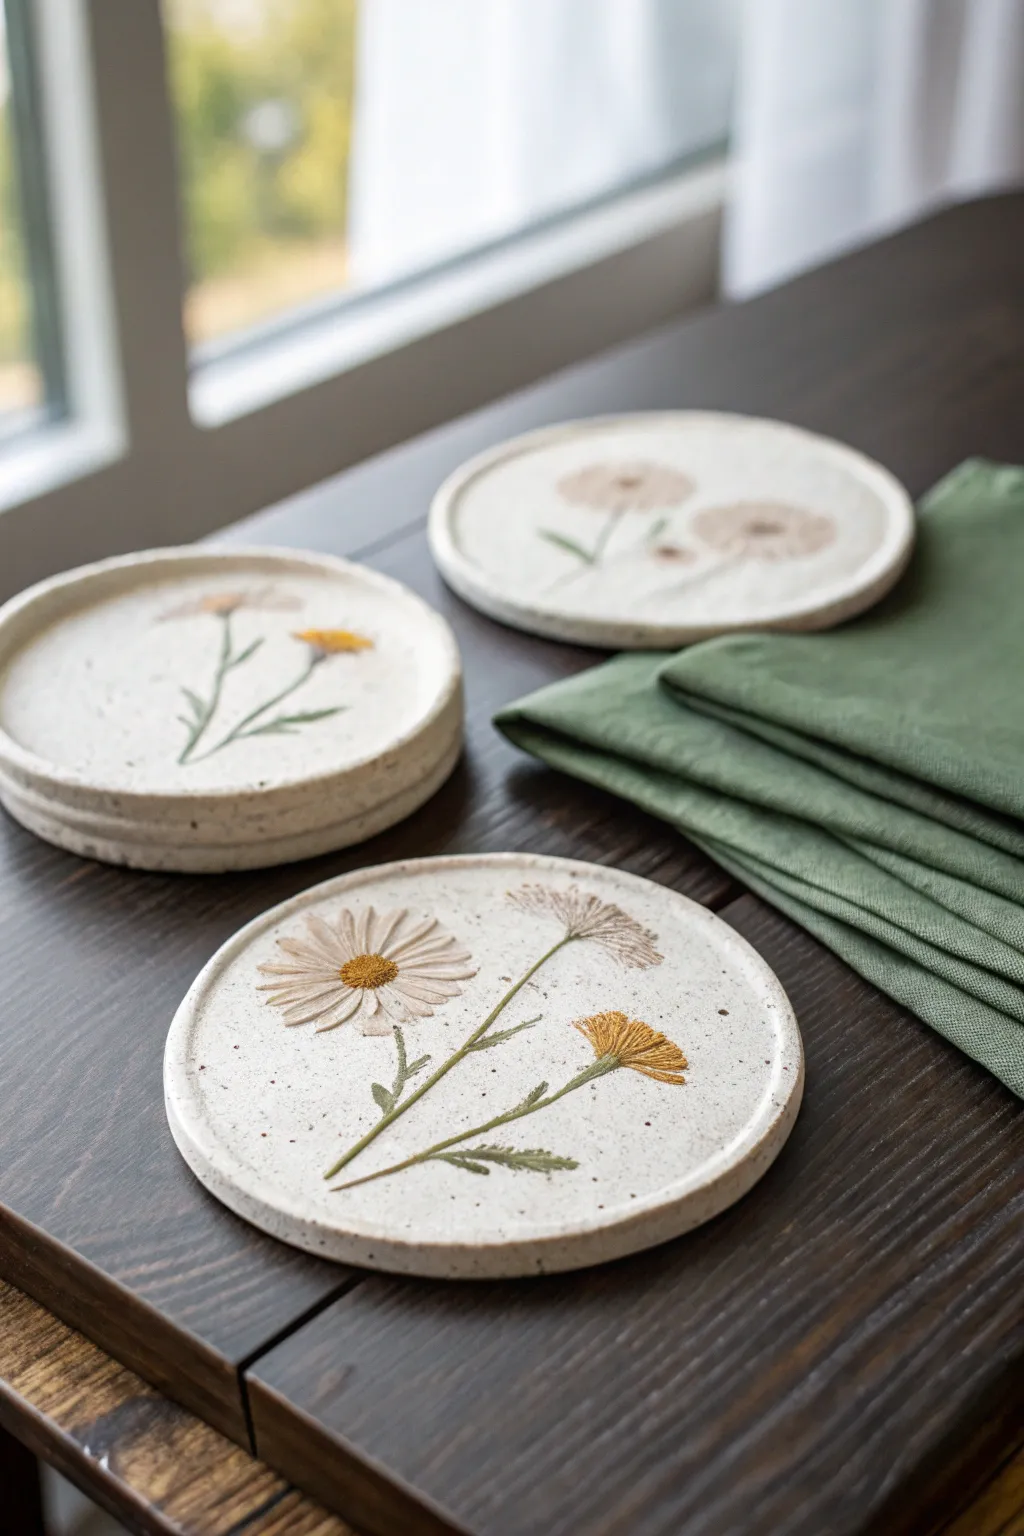
Capture the delicate beauty of a summer garden with these speckled clay coasters featuring pressed wildflowers. The subtle stone-like texture and preservation of natural elements make them a timeless addition to any coffee table.
Step-by-Step Guide
Materials
- White or speckled oven-bake polymer clay (or air-dry clay)
- Small dried pressed flowers (daisies, wildflowers, greenery)
- Round cookie cutter (approx. 4 inches) or a bowl to trace
- Rolling pin
- Parchment paper or silicone baking mat
- Liquid polymer clay or craft glue (if using air-dry clay)
- Matte or satin polyurethane varnish for sealing
- Soft paintbrush
- Fine-grit sandpaper (optional)
- Craft knife
- Tweezers
Step 1: Preparing the Clay Base
-
Conditioning the clay:
Start by warming the clay in your hands, kneading it until it is soft and pliable. If you want a speckled look but only have white clay, try mixing in a tiny pinch of cracked black pepper or sand for texture. -
Rolling it out:
Place the clay between two sheets of parchment paper to prevent sticking. Roll it out evenly until it is about 1/4 inch thick. You want it substantial enough to be durable but not clunky. -
Cutting the shape:
Using your round cookie cutter or a bowl as a guide, press firmly to cut a perfect circle. Peel away the excess clay, which you can save for the next coaster. -
Smoothing the edges:
Dip your finger in a little bit of water (or baby oil for polymer clay) and gently run it along the cut rim to smooth any harsh edges. -
Creating the raised rim:
To mimic the slight lip shown in the photo, gently press your thumb just inside the outer edge all the way around, creating a subtle indentation while leaving the very rim slightly higher.
Fresh vs. Dried
Always use completely dried, pressed flowers. Fresh flowers contain moisture that will rot inside the clay or bubble up during the baking process.
Step 2: Applying the Botanicals
-
Planning the arrangement:
Before attaching anything, lay your dried flowers gently on the clay surface to test your composition. I like to arrange stems near the bottom to look like they are growing upwards. -
Prepping the surface:
Apply a very thin layer of liquid polymer clay (or glue if using air-dry clay) to the specific spots where the flowers will sit. This acts as an adhesive bond. -
Placing the stems:
Using tweezers for precision, pick up your pressed greenery and stems first, laying them gently onto the adhesive layer. -
Adding the blooms:
Layer the flower heads over the top of the stems. Press them down incredibly gently with your finger so they make full contact with the clay. -
Embedding the flowers:
Place a fresh piece of parchment paper over the entire coaster. Use your rolling pin to roll *very* lightly over the paper once. This presses the flowers flush into the clay surface without distorting the coaster’s shape.
Gilded Edge
Once the varnish is dry, paint the very top rim of the coaster with liquid gold leaf or metallic acrylic paint to add a touch of elegance.
Step 3: Finishing Touches
-
Baking or drying:
If using polymer clay, bake according to the package instructions (usually 275°F for 15-30 minutes). If using air-dry clay, let it sit in a cool, dry place for 24-48 hours, flipping occasionally for even drying. -
Cooling down:
Allow the coasters to cool completely on a flat surface. Do not attempt to sand or seal them while they are still warm. -
Sanding imperfections:
Check the edges for any roughness. If needed, use fine-grit sandpaper to buff the rim, but avoid sanding over the delicate flowers. -
Sealing the coaster:
Dip a soft brush into your matte or satin varnish. Apply a thin, even coat over the entire top surface, ensuring the flower petals are fully encapsulated so they don’t flake off. -
Adding a second coat:
Let the first coat dry fully, then apply a second coat for extra durability against moisture from cups. -
Backing for protection:
For a professional finish, you can cut a circle of felt or cork and glue it to the underside of the coaster to protect your table surfaces.
Enjoy your lovely new set of nature-inspired coasters for your next tea time
Minimal Photo Holder Stand
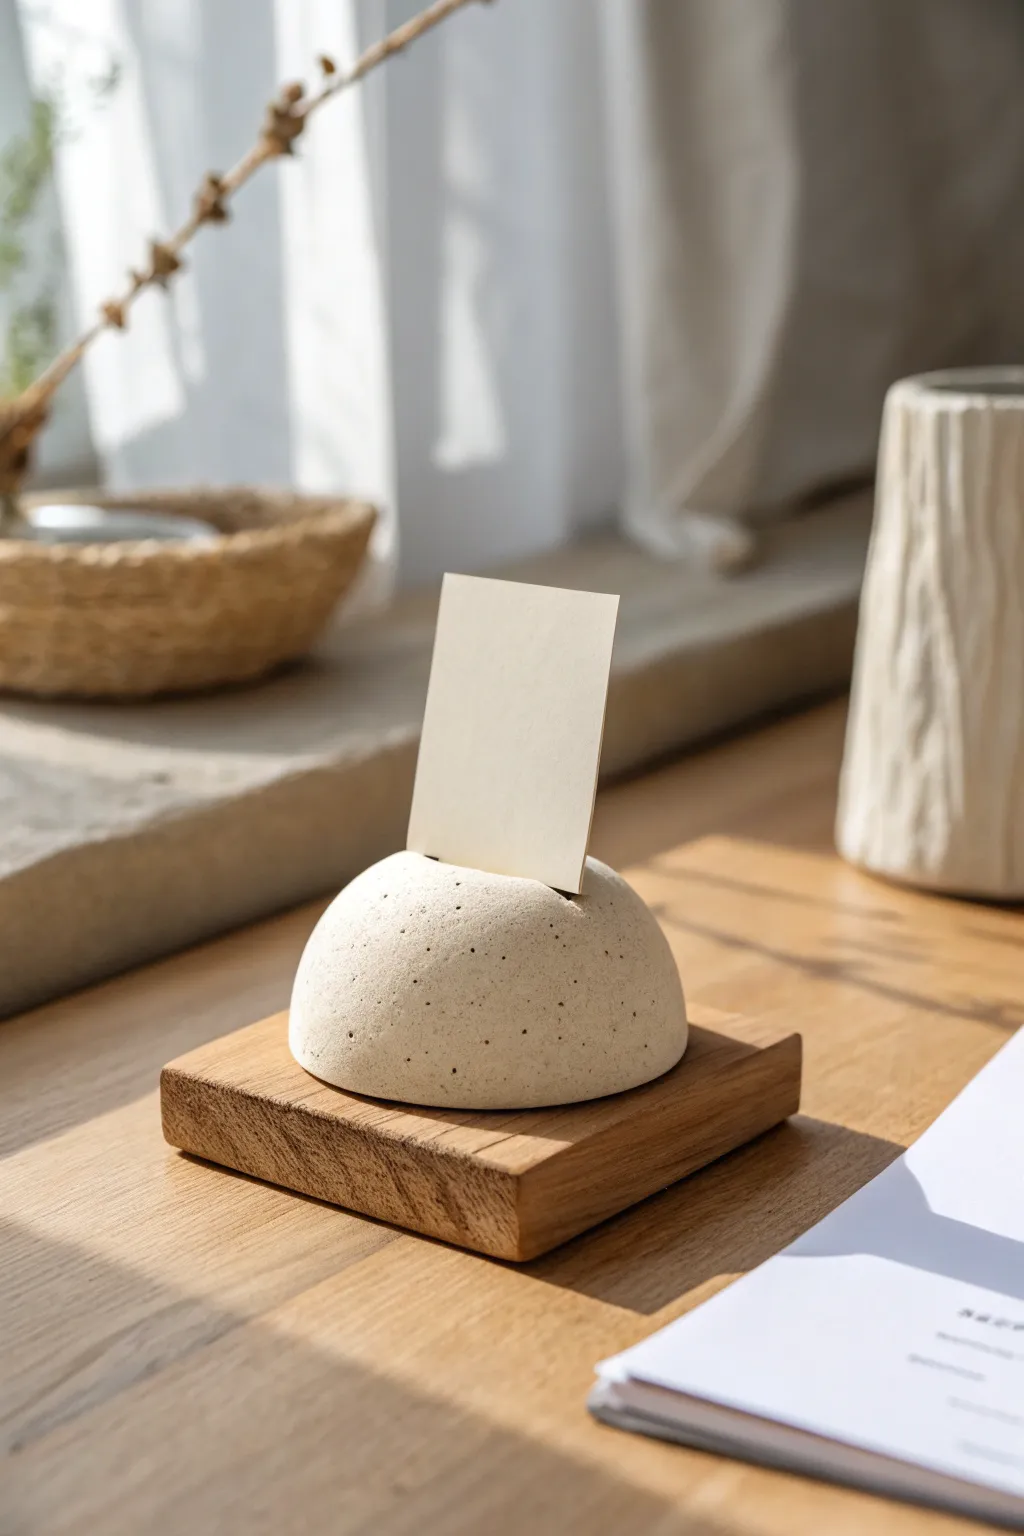
Achieve the sophisticated look of raw stone with simple modeling clay in this minimalist photo holder project. The speckled, matte finish mimics concrete perfectly, creating a serene and grounded desk accessory for your favorite snapshots.
Step-by-Step Guide
Materials
- Air-dry modeling clay (white or light grey)
- Black acrylic paint
- Old toothbrush
- Square wooden coaster or offcut (approx 3×3 inches)
- Craft knife or sturdy plastic card
- Fine-grit sandpaper
- Matte sealant spray
- Rolling pin
- Bowl of water
- Super glue or strong wood glue
Step 1: Shaping the Dome
-
Condition the clay:
Begin by taking a handful of air-dry clay and kneading it thoroughly in your hands until it becomes warm, soft, and pliable. -
Form a ball:
Roll the conditioned clay between your palms to create a smooth, tight sphere about the size of a tangerine. -
Create the base:
Place the sphere onto your work surface and press down gently to flatten the bottom, creating a dome shape. -
Refine the curve:
Cup your hands around the clay and gently smooth the sides, ensuring the dome is symmetrical. -
Smooth the surface:
Dip your finger in a little water and run it over the clay to remove any fingerprints or cracks. -
Cut the slot:
Take your craft knife or a rigid plastic card and press it firmly into the center of the dome’s peak. -
Widen the gap:
Wiggle the tool slightly back and forth to ensure the slot is wide enough to hold cardstock, but narrow enough to grip it securely. -
Dry completely:
Set the dome aside in a cool, dry place for at least 24-48 hours until it hardens completely and turns white.
Uneven or “wobbly” base?
If the bottom of your dry clay dome isn’t perfectly flat, tape a sheet of sandpaper to a table and rub the dome’s base in circles against it until level.
Step 2: Texturing and Assembly
-
Sand the flaws:
Once dry, use fine-grit sandpaper to gently buff away any remaining uneven spots on the dome’s surface. -
Prepare the speckle mix:
Dilute a small amount of black acrylic paint with water until it has an ink-like consistency. -
Apply the faux-stone look:
Dip an old toothbrush into the watered-down paint, hold it over the clay dome, and run your thumb across the bristles to flick tiny specks onto the surface. -
Adjust density:
I like to vary the distance of the brush to create a mix of fine mist and slightly larger spots for a natural stone effect. -
Let the paint dry:
Allow the speckled paint effect to dry completely, which should only take about 15 minutes. -
Seal the piece:
Spray the dome with a matte sealant to protect the finish without adding an artificial gloss. -
Prep the wood base:
Ensure your wooden square is clean and free of dust; you can lightly sand the edges if they feel sharp. -
Apply adhesive:
Apply a generous dot of super glue or strong wood glue to the center of the wooden square. -
Mount the dome:
Press the clay dome firmly onto the glue spot and hold it in place for 30 seconds to bond. -
Final cure:
Let the glue cure according to the manufacturer’s instructions before inserting your first photo.
Level Up: Terrazzo Style
Knead tiny chips of colored dried clay into the wet white clay before shaping. Sand heavily after drying to reveal the colorful fragments inside.
Now you have a serene, modern display piece ready to hold your most treasured memories or important notes
Ring Cone for the Sink
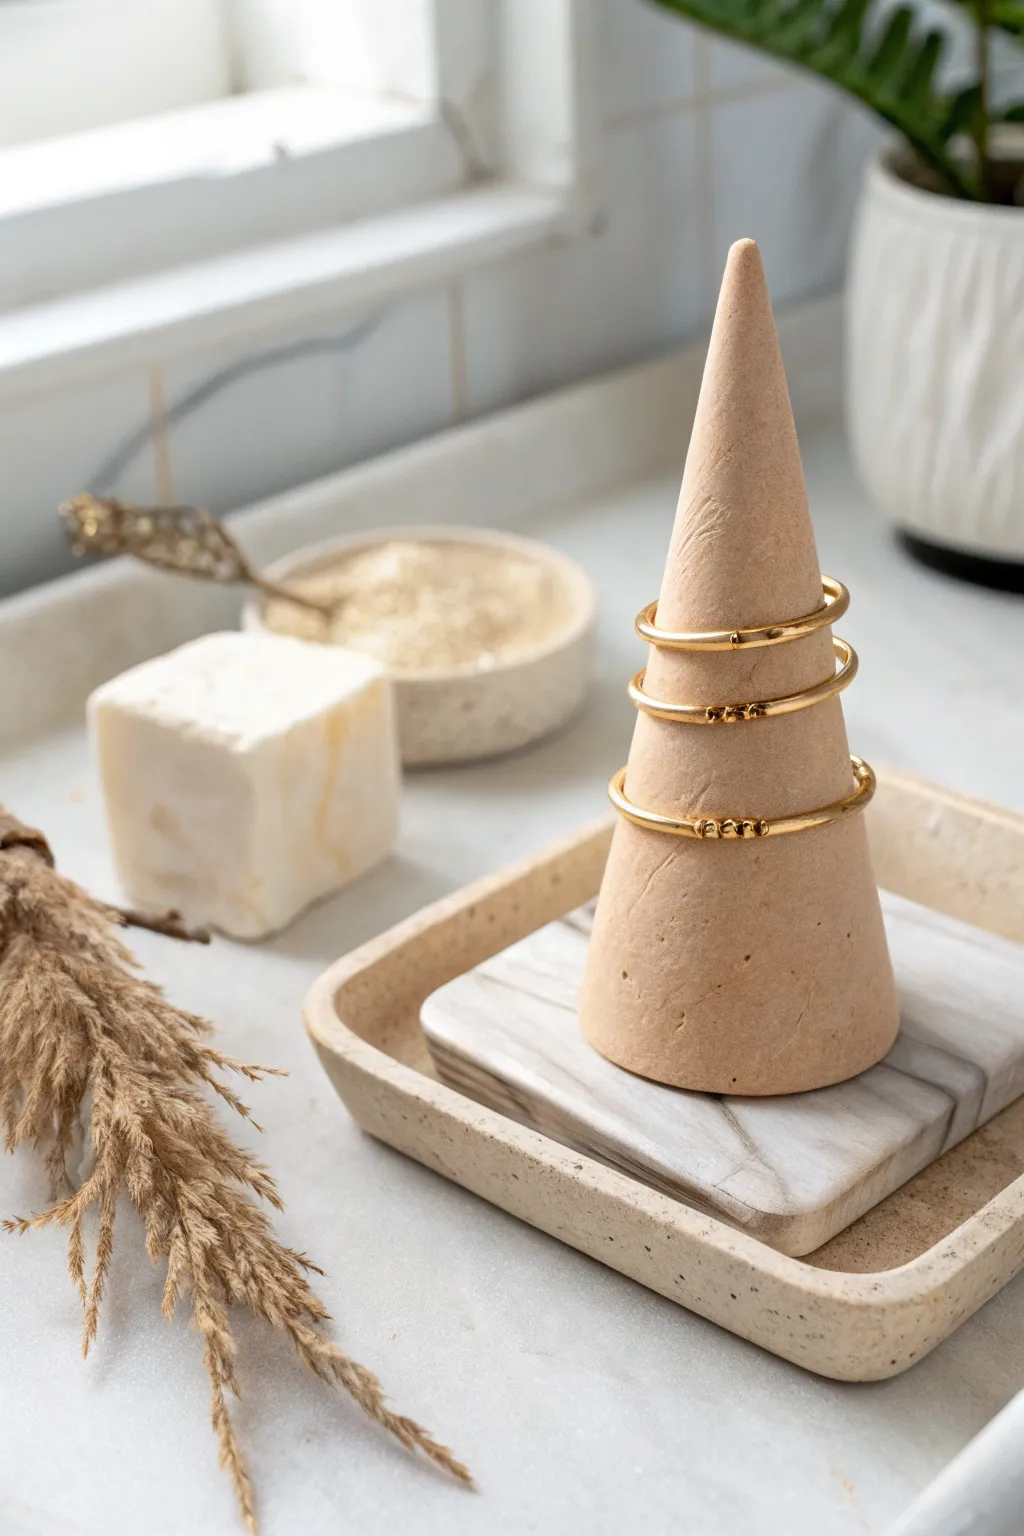
Keep your jewelry safe while washing your hands with this sleek, architectural ring holder. The natural, sandstone-like finish and geometric stacking design bring a spa-like tranquility to any bathroom sink.
Step-by-Step
Materials
- Air-dry modeling clay (stone or sand color)
- Acrylic rolling pin
- Sharp craft knife or clay blade
- Fine-grit sandpaper (200-400 grit)
- Small square template (approx. 3×3 inches)
- Ruler
- Small bowl of water
- Clear matte varnish or sealant
- Paintbrush for varnish
- Texturing tool (old toothbrush or stiff bristle brush)
- White and grey marbling clay (optional for base)
Step 1: Sculpting the Cone
-
Condition the clay:
Begin by taking a lump of your sand-colored clay about the size of a golf ball. Knead it in your hands for a minute until it becomes warm and pliable, which helps prevent cracks later on. -
Roll a ball:
Roll the clay between your palms to create a smooth, tight sphere. Visually check for any major seams or air pockets and smooth them out with your thumb. -
Form a teardrop:
Place the ball on your work surface. applying uneven pressure with the side of your hand, roll the ball back and forth to elongate one side into a tapered teardrop shape. -
Refine the cone shape:
Stand the teardrop up on its fat end. Gently tap the base against the table to flatten it so it stands perfectly upright. Roll the sides between your palms to straighten the taper until it looks like a sharp cone. -
Add surface texture:
For that natural stone look seen in the photo, gently tap the surface of the cone with a stiff bristle brush or an old toothbrush. Avoid deep indentations; you just want a subtle, porous texture. -
Let it firm up:
Set the cone aside to dry for about 30 minutes. It shouldn’t be fully dry, just firm enough to handle without deforming while you work on the base.
Clean Lines
If your cone tip keeps bending while sculpting, stick a toothpick inside as an internal armature. It adds strength and keeps the point sharp.
Step 2: Creating the Marble Base
-
Prepare marbling colors:
To recreate the marbled square base, take a chunk of white clay and a much smaller piece of grey clay. Twist them together like a candy cane, fold, and twist again. -
Stop mixing early:
Be careful not to over-knead, or you will end up with a solid light grey color. Stop when you see distinct streaks of grey running through the white. -
Roll out the slab:
Using your acrylic roller, flatten the marbled clay into an even slab, approximately 1/4 inch thick. I find using playing cards as depth guides on either side helps keep it level. -
Cut the square:
Place your square template onto the clay. Use your sharp craft blade to slice straight down around the edges for a clean, geometric cut. -
Smooth the edges:
Dip your finger in a little water and run it along the sharp cut edges of the square to soften them slightly, removing any drag marks from the knife.
Step 3: Assembly and Finish
-
Dry completely:
Allow both pieces to dry fully according to your clay package instructions. This usually takes 24 to 48 hours for air-dry clay. -
Sand for perfection:
Once bone dry, take your fine-grit sandpaper and gently buff the cone. Focus on the tip to ensure it’s smooth and won’t scratch your rings. -
Sand the base edges:
Give the edges of the square base a quick sanding as well to emphasize that sharp, stone-slab aesthetic. -
Apply sealant:
Since this will live near a sink, water protection is vital. Apply a thin coat of matte varnish to the entire cone. -
Second coat:
Let the first coat dry, then apply a second layer of varnish to ensure a watertight seal. -
Seal the base:
Don’t forget to varnish the marbled coaster base as well, covering the top, sides, and bottom. -
Final arrangement:
Once the varnish is cured, place the cone in the center of the square base. You can glue them together for stability, or leave them separate for a modular look.
Faux Stone Hack
Mix dried used coffee grounds or cracked black pepper into your beige clay before sculpting to create a realistic speckled granite effect.
Place your new ring holder next to the faucet and enjoy the simple elegance it brings to your daily routine
Marbled Color-Block Bead Bowl
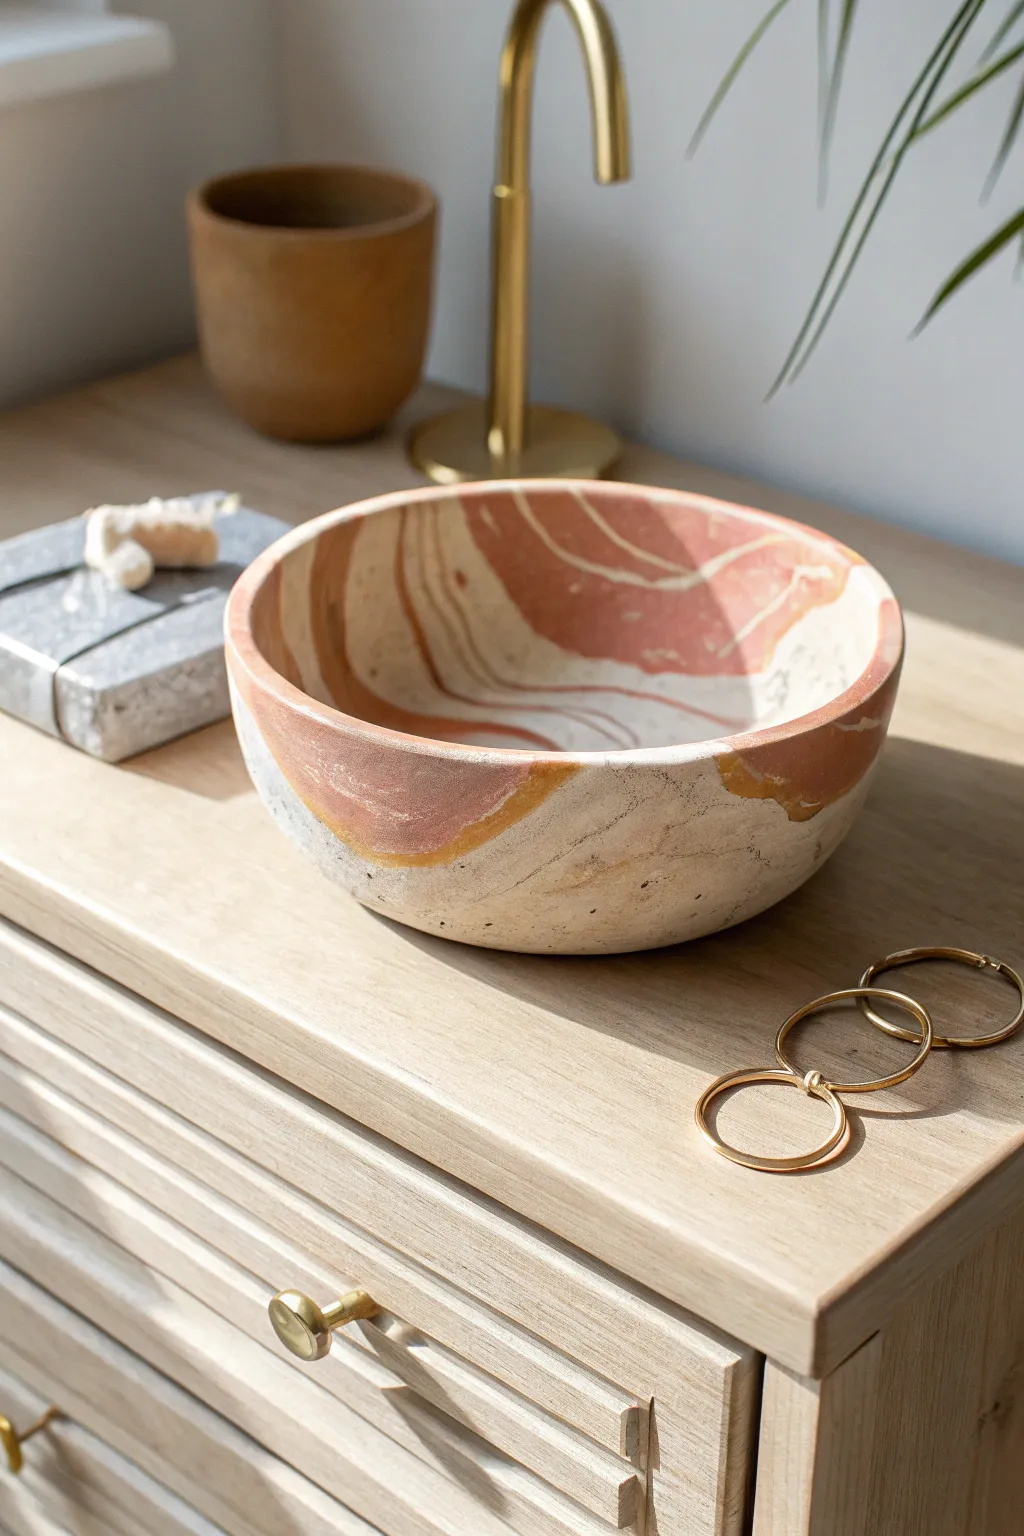
Elevate your vanity with this stunning, desert-inspired bowl featuring organic swirls of terracotta, cream, and soft beige. The matte finish and smooth curves give it a high-end, store-bought look that’s surprisingly simple to achieve at home.
Step-by-Step Tutorial
Materials
- White or cream polymer clay (or air-dry clay)
- Terracotta or rust-colored polymer clay
- Beige or light tan polymer clay
- Rolling pin or acrylic roller
- Oven-safe bowl (for mold)
- Craft knife or scalpel
- Fine-grit sandpaper (400-600 grit)
- Matte varnish or sealant (optional)
- Aluminum foil (optional)
Step 1: Creating the Marbled Slab
-
Condition the Clay:
Begin by thoroughly kneading each color of clay separately. You want them warm and pliable so they blend smoothly later without cracking. -
Form Snakes:
Roll each color into several long, snake-like ropes of varying thicknesses. Make the white ropes slightly thicker if you want that to be your base tone. -
Twist and Combine:
Gather your snakes into a bundle and twist them together tightly. Fold the twisted rope in half and twist again to start encouraging the colors to interact. -
Roll and Fold:
Roll the twisted clay into a ball, then roll it out into a thick log. I like to twist this log one more time for finer details. -
Create the Slab:
Press the log together into a compact block. Using your rolling pin, roll the block out flat into a sheet about 1/4 inch thick. Turn the clay occasionally to striping stays organic. -
Check the Pattern:
Examine your slab. If the marble effect isn’t swirly enough for your taste, you can fold the sheet in half and roll it out one more time.
Clean Cuts Tip
Chill your clay in the fridge for 10 minutes before trimming the rim. Firmer clay cuts cleaner and deforms less under the knife.
Step 2: Shaping the Bowl
-
Prepare the Mold:
Choose an oven-safe bowl that has the shape you want. Flip it upside down. If using a very smooth bowl, you might want to create a layer of foil over it to prevent sticking. -
Drape the Clay:
Gently lift your clay slab and drape it over the inverted bowl. Allow gravity to help it settle initially so you don’t stretch the pattern too much. -
Smooth the Sides:
Using your palms, softly press the clay against the bowl form, working from the center bottom downwards to eliminate trapped air bubbles. -
Trim the Excess:
Use a sharp craft knife to trim the uneven edges of the clay at the base of your inverted bowl mold to create a clean, straight rim. -
Refine the Rim:
Run your finger along the cut edge to smooth it out and round off any sharp corners left by the knife.
Step 3: Baking and Finishing
-
Bake the Piece:
Place the bowl (with the clay still on it) onto a baking sheet. Bake according to your brand of clay’s specific temperature and time instructions. -
Cool Completely:
Let the clay cool completely before attempting to remove it from the mold. It is fragile while warm and needs to harden fully. -
Remove from Mold:
Gently pop your clay bowl off the form. If it sticks, gently leverage a spot with a dull knife, but be extremely careful not to scratch it. -
Sand for Smoothness:
Dip your fine-grit sandpaper in a little water and wet-sand the rim and any rough spots on the surface. This gives that professional, stone-like texture. -
Clean Up:
Wipe away any sanding dust with a damp cloth or rinse quickly under cool water and dry immediately. -
Seal (Optional):
For extra durability, apple a thin coat of matte varnish. This will protect the surface without ruining the natural, earthy look.
Surface Bubbles?
If you see air bubbles while rolling, pop them gently with a needle and smooth the area with your finger before baking.
Place your jewelry or trinkets inside and admire the chic, modern accent you’ve created
Mini Room Scene Shadowbox
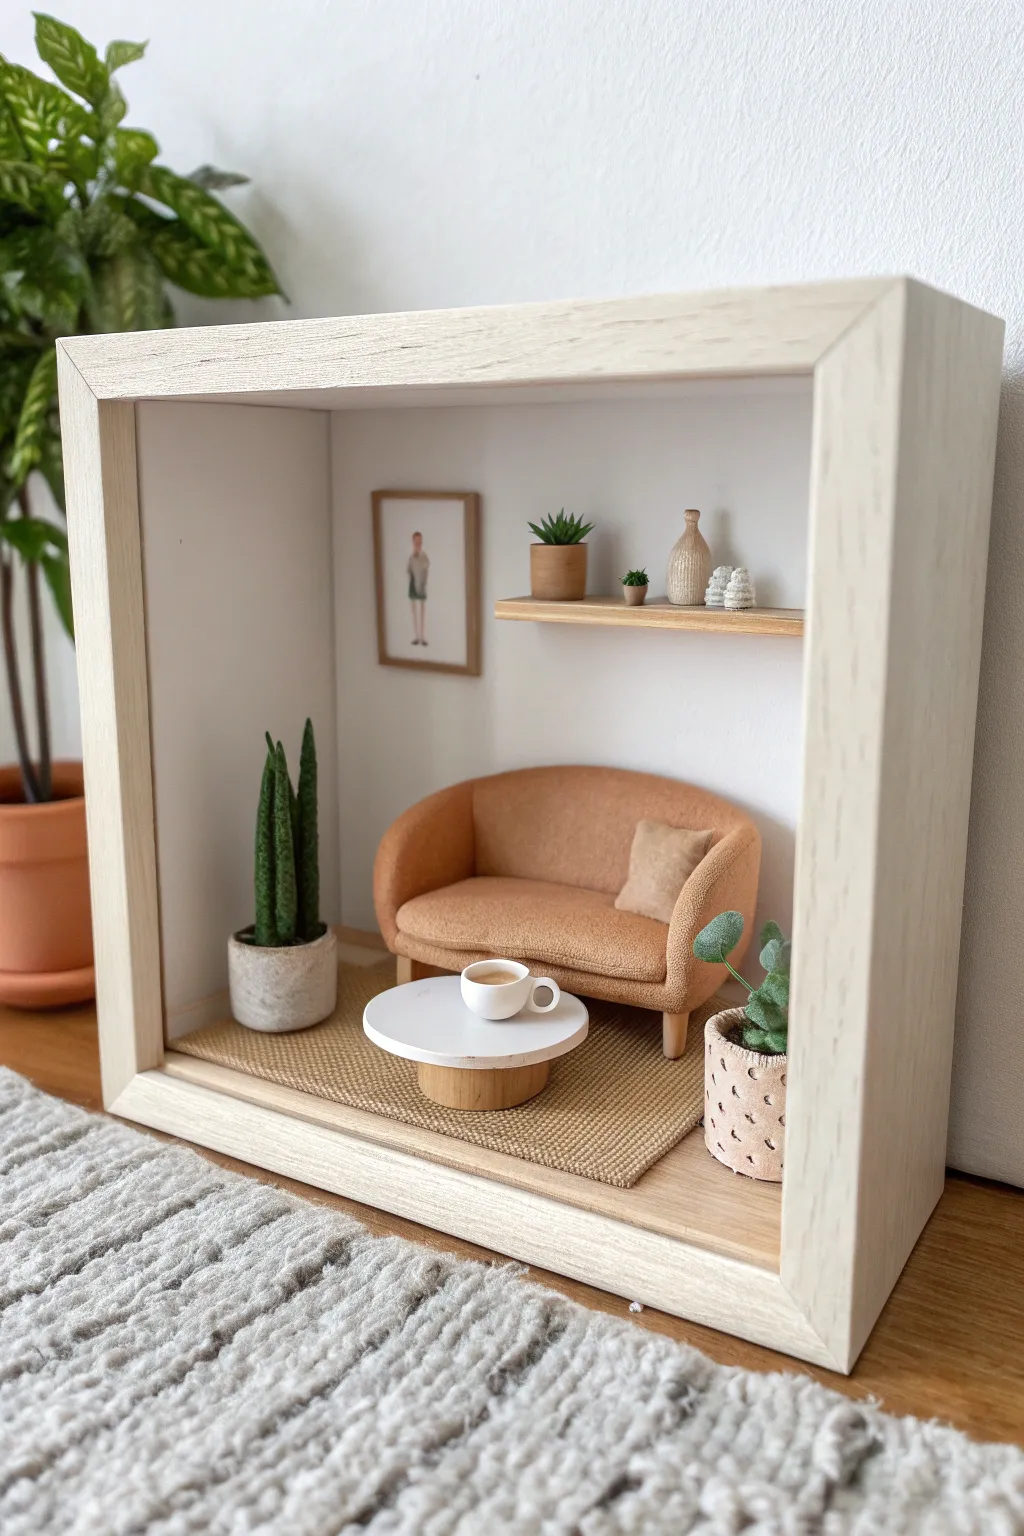
Capture the cozy essence of a Scandinavian living room in miniature form with this shadowbox display. Using modeling clay and a simple wooden frame, you’ll sculpt tiny furniture, plants, and décor to create a serene, permanent diorama.
Step-by-Step
Materials
- Deep wooden shadowbox frame (unfinished wood)
- Polymer clay (terracotta/orange, white, beige, green, brown)
- Balsa wood sheet (thin)
- Small piece of textured fabric (for the rug)
- White acrylic paint
- Super glue or strong craft glue
- Modeling tools (dotting tool, needle tool)
- Fine sandpaper
- X-acto knife
- Miniature photo print (optional)
- Rolling pin
Step 1: Preparing the Room Shell
-
Prime the walls:
Remove the glass from your shadowbox frame. Paint the interior back panel and side walls with white acrylic paint to simulate clean, bright plaster walls. Let this dry completely while you work on the furniture. -
Create the shelf:
Cut a small, thin strip of balsa wood to serve as the floating shelf. Sand the edges lightly so they aren’t sharp, but keep the natural wood finish to match the frame. -
Install the rug:
Cut a rectangle from your textured fabric (burlap or a thick woven scrap works well) to fit the floor area. Glue it down center-stage, leaving a border of the natural wood frame visible around the edges.
Sticky Situation?
If your tiny clay parts aren’t sticking together before baking, use a drop of ‘liquid polymer clay’ or baby oil as a bonding agent between the raw pieces.
Step 2: Sculpting the Sofa
-
Form the base:
Condition your terracotta or orange-colored clay until soft. Shape a thick, rounded semi-circle log for the seat base. -
Add the backrest:
Roll a long, flat sheet of the same clay. Wrap it around the back curve of your seat base to create a continuous, curved arm and backrest. Smooth the seams where the clay pieces join so it looks like one upholstered piece. -
Texture the fabric:
Here I like to gently press a piece of coarse fabric or a toothbrush against the clay surface to mimic the texture of upholstery before baking. -
Make the pillow:
Shape a tiny square from beige clay. Gently dent the center to make it look ‘sat on’ and soft, then place it in the corner of the sofa. -
Legs and baking:
Shape four tiny, tapered cylinders from beige or wood-tone clay for the legs. Bake the sofa parts according to your package instructions—attach the legs with a dab of super glue after baking for stability.
Step 3: Crafting Details & Accessories
-
Coffee table construction:
Roll out white clay and cut a perfect circle using a small cutter or bottle cap. This is the tabletop. -
Coffee table base:
Create a cylinder from wood-tone clay or cut a thick dowel piece for the base. Bake the clay top, then glue it to the base. -
Miniature coffee cup:
Roll a minuscle ball of white clay, indent the center with a dotting tool, and add a hair-thin snake of clay for the handle. Fill the center with a drop of brown paint or liquid clay for the ‘coffee’. -
Shelf décor:
Sculpt tiny geometric vases using beige and white clay. For variety, make one tall and textured, and one short and round. -
Sansevieria plant:
Roll thin, tapered snakes of dark green clay. Press them flat and use a needle tool to scratch vertical lines for texture. Group three or four together into a ‘pot’ made of grey clay. -
Potted shelf plant:
Make a tiny cylinder pot from terracotta clay. Add minuscule spikes of green clay to resemble a succulent or aloe plant.
Pro Texture Tip
For the basket planter on the right, use a needle tool to poke small holes in a grid pattern on the raw clay to simulate a woven or perforated texture.
Step 4: Assembly
-
Mounting the shelf:
Glue the balsa wood shelf to the back wall, slightly to the right of the center. -
Placing the pots:
Glue your tiny clay vases and the small succulent pot onto the shelf. Tweezers are very helpful here. -
Hanging art:
Make a tiny frame from thin snakes of brown clay or balsa scraps. Glue a tiny printed image inside and attach it to the wall on the left. -
Arranging the furniture:
Glue the rug down first if you haven’t yet. Position the sofa on top, then place the coffee table in front of it. -
Adding life:
Place the large plant pot to the left of the sofa and the smaller patterned pot to the right. Finally, glue the coffee cup onto the table.
Place your warm little room on a bookshelf where the light can catch the tiny details you created