
Every October, I end up with clay dust on my shirt and a pile of Halloween clay beads on my table—because spooky-season bracelets are just too fun to stop making. Here are my go-to halloween clay bead ideas that look cute solo, but really shine as a stacked set.
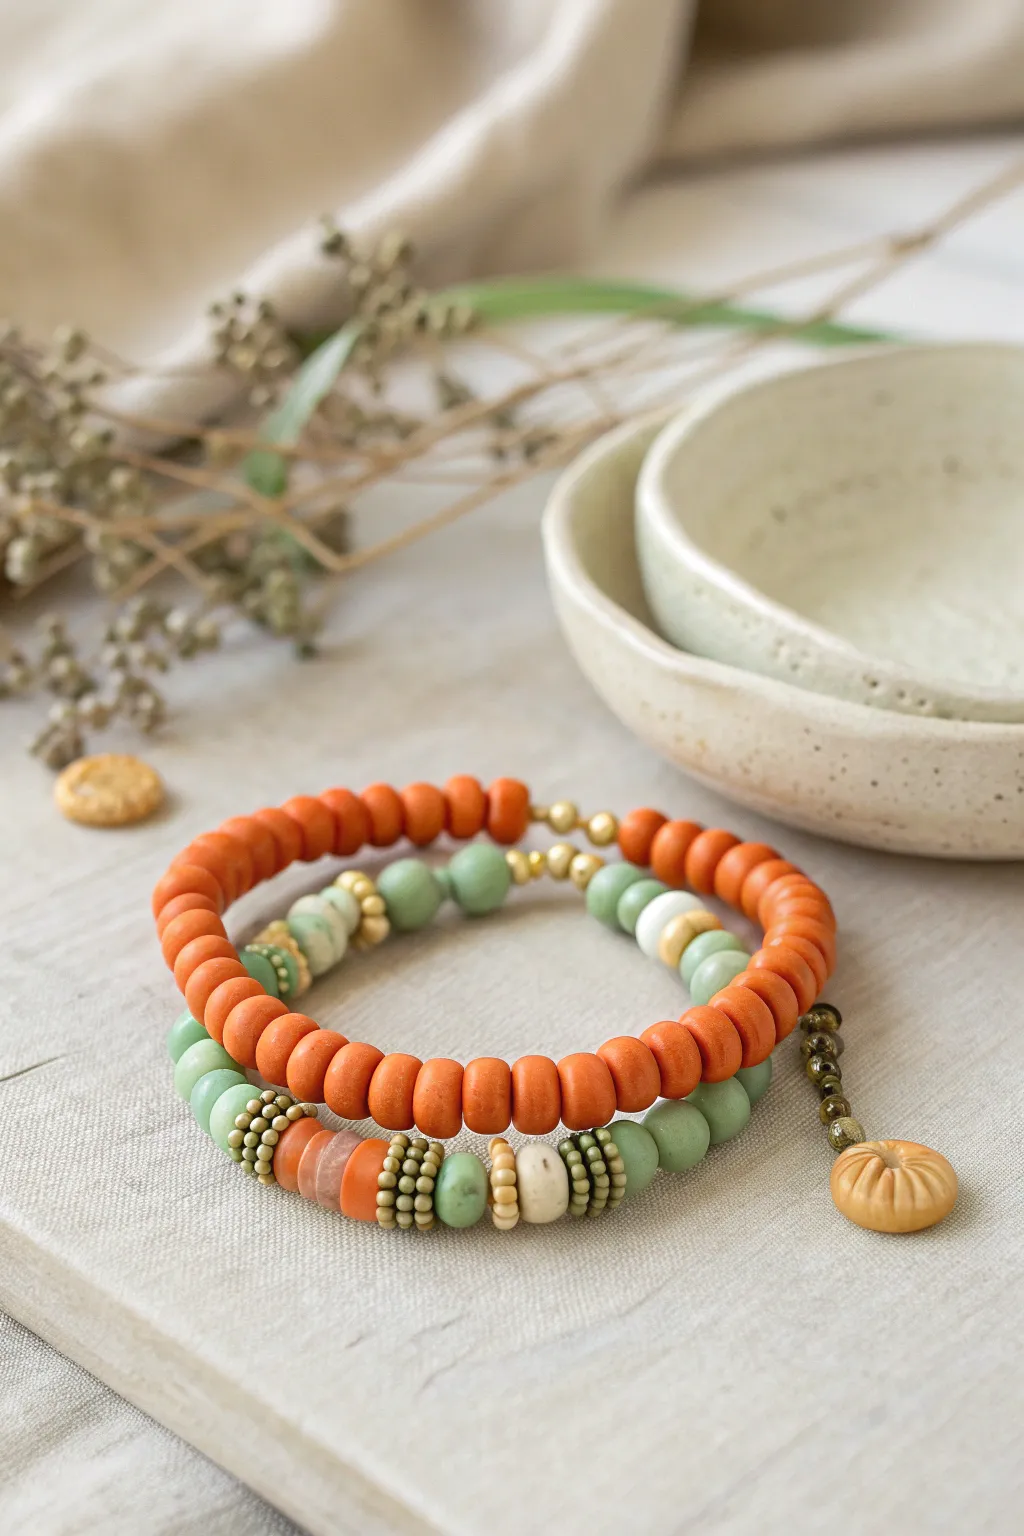
Classic Orange-Black-Purple Stripe Stack
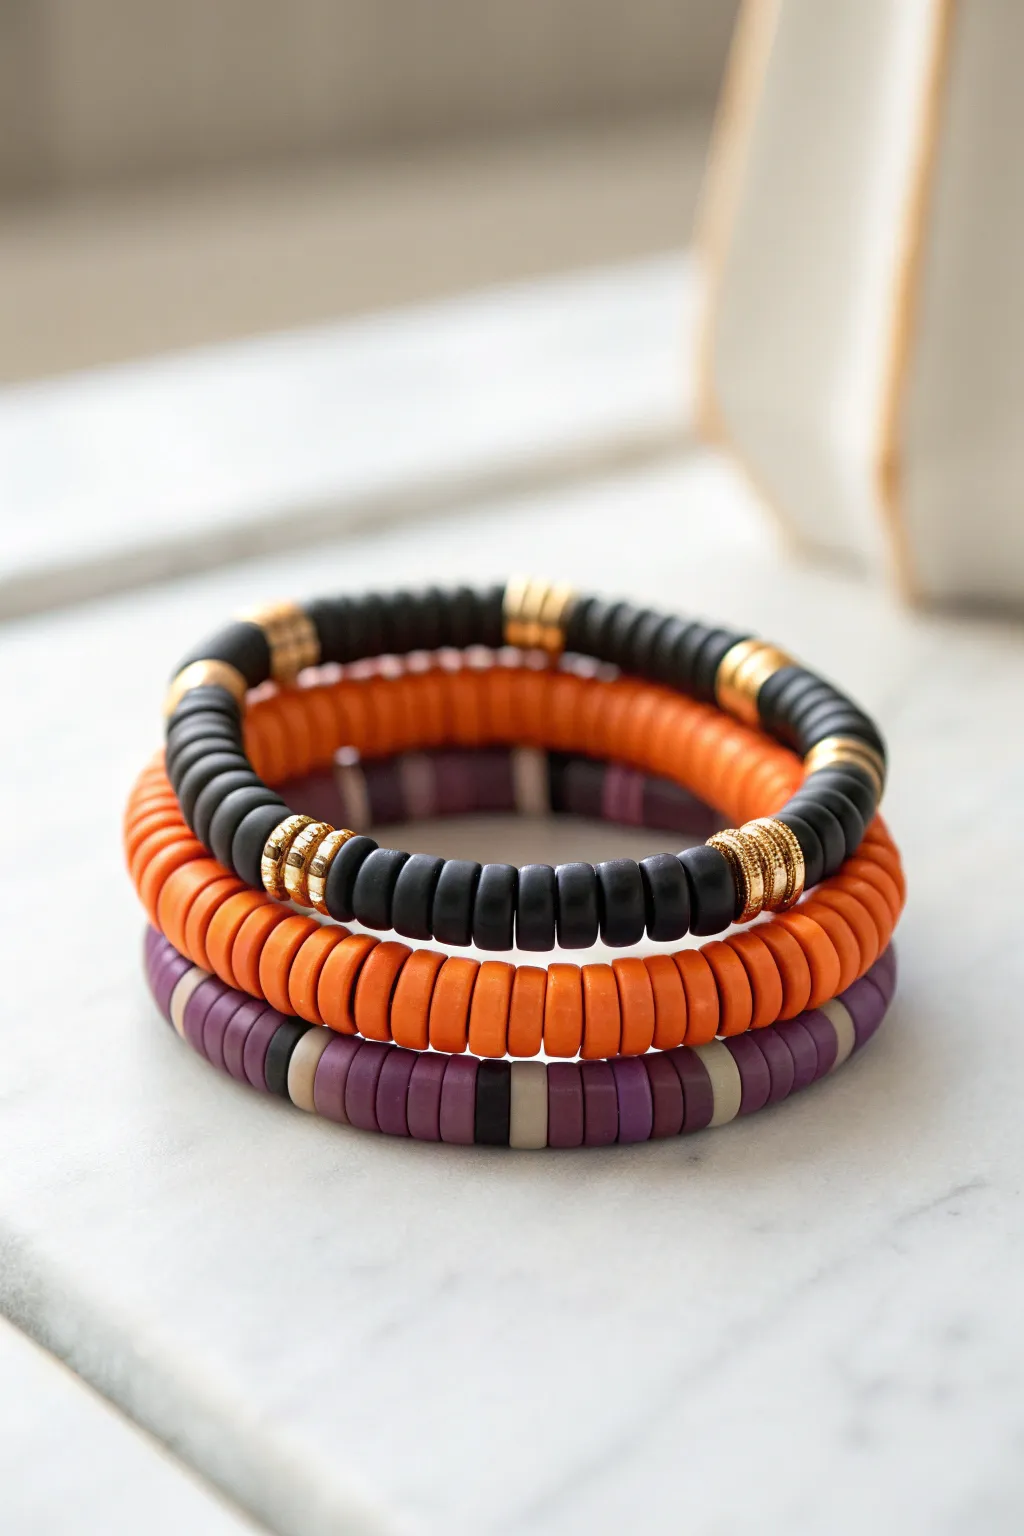
Embrace the Halloween spirit without sacrificing style with this elegant trio of stacked bracelets. Featuring a classic color palette of matte black, vibrant pumpkin orange, and deep purple, these stretchy bracelets mix clay heishi beads with metallic accents for a sophisticated seasonal look.
Step-by-Step
Materials
- 6mm polymer clay heishi beads (matte black, pumpkin orange, dark purple, beige/tan)
- Gold tone heishi spacer beads or textured gold disc beads
- 0.8mm clear elastic cord (centering on 0.8mm ensures durability)
- Super glue or jewelry cement (GS Hypo Cement recommended)
- Scissors
- Bead stopper or tape
- Ruler or measuring tape
Step 1: Preparation
-
Measure and Cut:
Begin by measuring your wrist to determine the correct size. Add about 3-4 inches of extra cord to your wrist measurement to give yourself plenty of room for tying knots later. -
Secure the End:
Cut three separate strands of elastic cord, one for each bracelet pattern. Attach a bead stopper or a piece of tape to one end of each strand to prevent your beads from sliding off while you work.
Gold Preservation
Coat your metallic gold spacer beads with a thin layer of clear nail polish before stringing. This helps prevent tarnishing from skin oils.
Step 2: Bracelet 1: The Black & Gold Accent
-
Start the Pattern:
For the top bracelet, start by stringing approximately 10 to 12 matte black heishi beads onto the cord. -
Add Gold Accents:
Slide on a textured gold spacer bead. If you have different widths, stacking three thin gold spacers works beautifully here to create a chunky metallic band. -
Repeat the Sequence:
Continue this pattern—10-12 black beads followed by a gold accent section—until you reach your desired length. I like to check the fit against my wrist periodically to ensure the metal accents space out evenly.
Knot Slipping?
If your elastic knot feels slick and wants to undo itself, wipe the ends of the cord with a little rubbing alcohol before tying to add grip.
Step 3: Bracelet 2: The Solid Pumpkin
-
Load the Orange Beads:
This middle layer is the anchor of the stack. Simply string your vibrant pumpkin orange heishi beads continuously onto the second cord. -
Check Consistency:
Since this is a solid color strand, variation in bead thickness can be more obvious. Inspect your beads as you string them, discarding any that are broken or unevenly sliced. -
Match the Length:
Hold this strand up against your first black bracelet to ensure they are exactly the same circumference before you prepare to tie it off.
Step 4: Bracelet 3: The Purple Stripe Pattern
-
Create the Color Block:
For the bottom bracelet, start with a section of dark purple beads about an inch long. -
Insert Contrast:
Slide on one beige/tan bead, followed by one black bead, and then another beige/tan bead. This creates a small graphic stripe. -
Continue the Pattern:
Follow your stripe detail with another inch-long section of purple beads. Repeat the ‘beige-black-beige’ pattern around the entire bracelet.
Step 5: Finishing Touches
-
Pre-stretch the Cord:
Before tying, gently pull on the ends of the elastic cord for each bracelet. This pre-stretching step helps prevent the bracelet from sagging or loosening after you wear it. -
Tie the Surgeon’s Knot:
Remove the bead stopper. Cross the ends, loop one under the other twice, and pull tight. Repeat this knotting process 2-3 times for maximum security. -
Glue the Knot:
Apply a tiny dab of jewelry cement or super glue directly onto the knot. Let it dry completely before trimming the excess cord close to the knot. -
Hide the Knot:
If possible, gently tug the elastic so the knot slides inside the hole of a nearby bead, making the finish invisible.
Wear your new festive stack together for a full impact or separate them for a subtle nod to the holiday season


Candy Corn Color-Block Heishi Bracelet
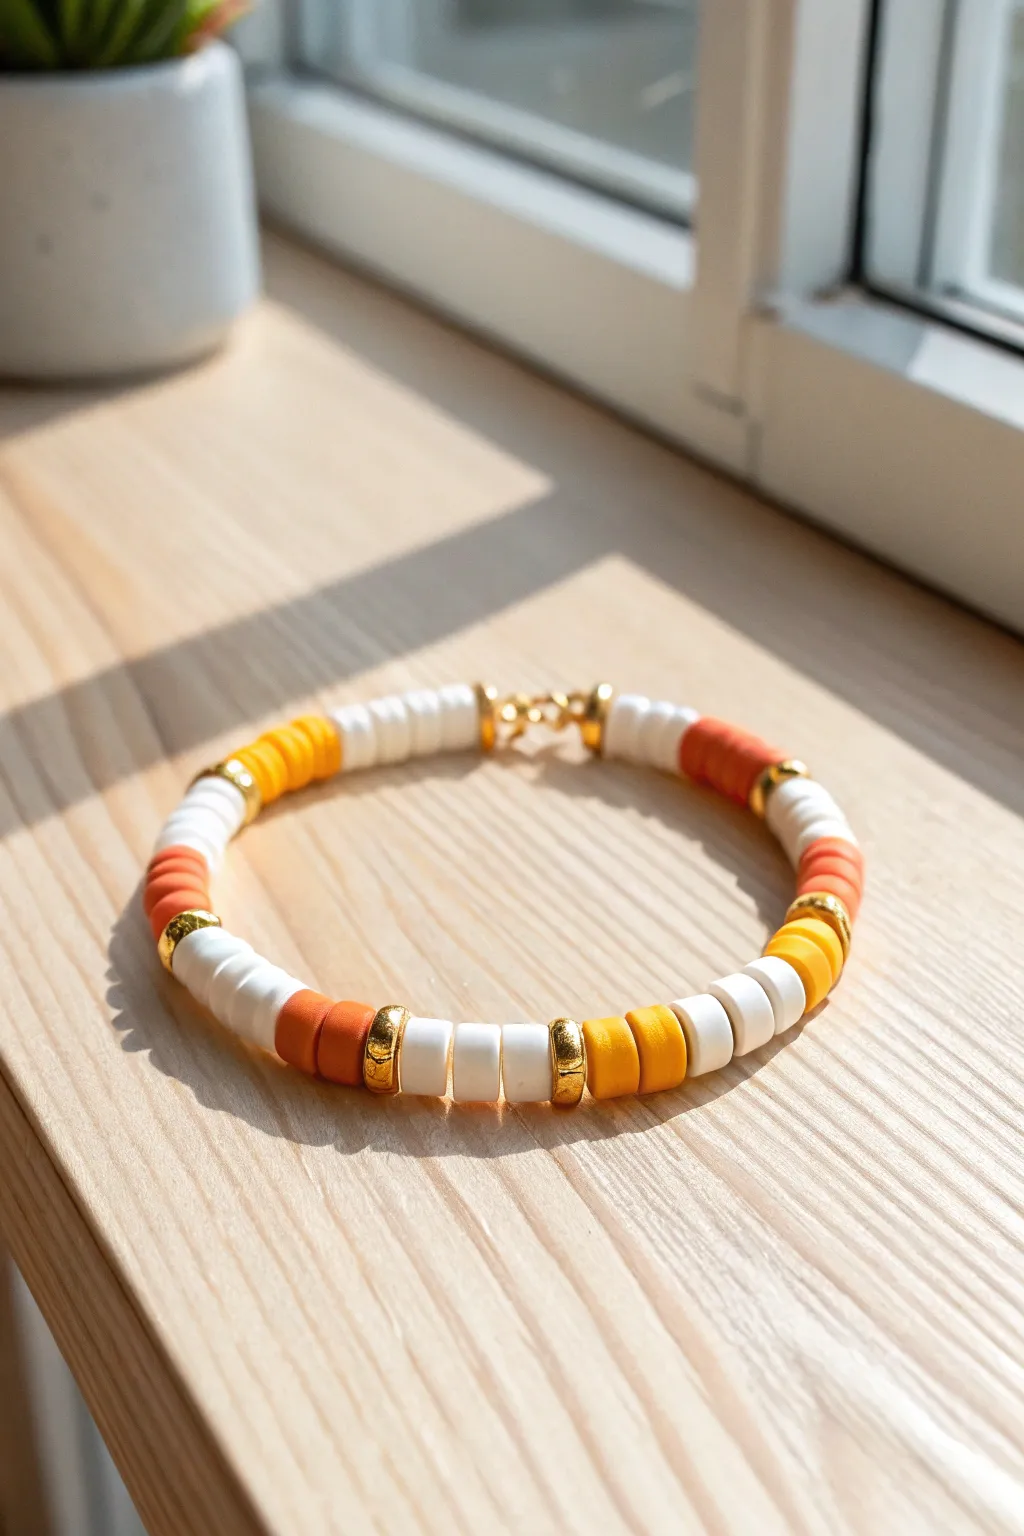
Capture the sweet nostalgia of Halloween with this minimalist bracelet that channels classic candy corn colors. Using flat polymer clay heishi beads in blocks of white, bright orange, and sunshine yellow separated by elegant gold accents creates a wearable treat that isn’t too spooky.
Step-by-Step Tutorial
Materials
- 6mm Polymer clay heishi beads (White, Yellow, Orange)
- 6mm Gold barrel or spacer beads
- Clear elastic beading cord (0.7mm or 0.8mm)
- Gold tone crimp beads (optional)
- Lobster claw clasp and jump ring (optional)
- Jewelry glue or clear nail polish
- Scissors
Step 1: Planning and Measuring
-
Measure your wrist:
Wrap a flexible measuring tape around your wrist to find your size. Add about half an inch to this measurement to ensure the bracelet isn’t too tight once beaded. -
Cut the cord:
Cut a piece of elastic cord roughly 10 inches long. This extra length might seem excessive, but I prefer having plenty of room to tie secure knots at the end without struggling. -
Secure the end:
If you are stringing loose beads, place a piece of tape over one end of your cord to stop beads from sliding off while you work.
Keep it Uniform
Count your beads carefully! Heishi beads vary slightly in thickness, so visually compare your color blocks to ensure they look equal in length.
Step 2: Creating the Pattern
-
Start with white:
Begin your pattern by threading on five white heishi beads. This creates the first ‘tip’ of your candy corn sequence. -
Add a gold accent:
Slide on one gold spacer bead. This metallic break adds a touch of chic elegance that elevates the plastic beads. -
Transition to orange:
Thread on five orange heishi beads. Ensure they are sitting flat against the gold spacer. -
Second gold accent:
Place another gold spacer bead on the string after the orange section. -
Finish the block with yellow:
Add your final color block consists of five yellow heishi beads. -
Complete the sequence:
Add one final gold spacer bead after the yellow block. Your repeating unit is now complete: White, Gold, Orange, Gold, Yellow, Gold.
Add a Charm
Enhance the Halloween vibe by attaching a small gold ghost or pumpkin charm to one of the jump rings near the clasp.
Step 3: Finishing the Bracelet
-
Repeat the pattern:
Continue this sequence—5 white, spacer, 5 orange, spacer, 5 yellow, spacer—until you reach your desired length. Check the fit by wrapping it around your wrist occasionally. -
Pre-stretch the cord:
Before tying, give the ends of the elastic a gentle tug. This pre-stretches the material so your bracelet won’t sag after you wear it for the first time. -
Tie the knot:
Remove the tape and tie the ends together using a sturdy surgeon’s knot. Loop the right cord over the left twice, pull tight, then loop left over right. -
Secure with glue:
Apply a tiny dot of jewelry glue or clear nail polish directly onto the knot. Let this dry completely before trimming the excess string. -
Hide the knot:
If possible, gently tug the bracelet so the knot slides inside one of the gold spacer beads or heishi beads to conceal it. -
Attach hardware (optional):
If you prefer a non-stretchy finish like the photo, use crimp tubes to attach a gold lobster clasp and jump ring to the ends instead of tying a knot.
Now you have a festive accessory that brings a subtle pop of seasonal color to your wrist


Ghost White Pop on Midnight Black
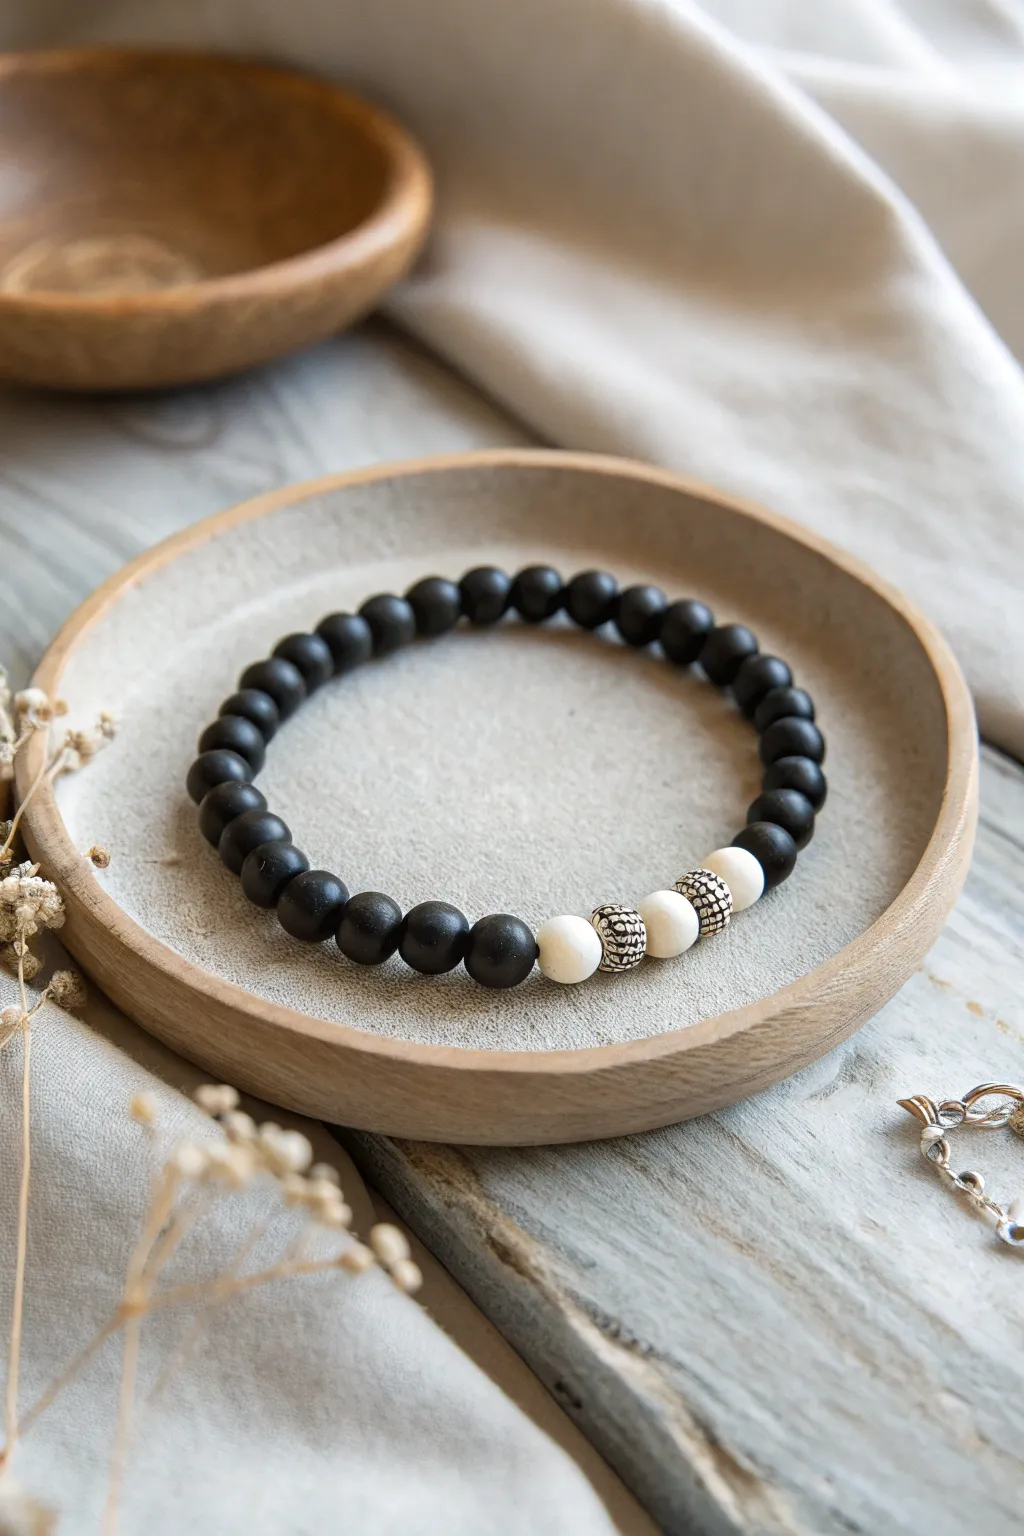
For a sophisticated nod to Halloween that you can wear all year round, this bracelet pairs matte black beads with a striking “ghostly” focal point. The contrast between the deep midnight tones and the stark white accents creates a spooky yet elegant vibe perfect for the season.
Step-by-Step
Materials
- Matte black round beads (8mm, approx. 20-24 beads)
- Matte white round beads (8mm, 3 beads)
- Textured silver spacer beads or rondelles (approx. 6-8mm, 2 beads)
- Stretch cord (0.8mm or 1mm thickness)
- Jewelry glue or clear nail polish
- Scissors
- Tape or binder clip (optional)
- Bead design board or soft cloth
Step 1: Planning the Design
-
Measure your wrist:
Before you begin, wrap a piece of string or a flexible measuring tape around your wrist to determine the circumference. Add about half an inch to this measurement to ensure a comfortable fit that isn’t too tight. -
Prepare your workspace:
Lay out a soft cloth or use a bead design board. This prevents your round beads from rolling away while you work and allows you to visualize the pattern before threading. -
Lay out the partial black base:
Start by setting out about 10 of the matte black beads in a straight line. This will form the first half of the bracelet band. -
arrange the focal point:
Now, create the centerpiece. Place one white bead, followed by a silver spacer, then the second white bead, another silver spacer, and finally the third white bead. This creates the ‘ghostly’ pop against the dark background. -
Complete the layout:
Finish your design line by adding the remaining matte black beads after the focal section until you reach your target length.
Knot Hiding Trick
If the knot is too big for the bead hole, gently ream the hole of the bead meant to cover it with a bead reamer tool to widen it slightly.
Step 2: Stringing the Beads
-
Cut the cord:
Cut a piece of stretch cord about 10-12 inches long. Having this extra length makes tying the final knot much easier than struggling with short ends. -
Secure the end:
I like to place a piece of tape or a binder clip on one end of the cord so the beads don’t slide right off as I’m stringing them. -
Thread the first black section:
Begin threading the first set of matte black beads onto the cord. Check them as you go to ensure none have chipped holes. -
Add the first white bead:
Slide on the first matte white bead, pushing it snug against the black ones. -
Insert the first spacer:
Thread one of the textured silver spacer beads next. Ensure the texture is visible and not hidden by the channel of the bead. -
Add the center bead:
Add the second white bead. This is the true center of your design. -
Finish the focal section:
Add the second silver spacer followed by the final white bead pattern immediately after the center bead. -
Complete the loop:
Thread the remaining black beads onto the cord to finish the circle.
Step 3: Securing the Bracelet
-
Pre-stretch the cord:
Before tying, hold both ends of the cord and give it a few gentle tugs. This pre-stretching helps prevent the bracelet from sagging or loosening after you wear it a few times. -
Tie a surgeon’s knot:
Bring the ends together. Cross the right end over the left, loop it under, and pull tight. Then, cross the left over the right, loop it under *twice*, and pull tight again. This extra loop makes the knot very secure. -
check the tension:
Ensure there are no gaps between the beads, but don’t pull so tight that the bracelet begins to pucker or twist. -
Apply adhesive:
Dab a tiny drop of jewelry glue or clear nail polish directly onto the knot. This seals the threads together permanently. -
Hide the knot:
While the glue is still slightly tacky, slide the knot inside the hole of the nearest black bead to hide it from view. -
Trim excess cord:
Once the glue is fully dry (wait about 10-15 minutes to be safe), use sharp scissors to trim the excess cord ends as close to the bead hole as possible without nicking the knot.
Wonky Pattern?
If the focal point doesn’t sit centered on your wrist, you may have uneven numbers of black beads on either side. Count and re-string to balance.
Slip on your new monochrome accessory and enjoy the subtle spooky flair it adds to your outfit


Pumpkin Patch Mix With Orange Discs
Embrace the cozy vibes of autumn with this darling bracelet duo that pairs vibrant orange clay discs with earthy sage greens. The standout feature is a sweet little clay pumpkin charm that adds just the right amount of seasonal flair without being overly spooky.
Detailed Instructions
Materials
- Orange polymer clay heishi disc beads (approx. 6mm)
- Sage green round stone or clay beads (approx. 6-8mm)
- Assorted accent beads: cream wood rounds, textured brass spacers
- Small antique brass or gold seed beads
- Small clay pumpkin bead or charm
- Strong elastic jewelry cord (0.8mm or 1mm recommended)
- Jewelry glue or clear nail polish
- Scissors
Step 1: Creating the Orange Disc Bracelet
-
Measure and Cut:
Cut a piece of elastic cord about 10-12 inches long. It’s always better to have too much cord than too little when trying to tie the final knot. -
Pre-stretch the Cord:
Gently pull on the elastic cord several times to pre-stretch it. This crucial step prevents the bracelet from drooping or stretching out permanently after you wear it for the first time. -
Start Beading:
Begin threading your orange clay heishi discs onto the cord. Since these beads are uniform, you can create a solid block of color which forms the vibrant base of this bracelet. -
Add Metal Accents:
About halfway through your strand, break up the orange by adding a few small brass spacer beads. I like to sandwich a slightly larger gold bead between two discs for a touch of shine. -
Prepare the Charm Area:
As you near the end of the strand, thread on about 5-8 small brass seed beads. This section will serve as the anchor point for your dangling pumpkin charm later. -
Check fit:
Wrap the strand around your wrist to check the size. Add or remove orange discs until it fits comfortably but isn’t too loose. -
Secure the Charm:
Thread your clay pumpkin charm onto the cord so it rests directly against the section of seed beads you just created. Follow it with a few more seed beads to frame it nicely. -
Tie Off:
Tie a secure surgeon’s knot (right over left, left over right) and pull tight. Dab a tiny drop of jewelry glue on the knot, let it dry, and trim the excess cord.
Knot Security
Use a flexible jewelry glue like G-S Hypo Cement on your elastic knots. Super glue can make elastic brittle and prone to snapping over time.
Step 2: Creating the Mixed Green Bracelet
-
Layout the Design:
For the second bracelet, layout your beads on a measuring board or cloth first. You want a random, organic pattern rather than strict symmetry. -
Create Green Sections:
Start by threading 3-4 sage green round beads. These larger beads provide a nice textural contrast to the flat discs on the other bracelet. -
Build Textured Spacers:
Create visual interest by stacking 3-4 small brass seed beads or textured spacers together. Use these ‘stacks’ to separate the larger beads. -
Incorporate Orange Accents:
Echo the first bracelet by adding a small section of 3-5 orange disc beads. This ties the two pieces together visually as a set. -
Add Cream Highlights:
Thread on a cream-colored wooden bead or a bone bead followed by another brass spacer. These light neutrals brighten the overall palette. -
Repeat the Pattern:
Continue stringing, alternating between the sage green rounds, the brass spacer stacks, the orange disc sections, and the cream accents until you reach your desired length. -
Final Adjustments:
Before tying, hold the two bracelets together to ensure they are roughly the same size. The mixed bead bracelet often needs to be slightly looser because the larger beads take up more inner circumference. -
Finish the Set:
Tie off the second bracelet with a surgeon’s knot, applying glue to the knot for security. Once dry, hide the knot by sliding it inside one of the larger green beads if the hole allows.
Rustic Texture Upgrade
Mix in matte finish beads with glossy ones. Using unpolished stone or wood beads alongside smooth clay adds that authentic earthy feel.
Slip on your new stack and enjoy the perfect touch of autumn warmth on your wrist

The Complete Guide to Pottery Troubleshooting
Uncover the most common ceramic mistakes—from cracking clay to failed glazes—and learn how to fix them fast.
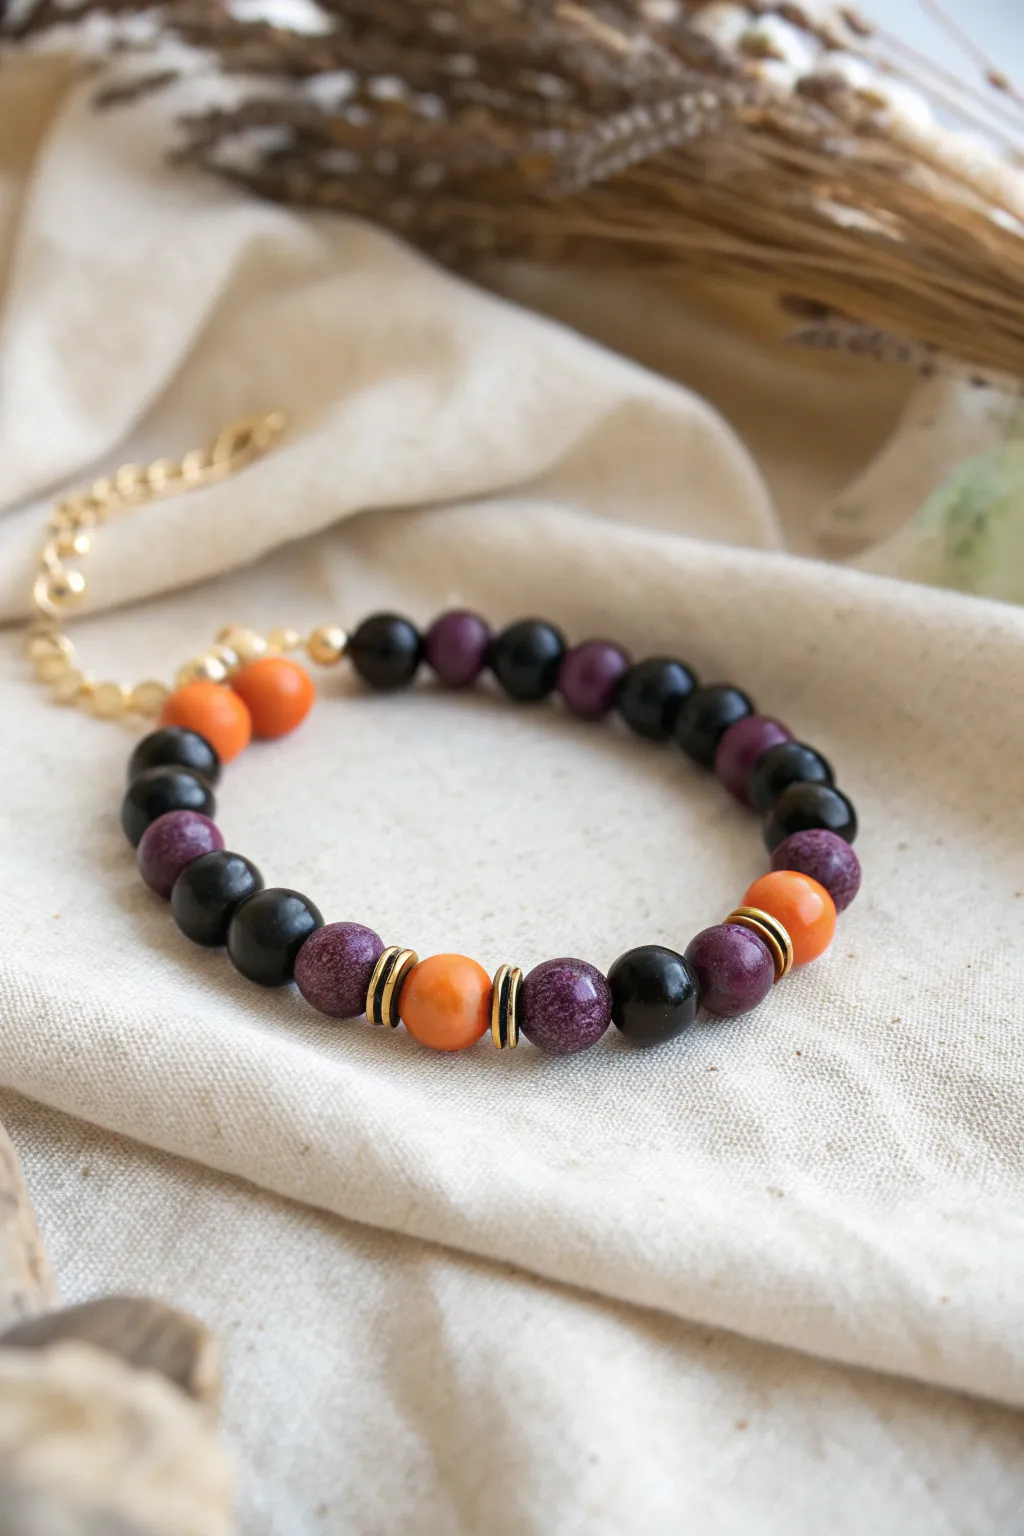
Bat Charm With Dark Purple Beads
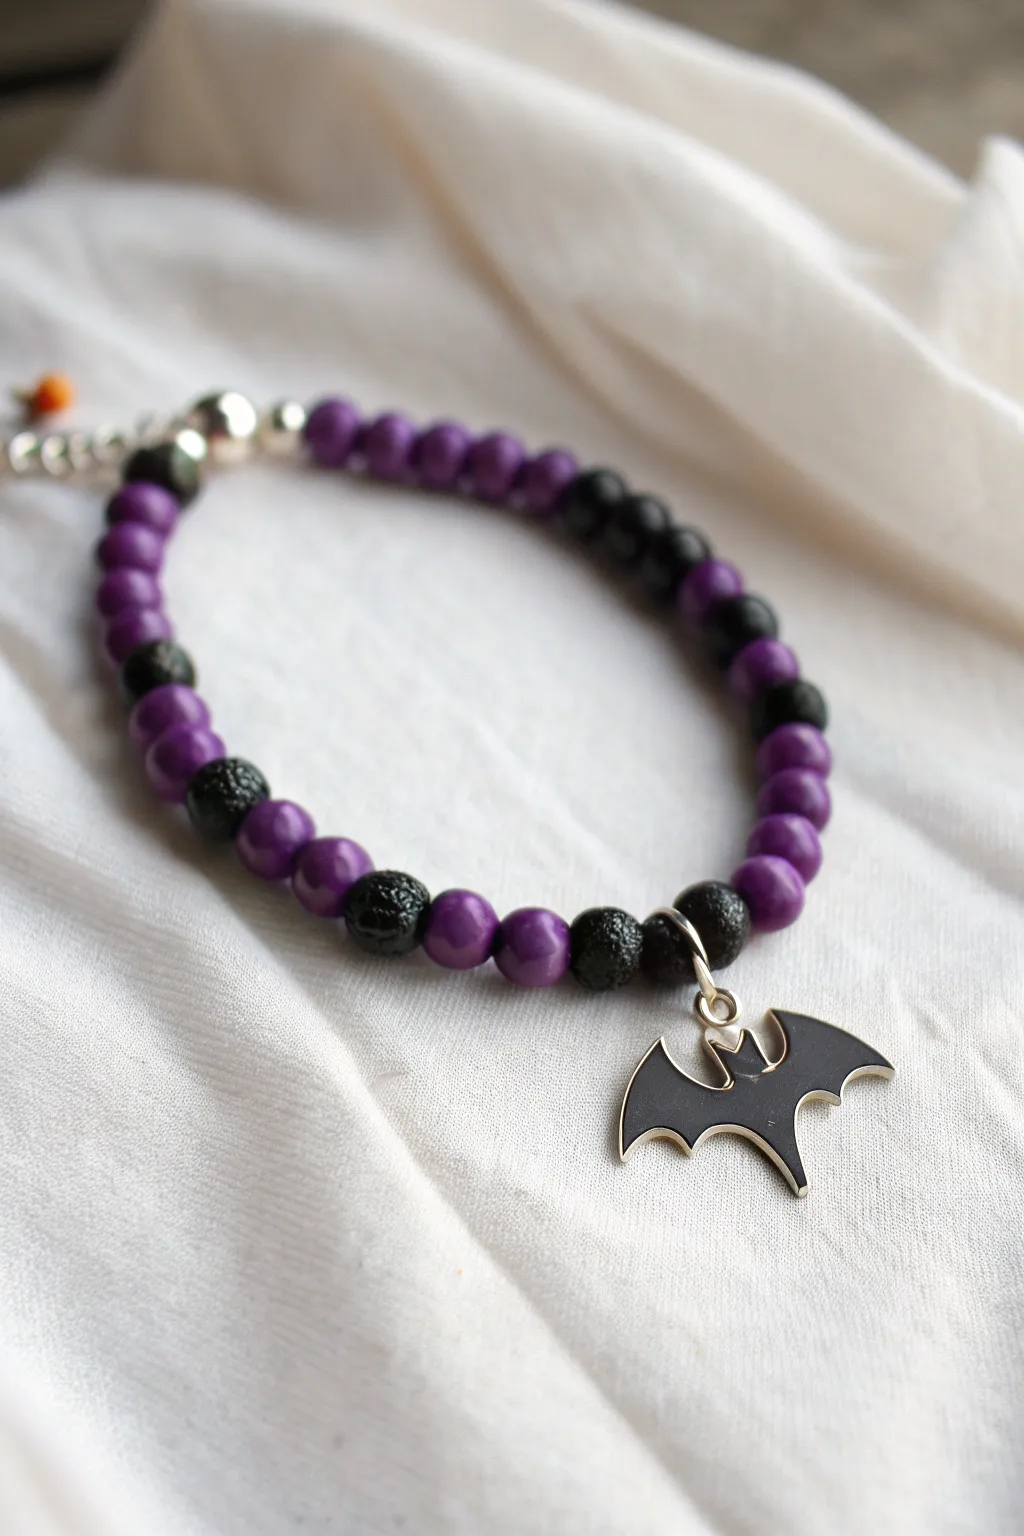
Embrace the spooky season with this simple yet striking beaded bracelet. Featuring a mix of smooth amethyst-tone beads, textured black lava stones, and a sleek enamel bat charm, this accessory adds a subtle gothic touch to your October ensemble.
Step-by-Step Tutorial
Materials
- Purple round beads (approx. 6mm or 8mm, likely dyed agate, jasper, or glass)
- Black lava stone beads (6mm or 8mm)
- Small smooth black glass beads (optional, for variation)
- Silver spacer beads (small round)
- Black enamel bat charm with silver outline
- Silver jump ring (4mm or 5mm)
- Beading wire (professional flexible wire like Soft Flex)
- Crimp beads (silver)
- Crimp covers (silver, optional)
- Lobster clasp and extension chain (silver)
- Chain nose pliers
- Wire cutters
- Crimping tool or flat nose pliers
Step 1: Planning the Pattern
-
Lay out your workspace:
Begin by spreading out a bead mat or a soft towel. This prevents your round beads from rolling away while you design your pattern. -
Design the core sequence:
Observe the pattern in the photo: it uses alternating sections. Start by grouping three purple beads together, followed by a single black lava bead. -
Establish the rhythm:
Lay out enough beads to cover your wrist length, following a general pattern of 2-3 purple beads separated by 1-2 black beads. Notice how the bracelet in the image isn’t perfectly symmetrical; some sections have two black beads, others have one. -
Position the focal point:
Determine where the center of the bracelet will be. Place a single black lava bead or a small cluster of black beads here to anchor the charm later.
Aromatherapy hack
Add a drop of essential oil (like patchouli or clove) to the sheer black lava beads. Their porous texture absorbs oil, turning this bracelet into a Halloween scent diffuser.
Step 2: Stringing the Beads
-
Cut the wire:
Cut a piece of beading wire about 10-12 inches long. This gives you plenty of extra room to work with the clasp without struggling. -
Secure the first end:
Thread a crimp bead and one half of your clasp (either the lobster claw or the jump ring for the chain) onto one end of the wire. -
Crimp the wire:
Loop the wire back through the crimp bead to create a secure loop. Use your crimping pliers to flatten or fold the crimp bead tight, ensuring the wire won’t slip out. -
String the beads:
Thread your beads onto the wire following the pattern you laid out. Start from one end and work your way toward the center focal point. -
Add the center highlight:
When you reach the center, add the specific black bead arrangement where the charm will hang. Stringing the charm directly onto the wire is an option, but using a jump ring later allows it to dangle freely. -
Finish the strand:
Continue stringing the remaining beads until you reach the desired length for your wrist. Remember to account for the length the clasp will add.
Step 3: Attaching the Hardware
-
Prepare the second end:
Thread a crimp bead onto the remaining open end of the wire followed by the second part of your clasp assembly (the extension chain loops). -
Close the loop:
Feed the wire tail back through the crimp bead and pull it taut. Leave just a tiny bit of slack so the bracelet remains flexible and doesn’t become stiff. -
Secure the final crimp:
Use your crimping tool to secure this final bead. Trim the excess wire tail close to the crimp bead with your flush cutters. -
Add crimp covers:
If you are using crimp covers, place them over the crimped beads and gently close them with pliers to make them look like smooth silver beads.
Make it glow
Swap the plain silver spacer beads for tiny glow-in-the-dark beads. In daylight, they look white, but in the dark, they add an eerie green luminescence to your wrist.
Step 4: Adding the Bat Charm
-
Open the jump ring:
Take your silver jump ring and hold it with two pairs of pliers. Twist the ends away from each other (front to back) rather than pulling them apart, to maintain the circle shape. -
Attach the charm:
Slide the loop of the bat charm onto the open jump ring. -
Mount to bracelet:
Hook the jump ring onto the wire between the designated center beads—usually between two black lava beads or a black and purple bead. -
Close the ring:
Using your pliers, twist the jump ring ends back together until they click shut and are perfectly flush. This ensures your bat won’t fly away.
Now you have a charmingly spooky accessory ready to wear for trick-or-treating or just adding a bit of dark elegance to your day
Witchy Moon-and-Stars Mix
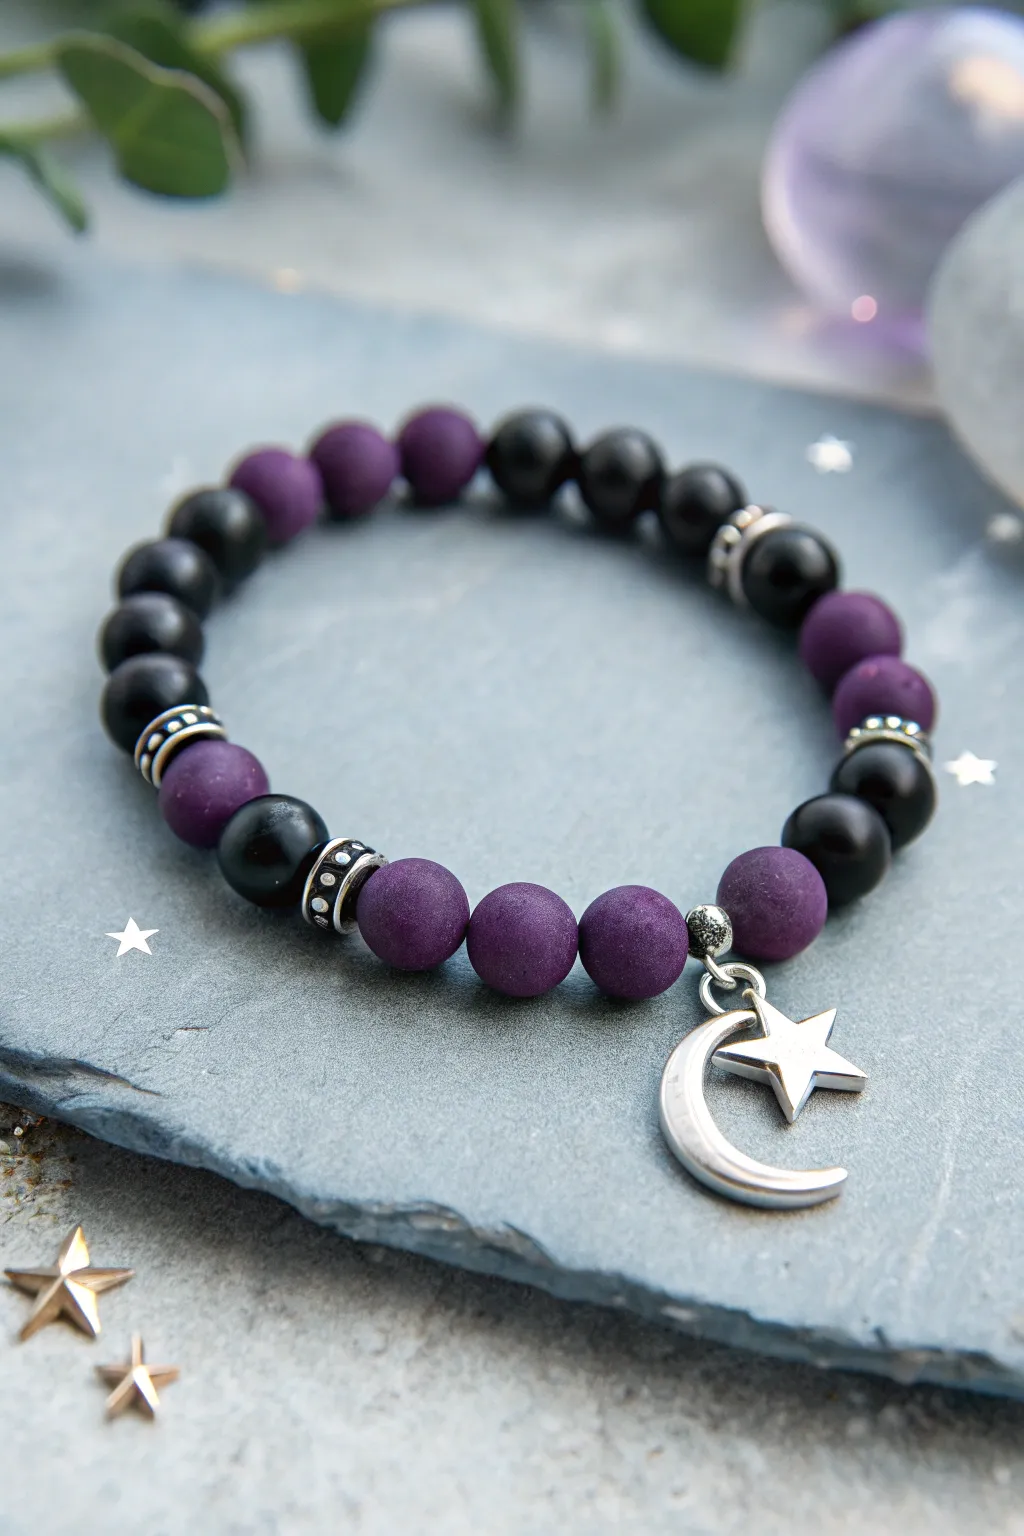
Channel the mystique of a midnight sky with this bewitching bracelet design. Featuring matte purple and glossy black beads accented with celestial silver charms, it’s the perfect subtle accessory for the witching season.
How-To Guide
Materials
- 10mm matte purple round beads (polymer clay or frosted agate)
- 8mm glossy black round beads (onyx or glass)
- Silver spacer beads with dotted detail
- Silver crescent moon charm
- Silver star charm
- Silver jump rings (sized to fit charms)
- Silver bail bead or charm hanger bead
- Elastic beading cord (0.8mm or 1mm)
- Jewelry adhesive or clear nail polish
- Scissors
Step 1: Planning and Prep
-
Measure your wrist:
Cut a piece of elastic cord about 10-12 inches long. This generous length gives you plenty of room to tie knots later without straining your fingers. -
Pre-stretch the cord:
Gently pull on the elastic cord several times to pre-stretch it. This crucial step prevents the bracelet from loosening up and sagging after you’ve worn it a few times. -
Lay out your pattern:
Before threading, arrange your beads on a layout board or a piece of felt. The pattern shown uses segments of 3-4 matte purple beads alternating with segments of black beads, separated by silver spacers.
Step 2: Stringing the Beads
-
Start with the focal point:
Thread the silver charm hanger bead onto the center of your cord. This hanging loop will eventually hold your moon and star charms. -
Add purple neighbors:
Slide one matte purple bead onto the cord on either side of the charm hanger to frame the focal point. -
Create the first purple segment:
String two more matte purple beads on the right side of the charm hanger, creating a block of three purple beads. I usually like to secure one end of the cord with a piece of tape so beads don’t slide off while I work. -
Insert the first spacer:
Add a silver spacer bead after the purple segment. The textured patterns on these spacers add a nice witchy detail. -
Add a black segment:
Thread three glossy black beads next. The contrast between the shiny black and matte purple is what gives this piece its depth. -
Continue the pattern:
Add another silver spacer, followed by a segment of two matte purple beads. -
Build the back section:
For the section that will sit on the back of the wrist, string a long sequence of black beads—about 5 or 6 depending on your wrist size—mixing in a spacer or two if you want more shimmer. -
Complete the loop:
Mirror your pattern on the other side of the charm hanger until the strand is long enough to wrap comfortably around your wrist without tightness.
Knot Security
When hiding the knot inside a bead, choose a bead with a slightly larger hole, like the black onyx, rather than the tight spacer beads.
Step 3: Finishing Touches
-
Secure the bracelet:
Bring the two ends of the elastic cord together. Tie a surgeon’s knot (loop the cord through twice instead of once on the first pass) and pull it tight. -
Reinforce the knot:
Add a tiny drop of jewelry adhesive or clear nail polish directly onto the knot. Let it dry for a minute to ensure it won’t slip. -
Hide the mechanics:
Trim the excess cord ends close to the knot, then gently tug the bracelet so the knot slides inside one of the adjacent beads to hide it. -
Prepare the charms:
If your moon and star charms aren’t already attached to jump rings, use pliers to carefully open a jump ring laterally (twist, don’t pull). -
Attach the moon:
Slide the crescent moon onto the jump ring, then loop it onto the silver charm hanger bead on your bracelet. -
Add the star:
Add the star charm onto the same jump ring so it nestles inside or slightly over the moon, creating a layered celestial look. -
Close the ring:
Using your pliers, twist the jump ring closed again, ensuring the ends meet perfectly flush so your charms don’t slip off.
Galaxy Sparkle
Use ‘blue sandstone’ beads instead of standard black onyx. They glitter like a starry night sky under light for an extra magical effect.
Slip on your new celestial accessory and enjoy the magical vibes it brings to your outfit


What Really Happens Inside the Kiln
Learn how time and temperature work together inside the kiln to transform clay into durable ceramic.
Black Cat Minimal With Yellow Eyes
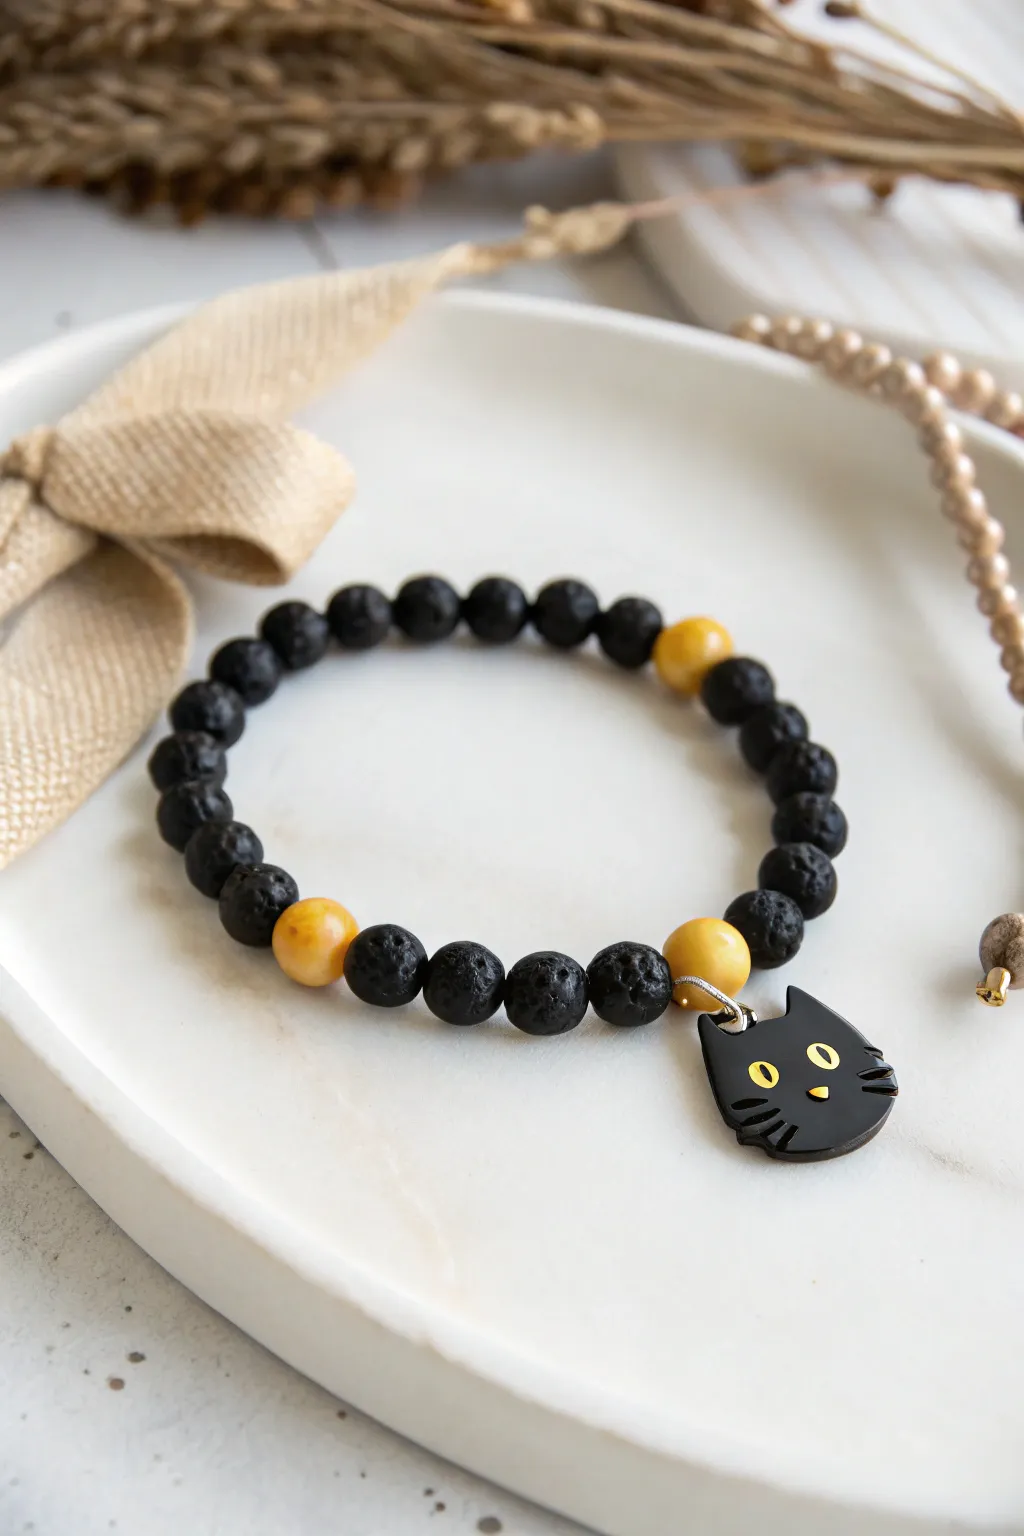
Embrace the spooky elegance of Halloween with this minimalist bracelet featuring striking textures and a custom-made charm. By combining porous lava stone beads with a handcrafted polymer clay black cat, you get a piece that serves as both jewelry and an essential oil diffuser.
Step-by-Step
Materials
- Black polymer clay
- Yellow polymer clay (or vibrant yellow acrylic paint)
- Black lava stone beads (6mm or 8mm)
- Yellow jade or amber accent beads (same size as lava stones)
- Elastic jewelry cord (0.8mm recommended)
- Small jewelry screw eye or jump ring
- Clay roller or pasta machine
- X-Acto knife or clay blade
- Needle tool or toothpick
- Gloss glaze (optional)
- Super glue or jewelry adhesive
- Oven for baking clay
Step 1: Sculpting the Cat Charm
-
Condition the clay:
Start by warming a small amount of black polymer clay in your hands until it becomes soft and pliable. -
Roll a flat sheet:
Use your clay roller to flatten the black clay to a uniform thickness, roughly 3mm to 4mm thick, ensuring it’s sturdy but not too heavy. -
Cut the silhouette:
Using a needle tool, lightly sketch a rounded cat head shape with two pointed ears directly onto the clay. -
Refine the shape:
Once happy with the outline, use your blade or X-Acto knife to cut out the shape cleanly. -
Soften the edges:
Gently tap the cut edges with your fingertip to round them off slightly so they aren’t sharp or boxy. -
Create the eyes:
Roll two tiny, flattened ovals of yellow clay and press them gently onto the face for eyes, or indent the clay now to paint them yellow later. -
Add pupils and nose:
Place minuscule specs of black clay onto the yellow eyes for pupils and a tiny yellow triangle for the nose. -
Detail the whiskers:
Use your needle tool to carefully press three horizontal indentations on each cheek to represent whiskers. -
Install the hardware:
Insert a small screw eye into the top center of the head (between the ears) before baking, or pierce a hole wide enough for a jump ring. -
Bake the charm:
Follow the manufacturer’s baking instructions for your specific brand of clay, usually at 275°F (130°C) for 15-30 minutes.
Scent Secret
Add a drop of pumpkin spice or clove essential oil directly onto the black lava beads. The porous stone holds the scent for days.
Step 2: Assembling the Bracelet
-
Measure the cord:
Cut a piece of elastic cord about 10-12 inches long to give yourself plenty of room for tying knots. -
Pre-stretch the elastic:
Give the cord a few firm tugs; this prevents the bracelet from stretching out and becoming loose after the first wear. -
Plan the pattern:
Lay out your beads on a design board or towel. A nice rhythm is a long run of black lava beads interrupted by two yellow accent beads. -
Thread the beads:
String the beads onto the cord, placing your baked and cooled cat charm between the two yellow accent beads so it acts as the focal point. -
Secure the charm:
If you used a screw eye, attach the charm to the cord using a jump ring to ensure it hangs correctly. -
Check the fit:
Wrap the strung beads around your wrist to ensure the size is comfortable, adding or removing lava beads as necessary. -
Tie the knot:
Tie a surgeon’s knot (loop the elastic through twice instead of once) and pull it tight. -
Glue the knot:
Dab a tiny drop of super glue or jewelry cement onto the knot and let it dry completely. -
Hide the knot:
Ideally, tuck the knot inside the hole of one of the adjacent lava beads for a seamless finish.
Glow Up
Use glow-in-the-dark polymer clay for the cat’s eyes. In daylight, they look white or pale yellow, but at night, they will eerily glow green.
Now you have a purr-fectly subtle accessory ready for the season
“BOO” Letter Beads With Spooky Spacers
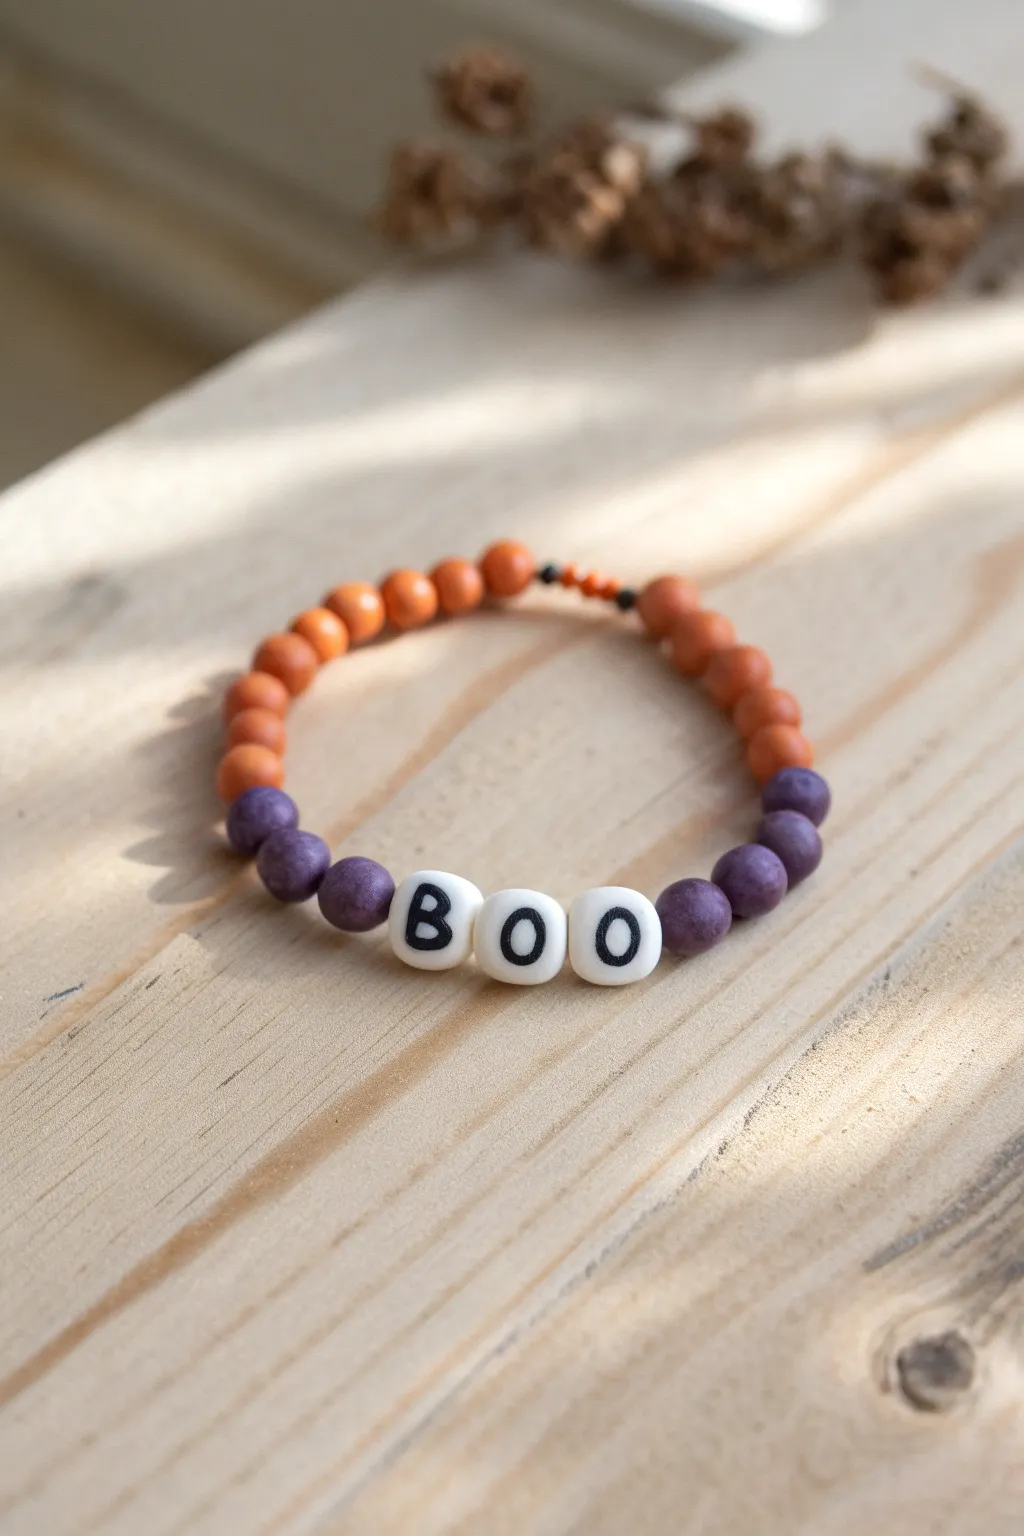
Celebrate spooky season with a handmade bracelet featuring classic Halloween colors and bold lettering. The combination of matte earthy orange and deep purple clay beads frames the fun ‘BOO’ centerpiece perfectly.
Step-by-Step Guide
Materials
- Polymer clay in burnt orange
- Polymer clay in deep plum purple
- Polymer clay in white
- Polymer clay in black (for the letters)
- Stretch cord (0.7mm or 0.8mm)
- Beading needle (optional but helpful)
- Small bead roller tools (optional)
- Jewelry spacers or crimp beads (for the clasp knot area)
- Super glue or jewelry cement
Step 1: Creating the Clay Beads
-
Condition the clay:
Start by warming up your orange and purple polymer clay in your hands until it is soft and pliable. This conditioning prevents cracking later on. -
Roll the rounds:
Pinch off small, equal-sized pieces of the orange clay. Roll them between your palms to create smooth spheres about 6-8mm in diameter. -
Create the purple batch:
Repeat the rolling process with the deep purple clay. Aim for about two-thirds as many purple beads as orange ones for this specific design. -
Make the letter beads:
Roll three slightly larger spheres from white clay. Flatten them gently into thick disc shapes or soft cubes, keeping edges rounded. -
Pierce the holes:
Using a bead piercing pin or a toothpick, carefully poke a hole through the center of every bead. Rotate the bead as you pierce to keep the shape round. -
Add the lettering:
Roll tiny, thin snakes of black clay. carefully form the letters ‘B’, ‘O’, and ‘O’ and press them gently onto the faces of your white beads. Alternatively, you can use a fine-tip permanent marker after baking. -
Bake the beads:
Arrange all your beads on a baking sheet lined with parchment paper. Bake according to your clay package instructions (usually around 275°F for 15-30 minutes). -
Cool down:
Let the beads cool completely before handling. I like to let them sit for an hour to ensure they harden fully.
Making Uniform Beads
Use a small circular cookie cutter or a dedicated bead-rolling tool to measure exactly the same amount of clay for every single bead.
Step 2: Assembling the Bracelet
-
Cut the cord:
Measure a length of stretch cord about 10-12 inches long. This gives you plenty of extra room for knotting. -
Stretch the cord:
Pre-stretch your elastic by pulling it firmly several times. This prevents the bracelet from drooping after you wear it a few times. -
Start with purple:
Thread three purple beads onto the cord. Secure one end with a piece of tape if you’re worried about them sliding off. -
Add the message:
String your ‘B’, ‘O’, and ‘O’ white beads in the correct order. -
Finish the purple section:
Add three more purple beads after the last ‘O’ to frame the word symmetrically. -
String the orange:
Fill the rest of the bracelet length with your orange clay beads until you reach the desired wrist size. -
Add accent spacers:
Near the end, you can add a few tiny spacer beads or micro-beads in contrasting colors like black or orange to hide where the knot will be. -
Tie the knot:
Bring the two ends together and tie a surgeon’s knot (a standard overhand knot with an extra loop). Pull tight. -
Secure the bond:
Add a tiny drop of super glue or jewelry cement to the knot for extra security. Let it dry for a minute. -
Trim the excess:
Carefully snip off the excess cord, leaving about 2mm tails. Ideally, tuck the knot inside one of the larger bead holes.
Fixing Broken Letters
If clay letters won’t stick or distort during baking, create plain white beads first and stamp or paint the letters on after they are baked and cooled.
Now you have a charmingly spooky accessory ready to wear seamlessly with your fall wardrobe

TRACK YOUR CERAMIC JOURNEY
Capture glaze tests, firing details, and creative progress—all in one simple printable. Make your projects easier to repeat and improve.
Gold-Tone Spacer Glow-Up Between Heishi
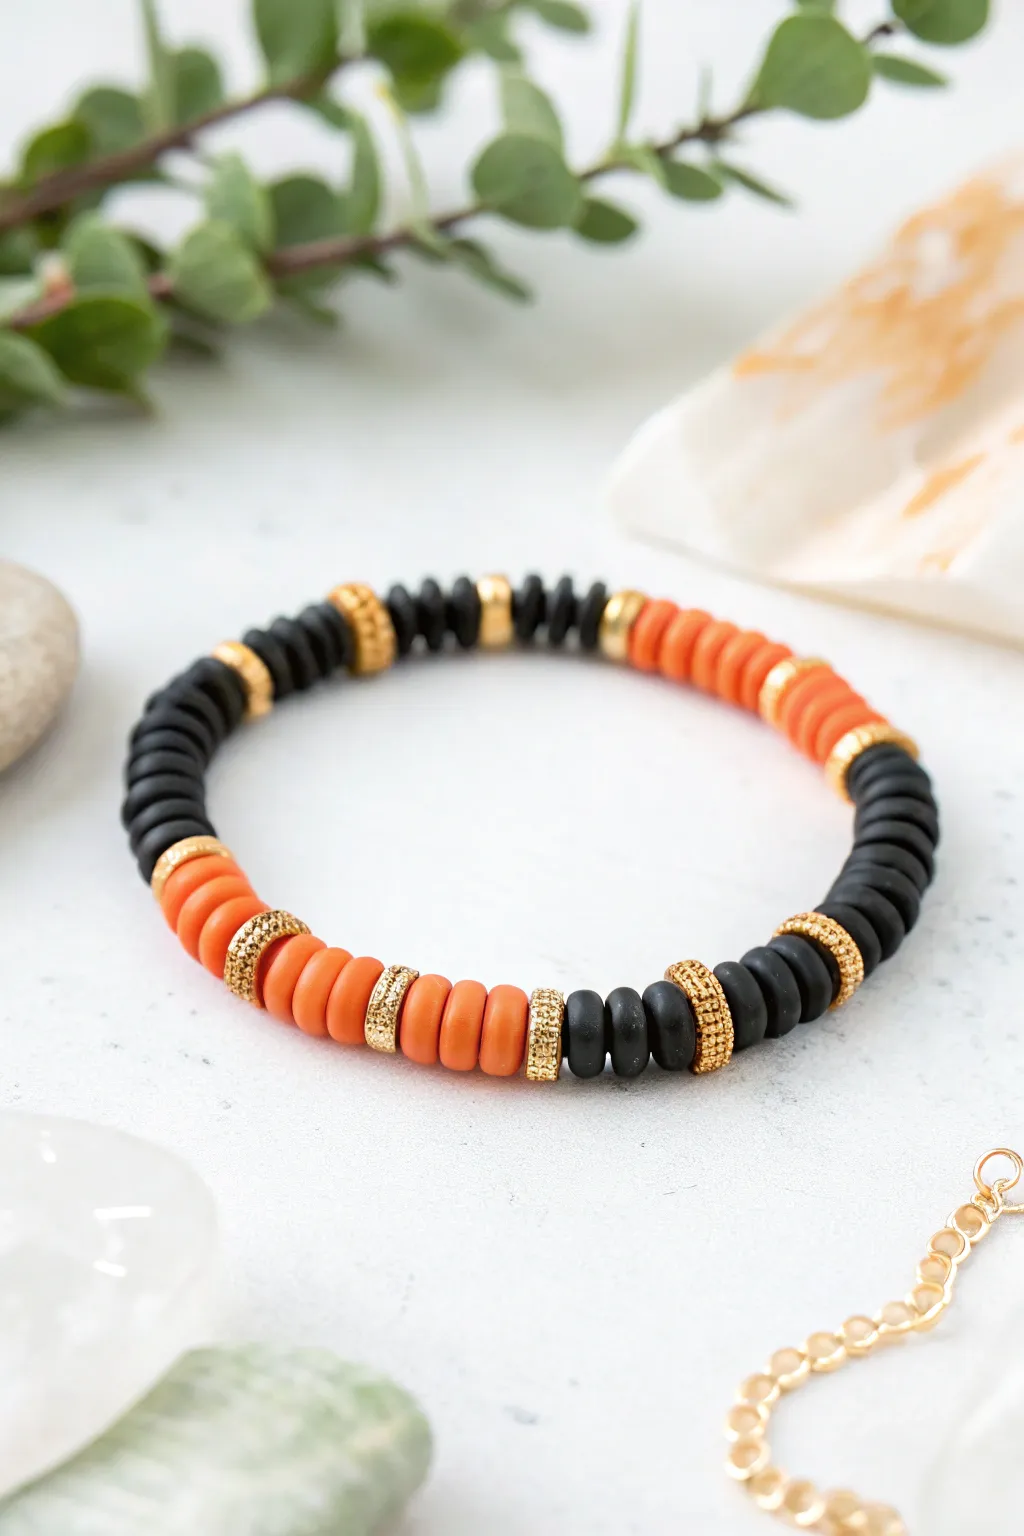
Elevate your Halloween accessory game with this sophisticated mix of matte black and pumpkin orange clay beads. The addition of varied gold-tone spacers transforms a simple color palette into a glamorous piece of wrist candy perfect for October and beyond.
Step-by-Step Guide
Materials
- Matte black polymer clay Heishi beads (6mm or 8mm)
- Orange polymer clay Heishi beads (6mm or 8mm)
- Gold-tone rhinestone rondelle spacer beads (approx. 6mm)
- Gold-tone smooth disc spacer beads (3-4mm)
- Gold-tone textured or patterned band spacer beads
- Strong elastic jewelry cord (0.8mm recommended)
- Jewelry glue or clear nail polish
- Scissors
Step 1: Planning and Prep
-
Measure your wrist:
Before cutting any cord, wrap a measuring tape around your wrist to find your size. Add about 0.5 to 1 inch to this measurement depending on how loose you like your fit. -
Prepare the cord:
Cut a piece of elastic cord approximately 10-12 inches long. Having extra length makes tying the final knot much easier than fighting with short ends. -
Stretch the elastic:
Gently pull tightly on the elastic cord several times. This ‘pre-stretching’ technique prevents the bracelet from sagging out of shape after the first few wears. -
Secure the end:
Attach a bead stopper or simply apply a piece of tape to one end of the cord so your beads don’t slide right off while you work.
Knot Slipping?
If your elastic knot feels insecure, try wetting the knot with a drop of water before pulling it tight. This creates friction and helps the knot sit much tighter.
Step 2: Creating the Pattern
-
Start with black:
Begin the sequence by threading on a section of black Heishi beads. Aim for about 10-12 beads to create a substantial dark block. -
Add the first glamour accent:
Slide on a textured gold band spacer followed by a smooth gold disc spacer to create visual separation. -
Transition to orange:
Thread on a section of orange clay beads. Keep this section slightly shorter than the black one, perhaps 6-8 beads, to balance the colors. -
Insert sparkly spacers:
Place a rhinestone rondelle spacer on the cord. These catch the light beautifully and break up the matte texture of the clay. -
Continue the pattern:
Add another small section of orange beads, mirroring the previous orange section. -
Add gold transitions:
Use a smooth gold disc spacer followed by a textured band spacer before switching back to black clay beads. -
Repeat the sequence:
Continue alternating between black and orange sections, separating them with your mix of gold spacers. I like to vary which gold spacer I use slightly to keep the design organic. -
Check the length:
Wrap the beaded cord around your wrist periodically. It should meet comfortable without gaps, but not feel constrictive.
Step 3: Finishing Touches
-
Verify the fit:
Once you have reached your desired length, bring the two ends together to ensure the pattern flows seamlessly without an awkward break in color. -
Tie the knot:
Remove the tape or stopper. Tie a simple overhand knot, followed by a double surgeon’s knot (looping the elastic through twice) for extra security. -
Secure with adhesive:
Place a tiny dot of jewelry glue or clear nail polish directly onto the knot. This prevents the slick elastic from working itself loose over time. -
Hide the mechanism:
If hole sizes allow, gently tug the cord to pull the glued knot inside one of the adjacent beads to hide it from view. -
Trim the excess:
Wait for the glue to dry completely, then use sharp scissors to trim the remaining cord tails as close to the bead as possible.
Charm Upgrade
Attach a small gold bat or ghost charm to one of the jump rings used as spacers for a dangling element that adds movement and extra festive flair.
Now slip on your finished creation and enjoy the sophisticated touch of Halloween spirit it adds to your outfit
Matte-and-Glossy Halloween Alternation
This elegant take on Halloween jewelry balances matte and glossy finishes for a sophisticated, adult-friendly accessory. By alternating deep purples, classic blacks, and vibrant pumpkin oranges with touches of gold, you create a piece that feels festive without being costumey.
Detailed Instructions
Materials
- Matte black round beads (8mm or 10mm)
- Glossy black round beads (8mm or 10mm)
- Textured/frosted deep purple round beads (8mm or 10mm)
- Smooth matte orange round beads (8mm or 10mm)
- Gold tone flat disc spacer beads (heishi style)
- Gold tone crimp beads
- Gold tone wire guardians (classic u-shape)
- Gold tone extension chain with lobster clasp
- Gold tone jump rings
- Beading wire (tiger tail or similar flex wire)
- Crimping pliers
- Wire cutters
- Chain nose pliers
Step 1: Planning the Pattern
-
Lay out your design board:
Before restringing anything, layout your beads on a bead board or a piece of felt to visualize the pattern. -
Establish the repeating sequence:
Observe the specific pattern shown: it’s not a simple 1-2-3 repeat. The design features blocks of color separated by gold accents. -
Create the focal sections:
Notice the distinct ‘highlight’ sections containing the orange beads. These are flanked by gold spacers to make them pop against the darker colors. -
Draft the dark sections:
Between the bright orange moments, alternate your glossy black, matte black, and textured purple beads. A good rhythm is often 3-5 dark beads between the orange focal points.
Stiff Bracelet Solution
If your bracelet feels rigid and won’t drape naturally, you likely pulled the wire too tight. Leave a tiny gap (hair’s width) near the clasp.
Step 2: Stringing the Beads
-
Cut your wire:
Cut a length of beading wire about 10-12 inches long. This gives you plenty of slack to work with on both ends. -
Secure the first end:
Thread a crimp bead onto the wire, followed by a wire guardian. Loop the wire back through the crimp bead. -
Attach the clasp:
Before crushing the crimp, hook the loop of your wire guardian onto the jump ring of your lobster clasp assembly. -
Crimp firmly:
Use your crimping pliers to flatten the crimp bead securely, locking the wire in place. Trim the short tail of the wire, or leave a tiny bit to tuck into the first bead. -
Start stringing:
Begin adding beads according to your layout. I usually start with a few dark beads to hide the crimp connection neatly. -
Add the gold spacers:
When you reach an orange bead in your pattern, sandwich it between two gold flat disc spacers. This creates that metallic definition seen in the image. -
Mind the texture mix:
As you string the darker sections, pay close attention to alternating the glossy and matte finishes. The light hits them differently, which gives the bracelet its depth. -
Check the length:
Periodically wrap the strand around your wrist. The extension chain will add adjustability, but the beaded portion should cover most of your wrist.
Pattern Precision
For the exact look, use two gold spacers for every single orange bead. The double-gold border isolates the color for maximum impact.
Step 3: Finishing Touches
-
Prepare the final end:
Once all beads are strung, thread on a crimp bead followed by another wire guardian. -
Attach the extension chain:
Loop the wire guardian through the final link or jump ring of your gold extension chain. -
Thread back through:
Pass the wire back down through the crimp bead and through the first 1-2 beads on your strand. -
Pull tight:
Pull the wire taut so there are no gaps between beads, but not so tight that the bracelet becomes stiff and rigid. -
Final crimp:
Use your crimping pliers to secure this final crimp bead. -
Trim excess wire:
Use flush cutters to snip the remaining wire tail as close to the beads as possible so nothing pokes out. -
Inspect connections:
Give a gentle tug on both ends to ensure your crimps are holding firm before wearing.
Now you have a sophisticated accessory perfect for adding a hint of Halloween spirit to your daily wardrobe
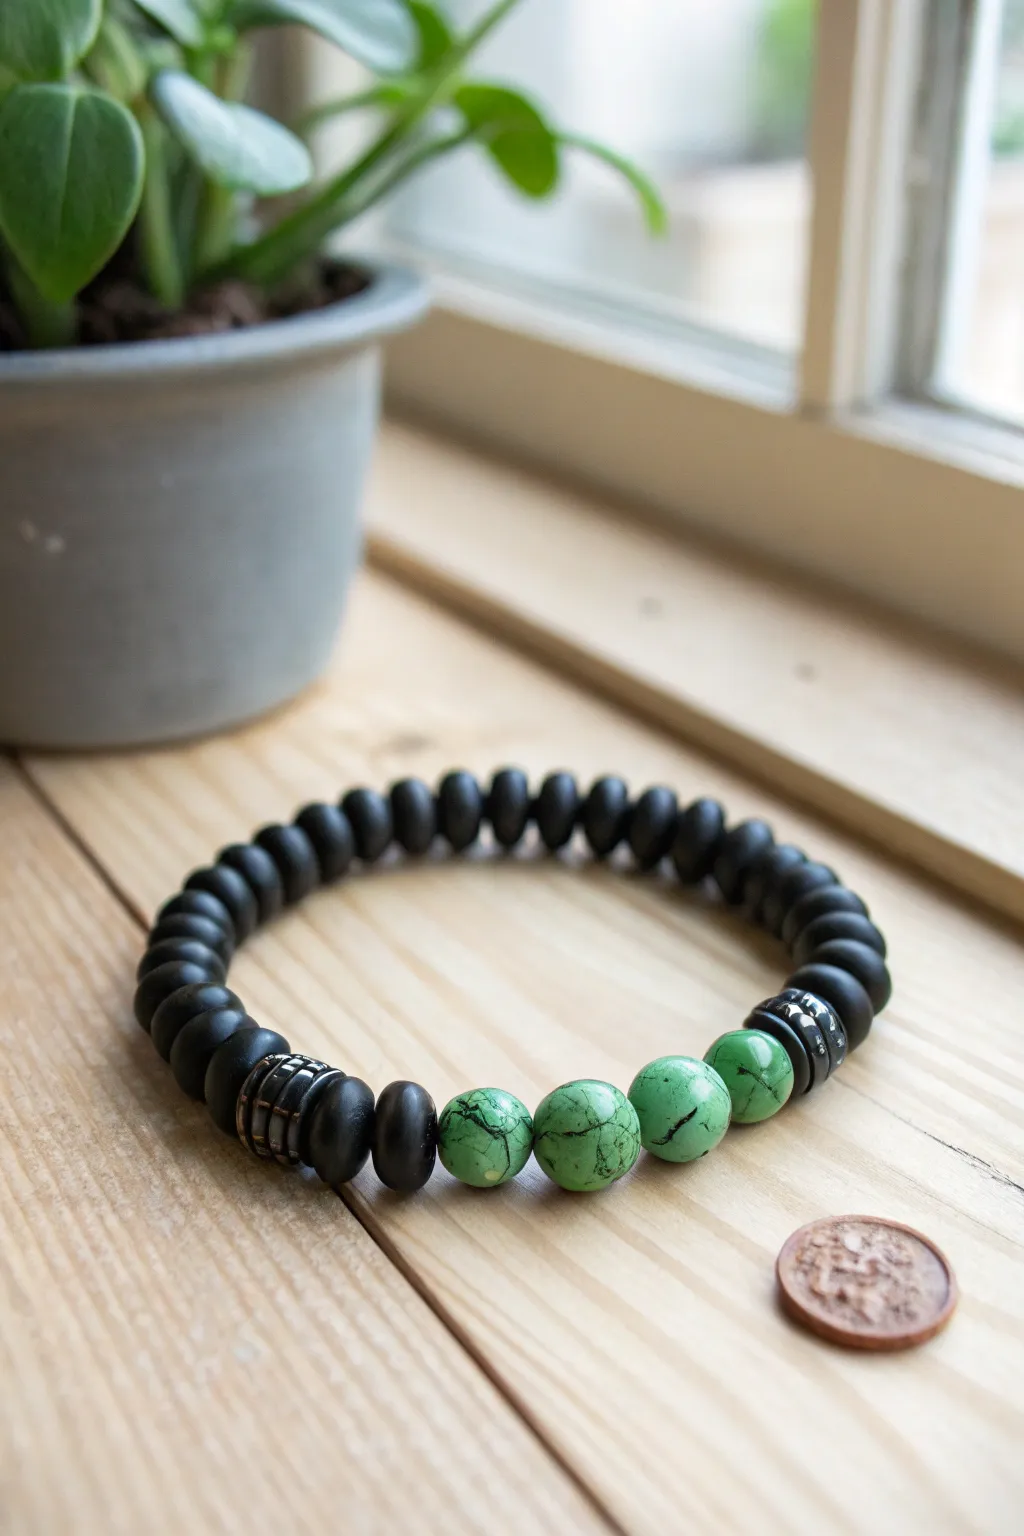
Lime Green “Slime” Accent Palette
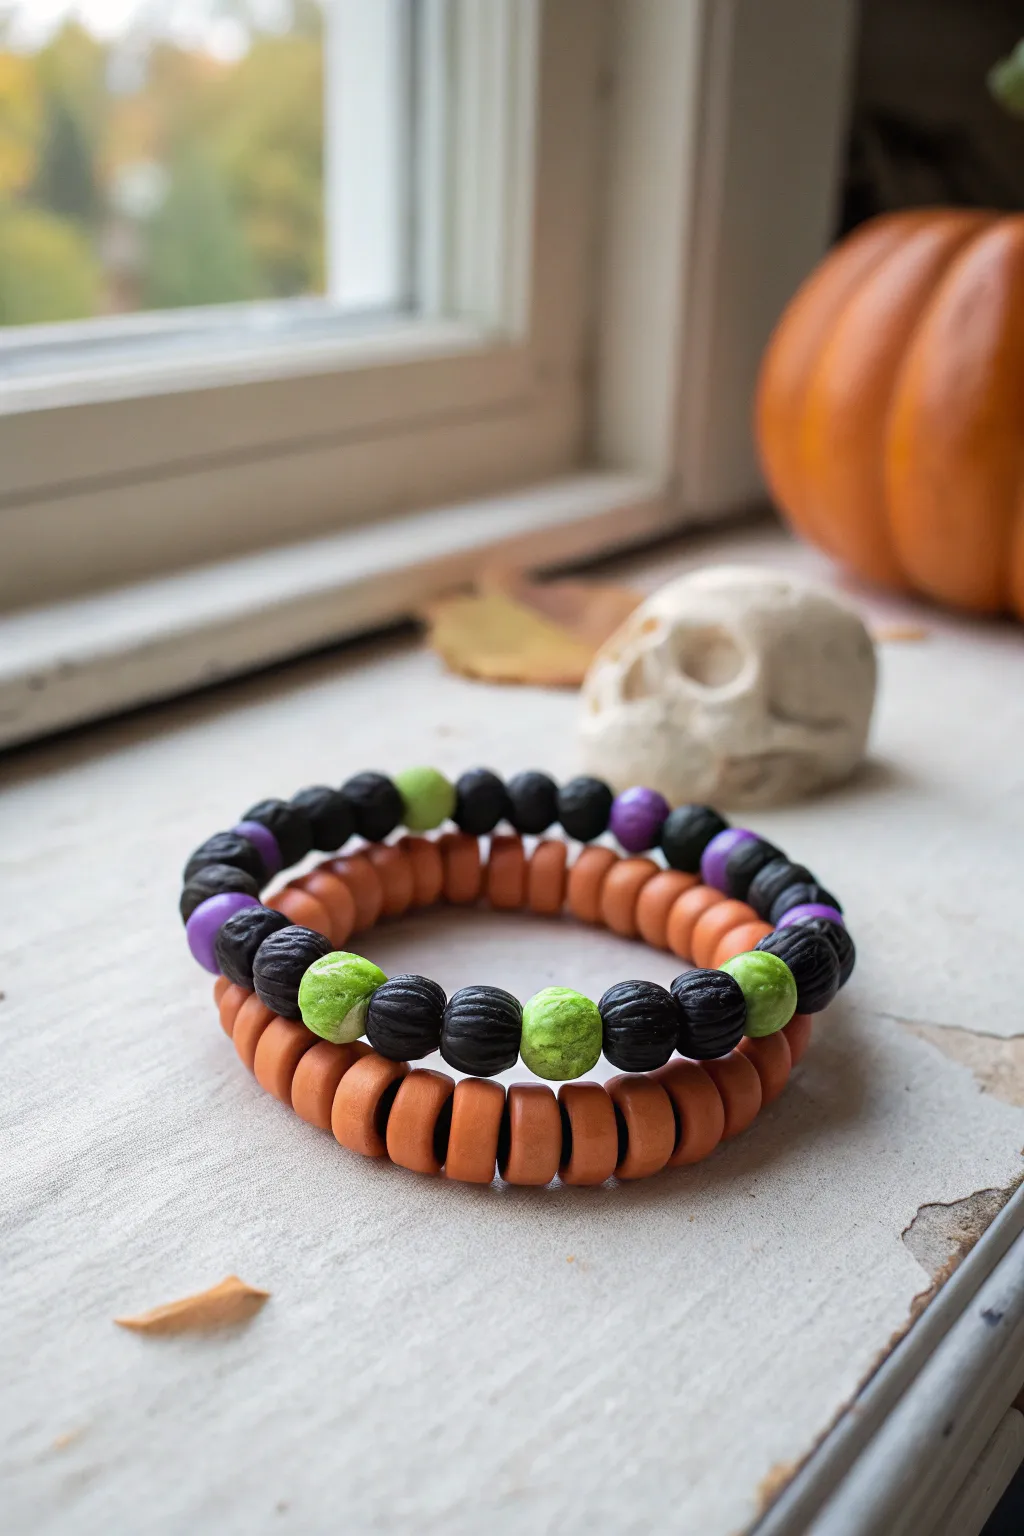
Embrace the eerie season with this duo of Halloween-inspired polymer clay bracelets featuring a satisfying mix of textures. One strand boasts chunky, lava-rock style beads accented with pops of slime green and witchy purple, while the companion piece offers a warm, matte pumpkin orange stack.
Step-by-Step Guide
Materials
- Black polymer clay
- Terracotta or pumpkin orange polymer clay
- Lime green polymer clay
- Purple polymer clay
- Elastic beading cord (0.7mm or 0.8mm)
- Bead rolling tool or acrylic block
- Toothpick or needle tool
- Texture tool (crumbled foil ball or sandpaper)
- Circle cutter (small, for uniform sizing)
- Blade or craft knife
- Super glue (gel type recommended)
Step 1: Crafting the Textured Black Beads
-
Portion the clay:
Start by conditioning your black polymer clay until it’s soft and pliable. Roll it into a long log and use a blade to slice it into equal-sized segments to ensure your beads are uniform. -
Roll spheres:
Take each black segment and roll it between your palms to create a smooth sphere. Aim for a diameter of about 8-10mm. -
Add texture:
To achieve that lava-rock look, gently roll the surface of the unbaked bead over a piece of coarse sandpaper or press a ball of crumpled aluminum foil against all sides. I find the foil gives the deepest, most organic crater effect. -
Pierce the holes:
Carefully poke a hole through the center of each textured bead using a toothpick or needle tool. Rotate the bead as you push through to prevent it from squashing.
Step 2: Creating Accent & Heishi Beads
-
Form the accent beads:
Repeat the rolling and piercing process with your lime green and purple clay. Keep these smooth or add texture depending on your preference, but make them slightly smaller than the black beads for visual variety. -
Prep the orange clay:
Condition the pumpkin orange clay and roll it out into a thick slab, approximately 4-5mm thick. -
Cut the discs:
Use a small circle cutter (roughly 10mm diameter) to punch out numerous circles from the orange slab. These will become your Heishi-style disc beads. -
Piercing discs:
Pierce the center of each orange disc. It’s often easier to pierce them while they are lying flat on your work surface to keep them from warping. -
Smoothing edges:
If the edges of the discs are sharp from the cutter, gently tap them with your finger to round them slightly, giving them a tumbled look.
Texturing Trick
For realistic ‘lava’ pits, mix a pinch of salt into the raw black clay surface before baking. After baking, soak the beads in water to dissolve the salt.
Step 3: Baking and Assembly
-
Bake the beads:
Arrange all your beads on a baking sheet lined with parchment paper. Bake according to the manufacturer’s instructions on your specific brand of clay (usually 275°F/130°C for 15-30 minutes). -
Cool down:
Allow the beads to cool completely before handling. They harden properly as they return to room temperature. -
Design the top bracelet:
Cut a length of elastic cord about 10 inches long. Layout your pattern for the black bracelet: try alternating three or four black textured beads with a single green or purple accent bead. -
String the beads:
Thread the beads onto the elastic. Check the fit around your wrist periodically to ensure you have enough length. -
Tie the knot:
Tie a secure surgeon’s knot (right over left, left over right, looped twice). Pull tight to secure the tension. -
Secure with glue:
Add a tiny drop of super glue specifically to the knot. Let it dry for a few seconds before trimming the excess cord ends. -
Assemble the orange stack:
Thread the orange disc beads onto a second piece of elastic. Because these are flat, you’ll need many more beads to create the full length. -
Finish the set:
Tie off the orange bracelet using the same knotting and gluing technique. Allow the glue to cure fully for 24 hours before wearing your new stack.
Wonky Holes?
If your bead holes distort while piercing, let the clay sit in the fridge for 10 minutes to firm up before you try poking the hole again.
Now you have a perfectly ghoulish set of accessories ready for any October outfit
Eyeball Focal Bead With Red Pops
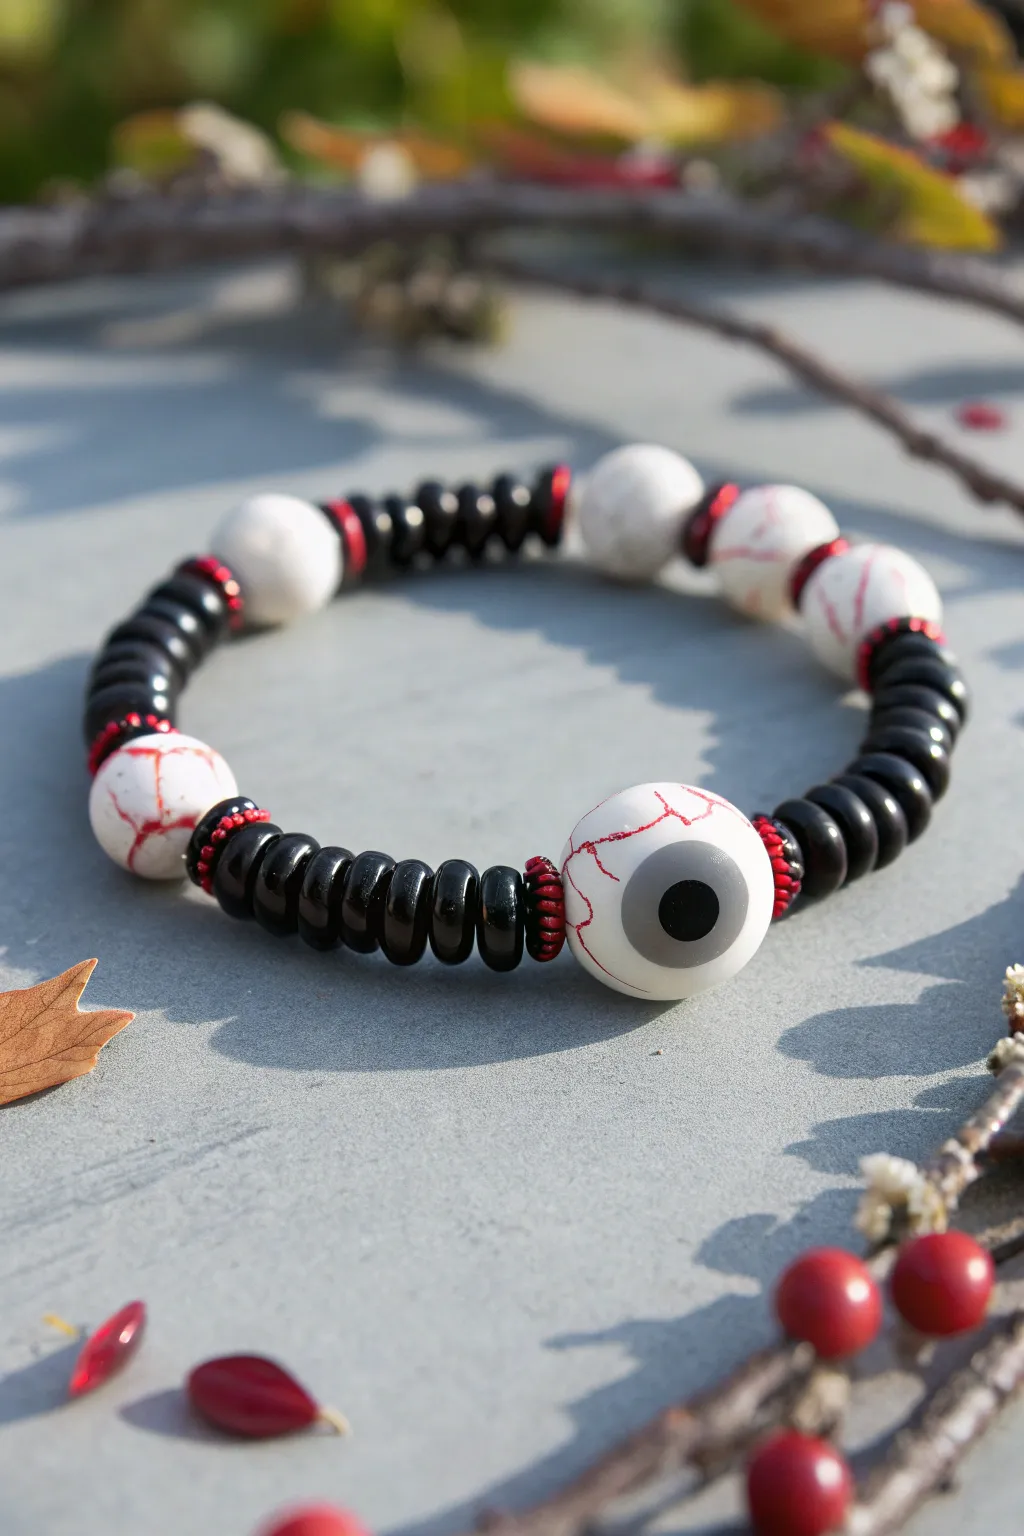
Get into the spooky spirit with this striking bracelet that stares right back at you. Combining a realistic focal eyeball bead with blood-splattered accents and sleek black discs, this accessory is the perfect mix of eerie and chic.
How-To Guide
Materials
- Large white round bead (ceramic, wood, or polymer clay)
- Medium white round beads (stone or crackle glass)
- Black disc beads (heishi or vinyl)
- Red seed beads (size 11/0 or similar)
- Elastic cord (0.8mm or 1mm)
- Acrylic paint (red, black, grey)
- Fine detail paintbrush (000 size)
- Clear sealant or varnish
- Super glue or jewelry cement
- Scissors
Step 1: Painting the Focal Eye
-
Prepare the iris base:
Take your largest white bead and identify the center face where the pupil will go. Paint a medium-sized circle using grey acrylic paint to form the iris. -
Add the pupil:
Once the grey is dry, paint a smaller solid black circle directly in the center of the grey iris. Allow this to dry completely. -
Detail with veins:
Load your finest brush with red acrylic paint. Starting from the edges of the bead (near the holes) and the edge of the grey iris, paint thin, squiggly lines radiating outward to create the bloodshot vein effect. -
Seal the design:
After the paint is fully cured, apply a thin coat of clear sealant over the painted area to protect your artwork from scratching.
Step 2: Prepping the Accents
-
Marbling effect:
Take the smaller white beads. If they aren’t already patterned, create a similar veined look using thin red paint strokes. -
Create scribbles:
Don’t worry about being neat here; random, jagged red lines mimic cracked capillaries perfectly. -
Let them dry:
Set these smaller accent beads aside to dry completely alongside your focal bead.
Paint Smearing?
If acrylic paint beads up on a smooth bead surface, lightly sand the bead first with fine-grit sandpaper to give the paint some ‘tooth’ to grip onto.
Step 3: Stringing the Design
-
Measure your cord:
Cut a length of elastic cord about 10-12 inches long to give yourself plenty of room for tying knots later. -
Pre-stretch the elastic:
Hold both ends of the cord and give it a few gentle tugs. This prevents the bracelet from stretching out and sagging after you wear it a few times. -
Start the sequence:
Thread on a section of black disc beads first. Based on the photo, aim for about 10-12 discs to create a solid dark block. -
Add red spacers:
Slide on three red seed beads next. These add a tiny pop of color that frames the white beads beautifully. -
Add the focal bead:
Thread your main painted eyeball bead onto the cord. -
Mirror the spacers:
Add another set of three red seed beads immediately after the focal bead. -
Continue the pattern:
Add another block of 10-12 black disc beads, followed by three red seed beads. -
Add accent beads:
Slide on one of your smaller ‘veined’ white beads. Follow this with another group of red seed beads. -
Repeat until finished:
Continue this pattern around the bracelet—black discs, red seeds, white accent bead, red seeds—until you reach the desired length for your wrist.
Pro Tip: Custom Irises
Mix a tiny amount of white into your grey paint for the iris to create highlights, giving the eyeball a more glossy, wet, and realistic appearance.
Step 4: Finishing Touches
-
Check the fit:
Wrap the strand around your wrist to ensure it fits comfortably without pinching. -
Tie the knot:
Secure the bracelet with a surgeon’s knot (loop the elastic through twice before pulling tight) and pull firmly. -
Glue and trim:
Place a tiny drop of super glue or jewelry cement on the knot. Let it dry, then trim the excess cord close to the knot, tucking it inside a bead hole if possible.
Now you have a wonderfully creepy accessory to complete your Halloween look
Marbled Monster Green and Black Beads
Channel the eerie vibes of classic monster movies with this striking beaded bracelet featuring custom-marbled clay beads. The contrast between the sleek matte black discs and the vibrant, vein-filled green spheres creates a sophisticated yet spooky accessory perfect for Halloween.
Detailed Instructions
Materials
- Polymer clay (emerald green, light green, black)
- Black polymer clay (for large batch of disc beads)
- Acrylic roller or pasta machine
- Bead piercing pins or toothpicks
- Circle cutters (small diameter for discs)
- Clear elastic bead cord (0.8mm or 1mm)
- Super glue or jewelry cement
- Wet/dry sandpaper (400-800 grit)
- Gloss glaze (optional for green beads)
- Metallic spacer beads (gunmetal or silver finish)
- Clean work surface (tile or glass)
Step 1: Marbling the Monster Beads
-
Condition the Clay:
Start by thoroughly conditioning your emerald green and light green polymer clays separately until they are soft and pliable. I also condition a very small amount of black clay at this stage. -
Mix the Base Green:
Combine two parts emerald green with one part light green to create a vivid, monstrous base color. Knead them together until the color is uniform. -
Prepare the Veining:
Roll the black clay into extremely thin, thread-like snakes. The thinner you can get these, the more realistic the crackle effect will look. -
Apply the Veins:
Wrap the thin black threads randomly around your ball of green clay. Don’t overthink the placement; randomness is key to a natural stone look. -
Roll and Compress:
Roll the green ball between your palms to embed the black clay into the surface. The black lines will smear and stretch, resembling cracks. -
Form Spheres:
Divide your marbled clay into four equal portions. Roll each portion into a perfect sphere, roughly 10-12mm in diameter. -
Pierce the Holes:
Gently pierce a hole through the center of each green sphere using a bead pin. Rotate the pin as you push to avoid distorting the round shape.
Uneven Marbling?
If your black veins look too thick, wrap the green clay in a thin sheet of translucent clay before rolling. This adds depth and breaks up heavy lines.
Step 2: Crafting the Black Discs
-
Roll the Black Sheet:
Condition a large batch of black clay and roll it out into a thick slab, approximately 3-4mm thick. You want these beads to be substantial, not wafer-thin. -
Cut the Discs:
Use a small circle cutter (about 8-10mm diameter) to punch out approximately 40-50 discs. You’ll need enough to cover roughly 3/4 of your wrist circumference. -
Smooth the Edges:
Gently tap the edges of each cut disc with your finger to round them off slightly, removing the sharp cut marks for a smoother finish. -
Pierce the Discs:
Carefully poke a hole through the center of every black disc. Try to keep the hole as centered as possible to ensure the bracelet hangs evenly. -
Bake the Beads:
Arrange all your green spheres and black discs on a baking tile. Bake according to your brand of clay’s instructions (usually 275°F/135°C for 15-30 minutes).
Step 3: Finishing and Assembly
-
Cool and Sand:
Allow the beads to cool completely. If any edges feel rough, wet-sand them lightly with fine-grit sandpaper under running water. -
Measure the Cord:
Cut a piece of elastic cord about 10 inches long. This gives you plenty of extra length for knotting. -
String the Focal Section:
Thread on two black discs, followed by a metallic spacer, then the four green marbled beads, another spacer, and two more black discs. This creates the central focal point. -
Fill the Band:
Continue threading the remaining black disc beads onto the cord until the bracelet reaches your desired length. -
Check the Fit:
Wrap the unfinished strand around your wrist to check the size. Add or remove black discs as needed for a comfortable fit. -
Tie the Knot:
Tie a secure surgeon’s knot (right over left, left over right, looped twice) to close the bracelet. Pull the elastic tight to secure the tension. -
Secure and Trim:
Apply a tiny dot of jewelry glue to the knot. Once dry, trim the excess cord ends and tug the knot inside one of the bead holes to hide it.
Pro Tip: Matte Finish
To get the ultra-matte finish seen on the black beads, buff them with a piece of denim after baking instead of adding any glaze or varnish.
Slip on your new creation and enjoy the subtle nod to monster lore on your wrist
Half-and-Half Bracelet: Sweet Meets Spooky
Embrace the duality of Halloween with this charming beaded bracelet that mixes the bright playfulness of candy corn colors with the classic, moody tones of a witch’s cauldron. The matte, handmade clay beads give this accessory a high-end, artisanal feel perfect for the entire spooky season.
How-To Guide
Materials
- Polymer clay (orange, yellow, white, black, purple)
- Bead rolling tool or acrylic block
- Toothpicks or a thick needle tool
- Elastico stretch cord (0.7mm or 0.8mm)
- Super glue or jewelry cement
- Parchment paper-lined baking sheet
- Oven (for curing clay)
- Scissors
Step 1: Making the Clay Beads
-
Condition the clay:
Start by warming up your polymer clay in your hands, kneading each color separately until it is soft and pliable. This prevents cracks later. -
Portion the clay:
Roll each color into a long snake of even thickness, then slice off equal-sized small chunks. Aim for pieces that are roughly pea-sized. -
Roll the spheres:
Take each small chunk and roll it between your palms to form a rough ball. For a perfectly smooth finish, I like to give them a final roll on a flat surface using an acrylic block in a circular motion. -
Pierce the holes:
Gently insert a toothpick or needle tool through the center of each sphere. Rotate the bead as you push the tool through to avoid flattening the shape. -
Refine the shape:
If the bead deformed slightly during piercing, gently roll it between your fingers again with the toothpick still inside to re-round it. -
Bake the beads:
Arrange your beads on a parchment-lined baking sheet. Bake according to your specific brand of polymer clay instructions (usually around 275°F or 135°C for 15-30 minutes). Let them cool completely before handling.
Pro Tip: Matte Finish
To keep that natural, matte look seen in the photo, avoid glazing the beads after baking. If you want a slight sheen, buff them lightly with a denim cloth instead.
Step 2: Designing the Pattern
-
Sort your colors:
Separate your finished, cooled beads into piles by color: orange, yellow, white, black, and the single accent purple bead. -
Create the candy corn segments:
Start laying out your pattern on a bead board or soft cloth. Form small groups that mimic candy corn: a yellow bead, an orange bead, and a white bead. -
Plan the spooky side:
Between the brighter sections, interject the Halloween classics. Use black beads as spacers or group them with orange for a pumpkin vibe. -
Insert the accent:
Place the single purple bead strategically amongst the orange and yellow beads to break up the warmth—this adds that pop of ‘witchy’ color seen in the photo. -
Check the length:
Arrange enough beads to wrap comfortably around your wrist. A standard adult bracelet is usually about 7 inches long.
Step 3: Assembly
-
Prepare the cord:
Cut a piece of elastic cord about 10-12 inches long. Pre-stretch it by pulling on it gently a few times; this prevents the bracelet from stretching out permanently later. -
Thread the beads:
String your beads onto the elastic following the pattern you designed. It helps to use a bead stopper or simply tape one end of the cord to the table so beads don’t slide off. -
Tie the knot:
Once all beads are on, bring the ends together. Tie a surgeon’s knot (right over left, left over right, looping the top strand through twice) and pull tight. -
Secure and hide:
Place a tiny drop of super glue on the knot. Before it dries completely, try to gently tug the knot inside the hole of a neighboring bead to hide it. -
Trim the excess:
Wait for the glue to dry fully, then use sharp scissors to trim the excess cord as close to the bead as possible without cutting the knot.
Level Up: Glow in the Dark
Swap the standard white clay for glow-in-the-dark polymer clay. In daylight it looks like regular candy corn, but at night your bracelet becomes a glowing accessories.
Wear your new festive accessory with your favorite cozy sweater for the perfect autumn look
Mismatched “Odd Pair” Halloween Stack
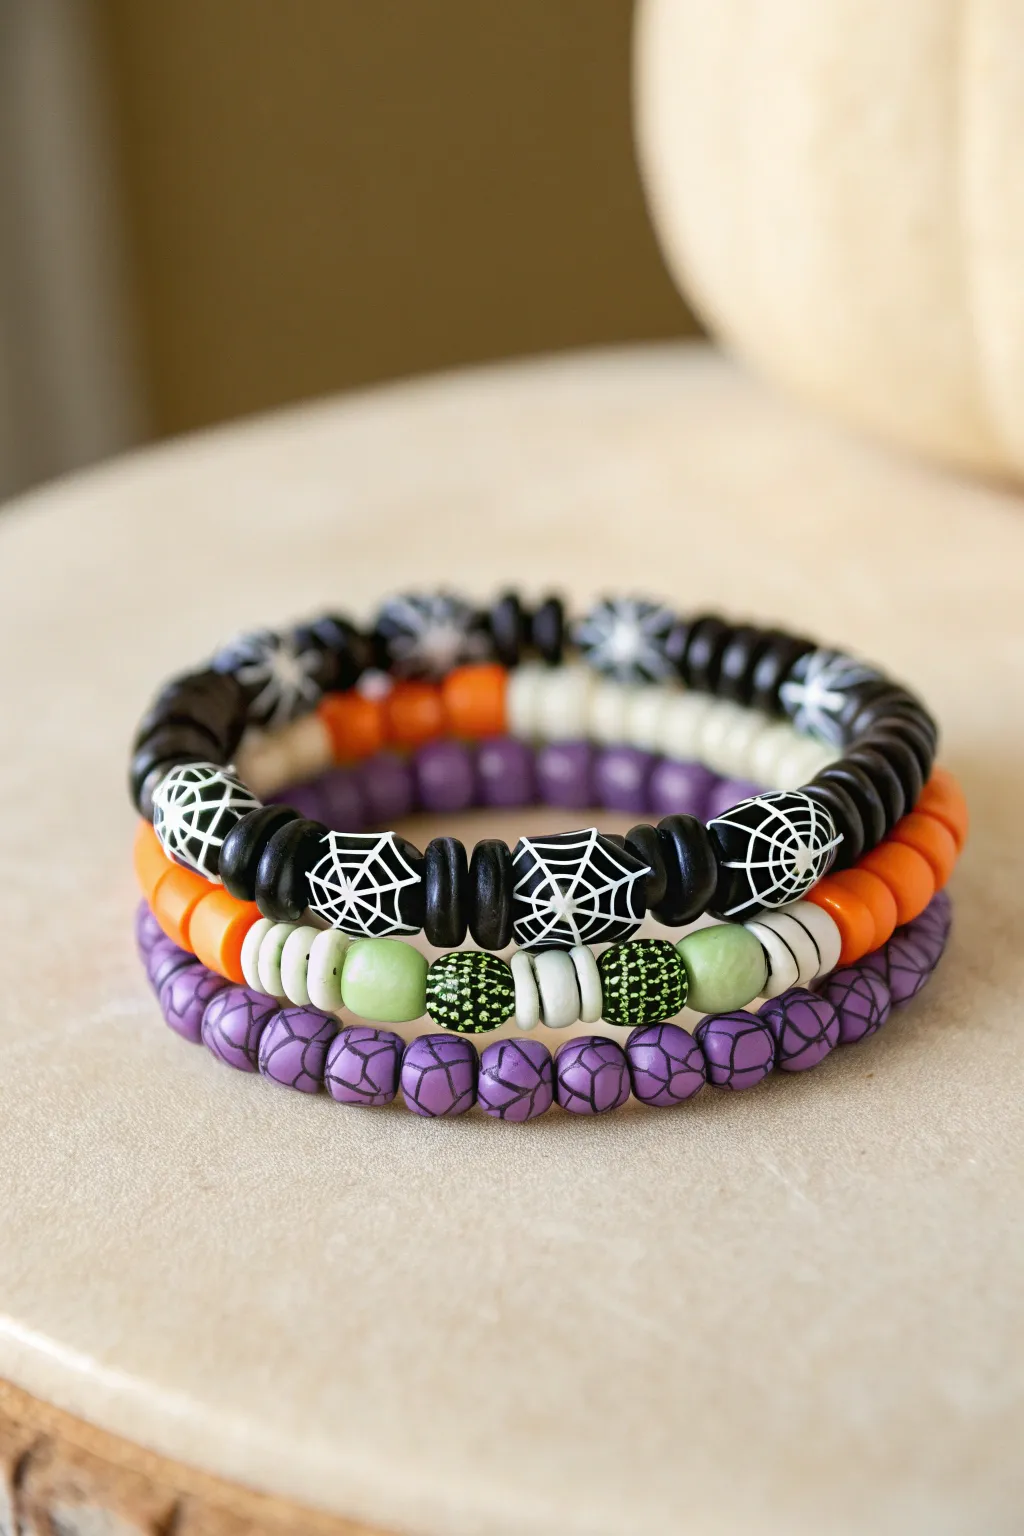
This mismatched set combines different textures and patterns for a perfectly imperfect Halloween stack. With black spiderwebs, cracked purple stone effects, and pops of lime green and orange, these three bracelets are designed to look eclectic yet unified.
Detailed Instructions
Materials
- Stretch cord (0.8mm or 1mm thickness)
- Black heishi clay beads (disc-shaped) – approx. 6mm
- Large black round beads with white spiderweb print – approx. 10mm
- Purple stone-effect round beads (crackle pattern) – approx. 8mm
- Solid orange heishi clay beads
- Solid purple heishi clay beads
- Solid light green round beads – approx. 8mm
- Green/black splatter or terrazzo pattern beads – approx. 8mm
- White or cream heishi clay beads
- Jewelry glue or clear nail polish
- Scissors
Step 1: The Spiderweb Feature Bracelet
-
Prepare your cord:
Cut a length of stretch cord about 10-12 inches long. This gives you plenty of slack for tying knots later without losing beads. -
Create the focal point:
Start by stringing your main feature beads. Thread on a pattern of one large spiderweb bead, followed by three black clay disc spacers. -
Repeat the pattern:
Continue this sequence—one spiderweb bead, three black discs—until you have about 5 or 6 spiderweb beads centered on the cord. -
Finish the strand:
Fill in the rest of the wrist size using solid black clay disc beads on either side of your patterned section to complete the circle. -
Secure the bracelet:
Tie a strong surgeon’s knot (right over left, left over right), dab with a tiny drop of glue, and trim the excess cord once dry.
Step 2: The Purple Crackle Bracelet
-
Start the second strand:
Cut another 10-12 inch piece of stretch cord. This bracelet will sit at the bottom of the stack and provides a chunky texture. -
Build the base:
String on the purple crackle-effect round beads for the majority of the bracelet length. -
Add the color block:
For the back section (or the hidden side), switch to solid purple clay disc beads. -
Layer in contrast:
Sandwich a small section of cream or white clay discs, followed by a section of bright orange clay discs, right in the middle of your purple clay section. -
Close the loop:
Check the fit against your wrist, then knot, glue, and trim just like the first bracelet.
Stretch Before Stringing
Pre-stretch your elastic cord firmly a few times before adding beads. This prevents the bracelet from sagging or loosening up immediately after you finish making it.
Step 3: The Green & Orange Accent Bracelet
-
Prepare the final cord:
Cut your third length of cord. This bracelet acts as the ‘connector’ that ties the colors of the other two together. -
Create the green pattern:
Thread a repeating pattern: two cream clay discs, one solid green round bead, two cream discs, one green speckled/terrazzo bead. -
Extend the pattern:
Repeat this sequence for the front half of the bracelet. -
Add orange warmth:
Transition into solid orange clay disc beads for a significant chunk of the bracelet. -
Finish with monochrome:
Complete the loop with a section of black clay discs blended into cream discs to balance the look. -
Final assembly:
Tie your final secure knot, apply adhesive, and let it cure fully before wearing your new stack.
Knot Slipping?
If your surgeon’s knot won’t hold tight on slippery elastic, try hiding the knot inside the hole of one of the larger bead beads (like the spiderweb one) for a cleaner finish.
Now you have a wonderfully mismatched set ready for any pumpkin patch visit