If you love making things that are both cute and actually useful, a clay speaker is such a satisfying project. I’m sharing my favorite clay speaker ideas that range from classic acoustic amplifiers to quirky sculptures that still help your phone sound louder.
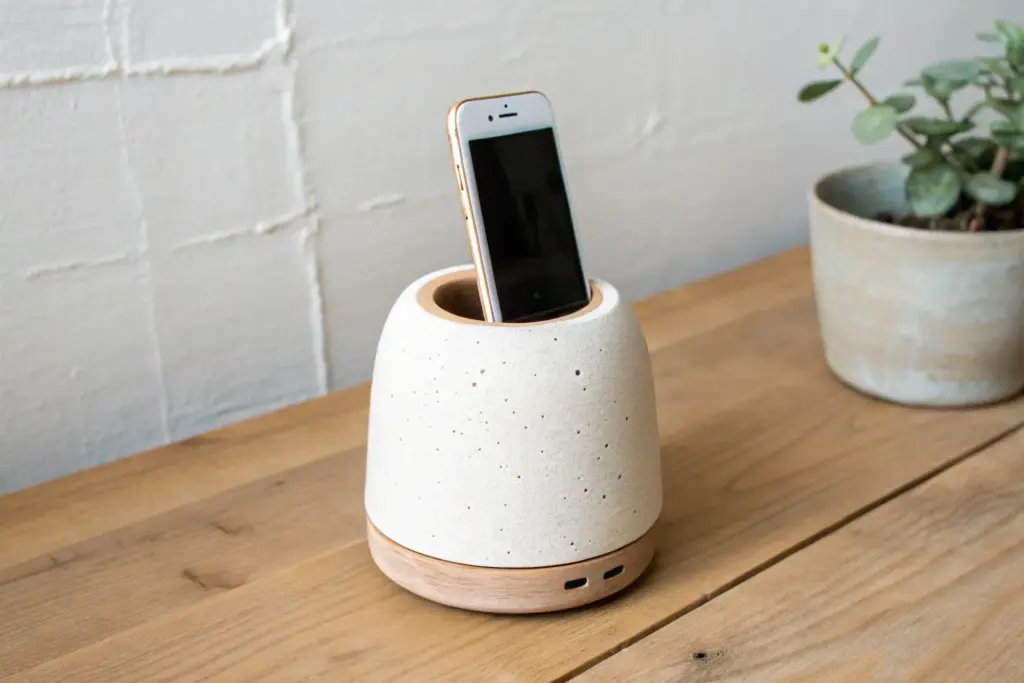
Simple Slot-and-Chamber Dock
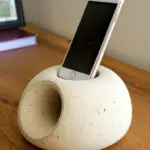
This elegant passive amplifier brings a rugged, industrial charm to your desk or bedside table. Crafted from a single block with a smooth, sandy finish, it naturally boosts your phone’s volume without needing a single cord or battery.
Detailed Instructions
Materials
- High-density foam block (or polystyrene) for the mold core
- Cardboard or foam board for the mold box
- Fine-grain concrete mix or crafting cement
- Sandpaper (various grits from 120 to 400)
- Hobby knife or hot wire cutter
- Hot glue gun
- Circular cookie cutter or PVC pipe section (approx. 2-3 inches diameter)
- Wooden dowels or skewers
- Thin wood sheet or veneer (light tone)
- Drill with small bit (1/8 inch)
- Small disk magnet (optional)
- Release agent (cooking spray or petroleum jelly)
- Mixing bucket and stir stick
- Clear matte sealant spray
Step 1: Creating the Negative Mold
-
Measure your device:
Begin by measuring the width and thickness of your smartphone. Add about 2-3mm of clearance to these dimensions to ensure the phone fits comfortably even with a thin case. -
Carve the core shape:
Cut a block of high-density foam to represent the hollow chamber inside the speaker. This shape should be a rectangle slightly smaller than your final speaker dimensions, with a protrusion on top that matches your phone’s measurements. -
Build the outer box:
Construct a rectangular mold box using foam board or cardboard. Use hot glue to seal the edges completely so no liquid concrete leaks out. The internal dimensions should be roughly 8 inches long, 4 inches tall, and 3 inches deep. -
Position the channel:
Glue your foam core ‘chamber’ to what will be the top of the mold (currently the bottom of your box). Ensure the phone-slot protrusion touches the bottom face of the mold perfectly flat. -
Add the grille void:
Locate where the speaker hole will be. Glue a circular foam disc or a short section of PVC pipe inside the mold box front face. This will create the large circular recess for the sound. -
Create the sound port:
Connect the internal chamber foam to the circular grille foam. You need a passage for air to travel from the phone chamber to the speaker exit. A small block of foam bridging these two components is essential here. -
Form the decorative slit:
If you want the small decorative slit seen to the left of the speaker, glue a thin strip of foam or wood onto the inner wall of the mold face.
Vibration Tip
To get fewer bubbles on the surface, hold a palm sander (without sandpaper) against the table next to your mold while pouring. The vibration helps settle the concrete.
Step 2: Casting the Concrete
-
Lubricate the mold:
Spray the interior of your mold box and the foam core liberally with release agent. This is crucial for removing the foam later without damaging the casting. -
Mix the concrete:
Prepare your fine-grain concrete mix according to the package instructions. You want a consistency similar to pancake batter—pourable but not watery. -
Pour slowly:
Pour the concrete into the mold box. I find it helpful to pour into one corner and let it flow around the foam core to minimize trapped air pockets. -
Vibrate the mold:
Tap the sides of the mold box repeatedly and gently drop it on the table a few times. You want to see air bubbles rising to the surface; this creates that smooth, stone-like surface. -
Let it cure:
Allow the concrete to cure undisturbed for at least 24 to 48 hours. Do not rush this step, as green concrete is brittle and prone to cracking.
Level Up: Pigment
Add powdered oxide pigments to your dry concrete mix before adding water. Try a charcoal black or terracotta red for a completely different vibe.
Step 3: Demolding and Finishing
-
Remove the outer box:
Peel away the cardboard or foam board exterior. Be gentle with the corners. -
Excavate the foam:
Using pliers and a picking tool, carefully dig out the foam core from the phone slot and the front speaker hole. Take your time to ensure the internal chamber is clear of debris. -
Prepare the wooden grille:
Cut a circle from your thin wood sheet that fits snugly into the front recess. Mark a geometric pattern of dots on the wood. -
Drill the sound holes:
Using a small drill bit, carefully drill through your marked pattern on the wooden disk. Sand the face of the wood lightly to remove any splinters. -
Check the fit:
Test fit the wooden grille into the circular recess. If it’s too tight, sand the edges slightly until it sits flush. -
Sand the concrete body:
Use 120-grit sandpaper to remove any rough seams or sharp edges on the concrete block. Progress to 400-grit for a satiny, polished feel. -
Install the grille:
Apply a few small dabs of strong glue to the back rim of the wooden grille and press it into place within the concrete recess. -
Seal the surface:
Spray the entire concrete block with a matte clear sealant. This prevents dust and protects the surface from oils on your hands.
Place your phone in the slot and enjoy the surprisingly warm, amplified sound of your new desktop creation


Wheel-Thrown Resonance Pod
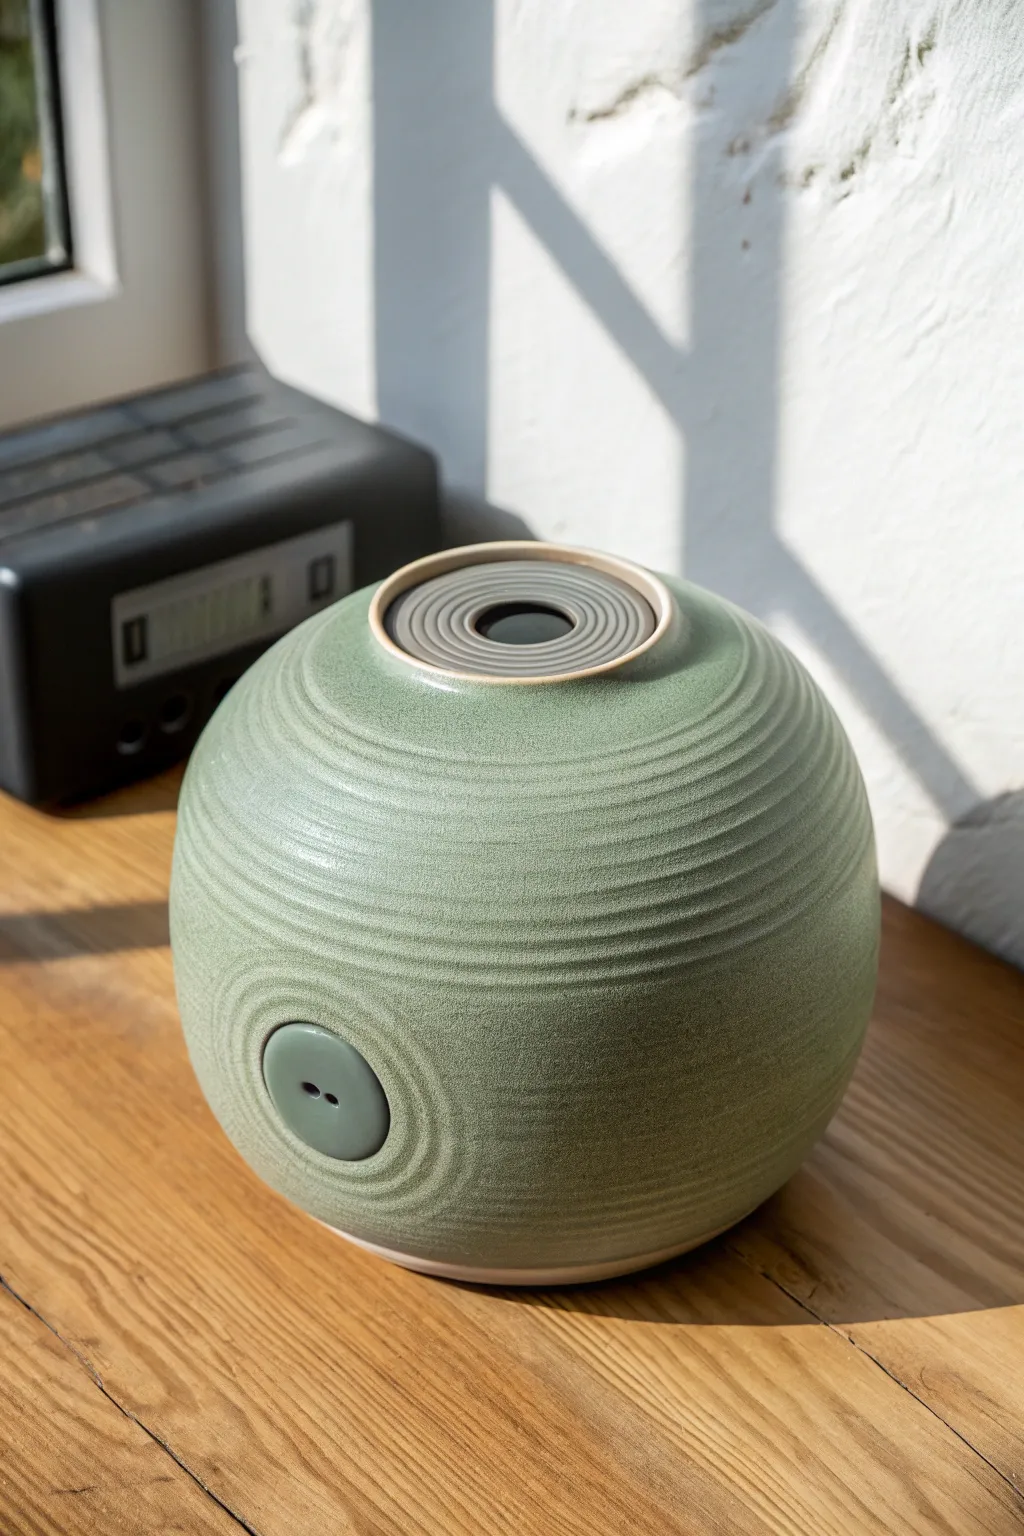
This spherical ceramic amplifier combines acoustic function with a calming, zen-garden aesthetic. The passive speaker design utilizes a hollow, ribbed form to naturally boost the sound from your phone without needing any cords or batteries.
Step-by-Step Guide
Materials
- Stoneware clay (approx. 3-4 lbs)
- Pottery wheel
- Rib tool (serrated and smooth)
- Needle tool
- Trimming tools
- Sponge
- Wire cutter
- Heat gun (optional)
- Calipers
- Matte green glaze
Step 1: Throwing the Sphere
-
Center the clay:
Start with a well-wedged ball of stoneware clay. Slam it onto the wheel head and center it thoroughly, ensuring a wide, stable base to support the final spherical shape. -
Open and widen:
Open the clay down to about a half-inch from the bat. Pull the floor out wide, creating a broad curve rather than a flat bottom, which helps with the resonant shape. -
Pull the walls:
Begin pulling the walls upward. Instead of a cylinder, aim for a bowling ball shape by applying pressure from the inside to bulge the belly out while gently collaring the rim inward with each pull. -
Close the form:
Continue collaring the neck in significantly. As the opening gets smaller, trap air inside the vessel; the trapped air pressure will support the walls as you refine the sphere shape. -
Add texture:
While the wheel is spinning, use the corner of a throwing rib or a specific texturing tool to press a continuous spiral groove from the base all the way to the top rim. This creates the visual ribbed effect. -
Finish the neck:
Close the top completely or leave a very specific, thick rim that will be trimmed later. For this design, I prefer to close it mostly off, leaving just enough clay to trim a clean recessed opening later.
Air Pressure Trick
When closing the sphere, rapid closing traps air that pushes back against your hands. This internal pressure is crucial for shaping the perfect round belly without collapsing.
Step 2: Trimming and Sculpting
-
Leather hard drying:
Allow the piece to dry to a firm leather-hard stage. It needs to be sturdy enough to be handled and carved without deforming. -
Trim the foot:
Invert the sphere into a chuck or a thick coil on the wheel. Trim the bottom to a smooth curve so it looks like a continuous ball. -
Carve the top recess:
Flip the pot right-side up. Use a trimming tool to carve a concentric, stepped recession into the top. This acts as the sound port. Use a hole cutter or needle tool to open the center hole cleanly. -
Create the sound inlet:
Identify the spot on the ‘belly’ of the pot where a phone speaker would align. Gently press a circular indentation into the clay to mark the area. -
Sculpt the button detail:
From a scrap slab of clay, cut a perfect circle. Attach this to the indented area using slip and score marks. Smooth the edges so it integrates seamlessly but stands slightly proud of the surface. -
Pierce the inlet:
Using a small hole cutter or drill bit, create the two small acoustic holes in the center of the button feature. These allow sound to enter the resonance chamber. -
Refine the surface:
Go over the ribbed texture with a damp sponge to soften any sharp ridges, ensuring the glaze will break nicely over the high points.
Step 3: Glazing and Firing
-
Bisque fire:
Slowly dry the piece to avoid cracking, then bisque fire it to Cone 04 (or your clay body’s specification). -
Wax the foot:
Apply wax resist to the very bottom contact point to prevent sticking to the kiln shelf. -
Apply glaze:
Dip or spray a satin matte green glaze. A glaze that breaks on texture is ideal here to highlight the throwing rings. -
Glaze fire:
Fire to the final temperature (likely Cone 6 or 10). Let the kiln cool completely before removing the piece to ensure thermal shock doesn’t crack the round form.
Acoustic Tuning
Make the top hole slightly smaller than the side intake holes. This compression creates a deeper, richer sound amplification through the chamber.
Now you have a functional piece of acoustic art ready to amplify your favorite playlists


Nautilus Shell Spiral Horn
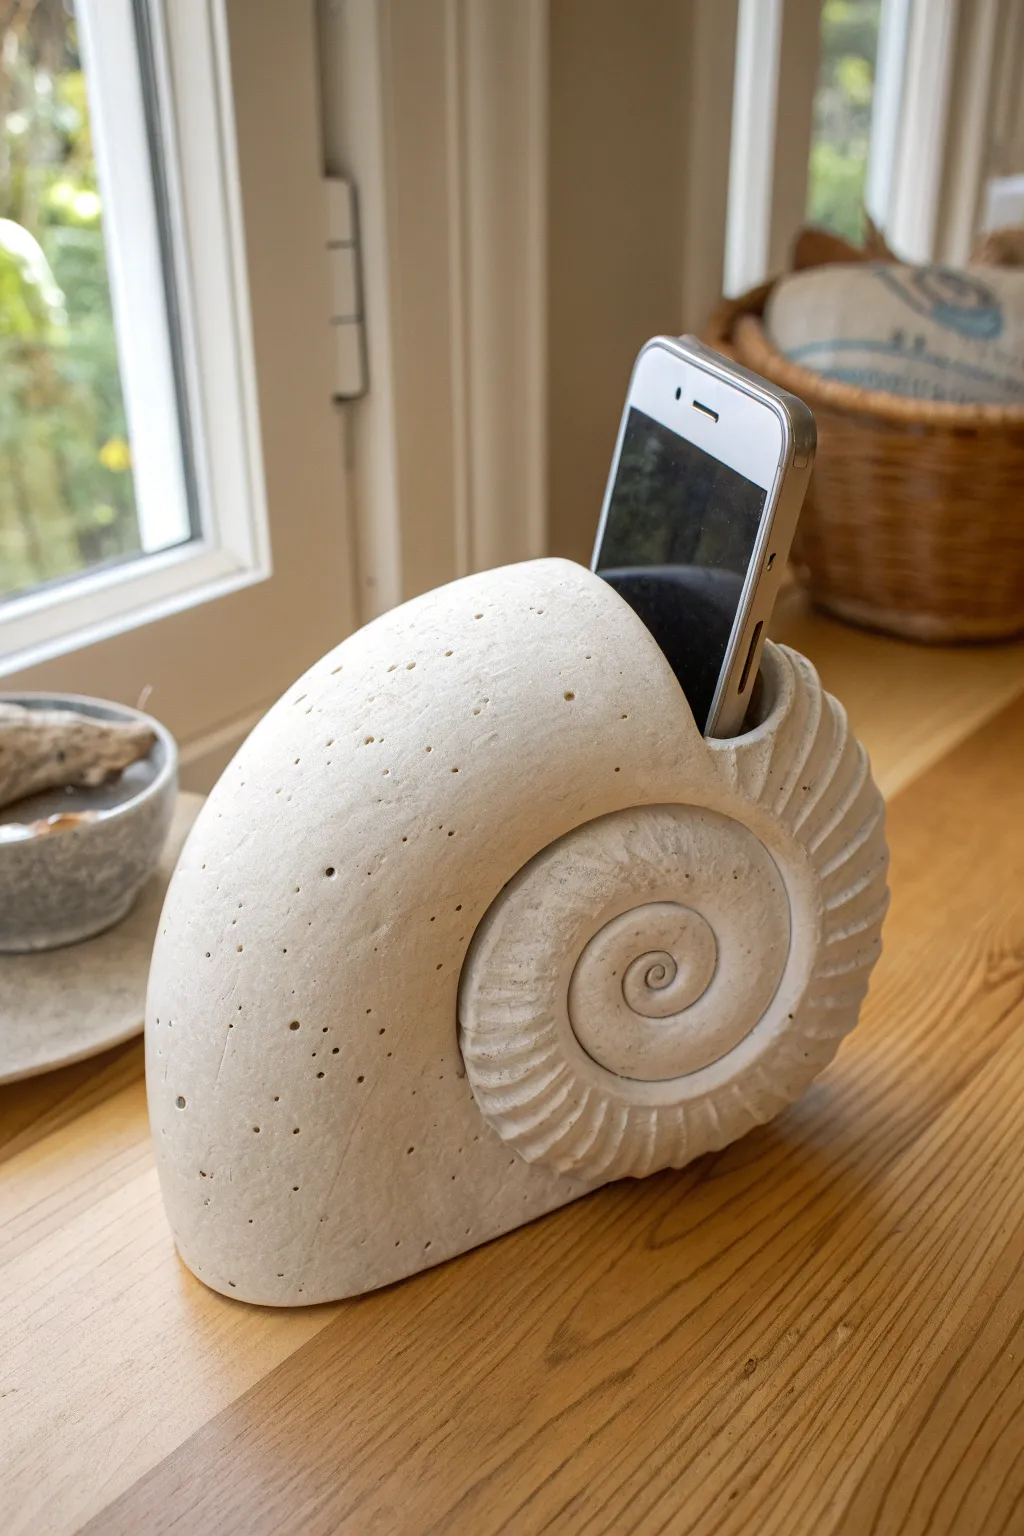
Enhance your phone’s sound naturally with this stunning acoustic speaker, modeled after the Golden Ratio of a nautilus shell. Crafted from textured clay, this piece combines sculptural elegance with functional audio amplification, needing no cords or batteries.
Detailed Instructions
Materials
- Stone-effect or white speckled stoneware clay (approx. 3-4 lbs)
- Pottery tools (rib, needle tool, sponge)
- Rolling pin
- Newspaper or paper towels
- Slip (clay mixed with water)
- Scoring tool or fork
- Carving tools (small loops and gouges)
- Medium-grit sandpaper
- Clear matte glaze (optional)
- Your smartphone (for sizing)
Step 1: Forming the Core Spiral
-
Prepare the workspace:
Begin by wedging your clay thoroughly to remove air bubbles, as this project requires thick, sturdy walls. Prepare a clean, canvas-covered surface or a wooden board to work on. -
Create the base coil:
Roll out a large, tapered coil of clay. It should be quite thick at one end (about 3 inches diameter) and taper down to a point at the other, resembling a long carrot. -
Shape the interior cavity:
Carefully hollow out the thick end of the coil using a loop tool, creating a deep tunnel that will act as the sound chamber. Don’t go all the way through; stop about two-thirds of the way down the taper. -
Start the spiral:
Begin curling the tapered, solid end of the coil inward to form the center of the nautilus spiral. Use a little slip on the touching surfaces to help them bond if the clay is stiff. -
Build the outer chamber:
Continue wrapping the hollowed, thick end around the solid center spiral. The shape should expand outward, creating that classic ‘9’ shape of a nautilus.
Collapsing walls?
If the hollow chamber starts to sag while shaping, stuff the inside loosely with crumpled newspaper. This supports the clay while drying and burns away during firing.
Step 2: Sculpting and Refining
-
Smooth the seams:
Blend the coils together on the exterior using a rib tool or your thumb. You want the overall form to look like one continuous shell, not distinct separate ropes of clay, though the spiral line remains visible on the side. -
Sizing the phone slot:
On the top curve of the largest chamber, cut a rectangular slot. I strongly recommend measuring your phone (with its case on) first to ensure a loose but secure fit. -
Refining the slot:
Smooth the edges of this cutout with a damp sponge. Insert a tool inside the slot to ensure the opening connects cleanly to the internal hollow chamber you created earlier. -
Define the spiral ridges:
Using a modeling tool, carve distinct ridges or pleats along the side of the shell, radiating from the spiral center. In the image, these are prominent near the center and fade out toward the smooth outer shell. -
Create the ‘eye’ of the spiral:
Refine the very center of the spiral with a small loop tool, creating a distinct button-like swirl that acts as the focal point of the design.
Level Up: Sound Boost
Glaze just the *inside* of the spiral with a high-gloss glaze. A smooth, glass-like interior surface reflects sound waves better than raw clay, making your speaker louder.
Step 3: Texturing and Finishing
-
Add surface texture:
To mimic the fossilized look in the photo, gently poke the smooth outer surface with a stiff-bristled brush or a needle tool to create random pitting and tiny holes. -
Level the base:
Gently tap the bottom of the shell against your table to create a flat spot. This ensures the speaker creates a stable seal with the surface it sits on. -
Slow drying:
Cover the piece loosely with plastic. Because the walls vary in thickness, let it dry very slowly over several days to prevent cracking. -
Sanding:
Once bone dry (greenware), lightly sand the exterior to soften any sharp ridges created during sculpting. Wear a mask during this step. -
Firing:
Bisque fire the piece according to your clay’s specifications. -
Final Surface:
For the raw stone look shown, you can leave the exterior unglazed or apply a very thin wash of matte oxide. If glazing, pour a glossy glaze inside the chamber to help reflect sound, but keep the outside matte.
Place your phone in the slot and enjoy the warm, amplified tones of your handmade creation


Flower Bloom Megaphone
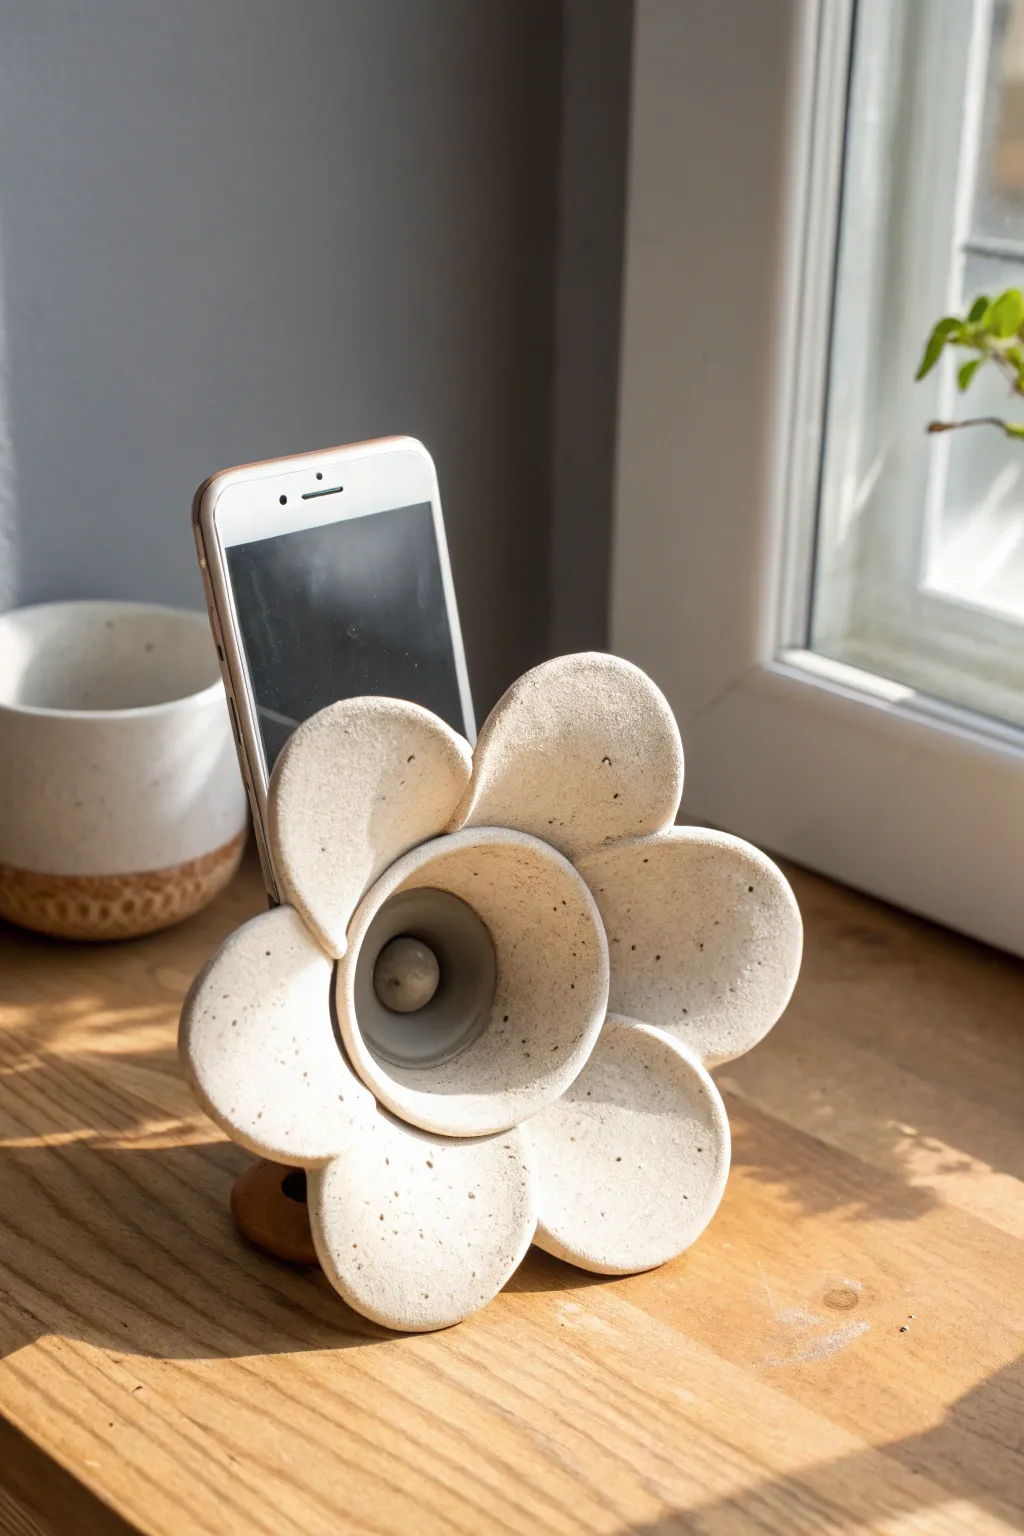
This elegant acoustic amplifier uses the natural properties of fired clay to boost your phone’s volume without any cords or batteries. Modeled after a blooming flower, the megaphone shape directs sound outward while the speckled stoneware finish adds an organic touch to your windowsill.
Step-by-Step
Materials
- Speckled stoneware clay (mid-fire)
- Rolling pin
- Canvas work surface
- Slab roller (optional)
- Circle cutter or template (approx. 3-inch diameter)
- Needle tool
- Scoring tool or serrated rib
- Slip (clay mixed with water)
- Sponge
- Wooden modeling tool
- Plastic wrap
- Sandpaper (fine grit)
- Small balloon (optional, for shaping center)
Step 1: Forming the Acoustic Chamber
-
Roll the slab:
Begin by rolling out a slab of speckled clay to an even thickness of about 1/4 inch. Smooth the surface with a rib to compress the clay particles, which helps prevent warping later. -
Create the central cone:
Cut a semi-circle from your slab. Roll this semi-circle into a funnel or cone shape, leaving the narrow end open about 1 inch wide (large enough for sound to travel through) and the wide end flaring out. -
Refine the cone:
The cone will act as the megaphone. Smooth the seam where the clay overlaps using your finger or a wooden tool until the join is invisible. I generally like to flare the wide opening slightly outward with a wet finger to start the flower shape. -
Make the phone holder backing:
Cut a rectangular strip of clay wide enough to hold your specific phone model, plus an inch on either side. Form this into a rounded U-shape or a small box-like enclosure that will attach to the back of the narrow cone end. -
Cut the sound slot:
Carefully cut a slot into the top of your U-shaped holder where the phone will sit. Ensure the bottom of this holder aligns with the narrow opening of your cone so the speaker sits directly over the hole. -
Attach chamber to holder:
Score and slip the narrow end of the cone and the corresponding hole on the phone holder. Press them firmly together, blending the clay on the outside to create a seamless transition for the sound waves.
Drooping Petals?
If petals sag during construction, support them with small chunks of upholstery foam or crumpled newspaper. Leave these props in place until the clay is leather-hard.
Step 2: Sculpting the Bloom
-
Cut the petals:
From the remaining slab, cut six oval or egg-shaped petals. They should be roughly uniform in size but don’t need to be mechanically perfect—organic variance looks better here. -
Initial petal shaping:
Gently cup each petal in your palm to give it a slight concave curve. Smooth the edges with a damp sponge to remove any sharp cutting lines. -
Attach the first layer:
Score and slip the wide rim of your central cone. Attach three petals evenly spaced around the rim. Use your thumb to blend the base of the petal into the cone’s interior surface, creating a smooth line. -
Attach the second layer:
Position the remaining three petals in the gaps between the first set. Attach them in the same manner, blending the clay securely at the base. The layering adds depth and structural support. -
Refine the curve:
Once all petals are attached, adjust their angles. They should open outward like a trumpet. You may need to prop them up with crumpled paper or foam while the clay is soft to keep them from drooping. -
Smooth the interior:
Use a damp sponge to meticulously smooth the inside of the flower throat. A smooth surface reflects sound better than a rough one, so take your time here.
Step 3: Finishing and Firing
-
Add a base:
If the structure feels front-heavy, create a small, heavy disk of clay and attach it to the bottom of the phone holder area to act as a counterweight and foot. -
Slow drying:
Cover the piece loosely with plastic wrap. Let it dry very slowly over several days to prevent the connection points from cracking as the clay shrinks. -
Bisque fire:
Once bone dry, fire the piece to bisque temperature (usually Cone 04). Afterward, lightly sand any rough spots or sharp edges on the petals. -
Glazing decision:
To achieve the look in the photo, leave the clay unglazed to show off the raw speckle, or apply a very thin matte clear glaze. Avoid thick glazes that might clog the acoustic channel. -
Final firing:
Fire the piece to maturity (Cone 5 or 6 for stoneware). The heat will vitrify the clay, making it dense and resonant for better sound amplification.
Color Pop
While the raw clay is beautiful, try glazing just the inside of the bloom with a bright glossy color like yellow or pink. This creates a stunning contrast and can slightly improve sound reflection.
Place your phone in the slot and enjoy the surprisingly rich volume boost from your handcrafted bloom

The Complete Guide to Pottery Troubleshooting
Uncover the most common ceramic mistakes—from cracking clay to failed glazes—and learn how to fix them fast.
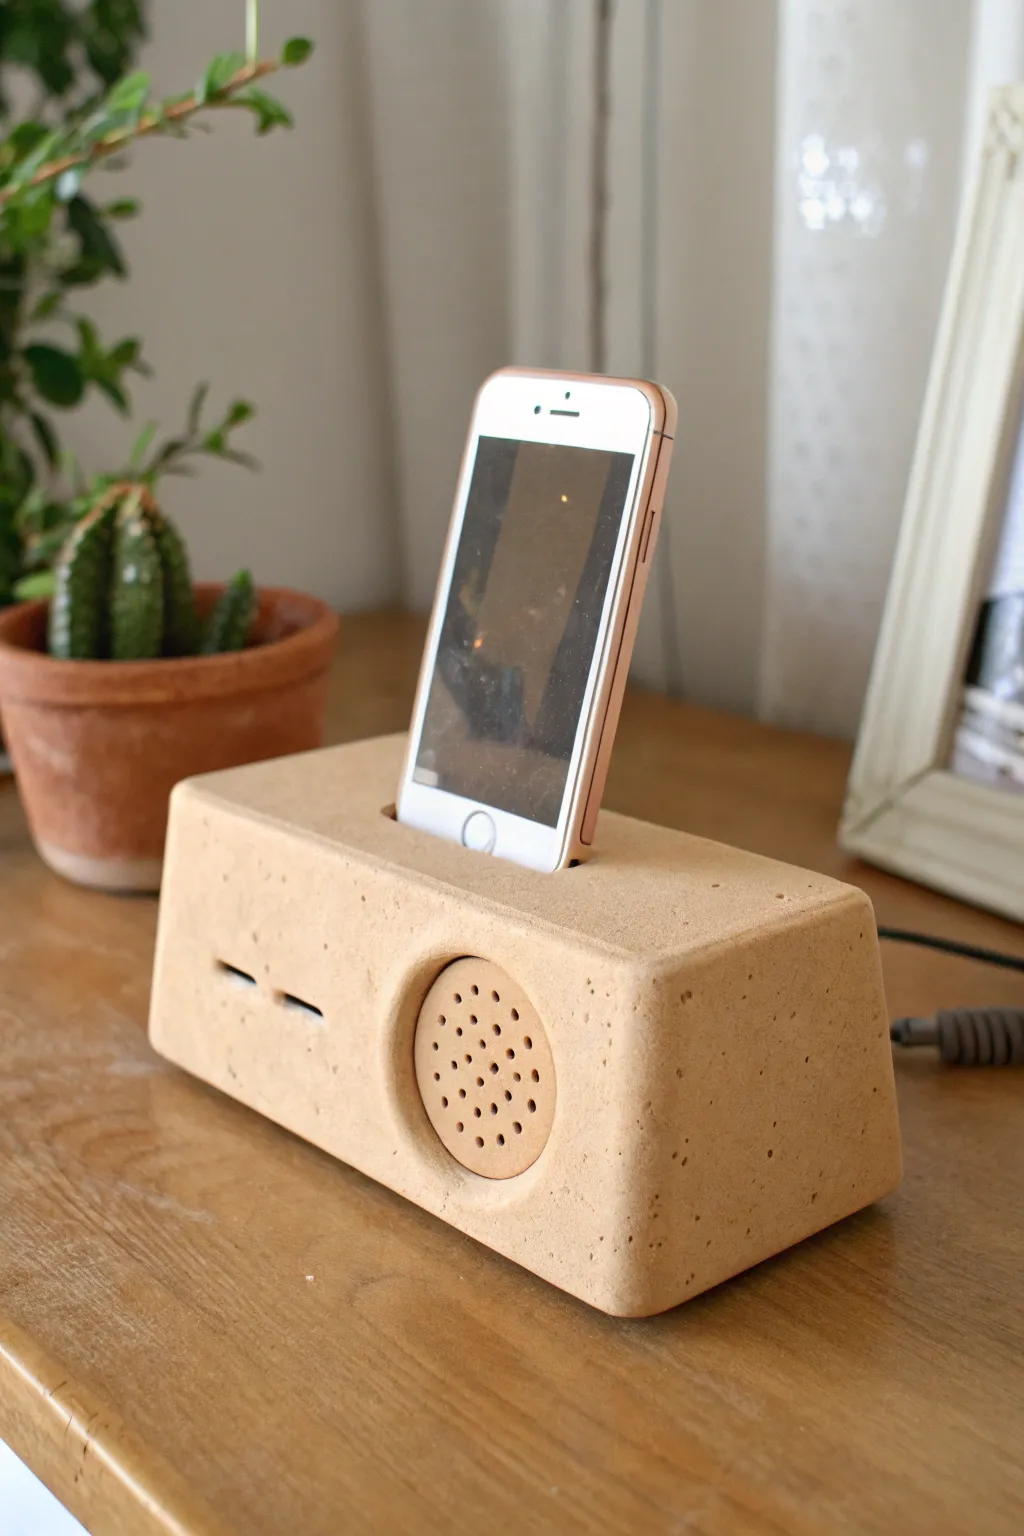
Minimal Arch Tunnel Speaker

This sleek, architectural passive speaker combines modern design with ancient materials to naturally amplify your phone’s sound. Its clean arch shape and textured, stone-like finish make it a functional piece of sculpture perfect for a nightstand or desk.
Step-by-Step Tutorial
Materials
- Air-dry clay (stone, granite, or white color)
- Rolling pin
- Cardboard or sturdy cardstock (for the mold)
- Masking tape
- Sharp craft knife or clay needle tool
- Ruler
- Sandpaper (fine and medium grit)
- Water and a small sponge
- Clear matte sealant spray
Step 1: Creating the Structural Form
-
Build the internal mold:
Cut a strip of cardboard about 4 inches wide and 12 inches long. Bend it into a ‘U’ or arch shape that matches the desired inner curve of your speaker. Secure the bottom ends with tape to a flat piece of cardboard so the arch holds its shape firmly. -
Prepare the clay slab:
Roll out a substantial amount of air-dry clay into a long, rectangular slab. Aim for a thickness of about 1/2 inch to ensure structural integrity. The slab needs to be wide enough to cover your cardboard arch with some overhang. -
Drape the clay:
Carefully lift your clay slab and drape it over the cardboard arch mold. Gently press it down along the sides so it takes the shape of the curve without thinning the clay out too much. -
Trim the excess:
Using your craft knife held vertically against the work surface, trim the excess clay at the bottom where it meets the table so the arch stands flat. Then, trim the front and back faces to be flush with the cardboard mold edges. -
Create the front and back walls:
This speaker is open-ended, but to give it that thick architectural look seen in the photo, slight lips or thickened edges help. However, for this specific tunnel design, simply smoothing the edges to show the thickness of the slab is sufficient. Use water on your finger to round over any sharp cuts.
Step 2: Refining and Detailing
-
Measure the phone slot:
Measure the width and thickness of your smartphone. Mark a rectangular slot on the very top center of the clay arch. It should be slightly wider than your phone to accommodate cases. -
Cut the acoustic slot:
Carefully cut out the rectangular slot with your knife. This hole must go all the way through the clay arch so the sound can travel into the tunnel below. -
Test the fit:
The clay shrinks as it dries, so make the slot about 10-15% larger than necessary. I usually check visually to ensure the lines are straight and parallel to the arch’s sides. -
Add texture:
To mimic the stone look in the image, lightly prick the surface with a needle tool or an old toothbrush. These tiny, random indentations create a porous, organic texture. -
Initial smoothing:
Dip a sponge in water and wring it out almost completely. Wipe down the entire surface to soften tool marks, but maintain that speckled texture you just created.
Uneven Footing?
If your dried arch wobbles on the table, tape a sheet of rough sandpaper to a flat surface. Rub the bottom of the speaker against it in a circular motion until completely flat.
Step 3: Drying and Finishing
-
Slow drying process:
Leave the clay on the cardboard mold for at least 24 hours. If you remove it too soon, the arch might sag. Cover it loosely with plastic wrap to prevent cracking if your environment is very dry. -
Remove the mold:
Once the clay is leather-hard (firm but cool to the touch), carefully slide the cardboard mold out from underneath. Let it dry for another 24-48 hours until bone dry and room temperature. -
Sanding:
Using medium grit sandpaper, smooth out the bottom edges so the speaker sits perfectly flat. Switch to fine sandpaper to gently refine the outer curve and the inside of the phone slot. -
Dust and clean:
Wipe away all sanding dust with a slightly damp cloth or a dry paintbrush. Ensure the texture holes aren’t clogged with white dust. -
Sealing:
In a well-ventilated area, spray the entire piece with a clear matte sealant. This protects the clay from moisture and fingerprints while preserving that raw, natural stone appearance.
Acoustic Boost
Make the phone slot slightly deeper or add a small clay ‘shelf’ inside just below the slot. This directs sound downward into the tunnel curve more efficiently for louder volume.
Enjoy the warm, amplified tunes drifting from your handmade sculptural speaker
Brick-Style Modular Amplifier
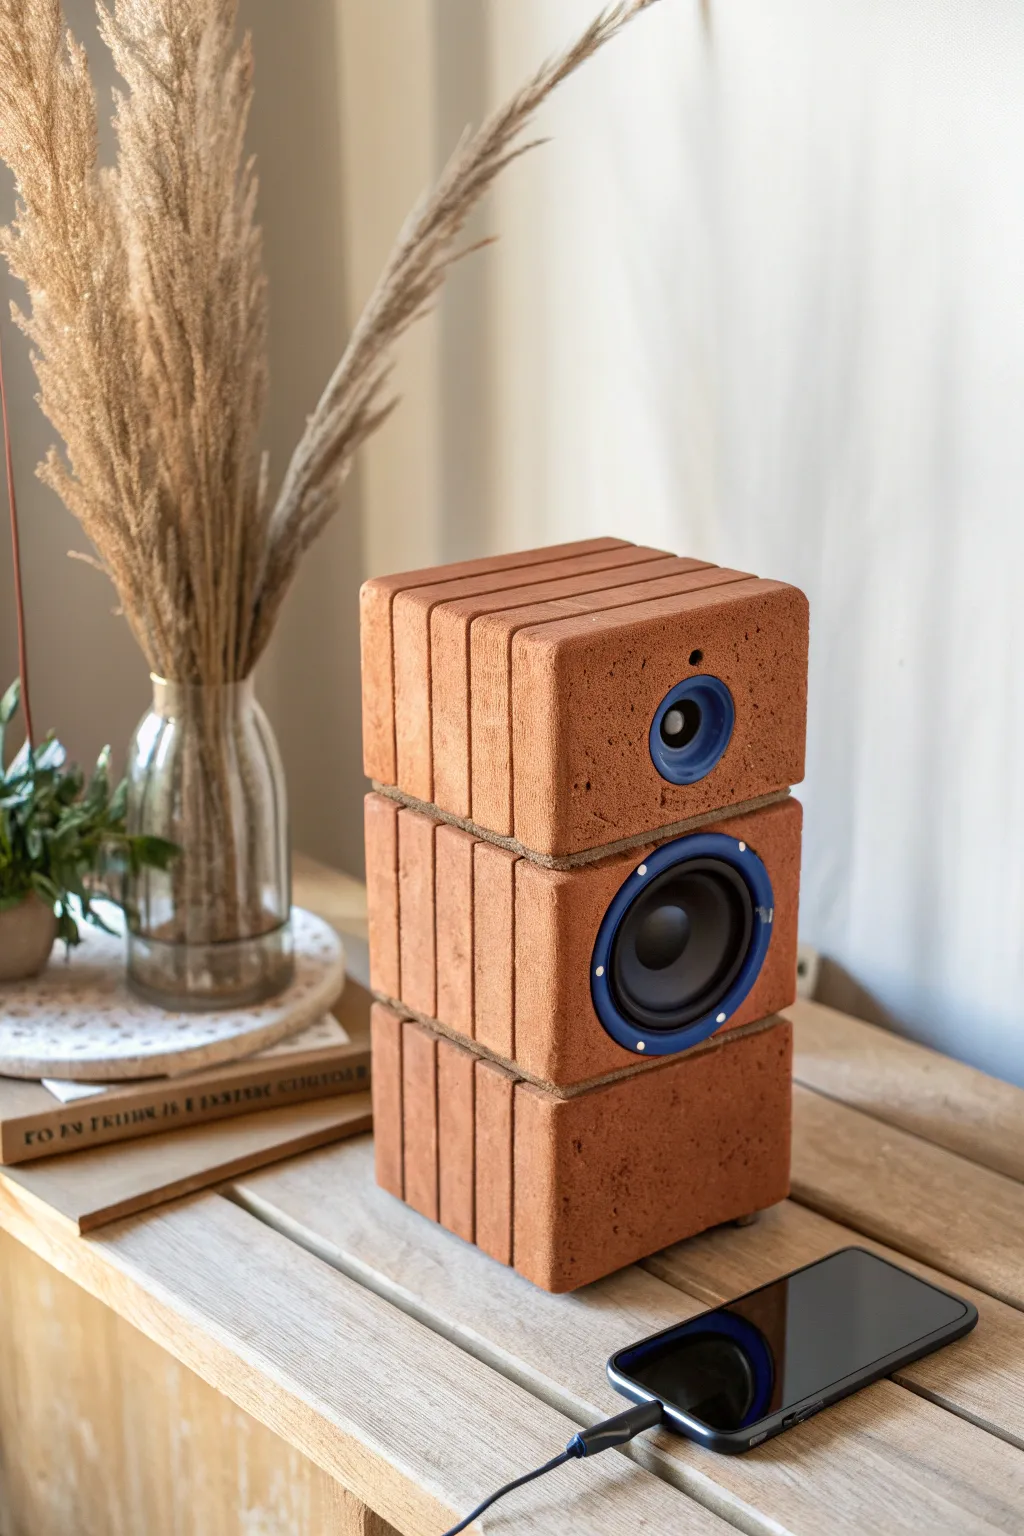
This project transforms standard audio components into a striking piece of industrial-organic decor using terracotta clay. With its stacked modular design and groovy brick-like texture, this speaker housing serves as both a functional amplifier and a conversation-starting sculpture.
Step-by-Step
Materials
- Air-dry terracotta clay (or kiln-fire clay if you have access to a kiln)
- Square wooden dowels (approx. 1/4 inch thick)
- Small speaker driver kit (woofer and tweeter)
- Speaker terminal cup and wiring
- Rolling pin
- Clay cutting tool or knife
- Circle cutters or varying size cups
- Slip (clay and water mixture)
- Scoring tool or old fork
- Sanding sponge
- Epoxy or strong construction adhesive
- Clear matte sealant spray
- Blue acrylic paint (optional for speaker rim accents)
Step 1: Prepping the Clay Slabs
-
Roll out the base slabs:
Begin by wedging your clay to remove air bubbles, then roll it out into a consistent thickness of about half an inch. You will need enough clay to construct three separate hollow boxes. -
Create the brick texture:
Before cutting your shapes, press the square wooden dowels firmly into the wet clay surface at regular intervals. This creates the vertical grooves that mimic the look of stacked bricks shown in the design. -
Cut the box panels:
Measure and cut six square panels for each of the three modules (18 panels total). Ensure the grooved texture runs vertically on the four side panels. -
Cut speaker holes:
On one of the textured panels intended for the top box, cut a small circular hole for the tweeter. On a panel for the middle box, cut a larger hole for the main woofer. -
Refine the edges:
Smooth the cut edges with a damp finger or sponge to remove sharp burrs, but keep the corners relatively crisp to maintain that blocky, brick aesthetic.
Step 2: Assembling the Modules
-
Score and slip:
Using your scoring tool, scratch up the edges where the clay slabs will join. Apply a generous amount of slip to these scored areas to act as glue. -
Construct the boxes:
Assemble the three separate hollow cubes. For the bottom module, seal it completely. For the middle and top modules, leave the back panel removable or cut a large access hole for wiring later. -
Reinforce the seams:
Roll thin coils of clay and press them into the interior corners of your boxes to strengthen the joints. Smooth these out so the structure is solid. -
Create cable channels:
While the clay is still workable, punch small pass-through holes between the top and middle boxes, and the middle and bottom boxes, to allow wires to run internally through the stack.
Acoustic Dampening Tip
Stuff the hollow clay boxes loosely with polyfill stuffing. This prevents hollow echoing and improves the overall sound quality.
Step 3: Finishing and Electronics
-
Dry slowly:
Cover your clay boxes loosely with plastic meant to control drying. Let them dry very slowly over several days to prevent warping or cracking. -
Sand and seal:
Once fully dry (and fired, if using kiln clay), lightly sand any rough spots. Spray the exterior with a clear matte sealant to protect the finish without making it too glossy. -
Paint the accents:
If your speaker kit didn’t come with blue accents, carefully paint the plastic mounting rings of your speaker drivers with blue acrylic paint to match the reference look. -
Install the drivers:
Insert the tweeter into the top box and the woofer into the middle box. Secure them using a strong adhesive like epoxy or screws if the clay is thick enough to hold anchors. -
Wire it up:
Thread the speaker wires through the internal channels you created. Connect the drivers to your amplifier board or terminal cup, which can be mounted on the back of the bottom or middle unit. -
Stack and secure:
Stack the three cured modules. You can glue them together for permanence or use small rubber feet between layers to reduce vibration and keep them modular.
Cracked Clay Fix
If hairline cracks appear during drying, mix white vinegar into your clay slip. This creates a paste that patches cracks effectively.
Plug in your audio source and enjoy the warm, rich tones from your handcrafted ceramic sound system


What Really Happens Inside the Kiln
Learn how time and temperature work together inside the kiln to transform clay into durable ceramic.
Glossy Color-Block Glaze Pop
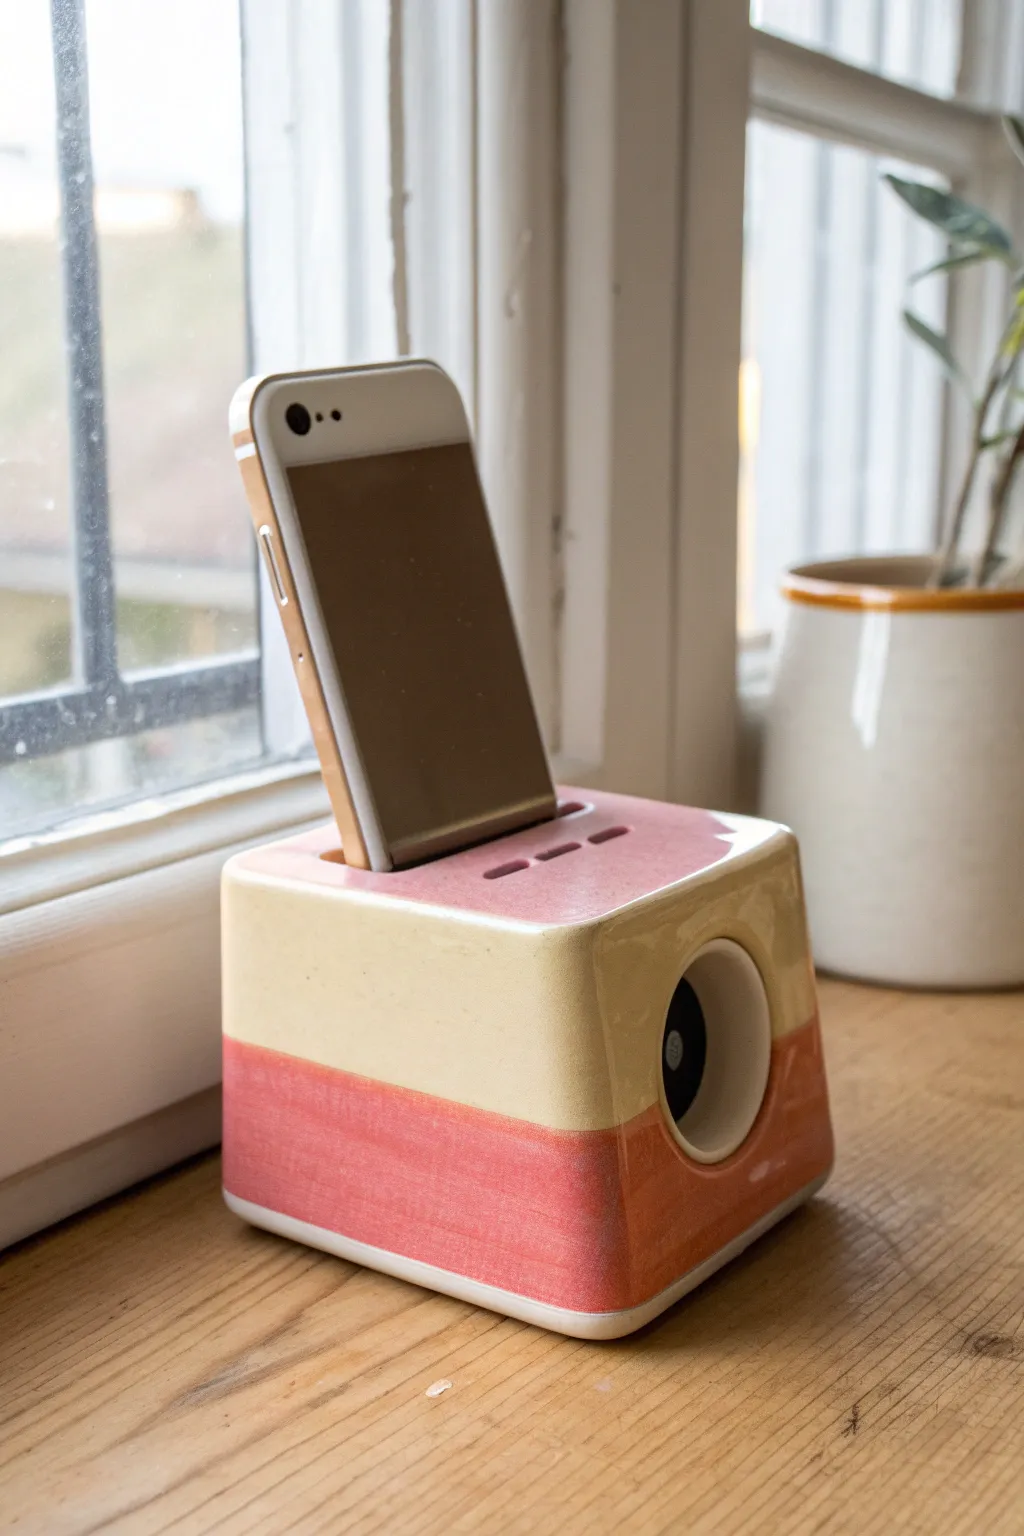
Amplify your tunes without electricity using this chic, passive ceramic speaker that doubles as stylish home decor. The sleek cube design features a minimalist two-tone glaze in cream and coral, adding a glossy pop of color to any windowsill or desk.
How-To Guide
Materials
- White stoneware clay (low-fire or mid-fire)
- Clay slab roller or rolling pin
- Product dimension ruler
- Clay knife or fettling knife
- Slip and score tool (or fork)
- Circle cutter (approx. 2-inch diameter)
- Rectangular template (for phone slot)
- Sponge
- Rib tool (metal or rubber)
- Small drill bit or needle tool (for sound vents)
- Kiln
- Cream/Off-white glossy glaze
- Coral/Pink glossy glaze
- Glaze brushes
- Wax resist
Step 1: Construction
-
Roll the Slabs:
Begin by rolling out your white stoneware clay into an even slab, approximately 1/4 inch thick. Ensure the thickness is uniform to prevent warping during drying. -
Cut the Panel Pieces:
Using a ruler and knife, cut out six square panels. Measure specifically for your desired size, but 4×4 inches is a good standard starting point for most phones. -
Prepare the Top Panel:
On one of the square panels, measure the width and thickness of your smartphone. Cut a rectangular slot in the center that is slightly larger than the device to account for shrinkage. -
Add Sound Vents:
Just behind the main phone slot on that same top panel, use a small drill bit or needle tool to poke three or four small holes. These act as additional acoustic vents. -
Prepare the Front Panel:
Take another square panel (this will be the front) and use your circle cutter to create a large hole in the exact center. This is where the sound will project. -
Score and Slip:
Score the edges of the bottom base panel and the corresponding edges of your side walls. Apply slip generously to these roughened areas. -
Assemble the Walls:
Attach the four side walls (including the front face with the hole) to the base. Press the joints firmly together. -
Reinforce the Seams:
Roll tiny coils of clay and press them into the interior seams where the walls meet. Smooth these out with your finger or a modeling tool to ensure structural integrity. -
Attach the Top:
Score and slip the top edges of the walls and the underside of the top panel (the one with the slot). Carefully place the top panel on, ensuring the slot is aligned correctly. -
Smooth the Edges:
Let the box stiffen slightly to leather-hard. Then, use a damp sponge and a rib tool to smooth all outside corners, rounding them gently for that soft, finished look shown in the photo.
Step 2: Firing and Glazing
-
Bisque Fire:
Allow the constructed speaker to dry completely slowly to avoid cracking. Once bone dry, fire it in the kiln to a bisque temperature (usually cone 04). -
Clean the Bisqueware:
Wipe the fired piece down with a damp sponge to remove any kiln dust, which can prevent the glaze from adhering properly. -
Mark the Glaze Line:
Using a pencil, lightly draw a straight horizontal line around the entire perimeter of the cube, dividing the bottom third from the top two-thirds. -
Apply Bottom Color:
Dip your brush in the coral/pink glaze. Paint the bottom section up to your pencil line. I find applying three even coats gives the most opaque, solid color coverage. -
Apply Top Color:
Switch to a clean brush and apply the cream glaze to the top section, carefully meeting the coral line without overlapping too much. Don’t forget to glaze the inside rim of the speaker hole. -
Glaze the Top Surface:
Continue the cream glaze onto the top face of the cube. Be careful around the phone slot; glaze the very edge, but try to avoid globs running inside. -
Clean the Bottom:
Use a sponge to wipe the very bottom of the piece completely clean of glaze, or apply wax resist before glazing, to prevent it from sticking to the kiln shelf. -
Glaze Fire:
Place the piece back in the kiln for the final glaze firing according to your clay and glaze specifications (typically cone 5 or 6 for stoneware).
Acoustic Sweet Spot
For better sound amplification, smooth out the interior corners inside the box with extra clay coils to help sound waves bounce out rather than getting trapped in sharp 90-degree corners.
Shrinkage Check
Make the phone slot 15-20% larger than your actual phone. Clay shrinks significantly during drying and firing; if the slot is too tight, your phone won’t fit the finished piece.
Place your phone in the slot and enjoy the naturally amplified sound from your beautiful handmade creation
Matte Earthenware Raw Look

Bring the warmth of natural materials into your tech setup with this stunning earthenware speaker enclosure. The finish celebrates the raw, matte beauty of terracotta clay, featuring a seamless cylindrical body and a clever recessed top for your device.
Step-by-Step Tutorial
Materials
- Earthenware or terracotta clay body (approx. 3-4 lbs)
- Bluetooth speaker component kit (driver, amp, battery, charging module)
- Wide PVC pipe or cylindrical mold (approx. 6-inch diameter)
- Plastic wrap or release agent
- Rolling pin and guide strips (3/8 inch thickness)
- Needle tool and clay knife
- Circle cutter or compass tool
- Perforated metal mesh or heavy grille fabric
- Pottery sponge and rib tool
- Sanding sponges (medium and fine grit)
- Epoxy adhesive
- Matte spray sealant (optional)
- Drill with ceramic bit (if adding holes post-firing)
Step 1: Forming the Main Cylinder
-
Prepare the Clay Slab:
Begin by rolling out a substantial slab of terracotta clay. Use 3/8-inch guide strips on either side of your rolling pin to ensure the wall thickness remains perfectly uniform, which is crucial for structural integrity during firing. -
Set Up the Mold:
Take your PVC pipe or cylindrical form and wrap it generously with plastic wrap or paper. This acts as a barrier so the clay doesn’t stick to the form later. -
Build the Walls:
Cut a rectangular strip from your slab that is tall enough for your desired speaker height plus a little extra for shrinkage. Wrap this strip around your covered form, overlapping the ends slightly. -
Join the Seams:
Score the overlapping edges thoroughly and apply slip. Press the seam together firmly. I like to use a wooden rib tool here to smooth the seam until it completely disappears, blending the clay so the cylinder looks seamless. -
Add the Base:
Cut a circle from the remaining slab slightly larger than the cylinder’s diameter. Score and slip the bottom edge of your cylinder and attach it to this base, smoothing the connection on both the inside and outside.
Smoother Seams
When blending the main vertical seam, work at a diagonal angle rather than straight up and down. This prevents the clay wall from thinning out too much in one spot.
Step 2: Sculpting Features & Apertures
-
Create the Top Recess:
Cut a second circular disc for the top. Before attaching, press a slightly smaller flat object into the center to create a shallow depression or ‘tray’ area where a phone can sit. -
Attach the Top:
Join this top disc to the cylinder walls using the score-and-slip method. Ensure the recessed area is level. Smooth the rim where the top meets the walls to create a soft, rounded bevel. -
Mark the Speaker Cutout:
Once the clay has stiffened to a ‘leather hard’ state, distinctively mark a large off-center circle on the front face where the speaker driver will sit. -
Cut the Aperture:
Carefully cut out this large circle using a sharp needle tool or knife. Clean up the edges with a damp sponge so they are perfectly smooth. -
Add Button Detail:
Near the bottom right, press a small circle stamp or carve a faux button indentation. If your electronic kit requires a physical button here, cut a precise hole to fit the mechanism. -
Refine the Surface:
Use a damp sponge to wipe down the entire piece, removing any fingerprints or canvas marks. Aim for that smooth, velvety texture seen in the photo.
Step 3: Firing and Assembly
-
Slow Drying:
Allow the piece to dry very slowly under loose plastic for several days to prevent warping or cracking. -
Bisque Fire:
Fire the piece in a kiln to cone 04 (or according to your clay body’s specs). We are leaving it unglazed to maintain the matte, raw earthenware aesthetic. -
Sand the Finish:
Once fired and cooled, lightly sand the exterior with fine-grit sandpaper to achieve a soft, touchable surface. -
Install the Mesh:
Cut a piece of perforated metal mesh to size. Use epoxy to glue it securely to the inside of the speaker cutout. -
Mount Electronics:
Insert your speaker components through the bottom (if you left it open) or mount them onto a removable backplate. Secure the driver behind the mesh.
Upgrade: Wireless Power
Embed a thin wireless charging coil directly under the clay in the top recessed area before the clay dries. Test thickness to ensure signal passes through.
Place your new speaker in a sunlit corner and enjoy the blend of acoustic warmth and modern design

TRACK YOUR CERAMIC JOURNEY
Capture glaze tests, firing details, and creative progress—all in one simple printable. Make your projects easier to repeat and improve.
Frog Mouth Speaker Buddy

This whimsical ceramic frog acts as an acoustic amplifier for your smartphone, boosting volume naturally through its wide, bellowing mouth. With its speckled green glaze and terracotta interior, it adds a charming, handmade touch to any desk or bedside table.
How-To Guide
Materials
- Earthenware or stoneware clay (approx. 2-3 lbs)
- Pottery wheel (optional, can be hand-built)
- Clay sculpting tools (needle tool, rib, sponge)
- Rolling pin
- Slip and scoring tool
- Underglaze (black, dark green)
- Glaze (speckled glossy green, clear/gloss)
- Smartphone (for sizing)
- Kiln
Step 1: Forming the Body
-
Create the base cylinder:
Begin by throwing a medium-sized cylinder on the wheel, or slab-building one if you prefer hand-building. You want a closed form eventually, so bring the walls inward at the top to create a dome shape, similar to an igloo. -
Angle the shape:
While the clay is still plastic, gently push the form so it creates an oblong, frog-like hill rather than a perfect circle. The front needs to be slightly elevated to support the mouth opening. -
Open the mouth:
Once leather hard, use a needle tool to cut a large circular opening on the front face. This will be the amplifier’s horn. Smooth the cut edges with a damp sponge. -
Refine the mouth rim:
Add a small coil of clay around the mouth opening and blend it seamlessly into the body. Flare this lip outward slightly to exaggerate the ‘croaking’ expression.
Slumping Slot?
If the phone slot sags while drying, insert a piece of rigid cardboard wrapped in newspaper into the slot. This supports the clay until it’s leather hard.
Step 2: Adding Features & Function
-
Sculpt the eye sockets:
Roll two small balls of clay for eyes. Score and slip them onto the top of the head, near the front. Use a modeling tool to create eyelids by dragging clay from the forehead over the top half of the spheres. -
Add the legs:
Fashion two large, thick coils to serve as the rear legs. Attach these to the sides of the body, curving them forward like a crouching frog. Blend the seams thoroughly so they don’t crack during firing. -
Form the feet:
At the base of the legs, sculpt slight protrusions for feet. Use a tool to impress simple toe lines or webbing details. -
Cut the phone slot:
Measure the width and depth of your phone carefully. On the back of the frog (behind the eyes), cut a rectangular slot. It needs to be wide enough for the phone to sit comfortably, but snug enough to hold it upright. Test the fit gently. -
Connect the chambers:
Ensure there is a clear, hollow path from the phone slot through the body and out the mouth. This continuous channel is crucial for the sound waves to travel and amplify effectively.
Acoustic Boost
For better sound, smooth the interior chamber walls as much as possible. A smoother surface reflects sound waves better than a rough one.
Step 3: Detailing & Glazing
-
Bisque fire:
Allow the piece to dry completely slowly to prevent warping. Fire to cone 04 (or your clay’s specific bisque temperature). -
Apply interior color:
Pour a warm terracotta or reddish-orange glaze inside the mouth opening. Swirl it to coat the interior chamber fully, then pour out the excess. -
Glaze the exterior:
Brush 2-3 coats of a speckled green glaze over the entire outer body. I find avoiding the very bottom prevents sticking to the kiln shelf. -
Add froggy spots:
Using a smaller brush and a darker green glaze or underglaze, dab irregular spots along the back and legs to give the skin texture. -
Detail the face:
Paint the pupils black with underglaze. Add small black dots specifically on the snout for nostrils and ‘freckles.’ Use a thin liner brush to paint a crisp black line separating the mouth rim from the face. -
Final firing:
Fire the piece again to the maturity temperature of your glaze (typically cone 5 or 6 for stoneware). Let it cool completely in the kiln before removing.
Now you have a charming amphibian friend ready to amplify your favorite tunes with acoustic power
Whale Spout Sound Port
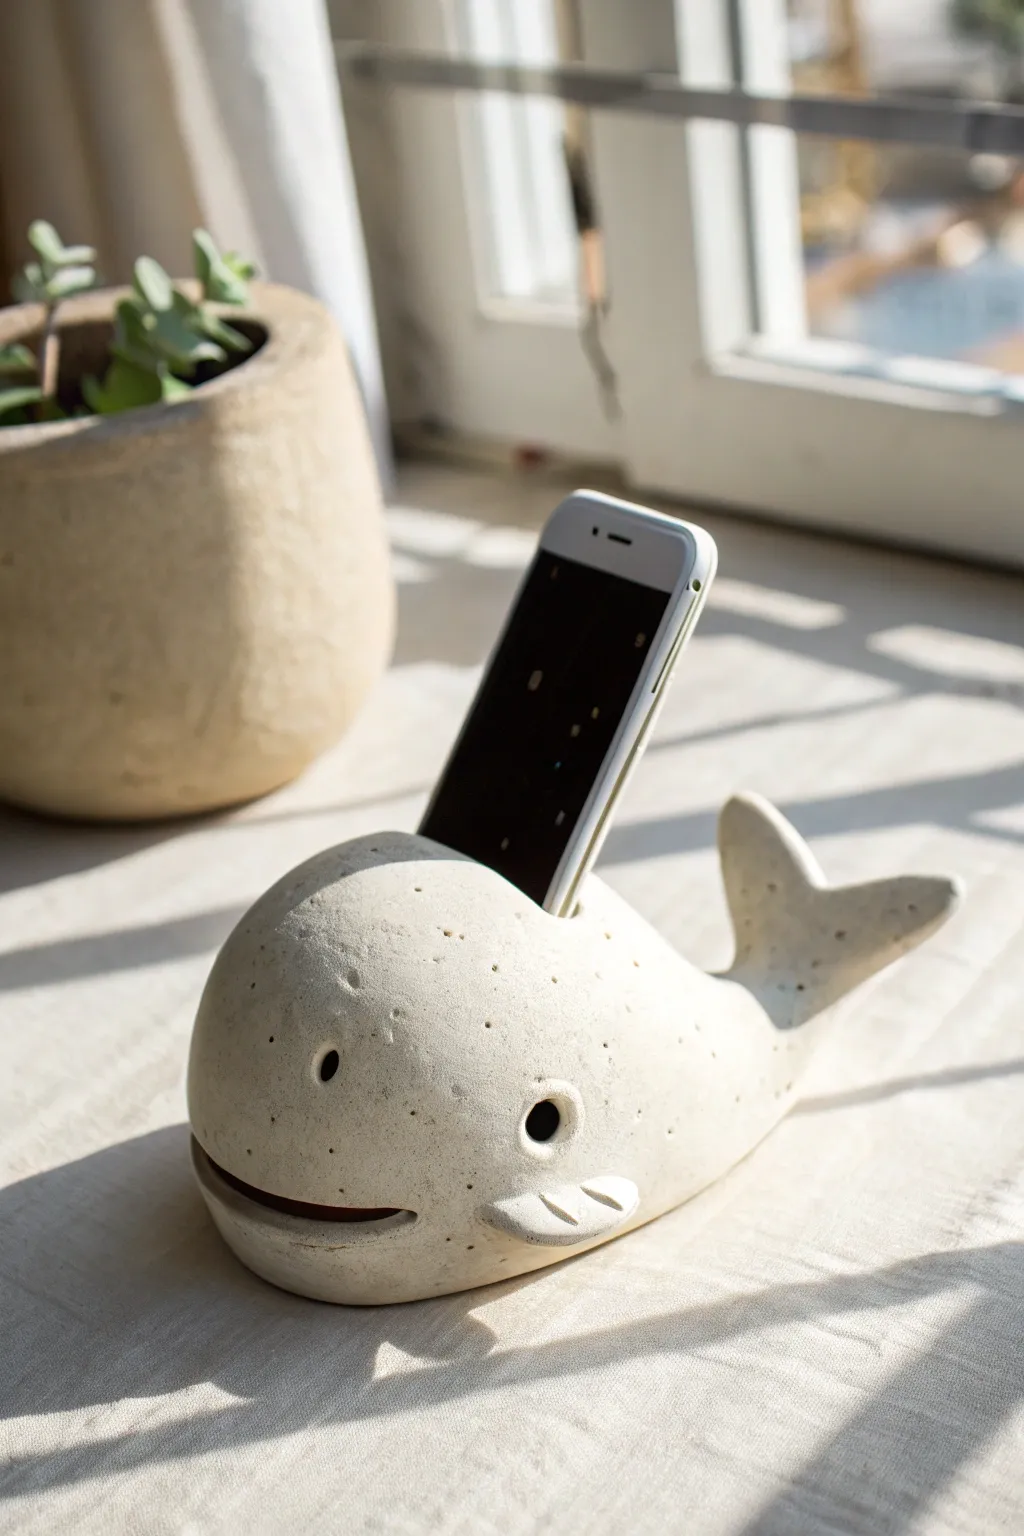
Transform a lump of clay into this adorable acoustic companion that naturally amplifies your phone’s sound. With its charming speckled finish and friendly smile, this whale serves as both a functional desk accessory and a delightful piece of sculpture.
Step-by-Step Tutorial
Materials
- Speckled stoneware clay (white or light beige)
- Pottery tools (needle tool, rib, sponge)
- Rolling pin
- Water and slip
- Measuring tape or ruler
- Hollow tube or dowel (slightly wider than your phone)
- Modeling tool (spoon-shaped)
- Kiln for firing (or air-dry clay alternative if not firing)
Step 1: Shaping the Body
-
Prepare the Clay:
Start by wedging a substantial ball of speckled clay to remove air bubbles. You want a mass slightly larger than a softball. -
Form the Basic Shape:
Gently shape the ball into a smooth, elongated teardrop form. The rounded end will be the head, tapering back towards where the tail will attach. -
Create the Phone Slot:
Using a rectangle-shaped cutter or a knife, carefully cut a slot into the top center of the head. Important: Measure your phone’s width and depth first, adding about 15% extra to account for clay shrinkage during drying and firing. -
Hollow the Interior:
You need a hollow chamber for the sound to resonate. Carefully scoop out the clay from the bottom, working upwards toward the slot you just cut, leaving walls about 1/4 inch thick. Ensure the hollow space connects directly to the phone slot. -
Refine the Slot:
Smooth the interior edges of the phone slot with a damp finger or sponge so it won’t scratch your device later. -
Seal the Bottom:
Roll a slab of clay about 1/4 inch thick. Score and slip the bottom rim of your hollow whale, then attach it to the slab to close the chamber. Trim away the excess clay and smooth the seam until invisible.
Slumping Tail?
If the tail droops while the clay is soft, prop it up with a small sponge or wad of paper towels. Leave this support in place until the clay is leather-hard and can hold its own weight.
Step 2: Adding Features
-
Sculpt the Tail:
Hand-build a separate tail fluke shape. It should look like a gently curved ‘Y’. Score and slip the tapered end of the body and the base of the tail, then press them firmly together. -
Secure the Tail:
Use a modeling tool to blend the clay across the join. I like to add a tiny coil of clay around the seam and smooth it out to ensure the tail doesn’t crack off during drying. -
Add Side Fins:
Shape two small, flat oval pieces for pectoral fins. Attach these low on the sides of the body using the score-and-slip method. Use a tool to impress faint lines for texture if desired. -
Carve the Mouth:
Using a wire loop tool or a sharp knife, carve a long, curving line across the front lower section for the mouth. Cut slightly deeper to create a shadowed ‘smile’ effect. -
Create the Eyes:
Use a small circular tube or the back of a paintbrush to poke two deep holes for eyes. These should be symmetrical and placed somewhat wide apart for a cute look. -
Puncture the Blowhole:
While the main slot holds the phone, you can add small decorative holes nearby or texture the surface to mimic barnacles or skin details using a needle tool.
Step 3: Finishing Touches
-
Smooth the Texture:
Take a damp sponge and gently wipe down the entire piece. This brings the ‘grog’ or speckles to the surface and removes any sharp fingerprints. -
Dry Slowly:
Because the walls vary in thickness, cover the whale loosely with plastic for the first 24 hours to separate drying speed, then uncover to let it dry completely bone dry. -
Bisque Fire:
Fire the piece to cone 04 (or your clay’s specific bisque temperature). -
Glaze Application:
Apply a clear matte glaze or a very light translucent wash to protect the surface while keeping that raw, stony look visible. Avoid thick opaque glazes that would hide the speckles. -
Final Firing:
Fire the piece again to the final maturity temperature of your clay body (likely cone 5 or 6 for stoneware).
Sound Check
Make the interior chamber as large and smooth as possible. A rough interior absorbs sound, while a smooth, large hollow cavity reflects sound waves better for louder amplification.
Place your phone in the slot and enjoy the surprisingly rich sound from your new aquatic friend
One-Eyed Monster Tongue Dock
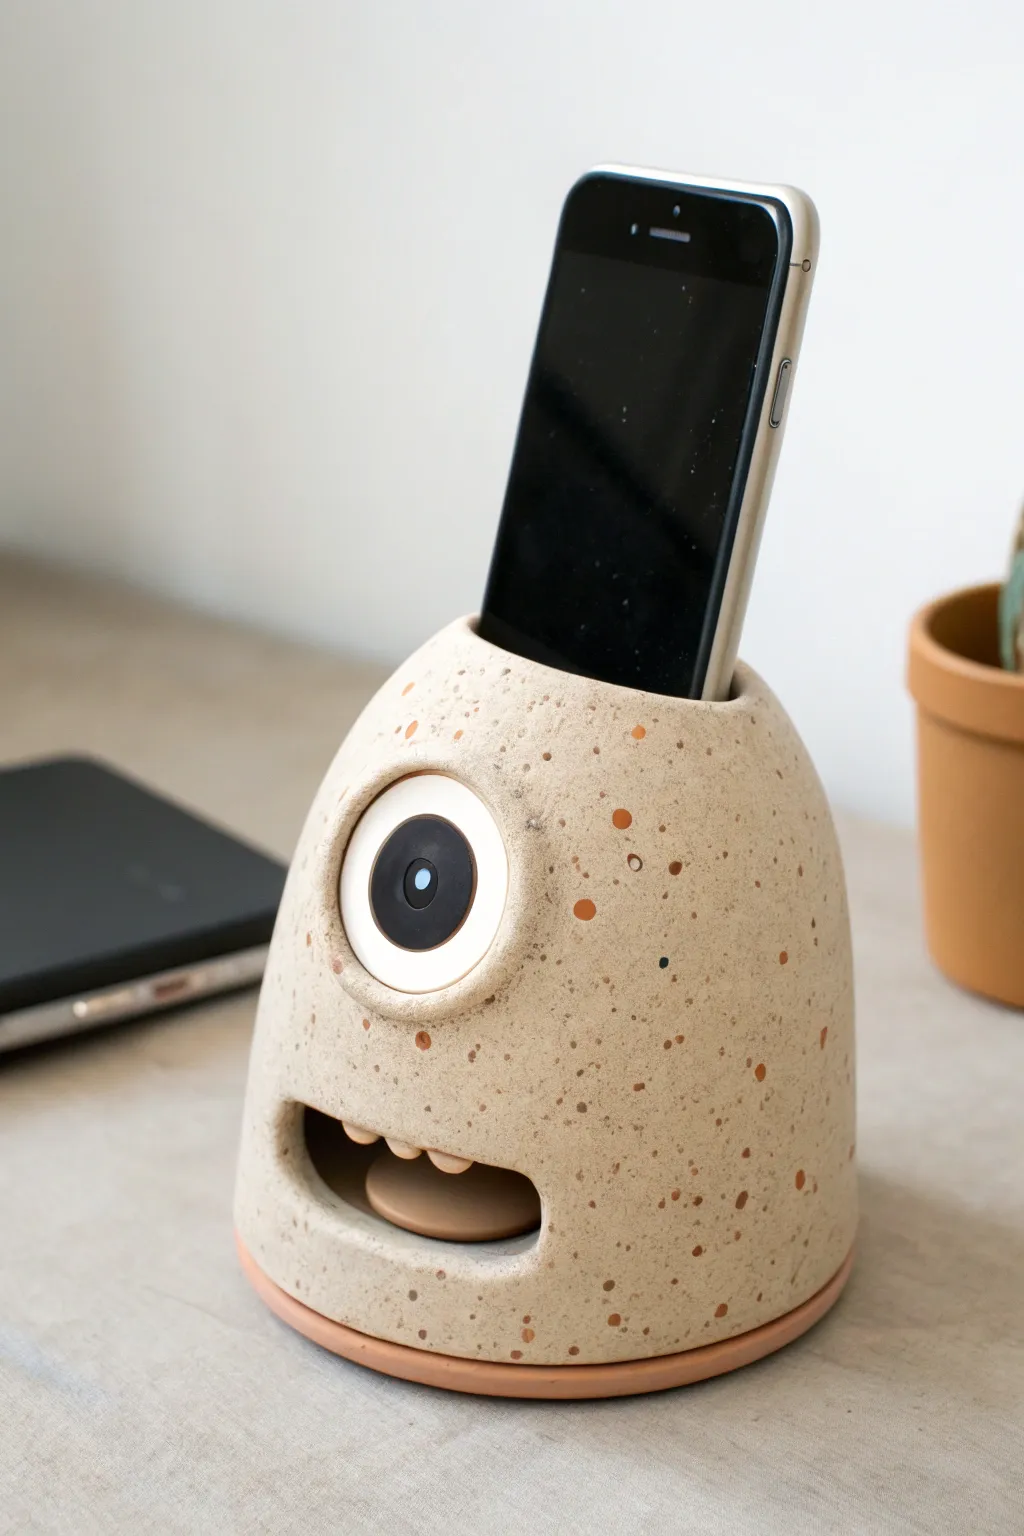
This whimsical ceramic speaker dock combines functionality with personality, featuring a speckled beige stoneware body, a distinctive single eye, and a tongue-like shelf that amplifies sound naturally. The heavy-bottomed design securely holds your phone while giving your desk a friendly, slightly goofy companion.
Step-by-Step
Materials
- Speckled stoneware clay (beige/buff body)
- Pottery wheel (or coil/slab tools for handbuilding)
- Pottery carving tools (needle tool, loop tool)
- Smooth wooden rib
- Underglaze (black, white, and terracotta/orange)
- Clear matte glaze
- Sponge and water
- Rolling pin
- Slip and scoring tool
Step 1: Forming the Body
-
Prepare the Clay:
Wedge about 2-3 pounds of speckled stoneware clay thoroughly to remove air bubbles. This heavy body is essential for stability when holding a phone. -
Throw the Main Form:
Center your clay on the wheel and throw a closed-form cylinder. Aim for a wide base that tapers gently inwards as it rises, creating a soft, bell-shaped or gumdrop silhouette. -
Close the Top:
Instead of leaving the rim open, collar the clay inward until it is completely closed and rounded off at the top. Use a rib to smooth the exterior profile. -
Refine the Surface:
While the wheel is spinning slowly, use a flexible metal rib to compress the walls and remove any throwing rings, leaving a smooth, uniform surface. -
Create the Base:
If you are not trimming later, ensure the bottom is flat and undercut slightly with a wooden knife to create a clean shadow line.
Step 2: Sculpting Features
-
Cut the Phone Slot:
Wait until the clay is leather-hard. Measure your phone’s width and thickness. Cut a slot into the very top of the rounded form, ensuring it is deep enough (about 1–1.5 inches) effectively hold the device upright. -
Carve the Mouth:
Locate the ‘face’ area below the phone slot. Carve out a wide, oval-shaped mouth cavity. This acts as the sound resonance chamber. -
Form the Tongue:
Roll a small slab of clay and cut a round disc. Place this inside the mouth cavity on the floor of the opening, sticking out slightly. This ‘tongue’ helps direct sound outward. -
Add the Teeth:
Roll tiny coils of clay into nub-like teeth. Score and slip them onto the upper lip of the mouth opening, pressing them gently so they look like they are protruding from the gum. -
Sculpt the Eye Socket:
Roll a coil of clay and attach it in a circle above the mouth to form the eyelid. Blend the outer edge smooth into the body, but keep the inner edge sharp to define the socket. -
Insert the Eye:
Form a smooth distinct dome of clay—like a large contact lens—and press it into the socket area. Ensure it bulges out slightly but stays within the eyelid boundaries. -
Create the Pupil:
For the pupil, you can either carve a slight depression in the center of the eye now or wait to paint it later. I prefer carving a tiny recess to make glazing easier.
Sound Check
Make sure the hole connecting the phone slot to the main hollow body is open and clear. The clearer the path from the phone speaker to the mouth, the louder the sound.
Step 3: Finishing and Glazing
-
Initial Drying:
Let the piece dry slowly under plastic to prevent the attachments (teeth and eye) from cracking away from the body. -
Bisque Fire:
Once bone dry, fire the piece to bisque temperature (usually cone 04) to prepare it for glazing. -
Glaze the Eye:
Use a detail brush to apply opaque white underglaze to the eyeball (scad). Apply black underglaze carefully to the pupil center. Leave the eyelid the natural clay color. -
Glaze the Tongue and Base:
If you want a contrast, you can apply a terracotta-colored matte glaze or underglaze to the tongue and the very bottom rim of the speaker, or leave them bare if your clay body is naturally warm. -
Apply Clear Coat:
Dip the entire piece (or brush) in a clear matte glaze. This will seal the clay and make the speckles in the stoneware pop without making the monster look glossy and plastic. -
Wipe the Foot:
Sponge off any glaze from the very bottom contact ring to prevent it from sticking to the kiln shelf. -
Final Firing:
Fire to the maturation temperature of your clay (likely Cone 5 or 6 for stoneware). Allow to cool completely before docking your phone.
Level Up: Tech Specs
Drill a small hole in the back or bottom of the dock before firing. This lets you thread a charging cable through so your monster can charge the phone while playing music.
Now you have a charming acoustic amplifier that brings both sound and character to your space
Tentacle Tripod Phone Stand Speaker
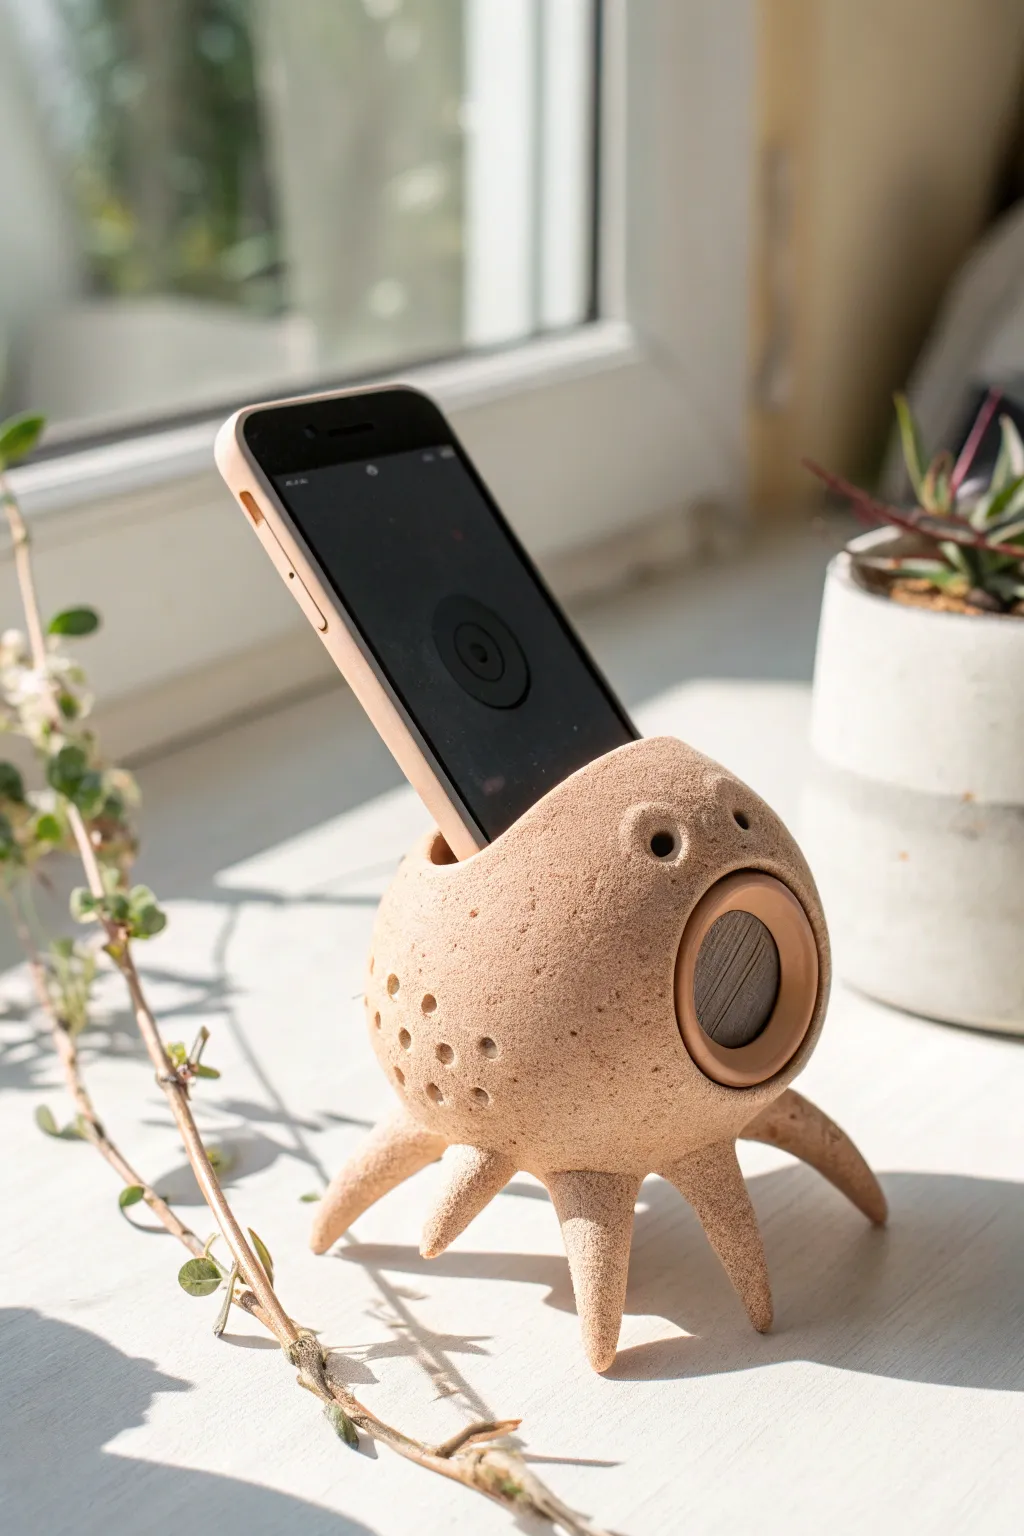
This quirky, alien-inspired passive speaker combines sculptural fun with acoustic functionality. Crafted from textured stoneware clay, its hollow acoustic chamber naturally amplifies your phone’s sound while standing perched on cute tentacle legs.
Detailed Instructions
Materials
- Speckled stoneware clay (groggy texture)
- Pottery wheel (optional, but recommended for the body)
- Wooden sculpting tools
- Sponge
- Wire cutter
- Pin tool or needle tool
- Hole cutter or small circular cookie cutter
- Slip (clay and water slurry)
- Scoring tool (or serrated kidney)
- Rolling pin (if hand-building)
- Smartphone for sizing
Step 1: Forming the Acoustic Chamber
-
Start with a ball:
Begin with about 1.5 to 2 pounds of well-wedged speckled clay. If you are throwing on a wheel, center the clay and open it up to create a hollow sphere or enclosed form. -
Shape the enclosure:
Pull the walls up and curve them inward to create a bulbous, round shape. You want the walls to be roughly 1/4 inch thick for stability. -
Alternative: Pinch pot method:
If you aren’t using a wheel, create two equal-sized pinch pots. Score and slip the rims, then join them together to form a sealed hollow sphere. Smooth the seam completely with a rib tool. -
Refine the surface:
Unlike typical smooth pottery, this creature looks best with texture. Sponge the surface lightly but don’t over-smooth it; allow the grog in the clay to create a sandy, stone-like skin. -
Cut the phone slot:
Wait until the clay is leather-hard. Using your phone as a visual guide (don’t touch the clay with the actual phone!), carve a rectangular slot in the top rear of the sphere. Make it slightly wider than your phone to account for clay shrinkage.
Acoustic Tuning
The larger the internal hollow chamber, the deeper the resonance. Keep walls smooth inside for better sound reflection.
Step 2: Adding Features and Legs
-
Carve the sound port:
On the front face, directly opposite where the phone speaker will sit, cut a large circular opening. This is the main mouth that will project the sound. -
Refine the rim:
Roll a small snake of clay and attach it around the rim of the sound port using slip. Smooth it down to create a pronounced, lip-like ring around the opening. -
Create the eyes:
Above the mouth, punch two small, deep holes for eyes using the back of a paintbrush or a small hole cutter. Ensure they don’t punch all the way through if you want to maintain the air chamber, or punch through for aesthetics. -
Add texture dots:
On the sides of the body, use a small, round tool to press unexpected patterns of indentations. These mimic the breathing holes of sea creatures or speaker grill dots. -
Roll the tentacles:
Roll out four to six thick coils of clay. Taper them at one end so they look like pointed tentacles or starfish legs. They should carry some weight. -
Attach the legs:
Score the bottom of your sphere and the thick ends of the tentacles. Apply slip generously and press them onto the body. I find it easiest to flip the body upside down for this step. -
Position the stance:
Flip the piece back over carefully. Arrange the legs so they splay out naturally, supporting the weight of the body. Press the tips firmly onto your work surface to flatten them slightly for stability. -
Test the balance:
Gently check that the piece sits level and won’t tip over when the weight of a phone is added to the back slot. Adjust the leg angles if necessary.
Sagging Legs?
If legs collapse under the body’s weight, prop the sphere up on a sponge or block while the legs stiffen to leather-hard.
Step 3: Finishing and Firing
-
Final smoothing:
Inspect all joints where legs meet the body. Use a small wooden tool to compress the seams so they disappear, blending the clay for a seamless organic look. -
Drying:
Cover the piece loosely with plastic for the first 24 hours to let the moisture even out, especially between the thick legs and the hollow body. Then uncover and let dry completely. -
Bisque fire:
Fire the piece to bisque temperature (usually cone 04/06) in a kiln. -
Glazing (Optional):
To maintain the natural stone look shown in the image, avoid glossy colored glazes. Instead, wipe on a thin iron oxide wash or use a matte, transparent glaze to highlight the speckles. -
Final firing:
Fire for the final time according to your clay body’s maturation temperature (likely cone 5/6 for stoneware).
Place this little creature on your desk and enjoy naturally amplified tunes with a sculptural touch
Lantern Cutout Sound Diffuser
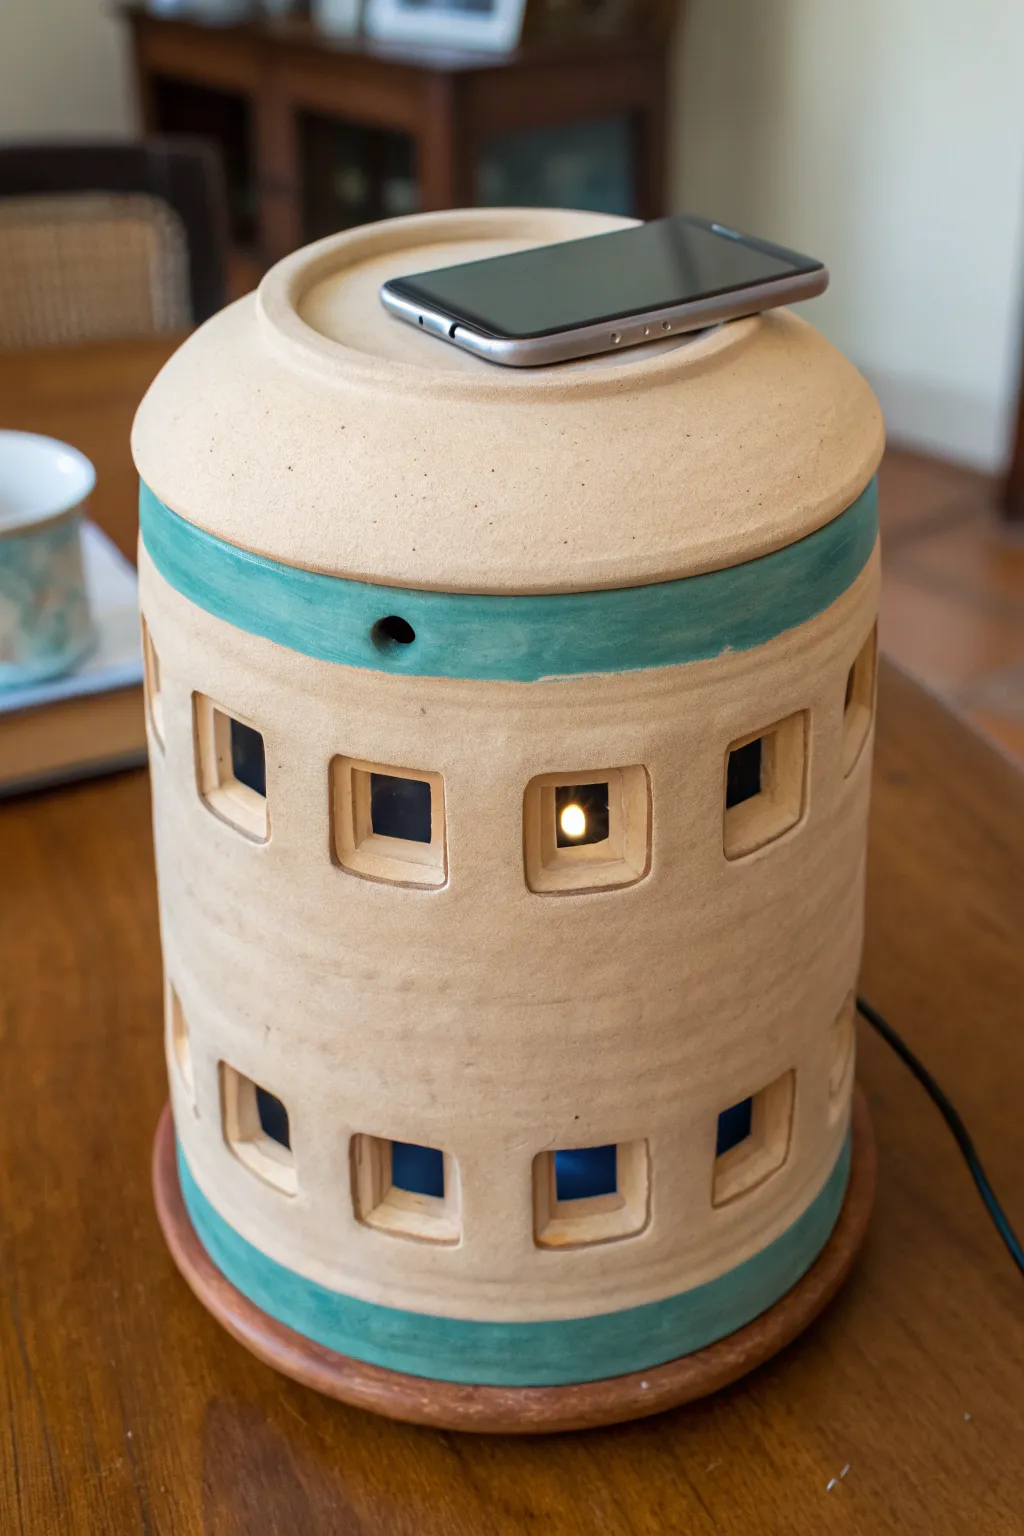
This rustic clay speaker doubles as an ambient lantern, amplifying your phone’s audio through a hollow ceramic chamber while casting a warm glow through architectural cutouts. Its unglazed, sandy texture and teal accents give it a charming Mediterranean feel perfect for cozy evenings.
Step-by-Step
Materials
- Stoneware clay (groggy or sandy texture suited for hand-building)
- Rolling pin and guide sticks (approx. 1/4 inch thick)
- Cylindrical mold or form (PVC pipe or large can)
- Needle tool
- Serrated rib tool
- Fettling knife
- Square cookie cutter or sharp craft knife
- Slip (clay and water slurry)
- Scoring tool
- Teal underglaze or slip
- Clear matte glaze (optional)
- Sponge
- Paintbrush
- Battery-operated LED light puck
Step 1: Forming the Main Cylinder
-
Roll the slab:
Begin by rolling out a substantial slab of stoneware clay to an even thickness of about 1/4 inch. Use guide sticks on either side of your rolling pin to ensure the thickness is consistent, which is crucial for structural integrity. -
Cut to size:
Measure the circumference of your chosen cylindrical form (like a large PVC pipe). Cut a rectangular strip from your slab that is slightly longer than this measurement to allow for overlapping or joining. -
Create the cylinder:
Wrap the clay slab around your form. Score the edges where they meet, apply a generous amount of slip, and press them firmly together to create a seamless join. Smooth over the seam with a rib tool so it becomes invisible. -
Add the base:
Roll a smaller slab for the bottom. Place your cylinder on top of it, trace around the edge, and cut out the circle. Score and slip the bottom edge of the cylinder and the new circular base, then attach them firmly. -
Form the top cap:
Create a second circular slab for the top, slightly wider than the cylinder to create a small overhang or rim. You can hand-model a shallow depression in the center where the phone will eventually sit. -
Cut the sound slot:
Before attaching the top, carefully cut a thin, rectangular slot in the center of the top cap. This is where the phone will rest and project sound into the chamber. Ensure the hole is wide enough for your specific device.
Slumping Walls?
If the cylinder starts to slouch while cutting windows, stuff the inside with crumpled newspaper or plastic bags. This provides temporary internal support until the clay stiffens.
Step 2: Detailing and Refining
-
Attach the top:
Score and slip the top rim of your cylinder and the underside of your top cap. Join them together, smoothing the transition or leaving a deliberate distinct rim as seen in the photo. -
Mark the window grid:
Using a light touch with a needle tool, lightly sketch a grid for your windows. Aim for two rows of square openings, spacing them evenly around the circumference. -
Cut the windows:
Use a small square cookie cutter or a sharp fettling knife to cut out the windows. I find it helpful to support the clay wall from the inside with my other hand to prevent it from collapsing while cutting. -
Smooth the edges:
Once leather hard, take a slightly damp sponge and smooth the sharp edges of every window cutout. This gives the piece a finished, professional look rather than a raw, sharp one. -
Drill the sound port:
Use a specialized hole cutter or a small drill bit to create a small round hole near the top teal band area. This acts as an additional sound escape or decorative element. -
Create the separate base saucer:
Standard plant saucers work well, or you can throw or hand-build a shallow dish that is slightly wider than your tower to serve as a coaster-like base.
Crisp Corners
For ultra-clean window corners, don’t drag your knife. Instead, push the blade straight in at the corners first to sever the connection, then connect the cuts.
Step 3: Decoration and Firing
-
Apply masking tape:
To get crisp lines for the colored bands, apply masking tape or wax resist around the cylinder, leaving a strip exposed at the top and bottom. -
Paint the accents:
Apply two to three coats of teal underglaze or colored slip to the exposed bands. Peel off the tape before the underglaze is completely bone dry to avoid chipping the edges. -
Bisque fire:
Allow the piece to dry slowly and completely (at least a few days) before loading it into the kiln for a bisque fire (typically cone 04 or 06). -
Final glaze firing:
If you want a raw finish like the example, you might opt to leave the main body unglazed or apply a very thin matte clear wash to seal it. Fire to the final temperature required by your clay body. -
Assemble:
Once cool, place a battery-operated LED puck light inside the tower through the bottom (if open) or drop in a small string of lights. Set your phone on top and enjoy the amplified tunes.
This clever fusion of acoustic science and pottery technique results in a functional centerpiece perfect for any table setting
Active Speaker Driver Clay Housing

This project combines sleek modern audio tech with the raw, organic beauty of stoneware. The result is a heavy, acoustically dampening enclosure that looks like a piece of carved granite but is actually hand-molded clay.
How-To Guide
Materials
- Speckled white stoneware clay (groggy texture recommended)
- Active full-range speaker driver (3-4 inch diameter)
- PVC pipe (diameter slightly larger than speaker driver)
- Plastic sphere or styrofoam ball (cut in half)
- Pottery wheel (optional, can be hand-built)
- Fettling knife and needle tool
- Sponge and bucket of water
- Drill with masonry bit
- Threaded inserts and machine screws
- Speaker wire and soldering kit
- Amplifier board (if making active) or USB interface
- Clear matte varnish or masonry sealer
Step 1: Forming the Main Body
-
Prepare the clay:
Begin by thoroughly wedging your speckled stoneware clay. You want to eliminate all air bubbles to prevent cracking during firing, especially since the walls will be thick. -
Create the rough cylinder:
Roll out a thick slab of clay, approximately 1/2 inch thick. Wrap this around a section of PVC pipe to form a perfect cylinder. This pipe acts as your internal support and ensures the driver will fit later. -
Shape the back dome:
Unlike a simple tube, the back of this speaker is rounded. Mold a slab of clay over a half-sphere form (like a styrofoam ball) and score and slip it onto one end of your clay cylinder. Smooth the seam thoroughly so it becomes one continuous unit. -
Refine the shape:
Once the clay is leather-hard (firm but not dry), remove the internal supports. Place the form on a banding wheel and use a rib tool or paddle to smooth the transition between the cylindrical front and the domed back. -
Create the front heavy rim:
The front face needs extra thickness to hold the screws. Add a thick coil of clay to the inner rim of the open end, smoothing it inwards to create a flat, wide distinctive lip.
Acoustic Dampening
Before sealing, stuff the inside loosely with poly-fill or raw wool. This prevents sound waves from bouncing around inside the hard ceramic shell.
Step 2: Detailing and Firing
-
Measure the driver fit:
Carefully measure your speaker driver’s mounting holes. Mark these four equidistant points on the flat clay rim you just created. -
Pre-drill holes:
While the clay is leather-hard, gently drill or punch holes at your marked points. Make them slightly larger than your final screws to account for clay shrinkage (usually 10-15%). -
Create the cable exit:
Don’t forget a small hole in the lower back of the dome for the speaker wire or USB cable to exit. Smooth the edges of this hole with a damp sponge. -
Texture and smooth:
I prefer to sponge the exterior with a slightly damp sponge to expose the grog (the speckles) in the clay body, giving it that stone-like appearance. -
Bisque fire:
Allow the piece to dry slowly under plastic for several days to prevent warping. Once bone dry, bisque fire it to the recommended cone for your specific clay. -
Glazing (Optional):
For this raw stone look, skip the glaze. Instead, fire the unglazed clay to maturity. This vitrifies the clay, making it rock-hard and water-resistant.
Step 3: Assembly and Electronics
-
Seal the surface:
Apply a coat of clear matte masonry sealer or varnish to the fired ceramic. This keeps dust down and prevents fingerprints from staining the raw clay. -
Install threaded inserts:
Epoxy threaded brass inserts into the four mounting holes you created on the rim. This ensures you can screw the driver in tightly without cracking the ceramic. -
Connect the electronics:
Thread your USB or speaker wire through the back hole. Solder the connections to the speaker driver terminals. If using a small internal amp, secure it inside the housing with hot glue. -
Seal the wire hole:
Use a dab of clear silicone or Blu-Tack around the wire exit hole to make the acoustic chamber airtight. -
Mount the driver:
Place the speaker driver into the housing opening. Gently tighten the machine screws into the threaded inserts until flush. -
Final test:
Connect your new stone speaker to an audio source and enjoy the warm, solid sound that only a dense housing can provide.
Make it a Set
Create a second slightly larger housing to act as a subwoofer, or make a matching pair for true stereo sound on your desk.
Now you have a functional piece of brutalist art that sounds as solid as it looks