If you’ve ever pressed something into soft clay and thought, “Okay, that was fun,” you’re already halfway to making your own stamps. These easy clay stamp ideas are my go-to starting points when I want quick texture, crisp patterns, and that satisfying little “pop” of detail.
Simple Geometric Clay Stamps
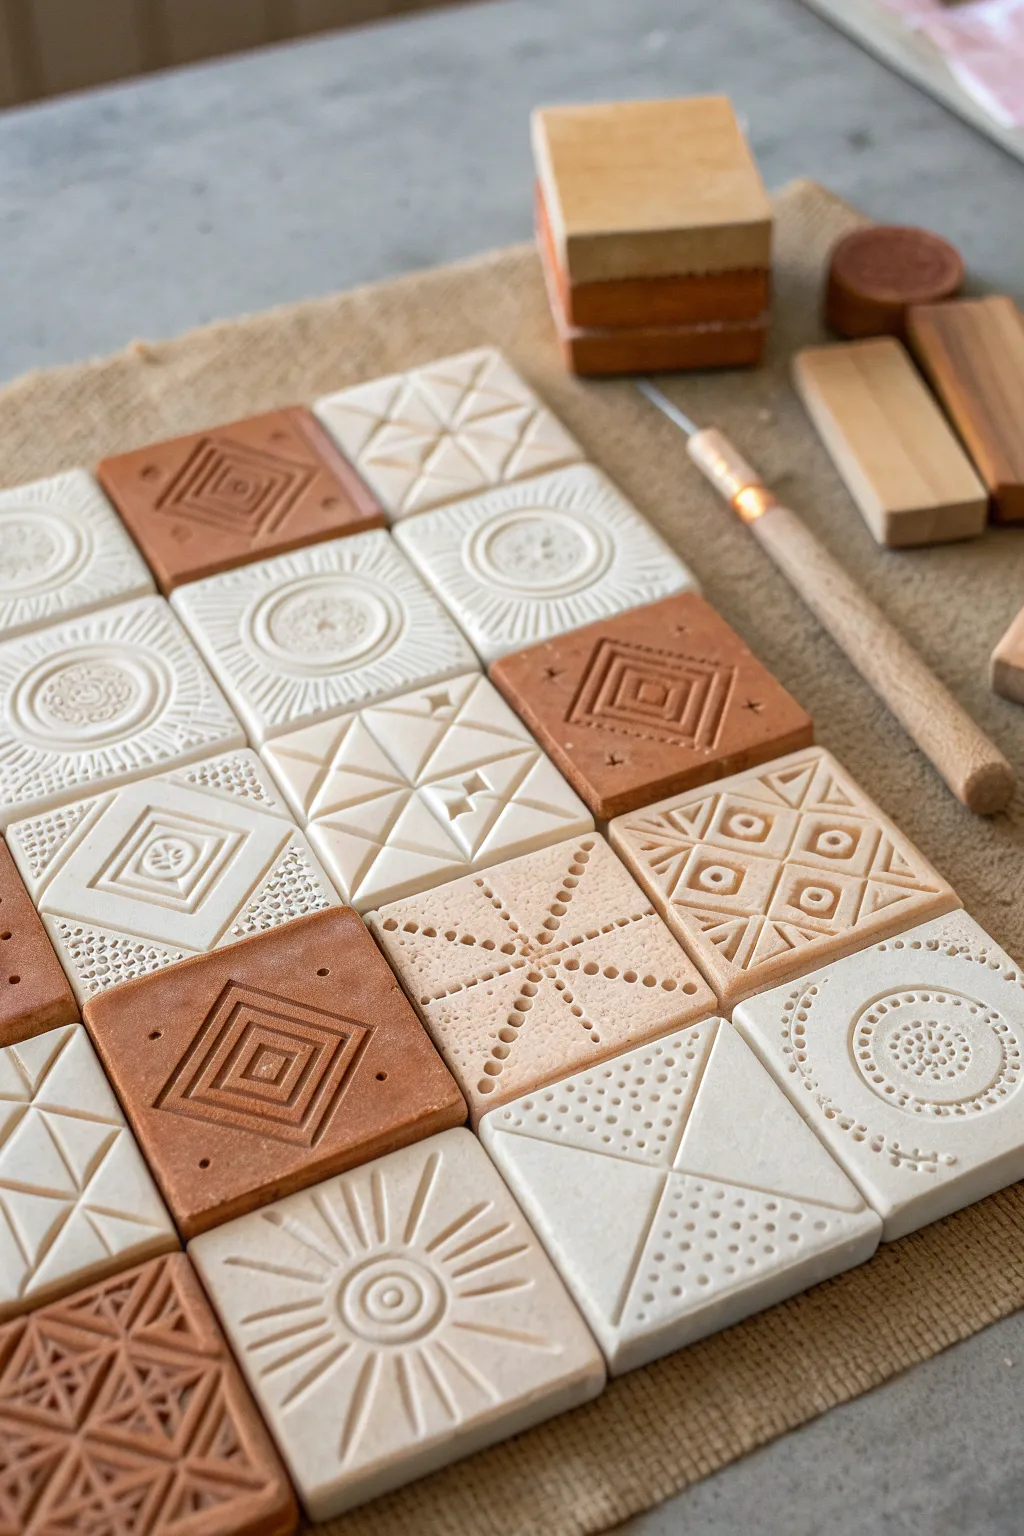
These charming, modular clay tiles double as both finished decorative pieces and reusable stamps for future pottery projects. The design features a mix of white and terracotta clay squares, each carved with crisp, geometric motifs like sunbursts, diamonds, and linear grids.
How-To Guide
Materials
- White polymer or air-dry clay
- Terracotta-colored polymer or air-dry clay
- Rolling pin
- Square cookie cutter (approx. 1.5 – 2 inches)
- Needle tool or awl
- Small ball stylus tool
- Flat geometric carving tool or small flathead screwdriver
- Ruler
- Sandpaper (fine grit)
- Clear matte varnish (optional)
Step 1: Preparing the Base Tiles
-
Condition the clay:
Start by warming up your white and terracotta clay in your hands separately until it is soft and pliable. If using polymer clay, ensure there are no air bubbles trapped inside. -
Roll out slabs:
Roll each clay color into a flat, even slab about 1/4 inch thick. I find using depth guides or stack of playing cards on either side of the roller helps keep the thickness perfectly consistent. -
Cut the squares:
Using your square cookie cutter, punch out an equal number of squares from both the white and terracotta slabs. You’ll want about 16-20 total tiles for a nice grid arrangement. -
Smooth the edges:
Gently tap the sides of each square against your work surface to sharpen the corners, or run a finger along the edges to remove any burrs left by the cutter.
Clean Lines Hack
Chill your clay slabs in the fridge for 10 minutes before carving. The firmer clay resists dragging and yields much sharper, cleaner lines.
Step 2: Carving the Patterns
-
Create the concentric diamond:
On a terracotta square, press a square tool or use your knife to lightly mark a diamond shape in the center. Carefully carve out lines inside this shape to create smaller, nesting diamonds. -
Carve the sunburst:
Take a white square and use a small circle cutter or ball stylus to impress a circle in the center. Use your needle tool to radiate lines outward to the edge, creating a sun effect. -
Add texture with dots:
For the dotted patterns, use the ball stylus. Press firmly to create rows of dots intersecting in an ‘X’ shape or bordering geometric lines. -
Design the triangle grid:
On another white tile, use a knife to score a large ‘X’ corner to corner. Fill two opposite triangles with a grid of small impressed dots and leave the other two smooth for contrast. -
Carve the nested squares:
For the linear square design, use a v-gouge or needle tool to carve concentric squares, starting from the center and working your way out to the edge. -
Mix and match:
Continue patterning the remaining tiles, alternating designs between the white and terracotta bases. Don’t worry about perfection; slight variations add to the handmade charm.
Fixing Mistakes
If you carve a line too deep or in the wrong spot, don’t panic. dab a tiny amount of water (or liquid clay) on the spot and smooth it over with your finger to “erase.”
Step 3: Finishing Touches
-
Clean up debris:
Before baking or drying, use a soft, dry brush to gently sweep away any little crumbs of clay produced during the carving process. -
Cure the clay:
If using polymer clay, bake according to the package directions (usually 275°F for 15-30 mins). If using air-dry clay, let the tiles sit in a dry spot for 24-48 hours. -
Sand rough spots:
Once fully cured or dry, inspect the edges. Use a fine-grit sandpaper to lightly smooth any sharp points or uneven sides. -
Seal the surface:
To protect your work, apply a thin layer of matte varnish. This brings out the richness of the terracotta color without making it glossy. -
Arrangement:
Lay your finished tiles out in a grid, alternating colors and patterns to create a cohesive mosaic composition.
You now have a beautiful set of geometric tiles that can be displayed as art or used to imprint texture onto future pottery creations


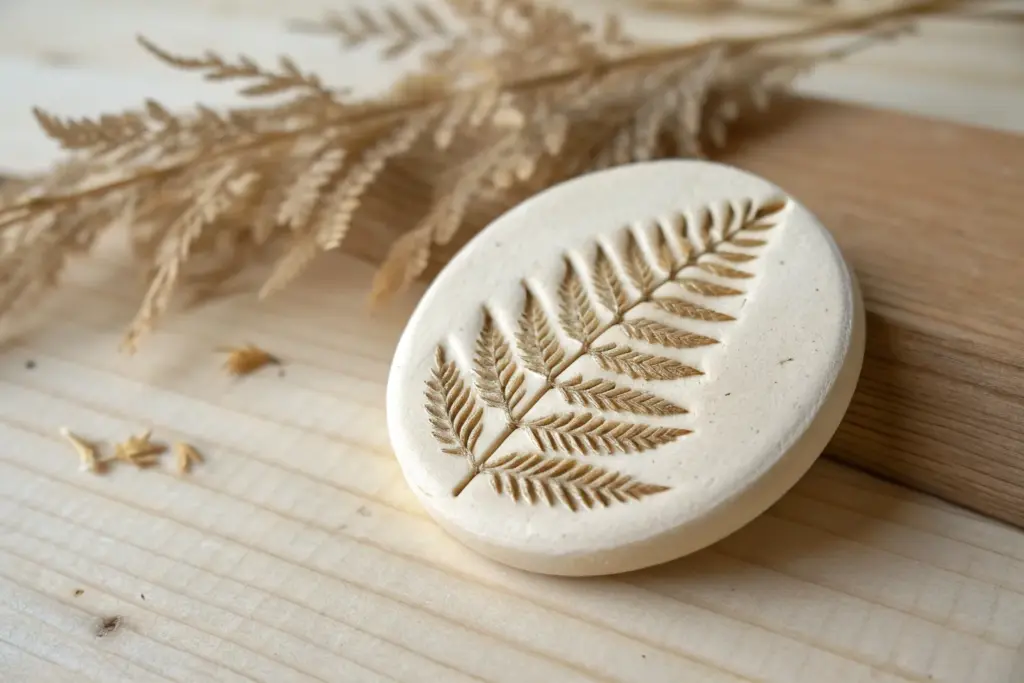
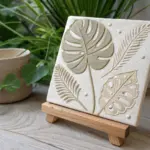
Leaf Vein Imprint Stamps

Capture the delicate beauty of nature forever with this minimalist ceramic plate featuring a crisp fern impression. The speckled clay body and warm, creamy glaze allow the subtle details of the leaf veins to take center stage.
Detailed Instructions
Materials
- Speckled stoneware clay (white or light buff)
- Fresh or dried fern leaf (sturdy, with clear veins)
- Rolling pin
- Canvas mat or cloth (to prevent sticking)
- Circular bat or template (approx. 6-7 inches)
- Needle tool or fettling knife
- Potter’s sponge
- Pottery rib (wood or rubber)
- Transparent or semi-opaque creamy white glaze
- Kiln (or access to a firing service)
Step 1: Preparation & Forming
-
Wedge the clay:
Begin by thoroughly wedging your speckled stoneware clay to remove any air bubbles and ensure an even consistency. A ball of clay about the size of a large grapefruit should suffice for this plate size. -
Roll the slab:
Place your clay on a canvas mat. Using a rolling pin, roll the clay out into a smooth, even slab. Aim for a thickness of approximately 1/4 to 3/8 of an inch, keeping the pressure consistent to avoid lumpy areas. -
Compress the slab:
Take a rubber or wooden rib and drag it gently across the surface of the clay in multiple directions. This compression aligns the clay particles, reducing the chance of warping later, and creates a pristine canvas for your imprint. -
Cut the circle:
Place your circular template or bat onto the clay slab. Using a needle tool held vertically, trace around the template to cut out a perfect circle. Remove the excess clay scraps and set them aside. -
Smooth the edges:
Dip your finger or a sponge lightly in water and run it along the cut edge of the circle. This softens the sharp angle left by the needle tool and gives the rim a more finished, professional look. -
Lift the rim:
To create the shallow dish shape, gently lift the edges of the circle. You can do this by placing the slab into a shallow slump mold or by pinching the edges upward by hand while turning the slab on a banding wheel.
Step 2: Stamping & Refining
-
Position the fern:
Select your best fern frond. Place it vein-side down onto the center of the plate. I generally like to position it slightly off-center or on a curve for a more dynamic composition, but centered works beautifully too. -
Imprint the design:
Using a small pony roller or just your fingers, press the leaf firmly into the clay. Be careful not to shift the leaf. You need enough pressure to catch the fine veins, but not so much that you distort the plate’s thickness. -
Remove the leaf:
Find the stem end of the fern and carefully peel the leaf away from the clay. Do this slowly to ensure no plant matter gets stuck in the intricate Impression. -
Clean up details:
Inspect the rim and the surface one last time. If the rim became slightly misshapen during stamping, gently re-round it with your sponge. Smooth out any unintentional fingernail marks. -
Slow drying:
Cover the plate loosely with plastic to let it dry slowly to the leather-hard stage. This prevents the rim from drying faster than the center, which causes cracking.
Clean Veins
If the leaf pulls up clay bits, let the slab dry for 10-15 minutes before pressing. Slightly drier clay releases the leaf cleaner.
Step 3: Glazing & Firing
-
Bisque fire:
Once bone dry, fire the piece to a bisque temperature (usually cone 04 or 06, depending on your clay body). This prepares the ceramic for glaze application. -
Wipe clean:
After the kiln cools, wipe the bisque-ware with a damp sponge to remove any dust. Dust can resist glaze, causing crawling or bald spots. -
Apply glaze:
Pour a creamy, semi-opaque white glaze over the interior of the plate. Pour the excess out quickly. This type of glaze will pool slightly in the fern impression, highlighting the texture while letting the clay’s speckles show through. -
Clean the distinct rim:
Using a wet sponge, carefully wipe the glaze off the very top edge of the rim. This exposes the raw toasted clay color, creating that beautiful contrast seen in the photo. -
Glaze fire:
Fire the plate again to the maturity temperature of your clay and glaze (likely cone 5 or 6 for stoneware). Allow the kiln to cool completely before opening.
Iron Oxide Pop
Before glazing, rub a red iron oxide wash into the leaf imprint and sponge off the excess to make the fossil pattern darker.
Once cooled, your plate is ready to bring a touch of woodland serenity to your table setting


Dots, Dashes, and Sprinkle Textures
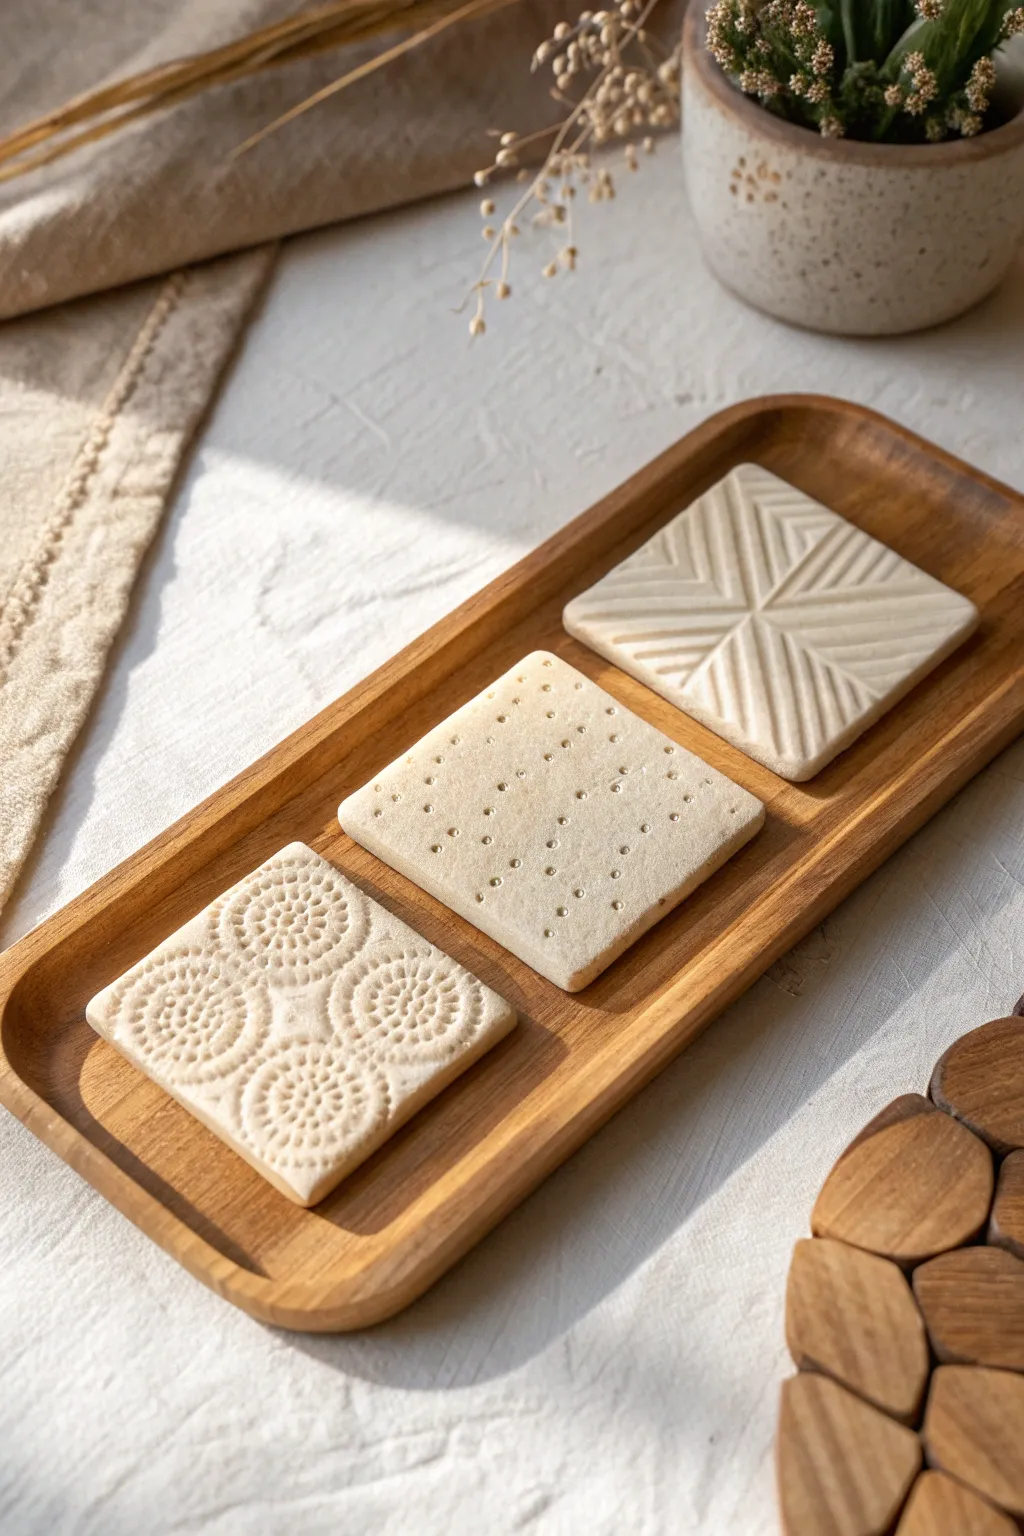
These elegant clay squares showcase the incredible versatility of simple household objects as stamps, transforming basic clay into sophisticated geometric decor. With three distinct patterns ranging from intricate dotted circles to clean architectural lines, this project proves that beautiful texture is just a press away.
Step-by-Step Guide
Materials
- White air-dry clay or polymer clay
- Rolling pin
- Square cookie cutter (approx. 3-4 inches)
- Ruler
- Wooden skewer or toothpick
- Ball stylus tool (or an empty ballpoint pen)
- Butter knife or clay blade
- Fine-grit sandpaper (optional)
- Matte sealant or varnish
Step 1: Preparation & Base Creation
-
Condition the Clay:
Start by taking a substantial chunk of your white clay and kneading it thoroughly in your hands until it feels warm and pliable. If you are using air-dry clay, keep a small bowl of water nearby to smooth any cracks that appear. -
Roll the Slab:
Place the clay on a clean, smooth surface or silicone mat. Using your rolling pin, roll the clay out into a large, even slab. Aim for a thickness of about 1/4 inch (6mm) to ensure your tiles are sturdy enough to handle. -
Cut the Squares:
Press your square cookie cutter firmly into the clay slab to create three separate squares. If you don’t have a cutter, measure 3.5-inch squares with a ruler and carefully slice them out using a clay blade or knife. -
Smooth the Edges:
Gently run a damp finger along the cut edges of each square to soften any sharp corners or roughness left by the cutting tool.
Stamp Testing
Before stamping your final squares, test your tools on a scrap piece of clay slab. This helps you gauge how much pressure to apply without punching all the way through.
Step 2: Creating Texture: The Dotted Circle Tile
-
Mark the Centers:
On the first square, visualize dividing it into four smaller quadrants. Use a very light touch to mark the center point of each quadrant. -
Stamp the Inner Ring:
Using a small ball stylus tool, press a ring of dots around your first center point. Keep the pressure consistent so all dots have the same depth. -
Expand the Pattern:
Add a second, larger ring of dots around the first one. I find it helpful to stamp opposing dots (top, bottom, left, right) first to keep the circle symmetrical. -
Fill the Gap:
Create a third, larger ring of dots. Then, to create the dense texture seen in the photo, add a ring of smaller dots or dashes in between your main rings using a thinner tool like a toothpick. -
Repeat for Quadrants:
Repeat this concentric circle process for the other three quadrants so the entire tile is covered in four large medallion patterns.
Step 3: Creating Texture: The Minimal Grid Tile
-
Create a Grid:
On the second square, use a ruler to lightly impress a grid of guide lines, creating roughly 5 rows and 5 columns. -
Pierce the Holes:
Using a blunt skewer or a medium-sized stylus, press a single clean hole at every intersection of your grid lines. Press straight down and pull straight up to keep the holes crisp. -
Add Variation:
For extra visual interest, verify your spacing is slightly organic rather than perfectly machine-made; a little handmade wobble adds charm.
Fixing Distortion
If stamping the pattern has warped the square shape of your tile, gently use your ruler or a flat edge to push the sides back into a straight square before drying.
Step 4: Creating Texture: The Chevron Line Tile
-
Mark the Diagonals:
On the third square, use the back of a butter knife or a ruler edge to gently press diagonal ‘X’ lines from corner to corner, finding the absolute center. -
Impress Vertical Lines:
In the top and bottom triangular sections created by your ‘X’, press a series of vertical parallel lines. Start from the center vertical line and work outward to the diagonals. -
Impress Horizontal Lines:
In the left and right triangular sections, press horizontal parallel lines. They should meet the vertical lines at the diagonal seams, creating a chevron or diamond effect. -
Deepen the Lines:
Go over your lines a second time to ensure they are deep and clearly defined, as the clay may have rebounded slightly.
Step 5: Finishing Touches
-
Dry Flat:
Place all three textured tiles on a wire rack or between two sheets of parchment paper with a light weight on edges to prevent curling. Let them air dry for 24-48 hours until completely hard. -
Sand Imperfections:
Once fully dry, lightly sand the edges with fine-grit sandpaper to remove any burrs or sharp spots. -
Seal:
Apply a coat of matte spray varnish or brush-on sealant to protect the clay from moisture and dirt without altering the natural matte look.
Arrange your trio of textured tiles on a tray and enjoy the modern, handmade warmth they add to your space.


Chevron and Herringbone Stamps
Create a modern, cozy tumbler that combines the rustic warmth of speckled clay with a crisp, geometric pattern. This project uses a simple chevron stamp technique to create a seamless band of design that feels both timeless and trendy.
Detailed Instructions
Materials
- Speckled stoneware clay (e.g., Lagunitas)
- Chevron or herringbone bisque stamp (or carved linoleum block)
- Potter’s wheel (or tools for slab building)
- Needle tool
- Rib tool
- Sponge
- Cobalt blue underglaze
- Small paintbrush
- Clear glossy glaze
- Kiln
Step 1: Forming the Vessel
-
Wedge the clay:
Start with a ball of speckled stoneware clay, wedging it thoroughly to remove air bubbles. A pound of clay is usually perfect for a tumbler of this size. -
Throw the cylinder:
Center your clay on the wheel and open it up. Pull the walls up into a straight-sided cylinder, keeping the rim slightly thicker for durability. -
Shape the tumbler:
Using a rib tool, smooth the outside walls. Create a very subtle taper towards the bottom for a comfortable hand-feel. -
Define the rim:
Use a chamois or your sponge to compress and round the rim, ensuring it’s smooth for drinking. -
Dry to leather hard:
Cut the pot off the wheel and let it dry until it reaches a sturdy leather-hard state. It needs to be firm enough to withstand stamping pressure without warping. -
Trim the foot:
Invert the tumbler on the wheel and trim the bottom, leaving a distinct unglazed foot area as seen in the photo.
Stamp Support
When stamping thin walls, hold a rib tool or a block of wood against the inside wall. It provides resistance so you can press hard without collapsing the shape.
Step 2: Stamping and Decoration
-
Plan the band:
Lightly mark two horizontal lines around the middle of the cup to guide where your pattern will go, ensuring the band stays straight. -
Apply the stamp:
Press your chevron stamp firmly into the clay between your guide lines. Support the wall from the inside with your hand to prevent the cup from deforming. -
Repeat the pattern:
Align the next stamp impression directly beside the first one to create a continuous, seamless band of zig-zags around the circumference. -
Clean up edges:
If the stamping process raised any sharp burrs of clay, smooth them gently with a fingertip, but keep the definition sharp. -
Bisque fire:
Allow the tumbler to dry completely to the bone-dry stage, then load it into the kiln for a bisque firing.
Step 3: Glazing and Finishing
-
Clean surface:
Wipe the bisque-fired cup with a damp sponge to remove any kiln dust before glazing. -
Inlay the underglaze:
Paint cobalt blue underglaze generously over the stamped chevron area, making sure the liquid gets into every deep crevice of the pattern. -
Wipe back:
Once the underglaze is slightly dry, use a clean, damp sponge to wipe the surface. This removes the blue from the high points but leaves it trapped in the stamped grooves. -
Add detail lines:
I like to use a small liner brush to paint a thin blue band bordering the top and bottom of the chevron section to frame the pattern neatly. -
Clear glaze application:
Dip the entire tumbler (except the foot) into a clear glossy glaze. This will seal the clay and make the speckles pop. -
Wipe the foot:
Clean the glaze off the bottom foot ring completely so it doesn’t stick to the kiln shelf. -
Final firing:
Fire the piece to the maturation temperature of your specific clay body (likely Cone 5 or 6 for stoneware).
Customize the Pattern
Try alternating the direction of your stamp (up then down) to create diamond shapes instead of a standard continuous chevron wave.
Now you have a stunning, functional piece of art ready for your morning coffee

The Complete Guide to Pottery Troubleshooting
Uncover the most common ceramic mistakes—from cracking clay to failed glazes—and learn how to fix them fast.
Concentric Circle “Bubble” Stamps
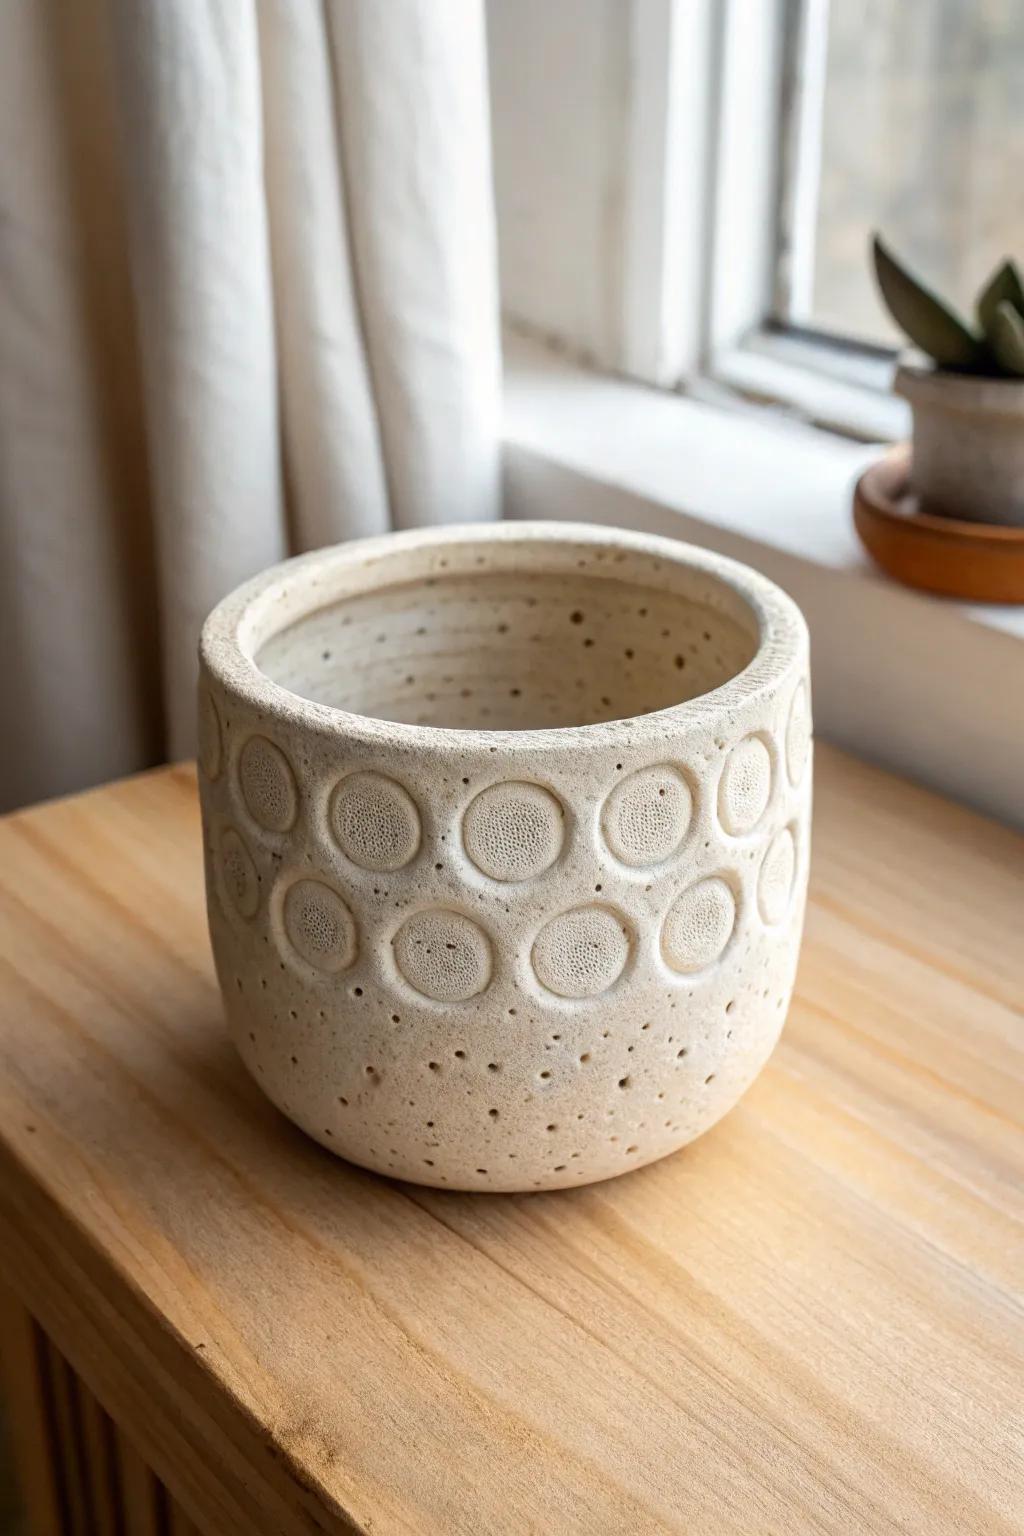
This charming planter combines organic textures with geometric precision, featuring a band of stamped concentric circles that resemble rising bubbles. The speckled clay body and scattered pinholes add a raw, earthy finish that feels both modern and handmade.
Step-by-Step Tutorial
Materials
- Stoneware clay (speckled or sand-coloured)
- Pottery wheel (or slab roller/rolling pin for hand building)
- Cylindrical loop tool or circle cutter (approx. 1 inch diameter)
- Needle tool
- Poring sponge
- Wooden rib tool
- Wire cutter
- Matte white or clear glaze
Step 1: Forming the Vessel
-
Prepare the Clay:
Begin by wedging about 2-3 pounds of speckled stoneware clay to remove air bubbles and ensure an even consistency. -
Center and Open:
Throw the clay onto the wheel bat and center it. Open the mound to create the floor of your pot, keeping it thick enough to trim later. -
Pull the Walls:
Pull the walls up into a straight-sided cylinder. Aim for a height of about 5-6 inches and a width of 5 inches. -
Shape the Profile:
Using a wooden rib on the inside and your hand on the outside, gently belly out the form slightly to create a soft, rounded bottom curve while keeping the rim relatively straight. -
Smooth the Surface:
Run a metal or rubber rib over the exterior to remove throwing lines. A smooth canvas is crucial for the stamping texture to stand out. -
Define the Rim:
Compress the rim with a chamois or sponge to ensure it is smooth and durable.
Step 2: Stamping and Texturing
-
Leather Hard Consistency:
Allow the pot to dry to a leather-hard state. It should be firm enough to handle without deforming but still soft enough to accept an impression. -
Create the Stamp:
If you don’t have a designated bubble stamp, use the round end of a marker cap, a small cookie cutter, or create a bisque clay stamp with concentric circles carved into it. -
First Row of Impressions:
Starting about an inch below the rim, press your circle stamp firmly into the clay. Support the wall from the inside with your hand to prevent warping. -
Second Row:
Create a second row of circles directly below the first. Try to offset them slightly (like a brick pattern) or align them directly, depending on your preference. For this look, align them vertically. -
Add Inner Texture:
If your stamp is deeply recessed, use a rough sponge or a stiff brush to dab inside the stamped circles. I find this creates that unique, porous ‘coral’ texture seen in the center of the bubbles. -
Puncturing the Lower Body:
Using a needle tool, poke scattered holes around the lower third of the pot and in the spaces between the circle stamps. Vary the depth slightly, but don’t pierce all the way through the wall. -
Refine the Pinholes:
Gently rub a finger over the pinholes to smooth any sharp burrs of clay that may have lifted up.
Warped Walls?
If the pot distorts while stamping, your clay is too wet. Wait an hour or gently use a heat gun to stiffen the surface before trying again.
Step 3: Finishing and Firing
-
Trimming:
Place the pot back on the wheel inverted (using a chuck or adhering it to the bat head). Trim the excess weight from the bottom and carve out a neat foot ring. -
Add Drainage:
Since this is a planter, don’t forget to cut a drainage hole in the center of the bottom. -
Slow Drying:
Cover the pot loosely with plastic to let it dry slowly and evenly, preventing cracks. -
Bisque Fire:
Once bone dry, fire the piece to bisque temperature (usually Cone 06 or 04). -
Glazing:
Apply a matte white or very light wash glaze. Wipe back the glaze with a damp sponge so it mostly remains in the recesses of the stamps and holes, highlighting the texture. -
Final Firing:
Glaze fire the piece to the maturity temperature of your clay body (likely Cone 5 or 6).
Make it Colorful
Before glazing, brush an iron oxide wash into the stamped circles and wipe it back. This will create a high-contrast, rustic look against a white glaze.
Now you have a beautifully textured vessel ready to house your favorite succulent or fern
Mini Star and Moon Stamps
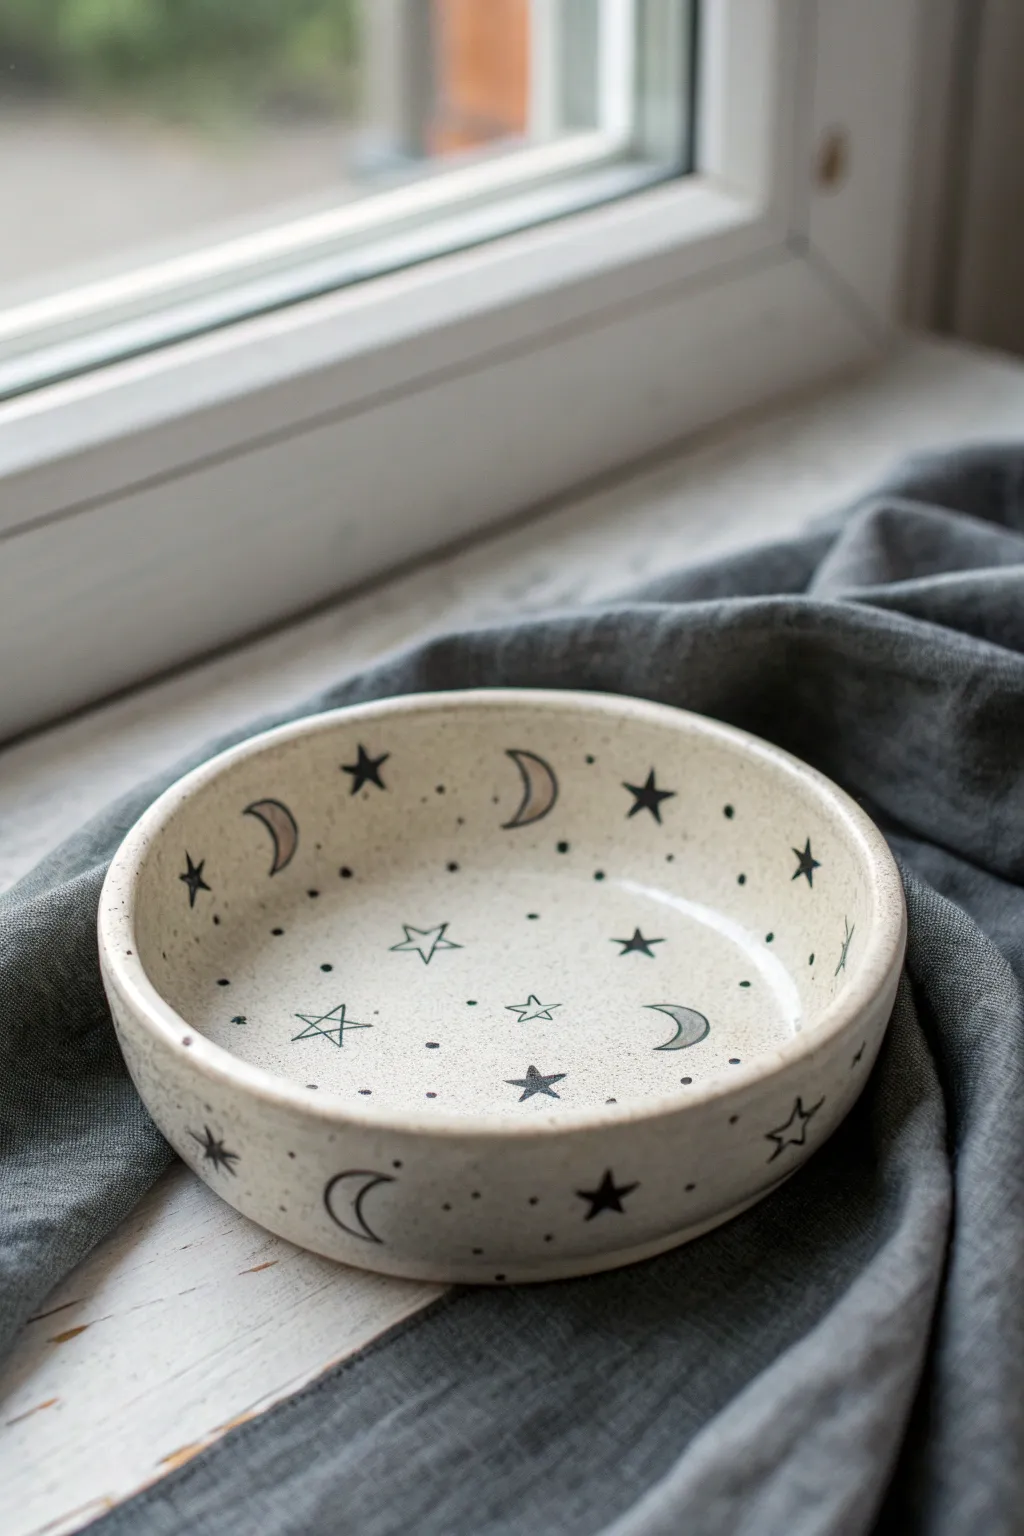
This charming, low-profile bowl brings the night sky to your table with its whimsical scattering of moons and stars. The speckled clay body provides a beautiful, natural canvas for the crisp, stamped motifs and glossy finish.
Detailed Instructions
Materials
- Speckled stoneware clay (e.g., intense speckle or sandy body)
- Small moon and star bisque stamps or rubber stamps
- Rolling pin and guide sticks (approx. 1/4 inch thick)
- Round slump mold or a bowl to use as a form
- Pottery knife or needle tool
- Smoothing rib (soft rubber or kidney)
- Black underglaze (or dark blue/grey)
- Small fine-point liner brush
- Sponge
- Clear glossy glaze
- Kiln (or access to firing services)
Step 1: Forming the Bowl
-
Prep the Clay:
Begin by wedging your speckled clay thoroughly to remove air bubbles and ensure an even consistency. This is crucial for structural integrity during firing. -
Roll the Slab:
Using your rolling pin and guide sticks, roll out a slab of clay to a uniform 1/4-inch thickness. Rotate the clay occasionally so it doesn’t stick to your work surface. -
Smooth the Surface:
Before cutting, run a soft rib over both sides of the slab. I like to do this to compress the clay particles, which helps prevent warping later on. -
Cut the Circle:
Place your slump mold or a circle template onto the slab to gauge the size. Cut a circle slightly larger than your mold, accounting for the depth of the bowl. -
Shape the Form:
Gently lift your clay circle and drape it into your slump mold. Press it down softly from the center moving outward to ensure it conforms to the curve without trapping air underneath. -
Refine the Rim:
Once the clay is in the mold, use a damp sponge or your fingers to round off the rim. A sharp edge can be uncomfortable to hold and prone to chipping.
Stamp Clarity Tip
Dust your stamps lightly with cornstarch before pressing into the clay. This acts as a release agent and prevents the stamps from sticking or pulling up texture.
Step 2: Stamping the Night Sky
-
Plan Your Pattern:
While the clay is still leather hard but firm enough to hold shape, plan your celestial layout. You want a random, scattered look rather than a strict grid. -
Stamp the Crescents:
Press your moon stamps gently into the clay. Place some on the inner floor, some climbing up the walls, and a few on the exterior rim. -
Add the Stars:
Intersperse the star stamps among the moons. Vary the orientation of the stars so they look like they are twinkling in different directions. -
Create Depth:
Stamp some stars firmly for deep impressions and others lightly for subtle texture. If you have both solid and outline star stamps, alternate them for visual interest. -
Detail with Dots:
Using the back end of a small paintbrush or a dull needle tool, press small dots into the empty spaces to mimic distant stars or stardust. -
Dry Slowly:
Let the bowl dry slowly under loose plastic to the bone-dry stage. Uneven drying can cause the rim to warp.
Step 3: Glazing and Finishing
-
Bisque Fire:
Fire the bone-dry piece in a kiln to bisque temperature (usually Cone 04 or 06 depending on your clay). -
Apply Underglaze:
Once bisque fired, paint black underglaze into the stamped impressions. Don’t worry about staying perfectly in the lines. -
Wipe Back:
Using a slightly damp sponge, wipe away the excess underglaze from the surface, leaving the color trapped only within the stamped recesses. -
Clear Glaze Application:
Dip the entire bowl into a clear glossy glaze or brush on three even coats. This will make the speckles in the clay pop and seal the surface for food safety. -
Wipe the Foot:
Carefully wipe any glaze off the bottom foot heat ring of the bowl so it doesn’t fuse to the kiln shelf. -
Final Fire:
Glaze fire the piece to the maturity temperature of your clay body (typically Cone 5 or 6 for stoneware).
Make it Metallic
After the final glaze firing, apply a gold overglaze luster to the star shapes and fire a third time at a low temperature for real 22k gold accents.
Now you have a stunning, celestial piece that captures the magic of a starry night in functional ceramic form


What Really Happens Inside the Kiln
Learn how time and temperature work together inside the kiln to transform clay into durable ceramic.
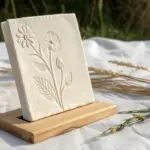
Easy Daisy and Petal Stamps
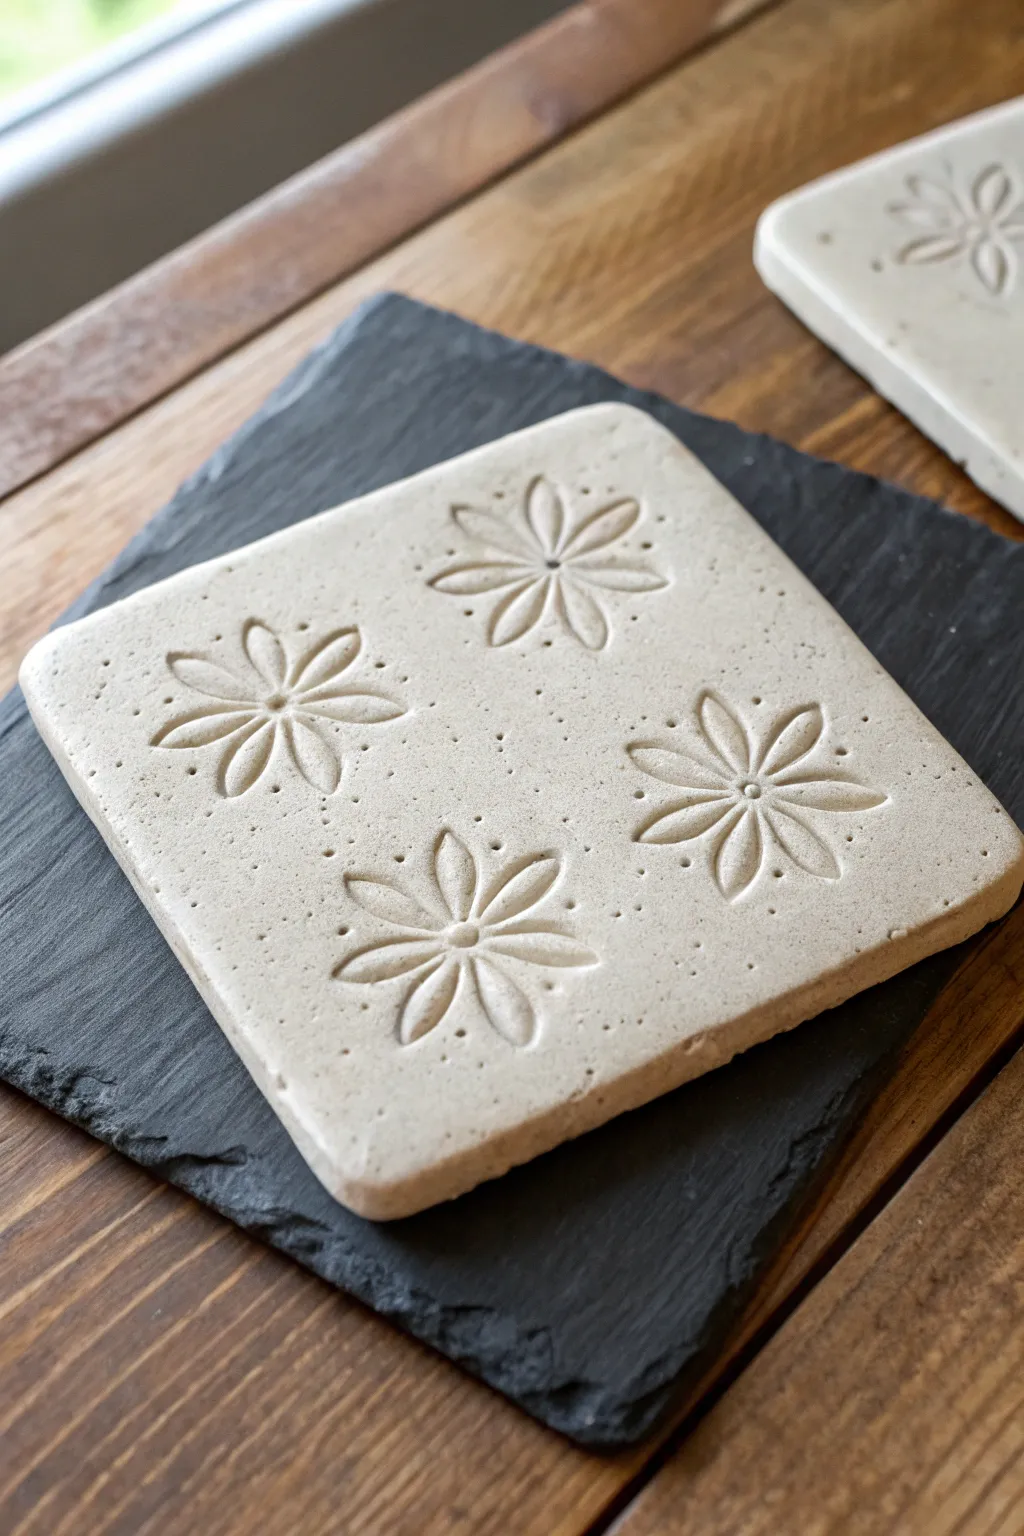
These charming coasters feature deeply impressed daisy motifs on a smooth, sandy-colored clay surface, offering a touch of rustic elegance. The combination of simple floral patterns and a slate backing creates a functional piece of art that looks much more complicated to make than it actually is.
How-To Guide
Materials
- White or light stoneware clay (preferably with fine grog)
- Rolling pin
- Two wooden guide strips (approx. 1/4 inch thick)
- Square cookie cutter (approx. 4×4 inches) or a knife and ruler
- Daisy/flower petal clay stamp (or a modeling tool to create the shape)
- Small needle tool or toothpick
- Sponge and water
- Natural slate coaster or backing tile (optional, for mounting)
- Strong adhesive (like E6000), if mounting to slate
- Clear matte varnish or sealant
Step 1: Preparing the Clay Base
-
Wedging the clay:
Start by taking a handful of clay and wedging it thoroughly to remove any air bubbles. This step is crucial for preventing cracks during firing or drying. -
Setting up guides:
Place your wooden guide strips on either side of your clay ball on a canvas or non-stick surface. These will ensure your coaster has a perfectly even thickness. -
Rolling the slab:
Using your rolling pin, roll the clay out until the pin rests firmly on the guide strips. Roll in multiple directions to compress the clay platelets. -
Smoothing the surface:
Take a slightly damp sponge or a rubber rib tool and gently smooth the surface of the clay slab to remove any canvas texture or rolling marks. -
Cutting the square:
Press your square cutter firmly into the clay. If you don’t have a cutter, measure a 4×4 inch square with a ruler and carefully cut it out with a fettling knife. -
Refining edges:
Once cut, run your damp finger along the sharp edges of the square to soften them slightly. This prevents chipping later and gives a more finished look.
Stamp Release Trick
Dust your clay stamp lightly with cornstarch before pressing it into the wet clay. This ensures the clay doesn’t stick inside the detailed crevices of the petals.
Step 2: Stamping the Design
-
Planning the layout:
Before committing to the clay, visualize where your four flowers will go. They should be evenly spaced in a grid pattern. -
Stamping the first flower:
Press your daisy stamp firmly into one quadrant of the square. Apply even pressure so all petals impress at the same depth. -
Completing the grid:
Repeat the stamping process for the remaining three quadrants, trying to keep the alignment symmetrical. -
Adding separation details:
Using a needle tool or toothpick, create a very faint, dotted texture between the flowers if desired, mimicking the speckled look in the photo. -
Adding center pollen dots:
Gently poke a small hole or indentation in the very center of each flower to define the bloom. -
Decorative speckling:
I like to take a stiff brush or needle tool and add tiny random pinpricks around the petals to enhance the organic, stone-like texture.
Step 3: Finishing and Assembly
-
Slow drying:
Place your clay square between two pieces of drywall or under loose plastic to let it dry slowly. This prevents the corners from curling up. -
Bisque firing:
Once bone dry, fire the piece in a kiln according to your clay body’s instructions (usually Cone 04-06). -
Glazing or sealing:
For the look in the photo, skip a colored glaze. Instead, wash it with a very diluted oxide if you want to highlight the texture, or simply seal it with a clear matte varnish. -
Applying the backing:
If you are mounting this onto a slate tile like the image suggests, clean the back of your ceramic piece and the slate surface with alcohol. -
Gluing securely:
Apply a strong adhesive like E6000 to the back of the ceramic square and press it firmly centered onto the slate backing. -
Final cure:
Allow the adhesive to cure for at least 24 hours before using the coaster for your morning coffee.
Warped Edges?
If your coaster curls while drying, flip it over, mist the back slightly, and place a weighted board on top for a day to flatten it back out.
Enjoy using your beautifully textured coasters that bring a bit of the garden indoors
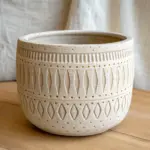
Repeat Border Band Stamps

This charming ceramic bowl features a warm, speckled clay body adorned with a repeating stamped wheat or leaf border that feels rustic yet refined. The design is framed by subtle incised lines and a delicate dotted rim, creating a piece that looks equally beautiful on display or holding your morning cereal.
How-To Guide
Materials
- Speckled stoneware clay (e.g., a sandy or groggy buff clay)
- Pottery wheel or slab roller/mold (depending on construction method)
- Rib tool (wooden or silicone)
- Needle tool
- Sponge
- Carving tool or sgraffito loop tool
- Leaf/wheat pattern stamp (bisque or rubber)
- Small round tool or drill bit (for dots)
- Clear or transparent matte glaze
- Red iron oxide wash or brown underglaze (optional for inlay)
Step 1: Forming the Bowl
-
Prepare the Clay:
Begin by wedging your speckled stoneware clay thoroughly to remove air bubbles. This specific look relies heavily on the clay body itself, so choose one with nice iron speckles built in. -
Wheel Throwing:
Throw a medium-sized bowl on the wheel. Aim for a gently curving profile with a distinct, slightly thickened rim. Compress the bottom well to prevent cracking. -
Refining the Shape:
Use a rib tool while the wheel is spinning slowly to smooth the exterior and interior walls, removing throwing lines if you want the smooth canvas shown in the photo. -
Drying to Leather Hard:
Allow the bowl to dry slowly until it reaches a sturdy leather-hard stage. It needs to be firm enough to handle the pressure of stamping without warping. -
Trimming:
Trim the foot of the bowl to give it a nice lift. Ensure the walls are an even thickness before you begin decoration.
Step 2: Stamping and Detailing
-
Marking Guidelines:
Place the bowl back on the banding wheel. Using a needle tool, lightly scribe two parallel ring lines around the exterior belly of the bowl. These will serve as the top and bottom boundaries for your main stamp band. -
Deepening the Lines:
Go back over your scribed lines with a carving tool or loop tool to create defined grooves. This frames the stamped area beautifully. -
Applying the Main Stamp:
Hold the wall of the bowl from the inside with one hand to support it. With your other hand, press your leaf or wheat pattern stamp firmly into the clay between the two carved grooves. Repeat this process around the entire circumference. -
Adding the Rim Detail:
Near the top rim, create a single row of small indentations. You can use the back of a small drill bit or a tiny round stylus tool. Space them evenly for a clean, rhythmic look. -
Smoothing:
Gently gently run a finger or a very slightly damp sponge over any sharp burrs raised by the stamping process, but be careful not to erase the texture.
Uneven Stamping?
If your stamps aren’t meeting perfectly at the end of the rotation, slightly adjust the spacing of the last 3-4 impressions to hide the gap visually.
Step 3: Finishing and Glazing
-
Bisque Firing:
Once the bowl is bone dry, fire it to bisque temperature (usually cone 04 or 06). -
Staining the Texture:
To make the pattern pop like in the image, apply an iron oxide wash or a thinned dark brown underglaze over the stamped area. Wipe it back immediately with a damp sponge so color remains only in the recesses. -
Wax Resist:
Apply wax resist to the foot ring to prevent glaze adhesion where it meets the kiln shelf. -
Glazing:
Dip the entire bowl into a clear or semi-matte transparent glaze. This allows the natural speckles of the clay and the oxide-stained texture to shine through clearly. -
Final Firing:
Fire the piece to the maturation temperature of your specific clay and glaze combination (likely cone 5/6 or cone 10).
Stamp Clarity Tip
Dust your bisque or rubber stamp lightly with cornstarch before pressing it into the clay to prevent it from sticking and pulling up the surface.
Once cooled, you’ll have a beautifully textured bowl ready for your kitchen table

TRACK YOUR CERAMIC JOURNEY
Capture glaze tests, firing details, and creative progress—all in one simple printable. Make your projects easier to repeat and improve.
Grid and Checkerboard Stamps
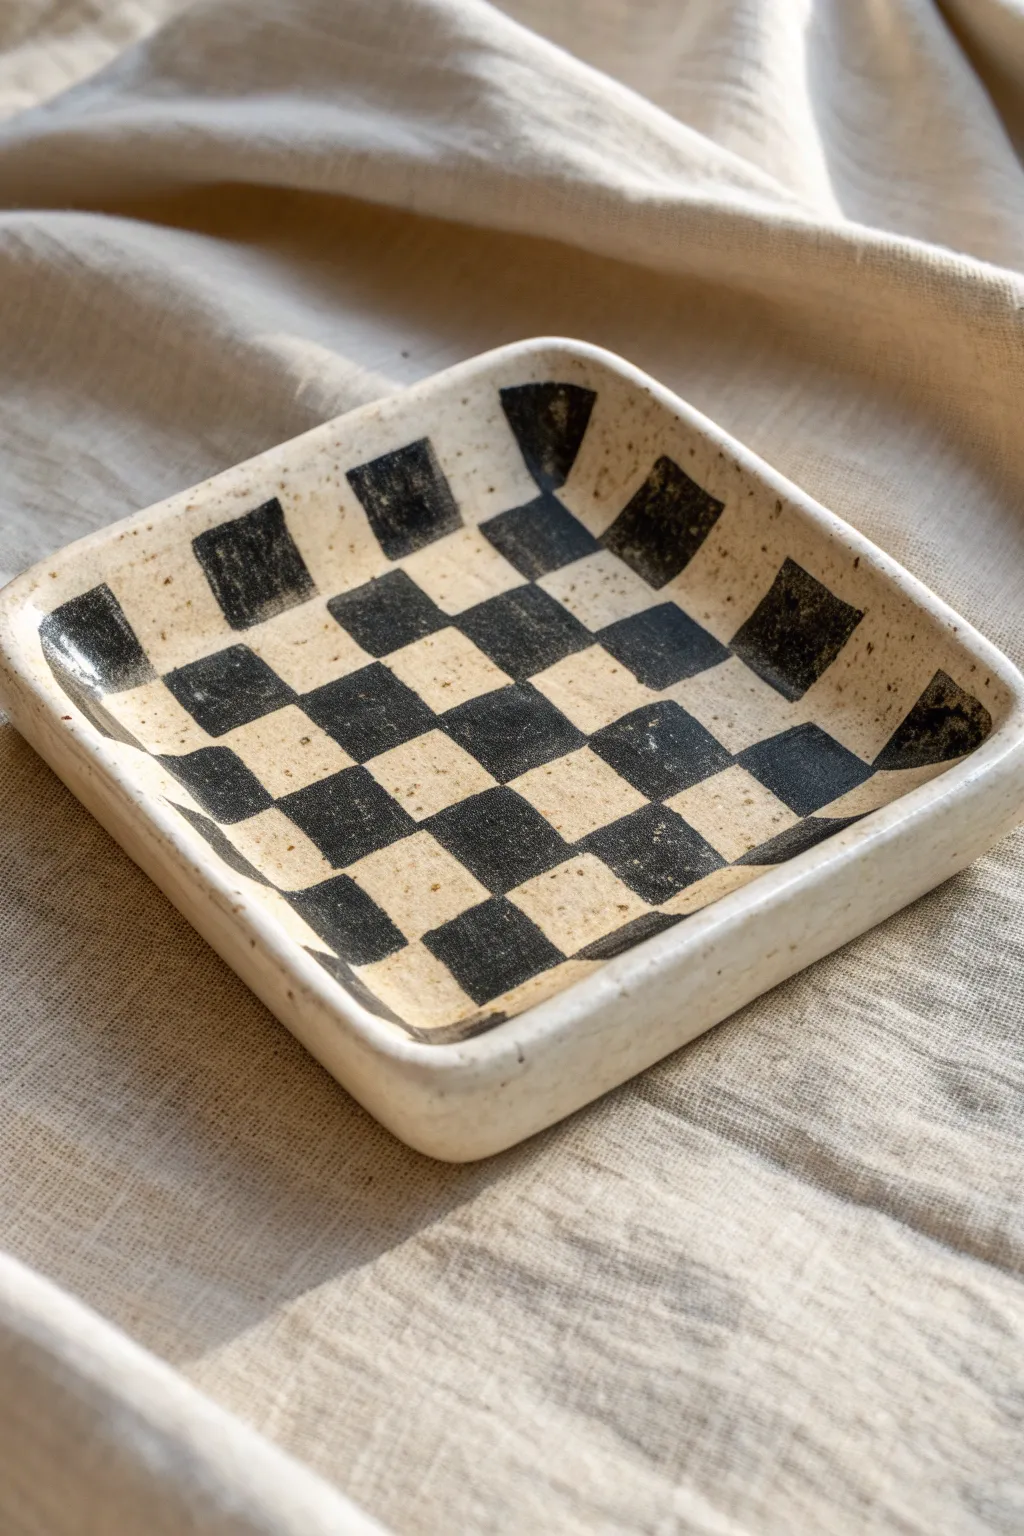
This trendy, handmade ceramic dish features a classic black and white checkerboard pattern brought to life with a slightly imperfect, wobbly organic aesthetic. Perfect for holding jewelry or keys, its speckled clay body adds warmth and texture behind the bold geometric design.
Step-by-Step Guide
Materials
- Speckled stoneware clay (or white polymer clay with faux speckles)
- Square cookie cutter (approx. 4-5 inches)
- Rolling pin
- Canvas mat or slab roller
- Sponge
- Soft rib tool (silicone or rubber)
- Small square foam stamp or linoleum block (approx. 0.5-0.75 inch)
- Black underglaze (for ceramics) or black acrylic paint (for air-dry/polymer)
- Clear transparent glaze (for ceramics) or gloss varnish
- Small flat paintbrush
- Needle tool
- Cornstarch (for release)
Step 1: Shaping the Clay Body
-
Prepare your clay:
Start by wedging your speckled stoneware clay thoroughly to remove air bubbles. If you are using polymer clay, condition it until it’s soft and pliable. -
Roll out a slab:
Using a rolling pin on a canvas mat, roll the clay into an even slab about 1/4 inch thick. I like to rotate the clay periodically to ensure it doesn’t stick to the mat. -
Cut the base shape:
Press your large square cookie cutter into the slab to create the main form of the dish. Alternatively, cut a square template from paper and trace around it with a needle tool. -
Smooth the edges:
Dip your finger in a tiny bit of water and run it along the cut edges to soften any sharp angles or burrs left by the cutter. -
Create the rim:
Gently lift the edges of the square slab upwards with your fingertips to create a shallow wall. You want a soft curve rather than a sharp 90-degree angle. -
Refine the shape:
Use a soft rib tool or a damp sponge to smooth the interior curve where the floor meets the wall, ensuring the transition is seamless. -
Let it firm up:
Allow the dish to reach a leather-hard state. It should be firm enough to handle without deforming but still cool to the touch.
Stamp Master Tip
Make your own stamp from a piece of kitchen sponge. The porous texture holds underglaze well and creates that rustic, uneven look shown in the photo.
Step 2: Stamping the Grid
-
Prepare the stamp:
Select a small square foam stamp. If you don’t have one, carve a simple square out of a scrap linoleum block or even a firm eraser. -
Load the color:
Pour a small amount of black underglaze onto a palette. Lightly dab your square stamp into the pigment, ensuring an even coating but not a dripping glob. -
Plan your center:
Visually locate the center of your dish. It helps to start the pattern here and work outward to ensure symmetry. -
Stamp the first row:
Press the stamp down firmly into the center of the clay. Lift straight up to avoid smearing. Continue stamping in a diagonal line (corner to corner) to establish your checkerboard spacing. -
Fill the checkerboard:
Fill in the remaining squares, visualizing a grid where every other space is left blank. Don’t worry if the squares warp slightly as they go up the curved rim; this adds character. -
Touch up edges:
If the stamp leaves faint spots, use a small flat paintbrush with a tiny bit of underglaze to fill in the color, but try to keep the stamped texture visible.
Step 3: Finishing Touches
-
Bisque fire:
Once the dish is bone dry, fire it in the kiln to bisque temperature (Cone 04). If using oven-bake clay, bake according to package instructions now. -
Apply clear glaze:
Dip the bisqued dish into a clear transparent glaze. This will seal the clay and make the black checks pop against the speckled background. -
Wipe the foot:
Use a damp sponge to wipe any glaze off the very bottom of the dish so it doesn’t stick to the kiln shelf. -
Final firing:
Fire the piece again to the maturity temperature of your clay body (likely Cone 5 or 6 for stoneware). For polymer clay, apply a gloss varnish instead.
Smudged the paint?
If you smudge underglaze on raw clay, don’t wipe it wet! Let it dry completely, then gently scratch the mistake off with a needle tool or sanding sponge.
Place your finished dish on a bedside table or vanity to enjoy that stylish grid pattern every day
Lace-Look Texture With Mesh Stamps
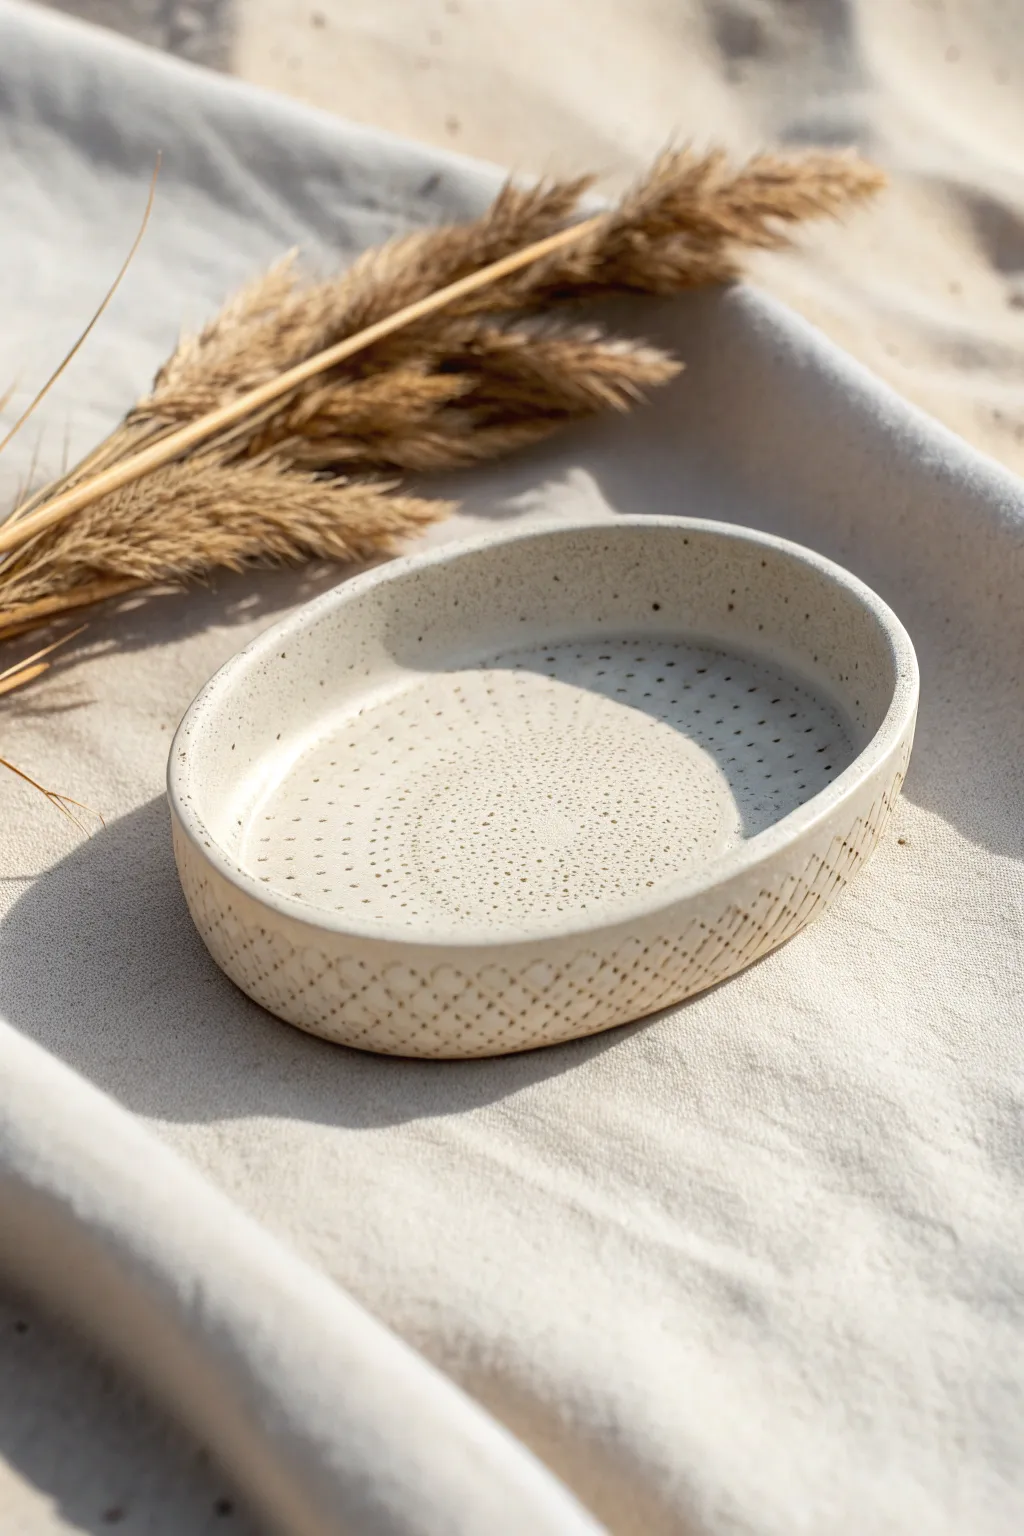
Achieve a delicate, fabric-imprinted look on pottery using simple mesh tools. This project creates a shallow, speckled oval dish with a subtle dotted texture that mimics woven lace or canvas.
Detailed Instructions
Materials
- Speckled cream stoneware clay (e.g., Speckled Buff)
- Small mesh sheet, burlap, or plastic canvas
- Rolling pin
- Oval template or cookie cutter
- Sponge
- Rib tool (wooden or rubber)
- Fettling knife or needle tool
- Clear matte glaze
- Canvas work surface
- Plastic wrap
Step 1: Preparing the Slab
-
Wedge the clay:
Start by thoroughly wedging a ball of speckled stoneware clay to remove any air bubbles. Look for a clay body with integrated manganese speckles for that authentic look shown in the photo. -
Flatten the base:
Press the ball flat onto your canvas work surface with your palm. -
Roll the slab:
Using your rolling pin, roll out the clay to a uniform thickness of about 1/4 inch. Flip the clay occasionally to prevent sticking and ensure evenness. -
Smooth the surface:
Run a damp rib tool firmly over the surface to compress the clay particles and create a perfectly smooth canvas for your texture.
Sticky Mesh?
If the mesh pulls up chunks of clay when you remove it, lightly dust the clay surface with cornstarch before laying down the mesh. This acts as a resist without affecting the texture.
Step 2: Adding Texture and Shaping
-
Position the mesh:
Lay your mesh material, plastic canvas, or coarse fabric gently over the center of the slab. Ensure it is flat and free of wrinkles. -
Imprint the pattern:
Roll your rolling pin over the mesh with firm, consistent pressure. You want the mesh to press deeply enough to leave distinct dots, but not so deep that it thins the clay structure significantly. -
Remove the stamp:
Carefully peel back the mesh to reveal the dotted, grid-like pattern. -
Cut the shape:
Place your oval template over the textured area. Use a needle tool or fettling knife to cut vertically around the template. Remove the excess clay. -
Smooth the rim:
Before lifting the oval, run a damp fingertip or sponge gently around the cut edge to soften any sharpness.
Step 3: Forming the Walls
-
Lift the walls:
Carefully lift the clay slab. There are two ways to do this: drape it inside a shallow slump mold for a perfect curve, or build the walls by hand. For this piece, a slump mold works best to preserve the interior texture. -
Establish the curve:
If hand-building, place the slab on a banding wheel. Gently pinch and lift the outer 1 inch of the oval upwards to create a shallow wall. -
Texture the exterior:
If you want the texture on the outside walls like the photo, you should have textured the entire slab before cutting. If you missed this, lightly press the mesh against the exterior walls now while supporting the inside. -
Refine the rim profile:
Use a sponge to ensure the rim is rounded and smooth. I like to check that the wall height is consistent all the way around the oval. -
Slow drying:
Loosely cover the piece with plastic wrap. Let it dry slowly to the leather-hard stage to prevent warping.
Make it Pop
To highlight the mesh texture further, brush a dark oxide wash (like iron oxide) into the grooves after bisque firing, then wipe away the excess with a damp sponge before glazing.
Step 4: Finishing and Firing
-
Bisque fire:
Once bone dry, fire the piece in a kiln to bisque temperature (usually Cone 04). -
Apply clear glaze:
Dip or brush a clear matte glaze over the entire piece. The clear glaze allows the natural speckles of the clay body to shine through as the main visual feature. -
Wipe the foot:
Sponge off any glaze from the bottom of the tray so it doesn’t stick to the kiln shelf. -
Final firing:
Glaze fire the piece to the maturity temperature of your clay (typically Cone 5 or 6 for stoneware).
Enjoy using your beautifully textured tray as a soap dish or a catch-all for jewelry.
Button Imprint Stamp Sets
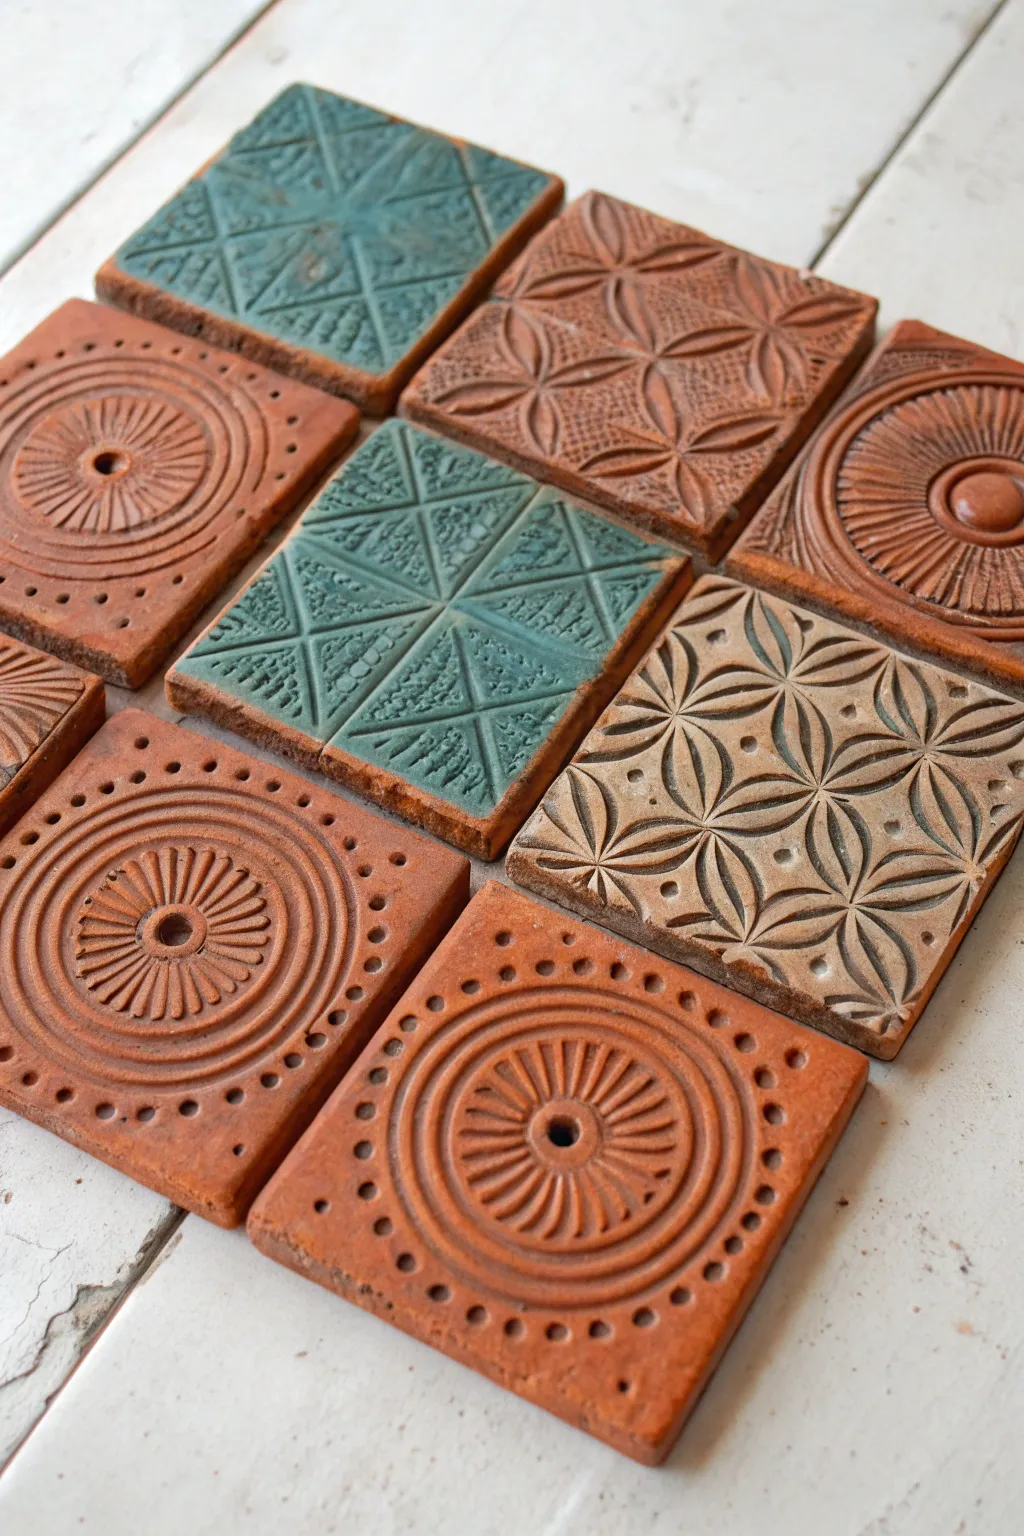
These charming, rustic tiles feature intricate geometric patterns created with nothing more than simple buttons and everyday objects. The result is a set of textured, earthy coasters or decorative tiles that look like they were unearthed from an ancient site.
Step-by-Step Tutorial
Materials
- Air-dry clay (terracotta color) or polymer clay
- Rolling pin
- Square cookie cutter (approx. 3-4 inches) or a knife and ruler
- Canvas mat or parchment paper
- Large vintage buttons with deep relief patterns
- Smaller buttons for center details
- A small drinking straw or knitting needle
- Wooden skewer or toothpick
- Sponge
- Acrylic paint (teal, antique white)
- Paper towels
- Matte clear sealant (optional)
Step 1: Preparing the Clay Base
-
Condition the clay:
Start by kneading your terracotta-colored clay until it is soft, pliable, and free of air bubbles. If you are using polymer clay, the warmth of your hands will make it easier to work with. -
Roll out a slab:
Place the clay on a canvas mat or parchment paper to prevent sticking. Using your rolling pin, roll the clay out into an even slab about 1/4 inch thick. You want it substantial enough to take a deep impression without warping. -
Cut the shapes:
Press a square cookie cutter firmly into the clay to create your tile shapes. Alternatively, measure perfect squares with a ruler and slice them cleanly with a craft knife. -
Smooth the edges:
Dip your finger in a little water (for air-dry clay) or baby oil (for polymer) and gently run it along the cut edges of your squares to soften any sharpness and give them a finished look.
Sticky Situation?
If your buttons stick to the clay, lightly dust the clay surface with cornstarch (for polymer) or a tiny bit of water (for air-dry) before stamping to ensure a clean release.
Step 2: Stamping the Designs
-
Select your stamps:
Gather a variety of buttons. Look for metal or plastic shank buttons with raised geometric lines, flower petals, or concentric circles. These act as your primary stamping tools. -
Create the circular design:
For the circular motif, find a large round object or button to press a central ring. Then, use the edge of a credit card or a skewer to press radiating lines outward from the center, mimicking sun rays. -
Add corner details:
On the circular tiles, take a small stylus or a dull pencil tip and gently press a dot pattern into the four corners of the square to frame the central circle. -
Impress the geometric flower:
For the floral geometric tile, find a button with a petal design. Press it repeatedly in a grid pattern. I like to overlap the edges of the impressions slightly so the petals connect, creating a continuous lattice effect. -
Form the triangular pattern:
To make the teal tile’s design, use a long, straight edge or ruler to press an ‘X’ across the tile, connecting opposite corners. Then press a horizontal and vertical line through the center to create eight triangles. -
Texture the triangles:
Select a stamp or textured fabric and press it gently inside specific triangles to create contrasting rough patches, leaving alternating triangles smooth. -
Refine the impressions:
Check all your lines. If any impression looks too faint, go over it again carefully. The deeper the texture now, the better the antiquing phase will look later.
Go Magnetic
Glue strong magnets to the back of smaller versions of these tiles. They make incredibly stylish refrigerator magnets that look like miniature architectural fragments.
Step 3: Finishing and Antiquing
-
Dry or bake:
If using air-dry clay, let the tiles dry on a wire rack for 24-48 hours, flipping them occasionally to prevent curling. For polymer clay, bake according to the manufacturer’s instructions on the package. -
Prepare the ‘wash’ paint:
Once fully cured and cool, mix a small amount of teal or off-white acrylic paint with water (about 50/50 ratio) to create a thin wash. -
Apply the wash:
Brush the watered-down paint liberally over the textured surface of a tile, ensuring the liquid flows into all the deep crevices and stamped lines. -
Wipe back:
Immediately take a damp paper towel or sponge and wipe across the surface. You want to remove most of the paint from the raised areas while leaving the pigment settled in the recessed lines. -
Repeat for variety:
Leave some tiles plain naked terracotta for contrast, and use different wash colors on others to create a varied set like the one in the photo. -
Seal the work:
To protect your coasters from moisture, apply a thin coat of matte varnish or sealant over the top once the paint is completely dry.
Arrange your finished tiles on a coffee table or mount them in a shadow box to enjoy their rustic, architectural charm
Shell and Pebble Press Stamps
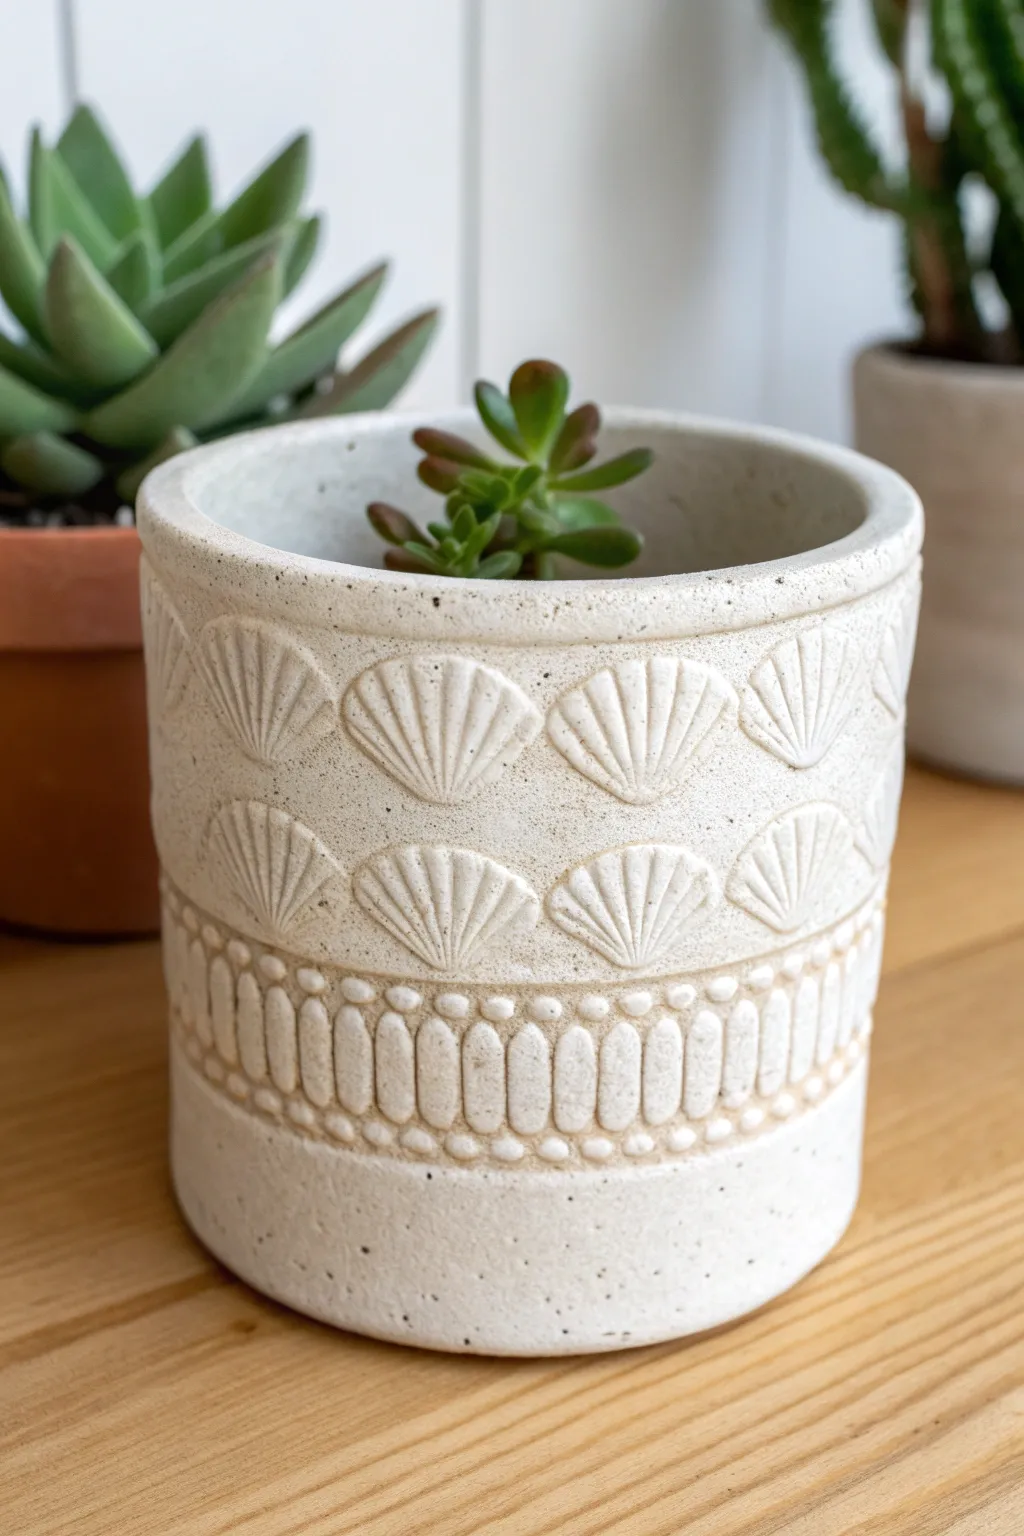
Bring the calming vibes of the coast into your home with this textured planter featuring rhythmic shell imprints and a pebble-like border. The speckled clay body gives it a natural, sandy appearance that beautifully complements succulents.
Step-by-Step Guide
Materials
- Speckled buff stoneware clay (or polymer clay for non-functional decor)
- Real sea scallop shell (small to medium)
- Small oval pebble or rounded sculpting tool
- Rolling pin
- Canvas work surface
- Cylindrical mold (like a large can or PVC pipe)
- Fettling knife or craft knife
- Scoring tool (serrated rib or needle tool)
- Slip (clay and water slurry)
- Sponge
- Matte white glaze (if firing)
Step 1: Preparing the Slab
-
Roll out the clay:
Begin by rolling out a generous slab of speckled clay on your canvas surface. Aim for a thickness of about 1/4 inch to ensure the walls are sturdy enough to support the planter’s shape. -
Cut the rectangle:
Measure the circumference of your cylindrical mold and add an inch for overlap. Cut a long rectangle from your slab to these dimensions, ensuring the height is what you want for your final pot. -
Smoothen surfaces:
Before texturing, run a slightly damp sponge or a soft rib over the clay surface to remove any canvas texture or rolling pin marks. This creates a clean slate for your stamping.
Clean Impressions
Dust your shell and pebble tools lightly with cornstarch before pressing them into the clay. This acts as a release agent and prevents the tool from sticking or pulling up the clay.
Step 2: Stamping the Design
-
Plan the spacing:
Mark a light visual guideline about halfway up the rectangle. This will separate your shell zone from the pebble border zone. -
First shell row:
Take your clean scallop shell. Press the ribbed side firmly into the clay near the top edge. Rock it slightly left and right to get a deep impression of the fan shape. -
Continue the pattern:
Repeat the shell stamp horizontally across the slab. I like to keep them touching slightly, creating a continuous scalloped wave. -
Second shell row:
Directly below the first row, press a second row of shells. Align the bottom point of the new shell directly under the meeting point of the two shells above it for an alternating, scale-like effect. -
Create the border:
Below the shells, press two horizontal lines using a straight edge or a thin dowel to define a band area. This band should be about an inch wide. -
Pebble pressing:
Using a small, smooth pebble or the rounded end of a sculpting tool, press vertical oval indents inside the band you just created. Space them tightly together like a row of seeds. -
Add detail dots:
Use a smaller tool tip to press tiny dots along the top and bottom ridges of the pebble band for extra texture.
Driftwood Feet
Elevate your planter by creating three small, round clay balls and attaching them to the base as feet. Texture them with a wood grain tool to mimic driftwood supports.
Step 3: Assembling the Cylinder
-
Bevel the edges:
Cut the short ends of your rectangle at a 45-degree angle. This allows for a seamless join when you roll it into a cylinder. -
Score and slip:
Rough up the beveled edges with your scoring tool and apply a generous amount of slip. -
Form the shape:
Wrap the slab around your cylindrical mold. Press the scored edges together firmly. You may need to reach inside to support the wall while smoothing the seam on the outside. -
Hide the seam:
Gently re-stamp or smooth over the joined area so the pattern looks continuous. If the seam interrupts a shell, press the shell tool over it again.
Step 4: Finishing Touches
-
Attach the base:
Roll a smaller slab for the base. Place your cylinder on top of it, trace around the bottom edge, and cut out the circle. -
Join base to wall:
Score and slip the bottom edge of the cylinder and the edge of the base circle. Press them together, then use a wooden tool to smudge the clay across the seam on the underside for a strong bond. -
Refine the rim:
Smooth the top rim of the pot with a damp sponge or a chamois strip to ensure it’s comfortable to touch. -
Dry and fire:
Let the piece dry slowly under plastic to prevent warping. Once bone dry, bisque fire the piece. Apply a thin matte white glaze that allows the speckles/texture to show through, wipe back the glaze from the high points if desired, and glaze fire.
Once fired and cooled, pot your favorite succulent and enjoy your handmade coastal creation
Carved Soft Rubber Block Stamps
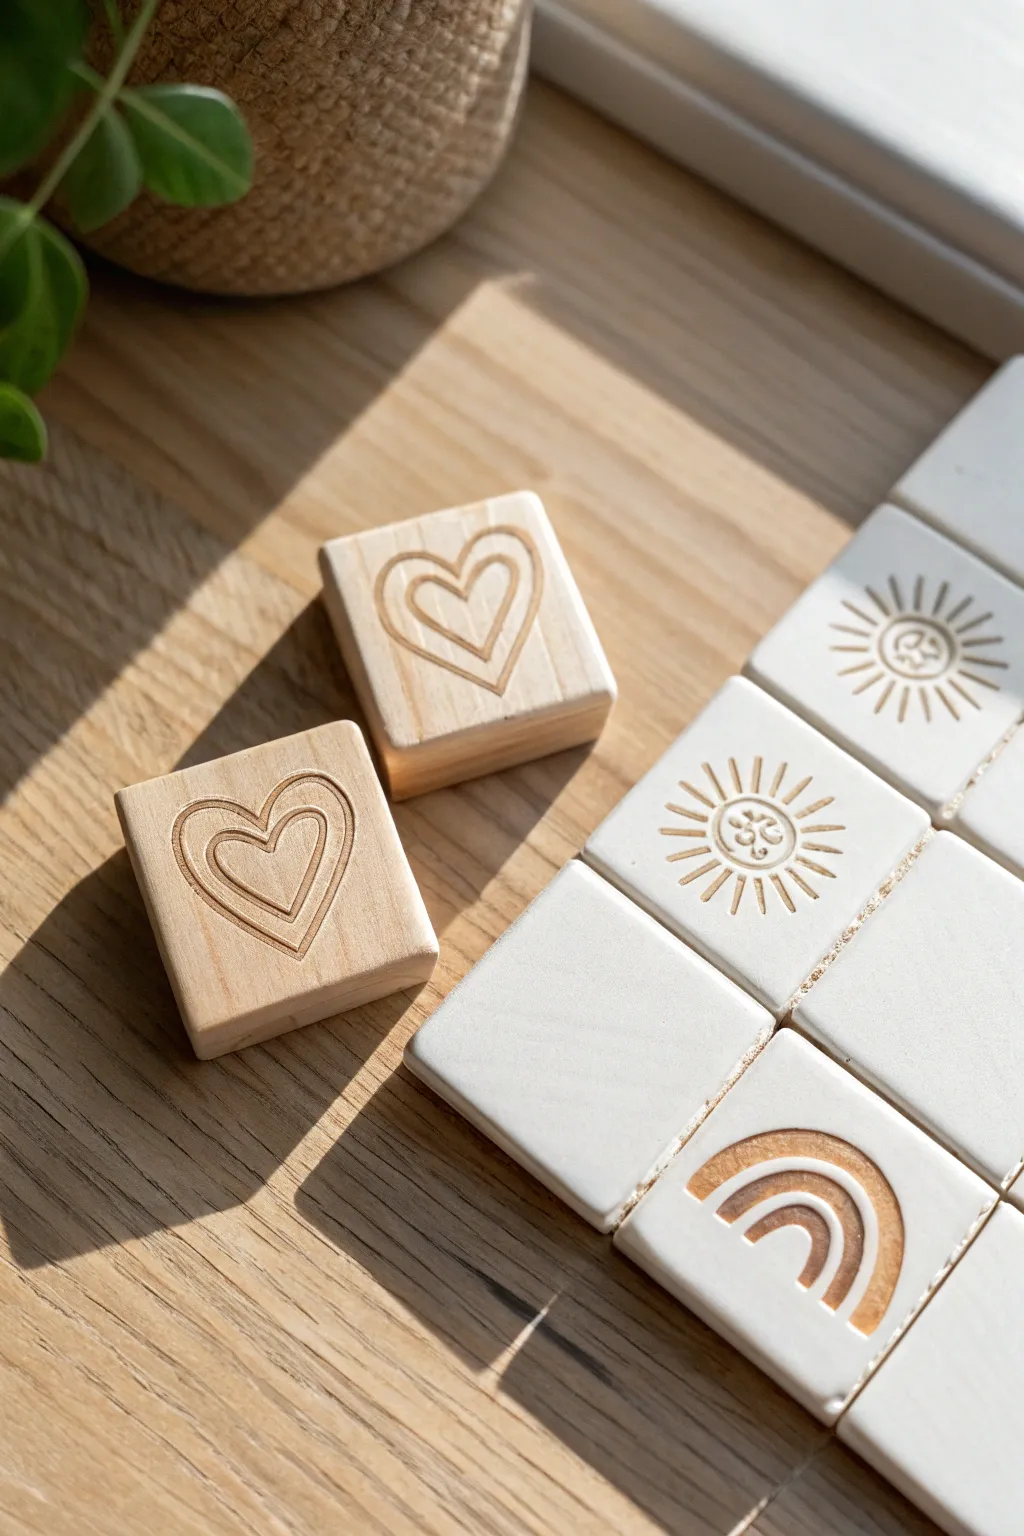
Embrace the natural warmth of wooden textures with these simple yet striking heart stamps. This project transforms basic pine blocks and soft clay into a charming collection of personalized tiles, perfect for rustic decor or sweet handmade gifts.
Detailed Instructions
Materials
- Square wooden blocks (untreated pine or basswood)
- V-gouge carving tool (linocut set)
- Pencil
- Air-dry clay or polymer clay (white)
- Rolling pin
- Fine-grit sandpaper (220 grit)
- Ruler
- Canvas or craft mat
Step 1: Designing and Carving the Wood
-
Prepare the timber blocks:
Begin with smooth, square wooden blocks. If your wood feels rough, give the stamping face a quick sanding with fine-grit sandpaper to ensure a clean impression later. -
Sketch the heart motif:
Using a pencil, draw your design directly onto the smooth face of the wood. For this project, draw a large heart shape, and then a slightly smaller heart inside it to create a double-outlined effect. -
Start the center carving:
Take your V-gouge tool and carefully carve out the innermost heart shape first. You want to remove the wood inside the smallest heart so it becomes negative space. -
Carve the gap:
Move to the space between the two heart outlines. Carve a consistent channel between your pencil lines, removing the wood to create separation between the inner and outer heart rings. -
Define the outer edge:
Carve away the wood immediately surrounding the large outer heart. You don’t need to carve the entire background away yet, just enough to clearly define the shape’s boundary. -
Clear the background:
Continue carving outwards from the main shape to the edges of the block. The goal is to lower the background level so only the double-heart lines remain raised and flush with the original surface. -
Clean up stray fibers:
Inspect your carving for any small splinters or rough patches in the negative space. Use the tool or a bit of folded sandpaper to smooth these out so they don’t snag the clay.
Sticky Clay Fix
If clay gets stuck in the wood grooves, use an old toothbrush or a stiff paintbrush to gently flick the debris out before it hardens.
Step 2: Stamping the Clay Tiles
-
Condition the clay:
Take a portion of white air-dry or polymer clay and knead it until it is soft, pliable, and free of cracks. -
Roll out a slab:
Place the clay on a canvas or craft mat to prevent sticking. Use a rolling pin to flatten the clay into an even slab, approximately 1/4 inch thick. -
Cut the tiles:
Using a ruler and a knife or a square cookie cutter, cut the clay into uniform squares that are roughly the same size as your wooden stamps. -
Smooth the edges:
Dip your finger in a little water (for air-dry clay) and run it along the cut edges of each square to soften them and remove any sharp angles. -
Make the impression:
Press your finished wooden stamp firmly into the center of a clay tile. Apply even pressure across the back of the block to ensure the entire design transfers. -
Release carefully:
Gently wiggle the wooden block slightly to break the suction, then lift strictly upwards. If the wood sticks, I find dusting the stamp with a tiny bit of cornstarch helps it release cleanly. -
Repeat with variations:
Create a set by stamping other designs, like suns or rainbows, onto the remaining tiles to build a cohesive collection. -
Let them cure:
Allow the stamped tiles to dry completely according to your clay package instructions. For air-dry clay, flip them over halfway through the drying process to prevent curling.
Pro Tip: Depth Check
Make a test print on a scrap piece of clay before your final tiles. This reveals areas where the background carving isn’t deep enough.
Enjoy displaying your beautiful, handcrafted tiles or use the wooden blocks themselves as rustic decor pieces
Foam Sheet Stamps for Bold Shapes
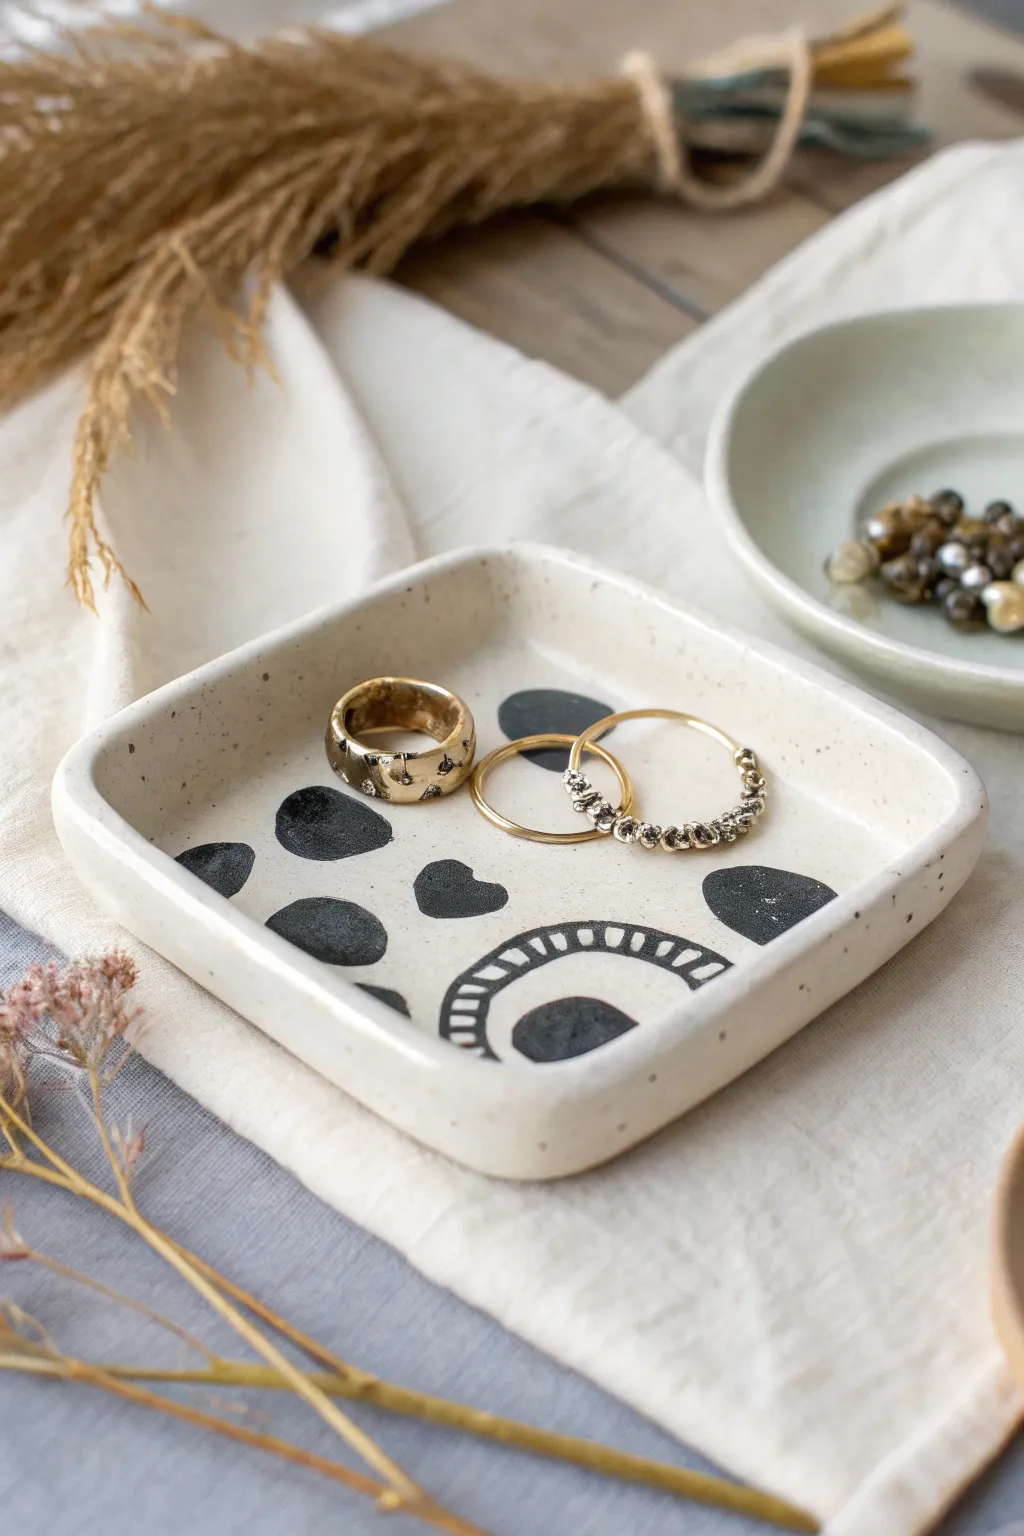
Create a modern, artful home for your favorite rings using simple foam shapes. This project transforms basic polymer or air-dry clay into a speckled, boutique-style dish featuring bold black organic motifs.
How-To Guide
Materials
- White polymer clay (optionally with speckles)
- Black acrylic paint
- Craft foam sheet (2mm thick)
- Small wood block or acrylic stamping block
- Rolling pin or clay machine
- Square cookie cutter (approx 4-5 inches)
- Sponge or foam pouncer
- Scissors
- Glue stick
- Sandpaper (fine grit)
- Matte or satin varnish (polymer clay compatible)
Step 1: Stamp Creation
-
Design your shapes:
Begin by sketching simple, organic shapes onto your craft foam sheet. For this look, you’ll need two distinct designs: a medium-sized organic blob (almost like a kidney bean or irregular oval) and a segmented arch shape. -
Cut the foam:
Carefully cut out your shapes using sharp scissors. For the segmented arch design, cut thin strips away from a solid arch shape to create the ladder-like negative space, or assemble small rectangular pieces to form the curve. -
Mount the stamps:
Apply a thin layer of glue stick to the back of your foam cutouts. Press them firmly onto your wood or acrylic block. If you don’t have a block, even a steady jar lid can work as a handle.
Step 2: Clay Preparation
-
Condition the clay:
Warm up your white polymer clay by kneading it in your hands until it becomes soft and pliable. If you want the speckled pottery look shown in the photo but only have plain white clay, mix in a tiny pinch of black pepper or dried used coffee grounds. -
Roll the slab:
Roll the clay out onto a clean, smooth surface until it is about 1/4 inch thick. Ensure the thickness is even throughout to prevent cracking during baking. -
Cut the base shape:
Use your square cookie cutter to punch out the main shape of the dish. If you don’t have a cutter large enough, print a square template on paper, lay it on the clay, and cut around it with a craft knife.
Smudged Paint?
If paint smears on raw polymer clay, dip a Q-tip in rubbing alcohol and gently wipe the error away. It acts like an eraser without ruining the clay surface.
Step 3: Stamping and Forming
-
Load the paint:
Squeeze a small amount of black acrylic paint onto a palette. Use a sponge pouncer to dab paint evenly onto your foam stamp. Avoid overloading it, as too much paint will cause the edges to slip and blur. -
Test prints:
Before stamping your final piece, I always do a quick test press on a scrap piece of paper or clay to check that the coverage is solid but not gloopy. -
Stamp the pattern:
Press the stamp firmly onto the flat clay slab. Create a balanced composition by placing the organic blobs randomly and adding the arch motif near one edge. Lift the stamp straight up to keep the lines crisp. -
Dry the paint:
Allow the acrylic paint to dry completely on the raw clay. This usually takes about 10–15 minutes. -
Form the rim:
Once dry, gently lift the edges of the square slab. Use your fingertips to pinch and curve the corners upward to create a shallow basin shape. Keep the bottom flat so it sits stable on a table. -
Smooth the edges:
Dip your finger in a little rubbing alcohol or baby oil and run it along the rim to smooth out any rough fingerprints or jagged cuts from the shaping process.
Texture Trick
To mimic the speckled stoneware look perfectly, mix ‘Granitex’ clay with regular white clay, or knead in actual ground black pepper before rolling.
Step 4: Finishing
-
Bake or dry:
Follow the manufacturer’s instructions for your specific clay. For polymer clay, place the dish on a parchment-lined baking sheet and bake at the recommended temperature (usually around 275°F/135°C). -
Cool down:
Let the dish cool completely in the oven with the door strictly closed to prevent thermal shock cracks. -
Light sanding:
If the rim feels sharp after baking, gently rub it with fine-grit sandpaper under running water to soften the edge. -
Seal the piece:
Apply a thin coat of matte water-based varnish to seal the paint and give the dish a finished, professional ceramic feel.
Place this stylish little dish on your nightstand to keep your daily jewelry safe and organized
Negative Space Cutout Clay Stamps
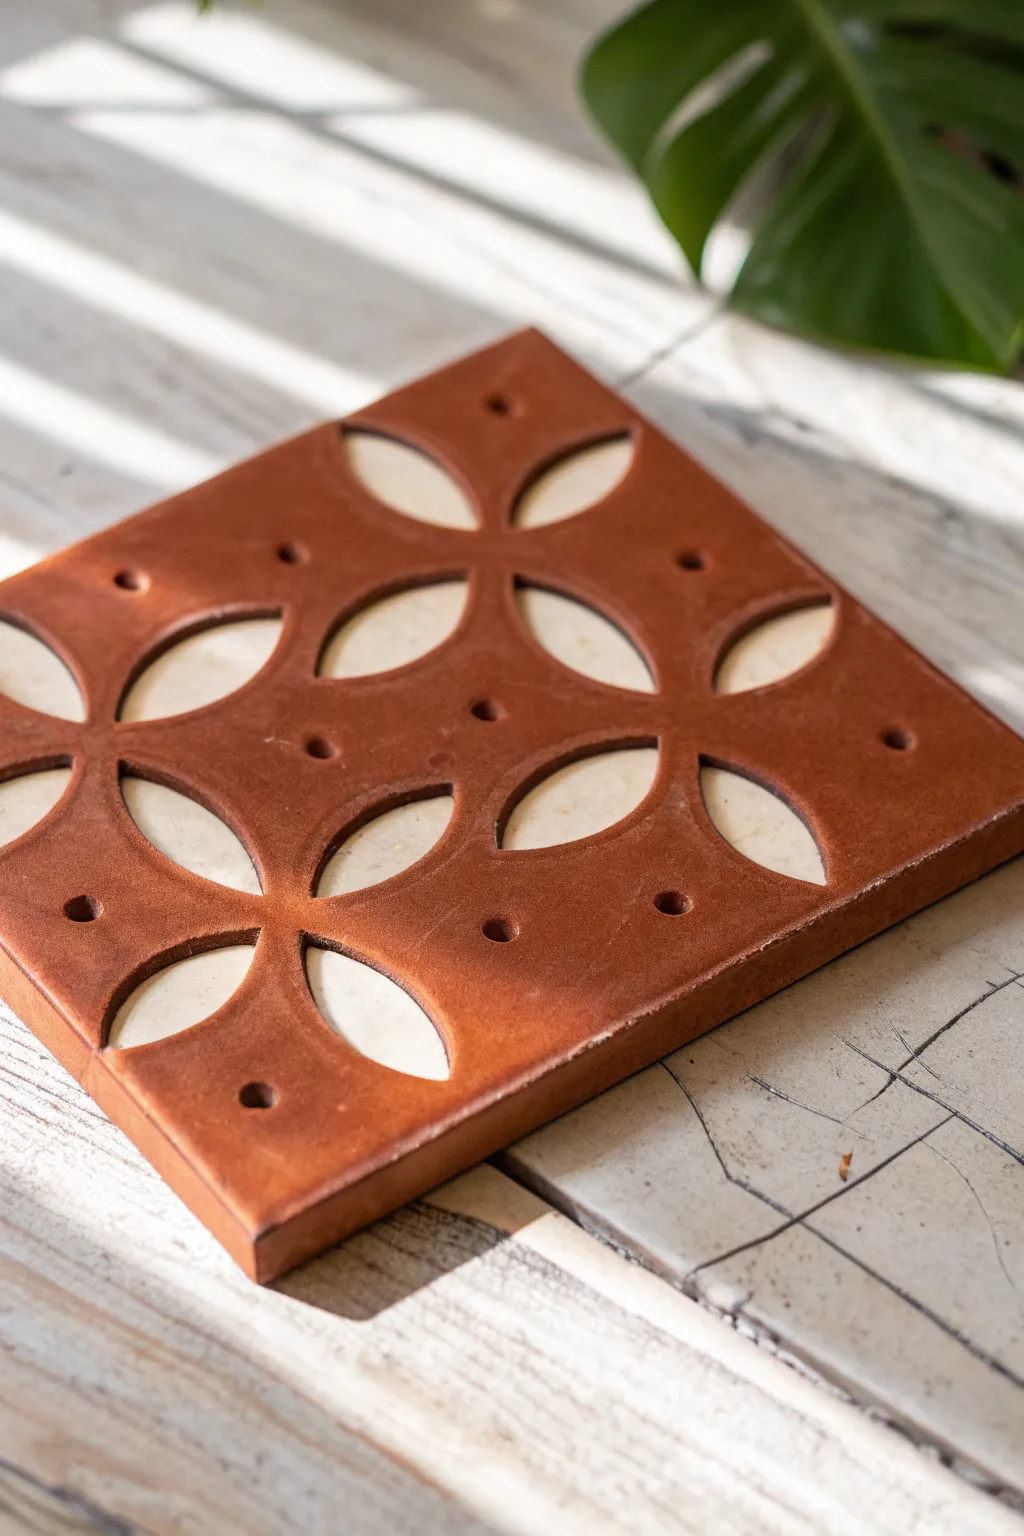
This project transforms a simple slab of clay into a stunning relief tool, featuring elegant petal-shaped cutouts and precise punched details. The rich terracotta finish allows you to see the design clearly, making it perfect for stamping patterns onto fabric, paper, or other clay surfaces.
Step-by-Step Tutorial
Materials
- Polymer clay or air-dry clay (terracotta color)
- Clay roller or rolling pin
- Two depth guides (e.g., wooden slats or stacks of playing cards)
- Square cookie cutter (approx. 3-4 inches) or ruler and craft knife
- Small teardrop or petal-shaped clay cutter
- Small round piping tip or straw (for hole punching)
- Smoothing tool or sponge
- Cornstarch or baby powder (release agent)
- Fine-grit sandpaper
Step 1: Preparation and Base Construction
-
Condition the clay:
Begin by thoroughly kneading your terracotta clay until it is soft, pliable, and free of cracks. Warm clay is much easier to work with and will result in cleaner cuts later. -
Set up guides:
Place your depth guides on your work surface. Since this will be a stamp, you want a substantial thickness—aim for about 1/4 to 3/8 of an inch thick to ensure durability. -
Roll the slab:
Place the ball of clay between the guides and roll it flat with your roller. Ensure the thickness is perfectly even across the entire surface. -
Cut the square:
Press your square cookie cutter firmly into the clay slab. Alternatively, use a ruler and craft knife to measure and cut a perfect square. Remove the excess clay from around the edges. -
Smooth the surface:
Gently run a damp sponge or a smoothing tool over the surface and edges of your square to remove any fingerprints or texture from the roller.
Clean Cuts Every Time
Place a sheet of plastic wrap over the clay before pressing your cutters. This creates a soft, pillowed edge and prevents the clay from getting stuck inside tight cutter corners.
Step 2: Creating the Negative Space Design
-
Mark the center:
Lightly identifying the center of your square can help with alignment, though visual estimation works well for a more organic look. You can make a tiny indented mark if helpful. -
Dust the cutters:
Dip your petal cutter into cornstarch or baby powder. This is crucial for getting the clay pieces to pop out cleanly without dragging and ruining the shape. -
Position the first petals:
Visualize a grid of circles intersecting. Press the petal cutter into the clay to create the central flower motif where four petals meet at a central point. -
Remove the cutouts:
Carefully lift the cut shapes out. If they stick, you can use a needle tool to gently hook and lift the discarded clay without disturbing the surrounding walls. -
Complete the pattern:
Continue cutting petal shapes radiating outward. In this design, half-petals extend off the edges of the square, creating a continuous pattern look. -
Refine the edges:
I like to take a moment here to gently tap down any raised clay ridges created by the cutter pressing into the slab.
Make It a Roller
Instead of a square tile, wrap your clay slab around a PVC pipe or rolling pin before cutting the design to create a continuous rolling texture tool for larger pottery projects.
Step 3: Adding Detail and Finishing
-
Prepare the hole punch:
Select a small round tool, like a piping tip or a stiff straw. Dust the tip with your release powder. -
Punch accent holes:
Punch small holes in the negative spaces between the petals. Aim for the center of the solid areas to balance the visual weight of the design. -
Add perimeter dots:
Add a few more punched holes near the outer edges of the square to act as border accents. -
Clean the back:
Flip the tile over carefully. The cutting process often pushes a small rim of clay out on the reverse side. Smooth this flat so your stamp will lie level when used. -
Dry or bake:
If using polymer clay, bake according to the package directions (usually on a tile in the oven). If using air-dry clay, let it dry slowly away from direct heat to prevent warping. -
Sand for flatness:
Once fully cured or dry, place a sheet of fine-grit sandpaper on a flat surface. rub the face of the stamp against it in circular motions to ensure the stamping surface is perfectly flush. -
Final cleaning:
Wipe away any sanding dust with a slightly damp cloth or baby wipe.
Now you have a durable, custom tool ready to imprint beautiful geometric patterns onto your next masterpiece
Layered Stamping for Depth and Texture

This elegant ceramic bowl showcases how simple geometric stamps can be combined to create complex, mandala-like borders. The warm, toasted clay body contrasts beautifully with the intricate golden-brown inlaid patterns, giving the piece a cozy, artisanal feel.
How-To Guide
Materials
- Speckled stoneware clay (cream or white)
- Pottery wheel (or slab roller/hump mold for handbuilding)
- Trimming tools
- Bisque stamps (leaf/petal shape, grid/waffle texture, triangle)
- Red iron oxide wash or golden-brown underglaze
- Sponge
- Clear matte glaze
- Kiln
- Soft rib tool
Step 1: Forming the Base
-
Throw or Build the Bowl:
Begin by creating a simple, deep bowl form. If throwing on the wheel, aim for a smooth, even curve and a defined rim. If handbuilding, drape a slab over a hump mold to achieve that perfect hemispherical shape. Keep the walls roughly 1/4 inch thick to support deep stamping. -
Refine the Surface:
Once the clay reaches a firmer leather-hard stage, rib the interior and exterior to remove any throwing lines or canvas marks. A smooth canvas is essential for crisp stamp impressions. -
Trim the Foot:
Turn the bowl over and trim a clean foot ring. This elevates the form and gives you a stopping point for your exterior decoration.
Uneven Stamping?
If your stamps aren’t pressing to the same depth, support the clay wall directly behind the stamp with a firm sponge or rib. Uneven pressure usually happens when the clay wall flexes away from you.
Step 2: Stamping the Interior
-
Mark Guidelines:
Using a decorating disk or simply eyeing it, lightly scratch a faint horizontal line about 1.5 inches down from the rim on the inside. This will keep your border level. -
Stamp the Leaf Border:
Take your leaf-shaped outline stamp. Press it firmly into the clay just above your guideline, repeating the shape side-by-side all the way around the inner circumference. Support the outside of the bowl with your hand to prevent warping. -
Fill with Texture:
Using a smaller grid or waffle-texture stamp, press into the negative space between the leaf shapes. This creates that lovely cross-hatched background that adds depth. -
Create the Bottom Medallion:
Center your attention on the very bottom of the bowl. Stamp a central flower or star shape first. Then, create concentric rings around it using small triangle stamps and curved line tools to build the mandala effect shown in the image.
Go Multicolored
Instead of a single oxide wash, try using different colored mishima slips in the grooves. Fill the leaf veins with teal and the grid background with navy for a vibrant, modern twist.
Step 3: Stamping the Exterior
-
Repeat the Motif:
On the outside of the bowl, you’ll mirror the interior design but flipped. Stamp a row of the leaf shapes near the bottom third of the bowl, pointing upwards. -
Add Exterior Texture:
Just like the inside, fill the spaces within or between your exterior leaf stamps with the grid texture. This repetition ties the inside and outside together visually. -
Clean Up Edges:
Use a soft, slightly damp sponge to gently smooth over any sharp burrs raised by the stamping process, being careful not to erase the details.
Step 4: Glazing and Finishing
-
Bisque Fire:
Let the bowl dry slowly to prevent cracking, then bisque fire it according to your clay body’s specifications. -
Apply Oxide Wash:
Mix red iron oxide with water (or use a dedicated golden-brown underglaze). Brush this generously over all stamped areas, ensuring it gets deep into the crevices. -
Wipe Back:
Using a clean, damp sponge, wipe away the excess oxide from the high points of the surface. You want the color to remain only in the stamped recesses, highlighting the pattern. -
Apply Clear Glaze:
Dip or brush a coat of clear matte glaze over the entire piece. A matte finish looks particularly nice here as it mimics the texture of stone and doesn’t distract with high-gloss reflections. -
Final Fire:
Load the kiln for your glaze firing. Make sure the foot ring is wiped clean of glaze before firing.
Enjoy using your new patterned bowl for everything from morning cereal to serving salads
Stamped Texture Test Tiles Library
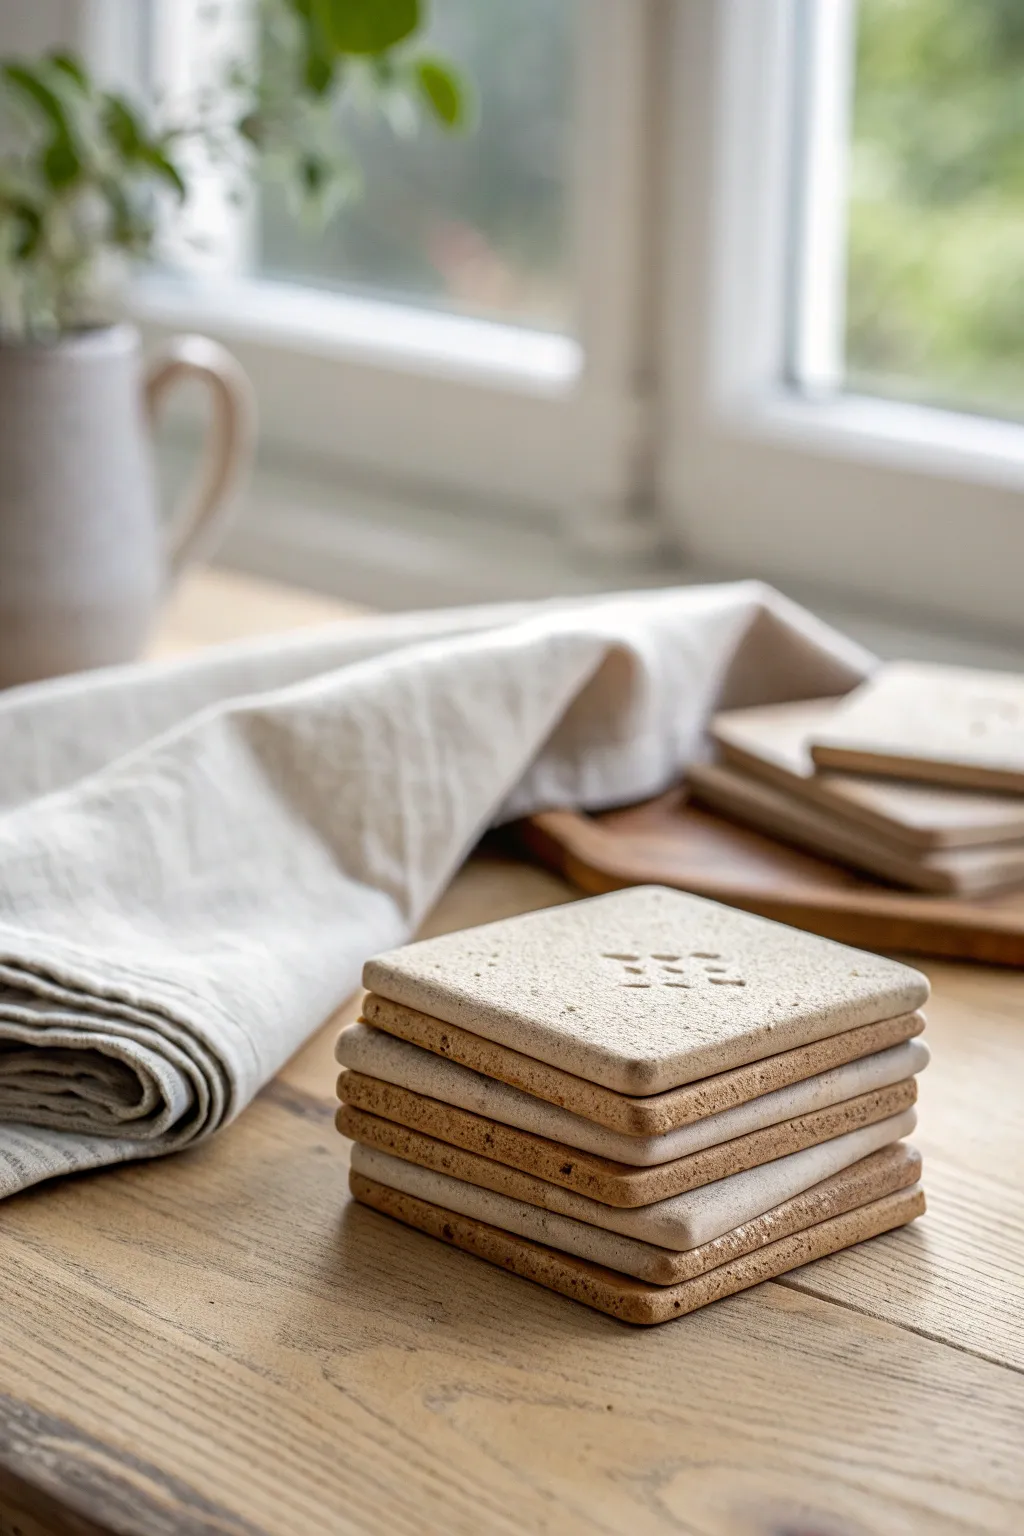
Create a sleek stack of dual-toned ceramic coasters that highlight the natural beauty of speckled clay. These square tiles feature subtle stamped textures and a raw, earthy finish similar to traditional test tiles, perfect for protecting surfaces in style.
Step-by-Step Tutorial
Materials
- Speckled stoneware clay (light beige or white)
- Tan or light brown stoneware clay
- Rolling pin
- Square cookie cutter (approx. 3.5 – 4 inches)
- Small geometric stamps or found objects (screw heads, pen caps)
- Wooden guide strips (1/4 inch thick) or slat guides
- Smoothing rib or damp sponge
- Fettling knife
- Canvas work surface
Step 1: Preparing the Clay Slabs
-
Wedge the clay:
Begin by wedging both your speckled light clay and your tan clay thoroughly to remove air bubbles. This ensures a uniform consistency and prevents cracking later. -
Set up guides:
Place your wooden guide strips on your canvas surface. Space them slightly wider than the width of your intended slab to ensure an even thickness. -
Roll the light clay:
Roll out the light speckled clay between the guides until the rolling pin rests flat on the wood strips. Aim for a consistent 1/4 inch thickness. -
Roll the tan clay:
Repeat the rolling process with the tan clay body. I find keeping separate canvas areas helps prevent cross-contamination of clay colors. -
Smooth the surface:
Use a flexible rib or a slightly damp sponge to compress the clay surface. Run it gently over the slab to remove canvas texture and align the clay particles.
Step 2: Cutting and Stamping
-
Cut the squares:
Press your square cutter firmly into the slabs to create your coaster shapes. If you don’t have a cutter, measure a paper template and cut around it with a fettling knife. -
Soften the edges:
Once the squares are cut, gently run a damp finger along the sharp edges and corners to round them off slightly. This prevents chipping after firing. -
Plan your texture:
Select a simple geometric stamp or a found object. For the look in the photo, a tool with a grid of small dots or a simple cross-hatched pattern works best. -
Apply the stamp:
Press your chosen tool into the center of the leather-hard square. Apply firm, even pressure to leave a clean impression without warping the overall shape. -
Optional variation:
Feel free to experiment by stamping corners or creating a repetitive border on a few tiles, though keeping it centered maintains that minimal test-tile aesthetic.
Fixing the Warp
If your tiles curl up while drying, flip them over and place a light weight on the center. Uniform drying is key, so keep them away from drafty windows.
Step 3: Drying and Refining
-
Sandwich drying:
To keep the tiles perfectly flat, sandwich them between two pieces of drywall or wooden ware boards while they dry slowly. -
Initial dry check:
Check the tiles after a day. They should be leather hard. If any warping has occurred, gently weigh them down with a small sandbag or heavy book. -
Sponge finish:
Give the surface one final wipe with a nearly dry sponge to smooth out any burrs created during the stamping process. -
Bone dry:
Let the tiles dry completely to the bone-dry stage. They will feel room temperature to the touch rather than cool.
Make It a Set
Create a matching holder for your stack by building a simple U-shaped clay tray or a wooden base to display your finished texture library.
Step 4: Firing
-
Bisque fire:
Load the tiles into the kiln for a bisque firing (usually Cone 04). Stack them carefully if you are short on space, but flat is best. -
Glaze decision:
For the raw look in the photo, leave the clay unglazed to show off the speckles. If you want functionality, apply a clear matte glaze only to the top surface. -
Final fire:
Fire the coasters to the maturity temperature of your specific clay body (e.g., Cone 5 or 6 for stoneware). This vitrifies the clay, making it durable and water-resistant even without glaze.
Stack your finished coasters on a coffee table to add a touch of handmade, architectural warmth to your living space