If you love making chubby little clay critters that actually make sound, cute clay rattles are pure studio joy. I usually build mine as a hollow pinch pot form with tiny clay beads inside, then add simple features that crank the cuteness way up.
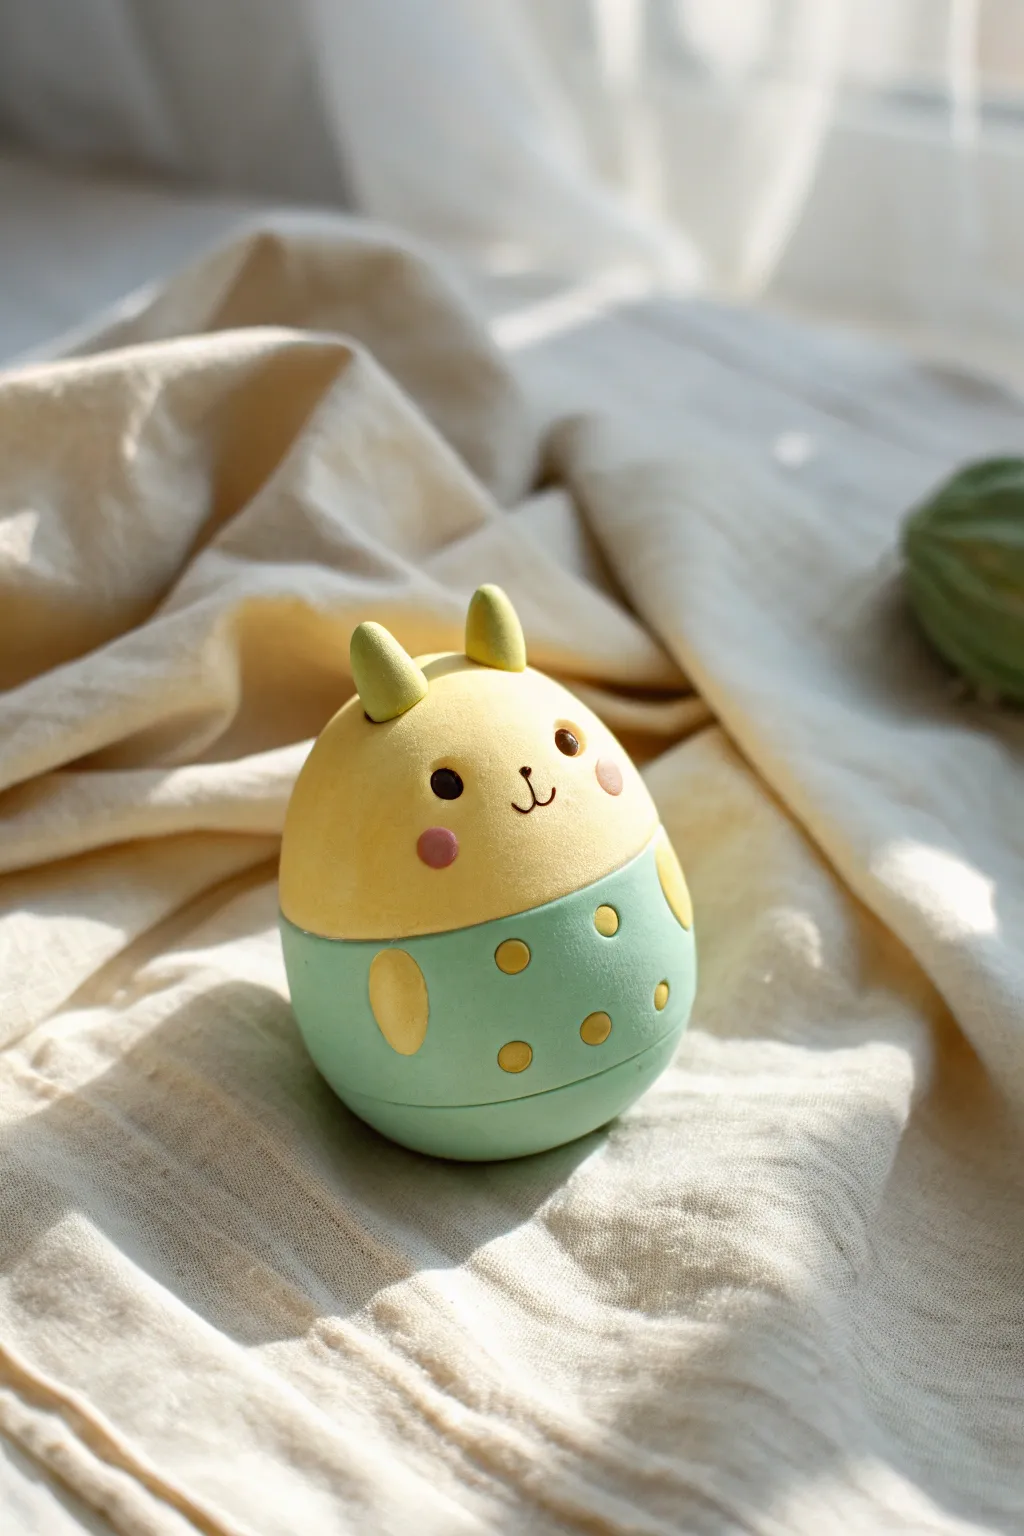
Round Bunny Belly Rattle
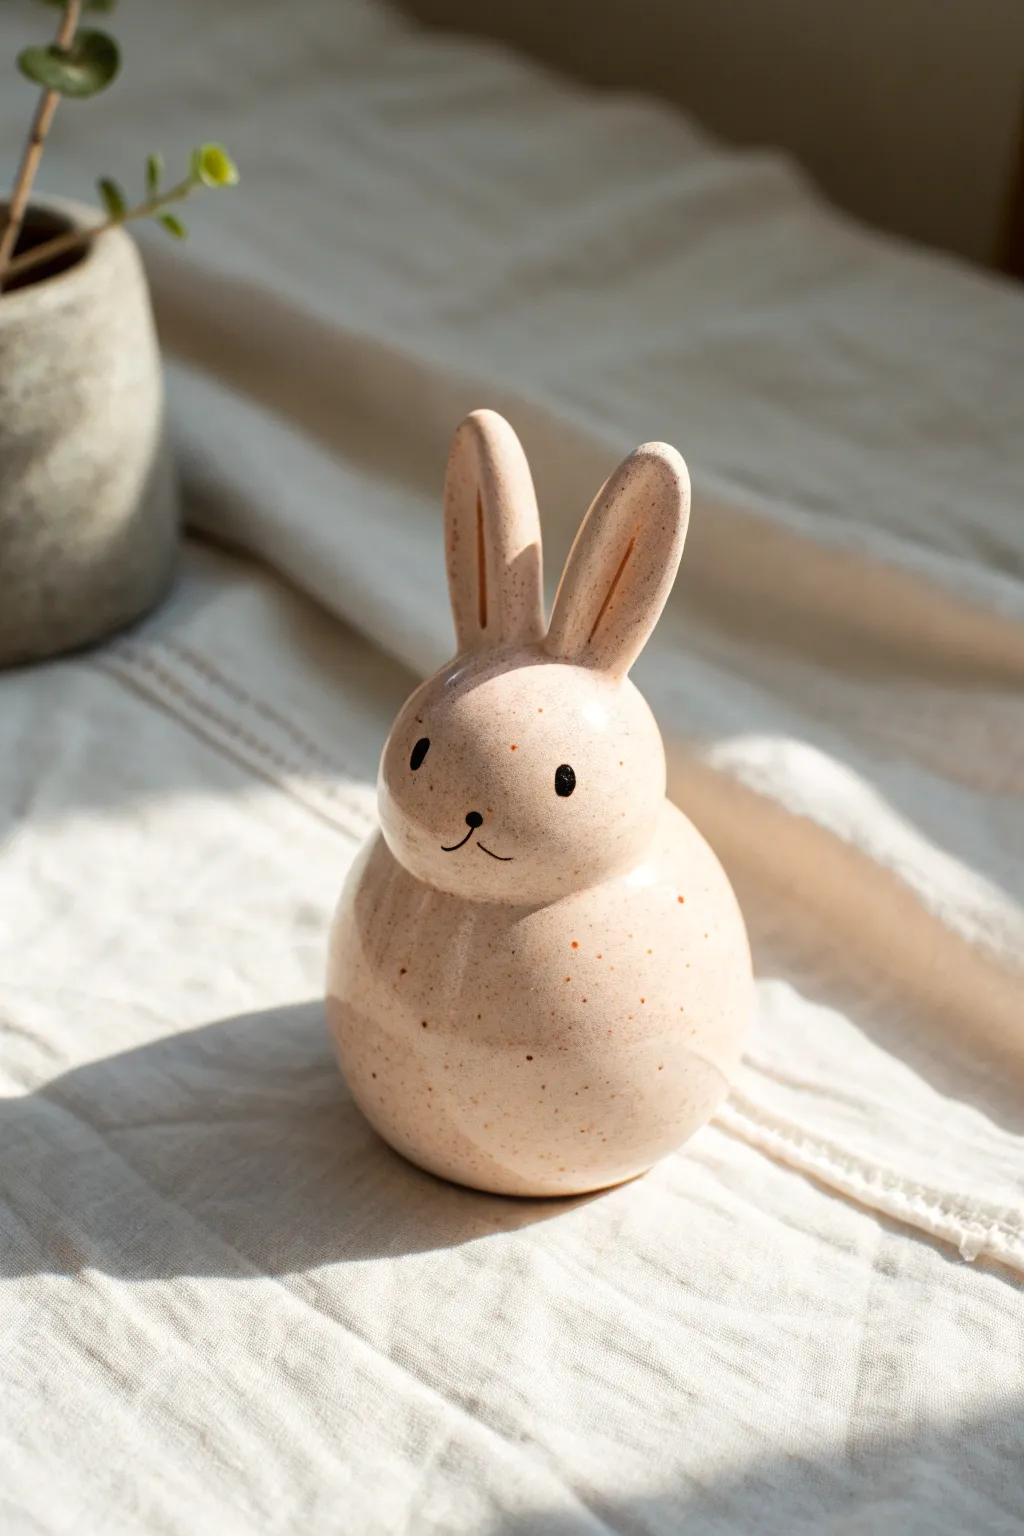
This adorable bunny rattle features a soothingly round, weighty belly and a soft speckled glaze that gives it a wonderfully tactile finish. It’s the perfect size for little hands to shake, producing a gentle ceramic clinking sound that isn’t too loud.
How-To Guide
Materials
- White stoneware or polymer clay (oven-bake)
- Small ceramic beads or dried beans (for the rattle)
- Pink speckled glaze (if using ceramic)
- Black underglaze or acrylic paint
- Fine detail brush
- Rolling pin
- Pointed modeling tool
- Sponge
- Newspaper or tissue paper
- Slip and scoring tool (for ceramic)
Step 1: Forming the Body
-
Prepare the Clay:
Begin with a ball of clay roughly the size of a tennis ball. Wedge it thoroughly to remove air bubbles if you are using stoneware, or condition it until pliable if you are using polymer clay. -
Create Pinch Pots:
Divide your clay ball into two equal halves. Press your thumb into the center of one half and gently pinch the walls while rotating to create a uniform bowl shape. Repeat with the second half. -
Insert Rattle Mechanism:
If using ceramic, create tiny clay balls and wrap them loosely in a small piece of newspaper before placing them inside one pinch pot. For polymer clay, use a small metal bell or dried beans wrapped in foil. -
Seal the Body:
Score the edges of both pinch pots and apply slip (or liquid clay for polymer). Press them firmly together to create a hollow sphere. Smooth the seam completely with your thumb or a rib tool so the join is invisible. -
Refine the Shape:
Gently roll the sphere on a table to ensure it is perfectly round, then tap the bottom lightly to create a small flat spot so the bunny stands upright without wobbling.
Making Noise
Wrap your rattle beads in paper before sealing the clay. The paper burns away in the kiln, leaving the beads free to rattle inside the hollow body.
Step 2: Sculpting the Head and Ears
-
Form the Head:
Roll a smaller ball of clay, roughly a third of the size of the body. Shape it into a soft oval, slightly wider at the bottom for chubby cheeks. -
Attach the Head:
Score and slip the top of the body and the bottom of the head. Press the head firmly onto the body, blending the clay at the neck seam downwards so the two shapes merge into one continuous silhouette. -
Shape the Ears:
Roll two small logs of clay. Flatten them slightly and taper the ends. Use your thumb or a modeling tool to create a shallow indentation running down the center of each ear. -
Attach the Ears:
Score the top of the head and the base of the ears. Attach them upright, smoothing the clay at the base to ensure a strong bond. I like to pose them slightly apart for a curious expression. -
Smoothing:
Go over the entire piece with a slightly damp sponge (or baby oil for polymer) to remove any fingerprints or rough textures.
Step 3: Firing and Finishing
-
First Firing (Ceramic Only):
Allow the clay to dry completely (bone dry) before bisque firing it in the kiln according to your clay body’s specifications. -
Glazing:
Apply a speckled pink or oatmeal glaze. Dip the bunny or brush on 2-3 even coats, avoiding the very bottom where it sits on the kiln shelf. -
Painting the Face:
Using a fine detail brush and black underglaze (or acrylics for polymer), paint two small oval eyes wide apart. Add a tiny ‘Y’ shape for the nose and mouth. -
Final Fire or Bake:
Fire the piece again to the glaze temperature. If using polymer clay, bake according to the package instructions and seal with a gloss varnish after cooling.
Preventing Cracks
Poke a tiny, hidden air hole (usually at the bottom or under an ear) with a needle tool. Trapped air expands in the kiln and will explode your bunny without a vent.
Listen to that satisfying ceramic wobble as your new little friend sits on the shelf.


Classic Turtle Shell Rattle
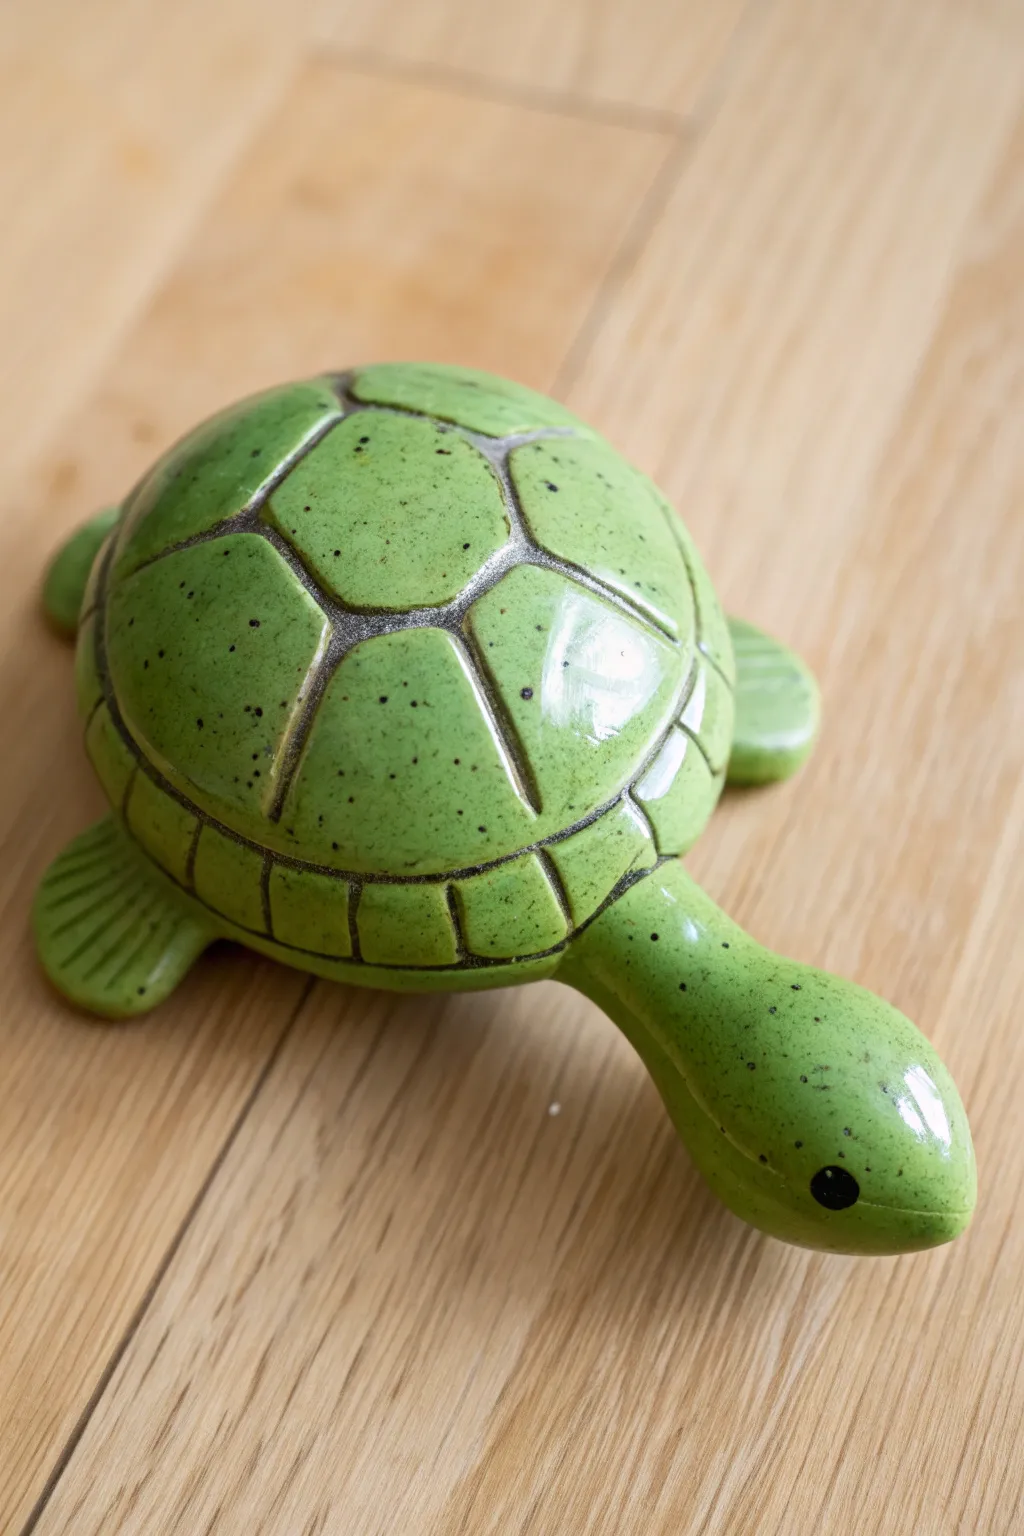
Bring a charming reptilian friend to life with this clay rattle project, featuring a vibrant speckled green glaze and a smooth, segmented shell. The finished piece is as functional as it is decorative, producing a satisfying sound from the hidden clay pellets inside.
Detailed Instructions
Materials
- Earthenware or stoneware clay (white or light body)
- Clay scoring tool or clean toothbrush
- Slip (clay mixed with water)
- Small rolling pin
- Newspaper or paper towels
- Needle tool
- Loop tool for carving
- Sponge
- Speckled green gloss glaze
- Small round paintbrush
- Black underglaze
- Clear glaze (optional)
Step 1: Forming the Body
-
Create the Pinch Pots:
Start with two balls of clay, roughly the size of a tangerine and a lime. Press your thumb into the center of each to create two pinch pots. One should be slightly deeper and wider (the top shell) and the other flatter (the belly). -
Make the Rattle Pellets:
Roll 5-7 small balls of clay, about the size of peas. Wrap them loosely in a small piece of newspaper or paper towel. This prevents them from sticking to the inside walls while you work. -
Join the Halves:
Score the rims of both pinch pots thoroughly and apply slip. Place the wrapped clay pellets inside, then press the two rims together firmly to seal the air inside. -
Shape the Shell:
Using a wooden paddle or your hands, gently shape the joined sphere into an oval, slightly flattened at the bottom to create the turtle’s body shape. -
Smooth the Seam:
Drag clay across the seam where the two pots meet to blend them invisible. I like to use a moist sponge here to burnish the surface until it is completely smooth.
Wrap It Up
Don’t skip wrapping the internal rattle balls in paper! Without this barrier, the balls often fuse to the inner wall while the clay is wet and drying.
Step 2: Adding Details
-
Form the Head:
Roll a coil of clay that tapers at one end. Bend it slightly to create an upright neck and rounded head shape. -
Attach the Neck:
Score and slip the base of the neck and the front of the shell. Press them together firmly and blend the clay backward onto the shell for a strong bond. -
Create Fins:
Flatten small balls of clay into four distinct flipper shapes. Use a needle tool to gently impress lines into them to mimic webbing or texture. -
Attach Limbs:
Score and slip the undersides of the shell and attach the four flippers. Ensure the turtle sits stable on the table; adjust the fin angles if it rocks too much. -
Carve the Shell Pattern:
Using a needle tool, lightly sketch a hexagonal pattern on the top of the shell. Once satisfied with the spacing, use a loop tool or a modeling tool to carve deep grooves along these lines to define the scutes. -
Define the Rim:
Carve a horizontal line around the circumference of the shell, separating the top carapace from the belly, and add vertical hatch marks around the lower rim. -
Add Facial Features:
Poke a small hole for the eye using the blunt end of a paintbrush or a specialized hole cutter tool. Smooth the edges of the hole. -
Vent Hole:
This is crucial: Use a needle tool to poke a hidden vent hole on the underside (belly) of the turtle to allow air to escape during firing so it doesn’t explode.
Step 3: Glazing and Finishing
-
Bisque Fire:
Allow the turtle to dry slowly under plastic for a few days, then uncover until bone dry. Fire it in the kiln to cone 04 (or your clay’s bisque temperature). The paper inside will burn away, leaving loose rattle pellets. -
Apply Black:
Paint black underglaze into the eye socket and deep into the carved grooves of the shell. Wade a damp sponge over the surface to wipe away excess black from the high points, leaving it only in the recesses. -
Apply Green Glaze:
Using a soft brush, apply 2-3 coats of speckled green gloss glaze over the entire top of the turtle (shell, head, and fins). -
Check the Bottom:
Wipe the bottom of the turtle’s belly and the tips of the flippers clean of any glaze so it won’t stick to the kiln shelf. -
Final Fire:
Fire the piece again to the maturation temperature of your specific glaze (typically cone 05/06 for low fire or cone 5/6 for mid-fire).
Sticky Situation
If the glaze runs too much during firing and sticks to the shelf, create tiny ‘stilts’ or cookies from scrap clay to prop the turtle up next time.
Enjoy the gentle sound and cheerful green color of your completed turtle rattle


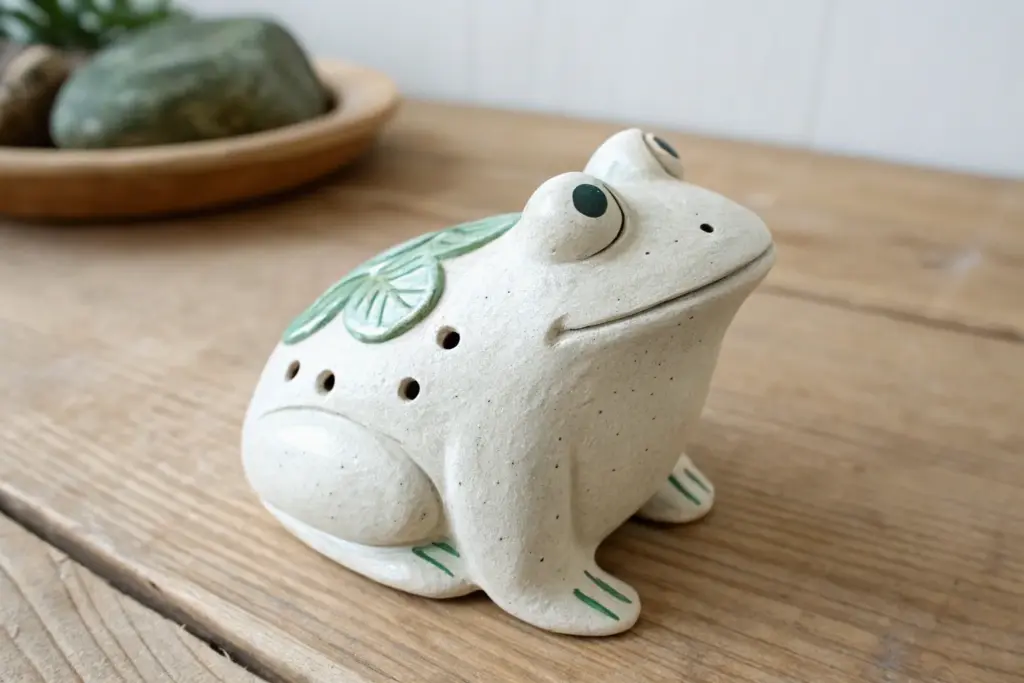
Chubby Frog Rattle
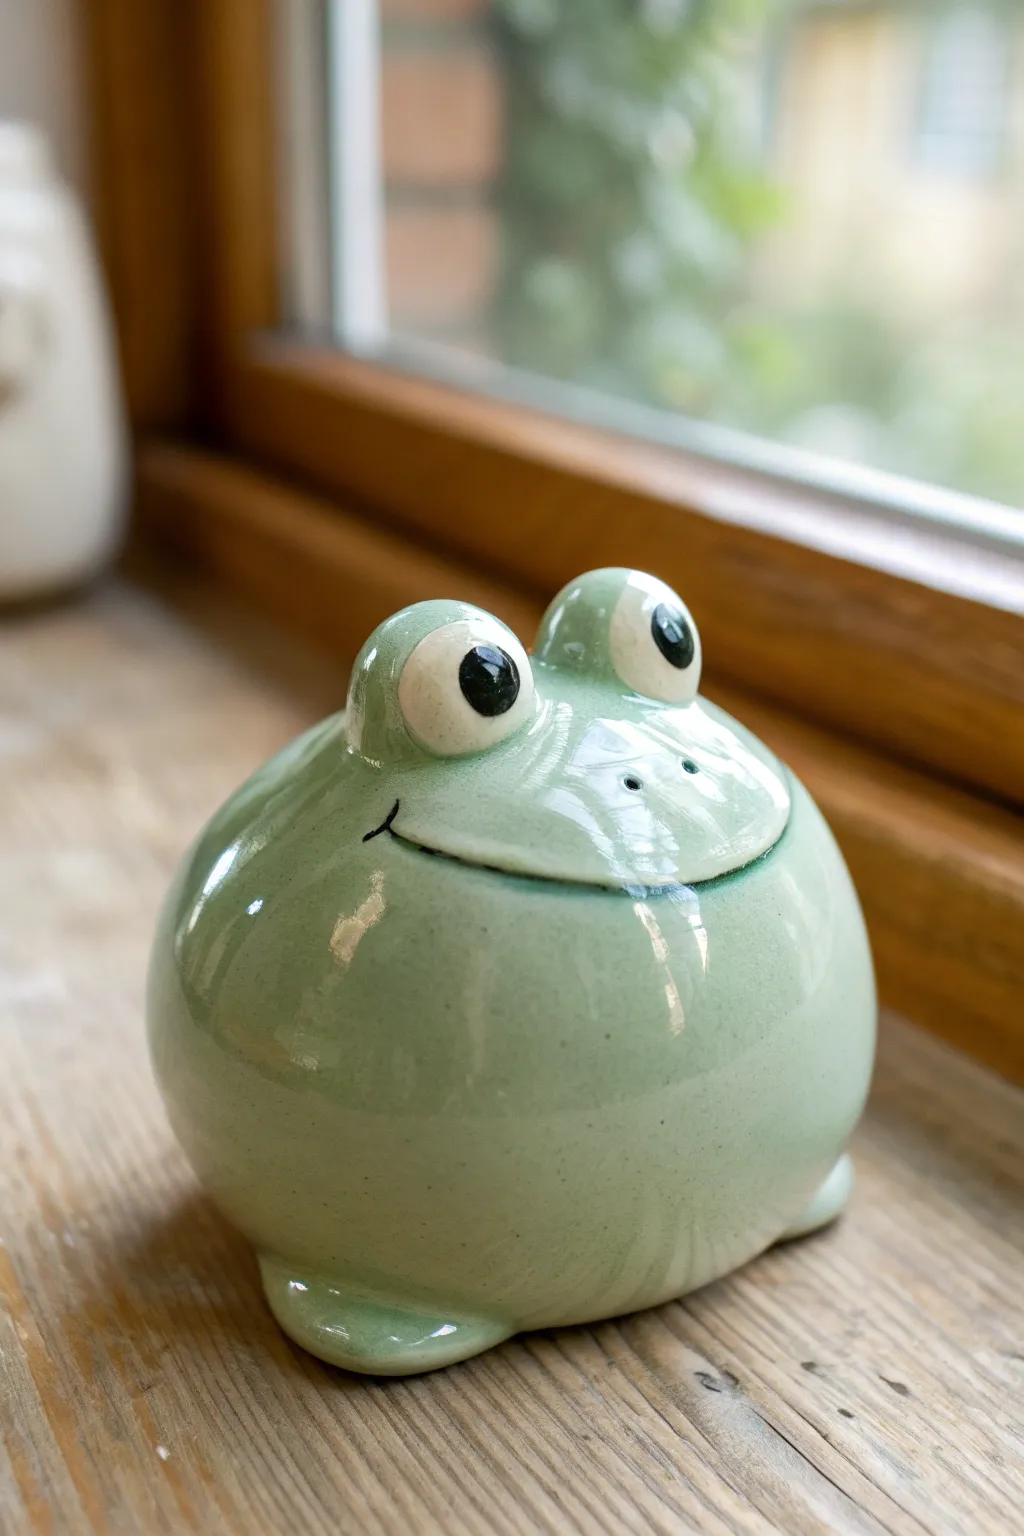
This ridiculously rotund ceramic frog brings a smile to anyone’s face with its glossy green finish and bug-eyed expression. Because it’s hollow to function as a rattle, the form feels light and lively in your hands, making it a perfect beginner sculpting project.
Step-by-Step
Materials
- White earthenware or stoneware clay
- Newspaper or paper towels
- Needle tool
- Scoring tool (or serrated rib)
- Slip (clay and water mixture)
- Small clay beads or dried clay bits (for the rattle)
- Sponge
- Underglaze (black)
- Celadon or light green transparent glaze
- Small paintbrushes
- Kiln access
Step 1: Forming the Body
-
Prepare pinch pots:
Start by rolling two equal-sized balls of white clay, roughly the size of a tangerine. Using your thumb, press into the center of each ball and pinch the walls evenly to create two matching hemispherical bowls. -
Thin the walls:
Continue pinching until the walls are about a quarter-inch thick all around. Keep the rims slightly thicker to help with joining later. -
Add the noise makers:
Before closing them up, wrap a few small, dried hard clay balls (about pea-sized) in a small piece of newspaper or paper towel. Place this packet inside one of the bowls. The paper prevents the rattle beads from sticking to the walls while the clay is wet and will burn away in the kiln. -
Score and slip:
Rough up the rims of both bowls using your scoring tool or a serrated rib. Apply a generous amount of slip to the scored areas. -
Join the halves:
Press the two bowls together firmly to create a closed sphere. Use your thumb or a wooden tool to smudge the clay across the seam, knitting the two halves together until the line disappears completely. -
Shape the sphere:
Gently paddle the ball with a wooden paddle or your hands to round it out and compress the trapped air, giving the frog its distinctively chubby, inflated look.
Step 2: Adding Features
-
Sculpt the eyes:
Roll two small balls of clay for the eyes. These should be substantial enough to stand up on top of the head. Press them slightly so they have a flat bottom for attachment. -
Attach the eyes:
Score and slip the top of the body and the bottom of the eye balls. Press them firmly onto the head, smoothing the clay downward at the back of the eyes to blend them seamlessly into the body. -
Create the pupils:
Roll two tiny, flattened discs of clay and attach them to the front center of each eyeball using a dab of slip. This creates the iris area. -
Define the mouth:
Use a needle tool or a thin wooden rib to gently impress a wide, curved smile across the face. Don’t cut all the way through; just press deep enough to create a shadow line. -
Add nostrils:
Poke two very small holes above the mouth line for nostrils. This is crucial—since the form is a hollow sealed sphere, these holes allow expanding air to escape during firing so your frog doesn’t explode. -
Form the feet:
Roll a coil of clay and cut it into two small segments. Flatten them slightly into oval shapes to serve as feet. -
Attach the feet:
Score and slip the bottom of the frog and attach the feet so they just barely peek out from under the belly. This also helps stabilize the round form so it doesn’t roll away. -
Smooth the surface:
Wipe the entire piece down with a slightly damp sponge to remove any fingerprints or rough textures. The smoother the clay now, the glassier the glaze will look later.
Rattle Rescue
If the rattle doesn’t make noise after firing, the internal beads likely stuck to the wall. Always wrap beads in paper and ensure the interior isn’t too wet when joining.
Step 3: Glazing and Firing
-
Bisque fire:
Allow the frog to dry slowly and completely before bisque firing it in the kiln to cone 04 (or your clay’s specification). -
Paint the details:
Once bisqued, use a fine brush and black underglaze to carefully paint the pupils and trace the indented smile line. Let the underglaze dry. -
Apply glaze:
Dip or brush the entire frog (except the bottom where it sits) in a celadon or translucent light green glaze. The transparency allows the white clay and the black underglaze details to show through. -
Final fire:
Fire the piece again for the glaze firing, usually to cone 5 or 6 depending on your stoneware. Ensure the air release holes remain clear of glaze.
Make it a Trio
Create a whole choir by varying the sizes! Try making a tiny ‘tadpole’ version or a giant ‘bullfrog’ version with darker green glaze and warts.
Give your finished frog a shake to hear that satisfying ceramic clatter and enjoy your new desk companion


Nesting Chick Rattle
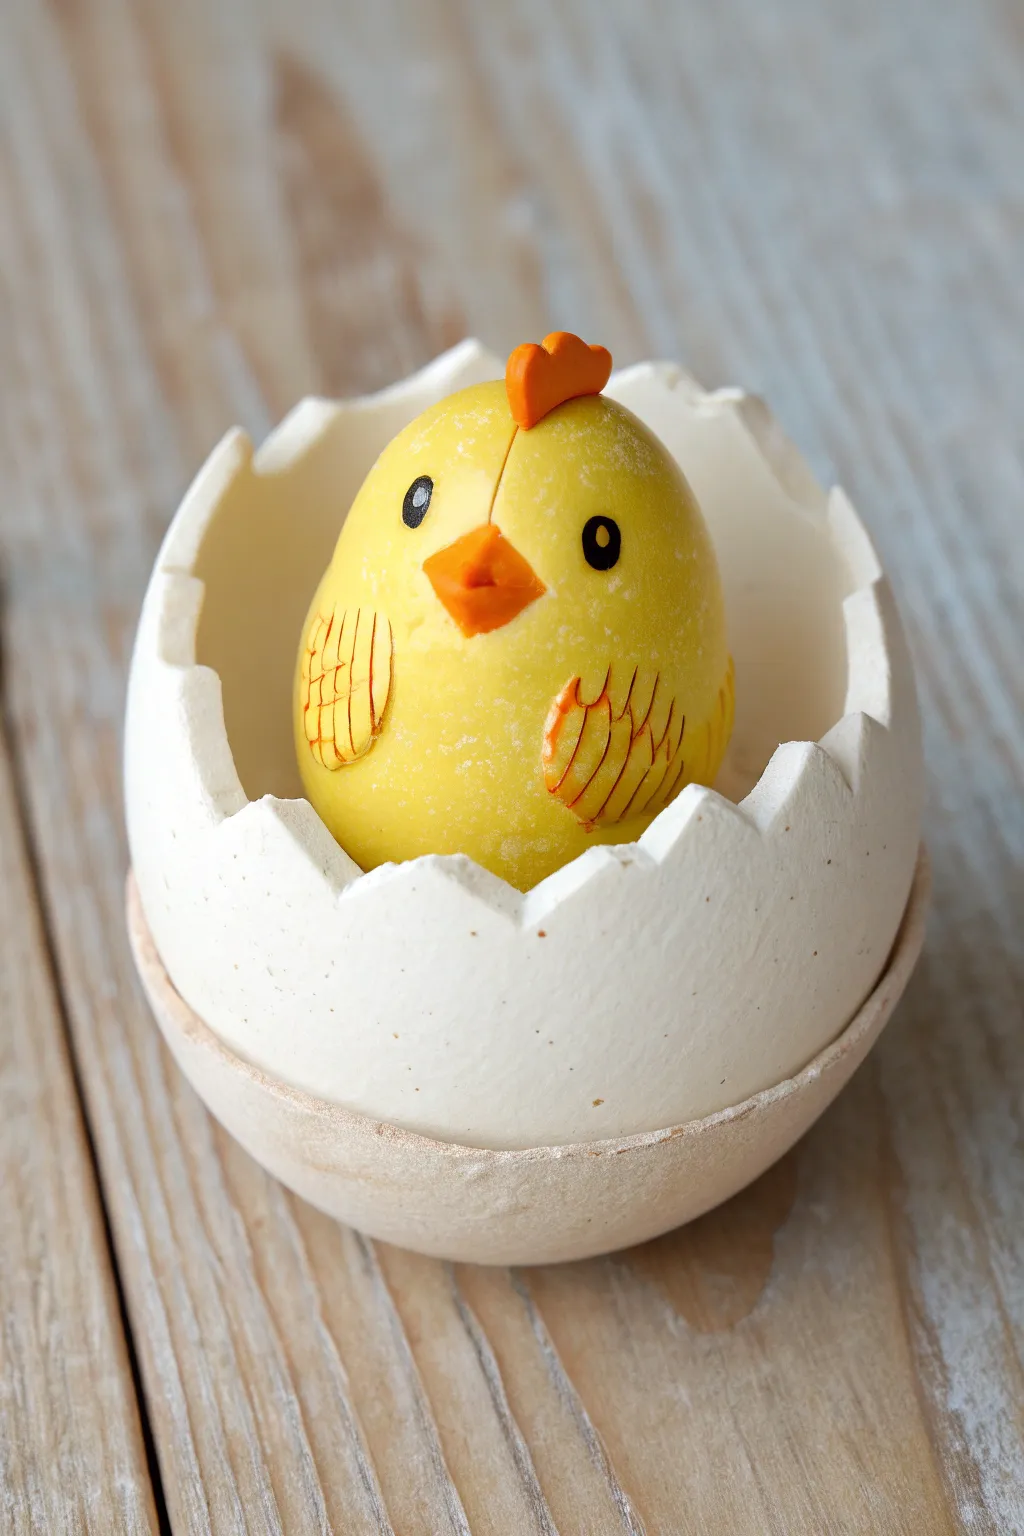
Celebrate new beginnings with this charming polymer clay project featuring a bright yellow chick peeking out from a cracked eggshell. Not only is it visually adorable with its textured details and sweet expression, but the hidden rattle mechanism inside makes it a delightful sensory toy for little ones.
Step-by-Step Tutorial
Materials
- White polymer clay (approx. 2oz)
- Yellow polymer clay (approx. 1.5oz)
- Orange polymer clay (small amount)
- Black polymer clay or acrylic paint
- Rattle insert or small metal bells
- Aluminum foil
- Clay roller
- X-Acto knife or craft blade
- Needle tool or toothpick
- Small circle cutter
- Oven for baking
- Gloss glaze (optional)
Step 1: Forming the Eggshell Base
-
Prepare the foil core:
Crumple a piece of aluminum foil into a ball about the size of a golf ball. This will serve as the lightweight core for your egg shape and save on clay. -
Roll out the white clay:
Condition your white polymer clay until it is soft and pliable, then roll it into a sheet approximately 1/4 inch thick. It needs to be sturdy enough to hold its shape. -
Cover the foil:
Wrap the white clay sheet around the bottom half of your foil ball to create a bowl shape. This will become the bottom part of the shell. -
Create the jagged edge:
Using your craft blade, carefully cut a jagged, zigzag pattern around the rim of the white clay bowl. Remove the excess clay from the top to reveal the ‘cracked’ egg look. -
Smooth the exterior:
Gently rub the outside of the shell with your finger to remove any fingerprints and slightly soften the sharp points of the cracked edge so they aren’t dangerous. -
First bake:
Bake this white shell piece according to your clay manufacturer’s instructions (usually 275°F for 15 minutes) just to set the shape. Let it cool completely.
Clean Crack Lines
To get ultra-clean zigzag cuts on the eggshell, chill the clay in the fridge for 10 minutes before cutting. Cold clay resists dragging and holds sharp points much better.
Step 2: Sculpting the Chick Rattle
-
Remove the foil:
Once the white shell is cool, carefully remove the aluminum foil from the inside. The shell should now be a hollow bowl. -
Form the chick’s body:
Condition your yellow clay. Roll it into a smooth, egg-shaped oval that fits snugly inside your baked white shell but peeks out significantly over the top. -
Insert the rattle:
Slice the yellow egg shape in half vertically. Hollow out a small cavity in the center of both halves, place your rattle insert or bells inside, and press the halves back together firmly. -
Smooth the seam:
Roll the yellow shape in your hands until the seam disappears completely. I like to double-check that it still fits nicely in the white shell at this stage. -
Texture the wings:
Flatten two small balls of yellow clay into teardrop shapes for wings. Attach them to the sides of the body. Use a needle tool to press vertical lines into the wings to simulate feathers. -
Add the beak:
Shape a tiny pyramid of orange clay. Press it onto the center of the face, using a tool to indent the corners slightly for a smile. -
Create the comb:
Form a small, three-bumped ridge using orange clay. Attach this to the very top of the chick’s head for its comb. -
Embed the eyes:
Roll two minuscule balls of black clay and press them onto the face above the beak. Alternatively, you can create indentations now and paint them black after baking. -
Refine the details:
Use a needle tool or a clean toothbrush to gently stipple the surface of the yellow clay, giving the chick a fluffy, feathery texture rather than a perfectly smooth finish.
Natural Speckles
Mix a tiny pinch of black pepper or brown craft sand into your white clay before rolling it out. This creates a realistic, organic speckled eggshell effect without painting.
Step 3: Assembly and Finish
-
Secure the chick:
Place a small amount of liquid polymer clay or ‘Bake & Bond’ into the bottom of the white shell. Press the yellow chick firmly into the shell. -
Add a separate shell rim (Optional):
If you want the layered look shown in the image, roll a thin strip of white clay, cut a zigzag edge, and wrap it around the base of the chick where it meets the main shell. -
Final smooth:
Check the white shell for any dust or lint; clean it with a bit of rubbing alcohol on a q-tip if necessary. -
Final bake:
Bake the entire assembled piece again for the full recommended time (often 30 minutes per 1/4 inch of thickness). This ensures the chick and shell bond permanently. -
Highlight the eyes:
Once cool, add a tiny dot of white paint to the black eyes to bring them to life with a ‘catchlight’.
Give your little chick a gentle shake to hear that satisfying rattle sound as you admire your handiwork

The Complete Guide to Pottery Troubleshooting
Uncover the most common ceramic mistakes—from cracking clay to failed glazes—and learn how to fix them fast.
Sleepy Bear Cub Rattle
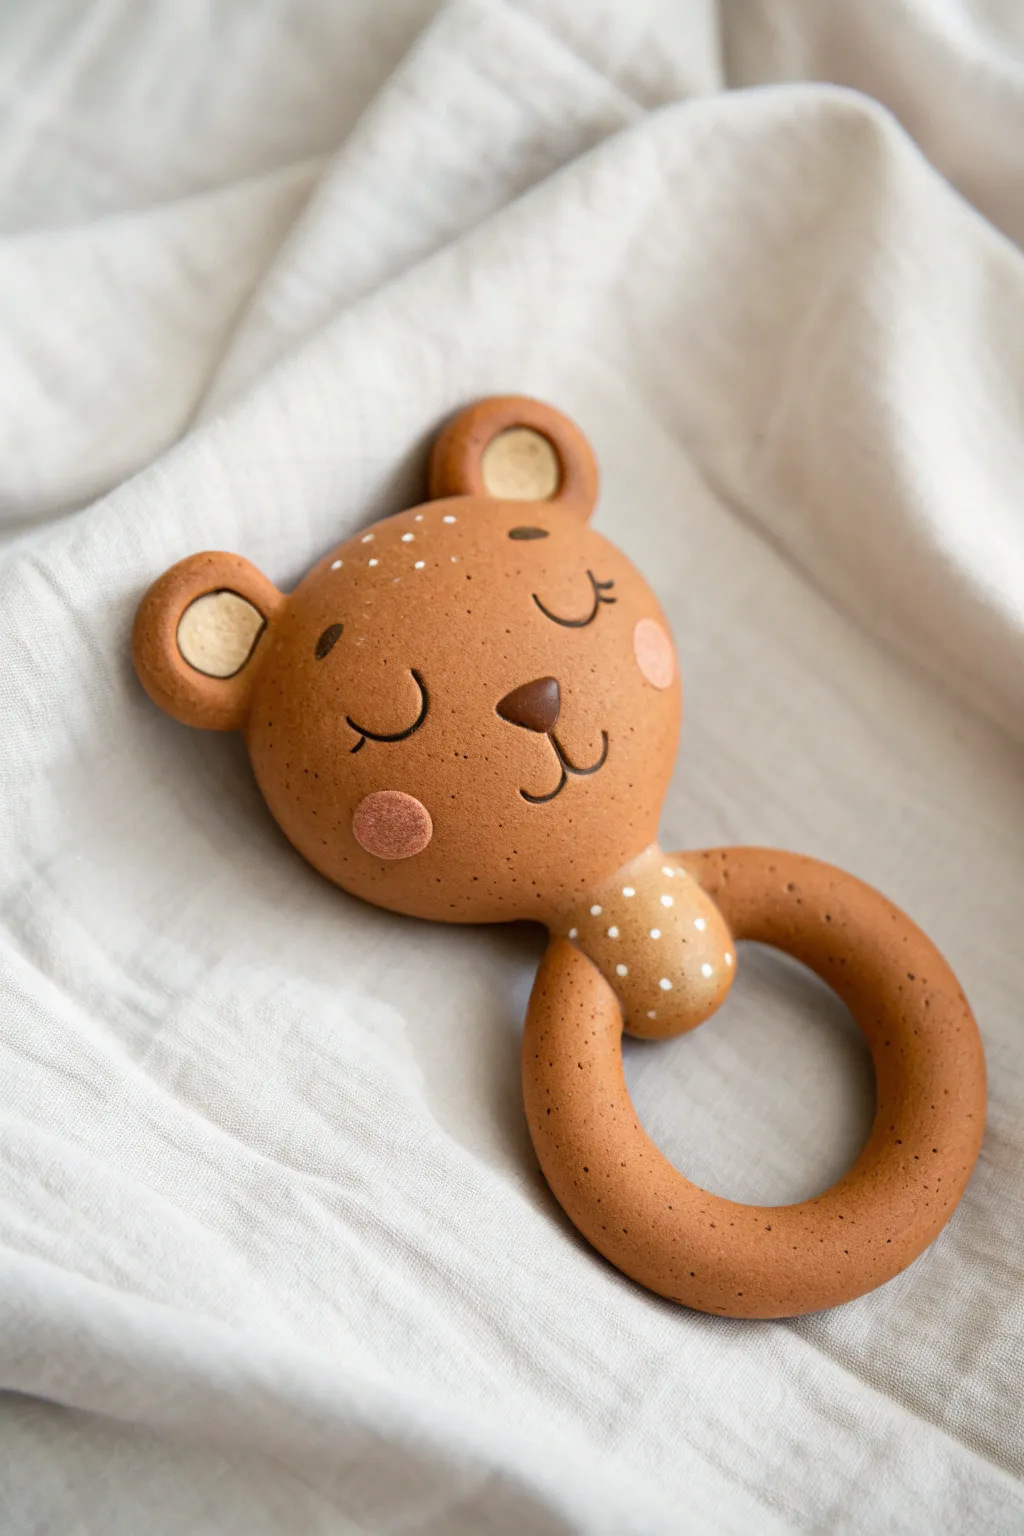
Craft a soothing sensory toy for little ones with this adorable sleeping bear rattle. Made from smooth, warm-toned clay and finished with delicate painted features, this piece combines nursery charm with a tactile, handmade feel.
Detailed Instructions
Materials
- Light terracotta or cinnamon-colored polymer clay
- Light beige or cream polymer clay
- Dark chocolate brown polymer clay
- Blush pink polymer clay (or soft pastel chalk)
- White acrylic paint
- Fine-grit sandpaper
- Rattle insert (small noise maker box)
- Sculpting tools (needle tool, ball stylus)
- Small fine-point paintbrush
- Oven for baking clay
- Satin or matte polymer clay varnish (non-toxic certified)
Step 1: Forming the Base
-
Prepare the Ring:
Begin by conditioning a large portion of your terracotta clay until it’s pliable and smooth. Roll it into a long, even snake about 3/4 inch thick. -
Shape the Loop:
Curve the clay snake into a ring shape, ensuring the ends meet cleanly. Smooth the seam thoroughly with your thumb or a clay tool so the join is invisible and the ring is uniform. -
Texture the Clay:
To mimic the speckled stoneware look in the photo, you can mix a tiny pinch of ground black pepper or dark clay crumbs into your terracotta clay before sculpting, or gently speckle the surface with a stiff brush later.
Safety First
Since rattles are shaken vigorously, ensure all joined parts (ears, head-to-ring) are blended seamlessly. Use liquid clay or ‘Bake & Bond’ adhesive at seams for maximum durability.
Step 2: Sculpting the Bear Head
-
Create the Head Shape:
Roll a large ball of terracotta clay and flatten it slightly into a rounded oval pillow shape. This will be the bear’s main facial area. -
Insert the Rattle:
Carefully slice the head shape in half horizontally. Hollow out a small cavity in the center, place your rattle insert inside, and reseal the clay, smoothing the seam completely so no trapped air remains. -
Form the Ears:
Roll two smaller balls of terracotta clay. Press your thumb into the center of each to create a cup shape, then attach them firmly to the top corners of the head using a bit of liquid clay for a strong bond. -
Add Inner Ear Details:
Take two tiny discs of the cream-colored clay. Press them gently into the indentations of the ears to create the soft inner ear contrast. -
Connect Head to Ring:
Position the bear head at the top of your ring joint (to hide any remaining seam). Blend the clay at the neck area downward onto the ring to create a secure, seamless transition.
Step 3: Refining Features
-
Add the Collar Detail:
Wrap a small band of clay right where the head meets the ring to create a decorative ‘collar’ or bib area. Smooth it so it bulges slightly, giving the rattle dimension. -
Sculpt the Nose:
Take a tiny triangle of dark chocolate clay and press it into the center of the face. Round the corners slightly for a soft, friendly look. -
Create Cheeks:
Press two small, very thin circles of blush pink clay onto the cheeks. Alternatively, you can brush on pink pastel chalk powder before baking for a softer, airbrushed effect. -
Initial Bake:
Bake the piece according to your clay manufacturer’s instructions. Usually, this is around 275°F (130°C) for 15-30 minutes depending on thickness. Let it cool completely.
Speckled Effect
To get that realistic stoneware texture without special clay, simply mix loose tea leaves or coarse black pepper into your clay block before rolling. It adds organic charm instantly.
Step 4: Finishing Touches
-
Paint the Sleepy Eyes:
Using your finest brush and a mix of brown and black paint (or a fine tip paint pen), draw two U-shaped curves for the sleeping eyes. Add three tiny lashes to the outer corners. -
Paint the Mouth:
Draw a small vertical line down from the nose, connecting to a shallow ‘w’ shape to form the smiling mouth. -
Add Decorative Dots:
Dip the tip of a toothpick or a small dotting tool into white acrylic paint. Add a cluster of tiny white dots on the forehead and larger dots on the ‘collar’ section for whimsy. -
Seal the Rattle:
Once the paint is fully dry, coat the entire rattle with a non-toxic matte or satin varnish. This protects the paint and gives the clay a professional finish.
Now you have a sweet, handmade heirloom that looks lovely on a nursery shelf and feels great in little hands
Kitten Face Bell Rattle
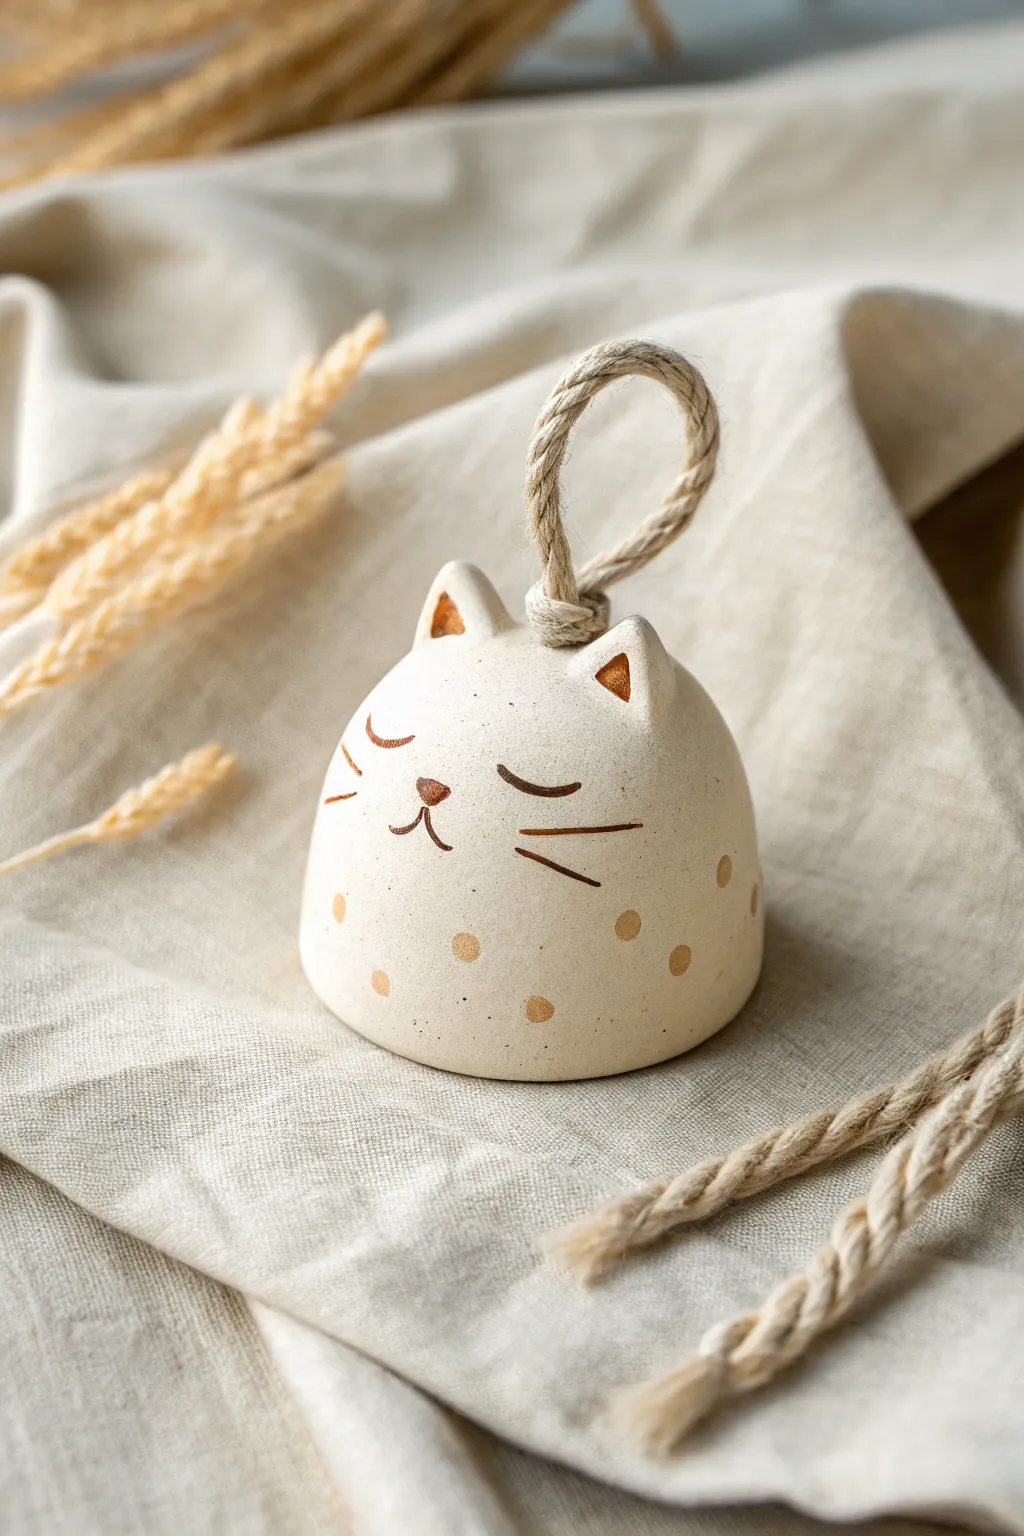
Bring a sense of calm and charm to your space with this adorable ceramic-style kitten rattle. Featuring a soothing cream finish, delicate gold accents, and a rustic rope handle, this project combines simple sculpting with minimalist painting for a truly sweet result.
Step-by-Step Tutorial
Materials
- Air-dry clay or white polymer clay
- Ceramic bead or small jingle bell (for the internal rattle mechanism)
- Acrylic paints: Cream/Off-White, Metallic Bronze or Soft Gold, Dark Brown
- Fine grit sandpaper
- Sculpting tools (needle tool, smoothing sponge)
- Natural jute rope or thick twine (approx. 5 inches)
- Small paintbrush (fine liner)
- Matte sealant or varnish
- Water cup (for smoothing)
- Rolling pin
Step 1: Shaping the Base
-
Prepare the Clay:
Begin by conditioning a sphere of clay regarding the size of a tangerine. Knead it well to remove air bubbles, ensuring the finish will be smooth later. -
Form the Pinch Pot:
Push your thumb into the center of the sphere and gently pinch around the sides to create a hollow dome shape. You want the walls to be roughly 1/4 inch thick for durability. -
Refine the Dome:
Place the dome on your work surface and gently pat the top to round it out. The bottom rim should be flat so it can sit evenly, though you want the overall look to be a soft, rounded bell shape. -
Create the Rope Hole:
Using a needle tool or a straw, punch a hole directly in the center of the top of the dome. Make this hole slightly larger than your rope thickness, as clay can shrink slightly when drying.
Cracking Clay?
If small cracks appear while drying, mix a tiny amount of clay with water to make a paste (slip) and fill them in. Smooth over with a finger and let dry again.
Step 2: Sculpting Details
-
Shape the Ears:
Form two small, equal-sized triangles from extra clay. Gently curve them slightly to mimic a cat’s alertness. -
Attach the Ears:
Score the clay (scratch the surface) where the ears will go and on the base of the ear triangles. Apply a tiny bit of water or liquid clay bond, then press the ears firmly onto the top of the dome, just beside the center hole. -
Smooth the Seams:
Use a sculpting tool or your finger dipped in water to blend the clay from the ears into the main dome. The transition should be seamless so the ears look like they grew out of the head. -
Smooth the Surface:
Take a slightly damp sponge and wipe down the entire exterior. This removes fingerprints and creates that polished, ceramic look before you let it set. -
Drying Time:
Let the clay dry completely according to package instructions. For air-dry clay, I usually leave it for at least 24-48 hours to ensure the core is solid.
Pro Tip: Clean Lines
To get super sharp whisker lines, use a fine-tip waterproof archival ink pen instead of a paintbrush. It offers way more control on the curved surface.
Step 3: Finishing and Assembly
-
Sand for Perfection:
Once bone dry, lightly sand any bumps or rough edges with fine-grit sandpaper. Wipe away the dust with a dry cloth. -
Base Coat:
Paint the entire piece (except the rope) with a creamy off-white acrylic paint. You may need two thin coats for opaque coverage. Let this dry fully. -
Painting the Face:
Using a very fine liner brush and dark brown paint mixed with a tiny drop of water for flow, paint two curved lines for sleeping eyes and a small anchor shape for the mouth. Add three whiskers on each cheek. -
Adding Gold Accents:
Switch to your metallic bronze or soft gold paint. Fill in the triangular insides of the ears and paint a cute inverted triangle for the nose. -
Polka Dot Detail:
Using the back end of a paintbrush or a dotting tool dipped in the gold paint, stamp random polka dots around the bottom half of the bell for a textured look. -
Seal the Work:
Apply a coat of matte varnish to protect the paint and give the clay a finished feel. Avoid gloss if you want to maintain the natural, earthy aesthetic shown in the photo. -
Prepare the Rattle:
Tie your ceramic bead or bell to the middle of your jute rope. Fold the rope in half so the bead hangs down. -
Install the Handle:
Thread the two loose ends of the rope up through the hole in the top of the cat’s head from the inside. Tie a sturdy overhand knot on the outside (top) to create the loop handle and secure the bell inside.
Hang this sweet little guardian near a window or door to enjoy a gentle chime whenever it moves


What Really Happens Inside the Kiln
Learn how time and temperature work together inside the kiln to transform clay into durable ceramic.
Little Pig Snout Rattle

This adorable little pig rattle fits perfectly in small hands, featuring a classic glossy pink finish and a sweet, simple expression. The smooth, rounded shape is not only cute but provides a gentle surface for auditory sensory play.
Step-by-Step
Materials
- Polymer clay (pale pink and white)
- Small rattle insert or dried beans
- Aluminum foil
- Liquid polymer clay (optional)
- Gloss glaze or polyurethane varnish
- Soft paintbrush
- Black acrylic paint
- Red acrylic paint
- Dotting tool or toothpick
- Modeling tools (or a plastic knife/spoon)
Step 1: Forming the Body
-
Create the core:
Start by scrunching a piece of aluminum foil into a tight ball about the size of a golf ball. This keeps the rattle lightweight and saves clay. -
Condition the clay:
Take a block of pale pink polymer clay and knead it until it is soft and malleable. I like to mix in a tiny pinch of white to get that really soft, milky pink tone. -
Cover the core:
Flatten the pink clay into a sheet about 1/4 inch thick. Wrap this sheet entirely around your foil ball, smoothing out the seams until you have a perfect sphere. -
Insert the rattle:
Carefully slice the ball in half. Remove the foil core. Place your rattle insert or a few dried beans into the center, then re-seal the two halves together, smoothing the seam line completely so it becomes invisible.
Seamless Seams
If the seam where you joined the body halves keeps cracking, use a drop of liquid polymer clay ‘glue’ between the edges before smoothing them together.
Step 2: Sculpting the Features
-
Shape the shout:
Roll a small ball of pink clay and flatten it slightly into an oval disk. Press this firmly onto the front center of your sphere to create the snout. -
Add nostrils:
Using a small dotting tool or the back of a paintbrush, make two indentations in the snout for nostrils. You can dab a tiny bit of red paint into these holes now or wait until later. -
Form the ears:
Create two small triangles of pink clay. Gently curve them forward slightly to give the pig a perky expression. Attach these to the top of the head, blending the clay at the base for a secure hold. -
Add the feet:
Roll four tiny balls of pink clay for the legs. Press these onto the bottom of the body so the pig stands upright without rolling away. -
Smooth the surface:
Dip your finger in a little rubbing alcohol or baby oil and gently run it over the entire piece to remove fingerprints and smooth out any bumps. -
Bake firmly:
Preheat your oven according to your clay manufacturer’s instructions (usually around 275°F/135°C). Place the pig on a baking sheet and bake for roughly 30 minutes to ensure it hardens completely.
Step 3: Painting and Finishing
-
Cool down:
Allow the clay to cool completely before handling. It creates a stronger bond and makes painting easier. -
Paint the eyes:
Dip a fine-point dotting tool into black acrylic paint. Carefully place two small dots above the snout for the eyes. -
Paint the nostrils:
If you didn’t add color earlier, use a tiny amount of red or dark pink paint inside the nostril indentations to define them. -
Seal the piece:
Once the paint is fully dry, apply a generous coat of high-gloss glaze. This mimics the ceramic look of the original inspiration and protects the paint from chipping during play. -
Second coat:
For extra durability and shine, I allow the first coat to dry for an hour and then apply a second thin layer of glaze. -
Final dry:
Let the rattle sit for at least 24 hours to cure the glaze fully before testing out the sound.
Uneven Standing?
If your pig wobbles, gently press the unbaked clay figure down onto a flat surface (like a glass tile) to flatten the bottoms of the four feet simultaneously.
Now your little pig is ready to shake, rattle, and roll on the nursery shelf
Fluffy Sheep Texture Rattle
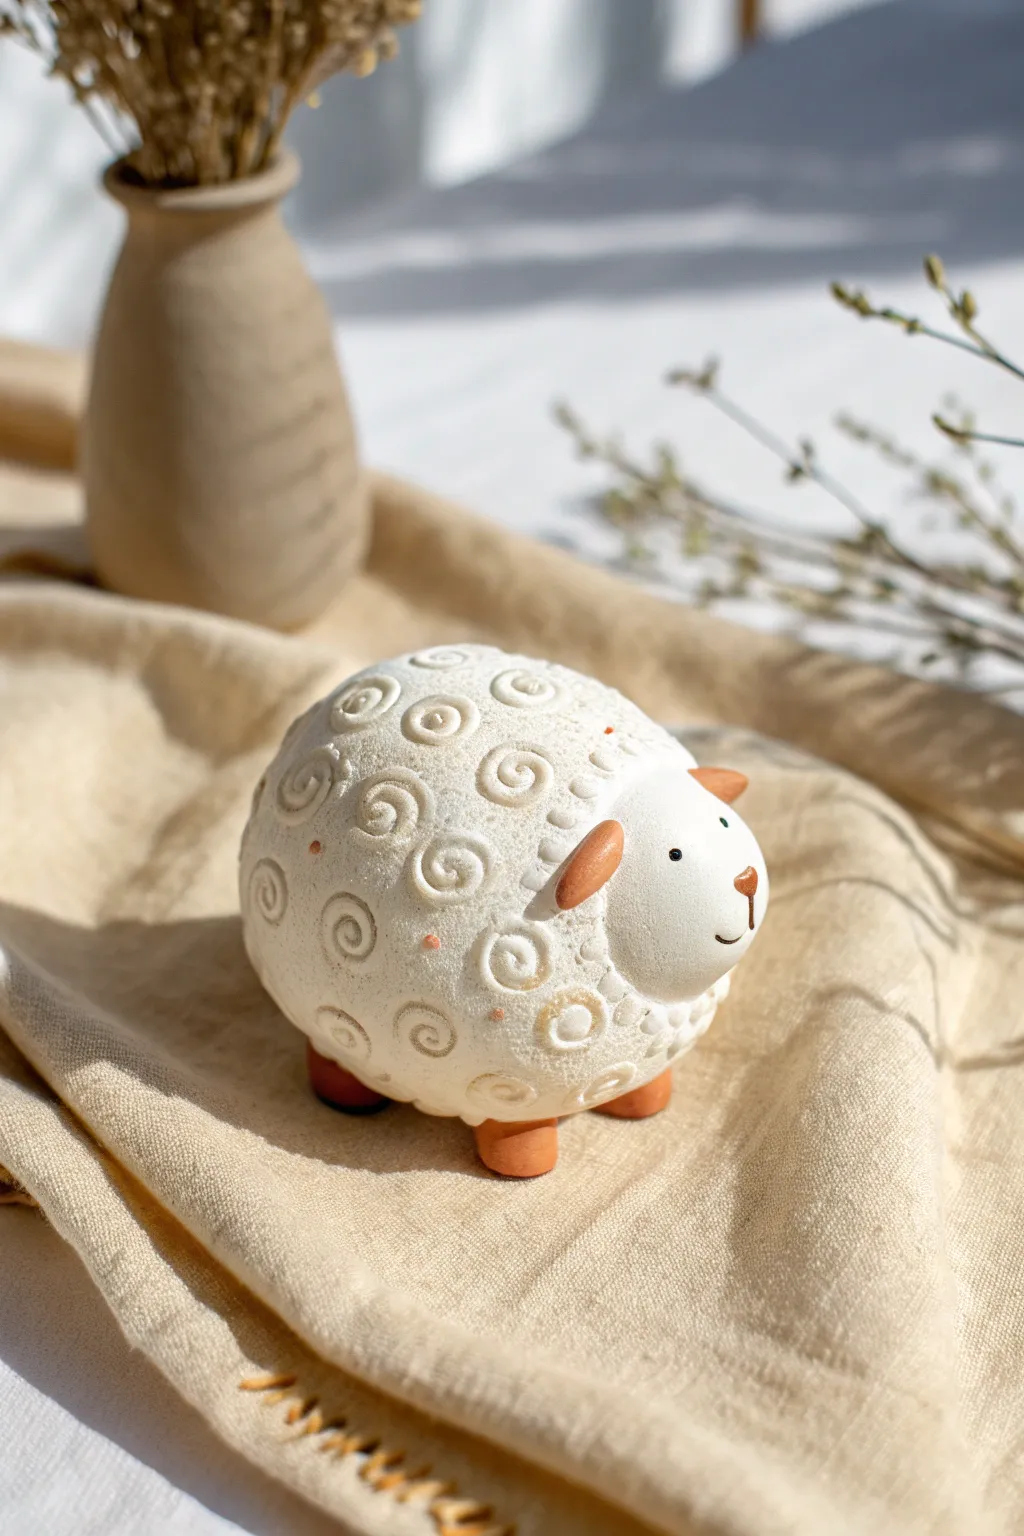
This adorable round sheep combines touchable texture with a gentle rattling sound, making it a delightful sensory object or decorative piece. The spiral patterns create the illusion of fluffy wool, while the terracotta-colored accents add a warm, earthy contrast to the white body.
Detailed Instructions
Materials
- White polymer clay (or air-dry clay)
- Terracotta or reddish-brown polymer clay
- Rolling pin
- Small rattle insert or beads inside a small container
- Needle tool or toothpick
- Ball stylus tool (medium size)
- Black acrylic paint
- Small detail brush
- Gloss varnish (optional)
- Small coil maker or extruder (optional)
Step 1: Forming the Body and Rattle
-
Prepare the core:
Start by conditioning your white clay until it is soft and pliable. Roll a ball of clay roughly the size of a tangerine. -
Insert the rattle:
Cut the ball in half or create a deep indentation. Insert your rattle mechanism into the center. If you don’t have a pre-made insert, a small metal box with dried beans or beads works perfectly. -
Seal the shape:
Close the clay around the rattle insert, ensuring there are no air pockets trapped against the mechanism. Roll it between your palms until you have a smooth, perfect sphere. -
Distinguish the head:
Gently pinch and smooth a section of the sphere to create a slightly protruding, smooth mound for the face. The goal is to keep this area free of texture later.
Curl Consistency
For perfectly uniform wool spirals, use a clay extruder with a small round disc. This creates a long strand of exact thickness that you can chop and roll quickly.
Step 2: Adding the Wool Texture
-
Create spiral coils:
Roll out many thin ‘snakes’ or strands of white clay. I find it easiest to roll a long strand and then cut it into uniform 1-inch segments. -
Wind the curls:
Take a segment and roll it into a tight spiral, like a cinnamon roll. You will need dozens of these small spirals to cover the body. -
Apply the wool:
Begin pressing the spirals onto the sheep’s body, starting from the back and working your way toward the face. Press them firmly enough to adhere, but gently enough to preserve the spiral shape. -
Blend the edges:
Use your ball stylus to gently blend the edges where the spirals meet, ensuring there are no large gaps showing the smooth under-layer, except for the face area. -
Texture the gaps:
If tiny gaps remain between spirals, use a needle tool to stipple the clay, adding a rough texture that mimics wool fuzz.
Make it hangable
Add a metal eye pin into the top of the sheep before baking. Once finished, thread a ribbon through it to turn your rattle into a cute hanging ornament.
Step 3: Features and Finishing
-
Sculpt the feet:
Take the terracotta clay and roll four small, equal-sized balls. Slightly flatten the bottoms to create stable feet. -
Attach the legs:
Press the feet onto the bottom of the sheep body. Blend the clay seams upwards into the white body so they don’t pop off later. -
Form the ears:
Shape two small teardrops from the terracotta clay. Flatten them slightly and press them onto the sides of the head area, just where the smooth face meets the textured wool. -
Add the nose:
Roll a tiny triangle of terracotta clay and place it in the center of the face for the nose. -
Refine the face:
Using a needle tool, carefully etch a small vertical line down from the nose to create the mouth details. -
Bake or dry:
Follow the manufacturer’s instructions for your specific clay. Ensure the piece is stable and propped up if necessary so the feet remain flat. -
Paint the eyes:
Once cool or dry, use a fine detail brush or a toothpick dipped in black acrylic paint to dot two small eyes above the nose. -
Final touches:
You can add tiny pink dots to the ‘wool’ for a bit of whimsy, as seen in the inspiration image, or leave it pure white.
Give your new woolly friend a gentle shake to hear that satisfying rattle sound creates

TRACK YOUR CERAMIC JOURNEY
Capture glaze tests, firing details, and creative progress—all in one simple printable. Make your projects easier to repeat and improve.
Wide-Eyed Owl Rattle
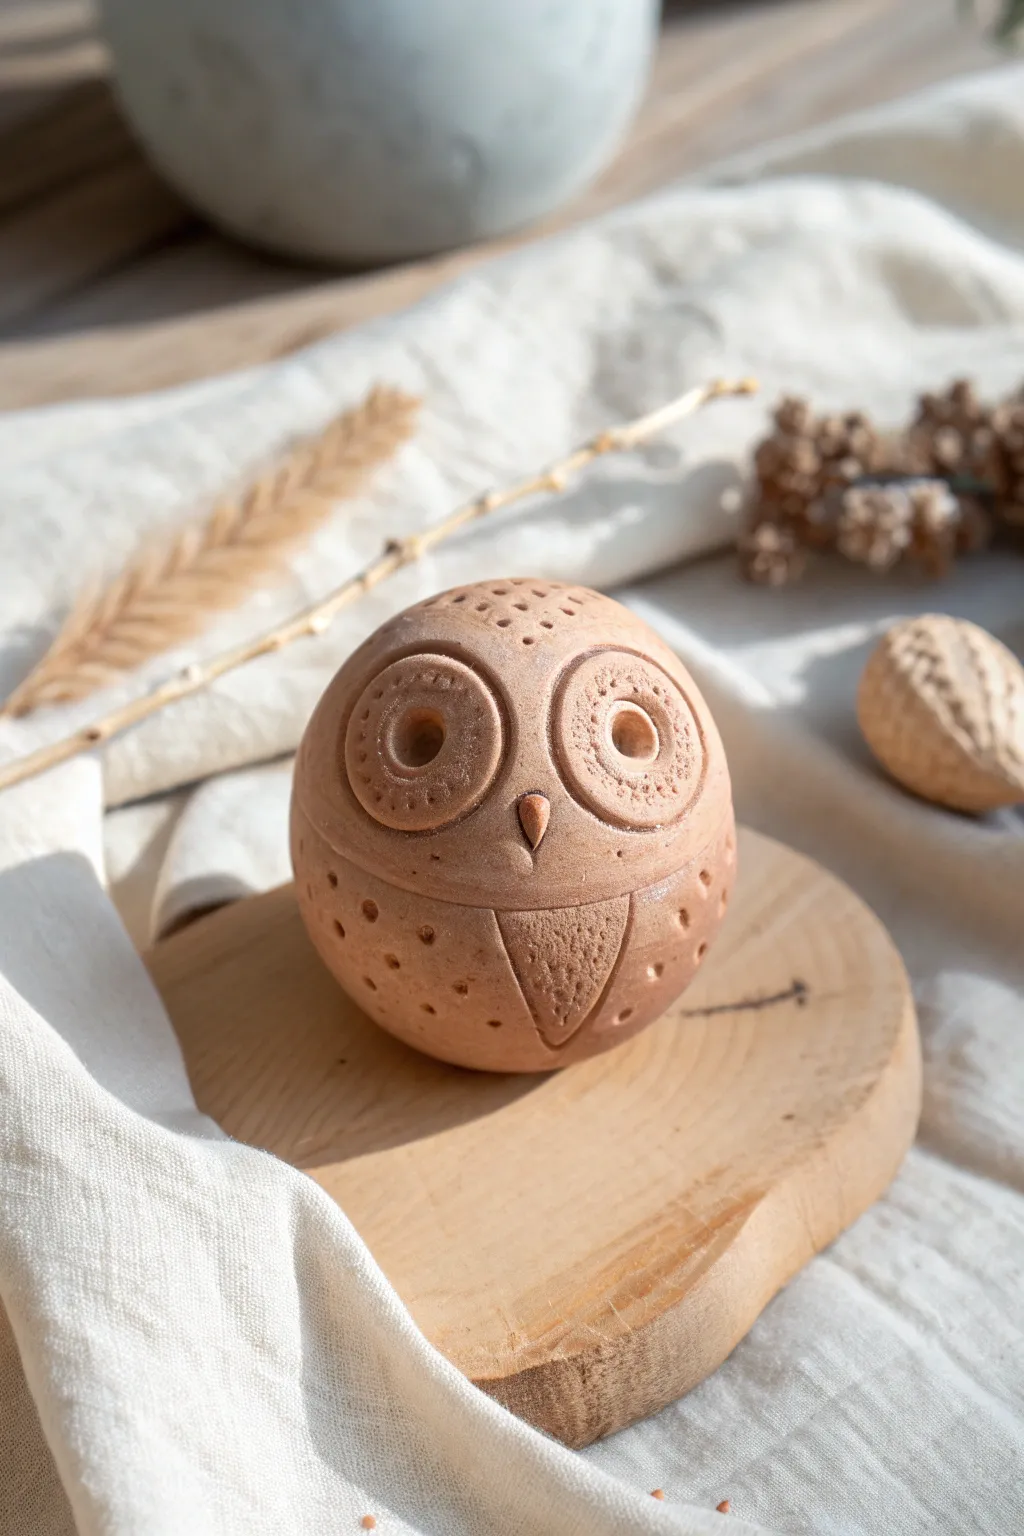
This charming, spherical owl rattle captures the warmth of natural terracotta with its smooth, round form and playful etched details. Its wide, expressive eyes and tactile texture make it a delightful sensory object for decoration or gentle play.
Step-by-Step Tutorial
Materials
- Terracotta-colored polymer clay or air-dry clay
- Ceramic rattle insert or small dried beans
- Aluminum foil
- Rolling pin
- Needle tool or toothpick
- Small circle cutter (approx. 1/2 inch)
- Medium circle cutter (approx. 1 inch)
- Soft sponge or chamois
- Water (for smoothing)
Step 1: Forming the Base
-
Create the core:
Crumple a piece of aluminum foil into a tight ball, slightly smaller than a tennis ball and roughly the size you want the interior of your owl to be. -
Prepare the clay:
Condition your terracotta clay until it is soft and pliable. Roll it out into a flat sheet about 1/4 inch thick. -
Wrap the foil:
Place the foil ball in the center of the clay sheet. Wrap the clay gently around the foil, pinching off excess clay and smoothing the seams together until you have a seamless sphere. -
Insert the rattle:
Carefully slice the sphere in half. Remove the foil core. Place your rattle insert or a few dried beans into one hollow half. -
Reseal the sphere:
Score the edges of both hemispheres (scratch them up a bit) and add a tiny bit of water or liquid clay as glue to join them back together. Smooth the seam completely with your fingers so it disappears.
Rattle Doesn’t Rattle?
If using air-dry clay, the clay can sometimes shrink and trap the beans. Wrap your beans loosely in a tiny scrap of paper before inserting them to create a space buffer.
Step 2: Sculpting the Face
-
Define the face area:
Lightly trace a curved horizontal line across the middle of the sphere to mark where the head meets the body. -
Make the eye sockets:
Use the medium circle cutter to gently impress two large circles side-by-side on the upper half of the sphere. Don’t cut all the way through; just make a clear indentation. -
Create the pupils:
Using the smaller circle cutter, press into the center of the larger eye circles to create depth. You can use your thumb to slightly concave this inner area for a more sculpted look. -
Add the beak:
Roll a tiny cone of clay. Attach it between and slightly below the eyes, pressing it firmly so it points downward. -
Form the wings:
Draw two U-shaped lines on the chest area just below the face line to suggest tucked wings. I like to slightly raise the clay inside these lines to make the wings look puffy.
Earthy Patina
After baking/drying, dilute white acrylic paint with water (50/50 mix). Brush it over the owl and immediately wipe it off with a rag, leaving white residue in the etched dots.
Step 3: Adding Texture & Details
-
Detail the eyes:
Use a needle tool to poke tiny, dense dots inside the outer ring of the eyes to create a textured iris effect. -
Add forehead spots:
Poke a symmetrical pattern of small dots on the very top of the head, radiating outward like feathers. -
Texture the body:
Add scattered poke marks around the lower body and on the wings to mimic speckled feathers. Vary the pressure to create different sized holes. -
Smooth the surface:
Dip a sponge or your finger in water and gently run it over the entire piece to soften any sharp ridges from your tools, giving it that weathered, stone-like finish. -
Dry or bake:
If using air-dry clay, let the owl sit undisturbed for 24-48 hours. If using polymer clay, bake according to the package instructions, usually at 275°F (130°C) for about 30 minutes.
Once fully cured, give your little spherical owl a shake to hear its gentle sound.
Baby Dino Egg Rattle
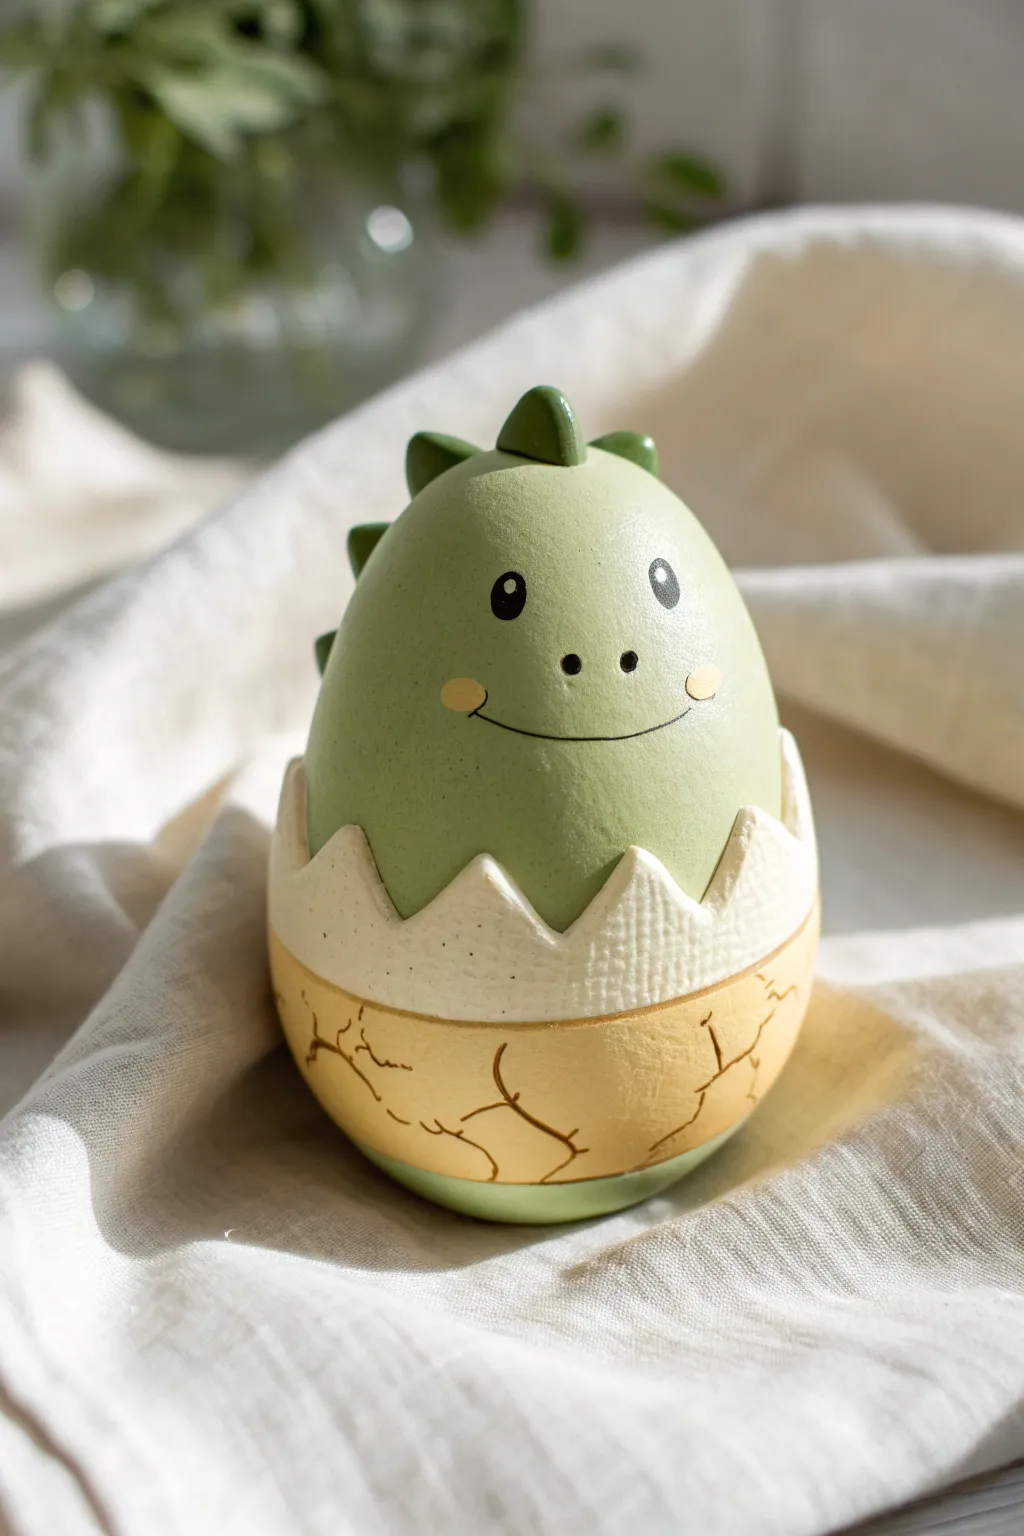
This adorable green dinosaur peeking out of its cracked shell is a whimsical, smooth-finish rattle perfect for little hands. With its gentle pastel colors and friendly painted face, it captures the sweet moment of a baby dino saying hello to the world.
Step-by-Step
Materials
- Lightweight air-dry clay or polymer clay (pastel green, cream/off-white, darkened yellow)
- Rattle insert (small plastic container with beads or specialized rattle ball)
- Acrylic paints (black, white, pink)
- Fine detail paintbrush (size 0 or 00)
- Sculpting tools (needle tool, smoothing tool)
- Aluminum foil (for core)
- Rolling pin
- Clear matte varnish or sealant (non-toxic)
Step 1: Forming the Core
-
Prepare the rattle insert:
Start by ensuring your rattle noise-maker is secure. If making your own, place a few beads inside a small plastic container and tape it shut tightly. -
Create a foil armature:
Wrap aluminum foil around the rattle insert to create a basic egg shape. Pack it tight to minimize air pockets, creating a sturdy base that saves on clay weight. -
Smooth the foundation:
Roll the foil egg on a hard surface to compress any sharp points. This ensures the final clay surface will be smooth and even.
Uneven Seams?
If the clay seams where the dino meets the shell look rough, roll a very thin ‘snake’ of clay, place it over the gap, and smooth it out with a wet finger to hide the join.
Step 2: Sculpting the Dino Body
-
Roll out the green clay:
Condition your pastel green clay until soft, then roll it into a sheet about 1/4 inch thick. It needs to be thick enough to cover the foil without tearing. -
Cover the top half:
Drape the green clay over the top two-thirds of your foil egg. Smooth it down the sides, ensuring no foil shows through. -
Shape the head:
Gently mold the green clay to be perfectly round and smooth at the top, tapering slightly as it goes down. Use a little water on your fingers to buff out any fingerprints. -
Form the spines:
Make three or four small triangles from a slightly darker green clay. Attach these in a row down the center back of the head, blending the base of each spine into the main body so they don’t pop off.
Textured Touch
Before baking, gently press a piece of coarse sandpaper against the yellow bottom shell section to give it a realistic, gritty stone texture distinct from the dino.
Step 3: Creating the Cracked Shell
-
Prepare the shell layer:
Roll out a sheet of cream or off-white clay. Using a craft knife or needle tool, cut a zig-zag pattern along one long edge to mimic a cracked eggshell edge. -
Attach the shell:
Wrap this cream strip around the bottom third of the egg, covering the exposed foil or meeting the green clay. The zig-zag points should overlap the green body slightly. -
Add texture to the rim:
Use a toothbrush or a rough sponge to gently dab the cream clay, giving it a porous, eggshell-like texture compared to the smooth dinosaur skin. -
Create the bottom shell segment:
Roll a strip of darkened yellow or ochre clay. Wrap this around the very bottom curved section of the egg, slightly overlapping the cream layer. -
Blend the shell seam:
Use your thumb or a smoothing tool to blend the seam where the yellow clay meets the cream clay so it feels like one solid shell piece. -
Sculpt the cracks:
With a needle tool, carve thin, branching lines into the yellow lower shell to simulate cracking. Vary the pressure to make some cracks deeper than others.
Step 4: Painting and Finishing
-
Dry or bake:
Allow the clay to fully cure according to the package instructions. If using air-dry clay, I usually let it sit for at least 24 hours to ensure the core is dry. -
Paint the eyes:
Using a fine detail brush and black acrylic paint, paint two small vertical ovals for eyes on the green section. Leave space between them for the snout. -
Add eye highlights:
Once the black is dry, add a tiny white dot to the top of each oval to bring the character to life. -
Paint the nose and mouth:
Paint two tiny dots for nostrils and a thin, wide U-shape line for a smile. Keep the line weight very delicate. -
Add rosy cheeks:
Mix a pale pink or peach color and paint small oval blushes at the corners of the smile. -
Enhance the shell cracks:
Dilute a bit of brown paint with water to make a wash. Run this into the carved cracks on the yellow shell, then quickly wipe the surface clean, leaving the dark color only in the crevices. -
Seal the rattle:
Apply a coat of non-toxic matte varnish over the entire piece to protect the paint and give the rattle a unified, professional finish.
Once sealed and dry, your gentle little dino rattle is ready to shake and delight
Tiny Whale Bubble Rattle
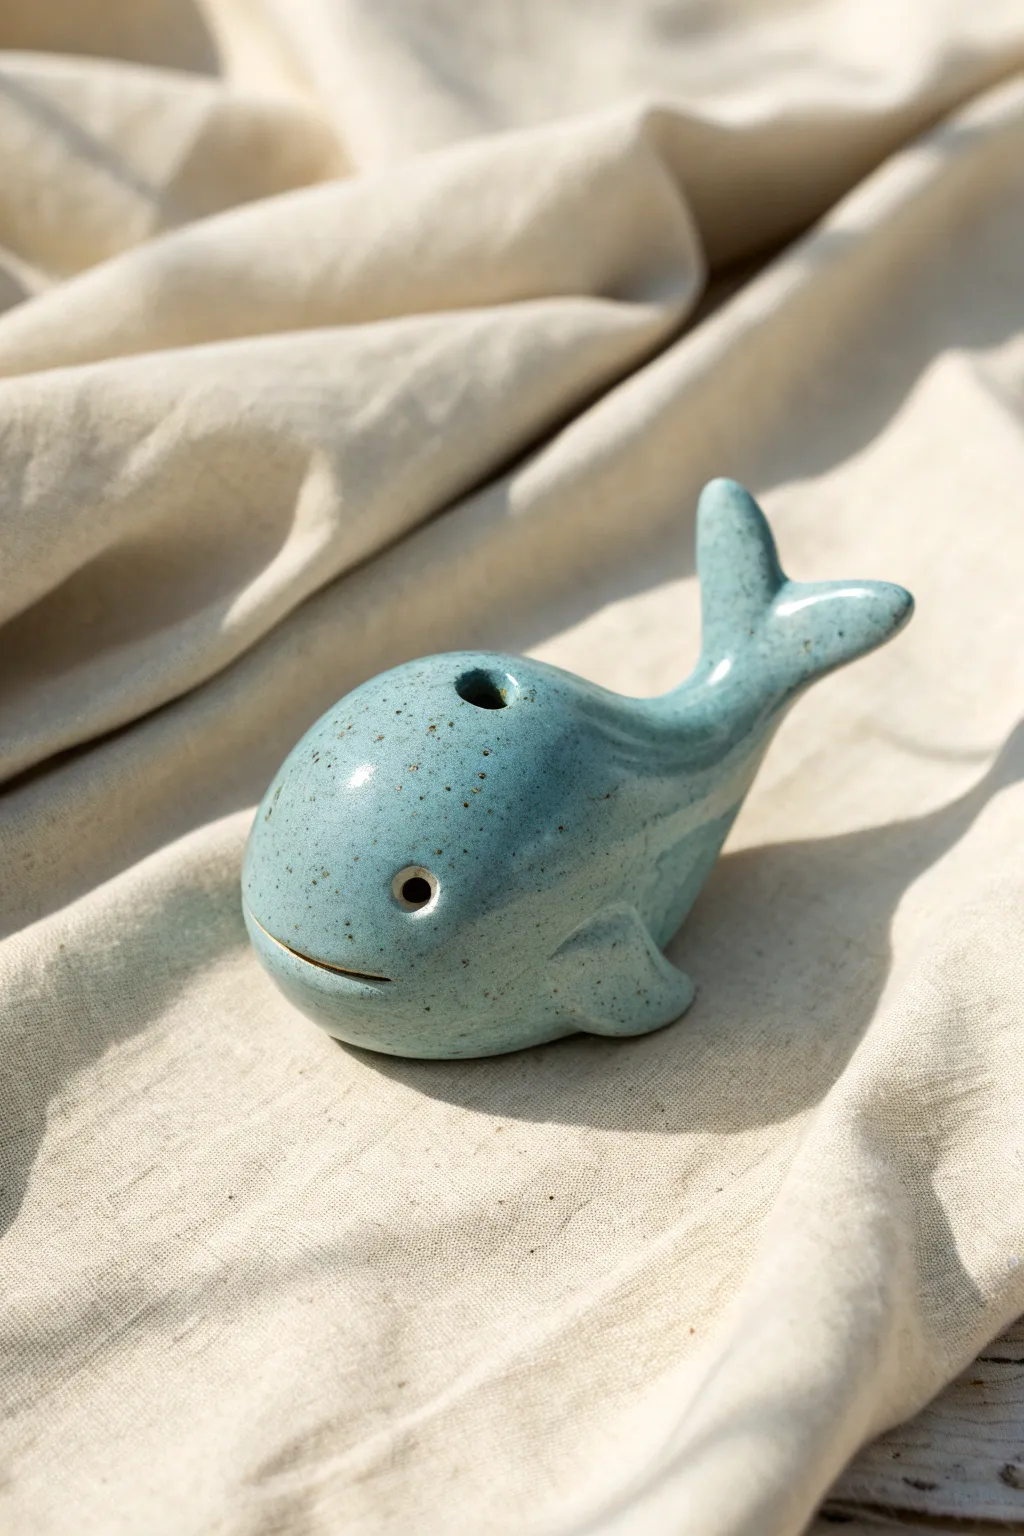
Sculpt a splash of ocean charm with this adorable ceramic whale rattle, finished with a glossy, speckled blue glaze. Its rounded, playful form fits perfectly in the palm of your hand, making it a delightful keepsake or gift.
Step-by-Step Guide
Materials
- Stoneware clay (smooth or speckled)
- Small ceramic rattle beads or dried clay balls
- Pottery tools (needle tool, modeling tool)
- Sponge
- Blue speckled glaze (stoneware)
- Kiln for firing
- Small paintbrush
- Newsprint or paper towel
Step 1: Forming the Body
-
Create pinch pots:
Start by rolling two equal-sized balls of clay, roughly the size of a golf ball or slightly larger. Using your thumb, gently press into the center of each ball to open them into two hemispherical pinch pots. -
Thin and smooth:
Pinch the walls of your pots evenly, aiming for about a quarter-inch thickness throughout. Keep the rims slightly thicker to help with joining later. -
Insert the rattle:
Before closing, wrap 3-5 small fired clay beads or ceramic rattle balls in a small piece of newsprint or paper towel. Place this little package inside one of the pinch pots. The paper prevents the beads from sticking to the wet clay walls and will burn away in the kiln. -
Join the halves:
Score the rims of both pinch pots with a needle tool and apply a dab of slip or water. Press the two halves together firmly to create a sealed hollow sphere. -
Shape the whale:
Gently roll and pat the sphere on your work surface to elongate it slightly into an egg shape. Smooth the seam completely with a modeling tool or your thumb so it becomes invisible.
Step 2: Adding Details
-
Pull the tail:
On the narrower end of your egg shape, pinch and pull a section of clay outwards to form the tail stock. Flatten the end and use a knife or tool to split it, shaping two distinct flukes that curve upward. -
Add the flippers:
Form two small, flat triangles from a scrap of clay. Score and slip the sides of the whale’s body and attach the flippers, smoothing the clay downward to integrate the seam seamlessly. -
Carve the mouth:
Use a needle tool or a thin fettling knife to slice a gentle, curved line near the bottom front of the head for the mouth. -
Create eyes and blowhole:
Use the rounded end of a paintbrush handle or a small hole cutter to press indentations for the eyes on either side. Press a slightly larger hole on the very top for the blowhole. -
Vent holes:
Ensure at least one of these holes (likely the blowhole or a hidden spot underneath) actually pierces through to the hollow center. This is crucial so the air can escape during firing to prevent explosion.
Muted Rattle?
If the rattle doesn’t sound after firing, the beads may be stuck to the side. Ensure you wrap beads in paper/newspaper before sealing the body; the paper burns away, leaving beads free.
Step 3: Refining and Glazing
-
Smooth the surface:
Using a slightly damp sponge, wipe down the entire surface of the whale to remove fingerprints and harsh tool marks. The surface should be buttery smooth. -
Bisque fire:
Allow the whale to dry slowly and completely. Once bone dry, fire it in the kiln to a bisque temperature (usually cone 04). -
Apply glaze:
Dip the bisque-fired whale into a glossy blue glaze. If your glaze doesn’t have speckles, you can splatter a contrasting iron oxide wash or a darker glaze over the top. -
Check the holes:
Immediately check the blowhole and eyes. If glaze has filled them, gently blow it out or use a pin to clear the opening so the details remain crisp. -
Wipe the foot:
Clean off any glaze from the bottom resting point of the whale with a damp sponge. -
Final fire:
Fire the piece again to the maturation temperature of your chosen clay and glaze (typically cone 5 or 6 for stoneware).
Make it Splash
Before glazing, gently dab a sponge with wax resist over the eyes and inside the mouth. This keeps those areas raw clay color, creating a cute contrast against the shiny blue glaze.
Now your little ceramic whale is ready to rattle and roll its way into someone’s heart
Ladybug Dot Rattle
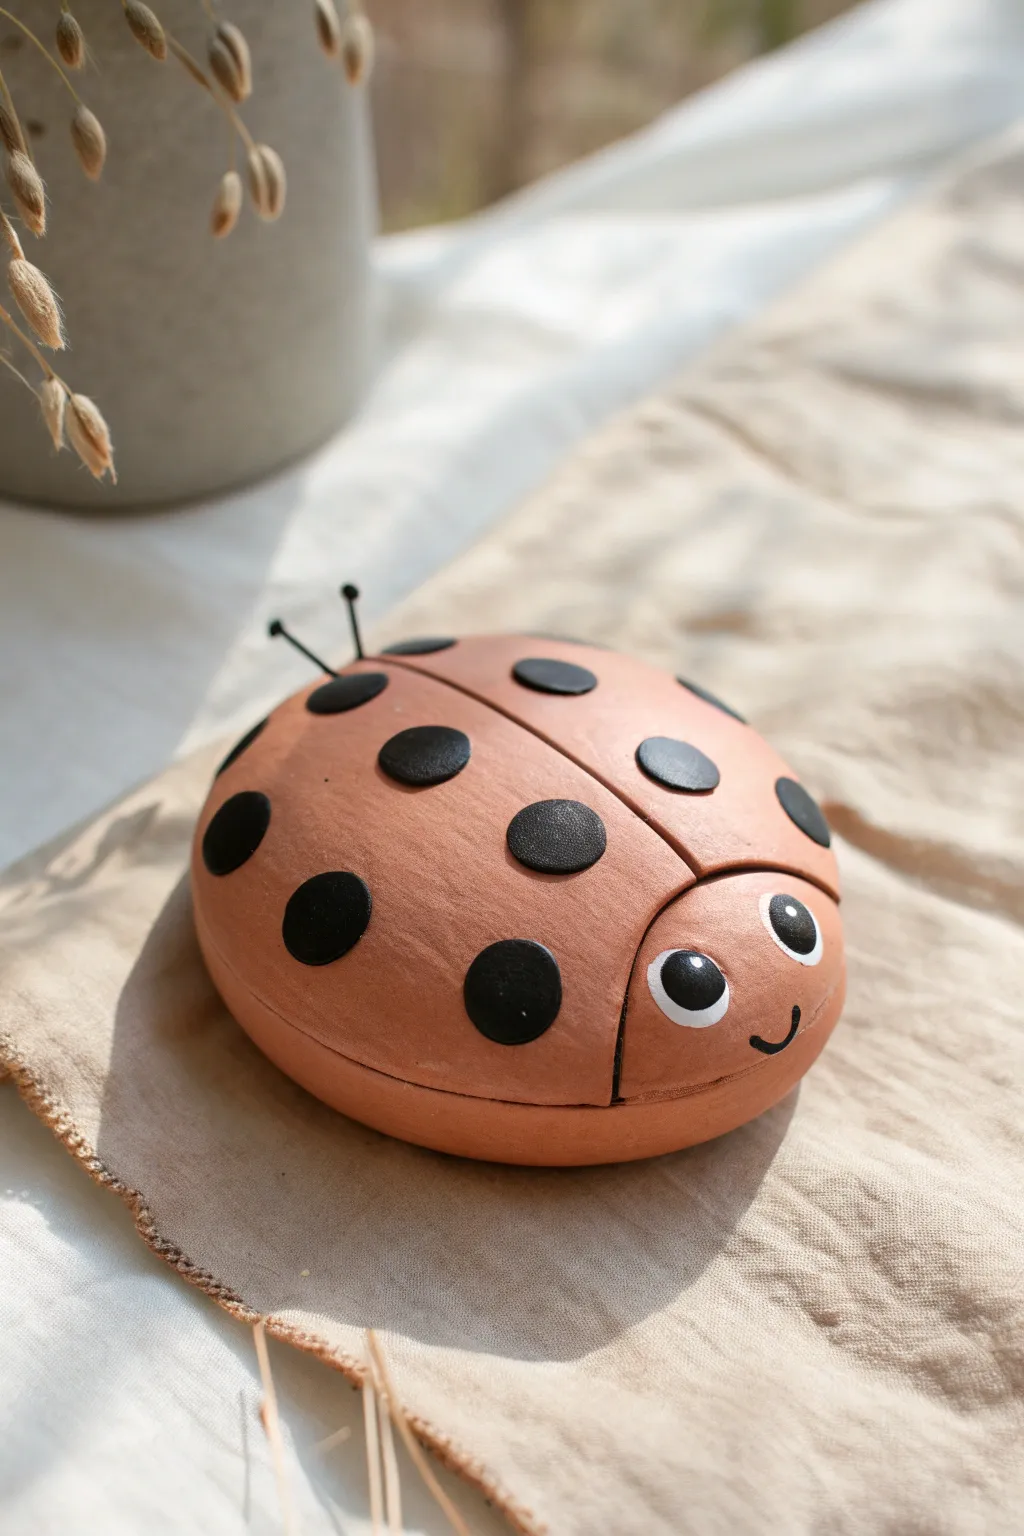
Bring a little garden charm to life with this rounded terracotta-colored ladybug rattle. Its distinct split-wing back and friendly painted face make it a delightful sensory toy or a sweet decorative piece for a nursery shelf.
Step-by-Step
Materials
- Terracotta-colored polymer clay (or air-dry clay painted terracotta)
- Black polymer clay
- White acrylic paint
- Small rattle insert or dried beans/beads
- Black jewelry wire (20-22 gauge)
- Clay knife or needle tool
- Ball stylus tool
- Fine-grit sandpaper
- Matte varnish (optional)
- Small paintbrush
Step 1: Forming the Body
-
Prepare the core:
Start by conditioning a large ball of terracotta-colored clay until it is soft and pliable. Flatten it slightly into a thick pancake shape. -
Create the hollow:
Using your thumbs, gently press into the center of the clay to form a bowl shape. Repeat this process to make a second matching bowl. -
Add the noise:
Place your rattle insert or a small handful of dried beans into one of the clay bowls. Be careful not to overfill it; the sound needs room to bounce around. -
Seal the rattle:
Place the second bowl on top of the first. Pinch the seams together firmly all the way around, smoothing the clay with your fingers until the seam line disappears completely and you have a smooth, flattened sphere. -
Define the shape:
Gently roll the sphere on your work surface to smooth out imperfections. Flatten the bottom slightly so the ladybug will sit stable without rolling away.
Smooth Operator
Before baking, brush a tiny amount of baby oil or clay softener over the terracotta clay with your finger. It removes fingerprints and creates a flawless, professionally smooth surface.
Step 2: Sculpting Details
-
Mark the head:
Using a clay knife, gently score a curved line across the front third of the body. This visual separation creates the ladybug’s head. -
Create the wings:
From the center of that head line, drag your tool straight back down the spine of the ladybug to the rear. Deepen this groove slightly to simulate the separated wing casing. -
Make the spots:
Roll out a thin sheet of black clay. Use a small circular cutter or a straw to punch out several small flat circles. -
Attach the spots:
Press the black circles onto the terracotta body in a random pattern. I like to press them down until they are flush with the surface for a smooth finish. -
Add the antennae:
Cut two short pieces of black wire, about an inch long. curled slightly at the ends if desired. Insert them firmly into the top of the head area. -
Insert eye sockets:
Use a large ball stylus to press two distinct indentations into the face area where the eyes will go.
Natural Texture
For a rustic look, use a textured sponge to gently pat the terracotta surface before baking. This gives it a stone-like feel similar to a real garden planter.
Step 3: Finishing Touches
-
Bake or dry:
Follow the manufacturer’s instructions for your specific clay. If baking polymer clay, support the rounded shape with a bed of polyester batting to prevent flat spots. -
Paint the eyes:
Once cool and dry, fill the indented eye sockets with white acrylic paint. Since white can be translucent, you might need two coats for opacity. -
Add pupils:
Dip the end of a paintbrush handle or a large dotting tool into black paint (or use a tiny bit of black clay if preferred) and add the pupils to the center of the white eyes. -
Draw the smile:
Using a very fine liner brush and black paint, cultivate a tiny, curved smile just below the eyes. -
Seal the piece:
Apply a coat of matte varnish to protect the paint and clay, giving the rattle a professional, durable finish.
Give your little ladybug a gentle shake to hear the satisfying sound of your handiwork
Strawberry Sweet Rattle

This charming rattle mimics the texture and shape of a ripe strawberry using earthy clay tones. With hollowed seed details that allow the sound to escape, it makes for both a beautiful decorative piece and a delightful instrument.
Step-by-Step Guide
Materials
- Red earthenware or terracotta clay
- Green tinted clay (or green underglaze/slip)
- Small clay beads or dried beans (for rattle sound)
- Needle tool or small awl
- Loop carving tool
- Scoring tool (or fork)
- Slip (clay and water mixture)
- Sponge
- Sculpting spatula
Step 1: Forming the Body
-
Prepare the clay:
Begin with a ball of red earthenware clay about the size of a tennis ball. Knead it well to remove air bubbles, as trapped air can cause cracking during firing. -
Create pinch pots:
Divide the ball into two equal halves. Using your thumb, press into the center of each half and pinch the walls evenly against your palm to create two symmetrical bowl shapes. -
Refine the shape:
Gently shape the pinch pots so they are slightly tapered towards the bottom, resembling the top and bottom halves of a strawberry heart shape. -
Add the rattle:
Place several small, pre-fired clay beads or dried beans inside one of the pinch pots. Ensure they are dry so they don’t stick to the interior walls. -
Join the halves:
Score the rim of both pinch pots with a serrated tool and apply a generous layer of slip. Press the two halves together firmly to create a sealed hollow form. -
Shape the strawberry:
Paddle or smooth the joined seam with a flat wooden spatula. Gently manipulate the clay into a soft, triangular strawberry shape—wide at the top and tapering to a rounded point at the bottom.
Sound Check
Make sure your seed holes are large enough! Glaze can fill tiny holes, muffled sound. Pierce them again after glazing but before firing.
Step 2: Sculpting Details
-
Mark seed placement:
Using a needle tool, lightly mark small teardrop shapes periodically around the surface of the strawberry to plan where your sound holes will go. -
Carve the seeds:
Use a small loop tool or an angled blade to carve deeply into these markings. Create teardrop-shaped indentations. Pierce through the clay wall at the deepest point of the seed indentation to allow sound to escape. -
Clean the edges:
Wait for the clay to firm up slightly to leather-hard, then use a damp sponge or soft brush to smooth the rough edges around each carved seed hole. -
Prepare the leaves:
Roll out a small slab of green clay (or red clay you plan to paint later). Cut out five or six petal-like leaf shapes with pointed tips. -
Texture the leaves:
Use a needle tool or knife to gently score a central vein and smaller branching veins onto the top surface of each leaf for a realistic look. -
Attach the calyx:
Score and slip the top of your strawberry. Arrange the leaves in a star pattern on the top, allowing the tips to drape slightly over the curve of the fruit. -
Adding the stem:
Roll a small coil of green clay for the stem. Attach it securely to the center where all the leaves meet, blending the clay at the base so it looks organic. -
Final texture check:
I like to take a dry sponge and gently dab the red surface of the strawberry to give it a slightly pitted, skin-like texture, avoiding the smooth leaves. -
Drying and firing:
Allow the piece to dry slowly under loose plastic to prevent the seams from cracking. Once bone dry, fire according to your clay’s specific temperature guidelines.
Cracked Seams?
If the join line reappears while drying, score it deeply, add fresh clay coils into the crack, and smooth it over. Dry very slowly.
Now you have a rustic, handmade shaker that looks as sweet as it sounds
Mushroom Cap Critter Rattle
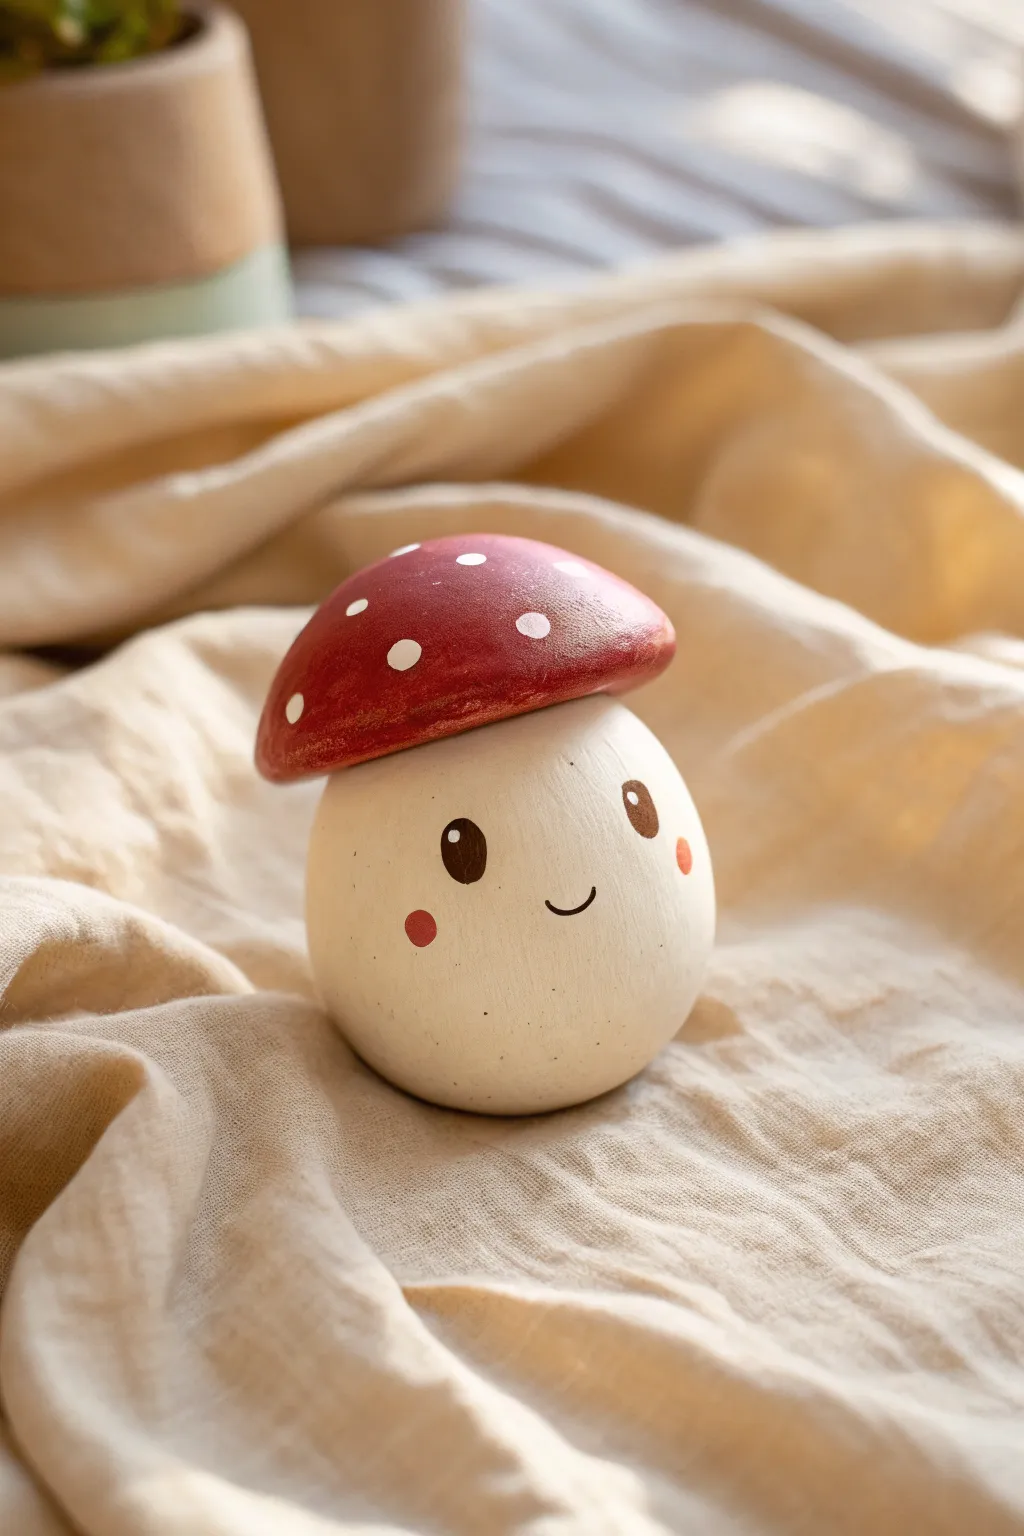
This adorable woodland friend brings a touch of whimsy to playtime with its gentle rattle sound and sweet, smiling face. Crafted from smooth wood and painted with non-toxic colors, this chunky mushroom is perfectly sized for little hands to grasp and shake.
Step-by-Step Tutorial
Materials
- Hollow wooden egg shaker (approx. 2.5 inches)
- Wooden mushroom cap piece (flat bottom, domed top, sized to fit the egg)
- Drying beads or dried beans (if filling yourself)
- Wood glue
- Sandpaper (fine grit, 220-400)
- White acrylic paint (warm cream tone)
- Red acrylic paint (deep earthy red)
- Dark brown acrylic paint
- Soft pink acrylic paint
- Medium flat paintbrush
- Small round detail brush (size 0 or 1)
- Dotting tool or toothpick
- Matte non-toxic varnish or sealant
Step 1: Preparing the Base
-
Prepare the surfaces:
Begin by lightly sanding both the wooden egg shaker and the wooden mushroom cap. You want to remove any existing finish or rough spots to ensure the paint adheres properly. Wipe away all dust with a barely damp cloth. -
Prime the egg:
Apply a base coat of the warm cream-colored white paint to the entire wooden egg. Use your flat brush for even coverage. I like to let this dry briefly before applying a second coat to ensure the wood grain doesn’t show through too much. -
Paint the cap:
While the egg dries, paint the top surface of the mushroom cap with the deep red acrylic paint. Leave the flat bottom unpainted for now, as this is where the glue will go later. Apply two coats for a rich, vibrant color. -
Check fit and finish:
Once both pieces are fully dry, do a quick dry fit to see how the cap sits on the egg. If the paint has created any bumps on the contact surfaces, lightly sand them down for a flush fit.
Uneven Dots?
If your polka dots look streaky or raised, try thinning your paint slightly with water. Practice on paper first to get a perfect round stamp.
Step 2: Painting the Details
-
Add polka dots:
Using the back of your paintbrush handle or a dotting tool, dip into the cream paint you used for the body. Gently press dots onto the red mushroom cap. Vary the spacing but try to keep the dot sizes relatively uniform. -
Outline the shiny spots:
For the charming eyes, use the small round brush and dark brown paint. Paint two oval shapes on the upper half of the egg. They should be spaced slightly apart to leave room for the smile. -
Add eye highlights:
Once the brown eye paint is tacky or dry, use a toothpick or a very fine dotting tool to add a tiny white heavy dot in the upper corner of each oval. This ‘catchlight’ brings the character to life. -
Paint the smile:
With the detail brush and dark brown paint, carefully draw a small, U-shaped mouth centered between and slightly below the eyes. Keep the line thin and delicate. -
Rosy cheeks:
Dip a fingertip or a round foam pouncer into the soft pink paint. Dab off most of the excess on a paper towel, then gently stamp a small circle on either side of the smile. -
Texture detail (optional):
To mimic the speckled look in the photo, you can flick a very small amount of watered-down brown paint from an old toothbrush onto the lower half of the egg, creating tiny speckles.
Pro Tip: Eye Spacing
For maximum cuteness (the ‘kawaii’ factor), place the eyes lower on the face and wider apart than you think. It makes the forehead look bigger and sweeter.
Step 3: Assembly and Sealing
-
Glue the cap:
Apply a generous ring of wood glue to the flat bottom of the mushroom cap piece. I prefer to keep the glue slightly away from the very edge so it doesn’t squeeze out messy. -
Positioning:
Press the cap firmly onto the top of the egg shaker. Ensure it is centered. Wipe away any excess glue immediately with a damp paper towel or q-tip. -
Clamp or weight:
If possible, place a small weight on top of the mushroom or use a clamp to hold the pieces tightly together while the glue cures. Let it sit undisturbed for at least 2 hours. -
First coat of sealant:
Apply a thin layer of matte non-toxic varnish over the entire rattle. This protects the paint from chipping during play. -
Final smooth:
Once dry, check for any roughness. If the varnish raised the grain, do a very gentle pass with 400-grit sandpaper. -
Final coat:
Apply a second and final coat of varnish for durability. Allow the finished rattle to cure for 24 hours before giving it to a child.
Your finished mushroom rattle is now ready to bring rhythm and joy to nursery rhymes and playtime
Cloud-and-Raindrop Rattle
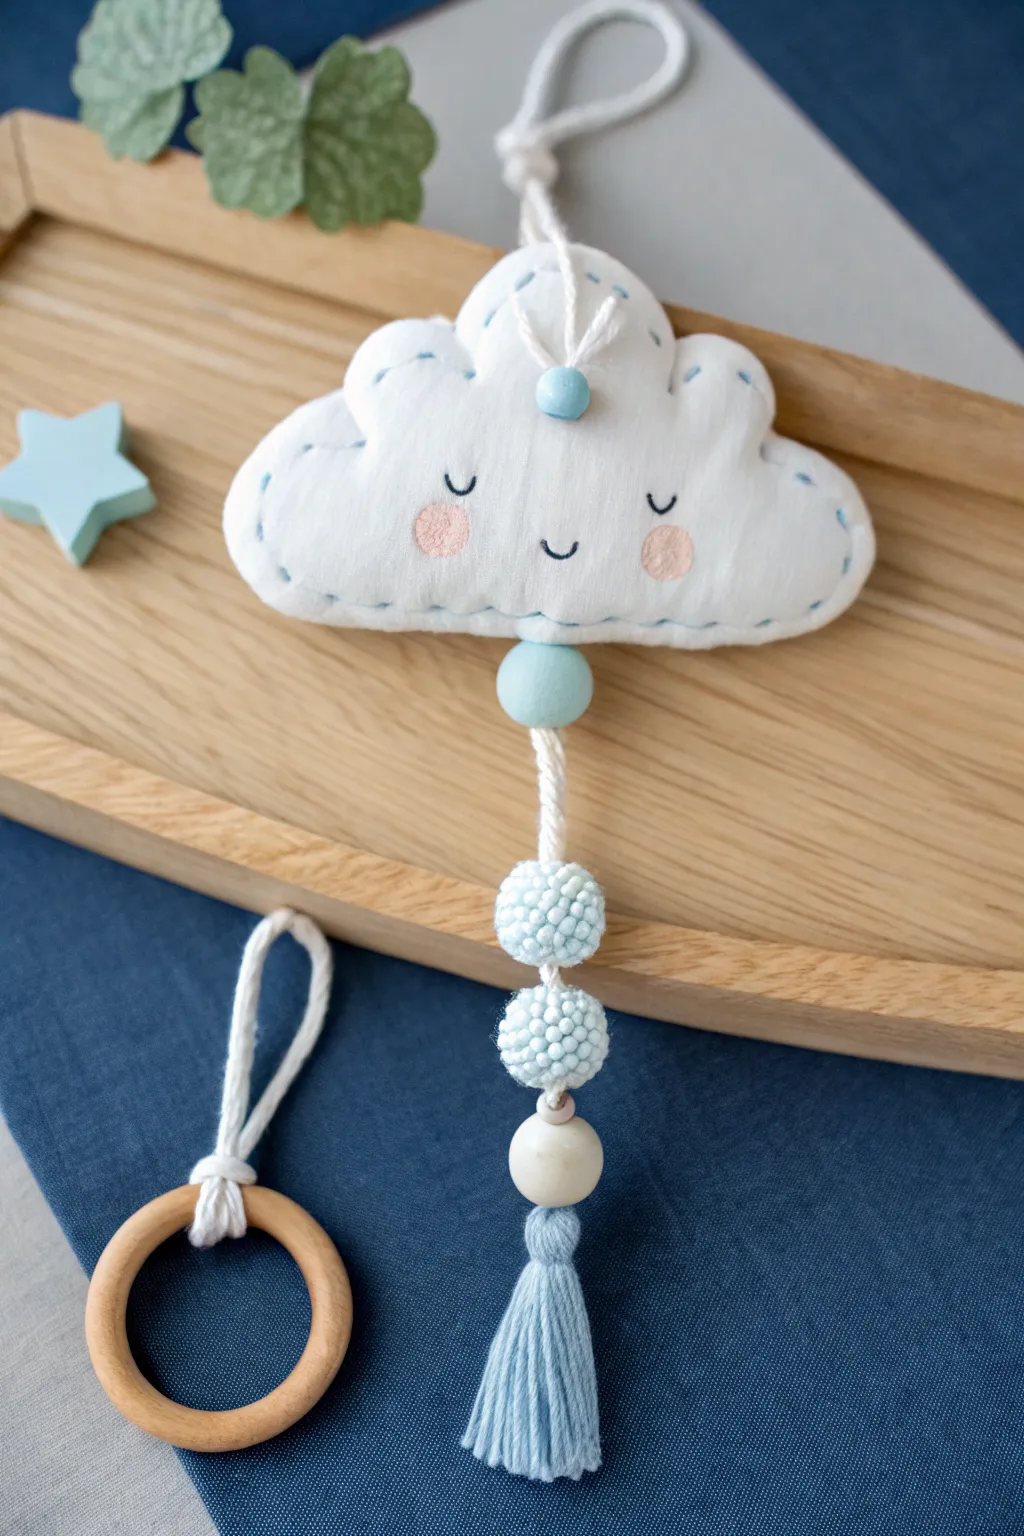
Although this sweet little cloud looks soft and cuddly, its design is sturdy enough for playtime, featuring gentle pastel embroidery and a charming beaded tail. With its playful tassel and sleeping face, this sewing project brings a calming, dreamy vibe to any nursery collection.
Detailed Instructions
Materials
- White cotton or muslin fabric (lightweight)
- Polyester fiberfill stuffing
- Rattle insert (optional)
- Embroidery floss (light blue, dark grey/black, soft pink)
- Small wooden beads (white and painted light blue)
- Blue textured or crochet beads (medium size)
- White or cream macramé cord/thick cotton yarn
- Light blue yarn (for the tassel)
- Sewing needle and embroidery needle
- White sewing thread
- Scissors
Step 1: Shaping the Cloud Face
-
Prepare the fabric layers:
Cut two identical cloud shapes from your white cotton fabric. A smoothly curved, bubbly shape works best, roughly 5-6 inches wide. -
Sketch the face:
On the front piece, lightly sketch sleeping eyes (u-shapes), a small smile, and round cheeks using a disappearing ink fabric marker or dull pencil. -
Embroider the features:
Using two strands of dark grey or black floss, stitch the eyes and mouth with a simple backstitch. Be sure to anchor your knots securely on the wrong side. -
Add rosy cheeks:
Switch to soft pink floss. Fill in the cheek circles using a satin stitch to create solid, rosy spots on either side of the smile. -
Stitch the perimeter accents:
Thread your needle with light blue embroidery floss. Sew a running stitch around the entire perimeter of the front cloud piece, staying about 1/4 inch from the raw edge.
Knot Security
For safety, apply a tiny drop of non-toxic fabric glue to every knot on the tail cord before sliding beads over them. This prevents unraveling during play.
Step 2: Assembly and Filling
-
Attach the top loop:
Cut a short length of white macramé cord. Fold it into a loop and sandwich the raw ends between the two fabric layers at the top center, pointing inward. -
Prepare the bottom cord:
Cut a longer piece of white cord (about 10 inches) for the tail. Knot one end and place the knot between the fabric layers at the bottom center, with the tail trailing inward. -
Sew the cloud body:
Place the fabric pieces right sides *out* (this is a raw-edge style project). Using white sewing thread, stitch around the cloud shape, following the blue embroidery guide you made earlier but staying just inside it. -
Leave a gap:
Stop sewing when you have about 1.5 inches remaining open at the bottom edge near the tail cord. -
Stuff the cloud:
Gently push polyester fiberfill into the cloud shape. Use a chopstick or pencil to get the stuffing into the curved bumps. If using a rattle insert, tuck it into the center now. -
Close the seam:
Finish sewing the opening closed, ensuring the bottom tail cord is securely stitched into place.
Step 3: Beading and Tassel
-
Add decorative top bead:
Using a needle and thread, sew a small blue wooden bead to the front of the cloud, right at the base of the top loop. -
Thread the tail beads:
Slide a large light blue wooden bead up the bottom tail cord until it rests against the fabric. -
Secure the cord:
Tie a simple overhand knot in the white cord directly under the wooden bead to hold it in place. I find this keeps everything tighter than relying on friction alone. -
Braid the mid-section:
If your cord is thin, you might want to braid loosely here; otherwise, leave a 1-inch gap of straight cord. -
Add texture beads:
Thread on two textured blue beads (crochet-covered or bumpy beads look great here). Separate them slightly with small knots if desired. -
Finish the bead stack:
Add one final cream or white wooden bead at the bottom of your stack. -
Create the tassel:
Wrap light blue yarn around three fingers about 15 times. Tie the bundle at the top, cut the bottom loops, and wrap a piece of yarn around the neck to secure it. -
Attach the tassel:
Sew or tie the tassel securely to the very end of the white tail cord, trimming any excess cord so it’s hidden inside the tassel head.
Sensory Upgrade
Insert a layer of crinkle paper inside the cloud alongside the stuffing to add a satisfying crunch sound when the toy is squeezed.
Now you have a charming, handmade keepsake perfect for gifting or decorating a special space
Cartoon Mouse Ears Rattle
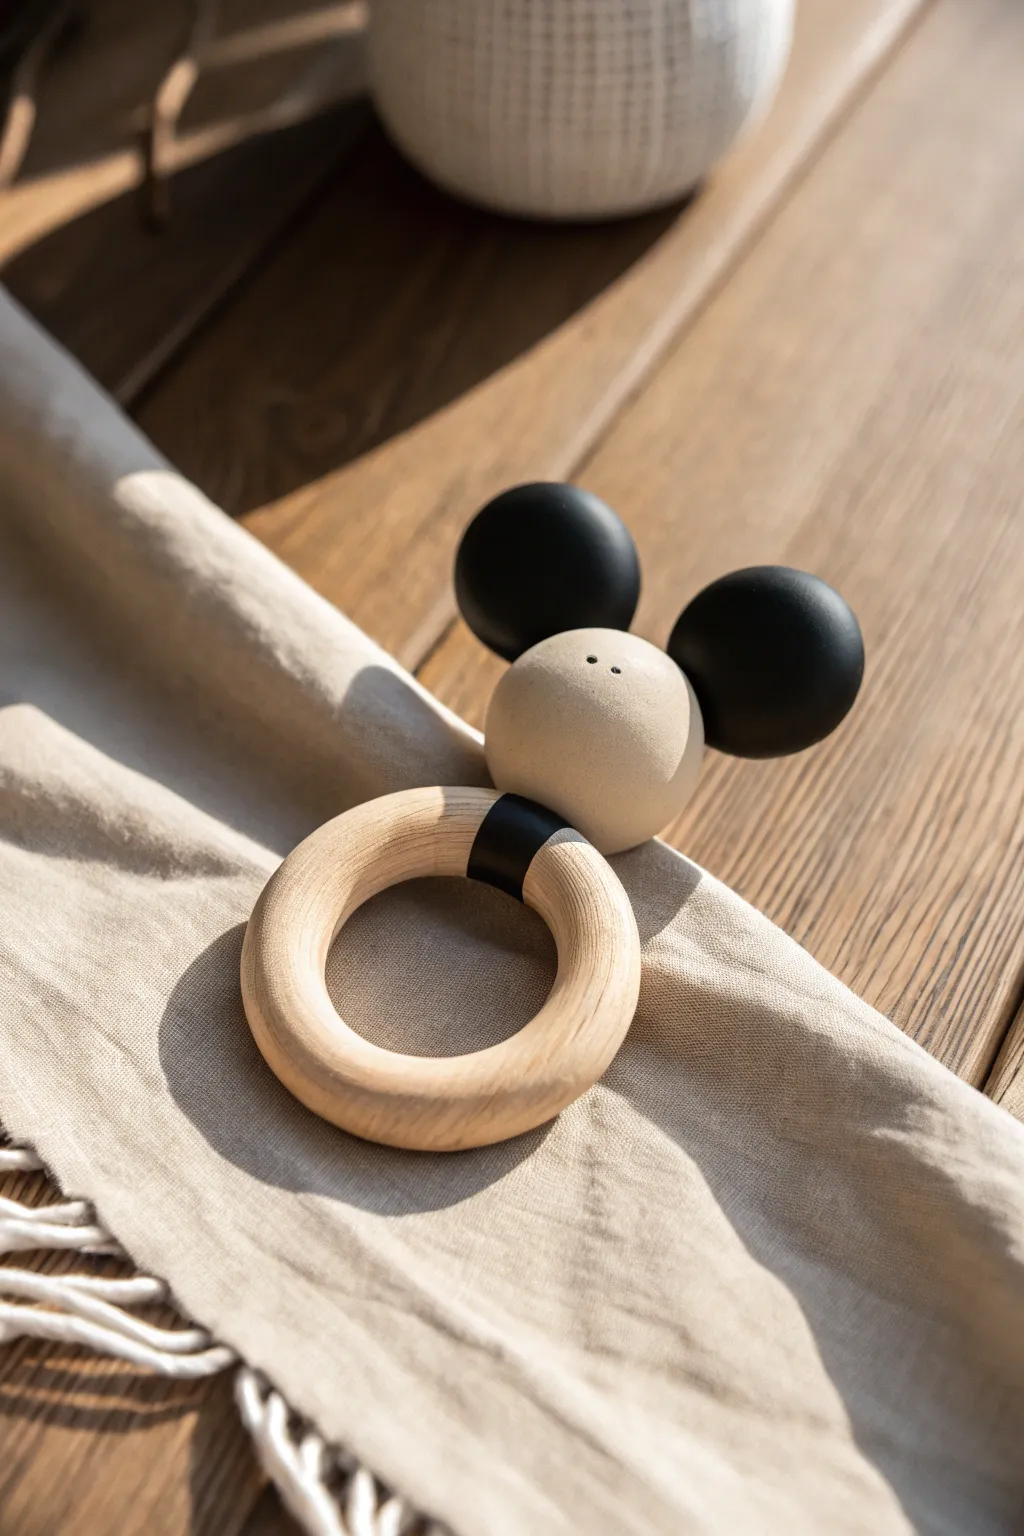
This charming rattle combines the natural warmth of wood with sleek, modern clay design. Featuring an iconic mouse silhouette in matte earth tones, it’s a stylish and tactile toy perfect for little hands to grasp and shake.
Step-by-Step Tutorial
Materials
- Natural wooden teething ring (approx. 2.5 – 3 inches diameter)
- Polymer clay (beige/tan and black)
- Black leather cord or flat leather strip (approx. 5mm width)
- Strong craft glue (E6000 or similar)
- Aluminum foil
- Pointed sculpting tool or needle tool
- Sandpaper (fine grit)
- Rattle insert (small plastic rattle box or bell)
- Oven
- Baking sheet/parchment paper
Step 1: Sculpting the Head
-
Prepare the Core:
To keep the rattle lightweight, crumble a small ball of aluminum foil about the size of a walnut. Pack it tightly so it creates a solid base for the clay. -
Insert the Rattle:
Press a small rattle insert or bell into the foil core. Ensure it is secure but not muffled; you might need to leave a tiny air pocket around the bell mechanism itself inside the foil. -
Cover with Clay:
Condition your beige polymer clay until it is soft and pliable. Flatten a sheet of clay approximately 1/4 inch thick and wrap it completely around the foil core. -
Smooth the Sphere:
Roll the clay ball between your palms to smooth out all seams and fingerprints. Aim for a perfect sphere roughly 1.5 inches in diameter. -
Add the Eyes:
Using a needle tool or a very fine point, poke two tiny holes near the top-center of the beige sphere. These minimal ‘eyes’ give the character personality without needing paint.
Loose Ears?
If the ears feel wobbly after baking, carefully detach them, add a drop of superglue, and reattach. For extra strength, insert a small wire pin between the head and ears before baking next time.
Step 2: Creating the Ears
-
Form the Ear Balls:
Take your black polymer clay and roll two smaller spheres. These should be identical in size, approximately 0.75 inches in diameter. -
Attach the Ears:
Press the black spheres onto the top of the beige head. To ensure a strong bond, I like to use a tiny bit of liquid clay adhesive or score the connection points slightly before pressing them together. -
Blend the Seams:
Gently smooth the clay where the black ears meet the beige head. You want them to look like separate geometric shapes, but they must be fused securely so they don’t detach. -
Create the Neck Connection:
Flip the head assembly over. Use the wooden ring to make an indentation at the bottom of the beige sphere, creating a curved groove where the ring will eventually sit. -
Make the Strap Channel:
Using a modeling tool, carve a shallow, flat channel across the bottom indentation. This channel should be just wide enough for your leather strip to lay flush later.
Texture Twist
For a different sensory experience, use a toothbrush to gently stipple the beige clay before baking. This creates a stone-like texture that contrasts beautifully with the smooth black ears.
Step 3: Baking and Assembly
-
Bake the Clay:
Place the clay head on a parchment-lined baking sheet. Bake according to your polymer clay package instructions (usually around 275°F for 15-30 minutes per 1/4 inch of thickness). -
Cool and Sand:
Allow the clay to cool completely in the oven. Once cool, gently sand any rough spots or fingerprints with fine-grit sandpaper for that ultra-matte finish. -
Prepare the Leather:
Cut a short length of black leather strip, long enough to loop around the wooden ring and tuck into the head. Test the fit before gluing. -
Attach to Ring:
Apply a strong adhesive to the bottom indentation of the clay head and the channel you carved. -
Secure the Strip:
Place the wooden ring into the groove. Loop the leather strip tightly around the ring and press the ends into the channel with glue. -
Final Hold:
Hold the leather strip firmly in place for a few minutes while the glue sets, or use a rubber band to keep pressure on it until dry. -
Inspect Safety:
Once fully cured, pull firmly on all parts to ensure the ears and ring are completely secure before giving it to a child.
Now you have a stylish, modern rattle that looks just as good on a nursery shelf as it does in play
Peekaboo Pocket Monster Rattle
This adorable, egg-shaped creature combines soft pastel tones with a charmingly simple face to create a delightful handheld rattle. With its mint green pajama-like bottom and sunny yellow top, this smooth clay project is perfect for beginners looking to practice clean joinery and facial detailing.
How-To Guide
Materials
- Polymer clay (pale yellow, mint green, white, black, pink)
- Rattle insert or small metal container with beads
- Aluminum foil
- Rolling pin or pasta machine
- Circle cutter (small)
- Needle tool
- Ball stylus tool
- Smoothing tool or blending silicone brush
- Oven or kiln (depending on clay type)
- Sculpting blade
Step 1: Creating the Core and Base
-
Form the armature:
Begin by crumpling aluminum foil into a tight egg shape that is slightly smaller than your desired final size. This core saves clay and keeps the rattle lightweight. -
Prepare the rattle sound:
If you are using a pre-made rattle insert, embed it securely into the foil core now. If making your own, place a few beads inside a very small metal tin or hollow clay ball and press it into the center of your foil armature. -
Cover the bottom half:
Condition your mint green clay until pliable. Roll it into a sheet about 1/4 inch thick. Cut a circle or strip large enough to cup the bottom half of your foil egg. -
Smooth the trousers:
Wrap the mint green clay around the bottom half of the egg shape. Smooth the clay upwards, ensuring there are no trapped air bubbles between the foil and the clay. -
Create a clean rim:
Use your sculpting blade to trim the top edge of the green clay so it forms a straight, horizontal line around the ‘waist’ of the monster.
Step 2: Adding the Upper Body
-
Cover the top half:
Condition the pale yellow clay and roll it to the same thickness as the green base. Mold this over the top half of the foil egg, bringing it down to meet the green section. -
Join the seam:
Where the yellow and green clays meet, you want a tight fit but distinct color separation. Gently press the yellow clay down against the green edge. Use a smoothing tool to ensure the surface is flush, though a visible seam line is actually desirable for the design. -
Refine the egg shape:
Roll the entire figure gently between your palms to smooth out fingerprints and perfect the rounded egg silhouette. This is the moment to fix any lumpiness.
Uneven Seams?
If the line joining the two colors looks messy, roll a very thin ‘belt’ of clay in a contrasting color and wrap it around the waist to hide the seam completely.
Step 3: Character Details
-
Add the spots:
Roll tiny balls of the pale yellow clay and flatten them into small discs. Press these randomly onto the green ‘pants’ section to create a polka-dot pattern. Use your finger to smooth them so they look inlaid rather than stuck on top. -
Sculpt the ears:
Take two small pieces of pale green or yellow clay (matching the top or slightly darker) and roll them into short, rounded cones. I find it helpful to slightly flatten the base of the cone for better adhesion. -
Attach the ears:
Place the ears on top of the head, spaced slightly apart. Blend the seams at the base of the ears into the head using a silicone tool so they are securely attached. -
Create the arms:
Shape two small, flattened ovals of yellow clay. Press these onto the sides of the body where the colors meet, hugging the ‘waistline’ to look like little resting arms.
Texture Twist
Before baking, gently press a piece of rough fabric or sandpaper against the clay surface to give the monster a matte, stone-like texture instead of a glossy finish.
Step 4: Face and Finishing
-
Indent eye sockets:
Use a ball stylus to make two small indents where the eyes will go. This helps the eye clay sit flush with the face. -
Insert the eyes:
Roll two tiny balls of black clay and press them into the sockets. Flatten them gently. -
Blush the cheeks:
Take the tiniest amount of pink clay, flatten it into thin ovals, and press them onto the cheeks specifically below and slightly outside the eyes. -
Draw the mouth:
Using a needle tool or a very fine piece of black clay rolled into a thread, create a small ‘U’ shape mouth with a tiny vertical line leading to a nose dot. Press it gently onto the face. -
Bake or dry:
Follow the manufacturer’s instructions for your specific clay. If using polymer clay, bake it in an oven, usually at around 275°F (130°C), supporting the round bottom with polyester batting so it doesn’t flatten.
Once cooled, give your little monster a shake to hear its cheerful rattle sound
Glow-Style Star Planet Rattle
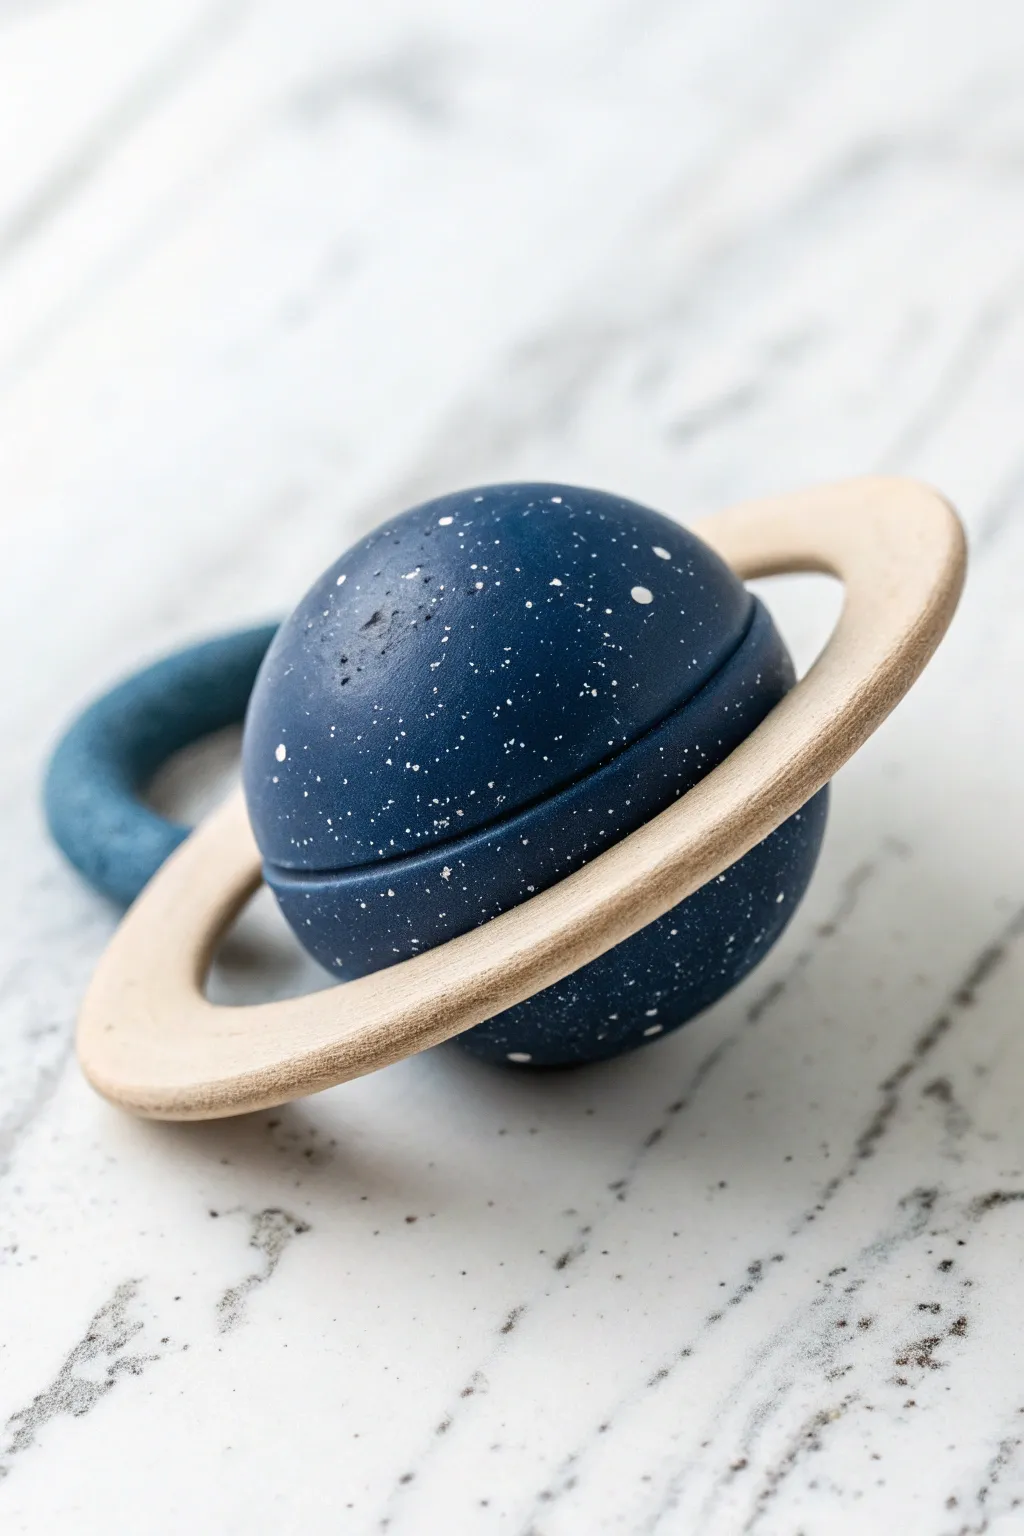
Blast off into a galaxy of sensory play with this stunning celestial rattle. Featuring a deep midnight blue planet speckled with stardust and encircled by a natural wooden ring, it’s a modern, gender-neutral toy that looks beautiful on any nursery shelf.
Step-by-Step Guide
Materials
- Polymer clay (midnight blue or navy)
- Polymer clay (white or glow-in-the-dark for stars)
- Natural wood teether ring (approx. 3-inch diameter)
- Rattle insert or small jingle bell
- Aluminum foil
- Rolling pin or acrylic roller
- Sharp craft knife
- Old toothbrush or stiff paintbrush
- Sandpaper (fine grit)
- Water-based polyurethane varnish (satin or matte, non-toxic)
- Small paintbrush
- Oven and baking tray
Step 1: Forming the Core
-
Prepare the rattle sound:
Begin by taking your rattle insert or jingle bell. Wrap it securely in a small amount of aluminum foil, creating a tight ball roughly the size of a large grape. This prevents the clay from muffling the sound too much. -
Condition the clay:
Warm up your navy blue polymer clay by kneading it thoroughly in your hands until it becomes soft and pliable. This step creates a stronger bond and smoother finish later. -
Create the base sphere:
Roll the blue clay into a smooth ball slightly larger than your wooden ring’s inner circle. Slice this ball in half using your craft knife. -
Insert the core:
Place your foil-wrapped rattle insert into the center of one clay hemisphere. Press it in gently to nestle it. -
Seal the planet:
Place the second hemisphere on top to reform the sphere. Smooth the seam firmly with your thumb, blending the clay until the line completely disappears and the ball is perfectly round.
Starry Night Tip
Don’t aim for perfect, even spacing with your paint speckles. Real galaxies have clusters and voids, so random flicking creates a much more authentic cosmic look.
Step 2: Creating the Orbit
-
Measure the ring channel:
Hold your wooden ring against the clay sphere to gauge where it needs to sit. I like to mark a faint guideline around the equator of the ball with a needle tool. -
Carve the groove:
Using a modeling tool or the back of a knife, carefully create a shallow groove all the way around the equator where you marked. This channel needs to be wide enough to accept the inner edge of the wooden ring. -
Split the sphere (optional method):
Alternatively, if your wooden ring is solid and cannot be opened, you will need to slice your clay sphere in half again at the equator. Place the ring between the halves, then reseal the clay around the ring, smoothing the seam meticulously. -
Add the handle (if desired):
The image implies a handle loop behind the planet. Roll a thick snake of blue clay, bend it into a ‘U’ shape, and blend the ends firmly onto the back or bottom hemisphere of your planet. Ensure the connection is seamless for safety.
Glow Up
Swap the white paint for glow-in-the-dark acrylic paint or use glow polymer clay bits. The rattle will softly illuminate after lights out, acting as a soothing focal point.
Step 3: Stardust & Finishing
-
Mix the spatter paint:
Take a tiny amount of acrylic white paint (or white liquid clay) and dilute it slightly with water until it has a milky consistency. -
Apply the stars:
Dip an old toothbrush into your white mixture. Hold the brush over the blue clay and run your thumb across the bristles to flick tiny speckles onto the surface. Rotate the planet to get even coverage resembling a galaxy. -
Let the texture dry:
Allow the speckled paint to dry completely. If you achieved the look purely with white clay bits instead of paint, lightly roll the ball to embed the specks flush with the surface. -
Bake the project:
Place the rattle on a baking sheet lined with parchment paper. Bake according to your clay package instructions (usually 275°F/135°C for about 30 minutes per 1/4 inch of thickness). -
Cool down:
Turn the oven off and let the rattle cool down slowly inside the oven. This prevents cracking from thermal shock. -
Sand for smoothness:
Once fully cool, use fine-grit sandpaper to gently buff out any fingerprints or rough spots on the clay. Pay extra attention to the seam where the clay meets the wooden ring. -
Seal for safety:
Apply 1-2 thin coats of water-based, non-toxic polyurethane varnish to the clay parts. This protects the ‘stars’ and gives the rattle a pleasing, saliva-resistant sheen.
Now you have a wonderful handcrafted toy that brings a little piece of the night sky into your playtime routine