
I love how white air dry clay instantly gives you that clean, calm look—even when the project is super simple. If you’re craving minimalist decor and sweet little handmade gifts, these ideas are the ones I keep reaching for in my studio.
Leaf-Imprint Trinket Dish
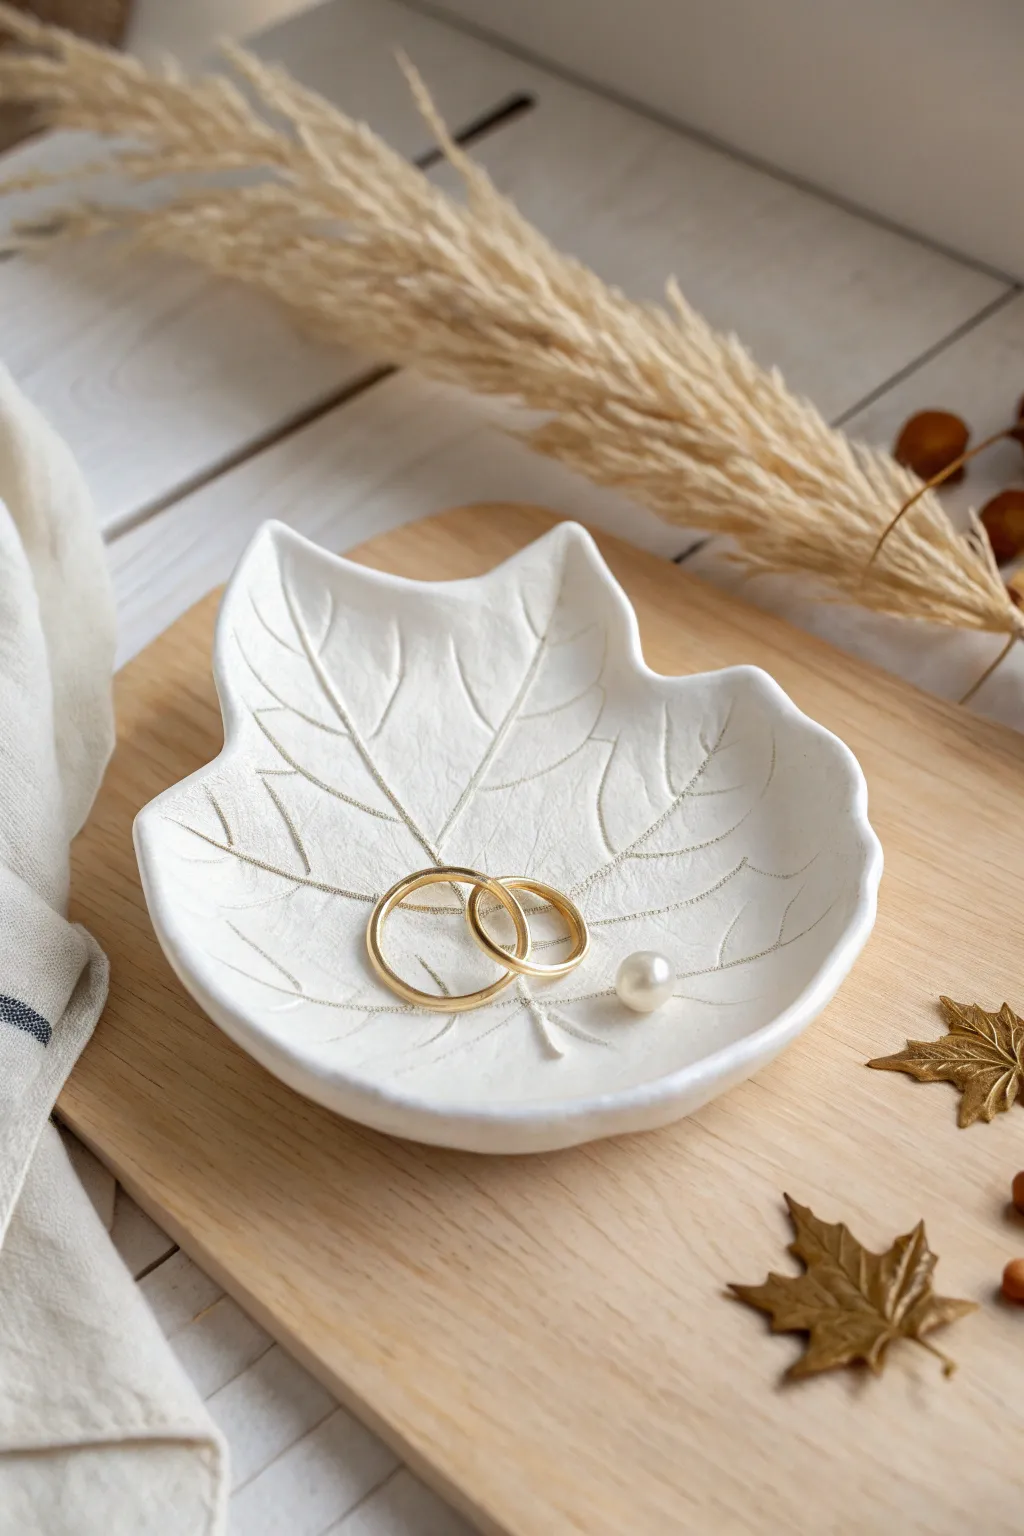
Capture nature’s delicate beauty with this sophisticated trinket dish, perfect for holding precious rings or earrings. The immaculate white clay embossed with fine veins and highlighted with subtle gold touches creates a piece that looks effortlessly high-end.
Step-by-Step Tutorial
Materials
- White air dry clay
- Rolling pin
- Fresh leaf with prominent veins (e.g., maple or sycamore)
- Craft knife or scalpel
- Small bowl (for shaping)
- Fine-grit sandpaper
- Gold acrylic paint or liquid gilding
- Fine-point paintbrush
- Clear varnish or sealant (gloss or matte)
- Water and sponge for smoothing
Step 1: Preparation and Impression
-
Condition the clay:
Begin by taking a handful of white air dry clay and kneading it in your hands until it becomes soft, pliable, and free of cracks. -
Roll it out:
On a clean, flat surface, roll the clay out to an even thickness of about 1/4 inch (6mm). If the clay sticks, you can lay down a sheet of parchment paper first. -
Select your leaf:
Choose a fresh, sturdy leaf with a distinctive shape and strong vein structure. A slightly dried leaf might crumble, so fresh is usually best for a clean impression. -
Create the imprint:
Place the leaf vein-side down onto the clay slab. Gently roll over it with your rolling pin, applying firm but even pressure to embed the veins deep into the surface.
Fixing curl
If edges curl up too much while drying, weigh the center down with a small bag of rice. This keeps the base flat and stable.
Step 2: Shaping and Refining
-
Cut the shape:
Using a craft knife or scalpel, carefully cut around the outline of the leaf. Move slowly around the serrated edges to keep the points sharp. -
Remove the leaf:
Find the stem of the leaf and gently peel it away from the clay to reveal the detailed impression underneath. -
Smooth the edges:
Dip your finger in a little water and run it along the cut edges of the clay to smooth out any roughness or sharp bits left by the knife. -
Form the curve:
Carefully lift your clay leaf and place it inside a shallow bowl. Press it gently so it takes on a curved, dish-like shape. Ensure the center is flat enough to hold rings. -
Dry completely:
Allow the dish to dry in the bowl for 24-48 hours. I find that flipping it over halfway through the drying process helps the bottom dry evenly.
Level Up
Use a small pearl bead and glue it near the stem base for a luxurious, mixed-material accent.
Step 3: Decoration and Finish
-
Sand imperfections:
Once fully cured and hard, remove the dish from the bowl. Use fine-grit sandpaper to gently buff the edges for a professional, smooth finish. -
Prepare the gold paint:
Shake your liquid gilding or mix your metallic gold acrylic paint. You want a consistency that flows easily off a thin brush. -
Paint the veins:
Using your finest brush, carefully trace the indented veins of the leaf with gold paint. A shaky hand actually helps here, as natural veins aren’t perfectly straight. -
Highlight the rim:
Lightly brush a thin line of gold along the very edge of the dish to frame the shape. -
Seal the piece:
Protect your work by applying a coat of clear varnish. Satin or matte finish looks most natural for this project.
Place your finished dish on a bedside table to add a touch of organic elegance to your room


Minimal Ring Cone And Dish Set
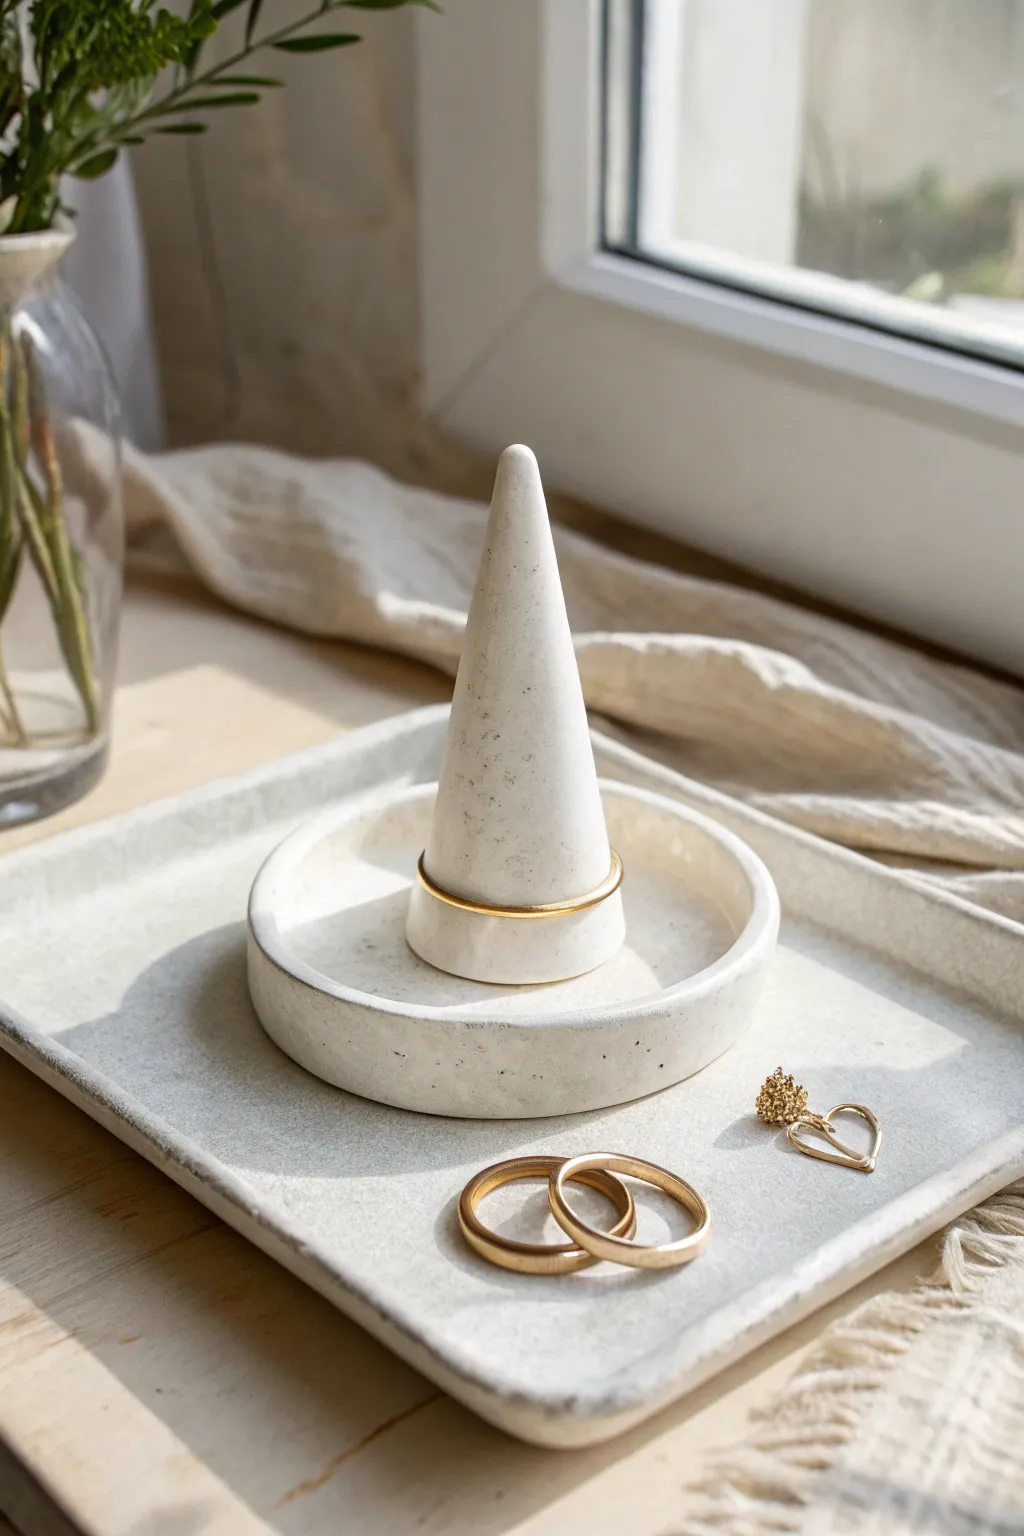
This elegant three-piece set combines a ring cone, a matching catch dish, and a rectangular tray for a complete jewelry organization station. The minimalist white finish with subtle speckles gives it a high-end ceramic look without needing a kiln.
How-To Guide
Materials
- White stone-effect air dry clay (or plain white clay)
- Course black pepper or dried coffee grounds (if using plain clay)
- Acrylic rolling pin
- Sharp craft knife or extensive blade
- Sandpaper (fine grit)
- Small bowl of water
- Circular cookie cutter (approx. 4 inches)
- Ruler
- Matte spray varnish
Step 1: Preparation & Clay Mixing
-
Prepare the speckle mix:
If you aren’t using pre-speckled stone clay, designate a chunk of white air dry clay the size of a grapefruit. Sprinkle in a teaspoon of coarse black pepper or dried coffee grounds. -
Knead thoroughly:
Knead the clay and your speckle additive together until the particles are evenly distributed. This might take a few minutes, but it’s crucial for that uniform stone look. -
Roll the slab:
Roll your clay out onto a smooth, non-stick surface until it is approximately 1/4 inch thick. Try to keep the thickness consistent across the entire slab.
Seamless Smoothness
Use a slightly damp sponge to wipe the clay before drying. This acts like a ‘pre-sanding’ step and saves you work later.
Step 2: Forming the Tray & Dish
-
Cut the rectangle base:
Using a ruler and your craft knife, cut a large rectangle from the slab. A size of 6×8 inches works well for a vanity tray. -
Create the tray walls:
Cut long strips of clay, about 1/2 inch tall. Score the edges of your rectangle base and the bottom of the strips with a craft knife. -
Attach the rim:
Apply a little water to the scored areas and press the strips onto the perimeter of the rectangle. Smooth the seam where the wall meets the base using your finger or a modeling tool. -
Cut the round dish:
From the remaining rolled clay, use your circle cutter to punch out a round base. -
Build the dish rim:
Similar to the tray, cut a strip of clay tall enough to create a low wall. Attach this to the circle base using the score-and-slip method, creating a shallow bowl. -
Smooth the edges:
Dip your finger in water and run it along the top rims of both the tray and the round dish to soften any sharp angles.
Add a Luxe Touch
Paint the very rim of the cone or the edge of the tray with liquid gold leaf for a striking metallic accent.
Step 3: Sculpting the Ring Cone
-
Form the initial cone:
Take a ball of remaining clay and roll it between your palms into a thick cylinder. Place it on your work surface and roll one end with more pressure to taper it into a point. -
Refine the shape:
Stand the cone up. If it wobbles, press the wide base gently against the table to flatten it. Use your fingers to smooth the sides upward toward the point. -
Check height:
Place the cone briefly into the wet round dish to ensure the proportions look pleasing. The cone should stand taller than the dish walls.
Step 4: Finishing Touches
-
Drying phase:
Place all three pieces in a spot away from direct heat. I usually let thicker pieces like the cone dry for at least 48 hours to ensure the core is solid. -
Rotate while drying:
Flip the tray and dish occasionally during the drying process to prevent the flat bases from curling upward. -
Sanding:
Once bone dry, take your fine-grit sandpaper and gently buff out any fingerprints or uneven seams. Be gentle with the tips of the cone. -
Dust off:
Wipe away all sanding dust with a dry cloth or a soft brush. -
Seal the set:
Take the pieces to a ventilated area and apply a light coat of matte spray varnish. This protects the clay from moisture and gives it a finished, professional feel.
Arrange your favorite jewelry on your new handmade display and enjoy the sleek organization it brings to your space


Textured White-On-White Coasters
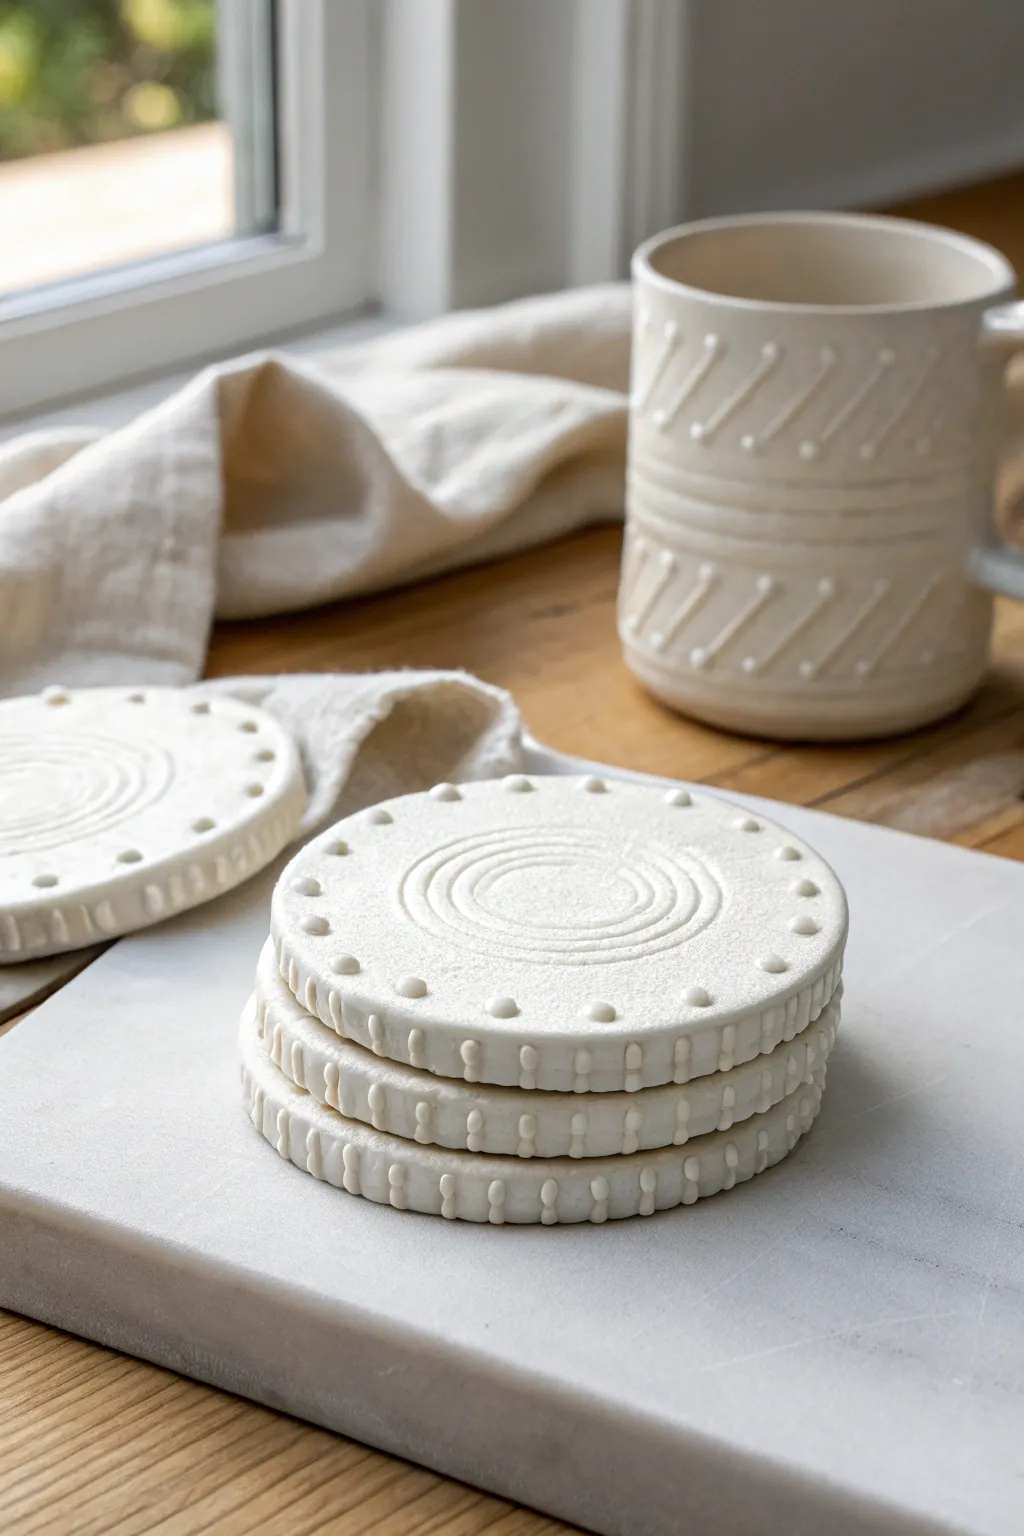
These minimal white-on-white coasters add a sophisticated touch to your coffee table with their blend of geometric patterns and organic textures. Using simple tools, you’ll create a raised relief design that mimics high-end ceramic studio pottery without needing a kiln.
Step-by-Step Tutorial
Materials
- White air-dry clay (smooth texture)
- Rolling pin
- Circle cookie cutter (approx. 4 inches) or a glass
- Clay sculpting tools (specifically a small ball tool and a flat ribbon tool)
- Parchment paper or canvas mat
- Small cup of water
- Fine-grit sandpaper (400 grit)
- Matte spray sealant or acrylic varnish
- Sponge
Step 1: Shaping the Base
-
Condition the clay:
Take a handful of air-dry clay and knead it in your hands for about a minute. This warms up the material and ensures there are no air bubbles hidden inside. -
Roll out the slab:
Place your clay on parchment paper and roll it out until it is an even 1/2-inch thickness. You want these to be substantial enough to hold the side texture later. -
Cut the circles:
Press your circle cutter firmly into the clay slab. If the clay sticks, give the cutter a little wiggle before lifting it out. Carefully remove the excess clay from around the circle. -
Smooth the edges:
Dip your finger in a tiny bit of water and run it along the cut edge to smooth out any sharpness or crumbs left by the cutter.
Step 2: Creating Surface Texture
-
Mark the center:
Gently find the center of your coaster. You don’t need to measure perfectly; eyeballing it adds to the handmade charm. -
Incise the spiral:
Using a pointed sculpting tool or needle tool, gently carve a concentric swirl starting from the center. Create about 4-5 rings, keeping your pressure light so you don’t cut too deep. -
Add inner dots:
Roll tiny balls of clay, about the size of peppercorns. Score the surface where you want them to sit (just outside the spiral design), add a dab of water (slip), and press the balls down gently. -
Dome the dots:
Using a small damp sponge, smooth over the attached clay balls so they look like integrated bumps rather than stuck-on pieces. -
Create the outer rim dots:
Repeat the previous process to create a ring of larger clay dots near the very edge of the top surface. Space them evenly, leaving about a half-inch between each one.
Prevent Cracking
If you see cracks forming while drying, mix a tiny bit of clay with water to make a paste and fill them in immediately before full drying occurs.
Step 3: Detailing the Sides
-
Prepare the side texture:
Hold the coaster gently in your palm or on a small turntable if you have one. You’ll be working on the vertical edge thickness. -
Add vertical ribs:
Take tiny snakes of clay or small oval balls and attach them vertically along the side edge using the score-and-slip method. -
Align the pattern:
I find it looks best if these vertical side ribs align directly underneath the dots on the top rim, creating a continuous visual line. -
Refine the shape:
Use a flat modeling tool to press the side ribs slightly flat, ensuring they adhere well and have a uniform pill shape.
Level Up: Color Wash
Mix water with a touch of tan acrylic paint and brush it over the textured areas, then wipe back with a cloth to highlight the relief details.
Step 4: Finishing Touches
-
Controlled drying:
Place the coasters on a flat wire rack. To prevent curling, place a lightweight board or book on top of them (with parchment in between) for the first 12 hours. -
Full dry time:
Remove the weight and let them dry completely for another 24-48 hours until the clay turns a distinctive chalky white. -
Sand for smoothness:
Lightly sand any rough spots or fingerprints with 400-grit sandpaper. Be very gentle around the raised raised dots. -
Seal the piece:
Since air-dry clay isn’t water-resistant, apply 2-3 coats of a matte spray sealant or varnish to protect your coaster from condensation.
Enjoy your beautiful new coaster set with your next cup of hot coffee


Pebble-Style Incense Holder
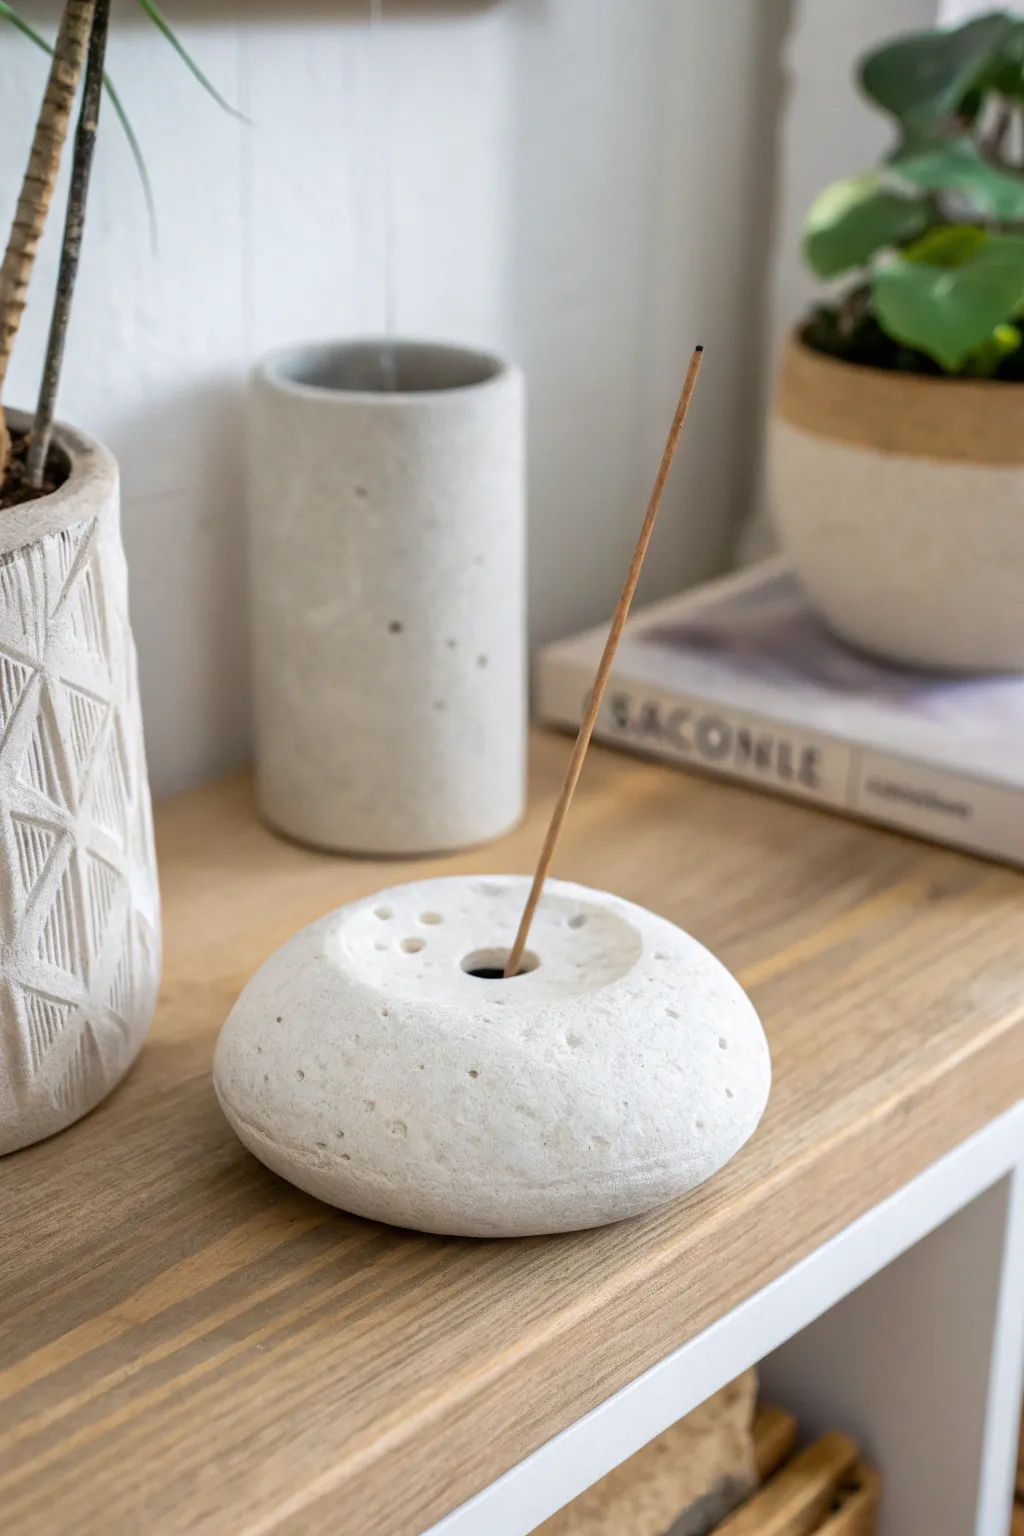
Create a minimalist, nature-inspired accent for your home with this textured incense holder that mimics eroded river stone. The rough, porous finish adds organic warmth to your space while keeping your incense stick perfectly angled.
Step-by-Step Guide
Materials
- White air-dry clay
- Rolling pin (acrylic or wooden)
- Old toothbrush or stiff bristle brush
- Wooden skewer or toothpick
- Sandpaper (fine and medium grit)
- Small bowl of water
- Sponge
- Matte sealant or varnish
Step 1: Shaping the Base
-
Condition the Clay:
Begin by taking a chunk of white air-dry clay roughly the size of a tangerine. Knead it thoroughly in your hands to warm it up and remove any air bubbles, ensuring the consistency is smooth and pliable. -
Form a Ball:
Roll the clay between your palms to create a tight, smooth sphere. Don’t worry if it isn’t mathematically perfect; organic shapes work best for this project. -
Flatten Slightly:
Place the ball on your work surface and gently press down with your palm or a flat object. You want to create a thick, rounded disc shape—think of a skipped stone or a flattened river pebble—keeping the edges rounded rather than sharp. -
Smooth the Edges:
Dip your finger in a little water and run it along the perimeter of the stone to smooth out any cracks or major creases. Leave the top surface alone for now, as we will be texturing it shortly.
Stone Effect Trick
Mix semi-dried clay crumbs into your fresh clay ball before rolling. These harder bits create natural lumps and bumps for instant, realistic rocky texture.
Step 2: Adding Texture and Function
-
Create the Main Hole:
Using a wooden skewer, poke a hole directly into the center of the pebble. Note the angle of the incense stick in the photo; insert your skewer at a slight angle (about 75-80 degrees) rather than perfectly straight up, so the ash falls onto the stone. -
Widen the Hole:
Gently wiggle the skewer in a small circular motion to widen the opening slightly. Remember that clay shrinks as it dries, so the hole needs to be a tiny bit larger than your standard incense stick. -
Initial Texturing:
Take an old toothbrush or a stiff bristle brush and press it firmly all over the surface of the clay. Rock the brush back and forth to create a pitted, porous look resembling pumice or weathered limestone. -
Enhance the Texture:
For deeper pits and ‘wormholes,’ use the blunt end of your skewer or a small rounded pottery tool to press random divots into the surface. Vary the pressure so some are deep and others represent shallow surface imperfections. -
Detail the Center:
Add a cluster of small decorative holes near the central incense opening using a toothpick. This mimics the natural erosion found in sea stones. -
Refining the Shape:
Since texturing can sometimes flatten the form, gently cup the stone in your hands again to re-round the heavy edges without smoothing out your hard work.
Stick Won’t Stand?
If the dried hole is too loose, put a drop of white glue at the bottom. Once dry, it creates a rubbery grip that holds the incense stick steady.
Step 3: Drying and Finishing
-
Let it Dry:
Place your holder on a wire rack or piece of parchment paper to air dry. This thick shape will need substantial drying time—usually 24 to 48 hours depending on humidity. Flip it over halfway through to ensure the bottom dries evenly. -
Check for Dryness:
The clay should feel room temperature and look chalky white when fully dry. If it feels cold to the touch, let it sit longer. -
Soft Sanding:
Once bone dry, take a piece of fine-grit sandpaper and very lightly graze over the textured surface. You don’t want to remove the pits, just knock down any sharp tiny ridges that might be uncomfortable to handle. -
Dust Clean:
Use a dry, soft brush to sweep away all the clay dust from the sanding process, paying special attention to clearing out the incense hole. -
Test the Fit:
Gently test an incense stick in the hole. If it’s too tight due to shrinkage, carefully use a small drill bit or a sharp tool to manually carve out just enough space for a secure fit. -
Seal the Piece:
Apply a coat of matte varnish or sealant. I prefer a matte finish to keep the natural stone look, but sealing is crucial to protect the clay from ash stains and burn marks.
Place your new stone holder on a shelf and enjoy the serene atmosphere it brings to the room

What Really Happens Inside the Kiln
Learn how time and temperature work together inside the kiln to transform clay into durable ceramic.
Simple Taper Candle Holders
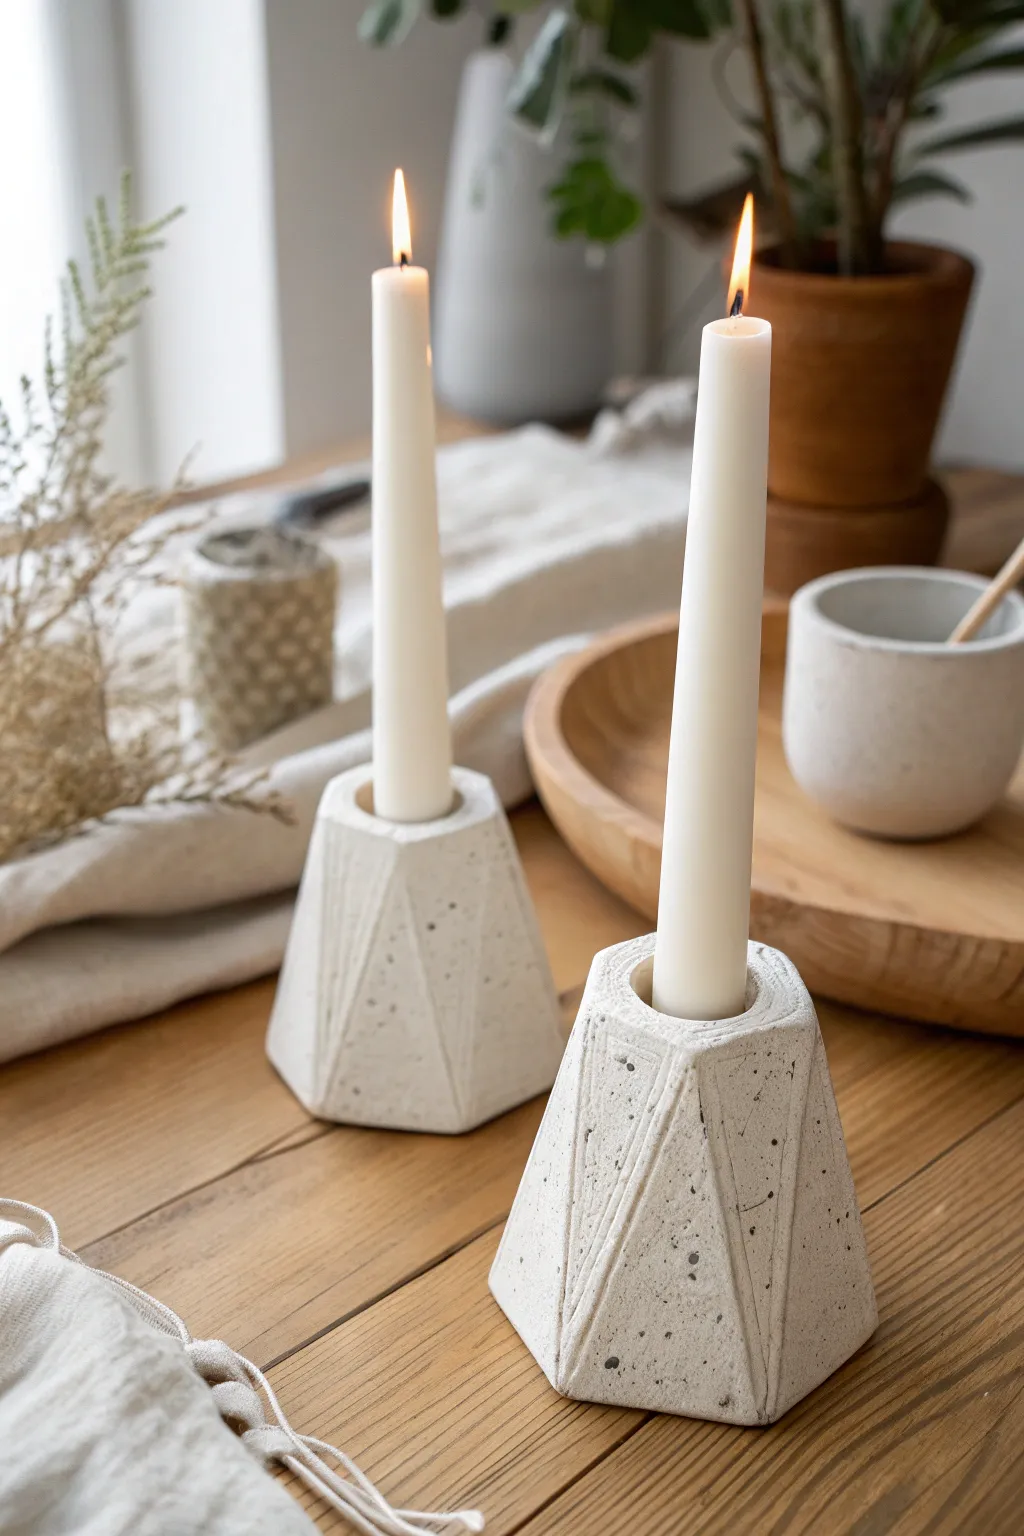
Elevate your table setting with these modern, faceted candle holders that mimic the look of high-end stoneware. Using simple air-dry clay and a touch of texturing, you can create these sturdy geometric forms that frame flickering candlelight beautifully.
How-To Guide
Materials
- White air-dry clay (approx. 500g)
- Black pepper or dried coffee grounds (for speckling)
- Taper candle (to size the hole)
- Rolling pin
- Sharp crafting knife or scalpel
- Ruler or straight edge
- Small cup of water
- Fine-grit sandpaper (220-400 grit)
- Matte spray varnish or sealant
Step 1: Preparing the Clay
-
Mix the texture:
Start by taking a large chunk of white air-dry clay. To achieve that stony, speckled look, sprinkle a pinch of coarse black pepper or dried coffee grounds onto the clay. -
Knead thoroughly:
Knead the clay repeatedly to distribute the speckles evenly throughout the mass. If the clay feels dry, dip your fingers in water to keep it pliable. -
Form the base block:
Shape the clay into a tall, thick cylinder or block. You want it to be slightly wider at the bottom than the top, roughly 3-4 inches tall and 3 inches wide at the base.
Step 2: Shaping the Geometry
-
Create the candle recess:
Take your taper candle and press it vertically into the center of the top of your block. Twist it gently to create a deep socket, aiming for about 1 inch deep. -
Widen slightly:
Wiggle the candle slightly to make the hole just a hair wider than the candle itself, as clay shrinks when it dries. Remove the candle for now. -
Define the hexagonal base:
Using your knife and a ruler, slice six straight edges around the bottom perimeter of the clay block to create a hexagon shape. -
Carve the tapered sides:
Slice upward from the bottom hexagonal corners toward the top rim. Angle your cuts inward so the holder gets narrower at the top, creating trapezoidal faces. -
Refine the top rim:
Trim the top edge flat so it is parallel to the table surface. You can chamfer the inner edge of the hole slightly with your fingertip to make inserting the candle easier later. -
Smooth the faces:
Dip your finger in water and run it over the cut planes to remove any drag marks from the knife, keeping the edges crisp but smooth.
Sharper Edges
Let the clay dry for about an hour after shaping but before sanding. Semi-dry clay slices cleaner than wet clay.
Step 3: Adding Details & Finishing
-
Scribe the lines:
Use the back of your knife tip or a modeling tool to firmly press vertical lines into the clay faces. Create a mix of longer parallel lines and triangles to mimic the geometric pattern in the image. -
Clean the grooves:
Run a damp paintbrush through the carved lines to smooth out any clay burrs created by the carving tool. -
Slow drying:
Set the holder aside to dry in a cool, draft-free area. Because the clay is thick, I recommend turning it upside down after 24 hours to help the bottom dry evenly. -
Check for cracks:
If minor surface cracks appear during the drying process (usually 48-72 hours total), fill them with a slip made of watered-down clay. -
Sand for perfection:
Once fully bone dry, use fine-grit sandpaper to polish the flat faces. This sharpens the geometric angles and exposes more of the speckles. -
Seal the piece:
Apply two coats of matte spray varnish to protect the clay from humidity and soot, allowing full drying time between coats.
Wobbly Candle?
If the hole shrank too much, gently sand the inside with rolled-up sandpaper. If too loose, drip a little melted wax in before placing the candle.
Now you have a stunning pair of faux-stone holders ready to light up your next dinner party
Tiny Bud Vases With Clay Sleeves
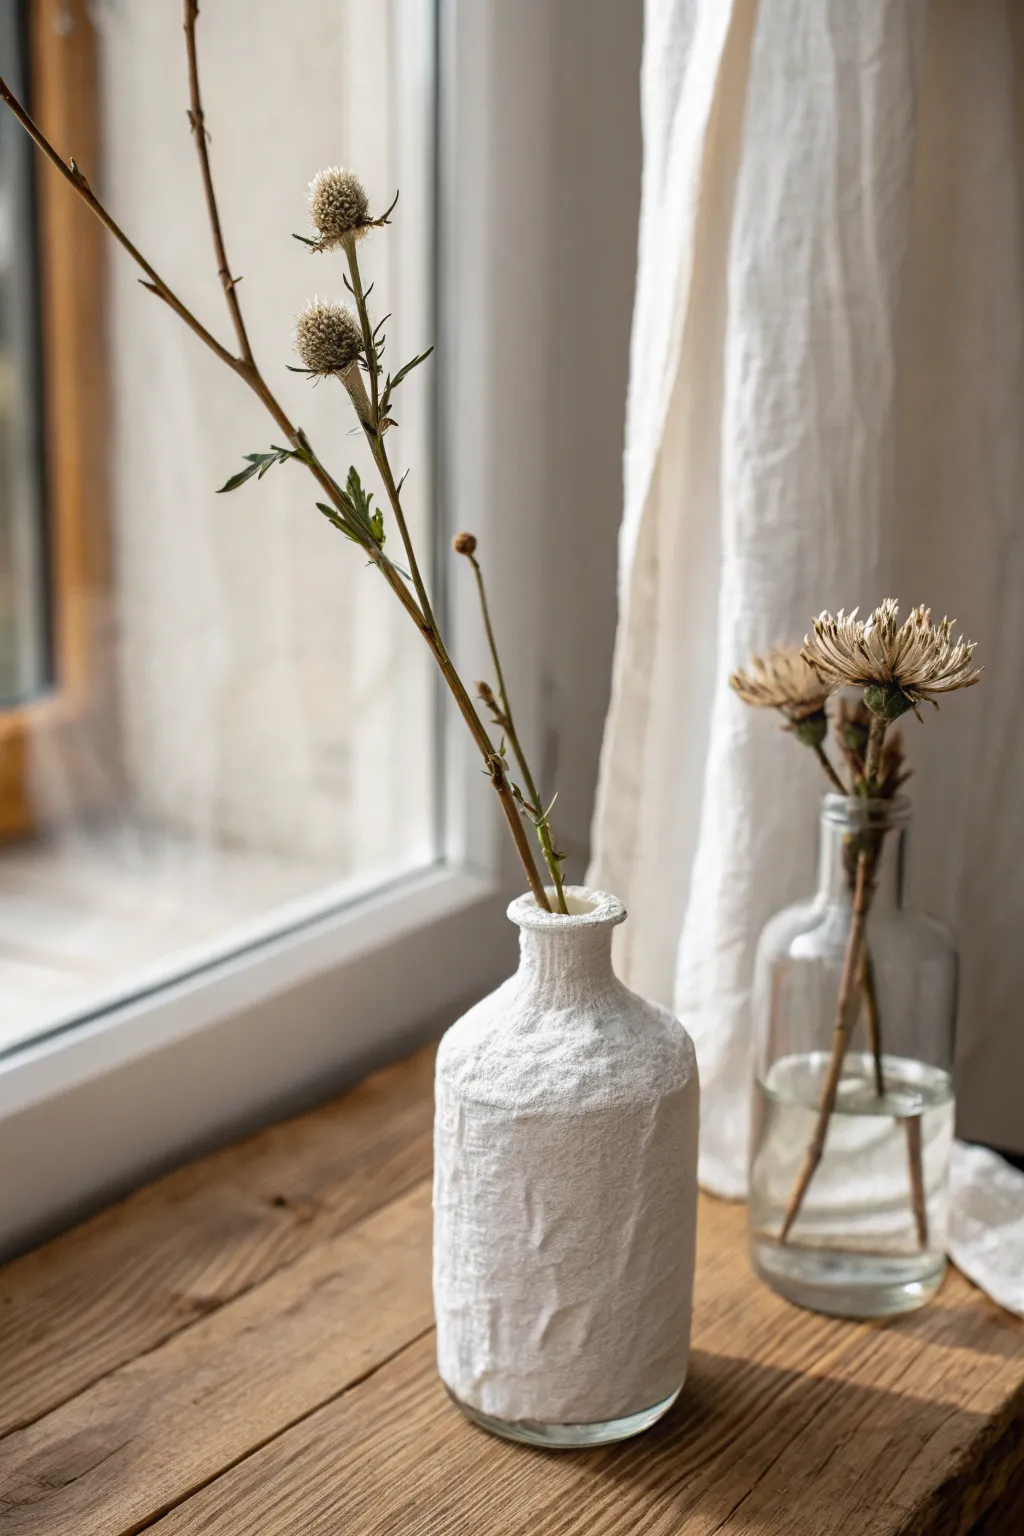
Transform a plain glass recycling bin rescue into a high-end vase with this incredibly simple texturing technique. The result is a stunning, matte white vessel that mimics the look of raw plaster or organic stoneware.
Step-by-Step Guide
Materials
- Small glass bottle (empty spice jar or soda bottle)
- White air dry clay
- Rolling pin
- Parchment paper or non-stick mat
- Craft knife
- Small bowl or cup of water
- Pottery sponge or damp cloth
- Canvas scrap or linen fabric (for texturing)
- Sandpaper (optional)
Step 1: Preparation and Rolling
-
Clean the Glass:
Begin by thoroughly cleaning your glass bottle. Remove any labels and sticky residue, then wipe it down with rubbing alcohol or soapy water to ensure a clean surface for the clay to grip. -
Condition the Clay:
Take a generous handful of white air dry clay and knead it in your hands for a minute or two. This warms up the material and makes it pliable, reducing cracks later on. -
Roll It Out:
Place the clay onto a sheet of parchment paper or a non-stick mat. Using your rolling pin, roll the clay out into a rectangular slab that is slightly taller than your bottle and wide enough to wrap completely around it. -
Add Texture:
This is the secret to that organic look. Lay a piece of rough canvas, linen, or even a crumpled paper towel on top of your rolled clay. Gently roll over it once with the rolling pin to imprint a subtle, fabric-like texture.
Sticky Situation?
If the clay keeps sliding down the smooth glass, brush a thin layer of PVA glue onto the glass bottle before wrapping the clay. This acts as a primer for better adhesion.
Step 2: Sleeve Construction
-
Measure and Trim:
Lay your bottle on the clay to check sizing. Use a craft knife to trim the clay into a clean rectangle, ensuring the top edge is straight so it will sit nicely around the bottle’s neck. -
Apply the Clay:
Carefully lift the clay slab and wrap it around the glass bottle. I find it easiest to stand the bottle up and drape the clay around it, rather than rolling the bottle on the table. -
Join the Seam:
Where the two edges of clay meet, gently pinch them together. You don’t need to smooth this seam perfectly flat; leaving a slightly visible, raised ridge adds to the rustic handmade charm shown in the photo. -
Secure the Seam:
Dip your finger in a little water and run it along the inside of the seam overlap to help the clay bond to itself, pressing firmly but preserving the texture. -
Trim the Bottom:
At the base of the bottle, tuck the excess clay underneath just slightly, or use your knife to trim it flush with the glass bottom so the vase sits flat.
Step 3: Refining the Shape
-
Mold the Neck:
Gently squeeze the clay around the neck of the bottle. The clay should hug the glass form comfortably. You can let the clay extend slightly above the glass rim to hide it completely. -
Create the Rim:
Fold the very top edge of the clay slightly outward or pinch it to create a distinct lip. This mimics a traditional ceramic vase opening. -
Enhance the Imperfections:
Look over the vase surface. If it looks too smooth, gently press your fingers into the clay to create subtle dents or undulations. The goal is an organic, ‘wabi-sabi’ aesthetic. -
Check the Bottom Edge:
Before setting it aside, tap the bottom of the bottle on the table a few times to ensure the base is perfectly flat and stable.
Color Wash
Mix just a drop of beige or gray acrylic paint into a cup of water. Brush this wash over the dry clay and wipe it back immediately with a cloth to highlight the texture.
Step 4: Finishing
-
Initial Drying:
Place the vase in a safe spot away from direct heat sources. Let it dry for about 24 hours. Placing it on a wire rack helps air circulate underneath. -
Check for Shrinkage:
Air dry clay shrinks slightly as it dries. Because there is a rigid glass core, you might see small hairline cracks appear. Don’t panic; this is normal. -
Patch Cracks (Optional):
If cracks appear, mix a tiny bit of fresh clay with water to make a paste (slip) and stroke it into the cracks with your finger, smoothing it out. -
Final Sand:
Once fully bone-dry (usually 48–72 hours), use fine-grit sandpaper to gently soften any sharp edges on the rim, but leave the main body texture rough.
Now you have a beautifully textured vase ready to hold your favorite dried botanicals or fresh stems


The Complete Guide to Pottery Troubleshooting
Uncover the most common ceramic mistakes—from cracking clay to failed glazes—and learn how to fix them fast.
Matte White Mini Planter
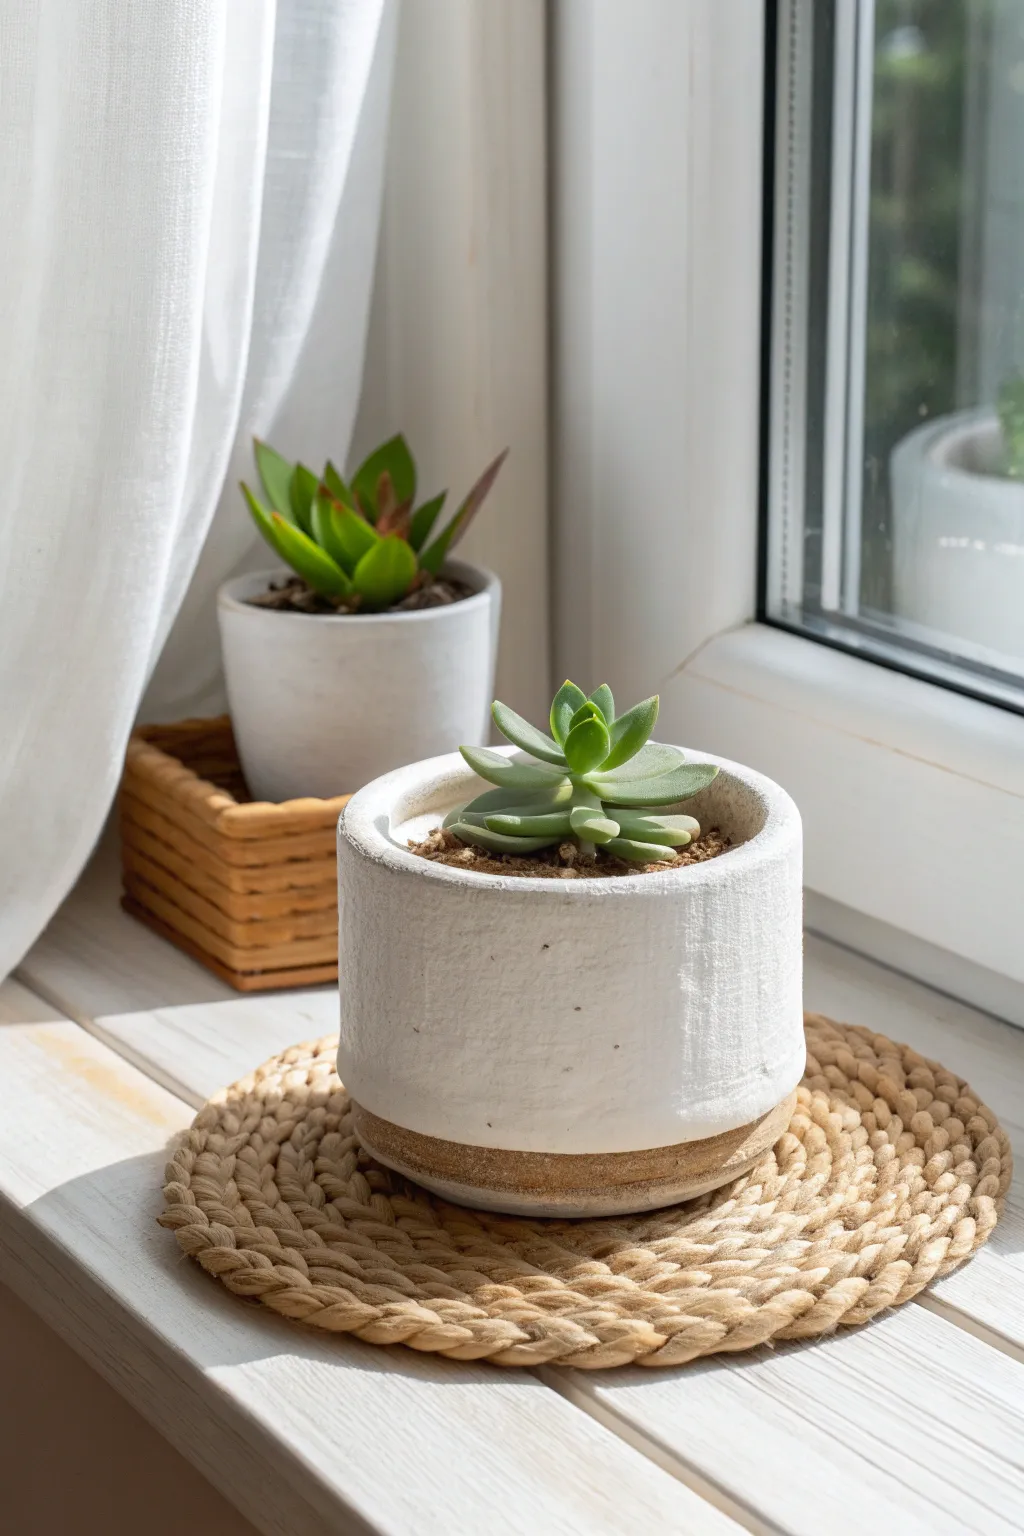
This charming little planter brings a clean, organic touch to any windowsill with its rough, matte stone-like texture and contrasting earthy base. It is designed to perfectly hold a small succulent, blending modern minimalism with rustic warmth.
Detailed Instructions
Materials
- White air dry clay
- Rolling pin
- Craft knife or clay tool
- Empty can or jar (to use as a mold)
- Parchment paper
- Slip (clay mixed with water)
- Small paintbrush (for slip application)
- Brown acrylic paint or water-based stain
- Matte white acrylic paint (optional)
- Sandpaper (medium grit)
- Matte sealant spray
Step 1: Forming the Base Structure
-
Prepare your workspace:
Lay down a sheet of parchment paper to prevent the clay from sticking to your table. Take a substantial chunk of white air dry clay and knead it until it feels pliable and warm. -
Roll the slab:
Roll the clay out into a long rectangle, aiming for a consistent thickness of about 1/4 inch. This will become the walls of your planter. -
Cut the clay strip:
Using your craft knife and a straight edge, trim the rolled clay into a clean, long strip. The height of the strip will determine the height of your pot, so measure against your chosen succulents. -
Prepare the base:
Roll out a separate, smaller circle of clay for the bottom. You can trace around your can or jar mold to get the exact size needed for the floor of the pot. -
Wrap the mold:
Wrap your chosen can or jar loosely with parchment paper. This is crucial so you can remove the mold later without the clay gripping the metal or glass.
Step 2: Assembling the Pot
-
Build the walls:
pick up your clay strip and wrap it around the parchment-covered mold. Where the ends overlap, cut through both layers simultaneously with your knife for a perfect butt joint. -
Score and slip:
Rough up the edges of the seam and the edges of the circular base with a tool. Apply a little water or clay ‘slip’ to these roughed-up areas to act as glue. -
Join the pieces:
Press the wall seam together firmly. Place the cylinder onto the circular base and press the edges together to seal the bottom. Use your thumb or a tool to smooth the clay across the joins so they disappear. -
Refine the rim:
While the clay is still on the mold, gently smooth the top rim with a wet finger to get a nice, rounded edge. I prefer leaving it slightly uneven to enhance the handmade look. -
Create texture:
Before the clay dries, gently pat the entire exterior surface with a crumpled ball of aluminum foil or a coarse sponge. This creates that lovely stone-like pitting seen in the photo. -
Initial drying:
Let the pot sit on the mold for about an hour so it holds its shape, then carefully slide the mold out. Let the clay dry completely for 24-48 hours until it’s white and hard.
Texturizing Secret
For an even deeper stone texture, mix dried coffee grounds or sand directly into the clay body before rolling it out.
Step 3: Finishing Touches
-
Sand imperfections:
Once fully dry, lightly sand any sharp ridges or rough seams. Don’t over-sand, as you want to keep the texture you added earlier. -
Enhance the white:
If your clay dried with a greyish tint, apply a coat of matte white acrylic paint. Dab it on rather than brushing it to preserve the pitted texture. -
Paint the base:
Mix a diluted brown acrylic paint or stain. Carefully paint the bottom half-inch of the planter to create the faux-stoneware dipped look shown in the image. -
Feather the edge:
Use a damp brush or rag to wipe the upper edge of the brown paint slightly. This creates a soft, organic transition line rather than a harsh stripe. -
Seal the piece:
Since air dry clay isn’t waterproof, spray the entire pot—inside and out—with a matte sealant. Apply 2-3 coats, letting it dry between each, to protect it from moisture.
Drainage Hack
Since air dry clay hates water, use a plastic nursery pot inside this vessel rather than planting soil directly against the clay walls.
Place your favorite succulent inside and enjoy the serene, natural vibe this little pot adds to your space
Personalized White Initial Keychains
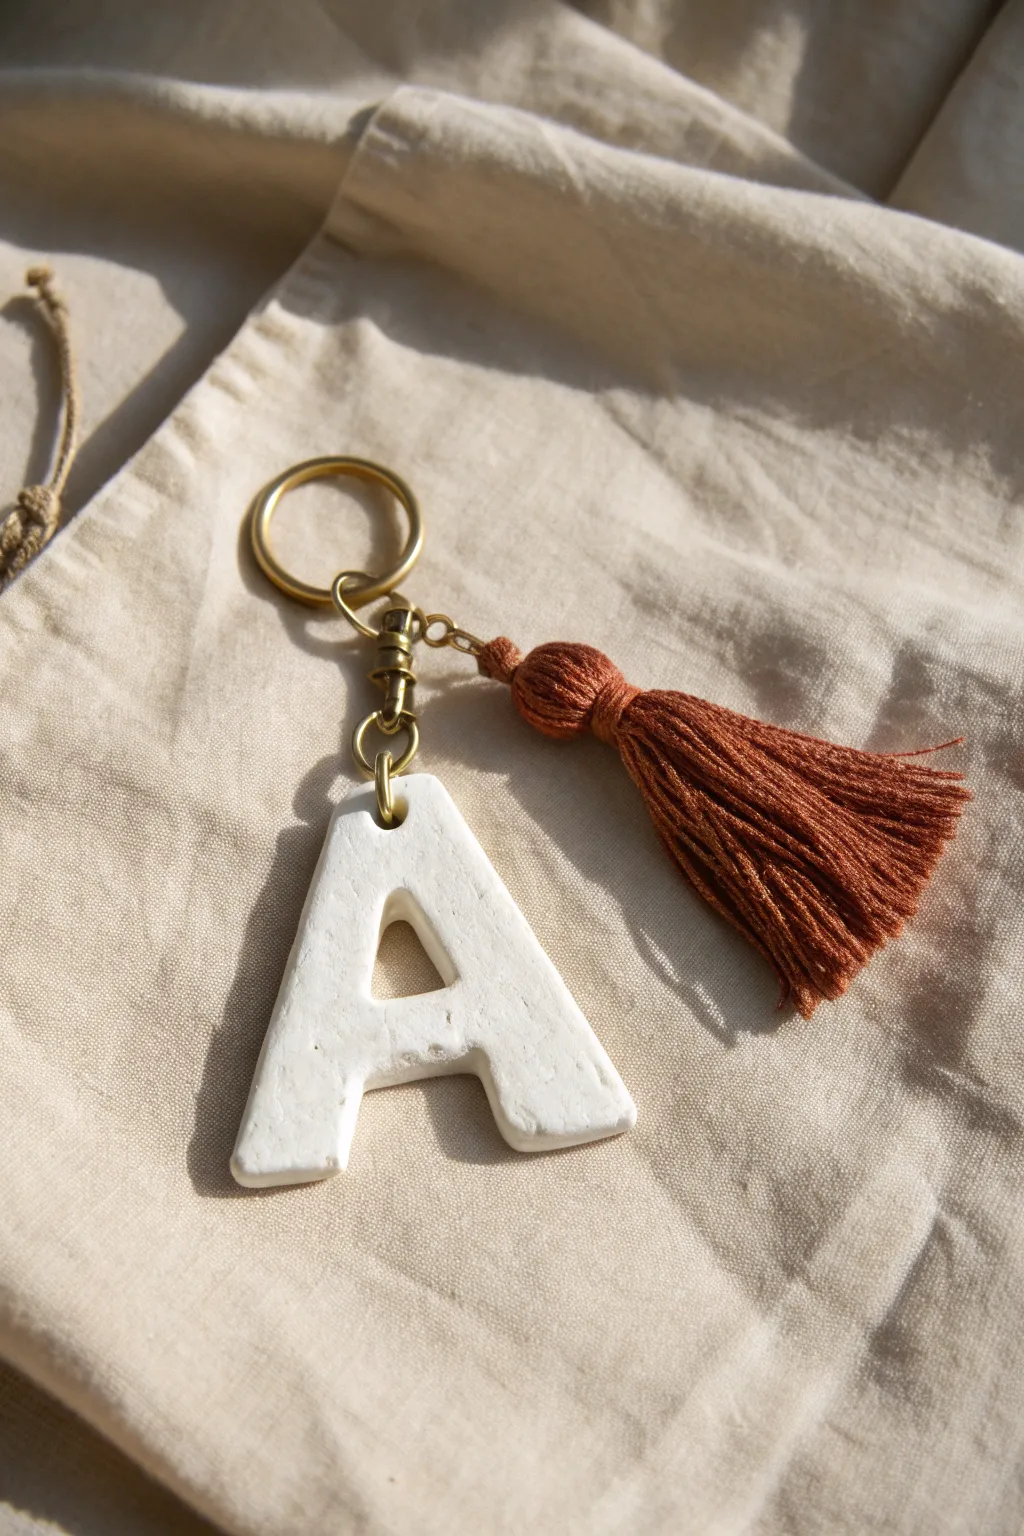
Create a sophisticated, minimalist accessory with this textured clay letter keychain featuring a rustic tassel accent. This project combines the simplicity of white clay with warm brass tones for a personalized gift that looks high-end but is wonderfully easy to make.
Step-by-Step Tutorial
Materials
- White air dry clay
- Rolling pin
- Parchment paper or silicone mat
- Exacto knife or clay cutting tool
- Printed letter template (font of choice)
- Small eye screw pin (brass)
- Sandpaper inside a fine grit (400 or higher)
- Gold keyring hardware with swivel clasp
- Embroidery floss (rust/amber color)
- Needle nose pliers
- Piece of cardboard (approx. 3 inches wide)
- Scissors
Step 1: Sculpting the Letter
-
Prepare your workspace:
Lay down a sheet of parchment paper or a silicone mat to protect your table and prevent sticking. -
Roll the clay:
Take a handful of white air dry clay and knead it briefly until pliable. Roll it out into an even slab, approximately 1/4 inch thick. Avoid going too thin, as the keychain needs to be sturdy. -
Position the template:
Place your printed and cut-out paper letter template gently onto the clay surface. A blocky, sans-serif font works best for structural integrity. -
Cut out the shape:
Using a sharp Exacto knife held vertically, carefully trace around the paper template to cut out your letter. Move slowly around curves to keep the edges clean. -
Clean the edges:
Remove the excess clay. Dip your finger in a tiny bit of water and gently smooth any rough edges or stray clay bits on the letter’s perimeter. -
Add texture (optional):
For the slightly rustic look seen in the photo, you can gently tap the surface with a piece of crumpled foil or leave the natural stone-like texture as is. -
Insert the hardware:
While the clay is still wet, carefully screw the brass eye pin into the top center of the letter. Ensure it goes in straight and deep enough to be secure, but not so deep that it pokes through the front or back. -
Let it dry:
Allow the clay to dry completely according to the package instructions. This usually takes 24-48 hours. Flip the letter halfway through drying to ensure the back dries evenly.
Hardware Grip
Add a dab of super glue or strong craft glue to the threads of the eye screw before inserting it into the wet clay. This ensures it won’t twist out once the clay shrinks slightly during drying.
Step 2: Refining and Assembly
-
Sand for finish:
Once fully cured, use fine-grit sandpaper to lightly buff out any sharp corners or imperfections on the back and sides. Wipe away the dust with a dry cloth. -
Start the tassel:
Wrap the rust-colored embroidery floss around your 3-inch piece of cardboard about 20-30 times, depending on how full you want the tassel. -
Secure the top:
Cut a separate 6-inch piece of floss. Thread it under the wrapped looped threads at one end of the cardboard and tie a tight double knot to secure the top bundle. -
Create the tassel head:
Slide the loop off the cardboard. Cut another piece of floss and wrap it tightly around the bundle, about 1/2 inch down from the top knot, to create the tassel’s ‘head’. Tie it off and tuck the ends inside. -
Trim the ends:
Cut the bottom loops of the tassel to free the strands, then trim them in a straight line so the tassel looks neat and uniform. -
Attach the tassel:
Using a small jump ring or the tie-off string from the top of the tassel, attach it to the main keyring assembly. -
Final assembly:
Use needle nose pliers to open the jump ring on your gold keychain clasp. Thread on the dried clay letter via its eye screw, add the tassel, and close the jump ring securely.
Terrazzo Twist
Mix tiny colored chips of dry clay or even distinct flecks of black pepper into your white clay before rolling it out to create a trendy faux-terrazzo or speckled stone effect.
Now you have a handmade, boutique-style accessory ready to organize your keys or gift to a friend

TRACK YOUR CERAMIC JOURNEY
Capture glaze tests, firing details, and creative progress—all in one simple printable. Make your projects easier to repeat and improve.
Modern Arch Rainbow Decor In White
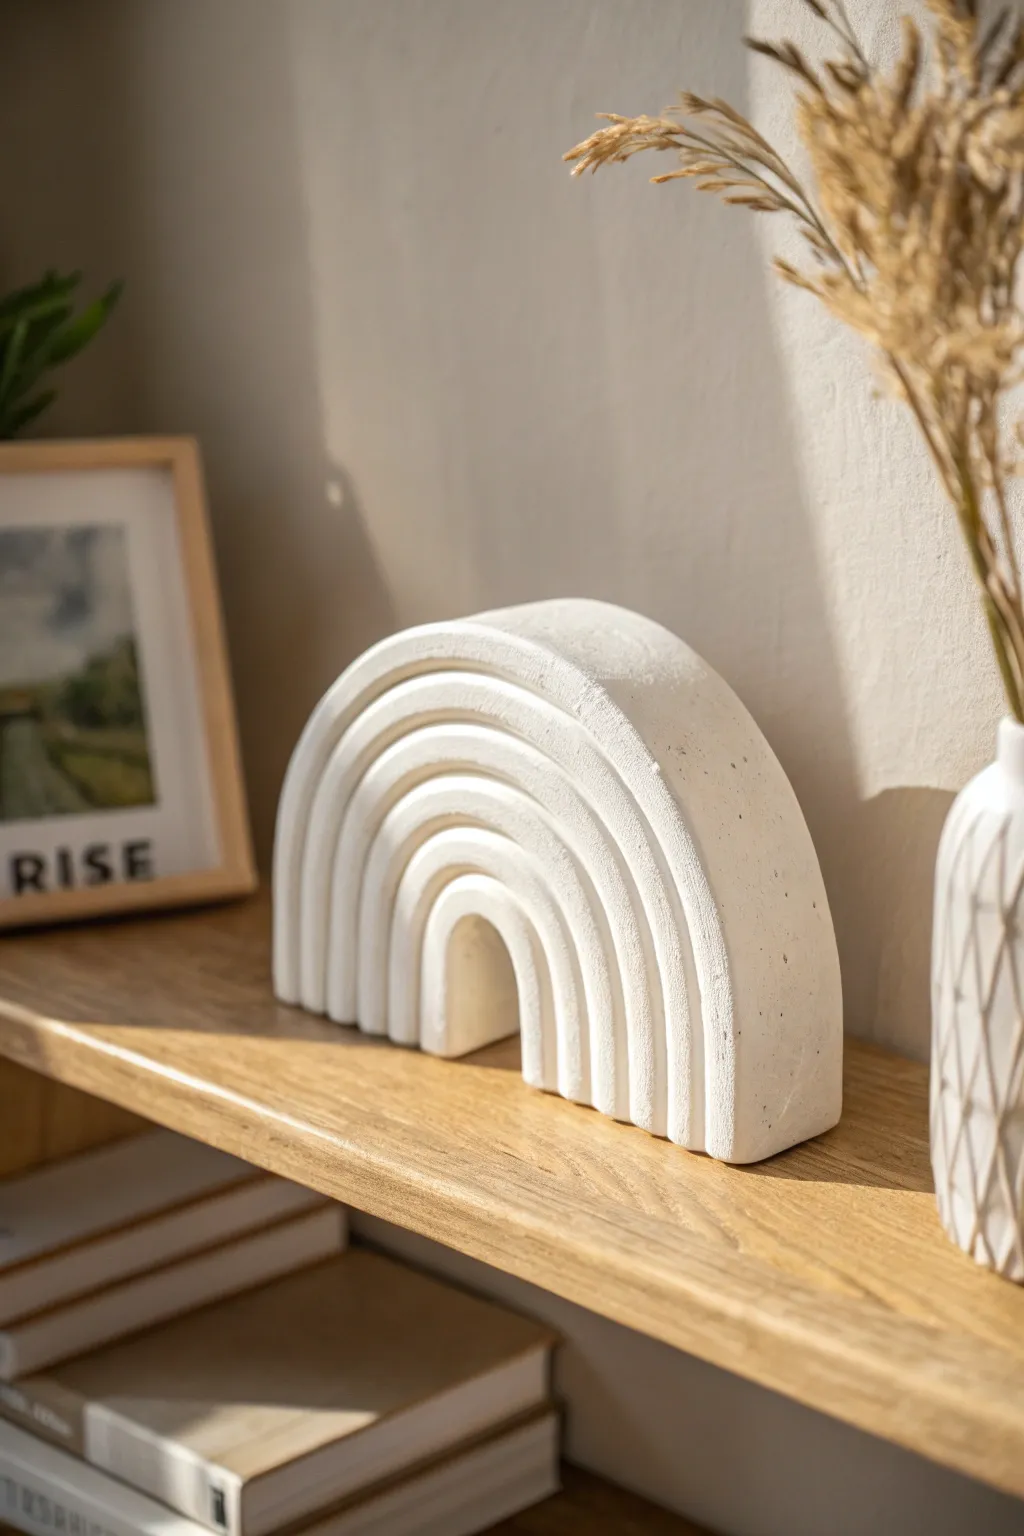
This chic, sculptural rainbow brings a touch of modern design to any shelf, mimicking the high-end look of cast stone or concrete despite being made from humble air-dry clay. Its monochromatic matte finish creates a sophisticated play of light and shadow through the concentric arches.
Step-by-Step Guide
Materials
- White air-dry clay (approximately 1kg block)
- Rolling pin
- Sharp craft knife or clay slicing tool
- Ruler
- Small bowl of water
- Fine-grit sandpaper (220 grit)
- White acrylic paint (matte)
- Baking soda (for texture)
- Stiff bristle paintbrush
- Parchment paper or silicone mat
Step 1: Prepping and Rolling
-
Condition the clay:
Begin by kneading your air-dry clay thoroughly. You want it warm and pliable to prevent cracking during the rolling process, so work it until it feels consistent. -
Roll the slab:
Place the clay on a sheet of parchment paper. Use your rolling pin to flatten the clay into a large, even slab. Aim for a thickness of about 1 inch (2.5 cm) to give the sculpture enough stability to stand upright. -
Ensure even thickness:
Check that the slab is level. If you have depth guides or two wooden slats of the same thickness, place them on either side of the clay to rest your rolling pin on for a perfectly flat surface.
Seamless Smooth Tip
Use a baby wipe to smooth the clay while it’s wet instead of sandpaper later. It reduces dust and creates a very silky surface.
Step 2: Cutting the Arches
-
Create a template:
Sketch a semi-circle rainbow shape on a piece of paper first to get your proportions right, then cut it out. Place this paper template directly onto your clay slab. -
Cut the outer shape:
Using a sharp craft knife held vertically, carefully trace around the outer edge of your template to cut the main semi-circle shape. -
Carve the concentric lines:
This is the most critical step. Instead of cutting separate arches and sticking them together, we are carving grooves into the solid block. Use a ruler to lightly mark even intervals (about 0.5 to 0.75 inches apart) along the bottom edge. -
Score the grooves:
Use a U-shaped carving tool or the tip of your knife to carve deep channels along the arch lines. Don’t cut all the way through initially; just create deep V or U-shaped grooves that define the separate bands of the rainbow. -
Refine the separation:
Ideally, you want the front face to look like separate bands while the back remains one solid piece for structural integrity. However, for the look in the photo, the arches are fully separated. So, complete the cuts all the way through the slab. -
Cut the center void:
Remove the smallest, innermost semi-circle completely to create the empty space in the center of the arch. -
Smooth the edges:
Dip your finger in a little water and run it along all the cut edges to smooth out any jagged bits or crumbs from the slicing process.
Level Up: Travertine
Poke small, random holes with a needle tool before the paint dries. This mimics the porous look of expensive travertine stone.
Step 3: Assembly and Drying
-
Reassemble the rainbow:
If you cut the pieces completely apart, now is the time to stack them back together. Score the touching sides of each arch with a needle tool to create a rough texture. -
Apply slip:
Mix a tiny bit of clay with water to make a ‘slip’ paste. Apply this to the scored edges and press the arches firmly together. I prefer to do this on the final display side facedown to keep the front flush. -
Slow drying:
Cover the sculpture loosely with a plastic bag or plastic wrap. Let it dry slowly for 24-48 hours. Drying too fast can cause warping, so patience is key here. -
Flip and finish drying:
Once the top feels dry/leathery, carefully flip the piece over to let the underside dry. Remove the plastic and let it sit for another 24 hours until bone dry and hard.
Step 4: Creating the Stone Texture
-
Sand for smoothness:
Take your 220-grit sandpaper and gently sand the flat front and back faces to ensure they are perfectly even. Wipe away dust with a slightly damp cloth. -
Mix textured paint:
To achieve that faux-stone finish, mix your white acrylic paint with baking soda. Start with a 1:1 ratio; the mixture should be fluffy and thick. -
Apply the first coat:
Using a stiff bristle brush, dab (don’t stroke) the paint mixture onto the rainbow. The dabbing motion creates a pitted, stone-like texture. -
Layering the texture:
Let the first coat dry completely, then apply a second coat. Focus heavily on the grooves between the arches to ensure no raw clay color shows through. -
Final speckling:
Optional: Dilute a tiny drop of grey or black paint with water. Load an old toothbrush and flick extremely fine speckles onto the white surface for a terrazzo or concrete effect.
Now you have a stunning, architectural piece that looks heavy and expensive but fits perfectly on your bookshelf
Clean Photo And Place Card Holders
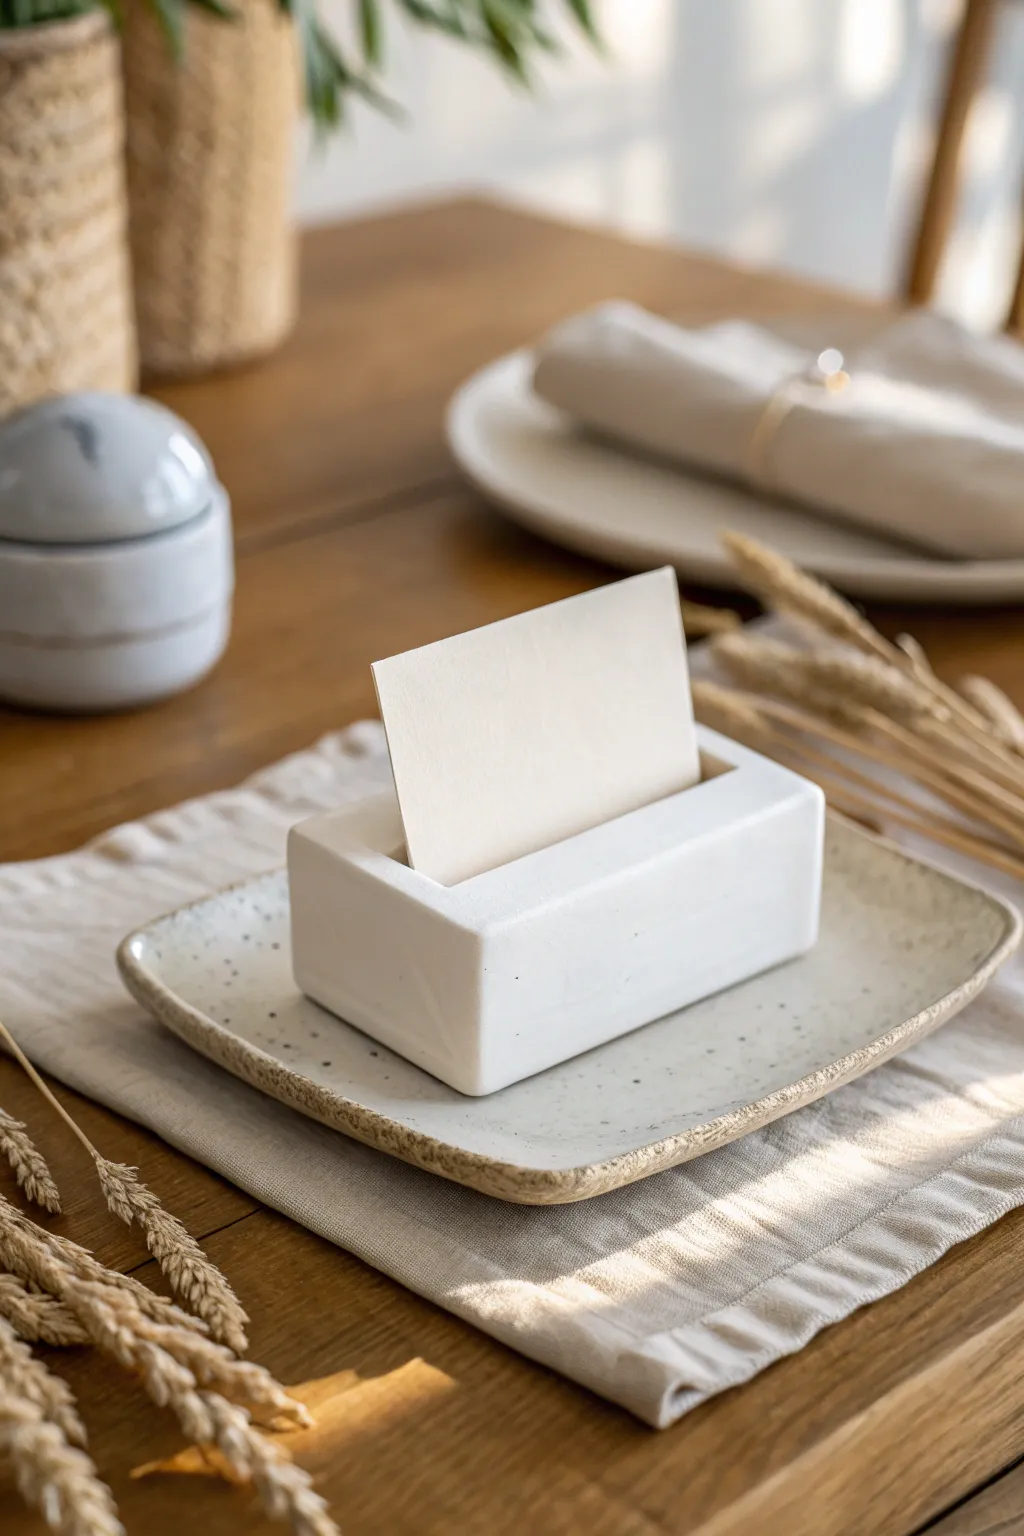
Bring a touch of modern elegance to your table settings with this ultra-clean rectangular card holder. The design relies on crisp edges and smooth white air dry clay to create a sophisticated, gallery-like display for photos or name cards.
Step-by-Step
Materials
- White air dry clay (high quality, fine grain)
- Acrylic rolling pin
- Two wooden guide strips (approx. 1 inch thick)
- Sharp craft knife or clay blade
- Ruler
- Fine-grit sandpaper (220 and 400 grit)
- Small cup of water
- Thick cardstock or a sturdy playing card (for the slot)
- Matte spray varnish (optional)
Step 1: Shaping the Base
-
Condition the Clay:
Begin by taking a substantial chunk of white air dry clay. Knead it in your hands for a few minutes until it is warm, pliable, and free of any air pockets. -
Set Up Guides:
Place your two wooden guide strips on your work surface, spaced slightly wider than your desired block length. These will ensure your clay is rolled to a perfectly uniform thickness. -
Roll the Slab:
Place the clay ball between the guides and use your acrylic rolling pin to flatten it. Roll until the pin rests on the wooden strips, creating a thick, even slab. -
Measure the Rectangle:
Using a ruler, lightly mark a rectangle on the surface of the clay. Aim for dimensions around 3 inches long by 1.5 inches wide for a standard card holder. -
Cut the Block:
Use a sharp clay blade or craft knife to cut straight down along your ruler markings. Keep the blade perpendicular to the table to ensure the sides are perfectly vertical, not slanted. -
Smooth the Edges:
Dip your finger in a small amount of water and run it gently along the sharp cut edges to soften them slightly. Use the flat side of your blade to tap any bulging sides back into a straight line.
Fixing Cracks
If small hairline cracks appear while drying, mix a tiny bit of fresh clay with water to make a paste (slip). Fill the crack, let dry, and sand smooth.
Step 2: Creating the Slot
-
Mark the Center:
Find the exact center of the top face of your block. Mark a straight line down the middle length-wise where the card will sit. -
Create the Indentation:
Take a piece of thick cardstock or an old credit card. Press it firmly into the clay along your marked line, sinking it about a half-inch deep. -
Widen the Gap:
Wiggle the card strictly back and forth (not side to side) to slightly widen the slot so it doesn’t close up as the clay shrinks during drying. -
Refine the Slot Opening:
If the clay puffed up around the slot entrance, gently smooth it back down with a damp fingertip to maintain that crisp, flat top surface.
Sharper Corners
To get those ultra-crisp corners, sand the block against a flat surface in a figure-8 motion rather than holding the sandpaper in your hand.
Step 3: Finishing Touches
-
Slow Drying:
Place the block on a wire rack or a piece of parchment paper. Let it dry slowly away from direct sunlight to prevent cracking gently turning it over every few hours for even airflow. -
Initial Sanding:
Once fully dry (usually 24-48 hours), take your 220-grit sandpaper and sand all six sides. Place the sandpaper flat on the table and rub the block against it to keep the faces perfectly flat. -
Polishing:
Switch to the 400-grit sandpaper for a final polish. This will make the surface feel incredibly smooth, almost like unglazed porcelain. -
Clean the Slot:
Fold a small piece of sandpaper and carefully run it through the card slot to remove any debris or rough bits inside. -
Dust Off:
Wipe the entire piece with a barely damp cloth or a dry microfiber towel to remove all white clay dust. -
Seal (Optional):
For protection against fingerprints, you can apply a light coat of matte spray varnish. I usually skip this step to keep the raw, natural texture shown in the photo.
Now you have a sleek, modern holder ready to showcase your favorite memories or guide guests to their seats
Monogram Napkin Rings
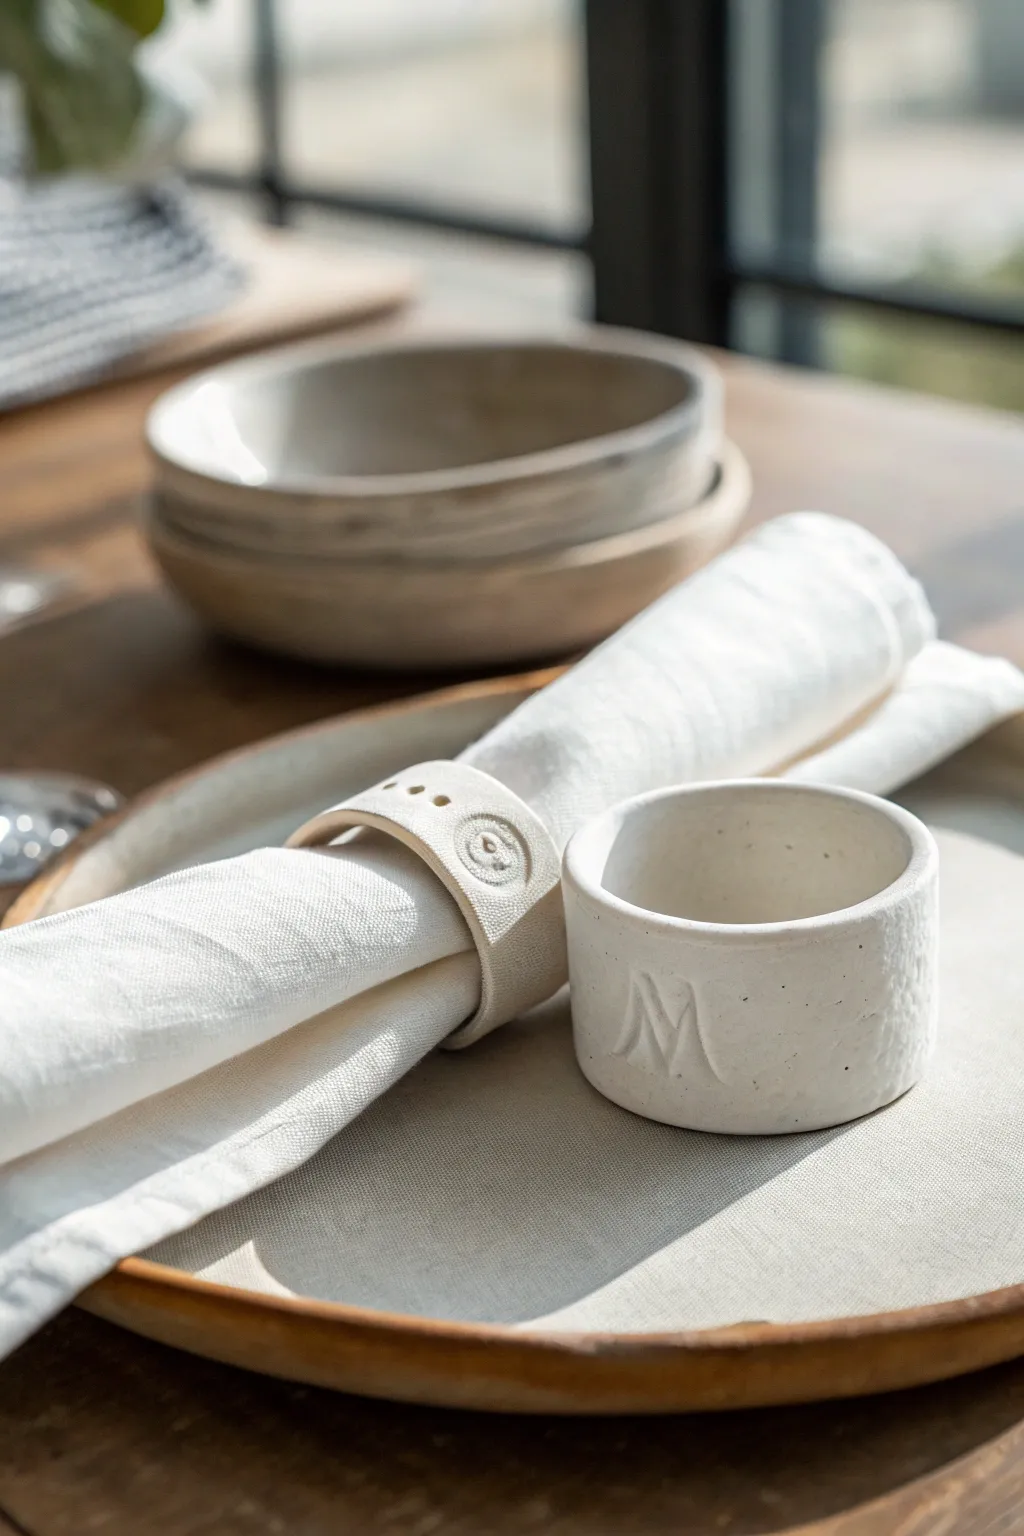
Elevate your table setting with these custom handcrafted napkin rings, made from simple air-dry clay. This tutorial covers two distinct but complementary designs: a sleek wraparound band with an embossed seal and a sturdy cylindrical ring featuring a prominent raised monogram.
How-To Guide
Materials
- White or off-white air-dry clay
- Rolling pin or acrylic roller
- Sharp craft knife or clay blade
- Ruler
- Cylindrical form (like a paper towel roll, PVC pipe, or rolling pin) for shaping
- Plastic wrap or parchment paper
- Alphabet stamps or a custom initial stamp
- Small circular object or clay tool for dot details
- Bowl of water
- Fine-grit sandpaper (optional)
- Matte sealant or varnish
Step 1: Preparation & Condition
-
Prep the workspace:
Begin by covering your work surface with a mat or parchment paper to prevent sticking. Unwrap your air-dry clay. -
Condition the clay:
Knead a generous chunk of clay in your hands for a few minutes. You want it warm and pliable to minimize cracks during rolling. -
Create a slab:
Using your rolling pin, roll the clay out into an even slab. Aim for a thickness of about 1/4 inch (6mm) for sturdy rings that won’t be too fragile.
Crack Control
If small cracks appear while drying, don’t panic. Mix a tiny bit of clay with water to make a paste and fill the cracks, then smooth over.
Step 2: Style 1: The Monogram cylinder
-
Measure and cut:
For the solid ring style shown on the right, use your ruler and knife to cut a long rectangular strip. A good size is roughly 1.5 inches wide and 5 inches long. -
Form the ring:
Wrap the strip around your cylindrical form. I find covering the form in a bit of plastic wrap first helps the clay slide off later. -
Join the seam:
Overlap the ends slightly or butt them together securely. Dip your finger in water and smooth the seam until it disappears entirely, blending the clay into a continuous loop. -
Add the monogram:
While the clay is still on the form and soft, gently press your chosen initial stamp deeply into the center. Wiggle it slightly to ensure a clear impression before lifting. -
Smooth the edges:
Run a wet finger along the top and bottom rims to soften any sharp corners left by the cutting blade.
Step 3: Style 2: The Embossed Band
-
Cut a thinner strip:
For the wraparound style on the left, roll a fresh slab slightly thinner than the first. Cut a strip about 1 inch wide and 6-7 inches long. -
Shape the overlap:
Curl the strip into a loop, but instead of blending the seam perfectly, let one end overlap the other visibly, creating a wrapped effect. -
Secure the bond:
Score the touching surfaces with your knife (make little hatch marks), add a drop of water, and press the overlapping end down firmly to adhere it. -
Add circular detail:
Press a small circular stamp or button into the overlapping end to create the seal-like impression shown in the photo. -
Create decorative dots:
Use a small stylus or a toothpick to poke a row of three shallow holes or dots along the band, leading towards the seal.
Texture Tip
For a stone-like look, dab the wet clay gently with a stiff bristle brush or a crumpled ball of foil before letting it dry.
Step 4: Finishing Touches
-
Initial drying:
Let the rings sit on their forms for about an hour so they hold their shape, then gently slide them off. -
Full cure:
Allow them to dry completely for 24-48 hours. Turn them occasionally to ensure airflow reaches all sides. -
Refine the surface:
Once fully hard, inspect for rough spots. Use fine-grit sandpaper to gently smooth rims or buff away fingerprints. -
Seal:
Apply a coat of matte varnish or sealant. This protects the porous clay from food stains and moisture.
Now you have a timeless set of personalized table accessories ready for your next gathering
Essential Oil Diffuser Discs
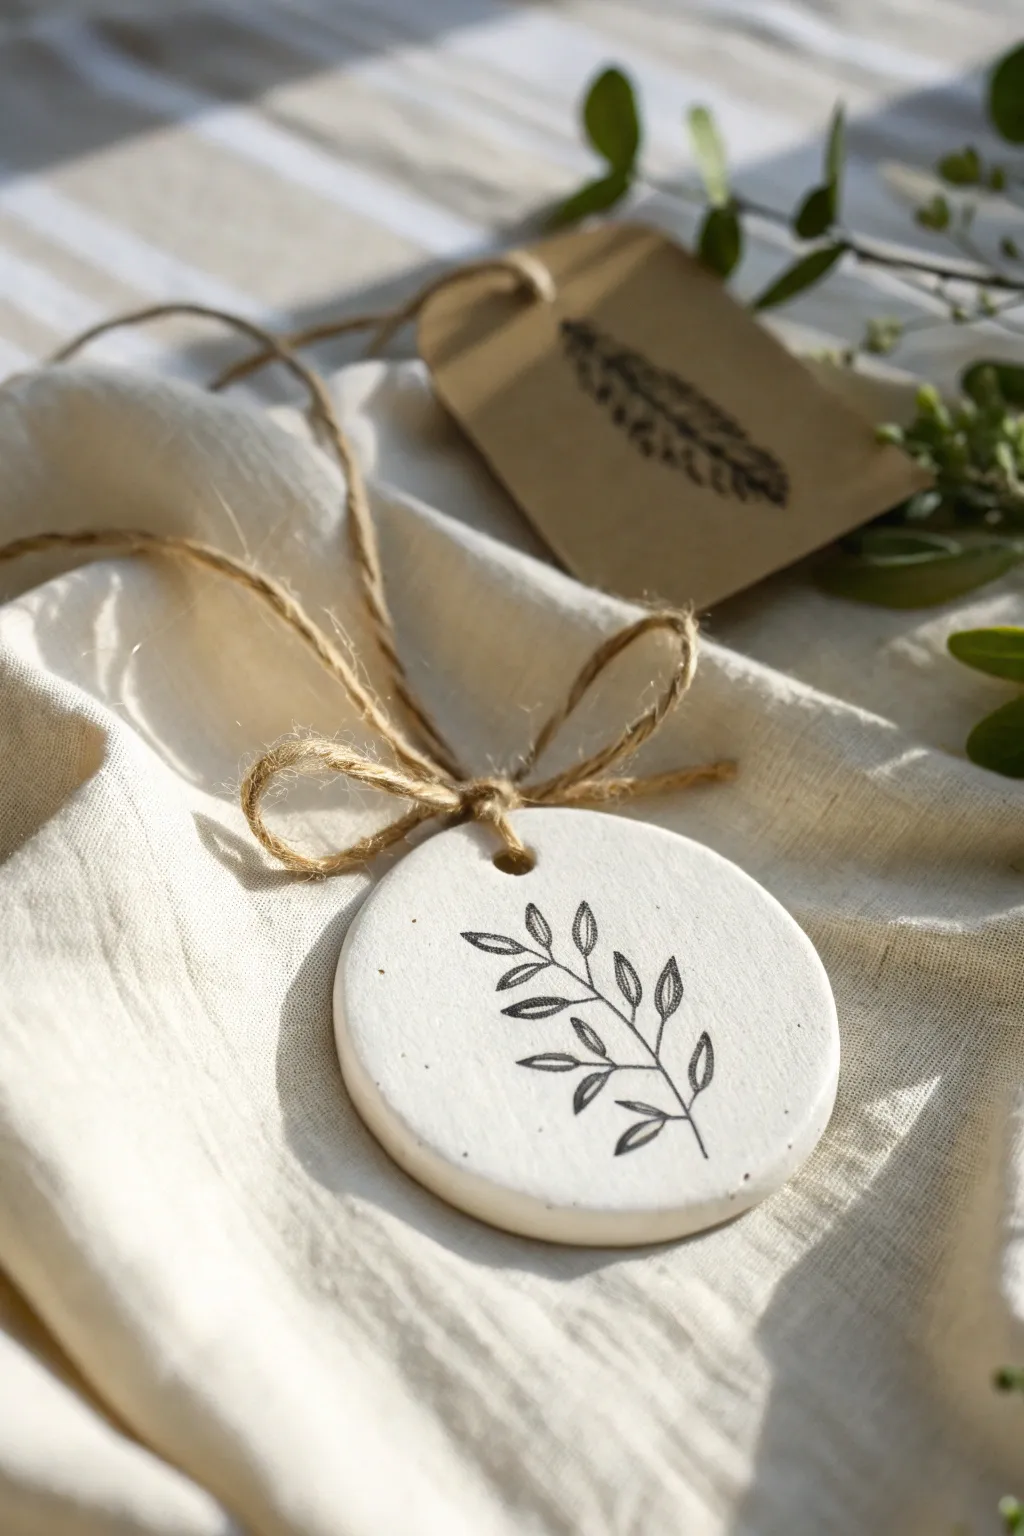
Create a minimalist and functional piece of decor with this simple air-dry clay project. These smooth white discs feature a delicate stamped botanical design and double as natural essential oil diffusers for small spaces.
How-To Guide
Materials
- White air-dry clay
- Rolling pin
- Round cookie cutter (approx. 2.5-3 inches)
- Rubber stamp with botanical/leaf design
- Black ink pad (permanent or archival ink recommended)
- Straw or small skewer (for creating the hole)
- Fine-grit sandpaper (400 grit or higher)
- Jute twine
- Small bowl of water
- Essential oils (optional, for use)
Step 1: Shaping the Disc
-
Condition the clay:
Begin by taking a handful of white air-dry clay and kneading it in your hands until it becomes soft, pliable, and free of cracks. -
Roll it out:
Place the clay on a smooth, clean surface or a silicone mat. Use a rolling pin to flatten the clay to an even thickness of about 1/4 inch. Try to keep the thickness consistent so it dries evenly. -
Cut the shape:
Press your round cookie cutter firmly into the rolled clay. Lift the cutter and gently peel away the excess clay from around the circle. -
Smooth the edges:
Dip your finger into a small bowl of water and gently run it along the cut edges of the circle to smooth out any roughness or jagged bits left by the cutter. -
Create the hanging hole:
While the clay is still wet, use a drinking straw or a skewer to punch a hole near the top of the circle. Make sure it is centered and not too close to the edge to prevent cracking later.
Fixing Smudged Ink
If you smudge the stamp, don’t panic! Since the ink is only on the surface, you can often gently wipe it away with a damp cloth immediately, or lightly sand off the mistake once the clay is fully dry.
Step 2: Stamping the Design
-
Prepare the stamp:
Select your botanical rubber stamp. Press it firmly onto the black ink pad, ensuring the raised design is thoroughly and evenly coated with ink. -
Test the impression:
I always recommend doing a quick test stamp on a scrap piece of paper or flattened clay first to check the ink coverage and orientation. -
Stamp the clay:
Carefully align the stamp over the center of your wet clay disc. Press down gently but firmly, applying even pressure to transfer the ink without squishing the clay shape too much. -
Lift carefully:
Lift the stamp straight up to avoid smudging the crisp black lines of the leaf design. -
Let it dry:
Place the disc on a wire rack or a piece of parchment paper to dry. allow it to air dry for 24-48 hours, flipping it occasionally to ensure both sides dry evenly.
Step 3: Finishing Touches
-
Sand for smoothness:
Once the clay is completely bone dry and hard, take your fine-grit sandpaper and very gently sand the edges and the surface (avoiding the inked area) to remove any remaining imperfections. -
Clean the dust:
Wipe the disc with a dry, soft cloth or a clean paintbrush to remove any white clay dust from sanding. -
Cut the twine:
Cut a length of jute twine, approximately 10-12 inches long. -
Thread the loop:
Fold the twine in half and push the looped end through the hole in the clay disc from front to back. -
Secure the hanger:
Pull the loose ends of the twine through the loop and tighten it gently to secure it to the top of the disc. -
Tie the bow:
Take the loose ends and tie a simple bow just above the clay loop. Adjust the loops of the bow until they look balanced and cute. -
Add scent (optional):
To use as a diffuser, add 2-3 drops of your favorite essential oil onto the back or the un-inked portion of the clay. The porous material will absorb the oil and release the scent slowly.
Natural Texture
Before cutting your circle, try gently pressing a piece of linen or canvas onto the wet clay surface. This imitates a fabric texture that looks beautiful behind the stamped botanical design.
Hang your finished disc in a small room or closet to enjoy the subtle aroma and simplistic beauty
Embossed White Star Ornaments
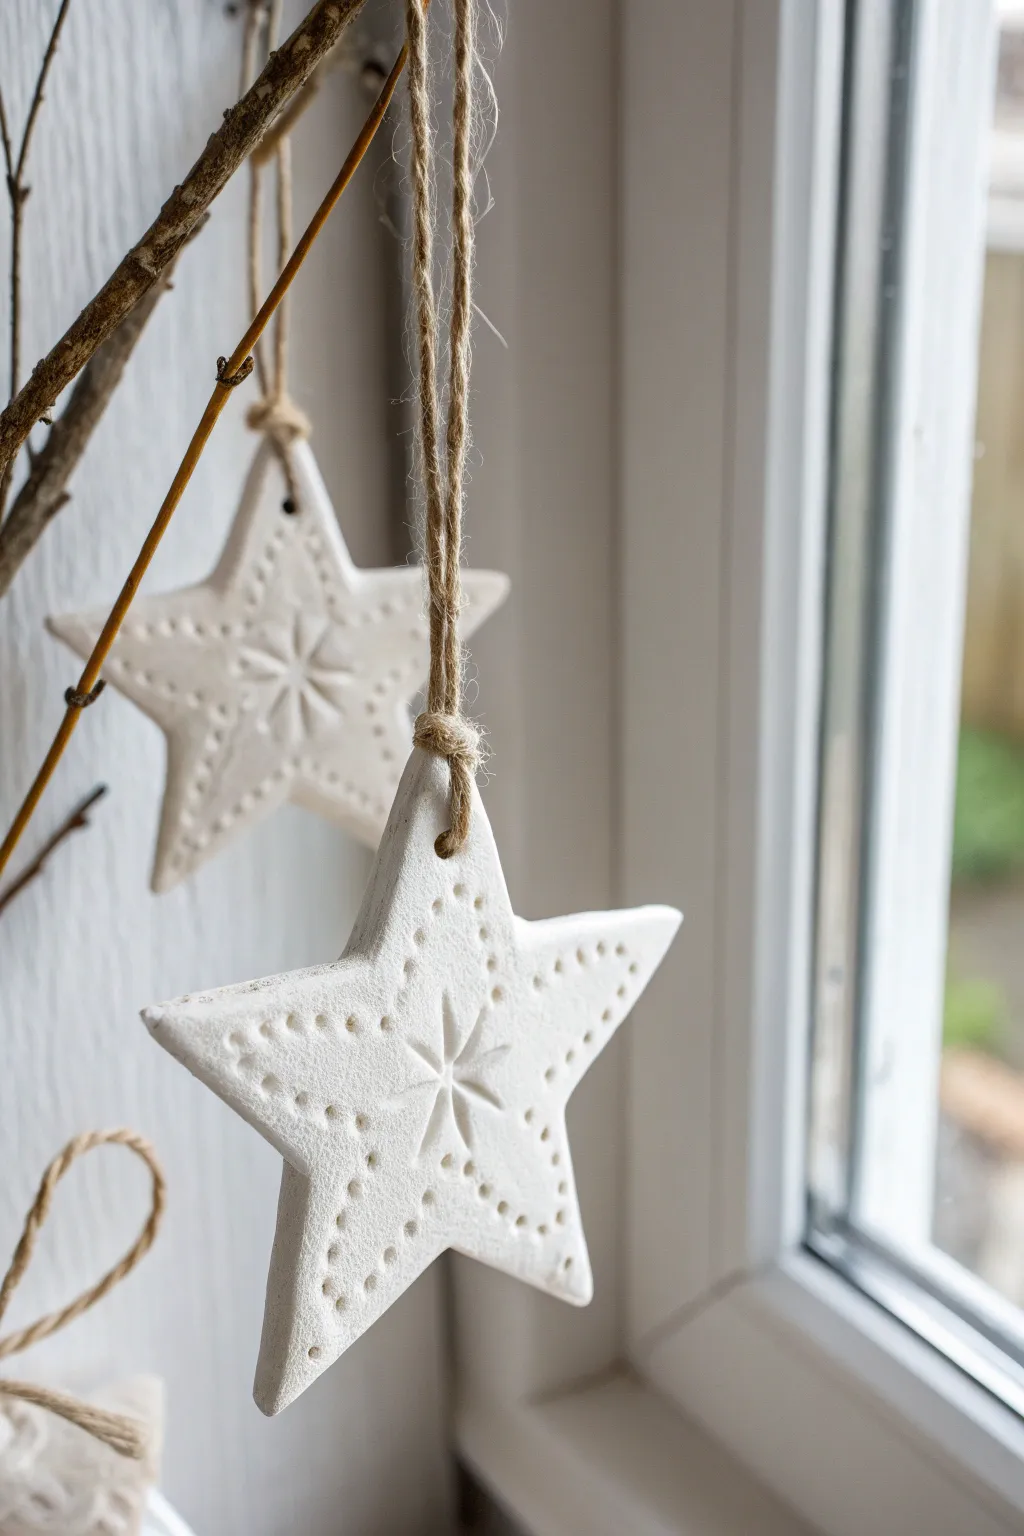
Capture the serene beauty of winter with these minimalist Scandinavian-inspired star ornaments. The matte white finish and subtle embossed details create a timeless look perfect for hanging in windows or on natural branches.
Step-by-Step Guide
Materials
- White air dry clay (e.g., DAS or Crayola)
- Star-shaped cookie cutters (various sizes)
- Rolling pin
- Parchment paper or silicone mat
- Wooden skewer or toothpick
- Small snowflake stamp or embossing tool
- Needle tool or small nail (for piercing holes)
- Fine-grit sandpaper (optional)
- Natural jute twine
- Small bowl of water
Step 1: Shaping the Stars
-
Prepare the workspace:
Lay down a sheet of parchment paper or a silicone mat to prevent sticking. Taking a chunk of air dry clay, knead it briefly in your hands until it feels warm and pliable without cracking. -
Roll the slab:
Using the rolling pin, flatten the clay into an even slab. Aim for a thickness of about 1/4 inch (6mm). If the clay is too thin, it may warp; too thick, and it will be heavy. -
Cut the shapes:
Press your star-shaped cookie cutter firmly into the clay. Wiggle it slightly to ensure a clean cut before lifting it away. Clear away the excess clay around the star so you can lift the shape without distorting the points. -
Smooth the edges:
Dip your finger into a small bowl of water and gently run it along the cut edges of the star. This removes any jagged bits or crumbs left by the cutter.
Step 2: Embossing Details
-
Create the center motif:
Wait about 10-15 minutes for the clay to firm up slightly; this prevents the tool from sinking too deep. Take your snowflake stamp or a small embossing tool and press it firmly into the direct center of the star. -
Detail the center star manually:
If you don’t have a stamp, I find using a small knife or flat tool works well to press a simple 6-point asterisk shape into the center, mimicking the photo. -
Add the dotted border:
Using the blunt end of a wooden skewer or a dedicated ball stylus tool, create a row of small dots tracing the inner perimeter of each star point. Space them evenly for a clean look. -
Pierce the hanging hole:
Use a needle tool or a skewer to poke a hole near the top point of the star. Make the hole slightly larger than you think necessary, as clay can shrink slightly as it dries. -
Double-check the exit hole:
Flip the star over gently and clean up the exit point of the hole to ensure there is no ragged clay sticking out the back.
Cracking Issues?
If you see tiny surface cracks while drying, mix a small amount of fresh clay with water to make a paste (slip) and smooth it into the cracks with your finger.
Step 3: Drying and Assembly
-
Initial drying phase:
Place your finished stars on a fresh sheet of parchment paper in a flat, dry area away from direct heat sources. -
Flip for even drying:
After about 12 hours, flip the stars over. This step is crucial to prevent the points from curling upward as moisture evaporates. -
Complete the cure:
Let them dry for another 24 to 48 hours until the clay turns bright white and feels hard to the touch. -
Sand imperfections:
Once fully bone dry, inspect the edges. If there are any sharp spots, very gently buff them away with fine-grit sandpaper. -
Cut the twine:
Cut a length of natural jute twine, approximately 8-10 inches long, depending on how low you want the ornament to hang. -
Thread the loop:
Thread one end of the twine through the hole in the star. Bring the two ends together and tie a simple overhand knot near the ends to create a loop. -
Variation for hanging:
Alternatively, fold the twine in half, push the loop end through the hole, and pull the tails through that loop (a lark’s head knot) for a different hanging style shown in some variations.
Level Up: Scented Clay
Add a drop of essential oil (like cinnamon or pine) into the clay during the kneading phase. Your ornaments will release a subtle holiday scent as they hang.
Now you have a set of charming, rustic stars ready to bring a touch of snowy warmth to your home decor
Tiny White Ghost Figurines
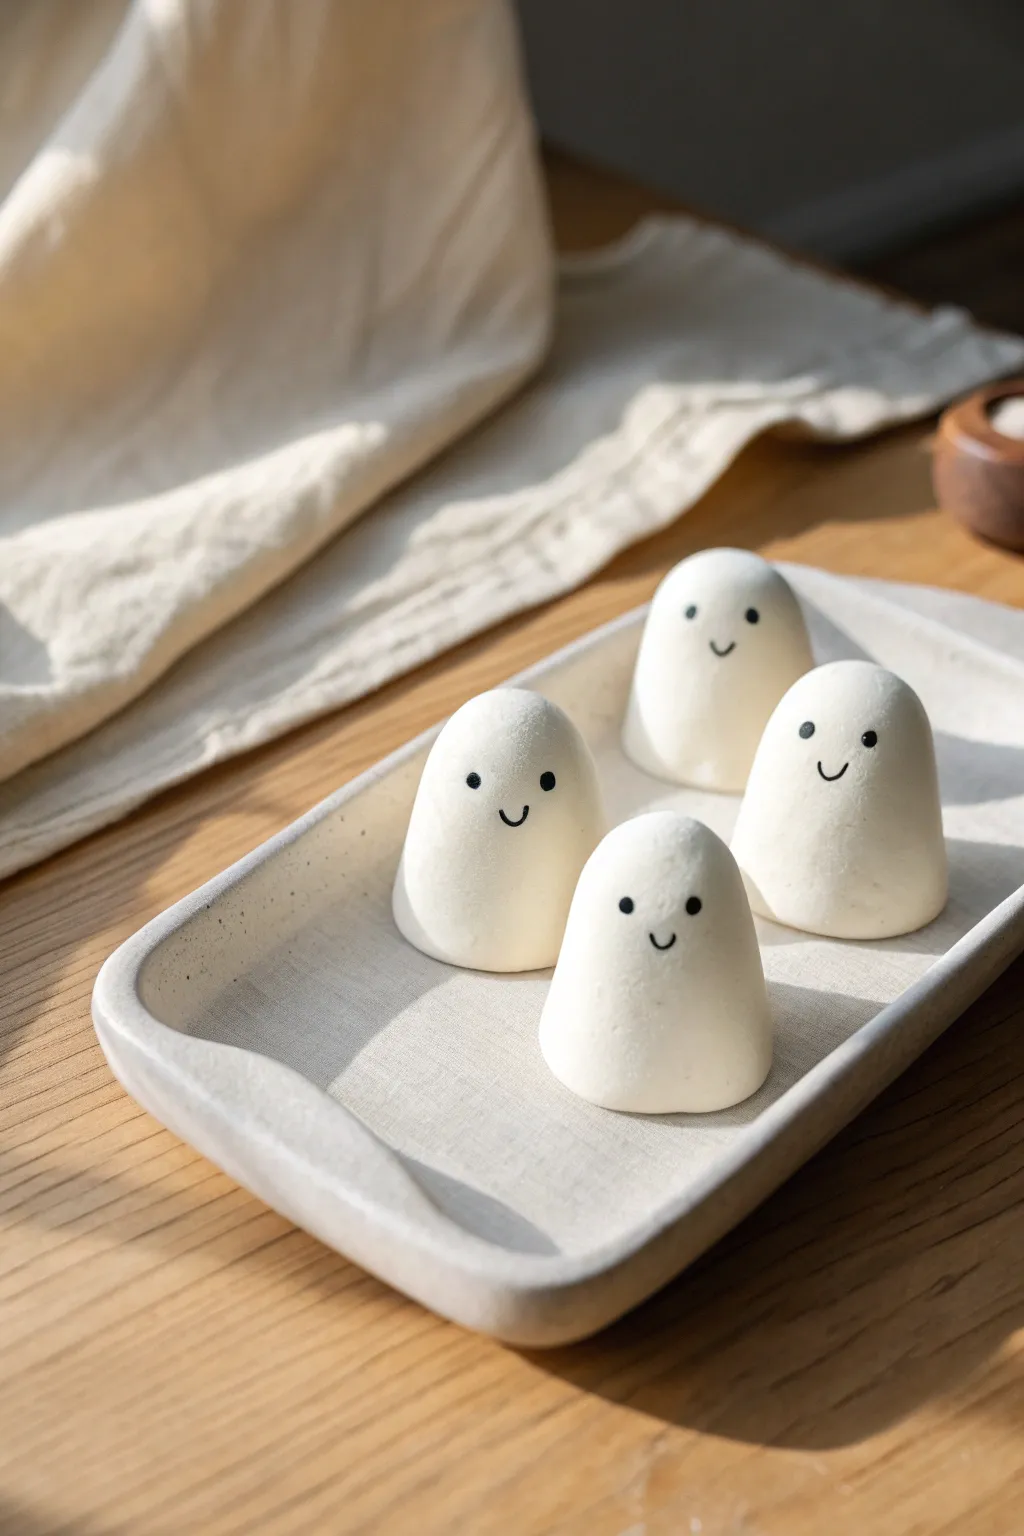
These charming little specters add a touch of whimsy to any desk or shelf with their smooth, minimalist forms and friendly smiles. This project is perfect for beginners, focusing on creating simple, rounded shapes with a clean, matte finish.
Step-by-Step Tutorial
Materials
- White smooth air dry clay
- Rolling pin (acrylic or wooden)
- Small cup of water
- Sandpaper (fine grit, 400-600)
- Black acrylic paint or Posca marker (extra fine tip)
- Small detail brush (if using paint)
- Matte sealant spray or varnish
- Clean work surface or silicone mat
Step 1: Shaping the Basis
-
Prepare the clay:
Start by taking a small handful of air dry clay. Knead it thoroughly in your hands until it becomes soft, pliable, and free of any air pockets. -
Form spheres:
Divide your clay into four equal portions, each about the size of a walnut. Roll each piece between your palms to create smooth, tight balls. -
Shape the cones:
Take one sphere and gently roll it on your work surface while applying slightly more pressure to the top half. You want to create a rounded cone shape rather than a sharp point. -
Flatten the base:
Tap the bottom of the cone firmly against the table to create a flat, stable base so the ghost stands upright. -
Round the head:
Use your thumb to gently round over the top of the cone. The goal is a domed, bullet-like silhouette rather than a traditional pointy ghost sheet.
Step 2: Refining the Surface
-
Smooth the seams:
Dip your finger in a tiny bit of water and run it over the entire surface of the ghost. This smooths out fingerprints and minor imperfections. -
Check the silhouette:
Examine the ghost from all sides. The transition from the base to the head should be seamless and organic. -
Repeat for the set:
Repeat the shaping and smoothing process for the remaining three ghosts. It looks nice if they vary slightly in height or width, giving them individual personalities. -
Let them dry:
Place the figurines in a safe spot away from direct heat. Let them dry for 24-48 hours until they are completely hard and white. -
Sand for perfection:
Once fully dry, gently sand the curved surfaces with fine-grit sandpaper to remove any lingering bumps or texture. Wipe away the dust with a slightly damp cloth.
Cracks Appearing?
If you see hairline cracks while drying, mix a tiny bit of fresh clay with water to make a paste (slip) and fill them in, then smooth over.
Step 3: Adding Character
-
Plan the faces:
Before painting, lightly mark the eye placement with a pencil if you’re nervous about symmetry. Aim for the upper middle section of the form. -
Paint the eyes:
Using a Posca marker or a fine brush with black acrylic paint, dab two small, solid black dots for eyes. Keep them relatively wide-set for a cuter look. -
Draw the smile:
Carefully draw a tiny ‘u’ shape right between the eyes, positioned slightly lower. A smaller mouth often makes the expression look sweeter. -
Dry the details:
Allow the black paint or ink to dry completely to avoid smudging the crisp lines. -
Seal the work:
Apply a coat of matte varnish or spray sealant. I prefer a spray for this step to ensure the black ink doesn’t smear during application.
Make It a Set
Create a matching shallow rectangular tray out of clay to display your ghosts, just like in the photo, for a complete vignette.
Arrange your new little friends on a shelf where they can bring a subtle smile to your day
Abstract Line-Face Catchall Bowl
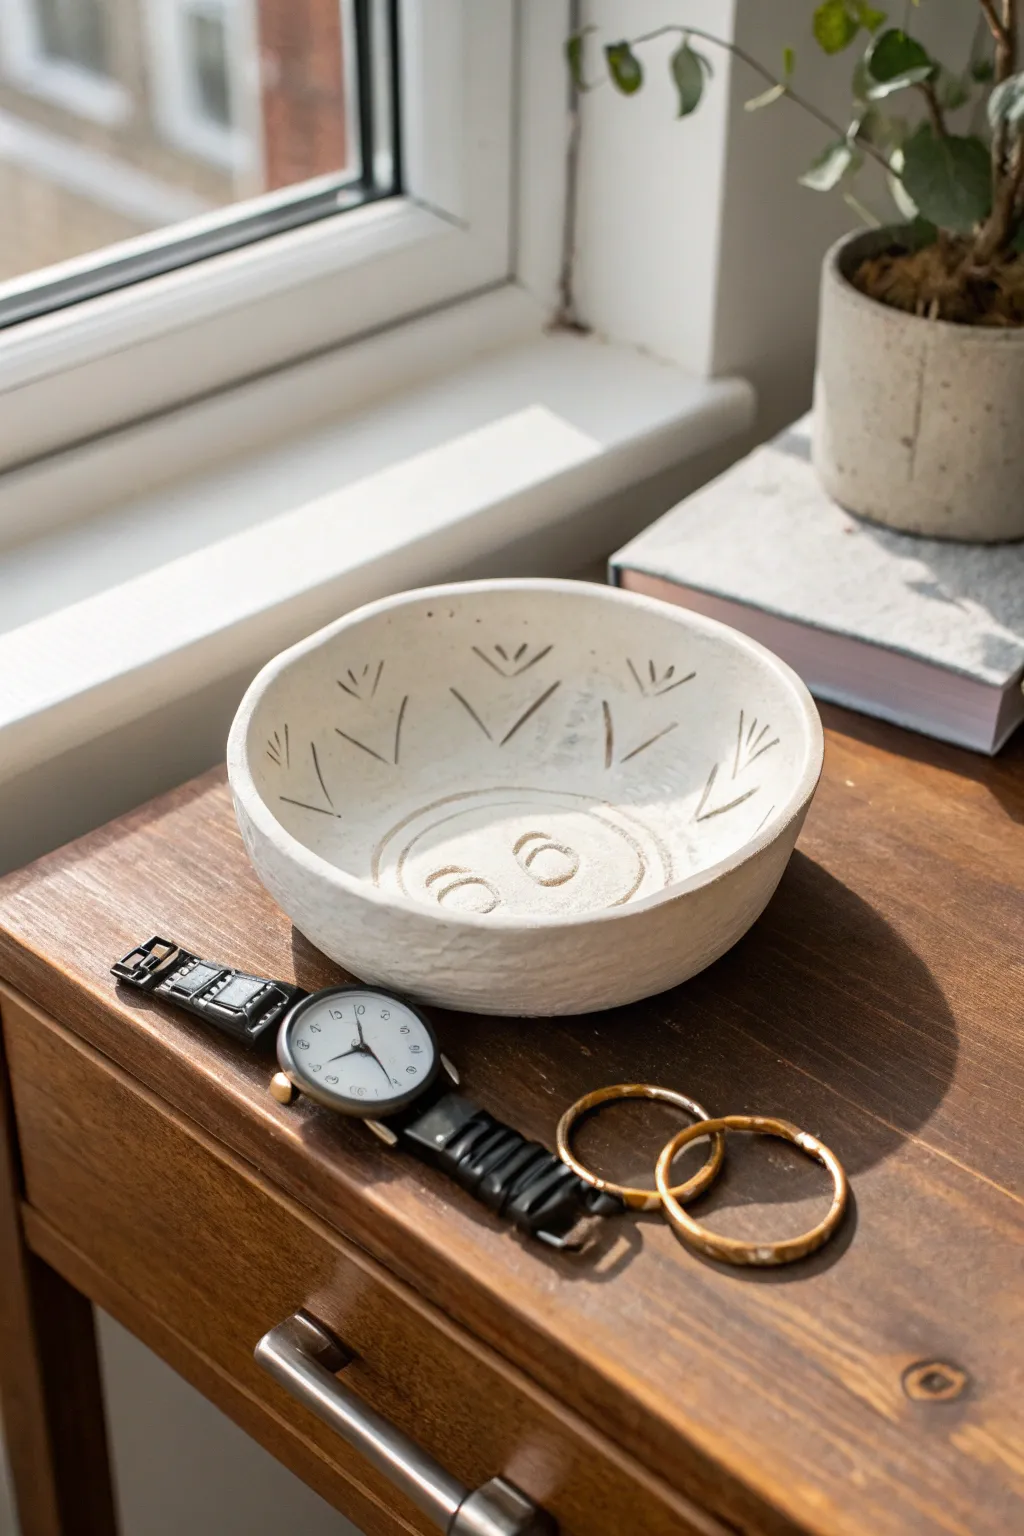
This minimalist catchall bowl combines the rustic warmth of hand-formed clay with a charming abstract face design. The raw, matte finish and incised details give it a modern organic look perfect for holding jewelry or keys.
How-To Guide
Materials
- White smooth air dry clay
- Rolling pin
- Small bowl (for a mold template)
- Plastic wrap (cling film)
- Clay carving tool or toothpick
- Sponge and water
- Fine-grit sandpaper (220 grit)
- Matte sealant or acrylic varnish
Step 1: Shaping the Base
-
Prepare the workspace:
Lay down a canvas cloth or non-stick mat to work on, as air dry clay can stick to wood or glass. Knead a grapefruit-sized ball of clay until it is warm and pliable. -
Roll the slab:
Use your rolling pin to flatten the clay ball into a consistent slab about 1/4 inch thick. Rotate the clay frequently to ensure an even circle. -
Cut the circle:
Find a bowl slightly larger than the size you want your finished piece to be. Place it upside down on the slab and use a knife to trace and cut out a perfect circle. -
Prepare the mold:
Take the small bowl you are using as a mold and wrap the inside with a layer of plastic wrap. This ensures the clay releases easily later. -
Form the bowl shape:
Gently lift your clay circle and press it into the plastic-lined bowl. Smooth it down from the center outward to remove trapped air bubbles.
Smooth Moves
Use a barely damp sponge to smooth cracks while shaping. Too much water weakens the structure, so wring it out fully.
Step 2: Carving the Design
-
Smooth the edges:
While the clay is still in the mold, use a slightly damp sponge or your fingertip to smooth the top rim. You want a soft, organic edge rather than a sharp cut. -
Preliminary drying:
Let the clay sit in the mold for about 30-60 minutes until it is leather-hard. It should be firm enough to hold its shape but soft enough to carve. -
Sketch lightly:
Remove the bowl from the mold carefully. Using a toothpick, very lightly sketch out the central circle for the face and the radiating V-shapes around the rim to check your spacing. -
Carve the face:
Use a carving tool or the blunt end of a skewer to etch deeply into the clay. Create the circular outline at the bottom, then add two oval eyes and a straight nose line. -
Detail the rim:
Carve the abstract floral markings along the inner walls of the bowl. Create V-shapes with three small lines radiating from the top of each V. -
Clean up burrs:
As you carve, small crumbs of clay will form. Brush these away gently with a soft, dry paintbrush rather than your fingers to avoid smudging the lines.
Step 3: Finishing Touches
-
Full drying:
Place the bowl on a wire rack to dry completely. This usually takes 24-48 hours depending on humidity. Rotate it occasionally for even airflow. -
Sanding:
Once bone dry, take the fine-grit sandpaper and gently smooth the rim and the outside of the bowl. Be careful not to sand away your carved incense details. -
Highlighting the lines:
If you want the carving to stand out more, you can use a damp brush to wash a tiny bit of watered-down brown paint into the crevices, then wipe the surface clean. -
Sealing:
Apply a coat of matte sealant or varnish to protect the clay from moisture and stains. I prefer a matte finish to keep that natural, stonelike appearance.
Cracks While Drying?
Mix a tiny bit of fresh clay with water to make a paste (slip). Fill the crack, smooth it over, and let it re-dry slowly.
Place your finished bowl on a sunny dresser to beautifully catch the light and your favorite trinkets
Moon Phase Wall Mobile In White
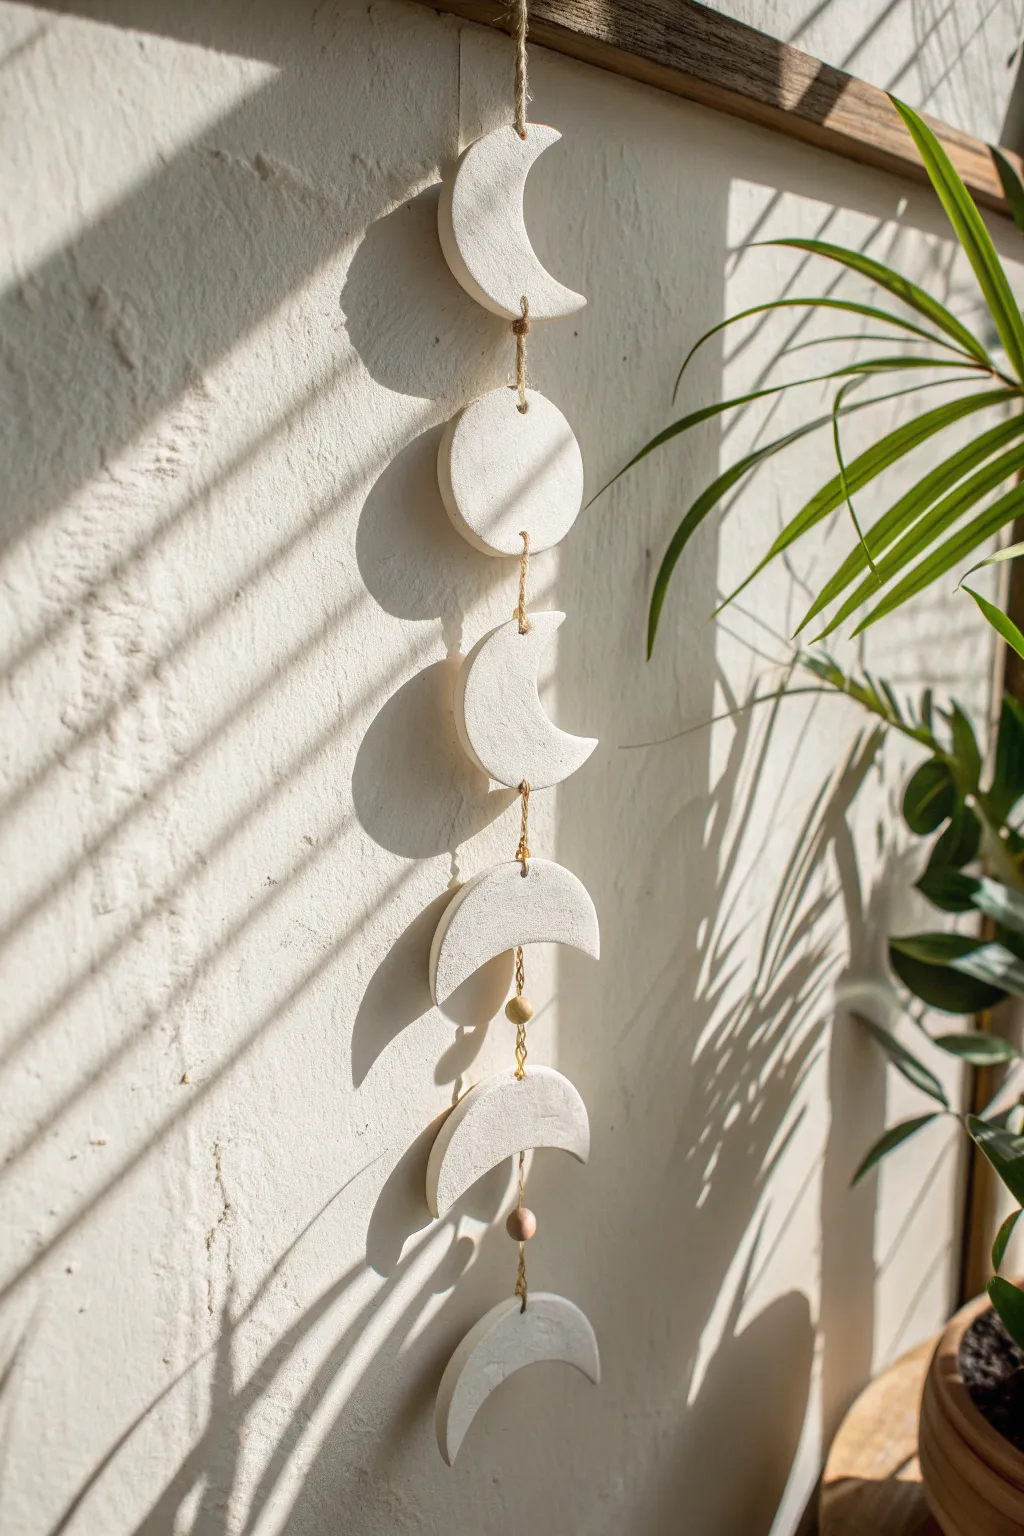
Capture the magic of the lunar cycle with this minimalist white air dry clay wall hanging. Its textured, organic finish and vertical arrangement create a calming, bohemian focal point for any sunlit corner.
Step-by-Step Tutorial
Materials
- White air dry clay (approx. 500g)
- Rolling pin
- Circle cookie cutter (approx. 3-inch diameter)
- Craft knife or clay tool
- Parchment paper or smooth work mat
- Sanding sponge or fine-grit sandpaper
- Jute twine or hemp cord
- Small wooden beads (natural finish)
- Skewer or toothpick (for poking holes)
- Small bowl of water
- Wooden dowel or strong stick (for hanging, optional)
Step 1: Shaping the Moons
-
Roll out the clay:
Take a generous handful of air dry clay and knead it briefly to warm it up. Roll it out on parchment paper until it is an even slab, approximately 1/4 inch thick. Aim for consistency so all your moons carry the same visual weight. -
Cut the base circles:
Using your circle cutter, punch out six full circles. These will serve as the base for all your shapes, ensuring the curve of every crescent matches perfectly. -
Create the full moon:
Set one perfect circle aside. This will be the center of your mobile, representing the full moon phase. -
Carve the crescents:
For the remaining five circles, use the same cutter to slice into the clay again, creating crescent shapes. Vary the thickness slightly if you want to represent different phases, or keep them uniform like the example for a stylized look. -
Smooth the edges:
Dip your finger in a small bowl of water and gently run it along the cut edges of each clay piece. This removes any jagged bits and softens the look. -
Add holes for stringing:
Using a skewer, carefully poke holes through the clay. The top crescent needs a hole at the top and bottom. The middle pieces need vertical holes (top to bottom). The bottom crescent only needs one hole at the top. Make the holes large enough for your twine.
Step 2: Drying and Refining
-
Let them dry:
Place your clay pieces on a flat surface in a dry area. Let them cure for 24-48 hours. I find flipping them over halfway through the drying process helps prevent warping. -
Sand for texture:
Once fully bone dry, use a sanding sponge to lightly buff the surfaces. For this project, you don’t want a perfectly polished finish; leave a little texture to catch the light. -
Dust off:
Wipe each piece with a dry cloth or soft brush to remove any clay dust before assembly.
Fixing Cracks
If you spot small cracks as the clay dries, mix a tiny amount of fresh clay with water to make a paste. Fill the crack, smooth it over with a finger, and let it dry again.
Step 3: Assembly
-
Prepare the twine:
Cut a long length of jute twine, roughly 4 feet long to be safe. You can always trim the excess later. -
Start at the bottom:
Tie a secure double knot at one end of the twine. Thread the bottom-most crescent (points facing down) onto the string so it rests on the knot. -
Add spacing beads:
Thread a wooden bead onto the twine, sliding it down to rest just above the bottom crescent. Tie a knot a few inches up the string where you want the next moon piece to sit. -
Thread the next moon:
Slide the next crescent onto the string. The knot you just tied should sit inside the bottom hole of this piece, supporting its weight. -
Repeat the pattern:
Continue this pattern: add a bead, tie a knot for spacing, and add the next moon phase. Ensure your ‘Full Moon’ circle is in the center of the arrangement. -
Secure the top:
For the top crescent, create a loop with the remaining twine for hanging. If you prefer a sturdier mount, tie the top string to a small wooden dowel or piece of driftwood. -
Final adjustments:
Hang the mobile up and gently rotate the beads or adjust the knots to ensure all the moons are facing forward and hanging straight.
Gilded Edges
For a touch of celestial luxury, paint just the thin outer edge of each moon phase with liquid gold leaf or metallic gold acrylic paint after sanding.
Hang your lunar creation near a window where the changing light throughout the day will cast beautiful, shifting shadows across the wall