If you can roll a ball, pinch a bowl shape, or make a little clay “snake,” you can totally make adorable mini sculptures. These simple clay sculpture ideas for beginners are all about easy shapes, forgiving details, and that satisfying “I made this!” feeling.
Pinch Pot Kitty
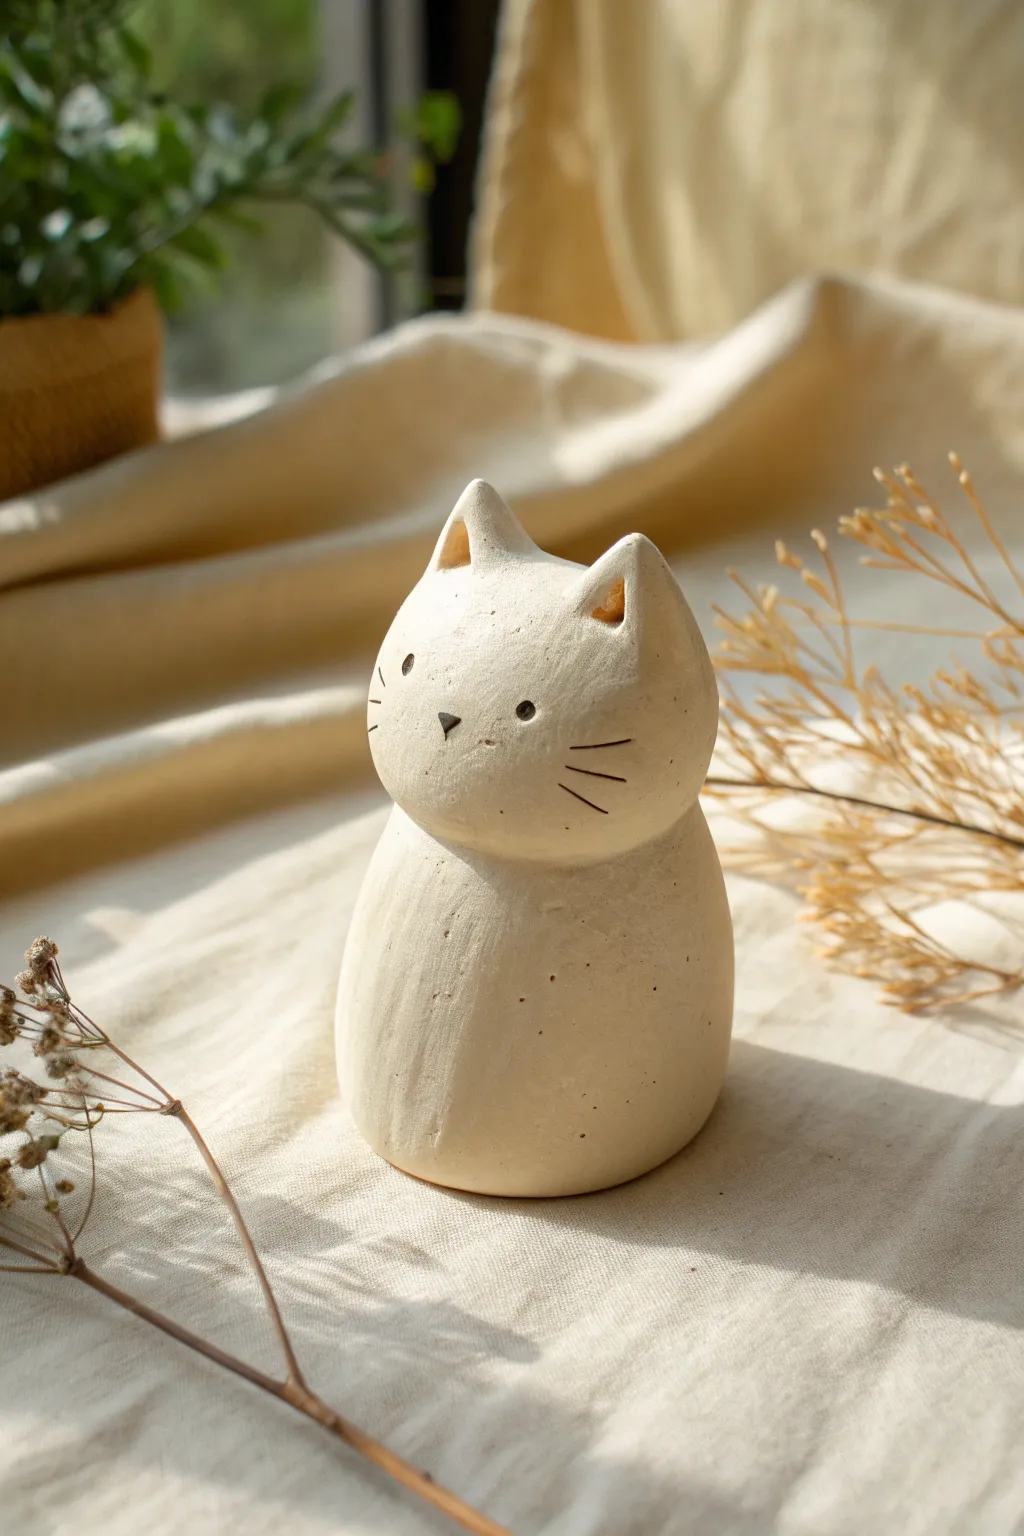
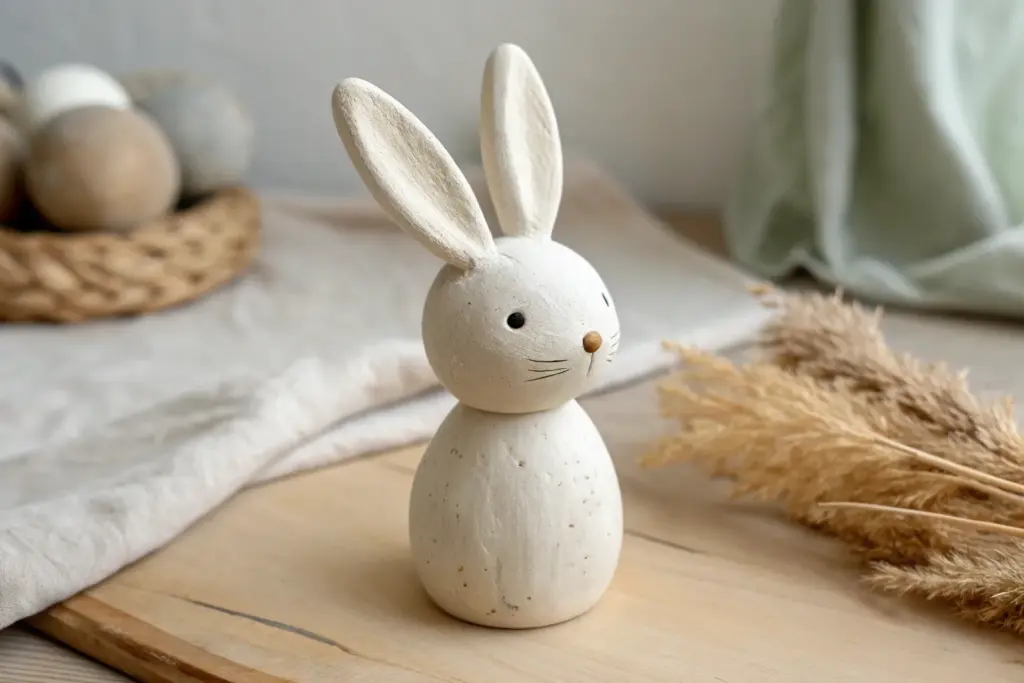
This minimalist sculpture turns two simple spheres of clay into a charming feline friend with a rustic, matte cream finish. By mastering the basic pinch pot technique, you’ll create a sturdy base and a whimsical face that captures the quiet sweetness of a cat sitting in the sun.
Step-by-Step Guide
Materials
- Air-dry clay (white or cream)
- Small cup of water
- Pointed modeling tool or toothpick
- Small wooden smoothing kidney or spoon back
- Scoring tool (or serrated knife)
- Fine-grit sandpaper (optional)
- Matte clear sealant (optional)
Step 1: Forming the Body
-
Prepare the Body Clay:
Start with a ball of clay about the size of a tennis ball. Roll it firmly between your palms to smooth out any cracks or air pockets before you begin shaping. -
Create the Pinch Pot:
Push your thumb into the center of the ball, stopping before you break through the bottom. Gently pinch the clay between your thumb and fingers while rotating the ball to open it up into a hollow cup shape. -
Refine the Shape:
Gradually pinch the walls upward and slightly inward to create a tapered, pear-like form rather than a wide bowl. The base should be slightly wider than the top, mimicking a sitting cat’s posture. -
Level the Base:
Gently tap the bottom of your pinch pot against your table surface. This creates a flat area so your kitty will stand upright without wobbling.
Step 2: Shaping the Head
-
Form the Head Sphere:
Roll a second, smaller ball of clay for the head. It should be roughly one-third the size of the body. Keep rolling until it is perfectly round and smooth. -
Score and Slip:
Use your scoring tool or a toothpick to scratch rough cross-hatch marks on top of the body and the bottom of the head. Dab a little water (or clay slurry) onto the scratched areas to act as glue. -
Attach the Head:
Press the head firmly onto the body with a slight twisting motion to lock the clay pieces together. Be careful not to flatten the spherical shape of the head too much. -
Blend the Seam:
Using your thumb or a modeling tool, gently drag clay from the neck area down onto the body and up onto the head to erase the seam. Smooth over this area so the join is invisible.
Slip & Stick Pro Tip
To fix cracks while drying, make a ‘slurry’ paste by dissolving a small scrap of dry clay in water. Paint this into cracks and smooth over it for seamless repairs.
Step 3: Adding Details
-
Pinch the Ears:
Instead of adding separate pieces, pinch the clay on top of the head directly. I find it easiest to use my thumb and forefinger to pull two small triangles of clay upward to form the ears. -
Define the Ear Hollows:
Use the rounded end of a small tool or your pinky finger to press a small indentation into the front of each ear triangle, giving them depth. -
Smooth the Surface:
Dip your finger in a tiny bit of water and run it over the entire sculpture. Erasure fingerprints and refine the curves, aiming for that sleek, minimalist look shown in the photo. -
Mark the Eyes:
Take your pointed tool or toothpick and gently press two small dots into the clay for eyes. Space them somewhat wide apart to achieve that cute, inquisitive expression. -
Carve the Nose:
Press a small, inverted triangle shape just below and between the eyes. Create a tiny vertical line trailing down from the point of the triangle for the mouth. -
Add Whiskers:
Using a light touch, drag your pointed tool through the clay to create three whisker lines on each cheek. Keep the lines thin and varying slightly in length. -
Final Texture Check:
Look over the sculpture one last time. If you want a slightly rustic texture, you can gently pat the surface with a canvas cloth or a sponge before letting it dry. -
Dry and Finish:
Let the sculpture dry slowly away from direct heat for 24-48 hours. Once fully white and hard, you can lightly sand any rough spots or seal it with a matte varnish.
Level Up: Tail Tales
Before drying, roll a thin snake of clay and wrap it around the base of the body to add a curled tail, blending it securely at the back.
Place your little clay companion on a sunny windowsill where the light can catch its simple features


Chubby Little Duck
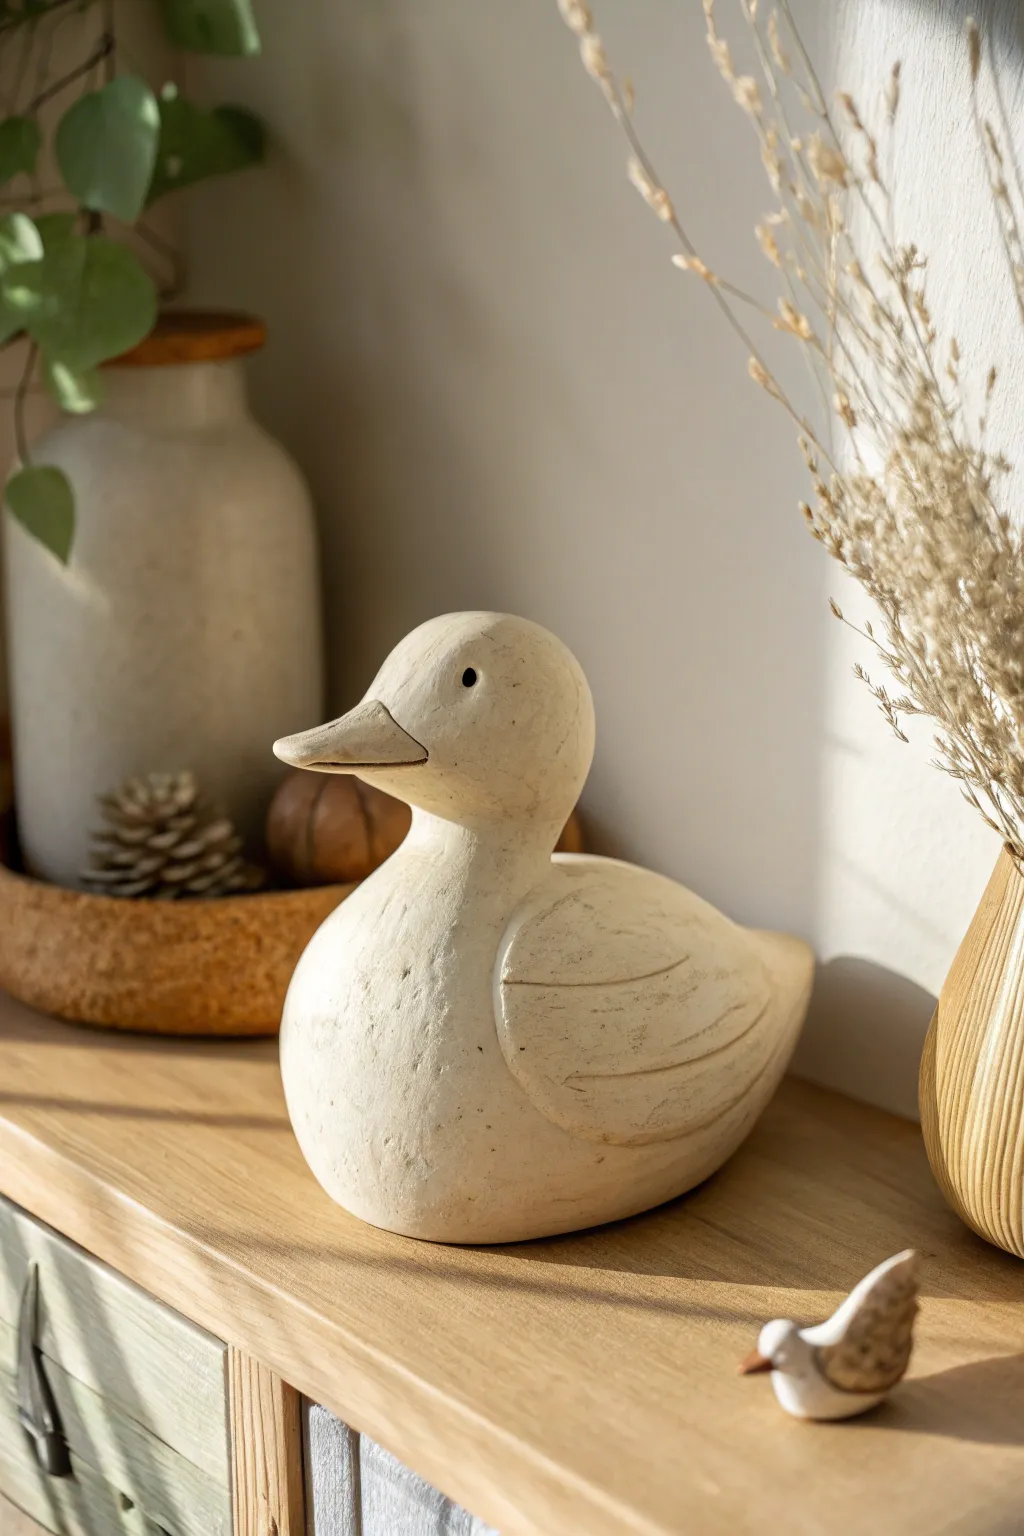
This charming, rustic duck features a wonderfully textured, chubby body and a simple, stylized form that fits perfectly into farmhouse or cottagecore decor. Its matte cream finish and deliberate imperfections give it a handcrafted, timeless appeal that looks lovely on any shelf.
Step-by-Step
Materials
- White strong air-dry clay (or polymer clay)
- Small cup of water
- Basic sculpting tools (wire cutter, wooden modeling tools)
- Needle tool or toothpick
- Sponge
- Fine-grit sandpaper
- Acrylic paint (cream or off-white)
- Acrylic paint (thinned brown or dark grey for antiquing)
- Matte varnish or sealant
- Fine liner brush
- Black acrylic paint (for eyes)
Step 1: Forming the Basic Shapes
-
Prepare the clay:
Start by kneading a large handful of clay until it is warm and pliable. This removes air bubbles and makes the material easier to work with. -
Shape the body:
Roll the majority of your clay into a large, smooth ball. Gently taper one end slightly to create a very subtle teardrop shape, flattening the bottom so it sits securely on your work surface without rolling. -
Create the head:
Roll a smaller ball of clay, roughly one-third the size of the body. Keep it spherical but slightly shape the back of it to flow into the neck area. -
Join the pieces:
Score the top of the body and the bottom of the head with a needle tool or toothpick (scratch cross-hatch marks). Apply a dab of water or slip, press the head firmly onto the body, and smooth the clay across the seam with your thumb to create a seamless neck. -
Refine the posture:
Tilt the head slightly upward to give the duck an inquisitive look. I find this simple adjustment adds so much personality to the final piece.
Cracked Clay?
If small cracks appear while drying, don’t panic. Mix a tiny bit of fresh clay with water to make a paste (slip) and fill the cracks. Smooth over and let dry again.
Step 2: Sculpting Details
-
Form the beak:
Pinch a small amount of clay into a flattened triangle or spade shape. Score the attachment point on the face and press the beak firmly in place. -
Refine the beak shape:
Blend the seams where the beak meets the cheek. Use a modeling tool to smooth the top and define the distinct, wide bill shape seen in the reference. -
Add the mouth line:
Carefully slice a horizontal line along the side of the beak to separate the top and bottom bill, giving it dimension. -
Outline the wings:
Using a needle tool or a sharp modeling tool, deeply incise a large semi-circle or oval shape on the side of the body to represent the wing. -
Detail the feathers:
Inside the wing outline, carve two or three long, curved horizontal lines to suggest layers of feathers. Keep these lines fairly deep so they show up after painting.
Step 3: Finishing and Painting
-
Beak texture:
Before the clay dries, use a slightly rough sponge or a stiff brush to gently stipple the surface of the clay, removing fingerprints and giving it that stone-like texture. -
Create the eyes:
Use the rounded end of a small paintbrush or a dotting tool to make small indentations where the eyes will go. -
Dry thoroughly:
Let the sculpture dry completely. This usually takes 24-48 hours depending on humidity; turn it occasionally to ensure the bottom dries too. -
Sand imperfections:
Once bone dry, lightly sand any sharp burrs or rough patches, but leave the overall surface texture intact. -
Base coat:
Paint the entire duck with your cream or off-white acrylic paint. You may need two coats for opaque coverage. -
Antique the cracks:
Mix a very watery wash of brown or dark grey paint. Brush it into the wing recesses and beak lines, then immediately wipe the surface with a damp cloth, leaving the dark color only in the deep grooves. -
Paint the eyes:
Using a fine liner brush or a toothpick, carefully place a dot of black paint into the eye indentations you made earlier. -
Seal:
Brush on a coat of matte varnish to protect the finish without adding unwanted shine.
Style Upgrade
For a more rustic, vintage look like the photo, dilute your cream paint slightly so the raw clay texture shows through in spots, rather than covering it perfectly.
Place your finished duck near a sunlit window or alongside some dried flowers to complete the cozy vignette


Easy Turtle With Shell Lines

This charming little turtle project celebrates the natural warmth of terracotta clay with a simple, etched design. Its friendly expression and patterned shell make it a delightful addition to any tabletop or shelf.
Step-by-Step Tutorial
Materials
- Terracotta air-dry clay (or polymer clay in terracotta color)
- Clay carving tools or a needle tool
- Small rolling pin
- Water in a small cup
- White acrylic paint
- Fine-grit sandpaper (optional)
- Black fine-tip marker or black paint
- Clay sculpting sponge
Step 1: Sculpting the Body
-
Form the shell base:
Start with a ball of clay about the size of a lemon. Roll it smooth between your palms, then gently press it down onto your work surface to create a dome shape. The bottom should be flat, while the top remains rounded. -
Shape the head:
Roll a smaller ball of clay, roughly grape-sized, and shape it into a slightly elongated oval. This will become the turtle’s head. -
Connect the head:
Score the connection points on the shell and the back of the head by scratching specifically criss-cross lines. Add a touch of water (or slip) to these rough areas and press the head firmly against the front of the shell dome. Smooth the seam with your finger or a tool. -
Create flippers:
Roll four equal-sized small balls of clay. Flatten them into teardrop or leaf shapes to create the flippers. The back flippers can be slightly shorter than the front ones. -
Attach the flippers:
Just like the head, score and slip the underside of the shell and the tops of the flippers. Press them into place underneath the shell’s edge so they stick out naturally.
Cracks Appearing?
If you see hairline cracks while drying, mix a tiny bit of fresh clay with water to make a paste (slip) and smooth it into the cracks with your finger.
Step 2: Adding Details
-
Define the shell rim:
Use a needle tool or a clay knife to gently carve a horizontal line all the way around the base of the shell, creating a distinct rim or border. -
Etch the shell pattern:
On the top of the dome, lightly etch a central hexagon or irregular polygon. From the points of this center shape, draw lines radiating outward toward the rim line you just created. -
Add rim texture:
Along the bottom rim strip, carve small vertical tic-marks all the way around to give the shell edge some texture. -
Carve flipper veins:
Use your needle tool to draw a central line down each flipper, then add angled veins branching off to look like a leaf pattern. -
Sculpt the face:
Using a small tool, carve a gentle curved line for the mouth. Use the rounded end of a tool to make slight indentations where the eyes will go. -
Smooth imperfections:
Dip your finger or a small sponge in water and very lightly smooth out any unwanted fingerprints or rough crumbs of clay, being careful not to erase your etched lines.
Make it Shine
After the paint is fully dry, apply a coat of matte or satin varnish. This seals the clay, protects the paint, and deepens the terracotta color.
Step 3: Finishing Touches
-
Let it dry:
Allow the sculpture to dry completely. If you are using air-dry clay, this usually takes 24-48 hours depending on humidity. I like to let this dry away from direct sunlight to prevent cracking. -
Highlight the lines:
Once fully dry, take a very fine brush with watered-down white acrylic paint. Carefully paint inside the etched lines on the shell pattern. -
Add dots:
Dip the non-brush end of a paintbrush into white paint and stamp small white dots into the center of each shell segment. -
Wipe back excess:
If the white paint spills out of the grooves, quickly wipe the surface with a slightly damp paper towel, leaving the white pigment only deep inside the carving. -
Draw the eyes:
Use a black fine-tip marker or a tiny dot of black paint to draw the closed eye shape and a small nostril dot as shown in the reference image.
Place your finished turtle near a potted plant for a cute, nature-inspired display


Mini Frog With Big Eyes
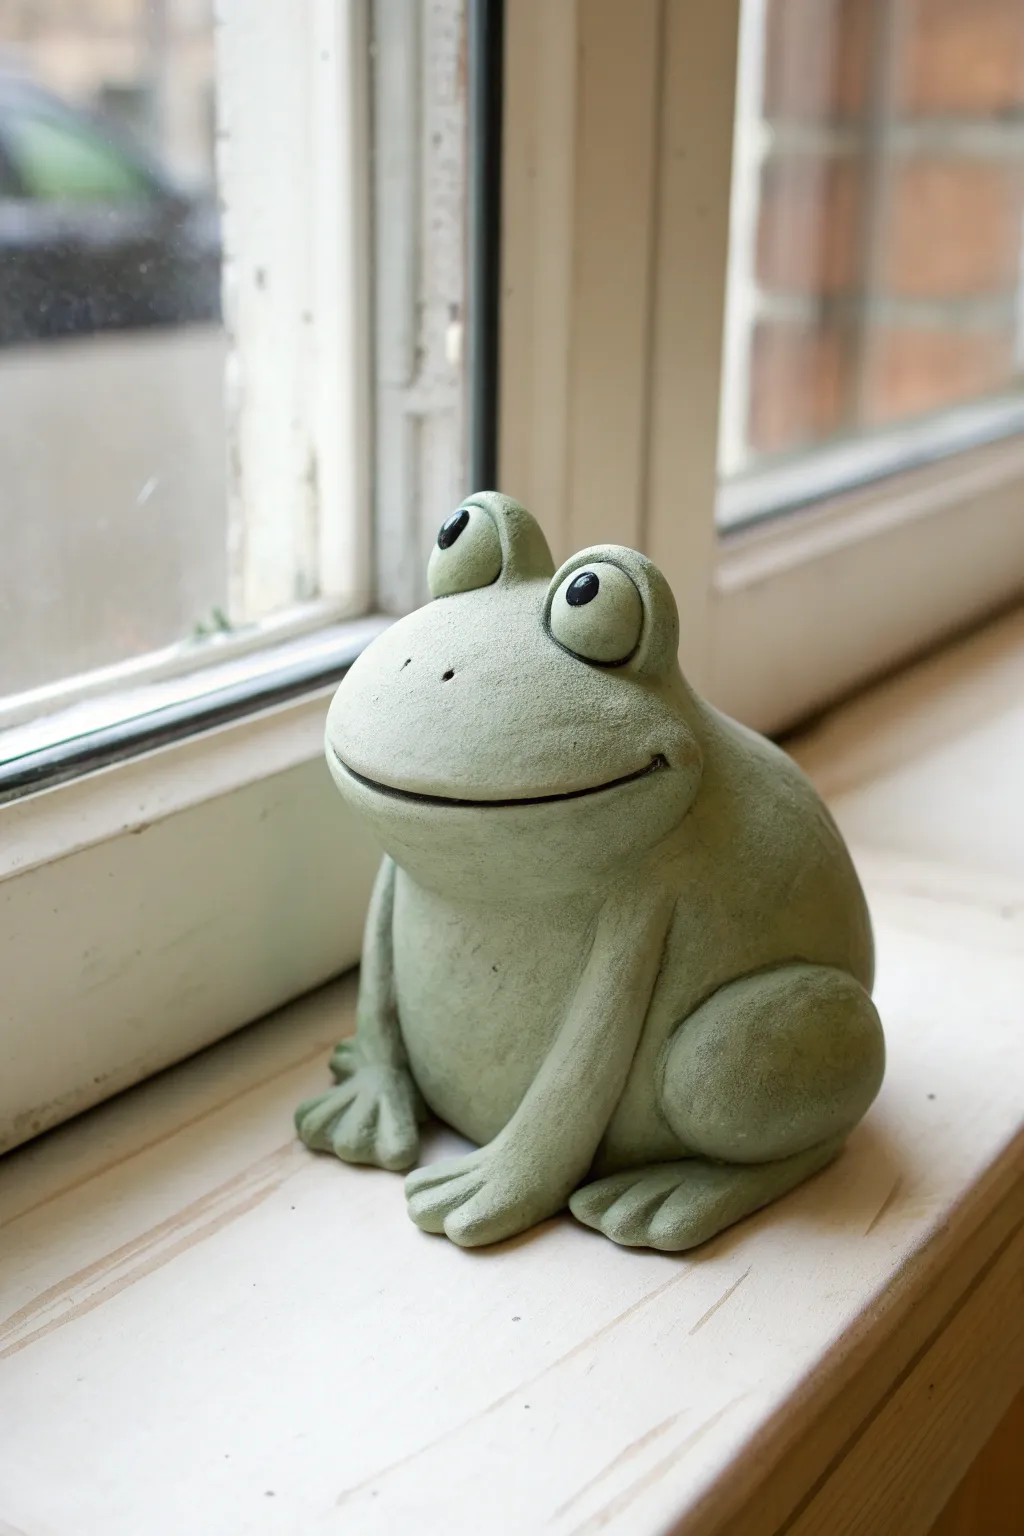
Create a charming desk companion with this simple sculpted frog, featuring oversized eyes and a friendly grin. The project focuses on basic shapes and smoothing techniques to achieve a clean, stone-like finish that looks great on any windowsill.
Detailed Instructions
Materials
- Air-dry clay or polymer clay (grey or stone-colored)
- Clay sculpting tools (needle tool, blending tool)
- Small bowl of water (for smoothing air-dry clay)
- Acrylic paint (black and potentially a sage green if using white clay)
- Fine grit sandpaper
- Matte varnish or sealant
- Aluminum foil (optional, for armature)
Step 1: Forming the Body Base
-
Create the core:
Start by rolling a large ball of clay into a smooth, slightly flattened teardrop shape. This will serve as the combined head and body of the frog. -
Shape the posture:
Gently tap the wider bottom of the teardrop on your work surface to create a flat base so the frog sits stably without rolling. -
Define the head:
Although the frog is one cohesive mass, use your thumbs to gently press a slight indentation about halfway up the form to subtly suggest where the neck area would be, keeping the transition very smooth.
Clean Seams
Dip your finger or tool in a tiny bit of water (for air-dry) or baby oil (for polymer) to erase seam lines completely for a professional look.
Step 2: Adding the Legs
-
Prepare the hind legs:
Roll two medium-sized balls of clay into thick sausage shapes. Flatten them slightly to create the muscular thigh sections. -
Attach the thighs:
Press one thigh shape against each side of the lower body. Use a blending tool or your finger to smooth the seams entirely into the main body so they look like one piece. -
Form the feet:
For the front legs, roll two smaller cylinders. Flatten the ends to make the feet. -
Detail the toes:
Use a needle tool or knife to cut two notches into each flattened foot, creating three distinct toes. Round off the edges of each toe with your fingertips. -
Attach front legs:
Place the front legs vertically against the chest area, blending the top of the legs seamlessly into the body just below the ‘neck’ indentation.
Step 3: Sculpting the Face
-
Make the eye sockets:
Roll two small balls of clay for the eyes. Before attaching them, press two indentations into the top of the head where you want them to sit. -
Attach the eyes:
Score and slip (if using air-dry clay) the indentations, then press the eye balls firmly into place. They should protrude significantly. -
Add eyelids:
Roll two tiny snakes of clay and flatten them. Drape these over the top and bottom of each eyeball to create heavy, expressive eyelids, blending the edges into the head. -
Carve the mouth:
Use a needle tool to draw a wide, sweeping smile across the face. Make the cut deep enough to be visible after painting. -
Refine the expression:
Press small indentations at the corners of the mouth to accentuate the smile. Poke two tiny holes above the mouth for nostrils.
Cracking Clay?
If small cracks appear while drying, mix a small amount of fresh clay with water to make a paste and fill them in like spackle.
Step 4: Finishing Touches
-
Texture the skin:
To mimic the stone look in the photo, gently dab the surface with a stiff toothbrush or a ball of crinkled foil. Avoid the eyes, which should remain smooth. -
Dry thoroughly:
Allow your sculpture to dry completely according to your clay manufacturer’s instructions. I usually give air-dry clay at least 24-48 hours. -
Sand imperfections:
Once dry, use fine-grit sandpaper to smooth out any unintentional bumps or fingerprints, especially around the base and seams. -
Paint the details:
If your clay wasn’t pre-colored, paint the entire frog a muted sage green. Once dry, use a fine brush to paint the pupils solid black and darken the inside of the mouth line. -
Seal the work:
Finish with a coat of matte varnish to protect the clay while maintaining that natural, stony appearance.
Place your finished frog near a light source to let the shadows highlight his cheerful expression

The Complete Guide to Pottery Troubleshooting
Uncover the most common ceramic mistakes—from cracking clay to failed glazes—and learn how to fix them fast.
Round Owl With Texture Feathers
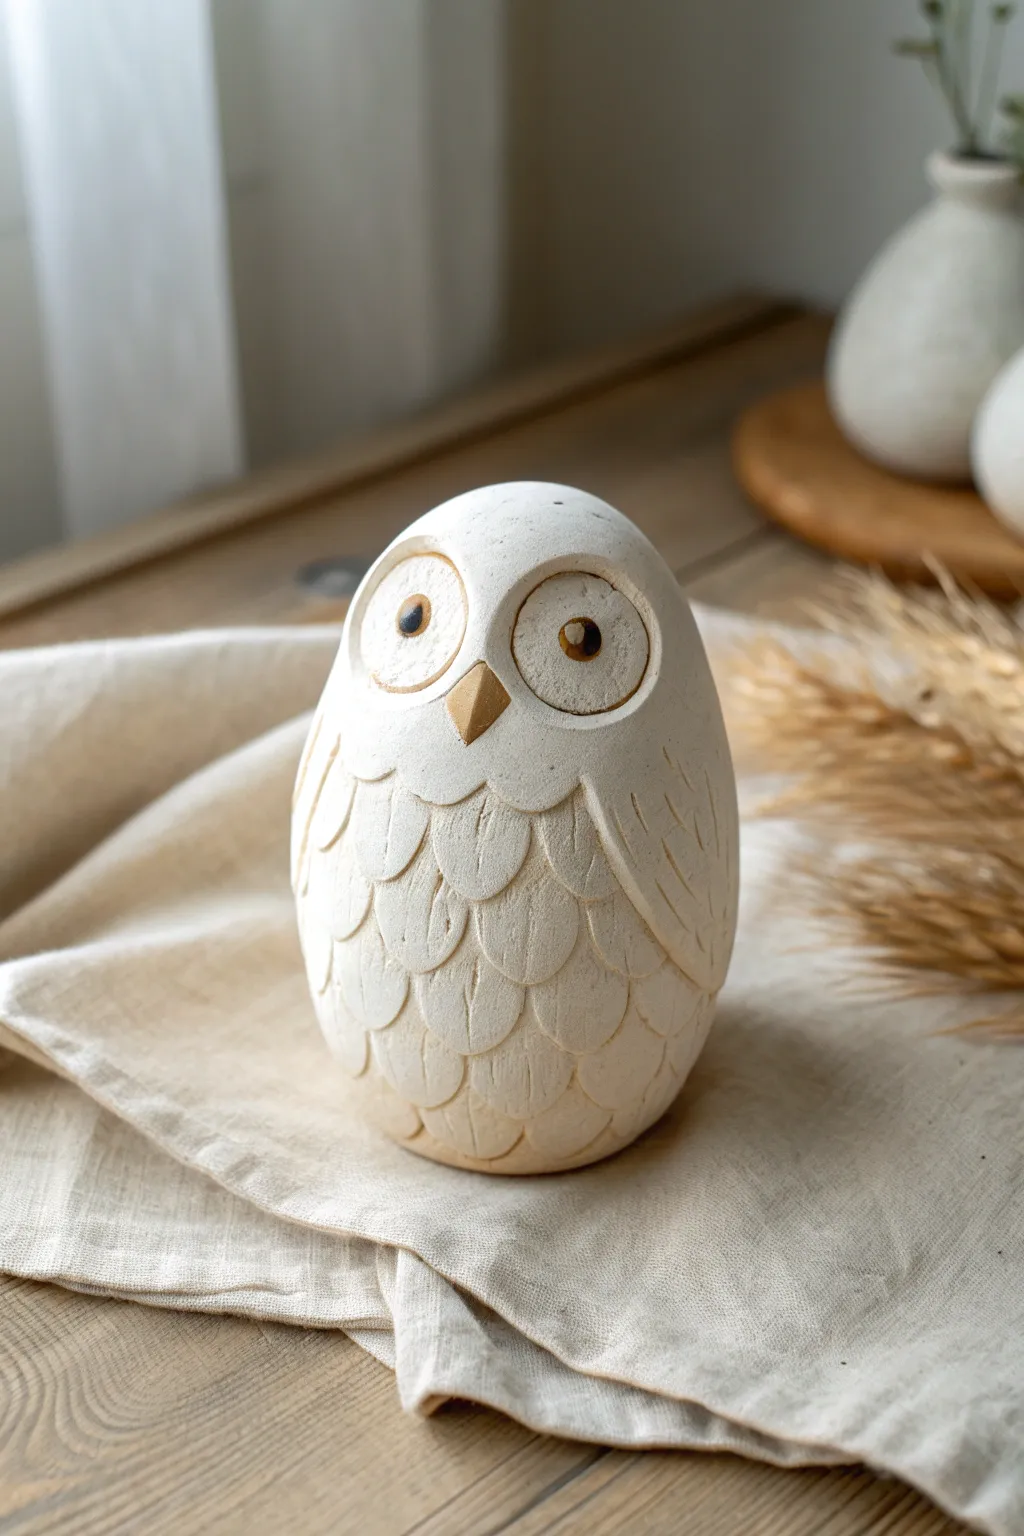
This charming, minimalist owl sculpture begins as a simple egg shape and comes to life through clever texturing. Its rustic, matte finish and carved feather details make it a perfect beginner project that looks surprisingly sophisticated.
Step-by-Step Tutorial
Materials
- White or cream air-dry clay (or polymer clay)
- Small rolling pin
- Loop tool or U-shaped sculpting tool
- Needle tool or toothpick
- Small circular cutter (approx. 1 inch diameter)
- Smaller circular cutter or straw (for pupils)
- Clean sponge and water
- Acrylic paints (white, beige, dark brown)
- Fine grit sandpaper
Step 1: Forming the Base
-
Condition the clay:
Start by kneading a generous handful of clay until it is soft, pliable, and free of air bubbles. If the clay feels too dry, mist it lightly with water. -
Roll the main body:
Roll the clay into a smooth ball between your palms, then gently elongate it into a solid oval or egg shape. Aim for a height of about 4-5 inches depending on your preference. -
Flatten the base:
Tap the wider end of the egg gently against your work surface. This creates a flat bottom so your owl will stand upright without wobbling. -
Check for smoothness:
Inspect the surface for cracks. Smooth them out using a damp finger or a slightly wet sponge, ensuring the egg shape remains symmetrical.
Keeping It Uniform
To keep feather sizes consistent, mark horizontal guide lines lightly around the belly before you start carving the individual scales.
Step 2: Creating the Face
-
Outline the eyes:
Decide on the placement of the face, slightly above the center of the egg. Press a medium-sized circular cutter gently into the clay to mark two side-by-side circles for the eye sockets. -
Sculpt the eye sockets:
Using the cutter markings as a guide, lightly carve out the interior of the circles to create slightly recessed, concave areas. -
Add the eyeballs:
Roll two small, identical balls of clay and flatten them into discs. Press these into the center of the recessed eye sockets. -
Detail the pupils:
Use a straw or a very small circular tool to impress a pupil into the center of each eyeball disc. -
Form the beak:
Shape a tiny pyramid or triangle of clay. Attach this beak right where the two eye circles meet at the bottom. Score the back of the beak slightly to help it adhere.
Step 3: Texturing the Feathers
-
Define the wings:
Use a needle tool to very lightly sketch large oval shapes on the sides of the body to distinguish where the wings will rest. -
Carve the breast feathers:
Start at the bottom of the owl’s belly. Using a U-shaped loop tool, press into the clay and drag upward slightly to create a U-shaped ‘scale’ pattern. Repeat in staggered rows moving upward toward the neck. -
Carve the wing feathers:
For the wings, create longer, vertical indentations that curve slightly with the shape of the body to suggest folded feathers. -
Add gentle texture:
I like to take a coarse piece of fabric or a toothbrush and gently dab the un-carved areas (like the head) to give the surface a subtle, stone-like texture. -
Clean up edges:
Use a soft brush to sweep away any clay crumbs created during the carving process.
Natural Wood Look
Skip the white paint! Use terracotta or brown clay, and once dry, dry-brush with lighter beige paint to mimic the look of carved wood.
Step 4: Finishing Touches
-
Dry completely:
Allow the sculpture to dry fully according to your clay’s package instructions. This usually takes 24-48 hours for air-dry clay of this thickness. -
Sand for finish:
Once dry, gently sand any rough peaks on the head or back with fine-grit sandpaper for a smooth feel. -
Apply base coat:
Paint the entire owl with a creamy off-white acrylic paint. Two thin coats are better than one thick coat. -
Add an antique wash:
Mix a tiny drop of brown paint with plenty of water. Brush this wash over the textured feathers, then immediately wipe the surface with a paper towel. The brown will stay in the grooves, highlighting the carving. -
Detail the eyes:
Paint the pupils dark brown or black using a fine detail brush to make the expression pop.
Place your finished owl on a shelf or mantle where the light will catch the textures of its new feathers
Tiny Whale With a Happy Tail
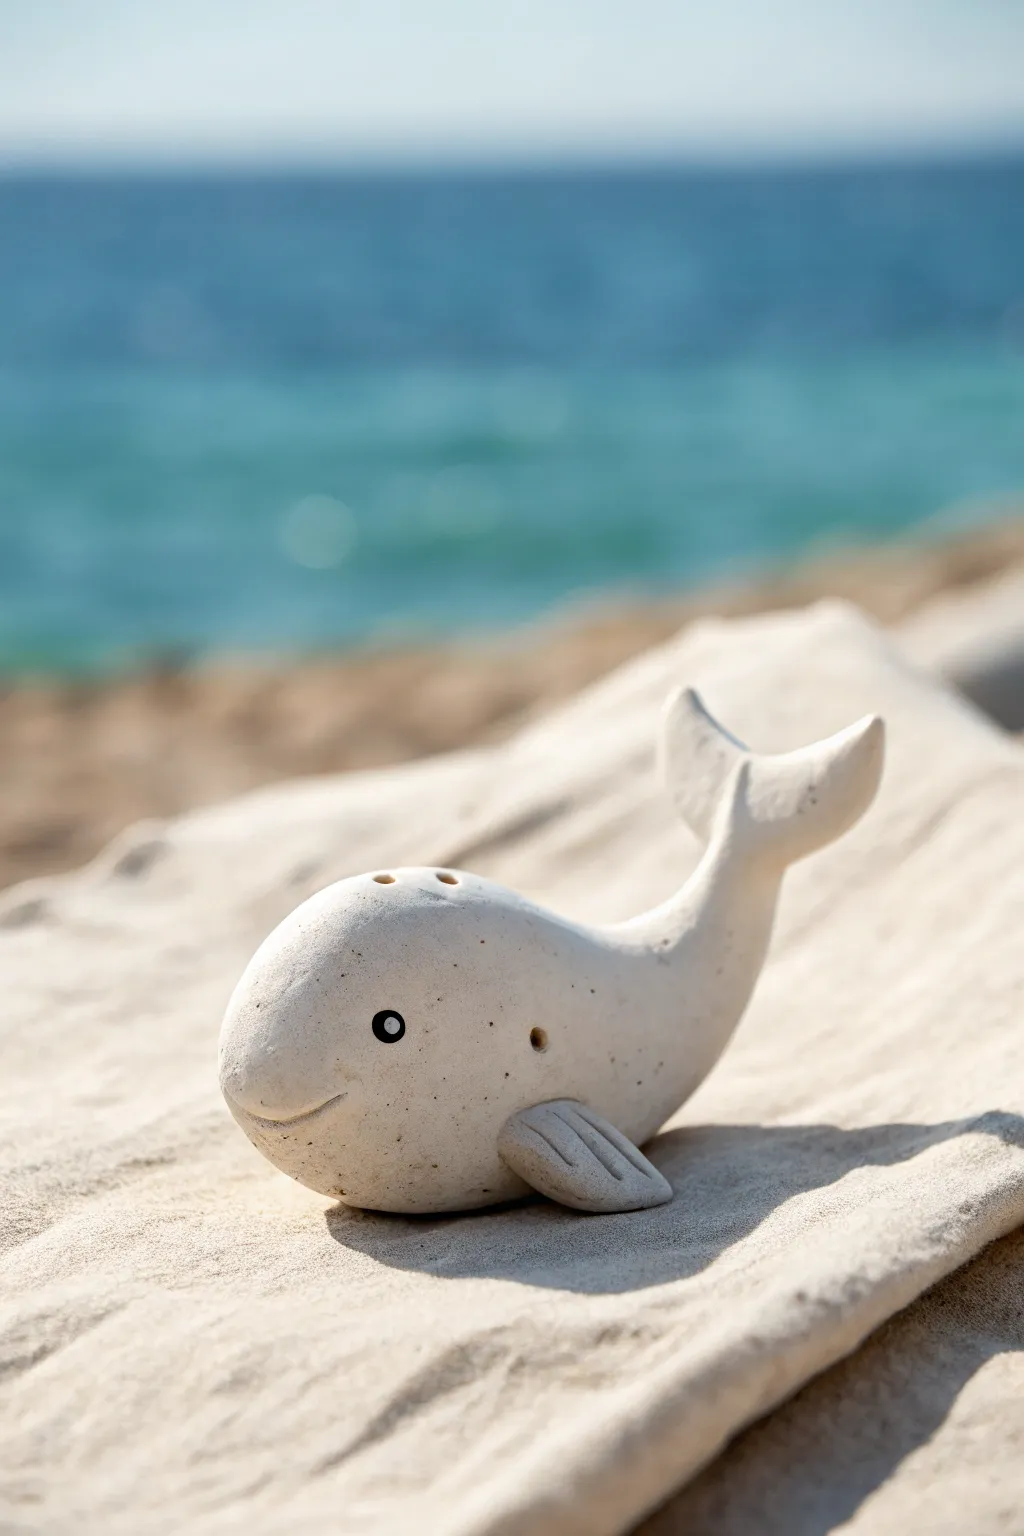
Capture the calm of the ocean with this charming little whale, featuring a smooth, matte finish and subtle speckled texture. This project is perfect for beginners, focusing on simple rounded shapes and minimalist facial details to create a character full of personality.
Detailed Instructions
Materials
- White or speckled cream polymer clay (or air-dry clay)
- Small ball tool or dotting tool
- Modeling tool with a knife edge
- Black acrylic paint
- Small fine-point paintbrush
- Needle tool or toothpick
- Smooth work surface/mat
Step 1: Shaping the Body
-
Prepare the Clay:
Start by conditioning your clay. Knead it in your hands until it is soft, pliable, and free of cracks. This ensures a smooth finish later on. -
Form the Base:
Roll the clay into a smooth sphere about the size of a golf ball or slightly larger, depending on how big you want your whale to be. -
Elongate the Drop:
Gently roll one side of the sphere against your work surface to taper it into a large teardrop shape. This will become the body and tail. -
Curve the Tail:
Take the tapered end (the tail) and gently bend it upward. I like to smooth the underside of the curve with my thumb to keep it looking organic and fluid. -
Flatten the Flukes:
Pinch the very tip of the tail to flatten it horizontally into a fan shape. -
Cut the Flukes:
Using your knife tool, cut a small ‘V’ notch in the center of the flattened tail fan to create distinct left and right flukes. Soften the cut edges with your fingertip.
Cracks Appearing?
If you see cracks while smoothing the tail, dip your finger in a tiny bit of water (for air-dry clay) or baby oil (for polymer clay) and massage the area until smooth.
Step 2: Fins and Facial Features
-
Make the Fins:
Roll two small pea-sized balls of clay. Flatten each one into a rounded triangle or teardrop shape to form the pectoral fins. -
Add Fin Details:
Use the knife edge tool to press two or three gentle lines into each fin to simulate texture. -
Attach the Fins:
Press the fins onto the lower sides of the whale’s body. Blend the clay at the attachment point using a modeling tool or your finger so they don’t fall off. -
Create the Blowhole:
On the very top of the head, use a small ball tool or the blunt end of a paintbrush to press two small indentations side-by-side for the blowhole. -
Carve the Smile:
Using a needle tool or the edge of a curved tool, press a long, gentle arc into the front lower side of the face. Curve the end slightly upward for a happy expression. -
Mark the Eye Sockets:
Press a small circular indentation where you want the eye to be. This creates a guide for painting later. -
Add Texture (Optional):
If your clay isn’t naturally speckled, you can gently prick the surface sparingly with a toothbrush or needle tool to give it an organic, stone-like feel.
Make it Functional
Before baking, make the blowholes deeper and wider to hold dried flower stems, turning your sculpture into a tiny, decorative vase.
Step 3: Finishing Touches
-
Bake or Dry:
Follow the manufacturer’s instructions for your specific clay. If baking polymer clay, tent it with aluminum foil to prevent scorching the white color. -
Cool Down:
Allow the piece to cool completely before applying any paint. -
Paint the Eyes:
Dip a fine paintbrush or dotting tool into black acrylic paint. Carefully fill in the eye indentation you made earlier. -
Add the Glint:
Once the black paint is dry, use a toothpick to add a tiny dot of white paint to the center of the eye. This ‘catchlight’ brings the character to life. -
Define the Blowhole:
Add a tiny wash of diluted dark paint inside the blowhole indentations to create depth, wiping away any excess on the surface.
Place your finished whale on a sunny shelf to bring a bit of beachside calm to your room


What Really Happens Inside the Kiln
Learn how time and temperature work together inside the kiln to transform clay into durable ceramic.
Coil Snake With Simple Spots
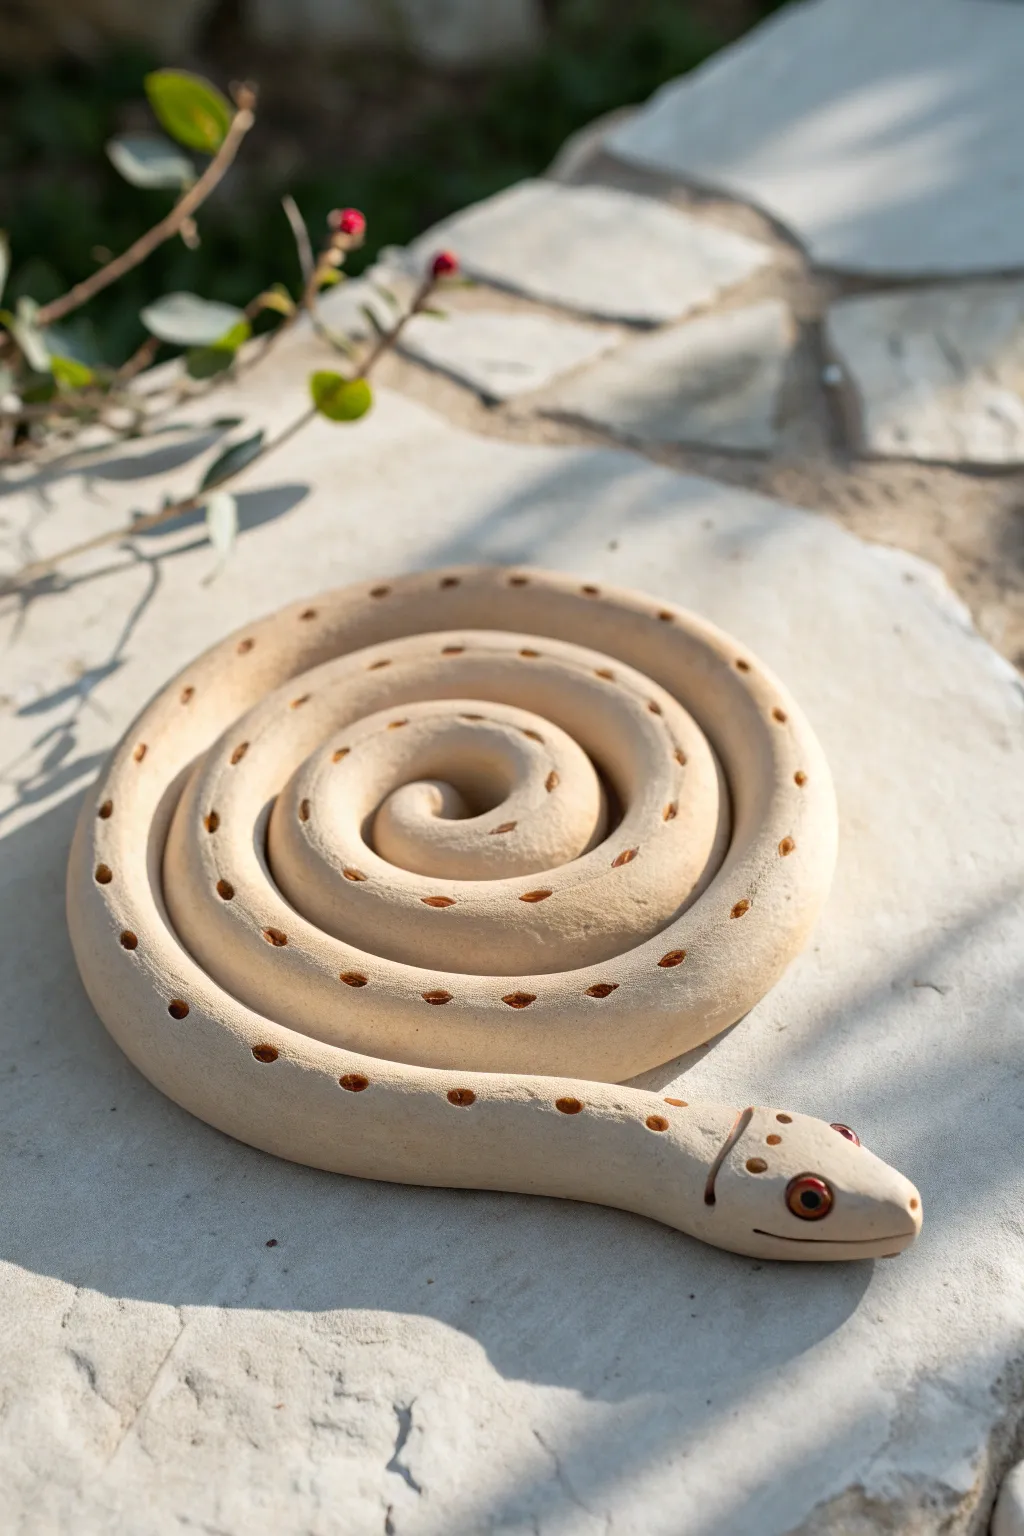
This charming little reptile is the perfect introductory project for mastering the classic coil technique. Its smooth, spiral body and simple indented spots create a satisfying texture that looks delightful on a garden stone or desk.
How-To Guide
Materials
- Light beige or buff-colored air-dry clay (or polymer clay)
- Small stylus tool or a round-ended sculpting tool
- Pointed modeling tool or toothpick
- Two small reddish-brown beads (glass or stone) for eyes
- Brown acrylic paint or slip (if using ceramic clay)
- Fine detail paintbrush
- Smooth work surface or rolling mat
Step 1: Forming the Body
-
Prepare the clay:
Start by conditioning your clay until it is soft and pliable. If you are using air-dry clay, knead it briefly to remove air bubbles and ensure an even consistency. -
Roll the coil:
Take a large handful of clay and begin rolling it into a long snake shape on your work surface. Use the palms of your hands and roll from the center outwards to keep the thickness even. -
Check the taper:
Aim for a coil that is about 18 to 24 inches long. The head end should remain thick (about 1 inch wide), while the tail end should gently taper to a thinner point. -
Smooth the surface:
Before coiling, run a slightly damp finger or a sponge along the length of the clay snake to smooth out any cracks or fingerprint marks. -
Begin the spiral:
Starting with the tapered tail end, begin winding the clay into a flat spiral. Keep the coils tight against each other, but don’t squish them together too hard. -
Shape the head:
As you reach the thickest part of the coil, leave the last 3-4 inches free from the spiral. Gently lift the head slightly and shape it into a rounded, slightly triangular snake head. -
Define the mouth:
Using a knife tool or a thin piece of wire, slice a gentle horizontal line into the front of the snout to create a smiling mouth.
Smooth Operator
To prevent your coil from flattening on one side while rolling, maintain steady speed and don’t press down too hard. Let the friction do the work.
Step 2: Detaling and Finishing
-
Add the eyes:
Take your two reddish-brown beads and press them firmly into the sides of the head. I find pressing them in a bit deep helps them stay secure as the clay shrinks during drying. -
Mark the spots:
Using a small, round-ended tool or stylus, press small indentations along the spine of the snake. Space them evenly, following the spiral from the neck all the way to the tail tip. -
Create the spot texture:
Instead of a perfect circle, slightly drag the tool as you lift it to create an elongated, oval-like impression for each spot. -
Paint the spots:
Dip a fine detail brush into brown acrylic paint (or brown slip if working wet) and carefully fill the inside of each indented spot. Try to keep the paint only within the depression for a clean look. -
Add head details:
Add a few smaller painted dots on top of the head in a decorative pattern, perhaps a small triangle of three dots between the eyes. -
Detail the eyes:
If your beads are plain, you can carefully paint a tiny black pupil in the center of each bead, or outline the eye socket with a very thin line of brown paint. -
Smooth final imperfections:
Do a final check over the piece. If you touched the coil and marred the surface, smooth it out gently with a soft, dry brush. -
Dry the piece:
Place your snake on a flat board to dry. If using air-dry clay, rotate it occasionally so the bottom dries evenly; if baking polymer clay, follow the package instructions.
Natural Texture
Before the clay dries, gently press a piece of coarse fabric or burlap against the belly or sides to give the snake a subtle, scaly skin texture.
Once fully dry, your coiled friend is ready to guard your garden or keep you company on your shelf
Ladybug From Two Balls
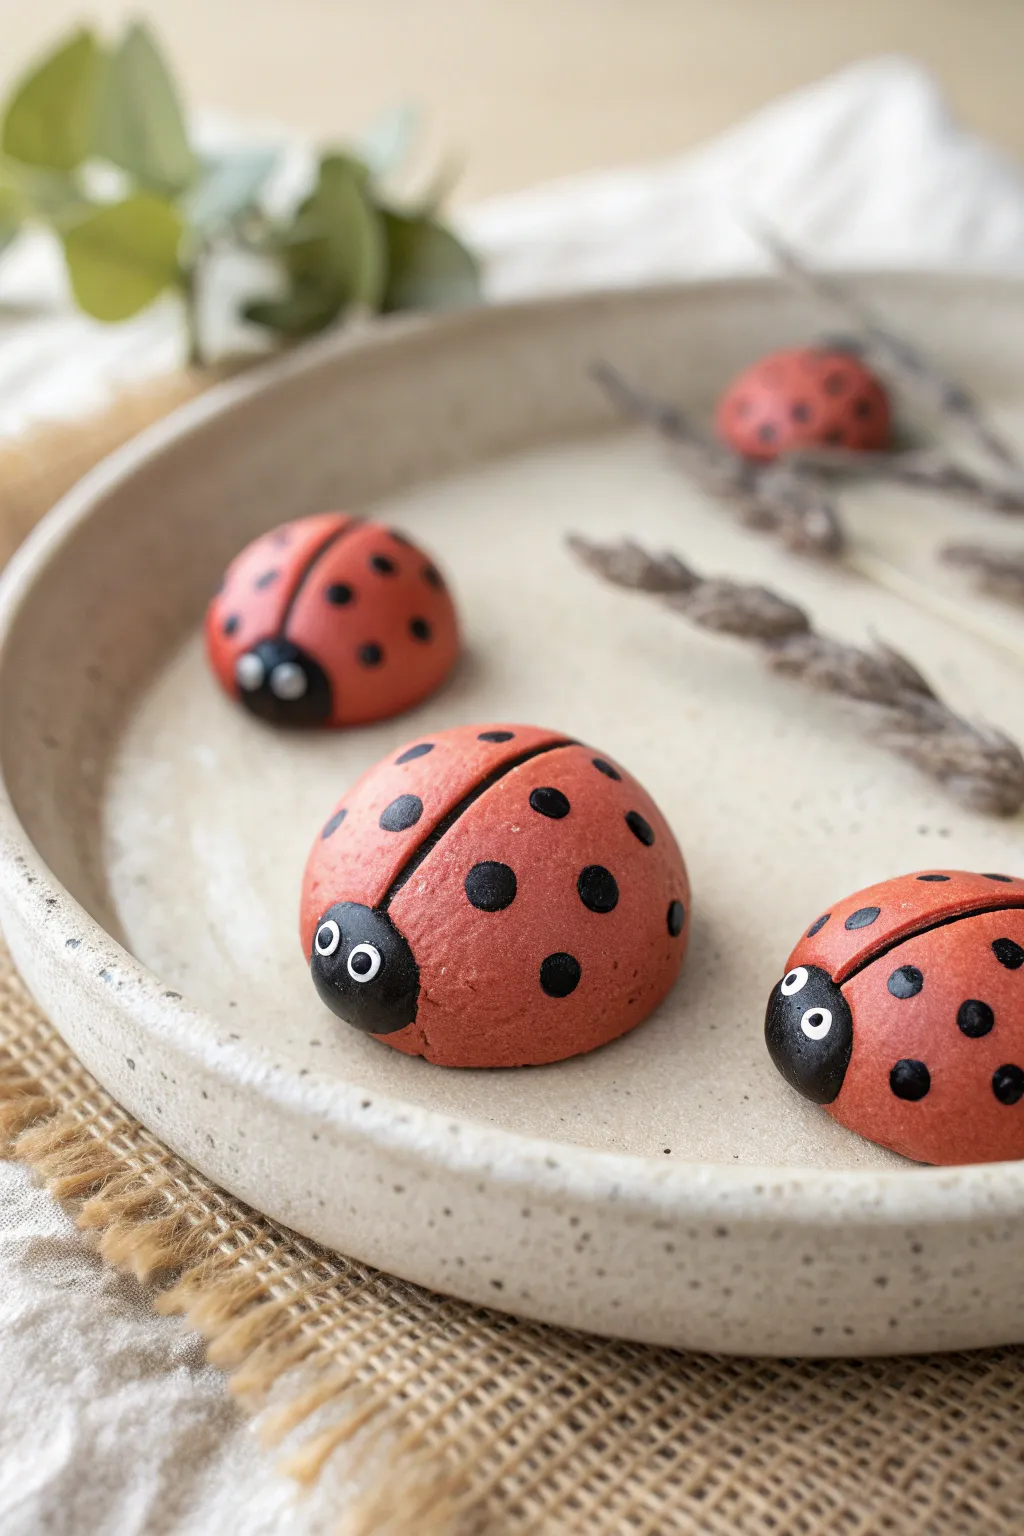
These charming little ladybug sculptures are perfect for brightening up a planter or sitting sweetly on a decorative plate. Their rounded, smooth bodies and distinct wing separation give them a delightful, toy-like quality that is achievable for complete beginners.
Step-by-Step Guide
Materials
- Red polymer clay (or air-dry clay painted red)
- Black polymer clay
- White acrylic paint
- Small dotting tool or toothpick
- swapping blade or plastic knife
- Oven for baking (if using polymer clay)
- Gloss varnish (optional)
Step 1: Shaping the Bodies
-
Prepare the red clay:
Start by conditioning your red clay until it is soft and pliable. Roll a portion into a smooth, crack-free sphere about the size of a walnut. -
Form the dome:
Gently press the bottom of the sphere onto your work surface to flatten it slightly, creating a sturdy dome shape rather than a perfect ball. -
Create the wing split:
Using a clay blade or the back of a plastic knife, carefully press a straight line down the center of the red dome to simulate the separated wings. Don’t cut all the way through; just create a deep groove. -
Smooth the edges:
If the groove created slight ridges, gently tap them with your finger to round off the edges while maintaining the central indentation.
Clean Hands Trick
Red and black clay stain easily! Use baby wipes to clean your hands thoroughly between colors to keep your red bright and smear-free.
Step 2: Adding the Head
-
Roll the head piece:
Take a much smaller piece of black clay, roughly one-quarter the size of the body, and roll it into a ball. -
Flatten the connection point:
Press one side of the black ball flat against the table so it has a stable base like the body. -
Attach the head:
Press the flat side of the black ball firmly against the front of the red body. You can use a tiny dab of liquid clay or water (for air-dry clay) to ensure a strong bond. -
Blend the seam:
Use a modeling tool or your finger to gently smooth the underside seam where the head meets the body, ensuring the two pieces become one solid unit.
Step 3: Detailing and Finishing
-
Create the spots:
Roll tiny, almost seed-sized bits of black clay into balls. Flatten them extremely thin between your fingers. -
Apply the spots:
Press these flattened black dots randomly onto the red wings. Make sure you place them symmetrically if you prefer a realistic look, or scatter them for whimsy. -
Secure the spots:
Gently roll the entire ladybug very lightly in your palm or tap the spots to ensure they are flush with the red surface and won’t pop off later. -
Add the eye base:
If using clay for eyes, roll two microscopic white balls and press them onto the black head. Alternatively, you can paint these later. -
Bake or dry:
Follow the manufacturer’s instructions for your specific clay. If baking polymer clay, usually 275°F (135°C) for 15-30 minutes does the trick. -
Paint the eyes:
Once cooled (or dried), use a dotting tool dipped in white acrylic paint to create the whites of the eyes if you didn’t use clay. -
Add pupils:
Wait for the white paint to dry completely. Then, using a smaller tool or toothpick, add a tiny black dot in the center of each white circle. -
Varnish:
For a shell-like shine similar to the photo, apply a coat of gloss varnish over the red wings, avoiding the head if you want a matte contrast.
Natural Texture
Before baking, gently press a piece of rough sandpaper or a clean toothbrush against the red wings to mimic a realistic, organic texture.
Arrange your finished bugs on a leafy surface or a textured plate to show off their adorable personalities

TRACK YOUR CERAMIC JOURNEY
Capture glaze tests, firing details, and creative progress—all in one simple printable. Make your projects easier to repeat and improve.
Tiny Dinosaur With Plate Spikes
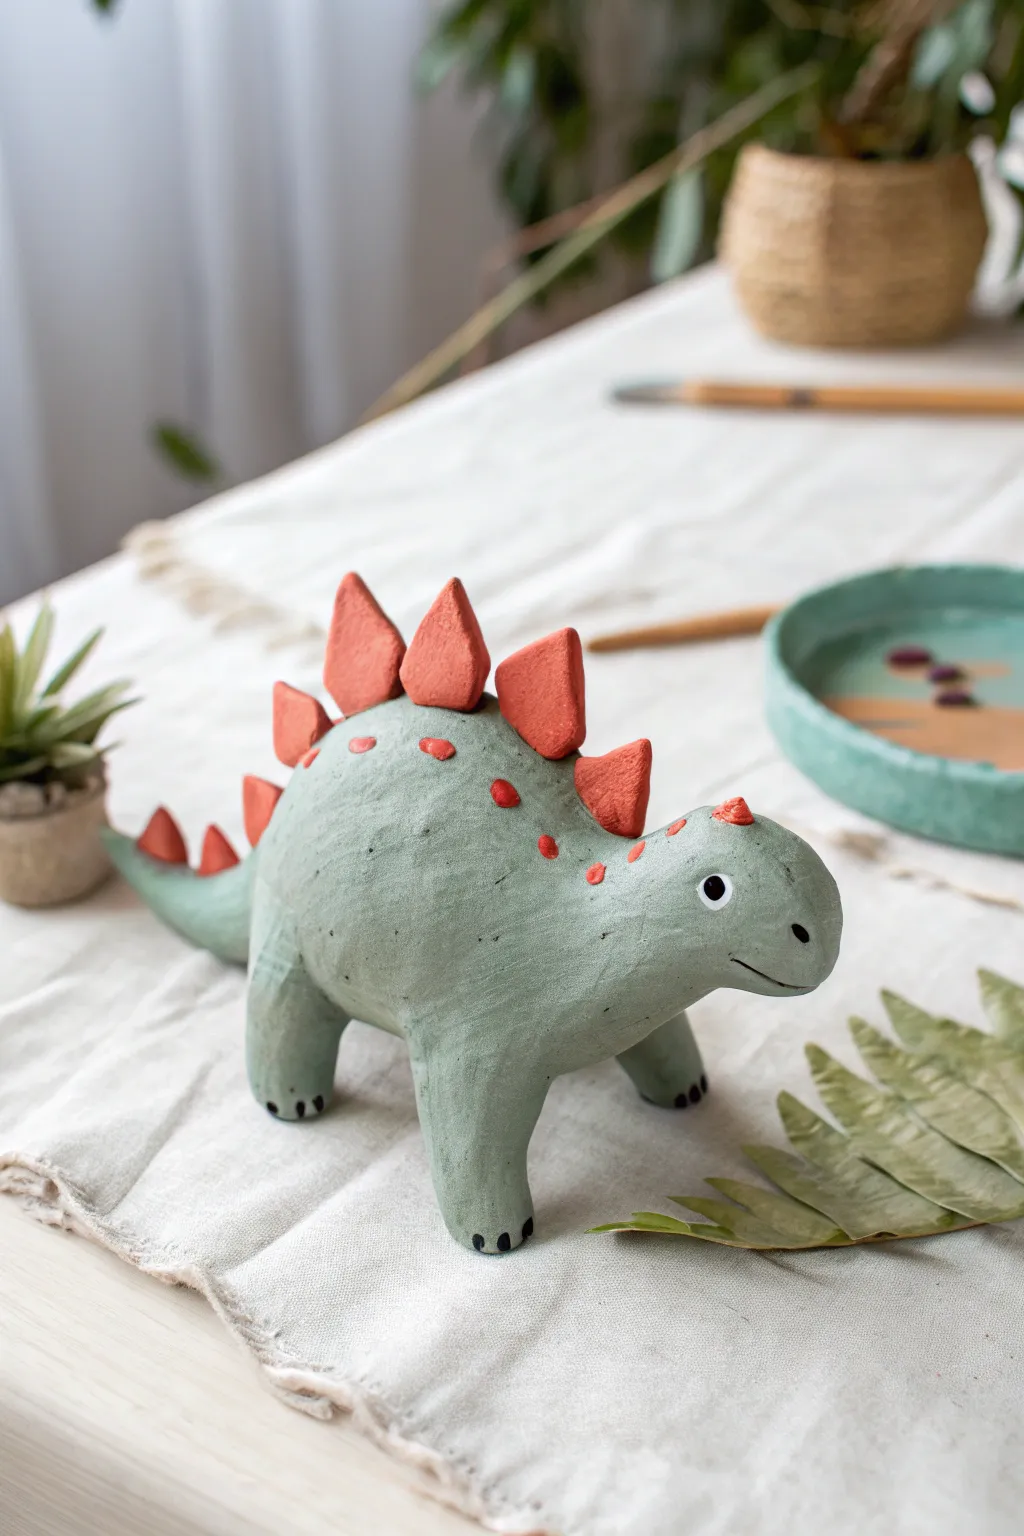
This charming little stegosaurus features a smooth, minty-green body accented with striking terracotta-colored plates. Its delightfully simple shape and friendly expression make it a perfect project to practice basic sculpting and attachment techniques.
Step-by-Step
Materials
- Air-dry clay (grey/white base)
- Acrylic paints (Mint Green, Terracotta Orange, Black, White)
- Fine-grit sandpaper
- Small bowl of water
- Sculpting tools (needle tool, smoothing tool)
- Paintbrushes (detail brush and medium flat brush)
- Matte varnish (optional)
Step 1: Sculpting the Body
-
Form the main shape:
Start with a large ball of clay about the size of a tangerine. Gently roll and elongate one side to create a tapering tail, and pull the other side slightly upward to form a rounded head shape. -
Create the legs:
Roll four smaller cylinders of clay for the legs. They should be stout and sturdy to support the body’s weight. Flatten the tops slightly to create a good attachment surface. -
Attach the legs:
Score (scratch) the bottom of the body and the tops of the legs, add a dab of water or slip, and press them firmly together. Use a smoothing tool or your finger to blend the seams until the legs look like they grew naturally from the body. -
Refine the posture:
Stand the dinosaur on your work surface. Press down gently to ensure all four feet are level. If he leans, adjust the legs now while the clay is still pliable. -
Add the face:
Using a blunt tool or your thumb, gently smooth the face area. Use a needle tool to carve a simple, curved smile line near the snout.
Floppy Spikes?
If the clay plates keep falling over while wet, prop them up with small pieces of crumbled paper towel or foam until the clay stiffens.
Step 2: Adding the Spikes
-
Shape the plates:
Roll out a small slab of clay or flatten several small balls. Cut or shape them into irregular triangles with rounded edges. You’ll need about 7-9 plates, graduating in size from small (for the tail/neck) to large (for the back). -
Arrange the spine:
Lay out your plates in a line on the table first to find the best arrangement. I find visualizing the size progression helps prevent creating a lopsided dinosaur. -
Attach the plates:
Score the bottom edge of each plate and the ridge of the dinosaur’s back. Working from the neck to the tail, attach each plate firmly. Use a small tool to smooth the clay at the base of each spike so they don’t fall off. -
Texture details:
If desired, add tiny, flattened dots of clay randomly along the upper back for extra texture, blending them flush with the skin. -
Dry completely:
Let the sculpture dry for 24-48 hours. It should feel room temperature and look chalky when fully dry.
Step 3: Painting and Finishing
-
Sand imperfections:
Once dry, gently use fine-grit sandpaper to remove any fingerprints or rough bumps. Wipe away the dust with a slightly damp cloth. -
Base coat:
Paint the entire body, excluding the plates if possible, with a soft mint green acrylic paint. You may need two coats for opaque coverage. -
Paint the plates:
Carefully paint the back plates with a warm terracotta or rusty orange color. Using a small brush will help you stay inside the lines where the spikes meet the green body. -
Add spots:
Using the tip of a small brush or a dotting tool, add small terracotta dots along the upper back near the plates to mimic the sculpted texture or add visual interest. -
Paint the eyes:
Mix a tiny amount of black and white to make a dark grey (or use pure black). Paint small circles for eyes. Once dry, add a tiny white dot in the center for a sparkle. -
Define the toes:
Using the very tip of your smallest brush and black paint, make three tiny vertical dashes on the bottom front of each foot to represent toes. -
Seal result:
Finish with a coat of matte varnish to protect the paint and give the dinosaur a finished, professional look without making it too shiny.
Smooth Operator
Dip your finger in water (or vinegar if the clay is stubborn) and run it over the finished sculpture shape before drying to remove fingerprints.
Place your new prehistoric friend on a shelf or desk where his friendly smile can be seen
Balloon-Style Puppy Sculpture
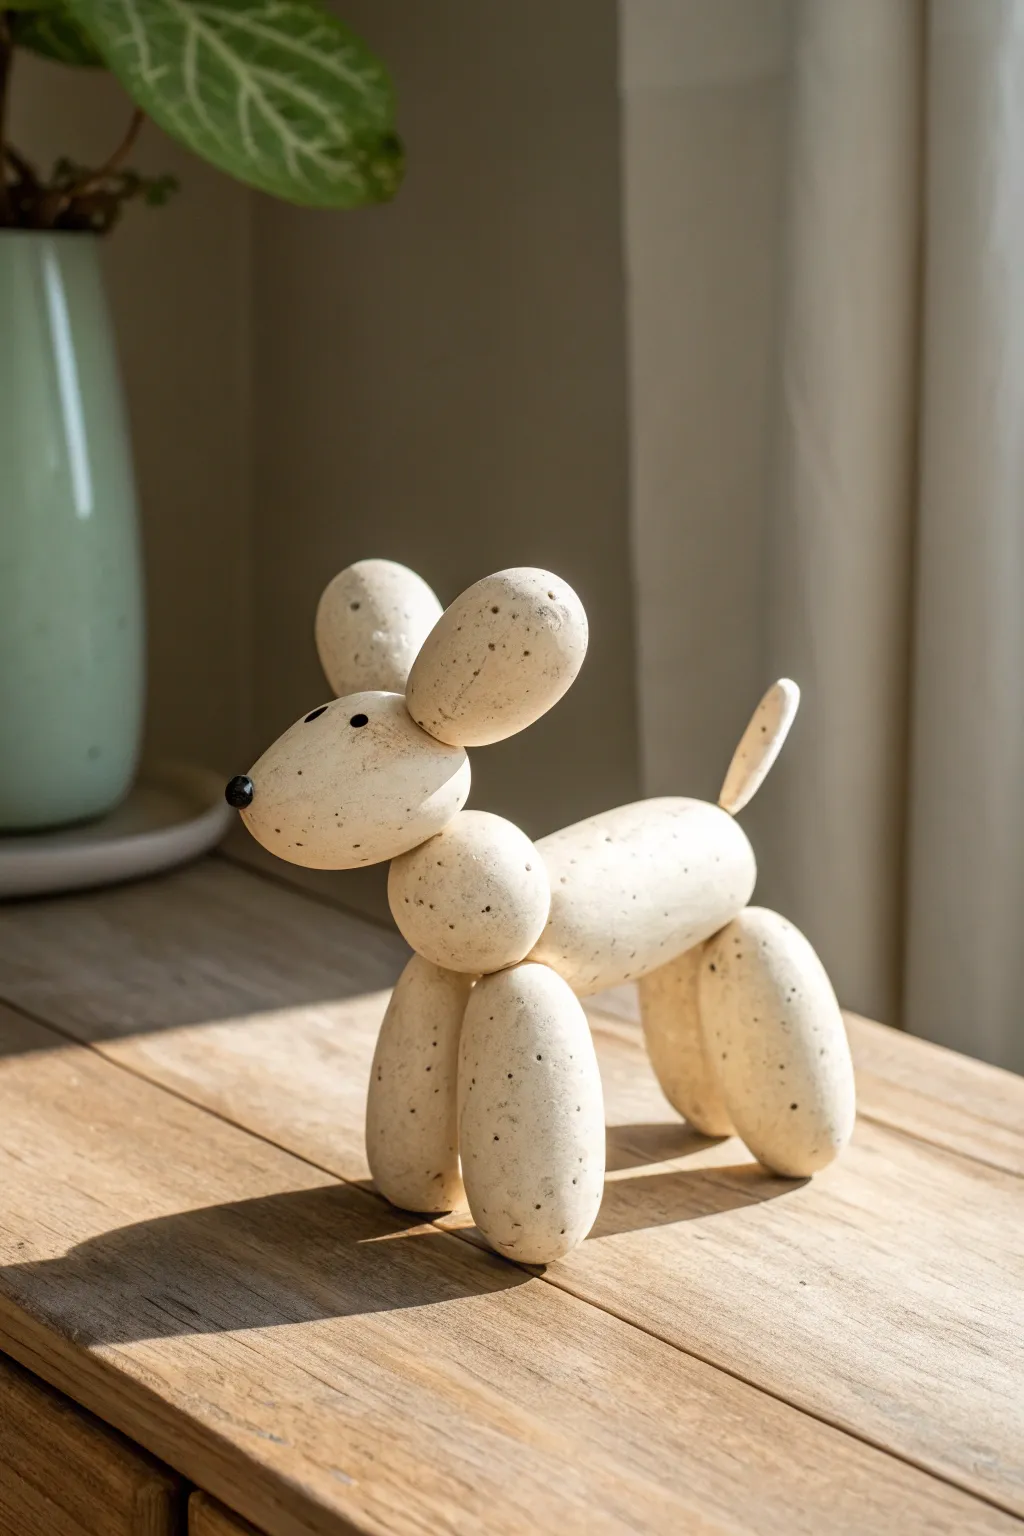
Transform humble clay into a whimsical faux-stone masterpiece with this charming balloon dog sculpture. The clever design mimics the classic twisted balloon shape while sporting a sophisticated, speckled eggshell finish that fits perfectly in modern decor.
Detailed Instructions
Materials
- White air-dry clay or polymer clay
- Rolling pin
- Aluminum wire (1mm or 1.5mm gauge) for armature
- Wire cutters
- Clay sculpting tools or a toothpick
- Water and a small brush (for joining)
- Sandpaper (fine grit)
- Acrylic paint (black and brown)
- Old toothbrush
- Matte varnish or sealant
Step 1: Preparation & Shapes
-
Condition the clay:
Begin by kneading your white clay thoroughly until it’s warm, pliable, and free of cracks. If using air-dry clay, keep a damp cloth nearby to cover pieces you aren’t currently shaping. -
Create the main body log:
Roll a smooth, thick cylinder for the body, about 2.5 inches long. Round off both ends gently so it resembles an inflated balloon segment rather than a cut pipe. -
Form the legs:
Roll four identical cylinders for the legs. These should be slightly shorter and thicker than the body segment. Slightly taper one end of each leg where it will attach to the body to mimic the pinched look of a balloon twist. -
Shape the neck connector:
Roll a small sphere about the size of a large marble. This spherical piece will act as the connector between the body and the head, simulating the twisted knot of a balloon. -
Sculpt the head components:
Create a slightly larger, tapered teardrop shape for the muzzle. Then, roll two flattened oval shapes for the ears, ensuring they are thick enough to hold their shape without drooping. -
Make the tail:
Roll a tiny, cute cone shape for the tail. It should be small and perky, curving slightly upward if you desire a bit of extra character.
Step 2: Assembly
-
Wire the legs:
Cut short lengths of aluminum wire (about 1 inch each). Insert half of the wire into the top of each leg piece, then push the exposed wire into the underside of the body cylinder. This internal armature prevents the legs from falling off later. -
Smooth the leg joints:
Use a little water (for air-dry clay) or slip to smooth the seams where the legs meet the body. You want the join to look tight, like balloons twisting together, not like two separate objects just sitting next to each other. -
Attach the neck knot:
Use a small piece of wire to attach the spherical neck connector to the front top of the body. Press it down firmly so it seats well. -
build the head:
Attach the muzzle piece to the front of the neck sphere using another wire support. Then, attach the two ears to the top back of the muzzle piece. Positioning the ears slightly high gives it that alert, happy puppy look. -
Refine the shape:
Attach the tail to the rear. Once assembled, use your fingers or a smoothing tool to erase unintentional fingerprints. Ensure all the ‘balloon’ segments look inflated and round. -
Add facial details:
Roll a tiny black bead of clay for the nose and press it onto the tip of the muzzle. Use a small tool to create two shallow indentations for eyes, or press in small black beads.
Drooping Heads?
If the head is too heavy and tilts while wet, prop it up with a small motionless object (like a balled-up piece of foil or a spare sponge) underneath the chin until the clay firms up enough to hold itself.
Step 3: Finishing Effects
-
Dry and sand:
Allow the sculpture to dry completely (24-48 hours for air-dry clay). Once hard, likely give it a pass with fine-grit sandpaper to remove any rough texture, aiming for a smooth, matte stone feel. -
Create the speckle mix:
Mix a small amount of brown and black acrylic paint with a few drops of water to create a fluid, inky consistency. It needs to be thin enough to flick easily from a brush. -
Apply the speckles:
I prefer to test this on paper first: dip an old toothbrush into the paint mix, then run your thumb across the bristles to flick tiny droplets onto the sculpture. Rotate the dog to get even coverage. -
Paint the eyes and nose:
If you didn’t use colored clay, paint the nose tip black and add two small black dots for the eyes using a fine detail brush. -
Seal the piece:
Once the paint is fully dry, coat the entire sculpture with a matte varnish. This protects the finish and enhances the stone-like appearance without making it look like shiny plastic.
Pro Tip: Seamless Joints
For the most realistic balloon look, don’t smooth the joints completely flat. Leave a deep crease where the ‘balloons’ meet to mimic the tight tension of twisted rubber.
Place your new stone-effect puppy on a shelf where it can charmingly overlook the room.