Whenever you want that satisfying “I made a sculpture!” feeling without the stress, easy clay sculptures are where it’s at. I’m sharing my go-to beginner ideas that lean on simple shapes—balls, coils, and little pinches—so you can make something adorable fast.
Round Pinch Pot Bunny
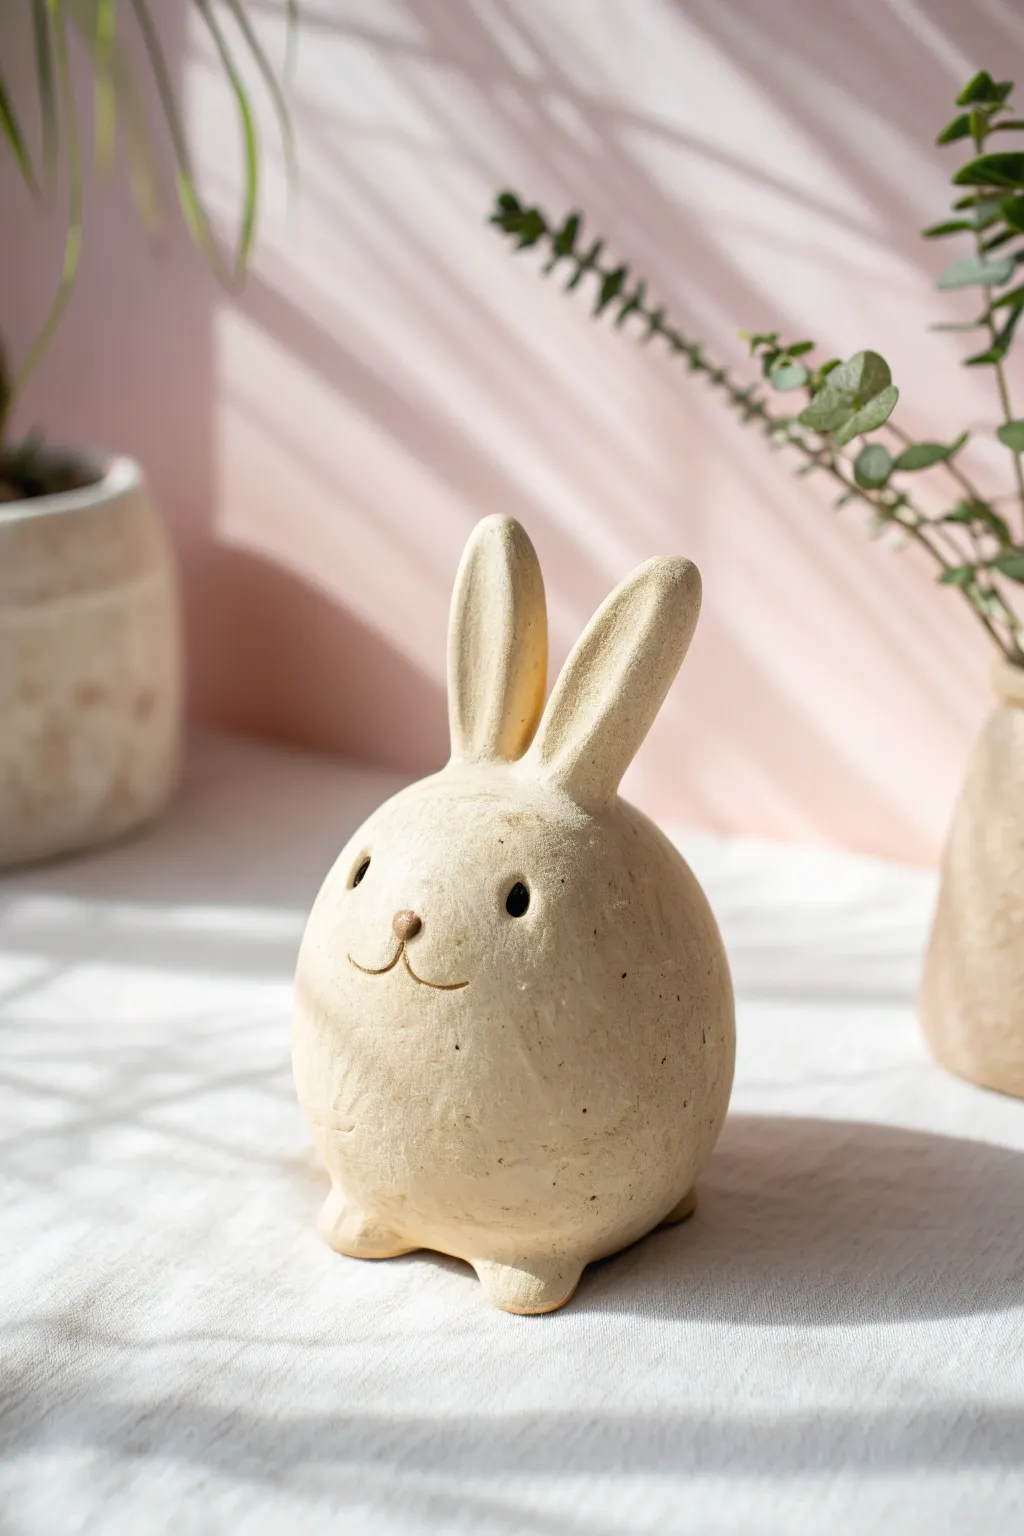
Sculpt a delightfully chubby companion using the classic pinch pot method as your base. This minimalist clay bunny features a wonderfully round body, textured matte finish, and an endearing simple face that captures maximum charm with minimal fuss.
Step-by-Step Guide
Materials
- Air-dry clay (stone or cream colored)
- Small bowl of water
- Pointed sculpting tool or toothpick
- Sponge
- Small rolling pin
- Slip (clay mixed with water into a paste)
- Black acrylic paint (optional, for eyes)
- Fine grit sandpaper
Step 1: Forming the Body
-
Create a sphere:
Start by rolling a generous handful of clay into a smooth, even ball. I find it helpful to pat it firmly between my palms to remove air pockets before rolling. -
Start the pinch:
Hold the ball in one hand and press your thumb deep into the center, stopping before you push through the bottom. -
Pinch the walls:
Gently pinch the clay between your thumb and fingers, rotating the ball as you go. Work your way from the bottom up to the rim. -
Shape the enclosure:
As you pinch, gently curve the top edges inward to close the sphere back up. You want to create a hollow, enclosed ball rather than an open bowl. -
Seal the sphere:
Pinch the opening completely shut, smoothing the clay over the seam with a little water until the join is invisible. -
Tap the base:
Gently tap the bottom of your sphere against your work surface to create a small flat area so the bunny sits stably without rolling.
Cracks while rolling?
If the clay sphere develops cracks as you close it, your clay is likely too dry. Dip your fingers in water and massage the cracks together immediately to heal them.
Step 2: Adding Features
-
Shape the ears:
Roll two equal sausage shapes of clay. Flatten them slightly and taper one end of each into a point. -
Refine ear form:
Use your thumb to create a shallow indentation running down the center of each ear, giving them a natural, spoon-like curve. -
Attach ears:
Score (scratch) the bottom of the ears and the top of the head. Apply a dab of slip, press the ears firmly in place, and blend the seams downward until smooth. -
Make the feet:
Roll two small marble-sized balls of clay. Flatten them slightly into thick discs. -
Attach the feet:
Score and slip the bottom front of the body, then press the feet underneath so they just peek out, supporting the round belly.
Add a Tail
Don’t forget the back view! Roll a small, textured ball of clay (stippled with a toothpick for fluffiness) and attach a classic cottontail to the rear.
Step 3: Detailing and Finishing
-
Carve the eyes:
Using the back of a small paintbrush or a rounded tool, press two deep, small indentations for the eyes about halfway down the face. -
Sculpt the nose:
Roll a tinier-than-pea-sized ball of clay and attach it centrally below the eyes. Press it flat into a soft triangle shape. -
Carve the mouth:
Use a needle tool or toothpick to incise a simple ‘w’ shape or anchored smile lines connecting directly to the bottom of the nose. -
Smooth the surface:
Dampen a sponge slightly and wipe down the entire sculpture to remove fingerprints and harsh tool marks. -
Dry properly:
Let the sculpture dry slowly away from direct heat or sunlight for 24-48 hours to prevent cracking. -
Final touches:
Once fully dry, lightly sand any rough spots. If you want darker eyes, dilute a tiny drop of black paint and carefully fill the eye indentations.
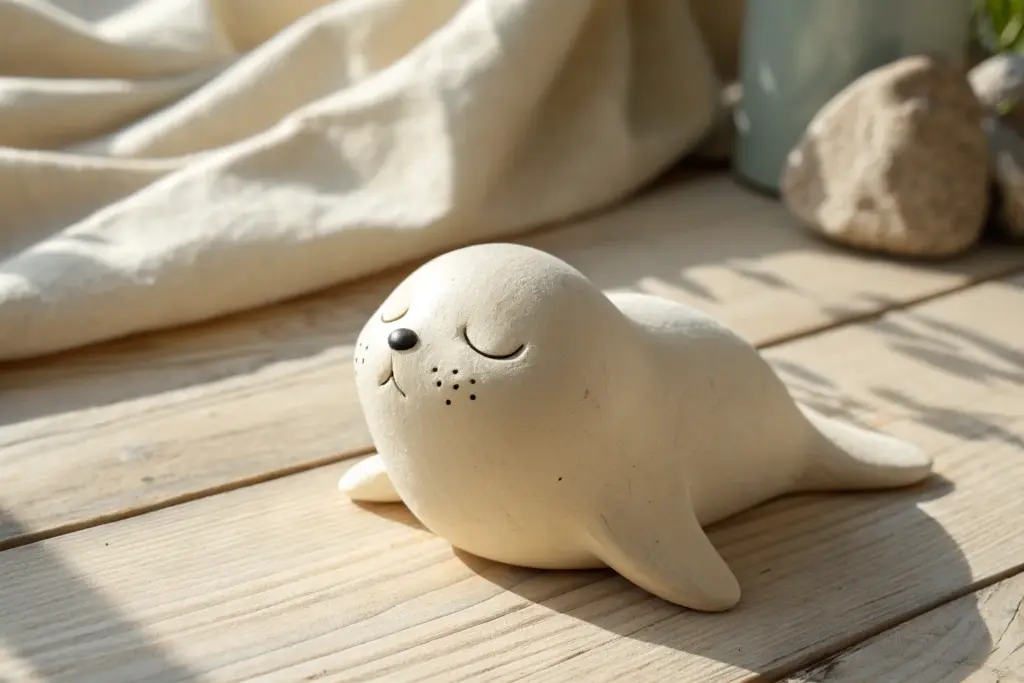
Place your earthy bunny near a plant or on a sunny shelf to enjoy its calming presence


Dot-Eye Frog Sculpture Pebble
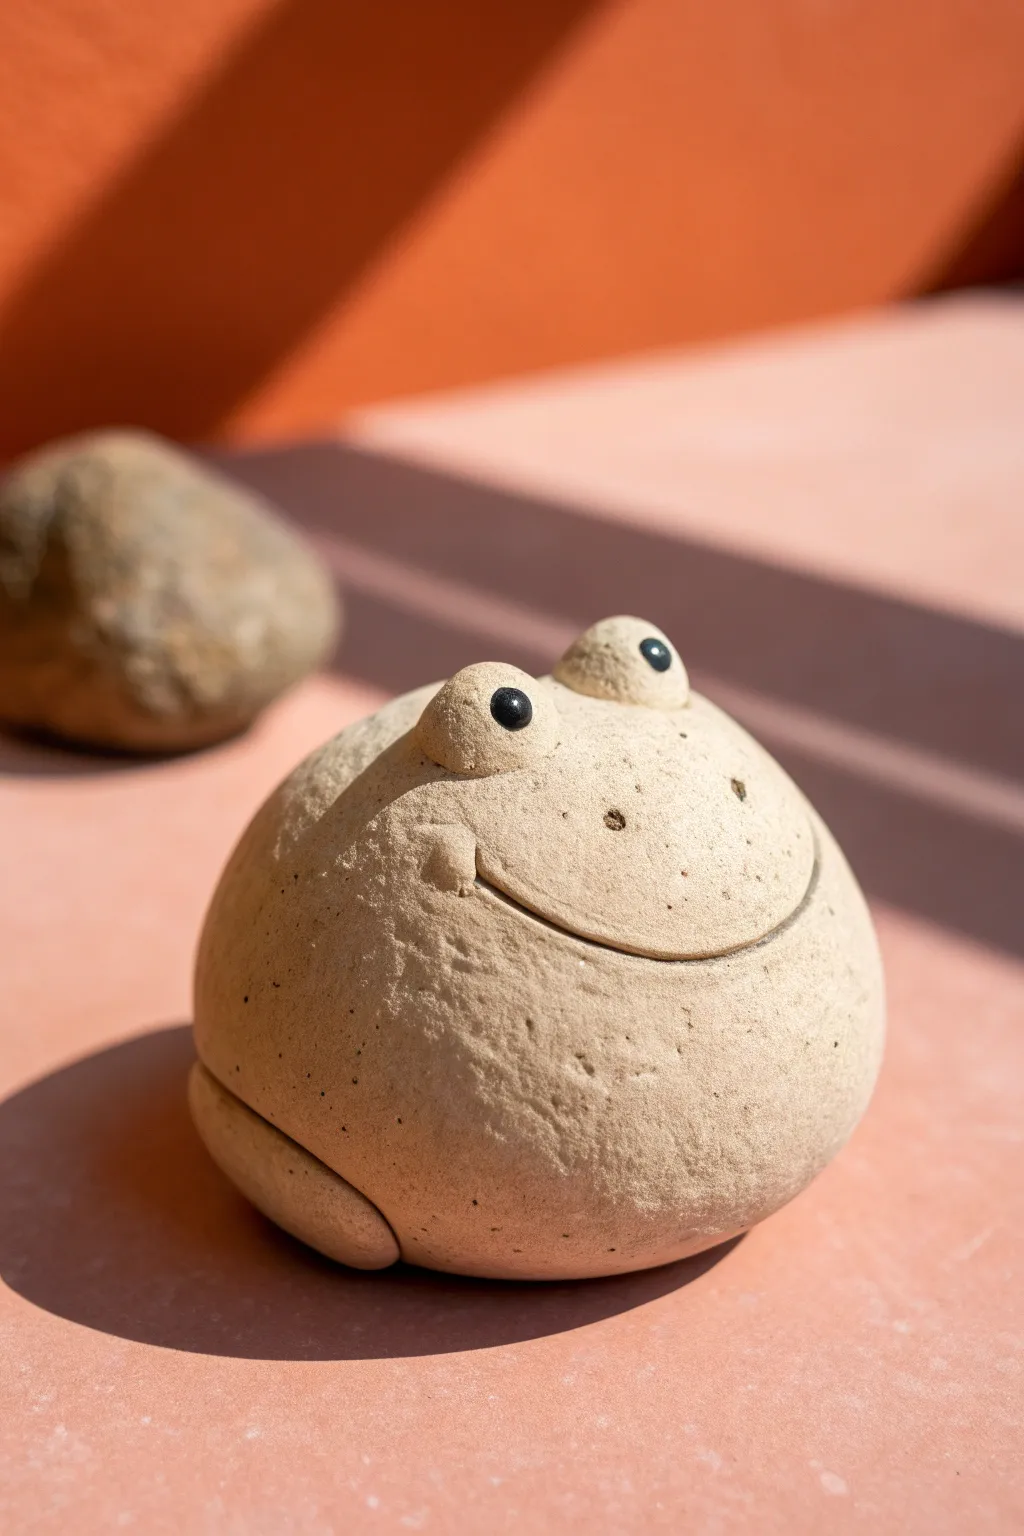
Transform ordinary clay into a deceptively realistic stone amphibian that brings a stony smile to your garden or desk. This project uses texture and a clean, simple form to mimic the look of a smooth river pebble that has come to life.
Step-by-Step Tutorial
Materials
- Stone-colored polymer clay or air-dry clay (grey, beige, or sandy)
- Black polymer clay or black acrylic paint
- Small ball stylus or toothpick
- Texture sponge or stiff-bristled toothbrush
- Needle tool or thin wire loop tool
- Real stone for texture rushing (optional)
Step 1: Shaping the Base
-
Prepare the Clay:
Begin with a large handful of your stone-colored clay. Knead it thoroughly until it is soft and free of any cracks or air bubbles. -
Form the Body:
Roll the clay into a smooth ball between your palms. Gently flatten the bottom against your work surface so it sits stable without rolling away. -
Create the Dome:
Press down slightly on the top to create a domed muffin shape rather than a perfect sphere. The silhouette should look heavy and grounded, like a natural river rock. -
Add Texture:
While the clay is still soft, lightly press a coarse sponge or a stiff toothbrush all over the surface. I like to gently roll a real rock over the clay to imprint genuine stone imperfections.
Step 2: Sculpting the Face
-
Form the Eye Sockets:
Roll two small balls of the same body clay, each about the size of a large pea. -
Attach the Eye Mounds:
Place these balls on the upper front curve of the body, spacing them slightly apart. Blend the bottom edges of the balls downward into the main body so they look like raised bumps on the stone. -
Integrate the Eyelids:
Smooth the clay around the eye mounds until the seams disappear completely, maintaining that continuous stony texture. -
Carve the Smile:
Using a needle tool or wire loop, carve a long, wide upward curve for the mouth. Make the cut fairly deep and clean to create a distinct shadow line. -
Refine the Smile:
At the corners of the mouth, create small, subtle dimples or indentations to give the frog a cheerful expression. Soften any sharp ridges created by the cut with your finger. -
Add Nostrils:
Use a small ball stylus or the blunt end of a toothpick to press two tiny indentations above the mouth for the nose.
Stone Effect
Mix a tiny pinch of ground black pepper or dried tea leaves into your clay before sculpting. This creates internal texture that looks like granite speckles.
Step 3: Adding Details
-
Create the Leg Bumps:
Roll a small sausage of clay and flatten it slightly. Attach this to the lower side of the body, curving it to mimic a tucked-in leg. -
Blend the Legs:
Smooth the upper seam of the leg into the body, leaving the bottom edge distinct to create depth. Repeat on the other side if visible, though often just a hint of a leg bump is enough for this stylized look. -
Insert the Eyes:
Use a small tool to press a deep indentation into the center of each eye mound. Roll two tiny balls of black clay and press them firmly into these sockets. -
Alternative Eye Eyes:
If you don’t have black clay, you can simply create the indentation now and paint the black dot after the main sculpture is dry. -
Reapply Texture:
Go back over any areas where your fingers might have smoothed out the texture, specifically around the mouth and eyes, dabbing with your sponge. -
Add Speckling:
For added realism, you can flick a toothbrush with diluted brown or grey paint over the surface to create tiny mineral speckles.
Garden Variation
Make a whole family in different sizes. Try stacking two on top of each other before baking for a cute totem pole effect for your flower pots.
Step 4: Finishing Up
-
Drying or Baking:
If using polymer clay, bake according to the package instructions. If using air-dry clay, set it aside in a cool, dry place for 24-48 hours. -
Matte Sealer:
Once fully cured or dry, apply a matte varnish. Avoid glossy finishes, as you want to maintain the dry, natural look of raw stone.
Now you have a charming little stone companion that captures the quiet stillness of nature


Simple Turtle Sculpture With Stamped Shell
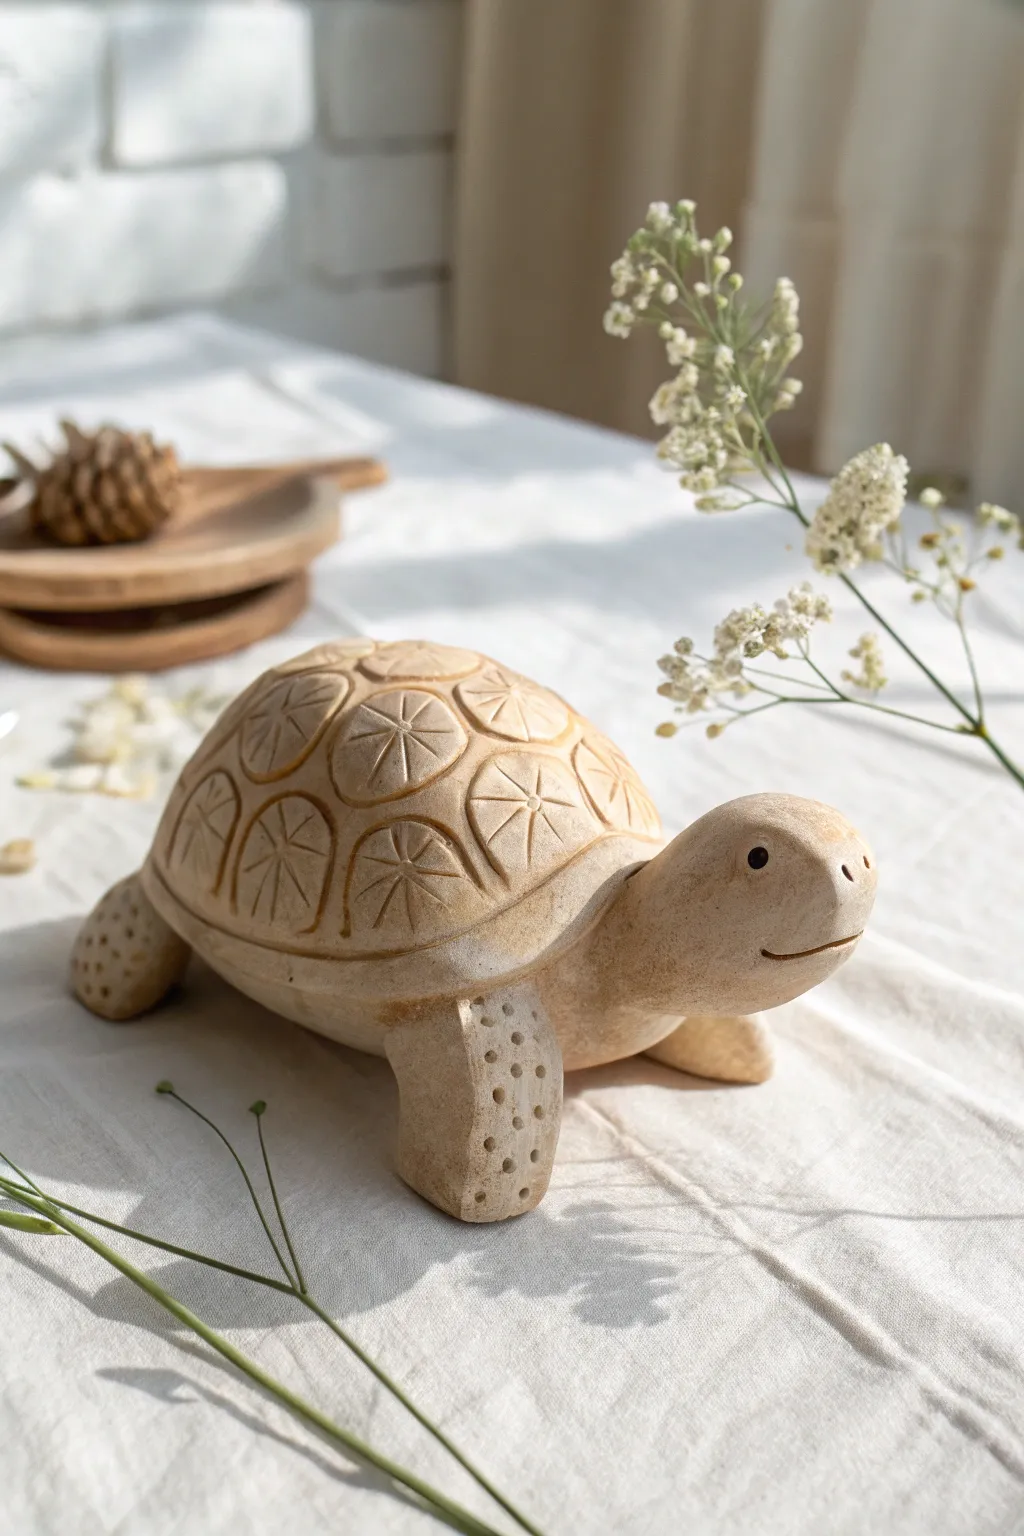
Create a charming, nature-inspired turtle sculpture featuring a distinctively patterned shell made with simple stamping techniques. This project captures a soft, organic look using basic clay shaping and easy texture tools for a delightful finish.
Step-by-Step Guide
Materials
- Air-dry clay (stone or light beige color)
- Small rolling pin
- Modeling tools (or a butter knife and toothpick)
- Small circular object for stamping (like a marker cap)
- Needle tool or skewer
- Water and sponge for smoothing
- Brown acrylic paint (for antiquing)
- Paper towel or rag
Step 1: Making the Base Shape
-
Form the shell body:
Begin with a large ball of clay roughly the size of a tennis ball. Gently flatten the bottom against your work surface while cupping the top to create a smooth, domed hemisphere shape. -
Create the head:
Roll a smaller ball of clay into a thick teardrop or pear shape. Specifically, one end should be slightly tapered to serve as the neck. -
Attach the head:
Score (scratch) the back of the neck and the front of the shell body where they will join. Apply a dab of water or slip, press the pieces together firmly, and smooth the clay across the seam so it looks seamless. -
Shape the flippers:
Roll four equal-sized small balls of clay. Flatten them slightly into thick, rounded rectangular shapes to act as the legs. -
Attach the legs:
Position the four legs under the shell’s edge. Score and slip these connection points as well, blending the clay upwards into the underside of the shell to ensure they are secure.
Step 2: Adding Details
-
Define the face:
Using the side of a modeling tool or a spoon, carve a gentle, curved line for the mouth. Use a small round tool to press indentations for the eyes. -
Add nostrils:
With a needle tool, poke two tiny holes at the very tip of the snout for nostrils. -
Texture the legs:
Using a small, dull point (like the end of a paintbrush handle), press rows of small dots onto the outer surfaces of the legs to simulate scales. -
Prepare the shell for stamping:
Ensure the shell dome is still damp and smooth. If it has started to dry, lightly mist it with water or smooth it with a damp sponge.
Clean Imprints
If your stamping tool sticks to the clay, lightly dust the tool with cornstarch or dip it in water before pressing it into the shell. This ensures a crisp, clean pattern.
Step 3: Stamping and Finishing
-
Outline the scutes:
Using a blunt tool on the shell, lightly draw a pattern of large shapes (scutes) resembling a soccer ball pattern—usually a central hexagon surrounded by other shapes. -
Stamp the pattern:
Take your stamping tool (like a marker cap or wheel tool) and press a starburst or wheel pattern into the center of each drawn scute. This creates the decorative relief seen in the reference. -
Refine the shell edge:
Use a modeling tool to create a slight rim or groove around the very bottom edge of the shell, separating the shell visually from the body underneath. -
Initial drying:
Allow the sculpture to dry completely according to your clay’s package instructions. This usually takes 24-48 hours for air-dry clay. -
Apply an antique wash:
Once dry, mix a small amount of brown acrylic paint with water to create a thin wash. Brush this over the sculpture, letting it settle into the stamped grooves. -
Wipe back:
Looking at the reference, the color is subtle. Immediately wipe away most of the paint on the surface with a paper towel, leaving the dark color only in the deep textures. -
Final dry:
Let the paint wash dry completely before handling or sealing your new friend.
Cracking Seams?
If the head or legs start to separate during drying, fill the gap with a ‘slurry’ made of clay dissolved in water, then smooth over it and let it dry again.
Enjoy displaying your calm earthen turtle on a shelf or desk


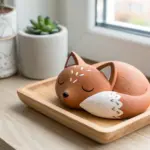
Cat Loaf Mini Sculpture
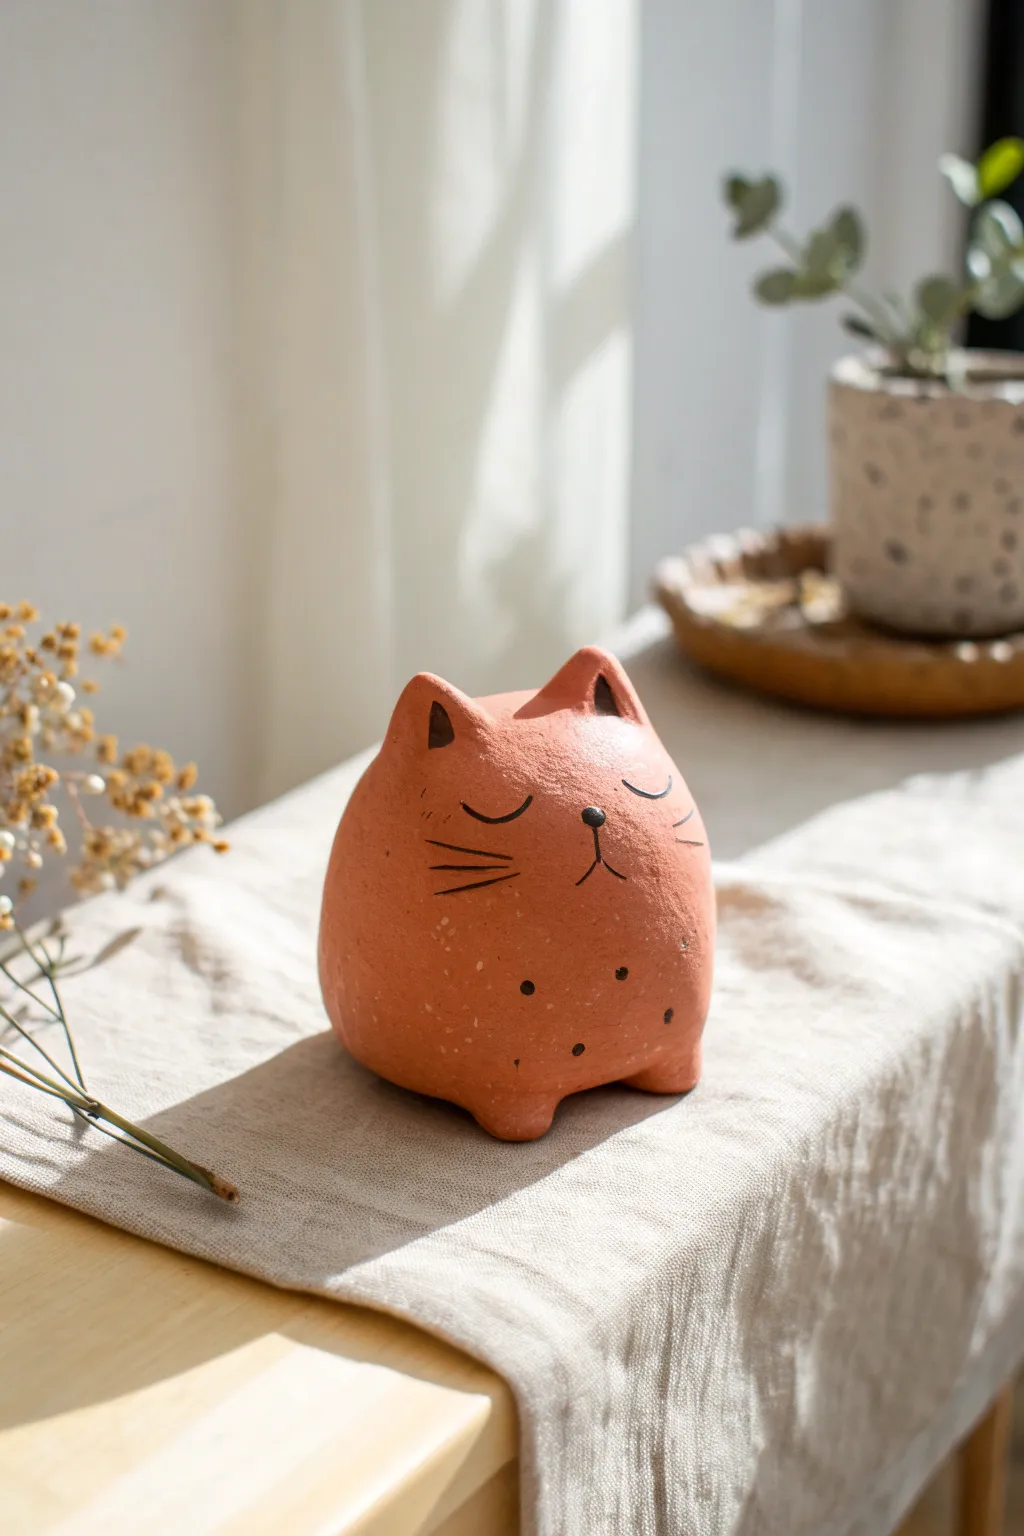
This charming, rotund kitty sculpture captures the essence of a peaceful cat loafing in the sun. With its warm terracotta tone and simple painted features, it makes for a delightful and minimalist desk companion.
Step-by-Step Tutorial
Materials
- Air-dry clay (terracotta color)
- Acrylic paint (black and white)
- Matte sealant or varnish
- Fine-point paintbrush
- Small bowl of water
- Pointed sculpting tool or toothpick
- Optional: Smoothing sponge
Step 1: Shaping the Base
-
Form the main body:
Start with a handful of terracotta air-dry clay roughly the size of a large orange. Roll it between your palms until you have a smooth, solid ball. Once smooth, gently tap the bottom against your work surface to create a flat, stable base so the cat won’t roll away. -
Create the loaf shape:
Using your palms, gently press the sides of the ball to elongate it slightly upwards, creating a rounded dome shape. It should look like a squat egg or a gumdrop. Keep the top rounded rather than pointy. -
Smooth the surface:
Dip your finger in a little water and run it over the clay to smooth out any cracks or fingerprints. Getting a pristine surface now saves sanding time later. -
Pinch the ears:
At the top of the dome, identify where the ears should go. Gently pinch two triangular shapes directly from the clay body. I find it easier to pull the clay up slowly rather than adding separate pieces, as this makes the sculpture stronger. -
Refine the ears:
Use your thumb to press a small indentation into the front of each triangular ear to give them depth. Smooth the transition between the ears and head so they look seamless.
Keep it Clean
Keep separate water bowls for smoothing clay and cleaning brushes. Clay residue in your paint water can make your black lines look muddy or grey.
Step 2: Adding Details
-
Add the feet:
Roll two very small balls of clay, about the size of peas. Press these onto the bottom front edge of your sculpture to create two tiny, nubby feet peeking out. -
Blend the feet:
Use a modeling tool or your finger to blend the back and top edges of the feet into the main body, leaving the front rounded. This makes them look like part of the solid form. -
Dry the sculpture:
Place your cat in a safe, dry spot away from direct heat. Let it dry completely for 24-48 hours. The clay will lighten in color and feel hard to the touch when ready. -
Optional sanding:
Once fully dry, check for any rough spots. You can gently sand these down with fine-grit sandpaper for a professional finish, then wipe away the dust.
Step 3: Painting & Finishing
-
Paint the nose:
Using a fine-point brush and black acrylic paint, create a small, inverted soft triangle or oval in the center of the face for the nose. -
Draw the mouth:
Paint a thin vertical line coming down from the nose, and then split it into an inverted ‘V’ shape to form the mouth. -
Add the eyes:
Paint two simple curved lines for closed, sleeping eyes. Ensure they are level with the top of the nose for a sweet expression. -
Paint whiskers:
With a very light hand, paint three horizontal whiskers on each cheek. Keep the lines thin and slightly tapered at the ends. -
Detail the ears:
Paint the inner triangles of the ears black. This creates a bold contrast against the terracotta clay. -
Add belly speckles:
Dip the very tip of your brush (or a toothpick) in black paint and add a few random dots on the lower belly area for texture and character. -
Seal the work:
Once the paint is completely dry, apply a coat of matte varnish or sealant. This protects the clay and keeps the paint from chipping.
Texture Twist
Before drying, gently press a clean piece of linen fabric or burlap against the clay surface to give the ‘fur’ a subtle, woven texture.
Place your finished cat loaf on a sunny windowsill or shelf to enjoy its calm presence

The Complete Guide to Pottery Troubleshooting
Uncover the most common ceramic mistakes—from cracking clay to failed glazes—and learn how to fix them fast.
Tiny Sitting Bear Cub Sculpture
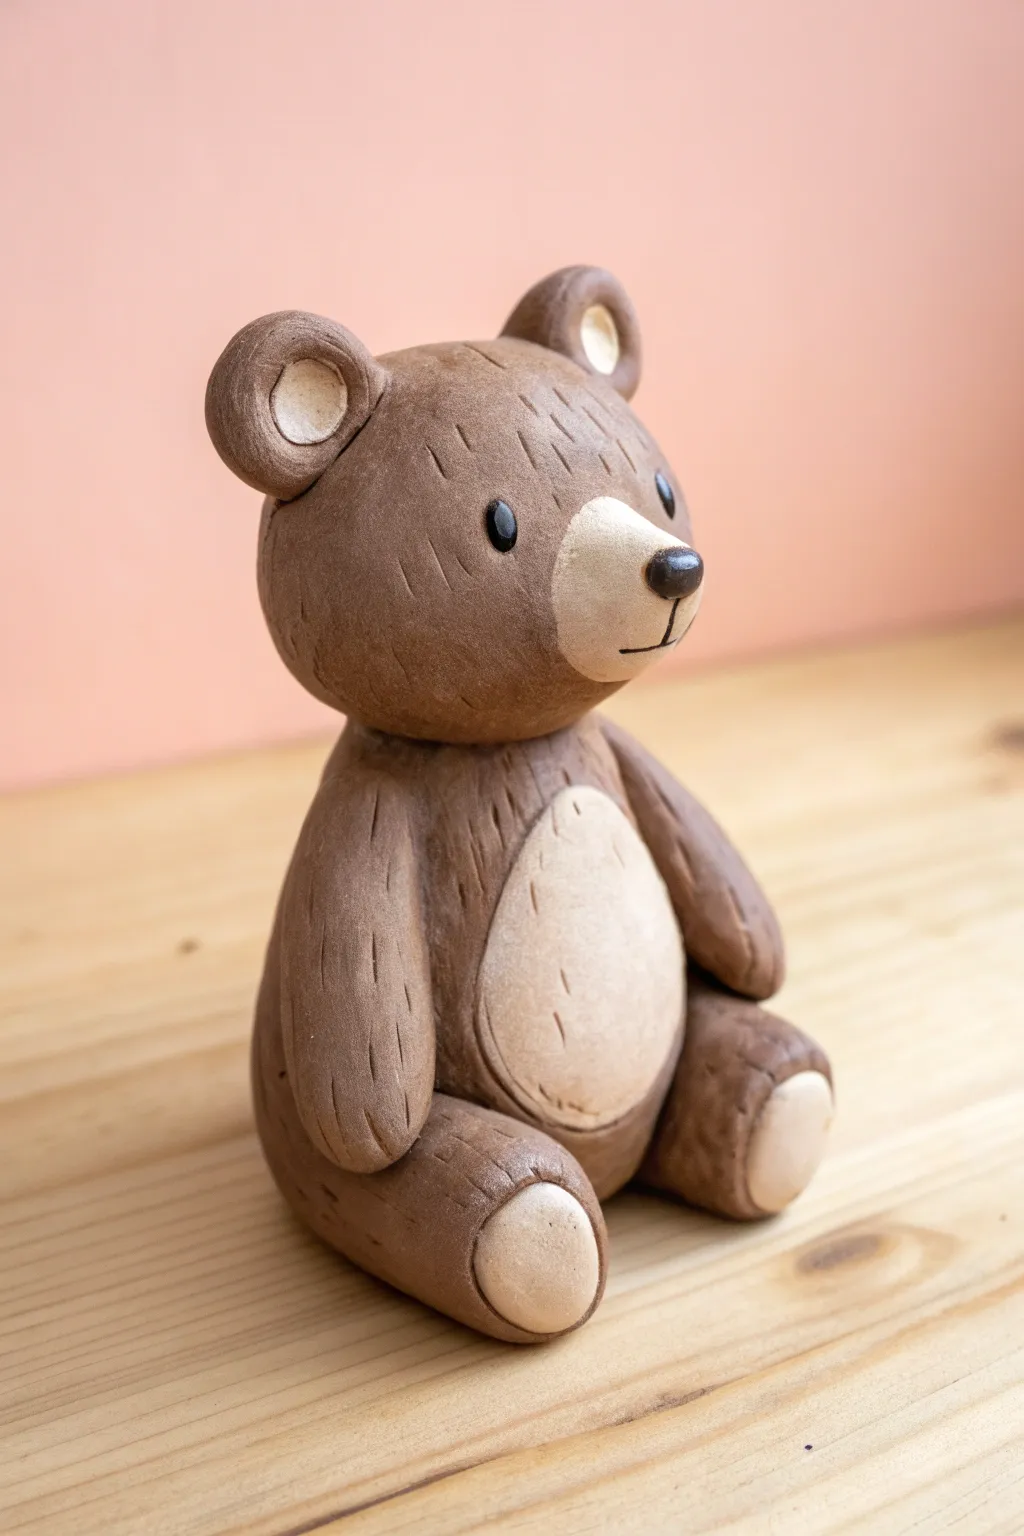
This adorable sitting bear cub sculpture captures the warmth of a classic teddy bear with the refined finish of ceramic art. Its textured fur, contrasting snout, and sweet expression make it a perfect beginner-friendly project that looks impressively professional.
How-To Guide
Materials
- Polymer clay or air-dry clay (Brown)
- Polymer clay or air-dry clay (Cream/Pale Beige)
- Black clay (very small amount) or black acrylic paint
- Basic sculpting tools (needle tool, modeling tool)
- Aluminum foil (for armature core, optional)
- Smoothing oil or water (depending on clay type)
- Small ball stylus tool
- Gloss varnish (optional)
Step 1: Shaping the Core
-
Torso Base:
Begin by conditioning your brown clay until it is soft and pliable. Roll a medium-sized ball into a teardrop shape—this will become the bear’s body. -
Head Formation:
Roll a second, slightly smaller ball of brown clay for the head. Gently flatten the bottom of the sphere so it will sit securely on the neck area of the torso. -
Connection:
Press the head firmly onto the top of the teardrop body. If you are using air-dry clay, create cross-hatch scratches on both contact surfaces and add a dab of water or clay slip for a stronger bond.
Seamless Seams
To prevent limbs from falling off, blend the clay at the joint. Use a modeling tool to drag a little clay from the leg onto the body, then smooth it over.
Step 2: Limbs and Features
-
Legs:
Roll two thick sausages of brown clay for the legs. Slightly curve them and press them against the bottom sides of the body so the bear appears to be in a seated position. -
Paw Pads:
Take two small balls of cream-colored clay and flatten them into discs. Press these onto the soles of the feet to create the lighter paw pads. -
Arms:
Create two smaller sausage shapes for the arms. Attach them high on the shoulders, angling them downward so the tips rest gently on the bear’s thighs or belly. -
Ears:
Form two small balls of brown clay and flatten them slightly. Press a smaller divot into the center of each, then fill that divot with a tiny flattened circle of cream clay. Attach these to the top of the head. -
Snout:
Roll a ball of cream clay and flatten it into an oval. Press this securely onto the center of the face, slightly lower than the eyes will be.
Scarf it Up
Add a seasonal touch by rolling a thin snake of red or green clay to wrap around the bear’s neck as a tiny scarf before baking.
Step 3: Texturing and Details
-
Belly Detail:
Roll a thin oval of cream clay and press it onto the bear’s tummy. Smooth the edges carefully so it looks integrated rather than just stuck on. -
Fur Texture:
Using a needle tool or a sharp toothpick, gently gently scratch short, vertical lines all over the brown sections of the bear. I like to follow the curve of the body to make the ‘fur’ look natural. -
Facial Features:
Roll a tiny black nose and place it at the top of the cream snout. Use your needle tool to score a vertical line down from the nose and a small curve for the mouth. -
Eyes:
Add two small, flattened ovals of black clay for the eyes just above the snout. Alternatively, you can paint these on after baking/drying. -
Final Smoothing:
Check all seams, especially where the limbs connect. Run a finger or a silicone tool over any rough fingerprints, being careful not to smudge your fur texture.
Your charming little bear is now ready for baking or drying, destined to bring a smile to anyone who sees it
Mini Whale Sculpture With Flat Belly Base
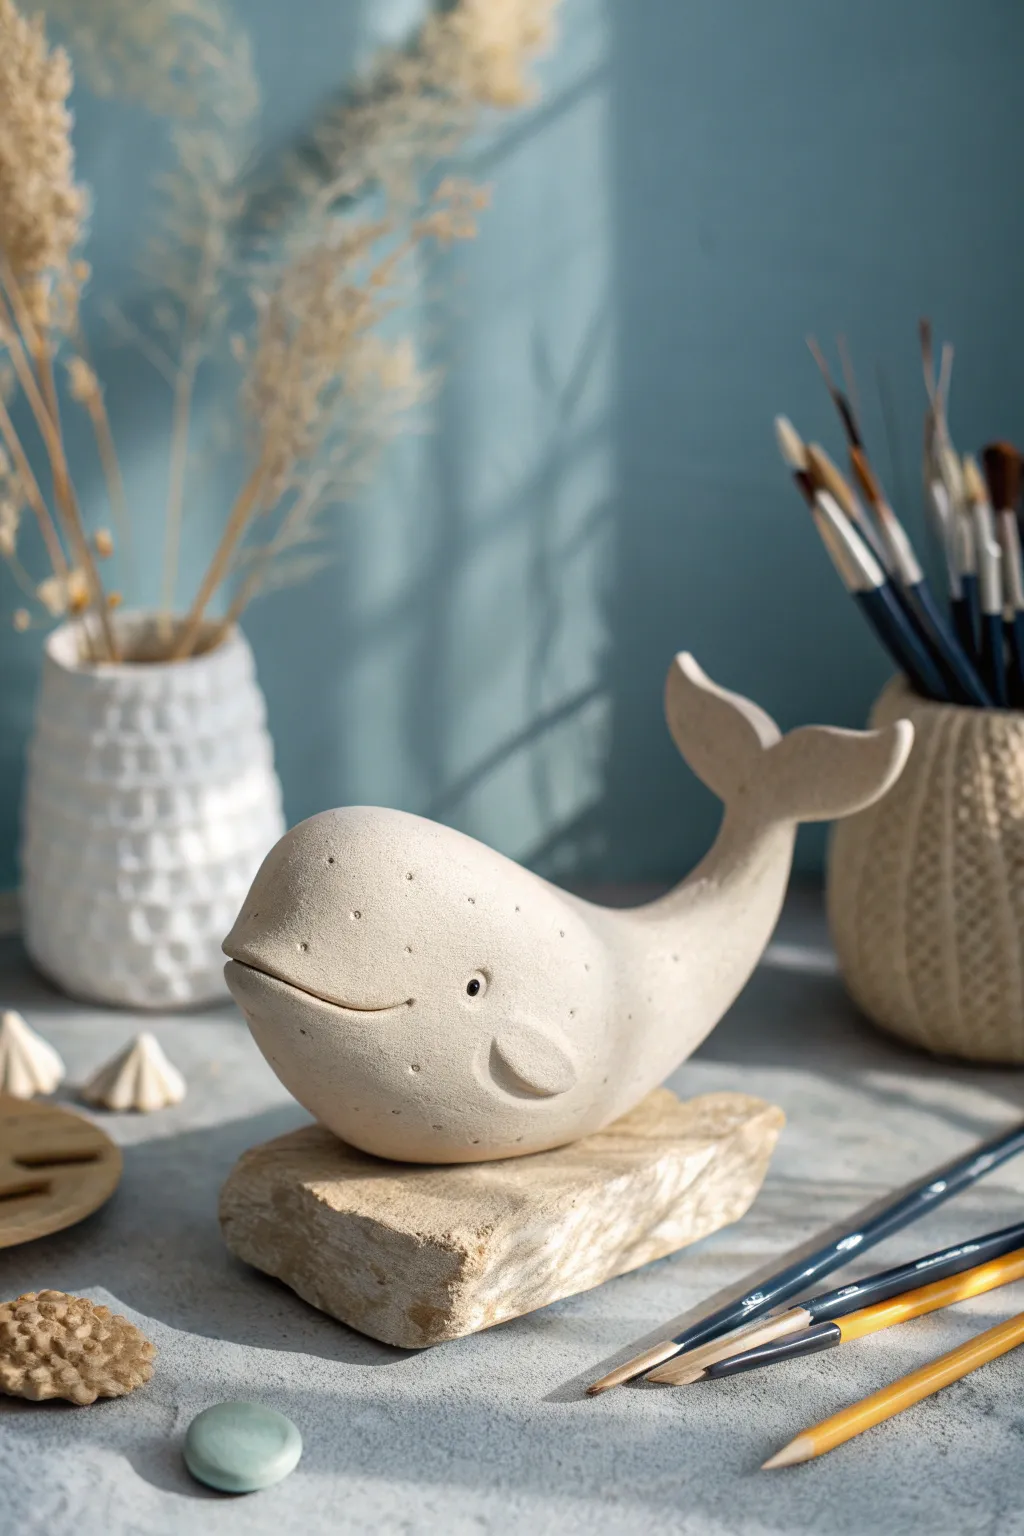
This charming minimalist whale features a gentle curve and a textured, stone-like finish that brings warmth to any shelf. Its flat belly base ensures stability, making it a perfect beginner-friendly sculpture project.
Step-by-Step Guide
Materials
- Air-dry clay or polymer clay (stone or granite effect works best)
- Small rolling pin
- Modeling tools (or a toothpick and a dull knife)
- Small bowl of water (for smoothing)
- Sandpaper (fine grit)
- Black acrylic paint (for the eye)
- Fine-point paintbrush or toothpick
Step 1: Shaping the Form
-
Prepare the clay:
Start by conditioning a fist-sized ball of clay in your hands until it is pliable and warm, ensuring there are no air bubbles trapped inside. -
Create the base tapered log:
Roll the clay into a thick log shape, keeping one end bulbous for the head and gradually tapering the other end significantly to form the tail section. -
Form the curve:
Gently bend the tapered tail section upwards to create the whale’s distinctive swimming silhouette. I like to continuously smooth the underside curve with my thumb as I bend it to prevent cracking. -
Flatten the belly:
Press the main body firmly onto your work surface to create a flat base. This is crucial as it creates the ‘belly’ that allows the sculpture to sit securely on a rock or shelf without rolling over. -
Refine the head:
Smooth out the bulbous front end, making it rounded and blunt. The transition from the head to the body should be seamless.
Natural Texture Hack
Mix dried tea leaves or black pepper directly into your white clay before sculpting. This creates that lovely organic, speckled stone effect without needing to paint it later.
Step 2: Sculpting Details
-
Make the tail flukes:
Flatten the very tip of the raised tail section between your thumb and forefinger. Using a knife or modeling tool, split this flattened section down the middle. -
Shape the flukes:
Spread the two split sections apart slightly and mold them into rounded triangles. Smooth the edges so they curve gently upward. -
Attach the fins:
Create two small, flat tear-drop shapes from extra clay. Score the side of the whale body and the back of the fin, apply a dab of water (or slip), and press the fins onto the lower sides of the body. -
Blend the seams:
Use a modeling tool to blend the clay from the fin into the body so it looks like one piece, leaving the outer edges of the fin distinct. -
Carve the mouth:
Using a sharp tool or knife, carefully carve a long, curving line starting from the front of the face and curving slightly upward near the fin to give the whale a gentle smile.
Step 3: Texturing and Finishing
-
Add surface texture:
To mimic the speckled look in the photo, gently prick the surface of the clay randomly with a needle tool or stiff brush bristles. Don’t puncture deep; just create tiny surface divots. -
Create the eye socket:
Press a small, round indentation into the clay above the corner of the mouth where the eye will go. -
Initial drying:
Set the whale aside to dry. If using air-dry clay, let it sit for 24-48 hours away from direct heat to prevent cracking. -
Sand for smoothness:
Once fully cured, use fine-grit sandpaper to gently smooth out any fingerprints or sharp ridges, particularly around the tail and fins. -
Enhance texture:
If your clay choice is plain white, you can now flick a toothbrush dipped in diluted grey or brown paint across the surface to create artificial speckles. -
Paint the eye:
Dip a toothpick or fine brush into black acrylic paint and carefully fill the small indentation you made for the eye. Add a tiny white dot for a highlight if you want extra life.
Drooping Tail?
If the tail keeps sagging while drying, prop it up with a crumpled piece of aluminum foil or a small sponge. Remove the prop only once the clay is fully hardened.
Place your finished whale on a piece of driftwood or flat stone to complete the serene, oceanic look.


What Really Happens Inside the Kiln
Learn how time and temperature work together inside the kiln to transform clay into durable ceramic.
Coiled Snake Sculpture Spiral
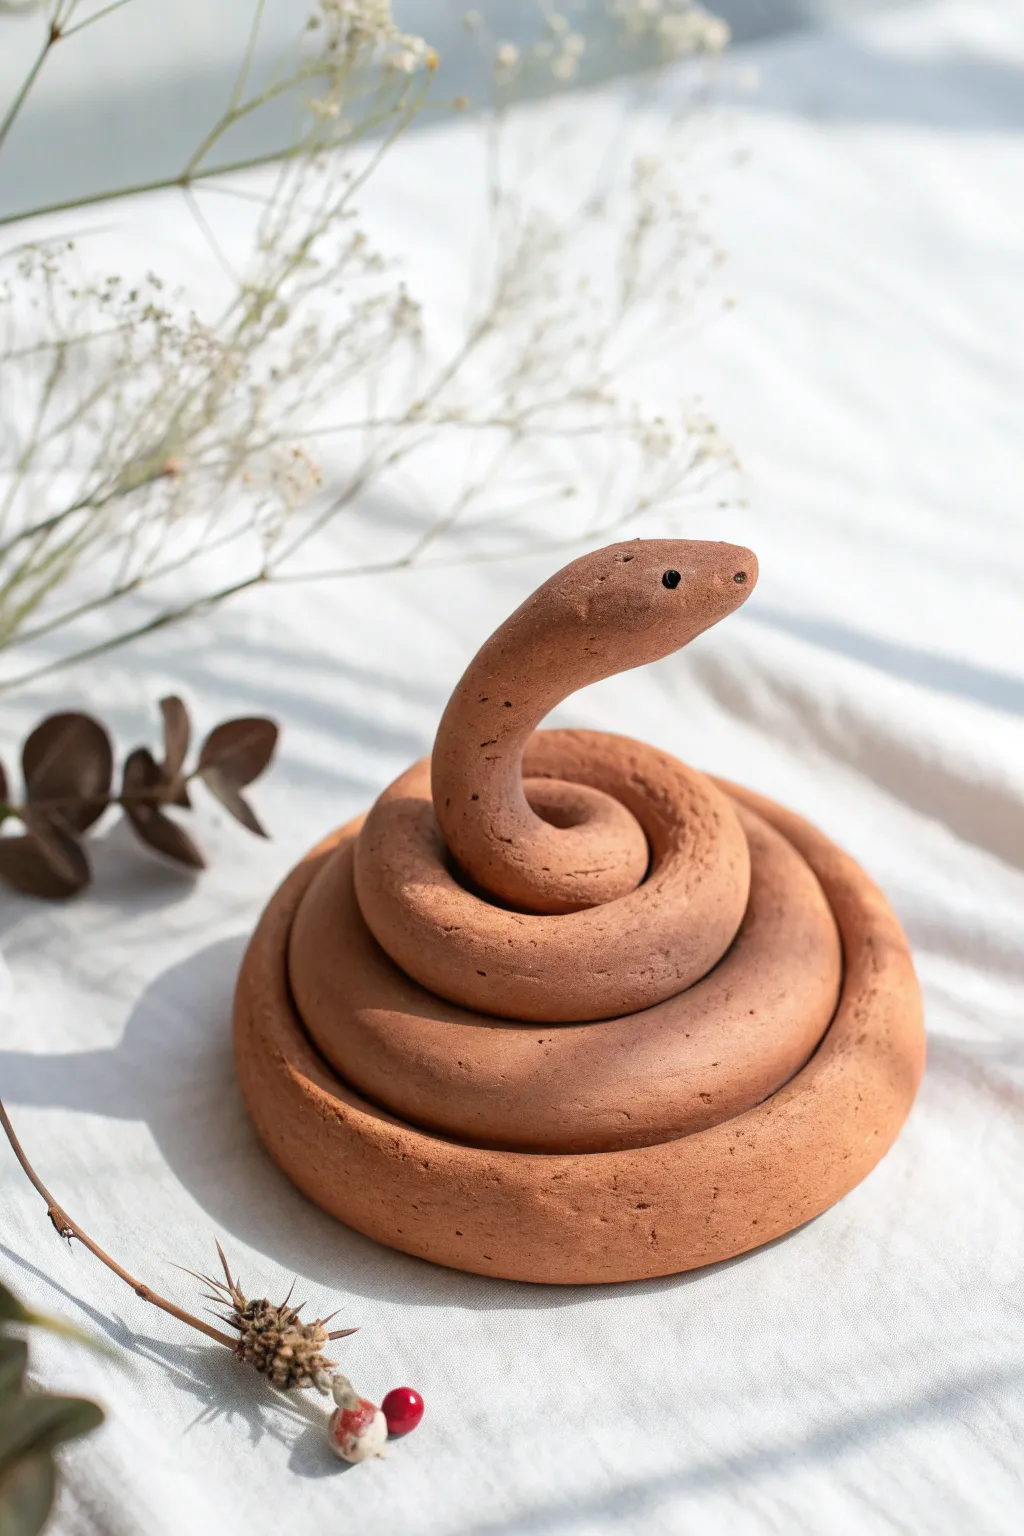
Capture the graceful movement of a snake with this simple yet striking clay sculpture. Using basic coiling techniques, you’ll create a perfectly spiraled reptile with a smooth, terracotta finish that adds an earthy touch to any shelf.
How-To Guide
Materials
- Terracotta-colored air-dry clay or polymer clay
- Rolling surface (canvas mat or silicone sheet)
- Small cup of water (for smoothing)
- Sponge or soft cloth
- Small black beads or black acrylic paint
- Needle tool or toothpick
- Fine-grit sandpaper (optional)
Step 1: Preparing the Base Form
-
Condition the clay:
Begin by taking a large handful of your terracotta clay. Knead it thoroughly in your hands to warm it up and remove any air bubbles, ensuring it’s pliable and ready for shaping. -
Roll the main coil:
Place the clay on your rolling surface. Using the palms of your hands, roll the clay back and forth to create a long, thick cylinder. Aim for a consistent thickness of about 3/4 to 1 inch. -
Taper the tail:
Focus your rolling on one end of the cylinder to create the tail. Gradually increase pressure as you roll outwards so the clay thins down to a gentle point, while keeping the head end thick. -
Smooth the surface:
Before coiling, inspect the long snake body for cracks. Dip your finger in a little water and gently run it along the clay to smooth out any imperfections.
Step 2: Coiling and Shaping
-
Start the spiral:
Take the tapered tail end and begin curling it inward to form the center of the base. Press it down strictly so it lays flat against your work surface. -
Build the body:
Continue winding the clay body around that center point. Instead of stacking directly on top, lay each coil snugly against the previous ring, spiraling outward and slightly upward. -
Create the taper illusion:
As you wind the thicker parts of the body, allow the coils to naturally stack higher, creating a pyramid-like elevation. -
Raise the head:
When you have about 3-4 inches of clay remaining at the thick end, stop coiling. Gently bend this section upward so the snake’s head rises vertically from the center of the coils. -
Shape the head:
Mold the raised end into a smooth, oval head shape. Flatten the top slightly and round off the snout to give it a friendly, distinct profile.
Cracking Coils?
If the clay starts cracking while bending the spiral, it’s too dry. Apply water to the cracks and smooth with a finger, or re-knead the clay with a drop of water before re-rolling.
Step 3: Refining Details
-
Blend hidden seams:
Where the coils touch, you might want extra stability. If you like, gently smudge the clay on the *underside* or interior curves to bond the rings together without ruining the outer texture. -
Sponge finish:
Take a slightly damp sponge and wipe it over the entire sculpture. This removes fingerprints and gives that matte, stone-like texture seen in the photo. -
Add visual texture:
To mimic the natural, earthy look of the example, you can lightly tap the surface with a stiff brush or a crumpled ball of foil to add very subtle pitting. -
Create eye sockets:
Using your needle tool or a small rounded visually tool, make two small indentations on either side of the head where the eyes will go. -
Insert the eyes:
Press a small black bead into each indentation. Alternatively, if you plan to paint the eyes later, leave the indentations empty for now. -
Nostril details:
Use the very tip of your needle tool to poke two tiny holes at the front of the snout for nostrils.
Make it Sparkle
For a mystical look, mix mica powder into your clay before rolling, or brush the finished dried piece with a metallic bronze wax to highlight the coil texture.
Step 4: Finishing Touches
-
Let it dry:
Allow the sculpture to dry completely. If using air-dry clay, this may take 24-48 hours depending on thickness. If using polymer, bake according to package instructions. -
Sand for perfection:
Once fully cured, use fine-grit sandpaper to buff away any remaining rough spots or sharp edges, particularly around the head curve. -
Paint the eyes:
If you didn’t use beads, now is the time to take a fine brush and dot a tiny amount of black paint into the eye sockets for a crisp, finished look.
Place your finished serpent near a sunny window or some dried flowers to admire its elegantly simple form
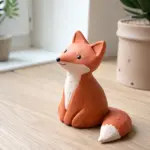
Easy Octopus Sculpture With Noodle Legs
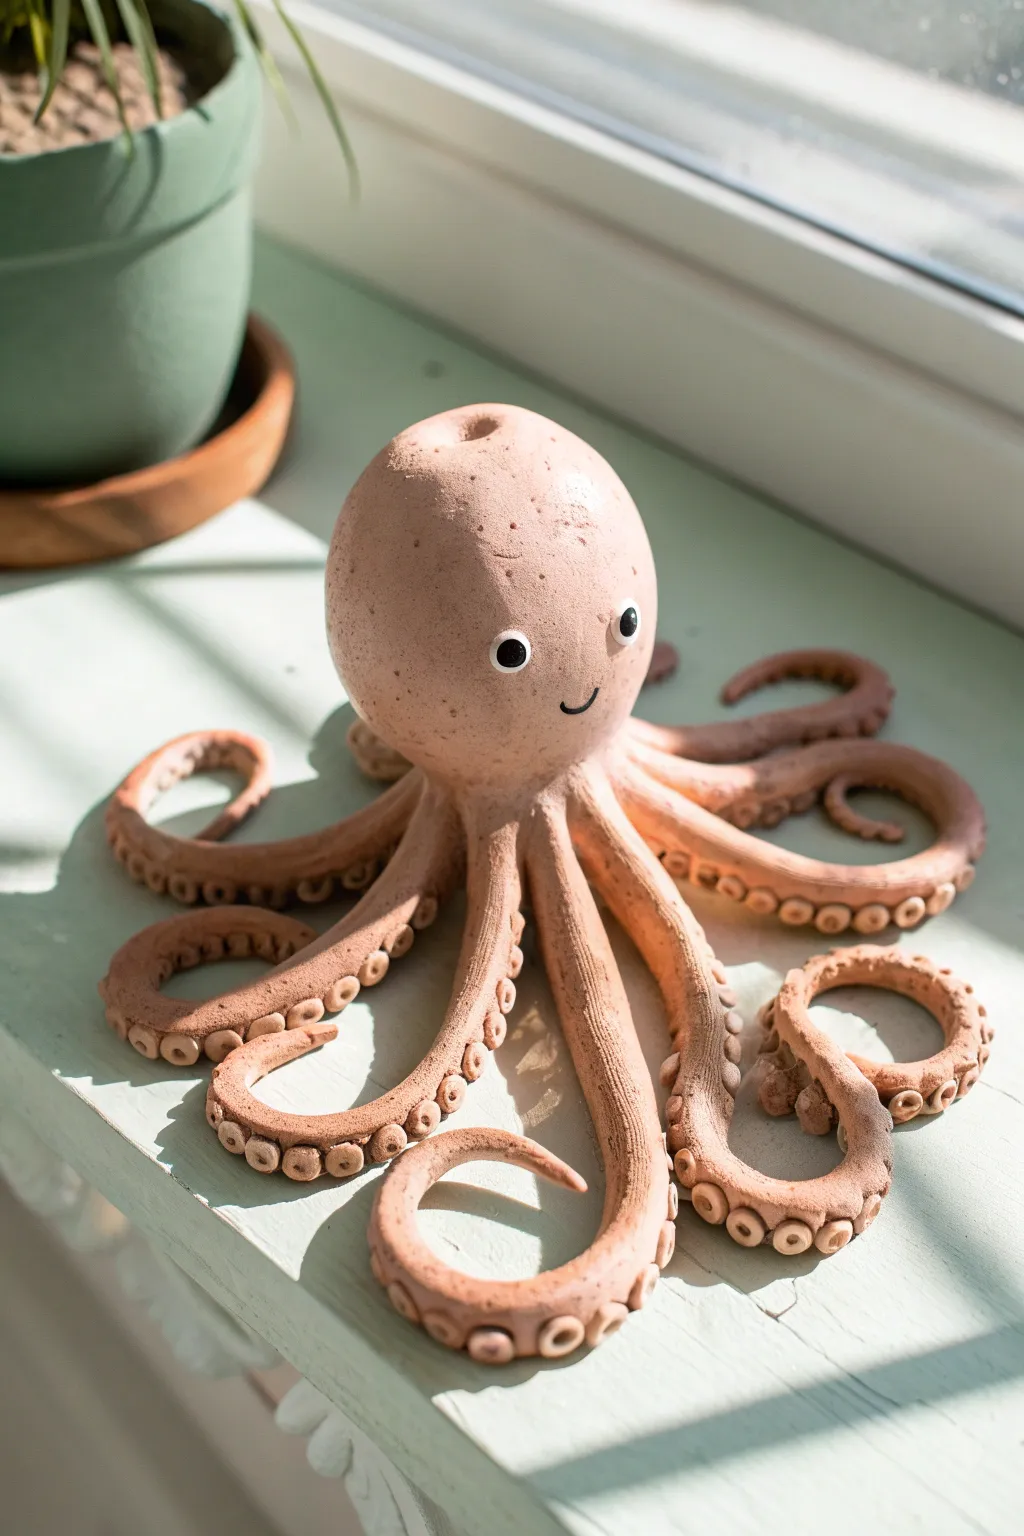
This charming, terracotta-toned octopus features playful, sprawling tentacles and a sweet, simple face that brings it to life. Its textured surface and distinct suction cups give it a wonderful tactile quality perfect for a sunny windowsill display.
Step-by-Step
Materials
- Air-dry clay (terra cotta color) or polymer clay
- Small rolling pin
- Modeling tools (or a toothpick and a smooth knife)
- Small straw or drinking straw (for suction cups)
- Water in a small cup (for smoothing)
- Black acrylic paint
- White acrylic paint
- Fine detail paintbrush
- Matte sealant spray (optional)
Step 1: Forming the Body
-
Prepare the Clay:
Start by conditioning your clay. Knead a large handful until it is soft, pliable, and free of cracks. This warmth will make shaping much easier. -
Shape the Head:
Roll a ball of clay roughly the size of a tennis ball. Gently elongate it slightly into an egg shape to form the main head of the octopus. -
Hollow the Head (Optional):
If you are using a large amount of clay, you might want to gently hollow out the bottom of the egg shape with your thumb to save material and ensure even drying. -
Smooth the Surface:
Dip your finger in a little water and smooth out the surface of the head. You want a nice, organic look, so it doesn’t need to be geometrically perfect. -
Add the Spout:
Using a modeling tool or the handle of a brush, press a small indentation into the very top of the head to mimic a siphon or spout.
Suction Cup Hack
Instead of rolling individual balls, use a small straw to punch circles out of a flattened sheet of clay, then press them onto the legs.
Step 2: Creating the Tentacles
-
Roll the Coils:
Roll out eight long, snake-like coils of clay. Aim for them to be thicker at one end (where they attach to the body) and taper down to a point at the tip. -
Texture the Legs:
I like to gently press a textured fabric or sponge lightly against the damp clay coils to give them a natural skin-like texture before attaching. -
Attach the Legs:
Turn the head upside down. Score the bottom of the head and the thick ends of the tentacles. Apply a little water or slip, then firmly press the eight legs onto the base of the head. -
Blend the Seams:
Flip the octopus upright. Use a modeling tool to smooth the clay where the legs meet the body, ensuring there are no visible joining lines. -
Arrange the Pose:
Drape the legs in a radial pattern. Curl the tips of the tentacles outward or inward to create movement, making sure they look relaxed and flowing.
Sea Glass Accents
Press small pieces of tumbled sea glass or tiny shells into the head or tentacles while the clay is wet for a beach-comber vibe.
Step 3: Adding Details
-
Create Suction Cups:
Roll tiny little balls of clay—dozens of them. Press these onto the undersides of the tentacles. -
Define the Cups:
Using a small straw or the end of a pen casing, press into the center of each tiny ball to create the ring shape characteristic of a suction cup. -
Refine the Surface:
Do a final check over the sculpture. Use a damp sponge to smooth any fingerprints, but leave the subtle surface imperfections that give it character. -
Drying Time:
Allow the sculpture to dry completely. For air-dry clay, this may take 24-48 hours depending on thickness. If baking polymer clay, follow package instructions.
Step 4: Face and Finish
-
Paint the Eyes:
Using the handle of a paintbrush, dot two circles of white paint onto the face. Once dry, add smaller black dots in the center for pupils. -
Add the Smile:
With a very fine brush and black paint, draw a tiny, simple curved line for the smile just below and between the eyes. -
Seal (Optional):
If you plan to keep this near moisture or plants, spray the entire piece with a matte sealant to protect the finish.
Place your new cephalopod friend in a sunny spot to watch over your room

TRACK YOUR CERAMIC JOURNEY
Capture glaze tests, firing details, and creative progress—all in one simple printable. Make your projects easier to repeat and improve.
Chubby Penguin Sculpture With Tiny Wings
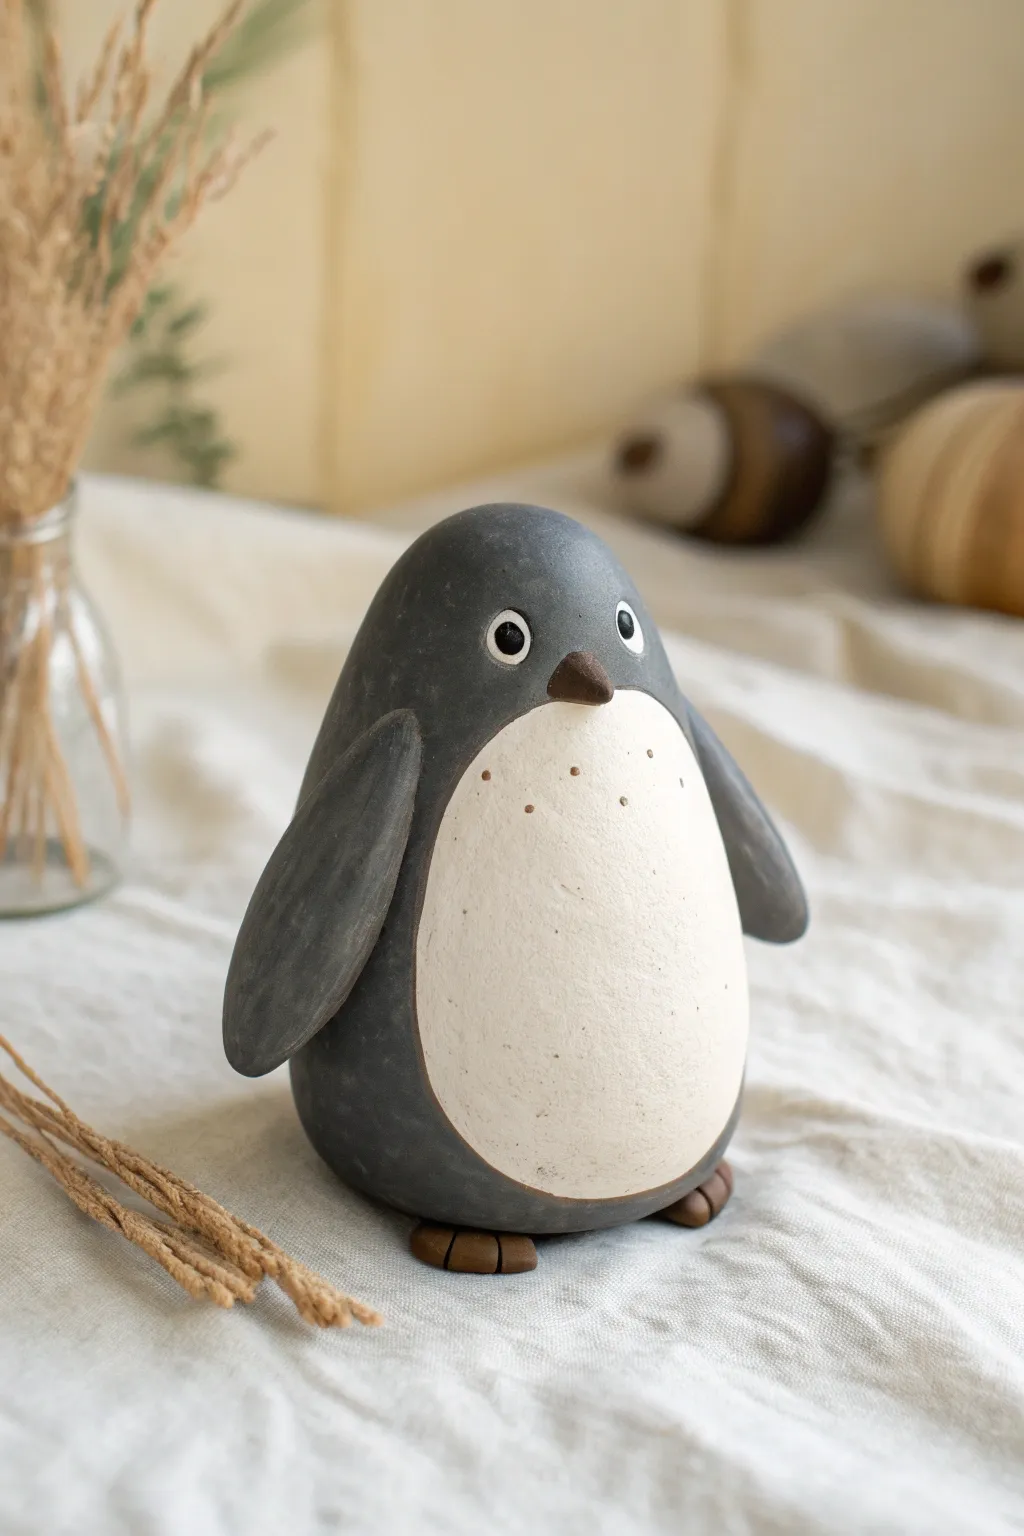
This adorable penguin sculpture is all about smooth curves and simple shapes, resulting in a charmingly stout character with a distinct personality. Its matte finish and muted grey tones give it a sophisticated, modern look perfect for desk decor or a thoughtful handmade gift.
Detailed Instructions
Materials
- Polymer clay or smooth air-dry clay (Dark grey/charcoal)
- Polymer clay or smooth air-dry clay (Cream/Off-white)
- Polymer clay or smooth air-dry clay (Brown)
- Small amount of white and black clay (for eyes)
- Clay sculpting tools (specifically a needle tool and a smoothing tool)
- Rolling pin
- Circle cutter or craft knife
- Wire armature or aluminum foil (optional, for core bulk)
- Fine grit sandpaper
- Matte varnish (optional)
Step 1: Forming the Body
-
Create the core:
Start with a large ball of your dark grey clay. If you want to save clay, you can wrap a tight ball of aluminum foil with a thin layer of the grey clay. Roll it between your palms until it’s perfectly smooth. -
Shape the egg:
Gently gently taper the top of the ball to create a rounded egg shape. The bottom should be wider than the top to give him that signature chubby look. -
Flatten the base:
Tap the bottom of your egg shape on your work surface a few times. This creates a stable, flat base so your penguin won’t wobble later.
Belly Cracking?
If the cream belly clay cracks while drying or baking, the layer was likely too thin or dried too fast. Patch cracks with a mix of fresh clay and water (or liquid clay).
Step 2: Adding the Belly
-
Roll out the cream clay:
Take a portion of the cream or off-white clay and roll it out into a thin sheet, about 2mm thick. -
Cut the belly patch:
Using a craft knife, cut an elongated oval shape. The top should be slightly narrower than the bottom, mimicking the body shape but smaller. -
Attach the belly:
Press the cream oval onto the front of the grey body. Start from the center and smooth outwards to prevent air bubbles. -
Blend the seams:
I like to use a soft silicone tool or my finger to gently rub the edges of the cream clay into the grey clay, ensuring they look like one solid piece rather than a sticker on top. -
Add texture details:
Using a needle tool, poke tiny, random shallow holes on the upper chest area of the cream clay. This suggests tiny feathers or specks.
Step 3: Wings and Features
-
Make the wings:
Roll two equal-sized logs of grey clay and flattening them into elongated teardrops. They should be relatively thick and sturdy. -
Attach the wings:
Press the wings onto the sides of the body. Position them fairly low so firmly they look relaxed. Blend the top shoulder joint into the body, but leave the tips hanging free slightly. -
Sculpt the beak:
Take a tiny piece of brown clay and shape it into a small cone. Press it onto the face area, right where the cream belly meets the grey forehead. -
Create the eyes:
Make two small depressions on either side of the beak. Roll tiny balls of white clay for the whites, and even tinier black balls for the pupils, pressing them into the sockets. -
Make the feet:
Form two small, flat ovals from brown clay. Use a knife tool to mark two indentations on each one to create toes. -
Attach the feet:
Place the feet under the front edge of the body so they poke out just enough to be cute.
Seamless Blending
To get that perfectly smooth transition between colors without smudging, wipe your tool or finger clean after every single stroke when blending the white into the grey.
Step 4: Refining and Finishing
-
Smoothing check:
Look over the entire sculpture for fingerprints. Dip your finger in a little bit of water (for air dry) or baby oil (for polymer) and gently buff away any imperfections. -
Cure or dry:
If using polymer clay, bake according to the package instructions. If using air-dry clay, let it sit in a cool, dry place for at least 24 hours. -
Matte finish:
Once fully cured or dry, apply a coat of matte varnish to protect the surface while keeping that soft, stony aesthetic seen in the reference.
Now you have a stoic yet adorable little friend ready to keep you company on your desk
Hedgehog Sculpture Ring Holder
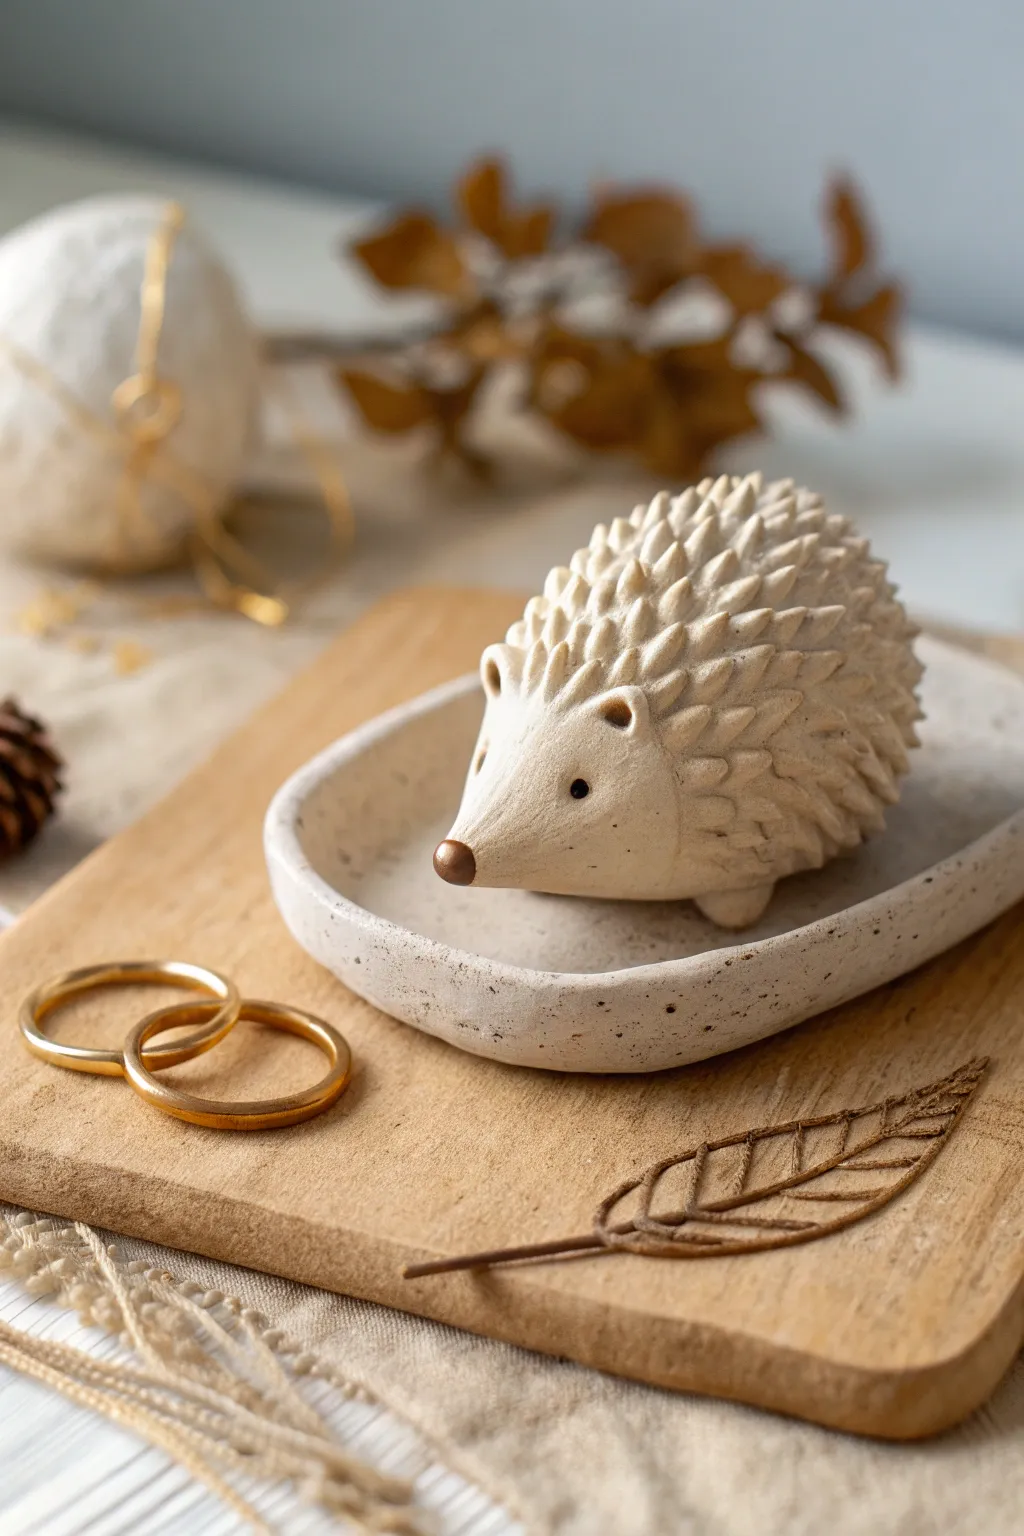
Keep your precious jewelry safe with this adorable, spiky guardian crafted from clay. This charming hedgehog sits in its own custom dish, offering a textured back perfect for holding rings or simply looking cute on your dresser.
Step-by-Step
Materials
- Air-dry clay (white or light cream)
- Small rolling pin
- Modeling tools (or a toothpick)
- Small craft knife
- Water in a small cup
- Fine-grit sandpaper
- Acrylic paint (warm brown, black)
- Small paintbrush
- Matte varnish or sealant
- Small sponge (optional for smoothing)
Step 1: Shaping the Base Dish
-
Roll the slab:
Begin by conditioning a handful of clay until it’s pliable. Roll it out into a flat, even slab about 1/4 inch thick to form the base. -
Cut the shape:
Use your craft knife to cut a loose organic oval or rounded rectangular shape. It doesn’t need to be geometrically perfect; a slightly organic form looks more natural. -
Form the rim:
Gently pinch up the edges of your slab all the way around to create a shallow rim. Smooth the inside transition with a little water on your finger so there are no cracks. -
Add texture:
If desired, lightly flick a stiff paintbrush or toothbrush against the rim to add a subtle speckled texture, similar to stoneware. Set the dish aside on a flat surface.
Step 2: Sculpting the Hedgehog Body
-
Form the core:
Take a larger ball of clay and roll it into an egg shape. This will be the main body of your hedgehog. -
Refine the snout:
Gently pull and taper one end of the egg to create a pointed snout. Try to curve the nose slightly upward for an inquisitive expression. -
Flatten the bottom:
Tap the bottom of the hedgehog on your work surface to flatten it slightly so it sits stable without rolling over. -
Check the fit:
Place the hedgehog body into your damp dish to ensure the proportions look right. It should sit comfortably in the center with space around it.
Spike Strategy
Instead of attaching individual spikes, use small curved scissors to snip into the clay surface. Lift the snipped clay slightly to form perfect, integrated quills without the mess.
Step 3: Adding Details and Texture
-
Attach the ears:
Roll two huge tiny balls of clay, flatten them slightly, and press them onto the head where the ears should go. Use a round tool to indent the centers. -
Create the spikes:
This is the meditative part. I like to start from the back and work forward. Pinch small bits of the clay on the back into little points, or attach tiny teardrop shapes of clay individually. -
Layer the texture:
Continue creating rows of these small spikes until you cover the entire back, stopping just behind the ears. Keep the points aiming backward for a streamlined look. -
Add feet:
Roll four tiny balls for feet. Attach them to the bottom of the body using a ‘score and slip’ technique (scratching the surface and adding water) so they stick firmly. -
The nose bead:
Roll a very small, smooth ball of clay and attach it to the very tip of the shout for the nose. -
Secure to dish:
Score the bottom of the hedgehog’s feet and the center of the dish. Add a dab of water and press the hedgehog firmly into the dish to bond them as one piece.
Golden Glamour
For a luxe touch, paint just the tips of the hedgehog’s quills or the rim of the dish with metallic gold liquid leaf after the sealant has fully dried.
Step 4: Finishing Touches
-
Drying time:
Let sculpture dry completely. This creates a stronger bond. Depending on humidity, this usually takes 24 to 48 hours. Turn it occasionally if possible to let air reach the bottom. -
Sanding:
Once bone dry, use fine-grit sandpaper to gently smooth the rim of the dish and the hedgehog’s face. Be careful around the delicate spikes. -
Painting the eyes:
Using the smallest brush you have or a toothpick, dot two tiny black eyes onto the face. -
Painting the nose:
Paint the round nose bead with a warm copper or brown acrylic paint to give it a contrasting finish. -
Speckling (Optional):
To mimic the ceramic look in the photo, dilute some brown paint and flick it off a toothbrush onto the dish and lower body for a speckled effect. -
Sealing:
Apply a coat of matte varnish over the entire piece to protect the clay from moisture and give it a professional, finished sheen.
Now you have a sweet little companion to look after your rings on your bedside table
Classic Duck Sculpture With Ripple Base
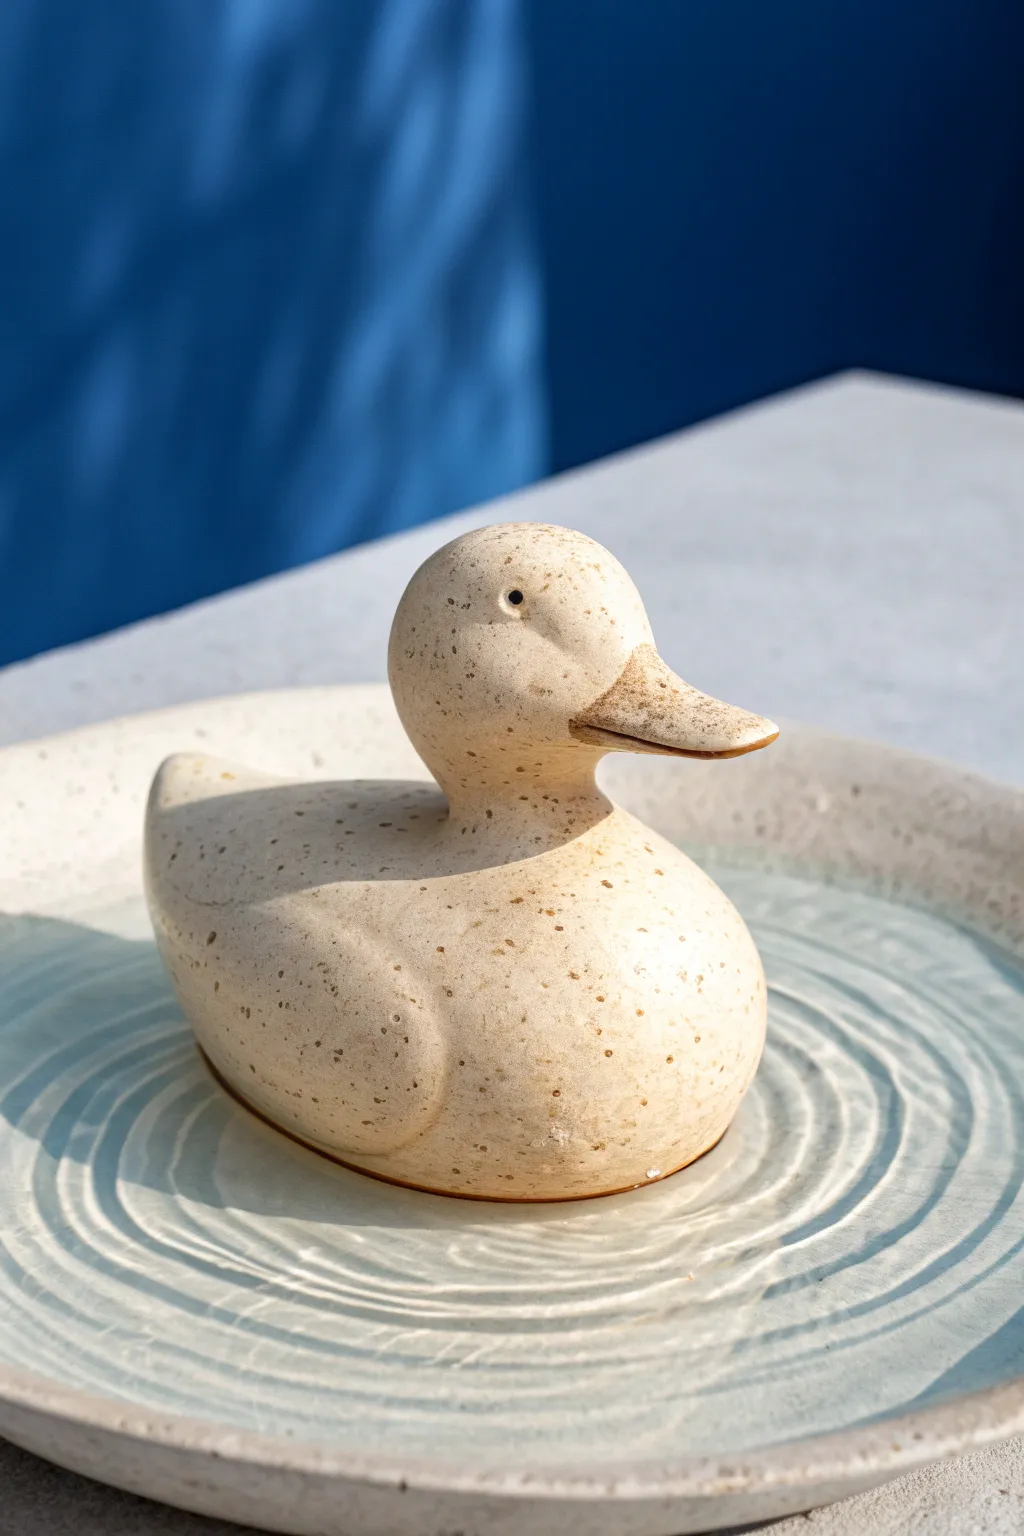
This charming project captures the serene moment of a duck gliding through water, complete with a textured base that mimics outward ripples. The speckled, natural finish gives it a timeless, stoneware pottery feel without needing a complex kiln setup if you use air-dry clay.
Step-by-Step Guide
Materials
- White air-dry clay or polymer clay (approx. 500g)
- Small bowl suitable for water
- Rolling pin
- Aluminum foil (for armature)
- Modeling tools (needle tool, smooth wooden tool)
- Sponge
- Acrylic paints (Cream, Beige, Burnt Umber)
- Old toothbrush (for speckling)
- Gloss varnish or clear resin (optional for wet look)
- Fine grit sandpaper
Step 1: Sculpting the Base
-
Prepare the Dish:
Begin by rolling out a large slab of clay to about 1/4 inch thickness. Place your small bowl upside down on the clay and cut a circle around it, leaving a generous margin, or simply drape the slab inside a shallow bowl to form a curved dish shape. -
Create the Ripples:
While the clay inside the shallow dish is still soft, use a looped modeling tool or your fingertip to carve concentric circles. Start from the center and spiral outward gently. -
Soften the Edges:
Dip your finger in a little water and smooth down the ridges of your ripples so they look like soft water movements rather than sharp grooves. Set the dish base aside to firm up.
Smooth Surface Secret
Keep a small bowl of water nearby. Between shaping steps, dip your finger and run it over the clay to erase fingerprints immediately, reducing sanding time later.
Step 2: Forming the Duck
-
Build the Core:
Crumple a piece of aluminum foil into a rough oval shape for the body and a smaller sphere for the head. This saves clay and keeps the sculpture lightweight. -
Cover with Clay:
Flatten sheets of clay and wrap them entirely around your foil armatures. Smooth out any seams completely so you have two clean shapes. -
Attach Head to Body:
Score (scratch) the top of the body and the bottom of the head. Add a dab of water or slip (liquid clay) and press them firmly together. -
Blend the Neck:
Use a wooden modeling tool to pull clay from the neck down to the body and from the body up to the neck, creating a seamless transition. I prefer to smooth this area repeatedly with a damp sponge to get that fluid, organic look. -
Shape the Tail:
Pinch the rear of the oval body and gently pull it upward to form a pointed tail. Curve it slightly for a jaunty silhouette. -
Sculpt the Wings:
Roll two small, flattened teardrop shapes of clay. Attach one to each side of the body, pressing the edges down so they blend in, leaving the middle slightly raised to suggest folded wings.
Level Up: Real Water
Seal the ripple bowl thoroughly with waterproof varnish. Once cured, you can actually fill the dish with real water for the duck to sit in for a dynamic display.
Step 3: Refining Details
-
Make the Beak:
Form a small, flattened cone shape. Attach it to the front of the head, blending the seam where it meets the face. Use a needle tool to drag a line horizontally across the beak to separate the top and bottom mandibles. -
Add the Eyes:
Use the rounded end of a paintbrush handle to press small indentations on either side of the head. Roll tiny balls of clay to fill these holes, or leave them indented for a stylized look. -
Final Smoothing:
Take a wet sponge and go over the entire duck, removing fingerprints and imperfections. Let both the duck and the base dry completely (24-48 hours depending on humidity).
Step 4: Decoration
-
Base Coat:
Once dry and lightly sanded, paint the entire duck with a creamy off-white or light beige acrylic paint. You may need two coats for opaque coverage. -
Speckling Technique:
Mix a small amount of Burnt Umber paint with a drop of water to thin it. Dip an old toothbrush into this mix. -
Apply Speckles:
Hold the toothbrush near the duck and run your thumb across the bristles to flick tiny splatters of brown paint onto the surface. This imitates the look of speckled stoneware clay. -
Detail the Beak:
Paint the beak a slightly darker tan or muted orange, blending it slightly near the face for a natural transition. -
Finishing the Pond:
Paint the ripple base a very pale, watery blue or leave it natural stone color. Once dry, place your duck in the center. -
Seal (Optional):
To mimic the wet look in the photo, pour a thin layer of clear resin into the ridges of the base, or simply coat the ‘water’ ripples with a high-gloss varnish.
Now you have a serene little waterfowl sculpture perfect for bringing a moment of calm to your desk or shelf
Stacked Animal Totem Sculpture
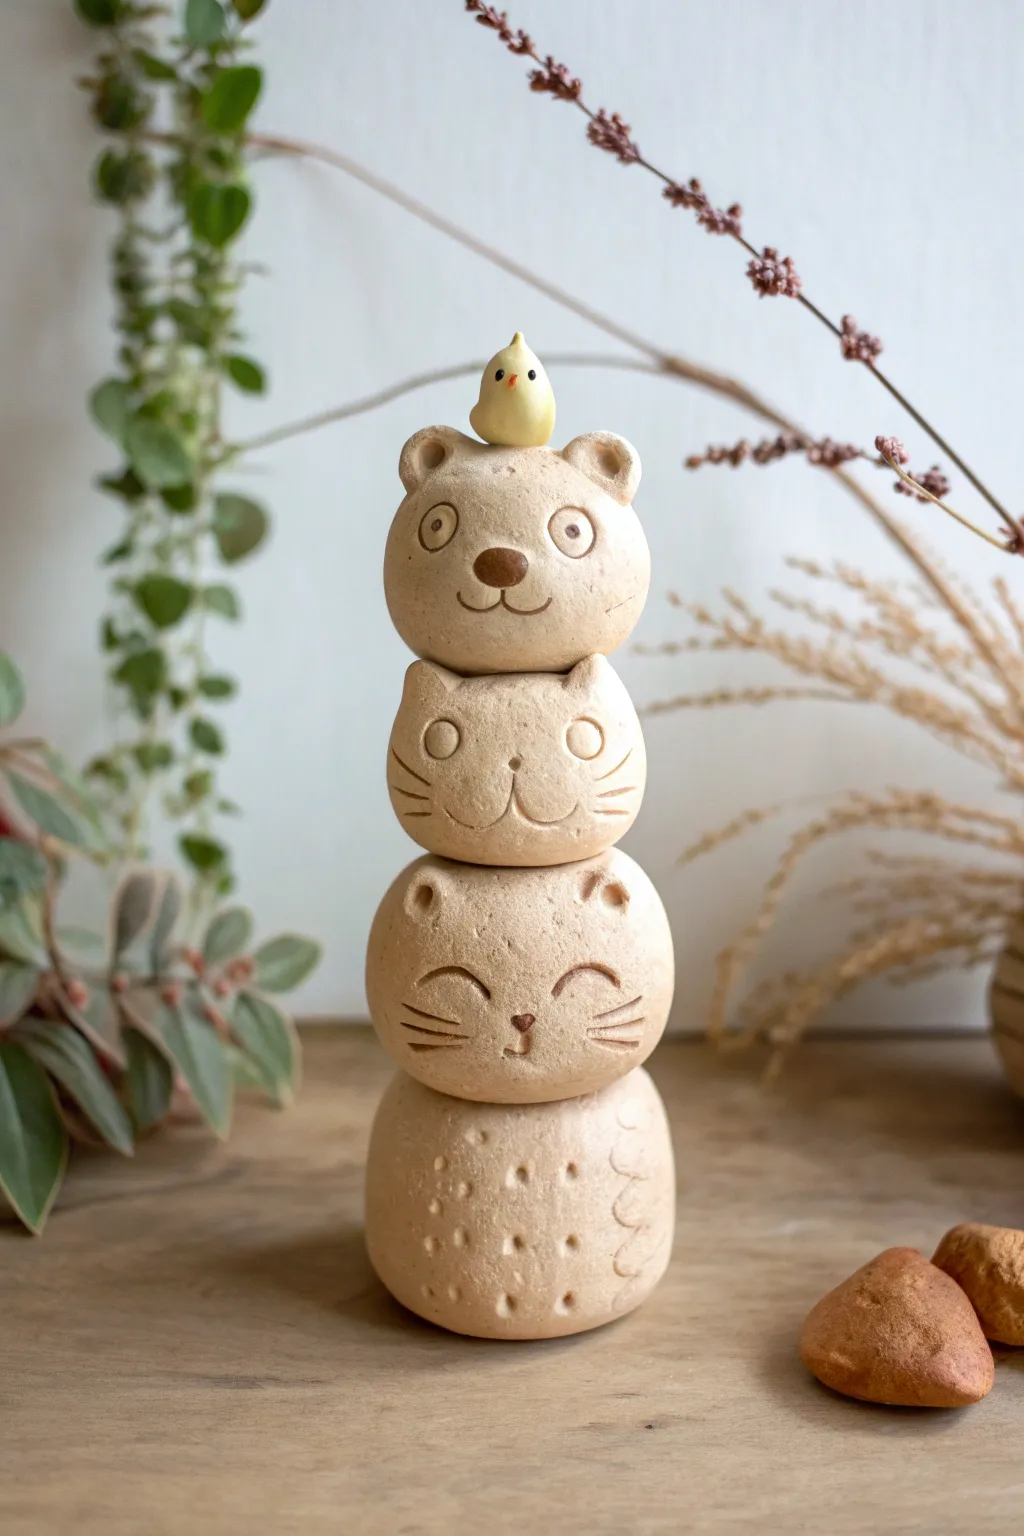
Create a charming vertical stack of forest friends with this delightful clay totem project. The natural, unpainted look of the beige clay highlights the simple carved details, making it a perfect accent for a bookshelf or windowsill.
Step-by-Step
Materials
- Air-dry clay or polymer clay (beige/natural stone color)
- Small amount of yellow clay (for the bird)
- Clay sculpting tools (needle tool, modeling tool)
- Small rolling pin
- Water slip (if using air-dry clay) or liquid polymer clay
- Aluminum foil (optional, for lightweight cores)
- Acrylic paint (brown and orange) for details
- Fine detail paintbrush
- Clear matte varnish (optional)
Step 1: Forming the Base Components
-
Prepare the clay:
Begin by conditioning your beige clay until it is soft and malleable. Divide the clay into four portions graduating slightly in size, with the largest portion reserved for the bottom owl section. -
Shape the owl base:
Roll the largest portion into a smooth cylinder with rounded edges. Flatten the bottom gently on your work surface so it stands stable. -
Form the cat heads:
Roll the next two portions of clay into spheres. Gently flatten them just a bit into hamburger shapes—these will be the two cat heads in the middle. -
Create the bear head:
Roll the final beige portion into a sphere for the bear at the top. This should be roughly similar in size to the cat heads below it. -
Make the tiny bird:
Using a very small pinch of yellow clay, roll a teardrop shape for the bird. It should be tiny enough to perch comfortably on the bear’s head.
Wobbly Tower?
If your clay is too soft and the heads are squishing the ones below, insert a toothpick or dowel through the center of the entire stack while the clay is wet to act as an internal spine.
Step 2: Sculpting the Details
-
Texture the owl:
Take the bottom cylinder and use a small loop tool or the end of a paintbrush to press ‘U’ shapes into the clay belly to mimic feathers. Add simple curved wings on the sides by lightly carving outlines. -
Detail the first cat:
On the second ball (the bottom cat), attach two tiny triangles for ears. Use a needle tool to carve smiling eyes (arches), whiskers, and a small nose. I prefer to press the nose in slightly for depth. -
Detail the second cat:
On the third ball, attach ears again. This time, create circular eyes by pressing the end of a round tool into the clay. Add whiskers and a typical cat mouth shape. -
Sculpt the bear:
For the top beige sphere, pinch two small rounded ears and attach them. Press a small ball of clay onto the center for the snout, then carve a smile underneath it. -
Refine the bird:
Add a microscopic orange beak to your yellow bird and tap the bottom so it sits flat.
Step 3: Assembly and Finishing
-
Stack the pieces:
If using air-dry clay, score the contact points and add a dab of water or slip. If using polymer, use liquid clay. Stack them: owl, smiling cat, wide-eyed cat, bear. -
Secure the bird:
Place the tiny yellow bird on the very top of the bear’s head, securing it firmly. -
Check stability:
Gently press down on the stack to ensure good adhesion between layers without squishing the shapes. Make sure the tower isn’t leaning. -
Dry or Bake:
Allow the sculpture to air dry completely (24-48 hours) or bake according to your polymer clay package instructions. -
Paint facial features:
Once dry/cool, use a fine brush with brown paint to fill in the bear’s nose and the cat’s nose. Add tiny black dots for the bird’s eyes. -
Enhance carvings:
If you want the carved lines to pop, you can do a light brown wash over the grooves and wipe away the excess, though the natural shadow works nicely too.
Creative Twist
Create a seasonal variation by swapping the animals! Try a snowman on the bottom, a reindeer in the middle, and an elf on top. Or add tiny clay scarves to the animals.
Place your adorable animal totem among your houseplants for a hidden forest surprise