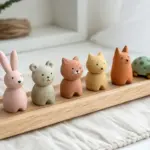
Whenever I’m craving a quick, satisfying project, I go straight for small clay figurines—they’re adorable, low-pressure, and you can finish a whole little “cast of characters” in one sitting. These ideas are all about simple shapes, sweet details, and that extra charm you only get from working in miniature.
Chibi Cat Minis
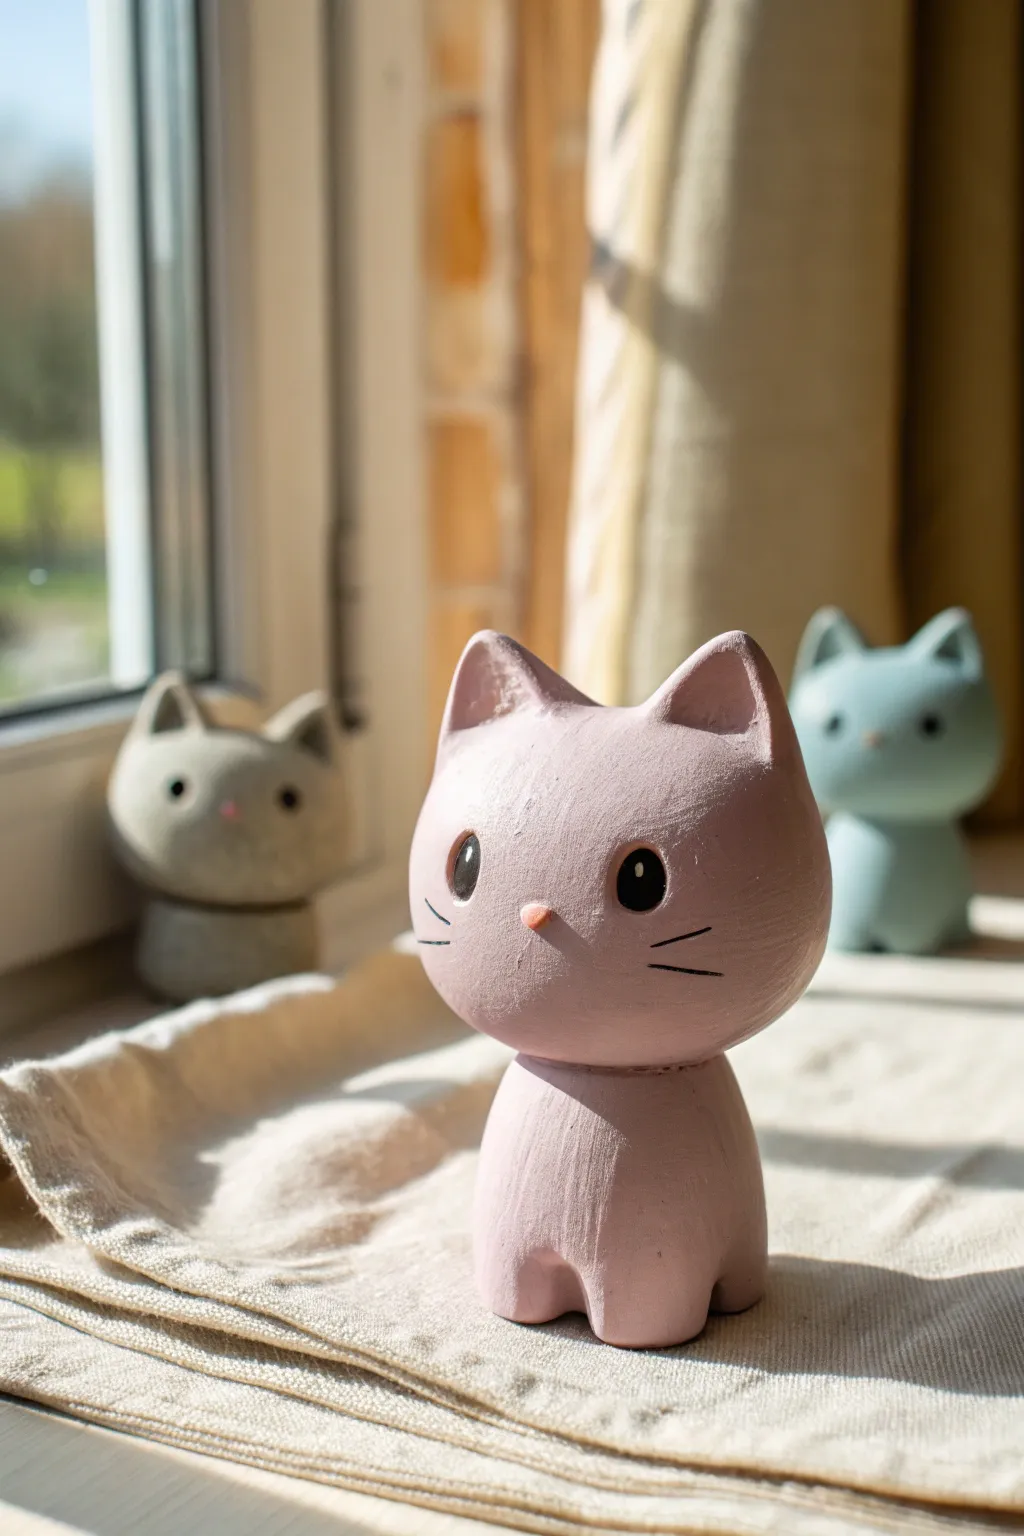
These adorable, minimalist cat figurines bring a soft touch of whimsy to any windowsill with their smooth curves and pastel hues. The design relies on simple geometric shapes—a rounded head and a gentle, sloping body—making it a perfect project for beginners looking to practice smoothing techniques.
Step-by-Step Tutorial
Materials
- Air-dry clay or polymer clay (white base recommended)
- Acrylic paints (pastel pink, baby blue, soft grey, black, white)
- Fine-grit sandpaper (400-600 grit)
- Sculpting tools (needle tool and a smoothness tool)
- Small cup of water (for smoothing air-dry clay)
- Fine detail paintbrush (size 0 or 00)
- Medium flat paintbrush
- Matte or satin varnish
Step 1: Shaping the Base Structures
-
Roll the body:
Start with a golf-ball-sized amount of clay for the body. Roll it into a smooth ball first to remove cracks, then gently roll it against your surface to form a thick, sturdy cylinder that is slightly wider at the bottom. -
Define the legs:
Stand the cylinder upright. Using your thumb or a rounded sculpting tool, gently press into the bottom center of the cylinder to create an arch. This separates the two front ‘stub’ legs without needing detailed paws. -
Form the head:
Roll a second ball of clay, slightly larger than the width of the body’s top. This chibi style emphasizes a large head, so don’t be afraid to go big. Slightly flatten the front to create the face plane. -
Sculpt the ears:
Pinch two small triangles of clay from your supply. Attach them firmly to the top of the head, blending the seams downward so they look like they grew out of the skull rather than just sitting on top. -
Refine the ear shape:
Use a damp finger to smooth the join lines. Press a small indentation into the front of each triangle to give the ears depth, keeping the tips slightly rounded for a softer look.
Smoother Seams
Dip your finger in water (for air-dry) or baby oil (for polymer) and run it over the clay before it hardens. This eliminates fingerprints and reduces sanding time later.
Step 2: Assembly and Refining
-
Connect head and body:
Score the top of the body and the bottom of the head with a needle tool (cross-hatching). If using air-dry clay, apply a dab of water or slip; for polymer, use liquid clay. Press the parts together firmly. -
Smooth the neck seam:
The neck should be subtle. Use a smoothing tool to blend the clay slightly at the connection point, ensuring the head is stable but retains its bobble-like appearance. -
Add the nose:
Roll a tiny, lentil-sized piece of clay. Press this onto the center of the face, slightly lower than the midline. It should be a distinct, raised bump. -
Dry or bake:
If using air-dry clay, let the figure dry for 24-48 hours away from direct heat. If using polymer clay, bake according to the manufacturer’s instructions. -
Sand for perfection:
Once fully cured, use fine-grit sandpaper to buff away any fingerprints or uneven textures. This step is crucial for achieving that manufactured, ceramic-like finish visible in the photo.
Step 3: Painting the Personality
-
Base coat application:
Mix a soft, uneven pastel pink (or blue/grey for the friends) using white and a tiny dot of color. Apply two to three thin layers over the entire figure, letting each dry completely to avoid brushstrokes. -
Highlight the nose:
Paint the small raised nose bump in a slightly darker or more saturated shade of pink than the body color to make it pop. -
Detail the eyes:
Using your finest brush and black paint, create two tall oval shapes for eyes. Place them wide apart to enhance the cute factor. Leave a tiny speck of unpainted space or add a white dot later for a sparkle highlight. -
Add whiskers:
With the paint thinned slightly with water for better flow, paint two very thin, straight lines on each cheek. Keep them horizontal and parallel. -
Seal the work:
Protect your paint job with a coat of matte or satin varnish. This mimics the look of unglazed ceramic and prevents the pastel paint from chipping.
Tail Variation
Before baking, roll a thin snake of clay and wrap it around the base of the body to create a curled tail that hugs the side of the cat.
Now you have a charming little feline friend ready to guard your succulents or books


Chunky Puppy Pals
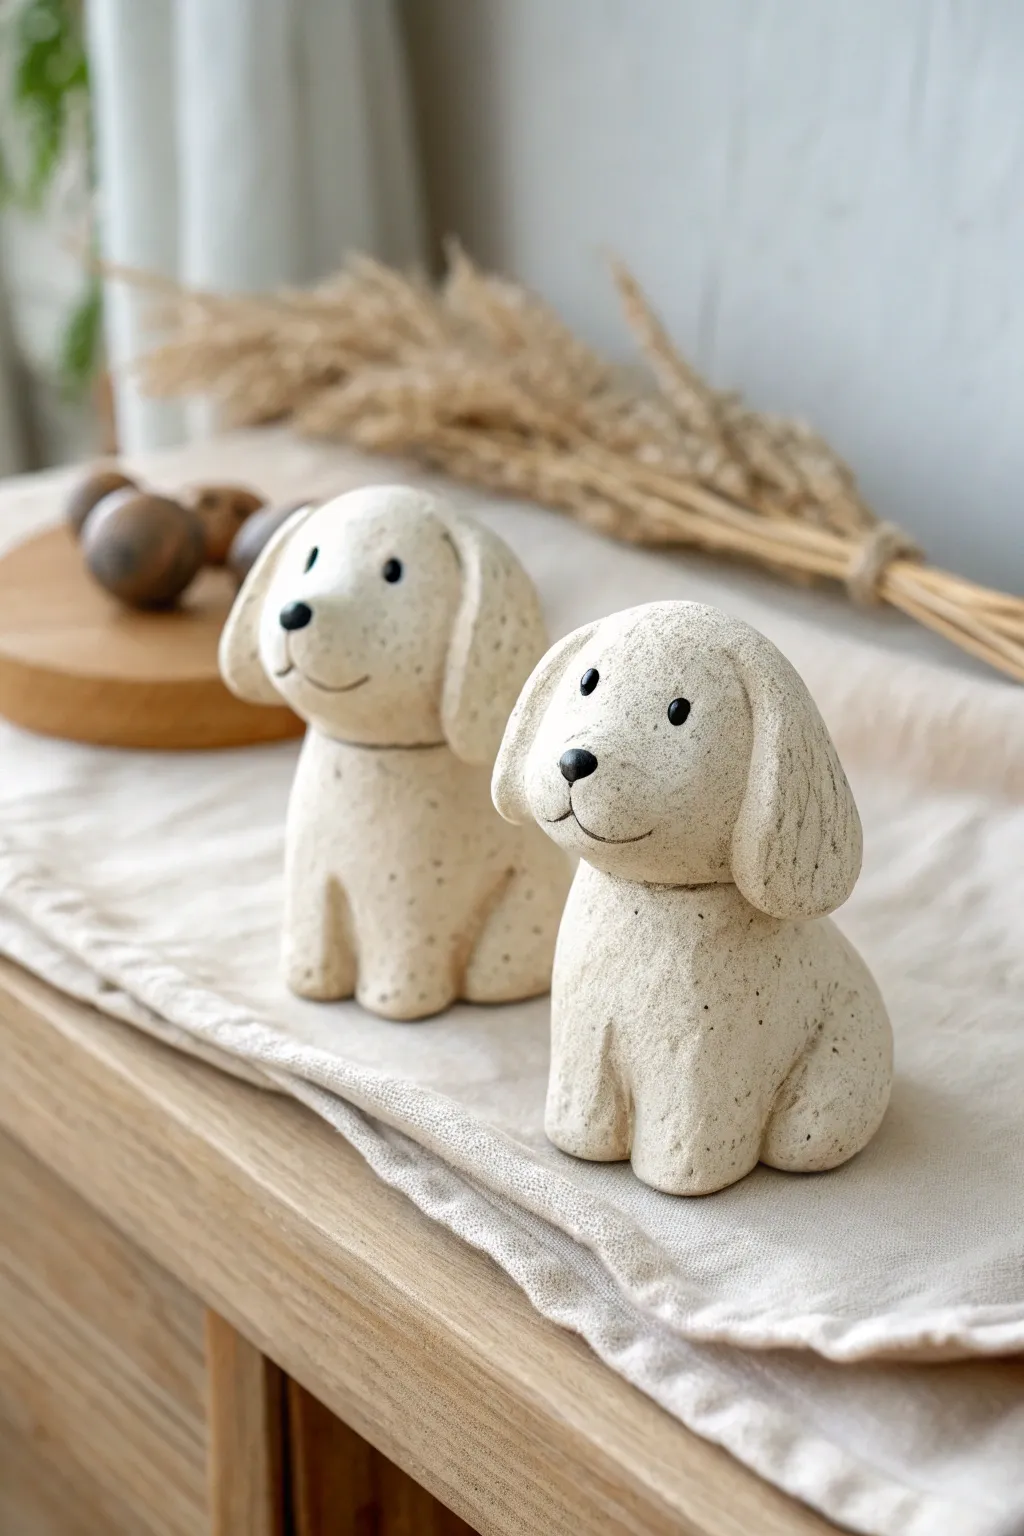
These adorable, minimalist puppy figurines capture the heart with their simple shapes and charming, speckled stone texture. The design relies on soft curves and a chunky aesthetic, making them a perfect beginner project that looks high-end.
Step-by-Step
Materials
- Stone-effect polymer clay (granite or speckled white)
- Black polymer clay (tiny amount for nose)
- Small black glass beads or seed beads (for eyes)
- Clay sculpting tools (needle tool, blending tool)
- Acrylic roller
- Aluminum foil (for core)
- Baking sheet and parchment paper
- Wet wipes or baby oil (for smoothing)
Step 1: Forming the Base
-
Create the core:
Crumple a small piece of aluminum foil into a tight, slightly elongated gumdrop shape. This acts as an armature to save clay and reduce baking time. -
Condition the clay:
Take a generous portion of your stone-effect clay and knead it thoroughly until it is soft and pliable. I find warm hands make this process much faster. -
Wrap the body:
Flatten the conditioned clay into a thick sheet and wrap it completely around your foil core. Roll it between your palms to smooth out any seams, aiming for a rounded, slightly bottom-heavy pear shape. -
Shape the seated posture:
Gently tap the bottom of your pear shape onto your work surface to create a flat base so the dog sits stably.
Clean Texture Trick
To remove pesky fingerprints without losing the stone look, lightly brush the raw clay with a little baby oil before texturing with the toothbrush.
Step 2: Sculpting the Head & Features
-
Form the head shape:
Roll a second ball of clay, slightly smaller than the body. Press it gently to flatten the bottom slightly where it will attach to the neck area. -
Attach the head:
Place the head atop the body. Use a blending tool or your thumb to drag a little clay from the neck area up into the head and vice versa to secure the bond, then smooth the seam until invisible. -
Define the snout:
The face on these puppies is somewhat flat but rounded. Pinch the front of the face very subtly to suggest a snout area without adding a separate piece of clay. -
Make the ears:
Roll two equal-sized small logs of clay. Flatten them into elongated teardrop shapes. These should be thick and substantial, not thin sheets. -
Attach the ears:
Press the rounded top of each ear onto the sides of the head. Blend the clay at the attachment point only, leaving the flaps hanging loose and natural. -
Adjust the hang:
Gently curb the ear flaps so they hug the face slightly. You can add faint vertical lines with a needle tool to simulate fur texture on the ears.
Tail Wagging Fun
Don’t forget the back! Add a tiny, triangular nub of clay to the lower back for a tail, blending it upwards so it looks like it’s wagging.
Step 3: Adding Personality
-
Indicate the legs:
Roll two small sausages of clay for the front legs. Attach them vertically to the front of the body, blending the top edge into the chest. -
Carve the paws:
At the bottom of the front legs and the rear haunches, use a needle tool to make tiny vertical indentations to suggest toes. -
Create the smile:
Use a needle tool or a small curved blade to impress a simple, shallow sideways ‘3’ shape or a gentle curve for the mouth. -
Insert the eyes:
Press two small black glass beads into the face above the snout. Set them deep enough so they don’t pop out during baking. -
Add the nose:
Roll a tiny, slightly oval ball of black clay. Press it firmly onto the tip of the snout area, just above the mouth line. -
Refine the texture:
Before baking, give the whole piece a once-over with a stiff bristle brush or a toothbrush. Gently tap it over the surface to enhance the stone texture and remove fingerprints. -
Bake the figurine:
Place your puppy on a parchment-lined baking sheet. Bake according to your clay manufacturer’s instructions (usually 275°F/130°C for 15-30 minutes per 1/4 inch of thickness). -
Cool down:
Allow the figurine to cool completely in the oven with the door slightly ajar to prevent cracking from sudden temperature changes.
Display your new loyal friends on a shelf or desk where their cheerful expressions can brighten your day


Round Bunny Buddies
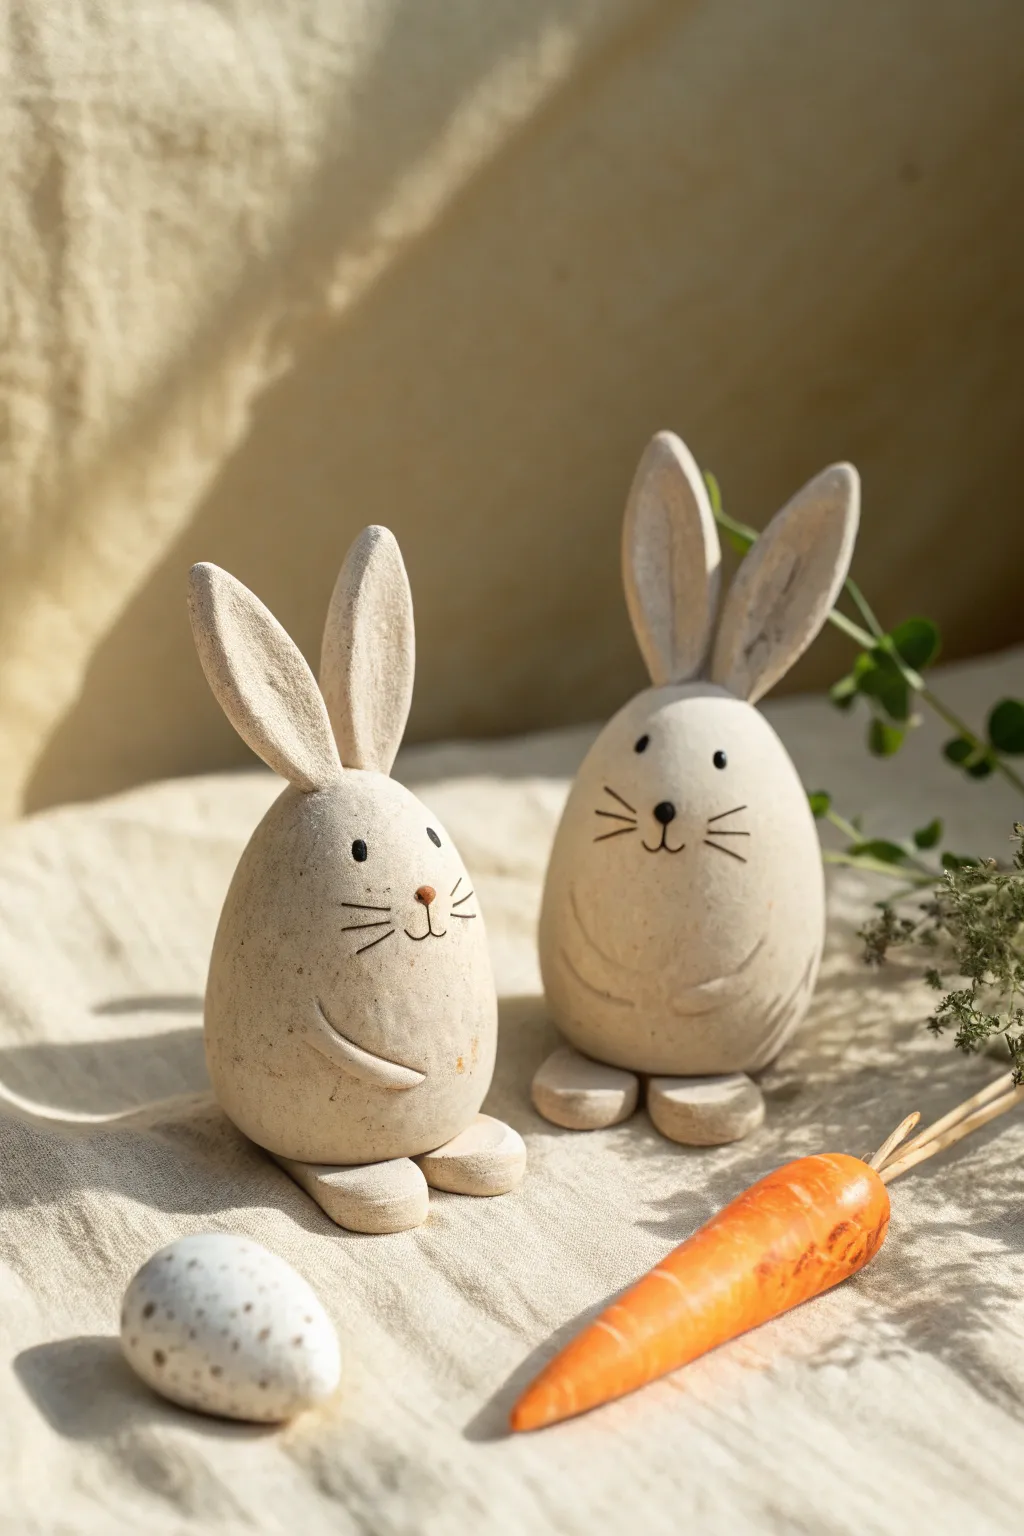
These charming, egg-shaped bunnies bring a rustic, minimalist touch to your seasonal decor with their speckled stone finish. Simple shapes and subtle carved details make this an approachable project for beginners looking to create a sweet pair of long-eared friends.
Step-by-Step Tutorial
Materials
- Light beige polymer clay (preferably ‘granitex’ or stone effect)
- Black acrylic paint
- Fine detail paintbrush (size 0 or 00)
- Clay sculpting tools (needle tool and curved modeling tool)
- Small rolling pin
- Liquid clay or Bake and Bond (optional)
- Aluminum foil (for armature core)
- Oven
- Baking sheet with parchment paper
- Matte varnish (optional)
Step 1: Shaping the Bodies
-
Create the core:
Crumple a small amount of aluminum foil into a tight egg shape. This saves clay and keeps the figurine lightweight. Make two cores if you are creating a pair of bunnies. -
Cover with clay:
Condition your stone-effect beige clay until soft. Roll it into a sheet about 1/4 inch thick. Wrap this sheet around your foil core, smoothing the seams together until you have a seamless, smooth egg shape. -
Refine the form:
Roll the egg shape gently between your palms to remove any fingerprints. If the base isn’t flat enough to stand, gently tap the bottom of the egg against your work surface to create a stable, flat bottom. -
Add the feet:
Roll two small balls of clay and flatten them into rounded ovals. Place these side-by-side underneath the front of the body to serve as feet. Press gently so they adhere to the main body.
Keeping it Clean
Keep baby wipes or hand sanitizer nearby. Light-colored clay picks up lint and dust easily. Clean your hands and tools before touching the pale clay to keep it pristine.
Step 2: Adding Details
-
Form the ears:
Roll two elongated teardrop shapes for the ears. Flatten them slightly. Use a modeling tool to create a shallow indentation running down the center of each ear for a natural look. -
Attach the ears:
Press the wider ends of the ears onto the top of the head. I like to blend the clay at the attachment point using a silicone tool to ensure they don’t pop off later. You can use a dab of liquid clay here for extra strength. -
Carve the arms:
Using a curved modeling tool or a needle tool, gently carve two curved lines on the lower half of the body to suggest arms resting on the belly. Keep the lines smooth and not too deep. -
Sculpt the face:
For the nose, roll a tiny speck of clay (you can use a slightly darker beige or mix a dab of orange paint into your clay) into a triangle and press it onto the center of the face. -
Pre-bake texture:
Before baking, inspect your bunny. If your clay isn’t pre-speckled, you can flick a stiff toothbrush with diluted brown paint over the raw clay now, or wait until after baking.
Step 3: Baking and Painting
-
Bake carefully:
Place your bunnies on a parchment-lined baking sheet. Bake according to your polymer clay package instructions (usually 275°F/135°C for 15-30 minutes per 1/4 inch of thickness). -
Cool down:
Turn off the oven and let the bunnies cool down completely inside or on the counter. Do not paint them while they are warm. -
Paint the eyes:
Dip the handle end of a paintbrush or a dotting tool into black acrylic paint. Dot two small, solid black eyes above the nose. -
Add whiskers and mouth:
Using your finest detail brush, paint three thin whiskers on each cheek. Paint a small vertical line down from the nose, curving into a shallow ‘w’ shape for the mouth. -
Final touches:
If you want a sealed finish, apply a coat of matte varnish. This protects the paint and gives the stone texture a finished look.
Accessorize Your Bunny
Make a tiny clay carrot or an Easter egg to place next to your bunny, or tie a thin piece of jute twine or raffia around its neck for a rustic bow tie.
Set your new earthen friends on a shelf or windowsill to enjoy their quiet charm


Tiny Frog Sitters
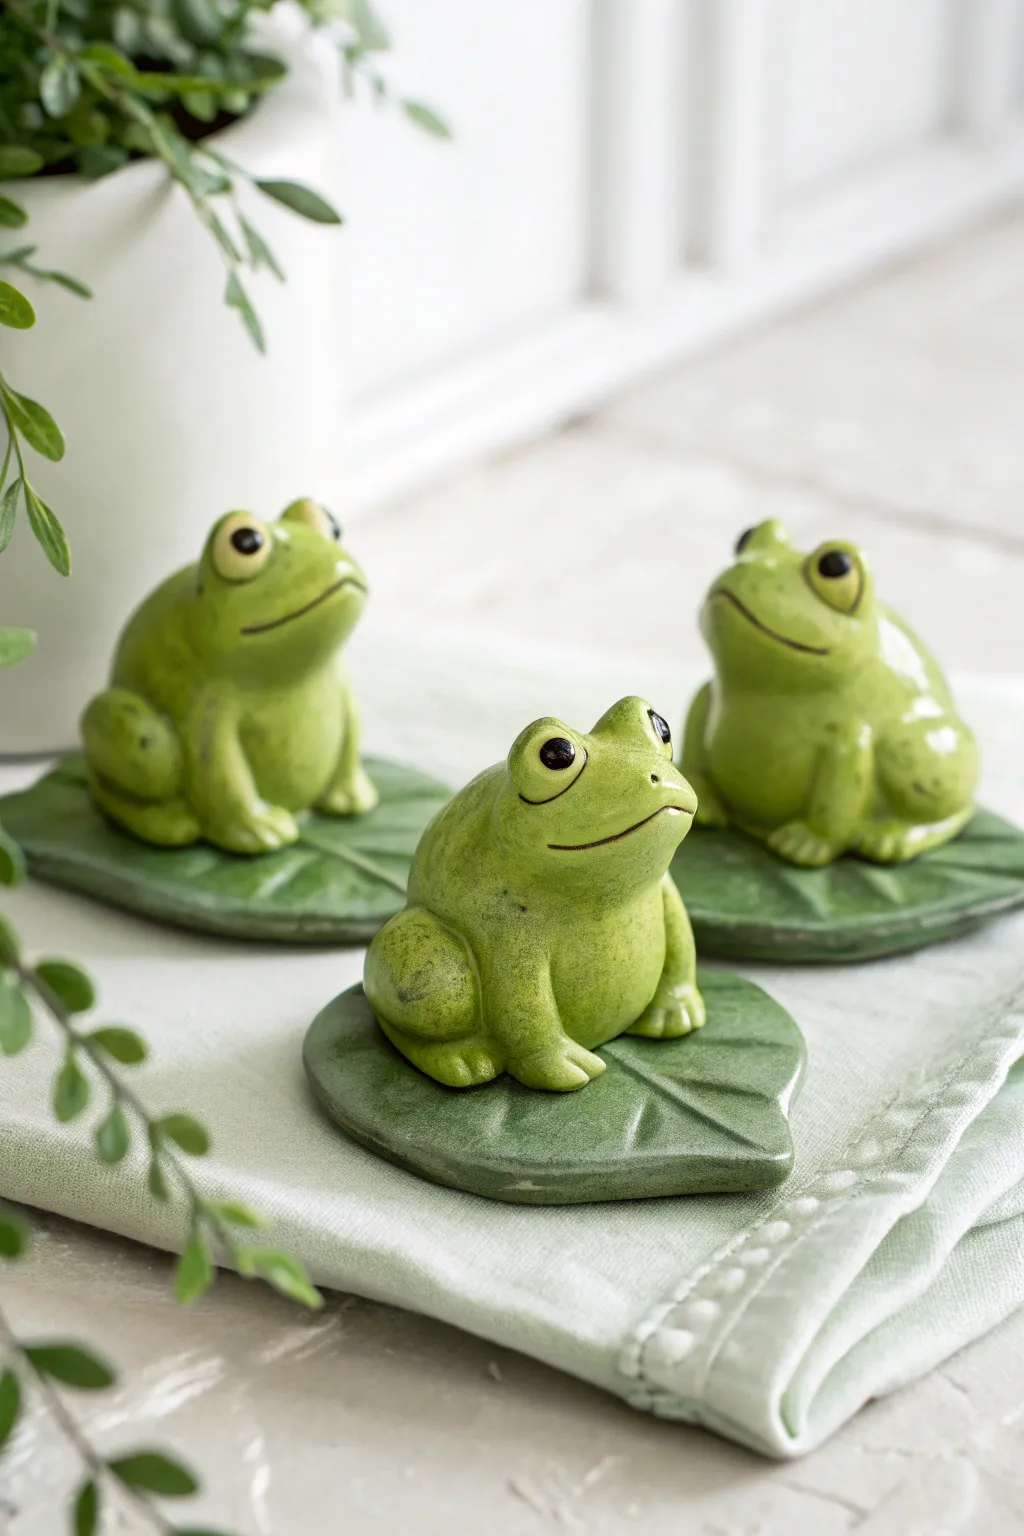
These charming little amphibians add a touch of pond-life magic to any shelf or planter ledge without the mess. Sculpted from polymer clay and finished with a glossy sheen, they feature friendly expressions and rest peacefully on their own textured lily pads.
Detailed Instructions
Materials
- Polymer clay (light green, dark green, black, white)
- Acrylic paint (moss green, yellow-green, brown wash)
- Sculpting tools (needle tool, ball stylus)
- Smooth work surface or ceramic tile
- Rolling pin
- Small paintbrush
- Gloss glaze or varnish
- Oven (for baking per clay instructions)
Step 1: Sculpting the Leaf Base
-
Prepare the leaf clay:
Start by conditioning a chunk of dark green polymer clay until it’s soft and pliable. Roll it into a smooth ball about the size of a walnut to ensure there are no air bubbles trapped inside. -
Shape the pad:
Flatten the ball onto your work surface using a rolling pin or the palm of your hand until it is roughly 1/8th inch thick. Pinch one end slightly to create a subtle point and use a round cutter or your fingers to indent the opposite side, forming a classic heart-like lily pad shape. -
Add texture:
Using a needle tool or a craft knife, gently score a central vein line running from the indentation toward the tip. Add branching veins radiating outward to give the leaf realistic texture. -
Refine the edges:
Smooth the edges of the leaf with your finger to remove any harsh cuts. Gently lift the edges slightly to give the leaf a natural, cupped appearance rather than looking perfectly flat.
Unwanted Fingerprints?
If you can’t smooth out prints with oil, try lightly brushing the unbaked clay with cornstarch or baby powder before handling it one last time.
Step 2: Forming the Frog
-
Create the body:
Take a portion of light green clay and roll it into a slightly squat, oval shape for the frog’s body. The bottom should be flattened slightly so it sits securely on the leaf base you just made. -
Add the hind legs:
Roll two smaller balls of the same green clay into teardrop shapes. Flatten them slightly and press them onto the sides of the body towards the back, ensuring the wider part forms the thigh and the narrow tip points forward for the foot. -
Sculpt the front legs:
Roll two thin cylinders or ‘snakes’ of clay for the front arms. Attach these to the front of the chest area, blending the clay at the shoulder so it looks seamless. I like to press the ends down firmly to mimic little hands resting on the ground. -
Detail the toes:
Use a needle tool to gently impress lines into the tips of the front and back feet to suggest toes. You don’t need to cut all the way through; just a small indentation creates the illusion of webbed feet.
Make It a Set
Create different poses: sculpt one frog looking up at a fly, or one stretching a leg out. Vary the leaf sizes to create a diverse lily pad cluster.
Step 3: Face and Details
-
Add the eyes:
Roll two very small balls of light green clay and place them on top of the head for eye sockets. Press a tiny indentation into the center of each with a ball stylus, then insert a tiny bead of black clay for the pupil. -
Create the expression:
Use the side of your needle tool or a dedicated smile tool to press a wide, gentle curve into the face for the mouth. Adding tiny dimples at the corners can make the frog look friendlier. -
Refine the surface:
Dip your finger in a little bit of baby oil or clay softener and gently rub the frog to remove any fingerprints. This step helps achieve that smooth, amphibian-skin look before baking. -
Bake the project:
Place your frogs on their leaves on a ceramic tile or baking sheet. Bake according to your polymer clay manufacturer’s instructions—usually around 275°F (135°C) for 15-30 minutes depending on thickness.
Step 4: Finishing Touches
-
Apply a wash:
Once cool, mix a small amount of brown acrylic paint with water. Brush this wash over the textured leaf and into the crevices of the frog’s legs, then immediately wipe away the excess with a paper towel to highlight the details. -
Dry brush texture:
Dip a dry brush into a tiny amount of yellow-green paint and lightly dust the top of the frog’s head and back. This adds dimension and mimics the mottled skin of a real frog. -
Seal the piece:
Finish by applying a coat of gloss glaze to the frog and a satin or matte glaze to the leaf. The glossy finish gives the frog a wet, freshly-emerged-from-the-pond appearance.
Once the glaze dries, place your little trio near a potted plant for an adorable surprise

The Complete Guide to Pottery Troubleshooting
Uncover the most common ceramic mistakes—from cracking clay to failed glazes—and learn how to fix them fast.
Pocket Turtle Figurines
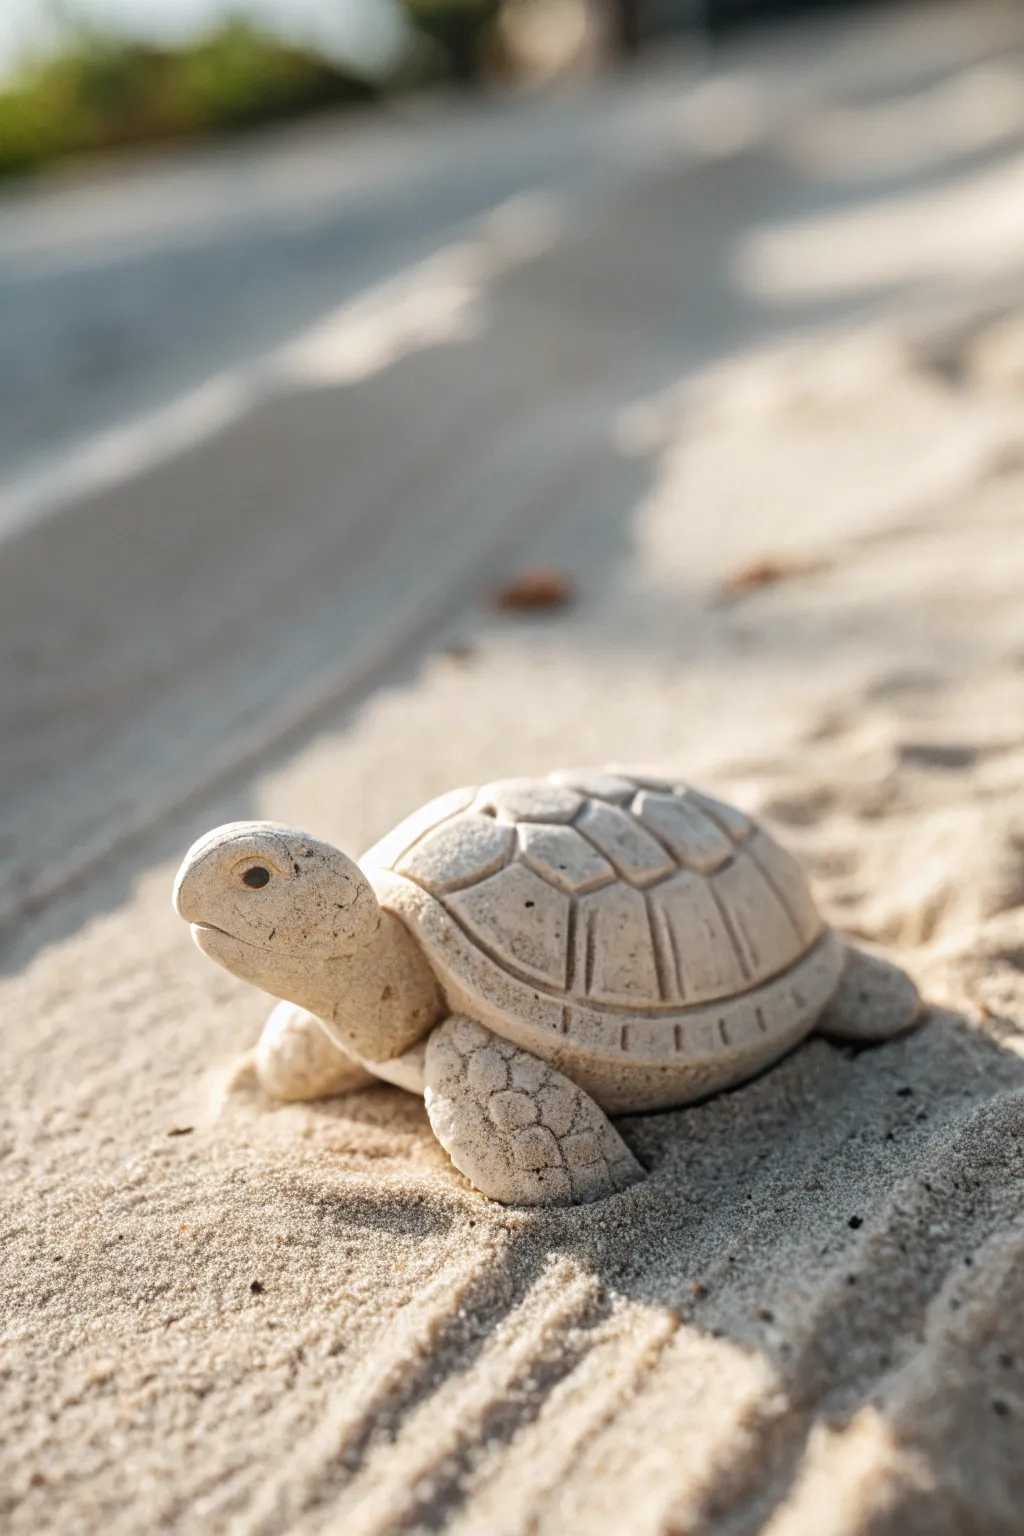
Create a charming, palm-sized companion that mimics the look of carved sandstone using polymer clay. This project features a distinctly textured shell and realistic flipper details, perfect for a beachy vibe or a desk mascot.
Step-by-Step Guide
Materials
- Beige or sand-colored polymer clay (e.g., Fimo or Sculpey)
- Granite-effect polymer clay (optional, for mixing)
- Needle tool or toothpick
- Small ball stylus tool
- Flexible sculpting blade
- Clean toothbrush or stiff bristle brush
- Coarse sandpaper or a texture sponge
- Oven for baking
Step 1: Forming the Base
-
Mix the clay:
Start by conditioning your beige clay until it’s soft and pliable. If you want that speckled, stony look shown in the photo, I like to mix in a very small amount of granite-effect clay—just enough to add tiny flecks without darkening the color too much. -
Shape the shell body:
Roll a ping-pong sized ball of clay, then gently press it onto your work surface to flatten the bottom. Dome the top with your fingers to create a smooth, high-arch mound for the shell. -
Texture the shell surface:
Before adding details, gently tap the entire domed surface with a clean toothbrush or a texture sponge. This breaks up the smoothness and gives it that weathered stone appearance.
Keeping the Shape
If the heavy shell makes the turtle sag while sculpting, rest the belly on a small piece of crumpled foil to support the arch until it’s baked hard.
Step 2: Sculpting the Flippers and Head
-
Create the front flippers:
Roll two equal pea-sized balls into teardrop shapes. Flatten them slightly so they look like paddles. -
Attach front flippers:
Press the wide end of the teardrops under the front left and right sides of the shell. Angle them slightly outward as if the turtle is pushing itself up. -
Texture the flippers:
Use your needle tool to lightly draw irregular mosaic shapes or cracked-earth patterns on the top surface of the flippers to mimic heavy scales. -
Add back flippers:
Repeat the process with two slightly smaller balls for the rear legs. Tuck these under the back of the shell, just peaking out. -
Form the head:
Roll a cylinder that is rounded at one end. This will be the neck and head. Curve it slightly upwards so the turtle looks alert. -
Attach the head:
Smooth the neck end under the front center of the shell. Blend the clay underneath using your sculpting tool so it’s securely attached. -
Detail the face:
Use the needle tool to horizontally slice a smiling mouth line across the front of the snout. For the eyes, press your small ball stylus firmly into the sides of the head to create deep, shadowed sockets.
Step 3: Refining the Shell
-
Define the shell rim:
Use your needle tool or a small knife to score a deep line around the entire circumference of the shell, creating a distinct rim or ‘marginal scutes’ layer just above the legs. -
Carve the central scutes:
Draw a hexagon in the very center of the shell’s dome. This is your starting point for the pattern. -
Add radiating lines:
From each point of the central hexagon, draw lines extending down toward the rim line you created earlier. This creates the classic tortoise shell pattern. -
Deepen the grooves:
Go back over your shell lines with the needle tool to make them deeper and wider. This ensures the design stays visible after baking. -
Final texture check:
Inspect your figurine for fingerprints. If you find any, gently dab them away with the toothbrush to restore the sandy texture. -
Bake the figurine:
Bake according to your clay manufacturer’s instructions (usually around 275°F/130°C for 15-30 minutes). Let it cool completely in the oven to prevent cracking.
Stone Effect Finish
After baking, dilute brown acrylic paint with water and wash it over the shell. Wipe off the surface immediately—paint stays in the grooves for depth.
Place your finished turtle on a shelf or carry it in your pocket as a sturdy little reminder of the sea
Mini Penguin Waddlers
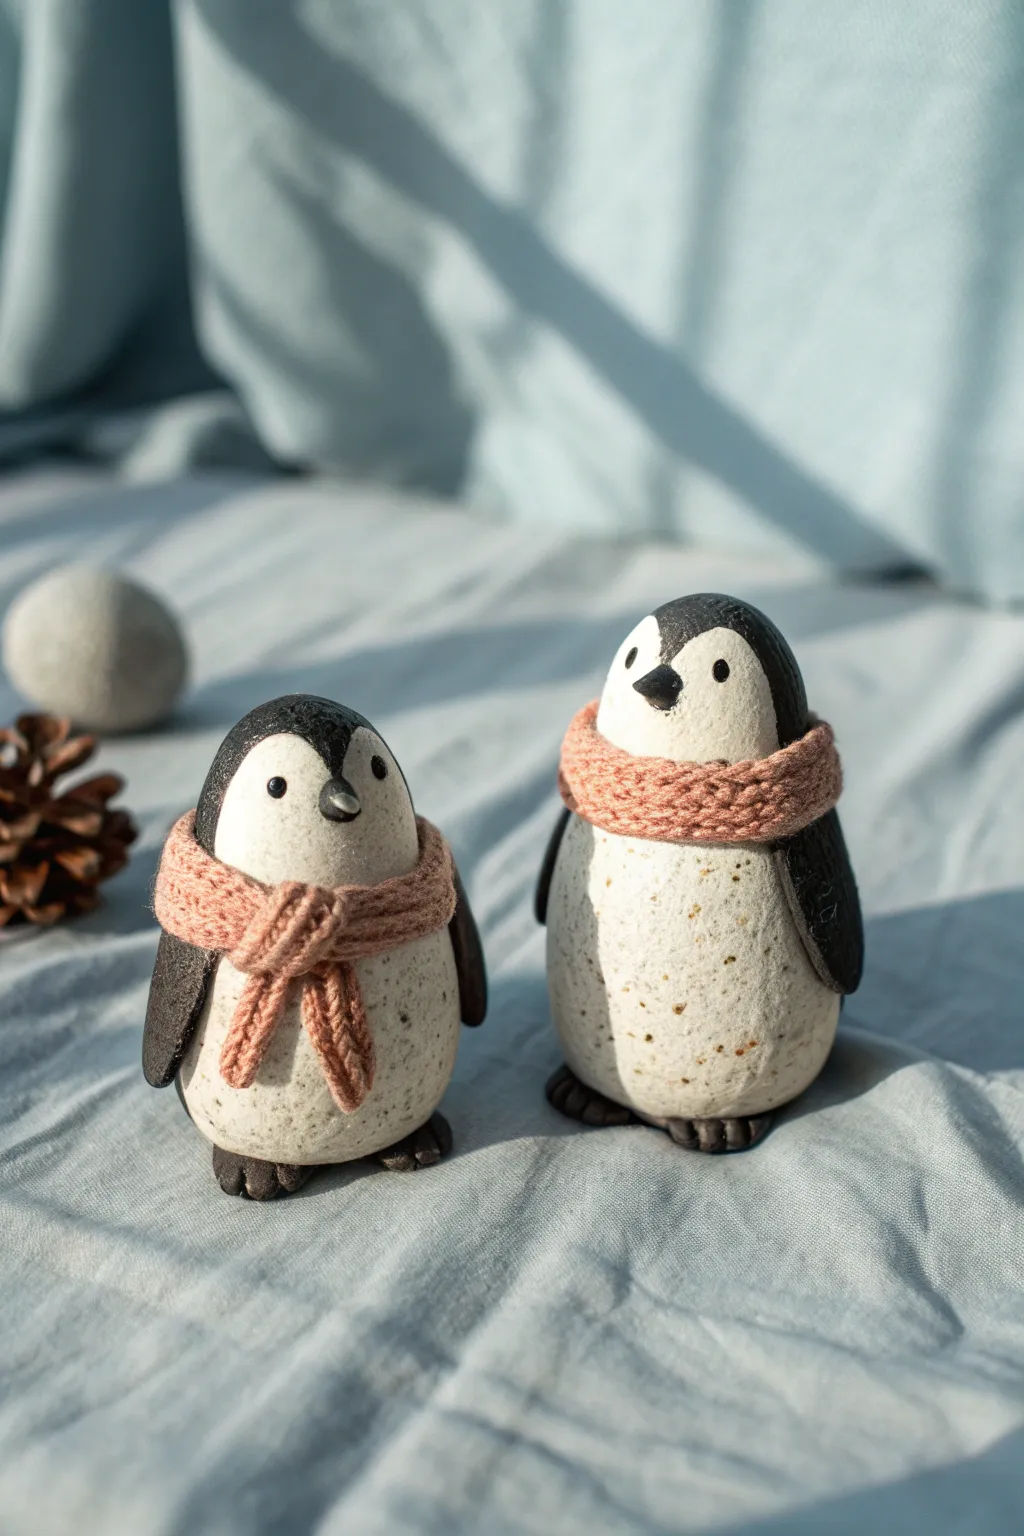
Create a charming pair of winter – ready penguins with a delightful speckled stone texture and miniature knitted accessories. These adorably round figurines combine simple clay modeling with a touch of gentle finishing work to achieve a rustic, handcrafted look.
How-To Guide
Materials
- White polymer clay (or air-dry clay)
- Black polymer clay
- Light pink or peach yarn (fine weight)
- Toothpicks or knitting needles (for texture)
- Ground black pepper or dried tea leaves (for speckling)
- Acrylic paint (black and white)
- Matte varnish or sealant
- Sculpting tools (needle tool, ball tool)
- Fine grit sandpaper
Step 1: Preparing the Speckled Base
-
Mix the clay:
Begin by conditioning your white polymer clay until it is soft and pliable. To achieve that organic, stony look seen in the photo, mix in a pinch of ground black pepper or tiny flakes of dried tea leaves into the white clay. Knead thoroughly until the specks are evenly distributed. -
Shape the bodies:
Divide your clay into two portions, making one slightly larger than the other for visual variety. Roll each piece into a smooth ball, then gently elongate them into egg shapes with a slightly flattened bottom so they stand securely. -
Smooth the surface:
Use your fingers or a flat tool to smooth out any fingerprints. The shape should be plump and rounded at the bottom, tapering slightly toward the head area.
Texturing Trick
To get realistic ‘knit’ texture on the scarf without tedious sculpting, try rolling the clay strip over a piece of coarse fabric or actual knitting before attaching it.
Step 2: Adding Penguin Features
-
Create the black head cap:
Roll out a small piece of black clay into a thin sheet. Cut a curved ‘widow’s peak’ shape and drape it over the top of the white egg shape to form the penguin’s head markings. Smooth the edges down so they blend seamlessly into the white body. -
Refine the face:
Use a modeling tool to carefully shape the black clay around the ‘face’ area, ensuring the characteristic heart-shaped hairline is centered. -
Attach the wings:
Form two teardrop shapes from black clay for the wings. Flatten them gently and attach one to each side of the body, curving them slightly to follow the roundness of the penguin’s tummy. -
Add the beak:
Roll a tiny cone of black clay for the beak. Press it firmly onto the center of the face, just below the black hairline. You can use a needle tool to create a tiny separation line if you want an open beak look. -
Form the feet:
Create small, flat ovals from dark clay (black or dark grey). Use a knife tool to press two indentations into the front of each oval to create toes. Place the body on top of these feet, pressing gently to bond them. -
add the eyes:
Use a small ball tool to make tiny indentations for the eyes. Insert very small balls of black clay, or wait until after baking to paint them on for precision. -
Add catchlights:
If you are using clay for eyes, add the tiniest speck of white clay to each black eye to give them a spark of life.
Step 3: SCULPTING THE SCARVES
-
Prepare the scarf clay:
Since actual knitting is too bulky for this scale, we will simulate it with clay. Take a muted pink or peach clay (mix white with a tiny dot of red and brown). Roll it into a long, thin snake. -
Flatten and texture:
Gently flatten the snake into a strip. Use a needle tool or a clean toothbrush to impress a detailed texture. Create tiny ‘V’ shapes repeatedly along the strip to mimic a knit stitch pattern. -
Wrap the straight scarf:
For the taller penguin, wrap the textured strip around the neck area simply, creating an infinity scarf look. Overlap the ends at the back and blend them. -
Create the knotted scarf:
For the smaller penguin, wrap the strip around the neck but leave the ends longer. Cross one end over the other in the front to simulate a tied knot, letting the ends drape down the belly. -
Detail the fringe:
Use your needle tool to add deeper vertical lines at the very ends of the knotted scarf to look like yarn fringe.
Lint Control
White clay picks up everything! Wipe your hands and work surface with a baby wipe before handling the white clay, and keep it covered when not actively shaping it.
Step 4: Finishing Touches
-
Baking:
Bake the figurines according to your specific polymer clay’s package instructions (usually 275°F/135°C for 15-30 minutes). Let them cool completely. -
Enhancing the stone texture:
Once cool, I like to lightly sand the white areas with very fine sandpaper. This exposes the pepper/tea specks and removes any shiny plastic look, enhancing the stone effect. -
Sealing:
Apply a coat of matte varnish to the entire piece. This protects the clay and unifies the finish. -
Highlighting eyes:
If you didn’t add white clay highlights earlier, use a toothpick to place a tiny dot of white acrylic paint on the eyes now for that bright, attentive expression.
Set your finished pair on a windowsill or desk for a permanent touch of winter whimsy


What Really Happens Inside the Kiln
Learn how time and temperature work together inside the kiln to transform clay into durable ceramic.
Little Bear Cub Blobs
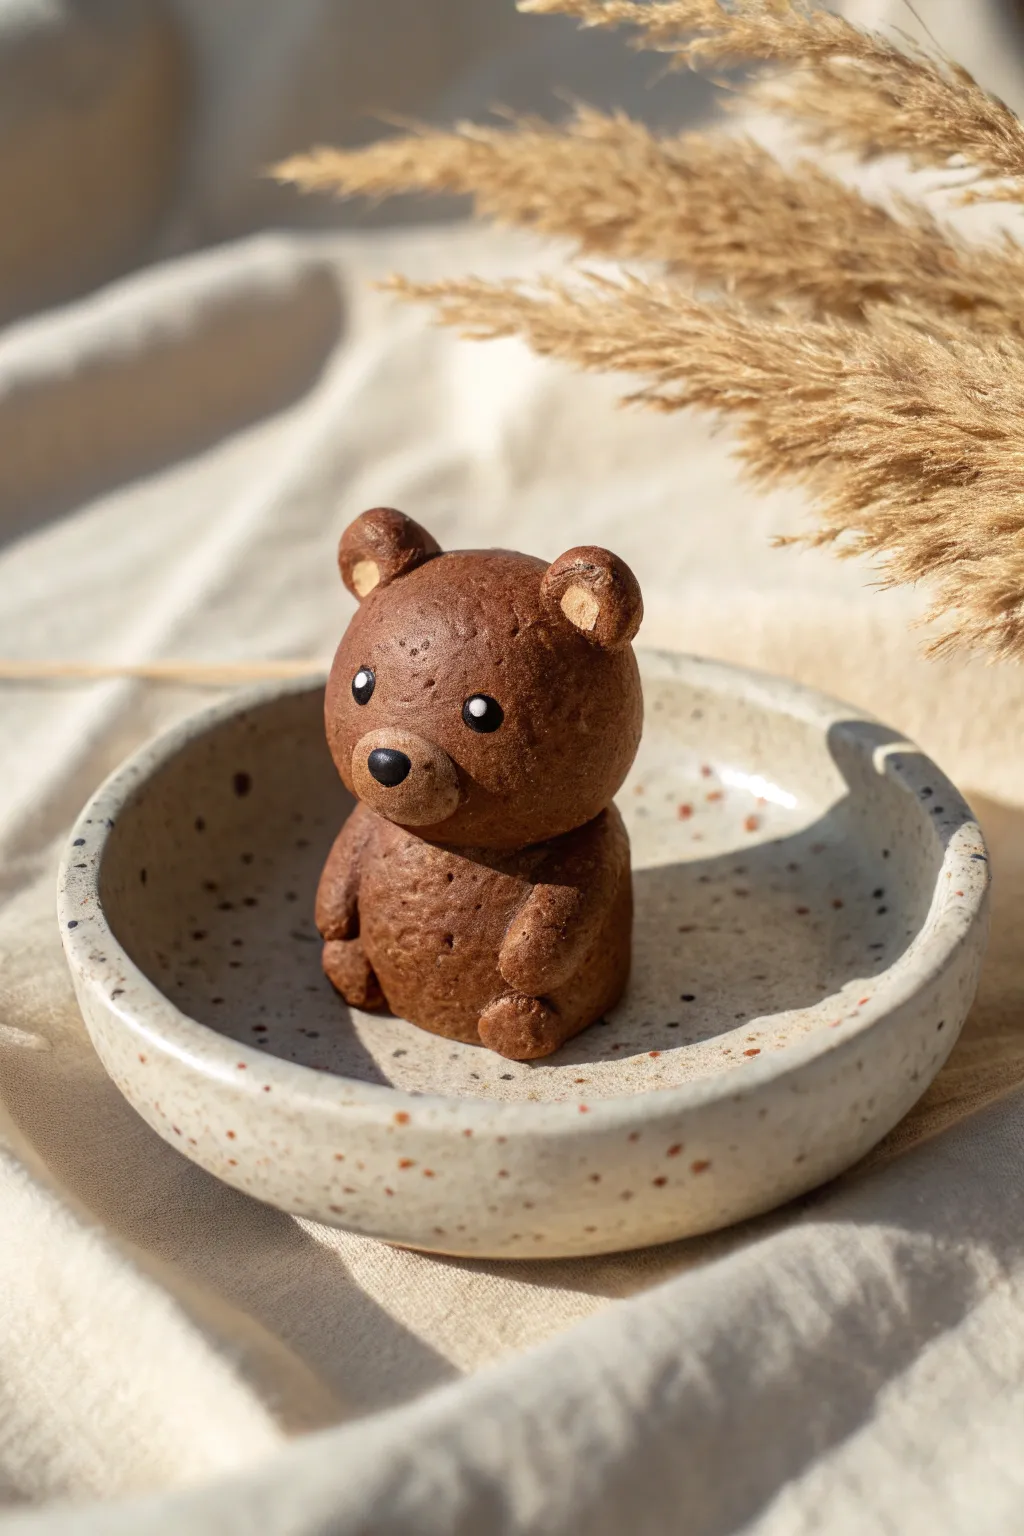
This adorable bear figurine captures the charm of a freshly baked cookie with its textured, toasty brown finish. With simple shapes and a clever texturing technique, you can create a sweet little desk companion that looks almost good enough to eat.
Step-by-Step Guide
Materials
- Polymer clay (chocolate brown)
- Polymer clay (light tan or beige)
- Black acrylic paint
- White acrylic paint
- Small ball stylus tool
- Toothbrush or crumpled aluminum foil (for texturing)
- Fine detail paintbrush
- Gloss varnish (optional)
Step 1: Shaping the Head
-
Roll the base:
Start by conditioning a chunk of chocolate brown clay until it is soft and pliable. Roll it into a smooth sphere about the size of a walnut to form the bear’s head. -
Form the muzzle:
Pinch off a tiny piece of the same brown clay and roll it into a small oval. Flatten it slightly. -
Attach the muzzle:
Press the flattened oval onto the lower center of the head sphere. Blend the edges gently with your finger or a tool so it looks like one cohesive piece, but keeps a slightly raised profile.
Getting that “Cookie” Look
For a hyper-realistic baked texture, dust the unbaked clay lightly with soft lighter-brown pastel chalks before texturing. It adds depth to the “pores.”
Step 2: Creating the Ears
-
Make ear bases:
Create two small balls of brown clay, roughly pea-sized. -
Add inner details:
Take two tiny specks of the light tan clay and press them onto the brown ear balls, flattening them into little discs. -
Attach and shape:
Press the ears onto the top sides of the head. Use your thumb to flatten them slightly against the head curve, ensuring a strong bond.
Step 3: Building the Body
-
Form the torso:
Roll a slightly larger cylinder of brown clay for the body. It should be a bit wider at the bottom to give the bear a stable, sitting posture. -
Flatten the top:
Press the top of the cylinder gently to create a flat surface where the head will rest. -
Add the arms:
Roll two small sausage shapes for arms. Attach them to the sides of the body, curving them forward so they rest on the belly. -
Add the feet:
Make two small oval balls for feet and press them onto the bottom front of the body, just peeking out. -
Assembly:
Place the finished head onto the body. Press down firmly but carefully to bond them without squashing your shapes. I sometimes insert a small cut piece of wire or toothpick between the head and body for extra stability.
Fingerprints Everywhere?
If you’re leaving fingerprints while handling the clay, use a tiny bit of baby oil on your fingers, or rely heavily on the toothbrush texturing step to hide them.
Step 4: Texturing and Details
-
Applying texture:
This is the secret sauce: take an old toothbrush or a ball of crumpled foil. Gently tap it all over the surface of the bear. -
Refine the texture:
Continue tapping until the entire surface has a porous, sponge-cake appearance. Be careful not to smudge the distinct shapes of the muzzle or inner ears too much. -
Bake the clay:
Bake your bear according to the manufacturer’s instructions on your specific package of polymer clay. Let it cool completely before painting.
Step 5: Painting the Face
-
Paint the nose:
Use black acrylic paint and a fine brush to paint a small, rounded triangle on the muzzle for the nose. -
Paint the eyes:
Dip a ball stylus or the handle end of a paintbrush into black paint. Dot two eyes onto the face, spacing them widely for a cute look. -
Add the sparkle:
Once the black paint is dry, use a very fine tool to add a tiny white dot to the upper corner of each eye. This brings the character to life. -
Finish up:
If you want a wet look for the nose and eyes, apply a tiny drop of gloss varnish to those areas only.
Now you have a sweet little bear cub ready to sit on your shelf or keep you company.
Baby Octopus Figurines
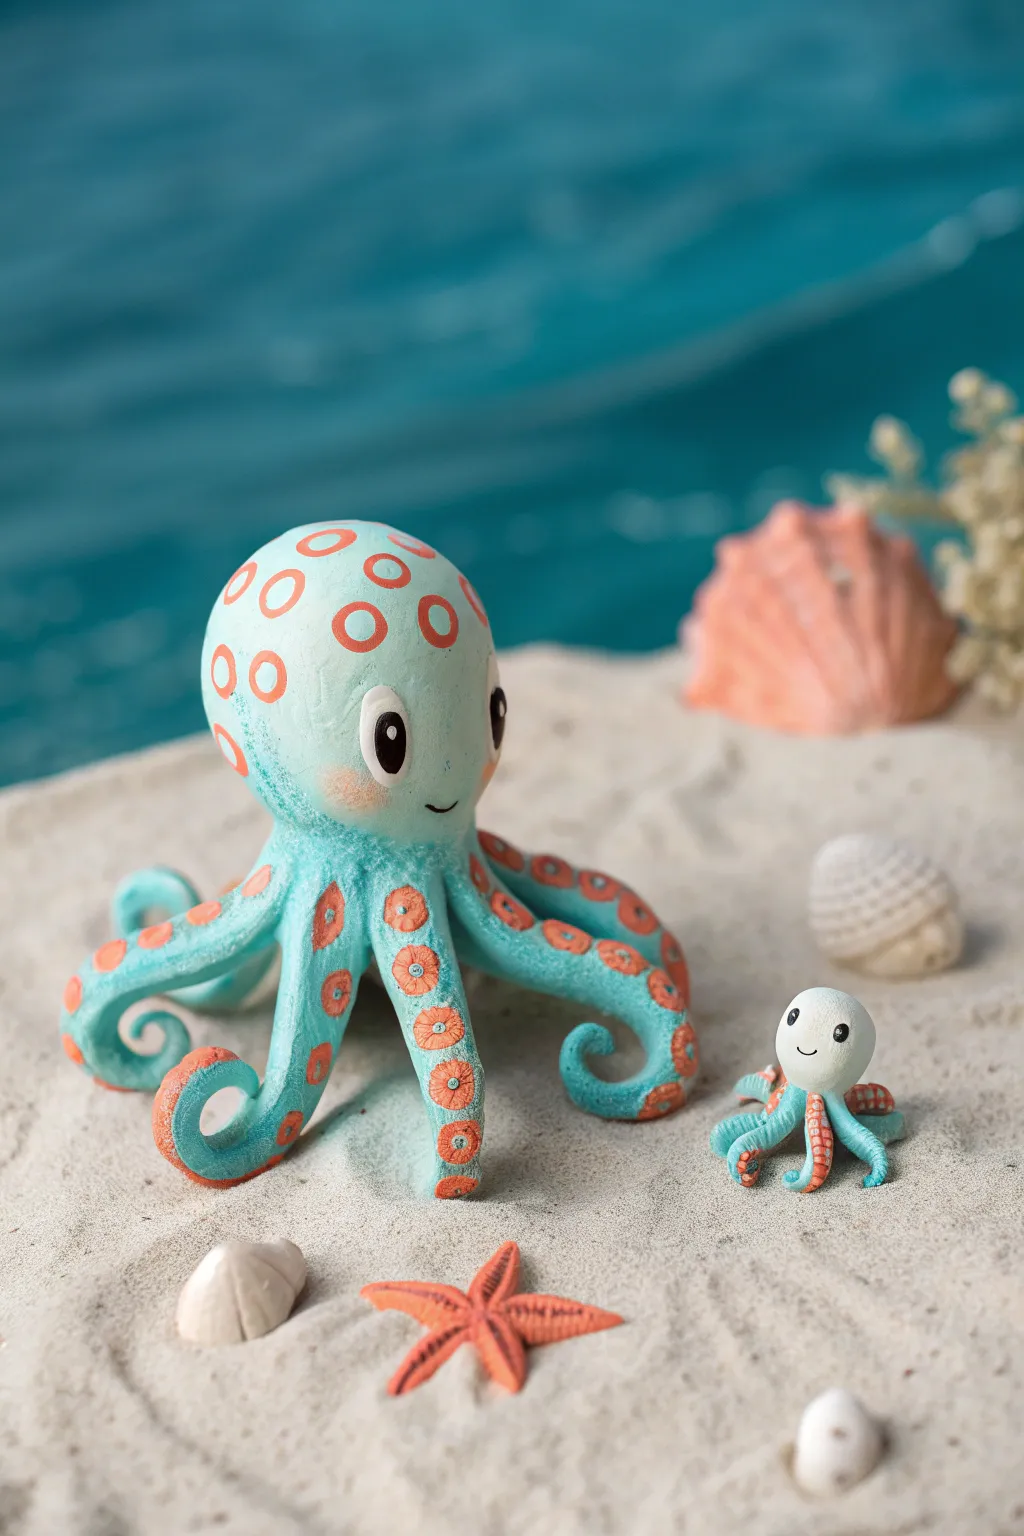
Sculpt this adorable duo featuring a friendly mamma octopus and her tiny baby counterpart, perfect for a seaside-themed display. Their whimsical turquoise bodies are accented with coral-orange spots and textured suckers, giving them a charming, tactile finish.
Step-by-Step Tutorial
Materials
- Polymer clay (Turquoise Blue)
- Polymer clay (Coral Orange)
- Polymer clay (White)
- Polymer clay (Black)
- Acrylic rolling pin
- Ball stylus tools (large and small)
- Needle tool or toothpick
- Soft pastel chalk (pink/blush) and soft brush
- Blade or craft knife
- Oven and baking tray
Step 1: Sculpting the Large Octopus Body
-
Form the head:
Start by conditioning a substantial ball of turquoise clay until it is soft and pliable. Roll it into a smooth sphere, then gently elongate the bottom slightly to create a bulbous egg shape for the head. -
Create the base:
Flatten the bottom of your head shape slightly so it can sit upright without rolling away while you work on the legs. -
Roll the tentacles:
Roll eight sausages of turquoise clay. They should be thicker at one end and taper down to a point at the other. Make them long enough to curl artistically. -
Attach the tentacles:
Flip the head upside down. Press the thick ends of the eight tentacles onto the bottom center of the head, blending the clay seams smooth with your thumb or a modeling tool so they looked joined naturally. -
Pose the legs:
Turn the octopus upright. Curl the ends of the tentacles upwards and outwards in spiral shapes to give the figure a fluid, floating movement.
Step 2: Adding Details and Texture
-
Make the suckers:
Take your coral orange clay and roll it into a thin snake. Slice off many small, equal-sized discs. -
Apply the suckers:
Press these orange discs onto the underside of the curled-up tentacles. Once placed, use a small ball stylus to press into the center of each orange dot, creating a cup-like sucker texture. -
Create head spots:
Roll thin snakes of coral clay and form them into small rings. Gently press these rings onto the top and sides of the head to create the circular markings. -
Sculpt the eyes:
Flatten two ovals of white clay and press them onto the face area. Add smaller black clay ovals on top for pupils, placing them slightly towards the bottom for a cute expression. -
Add highlights:
Place a tiny white dot of clay on the upper right side of each black pupil to bring the eyes to life. -
Blush the cheeks:
Scrape a little pink soft pastel into powder. Use a soft, dry brush to gently dab rosy cheeks just below the eyes. -
Smile detail:
Use a needle tool or the edge of a small tool to impress a simple, curved smile between the cheeks.
Droopy Tentacles?
If the legs sag before baking, support them with small balls of aluminum foil or batting. This holds the curl shape while the clay cures in the oven, ensuring perfectly lifted spirals.
Step 3: Creating the Baby Octopus
-
Form the mini body:
Using a much smaller amount of white clay (or very pale turquoise), roll a small ball for the baby’s head. -
Miniature tentacles:
Create tinier turquoise tapered logs for the legs. Attach them to the white head just like the larger version, blending well. -
Baby details:
Add tiny orange clay stripes or dots to the legs for color coordination. Use a needle tool to poke two eyes and a tiny smile directly into the clay face, or use tiny bits of black clay for eyes.
Textured Skin Look
Before baking, gently tap the blue surface with a clean toothbrush or piece of sandpaper. This removes the plastic shine and gives the octopus a realistic, stone-like matte texture.
Step 4: Baking and Finishing
-
Final inspection:
Check both figures for fingerprints. I like to lightly buff them with a drop of baby oil on my finger to smooth imperfections before baking. -
Bake the batch:
Place your octopuses on a baking tray lined with parchment paper. Bake according to your brand of polymer clay instructions (usually 275°F/135°C for 15-30 minutes per 1/4 inch thickness). -
Cool down:
Let the figures cool completely in the oven with the door cracked open to prevent thermal shock cracks.
Now you have a charming sea creature family ready to decorate your shelf or accompany a sand castle display

TRACK YOUR CERAMIC JOURNEY
Capture glaze tests, firing details, and creative progress—all in one simple printable. Make your projects easier to repeat and improve.
Mushroom People Figurines
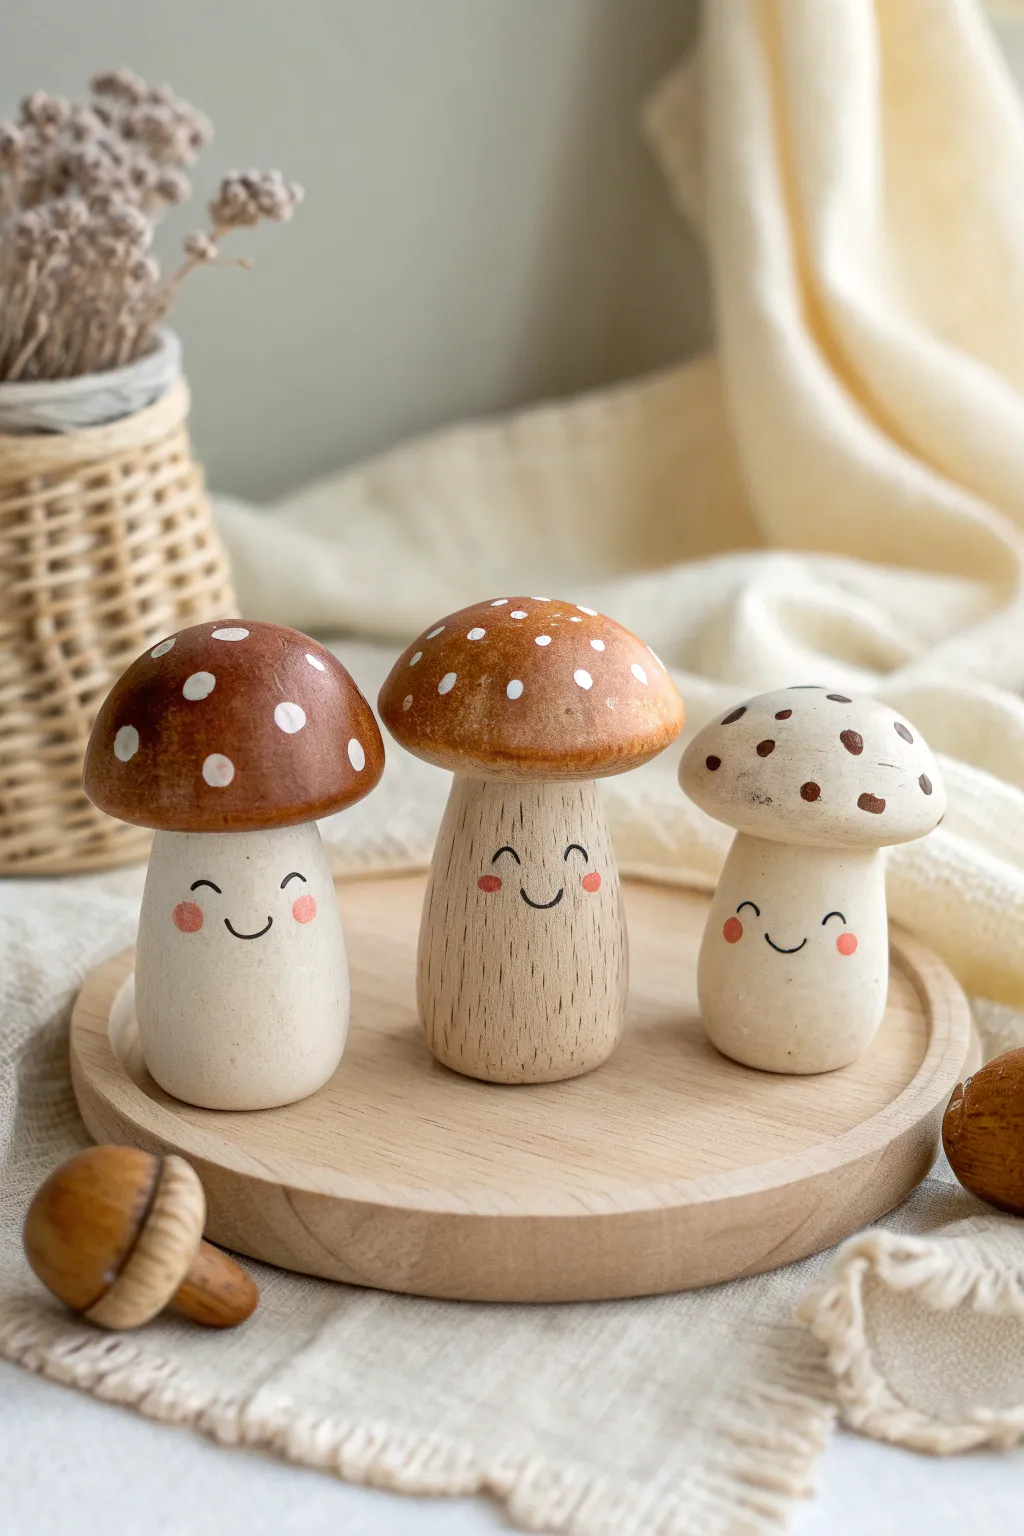
Bring the forest floor indoors with these endearing mushroom friends, featuring natural wood grain textures and sweet, hand-painted expressions. This project combines simple turning shapes with delicate detail work to create a charming trio that feels both rustic and playful.
Detailed Instructions
Materials
- Unfinished wooden mushroom turnings (various heights, 2-4 inches)
- Fine-grit sandpaper (220 and 400 grit)
- Acrylic craft paints (Burnt Sienna, Warm White, Dark Chocolate Brown, Black, Soft Pink)
- Small flat paintbrush
- Fine-point detail brush (for facial features)
- Dotting tool or toothpick
- Matte finish wood sealer spray
- Soft cloth for wiping
Step 1: Preparing the Wood
-
Initial Sanding:
Begin by sanding your unfinished wooden mushroom shapes with 220-grit sandpaper to remove any rough patches or splinters. -
Smoothing:
I like to follow up with 400-grit sandpaper to make the surface incredibly smooth, especially on the cap where we’ll be applying paint. -
Dust Removal:
Wipe the mushrooms down thoroughly with a clean, dry tack cloth or soft rag to remove all sawdust before painting.
Wood Stain Wash
Mix acrylic paint with water (1:1 ratio) instead of using it straight. It acts like a wood stain, letting the natural grain show through the color.
Step 2: Painting the Caps
-
The Dark Cap:
For the left mushroom, paint the cap solid Burnt Sienna. Use a flat brush and apply thin, even coats, letting the wood grain show slightly through if desired. -
The Mottled Cap:
For the middle mushroom, mix a little Burnt Sienna with a drop of water to create a semi-transparent wash. Apply this to the cap, dabbing slightly to create a textured, organic look rather than a solid block of color. -
The Light Cap:
Paint the third mushroom cap in a creamy Warm White or very pale beige solid coat. -
Adding Spots (Dark Cap):
Once the Burnt Sienna cap is dry, use a dotting tool dipped in Warm White to add random polka dots across the surface. -
Adding Spots (Mottled Cap):
For the middle mushroom, use a finer tip to add tiny white speckles, mimicking natural mushroom textures. -
Adding Spots (Light Cap):
For the white cap, switch to Dark Chocolate Brown paint. Add small, irregular dots to give it a speckled eggshell appearance.
Make It A Village
Vary the sizes of your wooden blanks largely to create a ‘family’ look. Try adding tiny felt scarves or moss hats for seasonal variations.
Step 3: Creating the Faces
-
Adding Cheeks:
Dip the tip of your pinky finger or a round sponge dabber into Soft Pink paint. Gently press onto the ‘stem’ area to create rosy cheeks. Keep the paint application light. -
Drafting the Face:
Lightly sketch the eyes and mouth with a pencil first to ensure the expressions are centered between the cheeks. -
Painting the Eyes:
Using your finest detail brush and black paint (or a fine-tip paint marker), carefully paint small curved arches for happy, closed eyes. -
Painting the Smiles:
Connect the cheek area with a simple, thin U-shaped smile right in the center.
Step 4: Finishing Touches
-
Texture Detailing:
If your wooden stems look too plain, use a dry brush with a tiny amount of brown paint to add vertical streaks, mimicking bark texture. -
Sealing:
Take the mushrooms to a well-ventilated area and apply a light coat of matte sealer to protect the paint without making them too shiny. -
Final Cure:
Allow the projects to cure for at least 24 hours before handling them or placing them on display.
Now you have a trio of friendly fungi ready to brighten up a shelf or desk
Smiling Cactus Cuties

Bring a little desert cheer to your desk with this irresistibly cute potted cactus figure. This project uses texture and simple shapes to create a stylized, friendly succulent that never needs watering.
How-To Guide
Materials
- Polymer clay (light green, dark brown/soil color)
- Small terracotta pot (approx. 2 inches/5cm diameter)
- Black acrylic paint or black polymer clay
- Aluminum foil
- Wire brush or stiff toothbrush (for texturing)
- Needle tool or toothpick
- Ball stylus tool
- Soft pastel chalks (dark green/teal)
- Paintbrush
- Matte varnish spray
Step 1: Preparing the Base
-
Examine Your Pot:
Start with a clean, dry miniature terracotta pot. Ensure the inside is free of dust so your clay will adhere properly later on. -
Create a Foil Core:
Crumple a piece of aluminum foil into a tight ball. This will fill the bulk of the pot and save clay. Press it firmly into the bottom of the pot, leaving about half an inch of space from the rim. -
Add the Soil Layer:
Condition a chunk of dark brown clay until soft. Flatten it into a thick pancake shape. -
Secure the Soil:
Place the brown clay over the foil core, tucking the edges down against the inner walls of the pot. Press firmly to ensure it doesn’t fall out after baking. -
Texture the Dirt:
Using a stiff toothbrush or a texturing tool, tap repeatedly all over the brown clay surface to mimic the crumbly look of potting soil.
Fingerprint Troubles?
Since this cactus has a smooth rounded shape, unwanted fingerprints show up easily. A light dusting of cornstarch on your fingers before rolling can prevent this.
Step 2: Sculpting the Cactus
-
Form the Main Body:
Condition your light green clay and roll it into a smooth ball. Slowly elongate it into a pill or capsule shape with a rounded top. -
Check the Size:
Place your green capsule onto the soil base to test the fit. It should look plump and fill most of the center space. -
Create Vertical Ribs:
Use a needle tool or the side of a toothpick to press vertical indentations running from the top center down to the bottom. Space these evenly around the entire circumference. -
Soften the Lines:
Gently rub your finger over the indented lines to smooth any sharp edges, creating soft, rounded ribs rather than harsh cuts. -
Add Realistic Texture:
Take your toothbrush again and gently tap the entire surface of the green clay. This gives it that specific matte, organic texture seen in the photo. -
Shading the Crevices:
Scrape a little dark green soft pastel into dust. Use a small dry brush to apply this powder into the vertical grooves you created; this adds depth and dimension. -
Mounting the Cactus:
Press the green cactus body firmly onto the center of the textured soil base. I sometimes use a small piece of wire between the two parts for extra stability.
Step 3: The Friendly Face
-
Mark the Features:
Decide where the face looks best—usually slightly higher than the middle. make tiny pilot holes with a needle tool. -
Add the Eyes:
Roll two miniscule balls of black clay. Press them into the eye positions, flattening them slightly so they look embedded. -
Sculpt the Smile:
Roll a very thin snake of black clay for the mouth. Curve it into a ‘U’ shape and gently press it onto the cactus below the eyes. -
Create Needle Spots:
Using a small needle tool, poke random small holes all over the green surface (avoiding the face area) to represent where spines would be. -
Final Bake:
Bake the entire piece (pot included) according to your clay manufacturer’s instructions. Let it cool completely inside the oven to prevent cracking. -
Finishing Touch:
To achieve the powdery look in the photo, spray the finished piece with a matte varnish once fully cooled.
Make it fuzzy!
For an even softer look, you can buy flocking powder. Brush glue on the baked cactus and dip it in the powder for a realistic fuzzy texture.
Place your smiling succulent on a sunny windowsill and enjoy your handcrafted gardening success
Flower Bud Babies
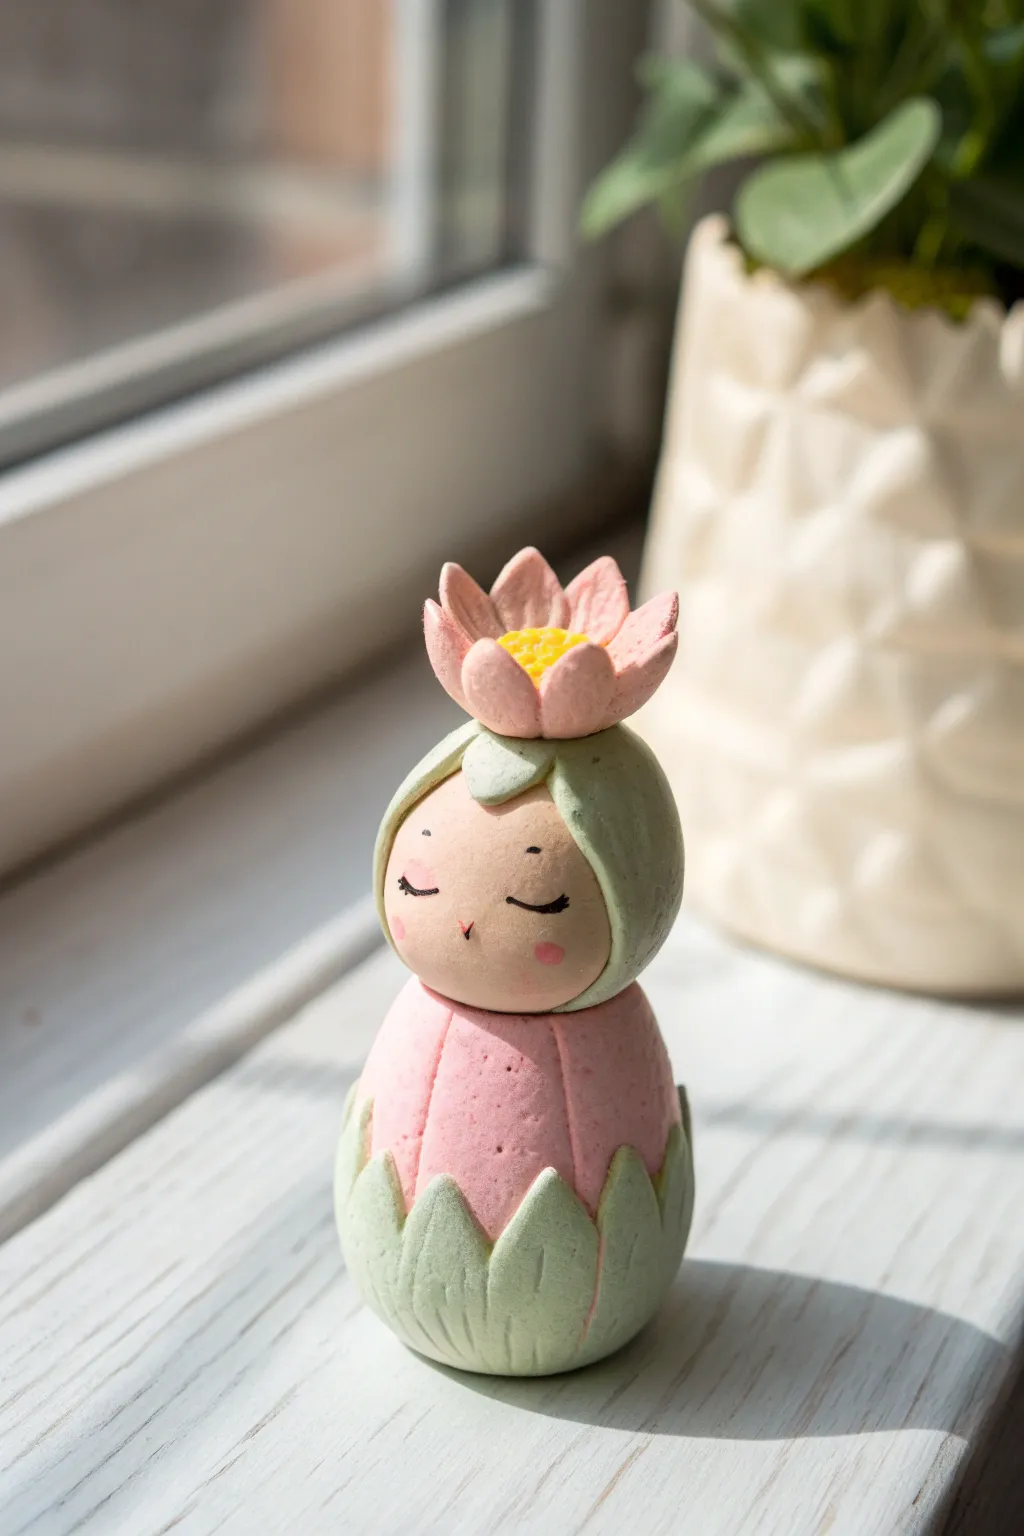
Capture the sweetness of spring with this adorable clay figurine, featuring a peaceful sleeping face nestled inside a blooming tulip-like body. With its soft pastel palette and gentle textures, this flower child makes a charming addition to any windowsill or planter.
Step-by-Step
Materials
- Polymer clay (pale pink, sage green, skin tone of choice, yellow)
- Clay sculpting tools (needle tool, ball stylus)
- Acrylic paint (black, pink for blush)
- Fine detail paintbrush
- Soft pastel chalks (optional, for shading)
- Oven for baking polymer clay
- Aluminum foil (for armature core)
Step 1: Forming the Base Body
-
Create the core:
Start by scrunching a small piece of aluminum foil into a teardrop shape. This saves clay and keeps the figurine lightweight. -
Wrap the body:
Condition your pink clay until soft, then flatten a sheet and wrap it completely around the wider bottom part of your foil core. Smooth out any seams with your fingers until you have a clean, egg-like shape. -
Add texture lines:
Using a needle tool or the back of a craft knife, gently press vertical indentations around the pink body to mimic the separation of flower petals. -
Create the leafy base:
Roll out a strip of sage green clay. Use a craft knife to cut a zigzag pattern along one edge to create triangular leaf points. -
Attach the base leaves:
Wrap this green strip around the very bottom of the pink body, pressing the triangular points upward so they cup the pink bud. Smooth the bottom seam so the figurine stands flat.
Smoother Seams
If clay seams aren’t blending well, apply a tiny drop of baby oil or clay softener to your finger. Rub gently in circles to erase the lines completely.
Step 2: Sculpting the Head and Hood
-
Form the head:
Roll a ball of skin-tone clay. It should be proportional to the body—slightly smaller than the pink base section. Place it on top of the body, pressing gently to adhere. -
Make the green hood:
Flatten a small disc of sage green clay. Drape it over the top/back of the head, shaping it like a bonnet. -
Shape the hood edge:
Mold the front edge of the green hood so it creates a little point or ‘widow’s peak’ on the forehead, framing the face nicely. -
Texture the hood:
Your fingerprints naturally smooth the clay, but if you want that natural matte look, lightly tap the surface with a stiff brush or toothbrush before baking.
Seasonal Variation
Change the petal colors to match the seasons! Try deep orange and yellow for an autumn vibe, or icy blue and white for a winter snowdrop baby.
Step 3: Creating the Crown Flower
-
Form the petals:
Create 5-6 tiny teardrops from pink clay. Flatten them slightly between your thumb and forefinger to make petals. -
Assemble the flower:
Arrange these petals in a circle on top of the green hood, pressing their points together at the center to form an open bloom. -
Add the center:
Take a tiny pinch of yellow clay, texture it with a needle tool to look like pollen, and place it right in the center of the pink petals.
Step 4: Facial Features & Baking
-
Pre-baking check:
Before baking, ensure the head is secure. I like to insert a small piece of wire or toothpick between the head and body for extra stability. -
Bake the piece:
Bake your figurine according to the clay manufacturer’s instructions (usually 275°F/130°C for 15-30 minutes). Let it cool completely. -
Paint the eyes:
Using your finest brush and black acrylic paint, carefully draw two downward curves for closed, sleeping eyes with tiny eyelashes. -
Add blush:
Mix a tiny bit of pink paint with water for a wash, or use dry pastel dust, to add rosy cheeks to the face.
Once painted and dried, your little flower bud baby is ready to bring a touch of serenity to your space
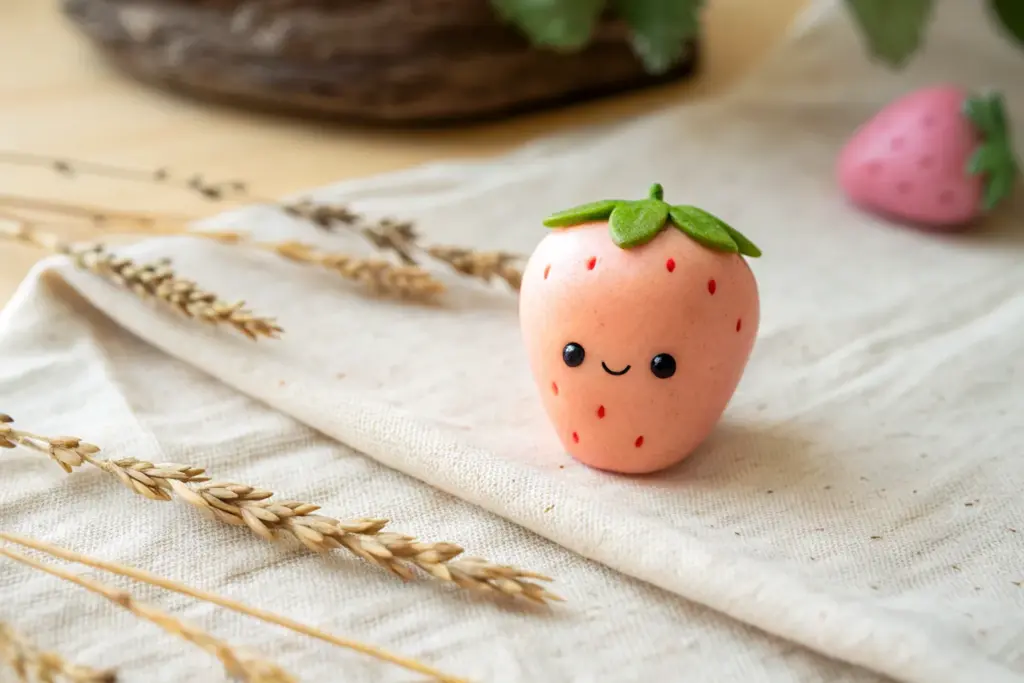
Fruit Friend Figurines

This adorable little strawberry buddy is bursting with charm, featuring a high-gloss finish that makes it look almost juicy enough to eat. With its wide-set eyes and gentle smile, this figurine is the perfect introduction to sculpting cute fruit characters.
Step-by-Step Guide
Materials
- Polymer clay (Bright Red, Leaf Green, White, Black)
- Modeling tools (ball stylus, needle tool)
- Acrylic paint (Black)
- High-gloss glaze or UV resin
- Small paintbrush
- Aluminum foil (optional core)
- Baking sheet and parchment paper
- Wet wipes for smoothing
Step 1: Shaping the Berry Body
-
Conditioning the Red Clay:
Begin by thoroughly conditioning your bright red polymer clay in your hands until it is warm and pliable. This prevents cracking later on. -
Forming the Base Shape:
Roll the red clay into a smooth sphere, then gently roll one end between your palms to create a slight taper. You want a rounded cone shape that mimics a ripe strawberry. -
Flattening the Bottom:
Tap the wider end of your strawberry gently onto your work surface. This creates a small flat spot so your figurine stands upright without wobbling. -
Smoothing the Surface:
Inspect the clay for any fingerprints. I like to gently rub the surface with a finger dipped in a tiny bit of baby oil or cornstarch to buffer them out.
Step 2: Adding Texture and Seeds
-
Creating Seed Indentations:
Using a needle tool or the fine tip of a ball stylus, press small, vertical teardrop shapes into the red surface. -
Spacing the Seeds:
Scatter these indentations randomly but evenly all around the strawberry, leaving a clear, smooth oval space in the center for the face. -
Painting the Seeds:
Take a very fine brush or a toothpick dipped in black acrylic paint. Carefully dot the inside of each indentation you just made. -
Cleaning Up:
If any paint gets on the surface outside the holes, wipe it away immediately with a damp cotton swab before it dries.
Seed Depth Trick
Don’t just paint dots on the surface! Actually pressing small divots into the clay before painting adds realistic shadow and dimension to the seeds.
Step 3: Sculpting the Leafy Crown
-
Preparing Green Clay:
Condition a small amount of leaf green clay. Divide it into 4 or 5 tiny pea-sized balls. -
Shaping the Leaves:
Flatten each green ball into a teardrop shape. Use your fingers to curve the tips slightly for a natural look. -
Attaching the Leaves:
Press the wide end of the leaves onto the top center of the strawberry. Arrange them so they overlap slightly and radiate outward. -
Adding Textural Detail:
Use a needle tool or knife to gently score a central vein down the middle of each leaf. -
Adding the Stem:
Roll a tiny cylinder of green clay and press it securely into the center where all the leaves meet.
Dust Magnets
Red clay shows every speck of dust. Keep a piece of scotch tape handy to dab your raw clay shape and lift off lint before baking.
Step 4: Creating the Face
-
Positioning the Eyes:
In the smooth area you reserved earlier, press two small indentations with a ball stylus where the eyes will go. -
Filling the Eyes:
Roll two tiny balls of black clay and press them into the sockets. Flatten them slightly so they aren’t bulging out too much. -
Adding Highlights:
Roll two incredibly tiny specks of white clay. Place one in the upper right corner of each black eye pupil to give it that sparkling, lively look. -
Sculpting the Smile:
Use a needle tool or a small U-shaped clay cutter to press a gentle curve between and slightly below the eyes. Fill this thin line with a tiny amount of black paint or a thin snake of black clay.
Step 5: Baking and Glazing
-
Baking:
Place your strawberry on parchment paper and bake according to your polymer clay package instructions (usually 275°F/135°C for 15-30 minutes per 1/4 inch thickness). -
Cooling:
Let the figurine cool completely before handling. It will be slightly soft when hot but hardens as it cools. -
Applying Glaze:
Brush a thick coat of high-gloss glaze or UV resin over the red body and eyes. This mimics the wet, shiny look in the photo. -
Matte Contrast:
For contrast, leave the green leaves matte, or apply a satin varnish to them instead of the high gloss.
Once that glaze dries, you have a permanently cheerful strawberry friend to brighten your desk.
Happy Cup-and-Straw Figurines
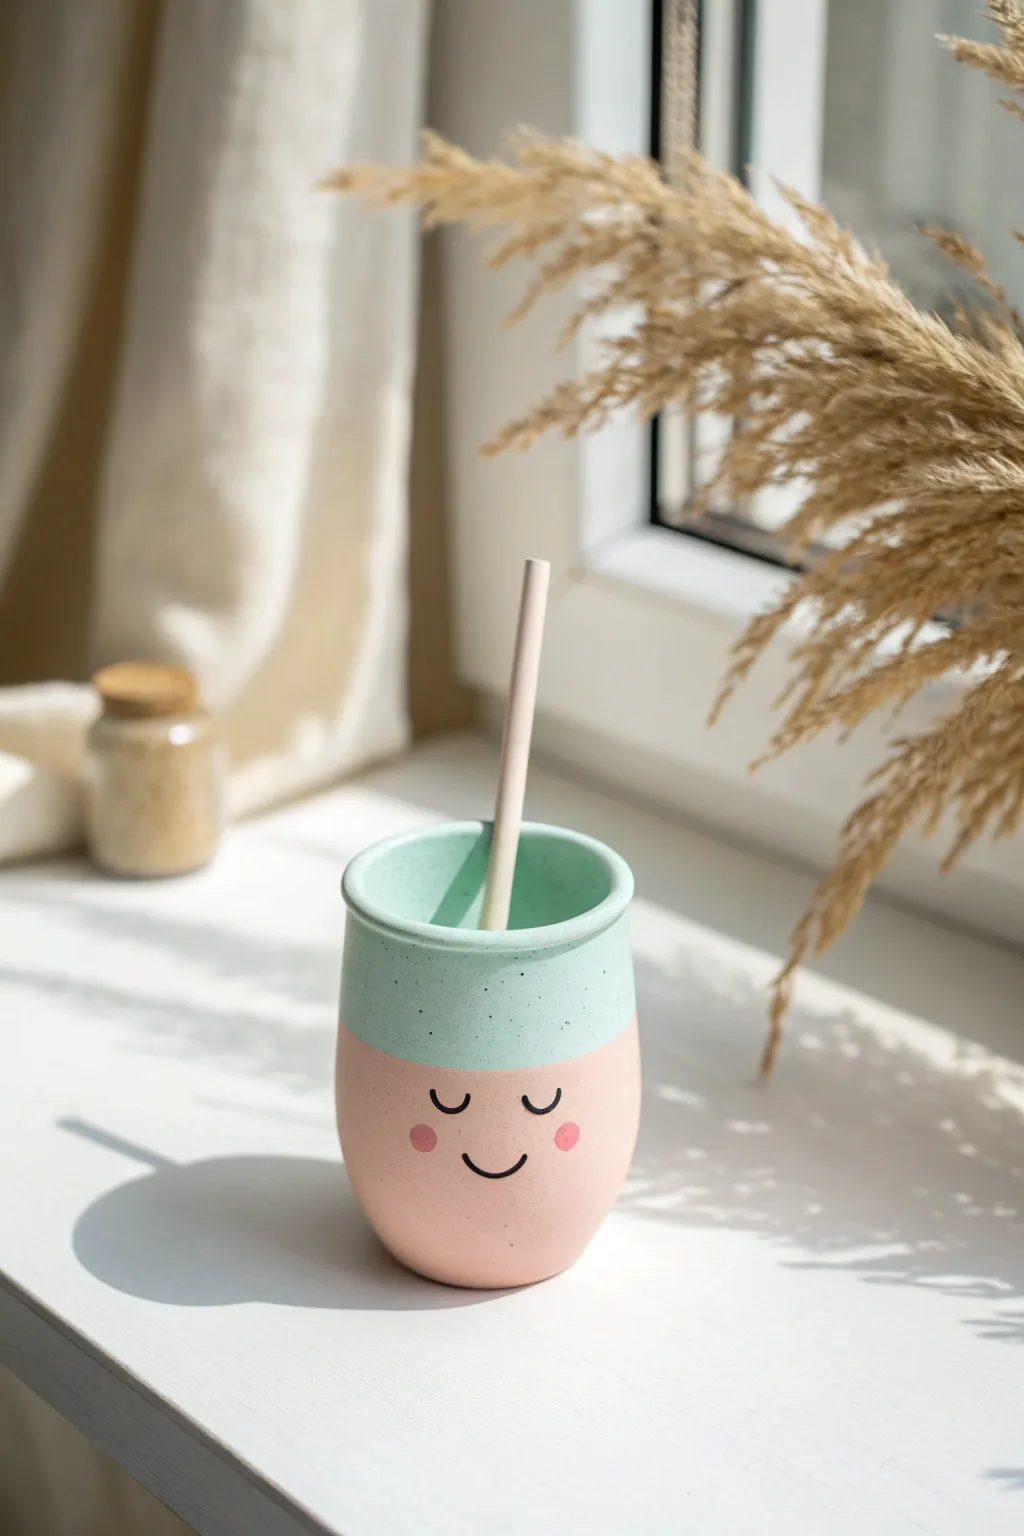
This adorable two-toned cup figurine features a soft mint green top and baby pink bottom, finished with a charming sleepy face. It captures the look of glazed ceramic but is crafted entirely from clay, complete with a matching decorative straw.
Detailed Instructions
Materials
- Polymer clay (Pastel Pink and Mint Green)
- Polymer clay (White – for the straw)
- Acrylic paint (Black and rose pink)
- Small rolling pin
- Circle cutter (approx. 2-3 inches)
- Clay blade or crafting knife
- Smoothing tool or sponge
- Fine detail paintbrush or dotting tool
- Matte sealant or varnish
- Wooden skewer (for structure)
Step 1: Shaping the Base
-
Form the pink base:
Start by conditioning a ball of pastel pink polymer clay until it is soft and pliable. Roll it into a smooth sphere, aiming for a size slightly larger than a golf ball to serve as the bottom half of the cup. -
Create the cup shape:
Gently press your thumb into the center of the pink sphere to create an indentation. Begin pinching the sides upwards to form a bowl shape with rounded bottom edges, keeping the walls relatively thick for stability. -
Flatten the bottom:
Tap the bottom of your pink cup shape lightly against your work surface. You need a flat area just large enough for the figurine to stand upright without wobbling.
Step 2: Adding the Top Tier
-
Condition the green clay:
Take an equal amount of mint green clay and condition it well. Roll this into a cylinder shape that matches the circumference of your pink base. -
Form the upper rim:
Flatten the green cylinder slightly and shape it into a ring or a hollow cylinder. Place this directly on top of the pink base you created earlier. -
Blend the seam:
With your thumb or a smoothing tool, gently pull the clay from the green section down slightly onto the pink, and push the pink slightly up, just on the inside, to fuse them. On the outside, aim for a clean, straight horizon line where the colors meet, smoothing it with your finger to remove any gaps. -
Refine the rim:
Make sure the top edge of the green section is somewhat thick and rounded, mimicking the lip of a ceramic mug. Use your finger to smooth this rim until it is perfectly even.
Uneven Seam Line?
If the line between pink and green is messy, roll a thin snake of white clay and wrap it around the seam as a decorative belt to hide the join.
Step 3: Making the Straw
-
Mix a pale pink:
Mix a tiny amount of the pink clay with white clay to get a very pale, milky pink color for the straw. -
Roll the straw:
Roll this pale mixture into a thin snake. Cut a section about 3 inches long. -
Insert the straw:
Place the straw into the cup. You can have it leaning casually against the rim. If you want it permanently fixed, gentle press it against the inside wall of the green clay.
Speckling Pro-Tip
Cover the face area with a small piece of paper or masking tape while flicking the paint so you don’t get black specks inside the pink cheek dots.
Step 4: Adding the Facial Features
-
Pre-bake prep:
Before adding the face, check the surface for fingerprints. I like to brush the clay lightly with a tiny bit of cornstarch or baby oil to smooth out imperfections. -
Bake the figurine:
Bake the clay cup according to the manufacturer’s instructions on your package (usually 275°F for 15-30 minutes). Let it cool completely before painting. -
Paint the eyes:
Using a very fine detail brush and black acrylic paint, draw two small ‘U’ shapes on the pink section for the sleeping eyes. Check that they are symmetrical and centered. -
Add lashes:
carefully add a tiny, subtle flick to the outer corner of each ‘U’ shape to create eyelashes. -
Paint the smile:
Below the eyes, paint a small, simple curved line for the smile. Keep the line thin and delicate. -
Add rosy cheeks:
Dip a dotting tool or the back of a paintbrush into rose pink paint. Dab two small, perfect circles on either side of the smile for the cheeks. -
Speckle effect:
To get that speckled ceramic look, dilute a tiny drop of black paint with water. Dip an old toothbrush into it and run your thumb over the bristles to flick tiny specks onto the cup. Practice on paper first to control the spray. -
Seal the piece:
Once the paint is fully dry, coat the entire figurine in a matte varnish to protect the paint and give it a finished, soft-touch texture.
Place your little happy cup on a windowsill or desk for a daily dose of cuteness
Blob Monster Minis
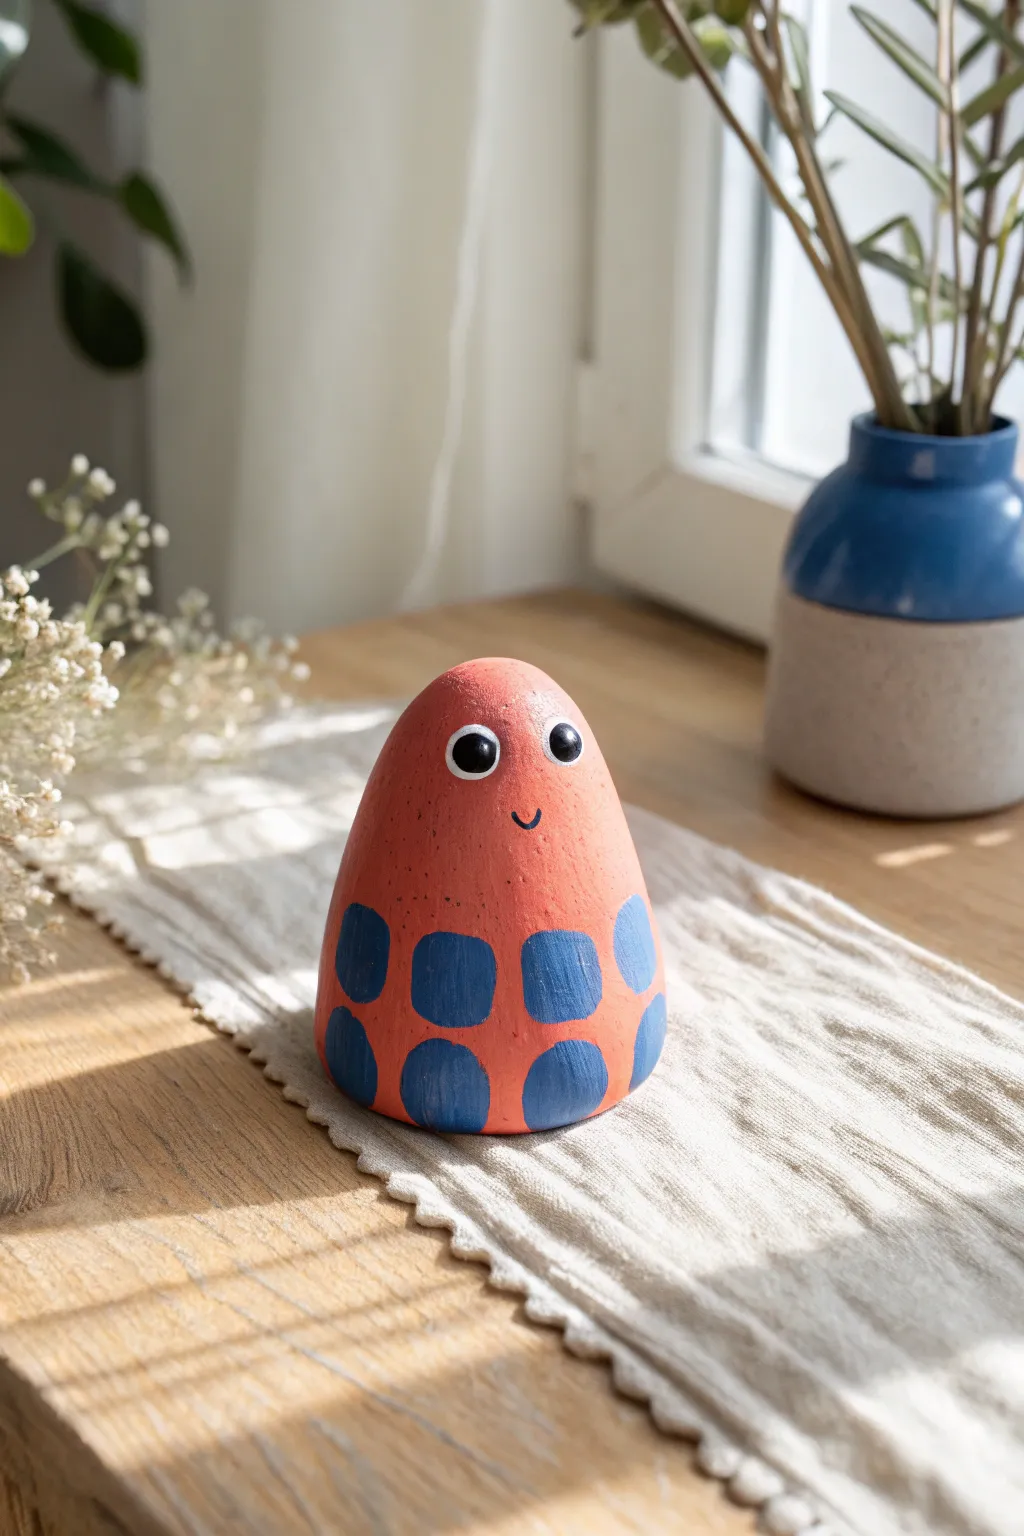
This charming little desktop companion is a simple yet delightful project perfect for beginners. With its warm terracotta hue, playful blue spots, and friendly expression, this smooth blob monster brings a touch of whimsy to any space.
Step-by-Step Guide
Materials
- Air-dry clay (smooth, white or terracotta)
- Acrylic paints: warm coral/rust, royal blue, white, black
- Paintbrushes: medium flat brush, small detail brush
- Fine-grit sandpaper (optional)
- Palette or paper plate
- Cup of water
- Clear matte varnish (optional)
Step 1: Shaping the Base
-
Prepare the Clay:
Take a handful of air-dry clay roughly the size of a tangerine. Knead it in your hands for a minute to warm it up and remove any air bubbles, ensuring the texture is consistent and pliable. -
Form a Sphere:
Roll the clay between your palms to create a smooth, tight ball. Aim for a shape that loves gravity—it doesn’t need to be geometrically perfect, just pleasantly round. -
Create the Cone Shape:
Place the ball on your work surface. Use your palms to gently roll and taper the top half of the ball, creating a rounded cone or teardrop shape. The base should remain somewhat wide and stable. -
Flatten the Bottom:
Lift the figurine and tap the bottom firmly against the table to create a flat, stable base so your monster won’t wobble. Smooth out any harsh edges created by this impact. -
Smooth the Surface:
Dip your finger in a tiny bit of water and run it over the entire surface of the clay. This ‘slip’ technique helps erase fingerprints and minor cracks. I like to spend extra time here to get a glass-like finish. -
Initial Drying:
Set your figurine aside to dry completely. Depending on your climate and the clay brand, this usually takes 24-48 hours. Turn it over occasionally to let the bottom breathe. -
Sand for Perfection:
Once fully dry and hard, use a piece of fine-grit sandpaper to buff away any remaining lumps or uneven spots, focusing on the round top and the base edge.
Step 2: Painting and Details
-
Base Coat Mixing:
Mix your warm coral paint. If you don’t have this exact shade, combine orange with a touch of red and a tiny drop of brown to achieve that earthy look. -
Apply Base Color:
Paint the entire figurine with your coral mix. Use even vertical strokes. You will likely need two or three thin coats for full opacity, letting each layer dry in between. -
Sketch the Pattern:
Once the base is bone-dry, lightly visualize where the spots will go. The design features two rows of roughly square or rectangular shapes wrapping around the bottom third of the body. -
Paint the Blue Spots:
Using a smaller flat brush and royal blue paint, create the bottom row of spots first. These should touch the very bottom edge of the figurine. Keep the edges soft and rounded, not sharp squares. -
Second Row of Spots:
Paint the second tier of blue spots right above the first row, positioning them in the gaps between the lower spots (like a brick pattern). Make these slightly smaller than the bottom row. -
The Whites of the Eyes:
Switch to your detail brush. Paint two solid white circles near the top third of the figure. Space them slightly apart create a goofy, wide-eyed look. -
Adding Pupils:
Once the white circles are dry, carefully paint black circles inside them. Position the pupils slightly toward the right (or whatever direction you want him looking) rather than dead center for more personality. -
The Eye Shine:
This is the most crucial step for cuteness: add a tiny, pure white dot to the upper right corner of each pupil to simulate a reflection. -
A Happy Smile:
Using the very tip of your finest brush (or a black paint pen), draw a tiny ‘u’ shape between and slightly below the eyes for the mouth. -
Seal the Deal:
Protect your new friend with a layer of clear matte varnish. This unifies the sheen of the paint and prevents scratching over time.
Smooth Surface Secret
If you struggle with fingerprints, lightly brush the raw clay with a damp makeup sponge before drying. It smooths texture better than fingers alone.
Make Him Friendly
Give your blob a job! Sculpt a small divot in the top of the head before drying to turn him into a cute photo holder or memo clip stand.
Place your little blob monster on a windowsill or desk where his cheerful smile can brighten your day
Mini Ghost Figurines
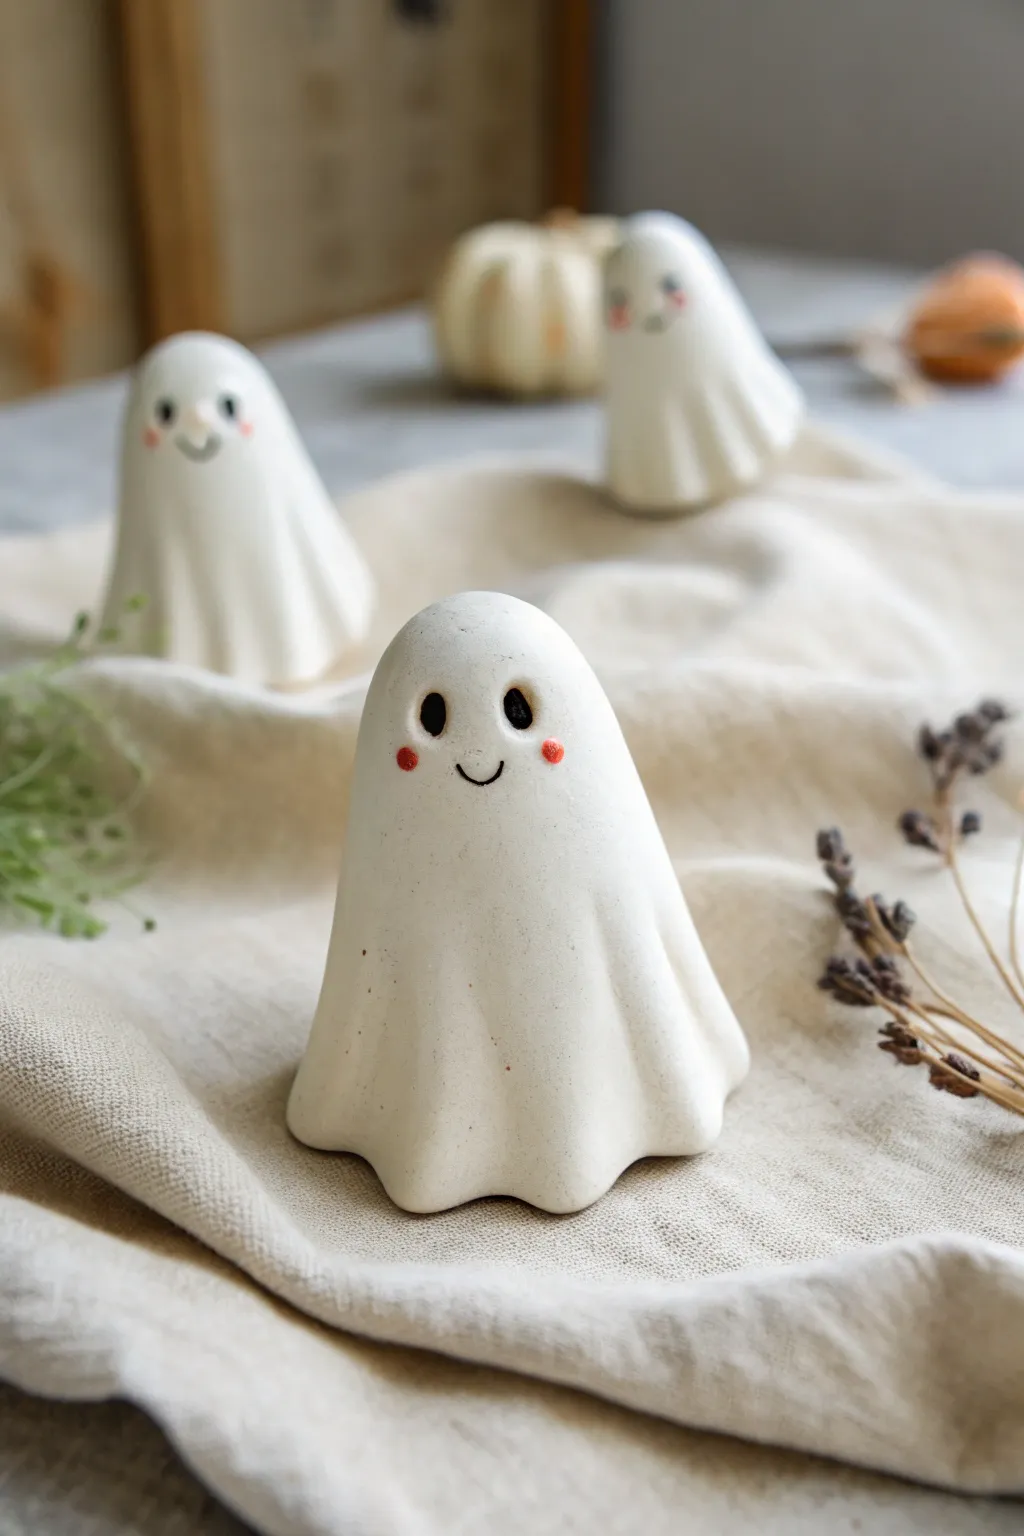
These simple yet adorable ghost figurines capture the cozy side of spookiness with their matte finish and rosy cheeks. The project relies on basic forming techniques to create soft, flowing drapery folds that look like suspended fabric.
How-To Guide
Materials
- White polymer clay (matte finish) OR white air-dry clay
- Small rolling pin
- Ball tool or rounded sculpting tool
- Aluminum foil
- Needle tool or toothpick
- Soft pastel chalks inside pink/red and black
- Small detail brush
- Matte varnish (optional)
- Parchment paper
Step 1: Forming the Core
-
Create the armature:
Ball up a piece of aluminum foil into a rough cone or gumdrop shape about 1.5 inches tall. This will act as the support structure so your ghost holds its shape while baking or drying, and it saves clay. -
Condition the clay:
Take a portion of white clay and knead it thoroughly until it is warm and pliable. This conditioning step is crucial to prevent cracks later on. -
Roll the sheet:
Roll the clay out into a circle roughly 1/8 inch thick. It doesn’t need to be a perfect circle, as irregular edges can add to the natural fabric look.
Step 2: Draping the Ghost
-
Position the clay:
Gently lift your clay circle and center it over the top of your foil armature. -
Initial draping:
Let the clay fall naturally over the sides. Use your fingers to gently guide it down, smoothing the top part into a rounded dome shape for the head. -
Create main folds:
Pinch the bottom edges of the clay gently inward to create vertical folds. I like to twist the bottom hem slightly to make it look like the ghost is floating or swirling. -
Refine the hem:
Use your fingers to push the bottom edge of the clay slightly outward so it flares. This creates a stable base for the figurine to stand on once the foil is removed.
Uneven Drapes?
If the folds look too stiff, gently heat the clay with a hairdryer for 10 seconds to soften it, then re-drape for a fluid flow.
Step 3: Adding the Feature
-
Mark eye placement:
Using a needle tool, make two very faint dots where you want the eyes to go. Placing them slightly wider apart gives a cuter, more innocent expression. -
Sculpt the eye sockets:
Take a small ball tool and gently press into your marked spots to create shallow indentations for the eyes. -
Create the smile:
Use the needle tool or a small curved sculpting tool to press a simple U-shape smile between the eyes. Keep the line thin and delicate. -
Smooth the surface:
Check the entire ghost for fingerprints. Lightly brush over any imperfections with a tiny bit of baby oil (for polymer) or water (for air-dry) on your finger.
Textured Finish
Before baking, gently dab the surface with an old toothbrush or stiff bristle brush to create a speckled, faux-ceramic stone texture.
Step 4: Color and Finish
-
Prepare the cheeks:
Scrape a small amount of pink or red soft pastel into a fine dust on a piece of paper. -
Apply blush:
Dip a soft, dry brush into the pastel dust and gently dab it onto the cheeks, just outside the smile line. Build the color slowly for a soft, airbrushed look. -
Painting the eyes:
You can fill the eye indentations with tiny balls of black clay, or paint them with black acrylic after hardening. For the look in the photo, simple black paint filling the sculpted holes works perfectly. -
Hardening the clay:
Bake your polymer clay according to the package instructions (usually 275°F for 15-30 minutes) or let air-dry clay set for 24-48 hours. -
Removing the foil:
Once fully cooled or dry, carefully dig out the aluminum foil from underneath if you want the ghost to be hollow, or simply leave it in for weight. -
Final texture check:
The ghosts in the image have a slightly textured, stone-like surface. If your clay is too shiny, lightly sand it with fine-grit sandpaper after baking to achieve that matte, bisque finish.
Place your little phantom squad on a mantel or windowsill to create a friendly haunting scene
Acorn-Hat Gnomes
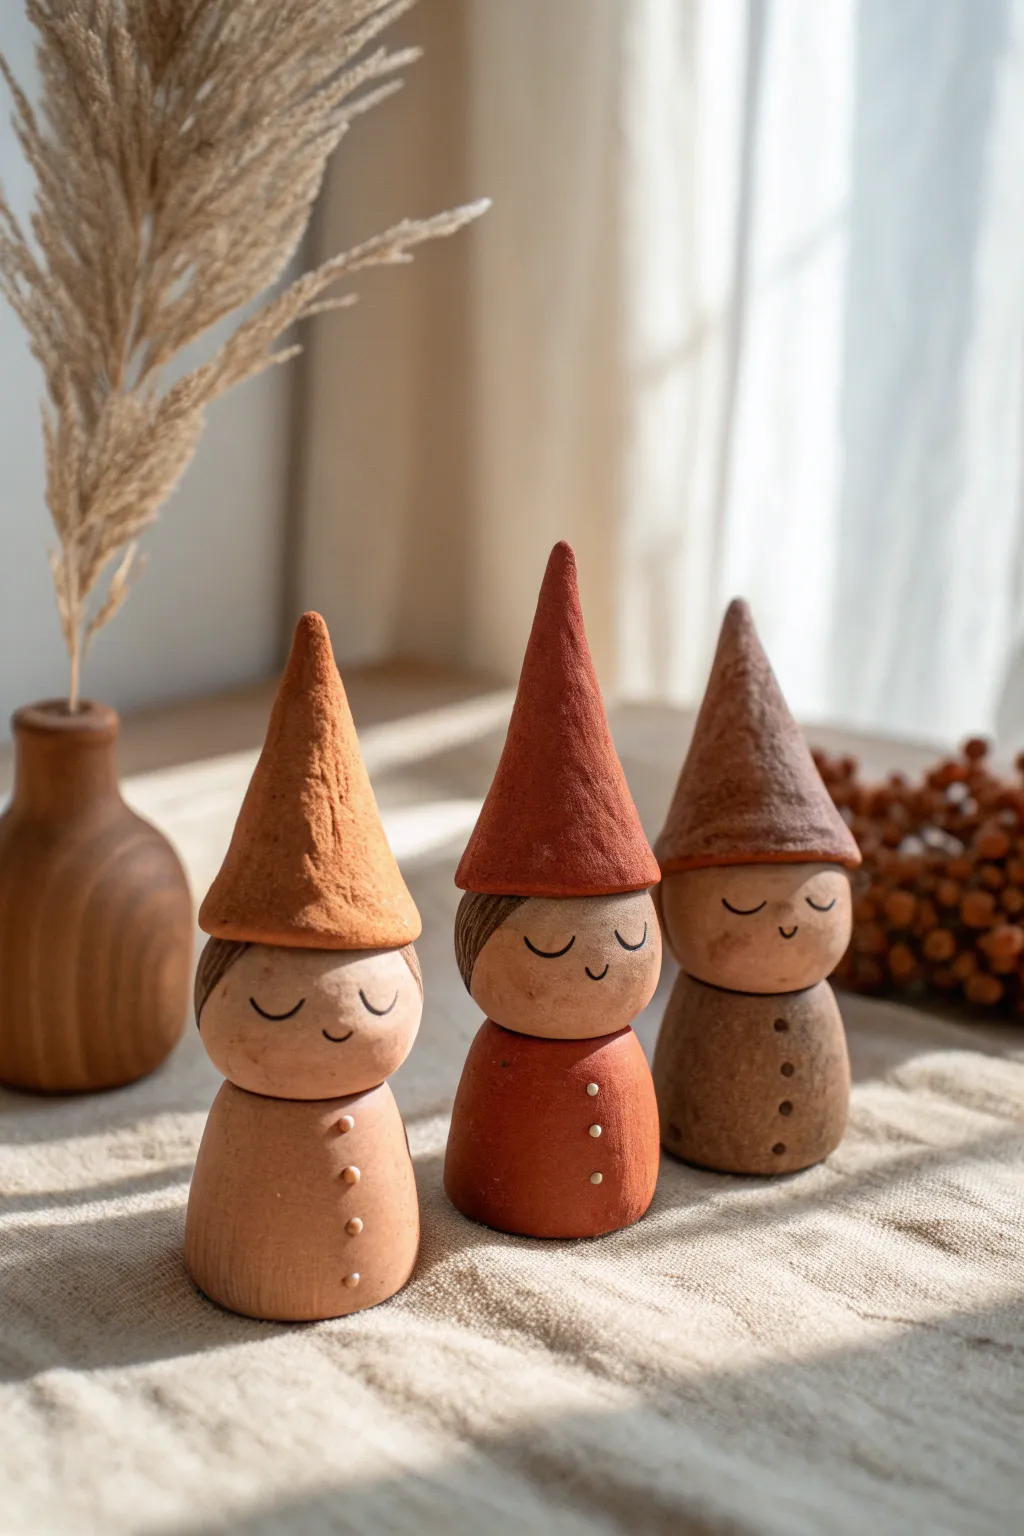
These adorable woodland spirits combine the earthy charm of terracotta with quirky personality using minimal shapes. With their tall, pointed hats and sleepy expressions, they make perfect whimsical shelf sitters for subtle fall decor.
Step-by-Step Guide
Materials
- Polymer clay (terracotta, beige, dark brown, and burnt orange)
- Small wooden balls or pre-baked clay spheres (for heads, approx 1-inch diameter)
- Foil or small foam cone (for core structure)
- Clay sculpting tools (needle tool, smoother)
- Black acrylic paint or fine-tip permanent marker
- White acrylic paint
- Small detail paintbrush
- Matte varnish or sealant (optional)
- Texturing sponge or toothbrush
Step 1: Shaping the Bodies
-
Prepare the Base Clay:
Start by conditioning your terracotta, burnt orange, and dark brown clays separately until they are soft and pliable. You’ll want about a golf-ball-sized amount for each body. -
Form the Cone Shape:
Roll the clay into a smooth ball, then gently roll one side against your work surface to create a tapered cone shape with a flat bottom. It should stand stably on its own. -
Refine the Silhouette:
Tap the bottom on the table to flatten it perfectly. Use your fingers to round out the top of the cone slightly so the head will sit comfortably. -
Add Texture (Optional):
For the darker brown gnome, I like to gently tap the surface with an old toothbrush or a crumpled ball of foil to give it a rougher, more earthy texture, while keeping the others smoother. -
Create Button Details:
Roll tiny, pinhead-sized balls of white clay (or create indentations to paint later). Press three of these vertically down the front of the body to mimic buttons.
Wobbly Gnomes?
If the gnomes tip over, pres-bake the body first to create a solid base, or flatten the bottom further by sanding it gently after baking.
Step 2: Creating the Heads & Hats
-
Position the Head:
Take a beige clay ball (or wooden bead) and press it firmly onto the top of the body cone. Blending a small amount of clay between the neck and body can help secure it. -
Sculpt the Hat Core:
Roll a new cone of clay in a matching or contrasting earth tone. This needs to be significantly taller than the body to achieve that signature high-hat look. -
Hollow and Fit:
Use your thumb to create an indentation in the base of the hat cone so it can cup over the top of the head. -
Shape the Brim:
Press the hat onto the head. Gently pinch and pull the bottom edge of the hat outward slightly to create a very subtle brim that shadows the face. -
Refine the Point:
Gently roll the tip of the hat between your fingers to make it sharp and whimsical. You can leave it straight or give it a slight, jaunty curve. -
Texture the Hat:
Use a texturing sponge to dab the surface of the hat. This makes it look like felt or rough pottery, contrasting nicely with the smooth face. -
Add Hair Details:
Roll a very thin snake of dark brown clay. Flatten it and attach it just under the rim of the hat on the sides of the face to suggest simple hair.
Step 3: Finishing Touches
-
Bake the Figures:
Place your gnomes on a tile or baking sheet. Bake according to your polymer clay package instructions (usually 275°F for 15-30 minutes). -
Cool Down:
Let the figurines cool completely before handling. This is crucial as warm clay is fragile. -
Paint the Face:
Using the finest brush or a marker, draw two downward curving crescents for sleepy eyes and a tiny ‘u’ for a smiling mouth. -
Highlight Buttons:
If you made indentations earlier instead of clay balls, use a toothpick to dab a tiny dot of white paint into each button spot. -
Seal (Optional):
Apply a coat of matte varnish to protect the paint and give the gnomes a finished, professional ceramic look.
Seasonal Switch
Swap the earth tones for deep greens and reds for Christmas, or add tiny clay leaves or acorns to the hat brims for extra forest flair.
Arranged together, these sleepy little characters bring a sense of calm and craftiness to any corner of your home.
Tiny Dragon Hatchlings
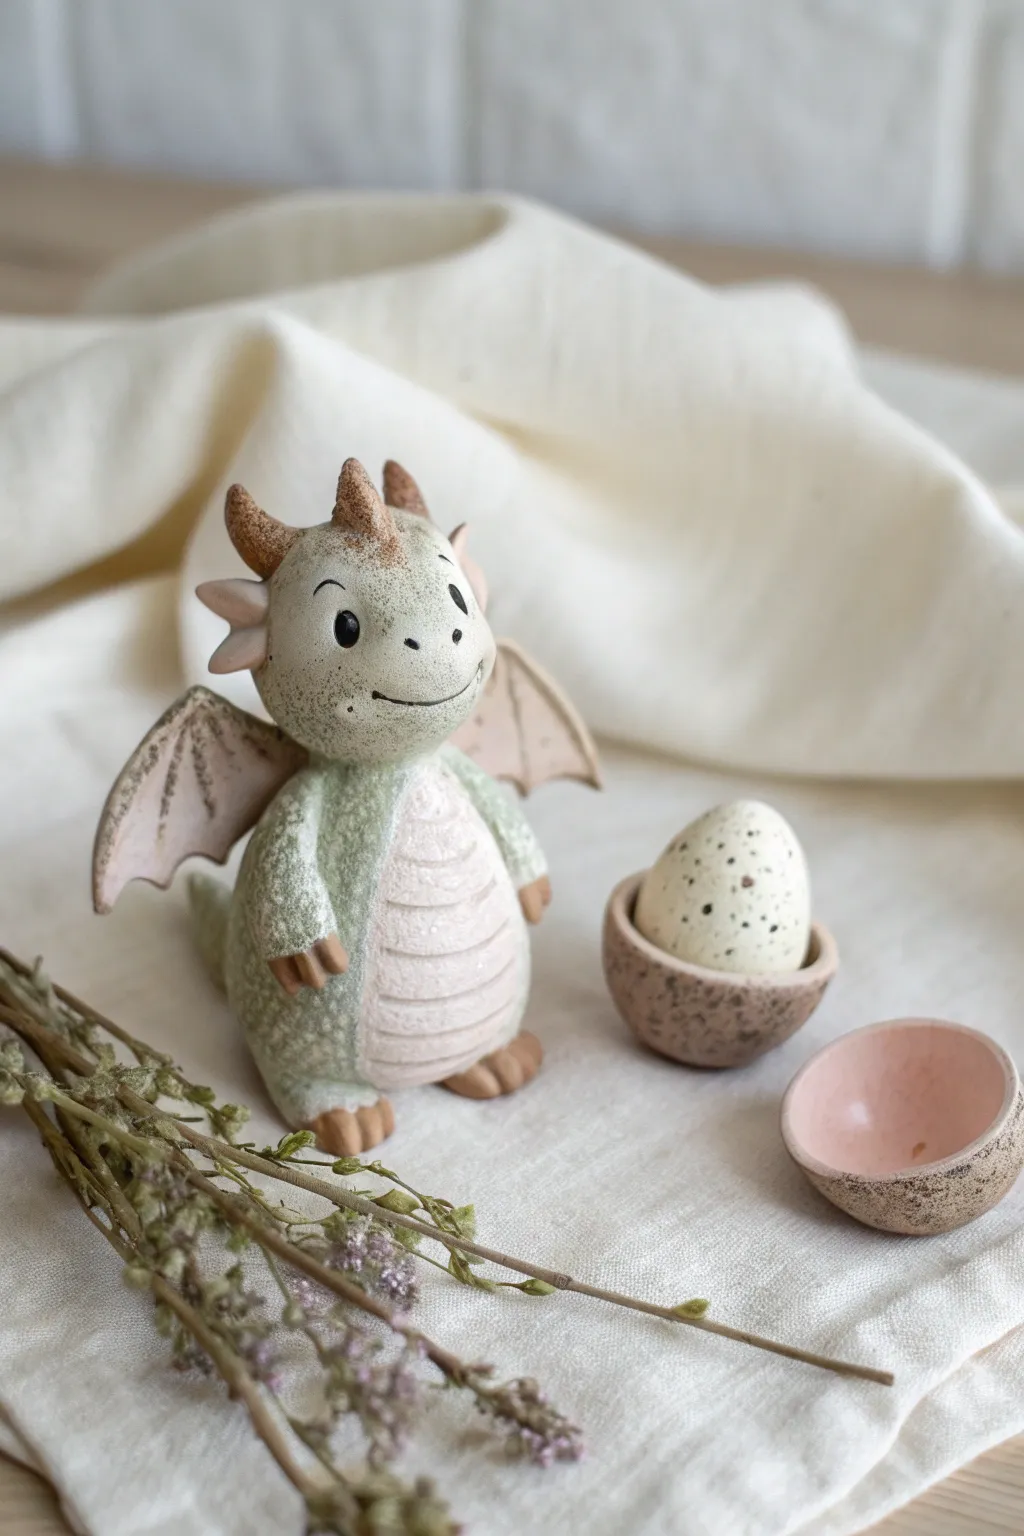
This adorable speckled dragon figurine is full of character, featuring a textured green body, rosy wings, and a sweet, hatched egg companion. Created with polymer or air-dry clay, the rough, sandy finish gives it a charming, rustic pottery feel perfect for fantasy lovers.
Step-by-Step
Materials
- Polymer clay (light green, cream/beige, dusty pink, brown)
- Flecked/granite effect clay (or coarse sand/pepper to mix in)
- Black acrylic paint
- Small dotting tool or toothpick
- Needle tool
- Soft paintbrush
- Textured sponge or toothbrush (for skin texture)
- Matte varnish
Step 1: Sculpting the Dragon Body
-
Prepare the Base Clay:
Start by mixing your light green clay with a small amount of granite-effect clay or very fine sand to achieve that speckled, stone-like texture seen in the photo. Knead it until soft and pliable. -
Form the Main Shapes:
Roll a larger ball for the body (about the size of a walnut) and a slightly smaller ball for the head. Gently press the body ball onto a flat surface to create a stable base so the dragon stands upright. -
Shape the Belly:
Take a piece of cream-colored clay and flatten it into an oval. Press this onto the front of the green body. Use a needle tool to score horizontal lines across the cream belly to create the ribbed scale effect. -
Attach the Head:
Press the head ball firmly onto the body. If using polymer clay, blending the clay at the neck slightly will secure the bond; for air-dry clay, use a little slip or water. -
Create the Texture:
Using an old toothbrush or a stiff stippling brush, gently tap all over the green parts of the dragon’s skin to create a pitted, rough texture. Avoid texturing the smooth cream belly.
Head Won’t Stay Up?
If the head keeps drooping or looking heavy, insert a short piece of toothpick or wire into the body and slide the head onto it for internal structural support.
Step 2: Adding Details & Wings
-
Sculpt the Face:
Use a needle tool to carve a wide, curved smile toward one side of the face. Indent two small sockets for the eyes and add tiny balls of black clay, or simply paint them in the sockets later. -
Form the Snout and Horns:
Add two tiny nostrils above the mouth. Roll two small cones of brown clay for the horns and attach them to the top of the head. Add a small ridge of green down the center of the forehead. -
Arms and Legs:
Roll four small sausages of green clay. Attach two at the bottom for feet and two on the sides for arms. Use a knife tool to mark three little toes on each paw. Add tiny brown tips for claws if desired. -
Create the Wings:
Roll out a thin sheet of dusty pink clay. Cut two triangle shapes. Use your needle tool to score vertical lines to represent wing bones. Gently curve them and attach the wider edge to the dragon’s back. -
Add Wing Texture:
Lightly brush the edges of the pink wings with a little brown pastel dust or diluted paint before baking/drying to give them the weathered, vintage look shown in the image.
Step 3: The Egg & Finishing Touches
-
Shape the Egg Cup:
Form a small pinch pot from brown or beige clay to act as the egg holder. Give it a rough, speckled texture similar to the dragon’s body. -
Create the Egg:
Roll an egg shape from cream clay. You can create a second half-shell piece painted pink inside, as seen next to the full egg. -
Speckling the Egg:
Flick diluted black or brown paint onto the cream egg using an old toothbrush to create natural-looking speckles. -
Baking or Drying:
Follow the specific instructions for your clay type. Place the figurine on a tile or parchment paper. I like to let it cool completely in the oven to prevent cracking. -
Paint Details:
Once hardened, use a fineliner brush to add small eyebrows and refine the eyes with a white highlight dot. -
Final Wash:
To enhance the ‘stone’ look, apply a very watery wash of brown acrylic paint over the green body, wipe it off quickly with a paper towel, leaving the dark pigment only in the textured crevices.
Make It Magical
Create a ‘nest’ for your dragon by gluing dried moss or preserved baby’s breath flowers around the base of the figurine for a forest-floor aesthetic.
Once sealed with a matte varnish, your tiny green friend is ready to guard your desk