If you’re craving something cute and a little spooky, polymer clay Halloween projects are my favorite quick win. These ideas stick to simple shapes and beginner-friendly details, so you can make a whole batch without stressing.
Chubby Little Ghost Charms
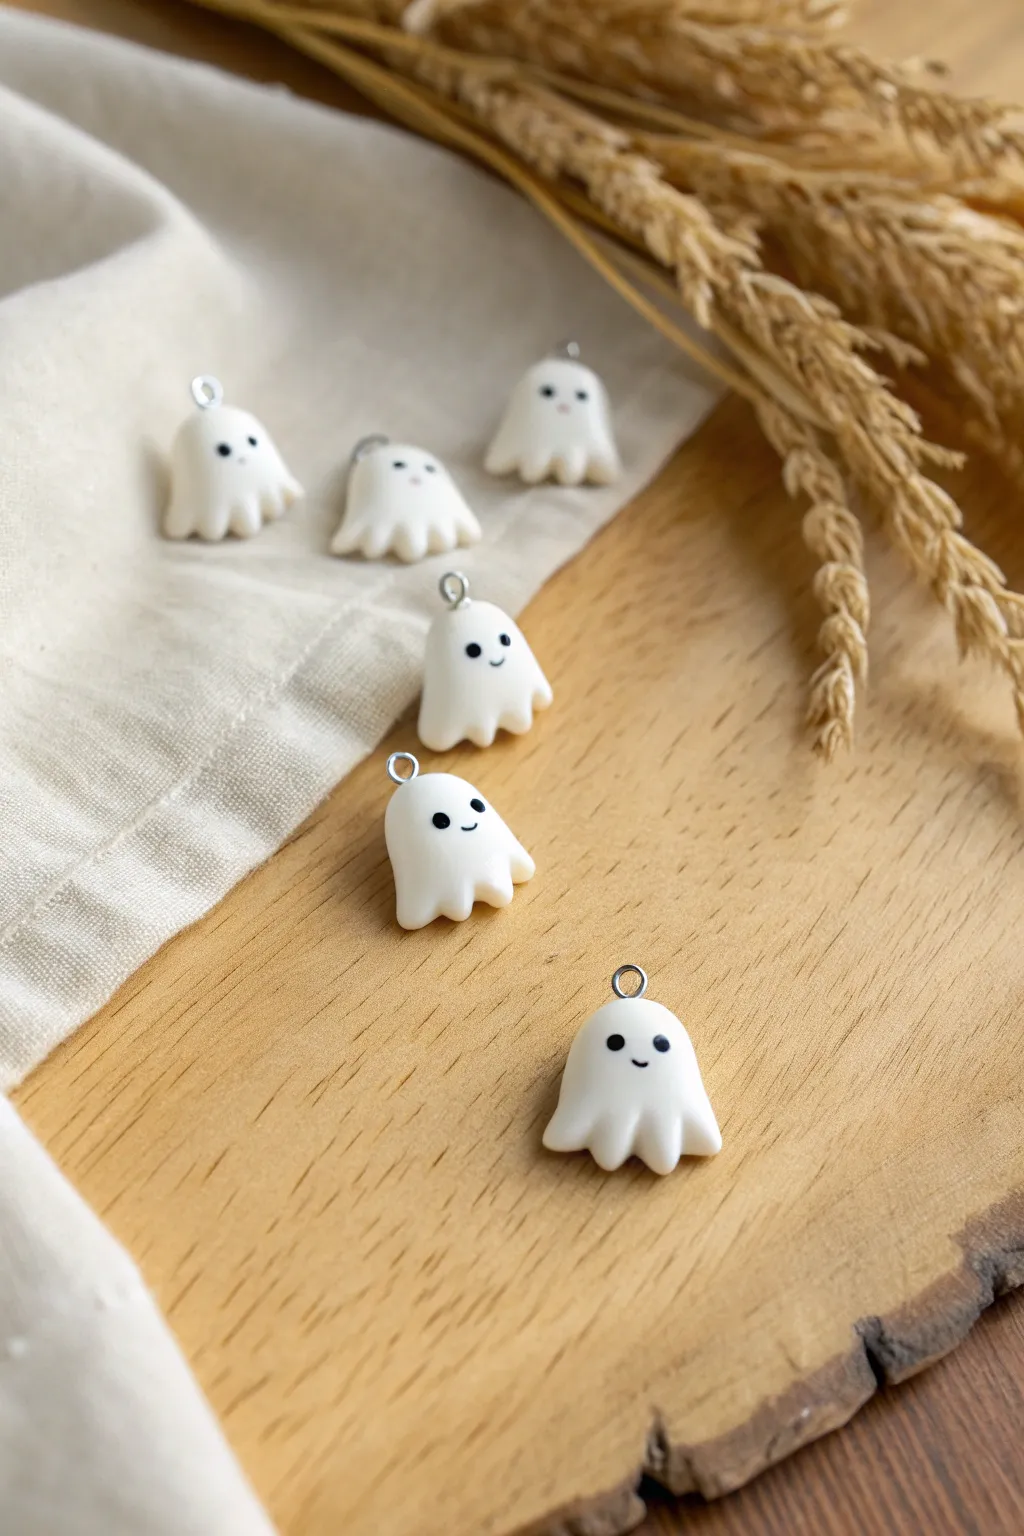
These adorable, chunky ghost charms are the perfect mix of spooky and sweet for your Halloween jewelry collection. Their simple, rounded bodies and tiny smiles make them quick to sculpt and incredibly charming.
How-To Guide
Materials
- White polymer clay
- Black acrylic paint
- Small dotting tool or toothpick
- Very fine detail paintbrush
- Silver screw eye pins (approx. 4mm or 5mm)
- Gloss glaze (polyurethane or water-based)
- Ceramic tile or baking sheet
- Clay roller or acrylic rod
- Oven (for baking clay)
- Needle tool
Step 1: Shaping the Ghost
-
Condition the clay:
Begin by taking a chunk of white polymer clay and kneading it thoroughly in your hands until it becomes soft, warm, and pliable. This conditioning prevents cracks during baking. -
Form the base sphere:
Roll a piece of the conditioned clay into a smooth ball about the size of a large marble (approximately 1.5 cm in diameter). Ensure there are no visible seams or air bubbles. -
Create a teardrop shape:
Gently roll one side of the ball against your work surface to elongate it slightly, creating a very chubby, rounded teardrop or dome shape. -
Flatten the bottom:
Press the wider bottom of the teardrop onto your work surface so the ghost stands up straight. It should look like a small, white mound. -
Mark the ruffles:
Using your needle tool or a toothpick, gently press vertical indentations around the bottom edge of the ghost. You want about 4 to 5 indentations evenly spaced around the circumference. -
Sculpt the skirt:
Use your fingers to gently pinch and pull the clay between the indentations outwards slightly. This creates the ruffled ‘sheet’ look at the bottom of the ghost. -
Smooth the edges:
go back over the ruffled edges with your fingertip to soften any sharp lines created by the tool. The look should be soft and billowy, not sharp. -
Refine the posture:
I like to give the top of the head a very slight tilt or curve to one side to add personality, rather than having it perfectly symmetrical.
Step 2: Hardware & Baking
-
Insert the eye pin:
Take a silver screw eye pin and gently twist it into the center of the top of the ghost’s head. Screw it in until only the loop is visible. -
Secure the pin:
Remove the pin, add a tiny dab of liquid clay or bake-and-bond adhesive to the threads, and screw it back into the same hole. This ensures it won’t fall out after baking. -
Bake the charms:
Place your ghosts on a ceramic tile or baking sheet lined with parchment paper. Bake according to your specific brand of clay’s instructions (usually around 275°F/135°C for 15-30 minutes). -
Cool down:
Allow the ghosts to cool completely in the oven or on a cooling rack before handling them. The clay hardens fully as it cools.
Fixing Dust Specks
White clay attracts dust like a magnet. Keep a bit of rubbing alcohol and a Q-tip nearby to wipe away lint before baking.
Step 3: Painting & Finishing
-
Paint the eyes:
Dip a small dotting tool or the blunt end of a toothpick into black acrylic paint. Carefully dot two eyes onto the upper third of the ghost’s face. -
Paint the mouth:
Using an extremely fine detail brush or a needle tool dipped in paint, draw a tiny, curved smile between the eyes. -
Dry the paint:
Let the acrylic paint dry completely. This usually takes about 10-15 minutes depending on how thick the paint is. -
Apply glaze:
Brush a thin coat of gloss glaze over the entire ghost to give it a shiny, finished look and to protect the paint from scratching off. -
Final cure:
Let the glaze dry fully according to the bottle instructions. Once dry, your chubby ghost charm is ready to be attached to earrings or a necklace.
Glow in the Dark
Swap standard white clay for glow-in-the-dark polymer clay. The process is identical, but the spooky factor doubles at night.
Now you have a handful of friendly spirits ready to haunt your jewelry box


Mini Jack-o’-Lantern Faces
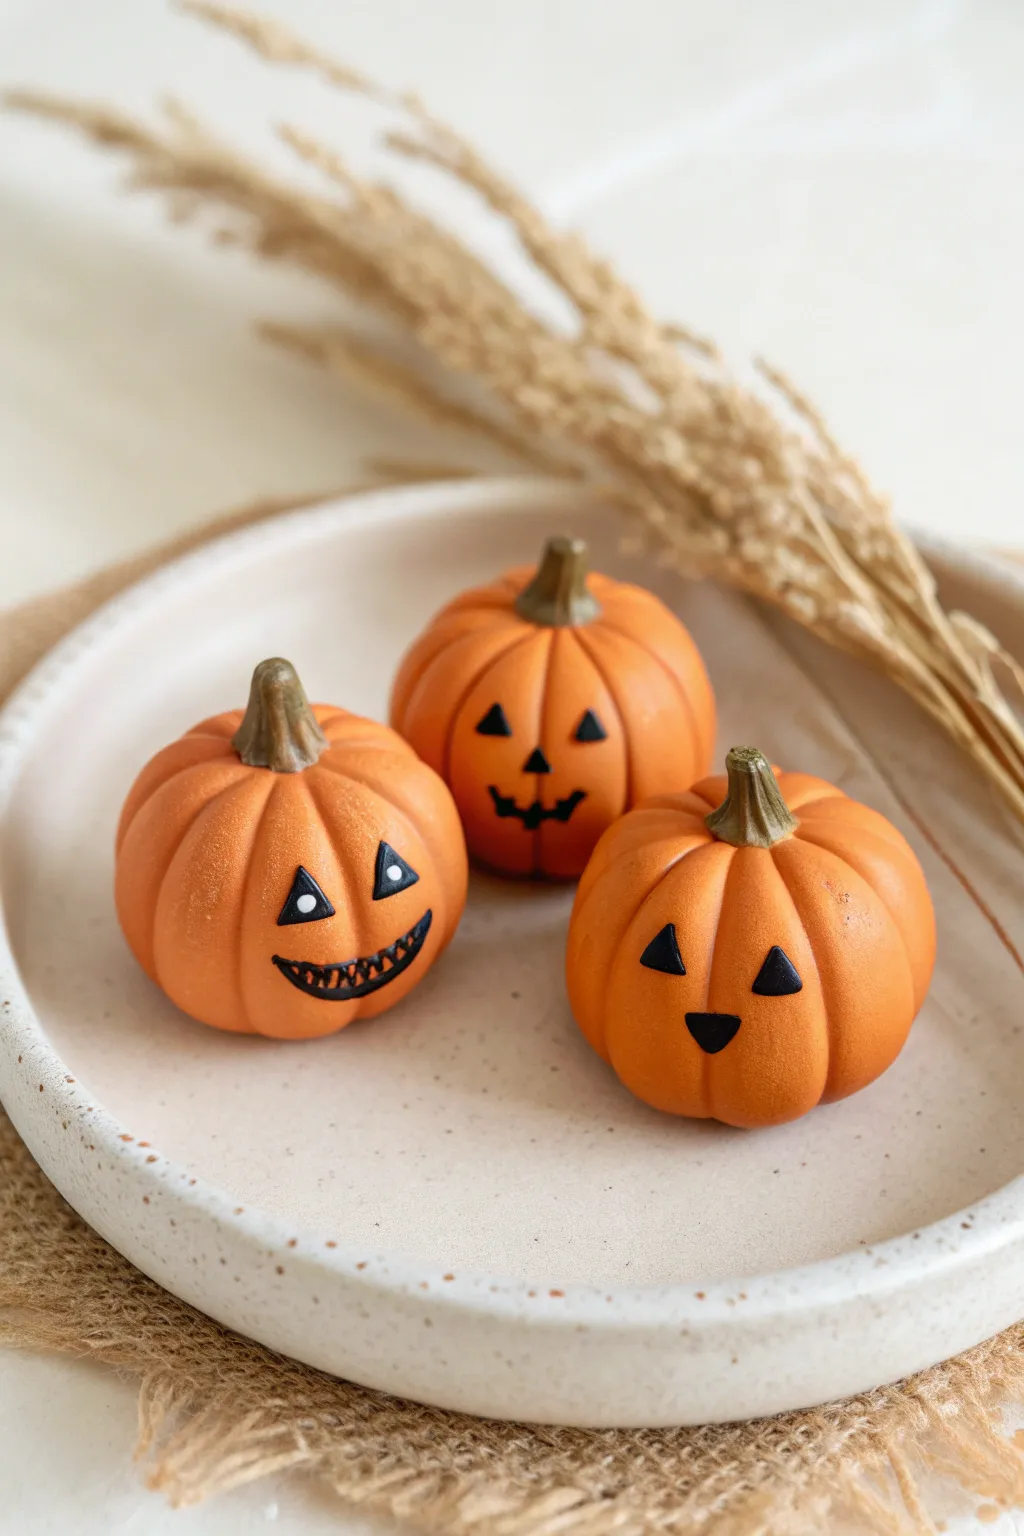
These adorable mini pumpkins bring a touch of Halloween spirit to any small space with three distinct, hand-painted personalities. Featuring a smooth matte finish and realistic earthy stems, they are the perfect beginner-friendly project for spooky season decor.
Step-by-Step Tutorial
Materials
- Orange polymer clay (pumpkin shade)
- Olive green or brown polymer clay (stem shade)
- Needle tool or toothpick
- Ball stylus tool
- Small blending tool or silicone shaper
- Black acrylic paint
- White acrylic paint
- Fine detail paintbrush (00 or 000 size)
- Soft pastel chalks (orange/brown) for shading (optional)
- Matte varnish
- Oven and baking sheet
Step 1: Sculpting the Pumpkins
-
Portion the clay:
Start by conditioning your orange polymer clay until it is soft and pliable, then divide it into three equal portions about the size of a walnut. -
Roll spheres:
Roll each portion between your palms to create a smooth, tight ball. Aim to smooth out any seams or fingerprints completely before moving on. -
Shape the form:
Press down very gently on the top and bottom of each sphere to flatten them into a squat pumpkin shape. I prefer them to be slightly wider than they are tall. -
Indent the top:
Use a ball stylus or the round end of a paintbrush to press a small indentation into the top center of each pumpkin, creating a seat for the stem. -
Create the ribs:
Starting from the top center indentation, press a needle tool or toothpick down the side of the pumpkin to the bottom center. Repeat this all around the sphere to create the vertical ribs. -
Soften the lines:
If the indentation lines look too harsh, gently run your finger or a silicone tool over them to round out the sections so the pumpkins look plump rather than sliced.
Step 2: Adding Stems & Details
-
Form the stems:
Take small bits of olive green or brownish clay and roll them into small, tapered cone shapes. -
Texture the stems:
Use your needle tool to scratch vertical lines up and down the stem cones to mimic fibrous wood texture. -
Attach the stems:
Place a stem into the indentation you made earlier on each pumpkin. Press firmly or blend the base of the stem slightly into the orange clay to ensure a secure bond. -
Add shading (Optional):
For extra dimension, brush a tiny amount of shaved orange or brown pastel chalk into the crevices of the ribs before baking. -
Bake:
Bake the pumpkins according to your specific clay manufacturer’s instructions (usually 275°F/135°C for 15-30 minutes). Let them cool completely before painting.
Clean Lines Hack
If you struggle painting tiny shapes, use a fine-tip black permanent marker or posca pen instead of a brush. It gives you better control over geometric eyes.
Step 3: Painting the Expressions
-
Draft the happy face:
On the first pumpkin, use your fine brush and black paint to create two small triangles for eyes. For the mouth, paint a curved, toothy grin with pointed teeth design. -
Draft the spooky face:
On the second pumpkin, paint arched triangular eyes and a small triangular nose. Paint a jagged, stitched-looking mouth line straight across with vertical hash marks. -
Draft the minimalist face:
For the third pumpkin, keep it simple with two triangle eyes and an inverted triangle nose located lower down. Add a very small mouth or leave it purely geometric. -
Add white highlights:
Once the black paint is fully dry, use the very tip of your brush or a toothpick to add tiny white dots inside the eyes of the grinning pumpkin for a playful look. -
Seal:
Protect your paint job by applying a thin layer of matte varnish over the entire pumpkin, which removes the ‘plastic’ shine and gives a high-quality finish.
Glow in the Dark
Mix glow-in-the-dark powder into your orange clay or use glow-in-the-dark paint for the eyes to make them illuminate when the lights go out.
Set your trio on a small dish or scattered on a shelf to complete your miniature autumn display


Candy Corn Stud Earrings
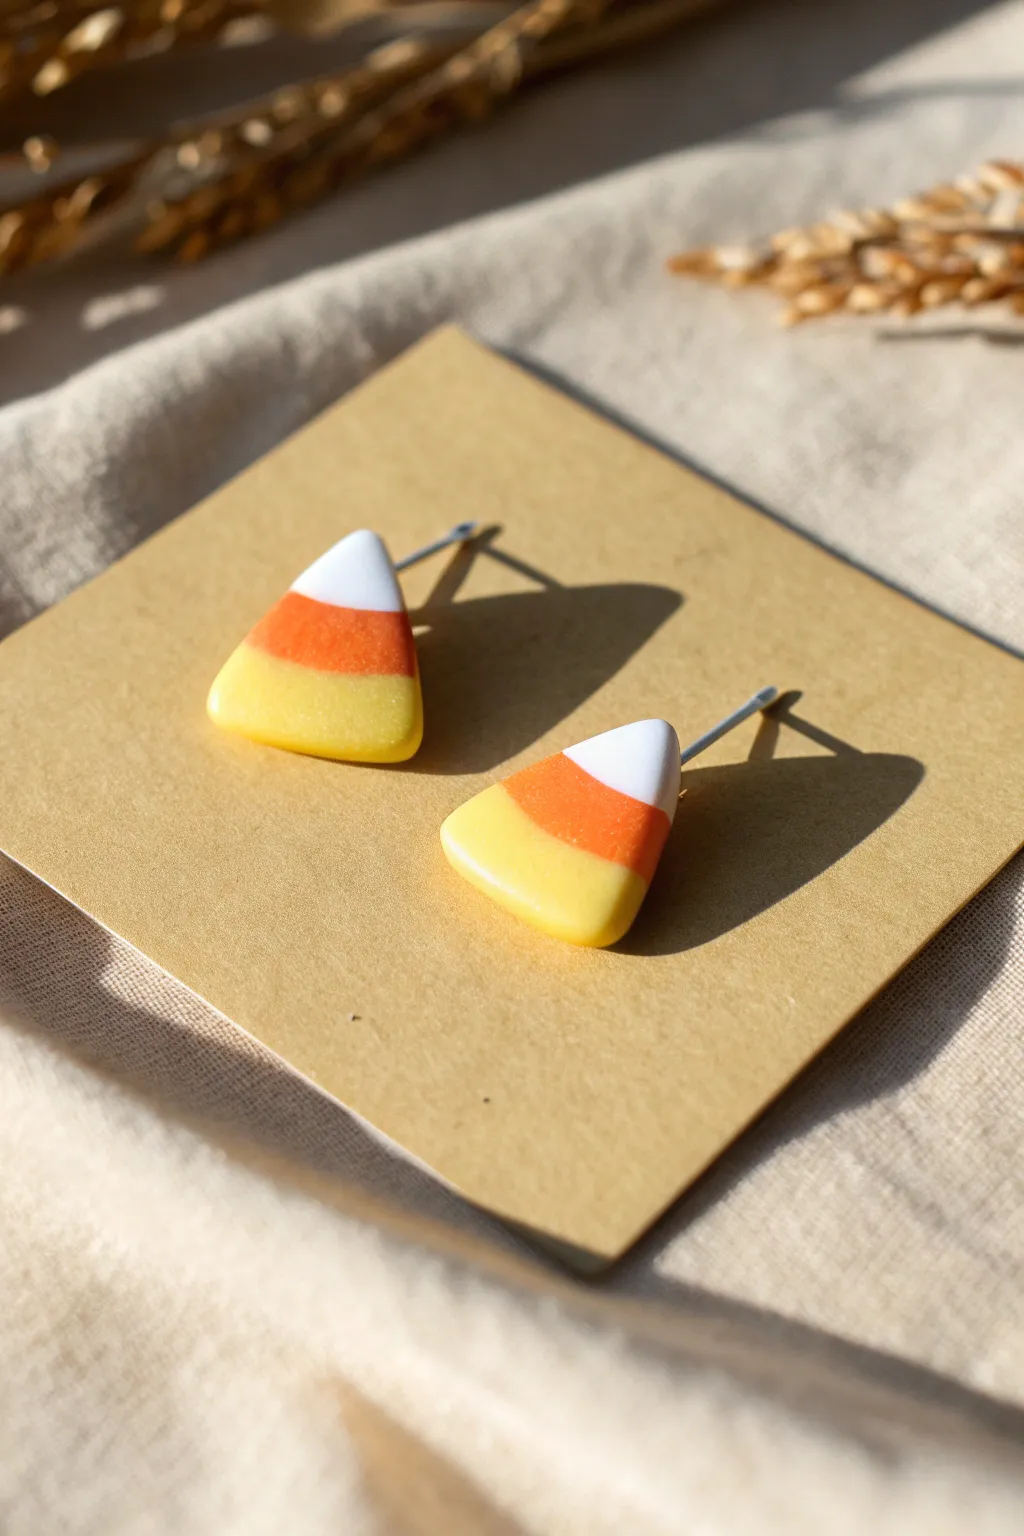
These miniature candy corn earrings capture the classic Halloween treat perfectly with their iconic yellow, orange, and white tiers. They have a smooth, semi-gloss finish that makes them look almost good enough to eat, adding a subtle festive touch to any outfit.
Detailed Instructions
Materials
- Polymer clay (white, orange, yellow)
- Clay roller or pasta machine
- Tissue blade or sharp clay knife
- Small triangle cutter (optional)
- Earring posts (surgical steel or sterling silver)
- Strong craft glue (e.g., E6000) or liquid clay
- Gloss glaze or UV resin (optional for shine)
- Small paintbrush
- Oven for baking
Step 1: Creating the Striped Block
-
Condition the Clay:
Start by kneading each color of clay (white, orange, and yellow) separately until they are soft and pliable. This prevents cracks and makes blending easier. -
Roll Out Sheets:
Roll each color into a thick slab. You want them to be roughly the same thickness, about 4-5mm each, to create equal bands of color. -
Stack the Colors:
Place the strips on your work surface in the classic candy corn order: yellow on the bottom, orange in the middle, and white on top. Press the edges together firmly so they stick. -
Consolidate the Block:
Gently compress the stack from the top and bottom to ensure the layers adhere completely. I like to run a roller lightly over the seam lines to smooth them out, creating a unified block.
Step 2: Shaping the Candy Corn
-
Slice the Slab:
Using your tissue blade, trim the uneven edges of your stacked block to reveal clean, sharp lines where the colors meet. -
Cut Triangles:
Cut a slice off the block about 3-4mm thick. Now, use your blade to cut triangular shapes from this slice. Angle your cuts to create that signature tapered candy corn look, keeping the white section at the point. -
Soften the Edges:
Once cut, the edges might look a bit sharp. Use your fingertip to very gently tap and smooth the corners and sides, giving the candy a softer, more realistic appearance. -
Check Size:
Hold the clay shape up to your earlobe to ensure the size works well as a stud. It should sit comfortably without hanging off too much.
Smudged Colors?
If the orange smears onto the white while cutting, wipe your blade with an alcohol wipe or baby wipe between every single cut for crisp lines.
Step 3: Baking and Assembly
-
Bake the Pieces:
Place your clay triangles on a baking sheet lined with parchment paper. Bake according to your specific brand’s package instructions (usually around 275°F/135°C for 15-30 minutes). -
Cool Down:
Let the pieces cool completely before handling. Polymer clay hardens as it cools, so don’t worry if they feel slightly flexible right out of the oven. -
Prepare Posts:
Apply a very small dot of strong jewelry glue (like E6000) to the flat pad of your earring post. -
Attach Posts:
Press the glued post onto the back of the clay candy corn, positioning it slightly towards the top (the white section) so the earring hangs correctly on the ear. -
Secure with Clay (Optional):
For extra durability, you can apply a tiny smear of liquid polymer clay over the earring pad and bake again briefly, but strong glue usually works perfectly fine on its own.
Add Sparkle
Mix a tiny amount of translucent glitter into the white clay or dust the unbaked pieces with white glitter powder for a sugary, crystallized effect.
Step 4: Finishing Touches
-
Apply Glaze:
To get that sugary shine seen in the photo, apply a thin coat of gloss glaze or UV resin to the front and sides of the earrings. -
Cure or Dry:
Allow the glaze to air dry according to the bottle’s time, or cure under a UV lamp if using resin. This seal also protects distinct color lines.
Now you have a charming pair of seasonal studs ready to wear or gift to a friend


Tiny Black Cat on a Pumpkin
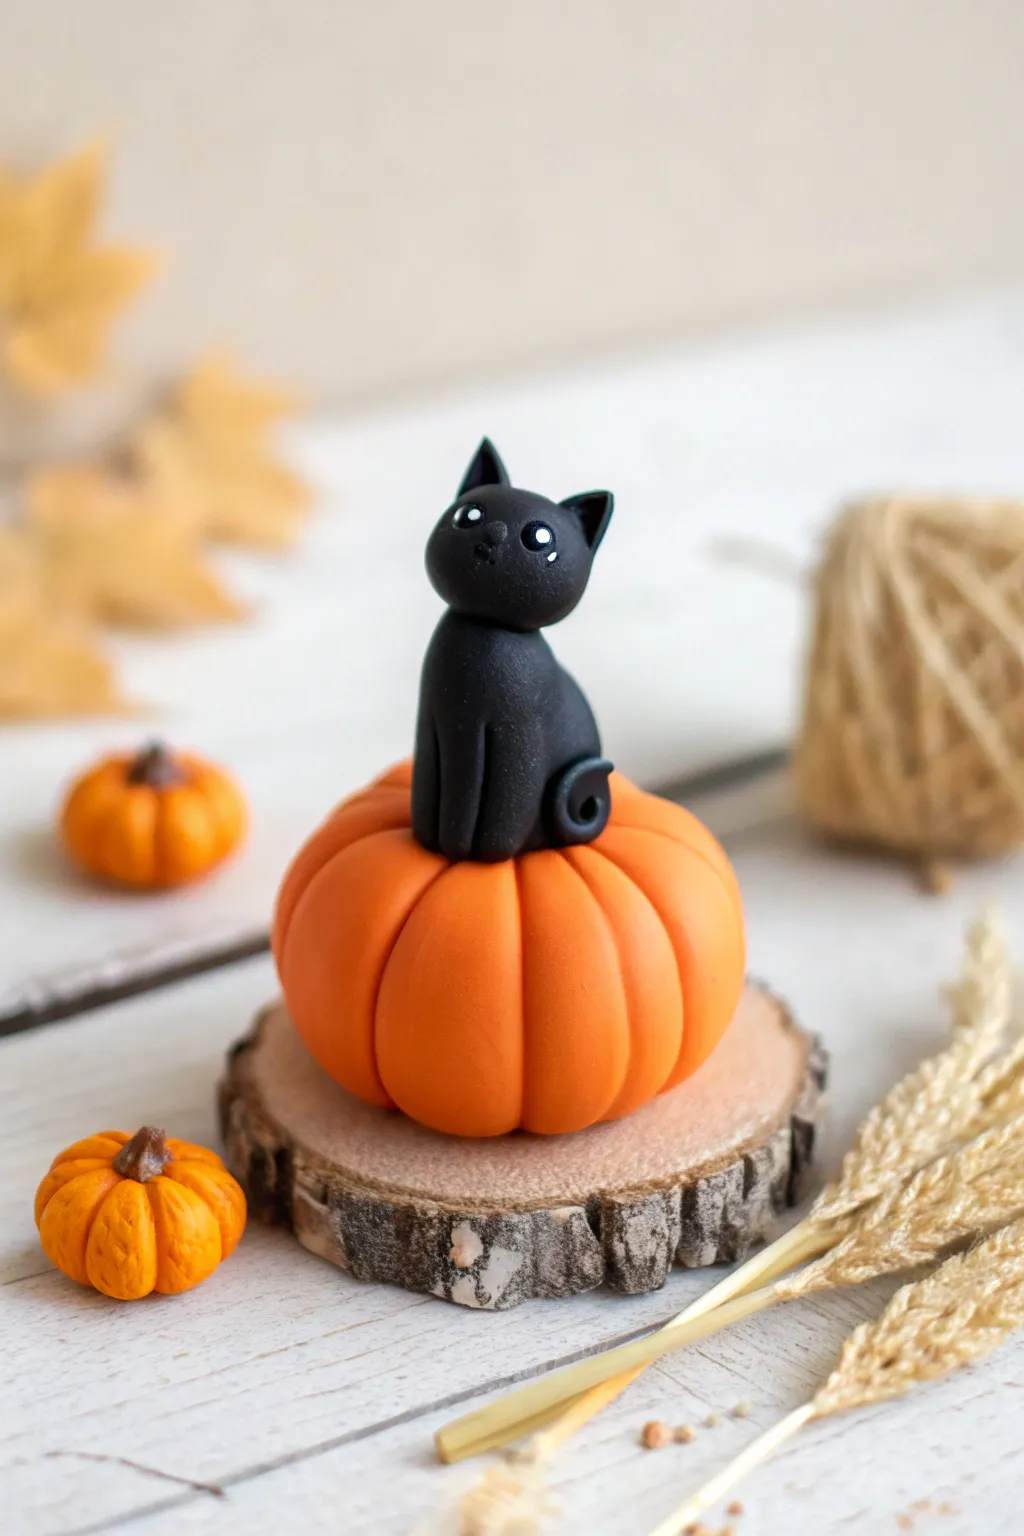
Embrace the spooky spirit with this adorable figurine featuring a sleek, tiny black cat perched atop a bright orange pumpkin. Its clean lines and matte finish give it a charming, modern look perfect for a tiered tray or miniature display.
Step-by-Step
Materials
- Polymer clay (black, orange, dark brown)
- White acrylic paint or tiny white clay beads
- Ball stylus tool or toothpick
- Basic sculpting tools (knife, needle tool)
- Small circle cutter (optional)
- Small wood slice for display
- Polymer clay adhesive or liquid clay (optional)
Step 1: Sculpting the Pumpkin Base
-
Condition the clay:
Start by taking a chunk of orange polymer clay and kneading it thoroughly in your hands until it becomes soft, pliable, and easy to work with. -
Form the basic sphere:
Roll the orange clay into a smooth, even ball about the size of a walnut or slightly larger, depending on how big you want your final piece. -
Flatten slightly:
Gently press the ball down against your work surface to create a flat bottom so it doesn’t roll away, and slightly flatten the top where the cat will sit. -
Create the segments:
Using a dull knife or the side of a needle tool, press vertical indentations all around the pumpkin, starting from the center top hole down to the bottom to create the ribbed segments. -
Refine the shape:
If the segments look too sharp, smooth them gently with your finger. Use a ball tool to create a small depression on the very top center. -
Add shading (optional):
For a bit of depth, you can lightly brush some reddish-orange pastel chalk into the crevices of the pumpkin ribs before baking.
Clean Hands, Clean Clay
Black clay shows every speck of dust! Keep a pack of baby wipes nearby and clean your hands and tools thoroughly before handling the black clay.
Step 2: Creating the Black Cat
-
Shape the body:
Take a piece of black clay (about half the volume of the pumpkin) and roll it into a smooth teardrop or pear shape. This forms the seated body. -
Position the body:
Place the teardrop shape onto the center depression of your pumpkin, flattening the wider bottom slightly to adhere it securely. -
Define the front legs:
Using a small sculpting tool or a dull blade, make a vertical indentation down the front center of the body to separate the two front paws, rounding them slightly at the bottom. -
Form the head:
Roll a smaller ball of black clay for the head. It should look slightly oversized for maximum cuteness. -
Attach the head:
Place the head on top of the narrow point of the body teardrop. I recommend adding a tiny drop of liquid clay here for a stronger bond. -
Make the ears:
Form two tiny triangles of black clay. Gently press them onto the top of the head, blending the seam at the back with a rubber tool if necessary. -
Add the tail:
Roll a thin snake of black clay. Attach one end to the back or side of the body and curl the tip into a cute spiral against the cat’s hip. -
Create eye sockets:
Use a small ball stylus to press two small indentations into the face where the eyes will go. -
Insert the eyes:
Settle two tiny balls of white clay into the sockets (or leave them empty to paint later). Add tiny black pupils if using clay. -
Initial Bake:
Bake the piece according to your clay manufacturer’s instructions (usually 275°F/135°C for 15-30 minutes). Let it cool completely.
Glow in the Dark
Swap the white eye paint for glow-in-the-dark acrylic paint or clay. Your kitty’s eyes will eerily shine when the lights go out!
Step 3: Finishing Touches
-
Paint the eyes:
If you didn’t use white clay for eyes, use a fine detail brush or a toothpick to dab small white dots for the eyes now. -
Add the nose:
Using the very tip of a needle tool, scratch or paint a tiny nose and mouth detail just below the eyes. -
Create mini pumpkins:
Use leftover orange clay to make two tiny pumpkins following the same steps as the large one, adding tiny brown stems. -
Display:
Arrange your main pumpkin cat and the miniature pumpkins on a rustic wood slice to complete the autumn scene.
Place this charming duo on your desk or windowsill for a subtle nod to the Halloween season

What Really Happens Inside the Kiln
Learn how time and temperature work together inside the kiln to transform clay into durable ceramic.
Easy Bat Wing Charms
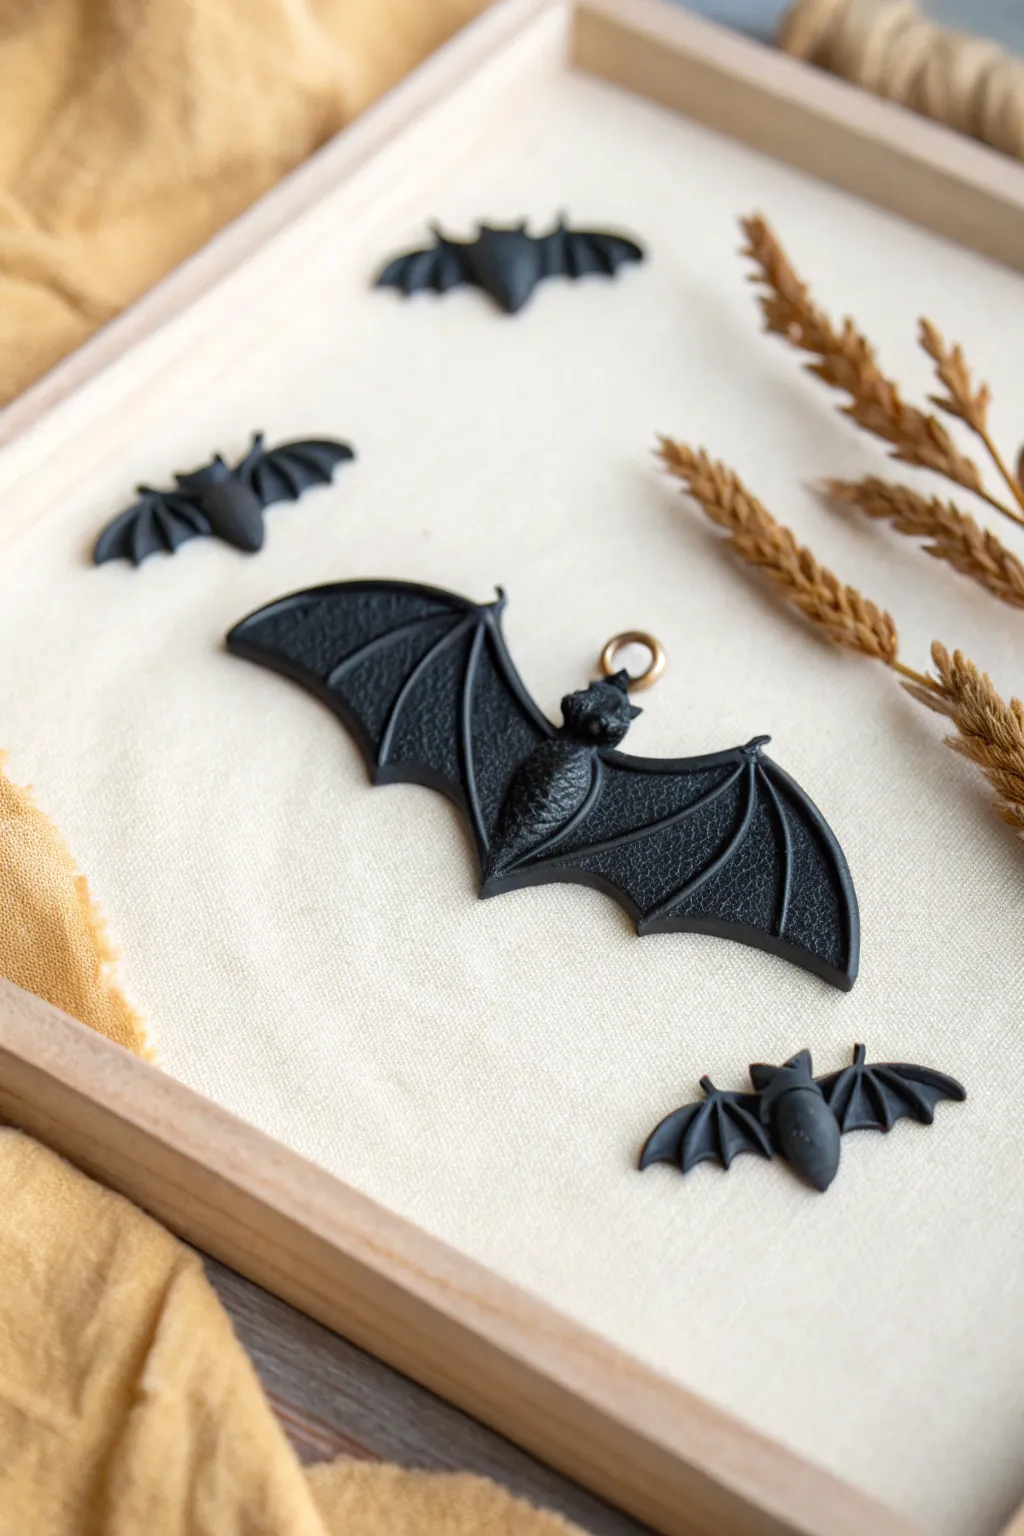
These striking, leather-textured bat charms are the perfect spooky accessory for necklaces or earrings. With their deep black finish and intricate wing details, they look deceptively complex but are surprisingly simple to sculpt.
Step-by-Step Guide
Materials
- Black polymer clay
- Rolling pin or clay machine
- Texture sheet (leather or stone pattern) or coarse sandpaper
- Needle tool or toothpick
- Small ball stylus tool
- Eyepins (gold or antique brass)
- X-Acto knife or clay blade
- Baking sheet and parchment paper
- Oven
Step 1: Prepping the Clay
-
Condition the Clay:
Start by kneading the black polymer clay thoroughly in your hands until it becomes soft, warm, and pliable. Proper conditioning prevents cracks later on. -
Roll It Out:
Using your rolling pin or a pasta machine on a medium setting, flatten the clay into an even sheet approximately 3mm to 4mm thick. -
Add Texture:
Place your leather-patterned texture sheet or a piece of coarse sandpaper over the clay slab. Roll firmly over it once to imprint a deep, organic texture onto the surface.
Fixing Fingerprints
If you accidentally smooth out the texture while handling, lightly embrace the imperfections or re-press the texture sheet gently over the smudged area before baking
Step 2: Shaping the Wings
-
Cut the Basic Shape:
Using a needle tool, lightly sketch the outline of a bat wing on the textured clay surface. You want a wide span with pointed scallops along the bottom edge. -
Refine the Edges:
Carefully cut out the wing shape using your X-Acto knife. Smooth the raw cut edges with your fingertip to remove any sharpness, blending them slightly into the back. -
Add Wing Bones:
Roll very thin snakes of black clay to create the skeletal structure of the wings. Lay them on top of your cutout, stretching from the central point out to the tips of the scallops. -
Blend the Bones:
Gently press these thin snakes onto the wings so they adhere. I like to use a small ball tool to press along the sides of the ‘bones,’ making them look integrated rather than just sitting on top.
Step 3: Creating the Body
-
Form the Torso:
Roll a small, elongated teardrop shape for the bat’s body and a smaller round ball for the head. -
Attach to Wings:
Press the body onto the center of your wing piece where the wings meet. Place the head firmly on top of the torso. -
Detail the Face:
Use your needle tool to poke two tiny holes for eyes. Shape two tiny triangles of clay and attach them as ears. -
Texture the Body:
Use the needle tool or a stiff brush to stipple the body and head, giving it a furry appearance that contrasts with the leathery wings.
Add Subtle Shimmer
Before baking, lightly brush purple or deep blue mica powder over the raised wing bones. This highlights the details without losing the goth aesthetic
Step 4: Finishing Touches
-
Insert Hardware:
Trim an eyepin to the correct length. Carefully push the pin into the top of the bat’s head, centered perfectly, leaving only the loop visible. -
Check Adhesion:
Gently wiggle the clay around the pin insertion point to ensure the metal is enclosed securely. -
Make Shadows (Optional):
Roll out a tiny amount of leftover clay and cut small silhouette versions for the background decor if you want a matching set. -
Bake:
Preheat your oven according to the manufacturer’s instructions on your clay package (usually around 275°F or 130°C). -
Cool Down:
Place the pieces on parchment paper and bake for the recommended time, usually 15-30 minutes per 1/4 inch of thickness. Let them cool completely before handling.
Once cooled, simply attach a jump ring to the eye pin and string it onto a cord for a beautifully eerie necklace
Simple Spider and Web Pins
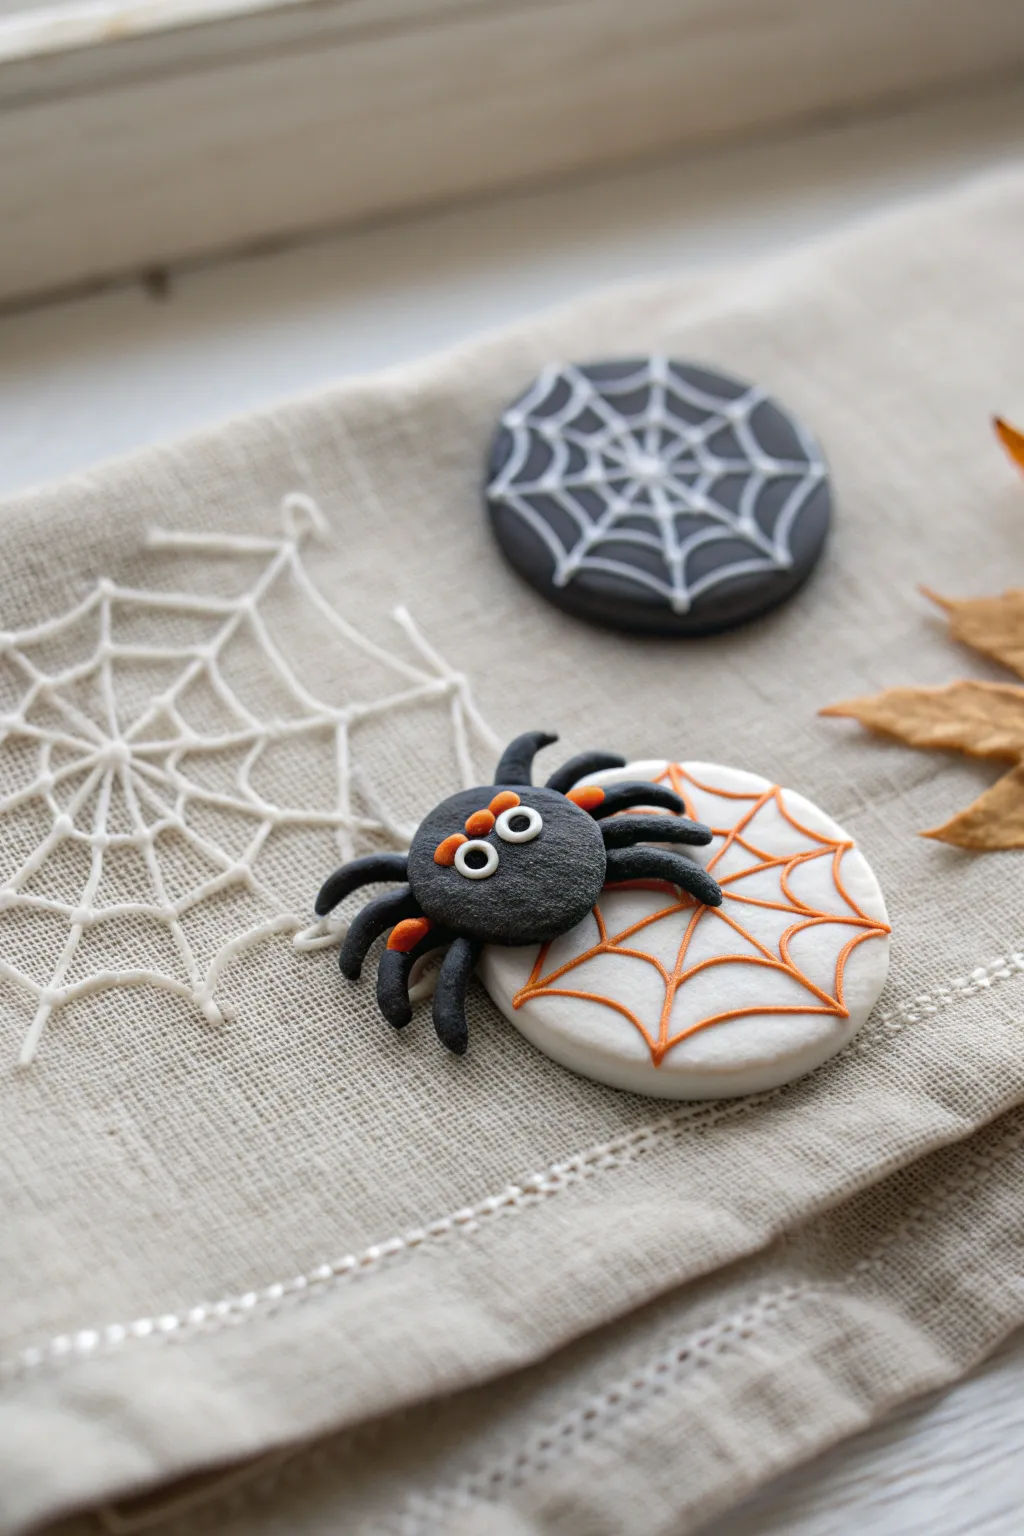
Embrace the spooky spirit with these adorable Halloween accessories featuring a friendly black spider and delicate web designs. This project uses polymer clay to create both a standalone web brooch and a cute spider perched on its own webby base.
Step-by-Step
Materials
- Black polymer clay
- White polymer clay
- Orange polymer clay
- Liquid polymer clay (Translucent or White)
- Needle tool or toothpick
- Small round cutter (approx. 1-1.5 inches)
- Acrylic rolling pin
- Wet wipes
- Gloss glaze (optional)
- Two pin backs
- Super glue or E6000
- Baking sheet and parchment paper
- Oven
Step 1: Creating the Webbed Bases
-
Prepare the Bases:
Condition a ball of white polymer clay until soft. Roll it out to about 1/4 inch thickness and use your round cutter to punch out a perfect circle. Repeat this with black clay if you want to make the contrasting black web pin shown in the background. -
Smooth the Edges:
Gently rub the edges of your clay circles with your finger to round them off slightly. This gives the finished piece a more polished, professional look rather than a sharp, raw cut. -
Mix the Webbing ‘Icing’:
To create the fine lines for the web, mix a small amount of orange clay with liquid polymer clay in a small cup. Stir until you have a pipeable paste consistency. I find a toothpick works well for mixing. -
Apply the Web Lines:
Roll extremely thin snakes of orange clay for the web lines, or carefully apply your liquid clay mixture using a needle tool. Create a central point and draw lines radiating outward to the edge of the circle. -
Connect the Web:
Add the curved connector lines between the radiating spokes. Start near the center and work your way out in concentric swoops to form the classic spiderweb pattern. -
Make the Black Web Base:
For the black background pin, repeat the webbing process using extremely thin ropes of white clay on your black circle base. Press them down gently so they bond with the base.
Legs Falling Off?
If the spider legs won’t stick, use a tiny dab of liquid clay or ‘Bake and Bond’ as glue between the leg and the body before baking.
Step 2: Sculpting the Spider
-
Form the Body:
Roll a medium ball of black clay for the spider’s body and flatten it slightly into a dome shape. The texture in the photo looks a bit rough, so you can gently tap the surface with a stiff brush or keep it smooth. -
Position on the Web:
Place the spider body onto the white/orange web base you created earlier. Offset it slightly from the center for a more dynamic composition. -
Create the Legs:
Roll eight small, tapered logs of black clay for the legs. They should be thicker near the body and pointed at the ends. -
Attach the Legs:
Attach four legs to each side of the body. Bend them at the ‘knees’ so they look like they are crawling, and gently press the ends onto the white base to secure them. -
Add Decorative Spots:
Take tiny pinched balls of orange clay and press them onto the spider’s back and leg joints for pops of color. Use a needle tool to texture them slightly if desired. -
Make the Eyes:
Roll two tiny white balls and flatten them onto the spider’s face area. Add even tinier black balls for pupils, or use black paint after baking for precision.
Step 3: Creating the Free-standing Web (Optional)
-
Sketch the Template:
If you want to make the delicate white web shown on the left, sketch a web pattern on a piece of paper first. Place a piece of glass or clear bake-able sheet over it. -
Pipe or Roll:
Using white liquid clay in a fine-tip bottle, trace your pattern. Alternatively, roll incredibly thin snakes of white clay and lay them out over the template, pressing the joins together firmly.
Glow in the Dark
Swap the white clay for Glow-in-the-Dark polymer clay! Your spider’s eyes and the web bases will shine spookily when the lights go out.
Step 4: Finishing Up
-
Bake:
Place all your pieces on a parchment-lined baking sheet. Bake according to your clay manufacturer’s instructions (usually 275°F/135°C for 15-30 minutes). -
Cool Down:
Let the pieces cool completely before handling. The thin web parts will be fragile while warm. -
Add Hardware:
Flip your cooled clay pieces over. Apply a drop of strong super glue or E6000 to the back and press a pin back mechanism firmly into place. -
Final Touches:
For extra durability, you can add a coat of matte or gloss varnish to the spider, but leaving the web matte provides a nice contrast.
Pin these onto a cozy sweater or a tote bag for instant Halloween flair


The Complete Guide to Pottery Troubleshooting
Uncover the most common ceramic mistakes—from cracking clay to failed glazes—and learn how to fix them fast.
Mummy Beads With Peeky Eyes
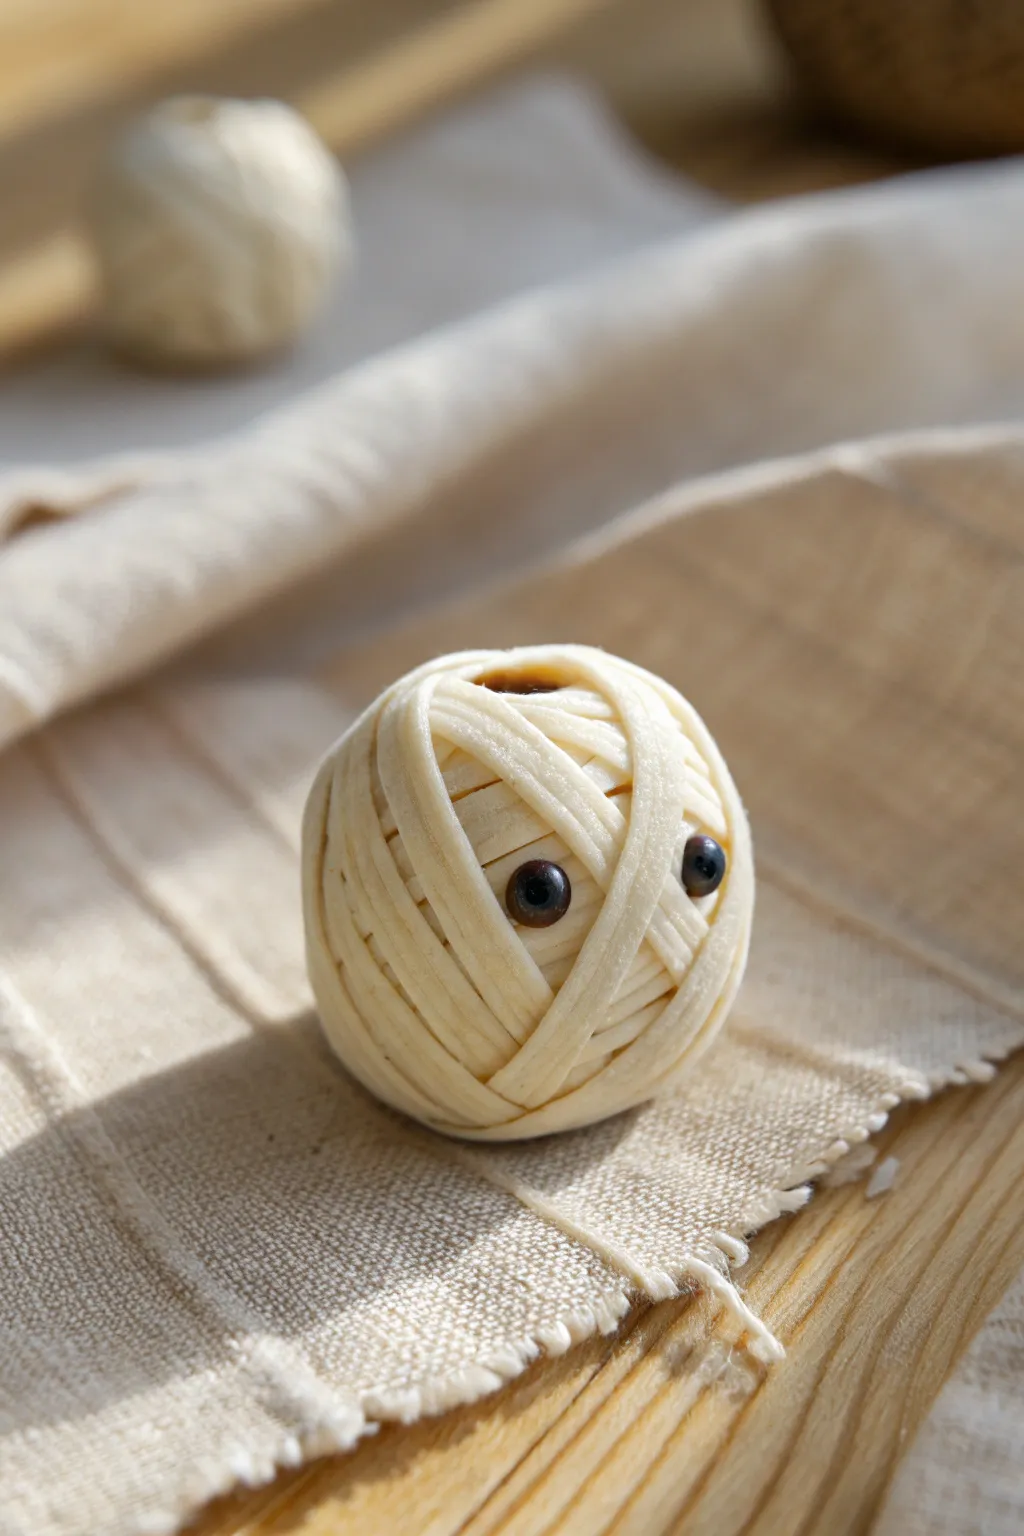
These adorable mummy beads are the perfect mix of spooky and sweet, featuring playful eyes peeking out from layers of textured bandages. They make fantastic additions to Halloween jewelry or seasonal garlands, bringing a handcrafted charm to your holiday decor.
How-To Guide
Materials
- White or beige polymer clay
- Translucent liquid polymer clay (optional)
- Black glass seed beads (4mm or 6mm)
- Brown acrylic paint (burnt umber)
- Pasta machine or acrylic rolling pin
- Tissue blade or craft knife
- Toothpick or needle tool
- Awl or bead ream
- Wet wipes or baby oil
- Baking sheet with parchment paper
- Gloss glaze (optional)
Step 1: Prepping the Base
-
Color Mixing:
Begin by conditioning your white polymer clay until it’s soft and pliable. To achieve the slightly aged, linen look seen in the photo, mix in a tiny pinhead-sized amount of brown or beige clay. You want an off-white, antique bone color rather than a stark, bright white. -
Forming the Core:
Roll a portion of your conditioned clay into a smooth ball about the size of a large marble or a gobstopper. Ensure there are no cracks or air bubbles by rolling it firmly between your palms. -
Creating the Hole:
Since this is a bead, you need a hole for stringing. Gently pierce the ball straight through the center with your awl or bead ream. Rotate the tool as you push to prevent flattening the sphere significantly.
Step 2: Applying the Bandages
-
Rolling Sheets:
Roll out the remaining beige/white clay into a very thin sheet. If you are using a pasta machine, I usually go for the second or third thinnest setting. If rolling by hand, aim for about 1mm thickness. -
Cutting Strips:
Using a sharp tissue blade, slice the clay sheet into long, narrow strips. These should be approximately 2-3mm wide. Don’t worry if they aren’t perfectly uniform; slightly uneven widths add to the ragged mummy effect. -
Adding Texture:
Before lifting the strips, gently press a piece of coarse fabric or a fine sandpaper onto the clay surface to give it a subtle fabric texture, mirroring the gauze look in the reference image. -
First Wrap:
Take your first strip and wrap it randomly around the base ball. Avoid covering the bead holes you created earlier. The goal is to start building layers and hiding the smooth core.
Keep It Clean
White clay picks up lint instantly. Keep baby wipes nearby and clean your hands and tools thoroughly before starting to ensure your bandages stay pristine.
Step 3: The Peeky Eyes
-
Planning the Face:
Decide where the ‘face’ of your mummy will be. Use a ball tool or the end of a paintbrush to make two small indentations side-by-side where the eyes will sit. -
Inserting Eyes:
Press a black glass seed bead firmly into each indentation. Orient the beads so their holes are facing sideways (hidden) if possible, or use solid glass eyes. If they feel loose, a tiny drop of liquid clay acts as great glue here. -
Framing the Gaze:
This is crucial for the ‘peeky’ look: take a new strip of clay and drape it diagonally just over the top edge of one eye, and another strip just under the bottom edge. Repeat for the other eye. -
Creating Depth:
Ensure the strips slightly overlap the edges of the beads, making it look like the mummy is peering out from deep within the bandages.
Glow Up
Swap the standard white clay for glow-in-the-dark polymer clay. During the day it looks like regular bandages, but at night your mummy necklace will glow green
Step 4: Finishing Touches
-
Final Wrapping:
Continue wrapping the rest of the ball with your clay strips. Crisscross them in random directions—horizontal, vertical, and diagonal—to build up bulk and dimension. -
Checking the Holes:
Periodically re-insert your awl into the bead holes to ensure they haven’t been covered by stray bandages. Keep the pathways clear. -
Antiquing Wash:
To get that shadowed depth between the wraps, dilute a drop of brown acrylic paint with water. Brush this wash over the entire raw bead, getting into all the crevices. -
Wiping Back:
Immediately wipe the surface gently with a wet wipe or paper towel. This removes the paint from the high points of the bandages but leaves the dark brown in the cracks, defining the separate strips. -
Baking:
Place your bead on a parchment-lined baking sheet. Bake according to your specific polymer clay manufacturer’s instructions (usually 275°F/130°C for about 30 minutes per 1/4 inch of thickness). -
Cooling and Glazing:
Allow the bead to cool completely. For a wet, spooky look, you can add a small dot of gloss glaze just to the black eyes, keeping the bandages matte.
String these charming little characters onto a simple cord or combine them with orange and black beads for a festive creative statement
Mini Witch Hat Toppers
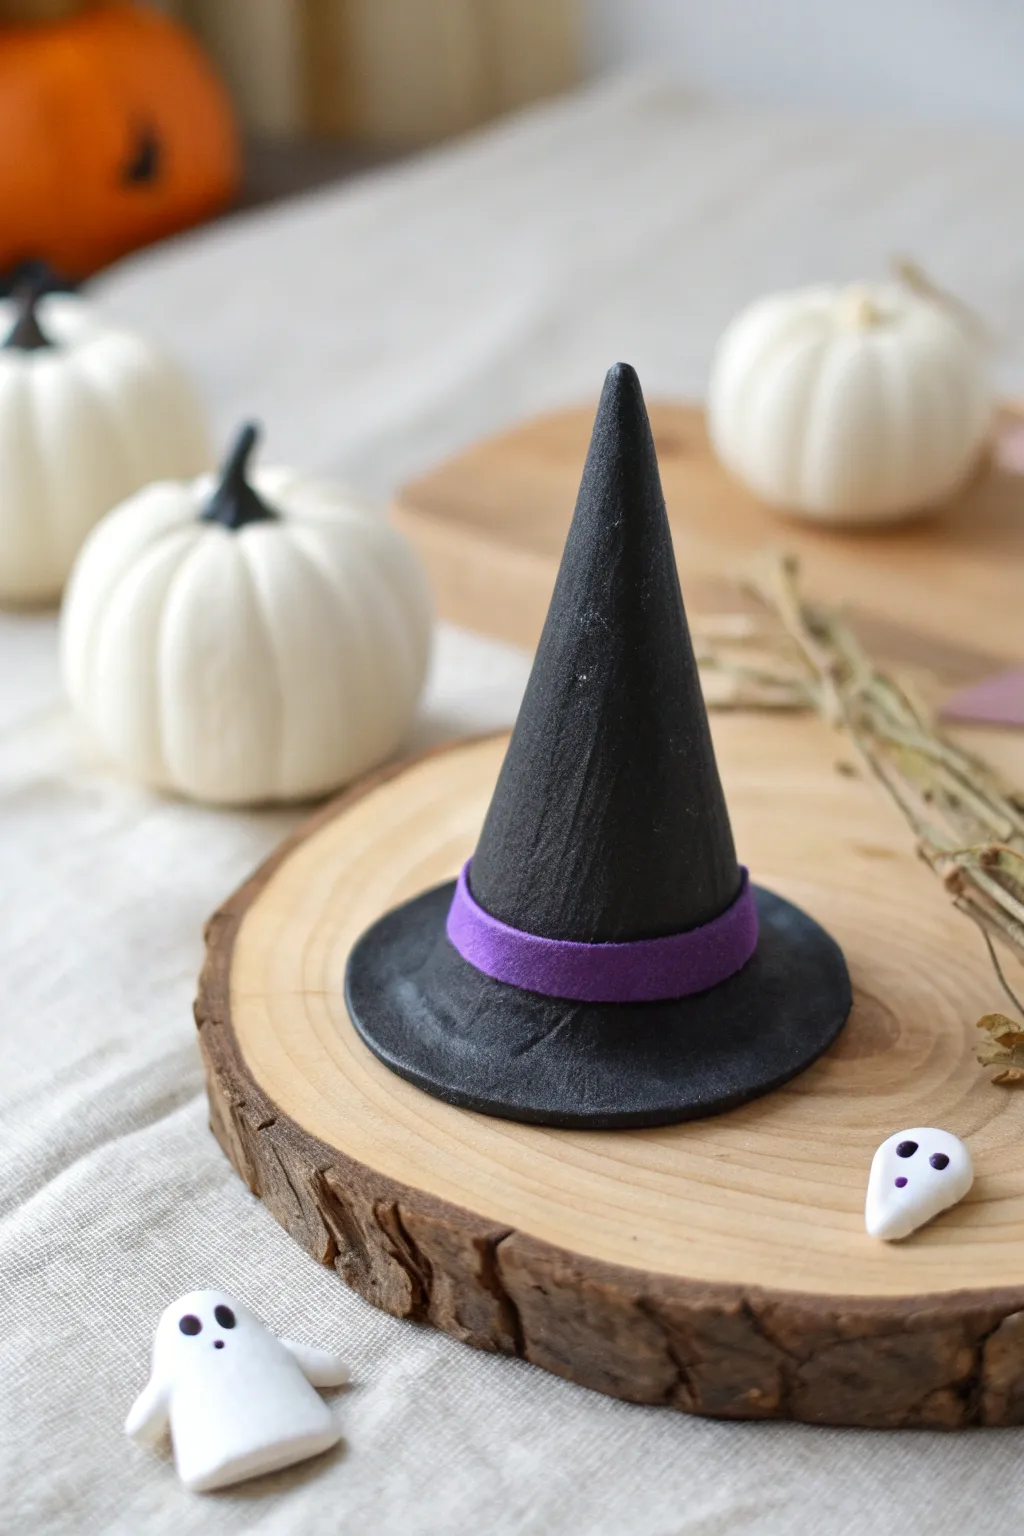
This bewitching little hat topper is simplicity at its spookiest. With its deeply textured black cone and vibrant purple band, it adds a perfect touch of magic to your Halloween décor or even a batch of cupcakes.
Step-by-Step Guide
Materials
- Black polymer clay
- Purple polymer clay
- Rolling pin or acrylic roller
- Round cookie cutter (approx. 2-3 inches)
- X-acto knife or clay blade
- Texture tool (toothpick, stiff-bristled brush, or sandpaper)
- Liquid clay (optional but recommended for bonding)
- Oven for baking
- Baking sheet/tile
Step 1: Forming the Base
-
Condition the clay:
Start by kneading a chunk of black polymer clay in your hands until it is soft, pliable, and free of cracks. This ensures the clay won’t crumble as you shape it. -
Roll out the brim:
Using your acrylic roller, flatten a portion of the black clay into a sheet about 1/8th of an inch thick. You want it sturdy enough to hold the cone but thin enough to look like fabric. -
Cut the circle:
Press your round cookie cutter firmly into the sheet to create a perfect circle for the hat’s brim. Gently peel away the excess clay. -
Smooth the edges:
Running your finger lightly around the circumference of the cut circle helps soften the sharp edge left by the cutter, giving it a more finished appearance.
Texturing Trick
To get that vertical grain look without special tools, roll the cone gently over a piece of coarse sandpaper before attaching it to the brim.
Step 2: Sculpting the Cone
-
Shape the cone:
Take a separate ball of conditioned black clay and roll it between your palms, applying more pressure to one side to form a teardrop or cone shape. -
Refine the height:
Stand the cone up on your work surface. Gently roll it back and forth while applying slight upward pressure to elaborate the point, making it tall and slender rather than short and squat. -
Create the texture:
Before attaching it to the brim, use a stiff brush, sandpaper, or an old toothbrush to press texture into the surface of the cone. I like to drag the tool vertically to mimic felt or worn fabric grain. -
Attach to base:
Center the textured cone onto the black circle base. If the clay is fresh, pressing them firmly together should work, but a small dab of liquid clay creates a much stronger bond. -
Blend the seam:
Use a clay tool or your fingernail to slightly drag a tiny bit of clay from the bottom of the cone onto the brim to lock it in place, though this will mostly be covered by the band later.
Floppy Brim Fix
If your brim is drooping before you bake it, support the edges with a ring of crumpled aluminum foil or polyester batting until it hardens in the oven.
Step 3: Adding the Hat Band
-
Prepare the purple clay:
Condition a small amount of purple clay until smooth. Clean your hands or roller first to avoid transferring black residue onto the bright color. -
Create a thin strip:
Roll the purple clay into a very thin, long snake or flat ribbon. Flatten it gently with the roller until it is uniform in width, roughly 1/4 inch wide. -
Trim the ribbon:
Use your blade to cut straight edges on the top and bottom of the purple strip so it looks like a clean ribbon. -
Wrap the hat:
Carefully wrap the purple strip around the base of the cone where it meets the brim. Cut off any excess length with your blade where the ends meet. -
Smooth the join:
Press the seam of the purple band gently with a smoothing tool to hide the cut. Position this seam at the ‘back’ of the hat.
Step 4: Baking and Finishing
-
Final check:
Look over the hat for any accidental fingerprints. You can gently buff them out with a tiny bit of baby oil or cornstarch on your finger. -
Bake:
Place the hat on a ceramic tile or baking sheet parchment. Bake according to your specific clay package directions (usually 275°F/135°C for about 15-30 minutes depending on thickness). -
Cool down:
Allow the hat to cool completely in the oven or on the counter before handling to prevent the brim from warping while soft.
Once cooled, your miniature witch hat is ready to cast a charming spell on your Halloween display

TRACK YOUR CERAMIC JOURNEY
Capture glaze tests, firing details, and creative progress—all in one simple printable. Make your projects easier to repeat and improve.
Cute Skull Bead Focals
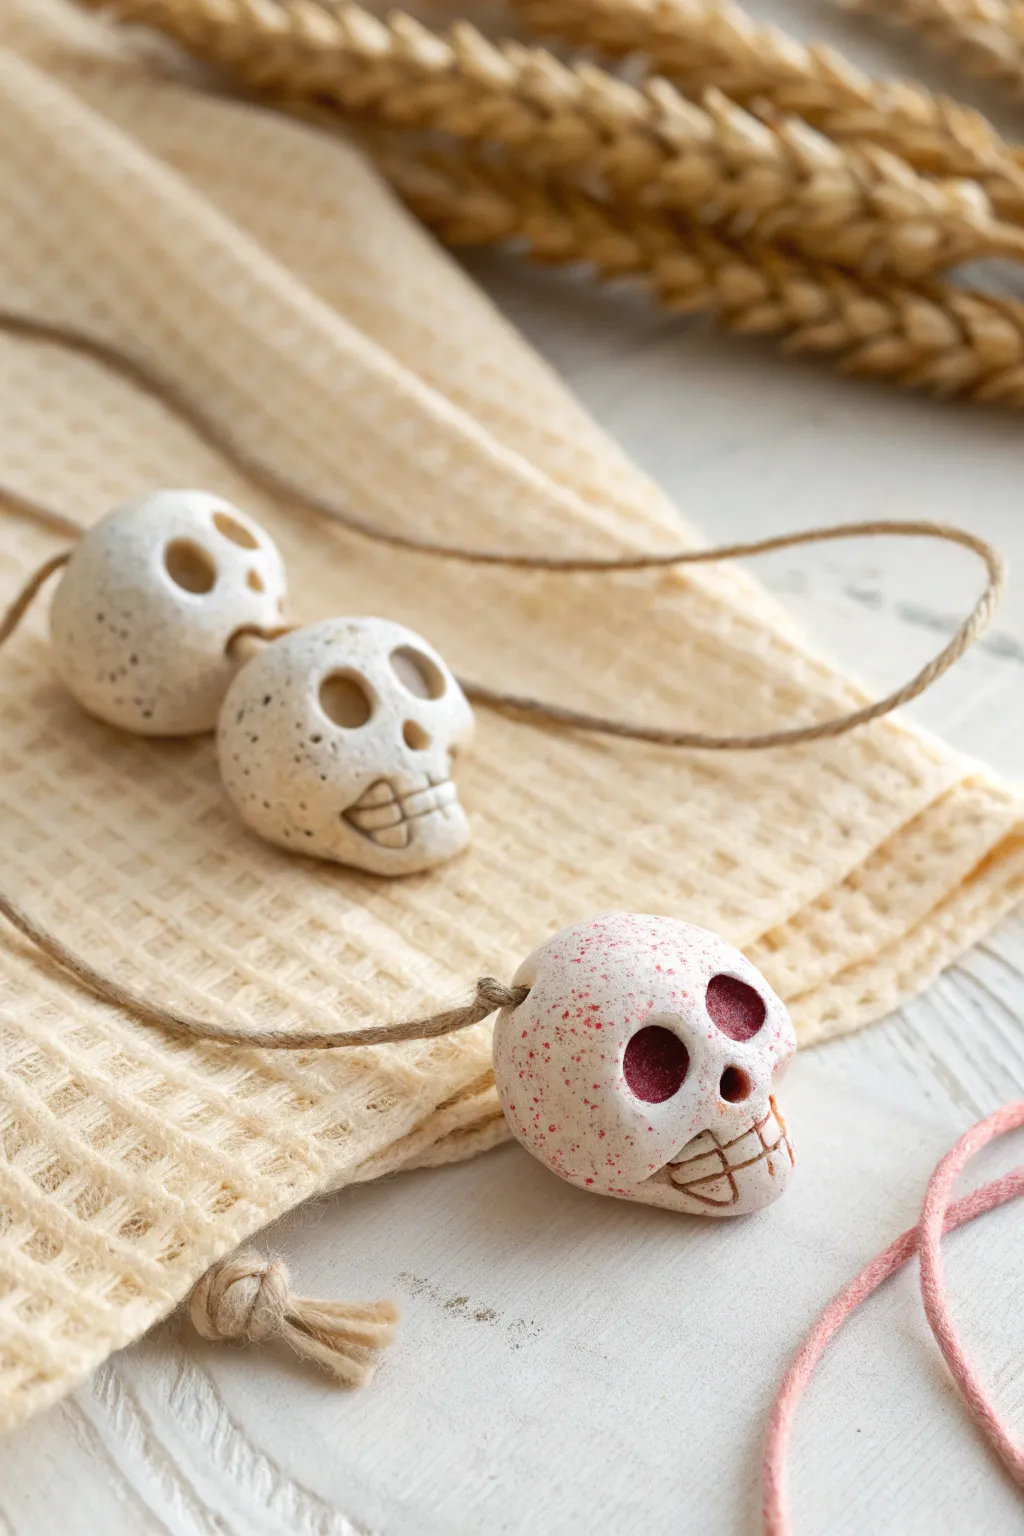
Create rustic, charmingly spooky focal beads that look like ancient artifacts with a modern twist. These chunky polymer clay skulls feature a speckled stone finish and deep, shadowed eye sockets perfect for chunky necklaces or Halloween charm bracelets.
Detailed Instructions
Materials
- White or beige polymer clay
- Translucent polymer clay (optional)
- Black pepper or dried tea leaves (for speckling)
- Ball stylus tool (medium and large)
- Needle tool or toothpick
- Acrylic paint (red and black/brown)
- Old toothbrush
- Thick jute twine or hemp cord
- Skewer or thick knitting needle (for piercing)
- Oven for baking
Step 1: Mixing and Shaping
-
Prepare the Clay Base:
Condition your white or beige clay until it is soft and pliable. If you want a more stony look, mix in a small amount of translucent clay to give it depth. -
Add Texture:
To achieve that organic, speckled look seen in the photo, flatten your clay and sprinkle a pinch of ground black pepper or finely crushed dried tea leaves onto it. Fold the clay over and knead until the specks are evenly distributed. -
Form the Base Shape:
Roll the clay into a smooth ball approximately 1 inch in diameter. Then, gently pinch the lower half to create a slightly tapered jawline, giving it a subtle pear shape.
Step 2: Sculpting the Features
-
Create Eye Sockets:
Take your large ball stylus and press firmly into the upper half of the skull to create two deep indentations for the eyes. Wiggle the tool slightly to widen them; they shouldn’t be perfect circles. -
Add the Nose:
Using a smaller ball stylus or the back of a paintbrush, press a small, inverted ‘V’ or triangle shape just below the eyes for the nose cavity. -
Define the Mouth:
Use a needle tool to draw a horizontal line across the jaw area for the mouth. Adding a slight curve upwards at the corners gives them a ‘cute’ rather than scary expression. -
Detail the Teeth:
Draw short, vertical lines across the mouth slit to simulate teeth. Don’t worry about making them perfectly evenly spaced; primitive irregularity adds character here. -
Piercing the Bead:
Since these are focal beads, you’ll need a large hole. Carefully insert a skewer or thick needle horizontally through the side of the skull, right behind the eye sockets. Twist gently as you push through to avoid distorting the face.
Distortion Disaster?
If the face smushes while piercing the hole, try putting the bead in the fridge for 20 minutes first. Cold clay is harder and holds detail better during drilling.
Step 3: Finishing and Baking
-
Baking:
Place your skulls on a baking sheet or ceramic tile. Bake according to the manufacturer’s instructions for your specific brand of clay (usually around 275°F/135°C for 15-30 minutes). Let them cool completely. -
Adding Paint Effects:
For the ‘bloody’ variant shown in the foreground, dilute a tiny drop of red acrylic paint with water. Paint the inside of the eye sockets carefully. -
Creating Splatters:
Dip an old toothbrush into your red paint (undiluted or slightly thinned). Run your thumb across the bristles to flick tiny speckles of paint onto the skull’s forehead and cheekbones. -
Antiquing (Optional):
For the plain skulls, you can brush on a wash of brown paint and wipe it off immediately with a paper towel. This leaves dark pigment in the teeth lines and nose cavity to make the details pop. -
Sealing:
Once the paint is fully dry, apply a thin coat of matte varnish to protect the surface, or leave them bare for a raw, porous ceramic feel. -
Stringing:
Thread your finished skull onto a piece of rustic jute twine or hemp cord to complete the primitive aesthetic.
Glow Up
Use glow-in-the-dark clay for the base! The specks and paint will still show in daylight, but they’ll turn into eerie floating green skulls when the lights go out.
Layer these with wooden beads or bone spacers for a truly archaeological vibe
Frankenstein Mini Heads
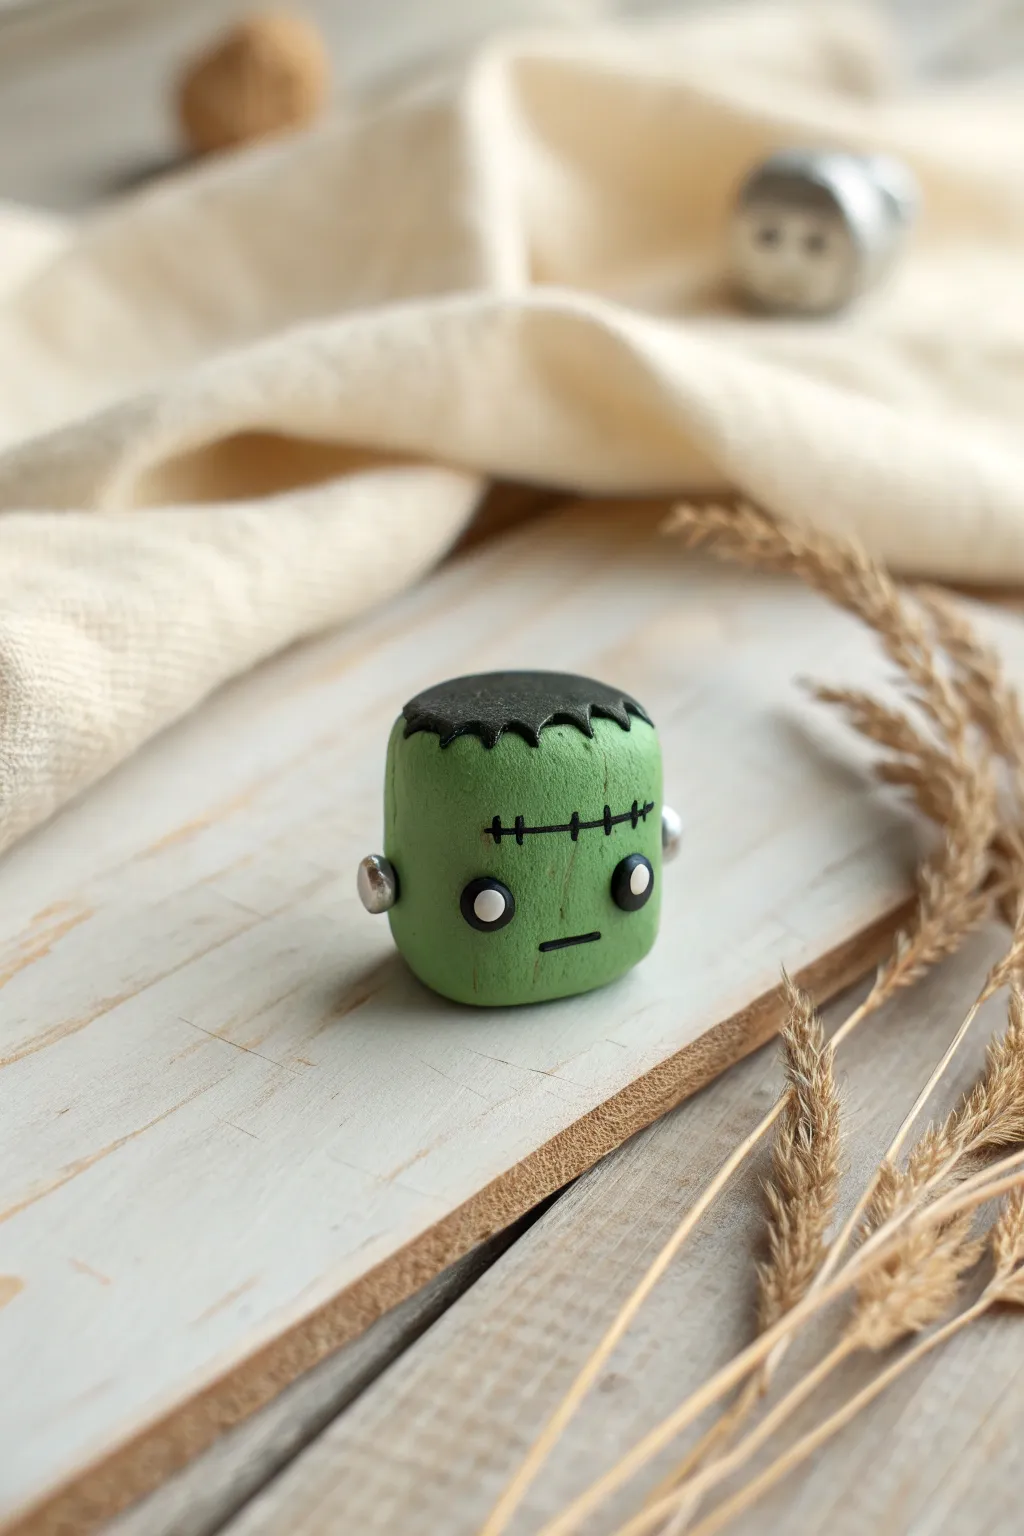
These adorable little Frankenstein heads are the perfect introduction to polymer clay sculpting, featuring a delightfully spooky yet sweet expression. With their signature bolts and stitched forehead, they make charming Halloween decor or festive jewelry pieces.
How-To Guide
Materials
- Polymer clay (green, black, white, silver/grey)
- Clay blade or craft knife
- Modeling tools (dotting tool, needle tool)
- Black acrylic paint or fine tip permanent marker
- Baking sheet or ceramic tile
- Oven (for curing)
- Gloss glaze (optional)
Step 1: Shaping the Head
-
Condition the clay:
Start by kneading a chunk of green polymer clay until it is soft and pliable, ensuring there are no air bubbles trapped inside to prevent cracking during baking. -
Form the base cylinder:
Roll the green clay into a smooth ball about the size of a large cherry, then gently tap the top and bottom against your work surface to flatten them into a rounded cylinder shape. -
Smooth the sides:
Roll the cylinder slightly on its side to smooth out any fingerprints, maintaining a slightly flawed, organic shape that adds to the monster’s character.
Step 2: The Iconic Hair
-
Flatten black clay:
Condition a piece of black clay and roll it out into a thin, flat sheet, roughly 2mm thick. -
Cut the hairline:
Using your craft knife or clay blade, cut a jagged, zig-zag pattern along one edge of the black sheet to create the monster’s classic bangs. -
Apply the hair cap:
Place the black sheet over the top of the green cylinder, positioning the jagged edge on the front face. Gently press it down to adhere it to the green clay without smashing the head shape. -
Trim the excess:
Trim away any extra black clay at the back and sides so it forms a neat “cap,” smoothing the seams where the black clay meets the green at the back.
Clean Prints
A bit of rubbing alcohol on a Q-tip or a baby wipe works wonders for smoothing out fingerprints on raw clay before you bake it.
Step 3: Facial Features
-
Prepare the eyes:
Roll two small balls of black clay and flatten them slightly into discs. Place these onto the face, spacing them wide apart for a cute look. -
Add the highlights:
Take tiny specs of white clay, roll them into minuscule balls, and press them onto the upper right corner of each black eye to bring the character to life. -
Create the bolts:
Form two small balls of silver or grey clay. Press them gently onto the sides of the head, slightly below the eye level, to serve as the neck bolts. -
Refine the bolts:
If you want extra detail, use a flat tool to gently press the outer face of the silver balls to make them look more like metal screw heads.
Level Up
Insert an eye pin into the top of the head before baking to turn this mini sculpture into a charm for a necklace or keychain.
Step 4: Details and Finishing
-
Add the scar:
Using a thin detail brush with black acrylic paint or a very fine permanent marker, draw a horizontal line across the forehead with smaller vertical hatch marks to create the stitches. -
Draw the mouth:
Draw a simple, straight horizontal line near the bottom of the face for a stoic, monster expression. -
Bake the piece:
Place your finished monster on a ceramic tile or baking sheet covered with parchment paper. Bake according to your brand of clay’s specific instructions (usually 275°F for 15-30 minutes). -
Cool down:
Let the piece cool completely inside the oven with the door cracked, or remove and let sit until room temperature before handling to ensure durability. -
Optional glaze:
For a finished look, I sometimes apply a thin coat of satin or gloss glaze to the eyes and hair, but leaving the face matte gives it a nice texture.
Your mini monster is now ready to spook up your shelf
Glow-Style Ghosties
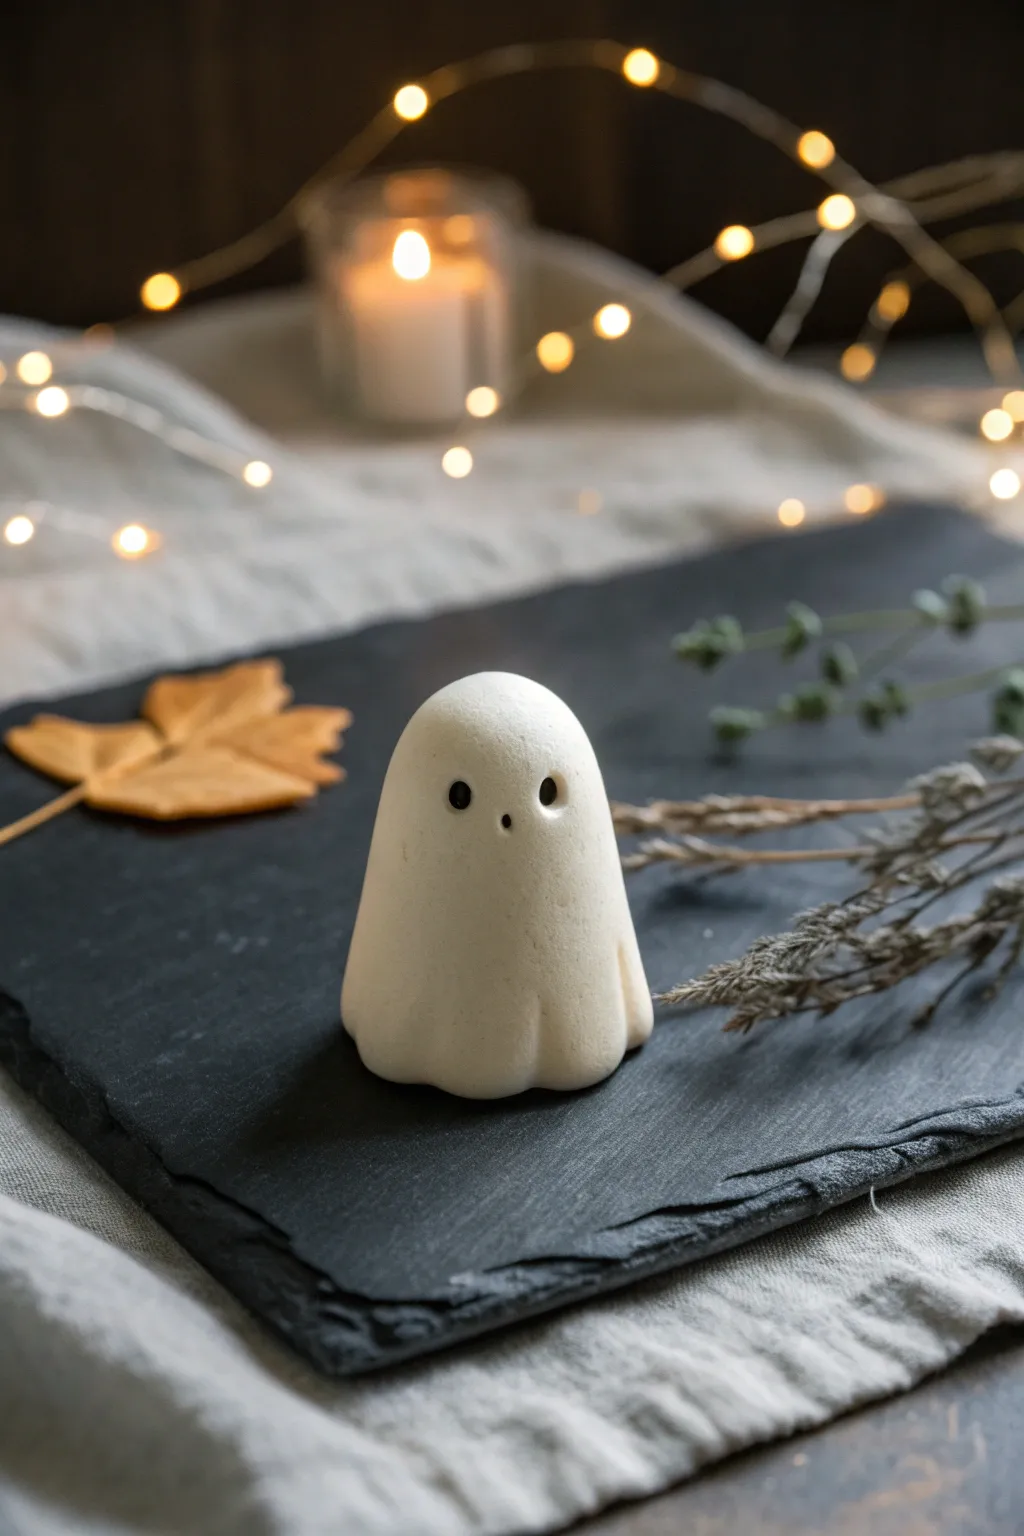
Create a hauntingly simple figurine that captures the essence of Halloween with clean lines and a soft, matte finish. This project focuses on subtle shaping and texture to achieve a high-end, ceramic-like look without needing a kiln.
Step-by-Step Guide
Materials
- White polymer clay (approx. 2oz)
- Black polymer clay (tiny amount)
- Acrylic roller or glass jar
- Ball stylus tool (medium and small)
- Needle tool or toothpick
- Cornstarch or baby powder (for texture)
- Soft bristle brush
- Oven-safe baking tile or ceramic tile
- Sandpaper (fine grit, optional)
- Matte varnish (optional)
Step 1: Shaping the Base
-
Condition the Clay:
Begin by thoroughly conditioning your white polymer clay. Knead it in your hands until it is warm, soft, and pliable. This prevents cracking later on. -
Roll a Ball:
Roll the conditioned clay into a smooth, crack-free sphere roughly the size of a golf ball. Inspect it closely to ensure there are no air bubbles trapped inside. -
Form a Cylinder:
Gently roll the ball on your work surface to elongate it slightly into a thick cylinder shape. Keep the top rounded for the ghost’s head. -
Create the Bell Shape:
Stand the cylinder upright. Gently press down on the clay using your thumbs to widen the base while keeping the top domed. You want a subtle bell shape that tapers toward the head. -
Initial Smoothing:
Use your fingers to smooth out any fingerprints. Lightly glide your thumb over the surface in circular motions to create a flawless, seamless finish.
Step 2: Refining the Form
-
Define the Drapes:
To make the ghost look like it’s wearing a sheet, use the side of your finger or a large modeling tool to press subtle vertical indentations near the bottom edge. -
Scallop the Hem:
Where you created the indentations, gently pinch the clay at the very bottom edge to create a wavy, scalloped hemline. This helps the ghost sit naturally. -
Check Stability:
Set the ghost on your baking tile. Ensure it stands flat and doesn’t wobble. If it leans, gently press the ghost down onto the tile to flatten the underside. -
Add Stone Texture:
Dip a soft brush into a little cornstarch. Tap the brush gently all over the ghost’s surface. This removes the glossy sheen of raw clay and gives it that beautiful stone-like matte texture shown in the photo.
Fingerprint Fighter
Dusting your fingertips with cornstarch before the final smoothing step acts as a buffer, preventing stubborn prints and giving a velvety texture.
Step 3: Adding the Face
-
Mark Eye Position:
Decide where the face should go. Use a needle tool to make two tiny guide pricks for the eyes, placing them slightly lower than the center of the head for a cuter look. -
Create Eye Sockets:
Using a medium ball stylus, press gently into your guide marks to create small, round indentations. Do not go too deep; just enough to seat the black clay. -
Create the Mouth:
Use a smaller ball stylus to make a tiny indentation for the mouth, centered and slightly below the eyes. -
Prepare Black Clay:
Take a very small amount of black clay. Roll two tiny spheres for the eyes and an even smaller one for the mouth. -
Insert Features:
Place the black spheres into the indentations. Gently press them flat with your finger brightness so they are flush with the white surface.
Glow Up
Swap the standard white clay for glow-in-the-dark polymer clay. The daytime look remains the same, but it becomes a luminous spook at night.
Step 4: Baking and Finishing
-
Final Surface Check:
Before baking, do one last check for lint or dust. If you see any, use a piece of scotch tape to gently lift it off, or smooth it over with a little more cornstarch. -
Bake:
Bake the clay according to the manufacturer’s instructions (usually 275°F/130°C for 15-30 minutes per 1/4 inch thickness). Use an oven thermometer to ensure accuracy. -
Cool Down:
Let the figurine cool completely inside the oven with the door slightly ajar. Sudden temperature changes can cause thermal shock cracks. -
Matte Finish:
If your ghost is too shiny after baking, lightly sand it with very fine water-wet sandpaper, or apply a layer of specialized matte varnish.
Now you have a charming little companion ready to haunt your desk or shelf
Pumpkin Patch Variety Set

Capture the essence of autumn with these delightful miniature pumpkins, perfect for scattering across a tablescape or nesting in a decorative bowl. This project focuses on creating a variety of realistic shades and textures, from classic orange to trendy cream and dusty pink, all finished with lifelike, twisted stems.
Step-by-Step
Materials
- Polymer clay (white, beige, orange, red, brown, and translucent)
- Needle sculpting tool or toothpick
- Ball stylus tool (medium and small)
- Soft pastel chalks (brown, burnt orange, yellow ochre)
- Small soft paintbrush
- Liquid polymer clay (optional but helpful)
- Craft knife
- Acrylic roller or pasta machine
- Baking sheet and parchment paper
- Matte varnish (optional)
Step 1: Mixing and Forming the Base
-
Prepare your color palette:
Start by conditioning your clay. For the variety shown, you’ll want three distinct mixes: a pure cream (mix white with a tiny dot of beige), a vibrant orange (orange with a touch of red), and a muted dusty pink (beige with a speck of red and brown). Keep a separate lump of dark brown for the stems. -
Create uniform portions:
Roll your conditioned clay into logs and cut equal sections to ensure your pumpkins are similar in size, roughly 1 to 1.5 inches in diameter. -
Shape the spheres:
Roll each section between your palms to create a smooth, tight ball. If you see any air bubbles or cracks, smooth them out now with your finger, as they will be harder to fix later. -
Flatten slightly:
Gently press the top and bottom of each sphere against your work surface to create a squat, pumpkin shape rather than a perfect ball. This gives them a natural, gravity-settled look. -
Mark the center:
Use a medium ball stylus or the back of a paintbrush to make a small indentation in the very center of the top. This is where the stem will eventually sit.
Fixing Fingerprints
Notice fingerprints on your smooth clay? Before baking, lightly brush the pumpkin with a tiny amount of baby oil or clay softener to melt them away.
Step 2: Sculpting the Ribs
-
Draw the initial lines:
Using the needle tool or a dull knife, lightly mark the clay from the top center indentation down to the bottom center. Start by dividing the pumpkin into quarters (North, South, East, West). -
Divide the sections:
Once you have four main sections, divide each of those in half again to create eight even ribs. For a more organic look, you can make some sections slightly wider than others. -
Deepen the grooves:
Go back over your lines with the needle tool, pressing deeper this time. Roll the tool slightly side-to-side to widen the groove and smooth the sharp edges of the cut. -
Soften the shape:
Use your finger to gently stroke down each rib, softening the harsh lines created by the tool. The goal is a puffy, segmented look, not a sliced one.
Step 3: Adding Realistic Stems
-
Prepare the stem clay:
Condition a small amount of dark brown clay. I prefer to mix in a tiny bit of translucent clay here; it gives the stem a less ‘plastic’ appearance after baking. -
Shape the stems:
Roll tiny tapered logs or cones of brown clay. Twist them slightly as you roll to create natural-looking ridges and a gnarled texture. -
Attach the stem:
Place a tiny drop of liquid polymer clay (or simply press firmly if the clay is tacky) into the indentation on top of a pumpkin. Press the wider base of the stem into the hole. -
Texturize the connection:
Use a needle tool or toothpick to drag the bottom edge of the brown stem clay down slightly onto the pumpkin skin, blending them just a tiny bit to secure the bond.
Curly Vine Upgrade
Roll a hairline-thin snake of green or brown clay and wrap it around a needle tool. Slide it off and attach near the stem for a cute curly vine.
Step 4: Shading and Baking
-
Curate shading powder:
Scrape a little bit of soft pastel chalk onto a piece of paper. Use burnt orange for the orange pumpkins and a mix of light brown/yellow ochre for the white and pink ones. -
Apply shading:
Dip a soft, dry brush into the chalk powder. Gently dust the powder into the deep grooves and around the base of the stem. This adds incredible depth and realism to the finished piece. -
Bake the batch:
Arrange your pumpkins on a parchment-lined baking sheet. Bake according to your customized clay brand’s instructions (usually 275°F/135°C for 15-30 minutes). -
Cool down:
Let the pumpkins cool completely in the oven with the door cracked open. This prevents thermal shock and potential cracking. -
Optional finish:
If you want to seal the chalk pastels, apply a very thin layer of matte varnish. Avoid glossy finishes, as real pumpkins have a waxy, matte skin.
Arrange your finished pumpkins on a pretty ceramic plate to bring a touch of handmade autumn warmth to your home
Cauldron Trinket Dish Mini
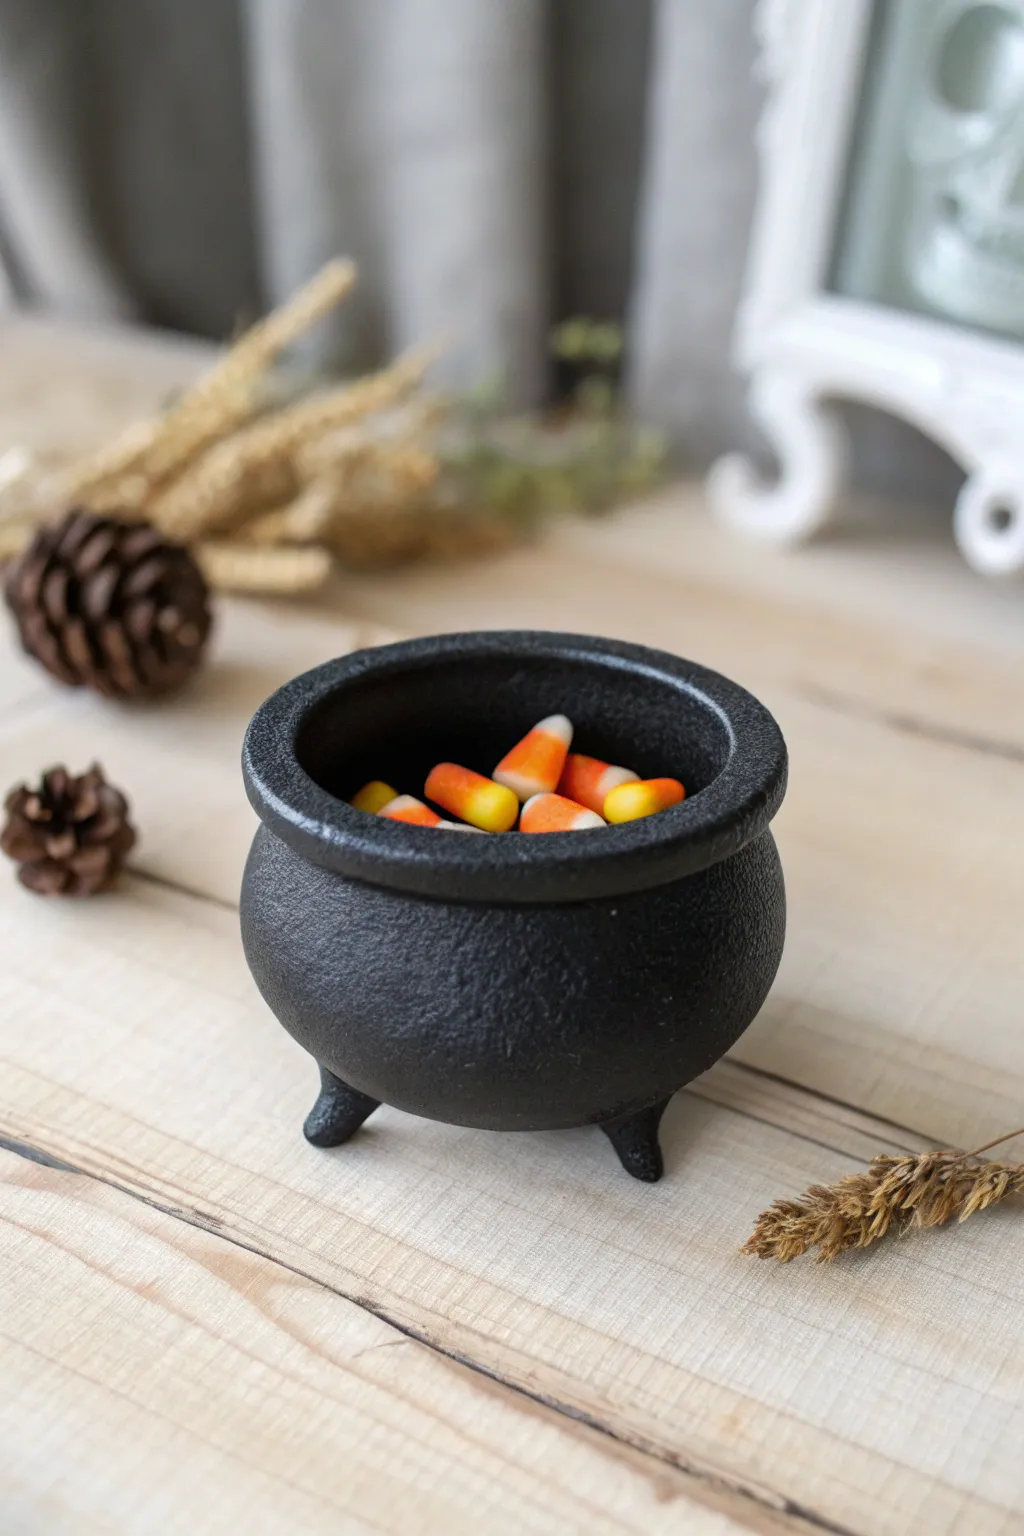
Summon a spooky touch to your decor with this miniature cauldron trinket dish. With its classic rounded belly, sturdy tripod legs, and deep iron-like texture, it’s perfect for holding tiny treats or spooky treasures.
Step-by-Step Guide
Materials
- Black polymer clay (approx. 2oz)
- Ball stylus tool or rounded paintbrush end
- Toothbrush or crumpled aluminum foil ball (for texture)
- Small round cutter or bottle cap (approx. 1.5 inches)
- Acrylic roller
- Liquid polymer clay or Bake & Bond
- Smooth work surface (ceramic tile or glass)
- Oven
Step 1: Forming the Bowl
-
Preparation:
Begin by conditioning your black polymer clay thoroughly in your hands until it is soft, pliable, and free of cracks. -
The Base Shape:
Roll a large portion of the clay into a smooth ball, roughly the size of a golf ball or slightly smaller depending on your desired dish size. -
Creating the Hollow:
Hold the ball in your non-dominant hand. With your thumb, gently press into the center to start creating an indentation. -
Pinching the Walls:
Using a pinching motion with your thumb and forefinger, rotate the ball while pressing the walls outward and upward. Aim for an even thickness of about 1/4 inch throughout the bowl. -
Smoothing:
Smooth out any fingerprints or major lumps on the inside and outside using your fingertips or a large ball stylus. -
Shaping the Belly:
Gently press the bottom of the bowl onto your work surface to flatten it slightly, while pushing the sides outward to create that classic, round-bellied cauldron silhouette.
Cast Iron Effect
For an antique iron look, lightly brush silver mica powder or rub ‘Rub ‘n Buff’ wax over the textured surface *after* baking to highlight the bumps.
Step 2: Adding the Rim & Texture
-
Rolling a Coil:
Take a smaller piece of black clay and roll it into a long, even snake (coil) that is slightly thicker than the rim of your bowl. -
Attaching the Rim:
Apply a tiny amount of liquid clay around the top edge of your bowl. Place the coil on top, cutting off any excess so the ends meet perfectly. -
Blending the Seam:
Use your thumb or a modeling tool to blend the bottom of the coil downward into the bowl wall on the outside, securing it firmly. Keep the top rounded to define the lip. -
Texturing:
To mimic cast iron, gently tap the entire exterior surface with an old toothbrush or a ball of crumpled aluminum foil. I like to be thorough here to hide any lingering fingerprints.
Step 3: Legs & Baking
-
Making the Feet:
Roll three small, equal-sized balls of black clay, each about the size of a pea. -
Shaping the Legs:
Roll these into slight teardrop cones, flattening the wider end slightly to create a stable foot. -
Positioning:
Flip your cauldron upside down. Mark three equidistant points on the bottom curve of the bowl where the legs will go. -
Attaching:
Add a dot of liquid clay to each mark and press the pointed end of the teardrops onto the bowl. Blend the clay of the legs onto the bowl body for a strong bond. -
Leveling:
Turn the cauldron right-side up and gently press it down onto your work tile to ensure it sits level and doesn’t wobble. -
Final Check:
Give the exterior one last pass with your texturing tool if blending the legs smoothed out any areas too much. -
Baking:
Bake the piece according to your specific clay brand’s package instructions, usually around 275°F (135°C) for 30 minutes. -
Cooling:
Allow the cauldron to cool completely in the oven before moving it to prevent cracking.
Make it Bubble
Fill the baked cauldron with UV resin dyed lime green. Add tiny glass beads before curing to create a perpetually bubbling witch’s brew.
Fill your new creation with candy corn or tiny crystals to complete the magical aesthetic
Coffin-Shaped Keychain Tag
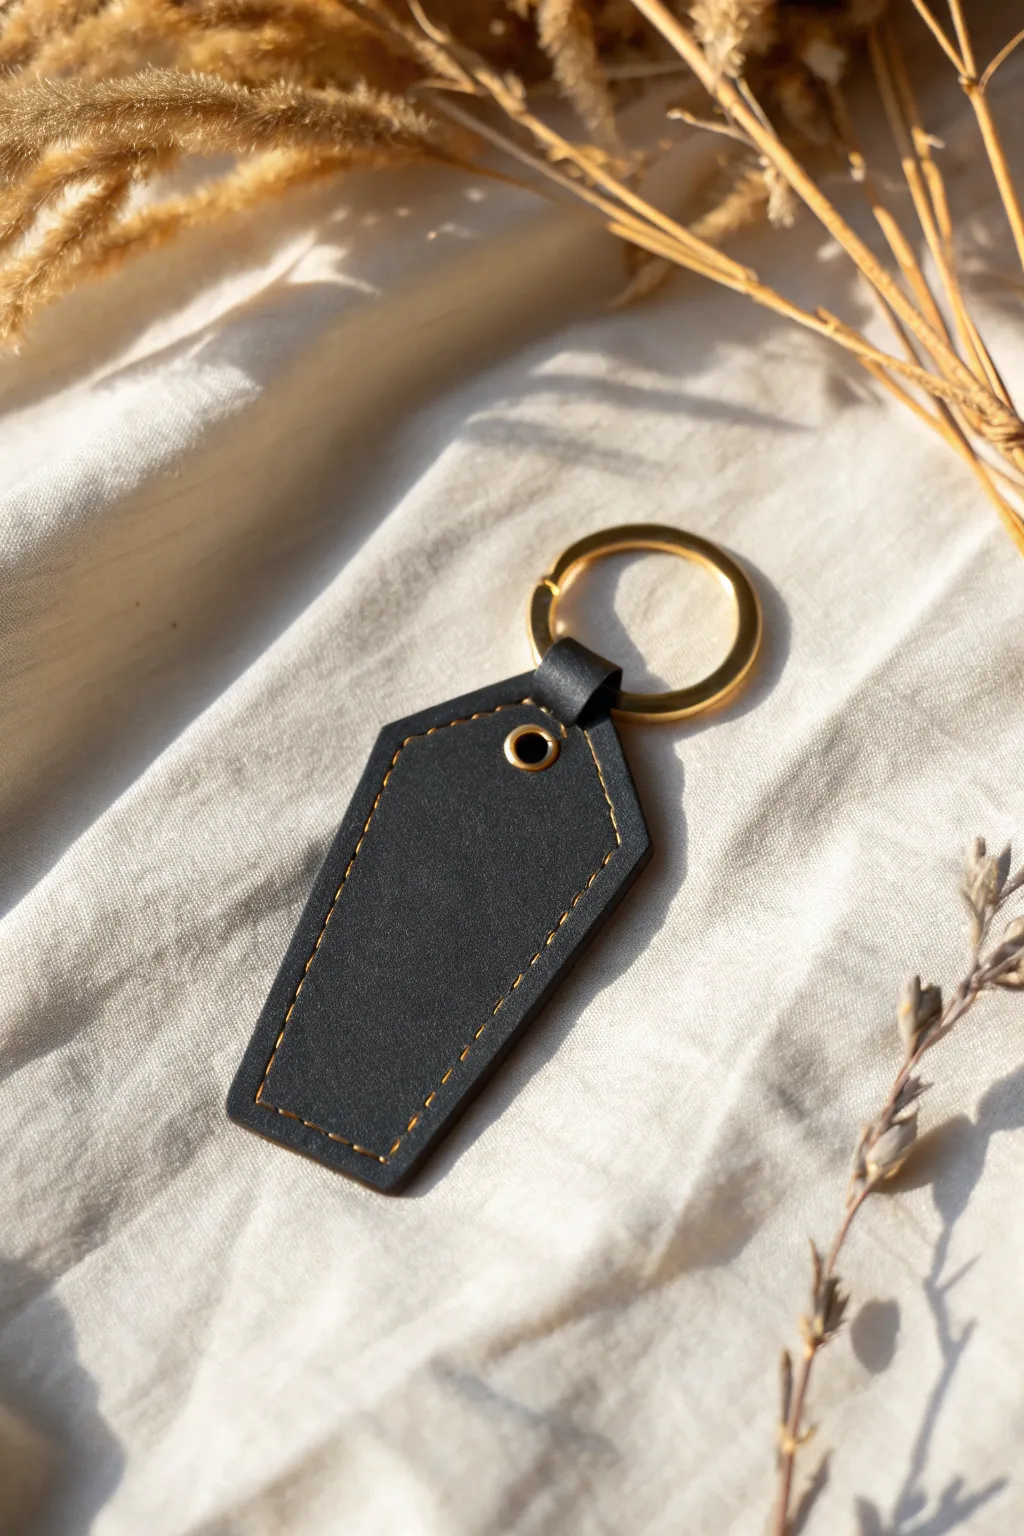
Embrace the spooky season with this sleek, minimalist coffin keychain that looks deceptively like high-end leather. Using black polymer clay and a clever stitching technique, you can craft a sophisticated accessory that adds just the right amount of gothic flair to your keys.
Detailed Instructions
Materials
- Black polymer clay (Premo or Fimo recommended)
- Acrylic rolling pin or clay machine
- Coffin-shaped clay cutter (approx. 2.5 inches)
- Texture sponge or genuine leather swatch (for texturing)
- Needle tool or sharp awl
- Gold acrylic paint
- Fine detail paintbrush
- Wet wipes or paper towel
- Standard gold keyring
- Jump ring (gold, 8mm-10mm)
- Small metal eyelet (gold, optional)
- Gloss or satin polyurethane varnish (optional)
- Oven
Step 1: Shaping the Base
-
Condition the Clay:
Begin by thoroughly conditioning your black polymer clay until it is soft and pliable. Warm clay is less likely to crack and easier to texture. -
Roll out the Sheet:
Roll the clay out to a medium thickness, approximately 3mm to 4mm. You want it thick enough to be durable as a keychain but thin enough to resemble a leather strap. -
Add Leather Texture:
Before cutting the shape, gently press a texture sponge or a scrap piece of real leather onto the surface of the clay sheet. This imitates the grain of real leather hide. -
Cut the Shape:
Press your coffin-shaped cutter firmly into the textured clay. Lift the cutter and carefully remove the excess clay from around the shape.
Stitch Fixes
If your stitched dashes look messy after baking, you can clean them up by re-indenting them with a sharp needle before apply the gold paint.
Step 2: Adding the ‘Stitch’ Details
-
Mark the Stitch Line:
Using a ruler and a dull tool, very lightly scribe a guide line about 3mm inside the perimeter of the coffin shape. Don’t cut deep; this is just a guide for your ‘stitches’. -
Create Stitch Holes:
Take your needle tool or awl and press straight down into the clay along your guide line to create small dashes. Space them evenly to mimic machine sewing. -
Add the Top Loop Holder:
Cut a small, thin rectangular strip of black clay (about 1cm x 3cm). Fold it over to create a loop and press it firmly onto the top center of the coffin shape. -
Secure the Loop:
Smooth the back seam of this loop into the main coffin body so they fuse together. I like to use a little liquid clay here to ensure a permanent bond. -
Insert Eyelet (Optional):
If using a metal eyelet for the hole, press it into the center of the coffin, just below the top loop. If not, simply punch a clean hole using a drinking straw or round cutter.
Custom Embossing
Before baking, use tiny alphabet stamps to press initials or a spooky word like ‘RIP’ into the center of the leather-textured clay.
Step 3: Baking and Finishing
-
Bake the Clay:
Place your piece on a ceramic tile or baking sheet. Bake according to the manufacturer’s instructions for your specific brand of clay (usually around 275°F/130°C for 30 minutes). -
Cool Down:
Allow the piece to cool completely before handling. It will be slightly flexible while warm but will harden as it reaches room temperature. -
Paint the Stitches:
Dip your fine brush into gold acrylic paint. Carefully fill in the indented dash marks you created earlier. Don’t worry if you get paint outside the lines. -
Wipe Excess Paint:
While the paint is still wet, take a damp paper towel or baby wipe and gently swipe across the surface. This removes surface paint but leaves the gold trapped inside the indented ‘stitches’. -
Seal the piece:
To protect the paint and give it a finished look, apply a thin coat of satin varnish. Avoid high gloss if you want to maintain the realistic leather effect. -
Attach Hardware:
Once dry, open your gold jump ring with pliers. Thread it through the clay loop (or eyelet) and attach it to the main gold keyring. -
Final Check:
Close the jump ring securely. Give the keychain a gentle tug to ensure all hardware is completely closed and secure.
Now you have a chic, gothic accessory ready to haunt your keyring all year round
Potion Bottle Charms
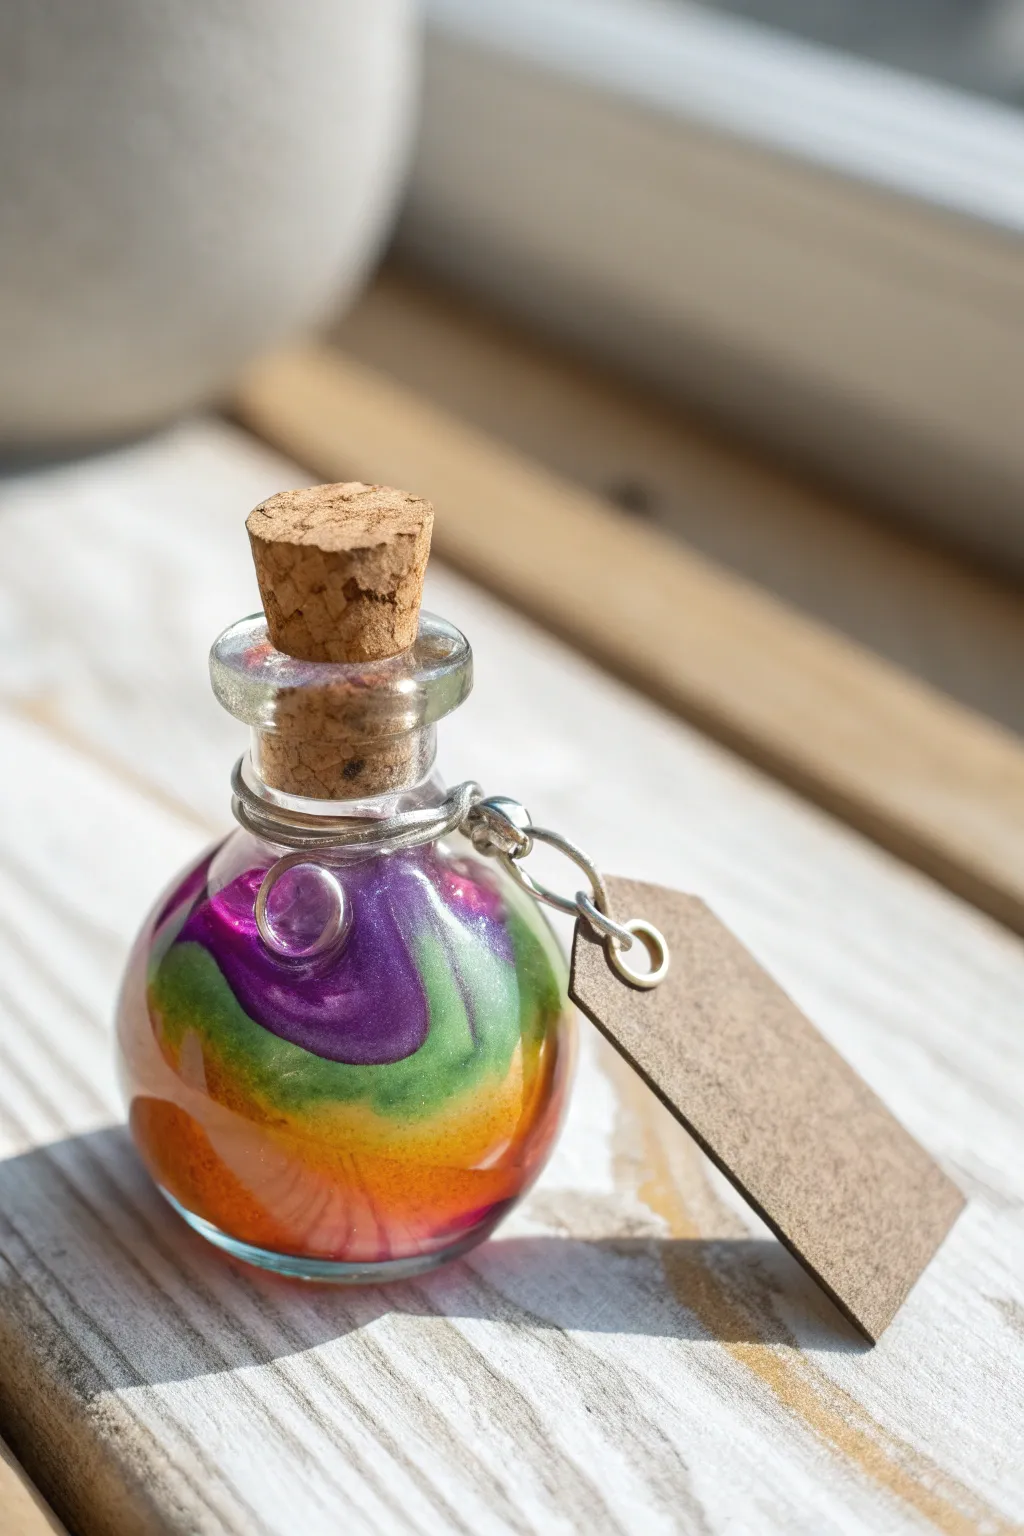
Capture the magic of a bubbling cauldron in miniature form with this vibrant potion bottle charm. By swirling colored liquid polymer clay inside a tiny glass vessel, you create a mesmerizing, permanent spell ingredient perfect for Halloween jewelry.
Step-by-Step Guide
Materials
- Small glass bottle with cork stopper
- Liquid polymer clay (clear or translucent)
- Alcohol inks (Purple, Lime Green, Yellow, Orange)
- Heat gun or crafting heat tool
- Silver craft wire (20 or 22 gauge)
- Small jump rings
- Blank cardstock tag
- Round nose pliers
- Wire cutters
- Disposable mixing cups and toothpicks
- Oven timer
Step 1: Preparing the Potion Base
-
Clean the vessel:
Begin by removing the cork from your glass bottle and ensuring the inside is completely clean and dry using a cotton swab. Any dust or residue will show up in your final potion. -
Mix liquid clay colors:
Squeeze a small amount of clear liquid polymer clay into four separate disposable cups. You won’t need much, just enough of each color to partially fill your tiny bottle. -
Tint the clay:
Add one drop of alcohol ink to each cup: purple in the first, lime green in the second, yellow in the third, and orange in the fourth. Stir each thoroughly with a toothpick until the color is opaque and uniform.
Air Bubble Trouble?
If you see bubbles in the liquid clay, let the bottle sit for 10 minutes before heating. Pop stubborn surface bubbles with a needle.
Step 2: Creating the Swirl Effect
-
Pour the first layer:
Carefully pour a small amount of the purple liquid clay into the bottom of the bottle. If you have trouble pouring, dip a toothpick into the mix and drip it in slowly to keep the bottleneck clean. -
Add contrasting colors:
Without waiting for the first layer to settle too much, drip a bit of the lime green clay on one side, followed by the yellow and orange on the other side. -
Swirl the mixture:
Take a clean toothpick or a needle tool and insert it into the bottle. Gently drag the tool through the liquid clay layers to create swirls, but stop before the colors muddy together—you want distinct ribbons of color. -
Check opacity:
Hold the bottle up to the light. If it looks too transparent, add another drop of tinted liquid clay to fill any gaps, ensuring the glass is coated to your liking.
Step 3: Curing and Sealing
-
Heat set the clay:
Using a heat gun, gently blow hot air against the outside of the glass bottle. Keep the gun moving constantly to avoid cracking the glass. I usually do this for about 1-2 minutes until the liquid clay starts to gel. -
Bake the bottle:
Place the open glass bottle (without the cork!) upright on a baking sheet. Bake according to your liquid clay manufacturer’s instructions, usually around 275°F (130°C) for 15-20 minutes. -
Cool down:
Let the glass cool completely inside the oven with the door cracked open. Rapid temperature changes can shatter the glass, so patience is key here. -
Secure the cork:
Once cool, apply a tiny dab of strong craft glue or super glue to the rim of the bottle and insert the cork firmly to seal your potion forever.
Glow Up
Mix glow-in-the-dark powder into the lime green or yellow liquid clay layers for a potion that eerily illuminates at night.
Step 4: Wire Wrapping and Finishing
-
Start the wire wrap:
Cut a 4-inch piece of silver wire. Wrap the center of the wire snugly around the neck of the bottle, just below the glass rim. -
Create the twist:
Where the wire ends meet, twist them together tightly using your flat nose pliers to secure the loop around the neck. -
Form the loop:
Using your round nose pliers, form one of the wire tails into a small loop and wrap the excess wire back around the base of the loop to secure it. Trim any sharp excess wire. -
Attach the tag:
Open a small jump ring and thread it through the hole of your blank cardstock tag. Attach this ring to the wire loop you just created on the bottle. -
Label the potion:
Use a fine-tip pen to write a spooky name or ingredient on the tag, or leave it blank for a mysterious, unlabeled look.
Now you have a charmingly dangerous-looking potion bottle ready to wear or display
Eyeball Ring or Charm

This striking eyeball ring balances the line between creepy and stylish, making it the perfect subtle accessory for Halloween. With a smooth white base and a vivid blue iris, this project focuses on clean lines and a glossy finish to achieve that eerie, realistic glass-eye gaze.
Step-by-Step
Materials
- White polymer clay
- Translucent liquid polymer clay
- Sky blue acrylic paint (or blue polymer clay)
- Black acrylic paint (or black polymer clay)
- Gloss glaze or UV resin
- Adjustable metal ring blank with flat pad
- Needle tool or toothpick
- Small round cutter (for iris)
- Superglue or heavy-duty jewelry adhesive
- Rolling pin or pasta machine
- Fine detail paintbrush
Step 1: Forming the Eyeball Base
-
Condition the Clay:
Begin by thoroughly conditioning your white polymer clay until it is soft and free of cracks. Warm clay is essential for a smooth, spherical finish. -
Shape the Sphere:
Roll a small amount of white clay into a perfect ball. Size it against your ring blank pad—it should be slightly wider than the pad but not overwhelmingly large for your finger. -
Flatten the Base:
Gently press the ball onto a flat surface to create a slight dome shape rather than a full sphere. This ensures it creates a good contact surface with the ring blank later. -
Smooth Imperfections:
Check the white dome for any fingerprints or lint. I like to gently rub the surface with a tiny bit of baby oil on my finger to smooth everything out perfectly.
Step 2: Creating the Iris and Pupil
-
Indent the Iris:
Using the end of a paintbrush handle or a small ball tool, gently press a concave indentation into the very center of the white dome to mark where the iris will go. -
Prepare the Blue Iris:
If using clay, roll out a tiny, thin sheet of blue clay and cut a small circle that fits your indentation. If using paint, you will fill this area later after baking the white base. -
Detailing the Iris:
For a realistic look, take a needle tool and gently scratch fine lines radiating from the center of the blue circle outward, clearer near the pupil and fading toward the edge. -
Add the Pupil:
Roll a teeny-tiny ball of black clay, flatten it, and place it exactly in the center of the blue iris. Press it down so it is flush with the blue surface. -
Initial Bake (Optional):
If you are worried about squishing your design while working, you can bake the eye now according to your clay package instructions before glazing. If using paint for the eye color, bake the white dome now.
Realistic Glare
Add a tiny, single dot of white paint to the edge of the black pupil before glazing. This ‘catchlight’ brings the eye to life instantly.
Step 3: Assembly and Finishing
-
Painting (If applicable):
If you baked a plain white dome, carefully paint the iris circle blue and let it dry. Add a smaller black dot in the center for the pupil. -
The Glossy Lens Effect:
This is the most critical step. Apply a dome of UV resin or several thick coats of gloss glaze over the iris area. You want to create a raised, clear lens over the eye to mimic a cornea. -
Cure the Lens:
If using UV resin, cure it under a UV lamp until hard and non-tacky. If using glaze, allow it to dry completely in a dust-free area. -
Prepare the Ring Blank:
Scuff the surface of the metal ring pad slightly with sandpaper to give the glue more texture to grip onto. -
Attach the Eye:
Apply a strong dab of superglue or jewelry adhesive to the ring pad. Press the flat back of the polymer clay eye firmly onto the metal. -
Final Cure:
Let the adhesive set for the full recommended time (usually 24 hours for maximum strength) before wearing.
Fixing Fingerprints
If you smudge the smooth white clay before baking, brush on a tiny amount of rubbing alcohol or acetone to melt the surface marks away.
Now you have a watchful accessory to keep an eye on things this Halloween season
Cute Monster Toe Beans
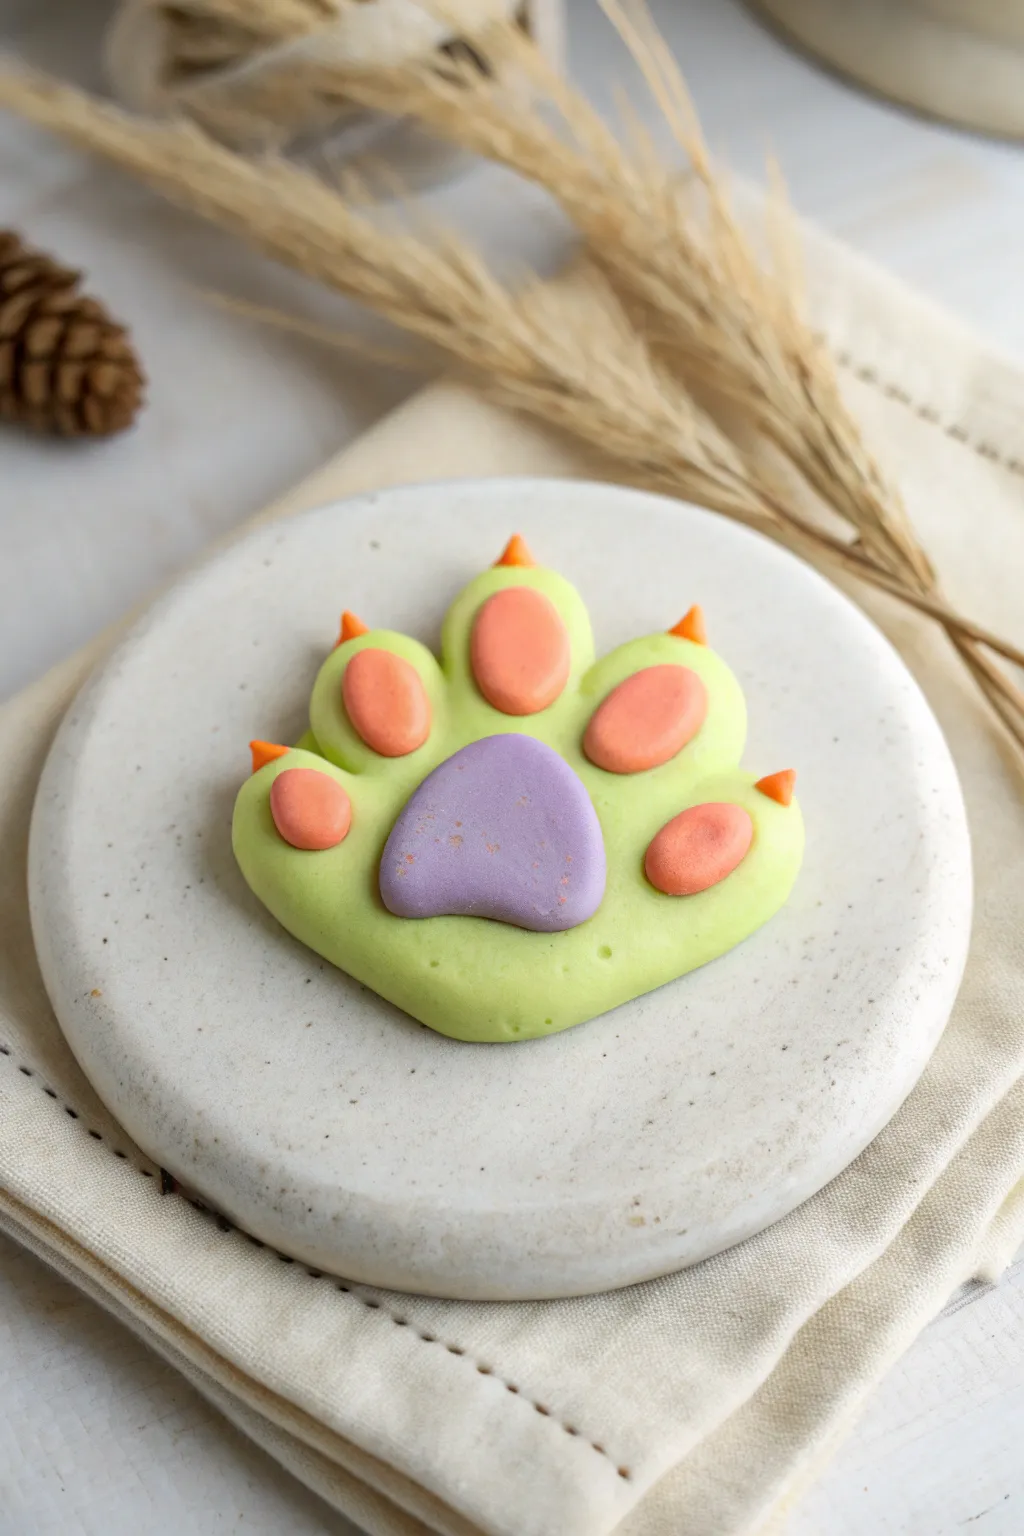
These adorable monster toe beans mix spooky and sweet with a soft pastel color palette. The project features a chunky, lime-green paw pad accented with playful orange claws and a textured purple center.
Step-by-Step Tutorial
Materials
- Polymer clay in pastel lime green
- Polymer clay in soft orange/peach
- Polymer clay in lavender purple
- Rolling pin or pasta machine
- Round clay cutters (various sizes)
- Small ball tool
- Modeling tool or toothpick
- Baking sheet and parchment paper
- Soft paintbrush for texture (optional)
Step 1: Creating the Base Paw
-
Condition the green clay:
Start by warming up your pastel lime green clay in your hands until it becomes soft and pliable. This conditioning prevents cracks later on. -
Roll out the base:
Roll the green clay into a smooth ball, then flatten it gently into a thick slab, about 1/4 inch thick. -
Shape the main pad:
Use your fingers to gently shape the flattened lime green clay into a rounded, slightly bulbous paw shape. It doesn’t need to be perfectly symmetrical; organic monster shapes are cuter. -
Indent the toe spots:
Using your thumb or the large end of a ball tool, press four distinct indentations along the top arc of the paw where the toe beans will sit. -
Create the center hollow:
Press a larger indentation into the center-bottom of the green shape to accommodate the main paw pad.
Fingerprint Fixer
If you notice fingerprints on your smooth orange or purple pads, lightly brush them with a tiny bit of baby oil or cornstarch before baking to smooth them out.
Step 2: Adding the Toe Beans
-
Form the orange beans:
Take your soft orange clay and roll four small, equal-sized balls. -
Flatten into ovals:
Gently press these balls into elongated oval shapes that will fit snugly into the indentations you made earlier. -
Attach the toes:
Place each orange oval into its corresponding green hollow. Press them down gently so they bond with the base layer without losing their puffy shape. -
Make the main pad:
Condition a piece of lavender purple clay and roll it into a large ball, roughly double the size of the toe beans. -
Shape the purple heart:
Flatten the purple ball slightly and pinch the bottom to create a soft, rounded triangular or heart-like shape. -
Place the center:
Nestle the purple pad into the large central indentation on the green base. Use a flat tool to smooth the edges if necessary.
Step 3: Detailing and Claws
-
Form tiny claws:
Using a tiny amount of the same orange clay, roll five very small, pointy cones. -
Attach to fingertips:
Carefully press one cone onto the very top tip of each green toe section, and one on the outer edge if you like an extra claw. -
Blend the seams:
I find it helpful to use a small silicone tool or the side of a toothpick to gently blend the base of the claw into the green clay so it doesn’t fall off during baking. -
Add subtle texture:
Take a clean toothbrush or texturing sponge and very lightly tap the surface of the green clay to give it a matte, skin-like texture, avoiding the smooth toe beans. -
Dust (Optional):
If you want extra depth, lightly brush some pastel chalk dust over the purple pad to give it a speckled look. -
Prep for baking:
Transfer your finished paw onto a parchment-lined baking sheet. -
Bake:
Bake the piece according to your specific brand of clay’s instructions—usually around 275°F (130°C) for 15-20 minutes. -
Cool down:
Let the piece cool completely on the baking sheet before handling, as warm clay is fragile.
Make It Interactive
Before baking, attach a strong magnet to the back or poke a hole through the top to turn this cute monster paw into a fridge magnet or a statement necklace.
Once cooled, your little monster paw is ready to add a touch of creepy-cute flair to your Halloween decor
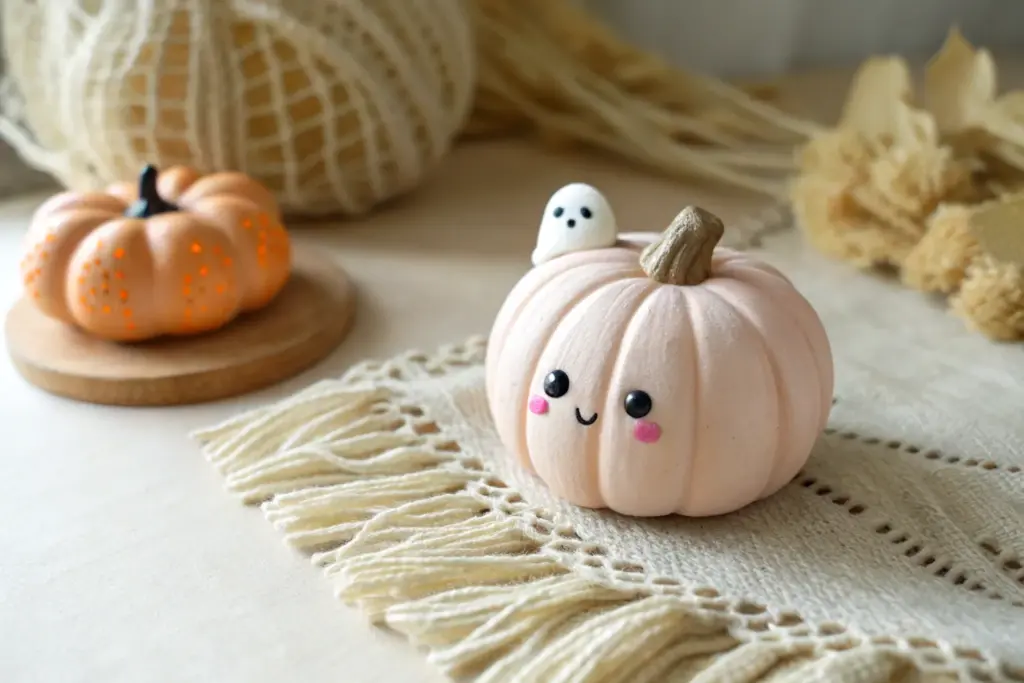
Ghost in a Pumpkin Scene
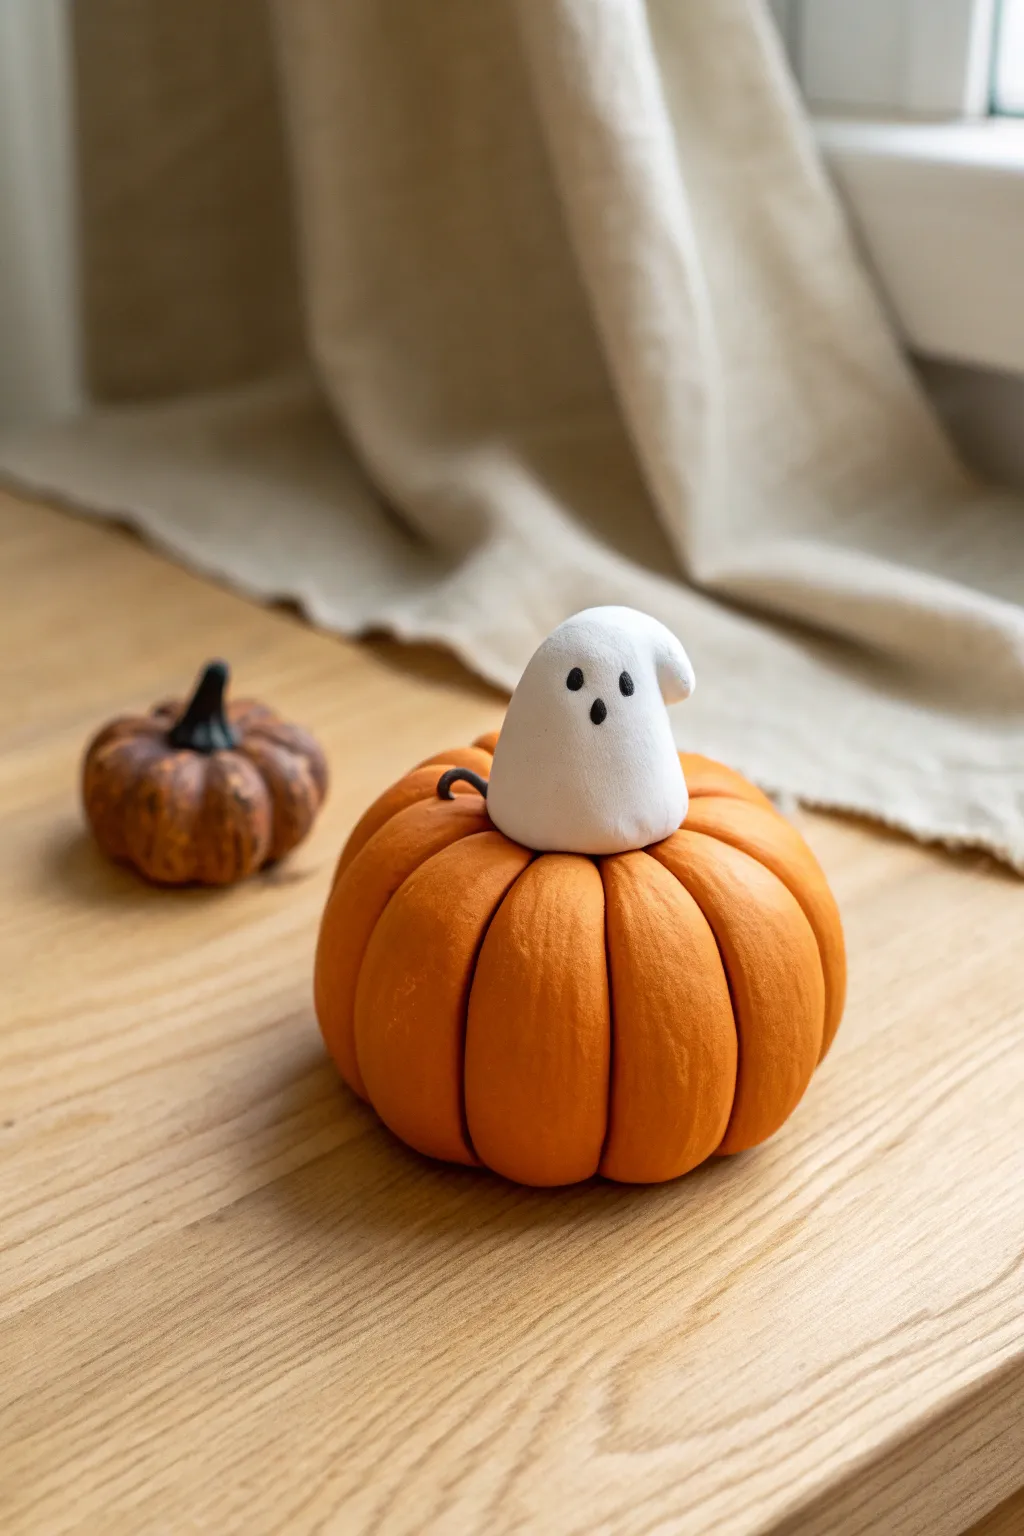
This adorable scene features a plump, vibrant orange pumpkin topped with a tiny, curious ghost emerging from the center. It’s a charmingly simple sculpture that balances the rustic texture of fall produce with the spooky cuteness of Halloween.
Detailed Instructions
Materials
- Polymer clay (Orange, White, Black, Brown)
- Ball stylus tool
- Needle tool or clay knife
- Soft pastel chalks (orange, brown) for shading
- Small paintbrush
- Acrylic roller or pasta machine
- Gloss glaze (optional)
Step 1: Sculpting the Main Pumpkin
-
Prepare the Base:
Start by conditioning a substantial amount of orange polymer clay until it is soft and pliable. Roll it into a smooth, tight sphere about the size of a tangerine. -
Flatten Slightly:
Gently press the sphere down onto your work surface to create a flat bottom helps it stand, and flatten the top just a little to create a squat, pumpkin-like shape. -
Create the Indentation:
Use your thumb or a large ball tool to press a deep indentation into the top center of the orange sphere. This depression needs to be wide enough to eventually seat your ghost. -
Mark the Segments:
Using a needle tool or the back of a craft knife, gently score vertical lines from the top center indentation down to the bottom center, dividing the pumpkin into eights or tenths. -
Define the Ribs:
Use a modeling tool or your finger to smooth and round the clay between your score lines. You want distinct, puffy lobes rather than just sharp cuts. -
Add Texture:
For a realistic look, I like to take a toothbrush or crumpled foil and very lightly tap the surface of the orange clay to remove fingerprints and add a subtle organic texture. -
Shade the Crevices:
Scrape a little dark orange or brown soft pastel into a powder. Use a small, dry brush to dust this powder into the deep vertical grooves of the pumpkin to add dimension.
Clean White Clay
White clay picks up everything! Wash your hands thoroughly before touching the white clay, and roll it on a fresh piece of parchment paper to avoid color transfer from the orange.
Step 2: Creating the Ghost
-
Form the Ghost Body:
Condition a piece of white clay roughly one-third the size of your pumpkin. Roll it into a smooth ball, then elongate it slightly into a distinctive gumdrop or dome shape. -
Shape the Head:
Refine the top of the white shape so it is rounded and smooth. Gently pull one side of the dome downwards slightly to create a subtle draping effect, almost like fabric. -
Fit to the Pumpkin:
Test the fit by placing the white shape into the pumpkin’s top indentation. Press it down gently so the bottom molds to the pumpkin’s curve, making it look like it’s emerging from within. -
Add the Eyes:
Take two minuscule specks of black clay and roll them into balls. Press these onto the upper third of the ghost’s face. Embedding them slightly ensures they don’t fall off later. -
Add the Mouth:
Roll an even smaller speck of black clay into a tiny oval. Place this below the eyes, centered, to create a surprised ‘O’ expression. -
Create the Stem Detail:
Roll a very thin snake of dark brown clay. Curl one end into a small pigtail shape. -
Attach the Stem:
Place this little curly tendril right at the seam where the ghost meets the pumpkin, making it look like the original pumpkin stem was pushed aside.
Step 3: Baking and Finishing
-
Final Check:
Look over the piece for any lint or dust, especially on the white clay. Use a bit of rubbing alcohol on a cotton swab or a piece of clear tape to lift away debris. -
Bake:
Bake the sculpture according to your clay manufacturer’s instructions. Usually, this is around 275°F (135°C) for 15-30 minutes, depending on thickness. -
Cool Down:
Allow the piece to cool completely in the oven or on the baking sheet before handling it, as hot clay is fragile. -
Optional Glaze:
If you want a wet, ceramic look, apply a coat of polymer clay gloss glaze to the pumpkin, but leave the ghost matte for a nice contrast.
Seamless Merging
To ensure the ghost doesn’t pop off after baking, put a drop of liquid polymer clay or ‘Bake & Bond’ in the pumpkin’s indentation before pressing the ghost into place.
Place your little ghost pumpkin on a windowsill or desk to bring a touch of seasonal spirit to your day
Haunted House Silhouette Pendants
Capture the eerie charm of Halloween with this textured black house pendant featuring glowing windows. This simple silhouette project uses clever texturing to mimic old, weathered wood for a truly haunted feel.
Step-by-Step
Materials
- Black polymer clay
- Translucent or glow-in-the-dark polymer clay
- Liquid polymer clay (translucent or clear)
- Acrylic roller or pasta machine
- Craft knife or scalpel blade
- Needle tool or awl
- Coarse grit sandpaper or a stiff wire brush (for texturing)
- Small square cutter (optional, for windows)
- Jump ring
- Jewelry pliers
Step 1: Planning and Texturing
-
Condition the clay:
Begin by thoroughly conditioning a block of black polymer clay until it is soft and pliable. Roll it out into a sheet approximately 3mm to 4mm thick; you want it sturdy enough to hold its shape. -
Add wood grain texture:
Before cutting the shape, press a stiff wire brush or a piece of coarse sandpaper firmly onto the surface of the clay sheet. Drag it slightly in vertical lines to create deep, rugged scratches that mimic wood grain. -
Refine the texture:
Go back in with a needle tool to accentuate a few deeper cracks or knotholes, ensuring the texture looks organic and weathered rather than uniform.
Step 2: Cutting and Assembly
-
Cut the house outline:
Using a craft knife, freehand cut a simple house silhouette. A tall, narrow rectangle with a triangular roof works best for that spooky, crooked look. You can flare the eaves slightly for a more gothic appearance. -
Mark window positioning:
Lightly press your knife or needle tool onto the clay surface to mark where you want your windows. A classic arrangement is two square windows on the bottom and an arched window in the attic. -
Cut out the windows:
carefully cut out the window shapes. Remove the black clay from these squares, keeping the cuts as clean as possible. Don’t worry if edges are slightly rough; it adds to the haunted vibe. -
Create window panes:
Instead of leaving the windows purely open, roll very thin ‘snakes’ of black clay. Lay them across the open window spaces to create a cross shape for the window panes. -
Secure the panes:
Gently press the ends of these thin strips into the main body of the house on the back side to secure them, or gently blend the seams with a rubber shaping tool. -
Add the backing layer:
Roll out a very thin sheet of translucent or glow-in-the-dark clay. Cut a piece slightly smaller than your house silhouette. -
Attach the backing:
Place the translucent sheet onto the back of your black house cutout. Press gently so it adheres and fills the window gaps from behind, creating a ‘glass’ effect. -
Seal the back:
I prefer to add a thin layer of liquid polymer clay between the black front and the backing sheet to ensure a permanent bond during baking.
Uneven Texture?
If your texture disappears while cutting, re-apply it gently after the shape is cut. Use a toothbrush to dab texture without distorting the straight edges.
Step 3: Details and Finishing
-
Sculpt the door:
Use a needle tool or the tip of your knife to incise an arched door shape at the bottom. Don’t cut all the way through; just create a deep groove. -
Add a door handle:
Make a tiny indentation with a small ball tool or needle to represent a doorknob, or add a minuscule ball of clay and press it onto the door. -
Refine edges:
Smooth the outer edges of the house with your finger to remove sharp cutting marks, but be careful not to flatten your wood texture. -
Add the hanging loop:
At the peak of the roof, use a pin drill or a thick needle to make a hole for the jump ring. Ensure there is enough clay above the hole so it won’t break. -
Bake the piece:
Bake the pendant according to your clay manufacturer’s instructions. Usually, this is around 275°F (130°C) for 30 minutes, but check your packaging. -
Cool and assemble:
Allow the piece to cool completely. Once cool, use jewelry pliers to open a jump ring, thread it through the hole, and close it securely.
Make it Glow
Use glow-in-the-dark clay for the window backing instead of plain translucent. Charge it under a lamp, and your haunted house will eerily light up when the lights go out.
Wear your miniature haunted abode on a simple cord or silver chain to complete your spooky season look
Spooky Snack Charms Mix
Carry a little bit of spooky sweetness with you everywhere with these adorable chocolate and candy-inspired charms. This project combines classic Halloween icons like candy corn and ghosts with realistic textures to create a high-quality keychain that looks good enough to eat.
Step-by-Step Tutorial
Materials
- Polymer clay (white, orange, yellow, dark brown, green)
- Black polymer clay or black acrylic paint (for faces)
- Texturing tools (toothbrush or stiff bristle brush)
- Needle tool or toothpick
- Ball tool (small)
- Rolling pin
- Small circle cutter
- Craft blade or X-Acto knife
- Eye pins
- Jump rings and keychain hardware
- Gloss glaze (optional for chocolate)
- Liquid clay (optional for bonding)
Step 1: Shaping the Candy Corn
-
Mix colors:
Prepare white, yellow, and orange clay. Condition each piece until soft and pliable. -
Layer the clay:
Roll each color into a thick log of equal width. Stack them vertically: white on the bottom, orange in the middle, and yellow on top (or follow the reference image: yellow top, orange middle, white bottom). -
Cut the shape:
Compress the logs gently so they stick together. Use your blade to slice the stack into a triangle shape, creating the classic candy corn profile. -
Add texture:
Gently tap the surface of the candy corn with a toothbrush or stiff brush to give it a sugary, porous texture.
Clean Clay, Happy Clay
White clay picks up dust instantly. Clean your hands and work surface with a baby wipe or alcohol before touching white clay, or handle the white pieces first.
Step 2: Creating the Kawaii Ghost
-
Form the body:
Roll a ball of white clay and flatten it slightly into a thick teardrop shape. -
Shape the bottom:
Use a small ball tool or your fingers to gently indent the bottom edge, creating a wavy, scalloped skirt for the ghost. -
Texture:
Like the candy corn, tap the surface with your texturing tool to create a soft, marshmallow-like finish. -
Add a face:
Roll extremely tiny balls of black clay for eyes and a tiny ‘u’ shape for a smile. Press them firmly onto the ghost’s face. I find using a needle tool helps place these tiny pieces accurately.
Sticky Situation?
If your clay gets too soft and sticky to detail, pop it in the fridge for 10 minutes. This firms it up, making it easier to slice clean edges and avoid fingerprints.
Step 3: Making the Chocolate Bar
-
Base shape:
Condition dark brown clay and roll it into a flat rectangle, about 3-4mm thick. -
Create the grid:
Roll very thin snakes of the same brown clay. Lay them across the rectangle in an ‘X’ pattern or a grid to mimic a chocolate bar design. -
Refine edges:
Trim the excess ‘snake’ clay from the edges using a sharp blade to ensure clean, sharp lines. -
Detailing:
Use a needle tool to add tiny dots or indentations in the spaces between the lines for added realism.
Step 4: Crafting the Pumpkin & ‘Donut’ Ghost
-
Pumpkin base:
Create a round, slightly flattened ball of light brown or orange clay. Indent vertical lines around the sides to mimic pumpkin ribs. -
Pumpkin stem:
Add a tiny green stem on top. Use a needle tool to texture the main orange body heavily, making it look like a sugar-coated cookie or cake pop. -
Pumpkin face:
Add the signature kawaii black eyes and smile. -
Round ghost:
Cut a simple white circle using a cutter. Texture it entirely with the toothbrush. -
Ghost features:
Apply the tiny black eyes and mouth to the white circle charm.
Step 5: Assembly and Baking
-
Insert eye pins:
Trim your eye pins to an appropriate length. Dip the end in a tiny bit of liquid clay (or bake and bond glue) and insert one into the top of each charm. -
Bake:
Bake all charms according to your clay manufacturer’s instructions (usually 275°F/130°C for 15-30 minutes). -
Cool and glaze:
Let the charms cool completely. Apply a gloss glaze to the chocolate bar for a realistic sheen, but keep the marshmallow and cookie textures matte. -
Attach to keychain:
Use pliers to open jump rings and attach each charm to the chain lengths on your keychain hardware.
Enjoy styling your bag or keys with these incredibly cute handmade spooks