Every year I get a little obsessed with turning a simple block of air dry clay into holiday magic. These ideas are my go-to favorites for making festive decor and sweet little gifts that feel personal without being complicated.
Classic Cutout Holiday Ornaments
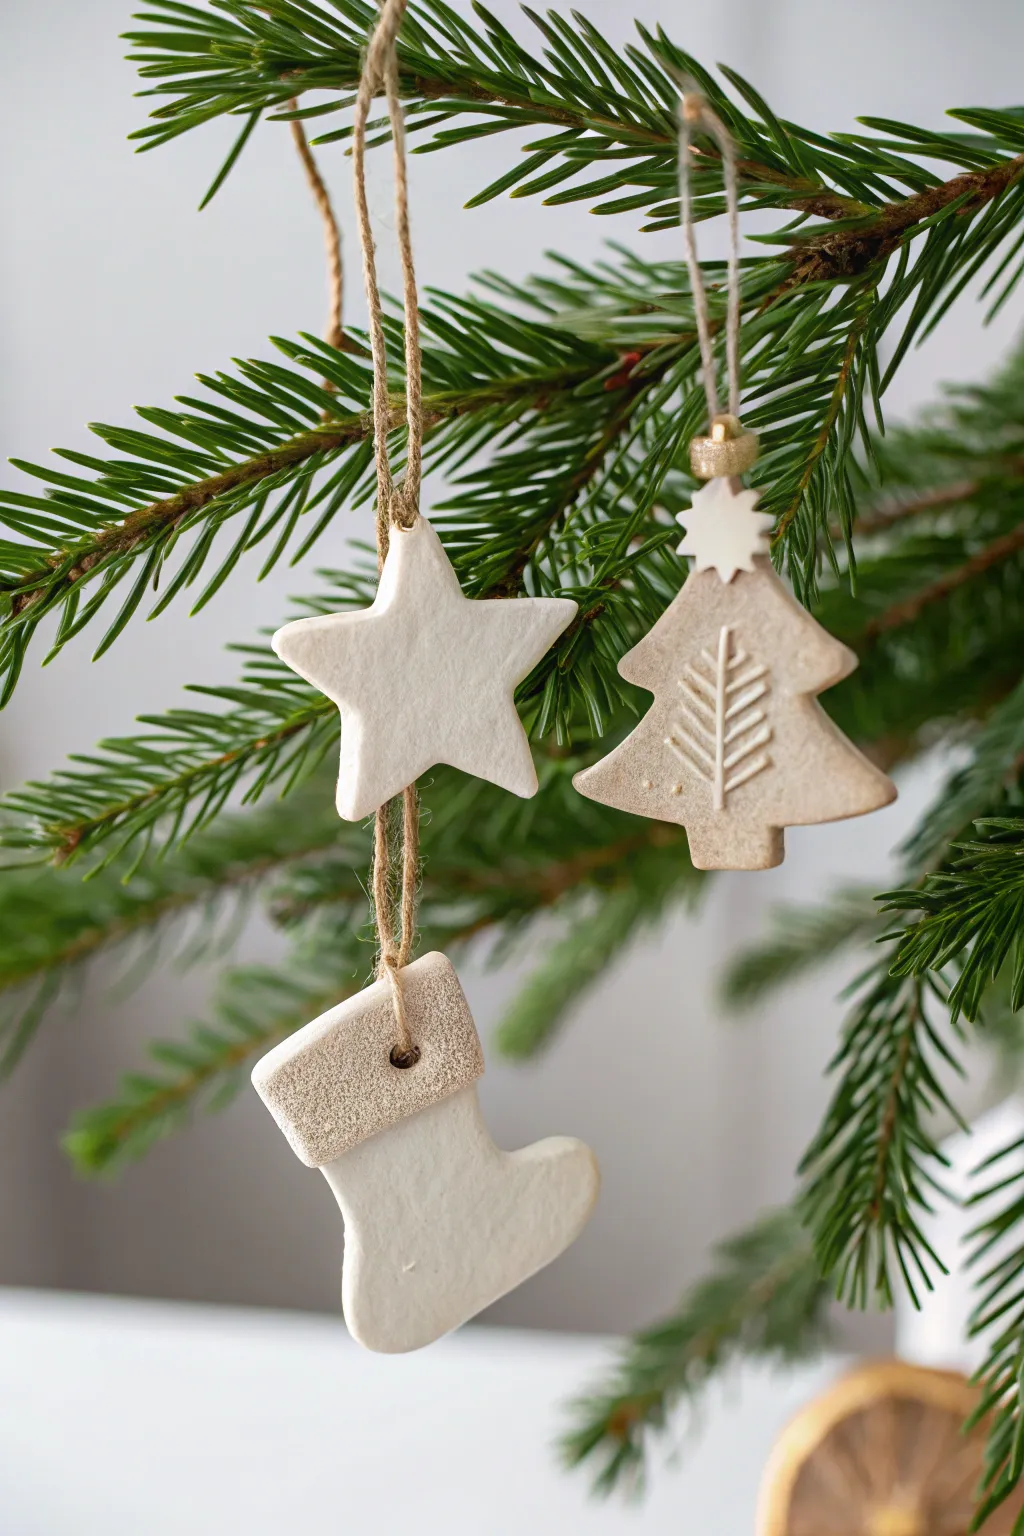
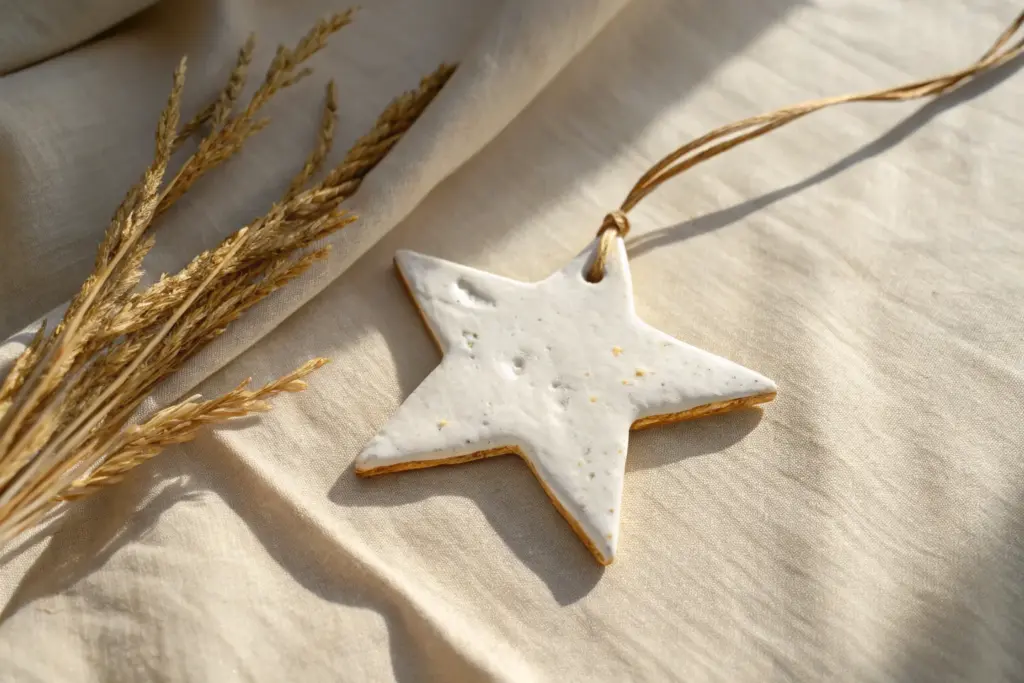
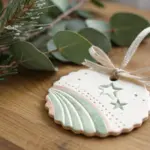
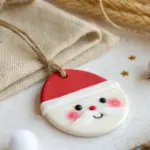
Embrace a minimalist Scandinavian aesthetic with these serene white clay ornaments featuring subtle embossed details and natural twine. They look beautiful against evergreen branches, offering a classic handmade touch that feels both rustic and refined.
Step-by-Step
Materials
- White polymer clay or air-dry clay
- Rolling pin
- Cookie cutters (Star, Tree, Stocking)
- Parchment paper or silicone mat
- Detail tool or toothpick
- Jute twine
- Small straw or skewer (for hole punching)
- Sandpaper (fine grit)
- Textured fabric or sandpaper (optional texture)
- Clear matte varnish (optional)
Step 1: Preparation & Cutting
-
Condition the Clay:
Begin by kneading your white clay thoroughly until it becomes warm and pliable. This prevents cracks and ensures a smooth finish. -
Roll It Out:
Place a sheet of parchment paper down and roll the clay out to an even thickness of about 1/4 inch. I find that keeping them slightly thicker helps prevent curling as they dry. -
Cut the Shapes:
Press your cookie cutters firmly into the clay to create your star, tree, and stocking shapes. Wiggle the cutter slightly before lifting to ensure a clean separation. -
Punch the Holes:
Use a small straw or skewer to poke a hole near the top of each ornament for hanging. Make sure the hole is wide enough for your jute twine to pass through later. -
Smooth the Edges:
Dip your finger in a little water (for air-dry clay) or baby oil (for polymer) and gently run it along the cut edges to smooth out any roughness.
Step 2: Adding Details
-
Create the Tree Embossing:
For the tree ornament, take a detail tool or toothpick and gently press a vertical line down the center of the tree shape. -
Add Branches:
Press angled lines radiating upward from the center line to create a stylized evergreen branch pattern. Keep the pressure light to make an impression without cutting through. -
Top the Tree:
Cut a tiny star shape from a scrap of clay and press it gently onto the top of the tree, just below the hanging hole, to add a 3D element. -
Texture the Stocking:
For the stocking cuff, you can either press a piece of coarse sandpaper or fabric into the clay to create a ‘woolly’ texture, or use a separate rectangle of clay placed on top for dimension. -
Leave the Star Simple:
To maintain the minimalist look shown in the photo, leave the star shape smooth and unadorned, letting the pure white color speak for itself.
Smooth Operator
To get that perfectly smooth surface before cutting, try rolling the clay out between two wooden rulers or spacers. This guarantees an even thickness across the entire slab.
Step 3: Finishing Touches
-
Drying Time:
Allow the ornaments to dry completely according to your clay package instructions. Turn them over halfway through the drying process to ensure even airflow and prevent warping. -
Sanding:
Once fully cured, use fine-grit sandpaper to gently buff away any remaining sharp edges or fingerprints for a porcelain-like finish. -
Sealing (Optional):
Determine if you want a protective coat; a light brush of matte varnish will protect the clay without adding unwanted shine. -
Prepare the Twine:
Cut lengths of jute twine, approximately 8 inches long for each ornament. -
Thread the Hangers:
Fold a piece of twine in half, push the loop through the ornament hole, and pull the tails through the loop to secure it with a lark’s head knot. -
Knot the Top:
Tie the two loose ends of the twine together in a simple overhand knot to create the hanging loop.
Curling Fix
If your air-dry clay edges start curling up while drying, gently weigh the pieces down with a heavy book placed over a piece of parchment paper once they are touch-dry.
Hang these delicate creations on your tree to enjoy a peaceful, handcrafted atmosphere this holiday season


Winter Greenery Imprint Ornaments
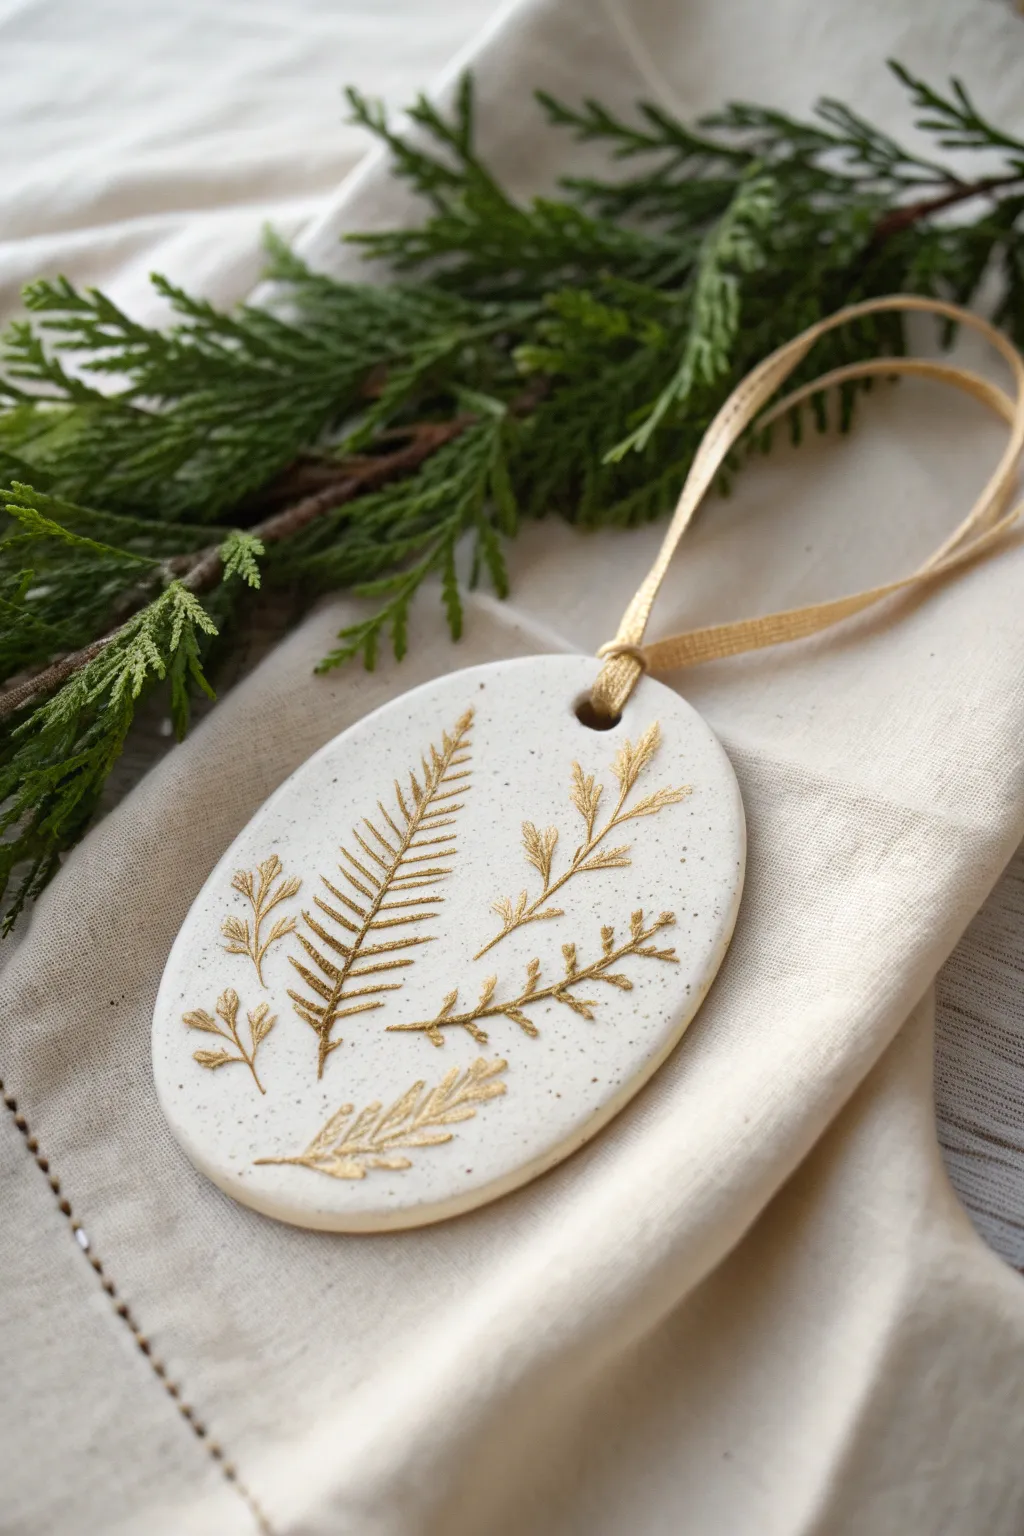
Capture the delicate beauty of evergreen sprigs with these elegant air-dry clay ornaments. The combination of impressed botanical textures and shimmering gold leafing creates a sophisticated, nature-inspired decoration perfect for the holiday season.
Step-by-Step Guide
Materials
- White polymer clay or high-quality air-dry clay (smooth finish)
- Small rolling pin
- Oval cookie cutter (approximately 3-4 inches)
- Fresh evergreen sprigs (cedar, juniper, or pine)
- Parchment paper or a silicone craft mat
- Gold metallic paint (acrylic or liquid gilding)
- Very fine detail paintbrush (size 0 or 00)
- Drinking straw or small circular cutter for the hanging hole
- Fine grit sandpaper (320 or 400 grit)
- Gold ribbon or twine
- Clear matte varnish (optional)
Step 1: Preparing the Clay Base
-
Condition the Clay:
Begin by taking a handful of your air-dry clay and kneading it in your hands to warm it up. This conditioning process is crucial as it removes air bubbles and makes the clay pliable and smooth. -
Roll Out the Slab:
Place your clay onto a piece of parchment paper or a silicone mat to prevent sticking. Use your rolling pin to flatten the clay to a uniform thickness, aiming for about 1/4 inch. If you want a speckled look like the example, you can knead in a tiny pinch of dried coffee grounds or black pepper before rolling. -
Check for Smoothing:
Look closely at the surface of your clay slab. If there are any wrinkles or cracks, smooth them out gently with a damp finger before proceeding to the next step.
Step 2: Creating the Impressions
-
Select Your Botanicals:
Choose small, flat sections of your evergreen greenery. Cedar works exceptionally well because its flat, scale-like leaves create a very distinct, fern-like pattern. -
Arrange the Composition:
Lay your chosen sprigs gently onto the rolled clay. Arrange them in a pleasing pattern, perhaps fanning out slightly as shown in the inspiration piece. Don’t press them in yet; just finalize the placement. -
Press the Greenery:
Once satisfied with the arrangement, take your rolling pin and gently roll over the greenery once or twice. Use firm, even pressure to embed the vegetation into the clay, ensuring the stems and leaves make a deep enough impression to hold paint later. -
Remove the Botanicals:
Carefully peel the greenery away from the clay. Use a pair of tweezers if small bits get stuck in the grooves. You should now have a clean, negative relief of the plant structure.
Fixing Curled Edges
If your ornament curls while drying, dampen the concave side slightly and place it under a heavy book overnight. The moisture helps relax the clay back into a flat shape.
Step 3: Cutting and Drying
-
Cut the Shape:
Position your oval cookie cutter over the impressed design to frame it perfectly. Press down firmly to cut the shape. If the clay sticks to the cutter, gently push it out from the top. -
Create the Hanging Hole:
Using a drinking straw or a small circular tool, punch a hole near the top of the oval. Make sure it isn’t too close to the edge to prevent the clay from cracking under the weight of the ribbon. -
Smooth the Edges:
Dip your finger in a little water and run it along the cut edges of the oval to smooth out any roughness or sharp bits left by the cutter. -
Allow to Dry:
Move the ornament, still on its parchment paper, to a flat surface to dry. I find that flipping the ornament over halfway through the drying process helps keep it perfectly flat. Let it dry for 24-48 hours until completely hard and white. -
Sand for Perfection:
Once fully dry, take your fine-grit sandpaper and very lightly sand the edges and the surface to remove any remaining imperfections. Wipe away the dust with a dry cloth.
Pro Tip: Release Agent
Lightly dust your greenery with cornstarch before pressing it into the clay. This acts as a release agent, ensuring the leaves peel away cleanly without tearing the clay surface.
Step 4: Gilding and Finishing
-
Prepare the Paint:
Shake your gold metallic paint or liquid gilding well. Pour a tiny amount onto a palette or a scrap piece of paper. -
Fill the Impressions:
Dip your fine detail brush into the gold paint. Carefully paint inside the indented lines created by the greenery. You don’t need to fill the entire groove; highlighting the deepest parts and the surface edges of the impression creates stunning depth. -
Refine the Details:
Work slowly from the center of the design outward to avoid smudging your work with your hand. If you accidentally get paint on the flat surface, you can often gently scrape it off with a craft knife once dry. -
Seal the Surface (Optional):
For longevity, you may apply a coat of clear matte varnish over the entire piece. This protects the clay from moisture and prevents the gold paint from tarnishing over time. -
Add the Ribbon:
Cut a length of gold ribbon or twine, about 8 inches long. Thread it through the hole at the top of the ornament and tie a secure knot or bow.
Hang your finished masterpiece on a tree or use it as a luxurious gift tag for a special present


Fingerprint Light Christmas Trees
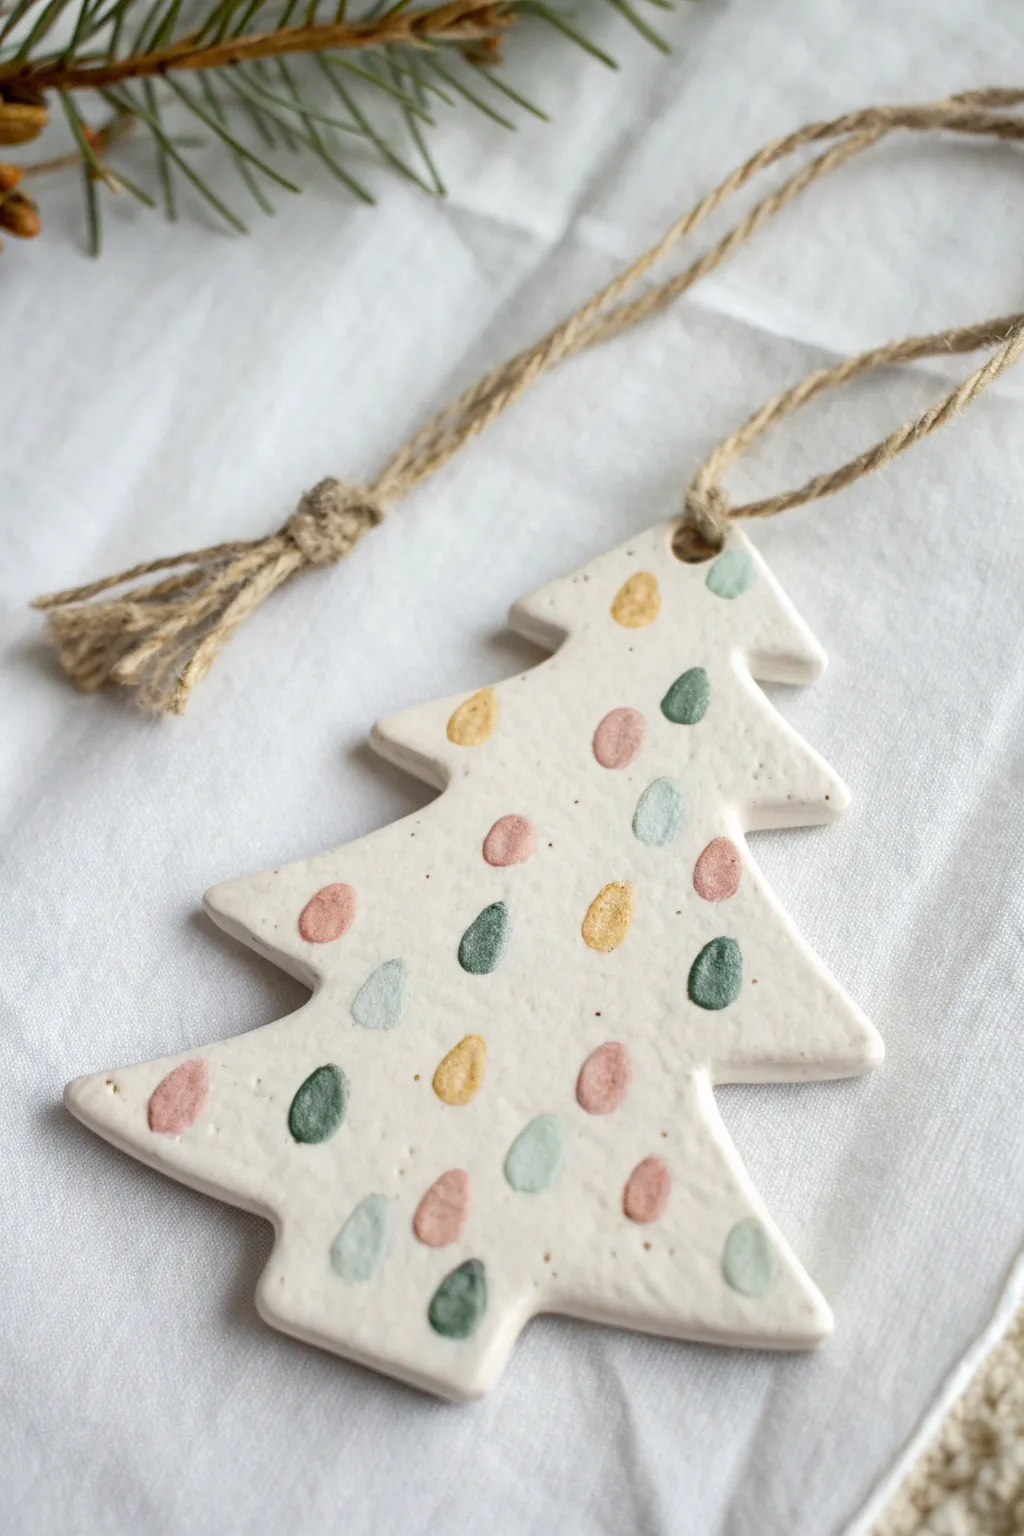
These charming ornaments capture a moment in time by turning tiny fingerprints into colorful Christmas lights on a snowy white tree. The rustic texture of the clay paired with soft pastels creates a keepsake that feels both modern and sentimental.
Detailed Instructions
Materials
- White air dry clay
- Rolling pin
- Christmas tree cookie cutter
- Drinking straw or skewer
- Acrylic paints (pastel pink, sage green, mustard yellow, light blue)
- Fine grit sandpaper
- Glossy sealant or varnish
- Jute twine
- Parchment paper or non-stick mat
Step 1: Shaping the Base
-
Prepare the workspace:
Lay down a sheet of parchment paper or a non-stick mat to protect your table and prevent the clay from sticking. -
Condition the clay:
Take a handful of air dry clay and knead it in your hands until it becomes soft, pliable, and free of cracks. -
Roll it out:
Use a rolling pin to flatten the clay to an even thickness, aiming for about 1/4 inch thick so the ornament is sturdy but not too heavy. -
Cut the shape:
Firmly press your Christmas tree cookie cutter into the clay, wiggle it slightly to ensure a clean cut, and lift away the excess clay from the edges. -
smooth the edges:
Dip your finger in a little water and gently run it along the cut edges of the tree to smooth out any roughness left by the cutter. -
Make the hanging hole:
Use a drinking straw or a skewer to punch a hole near the top, centered on the highest branch; make sure it acts as a clean puncture all the way through.
Clean Imprints Idea
If you want the texture of the print without paint smudge risks, press clean fingers into the clay first to make indents, let it dry, and paint into the depressions later.
Step 2: Adding the Fingerprints
-
Plan the spacing:
Before dipping in paint, visualize where the lights should go, ensuring they are scattered evenly across the tree’s surface. -
Apply the first color:
Squeeze a small amount of pastel pink paint onto a palette. Dip the tip of your index finger (or your child’s) into the paint, dab off excess on a paper towel, and press gently onto the clay 3-4 times in random spots. -
Switch colors:
Wipe your finger clean, then repeat the process with the next color—perhaps the sage green—filling in empty spaces. -
Complete the pattern:
Continue rotating through mustard yellow and light blue until the tree is covered in colorful ‘lights,’ taking care to angle your finger slightly to create that distinct oval bulb shape. -
Add texture:
I find that pressing the painted finger firmly enough to leave a slight indentation in the soft clay adds a wonderful tactile dimension to the finished piece. -
Dry completely:
Set the ornament aside on a flat surface to dry for at least 24-48 hours, flipping it over halfway through to ensure the back dries evenly.
Add Some Sparkle
Mix a tiny pinch of extra-fine iridescent glitter into your varnish before applying the top coat. It will make the clay surface look like shimmery, fresh-fallen snow.
Step 3: Finishing Touches
-
Sand the edges:
Once fully hard, lightly run a piece of fine-grit sandpaper along the outer rim to remove any remaining sharp burrs or imperfections. -
Seal the surface:
Apply a coat of glossy varnish or sealant over the entire front of the tree to make the colors pop and protect the clay from moisture. -
Prepare the hanger:
Cut a length of jute twine, about 8 inches long, to serve as the hanger. -
Thread the twine:
Fold the twine in half, push the looped end through the hole from front to back, and pull the tails through the loop to secure it with a lark’s head knot. -
Secure the top:
Tie the two loose ends of the twine together in a simple overhand knot to close the loop.
Hang your new personalized ornament on the tree and enjoy the handmade warmth it brings to your holiday decor


Faux Holiday Cookie Garland
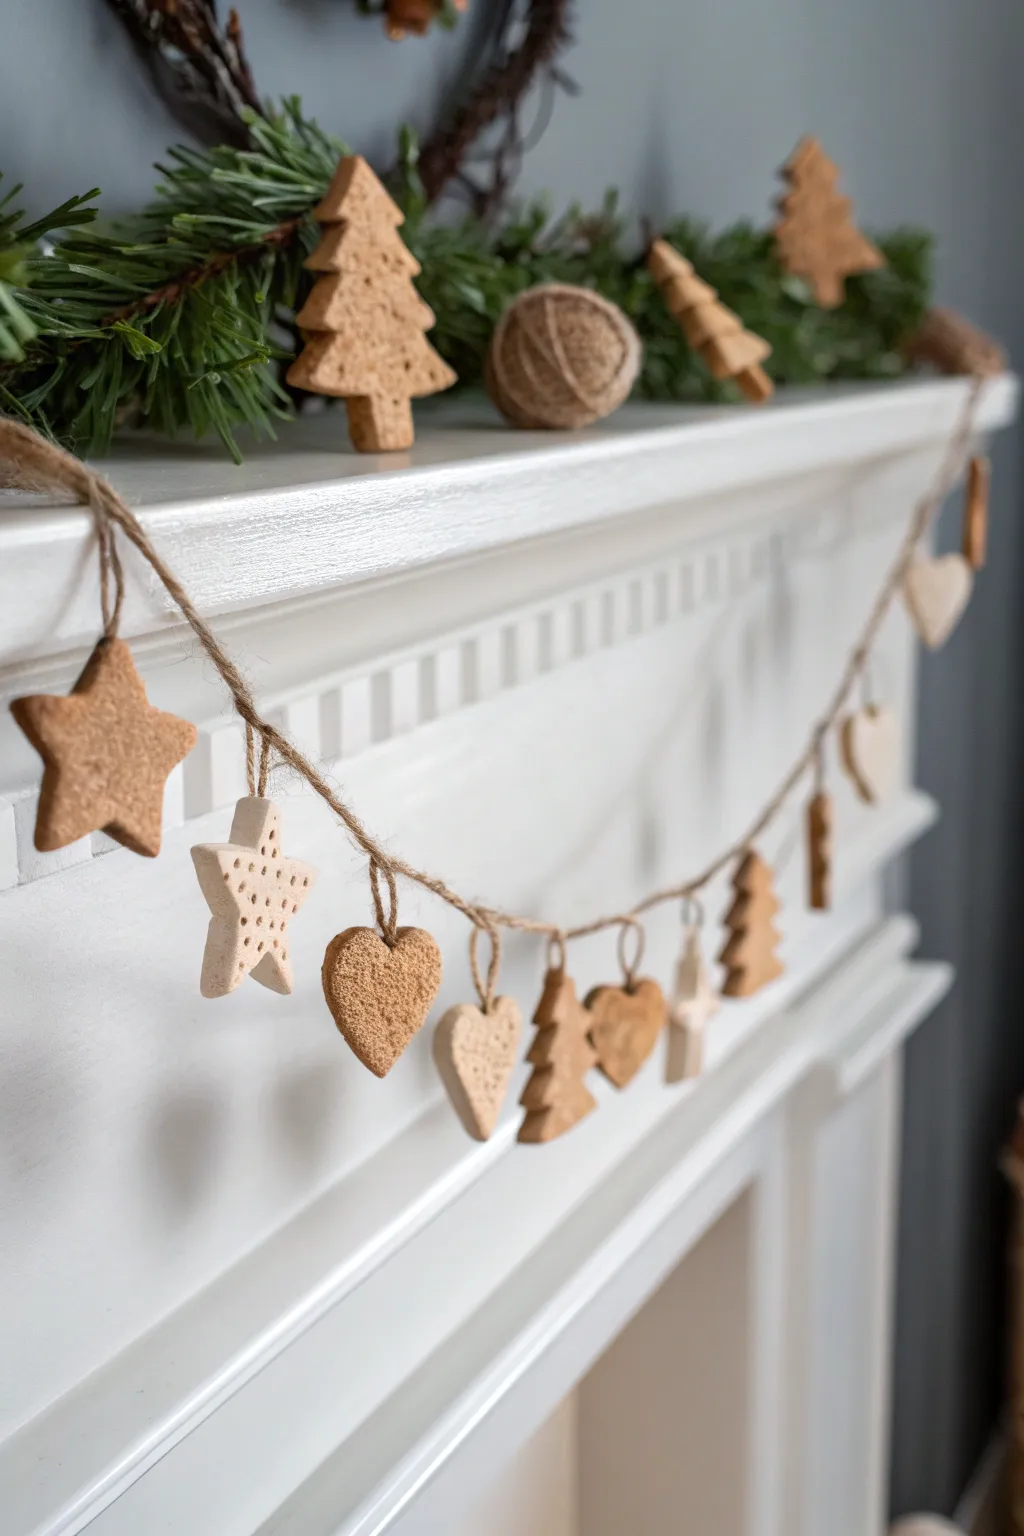
Bring the warmth of baking into your holiday decor without the mess of flour and sugar with this charming air dry clay garland. Mimicking the look of classic gingerbread and sugar cookies, this strung decoration adds a cozy, handmade touch to any mantelpiece or shelf.
How-To Guide
Materials
- Air dry clay (white)
- Acrylic paint (burnt umber, ochre, warm white)
- A rolling pin
- Holiday cookie cutters (small stars, hearts, trees)
- Texturing tools (toothpick, old toothbrush, lace, or sandpaper)
- Jute twine
- A drinking straw or skewer
- Fine-grit sandpaper
- Matte sealant spray
- Parchment paper or craft mat
Step 1: Preparing the ‘Dough’
-
Condition the Clay:
Begin by taking a large chunk of white air dry clay and kneading it in your hands until it becomes soft, pliable, and free of cracks. -
Create the Gingerbread Color:
To achieve the gingerbread look, mix a dab of burnt umber and a tiny touch of ochre acrylic paint directly into half of your white clay. Knead thoroughly until the color is uniform and resembles baked dough. -
Roll it Out:
Lay down parchment paper or a craft mat to prevent sticking. Roll out your ‘gingerbread’ clay to a uniform thickness, about 1/4 inch thick—just like real cookies. -
Roll the Sugar Cookie Clay:
Repeat the rolling process with the remaining plain white clay. If you want a warmer tone, I sometimes add just a drop of cream or warm white paint to take away the stark brightness.
Pro Tip: Realistic Texture
Gently press a sheet of crumpled aluminum foil over the wet clay surface. This creates subtle, uneven divots that look exactly like the surface of a baked cookie.
Step 2: Shaping and Texturing
-
Cut the Shapes:
Using your cookie cutters, press firmly into the rolled clay to cut out an assortment of stars, hearts, and Christmas trees. Try to make an equal mix of both clay colors. -
Smooth the Edges:
Dip your finger in a little bit of water and gently run it along the cut edges of each shape to smooth out any rough burs or jagged bits left by the cutter. -
Add Texture:
For a realistic baked look, gently press a piece of sandpaper or an old toothbrush onto the surface of the brown shapes to imitate a cookie crumb texture. -
Detailed Designs:
On the white stars or hearts, use a toothpick to poke small hole patterns or drawn lines, mimicking icing details or decorative indentations. -
Create Hanging Holes:
Before the clay creates a skin, use a straw or a skewer to poke a hole near the top of each ornament. Ensure the hole goes all the way through and is wide enough for your twine.
Troubleshooting: Curling Clay
If your ornament edges start lifting while drying, place a heavy book on top of them (with parchment paper in between) during the final few hours of drying to flatten them out.
Step 3: Drying and Finishing
-
Let them Dry:
Place all your shapes on a flat surface lined with parchment paper. Let them air dry for 24-48 hours. Flip them over halfway through the drying process to prevent curling. -
Sand Imperfections:
Once fully cured and hard, gently sand any remaining rough edges with fine-grit sandpaper for a polished, professional finish. -
Seal the Clay:
Take your shapes to a well-ventilated area and give them a light coat of matte sealant spray. This protects them from humidity without making them look glossy and plastic.
Step 4: Assembly
-
Cut the Main Line:
Measure the length of your mantel or display area and cut a piece of jute twine to size, leaving generous tails on each end for hanging. -
Cut Vertical Strings:
Cut shorter pieces of twine, varying their lengths slightly between 3 and 5 inches, to attach the cookies to the main line. -
Thread the Cookies:
Loop a short piece of twine through the hole of a clay cookie and tie a simple knot. -
Attach to Garland:
Tie the other end of the short string onto the main long garland line. Repeat this for all shapes, spacing them out evenly. -
Alternating Pattern:
For the best visual balance, alternate between the brown gingerbread shapes and the white sugar cookie shapes as you work your way down the line. -
Secure the Knots:
Once you are happy with the spacing, you can add a tiny dot of clear glue to the knots on the main line to stop the cookies from sliding out of position.
Hang your new festive garland and enjoy the cozy holiday atmosphere it creates

What Really Happens Inside the Kiln
Learn how time and temperature work together inside the kiln to transform clay into durable ceramic.
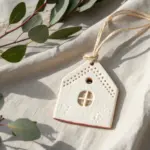
Minimalist Nordic Stars and Houses
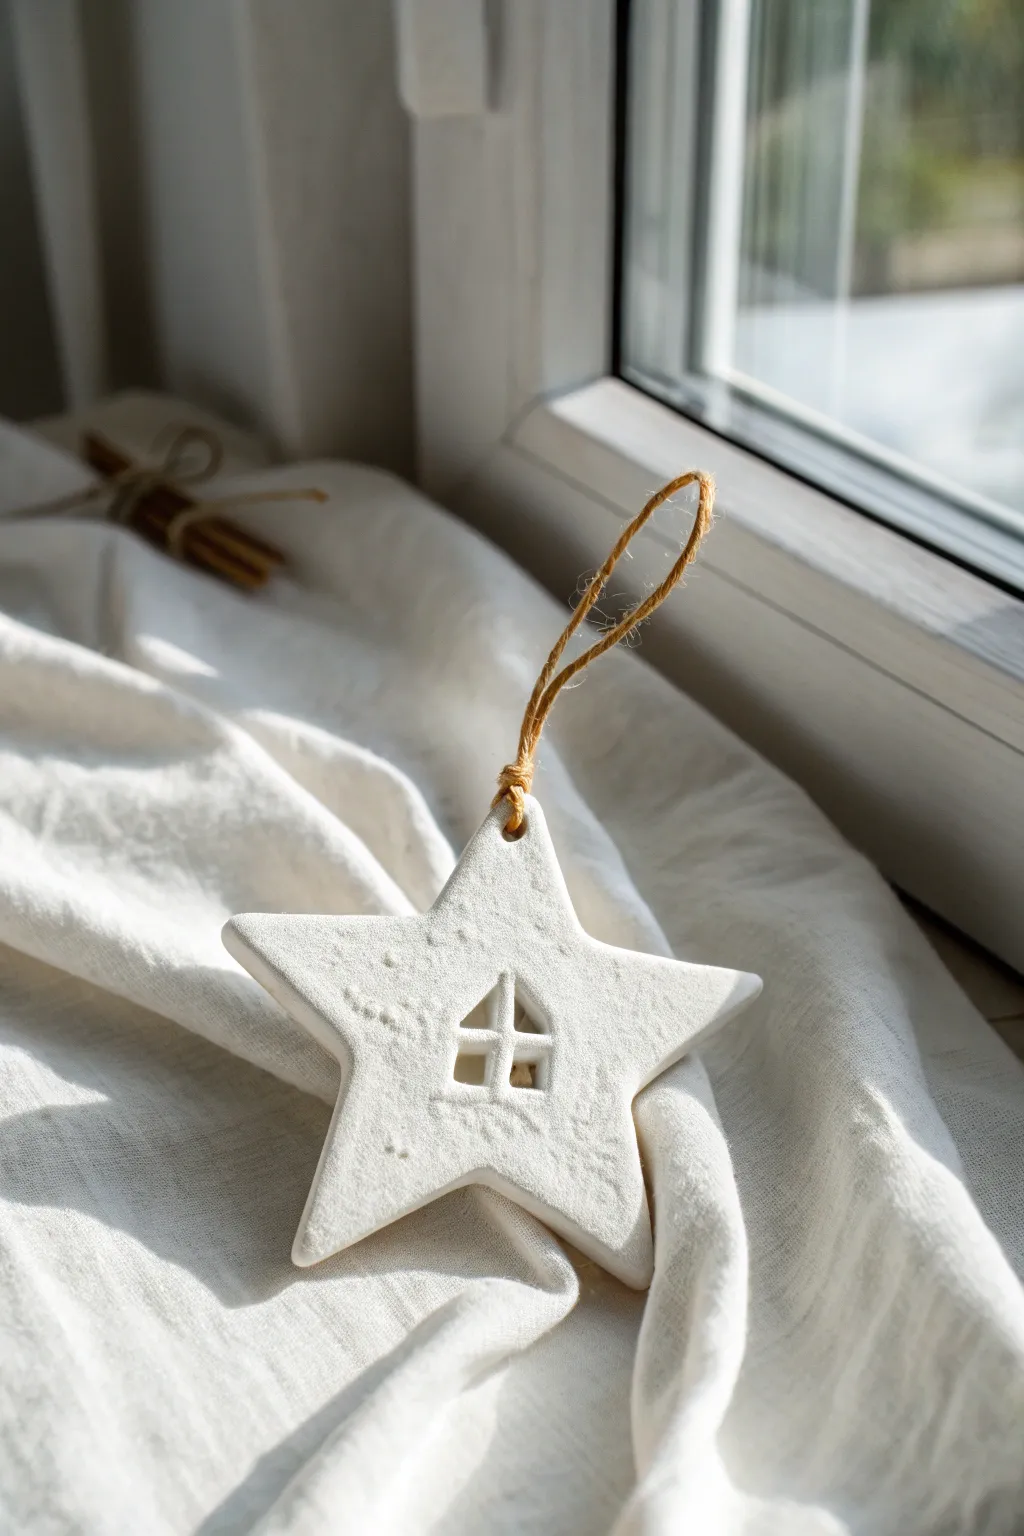
Capture the serene beauty of a winter landscape with these minimalist white clay stars. Featuring a charming house cutout and a subtle textured finish, they bring a touch of Scandi-chic elegance to any holiday tree or window display.
Detailed Instructions
Materials
- White air dry clay
- Rolling pin
- Star-shaped cookie cutter (approx. 3-4 inches)
- Small house-shaped clay cutter (or a sharp craft knife)
- Parchment paper or silicone mat
- Textured fabric (like linen or canvas) or a texture stamp
- Sanding sponge (fine grit)
- Straw or toothpick
- Natural jute twine
- Small bowl of water
Step 1: Preparation and Rolling
-
Prepare your workspace:
Lay down your parchment paper or silicone mat on a flat surface to prevent sticking. This ensures your clay releases easily later. -
Condition the clay:
Take a handful of air dry clay and knead it gently in your hands until it becomes soft, pliable, and free of cracks. -
Begin rolling:
Place the clay ball onto your mat and use the rolling pin to flatten it. Roll evenly in all directions. -
Check thickness:
Aim for a uniform thickness of about 1/4 inch (6mm). Too thin and it becomes fragile; too thick and it takes ages to dry. -
Add texture:
If you want that lovely organic look shown in the photo, gently press a piece of textured linen fabric onto the clay surface and roll over it once lightly with the pin.
Step 2: Cutting and Shaping
-
Cut the star:
Press your star-shaped cookie cutter firmly into the clay. Give it a tiny wiggle to ensure a clean cut before lifting it away. -
Create the center motif:
Position your small house cutter exactly in the center of the star. If you don’t have a cutter, carefully trace and cut a simple house silhouette with four window panes using a craft knife. -
Refine the cutout:
Use the tip of a knife or a needle tool to gently lift out the clay from the house shape. Clean up any rough edges inside the window panes with a damp paintbrush. -
Pierce the hanging hole:
Use a drinking straw to punch a clean hole at the top point of the star. A straw creates a much neater circle than a toothpick. -
Smooth the edges:
Dip your finger in a little water and run it along the outer edges of the star to smooth down any burrs left by the cutter.
Clean Cuts Every Time
Does your clay stick to the cutter? Dip the cutting edge into a bit of cornstarch or baking soda before pressing it into the clay for a flawless release.
Step 3: Drying and Finishing
-
Initial drying:
Leave the star on the parchment paper to dry. Place it in a safe spot away from direct heat sources, which can cause cracking. -
Flip occasionally:
After about 12 hours, gently flip the star over. This helps the air circulate and prevents the edges from curling upward as moisture evaporates. -
Wait for full cure:
Allow the ornament to dry completely for typically 24 to 48 hours, depending on humidity levels. The clay will turn a chalky white when fully dry. -
Sand for perfection:
Rub a fine-grit sanding sponge over the edges and surface. I like to focus on the points of the star to make sure they aren’t too sharp. -
Dust off:
Wipe the ornament with a dry cloth or use a soft brush to remove the white clay dust generated by sanding. -
Add the hanger:
Cut a 6-inch length of natural jute twine. Thread it through the hole at the top of the star. -
Secure the loop:
Tie a secure knot at the ends of the twine to create a rustic loop, adjusting the length to suit your tree branches.
Rustic Speckles
Knead recycled coffee grounds or loose tea leaves into the white clay before rolling. This creates a speckled, stone-like texture that enhances the Nordic vibe.
Enjoy the peaceful simplicity these handmade touched bring to your home decor this season
Rustic Wreath Ornaments With Twine Bows
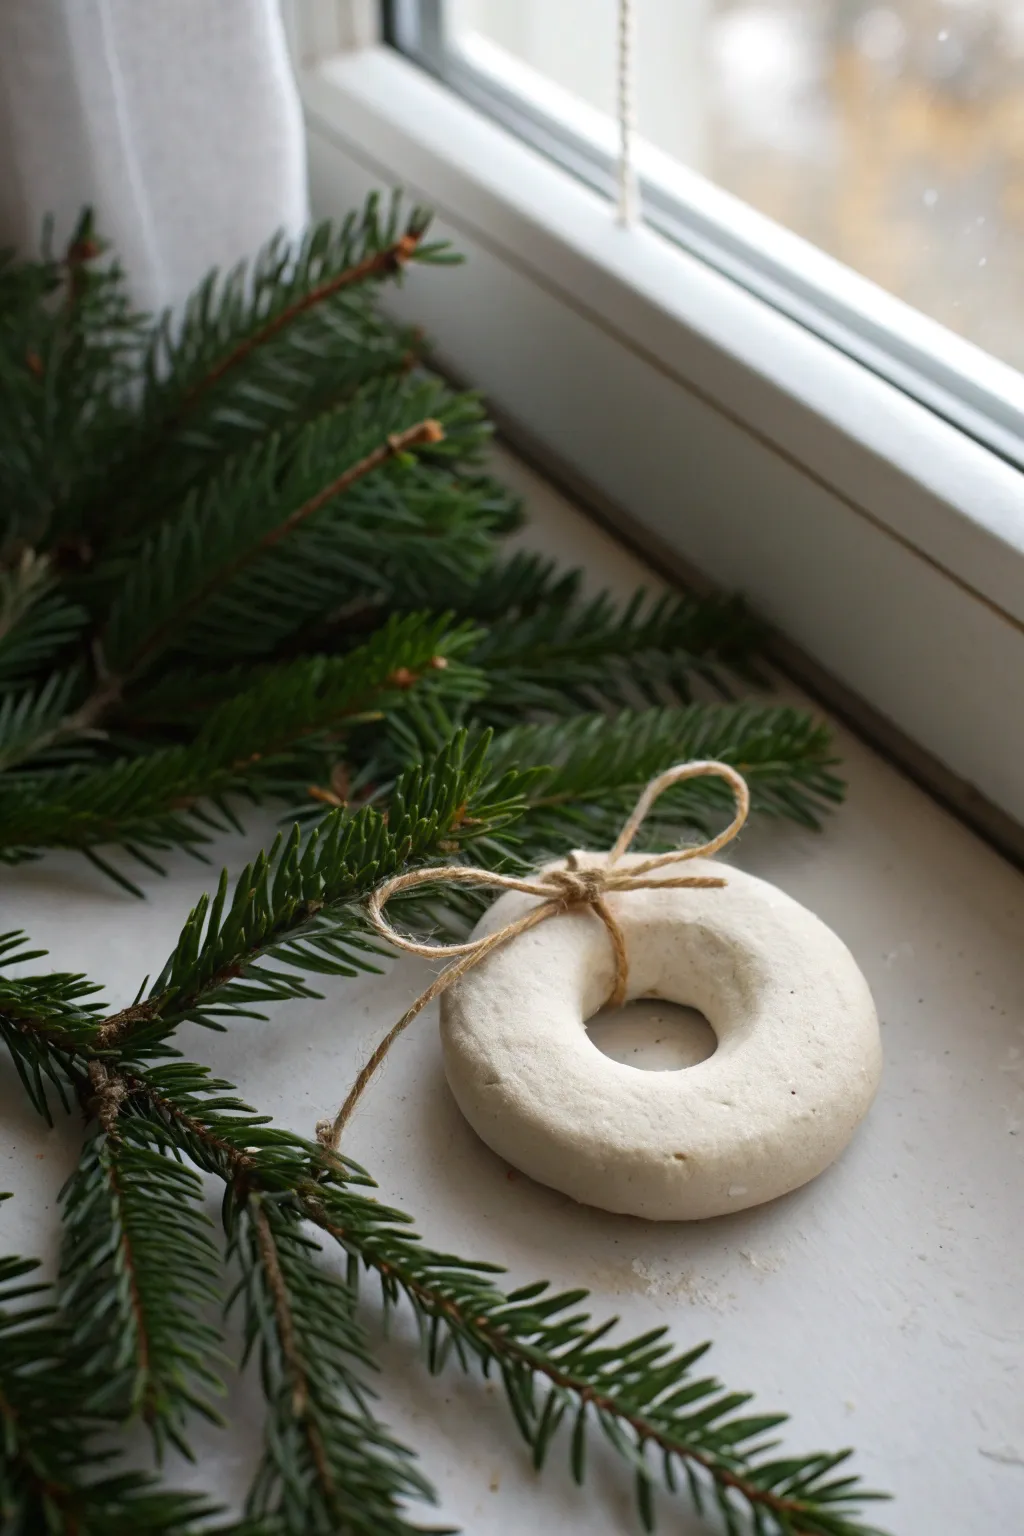
Embrace the beauty of simplicity with these charming, rustic ornaments that mimic the shape of a classic doughnut. The natural white clay paired with rough jute twine creates a cozy, Scandinavian-inspired look perfect for a winter windowsill or tree.
Step-by-Step Guide
Materials
- White classic air dry clay
- Jute twine or hemp cord
- Rolling pin
- Round cookie cutter (approx. 3 inches)
- Small round cutter (approx. 1 inch) or bottle cap
- Small bowl of water
- Parchment paper or craft mat
- Fine-grit sandpaper (optional)
Step 1: Shaping the Clay
-
Prep your surface:
Lay down a sheet of parchment paper or a silicone mat to prevent the clay from sticking to your work surface. -
Condition the clay:
Grab a handful of air dry clay and knead it in your hands for a minute until it feels soft, warm, and pliable. -
Roll it out:
Using a rolling pin, flatten the clay to a substantial thickness, aiming for about 1/2 inch to 3/4 inch thick. We want these chunky. -
Cut the outer circle:
Press your larger round cookie cutter firmly into the clay to create the base shape. -
Cut the inner circle:
Position the smaller cutter or bottle cap in the exact center of your circle and press down to create the ‘doughnut’ hole. -
Remove excess clay:
Peel away the scrap clay from the outside and push out the center hole piece. Keep these scraps for more ornaments.
Step 2: Refining and Drying
-
Soften the edges:
Dip your finger into a small bowl of water and gently run it along the sharp cut edges of the clay to round them off. -
smooth the surface:
While the clay is still damp, check for any major cracks or fingernail marks and smooth them out with a wet fingertip. I like to leave a little bit of natural texture for that rustic feel. -
Initial drying phase:
Place the clay ring on a clean, flat surface away from direct heat. Let it sit undisturbed for about 24 hours. -
Flip for even drying:
After the top feels dry to the touch, flip the ornament over so the bottom side is exposed to the air. -
Complete drying:
Allow another 24 hours (or up to 48 depending on humidity) for the clay to fully harden and turn a chalky white color. -
Optional sanding:
If there are any rough spots you dislike, lightly buff them with fine-grit sandpaper, wiping away the dust with a dry cloth.
Smoother Edges
Are sharp edges ruining the soft look? Wet a small sponge and gently pat the edges while wet instead of using your finger for a more uniform roundness.
Step 3: Adding the Rustic Bow
-
Cut the twine:
Cut a piece of jute twine approximately 10-12 inches long. -
Loop the twine:
Feed the twine through the center hole of the finished clay ring. -
Tie the knot:
Bring the ends together at the top of the ring and tie a tight, simple overhand knot to secure it against the clay. -
Form the bow:
Tie the remaining lengths into a small, classic bow, pulling the loops until they are relatively small and proportionate to the ring. -
Adjust the tails:
Trim the tails of the bow if they look too long or uneven, leaving enough length to add to the casual look.
Scented Decor
Add holiday aroma by kneading cinnamon or essential oils into the clay before rolling, or drop oils onto the absorbent clay back once dry.
Now you have a beautifully understated ornament ready to bring a touch of winter calm to your home decor


The Complete Guide to Pottery Troubleshooting
Uncover the most common ceramic mistakes—from cracking clay to failed glazes—and learn how to fix them fast.
Handmade Gift Tags That Double as Ornaments
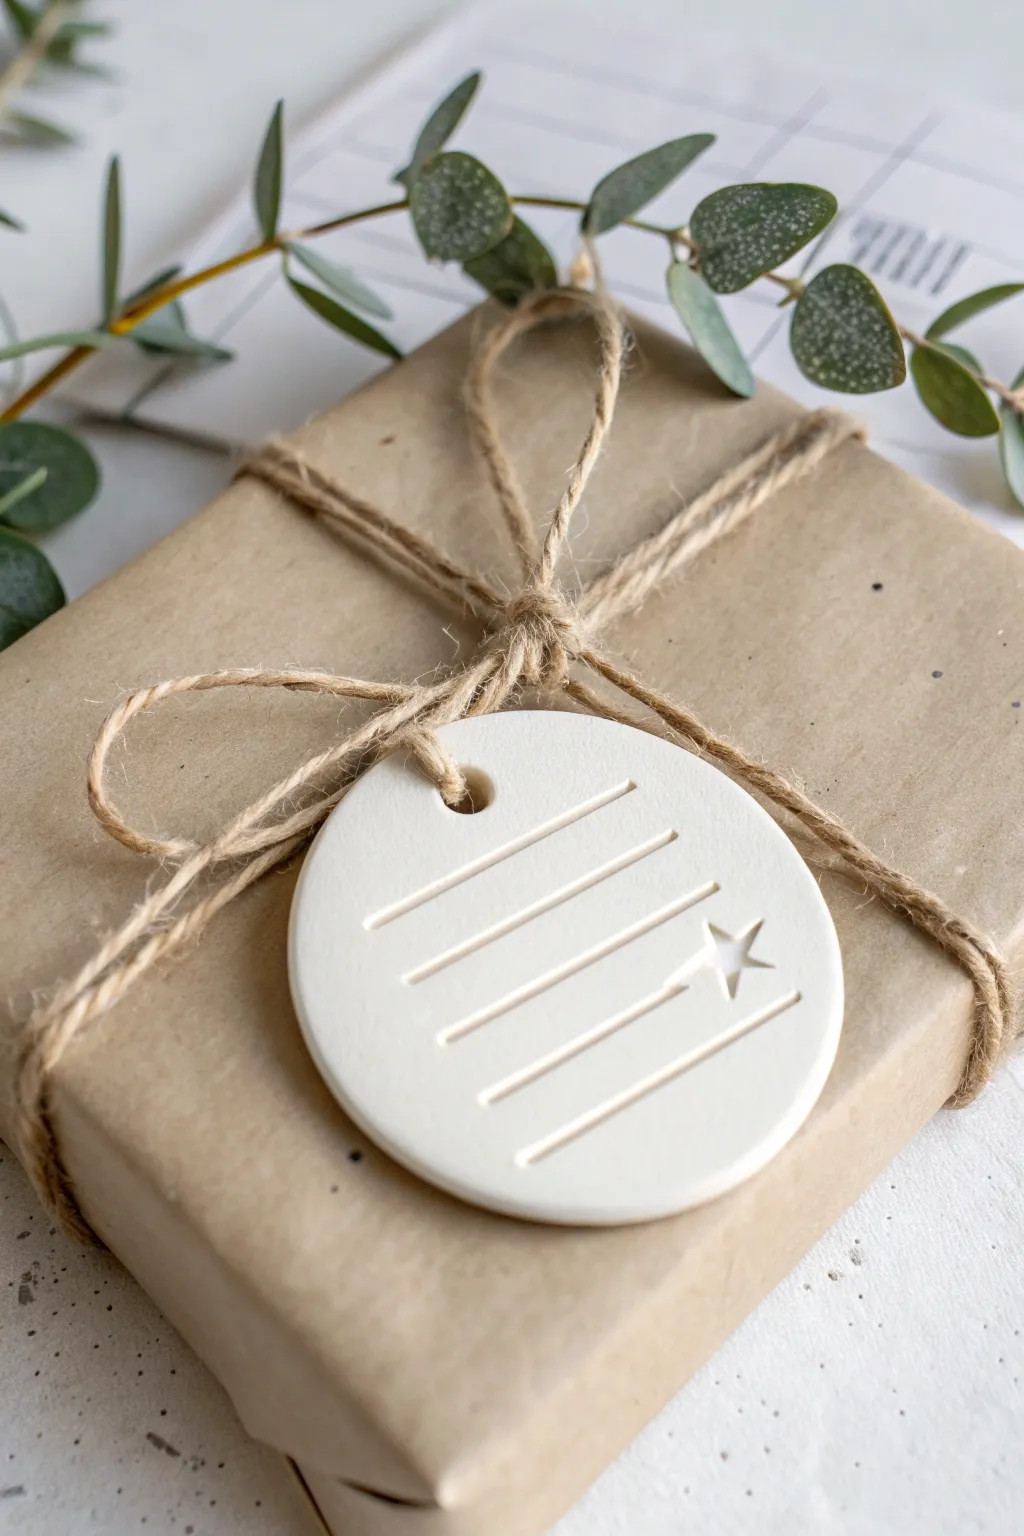
Turn simple air dry clay into a stunningly minimalist gift topper that adds a modern touch to any package. With its crisp lines and delicate star accent, this tag feels special enough to be kept as a keepsake ornament long after the unwrapping is done.
Detailed Instructions
Materials
- White classic air dry clay
- Rolling pin or smooth glass bottle
- Circle cookie cutter (approx. 2-3 inches)
- Small star-shaped clay cutter or stamp
- Ruler or straight edge
- Potter’s needle tool or a clean toothpick
- Drinking straw or small circular cutter (for the hole)
- Fine grit sandpaper (320 or 400 grit)
- Jute twine or rustic string
- Parchment paper or a silicone mat
- Small bowl of water
Step 1: Shaping the Base
-
Prepare your workspace:
Lay down a sheet of parchment paper or a silicone craft mat to prevent the clay from sticking to your table. -
Condition the clay:
Take a handful of air dry clay and knead it in your warm hands for a minute until it feels pliable and smooth. -
Roll it out:
Use your rolling pin to flatten the clay evenly. Aim for a thickness of about 1/4 inch (4-5mm)—too thin and it might crack, too thick and it gets heavy. -
Cut the circle:
Press your round cookie cutter firmly into the clay. Give it a tiny wiggle to ensure a clean separation before lifting the cutter away. -
Smooth the edges:
Dip your finger in a little bit of water and gently run it along the cut edge of the circle to smooth out any roughness or jagged bits.
Cracking Up?
If tiny cracks appear while drying, don’t panic. Mix a tiny bit of fresh clay with water to make a paste (slip) and smooth it into the cracks with your finger, then let dry again.
Step 2: Creating the Design
-
Mark the lines:
Gently press the edge of a ruler or a dull knife into the clay to create four parallel horizontal lines. Don’t cut all the way through; you just want a deep impression. -
Indent the star:
Position your small star cutter near the right end of the second line from the bottom. Press gently to stamp the shape without cutting fully through the clay. -
Refine the intersection:
Using a needle tool or toothpick, carefully clean up the area where the horizontal line meets the star so the design looks seamless. -
Add the hanging hole:
Use a drinking straw to punch a clean hole at the very top of the circle, centered above your design.
Step 3: Finishing Touches
-
Let it dry:
Place the tag on a drying rack or a fresh sheet of parchment. Let it air dry for 24-48 hours. I usually flip mine over halfway through so the bottom dries evenly. -
Sand for perfection:
Once fully hard and white, use fine-grit sandpaper to gently buff the edges and surface. This removes fingerprints and gives it that professional matte porcelain look. -
Dust it off:
Wipe the tag with a dry, soft cloth or a fluffy paintbrush to remove all the sanding dust from the grooves. -
Attach the twine:
Cut a length of jute twine, thread it through the hole, and tie it onto your gift. A simple knot keeps the aesthetic rustic and grounded.
Add Some Shine
For a festive twist, paint inside the indented grooves and star with liquid gold leaf or metallic paint using a very fine detail brush after the clay is fully dry.
Now your gift is ready to be given with a personalized touch that feels classic and modern all at once
Holiday Napkin Ring Charms
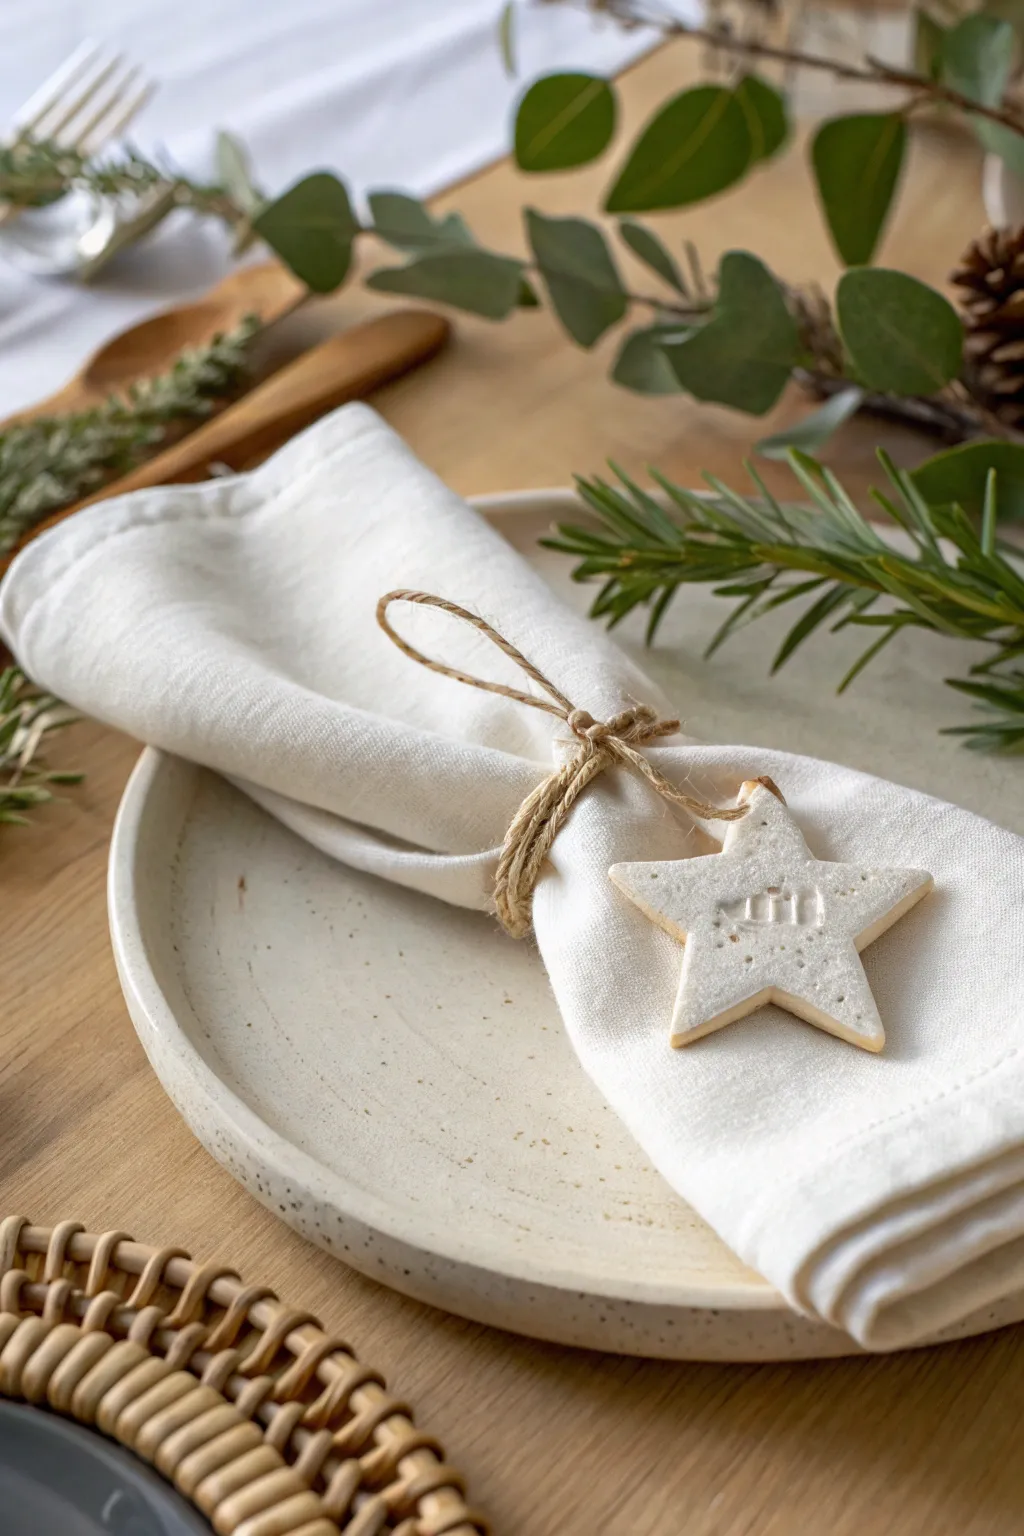
These charming clay stars add a rustic, handmade touch to your holiday table setting without feeling cluttered. Their simple white finish and natural twine tie create a beautiful Scandinavian-inspired aesthetic that complements fresh greenery perfectly.
Step-by-Step Guide
Materials
- White air-dry clay (smooth texture preferred)
- Rolling pin
- Parchment paper or non-stick craft mat
- Star-shaped cookie cutter (approx. 2-3 inches)
- Small holiday rubber stamp (tiny tree or house motif)
- Bamboo skewer or toothpick
- Fine-grit sandpaper (400 grit)
- Jute twine or hemp cord
- Clear matte acrylic sealer (optional)
- Small bowl of water
Step 1: Shaping the Stars
-
Prepare your workspace:
Lay down a sheet of parchment paper or a silicone craft mat to prevent sticking. Air-dry clay can pick up dust easily, so ensure your surface is clean before you begin. -
Condition the clay:
Take a handful of air-dry clay and knead it in your hands for a minute until it feels soft and pliable. This warms up the clay and helps prevent cracks from forming later. -
Roll out the slab:
Place the clay on your mat and use the rolling pin to flatten it. Aim for a consistent thickness of about 1/4 inch (6mm)—too thin and it might break; too thick and it will be heavy. -
Cut the shapes:
Press your star-shaped cookie cutter firmly into the clay. Lift the cutter straight up to get a clean edge. Repeat for as many napkin rings as you need. -
Clean the edges:
Dip your finger lightly in the bowl of water and gently smooth out any rough edges or stray bits of clay on the perimeter of your stars.
Step 2: Adding Detail & Drying
-
Position the stamp:
Identify the center of your star. I like to gently hover the stamp over the clay first to make sure the alignment feels balanced before committing. -
Impress the design:
Press your small rubber stamp gently but firmly into the center of the star. You want a clear impression, but be careful not to push all the way through the clay. -
Create the hanging hole:
Using a bamboo skewer or toothpick, poke a hole near the top point of the star. Wiggle the tool around slightly to ensure the hole is large enough for your twine to pass through easily. -
Initial drying phase:
Let the stars sit undisturbed on a flat surface. To keep them perfectly flat, you can place a piece of parchment paper on top and weigh them down lightly with a book for the first hour. -
Flip for even drying:
After about 12 hours, turn the stars over so the back side is facing up. This helps air circulate and ensures the clay dries evenly throughout. -
Complete drying:
Allow the stars to dry completely for 24 to 48 hours, depending on the humidity and brand of clay. They should feel hard and turn a solid, chalky white when ready.
Fixing Cracks
If hairline cracks appear while drying, mix a tiny bit of fresh clay with water to make a paste. Fill the crack, smooth with a finger, and let it dry again.
Step 3: Finishing Touches
-
Sand imperfections:
Once fully dry, take a piece of fine-grit sandpaper and very gently buff the edges of the star to soften any sharp ridges left by the cookie cutter. -
Seal (optional):
If you want to protect your charms from food stains or moisture, apply a thin coat of clear matte sealer. This will keep the look natural while adding durability. -
Cut the twine:
Cut a length of jute twine roughly 12 to 15 inches long for each napkin ring. You need enough length to wrap around the napkin twice. -
Thread the charm:
Pass one end of the twine through the hole in your star. Slide the star to the middle point of the twine string. -
Wrap the napkin:
Roll or fold your linen napkin. Take the twine and wrap it around the napkin’s center, circling it twice to create that rustic, layered cord look shown in the photo. -
Tie and secure:
Tie a simple double knot (or a small bow) on top, positioning the star so it hangs prominently on the front. Trim any excessively long twine ends if necessary.
Add Rustic Sparkle
Before the clay dries, gently press coarse sea salt or clear glitter into the surface to mimic the texture of freshly fallen snow or frost.
Now you are ready to set a beautifully understated holiday table

TRACK YOUR CERAMIC JOURNEY
Capture glaze tests, firing details, and creative progress—all in one simple printable. Make your projects easier to repeat and improve.
Advent Countdown Tokens in a Little Bowl
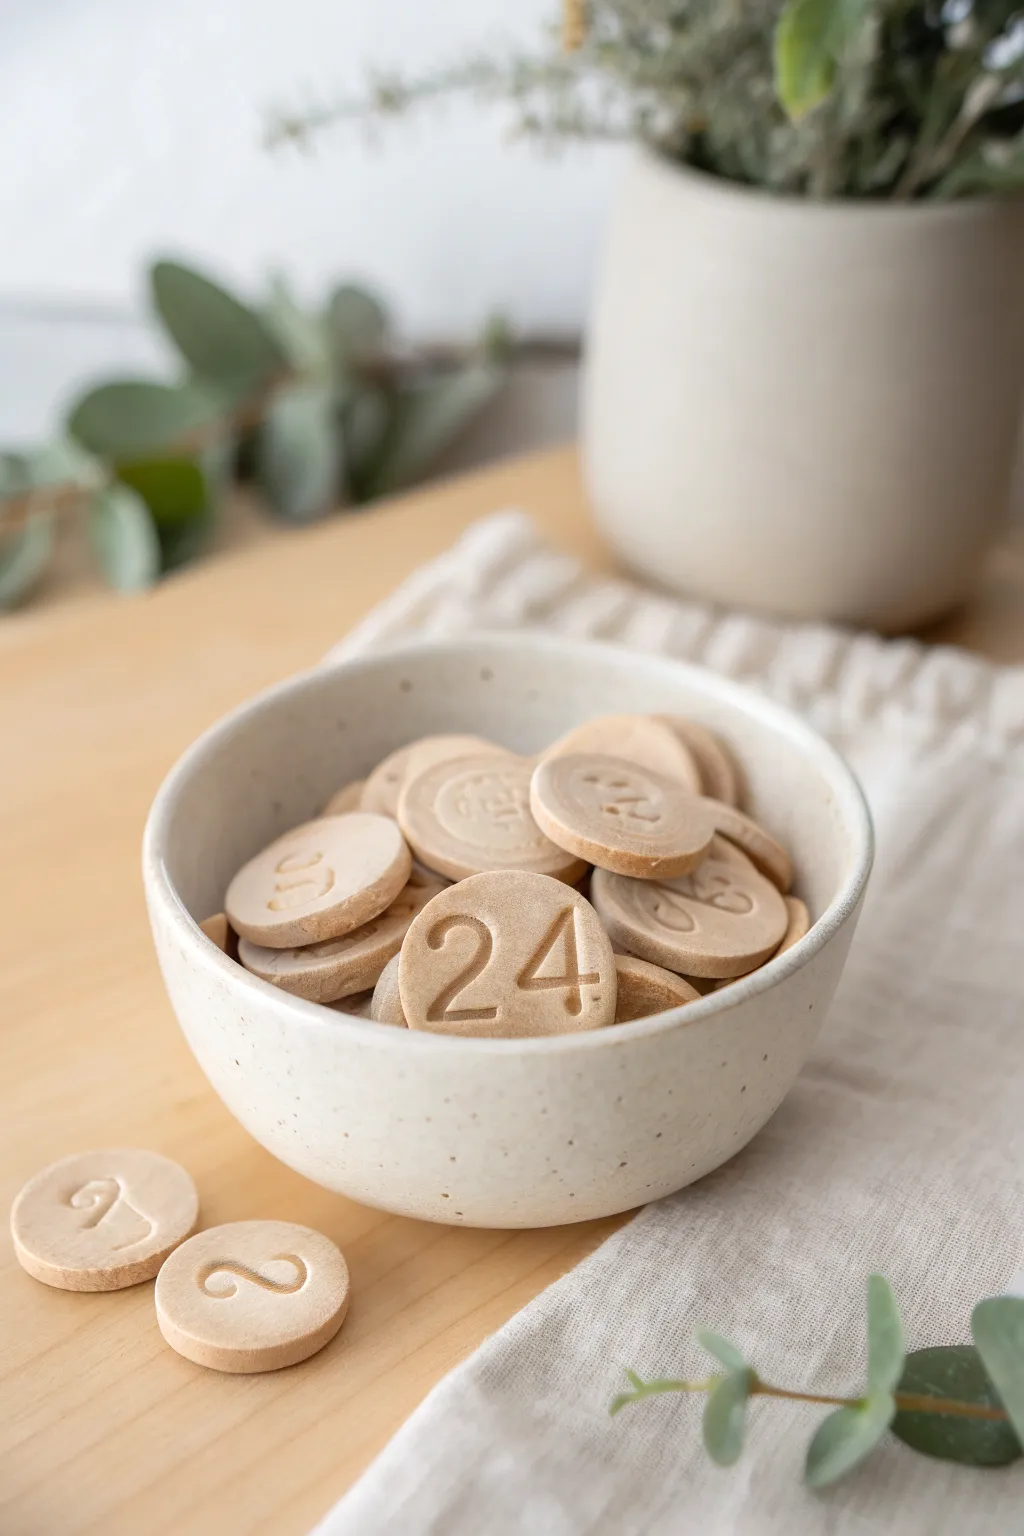
Count down the days in style with these beautifully simple numbered tokens, perfect for filling a decorative bowl or adding to your existing advent calendar. These sturdy little discs have a timeless, stamped pottery look without the need for a kiln.
Step-by-Step Guide
Materials
- Air dry clay (white or natural stone color)
- Acrylic rolling pin
- Small round cookie cutter (approx. 1-1.5 inches)
- Number stamps (wooden or rubber)
- Fine-grit sandpaper (220-400 grit)
- Parchment paper or non-stick craft mat
- Small bowl of water
- Sponge or soft paintbrush
- Acrylic sealer (matte finish, optional)
- A small stick or chopstick (for smoothing)
Step 1: Preparation & Rolling
-
Condition the clay:
Begin by taking a chunk of air dry clay and kneading it in your hands to warm it up. Work it until it feels pliable and smooth, ensuring there are no hidden air pockets inside. -
Prepare your surface:
Lay down a sheet of parchment paper or a silicone mat. This prevents sticking and makes it easier to move your tokens later without deforming them. -
Roll out the slab:
Use your acrylic rolling pin to roll the clay out evenly. Aim for a thickness of about 1/4 inch (6mm)—thick enough to feel substantial, but thin enough to dry thoroughly. -
Check consistency:
Inspect the surface of your clay slab. If you see any cracks or texture, wet your finger slightly and smooth them out before cutting.
Step 2: Cutting & Stamping
-
Cut the circles:
Press your round cookie cutter firmly into the clay to create your discs. You will need 24 (or 25) circles. Create a few extras just in case a stamping mishap occurs. -
Release the shapes:
Gently remove the excess clay from around the circles. If a circle sticks inside the cutter, gently push it out using a soft tool to avoid denting the surface. -
Smooth the edges:
Dip your finger in a little bit of water and run it around the cut edge of each circle. I find this simple step significantly reduces sanding time later by smoothing out sharp ridges. -
Prepare your stamps:
If your stamps are sticky, lightly dust them with cornstarch or dip them in water before pressing into the clay to ensure a clean release. -
Impress the numbers:
Ideally, start with double digits like ’24’ to gauge spacing. Press the number stamps firmly into the center of each disc. Apply even pressure so the impression depth is consistent across all numbers. -
Stamp the sequence:
Continue stamping all tokens from 1 to 24. For single digits, be mindful to center the number on the face of the token.
Stamp Clarity Trick
If your clay is too sticky, place a piece of plastic wrap over the disc before stamping. This creates a soft, pillowy edge to the numbers and prevents stuck clay.
Step 3: Drying & Finishing
-
Initial drying:
Place all the stamped tokens on a clean sheet of parchment paper on a flat surface. Let them sit undisturbed for at least 24 hours. -
Flip for evenness:
Turn the tokens over carefully to expose the bottoms to the air. This helps prevent warping as the clay shrinks during the drying process. -
Assess dryness:
Wait another 24 hours or until the tokens feel room temperature to the touch (damp clay often feels cold) and are a uniform light color. -
Sand edges:
Using fine-grit sandpaper, gently buff the edges of each token. Your goal is to round off any sharpness and create a soft, stone-like feel. -
Refine the surface:
If there are rough spots on the face or back, lightly sand those as well, being careful not to sand down the definition of your stamped numbers. -
Clean off dust:
Wipe each token with a slightly damp sponge or cloth to remove all sanding dust. This reveals the clean, natural color of the clay. -
Optional sealing:
To protect fingerprints and minor splashes, you can apply a thin coat of matte acrylic sealer. This will slightly darken the clay, giving it a richer tone.
Add Holiday Color
Mix a tiny amount of red or green acrylic paint into the clay before rolling, or paint inside the impressed numbers with gold metallic paint for a festive shine.
Once dry, display your beautiful handmade countdown in a simple bowl for an elegant holiday touch
Spice-Scented Ornaments for a Cozy Twist
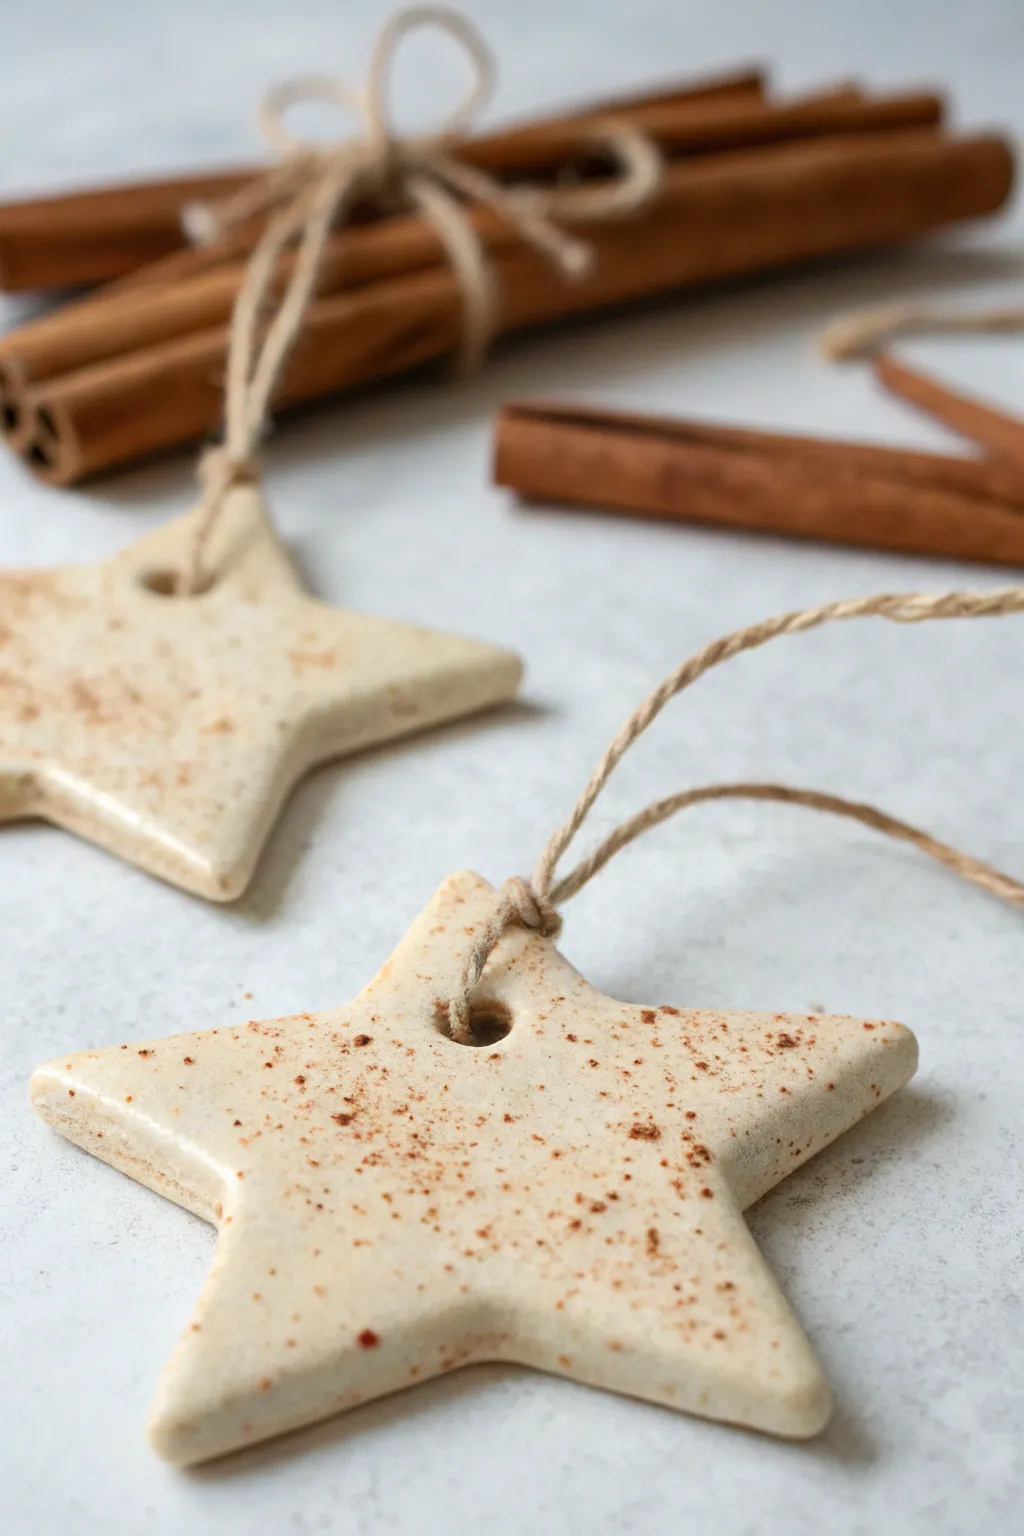
Simple and rustic, these star ornaments bring a natural warmth to holiday decor with their creamy clay base and dusting of aromatic spice. The speckled finish mimics the look of stoneware pottery while remaining lightweight and easy to string up on a tree or gift package.
How-To Guide
Materials
- White air-dry clay (or white polymer clay)
- Ground cinnamon
- Rolling pin
- Star-shaped cookie cutter
- Parchment paper or non-stick mat
- Straw or bamboo skewer (for making the hole)
- Jute twine or hemp cord
- Fine-grit sandpaper (optional)
- Clear matte acrylic sealer (optional)
Step 1: Preparing the Clay
-
Condition the Clay:
Begin by taking a handful of white air-dry clay and kneading it in your hands until it becomes soft, pliable, and free of cracks. The warmth of your hands will help condition it for rolling. -
Incorporate the Scent:
Flatten the clay slightly and sprinkle a generous pinch of ground cinnamon directly onto the surface. Fold the clay over to trap the spice inside. -
Create the Marbled Effect:
Knead the cinnamon into the clay, but stop just before it is fully uniform if you want larger speckles. For the look in the photo, continue kneading until the cinnamon is evenly distributed as fine specks throughout the white base. -
Dusting the Surface:
Before rolling, lightly dust your work surface with a tiny bit more cinnamon or cornstarch to prevent sticking. I find a little extra cinnamon on the outside adds texture.
Fixing Cracks
If small cracks appear as the clay dries, mix a tiny bit of fresh clay with water to make a paste and smooth it into the fissures with your finger.
Step 2: Shaping the Stars
-
Roll It Out:
Place the clay on parchment paper and use a rolling pin to flatten it to an even thickness, roughly 1/4 inch thick. Avoid rolling too thin, as air-dry clay can become brittle. -
Cut the Shapes:
Press a star-shaped cookie cutter firmly into the clay. Give it a tiny wiggle to ensure a clean cut, then lift the cutter straight up. -
Release the Stars:
Gently peel away the excess clay from around your star shapes. If the stars stick to the cutter, gently push them out from the top edges. -
Smooth the Edges:
Dip your finger in a little water and run it along the cut edges of the star to smooth out any roughness or loose bits of clay. -
Add Surface Texture:
While the clay is still wet, sprinkle a tiny pinch of fresh cinnamon over the top surface. Gently press the granules into the clay with your fingertip so they adhere rather than brushing off later. -
Pierce the Hole:
Use a straw or a skewer to poke a hole near the top point of the star. Make sure the hole is large enough to accommodate your twine, twisting the tool slightly as you pull it out to keep the opening clean.
Step 3: Finishing Touches
-
Drying Time:
Transfer the parchment paper with the stars to a flat, safe surface. Let them dry for 24 to 48 hours. Flip them over halfway through the drying process to prevent curling. -
Refine the Shape:
Once fully hardened, check the edges again. If they feel sharp or uneven, simple rub them gently with fine-grit sandpaper for a polished look. -
Seal (Optional):
To preserve the scent and texture, you can leave them raw. However, a light coat of matte acrylic spray will protect the clay from moisture without making it look plasticky. -
Cut the Twine:
Cut a length of jute twine, about 8 to 10 inches long, depending on how low you want the ornament to hang. -
Thread the Ornament:
Fold the twine in half to create a loop. Push the folded end through the hole in the star from front to back. -
Secure the Knot:
Pass the loose ends of the twine through the loop and pull tight to create a lark’s head knot directly on the ornament, just like in the example photo. -
Tie it Off:
Tie the two loose ends of the twine together in a simple overhand knot to close the hanger.
Rustic Wrapping
Use these stars as gift tags! Write the recipient’s name on the back with a marker and tie them onto packages alongside a real cinnamon stick.
Now you have a set of charming, fragrant stars ready to add a cozy touch to your holiday season