
I love how a basic pinch pot can turn into an instantly recognizable cat with just ears, a tail, and a few whiskers. Here are my go-to cat pinch pot ideas—from classic little kitty bowls to some playful, weirder options when you want a real conversation piece.
Classic Sitting Cat Pinch Pot Planter

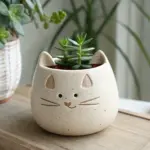
This adorable pinch pot project features a creamy, speckled finish and a serene, sleeping cat face that brings a sense of calm to any windowsill. It is the perfect size for a small succulent and combines basic hand-building techniques with simple yet expressive surface decoration.
Step-by-Step Tutorial
Materials
- White stoneware clay (preferably with speckles)
- Pottery tools (needle tool, rib tool)
- Sponge
- Water
- Underglaze (Black and Terracotta/Brown)
- Fine detail paintbrush
- Clear transparent glaze
- Kiln (or oven-bake clay alternative instructions)
Step 1: Forming the Base
-
Prepare the clay:
Start with a ball of clay roughly the size of a tennis ball. Wedge it securely to remove air bubbles, then pat it into a smooth sphere. -
Open the pot:
Push your thumb into the center of the sphere, stopping about a half-inch from the bottom. This thickness is crucial for stability. -
Pinch the walls:
Gently pinch the clay between your thumb and fingers, rotating the ball as you go. Work from the bottom up to thin the walls evenly to about a quarter-inch thick. -
Shape the sphere:
As you pinch, encourage the walls to curve inward slightly at the top rather than flaring out. You want a rounded, enclosed shape reminiscent of a cat’s head. -
Smooth the surface:
Use a damp sponge or a soft rib tool to smooth out the fingerprint marks on the exterior. Aim for a nice, round, organic curve. -
Create a flat base:
Gently tap the bottom of the pot against your work surface to create a small flat spot so the planter sits stably without rocking.
Step 2: Adding Features
-
Form the ears:
Take two small chickpea-sized balls of clay and shape them into triangles. Score the base of the triangles and the top rim of the pot where the ears will sit. -
Attach the ears:
Apply a little slip (clay and water mixture) to the scored areas and press the ears firmly onto the rim. They should curve naturally out of the form. -
Blend the seams:
Use a small modeling tool or your finger to smooth the clay from the ear down onto the pot, making the seam invisible. The ears should look like they grew out of the head, not just stuck on. -
Refine the rim:
The area between the ears should dip slightly. Smooth this rim with your finger or a sponge to ensure it is soft and not sharp. -
Dry properly:
Let the pot dry slowly to the leather-hard stage. I usually cover it loosely with plastic to ensure the ears don’t dry faster than the body.
Inner Smoothness
Don’t neglect the inside! While pinching, keep a damp sponge nearby to smooth the interior floor. Rough textures inside can trap dirt and make repotting difficult later.
Step 3: Decoration and Glaze
-
Map the face:
Once leather hard, very lightly sketch the face placement with a pencil. The graphite will burn off in the kiln. Position the eyes slightly wide for a cuter look. -
Paint the eyes:
Using a fine liner brush and black underglaze, paint two downward-curving ‘U’ shapes for closed eyes. Add small lashes at the outer corners. -
Add nose and mouth:
Paint a small rounded triangle for the nose and a simple ‘w’ shape for the mouth. Keep the lines delicate. -
Add whiskers:
Switch to a terracotta or warm brown underglaze. Paint two angled whiskers on each cheek area for a soft pop of color. -
Bisque fire:
Fire the piece to cone 04 (or according to your clay’s instructions). This sets the shape and underglaze. -
Applying clear glaze:
Dip the entire pot into a clear transparent glaze. If you used speckled clay, this is when those lovely spots will really prepare to shine through. -
Final firing:
Glaze fire the piece to the temperature required by your clay body (usually cone 6 for stoneware). Once cooled, it is ready for planting.
Uneven Walls?
If one side feels thicker, pinch specifically in that area to push clay toward thinner spots. If the rim gets wobbly, use a cheese cutter wire to slice the top uneven bit off.
Pop in your favorite succulent and enjoy your new ceramic companion


Round Cat Face Trinket Bowl
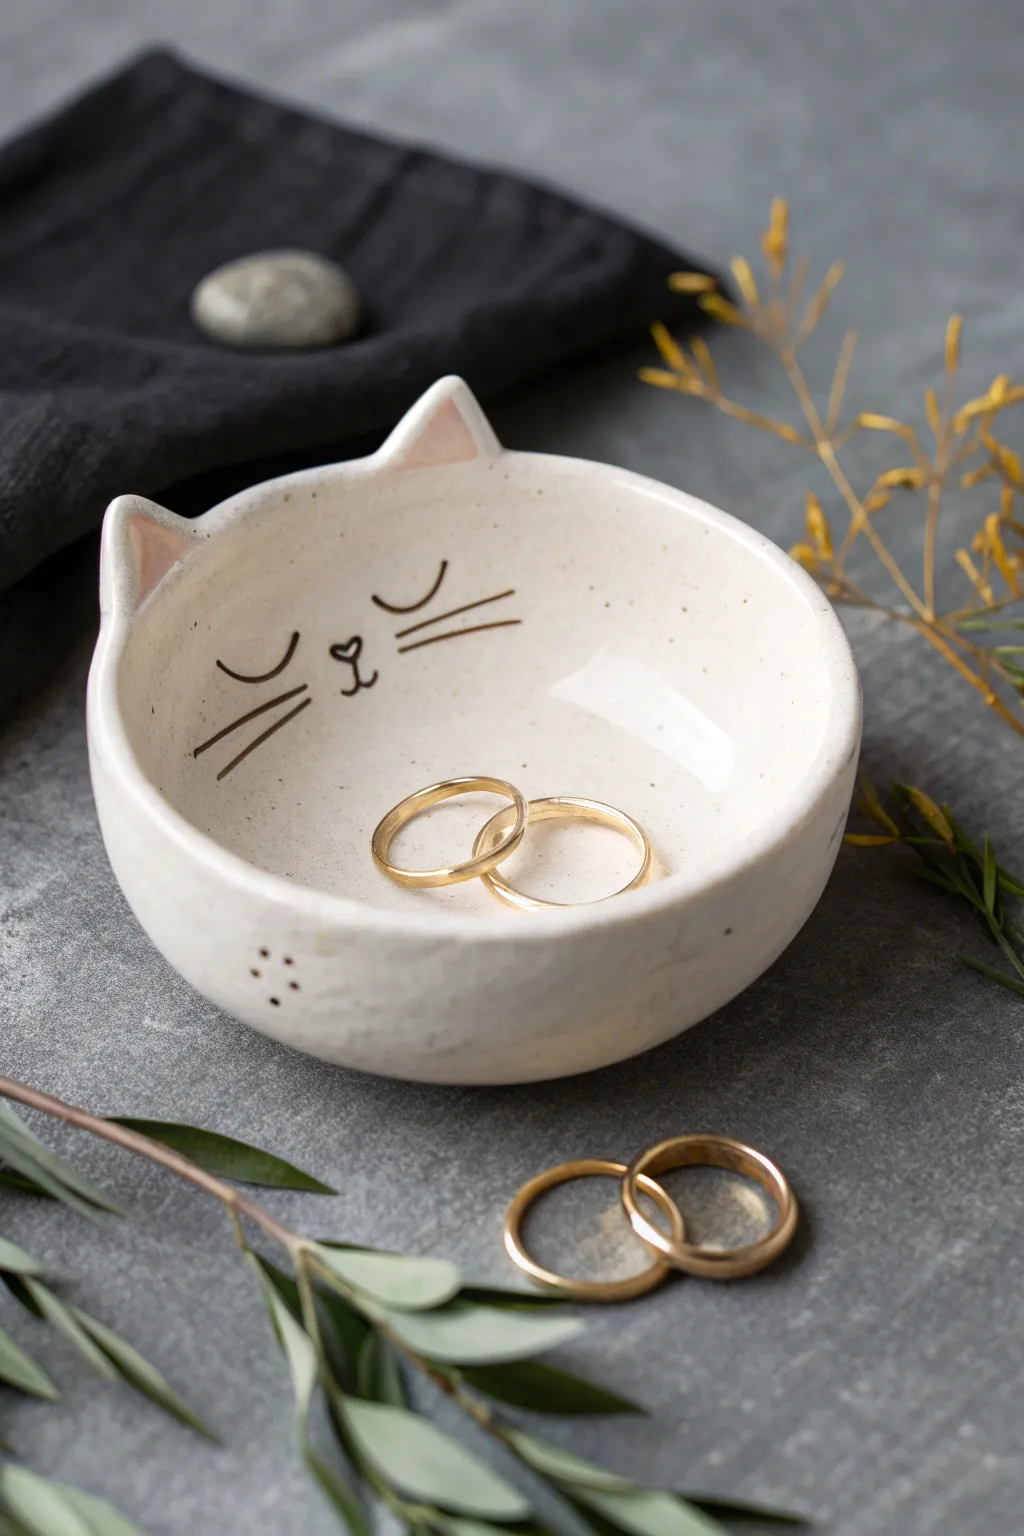
This charming little trinket bowl combines the simple shape of a pinch pot with adorable feline features. With its speckled cream glaze and minimalist black line work, it makes a perfect bedside keeper for your favorite rings.
Detailed Instructions
Materials
- White earthenware or stoneware clay (speckled clay optional)
- Small bowl of water
- Sponge
- Needle tool or toothpick
- Scoring tool (or fork)
- Rolling pin
- Pottery knife or craft knife
- Cream or white glaze (food safe if using for snacks)
- Black underglaze pencil or fine liner brush with black underglaze
- Dust pink underglaze (for ears)
- Clear transparent glaze
- Kiln (or access to a firing service)
Step 1: Forming the Base
-
Prepare the clay:
Start with a ball of clay roughly the size of a tangerine. Wedge it well to remove any air bubbles, which helps prevent cracking in the kiln. -
Start the pinch:
Hold the clay ball in your non-dominant hand. Gently push your thumb into the center, leaving about a half-inch of thickness at the bottom. -
Shape the walls:
Use a rhythmic pinching motion, rotating the ball as you go. Ideally, you want to pinch from the bottom upwards to create even walls. Aim for a thickness of about 1/4 inch throughout. -
Refine the rim:
Once you have a nice hemispherical shape, gently tap the rim on your work surface to level it, or use a damp sponge to smooth it out into a perfect circle. -
Smooth the surfaces:
Take a slightly damp sponge (wring it out well) and smooth both the interior and exterior surfaces to remove fingerprints and bumps.
Pro Tip: Steady Hands
When painting the face inside the curve, rest your painting hand on a stable surface or use a ‘mahl stick’ (or even just your other hand) to bridge across the bowl for steadier lines.
Step 2: Adding the Feline Features
-
Cut the ears:
Roll out a small scrap of clay to the same thickness as your bowl rim. Cut two small triangles for the ears. I prefer to make them slightly rounded at the tips for a softer look. -
Score and slip:
Mark rough cross-hatch lines (scoring) on the bottom of the ears and on the rim of the bowl where you want them to sit. Apply a dab of water or slip to these areas. -
Attach the ears:
Press the ears firmly onto the rim. Use a small wooden modeling tool or your finger to blend the clay seams completely so the ears look like they grew out of the bowl, not just stuck on. -
Initial drying:
Let your piece dry slowly to the ‘leather hard’ stage. This usually takes a few hours or overnight depending on humidity. It should feel firm but cool to the touch. -
Refine the shape:
Once leather hard, give the pot a final smoothing with a damp sponge or a burnishing stone to ensure a silky surface for the glaze.
Step 3: Painting and Glazing
-
Bisque fire:
Fire the greenware piece in the kiln to bisque temperature (usually Cone 04). This hardens the clay and prepares it for glazing. -
Base glazing:
Dip, brush, or pour your cream or white glaze over the entire piece. If you want the speckled look shown in the image but don’t have speckled clay, choose a glaze with speckles included. -
Draw the face:
Using a black underglaze pencil or a very fine liner brush dipped in black underglaze, carefully draw the sleeping eyes, nose, and whiskers on the inside curve of the bowl. -
Add ear details:
Apply a soft wash of dusty pink underglaze to the inner triangles of the ears for a pop of color. -
External details:
Don’t forget the outside! Add three tiny black dots near the base on the exterior for a cute, subtle detail. -
Clear coat (optional):
If your white base glaze wasn’t glossy, or if you used underglazes directly on bisque, apply a thin layer of clear transparent glaze over the painted areas to seal them. -
Final wipe:
Wipe the very bottom (foot) of the bowl with a wet sponge to remove any glaze so it doesn’t stick to the kiln shelf. -
Glaze fire:
Place the bowl back in the kiln for the final glaze firing (temperature depends on your specific clay and glaze, often Cone 5 or 6).
Troubleshooting: Cracks
If you see hairline cracks on the rim while pinching, compress the rim immediately with a damp sponge. Keep the rim slightly thicker than the walls during shaping to prevent this.
Once cooled, your cute ceramic kitty is ready to guard your jewelry on your dresser

Cat Pinch Pot Tea Light Holder
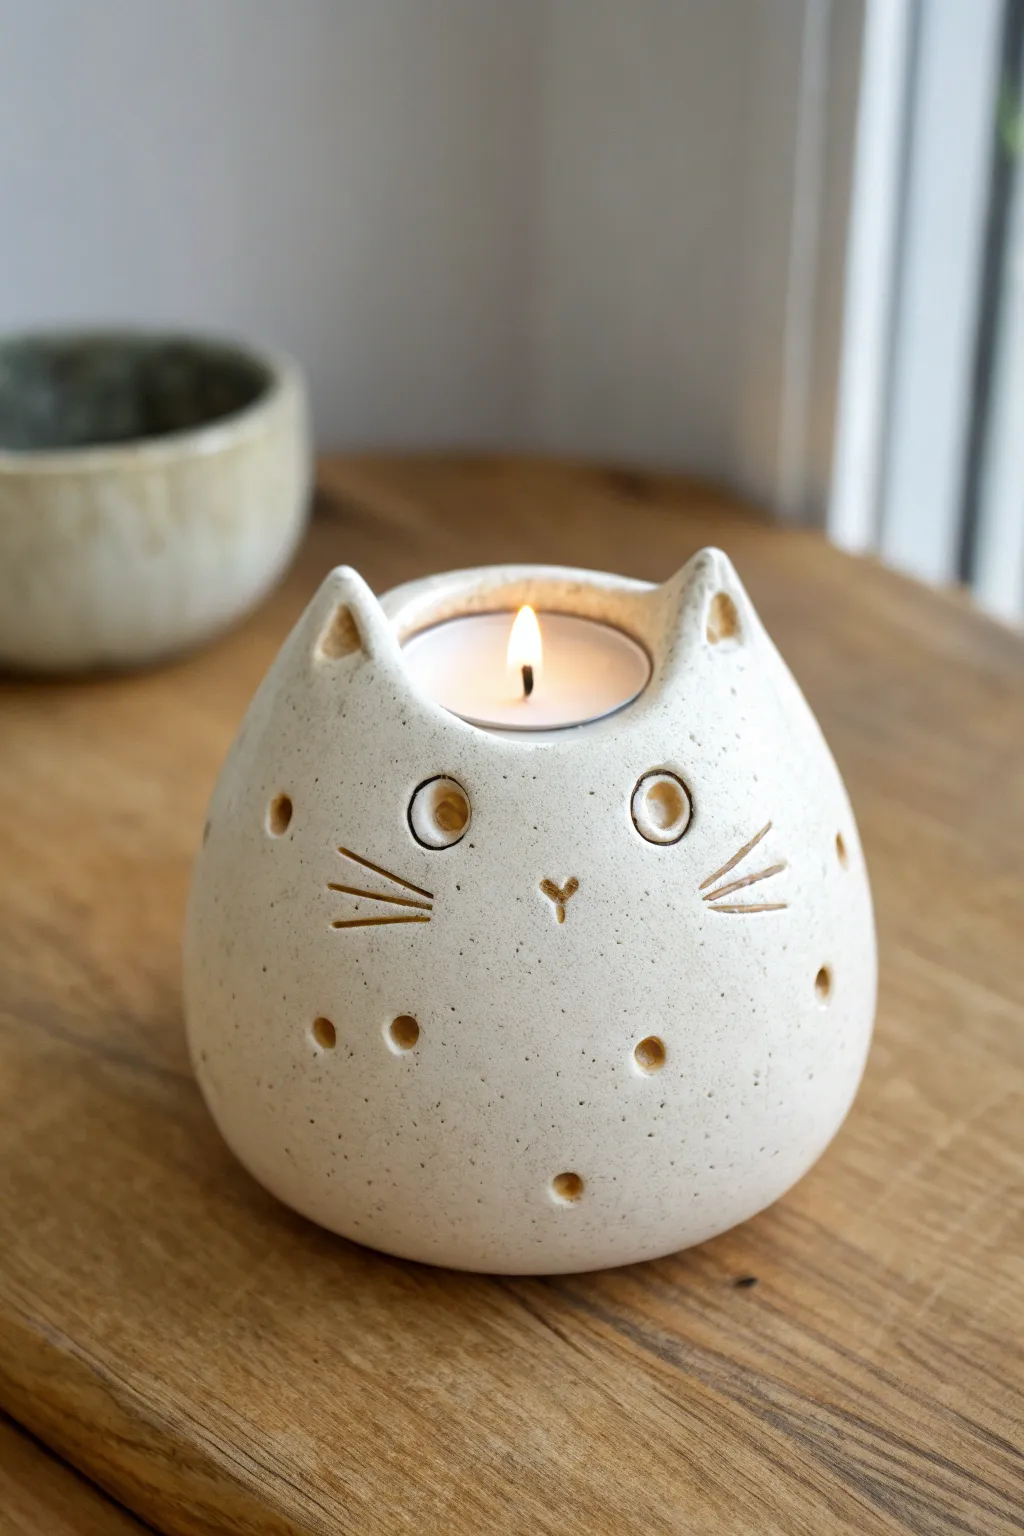
This adorable tea light holder transforms a simple ball of clay into a glowing feline friend with a charming speckled finish. The minimalist face and scattered light holes create a cozy, warm ambiance perfect for any nook in your home.
How-To Guide
Materials
- White or speckled stoneware clay body
- Tea light candle (for sizing)
- Small loop tool or needle tool
- Sponge
- Wooden modeling tool
- Water slip (clay and water mixture)
- Hole cutter or drinking straw
- Matte white or cream glaze
- Rolling pin (optional)
- Kiln (or air-dry clay sealant if not firing)
Step 1: Forming the Body
-
Prepare the clay:
Start with a ball of clay roughly the size of a large orange. Wedge it well to remove air bubbles, ensuring a smooth consistency before you begin shaping. -
Pinch the pot:
Push your thumb into the center of the ball, stopping about half an inch from the bottom. Gently pinch and rotate the clay between your thumb and fingers to open up the walls, aiming for an even thickness. -
Close the form:
Instead of keeping the rim wide like a bowl, gently curve the walls inward as you reach the top to create a rounded, enclosed sphere shape. -
Create the candle recess:
Use a real tea light candle as a template. Gently press it into the top center of your sphere to mark the size, but make the opening slightly larger to account for clay shrinkage during drying. -
Refine the rim:
Smooth the edges of the opening you just created. Use a damp sponge to soften the rim so it feels polished rather than sharp.
Fixing Cracks
If tiny cracks appear near the ears as it dries, score the crack, add a tiny bit of vinegar or slip, and smooth fresh clay over it immediately.
Step 2: Sculpting the Features
-
Shape the ears:
Take two small, equal-sized pieces of excess clay and shape them into triangles. Score the bottom of the ears and the attachment points on the cat’s head, add a dab of slip, and press them firmly into place near the rim. -
Detail the ears:
Use a wooden modeling tool to press a small indentation into the front of each ear, giving them depth and a realistic shape. -
Blend the seams:
Smooth carefully around the base of the ears where they meet the head. You want them to look like they grew out of the form, not just stuck on top. -
Carve the eyes:
Using a small loop tool or even the back of a pen cap, press two circles into the front for eyes. Carve slightly deeper in the center to create a pupil effect. -
Add the nose:
Press a tiny heart shape into the clay directly between and slightly below the eyes to make the nose. A needle tool works perfectly for this precision work. -
Draw the whiskers:
Use a needle tool or knife to gently score three lines on each cheek. Vary the angles slightly so they fan out naturally.
Step 3: Texturing and Finishing
-
Create light holes:
Use a small hole cutter or a drinking straw to punch random holes around the body of the cat. These will let the candlelight shine through, creating glowing spots in the dark. -
Clean up burrs:
Once the clay is leather hard, go back over your carved lines and punched holes with a damp sponge or finger to remove any little crumbs or sharp bits of clay. -
Dry slowly:
Cover the cat loosely with plastic to let it dry slowly over a few days. This prevents cracking, especially around the added ears. -
Bisque fire:
Fire the piece in the kiln to bisque temperature (usually Cone 04) to prepare it for glazing. -
Apply glaze:
Dip or brush a matte white or cream glaze over the entire piece. I find that wiping the glaze away from the recessed eye and nose carvings helps pop the details. -
Final wipe:
Ensure the bottom of the pot is wiped clean of any glaze so it doesn’t stick to the kiln shelf. -
Glaze fire:
Fire the piece a final time according to your clay and glaze instructions (typically Cone 5 or 6 for stoneware).
Make it Sparkle
For extra magic, punch star-shaped holes instead of circles on the body, or use a translucent glaze that lets the speckles of the clay show through.
Now light a candle inside and watch your little ceramic companion glow with warmth


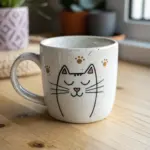
Cat Pinch Pot Cup With Tail Handle
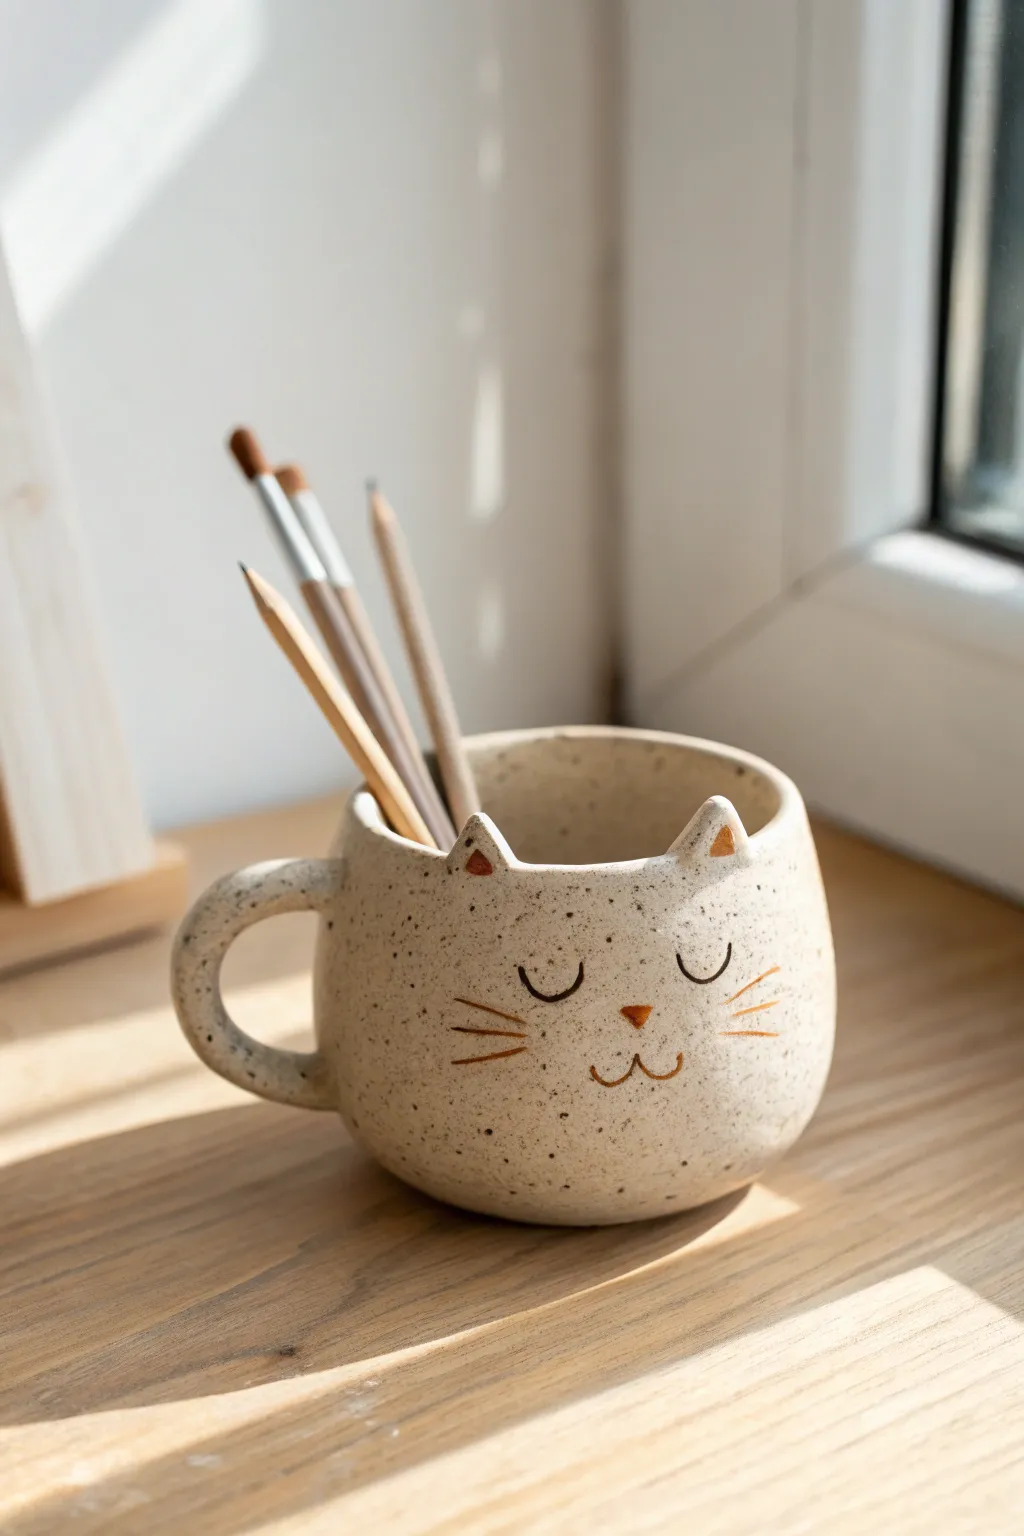
This charming ceramic mug combines the simplicity of a pinch pot with the whimsy of a sleepy cat. The finish features a lovely speckled clay body, minimalist facial features, and a sweet little tail handle that makes it perfect for holding pencils or your morning brew.
Detailed Instructions
Materials
- Speckled stoneware clay (pyrite or iron speckle)
- Needle tool
- Scoring tool (or fork)
- Slip (clay mixed with water)
- Small sponge
- Paintbrush (fine tip)
- Underglaze (black and rust/brown)
- Clear glaze (zinc-free recommended for speckled clay)
- Wooden sculpting tool
- Rolling pin (optional)
Step 1: Forming the Base
-
Prepare the Clay:
Start with a ball of clay roughly the size of a large orange. Wedge it well to remove air bubbles, then pat it into a smooth, round sphere in your hands. -
Open the Pot:
Push your thumb into the center of the ball, stopping about a half-inch from the bottom. This thickness is crucial for a stable base. -
Pinch the Walls:
Gently pinch the clay between your thumb and fingers, rotating the ball as you go. Work from the bottom up, aiming for an even thickness of about 1/4 inch throughout the walls. -
Shape the Belly:
As you pinch upwards, encourage the pot to balloon out slightly in the middle to create a round, chubby shape, then bring the rim in just a tiny bit for that classic mug silhouette. -
Smooth the Surface:
Use a damp sponge or your fingertips to smooth out any distinct fingerprint indentations on the exterior and interior, creating a clean canvas for the face.
Smooth Operator
Use a flexible metal or rubber rib tool on the outside of the pot while the clay is still soft. It compresses the wall and brings the speckles to the surface.
Step 2: Adding Features
-
Create the Ears:
Roll two small, marble-sized balls of clay. Flatten them slightly and pinch them into triangles. Tap the bottoms on your table to flatten the connection point. -
Attach the Ears:
Score the rim of the cup and the bottom of the ears. Apply a dab of slip, press the ears firmly onto the rim, and blend the clay downwards with a wooden tool until the seam disappears. -
Form the Handle:
Roll a coil of clay about 4 to 5 inches long. Taper one end slightly to mimic a tail tip. -
Attach the Tail:
Score and slip the attachment points on the back of the mug. Curve the coil into a ‘C’ or ‘?’ shape to act as the handle, blending the clay thoroughly where it meets the mug body for strength. -
Refine the Rim:
Run your damp sponge or a piece of chamois leather around the rim and over the ears to ensure everything is soft and comfortable for sipping.
Make It Yours
Instead of a plain tail, add texture to the handle using a toothbrush or scoring tool to make it look like a fluffy Persian cat tail!
Step 3: Painting & Finishing
-
Dry to Leather Hard:
Let the mug sit until it is leather hard—stiff enough to handle without deforming, but still cool to the touch. -
Outline the Face:
Using a very light touch with a needle tool, sketch the placement of the eyes, nose, and whiskers. I find this helps prevent mistakes with the underglaze later. -
Paint the Details:
Using a fine-tip brush and black underglaze, paint the two ‘U’ shapes for sleeping eyes, the mouth, and three whiskers on each side. -
Add Color Accents:
Use a rust or brown underglaze to verify the small triangle nose and add little triangles inside the clay ears. -
Bisque Fire:
Once bone dry, fire the piece to bisque temperature (usually bolt cone 04) to prepare it for glazing. -
Glaze:
Dip the entire mug into a transparent clear glaze. This will seal the clay and make it food-safe while allowing the beautiful speckles of the clay body to shine through. -
Final Fire:
Fire the mug a final time to the maturity temperature of your clay (likely cone 5 or 6). Once cool, sand the bottom if needed to prevent scratching surfaces.
Enjoy your cozy new mug for warm drinks or organizing your creative tools.

The Complete Guide to Pottery Troubleshooting
Uncover the most common ceramic mistakes—from cracking clay to failed glazes—and learn how to fix them fast.
Triangle Slab Ears for a Chunky Kitty

Sculpt this charming, functional chunky cat pot using simple pinch pot techniques combined with slab building for the ears. The finished piece features a lovely speckled cream body with distinct rust-orange accents that give it a warm, handmade character.
Step-by-Step Guide
Materials
- Speckled cream stoneware clay
- Rolling pin
- Fettling knife or needle tool
- Serrated rib or fork (for scoring)
- Slip (clay and water mixture)
- Underglaze (black for details, rust/orange for ears)
- Small liner brush
- Sponge
- Clear matte or satin glaze
Step 1: Forming the Body
-
Prepare the Clay:
Start with a ball of well-wedged speckled stoneware clay about the size of a large orange. Pat it into a smooth, round sphere to ensure an even starting point. -
Open the Pot:
Push your thumb deep into the center of the ball, stopping about a half-inch from the bottom. This base thickness is crucial for the pot’s stability. -
Pinch the Walls:
Gently pinch the clay between your thumb and fingers, rotating the ball as you work up the sides. Aim for uniform thickness—about a quarter-inch—while maintaining a slightly wider, rounded ‘chunky’ bottom shape. -
Smooth the Rim:
Once you have reached your desired height, use a damp sponge or your finger to compress and smooth the rim of the pot so it is level.
Step 2: Adding the Triangle Ears
-
Roll a Mini Slab:
Take a separate small chunk of clay and roll it out until it matches the thickness of your pot walls. -
Cut Triangles:
Using your needle tool or knife, cut two identical isosceles triangles which are slightly rounded at the corners. These should be fairly large compared to the pot to capture that alert cat look. -
Curve the Ears:
Gently bend the triangles slightly to give them a concave curve, mimicking the natural shape of a cat’s ear rather than leaving them perfectly flat. -
Score and Slip:
Score the bottom edge of the ears and the corresponding attachment points on the pot rim vigorously. Apply a generous dab of slip to both areas. -
Attach and Blend:
Press the ears firmly onto the rim. Use a small wooden tool or your finger to smooth the seam on the back side of the ear so it flows seamlessly into the pot body.
Don’t Rush the Dry
Because the ears are thin slabs attached to a pinched body, dry this piece very slowly under loose plastic to prevent the ears from cracking at the seams.
Step 3: Sculpting and Decoration
-
Define the Inner Ear:
Use a modeling tool to verify the transition between the ear and the inner rim is smooth, creating a contained area for the inner ear color later. -
Add Texture Details:
While the clay is leather hard, use a sharp needle tool to lightly scratch in the whisker lines. I find carving these when the clay is firmer prevents the lines from getting messy burrs. -
Carve the Face:
Gently carve the small vertical lines for the forehead markings and the small ‘w’ shape for the mouth. -
Bisque Fire:
Allow the piece to slow dry completely under plastic for a few days to equalize moisture, then bisque fire to cone 04 (or per your clay body specs).
Make it a planter
Poke a drainage hole in the bottom during the ‘Forming the Body’ phase to turn this cute cup into a functional succulent planter.
Step 4: Glazing and Finishing
-
Paint facial features:
Using a fine liner brush, apply black underglaze into the whisker carvings, the mouth, and paint two small solid ovals for eyes and a small triangle for the nose. -
Color the Ears:
Apply a rust-orange underglaze or glaze specifically to the interior triangle of the ears, staying neatly within the borders you created. -
Apply Clear Glaze:
Dip or brush the entire pot with a clear matte or satin glaze. This will seal the clay and make the speckles pop without obscuring your detailed painting. -
Final Fire:
Glaze fire the piece to the temperature appropriate for your clay and glaze, typically cone 5 or 6 for stoneware.
Once fired, fill your adorable new cat pot with trinkets or a drink and enjoy the handmade charm
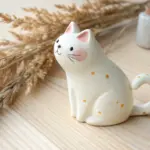
Wrapped Tail Coil That Doubles as a Foot

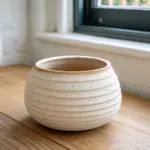
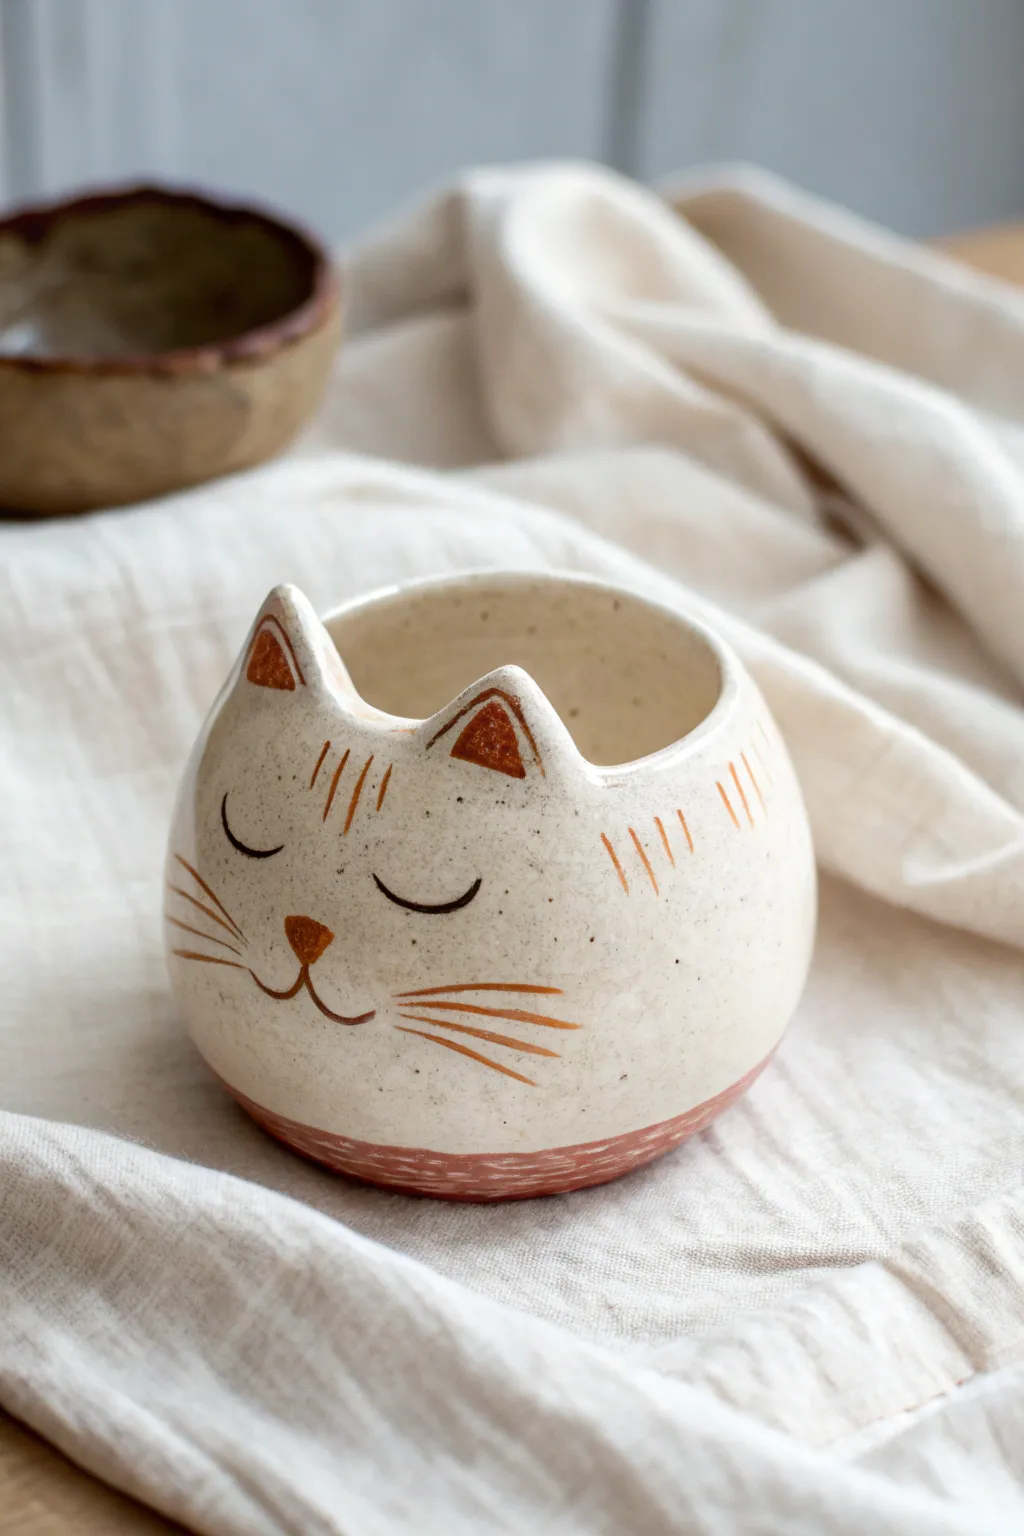
This serene, spherical ceramic cat captures a sense of perfect contentment with its minimalist face and pillowy form. Its creamy, raw stoneware finish and tiny stubby legs make it an adorable addition to any windowsill or desk.
Detailed Instructions
Materials
- Light-colored stoneware clay (with fine grog)
- Pottery needle tool
- Small serrated rib or scoring tool
- Slip (clay mixed with water)
- Wooden modeling tool
- Small sponge
- Underglaze (black for details, pink for nose)
- Fine detail brush
- Clear matte glaze (optional)
- Paddle (wooden kitchen spoon works perfectly)
Step 1: Forming the Body
-
Prepare the clay:
Start by wedging a softball-sized ball of light stoneware clay to remove any air bubbles. Pat it into a smooth, even sphere in your hands. -
Create the pinch pots:
Cut the sphere in half. Take one hemisphere and press your thumb into the center, pinching the walls gently as you rotate it to create a uniform bowl shape. Repeat with the second half. -
Join the halves:
Score the rims of both bowls aggressively with your serrated tool and apply a generous amount of slip. Press the two rims together firmly to form a hollow sphere. -
Seal the seam:
Using your thumb or a wooden tool, smudge clay across the seam line in diagonal strokes until it disappears totally. Do this around the entire circumference. -
Trap the air:
The trapped air inside will support the walls. Gently paddle the joined sphere with a wooden paddle or spoon to round out any flat spots and refine the spherical shape. -
Smooth the surface:
Run a damp sponge over the entire surface to remove the coarse texture of the scoring and creates that buttery smooth finish seen in the photo.
Step 2: Adding Features & Feet
-
Add the ears:
Roll two small triangles of clay. Score and slip the bottom of each and attach them fairly high up on the ‘head’ area. Blending the clay downwards into the body is crucial for a seamless look. -
Make the feet:
Create four small, equal-sized nubbins of clay for the legs. I prefer to make these quite short and stubby to emphasize the roundness of the body. -
Attach the feet:
Flip the cat gingerly and attach the four legs to the bottom using the score-and-slip method. Press gently to ensure they adhere well. -
Vent the piece:
Since this is a hollow form, use your needle tool to poke a discrete hole in the bottom (between the legs) to let expanding air escape during firing. -
Level it out:
Set the cat upright on a flat board and tap it gently downward. This ensures all four feet touch the ground evenly and gives the belly that satisfying ‘lofted’ look.
Collapsing Sphere?
If your sphere starts to dent while joining, the walls might be too thin. Let the pinch pot halves stiffen up for 20-30 minutes before joining them.
Step 3: Face & Finishing
-
Dry to leather hard:
Let the piece dry slowly under plastic until it reaches the leather-hard stage. It should be firm to the touch but still carveable. -
Carve the eyes:
Using a very sharp needle tool or fine sgraffito tool, gently carve two downward-curving crescents for the sleeping eyes. -
Add the nose:
Form a tiny, distinct rounded triangle with the incising tool for the nose, placed centrally between the eyes. -
Draw the whiskers:
Carve three long, sweeping lines on each cheek for whiskers. Keep your hand loose to give them a bit of movement. -
Apply finish colors:
Once fully dry (bone dry), use a fine brush to paint black underglaze into the carved lines of the eyes and whiskers. paint the nose a soft pink. -
Bisc & Glaze:
Bisque fire the piece. You can leave the raw clay unglazed for a stony texture, or dip it quickly in a matte clear glaze for a protective, satin finish.
Creative Tail Addition
Make a fifth coil, tapering it at the end. Attach it to the rear and wrap it around the side of the body so the tail tip rests near the front paws.
Place your finished round cat in a sunny spot where it can nap peacefully


What Really Happens Inside the Kiln
Learn how time and temperature work together inside the kiln to transform clay into durable ceramic.
Wide-Eyed Kitty With Raised Cheeks
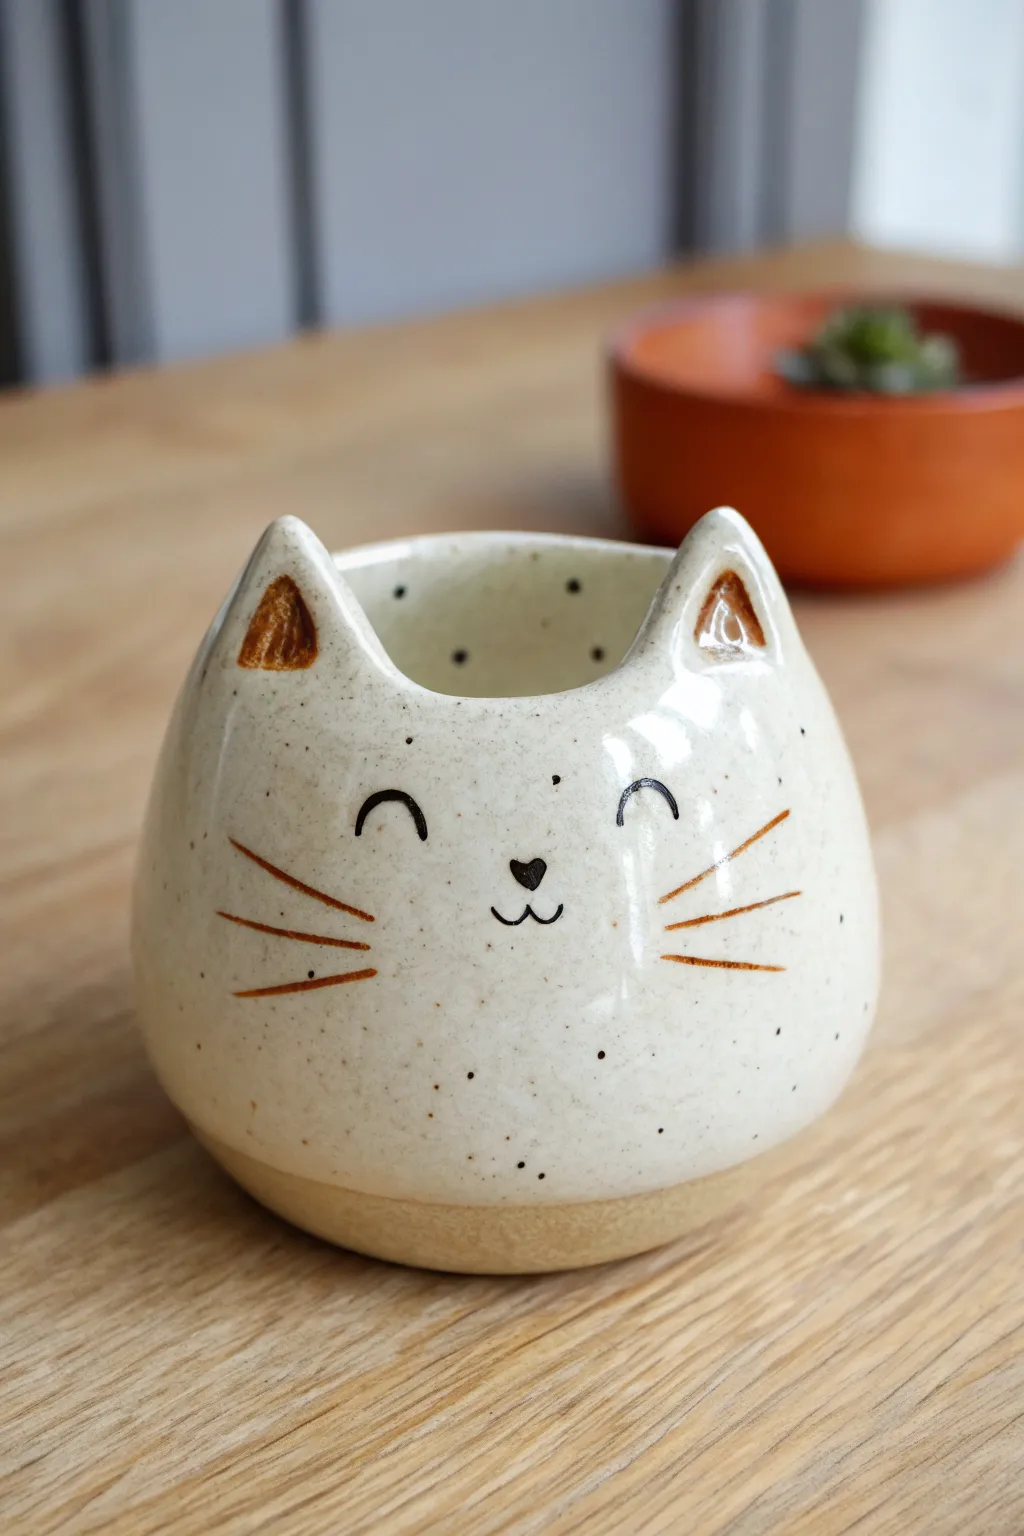
This charming ceramic pot features a smooth, creamy glaze speckled with natural clay flecks and a sweet, dreamy expression. With its curved, teardrop ears and minimalist painted face, it’s the perfect cozy home for a small succulent or cactus.
Step-by-Step
Materials
- Stoneware clay (speckled or light buff)
- Pottery tools (needle tool, rib, sponge)
- Slip (clay mixed with water)
- Underglaze (black and rust/brown)
- Clear or translucent white glossy glaze
- Small paintbrush
- Kiln access
Step 1: Forming the Base
-
Prepare the clay:
Start with a ball of clay roughly the size of a large orange. Wedge it well to remove air bubbles, ensuring the clay is pliable and smooth. -
Open the pot:
Hold the ball in your non-dominant hand. Press your thumb into the center, stopping about a half-inch from the bottom to create a thick, sturdy base. -
Pinch the walls:
Gently pinch and rotate the clay between your thumb and fingers, working from the bottom up. Aim for a rounded, bulbous belly shape rather than straight vertical walls. -
Refine the curve:
As you pinch upward, slightly curve the rim inward to create that enclosed, dome-like silhouette seen in the photo. Keep the walls even, about 1/4 inch thick. -
Smooth the exterior:
Use a smooth kidney rib tool or a slightly damp sponge to compress the outside of the pot, removing fingerprints and refining the round shape.
Step 2: Sculpting the Features
-
Shape the ears:
Roll two small triangles of excess clay. Gently curve them so they look like soft peaks rather than sharp pyramids. -
Score and slip:
Score the bottom of the ears and the spots on the rim where they will sit. Apply a dab of slip to join the pieces securely. -
Attach and blend:
Press the ears onto the rim. Use a modeling tool or your finger to blend the clay downward, making the seam invisible so the ears look like extensions of the pot. -
Create the ear hollows:
Use a small loop tool or your thumb to gently press an indentation into the front of each ear to give them depth. -
Add the foot ring:
Flip the pot over. Roll a thin coil of clay, creating a ring slightly smaller than the pot’s widest point to act as a foot. Attach it with score and slip, then flatten the bottom so it sits stable.
Uneven Walls?
If one side feels thicker while pinching, rotate the pot frequently and use a needle tool to gauge thickness. You can shave off excess clay with a loop tool later if needed.
Step 3: Decorating and Glazing
-
Bisque fire:
Let the pot dry slowly to bone dry state, then fire it in the kiln to bisque temperature (usually cone 04 or 06). -
Paint the face details:
Using a fine detail brush and black underglaze, paint two small arches for closed happy eyes and a tiny heart-shaped nose. Add a small ‘w’ mouth just below the nose. -
Add color accents:
Switch to a rust or light brown underglaze. Paint thin, tapered lines for whiskers on the cheeks. Fill in the inner triangle of the ears with the same warm brown tone. -
Wax the foot:
Apply wax resist to the bottom foot ring. I also like to apply a thin line of wax about a half-inch up from the bottom edge to leave a strip of raw clay exposed. -
Apply the main glaze:
Dip the pot into a glossy clear or translucent white glaze. If your clay isn’t naturally speckled, a ‘speckled white’ glaze works perfectly here. -
Clean up:
Wipe away any glaze that dripped onto the waxed bottom area with a damp sponge. -
Final firing:
Fire the piece again to the glaze temperature appropriate for your clay and glaze combination.
Add a Tail
For extra cuteness, sculpt a small, curved tail and attach it to the back of the pot in relief before firing, wrapping it slightly around the side.
Once cooled, your charming kitty pot is ready to be planted with greenery
Fur Texture Cat Pinch Pot With Soft Tool Marks
Embrace the imperfect charm of hand-built ceramics with this adorable cat-shaped vessel. Featuring a warm, speckled glaze and simple iron-oxide style details, this pinch pot mimics the soft look of fur through subtle carving and brushwork.
Step-by-Step Tutorial
Materials
- White stoneware clay with speckles (or standard white clay)
- Pottery sponge
- Pin tool or needle tool
- Loop tool (small)
- Rib tool (wood or rubber)
- Reddish-brown underglaze (Iron Red or Terracotta)
- Clear or translucent white speckled glaze (if using non-speckled clay)
- Fine detail paintbrush
- Bowl of water
- Kiln (or access to a firing service)
Step 1: Forming the Base
-
Prepare the clay ball:
Start with a lump of clay about the size of a tennis ball. Wedging it thoroughly is crucial to remove air bubbles, then roll it into a smooth, round sphere between your palms. -
Open the pot:
Hold the sphere in one hand and press your thumb into the center, stopping about a half-inch from the bottom. This establishes your floor thickness. -
Pinch the walls:
Using your thumb on the inside and fingers on the outside, gently pinch and rotate the clay. Work your way up from the bottom in a spiral motion. -
Shape the belly:
Aim for a slightly rounded, bulbous shape for the cat’s head. As you pinch, encourage the walls to curve outward slightly before coming back in at the rim. -
Smooth the surface:
Run a rubber rib or a damp sponge over the exterior to smooth out fingerprints, but don’t worry about being perfect; a little texture adds character.
Smooth Operator
To get perfectly smooth whiskers, thin your underglaze slightly with a drop of water. This helps the pigment flow off the brush without dragging on the textured clay.
Step 2: Sculpting the Features
-
Pinch the ears:
Identify where the face will be. Using your thumb and forefinger, gently pull up two triangular sections from the rim to create the ears. I find it helps to support the wall from the inside while pulling up. -
Refine the ear shape:
Smooth the transition between the ears and the rim so they look integrated rather than attached. Round the very tips slightly so they aren’t dangerously sharp after firing. -
Level the rim:
Check the space between the ears. Use a sponge to gently depress and smooth the rim here so it creates a soft curve, giving the cat a distinct forehead. -
Dry to leather hard:
Let the pot sit uncovered until it reaches the leather-hard stage. The clay should be firm enough to handle without deforming but still cool to the touch.
Make it a Planter
Before drying, use a hole punch tool to add a drainage hole in the bottom center. This turns your cute sculpture into a functional home for a small succulent.
Step 3: Decoration and Glazing
-
Sketch the face:
Lightly trace the eyes, nose, and mouth with a needle tool. Keep the eyes as simple curved arches (sleeping eyes) and the nose as a small inverted triangle. -
Paint facial details:
Load a fine detail brush with reddish-brown underglaze. Carefully paint over your sketched lines for the eyes, nose, and mouth, ensuring the lines are opaque. -
Add whiskers and fur:
Paint three long whiskers on each cheek. Then, add short, vertical hash marks on the forehead and the sides of the cheeks to suggest stripes or texture. -
Fill the ears:
Paint triangular patches inside the sculpted ears using the same underglaze color. -
Create the bottom border:
Paint a band around the very bottom of the pot with the underglaze. To create the texture shown in the image, you can gently scratch through this painted band with a stiff brush or tool while it’s damp. -
Bisque fire:
Once the underglaze is dry, fire the piece to Cone 04 (or your clay’s bisque temperature). -
Apply clear glaze:
Dip the bisqued pot into a clear glaze. If your clay body doesn’t have natural speckles, use a ‘speckled white’ glaze instead to achieve the spotted effect. -
Final firing:
Wipe the bottom of the foot clean with a sponge so it doesn’t stick to the kiln shelf. Fire the piece to the final temperature required by your clay and glaze (usually Cone 5 or 6).
Now you have a charming little ceramic companion ready to hold trinkets or succulents on your shelf

TRACK YOUR CERAMIC JOURNEY
Capture glaze tests, firing details, and creative progress—all in one simple printable. Make your projects easier to repeat and improve.
Calico Color-Blocked Cat Pinch Pot
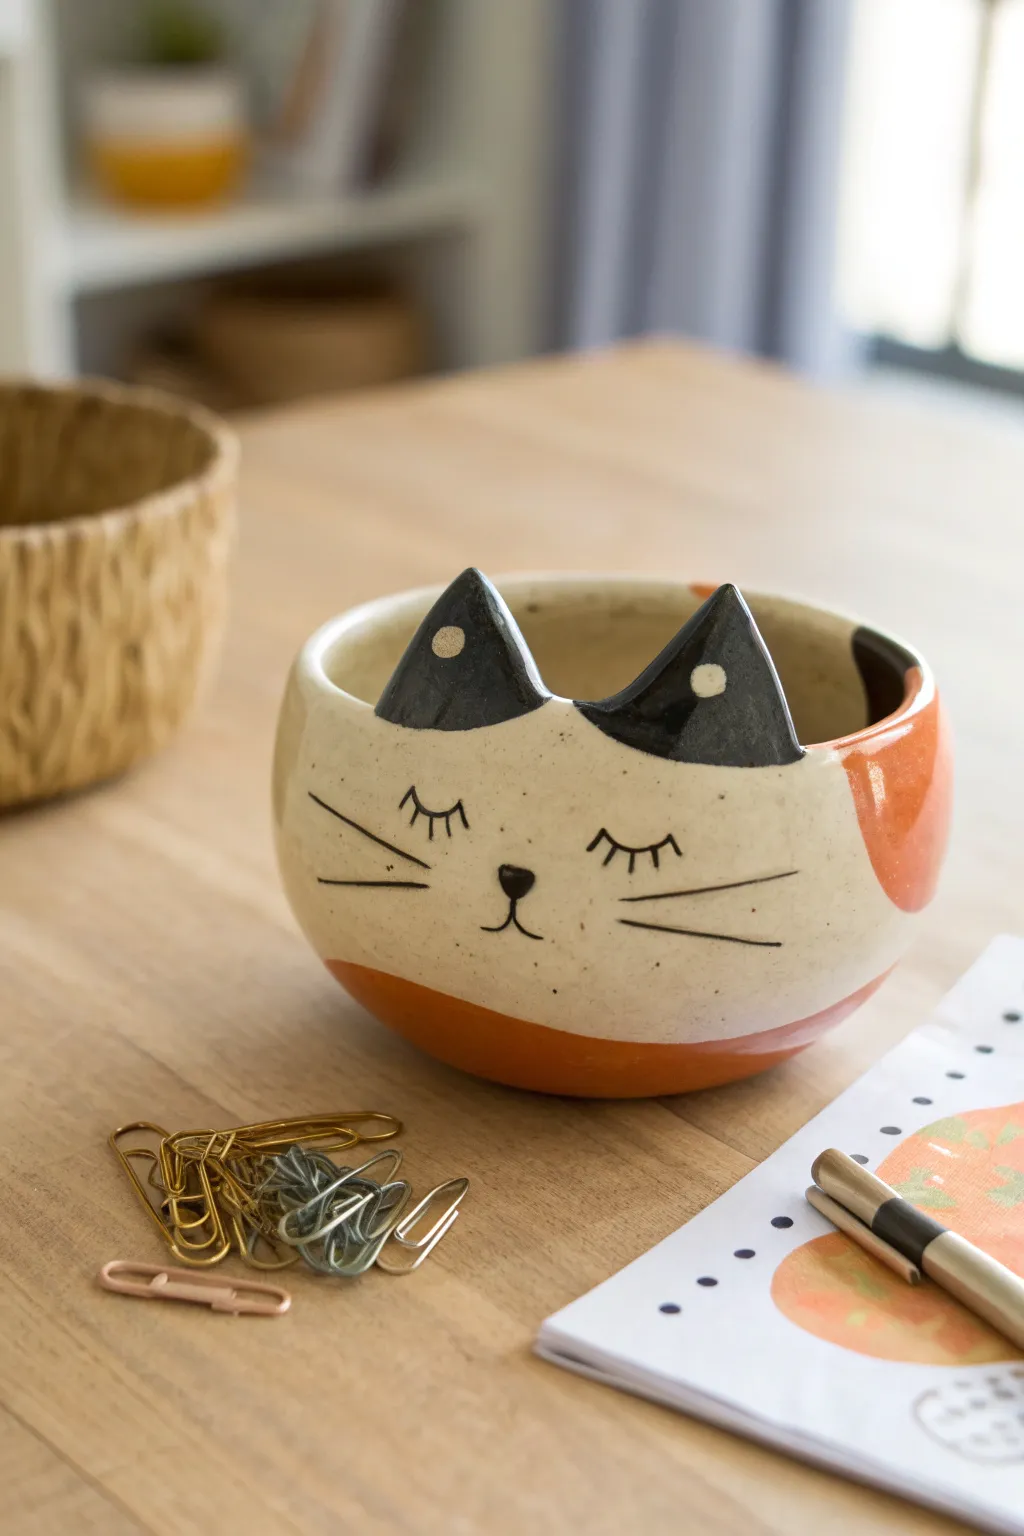
This adorable ceramic pinch pot captures the peaceful expression of a sleeping calico cat with simple facial details and bold color blocking. The natural speckling of the clay gives it a warm, handmade charm perfect for holding trinkets or small plants.
Detailed Instructions
Materials
- Speckled Stoneware Clay (or white clay)
- Needle Tool
- Small Loop Tool
- Scoring Tool (or old fork)
- Slip (clay mixed with water)
- Sponge
- Black Underglaze
- Terracotta/Orange Underglaze
- Clear Glaze (food safe if using for snacks)
- Fine Detail Paintbrush
- Medium Flat Paintbrush
- Kiln (or access to a firing service)
Step 1: Shaping the Base
-
Form the ball not:
Start by rolling a fist-sized amount of speckled clay into a smooth, even ball. Ensure there are no air pockets hidden inside. -
Open the pinch pot:
Push your thumb into the center of the ball, stopping about a half-inch from the bottom. Gently pinch and rotate the clay to open up the bowl shape, keeping the walls even. -
Smooth the walls:
Use a damp sponge or your fingers to smooth out any cracks on the rim or interior. I like to spend a little extra time here compressing the rim to prevent future cracking. -
Flatten the base:
Tap the bottom of the pot gently on your work surface to create a flat, stable base so the cat won’t wobble.
Fixing Wobbly Walls
If your pinch pot walls get floppy or too thin, stuff the inside with crumpled newspaper to hold the shape while it stiffens up.
Step 2: Adding the Ears
-
Cut the ears:
Roll out a small slab of clay (about 1/4 inch thick) and use your needle tool to cut two equal triangles with slightly rounded tips. -
Curvatures:
Gently curve the triangles slightly so they mimic the natural cupping of a cat’s ear. -
Score and slip:
Score the bottom edge of the ears and the corresponding spots on the pot’s rim. Apply slip to both scored areas. -
Attach firmly:
Press the ears onto the rim, blending the clay downwards on both the inside and outside of the pot until the seam disappears completely.
Pro Tip: Clean Lines
Use wax resist over your painted underglaze designs before dipping in clear glaze. This prevents smudging if you are brushing the final coat.
Step 3: Surface Decoration
-
Dry to leather hard:
Let the pot dry slowly until it is leather hard—firm enough to handle without warping, but still cool to the touch. -
Sketch the face:
Lightly sketch the placement of the eyes, nose, and color patches using a needle tool or pencil. The pencil marks will burn off in the kiln. -
Paint the black ears:
Using black underglaze, carefully paint the triangles of the ears. Extend the black slightly below the rim line to create a mask effect. -
Block the orange:
Apply the terracotta/orange underglaze to the side patch and the bottom section of the pot. Apply 2-3 coats for solid coverage. -
Add facial details:
With your finest detail brush and black underglaze, paint the sleeping eyelids, eyelashes, small triangular nose, and whiskers. -
The ear spots:
Once the black ear paint is dry, careful dot a small circle of white underglaze (or scrape away the black to reveal the clay) in the center of each ear.
Step 4: Firing and Glazing
-
Bisque fire:
Allow the piece to dry completely (bone dry) before loading it into the kiln for a bisque fire (usually cone 04). -
Clear glaze application:
After the first firing, dip or brush a clear glaze over the entire piece to seal the underglaze work. -
Glaze fire:
Fire the piece again to the maturation temperature of your specific clay and glaze (often cone 5 or 6 for stoneware).
Once cooled, your charming calico pot is ready to organize your desk or hold a little succulent plant
Sleeping Cat Pinch Pot With Closed Eyes

Capture the serene sweetness of a sleeping cat with this charming ceramic project. Featuring a rounded, organic form and minimalist hand-painted details, this pinch pot makes a perfect home for a tiny succulent or trinkets.
Step-by-Step Guide
Materials
- White stoneware or air-dry clay
- Pin tool or needle tool
- Small sponge
- Bowl of water
- Black underglaze or fine-tip black marker (if using air-dry clay)
- Small round paintbrush
- Orange or pink underglaze/paint (for the nose)
- Matte clear glaze or sealant
Step 1: Forming the Base
-
Start with a sphere:
Begin by taking a ball of clay roughly the size of a tangerine or tennis ball. Roll it back and forth between your palms until it is perfectly smooth and round. -
Open the pot:
Hold the sphere in your non-dominant hand. Gently press your thumb into the center of the ball, stopping about a half-inch from the bottom. This prevents creating a hole in the base. -
Pinch the walls:
Using a rhythmic pinching motion with your thumb inside and fingers outside, slowly rotate the ball. Work from the bottom up, thinning the walls evenly until you have a cup shape. -
Shape the curve:
As you pinch, gently encourage the walls to curve inward slightly at the top rim rather than flaring out. This gives the pot that cozy, rounded ‘sleeping cat’ silhouette. -
Tap the bottom:
Once the walls are even, tap the bottom of the pot gently against your work surface to create a small flat area, ensuring it sits strictly upright without wobbling.
Step 2: Sculpting the Ears
-
Mark ear positions:
Look at the rim of your pot and decide where the front face will be. Lightly mark two spots on the rim where the ears should rise. -
Pinch the clay upward:
At your marked spots, gently pinch the clay rim and pull it upward to form small triangles. Support the clay from behind with one finger while shaping with the other hand. -
Refine the triangles:
Smooth the transition from the rim to the ear so it looks like one continuous piece. The ears should be slightly rounded at the tips, not needle-sharp. -
Smooth the surface:
Dip your finger or a small sponge in water (sparingly) and run it over the entire pot to erase any fingerprints or cracks. I find a slightly damp sponge creates a lovely matte texture.
Smooth Operator
Use the back of a spoon to burnish the clay when leather-hard. This compresses the surface and gives it a satiny smoothness before you even paint.
Step 3: Adding the Details
-
Dry the piece:
Allow your clay to dry to a ‘leather hard’ state if using ceramic clay, or fully dry if using air-dry clay. Painting on wet clay can cause smudging. -
Paint the closed eyes:
Using a fine-tip brush and black underglaze (or marker), paint two downward-curving arcs for the sleeping eyes. Add tiny eyelashes to the outer corners for extra charm. -
Add the nose:
Paint a small, inverted triangle in the center, just below the eyes, using a touch of orange or soft pink paint. Keep it petite. -
Draw the whiskers:
With a very steady hand, paint three long, thin whiskers radiating outward from each cheek area. Try to make your brushstrokes swift to keep lines confident. -
Detail the ears:
Paint small black triangles inside the sculpted clay ears to give them depth and definition. -
Finish and fire:
If using ceramic clay, bisque fire, apply a clear matte glaze, and glaze fire. For air-dry clay, apply a matte sealant to protect your handiwork.
Make It a Planter
Pierce a drainage hole in the bottom before drying if you plan to pot real plants. Add cute paws peeking over the rim for extra personality.
Now you have a peaceful little feline companion to sit on your desk or windowsill
Long Cat Pinch Pot With Stretched Body Shape
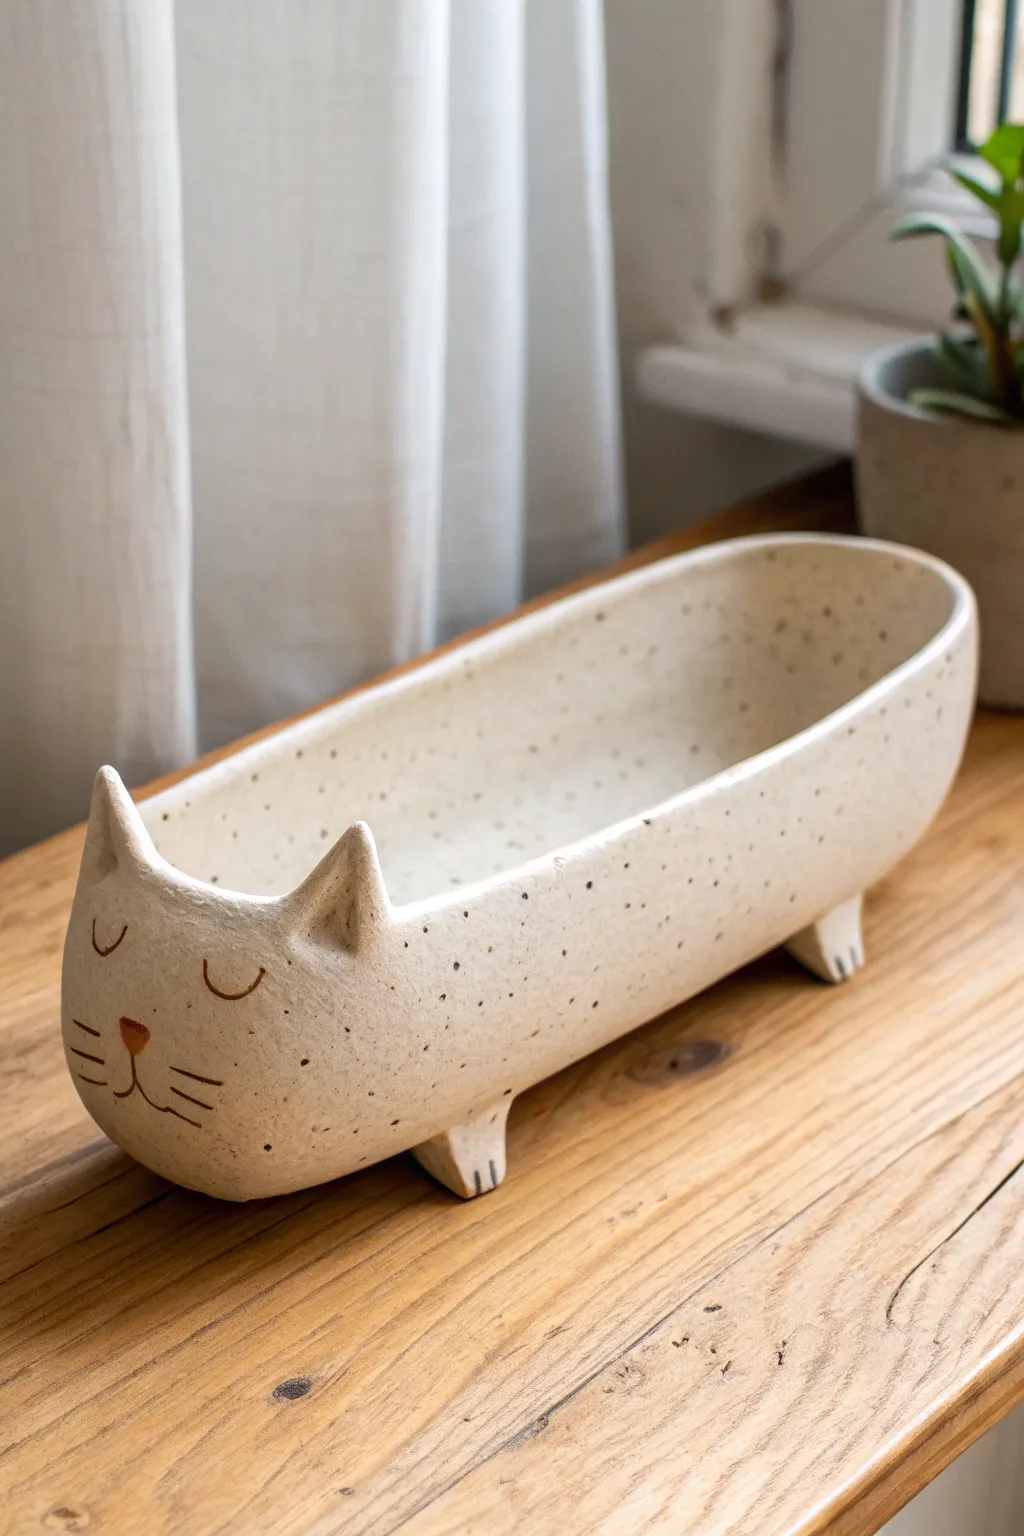
This whimsical planter features an exaggerated, stretched-out body that mimics a cat enjoying a long, lazy stretch. With its speckled cream glaze and peaceful sleeping face, it makes a charming home for succulents or small herbs.
Step-by-Step Tutorial
Materials
- Stoneware clay (speckled clay body recommended)
- Rib tool
- Fettling knife or needle tool
- Scoring tool or serrated kidney
- Slip (clay and water mixture)
- Small sponge
- Rolling pin
- Satin finish cream or white glaze
- Underglaze (brown or black for details)
- Fine detail brush
Step 1: Forming the Base
-
Prepare the slab:
Start by rolling out a medium-sized slab of speckled clay to about a 1/4-inch uniform thickness. Smooth both sides with a rib to compress the clay particles. -
Define the shape:
Cut a long oval shape from your slab for the base. This determines how long your cat will be, so aim for something roughly 10-12 inches long and 3-4 inches wide. -
Create the walls:
Roll a second slab or long strip of clay for the walls, maintaining the same 1/4-inch thickness. Ensure the strip is long enough to wrap around the entire perimeter of your oval base. -
Attach the walls:
Score the outer edge of the base and the bottom edge of your wall strip. Apply slip generously, then press the wall onto the base. Join the two ends of the wall strip together where they meet, smoothing the seam completely. -
Smooth the interior:
Use a small coil of clay to reinforce the inside seam where the wall meets the floor. I find using a slightly damp sponge on a stick helps smooth this interior corner if your hands can’t reach.
Step 2: Sculpting the Cat Features
-
Shape the head:
On one end of the oval, gently push the clay wall outward from the inside to create a slightly rounder, bulbous shape for the head area. -
Form the ears:
Pinch two small triangles of clay from your scraps. Score and slip them onto the top rim of the ‘head’ end. Blend the clay downwards so the ears look like they grow seamlessly from the body. -
Add the feet:
Flip the pot upside down once the clay is leather hard. Form four small, sturdy nubbins of clay for feet. Score and attach them to the base—two near the front, two near the back. -
Detail the paws:
Before the feet dry, use a needle tool to gently impress three small lines into the front of each foot to suggest toes. -
Refine the surface:
Turn the pot right-side up. Use a damp sponge to smooth the rim and any sharp edges. The rim should be soft and rounded, not sharp.
Warping Worries
Long shapes warp easily. Dry this very slowly by covering it loosely with plastic for several days. Flip it occasionally while drying to ensure even air exposure.
Step 3: Decoration and Glazing
-
Carve the face:
While the clay is still leather hard, use a needle tool to lightly carve two U-shapes for closed eyes, a small triangle nose, and whiskers. Alternatively, you can paint these later with underglaze. -
Bisque fire:
Allow the piece to dry slowly and completely before firing it in a bisque kiln to prepare it for glazing. -
Apply wax resist:
Brush wax resist onto the bottom of the feet to prevent them from sticking to the kiln shelf. -
Glaze the body:
Dip or brush the entire piece in a satin cream or off-white glaze. If you used a speckled clay body, the specks will show through nicely. -
Highlight the face:
If you carved the face, the glaze might pool slightly to define it. If you want more contrast, carefully paint the nose and whisker lines with a brown underglaze or oxide wash before the final firing. -
Final wipe:
Wipe away any glaze that may have dripped onto the waxed feet with a damp sponge. -
Glaze fire:
Fire the piece again to your clay’s specific maturation temperature (likely Cone 5 or 6 for stoneware).
Tail Time
Add a long, curled tail made from a coil of clay to the back end. It can wrap around the side of the body or curl up towards the rim as a handle.
Once fired, fill your elongated feline with soil and your favorite succulents for a perfect windowsill companion
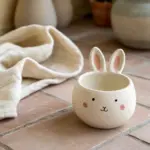
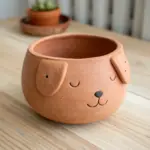
Lidded Cat Pinch Pot Treat Jar
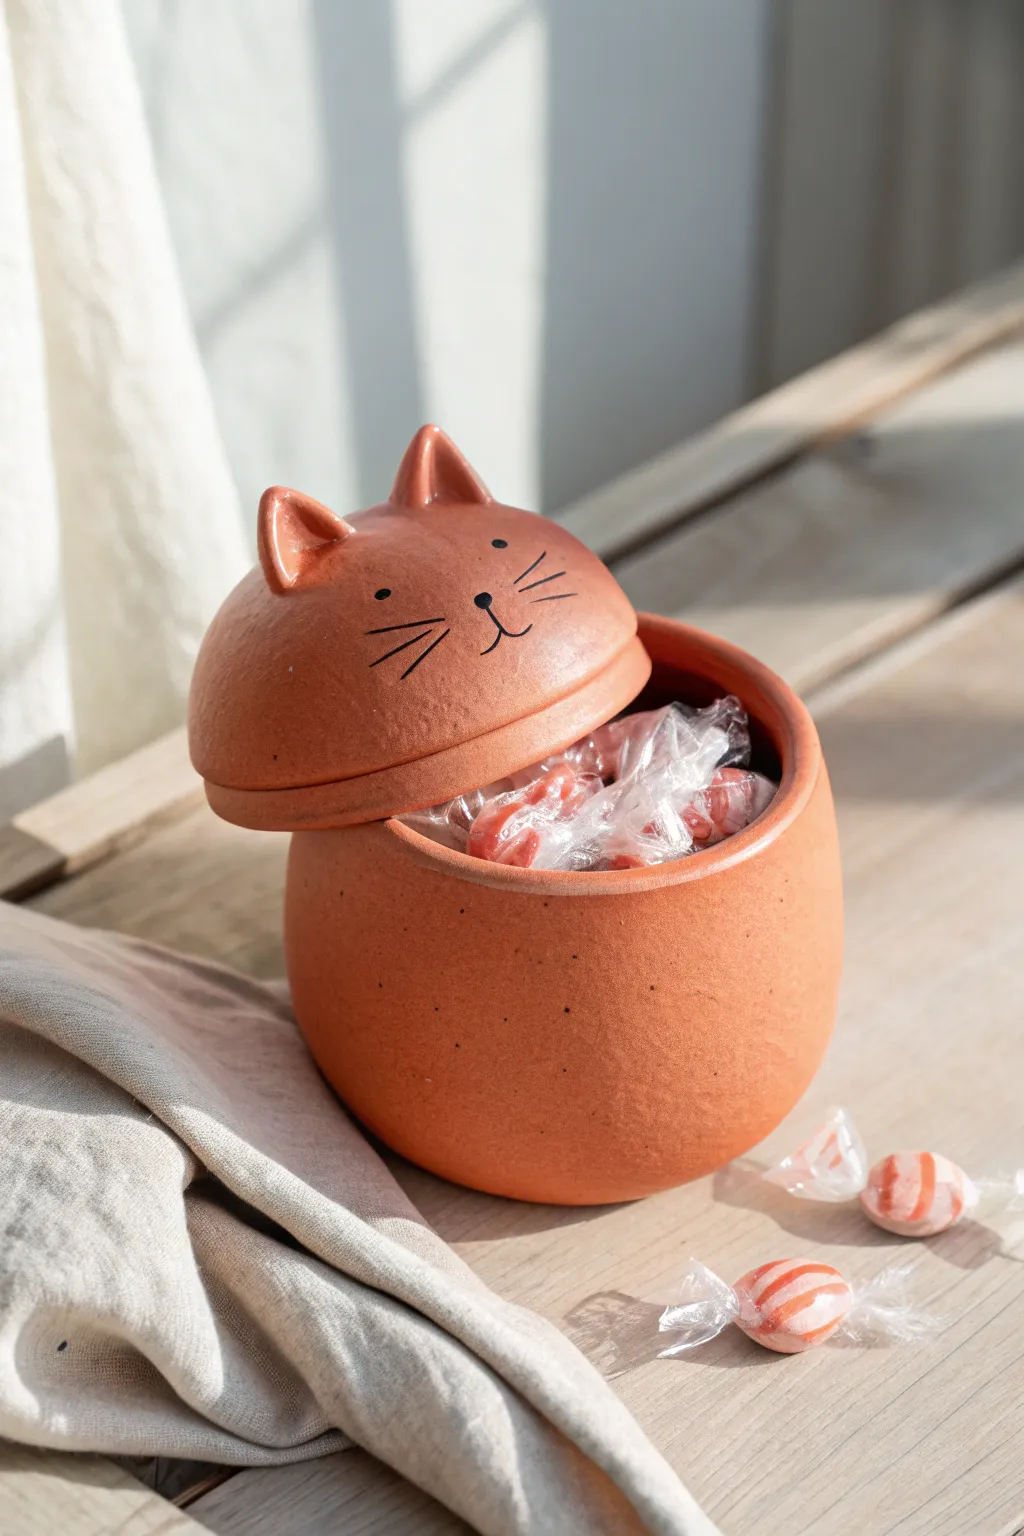
This charming lidded jar combines functional storage with whimsical design, featuring a smooth, terracotta-like finish and a sweet, simple cat face. Constructed from two pinch pots, it keeps your favorite sweets hidden away under an adorable feline guardian.
How-To Guide
Materials
- Earthenware or terracotta air-dry clay (or kiln-fire clay)
- Canvas mat or rolling surface
- Small bowl of water
- Scoring tool or needle tool
- Sponge
- Wooden modeling tool
- Black acrylic paint or glaze underglaze
- Fine detail paintbrush
- Matte clear sealant (if using air-dry clay)
Step 1: Forming the Base
-
Prepare the Clay:
Start with a softball-sized ball of terracotta-colored clay. Wedge it thoroughly to remove air bubbles and ensure a consistent texture, then divide it into two pieces: one slightly larger for the body and a smaller one for the lid. -
Pinch the Body:
Take the larger ball and press your thumb into the center, stopping about a half-inch from the bottom. Gently pinch and rotate the clay between your thumb and fingers to open up the bowl shape. -
Shape the Walls:
Continue pinching upward, aiming for a rounded, slightly bulbous shape that tapers in just a tiny bit at the rim. Keep the walls about 1/4 inch thick for durability. -
Refine the Rim:
Place the pot upside down on your canvas mat and gently tap it to level the rim. Flip it back over and smooth the lip with a slightly damp sponge so it’s flat and even. -
Create the Gallery:
Using your thumb or a modeling tool, gently press the inner edge of the rim downward and outward slightly to create a small ledge or ‘gallery’ where the lid will eventually sit—though for this simple style, a flush fit works too.
Smooth Operator
To get that super-smooth terracotta finish without sanding later, burnish the clay with the back of a spoon when it’s leather hard. It compresses the particles for a slight sheen.
Step 2: Sculpting the Head & Lid
-
Pinch the Lid:
Take the smaller ball of clay and pinch a second, shallower bowl. This will be the cat’s head. Test the fit frequently against the base pot to ensure the circumference matches perfectly. -
Dome the Top:
Since this is a lid, you want a domed exterior. Use a wooden paddle or your flat palm to gently round out the top surface while supporting the inside with your other hand. -
Add a Flange (Optional):
If the lid slides around too much, add a small coil of clay to the underside of the lid, just inside where it meets the jar rim. Score and slip to attach, then smooth it well. -
Form the Ears:
Shape two small triangles of clay for the ears. Gently press your thumb into the center of each triangle to create the inner ear curve. -
Attach the Ears:
Score the top of the lid and the bottom of the ears with a needle tool. Apply a dab of water or slip, press the ears firmly onto the head, and smooth the seams down with a wooden tool until they are invisible. -
Smooth the Surface:
I like to take a damp sponge at this stage and go over the entire outside of the jar and lid. Remove any fingerprints or texture marks to achieve that burnished, matte look seen in the photo.
Step 3: Details & Finishing
-
Dry to Leather Hard:
Let both pieces dry until they are leather hard—stiff but still cool to the touch. This makes painting or carving easier without deforming the shape. -
Paint the Face:
Using a very fine liner brush and black acrylic paint (or underglaze if kiln firing), carefully paint two small dots for eyes, a small triangular nose, and whiskers. Add a curved mouth connected to the nose. -
Add Speckles:
To mimic the natural clay texture in the image, you can lightly flick a toothbrush with thinned black or dark brown paint over the pot, creating subtle, random speckles. -
Final Drying:
Allow the clay to dry completely. If using air-dry clay, this may take 24-48 hours depending on humidity. -
Seal or Fire:
If using kiln clay, fire it according to the clay’s instructions. For air-dry clay, apply two coats of a matte sealant to protect the finish and paint.
Tail Handle
Add a curled clay tail to the back of the bottom pinch pot to act as a handle! It adds character and functionality without disrupting the face design.
Fill your new feline friend with sweet treats and place it somewhere special.
Pierced Whisker Dots and Cutout Details
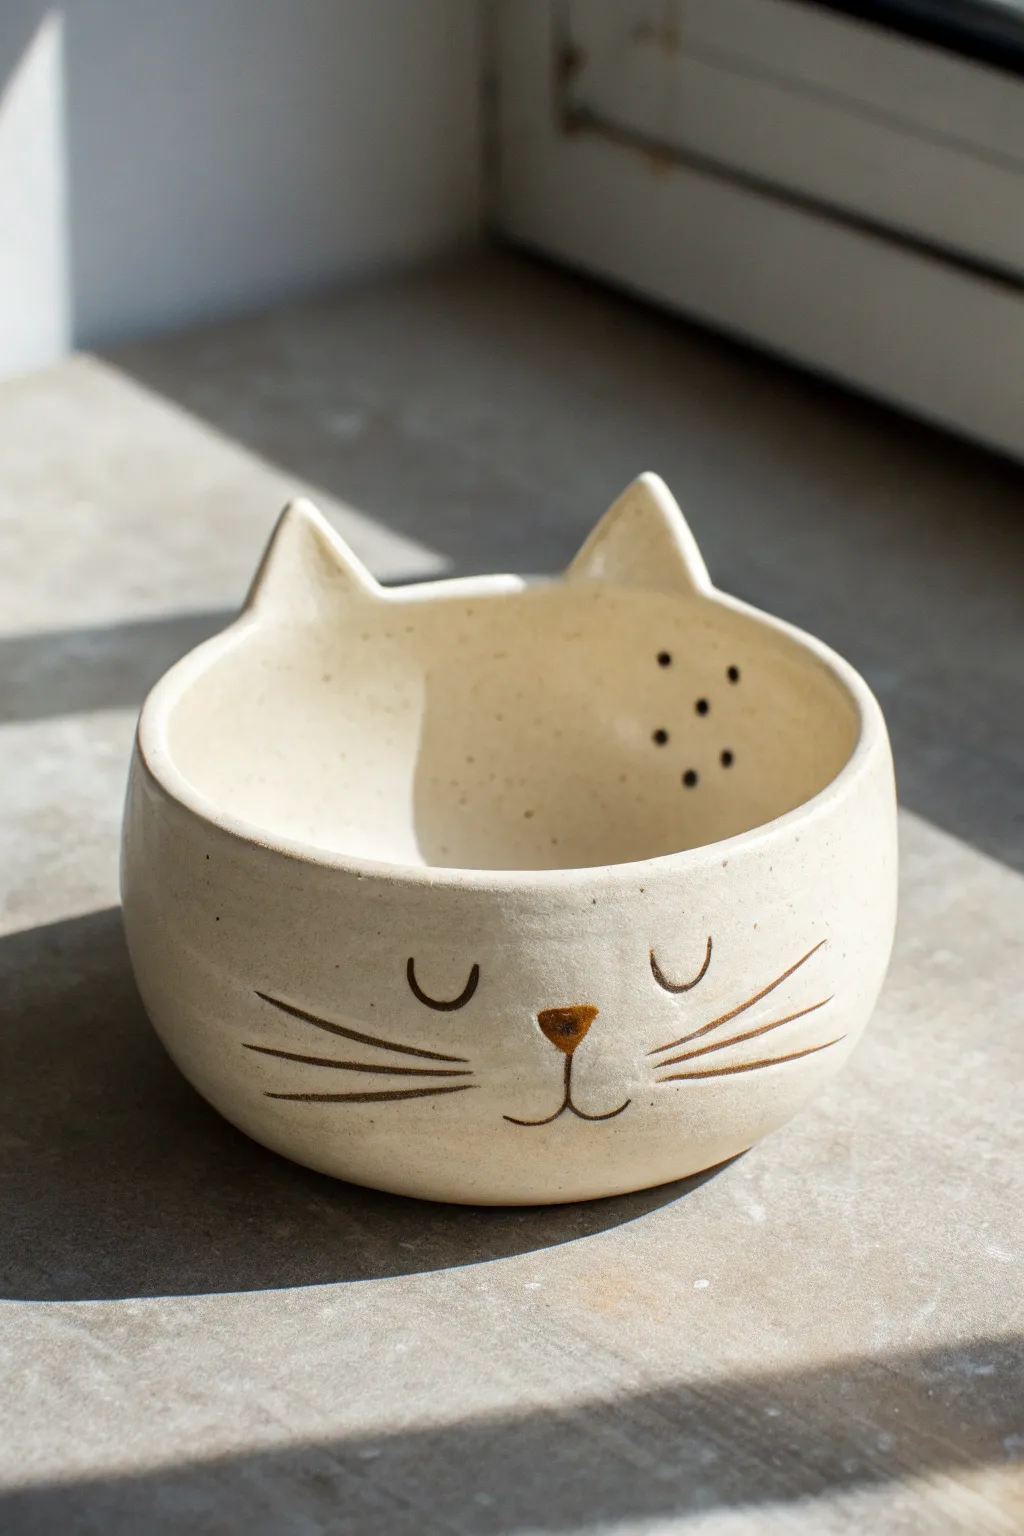
This adorable ceramic vessel transforms a simple pinch pot into a sleepy cat companion, perfect for holding small trinkets or serving as a yarn bowl. The creamy speckled glaze highlights the charming hand-carved whiskers and unique pierced details along the inner rim.
Step-by-Step Guide
Materials
- Speckled buff stoneware clay
- Pottery needle tool
- Small loop tool or carving tool
- Rib tool (metal or rubber)
- Sponge
- Scoring tool (or fork)
- Slip (clay and water mixture)
- Small drill bit tool or hole cutter
- Black underglaze
- Brown underglaze
- Small detail brush
- Clear or transparent matte glaze
- Kiln for firing
Step 1: Forming the Base
-
Prepare the clay:
Begin by wedging a ball of speckled buff clay about the size of a large orange to remove air bubbles. Creating a smooth consistency here prevents cracking later. -
Open the pot:
Push your thumb into the center of the ball, stopping about a half-inch from the bottom. Gently pinch and rotate your hand to open the walls outward. -
Shape the walls:
Continue pinching upward to thin the walls evenly. Aim for a consistent thickness of about 1/4 inch throughout the bowl. I like to keep the bottom slightly weighted for stability. -
Smooth the surface:
Use a flexible rib tool to scrape the exterior and interior walls. This compresses the clay particles and removes your fingerprints for a clean, professional finish.
Mishap Prevention
Use a damp sponge to smooth the sharp edges of the pierced holes while the clay is leather hard. Sharp edges can become like razors after firing.
Step 2: Sculpting the Cat Features
-
Form the ears:
Pinch two small, triangular pieces of fresh clay. Gently curve them to mimic a cat’s ear shape. -
Attach the ears:
Score the top rim of your bowl and the bottom of the ear triangles. Apply slip to both scored areas and press the ears firmly onto the rim. -
Blend the seams:
Using a modeling tool or your finger, drag clay from the ear down onto the bowl (and vice versa) to erase the connection line completely. Smooth with a damp sponge. -
Refine the shape:
Check the symmetry of the ears. Gently pinch the tips to sharpen them if they became rounded during attachment.
Step 3: Carving and Detailing
-
Sketch the face:
Once the clay is leather-hard (firm but cool to the touch), lightly scratch the outline of sleepy U-shaped eyes, a triangular nose, a mouth, and long whiskers. -
Carve the lines:
Use a needle tool or a very fine carving tool to deepen your sketched lines. Press firmly enough to create a groove that will hold glaze later, but take care not to cut all the way through. -
Clean up burrs:
Wait about ten minutes for the carving crumbs to dry slightly, then brush them away with a soft brush or smooth them gently with a fingertip. -
Add pierced details:
On the inner back wall or side (opposite the face), use a small hole cutter or drill tool to pierce a cluster of 5-7 decorative dots. Support the wall from behind with your hand while piercing to prevent warping.
Clean Lines
If your underglaze smears during the wipe-back step, rinse your sponge frequently. A dirty sponge will just muddy the clay rather than clean it.
Step 4: Glazing and Finishing
-
Bisque fire:
Let the piece dry completely to the bone-dry stage. Load it into the kiln for a bisque firing (usually Cone 04). -
Apply underglaze inlay:
Paint black underglaze over the eyes, whiskers, and pierced dots, and brown underglaze onto the nose. Ensure the liquid gets deep into the grooves. -
Wipe back:
Using a slightly damp sponge, wipe across the surface of the pot to remove the underglaze from the high points, leaving color only trapped inside the carved lines. -
Glaze the pot:
Dip or brush the entire piece with a clear or transparent matte glaze. This will seal the clay while letting the natural speckles show through. -
Final fire:
Fire the piece again to the maturation temperature of your specific clay body and glaze (typically Cone 5 or 6). Allow to cool completely before removing.
Place your finished pot on a windowsill to catch the light and enjoy your handmade feline friend
Cat Yarn Bowl Pinch Pot With Tail Notch
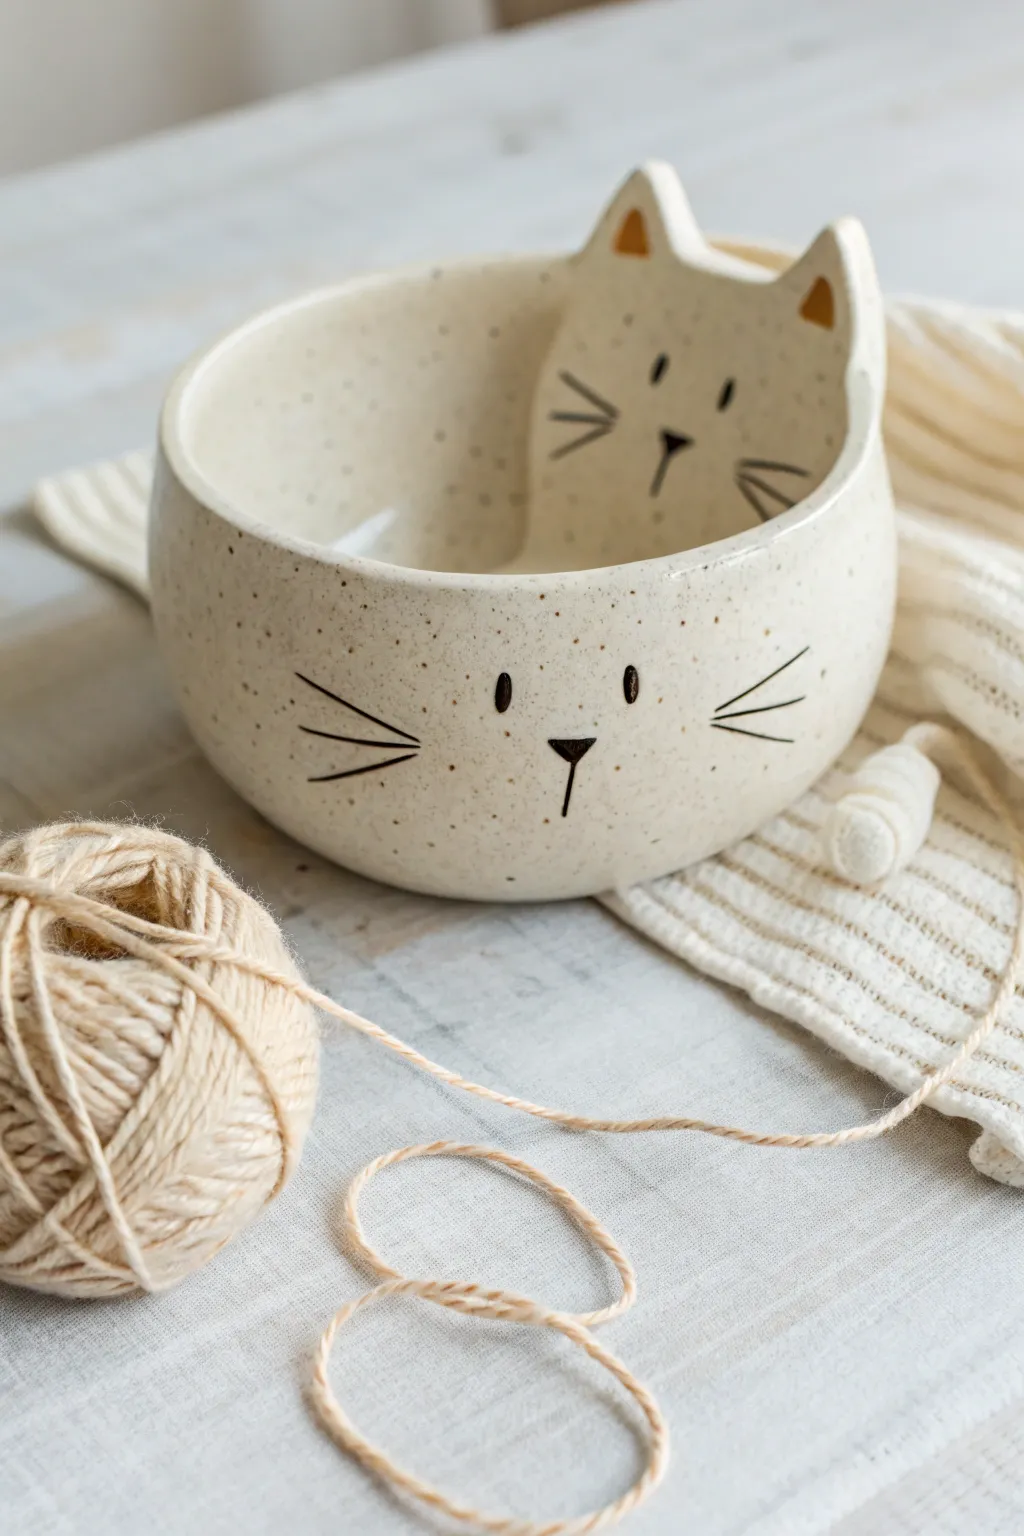
Keep your knitting tangle-free with this adorable ceramic yarn bowl featuring a playful cat face and sculpted ears. The speckled cream glaze gives it a cozy, handcrafted charm that looks lovely sitting next to your latest fiber project.
Step-by-Step Tutorial
Materials
- White stoneware clay (speckled or plain)
- Pottery tools (needle tool, rib tool, sponge)
- Slip (clay mixed with water)
- Scoring tool or fork
- Rolling pin
- Underglaze (black)
- Small detail brush
- Clear or speckled cream glaze
- Kiln access
Step 1: Forming the Base
-
Prepare the Clay:
Start with a ball of clay about the size of a large grapefruit. Wedge it thoroughly to remove air bubbles and ensure an even consistency. -
Create the Pinch Pot:
Press your thumb deep into the center of the ball, stopping about half an inch from the bottom. Gently pinch and rotate the clay between your thumb and fingers to open up the walls. -
Shape carefully:
Continue pinching upward and outward, aiming for an even wall thickness of about 1/4 inch. Keep the base slightly weighted for stability. -
Smooth the Form:
Use a rib tool to compress the inside floor and smooth the exterior walls. I find this step crucial for removing finger marks and creating a professional canvas for the face. -
Open the Rim:
Make sure the opening is wide enough to easily drop a ball of yarn inside, gently flaring the rim slightly if desired.
Step 2: Sculpting the Cat Features
-
Roll a Slab:
Roll out a small leftover piece of clay to about 1/4 inch thickness. This will become the decorative cat head extension. -
Cut the Shape:
Using a needle tool, cut out a silhouette of a cat’s head with pointed ears. It should be wide enough to attach securely to the back rim of your bowl. -
Attach the Head:
Score the bottom edge of your cutout and the corresponding spot on the bowl’s back rim. Apply slip generously to both surfaces. -
Blend the Seams:
Press the pieces together firmly. Use a modeling tool or your finger to smooth the clay downward, blending the seam completely so the head looks like an extension of the bowl wall. -
Detail the Ears:
Use a small loop tool or your thumb to gently impress the centers of the ears, creating depth and a realistic shape. -
Refine the Rim:
Go over the entire rim with a damp sponge to soften any sharp edges, integrating the new cat head seamlessly. -
Create the Yarn Guide:
On the side opposite or adjacent to the head, cut a swirl or J-shaped notch into the rim. This ‘tail’ cutout guides the yarn as you knit.
Smooth Surfaces
Burnish the clay slightly with a soft rib or back of a spoon when leather hard. A smoother surface makes painting the fine whisker lines much cleaner.
Step 3: Decoration and Glazing
-
Bisque Fire:
Allow the piece to dry slowly to the bone-dry stage, then fire it in the kiln to cone 04 (or your clay’s bisque temperature). -
Paint the Face:
Using a very fine liner brush and black underglaze, paint the whiskers, nose, eyes, and mouth on the front of the bowl. Repeat this face on the interior cat head slab. -
Add Inner Ear Details:
Paint small triangles or shading inside the sculpted ears if you want extra contrast, or leave them plain. -
Glaze Application:
Dip the entire bowl into a clear or semi-opaque cream glaze. If you used plain clay but want the look in the photo, choose a glaze with suspended speckles. -
Wipe the Foot:
Clean off any glaze from the very bottom of the pot with a wet sponge to prevent it from sticking to the kiln shelf. -
Final Firing:
Fire the piece again to the maturation temperature of your glaze and clay body (typically cone 5 or 6 for stoneware).
Customize It
Instead of painting, use sgraffito! Paint a patch of black underglaze while leather hard, then carve through it to reveal the white clay lines for the face.
Once cooled, your charming yarn bowl is ready to hold your wool and keep you company during crafting hours