When I want a low-stress clay day, I reach for air dry clay and make the tiniest kawaii cuties I can fit in my palm. These easy cute ideas lean on simple round shapes, sweet little faces, and pastel color vibes that make everything instantly more adorable.
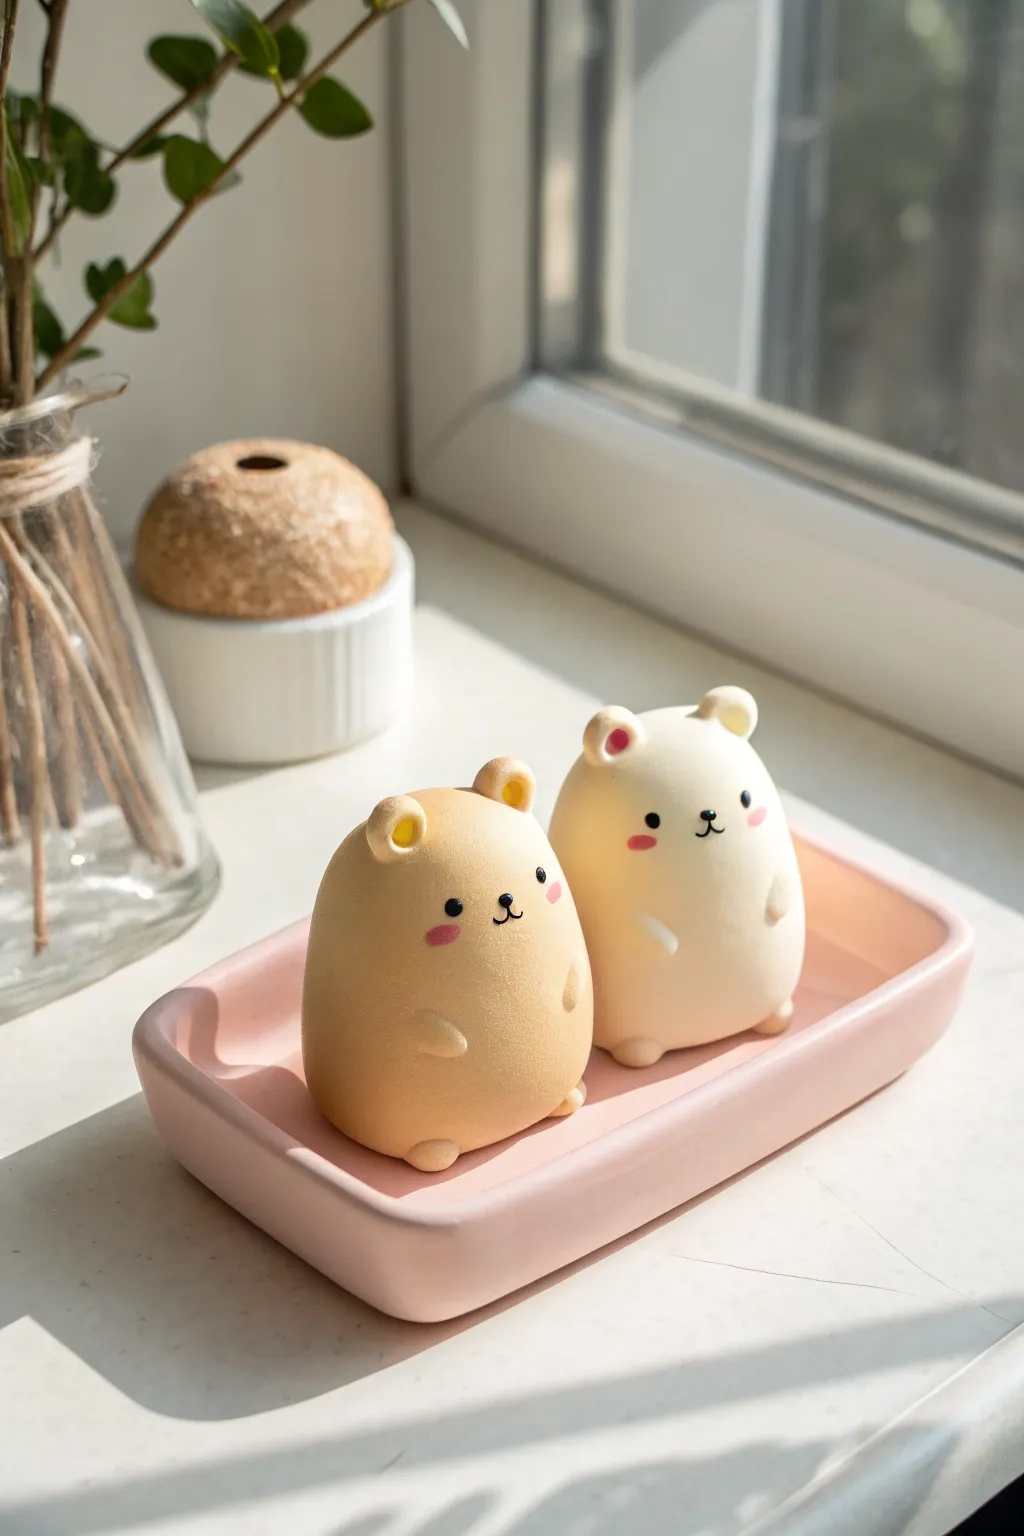
Chubby Cat Figurines
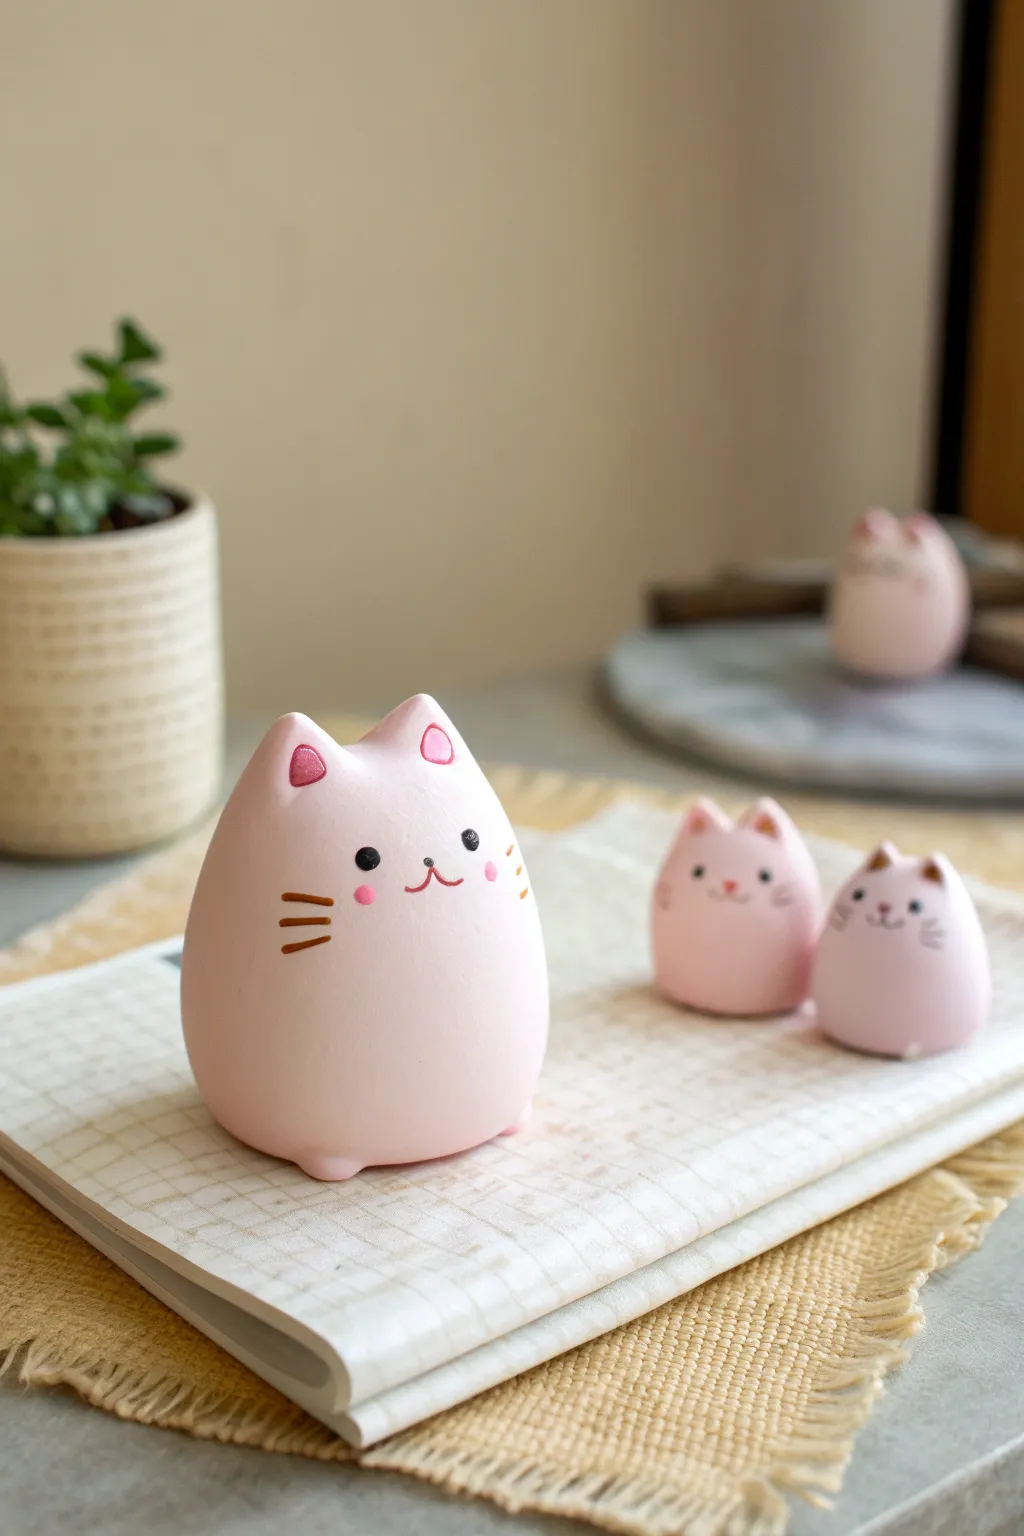
These delightfully rotund cat figurines rely on a simple egg-like shape to capture the essence of kawaii minimalism. With their sweet expressions and soft pastel pink hue, they make perfect desk buddies or gentle paperweights.
Step-by-Step Tutorial
Materials
- Air dry clay (white)
- Acrylic paint (pastel pink, darker pink, black, brown)
- Paintbrushes (fine detail brush and medium flat brush)
- Water cup
- Aluminum foil (optional for core)
- Smooth work surface or mat
- Sandpaper (fine grit)
- Matte varnish (optional)
Step 1: Shaping the Base
-
Prepare the clay:
Start by conditioning a handful of air dry clay. Knead it thoroughly until it is warm, pliable, and free of cracks. -
Form the main body:
Roll the clay into a smooth ball between your palms. Gently taper the top slightly so it resembles a wide, chubby egg shape rather than a perfect sphere. -
Create stability:
Tap the bottom of your egg shape firmly against your work surface. This flattens the base so the figurine will stand up straight without wobbling. -
Smooth the surface:
Dip your finger in a tiny bit of water and run it over the clay to smooth out any fingerprints or minor imperfections. The smoother the base, the cleaner your final paint job will look. -
Pinch the ears:
At the top of the tapered end, gently pinch two small triangles of clay upwards to form the ears. Keep them short and rounded for that cute, chubby look shown in the photo. -
Refine the shape:
Use a modeling tool or your fingertip to smooth the seam between the ears and the head, integrating them seamlessly into the main curve. -
Add the tiny feet:
Roll two very small, pea-sized balls of clay. Press these onto the bottom front edge of the body to create little nubby feet. -
Blend the feet:
Using a tool or wet finger, blend the upper edges of the feet into the body so they feel attached, not just stuck on. -
Dry completely:
Set your figurine aside to dry. Depending on the brand of clay and humidity, this could take 24-48 hours. Rotate it occasionally for even drying.
Cracks while drying?
Mix a small amount of clay with water to create a paste (slip). Fill the cracks with this paste, let it dry, and sand it smooth before painting.
Step 2: Painting and Details
-
Sand imperfections:
Once fully hard, check for rough spots. I gently buff the surface with fine-grit sandpaper to get that porcelain-smooth finish. -
Base coat:
Paint the entire figurine with a coat of soft pastel pink acrylic paint. Let it dry, and apply a second coat for opaque, streak-free coverage. -
Paint the inner ears:
Mix a slightly darker, warmer pink. Using a small brush, paint inverted teardrop shapes inside the ears. -
Add blush cheeks:
Using the same darker pink (or a slightly lighter variant), dab two small circles on the cheeks using the tip of a round brush or a dotting tool. -
Draw the eyes:
With a very fine detail brush and black paint, create two small, solid circles for eyes. Place them wide apart to enhance the cute factor. -
Create the mouth:
With the finest brush tip, paint a tiny ‘w’ shape between the eyes for the mouth, connecting it to a very small vertical line if desired. -
Add whiskers:
Using brown paint, carefully draw three short, horizontal lines on each cheek area for whiskers. -
Seal the work:
Once all paint is perfectly dry, apply a layer of matte varnish to protect your new friend from dust and scratches.
Family Variety
Make a whole family by varying the sizes. For the smallest kittens, try painting the ears brown or adding different colored patches for variety.
Place your finished chubby cats on a shelf or desk where they can bring a little calmness to your day


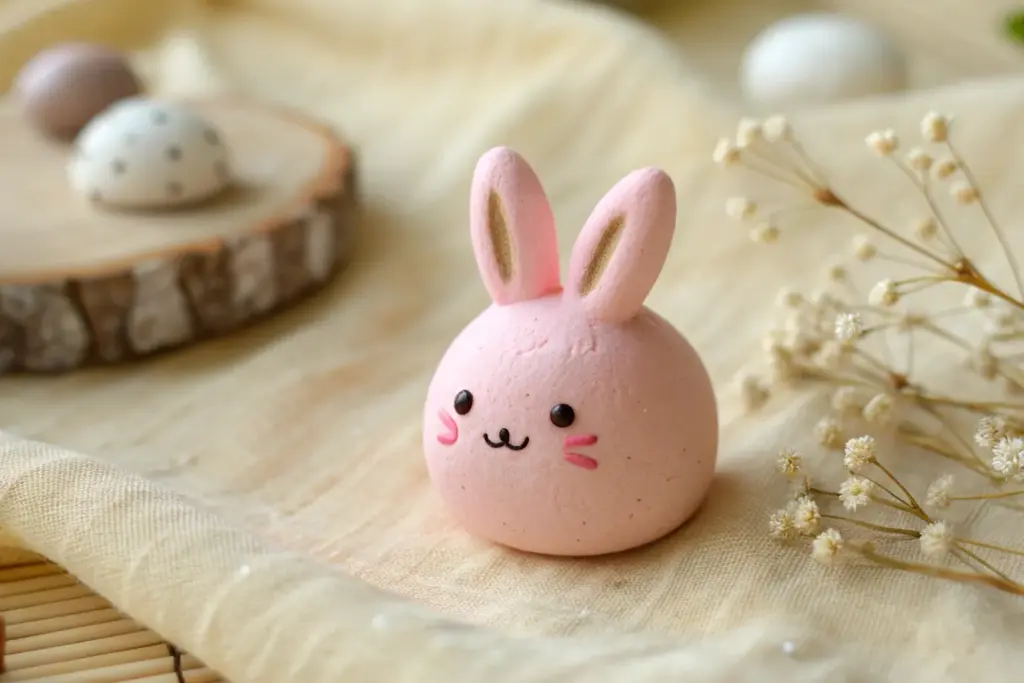
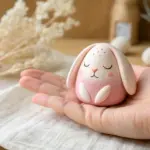
Round Bunny Charms
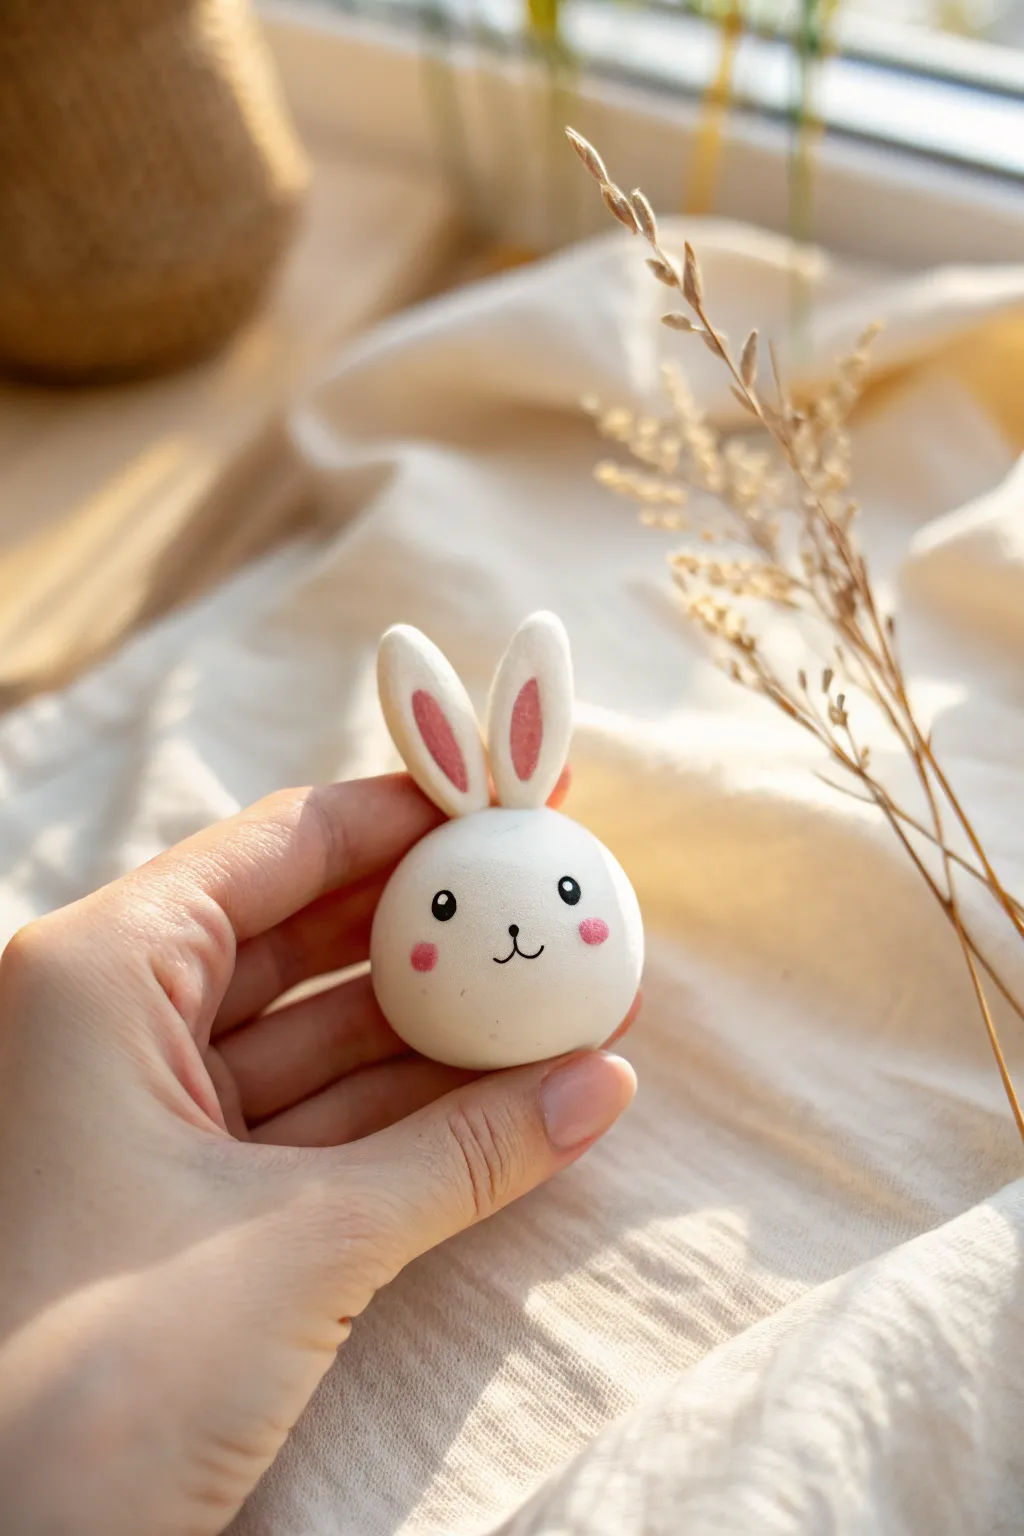
These delightfully simple bunny charms rely on clean, spherical shapes to achieve maximum kawaii factor. With just a few bits of clay and some careful painting, you can create a smooth, palm-sized friend perfect for spring decor.
Step-by-Step Guide
Materials
- White smooth air dry clay
- Acrylic paints (black, white, pink)
- Fine detail paintbrush (size 00 or 000)
- Dotting tool or toothpick
- Water and small sponge for smoothing
- Sandpaper (fine grit)
Step 1: Shaping the Base
-
Prepare the Clay:
Start by kneading a golf-ball-sized amount of white air dry clay until it is warm and pliable. This conditioning step prevents cracks later. -
Roll the Head:
Roll the clay between your palms to form a perfectly smooth sphere. Apply gentle, even pressure to ensure there are no lumps or flat spots. -
Smooth Imperfections:
Dip your finger or a small sponge lightly in water and gently rub away any fingerprints or seams on the sphere’s surface. -
Form the Ears:
Take two smaller, equal-sized pieces of clay (about the size of large peas) for the ears. Roll them into small balls first. -
Shape the Ears:
Gently roll these smaller balls into elongated teardrop or tic-tac shapes, slightly flattening them so they aren’t too thick. -
Attach the Ears:
Score the top of the head slightly where you want the ears to go. Use a tiny dab of water or slip (clay mixed with water) as glue, and press the bottom of the ears onto the head. -
Blend the Seams:
Using a clay tool or your finger, carefully smooth the clay at the base of the ears downwards onto the head so the connection becomes seamless. -
Final Smoothing:
Give the entire piece one last check for smoothness. I like to do a final pass with a barely damp finger to ensure the finish is satiny before leaving it to cure. -
Drying Time:
Let the bunny dry completely in a cool, dry place. This usually takes 24-48 hours depending on humidity. Flip it occasionally so the bottom dries evenly.
Step 2: Painting the Details
-
Sand for Perfection:
Once fully dry, inspect your bunny. If there are any rough spots, gently buff them away with fine-grit sandpaper for a porcelain-like finish. -
Paint the Inner Ears:
Mix a soft pink acrylic paint. Using a fine brush, paint an elongated oval shape inside each ear, leaving a white border around the edge. -
Draft the Face:
If you’re nervous about freehanding, use a pencil to very lightly mark where the eyes, nose, and cheeks will go. -
Paint the Snout:
Using black paint and your finest brush, paint a tiny ‘Y’ or anchor shape for the nose and mouth directly in the center of the face. -
Add the Eyes:
Paint two small black circles for eyes on either side of the nose. Keep them widely spaced for a cuter look. -
The Sparkle:
Once the black paint is dry, use a toothpick or dotting tool dipped in white paint to add a tiny ‘reflection’ dot in the upper corner of each eye. -
Rosy Cheeks:
Finally, use the pink paint (or a slightly darker pink) to dab small round cheeks just below the eyes.
Cracks while drying?
Mix a tiny bit of fresh clay with water to make a paste called ‘slip’. Fill cracks, smooth over, and let dry again.
Make it hangable
Before drying, insert a screw eye pin into the top center of the head to turn your bunny into a keychain or ornament.
Once sealed with a matte varnish, your round bunny is ready to bring a touch of sweetness to your desk or shelf


Blob Bear Desk Buddies
Create a pair of irresistibly squishy-looking friends to keep you company while you work. These minimalist bears rely on smooth, simple shapes and subtle pastel details for their charming kawaii aesthetic.
How-To Guide
Materials
- Air dry clay (white)
- Acrylic paint (light caramel/beige, black, pink)
- Fine-grit sandpaper
- Water and a small bowl
- Needle tool or toothpick
- Ball tool (small)
- Fine detail paintbrush
- Matte varnish or sealant
Step 1: Shaping the Bodies
-
Color the clay:
Start by mixing a tiny drop of light caramel or beige acrylic paint into half of your white clay. Knead it thoroughly until the color is completely uniform and streak-free. Leave the other half pure white. -
Form the base shape:
Roll your beige clay into a smooth ball, then gently roll it on your work surface to elongate it slightly into a rounded egg or gumdrop shape. The bottom should be wider than the top so it sits stable. -
Flatten the base:
Tap the bottom of your shape firmly on the desk to create a flat surface. This ensures your bear won’t wobble. Repeat the shaping process with the white clay so you have two matching blobs. -
Smooth the surface:
Dip your finger in a little water and gently run it over the clay to erase any fingerprints or cracks. You want an ultra-smooth, marshmallow-like finish.
Step 2: Adding Features
-
Make the ears:
Pinch off two tiny, pea-sized balls of clay matching the body color. Press them slightly flat. -
Attach the ears:
Score the top of the head slightly with your needle tool where the ears will go. Apply a dot of water and press the ears on. Use a blending tool or your finger to smooth the seam at the back of the ear so it looks seamless. -
Create the inner ear:
Use a small ball tool to gently press an indentation into the center of each ear. This adds depth and a cute stylized look. -
Form the arms:
Roll two very small, thin teardrop shapes for the arms. They should be tiny and subtle. -
Attach the arms:
Attach the arms to the sides of the body using a dab of water. Position them low on the ‘tummy’ area, angling them slightly inward for a shy, cute posture. -
Make the feet:
Roll two more tiny spheres for feet. Flatten them slightly and attach them at the very bottom front of the bear, peeking out from under the body. -
Initial drying:
Allow your bears to dry for 24-48 hours. I find it helpful to turn them upside down halfway through to ensure the bottom dries effectively.
Cracks appeared?
If small cracks form while drying, don’t panic. Mix a tiny amount of fresh clay with water to make a paste (slip) and fill in the crack, then smooth it over with a wet finger.
Step 3: Painting and Finishing
-
Refine the surface:
Once fully dry, inspect your bears. If there are any rough spots, gently buff them away with fine-grit sandpaper for a flawless finish. -
Paint the face:
Using your finest brush and black paint, add two small dots for eyes wide apart on the face. Paint a tiny ‘w’ shape between them for the mouth/nose. -
Add blush:
Mix a soft pink paint. Carefully paint small horizontal oval blushes right under the eyes. This specific placement is key to the chubby cheek look. -
Detail the ears:
Paint the inside indentation of the ears. Use yellow or orange for the brown bear and pink for the white bear to distinguish their characters. -
Seal the project:
Project the paint by applying a coat of matte varnish. Matte is better than gloss here because it maintains the soft, velvet-like appearance of the clay.
Level Up: Accessories
Make tiny accessories for them to hold! A miniature strawberry, a tiny book, or a little heart placed between their hands adds instant personality.
Set your new little friends on a window sill or desk organizer to brighten up your workspace


Tiny Smiling Frog Friends
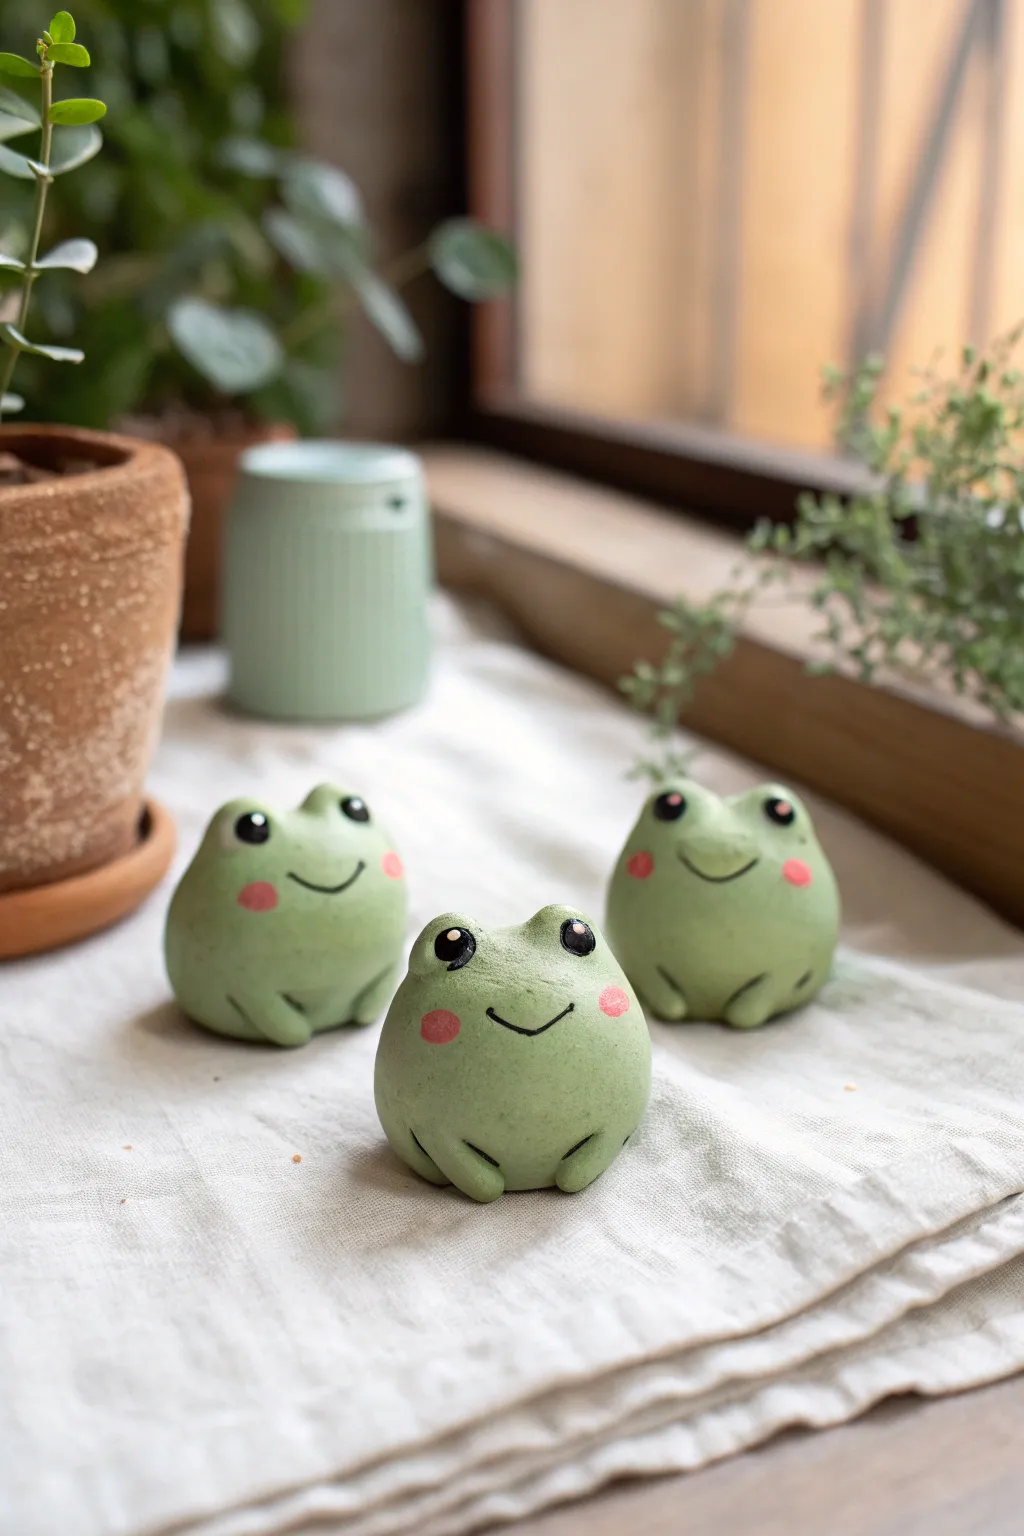
These adorable little amphibians are the perfect desk companions to bring a bit of nature-inspired cheer to your day. Their round, smooth bodies and sweet blushing cheeks make them an ideal project for air dry clay beginners who want cute results quickly.
Step-by-Step Tutorial
Materials
- White air dry clay (or cold porcelain)
- Acrylic paints: Sage green, black, white, pink
- Rolling pin
- Ball tool or rounded chopstick
- Fine detail paintbrush (size 0 or 00)
- Medium flat paintbrush
- Water cup
- Gloss varnish or clear nail polish (optional)
- Parchment paper or silicone mat
Step 1: Shaping the Bodies
-
Mix your base color:
Before sculpting, it’s best to tint your clay if you want a uniform look. Knead a pea-sized amount of sage green acrylic paint into a ball of white air dry clay until the color is consistent and streak-free. -
Divide the clay:
Split your green clay into three equal portions to create the trio. Roll each portion into a very smooth, crack-free sphere roughly the size of a golf ball or slightly smaller. -
Form the base shape:
Gently tap the bottom of one sphere onto your work surface to flatten it slightly so the frog sits upright without rolling away. -
Create the eye mounds:
For the eye sockets, roll two tiny balls of green clay (about the size of peppercorns). Place them on top of the head, spaced widely apart, and blend the bottom edges downward into the main body using a little water so they look like seamless bumps rather than attachments.
Smoothing Secrets
Use a tiny dab of water on your fingertip to erase fingerprints before drying. If cracks appear while drying, fill them with a wet clay ‘slurry’ paste.
Step 2: Adding Froggy Features
-
Sculpt the legs:
Roll two small, elongated ovals of green clay for the front legs. Attach them to the lower front of the body, angling them slightly inward. -
Shape the back legs:
Create larger, thicker ovals for the back legs. Press these firmly against the sides of the body towards the back, blending the clay at the contact points so they look tucked in. -
Define the toes:
Use a modeling tool or the edge of a credit card to press distinct little notches into the ends of the front and back feet to suggest toes. -
Smooth everything out:
Dip your finger in a tiny bit of water and gently run it over the entire frog to remove fingerprints and ensure all seams are invisible. -
Repeat for friends:
Repeat the leg and eye shaping process for the other two clay balls so you have a complete set of three frogs. -
Complete drying:
Let your frogs sit undisturbed on parchment paper for at least 24-48 hours. I usually flip them over once halfway through to ensure the bottom dries thoroughly.
Lily Pad Displays
Roll out a flat sheet of green clay and cut out a notched circle to create a custom lily pad coaster for your frogs to sit on.
Step 3: Painting the Face
-
Outline the eyes:
Once fully dry, use black acrylic paint and your finest brush to paint filled-in circles over the raised eye mounds you created earlier. -
Add the shine:
Dip the non-brush end of your paintbrush into white paint and dot a single highlight into the upper right corner of each black eye. This reflection brings them to life. -
Paint the smile:
With the fine liner brush and black paint (thinned slightly with water for flow), paint a wide, shallow ‘U’ shape between the eyes for the smile. -
Add the blush:
Mix a soft pink color. Dip your pinky finger or a q-tip into the paint, dab off the excess, and gently stamp a round rosy cheek on either side of the smile. -
Seal the deal:
To make the eyes look wet and glass-like, apply a drop of gloss varnish or clear nail polish just to the black painted area.
Now you have a trio of smiling green friends to brighten up your windowsill or shelf

The Complete Guide to Pottery Troubleshooting
Uncover the most common ceramic mistakes—from cracking clay to failed glazes—and learn how to fix them fast.
Pastel Dino Pals
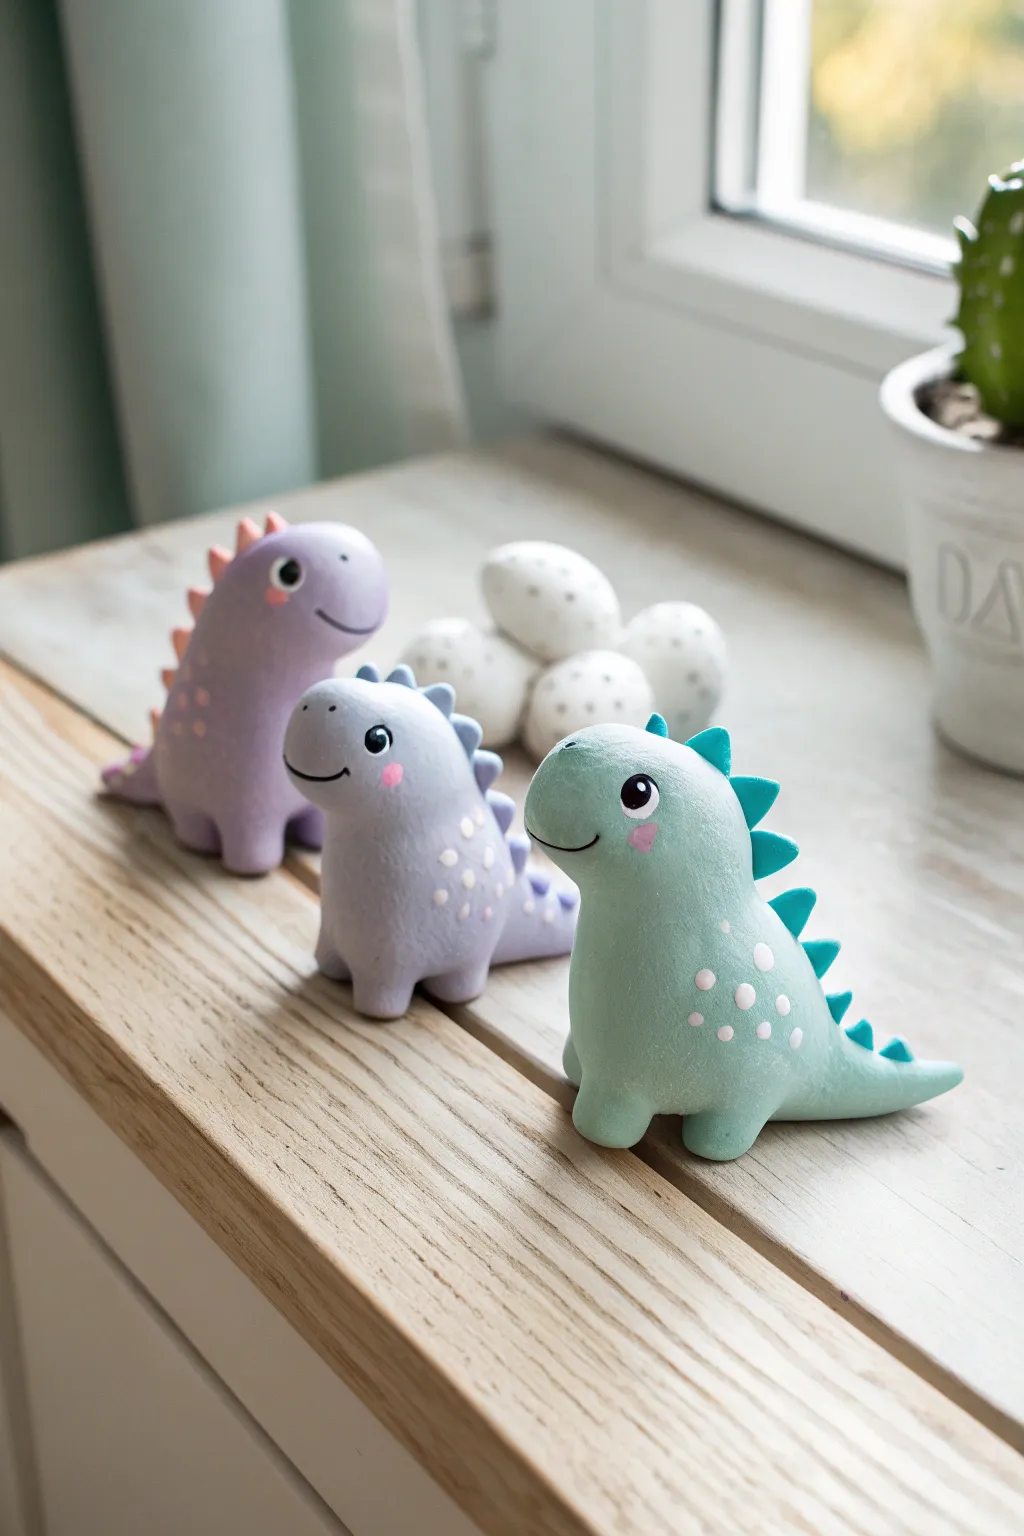
Brighten up any shelf with this adorable set of three prehistoric friends, featuring soft pastel hues and charming painted details. These air dry clay dinosaurs are surprisingly simple to sculpt, relying on basic shapes to create a smooth, matte-finished look that feels modern yet playful.
Step-by-Step
Materials
- Air dry clay (white)
- Acrylic paints (pastel purple, grey-blue, mint green, white, black, pink)
- Clay sculpting tools (specifically a smoothing tool and a needle tool)
- Water in a small cup
- Fine grit sandpaper
- Small detail paintbrush
- Matte varnish (optional)
Step 1: Body Sculpting
-
Mix your colors:
Start by tinting your white air dry clay. You can either paint the finished piece or knead a small amount of acrylic paint directly into the raw clay for a uniform base color. Create three distinct balls: one pastel purple, one grey-blue, and one mint green. -
Form the main shape:
Take the mint green ball first. Roll it between your palms to smooth out any cracks, then gently elongate it into a thick teardrop or pear shape. The wider bottom will be the body, and the tapered top will become the head. -
Define the head:
Using your thumb and forefinger, gently pinch and smooth the neck area to distinguish the head from the body. You want a subtle curve rather than a sharp angle, keeping the overall silhouette chubby and cute. -
Shape the snout:
Press lightly on the front of the face to create a slightly flattened snout area. This gives the face character and provides a flat plane for the painted mouth later. -
Add the legs:
Roll two small balls of matching clay for the feet. Flatten the bottoms against your work surface, then attach them to the base of the dinosaur’s body. Blend the seams upwards into the body using a sculpting tool or your finger with a tiny drop of water. -
Create the tail:
The tail is naturally formed from the pointy end of your initial teardrop shape. Gently curve it to one side or keep it straight, smoothing the transition so it flows naturally from the back.
Seamless Spikes
If spikes keep falling off, score both the back and the bottom of the spike with a needle tool before adding water. This creates ‘tooth’ for a stronger bond.
Step 2: Adding Details
-
Make the spikes:
For the spine, choose a contrasting clay color (or use the same color if you plan to paint them). Roll tiny balls of clay, then pinch them into small triangles. I find it easiest to make all the triangles first to ensure they graduate in size properly. -
Attach the spine:
Score the back of the dinosaur lightly with your needle tool where the spikes will go. Apply a dab of water and press the triangular spikes in a row, starting from the top of the head down to the tail. -
Smooth the connections:
Use a small flexible modeling tool to blend the base of each spike into the main body so they don’t fall off when dry. -
Repeat for friends:
Repeat the sculpting process for the purple and grey-blue dinosaurs. Vary their heights slightly or the tilt of their heads to give each one a unique personality. -
Drying time:
Let the figures dry completely in a safe, dry place. Depending on the brand of clay and humidity, this usually takes 24 to 48 hours. Turn them occasionally to ensure the bottoms dry evenly.
Step 3: Finishing Touches
-
Sand for smoothness:
Once fully dry, inspect your dinos. If there are any fingerprints or rough bumps, gently buff them away with fine-grit sandpaper until the surface feels like smooth porcelain. -
Paint the eyes:
Using a very fine detail brush and black acrylic paint, create a solid black circle for the eye. Once dry, add a tiny white dot in the upper corner for a ‘sparkle’ effect. -
Add rosy cheeks:
Mix a soft pink paint. Dip the tip of your brush (or a q-tip) into the paint, dab most of it off onto a paper towel, and gently stamp a small circle just below the eye. -
Body spots:
Using a lighter shade of the body color (or white), paint small, random polka dots on the lower half of the dinosaur’s body for texture. -
The smile:
With the finest brush you have (or a fine-tip black marker), draw a simple curved line for the smile. Keep it small and positioned near the snout area. -
Seal (Optional):
To protect your work, apply a thin coat of matte varnish. Avoid glossy finishes as the matte look is key to the soft aesthetic.
Crack Control
Tiny cracks appearing as it dries? Mix a small amount of fresh clay with water to make a paste (slip) and fill the cracks. Smooth it over and sand once dry.
Arrange your trio together on a windowsill or desk for an instant mood booster that adds a touch of prehistoric charm
Smiling Cloud and Star Minis
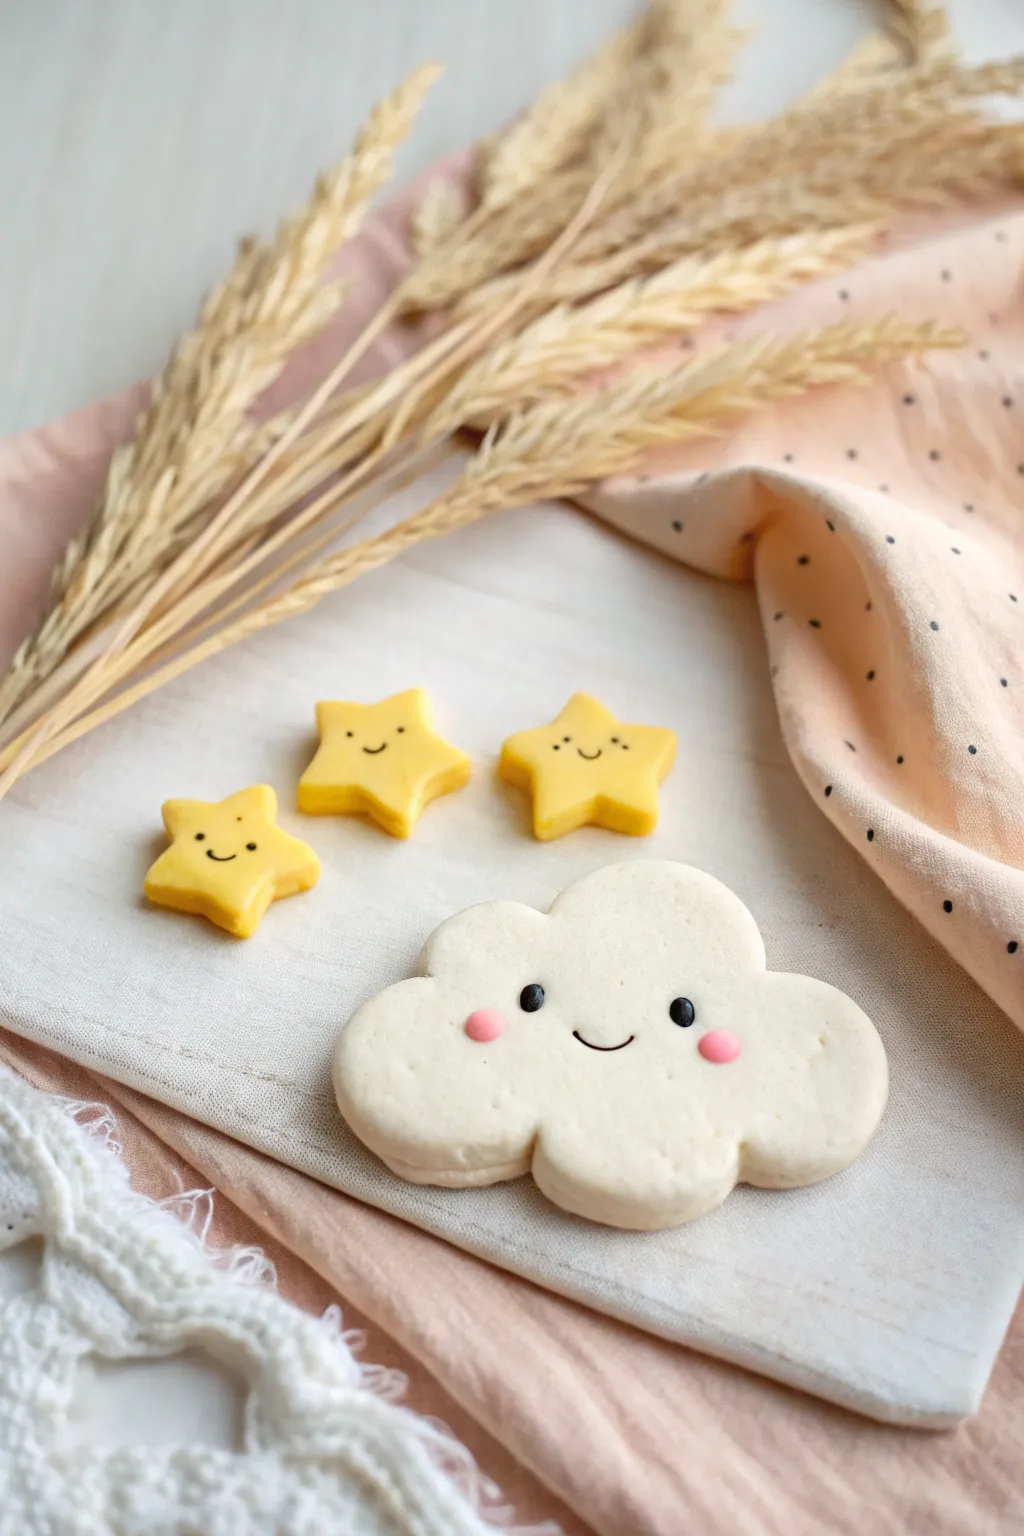
These utterly charming little figurines capture the whimsical essence of a sunny day with a fluffy white cloud and cheery yellow stars. Their simple, smooth shapes and sweet minimalist faces make them perfect beginner-friendly projects that look professionally polished.
How-To Guide
Materials
- White air dry clay
- Yellow acrylic paint or yellow air dry clay
- Rolling pin
- Cloud cookie cutter (small)
- Star cookie cutter (mini)
- Black fine-liner marker or black acrylic paint
- Fine tip paintbrush
- Pink acrylic paint
- Dotting tool or toothpick
- Sandpaper (fine grit)
- Matte varnish (optional)
Step 1: Shaping the Cloud
-
Condition the clay:
Begin by taking a chunk of white air dry clay and kneading it in your hands until it is soft, pliable, and free of cracks. -
Roll out the slab:
Using your rolling pin, flatten the clay into an even slab. Aim for a thickness of about 1/4 inch (6mm) to give the cloud a nice, puffy cookie-like appearance. -
Cut the shape:
Press a small cloud-shaped cookie cutter firmly into the clay. Lift it carefully. If the clay sticks to the cutter, gently push it out from the back without distorting the rounded edges. -
Soften the edges:
Dip your finger in a tiny bit of water and run it along the cut edges of the cloud to smooth them out. You want it to look soft and pillowy, not sharp.
Step 2: Creating the Stars
-
Prepare yellow clay:
Mix a small amount of yellow acrylic paint into a ball of white clay until the color is uniform, or use pre-colored yellow clay. You want a bright, cheerful sunny yellow. -
Roll and cut:
Roll this yellow clay out to the same 1/4 inch thickness as the cloud. Use a mini star cookie cutter to punch out three star shapes. -
Round the points:
Just like with the cloud, gently tap the points of the stars with a finger to slightly round them off. This makes them look cuter and less angular. -
Initial Drying:
Place the cloud and stars on a flat surface lined with parchment paper. Let them dry for at least 24 hours, flipping them once halfway through to ensure even drying. -
Refining:
Once fully dry, check for any rough spots. I like to use a fine-grit sandpaper to briefly buff the surface if there are any fingerprints or uneven textures.
Smooth Operator
If you don’t have water handy, a tiny dab of hand lotion or baby oil on your finger works wonders for smoothing out clay cracks before drying.
Step 3: Bringing Them to Life
-
Practice the faces:
Before painting on the clay, sketch the faces on a piece of paper to get the spacing right. Notice the eyes are wide-set for that ‘kawaii’ look. -
Draw the cloud’s mouth:
Using a fine-tip black marker or a very thin brush with black paint, draw a small, shallow ‘U’ shape in the center of the cloud for the smile. -
Add the cloud’s eyes:
Using a dotting tool or the back of a paintbrush dipped in black paint, place two small dots on either side of the smile. They should sit slightly higher than the mouth line. -
Apply rosy cheeks:
Dip a fresh dotting tool into pink acrylic paint. Dab a cheek spot just outside and slightly below each eye. The pink dots should be roughly the same size as the eyes. -
Draw the star faces:
For the stars, use a very fine marker or 000 brush. Draw two tiny dots for eyes and a small curved smile. Keep these features very small to fit the scale of the mini stars. -
Seal the work:
Allow the paint to dry completely. To protect your work, apply a thin coat of matte varnish over the pieces. This mimics the smooth finish seen in the photo.
Magnetize It
Glue small round ceramic magnets to the back of the dried pieces to turn them into an adorable fridge magnet set that holds photos or notes.
Now you have a sweet set of clay minis ready to brighten up your desk or shelf


What Really Happens Inside the Kiln
Learn how time and temperature work together inside the kiln to transform clay into durable ceramic.
Sweet Fruit Characters
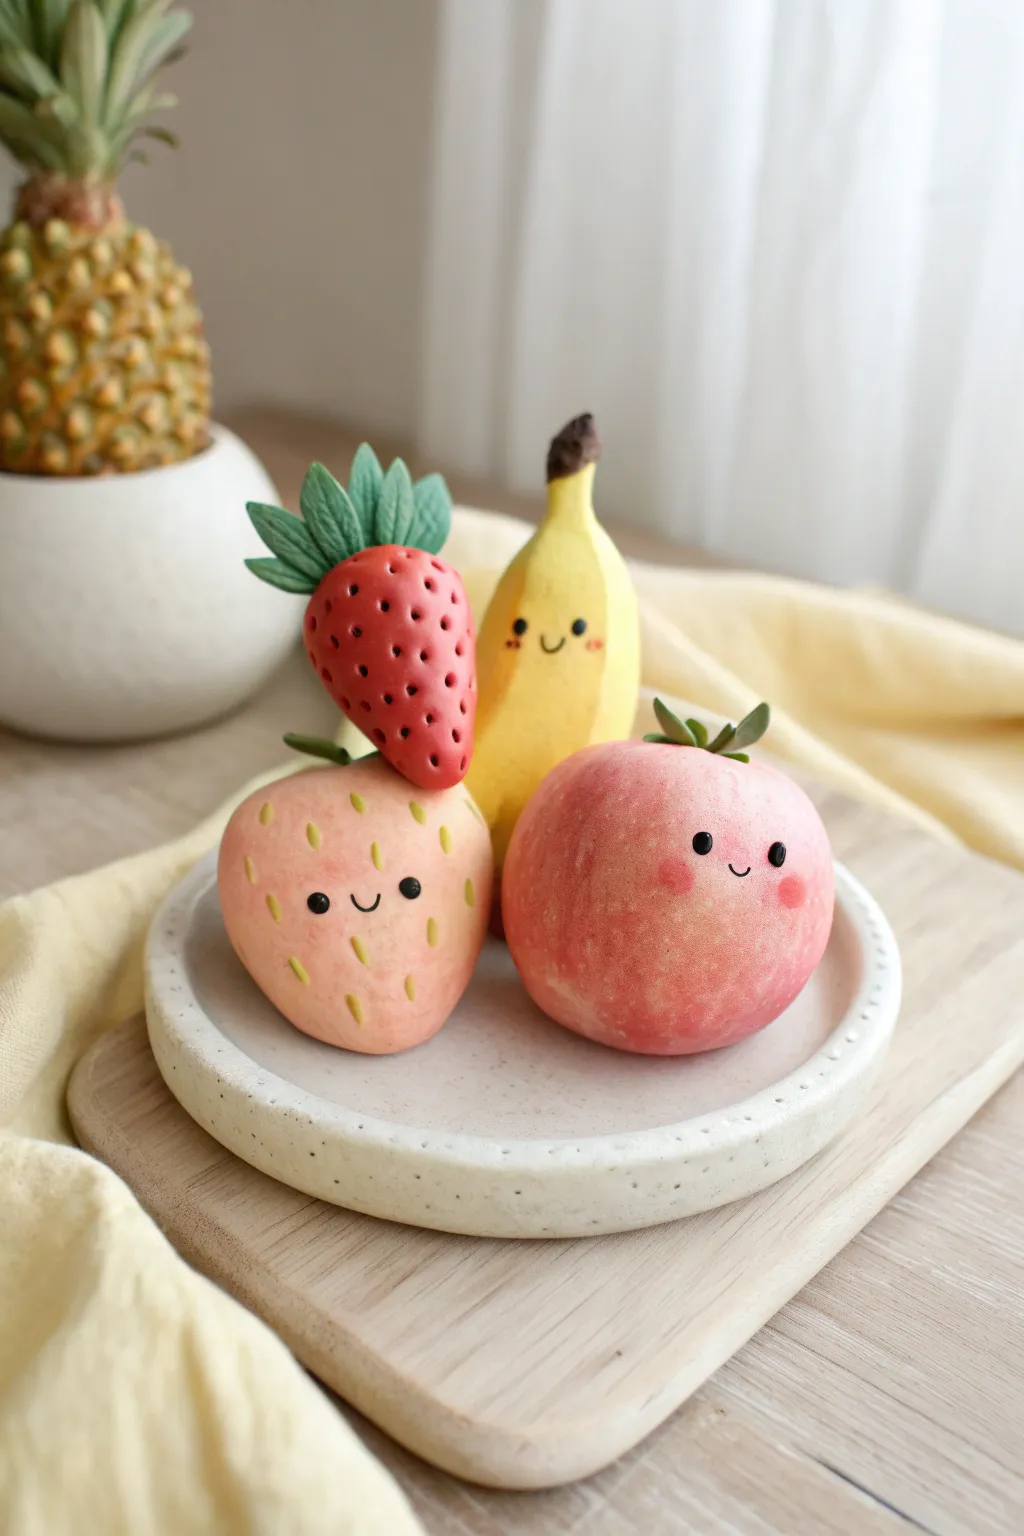
Create your own miniature fruit bowl with these adorable, smiling characters made from air-dry clay. These sweet figures feature soft pastel colors, tiny kawaii faces, and charming textures that bring a playful vibe to any desk or shelf.
Step-by-Step Tutorial
Materials
- White air-dry clay
- Acrylic paints (pastel pink, bright red, yellow, soft orange, green, black)
- Small paintbrush & detail brush
- Ball stylus tool or toothpick
- Toothbrush or textured sponge
- Water cup
- Clay varnish (matte or satin)
- Toothpicks (for structural support)
Step 1: Sculpting the Base Shapes
-
Form the peach:
Start by rolling a ball of clay about the size of a tangerine for the peach character. Gently press the top and bottom to flatten it just slightly, giving it a plump, round appearance. -
Shape the banana:
Take a smaller amount of clay and roll it into a cylinder. Taper one end to a point for the top stem and curve the body slightly to mimic a classic banana shape. -
Create the large strawberry:
Roll another medium-sized ball into a rounded teardrop shape. Flatten the wider end slightly so it can stand upright on its own. -
Make the mini strawberry:
Form a smaller teardrop shape using a marble-sized piece of clay. This little one will eventually sit on top of the larger strawberry.
Cracks while drying?
If small fissures verify appear as the clay shrinks, mix a tiny bit of fresh clay with water to make a paste (slip) and smooth it into the cracks with your finger.
Step 2: Adding Textures and Details
-
Add strawberry seeds:
Using a small ball stylus or a blunt toothpick, gently press small indentations all over the surface of the mini strawberry to create the seed texture. -
Texture the large strawberry:
Instead of deep holes, use a toothpick to press tiny, elongated dash marks randomly over the surface of the larger pale strawberry. -
Peach texturing:
For the peach, take a clean toothbrush or a textured sponge and lightly tap the surface of the wet clay. This gives it that soft, fuzzy skin look rather than being perfectly smooth. -
Sculpt the leaves:
Roll tiny bits of clay into teardrops and flatten them. Score lines down the center found on leaves. Attach a cluster of these to the top of the mini strawberry and the peach using a dab of water. -
Connect the strawberries:
Insert a short piece of toothpick into the top of the large strawberry, then press the mini strawberry onto it securely. Smooth the seam if necessary, or let them just touch. -
Drying time:
Let all your fruit characters dry completely in a well-ventilated area for at least 24-48 hours until they are hard and white.
Soft blushing tip
Instead of paint, I find using real powder blush or scraped soft pastel chalk applied with a dry Q-tip creates the softest, most natural rosy cheeks.
Step 3: Painting and Finishing
-
Paint the banana:
Mix a soft, buttery yellow acrylic paint and cover the banana completely. Once dry, paint the very tip of the stem a dark brown. -
Color the peach:
Sponge on a gradient for the peach. Start with a pale cream base, then lightly dab a soft pink onto one side and the bottom while the paint is tacky to create a blush effect. -
Paint the strawberries:
Paint the top mini strawberry a vibrant red. For the bottom strawberry, use a very pale peachy-pink. Paint all the leaves a muted sage green. -
Add the faces:
Using your smallest detail brush or a toothpick dipped in black paint, carefully dot two eyes and a tiny U-shaped smile onto each fruit friend. -
Rosy cheeks:
Dilute pink paint with water or use dry pastel chalk dust. Dab tiny pink spots just below the eyes for blushing cheeks. -
Highlight the seeds:
For the pale bottom strawberry, paint the little indented dash marks with a slightly darker yellow-green to make them stand out. -
Seal the project:
Once all paint is totally dry, apply a thin coat of matte varnish to protect your work without making it too shiny.
Arrange your finished fruit friends together on a small dish for the perfect desk companion
Donut and Cookie Treat Charms
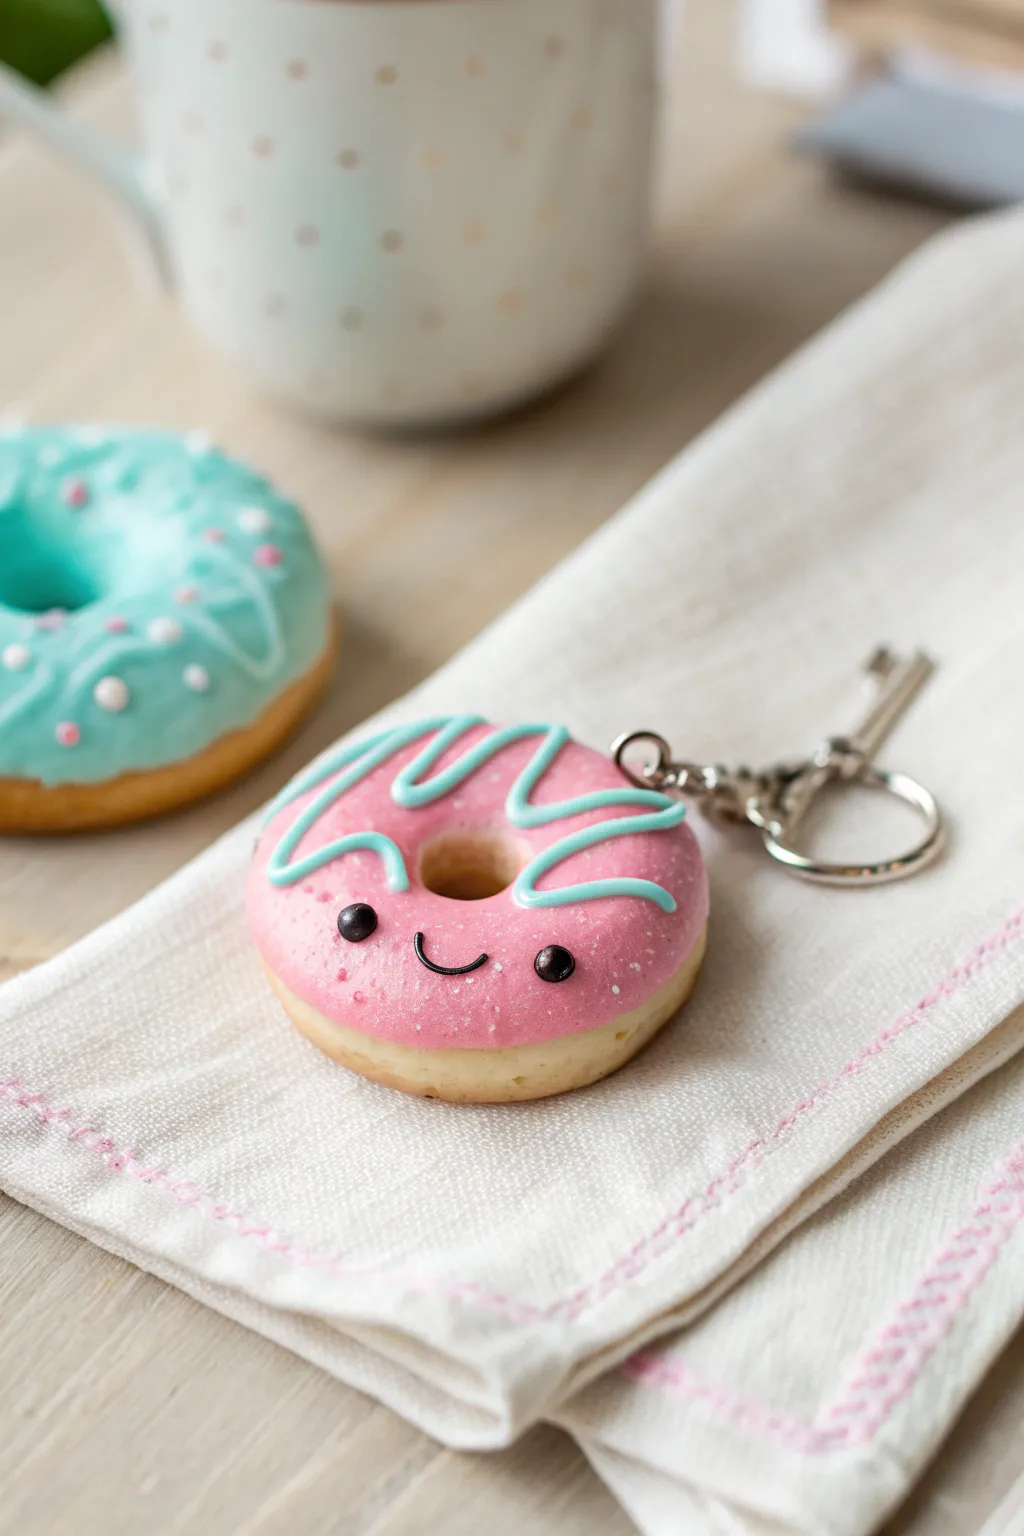
This adorable kawaii donut charm brings a touch of sweetness to your keys without the sticky fingers. With its cheerful little eyes and glossy pink frosting, it looks almost good enough to eat.
Step-by-Step
Materials
- Air dry clay (white or pre-colored beige/tan)
- Acrylic paints (pink, light blue, black, white)
- Yellow ochre pastel chalk or watered-down acrylic paint
- Rolling pin
- Small round cutter (for the donut hole, e.g., straw or piping tip)
- Small paintbrush
- Needle tool / toothpick
- Gloss varnish or UV resin
- Eye screw pin
- Keychain hardware
- Super glue (optional)
Step 1: Shaping the Dough
-
Mix the dough color:
Start by tinting a ball of white air dry clay with a very small amount of yellow ochre or light brown paint to achieve a baked dough color. Knead it thoroughly until the color is consistent. -
Form the base:
Roll the clay into a smooth ball free of cracks, then gently flatten it slightly with your palm to create a thick disc shape. It should look like an unglazed donut. -
Create the hole:
Use a small round cutter, like the end of a drinking straw or a small piping tip, to punch a clean hole directly in the center of the disc. -
Smooth the edges:
Gently soften the edges of the center hole and the outer rim with your fingertip and a tiny bit of water so the donut looks baked and rounded, not sharp. -
Add texture:
For a realistic touch, take an old toothbrush or a ball of aluminum foil and lightly tap it around the sides of the donut (the ‘dough’ part) to create a bread-like texture. -
Shade the dough:
Once creating the texture, dust the edges with a bit of shaved yellow ochre pastel chalk using a dry brush to give it that golden-brown baked appearance.
Realistic Drip Tip
When smoothing the pink frosting onto the base, push the clay down slightly more in random spots. This mimics gravity pulling the icing down the sides.
Step 2: Frosting & Face
-
Create the frosting:
Mix a separate piece of white clay with pink paint (or use pink clay). Roll this out thinly with a rolling pin. -
Cut the frosting shape:
Use a cutter slightly larger than your donut to cut a circle of pink clay. Then, poke a hole in the center matching the donut hole. -
Apply the frosting:
Place the pink clay circle on top of your dough base. Gently press down and smooth the edges so they look like melted icing. I find it helpful to vary the edge slightly to make it look like a natural drip. -
Insert the hardware:
Before the clay dries, screw the eye screw pin into the top of the donut. Dip the tip in a tiny bit of white glue or super glue first for extra security. -
Add the face:
Roll two minuscule balls of black clay for the eyes and press them onto the lower half of the donut. Roll an extremely thin snake of black clay for the smile and curve it between the eyes. -
Add eye highlights:
Use a needle tool or toothpick dipped in white paint to add a tiny dot to each black eye for that classic kawaii sparkle.
Step 3: Finishing Touches
-
Pipe the drizzle:
Mix some white clay with water and a bit of teal or light blue paint to create a thick paste (often called ‘clay slip’). Put this into a small ziplock bag, snip the corner, and pipe zigzag lines across the top of the donut. -
Let it dry completely:
Set your donut aside to dry fully. Depending on your brand of clay and humidity, this usually takes 24 to 48 hours. -
Glaze the frosting:
Paint a layer of gloss varnish or apply UV resin only to the pink frosting and blue drizzle areas. This makes the icing look wet and sugary while keeping the dough part matte. -
Attach the keychain:
Once the varnish is cured or dry, use pliers to open the jump ring on your keychain hardware and attach it to the eye screw pin.
Clay Shrinkage
Keep in mind that air dry clay shrinks as it dries. Make your donut hole slightly larger than intended so it doesn’t close up during the drying process.
Now you have a sweet little companion to keep your keys organized and cheerful

TRACK YOUR CERAMIC JOURNEY
Capture glaze tests, firing details, and creative progress—all in one simple printable. Make your projects easier to repeat and improve.
Polka-Dot Mushroom Buddies
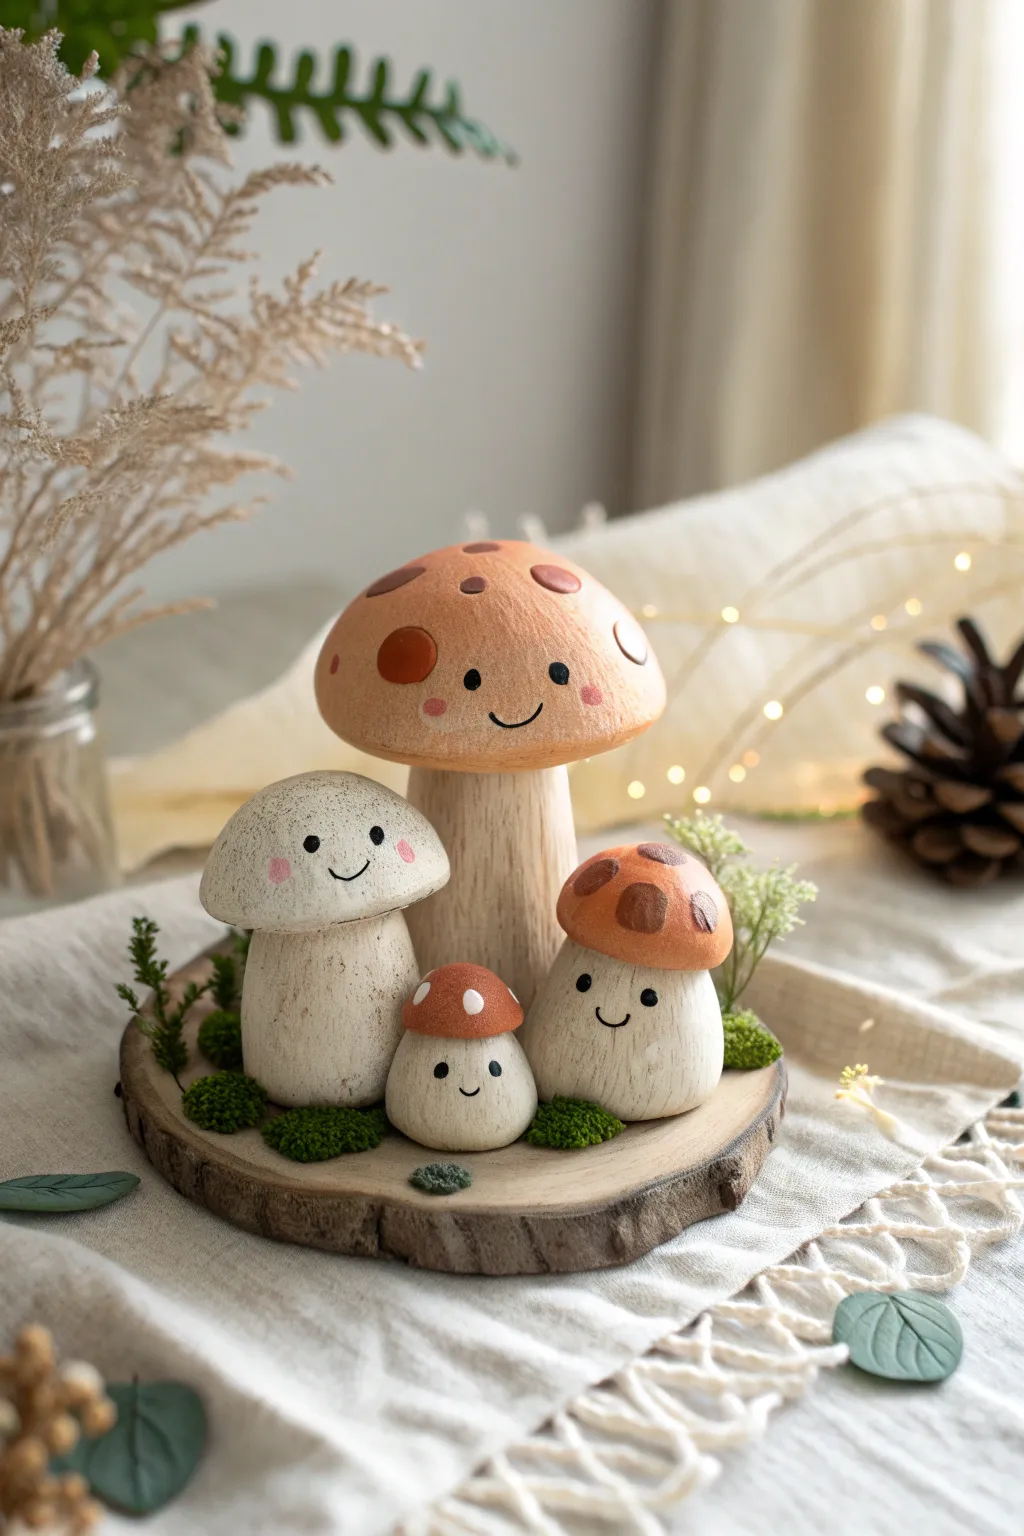
Create a cozy autumn atmosphere with this adorable family of four mushroom buddies sitting on a rustic wood slice. Their textured stems and sweet, rosy-cheeked smiles make them the perfect desk companions or seasonal decor.
Step-by-Step Guide
Materials
- White air dry clay (high quality)
- Acrylic paints (burnt sienna, cream/off-white, terracotta, black, pink)
- Various paintbrushes (flat shader, fine liner)
- Wood slice base (approx. 4-5 inches)
- Dried moss bits
- Texture tool (old toothbrush or stiff bristle brush)
- Sculpting tools (needle tool, rolling pin)
- Strong craft glue or hot glue gun
- Aluminum foil (for cores)
- Water cup
Step 1: Sculpting the Shapes
-
Prepare the cores:
To save clay and reduce drying time, tightly crumple aluminum foil into three teardrop shapes for the stems: one large tall one, one medium stout one, and one small stout one. Make sure they are dense. -
Wrap the stems:
Roll out sheets of white air dry clay. Wrap the clay around your foil cores, smoothing the seams with a little water until the foil is completely hidden and the surface is uniform. -
Create the baby mushroom:
For the tiniest mushroom, foil isn’t necessary. Simply roll a small ball of clay into a stout teardrop shape for its body. -
Form the caps:
Roll four balls of clay corresponding to the sizes of your stems. Flatten the bottom of each ball and gently curve the top to create a dome shape. The largest cap should be wider and flatter, while the smaller ones can be rounder. -
Add texture:
Before assembling, take your stiff brush or texture tool and gently drag vertical lines down the stems. This creates that realistic, fibrous mushroom stalk look. -
Assemble the pieces:
Score the top of each stem and the underside of each cap with a needle tool. Apply a dab of clay slip or water and press the caps firmly onto the stems. Smooth the connection point underneath if needed. -
Dry thoroughly:
Place your mushroom family in a safe, dry spot. Depending on your humidity, this could take 24-48 hours. Turn them occasionally so the bottoms dry evenly.
Step 2: Painting and Details
-
Base coat the stems:
Once fully dry, paint the stems with a creamy off-white color. You want the textured lines to show, so don’t paint too thickly. A slightly thinned paint works well here to settle into the grooves. -
Paint the caps:
Paint the largest cap a soft terracotta orange. For the two medium mushrooms, I like to use different shades—one creamy white and one burnt orange. Painting the baby mushroom a distinct reddish-brown adds nice variety. -
Add the spots:
Using a flat brush, dab circular spots onto the colored caps. Use a darker brown for spots on the orange caps, and soft pink or light brown for the white cap. -
Paint the faces:
Using your finest liner brush and black paint, carefully draw two small dots for eyes widely spaced apart. Add a tiny U-shape between them for a smile. -
Add rosy cheeks:
Dip a dry brush or cotton swab into pink paint, dab almost all of it off on a paper towel, and gently blush the cheeks under the eyes. -
Highlighting:
To make the eyes sparkle, add a tiny speck of white paint to the top right of each black eye dot.
Texturing Tip
If you don’t have a stiff brush, a ball of crinkled aluminum foil rolled gently over the wet clay stems creates a fantastic organic, wrinkled texture instantly.
Step 3: Final Assembly
-
Position the family:
Arrange the mushrooms on your wood slice to find the best composition. Placing the tallest one in the back usually looks best. -
Glue them down:
Secure each mushroom to the wood slice using strong craft glue or a hot glue gun. -
Add greenery:
Apply dabs of glue around the base of the mushrooms and press small clumps of dried moss into the glue to hide the seams and add a forest floor vibe.
Turn it into a Lamp
Before drying, hollow out the largest stem and cap, and insert a small battery-operated LED tea light inside to create a magical glowing nightlight.
Now you have a charming woodland scene that brings a touch of nature’s magic indoors
Sleepy Ghost Desk Friends
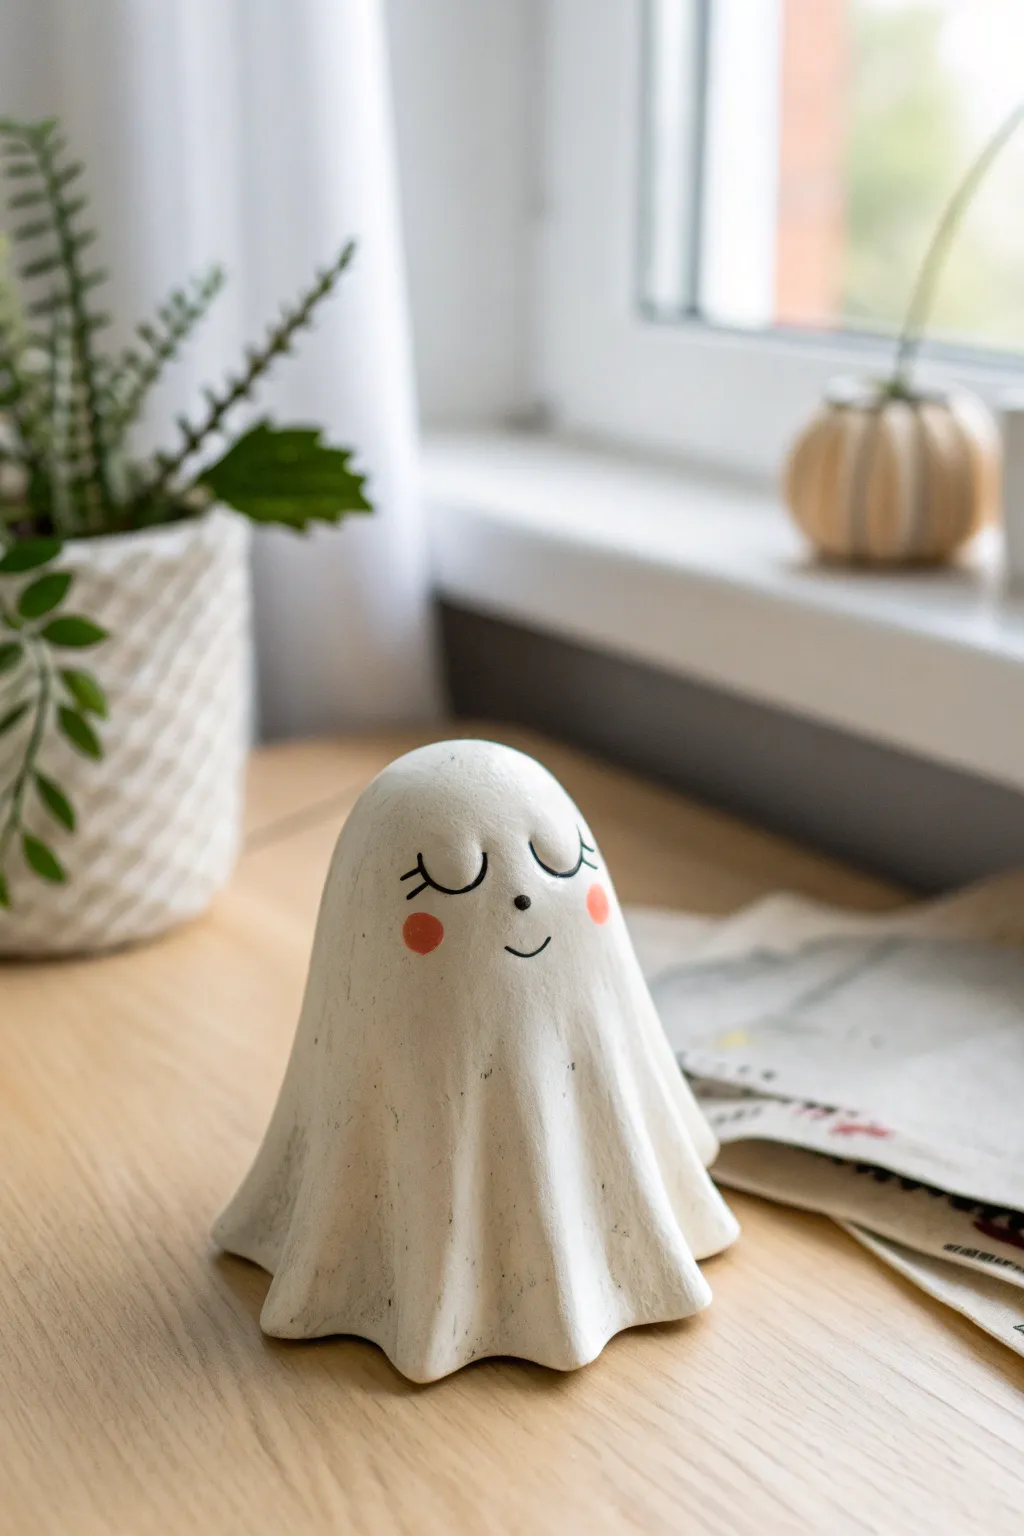
Bring a little spectral charm to your workspace with this peaceful, dozing ghost figure. Its ruffled folds and simple painted expression make it a perfect beginner sculpture that captures the softness of fabric in hardened clay.
Step-by-Step Tutorial
Materials
- White creative paperclay or other smooth air-dry clay
- Rolling pin
- Aluminum foil
- Small cup with water
- Clay sculpting tools (specifically a needle tool and a smoothing tool)
- Fine-grit sandpaper
- Fine-tip black permanent marker or acrylic paint
- Pink acrylic paint
- Small round paintbrush
- Matte varnish (optional)
Step 1: Forming the Core
-
Create the armature:
Crumple a piece of aluminum foil into a cone shape with a rounded top. This will be the inside support for your ghost to save clay and help it dry evenly. -
Check the size:
Ensure the foil armature stands stably on a flat surface. It should be roughly 3-4 inches tall, looking like a simple rounded hill. -
Roll out the slab:
Take a large ball of white air-dry clay and roll it out until it is about 1/4 inch thick. You want a circle large enough to drape completely over your foil core.
Step 2: Draping the Ghost
-
Position the clay:
Gently lift your clay circle and center it over the top of the foil cone. Let gravity do most of the work initially as it falls down the sides. -
Create the folds:
Using your fingers, gently pinch and guide the clay to form vertical wavy folds that gather at the bottom. The goal is to make it look like a hanging bedsheet. -
Shape the base:
Where the clay meets the table, press the edges slightly inward and flare them out to create a ruffled hem. This helps the ghost stand securely. -
Smooth the head:
Dip your finger in a little water and gently smooth out the top dome of the head so it is perfectly round and free of cracks. -
Refine the drapes:
Use a modeling tool to deepen the grooves between the folds. The deeper the shadow, the more realistic the ‘fabric’ will look. -
Trim excess:
If the clay is pooling too much at the bottom, use a knife or needle tool to trim the hemline into a wavy, organic shape. -
Final smooth:
Do a final pass over the entire surface with a barely damp sponge or finger to remove fingerprints. Let the sculpture dry completely for 24-48 hours.
Cracks happen
If small cracks appear as the clay dries, mix a tiny bit of fresh clay with water to make a paste (slip) and fill them in, then smooth over.
Step 3: Adding Personality
-
Sand imperfections:
Once fully dry and hard, take your fine-grit sandpaper and gently buff away any rough spots or sharp edges on the hem. -
Dust off:
Wipe the ghost down with a dry cloth or soft brush to remove all the creative dust before painting. -
Outline the face:
I highly recommend sketching the face lightly with a pencil first to get the placement right. Aim for the upper third of the ghost. -
Paint the eyes:
Using a fine-tip marker or a very thin brush with black paint, draw two downward-curved semi-circles for closed, sleeping eyes. -
Add lashes:
Add three tiny lashes to the outer corner of each eye for a sweet, feminine touch. -
Draw the nose and mouth:
Place a small dot for the nose between the eyes, and a small, delicate smile just below it. -
Rosy cheeks:
Dip a small round brush or a cotton swab into pink paint. Dab excess paint off on a paper towel, then gently stamp two round blush spots on the cheeks. -
Seal (Optional):
To protect your ghost, brush on a coat of matte varnish. Avoid glossy finishes if you want to keep the soft, fabric-like appearance.
Natural Texture
For a varied, aged look like the photo, lightly sponge diluted gray paint into the deep folds, then wipe it off the high points.
Now you have a quiet little companion to keep you company during your study sessions or work day
Chick and Egg Duo
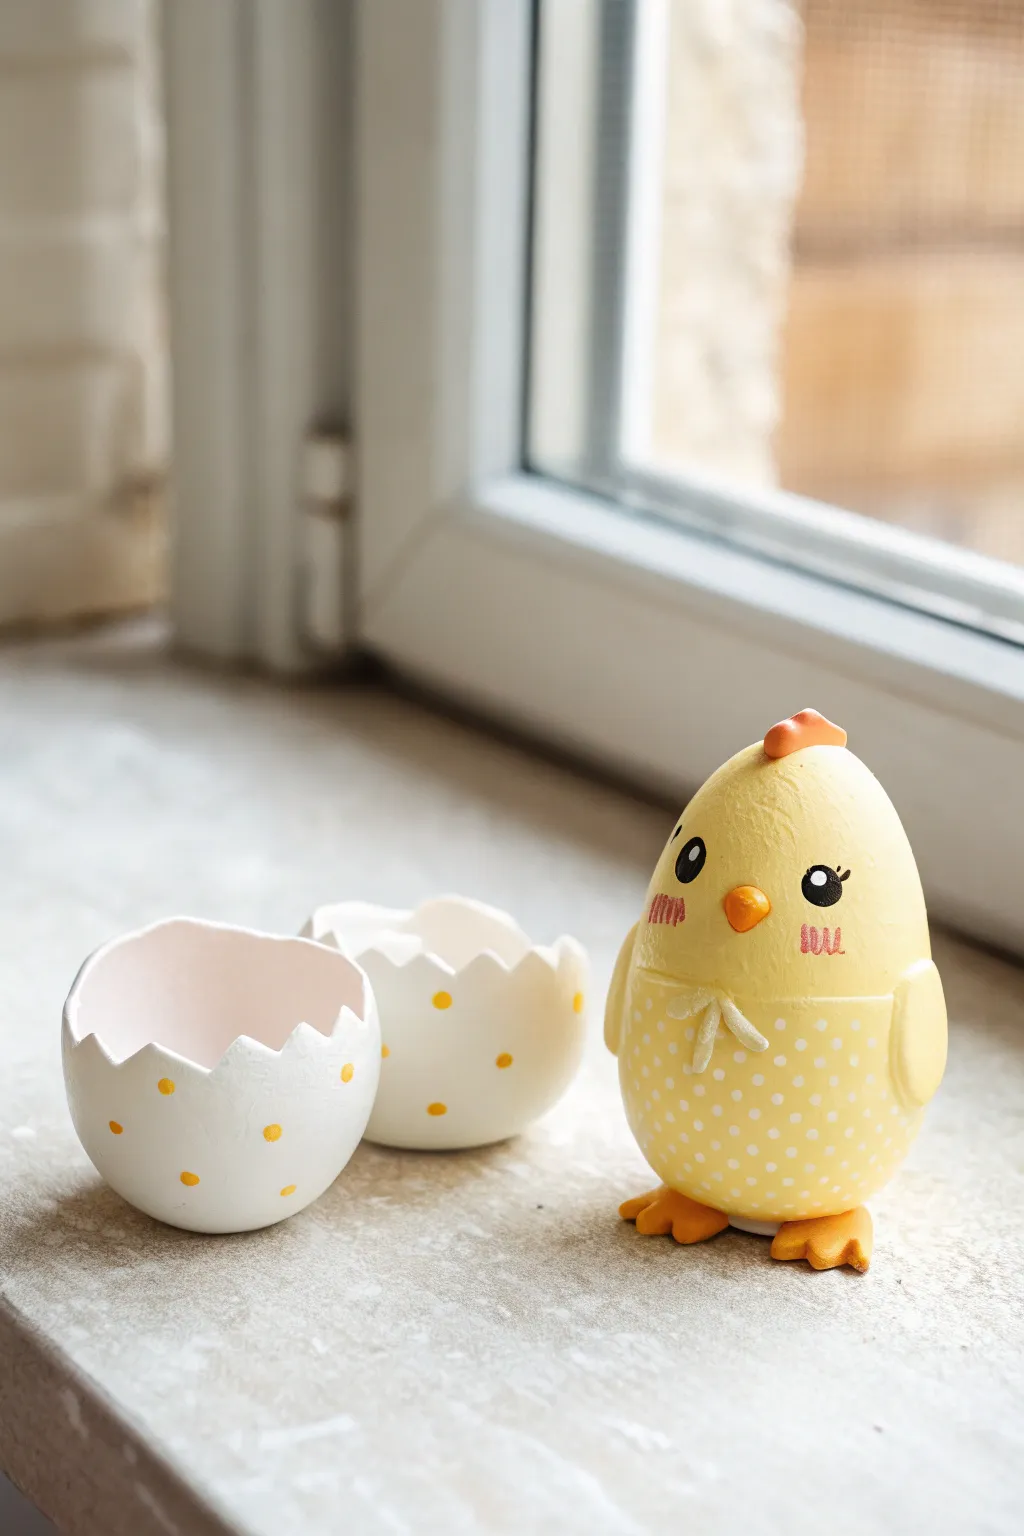
Celebrate new beginnings with this charming set featuring a cheerful yellow chick and its two cracked eggshell companions. Perfect for spring decor or just a dose of desktop cuteness, this project combines simple shaping with delicate painted details for a truly kawaii finish.
Detailed Instructions
Materials
- Air dry clay (white)
- Acrylic paints: Bright yellow, orange, white, pink, black
- Paintbrushes: Fine detail brush, medium flat brush
- Clay sculpting tools (or a toothpick and plastic knife)
- Sandpaper (fine grit)
- Water cup for smoothing
- Rolling pin
- Varnish (matte or satin finish)
Step 1: Shaping the Eggshells
-
Roll the clay:
Begin by rolling out a portion of white air dry clay until it is roughly 1/4 inch thick. You want it sturdy enough to stand but thin enough to look like a shell. -
Form the base bowls:
Mold the flat clay over a small spherical object, like a ping pong ball or the rounded end of a large egg, to create a hollow bowl shape. Alternatively, use the pinch pot method to create two small bowls by hand. -
Create the cracked edge:
Using a craft knife or a plastic clay tool, carefully cut a zig-zag pattern around the rim of each bowl to mimic a cracked eggshell. Remove the excess clay. -
Smooth the rims:
Dip your finger in a little water and gently run it along the cut jagged edges to soften any sharpness while keeping the points distinct. Set these aside to dry completely.
Cracks while Drying?
If small cracks appear as the clay dries, mix a tiny amount of fresh clay with water to make a paste (slip) and fill the cracks. Smooth over with a damp finger.
Step 2: Sculpting the Chick
-
Create the body:
Roll a larger ball of clay into a smooth egg shape about 2-3 inches tall. Tap the bottom gently on your workspace to flatten it so the chick stands upright securely. -
Add the wing detail:
Form two small, flat teardrop shapes for wings. Attach them to the sides of the body using a little water and blending the edges just slightly, or carve a subtle line around the body to suggest where the wings rest. -
Sculpt the comb:
Roll a tiny bit of clay into three small connected bumps or a small crest shape. attach this securely to the very top of the head using a drop of water as glue. -
Form the beak:
Make a tiny diamond or cone shape and attach it to the center of the face area. -
Form the feet:
Create two flat, three-pronged shapes for the feet. Place the body on top of them to ensure the balance is right before pressing them firmly to attach. I like to let the main body firm up for an hour before attaching feet to prevent squishing. -
Make the decorative bow:
Roll two very thin snakes of clay and form loops to make a bow shape. Attach this to the chest area of the chick. -
Let it dry:
Allow all your clay pieces to dry completely for 24-48 hours. They should feel hard and room temperature to the touch, not cool.
Level Up: Nest Life
Make a small nest for your set! Crumple brown paper or dried grass into a ring shape and glue it to a cardboard base for a cozy display.
Step 3: Painting and Finishing
-
Base coat the chick:
Paint the entire body of the chick with bright yellow acrylic paint. You may need two coats for opaque coverage. -
Paint details:
Use orange paint for the beak, the comb on top of the head, and the feet. Paint the little bow on the chest white or pale yellow. -
Add the face:
With your finest brush, paint two black circles for eyes. Add tiny white dot highlights inside the black to bring them to life. Paint small pink hashes on the cheeks for blush. -
Dotted pattern:
Using the handle end of a paintbrush or a dotting tool, dab small white dots all over the lower half of the chick’s body to create a pattern. -
Decorate the eggs:
Keep the eggshells white (or give them a fresh coat of white paint). Use yellow paint to add small polka dots around the exterior to match the theme. -
Seal the project:
Once all paint is dry, apply a coat of matte or satin varnish to protect your new friends.
Place your little chick near a sunny window and enjoy the vibrant splash of yellow it adds to your day.
Heart and Star Pocket Charms
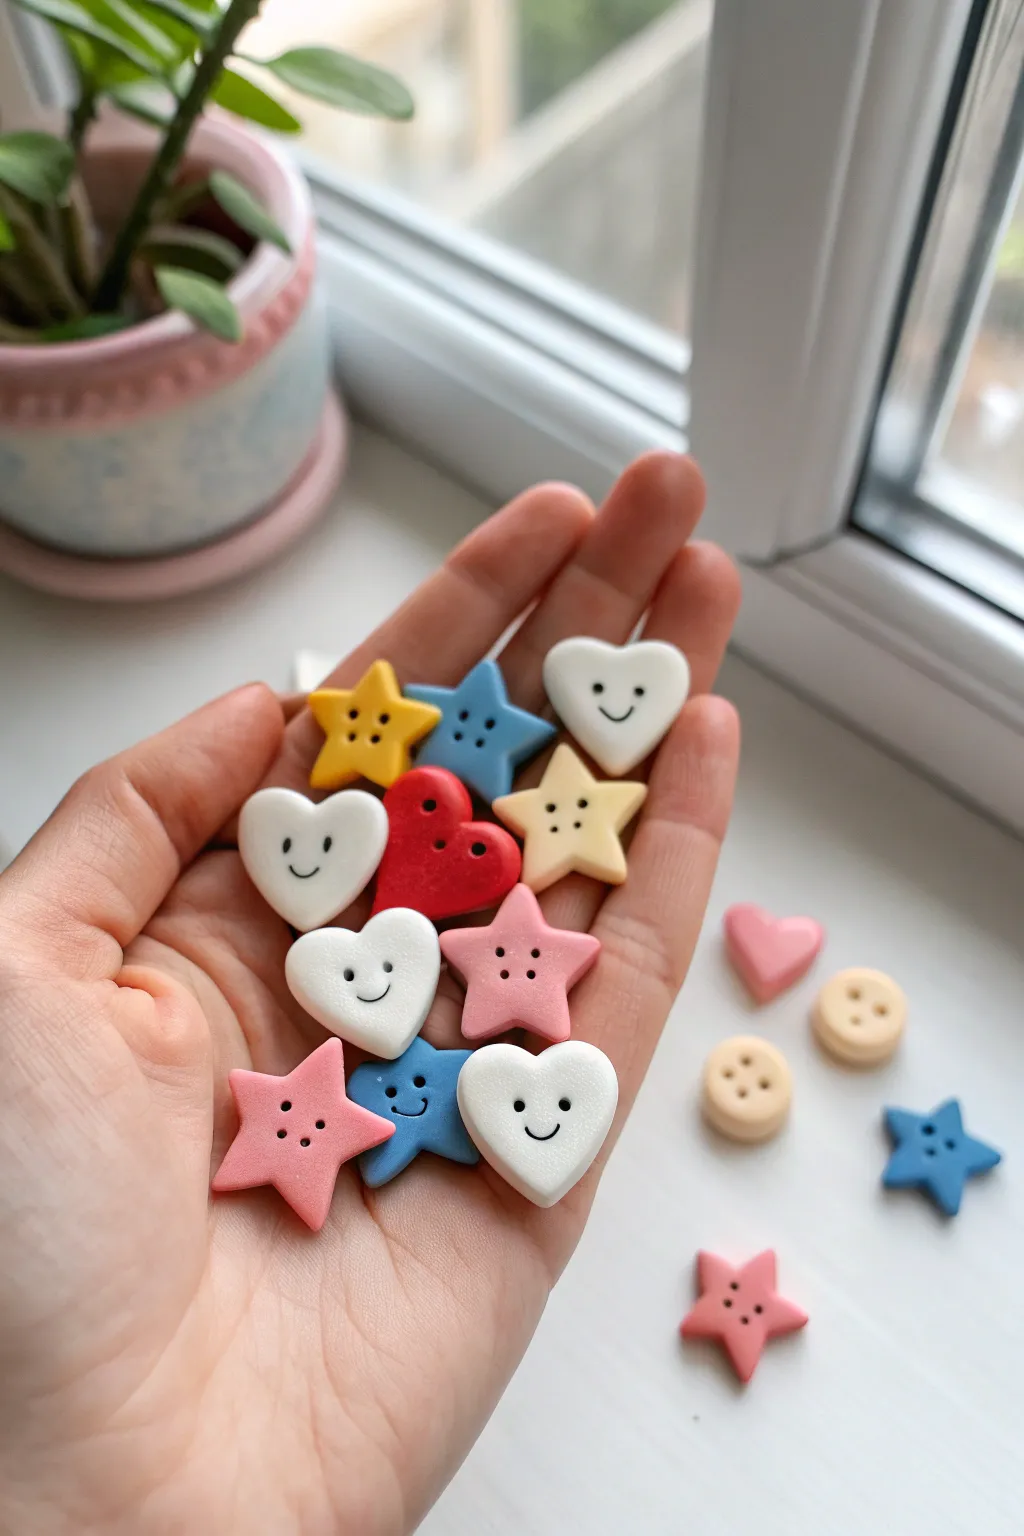
These delightful heart and star charms are a perfect blend of cute and functional, styled to look like chunky buttons with sweet little faces. Their smooth, matte finish and soft pastel palette make them ideal as pocket trinkets, scrapbooking embellishments, or adorable additions to a handmade gift.
Step-by-Step Guide
Materials
- Air dry clay (white)
- Acrylic paints (yellow, blue, light pink, red, black)
- Small heart and star cookie cutters (approx. 1 inch)
- Rolling pin
- Parchment paper or silicone mat
- Toothpick, skewer, or needle tool
- Fine grit sandpaper
- Small round paintbrush
- Ultra-fine tip black marker or detail brush
- Matte varnish (optional)
Step 1: Shaping the Clay Bases
-
Prepare your workspace:
Lay down your silicone mat or a sheet of parchment paper to prevent sticking. Pinch off a handful of air dry clay and knead it gently until it is soft, pliable, and free of cracks. -
Roll out the clay:
Use a rolling pin to flatten the clay into an even slab. Aim for a thickness of about 1/4 inch (6mm) to ensure the charms are sturdy and have that satisfying ‘chunky’ button feel. -
Cut the shapes:
Press your heart and star cutters firmly into the clay. Create a variety of both shapes to build a nice collection. Wiggle the cutter slightly before lifting to help release the shape cleanly. -
Smooth the edges:
Gently pop the clay shapes out of the cutters. Dip your finger in a tiny bit of water and run it along the cut edges to smooth out any roughness or stray bits of clay.
Step 2: Adding Details
-
Create button holes:
Take a toothpick or a blunt needle tool to create the faux button holes. For the stars and colored hearts, poke four holes in a square formation near the center. Press straight down and pull straight up for clean holes. -
Add face details (optional):
For the white heart charms intended to have faces, you can skip the four holes or place them lower. However, looking at our example, the smiley charms don’t have holes—they have painted features instead, so leave these surfaces smooth. -
Initial drying phase:
Place all your cut shapes on a clean sheet of parchment paper. Let them dry for about 24-48 hours. I like to flip them over halfway through the drying process to ensure the bottoms dry evenly and don’t curl. -
Sand for perfection:
Once fully dry and hard, inspect your charms. Use a fine-grit sandpaper to gently buff away any remaining sharp edges or uneven spots on the surface.
Hole perfection
Use a coffee stirrer or a the end of a small paintbrush instead of a toothpick for cleaner, larger button holes that look more realistic.
Step 3: Painting and Finishing
-
Base coat colors:
Select your acrylic paints. Paint some stars yellow, blue, pink, and red. Paint some hearts red and pink, leaving several hearts (and maybe a star or two) plain white. -
Let the paint dry:
Allow the base coats to dry completely. Acrylics dry fast, so this should only take 15-20 minutes. Apply a second coat if the color looks streaky. -
Paint the smiley faces:
On the white hearts (and select blue stars), use an ultra-fine black marker or a very thin brush with black paint to draw the faces. Place two small dots for eyes wide apart, and a simple ‘U’ curve for a smile. -
Add cheek blush:
I prefer using the tiniest amount of diluted pink paint on the tip of a toothpick to dot rosy cheeks onto the smiley faces for extra cuteness. -
Wait for final dry:
Ensure all painted details are fully dry before handling to avoid smudging your crisp lines. -
Seal the charms:
For durability, apply a thin coat of matte varnish over each charm. This seals the paint and gives the clay a professional, finished look without being too glossy.
Make them wearable
Glue flat-backed earring posts or brooch pins to the back of the dried charms to turn your pocket art into wearable accessories.
Enjoy scattering these cheerful little tokens on your desk or gifting them to brighten a friend’s day
Rice Ball Friends With Faces
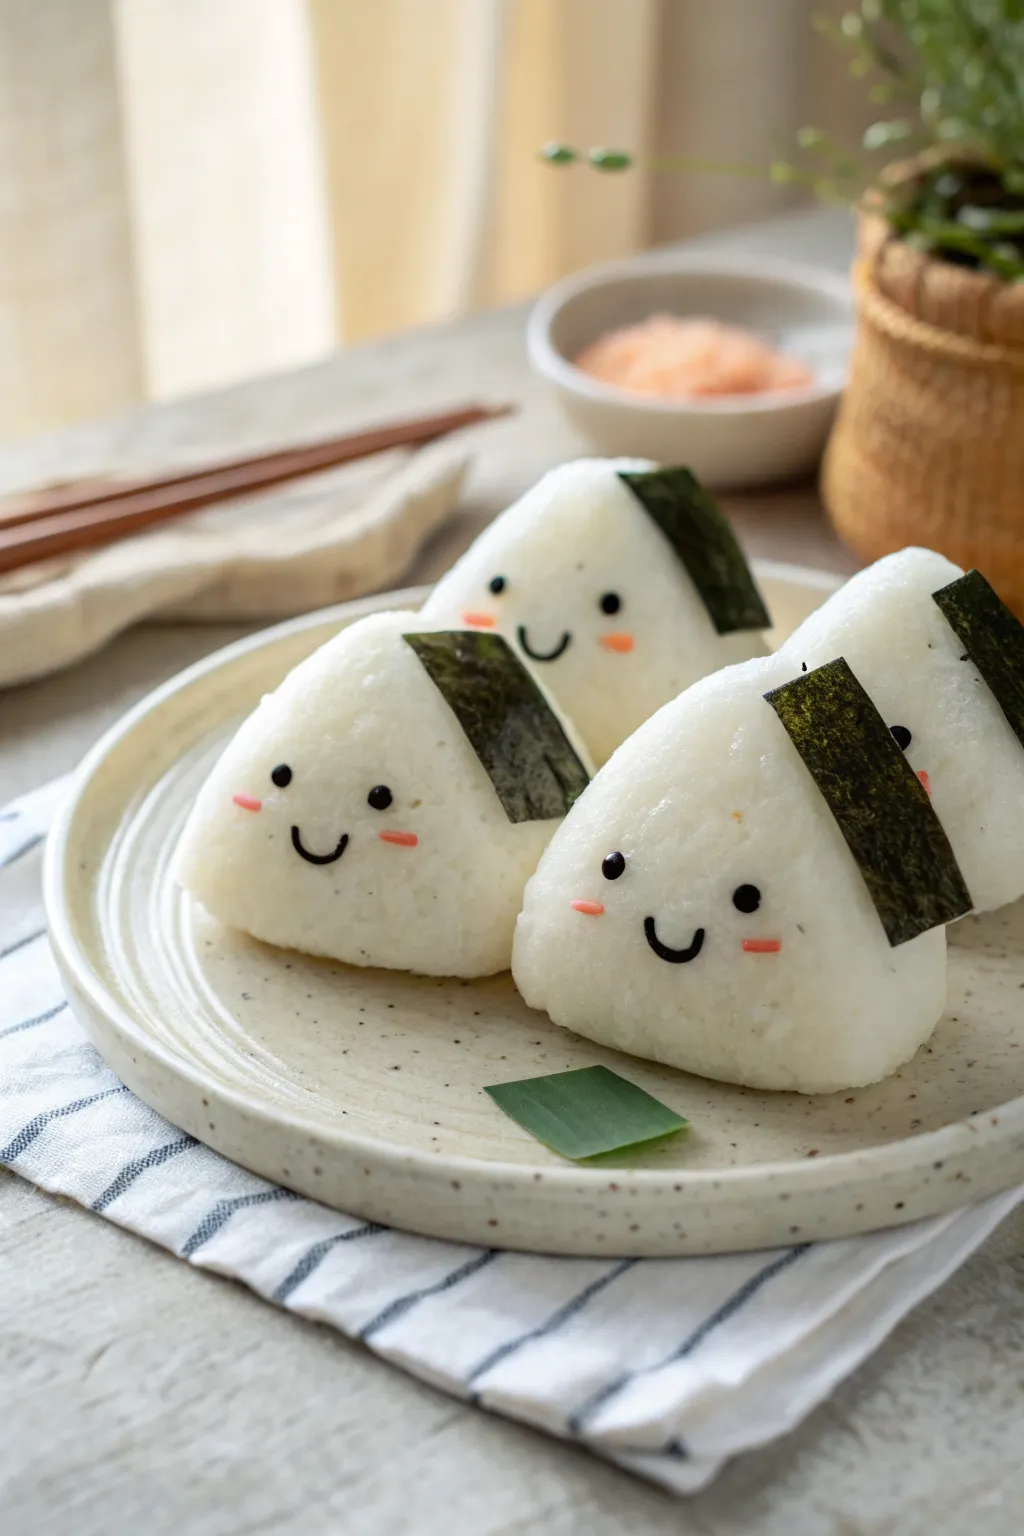
These adorable onigiri friends bring the charm of a Japanese bento box right to your desk without the sticky rice. With their textured surfaces and sweet little faces, they look almost good enough to eat.
Step-by-Step Tutorial
Materials
- White airy dry clay (lightweight polymer clay or foam clay works best for rice texture)
- Black air dry clay or black acrylic paint
- Pink acrylic paint or pink chalk pastel
- Old toothbrush or stiff stipple brush
- Rolling pin
- Scissors or craft knife
- Detail brush or dotting tool
- Matte varnish (optional)
Step 1: Shaping the Rice Base
-
Portion the clay:
Start by taking a chunk of white air dry clay about the size of a golf ball. Knead it until it’s soft and pliable, then roll it into a smooth sphere to remove any cracks. -
Form the triangle:
Gently flatten the ball slightly against your work surface. Use your hands to cup and press the sides, forming a rounded triangle shape. The corners should be soft and curved, not sharp, mimicking a real handmade rice ball. -
Add dimension:
Ensure the shape isn’t too flat; it should be plump and thick. I like to check it from the side to make sure it has a nice, chubby profile. -
Repeat for friends:
Create two more triangular shapes so you have a complete set of three onigiri.
Real Rice Texture
Mix tiny bits of dried white craft sand into your clay before shaping. This physically mimics actual rice grains better than surface texturing alone.
Step 2: Texturing the Rice
-
Prepare your tool:
To get that realistic rice grain look, you’ll need an old toothbrush or a stiff stipple brush. A ball of aluminum foil can also work in a pinch. -
Stipple the surface:
Gently tap the bristles all over the surface of your white clay triangles. Don’t drag the brush; just use an up-and-down tapping motion. -
Refine the texture:
Pay close attention to the edges and corners. The texture helps hide any fingerprints and gives the clay a fluffy appearance.
Step 3: Adding the Nori Wrapper
-
Roll out black clay:
Take a small amount of black clay and roll it out very thinly. Alternatively, if you are painting, skip to the painting steps, but using black clay adds nice dimension. -
Cut the rectangles:
Using scissors or a craft knife, cut out small rectangular strips. These should be wide enough to look like a strip of seaweed and long enough to wrap from the front face to the back. -
Texture the nori:
Before attaching, tap the black strips lightly with your texture tool. Real dried seaweed has a bumpy texture, so this adds realism. -
Attach the seaweed:
Place the strip centered on the bottom edge of your triangle. Gently press it up partway onto the front face and fold the rest underneath to the back. Use a tiny dab of water if it doesn’t stick immediately. -
Vary the placement:
For one or two of the rice balls, try placing the seaweed strip slightly off-center or wrapping a smaller piece around a top corner for variety.
Kawaii Accessories
Make tiny pink clay triangles to stick on top as ‘pickled plum’ hats, or sculpt a miniature shrimp tail poking out of the top corner.
Step 4: Painting the Faces
-
Mix face colors:
Prepare a small amount of black acrylic paint for the eyes and mouth. You’ll also need a soft pink for the cheeks. -
Paint the eyes:
Using a dotting tool or the back end of a paintbrush, dip into the black paint and stamp two small, wide-set eyes on the white area above the seaweed. -
Draw the smiles:
With a very fine detail brush, paint a tiny ‘U’ shape between the eyes for a happy smile. Keep the line thin and delicate. -
Blush the cheeks:
Dip a small brush into pink paint (or use pink chalk pastel dust) and gently dab little ovals under the eyes. This blushing effect gives them their kawaii personality. -
Let it dry:
Allow the paint to dry completely. Since the texture is bumpy, ensure the paint settles well without blobbing. -
Final finish:
Once fully dry, you can leave them matte for a natural look, or add a coat of matte varnish to protect your new friends.
Arrange your trio on a small plate or shelf to add a touch of whimsy to your room
Kawaii Mini Planters With Faces
Create an adorable home for your tiniest succulents or microgreens with these sleepy-faced pots. Their speckled finish and serene expressions give them a high-end ceramic look without the need for a kiln.
Step-by-Step Tutorial
Materials
- White smooth air dry clay
- Rolling pin
- Small bowl or jar (to use as a mold)
- Craft knife or clay cutter
- Water and small sponge
- Sandpaper (fine grit)
- Black acrylic paint or fine-tip paint pen
- Pink acrylic paint
- Small paintbrush or cotton swab
- Matte varnish or sealant (waterproof essential)
- Old toothbrush (for speckling)
Step 1: Sculpting the Base
-
Condition the clay:
Start by kneading a handful of white air dry clay until it is warm, pliable, and free of cracks. -
Roll it out:
Roll the clay into a slab approximately 1/4 inch thick. Try to keep the thickness even across the entire surface to ensure uniform drying. -
Cut the base:
Use your chosen bowl or jar as a guide to cut a circular base for the bottom of your pot. -
Create the walls:
Cut a long rectangular strip of clay from your slab. The height depends on how deep you want the pot, but 2-3 inches is usually perfect for small plants. -
Form the cylinder:
Wrap the rectangular strip around the circular base. Join the two ends of the strip together by blending the clay with your fingers or a modeling tool. -
Seal the bottom:
Blend the bottom edge of the wall into the circular base. Use a small amount of water on your finger to create a seamless join on both the inside and outside.
Fixing Crack
If small cracks appear while drying, don’t panic. Mix a tiny bit of fresh clay with water to make a paste (slip) and fill the cracks, then sand smooth once dry.
Step 2: Refining and Drying
-
Smooth the surface:
Dip a small sponge in water and gently wipe the entire surface to remove fingerprints and bumps. Don’t use too much water, or the clay will become mushy. -
Shape the rim:
Gently curve the top rim slightly inward with your fingers to give it that soft, rounded pottery aesthetic shown in the photo. -
Dry completely:
Let the pot dry for at least 24-48 hours. Turn it occasionally to ensure air reaches the bottom. -
Sand for perfection:
Once bone dry, use fine-grit sandpaper to buff away any remaining imperfections or sharp edges.
Make it a Gift
Before the clay dries, poke holes near the rim and add twine handles, or create a matching saucer for a complete gift set.
Step 3: Adding the Kawaii Face
-
Speckle effect:
Dip an old toothbrush into slightly watered-down black grey paint. Run your thumb over the bristles to flick tiny speckles onto the pot for a faux-stone look. -
Draw the eyes:
Using a fine-tip paintbrush or paint pen, draw two downward-curving arcs for the closed eyes. Add three small lashes to each arc. -
Add the nose and mouth:
Paint a small oval nose in the center, and draw a simple anchor-shaped mouth (‘w’ shape) connecting to it. -
Rosy cheeks:
Dip a cotton swab or round brush into pink paint. Dab off the excess, then press gently onto the clay to create soft, circular blush marks. -
Seal the deal:
Since this is a planter, apply 2-3 coats of a strong waterproof varnish or sealant inside and out to protect the clay from moisture.
Now your charming little planter is ready to bring a touch of serenity to your windowsill
Tiny Trinket Dish With a Face
This adorable little catch-all dish features a soothing teal interior, a soft pink exterior, and a sweet, slumbering face design. It’s the perfect size for holding rings, earrings, or tiny treasures on your bedside table.
How-To Guide
Materials
- Air dry clay (white)
- Acrylic paints (teal/turquoise, soft coral pink, black)
- Glossy varnish or glaze (crucial for that ceramic look)
- Rolling pin
- Small bowl or round cookie cutter (approx. 3-4 inches)
- Small sponge or foam brush
- Fine detail paintbrush (size 0 or 00)
- Sandpaper (fine grit)
- Water and a small dish
Step 1: Shaping the Dish
-
Condition the Clay:
Start by taking a handful of air dry clay and kneading it in your hands until it is warm, pliable, and smooth. -
Roll it Out:
Use your rolling pin to flatten the clay into an even slab, aiming for a consistent thickness of about 1/4 inch. -
Cut the Circle:
Place your small bowl or round cutter onto the clay and press down firmly to cut out a perfect circle. Remove the excess clay. -
Form the Curve:
Gently lift the edges of the circle with your fingertips, curving them upward to create a shallow bowl shape. You can smooth the curve by pressing the clay gently into the palm of your hand. -
Smooth the Edges:
Dip your finger in a little water and run it along the rim of the dish to erase any cracks or rough spots. I like to spend extra time here to ensure the rim looks professional. -
Let it Dry:
Place the dish on a flat surface to dry completely. This usually takes 24-48 hours depending on humidity; turn it over halfway through so the bottom dries evenly.
Uneven Rim?
If your rim is wavy, wait until the ‘leather hard’ stage (partially dry) to trim it with a craft knife for a cleaner edge before sanding.
Step 2: Painting and Details
-
Sand Imperfections:
Once fully dry, lightly sand any rough patches on the rim or surface with fine-grit sandpaper, then wipe away the dust. -
Paint the Interior:
Using a sponge or soft brush, paint the entire inside of the dish with your teal or turquoise acrylic paint. Apply two thin coats for better coverage. -
Paint the Exterior:
Flip the dish over and paint the outside and the very top of the rim with the soft coral pink. Be careful to create a clean line where the pink meets the teal. -
Dry the Base Coats:
Wait for the base colors to be completely bone dry before attempting the detail work. -
Sketch the Face:
Lightly sketch the sleeping face design—two curved lines for eyes, lashes, a tiny nose line, and a smile—using a pencil directly onto the teal paint. -
Paint the Lashes:
Load your finest detail brush with black acrylic paint. Carefully trace over your pencil lines to create the sleeping eyelids and eyelashes. -
Add the Smile:
Paint the small curved line for the nose and the slightly wider curve for the smile, keeping your hand steady. -
Create the Glint:
To mimic the speckled pottery look seen in the photo, you can flick a tiny amount of watered-down black paint onto the teal surface using an old toothbrush, though this is optional.
Step 3: Finishing Touches
-
Seal with Gloss:
Once the face detail is totally dry, apply a generous coat of high-gloss varnish or glaze over the entire dish. -
Second Coat:
Apply a second coat of varnish if needed to achieve that super-shiny, ceramic-like finish shown in the image. -
Final Cure:
Let the varnish cure according to the bottle instructions before placing any items inside.
Use a Template
Can’t free hand the face? Draw the face on tissue paper, place it on the dish, and trace over it with a wet brush to transfer faint guide lines.
Now you have a sweet spot to keep your favorite jewelry safe while you sleep
Stackable Animal Totem Minis
Create an adorable stack of four chubby animal friends with this simple air-dry clay project. The smooth texture and gentle pastel colors give these stackable minis a soft, marshmallow-like appearance perfect for desk decor.
Step-by-Step
Materials
- White air-dry clay (smooth, lightweight variety)
- Acrylic paints (pale pink, light brown/tan, white, black, dark brown)
- Small rolling pin
- Ball stylus tool or toothpick
- Detail paintbrush (0 or 00 size)
- Cup of water and sanding block (fine grit)
- Clay adhesive or white glue
Step 1: Shaping the Base Forms
-
Prepare your clay:
Start with fresh white air-dry clay. Knead it well until it is pliable and crack-free. You will need four equal portions for the heads. -
Mix base colors:
Leave one portion pure white for the rabbit. Mix a tiny drop of pale pink paint into one ball for the bottom bear. Mix a drop of light brown into the middle bear’s ball to create a tan shade. Leave the second-highest ball (the cream bear) mostly white with just a hint of yellow or beige. -
Roll spheres:
Roll each portion into a smooth, even ball. Gently press them onto your work surface to flatten the bottoms slightly so they will stack securely later. -
Smooth imperfections:
Dip your finger in a little water and smooth out any visible seams or cracks on the surface of your spheres. A smooth canvas is key for that kawaii look.
Step 2: Sculpting Ears & Details
-
Form the rabbit ears:
Take two small pieces of white clay and roll them into teardrop shapes. Flatten them slightly and attach them to the top of the pure white sphere. Use a tool to blend the seams downward. -
Add rabbit inner ears:
Mix a small amount of bright pink clay (or paint later). Press small flattened ovals into the center of the white rabbit ears. -
Create bear ears:
For the cream and tan bears, roll tiny balls of matching clay. Attach two to the top of each respective head. Use a ball tool to create a small indentation in the center of each ear. -
Sculpt the bottom bear:
For the pink bottom bear, attach two small, rounded ears. You can pinch them slightly at the base to give them a distinct shape. -
Add snouts:
For the tan and pink bears, roll extremely tiny balls of clay to create raised snout areas. Press these gently onto the lower center of the faces. The rabbit and cream bear can remain flat-faced. -
Drying time:
Let all four heads dry completely on a flat surface. This usually takes 24-48 hours depending on humidity. Rotate them occasionally so the bottoms dry evenly.
Cracks while rolling?
If your clay cracks while rolling spheres, it’s too dry. Knead in a drop of water or moisturizing lotion to rehydrate it before shaping again.
Step 3: Painting & Assembly
-
Sand for smoothness:
Once fully dry, use a fine-grit sanding sponge to gently buff away any fingerprints or rough spots. Wipe away the dust with a barely damp cloth. -
Paint the eyes:
Using a fine detail brush and black paint (or dark brown for a softer look), paint small, wide-set oval eyes on each face. Keep them level for a balanced expression. -
Add noses and mouths:
Paint small pink noses on the rabbit and top two bears. Use dark brown paint for the noses on the tan and pink bears. Add tiny ‘w’ shapes for mouths using your thinnest brush. -
Blushing cheeks:
I like to use a very dry brush with a dab of pink paint to stipple on rosy cheeks. For the rabbit, you can paint three small whiskers on each side in black. -
Final assembly:
Arrange your stack to check balance. Apply a dab of strong craft glue or superglue between each head, stacking them from the pink bear up to the rabbit. Hold in place until the glue sets.
Add a Function
Before drying, insert a thick wire vertically through all pieces to create a photo holder, or hollow out the top rabbit to make a tiny incense holder.
Display your totem on a sunny shelf where their cheerful faces can greet you every day
Cute Drink Carton Charms
These adorable little milk carton charms are the perfect blend of simplicity and sweetness. With their pastel pink tops and tiny smiling faces, they make delightful zipper pulls or keychain additions.
How-To Guide
Materials
- White air-dry clay (or polymer clay)
- Pastel pink air-dry clay (or white clay mixed with pink paint)
- Clay roller or acrylic rolling pin
- Sharp blade or clay knife
- Small dotting tool or toothpick
- Eye pin screw (silver or gold)
- Black acrylic paint
- Pink acrylic paint or pink chalk pastel
- Glossy varnish or UV resin
- Glue (E6000 or superglue)
- Fine detail paintbrush
Step 1: Shaping the Carton Base
-
Prepare the White Clay:
Start by conditioning a chunk of white clay until it is smooth and pliable. Roll it into a ball to remove any cracks. -
Form a Cube:
Gently press the ball against your work surface to flatten the bottom. Use your fingers and a flat tool to press the sides in, creating a solid cube shape. It should be taller than it is wide, roughly rectangular. -
Refine the Edges:
Tap the clay block on each side against your table to sharpen the corners. You want crisp, straight lines for that classic carton look. -
Create the Pink Top:
Roll out a small piece of pastel pink clay until it’s about 2mm thick. Cut a square that is exactly the same width and depth as the top of your white white block. -
Attach the Top:
Apply a tiny amount of water (if using air clay) to the top of the white block and gently press the pink square onto it. Smooth the seam slightly, but keep the color separation distinct.
Cracked Clay?
If small cracks appear while the clay dries, mix a tiny bit of fresh clay with water to make a paste. Fill the cracks, smooth with a wet finger, and let dry again.
Step 2: Adding Details
-
Make the Slanted Roof:
Usually, milk cartons have a slanted top. You can leave it flat for a ‘cube’ style as shown, or gently pinch the pink section upwards to form a slight ridge if you prefer a traditional milk carton roof. -
Create the Straw:
Roll a very thin snake of white clay. Cut a short segment, about 1cm long. -
Insert the Straw:
Use a tool to poke a small indentation into the pink top, slightly off-center. Dab a little glue or water in the hole and insert your white clay straw at a playful angle. -
Add Polka Dots:
Roll two or three microscopic balls of white clay. Flatten them gently onto the pink top section to create decorative polka dots. -
Insert Hardware:
While the clay is still wet, screw the eye pin into the top of the carton, opposite the straw. I like to remove it, add a dab of glue, and screw it back in for extra security.
Flavor Variations
Change the top color to customize the flavor! Use brown for chocolate milk, pale yellow for banana milk, or light green for matcha soymilk.
Step 3: Face and Finishing
-
Let it Dry:
Allow the charm to dry completely. For air-dry clay, this usually takes 24-48 hours depending on the thickness. -
Paint the Eyes:
Using a dotting tool or the back of a paintbrush dipped in black acrylic paint, stamp two small circles for eyes on the lower half of the white face. -
Add a Smile:
With your finest detail brush and black paint, draw a tiny ‘U’ shape between the eyes for a smile. -
Add Eye Highlights:
Once the black paint is dry, use a toothpick to add a tiny white dot to the upper corner of each eye. This brings the character to life. -
Apply Blush:
Dip a Q-tip into pink chalk pastel dust or very watered-down pink paint. Gently dab oval cheeks right under the eyes. -
Seal the Charm:
Coat the entire piece in a glossy varnish or UV resin. This protects the paint and gives the ‘milk’ a carton-like sheen.
Attach a jump ring and hook it onto your bag for a daily dose of cuteness
Mini Kawaii Collection Box Set
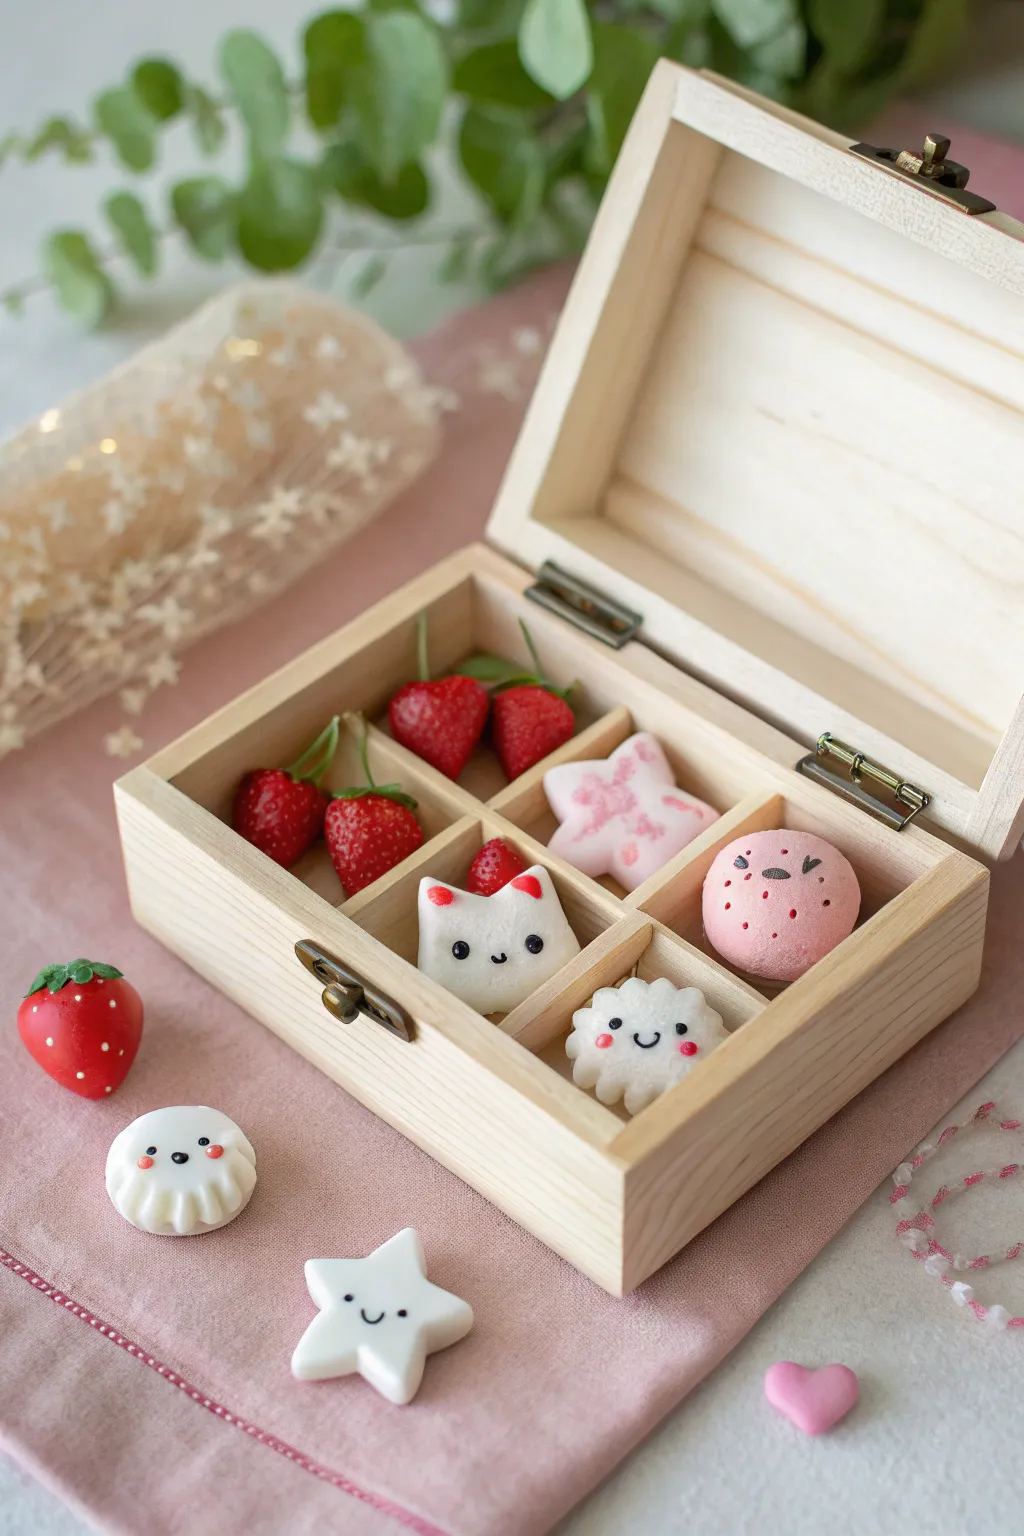
Create your own pocket-sized collection of cuteness with this charming air dry clay set. This tutorial guides you through sculpting tiny strawberries, stars, clouds, and critters to fill up a sweet wooden display box.
Detailed Instructions
Materials
- White air dry clay (lightweight/marshmallow type recommended)
- Acrylic paints (red, pink, black, white)
- Small wooden divider box (unfinished)
- Clay tools (needle tool, small ball tool)
- Fine detail paintbrush (000 size)
- Artificial strawberry leaves (or green clay)
- Toothpicks
- Gloss varnish or clear nail polish
Step 1: Setting the Scene
-
Prepare the Box:
Start with a clean, raw wooden divider box. Sand down any rough edges with fine sandpaper if needed, but leave the wood natural for that soft, minimalist aesthetic shown in the photo. -
Condition the Clay:
Take a handful of white air dry clay and knead it until it’s pliable and smooth. This prevents cracks from forming later.
Step 2: Sculpting the Strawberries
-
Shape the Base:
Roll small balls of clay and gently pinch the bottom into a tapered point, creating a rounded cone shape. Make 3 to 4 of these vary slightly in size. -
Add Texture:
Before the clay dries, use a needle tool or toothpick to poke small, shallow indentations all over the surface to mimic seed pockets. -
Insert Stems:
If using artificial leaves, press a small divot into the top center. If using clay stems, wait until the red paint phase is done to attach green clay leaves.
Clay Smoothing Hack
Use a tiny bit of water on your finger to smooth out fingerprints before the clay dries. For stubborn lines, a baby wipe works wonders gently buffing the surface.
Step 3: Crafting the Friends
-
Make the Cloud:
Flatten a small ball of white clay slightly. Pinch and pull small sections around the edge to create fluffy scallops. Smooth the edges with a wet finger. -
Sculpt the Cat:
Roll a smooth white sphere and flatten it into a thick disc. Pinch two small triangles at the top for ears, smoothing the seams invisible. -
Shape the Star:
Roll out clay and either use a small star cutter or hand-shape a chubby five-point star. Round off the points so they look soft and pillowy. -
Form the Pink Puff:
Mix a tiny dot of red paint into a ball of white clay to create baby pink. Roll it into a perfect sphere and press it flat on the bottom so it sits upright.
Make It Glossy
Coat just the eyes and the strawberries with UV resin or high-gloss varnish. The contrast between matte clay and shiny details makes them look professionally made.
Step 4: Bringing them to Life
-
Painting the Berries:
Once dry, paint the berry shapes bright red. I like to do two thin coats for vibrant coverage. -
Painting the Seeds:
Dip a toothpick into pale yellow or white paint and carefully tap it into the indentations you made earlier. -
Adding Leaves:
Glue the artificial leaves into the top divot of your strawberries, or sculpt and paint green clay leaves now. -
Painting Faces:
For the cloud, cat, and star, use a fine detail brush or a black fine-liner pen to draw tiny wide-set eyes and a small ‘u’ mouth. -
Adding Blush:
Dilute a tiny bit of pink paint with water or use a dry pastel dusting to add soft rosy cheeks to all your character pieces. -
Star Details:
For the pink star, you can paint a faint cherry blossom pattern using a darker pink shade for extra detail. -
Cat Ears:
Paint small red triangles inside the cat’s ears. -
Finishing Touches:
Give the eyes a tiny dot of white paint to add a ‘sparkle’ highlight. -
Assembly:
Arrange your finished, dry miniatures into the compartments of the wooden box. You can secure them with a dab of glue or leave them loose to rearrange later.
Now you have a precious collection containing tiny worlds of happiness ready to display on your desk