Pink polymer clay has this magical way of making even the simplest shape look instantly sweet and collectible. Here are my go-to pink polymer clay ideas—starting with the classic cute charms everyone loves, then sliding into more playful, unexpected twists.
Pink Heart Charms and Keychains
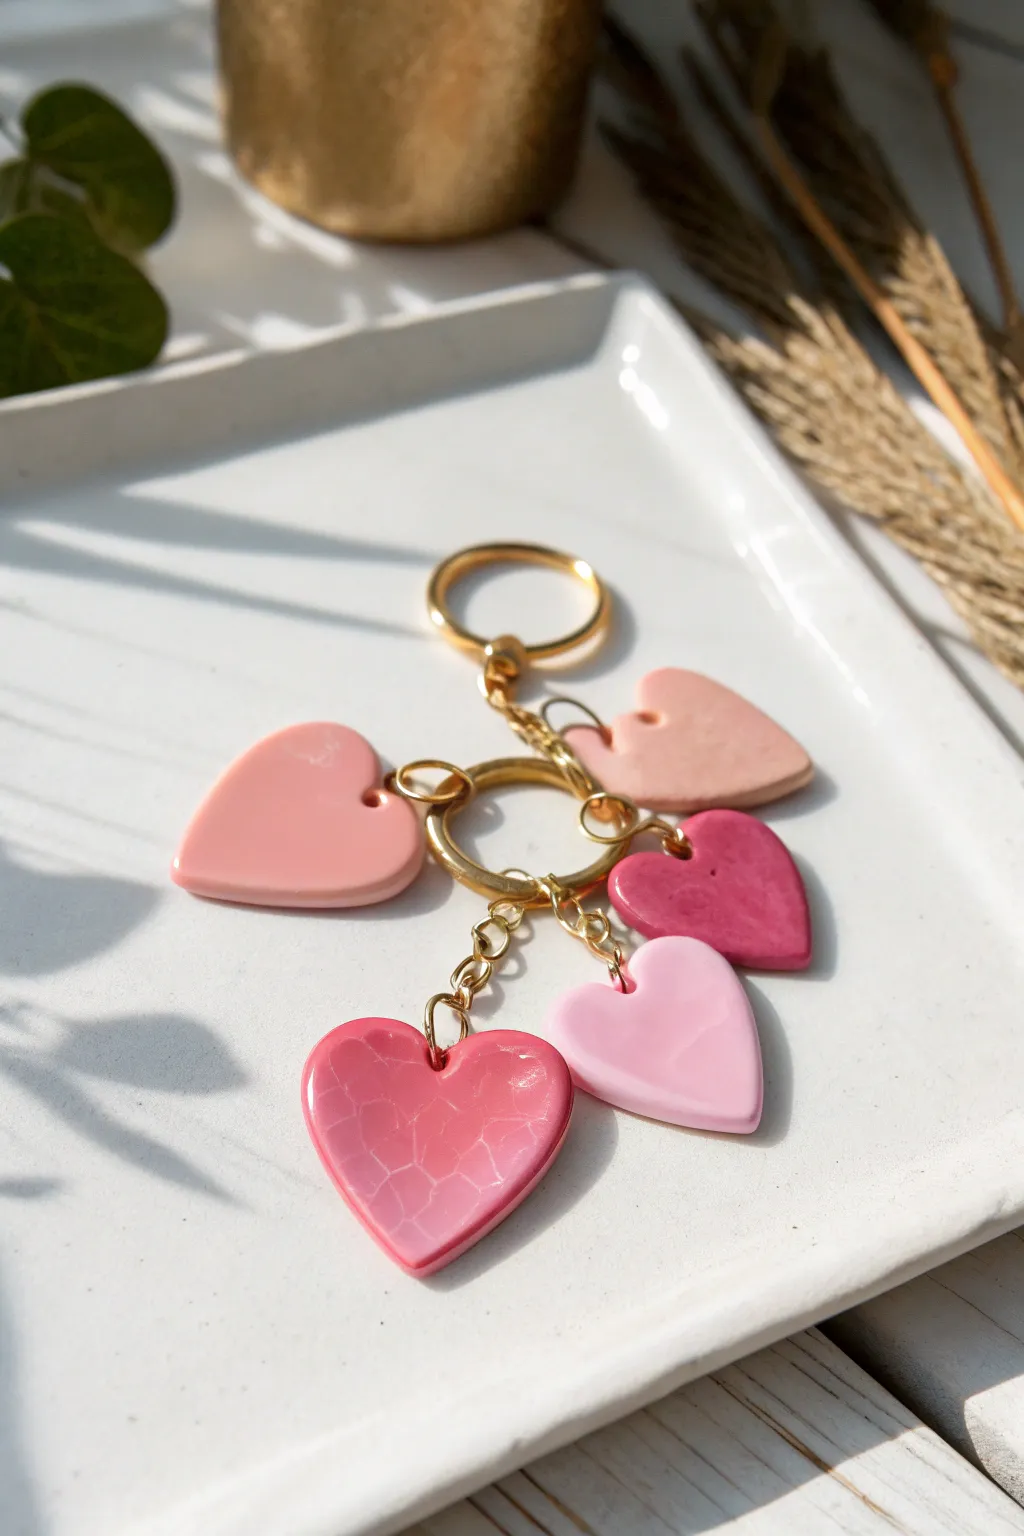
Showcase your love for pink with this delightful keychain featuring a cascading cluster of polymer clay hearts. By combining solid pastels with unique speckled and translucent effects, you’ll create a charming accessory that adds a pop of romance to any set of keys.
Step-by-Step
Materials
- Polymer clay in assorted colors (white, translucent, blush pink, hot pink, mauve)
- White acrylic paint or alcohol ink (optional for marbling)
- Heart-shaped clay cutters (approx. 1 inch size)
- Acrylic rolling pin or pasta machine
- Ceramic tile or baking surface
- Parchment paper
- Small hand drill or needle tool
- Gold tone findings: 1 large split key ring, 1 smaller connector ring, jump rings (6-8mm), small chain segments
- Jewelry pliers (round nose and chain nose)
- Gloss glaze or resin (optional)
Step 1: Prepping the Clay Styles
-
Conditioning:
Start by conditioning your clay blocks thoroughly. Knead each color in your hands until it is soft, warm, and pliable to prevent cracking later. -
Color mixing:
Create a gradient of pinks. Mix white with tiny amounts of hot pink to create a soft pastel, and mix mauve with white for a dusty rose shade. Leave some colors saturated for contrast. -
Creating the speckled effect:
For the textured translucent heart, take a small ball of translucent clay. Chop up very tiny, dust-like bits of opaque white or pale pink clay. -
Mixing the speckles:
Mix these chopped bits into the translucent base gently—don’t overblend, or the colors will muddy. You want visible suspended particles for that stone-like look. -
Creating the crackled effect:
For the “crackled” bright pink heart, roll a sheet of pink clay. Apply a thin layer of white acrylic paint or gold leaf to the surface and let it dry completely until a skin forms. -
Rolling:
Pass this painted sheet through your pasta machine on a slightly thinner setting or stretch it by hand. As the clay stretches, the dried paint layer will separate, creating beautiful organic cracks.
Sticky Situation?
If clay sticks to your cutter, dip the cutter in cornstarch or water before pressing down. This acts as a release agent and keeps the shape perfect.
Step 2: Cutting and Baking
-
Rolling sheets:
Using your acrylic roller or pasta machine, flatten all your prepared clay colors into sheets of even thickness, roughly 3mm to 4mm thick. -
Cutting shapes:
Use your heart cutter to stamp out five separate hearts from your different clay blends. I suggest pressing down firmly and giving a little wiggle to ensure clean edges. -
Smoothing edges:
Before baking, gently run your finger along the cut edges of the hearts to soften any sharp ridges or loose bits of clay. -
Drilling holes:
If you are drilling before baking, use a needle tool to create a hole in the upper lobe of each heart. Ensure the hole is large enough for your jump rings. -
Baking:
Place the hearts on a ceramic tile lined with parchment paper. Bake according to your specific brand’s package instructions (usually 275°F/135°C for 15-30 minutes). -
Finishing:
Once baked and fully cooled, you can sand the edges slightly if needed. If you want a high-shine finish like the photo, coat the hearts with a thin layer of UV resin or gloss varnish and cure.
Step 3: Assembly
-
Post-bake drilling:
If you didn’t pierce holes earlier, use a small hand drill now to carefully bore a hole into the top corner of each heart. -
Attaching jump rings:
Use two pairs of pliers to twist open your jump rings sideways. Thread one ring through each heart hole and close them securely. -
Constructing the keychain:
Take your smaller connector ring and attach it to the large split key ring. This serves as the central hub. -
Varying lengths:
Cut small segments of chain in different lengths (0.5 inch to 1.5 inches) creates that lovely cascading effect. -
Final connection:
Attach the hearts to the central connector ring using the chain segments. Hook some directly to the ring and some to the ends of the chains for visual variety.
Make it Sparkle
Mix a tiny pinch of gold mica powder or extra-fine glitter into the translucent clay batch to give one of your hearts a subtle, embedded shimmer.
Your keys are now organized in the sweetest way possible with this custom handmade accessory


Blush Bunny Mini Figurines
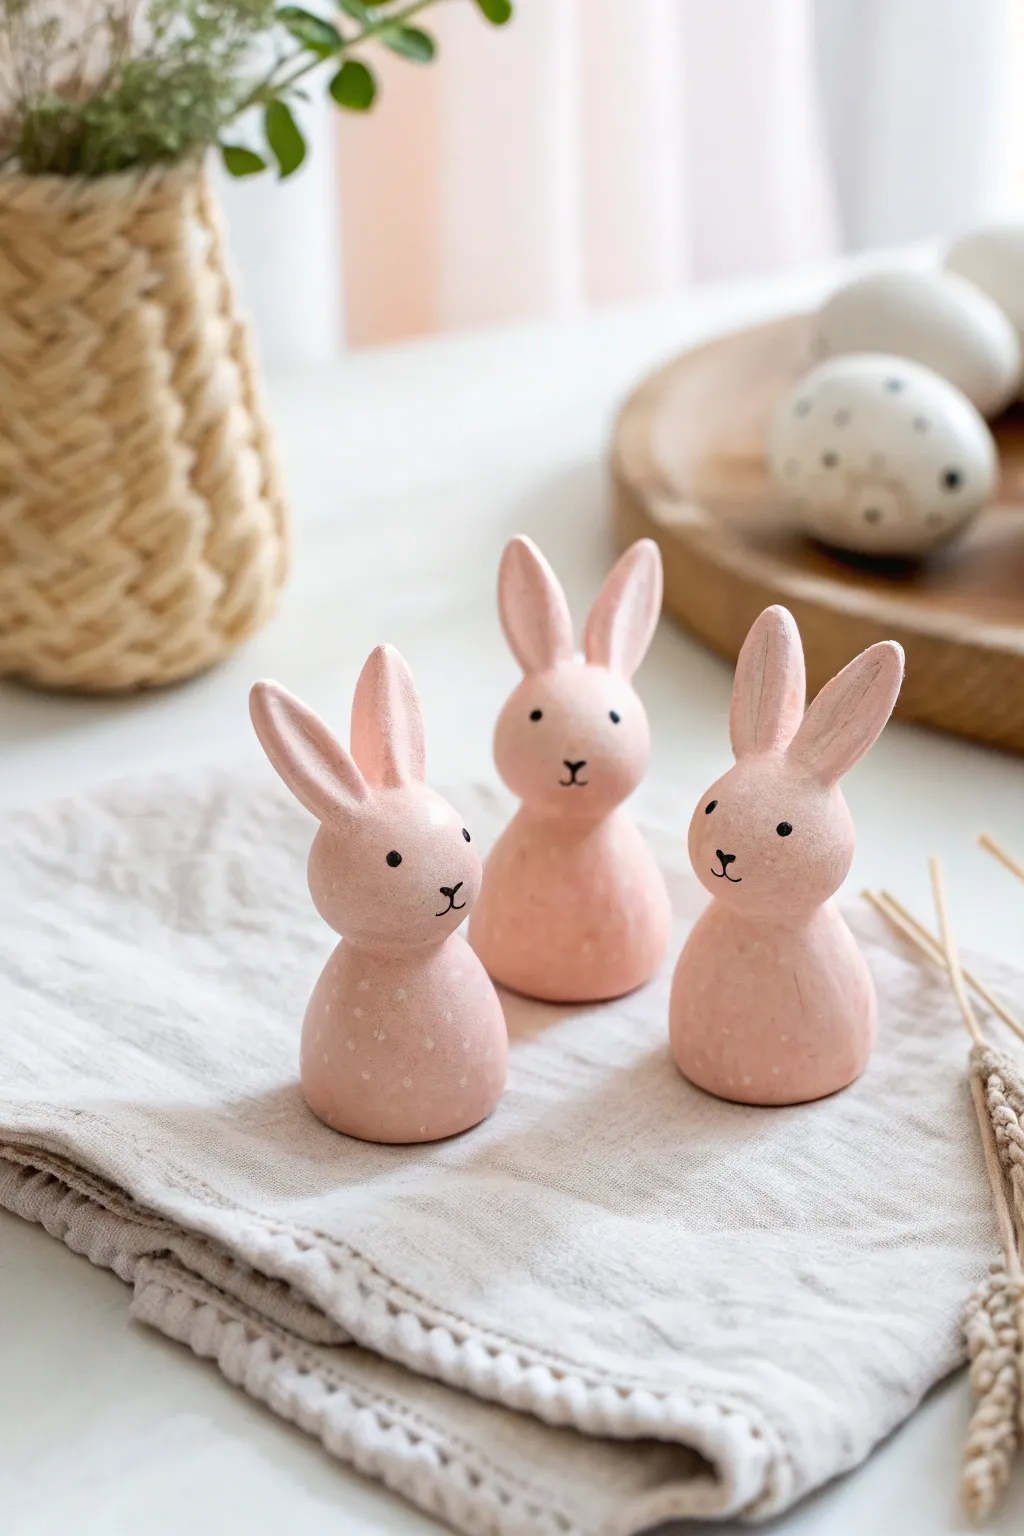
Create a trio of darling, modern spring decorations with these soft pink polymer clay bunnies. Their minimalist silhouette and sweet, barely-there expressions make them a perfect addition to a neutral Easter vignette or nursery shelf.
Step-by-Step Guide
Materials
- Polymer clay (blush pink or white mixed with a tiny bit of red)
- White acrylic paint
- Black acrylic paint
- Fine detail paintbrush (size 00 or 000)
- Small dotting tool or toothpick
- Clay blending tool or silicone shaper
- Old toothbrush or stiff bristle brush
- Baking sheet and parchment paper
- Oven
Step 1: Shaping the Bodies
-
Condition the Clay:
Begin by kneading your pink polymer clay until it is soft, pliable, and free of cracks. If you are mixing white and red to achieve a custom blush shade, ensure the colors are fully blended for a uniform tone. -
Form the Base:
Divide your clay into three equal portions for the bodies. Roll each piece into a smooth ball about the size of a walnut. -
Create the Cone Shape:
Gently gently roll one side of the ball against your work surface to taper it slightly, creating a soft, rounded cone shape. Often I flatten the bottom just enough so it stands securely without tipping. -
Form the Heads:
Take smaller pieces of clay, about one-third the size of the body pieces, and roll them into perfect spheres. -
Attach the Heads:
Place a head sphere onto the top of each body cone. Press down gently to adhere them but don’t squash the shape. -
Blend the Seams:
Using a clay blending tool or your finger, very gently smooth the clay where the head meets the body just slightly at the back of the neck to secure the bond.
Fixing Fingerprints
If you notice fingerprints on your raw clay, lightly brush the surface with a little baby oil or cornstarch before baking to smooth them out instantly.
Step 2: Ears & Details
-
Make the Ears:
To create the ears, roll six small, rice-grain-shaped logs of clay. Flatten them slightly between your fingers to create a petal shape. -
Refine Ear Shape:
Pinch one end of each ear to create a tapered point for attachment. You can gently curve the tips of a few ears for a lively, natural look. -
Attach Ears:
Press the pinched ends of the ears onto the top of the heads. Use your blending tool to smooth the clay downward onto the head so they don’t pop off during baking. -
Texture Option:
For the speckled bunny, adhere to the smooth finish for now; the speckles will be painted on later. Give all bunnies a final smooth down with your finger to remove any stray fingerprints. -
Bake:
Place your bunnies on a parchment-lined baking sheet. Bake according to your clay manufacturer’s instructions (usually 275°F/135°C for 15-30 minutes depending on thickness) and let them cool completely.
Add a Pom-Pom Tail
Glue a tiny white pom-pom or a small ball of white wool to the back of each figurine after baking for an adorable, fluffy cotton-tail detail.
Step 3: Painting Faces
-
Prepare Paint:
Squeeze a tiny dot of black acrylic paint onto a palette. You want the paint to be fluid but opaque. -
Paint the Eyes:
Using the tip of a toothpick or a very small dotting tool, dip into the black paint and create two wide-set eyes on the face. Keep them small for that cute ‘kawaii’ look. -
Draw the Nose and Mouth:
Switch to your finest detail brush. Paint a tiny ‘Y’ shape or a small anchor shape between and slightly below the eyes to form the nose and mouth. -
Add Speckles (Optional):
For the textured bunny variation, dip an old toothbrush into white acrylic paint. Run your thumb across the bristles to flick a fine mist of white dots onto the lower body of one bunny. -
Final Dry:
Allow the paint to dry completely. Since acrylic dries fast, this should only take about 10-15 minutes.
Now arrange your trio together for a subtle and sweet display of handmade charm


Chubby Pink Piglet Charms
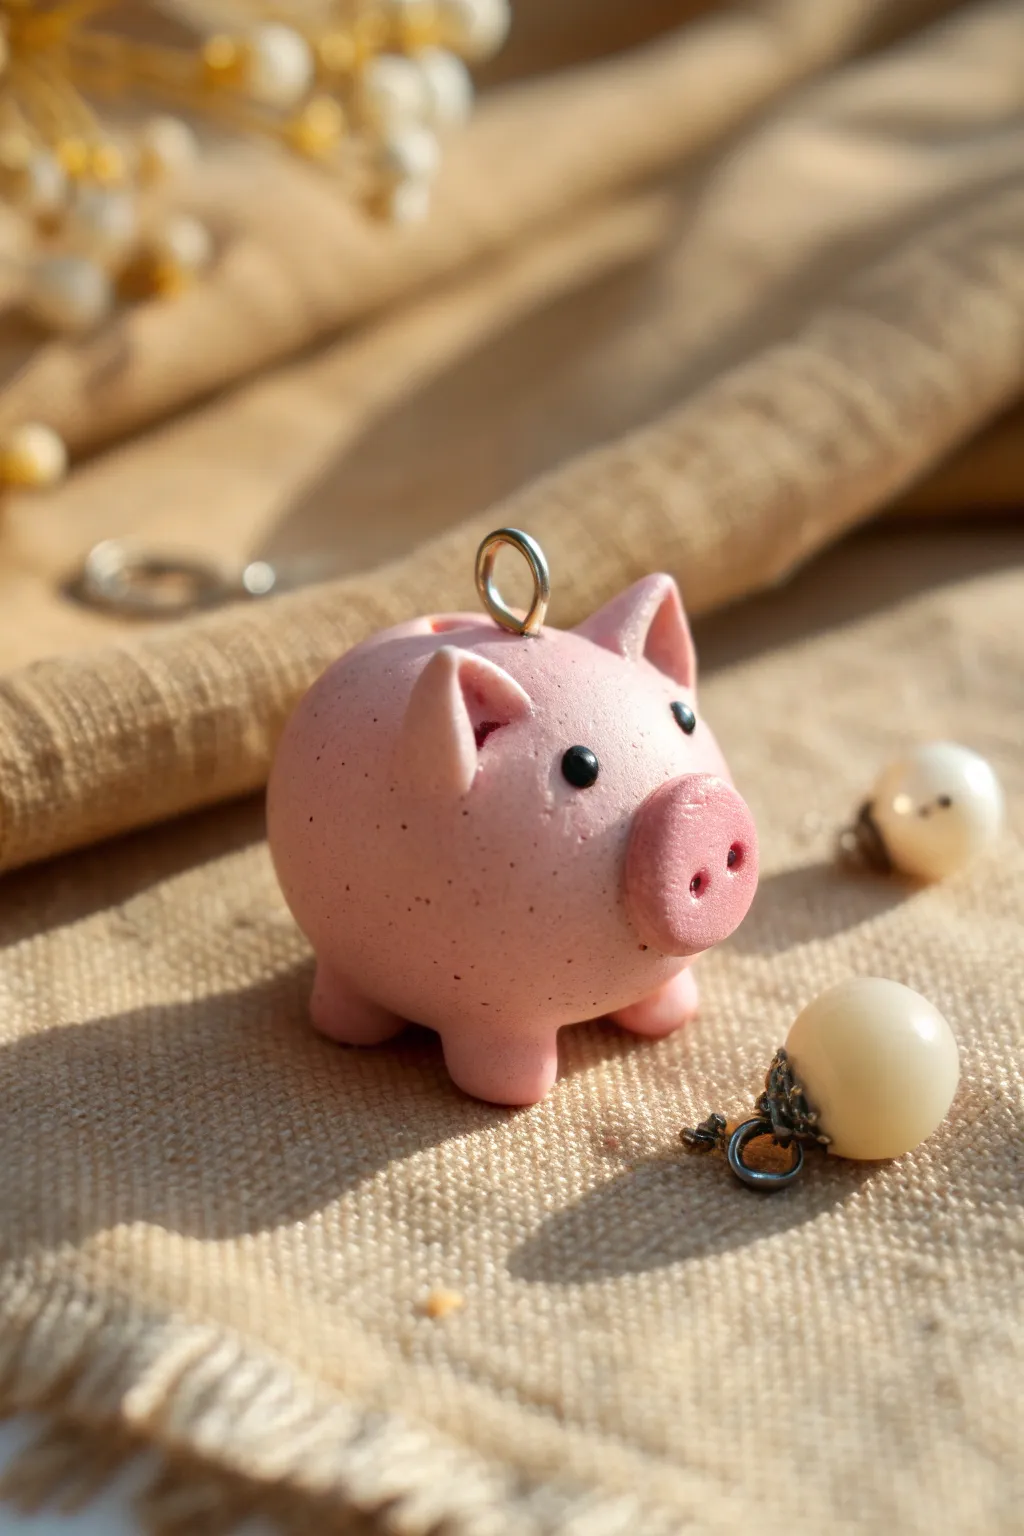
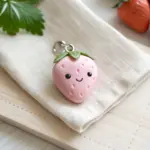
This adorably chubby piglet charm features a soft, dusty pink finish with subtle speckling that adds handcrafted charm. Its delightful round body and expressive little snout make it perfect for necklaces, bracelets, or even a cute keychain companion.
How-To Guide
Materials
- Polymer clay (dusty rose/light pink)
- Black glass beads or small black clay balls (for eyes)
- Small metal jump ring
- Liquid polymer clay or Bake & Bond
- Paring knife or clay blade
- Needle tool or toothpick
- Ball stylus tool
- Soft bristles brush (optional, for texturing)
- Black acrylic paint (optional, for speckling)
- Wet wipes
- Oven
Step 1: Shaping the Base Body
-
Condition the clay:
Start by taking a chunk of your pink polymer clay and kneading it thoroughly in your hands until it becomes soft and pliable. -
Create the main form:
Roll the conditioned clay into a perfect sphere. To get that distinct chubby look, gently press it against your work surface to flatten the bottom slightly so it can stand on its own. -
Add subtle texture:
If you want that slightly matte, stone-like texture seen in the photo, gently tap the surface with an old toothbrush or a crumpled piece of aluminum foil, but keep the pressure light. -
Create the speckled effect:
For the speckles, you can either mix tiny amounts of ground black pepper into the clay before rolling or lightly flick watered-down black acrylic paint onto the rolled ball using a stiff brush.
Fixing “Fingerprintitis”
If you notice fingerprints on your piglet before baking, lightly brush the surface with a little baby oil or cornstarch to smooth them away instantly.
Step 2: Adding Features & Details
-
Prepare the snout:
Roll a small, flattened oval of pink clay. It should be proportional to the face but prominent enough to be cute. -
Attach the snout:
Press the oval onto the lower front of your sphere. Use a smoothing tool to blend the back edges seamlessly into the head if you prefer a smoother transition, or leave it defined as shown. -
Detail the nostrils:
Using a needle tool or the small end of a ball stylus, press two evenly spaced holes into the snout to create the nostrils. -
Create eye sockets:
Use a medium ball stylus to create two small indentations just above the snout, spacing them wide apart for a kawaii look. -
Insert the eyes:
Place two small black beads into the sockets. Press them in firmly so they sit flush with the clay surface. -
Shape the ears:
Create two small triangles of pink clay. Gently curve them slightly to give them a natural, perked-up shape.
Step 3: Assembly and Finishing
-
Attach the ears:
Place the ears on top of the head. I find using a tiny dot of liquid clay here ensures they won’t pop off later. Blend the base of the ears into the head with a silicone tool. -
Form the legs:
Roll four small, equal-sized balls of pink clay for the feet. -
Attach the legs:
Position the four balls on the underside of the body. Press the piglet down gently onto a flat surface to flatten the feet and ensure it stands level. -
Add the hardware:
Insert a metal jump ring or eye pin into the top center of the pig’s back. Twist it slightly as you push it in to help the clay grip the metal. -
Secure the loop:
Smooth the clay around the entry point of the jump ring to ensure it is secure and looks neat. -
Baking:
Bake the charm according to your specific brand of polymer clay’s instructions (usually around 275°F/130°C for 15-30 minutes). -
Cooling:
Allow the piglet to cool completely inside the oven or on a wire rack before handling to prevent fingerprints while the clay is still soft.
Make it a Set
Create a tiny spherical tail on the back using a thin snake of clay curled into a spring shape for extra detail from all angles.
Enjoy your charming little creation as a personalized gift or a cute addition to your jewelry collection


Pink Cat Face Stud Earrings
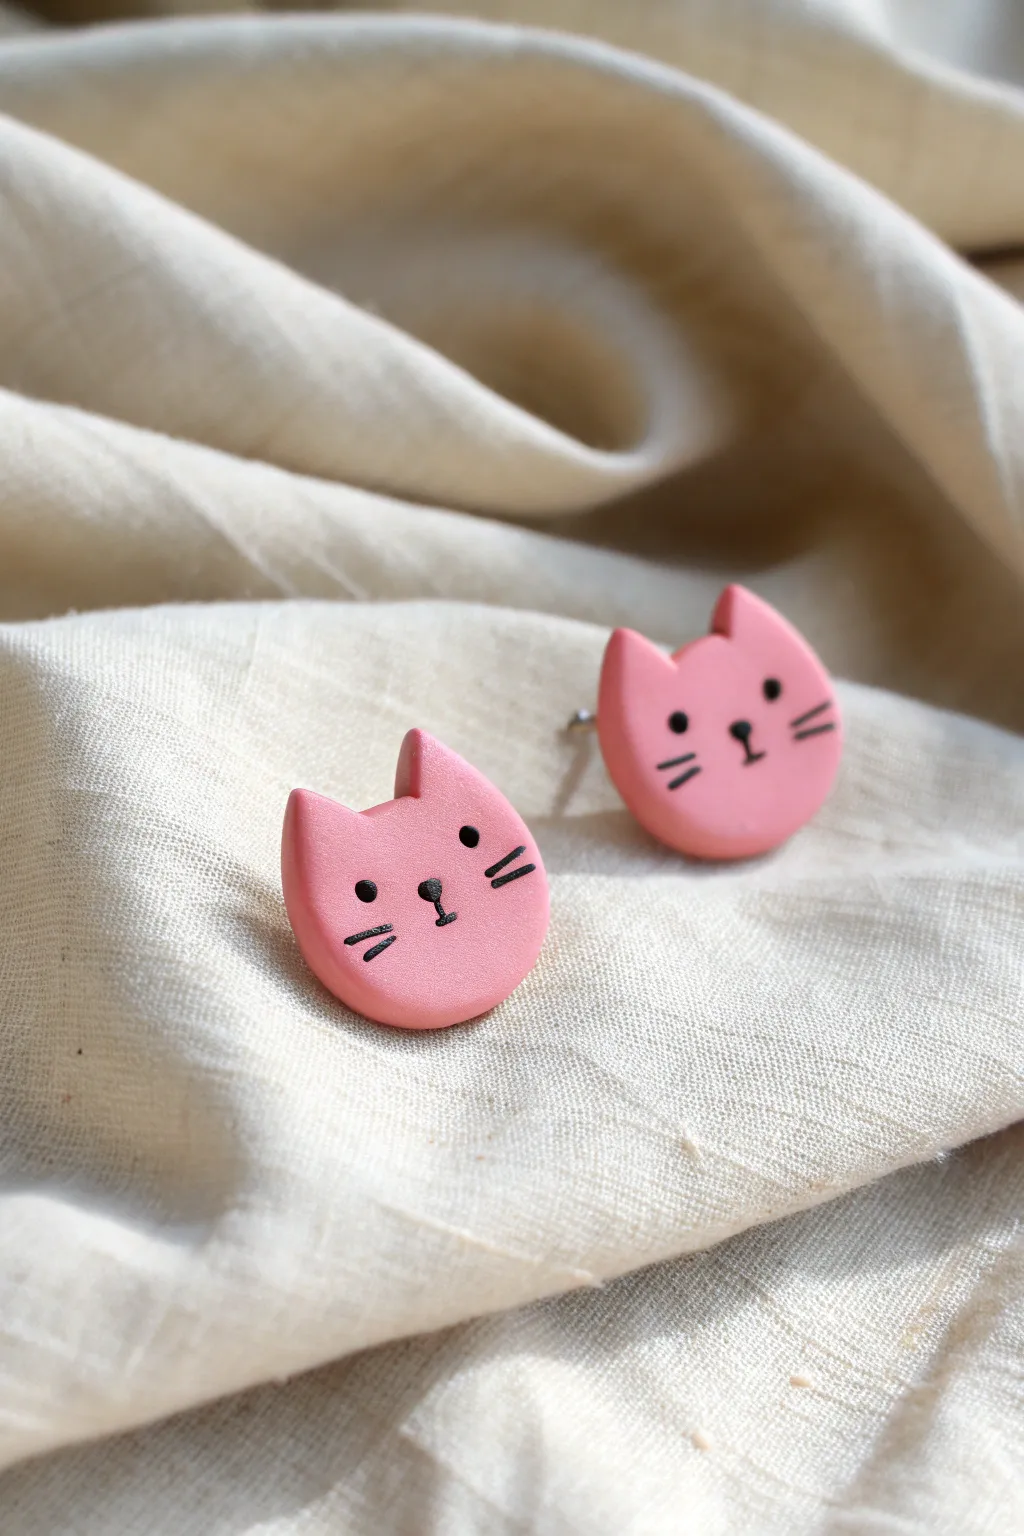
These simple yet charming stud earrings feature minimalist cat faces with delicate black details. The matte pink finish gives them a soft, modern look that is perfect for everyday wear.
Detailed Instructions
Materials
- Pink polymer clay (soft finish)
- Black acrylic paint or fine-point POSCA pen
- Liquid polymer clay or bake-and-bond
- Stainless steel stud earring posts
- Flat back earring clutches
- Gloss or matte varnish (optional)
- Circle cutter (approx. 1 cm diameter)
- X-acto knife or craft blade
- Rolling pin or pasta machine
- Fine detail paintbrush (000 size)
- Parchment paper and baking tray
Step 1: Shaping the Base
-
Condition the clay:
Start by warming a small amount of pink polymer clay in your hands. Knead and fold it until it is soft, pliable, and free of any air bubbles. -
Roll the slab:
Using your acrylic rolling pin or a pasta machine on a thick setting, roll the clay out into a smooth, even sheet. Aim for a thickness of about 3mm to ensure the studs are sturdy but not too heavy. -
Cut the circles:
Take your small circle cutter and firmly press down to cut out two identical circles. Lift away the excess clay carefully to avoid distorting the round shapes. -
Smooth the edges:
Gently rub your finger around the circumference of each circle to soften any sharp ridges left by the cutter. This gives the finished earring a more polished, professional feel.
Clean Edges Trick
Before baking, wipe the raw clay gently with a Q-tip dipped in rubbing alcohol. This removes fingerprints and smooths out tiny lint specks for a flawless finish.
Step 2: Creating the Ears
-
Form the triangles:
From your leftover pink clay, flatten a small piece slightly thinner than the face base. Use your X-acto knife to cut four tiny, identical triangles for the ears. -
Position the ears:
Place two triangles at the top of each circle base. Position them slightly apart to mimic the alert ears of a cat. -
Blend the seams:
Use a silicone tool or the back of your craft knife to gently blend the bottom edge of the triangles into the circle base. The seam should disappear completely on the front side. -
Refine the shape:
Once blended, tap the tips of the ears lightly to ensure they aren’t too sharp. Check that both cat faces look symmetrical before moving on.
Step 3: Baking and Assembly
-
First bake:
Place your clay pieces on a parchment-lined baking tray. Bake according to your brand’s specific instructions (usually 275°F/135°C for 15-30 minutes). Let them cool completely. -
Attach the posts:
Flip the cooled cat faces over. Apply a tiny dot of liquid clay or strong glue to the flat pad of your earring post. -
Secure the backing:
Press the post firmly onto the center of the back of the clay. For extra durability, I like to add a tiny specialized clay backing over the glue pad and re-bake briefly, but strong glue works for beginners too.
Uneven Whiskers?
If your paint lines get messy, use a toothpick to gently scrape away the mistake once the paint dries, or wipe it quickly with a damp Q-tip if wet.
Step 4: Adding the Face
-
Paint the eyes:
Using a very fine detail brush or a fine-point paint marker, carefully dot two small black circles for the eyes. Ideally, place them widely spaced for that cute ‘kawaii’ look. -
Draw the nose:
Paint a tiny upside-down triangle or oval between the eyes, slightly lower down, and draw a tiny vertical line extending downward from it. -
Add whiskers:
With a steady hand, draw two short, horizontal lines on each cheek. Keep these strokes light and quick to ensure they taper naturally. -
Seal the design:
Once the paint is fully dry, apply a thin layer of matte or gloss varnish over the front to protect the painted details from scratching off. -
Final cure:
Allow the varnish to dry completely according to the bottle instructions before handling or wearing your new earrings.
Now you have a sweet pair of handmade accessories to gift or keep for yourself

What Really Happens Inside the Kiln
Learn how time and temperature work together inside the kiln to transform clay into durable ceramic.
Strawberry Milk Popsicle Charms
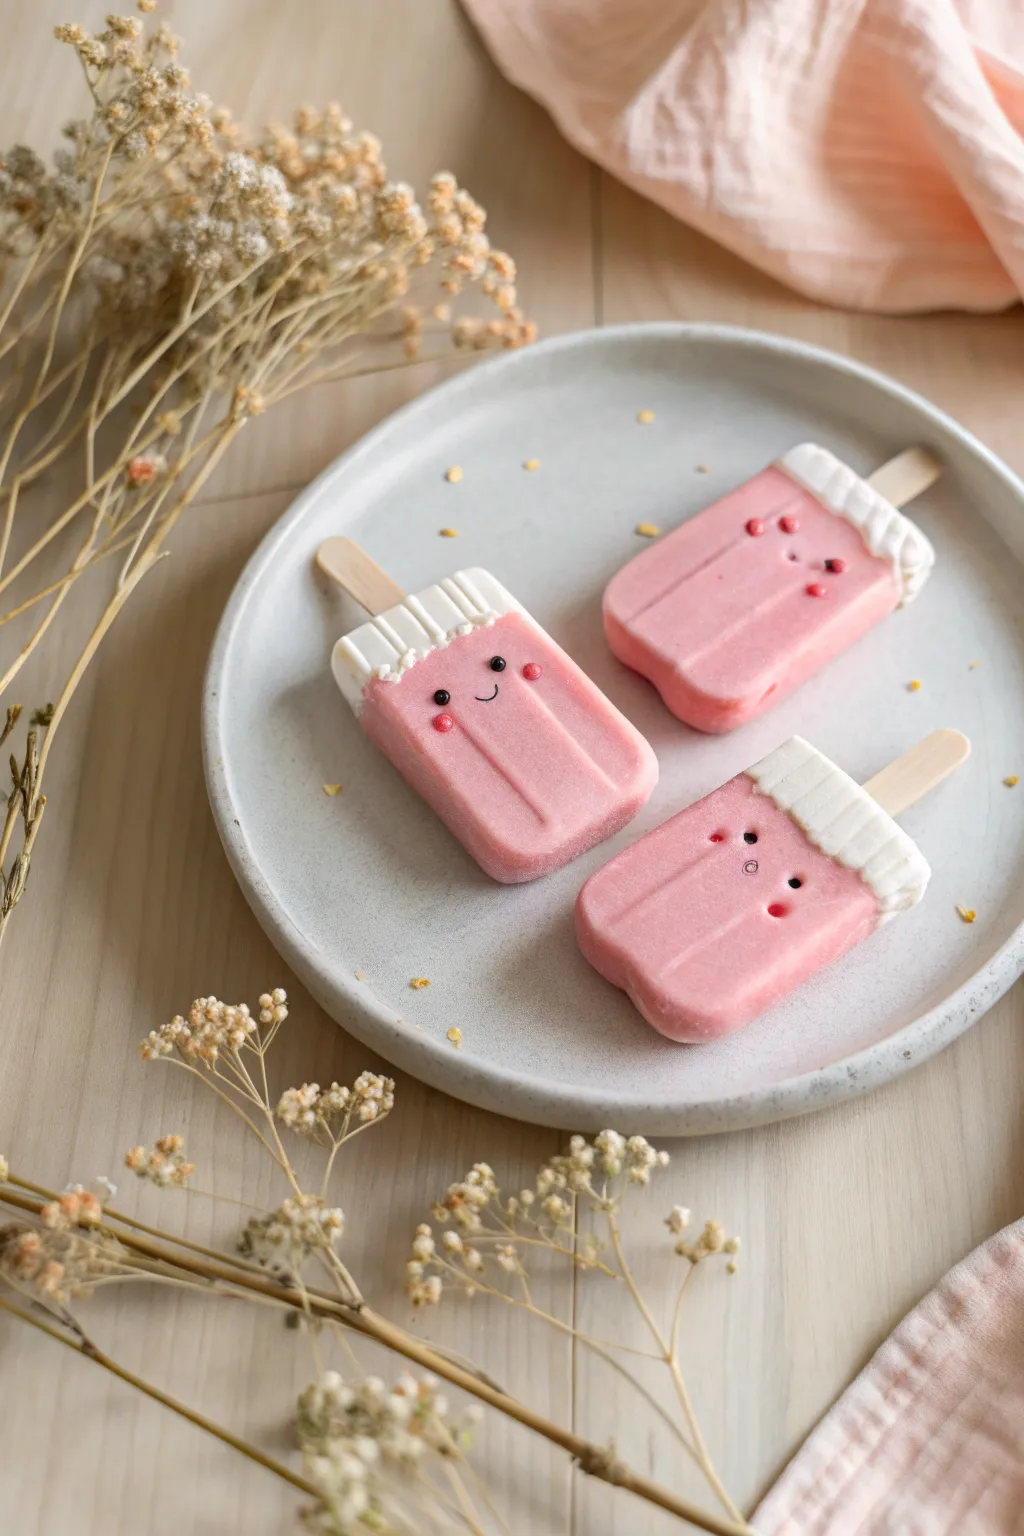
These adorable popsicle charms combine the soft, creamy hue of strawberry milk with cute facial expressions for a truly kawaii accessory. Perfect for keychains or whimsical jewelry, their realistic texture and glossy eyes make them irresistible.
Step-by-Step
Materials
- Polymer clay (translucent white, opaque white, bright pink)
- Liquid polymer clay (translucent)
- Wooden popsicle sticks (miniature craft size) or balsa wood
- Acrylic rolling pin
- Blade or craft knife
- Needle tool or dotting tool ball stylus
- Black and pink acrylic paint (dries matte)
- Fine detail paintbrush
- Soft pastel chalks (red or dark pink)
- Gloss glaze or UV resin (for eyes)
- Sandpaper (fine grit)
Step 1: Mixing the Perfect Strawberry Shade
-
Create the base color:
Start by mixing a large portion of translucent white clay with a small amount of bright pink. You want a milky, semi-translucent look rather than a solid block of color to mimic frozen ice cream. -
Adjust the opacity:
If the pink is too sheer, mix in a tiny pinch of opaque white clay. The final color should resemble a soft, pastel strawberry milkshake. -
Condition and roll:
Condition the clay thoroughly until it’s warm and pliable. Roll it out into a thick slab, approximately 6-8mm thick, ensuring it’s even.
Step 2: Shaping the Popsicles
-
Cut the basic shape:
Using your blade, cut a rectangle about 1 inch wide and 1.5 inches tall. Round off the top corners gently with your fingers to create the classic popsicle curve. -
Create the indentations:
Use the side of a needle tool or a blunt modeling tool to press two vertical indentations down the front face of the popsicle. These shouldn’t go all the way to the bottom edge. -
Insert the stick:
Take a miniature wooden craft stick and carefully insert it into the center of the bottom edge. Push it in about halfway up the popsicle for stability. -
Secure the stick:
Gently pinch the clay around the entry point of the stick to seal it. If you’re worried about it falling out later, you can add a dab of liquid clay to the stick before inserting. -
Texture the surface:
To give it that frosty look, lightly tap the surface with an old toothbrush or a piece of crumpled aluminum foil. This step is optional but adds realism.
Uneven Drips?
If your white cream topping looks too stiff, try mixing the white clay with a drop of liquid clay or baby oil to soften it before applying. This makes dragging the ‘drips’ down much smoother.
Step 3: Adding the Cream Topping
-
Prepare the ‘cream’:
Roll out a small snake of opaque white clay. It doesn’t need to be perfect as it represents melting cream. -
Apply the topping:
Drape the white clay over the top curved edge of your pink popsicle. Press it down gently so it adheres to the pink base. -
Create the drip effect:
Use a needle tool to drag the white clay downwards in short strokes, mimicking gravity pulling the cream down. Vary the lengths of these drips for a natural look. -
Texture the cream:
Using the needle tool, score faint vertical lines into the white section to mimic the frozen texture often found on the tips of popsicles.
Make it a Necklace
Before baking, insert a small metal screw eye pin into the top white section of the popsicle. Secure with liquid clay. Now you can easily attach a jump ring and chain.
Step 4: Baking and Facial Features
-
First bake:
Bake the charms according to your clay manufacturer’s instructions (usually 275°F/130°C for 15-30 minutes). Let them cool completely. -
Paint the eyes:
Using a fine dotting tool or the tip of a needle, dip into black acrylic paint and place two small dots for eyes wide apart on the pink section. -
Add the smile:
With an extremely fine paintbrush, draw a tiny ‘u’ shape between the eyes for a simple, sweet smile. -
Blush those cheeks:
Paint two tiny pink dots under the eyes, or use shaved pink pastel chalk applied with a dry brush for a softer, airbrushed blush effect. -
Highlight the eyes:
Once the black paint is dry, add a microscopic dot of white paint to the upper corner of each eye for a reflective sparkle. -
Seal the face:
I like to add a tiny drop of UV resin or gloss glaze just over the painted eyes and mouth. This protects the paint and makes the features pop.
Once the glaze is cured, you have a set of sweet treats that will never melt
Pink Frosted Donut Charms
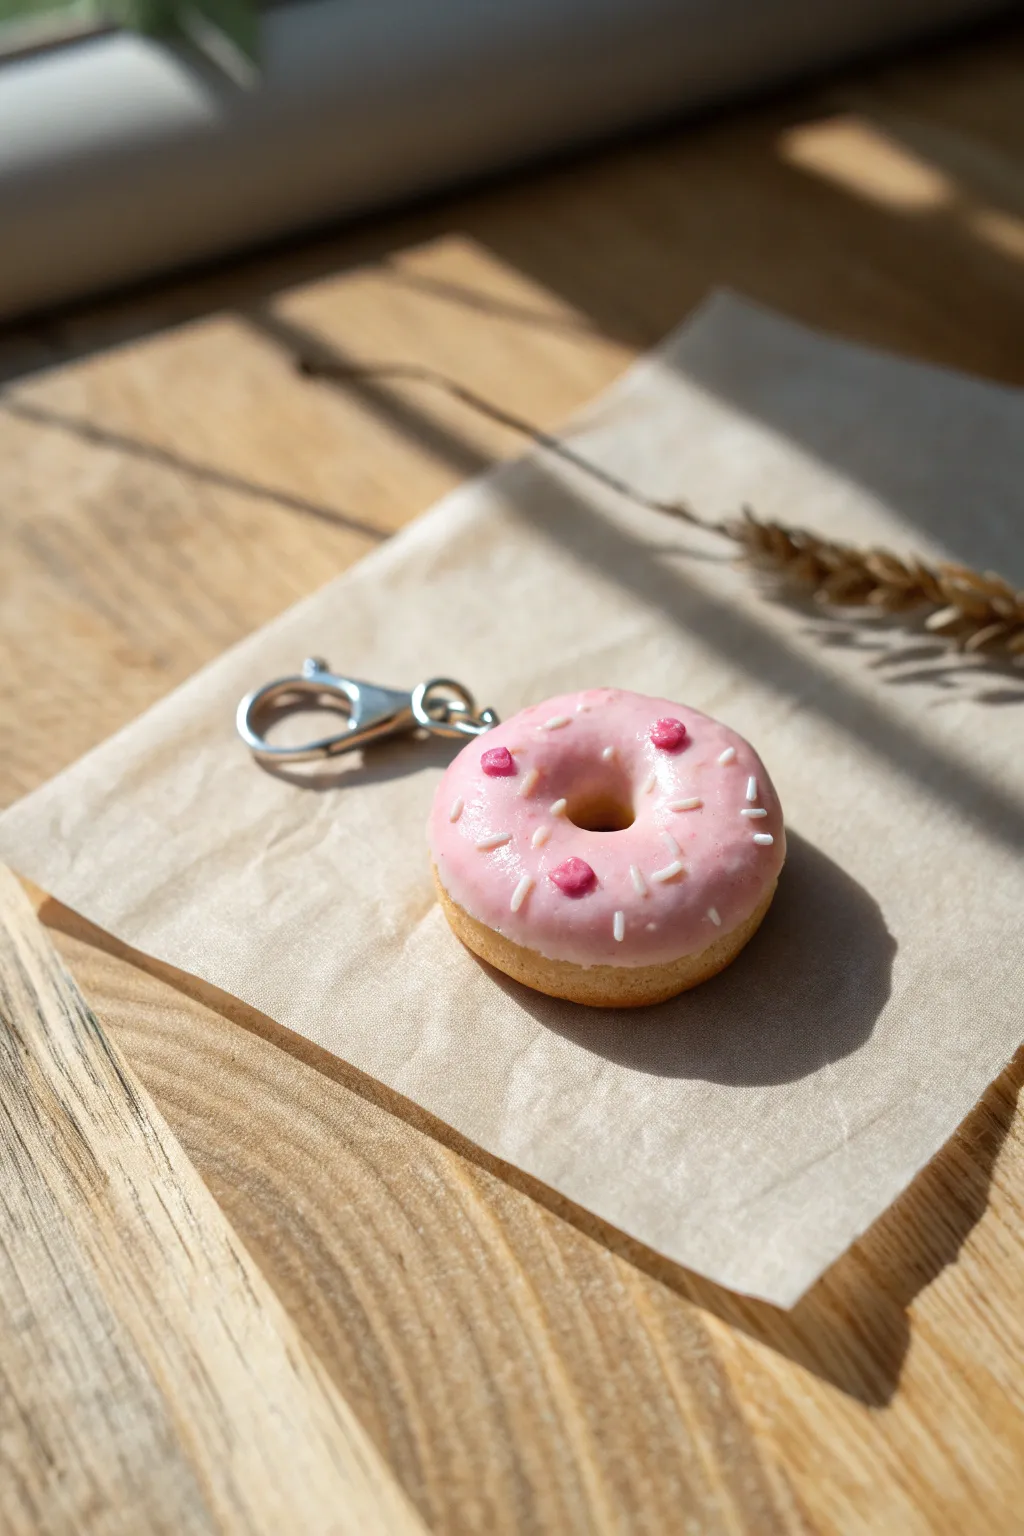
Capture the sweetness of a bakery treat with this adorable polymer clay donut charm. Featuring a golden-brown base, glossy pink icing, and delicate sprinkles, this miniature delight is perfect for keychains or jewelry.
Step-by-Step Tutorial
Materials
- Polymer clay in beige/light tan (dough color)
- Polymer clay in translucent white
- Polymer clay in light pink
- Polymer clay in bright pink (for heart sprinkles)
- White liquid polymer clay (or white clay + liquid gel/fimo liquid)
- Needle tool or toothpick
- toothbrush (for texturing)
- Soft pastels in orange and brown (chalks)
- Paintbrush for shading
- Eye pin or head pin
- Silver lobster clasp and jump ring
- Dotting tool or small ball tool
- Gloss glaze or UV resin
- Blade or craft knife
- Oven for baking
Step 1: Creating the Dough Base
-
Mix the dough color:
Start by conditioning your beige or light tan clay. For a more realistic baked look, I like to mix equal parts tan and translucent clay. -
Shape the base:
Roll a small amount of the clay into a smooth ball, roughly 1 inch in diameter. Then, gently flatten it with your finger into a thick disk shape with rounded edges. -
Create the hole:
Use a dotting tool or the back of a paintbrush to press a hole through the center. Wiggle the tool slightly to widen the hole, smoothing the edges so they look rounded rather than sharp. -
Texture the surface:
Take a clean toothbrush and gently tap it all over the surface of the donut. This creates a realistic bread-like texture. Be sure to texture the sides and inside the hole as well. -
Shade for a baked look:
Scrape some orange and brown soft pastels into a fine powder. Using a soft paintbrush, dust the orange powder lightly over the donut. Follow up with a tiny bit of brown on the edges and bottom to simulate a golden-baked crust.
Realistic Texture Tip
For ultra-realism, create a ‘tan line’ around the middle of the donut where the dough would float in oil, leaving that strip lighter and untextured.
Step 2: Adding the Pink Icing
-
Prepare the icing:
Mix a small amount of liquid polymer clay with a tiny bit of pink solid clay until you have a thick, syrup-like consistency. Alternatively, soften pink clay with a drop of baby oil or liquid gel until it’s spreadable. -
Apply the icing:
Carefully dab the pink mixture onto the top of your textured donut. Use the tip of a needle tool to guide the icing toward the edges, letting it form natural drips or irregular wavy edges, just like real glaze. -
Insert the hardware:
Before the icing or clay sets, carefully push an eye pin into the side or top of the donut. Ensure the loop is facing the right direction for hanging later.
Sticky Situation?
If your icing is too runny and dripping off the sides too fast, let the liquid clay mix sit for 10 minutes to thicken slightly before applying.
Step 3: Creating the Sprinkles
-
Make white sprinkles:
Roll a tiny snake of white clay as thin as possible. Bake this thin snake for 5 minutes just to harden it slightly, then chop it into tiny segments with a blade to create uniform jimmies. -
Make pink hearts:
Take a microscopic amount of bright pink clay, roll it into a tiny ball, and flatten it. Use a needle tool to indent the top deeply and nudge the bottom into a point, forming a tiny heart shape. -
Decorate the donut:
Using tweezers or a needle tool, place the white sprinkles randomly onto the wet pink icing. Add two or three bright pink hearts as focal points.
Step 4: Finishing Touches
-
Bake the charm:
Place your decorated donut on a tile or parchment paper. Bake according to your brand of clay’s instructions (usually 275°F/130°C for 15-30 minutes). Let it cool completely. -
Glaze the icing:
Once cool, apply a layer of gloss glaze or UV resin only to the pink icing part. This makes the frosting look wet and sweet while keeping the dough texture matte. -
Cure the glaze:
Allow the glaze to air dry or cure under a UV lamp if using resin. -
Assemble the keychain:
Open a jump ring using pliers and attach your lobster clasp to the eye pin on the donut. Close the jump ring securely.
Now you have a delicious-looking accessory ready to sweeten up your keychain or bag


The Complete Guide to Pottery Troubleshooting
Uncover the most common ceramic mistakes—from cracking clay to failed glazes—and learn how to fix them fast.
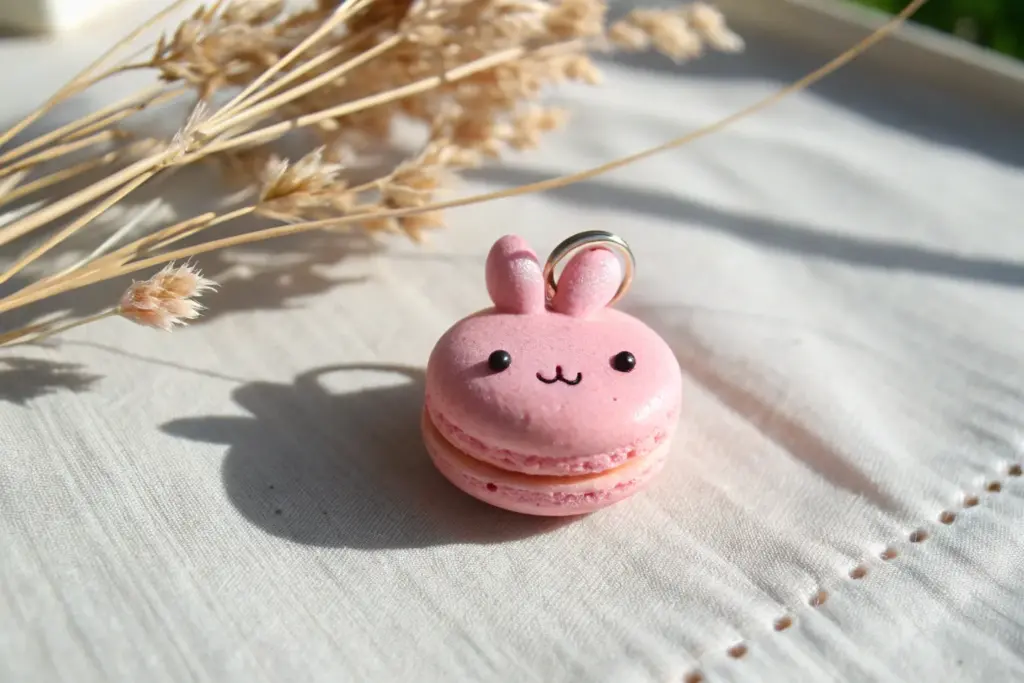
Mini Macaron Stack Pendants
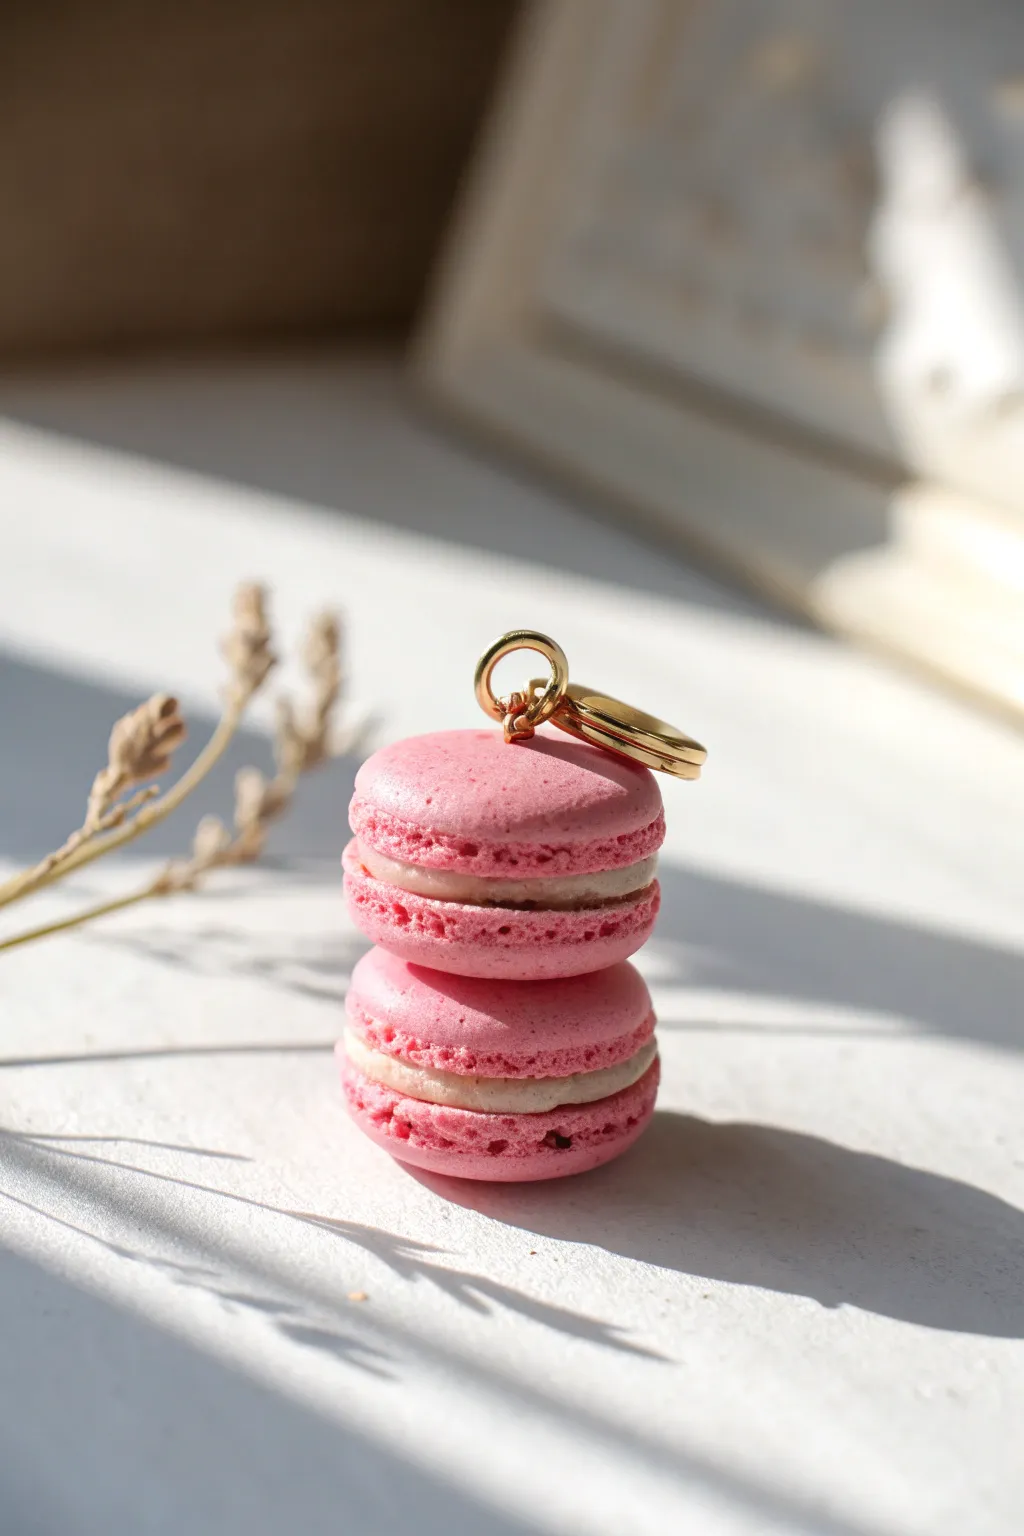
Capture the delicate charm of French patisserie with this adorable miniature macaron stack pendant. Using polymer clay, you’ll create textured, realistic-looking treats finished with a shiny gold loop perfect for hanging on a necklace chain.
Step-by-Step
Materials
- Pink polymer clay (rose or carnation shade)
- Translucent or white polymer clay (for the filling)
- Liquid polymer clay (translucent or white)
- Basic clay tools (blade, needle tool)
- Texture tools (sandpaper, toothbrush, or crumpled foil)
- Small round cutter (approx. 1-1.5 cm diameter)
- Gold screw eye pin or heavy gauge jump ring
- Ceramic tile or baking sheet
- Oven
Step 1: Forming the Shells
-
Condition and Flatten:
Begin by conditioning your pink polymer clay until it is soft and pliable, then roll it out into a sheet approximately 3-4mm thick. You want it thick enough to have that nice, rounded dome shape later. -
Cut the Circles:
Using your small round cutter, punch out four circles of clay. To avoid fingerprints, gently push them out of the cutter or use a piece of plastic wrap over the clay before cutting for a smoother dome. -
Soften the Edges:
Gently smooth the top edge of each circle with your finger to create a slight dome shape. The goal is to remove the sharp angle from the cutter while keeping the bottom flat. -
Texturing the Feet:
This is the most critical step for realism. Use a needle tool to gently tease the clay around the bottom edge of the dome, creating the iconic ‘feet’ of the macaron. I like to pull small bits of clay downward slightly. -
Refine the Texture:
Go back over the pulled clay ‘feet’ with the needle tool, poking it gently to create a porous, airy texture. Ensure this texture doesn’t extend too far up the smooth dome.
Step 2: Creating the Filling
-
Prepare the Cream:
Take a small amount of white or translucent clay and mix it with a tiny drop of liquid clay to make it slightly sticky and spreadable, like ganache. -
Form the Center disc:
Flatten a small ball of the white mixture into a disc slightly smaller than your pink shells. It doesn’t need to be perfectly round. -
Sandwich the First Macaron:
Place the white disc onto the flat side of one pink shell. Gently press the matching pink shell on top. Apply just enough pressure to make them stick, but not so much that you squash the textured feet. Repeat for the second macaron.
Pro Tip: Realistic Domes
Place cling wrap over your clay sheet before using the circle cutter. This instantly creates that rounded, pillowy dome shape without any extra smoothing required.
Step 3: Assembly & Fishing
-
Stack Them Up:
apply a tiny dab of liquid clay to the center top of one finished macaron. Place the second macaron directly on top, centering it perfectly. -
Insert the Hardware:
Take your gold screw eye pin (or a jump ring held by pliers). Gently twist or push it into the center of the top macaron dome. Ensure it goes deep enough to be secure but doesn’t poke through the filling. -
Final Texture Check:
While holding the stack (carefully!), inspect the textured feet. If handling smoothed them out, use your needle tool to rough them up again. -
Baking Prep:
Place your macaron stack on a ceramic tile or a baking sheet lined with parchment paper. -
Bake:
Bake according to your clay manufacturer’s instructions (usually around 275°F/130°C for 15-30 minutes). Tent with foil to prevent the pink color from darkening or scorching. -
Cool and Secure:
Let the piece cool completely. If the eye pin feels loose after baking, pull it out, add a drop of super glue, and reinsert it for permanent hold.
Troubleshooting: Smudged Texture
If you squash the ‘feet’ texture while assembling, refrigerate the shells for 10 minutes before handling. The firmer clay resists fingerprints better.
Now you have a charming miniature treat ready to wear or gift to a fellow dessert lover
Peachy-Pink Fruit Slice Charms
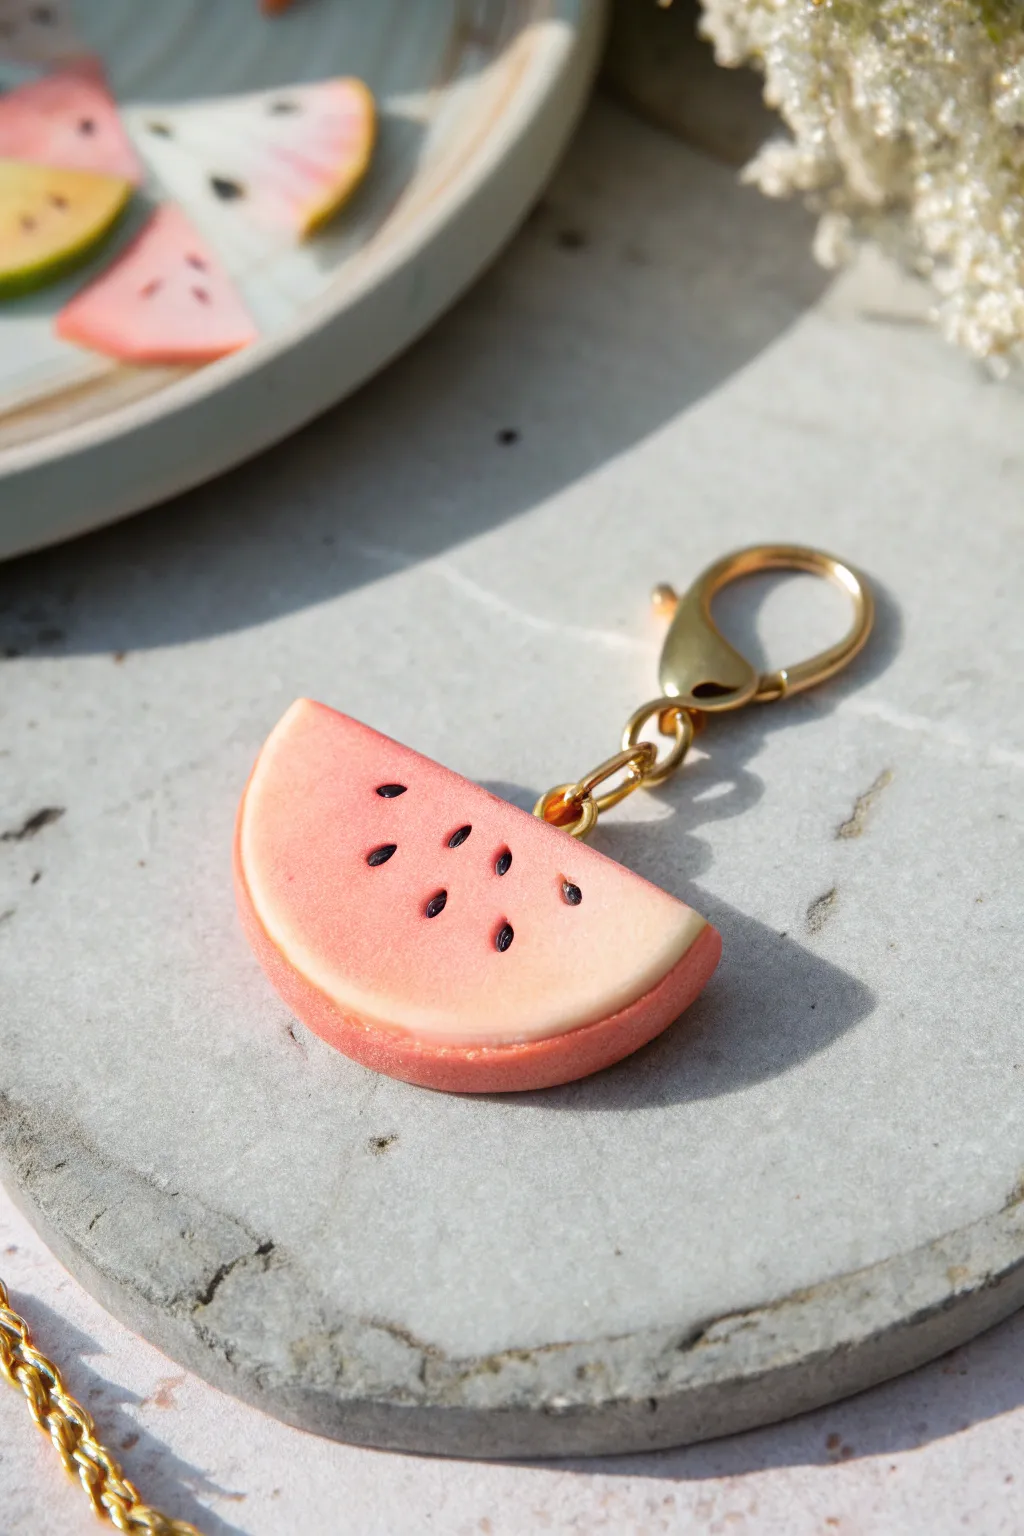
Capture the essence of summer with this delightful polymer clay fruit slice charm. Its soft gradient center and textured crust give it a realistic, almost edible appearance perfect for keychains or jewelry.
How-To Guide
Materials
- Polymer clay in translucent white
- Polymer clay in peach or coral pink
- Polymer clay in opaque white
- Polymer clay in black (tiny amount)
- Soft pastels in darker pink and red shades
- Liquid polymer clay (optional)
- Needle tool or toothpick
- Blade or craft knife
- Sandpaper or toothbrush (for texturing)
- Gold screw eye pin
- Gold lobster clasp and jump rings
- Gloss varnish or UV resin
Step 1: Creating the Cane
-
Mix the core color:
Begin by conditioning the peach or coral pink clay until it is soft and pliable. If you want that translucent, juicy look seen in the photo, mix one part colored clay with one part translucent clay. -
Form the fruit flesh:
Roll your peach mixture into a thick, smooth log. This will be the center of your watermelon slice. -
Add the inner rind:
Roll out a thin sheet of opaque white clay. Wrap this sheet fully around the peach log, trimming the excess with your blade so the seams meet cleanly without overlapping. -
Add the outer crust:
Create a slightly darker pink or coral shade for the outer crust. Roll this into a sheet similar in thickness to the white rind and wrap it around the white layer. -
Reduce the cane:
Gently squeeze and roll the log on your work surface to reduce its diameter and lengthen it. Working from the center out helps prevent the ends from distorting. -
Slice the shape:
Once reduced to your desired size (about 1.5 inches thick), use a sharp blade to cut a clean slice off the log. Cut this circle in half to create the semi-circle wedge shape.
Smudged Colors?
If the red pastel dust smudges onto the white rind, use a cotton swab dipped in rubbing alcohol or baby oil to wipe the white clay clean before baking.
Step 2: Detailing and Shaping
-
Refine the edges:
Gently pat the cut edges of your semi-circle with your finger to soften the sharp corners slightly, giving it a more organic fruit slice look. -
Texture the rind:
Using a toothbrush or a piece of coarse sandpaper, gently tap the curved outer edge (the crust) to give it a realistic, pitted texture. -
Create the seeds:
Roll tiny, elongated tear-drop shapes out of black clay. These should be extremely small to match the scale of the slice. -
Embed the seeds:
Press the tiny black seeds into the pink flesh of the clay. Use a needle tool to gently push them in so they are flush with the surface. -
Shade the center:
With a soft brush, apply a small amount of shaved pink or red reddish soft pastel dust to the very center of the slice near the straight edge. This creates that ripe, ombré effect where the fruit looks sweetest.
Make it Sparkle
Mix a tiny pinch of fine iridescent glitter into the translucent peach clay mix. It mimics the glistening water content of real fruit when the light hits it.
Step 3: Finishing Touches
-
Insert hardware:
Screw a small gold eye pin into the center of the curved top edge. I like to remove it, add a dab of liquid clay or super glue to the threads, and screw it back in for extra security. -
Bake carefully:
Bake the piece according to your clay manufacturer’s instructions. Usually, this means around 275°F (135°C) for 15-30 minutes, depending on thickness. -
Cool down:
Let the charm cool completely before handling it to ensure structural integrity. -
Seal the piece:
Apply a thin layer of matte varnish to the crust and a satin or semi-gloss glaze to the fruit flesh to make it look moist. -
Assemble the keychain:
Using pliers, open a jump ring and attach your fruit slice to the gold lobster clasp chain.
Now you have a sweet, summery accessory ready to brighten up your bag or keys

TRACK YOUR CERAMIC JOURNEY
Capture glaze tests, firing details, and creative progress—all in one simple printable. Make your projects easier to repeat and improve.
Pink Checkerboard Slab Earrings
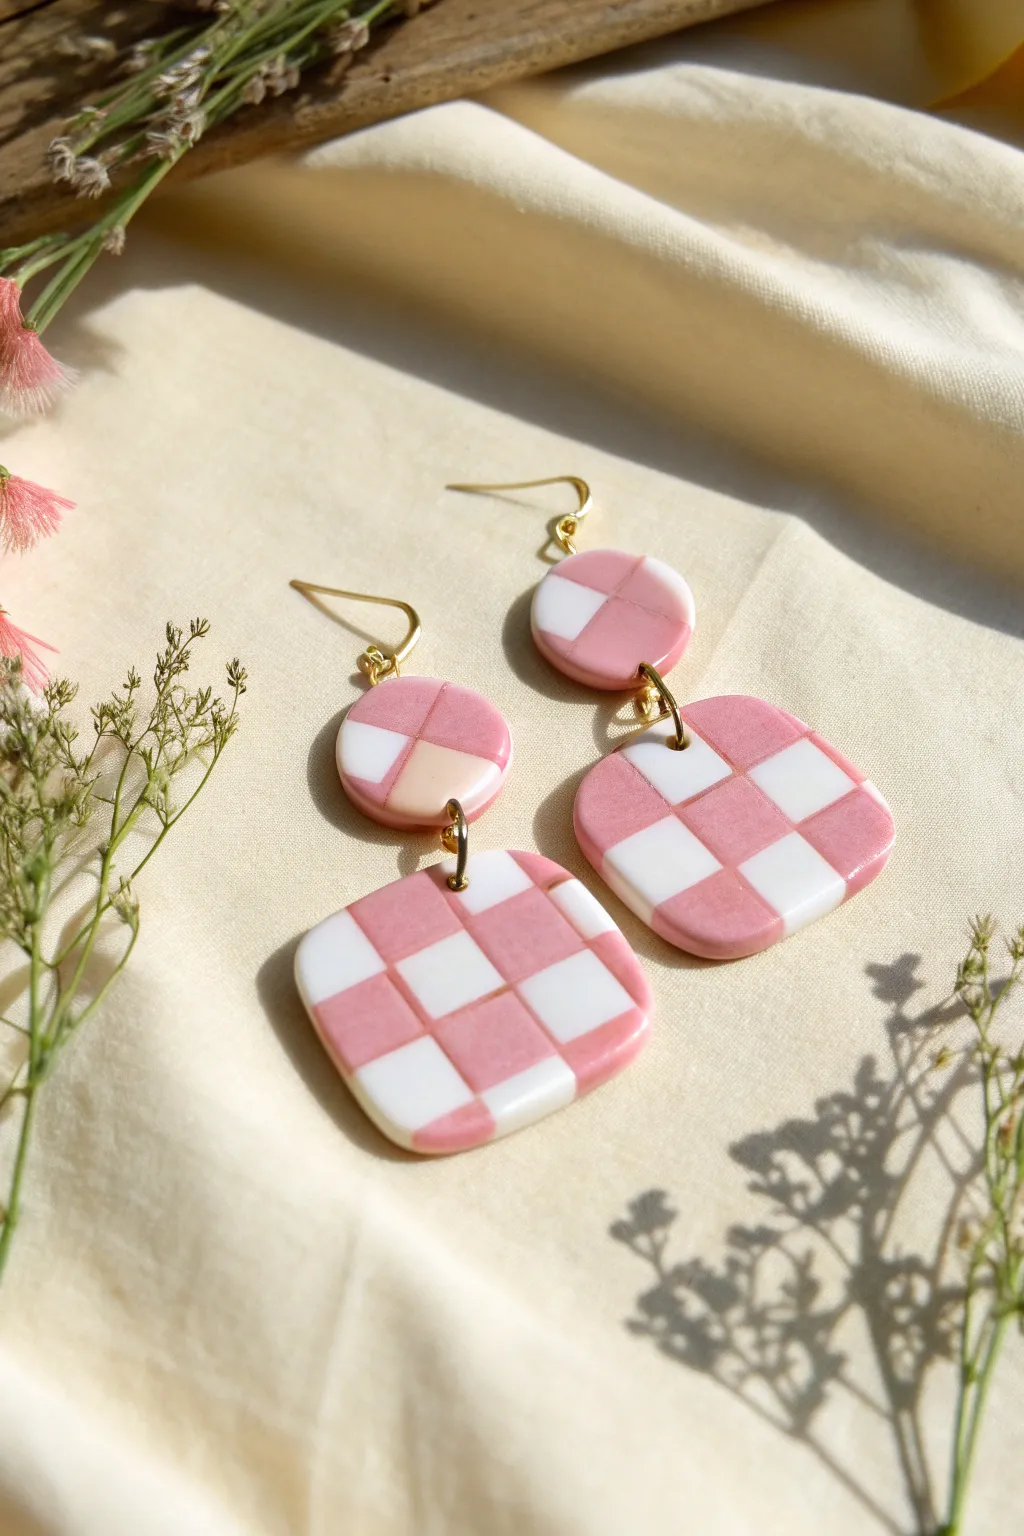
These sweet, retro-inspired earrings feature a classic pink and white checkerboard pattern cut into trendy square and circle slabs. The finish is glossy and smooth, creating a polished, professional look that rivals boutique jewelry.
Step-by-Step Tutorial
Materials
- Pink polymer clay
- White polymer clay
- Translucent polymer clay (optional, for mixing)
- Clay roller or pasta machine
- Tissue blade or rigid slicing blade
- Square cookie cutter (approx. 1 inch)
- Small circle cutter (approx. 0.5 inch)
- Hand drill or needle tool
- Jump rings (gold)
- Earring hooks (gold)
- Jewelry pliers
- UV resin (optional for glossy finish)
- UV lamp (if using resin)
- Wet/dry sandpaper (400-1000 grit)
Step 1: Creating the Checkerboard Cane
-
Condition the clay:
Start by thoroughly conditioning your pink and white polymer clay separately until they are soft and pliable. If the pink is too vibrant, mixing in a tiny bit of white or translucent clay can soften it to the pastel shade seen here. -
Roll out slabs:
Roll both the pink and white clay into sheets of equal thickness using your pasta machine on the thickest setting or an acrylic roller with depth guides. -
Cut matching strips:
Using your tissue blade, cut straight, even strips from both colors. Aim for strips that are roughly as wide as they are thick to eventually create square cross-sections. -
Assemble the striped log:
Stack the strips, alternating pink and white, to create a striped block. Ensure the layers adhere well to each other without trapping air bubbles. -
Slice the block vertically:
Slice your striped block vertically into new slabs. You should now have several slices that look like stripped ribbons. -
Offset the pattern:
Take one stripped slice and lay it down. Take the next slice and place it next to the first, but shift it up or down so the pink square sits next to a white square. -
Complete the slab:
continue adding slices in this offset manner until you have a sheet showing a checkerboard pattern large enough for your cutters. I like to gently compress the sides together with the blade to close any gaps. -
Smooth the surface:
Gently roll over the checkerboard slab with your acrylic roller to ensure the seams are fused and the surface is level.
Clean Cuts Pro-Tip
Chill your clay slab in the fridge for 10-15 minutes before using your cutters. Firm clay distorts less when cut, keeping your checkerboard lines straight and crisp.
Step 2: Cutting and Baking
-
Cut the shapes:
Place your square cutter over the checkerboard section, angling it slightly if you want the checks to sit diagonally like diamonds, or straight on for a classic grid. Cut two squares. -
Create the top pieces:
Use the small circle cutter to punch out two round components. You can use the leftover checkerboard slab, or create a simple four-square pattern for a simpler look on the lobe. -
Soften edges:
Gently smooth the cut edges with your fingertip to remove any harsh cutter marks before baking. -
Pierce holes:
Using a needle tool, poke holes for your jump rings. Place a hole at the top of the square piece and at the top and bottom of the circle piece. -
Bake:
Bake the pieces according to the clay manufacturer’s instructions, usually around 275°F (135°C) for 30-45 minutes on a ceramic tile or parchment paper.
Step 3: Finishing and Assembly
-
Sand the edges:
Once cool, use wet/dry sandpaper to smooth out any rough edges or fingerprints, starting with a coarser grit and moving to a fine grit. -
Apply finish (Optional):
For that high-gloss look in the photo, apply a thin layer of UV resin to the front of the earrings and cure under a UV lamp. Alternatively, buffing with a denim cloth works for a matte sheen. -
Drill (if needed):
If your holes closed up during baking or resin application, use a small hand drill to reopen them carefully. -
Connect components:
Open a jump ring with your pliers using a twisting motion (never pulling apart). Thread it through the bottom of the circle and the top of the square, then close it securely. -
Attach hooks:
Open the loop on your earring hook and attach it to the top hole of the circle component. Close the loop to finish.
Smudged Colors?
If pink clay smears onto the white squares while slicing, wipe your blade with an alcohol wipe or baby wipe between every single cut to keep the white sections pristine.
Now you have a stunning pair of graphic statement earrings perfect for adding a pop of color to any outfit
Tiny Pink Flower Cane Accents
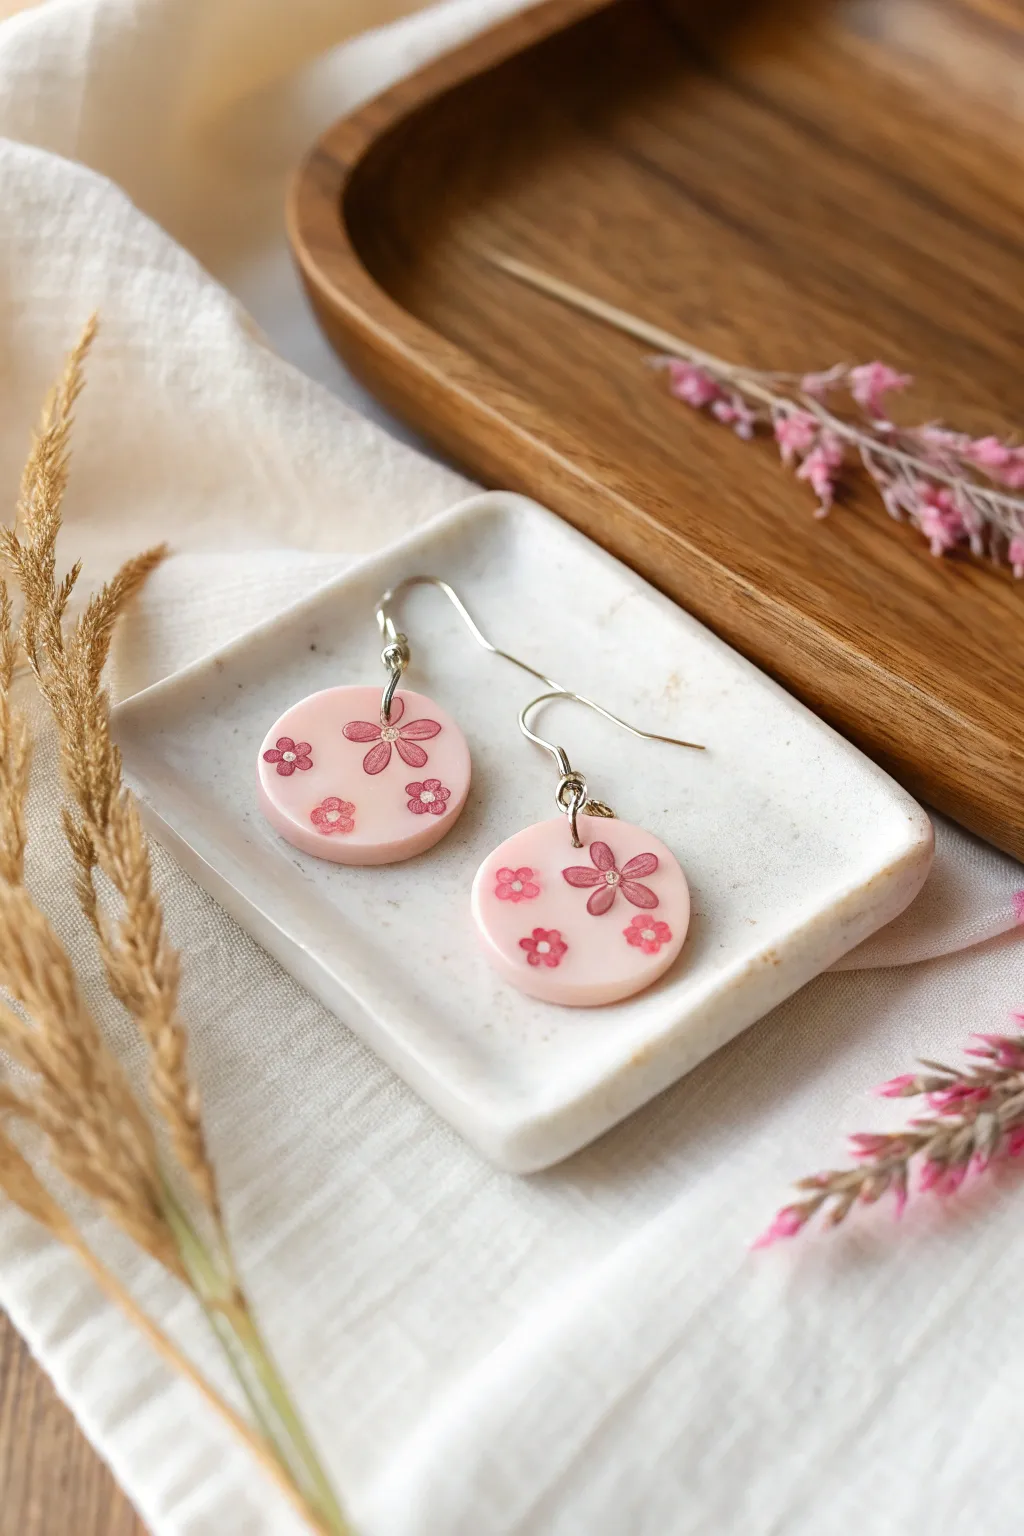
Soft pink tones meet delicate floral details in these charming polymer clay statement earrings. By using simple cane slices on a pastel base, you’ll create a sweet, romantic accessory perfect for spring days.
Detailed Instructions
Materials
- Polymer clay in light baby pink (base)
- Polymer clay flower cane (pre-made or homemade in dark pink)
- Round clay cutter (approx. 20-25mm)
- Acrylic rolling pin or pasta machine
- Tissue blade
- Small hand drill or piercing tool
- Jump rings (silver, 6-8mm)
- Earring hooks (silver)
- Chain nose pliers
- Sandpaper (wet/dry, 400-1000 grit)
- UV resin or gloss varnish (optional for shine)
Step 1: Preparing the Clay Canvas
-
Condition the base:
Begin by thoroughly conditioning your light baby pink clay. Knead it in your hands until it is warm, pliable, and free of any air bubbles. -
Roll out a slab:
Using your acrylic roller or pasta machine on a medium setting (around 3mm thickness), roll the pink clay into a smooth, even sheet. Place this on a ceramic tile or glass work surface to prevent sticking. -
Prepare the flower cane:
Take your dark pink flower cane. If it’s been sitting for a while, warm it slightly in your hands to prevent crumbling, but keep it firm enough to slice cleanly.
Clearer Slices
Chill your flower cane in the fridge for 10-15 minutes before slicing. Cold clay resists squishing, allowing you to cut paper-thin slices without distorting the flower petals.
Step 2: Designing the Floral Pattern
-
Slice the cane:
Using a very sharp tissue blade, slice several thin cross-sections of the flower cane. Aim for slices that are translucent-thin, roughly 0.5mm to 1mm thick. -
Arrange the flowers:
Gently pick up the flower slices with the tip of your blade and place them onto the pink clay slab. I like to scatter them somewhat randomly, letting some sit near the edges for a natural look. -
Embed the pattern:
Once you are happy with the arrangement, cover the clay with a piece of parchment paper or deli wrap. Gently roll over the surface with your acrylic roller to flatten the flowers into the base clay so the surface becomes completely smooth.
Step 3: Cutting and Baking
-
Cut the shapes:
Position your round cutter over the most pleasing parts of your floral pattern. Press down firmly to cut out two identical circles. -
Create holes:
Before baking, use a piercing tool to make a small hole near the top edge of each circle for the jump ring. Ensure the hole is large enough for your hardware but not so close to the edge that it might tear. -
Bake the pieces:
Place the tile with your clay pieces into a preheated oven. Bake according to the manufacturer’s instructions for your specific brand of clay (usually 275°F/130°C for 30-45 minutes). -
Cool down:
Once baked, turn off the oven and let the pieces cool completely inside before removing them. This helps prevent thermal shock and brittleness.
Texture Twist
Before baking, lightly press a piece of coarse sandpaper or a texture sponge onto the pink background areas (avoiding the flowers) to give the base a stone-like, matte texture.
Step 4: Finishing and Assembly
-
Sand the edges:
Dip your cooled clay pieces in water and use high-grit wet/dry sandpaper to smooth any rough edges or irregularities on the sides. -
Buff or glaze:
For a glossy finish like the photo, you can apply a thin layer of UV resin and cure it under a UV lamp, or simply buff the clay with a soft cloth for a matte sheen. -
Open the jump rings:
Using two pairs of pliers, twist a silver jump ring open laterally (front-to-back, never pull apart). -
Attach the hook:
Slide the open jump ring through the hole in the clay circle, then thread the loop of the earring hook onto the jump ring as well. -
Secure the hardare:
Twist the jump ring closed tightly so there is no gap. Repeat this process for the second earring.
Enjoy wearing your new botanical jewelry or gift them to a friend who loves pink
Rose-Swirl Pink Flamingo Figurines
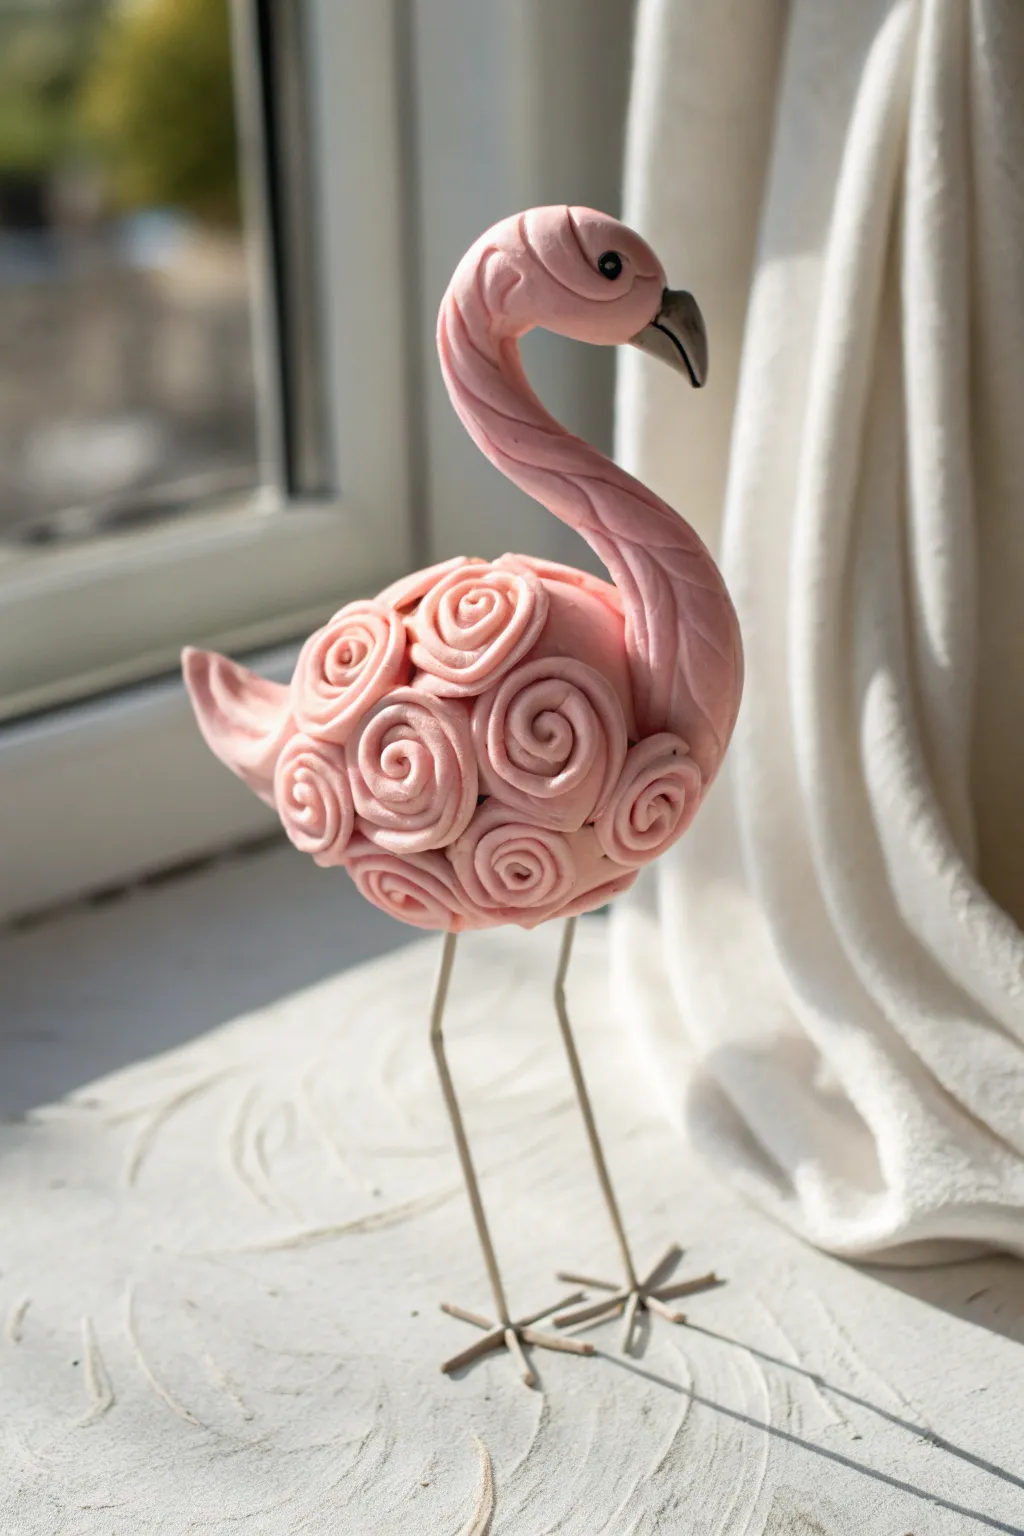
This charming little figurine combines the elegance of a flamingo with the texture of delicate roses. Using simple coils and basic sculpting, you’ll transform pink clay into a unique, decorative bird that looks lovely perched on a windowsill.
Step-by-Step
Materials
- Pink polymer clay (soft pink shade)
- Black polymer clay (tiny amount for the eye)
- Grey or metallic silver polymer clay (for the beak)
- Thin crafting wire or heavy-gauge floral wire (silver)
- Aluminum foil (for the armature base)
- Wire cutters
- Detailing needle tool
- Bake and Bond or liquid polymer clay (optional)
- Smooth work surface (glass or tile)
- Oven
Step 1: Forming the Core
-
Create the foil core:
Start by crumpling a small piece of aluminum foil into an egg shape about the size of a walnut. This will separate the body, save clay, and keep the figurine lightweight. -
Prepare the wire legs:
Cut two lengths of wire, roughly 3-4 inches long each. Bend one end of each wire into a small hook or loop to anchor it inside the clay body. -
Insert the legs:
Poke the hooked ends of your wires into the bottom of your foil egg. If they feel loose, you can secure them with a dab of super glue or hot glue before adding clay. -
Cover the body:
Condition a portion of your pink clay until it is soft and pliable. Flatten it into a sheet and wrap it completely around the foil egg, smoothing the seams until you have a perfect, seamless pink oval. -
Create the feet:
Cut four short pieces of wire (about 3/4 inch) for the toes. Twist/wrap two pieces around the base of each leg wire to form the feet, fanning them out so the bird can stand independently.
Droopy Neck Syndrome?
If the long neck sags while you are working, insert a piece of wire through the neck and into the foil body for internal support before baking.
Step 2: Sculpting the Neck and Head
-
Roll the neck coil:
Roll a snake of pink clay that is thicker at the bottom and tapers slightly towards the top. This will be the neck. -
Attach the neck:
Blend the thicker end of the snake onto the front-top of your body oval. Use your thumb or a modeling tool to smooth the clay downward so the seam disappears completely. -
Shape the S-curve:
Gently bend the neck into a graceful ‘S’ shape. At the very top, bulb the clay slightly to form the basic head shape, curving it downward. -
Add beak details:
Take a small cone of grey or silver clay and attach it to the face area, bending it downward for that classic flamingo hook. Use a needle tool to scribe a line separating the upper and lower beak. -
Make the eye:
Roll a strictly tiny ball of black clay. Press it gently into the side of the head. I like to use a needle tool to add a tiny indentation for the pupil to give it life. -
Detail the neck feathers:
Using your needle tool or a dull knife, gently score curved lines down the length of the neck to mimic feathers and add visual flow connecting to the body.
Step 3: Adding the Rose Texture
-
Roll thin clay ribbons:
Roll out several long, thin snakes of pink clay. Flatten them gently with your finger or a roller so they look like flat ribbons or linguine pasta. -
Create the rose center:
Take one end of a flattened ribbon and roll it tightly inward to create a spiral. This forms the center of your first rose. -
Place the first rose:
Apply a tiny dot of liquid clay (if you have it) to the side of the flamingo’s body. Press your clay spiral onto the body. -
Build the texture:
Continue creating these spiral ‘roses’ of varying sizes. Place them close together all over the main body oval, covering the smooth under-layer completely. -
Fill the gaps:
If you see small spaces between the larger spirals, make tiny little coils to fill them in, ensuring the foil core is fully concealed by these decorative swirls.
Clean Fingerprints
Apply a tiny bit of baby oil to your fingertips before smoothing the neck and head. It removes prints and gives the clay a professional finish.
Step 4: The Tail and Finish
-
Form the tail feathers:
Shape a separate, small triangle of pink clay. Attach it to the rear of the body, blending the seam underneath the rose spirals. -
Texture the tail:
Use your needle tool to draw deep grooves into the tail piece, sweeping upward to mimic the look of stiff tail feathers. -
Check the balance:
Stand your flamingo up on a glass tile. Adjust the wire feet slightly if it tips over; the toes should lay flat against the surface. -
Bake carefully:
Bake the figurine according to your clay manufacturer’s instructions (usually around 275°F/130°C for 15-30 minutes). I recommend propping the neck with a bit of polyester batting so it doesn’t droop in the heat.
Once cooled, your elegant bird is ready to bring a splash of pink to your shelf
Pastel Pink Dino With Floral Details
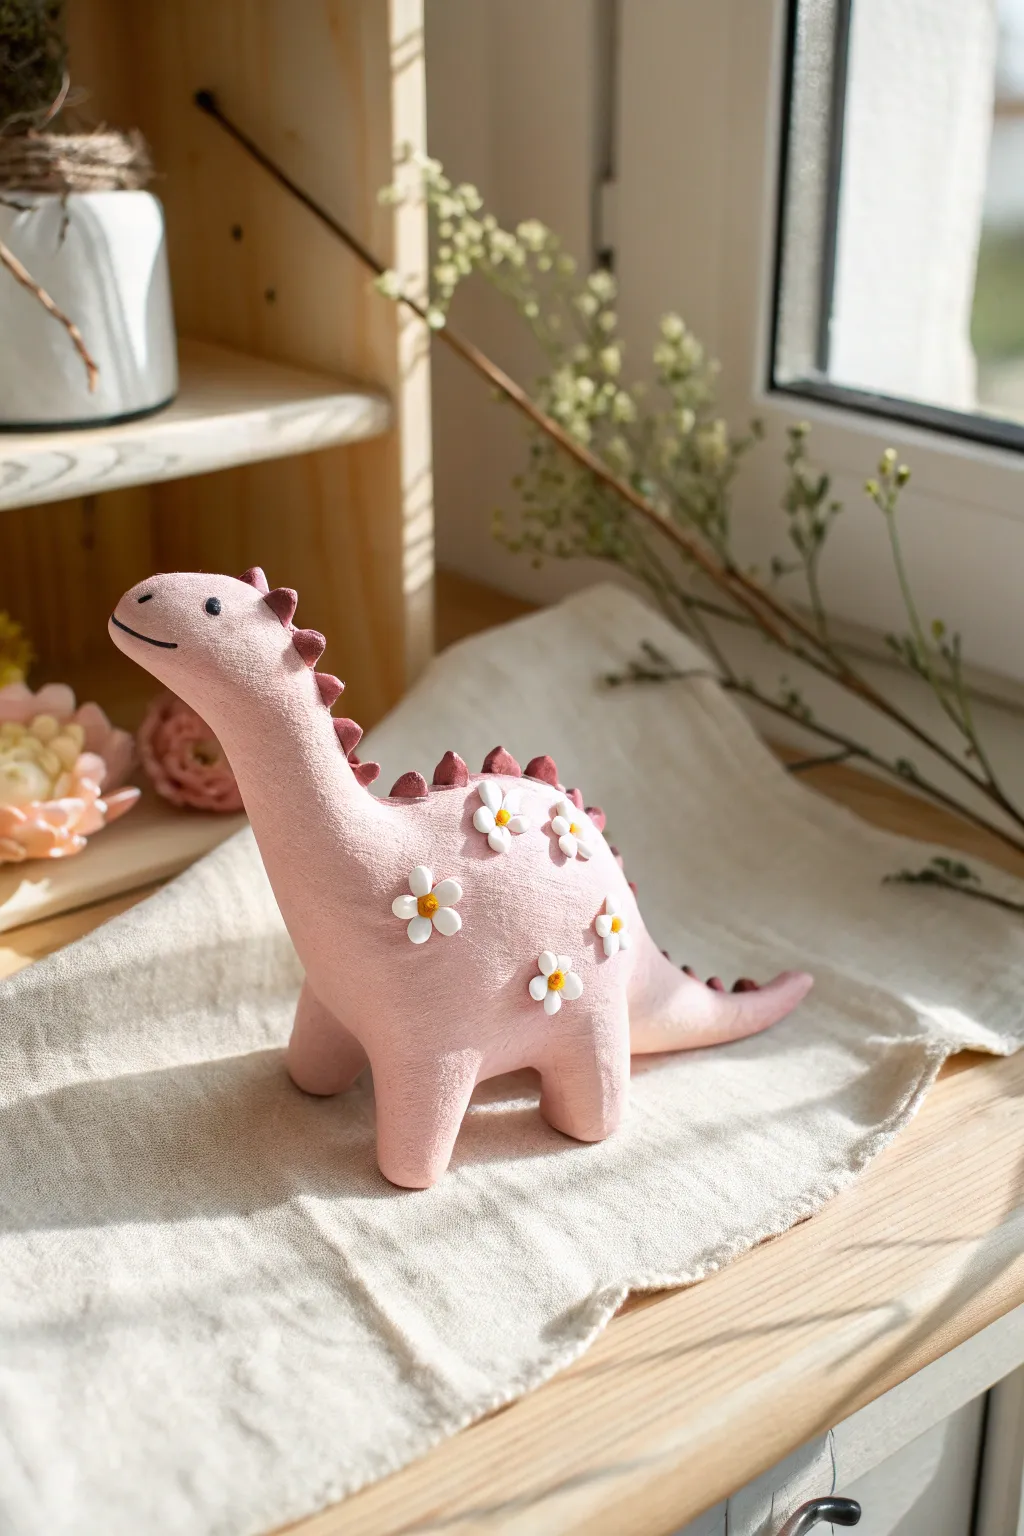
This adorable pastel pink dinosaur brings a touch of prehistoric sweetness to any corner. With its soft matte finish and delicate wildflower accents, it is a perfect beginner-friendly project that looks impressively professional.
Detailed Instructions
Materials
- Pastel pink polymer clay
- Deep rose or maroon polymer clay (for spikes)
- White polymer clay (for petals)
- Yellow polymer clay (for flower centers)
- Black glass beads or clay for eyes
- Needle tool or toothpick
- Ball stylus tool
- Wire armature (optional for neck strength)
- Soft paintbrush (for smoothing)
- Baking sheet and parchment paper
- Matte varnish (optional)
Step 1: Body Construction
-
Prepare the pink clay:
Begin by conditioning a large portion of your pastel pink clay. Knead it in your hands until it’s soft, pliable, and free of cracks. I always make sure there are no air bubbles trapped inside before shaping. -
Form the torso:
Roll the clay into a large, smooth egg shape. This will serve as the heavy base of the body. Gently flatten the bottom so the dinosaur can stand stably on your work surface. -
Shape the neck and head:
Pull and smooth clay upwards from the slimmer end of the egg to form a thick, sturdy neck. Gently curve it forward and shape a rounded, slightly elongated bean shape at the top for the head. -
Form the legs:
Roll four equal-sized cylinders of pink clay. These should be short and stout. Attach them to the underside of the body, blending the seams completely with a smoothing tool or your finger so they look like one continuous piece. -
Add the tail:
Create a cone shape for the tail. Attach the wider end to the back of the body and blend the seam thoroughly. Smooth the tail out until it tapers to a gentle point. -
Create the face:
Use a needle tool to gently impress a curved line for the smiling mouth. For the eyes, you can either embed small black glass beads or roll tiny balls of black clay and press them into place above the smile.
Head Drooping?
If the long neck starts to sag while working, insert a piece of crumpled aluminum foil or a toothpick inside the neck as an internal armature for support before baking.
Step 2: Adding Details
-
Make the spike row:
Condition the deep rose or maroon clay. Roll many small cone shapes, varying them slightly in size to create a natural look along the spine. -
Attach the spikes:
Starting at the top of the head and working down to the tail tip, press the spikes onto the center line of the back. Use the smallest spikes at the very beginning and very end of the row. -
Prepare flower components:
Roll tiny balls of white clay for petals and even smaller balls of yellow clay for the centers. For this scale, the balls should be no bigger than a peppercorn. -
Apply the flowers:
Place five white balls in a circle directly onto the dinosaur’s flank. Press a yellow ball into the center. The pressure should flatten them slightly into perfect petals. -
Detail the flowers:
Use a needle tool to press tiny indents or lines into each white petal. Poke the yellow center gently to give it a textured, pollen-like appearance. -
Repeat floral pattern:
Add 4-6 more daisies scattered randomly across the dinosaur’s body. Leave some space between them so the pink background still dominates. -
Add surface texture:
To mimic the matte, slightly rough look in the photo, gently tap the entire pink surface (avoiding the flowers and eyes) with a clean, stiff toothbrush or a crumpled ball of aluminum foil.
Clean White Petals
Polymers pick up dust easily. Always wash your hands or use wet wipes specifically before handling the white clay to ensure your flower petals stay bright and crisp.
Step 3: Baking and Finishing
-
Final smooth:
Do a final check for fingerprints. One trick is to lightly brush the clay with a tiny bit of baby oil or cornstarch to smooth imperfections before baking. -
Bake the project:
Preheat your oven according to the manufacturer’s instructions on your clay package (usually around 275°F or 130°C). Bake the dinosaur on a parchment-lined sheet for approximately 30-45 minutes depending on thickness. -
Cool down:
Let the dinosaur cool completely within the oven with the door slightly cracked. This gradual cooling helps prevent cracks in thicker sculptures. -
Matte finish:
The dinosaur in the image has a very dry, matte look. If your clay cured shiny, you can apply a layer of matte varnish to dull the sheen and protect the floral details.
Place your flowery friend on a windowsill or desk to enjoy its cheerful presence every day.
Pink Turtle With Patterned Shell
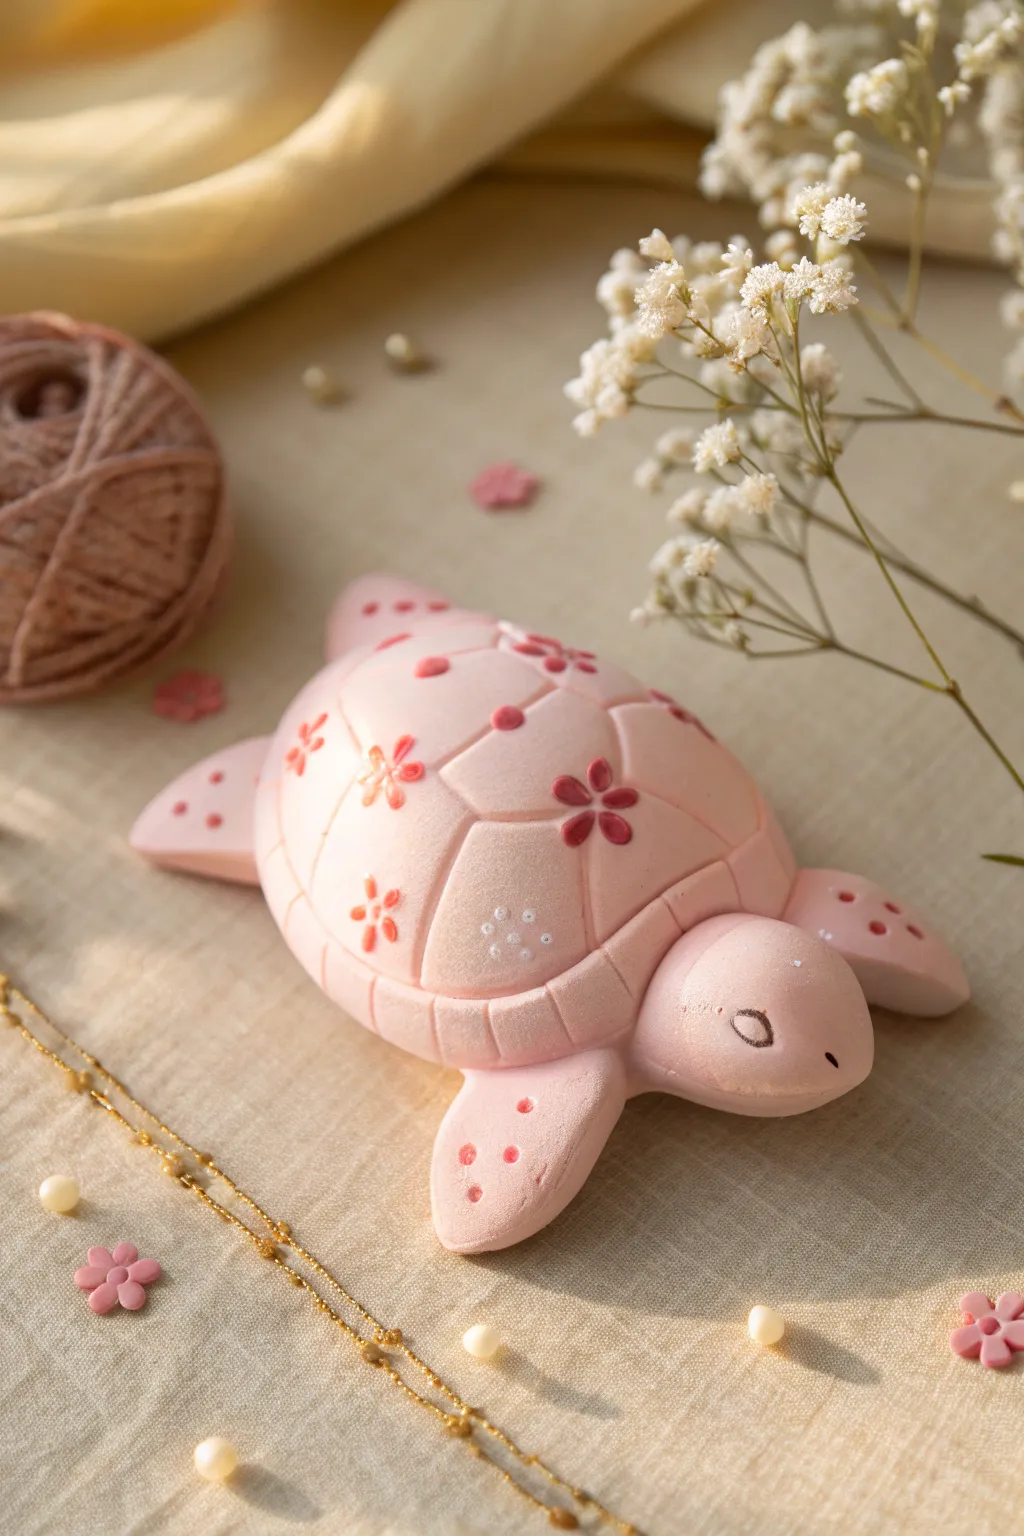
This adorable polymer clay turtle features a soft pastel pink body and a shell decorated with delicate floral motifs. It’s a peaceful little reptile perfect for holding rings or simply resting as a sweet desk pet.
How-To Guide
Materials
- Light pink polymer clay (pastel shade)
- Darker pink polymer clay (for flowers)
- White acrylic paint or tiny white clay bits
- Basic sculpting tools (blade, needle tool)
- Small ball tool
- Black clay snippet or fine tip black marker
- Gloss glaze (optional)
Step 1: Shaping the Base
-
Form the shell:
Start with a generous ball of light pink clay. Condition it well and roll it into a smooth dome shape for the shell, flattening the bottom slightly so it sits stable. -
Create the scutes:
Using a dull blade or a needle tool, gently etch the geometric pattern of the turtle’s shell. Draw a central hexagon, surrounded by pentagons, extending down to a rim around the bottom edge. -
Shape the head:
Roll a smaller ball of the same pink clay into a teardrop shape. Blunt the wider end for the nose and gently press the tapered end under the front of the shell to attach it. -
Add the flippers:
Create four flattened teardrop shapes for the flippers. The front two should be slightly larger and longer than the back two. Curve them slightly downwards to simulate swimming motion. -
Attach the limbs:
Blend the flippers onto the underside of the shell body using a sculpting tool to ensure they are securely attached without visible seams. -
Sculpt the tail:
Make a very tiny cone shape for the tail and attach it to the rear center of the underside.
Clean Clay Tip
Work with the lightest pink clay first, then the darker pink, and finally the black. Keep baby wipes nearby to clean fingers between colors to avoid transfers.
Step 2: Decorating the Shell
-
Make the flowers:
Take extremely tiny amounts of the darker pink clay. Roll them into microscopic balls and press them onto the shell in groups of five to form flower petals. -
Create petal details:
Using a needle tool, press a tiny line into the center of each dark pink petal to give it texture and definition. -
Add varied patterns:
On some shell segments, add simple dots instead of full flowers. You can also mix a bit of white into your pink clay to create a lighter shade for variation. -
Paint details:
If you prefer painting over clay applique, you can bake the turtle first and then paint these flowers with acrylics. However, for this look, embedding tiny clay bits works best. -
Add white accents:
Use a dotting tool or toothpick to add tiny clusters of white dots (or very pale pink) in the centers of the shell segments to balance the darker flowers.
Texture Twist
Before baking, lightly press a piece of coarse fabric or sandpaper against the unadorned parts of the shell to give it a realistic, matte stone texture.
Step 3: Finishing Up
-
Flipper details:
Add three small dark pink dots to the top of each flipper to tie the design together with the shell. -
The face:
For the sleeping eye, roll a hair-thin snake of black clay and curve it into a ‘U’ shape, pressing it gently onto the head. Alternatively, paint this on after baking. -
Baking time:
Bake your turtle according to your clay package instructions. A typical temperature is 275°F (135°C) for about 15-20 minutes, depending on thickness. -
Cooling down:
Let the piece cool completely in the oven before removing it to prevent any thermal shock cracking. -
Glazing:
I usually brush a thin coat of matte variance or semi-gloss glaze over the shell to protect the floral details.
This blooming turtle is now ready to slowly wander onto your display shelf
Bubblegum Pink Bead Bracelets
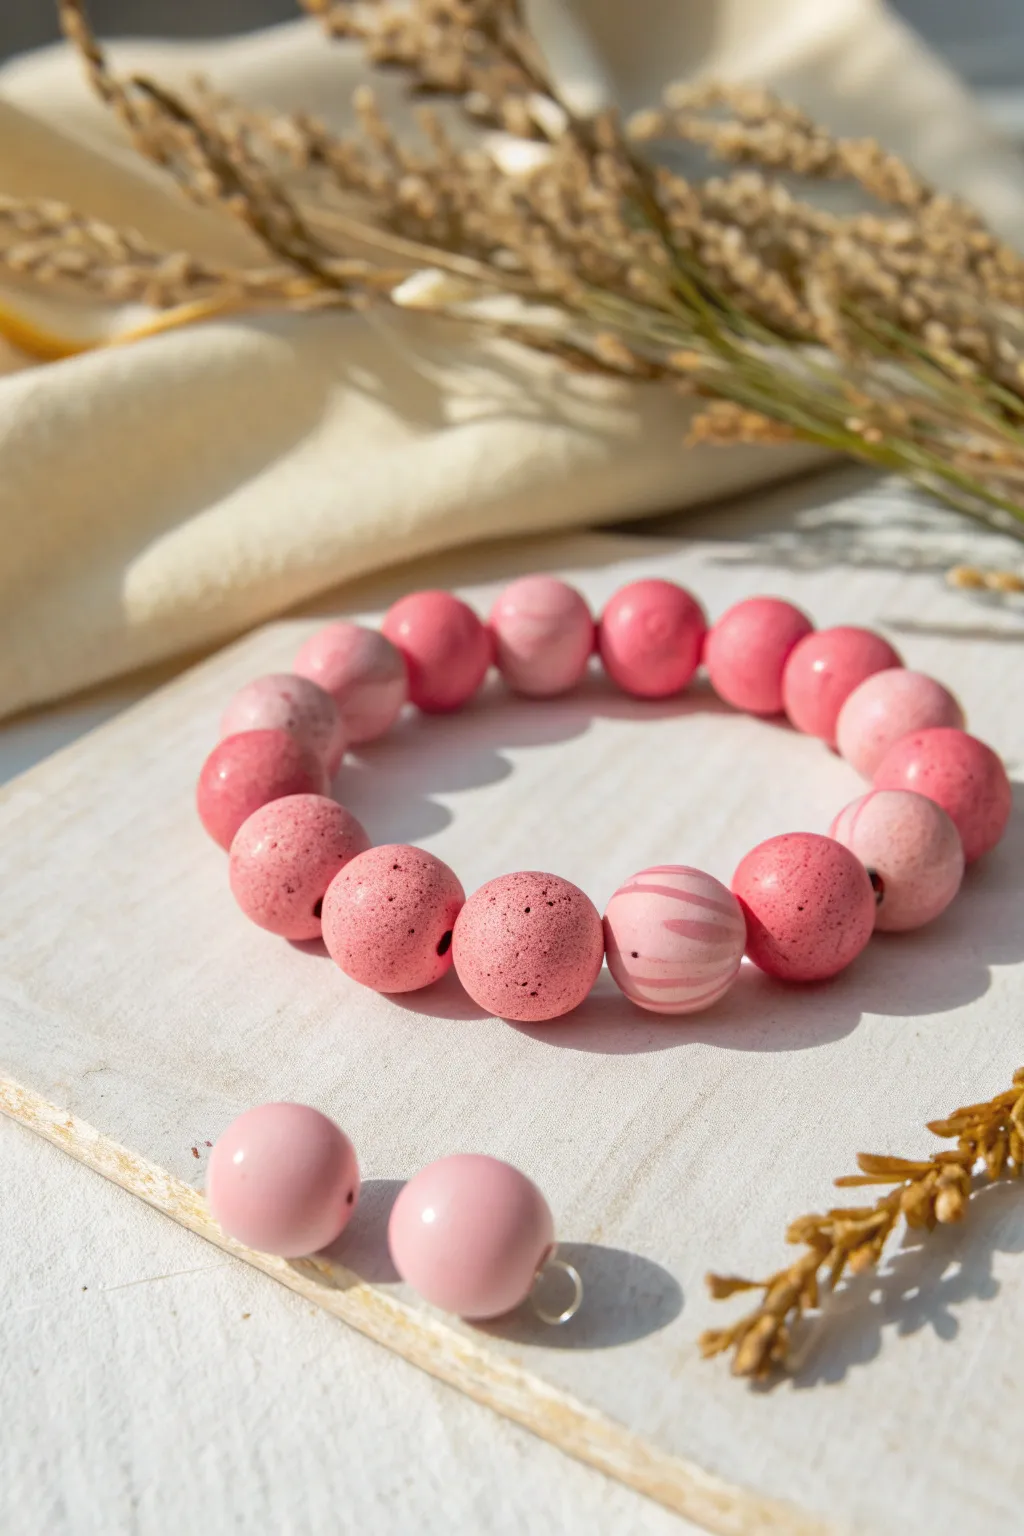
Capture the sweetness of summer with this delightful beaded bracelet featuring a mix of textures and patterns. By combining solid pinks with speckled granite effects and soft marbling, you’ll create a wrist accessory that looks good enough to eat.
Step-by-Step Guide
Materials
- Polymer clay in bright bubblegum pink
- Polymer clay in translucent or pearl white
- Coarse black pepper or dried used coffee grounds (for speckling)
- Beading elastic cord (0.8mm or 1mm)
- Clay roller or pasta machine
- Circle cutters or a bead roller tool
- A thick needle, awl, or toothpick (for piercing)
- Wet/dry sandpaper (400-800 grit)
- Super glue or jewelry cement
- Acrylic roller
- Oven and baking tray
Step 1: Creating the Clay Canes
-
Condition the base colors:
Begin by thoroughly conditioning your bubblegum pink clay until it is soft and pliable. Do the same for a smaller amount of the white or translucent clay. -
Mix the granite effect:
Take about half of your pink clay and flatten it out. Sprinkle a generous pinch of coarse black pepper or dried coffee grounds onto the surface. Fold the clay over and knead it repeatedly until the specks are evenly distributed throughout the pink base. -
Prepare the marble mix:
Take a small portion of the remaining plain pink clay and a roughly equal amount of white clay. Roll both into thin snakes. -
Twist and marble:
Twist the pink and white snakes together, then fold the twisted log in half and twist again. Stop when you see distinct streaks; don’t over-mix or the colors will blend into a solid lighter pink.
Hole Distortion?
If your beads get squashed into ovals while piercing them, try refrigerating the raw clay spheres for 20 minutes before making the holes. The firmer clay holds its shape much better.
Step 2: Forming the Beads
-
Portion the clay:
Using a blade or shape cutter, cut equal portions of the plain pink, the granite-speckled pink, and the marbled clay. Aim for pieces that are roughly the size of a large cherry pit. -
Roll spheres:
Roll each portion between your palms using a gentle circular motion. Apply firm pressure at first to eliminate air bubbles, then lighter pressure to smooth the surface into a perfect sphere. -
Check for consistency:
Line up your rolled beads to ensure they are roughly the same size. If one is too large, pinch off a bit of clay and re-roll; if too small, add a sliver of matching clay. -
Pierce the holes:
Ideally, let the beads sit for 15 minutes to firm up so they don’t squish. Then, carefully insert your needle or awl through the center of each bead with a twisting motion. I find twisting the bead onto the needle works better than pushing the needle through. -
Fix exits:
Check the exit hole on the opposite side of each bead. If the clay has puckered out, gently smooth it back down with your finger to ensure the bead sits flush.
Step 3: Baking and Assembly
-
Arrange for baking:
Place your beads on a baking sheet lined with parchment paper. To prevent flat spots, you can gently nestle them into a bed of cornstarch or baking soda. -
Bake the clay:
Bake according to your clay manufacturer’s specific instructions (usually around 275°F/130°C) for about 30-45 minutes. Longer baking makes for stronger beads. -
Cool and finish:
Allow the beads to cool completely. If there are any fingerprints, lightly sand them away under running water using fine-grit sandpaper, then buff with a soft cloth. -
Layout the design:
Arrange your beads in a pattern you like. The photo uses an alternating rhythm, grouping similar styles together, but a random mix works wonderfully too. -
String the beads:
Cut a piece of elastic cord about 10 inches long. String your beads onto the elastic, checking the fit around your wrist before you finish. -
Secure the knot:
Tie a surgeon’s knot (right over left twice, then left over right). Pull the elastic tight to secure. Add a tiny drop of super glue to the knot for extra security. -
Final trim:
Once the glue is dry, trim the excess elastic close to the knot. If the hole of your adjacent bead is large enough, gently tug the knot inside to hide it.
Glossy or Matte?
Leave the beads as-is for a natural stone look, or add a coat of water-based polyurethane varnish if you want a high-gloss, gumball-style shine.
Slide on your new creation and enjoy the pop of pink on your wrist.
Pink Terrazzo-Style Jewelry Tiles
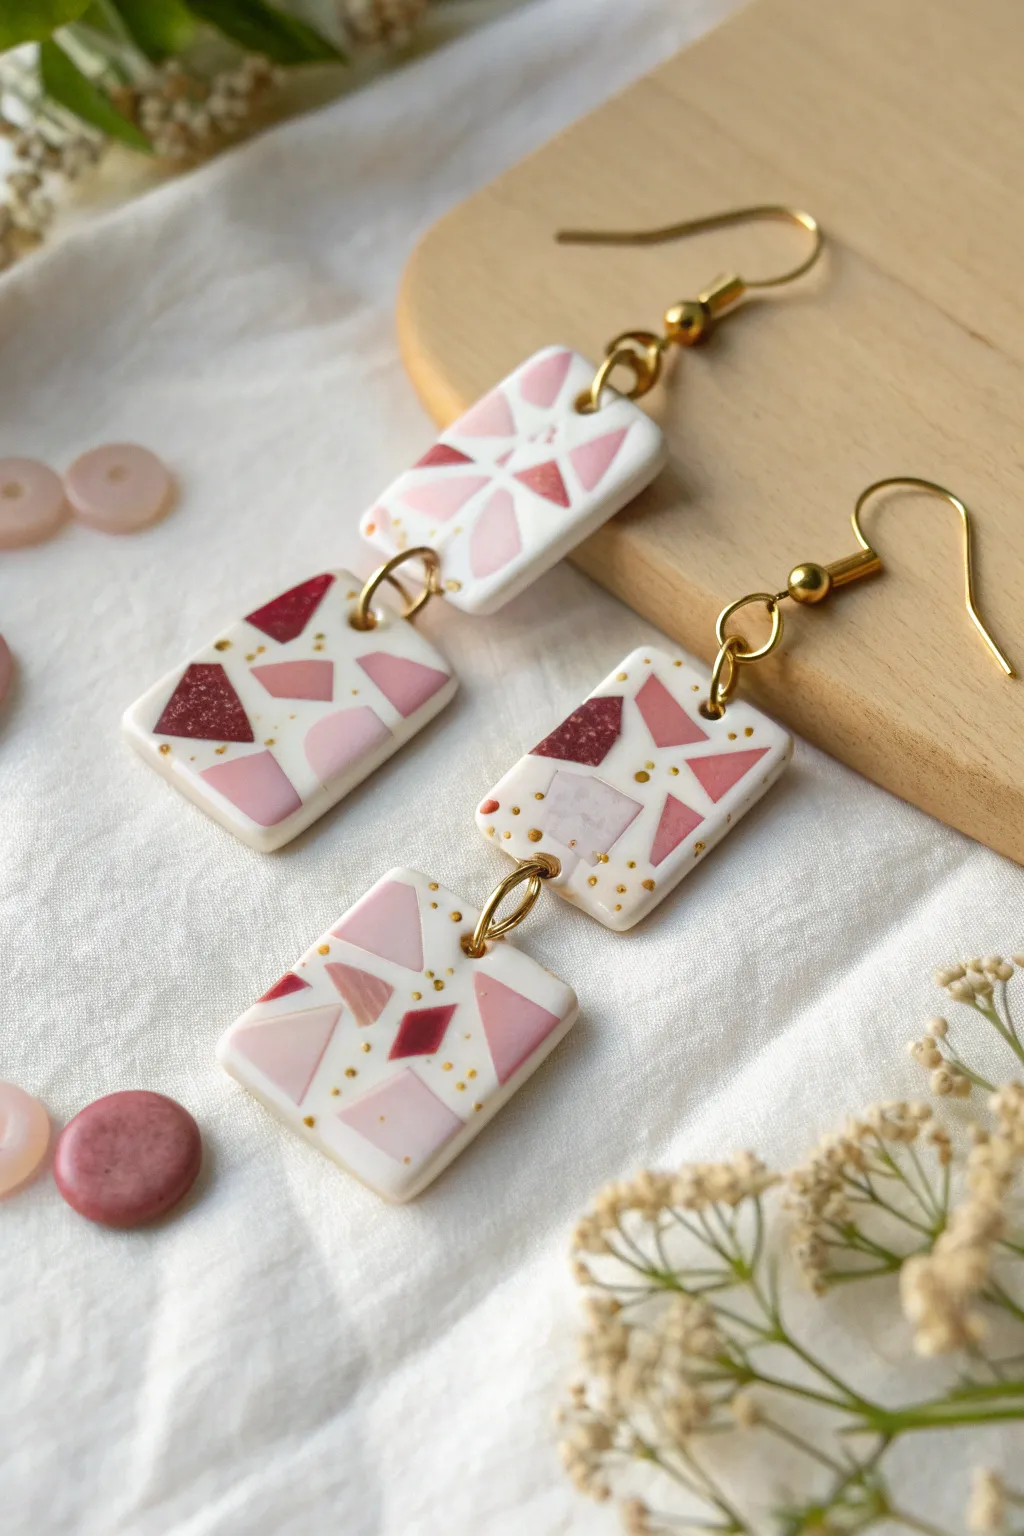
These elegant earrings combine soft blush tones with deep berry accents in a modern, fragmented pattern. The white base really makes the geometric shards pop, while touches of gold add a sophisticated shimmer perfect for daily wear.
Step-by-Step
Materials
- White or translucent white polymer clay
- Polymer clay in various pink shades (baby pink, dusty rose, deep burgundy)
- Gold leaf flakes or metallic gold acrylic paint
- Pasta machine or acrylic rolling pin
- Tissue blade or sharp craft knife
- Small rectangular clay cutter (approx. 1 inch)
- Small circle cutter (for jump ring holes)
- Parchment paper or ceramic tile
- UV resin (optional, for sealing)
- Gold jewelry findings: jump rings and earring hooks
- Jewelry pliers
Step 1: Prepping the Clay Shards
-
Condition the Clay:
Start by conditioning your colored clays (pinks and burgundy) until they are soft and pliable. Do the same for your white base clay to ensure no air bubbles are trapped inside. -
Create Thin Sheets:
Roll each colored clay into a very thin sheet. If you use a pasta machine, setting 5 or 6 works well. You want these quite thin so they integrate easily into the base later. -
Cut Geometric Shapes:
Using your sharp craft knife, cut the thin sheets into small, random geometric shapes. Think triangles, trapezoids, and irregular polygons. Keep them sharp and angular rather than rounded. -
Sort the Pieces:
Separate your tiny cut shapes into piles by color so you can easily grab what you need during assembly.
Clean Cuts Pro Tip
Place a piece of cling film (plastic wrap) over your clay slab before pressing down your cutter. This creates a lovely, soft beveled edge on your shapes instead of harsh, sharp corners.
Step 2: Assembling the Pattern
-
Prepare the Base:
Roll out your white clay to a medium thickness (about 2-3mm). This will be the main body of the earring. -
Place the Fragments:
Gently pick up your colored shards and press them lightly onto the white sheet. Leave plenty of white space between them to mimic the terrazzo style shown in the photo. -
Add Gold Accents:
Between the clay shards, add tiny flecks of gold leaf using a toothpick or tweezers. Don’t overdo it; just a few sparkles here and there look best. -
Flatten the Slab:
Cover the sheet with parchment paper and gently roll over it with your acrylic roller. This embeds the colored shards and gold leaf flush into the white base, creating a smooth, unified surface.
Level Up: Texture
Instead of a smooth finish, press a piece of coarse sandpaper or a texture sponge onto the white clay base before baking for a stone-like, tactile surface.
Step 3: Cutting and Baking
-
Cut the Rectangles:
Position your rectangular cutter over an area of the pattern you like best. Cut out four rectangles total (two for each earring). -
Pierce Holes:
While the clay is still raw, carefully use a small circle cutter or a needle tool to punch a hole at the top and bottom of the connector pieces, and just the top of the dangle pieces. -
Smooth the Edges:
I always take a moment here to gently smooth the cut edges with a finger dipped in a little cornstarch or water to remove any rough cutter marks. -
Bake:
Place your pieces on a ceramic tile or baking sheet. Bake according to your brand of clay’s instructions—usually 275°F (130°C) for about 30 minutes. Let them cool completely.
Step 4: Finishing Touches
-
Add Painted Details:
If you didn’t use gold leaf earlier, or want extra sparkle, dip a toothpick into gold acrylic paint and add tiny dots in the white spaces now. -
Seal (Optional):
For a glossy glass-like finish, apply a thin layer of UV resin to the front of the tiles and cure under a UV lamp. If you prefer a matte look, you can skip this step. -
Assemble Hardware:
Using two pairs of pliers, twist open a jump ring. Connect the top rectangle to the bottom rectangle. Close the jump ring securely so there is no gap. -
Attach Earring Hooks:
Open the loop on your fishhook ear wire and attach it to the top hole of the upper rectangle. Repeat for the second earring.
Wear your new geometric creations with pride and enjoy the subtle swing of these lightweight earrings
Marbled Pink-and-White Swirl Rings
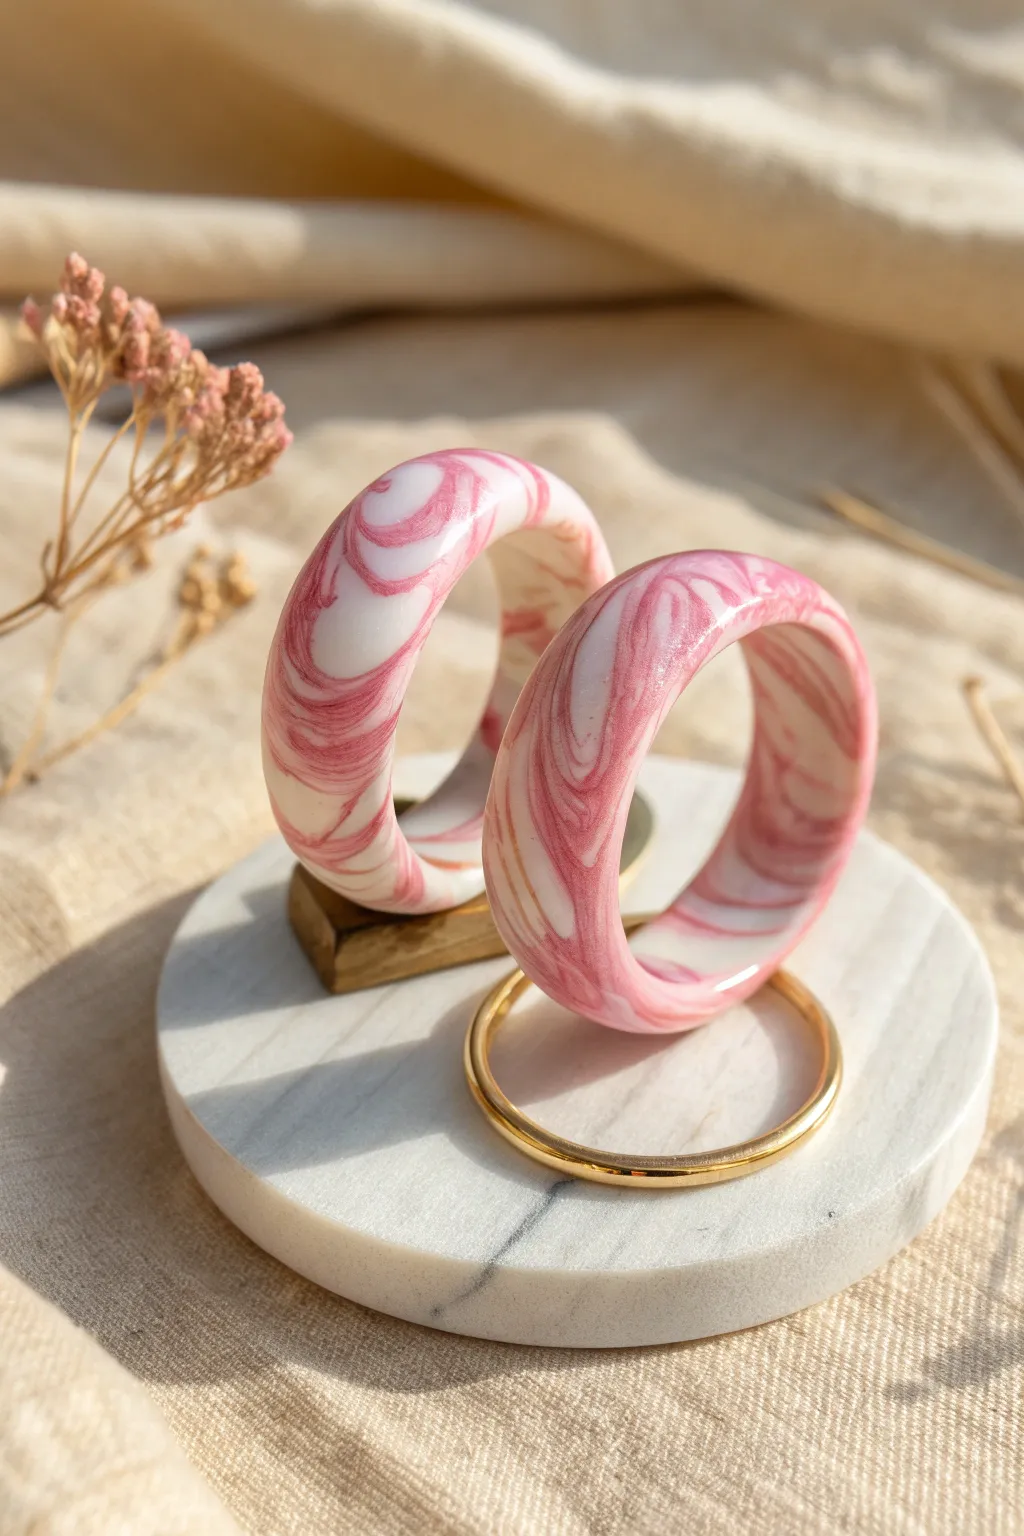
These wide, domed rings feature a mesmerizing dance between translucent white and shimmering pearlescent pink, reminiscent of agate stone or strawberries and cream. The glossy resin finish gives them a high-end, polished look that elevates simple clay into wearable art.
How-To Guide
Materials
- White polymer clay (opaque)
- Translucent white polymer clay
- Pearlescent pink polymer clay (or magenta mixed with pearl)
- Acrylic rolling pin
- Tissue blade or clay knife
- Ring mandrel (metal or silicone)
- Sandpaper kit (various grits from 400 to 2000)
- UV resin or polyurethane gloss varnish
- Small UV lamp (if using UV resin)
- Small paintbrush
Step 1: Prepping and Mixing the Clay
-
Condition the white clay:
Begin by thoroughly conditioning a block of opaque white clay in your hands until it is soft, malleable, and warm. -
Prepare the translucent clay:
Repeat the conditioning process with your translucent white clay. Mixing opaque and translucent whites adds depth to the marble effect later. -
Ready the pink clay:
Condition the pearlescent pink clay. If you don’t have a pre-mixed pearl pink, I like to mix equal parts magenta and pearl white to get that lovely shimmer seen in the photo. -
Create logs:
Roll each of your three colors (opaque white, translucent white, and pink) into long, snake-like logs about 4 inches long and 1/4 inch thick.
Step 2: Creating the Marbled Slab
-
Twist the logs:
Bundle the three logs together and twist them tightly like a candy cane. Fold the twisted log in half and twist again. -
Roll and fold:
Roll the twisted clay into a ball, then use your acrylic roller to flatten it out into a slab. -
Refine the marble:
Tear the slab into pieces and stack them randomly, then roll it flat again. This ‘tear and stack’ method creates more natural, organic swirls than just twisting. Stop when you love the pattern; over-mixing will turn it muddy. -
Roll to final thickness:
Roll your marbled slab until it is approximately 3-4mm thick. You want it substantial enough to be sturdy but thin enough to bend. -
Cut the strip:
Use your tissue blade to cut a long, straight rectangular strip from the best part of your marbled pattern.
Air Pockets?
Before baking, check for tiny air bubbles trapped under the surface. Gently pierce them with a needle tool and smooth the area with your finger to prevent bumps.
Step 3: Forming the Ring
-
Measure the mandrel:
Identify the correct size on your ring mandrel. Wrap the clay strip around that spot on the mandrel. -
Cut the seam:
Where the two ends of clay overlap, slice straight down through both layers with your blade. Remove the excess bits to create a perfect butt joint. -
Blend the seam:
Gently smooth the seam with your finger or a clay tool, blending the clay so the join becomes invisible. -
Dome the profile:
While it’s on the mandrel, gently press the edges of the clay band downward to give it a slightly rounded, domed profile rather than a flat, blocky shape. -
Bake:
Bake the clay according to the manufacturer’s instructions. Usually, this means leaving it on the oven-safe mandrel or a rolled piece of thick cardstock at 275°F (135°C).
Add Sparkle
Mix a pinch of gold leaf flakes into the translucent clay before marbling. The gold will peek through the layers for a luxurious, geode-like effect.
Step 4: Finishing Touches
-
Cool and sand:
Let the ring cool completely before removing it from the mandrel. Wet sand the edges and the surface starting with 400 grit and working up to 2000 grit for a silky smooth feel. -
Buff clean:
Wash the ring with soap and water to remove any sanding dust and let it dry thoroughly. -
Apply finish:
Brush a thin, even layer of UV resin or gloss varnish over the outside of the ring. This brings out the translucency and protects the clay. -
Cure:
If using UV resin, cure under a UV lamp for 2-3 minutes until hard and tack-free. If varnish, let dry overnight.
Slip on your beautiful new ring and enjoy showing off that custom swirl pattern you created
Faux Pink Agate Coaster Set

Mimic the luxurious look of natural stone with these stunning faux agate coasters, featuring elegant bands of blush, rose, and white. This project uses translucent and opaque polymer clays to create depth and realism that looks beautiful on any coffee table.
Step-by-Step Guide
Materials
- Translucent polymer clay
- Premo or Fimo clay in white
- Premo or Fimo clay in dark pink (e.g., Alizarin Crimson)
- Premo or Fimo clay in light pink (e.g., Blush or Ballerina)
- Acrylic roller or pasta machine
- Wide circular cookie cutter (approx. 3.5 – 4 inches)
- X-acto knife or tissue blade
- Wax paper or parchment paper
- Ceramic tile or glass baking sheet
- Fine grit sandpaper (400, 600, 800, 1000 grit)
- Polyurethane gloss varnish or UV resin (optional for high shine)
- Soft paintbrush
Step 1: Color Mixing and Prep
-
Condition the Clay:
Begin by thoroughly conditioning each block of clay until it is soft and pliable. You want the clay warm enough that it won’t crack when you roll it thin. -
Create Custom Shades:
Mix a small amount of dark pink with a 1:1 ratio of translucent clay to create a semi-transparent deep rose. Repeat this with the light pink and translucent clay. Leave some white clay pure opaque, but mix another portion of white with translucent for a milky quartz effect. -
Form the Logs:
Roll each color mixture into uneven, snake-like logs of varying thicknesses. You should have about 5-6 different logs ranging from pure white to translucent pink.
Step 2: Creating the Agate Pattern
-
Bundle and Twist:
Gather your clay snakes into a single thick bundle. Twist the bundle tightly like a candy cane to begin merging the colors together. -
Fold and Roll:
Fold the twisted log in half and roll it out again. Repeat this twisting and folding process 2-3 times, but be careful not to over-mix, or you will lose the distinct agate banding. -
Form a Block:
Mash the clay log into a solid, rectangular block shape. This helps compress the layers and prepares it for slicing. -
Sheet the Clay:
Using your acrylic roller or a pasta machine on a medium-thick setting, roll the block out into a long, flat sheet. Look for areas where the striations mimic natural stone lines. -
Enhance the Lines:
If your lines look too straight, you can gently push the edges of the sheet inward to ripple the clay, creating those wavy, organic lines seen in real agate.
Muddy Colors?
If your banding looks messy, you twisted too much. Stop mixing as soon as you see streaks. Keep distinct ropes of white to maintain contrast.
Step 3: Cutting and Baking
-
Cut the Coaster Shapes:
Place your sheet on a piece of parchment paper. I find it helpful to chill the sheet for 10 minutes in the fridge first to prevent distortion. Use your large circular cutter to punch out your coaster shapes. -
Smooth the Edges:
Gently run your finger around the rim of each circle to smooth out any sharp edges left by the cutter. -
Bake:
Transfer the clay circles to your ceramic tile or baking sheet. Bake according to the manufacturer’s instructions on your clay package (usually at 275°F / 130°C for 30 minutes per 1/4 inch thickness). -
Cool Down:
Allow the coasters to cool completely before removing them from the baking surface to ensure they remain flat.
Ice Water Shock
Immediately after baking, plunge the hot coasters into a bowl of ice water. This ‘shocks’ the translucent clay, making it significantly clearer and more glass-like.
Step 4: Finishing Touches
-
Sand for Smoothness:
Place your wet sandpaper on a flat surface. rubbed the coaster face-down in a circular motion, starting with 400 grit and working your way up to 1000 grit. This reveals the translucent depth. -
Clean Up:
Wash the coasters with soap and water to remove any sanding dust and let them dry fully. -
Gloss Finish (Optional):
For that wet, polished stone look seen in the photo, apply a thin layer of polyurethane gloss varnish or clear UV resin. If using resin, cure under a UV lamp. -
Protect the Base:
Consider gluing a circle of cork or felt to the bottom of each coaster to prevent slipping and protect your furniture.
Now you have a sophisticated set of coasters ready to hold your favorite drinks in style
Pink Cloud and Star Desk Decor
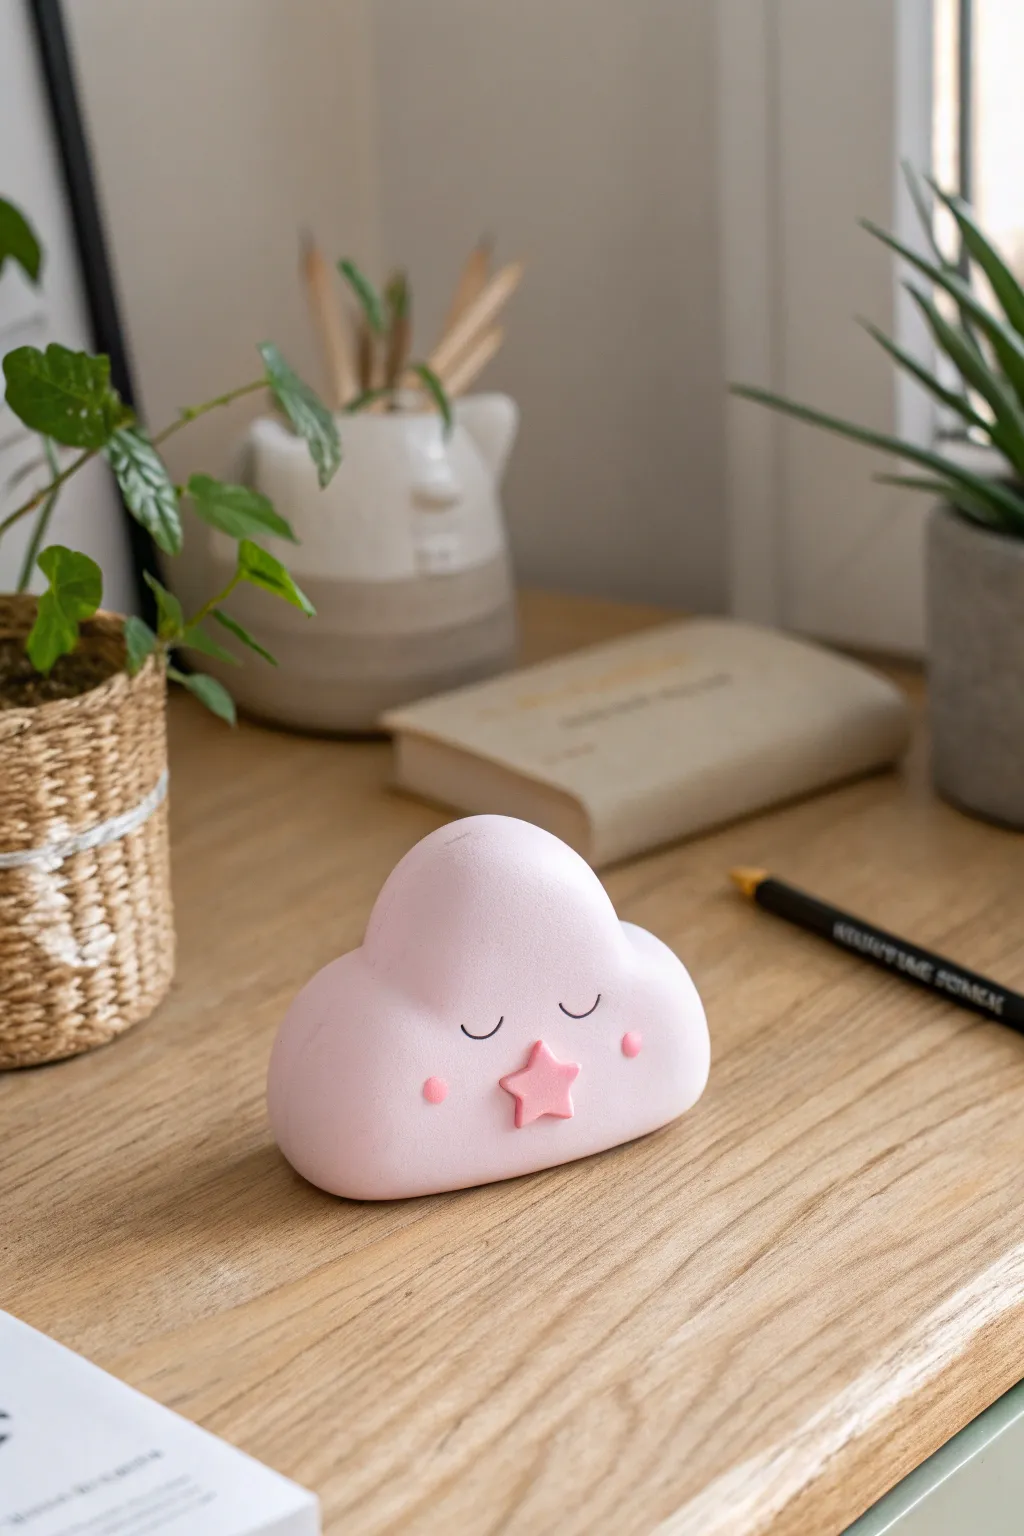
Add a touch of whimsy to your workspace with this adorable sleeping cloud figurine made from soft pink polymer clay. This charming desk buddy features a smooth, matte finish and a sweet star detail, perfect for holding small notes or simply brightening your day.
How-To Guide
Materials
- Polymer clay (pale pink)
- Polymer clay (slightly darker pink or coral for the star)
- Acrylic paint (black and pink)
- Fine detail paintbrush
- Rolling pin or pasta machine
- Cloud-shaped cookie cutter (optional)
- X-Acto knife or clay blade
- Ball stylus tool
- Fine-grit sandpaper (400-600 grit)
- Matte spray varnish
- Oven for baking
Step 1: Shaping the Cloud Base
-
Condition the Clay:
Begin by thoroughly conditioning your pale pink polymer clay. Knead it in your hands until it is warm, soft, and pliable to prevent cracking during baking. -
Form a Smooth Ball:
Roll the conditioned clay into a large, smooth ball. Ensure there are no air bubbles trapped inside by compressing it firmly as you roll. -
Establish the Thickness:
Flatten the ball slightly until it is about 1 to 1.5 inches thick. You want it to be substantial enough to stand upright on a desk without tipping over. -
Create the Cloud Shape:
Using your fingers, gently pinch and mold the top edge of the clay to create three distinct rounded bumps. Make the center bump slightly taller than the two side bumps for a classic cloud silhouette. -
Flatten the Base:
Press the bottom edge firmly against your work surface to create a completely flat base. This ensures your cloud will sit stable and straight. -
Refine the Edges:
Dip your finger in a tiny bit of water or clay softener and rub it gently over the surface to smooth out any fingerprints or sharp angles. The goal is a soft, puffy look.
Fixing Fingerprints
Can’t smooth out a stubborn fingerprint? Lightly brush the raw clay with a little baby oil or cornstarch before your final smoothing pass to dissolve ridges.
Step 2: Adding Details & Baking
-
Create the Star:
Take a small amount of the slightly darker pink clay. Roll it out to about 3mm thickness. -
Cut the Star Shape:
Use a small star cutter or carefully hand-cut a star shape using your X-Acto knife. I find that hand-cutting gives it a charming, organic feel. -
Attach the Star:
Place the star in the lower center of the cloud’s face. Press it gently to adhere it to the base clay, ensuring the edges are flush. -
Bake the Figurine:
Place your cloud on a ceramic tile or baking sheet lined with parchment paper. Bake according to your clay manufacturer’s instructions (typically 275°F/135°C for 15-30 minutes per 1/4 inch of thickness). -
Cool Completely:
Allow the cloud to cool completely in the oven with the door cracked open. This gradual cooling helps prevent thermal shock cracks.
Step 3: Painting and Finishing
-
Sand for Smoothness:
Once cool, inspect the surface. If there are any rough spots, wet-sand them gently with fine-grit sandpaper until the finish is silky smooth. -
Paint the Eyes:
Using a very fine detail brush and black acrylic paint, carefully paint two small, curved ‘U’ shapes for the sleeping eyes. Keep the lines thin and delicate. -
Add Cheek Blush:
Dip a ball stylus or the round end of a paintbrush handle into pink paint. Dot it gently onto the cheeks, just outside the star, to create rosy blush spots. -
Let Paint Dry:
Allow the acrylic paint to dry fully, which usually takes about 15 to 20 minutes. -
Seal the Project:
Take the project outside or to a well-ventilated area. Apply two light coats of matte spray varnish to protect the paint and give the clay a professional finish.
Weighted Base
To prevent tipping, embed a washed stone or a ball of crumpled aluminum foil inside the base of the cloud. This saves clay and adds necessary weight.
Place your new serene cloud friend on your desk to remind you to keep dreaming throughout the day
Pink Mini Planter Charms for Pots
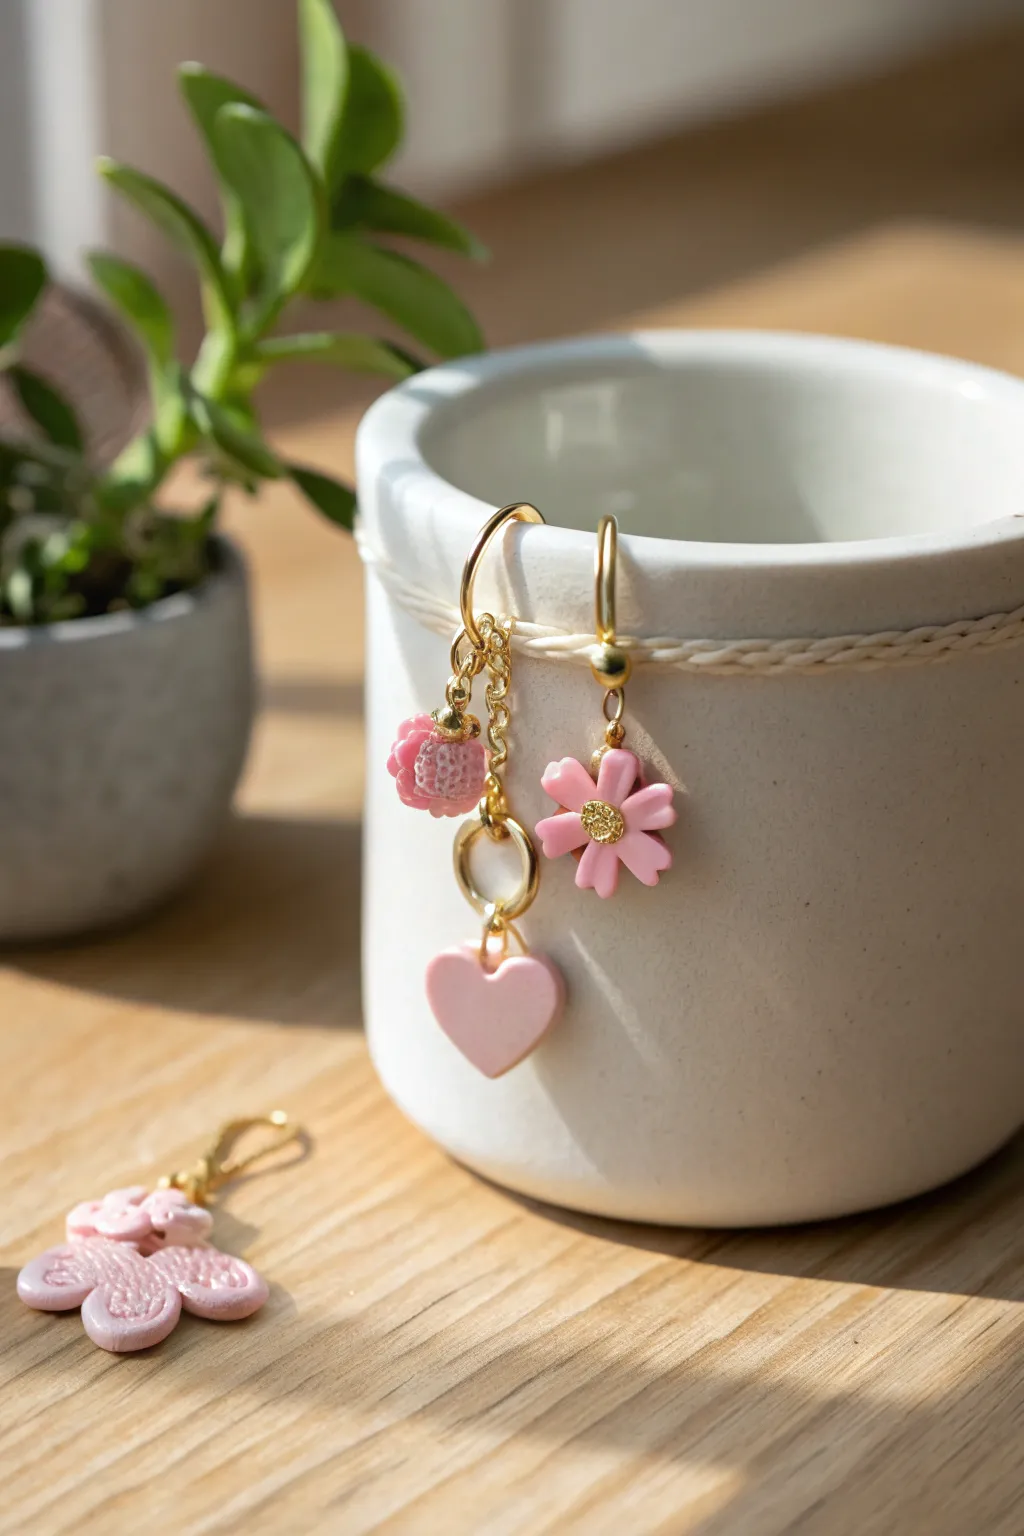
Add a touch of handcrafted sweetness to your indoor garden with these delightful dangling charms. These miniature polymer clay strawberries, flowers, and hearts are the perfect way to dress up a plain white planter with a pop of playful pink.
Step-by-Step Tutorial
Materials
- Pink polymer clay (light and medium shades)
- Gold polymer clay or gold acrylic paint
- Gold jewelry wire (20-22 gauge)
- Gold jump rings (4mm and 6mm)
- Short length of gold jewelry chain
- Wire cutters
- Round nose pliers
- Sculpting tools (needle tool, small ball tool)
- Small heart cutter (optional)
- Gloss glaze or resin (optional)
Step 1: Sculpting the Strawberry
-
Form the Base:
Start by taking a small pea-sized amount of medium pink clay. Roll it into a smooth ball, then gently taper one end to create a cone or strawberry shape. -
Create Texture:
Using a needle tool or a very fine dotting tool, gently poke small indentations all over the surface of the berry to mimic seeds. Don’t press too hard; you just want surface texture. -
Add the Cap:
Flatten a tiny ball of lighter pink clay. Use a craft knife to cut small triangles out of the edge to create a star-like leaf shape. Place this over the wider top end of your strawberry. -
Insert the Hook:
Cut a short piece of gold wire and form a small U-shape or loop. Insert the ends directly into the top center of the strawberry so only the loop remains visible. Smooth the clay around the wire to secure it.
Clean Those Prints
Before baking, lightly brush your raw clay pieces with a little baby oil or cornstarch on your finger. This smooths out accidental fingerprints and dust specks.
Step 2: Crafting the Floral Charm
-
Make Petals:
Roll five or six tiny balls of light pink clay, keeping them equal in size. Flatten them slightly between your fingers into teardrop shapes. -
Assemble the Flower:
Arrange the petals in a circle with the points meeting in the center. Gently press them together so they bond. -
Add the Center:
Roll a tiny ball of gold clay (or use yellow clay you plan to paint later) and press it into the center. While the clay is soft, I like to tap it with a toothbrush handle or needle tool to give it a pollen-like texture. -
Pierce for Hanging:
Carefully use a needle tool to create a hole through the top of one petal. Make sure the hole is large enough for your jump ring to pass through later.
Sparkle & Shine
Mix a tiny pinch of fine iridescent glitter into the translucent or pink clay before sculpting. It gives the charms a subtle, magical shimmer in the sunlight.
Step 3: Creating the Heart and Hardware
-
Shape the Heart:
Roll a sheet of light pink clay to about 3mm thickness. Use a small heart cutter to punch out a shape, or sculpt one by hand by indenting a ball of clay. -
Add a Loop:
Like the strawberry, insert a U-shaped wire loop into the top center of the heart cleavage. Ensure it’s secure. -
Baking:
Arrange all your pieces on a baking tile or parchment paper. Bake according to your brand of polymer clay instructions (usually 275°F/135°C for 15-30 minutes). Let them cool completely. -
Finishing Touches:
If you didn’t use gold clay for the flower center, carefully paint it gold now. You can also apply a gloss glaze to the charms for a shiny, ceramic look.
Step 4: Assembly
-
Create the Pot Hooks:
Cut two pieces of heavier gauge gold wire, about 2 inches long. Bend one end of each into a large shepherd’s hook shape—this will hang over the rim of your pot. -
Form the Loops:
On the straight end of your hooks, use round nose pliers to create a small enclosed loop. -
Chain the Charms:
Attach a small length of chain (about 1 inch) to one of the hook loops using a jump ring. -
Attach the Strawberry:
Connect the strawberry charm to the top of the chain section using a jump ring. -
Attach the Heart:
Connect the heart charm to the very bottom of that same chain using a larger jump ring for movement. -
Attach the Flower:
Attach the flower charm directly to the loop of the second pot hook using a single jump ring, letting it hang solo.
Now simply hook these adorable creations over the rim of your favorite succulent pot for an instant style upgrade
Pink Magnet Set With Cute Icons
Brighten up your workspace or fridge with this adorable collection of miniature pink magnets. These bite-sized polymer clay creations feature sweet motifs like bunny faces, hearts, and cherry blossoms, all unified by a soft, matte pink aesthetic.
How-To Guide
Materials
- Pink polymer clay
- Small amount of black polymer clay
- Rolling pin or pasta machine
- Small shape cutters (heart, circle, flower/sakura, star)
- Needle tool or toothpick
- Ball stylus tool
- Small craft magnets
- Strong craft glue (E6000 or similar)
- Baking sheet and parchment paper
- Oven
Step 1: Clay Preparation
-
Condition the Clay:
Begin by taking a chunk of your pink polymer clay and kneading it in your hands until it becomes warm, soft, and pliable. This conditioning step prevents cracks during baking. -
Roll Out the Slab:
Using a rolling pin or a pasta machine on a wide setting, roll the clay into an even sheet approximately 1/4 inch (6mm) thick. You want these to be sturdy enough to hold a magnet.
Clean Slates Only
Polymer clay picks up dust easily! Keep baby wipes nearby to clean your hands and tools often, especially before handling the light pink clay.
Step 2: Cutting the Basic Shapes
-
Cut Hearts:
Use a small heart-shaped cutter to punch out several hearts from your clay slab. Gently push them out of the cutter if they stick. -
Cut Flowers:
Use a 5-petal flower cutter to create the base for your sakura blossoms. Cut out at least four or five of these. -
Cut Bunny & Face Bases:
For the faces, use a small circle cutter. If you have a specific bunny cutter with ears, use that; otherwise, cut a circle and hand-shape two small elongated teardrops of clay, attaching them to the top of the circle for ears. -
Cut Star Shape:
Punch out a single star shape using a cutter, or hand-cut one if you prefer a softer, rounded star look.
Step 3: Detailing the Icons
-
Sculpt Flower Details:
To turn the basic flower shapes into sakura, use a needle tool to gently press an indentation into the outer edge of each petal. Then, use a small ball tool to press into the center of the flower. -
Add Flower Stamens:
With the needle tool, gently drag lines from the center indentation outwards onto each petal to create texture. -
Create Bunny Faces:
Roll incredibly tiny, thin snakes of black clay. Carefully place them onto the bunny shapes to form eyes and whiskers. You can also press small indentations for eyes instead of adding clay if you plan to paint them later, but black clay adds a crisp look. -
Add Bows:
For the bunny with a bow or the heart ‘gift’, create a tiny bow by flattening two small triangles of pink clay and meeting them in the middle with a small dot. Gently press this onto the chosen shape. -
Create the Winking Face:
On a plain circle cut-out, use your needle tool to gently impress a curved line for a winking eye and a small smile. Add tiny black clay bits for the open eye. -
Smooth the Edges:
Before baking, run your finger lightly around the edges of every piece to soften any sharp cutting lines. This gives the set a polished, professional finish.
Sakura Shading
Brush a tiny bit of dark pink soft pastel chalk dust into the centers of the flowers before baking for a beautiful, realistic ombre gradient.
Step 4: Finishing
-
Bake the Clay:
Arrange all your shapes on a parchment-lined baking sheet. Bake according to your specific polymer clay manufacturer’s instructions (usually around 275°F/135°C for 15-30 minutes depending on thickness). -
Cool Completely:
Remove the tray from the oven and allow the clay pieces to cool completely. They are fragile while hot, so don’t touch them yet. -
Attach Magnets:
Flip each piece over. Apply a strong dab of E6000 or super glue to the back and press a small craft magnet firmly into the adhesive. -
Dry Time:
Let the glue cure fully for 24 hours before sticking them to your fridge to ensure the magnets stay put.
Enjoy arranging your new sweet collection of magnets on any magnetic surface.