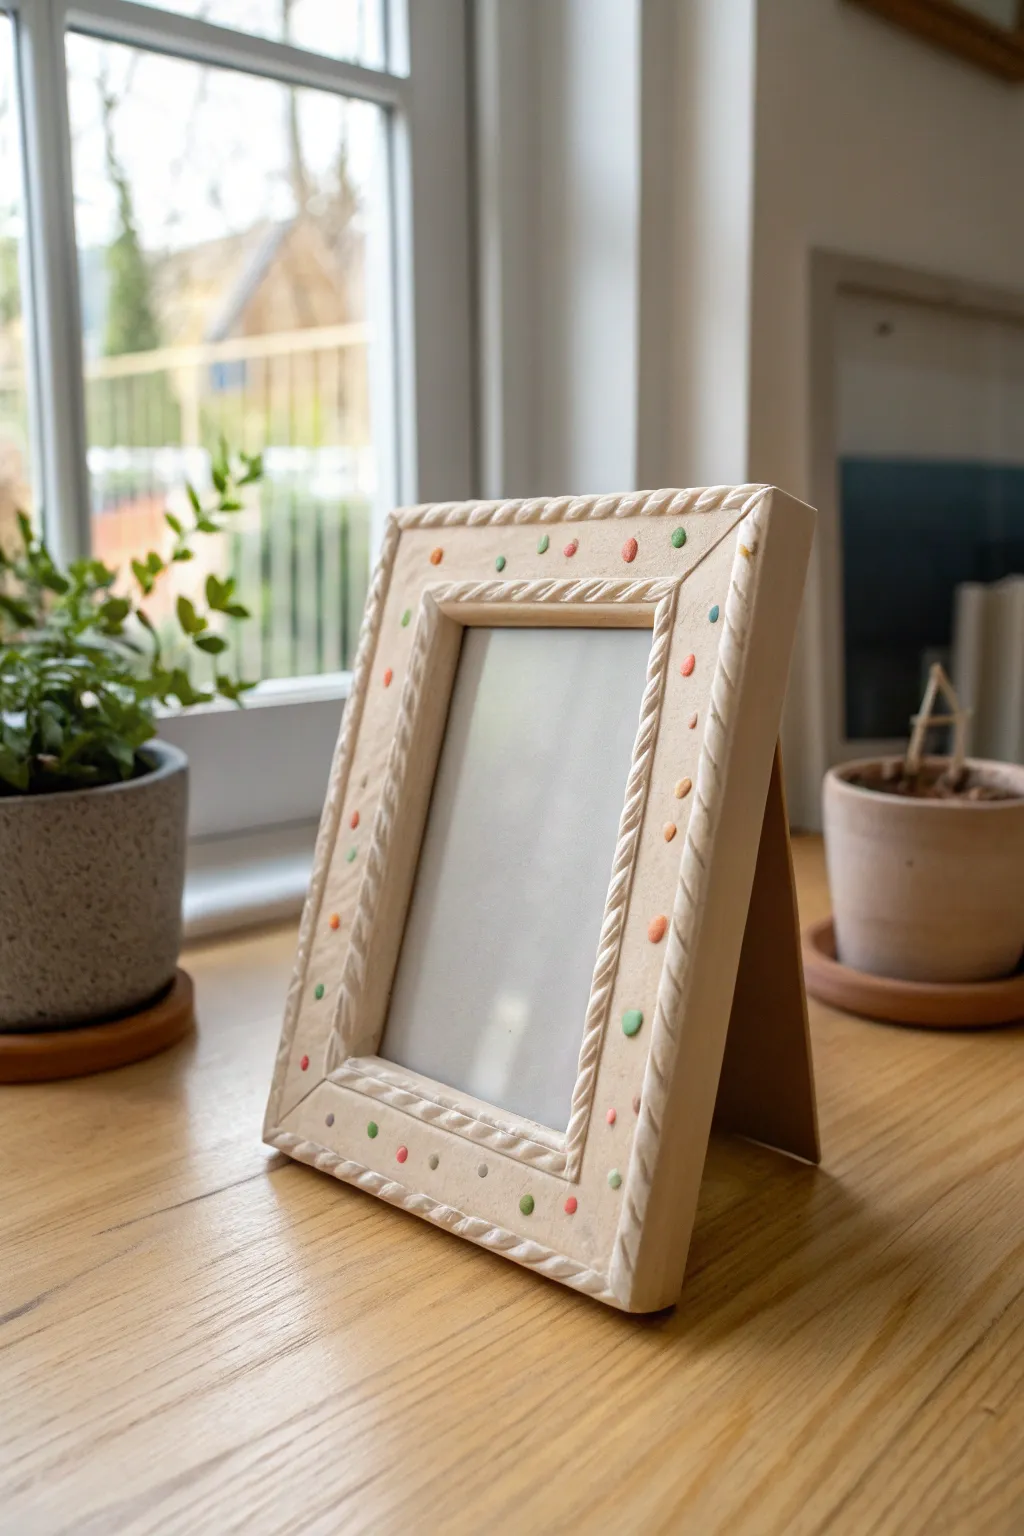
Whenever I want a photo to feel extra special, I dress up the frame with clay details—it’s like giving your memory a tiny sculpture to live in. These clay photo frame ideas are all about easy, satisfying ways to build that raised, touchable border with air-dry clay or polymer clay.
Classic Floral Corner Clusters
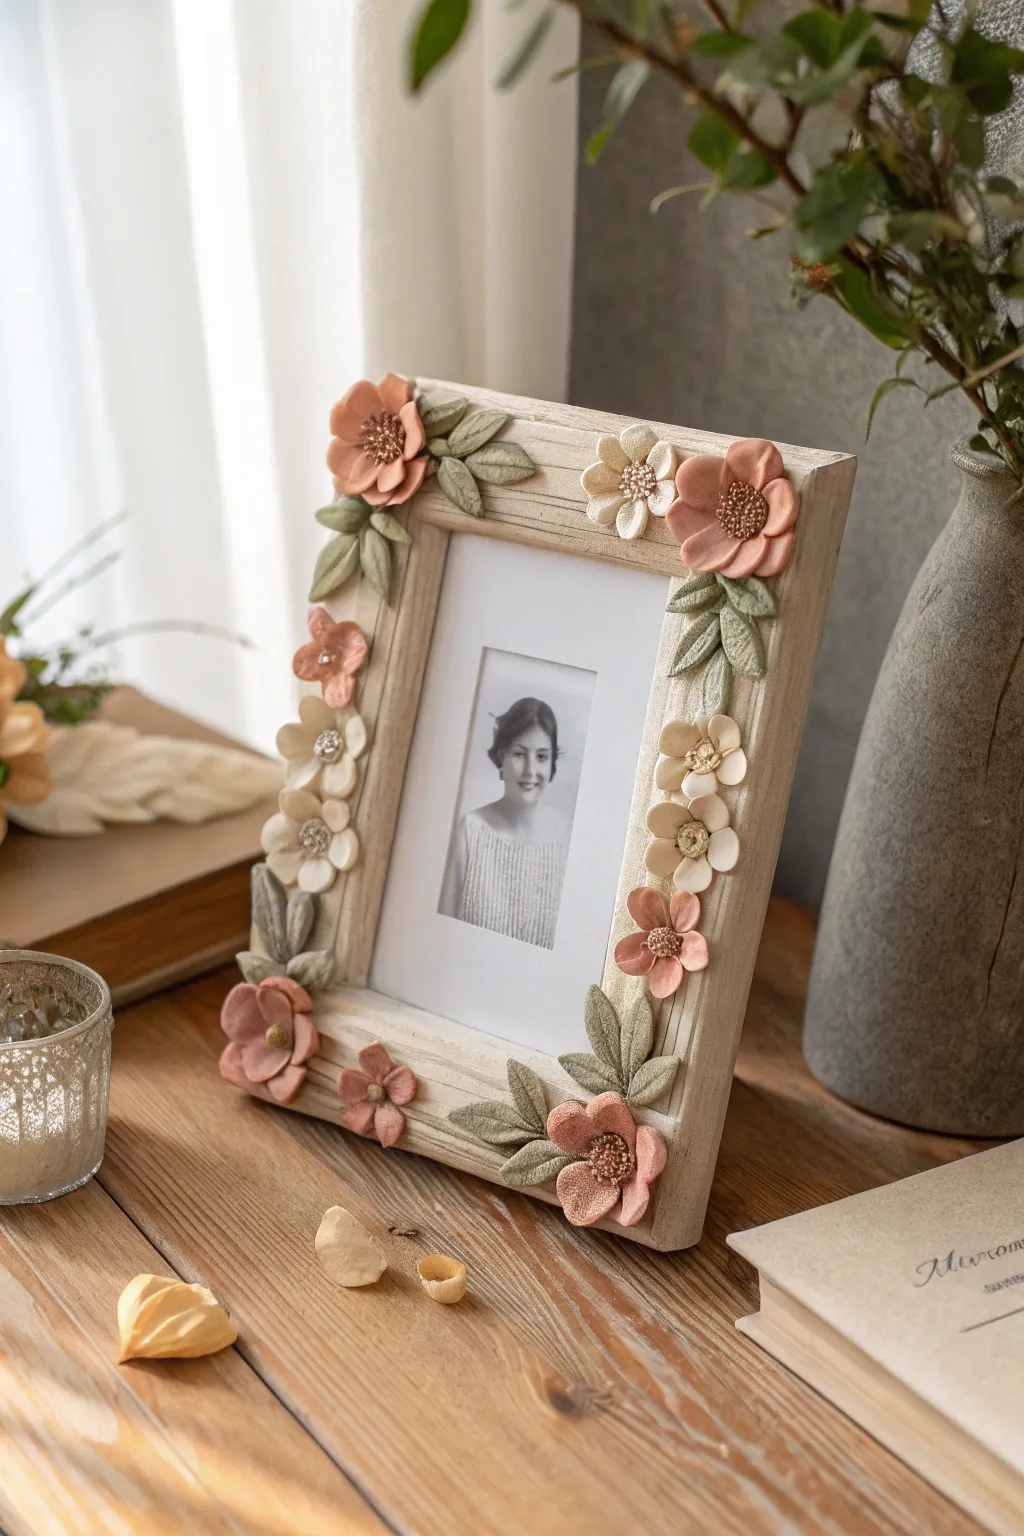
Transform a plain wooden frame into a romantic keepsake with this polymer clay project. Soft dusty rose and peach blooms climb the corners, creating an elegant, textural border perfect for cherished black and white photos.
Step-by-Step Guide
Materials
- Unfinished or light-stained wooden photo frame (flat profile)
- Polymer clay (peach, dusty rose, cream, sage green)
- Clay sculpting tools (needle tool, ball stylus)
- Strong craft glue or E6000
- Gold or bronze seed beads (for flower centers)
- Textured sponge or sandpaper
- Baking sheet and parchment paper
- Acrylic roller or pasta machine
Step 1: Prepping the Elements
-
Condition the clay:
Begin by warming standard polymer clay in your hands until it is pliable. Mix a touch of translucent clay into your peach and rose colors if you want a slightly softer, porcelain-like finish. -
Roll out thin sheets:
Use an acrylic roller or pasta machine to roll your colored clays into sheets about 1/8 inch thick. Uniform thickness helps everything bake evenly later.
Step 2: Sculpting the Flowers
-
Cut petal shapes:
For the larger rose-style flowers, use a small teardrop cutter or freehand cut 5-6 petals per flower from the peach and pink clay sheets. -
Shape the petals:
Place a petal in your palm and gently press the center with a ball stylus to cup it slightly. Use your fingers to thin out and curl the edges for a natural look. -
Assemble the base layer:
Arrange five petals in a circle, overlapping the edges slightly. Press them together at the center point so they adhere. -
Add inner layers:
Create a second, smaller layer of 3-4 petals and press this into the center of your base flower. I like to offset these petals so they fill the gaps of the layer below. -
Create petite accent blooms:
For the smaller cream flowers, cut simple five-petal shapes or mold tiny balls of clay, flattening them with a tool into round petals. -
Texturize the centers:
Take a needle tool and poke tiny holes in the center of each flower to create a textured stigmatic area. -
Add beaded details:
While the clay is still raw, gently press a cluster of gold or bronze seed beads firmly into the center of the larger flowers. Ensure they are embedded deep enough to stay put after baking.
Texturing Trick
Before baking, gently press a piece of coarse fabric or sandpaper against the clay petals. This gives them a matte, organic texture that looks less like plastic.
Step 3: Crafting the Foliage
-
Shape the leaves:
Form small teardrop shapes from the sage green clay. Flatten them gently to create leaf forms. -
Vein the leaves:
Use a needle tool or an X-acto knife to score a central vein down each leaf, followed by smaller diagonal veins for realistic detail. -
Bend and curve:
Pinch the base of each leaf and give the tip a slight twist or curve so they don’t lie perfectly flat against the frame.
Loose Beads?
If beads fall out after baking, simply add a tiny dot of clear superglue to the center indentation and press the beads back in with tweezers to secure them.
Step 4: Assembly and Finishing
-
Dry fit the arrangement:
Before baking, lay your raw clay pieces onto the wooden frame to plan your layout. Focus heavy clusters on opposite corners (like top-right and bottom-left) for a balanced composition. -
Bake the pieces:
Transfer your clay flowers and leaves to a parchment-lined baking sheet. Bake according to your brand’s package instructions, usually around 275°F (135°C) for 15-30 minutes. -
Cool completely:
Let all pieces cool fully before handling. Polymer clay is fragile when hot and hardens as it returns to room temperature. -
Glue the leaves:
Using a strong adhesive like E6000, glue the bottom layer of leaves down first. Hold them in place for a few seconds until the glue tacks. -
Attach the flowers:
Glue the large flowers on top of the leaf bases, followed by the smaller cream filler flowers. Check for gaps and add spare leaves where needed. -
Final clean up:
Remove any wisps of glue stringing between the flowers and give the glass a final wipe down before inserting your photo.
Now you have a charming, handcrafted frame ready to display your favorite memory.


Twisty Vine and Leaf Border
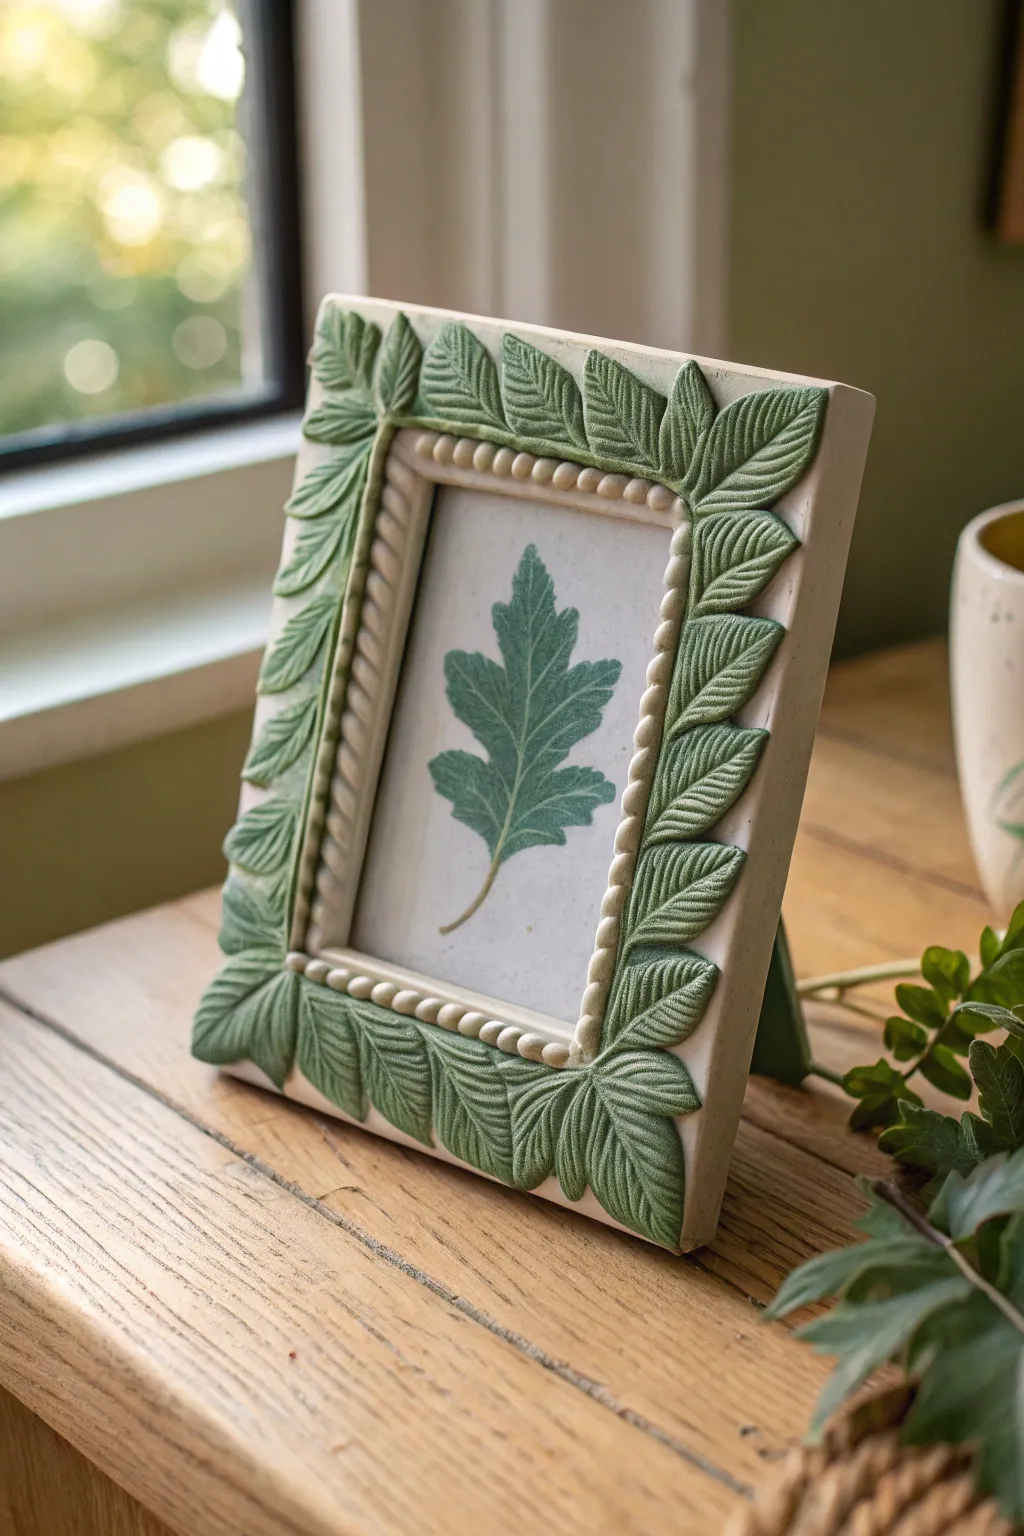
Bring the calming essence of nature indoors with this beautifully textured clay frame. Featuring deep green leaves with realistic veining and delicate beaded detailing, it transforms any simple photo into a botanical statement piece.
How-To Guide
Materials
- White air-dry clay or polymer clay
- Rolling pin
- Clay sculpting tools (specifically a needle tool and a small rounded tool)
- Leaf vein texture sheet or a real leaf for impressing
- Rectangle picture frame (wood or sturdy cardboard base)
- Acrylic paints: Sage green, Olive green, and Cream/White
- Fine grit sandpaper
- Strong craft glue (e.g., E6000 or PVA)
- Small paintbrush
- Matte UV varnish or sealant
Step 1: Preparing the Base
-
Prep the surface:
Begin by removing the glass and backing from your base frame. Lightly sand the wooden surface to give the glue and clay a better texture to grip onto. -
Create the clay base:
Roll out a thin, even sheet of white clay, about 3mm thick. Cut strips wide enough to cover the flat face of your frame. -
Attach the base layer:
Apply a thin layer of glue to the frame and lay your clay strips down, smoothing the seams together with a bit of water (if using air-dry clay) to create a seamless white canvas.
Step 2: Sculpting the Details
-
Roll the inner beading:
Roll out thin snakes of clay. Cut them into tiny, uniform pea-sized balls. -
Attach the beads:
Brush a line of glue or water along the inner edge of the frame opening. Press the small clay balls side-by-side along this edge to create a beaded border effect. -
Form the leaf shapes:
Roll out green-tinted clay (or white clay you plan to paint later) to about 4mm thickness. Use a small knife or leaf cutter to cut out numerous elongated tear-drop leaf shapes. -
Add texture:
Press a leaf vein texture sheet onto each clay leaf, or use a needle tool to hand-draw a central vein and smaller branching veins for a realistic look. -
Layer the leaves:
Starting at the corners, glue the leaves onto the frame. I find it looks best to overlap them slightly, pointing outward in a herringbone pattern to mimic organic growth. -
Refine the edges:
Use a sculpting tool to gently lift the tips of a few leaves or curl them slightly. This adds dimension so the frame doesn’t look too flat.
Cracking Clay?
If using air-dry clay, cracks can happen as it shrinks. Fill small cracks with a slurry (wet clay mixed with water) and smooth it over before painting.
Step 3: Color & Finish
-
Initial drying:
Allow the clay to dry completely according to the package instructions. Air-dry clay often needs 24-48 hours to fully harden. -
The base coat:
Paint the leaves with a solid coat of sage green acrylic paint. Ensure you get the paint into the deep crevices of the vein textures. -
Dry brushing details:
Once the base green is dry, lightly dip a dry brush into a lighter olive or cream paint. Wipe most of it off, then gently brush over the raised parts of the leaves to highlight the texture. -
Paint the beading:
Carefully paint the inner beaded border with a cream or off-white color to contrast nicely with the green foliage. -
Seal the work:
Brush on a coat of matte varnish to protect the paint and clay from moisture and dust. -
Reassembly:
Once the sealant is cured, place the glass, your chosen botanical print, and the backing board back into the frame.
Pro Tip: Realistic Veins
Don’t have a texture mat? Find a real leaf with deep veins from your garden, press it firmly into the clay, and peel it back to transfer nature’s exact pattern.
Place your finished masterpiece near a window to let the natural light highlight those intricate clay textures


Simple Hearts, Stars, and Dots
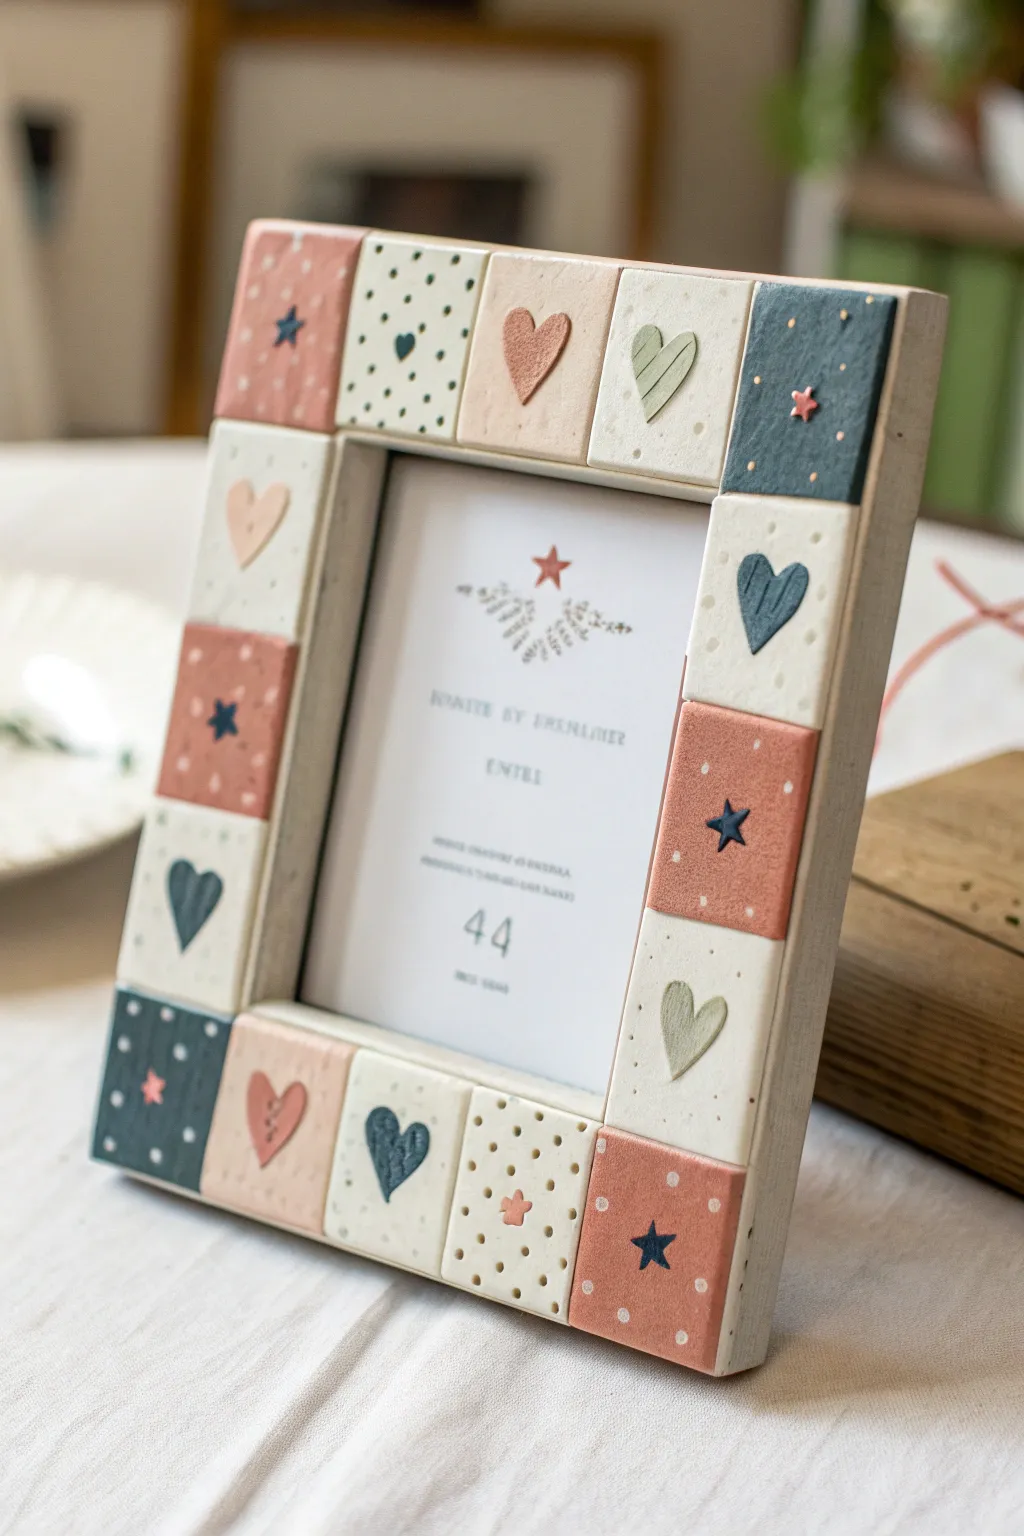
Capture the charm of handmade ceramics with this delightful grid-style photo frame, featuring a cozy pattern of hearts, stars, and polka dots. The muted palette of terracotta, sage, and deep teal gives it a sophisticated yet playful look perfect for preserving cherished memories.
Step-by-Step Guide
Materials
- Wooden picture frame with a flat, wide border (at least 1.5 inches)
- Air-dry clay (white or porcelain finish)
- Acrylic paints (terracotta, slate blue, cream, light blush, sage green)
- Rolling pin
- Ruler and craft knife
- Small clay cutters (heart and star shapes) or a needle tool
- Fine grit sandpaper
- Craft glue or heavy-duty adhesive
- Matte sealing varnish
- Small paintbrush
- Dotting tool or toothpick
Step 1: Creating the Tiles
-
Measure your frame:
Before touching the clay, measure the width and height of your frame’s border. Calculate the size of the square tiles you’ll need to create a grid that fits perfectly around the perimeter. -
Roll the clay:
Roll out your air-dry clay on a smooth surface to a uniform thickness of about 3-4mm. Using guide sticks on either side of your roller can ensure the slab is perfectly even. -
Cut the squares:
Using your ruler and craft knife, carefully cut out enough square tiles to cover your frame based on your earlier measurements. Cut a few extras just in case some crack or warp. -
Emboss the designs:
While the clay is still soft, gently press your heart and star cutters slightly into the surface to create depressed shapes. You don’t want to cut all the way through—just leave an impression. -
Create texture:
For the dotted tiles, use a dotting tool or the blunt end of a toothpick to press small divots into the clay. Vary the pattern—some tiles can have uniform grids of dots, while others can be random. -
Dry the tiles:
Lay your clay squares on a flat board to air dry. I usually flip them over after a few hours to ensure they dry evenly on both sides and don’t curl up at the edges. -
Smooth the edges:
Once fully cured (usually 24 hours), lightly sand the edges of each tile with fine-grit sandpaper to remove any sharp burrs or roughness for a clean, professional finish.
Clay Shrinkage Tip
Air-dry clay shrinks slightly when drying! Cut your squares about 1-2mm larger than your measured space to account for this shrinkage.
Step 2: Designing and Painting
-
Plan the layout:
Arrange your dry, unpainted tiles on the frame to finalize the pattern. Alternate between hearts, stars, and dots, ensuring no two identical designs sit right next to each other. -
Base coat the tiles:
Paint the background of each tile. Use cream for the ‘white’ tiles, terracotta for reddish-brown ones, and slate blue for the dark squares. Apply two thin coats for opaque coverage. -
Add the motifs:
Once the base coats are dry, paint the indented hearts and stars. Use a contrasting color for the motif—like a teal heart on a cream background or a blue star on terracotta. -
Detail the dots:
For the dotted tiles, dip a toothpick or fine brush into paint and carefully fill in the small divots you created earlier. A steady hand is key here. -
Apply speckles:
To mimic the ceramic look in the photo, dilute a tiny bit of dark brown paint and flick it off a toothbrush onto the cream tiles for a subtle speckled effect. -
Seal the tiles:
Apply a coat of matte varnish to each tile. This protects the paint and gives the clay a lovely finished texture that feels durable to the touch.
Warped Tiles?
If tiles curl while drying, slightly dampen the concave side and place them under a heavy book overnight to flatten them back out.
Step 3: Assembly
-
Prepare the frame:
If your wooden frame has a rough texture, sand it lightly. Paint the visible edges of the frame (inside and outside rims) in a neutral cream color that matches your clay tiles. -
Glue the tiles:
Starting from one corner, apply strong craft glue to the back of each tile and press it firmly onto the frame. Keep your spacing tight, but don’t force them if the fit is snug. -
Final drying time:
Let the glue set completely according to the manufacturer’s instructions, keeping the frame flat so the tiles don’t slide out of position.
Now you have a unique, handcrafted frame ready to display your favorite moment.


Minimal Scalloped Edge Frame
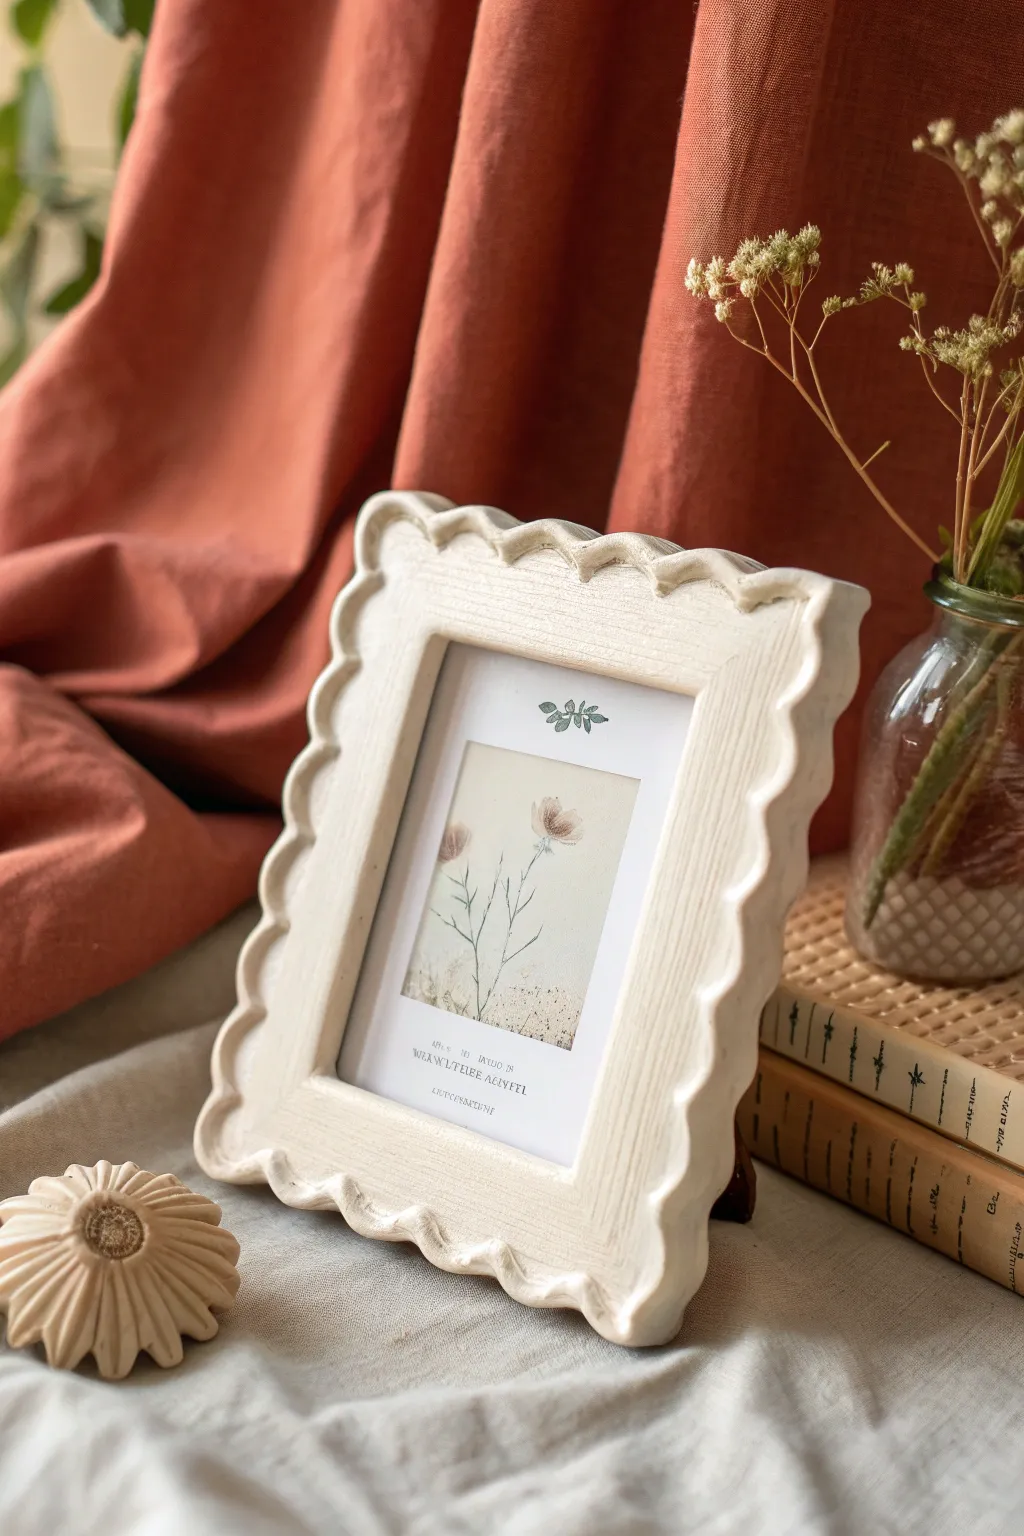
This project captures the essence of classic cottage decor with a hand-sculpted clay frame featuring gentle, undulating curves. The finish mimics a whitewashed wood texture, giving your favorite print a soft, vintage feel.
Step-by-Step Tutorial
Materials
- Air-dry clay (white or light grey)
- Rolling pin
- Parchment paper or canvas mat
- Wooden picture frame (plain, flat-surfaced) to use as a base
- Craft knife or clay cutter
- Small round cookie cutter (approx. 1 inch diameter) or bottle cap
- Water in a small cup
- Sculpting tools (needle tool and smoothing tool)
- Heavy-grit sandpaper (to add texture)
- Acrylic paint (cream, white, and a touch of light brown)
- Stiff bristle paintbrush
- Matte sealant spray or varnish
- Strong craft glue (e.g., E6000)
Step 1: Preparing the Base
-
Prep the workspace:
Lay down your parchment paper or canvas mat to prevent sticking. Take your plain wooden frame (ensure the glass and backing are removed) giving it a quick wipe to remove dust. -
Condition the clay:
Take a large chunk of air-dry clay and knead it in your hands until it’s pliable and warm. If it feels too dry, dip your fingers in water and work it in, but avoid making it sloppy. -
Roll out slabs:
Roll the clay out into a long, rectangular slab about 1/4 inch thick. You’ll need enough length and width to cover the face of your wooden frame completely.
Cracks happen!
If small cracks appear as the clay dries, don’t panic. Mix a small amount of fresh clay with water to make a paste (slip) and fill the cracks, then sand smooth once dry.
Step 2: Sculpting the Scallops
-
Cut strips:
Using the wooden frame as a rough guide, cut four wide strips of clay. These should be slightly wider than the frame’s molding to allow for the scalloped overhang. -
Apply adhesive:
Spread a thin layer of craft glue directly onto the face of the wooden frame. This ensures the wet clay bonds securely to the wood as it dries. -
Attach the clay:
Lay the clay strips onto the frame, pressing firmly but gently to avoiding squishing the clay too thin. Overlap the corners slightly and slice diagonally with your craft knife to create mitered joints. -
Blend the seams:
Dip your finger in a little water and smooth over the mitered corners until the seams disappear and the clay looks like one continuous piece. -
Create the scalloped edge:
Use your round cookie cutter or bottle cap to cut semi-circles out of the outer edge of the clay strips. Space them evenly to create that rhythmic, wavy pattern. -
Soften the cuts:
The cutter will leave sharp, harsh edges. Use a wet finger or a damp sponge to round over these cuts, making the scallops look soft and pillowy like the reference photo. -
Refine the inner edge:
Use your craft knife to trim the inner rectangle (where the photo goes) so it is clean and straight. Smooth this edge down with a little water as well.
Distressed Detail
To enhance the vintage look, water down a bit of brown paint and wash it over the dried frame, then immediately wipe it off. The dark pigment will stick in the grooves.
Step 3: Texturing and Drying
-
Add faux wood texture:
While the clay is still damp, take a stiff-bristled brush or even a crumpled piece of foil and drag it lightly along the surface length-wise. This mimics the grain shown in the image. -
Create ridges:
For deeper ‘wood grain’ lines like the ones near the inner opening, use a needle tool to lightly scratch parallel lines that follow the shape of the frame. -
Initial dry:
Let the frame sit undisturbed in a cool, dry place. Avoid direct sunlight which can cause cracking. Air-dry clay takes about 24-48 hours to cure fully depending on thickness. -
Sanding for finish:
Once bone dry, use heavy-grit sandpaper to rough up the surface further. This knocks down any weird bumps and enhances that rustic, weathered look.
Step 4: Painting and Assembly
-
Mix the base color:
Mix a creamy off-white acrylic paint. I like to add just a tiny drop of brown to warm it up so it isn’t stark white. -
Dry brushing:
Load a stiff brush with a small amount of paint and wipe most of it off on a paper towel. Lightly brush over the textured clay. The paint should catch the high points and leave the deeper texture lines darker. -
Highlighting edges:
Use a slightly lighter shade of cream on the very tips of the scallops to make the shape pop. -
Seal the work:
Once the paint is fully dry, spray the entire frame with a matte sealant. This protects the clay from moisture and gives it a professional finish. -
Final assembly:
Reinsert the glass, your chosen print, and the backing board into the frame. Secure the back clips, and your scalloped masterpiece is ready for display.
Place your newly sculpted frame near a window to let the natural light highlight those charming curves

The Complete Guide to Pottery Troubleshooting
Uncover the most common ceramic mistakes—from cracking clay to failed glazes—and learn how to fix them fast.
Text Banner With Name or Date
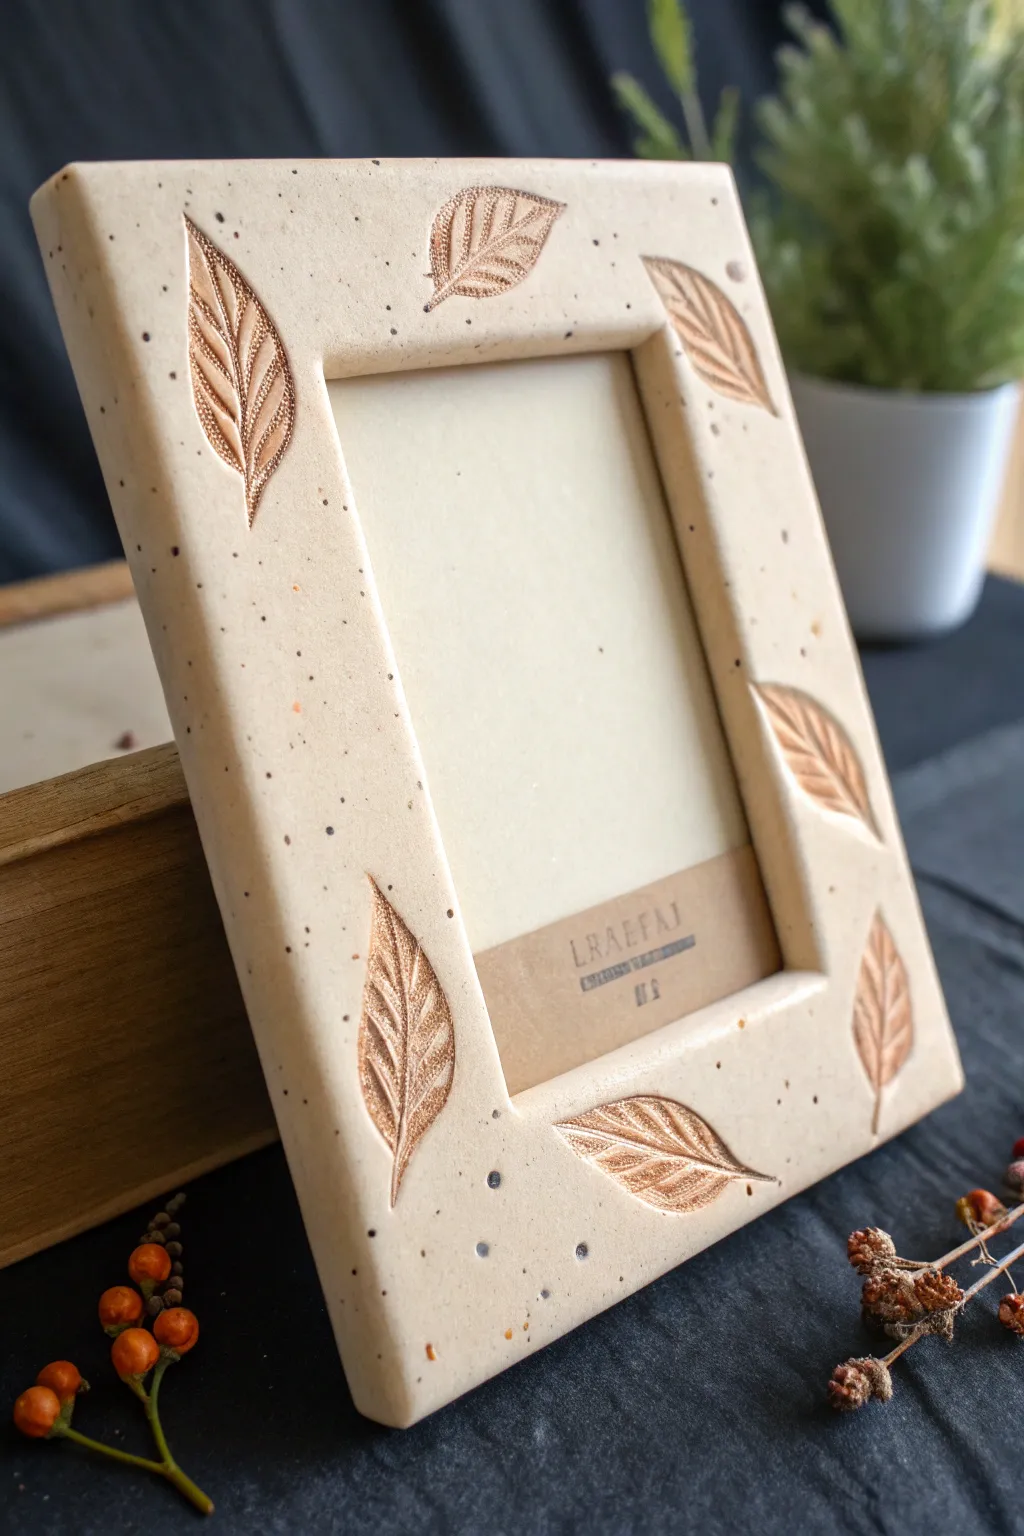
This charming photo frame captures the rustic elegance of stoneware pottery without needing a kiln. Featuring organic leaf impressions and a trending speckled finish, it provides a warm, earthy border for your favorite memories.
Step-by-Step
Materials
- Polymer clay (beige or cream color)
- Speckling agent (crushed black pepper or faux granite polymer clay)
- Rolling pin or acrylic roller
- Leaf rubber stamp or silicone mold (deep etching)
- Craft knife or clay blade
- Ruler
- Copper or bronze mica powder
- Small soft paintbrush
- Cardboard or cardstock (for the backing)
- Strong craft glue (e.g., E6000)
- Oven for baking
Step 1: Preparing the Clay Body
-
Condition the clay:
Begin by warming the beige polymer clay in your hands, kneading it thoroughly until it is soft and pliable. This prevents cracks during the sculpting process. -
Create the speckled effect:
If you aren’t using pre-speckled clay, mix in a small amount of ‘granite’ style clay into your beige base. I find that even kneading in a pinch of coarse black pepper or dried coffee grounds creates a convincing faux-ceramic look. -
Roll out the slab:
Flatten the clay into a smooth sheet using your roller. Aim for a thickness of about 1/4 inch (6mm) to ensure the frame is sturdy enough to stand on its own.
Stamp Alternative
Don’t have a leaf stamp? Go for a walk and find a real leaf with prominent veins. Press the actual leaf into the clay and peel it back carefully for a natural texture.
Step 2: Shaping the Frame
-
Cut the outer rectangle:
Decide on the size of your frame based on the photo you want to display. Use a ruler and your craft knife to cut a perfect rectangle for the outer edge. -
Cut the inner window:
Measure and mark the inner window, ensuring the borders are equal width on all sides. Carefully slice out the center rectangle and set the excess clay aside. -
Smooth the edges:
Run your finger lightly along the cut edges—both inside and outside—to soften any sharp corners and give it that hand-thrown pottery vibe.
Step 3: Embossing and Detailing
-
Plan leaf placement:
Before pressing, hover your stamp over the clay to visualize where the leaves will look best rather than pressing randomly. An odd number of leaves usually looks more organic. -
Press designs:
Firmly press your leaf stamp into the clay border. You want a deep impression so the design is visible, but be careful not to distort the rectangular shape of the frame. -
Add accent speckles:
For extra texture, you can use a toothbrush to flick a tiny bit of diluted acrylic paint or ink over the surface, or simply press larger granules of your speckling material into the surface manually.
Glazed Finish
After baking, apply a coat of semi-gloss polyurethane varnish to the flat surfaces (avoiding the metallic leaves) to mimic the look of glazed ceramic pottery.
Step 4: Gilding and Baking
-
Apply mica powder:
Dip a small, soft brush into your copper or bronze mica powder. Gently brush the powder specifically into the recessed leaf areas. -
Clean up excess:
If powder gets on the flat surface, wipe it away gently with a baby wipe or a damp finger so the metallic shine remains only inside the leaves. -
Bake the frame:
Place the clay on a baking sheet lined with parchment paper. Bake according to the manufacturer’s instructions for your specific brand of polymer clay. -
Cool down:
Allow the frame to cool completely in the oven with the door slightly ajar. Sudden temperature changes can sometimes cause thin clay frames to warp.
Step 5: Assembly
-
Prepare the backing:
Cut a piece of sturdy cardboard or cardstock slightly smaller than the outer dimensions of your frame. -
Attach the backing:
Apply strong glue to the back of the clay frame along three sides (bottom, left, and right), leaving the top open so you can slide a photo in. -
Create a stand (optional):
If you want the frame to stand on a table, fold a piece of cardstock into a triangle prism and glue it to the back panel, or attach a pre-made easel back.
Once fully assembled, slip in your favorite photo to complete this rustic, artisanal display piece
Soft Clouds and Sunny Sky Border
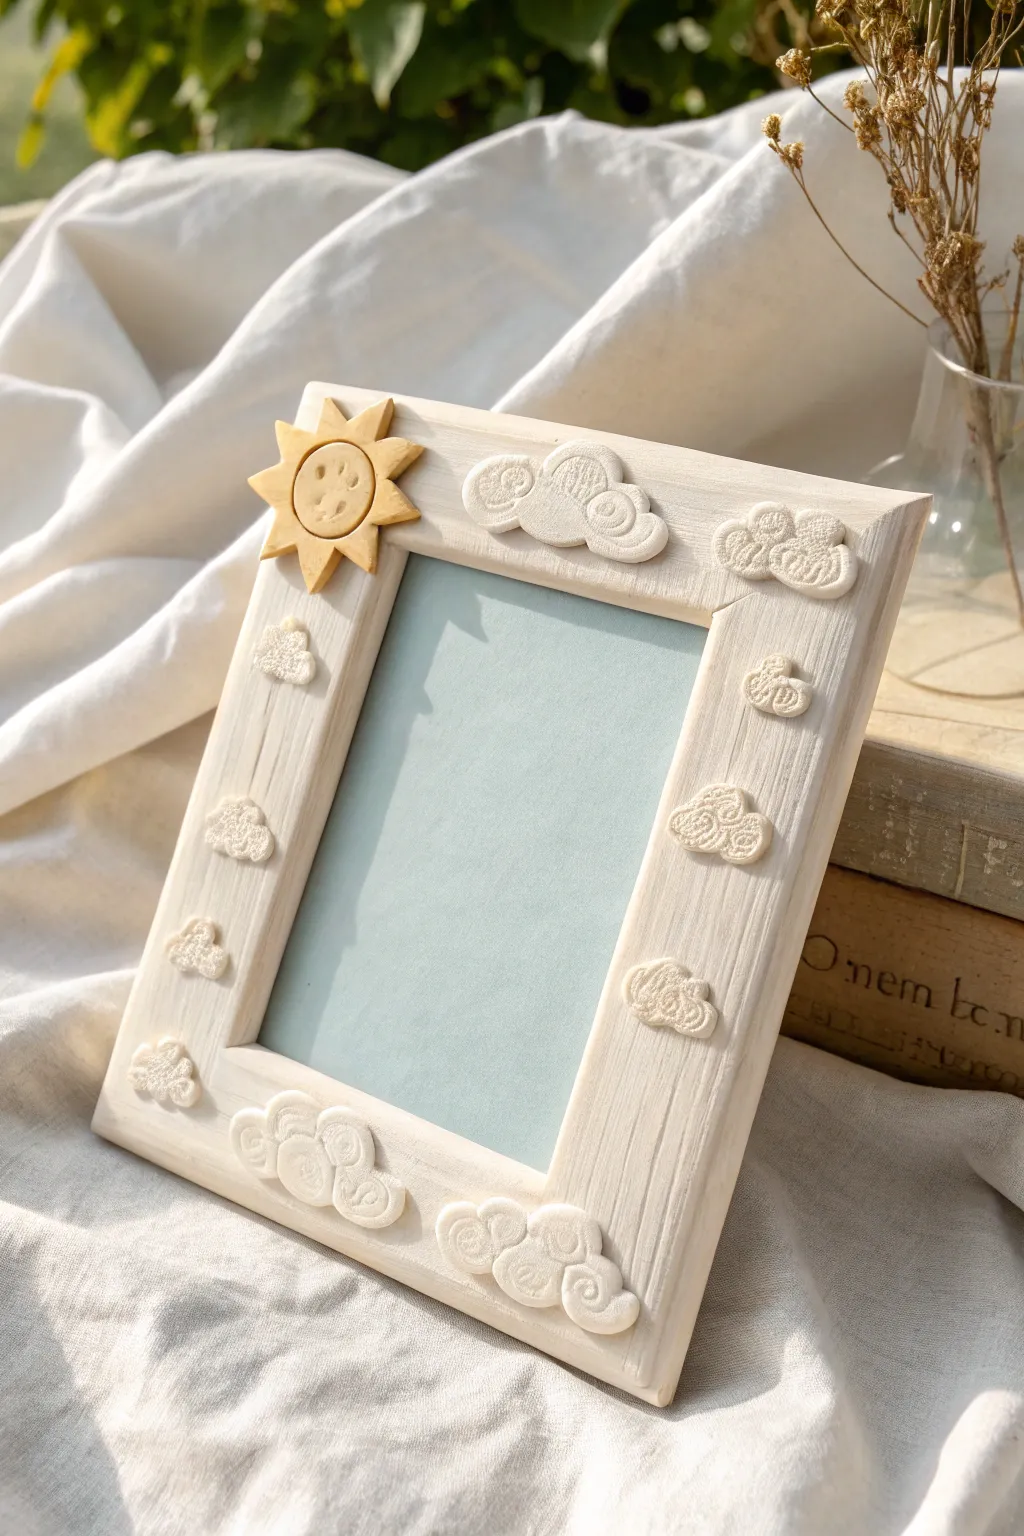
Brighten up your favorite memories with this adorable sky-themed photo frame. Featuring a cheerful yellow sun and fluffy textured clouds, this project adds a touch of whimsy and warmth to any room decor.
Step-by-Step Guide
Materials
- Simple wooden photo frame (flat profile work best)
- Air-dry clay or white polymer clay
- Yellow acrylic paint (or yellow polymer clay)
- Clay sculpting tools (needle tool, small ball stylus)
- Texture sponge or stiff bristle brush
- Craft glue or strong adhesive
- Rolling pin
- Gloss varnish (optional)
- Sandpaper (fine grit)
Step 1: Preparing the Frame
-
Clean the Surface:
Start by removing the glass and backing from your wooden photo frame. Wipe the wood frame down with a slightly damp cloth to remove any dust or oils. -
Initial Sanding:
Lightly sand the surface of the wood with fine-grit sandpaper. This creates a better grip for the glue later on. -
Base Coat (Optional):
If your wooden frame is unfinished, you might want to give it a coat of white acrylic paint or a white wash for a uniform look, though leaving the natural wood grain visible provides a nice contrast to the clay.
Step 2: Sculpting the Sun
-
Mix the Color:
If using white air-dry clay, knead a small drop of yellow acrylic paint into a walnut-sized ball of clay until the color is uniform. Alternatively, condition your yellow polymer clay until soft. -
Form the Center:
Roll a portion of the yellow clay into a smooth ball, then flatten it gently to create a disk about 1 inch in diameter. -
Create the Rays:
Roll out a flat sheet of yellow clay. Use a craft knife to cut about 7-9 small triangles. Attach these around the back edge of your sun disk, spacing them evenly. -
Add the Face:
Using a needle tool or small dotting tool, carefully press two holes for eyes and carve a curved line for a smile into the sun’s face. Add small cheek indentations for extra cuteness.
Seamless Swirls
When carving the spirals, dip your needle tool in water (for air-dry clay) or baby oil (for polymer) to prevent dragging and ensure clean lines.
Step 3: Creating the Cloud Collection
-
Condition the Clay:
Take a larger portion of white clay and knead it until it is pliable and smooth. -
Shape the Large Clouds:
Form oblong shapes for your corner clouds. Flatten them slightly, but keep them puffy—about 1/4 inch thick works well. -
Sculpt the Edges:
Use a modeling tool to indent curves along the top edge of the cloud shapes, creating that classic fluffy cumulus look. -
Add Swirl Texture:
This is the signature detail: use a needle tool to gently inscribed spiral patterns into the surface of the clouds. I like to vary the size of the swirls for a more organic feel. -
Create Mini Clouds:
Repeat the process to make smaller, accent clouds. You’ll need about 6-8 tiny clouds to scatter along the sides of the frame. -
Texture the Surface:
For added realism, gently dab the non-swirled areas of the clouds with a texture sponge or a toothbrush to give them a matte, stone-like finish.
Cracking Clay?
If air-dry clay cracks while drying, mix a tiny bit of fresh clay with water to make a paste and fill in the fissures, then smooth with a finger.
Step 4: Assembly and Finishing
-
Dry Run Arrangement:
Before gluing, lay your frame flat and arrange all your pieces. Place the sun in the top-left corner and the large clouds in other corners or centers to balance the design. -
attach the Sun:
Apply a dab of strong craft glue to the back of the sun and press it firmly onto the frame corner. Hold for a few seconds to secure. -
Attach the Clouds:
Glue the cloud pieces in place according to your arrangement. Ensure they don’t overhang the inner edge where the glass sits. -
Drying Time:
Let the frame sit undisturbed for at least 24 hours (or follow your specific clay’s baking instructions if using polymer). -
Sealing:
Once fully cured, apply a thin layer of matte or gloss varnish over the clay pieces to protect them from dust and moisture. -
Final Assembly:
Reinsert the glass, your favorite photo, and the backing board once everything is completely dry.
Now you have a charming, handmade keepsake to highlight your sunniest moments


What Really Happens Inside the Kiln
Learn how time and temperature work together inside the kiln to transform clay into durable ceramic.
Starry Night Sky Frame

Bring the magic of the cosmos into your home decor with this deep blue starry night frame. Featuring hand-carved celestial details and subtle gold accents, this project is perfect for framing a cherished memory or dreamy artwork.
Step-by-Step Tutorial
Materials
- Air-dry clay or polymer clay
- Rolling pin
- Flat, clean work surface
- Craft knife or clay cutter
- Ruler
- Small star-shaped clay cutters (optional)
- Small sculpting tools or toothpicks
- Acrylic paint (Deep Navy or Midnight Blue)
- Metallic gold paint
- Paintbrushes (flat and fine detail)
- Fine-grit sandpaper
- Cardboard or existing wooden frame base (optional backing)
Step 1: Shaping the Frame Base
-
Prepare the Clay:
Begin by conditioning your clay. Knead it thoroughly until it is soft, pliable, and free of any cracks. If using air-dry clay, keep your hands slightly moist. -
Roll Smooth:
Roll out the clay into a flat slab, aiming for a consistent thickness of about 1/4 inch. Creating a uniform thickness is key for a professional look. -
Cut the Rectangle:
Using a ruler and a craft knife, cut out a large rectangle that will form the outer edge of your frame. A standard size like 5×7 inches works well for this project. -
Open the Center:
Measure an inner rectangle, leaving a frame border of about 1.5 to 2 inches wide. Carefully cut out this center piece to create the window for your photo. -
Smooth the Edges:
Dip your finger in a little water (for air-dry) or baby oil (for polymer) and run it along the cut edges to soften them. You want to remove any sharp angles from the cutting process.
Step 2: Embossing and Carving
-
Mark Star Positions:
Before committing to any cuts, lightly mark where you want your stars and moon to go using a toothpick. Plan for a random, scattered pattern rather than perfect rows. -
Carve the Moon:
In one upper corner, carve a crescent moon shape. You can do this by pressing a round cutter in twice to create the crescent arc, or freehand it with a sculpting tool. -
Create Large Stars:
For the larger stars, use a knife tool to press a 5-point star shape directly into the wet clay. Don’t cut all the way through; just create a deep impression. -
Add Small Details:
Use a smaller tool or the tip of a pencil to press tiny dots or smaller 4-point stars into the empty spaces. This adds depth and simulates distant stars. -
Dry or Bake:
If using air-dry clay, let the frame dry flat for 24-48 hours, flipping it occasionally to prevent warping. If using polymer clay, bake according to the package instructions.
Warping Woes?
If your air-dry clay starts curling up while drying, gently weigh down the edges with books (protected by wax paper) or flip the frame every few hours to ensure even airflow.
Step 3: Painting the Cosmos
-
Sand Imperfections:
Once fully cured and hard, check the edges. I find that a quick pass with fine-grit sandpaper helps remove any rough burrs left from the drying process. -
Base Coat:
Apply a coat of deep navy blue acrylic paint over the entire frame, including the insides of the carved stars. Let this layer dry completely. -
Second Coat for Depth:
Apply a second coat of blue. While it is still slightly wet, you can dab a tiny bit of black paint into the corners to create a vignette effect, blending it gently. -
Dry Brushing:
Once the blue is dry, take a dry brush with a tiny amount of lighter blue or grey paint. Lightly sweep it over the surface texture to highlight the rustic clay finish. -
Gilding the Stars:
Using a fine detail brush, carefully paint the inside of select large stars and the moon with metallic gold paint. You don’t need to paint every single star; highlighting just a few creates a sophisticated look. -
Protect the Finish:
Seal the entire frame with a matte varnish to protect the paint and give it a finished, durable surface.
Cosmic Glow Up
For a magical touch, mix glow-in-the-dark powder into your white paint and fill a few of the smaller indented stars so your frame lights up at night.
Now you have a stunning, handcrafted frame ready to showcase your favorite moments
Rainbow Color-Block Border
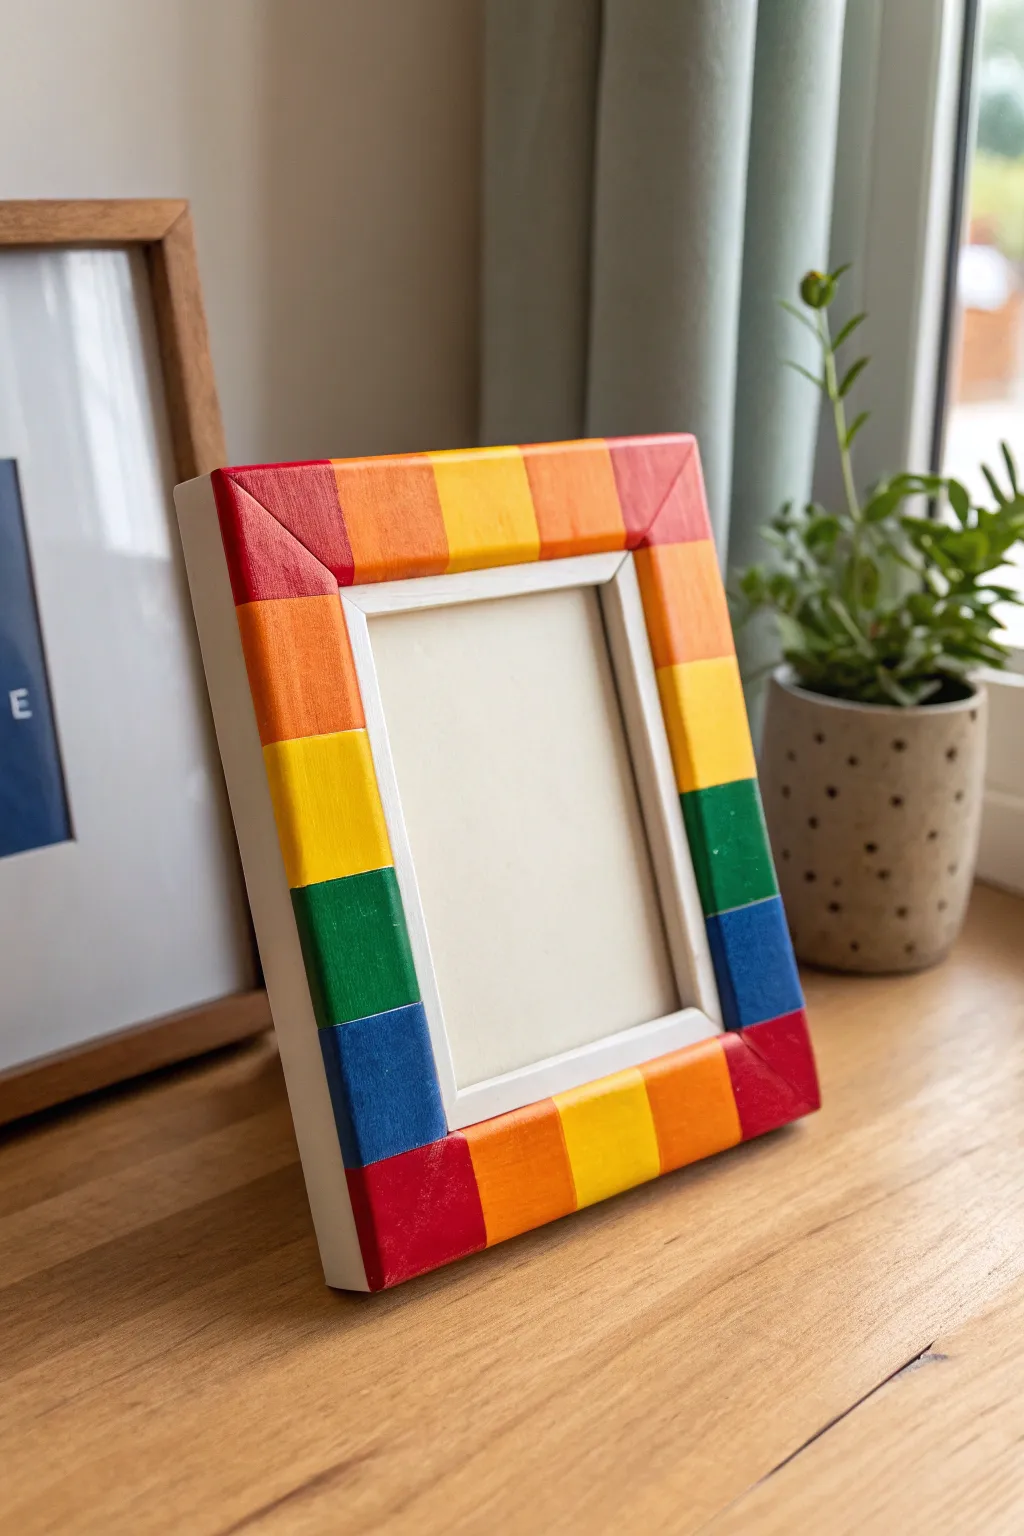
Bring a burst of joy to your desk or shelf with this cheerful, color-blocked photo frame. By segmenting bright primary and secondary colors into neat, bold rectangles, you can transform a plain wooden or clay frame into a modern statement piece.
Step-by-Step
Materials
- Wide, flat photo frame (wooden or air-dry clay base)
- White acrylic gesso or primer
- Acrylic paints (Red, Orange, Yellow, Green, Cobalt Blue)
- Painter’s tape or masking tape (approx. 1 inch width)
- Flat shader paintbrush (medium size)
- Small detail brush
- Ruler
- Pencil
- Matte or satin varnish
- Palette or paper plate
Step 1: Preparation & Base Coat
-
Clean surface:
Ensure your frame is clean and free of dust. If you are using a handmade clay frame, sand it lightly with fine-grit sandpaper to ensure a smooth painting surface. -
Apply primer:
Coat the entire front, sides, and inner rim of the frame with white gesso or acrylic primer. This white base makes the rainbow colors pop vividly later on. -
Dry and repeat:
Let the first coat dry completely. If the wood grain or clay texture is still visible, apply a second coat of white for full opacity. -
Inspect the inner rim:
Pay special attention to the inner bevel (the part touching the photo). This area remains white in the final design to create a clean visual break, so ensure it looks pristine.
Step 2: Drafting the Design
-
Measure the sides:
Using a ruler, measure the length of each side of the frame face. You want to divide these sides into roughly equal segments. -
Mark sections:
Lightly mark intervals with a pencil where your color blocks will change. For a standard 5×7 frame, blocks of about 1.5 to 2 inches work well. -
Draw dividing lines:
Use your ruler to draw faint straight lines across the width of the frame border at your marked intervals. Don’t worry about the corners yet; just focus on the straight sections. -
Handle corners:
Draw diagonal lines at the corners (mitred edges) to separate the top/bottom blocks from the side blocks, following the natural seam of the frame.
Crisp Lines Secret
Brush a tiny bit of clear matte medium or white base paint over the tape edge first. This seals the tape, so any bleed-under is invisible white, keeping your colors razor sharp.
Step 3: Painting the Rainbow
-
tape the first color set:
To get crisp lines, apply painter’s tape along the pencil lines facing the blocks you intend to paint red first. Press the edges of the tape down firmly. -
Apply red paint:
Paint the red sections using your flat brush. Use smooth, vertical strokes. I prefer applying two thin coats rather than one thick gloopy one. -
Remove tape and dry:
Peel the tape off while the paint is still slightly tacky to avoid chipping, then let the red sections dry completely. -
Continue the pattern:
Move to the next color in the spectrum (orange). Tape off the boundaries next to the dried red and the empty yellow spot. Paint the orange blocks. -
Fill remaining blocks:
Continue this process for yellow, green, and blue blocks. Work in non-adjacent sections if possible so you don’t have to wait for every single block to dry before moving on. -
Touch up edges:
Once all colors are applied, use a small detail brush to neaten any lines where the paint might have bled slightly or where the white rim needs cleaning up. -
Paint the sides:
Decide if you want the colors to wrap around the sides or adhere to the design in the image, which keeps the outer sides white. If keeping them white, touch up any wandering paint with white acrylic.
Uneven Color Coverage?
Yellow and orange paints are often translucent. If they look streaky, mix a tiny dot of white into them for the first coat to build opacity, then use pure color for the top coat.
Step 4: Finishing Touches
-
Erase pencil marks:
Check for any visible pencil lines that weren’t covered by paint and gently erase them. -
Apply varnish:
Seal your work with a coat of matte or satin varnish. This protects the paint from scratches and gives the colors a unified finish. -
Insert glass and backing:
Once the varnish is fully cured (usually 24 hours), place the glass, your favorite photo, and the backing board into the frame.
Now you have a brilliantly colorful frame ready to showcase your favorite memory

TRACK YOUR CERAMIC JOURNEY
Capture glaze tests, firing details, and creative progress—all in one simple printable. Make your projects easier to repeat and improve.
Stamped Botanical Pattern Frame
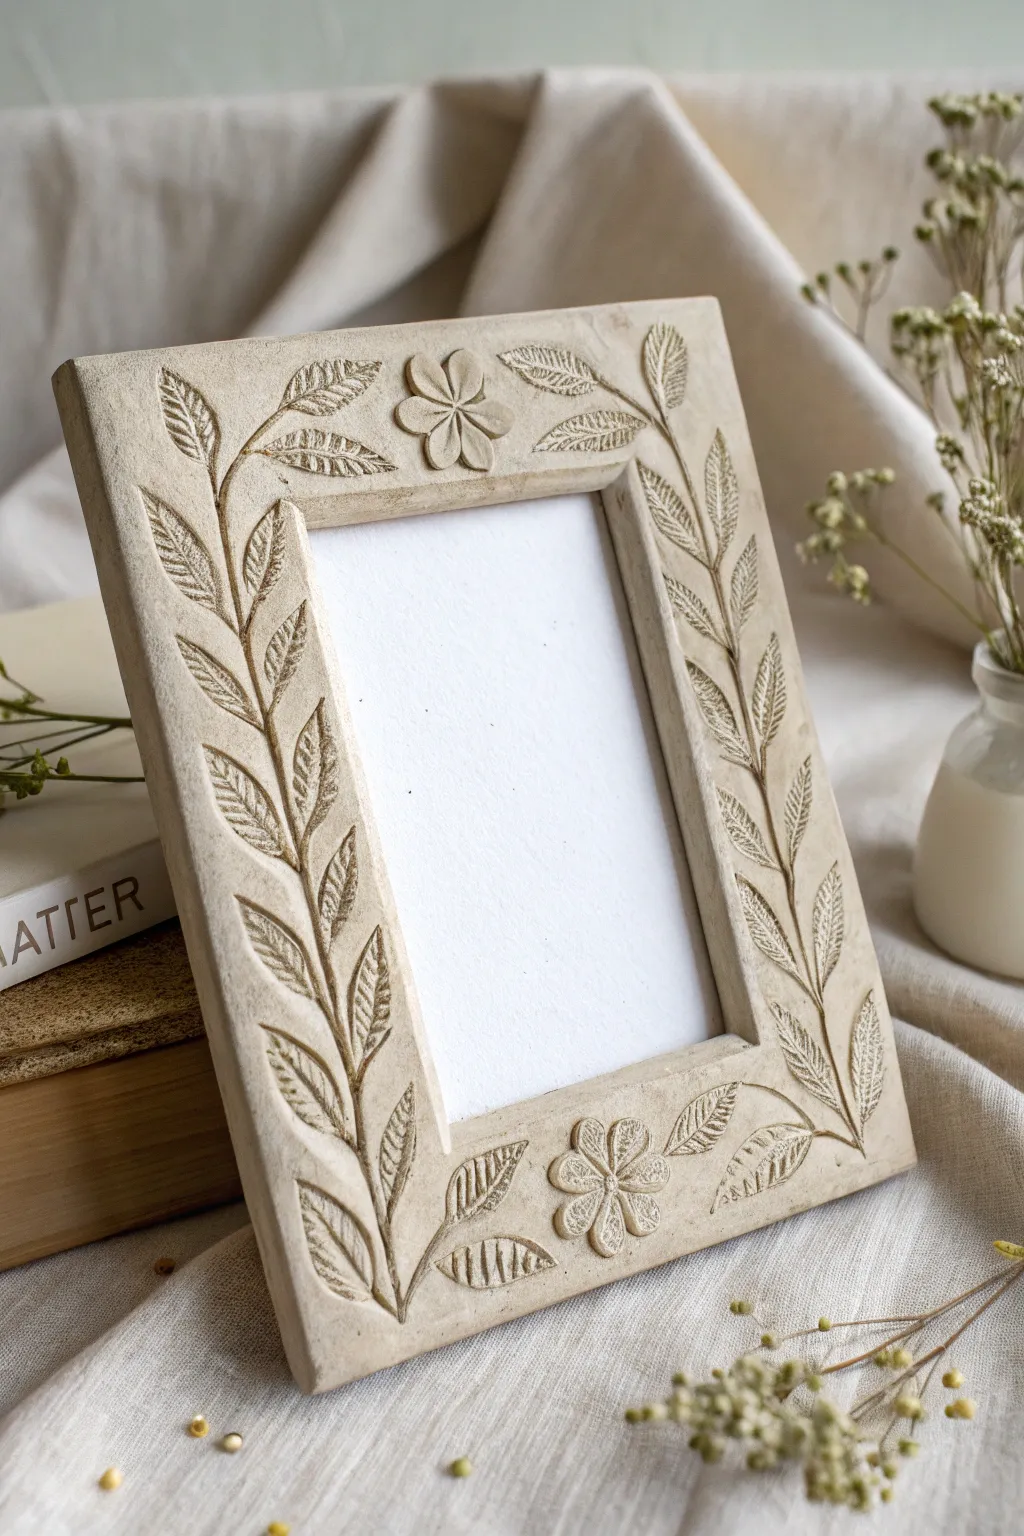
This project transforms simple air-dry clay into an elegant, stone-like photo frame featuring a delicate stamped botanical relief. The result is a sophisticated, textured piece that looks like it was hand-carved from limestone or pale wood.
How-To Guide
Materials
- White or light grey air-dry clay (finely textured)
- Rolling pin
- Parchment paper or canvas mat
- Existing plain wooden frame (flat profile) or cardboard backing
- Craft knife or scalpel (X-Acto)
- Needle sculpting tool or clay carving tool
- Small floral and leaf stamps (or actual leaves)
- Water in a small cup
- Soft paintbrush
- Fine-grit sandpaper
- Acrylic paint (thinned brown or grey for antique wash)
- Matte varnish or sealant
Step 1: Preparing the Base
-
Prep your workspace:
Lay down a sheet of parchment paper or a canvas mat to prevent sticking. Unwrap your air-dry clay and knead it briefly until it is pliable and smooth. -
Roll the clay slab:
Roll out the clay into an even slab, approximately 1/4 inch thick. Aim for a consistent thickness so the frame dries evenly. -
Measure and cut:
Place your wooden frame or template on top of the clay. Using your craft knife, carefully cut around the outer and inner edges of the frame shape. Remove the excess clay. -
Smooth the edges:
Dip your finger in a little water and run it along the cut edges to smooth out any sharpness or roughness. The finish should look soft, not jagged.
Cracks Appearing?
If small hairline cracks appear while drying, mix a tiny bit of fresh clay with water to make a paste (slip) and fill them in with a finger.
Step 2: Creating the Botanical Relief
-
Plan your vine placement:
Lightly trace a curving line with your needle tool along the sides of the frame to serve as a guide for the main stem. This ensures your pattern flows naturally. -
Carve the main stem:
Using the needle tool or a small carving gouge, deepen the main stem lines. I like to make these slightly irregular to mimic real organic growth. -
Stamp the leaves:
Press your leaf stamps into the clay branching off the main stem. If you don’t have stamps, you can hand-carve leaf shapes by outlining an oval and pressing lines inside for veins. -
Add floral accents:
Position a flower stamp (or create one by pressing five small teardrop shapes in a circle) at the center top and bottom of the frame for symmetry. -
Deepen the details:
Go back over your stamped impressions with the needle tool to sharpen the veins and edges. This extra definition helps the ‘carved’ look stand out later. -
Texture the background (optional):
If the smooth areas look too plain, gently tap them with a toothbrush or stiff brush to add a very subtle stone-like texture.
Step 3: Assembly and Finishing
-
Attach to backing:
Score the back of your wet clay frame and the front of your wooden base frame. Apply a small amount of PVA glue or clay slip and press the clay firmly onto the wood. -
Allow to dry completely:
Let the frame dry flat for 24 to 48 hours. Keep it away from direct heat to prevent warping or cracking. -
Sand for perfection:
Once fully dry and hard, use fine-grit sandpaper to gently smooth the outer edges and any rough spots on the surface. -
Create an antique wash:
Mix a tiny drop of brown or dark grey acrylic paint with plenty of water. You want a very watery, translucent consistency. -
Apply the wash:
Brush the wash over the entire frame, making sure it gets into the carved grooves of the leaves and flowers. -
Wipe back:
Immediately wipe the surface with a damp paper towel or cloth. The dark paint will stay in the recesses, highlighting the details, while the surface returns to a lighter color. -
Seal the piece:
Finish with a coat of matte varnish to protect the clay from moisture and dust without adding unwanted shine.
Gilded Touch
For a luxe upgrade, apply a tiny amount of gold wax rub to the raised edges of the leaves and flowers after the paint wash is dry.
Now you have a timeless, textured frame ready to highlight your favorite memory
Fruit Slice Summer Frame
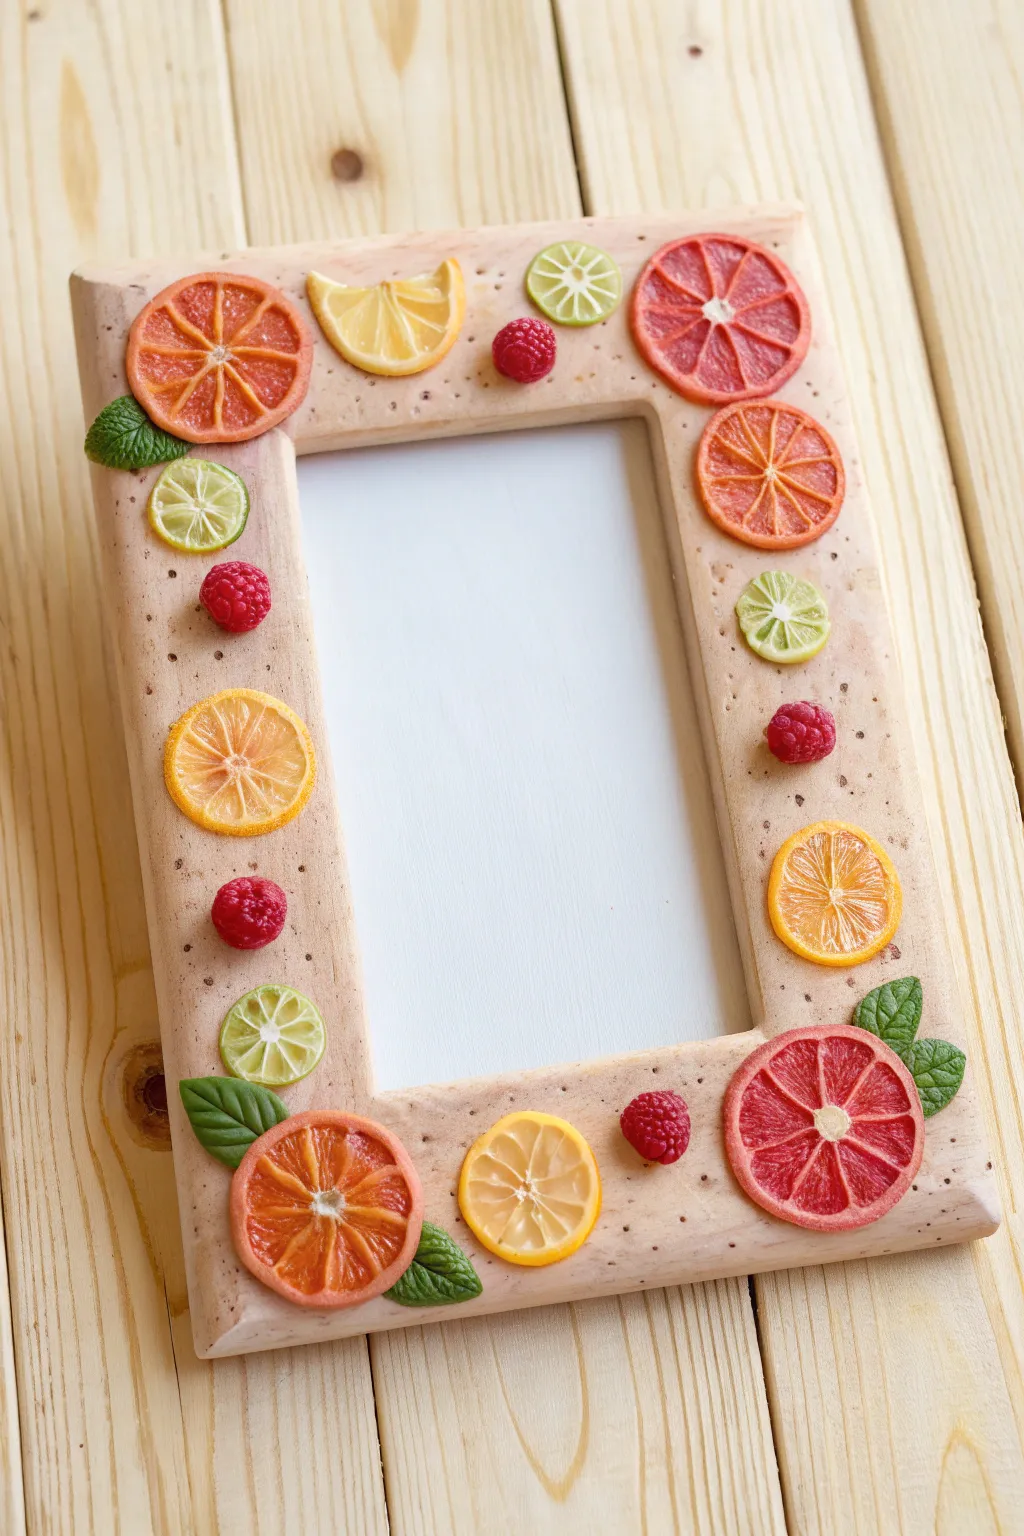
Bring the refreshing vibes of summer into your home decor with this vibrant picture frame. Adorned with realistic clay fruit slices and berries, this cheerful accessory transforms a plain wooden frame into a juicy work of art.
Step-by-Step Guide
Materials
- Unfinished wooden picture frame (flat profile)
- Polymer clay (translucent, white, orange, yellow, green, red/magenta)
- Liquid polymer clay (translucent)
- Needle tool or toothpick
- Gloss glaze or polyurethane varnish
- Acrylic craft paint (light beige/biscuit color)
- Old toothbrush (for texturing)
- Super glue or strong craft adhesive
- Razor blade or tissue blade
- Small dotting tool or ball stylus
Step 1: Creating the Fruit Canes
-
Mix your colors:
Start by mixing translucent clay with small amounts of colored clay to create segments for your citrus. You’ll need orange, yellow, pink-grapefruit, and lime green. Keep the colors semi-translucent for realism. -
Form the segments:
Shape your colored clay into a triangular log. Wrap this log in a very thin sheet of white clay to create the pith (the white lines between segments). -
Assemble the cane:
Arrange 8-10 of these triangular logs into a circle to form a wheel shape. Fill the center hole with a tiny snake of white clay. -
Wrap the fruit:
Wrap the entire cylinder in another thin sheet of white clay (inner rind), followed by a slightly thicker sheet of the matching fruit skin color (outer rind). -
Reduce the cane:
Gently squeeze and roll the cane to make it longer and thinner. Reduce it until the diameter is roughly the size of a quarter or a nickel, depending on your frame size. -
Slice the fruit:
Once the cane is firm (you can pop it in the fridge for 20 minutes), use your blade to cut thin, even slices. Cut some slices in half to create wedges. -
Texture the flesh:
Using a needle tool, gently poke and irradiate lines from the center of each slice outwards to mimic the pulpy texture of real citrus fruit.
Sticky Slices?
If your cane gets too soft and the slices squish while cutting, pause and put the clay cane in the freezer for 10 minutes to firm it up again.
Step 2: Sculpting Berries and Leaves
-
Form the raspberries:
Roll tiny balls of deep pink or red clay. Cluster many tiny balls together over a small core to form a raspberry shape, or use a mold if you have one. -
Make the mint leaves:
Flatten small tear-drop shapes of green clay. Use your needle tool to press a central vein and smaller side veins into each leaf. -
Bake the pieces:
Place all your fruit slices, wedges, berries, and leaves on a tile or parchment paper. Bake according to your clay manufacturer’s instructions.
Seed Detail
Add tiny teardrop-shaped seeds made of white or pale yellow clay to the center of your lemon and orange slices before baking for extra realism.
Step 3: Assembly and Finishing
-
Prepare the frame:
Paint your wooden frame with a light biscuit-colored acrylic paint. While still slightly wet, flick speckles of darker brown paint using an old toothbrush for a natural, cork-like look. -
Plan your layout:
Before gluing, lay out your baked clay pieces on the frame. I find it helpful to start with the large grapefruit slices in the corners and fill within smaller lemons and limes. -
Glue the elements:
Using strong adhesive, attach the pieces to the frame. Tuck the mint leaves slightly under the fruit slices for a layered effect. -
Add shine:
Apply a coat of gloss glaze or liquid polymer clay specifically to the ‘flesh’ part of the fruit slices. This makes them look juicy and fresh. -
Final touches:
Let the glaze dry completely before inserting your favorite summer memory into the frame.
Now you have a refreshing, handmade frame perfect for showcasing your brightest summer moments
Ocean Waves and Shell Accents
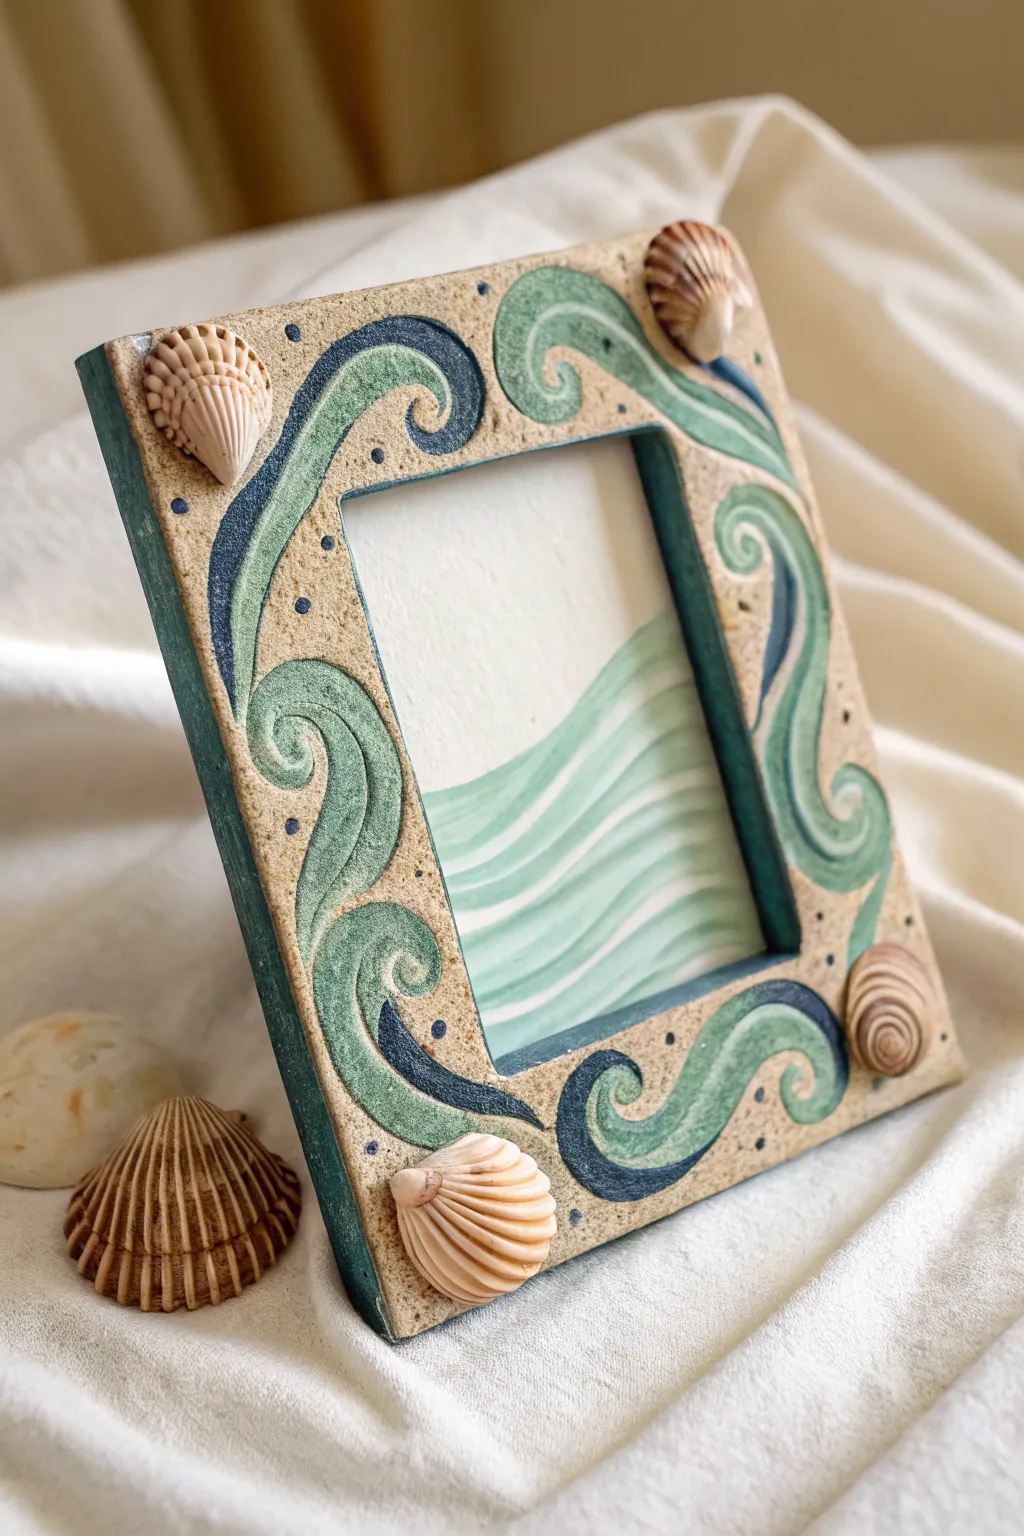
Bring the calming rhythm of the ocean to your decor with this textured clay frame. Featuring swirling carved waves, varied marine hues, and real shell accents, this project mimics the look of high-end ceramic artwork without needing a kiln.
How-To Guide
Materials
- Air-dry clay (stone or sand color preferred)
- Wooden rolling pin
- Cardboard template (rectangle frame shape)
- Craft knife or scalpel
- Sculpting loop tools or dental picks
- Acrylic paints (teal, seafoam green, navy blue, sandy beige)
- Small flat brushes and fine detail brushes
- Texturing tool (stiff bristle brush or toothbrush)
- Four small seashells
- Strong craft glue or E6000
- Matte varnish or sealant
Step 1: Shaping the Base
-
Roll the Slab:
Begin by rolling out your air-dry clay on a non-stick surface until it is a uniform slab, approximately 1/4 inch thick. A consistent thickness ensures the frame won’t warp as easily while drying. -
Cut the Frame Shape:
Place your cardboard template over the clay. Using a sharp craft knife, cut out the outer rectangle first, followed by the inner window rectangle to create the frame border. -
Smooth the Edges:
Dip your finger in a little bit of water and run it along the cut edges, both inside and outside, to soften any sharp corners or clay burrs. -
Add Main Texture:
Take a stiff bristle brush or an old toothbrush and stipple the entire surface of the frame gently. This creates a porous, stone-like texture that mimics sandstone.
Prevent Warping
Clay frames love to curl while drying. Place a sheet of parchment paper over the drying frame and weigh it down gently with a heavy book.
Step 2: Carving the Design
-
Sketch the Waves:
Lightly sketch your wave patterns directly onto the wet clay using a toothpick or needle tool. Draw large, swirling S-curves starting from the corners and flowing toward the center sides. -
Carve the Outlines:
Using a small loop tool, carefully carve out the clay along your sketched lines. I find it helpful to make these channels fairly deep to create a distinct separation between the ‘sand’ and the ‘water’. -
Sculpt Wave Details:
Inside the wavy shapes you’ve outlined, gently scrape away a thin layer of clay to make the wave sections slightly recessed compared to the sandy border borders. -
Create Inner Swirls:
Use a fine point tool to impress smaller swirl lines inside your larger wave shapes, following the flow of the curve to suggest movement in the water. -
Embed Shell Indentations:
Before the clay hardens, press your four seashells gently into the four corners of the frame to create perfect indentations for later gluing. Remove them and set them aside. -
Recess for Glass (Optional):
If you plan to add glass, flip the frame carefully and carve a shallow recess around the inner window on the back. -
Dry the Frame:
Allow the clay to dry completely flat for 24-48 hours. Turning it over halfway through the drying process helps prevent warping.
Fixing Cracks
If small cracks appear as the clay dries, mix a tiny amount of fresh clay with water to make a paste and fill the gaps, then sand smooth once dry.
Step 3: Painting and Assembly
-
Base Coat the Sand:
Mix a sandy beige acrylic paint and dab it onto the textured border areas. Using a dabbing motion keeps the paint inside the texture pores. -
Paint the Light Waves:
Fill the recessed wave shapes with a seafoam green or light teal color. You may need two coats for solid coverage. -
Add Depth with Dark Blue:
Using a fine detail brush and navy or dark teal paint, carefully paint the carved channels bordering the waves. This high contrast mimics the look of glazed ceramic inlay. -
Highlight the Lines:
With the same dark blue, trace the fine swirl lines inside the lighter green sections to accentuate the motion of the water. -
Dot Accents:
Dip the back of a paintbrush into dark blue paint and add small dots randomly around the sandy areas, mimicking pebbles or bubbles in the sand. -
Dry Brushing:
Once the base colors are dry, lightly dry-brush a tiny bit of off-white paint over the highest points of the texture to make the ‘sand’ look sun-bleached. -
Attach the Shells:
Apply a strong craft glue or E6000 to the indentations made earlier and press the seashells firmly into place at the corners. -
Seal the Frame:
Apply a coat of matte varnish over the entire clay surface. This protects the paint and unifies the sheen of the clay.
Now you have a stunning, beach-inspired frame ready to hold your favorite seaside memory
Desert Cactus Border
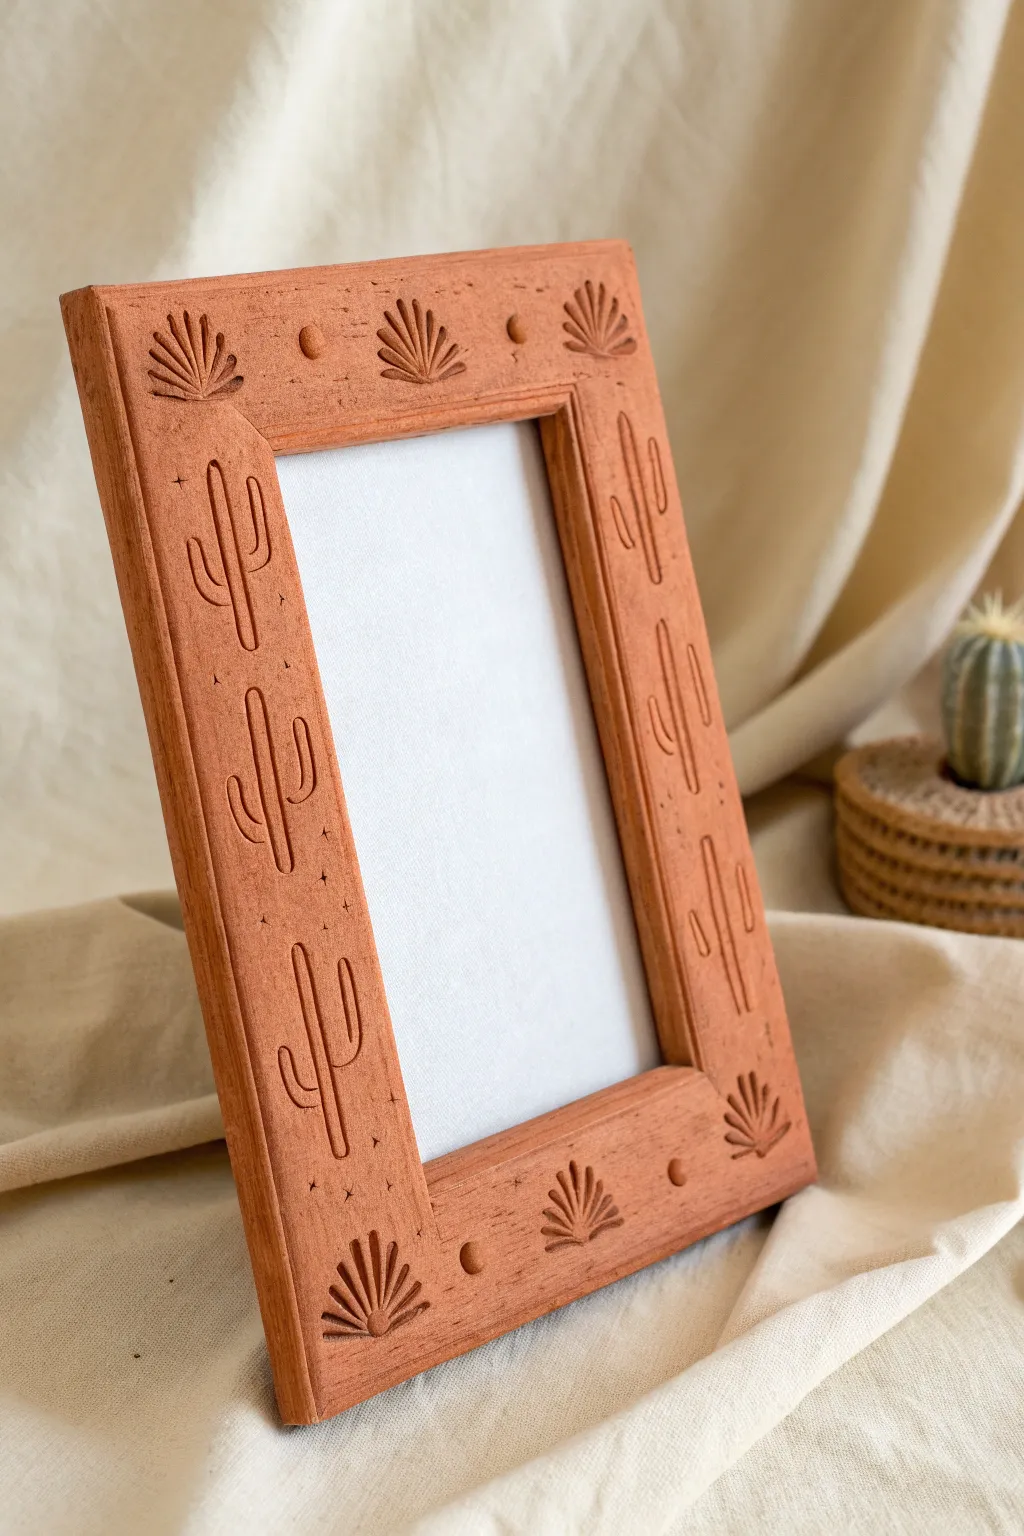
Bring the warmth of the desert into your home with this handcrafted clay frame featuring embossed sward cacti and sunrise motifs. The rich terracotta finish and tactile carved details give it an authentic, earthy feel perfect for bohemian decor.
Detailed Instructions
Materials
- Unfinished wooden photo frame (flat profile)
- Air-dry clay (white or terracotta)
- Terracotta acrylic paint (if using white clay)
- Rolling pin
- Clay sculpting tools (needle tool, small loop tool)
- Craft knife
- Sandpaper (fine grit)
- Wood glue or PVA glue
- Matte spray varnish
- Small cup of water
- Paintbrushes
Step 1: Preparing the Base
-
Prepare the frame:
Start by removing the glass and backing from your wooden frame. Give the wood a quick sanding to roughen the surface, which helps the clay adhere better. -
Roll out the clay:
Roll your air-dry clay into a long, flat slab approximately 1/8 to 1/4 inch thick. Ensure the thickness is consistent so the finished surface isn’t lumpy. -
Apply adhesive:
Brush a generous layer of wood glue or PVA glue onto the front surface of the wooden frame. -
Attach the clay slab:
Lay the clay slab over the glued frame face. Gently press it down to ensure good contact, smoothing out any air bubbles with your fingers. -
Trim the edges:
Using a sharp craft knife, trim the excess clay flush with the outer and inner edges of the frame for a clean, sharp border. -
Smooth the surface:
Dip your finger lightly in water and run it over the clay surface and edges to smooth out any fingerprints or knife marks.
Step 2: Carving the Desert Motifs
-
Map out the cacti:
Use a needle tool or a dull pencil to very lightly sketch the outline of three saguaro cacti on each vertical side of the frame. -
Sculpt the cactus relief:
Instead of adding clay, we will create a raised look by depressing the outline. Taking a small carving tool or blunt stylus, press deeply along your sketched cactus lines to create a distinct groove. -
Add cactus spines:
Inside the cactus outlines, scratch a single vertical line down the center of the main stem and arms to mimic ribs. -
Create the sunrises:
On the top and bottom horizontal bars, sketch three semi-circles (fans). One in each corner and one in the center. -
Detail the sun rays:
Press a series of radiating lines into each semi-circle using your knife or needle tool, fanning them out like sun rays or a shell pattern. -
Add decorative dots:
Between the sun motifs on the top and bottom, press the round end of a paintbrush handle into the clay to create simple, recessed dots. -
Intersperse stars:
Use the needle tool to gently scratch tiny four-point stars or cross-hatches randomly around the cacti on the vertical sides to fill the negative space.
Clay Cracking?
If small cracks appear as the clay shrinks during drying, mix a tiny bit of fresh clay with water to make a paste and fill the cracks, then sand smooth once dry.
Step 3: Finishing Touches
-
Let it dry completely:
Allow the frame to dry for 24-48 hours. I find it helps to flip it over halfway through the drying process to let air reach the wood side, preventing warping. -
Sand imperfections:
Once bone dry, use fine-grit sandpaper to gently smooth any rough burrs created during the carving process, especially around the cactus grooves. -
Paint the base color:
Paint the entire frame, including the inner and outer edges, with a rich terracotta-colored acrylic paint. You may need two coats for full opacity. -
Enhance the texture:
Mix a tiny amount of dark brown paint with water to create a wash. Brush it into the carved grooves and immediately wipe the surface with a damp cloth. The dark paint will stay in the recesses, making the design pop. -
Seal the piece:
Finish by spraying the frame with a clear matte varnish. This seals the clay and gives it that professional, fired-ceramic look without the kiln.
Pro Tip: Texture
Before painting, lightly dab the dry clay with a stiff bristle brush or a crumpled ball of foil to give the surface a subtle, sandy texture like real stone.
Now you have a stunning custom frame ready to hold your favorite desert memory
Mushrooms and Mossy Nooks
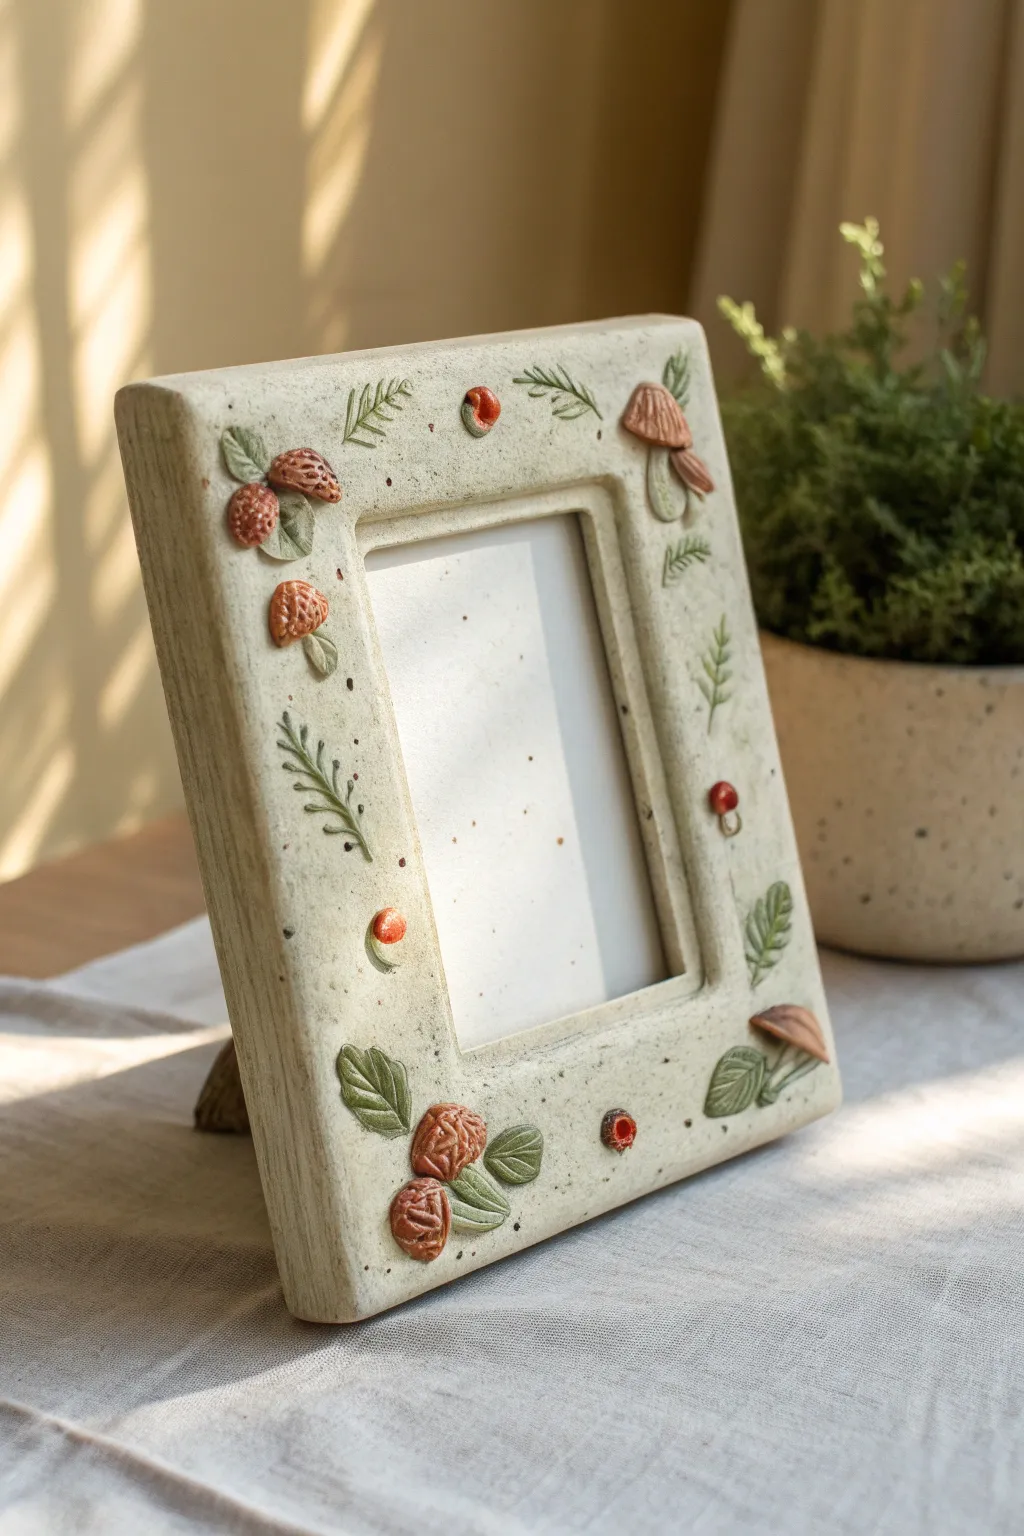
Bring the magic of the forest floor into your home with this charming clay frame adorned with tiny sculpted mushrooms and delicate ferns. The creamy, speckled base provides a perfect neutral canvas for the earthy reds and greens of the botanical details.
Step-by-Step
Materials
- Wooden picture frame (rectangular, approx. 5×7 inch)
- White or cream polymer clay (large block)
- Assorted polymer clay colors: terracotta/burnt orange, moss green, olive green
- Rolling pin or pasta machine
- Liquid polymer clay (Bake and Bond)
- Needle tool and small ball styling tool
- Coarse black pepper or brown acrylic paint (for speckles)
- Clean toothbrush or stiff bristle brush
- Cookie sheet and parchment paper
- Oven
Step 1: Preparing the Base
-
Condition the base clay:
Begin by conditioning a large amount of your white or cream clay until it is soft and pliable. If you want the speckled pottery look shown in the photo, knead in a pinch of coarse black pepper or dry coffee grounds. -
Roll out the slab:
Roll the clay into a flat, even sheet approximately 1/8 inch thick. Ensure the sheet is large enough to cover the entire front surface of your wooden frame with a little overhang. -
Apply the clay:
Brush a thin layer of liquid polymer clay onto the front of the wooden frame to act as an adhesive. Carefully drape your clay sheet over the frame, smoothing it down gently to avoid trapping air bubbles. -
Trim and finish edges:
Use a craft knife to trim the excess clay from the outer and inner edges. Smooth the cut sides with your finger to round them off slightly, giving the frame a soft, stone-like appearance rather than sharp edges. -
Texture the surface:
Take a clean toothbrush or a texture sponge and gently tap it all over the surface of the clay. This adds a realistic, slightly porous stone texture that helps the piece look organic.
Loose Leaves?
If small clay parts fall off after baking, don’t panic. A tiny drop of super glue or strong jewelry adhesive will reattach them permanently and is invisible once dry.
Step 2: Sculpting the Botanicals
-
Create fern leaves:
Condition small amounts of moss green and olive green clay. Roll tiny, thin snakes and flatten them slightly on your work surface. Use a needle tool to press a center vein and then make small angled indentations along the sides to mimic fern fronds. -
Attach the greenery:
Apply a tiny dot of liquid clay where you want a leaf to go. Gently lift your clay ferns with a blade and press them onto the frame borders. Arrange them sporadically, letting some curve naturally like real plants. -
Sculpt mushroom caps:
Roll small balls of terracotta or burnt orange clay. Press them gently onto your work surface to flatten the bottom, shaping the top into a dome. For some, pinch the edges slightly to make them look irregular or aged. -
Add cap details:
Using a needle tool, gently texture the tops of some mushroom caps to create a bumpy or porous look. I like to leave some smooth for variety. -
Form mushroom stems:
Roll small, thick cylinders of cream or light beige clay for the stems. Attach these to the frame first using a dot of liquid clay, positioning them near or overlapping the greenery. -
Assemble the mushrooms:
Place the prepared orange caps onto the stems. Gently press down to secure them. Use your needle tool to blend the clay slightly at the connection point underneath the cap if visible. -
Add tiny berries:
Roll extremely small spheres of red or orange clay. Press these into the spaces between leaves or near the frame edges to look like wild berries or forest buds. -
Create hollow accents:
Form a few small, ring-like shapes or hollow cups using the orange clay, resembling cup fungi. Press a small ball tool into the center to hollow them out and attach them to the frame.
Step 3: Finishing Touches
-
Add final texture:
Go back over the greenery with your needle tool to deepen any vein lines that may have flattened during application. Ensure all elements are securely bonded to the base layer. -
Double-check edges:
Inspect the inner window of the frame. If the clay has shifted, gently push it back to ensure a clean rectangular opening for your photo. -
Bake the frame:
Place the frame on a parchment-lined baking sheet. Bake according to the manufacturer’s instructions for your specific brand of clay (usually 275°F/130°C for 15-30 minutes). -
Cool and seal:
Allow the frame to cool completely in the oven. Once cool, you can leave it matte for a natural look or apply a thin layer of matte varnish to protect the surface from dust.
Leaf Lifter
Use the flat side of a craft knife blade to lift your delicate fern leaves off the table. This prevents them from stretching or tearing before you place them.
Pop in your favorite memory and enjoy your enchanted forest creation
Bird on a Branch Corner
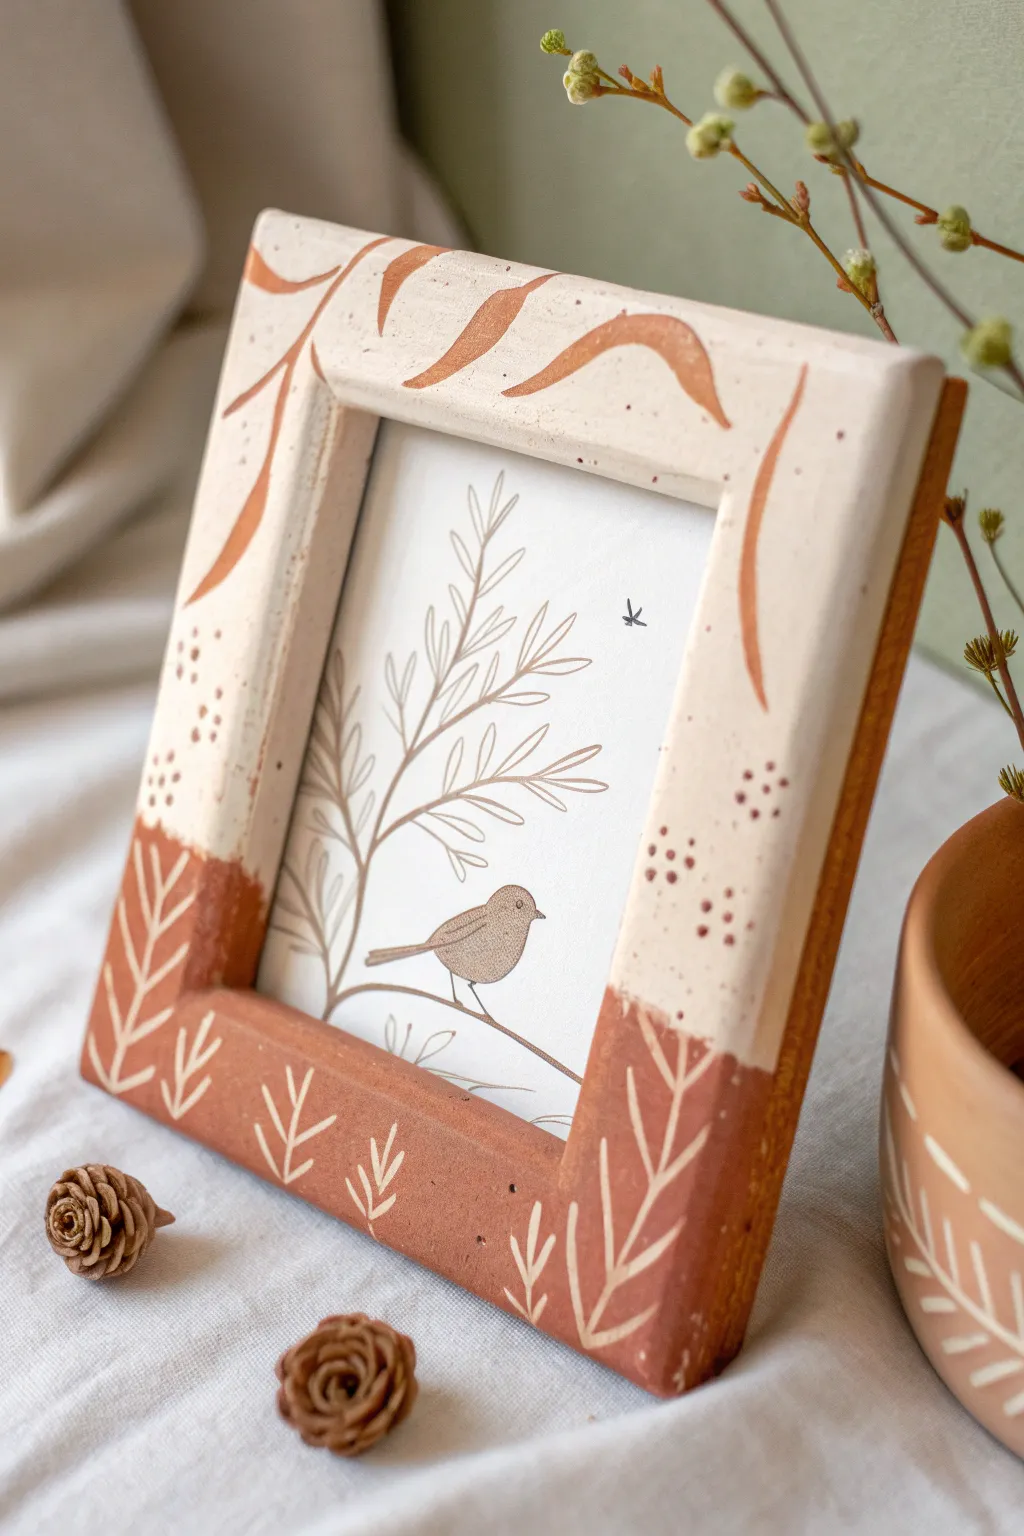
This charming photo frame combines the rustic warmth of terracotta with a delicate, creamy finish to create a perfect home for your favorite nature prints. The hand-painted leaf motifs evoke a serene, organic feel that brings a touch of the outdoors straight into your living space.
Step-by-Step Guide
Materials
- Wooden or smooth MDF picture frame (square profile)
- Terracotta colored acrylic paint (or actual terracotta clay if building from scratch, but painting is easier)
- Cream or off-white acrylic paint
- Fine detail paintbrush (size 0 or 1)
- Flat paintbrush (medium size)
- Pencil
- Ruler or painter’s tape
- Matte varnish or sealant
- Nature-themed print or illustration (bird on branch)
- Sandpaper (fine grit)
Step 1: Preparation & Base Coat
-
Prep the surface:
Begin by removing any glass or backing from your wooden frame. If the frame has a glossy finish, lightly sand it with fine-grit sandpaper to give the paint something to grip. -
Clean dust:
Wipe away all sanding dust with a slightly damp cloth to ensure a smooth painting surface. -
Base layer:
Paint the entire frame with the terracotta-colored acrylic paint. You may need two coats to get a rich, opaque finish that mimics real clay. Let this dry completely.
Uneven Lines?
If your painted vines look shaky, widen the stem slightly to hide the wobble. A slightly thicker line often looks more confident and intentional.
Step 2: Color Blocking
-
Top section:
Using your cream or off-white paint, block out the top two-thirds of the frame. You don’t need a perfectly straight line—the jagged, slightly uneven edge seen in the photo adds to the handmade pottery aesthetic. -
Refine the edge:
If I want a sharper contrast, I like to apply a second coat of cream paint, carefully dabbing the brush along the transition line to create a textured, organic separation between the cream and terracotta zones. -
Inner rim:
Don’t forget to paint the inner beveled edge of the frame in the cream color as well, stopping where the terracotta section begins to maintain the illusion.
Step 3: Painting the Details
-
Reference marks:
Once the paint is thoroughly dry, use a pencil to very faintly sketch the path of the sweeping leaves on the top corners and the bottom section. -
Top vines:
Switch to your fine detail brush. Dip it into the terracotta color and paint long, sweeping vine lines on the cream section, starting from the outer edges and curbing inward. -
Top leaves:
Add simple, elongated leaf shapes along these vines. Keep the strokes fluid and slightly tapered at the ends. -
Speckling detail:
Using the very tip of your brush or a toothpick, add tiny terracotta dots (stippling) near the transition line on the cream side. Group them in small clusters of three or four. -
Bottom vines:
Clean your brush and switch to the cream paint. On the bottom terracotta section, paint vertical, fern-like stems rising upward. -
Bottom leaves:
Paint small V-shaped leaves extending from these white stems. These should look more like wheat or fern fronds compared to the leafy vines on top.
Add Texture
Mix a teaspoon of baking soda into your base terracotta paint before applying. This creates a grainy, authentic ceramic texture that feels real to the touch.
Step 4: Assembly
-
Drying time:
Allow all paintwork to dry for at least an hour to prevent smudging. -
Sealing:
Apply a coat of matte varnish over the entire frame. This protects the acrylic design and unifies the finish, making it look more like fired ceramic. -
Insert artwork:
Place your bird illustration or photo back into the frame. Securing the backing firmly. -
Final touch:
Add small dried pine cones or natural elements near the frame for display if desired.
Place your finished frame on a shelf near a plant to highlight its natural charm
Checkerboard With Raised Tiles
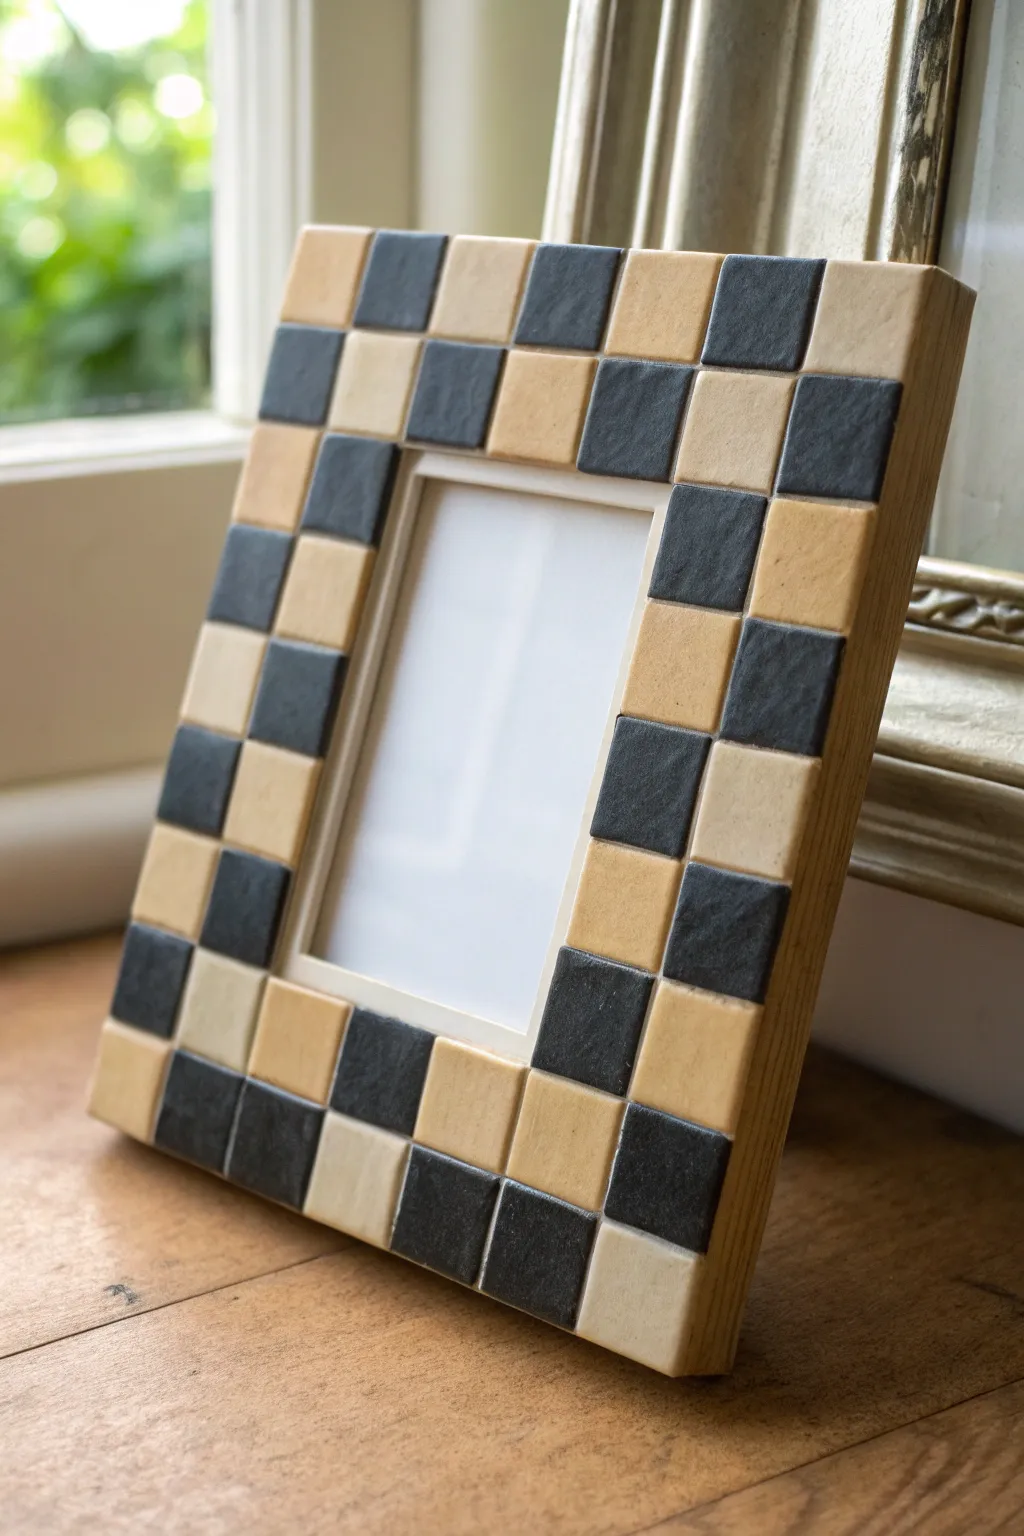
Transform a plain wooden frame into a modern statement piece using handmade clay tiles. This project achieves a chic, high-end look by alternating raised matte black and natural beige squares for a tactile checkerboard effect.
Detailed Instructions
Materials
- Flat, wide-bordered wooden picture frame
- Air-dry clay (black/charcoal and beige/natural)
- Acrylic rolling pin
- Square clay cutter (sized to fit your frame width)
- Strong craft glue or heavy-duty construction adhesive
- Ruler
- Craft knife
- Fine-grit sandpaper
- Parchment paper or non-stick work mat
- Matte spray sealant (optional)
Step 1: Planning and Prep
-
Measure the frame width:
Before slicing any clay, measure the width of your frame’s flat border. You need to determine what size square will fit perfectly. For example, if your border is 2 inches wide, you might want two 1-inch squares across. -
Calculate tile quantity:
Measure the total length of all four sides. Divide this by your tile size to estimate how many black and beige tiles you’ll need. It’s always smart to make a few extras of each color just in case. -
Select your cutter:
Find a square cutter that matches your calculations. If you don’t have a cutter the exact size, creating a simple paper template to trace around works just as well.
Sticky Situation?
If tiles are sliding while the glue dries, use small strips of painter’s tape to hold them in place tight against the frame until the adhesive sets fully.
Step 2: Creating the Tiles
-
Condition the beige clay:
Start with the lighter clay to avoid transferring dark pigments. Knead the beige air-dry clay until it’s soft, pliable, and free of cracks. -
Roll out the slab:
Using your acrylic roller, roll the clay out on parchment paper to an even thickness. Aim for about 1/4 inch thickness to get that nice raised dimension seen in the photo. -
Cut the light squares:
Press your cutter firmly into the clay slab to create your beige squares. If using a knife, use your ruler as a guide to ensure straight, even cuts. -
Smooth the edges:
Gently tap the edges of each square with your finger to soften any sharp cutting ridges. This gives the tiles a more finished, ceramic look. -
Repeat with dark clay:
Clean your hands and tools thoroughly, then repeat the process with the black or charcoal clay. Roll it to the same thickness as the beige tiles to ensure the surface of the frame is level. -
Dry the tiles:
Lay all the tiles flat on a piece of parchment paper. To prevent curling, I usually place a light book or board over them once they are partially dry. Let them cure completely according to the package instructions (usually 24-48 hours).
Texture Twist
Before cutting your squares, press a piece of linen fabric or a texture sheet into the clay slab to give the tiles a subtle, woven surface detail.
Step 3: Assembly
-
Sand the frame (optional):
If your wooden frame has a glossy finish, give it a quick scuff with sandpaper to help the glue adhere better. -
Refine the dry tiles:
Once the tiles are fully hard, inspect them. Use fine-grit sandpaper to smooth out any rough sides or uneven bottoms so they sit flush against the wood. -
Dry fit the layout:
Arrange the tiles on the frame without glue first. Start at the corners and work inward. This helps you spot any spacing issues before committing. -
Trim if necessary:
If the tiles don’t fit perfectly at the corners or edges, carefully sand or shave down the last few tiles to make everything fit snugly. -
Glue the first corner:
Apply a generous dab of strong craft glue to the back of a corner tile and press it firmly into place. -
Complete the pattern:
Continue gluing, alternating black and beige tiles. Keep them pressed tightly against each other to minimize gaps. -
Clean up excess glue:
Check for any glue that may have squeezed out between the tiles and wipe it away immediately with a damp cloth or cotton swab.
Step 4: Finishing Touches
-
Allow to cure:
Let the glue set completely. This ensures your heavy clay tiles won’t slide out of position when you stand the frame up. -
Seal the surface:
For longevity, spray the entire frame with a clear matte sealant. This protects the clay from moisture and dust without adding unwanted shine.
Now you have a striking geometric frame ready to showcase your favorite memory
Drippy Frosting Dessert Frame
Transform a plain wooden frame into a sweet, dessert-inspired keepsake using air-dry clay and a playful piping technique. With its creamy, textured base and sprinkle-like accents, this project looks good enough to eat but is sturdy enough to hold your favorite memories.
Step-by-Step Tutorial
Materials
- Simple flat wooden picture frame (4×6 or 5×7)
- White or cream air-dry clay
- Clay sculpting tools (specifically a rolling pin and knife)
- Piping bag with a star tip (or a clay extruder)
- Acrylic paints (Cream/Off-white, Pastel Green, Coral Orange, Baby Blue, Soft Pink)
- Small round paintbrush
- Gloss varnish or clear sealant (optional)
- Strong craft glue
- Sandpaper (fine grit)
Step 1: Preparing the Base
-
Prep the frame surface:
Begin by lightly sanding your wooden frame to create a rougher surface, which helps the clay adhere better. Wipe away any dust with a damp cloth. -
Roll out the base layer:
Take a large chunk of air-dry clay and roll it out into a thin sheets, approximately 1/8 inch thick. You want enough to cover the entire front face of the frame. -
Cover the frame:
Apply a thin layer of craft glue to the wooden frame, then lay your clay sheet over it. Press gently to smooth out air bubbles, wrapping the excess over the edges for a clean finish. -
Trim the excess:
Use a craft knife or clay tool to trim away the extra clay from the center opening and the outer edges. Smooth the cut sides with a little water on your finger.
Cracks in the Frosting?
If small cracks appear as the clay dries, mix a tiny bit of fresh clay with water to make a paste and fill them in before painting.
Step 2: Creating the Braided Border
-
Make clay ropes:
Roll out two long, thin snakes of clay for each side of the frame. Try to keep them consistent in thickness. -
Twist the braid:
Gently twist two clay snakes together to form a clear rope or braid pattern. Repeat this until you have enough length to border both the inner and outer edges of the frame. -
Attach the outer border:
Apply a small line of water or slip (clay mixed with water) to the outer edge of your frame. Press the braided clay rope firmly along the perimeter, trimming the corners at a 45-degree angle for a neat join. -
Attach the inner border:
Repeat the process for the inner opening where the photo will go. Press the braid into place securely so it bonds with the base layer. -
Let it dry completely:
Allow the sculpted frame to dry for at least 24-48 hours. I find that flipping it over halfway through helps it dry evenly without warping.
Add Real Texture
Instead of painting flat dots, roll tiny balls of clay and glue them onto the frame before painting for 3D sprinkles that pop.
Step 3: Painting and Decorating
-
Apply the base coat:
Once dry, paint the entire frame, including the braids, with a creamy off-white acrylic paint. You may need two coats to get a solid, opaque finish resembling frosting. -
Mix your sprinkle colors:
Prepare your palette with small amounts of pastel green, coral orange, baby blue, and soft pink paint. -
Paint the first dots:
Using a small round brush, dab small dots of the coral orange paint randomly across the flat area between the braids. Keep them spaced out comfortably. -
Add visual variety:
Switch to your pastel green and add an equal number of dots, filling in some of the empty spaces. -
Finish the confetti pattern:
Complete the ‘sprinkles’ look by adding the remaining blue and pink dots. Try to avoid clustering too many of the same color together. -
Define the texture:
If you want the braids to pop, you can do a very subtle dry-brush of a slightly lighter cream color over the raised twists. -
Seal the artwork:
To give it that shiny, glazed desert look, apply a coat of gloss varnish over the entire frame once the paint is fully dry.
Place your favorite photo inside and display your sweet creation on a desk or shelf
Embedded Texture Keepsake Frame
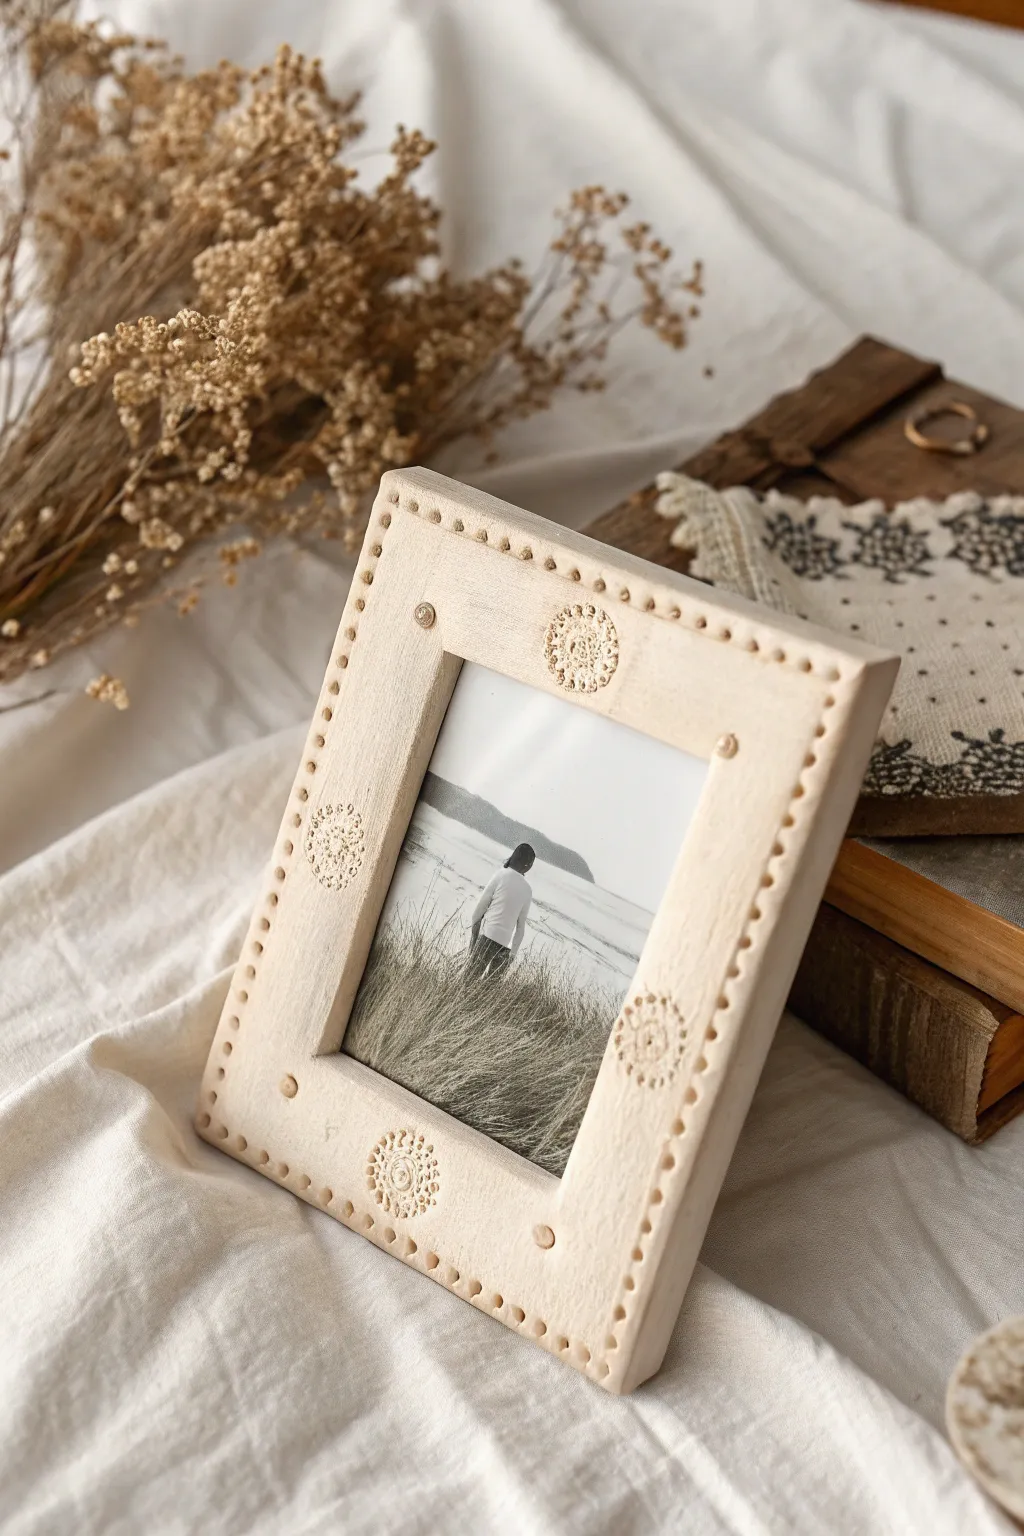
Capture a rustic, bohemian aesthetic with this textured clay frame project that turns simple air-dry clay into an intricate keepsake. By pressing lace or stamps into the soft surface, you create a timeless, handcrafted border perfect for your favorite black-and-white memories.
How-To Guide
Materials
- White sculpting air-dry clay (or polymer clay)
- Rolling pin or acrylic roller
- Square cookie cutter or craft knife
- Small lace doily, mandala stamp, or textured buttons
- Wooden skewer or needle tool
- Fine-grit sandpaper
- Small wooden frame backing (optional, for support)
- Strong craft glue (e.g., E6000)
- Matte sealant or varnish
Step 1: Preparing the Base
-
Condition the Clay:
Begin by taking a handful of white air-dry clay and kneading it thoroughly in your hands until it becomes warm, pliable, and free of cracks. -
Roll the Slab:
Place the clay on a smooth, non-stick surface or parchment paper. Use your roller to flatten it into an even slab, aiming for a thickness of about 1/4 inch (6mm) to ensure stability. -
Cut the Shape:
Using a ruler and craft knife, cut a clean square shape from your clay slab. Make sure it is large enough to accommodate your photo plus a generous border for texturing. -
Create the Photo Opening:
Measure the center of your square and cut out the inner window for your photograph. You can use a smaller square cookie cutter for precision, or carefully measure and cut with your knife.
Crack Control
If small cracks appear while drying, mix a tiny bit of fresh clay with water to make a paste and smooth it into the fissures with your finger.
Step 2: Adding Texture and Detail
-
Smooth the Edges:
Dip your finger in a tiny bit of water and run it along all the cut edges (inner and outer) to soften any sharp corners or rough clay burrs. -
Plan Stamp Placement:
Identify the four center points of the frame’s sides. This is where your main mandala or lace details will go. -
Press the Texture:
Take your lace doily section, stamp, or textured button and press it firmly into the clay at the center of the top side. Repeat this for the bottom, left, and right sides. -
Refine the Impression:
If the impression looks faint, gently rock the stamp slightly while pressing to deepen the relief without distorting the overall shape. -
Create the Dotted Border:
Using the blunt end of a wooden skewer or a small dotting tool, press small holes around the very outer perimeter of the frame. Space them evenly, about half a centimeter apart. -
Add Inner Details:
Create a second row of dotted indentations surrounding the inner photo window to mirror the outer border. -
Corner Accents:
For extra detail, press a small divot or tiny bead of clay into each of the four corners to visually anchor the design.
Antique Wash Effect
Dilute brown acrylic paint with water (1:5 ratio) and brush it over the dried texture. Wipe off the excess immediately to brown the crevices.
Step 3: Finishing Touches
-
Dry the Clay:
Allow the frame to dry completely in a cool, dry place. This usually takes 24-48 hours. I like to flip it over gently halfway through so the back dries evenly. -
Sand Imperfections:
Once fully hard, lightly gently sand the edges with fine-grit sandpaper to remove any remaining rough spots or fingerprints. -
Seal the Surface:
Apply a coat of matte varnish or sealant to protect the clay from moisture and dust while maintaining that natural, raw look. -
Attach Backing:
Glue a simple cardboard backing or a thin wooden frame back to the clay piece to hold the photo in place and provide a stand or hook. -
Insert Photo:
Trim your favorite photo to size and slide it into the frame, securing it from behind.
Place your new textured frame on a bedside table to add a touch of handmade warmth to your room