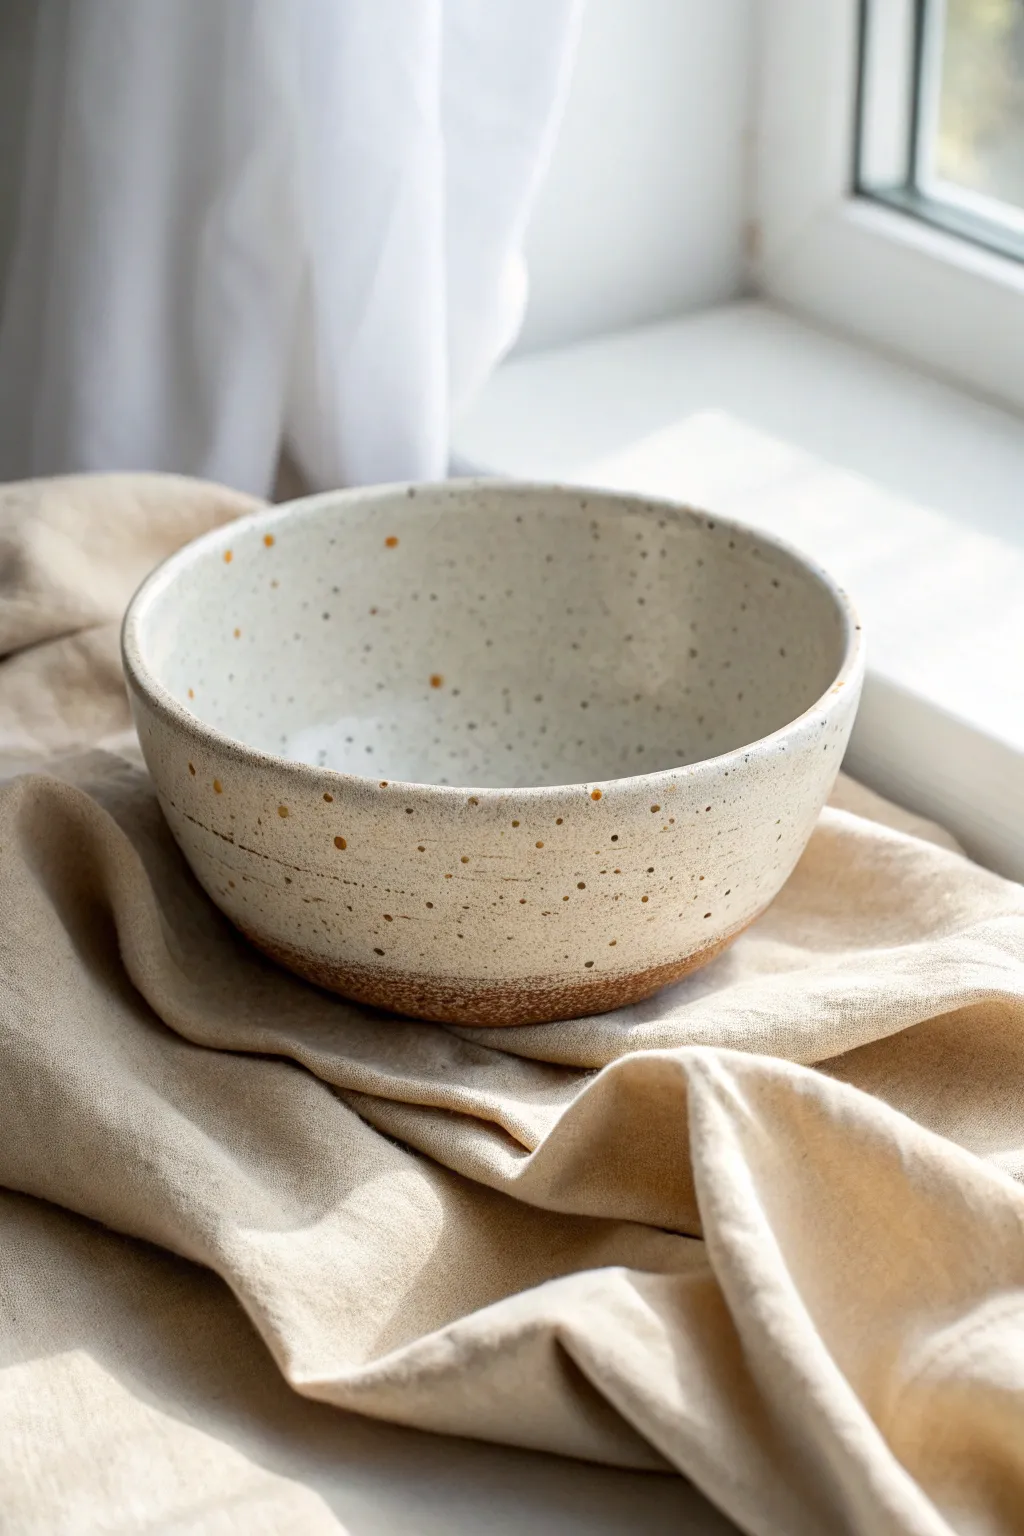
If you’ve been itching to make something cute and useful, simple clay bowls are the perfect little win. I love them because you can keep the shapes beginner-friendly and still play with texture, color, and tiny details that make them feel special.
Classic Pinch Pot Bowl
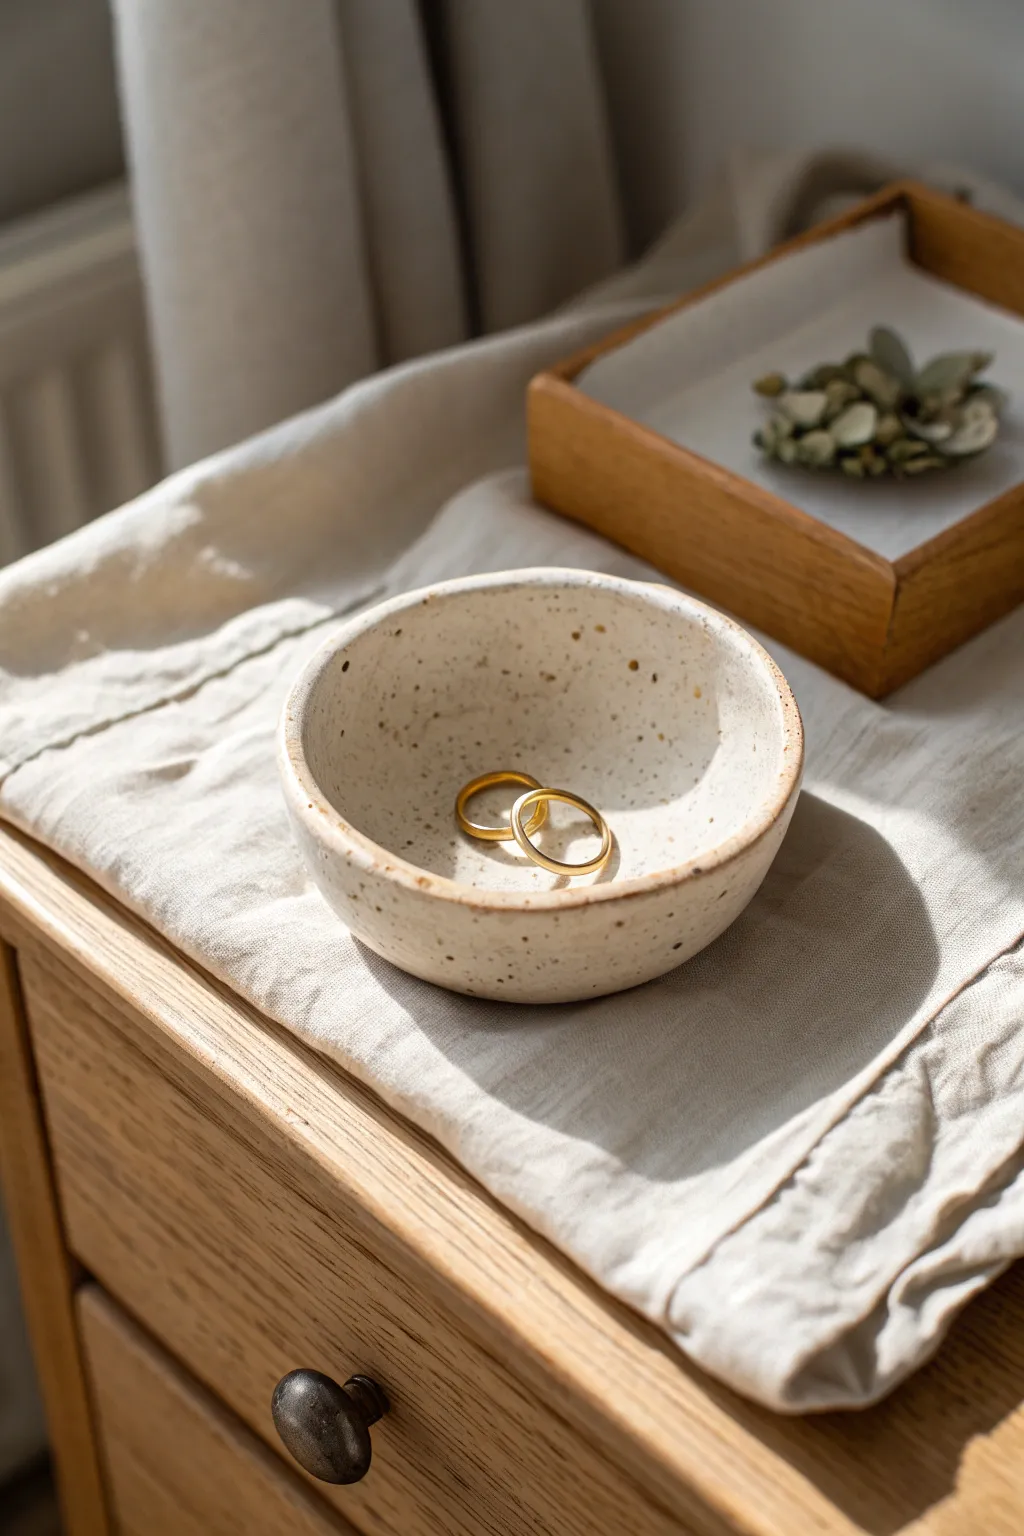
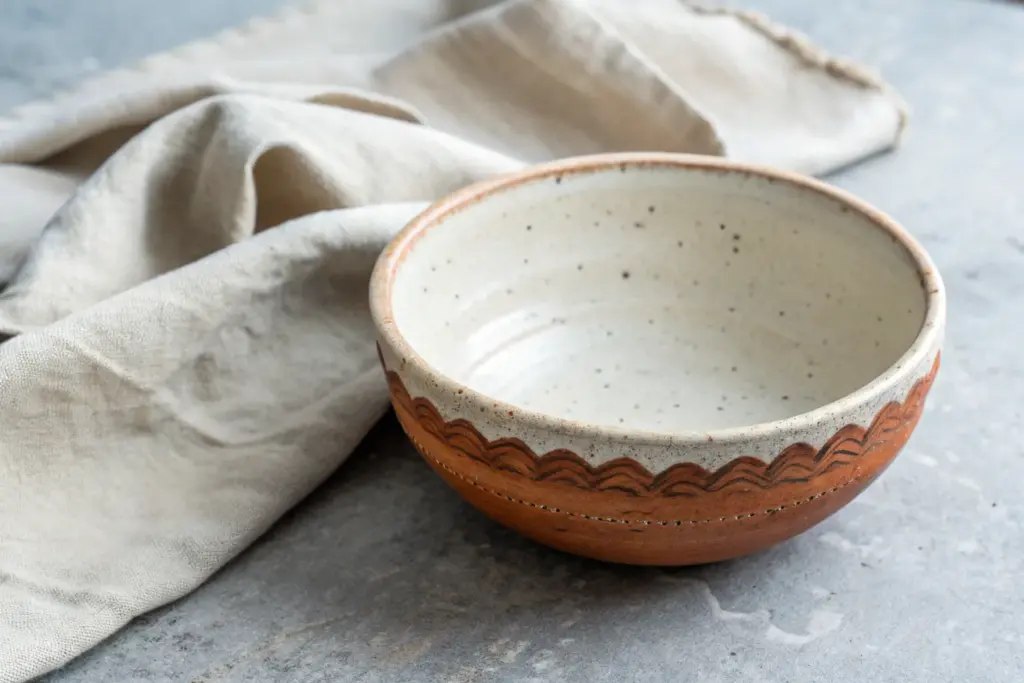
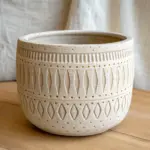
This charmingly imperfect little bowl captures the essence of organic clay work with its creamy speckled finish and gentle, wabi-sabi rim. Perfect for holding everyday rings or tiny treasures, this project introduces the wonderfully tactile and timeless technique of the pinch pot.
Detailed Instructions
Materials
- Speckled stoneware clay (white or cream body)
- Small bowl of water
- Synthetic sponge
- Wooden modeling tool or old credit card
- Canvas or cloth work surface
- Wire clay cutter
- Clear satin or matte ceramic glaze
- Kiln access (or air-dry clay alternative if firing isn’t possible)
Step 1: Forming the Base
-
Prepare the Clay:
Begin by slicing off a small amount of speckled stoneware clay. Roll it firmly between your palms until you have a smooth, crack-free ball about the size of a tangerine. -
Open the Center:
Hold the clay ball in your non-dominant hand. Gently press your thumb into the exact center of the sphere, pushing down until you are about a quarter-inch from the bottom. Don’t push all the way through. -
Start Pinching:
Keep your thumb inside the hole and your fingers on the outside. Begin pinching the clay wall gently, rotating the ball in your other hand slightly after each pinch. -
Establish Rhythm:
Work your way from the bottom of the pot up towards the rim, pinching with even pressure. I find a slow, meditative rhythm works best here to keep the wall thickness consistent. -
Widen the Bowl:
Continue rotating and pinching until the opening widens into a gentle bowl shape. Aim for walls that are roughly 1/4 inch thick throughout.
Step 2: Refining and Shaping
-
Check Thickness:
Feel the walls from bottom to top. If you find thick spots, give them a little extra pinch to distribute the clay. The goal isn’t machine-perfect symmetry, but rather a pleasing balance. -
Smooth the Rim:
The rim will naturally be uneven. Embrace this organic look, but dampen your finger slightly and run it along the edge to smooth out any sharp or jagged areas that could be uncomfortable to touch later. -
Refine the Interior:
Take a slightly damp sponge and wipe the inside of the bowl. This compresses the clay particles and creates that smooth, creamy surface seen in the reference image. -
Flat Bottom:
Tap the bowl gently on your work surface a few times. This creates a small, flat foot so the bowl sits stable and won’t wobble on your dresser.
Rim Technique
To get the slightly irregular, organic rim shown in the photo, resist the urge to trim it flat. Instead, tap the rim gently with a wooden spoon to compress it without leveling it.
Step 3: Finishing Touches
-
Smooth Exterior:
Use a flexible rib tool or an old credit card to gently scrape the outside if you want a cleaner look, or leave the faint finger marks for texture. The example image shows a relatively smooth but hand-touched surface. -
Slow Drying:
Place your finished pinch pot loosely under a plastic sheet. Let it dry slowly for a day or two until it reaches a ‘leather hard’ state, then uncover it to dry completely to ‘bone dry’. -
Bisque Fire:
Once bone dry, the piece needs its first firing in a kiln (bisque fire) to harden the clay into ceramic. -
Glazing:
Dip or brush your bisque-fired bowl with a clear satin glaze. A clear glaze is crucial here because it allows the natural speckles of the clay body to shine through, just like in the photo. -
Clean the Foot:
Wipe away any glaze from the very bottom of the pot with a wet sponge. This prevents the bowl from fusing to the kiln shelf during the final firing. -
Final Fire:
Fire the piece again specifically to the temperature required by your clay and glaze (usually Cone 5 or 6 for stoneware). This final step vitrifies the clay and melts the glaze into that durable, soft finish.
Make it a Set
Create two additional pinch pots in slightly graduating sizes. Nesting them together creates a beautiful vanity display for organizing different types of jewelry.
Once cooled from the kiln, your little speckled loveliness is ready to cradle your favorite rings


Bowl-Over-Bowl Mold Shape

Create a stunningly simple piece of functional decor using a beginner-friendly drape mold technique. This project results in a beautifully textured, organic white bowl that looks like it came straight from a boutique pottery studio.
Step-by-Step Tutorial
Materials
- Air-dry clay (white) or kiln-fire clay if you have access to a kiln
- A smooth plastic or ceramic bowl (to use as a mold)
- Plastic wrap or cling film
- Rolling pin
- Canvas mat or cloth (for rolling)
- Potter’s curved rib tool or an old credit card
- Sponge
- Water in a small cup
- Needle tool or sharp knife
- Fine-grit sandpaper (220 grit)
- Matte white acrylic paint or glaze (depending on clay type)
- Sealant (if using air-dry clay)
Step 1: Preparation and Rolling
-
Prepare your mold:
Select a bowl from your kitchen to act as your mold. Since we are doing a ‘bowl-over-bowl’ style, wrap the *outside* of your chosen bowl tightly with plastic wrap to prevent sticking. -
Wedge the clay:
Take a generous handful of white clay and knead it well to remove any air bubbles. This ensures a strong, crack-free finish later. -
Set up the workspace:
Lay down your canvas mat or a piece of cloth. This texture is actually perfect because it might impart a subtle weave pattern on the inside of your bowl. -
Roll out the slab:
Using your rolling pin, roll the clay out into a large, even circle. Aim for a thickness of about 1/4 inch—consistency is key so the bowl dries evenly. -
Smooth the slab surface:
Before moving the clay, take a slightly damp rib tool or sponge and gently compress the surface of the clay slab to smooth out major canvas marks or bumps.
Cracks while draping?
If the clay starts cracking at the curve while you drape it, it’s too dry. Spritz heavily with water, smooth the cracks with a slurry of clay and water, and cover with plastic for 10 minutes to rehydrate.
Step 2: Shaping the Bowl
-
Drape the clay:
Carefully lift your clay slab and center it over your inverted mold bowl. I find it easiest to let gravity do the initial work, letting the sides drape down naturally. -
Form the shape:
Starting from the top (the bowl’s base) and working downward, gently press the clay against the mold form. Use the meaty part of your palm to avoid leaving finger indentations. -
Trim the excess:
Once the clay is snug against the mold, use a needle tool or knife to trim the uneven edges at the bottom. Hold the tool parallel to the table surface while you rotate the project for an even rim. -
Refine the exterior:
Take your rib tool or credit card and glide it over the exterior surface. This compression not only smoothes the clay but also aligns the particles for strength. -
Soften the rim:
Dip your finger in a little water and run it along the cut rim to round off the sharp edge. A rounded rim is much more durable and pleasant to touch. -
Add texture (optional):
If you want that slightly scraped, handmade look seen in the photo, lightly drag the rib tool horizontally around the side of the bowl to leave subtle trail marks.
Natural Texture Hack
To get the gritty, stone-like texture seen in the image, mix a teaspoon of used coffee grounds or fine sand into your clay body before rolling it out. It adds beautiful speckling.
Step 3: Drying and Finishing
-
Initial drying:
Let the clay sit on the mold until it is leather hard. This usually takes a few hours to overnight, depending on humidity. -
Remove from mold:
Once the clay feels firm enough to hold its own shape, carefully lift it off the mold and peel away the plastic wrap. -
Smooth the interior:
Inspect the inside of the bowl. Use a slightly damp sponge to wipe away any wrinkles caused by the plastic wrap or rough spots from the canvas texture. -
Final drying:
Place the bowl rim-side up on a wire rack to allow air circulation. Let it dry completely until it is bone dry and chalky to the touch. -
Sanding:
In a well-ventilated area, use fine-grit sandpaper to gently buff the rim and any uneven patches on the exterior. -
Painting or Glazing:
If you used air-dry clay, apply two coats of matte white acrylic paint. If you actuaally fired the piece, apply a matte white glaze and re-fire. -
Sealing:
For air-dry clay projects, finish with a waterproof varnish if you plan to use it for holding anything other than dry decorative items.
Place your finished bowl on a soft linen cloth to really recreate that serene, natural aesthetic.


Pressed-In Bowl Mold Dish
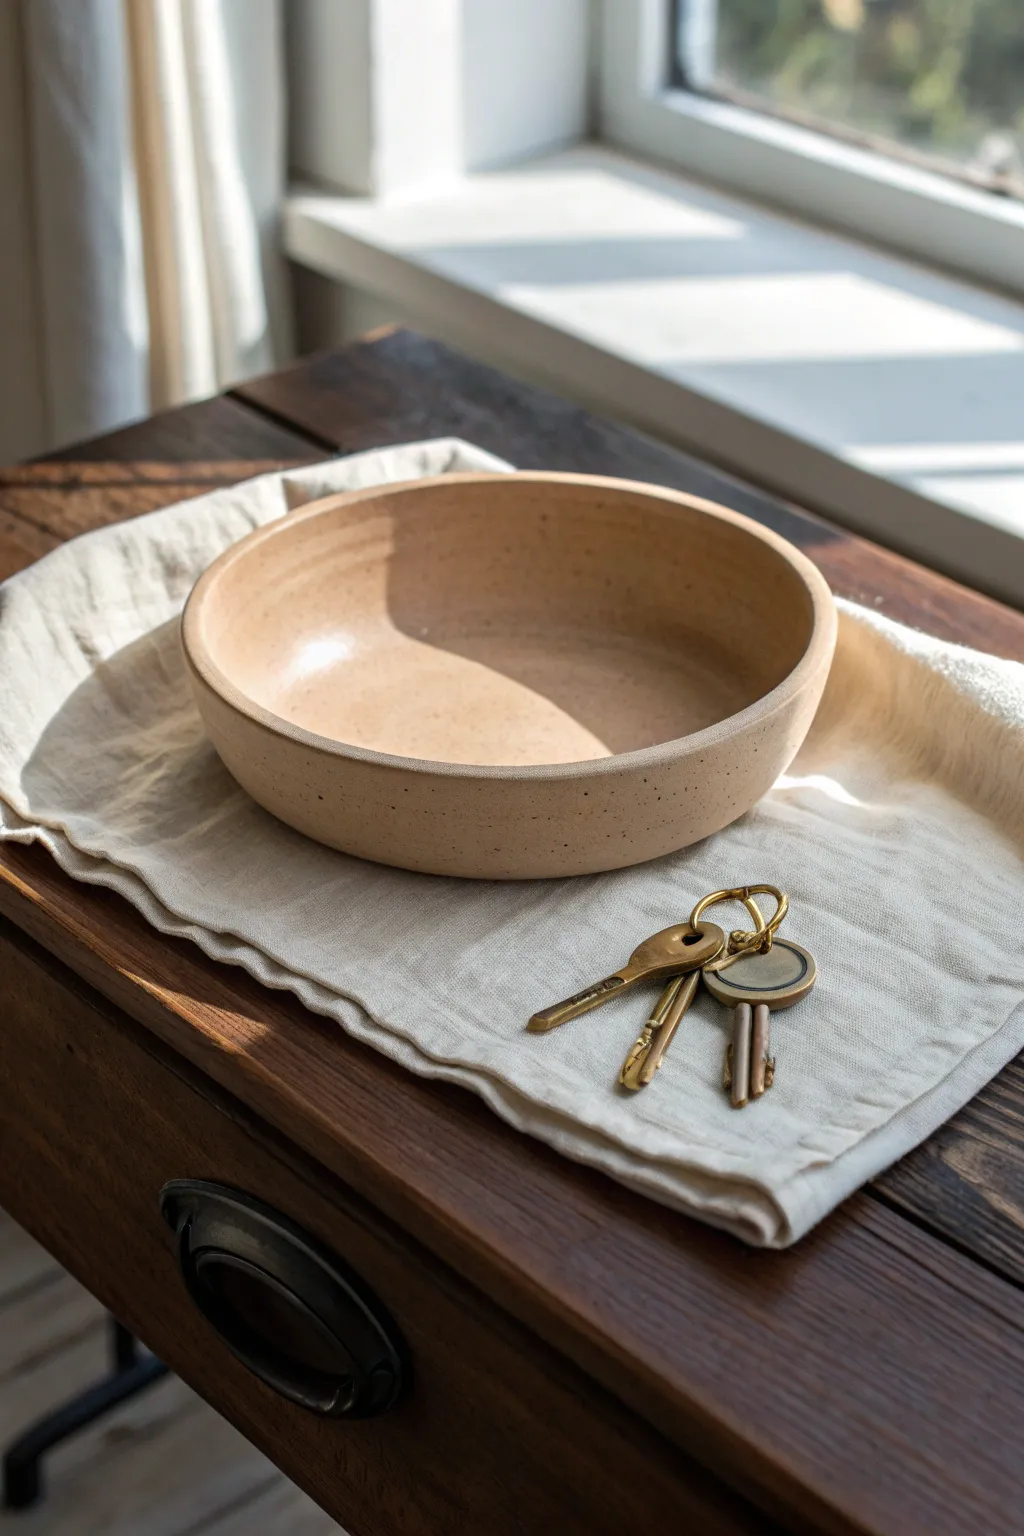
Create a stunningly simple entryway catch-all with this pressed-mold technique that achieves a professional ceramic look without a kiln. The finished bowl features a warm, sandy tone with delicate speckling that mimics natural stoneware.
Step-by-Step Guide
Materials
- Air-dry clay (white or terra cotta)
- Existing bowl (to use as a mold)
- Rolling pin
- Canvas mat or parchment paper
- Craft knife or needle tool
- Sponge
- Small bowl of water
- Sandpaper (fine grit)
- Acrylic paint (beige/tan, white, dark brown)
- Old toothbrush
- Matte sealant/varnish
Step 1: Preparation & Molding
-
Prepare your workspace:
Set up a clean, flat surface covered with a canvas mat or parchment paper to prevent the clay from sticking. Have your mold bowl nearby—a simple cereal or soup bowl works perfectly. -
Condition the clay:
Take a generous handful of air-dry clay and knead it in your hands until it becomes soft, pliable, and free of air bubbles. -
Roll out the slab:
Place the clay on your mat and use a rolling pin to flatten it into an even circle. Aim for a thickness of about 1/4 inch to ensure durability without being too heavy. -
Position the mold:
Turn your mold bowl upside down on the table if you want to mold over it, or keep it right-side up to mold inside it. I find molding inside gives a smoother exterior shape for this specific look. -
Press the clay:
Gently lift your clay slab and drape it into the bowl. Start pressing from the center outwards, ensuring the clay makes full contact with the bowl’s surface without trapping air. -
Trim the excess:
Once the clay is firmly pressed into shape, use a craft knife or needle tool to trim the excess clay around the rim. Hold the blade steady against the mold’s edge for a clean cut. -
Smooth the rim:
Dip your finger or a small sponge into water and run it along the cut rim to round off any sharp edges. This is crucial for that finished, professional look. -
Initial drying:
Let the clay sit in the mold for about 24 hours until it’s leather-hard. This helps it hold its shape before you remove it for full drying.
Step 2: Refining & Finishing
-
Remove and dry:
Carefully pop the clay bowl out of the mold. Set it upside down on a drying rack to allow air to circulate around the bottom. Let it dry completely for another 24-48 hours. -
Sand for smoothness:
Once fully dry, use fine-grit sandpaper to gently smooth out any bumps, fingerprints, or rough spots on the rim and surface. Wipe away dust with a slightly damp cloth. -
Mix the base color:
Mix beige, white, and a tiny drop of brown acrylic paint to create a warm, sandy ‘biscuit’ color. You want a shade that looks like natural, unglazed earthenware. -
Apply base coat:
Paint the entire bowl, inside and out, with your mixed color. You might need two thin coats for full coverage, letting the first dry before applying the second. -
Create the speckles:
Dilute a small mount of dark brown paint with water until it’s inky. Dip an old toothbrush into the mixture, point it at the bowl, and run your thumb across the bristles to flick tiny specks onto the surface. -
Practice your splatter:
Test the splatter technique on a piece of paper first to control the size of the dots. Aim for a fine mist rather than large blobs. -
Seal the project:
Wait for the paint to be bone dry. Apply a coat of matte varnish or sealant to protect the finish and deepen the colors slightly. -
Final cure:
Allow the varnish to cure according to the manufacturer’s instructions before using the bowl for your keys or jewelry.
Mold Release Trick
Line your mold bowl with plastic wrap or dust it lightly with cornstarch before pressing the clay in. This ensures the clay releases effortlessly without warping.
Faux Glaze Effect
For a two-tone look, tape off the bottom half and spray a high-gloss clear coat on the top half only, mimicking a dipped ceramic glaze finish.
Enjoy the organic, handmade charm this simple bowl adds to your daily routine


Easy Slab Circle Trinket Bowl
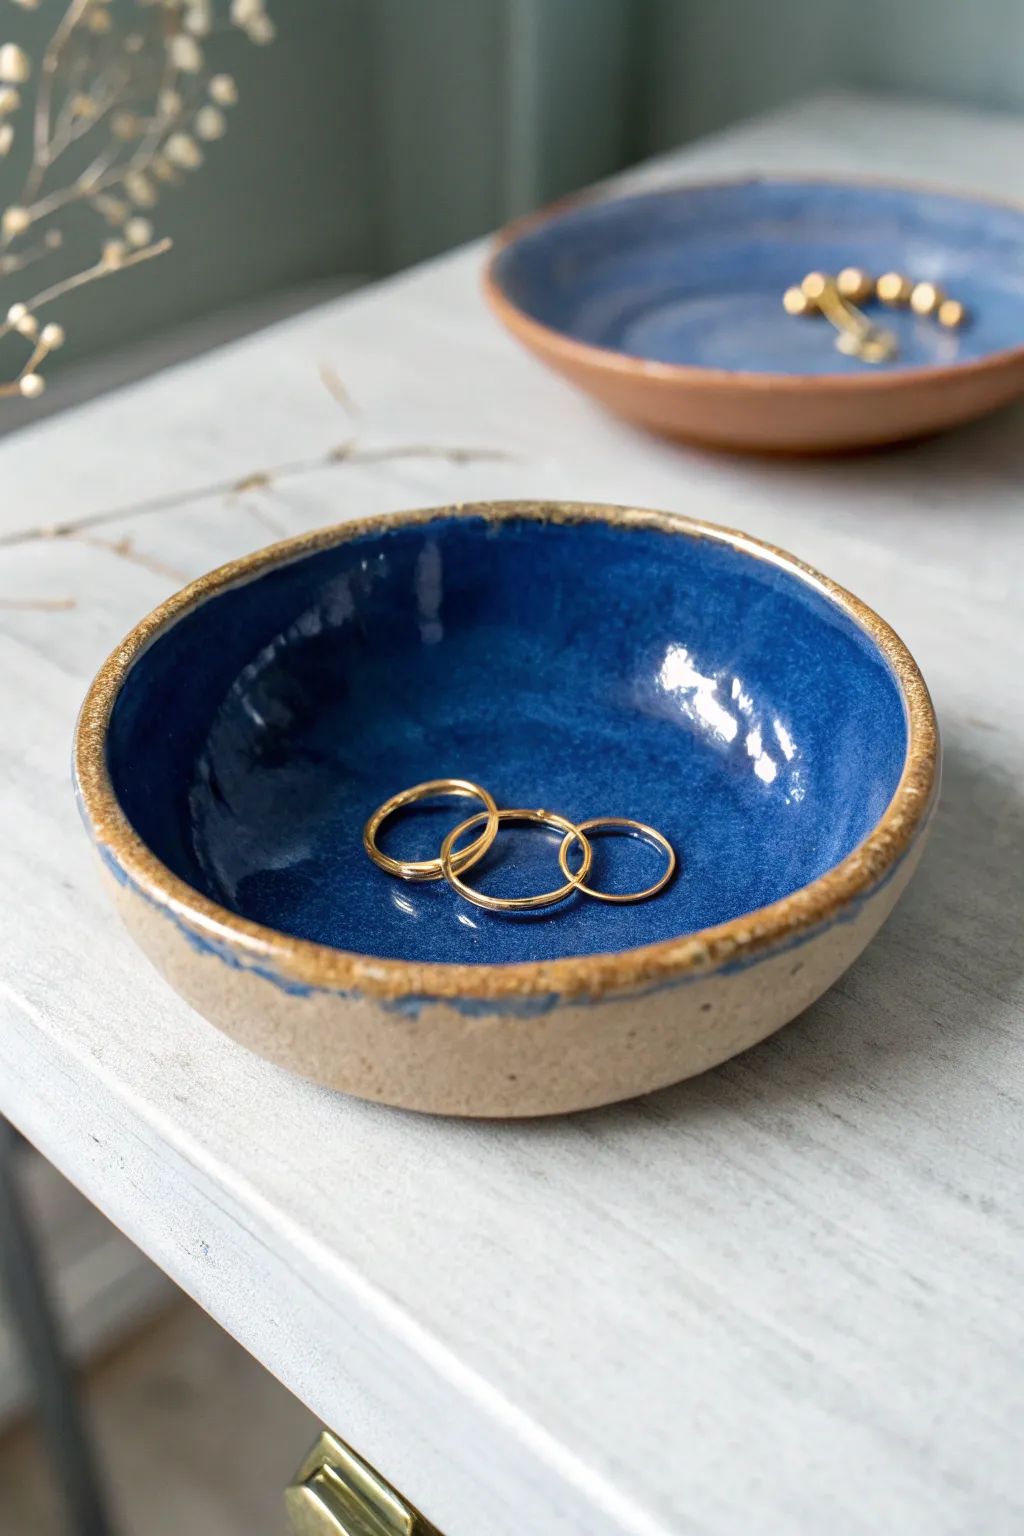
This rustic yet refined trinket bowl features a striking contrast between the raw, sandy texture of exposed stoneware and a glossy, midnight-blue interior. It is the perfect size for holding delicate rings and brings an organic, handmade feel to any vanity.
Detailed Instructions
Materials
- Speckled stoneware clay (mid-fire)
- Rolling pin
- Canvas mat or cloth
- Circular cookie cutter (approx. 4-5 inches) or a bowl to trace
- Small slump mold (a small plaster or bisque mold, or a small bowl covered in plastic)
- Small sponge
- Fettling knife or needle tool
- Rib tool (smooth wood or rubber)
- Deep cobalt blue glossy glaze
- Glaze brush (fan or mop style)
- Wax resist (optional)
Step 1: Forming the Bowl
-
Roll the slab:
Begin by wedging a ball of speckled stoneware clay to remove air bubbles. Flatten it slightly with your palm, then roll it out into a consistent slab about 1/4 inch thick. I like to roll in multiple directions to keep the thickness even across the entire surface. -
Cut the circle:
Place your circular cutter or a template onto the clay slab. Press down firmly to cut a clean circle. If using a template and needle tool, keep your hand steady and hold the tool vertical for a sharp edge. -
Smooth the edges:
Before molding, run a damp finger or a slightly moist sponge along the cut rim of your circle. This softens the sharp angle left by the cutter, preventing chipping later. -
Texture check:
If you want the exterior to have that gritty, natural look seen in the photo, ensure your canvas or work surface has imprinted a bit of texture onto the bottom side of the slab. -
Slump the clay:
Gently lift your clay circle and place it inside your slump mold. If using a household bowl as a mold, ensure it is lined with plastic wrap or cheesecloth so the clay doesn’t stick. -
Refine the curve:
Use a damp sponge or a soft rubber rib to gently press the slab into the curve of the mold. Start from the center and spiral outward to avoid trapping air pockets between the clay and the mold. -
Define the rim:
The rim in this project is slightly uneven and organic. You can gently press down on the rim with your thumb in spots to create subtle undulations rather than a perfect factory edge. -
Dry slowly:
Let the bowl dry in the mold until it is leather hard—firm enough to hold its shape but not bone dry. This usually takes a few hours to an overnight rest.
Step 2: Finishing and Glazing
-
Remove and clean:
Pop the bowl out of the mold. Use a damp sponge to do a final smoothing pass over the rim and the exterior, removing any sharp burrs, but be careful not to erase the stone texture. -
Bisque fire:
Place the bowl in the kiln for a bisque firing (typically cone 04 or 06). This hardens the clay and prepares it for glazing. -
Clean off dust:
Once cool, wipe the bisque-fired bowl with a damp sponge to remove any kiln dust. This ensures the glaze adheres properly without crawling. -
Apply wax resist (Optional):
To keep the rim crisp like the photo, you can carefully paint a line of wax resist along the very top edge and the entire exterior. Alternatively, you can just be very careful when brushing. -
Glaze the interior:
Stir your deep cobalt blue glaze thoroughly. Using a soft mop brush, apply a generous coat to the inside of the bowl only. Let it dry until the sheen disappears. -
Second coat:
Apply a second coat of blue glaze to the interior to ensure a deep, opaque color. Be careful near the rim—you want the glaze to stop just before it rolls over the edge. -
Clean the exterior:
If any glaze dripped onto the rim or the outside, wipe it away immediately with a damp sponge. The outside must remain raw clay to achieve the two-tone effect. -
Glaze fire:
Load the bowl into the kiln for the final glaze firing (match the temperature to your clay and glaze, usually cone 5 or 6 for stoneware). Ensure the bowl doesn’t touch other pots.
Warped Rims?
If your bowl warps while drying, weigh the rim down gently. Place a flat board on top of the rim with a very light weight while it dries to keep it perfectly level.
Luxury Gold Trim
Add a touch of opulence by applying gold luster to the raw clay rim after the glaze firing. You’ll need a third, lower-temperature firing to set the gold.
Once cooled, you will have a beautiful jewellery catch-all that highlights the honest beauty of the raw earth.

The Complete Guide to Pottery Troubleshooting
Uncover the most common ceramic mistakes—from cracking clay to failed glazes—and learn how to fix them fast.
Simple Coil Bowl With Visible Lines
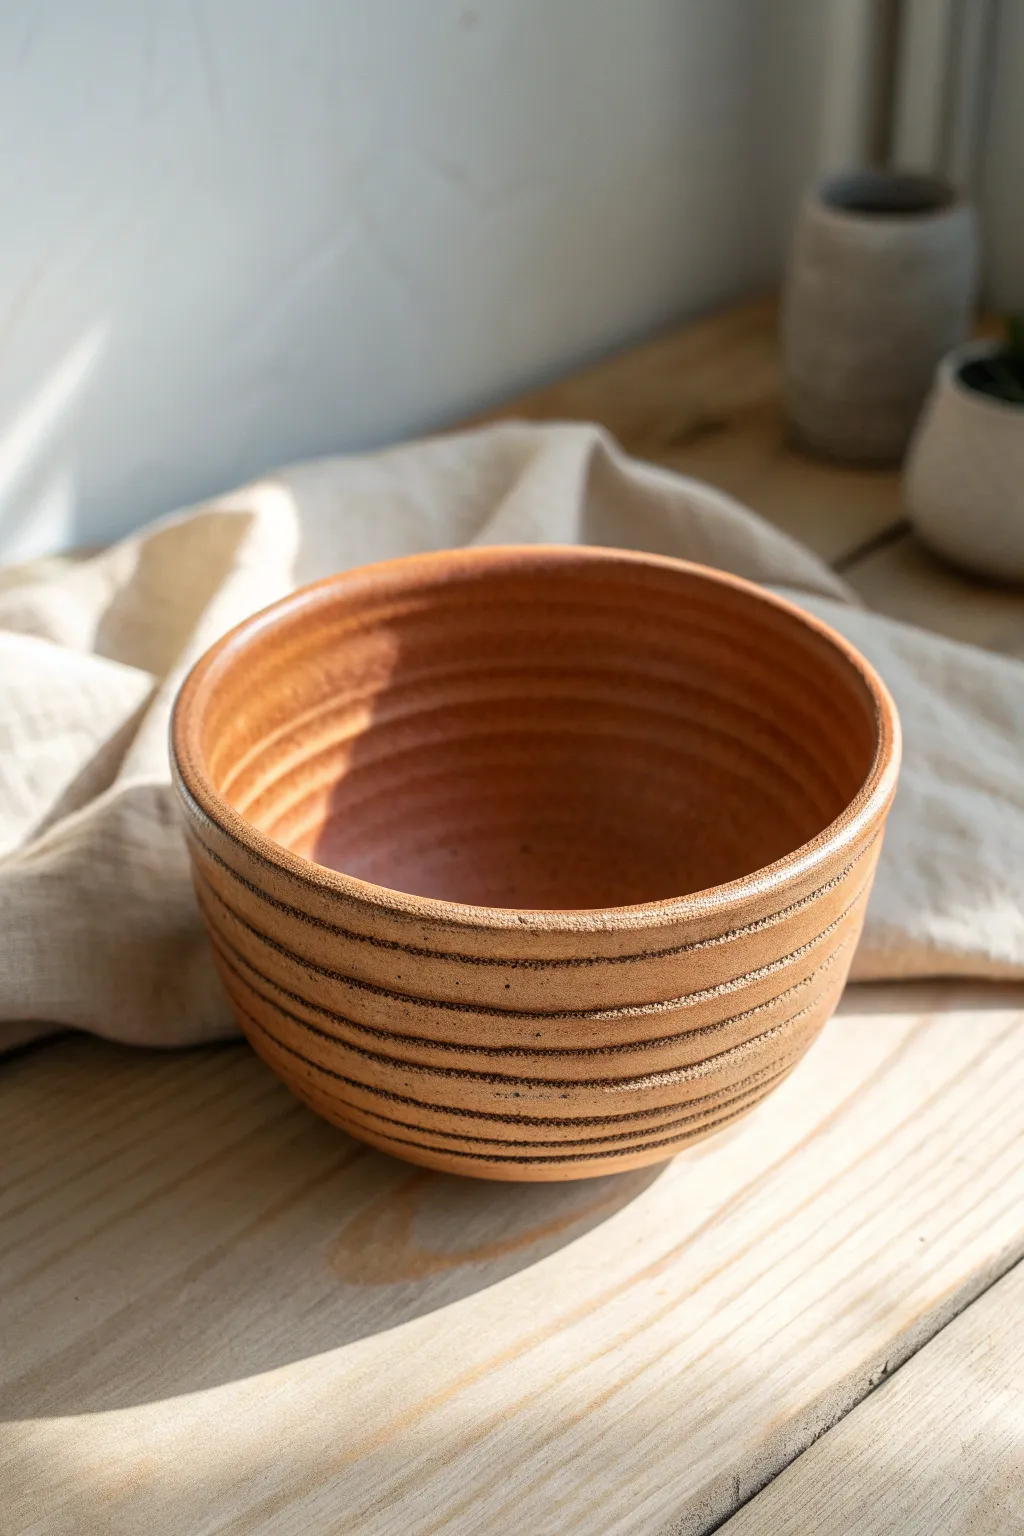
This rustic bowl celebrates the process of construction by leaving the coil lines visible on the exterior for a tactile, ribbed texture. The warm terracotta tone and simple form make it a perfect beginner-friendly project that looks intentionally earthy and handcrafted.
How-To Guide
Materials
- Terracotta or red stoneware clay
- Rolling pin
- Canvas or cloth board for working
- Needle tool
- Serrated rib tool
- Smooth rubber or metal rib
- Sponge
- Bowl for water (or slip)
- Wire cutter
- Wooden modeling tool
Step 1: Creating the Base
-
Roll the slab:
Begin by taking a handful of clay and wedging it well to remove air bubbles. Flatten it onto your canvas and roll it out with a rolling pin until it is about 1/4 inch thick. This will form the sturdy floor of your bowl. -
Cut the circle:
Use a needle tool or knife to cut out a perfect circle from your slab. A diameter of 4-5 inches works well for a medium-sized bowl. You can trace around a lid or plate to get a clean shape. -
Score the edge:
Take your serrated rib or needle tool and rough up the outer edge of the circle base. Apply a small amount of water or slip to the scored area to prepare it for attachment.
Step 2: Building the Walls
-
Roll the first coil:
Take a piece of clay and roll it between your hands or on the table into a long snake. Aim for an even thickness, roughly the width of your pinky finger. Creating consistent coils is key to the ribbed look shown in the photo. -
Attach the first layer:
Place the coil on top of the scored edge of your base. Gently press it down. -
Blend the interior:
Using your thumb or a wooden modeling tool, smear the inside edge of the coil down onto the base floor. This seals the seam. Make sure you *only* blend the inside; leave the outside unblended to keep that distinct ridge visible. -
Stack upward:
Roll another coil of the same thickness. Score the top of your previous coil and the bottom of your new coil, add a dab of moisture, and stack it on top. -
Curve the shape:
To flare the bowl outward like the example, place each new coil slightly further toward the outer edge of the coil below it. If you want the walls to come back in, place them slightly inward. -
Continue building:
Repeat the process for 5-7 layers, or until the bowl reaches your desired height. Remember to always blend the coils thoroughly on the inside for structural stability while resisting the urge to smooth the outside.
Fixing Gaps
If you see light through the coils, don’t just smooth over it. Pack a tiny bit of fresh clay into the gap from the inside and compress well to seal the leak without ruining the outer lines.
Step 3: Refining and Finishing
-
Smooth the interior:
Take a flexible metal or rubber rib and run it along the interior of the bowl. Compress the clay to create a smooth, functional surface. You can leave faint spiral marks if you enjoy the handmade look, but ensure the surface is sealed tight. -
Clean up the exterior lines:
Inspect the exterior ridges. If any spots were accidentally smudged, use a damp sponge or your finger to gently redefine the grooves between the coils. I find running a damp finger lightly along the groove helps soften any sharp crumbs of clay. -
Finish the rim:
The rim is the place your eye goes first. Use a damp sponge to smooth the topmost coil. You can gently pinch it to be slightly thinner than the rest of the wall for a refined lip. -
Slow drying:
Loosely cover the bowl with plastic to let it dry slowly. This prevents the coils from separating or cracking as the clay shrinks. Once bone dry, fire it according to your clay body’s instructions.
Two-Tone Effect
Use a darker clay slip or an iron oxide wash in the grooves between coils before firing. Wipe the surface clean so the dark color remains only in the deep lines for high contrast.
Now you have a charming vessel ready to be fired or used for dry storage
Smooth Coil Bowl With Blended Seams
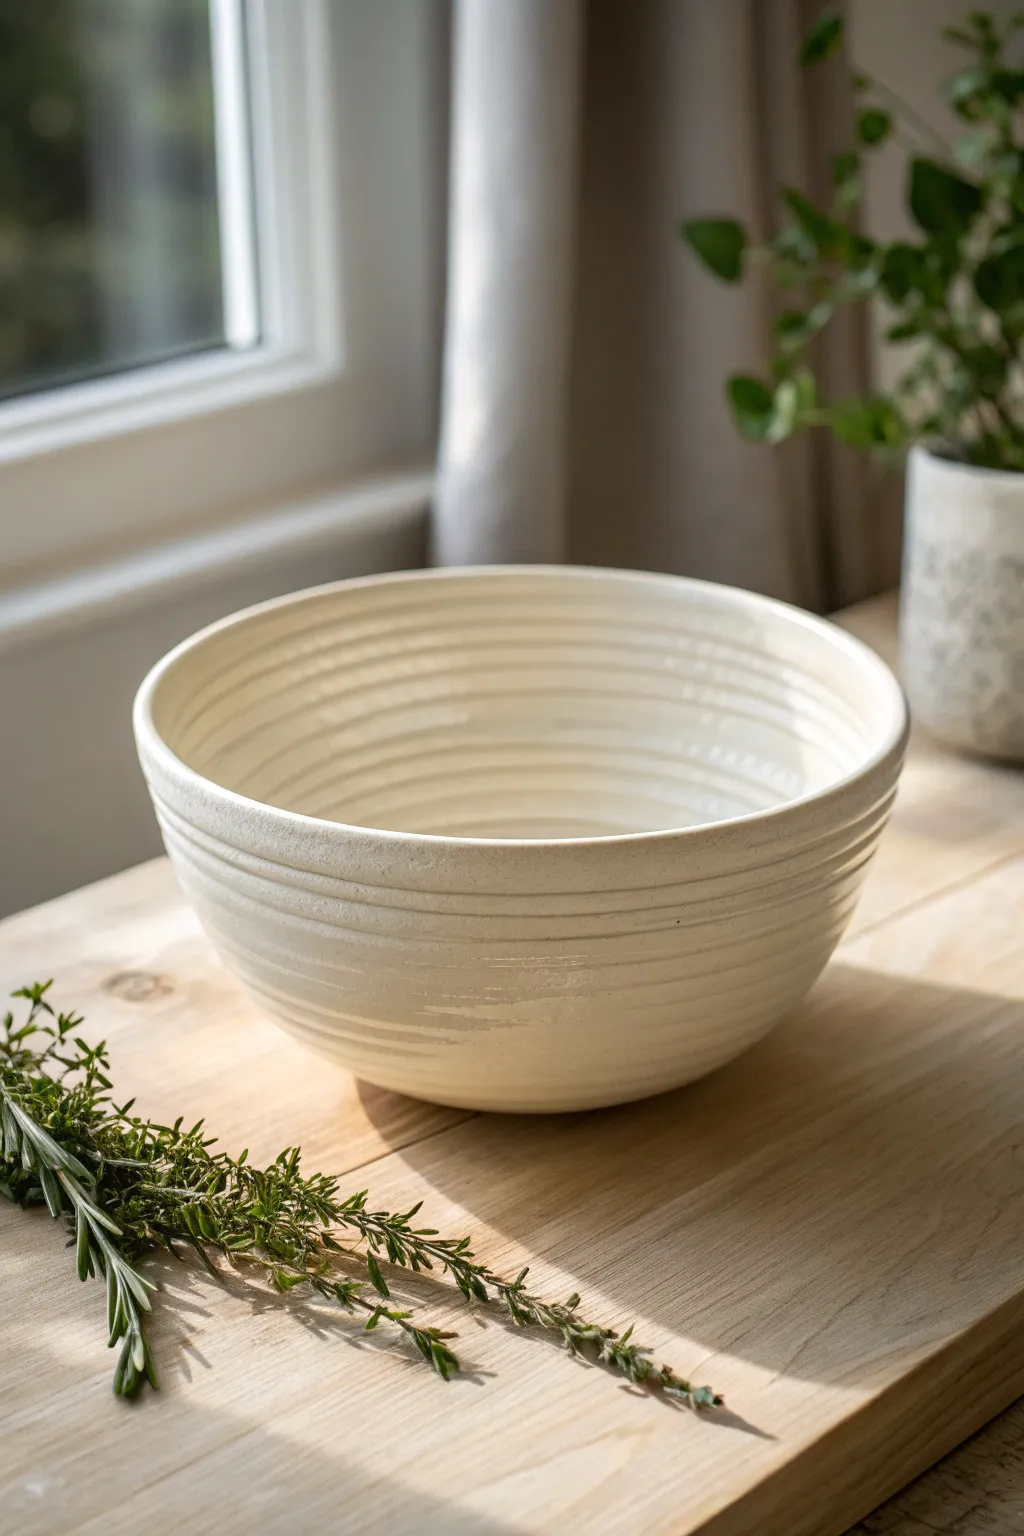
This project celebrates the process of hand-building by leaving the structural lines of the clay visible beneath a glossy, milky glaze. The result is a sturdy, comforting vessel that feels both rustic and refined, perfect for showcasing on a sunlit table.
Step-by-Step Guide
Materials
- White firing stoneware clay (approx. 2-3 lbs)
- Potter’s needle tool
- Scoring tool or serrated rib
- Slip (clay and water slurry)
- Wooden modeling tool
- Soft rubber rib
- Sponge
- Banding wheel (optional but helpful)
- Rolling pin and canvas mat
- Clear or transparent cream glossy glaze
Step 1: Creating the Base
-
Roll out the slab:
Begin by flattening a ball of white stoneware clay onto your canvas. Use a rolling pin to create an even slab that is roughly 3/8 inch thick. -
Cut the circle:
Place a circular template (like a small plate or lid) about 4 to 5 inches in diameter onto the slab. Trace around it with your needle tool to cut out the base for your bowl. -
Prepare the edge:
Gently score the outer rim of the clay circle and add a generous amount of slip. This ensures the first coil bonds securely to the floor.
Uneven Coils?
To fix wobbles, lay a flat board gently on top of the rim while the clay is soft. Tap it lightly to level all the high spots at once.
Step 2: Building the Walls
-
Roll the coils:
Take a chunk of clay and roll it back and forth on the table to create a long, snake-like coil. Aim for a consistent thickness, slightly thicker than a pencil. -
Lay the first ring:
Place the first coil directly onto the slipped edge of the base. When the ends meet, cut them at an angle, score, slip, and press them together to seal the ring. -
Blend the interior connection:
Using your thumb or a wooden tool, smear the clay from the inside of the coil down onto the base floor. This is crucial for structural integrity, even though we want to keep the coil look on the outside. -
Stack upwards:
Score the top of the first coil and add slip. Lay the next coil on top. I like to position this coil slightly outward to begin extending the bowl’s width. -
Create the taper:
Continue stacking coils. As you build height, place each new ring slightly further out than the last to flare the bowl, then bring the last couple of rings slightly vertical to form the rim.
Cracking Seams
If coils split apart during drying, you didn’t score deeply enough. Use a serrated rib to rough up surfaces aggressively before adding slip next time.
Step 3: Refining the Texture
-
Blend lightly:
Instead of smoothing the walls completely flat, use your finger or a soft rib to gently press the coils together. You want to seal the gaps without erasing the horizontal ridge lines. -
Focus on the interior:
For the inside of the bowl, support the outside with one hand while dragging a rounded wooden tool along the seams. Create a smooth, undulating surface that retains the ‘memory’ of the coils. -
Define external grooves:
If the exterior lines became too blurry during stacking, use the rounded end of a modeling tool to gently re-trace the grooves between coils. -
Shape the rim:
Run a damp sponge over the top rim to round it off. A sharp edge is prone to chipping, so aim for a soft, curved lip. -
Final smoothing:
Use a damp sponge to wipe down the entire piece. This removes sharp crumbs of clay and softens the transition between the ridges for that organic feel. -
Slow drying:
Loosely cover the bowl with plastic to let it dry slowly to a leather-hard state, then uncover to bone dry. This prevents the coils from cracking apart.
Step 4: Glazing
-
Bisque fire:
Fire the bone-dry bowl in a kiln to bisque temperature (usually Cone 04 or 06, depending on your clay). -
Apply glaze:
Pour a transparent cream or clear glossy glaze into the bowl, swirl to coat, and pour out. Dip the exterior or brush the glaze onto the outside. -
Check the thickness:
Ensure the glaze isn’t too thick in the grooves. If glaze pools too heavily in the texture lines, it might obscure the lovely coil detail you worked hard to preserve. -
Final wipe:
Wipe the bottom of the foot completely clean with a sponge so it doesn’t stick to the kiln shelf. -
Glaze fire:
Fire to the final temperature required by your clay and glaze combination.
Once fired, fill your beautiful new vessel with fruit or decorative items and admire the rhythmic texture you created by hand


What Really Happens Inside the Kiln
Learn how time and temperature work together inside the kiln to transform clay into durable ceramic.
Speckled Minimalist Bowl
This project features a beautifully understated ceramic bowl that embraces minimalist charm with its creamy speckled glaze and raw, unglazed base. The contrast between the smooth interior and the toasted clay exterior creates a tactile and visual warmth perfect for any home.
Step-by-Step Tutorial
Materials
- Speckled stoneware clay (e.g., buff with iron flecks)
- Pottery wheel (or banding wheel for hand-building)
- Sponge
- Wire texturing tool or rib
- Loop trimming tool
- Wire cutter
- Creamy matte white glaze (translucent)
- Wax resist
- Kiln for firing (Bisque and Glaze)
Step 1: Throwing the Form
-
Prepare the Clay:
Begin by wedging about 1.5 to 2 pounds of speckled stoneware clay. It’s crucial to remove all air bubbles to ensure the walls of your bowl are even and strong. -
Center on the Wheel:
Throw the clay ball firmly onto the center of the wheel head. Use wet hands and steady pressure to center the clay until it spins without wobbling. -
Open the Clay:
Gently press your thumbs into the center of the spinning clay to open it up, leaving about a half-inch of clay at the bottom for the foot. -
Pull the Walls:
Support the clay from both the inside and outside. Slowly pull the walls upward and outward to create a gentle curve. Aim for a shape that is slightly wider at the rim than the base. -
Refine the Rim:
Compress the rim with a chamois or a small strip of plastic to keep it smooth and rounded. This prevents future chipping and gives the bowl a finished look. -
Shape the Interior:
Use a flexible rib tool on the inside of the bowl while the wheel spins to smooth out finger marks and establish a continuous, sweeping curve. -
Cut from Wheel:
Use your wire cutter to slice underneath the bowl. Carefully lift it off the wheel head and place it on a ware board to dry until leather-hard.
Warping Walls?
If the rim warps during firing, your walls might be uneven. Ensure consistent thickness during the pulling phase to prevent slumping in the kiln.
Step 2: Trimming and Texturing
-
Center for Trimming:
Once leather-hard, place the bowl upside down on the wheel. Secure it with small coils of clay. -
Trim the Foot:
Use a sharp loop tool to carve away excess clay from the base. Define a distinct foot ring where the unglazed portion will eventually stop. -
Add Texture:
While the wheel is spinning slowly, I like to gently drag a wire tool or a serrated rib against the lower exterior. This creates subtle horizontal grooves that catch the glaze later. -
Smooth the Transition:
Use a damp sponge to soften any sharp ridges created by the trimming tool, blending the texture so it feels organic rather than mechanical. -
Bisque Fire:
Let the bowl dry completely to the bone-dry stage. Load it into the kiln and bisque fire it to roughly Cone 04 to prepare it for glazing.
Iron Speckle Pop
Choose a glaze with high translucency. An opaque glaze will hide the natural iron flecks in the clay, losing that lovely speckled character.
Step 3: Glazing and Finishing
-
Clean the Bisqueware:
Wipe the fired bowl with a damp sponge to remove any kiln dust, which can cause pinholes in your glaze. -
Apply Wax Resist:
Paint a band of wax resist around the bottom inch of the exterior and the entire foot ring. This ensures the raw speckled clay remains visible. -
Glaze the Interior:
Pour your creamy white glaze inside the bowl. Swirl it around carefully to coat the entire interior surface, then pour out the excess. -
Glaze the Exterior:
Holding the foot, dip the exterior of the bowl into the glaze, stopping right where the wax resist begins. The wax will repel the glaze, creating a clean line. -
Clean Up:
Use a damp sponge to wipe any stray droplets of glaze off the wax resist area or the foot ring to prevent the pot from sticking to the kiln shelf. -
Final Firing:
Fire the bowl in the kiln to the maturity temperature of your clay and glaze (typically Cone 5 or 6 for stoneware). Allow the kiln to cool naturally.
Now you have a stunning, functional piece of pottery that highlights the raw beauty of the clay
Metallic Rim Accent Bowl
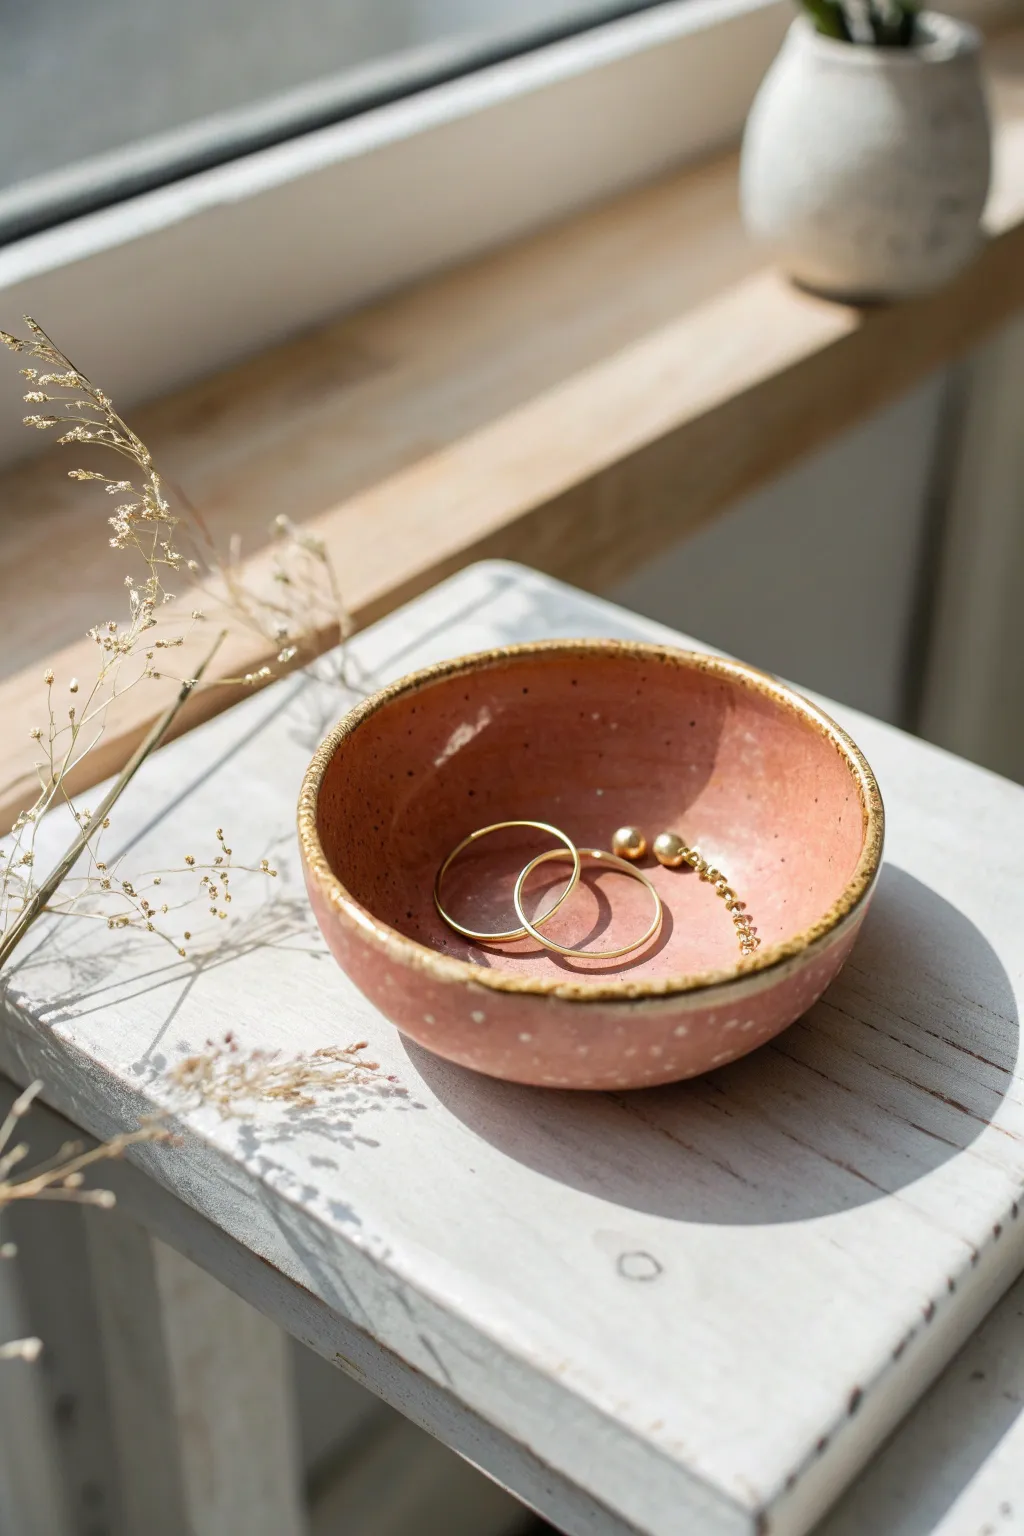
This charming little catch-all combines a warm, coral-pink hue with a sophisticated metallic rim, perfect for holding your favorite rings or dainty chains. The organic shape and speckled glaze give it a lovely handmade feel that adds character to any bedside table.
How-To Guide
Materials
- Air-dry clay or polymer clay (white)
- Acrylic rolling pin
- Small bowl or sphere for molding (to use as a form)
- Pottery sponge
- Sandpaper (fine grit)
- Coral pink acrylic paint (or glaze if firing)
- Clear sealant (varnish or mod podge)
- Metallic gold paint or gold leaf pen
- Small paintbrush
- Speckle medium or brown paint (optional for texture)
- Sharp craft knife
Step 1: Forming the Bowl
-
Prepare the Clay:
Start by conditioning a ball of clay about the size of a tangerine. Knead it in your hands until it is pliable and warm, ensuring there are no air bubbles trapped inside. -
Roll the Slab:
Using your acrylic rolling pin, roll the clay out into a flat slab. Aim for a thickness of about 1/4 inch; you want it substantial enough to hold shape but delicate enough to look refined. -
Cut the Circle:
Find a circular cutter or use a bowl as a template to cut a perfect circle from your slab. A diameter of about 4-5 inches works well for a trinket dish like this one. -
Shape the Curve:
Gently lift your clay circle and drape it over your mold (a small upside-down bowl works perfectly). Press it gently to conform to the shape, smoothing it down with your fingers. -
Refine the Rim:
While the clay is on the mold, check the rim. The bowl in the photo has a slightly organic, uneven edge, so don’t worry about perfection here. You can soften the edge with a damp sponge. -
Initial Drying:
Let the clay sit on the mold until it is leather-hard—firm enough to hold its shape but not fully dry. This usually takes a few hours depending on your clay type. -
Remove and Cure:
Carefully pop the clay off the mold. If using air-dry clay, let it dry fully for 24-48 hours. If using polymer clay, bake it according to the manufacturer’s temperature instructions.
Cracking Edges?
If you see hairline cracks while the clay dries, smooth a slurry of water and fresh clay into the gap immediately with your finger to bond it back together.
Step 2: Painting and Finishing
-
Smooth the Surface:
Once fully cured or dry, inspect the bowl. Use fine-grit sandpaper to gently smooth out any rough fingerprints or sharp edges on the rim. -
Base Coat Application:
Apply your coral pink paint. Cover both the interior and exterior. I find it usually takes two or three thin coats to get that rich, opaque color visible in the photo. -
Adding Speckles (Optional):
To recreate the subtle textured look, you can flicker a tiny amount of watered-down brown paint onto the surface using an old toothbrush, or simply skip this for a solid color look. -
Seal the Color:
Protect your paint job with a coat of clear sealant. A satin or gloss finish mimics the look of fired ceramic glaze best. -
The Golden Rim:
This is the signature step. Using a small detail brush and metallic gold paint (or a gold leaf pen for easier control), carefully paint the very top edge of the rim. -
Inner Rim Detail:
Extend the gold slightly down into the inner wall of the bowl, just a millimeter or two, to give it that dipped, luxurious appearance. -
Outer Rim Detail:
Repeat the previous step on the outer edge, creating a nice uneven, painterly gold band that frames the coral color. -
Final Cure:
Let the gold paint dry completely. If you used a specific metallic enamel, check if it needs a final sealant layer to prevent tarnishing over time.
Make it Luxe
Instead of paint, use liquid gold leaf for the rim. It smells stronger but dries to a brilliant, mirror-like shine that acrylic metals can’t quite match.
Place your new decorative bowl in a sunny spot to catch the light on that golden edge

TRACK YOUR CERAMIC JOURNEY
Capture glaze tests, firing details, and creative progress—all in one simple printable. Make your projects easier to repeat and improve.
Marbled Color-Swirl Bowl
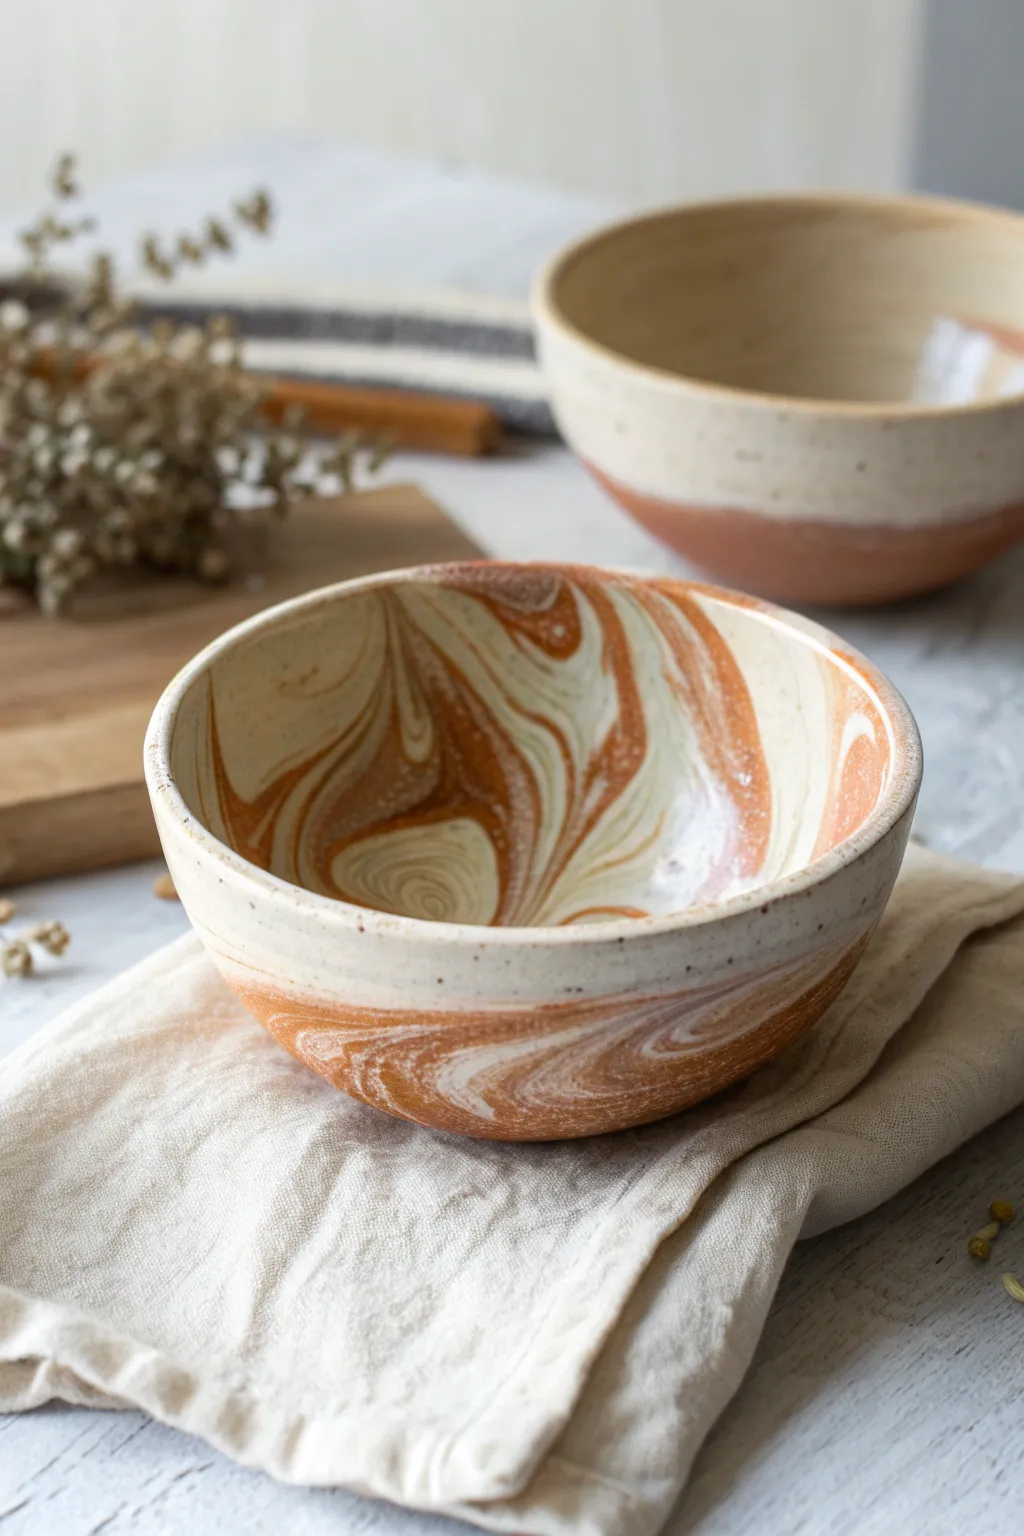
Achieve a sophisticated, fluid look with surprisingly simple techniques by blending two contrasting clay bodies. This marbled bowl features swirling ribbons of warm terracotta and creamy white stoneware, creating a unique pattern where no two pieces are ever exactly alike.
Step-by-Step Tutorial
Materials
- White stoneware clay
- Terracotta or red earthenware clay
- Pottery wheel (or rolling pin/slump mold for hand-building)
- Wire clay cutter
- Ribs (metal and rubber)
- Sponge
- Trimming tools
- Clear glaze (food safe)
Step 1: Preparing the Marbled Clay
-
Portion the clay:
Cut two equal-sized blocks of clay, one from your white stoneware and one from the terracotta. You’ll want about 1 to 1.5 lbs total for a cereal-sized bowl. -
Slice and stack:
Slice each block into thick slabs. Stack them in an alternating pattern: white, red, white, red, like a sandwich. -
Wedge lightly:
wedge the stacked clay just enough to adhere the layers, but be careful not to over-wedge. If you mix too much, the colors will blend into a solid pinkish-brown rather than distinct swirls. -
Slam center:
Form the clay into a ball and slam it onto your wheel head (or bat) to center it roughly, ensuring the prestigious swirls are visible on the outside.
Muddy Pattern?
If your swirls look blurry or smeared, use a sharp metal rib to scrape off the top layer of wet slip while throwing. The pattern underneath is usually much crisper.
Step 2: Throwing the Form
-
Center carefully:
Center the clay on the wheel. I like to use slightly less water than usual here to prevent the surface from getting too muddy, which can smear the crisp lines of the marbling. -
Open the clay:
Press your thumbs into the center to open the floor, pulling outwards to establish the base width of your bowl. -
Pull the walls:
Begin pulling up the walls. As the wall rises, you will see the strata of the different clays stretching and swirling together. Keep your pulls steady and consistent. -
Shape the curve:
Use a rib tool on the inside to push the belly of the bowl out, creating a nice, round curve up to the rim. -
Refine the surface:
Take a metal rib to the exterior while the wheel is spinning. Gently scrape away the ‘slurry’ or clay slip on the surface; this step is crucial because it reveals the sharp, defined marble pattern hidden beneath the muddy surface. -
Finish the rim:
Compress the rim with a piece of chamois or your sponge to ensure it is smooth and pleasant to drink from. -
Wire off:
Run your wire cutter under the base and set the bowl aside to dry until it reaches a leather-hard state.
Step 3: Finishing and Glazing
-
Trim the foot:
Once leather hard, center the bowl upside down on the wheel. Trim away the excess clay at the base to create a defined foot ring. -
Clean up:
Smooth out any trimming marks with a damp sponge, being careful not to smear the colors too much. -
Bisque fire:
Load the bowl into the kiln for a bisque firing according to the specifications of your clay bodies. -
Apply clear glaze:
Dip or brush a clear, shiny glaze over the entire piece. A transparent glaze is essential to let the natural clay colors show through vibrantly. -
Final fire:
Fire the piece a second time to the maturation temperature of your glaze and clay body.
Make it Hand-Built
No wheel? Simply roll your marbled clay ball into a flat slab with a rolling pin and drape it over a plaster mold or inside another bowl to shape it.
Now you have a stunning, food-safe bowl that celebrates the natural beauty of the earth materials involved
Half-Dipped Two-Tone Bowl
This charming project combines the raw, earthy texture of terracotta-colored clay with a smooth, glossy dip of cream glaze. The result is a simple yet sophisticated two-tone bowl that highlights the natural beauty of the ceramic material.
Step-by-Step
Materials
- Speckled warm-tone stoneware clay (e.g., speckled buff or terracotta)
- Potter’s wheel (or banding wheel for hand-building)
- Sponge
- Wire clay cutter
- Rib tool (wooden or metal)
- Trimming tools
- Cream or light mint dipping glaze
- Wax resist
- Kiln
- Bucket of water
Step 1: Throwing the Form
-
Prepare the clay:
Begin by wedging a ball of speckled stoneware clay, aiming for about 1.5 to 2 pounds. Ensure all air bubbles are removed to prevent issues during firing. -
Center on the wheel:
Slam the clay onto the center of the wheel head. Use wet hands and firm pressure to cone the clay up and down until it runs perfectly true in the center. -
Open the clay:
Drill your thumbs into the center of the mound, leaving about a half-inch of clay at the bottom for the foot. Gently pull the clay outward to establish the floor width. -
Pull up the walls:
Using your fingertips or knuckles, pull the clay upward to create height. Keep the walls even in thickness from bottom to top, aiming for a consistent cylinder shape first. -
Shape the curve:
Gently push from the inside while supporting the outside to bell the form out into a bowl shape. I like to use a rib tool here to compress the inside curve and remove throwing lines for a smoother interior finish. -
Refine the rim:
Use a piece of chamois or a wet sponge to compress and smooth the rim. A rounded rim feels better on the lips and is less likely to chip. -
Wire off:
Run a wire cutter underneath the bowl to separate it from the wheel head, then set it aside to dry to a leather-hard state.
Glaze Drips?
If glaze runs too much during the dip, scrape the edge with a metal rib immediately. If fired drips occur, use a diamond sanding pad under water to smooth them.
Step 2: Trimming and Bisque
-
Center for trimming:
Once leather hard, place the bowl upside down on the wheel. Secure it with small coils of clay or a trimming chuck. -
Define the foot:
Using a trimming tool, carve away excess clay from the bottom to create a defined foot ring. This lifts the bowl and gives it a professional profile. -
Smooth the exterior:
Run a smooth rib over the trimmed area to burnish the clay slightly, compressing the grog and speckles back into the surface. -
Dry completely:
Allow the bowl to dry slowly and evenly until it is bone dry. The clay will become lighter in color and fragile. -
Bisque fire:
Load the bowl into the kiln for a bisque firing (usually Cone 04). This hardens the clay and prepares it for glazing.
Step 3: Glazing the Two-Tone Design
-
Clean the bisque:
Wipe the fired bowl with a damp sponge to remove any kiln dust. This ensures the glaze adheres perfectly. -
Clear glaze interior (optional):
If you want the inside fully glossy like the example, pour a clear or matching cream glaze inside, swirl it to coat, and pour out the excess. Wipe the rim clean. -
Prepare the dip:
Stir your cream or light mint dipping glaze thoroughly. It should have the consistency of heavy cream. -
The half-dip technique:
Hold the bowl by its foot. turning it upside down. In one smooth motion, plunge the bowl straight down into the glaze bucket, stopping exactly halfway down the exterior wall. -
Hold and remove:
Hold the bowl in the glaze for about 3 seconds to build up an opaque layer, then lift it straight up. Shake gently to remove the last drip. -
Clean up:
Once the glaze is dry to the touch, flip the bowl over. Use a sponge to tidy up the glaze line if it’s uneven, though a natural wave looks organic and lovely. -
Final fire:
Place the bowl in the kiln for the glaze firing (check your clay body’s temperature, typically Cone 5 or 6 for stoneware). Ensure the unglazed bottom doesn’t touch the shelf.
Make it a Set
Vary the dipping angle for a set! Dip some straight, some at a 45-degree tilt, and some with a double-dip overlap for a cohesive but varied collection.
Now you have a stunning, functional bowl ready for your morning cereal or soup
Stamped Lace Texture Bowl
This elegant project transforms a slab of simple clay into a sophisticated vessel using nothing more than a vintage doily or lace remnant for texture. The result is a stunning, tactile bowl with intricate patterns adorning both the interior and exterior surfaces.
How-To Guide
Materials
- Light-colored stoneware or earthenware clay (smooth body)
- Vintage lace doily or textured silicone mat
- Rolling pin
- Canvas or heavy fabric work surface
- Bowl mold (plaster, plastic, or a simple kitchen bowl)
- Cornstarch (for release)
- Fettling knife or needle tool
- Rib tool (soft, kidney-shaped)
- Sponge
- Clear or white semi-matte glaze
Step 1: Preparation and Rolling
-
Prepare the Clay:
Begin by wedging your clay specifically to remove air bubbles, as these can ruin the delicate surface later. Shape the clay into a smooth, round ball. -
Initial flattening:
Place the clay ball onto your canvas work surface. Press it down with your palm to create a thick pancake shape. -
Roll the slab:
Use your rolling pin to rollout a slab of clay. Aim for an even thickness of about 1/4 inch (6mm). Turn the clay frequently to keep the shape relatively circular. -
Smooth the surface:
Before adding texture, take your soft rib tool and gently compress the clay surface to remove any canvas marks or imperfections.
Design Tip
Use a crochet hook to lightly press dots into the rim or specific areas of the lace pattern after rolling. This adds extra depth and definition to the raised areas.
Step 2: Adding Texture
-
Position the lace:
Lay your lace doily or fabric delicately over the clay slab. If you want the pattern on both sides, flipping the clay is tricky, so for this method, we will focus on getting a deep impression on the ‘top’ side. -
Secure the placement:
Lightly pat the lace down with your hand so it doesn’t shift during the next step. -
Roll the texture:
Firmly roll over the lace with your rolling pin. I find that one confident pass is better than rolling back and forth, which can cause ghost images. -
Reveal the pattern:
Find the edge of your lace and carefully peel it back to reveal the intricate impression left in the clay. -
Cut the shape:
Using a needle tool or fettling knife, cut a clean circle from the textured slab. You can use a paper template or a pot lid as a guide.
Texture Trouble?
If the lace sticks to the clay, dust the lace lightly with cornstarch before rolling. This prevents tearing the clay surface when you peel it back.
Step 3: Forming the Bowl
-
Prepare the mold:
Dust the inside of your chosen bowl mold with a little cornstarch. This acts as a release agent so the clay doesn’t stick. -
Slump the clay:
Carefully lift your clay circle and drape it *inside* the mold (for outside texture) or drape it *over* a hump mold (for inside texture). The image shows texture everywhere, which is achieved by pressing the clay into a mold that allows the outside texture to remain visible while the shape sets. -
Shape the curve:
Gently press the clay slab into the mold, starting from the center and working outward. Be meticulous not to smudge the beautiful lace pattern you just created. -
Refine the rim:
While the clay is supported by the mold, use a damp sponge to smooth the rim edge. It should be rounded and comfortable to the touch. -
Let it stiffen:
Allow the bowl to dry until it reaches a ‘leather hard’ state. This usually takes a few hours depending on humidity.
Step 4: Finishing and Glazing
-
Unmold carefully:
Once leather hard, gently remove the bowl from the mold. The shape should now hold on its own. -
Final Cleanup:
Inspect the rim and bottom one last time, smoothing any sharp edges with a slightly damp finger or sponge. -
Bisque fire:
Fire the piece in the kiln to bisque temperature (usually cone 04 or 06). -
Glaze application:
Dip or brush your bowl with a semi-matte cream or white glaze. A translucent glaze works best here, as it pools in the texture recesses to highlight the design. -
Final fire:
Fire the bowl a final time according to your clay and glaze specifications to vitrify the piece.
Enjoy using your beautifully textured bowl as a centerpiece or serving dish.
Botanical Leaf-Imprint Bowl
Capture nature’s intricate details forever in this elegant ceramic piece, featuring realistic leaf veins pressed directly into the clay surface. The finished bowl boasts a soothing celadon-green glaze that highlights every delicate line and curve.
Step-by-Step
Materials
- Light-colored stoneware or porcelain clay body
- Fresh leaves with prominent veins (like hydrangea or beech)
- Rolling pin
- Canvas mat or cloth-covered board
- Bowl mold or a similarly shaped kitchen bowl
- Needle tool or fettling knife
- Rib tool (flexible rubber or metal)
- Sponge
- Celadon or translucent green glaze
- Soft fan brush
- Kiln (required for firing)
Step 1: Prepping and Rolling
-
Wedge the clay:
Begin by thoroughly wedging your clay to remove any air bubbles and ensure an even consistency. A ball roughly the size of a grapefruit should be sufficient for a medium bowl. -
Roll out a slab:
Place your clay on a canvas mat or cloth-covered board. Use your rolling pin to flatten the clay into a smooth, even slab about 1/4 inch thick. Rotate the clay occasionally to keep it circular. -
Smooth the surface:
Take a flexible rib tool and gently compress the surface of the slab on both sides. This aligns the clay particles and creates a flawless canvas for your leaf print.
Step 2: Creating the Impressions
-
Select and place leaves:
Choose fresh leaves with thick, sturdy veins on the back. Arrange them vein-side down onto your clay slab in a composition you like, ensuring they don’t overlap too much near the edges. -
Roll the leaves in:
Gently but firmly roll over the leaves with your rolling pin. You want to press them deep enough to capture the texture flush with the surface, but not so deep that the clay becomes too thin. -
Cut the shape:
Place a circular template or a light bowl upside down over your slab to determine the size. Use a needle tool to cut a clean circle, leaving a bit of space around your leaf design if desired. -
Remove the leaves:
Carefully peel the leaves away from the clay using the tip of your needle tool to lift the stems. This is the magic moment where the detailed skeleton of the leaf is revealed.
Vein Definition Tip
Use leaves with stiff, protruding veins like sage or hydrangea. Soft, fleshy leaves like spinach won’t leave a deep enough impression to catch the glaze.
Step 3: Forming the Bowl
-
Slump into a mold:
Lift your clay slab carefully and drape it into a plaster slump mold or a simple kitchen bowl lined with plastic wrap or cheesecloth to prevent sticking. -
Shape the curve:
Gently press the slab into the curve of the mold. Use a damp sponge to smooth the rim, rounding off any sharp edges left by the cutting tool. -
Check the rim:
If the rim feels uneven, I sometimes run a barely damp chamois strip along the edge to compress and soften it for a professional finish. -
Dry slowly:
Let the bowl dry in the mold until it is leather-hard. This helps it retain its curved shape without warping.
Dual-Tone Effect
Rub a dark oxide wash (like iron oxide) into the veins and wipe it back before glazing. This adds striking contrast and accentuates the botanical details.
Step 4: Finishing and Firing
-
Refine the foot:
Once leather-hard, remove the bowl from the mold. Turn it over and trim or smooth the bottom. You can add a foot ring now if you are comfortable with wheel trimming or coil building. -
Bisque fire:
Allow the piece to become bone dry before loading it into the kiln for a bisque firing (usually to Cone 04 or 06, depending on your clay). -
Apply the glaze:
After the first firing, wipe the bisque ware with a damp sponge to remove dust. Apply 2-3 coats of a translucent celadon-green glaze. A translucent glaze is crucial because opaque glazes will hide the leaf texture. -
Clean the foot:
Use a sponge or wax resist to ensure the bottom of the bowl is completely free of glaze so it won’t fuse to the kiln shelf. -
Glaze fire:
Fire the bowl a second time to the temperature recommended by your glaze manufacturer (often Cone 5 or 6). Allow the kiln to cool completely before opening.
Now you have a tranquil, nature-inspired vessel perfect for holding trinkets or serving dry snacks.
Simple Fruit-Slice Painted Bowl
Capture the zest of summer with this delightful handmade clay bowl, featuring a stylized citrus interior design. Its warm, ombre segments in pinks and oranges bring a fresh, juicy aesthetic to your table or shelf.
Detailed Instructions
Materials
- Air-dry clay or kiln-fire clay
- Rolling pin
- Small bowl (to use as a slump mold)
- Fettling knife or craft knife
- Potter’s sponge
- Acrylic paints or underglazes (white, pale yellow, mustard, terracotta, blush pink)
- Fine detail brush (round size 1 or 2)
- Medium flat brush
- Clear sealer or clear gloss glaze
Step 1: Forming the Bowl
-
Roll the slab:
Start by rolling out your clay on a canvas or cloth surface to a consistent thickness of about 1/4 inch. If you are using air-dry clay, try to work efficiently to prevent it from drying out too quickly. -
Cut the rough shape:
Place a round template (like a plate or paper cutout) over your slab and cut out a circle. It doesn’t need to be mechanically perfect; a slightly organic edge adds to the handmade charm seen in the photo. -
Mold the curve:
Gently lift your clay circle and drape it *inside* a bowl lined with plastic wrap or a specifically designed slump mold. Press gently to take the shape. -
Refine the rim:
While the clay is leather-hard but still in the mold, smooth the rim with a damp sponge. You want softly rounded edges rather than sharp cuts. -
Dry thoroughly:
Allow the clay to dry completely according to your clay type (24-48 hours for air-dry, or bone dry for kiln firing). Wait until it is fully cured before painting.
Fresh Edges
Keep the white lines thickest near the rim and taper them slightly as they reach the center. This mimics the natural anatomy of a citrus slice much better than uniform lines.
Step 2: Painting the Design
-
Base coat (optional):
If your clay is dark, apply a thin layer of white primer or underglaze to the inside of the bowl to make the colors pop. If using white clay, you can skip this. -
Map the center:
Using a pencil, lightly mark a small circle in the very center of the bowl’s interior. This will be the meeting point for all your citrus segments. -
Mark the segments:
Draw lines radiating from that central circle to the rim, dividing the bowl into roughly 8-10 pie slices. Let these lines be naturally imperfect and hand-drawn. -
Create the white pith:
Using your fine detail brush and white paint, paint over your pencil lines. Make these lines fairly thick and bold, as they represent the pith of the fruit. -
Outline the rim:
Paint a white band around the inside edge of the rim, connecting it to the radiating lines. This frames the fruit slices. -
Mix your palette:
Prepare a warm palette on your mixing tray: a sunny yellow, a deep orange, a soft terracotta, and a muted pink. I find adding a touch of white to each color keeps them soft and cohesive. -
Paint the first segment:
Fill in one of the pie slices with the deep orange paint, being careful not to paint over your white pith lines. -
Alternate colors:
Move to the next segment and paint it a contrasting color, like the pale yellow. Continue around the bowl, alternating between pinks, oranges, and yellows to create a varied, natural look. -
Add depth:
While the paint is still slightly wet in each segment, you can dab a tiny bit of a darker or lighter shade near the outer edge to create a subtle gradient or shadow effect. -
Touch up lines:
Once the colored segments are dry, go back over the white lines with your detail brush to clean up any edges where the color might have strayed. -
Seal or glaze:
Finish the piece by applying a clear gloss varnish (for air-dry clay) or clear glaze (for kiln firing). This makes the fruit colors look juicy and protects your surface.
Make a Set
Create a whole fruit salad set by painting other bowls in different palettes: bright greens for lime, monochromatic yellows for lemon, or deep reds for blood orange.
Now you have a refreshing splash of color ready to brighten up your countertop
Scalloped Rim Dessert Bowl
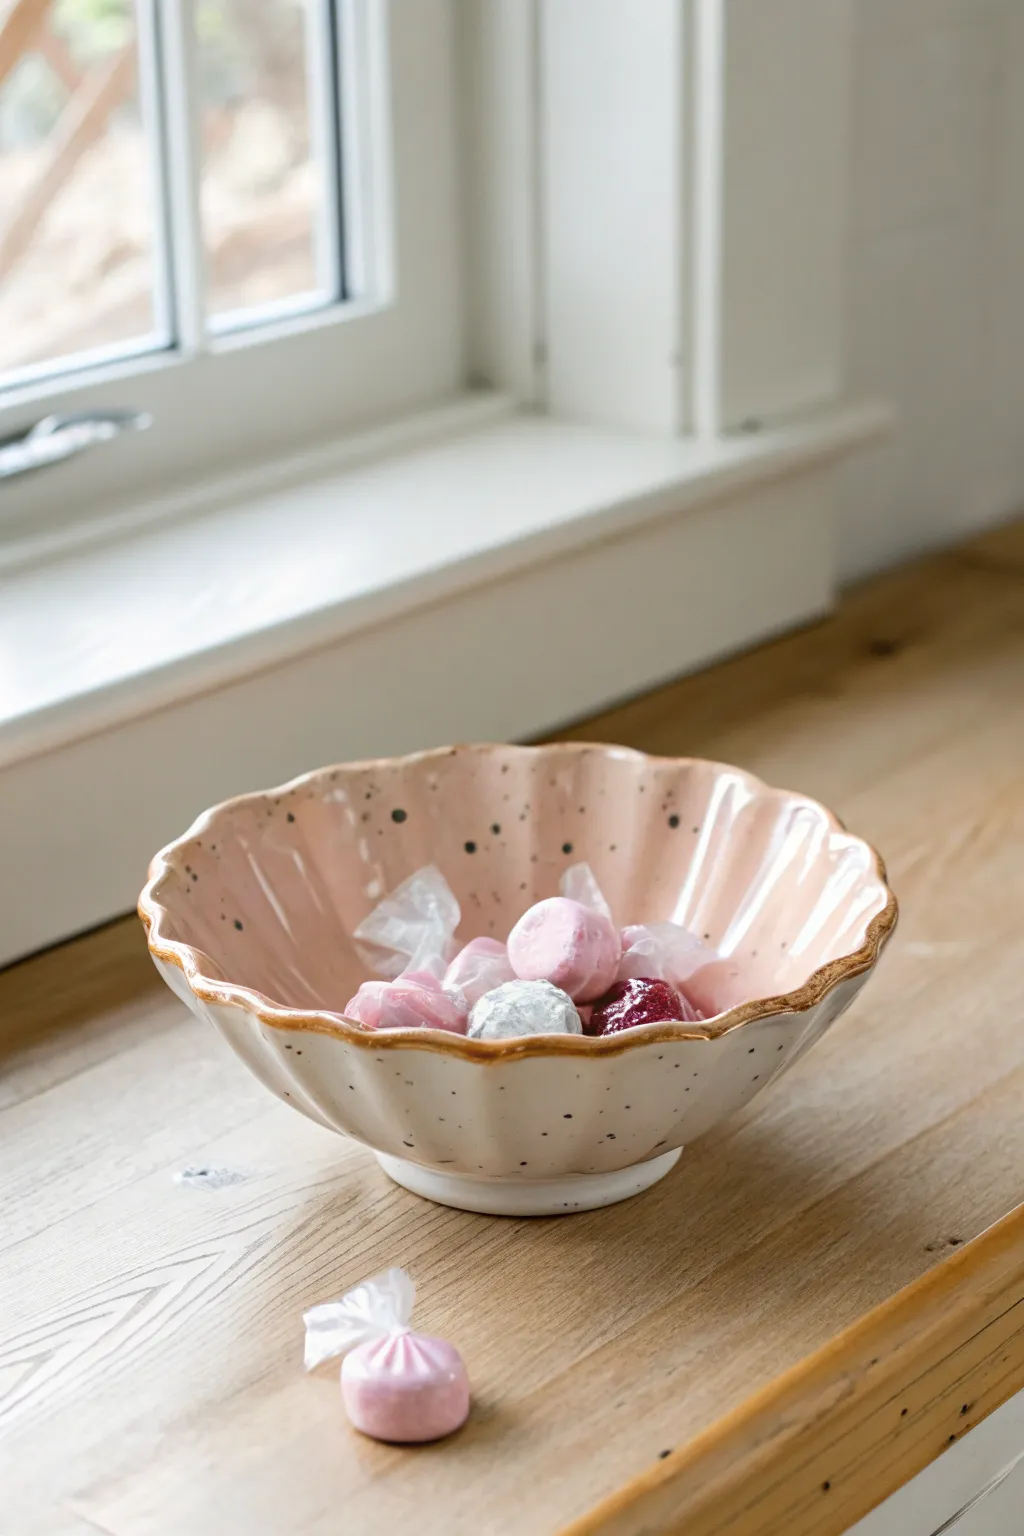
This charming footed bowl features a gentle fluted design reminiscent of a seashell, highlighted with a luxurious gold rim. The dual-glaze finish, combining blush pink interior with a speckled cream exterior, makes it perfect for holding candies or trinkets.
How-To Guide
Materials
- White stoneware clay (speckled clay optional, or use speckled glaze)
- Pottery wheel (or rolling pin and slump mold for hand-building)
- Rib tool (metal or wood)
- Needle tool
- Sponge
- Wire cutter
- Garrity rib or specialized fluting tool (optional but helpful)
- Fingers/thumb for scalloping
- Trimming tools
- Kiln
- Blush pink food-safe glaze
- Speckled cream or white glaze
- Gold overglaze luster
- Small liner brush (for gold)
Step 1: Throwing and Shaping
-
Center the clay:
Start with a ball of clay about the size of a large grapefruit. Wedge it thoroughly to remove air bubbles, then center it securely on your wheel head. -
Open the form:
Open the clay to create the floor of your bowl. Since this will be a wider, open bowl, aim for a gentle curve inside rather than a flat bottom. -
Pull the walls:
Pull the walls up and outward. You want a wide, flared shape that sits somewhat low. Keep the rim slightly thicker than usual to accommodate the scalloping later. -
Refine the curve:
Use a rib tool on the inside of the bowl to smooth out throwing lines and perfect that continuous, shallow curve from center to rim.
Step 2: Creating the Scallops
-
Mark the rim:
Slow the wheel or stop it completely. While the clay is still wet but firm enough to hold shape, visually divide the rim into even sections. -
Form the flutes:
With one finger supporting the outside and two fingers creating gentle pressure from the inside (or vice versa), press outward to create a wave-like scallop. Repeat this rhythmically around the entire circumference. -
Deepen the texture:
I like to run a finger down the inside of each outward scallop curve toward the center of the bowl. This creates the subtle fluted texture that mimics a shell. -
Smooth the edge:
Use a damp chamois or a very soft sponge to gently compress the rim again, ensuring the high and low points of your scallops are rounded and comfortable to the touch. -
Wire off:
Run a wire cutter underneath the base and set the bowl aside on a ware board until it reaches a leather-hard state.
Uneven Scallops?
If your rim spacing looks off, lightly mark the rim with a needle tool at 12, 6, 3, and 9 o’clock first. Then subdivide those sections to ensure your waves stay symmetrical around the bowl.
Step 3: Trimming and Footing
-
Center for trimming:
Once leather hard, flip the bowl upside down. You may need a foam bat or clay lugs to hold the uneven rim securely without crushing the scallops. -
Trim the exterior:
Trim away excess weight from the lower walls, following the inner curve of the bowl. -
Carve the foot ring:
Carve a defined foot ring. This bowl has a distinct, raised foot that elevates the scalloped body, giving it elegance. -
Dry and bisque:
Allow the bowl to dry slowly to prevent warping. Once bone dry, fire it in the kiln to bisque temperature (usually Cone 04).
Add a Pearl effect
Instead of a standard pink glaze, try using a pearlescent or ‘mother of pearl’ luster over a white glaze interior. This emphasizes the seashell inspiration and adds extra shimmer.
Step 4: Glazing and Finishing
-
Apply interior glaze:
Pour a blush pink glaze into the interior of the bowl, swirl it to coat entirely, and pour out the excess. Wipe any drips off the rim immediately. -
Apply exterior glaze:
Dip or brush the exterior with a cream glaze. If your clay body isn’t naturally speckled, choose a glaze with iron speckles suspended in it to achieve the dotted look. -
Glaze fire:
Fire the bowl to the maturity temperature of your glaze (typically Cone 5 or 6). Let even cool completely. -
Add gold accent:
Using a small liner brush, carefully paint a line of gold luster along the very edge of the scalloped rim. This highlights the wave shape beautifully. -
Luster fire:
Place the bowl back in the kiln for a third, lower-temperature firing (around Cone 018) to set the gold.
Fill your finished bowl with pastel treats or jewelry and enjoy the vintage elegance it adds to your space
Soft Square Pinched-Corner Bowl
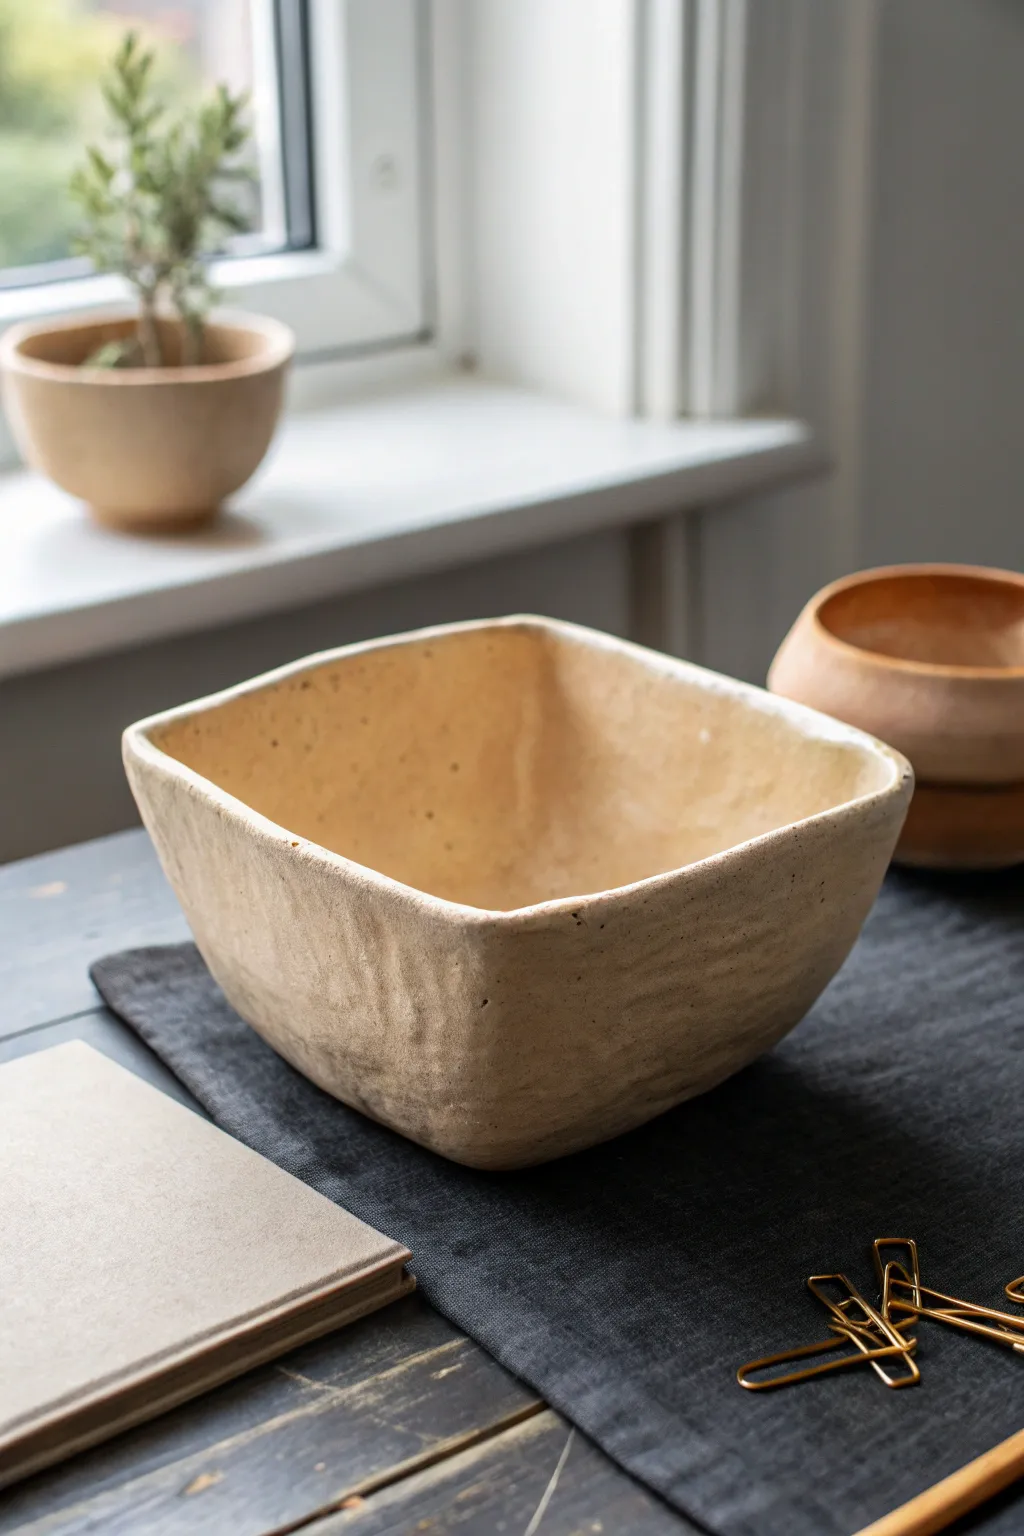
This rustic, hand-built bowl features a charmingly imperfect square shape with softened, rounded corners that feel comfortable in the hands. The textured, earthy finish gives it the look of ancient stone or weathered sandstone, making it a perfect functional centerpiece.
Step-by-Step Guide
Materials
- Stoneware clay (buff or speckled)
- Rolling pin
- Canvas working mat or wooden board
- Fettling knife or needle tool
- Flexible rib tool
- Wood modeling tool
- Sponge
- Water slip or vinegar
- Matte beige or sandstone glaze
- Kiln (or air-dry clay sealant if not firing)
Step 1: Forming the Slab Base
-
Prepare the Clay:
Begin by wedging a generous grapefruit-sized ball of clay to remove any air bubbles. Slam it onto your canvas board a few times to flatten it slightly. -
Roll the Slab:
Using your rolling pin, roll the clay out into a large, even slab. Aim for a thickness of about 1/4 to 3/8 of an inch. Ensure the thickness is consistent to prevent warping later. -
Compress the Slab:
Run a flexible rib tool firmly over the entire surface of the clay in multiple directions. This compression aligns the clay particles and creates a stronger finished piece. -
Cut the Square:
Based on the size you want for your bowl, cut a rough square shape from the slab using a needle tool or fettling knife. For the bowl shown, a 10×10 inch square is a good starting point.
Texturizing Tip
For that specific weathered look, lightly press a dry sea sponge or crumpled aluminum foil against the heavy clay exterior before it fully dries.
Step 2: Shaping the Bowl
-
Lift the Edges:
Place the clay square onto a piece of foam or a shallow plaster hump mold if you have one. If working freely, simply lift all four straight sides upwards gently with your hands. -
Pinch the Corners:
As you lift the sides, the corners will naturally bunch up. Gently pinch the excess clay at each of the four corners. -
Round the Corners:
Instead of sharpening the corners, use your thumb to press the pinched clay inward and smooth it out, creating that signature soft, rounded curve seen in the photo. -
Define the Walls:
Work your way around the bowl, pulling the walls upward and slightly outward to create depth. Use a damp sponge to keep the clay workable but avoid over-wetting it. -
Level the Rim:
The rim will likely be uneven after shaping. You can either trim it straight with a needle tool or, for a more organic look like the example, just smooth the high and low points with a damp chamois or your finger.
Step 3: Adding Texture and Refining
-
Add Surface Texture:
When the clay is slightly firm (leather hard), drag a serrated kidney tool or a piece of coarse sandpaper horizontally across the exterior walls. This mimics the striated, weathered rock texture. -
Refine the Interior:
Smooth out the inside of the bowl with a rib tool to ensure it is functional and easier to clean. I like to leave a few faint finger marks to show the handmade nature. -
Check the Base:
Flip the bowl gently or lift it to ensure the bottom is flat so it sits securely on a table. Tap the creation lightly on your work surface to level the bottom. -
Dry Slowly:
Loosely cover the bowl with plastic to let it dry slowly over several days. This prevents the corners from cracking as the clay shrinks.
Slumping Walls?
If your walls keep falling outward, the clay is too wet. Use a hair dryer on a low setting for a few minutes or prop the walls up with crumpled newspaper.
Step 4: Glazing and Finishing
-
Bisque Fire:
Once bone dry, fire the bowl in a kiln to bisque temperature (typically Cone 04 or 06). -
Apply Glaze:
Dip or brush your chosen matte beige or sandstone glaze onto the piece. For the look in the image, avoid glossy finish glazes. -
Wipe the Foot:
Use a damp sponge to completely wipe any glaze off the very bottom of the bowl so it doesn’t fuse to the kiln shelf. -
Final Fire:
Fire the bowl again to the glaze temperature specified by your clay and glaze manufacturer (e.g., Cone 6).
Now you have a stunning, stone-like vessel ready to hold fruit or simply serve as art.
Folded “Origami” Style Bowl
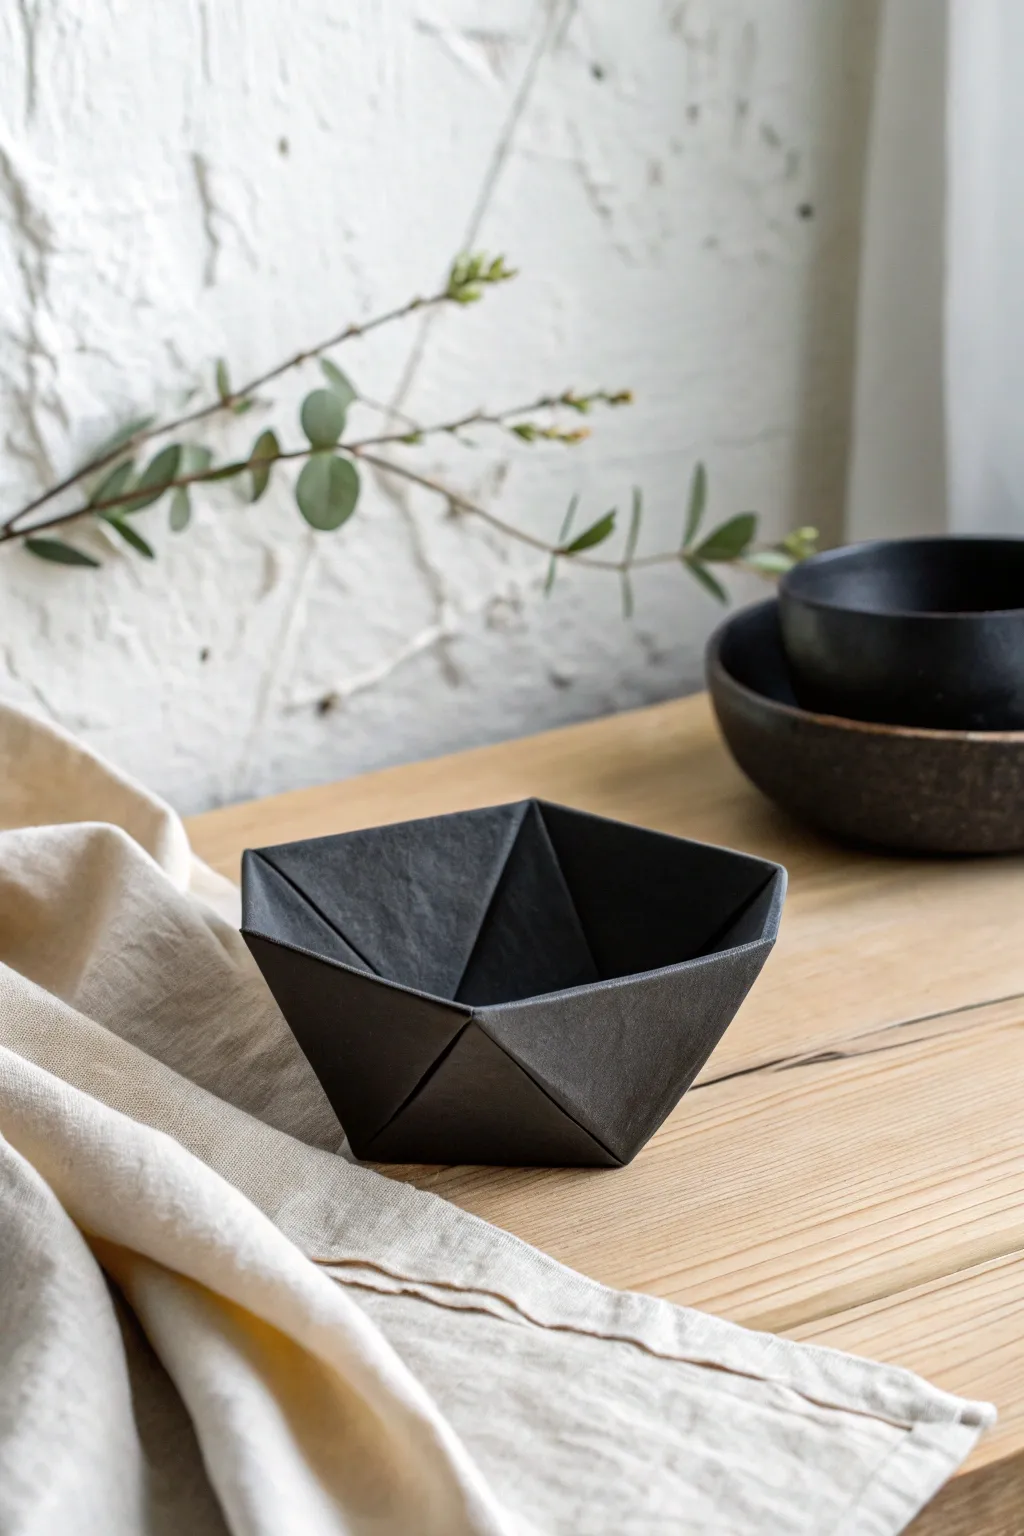
Bring the sharp, clean lines of Japanese paper folding into the world of ceramics with this striking origami-style bowl. By using slab-building techniques and precise cutting, you’ll create a modern, faceted vessel that looks like folded paper but has the durability of stone.
Step-by-Step
Materials
- Black stoneware clay or dark grey polymer clay (oven-bake)
- Rolling pin
- Two wooden guide strips (approx. 1/8 to 1/4 inch thick)
- Sharp craft knife or scalpel (X-Acto)
- Ruler
- Paper template (cardstock works best)
- Scoring tool or needle tool
- Slip (if using ceramic clay) or liquid clay (if using polymer)
- Smooth work surface or canvas mat
- Sponge
Step 1: Planning and Preparation
-
Create your template:
Before touching clay, sketch out your pattern on stiff cardstock. For this hexagonal bowl, you will need a base hexagon shape and six matching trapezoid shapes for the walls. Cut these out precisely. -
Prepare the clay slab:
Wedging your black clay thoroughly to remove air bubbles is crucial. Place the clay between your two wooden guide strips on a canvas surface. -
Roll it out:
Using the rolling pin, roll the clay out until the pin rests on the guide strips. This ensures your entire slab is a uniform thickness, which is essential for that crisp, factory-made origami look. -
Smooth the surface:
Take a slightly damp sponge or a rib tool and smooth the surface of the slab. I like to do this now rather than later to avoid distorting the sharp edges you’re about to cut.
Oops, Gaps Showing?
If your mitered corners have small gaps, don’t restart. Fill cracks with a tiny bit of soft clay slip, let it dry until firm, then sand it smooth before firing.
Step 2: Cutting and Assembly
-
Trace and cut the base:
Place your hexagonal template onto the slab. Using your sharp knife held perpendicular to the table, cut around the template cleanly. Set the excess clay aside. -
Cut the wall panels:
Using your trapezoid template, cut out six identical wall pieces. Be meticulously precise here; if the angles are off, the ‘fold’ lines won’t meet correctly. -
Bevel the edges:
To make the joints seamless and sharp, cut a 45-degree bevel on the bottom edge of each wall piece and along the edges of the hexagonal base where they will connect. -
Bevel the side seams:
Similarly, bevel the side edges of the trapezoids where they will touch each other. This mitered joint allows them to fit together snugly without a bulky seam. -
Score the clay:
Take your needle tool or serrated rib and rough up (score) all the beveled surfaces that will accept joinery. This creates texture for the slip or liquid clay to grab onto.
Step 3: Construction and Refining
-
Apply adhesive:
dab a generous amount of slip (for ceramic clay) or liquid clay (for polymer) onto the scored edges. It acts as the glue for your structure. -
Attach the first wall:
Press the first trapezoid wall onto one side of the hexagonal base. Support it with your hand or a small prop so it doesn’t fall over. -
Connect adjacent walls:
Attach the second wall piece to the base and firmly press its side bevel against the first wall’s side bevel. Wiggle them slightly to lock the seam. -
Complete the ring:
Continue adding wall pieces one by one, working your way around the hexagon. The final piece might need a little gentle easing to fit perfectly. -
Reinforce the seams:
On the *inside* of the bowl, run a very thin coil of clay along all the seams. Smooth it down with a modeling tool to reinforce the structure without ruining the sharp exterior lines. -
Clean up the exterior:
The beauty of this bowl is the sharp angles. Use a flat wooden tool or flexible rib to gently compress the exterior seams, sharpening that ‘folded’ appearance. -
Let it firm up:
Allow the clay to dry to a ‘leather hard’ state. This makes it stiff enough to handle for final smoothing without warping the geometric shape. -
Final smooth:
Use a slightly damp sponge to wipe away any fingerprints or rough crumbs on the rim, but be careful not to round over your beautiful sharp corners. -
Everything in the kiln:
If using ceramic clay, fire according to your clay body’s instructions (bisque then glaze fire, often leaving the outside unglazed for texture). If polymer, bake according to the package directions.
Metallic Accent
After firing or baking, apply gold leaf or gold luster along the rim or inside the cracks of the ‘folds’ to mimic the Japanese art of Kintsugi.
Once fired, this piece serves as a stunning minimalist centerpiece that celebrates the beauty of geometry
Hand-Shaped Palm Trinket Bowl
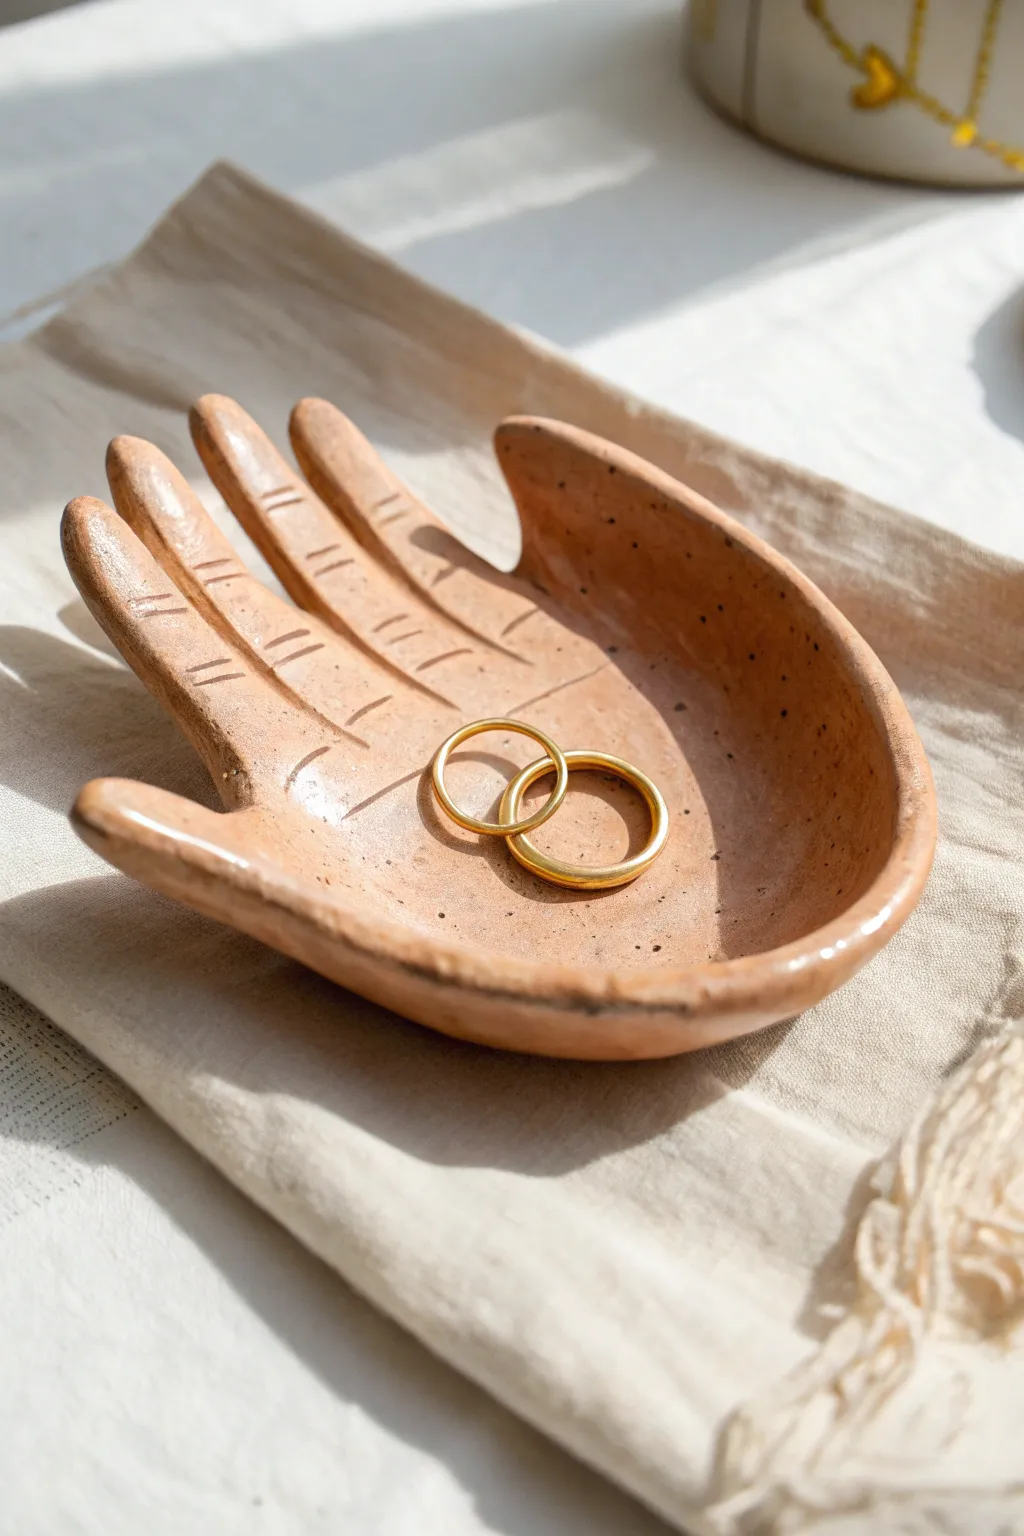
This charming, personalized catch-all dish mimics the gentle curve of a cupped palm, offering a unique spot for your favorite rings. With its warm terracotta tones and glossy speckled finish, it feels both modern and handmade.
Detailed Instructions
Materials
- Air-dry clay or polymer clay (terracotta color recommended)
- Rolling pin
- Craft knife or clay tool kit
- Small bowl (for shaping)
- Water (for smoothing)
- Fine-grit sandpaper
- Acrylic paint (burnt orange/terracotta)
- Black or dark brown acrylic paint (for speckles)
- High-gloss varnish or glaze
- Paintbrush
- Toothbrush (optional, for speckling)
Step 1: Shaping the Hand
-
Roll the Slab:
Begin by conditioning your clay until it is pliable but not sticky. Roll it out on a smooth surface to an even thickness of about 1/4 inch. -
Trace the Shape:
Place your own hand gently onto the clay slab as a template. Using a needle tool or craft knife, carefully trace around your fingers and palm. -
Cut the Outline:
Remove your hand and go back over the lines with your knife to cut cleanly through the clay. Keep the fingers slightly spread apart. -
Refine the Edges:
Dip your finger in a little water and run it along the cut edges of the clay hand. This smooths out any jagged bits or crumbs left from cutting. -
Add Palm details:
Using a dull modeling tool or the back of a knife, gently score lines into the fingers and palm to mimic natural skin creases. Don’t cut all the way through; just create indentations. -
Form the Curve:
Lift the clay hand carefully and drape it inside a small, shallow bowl. Press the palm area down gently so it takes the bowl’s curved shape, while slightly curling the fingers upward. -
Dry the Form:
Leave the clay in the bowl to dry completely. If using air-dry clay, this may take 24-48 hours. If using polymer, bake according to package instructions while supported by an oven-safe bowl.
Cracking Up?
If you see tiny hairline cracks as the clay air-dries, mix a small amount of fresh clay with water to make a paste and fill them in before sanding.
Step 2: Finishing and Glazing
-
Sand for Smoothness:
Once fully hardened, remove the hand from the bowl. Use fine-grit sandpaper to gently smooth any rough patches on the edges or underside. -
Base Coat:
If your clay wasn’t already terracotta colored, mix a warm, earthy orange acrylic paint. Apply two even coats to the entire piece, letting it dry between layers. -
Create the Texture:
To achieve the speckled ceramic look, dilute a tiny drop of black or dark brown paint with water. Dip a toothbrush or stiff brush into this mixture. -
Flick the Speckles:
Hold the brush over the bowl and run your thumb across the bristles to flick tiny droplets of dark paint onto the surface. I suggest practicing on scrap paper first to control the spray. -
Seal the Deal:
After the paint is bone dry, apply a generous coat of high-gloss varnish or glaze. This gives the piece that shine and protects your jewelry from scratching the paint. -
Final Cure:
Let the varnish cure completely in a dust-free area for at least 24 hours before placing your jewelry inside.
Gilded Touch
Paint the rim of the dish or the tips of the fingers with liquid gold leaf for a luxurious, modern accent.
Your handcrafted trinket dish is now ready to hold your most precious rings and things securely in its palm
Pierced Pattern Bowl With Twine Detail
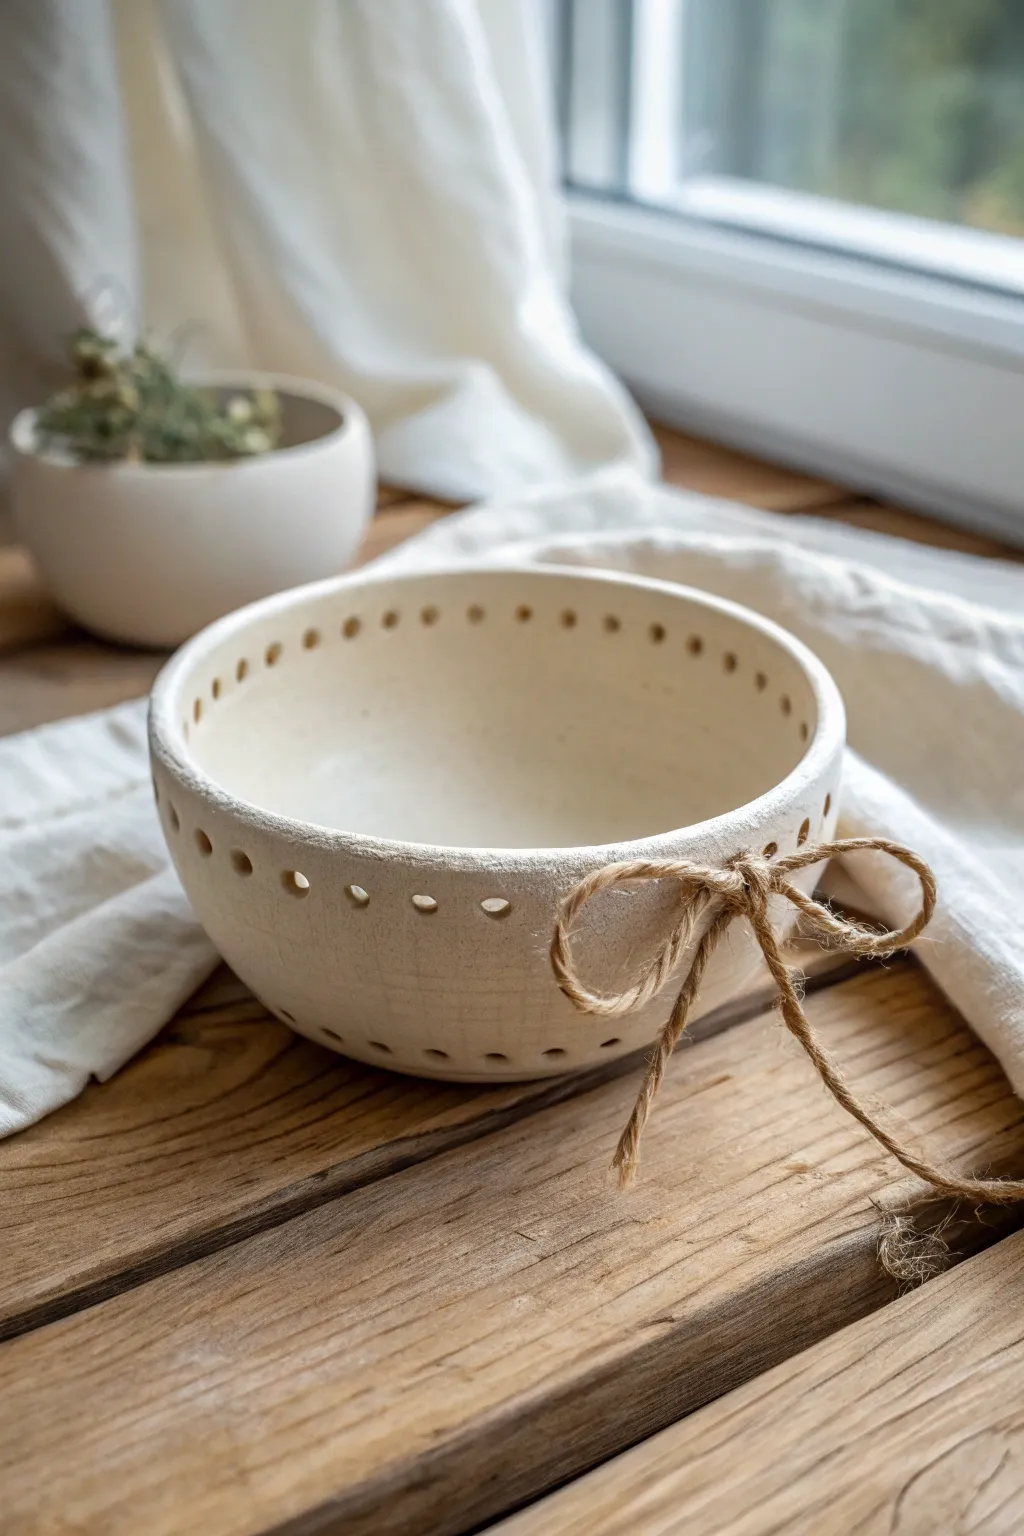
This charming, off-white clay bowl balances simplicity with texture, featuring two rows of delicate circular cutouts that add airy visual interest. The look is finished with a rustic hemp twine bow, making it a perfect decorative catch-all for a farmhouse or cottage-style home.
Step-by-Step Tutorial
Materials
- Air-dry clay or white stoneware clay (approx. 1-2 lbs)
- Rolling pin
- Circle template or a small bowl (approx. 5-6 inches diameter)
- Potter’s knife or fettling knife
- Small bowl mold (for draping or pressing)
- drinking straw or small circular fondant cutter
- Sponge
- Bowl of water
- Fine-grit sandpaper (for finish)
- Rough hemp twine or jute cord
- Clear matte varnish or sealant (optional)
Step 1: Preparing the Base
-
Condition the clay:
Start by taking a manageable wedge of your clay. Knead it in your hands to warm it up and remove any air bubbles, ensuring the consistency is smooth and pliable. -
Roll out a slab:
On a canvas cloth or a clean, non-stick surface, roll your clay out into an even slab. Aim for a thickness of about 1/4 inch—not too thin, or the walls will be fragile when pierced. -
Cut the circle:
Place your circle template or an existing bowl upside down on the slab. Trace and cut around it with your potter’s knife to create a perfect clay disc. -
Form the bowl shape:
Gently lift your clay disc and drape it into your mold (a slump mold works best here). Press the clay gently against the sides of the mold to establish the concave shape. I like to smooth the interior with a damp sponge immediately at this stage.
Clean Cuts Hack
If your straw gets clogged with clay while punching holes, dip the tip in a little vegetable oil or cornstarch before each punch. The clay plug will slide right out.
Step 2: Refining and Piercing
-
Smooth the lip:
While the clay is still in the mold but firm enough to hold its shape, use your finger or a damp chamois cloth to round off the sharp top edge of the rim. -
Let it firm up:
Allow the clay to dry until it reaches a ‘leather-hard’ state. This is crucial; if it’s too wet, the holes you punch will deform the bowl’s shape. -
Mark hole placement:
Using a needle tool or toothpick, lightly mark where your holes will go. You want a row just about 1/2 inch below the rim, spaced evenly apart. -
Create the top row:
Using a drinking straw or a small circular cutter, press firmly through the clay wall at your marked spots to create the upper row of perforations. Twist the tool slightly as you pull it out to get a clean cut. -
Add the bottom row:
Repeat the process closer to the base of the bowl. Notice in the image that these holes align vertically with the top row, creating a structured grid pattern. -
Clean the holes:
Use a small, damp brush to smooth any jagged bits of clay (burrs) that were pushed out inside or outside the holes during cutting.
Step 3: Finishing and Assembly
-
Dry completely:
Remove the bowl from the mold and let it dry completely. This can take anywhere from 24 to 48 hours depending on humidity and clay thickness. -
Sand for texture:
Once bone dry, take fine-grit sandpaper and gently sand the entire surface. Don’t make it perfectly smooth; keeping a little vertical scratching adds to that raw, handcrafted aesthetic seen in the photo. -
Seal or fire:
If using air-dry clay, apply a matte sealant to protect it. If using kiln-fire clay, this is when you would bisque fire and then apply a matte white glaze before the final firing. -
Prepare the twine:
Cut a length of hemp twine, approximately 12 inches long. You want enough length to tie a generous bow without struggling. -
Thread the detail:
Choose two holes on the bottom row that are side-by-side. Thread the twine through from the inside out, so both ends are facing you on the exterior of the bowl. -
Tie the bow:
Tie a simple shoelace knot. Tug the loops gently to make them even and droopy, then trim the tails so they hang elegantly without dragging too much.
Make it a Lantern
Place a battery-operated LED tea light inside when finished. The double rows of pierced holes will cast beautiful, patterned shadows on your table.
Place your finished bowl on a soft linen napkin to complete the cozy, natural vignette
Terrazzo-Style Confetti Chip Bowl
Channel the trendy look of Italian terrazzo floors into a modern, handmade vessel that adds a pop of playful color to your space. This project uses colorful clay chips embedded into a neutral base to create a sophisticated yet whimsical confetti effect.
Detailed Instructions
Materials
- Air-dry clay (white)
- Air-dry clay (terracotta, turquoise, mustard yellow, and sage green)
- Rolling pin
- Medium-sized mixing bowl (to use as a mold)
- Plastic wrap
- Craft knife or clay cutter
- Small bowl of water
- Sponge
- Fine-grit sandpaper (220-400 grit)
- Acrylic rolling pin or glass jar
- Matte sealant or varnish
Step 1: Preparing the Terrazzo Chips
-
Roll out colored clay:
Start by taking small pinches of your colored clays—terracotta, turquoise, mustard, and sage. Roll each color out individually until they are quite thin, about 1-2mm thickness. -
Cut jagged shapes:
Using your craft knife, cut these flattened colored sheets into random, angular shapes. Aim for triangles, irregular polygons, and slivers of varying sizes to mimic real stone chips. -
Let chips firm up:
Set these colored fragments aside on a piece of parchment paper. I like to let them dry for about 15-20 minutes so they are firm enough to handle without squishing, but still distinct from the base clay.
Step 2: Forming the Bowl Base
-
Roll the white base:
Take a large ball of white air-dry clay and knead it until soft. Roll it out into a large circle, aiming for a consistent thickness of about 1/4 inch. -
Distribute the chips:
Scatter your semi-dried colored chips across the surface of the white clay slab. Be random with your placement, and don’t forget to sprinkle some tiny crumbs of colored clay for a speckled effect. -
Embed the chips:
Gently roll over the slab again with your rolling pin to press the colored chips flush into the white base. They should become one smooth surface. -
Flip and repeat:
Carefully flip the clay slab over. Repeat the scattering and rolling process on the other side so both the interior and exterior of your bowl will have the pattern.
Clean Sanding Tip
Wear a mask while sanding air-dry clay! To verify your colors are fully revealed, wipe the spot with a damp finger; if the color brightens, you’ve sanded enough.
Step 3: Shaping and Drying
-
Prep the mold:
Wrap your mixing bowl mold tightly with plastic wrap. This prevents sticking and makes removal much easier later on. -
Drape the clay:
Lift your terrazzo-patterned slab and drape it inside the bowl mold. Gently press it against the walls of the bowl to take its shape. -
Trim the rim:
Use your craft knife to slice off the excess clay hanging over the rim of the mold. Aim for a relatively straight edge, though a little waviness adds handmade character. -
Smooth the edges:
Dip your finger in a little water and run it along the cut rim to soften the sharp edge. Smooth out any cracks that may have formed while draping. -
Initial dry:
Let the bowl sit in the mold for about 24 hours until it holds its own shape firmly. -
Remove and fully dry:
Carefully lift the clay bowl out of the mold. Remove the plastic wrap and place the bowl on a wire rack to dry completely for another 24-48 hours. Turn it occasionally to ensure even airflow.
Make it Shine
For a glossy, ceramic-glaze look instead of matte, swap the varnish for a high-gloss resin or a triple-thick glaze. This makes the confetti colors look wet and vibrant.
Step 4: Refining and Sealing
-
Sand for clarity:
Once bone dry, take your fine-grit sandpaper and sand the entire surface. This is a crucial step—sanding removes the thin film of white clay haze over your colored chips, making the colors pop. -
Dust off residue:
Wipe the bowl down thoroughly with a slightly damp sponge or cloth to remove all sanding dust. -
Seal the interior:
Apply a coat of matte varnish to the inside of the bowl. Let it dry completely according to the manufacturer’s instructions. -
Seal the exterior:
Flip the bowl and seal the outside. Apply a second coat if you plan to use this for holding keys or trinkets to protect it against scratches.
Now you have a stunning, artisanal vessel perfect for holding fruit or simply admiring on a sunlit shelf