If you’ve got a plain frame that feels a little blah, air dry clay is my favorite way to give it instant personality with a chunky, touchable border. I’m sharing my go-to air dry clay frame ideas—from classic florals to playful 3D scenes—so you can pick a vibe and run with it.
Classic Flower Garland Border

Transform a simple wooden frame into a charming cottage-core accent using air-dry clay to create this delicate floral border. The soft pastel pinks, creams, and sage greens create a gentle, embossed effect that looks beautiful in any cozy corner.
Step-by-Step
Materials
- Plain wooden picture frame (light unfinished wood works best)
- Air-dry clay (white)
- Acrylic paints (Titanium White, Sage Green, Soft Pink/Coral, Mustard Yellow)
- PVA glue or heavy-duty craft glue
- Sculpting tools (needle tool, small ball tool)
- Small rolling pin
- X-Acto knife or clay blade
- Matte varnish (optional)
Step 1: Prepping the Clay & Colors
-
Color mixing:
Before sculpting, mix your clay colors. Knead a small amount of acrylic paint directly into portions of white air-dry clay. You’ll need four distinct balls: Sage Green for leaves, Soft Pink for the larger flowers, White for the daisies, and a tiny amount of Mustard Yellow for the flower centers. -
Base preparation:
Clean your wooden frame with a dry cloth to remove dust. Lay it flat on your workspace so you can visualize the placement of your vine.
Step 2: Sculpting the Foliage
-
Rolling the vines:
Take small pinches of Sage Green clay and roll them into very thin snakes. These don’t need to be continuous; you can place short, curved segments to connect the flower clusters. -
Applying the vines:
Brush a thin line of PVA glue onto the frame where the vine will go. Gently press your green clay snakes onto the glue, following a meandering, organic path around the frame. -
Forming leaves:
Roll tiny tear-drop shapes from the green clay. Flatten them slightly between your fingers to create a leaf shape. -
Attaching leaves:
Dab a tiny dot of glue on the back of each leaf and press them onto the sides of your vine stems. Vary the angles to make it look natural. -
Texturing leaves:
Using a needle tool or a dull knife edge, gently press a center vein into each leaf. Add tiny side veins for extra detail if you like.
Clay Cracking?
If you see tiny cracks forming as the clay dries, don’t panic. Mix a tiny bit of fresh clay with water to make a paste and smooth it over the crack with your finger.
Step 3: Creating the Blooms
-
Making pink petals:
For the pink flowers, roll 8-10 small balls of pink clay. Flatten them into elongated ovals to form petals. -
Assembling pink flowers:
Apply a dot of glue on the frame where you want a flower. Arrange the pink petals in a circle, pressing the inner tips together. Use a modeling tool to smooth the connection points slightly. -
Adding texture:
Use the edge of your needle tool to press two or three longitudinal lines into each pink petal for that signature ribbed look. -
Sculpting white daisies:
Repeat the process with the white clay, making slightly shorter, rounder petals. Arrange these singly or in pairs along the vine. -
Tiny filler flowers:
Create miniature blossoms by making three tiny balls of light pink or cream clay and pressing them together in a triangle formation. Add these near the leaves to fill gaps.
Add Some sparkle
For a whimsical touch, lightly brush a tiny amount of pearlescent mica powder or gold pigment onto the center of the flowers before the varnish dries.
Step 4: Finishing Touches
-
Adding centers:
Roll small balls of Mustard Yellow clay. Flatten them slightly and press them into the center of every flower. -
Texturing pollen:
Take a needle tool or a clean toothbrush and gently stipple the yellow centers to give them a fuzzy, pollen-like texture. -
Final leaf detailing:
Check your composition. If some areas look bare, add extra single leaves or tiny clay buds. -
Drying:
Let the frame sit undisturbed for at least 24 hours. Air-dry clay shrinks slightly as it dries, so ensure your glue bond is strong. -
Sealing:
Once fully hard, create a protective barrier by brushing a coat of matte varnish over the clay elements. This prevents moisture from softening the detailed work.
Now you have a handmade heirloom that perfectly captures the beauty of a wildflower meadow

Simple Scalloped Edge Frame
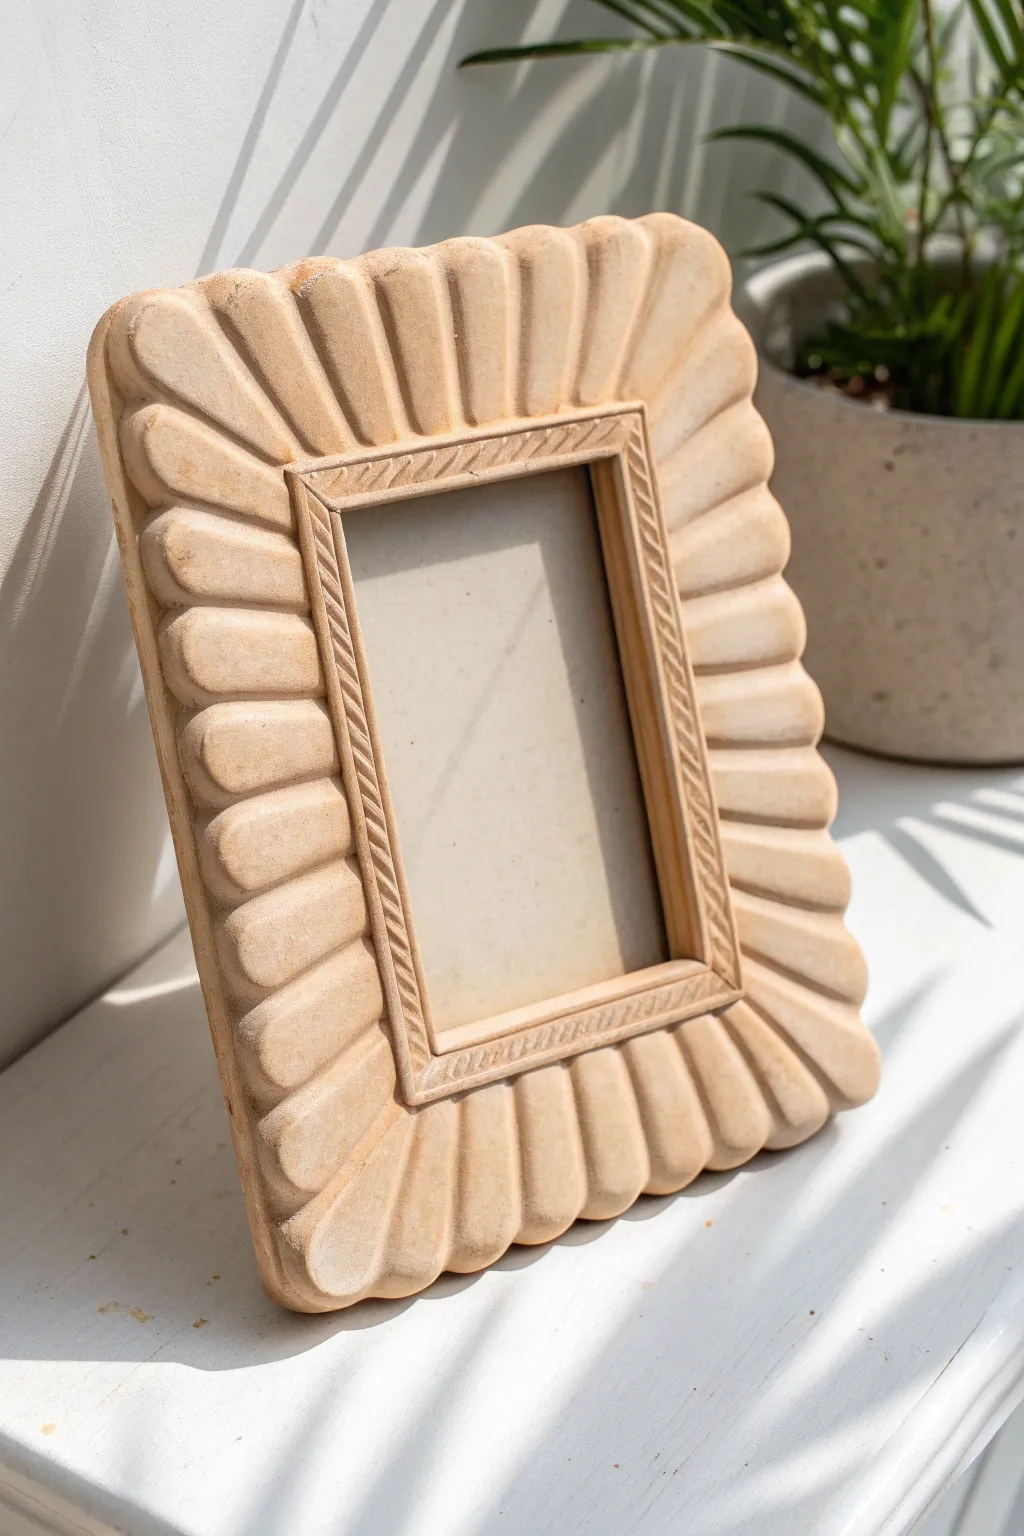
Transform a plain wooden photo frame into a stunning, sculptural piece that mimics carved sandstone. The radiating petal design adds organic warmth and shadow play to any corner of your home, creating a high-end look with accessible materials.
Step-by-Step Tutorial
Materials
- White or terracotta air-dry clay (approximately 500g)
- Plain, flat wooden photo frame (with glass and backing removed)
- PVA glue or wood glue
- Rolling pin
- Ruler or straight edge
- Clay sculpting tools (specifically a modeling knife and a curved shaping tool)
- Fine-grit sandpaper (220 grit)
- Small cup of water
- Acrylic paint (beige/cream and a darker brown wash)
- Matte sealant spray
Step 1: Base Preparation & Layering
-
Prepare the frame:
Remove the glass, backing, and any metal tabs from your wooden frame. Lightly sand the wooden surface to roughen it up, which helps the glue adhere better. -
Roll out the base:
Roll out a slab of air-dry clay to about 1/4 inch thickness on a non-stick surface or canvas cloth. The slab needs to be large enough to cover the entire face of your frame. -
Apply the clay:
Brush a generous layer of PVA glue onto the front of the wooden frame. Place the frame face-down onto your rolled clay slab, pressing firmly to ensure a strong bond. -
Trim the excess:
Using a craft knife, flip the frame over and trim the clay around the inner opening. Leave a significant overhang on the outer edges—about 1.5 to 2 inches—to create the extended scalloped shape.
Step 2: Sculpting the Design
-
Define the outer shape:
Gently shape the overhanging clay on the outside to flare slightly outward. The clay needs to be thick enough here to support the carving, so you might need to add a bit of extra clay underneath the rim if it feels flimsy. -
Mark the segments:
Using a ruler and a light touch with your knife, mark radial lines extending from the inner frame corner out to the edge. Imagine a sunburst pattern; spacing these evenly is key for the final look. -
Carve the grooves:
Use a rounded clay tool or the handle of a paintbrush to press deep valleys into the markings you just made. This creates the separation between each ‘ray’ or scallop. -
Round the petals:
Smooth each raised section with a wet finger to create a convex, rounded ‘petal’ shape. The clay should feel puffed up in the center of each segment and dip down at the seams. -
Shape the edge profile:
Use your fingers to round off the outer tips of the scallops. They shouldn’t be sharp; aim for a soft, pillow-like curve at the very edge of the frame.
Smooth Operator
Keep a small sponge damp with water nearby. Smoothing the clay with the sponge while wet reduces sanding time significantly later.
Step 3: Inner Details & Finishing
-
Create the inner border:
Roll a very thin snake of fresh clay. Apply a tiny amount of water to the inner edge of the frame opening and press this thin snake along the perimeter to create a raised border. -
Add texture:
Using a needle tool or the edge of a credit card, press small diagonal hash marks into this inner border to mimic a rope or braided texture. -
Slow drying:
Cover the frame loosely with plastic wrap and let it dry slowly away from direct heat. I usually rotate the frame every few hours to prevent warping. Let it cure for 24-48 hours. -
Sanding:
Once bone dry, gently sand any rough fingerprints or sharp burrs with fine-grit sandpaper. Wipe away the dust with a barely damp cloth. -
Base coat painting:
Paint the entire frame with a cream or beige acrylic paint. Ensure you get into all the deep grooves between the scallops. -
Adding depth:
Mix a very watery brown paint wash. Brush it over the frame and immediately wipe the high points with a paper towel. This leaves darker pigment in the crevices, highlighting the sculpted texture. -
Seal the work:
Finish with a light coat of matte spray varnish to protect the clay from moisture and dust without adding unwanted shine.
Cracking Up?
If small hairline cracks appear during drying, mix a tiny bit of fresh clay with water to make a ‘slip’ paste and fill the gaps, then sand smooth.
Place your favorite memory inside and enjoy the earthy elegance of your handcrafted frame


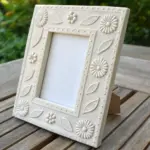
Beaded Dot Trim Frame
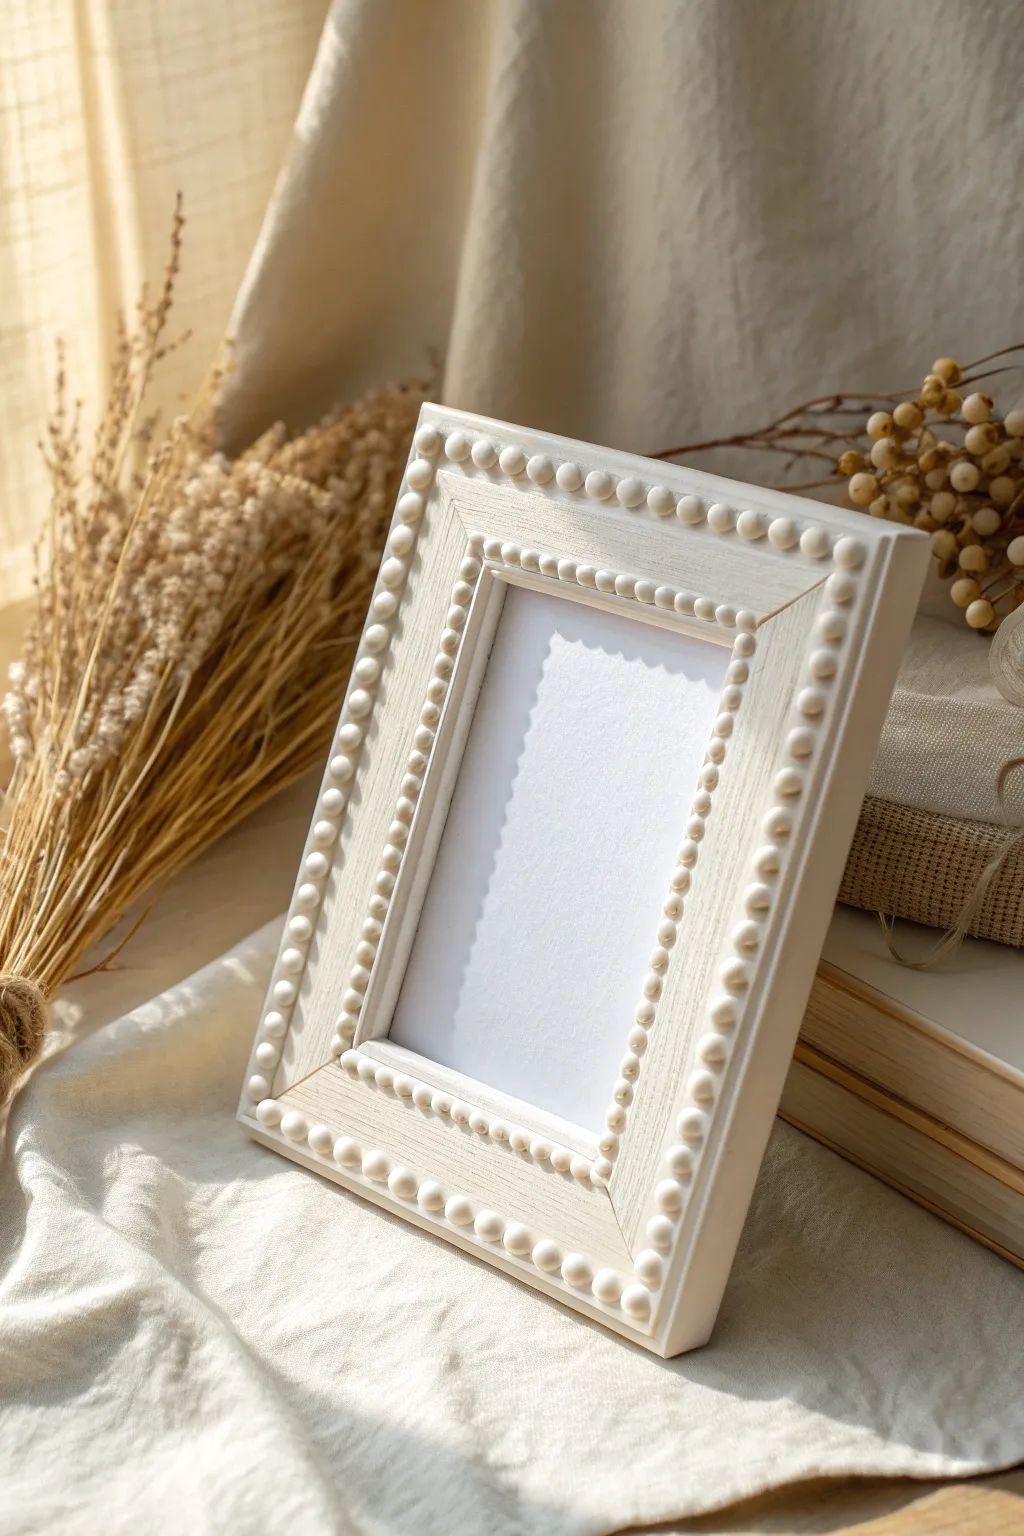
This project transforms a plain, flat wooden frame into a textured masterpiece with a charming beaded trim. The creamy white finish and repetitive dot pattern give it a soft, bohemian feel perfect for displaying cherished memories.
Step-by-Step
Materials
- Flat, wide wooden picture frame (unfinished or sanded)
- White smooth air-dry clay
- Rolling pin (acrylic preferred)
- Clay knife or craft blade
- Ruler
- Wood glue or heavy-duty craft glue
- Small bowl of water
- Sandpaper (medium and fine grit)
- White chalk paint or acrylic paint (matte finish)
- Clear matte sealer spray
- Small flat paintbrush
- Soft cloth
Step 1: Preparation & Clay Base
-
Prepare the frame:
Remove the glass and backing from your wooden frame. If the frame has a glossy finish, give it a quick scuff with medium-grit sandpaper to help the glue adhere better. Wipe away any dust with a damp cloth. -
Condition the clay:
Take a chunk of air-dry clay and knead it in your hands until it becomes warm and pliable. This conditioning step is crucial to prevent cracks later on. -
Roll coils:
Roll the clay onto a smooth surface to create long, thin snakes or coils. Aim for a thickness of about 1/4 inch (6mm). You will need enough length to cover the entire outer perimeter and the inner perimeter of the frame. -
Create the beads:
Using your clay knife, cut the coils into small, equal-sized segments. For the outer edge, cut slightly larger pieces; for the inner edge, cut them slightly smaller. Roll each segment between your palms to form a smooth, perfect sphere.
Step 2: Assembly
-
Apply glue:
Working on one side of the frame at a time, brush a generous line of wood glue along the outer edge. It’s best to work in sections so the glue doesn’t dry out before you place the beads. -
Attach outer beads:
Press the larger clay spheres onto the glue line, ensuring they touch each other snugly. Gently push down slightly to flatten the bottom of the bead against the frame, which increases the bonding surface. -
Continue the perimeter:
Repeat the process around the entire outer edge. When you reach the corners, you may need to slightly adjust the spacing or size of the last few beads to make them fit perfectly without gaps. -
Attach inner beads:
Apply glue to the inner recessed edge of the frame (closest to where the photo will sit). Place the smaller clay spheres here, pressing them gently into place just like the outer row. -
Smooth imperfections:
Dip your finger in a little water and lightly smooth out any fingerprints or cracks on the beads. Don’t use too much water, or the clay will become mushy. -
Texture the flat wood:
To mimic the textured wood look in the photo, you can apply a very thin layer of clay to the flat face of the frame and score it with a wire brush, or simply leave the wood exposed if it already has a nice grain.
Keep Them Uniform
To ensure all your clay beads are the exact same size, roll a slab of clay to a uniform thickness first, then use a small round cutter (like a straw or pastry tip) to punch out equal circles before rolling.
Step 3: Finishing Touches
-
Let it dry completely:
Allow the frame to dry for at least 24-48 hours. Air-dry clay shrinks slightly as it dries, so ensure it’s fully cured before painting. Avoid placing it in direct sunlight, which can cause cracking. -
Check adhesion:
Once dry, gently check if any beads are loose. If one pops off, simply adhere it back on with a dot of super glue or strong craft glue. -
Paint the frame:
Apply a coat of white chalk paint over the entire frame, including the beads and the wooden space between them. Chalk paint works wonderfully here to create that matte, plaster-like finish seen in the image. -
Apply a second coat:
If the wood grain is showing through more than you’d like, wait for the first coat to dry and apply a second layer. Ensure you get the brush into the crevices between the beads. -
Distress (Optional):
For a subtle aged look, verify the paint is bone dry, then very lightly sand the tops of the beads with fine-grit sandpaper to reveal a tiny bit of the clay texture underneath. -
Seal the work:
Spray the entire frame with a clear matte sealer. This protects the clay from moisture and prevents the paint from chipping over time. -
Reassemble:
Once the sealer is dry and no longer tacky, place the glass, your photo, and the backing back into the frame.
Natural Wood Look
Instead of painting everything solid white, mix a tiny drop of beige into your white paint and dry-brush it over the textured areas to highlight the ‘grain’ and give it warmth.
Now you have a custom, gallery-worthy frame that adds soft texture to any shelf


Modern Boho Arch Frame
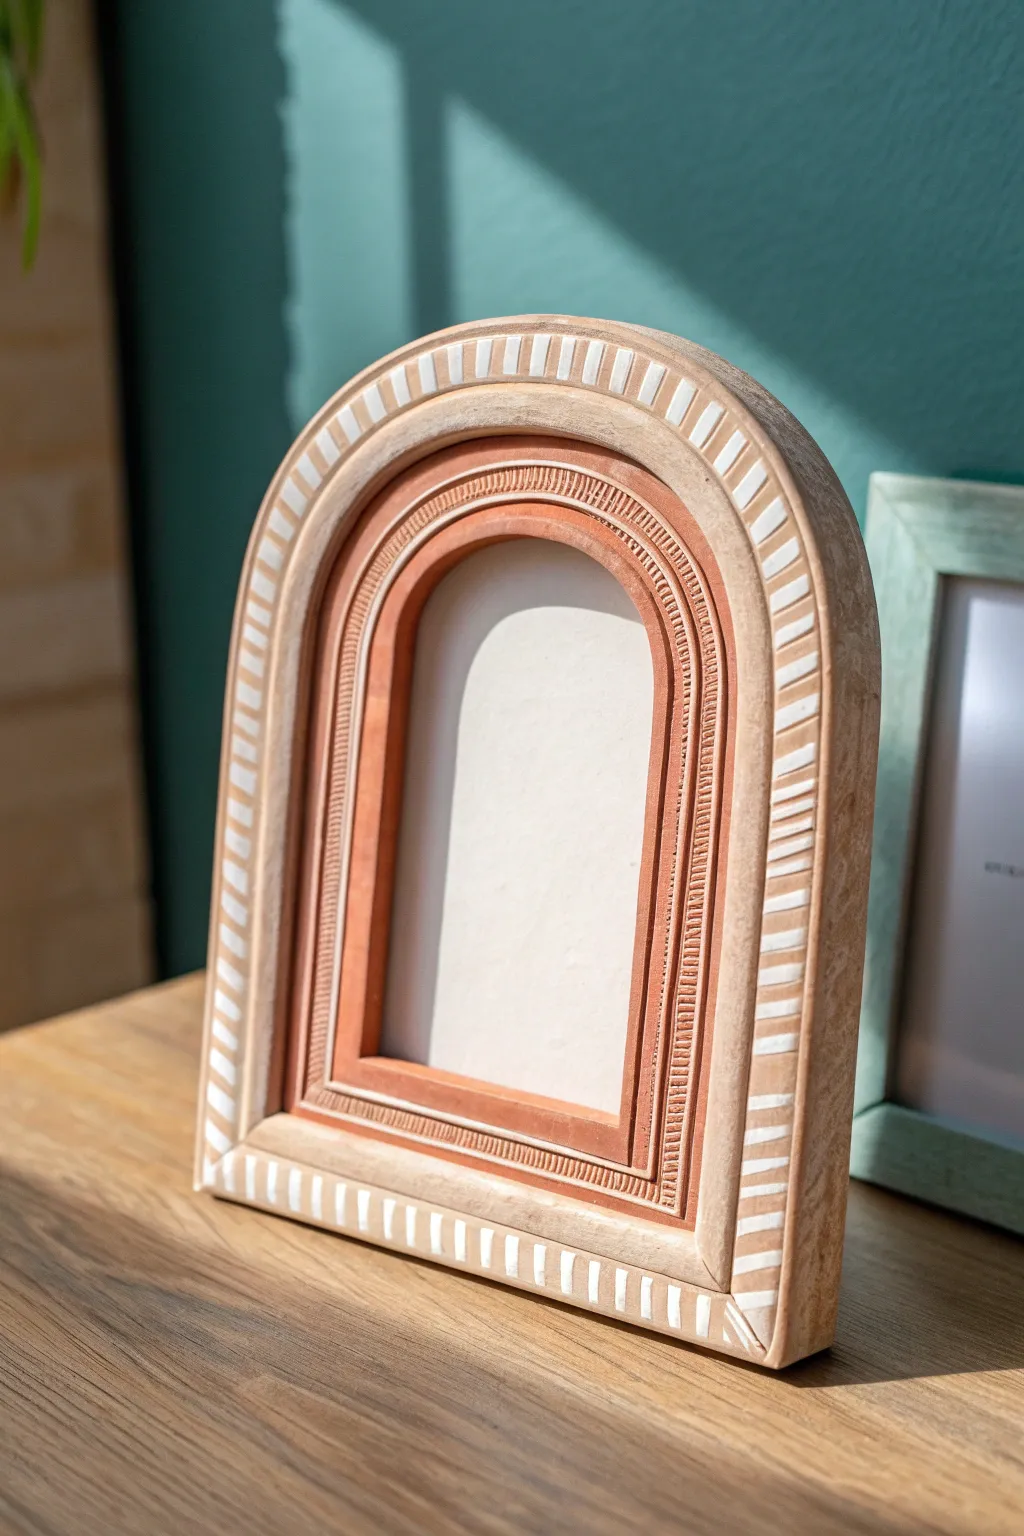
This project combines the warmth of terracotta tones with clean, geometric details for a stunning piece of modern decor. The arched shape and intricate carved textures give this air dry clay frame a high-end, artisanal look that belies its simple construction.
How-To Guide
Materials
- Air dry clay (white or natural stone color)
- Rolling pin
- Parchment paper or non-stick craft mat
- Craft knife or X-Acto blade
- Clay sculpting tools (needle tool, small loop tool)
- Wide, flat paintbrush
- Fine detail paintbrush
- Terracotta or warm burnt orange acrylic paint
- White or cream acrylic paint
- Sandpaper (fine grit)
- Cardboard or mat board (for backing)
- Strong craft glue or hot glue
Step 1: Shaping the Clay Base
-
Roll the clay slab:
Begin by taking a large chunk of air dry clay and kneading it until soft and pliable. Place it on parchment paper and use your rolling pin to create a smooth, even slab about 1/4 inch thick. Aim for a consistent thickness to prevent cracking. -
Create the arch template:
Sketch a simple arch shape on a piece of paper or cardstock to the size you want your photo opening to be, adding about 1.5 to 2 inches border around it. I like to fold the paper in half vertically to ensure the arch is perfectly symmetrical. -
Cut the main shape:
Lay your paper template onto the rolled clay slab. Using a sharp craft knife, trace around the outer edge of the template. Cut cleanly and remove the excess clay. -
Cut the inner window:
With the template still in place (or using a smaller inner template), carefully cut out the central window where the photo will eventually sit. Lift the center piece out gently. -
Smooth the edges:
Dip your finger in a little bit of water and run it along both the inner and outer cut edges to soften any sharpness or cutting debris. This initial smoothing will save you sanding time later.
Warping Woes
If edges curl while drying, place a lightweight book on the frame once it’s leather-hard (partially dry) to keep it perfectly flat.
Step 2: Sculpting the details
-
Define the borders:
Using a blunt sculpting tool or the back of a knife, gently press a continuous groove about half an inch inside the outer edge, mirroring the arch shape. Repeat this process near the inner window edge. -
Carve the inner texture:
Between the two grooves you just created—specifically closer to the inner window—use a needle tool or small fork to impress a row of tiny, vertical hatch marks or dots. Keep them tightly packed for that detailed texture seen in the reference. -
Carve the outer border:
Along the wider outer border, create evenly spaced, shallow rectangular indentations. You can do this by pressing the side of a flat sculpting tool or a small flathead screwdriver into the clay. These will later be highlighted with white paint. -
Final drying:
Allow the sculpted frame to dry completely on a flat surface. Depending on humidity, this usually takes 24 to 48 hours. Flip it carefully halfway through to ensure the back dries evenly.
Level Up: Texture
Mix baking soda into your base beige paint to create a gritty, ceramic-like texture that feels more like real fired pottery.
Step 3: Painting and Finishing
-
Sand imperfections:
Once fully dry and hard, lightly sand any rough spots on the edges with fine-grit sandpaper. Wipe away the dust with a dry cloth. -
Apply the base coat:
Mix a warm beige or stone color using white and a tiny drop of brown paint. Apply this all over the frame as a primer and base color. -
Add the terracotta accent:
Paint the inner recessed section of the frame—the area surrounding the window—with a rich terracotta or burnt orange color. Use a smaller flat brush to keep the lines crisp against the borders. -
Highlight the outer border:
Using a fine detail brush and cream or white paint, carefully fill in the rectangular indentations you pressed into the outer border. This high-contrast detail makes the pattern pop. -
Dry brush the texture:
Dip a dry brush lightly into the white paint, wipe almost all of it off on a paper towel, and gently sweep it over the terracotta section. This will catch on the high points of your hatch marks, highlighting the texture. -
Attach the backing:
Cut a piece of cardboard or mat board slightly larger than the photo window but smaller than the frame’s outer edge. Glue this to the back of the clay frame on three sides (leaving the top open) to create a pocket for sliding your photo in.
Slide your favorite photo into your new creation and enjoy the warmth it brings to your shelf

What Really Happens Inside the Kiln
Learn how time and temperature work together inside the kiln to transform clay into durable ceramic.
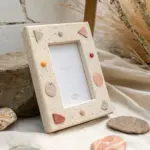
Terrazzo Speckle Clay Frame
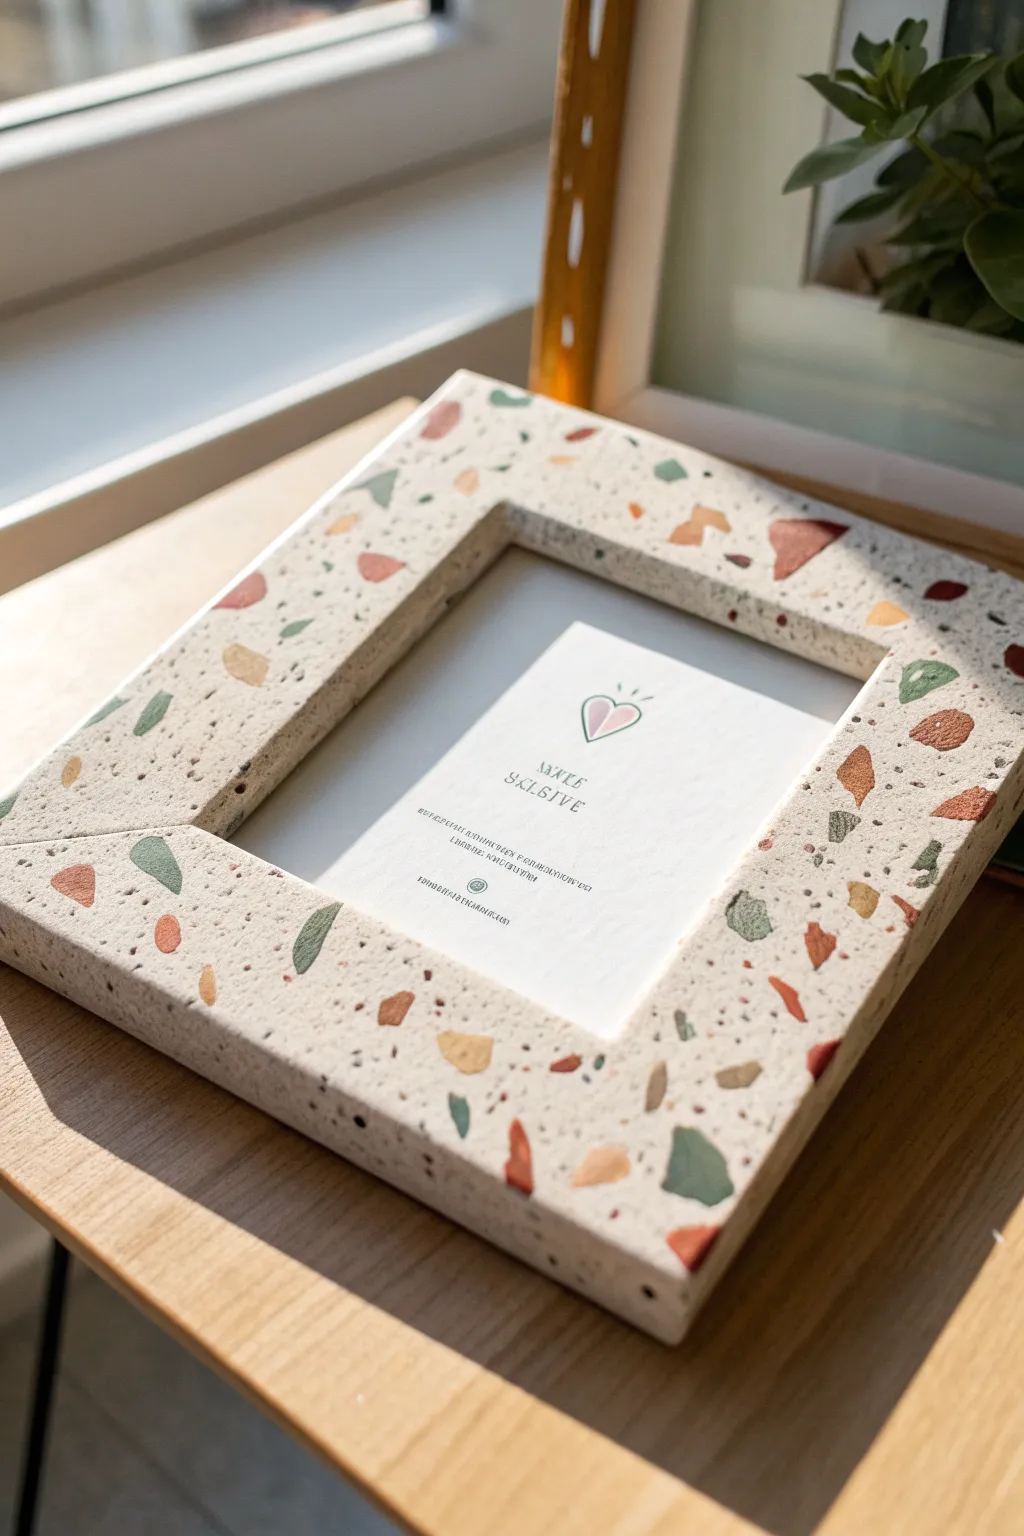
Bring the trending look of Italian stone into your home without the heavy price tag using simple air dry clay. This project layers colorful clay chips into a neutral base to create a sophisticated, speckled finish that looks remarkably like real terrazzo.
Detailed Instructions
Materials
- White or cream air dry clay (approx. 500g)
- Air dry clay in assorted colors (terracotta, sage green, mustard yellow, brown)
- Rolling pin
- Craft knife or scalpel
- Ruler
- Sandpaper (medium and fine grit)
- Small bowl of water
- Acrylic rolling pin or glass jar
- Matte varnish or sealant
- Cardboard or foam board (for template)
Step 1: Preparing the Terrazzo Chips
-
Roll colored clay:
Begin by taking small amounts of your colored clays—terracotta, sage, mustard, and brown. Roll each color out very thinly, aiming for a thickness of about 1-2mm. -
Create irregular shapes:
Tear or cut these thin sheets into random, jagged little pieces. Vary the sizes from tiny specks to larger shards for a natural look. I like to make more than I think I’ll need just in case. -
Let chips dry:
Spread these colored fragments out on a piece of paper and let them dry until they are leathery or fully hard. This ensures they hold their shape when pressed into the soft base later.
Clean Cuts
If your clay drags while cutting the inner window, dip your craft knife blade in water or oil before slicing for a crisp, clean edge.
Step 2: Forming the Base
-
Create a template:
While chips are drying, cut a square template from cardboard or foam board. A standard size is 15x15cm with a 9x9cm inner window, but customize this to fit your specific photo. -
Roll the base clay:
Knead your white or cream clay until it is smooth and pliable. heavy rolling pin to roll it out into a slab that is roughly 1cm thick. -
Cut the frame shape:
Place your template onto the rolled clay slab. Using a sharp craft knife and a ruler for guidance, cut around the outer and inner edges to create your frame shape.
Step 3: Embedding the Pattern
-
Arrange the chips:
Once your base frame is cut but still wet, scatter your dried colored chips over the surface. Arrange them randomly, ensuring a nice distribution of colors without overcrowding. -
Press chips in:
Gently press the chips into the surface with your fingers first. Then, use your rolling pin to firmly roll over the entire frame again. This forces the chips into the clay and levels the surface. -
Smooth the edges:
The rolling process might spread the frame slightly. Use your ruler to neaten up the straight edges and your fingers with a little water to smooth out any cracks on the sides. -
Dry the frame:
Place the frame on a flat board to dry. To prevent warping, flip it over gently every 12 hours. Let it dry completely for 24-48 hours until it’s uniform in color and hard.
Golden Hour
Mix a tiny amount of gold leaf flakes in with your colored chips before rolling them into the base for a luxurious, sparkling terrazzo effect.
Step 4: Finishing Touches
-
Sand for exposure:
This is the magic step. Take your medium grit sandpaper and sand the top surface of the frame. You need to sand away the thin layer of white clay covering your chips to reveal their bright colors underneath. -
Refine the surface:
Switch to fine grit sandpaper to smooth out scratches and leave the surface feeling like polished stone. Wipe away all dust with a slightly damp cloth. -
Seal the work:
Apply a coat of matte varnish to protect the clay and enhance the colors of the chips without adding an artificial shine. -
Add backing:
Once dry, glue a simple cardboard backing or a small triangular stand to the back of your frame to hold your photo in place.
Now you have a stunning, modern piece of decor ready to display your favorite memory
Rope Twist Texture Rim
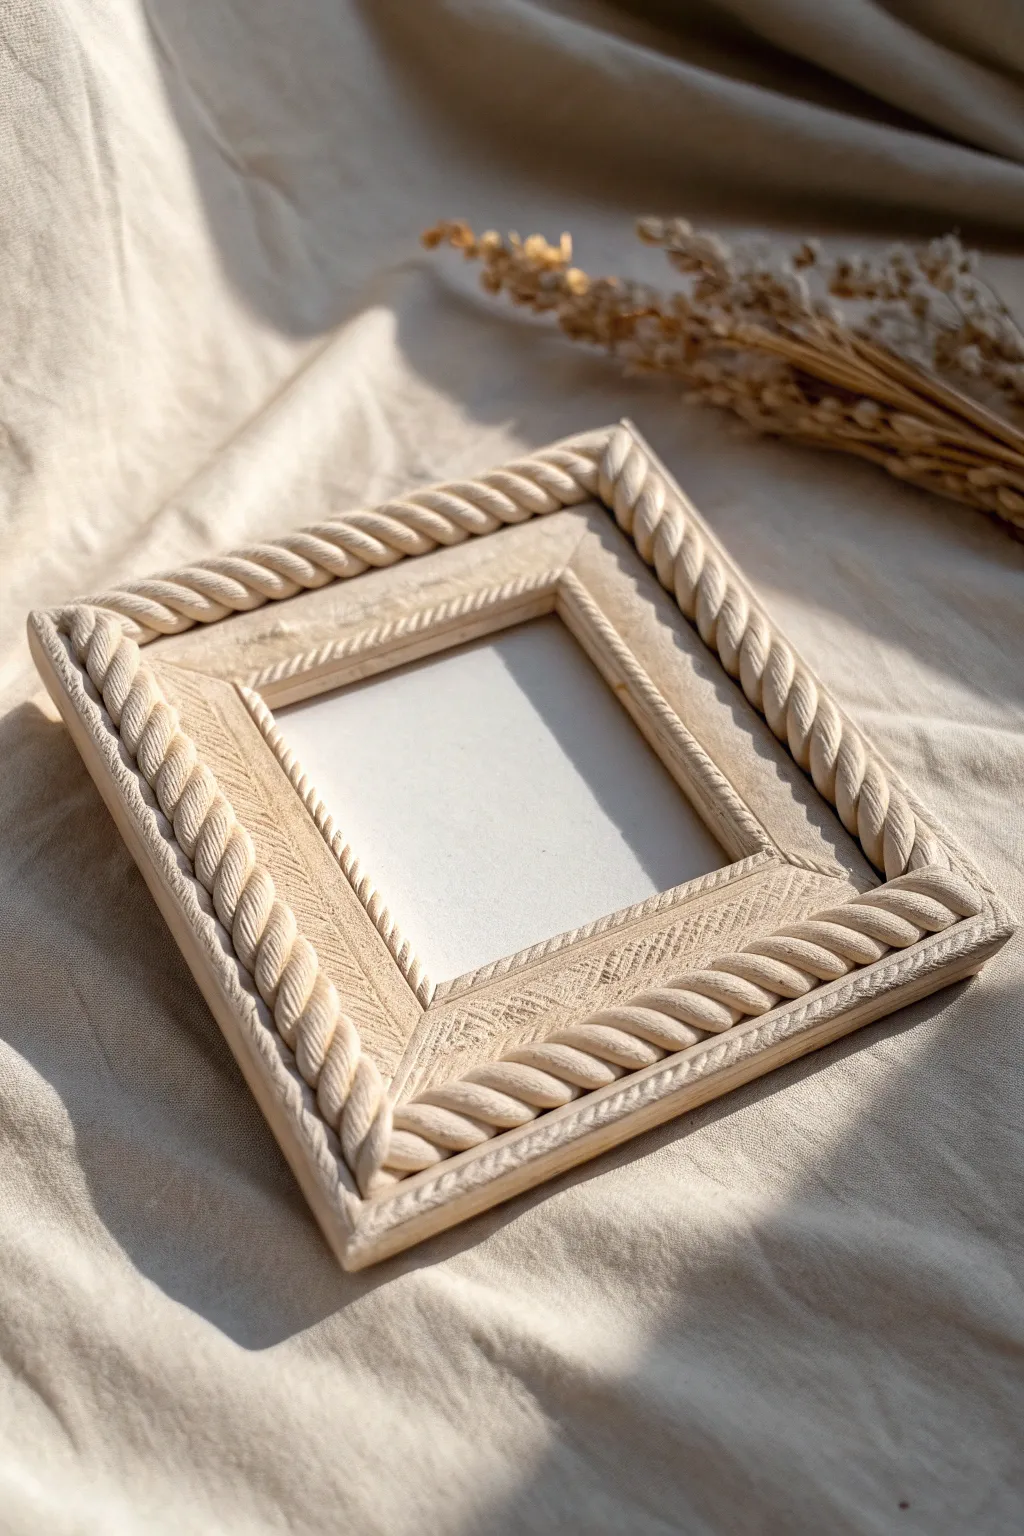
This elegant frame combines rustic charm with coastal style, featuring a beautifully crafted rope twist border and subtle etched textures. Using air-dry clay, you’ll create a durable and stylish piece perfect for showcasing your favorite memories.
Step-by-Step Guide
Materials
- White or natural air-dry clay
- Rolling pin
- Clay knife or craft knife
- Ruler
- Water in a small cup
- Score and slip tool (or an old toothbrush)
- Wood glue or PVA glue
- Flat wooden frame base (store-bought or cardboard)
- Needle tool or toothpick
- Fine-grit sandpaper
- Acrylic sealer (matte)
Step 1: Preparing the Base
-
Roll out the clay:
Begin by rolling out a slab of air-dry clay to an even thickness of about 1/8 inch. Ensure it is large enough to cover the flat surface of your chosen frame base. -
Cover the frame:
Apply a thin layer of wood glue to your frame base. carefully lift the clay slab and lay it over the frame, pressing gently to smooth out any air bubbles. -
Trim the edges:
Use your craft knife to trim away the excess clay from both the outer and inner edges of the frame, ensuring a clean, flush fit with the base. -
Smooth the surface:
Dip your finger in a little water and run it over the clay surface and along the cut edges to soften any sharp lines and create a perfect canvas for your textures.
Keep the Twist Tight
Work quickly when twisting your clay coils. If the clay starts to dry and crack, dip your fingers in water to rehydrate the snakes before twisting again.
Step 2: Creating the Rope Texture
-
Roll coils:
Roll out two long, even snakes of clay. They should be roughly the same diameter (about 1/4 inch thick) and long enough to span the perimeter of your frame. -
Twist the rope:
Place the two coils side-by-side. Gently pinch them together at one end, then carefully twist them around each other to form a tight rope pattern. -
Measure and cut:
Lay the twisted rope along one outer edge of your frame to measure the length needed. Cut the rope at a 45-degree angle where the corners will meet, creating a mitered effect. -
Score and slip:
Score the back of the rope and the outer edge of the frame base where the rope will sit. Apply a dab of water or slip to join them securely. -
Attach the rope:
Press the rope firmly onto the frame edge. Repeat this process for all four sides, carefully matching up the mitered corners for a seamless look.
Whitewash Finish
For a driftwood look, dilute white acrylic paint with water (1:1 ratio) and brush it over the dried clay. Wipe off the excess with a rag to let texture show.
Step 3: Adding Details and Finishing
-
Blend the corners:
Where the rope pieces meet at the corners, use a modeling tool or your fingertip to gently blend the clay so the twist appears continuous. -
Etch the texture:
Focusing on the flat inner section of the frame, hold your needle tool at an angle. Make short, slanted scratches into the clay surface. I find varying the pressure slightly gives it a more organic, wood-grain feel. -
Create a pattern:
Continue these etched marks all around the inner frame, keeping the diagonal direction consistent on each side to mimic joined wood planks. -
Define the inner border:
If desired, roll a very thin, single coil of clay and attach it to the innermost edge of the frame opening to create a clean, raised lip. -
Refine the twist:
Go back over your rope twist with a modeling tool to deepen the grooves between the strands, making the texture pop more visually. -
Dry properly:
Let the frame dry flat in a cool, dry place for at least 24-48 hours. Turn it over gently halfway through if possible to ensure even drying. -
Sand and seal:
Once fully dry, lightly sand any rough patches. Finish with a coat of matte acrylic sealer to protect the clay while maintaining that natural, raw aesthetic.
Now you have a stunning, textured frame ready to hold your most cherished photo


The Complete Guide to Pottery Troubleshooting
Uncover the most common ceramic mistakes—from cracking clay to failed glazes—and learn how to fix them fast.
Pressed Leaf and Fern Frame
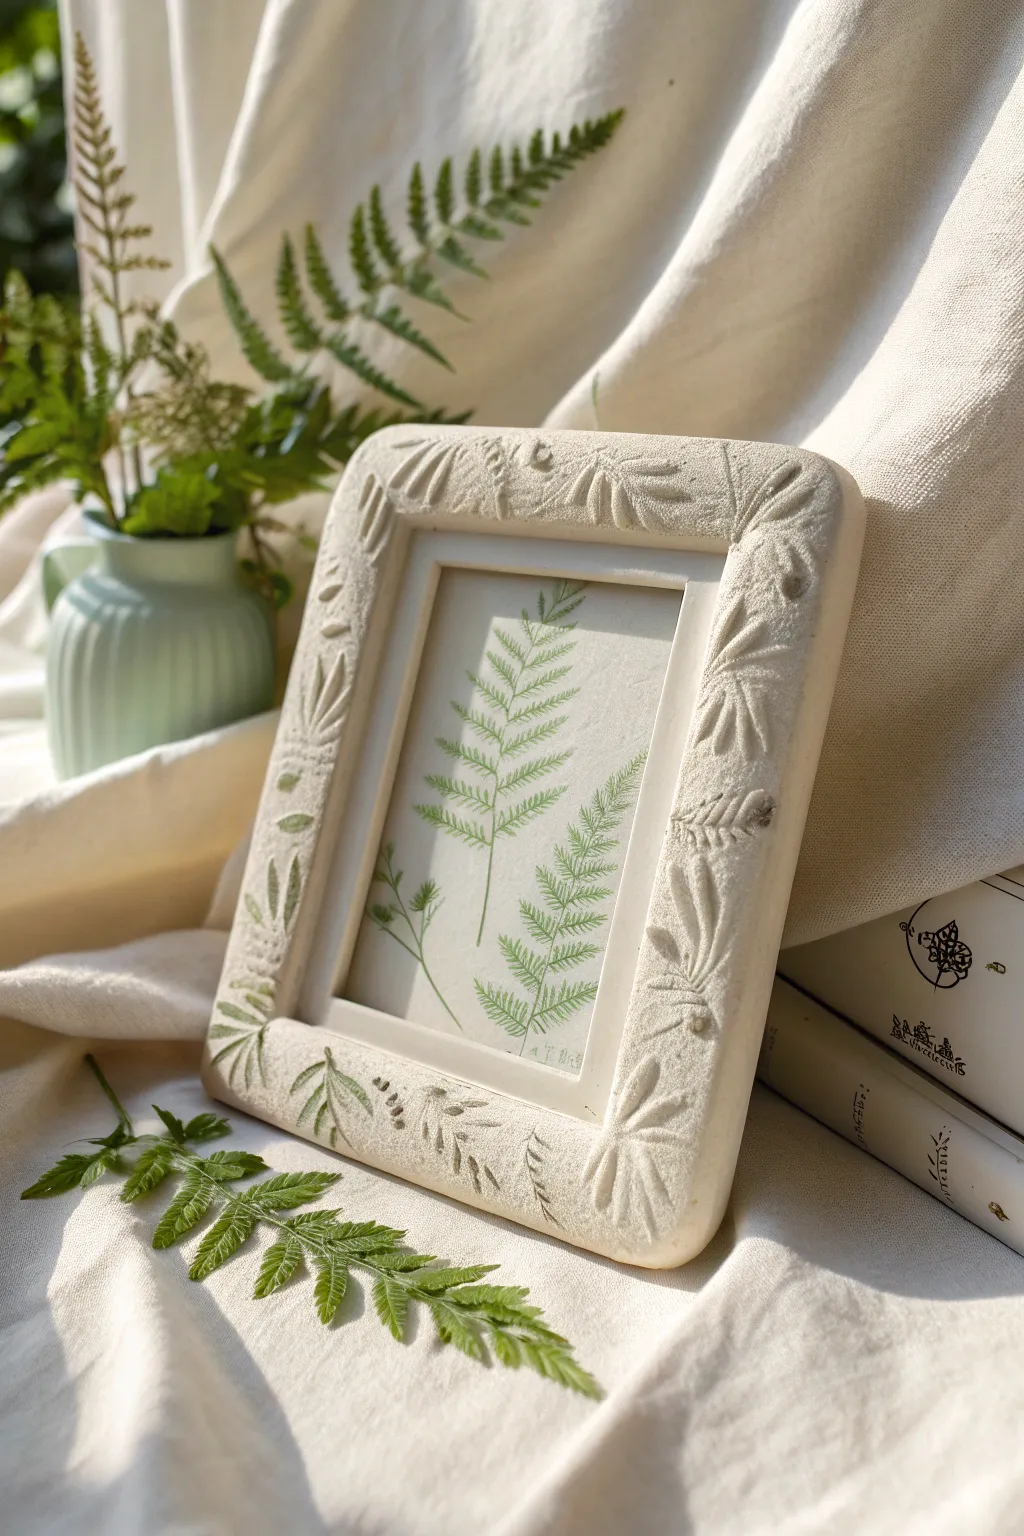
Enhance a simple photo frame with the organic texture of air dry clay and delicate botanical impressions. This project captures the quiet elegance of pressed ferns, creating a customized border that feels both rustic and refined.
Detailed Instructions
Materials
- Simple flat wooden photo frame (4×6 or 5×7)
- White or light beige air dry clay
- Rolling pin
- Craft knife or clay loop tool
- Real or faux fern leaves (sturdy veins work best)
- Modeling tools (needle tool and ball stylus)
- Water in a small cup
- White PVA glue
- Sandpaper (fine grit)
- Matte spray varnish
- Pressed fern or botanical print for display
Step 1: Preparation and Base Layer
-
Prepare the frame:
Remove the glass and backing from your wooden frame. Lightly sand the wooden surface to roughen it up, which helps the clay adhere better. -
Roll the clay:
Take a large chunk of air dry clay and knead it until soft and pliable. Roll it out into a long strip or slab that is roughly 1/4 inch thick and slightly wider than the borders of your frame. -
Apply adhesive:
Brush a generous layer of white PVA glue onto the front face of the wooden frame. -
Cover the frame:
Place strips of the rolled clay onto the glued frame. Press down firmly to eliminate air bubbles and ensure solid contact with the wood. -
Trim the edges:
Using a craft knife, carefully trim the excess clay from the outer and inner edges of the frame. Smooth the cut clay over the sides to cover the wood completely.
Clean Impressions
Dust your leaves with a tiny bit of cornstarch before pressing them into the clay. This acts as a release agent and prevents the leaf from tearing or sticking.
Step 2: Creating the Texture
-
Smooth the surface:
Dip your finger in a little water and run it over the clay surface to smooth out any seams or fingerprints. You want a relatively flat canvas, but a slight handmade unevenness adds charm. -
Plan the pattern:
Before making marks, visualize where your leaves will go. Arrange them in a loose, flowing pattern around the border, angling corners inward for a cohesive look. -
Emboss the main leaves:
Select sturdy fern fronds or leaves with prominent veins. Press them firmly into the wet clay. I prefer to roll over them gently with a small roller to ensure a deep, crisp impression. -
Remove the vegetation:
Carefully peel the leaves back up. Use the tip of a needle tool to lift a stem edge if it’s stuck. -
Refine the details:
If the impression is too faint, use your needle tool to re-trace the central veins and add deeper definition to the leaf patterns manually. -
Add sculpted accents:
Roll tiny, thin snake-like strips of clay to create stems. Gently press these onto the frame surface to connect disparate leaf impressions, blending the edges with a wet modeling tool. -
Stipple the background:
To make the smooth leaves pop, add texture to the negative space. Use a stiff paintbrush or a crumpled ball of aluminum foil to gently tap texture onto the clay between the leaf designs.
Step 3: Finishing Touches
-
Dry thoroughly:
Let the frame dry completely. Air dry clay shrinks as it dries, so keep it away from direct heat sources to prevent cracking. This usually takes 24-48 hours. -
Sand for smoothness:
Once bone dry, use fine-grit sandpaper to gently smooth any sharp peaks or rough edges on the sides of the frame. -
Apply a wash (optional):
To highlight the texture, you can mix a tiny drop of brown paint with water and brush it into the crevices, then wipe the surface clean with a damp cloth. -
Seal the work:
Spray the entire frame with a matte varnish. This seals the clay against humidity and prevents yellowing over time. -
Assemble display:
Clean your glass and place your pressed fern or botanical print inside. Secure the backing, and your nature-inspired frame is ready.
Antique Wash
After drying, rub a dilute mix of burnt umber acrylic paint into the grooves and wipe the surface immediately. The dark paint stays in the recesses, making the texture pop.
Enjoy the serene, natural beauty this handcrafted piece brings to your shelf or wall
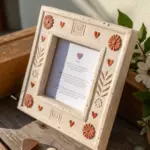
Minimal Raised Squiggle Corners
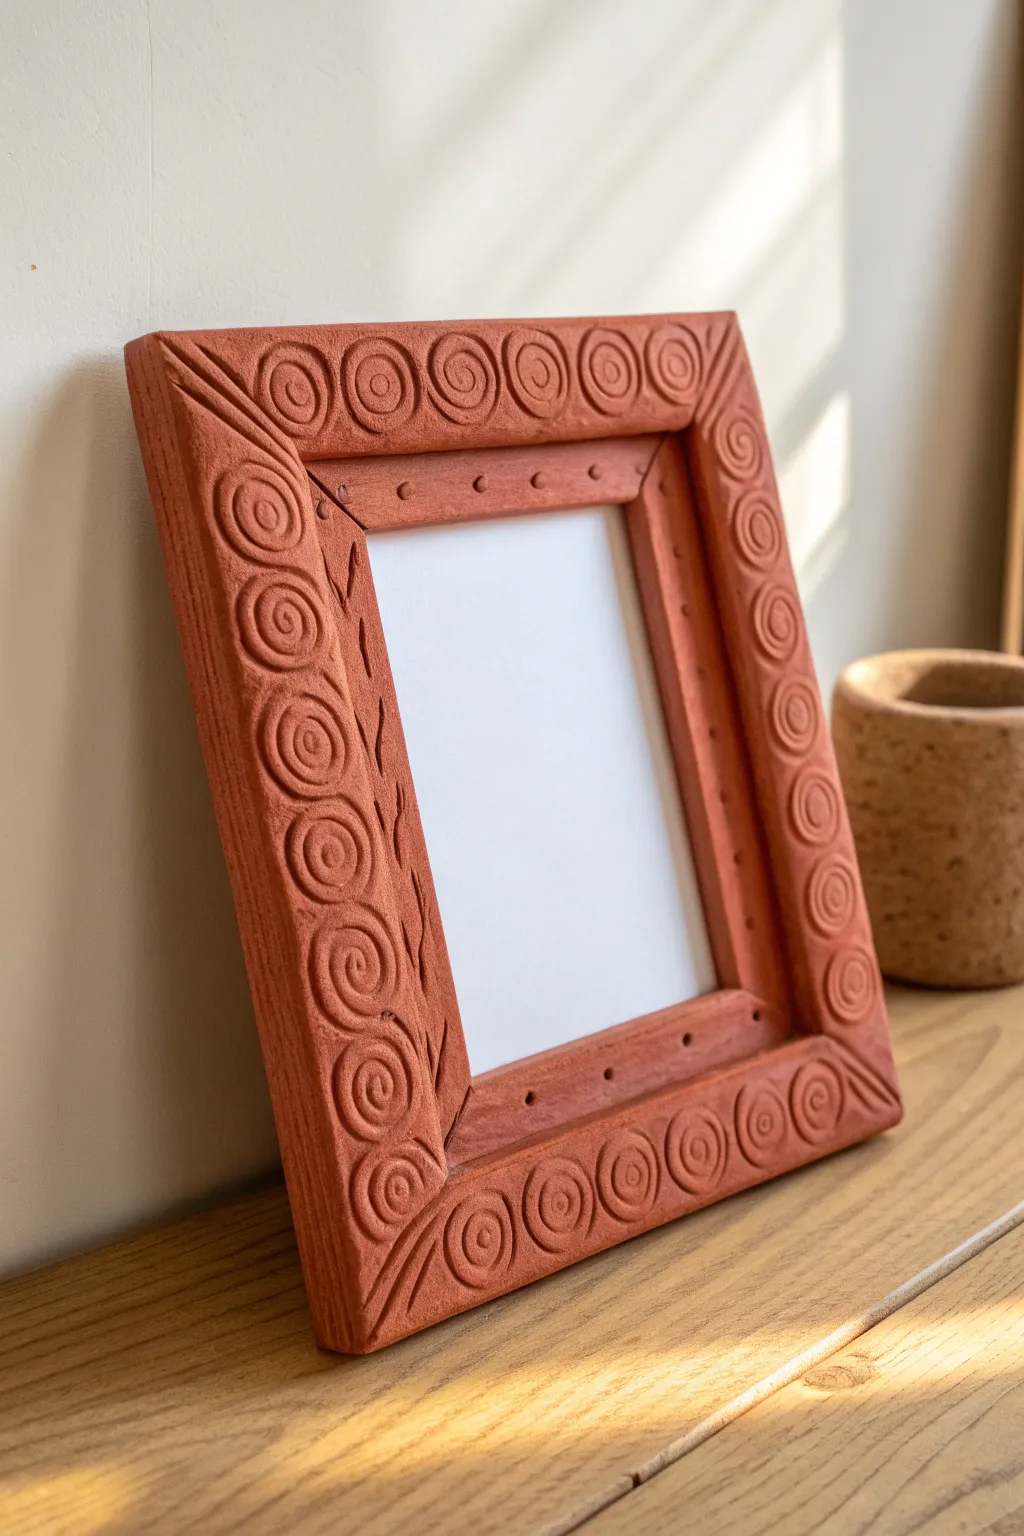
Transform a plain flat frame into an earthy, textured statement piece using air-dry clay. This project features a repeating spiral motif and subtle geometric detailing that mimics the look of carved sandstone or terracotta pottery.
Step-by-Step
Materials
- Flat, wide wooden picture frame (unfinished is best)
- Terracotta colored air-dry clay
- Rolling pin
- Clay knife or craft knife
- Small cup of water
- Slip (clay mixed with water)
- Clean work surface or clay mat
- Sandpaper (medium grit)
- Clear matte varnish or sealant
Step 1: Base Preparation
-
Prepare the underlying frame:
Remove the glass and backing board from your wooden frame. If the frame has a shiny finish, give it a quick sanding with medium-grit sandpaper to help the clay grip the surface better. -
Condition the clay:
Take a large chunk of your terracotta air-dry clay and knead it thoroughly. You want it warm and pliable to prevent cracks from forming later. -
Roll out the slab:
Roll your clay out onto a flat surface until it is about 1/4 inch thick. Aim for an even thickness throughout so the relief work sits level on the frame. -
Cut framing strips:
Measure the width and length of your frame’s sides. Cut four strips from your clay slab that are slightly wider than the wooden frame face to account for coverage.
Step 2: Application and Sculpting
-
Create slip:
Mix a small amount of clay with water until it forms a paste (slip). Brush this onto the wooden frame face; this acts as your glue. -
Apply clay strips:
Lay your clay strips onto the frame. Press them down firmly but gently, smoothing the seams at the corners to create a continuous surface. Trim any excess overhanging the edges with your knife. -
Smooth the foundation:
Dip your finger in water and run it over the clay surface to remove fingerprints and create a smooth, unified base for your design. -
Mark the corners:
Using a butter knife or clay tool, gently press diagonal indentation lines at each corner. This creates a mitred look and helps separate the design sections. -
Detail the inner bevel:
On the inner edge of the frame (the part closest to the photo), use a small, blunt tool to press tiny dots or dimples into the clay. Space them evenly for a stitched effect. -
Create the spirals:
Roll very thin, worm-like coils of clay. Coil these tightly into small spirals or ‘snails.’ Make enough to cover the main flat surface of the frame.
Keep it Malleable
Keep a spray bottle of water nearby. If the clay strips on the frame start drying before you finish the spirals, a light misting will reactivate the surface for better adhesion.
Step 3: Texturing and Finishing
-
Attach the spirals:
Apply a tiny dab of slip to the back of each spiral. Press them onto the frame in a neat row, centering them on the clay strips. I find gently flattening them slightly helps them look integrated rather than just stuck on. -
Add corner details:
In the corner spaces defined by your diagonal lines earlier, create a simple linear design. Press three or four straight grooves into the clay radiating from the corner angle. -
Refine the edges:
Check the outer and inner edges of your frame. If the clay has mushroomed out, trim it flush with the wood again so the frame will lie flat against the wall. -
Dry slowly:
Place the frame in a cool, dry spot away from direct sunlight. Let it dry for at least 24-48 hours. Drying too fast can warp the frame, so be patient. -
Spot sand:
Once fully dry and hard, inspect for any sharp burs or rough bits of clay. Gently sand these away without damaging the spiral relief. -
Seal the work:
Apply a coat of clear matte varnish. This will enrich the terracotta color slightly and protect the clay from moisture and dust over time.
Fixing Separation
If the clay pulls away from the wood while drying, don’t panic. Use a strong super glue or E6000 to reattach the dried clay piece back onto the wooden frame securely.
Once sealed and reassembled with your favorite photo, you’ll have a warm, custom piece of decor that looks authentically hand-carved

TRACK YOUR CERAMIC JOURNEY
Capture glaze tests, firing details, and creative progress—all in one simple printable. Make your projects easier to repeat and improve.
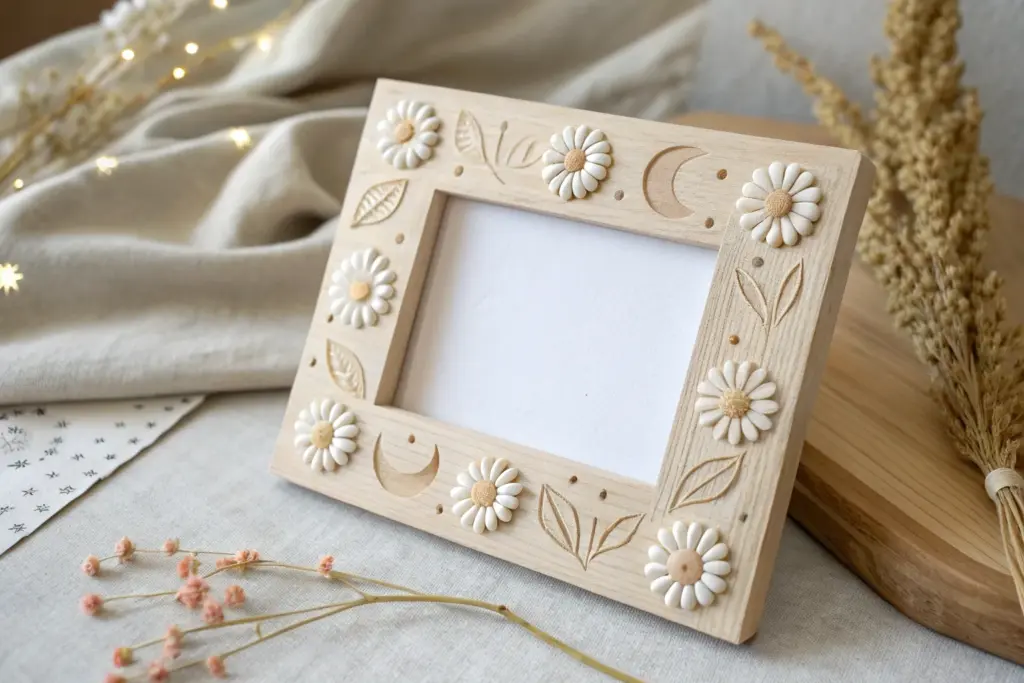
Moon and Stars Night Sky Frame

Bring the magic of the midnight sky into your home with this deep blue sculpted frame featuring carved moons and twinkling golden stars. This project transforms a basic wooden frame into a textured piece of art that looks like it came from an apothecary’s study.
How-To Guide
Materials
- Wide, flat wooden picture frame (as a base)
- Air dry clay (white or terracotta)
- Rolling pin
- Sculpting tools (needle tool, small ball stylus, clay knife)
- Acrylic paint (Deep Midnight Blue or Navy)
- Small star-shaped clay cutters (optional)
- Gold metallic paint or gold leafing pen
- Small spherical gold beads or gold faux pearls
- Super glue or strong craft glue
- Matte sealant spray or varnish
- Sandpaper (fine grit)
- Flat paintbrush and fine detail brush
- Water cup
Step 1: Preparing the Clay Base
-
Prep the frame:
Remove the glass and backing from your wooden frame. If the frame is very glossy, rough it up slightly with sandpaper to help the clay adhere better. -
Roll out the clay:
Roll your air dry clay into a slab approximately 3-4mm thick. Ensure it’s large enough to cover the entire front surface of your frame. -
Apply the clay:
Spread a thin layer of PVA or craft glue over the front of the wooden frame. Carefully lay your clay slab over the frame, pressing gently to remove air bubbles. -
Trim the edges:
Using a craft knife or clay blade, trim the excess clay from both the outer and inner edges of the frame for a clean, flush fit. -
Smooth it out:
Dip your finger in a little water and run it along the edges and surface to smooth out any cracks or fingerprints.
Clean Lines
Wipe your tools with a damp cloth or baby wipe frequently while carving. Clay buildup on the needle tool causes drag and ragged edges.
Step 2: Sculpting the Celestial Design
-
Sketch the layout:
To avoid crowding, lightly mark the clay with the tip of a needle tool where you want your main crescent moons and large stars to go. -
Carve the moons:
For the crescent moons, use a needle tool to deeply incise the outline. You can create a ‘relief’ look by slightly pressing down the clay surrounding the moon shape, making the moon itself stand out slightly. -
Imprint stars:
If you have small star cutters, gently press them onto the surface to create indentations. Alternatively, freehand the stars by carving five-point shapes with your needle tool. -
Add texture:
Using a needle tool, add small etched details inside the moons or trailing behind the stars to mimic comet tails or moon craters. -
Prepare bead placements:
Use a small ball tool or the head of a pin to create small divots where you plan to place the gold beads later. This ensures they sit securely. -
Dry thoroughly:
Let the frame dry completely for 24-48 hours. I usually flip it carefully halfway through to ensure the underside against the wood dries too.
Make it Sparkle
For a magical depth effect, mix a tiny amount of very fine silver glitter into your dark blue base paint before applying it.
Step 3: Painting and Finishing
-
Sand imperfections:
Once fully hard, gently sand any rough edges or sharp peaks with fine-grit sandpaper. -
Base coat:
Paint the entire frame, including the carved indentations, with a deep midnight blue acrylic paint. You may need two coats for opaque coverage. -
Seal the color:
Once the blue paint is dry, apply a coat of matte varnish. This gives it a professional finish and protects the clay. -
Highlighting details:
Use a very fine brush and metallic gold paint to color inside the carved stars and moons. A gold leafing pen also works wonderfully here for sharp lines. -
Add the stars:
Place a tiny drop of super glue into the divots you made earlier and press the gold beads into place. -
Reassemble:
Once everything is dry and the fumes have dissipated, replace the glass and backing.
Place your favorite photo inside and admire your personal piece of the night sky
Cloudy Pastel Dream Frame
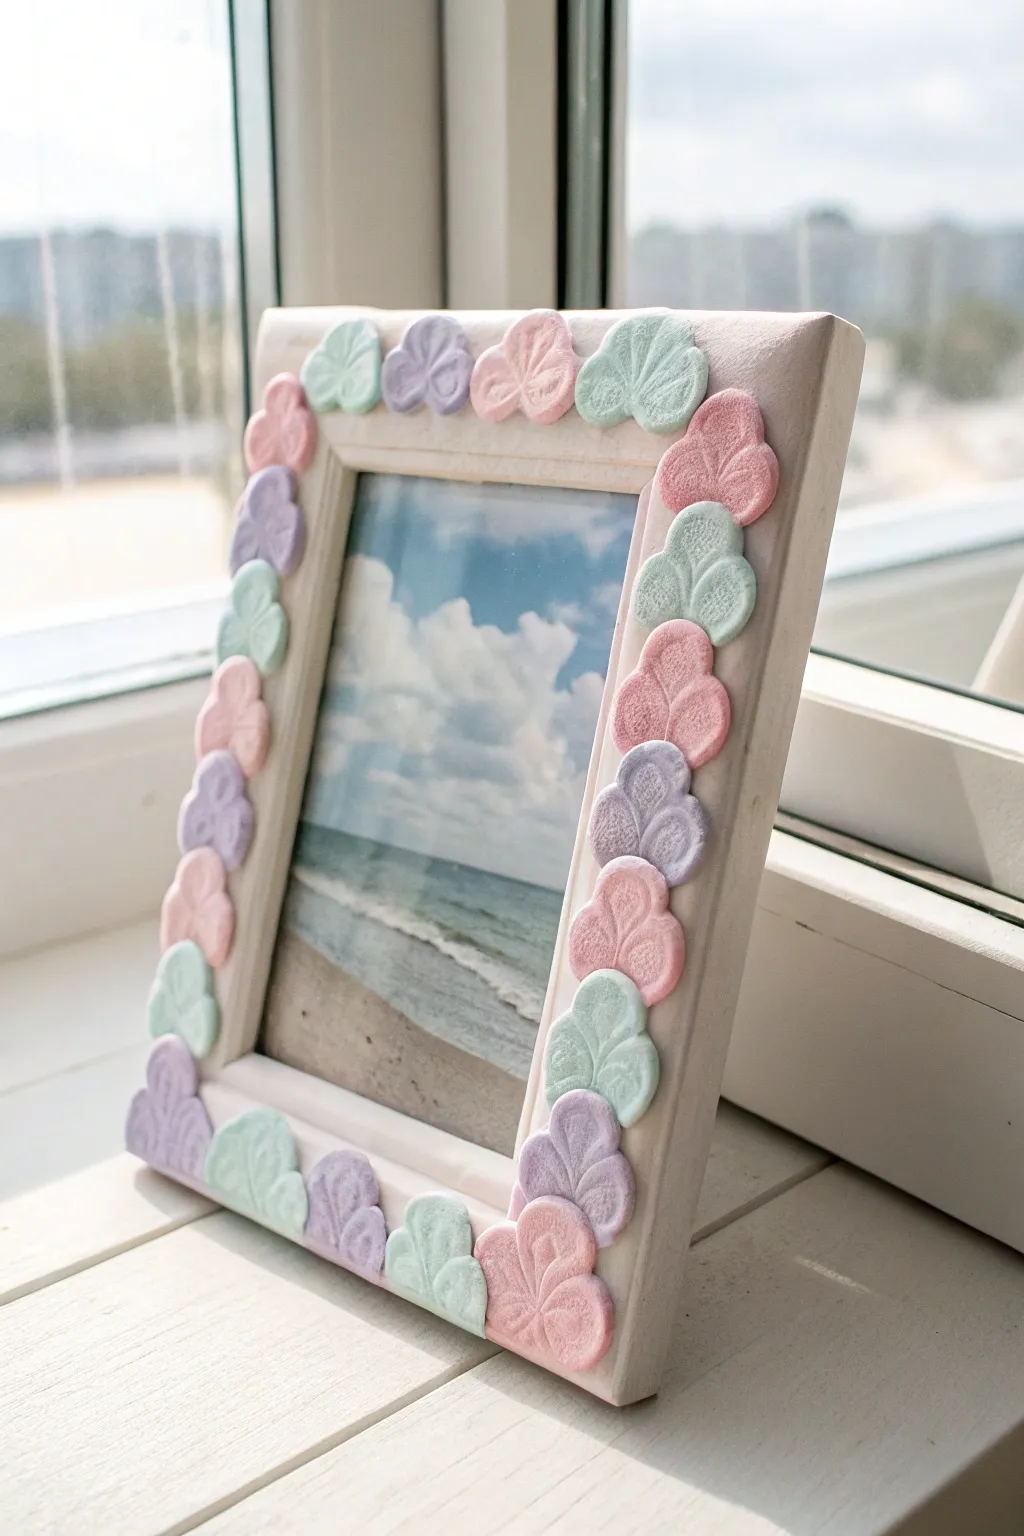
Transform a plain wooden frame into a whimsical piece of decor with soft, marshmallow-like clay shapes. This project uses gentle pastel hues to create a dreamy border that perfectly frames your favorite serene memories.
Detailed Instructions
Materials
- Plain wooden picture frame (white or light wood)
- White air dry clay (lightweight or foam clay works best)
- Acrylic paints (pastel pink, purple, and mint green)
- Tools: Rolling pin, clay sculpting tool or butter knife
- Small leaf or petal cookie cutter (approx. 1 inch)
- Craft glue or strong adhesive
- gloss or matte varnish (optional)
Step 1: Prepping the Clay
-
Divide the clay:
Start by separating your white air dry clay into three equal portions. Keep a fourth, smaller portion aside if you want to mix a custom shade or keep some pure white. -
Mix your colors:
Take a very small dab of pastel pink paint and knead it thoroughly into the first portion of clay. Continue kneading until the color is uniform and streak-free. -
Create the palette:
Repeat this mixing process with the pastel purple and mint green paints for the other two distinct clay balls. Aim for soft, candy-like hues rather than bold saturated colors. -
Protect the frame:
If your wooden frame isn’t already white, give it a quick coat of white acrylic paint and let it dry completely. This ensures the background creates a bright, clean canvas for your pastels.
Step 2: Shaping the Clouds
-
Roll it out:
Roll out your pink clay on a non-stick surface until it is about 1/4 inch thick. You want the pieces to have a nice, puffy volume, so don’t go too thin. -
Cut the shapes:
Using your petal or small cloud-shaped cutter, press firmly into the clay to create your shapes. If you don’t have a cutter, you can hand-mold small three-humped cloud shapes. -
Add texture:
With a sculpting tool or the back of a knife, gently press indentation lines into each shape to mimic the veins of a leaf or the folds of a cloud. In the reference, these lines fan out from the bottom center. -
Repeat for all colors:
Clean your tools, then repeat the rolling, cutting, and texturing process for the purple and mint green clay. Make sure you have enough total pieces to cover the perimeter of your frame. -
Smooth the edges:
Before they dry, gently run your finger around the cut edges of each piece to soften any sharp corners. I find this gives the finished frame a much softer, fabric-like look.
Clay Texture Tip
To get that sugary texture, gently press a clean sponge onto the wet clay surface before drying. It mimics a marshmallow surface perfectly.
Step 3: Assembly
-
Dry fit the design:
Lay your frame flat and arrange the clay pieces around the border without glue first. This lets you plan the alternating color pattern—pink, green, purple—to ensure they fit perfectly. -
Glue the first piece:
Start at a corner. Apply a robust dot of craft glue to the back of a clay shape and press it firmly onto the frame. -
Create the border:
Continue gluing the pieces around the frame, following your alternating color pattern. Place them close together so they are touching; this creates a seamless, scalloped edge. -
Handle corners:
When you reach a corner, you may need to slightly angle the pieces so they flow naturally around the bend. Tilt the shapes outward slightly to match the frame’s geometry. -
Let it cure:
Allow the entire frame to sit undisturbed for at least 24 hours. The clay needs to fully harden, and the glue needs to set completely to hold the weight. -
Seal (Optional):
For extra durability, you can brush on a layer of matte varnish once dry. This protects the clay from dust and moisture without altering the soft, chalky finish.
Add Some Sparkle
While the paint or varnish is still wet, sprinkle ultra-fine iridescent glitter on the ridges of the shapes for a magical, shimmering finish.
Once dry, slide in your favorite beach photo or dreamy landscape to complete the soft aesthetic
3D Mountain Landscape Border
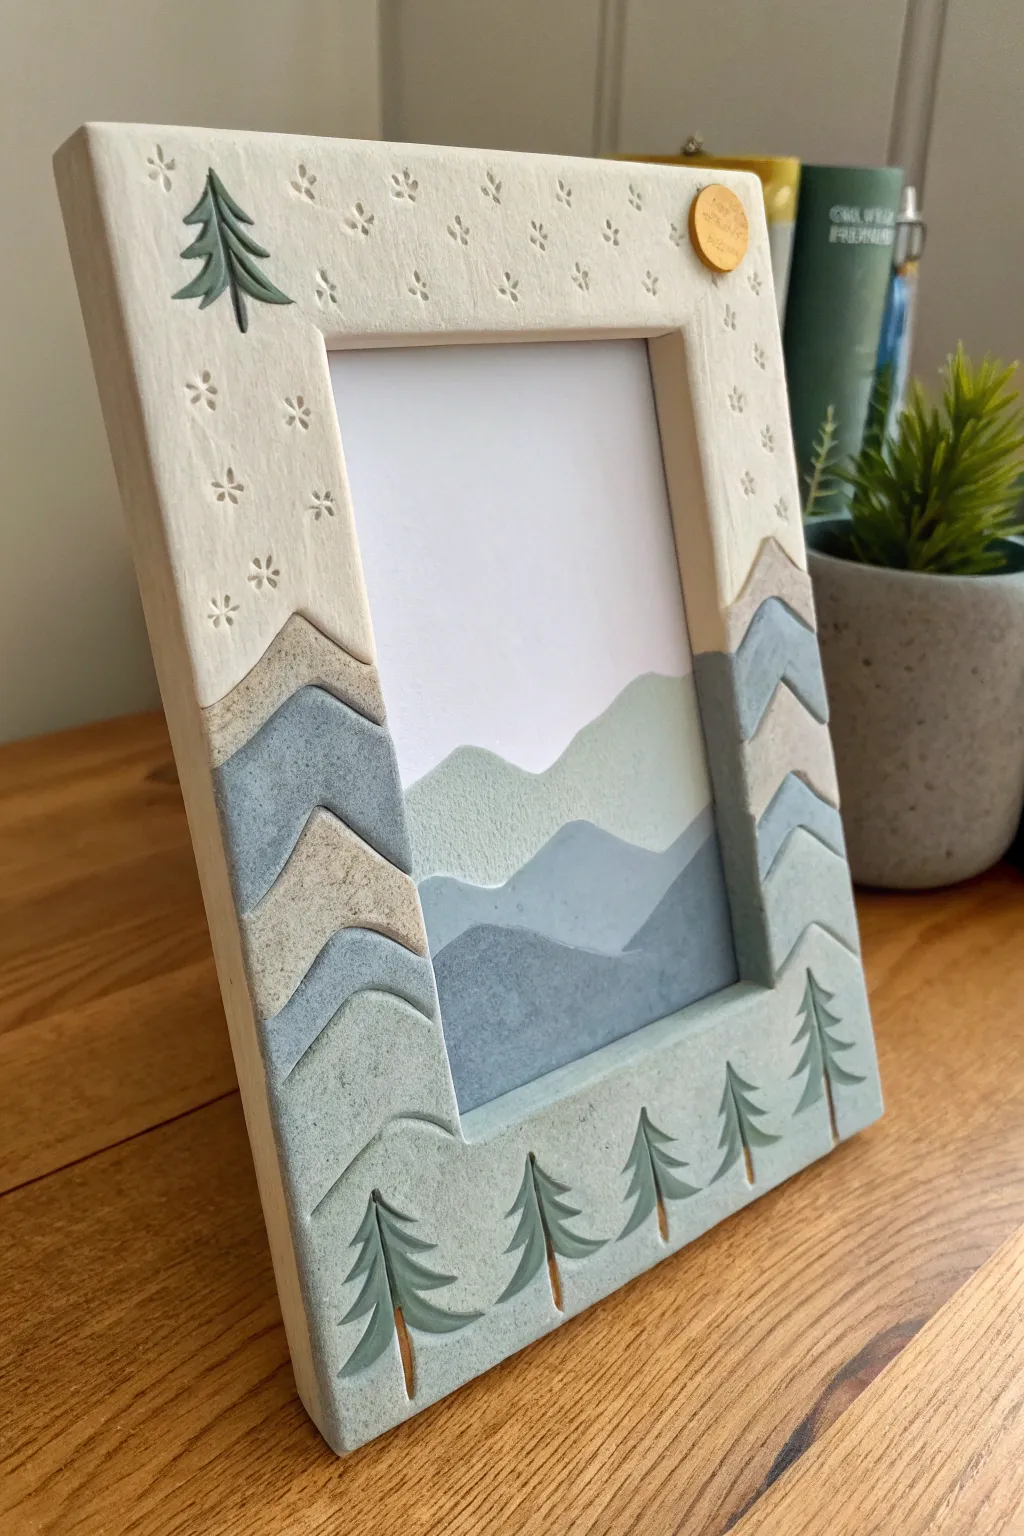
Bring the serenity of the mountains into your home with this stunning layered design. Using simple slab techniques and a soothing palette of blues and creams, you’ll transform a plain wooden frame into a textured highland landscape complete with pine trees and a golden moon.
Step-by-Step
Materials
- Flat wooden picture frame (about 1-inch border width)
- White air-dry clay
- Acrylic paints (Titanium White, Payne’s Gray, Sage Green, Metallic Gold)
- Rolling pin
- Clay knife or craft knife
- Water and small sponge
- Sandpaper (fine grit)
- Small stylus tool or toothpick
- Detail paintbrush and flat shader brush
- Strong craft glue or wood glue
- Matte varnish (optional)
Step 1: Preparing the Base Layer
-
Prepare the surface:
Begin by lightly sanding your wooden frame to create a grippy texture. Wipe away any dust with a damp cloth so your clay adheres properly later. -
Roll the clay slab:
Roll out a portion of white air-dry clay until it is roughly 3mm thick. You want a consistent, smooth sheet that is large enough to cover the top third of your frame. -
Cut the sky section:
Place the frame over the clay to measure, or create a paper template. Cut a U-shape that covers the top and extends partially down the sides. The bottom edge of this piece doesn’t need to be straight—give it a slight zigzag or scallop to mimic distant peaks. -
Attach the sky:
Apply a thin layer of glue to the top section of the wooden frame. Press the clay piece onto the wood, smoothing the edges gently with a wet finger to blend seams. -
Add texture:
While the clay is still soft, use a small stylus or a toothpick to press tiny snowflake or star patterns into the ‘sky’ area. Create clusters of dots or small asterisks for a falling snow effect.
Cracks in the peaks?
If small cracks appear during drying, make a ‘slurry’ paste by mixing a tiny bit of fresh clay with water. Smear this into the crack, smooth it with your finger, and let it dry again before painting.
Step 2: Building the Mountains
-
Create the mountain slabs:
Roll out more clay, slightly thicker than the sky layer (about 4-5mm). You will need enough for three distinct sections: the left side, the right side, and the bottom horizontal strip. -
Cut the zigzag peaks:
Using your craft knife, cut zigzag ‘chevron’ shapes. These will be stacked to look like mountains. For the very bottom strip, cut a long rectangle with a subtle wavy top edge to represent the foreground hills. -
Layer the sides:
Glue the chevron mountain shapes onto the side borders of the frame, overlapping the bottom edge of your ‘sky’ layer slightly. I find it helpful to moisten the back of the clay where it overlaps to ensure a tight bond. -
Add the foreground:
Attach the bottom horizontal strip last. This piece should sit on top of the lower edges of your side mountain pieces, creating a sense of depth where the foreground pops out most. -
Form the pine trees:
Roll tiny cones of clay and flatten them against the bottom strip. Use your knife to cut notches into the sides of the triangles, creating fir tree branches. Add about four or five trees across the bottom. -
Add the celestial detail:
Roll a very small ball of clay, flatten it into a coin, and adhere it to the top right corner of the frame to serve as the moon. -
Drying time:
Let the entire frame dry flat for at least 24-48 hours. Keep it away from direct heat to prevent the clay from cracking or warping as it shrinks.
Level Up: Insert Art
Paint a matching watercolor landscape on paper to put INSIDE the frame. Align the horizon line of your painting with the clay mountains on the frame for a seamless 3D effect.
Step 3: Painting and Finishing
-
Base coat the sky:
Once fully rigid, paint the top ‘sky’ section and the top edges of the mountains with a creamy off-white. Make sure to get paint into the little indented star textures. -
Paint the mountains:
Mix three shades of blue-grey. Paint the highest peaks (nearest the sky) the lightest grey-blue. Paint the middle chevron layer a medium stone blue. -
Paint the foreground:
For the bottom-most strip and the lowest mountain sections, use your darkest slate blue or a grey-green mix to ground the composition. -
Detail the trees:
Paint the raised pine trees in a muted sage green. Use a very fine brush to add a thin brown line for the trunks at the very bottom. -
Gild the moon:
Carefully paint the small circle in the top right with metallic gold paint for a pop of warmth. -
Optional texture painting:
If you want a stoned look like the example, use a stiff brush to stipple small darker speckles onto the mountain sections. -
Seal the work:
Finish with a coat of matte varnish to protect the clay and unify the finish without making it too shiny.
Place your favorite photo inside and enjoy the calm, crafted atmosphere this piece adds to your shelf.
Under-the-Sea Shell Frame
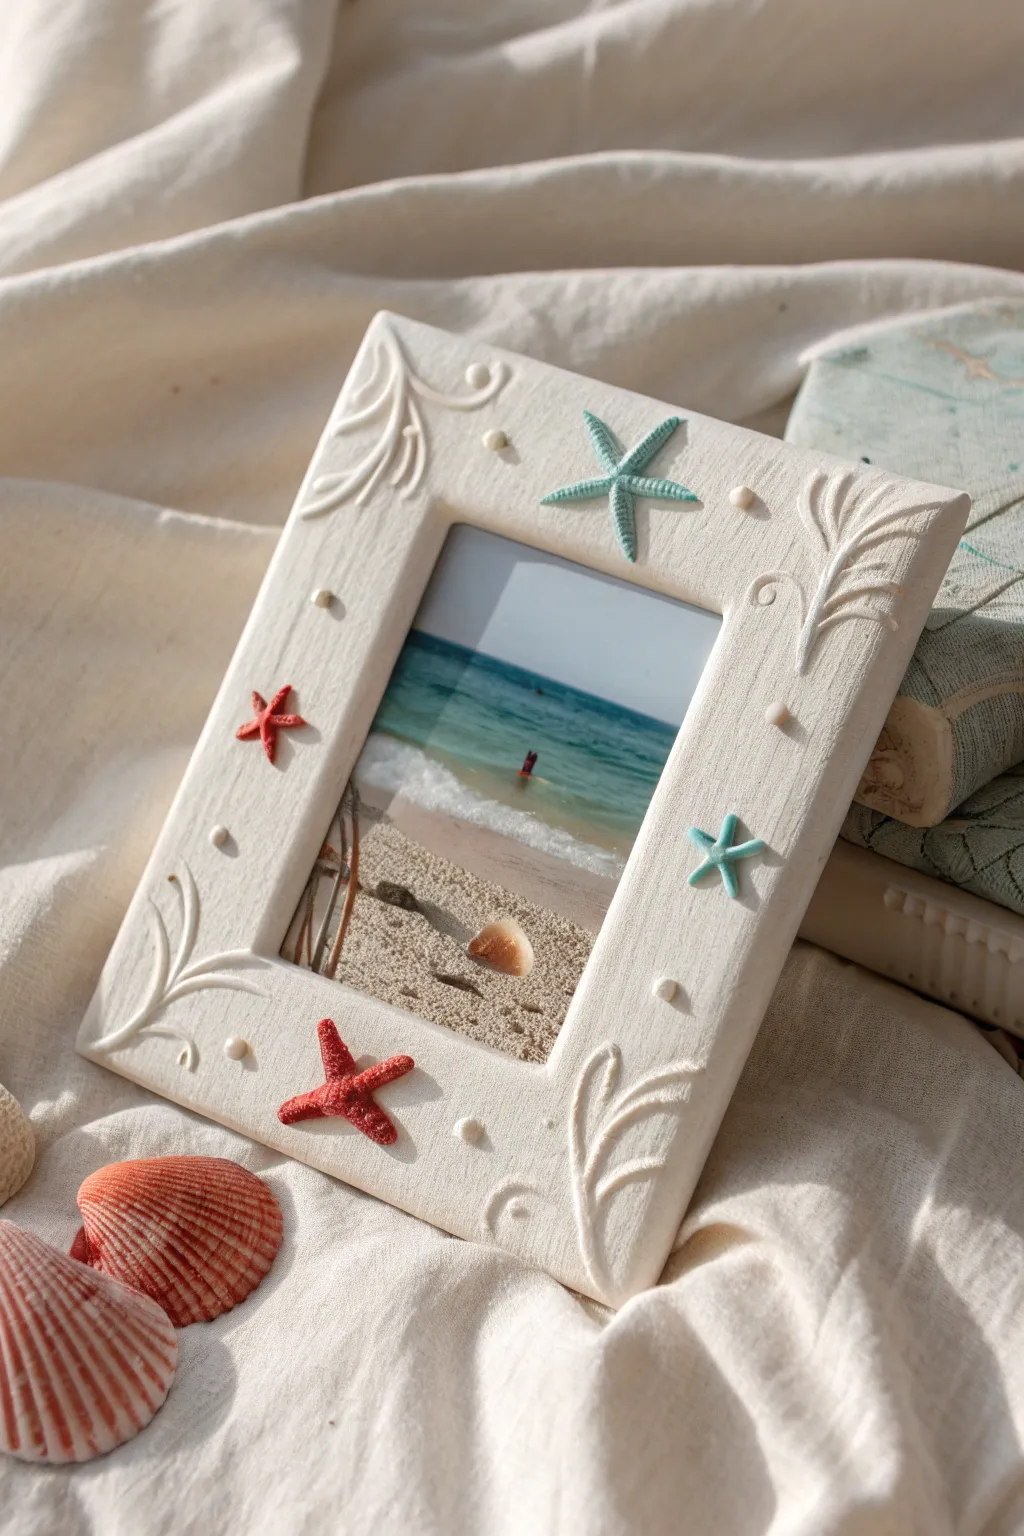
Capture the breezy elegance of the coast with this beautifully textured frame. Featuring delicate white clay sculpted with organic curves and accented by charming red and teal starfish, this project transforms a simple photo into a treasured beach souvenir.
Step-by-Step Tutorial
Materials
- White air dry clay
- Rolling pin
- Rectangular craft wood frame (flat surface)
- Hobby knife or clay cutting tool
- Sculpting fluid or water
- Clay sculpting tools (needle tool, small ball stylus)
- Texture sponge or sandpaper (optional)
- Acrylic paints (Teal, Red, White)
- Fine detail paintbrush
- Strong craft glue or E6000
- Clear matte varnish
Step 1: Preparing the Base
-
Roll out the clay:
Start by conditioning your white air dry clay until it’s pliable and smooth. Roll it out on a non-stick surface to a uniform thickness of about 1/4 inch. -
Cover the frame:
Apply a thin layer of glue to the face of your wooden frame base. Carefully lay the rolled clay sheet over the frame, smoothing it down gently to remove any trapped air bubbles. -
Trim the edges:
Using a sharp hobby knife, trim the excess clay from both the outer and inner edges of the frame. Smooth the cut sides with a little water on your fingertip to create a seamless finish. -
Create surface texture:
For that slightly weathered, sandy look seen in the photo, gently dab the surface with a textured sponge or lightly press rough sandpaper against the damp clay. Don’t overdo it; you just want a matte, organic feel.
Step 2: Sculpting the Details
-
Form the corner flourishes:
Roll very thin, tapered coils of clay (snakes) to create the seaweed-like flourishes. Arrange these in the corners of the frame, curving them naturally. -
Attach the flourishes:
Use a small amount of water or clay slip to bond the coils to the frame surface. Blend the base of the stems slightly into the frame, but leave the tips raised for dimension. -
Add detail dots:
Roll tiny balls of clay, varying slightly in size. Press these gently onto the frame surface around the flourishes and in open spaces to mimic pearls or sand grains. -
Sculpt the starfish:
Separately, shape five small starfish. Create a central ball and pull out five distinct arms. I find using a needle tool helps to drag the clay outward into sharp points. -
Texturize the starfish:
Use a needle tool or small brush to stipple the surface of the starfish, giving them their characteristic rough texture. Create a central indentation on each one. -
Dry the components:
Let the main frame and the loose starfish dry separately. This usually takes 24-48 hours depending on humidity. Flip them occasionally to ensure even drying.
Cracking Clay?
If small cracks appear as the clay dries on the wood frame, mix a tiny amount of fresh clay with water to make a paste and fill them in before painting.
Step 3: Assembly and Finishing
-
Paint the starfish:
Once fully dry, paint the starfish. Use a muted teal for two of them and a deep coral red for the other three to match the example. -
Highlight the texture:
While the paint is wet, you can dab a tiny bit of white to highlight the texture, or wait until dry and dry-brush a little white over the raised bumps. -
Paint the frame (optional):
The frame is intended to be white, but if your clay dried off-white, you can give it a coat of matte white acrylic paint for a crisp look. -
Attach the starfish:
Glue the painted starfish onto the frame. Place the large teal one at the top right, and scatter the red and smaller teal ones diagonally across the other corners as shown in the reference image. -
Seal the project:
Apply a coat of clear matte varnish over the entire frame. This protects the clay from moisture and gives the colors a finished, professional appearance. -
Insert your photo:
Once the varnish is cured, insert your favorite beach photo and display your handmade coastal art.
Add Real Shells
For extra authenticity, press tiny real seashells or bits of seaglass into the corners while the clay is still wet instead of sculpting everything.
Now you have a stunning, handcrafted frame ready to showcase your favorite summer memory
Citrus Slice Pop Frame
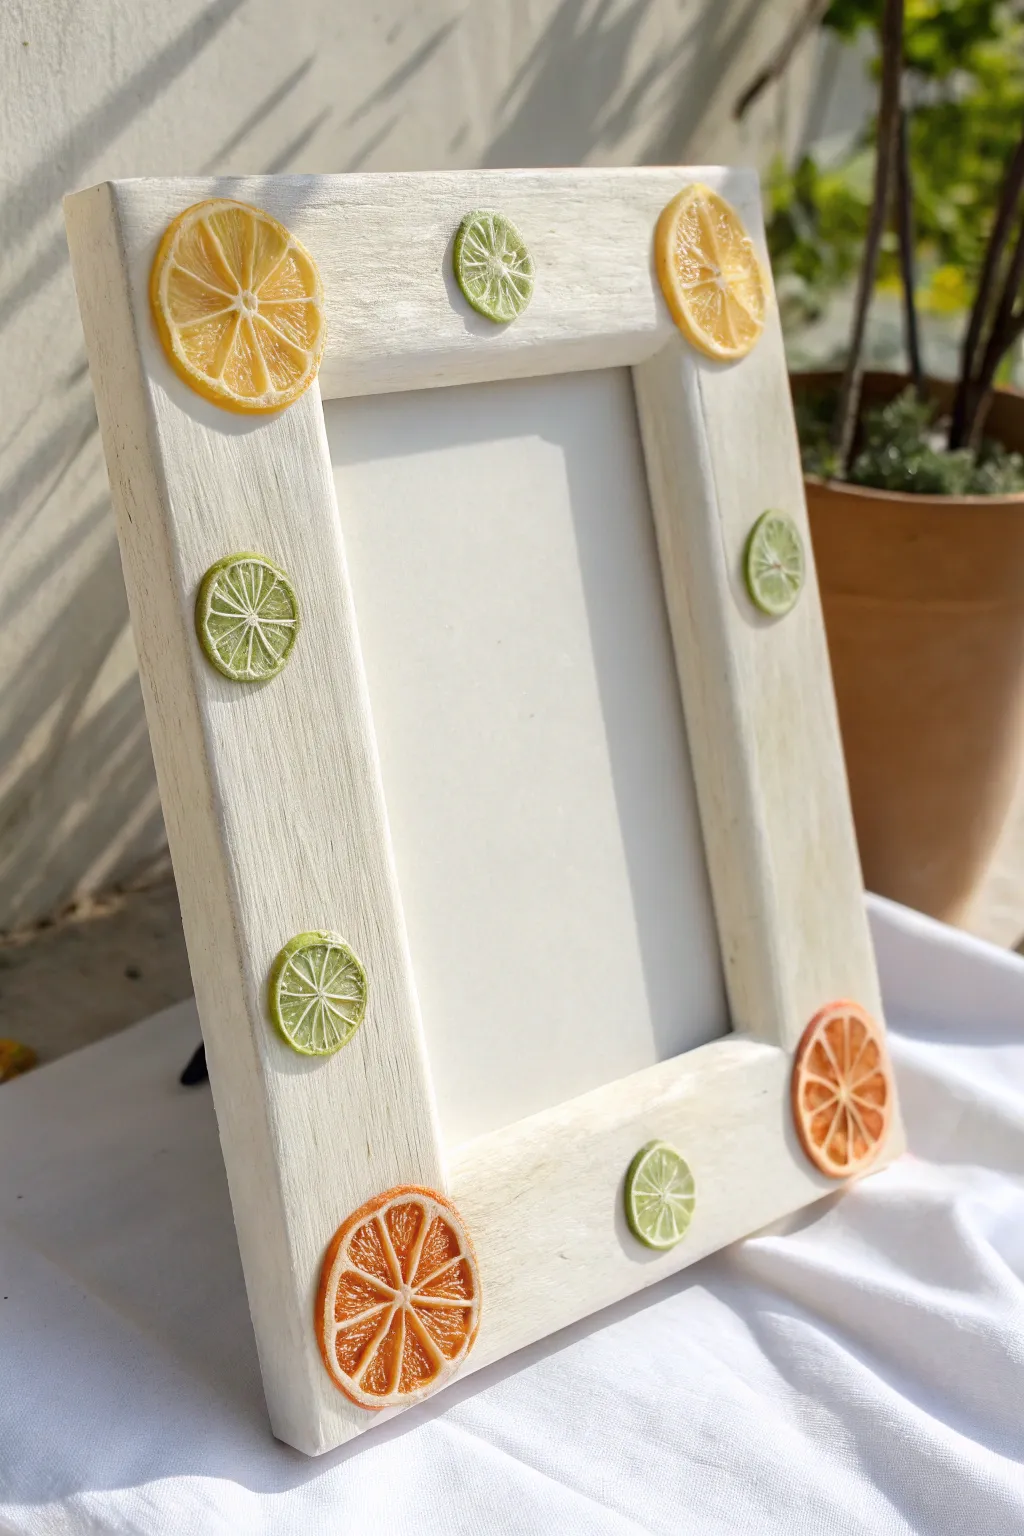
Bring a zest of summer into your home decor with this refreshing photo frame project. This DIY transforms a simple wooden frame into a fruity delight using realistic air dry clay citrus slices in vibrant shades of green, yellow, and orange.
Step-by-Step
Materials
- Wide, flat wooden photo frame (unfinished)
- Air dry clay (white)
- White acrylic paint
- Acrylic paints (orange, bright yellow, lime green, white)
- Mod Podge or strong craft glue
- Clay roller or rolling pin
- Craft knife or X-Acto knife
- Paintbrushes (flat brush for frame, fine detail brush for slices)
- Needle tool or toothpick
- Gloss varnish or clear nail polish
Step 1: Prepping the Frame
-
Base coat application:
Begin by removing the glass and backing from your wooden frame. Paint the entire front and sides of the frame with white acrylic paint. You may need two coats for a solid, opaque finish that hides the wood grain. -
Creating texture:
While the second coat is still slightly tacky, use a stiff , dry bristle brush to drag through the paint in long, vertical strokes. This mimics a subtle, whitewashed wood grain texture. -
Drying time:
Set the frame aside to dry completely while you work on the clay components.
Fixing Cracks
If your clay slices crack while drying, mix a tiny bit of fresh clay with water to make a paste (slip) and fill the cracks. Smooth it out and let dry again.
Step 2: Sculpting the Citrus Slices
-
Rolling out the clay:
Take a small portion of air dry clay and roll it out on a smooth surface to a thickness of about 3-4mm. You want it substantial enough to hold detail but not too bulky. -
Cutting the rounds:
Find a small circular cutter or a household object like a bottle cap (approx. 1-1.5 inches in diameter). Cut out about 8-10 circles. -
Sculpting the rind:
Using a smaller circular cutter or just free-handing with a needle tool, lightly impress a smaller circle inside the main one, leaving a thin border for the ‘rind’ or peel. -
Adding segments:
Use your knife to gently score lines dividing the inner circle into triangular segments, like a pizza. Do not cut all the way through; just create the indentations. -
Detailing the pulp:
This is the crucial step for realism. Take a needle tool and prick thousands of tiny texture holes inside each triangular segment. This mimics the juicy pulp of the fruit. -
Drying the clay:
Let your clay slices air dry completely according to the package instructions. This usually takes 24 hours. Placing them on parchment paper helps prevent sticking.
Make it a Set
Create a matching set by making larger slices (grapefruit!) for a bigger frame or tiny key limes for a mini magnet set.
Step 3: Painting & Assembly
-
Base colors:
Paint the dried clay rounds. Paint a few orange, a few lemon yellow, and a few lime green. Ensure the paint gets into the textured pulp holes. -
Adding pith details:
Once the base color is dry, use a very fine brush and white paint to carefully paint the radial lines between the segments and the inner rim of the rind. This represents the white pith. -
Glossing for juice:
To make the fruit look fresh and juicy, apply a thick coat of gloss varnish or clear nail polish over just the colored pulp sections, leaving the white pith matte if possible. -
Planning the layout:
Lay your painted slices onto the white frame to determine placement. I like to alternate colors and angles to keep the look organic and playful. -
Adhering the slices:
Apply a dab of strong craft glue or heavy-duty Mod Podge to the back of each slice and press firmly onto the frame. -
Final touches:
Let the glue cure completely before reassembling your frame with the glass and backing.
Now your zesty, handmade frame is ready to brighten up any shelf or desk space
Checkerboard Color-Block Frame
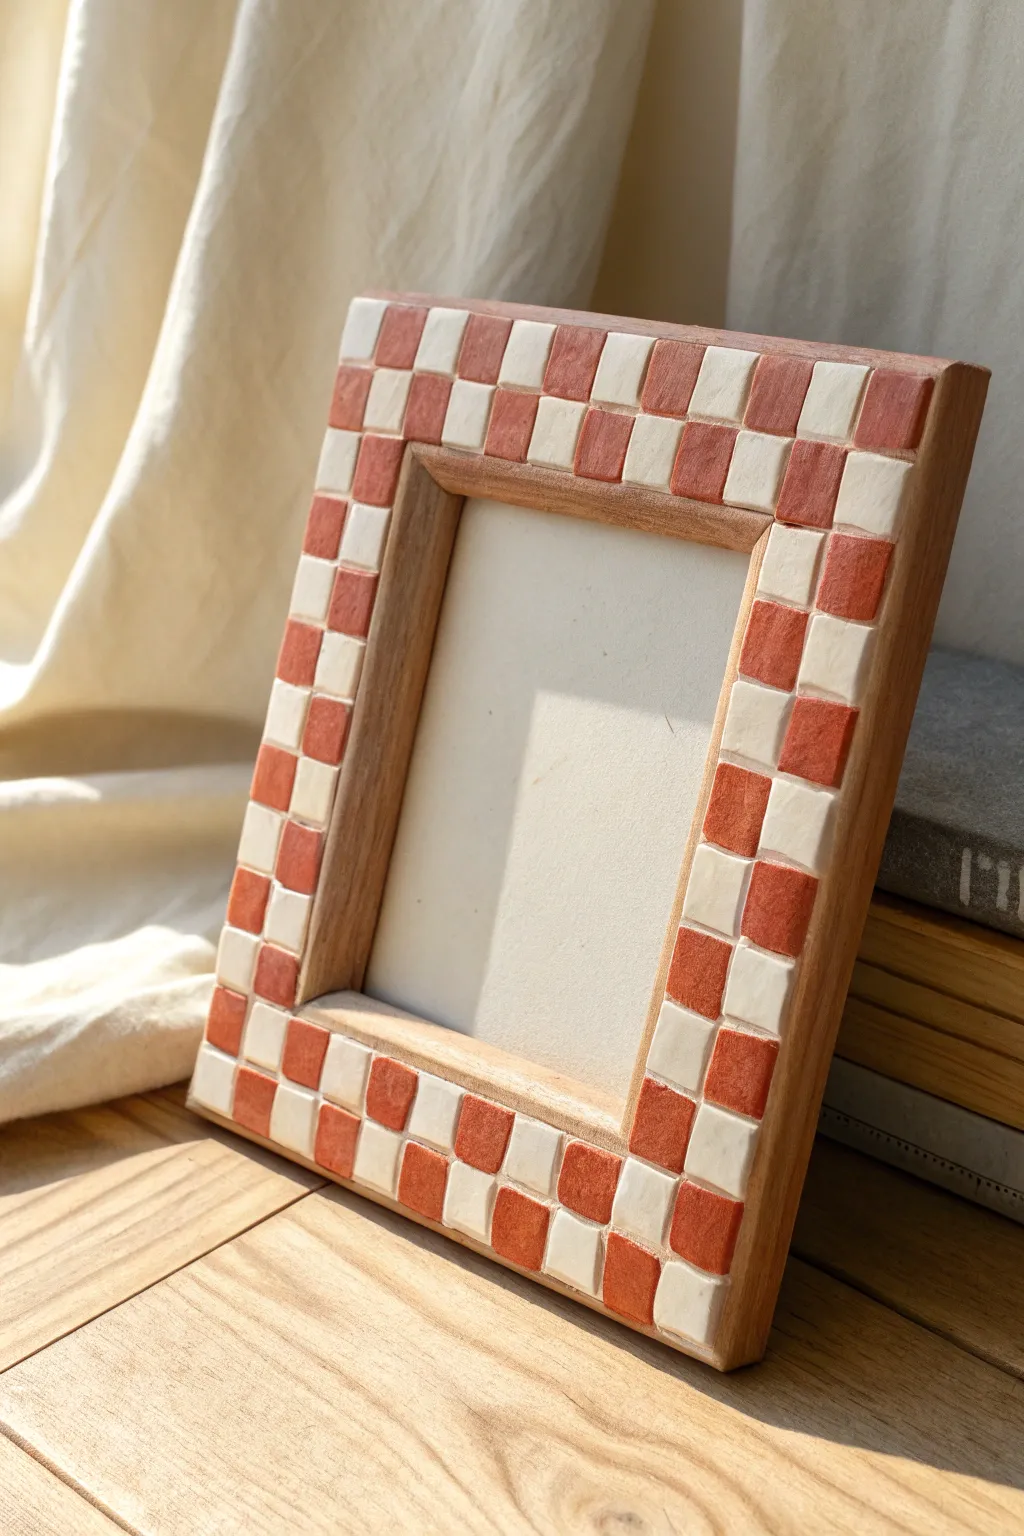
Transform a plain wooden frame into a trendy piece of decor using this simple tiling technique. The warm terracotta tones mixed with creamy white squares create a cozy, modern aesthetic that looks much more expensive than it is.
How-To Guide
Materials
- Flat, wide wooden picture frame (unfinished or sanded)
- Air dry clay (white)
- Acrylic paint (terracotta/burnt sienna and warm white)
- Rolling pin
- Ruler
- Craft knife or clay slicer
- Fine-grit sandpaper (220 grit)
- Wood glue or heavy-duty craft glue
- Matte sealant or varnish
- Small flat paintbrush
- Palette or mixing surface
- Parchment paper or silicone mat
Step 1: Prepping the Clay Tiles
-
Condition the clay:
Begin by taking a chunk of air dry clay and kneading it in your hands until it becomes soft, pliable, and free of cracks. -
Roll it out:
Place the clay on a sheet of parchment paper. Use a rolling pin to flatten it into an even slab, aiming for a thickness of about 3-4mm. Try to keep the thickness consistent so your tiles lie flat later. -
Measure your frame:
Measure the width of your wooden frame’s border. Divide this number by two to determine the ideal size for your squares (e.g., if the border is 1 inch wide, you’ll want 0.5-inch squares). -
Cut the grid:
Using a ruler and a craft knife, lightly score a grid onto your rolled-out clay slab according to your measurements. Once satisfied with the grid, press the blade all the way through to cut individual squares. -
Smooth the edges:
Carefully separate the squares. Run your finger gently along the cut edges of each square to soften any sharpness or stray clay bits. -
Let them dry:
Arrange the squares on a flat surface and let them air dry completely. This usually takes 24-48 hours depending on humidity. Flip them halfway through to prevent warping.
Uneven tiles?
If your tiles dried slightly warped, gently sand the bottom flat with coarse sandpaper before gluing, or use a thicker dollop of glue to level them out.
Step 2: Painting & Assembly
-
Prepare the surfaces:
Once the tiles are bone dry, lightly sand the edges if they look rough. Also, give the wooden frame a quick sanding to help the glue adhere better. -
Paint the first batch:
Separate your tiles into two equal piles. Paint the first pile with your terracotta or burnt sienna acrylic paint. You may need two coats for full opacity. -
Paint the second batch:
Paint the second pile with warm white or cream acrylic paint. I find that leaving them unpainted can look unfinished, so a coat of paint gives a professional look even if the clay is already white. -
Dry fit the pattern:
Before gluing, lay out your painted tiles on the frame to ensure they fit. You might need to adjust the spacing slightly to make the corners meet neatly. -
Glue the tiles:
Apply a small dab of wood glue to the back of a tile. Press it firmly onto the frame, starting at a corner. -
Continue the pattern:
Alternate colors as you work your way around the frame, keeping the gaps between tiles minimal and consistent. If a tile overhangs slightly, align it with the outer edge. -
Fill the gaps (optional):
If you notice small uneven gaps between tiles that bother you, you can mix a tiny bit of clay with water to make a paste and fill them, though the rustic gap look is part of the charm. -
Seal the project:
Once the glue is fully cured, apply a coat of matte varnish over the entire face of the frame. This protects the paint and gives the tiles a unified finish.
Pro Tip: Cutting Hack
Instead of a knife, use a small square cookie cutter or a fondant cutter to get perfectly identical squares every single time without measuring.
Place your favorite photo inside and admire the warm, textural difference this frame adds to your shelf
Faux Carved Woodgrain Frame
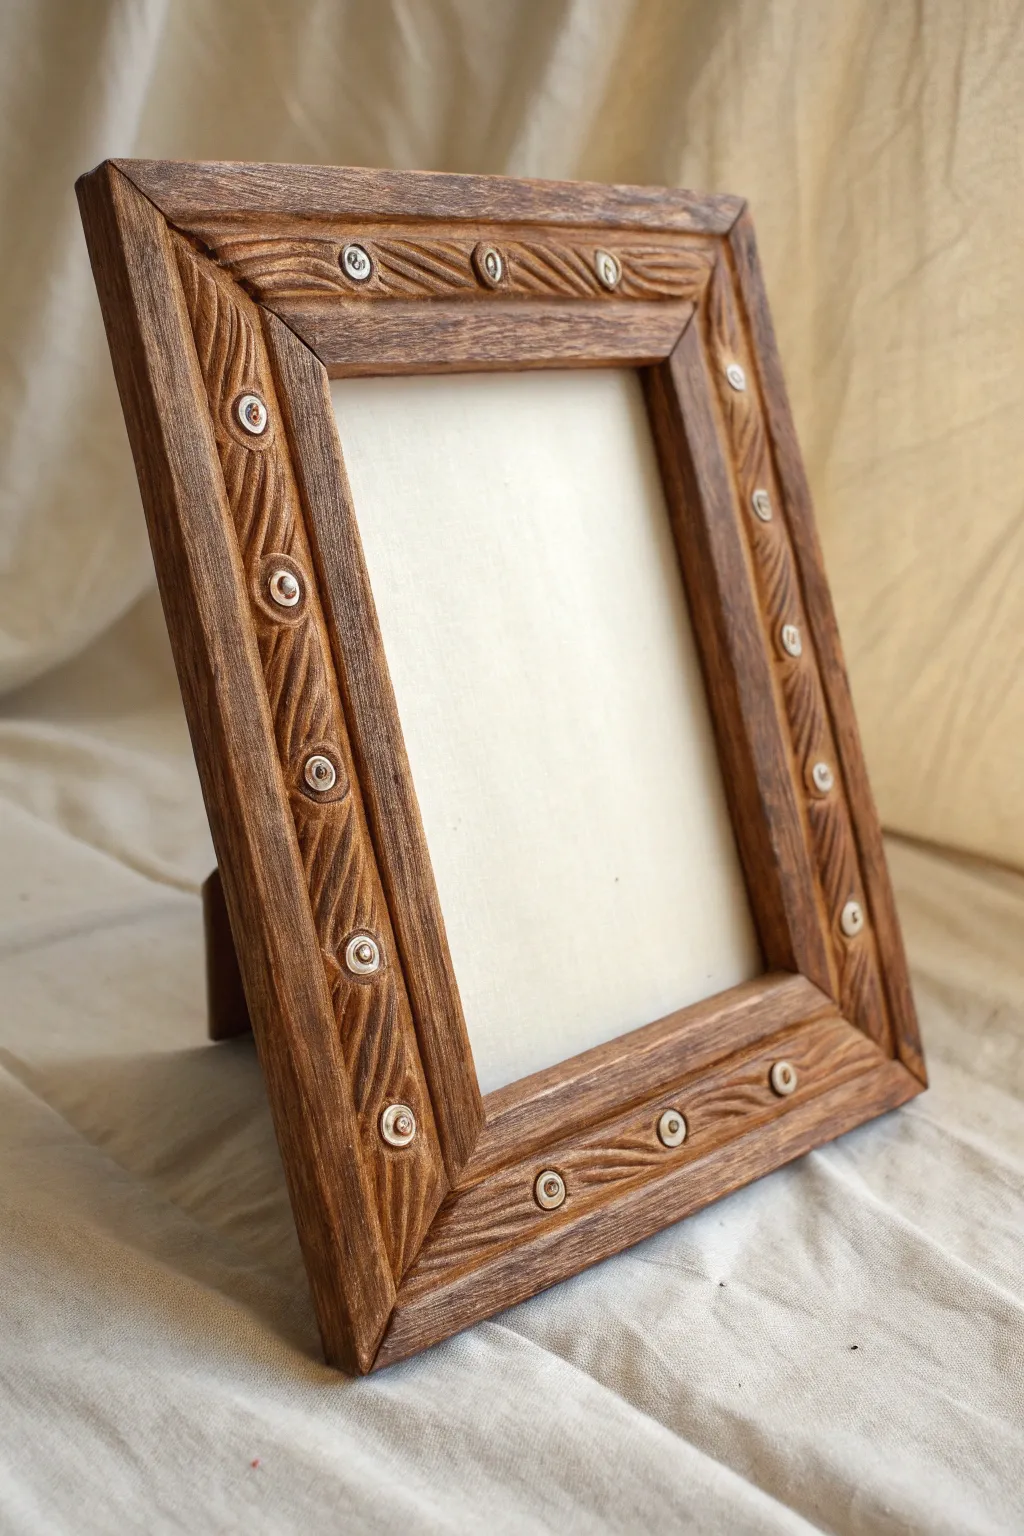
Transform a plain wooden frame into an antiqued masterpiece using air dry clay and careful texturing. This project mimics the intricate look of hand-carved wood complete with faux inlaid studs for a rustic, high-end finish.
Detailed Instructions
Materials
- Wide, flat wooden picture frame base
- Air dry clay (white or terracotta)
- PVA glue or wood glue
- Rolling pin
- Clay sculpting tools (knife tool, needle tool)
- Small circular cutter or straw
- Acrylic paints (dark brown, burnt sienna, black, metallic cream/silver)
- Paintbrushes (flat shader and find detail)
- Matte or satin varnish
- Sandpaper (fine grit)
Step 1: Preparing the Base
-
Prepare the surface:
Start by lightly sanding your wooden frame base to give the glue something to grip onto. Wipe away any dust with a damp cloth. -
Apply adhesive:
Brush a generous, even layer of PVA glue over the entire front face of the wooden frame. You want enough glue to hold the clay firmly, but not so much that it slides around.
Keep Clay Moist
Keep a spray bottle of water nearby. If the clay starts cracking while you textured the grain, a light mist will make it pliable again without creating mud.
Step 2: Applying and Sculpting the Clay
-
Roll out the clay:
Condition your air dry clay by kneading it until pliable. Roll it out on a flat surface to a thickness of about 1/4 inch (4-5mm). Ensure the strip is wide enough to cover the face of your frame. -
Lay the clay foundation:
Does the clay strip match your frame size? Carefully lay the clay over the glued frame. Trim the excess clay from the inner and outer edges using a sharp craft knife, pressing the edges down flush with the wood. -
Mark the diagonal carved pattern:
Using a clay knife tool or a blunt edge, lightly score diagonal lines across the frame to map out your sweeping ‘carved’ grooves. These should flow in a consistent direction for a unified look. -
Deepen the wood grain:
Use a rounded sculpting tool to press deeply into your scored lines, creating distinct ridges and valleys. I find that varying the pressure slightly makes the ‘carving’ look more organic and handmade. -
Add texture lines:
Within the raised areas between your main grooves, use a needle tool to scratch fine, parallel lines. These micro-textures simulate the natural grain of wood fiber. -
Create the stud accents:
Using a very small circular cutter or the end of a drinking straw, press small circles into the clay at regular intervals along the center of the frame sides. Don’t punch all the way through; just create an impression. -
Detail the studs:
Roll tiny balls of fresh clay and press them gently into the center of each circular impression to create a raised ‘rivet’ or ‘stud’ effect. -
Refine the corners:
Check the mitered corners where the frame sides meet. Use your knife tool to create a clean 45-degree angle separation line, ensuring the ‘wood grain’ pattern stops and starts cleanly at the joint. -
Allow to dry:
Let the frame dry completely. This usually takes 24-48 hours depending on humidity. Flip it occasionally if possible to let air reach the wood base.
Warping Woes
If the frame starts to bow as the clay shrinks during drying, place a heavy book on top of it (use wax paper in between!) once the clay is leather-hard.
Step 3: Painting and Finishing
-
Base coat:
Paint the entire hardened clay surface with a dark brown acrylic paint. Ensure you get the paint deep into all the carved crevices and grooves. -
Layering warmth:
Once the base is dry, dry-brush a layer of burnt sienna or a reddish-brown over just the raised ridges. This highlights the texture and mimics stained wood. -
Dark wash:
Mix a small amount of black paint with water to create a thin wash. Brush this over the frame and immediately wipe the raised surfaces with a rag, leaving shadows in the deep grooves. -
Painting the studs:
Using a fine detail brush, carefully paint the center studs with a metallic cream or dull silver paint. Keep the outer ring of the impression dark to help them pop. -
Final dry brush:
For added dimension, verify the paint is dry, then very lightly dry-brush the absolute highest points of the wood grain with a lighter tan color. -
Seal the piece:
Protect your hard work with a coat of matte or satin varnish. This seals the clay and unifies the paint finishes.
Place your favorite photo inside to complete the vintage aesthetic
Crackle Texture Vintage Frame
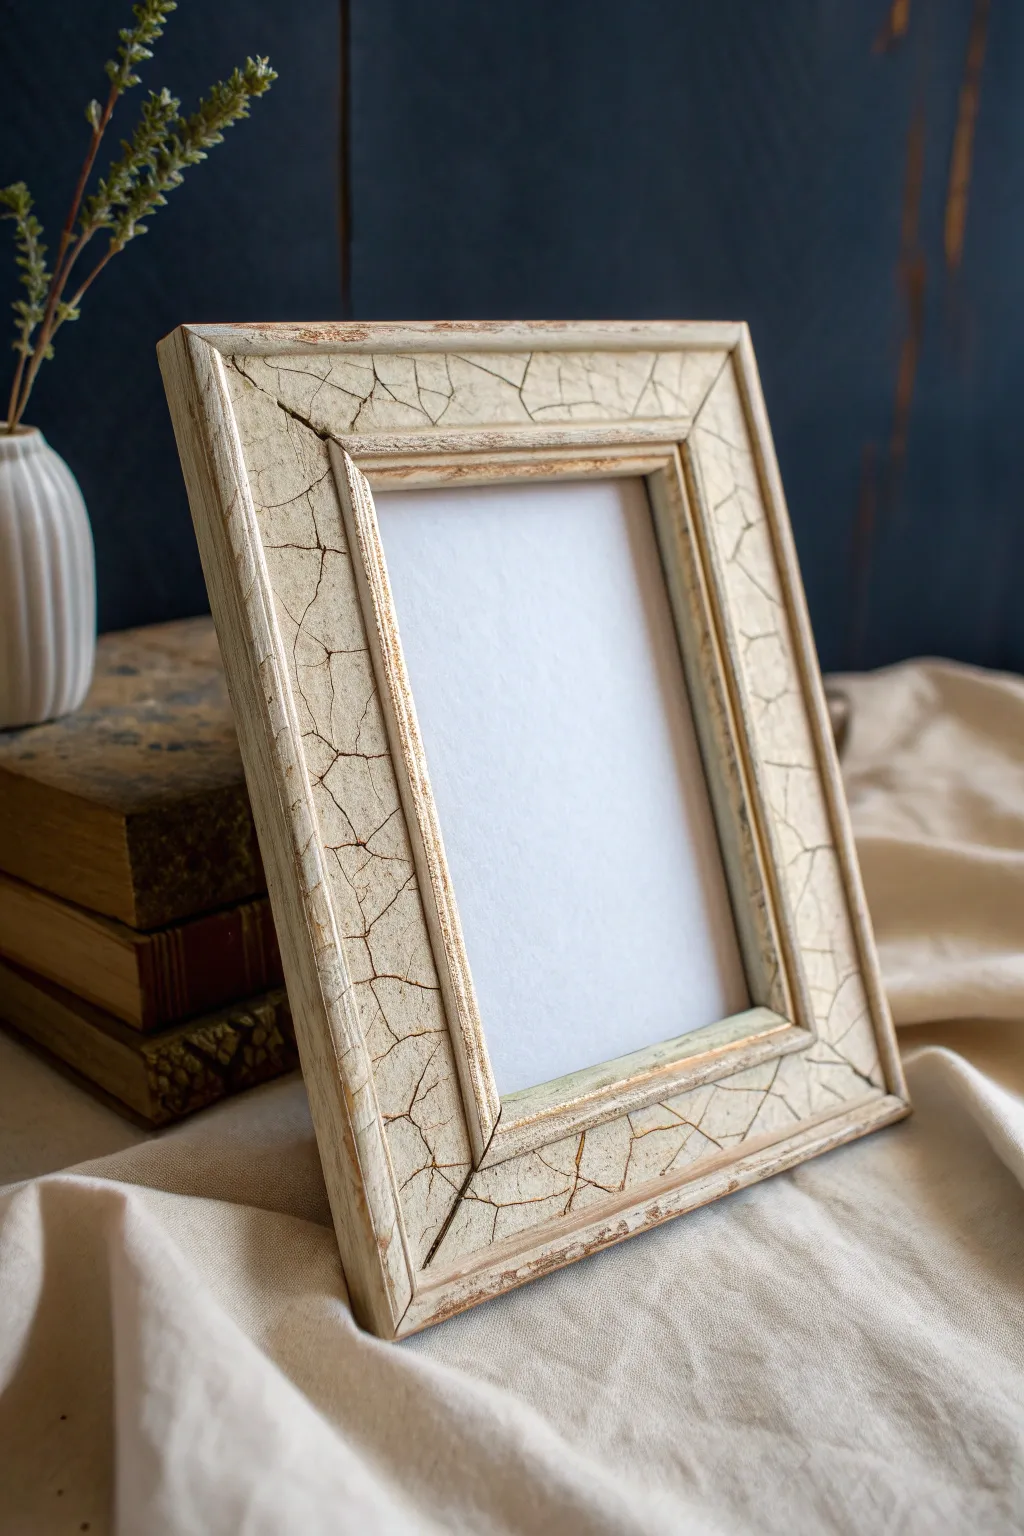
Transform a simple base into a stunning vintage-style piece with distinct old-world charm. This project uses air-dry clay and a special crackling medium to replicate the intricate, weathered texture of aged pottery or peeling paint.
Step-by-Step Guide
Materials
- White air-dry clay (approximately 500g)
- Small wooden picture frame (as a base)
- PVA glue or tacky craft glue
- Rolling pin
- Craft knife or clay cutter
- Crackle medium (or schools glue for a DIY version)
- Acrylic paint (Cream/Off-white)
- Acrylic paint (Antique Gold)
- Acrylic paint (Dark Brown or Raw Umber)
- Soft synthetic brushes
- Clean cotton rag or paper towel
- Sandpaper (fine grit)
Step 1: Prepping the Base
-
Surface Preparation:
Remove the glass and backing from your wooden frame so you are left with just the skeleton. Lightly sand the wood surface to give the glue and clay something to grip onto. -
Glue Application:
Apply a generous, even layer of PVA glue across the entire front surface of the wooden frame. You want it tacky but not dripping.
Step 2: Clay Application
-
Rolling the Clay:
On a clean, flat surface, roll out your air-dry clay to a uniform thickness of about 1/4 inch. If the clay is sticking, lightly dust your surface with cornstarch. -
Cutting Strips:
Measure the width of your frame’s borders. Use a craft knife and a ruler to cut four strips of clay that correspond to these measurements. -
Mounting the Clay:
Carefully press the clay strips onto the glued wooden frame. Smooth them down gently with your fingers to ensure full contact without squishing the clay too thin. -
Mitering Corners:
Where the strips meet at the corners, use your craft knife to cut a diagonal 45-degree line (a miter cut) through both overlapping layers of clay. Remove the excess bits and press the cut edges together seamlessly. -
Smoothing Edges:
Dip your finger in a little water and run it along the inner and outer edges of the frame to smooth out any rough textures or fingerprints. -
Drying Time:
Set the frame aside in a dry, room-temperature area. Allow the clay to dry fully, which usually takes 24-48 hours depending on humidity. It should look chalky white when ready.
Cracks Not Appearing?
If cracks are too subtle, your top coat was likely too thin or the medium dried too much. Next time, apply a heavier layer of medium and paint while slightly tackier.
Step 3: Creating the Crackle
-
Base Coat:
Paint the dried clay with a layer of Antique Gold acrylic paint. This color will peek through the cracks later, adding a rich depth. Let this layer dry completely. -
Applying Crackle Medium:
Apply a thick coat of crackle medium over the gold paint. Brush in one direction only and avoid overworking it. I’ve found that a thicker layer generally produces larger, more dramatic cracks. -
Wait for Tacky:
Let the crackle medium dry until it is tacky to the touch but not wet. Do not let it dry completely hard. -
Top Coat Application:
Load a soft brush with your Cream/Off-white acrylic paint. Quickly brush it over the tacky medium, applying it in the opposite direction of the medium strokes. Do not back-brush or go over the same spot twice, as this ruins the crackling effect. -
Watch it Crack:
Let the frame dry naturally. As the top coat dries, the chemical reaction will cause the paint to separate, revealing the gold underneath in a beautiful spiderweb pattern.
Metallic Leaf Upgrade
Instead of gold paint as a base, apply gold leaf to the clay before the crackle medium. The final cracks will shimmer with real metallic brilliance.
Step 4: Antiquing and Finishing
-
Mixing a Glaze:
Mix a small amount of Dark Brown acrylic paint with water (about 1 part paint to 3 parts water) to create a translucent wash. -
Applying the Wash:
Brush the brown wash over the entire frame, making sure it gets into the cracks and textured areas. -
Wiping Back:
Immediately use a clean, slightly damp cotton rag to wipe away the excess wash from the high points. The brown will remain in the recesses, highlighting the crackle texture instantly. -
Detailing Edges:
For extra dimension, use a dry brush with a tiny bit of darker brown or gold paint to lightly distressed the very edges of the frame. -
Final Assembly:
Once fully dry, replace the glass and backing. Your vintage masterpiece is now ready for a photo.
This sophisticated yet rugged frame adds immediate history to any modern shelf
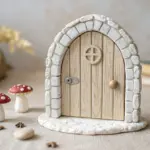
Polaroid-Style Mini Magnet Frames Set
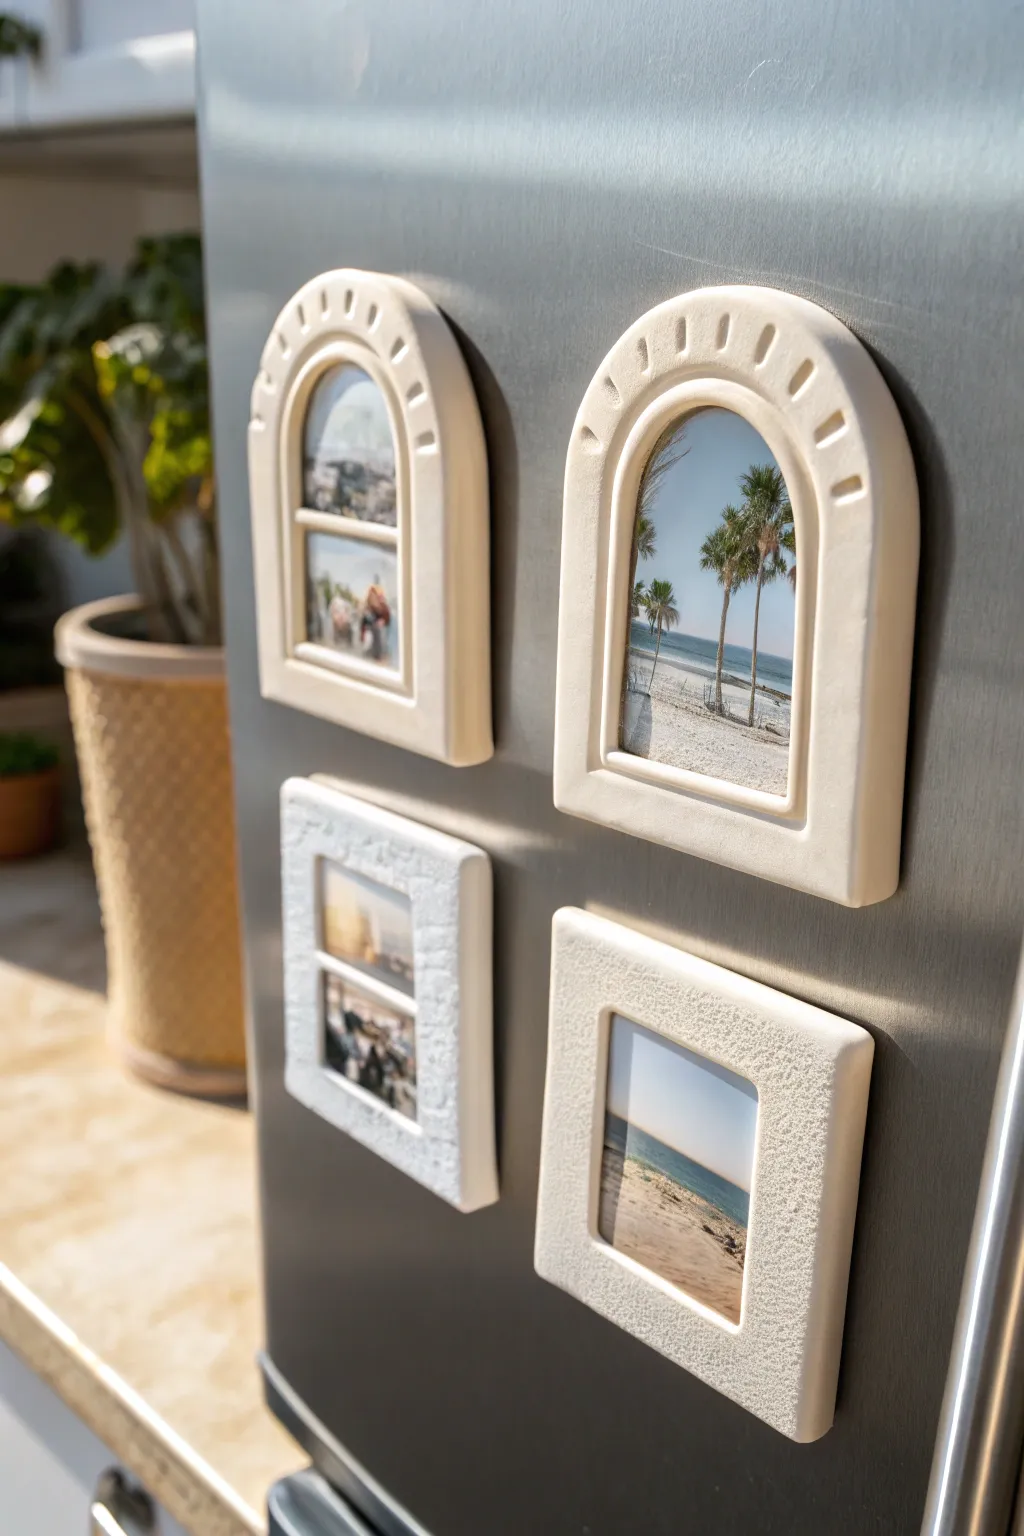
Transform your fridge into a mini gallery with these charming, textured air-dry clay frames. Featuring sunny arches and classic squares with subtle relief details, these magnets add a warm, handmade touch to your favorite snapshots.
Step-by-Step Tutorial
Materials
- White air-dry clay
- Rolling pin
- Clay knife or craft knife
- Small square cookie cutter (approx. 2-3 inches)
- Parchment paper or silicone mat
- Small bowl of water
- Sandpaper (fine grit)
- Strong craft glue or E6000
- Adhesive magnetic strips or round magnets
- Texture tools (toothpick, old toothbrush, or needle tool)
- Acrylic rolling guide or two wooden slats (optional for even thickness)
- Ruler
Step 1: Prepping the Clay Base
-
Condition the clay:
Begin by kneading a handful of white air-dry clay until it is soft, pliable, and free of cracks. If it feels too dry, dip your fingers in water and work the moisture in. -
Roll it out:
Place the clay between two depth guides (or just eyeball it) and roll it out onto parchment paper to a thickness of about 4-5mm. You want it sturdy enough to hold a photo but not too heavy for a magnet. -
Cut the shapes:
For the square frames, use a square cookie cutter to punch out your base shapes. For the arches, you can cut a rectangle and use the cutter or a round object to trim the top into a curve, or use a custom arch cutter if you have one.
Fixing Cracks
Tiny cracks appear while drying? Mix a small amount of fresh clay with water to make a paste (slip) and fill the cracks. Smooth over with a damp finger and let dry again.
Step 2: Creating the Windows
-
Mark the photo area:
Lightly press a smaller square cutter or use a ruler to mark where the photo ‘window’ will go in the center, leaving a border of about 1cm wide all around. -
Cut out the center:
Using your craft knife, carefully cut out the center window. Keep your knife perpendicular to the surface for clean, straight edges. -
Smooth the edges:
Dip your finger in a little water and gently run it along all the cut edges—both inside the window and around the outside—to smooth away any jagged bits or crumbs. -
Add a divider (optional):
If you want the ‘window pane’ look seen in the arched frame, roll a very thin snake or cut a thin strip of clay. Attach it horizontally across the window opening using a tiny bit of water and light pressure to blend the seams.
Step 3: Adding Texture & Detail
-
Create sun rays:
For the arched sunburst frame, use a modeling tool or the dull side of a knife to press radiating indentations along the curved top edge. Space them evenly for a neat look. -
Add surface texture:
For the square frames, texture the surface by gently tapping with an old toothbrush or a stiff stippling brush. This gives it that stone-like, slightly rough finish visible in the bottom frames. -
Refine the shape:
Double-check your shapes hasn’t warped while texturing. Gently nudge the sides back into straight lines with your ruler if needed.
Pro Tip: Clean Cuts
Coat your knife blade with a tiny bit of lotion or oil before cutting. This helps the blade glide through the clay without dragging or creating ragged edges.
Step 4: Drying & Assembly
-
Let them dry:
Place your frames on a flat surface lined with parchment paper. To prevent curling, I like to place a light book or board on top once the surface is dry to the touch, or flip them over halfway through the drying process. -
Sand for perfection:
Once fully dry (usually 24-48 hours), use fine-grit sandpaper to smooth out any remaining rough edges or uneven backs. -
Attach the magnet:
Cut a piece of adhesive magnetic strip to fit the back of the frame. For a stronger hold, add a dab of super glue or E6000 before pressing the magnet onto the clay. -
Create a photo pocket (optional):
If you want to swap photos easily, glue a small piece of cardstock to the back of the frame on three sides (left, right, bottom), leaving the top open to slide a picture in. Otherwise, simply tape your photo directly to the back.
Pop in your favorite summer memories and enjoy your custom fridge gallery
Tiny Shadowbox Frame With Clay Charms
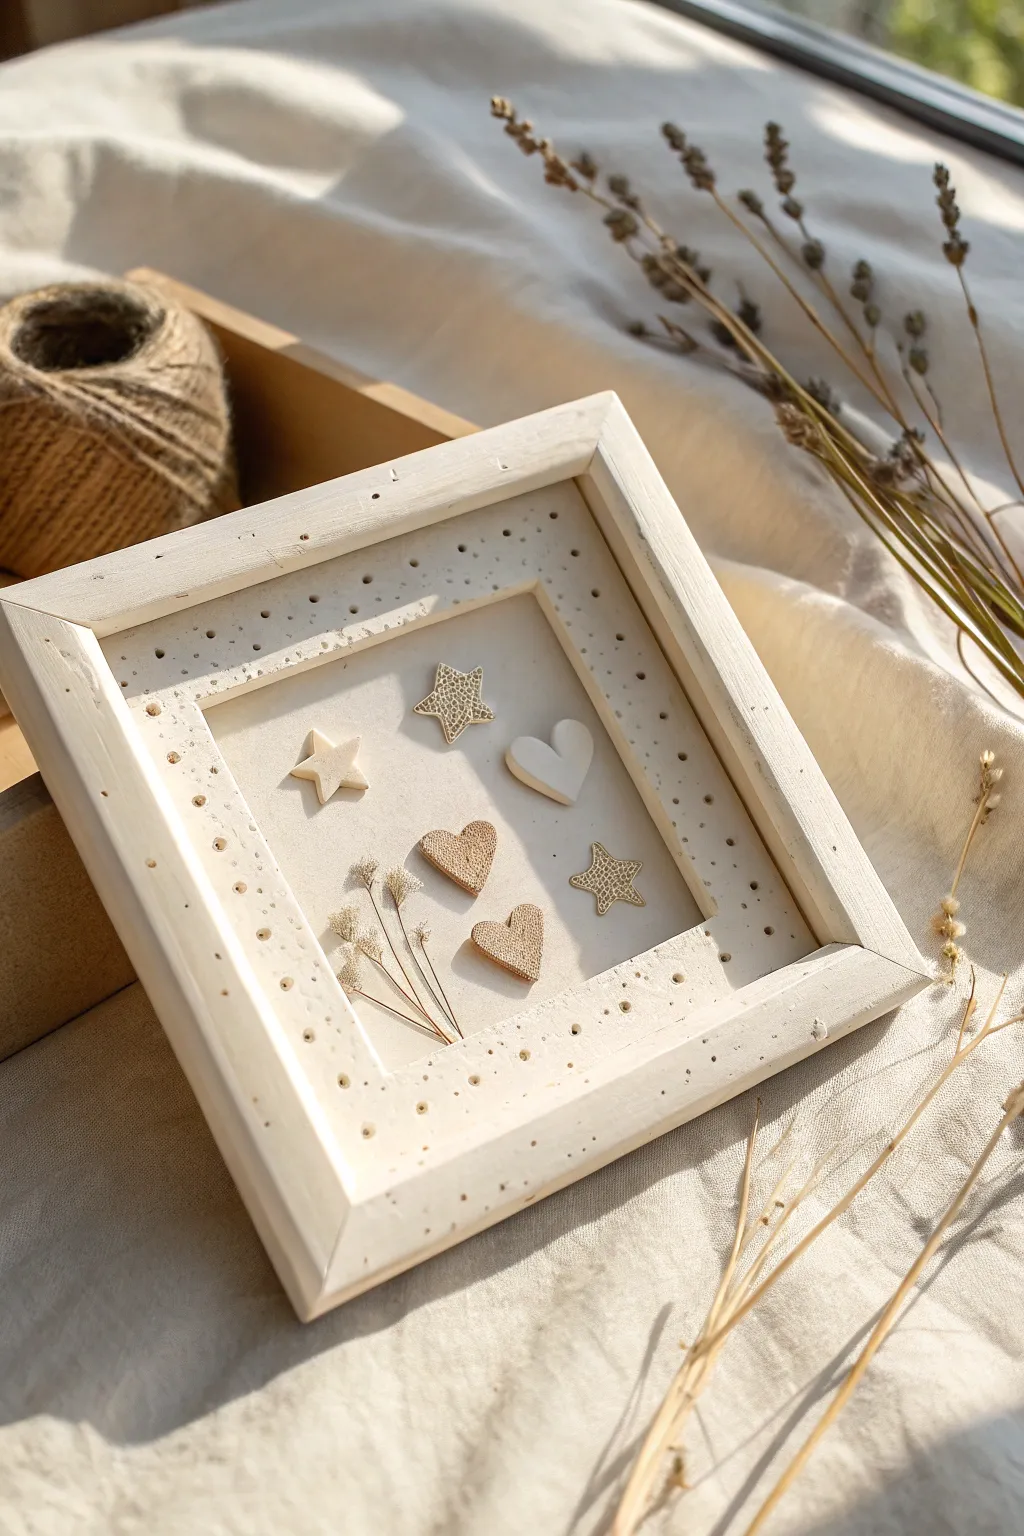
Create a charming keepsake by sculpting your own rustic frame and delicate clay miniatures. This tiny shadowbox combines textured stars, sweet hearts, and dried botanicals for a piece that feels both handcrafted and elegantly simple.
Step-by-Step Guide
Materials
- White or cream air-dry clay
- Rolling pin
- Square cookie cutter (approx. 4-5 inches)
- Smaller square cutter (for the window)
- Small star and heart clay cutters (micro size)
- Modelling tool with a small ball tip (or a toothpick)
- Textured stamp or fabric (for imprinting)
- Piece of sturdy cardstock or mat board (for backing)
- Dried baby’s breath or similar tiny dried flowers
- Craft glue or tacky glue
- Clay knife or craft blade
- Fine grit sandpaper
- Beige or cream acrylic paint (optional)
Step 1: Sculpting the Frame
-
Roll out the base:
Start by conditioning a large chunk of air-dry clay until it’s pliable. Roll it out on a smooth surface to a thickness of about 1/4 to 1/3 inch. Aim for a consistent thickness, as this will be the main structure of your frame. -
Cut the frame shape:
Use your large square cutter to cut the outer shape of the frame. If you don’t have a cutter large enough, measure a square and cut it out cleanly with your craft knife. -
Create the window:
Center your smaller square cutter within the clay slab. Press down firmly to remove the center square, creating the window opening. Save the cutout clay for the charms later. -
Bevel the edges:
Using your knife or fingers, gently bevel or angle the inner and outer edges of the frame to give it that traditional picture frame profile, rather than a harsh 90-degree block. -
Add decorative texture:
Take your small ball-tipped tool. Press it gently into the surface of the frame to create a pattern of recessed dots. I like to scatter them somewhat randomly, concentrating more around the inner window, to mimic a rustic ceramic look. -
Dry the frame:
Place the frame on a wire rack or between two heavy books (lined with parchment paper) to prevent warping. Let it dry completely for 24-48 hours.
Step 2: Creating the Charms
-
Roll thinner clay:
Roll out the leftover clay much thinner this time, about 1/8 inch thick, for the delicate charms. -
Texture specific areas:
Before cutting, press a textured stamp or a piece of coarse fabric into sections of the clay. This allows you to have some textured charms and some smooth ones. -
Cut the shapes:
Using your micro cutters, punch out several hearts and stars. You will need roughly two stars (one textured, one smooth) and three hearts (varied textures) to match the photo, but make extras just in case. -
Refine the edges:
Dip your finger in a little water and smooth out any rough edges on the tiny charms. Let these dry fully; they will dry much faster than the frame.
Smooth Operator
To get that milky smooth finish on the plain charms, dip your finger in water and buff the raw wet clay in circular motions before it dries.
Step 3: Assembly
-
Sand and smooth:
Once the frame is bone dry, gently sand any sharp corners or uneven spots with fine-grit sandpaper. Wipe away the dust with a slightly damp cloth. -
Prepare the backing:
Cut your cardstock or mat board to be slightly smaller than the outer dimensions of your clay frame. This will act as the back wall of your shadowbox. -
Mount the backing:
Apply a strong craft glue to the back of your clay frame and press it firmly onto the cardstock. Let the glue set so you have a solid ‘box’ to work inside. -
Arrange the composition:
Dry-fit your charms inside the frame window. Place a textured star at the top, a smooth star and heart on the left, and a textured heart and star near the bottom right to replicate the image’s balance. -
Glue the charms:
One by one, add a tiny dot of glue to the back of each charm and secure it in place on the backing board. -
Add the botanical touch:
Select a small sprig of dried baby’s breath. Trim the stem so it fits tucked into the bottom left corner. -
Secure the flowers:
Apply a tiny amount of glue to the stem and tuck it gently under or beside the lowest heart charm so it looks like it’s sprouting naturally.
Golden Hour Glow
Once fully dry, lightly brush gold luster dust or metallic watercolor over the textured parts of the stars to make the details pop against the white clay.
Display your miniature gallery on a sunny shelf or hang it as part of a wall collage